Overview
Do you own a car business, a showroom, or whatever products that you want to showcase to your online visitors? Do you need a simultaneously professional & beautiful website that your customers love, and that would make a good first impression on your business. Luxestate D8 will not let your expectation down.
Dig down the demo to find out more about the theme design. Along with Drupal 8 built out of the box, Luxestate D8 for a Drupal website is a choice you will not gonna miss.
If you're an experienced Drupal developer or if you want to build the theme from zero with only the basic appearance of your theme, find this guide in handy. This guide will give you the detailed step by step installation guide to help you start building the content for Luxestate D8 to look exactly like the demo site.
1. Luxestate D8 Package
Luxestate D8, as the name has implied, is a theme wholly dedicated for shopping only. The template can serve well as a B2B, or B2C ecommerce website. It comes with a clean simple design with fully responsive layout, easy to use template which is conforming to Drupal best practice & standard.
Drupal can build a strong Luxestate D8 website, and this theme proves the point.
Included content:
- README.txt
- Luxestate D8 theme: luxestate_d8-8.1.8.zip
- Demo Profile for Luxestate D8: luxestate_d8-demo-8.1.8.zip
2. Features
- Documentation included.
- Browser compatibility
- Web Technology (Html5/Css3, Twitter Bootstrap 3.1.1, Font Awesome 4.0.3,…)
- Fully responsive.
- Color variations.
- Easy customization.
- High usability
- Support both Left to Right and Right to Left Languages
3. Screenshots
Let's glance through the theme's design & some features:
Homepage
About us page
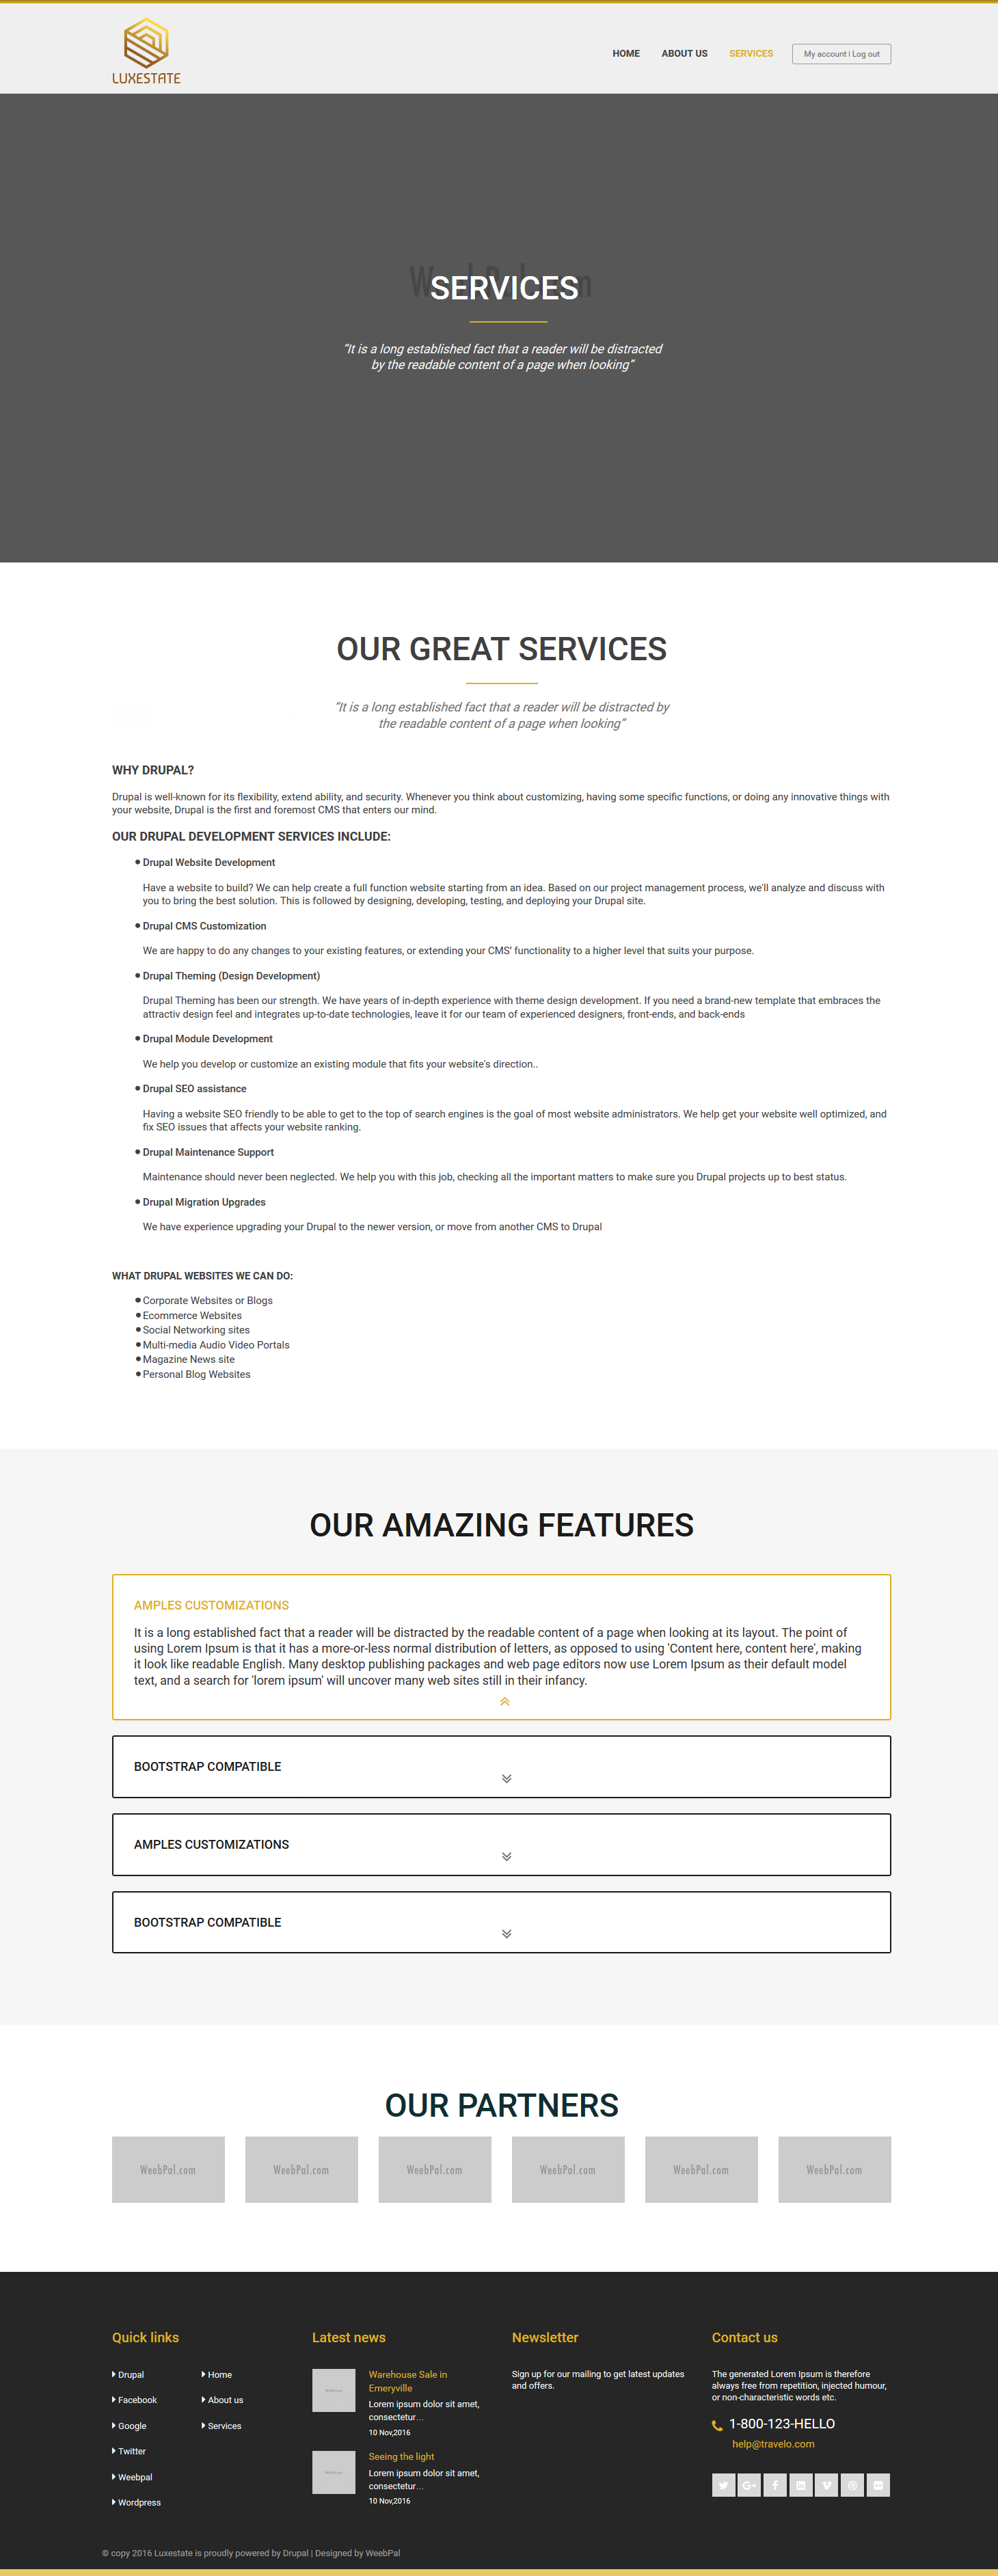
Services Page
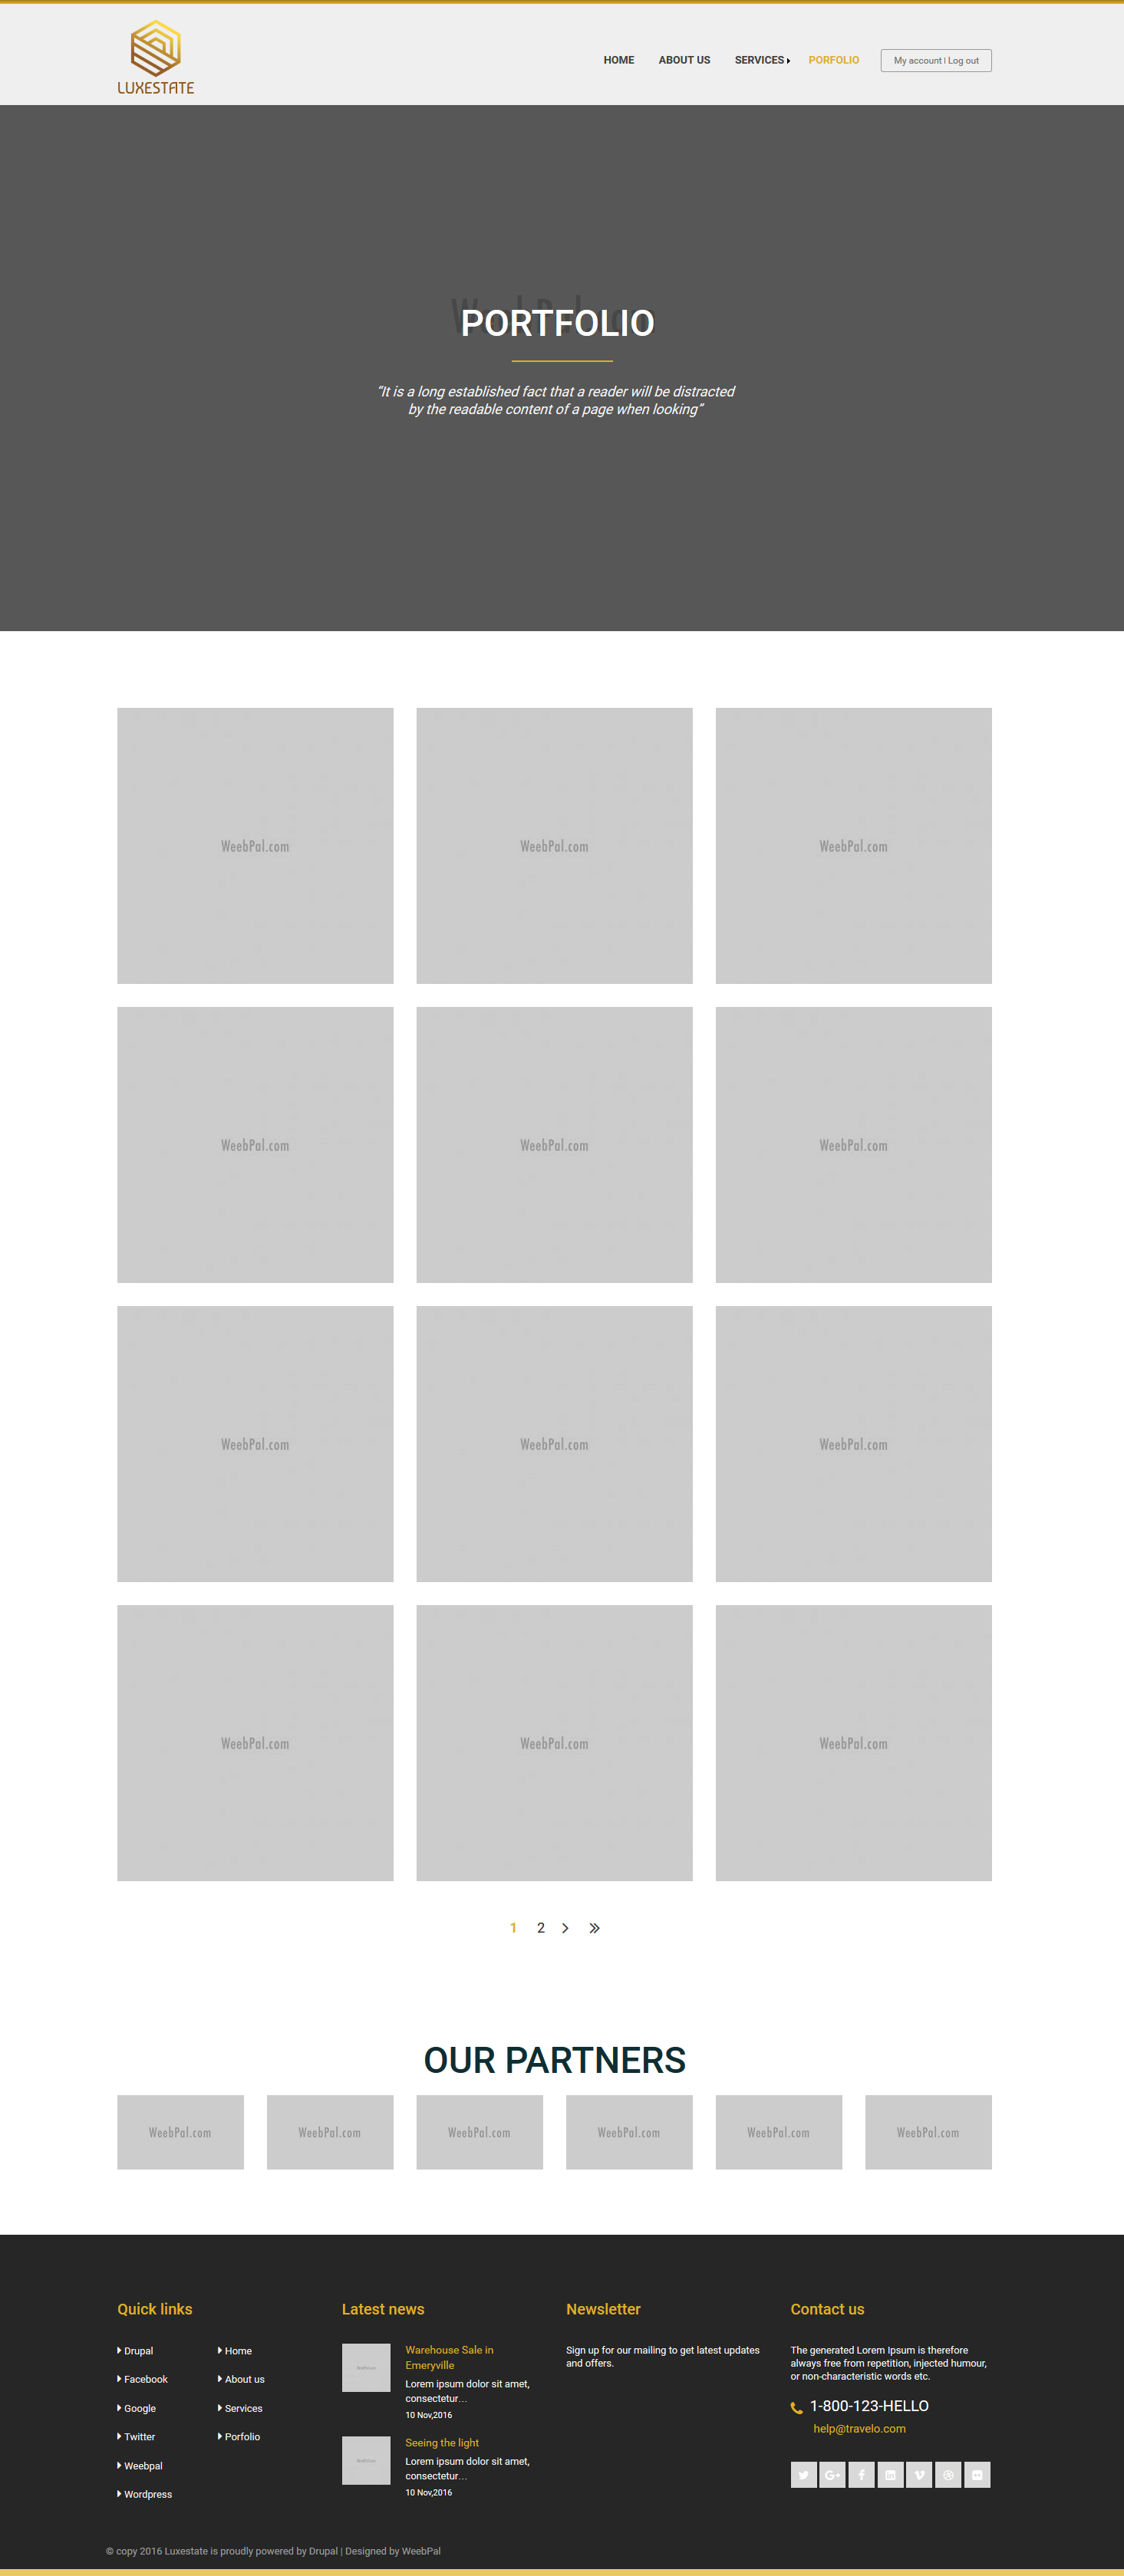
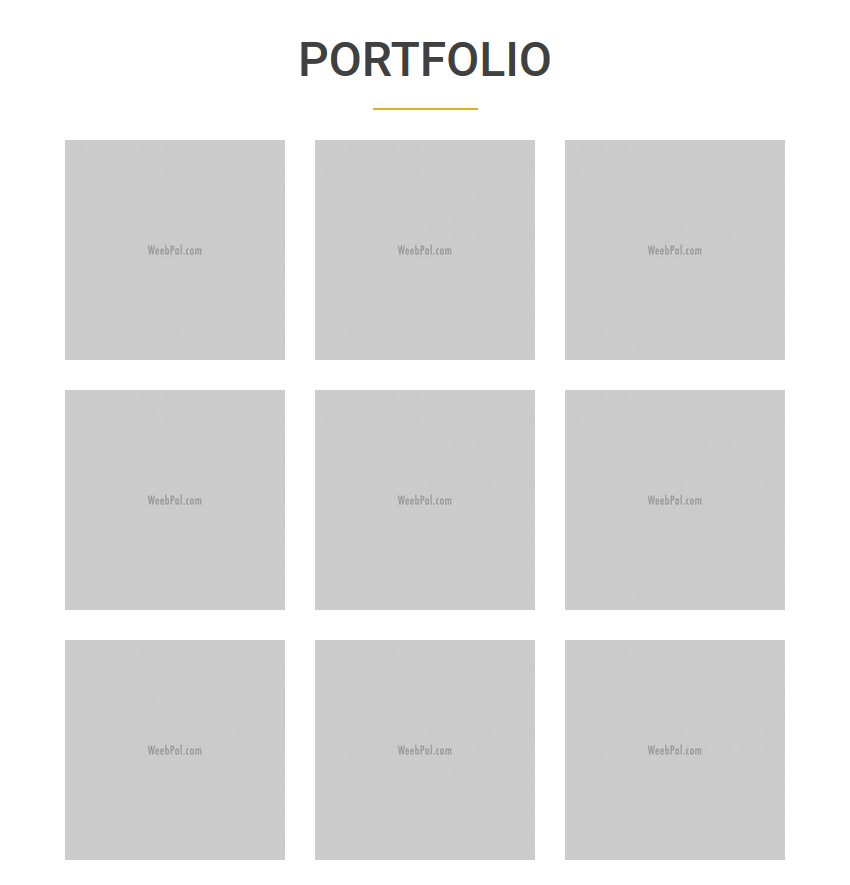
Porfolio Page
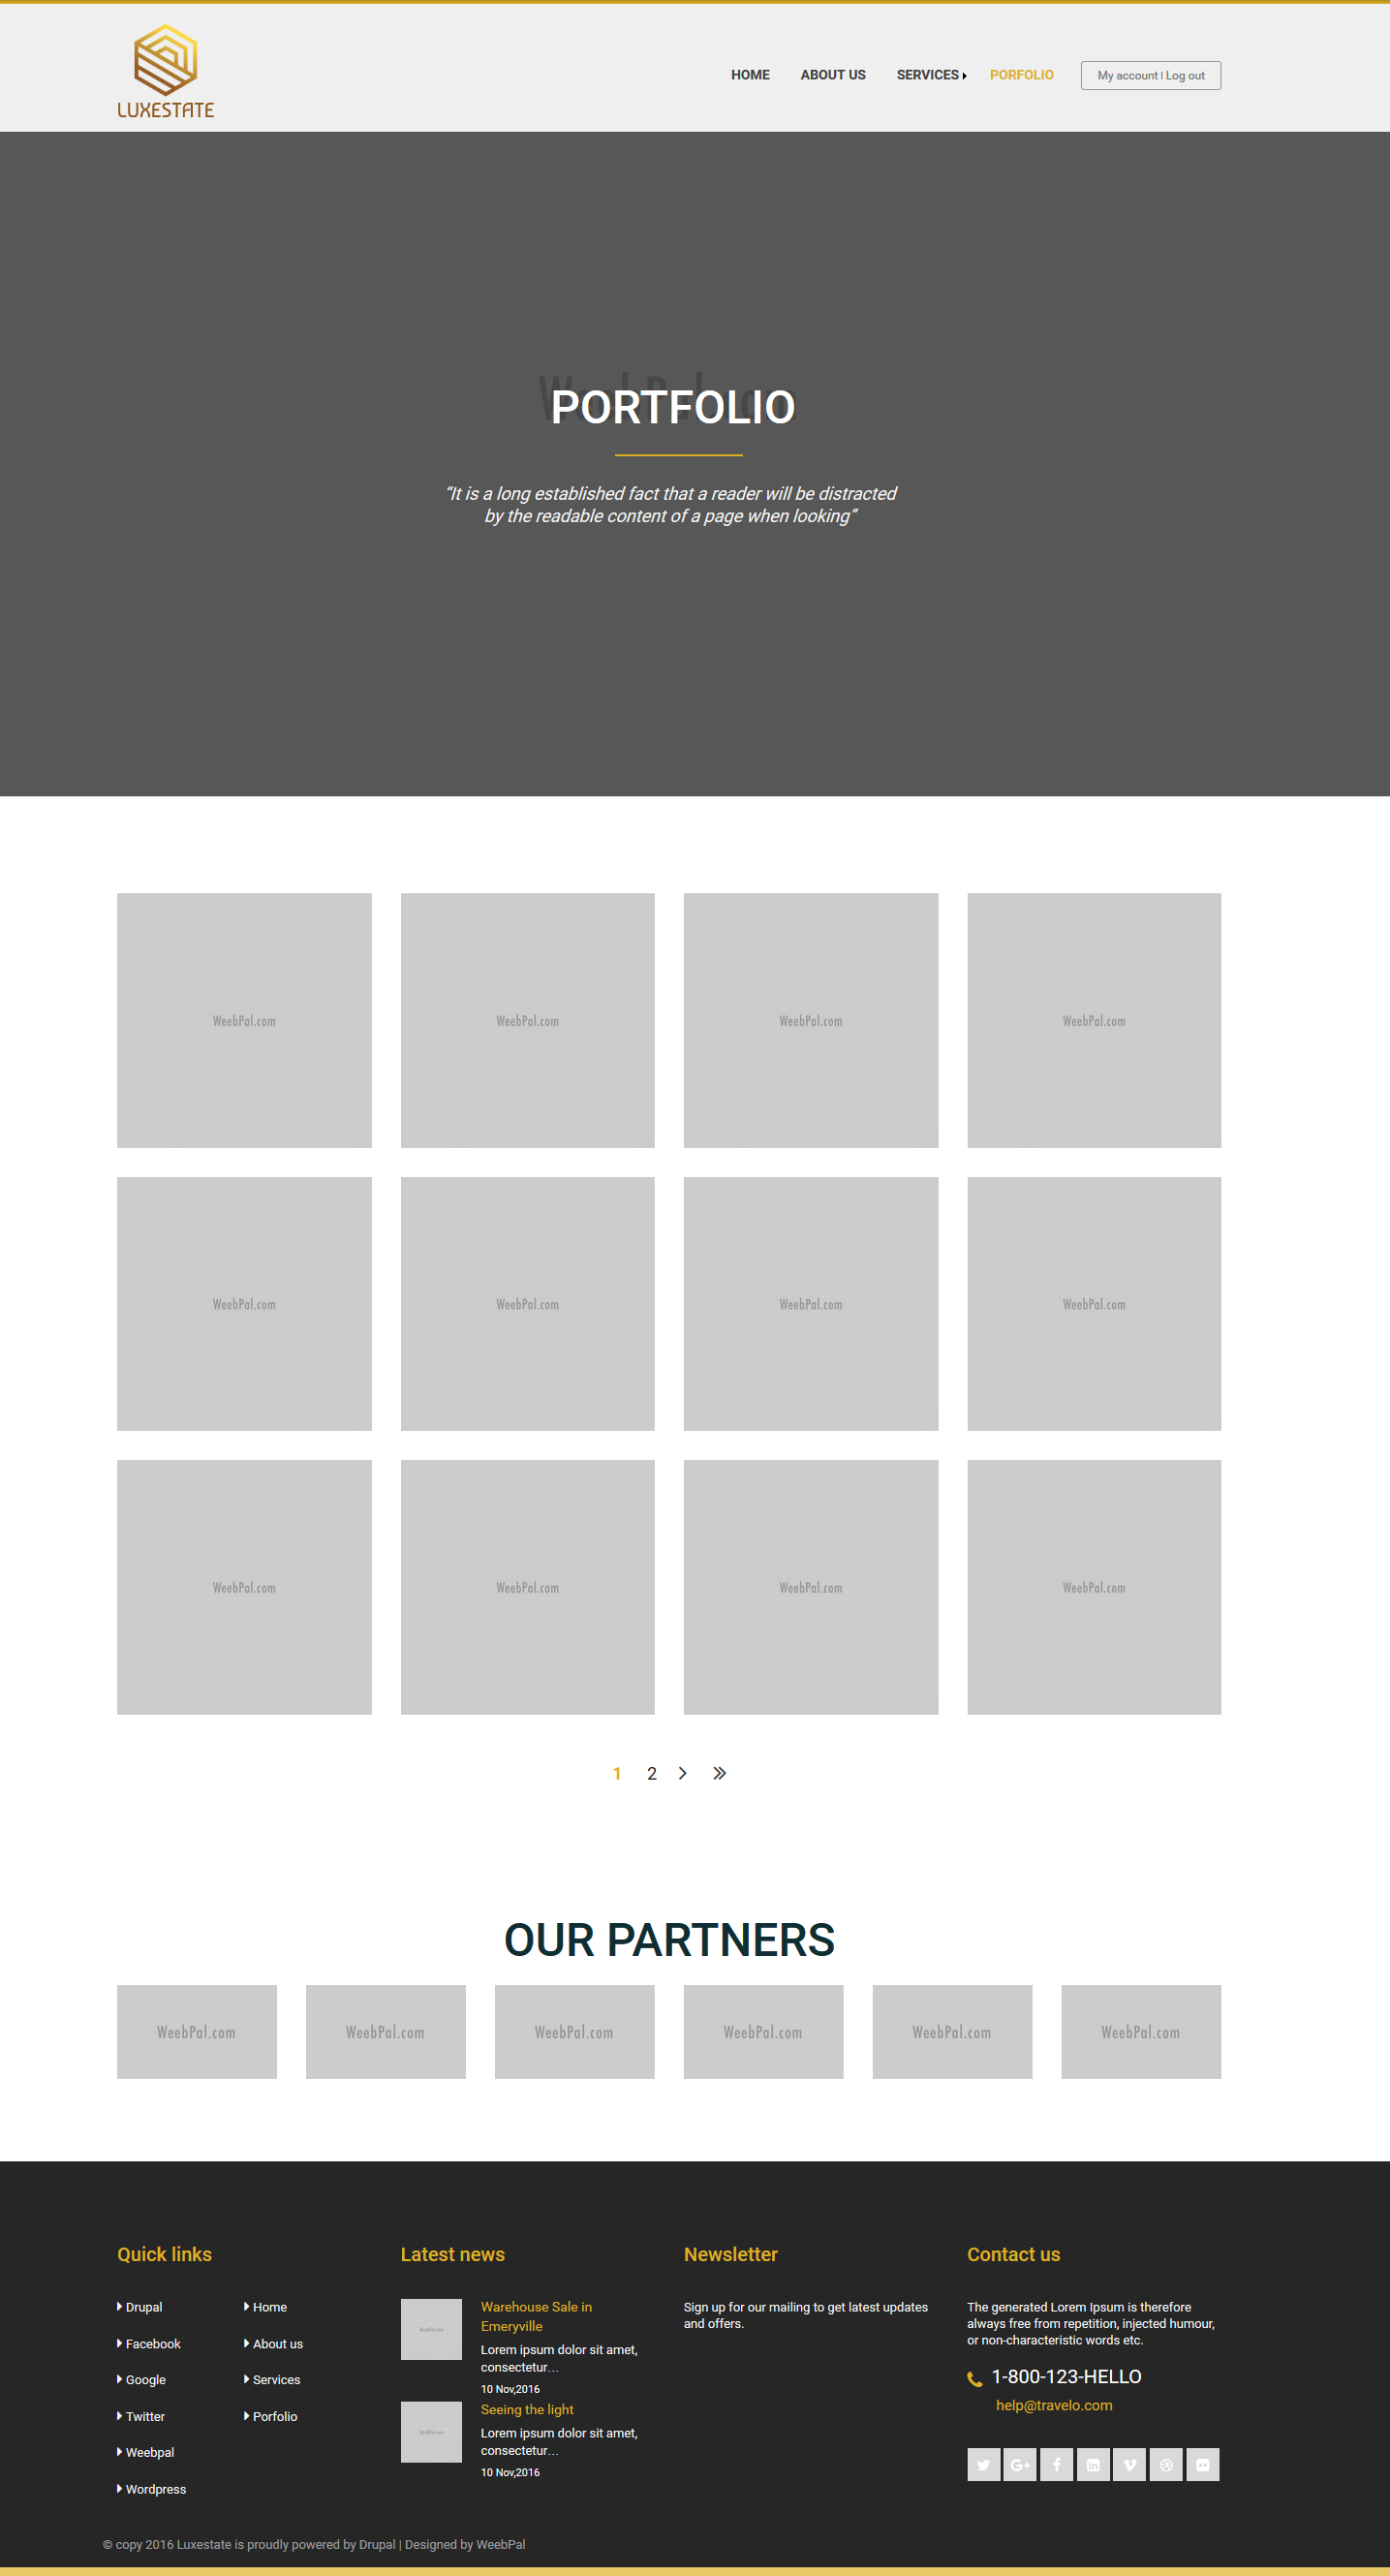
Porfolio 4 colum page
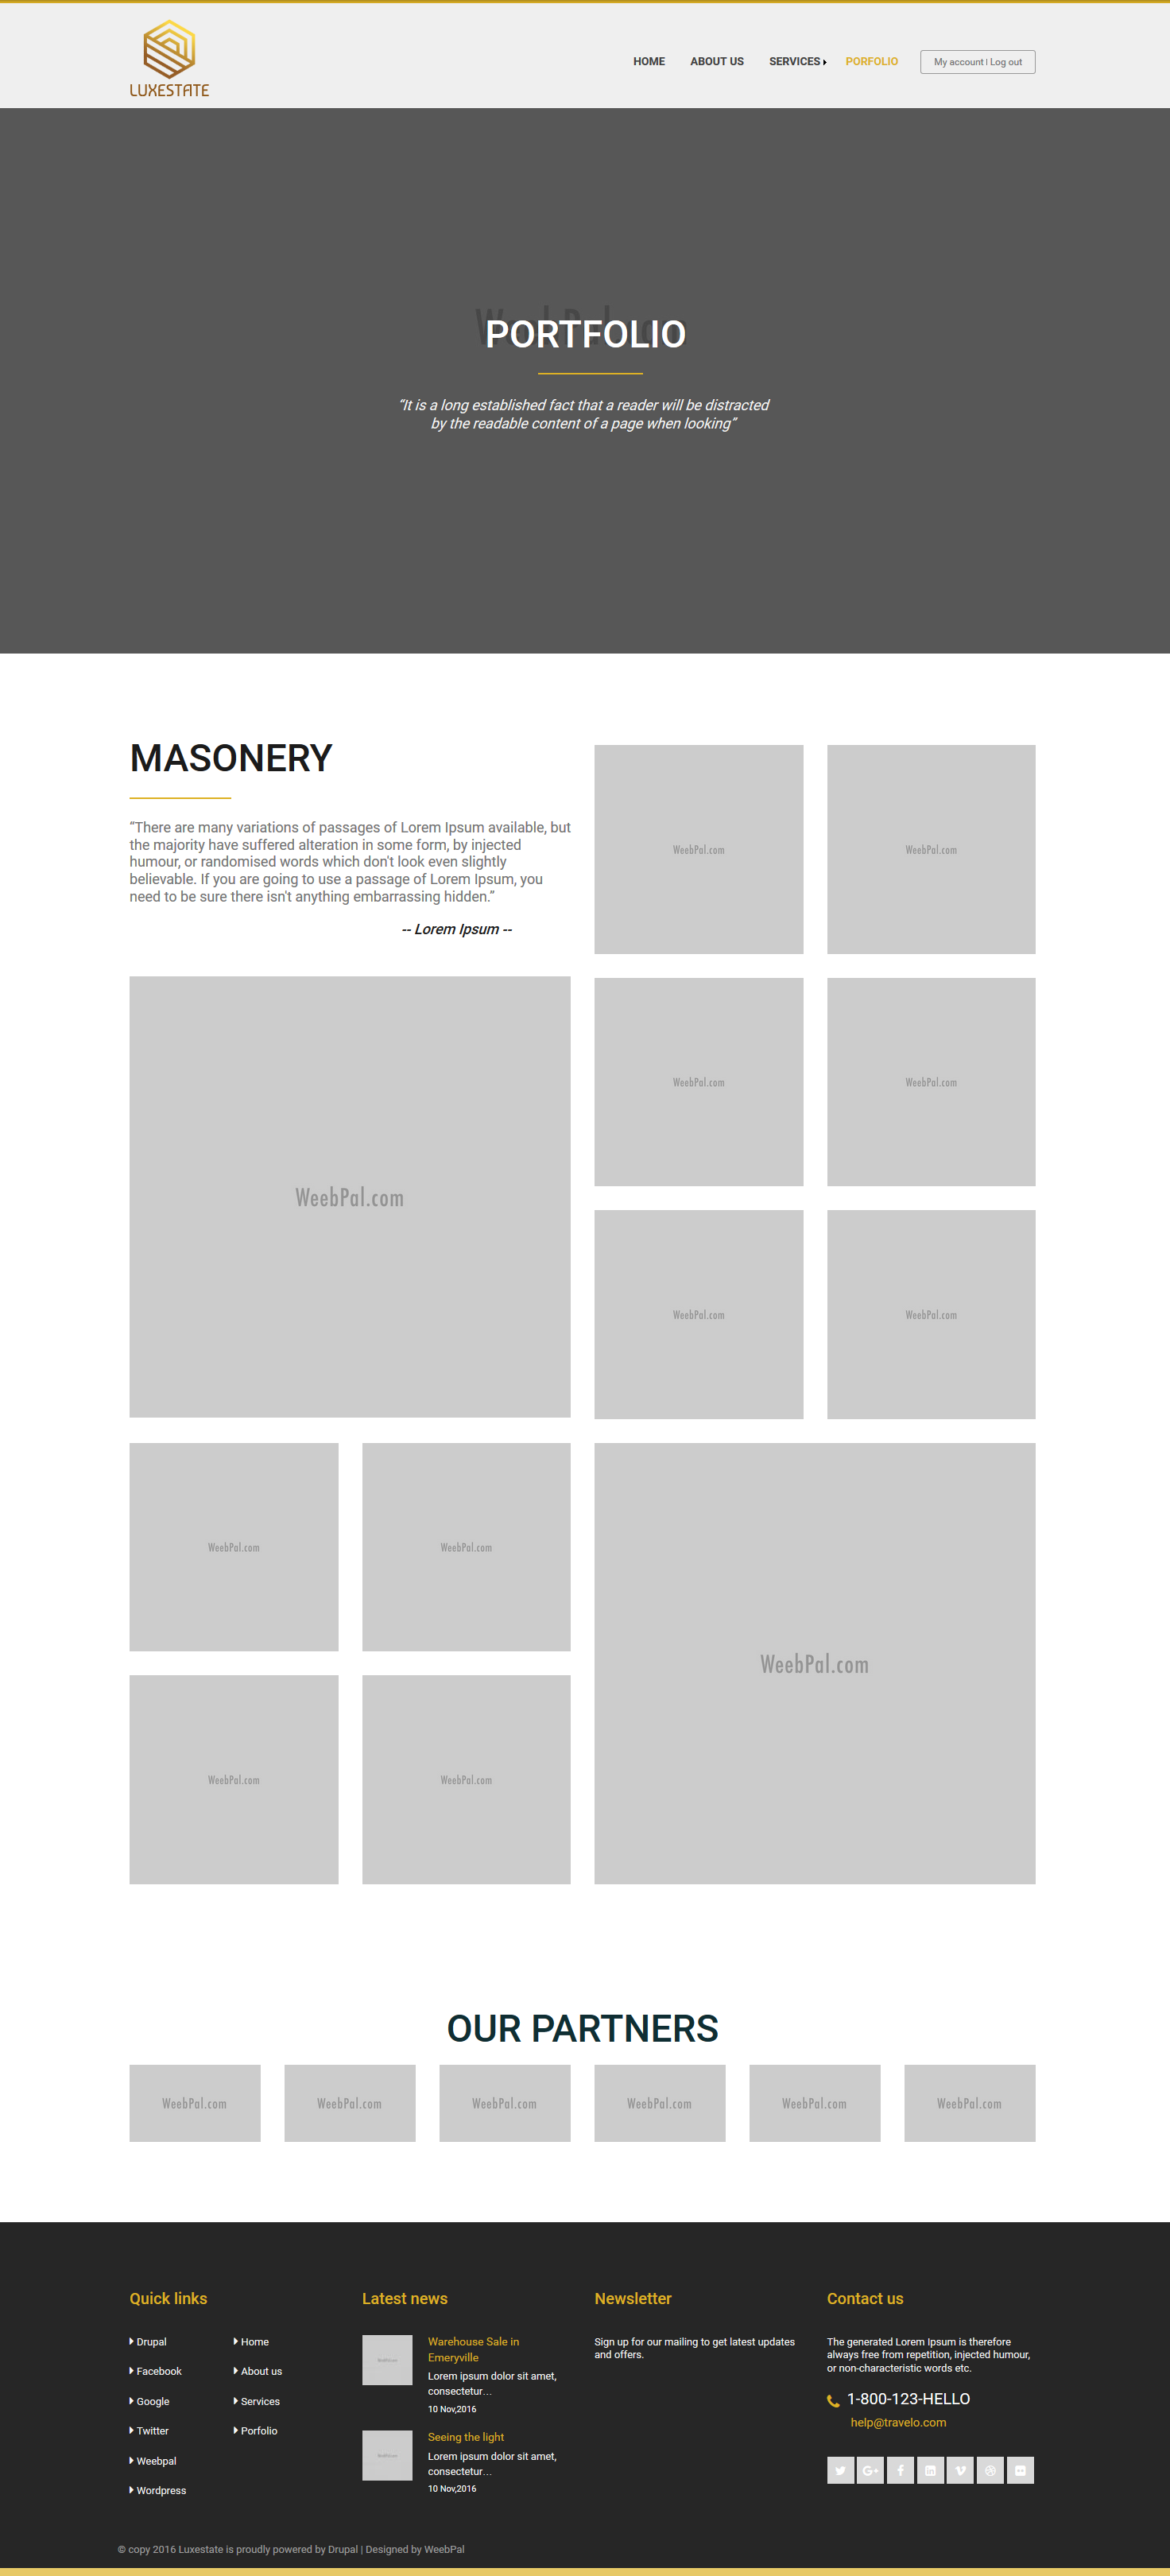
Porfolio Masonry page
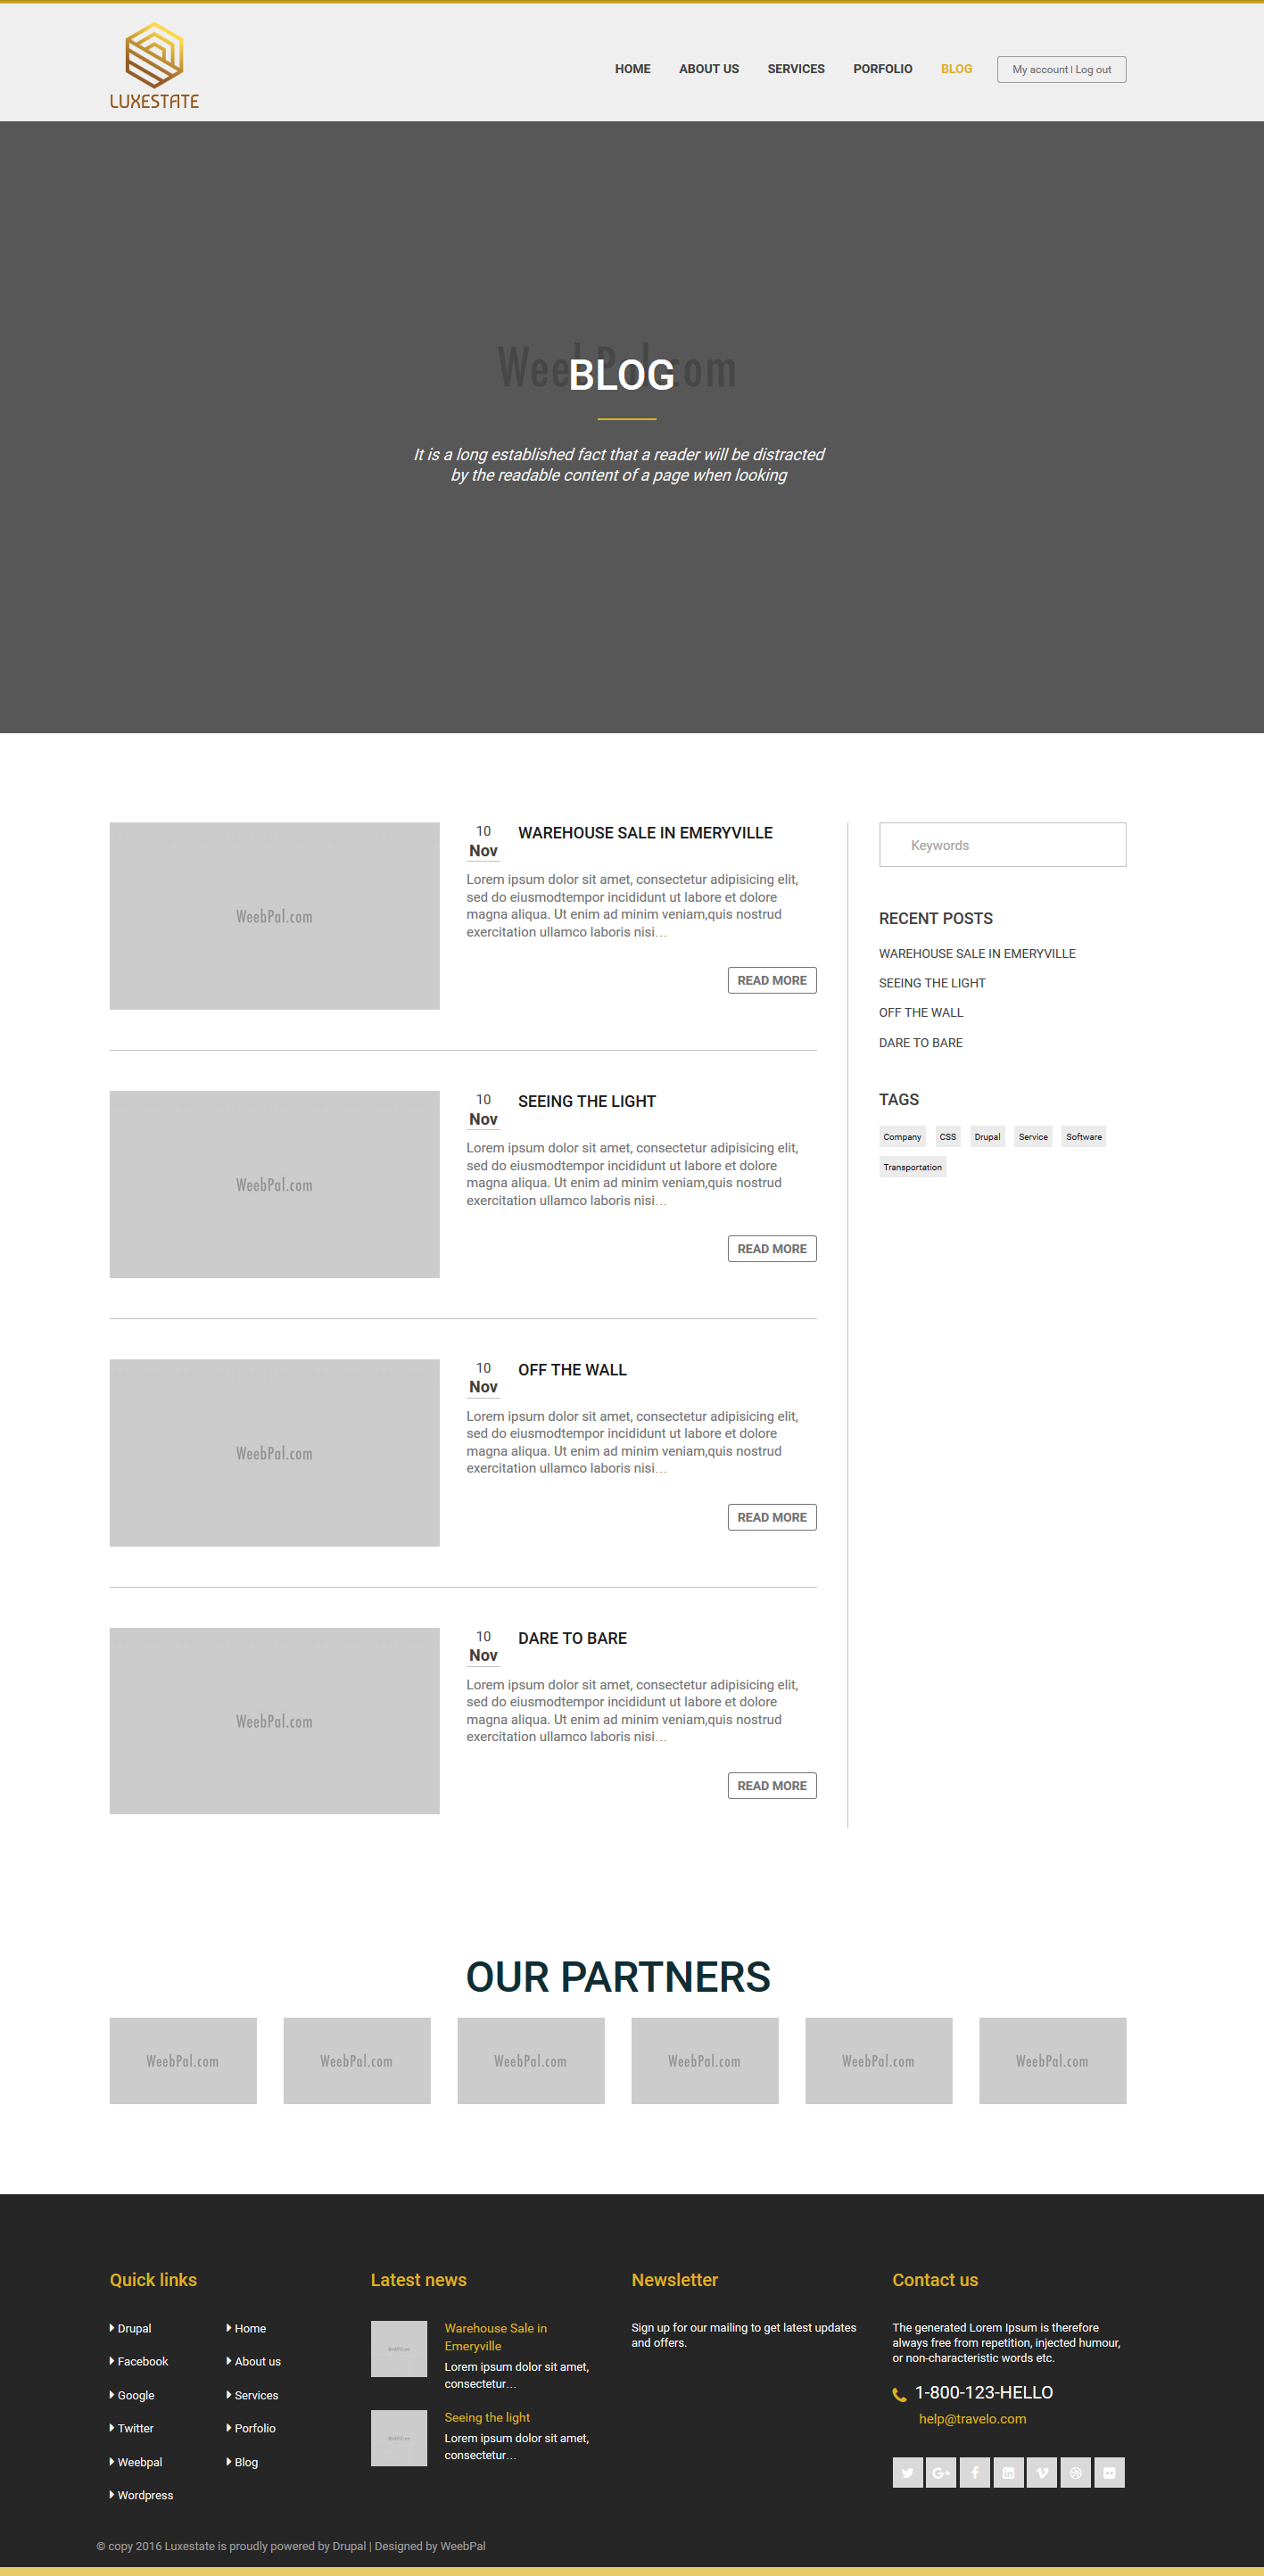
Blog page
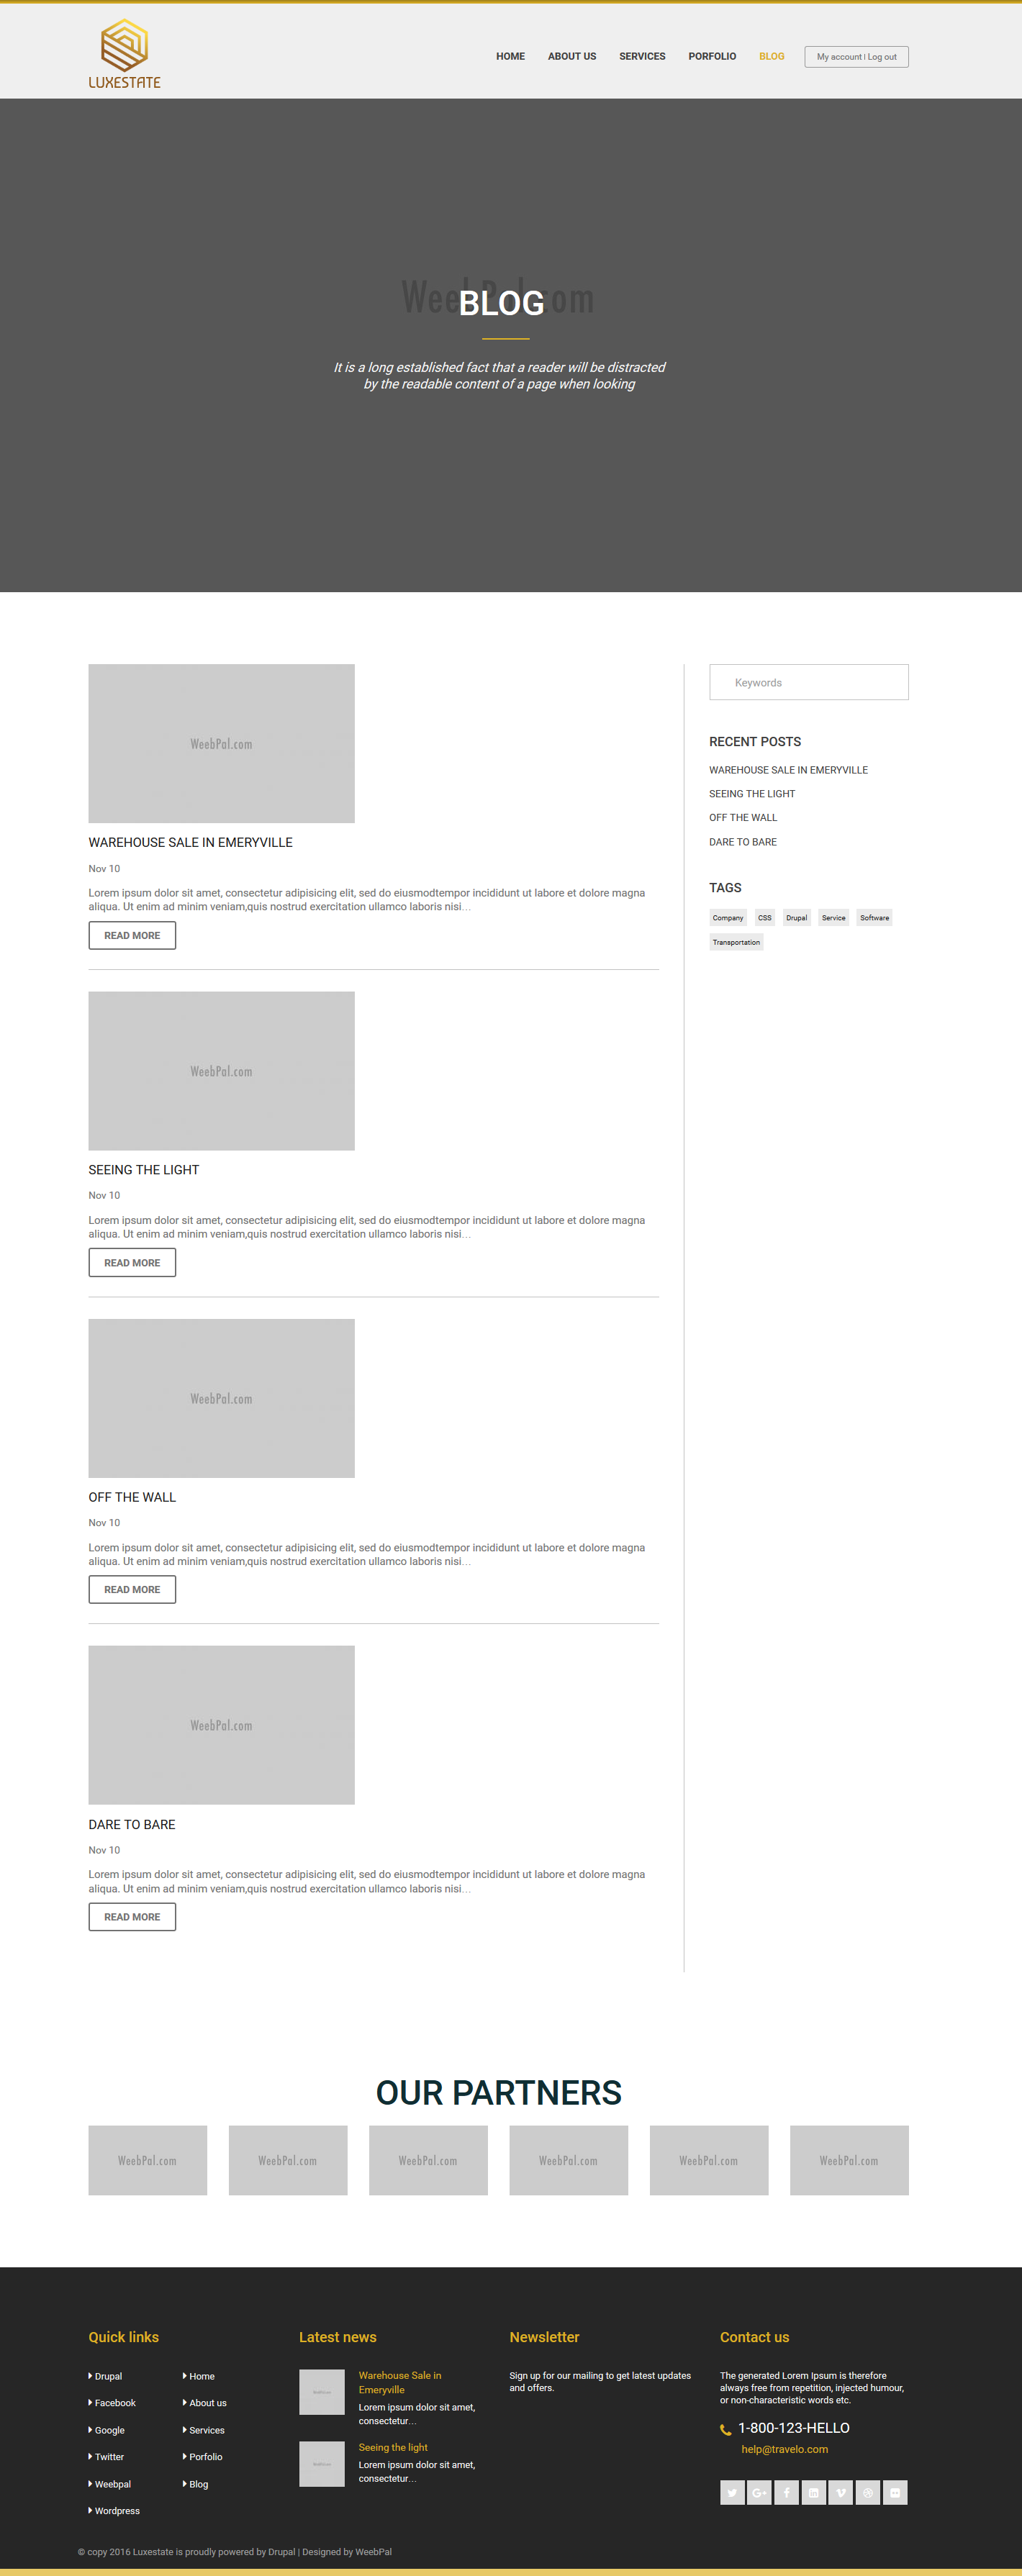
Blog Default page
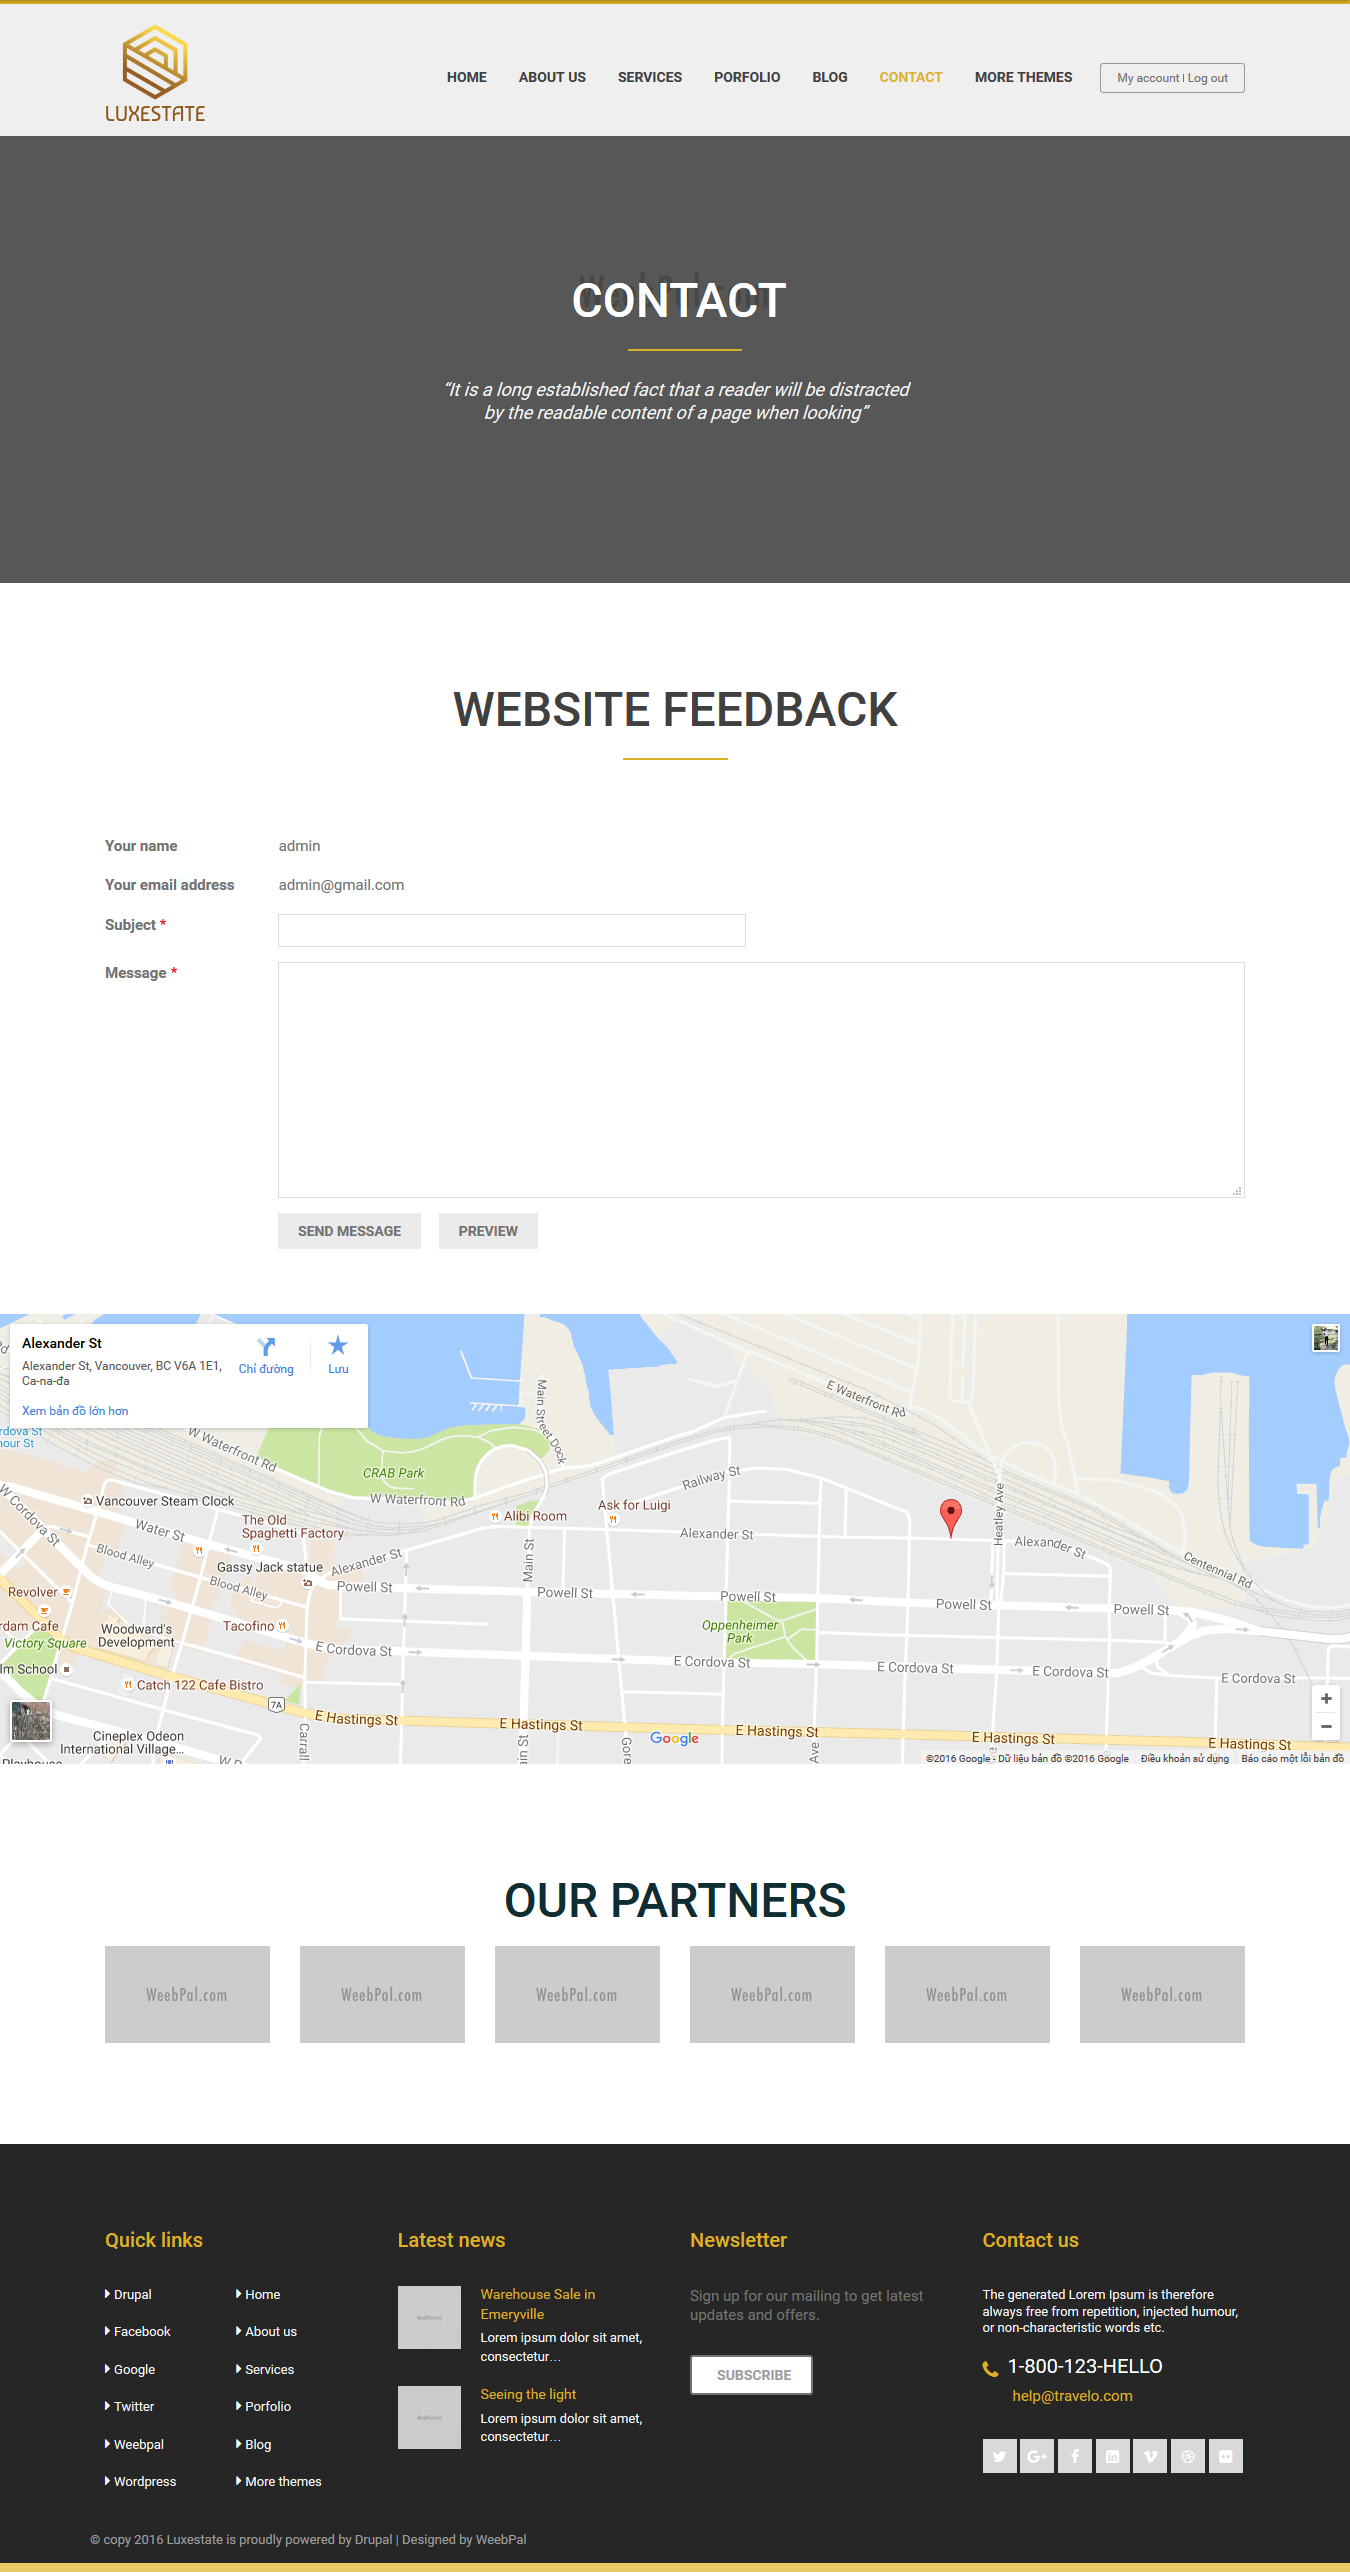
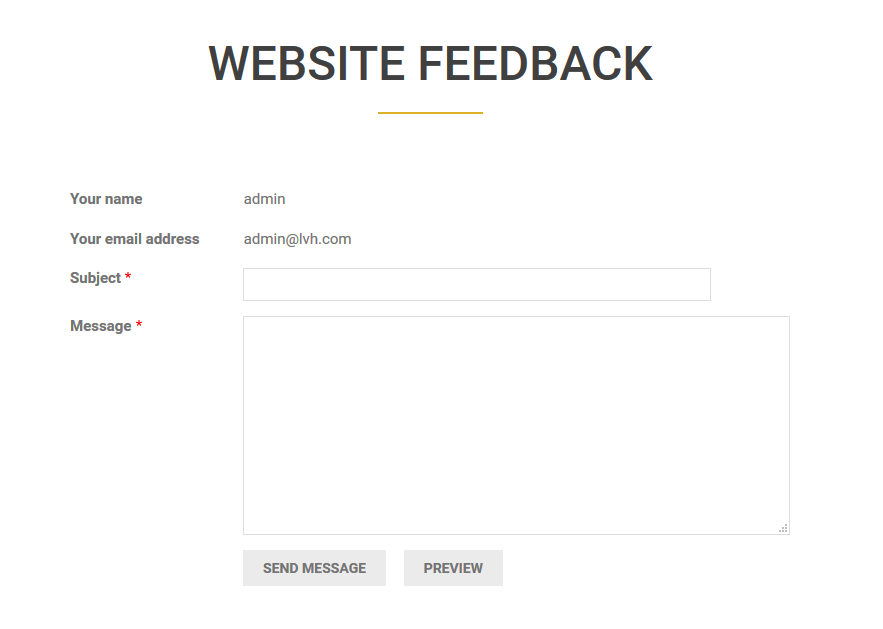
Contact page
4. System Configuration
Database
- MySQL 5.5.3/MariaDB 5.5.20/Percona Server 5.5.8 or higher with PDO and an InnoDB-compatible primary storage engine,
- PostgreSQL 9.1.2 or higher with PDO,
- SQLite 3.6.8 or higher
PHP
- PHP 5.5.9 or higher
- PHP 5GD library installed
- Disabled error_reporting flag on production server
- Enabled mod_rewrite in Apache for clean URLs
- Memory limit set up at least 128MB
If you are new to Drupal, please take a reference to System requirements on drupal.org.
5. Module requirements
Core Modules
- Action
- Aggregator
- Automated Cron
- Ban
- Basic Auth
- Big Pipe
- Block
- Block Content
- Book
- Breakpoint
- Locale
- Update manager
Third-party Modules
- Admin Toolbar
- Block Tabs
- Colorbox
- Ctools
- Devel
- Libraries
- Memcache
- Menu Link Attributes
- Node Class
- Pathauto
- Share This
- Taxonomy Menu
- Simplenews
- Token
- Video Embed Field
Download Drupal core files, and extend your site with modules at here.
Installation
How to install a WeebPal demo package
1. Download one theme package of your choice (e.g: Luxestate D8)
Files included:
- README.txt
- Luxestate D8 theme: luxestate_d8-8.1.8.zip
- Demo Profile forLuxestate D8: luxestate_d8-demo-8.1.8.zip
- This demo package includes all source codes and content, including sample images. This package will be used to build a site like our demo for the theme easily.
The below steps will give you the installation guide so that you can build your website to look exactly like the Luxestate D8 Demo
- luxestate_d8-demo-8.1.8.zip
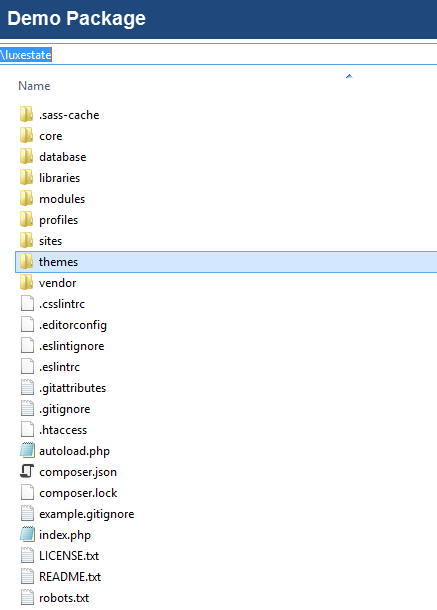
2. Extract luxestate_d8-demo-8.1.8.zip above and copy it into your host, and rename the directory
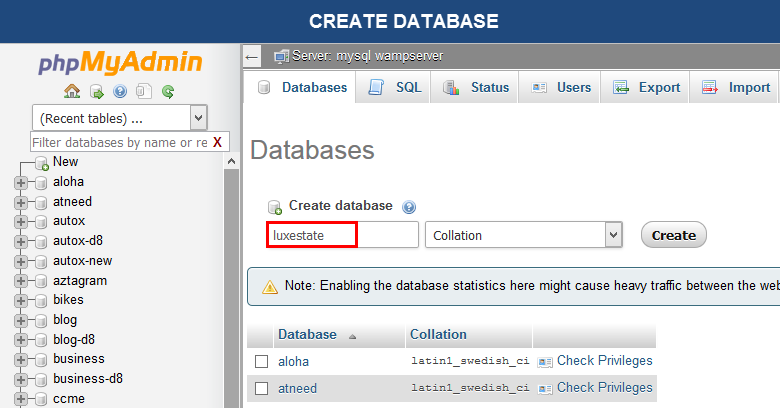
3. Access your MySQL database and create a new database (e.g: luxestate_d8) and user account. Don't forget to add correct permissions to new user to access the database
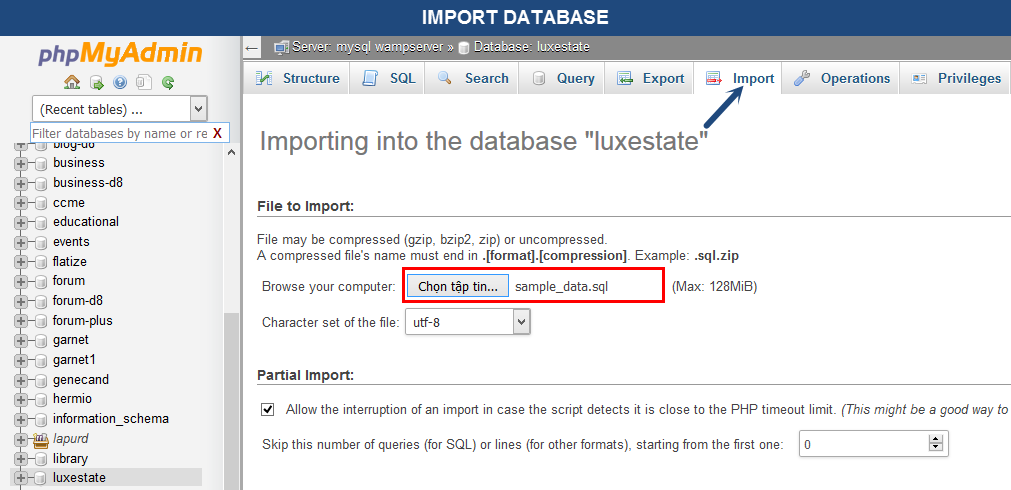
4. In the demo directory database/ , you can find database dump named sample_data.sql.
Import this file into new database.
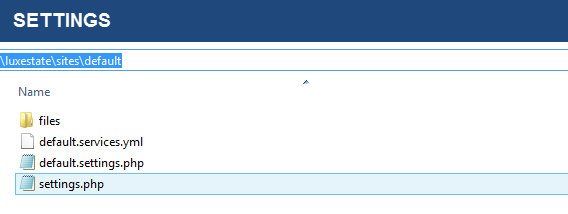
5. Now, you need to modify sites/default/default.settings.php file. Clone default.settings.php file, then rename it "settings.php"
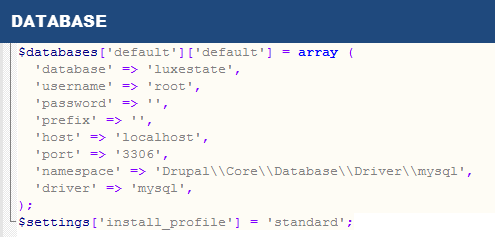
6. Open settings.php, locate the $database array and set proper credentials. Then move the $database code to the bottom of the file.
                    $databases['default']['default'] = array (
                      'database' => 'databasename',
                      'username' => 'username',
                      'password' => 'password',
                      'prefix' => '',
                      'host' => 'localhost',
                      'port' => '3306',
                      'namespace' => 'Drupal\\Core\\Database\\Driver\\mysql',
                      'driver' => 'mysql',
                       );
                   $settings['install_profile'] = 'standard';
When using this installation, you are installing everything from our preview server. So don't forget to set proper values to access to your database: db name, db admin username, db admin password, host, etc.
7. Open the browser and visit your website with the prepopulated content & layout exactly like our Luxestate D8 Demo
Now, you can visit administrator site with the admin account admin/admin to delete the unnecessary contents and add the new ones.
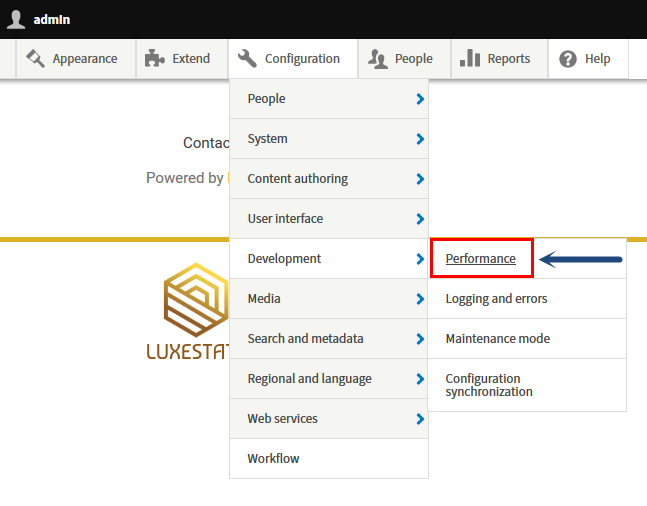
8. In site, navigate to Configuration > Development click Performance
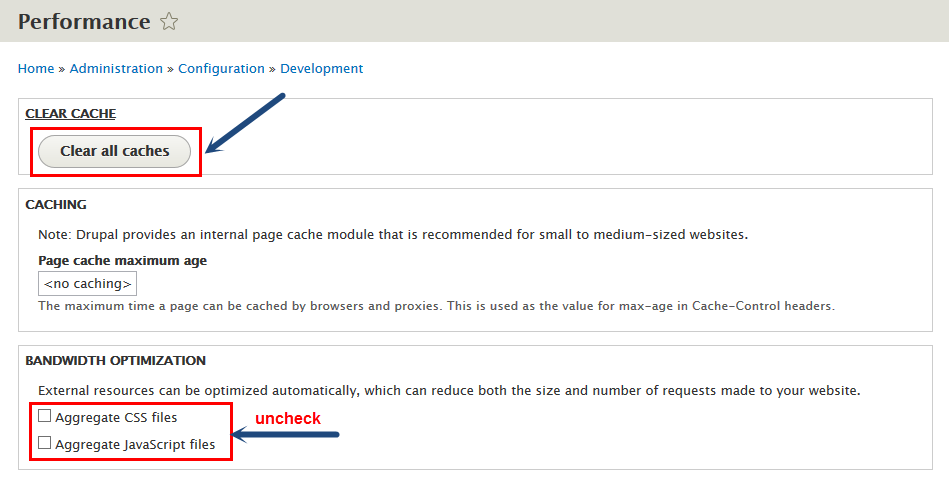
9. At Configuration Performance page, click Clear all cache button
How to install a WeebPal theme for Drupal developers
If you're an experienced Drupal user or if you want to build the theme from zero with only the basic appearance of Luxestate D8 Theme, find this guide in handy.
1. Install Drupal
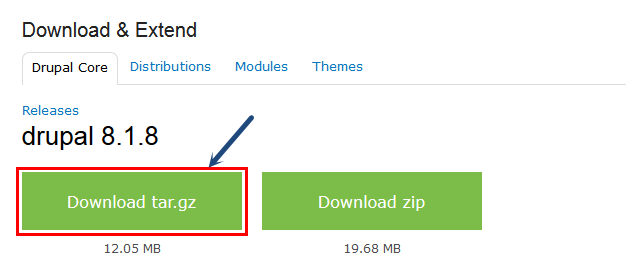
1. Go to Drupal download page and download the latest version of Drupal 8
2. Extract and copy Drupal folder to your host and rename the directory (e.g: luxestate_d8)
Follow steps below to install a Drupal site only:3. Access to database and create a new database with a name such as Luxestate D8.
4. Open browser and navigate to your website.
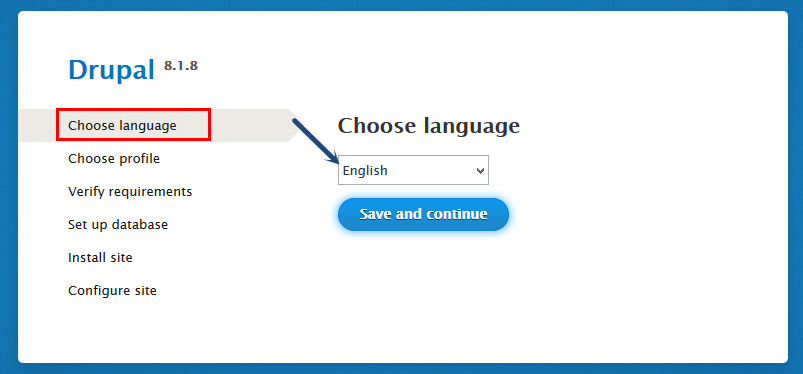
5. Choose language => click Save and continue button.
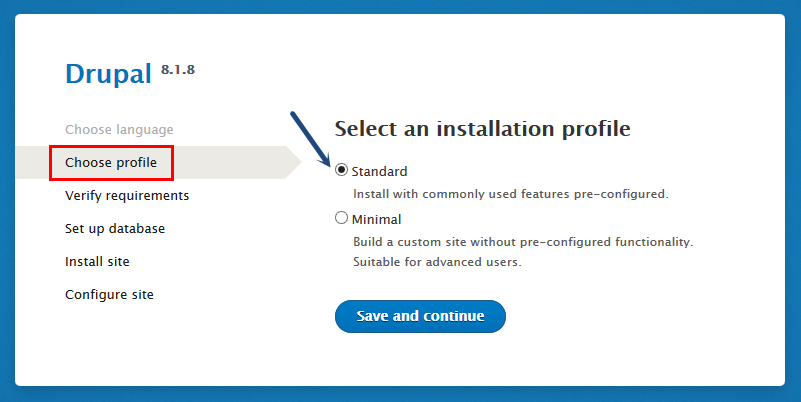
6. Select Standard => click Save and continue button.
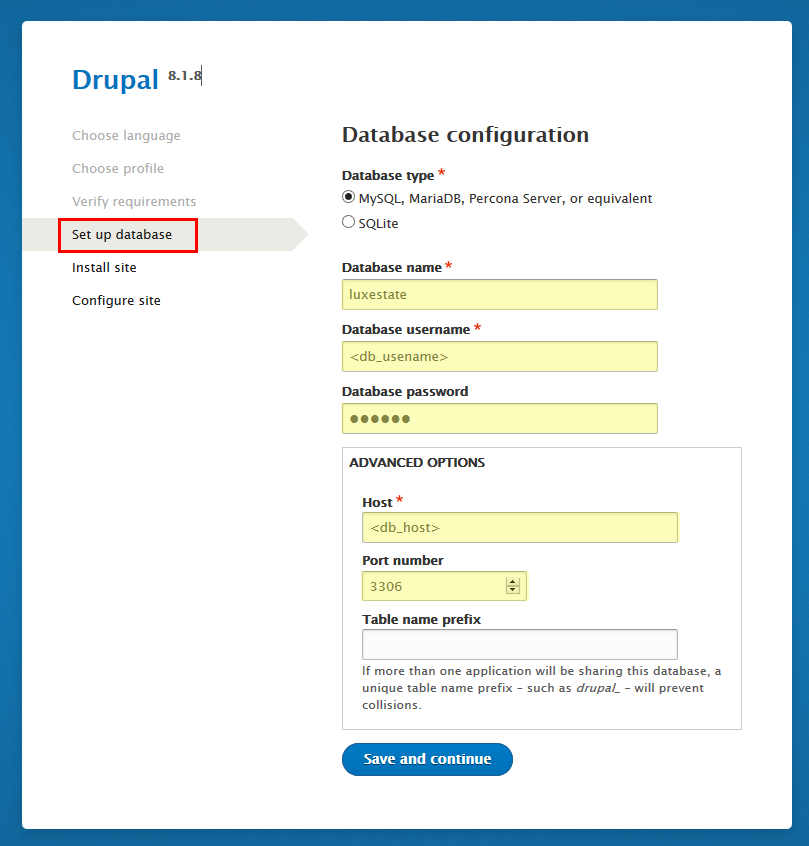
7. Enter database parameters => click Save and continue button.
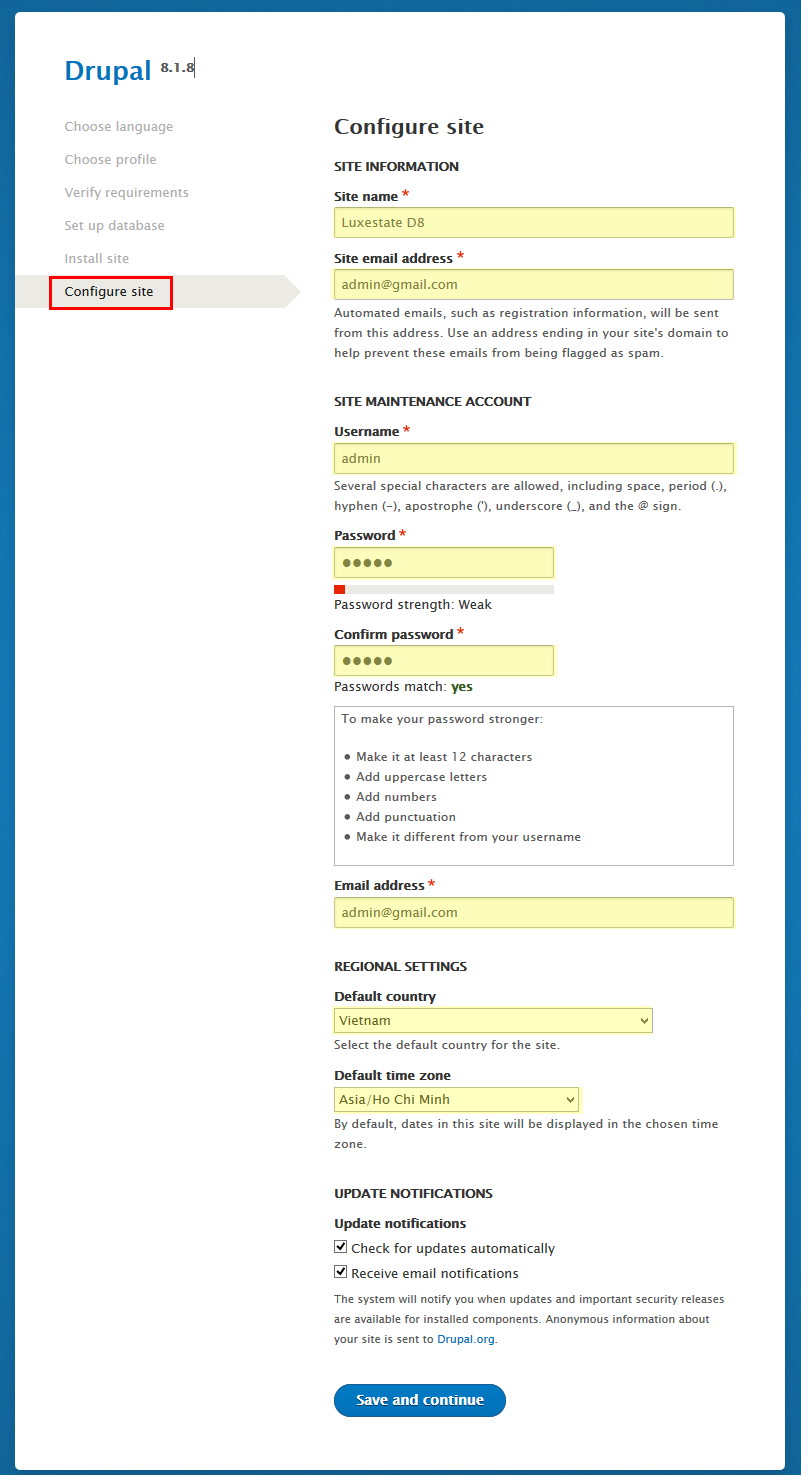
8. Enter site information => click Save and continue button.
9. Click Visit your new site and you will have a new site.
You can refer the guide from drupal.org to delve more details about drupal installation.
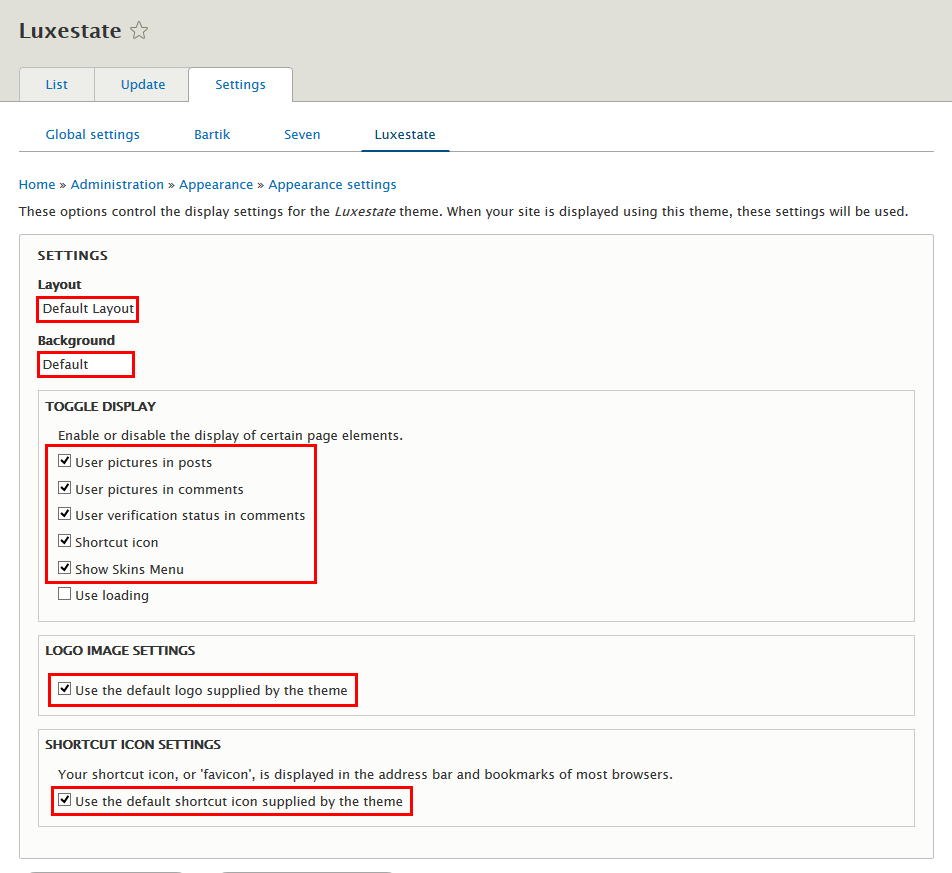
2. Install Luxestate D8 Theme
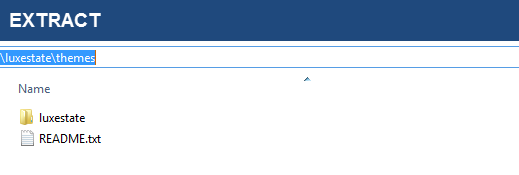
- Extract Luxestate D8 theme .ZIP file:
- luxestate_d8-8.1.8.zip
-
Move this theme into your Drupal folder: sites/all/themes
-
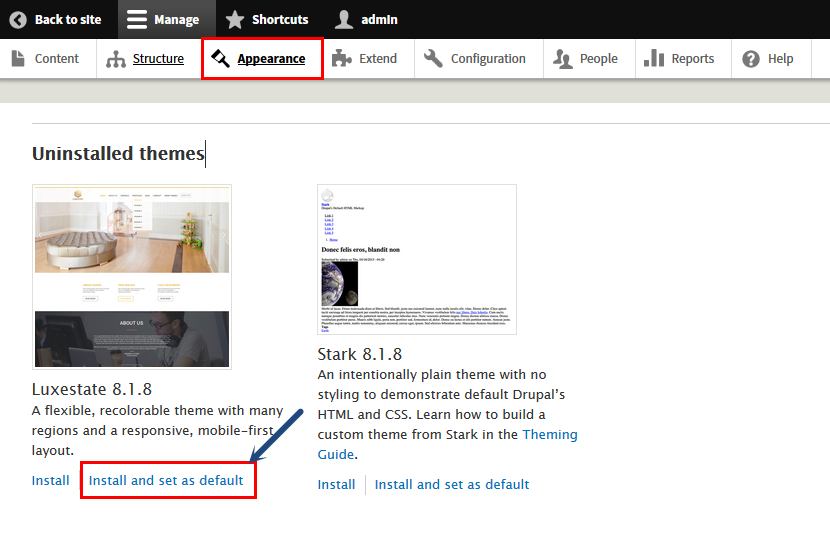
Navigate to Appearance > Choose Enable and set default Onepage theme
3. Install Required Modules
Now that you've enabled Onepage theme, you will install and enable the required modules (listed in the Module Requirements section) to customize and use them.
If you don't know how to install the contributed modules, this tutorial is an essential guide.
Cheat to install modules & theme:
- Extract luxestate_d8-8.1.8.zip
- Open extracted folder, go to sites/all and copy all folders inside (modules, themes, libraries)
- Paste them to your host, folder sites/all
Note: See this guide to get more details about installation
Taxonomy configuration
Quick Information
- Taxonomy: Taxonomy can be simply understood as category management using organizational keywords known in other systems as categories, tags or metadata. It allows you to connect, relate and classify your website's content. In Drupal, these terms are gathered within "vocabularies". The Taxonomy module allows you to create, manage and apply those vocabularies.
- Vocabulary: for example product category, tag, provider name, ...
- Term: the items in each vocabulary. For example: vocabulary product category has some terms: laptop, pc, mobile, tablet, camera, headphone, ...
- For more information about taxonomy, please see: Organizing content with taxonomies
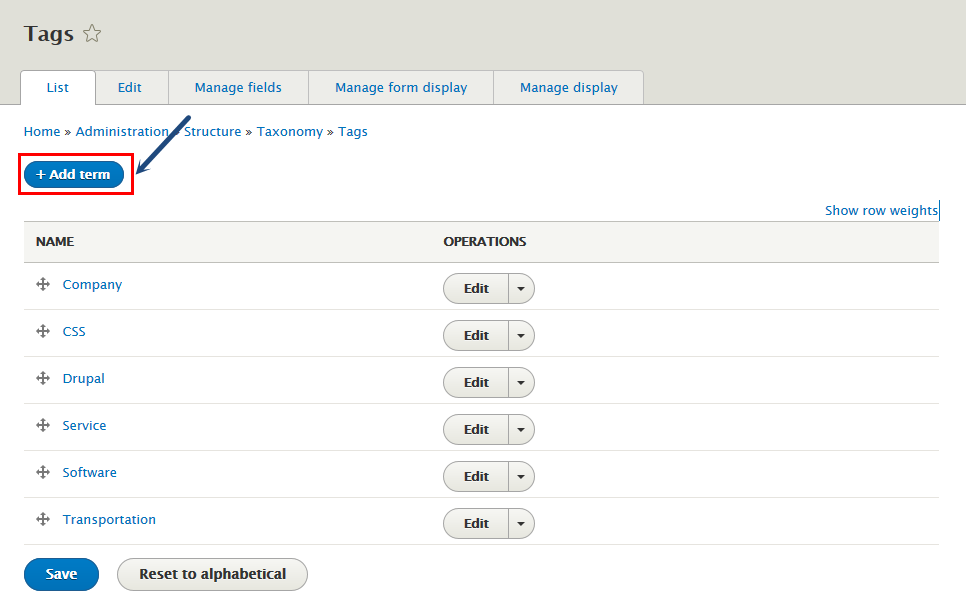
Step 1: Navigate to Structure > Taxonomy find Vocabulary Tags and click List terms button
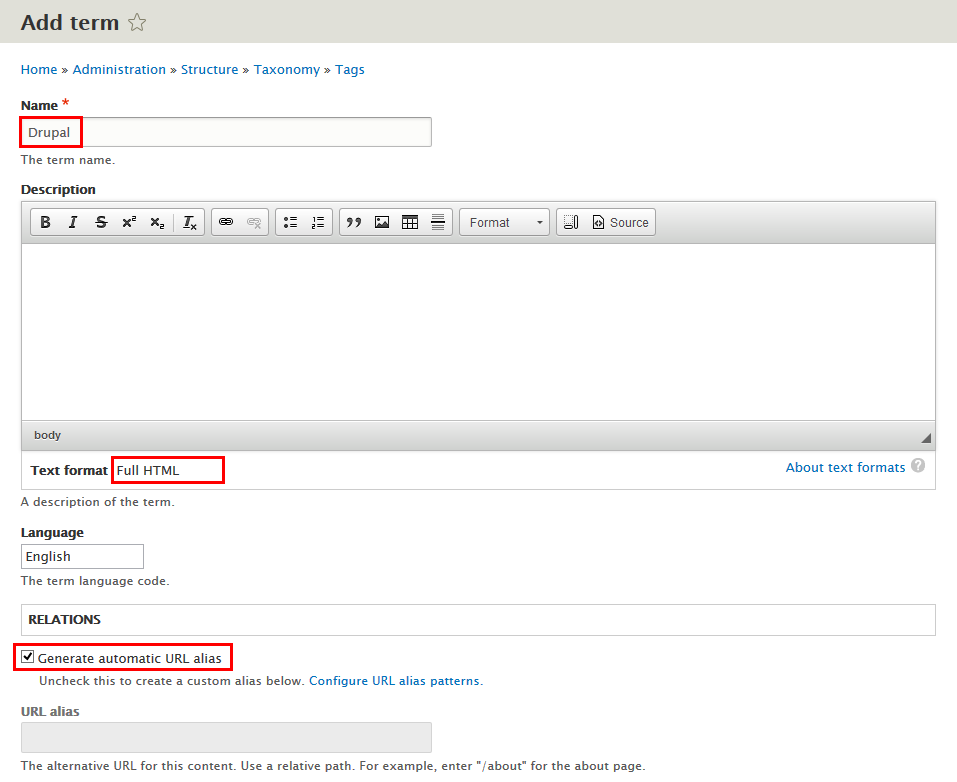
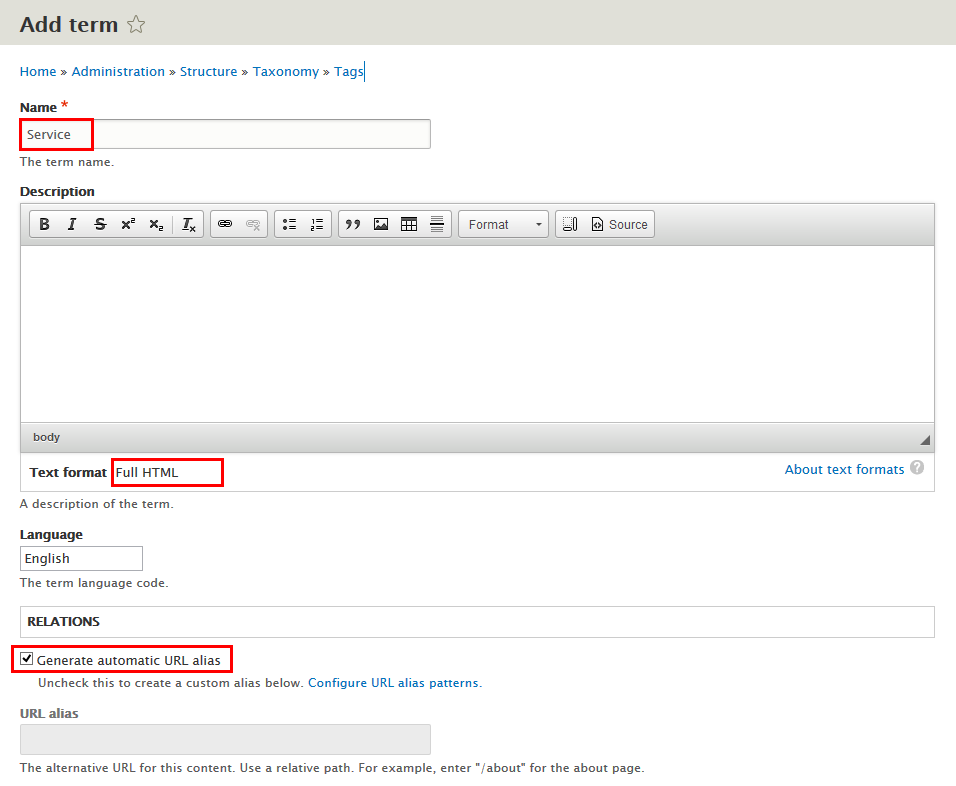
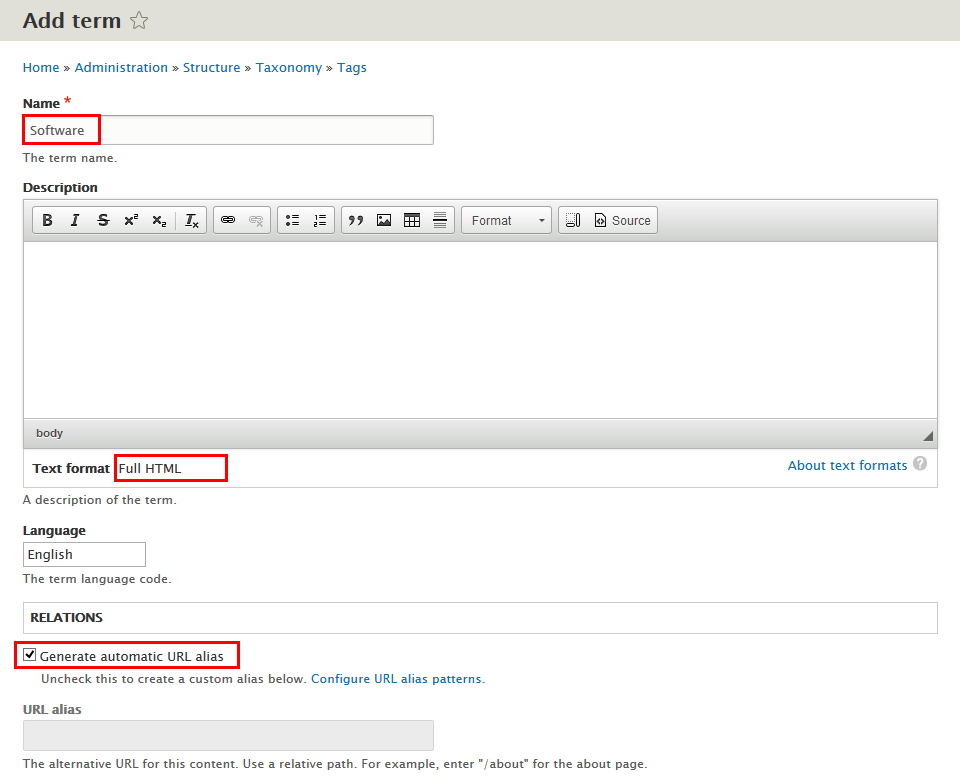
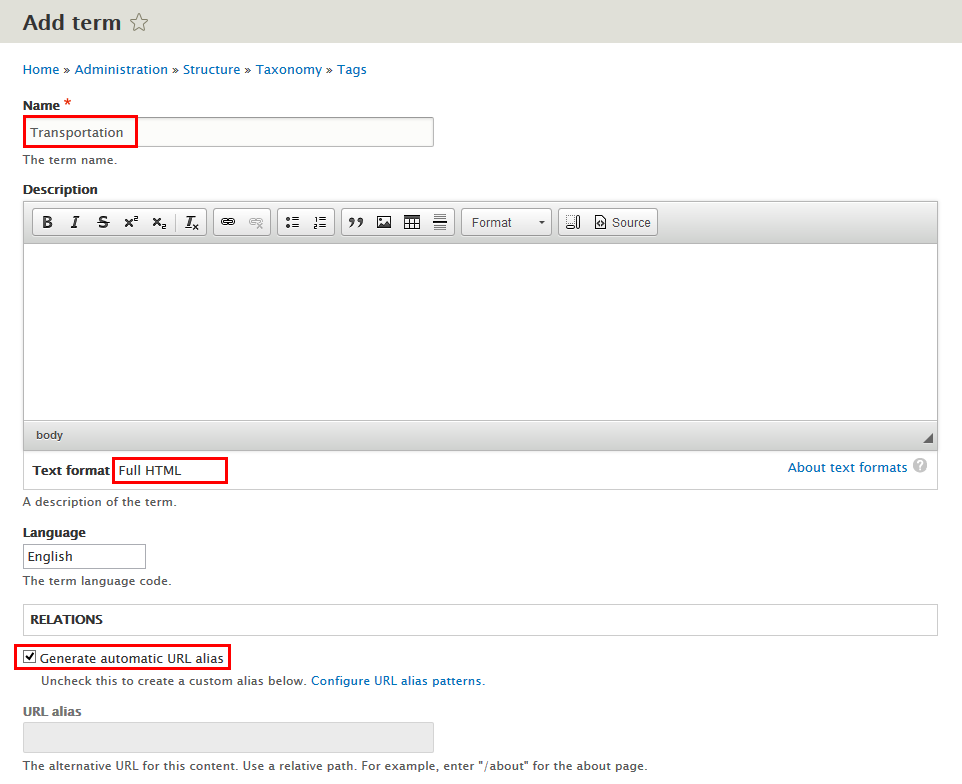
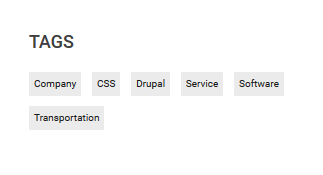
Step 2: Click Add term button to foreach add term Company, CSS, Drupal, Service, Software, Transportation for taxonomy Tags
Then, add terms
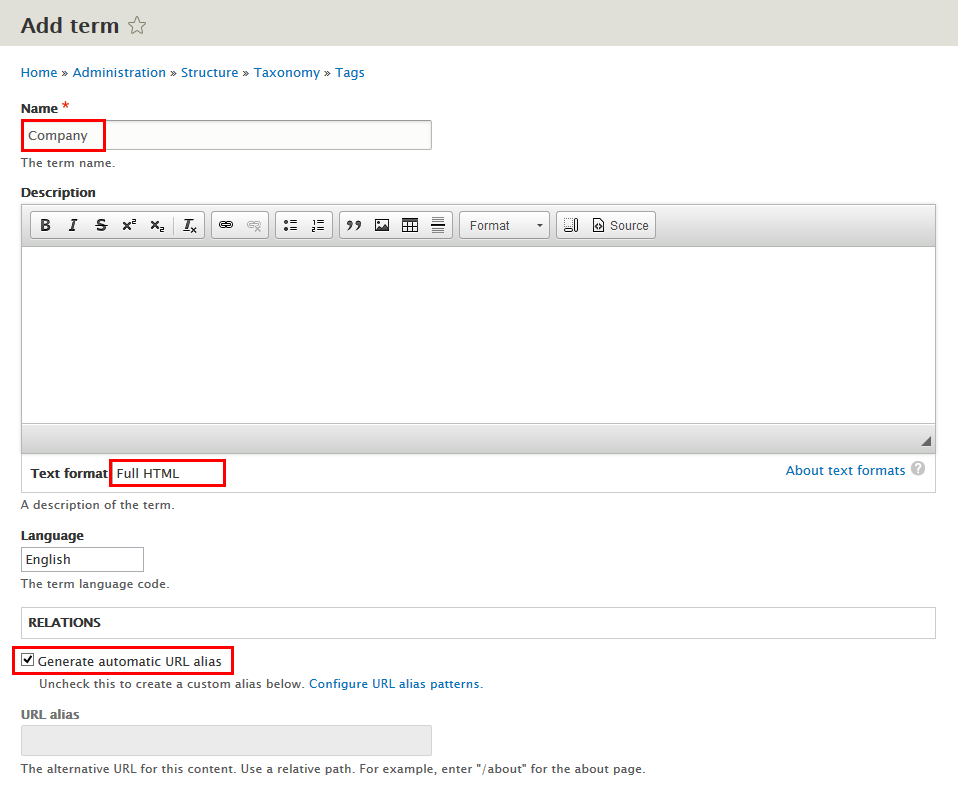
Step 3: Add term Company:
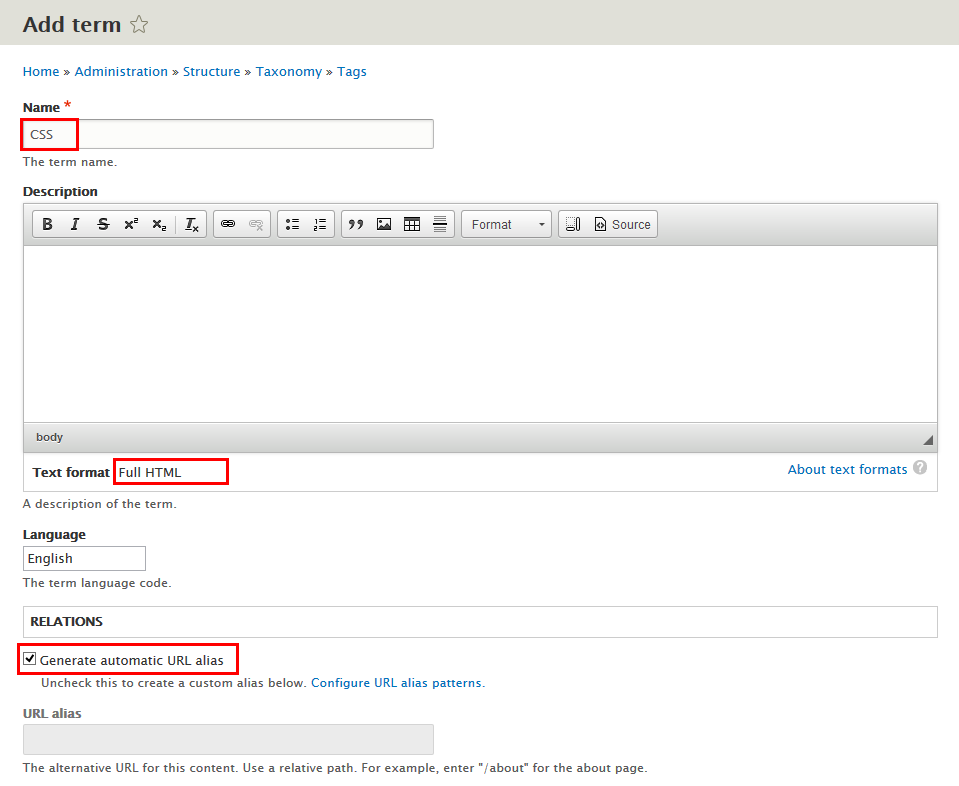
Step 4: Add term CSS:
Step 5: Add term Drupal:
Step 6: Add term Service:
Step 7: Add term Software:
Step 8: Add term Transportation:
Note: See this guide to get more details about taxonomy configuration
Media configuration
Image Style Configuration
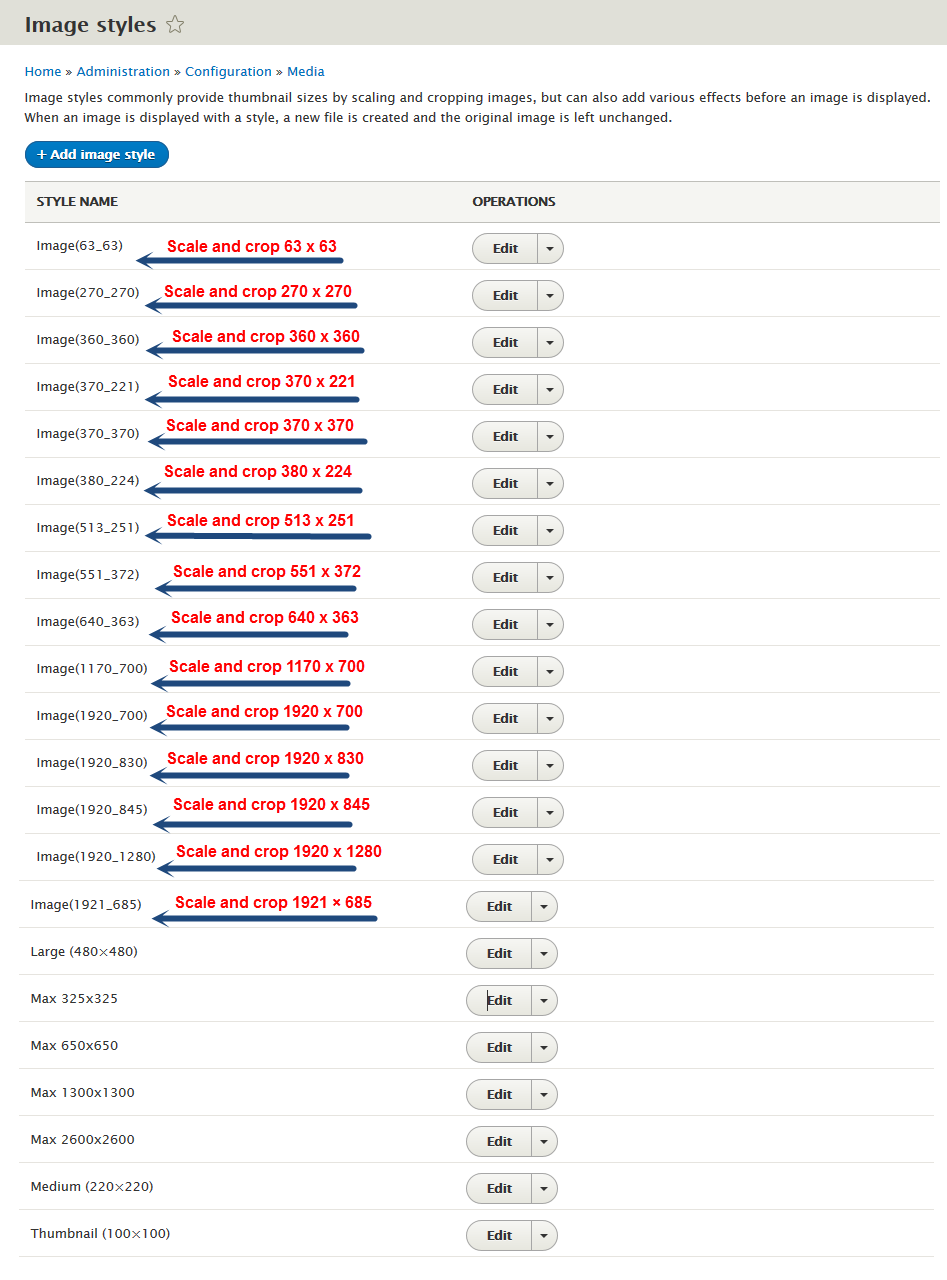
Image styles are the presets of image settings. Image styles are used to define how the images are shown.
Navigate to Configuration, In MEDIA area, click Image styles, then create image styles as the following:
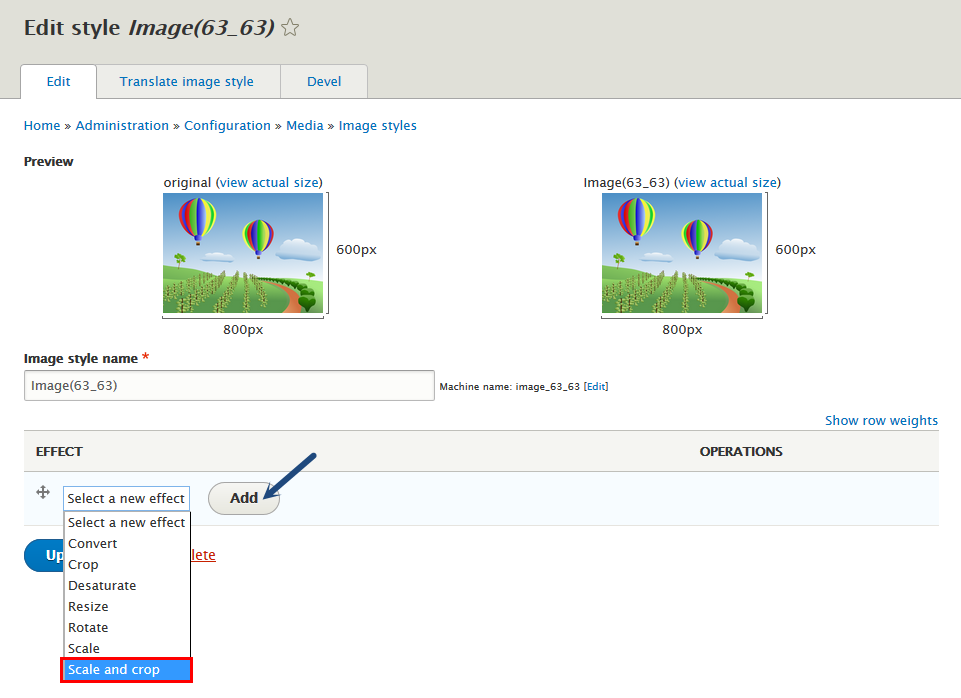
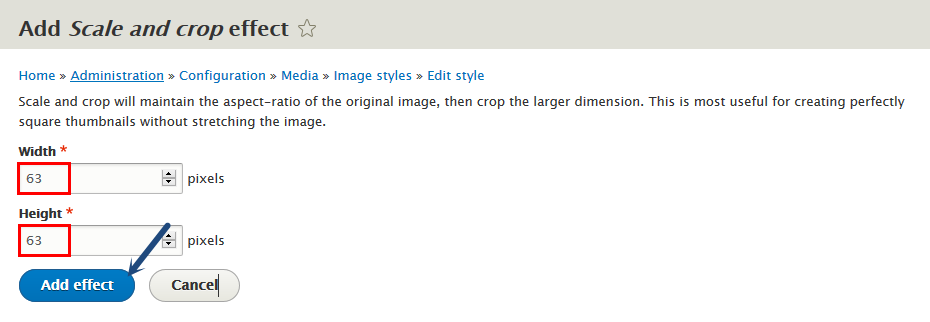
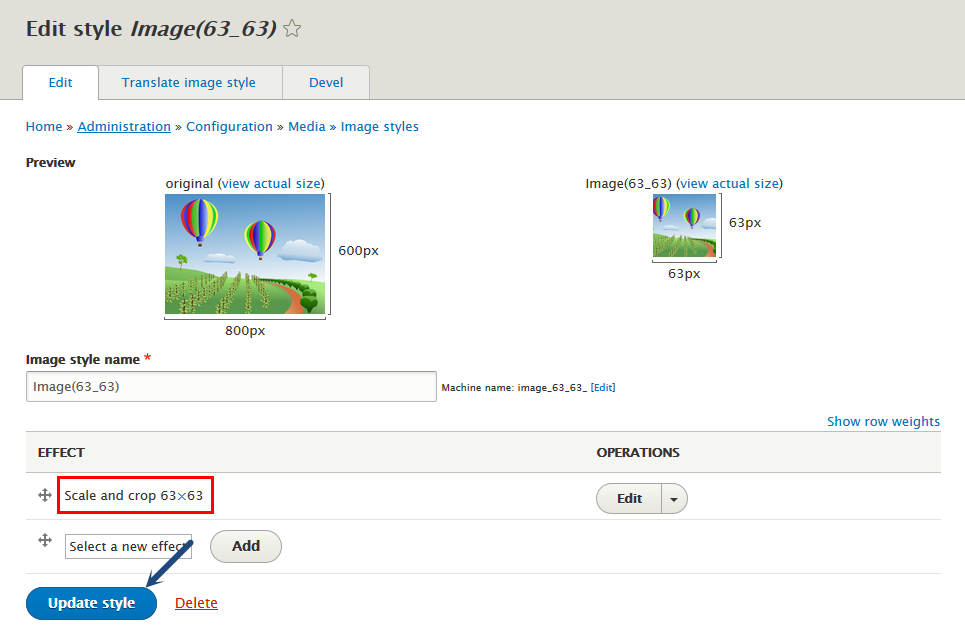
Set following properites for each image style by sequence
Step 1: Add image style
Step 2: Set effect for image style
Step 3: Update style for image style
Web services configuration
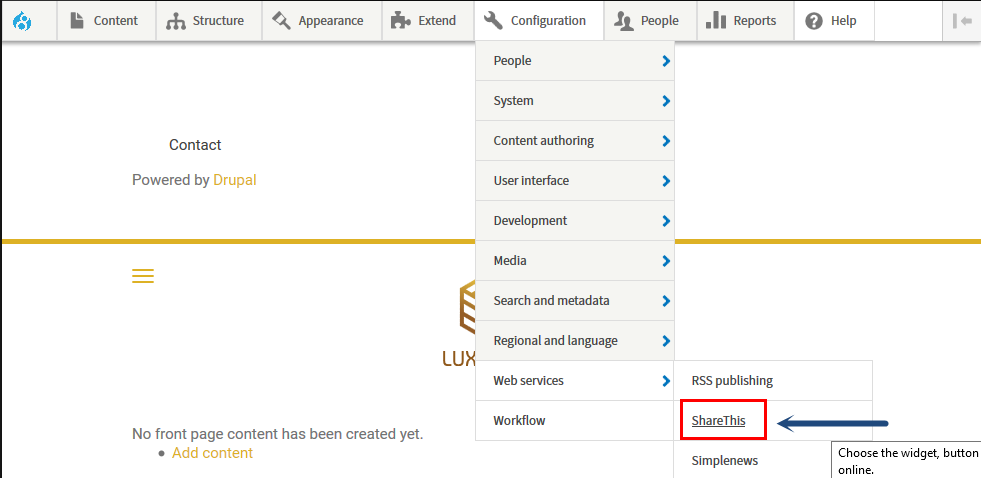
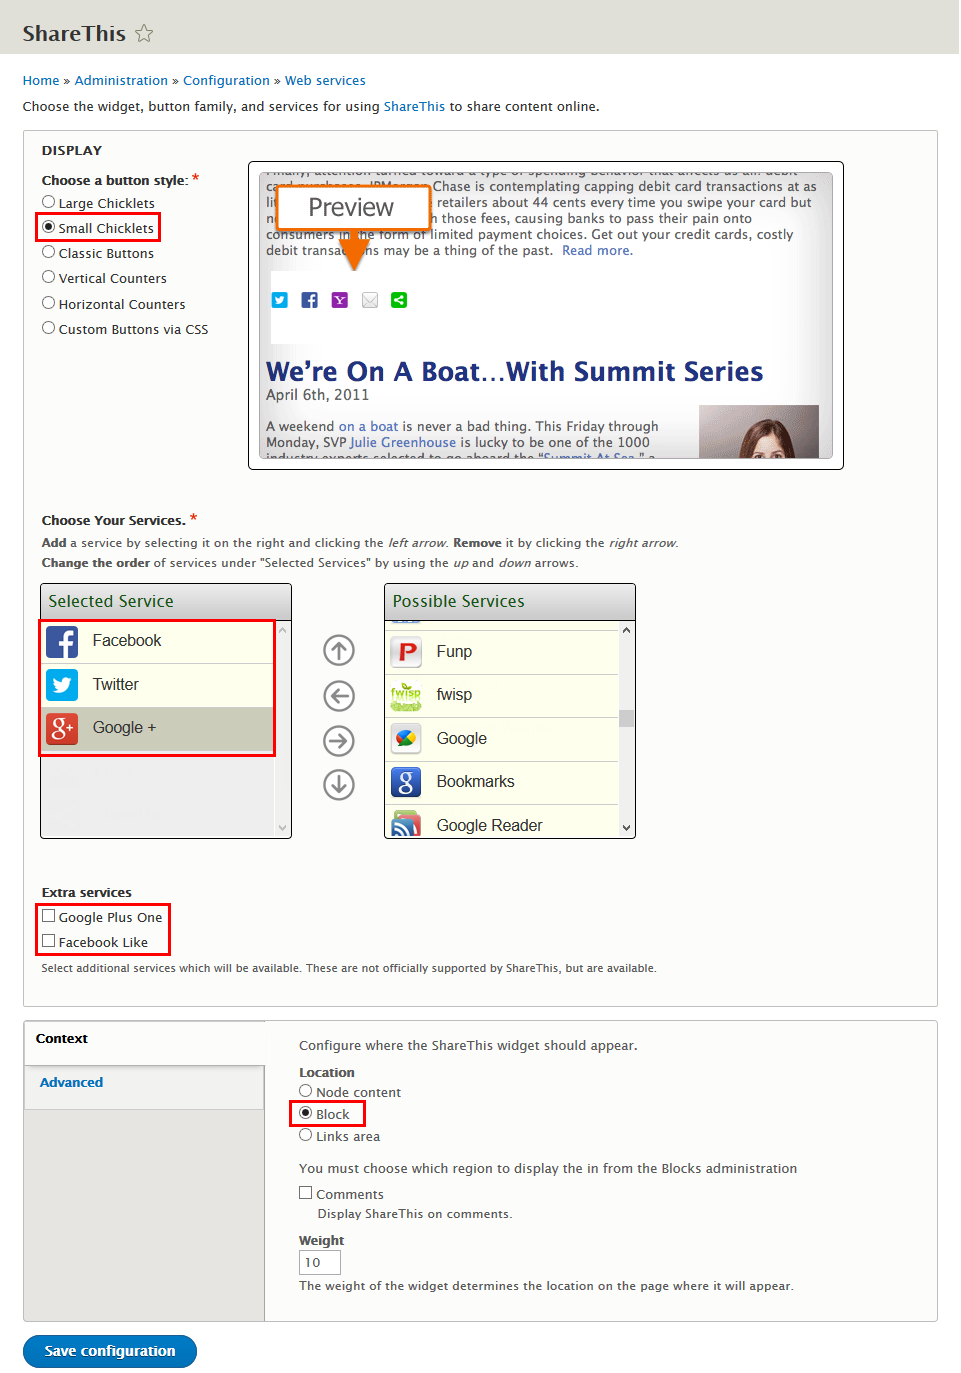
Configuration ShareThis
Step 1: Navigate to Configuration > Web services , find and click ShareThis line
Step 2: Set followinng properites ShareThis field
Content Type Configurations
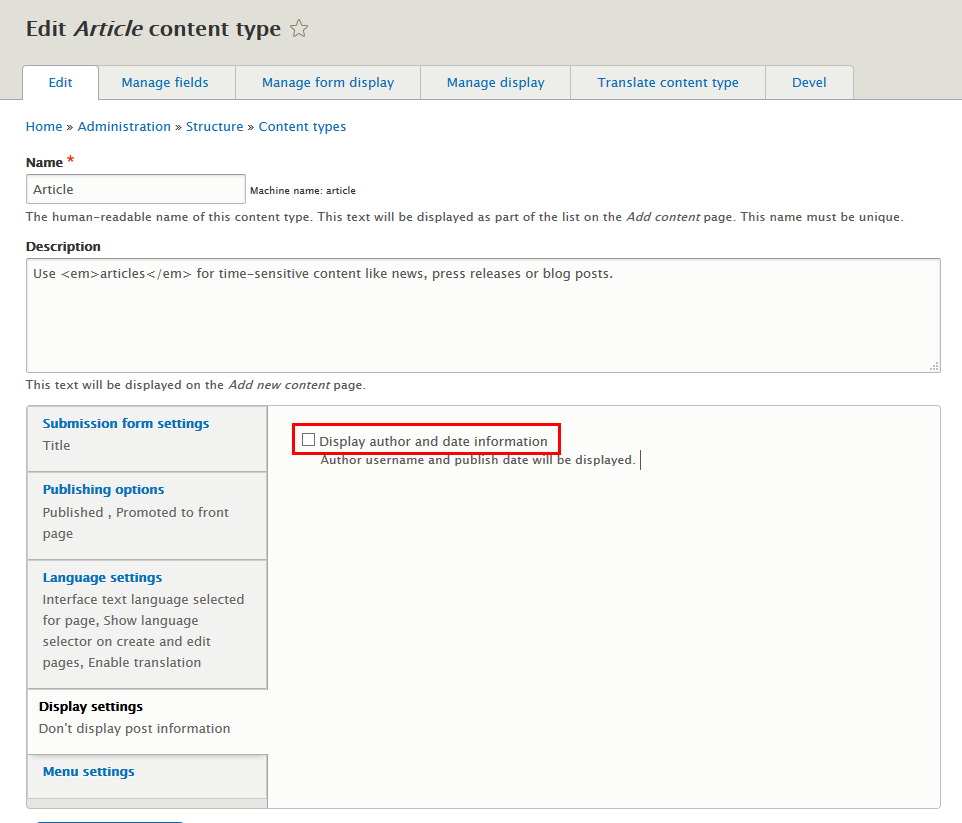
Modify Article type
Step 1: Navigate to Structure > Content Type > Articleset properites:
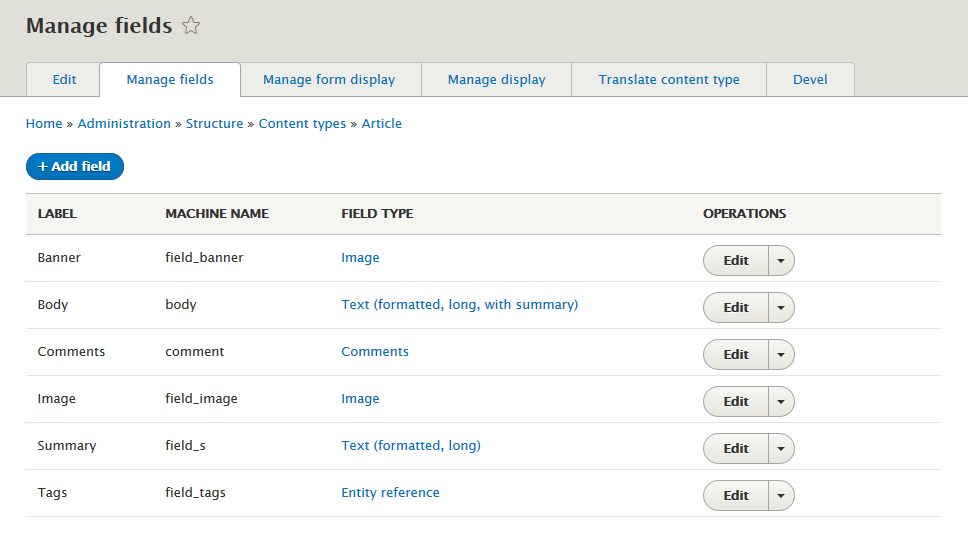
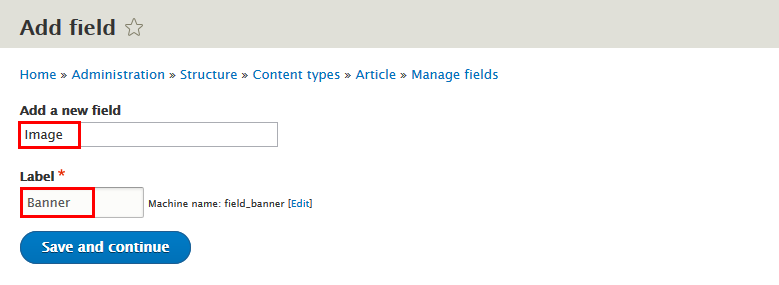
Step 2: Go to Manage fields tab, add following fields:
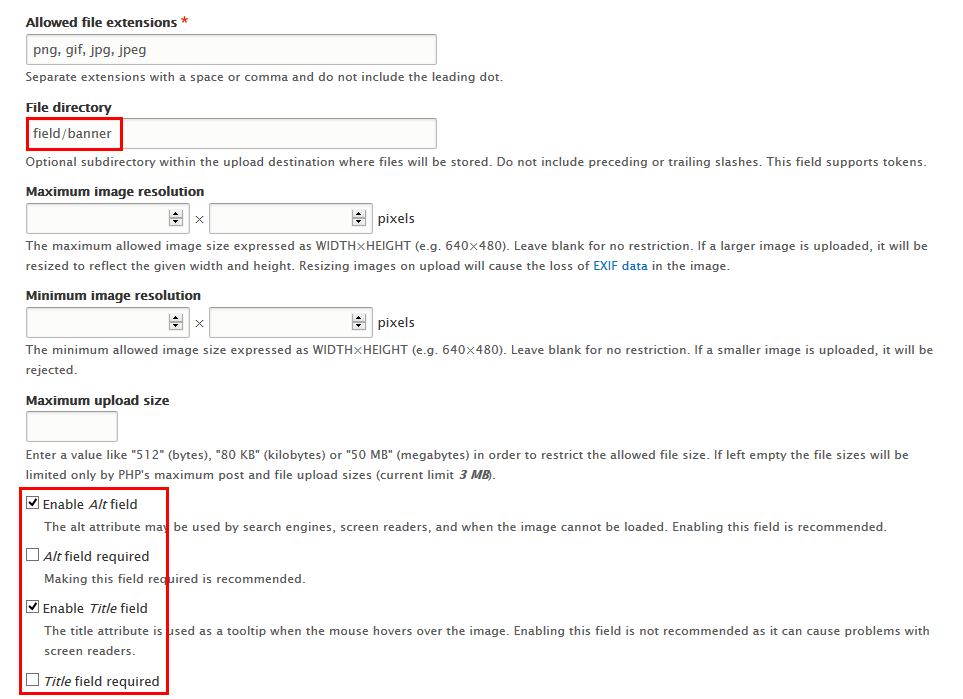
Step 3: Set properties for Banner field
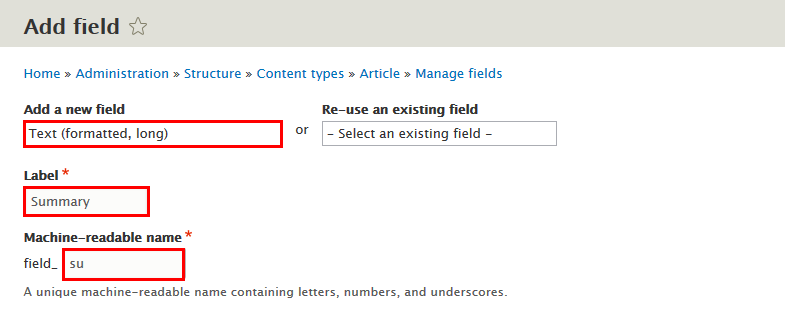
Step 4: Set properties for Summary field
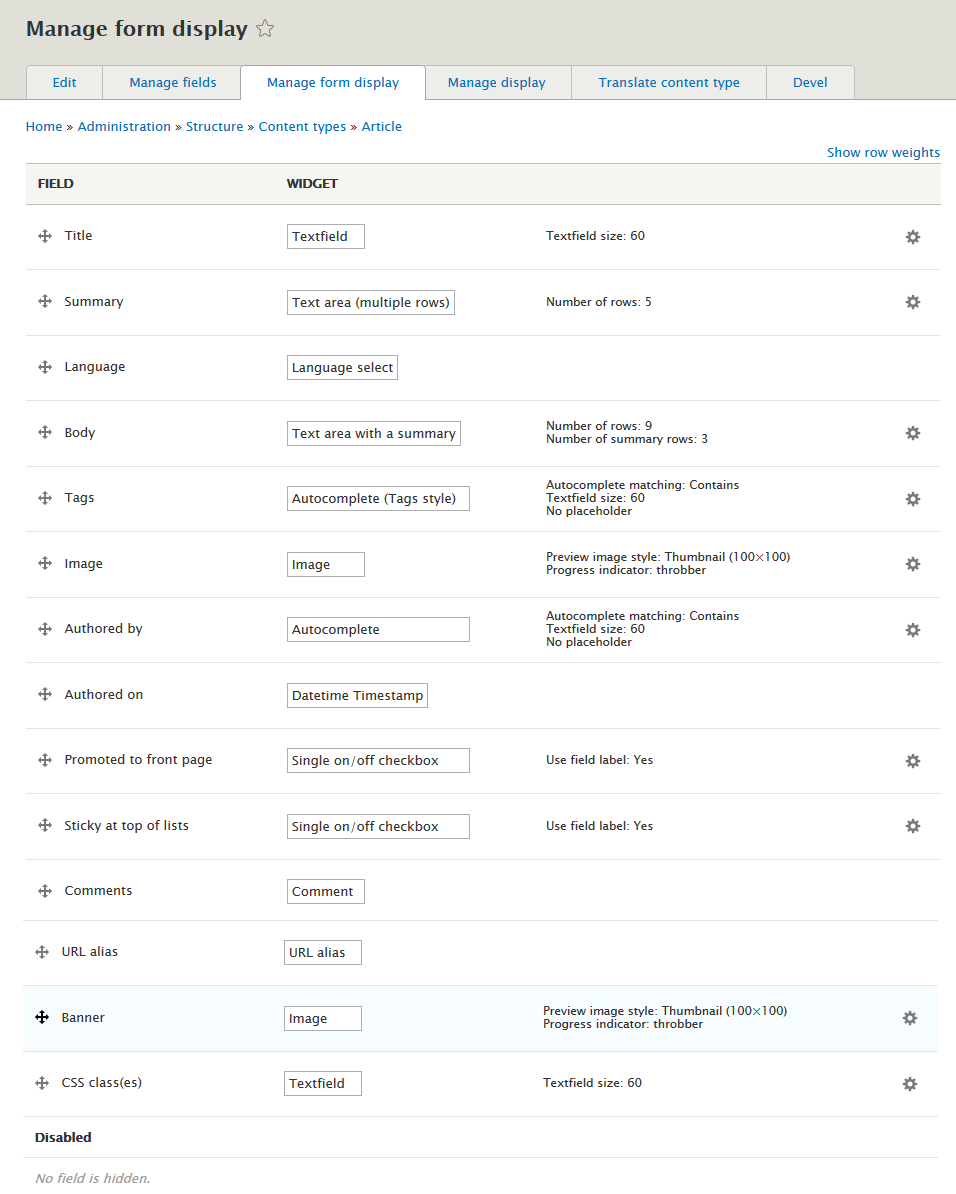
Step 5: Go to Manage form display tab, set following properties:
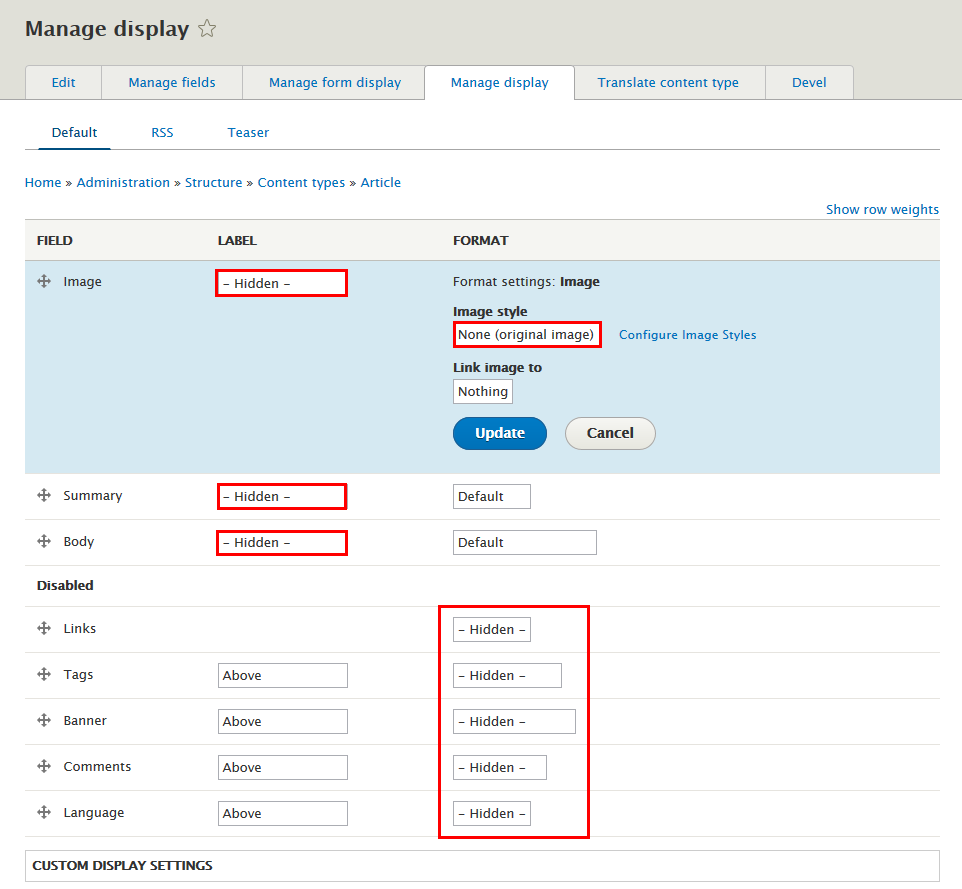
Step 6: Go to Manage display tab > Default tab, set following properties:
Step 7: Click Save button
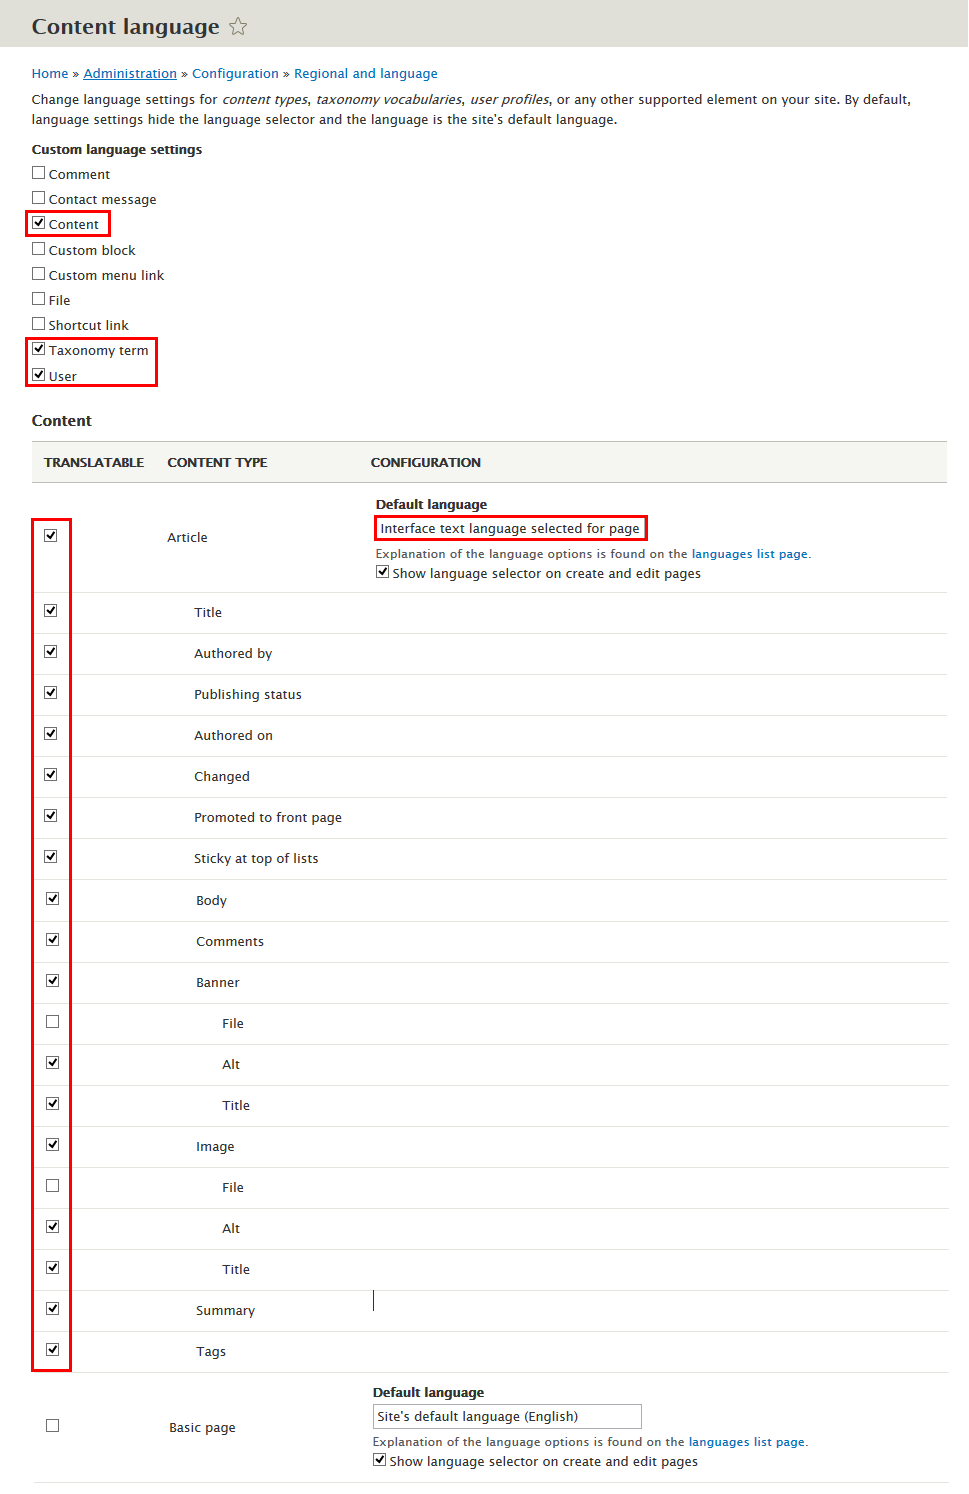
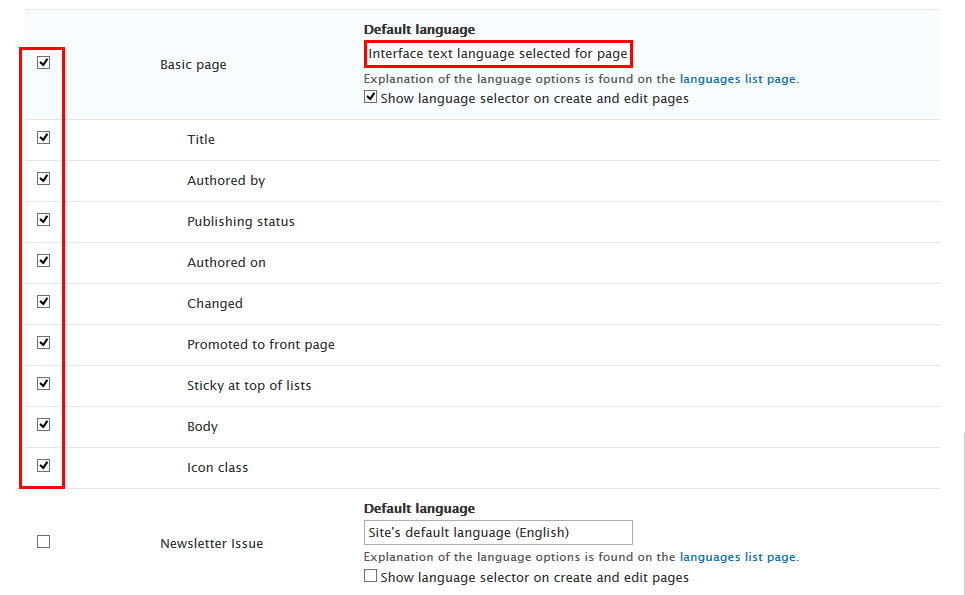
Step 8: Navigate to Configuration > Regional and language . Click Content language and translation add setting following fields:
Step 9: Click Save configuration button
Modify Basic page type
Step 1: Navigate to Structure > Content Type > Basic page. In Basic page, go to Manage display tab > Default tab, set following properties:
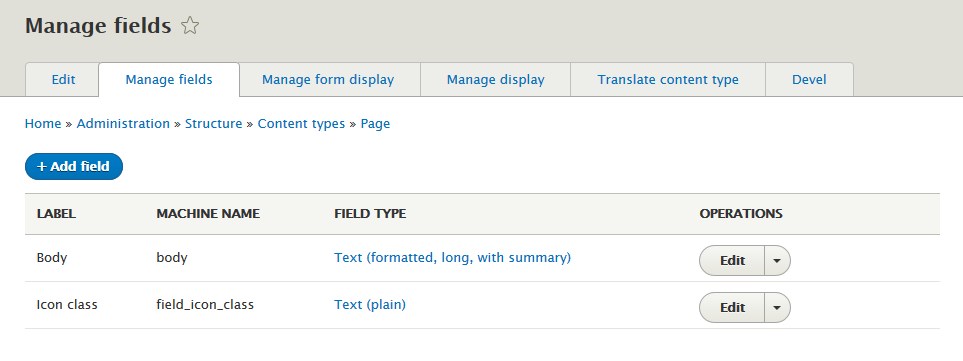
Step 2: Set properties for Icon class field
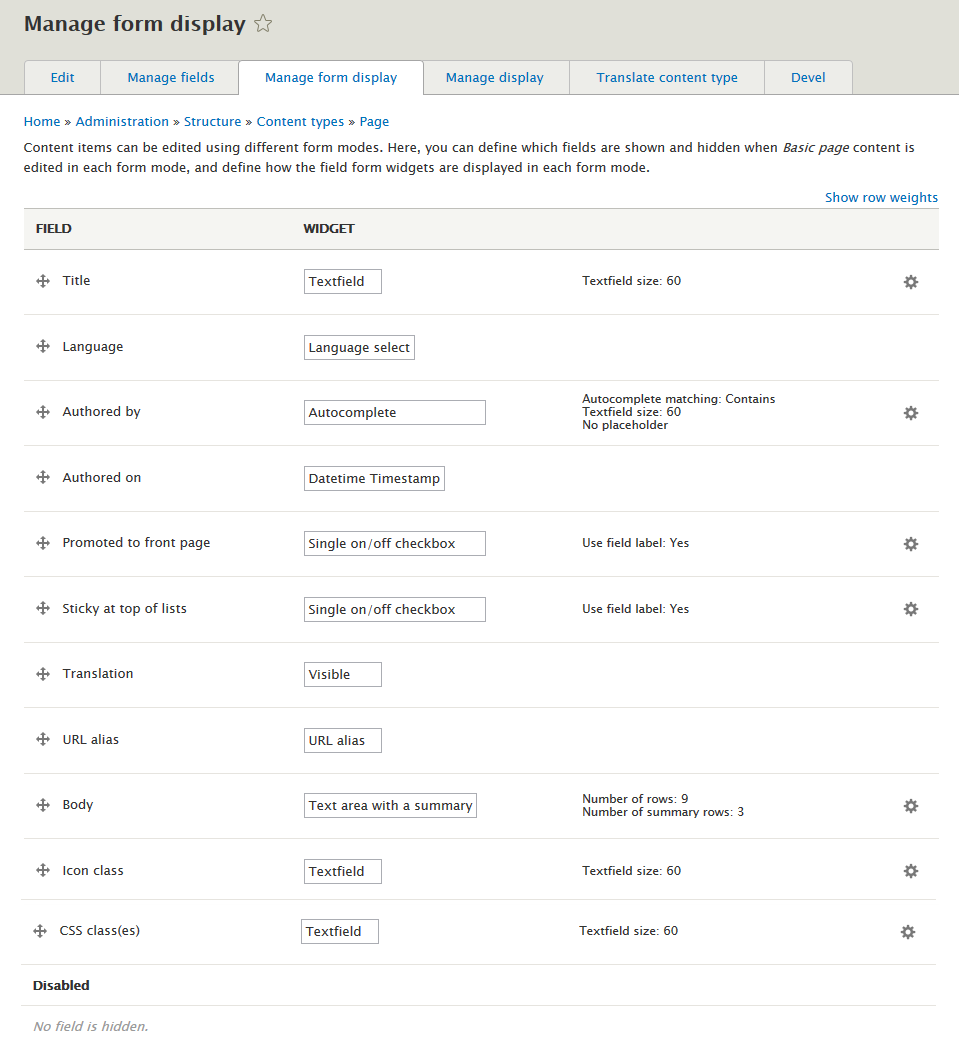
Step 3: Go to Manage form display tab, set following properties:
Step 4: Click Save button
Step 5: Navigate to Configuration > Regional and language . Click Content language and translation add setting following fields:
Step 6: Click Save configuration button
Create Banner type
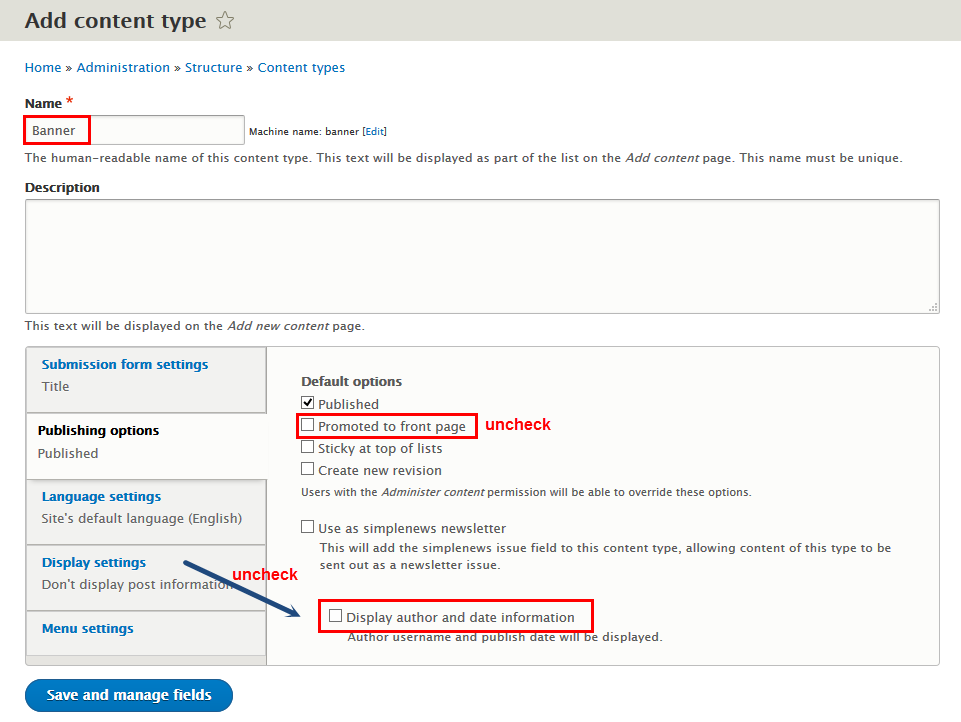
Step 1: Navigate to Structure > Content Type
Step 2: Click Add Content Type link to create Banner type
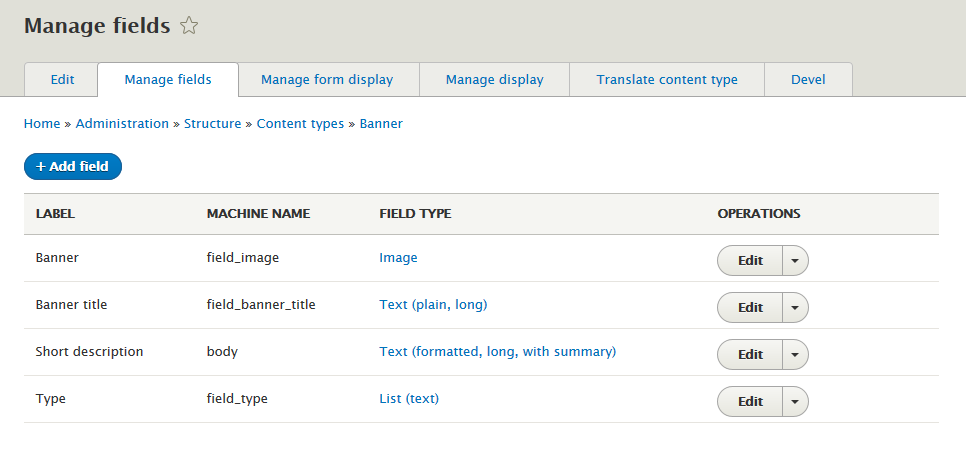
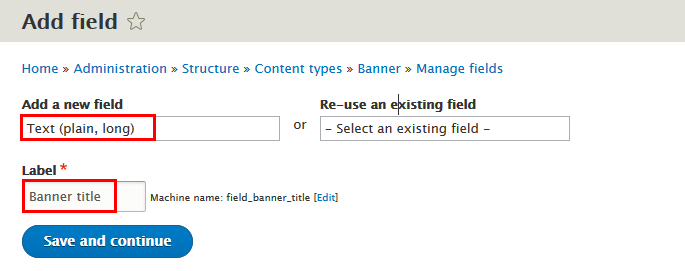
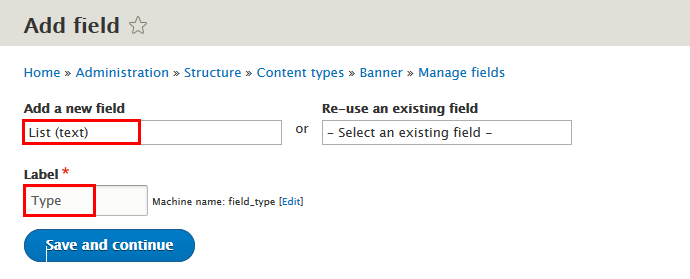
Step 3: Click Save and manage fields button, then add following fields:
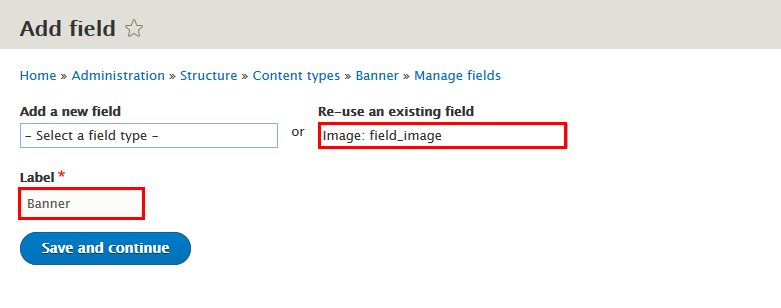
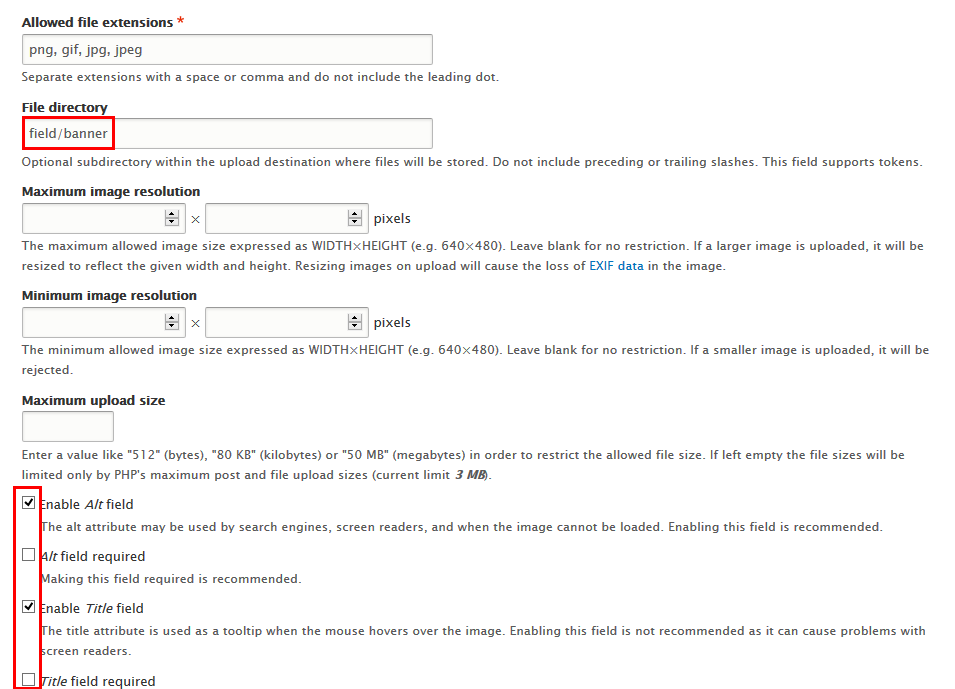
Step 4: Set properties for Banner field
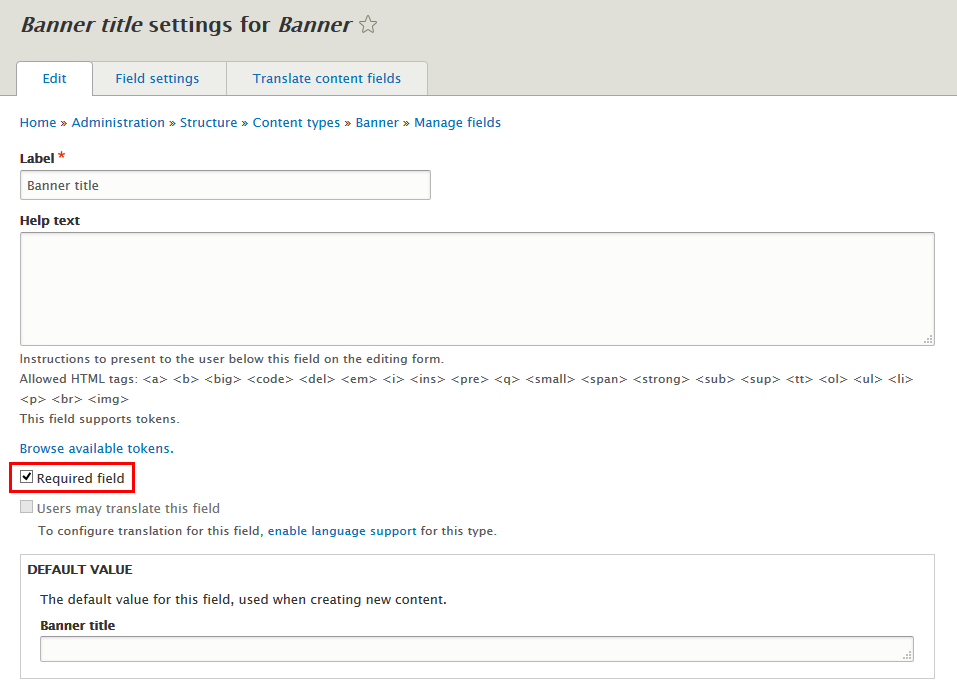
Step 5: Set properties for Banner title field
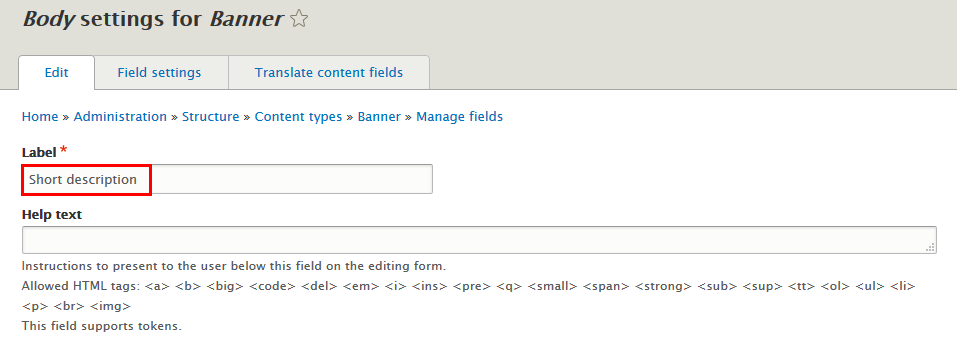
Step 6: Set properties for Body field
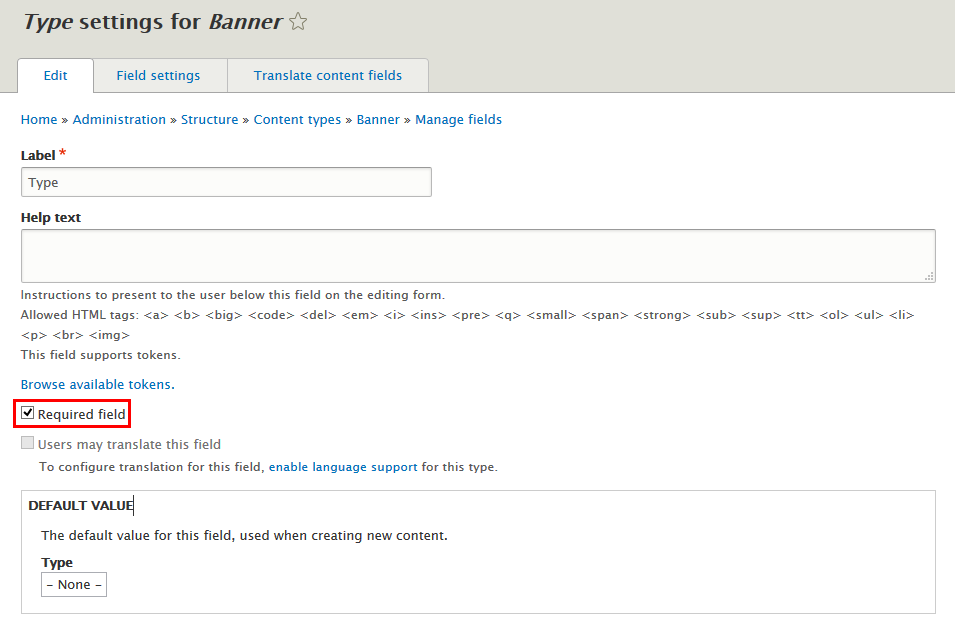
Step 7: Set properties for Type field
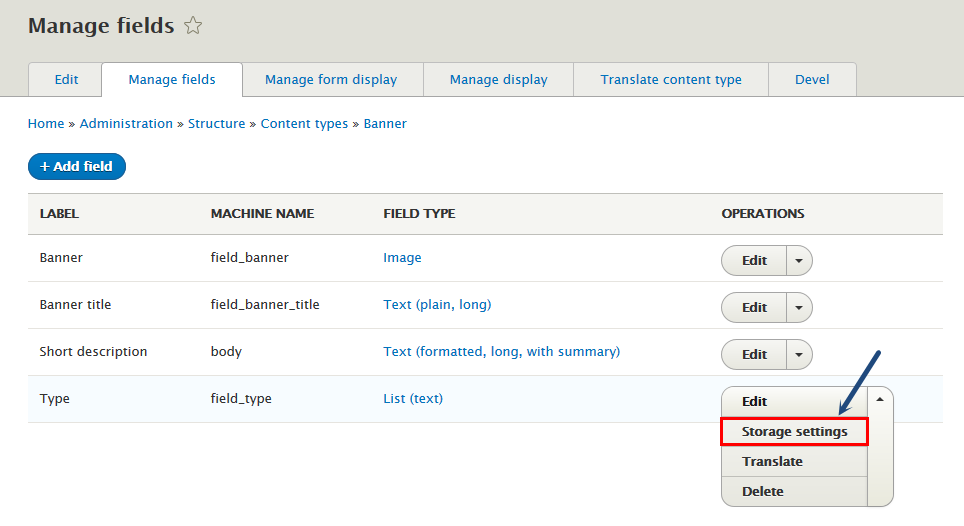
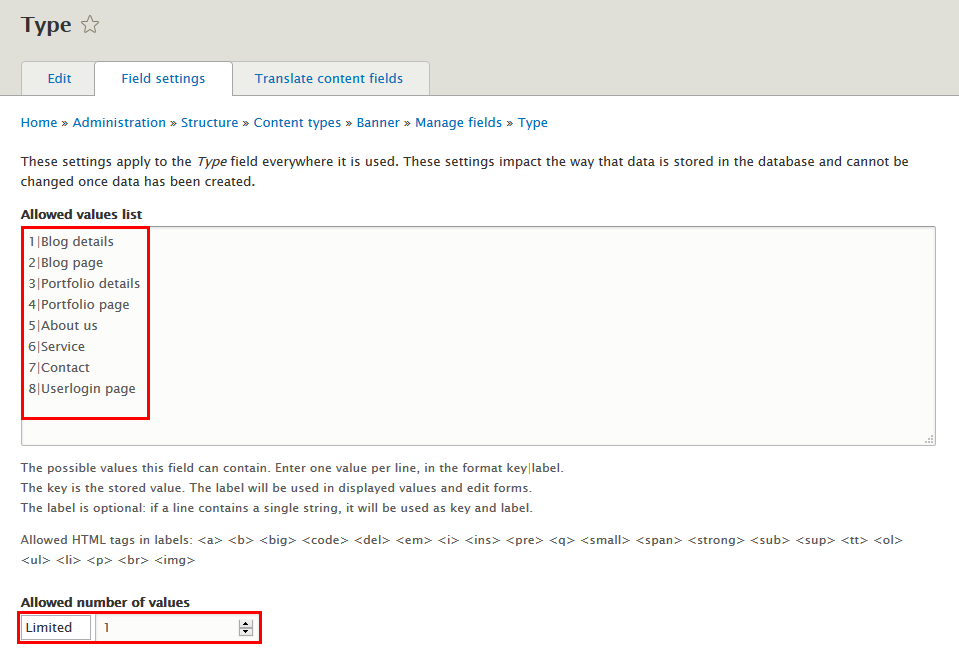
Step 8: At Manage fields tab, find Type field line to click Storage settings link and settings following properites:
Refer to following HTML code:
						1|Blog details
						2|Blog page
						3|Portfolio details
						4|Portfolio page
						5|About us
						6|Service
						7|Contact
						8|Userlogin page
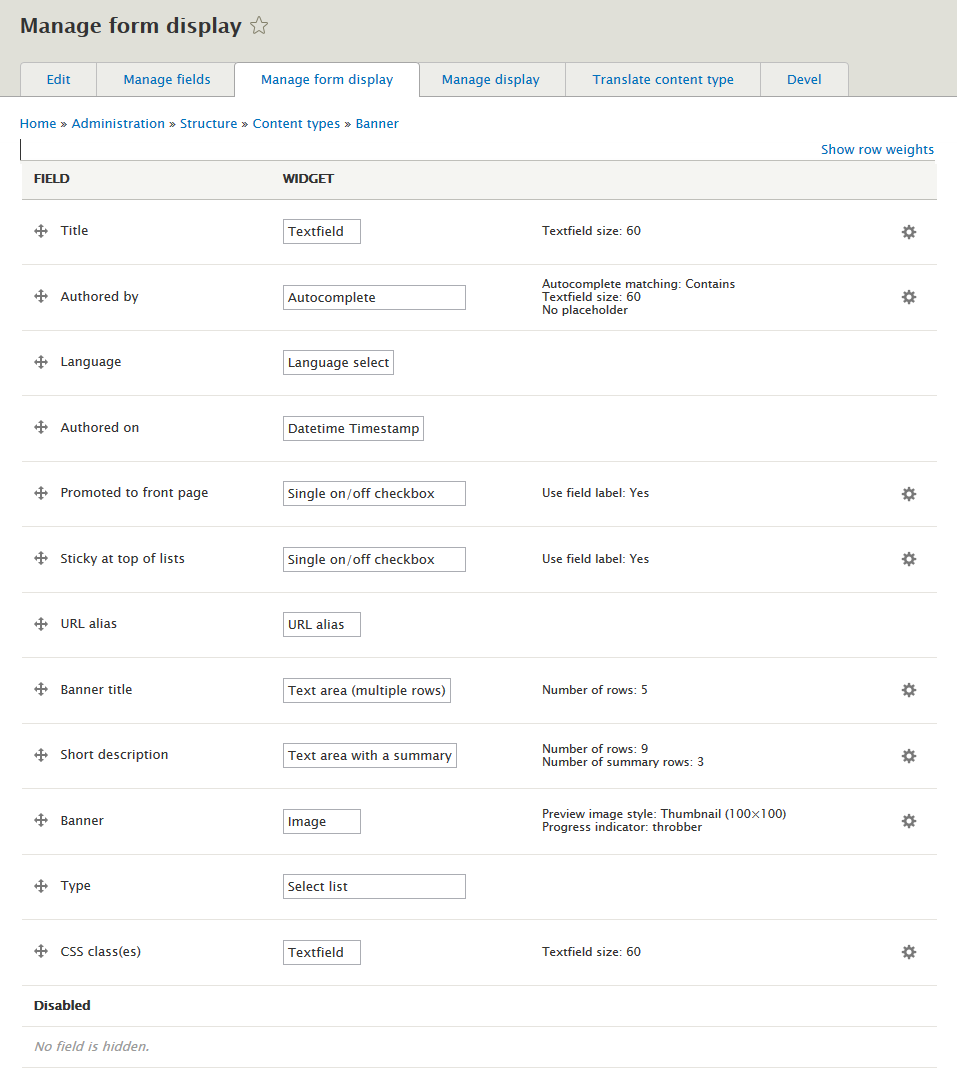
Step 9: Go to Manage form display tab, set following properties:
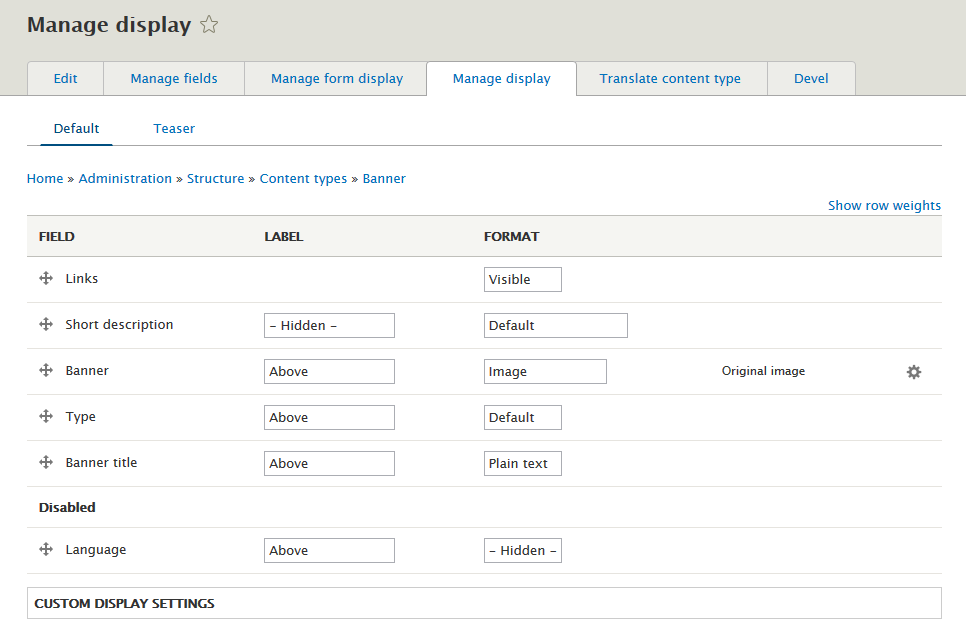
Step 10: Go to Manage display tab > Default tab, set following properties:
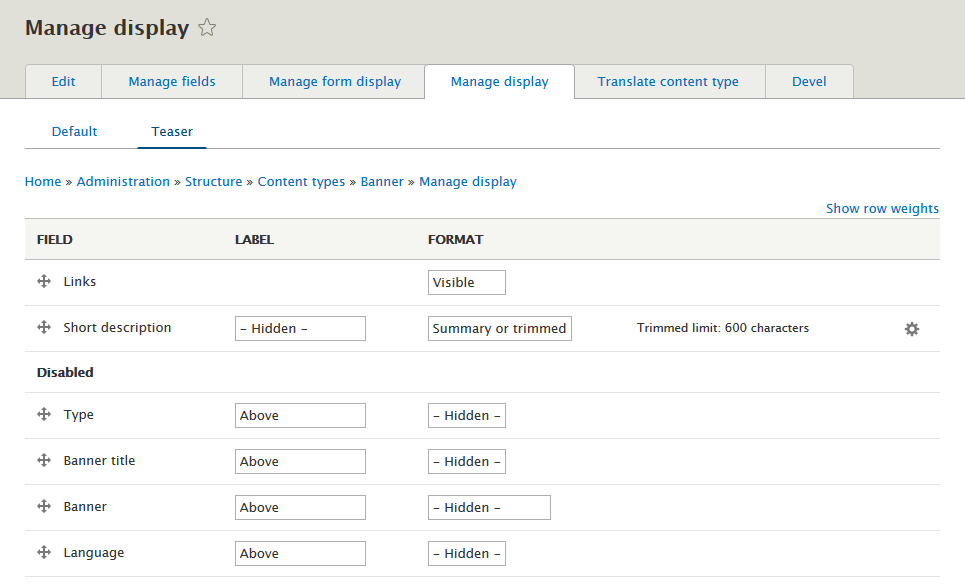
Step 11: Go to Manage display tab > Teaser tab, set following properties:
Step 12: Click Save button
Create Blog type
Step 1: Navigate to Structure > Content Type
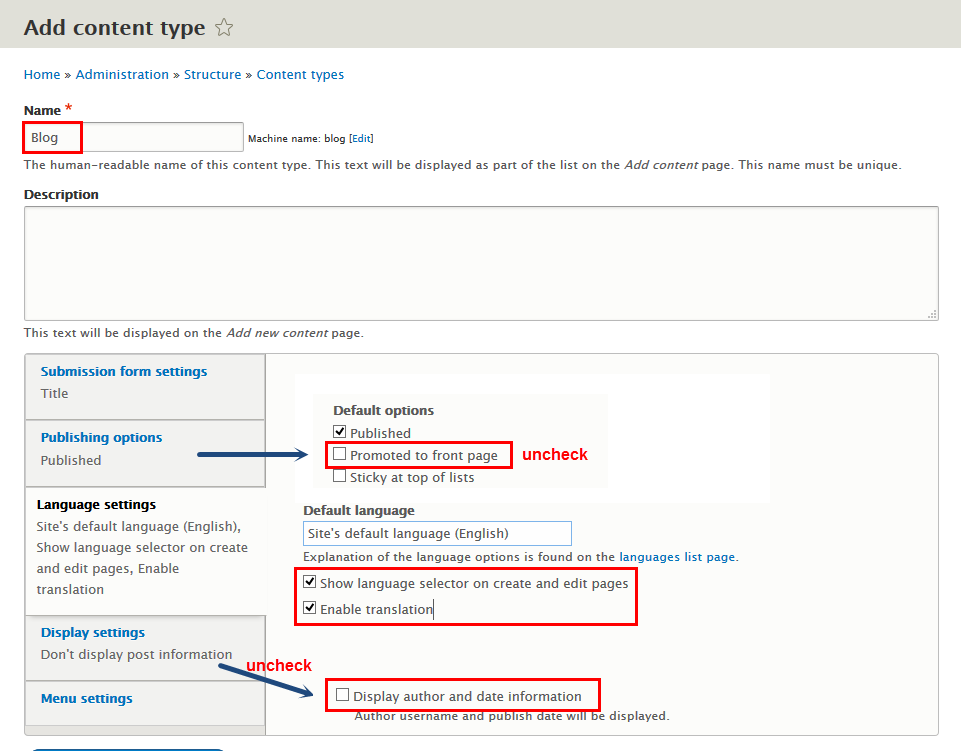
Step 2: Click Add Content Type link to create Blog type
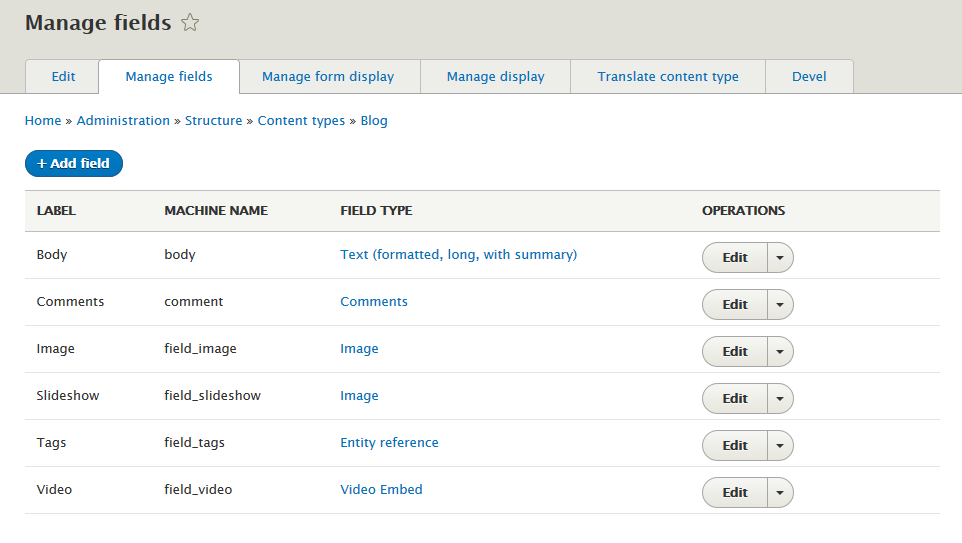
Step 3: Click Save and manage fields button, then add following fields:
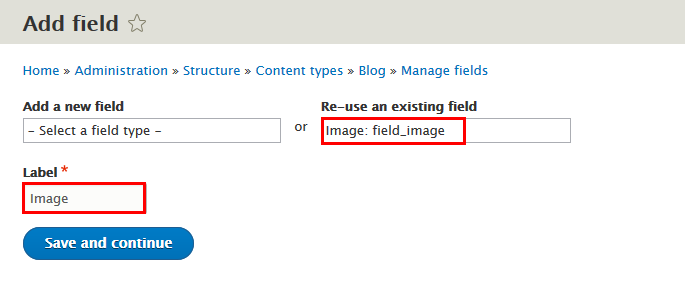
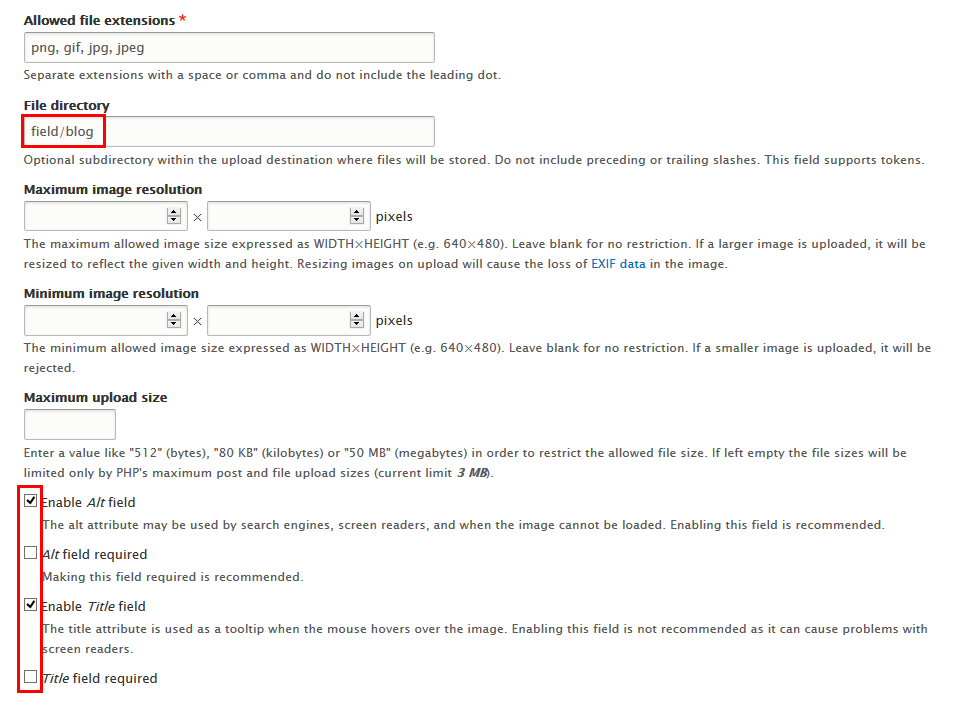
Step 4: Set properties for Image field
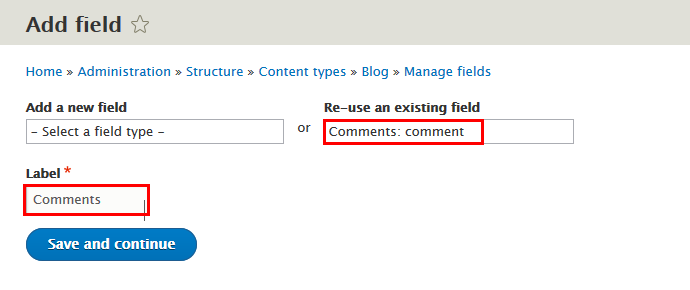
Step 5: Set properties for Comments field
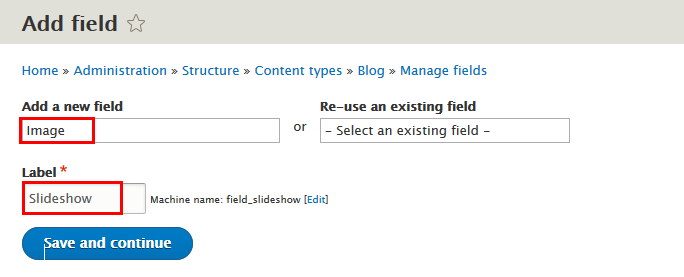
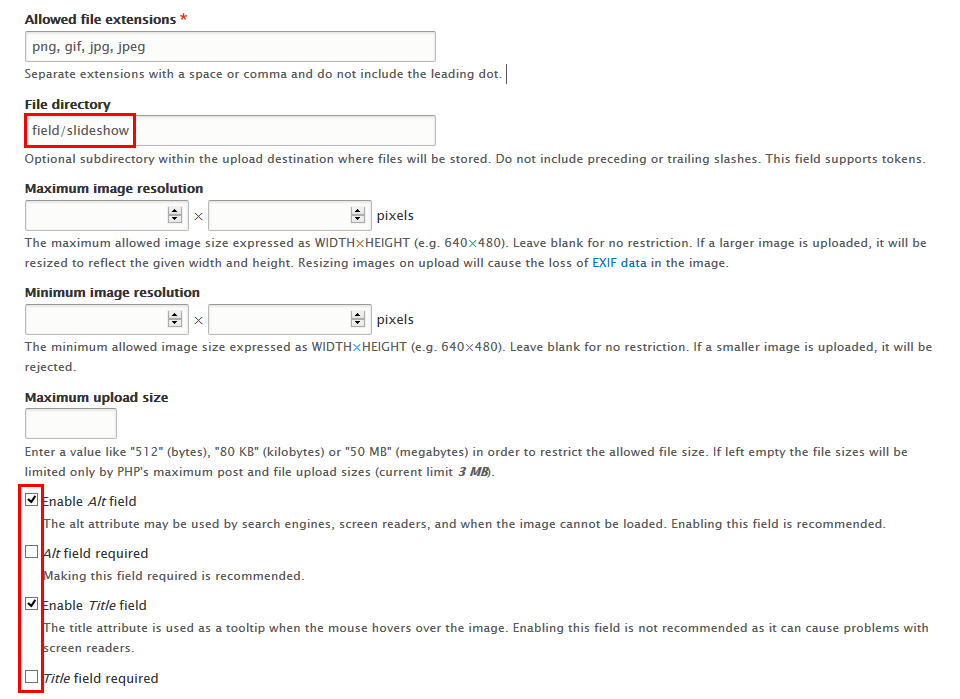
Step 6: Set properties for Slideshow field
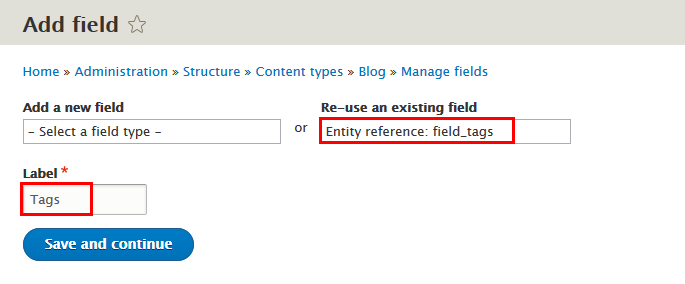
Step 7: Set properties for Tags field
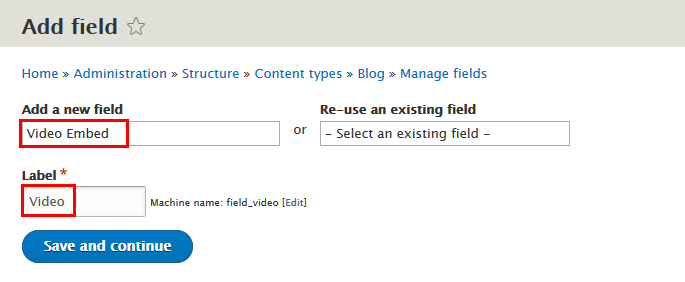
Step 8: Set properties for Video field
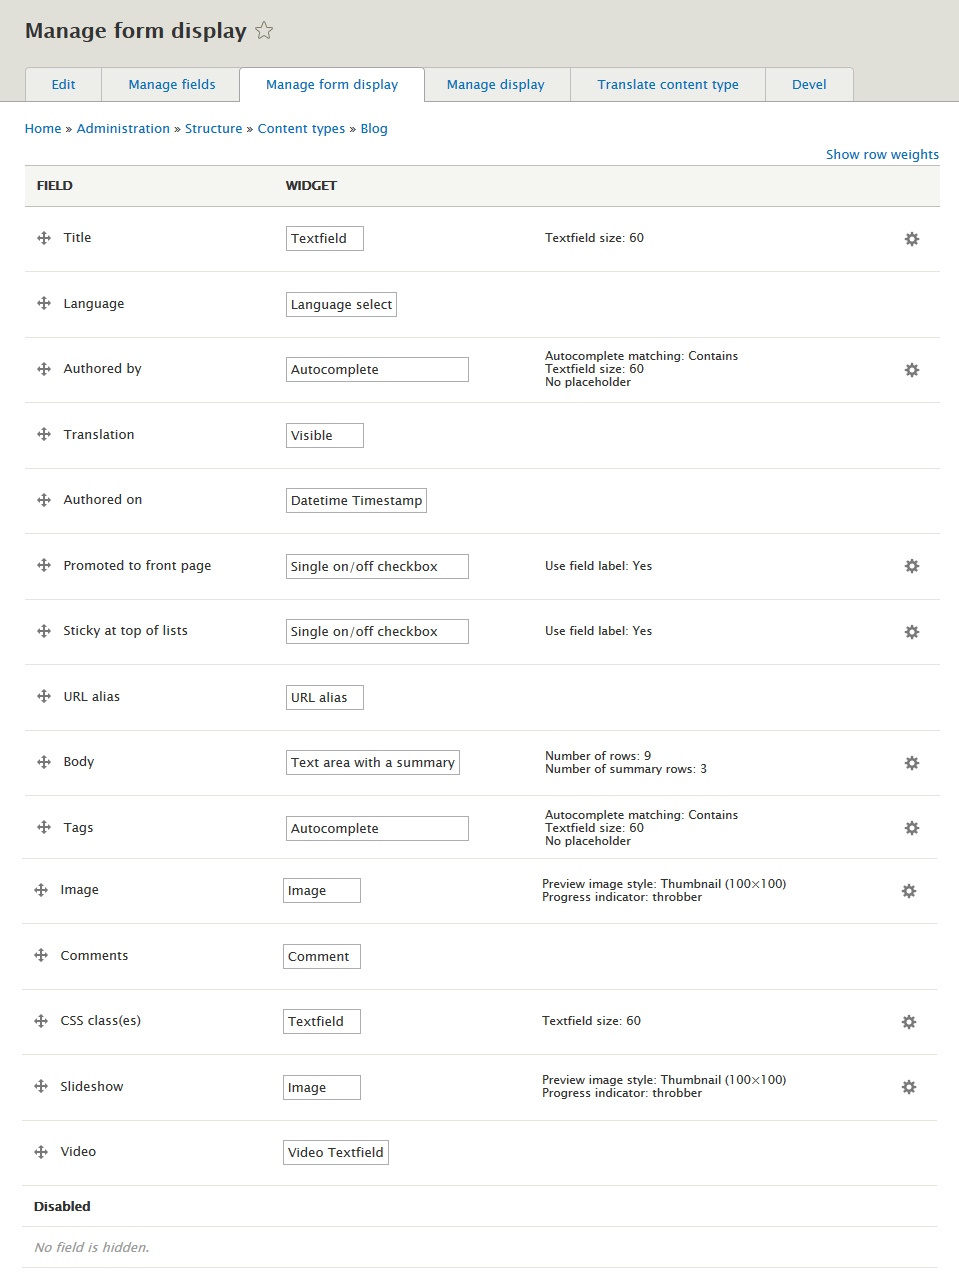
Step 9: Go to Manage form display tab, set following properties:
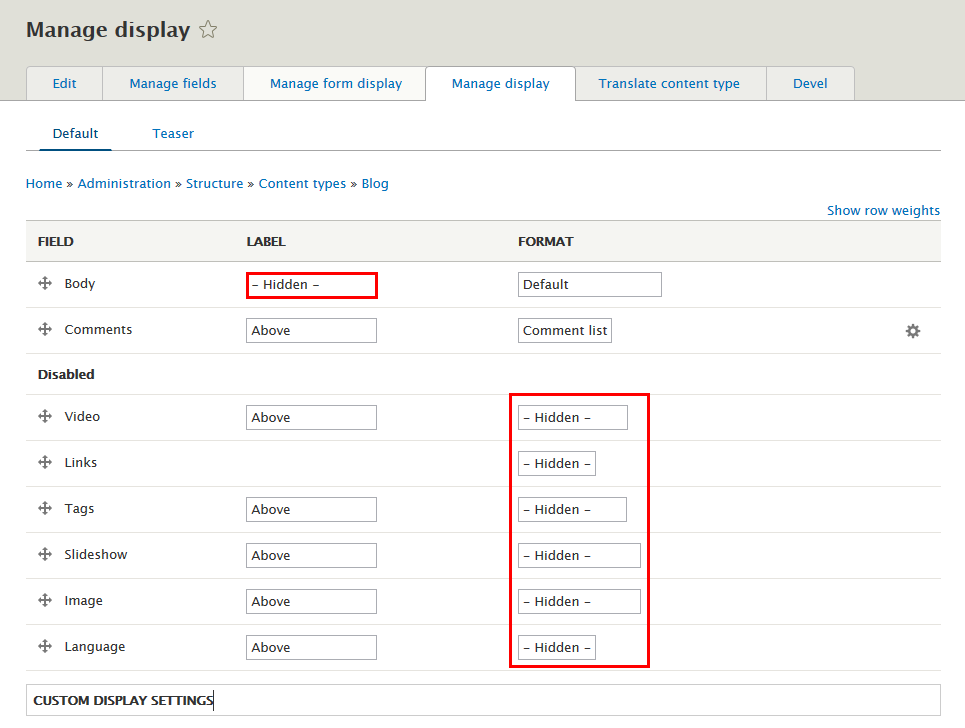
Step 10: Go to Manage display tab > Default tab, set following properties:
Step 11: Click Save button
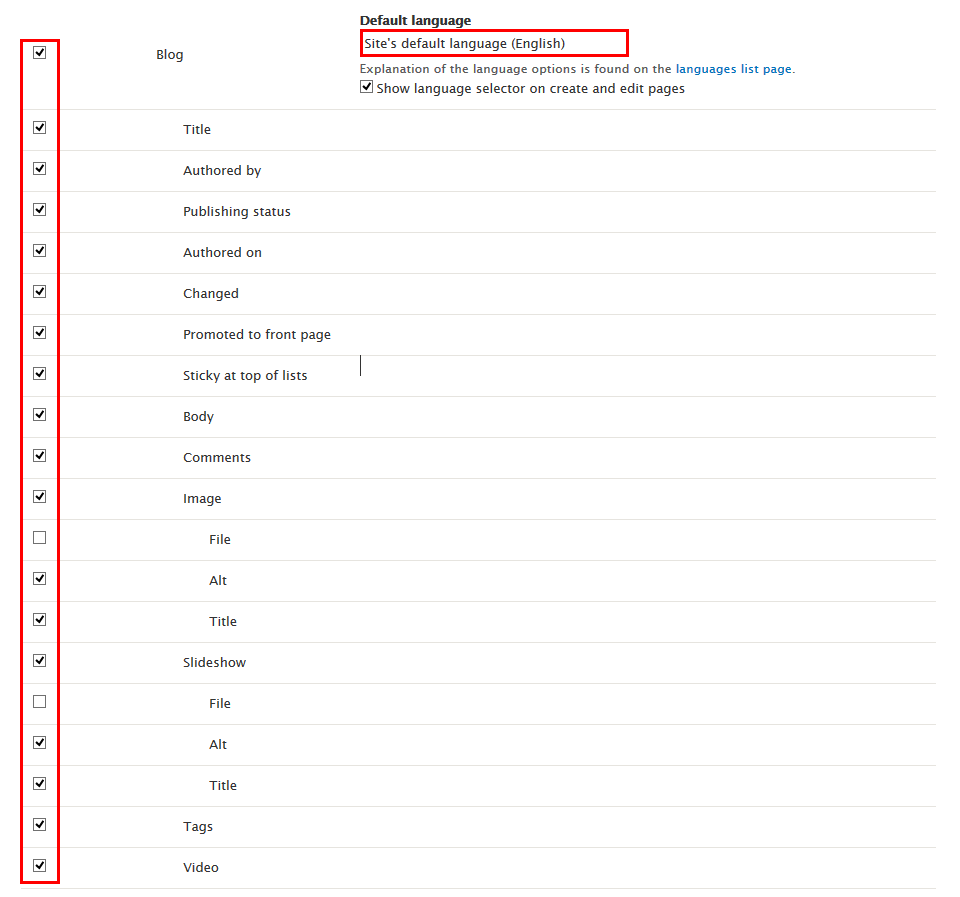
Step 12: Navigate to Configuration > Regional and language . Click Content language and translation add setting following fields:
Step 13: Click Save configuration button
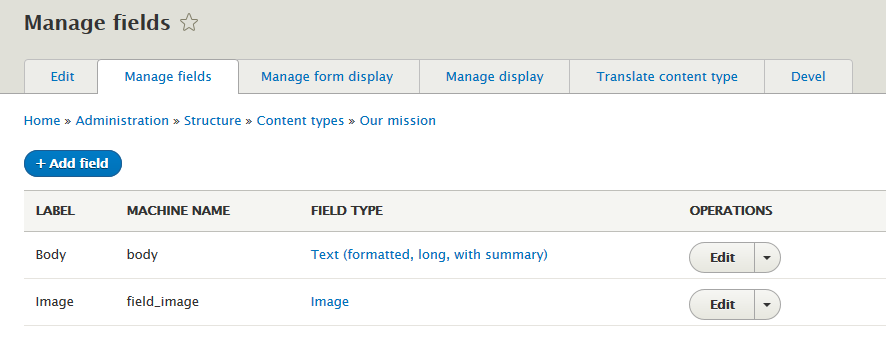
Create Our mission type
Step 1: Navigate to Structure > Content Type
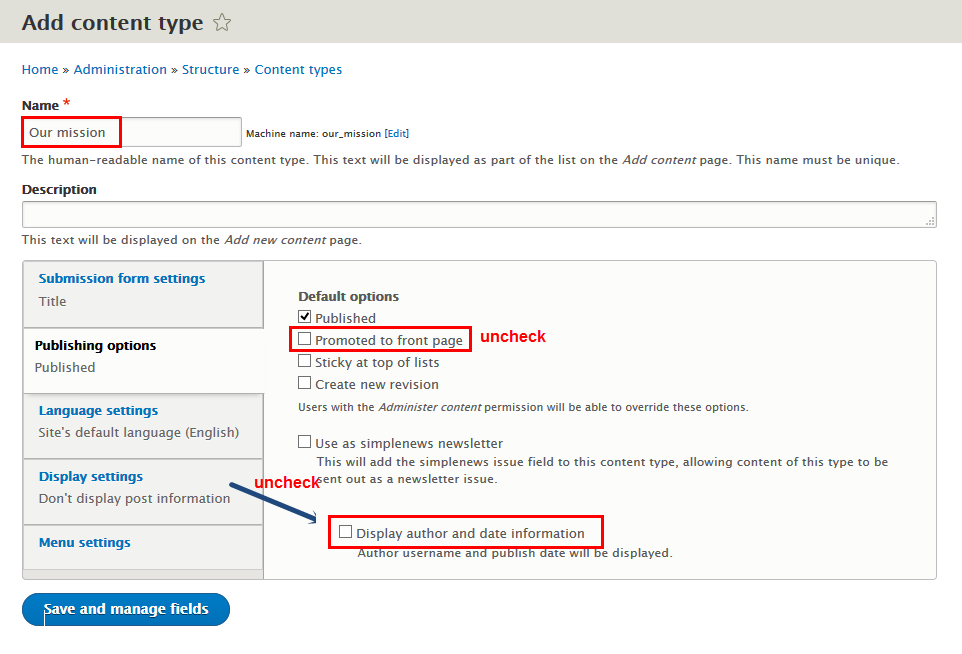
Step 2: Click Add Content Type link to create Our mission type
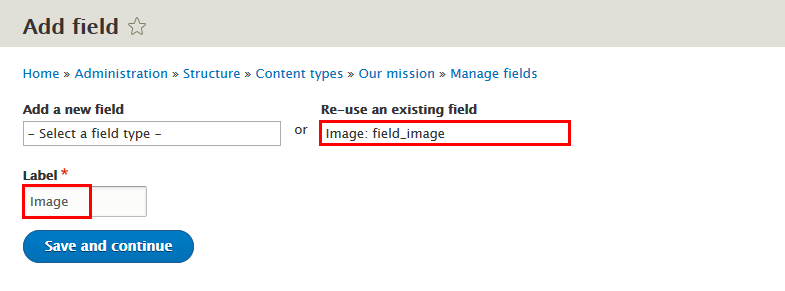
Step 3: Click Save and manage fields button, then add following fields:
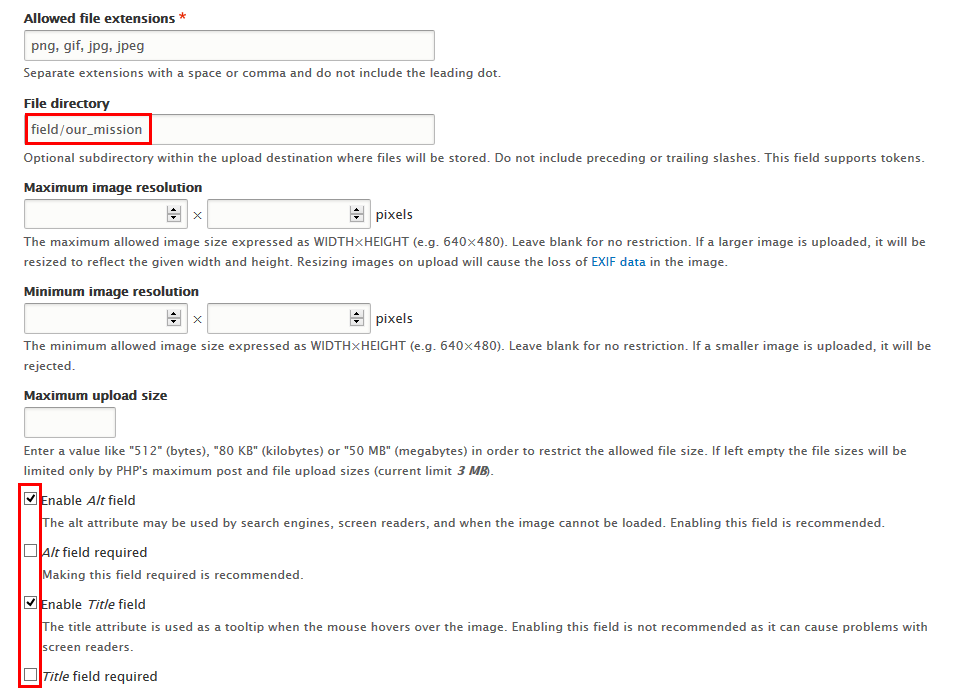
Step 4: Set properties for Image field
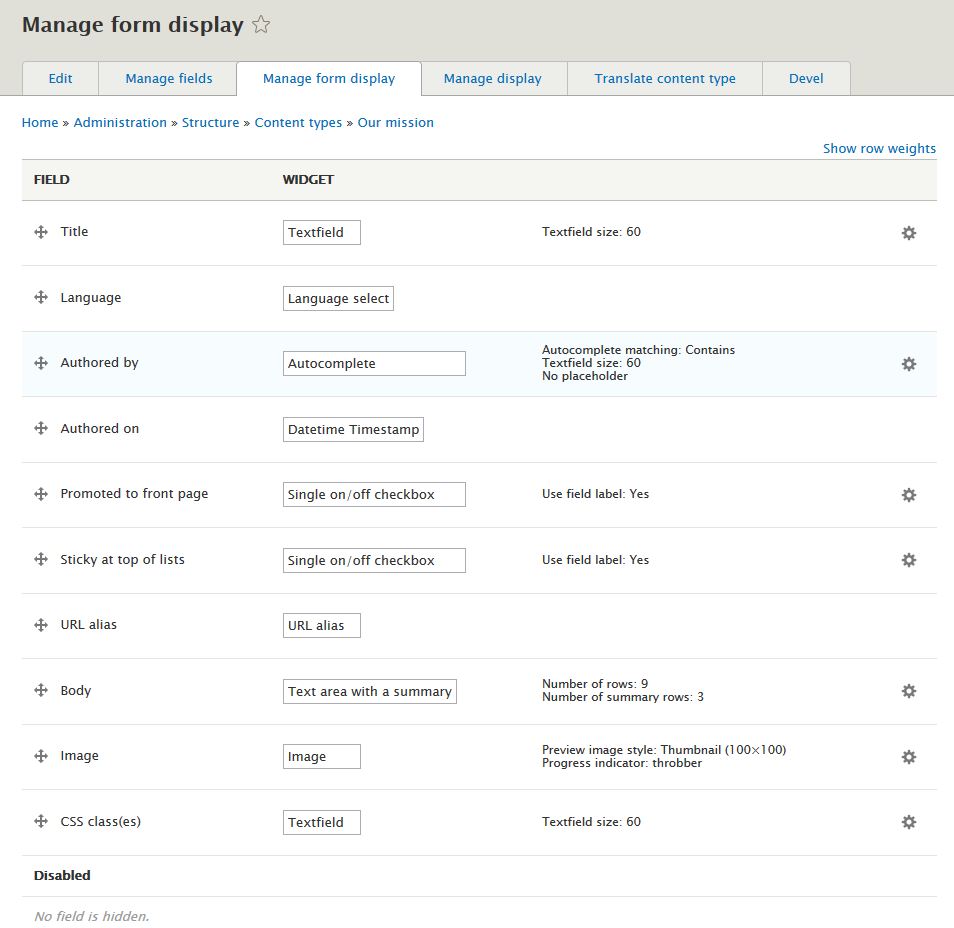
Step 5: Go to Manage form display tab, set following properties:
Step 6: Click Save button
Step 7: Navigate to Configuration > Regional and language . Click Content language and translation add setting following fields:
Step 8: Click Save configuration button
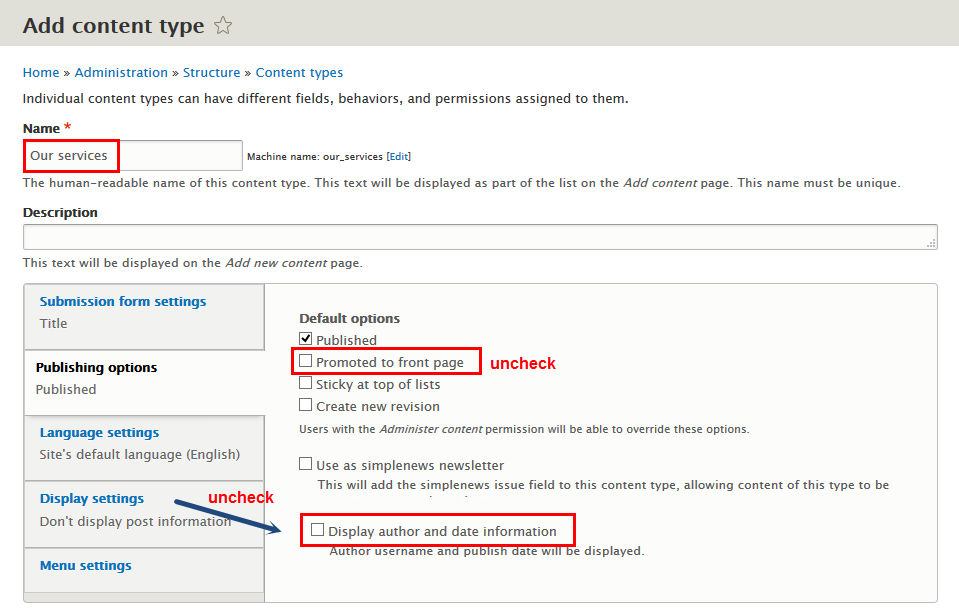
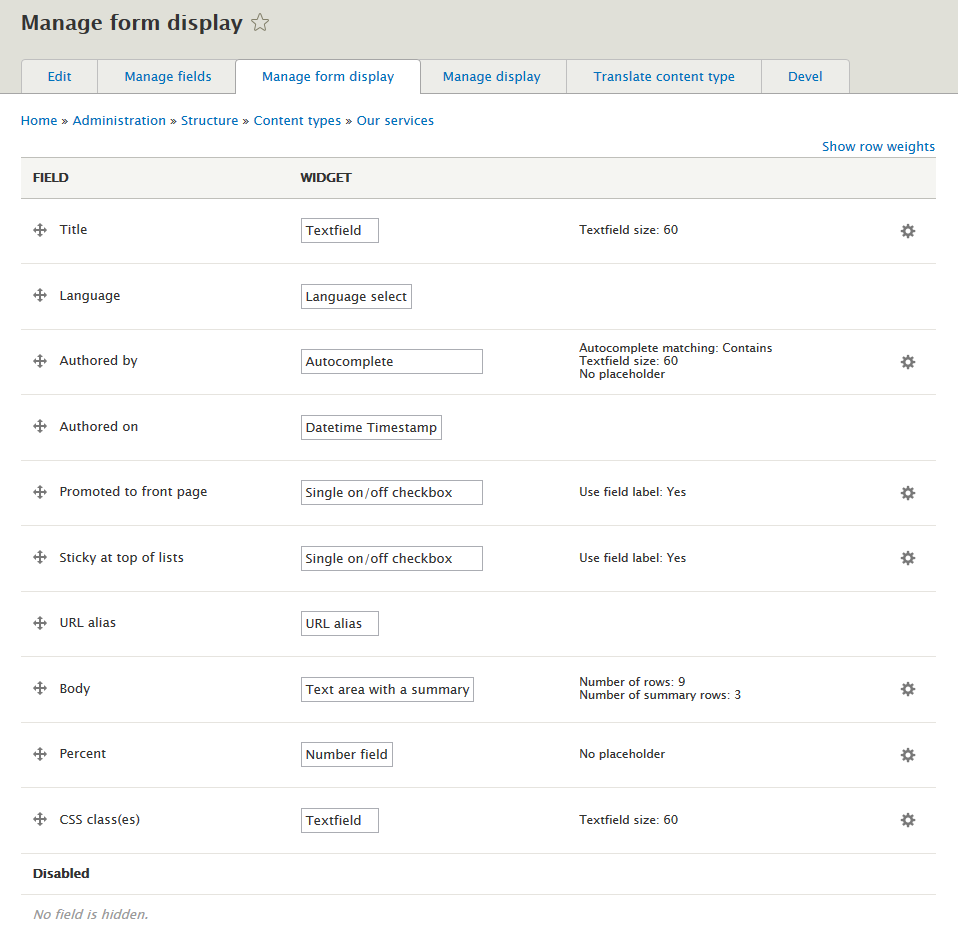
Create Our services type
Step 1: Navigate to Structure > Content Type
Step 2: Click Add Content Type link to create Our services type
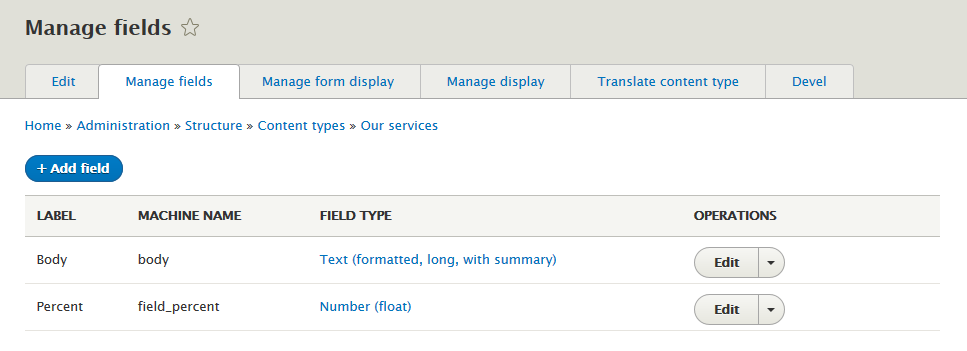
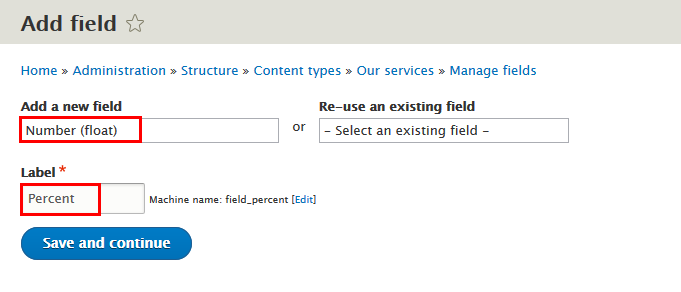
Step 3: Click Save and manage fieldsbutton, then add following fields:
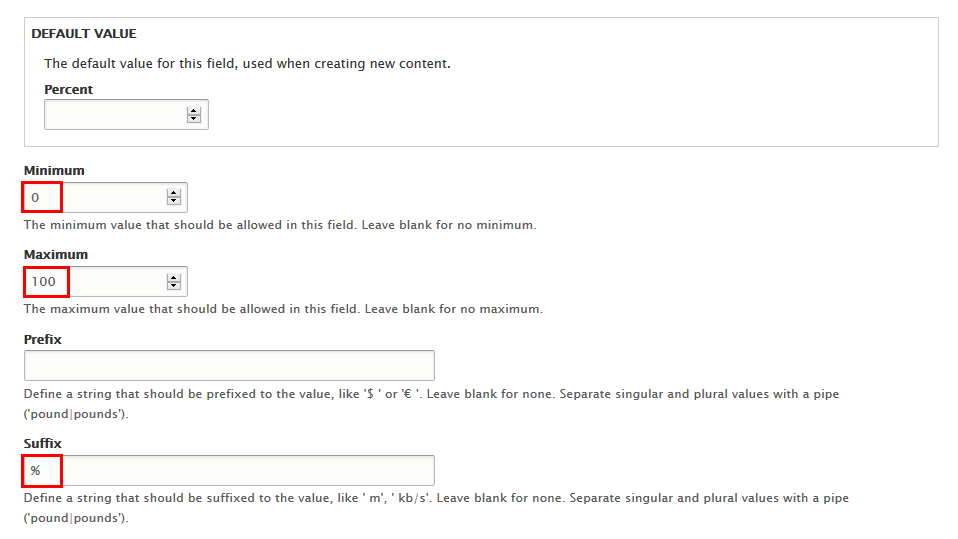
Step 4: Set properties for Percent field
Step 5: Go to Manage form display tab, set following properties:
Step 6: Click Save button
Step 7: Navigate to Configuration > Regional and language . Click Content language and translation add setting following fields:
Step 8: Click Save configuration button
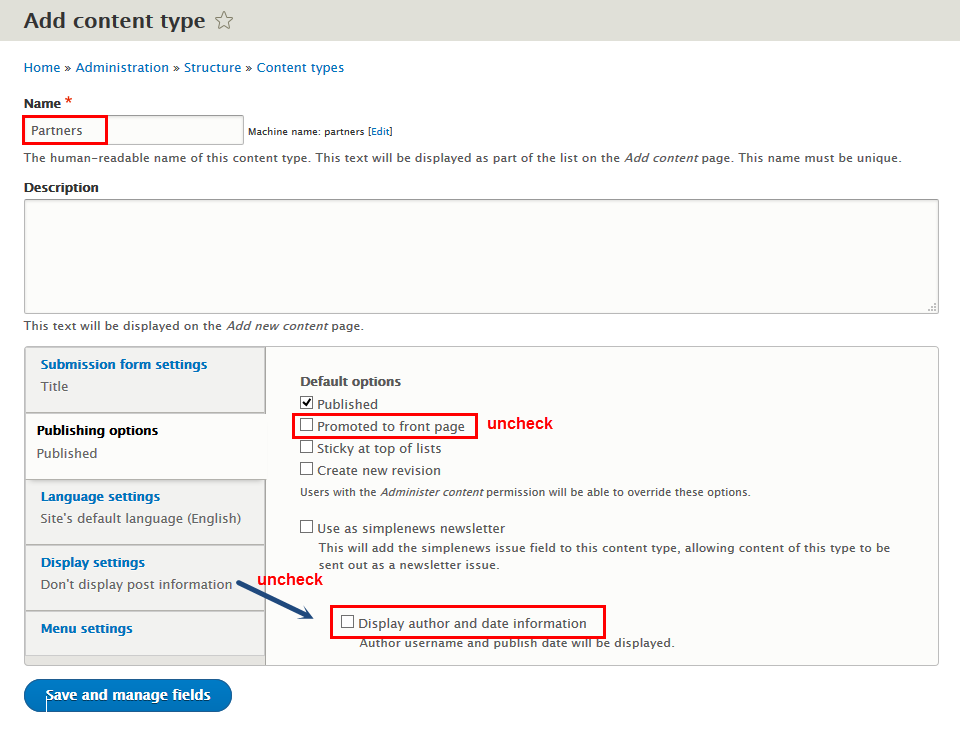
Create Partners type
Step 1: Navigate to Structure > Content Type
Step 2: Click Add Content Type link to create Partners type
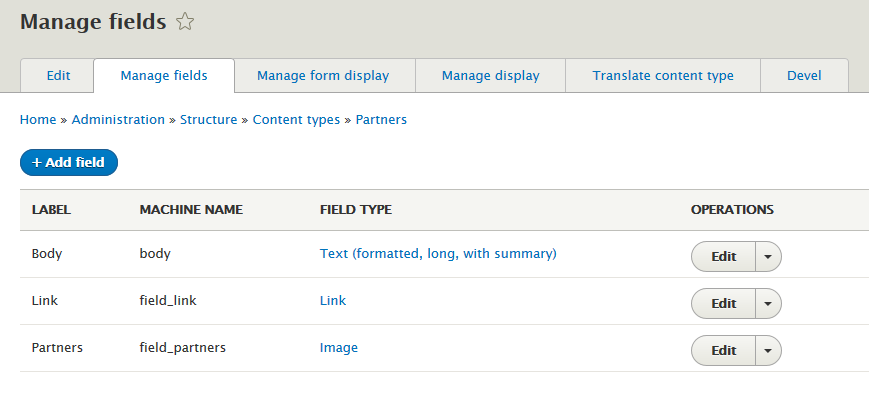
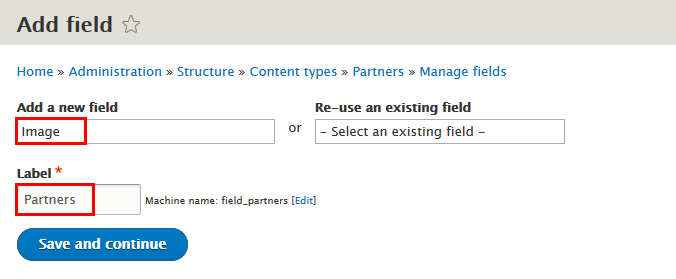
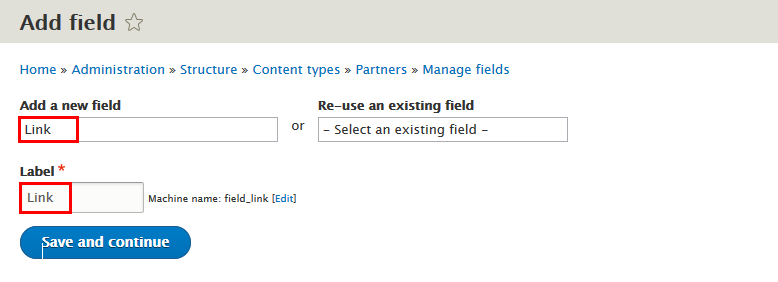
Step 3: Click Save and manage fields button, then add following fields:
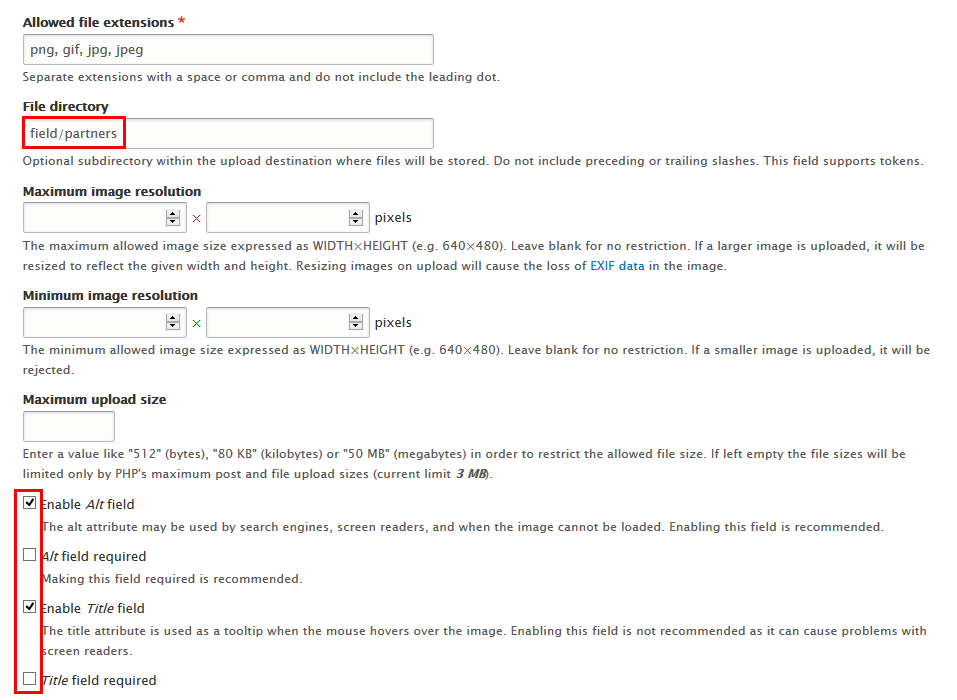
Step 4: Set properties for Partners field
Step 5: Set properties for Links field
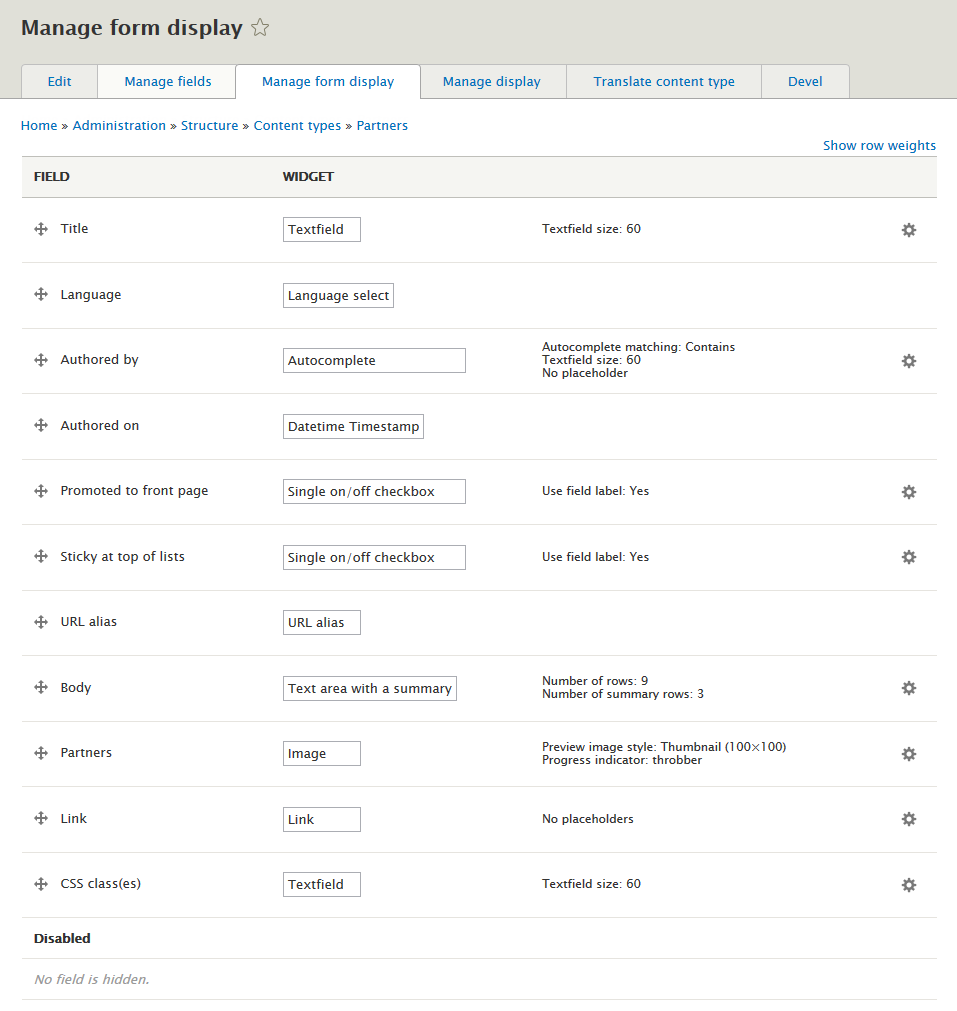
Step 6: Go to Manage form display tab, set following properties:
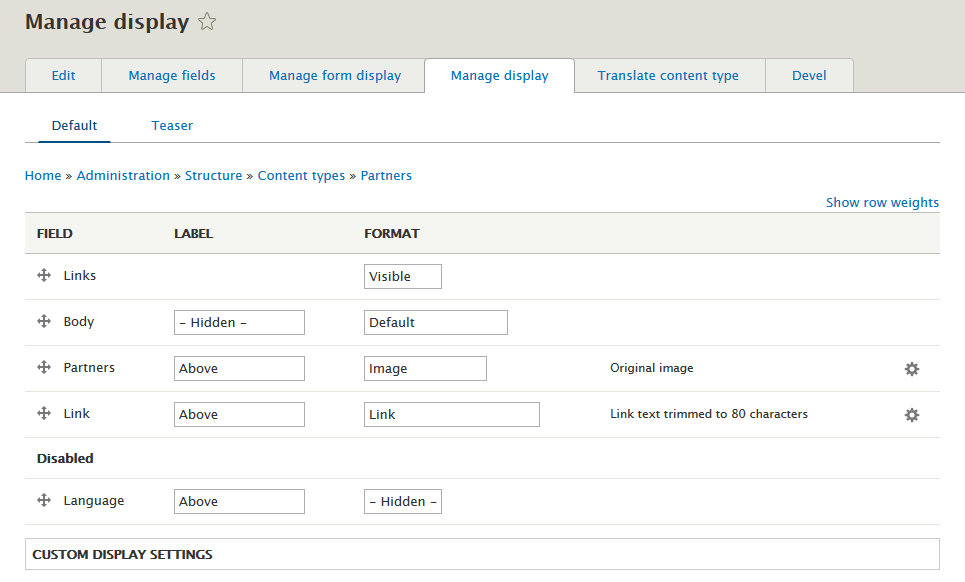
Step 7: Go to Manage display tab > Default tab. Set following properties:
Step 8: Click Save button
Create Portfolio type
Step 1: Navigate to Structure > Content Type
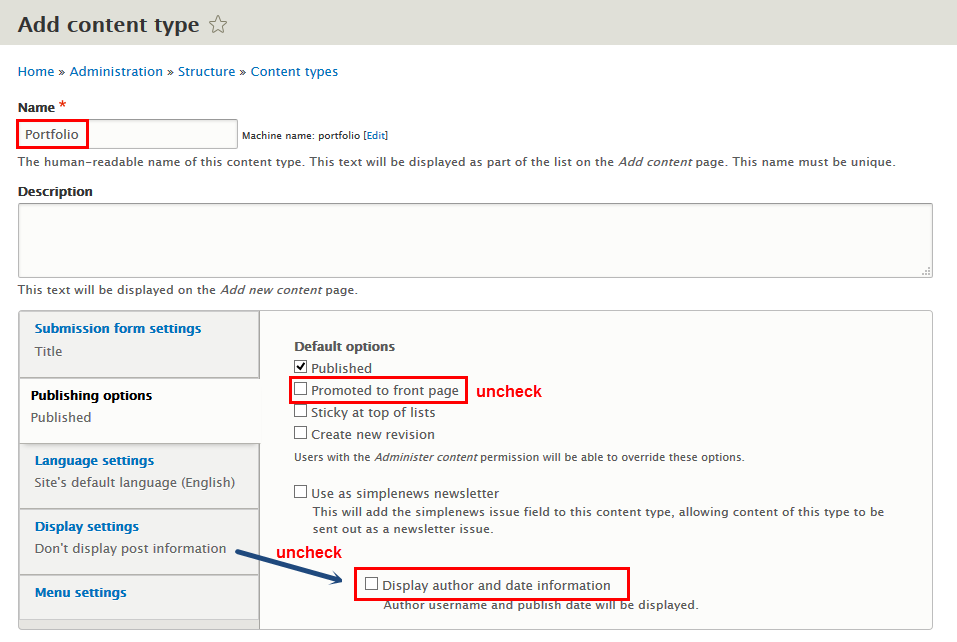
Step 2: Click Add Content Type link to create Portfolio type
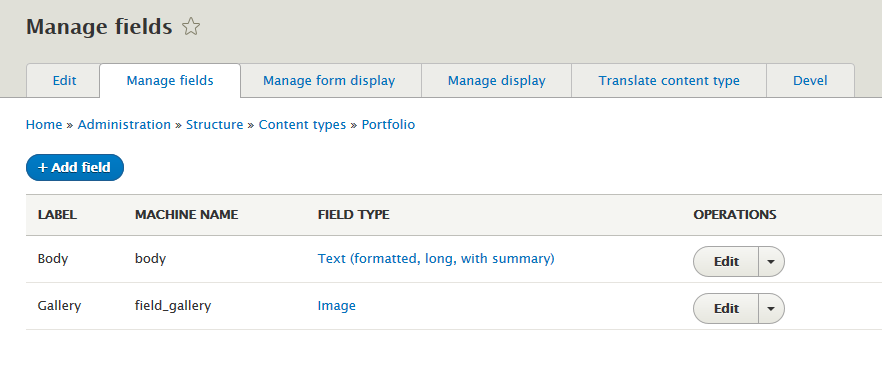
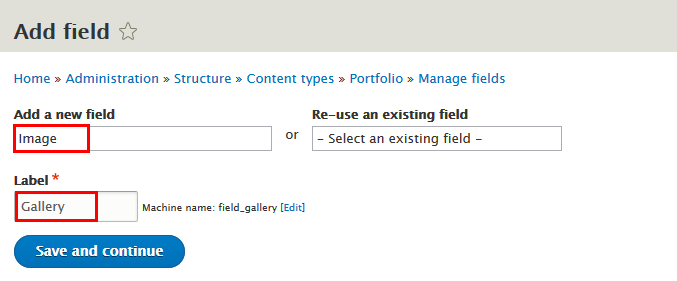
Step 3: Click Save and manage fields button, then add following fields:
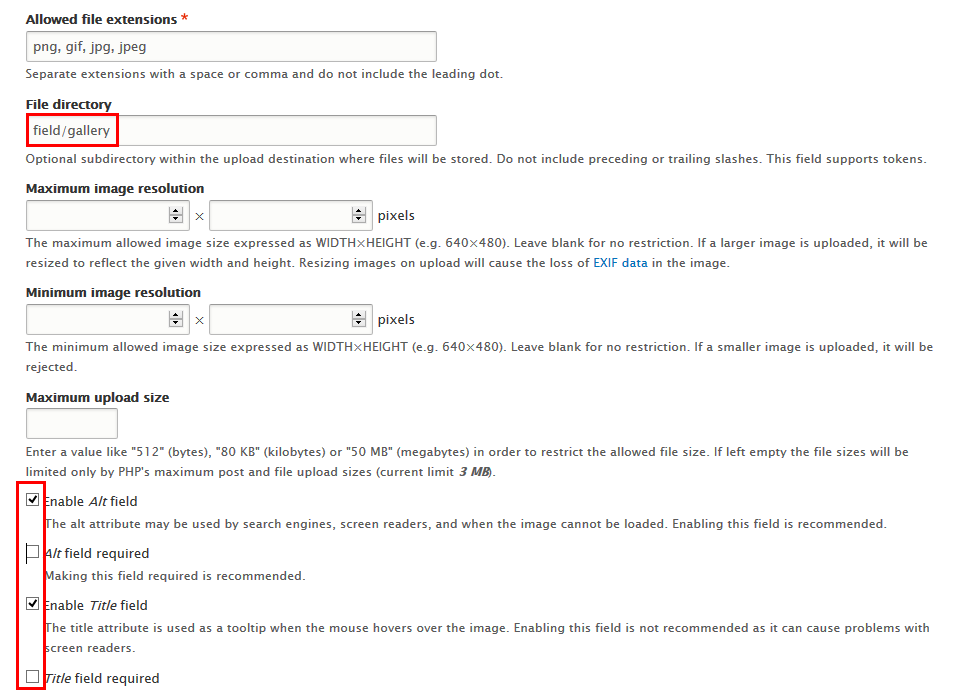
Step 4: Set properties for Gallery field
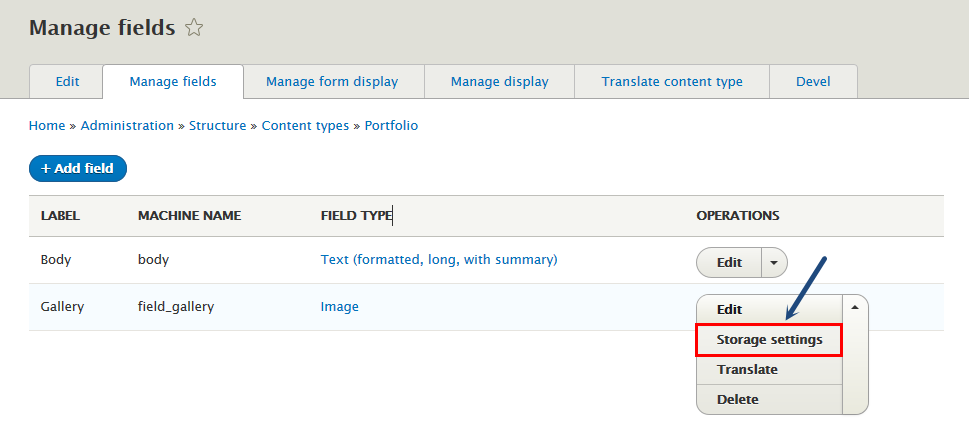
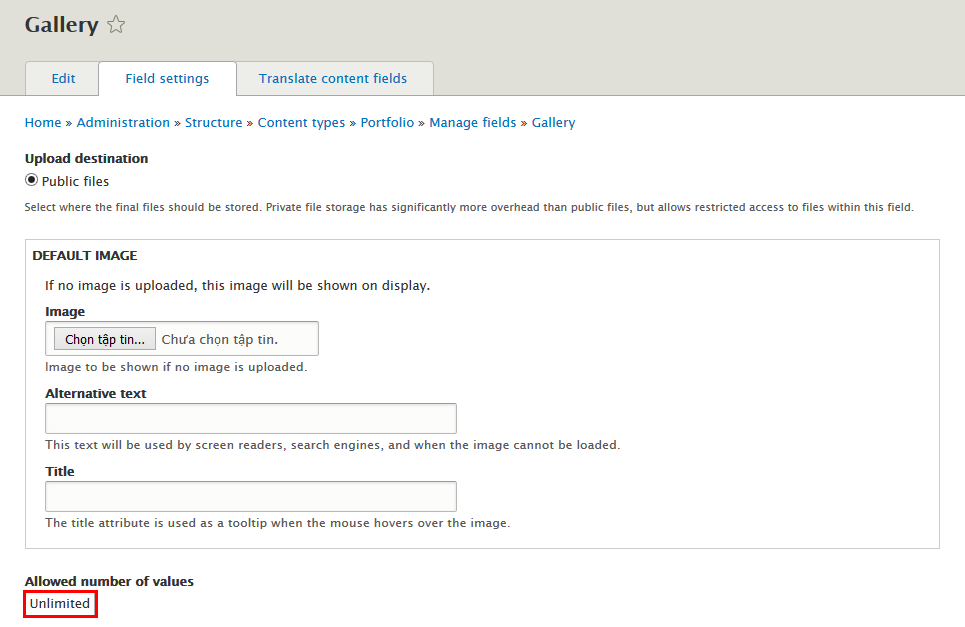
Step 5: At Manage fields tab, find Gallery field line to click Storage settings link and settings following properites:
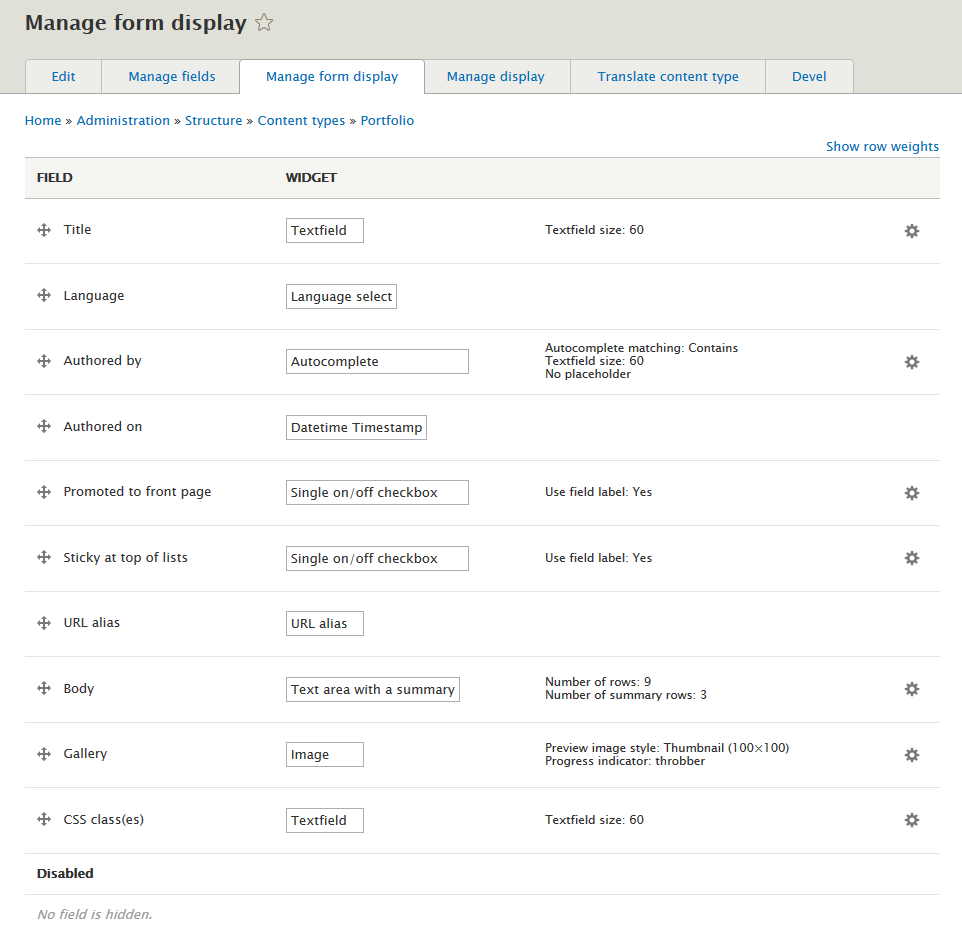
Step 6: Go to Manage form display tab, set following properties:
Step 7: Click Save button
Create Why us type
Step 1: Navigate to Structure > Content Type
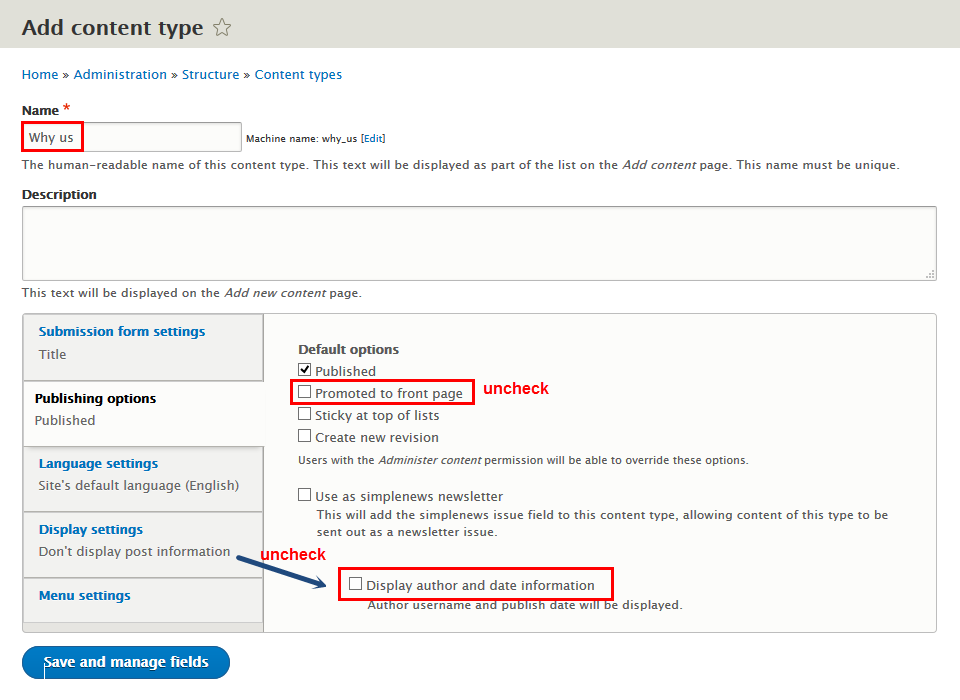
Step 2: Click Add Content Type link to create Why us type
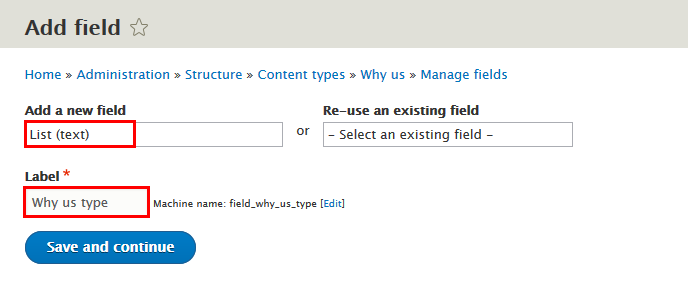
Step 3: Click Save and manage fields button, then add following fields:
Step 4: Set properties for Why us type field
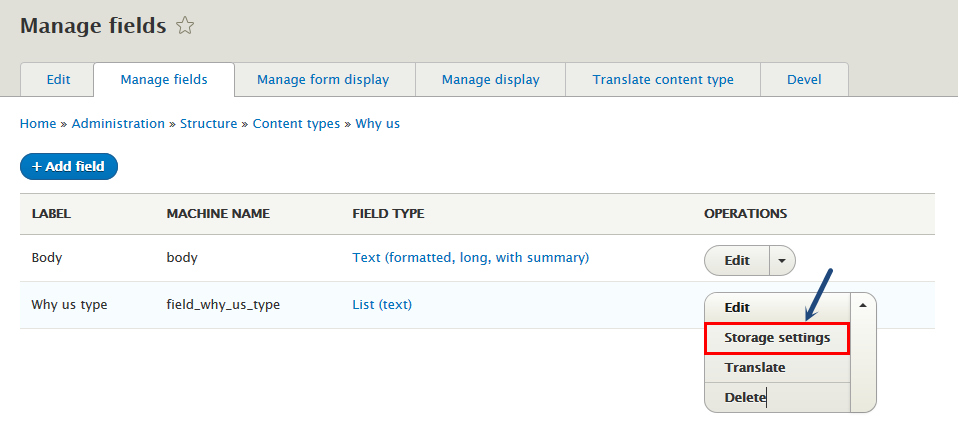
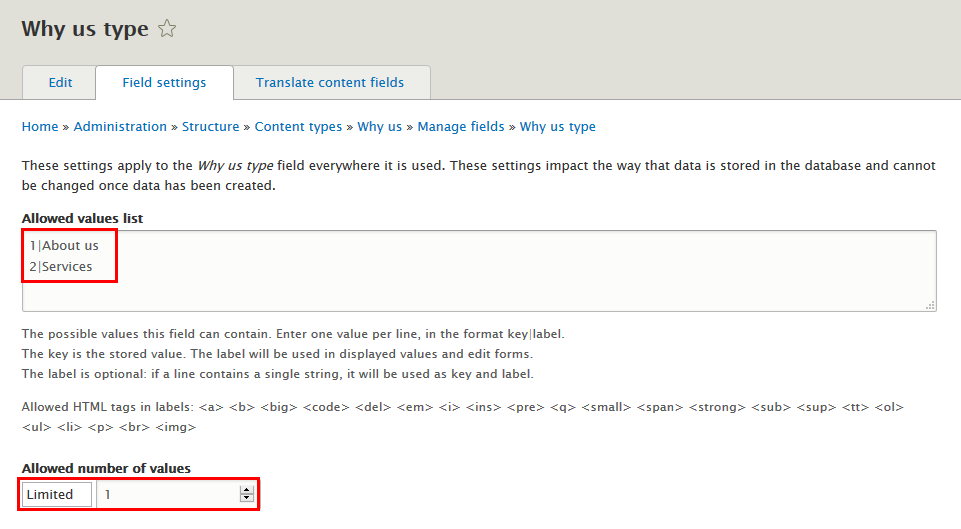
Step 5: At Manage fields tab, find Why us type field line to click Storage settings link and settings following properites:
Refer to following HTML code:
						1|About us
						2|Services
Step 6: Go to Manage form display tab, set following properties:
Step 7: Click Save button
URL aliases configuration
Add Patterns
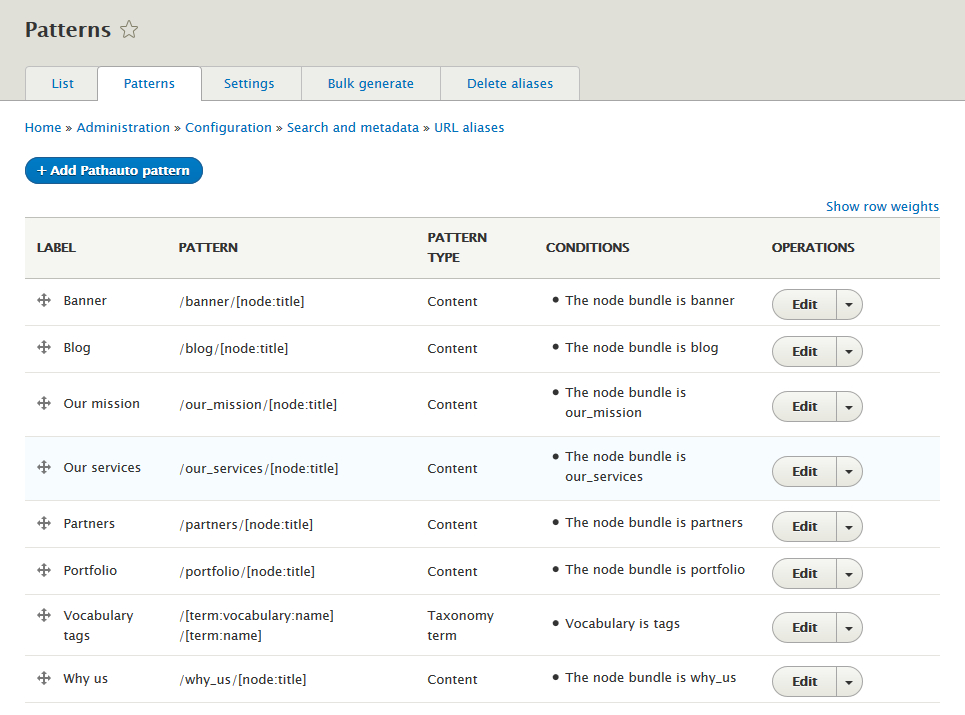
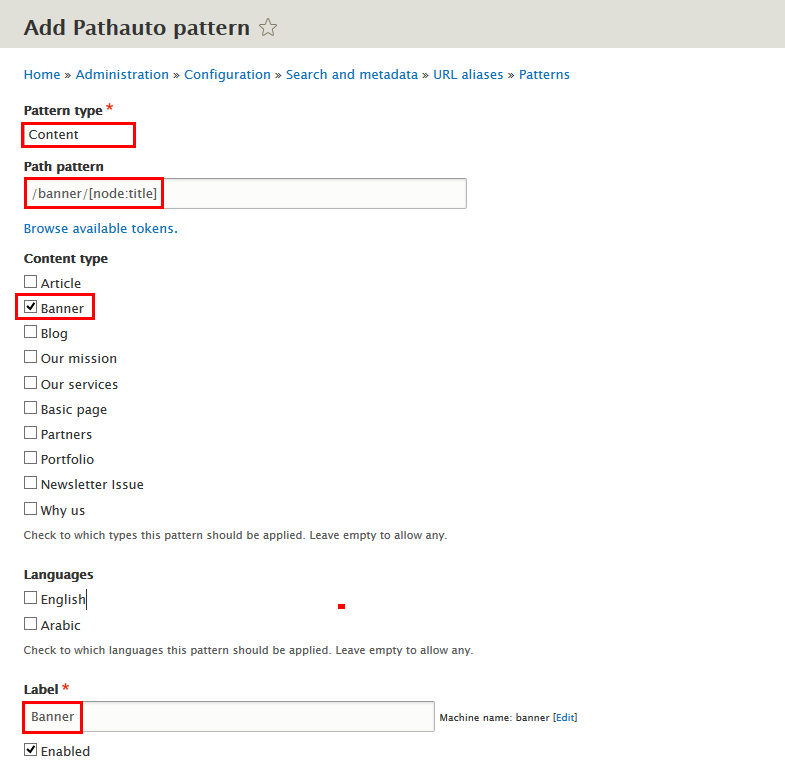
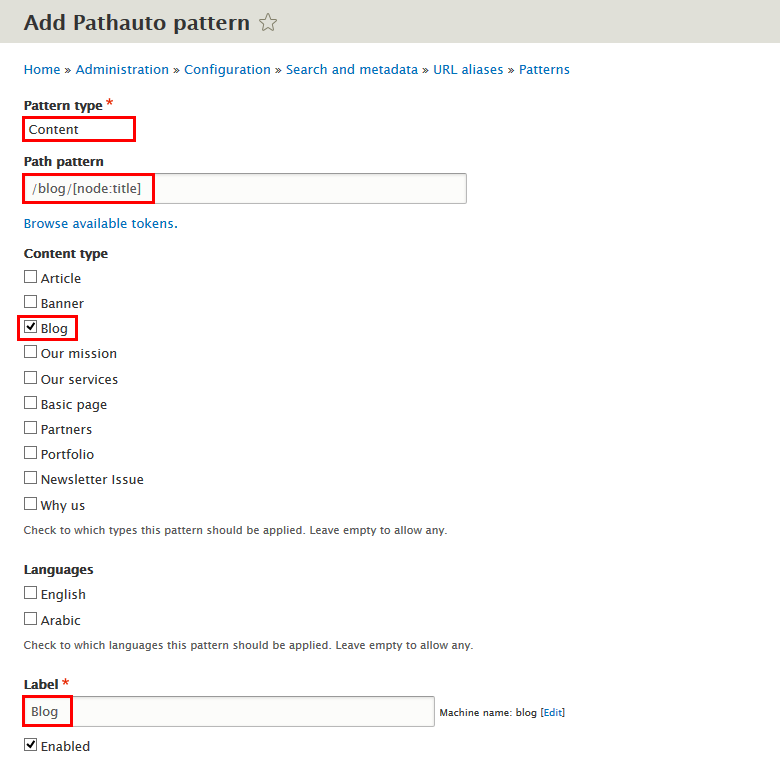
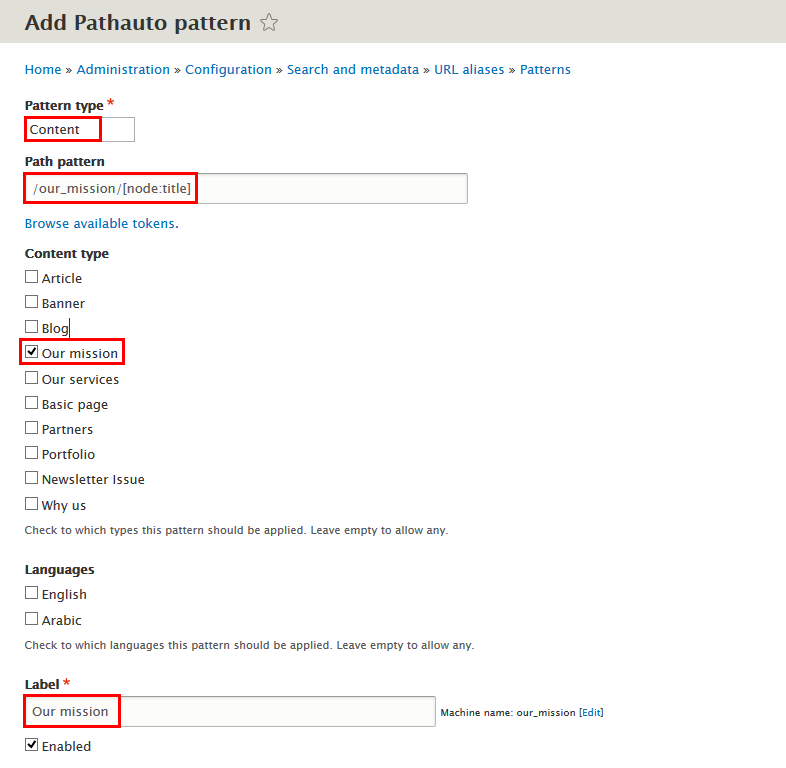
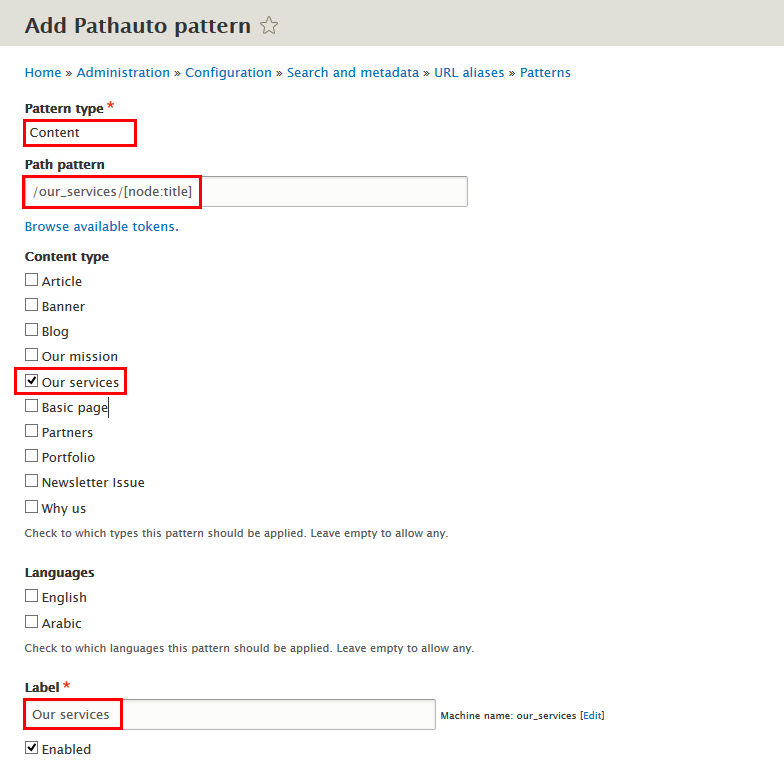
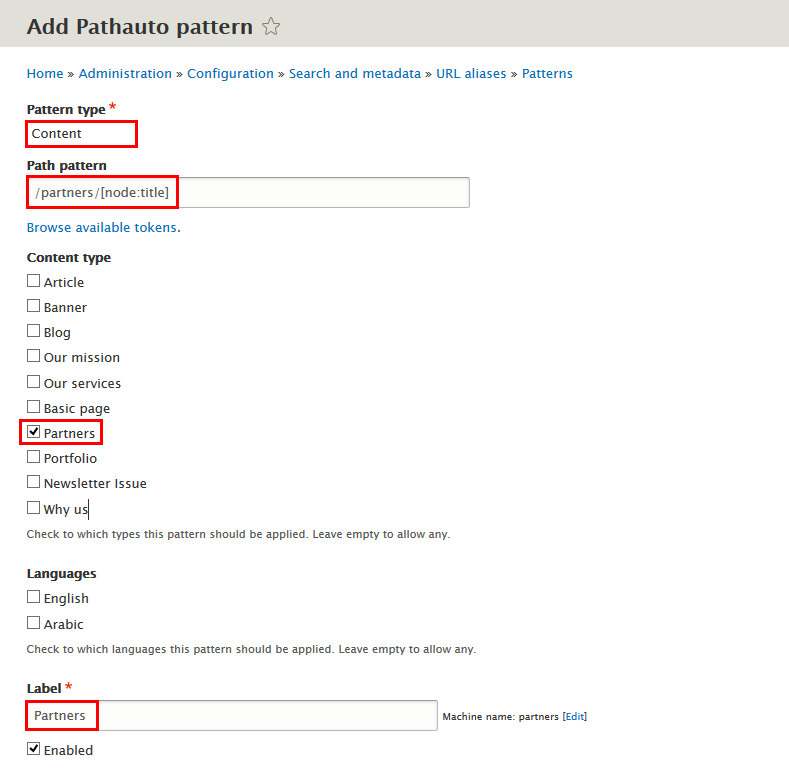
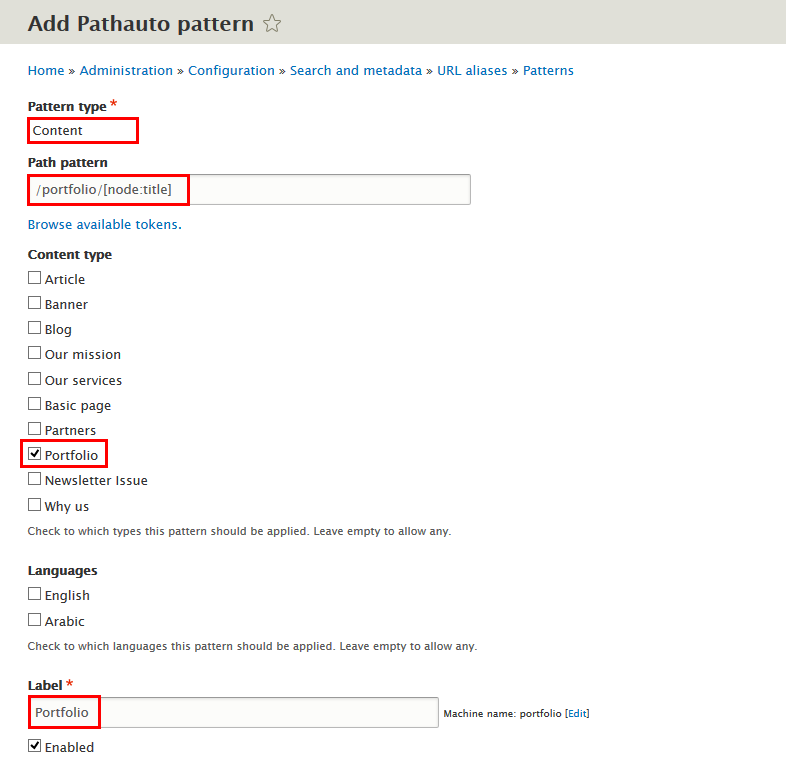
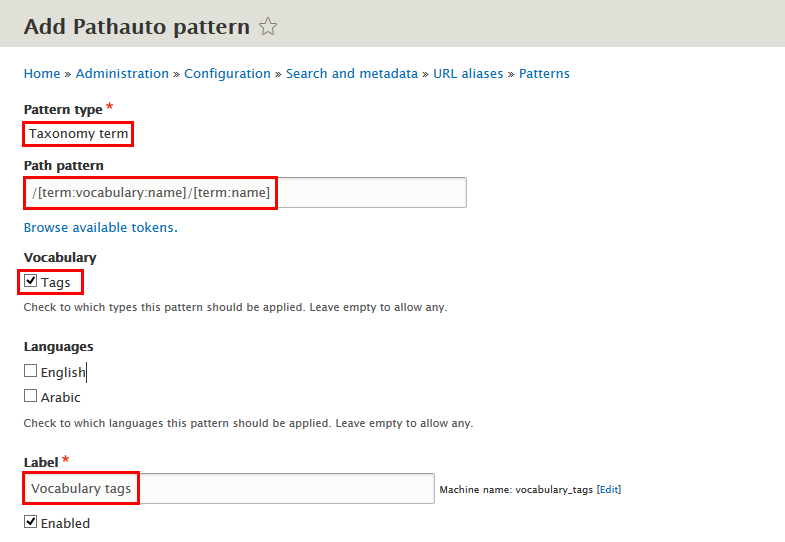
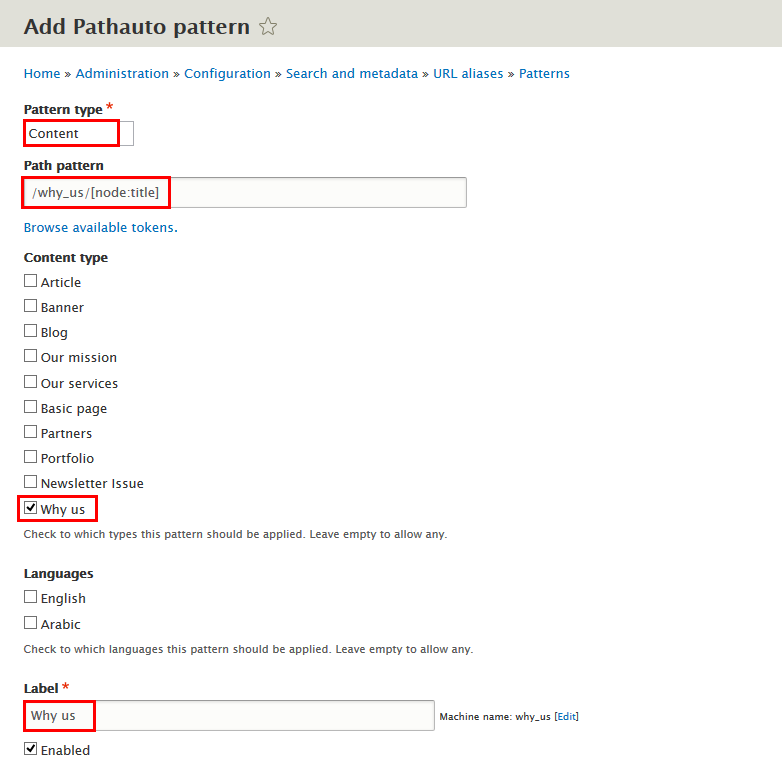
Step 1: Navigate to Configuration > Search and metadata > URL aliases click Patterns tabs then add Add Pathauto pattern following properties:
Step 2:Set properites for Banner pattern
Step 3:Set properites for Blog pattern
Step 4:Set properites for Our mission pattern
Step 5:Set properites for Our services pattern
Step 6:Set properites for Partners pattern
Step 7:Set properites for Portfolio pattern
Step 8:Set properites for Vocabulary tags pattern
Step 9:Set properites for Why us pattern
Step 10: Click Save button
Create Homepage
Slideshow block
Front end Display
1. Create Slideshow view
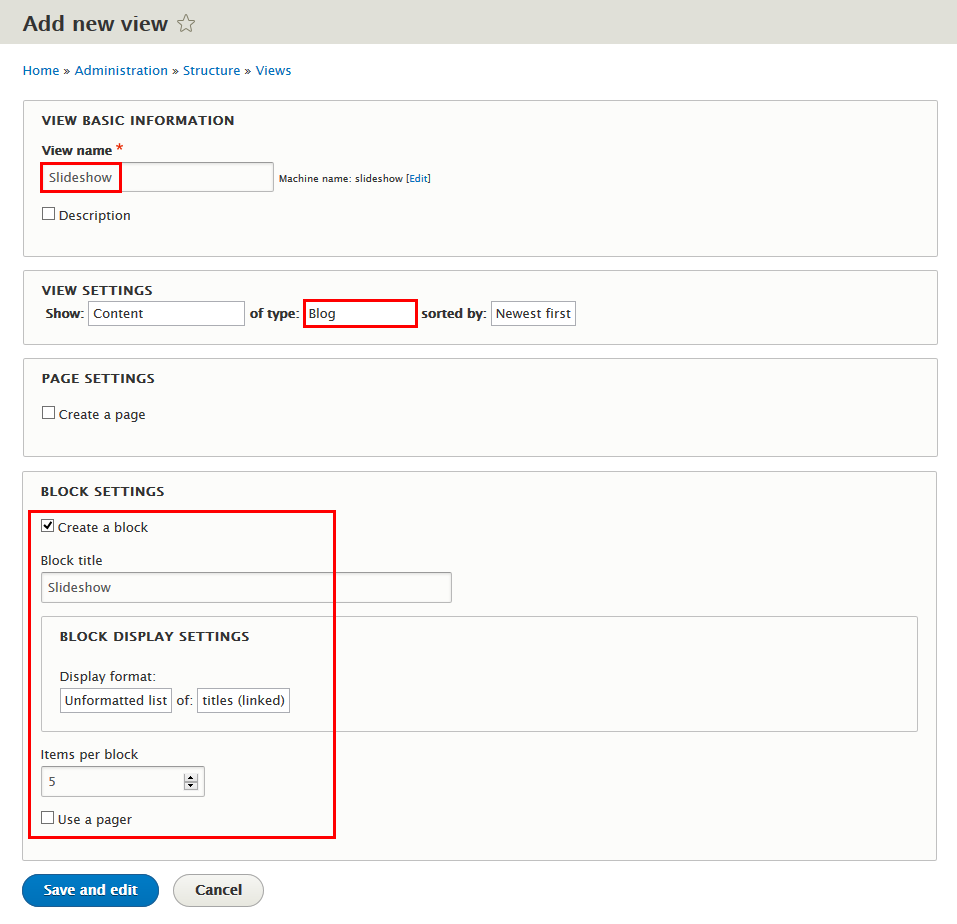
Step 1: Navigate to Structure > Views, click Add new view, then create Slideshow view with following settings:
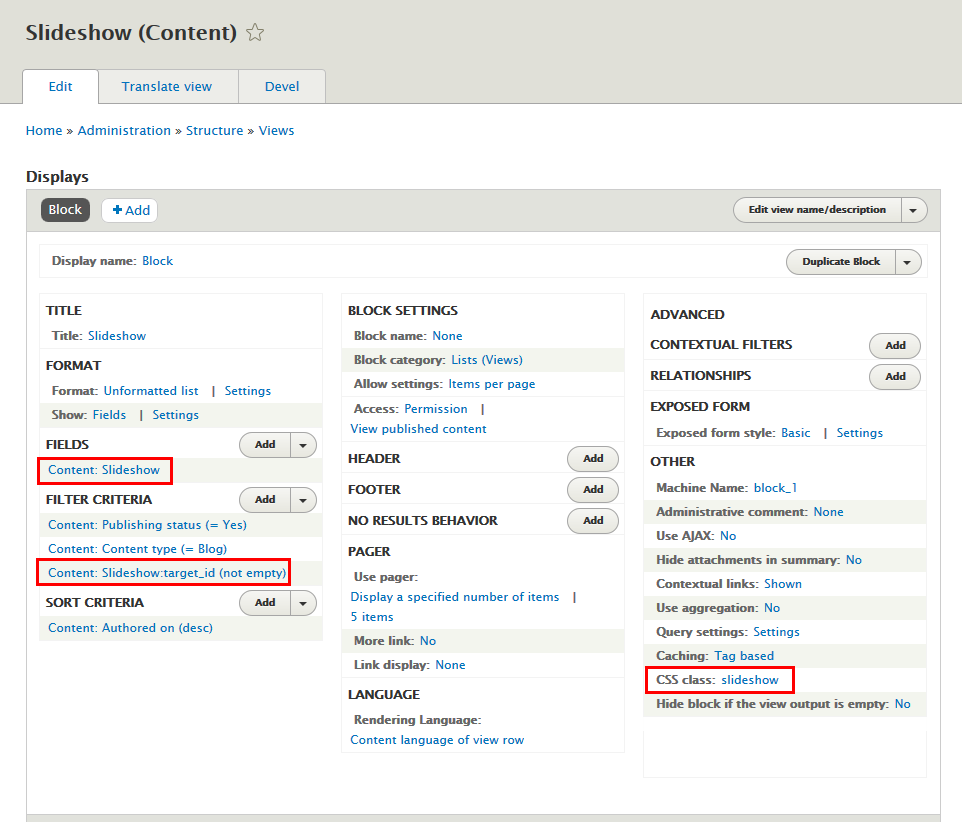
Step 2: Click Save and edit button. Next to steps below to set properties for following fields:
Step 3: At FIELDS area, click Add button to add fields: Content: Slideshow
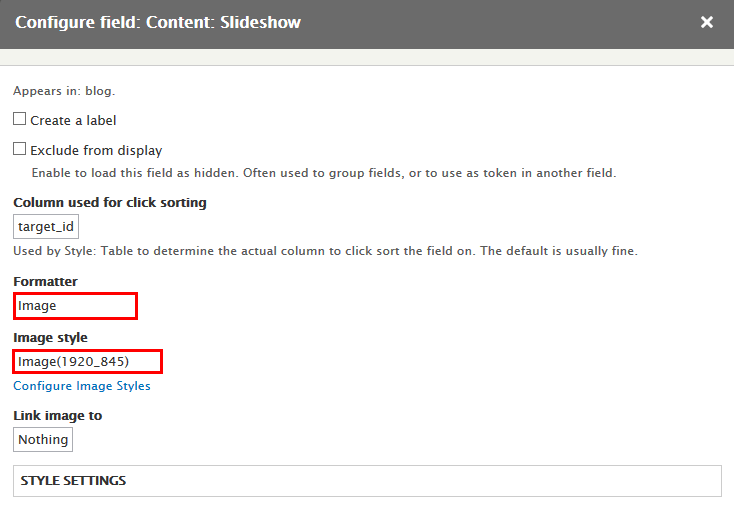
Step 4: Set properties for Content: Slideshow
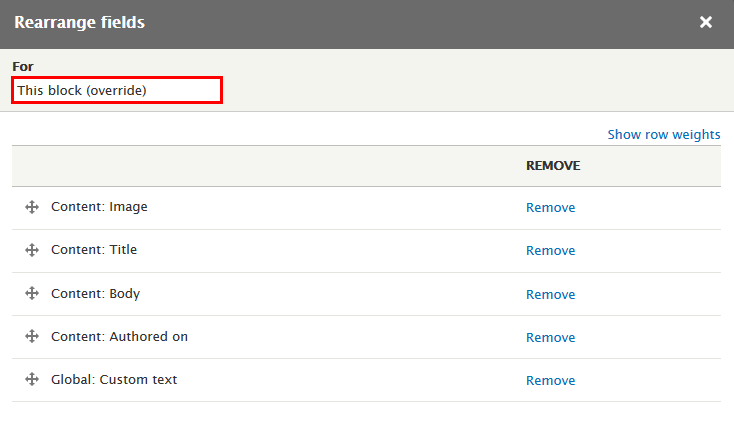
Step 5: At FIELDS area, click Rearrange button. Then remove Content: Title and set following arrange
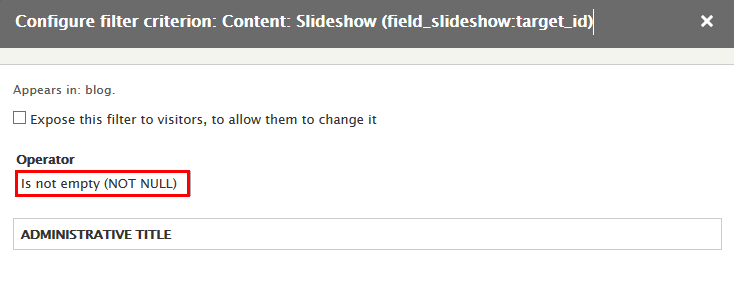
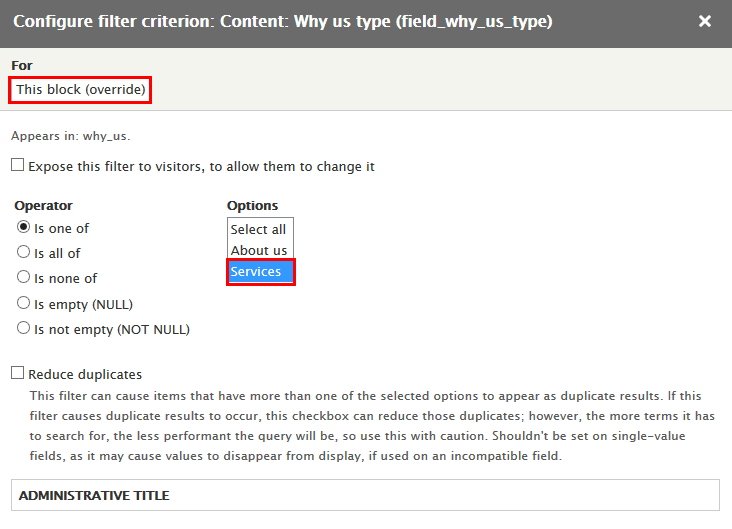
Step 6: At FILTER CRITERIA area, add Content: Slideshow:target_id field and set properties:
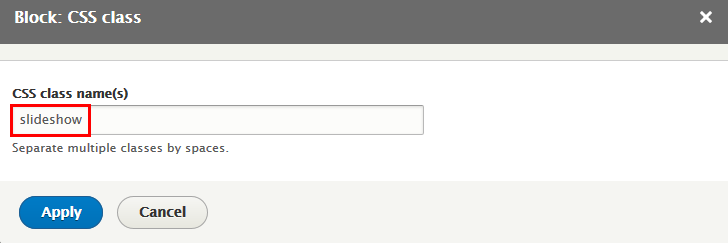
Step 7: At Advanced > OTHER area, add CSS class:
Step 8: Click Save to save view
2. Configure View: Slideshow block
Step 1: Navigate to Structure > Block layout
Step 2: Find Slideshow click Place block button
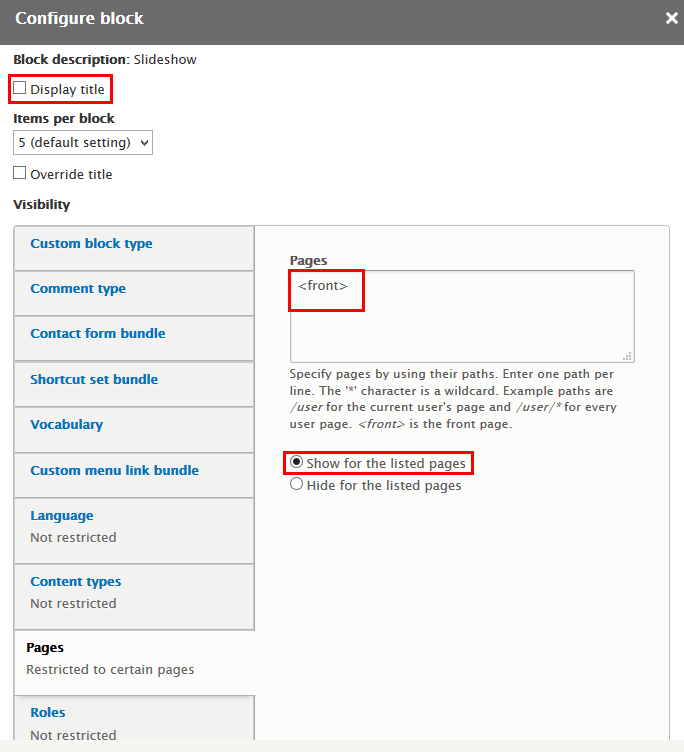
Step 3: Find Slideshow click Place block button and set following properites:
Step 4: Click Save block button.
Frontpage
Front end Display
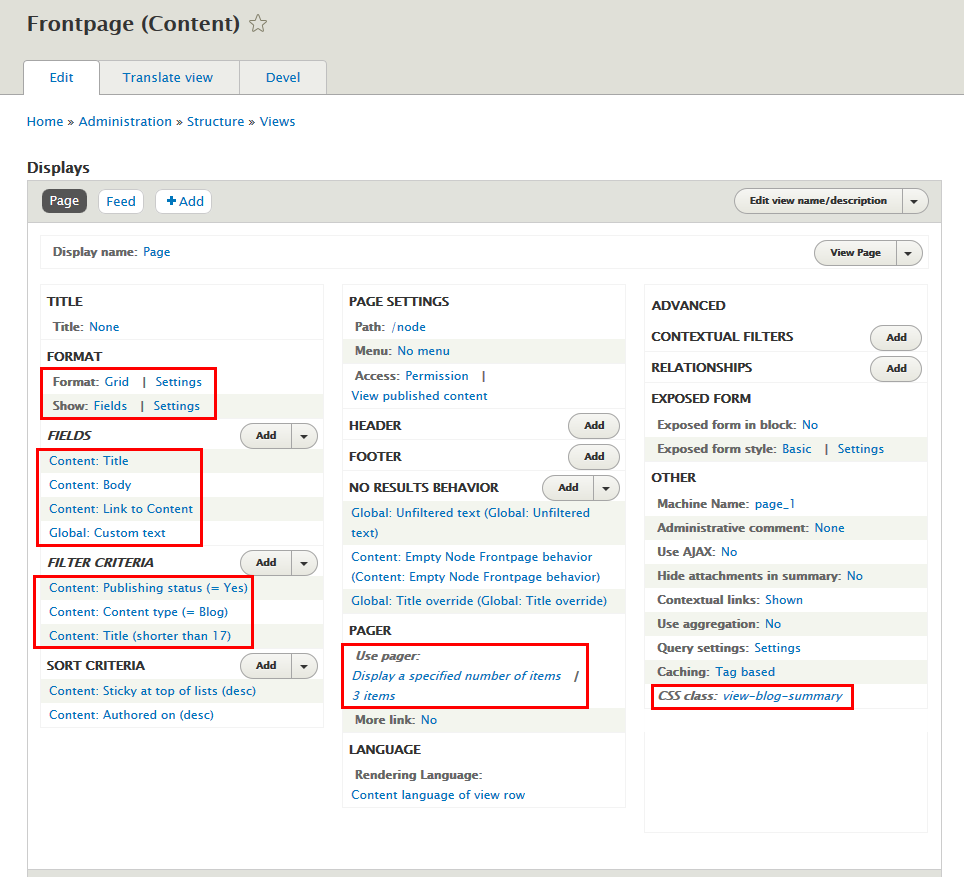
Step 1: Navigate to Structure > Views, find Frontpage view, then click Edit view with following settings:
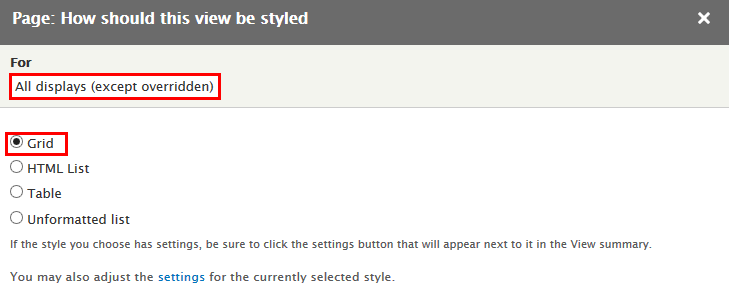
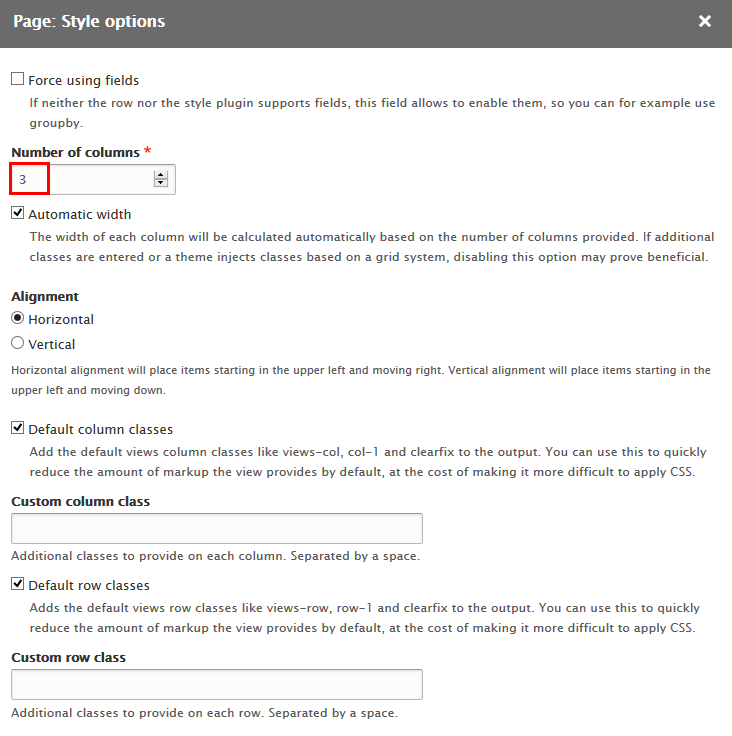
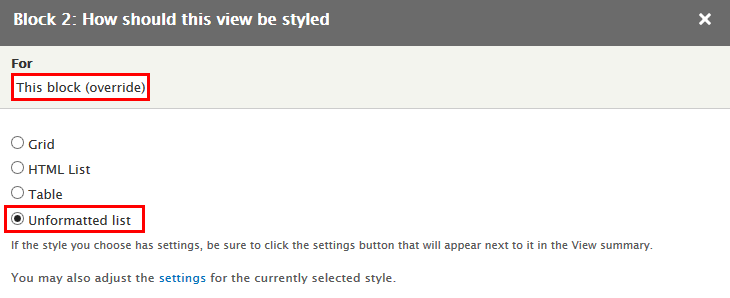
Step 2:At FORMAT area, find Format click link and set following properties:
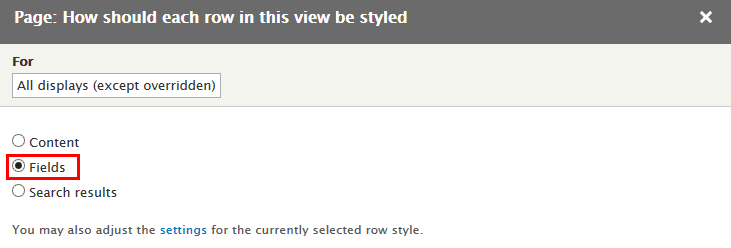
Step 3:At FORMAT area, find Show click and link and set following properties:
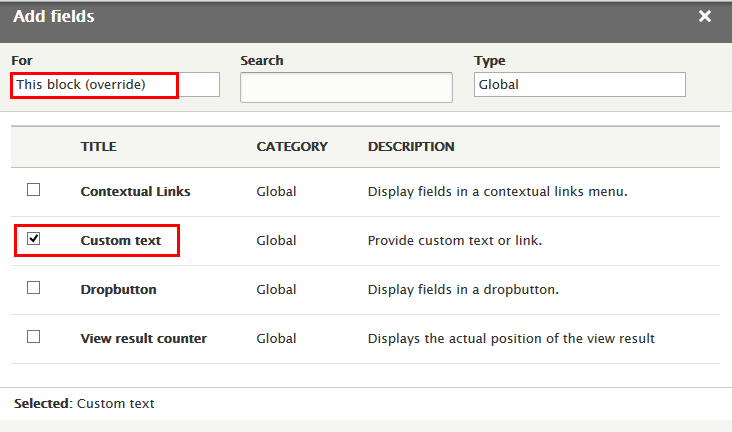
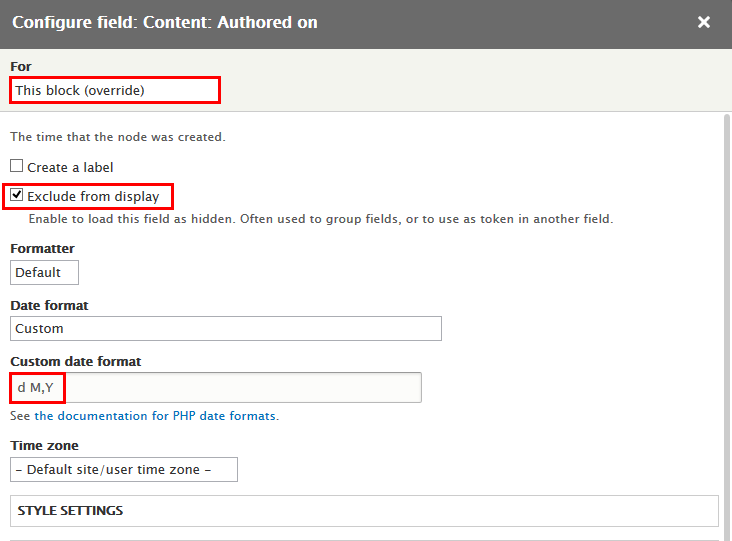
Step 4: At FIELDS area, click Add button to add fields: Content: Title, Content: Body, Content: Link to Content, Global: Custom text
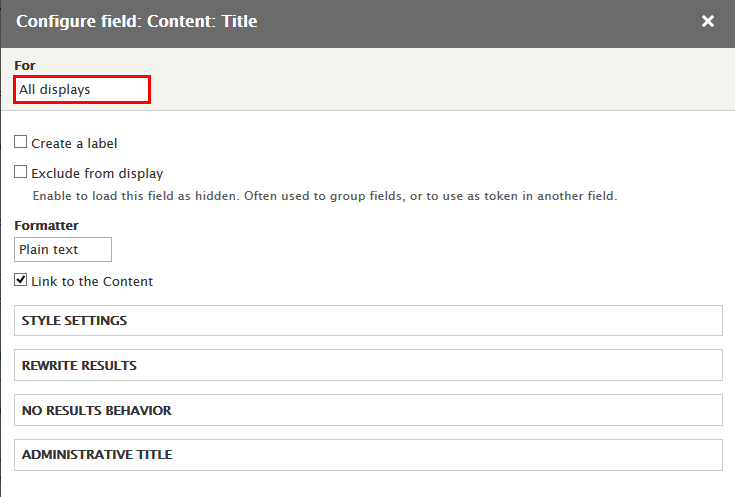
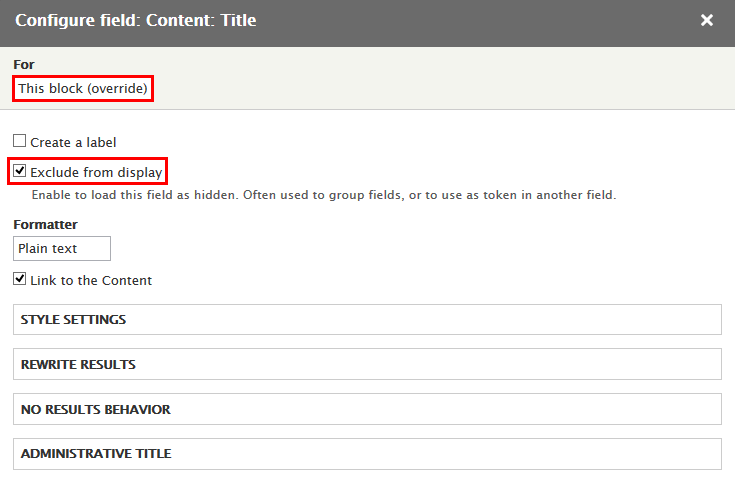
Step 5: Set properties for Content: Title
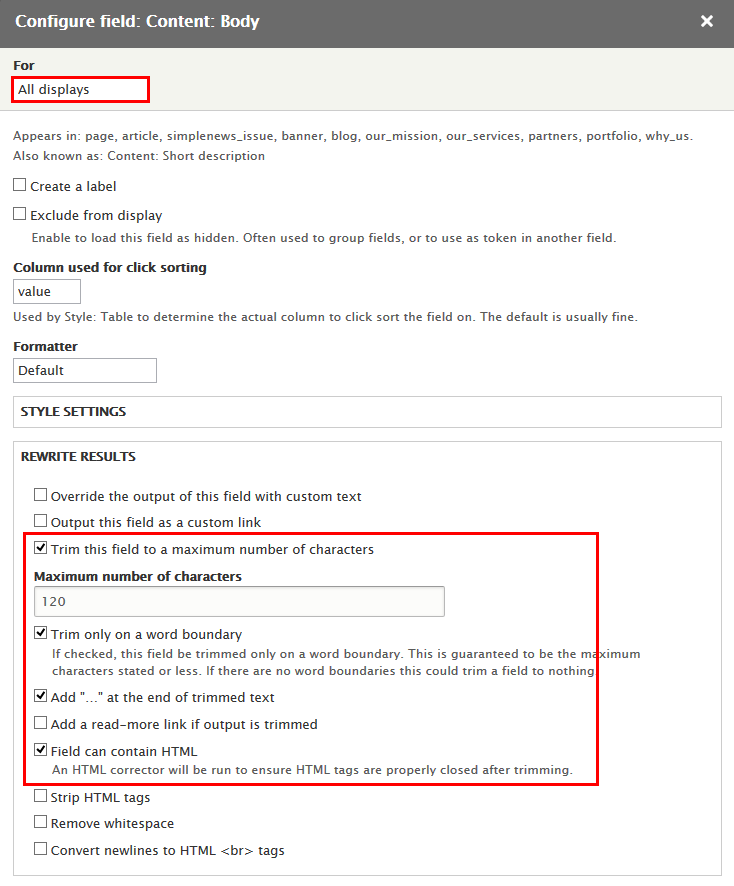
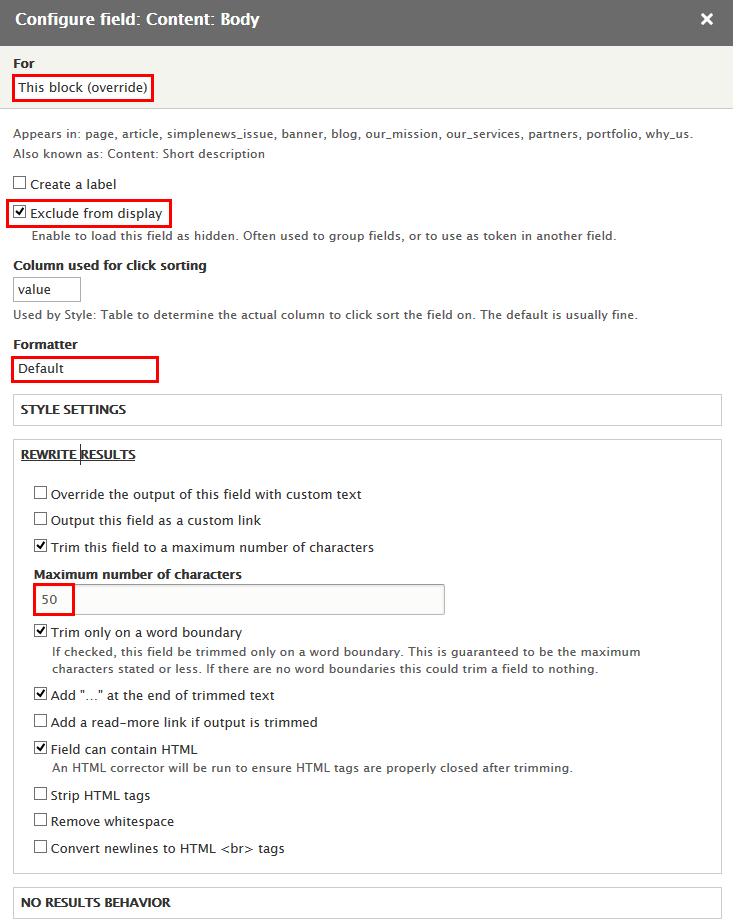
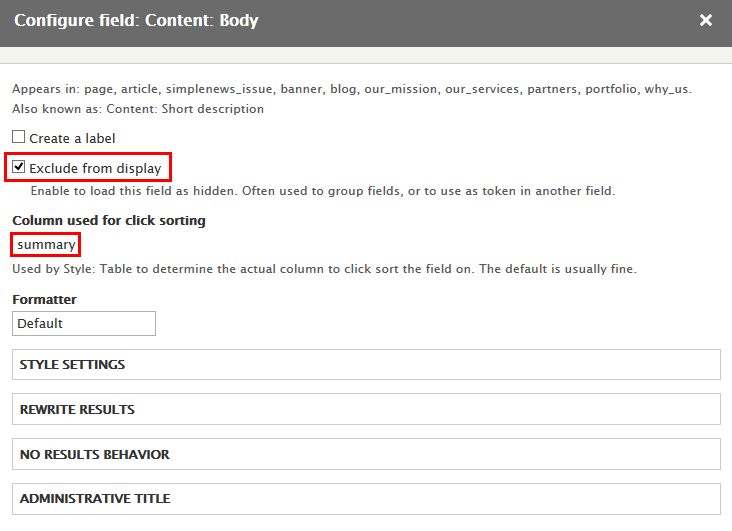
Step 6: Set properties for Content: Body
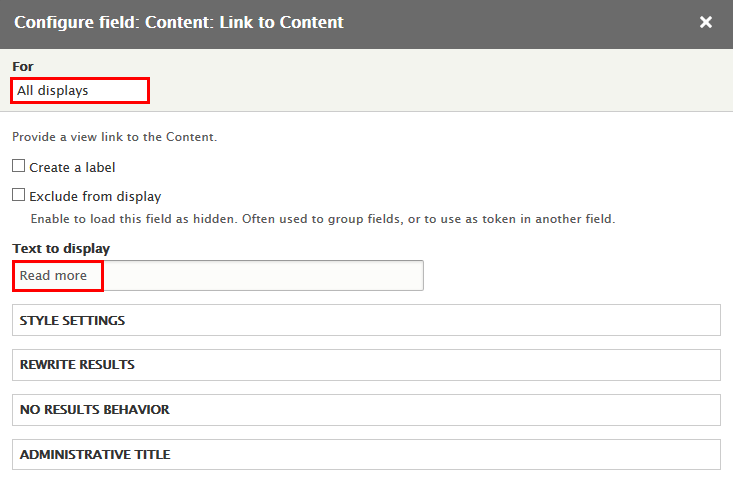
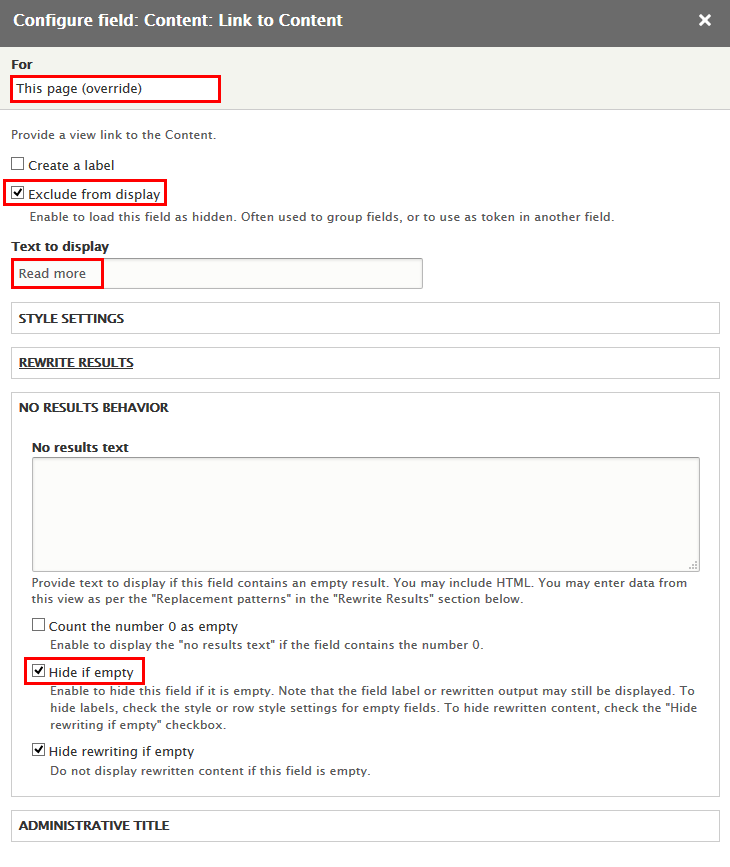
Step 7: Set properties for Content: Link to Content
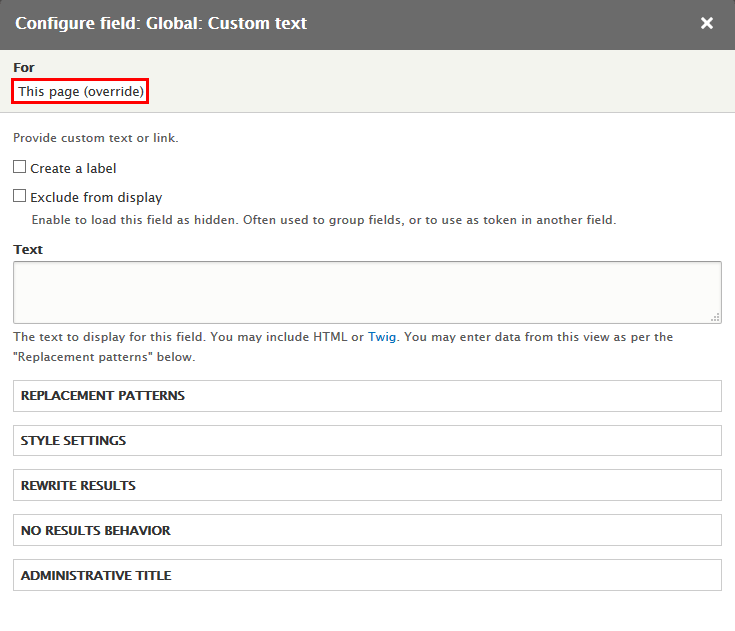
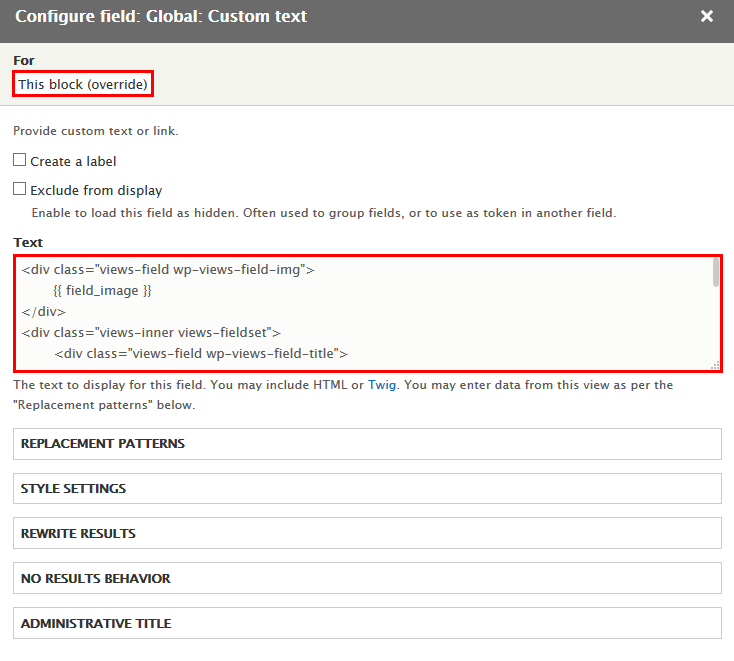
Step 8: Set properties for Global: Custom text
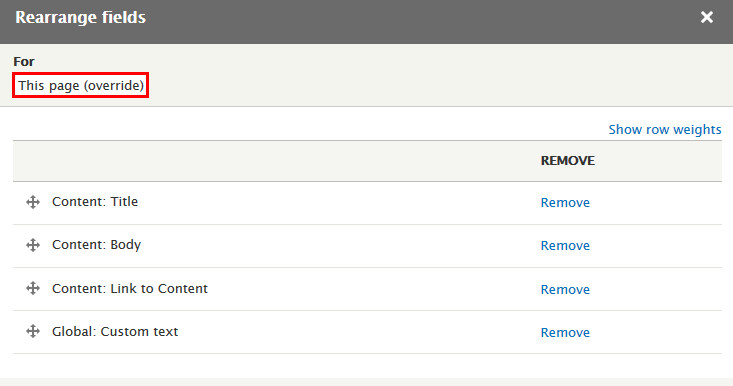
Step 9: At FIELDS area, click Rearrange button and set following arrange
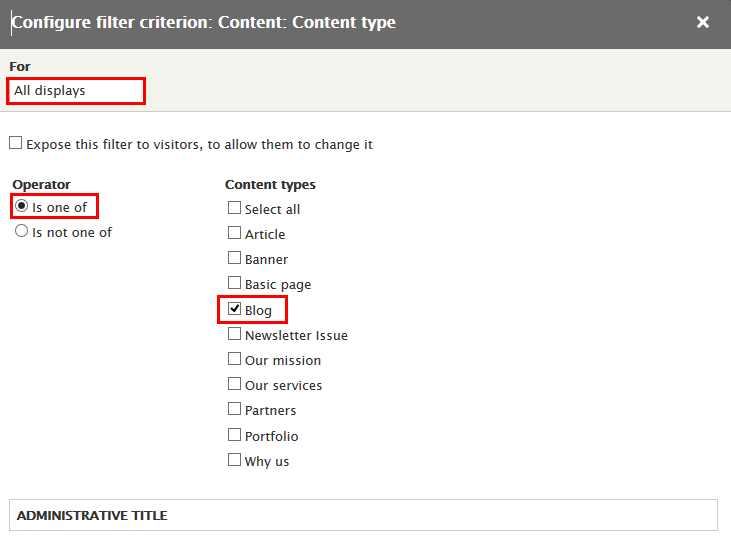
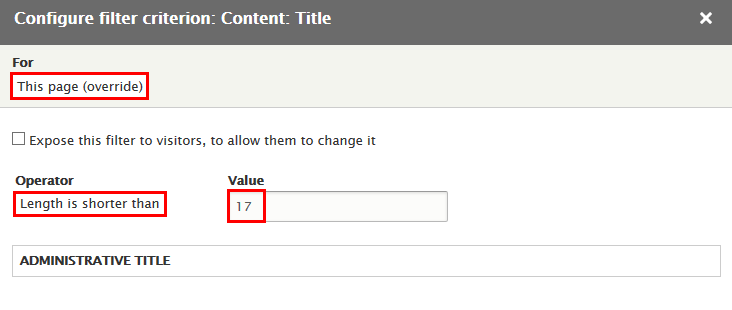
Step 10: At FILTER CRITERIA area, add Content: Content type, Content: Title field and set properties:
Step 11: Set properties for Content: Content type
Step 12: Set properties for Content: Title
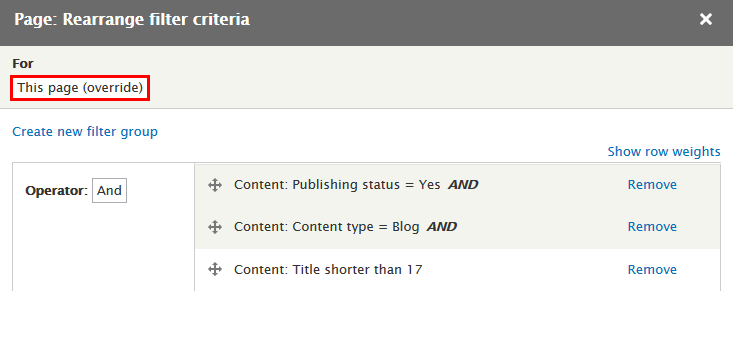
Step 13: At FILTER CRITERIA area, click Rearrange button to remove Content: Promoted to front page, Content: Translation language fields and set following arrange
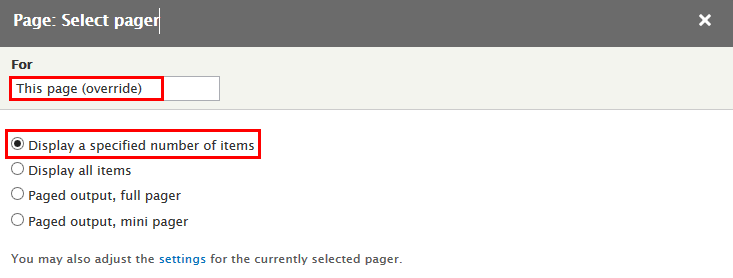
Step 14: At PAGER area, find and click Use pager link and set following properites:
Step 15: At Advanced > OTHER area, add CSS class:
Step 16: Click Save to save view
Welcome to Luxestate block
Front end Display
1. Add Welcome to Luxestate content
Step 1: Navigate to Content > Add content > Article
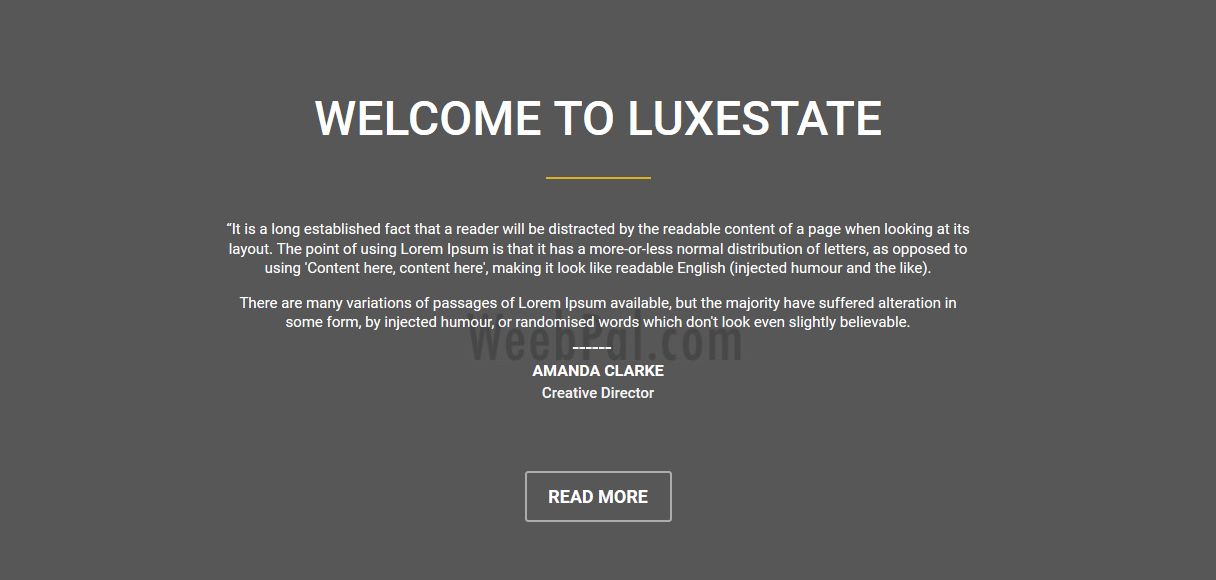
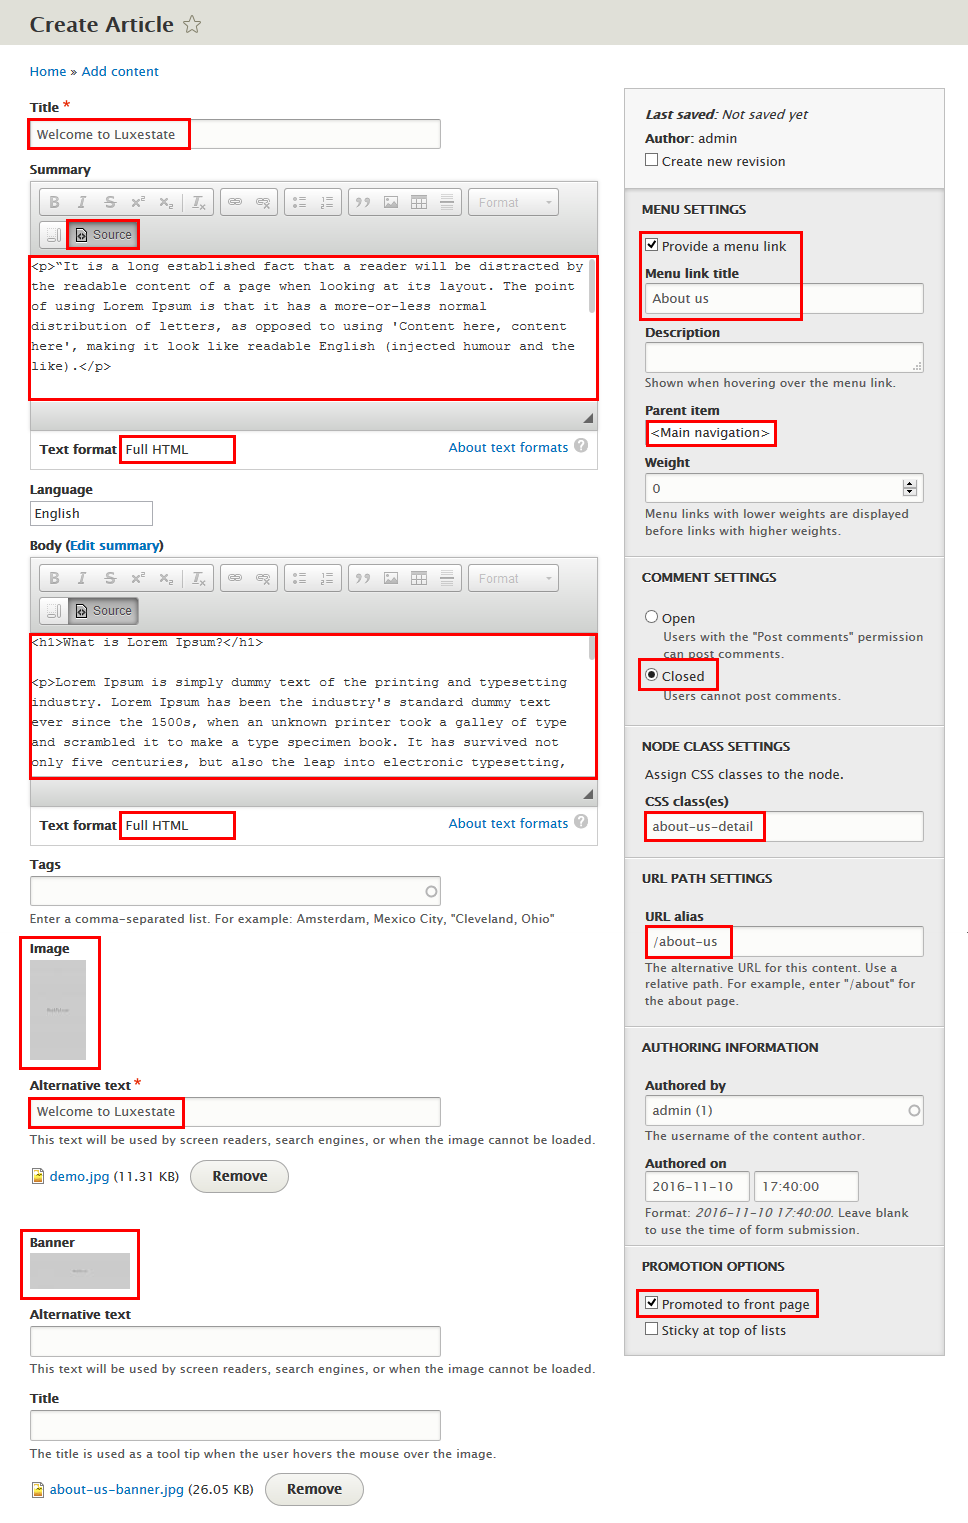
Step 2: Create Welcome to Luxestate content with following properites:
Step 3: Click Save block button.
Refer to following HTML code of Summary:
“It is a long established fact that a reader will be distracted by the readable content of a page when looking at its layout. The point of using Lorem Ipsum is that it has a more-or-less normal distribution of letters, as opposed to using 'Content here, content here', making it look like readable English (injected humour and the like).
There are many variations of passages of Lorem Ipsum available, but the majority have suffered alteration in some form, by injected humour, or randomised words which don't look even slightly believable.
AMANDA CLARKE
Creative Director
Refer to following HTML code of Body:
What is Lorem Ipsum?
Lorem Ipsum is simply dummy text of the printing and typesetting industry. Lorem Ipsum has been the industry's standard dummy text ever since the 1500s, when an unknown printer took a galley of type and scrambled it to make a type specimen book. It has survived not only five centuries, but also the leap into electronic typesetting, remaining essentially unchanged. It was popularised in the 1960s with the release of Letraset sheets containing Lorem Ipsum passages, and more recently with desktop publishing software like Aldus PageMaker including versions of Lorem Ipsum.
Where can I get some?
There are many variations of passages of Lorem Ipsum available, but the majority have suffered alteration in some form, by injected humour, or randomised words which don't look even slightly believable. If you are going to use a passage of Lorem Ipsum, you need to be sure there isn't anything embarrassing hidden in the middle of text. All the Lorem Ipsum generators on the Internet tend to repeat predefined chunks as necessary, making this the first true generator on the Internet. It uses a dictionary of over 200 Latin words, combined with a handful of model sentence structures, to generate Lorem Ipsum which looks reasonable. The generated Lorem Ipsum is therefore always free from repetition, injected humour, or non-characteristic words etc.
Where does it come from?
Contrary to popular belief, Lorem Ipsum is not simply random text. It has roots in a piece of classical Latin literature from 45 BC, making it over 2000 years old.
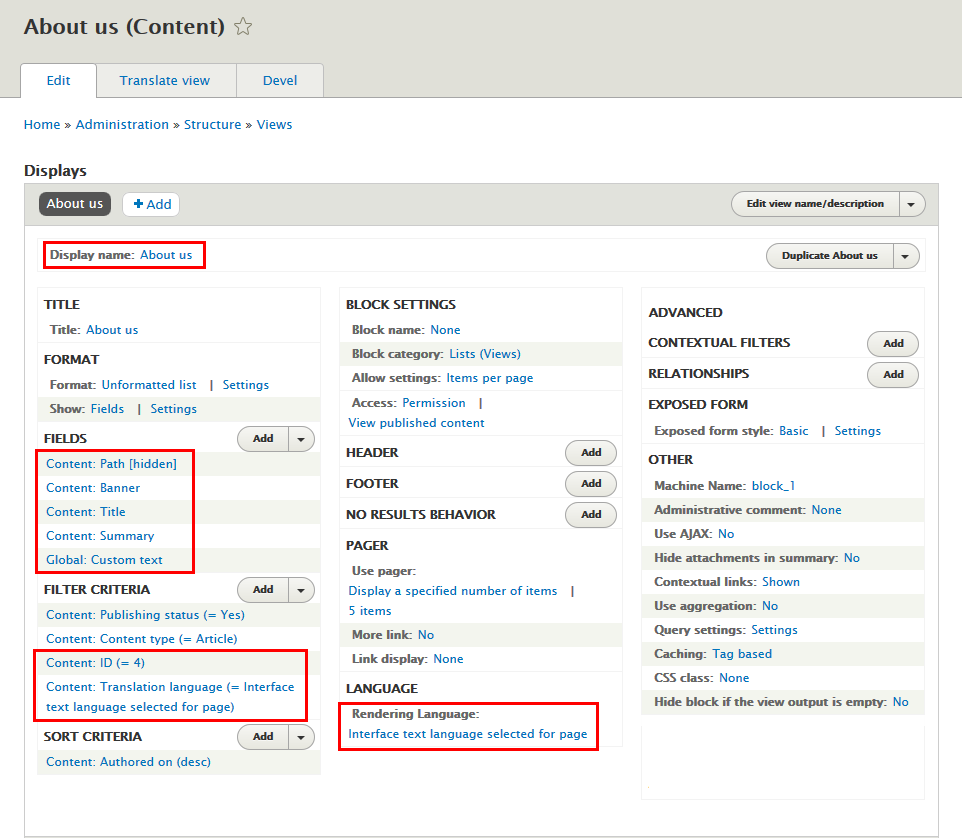
2. Create About us view
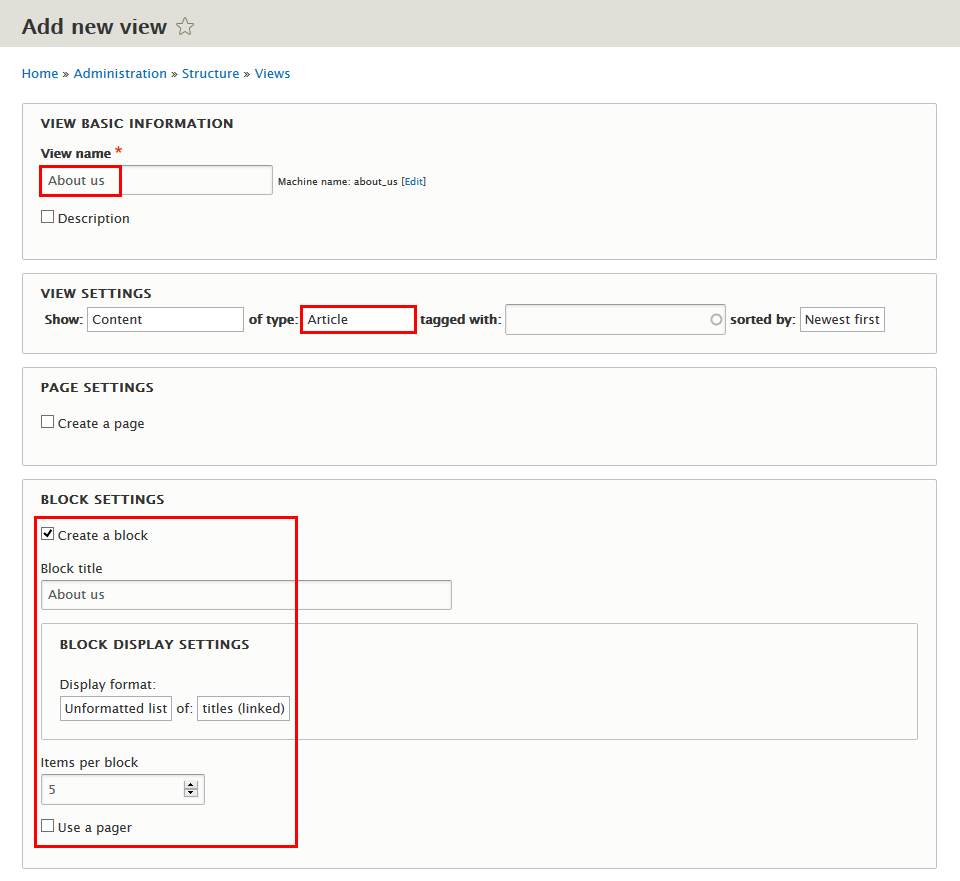
Step 1: Navigate to Structure > Views, click Add new view, then create About us view with following settings:
Step 2: Click Save and edit button. Next to steps below to set properties for following fields:
Step 3: At Display name area, click and set properties:
Step 4: At FIELDS area, click Add button to add fields: Content: Path, Content: Banner, Content: Summary, Global: Custom text
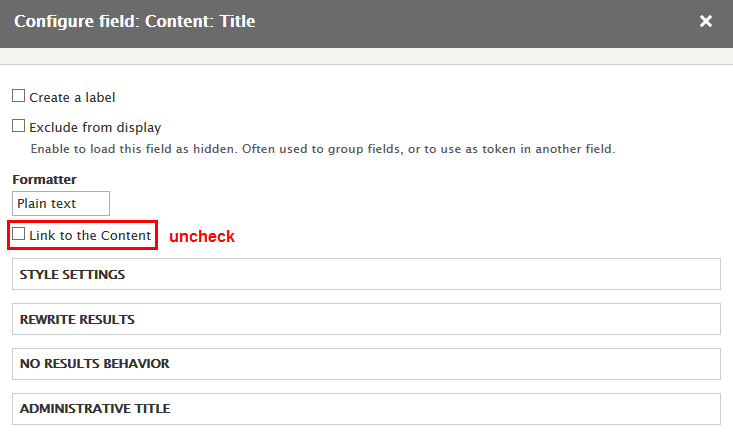
Step 5: Set properties for Content: Title
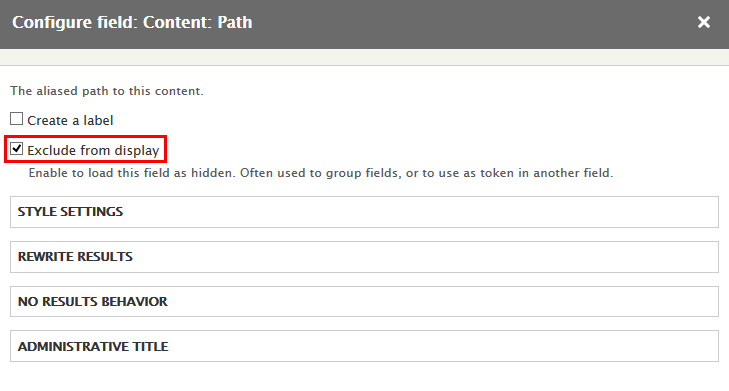
Step 6: Set properties for Content: Path
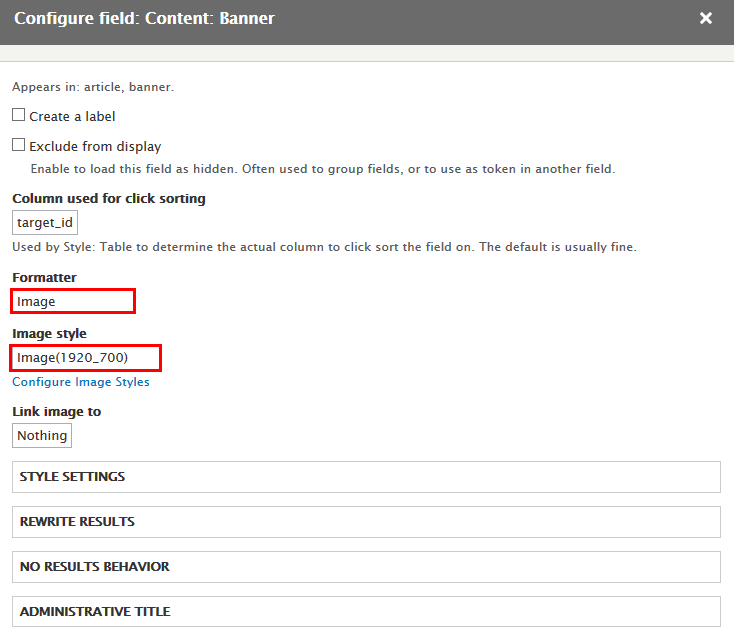
Step 7: Set properties for Content: Banner
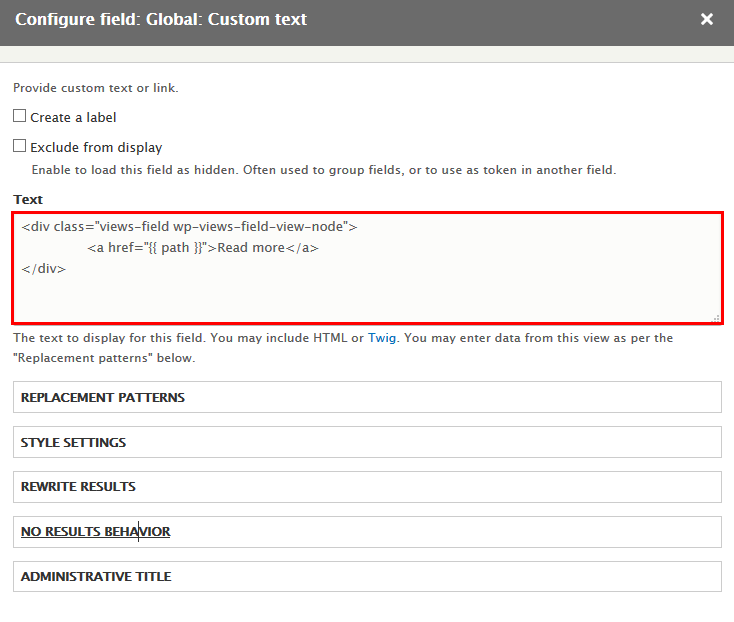
Step 8: Set properties for Global: Custom text
Refer to following HTML code:
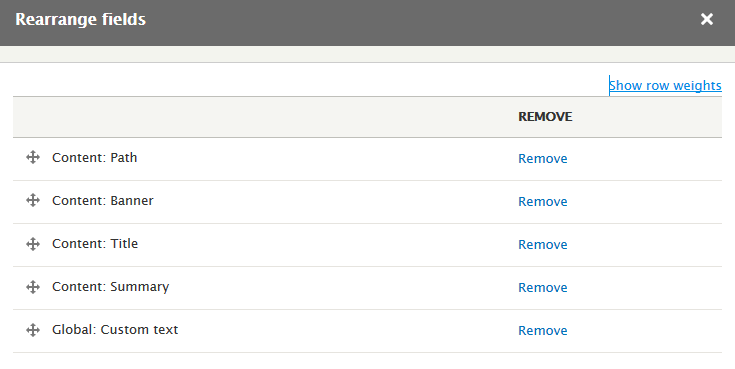
Step 9: At FIELDS area, click Rearrange button and set following arrange
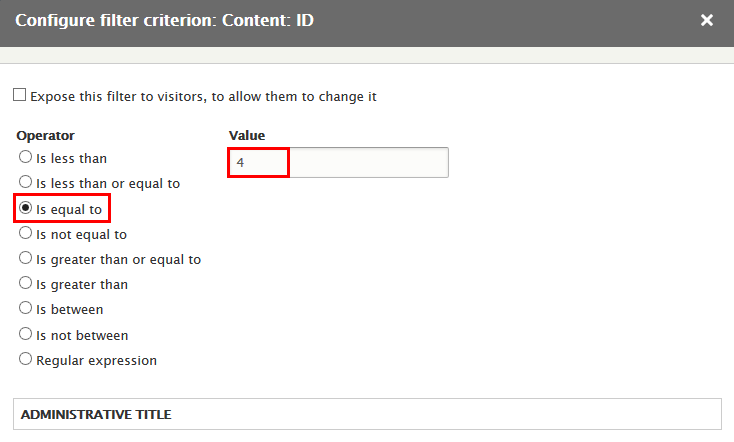
Step 10: At FILTER CRITERIA area, click Add button to add Content: ID, Content: Translation language fields and set following properites:
Step 11: Set properties for Content: ID
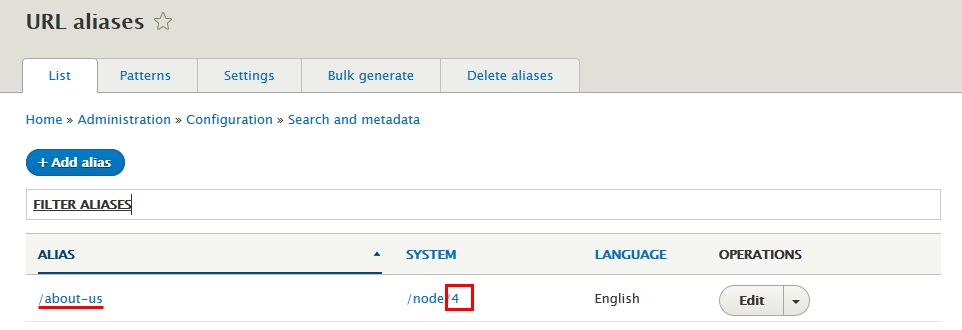
Note: ID of content is taken by
Navigate to Configuration > Search and metadata > URL aliases find /about-us path.
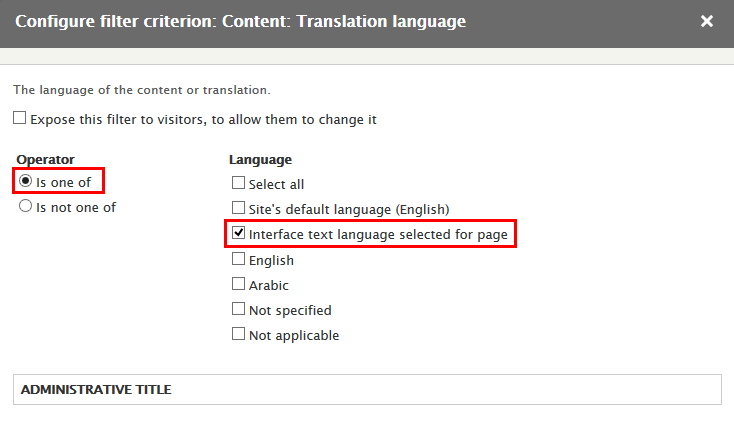
Step 12: Set properties for Content: Translation language
Step 13: At LANGUAGE area, find and click Rendering Language link and set following properites:
Step 14: Click Save to save view
3. Configure View: About us block
Step 1: Navigate to Structure > Block layout
Step 2: Find Panel second click Place block button
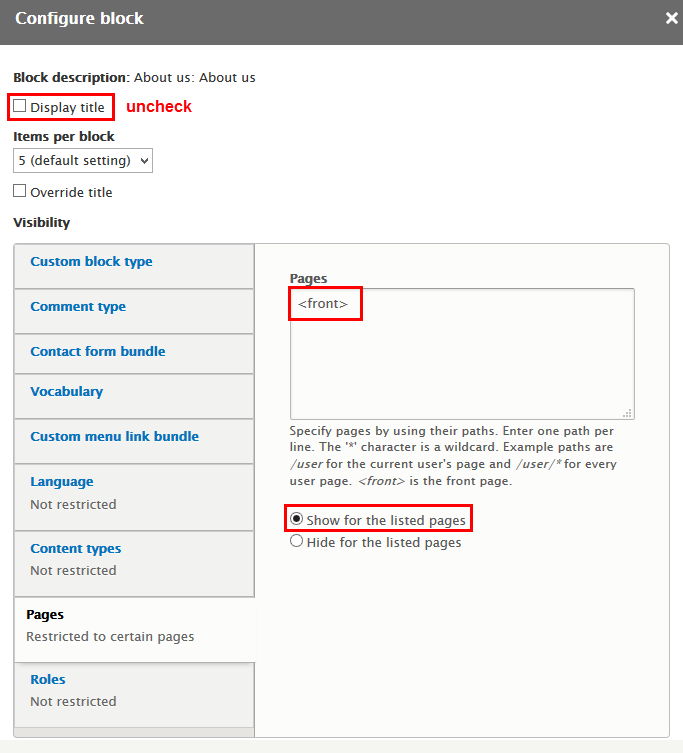
Step 3: Find About us: About us click Place block button and set following properites:
Step 4: Click Save block button.
Portfolio block
Front end Display
1. Create Portfolio block view
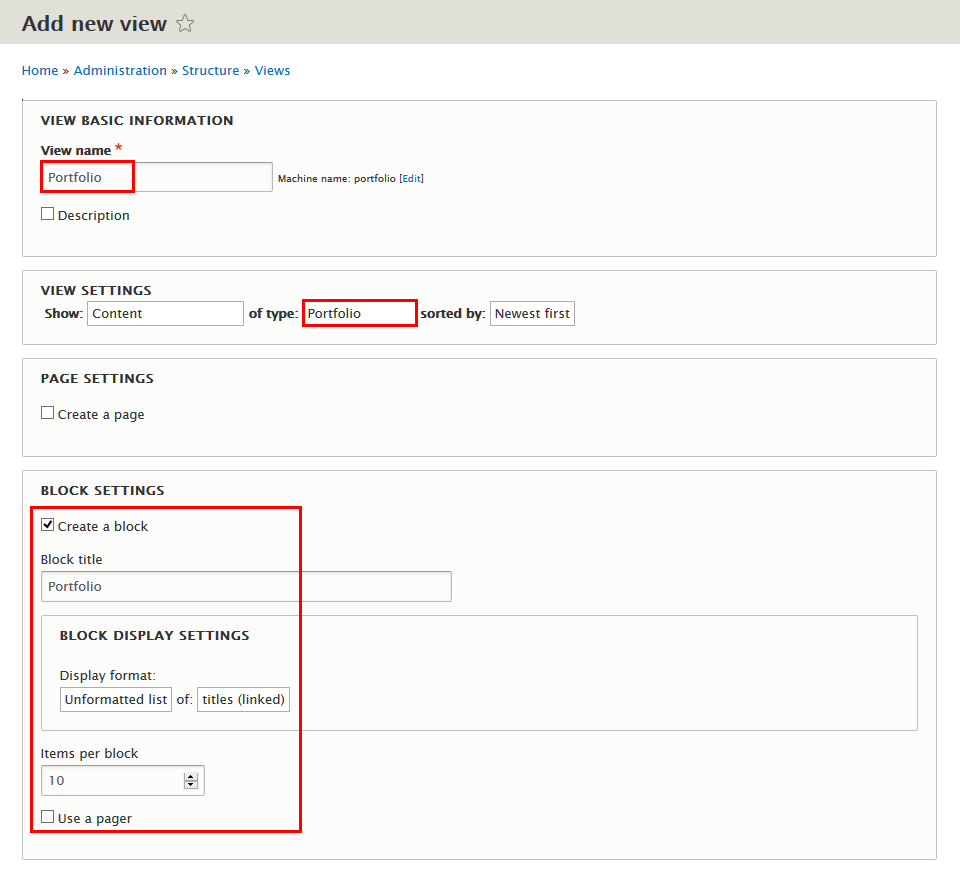
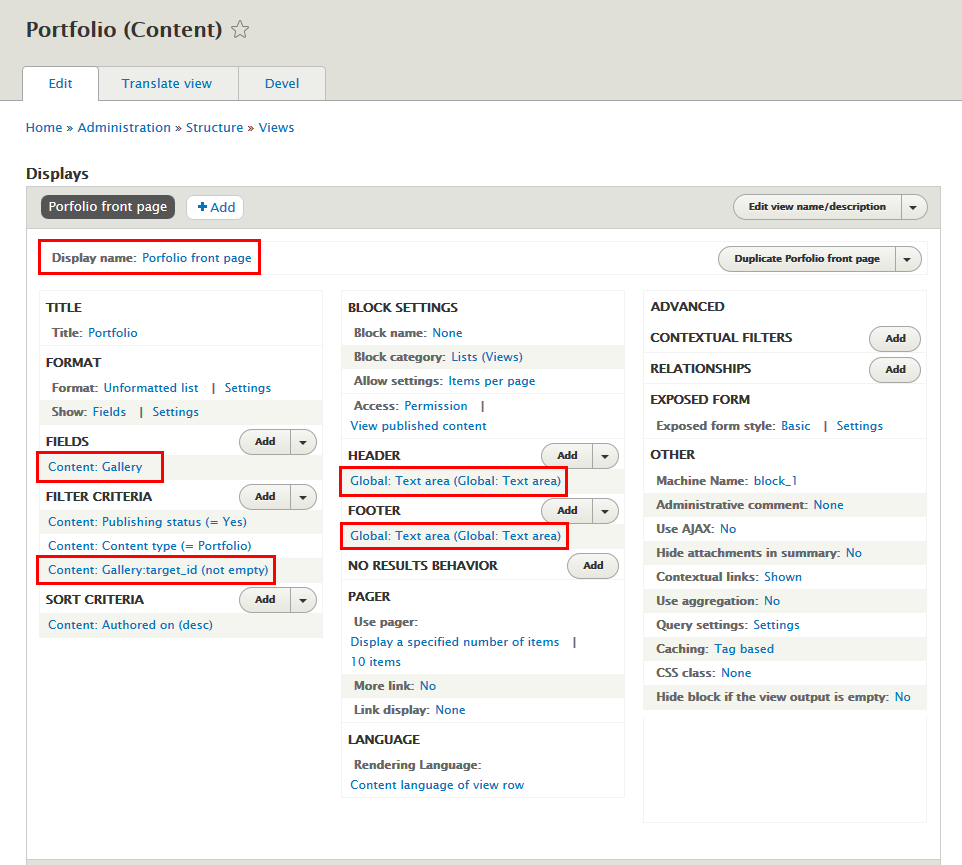
Step 1: Navigate to Structure > Views, click Add new view, then create Portfolio view with following settings:
Step 2: Click Save and edit button. Next to steps below to set properties for following fields:
Step 3: At Display name area, click and set properties:
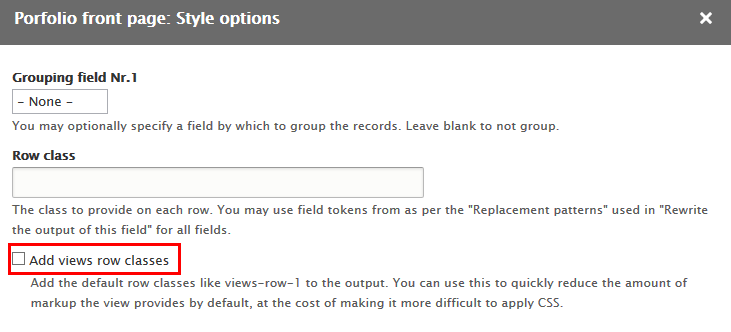
Step 4:At FORMAT area, find Format click Settings link and set following properties:
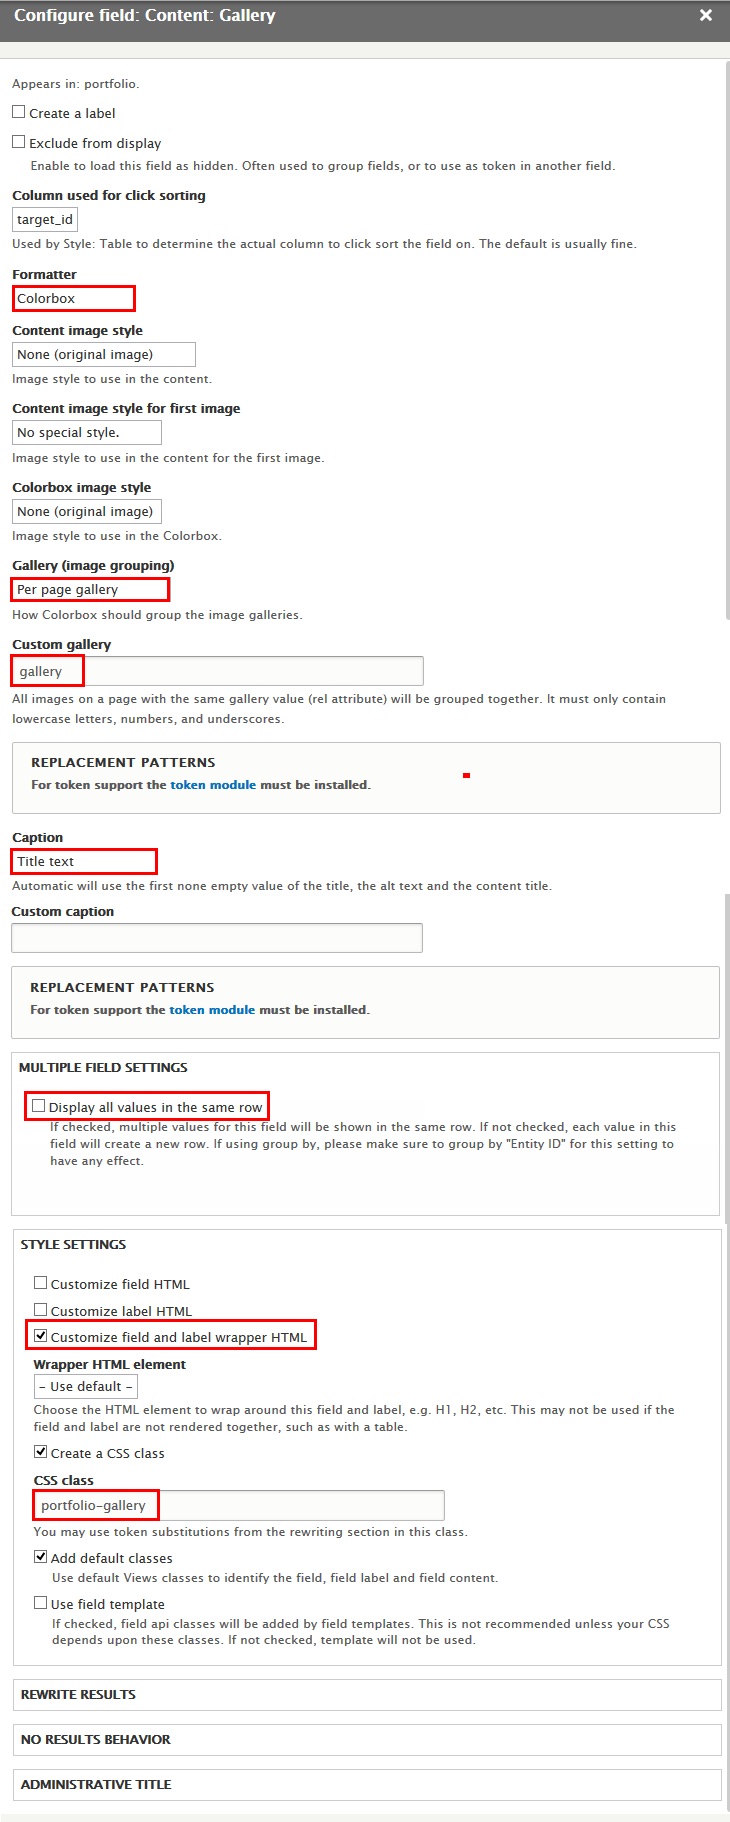
Step 5: At FIELDS area, click Add button to add fields: Content: Gallery
Step 6: Set properties for Content: Gallery
Step 7: At FIELDS area, click Rearrange to remove Content: Title button and set following arrange
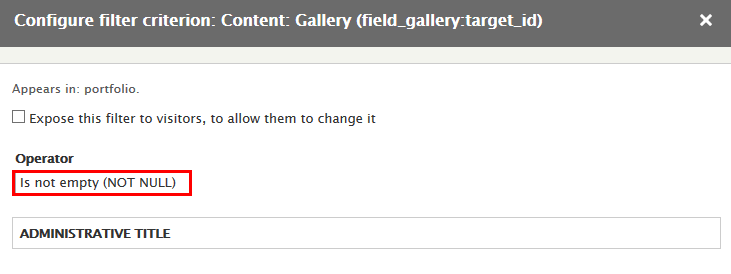
Step 8: At FILTER CRITERIA area, add Content: Gallery:target_id field and set properties:
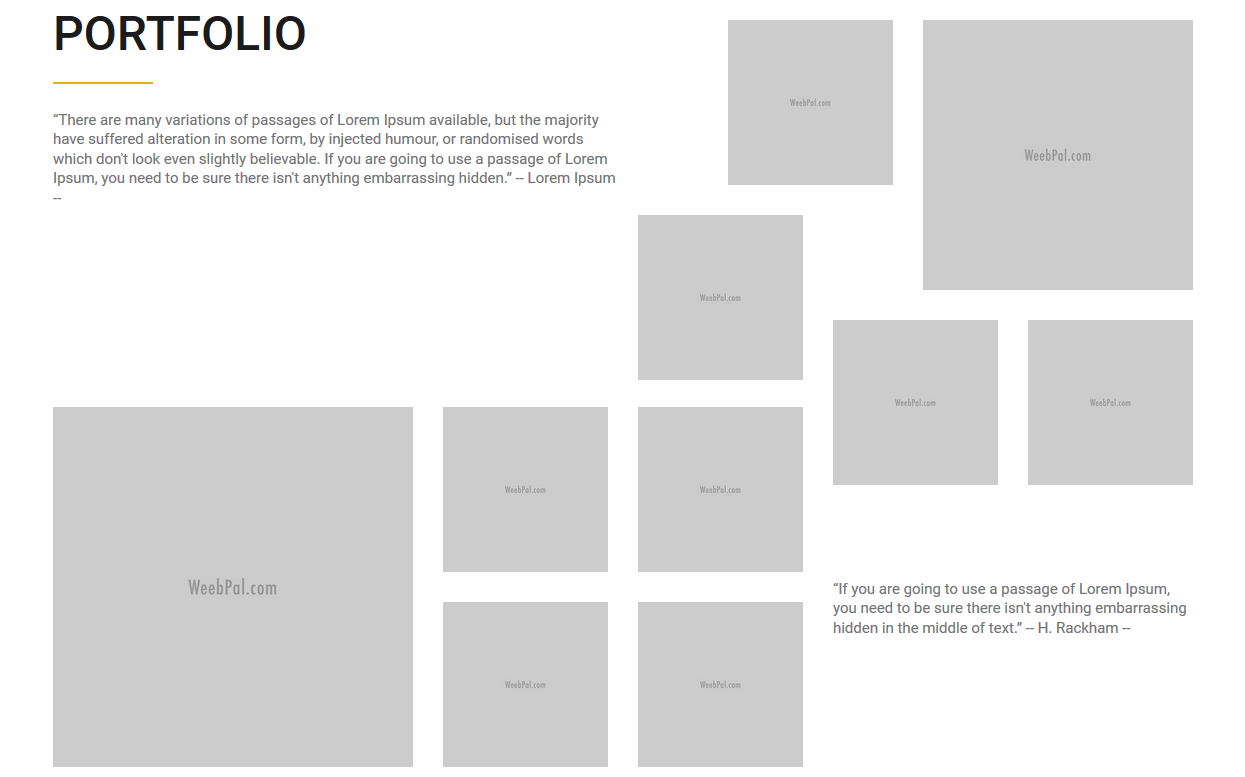
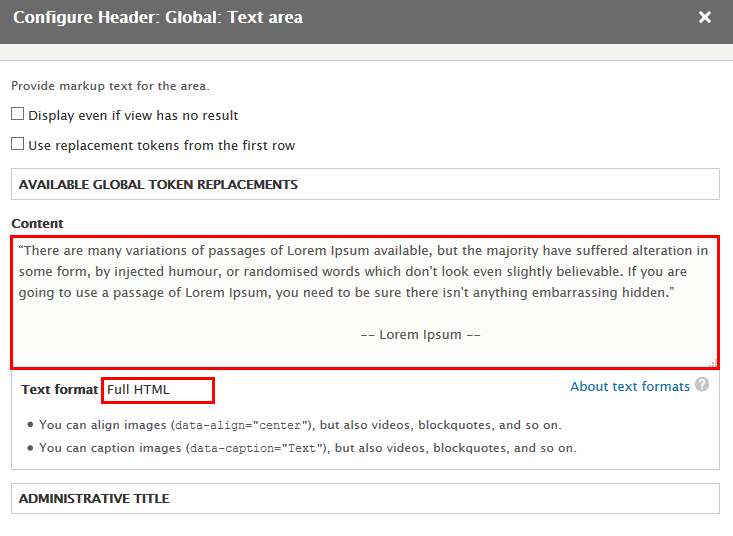
Step 9: At HEADER area, click Add button to add field Global: Text area with following properties:
Refer to following HTML code:
						“There are many variations of passages of Lorem Ipsum available, but the majority have suffered alteration in some form, by injected humour, or randomised words which don't look even slightly believable. If you are going to use a passage of Lorem Ipsum, you need to be sure there isn't anything embarrassing hidden.”

										   -- Lorem Ipsum --
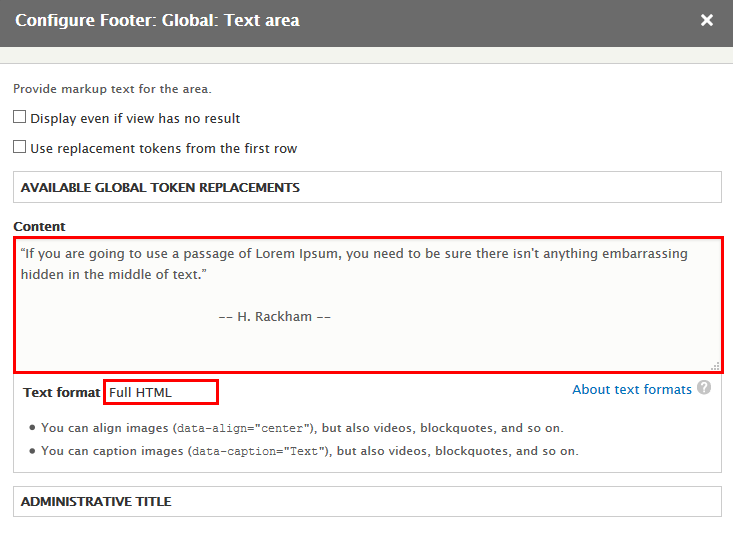
Step 10: At FOOTER area, click Add button to add field Global: Text area with following properties:
Refer to following HTML code:
						“If you are going to use a passage of Lorem Ipsum, you need to be sure there isn't anything embarrassing hidden in the middle of text.”

						-- H. Rackham --
Step 11: Click Save to save view
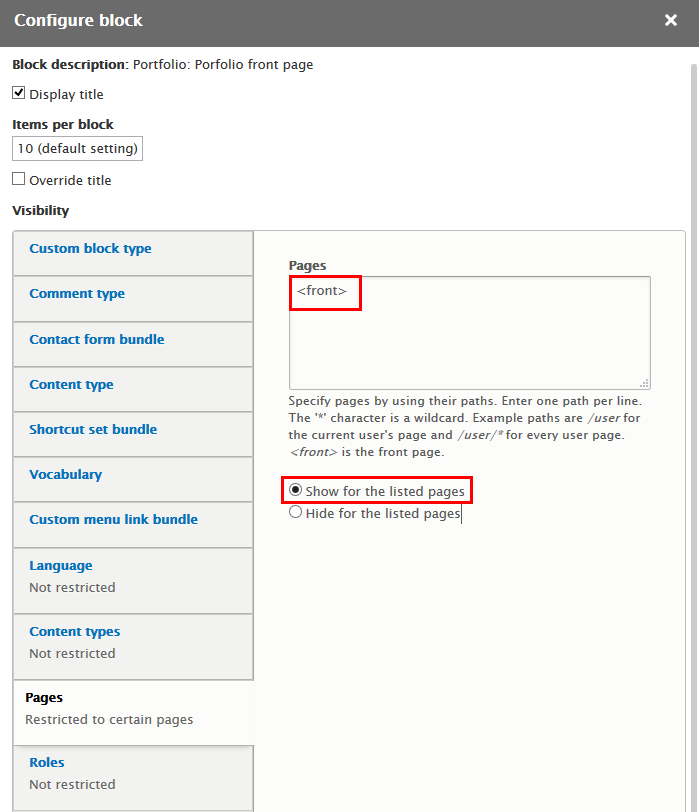
2. Configure Portfolio: Porfolio front page block
Step 1: Navigate to Structure > Block layout
Step 2: Find Panel third click Place block button
Step 3: Find Portfolio: Porfolio front page click Place block button and set following properites:
Step 4: Click Save block button.
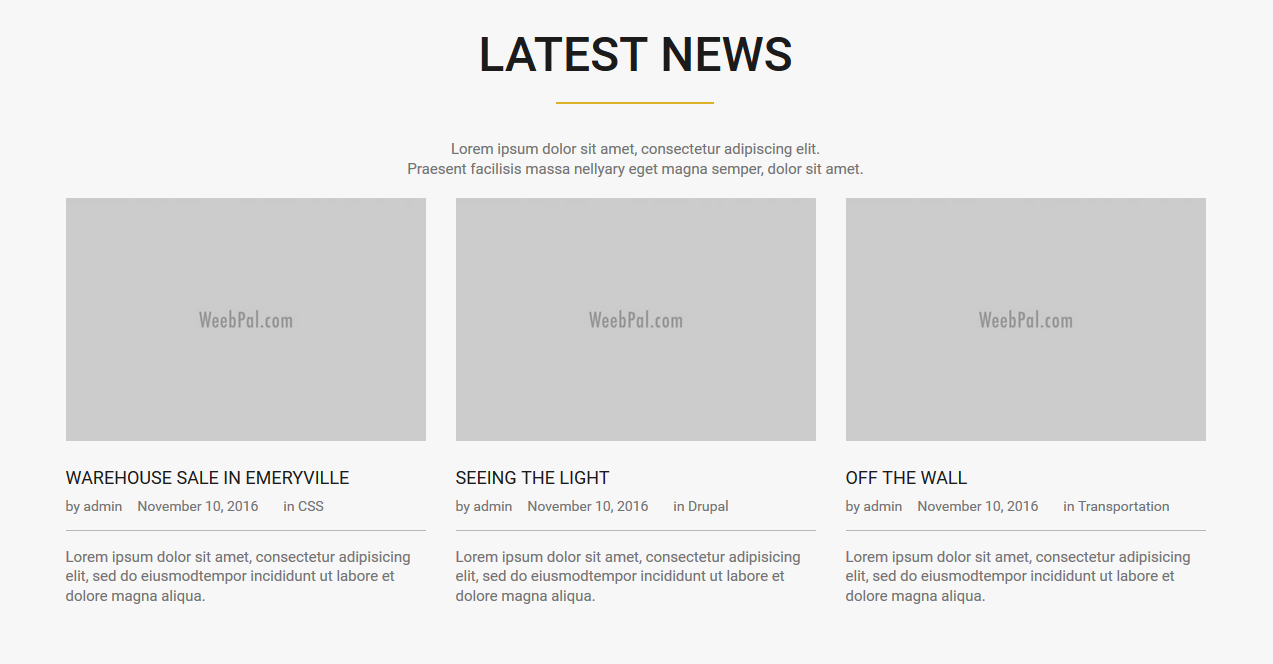
Latest news block
Front end Display
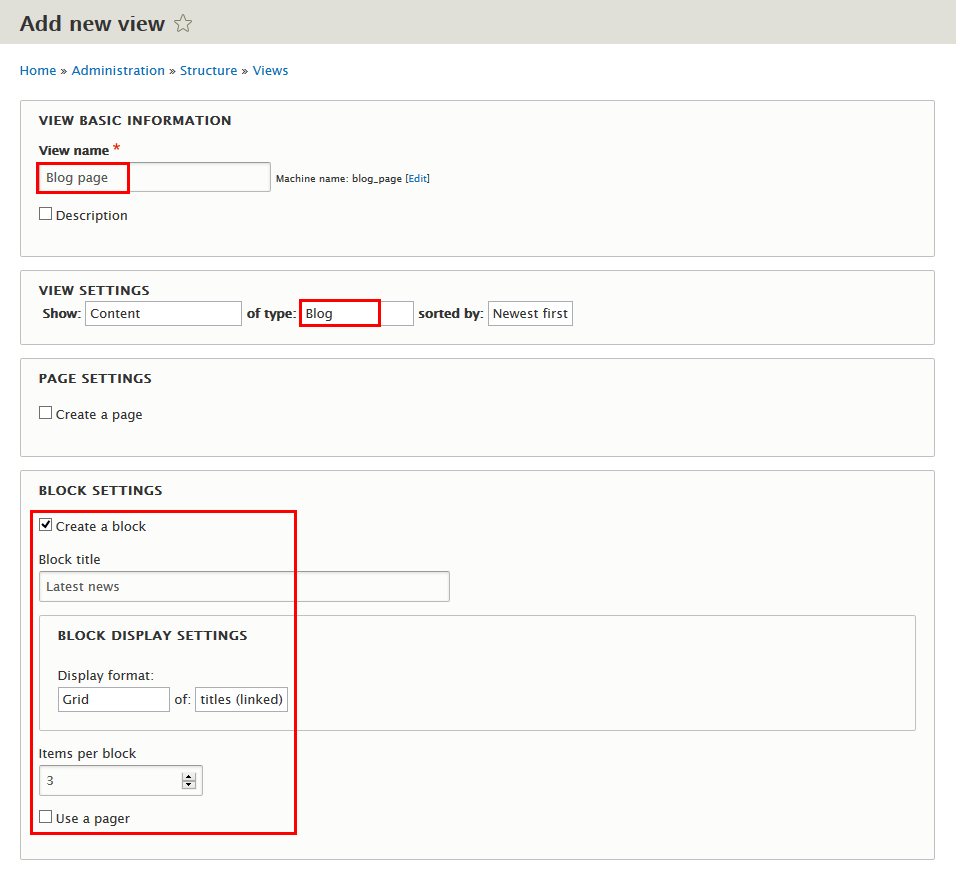
1. Create Blog page view
Step 1: Navigate to Structure > Views, click Add new view, then create Blog page view with following settings:
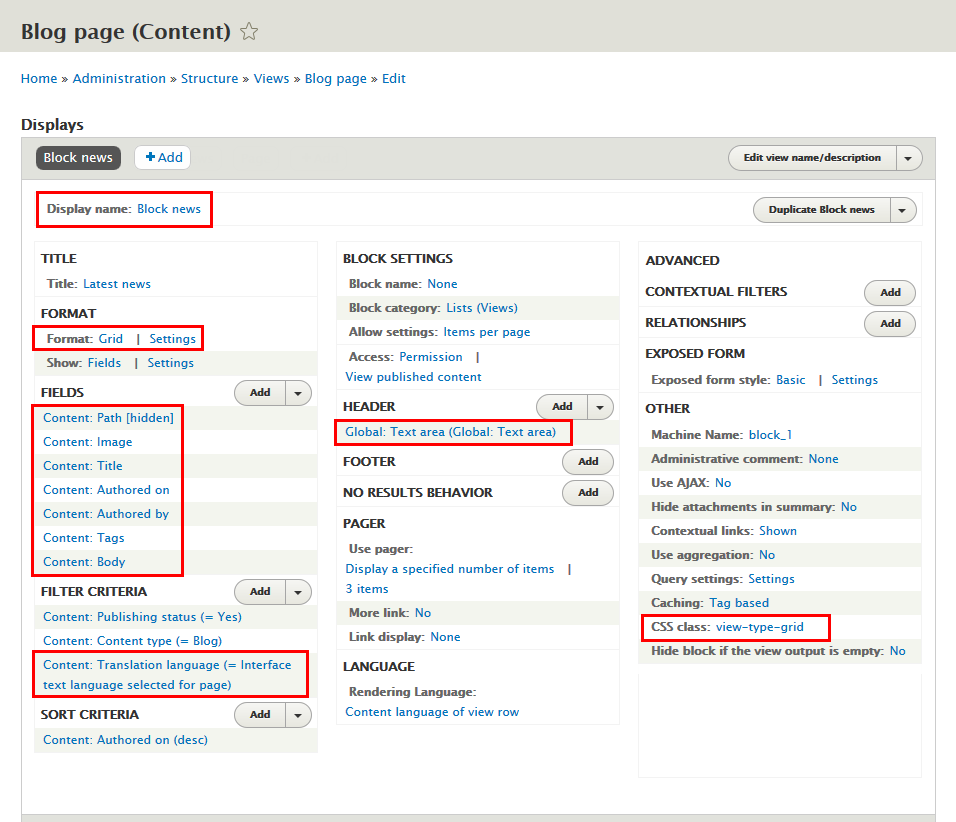
Step 2: Click Save and edit button. Next to steps below to set properties for following fields:
Step 3: At Display name area, click and set properties:
Step 4:At FORMAT area, find Format click Settings link and set following properties:
Step 5: At FILTER CRILERIA area, click Add button to add fields: Content: Path, Content: Image, Content: Authored by, Content: Authored on, Content: Tags, Content: Body
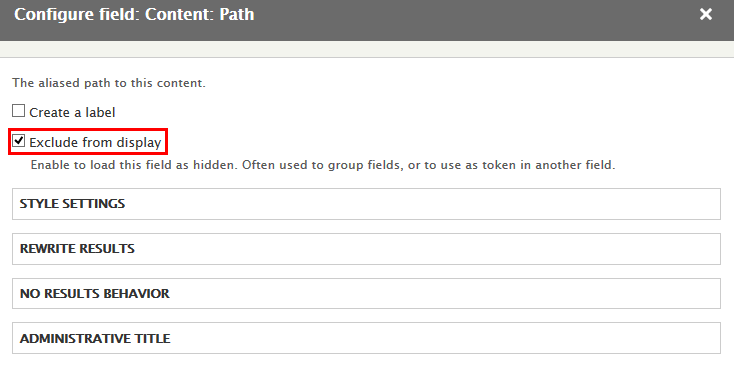
Step 6: Set properties for Content: Path
Step 7: Set properties for Content: Image
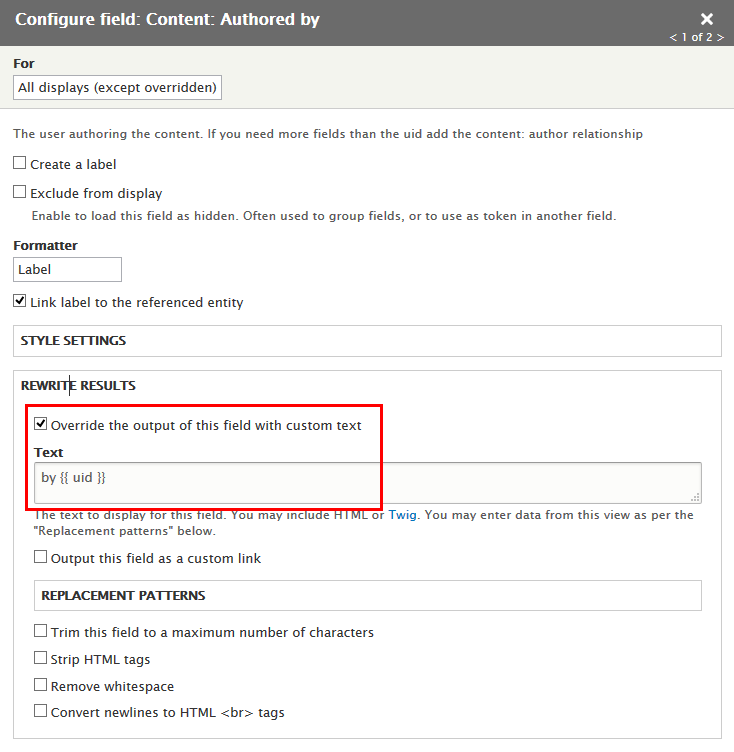
Step 8: Set properties for Content: Authored by
Refer to following HTML code:
by {{ uid }}
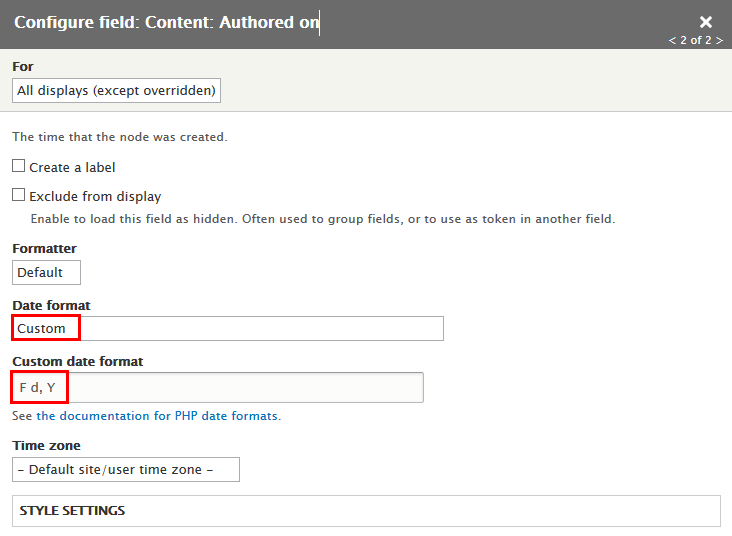
Step 9: Set properties for Content: Authored on
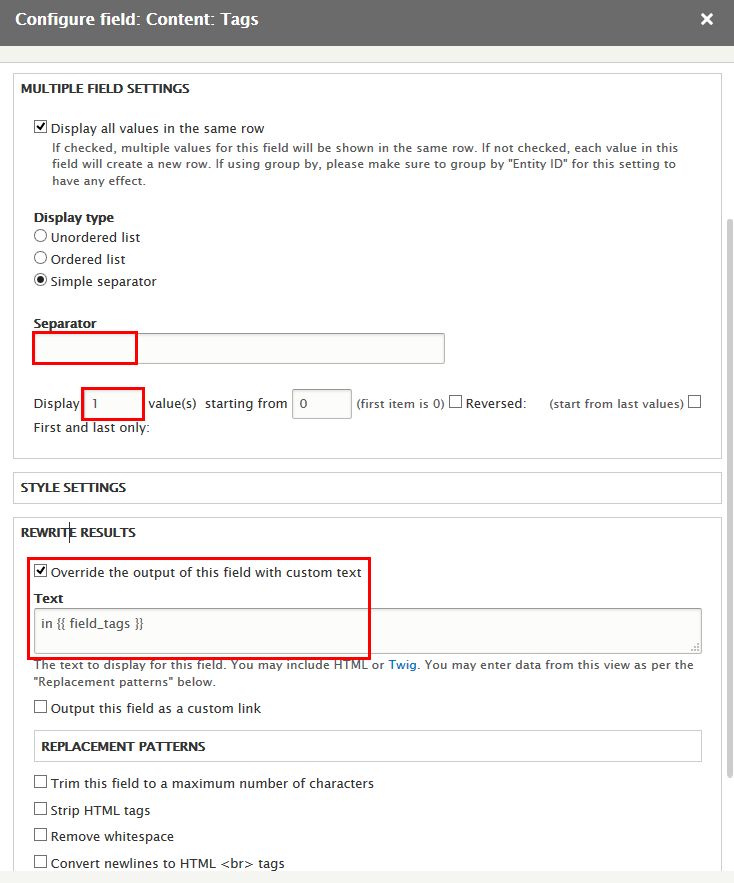
Step 10: Set properties for Content: Tags
Refer to following HTML code:
in {{ field_tags }}
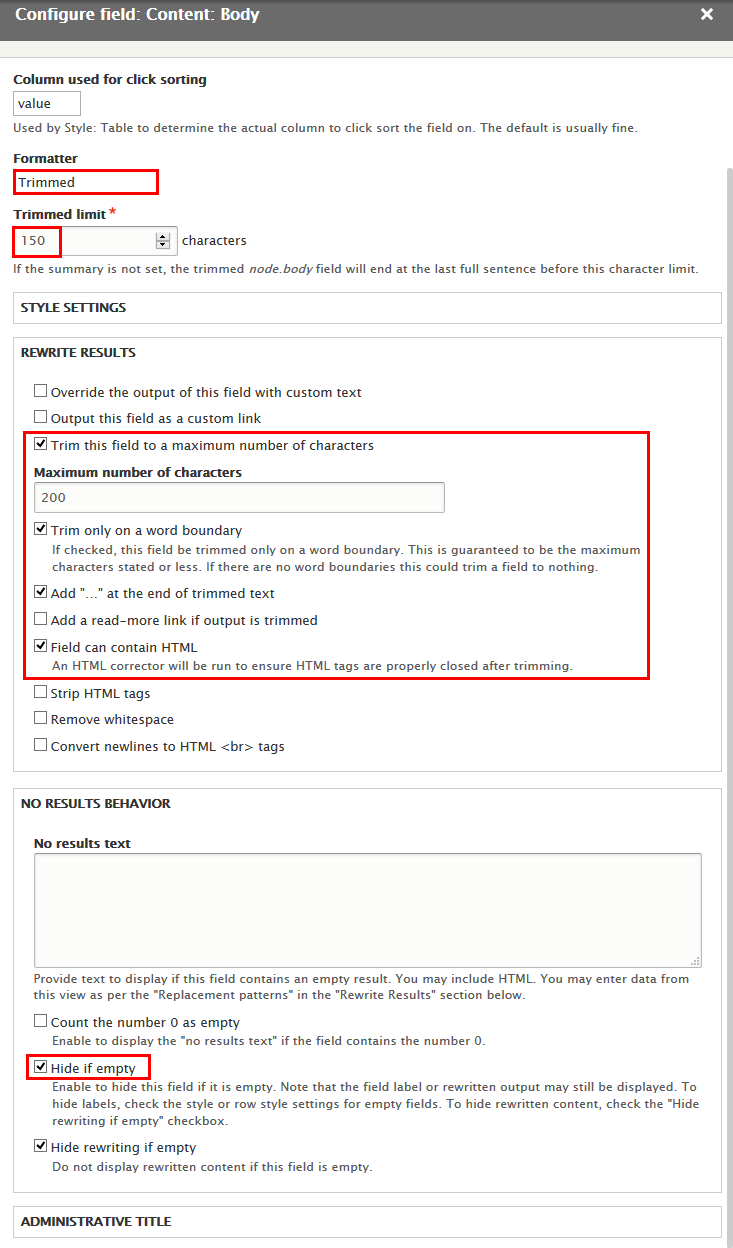
Step 11: Set properties for Content: Body
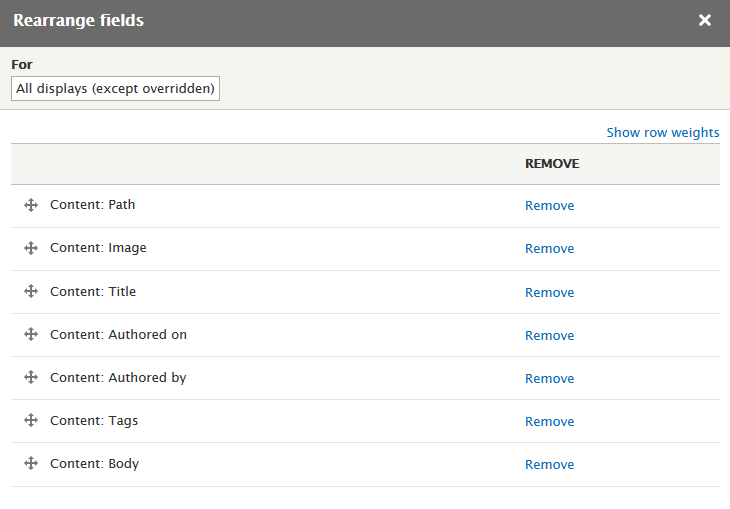
Step 12: At FIELDS area, click Rearrange button and set following arrange
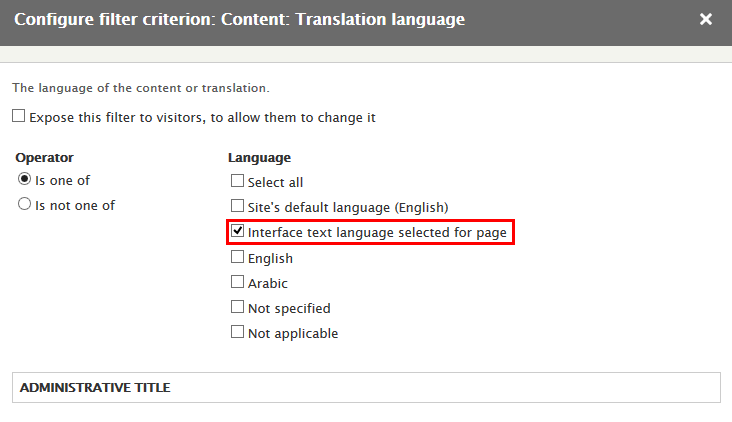
Step 13: At FILTER CRITERIA area, add Content: Translation language field and set properties:
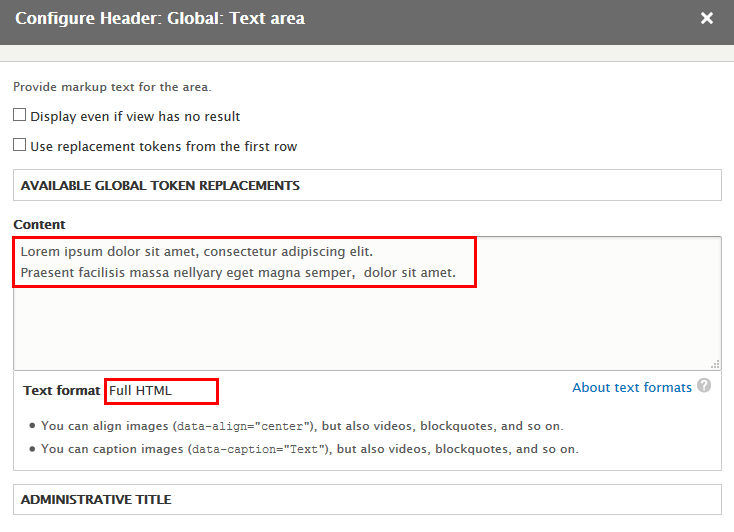
Step 14: At HEADER area, click Add button to add field Global: Text area with following properties:
Refer to following HTML code:
						Lorem ipsum dolor sit amet, consectetur adipiscing elit.
						Praesent facilisis massa nellyary eget magna semper,  dolor sit amet.
Step 15: At Advanced > OTHER area, add CSS class:
Step 16: Click Save to save view
2. Configure Blog page: Block news block
Step 1: Navigate to Structure > Block layout
Step 2: Find Panel fourth click Place block button
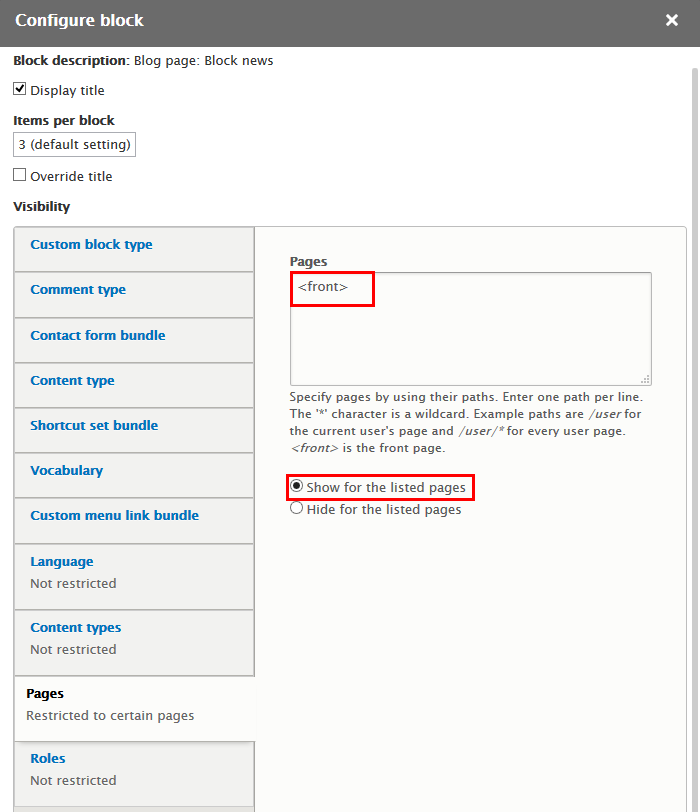
Step 3: Find Blog page: Block news click Place block button and set following properites:
Step 4: Click Save block button.
Our partners block
Front end Display
1. Create Our partners view
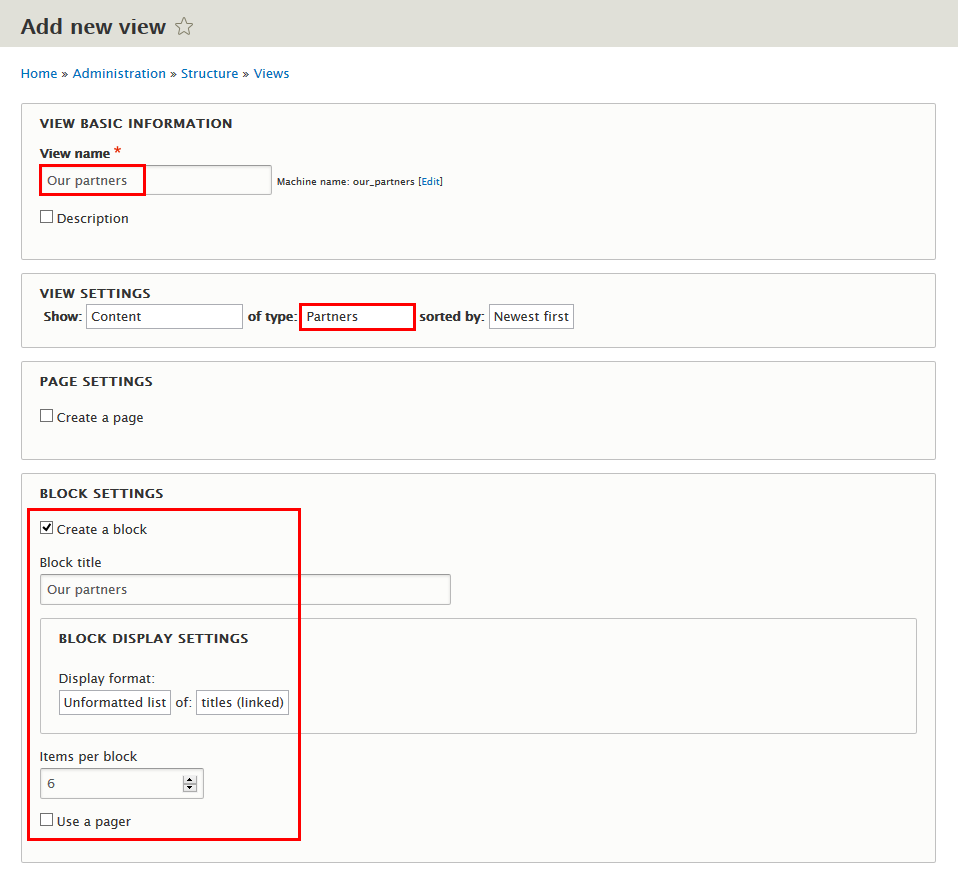
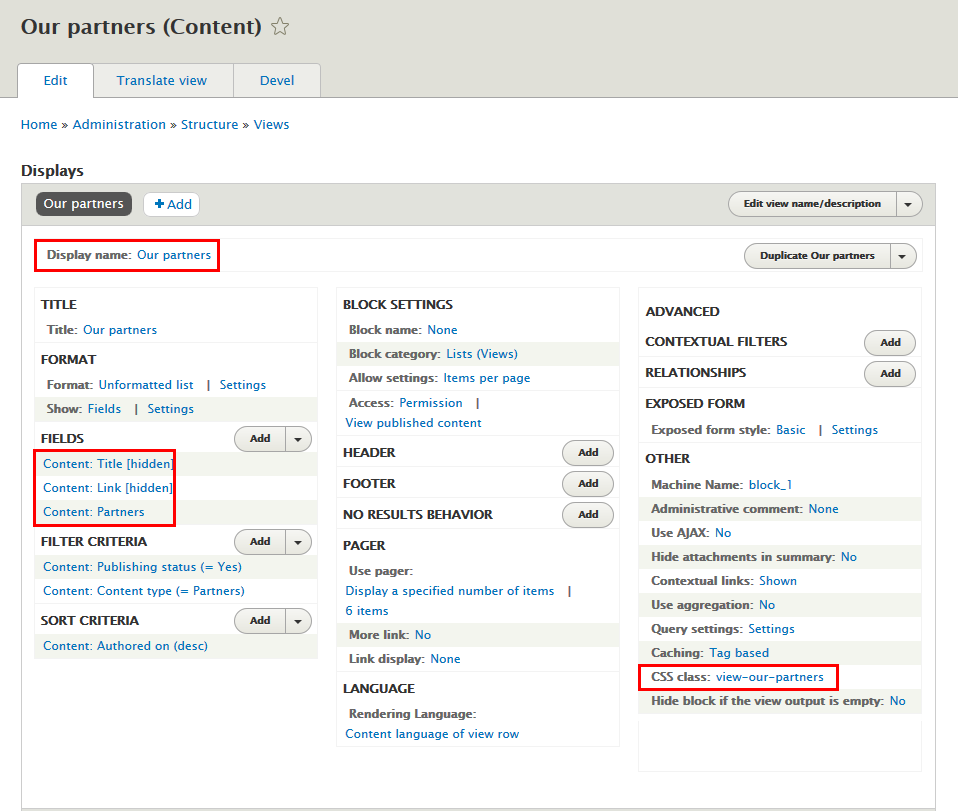
Step 1: Navigate to Structure > Views, click Add new view, then create Our partners view with following settings:
Step 2: Click Save and edit button. Next to steps below to set properties for following fields:
Step 3: At Display name area, click and set properties:
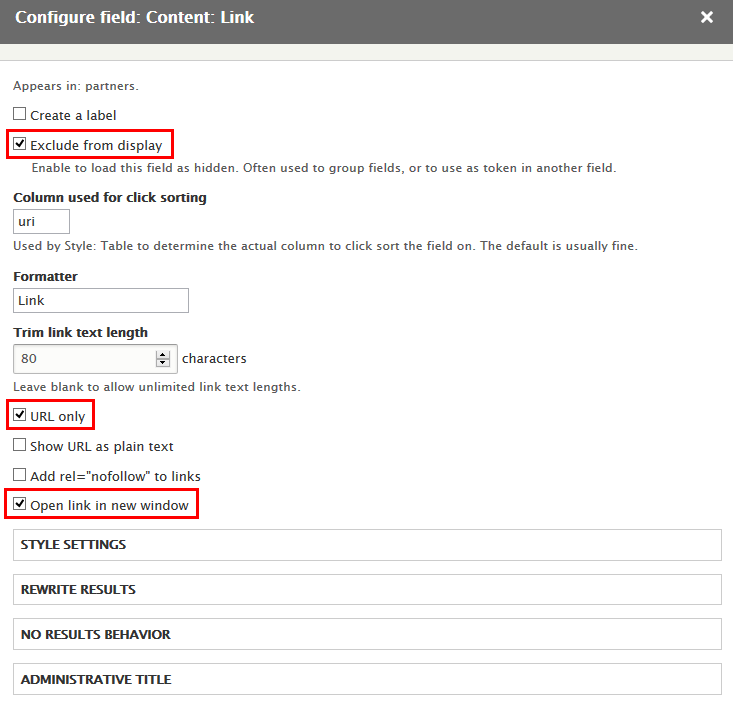
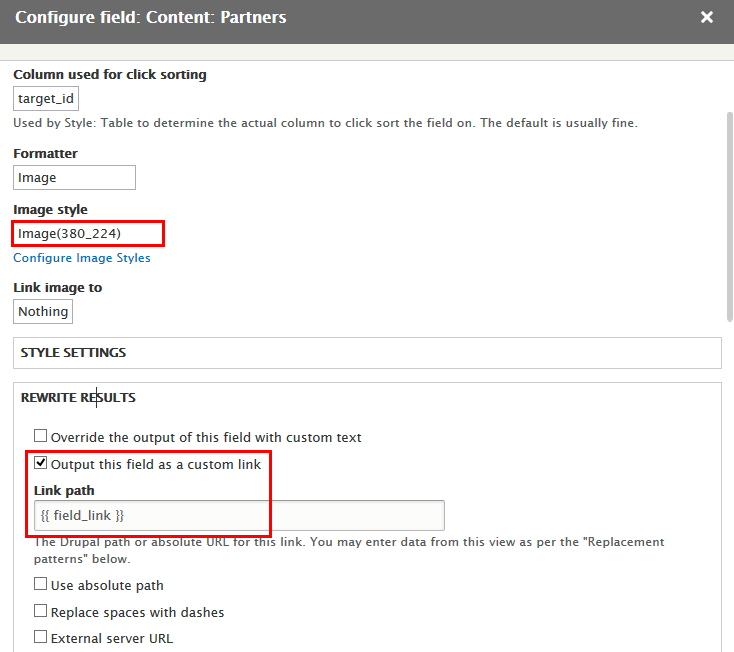
Step 4: At FIELDS area, click Add button to add fields: Content: Link, Content: Partners
Step 5: Set properties for Content: Link
Step 6: Set properties for Content: Partners
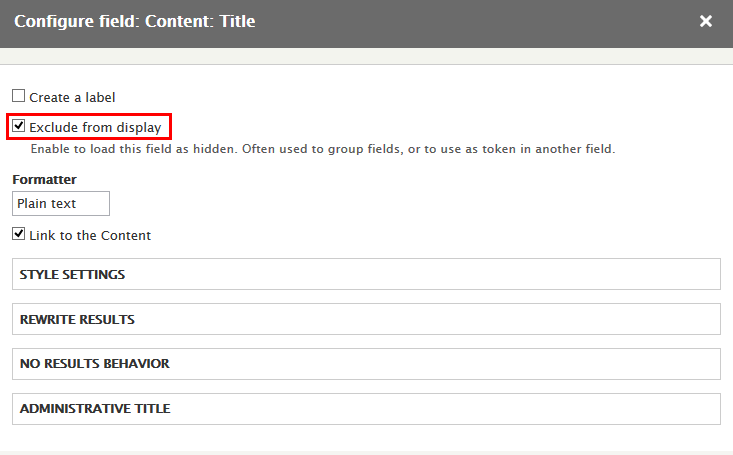
Step 7: Set properties for Content: Title
Step 8: At Advanced > OTHER area, add CSS class:
Step 9: Click Save to save view
2. Configure Our partners: Our partners block
Step 1: Navigate to Structure > Block layout
Step 2: Find Panel fifth click Place block button
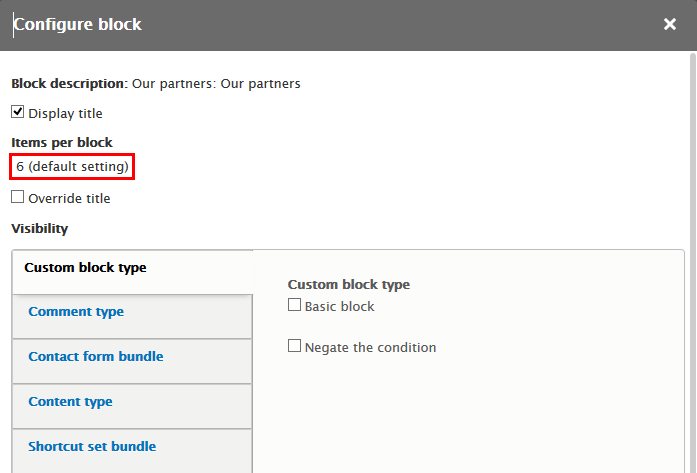
Step 3: Find Our partners: Our partners click Place block button and set following properites:
Step 4: Click Save block button.
Footer first column block
Front end Display
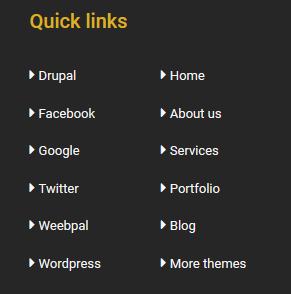
1. Create and add link Quick links menu
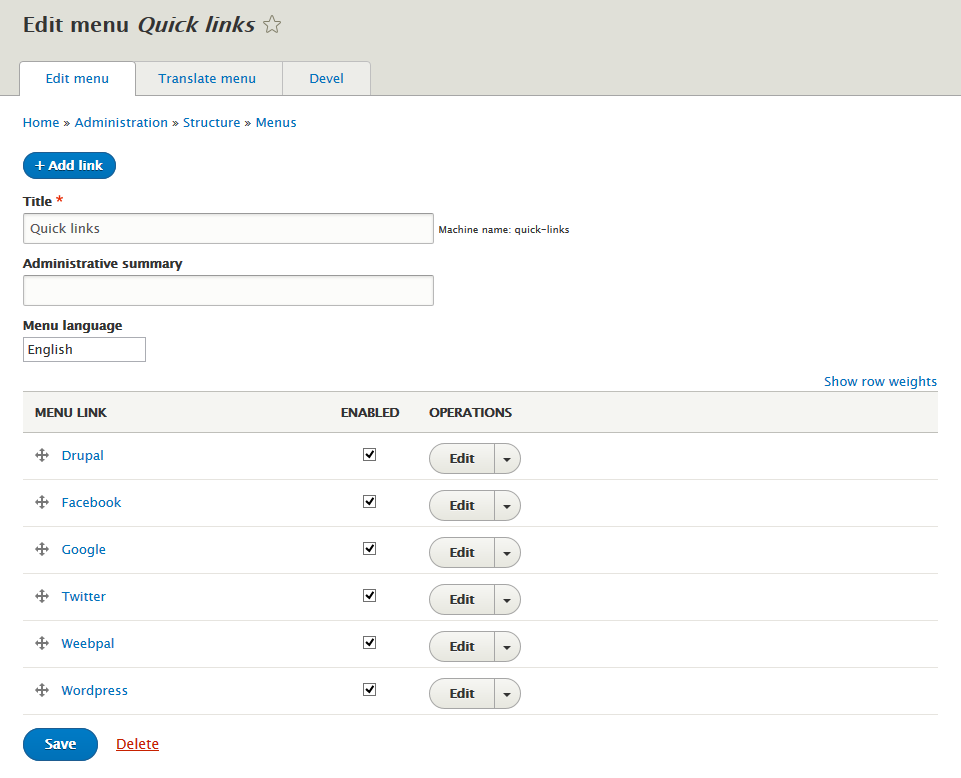
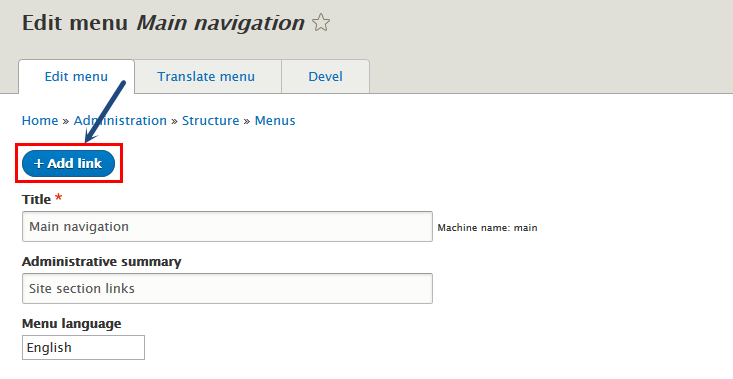
Step 1: Navigate to Structure > Menu, click Add menu link to create Quick links link with following properties:
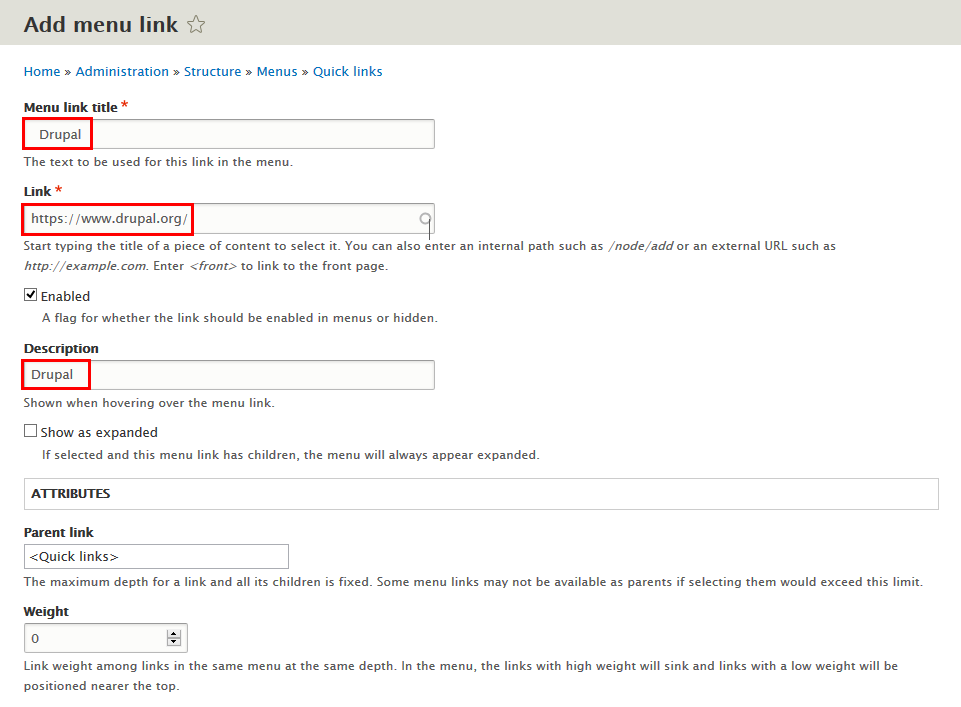
Step 2: Click Add link link to add link following: Drupal, Facebook, Google, Twitter, WeebPal, Wordpress menu items
Step 3: Set properties foreach menu item is the same Drupal menu item
Step 4: Click Save button
2. Configure Quick links block
Step 1: Navigate to Structure > Block layout
Step 2: Find Footer first column click Place block button
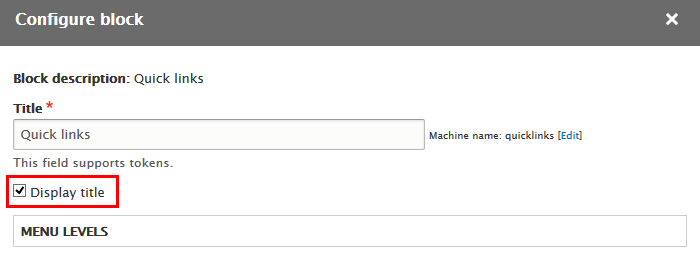
Step 3: Find Quick links click Place block button and set following properites:
Step 4: Click Save block button.
3. Configure Main navigation block
Step 1: Navigate to Structure > Block layout
Step 2: Find Footer first column click Place block button
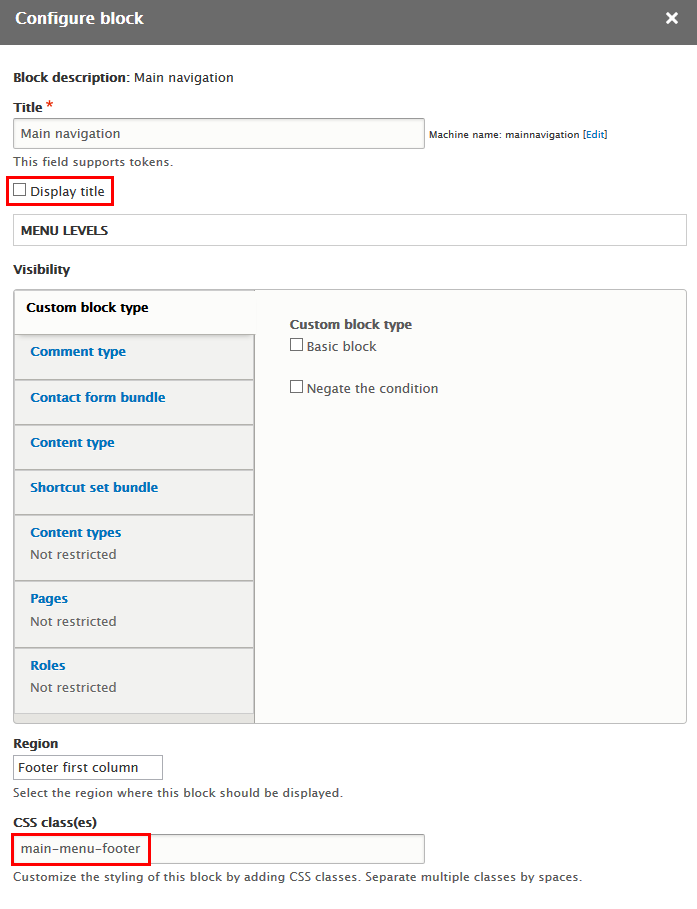
Step 3: Find Main navigation click Place block button and set following properites:
Step 4: Click Save block button.
Footer second column block
Front end Display
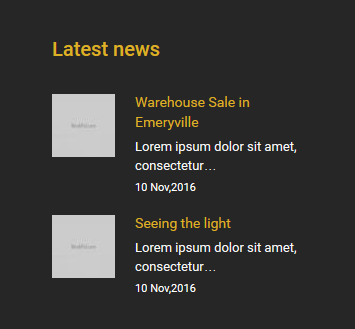
1. Add Latest news block view
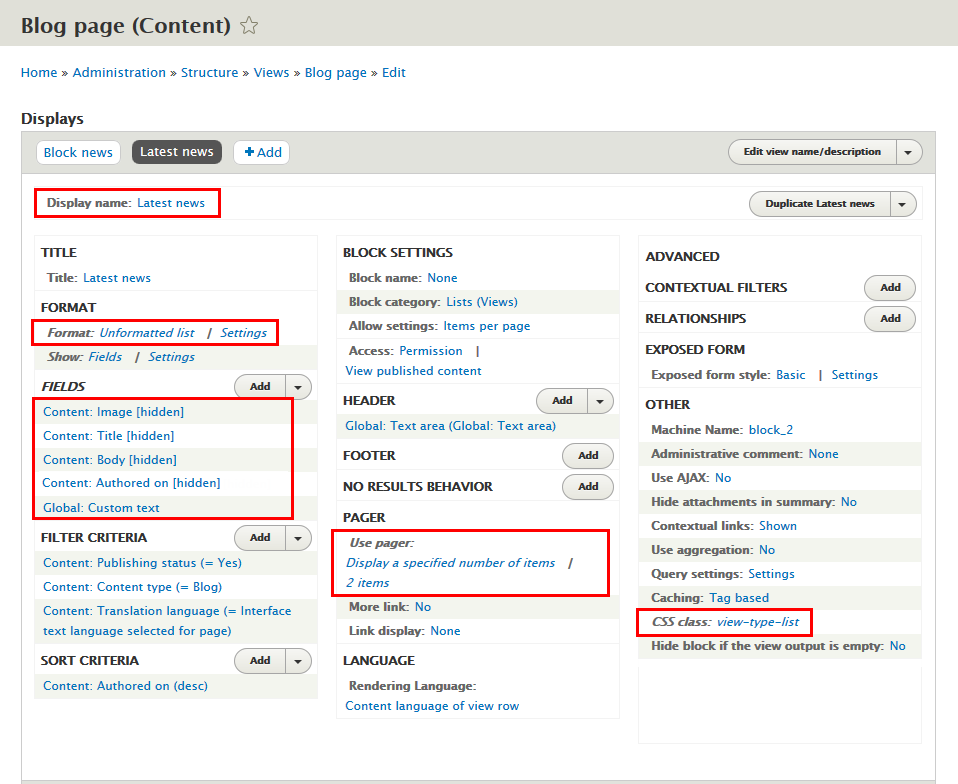
Step 1: Navigate to Structure > Views find Blog page view, then click Edit button:
Step 2: Click Add > Block button. Next to steps below to set properties for following fields:
Step 3: At Display name area, click and set properties:
Step 4:At FORMAT area, find Format click Format link and set following properties:
Step 5: At FILTER CRILERIA area, click Add button to add fields: Global: Text area
Step 6: Set properties for Global: Text area
Refer to following HTML code:
Step 7: Set properties for Content: Image
Step 8: Set properties for Content: Authored on
Step 9: Set properties for Content: Body
Step 10: Set properties for Content: Title
Step 11: At FIELDS area, click Rearrange button to remove Content: Path, Content: Authored by, Content: Tags and set following arrange
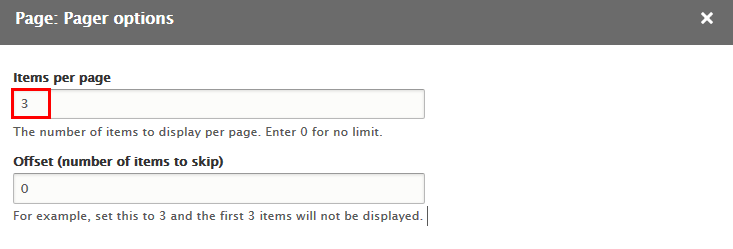
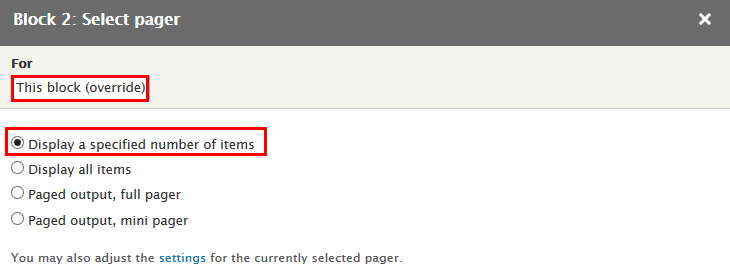
Step 12: At PAGER area, find Use pager click Display a specified number of items link and set following properites
Step 13: At PAGER area, find Use pager click 3 items link and set following properites
Step 14: At Advanced > OTHER area, add CSS class:
Step 15: Click Save to save view
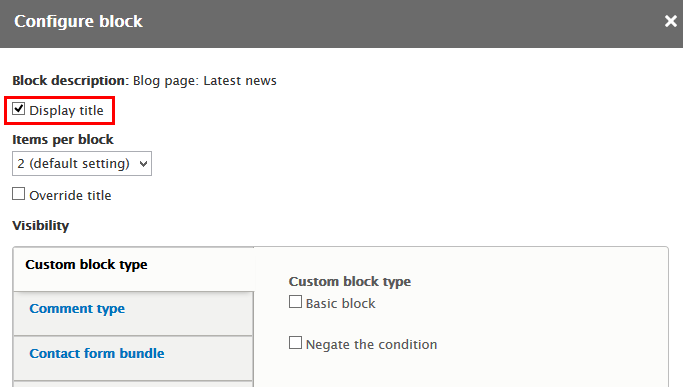
2. Configure Blog page: Latest news block
Step 1: Navigate to Structure > Block layout
Step 2: Find Footer second column click Place block button
Step 3: Find Blog page: Latest news click Place block button and set following properites:
Step 4: Click Save block button.
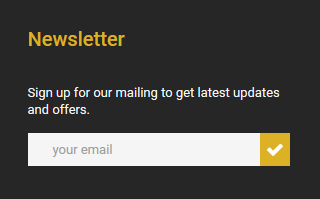
Newsletter block
Front end Display
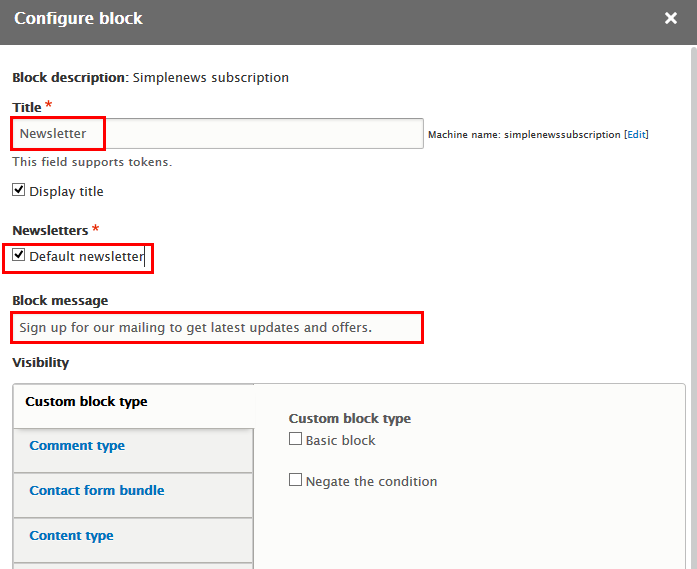
Configure Newsletter block
Step 1: Navigate to Structure > Block layout
Step 2: Find Footer third column click Place block button
Step 3: Find Simplenews subscription click Place block button and set following properites:
Step 4: Click Save block button.
Contact us block
Front end Display
Create and configure Contact us block
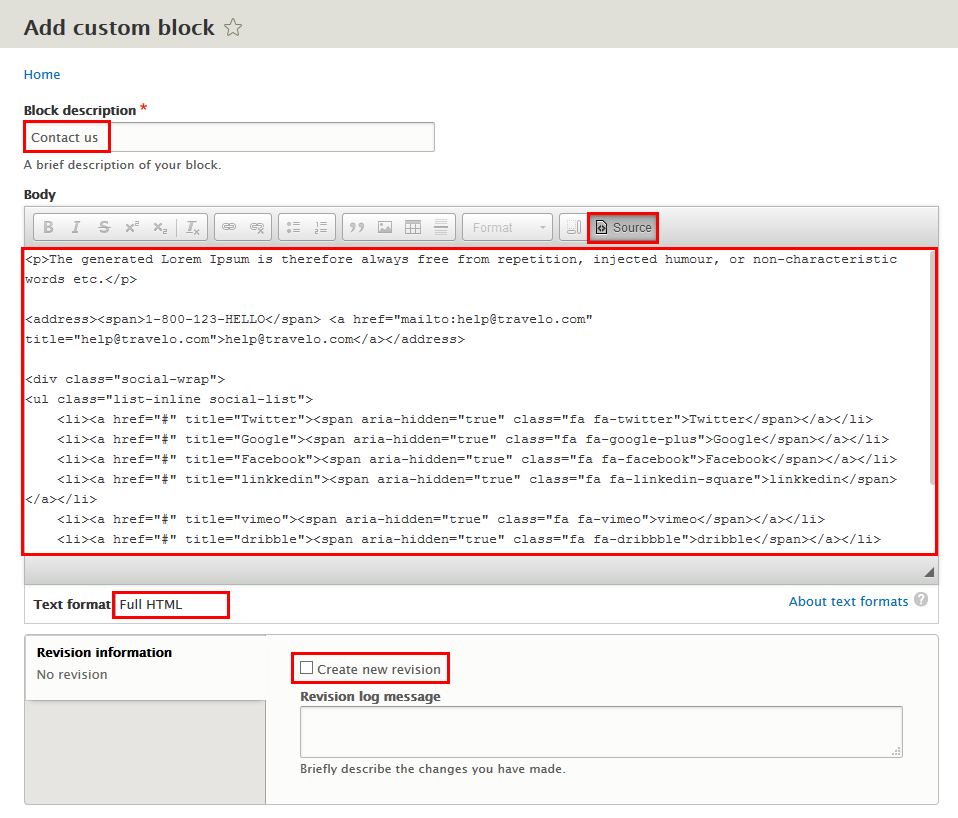
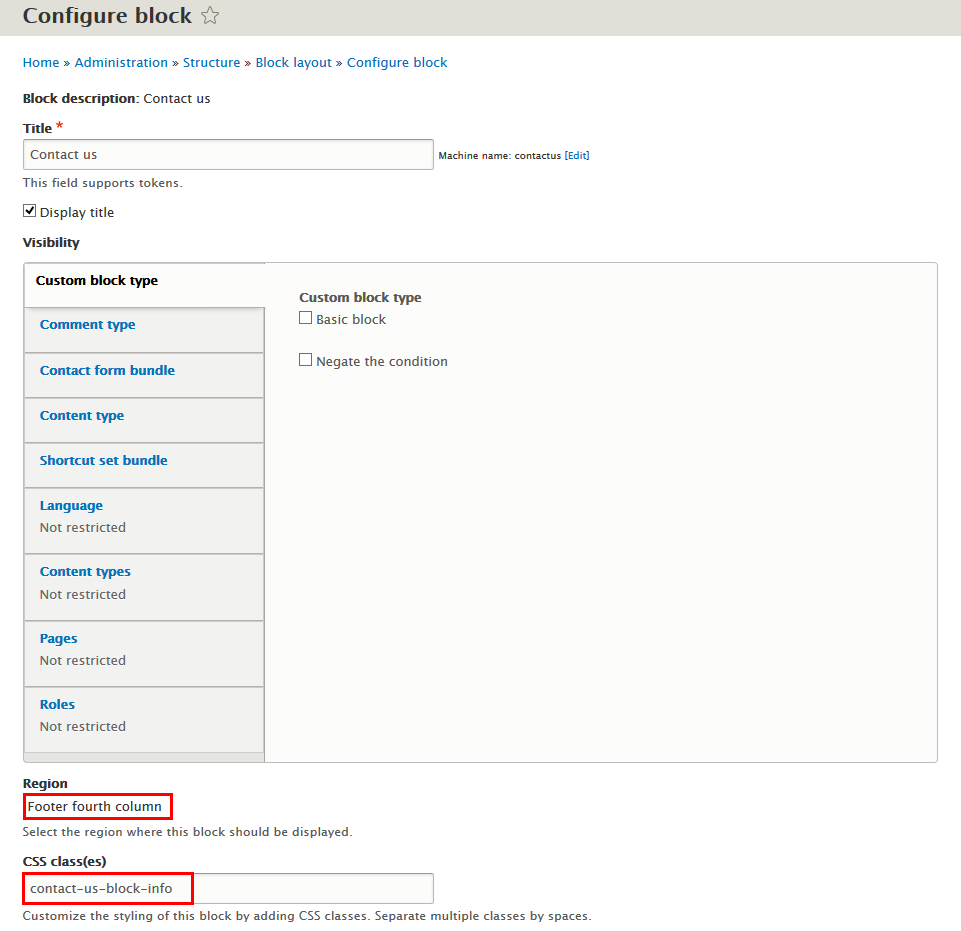
Step 1: Navigate to Structure > Block layout find Add custom block link. Click and create Contact us block with following properties:
Step 2: Click Save button
Refer to following HTML code:
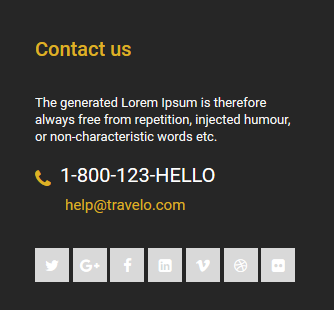
The generated Lorem Ipsum is therefore always free from repetition, injected humour, or non-characteristic words etc.
1-800-123-HELLO [email protected]Copyright block
Front end Display
Create and configure Copyright block
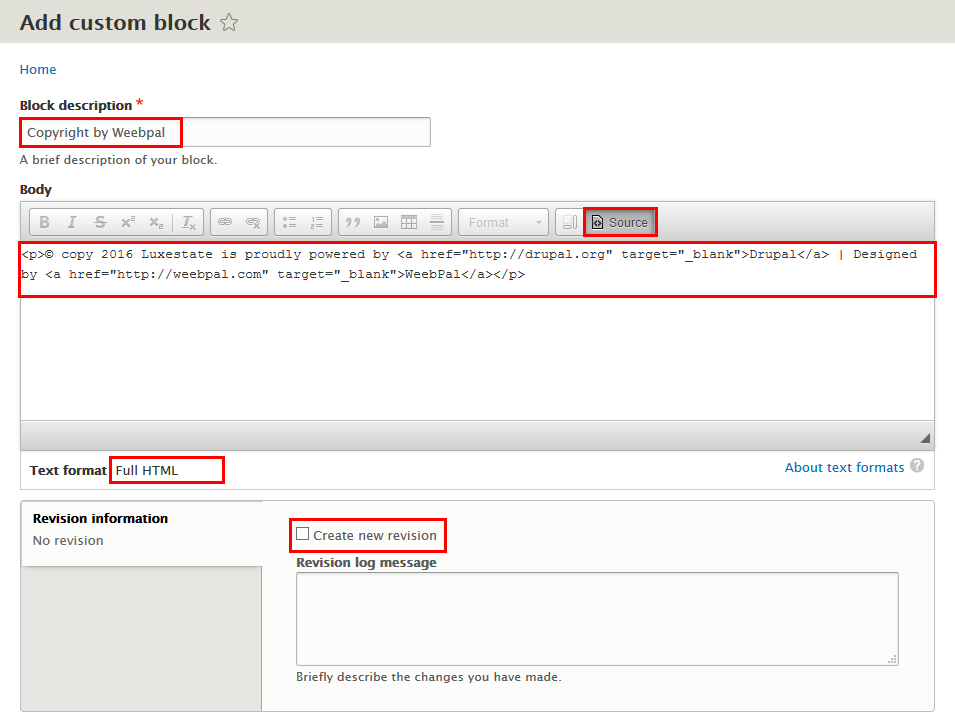
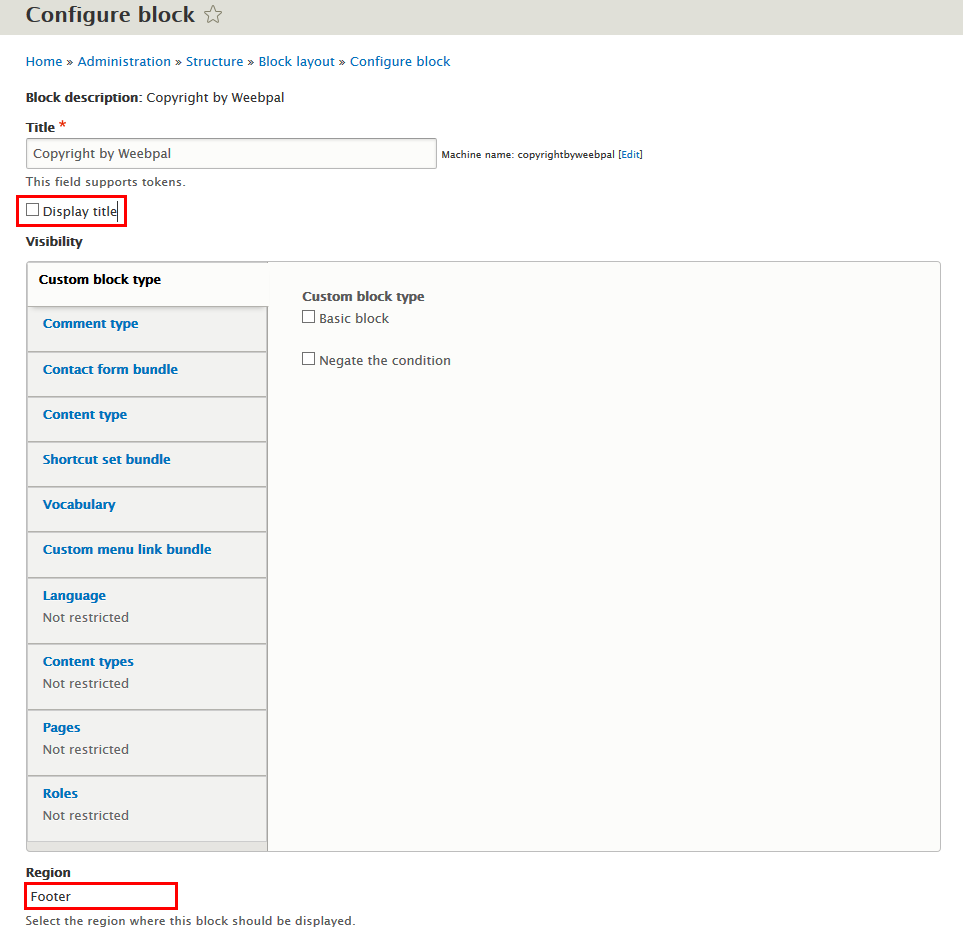
Step 1: Navigate to Structure > Block layout find Add custom block link. Click and create Copyright block with following properties:
Step 2: Click Save button
Refer to following HTML code:
© copy 2016 Luxestate is proudly powered by Drupal | Designed by WeebPal
Create Subpages
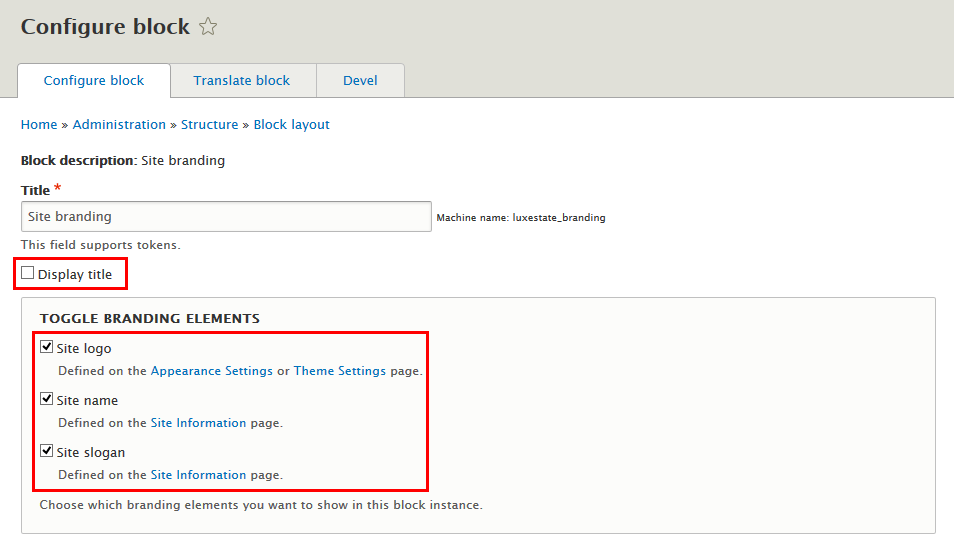
Site branding block
Configure Site branding block
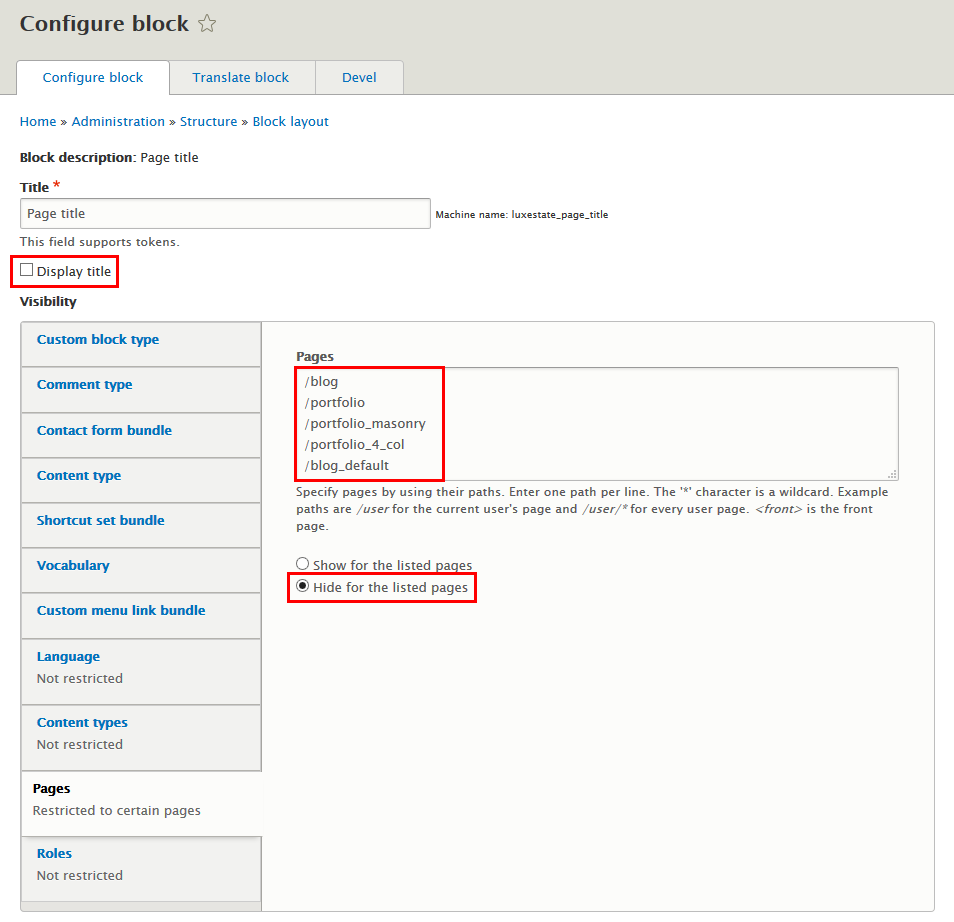
Page title block
Configure Page title block
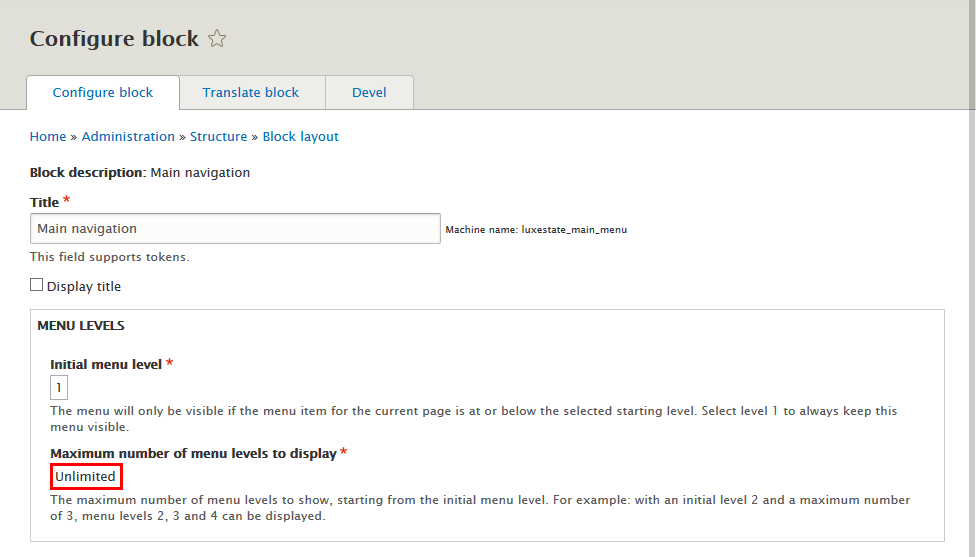
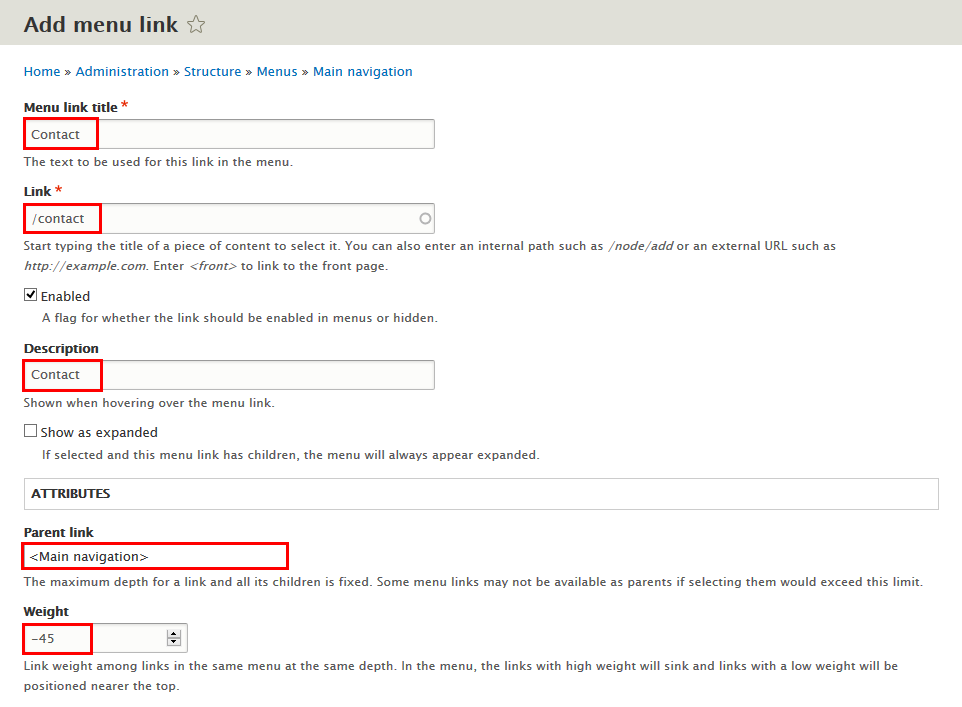
Main navigation menu block
Front end Display
1. Configure Main navigation block
Step 1: Navigate to Structure > Block layout
Step 2: Find Primary menu click Place block button
Step 3: Find Main navigation click Place block button and set following properites:
Step 4: Click Save block button.
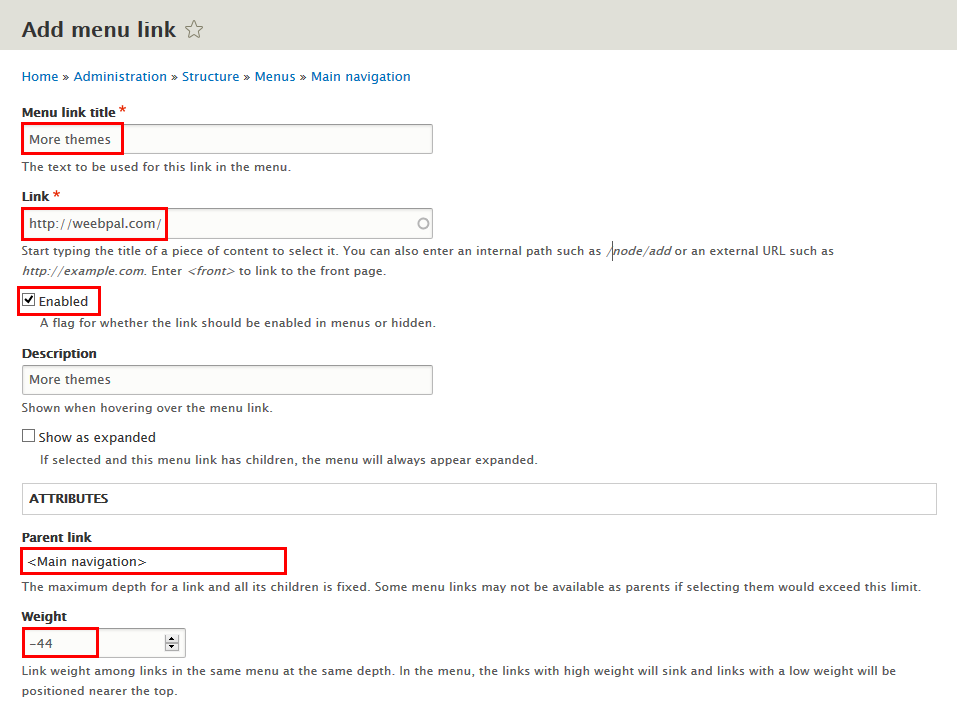
2. Add menu items
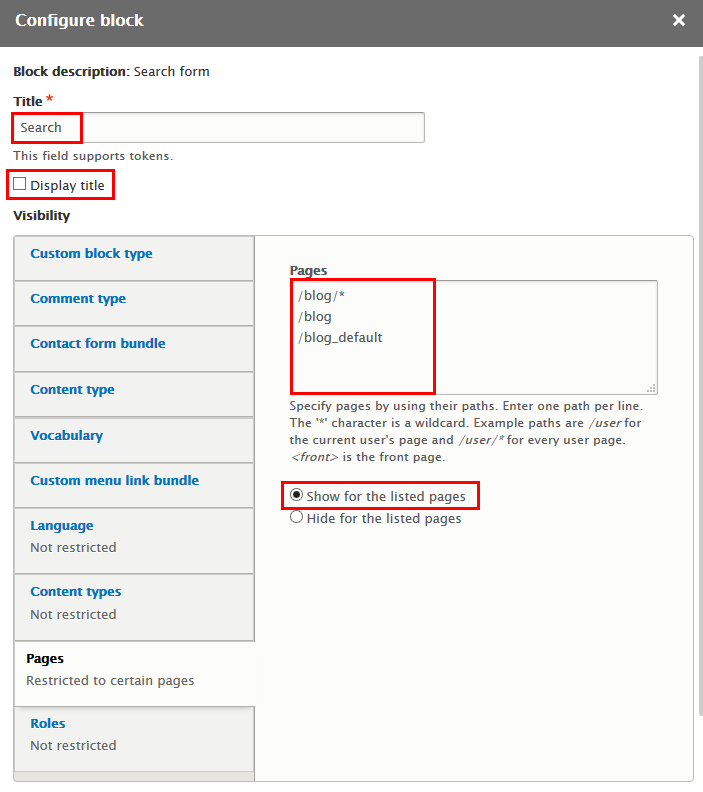
Sidebar first: Search form block
Front end Display
Configure Search form block
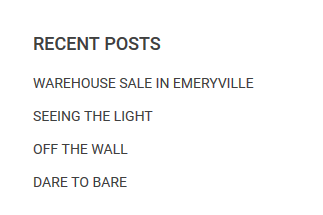
Sidebar first: Recent Posts block
Front end Display
1. Add Recent Posts block view
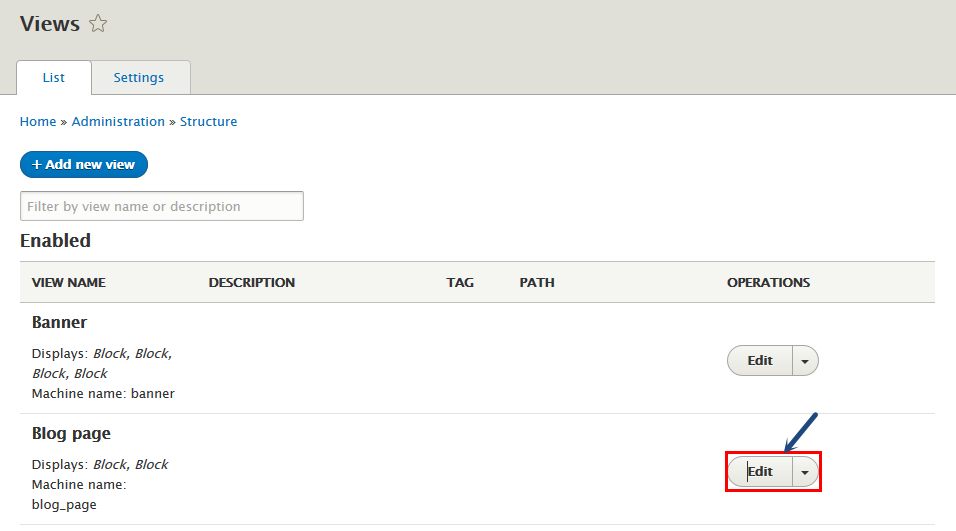
Step 1: Navigate to Structure > Views, find Blog page view click Edit button:
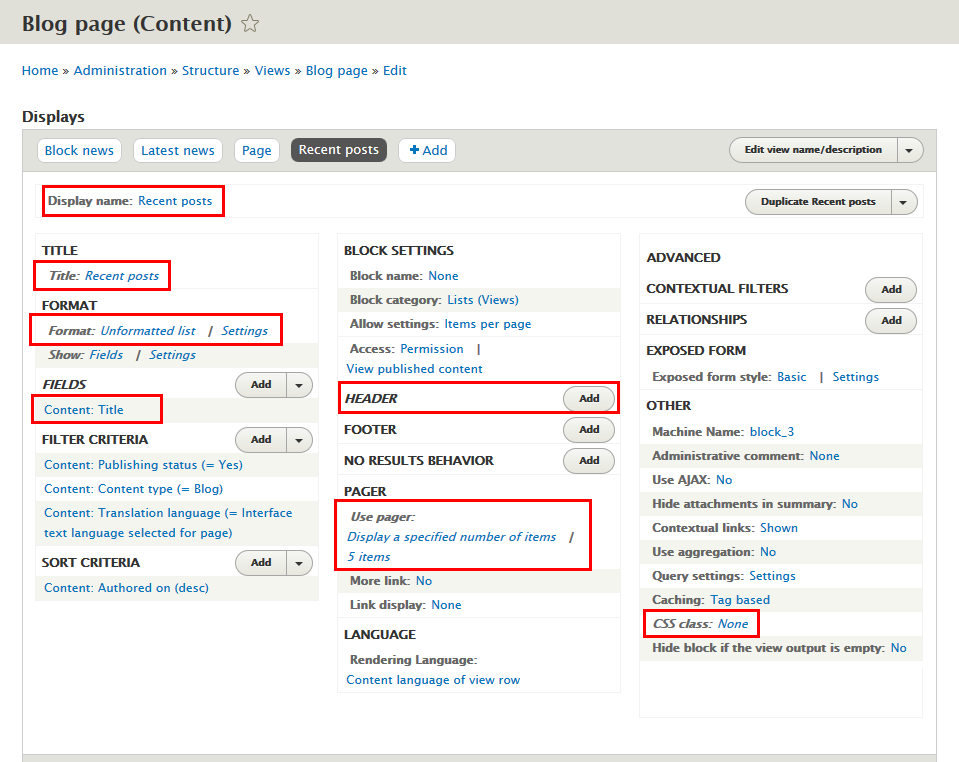
Step 2: Click Add > Block button to create Recent Posts block view and set properties for following fields:
Step 3: At Display name area, click and set properties:
Step 4: At TITLE area, find Title field and set following properites:
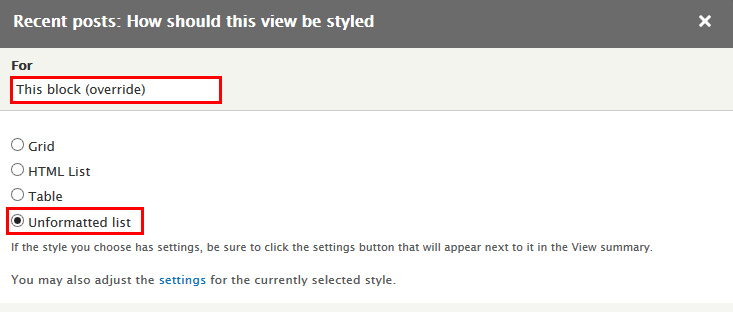
Step 5:At FORMAT area, find Format click link and set following properties:
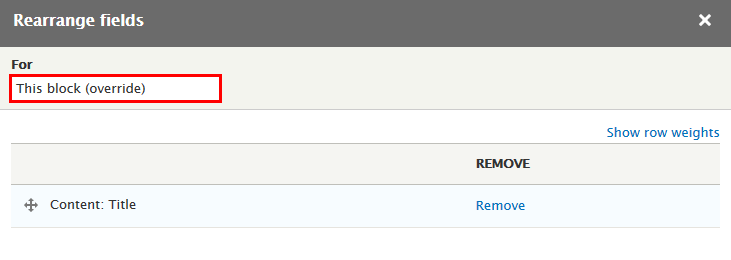
Step 6: At FIELDS area, click Rearrange button. Set For This block (override), then click Remove to remove Content: Path, Content: Image, Content: Authored by, Content: Authored on, Content: Tags, Content: Body field and set following properites:
Step 7: At HEADER area, set for This block (override), then click Remove field Global: Text area with following properties:
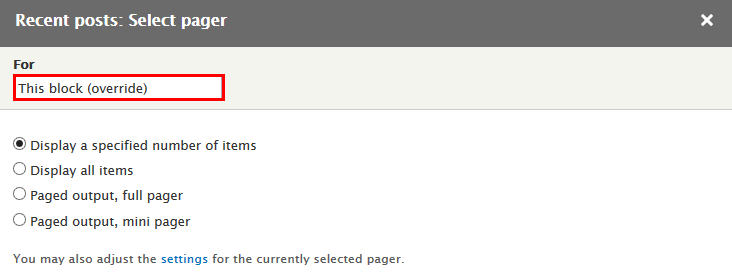
Step 8: At PAGER area, find Use pager click Display a specified number of items link and set following properites
Step 9: At PAGER area, find Use pager click 3 items link and set following properites
Step 10: At Advanced > OTHER area, add CSS class:
Step 11: Click Save to save view
2. Configure Blog page: Recent Posts block
Step 1: Navigate to Structure > Block layout
Step 2: Find Sidebar first click Place block button
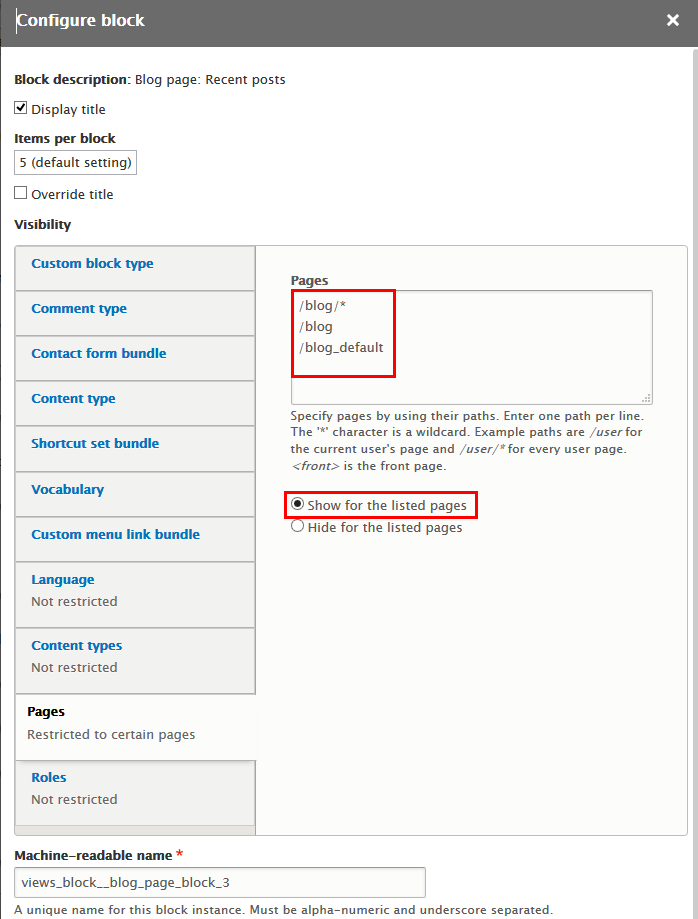
Step 3: Find Blog page: Recent Posts click Place block button and set following properites:
Step 4: Click Save block button.
Sidebar first: Tags block
Front end Display
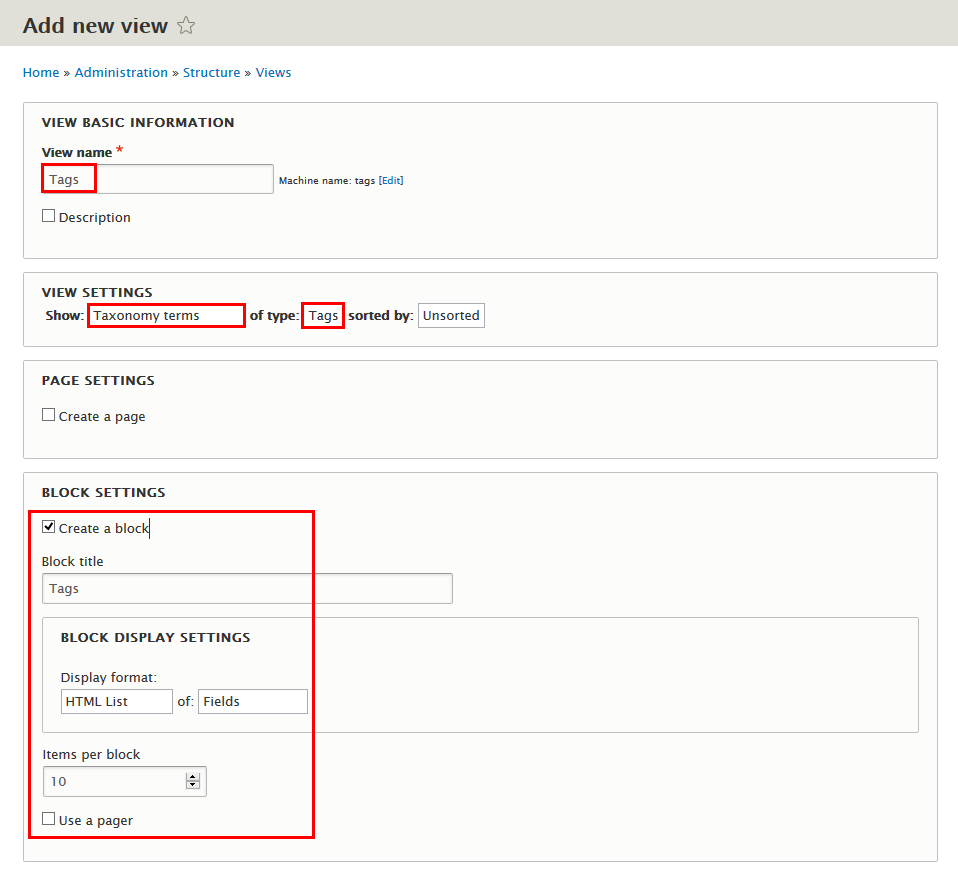
1. Create Tags view
Step 1: Navigate to Structure > Views, click Add new view then create Tags view with following settings:
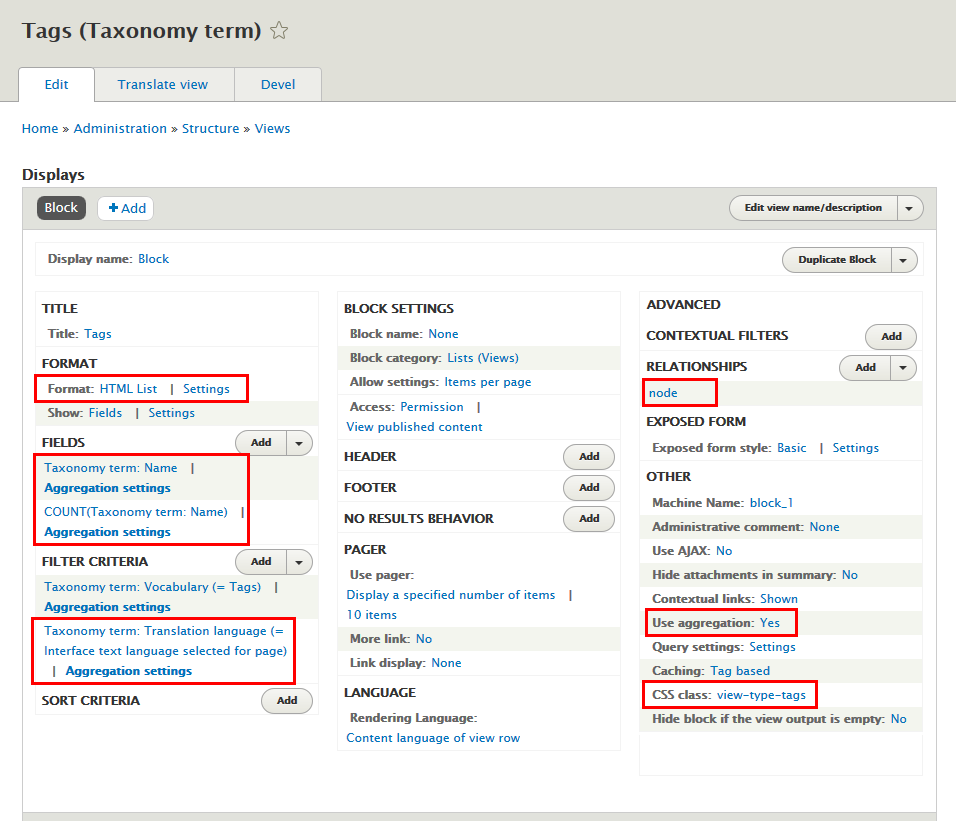
Step 2: Click Save and edit button. Next to steps below to set properties for following fields:
Step 3: At Advanced > OTHER area, click Use aggregation and set following properites:
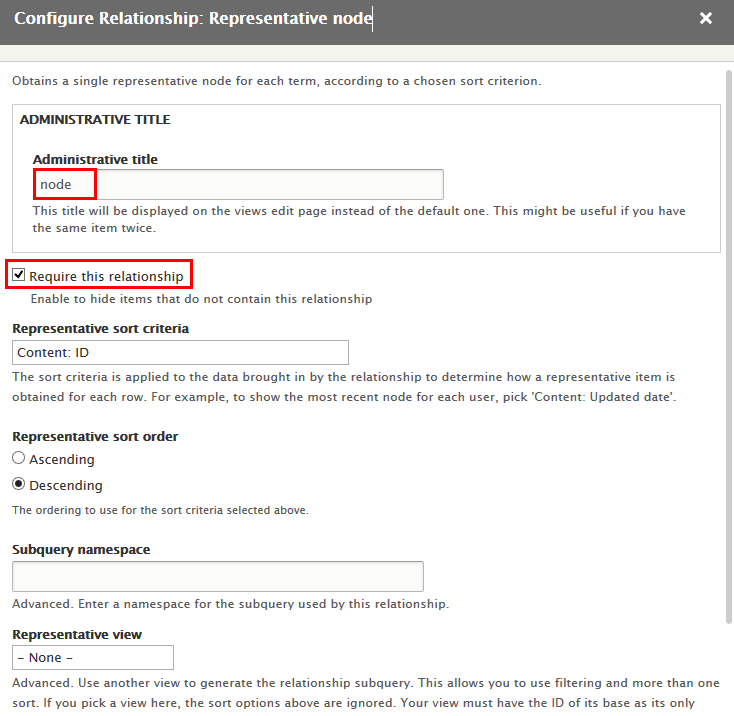
Step 4: At Advanced > RELATIONSHIP area, click Add button to add field Representative node and set following properites:
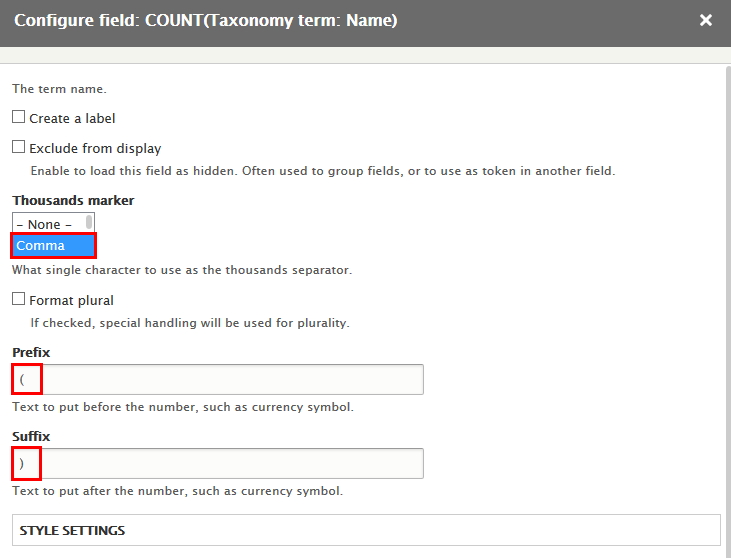
Step 5: At FIELDS area, click Add button to add fields: Taxonomy Term: Name
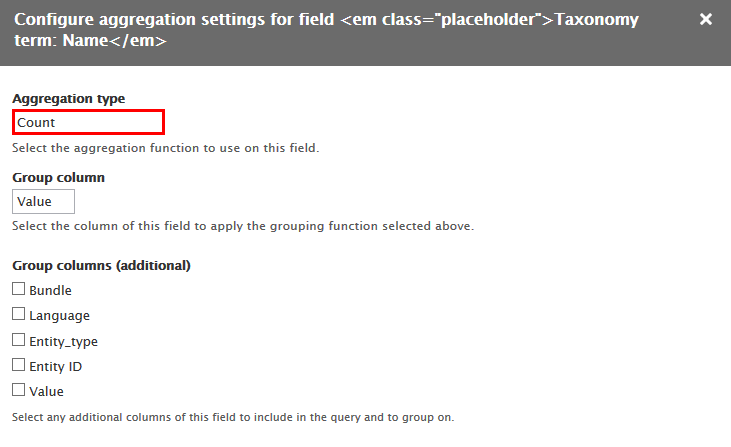
Step 6: Set properties for Taxonomy Term: Name
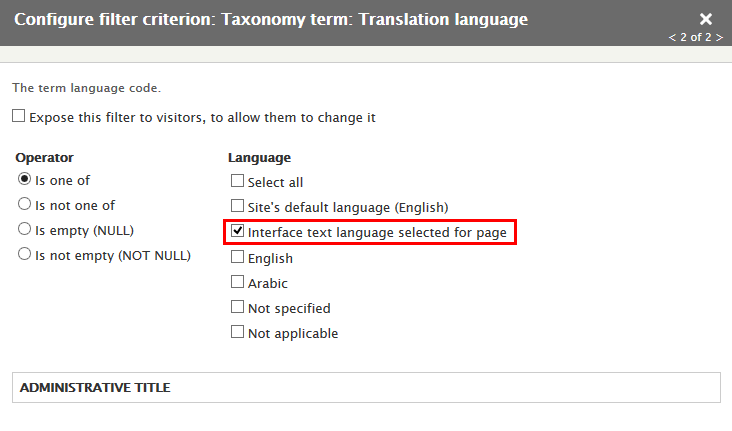
Step 7: At FILTER CRITERIA area, click Add button to add Taxonomy Term: Translation language fields and set following properites:
Step 8: At Advanced > OTHER area, add CSS class:
Step 9: Click Save to save view
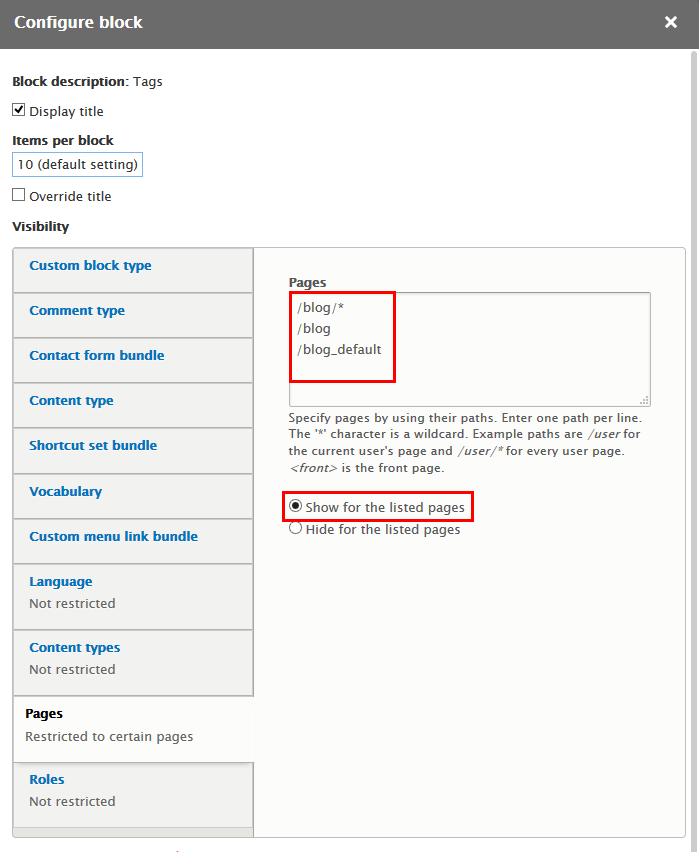
2. Configure Tags block
About Us page
Front end Display
1. Banner block
1.1 About us content
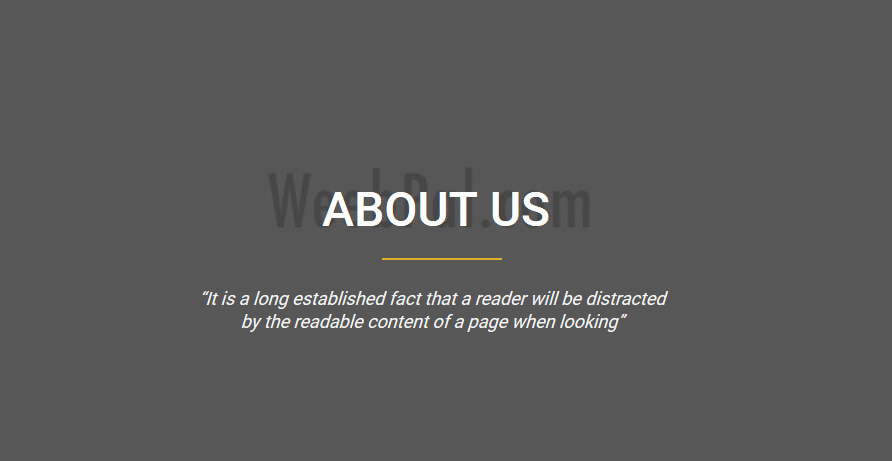
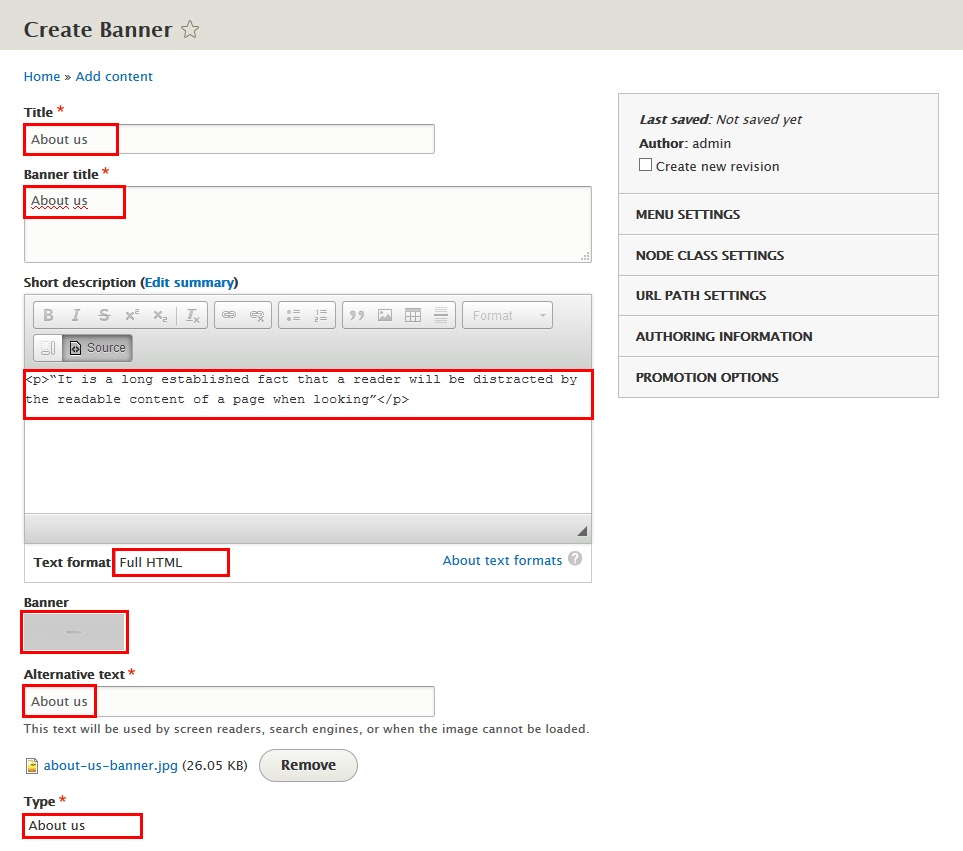
Step 1: Navigate to Content > Add content click Banner, create About us content with following properties:
Step 2: Click Save button
Refer to following HTML code:
“It is a long established fact that a reader will be distracted by the readable content of a page when looking”
1.2 Create Banner view
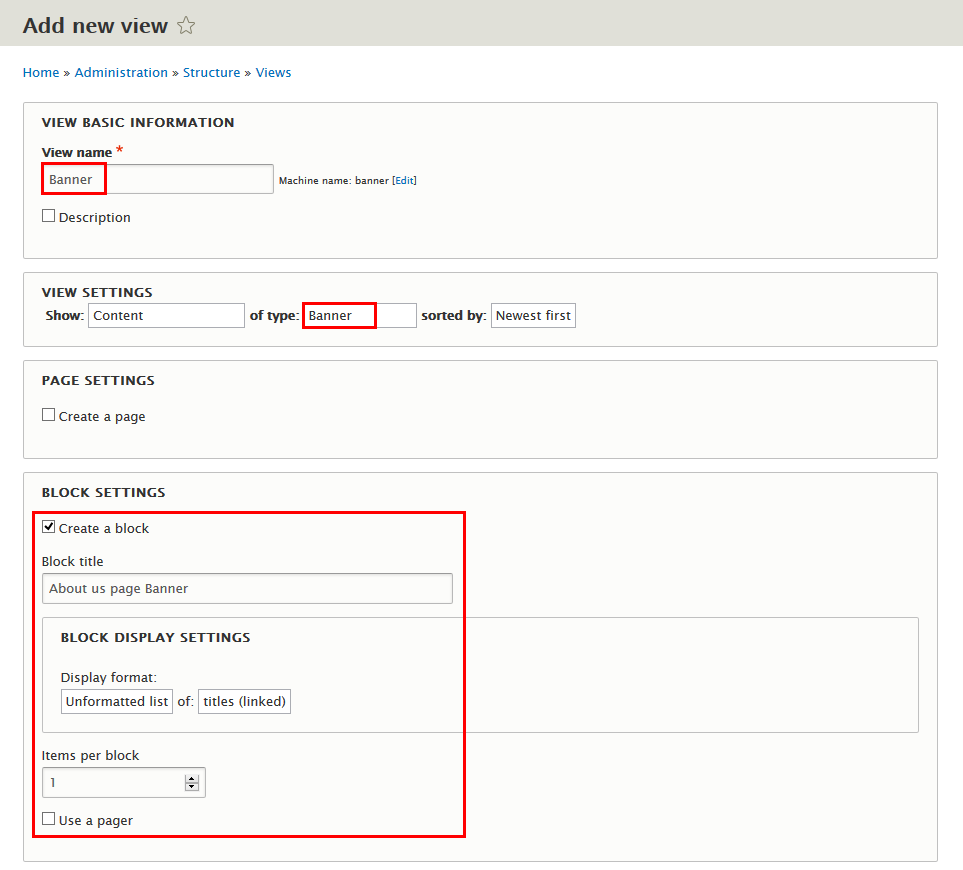
Step 1: Navigate to Structure > Views, click Add new view, then create Banner view with following settings:
Step 2: Click Save and edit button. Next to steps below to set properties for following fields:
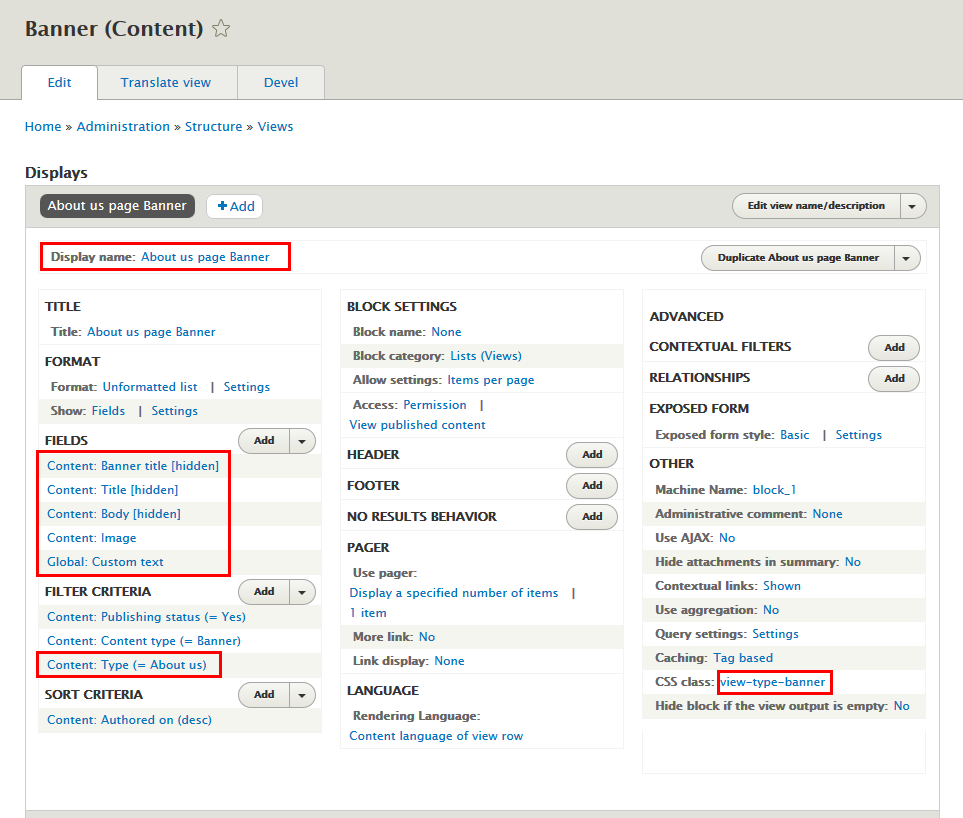
Step 3: At Display name area, click and set properties:
Step 4: At FIELDS area, click Add button to add fields: Content: Banner Title, Content: Body, Content: Image, Global: Custom text
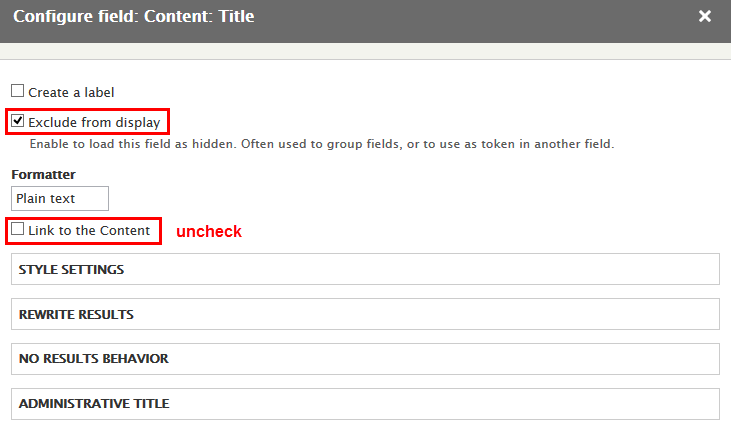
Step 5: Set properties for Content: Title
Step 6: Set properties for Content: Body
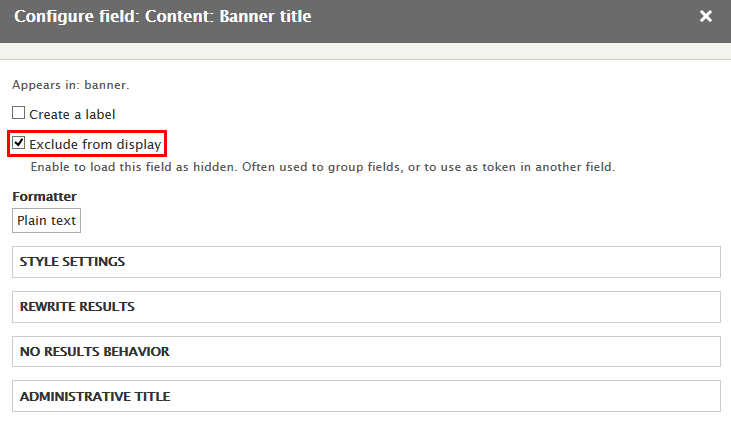
Step 7: Set properties for Content: Banner Title
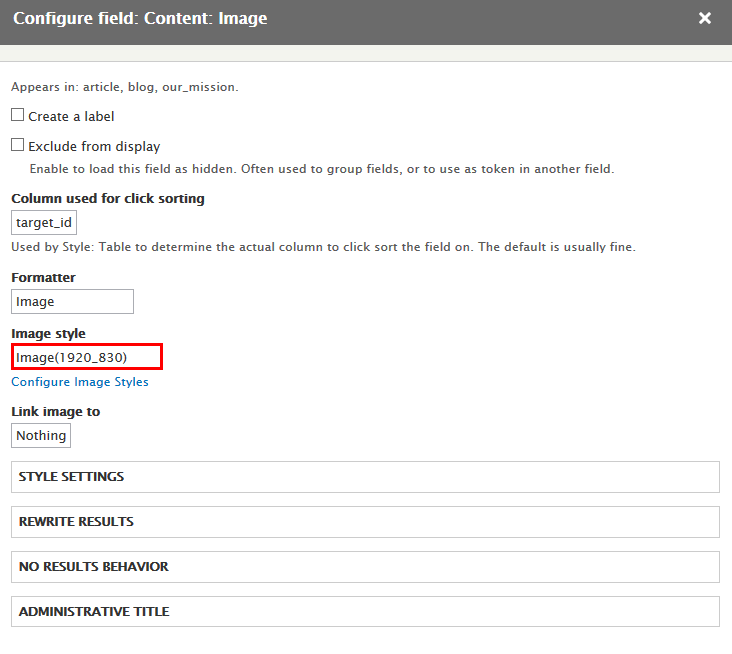
Step 8: Set properties for Content: Image
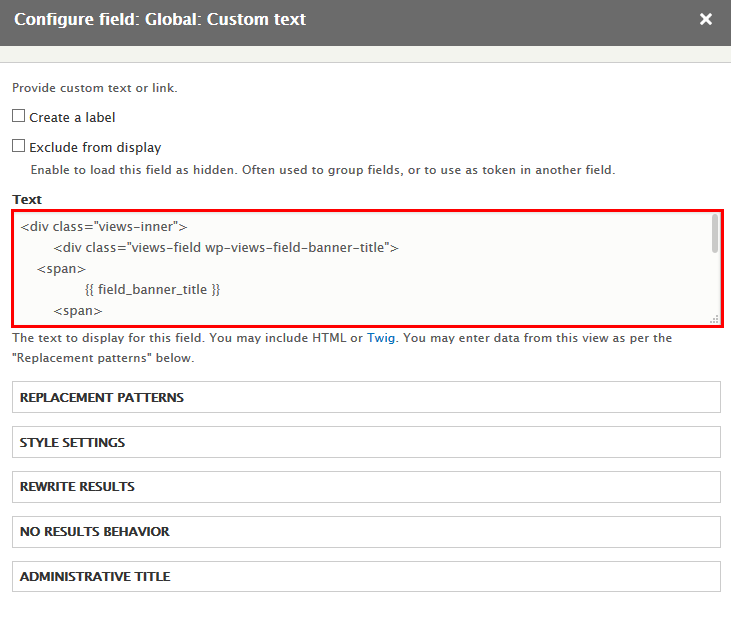
Step 9: Set properties for Global: Custom text
Refer to following HTML code:
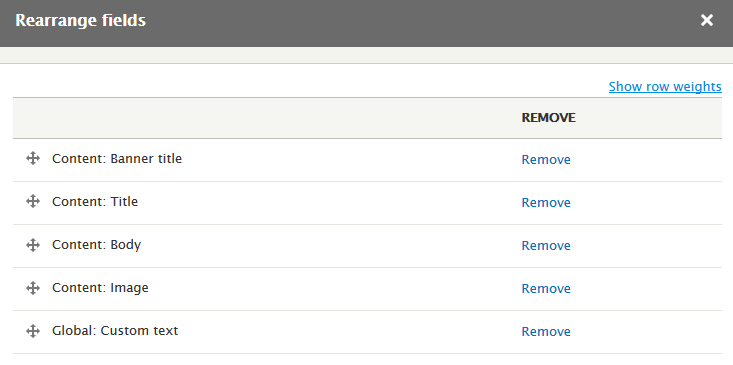
Step 10: At FIELDS area, click Rearrange button and set following arrange
Step 11: At FILTER CRITERIA area, click Add button to add Content: Type fields and set following properites:
Step 12: Set properties for Content: Type
Step 13: At Advanced > OTHER area, add CSS class:
Step 14: Click Save to save view
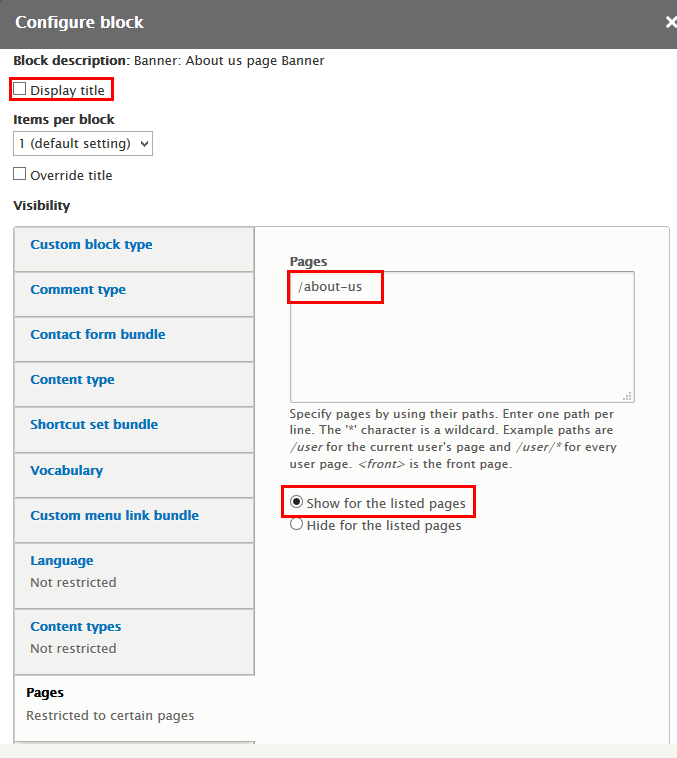
1.3 Configure Banner: About us page block
Step 1: Navigate to Structure > Block layout
Step 2: Find Banner click Place block button
Step 3: Find Banner: About us page Banner click Place block button and set following properites:
Step 4: Click Save block button.
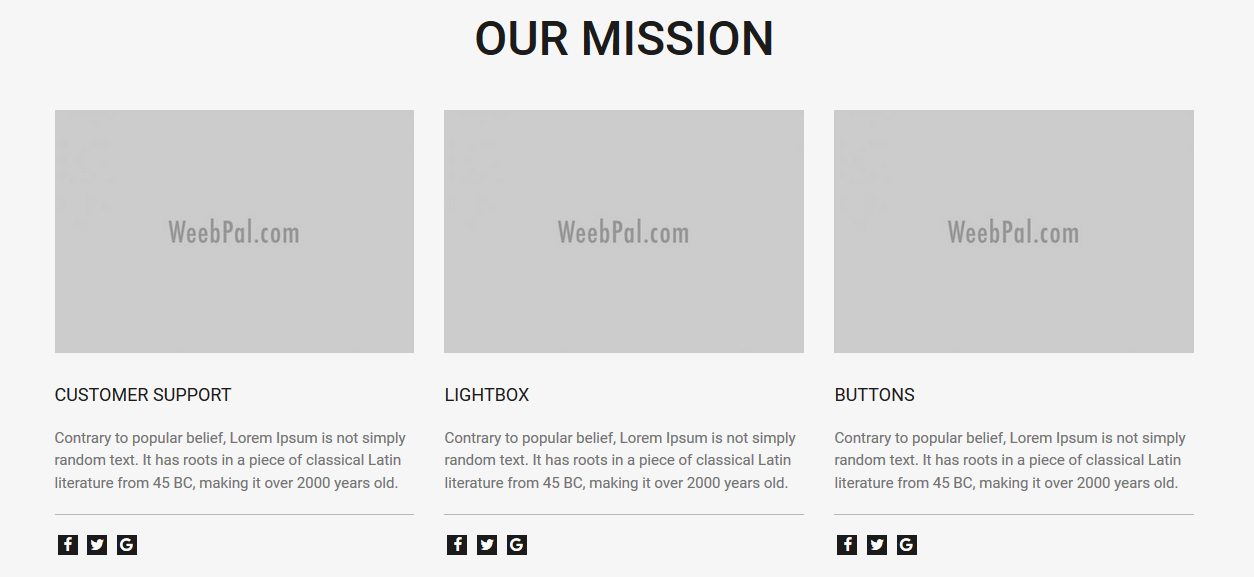
2. Our mission block
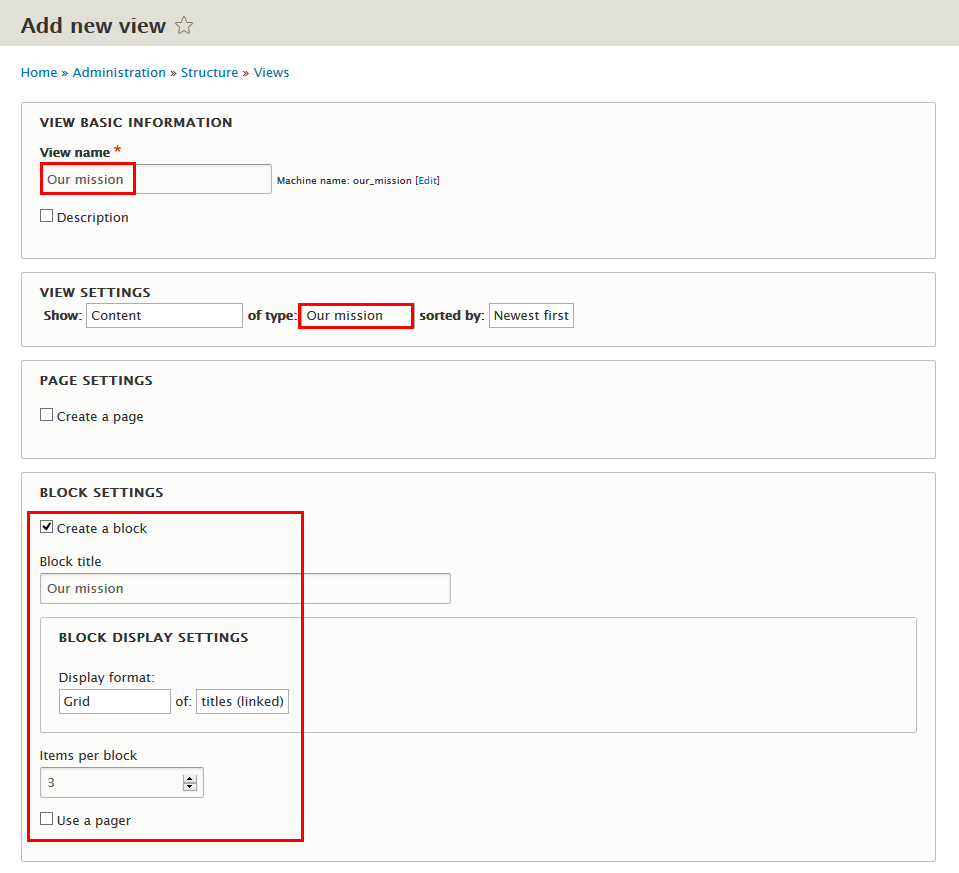
2.1 Create Our mission view
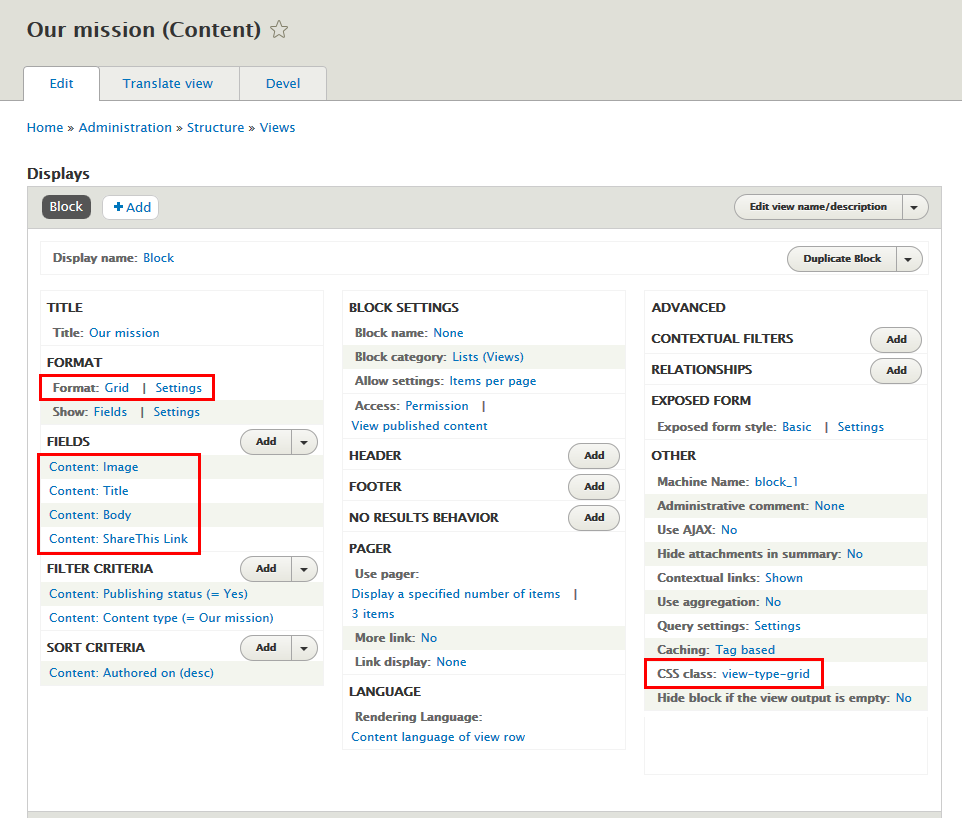
Step 1: Navigate to Structure > Views, click Add new view, then create Our mission view with following settings:
Step 2: Click Save and edit button. Next to steps below to set properties for following fields:
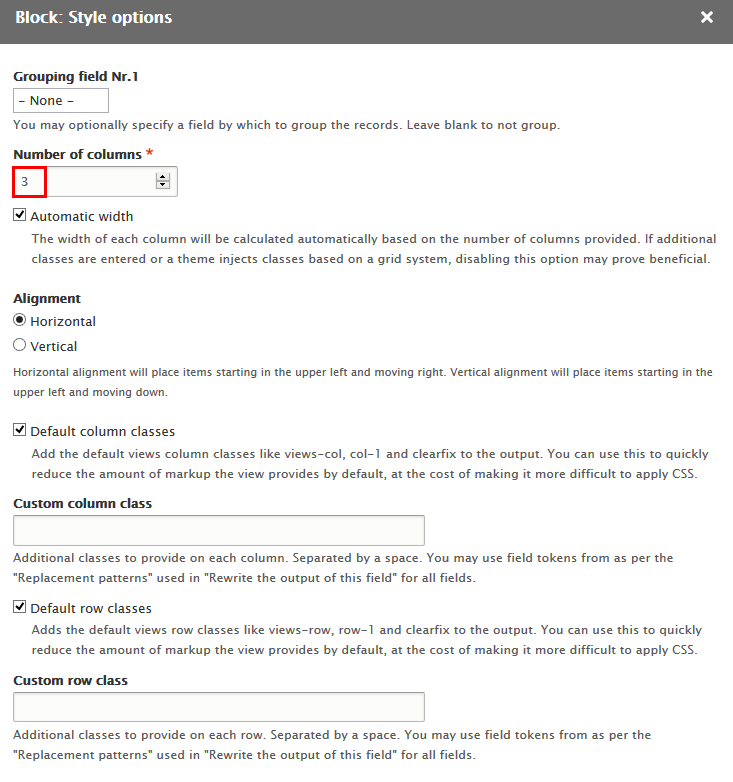
Step 3:At FORMAT area, find Format click Settings link and set following properties:
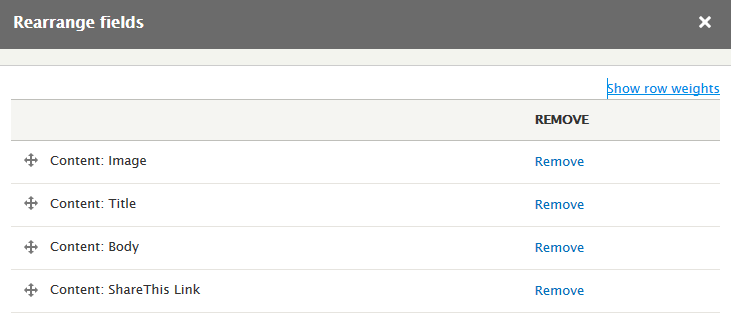
Step 4: At FIELDS area, click Add button to add fields: Content: ShareThis Link, Content: Body, Content: Image
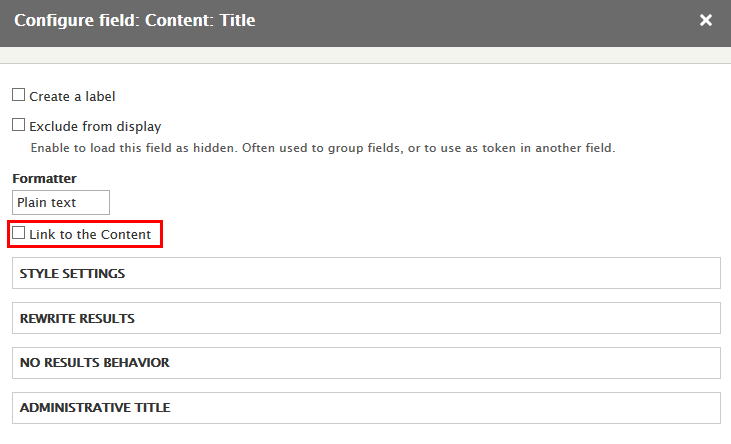
Step 5: Set properties for Content: Title
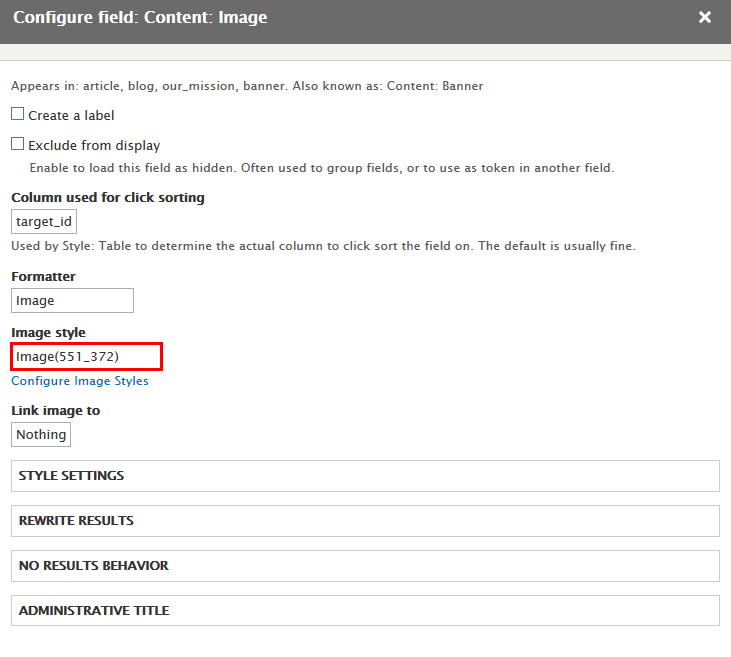
Step 6: Set properties for Content: Image
Step 7: At FIELDS area, click Rearrange button and set following arrange
Step 8: At Advanced > OTHER area, add CSS class:
Step 9: Click Save to save view
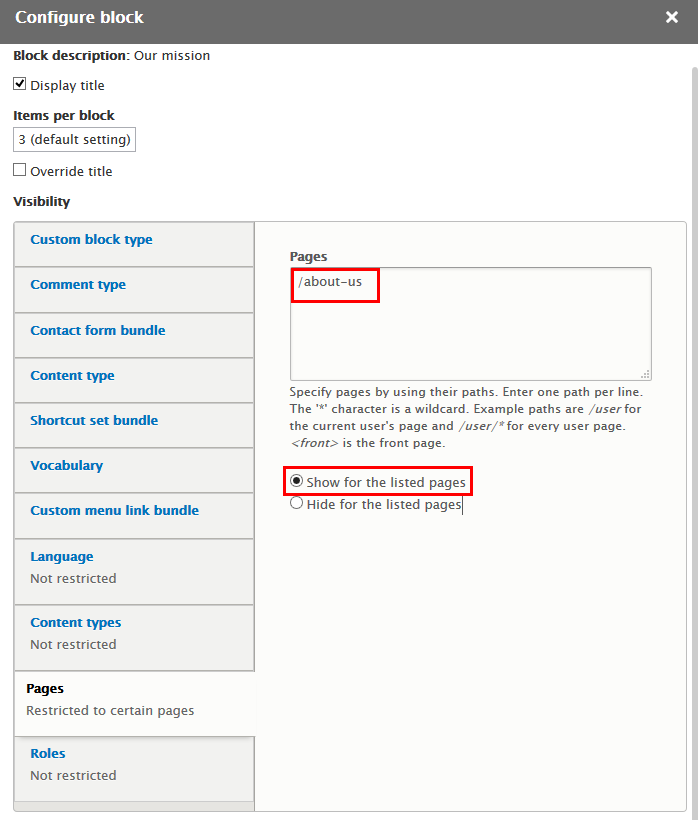
2.2. Configure Our mission block
Step 1: Navigate to Structure > Block layout
Step 2: Find Content bottom click Place block button
Step 3: Find Our mission click Place block button and set following properites:
Step 4: Click Save block button.
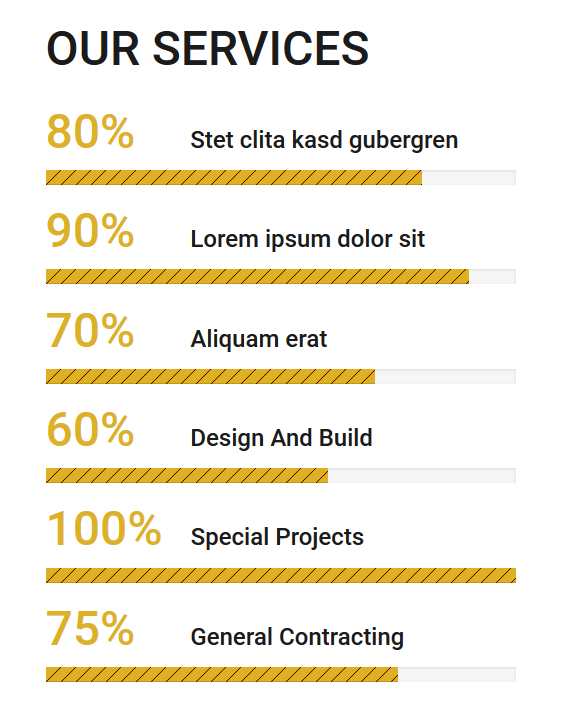
3. Our Service block
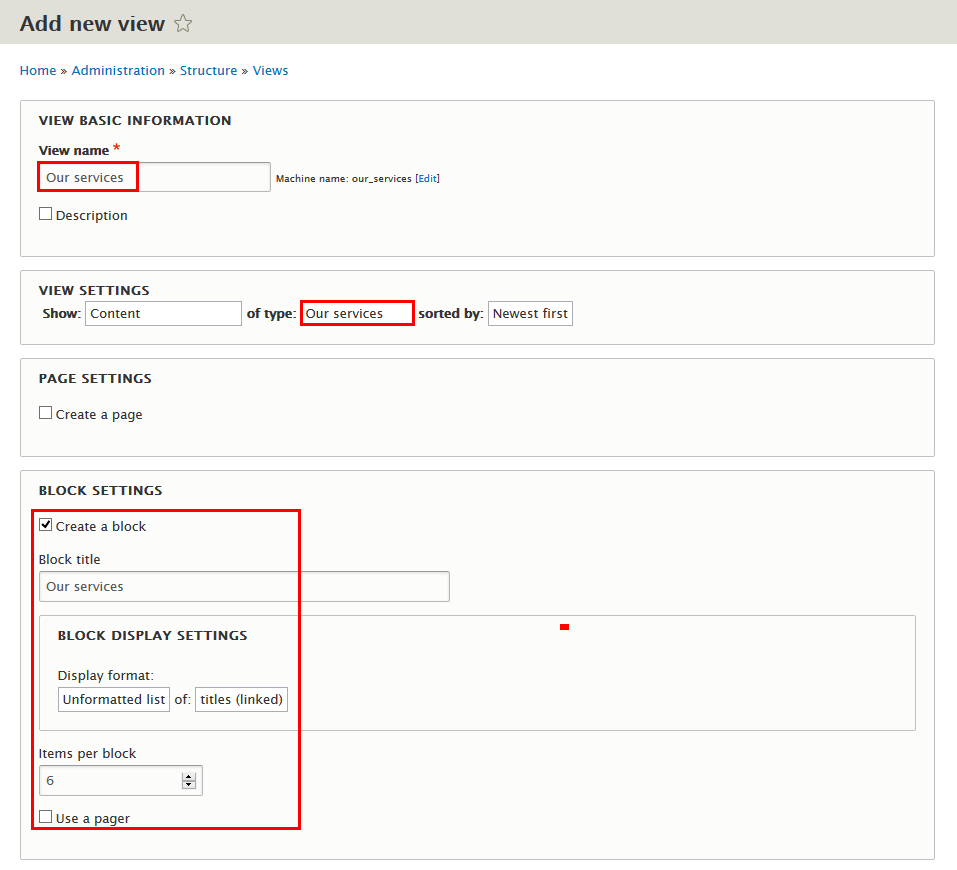
3.1 Create Our Service view
Step 1: Navigate to Structure > Views, click Add new view, then create Our Service view with following settings:
Step 2: Click Save and edit button. Next to steps below to set properties for following fields:
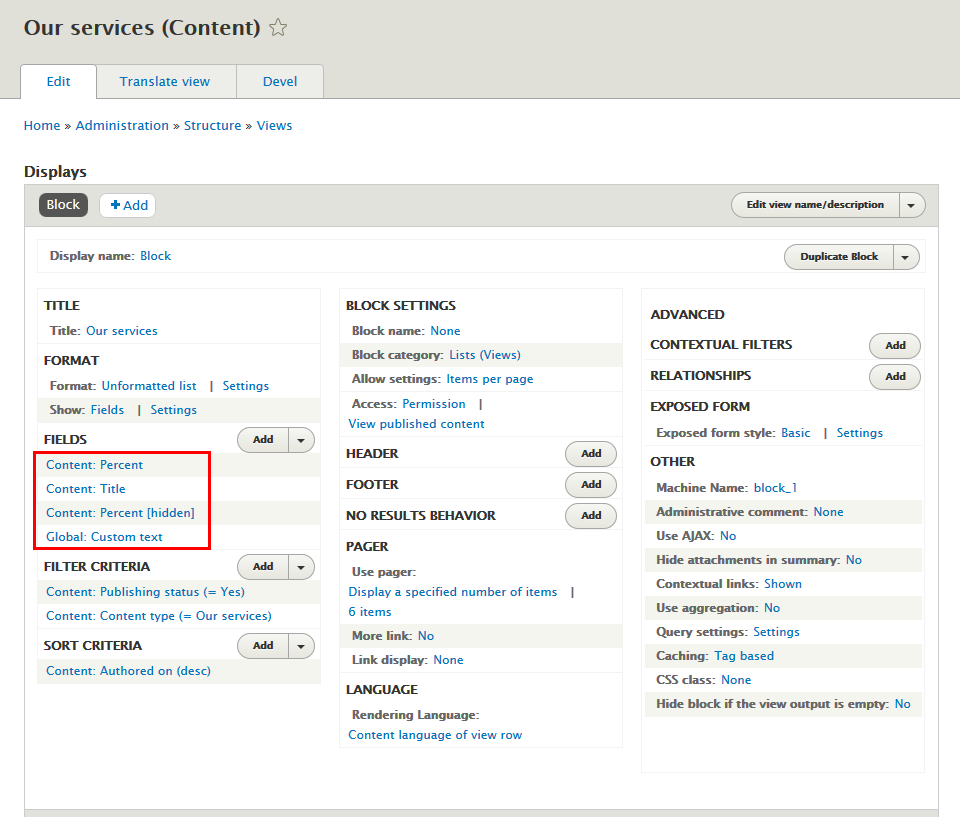
Step 3: At FIELDS area, click Add button to add fields: Content: Percent, Content: Percent, Global: Custom text
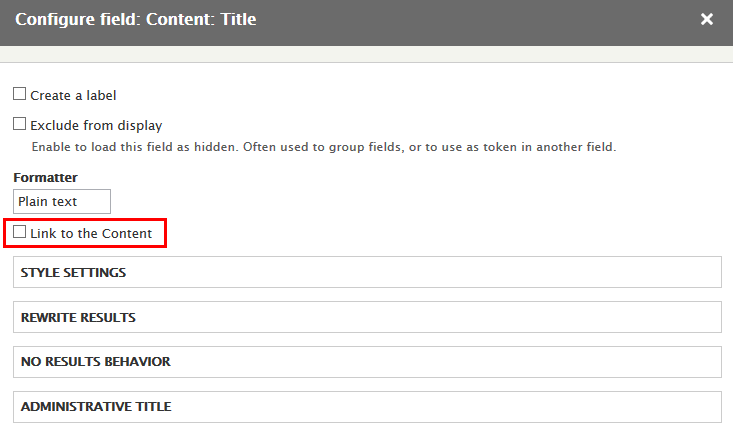
Step 4: Set properties for Content: Title
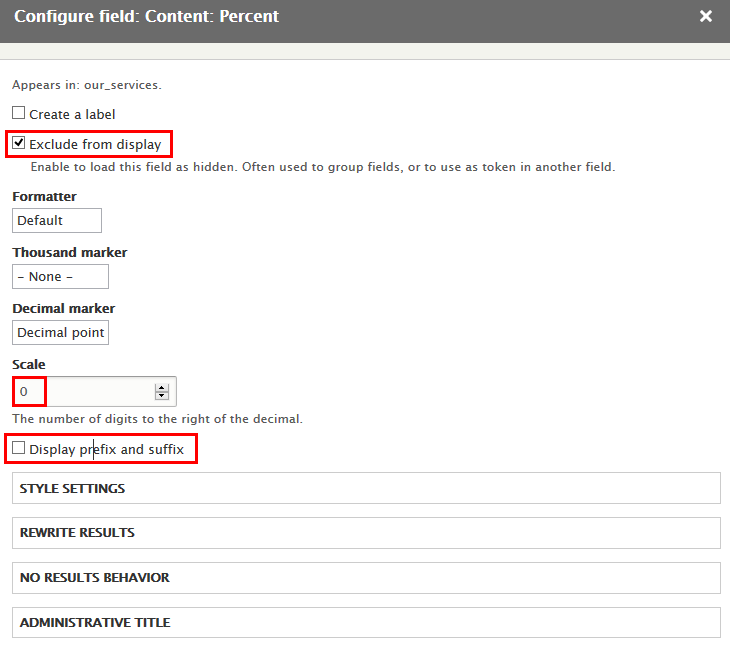
Step 5: Set properties for Content: Percent
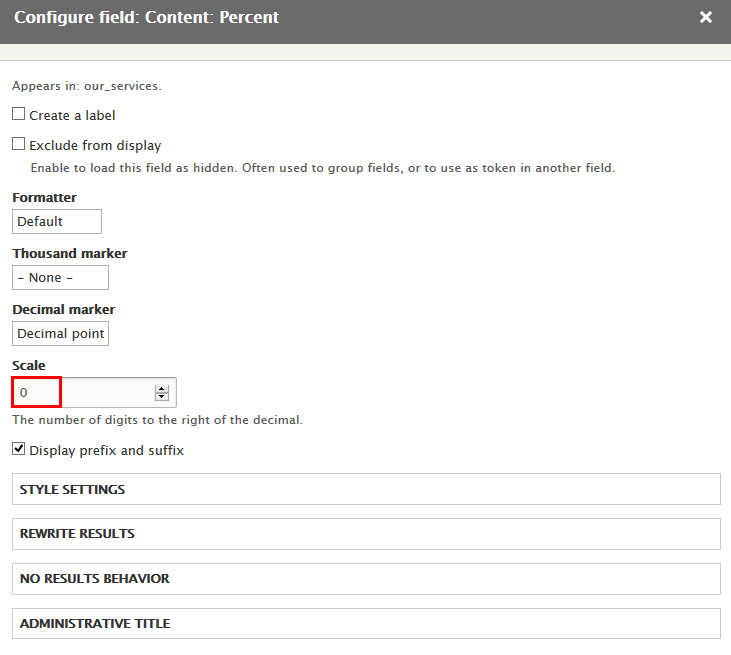
Step 6: Set properties for Content: Percent
Step 7: Set properties for Global: Custom text
Refer to following HTML code:
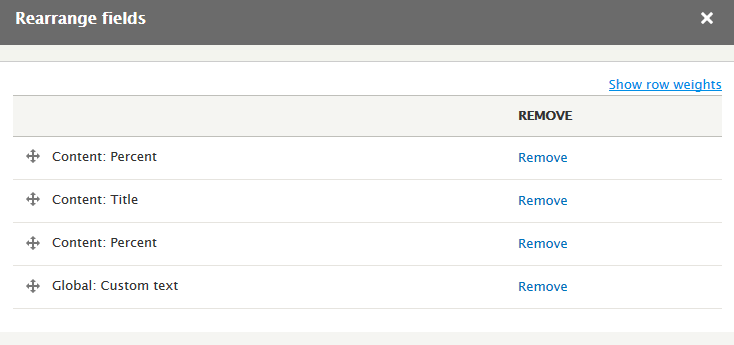
Step 8: At FIELDS area, click Rearrange button and set following arrange
Step 9: Click Save to save view
3.2 Configure Our Service block
Step 1: Navigate to Structure > Block layout
Step 2: Find Panel third click Place block button
Step 3: Find Our Service click Place block button and set following properites:
Step 4: Click Save block button.
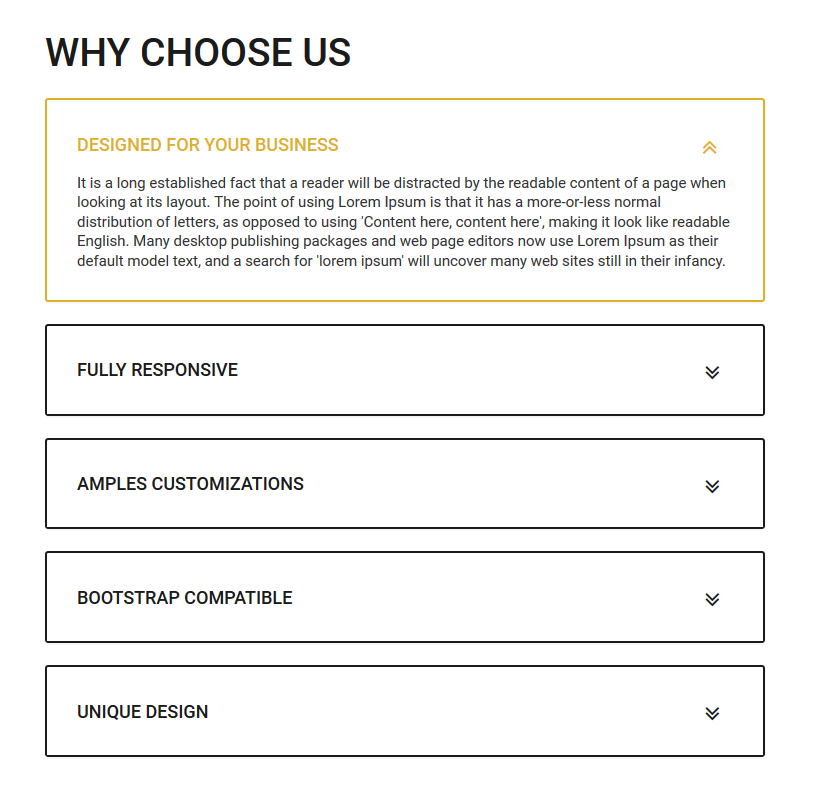
4. Why choose us block
4.1 Create Why us view
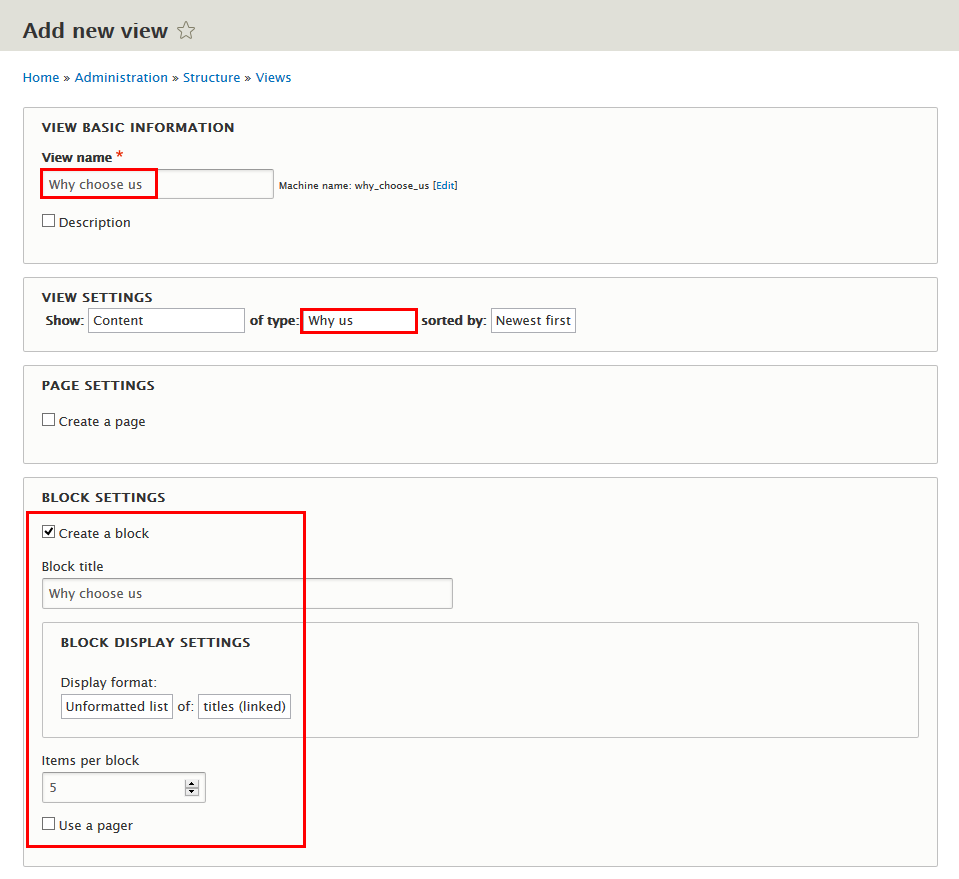
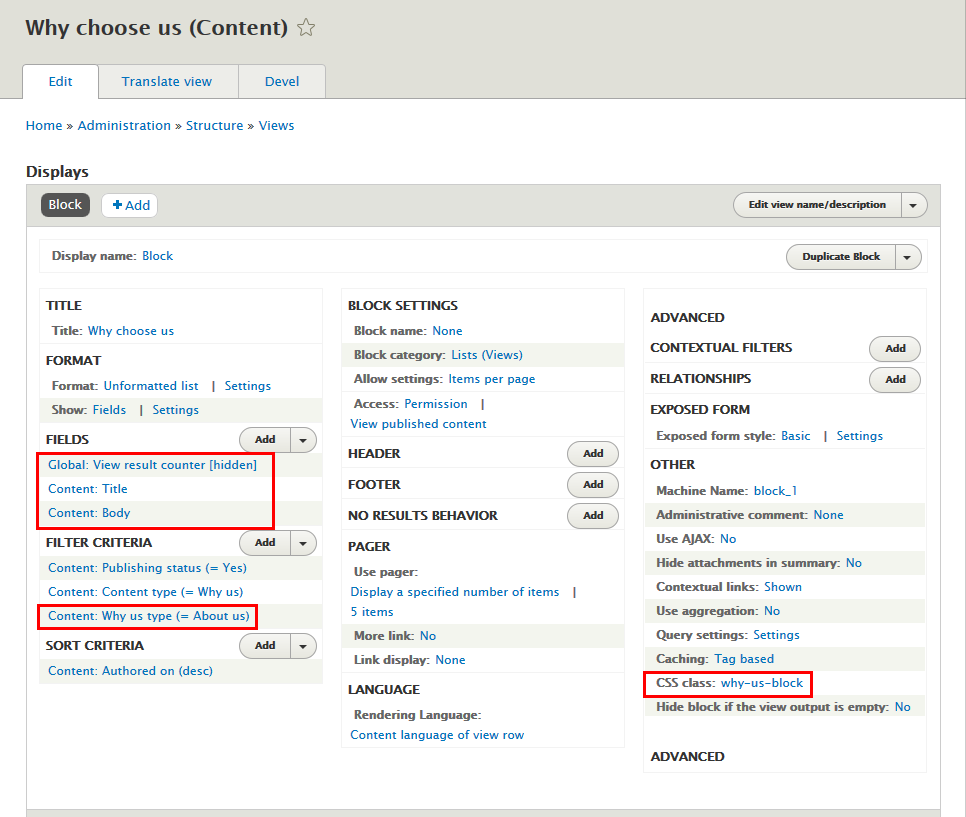
Step 1: Navigate to Structure > Views, click Add new view, then create Why choose us view with following settings:
Step 2: Click Save and edit button. Next to steps below to set properties for following fields:
Step 3: At FIELDS area, click Add button to add fields: Content: Body, Global: View result counter
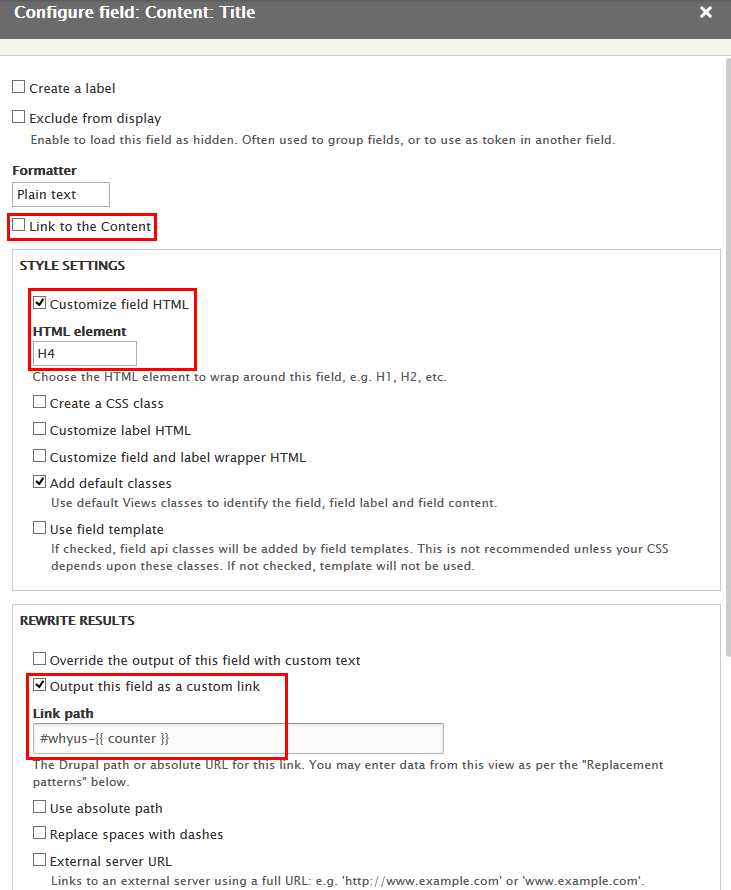
Step 4: Set properties for Content: Title
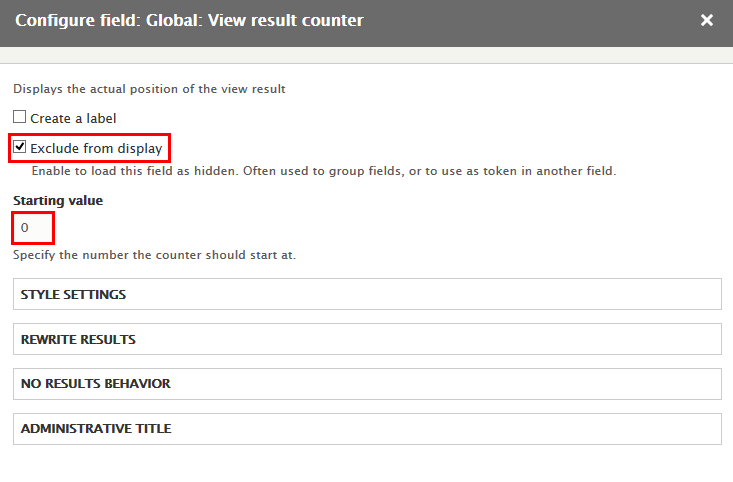
Step 5: Set properties for Global: View result counter
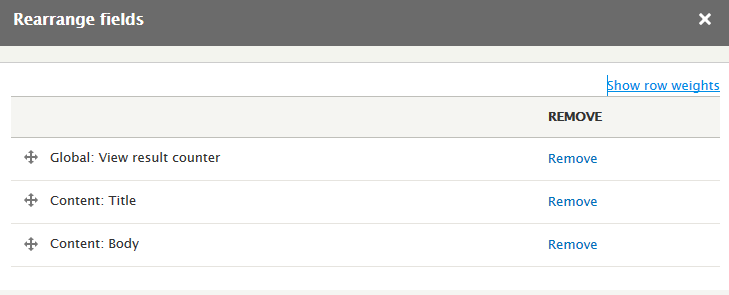
Step 6: At FIELDS area, click Rearrange button and set following arrange
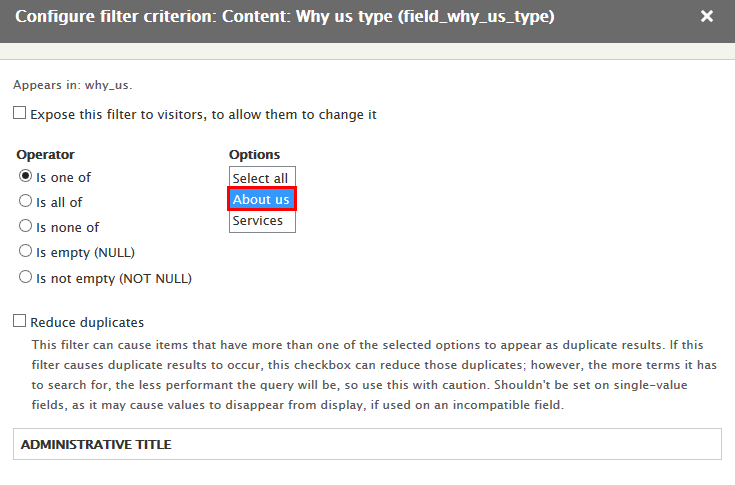
Step 7: At FILTER CRITERIA area, click Add button to add Content: Why us type fields and set following properites:
Step 8: Set properties for Content: Why us type
Step 9: At Advanced > OTHER area, add CSS class:
Step 10: Click Save to save view
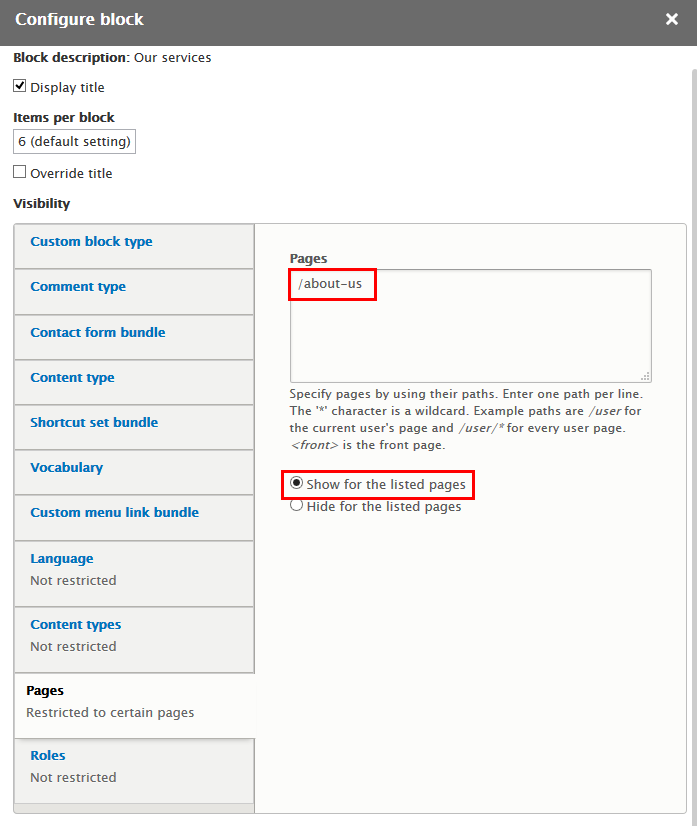
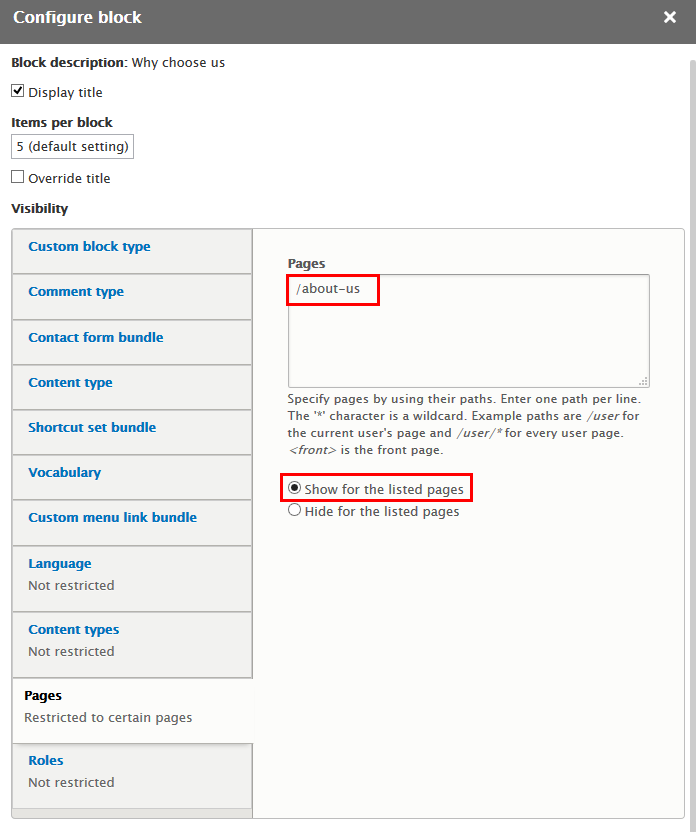
4.2 Configure Why choose us block
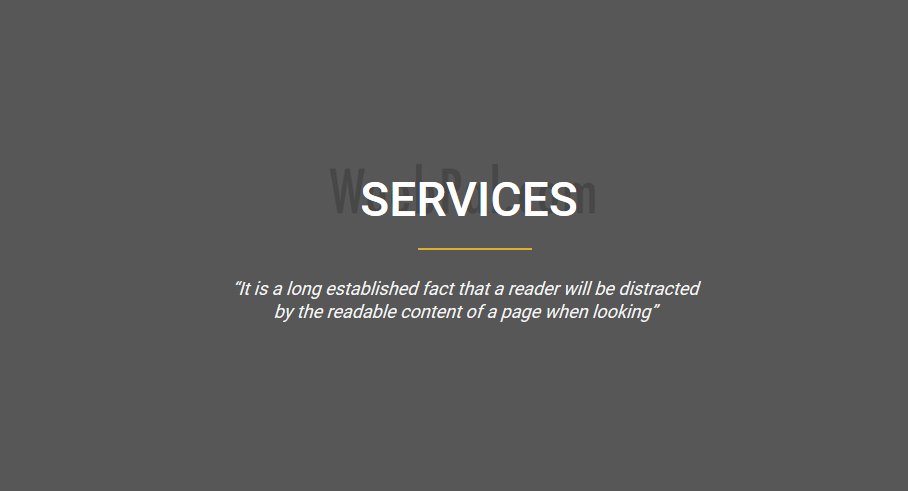
Services page
Front end Display
1. Banner block
1.1 Services content
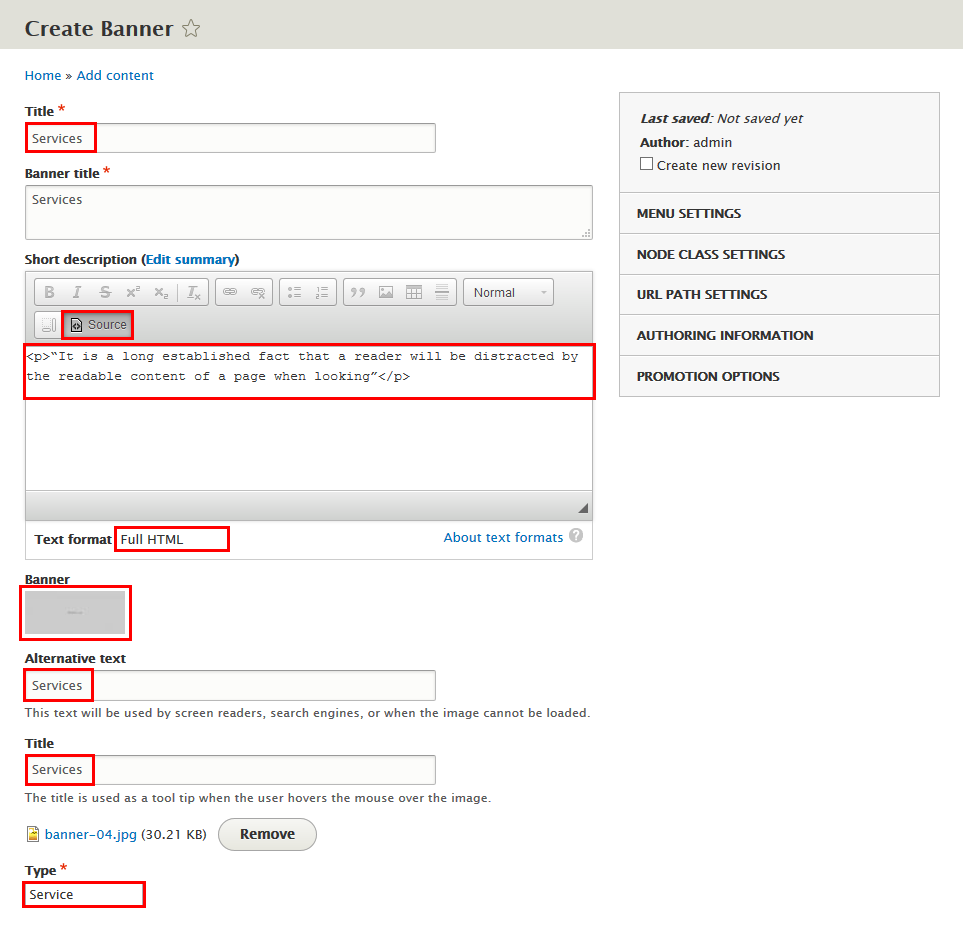
Step 1: Navigate to Content > Add content click Banner, create Services content with following properties:
Step 2: Click Save button
Refer to following HTML code:
“It is a long established fact that a reader will be distracted by the readable content of a page when looking”
1.2 Add Banner: Services page block view
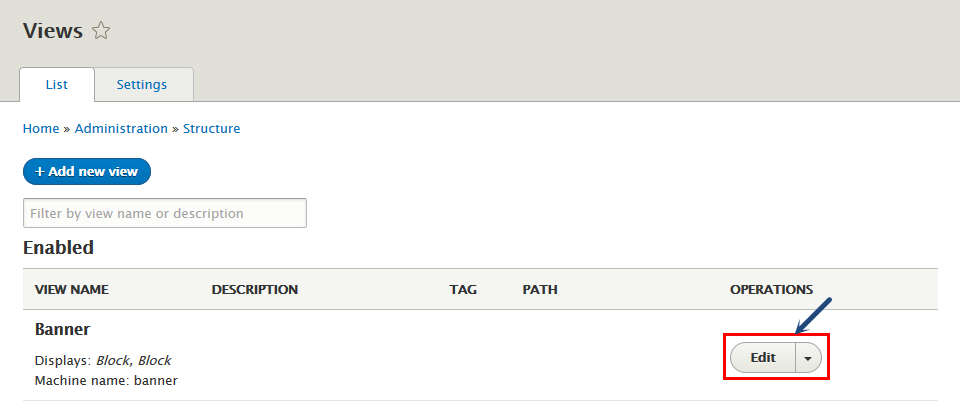
Step 1: Navigate to Structure > Views, find Banner view click Edit button:
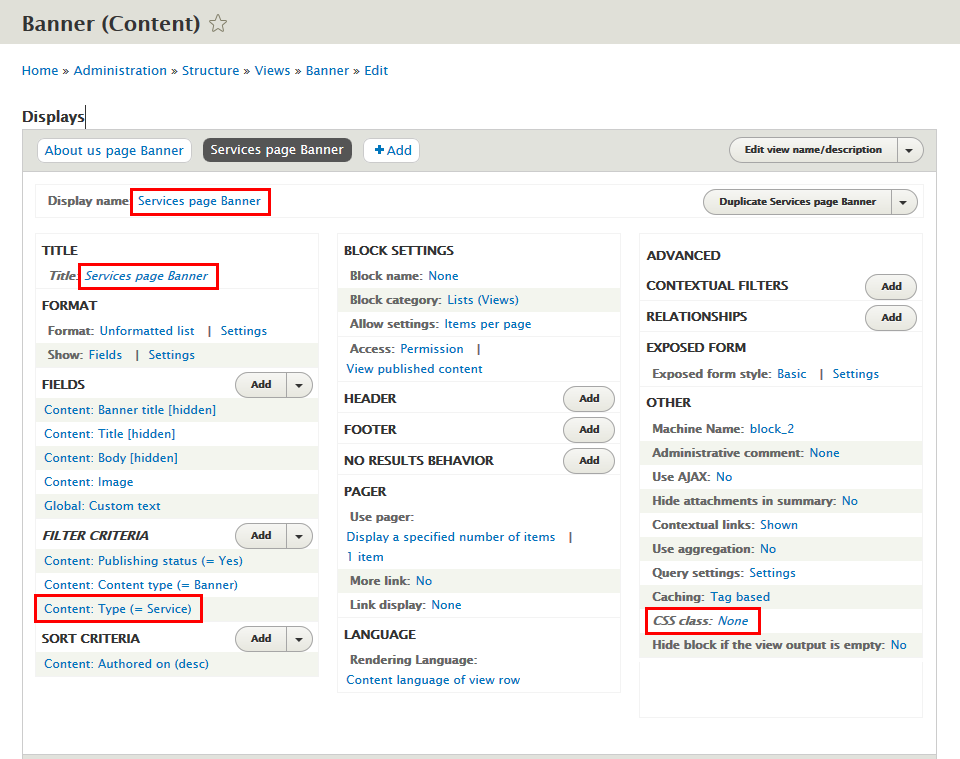
Step 2: Click Add > Block button to create Services page Banner block view and set properties for following fields:
Step 3: At Display name area, click and set properties:
Step 4: At TITLE area, click and set properties:
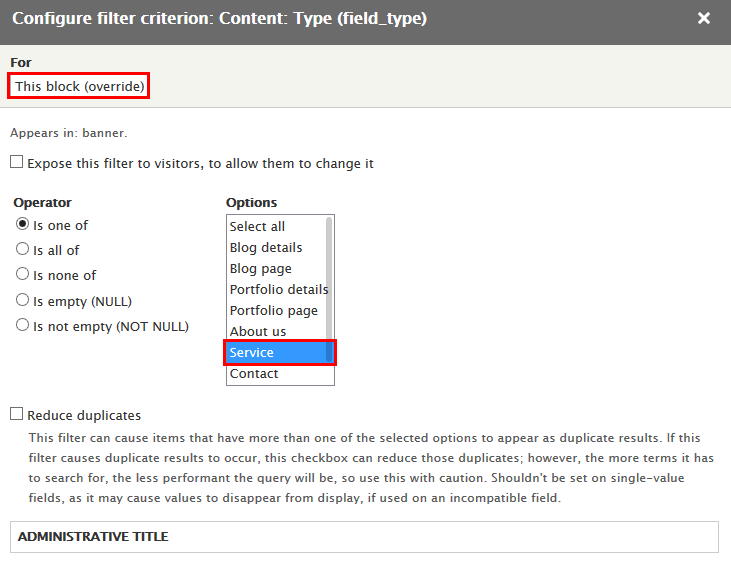
Step 5: At FILTER CRITERIA area, click Content: Type field and set following properites:
Step 6: At Advanced > OTHER area, add CSS class:
Step 7: Click Save to save view
1.3 Configure Banner: Services page block
Step 1: Navigate to Structure > Block layout
Step 2: Find Banner click Place block button
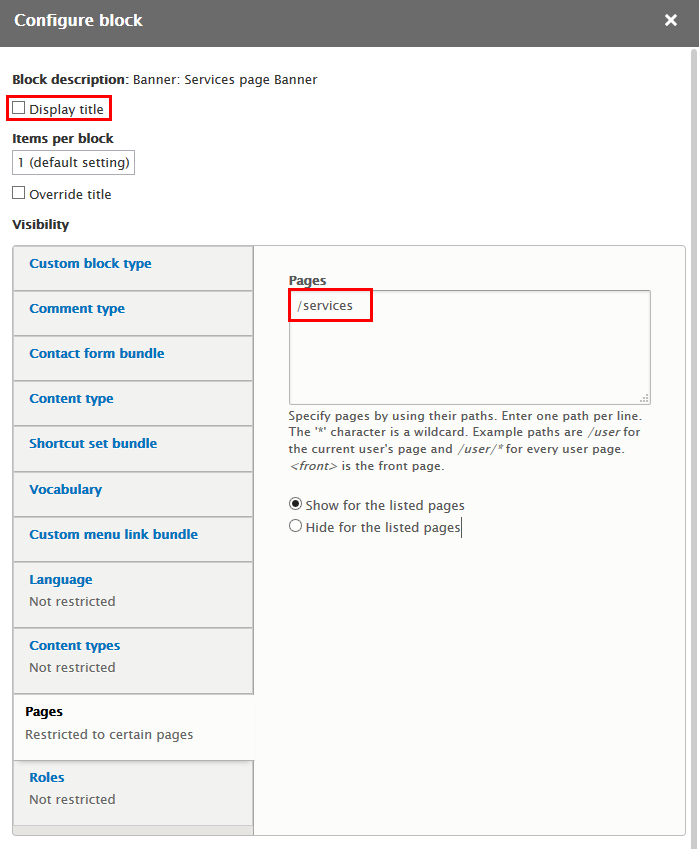
Step 3: Find Banner: Services page Banner click Place block button and set following properites:
Step 4: Click Save block button.
2. Services content
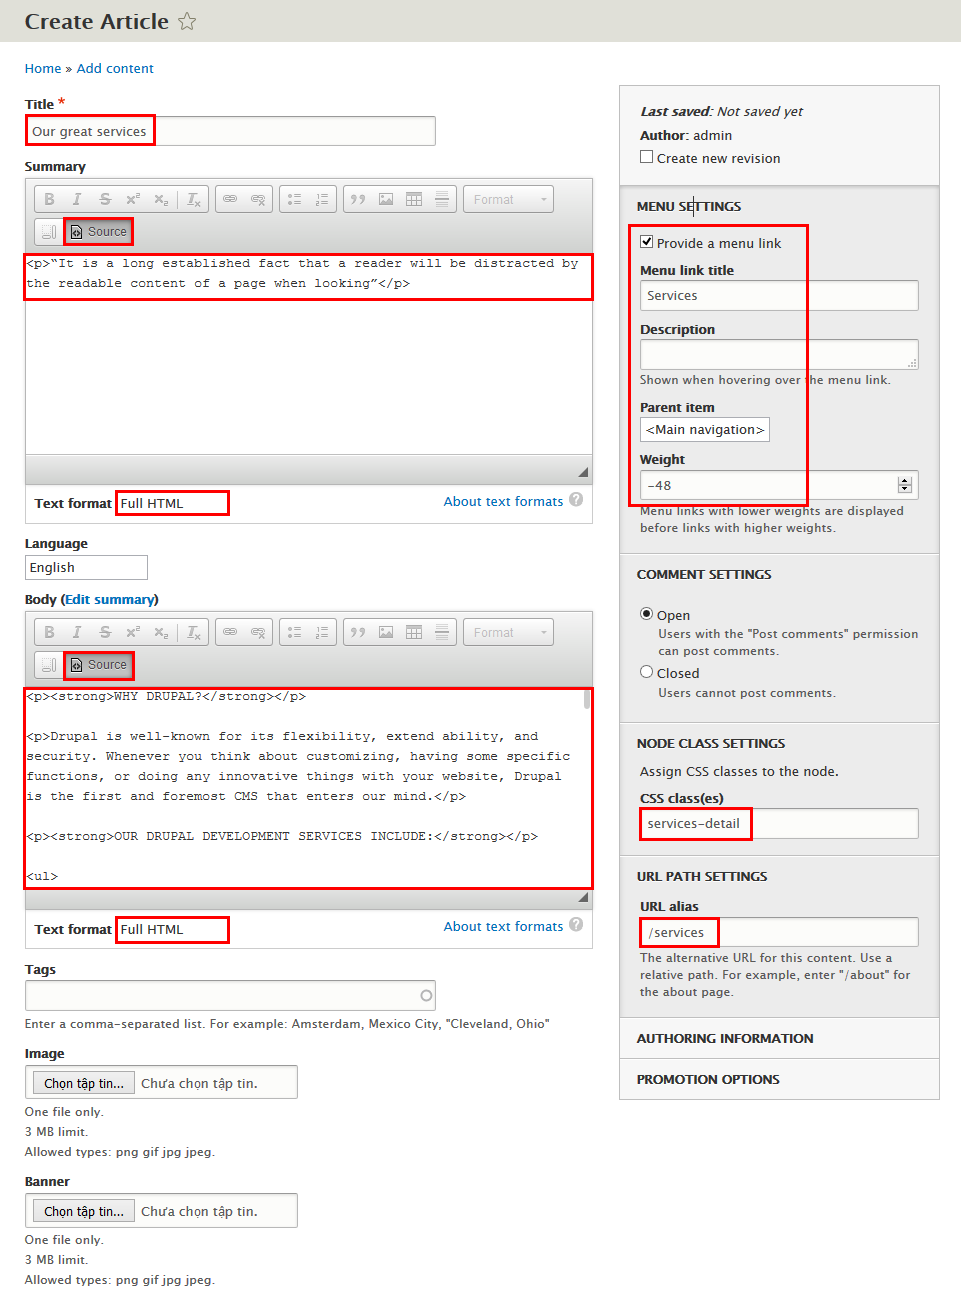
Step 1: Navigate to Content > Add content click Article to create Services content with following properties:
Step 2: Click Save button
Refer to following HTML code of Summary:
“It is a long established fact that a reader will be distracted by the readable content of a page when looking”
Refer to following HTML code of Body:
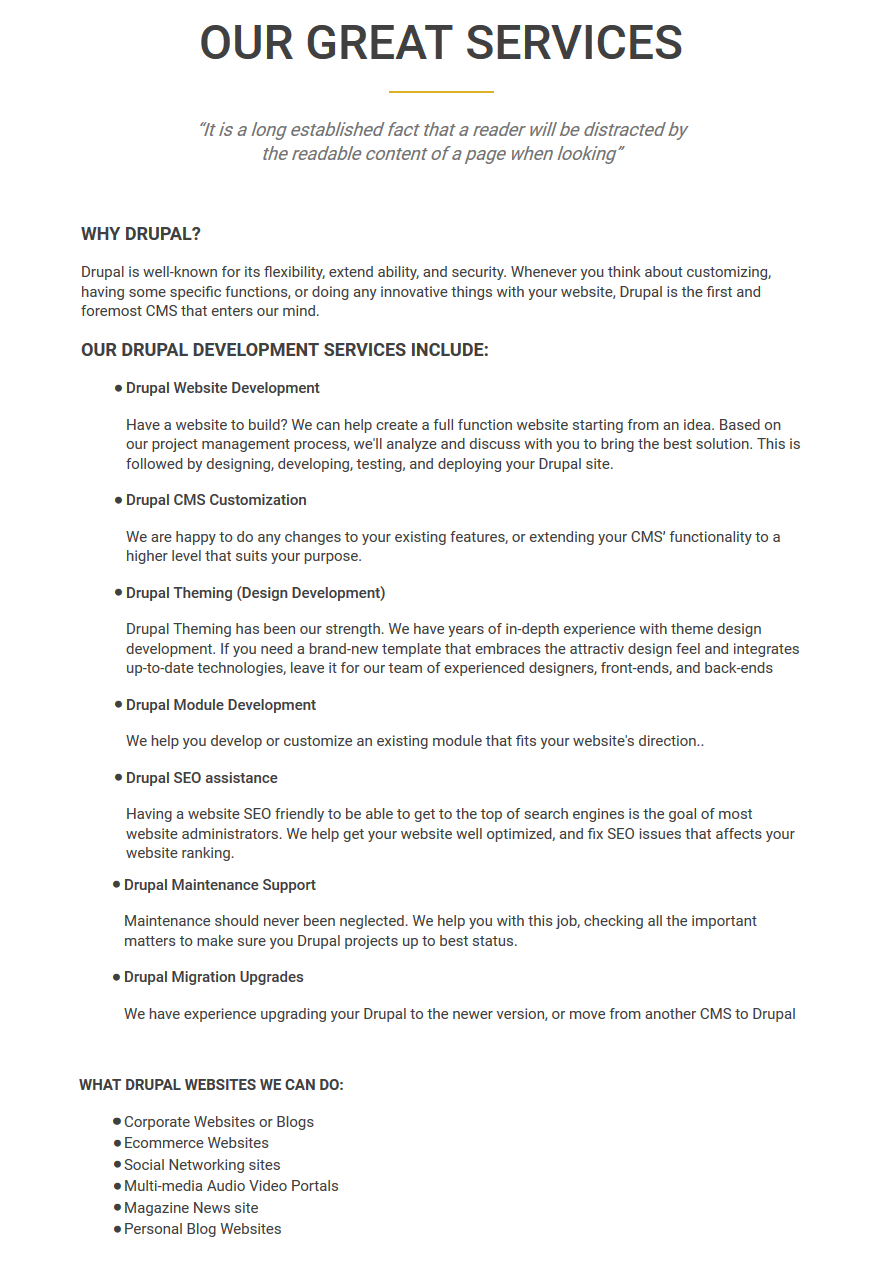
WHY DRUPAL?
Drupal is well-known for its flexibility, extend ability, and security. Whenever you think about customizing, having some specific functions, or doing any innovative things with your website, Drupal is the first and foremost CMS that enters our mind.
OUR DRUPAL DEVELOPMENT SERVICES INCLUDE:
- Drupal Website Development
Have a website to build? We can help create a full function website starting from an idea. Based on our project management process, we'll analyze and discuss with you to bring the best solution. This is followed by designing, developing, testing, and deploying your Drupal site.
- Drupal CMS Customization
We are happy to do any changes to your existing features, or extending your CMS’ functionality to a higher level that suits your purpose.
- Drupal Theming (Design Development)
Drupal Theming has been our strength. We have years of in-depth experience with theme design development. If you need a brand-new template that embraces the attractiv design feel and integrates up-to-date technologies, leave it for our team of experienced designers, front-ends, and back-ends
- Drupal Module Development
We help you develop or customize an existing module that fits your website's direction..
- Drupal SEO assistance
Having a website SEO friendly to be able to get to the top of search engines is the goal of most website administrators. We help get your website well optimized, and fix SEO issues that affects your website ranking.
- Drupal Maintenance Support
Maintenance should never been neglected. We help you with this job, checking all the important matters to make sure you Drupal projects up to best status.
- Drupal Migration Upgrades
We have experience upgrading your Drupal to the newer version, or move from another CMS to Drupal
WHAT DRUPAL WEBSITES WE CAN DO:
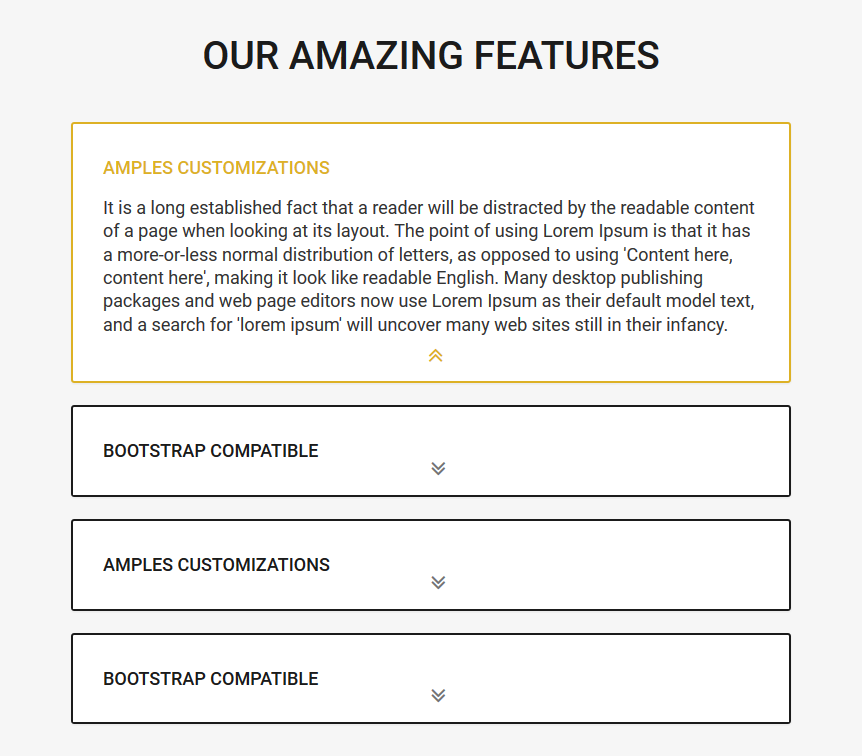
3. Our amazing features block
3.1 Add Our amazing features block view
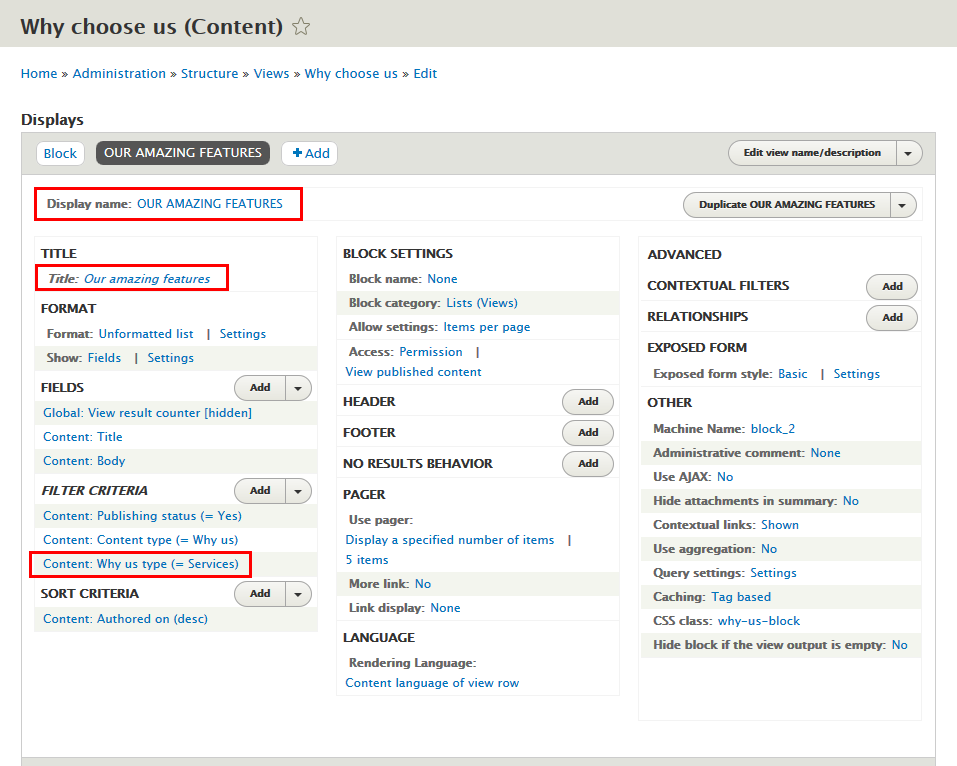
Step 1: Navigate to Structure > Views, find Why us view click Edit button:
Step 2: Click Add > Block button to create Our amazing features block view and set properties for following fields:
Step 3: At Display name area, click and set properties:
Step 4: At TITLE area, click and set properties:
Step 5: At FILTER CRITERIA area, click Content: Type field and set following properites:
Step 6: Click Save to save view
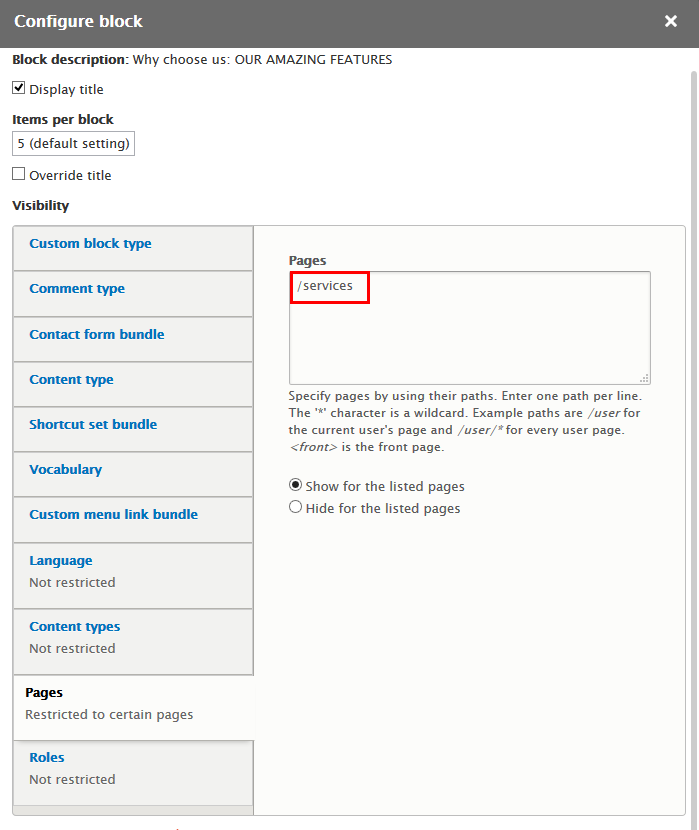
3.2 Configure Why choose us: Our amazing features block
Step 1: Navigate to Structure > Block layout
Step 2: Find Panel third click Place block button
Step 3: Find Why choose us: Our amazing features click Place block button and set following properites:
Step 4: Click Save block button.
Porfolio page
Front end Display
1. Banner block
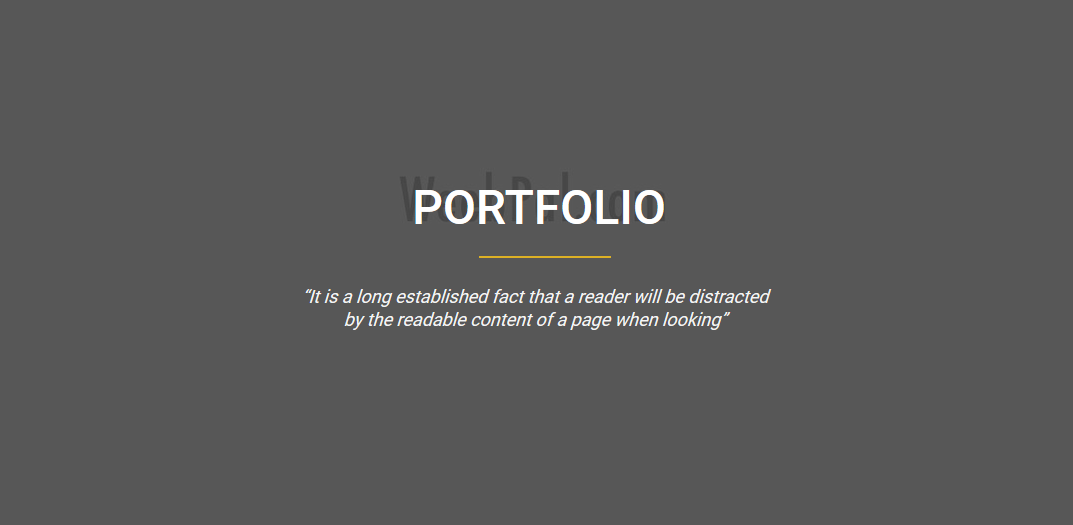
1.1 Porfolio page content
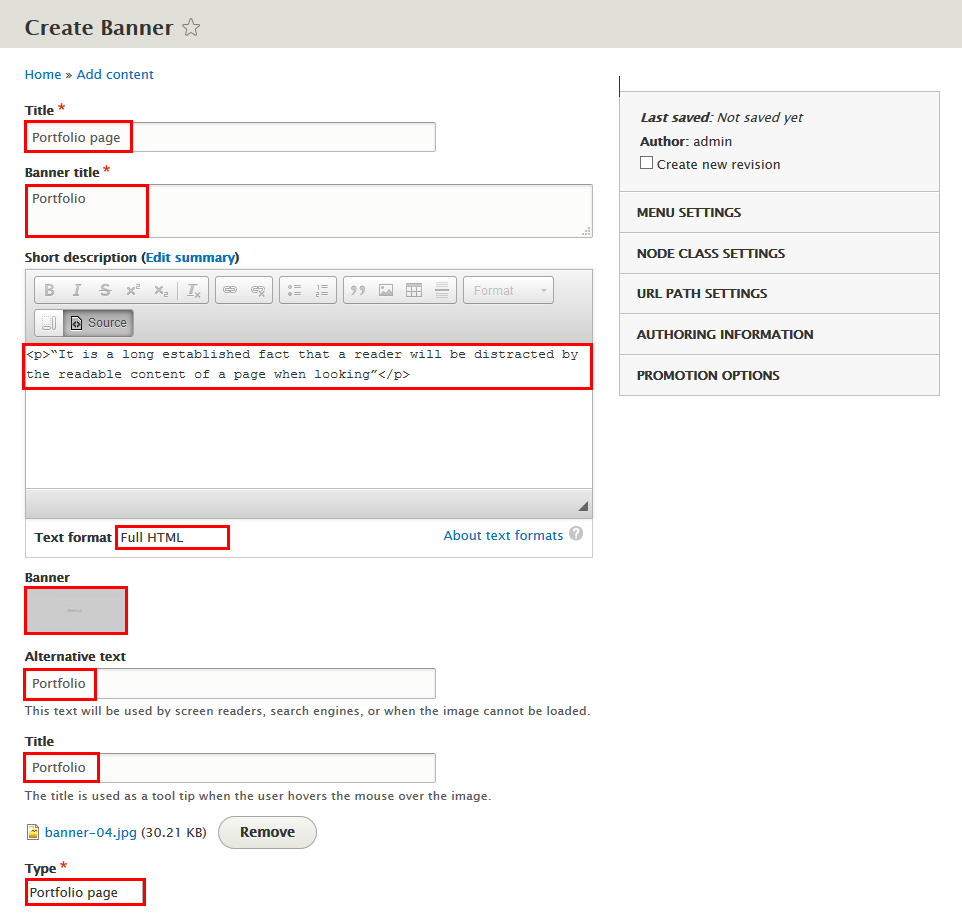
Step 1: Navigate to Content > Add content click Banner, create Porfolio page content with following properties:
Step 2: Click Save button
Refer to following HTML code:
“It is a long established fact that a reader will be distracted by the readable content of a page when looking”
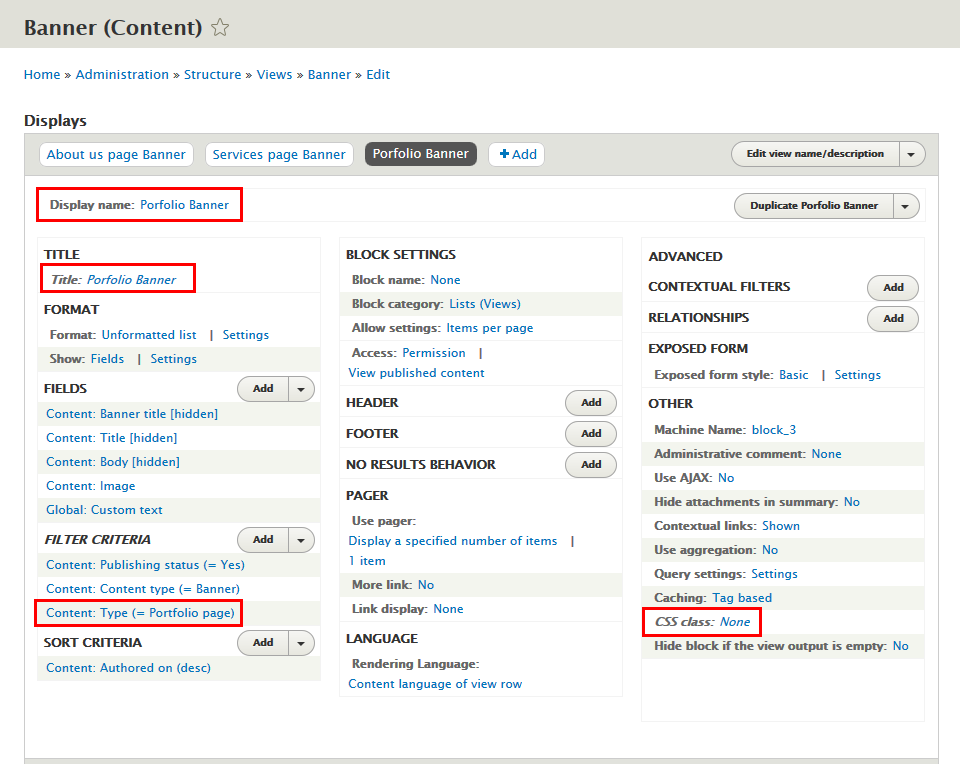
1.2 Add Banner: Porfolio Banner block view
Step 1: Navigate to Structure > Views, find Banner view click Edit button:
Step 2: Click Add > Block button to create Porfolio Banner block view and set properties for following fields:
Step 3: At Display name area, click and set properties:
Step 4: At TITLE area, click and set properties:
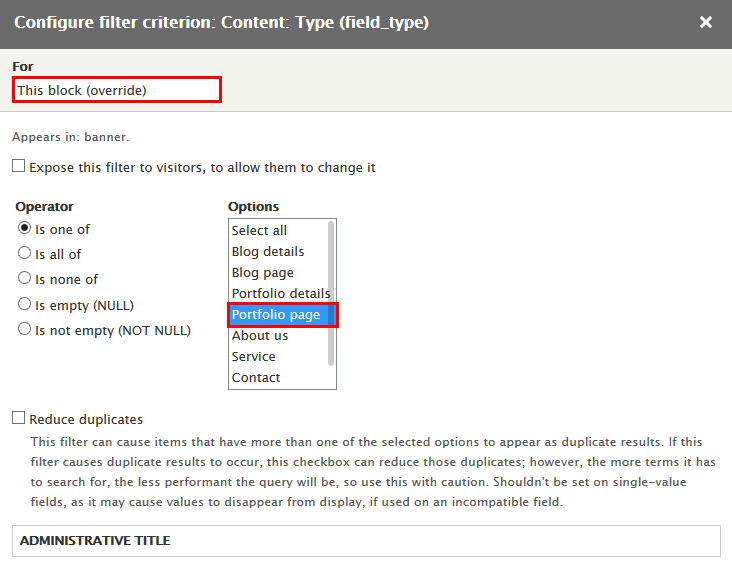
Step 5: At FILTER CRITERIA area, click Content: Type field and set following properites:
Step 6: At Advanced > OTHER area, add CSS class:
Step 7: Click Save to save view
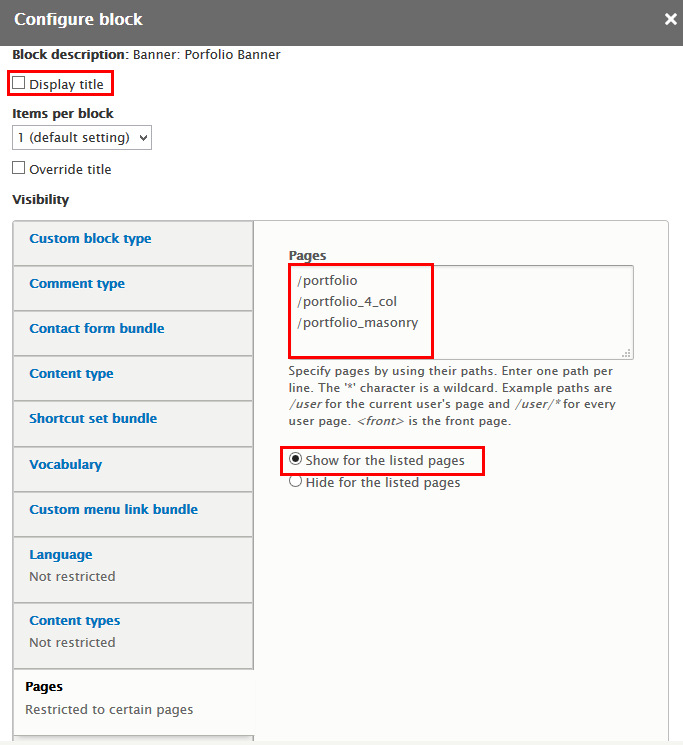
1.3 Configure Banner: Porfolio page block
Step 1: Navigate to Structure > Block layout
Step 2: Find Banner click Place block button
Step 3: Find Banner: Porfolio page click Place block button and set following properites:
Step 4: Click Save block button.
2. Porfolio page view
Add Page view
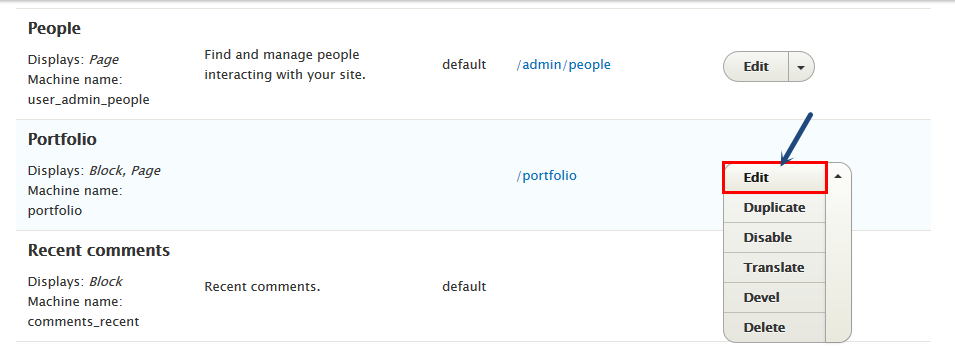
Step 1: Navigate to Structure > Views, find Portfolio view click Edit button:
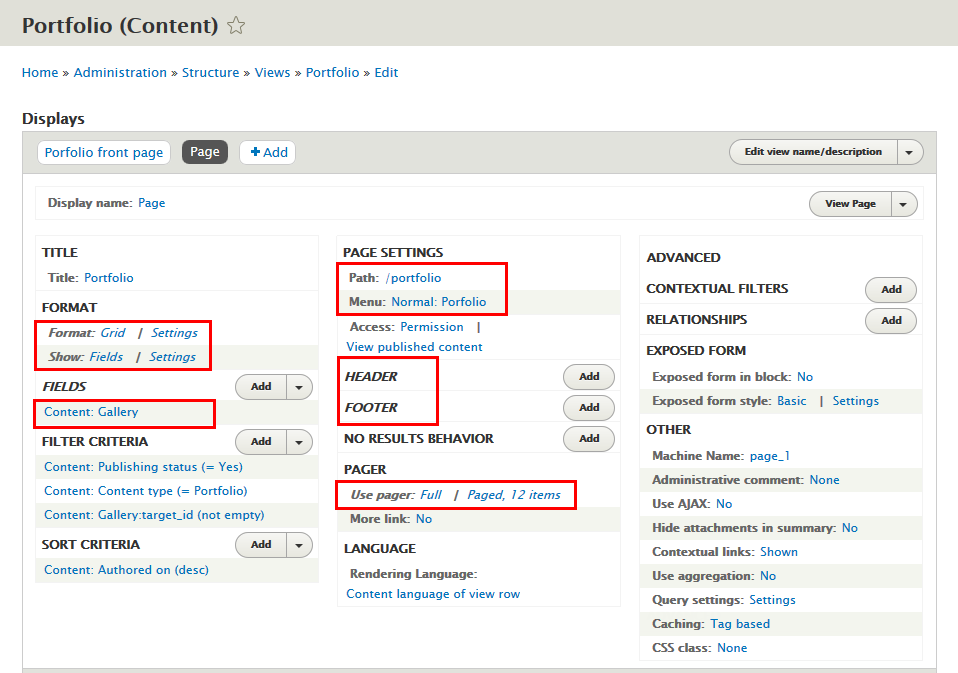
Step 2: Click Add > Page button to create Page view and set properties for following fields:
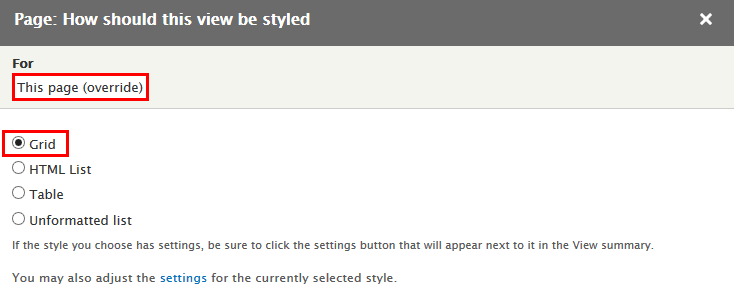
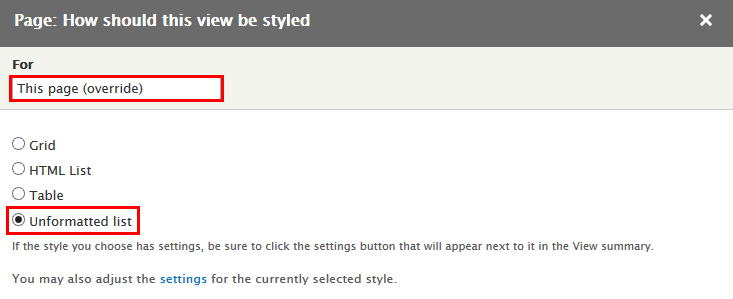
Step 3:At FORMAT area, find Format click link and set following properties:
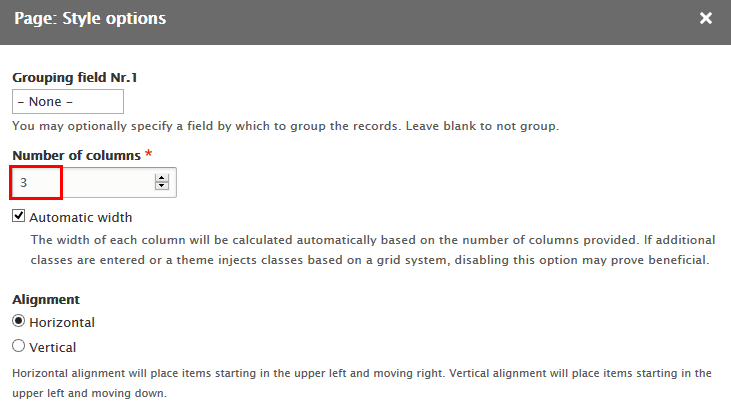
Step 4:At FORMAT area, find Format click Settings link and set following properties:
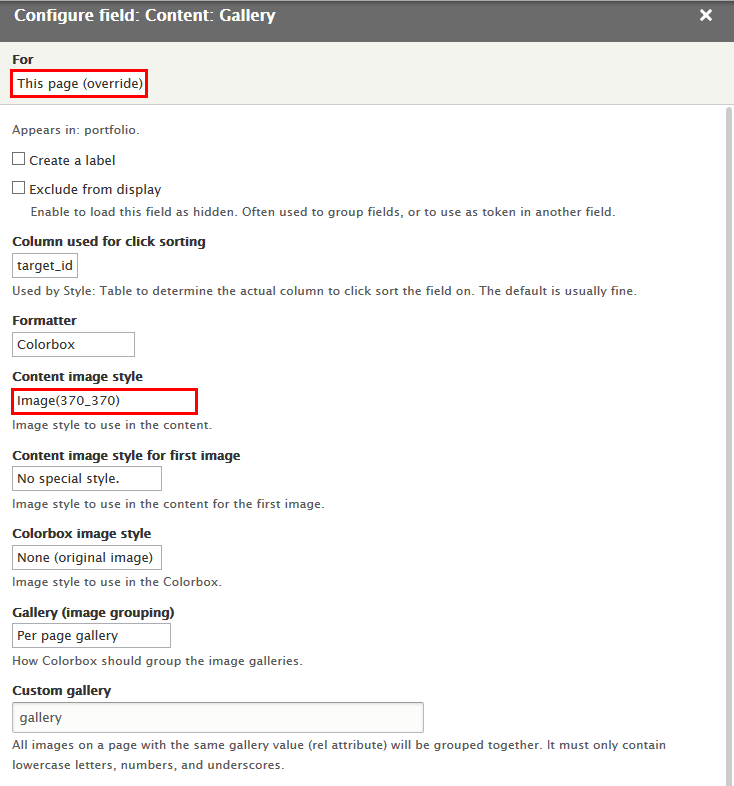
Step 5: At FIELDS area, click Content: Gallery field and set properites:
Step 6: At HEADER area, click Rearrange button. Set For This block (override), then click Remove link Global: Text area field
Step 7: At FOOTER area, click Rearrange button. Set For This block (override), then click Remove link Global: Text area field
Step 8: At PAGE SETTINGS area, find and click Path link and set following properites:
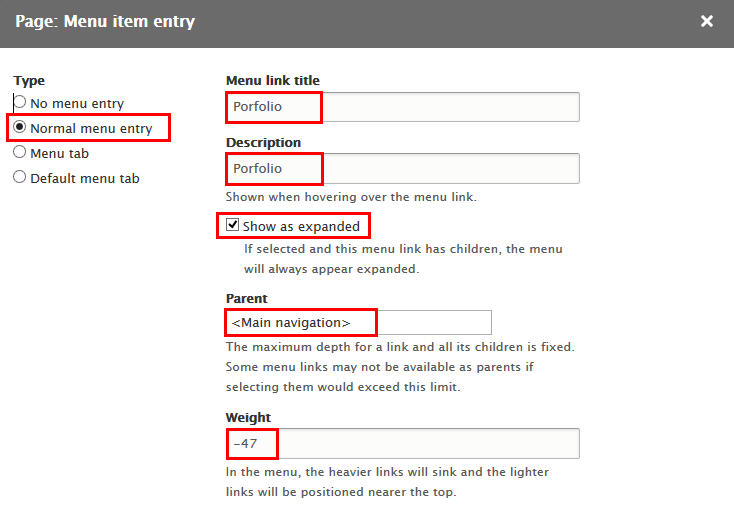
Step 9: At PAGE SETTINGS area, find and click Menu link and set following properites:
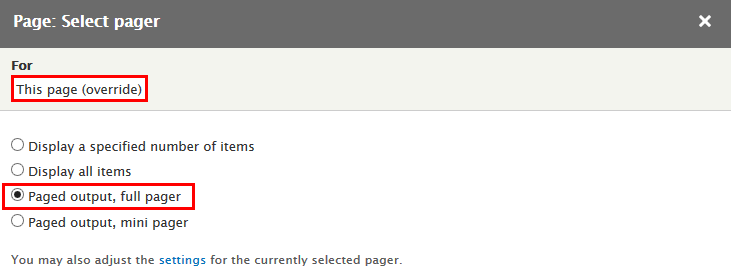
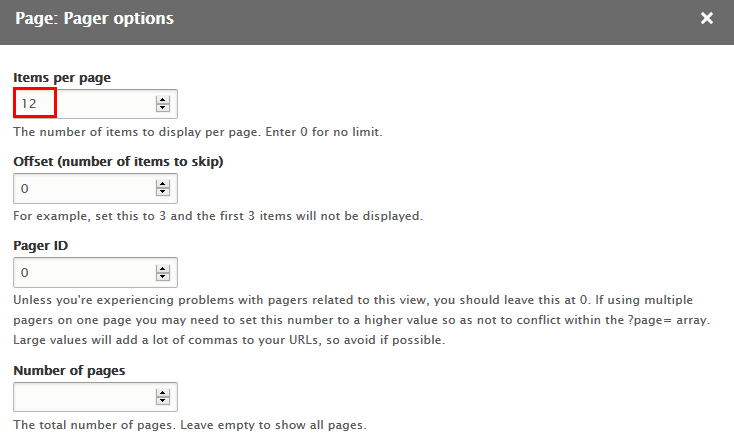
Step 10: At PAGER area, find Use pager and click Display a specified number of items link and set following properites
Step 11: Click Save to save view
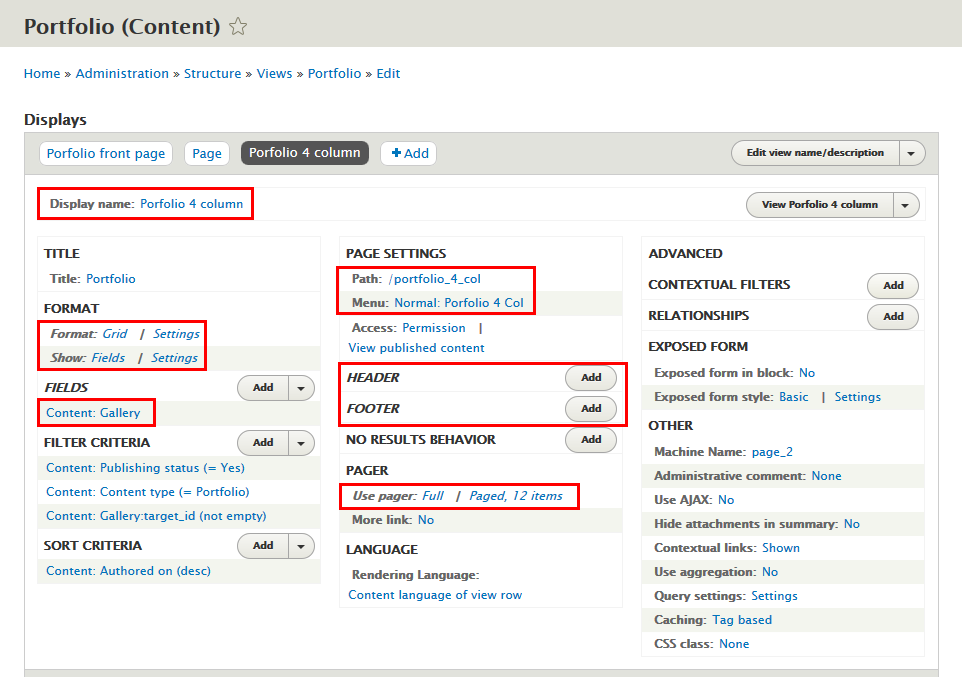
Porfolio 4 col page
Front end Display
Add Porfolio 4 column page view
Step 1: Navigate to Structure > Views, find Portfolio view click Edit button:
Step 2: Click Add > Page button to create Porfolio 4 column view and set properties for following fields:
Step 3: At Display name area, click and set properties:
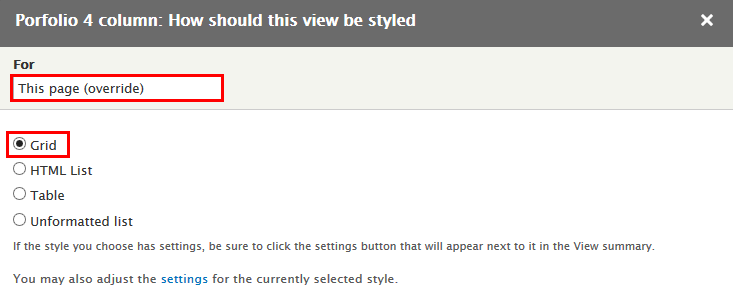
Step 4:At FORMAT area, find Format click link and set following properties:
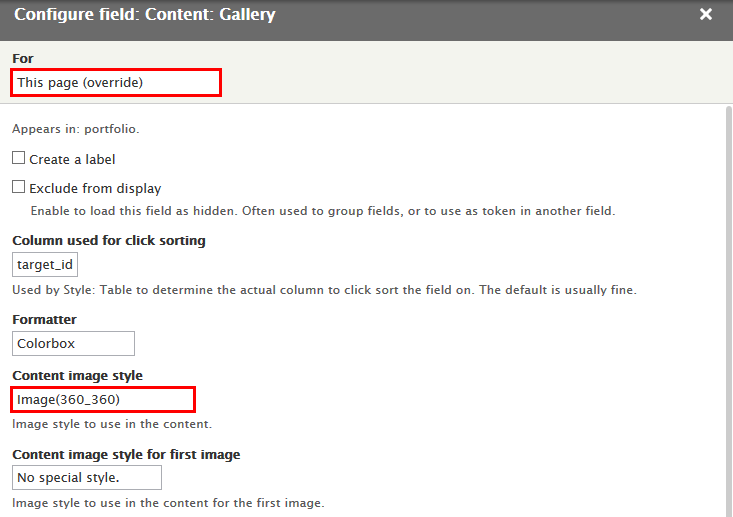
Step 5: At FIELDS area, click Content: Gallery field and set properites:
Step 6: At HEADER area, click Rearrange button. Set For This block (override), then click Remove link Global: Text area field
Step 7: At FOOTER area, click Rearrange button. Set For This block (override), then click Remove link Global: Text area field
Step 8: At PAGE SETTINGS area, find and click Path link and set following properites:
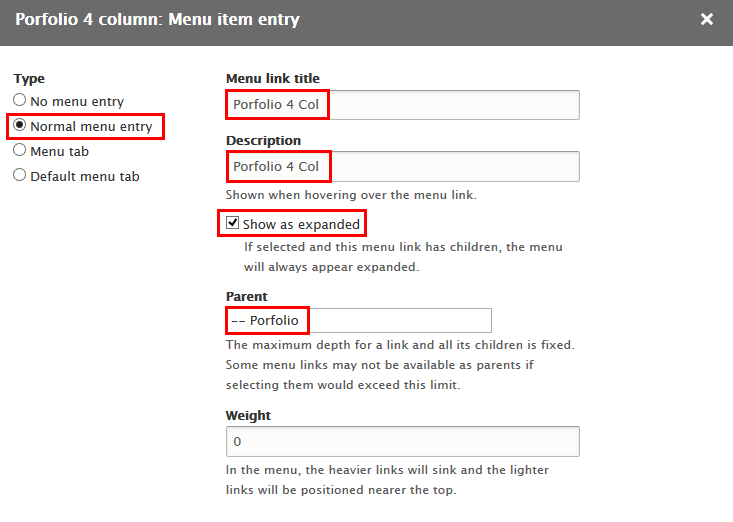
Step 9: At PAGE SETTINGS area, find and click Menu link and set following properites:
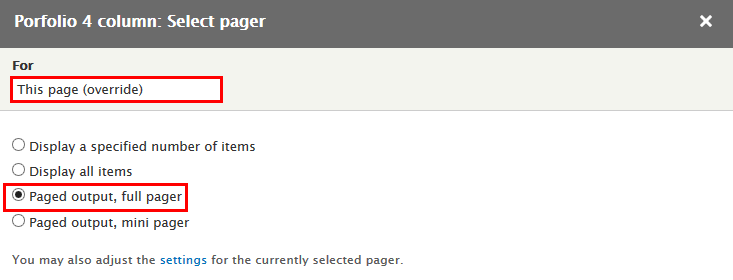
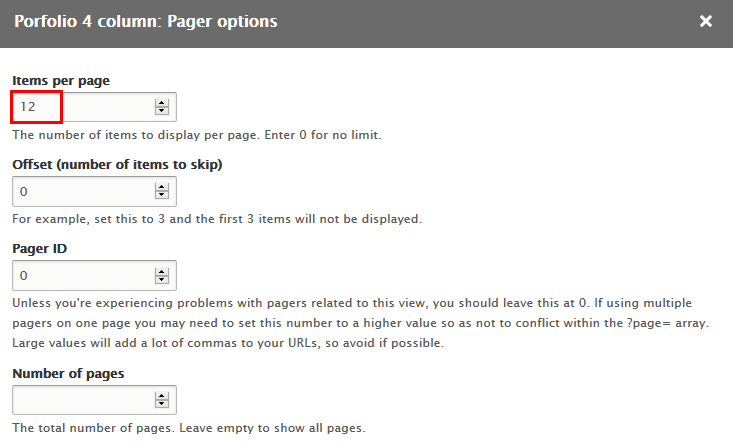
Step 10: At PAGER area, find Use pager and click Display a specified number of items link and set following properites
Step 11: Click Save to save view
Porfolio Masonry page
Front end Display
Add Porfolio Masonry page view
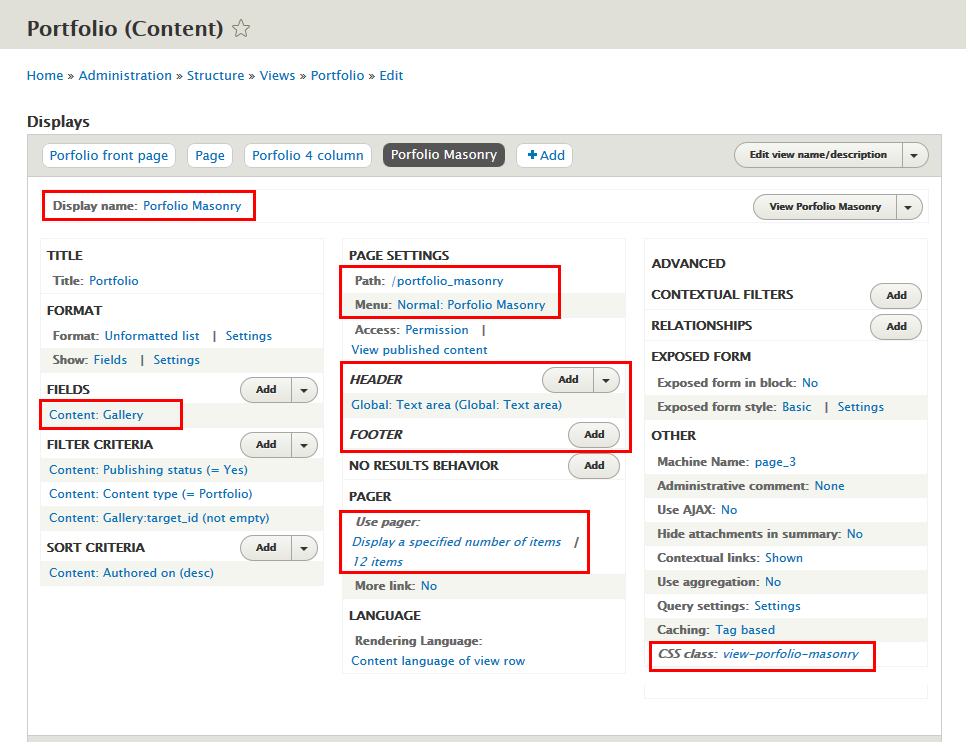
Step 1: Navigate to Structure > Views, find Portfolio view click Edit button:
Step 2: Click Add > Page button to create Porfolio Masonry view and set properties for following fields:
Step 3: At Display name area, click and set properties:
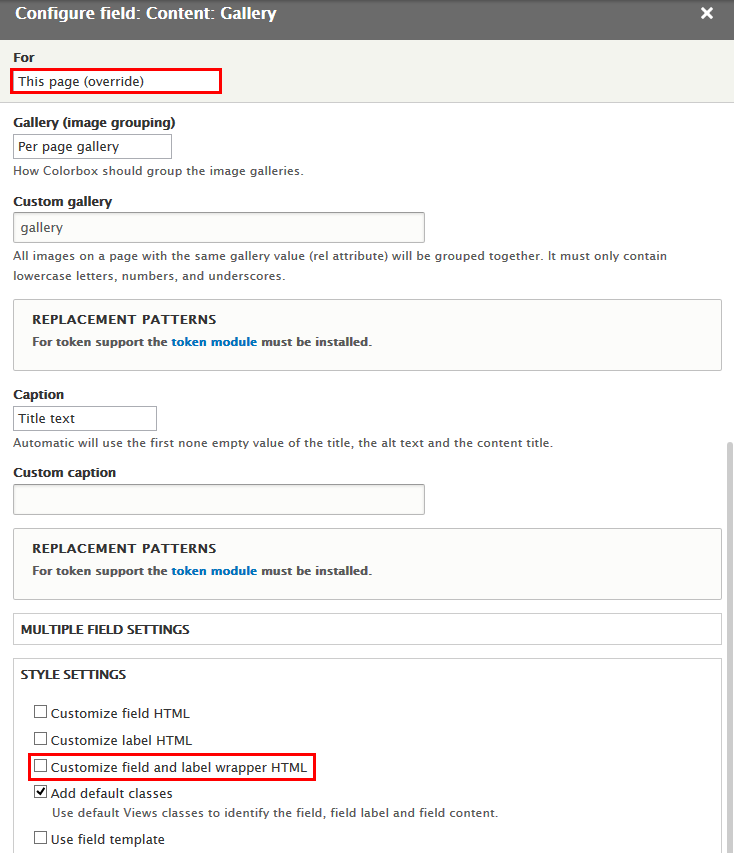
Step 4: At FIELDS area, click Content: Gallery field and set properites:
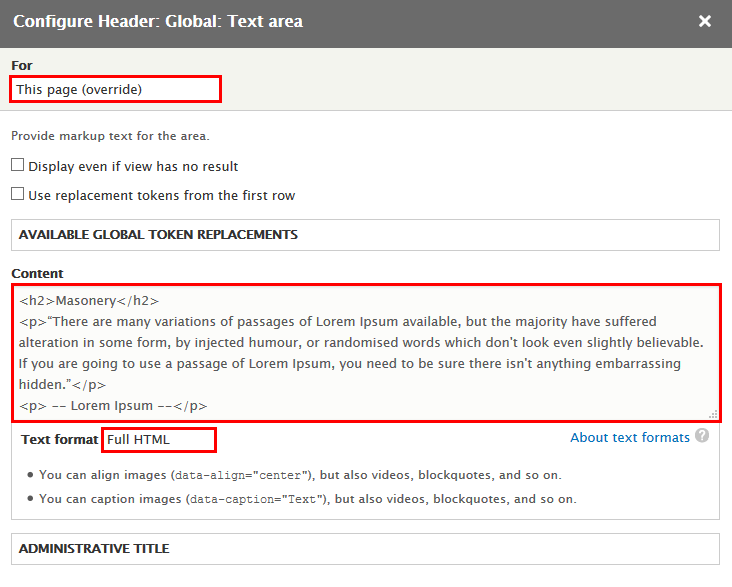
Step 5: At HEADER area, click Global: Text area field and set following properites:
Refer to following HTML code:
Masonery
“There are many variations of passages of Lorem Ipsum available, but the majority have suffered alteration in some form, by injected humour, or randomised words which don't look even slightly believable. If you are going to use a passage of Lorem Ipsum, you need to be sure there isn't anything embarrassing hidden.”
-- Lorem Ipsum --
Step 6: At FOOTER area, click Rearrange button. Set For This block (override), then click Remove link Global: Text area field
Step 7: At PAGE SETTINGS area, find and click Path link and set following properites:
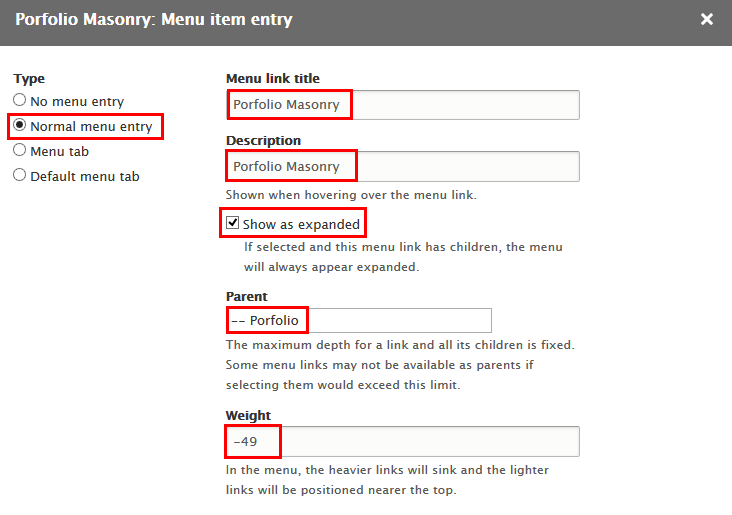
Step 8: At PAGE SETTINGS area, find and click Menu link and set following properites:
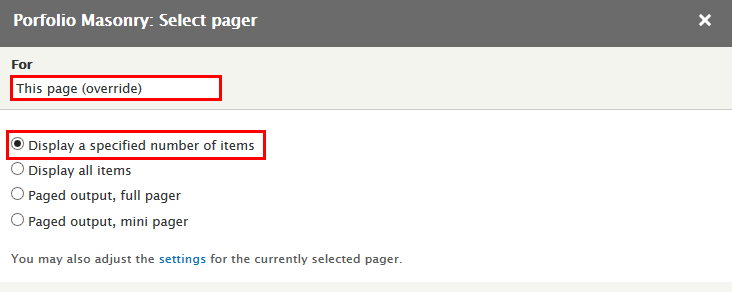
Step 9: At PAGER area, find Use pager and click Display a specified number of items link and set following properites
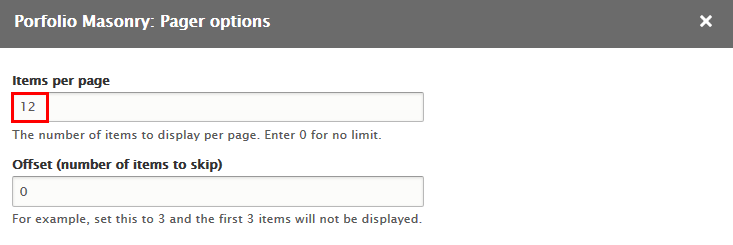
Step 10: At PAGER area, find Use pager and click 10 items link and set following properites
Step 11: At Advanced > OTHER area, add CSS class:
Step 12: Click Save to save view
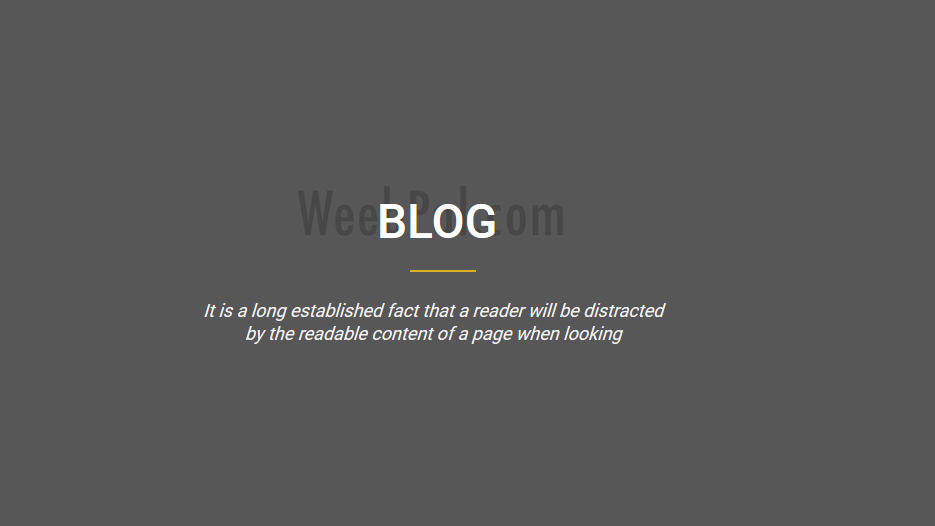
Blog page
Front end Display
1. Banner block
1.1 Blog page content
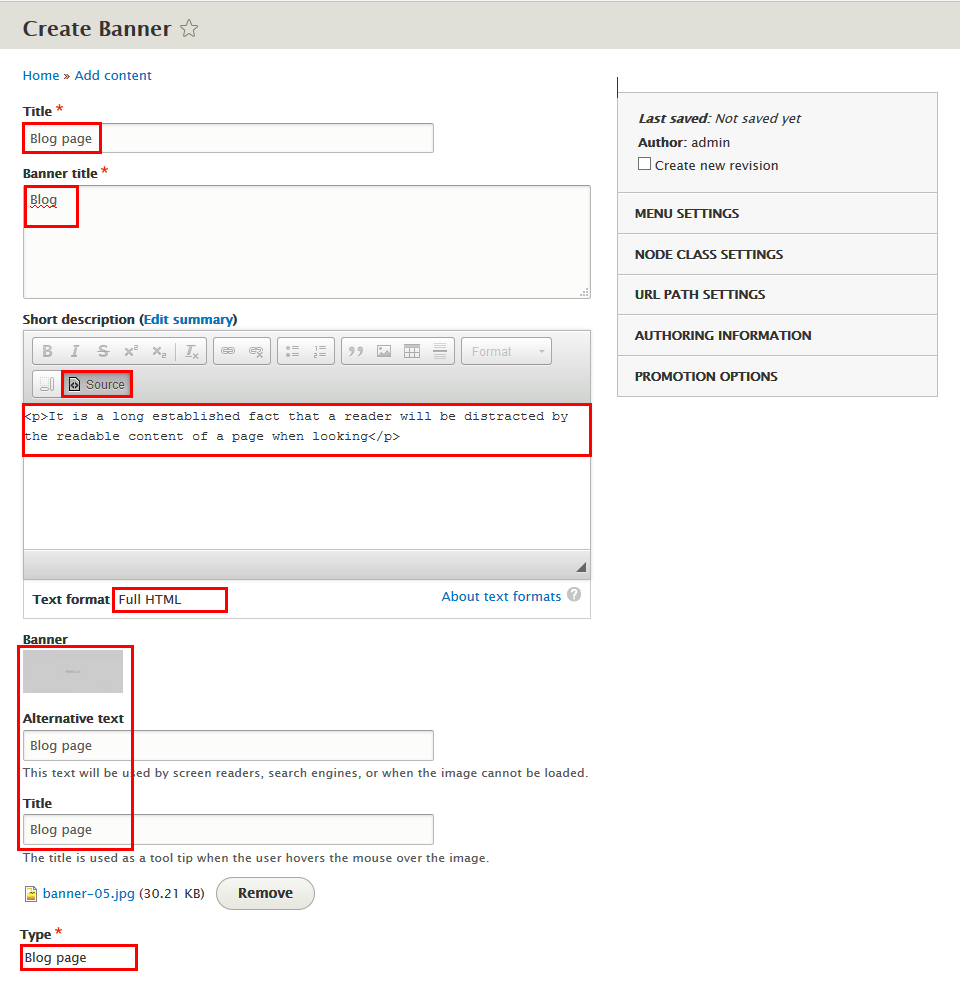
Step 1: Navigate to Content > Add content click Banner, create Blog page content with following properties:
Step 2: Click Save button
Refer to following HTML code:
“It is a long established fact that a reader will be distracted by the readable content of a page when looking”
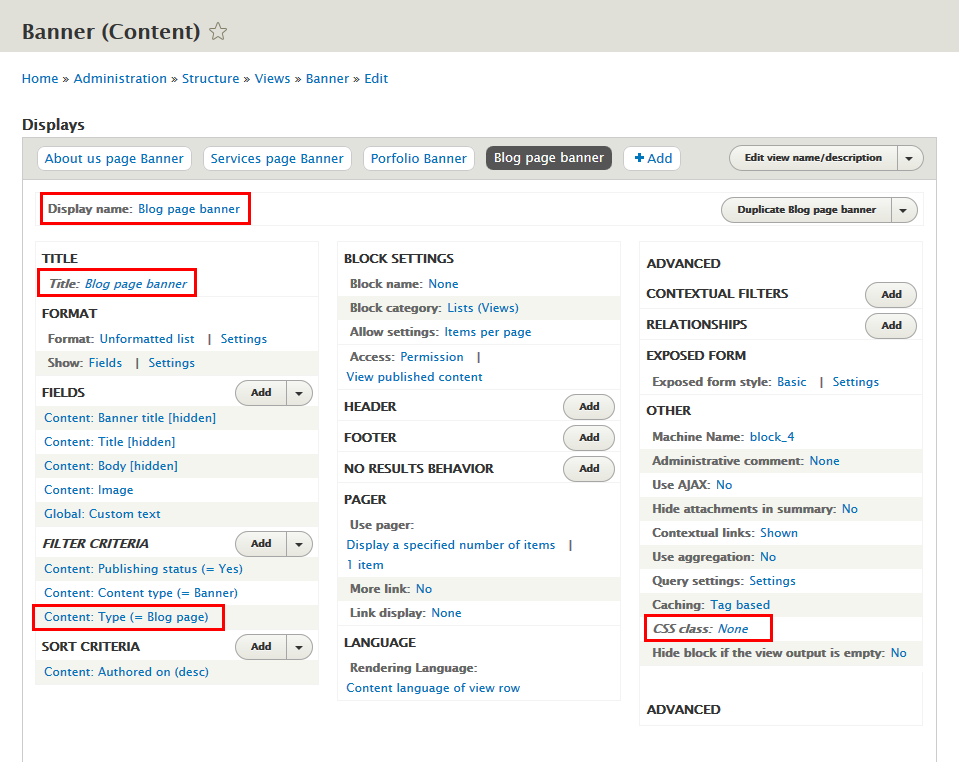
1.2 Add Banner: Blog page banner block view
Step 1: Navigate to Structure > Views, find Banner view click Edit button:
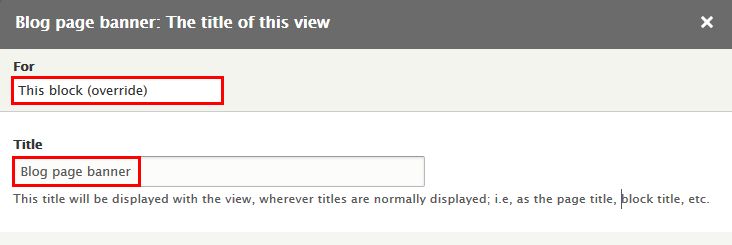
Step 2: Click Add > Block button to create Blog page banner block view and set properties for following fields:
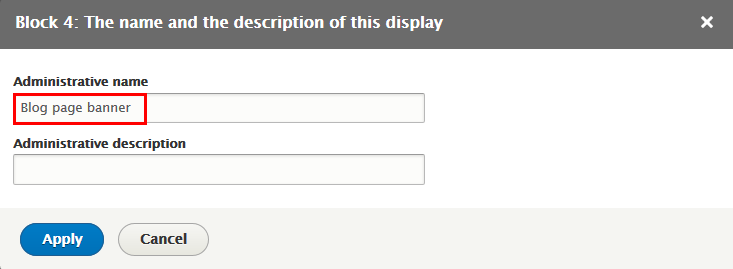
Step 3: At Display name area, click and set properties:
Step 4: At TITLE area, click and set properties:
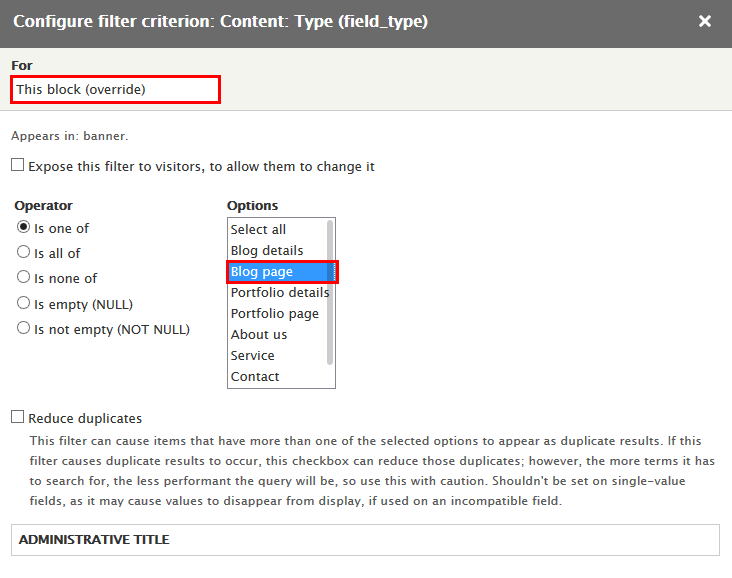
Step 5: At FILTER CRITERIA area, click Content: Type field and set following properites:
Step 6: At Advanced > OTHER area, add CSS class:
Step 7: Click Save to save view
1.3 Configure Banner: Blog page block
Step 1: Navigate to Structure > Block layout
Step 2: Find Banner click Place block button
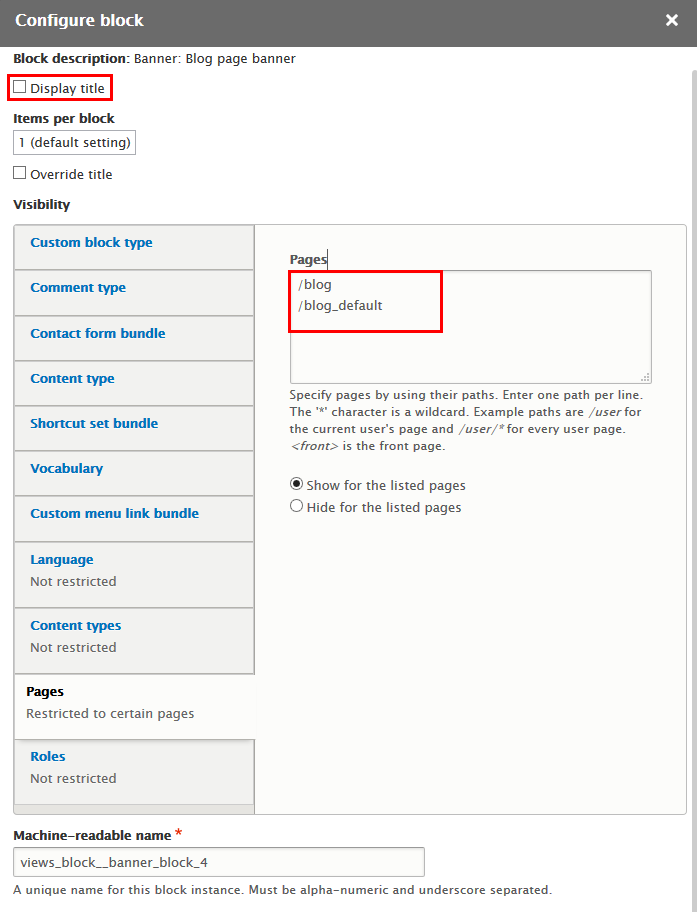
Step 3: Find Banner: Blog page banner click Place block button and set following properites:
Step 4: Click Save block button.
2. Blog page view
Add Page view
Step 1: Navigate to Structure > Views, find Blog page view click Edit button:
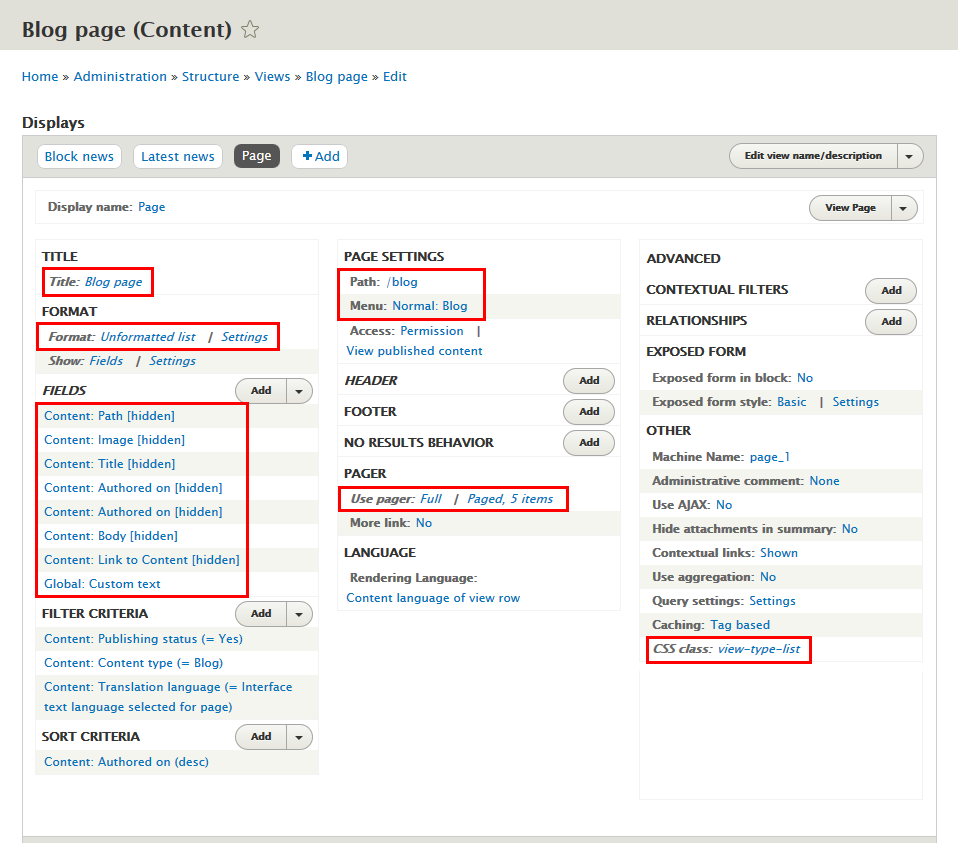
Step 2: Click Add > Page button to create Page view and set properties for following fields:
Step 3: At TITLE area, find Title field and set following properites:
Step 4:At FORMAT area, find Format click link and set following properties:
Step 5: At FIELDS area, click Add button to add fields: Content: Link to Content, Content: Authored on, Global: Custom text
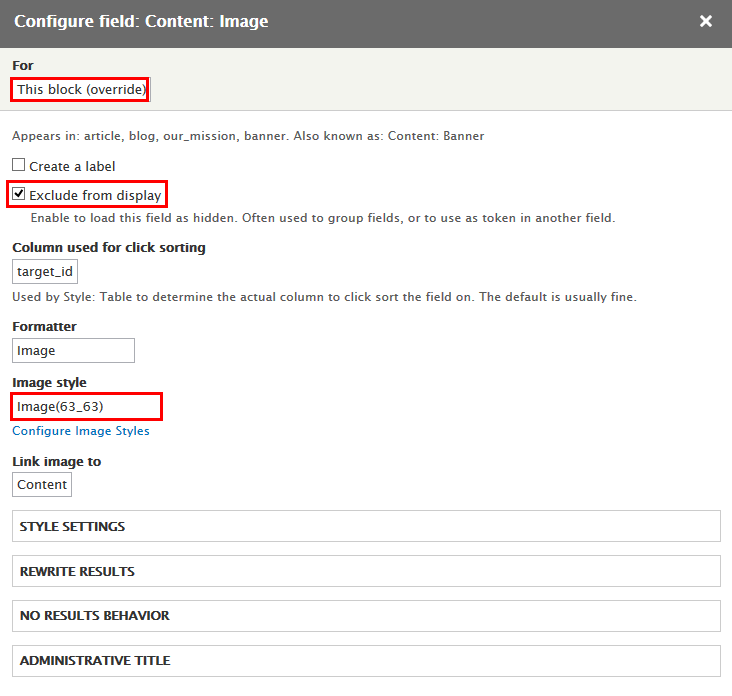
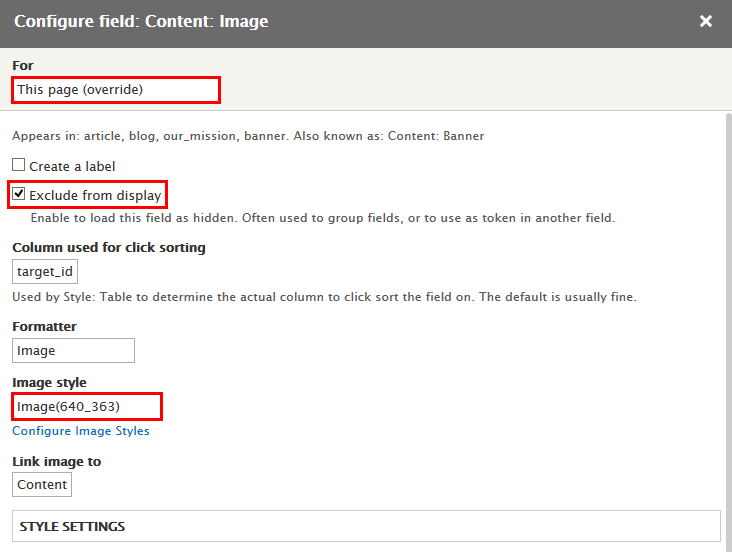
Step 6: Set properties for Content: Image
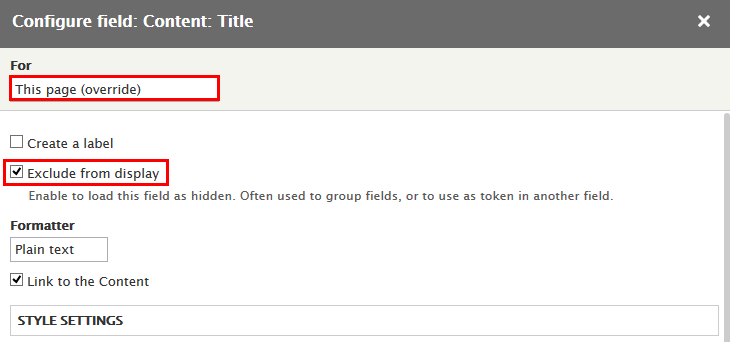
Step 7: Set properties for Content: Title
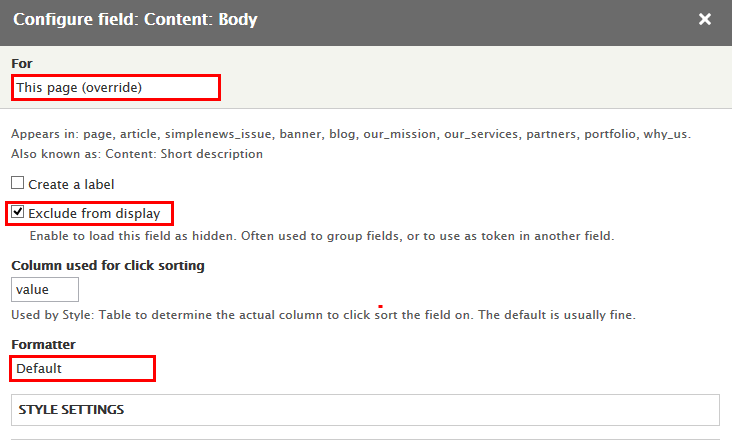
Step 8: Set properties for Content: Body
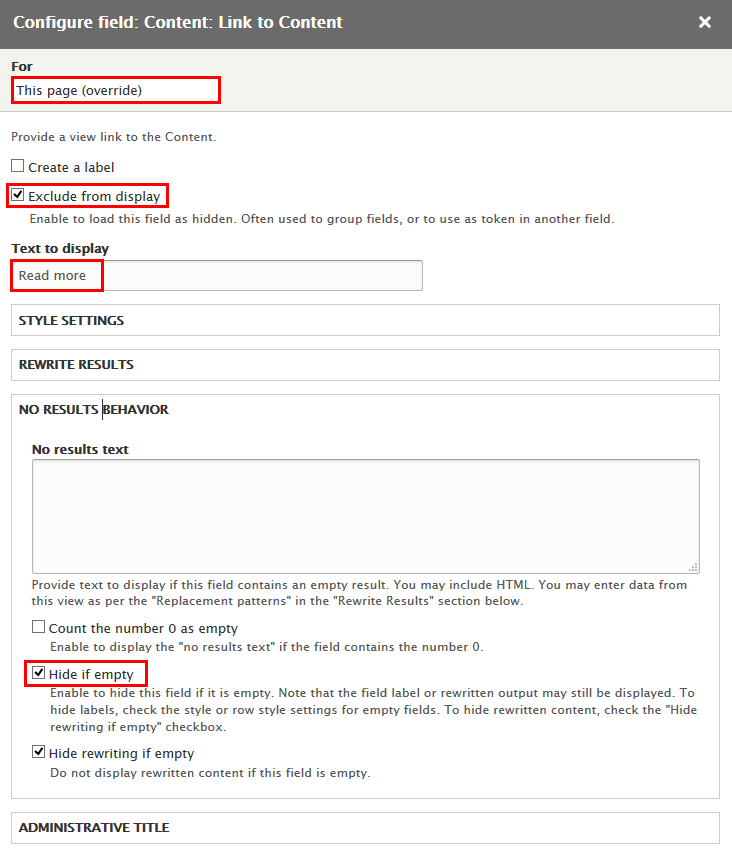
Step 9: Set properties for Content: Link to Content
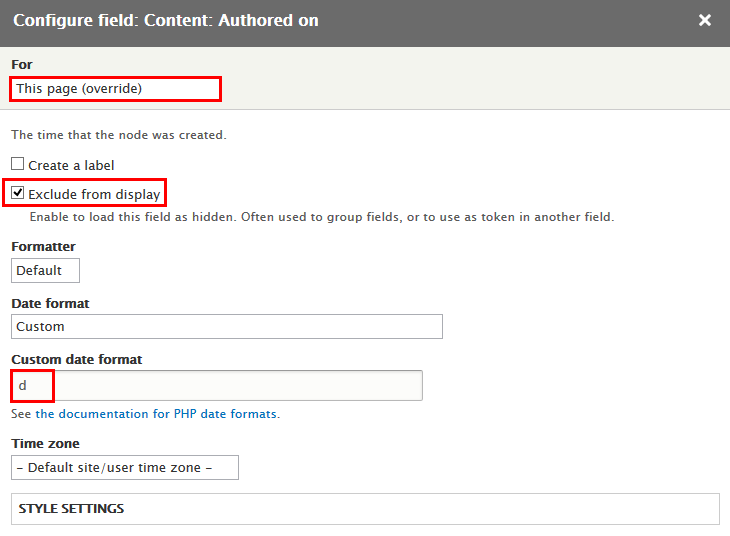
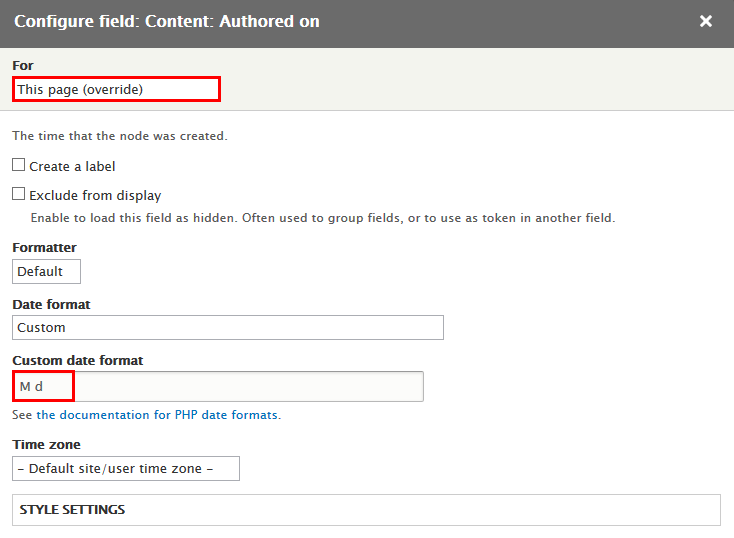
Step 10: Set properties for Content: Authored on
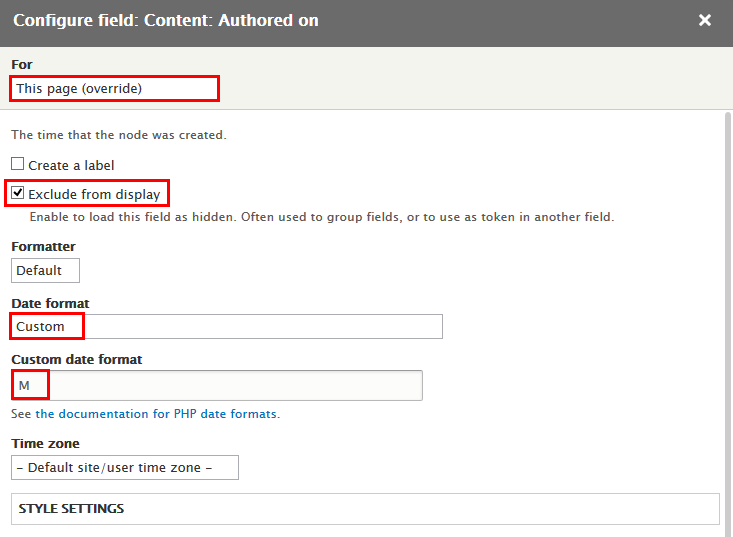
Step 11: Set properties for Content: Authored on
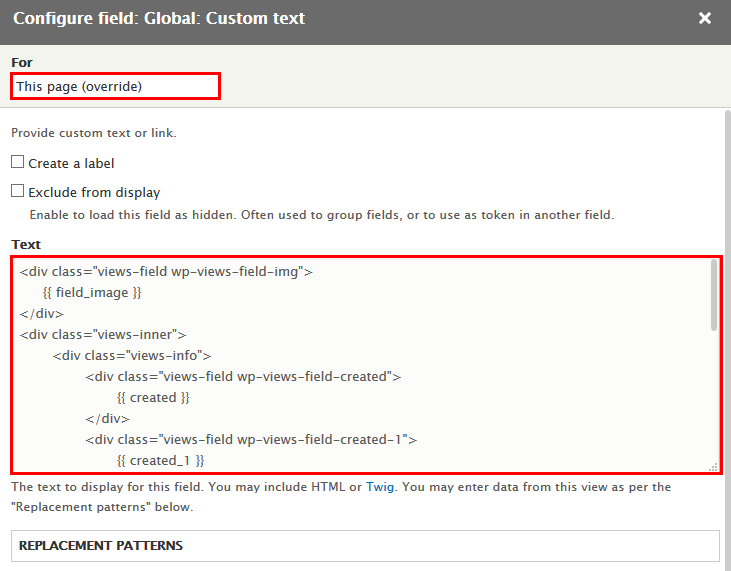
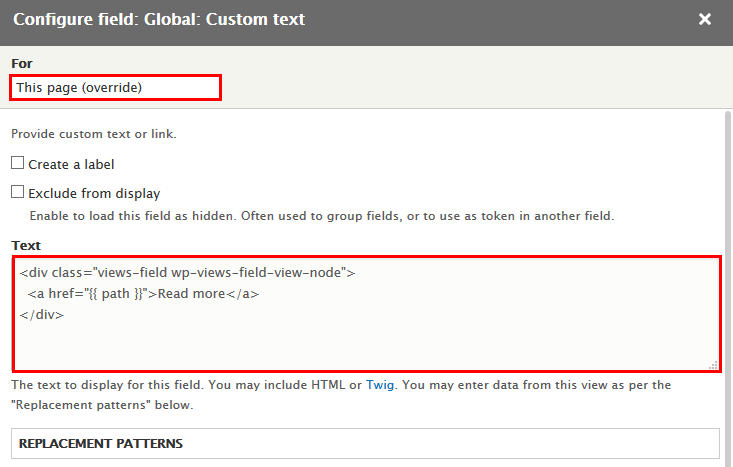
Step 12: Set properties for Global: Custom text
Refer to following HTML code:
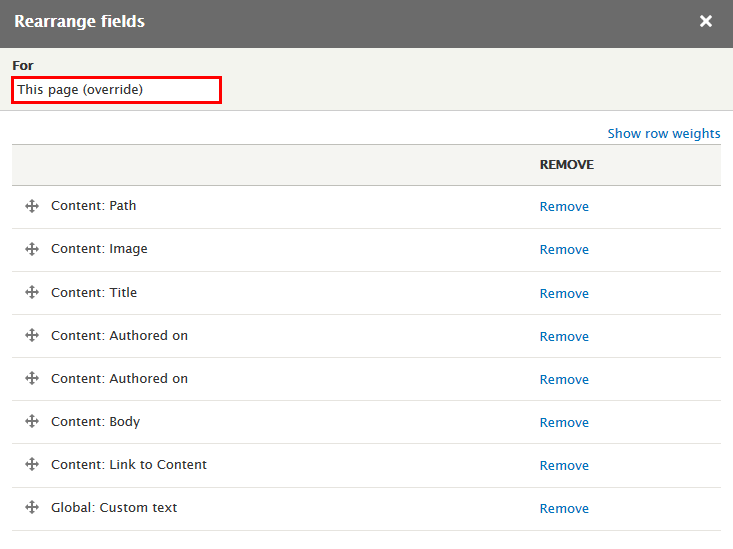
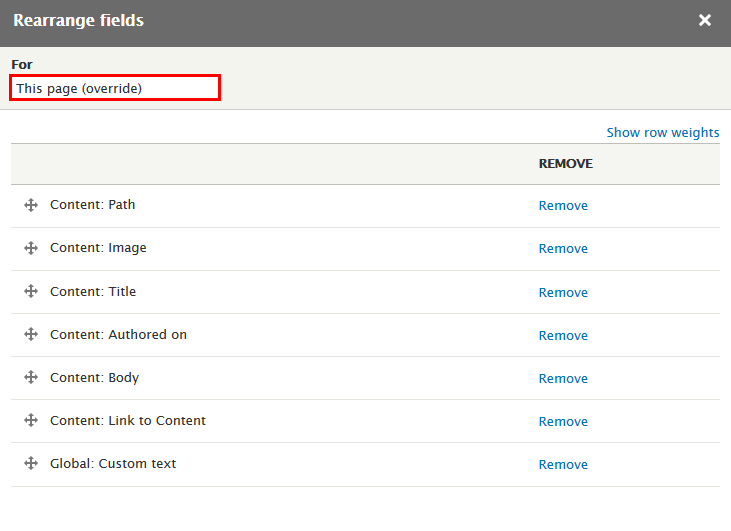
Step 13: At FIELDS area, click Rearrange button. Set For This page (override), then click Remove link Content: Tags, Content: Authored by field and set following properites:
Step 14: At HEADER area, click Rearrange button. Set For This page (override), then click Remove link Global: Text area field
Step 15: At PAGE SETTINGS area, find and click Path link and set following properites:
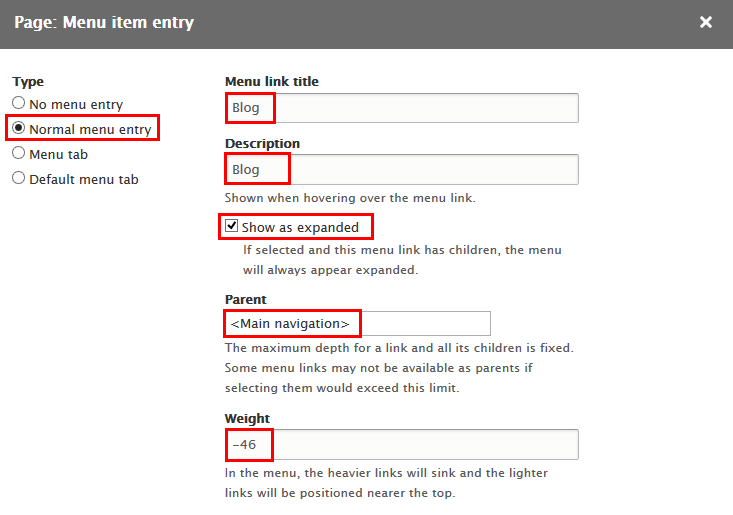
Step 16: At PAGE SETTINGS area, find and click Menu link and set following properites:
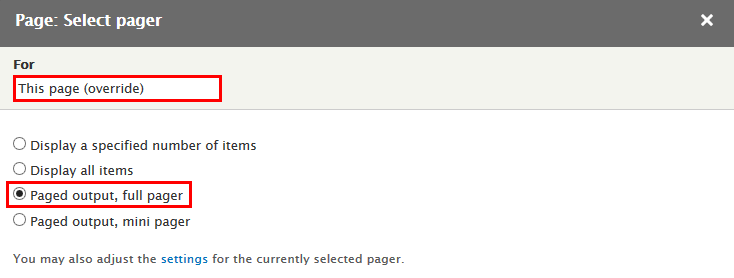
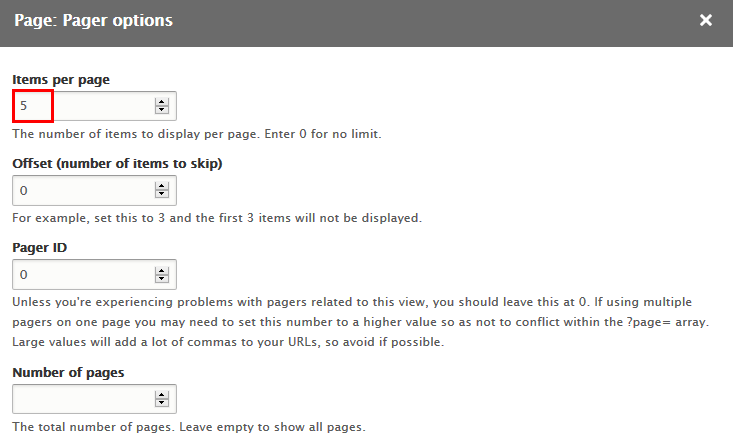
Step 17: At PAGER area, find Use pager and click Display a specified number of items link and set following properites
Step 18: At Advanced > OTHER area, add CSS class:
Step 19: Click Save to save view
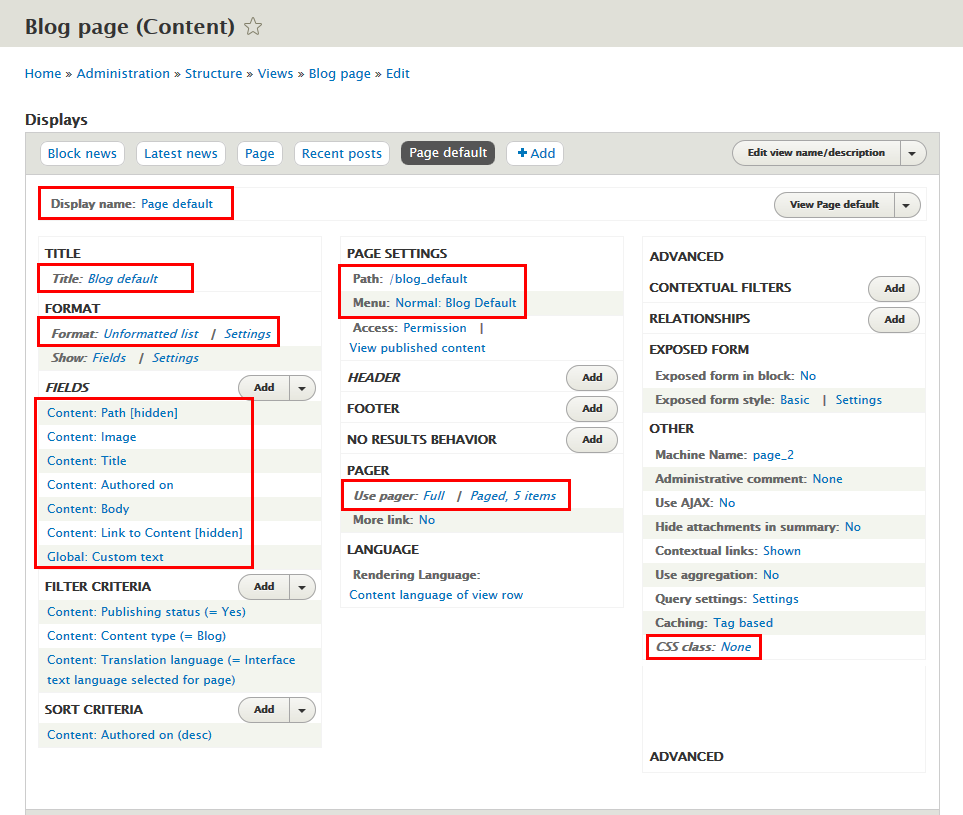
Blog default page
Front end Display
Add Page view
Step 1: Navigate to Structure > Views, find Blog page view click Edit button:
Step 2: Click Add > Page button to create Page default view and set properties for following fields:
Step 3: At Display name area, click and set properties:
Step 4: At TITLE area, find Title field and set following properites:
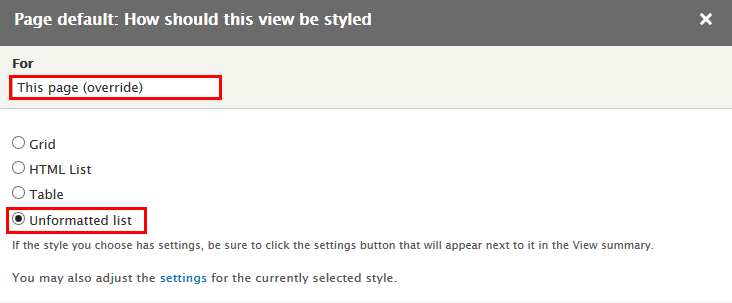
Step 5:At FORMAT area, find Format click link and set following properties:
Step 6: At FIELDS area, click Add button to add fields: Content: Link to Content, Global: Custom text
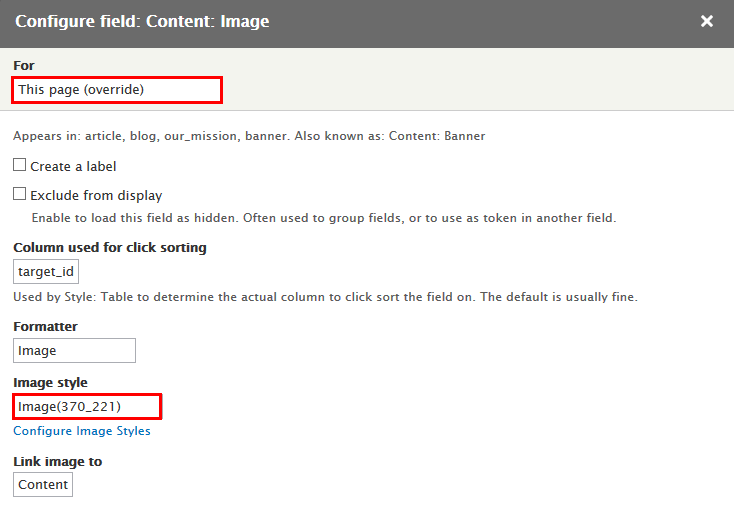
Step 7: Set properties for Content: Image
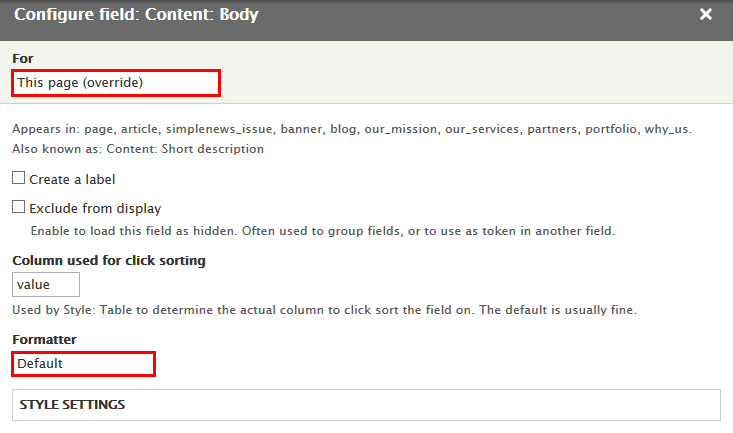
Step 8: Set properties for Content: Body
Step 9: Set properties for Content: Link to Content
Step 10: Set properties for Content: Authored on
Step 11: Set properties for Global: Custom text
Refer to following HTML code:
Step 12: At FIELDS area, click Rearrange button. Set For This page (override), then click Remove link Content: Tags, Content: Authored by field and set following properites:
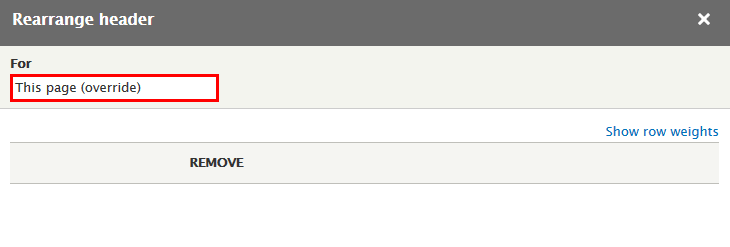
Step 13: At HEADER area, click Rearrange button. Set For This page(override), then click Remove link Global: Text area field
Step 14: At PAGE SETTINGS area, find and click Path link and set following properites:
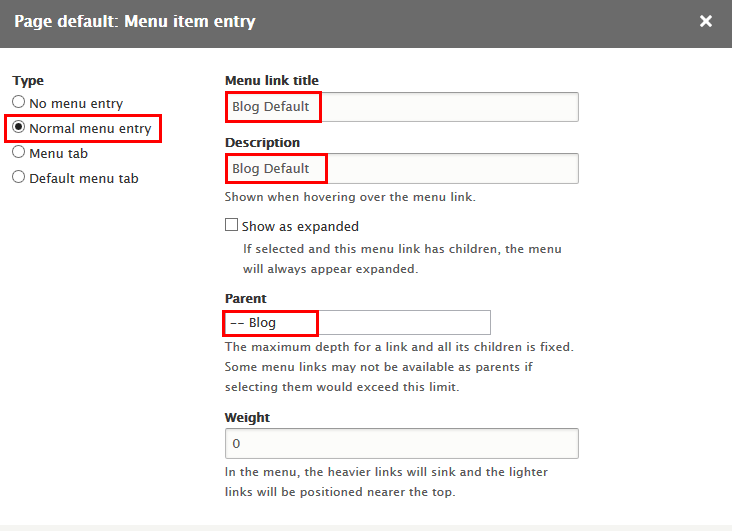
Step 15: At PAGE SETTINGS area, find and click Menu link and set following properites:
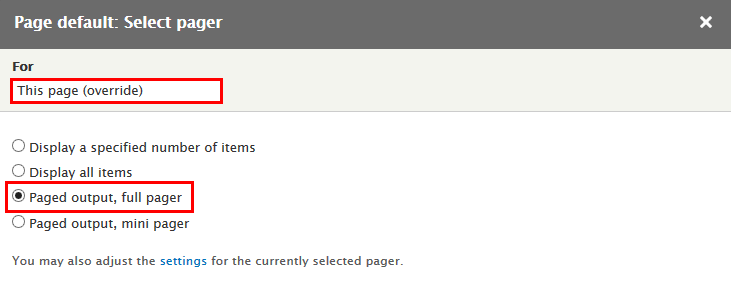
Step 16: At PAGER area, find Use pager and click Display a specified number of items link and set following properites
Step 17: At Advanced > OTHER area, add CSS class:
Step 18: Click Save to save view
Contact page
Front end Display
1. Banner block
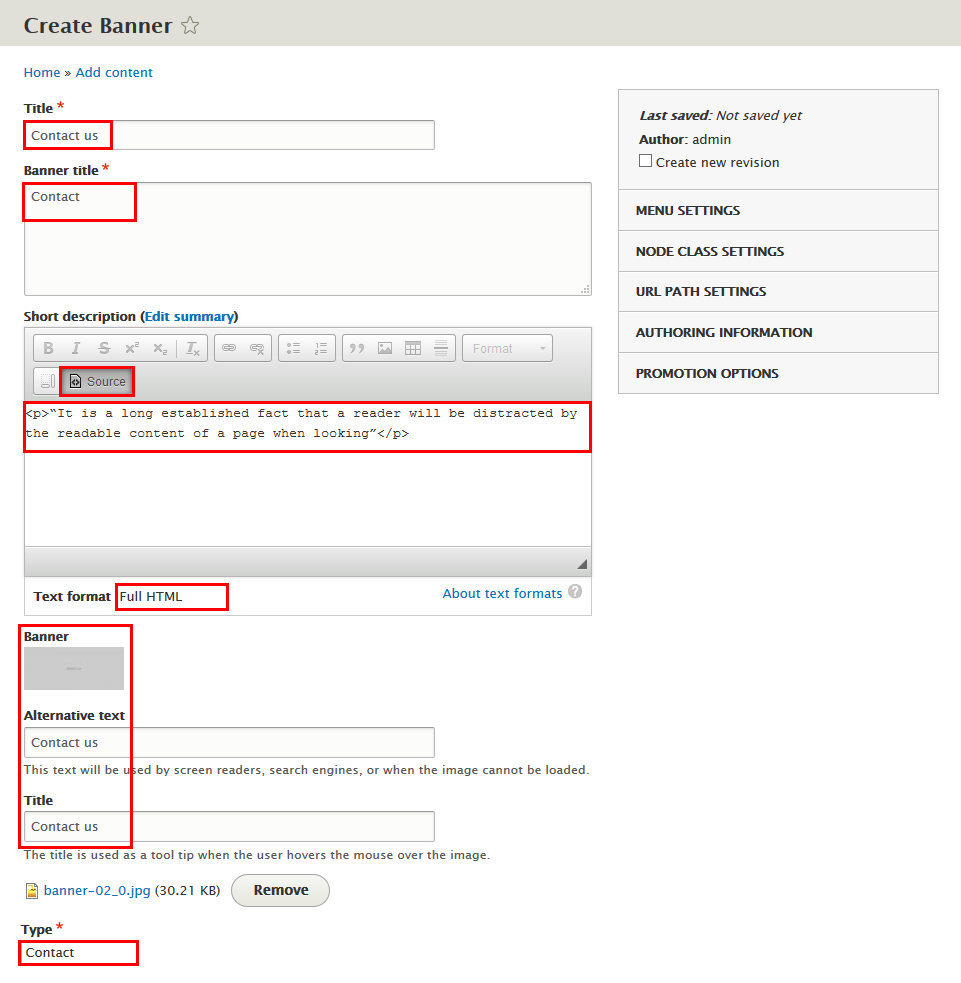
1.1 Contact us content
Step 1: Navigate to Content > Add content click Banner, create Contact us content with following properties:
Step 2: Click Save button
Refer to following HTML code:
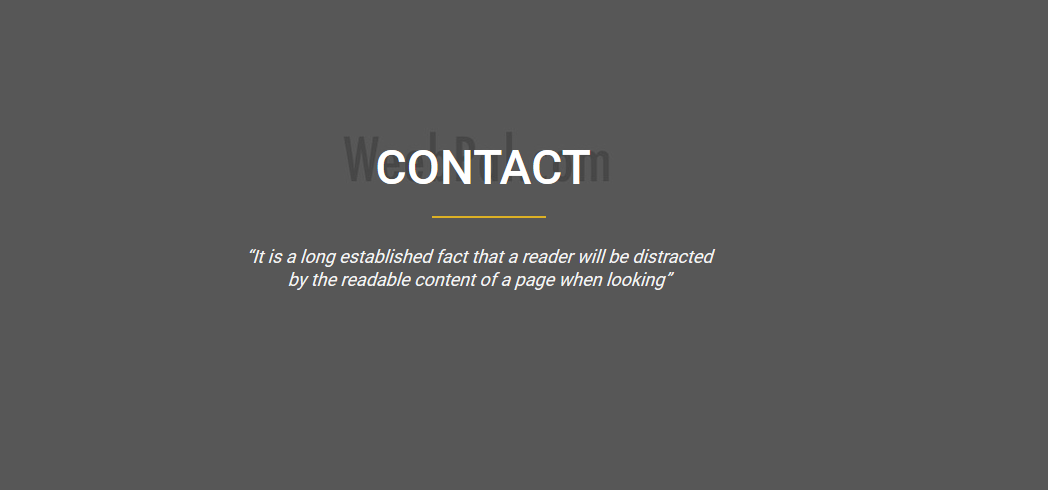
“It is a long established fact that a reader will be distracted by the readable content of a page when looking”
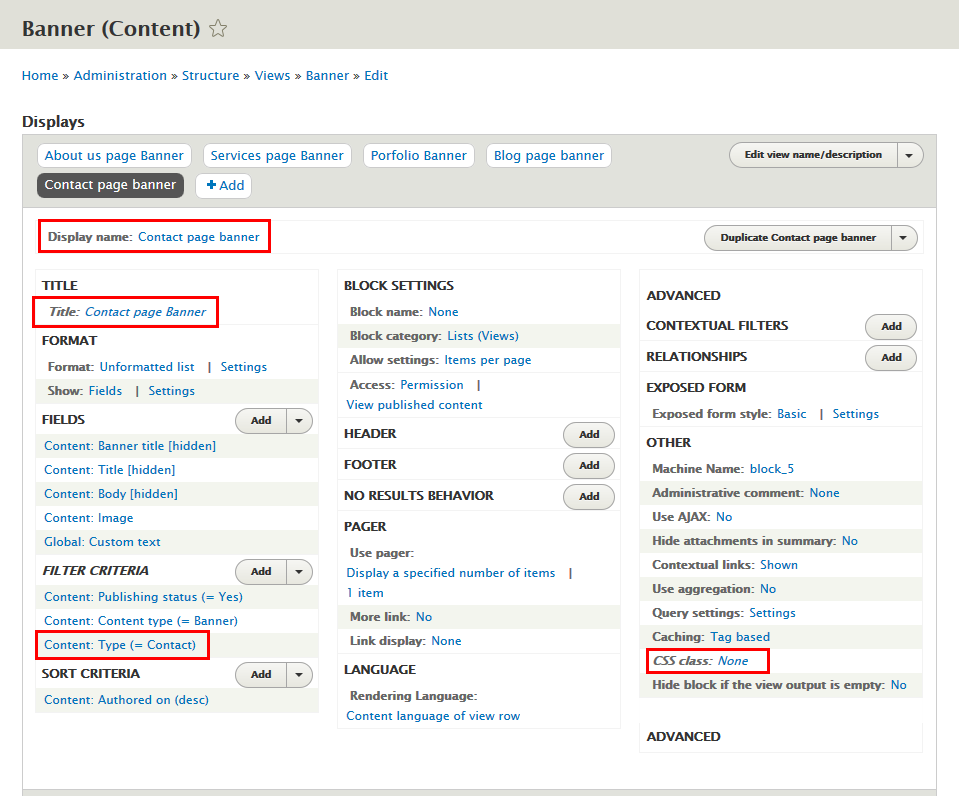
1.2 Add Banner: Contact page banner block view
Step 1: Navigate to Structure > Views, find Banner view click Edit button:
Step 2: Click Add > Block button to create Contact page banner block view and set properties for following fields:
Step 3: At Display name area, click and set properties:
Step 4: At TITLE area, click and set properties:
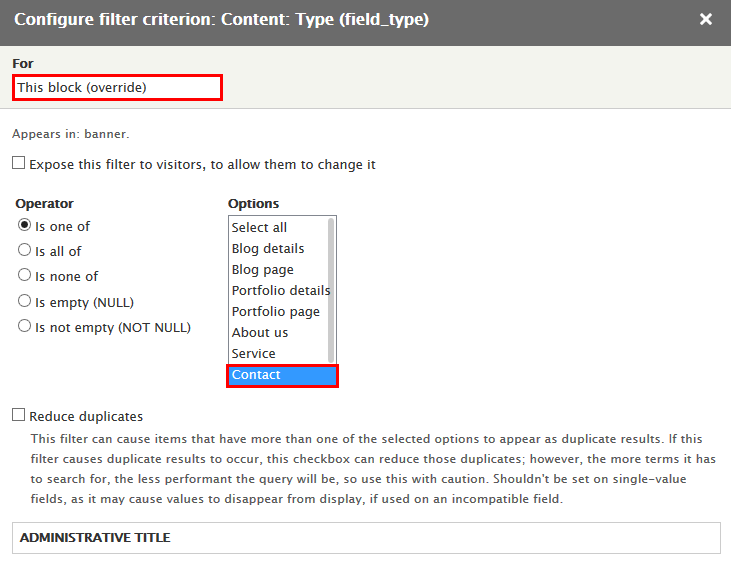
Step 5: At FILTER CRITERIA area, click Content: Type field and set following properites:
Step 6: At Advanced > OTHER area, add CSS class:
Step 7: Click Save to save view
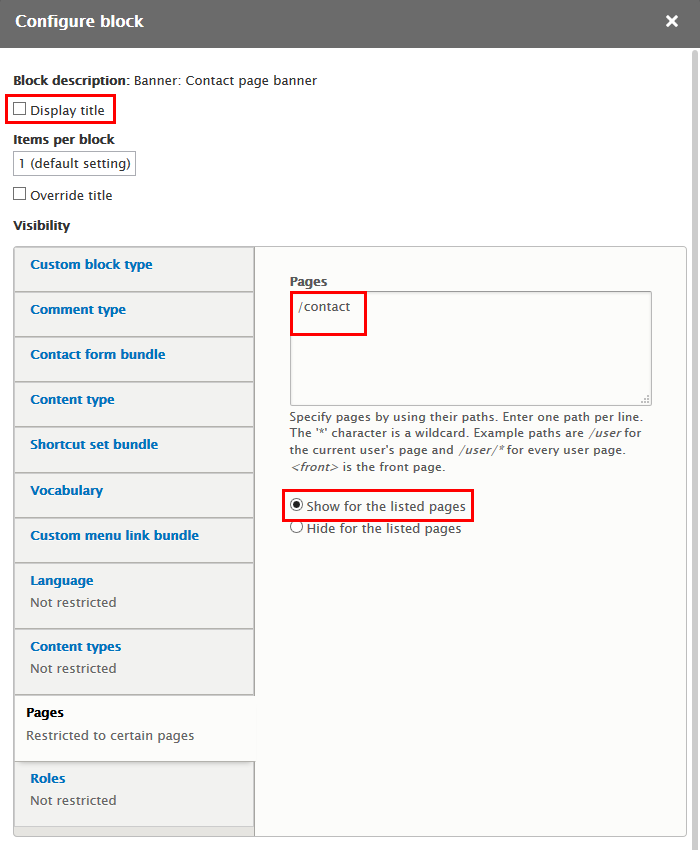
1.3 Configure Banner: Contact page block
Step 1: Navigate to Structure > Block layout
Step 2: Find Banner click Place block button
Step 3: Find Banner: Contact page banner click Place block button and set following properites:
Step 4: Click Save block button.
2. Configure Contact forms
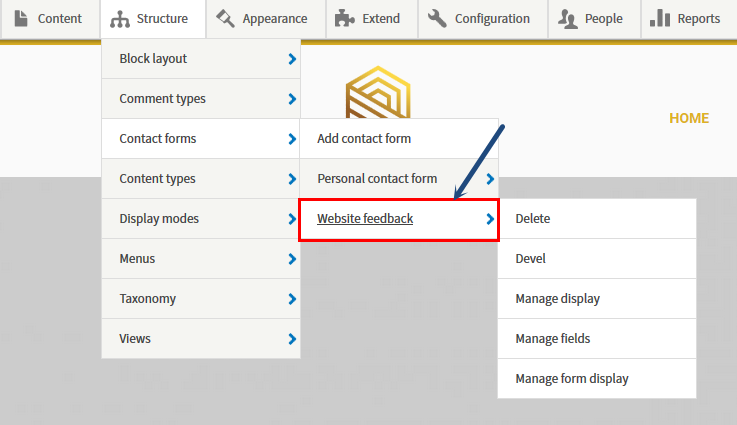
Step 1: Navigate to Structure > Contact forms find Website Feedback click and edit properties:
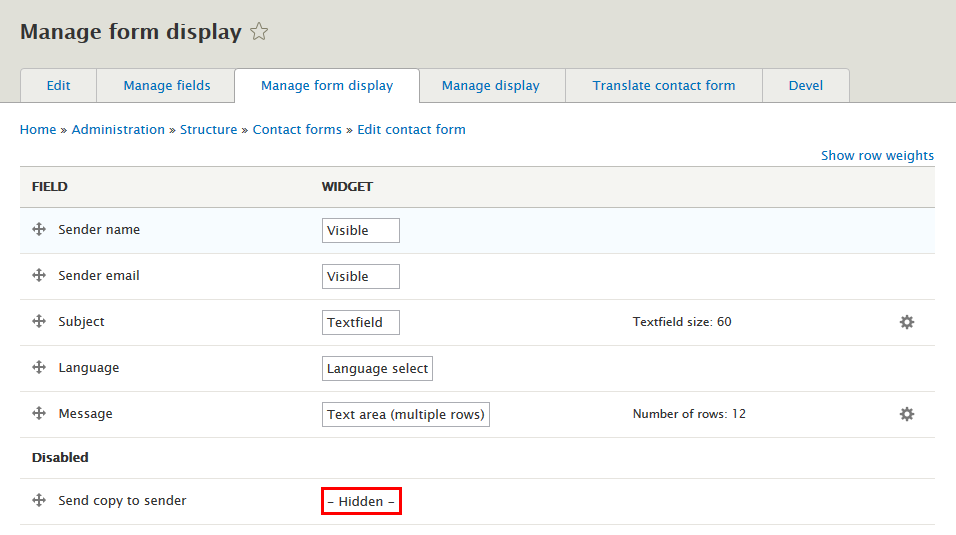
Step 2: Go to Manage form display tab , set following properties:
Step 3: Click Save button
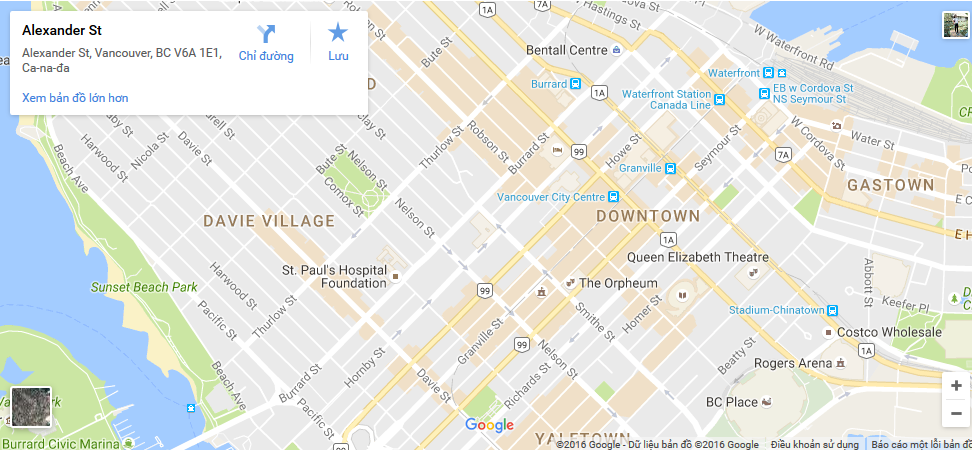
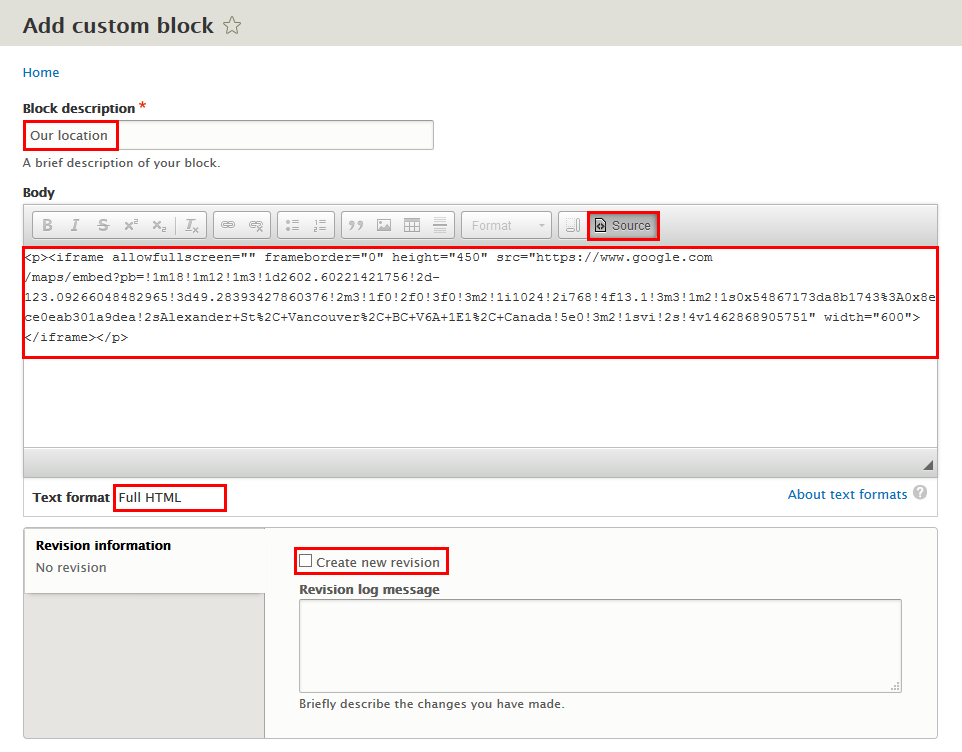
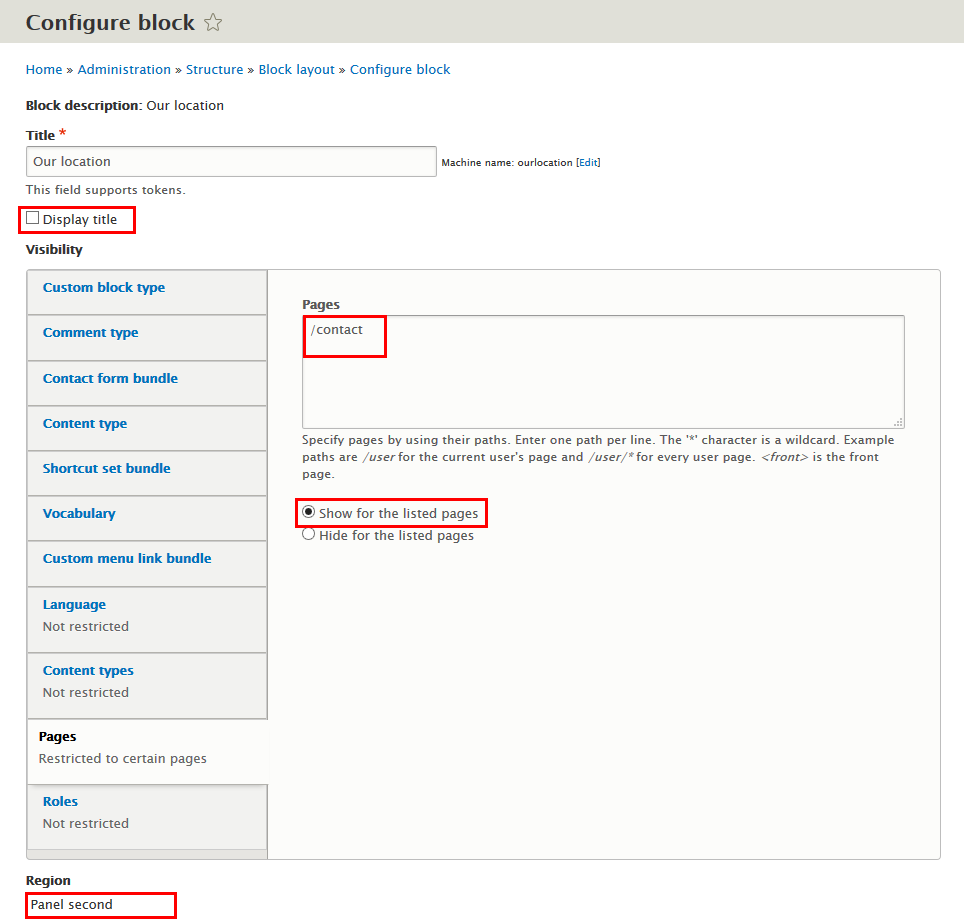
3. Create Our location block
Step 1: Navigate to Structure > Blocks click Add block, create Our location block and set with following properties:
Step 2: Click Save button
Refer to following HTML code:
More Configurations
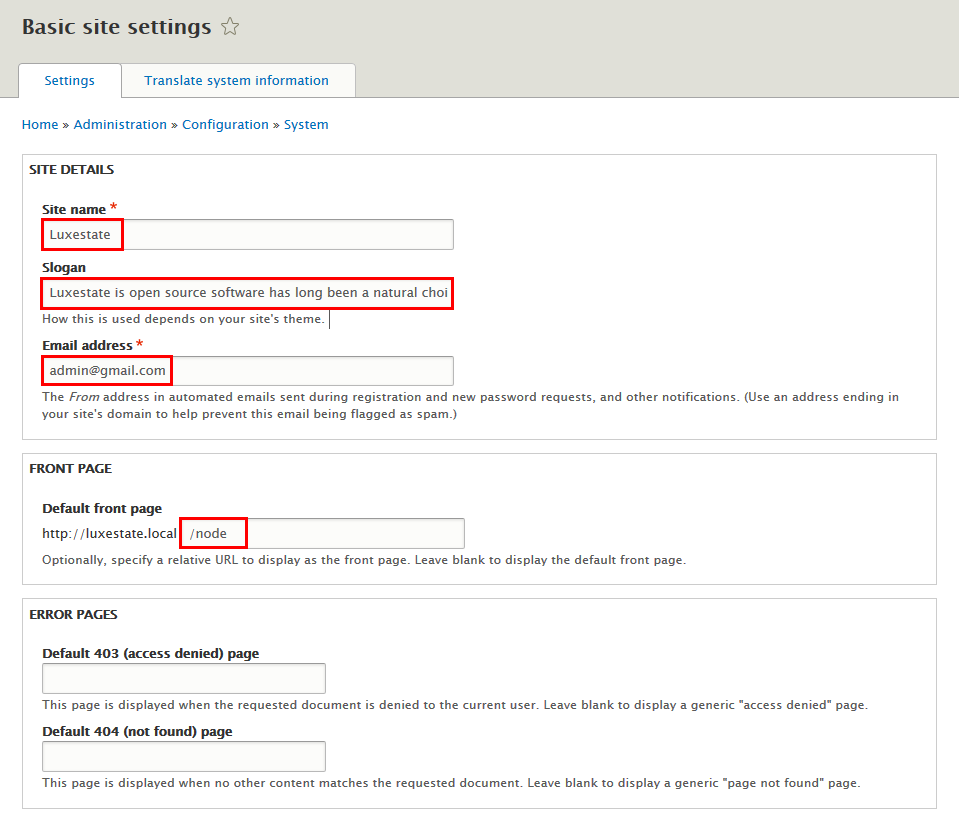
Site Information
In this section, you can change basic settings, such as the site name, slogan, e-mail address.
1. Log in to Administration site page by administrator account
2. Navigate to the Site Information page Configuration > System: Basic site settings
3. Change site details from the view:
- Site name
- Slogan
- E-mail address
- Set Default Front page
4. Click on Save configuration to finish editing.


