
-

- Doc Navigation
- Taxonomy Configurations
- Media Configurations
Overview
Starting with a new theme, it's sometimes takes a lot of time for first time users to really understand how it works. You may want to know how to customize layouts, typography, block styles and make it look the way you want.
In most cases you won't need to know PHP or database queries, but basic knowledge would be very helpful to get great results.
If you're an experienced Drupal developer or if you want to build the theme from zero with only the basic appearance of your theme, find this guide in handy. This guide will give you the detailed step by step installation guide to help you start building the content for Forum Plus D8 to look exactly like the demo site.
1. Forum Plus Package
Can't deny that finding a forum theme in Drupal is hard. We have spent some time searching for one but failed to do it. That's the intention of our delivering Forum Plus, an exclusive forum theme in Drupal. Who may say that ones cannot build a Drupal forum? Forum Plus will give you a modern responsive forum website with all the necessary features.
This is the Drupal 8 version of the theme.
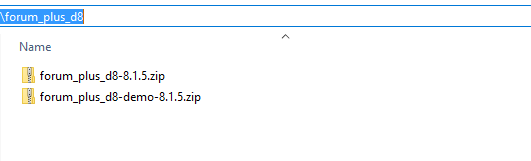
Included content:
- README.txt
- Forum Plus D8 theme: forum_plus_d8-8.1.5.zip
- Demo Profile for Forum Plus D8: forum_plus_d8-demo-8.1.5.zip
2. Features
- Documentation included.
- Browser compatibility
- Web Technology (Html5/Css3, Twitter Bootstrap 3.1.1, Font Awesome 4.0.3,…)
- Fully responsive.
- Color variations.
- Easy customization.
- High usability
- Support both Left to Right and Right to Left Languages
3. System Requirements
Database
- MySQL 5.5.3/MariaDB 5.5.20/Percona Server 5.5.8 or higher with PDO and an InnoDB-compatible primary storage engine,
- PostgreSQL 9.1.2 or higher with PDO,
- SQLite 3.7.11 or higher
PHP
- PHP 5.5.9 or higher
- PHP5 GD library installed
- Disabled error_reporting flag on production server
- Enabled mod_rewrite in Apache for clean URLs
- Memory limit set up at least 128MB
4. Screenshots
Let's glance through the theme's design & some features:
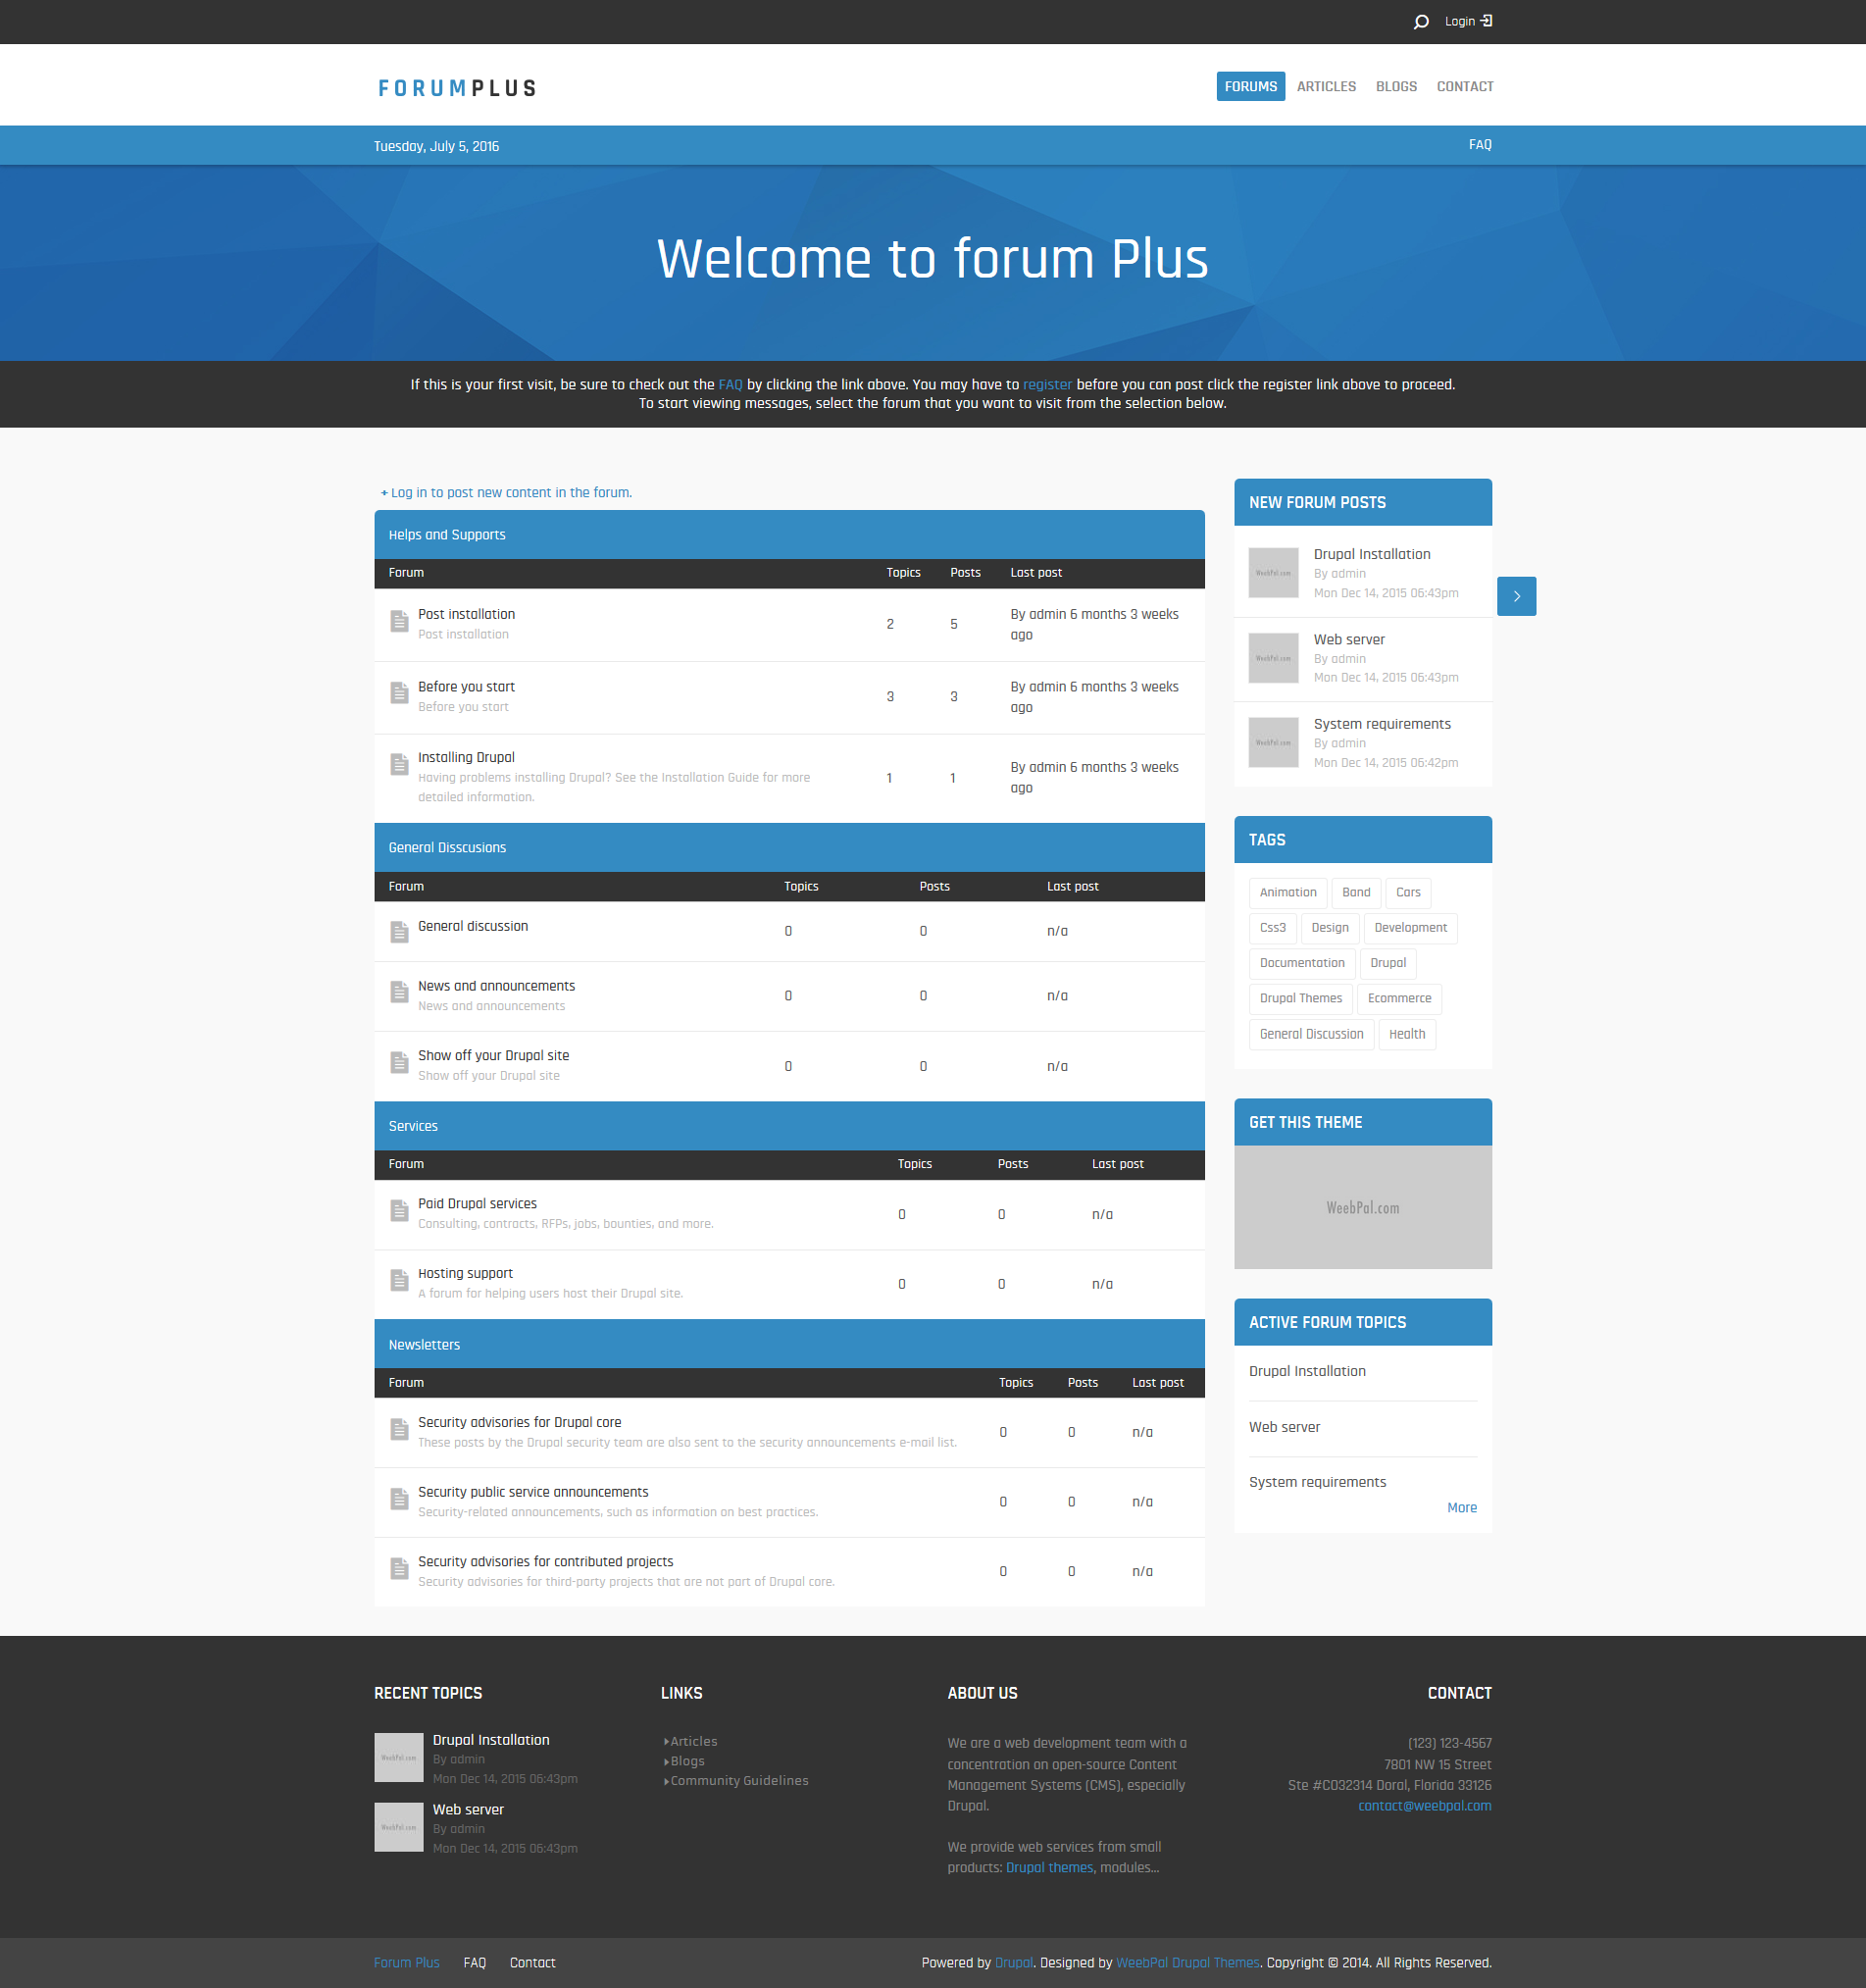
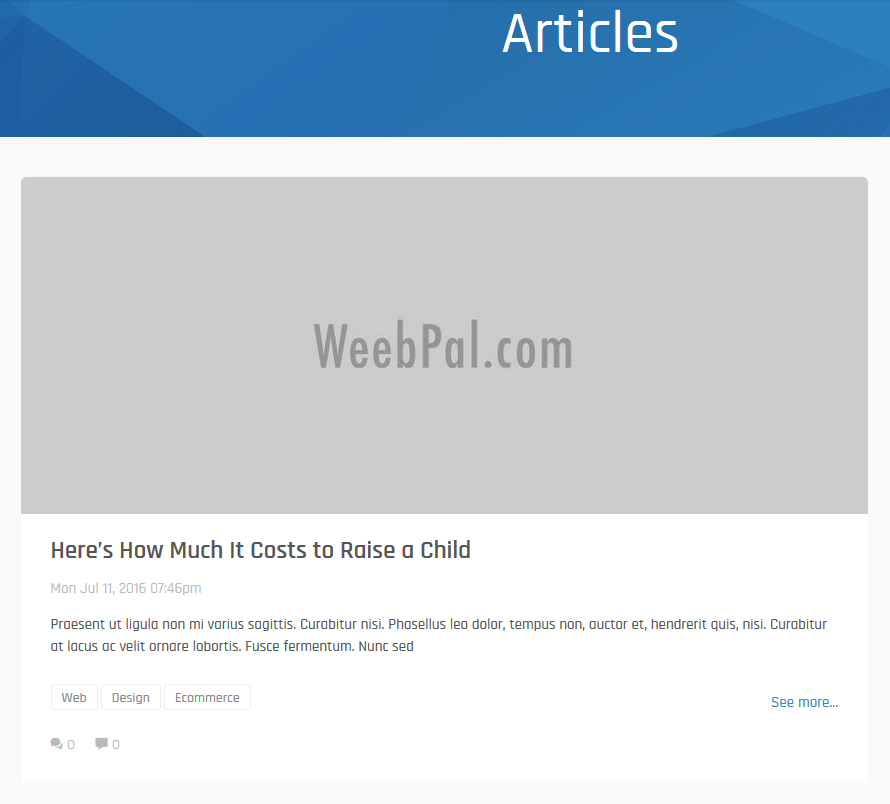
Homepage
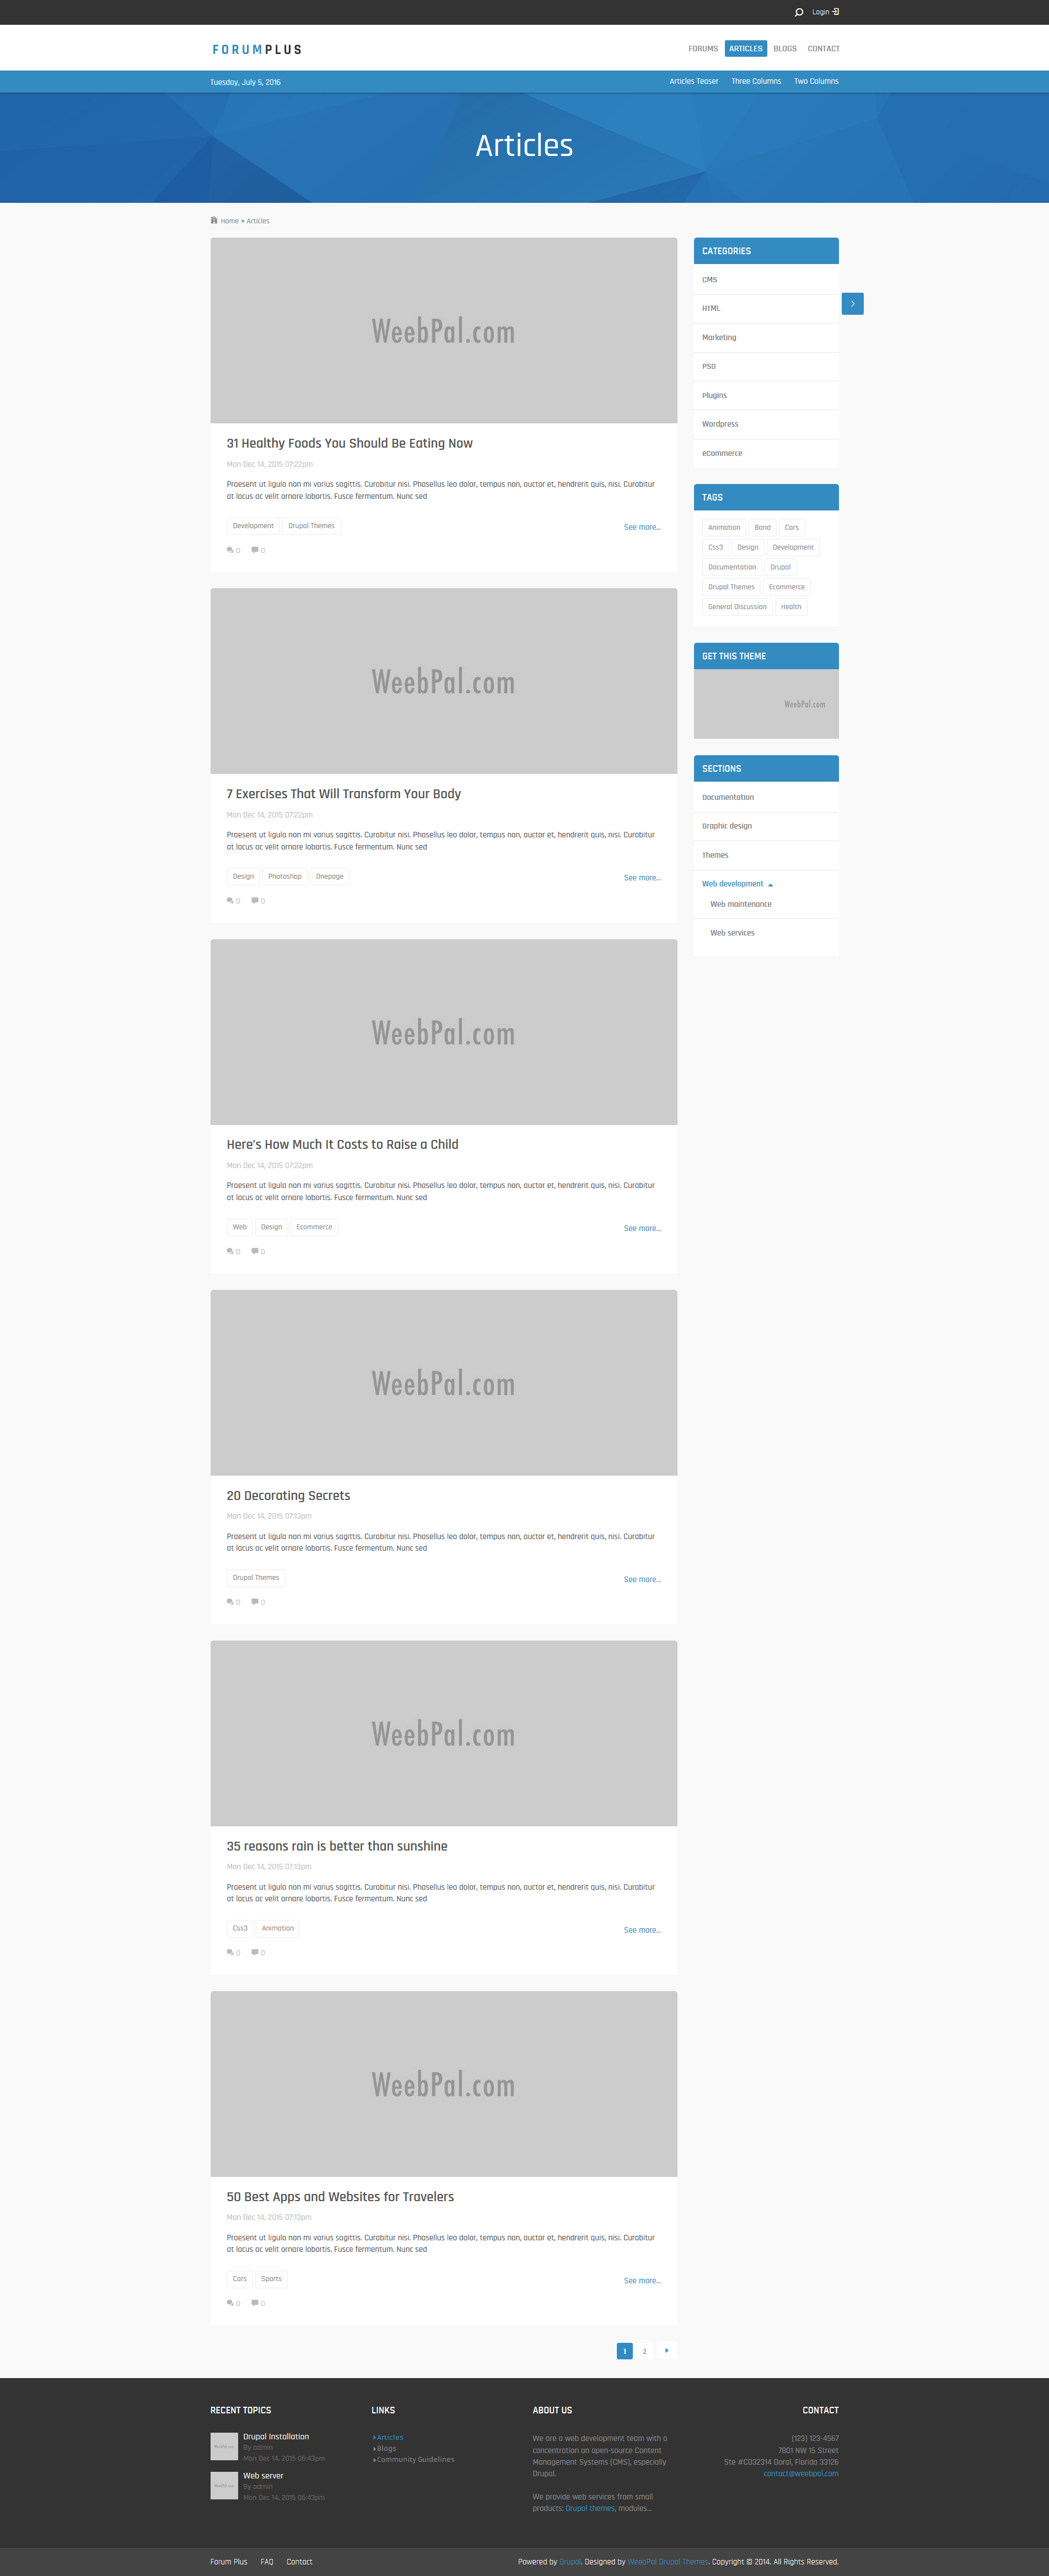
Articles page
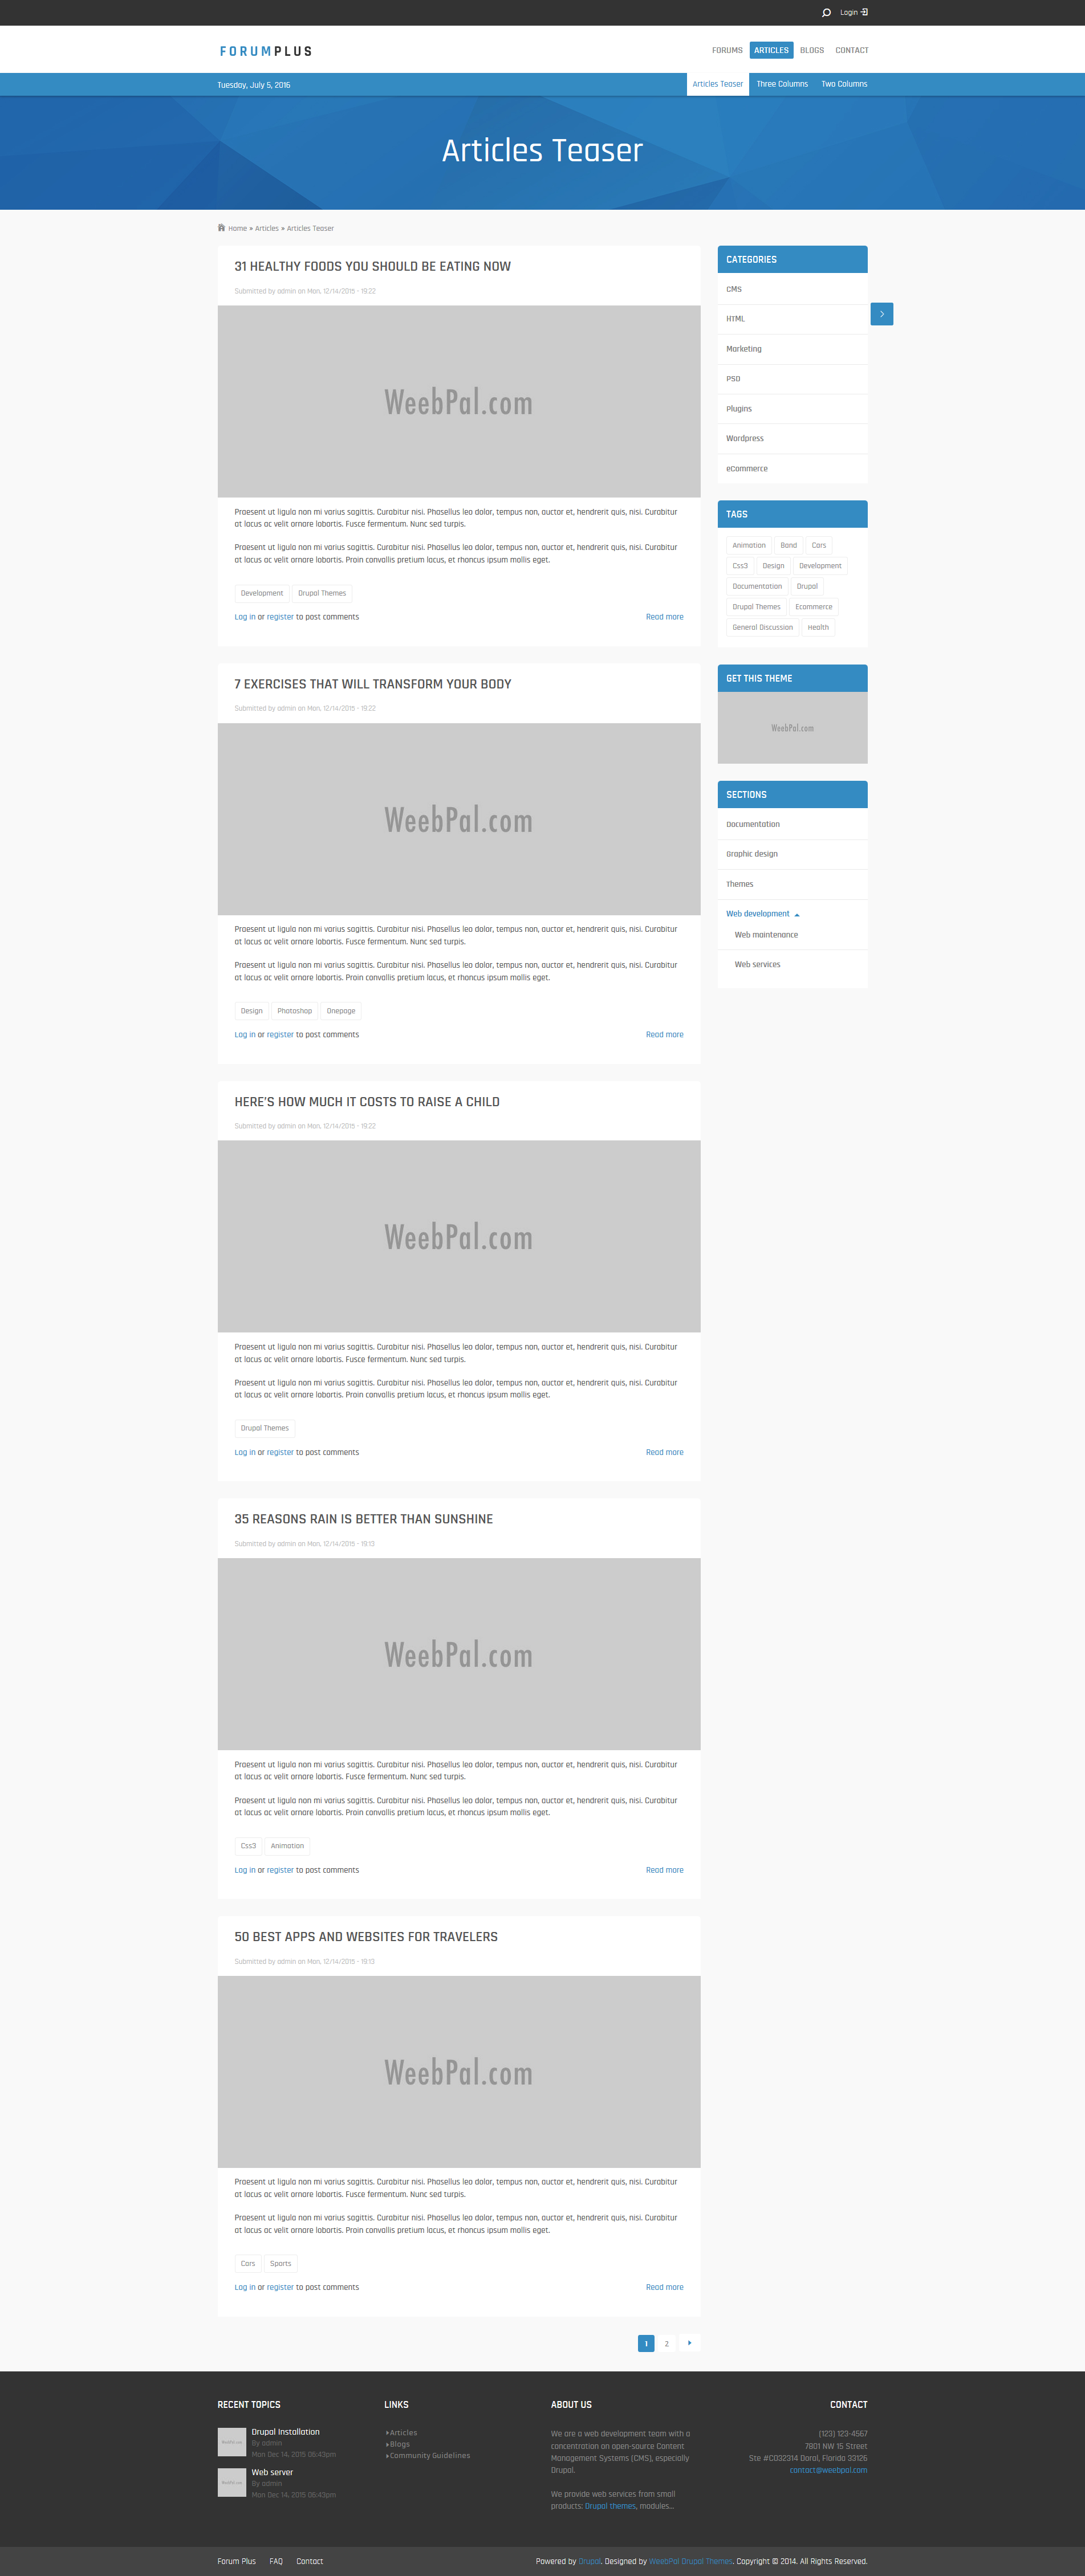
Articles Teaser page
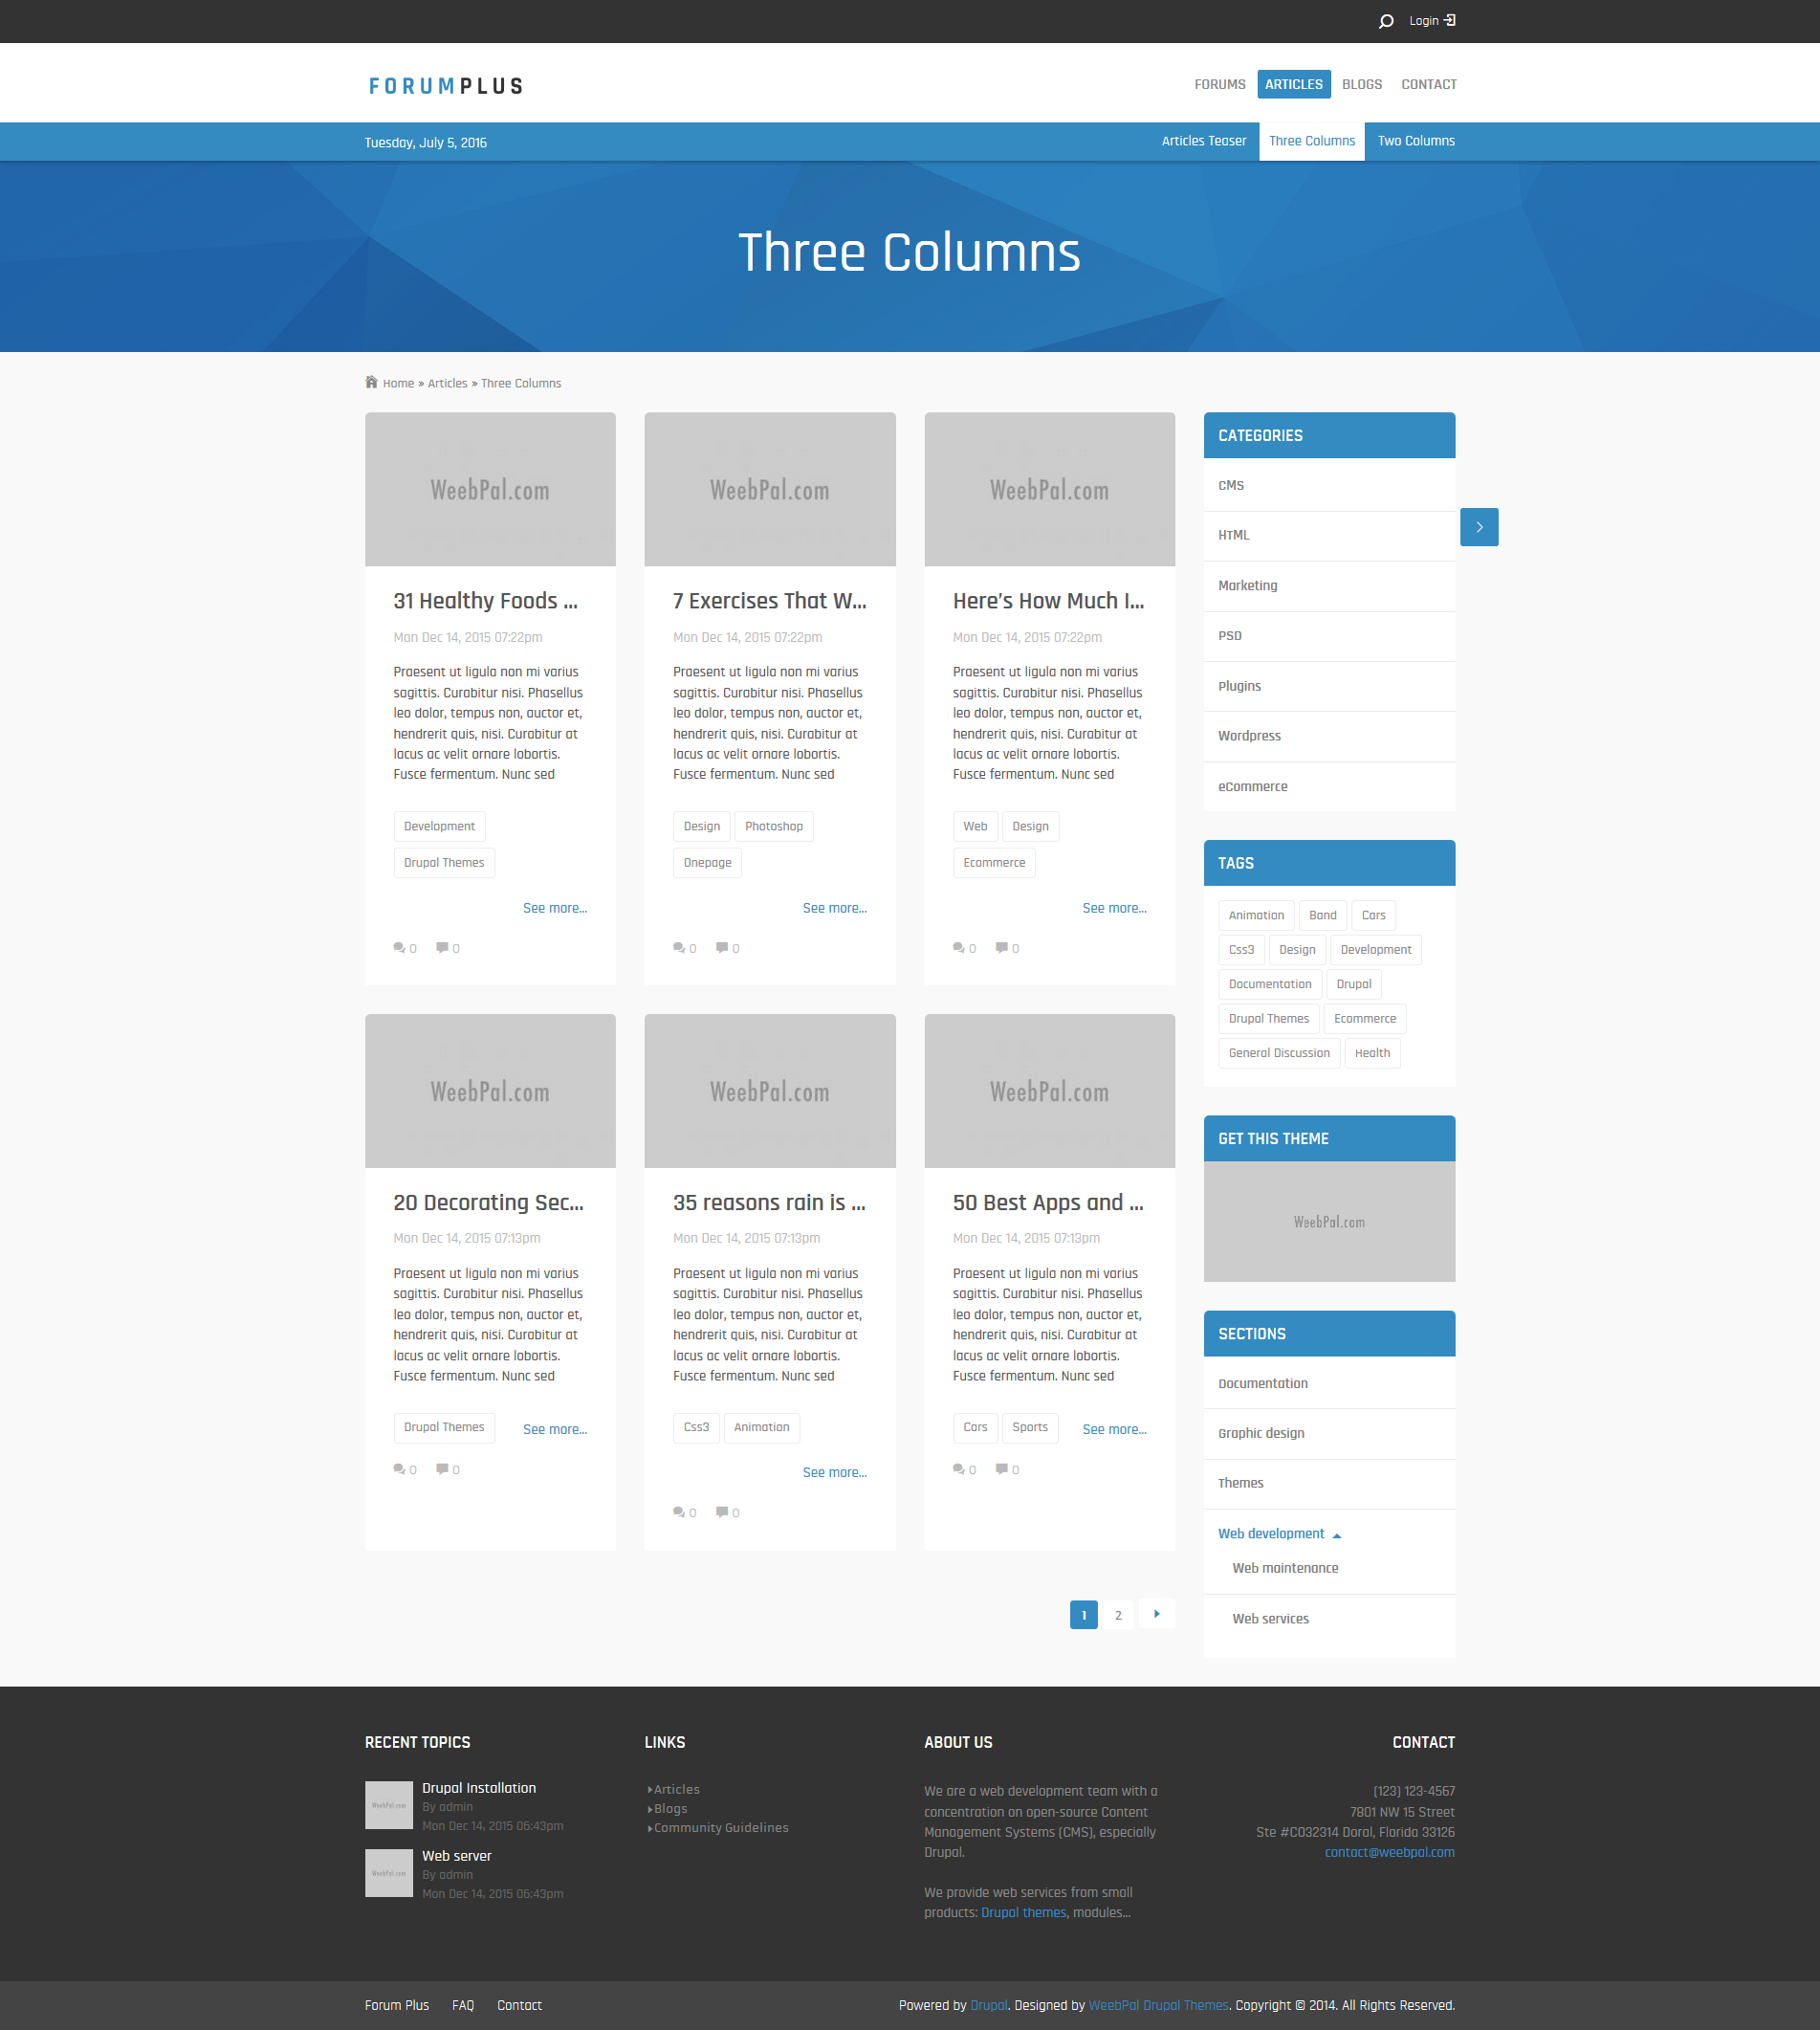
Three Columns page
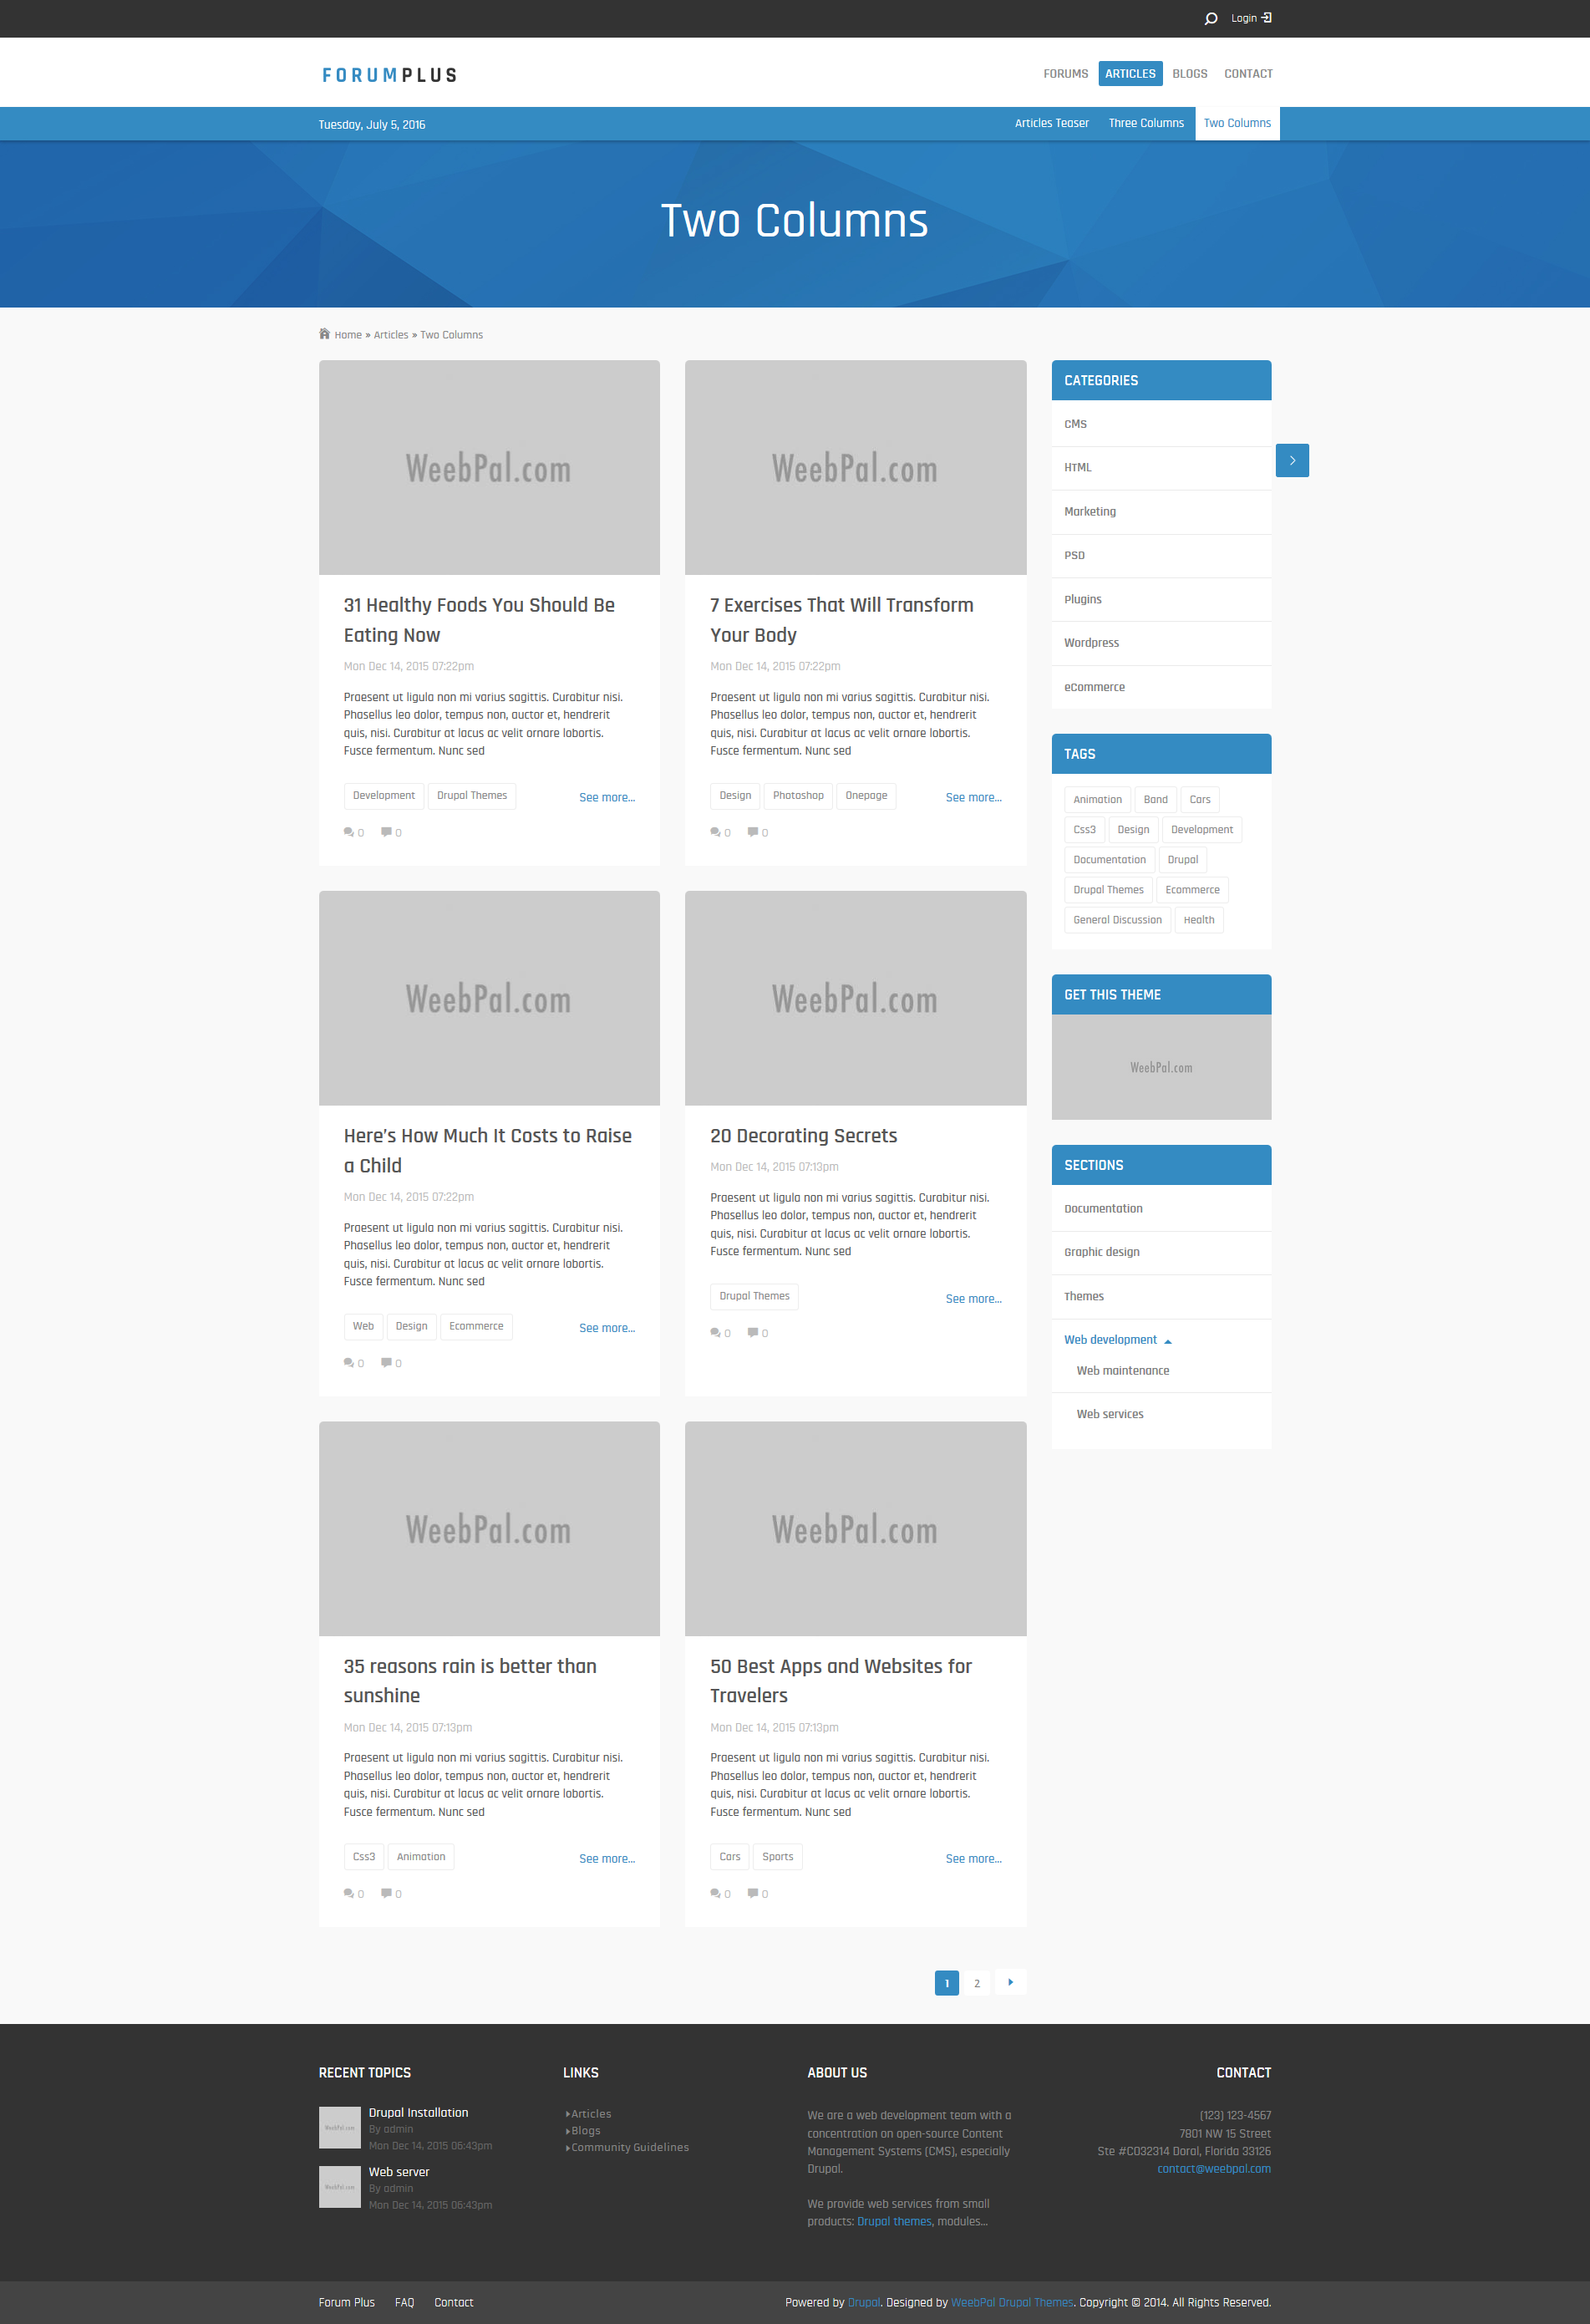
Two Columns page
Blogs page

Blogs Teaser page

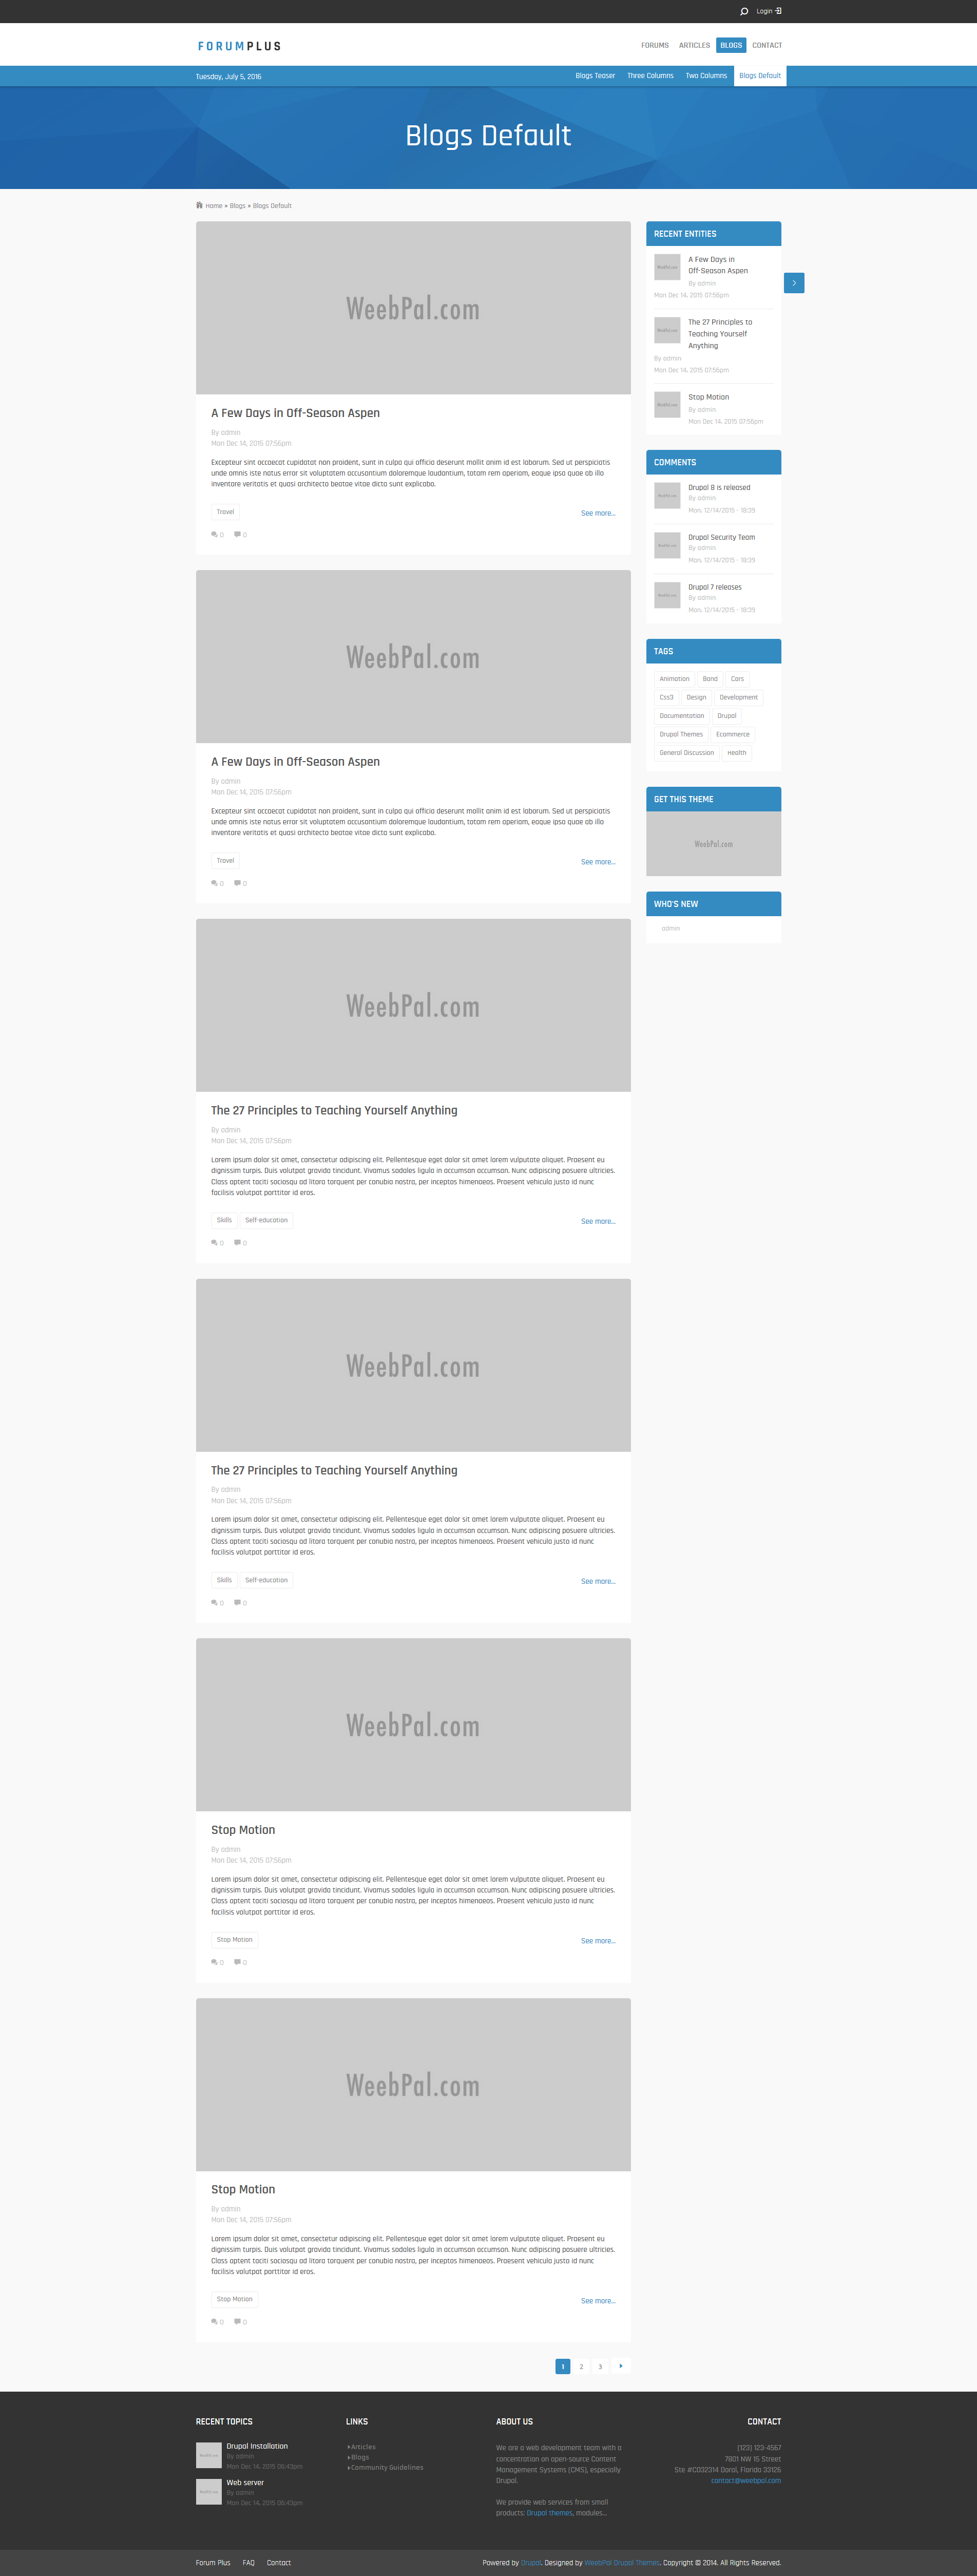
Blogs Default page
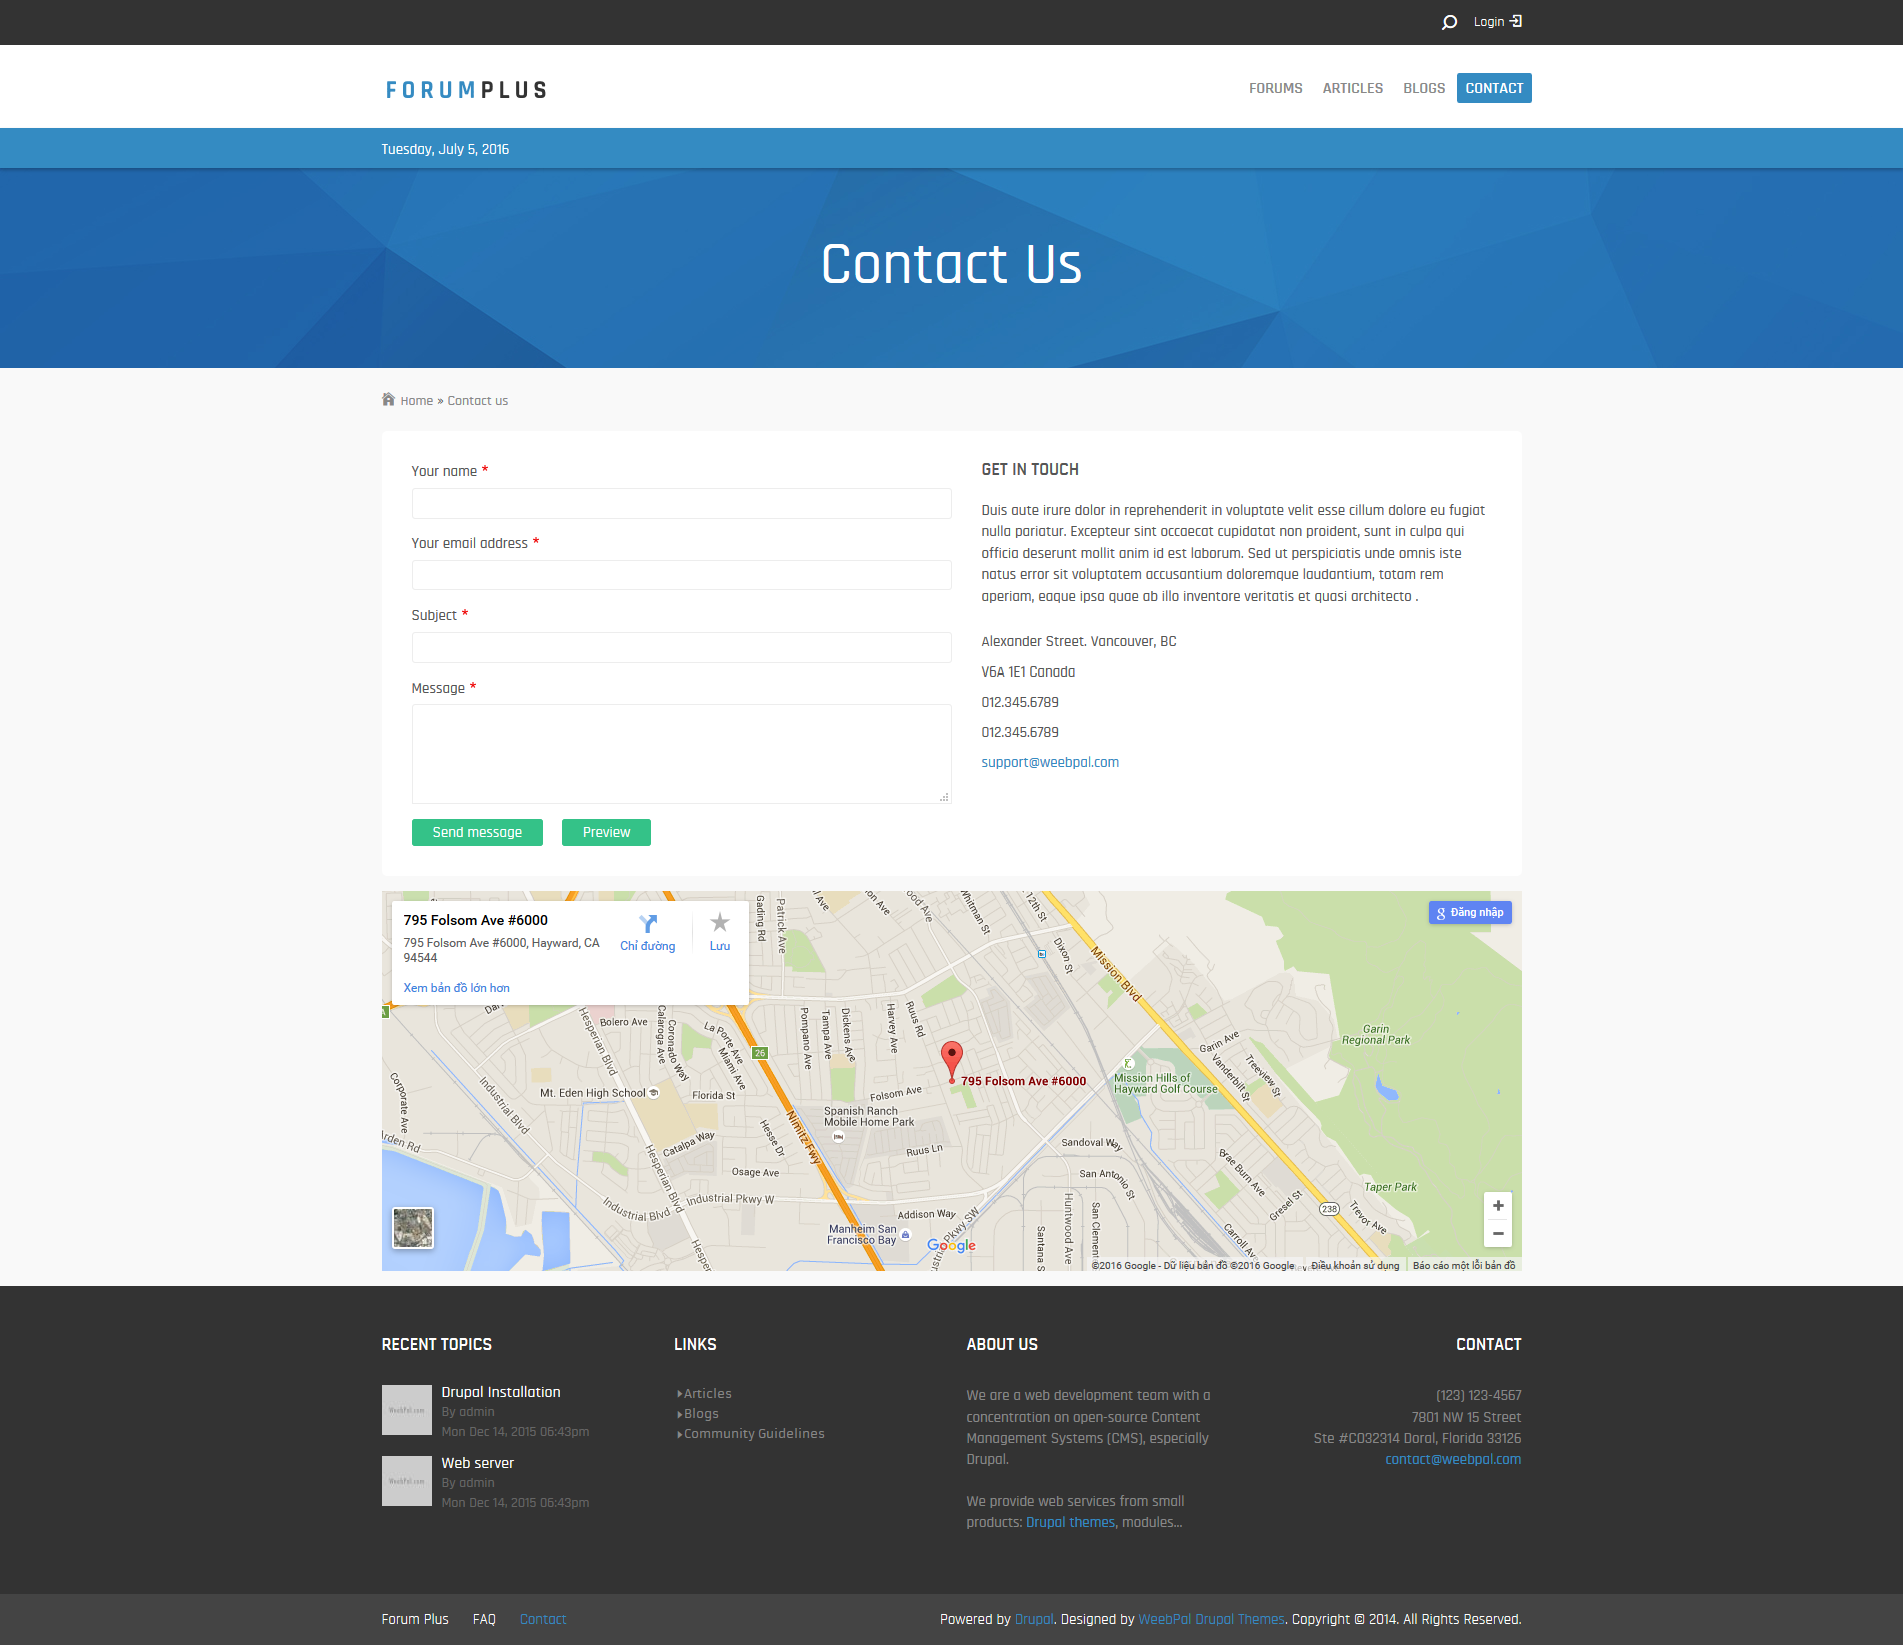
Contact Us page
5. Module requirements
Core Modules
- Admin_toolbar
- Memcache
- Weebpal_module
- Forum
- Statistics
Third-party Modules
Download Drupal core files, and extend your site with modules at here.
Installation
How to install a WeebPal demo package
1. Download one theme package of your choice (e.g: Forum Plus D8)
Files included:
- README.txt
- Forum Plus D8 theme: forum_plus_d8-8.1.5.zip
- Demo Profile for Forum Plus D8: forum_plus_d8-demo-8.1.5.zip This demo package includes all source codes and content, including sample images. This package will be used to build a site like our demo for the theme easily.
The below steps will give you the installation guide so that you can build your website to look exactly like the Forum Plus D8 Demo
- forum_plus_d8-8.1.5.zip
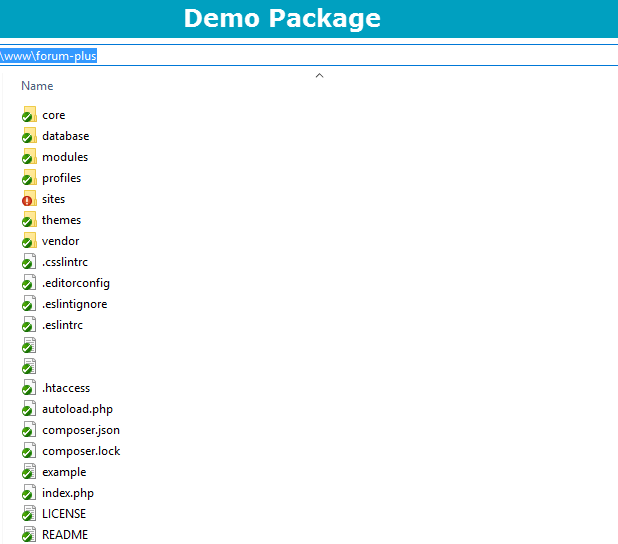
2. Extract forum_plus_d8-demo-8.1.5.zip above and copy it into your host, and rename the directory to forum-plus
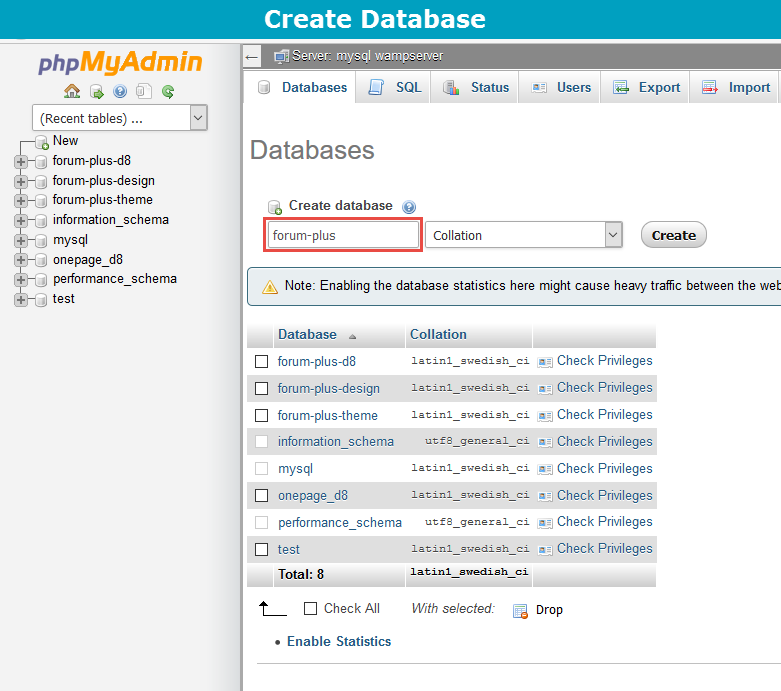
3. Access your MySQL database and create a new database (e.g: forum-plus) and user account. Don't forget to add correct permissions to new user to access the database
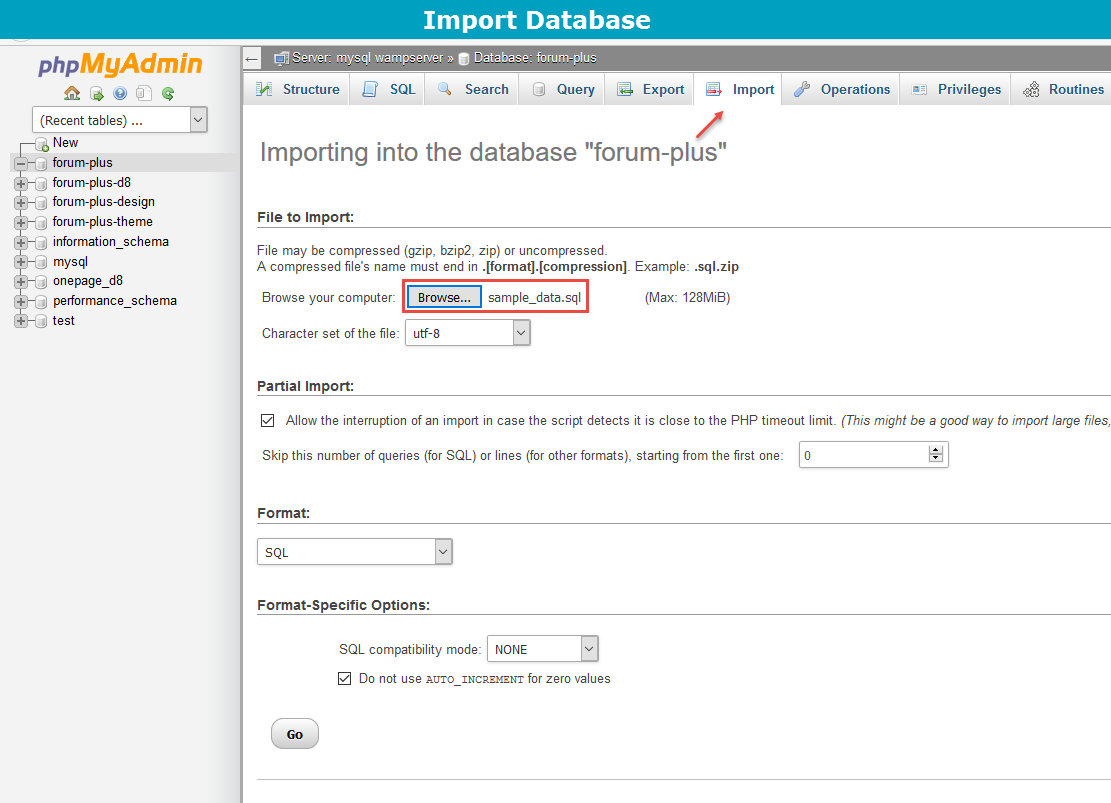
4. In the demo directory database/ (or profile/weebpal), you can find database dump named sample_data.sql.
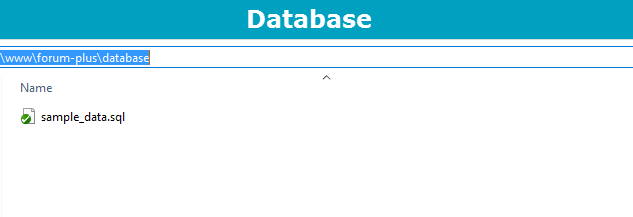
Import this file into new database.
5. Now, you need to modify sites/default/default.settings.php file. Clone default.settings.php file, then rename it "settings.php"
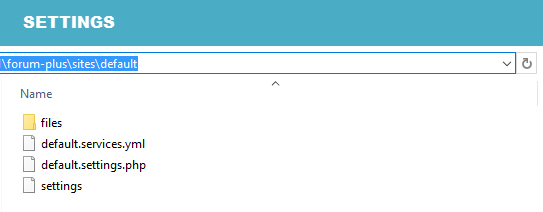
6. Open settings.php, locate the $database array and set proper credentials. Then move the $database code to the bottom of the file.
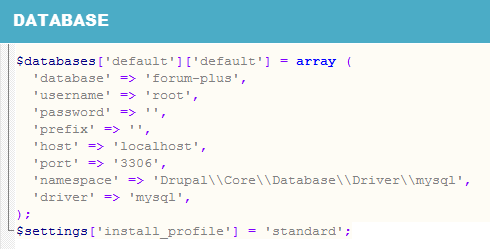
                    $databases['default']['default'] = array (
                      'database' => 'databasename',
                      'username' => 'username',
                      'password' => 'password',
                      'prefix' => '',
                      'host' => 'localhost',
                      'port' => '3306',
                      'namespace' => 'Drupal\\Core\\Database\\Driver\\mysql',
                      'driver' => 'mysql',
                       );
                   $settings['install_profile'] = 'standard';
When using this installation, you are installing everything from our preview server. So don't forget to set proper values to access to your database: db name, db admin username, db admin password, host, etc.
7. Open the browser and visit your website with the prepopulated content & layout exactly like our Forum Plus Demo
Now, you can visit administrator site with the admin account admin/admin to delete the unnecessary contents and add the new ones.
How to install a WeebPal theme for Drupal developers
If you're an experienced Drupal user or if you want to build the theme from zero with only the basic appearance of Forum Plus Theme, find this guide in handy.
1. Install Drupal
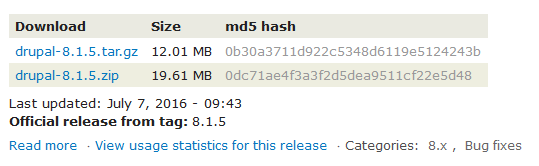
1. Go to Drupal download page and download the latest version of Drupal 8.
2. Extract and copy Drupal folder to your host and rename the directory (e.g: forum-plus)
Follow steps below to install a Drupal site only:3. Access to database and create a new database with a name such as forum-plus.
4. Open browser and navigate to your website.
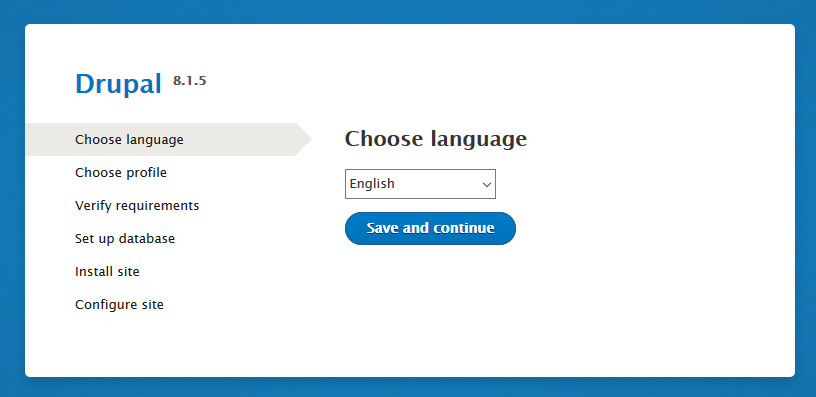
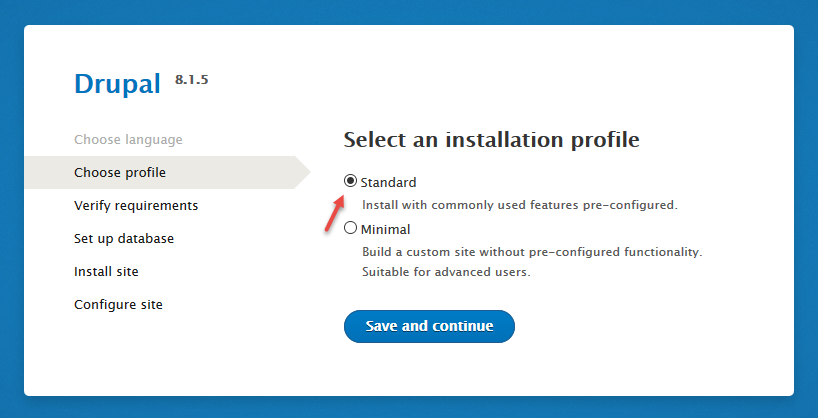
5. Choose language => click Save and continue button.
6. Select Standard => click Save and continue button.
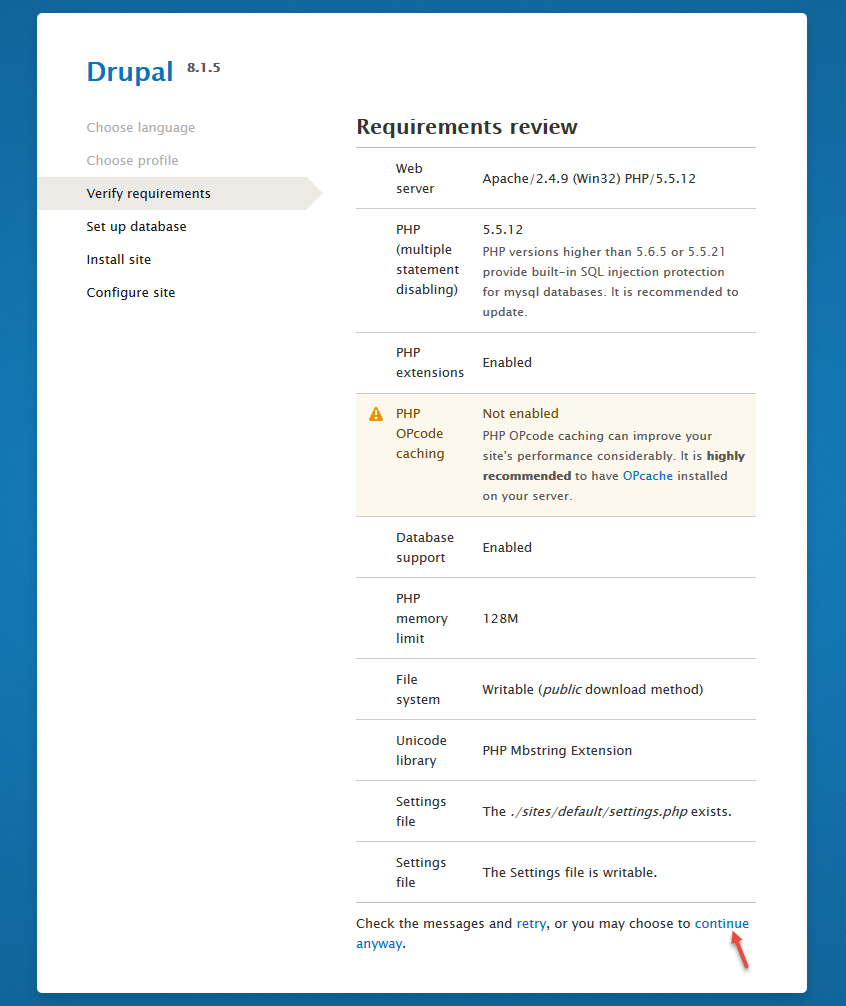
7. Choose continue anyway => click link.
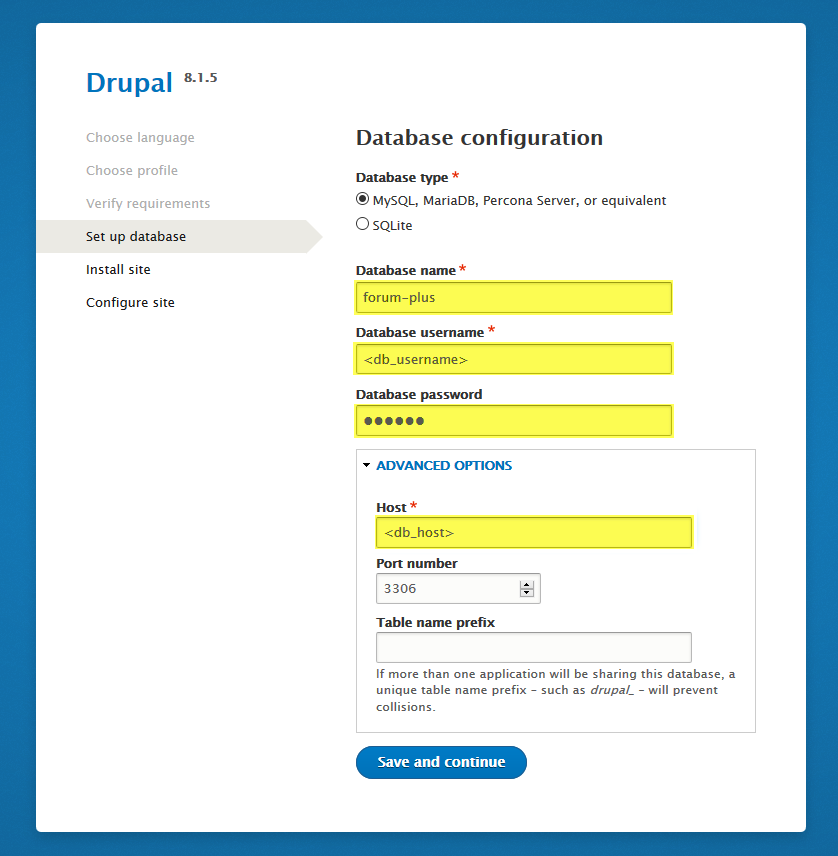
8. Enter database parameters => click Save and continue button.
9. Enter site information => click Save and continue button.

10. Click Visit your new site and you will have a new site.
You can refer the guide from drupal.org to delve more details about drupal installation.
2. Install Forum Plus D8 Theme
- Extract Forum Plus D8 theme .ZIP file:
- forum_plus_d8-8.1.5.zip
-
Move this theme into your Drupal folder: /themes

-
Navigate to Appearance > Choose Enable and set default Forum Plus theme

3. Install Required Modules
Now that you've enabled Forum Plus theme, you will install and enable the required modules (listed in the Module Requirements section) to customize and use them.
If you don't know how to install the contributed modules, this tutorial is an essential guide.
Cheat to install modules & theme:
- Extract forum_plus_d8-8.1.5.zip
- Open extracted folder, go to themes, modules and copy all folders inside (modules, themes)
- Paste them to your host, folder themes, modules
Note: See this guide to get more details about installation
Taxonomy configuration
Quick Information
- Taxonomy: Taxonomy can be simply understood as category management using organizational keywords known in other systems as categories, tags or metadata. It allows you to connect, relate and classify your website's content. In Drupal, these terms are gathered within "vocabularies". The Taxonomy module allows you to create, manage and apply those vocabularies.
- Vocabulary: for example product category, tag, provider name, ...
- Term: the items in each vocabulary. For example: vocabulary product category has some terms: laptop, pc, mobile, tablet, camera, headphone, ...
- For more information about taxonomy, please see: Organizing content with taxonomies
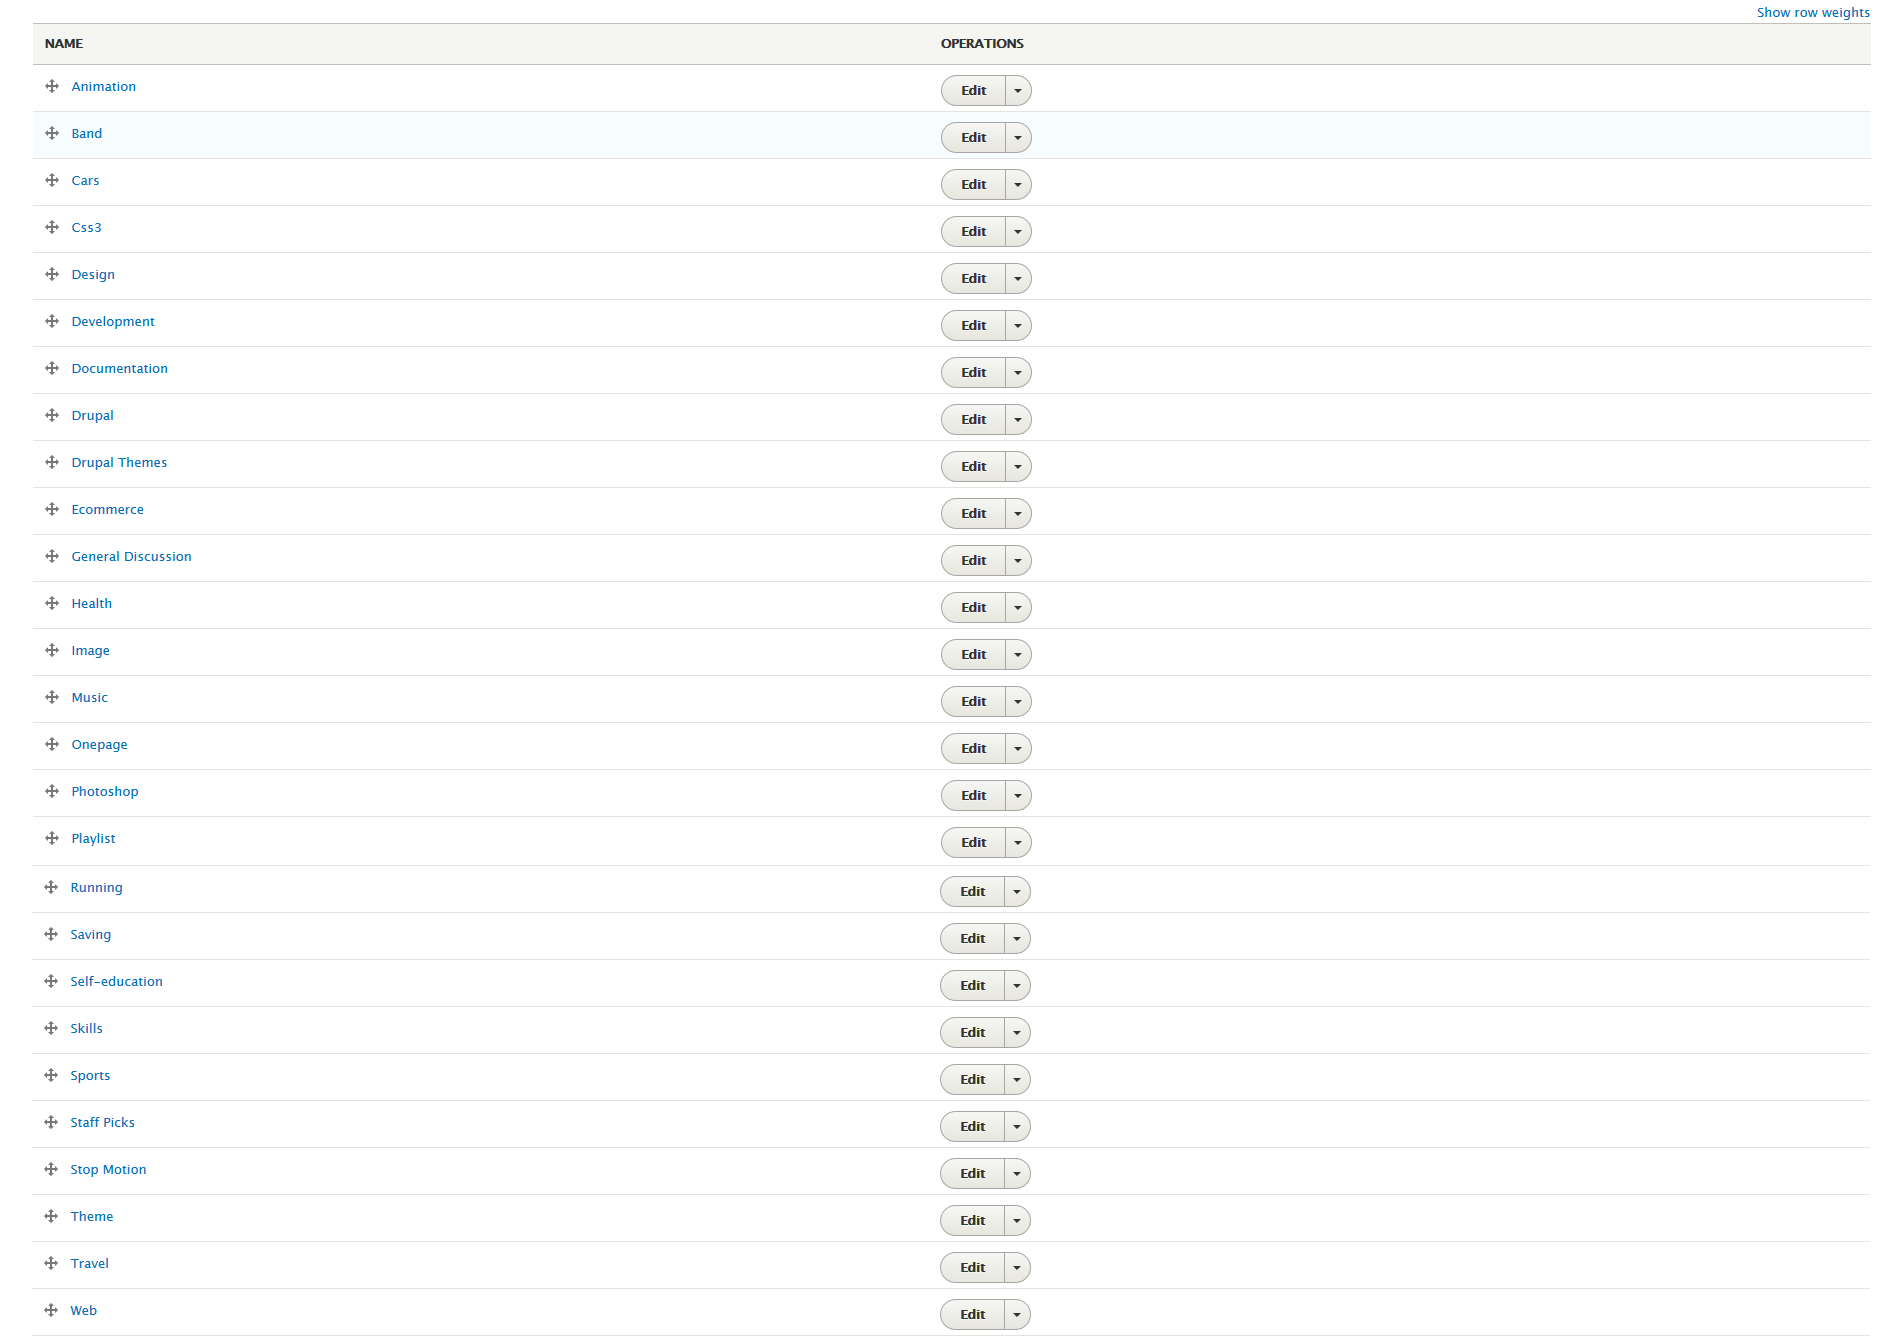
Step 1: Navigate to Structure > Taxonomy to create vocabularies as the following:
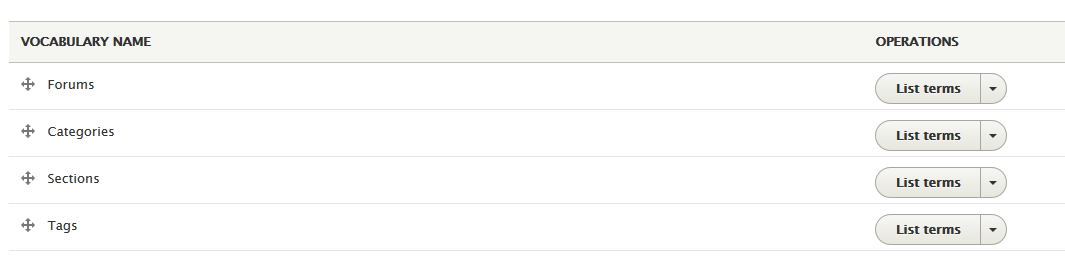
Then, add terms for each vocabulary
Step 2: Terms of Categories:
Step 3: Terms of Sections:
Step 3: Terms of Forums:

Step 3: Terms of Tags:
Note: See this guide to get more details about taxonomy configuration
Media configuration
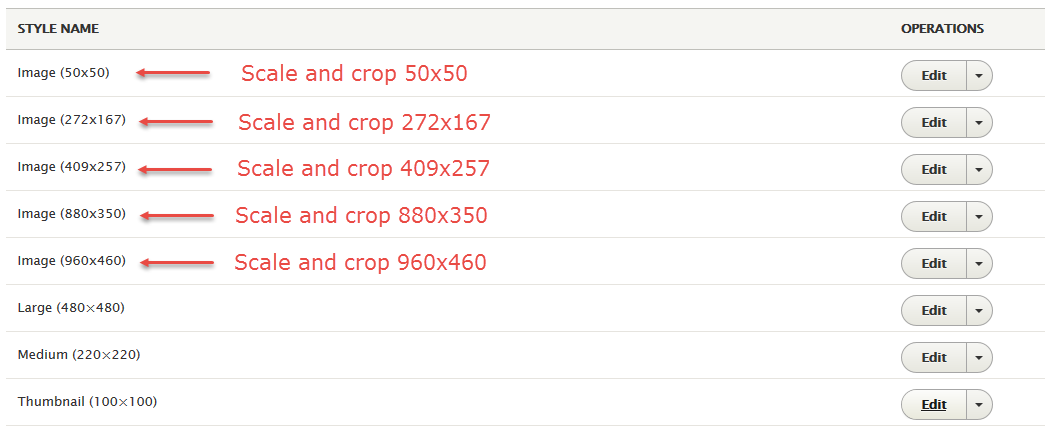
Image Style Configuration
Image styles are the presets of image settings. Image styles are used to define how the images are shown.
Navigate to Configuration, In MEDIA area, click Image styles, then create image styles as the following:
Content type configuration
Modify Article type
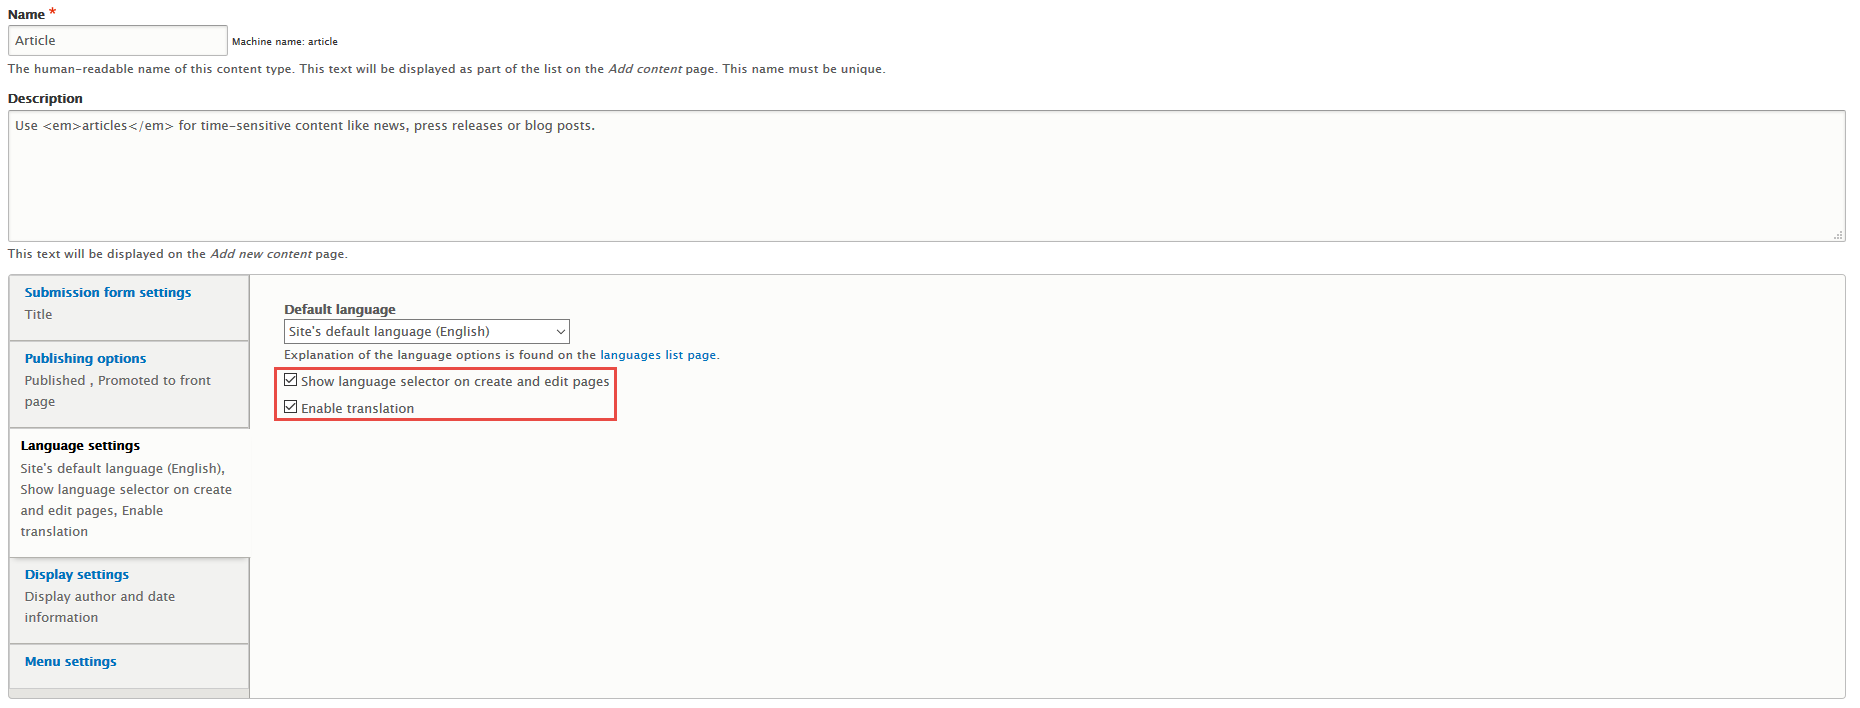
Step 1: Navigate to Structure > Content Type
Step 2: In Article row, click "Language settings" tabs, check field with following settings:

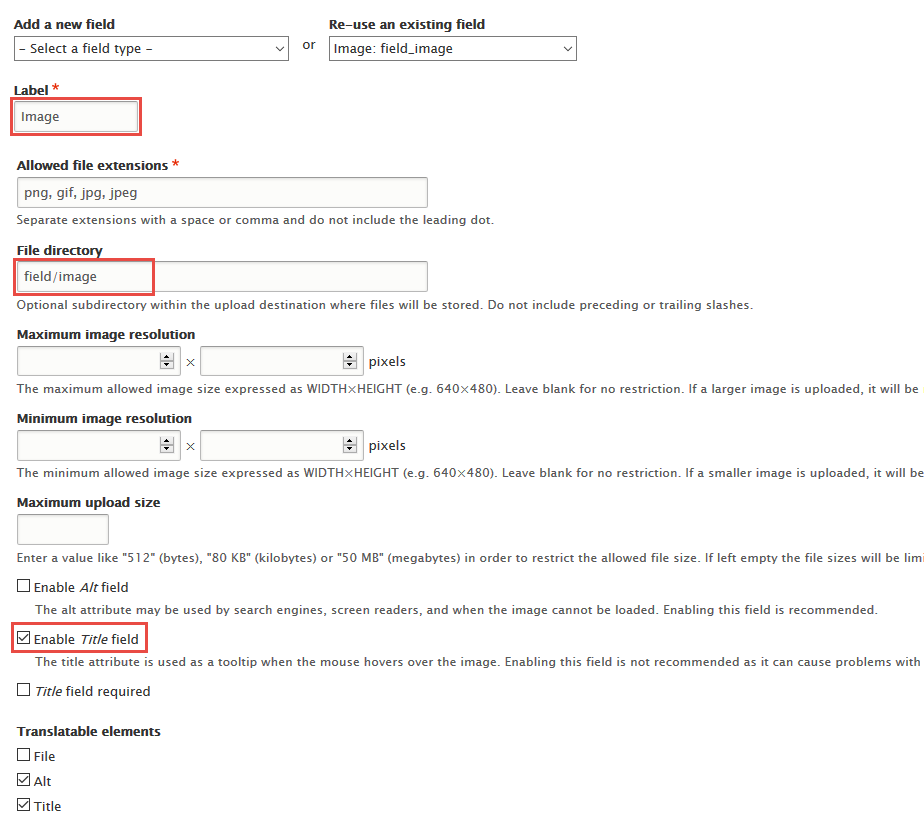
Step 3: In Article row, click "manage fields" link, Add "Category" field with following settings:
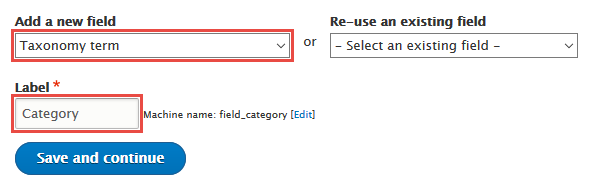
Step 4: Click Save and continue button, then click Save field settings button > Set following properties:
Step 5: Set properties for Category field

Step 6: Click Save Settings button
Step 7: In Article row, click "manage fields" link, Add "Section" field with following settings:
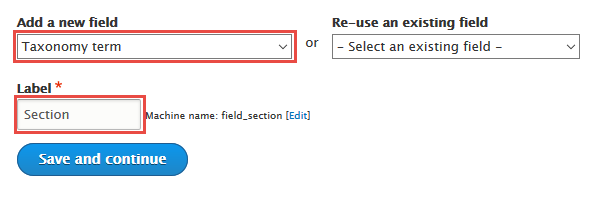
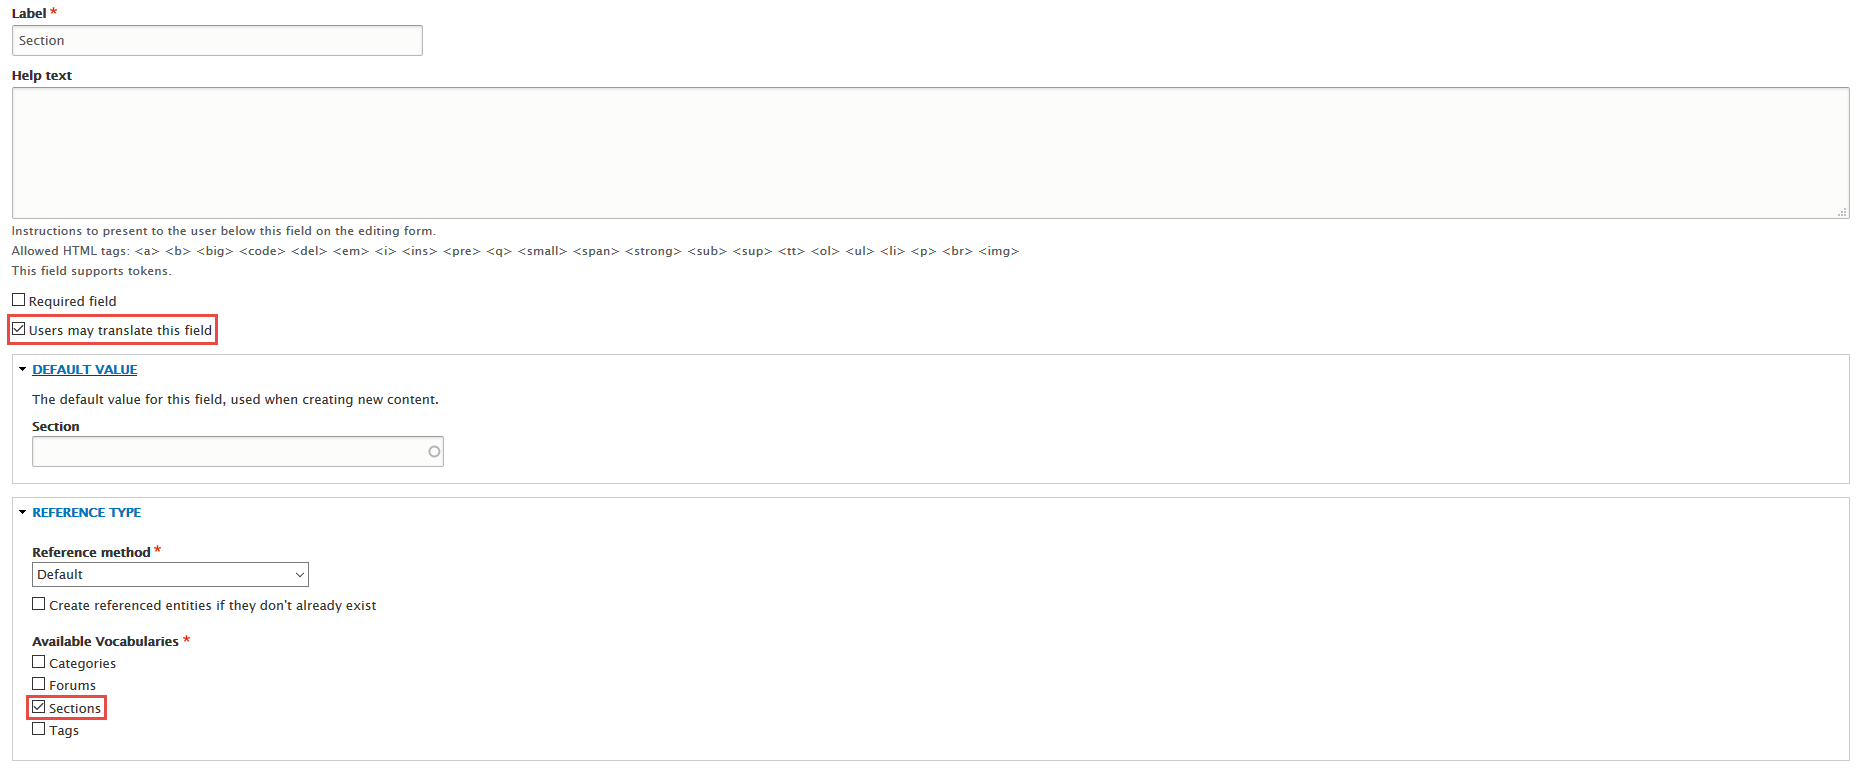
Step 8: Click Save and continue button, then click Save field settings button > Set following properties:
Step 9: Set properties for Section field
Step 10: Click Save Settings button
Step 11: Go to Manage display tab > Default tab, set following properties:
Step 12: Go to Manage display tab > Teaser tab, set following properties:

Step 13: Click Save button
Modify Forum topic type
Step 1: Navigate to Structure > Content Type
Step 2: In Forum topic row, click "Language settings" tabs, check field with following settings:

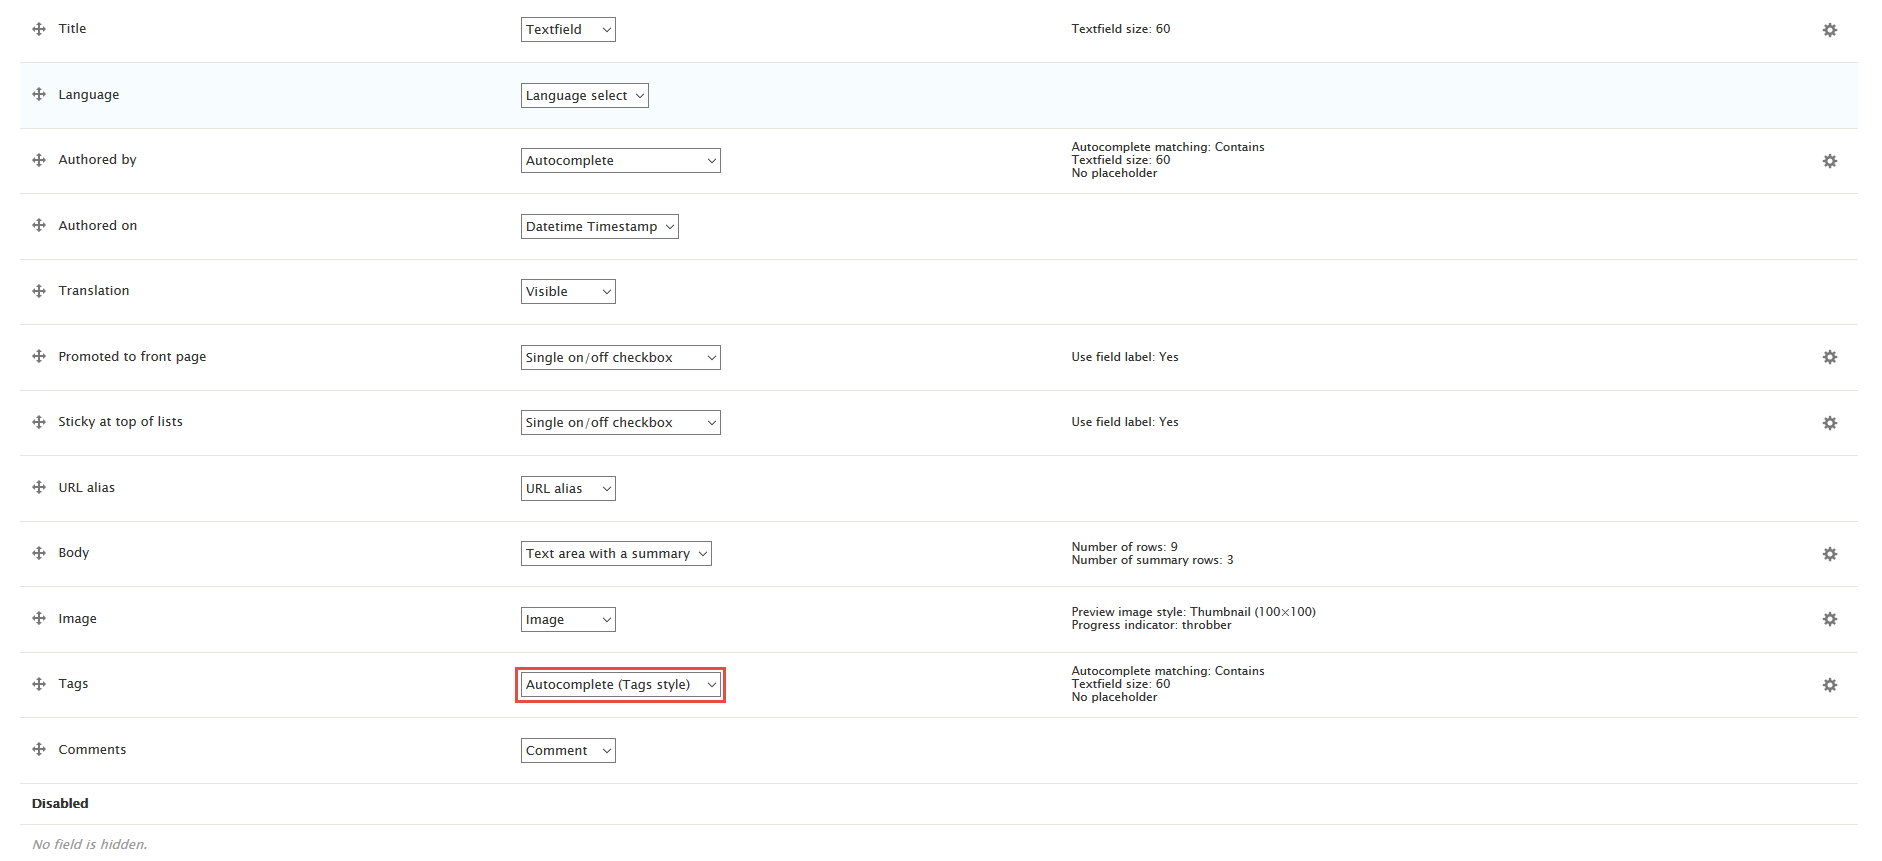
Step 2: In Article row, click "manage fields" link, find “Comments" field with following settings:
Step 3: Click Save Settings button
Step 4: Go to Manage display tab > Default tab, set following properties:
Step 5: Click Save button
Create Blog type
Step 1: Navigate to Structure > Content Type
Step 2: Click Add Content Type link to create Blog type

Step 3: Click Save content type button, then add following fields:

Step 4: Set properties for Comments field
Step 5: Set properties for Image field
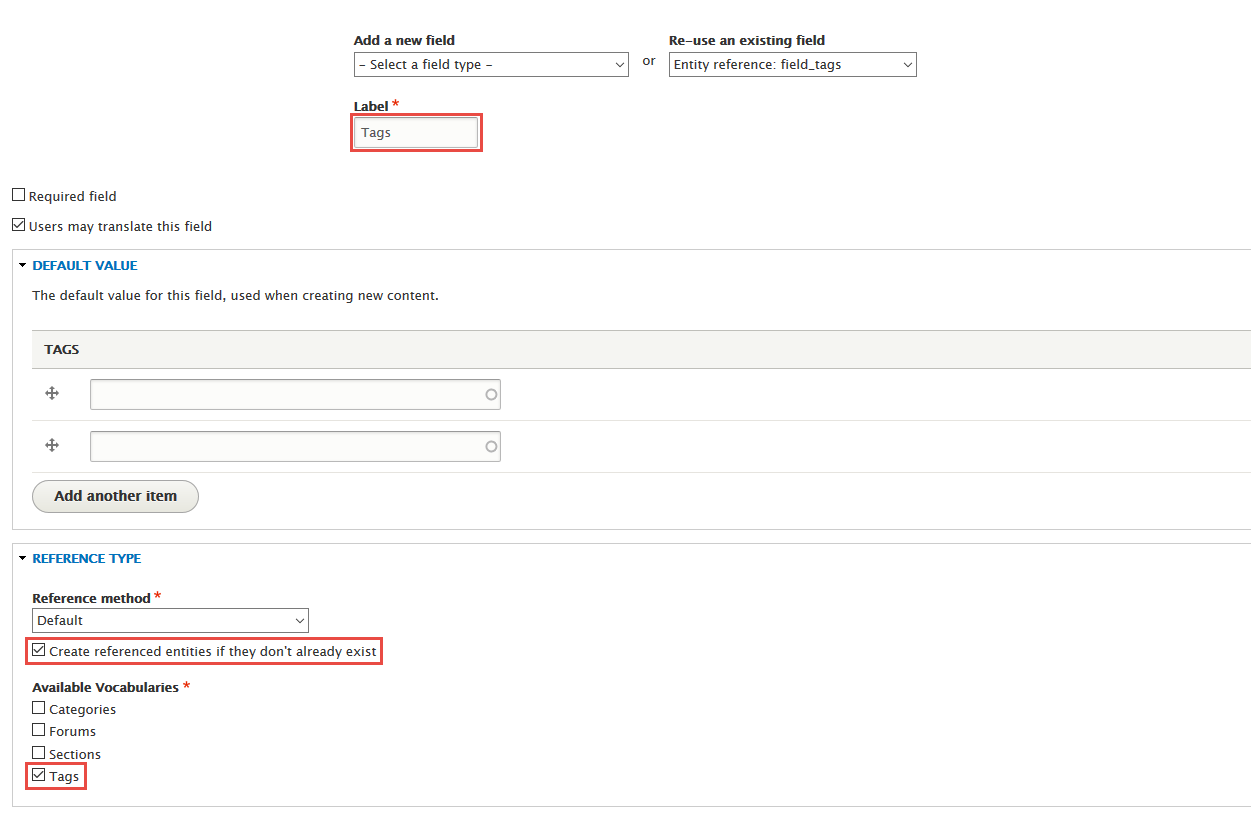
Step 6: Set properties for Tags field
Step 7: Go to Manage form display tab , set following properties:
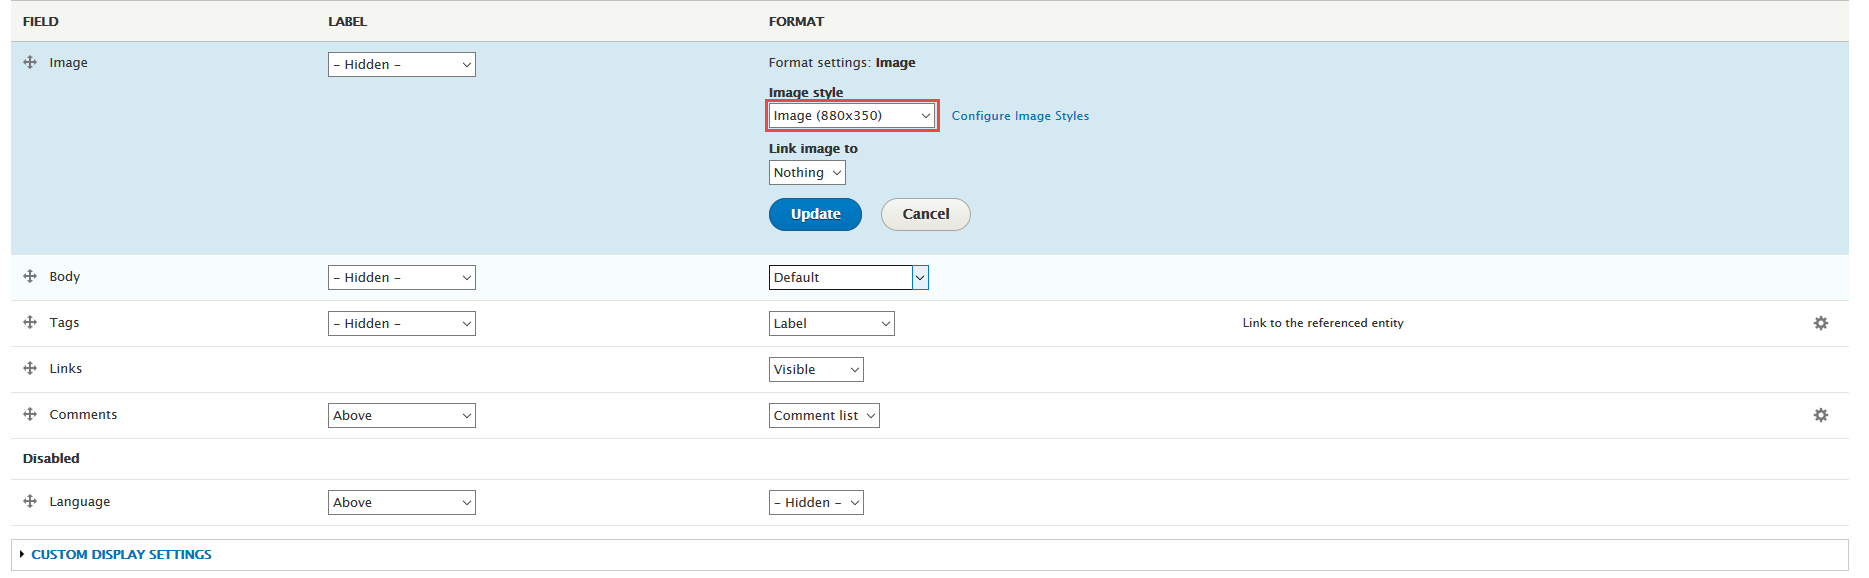
Step 8: Go to Manage display tab > Default tab, set following properties:
Step 9: Click Save button
Create FAQ type
Step 1: Navigate to Structure > Content Type
Step 2: Click Add Content Type link to create FAQ type
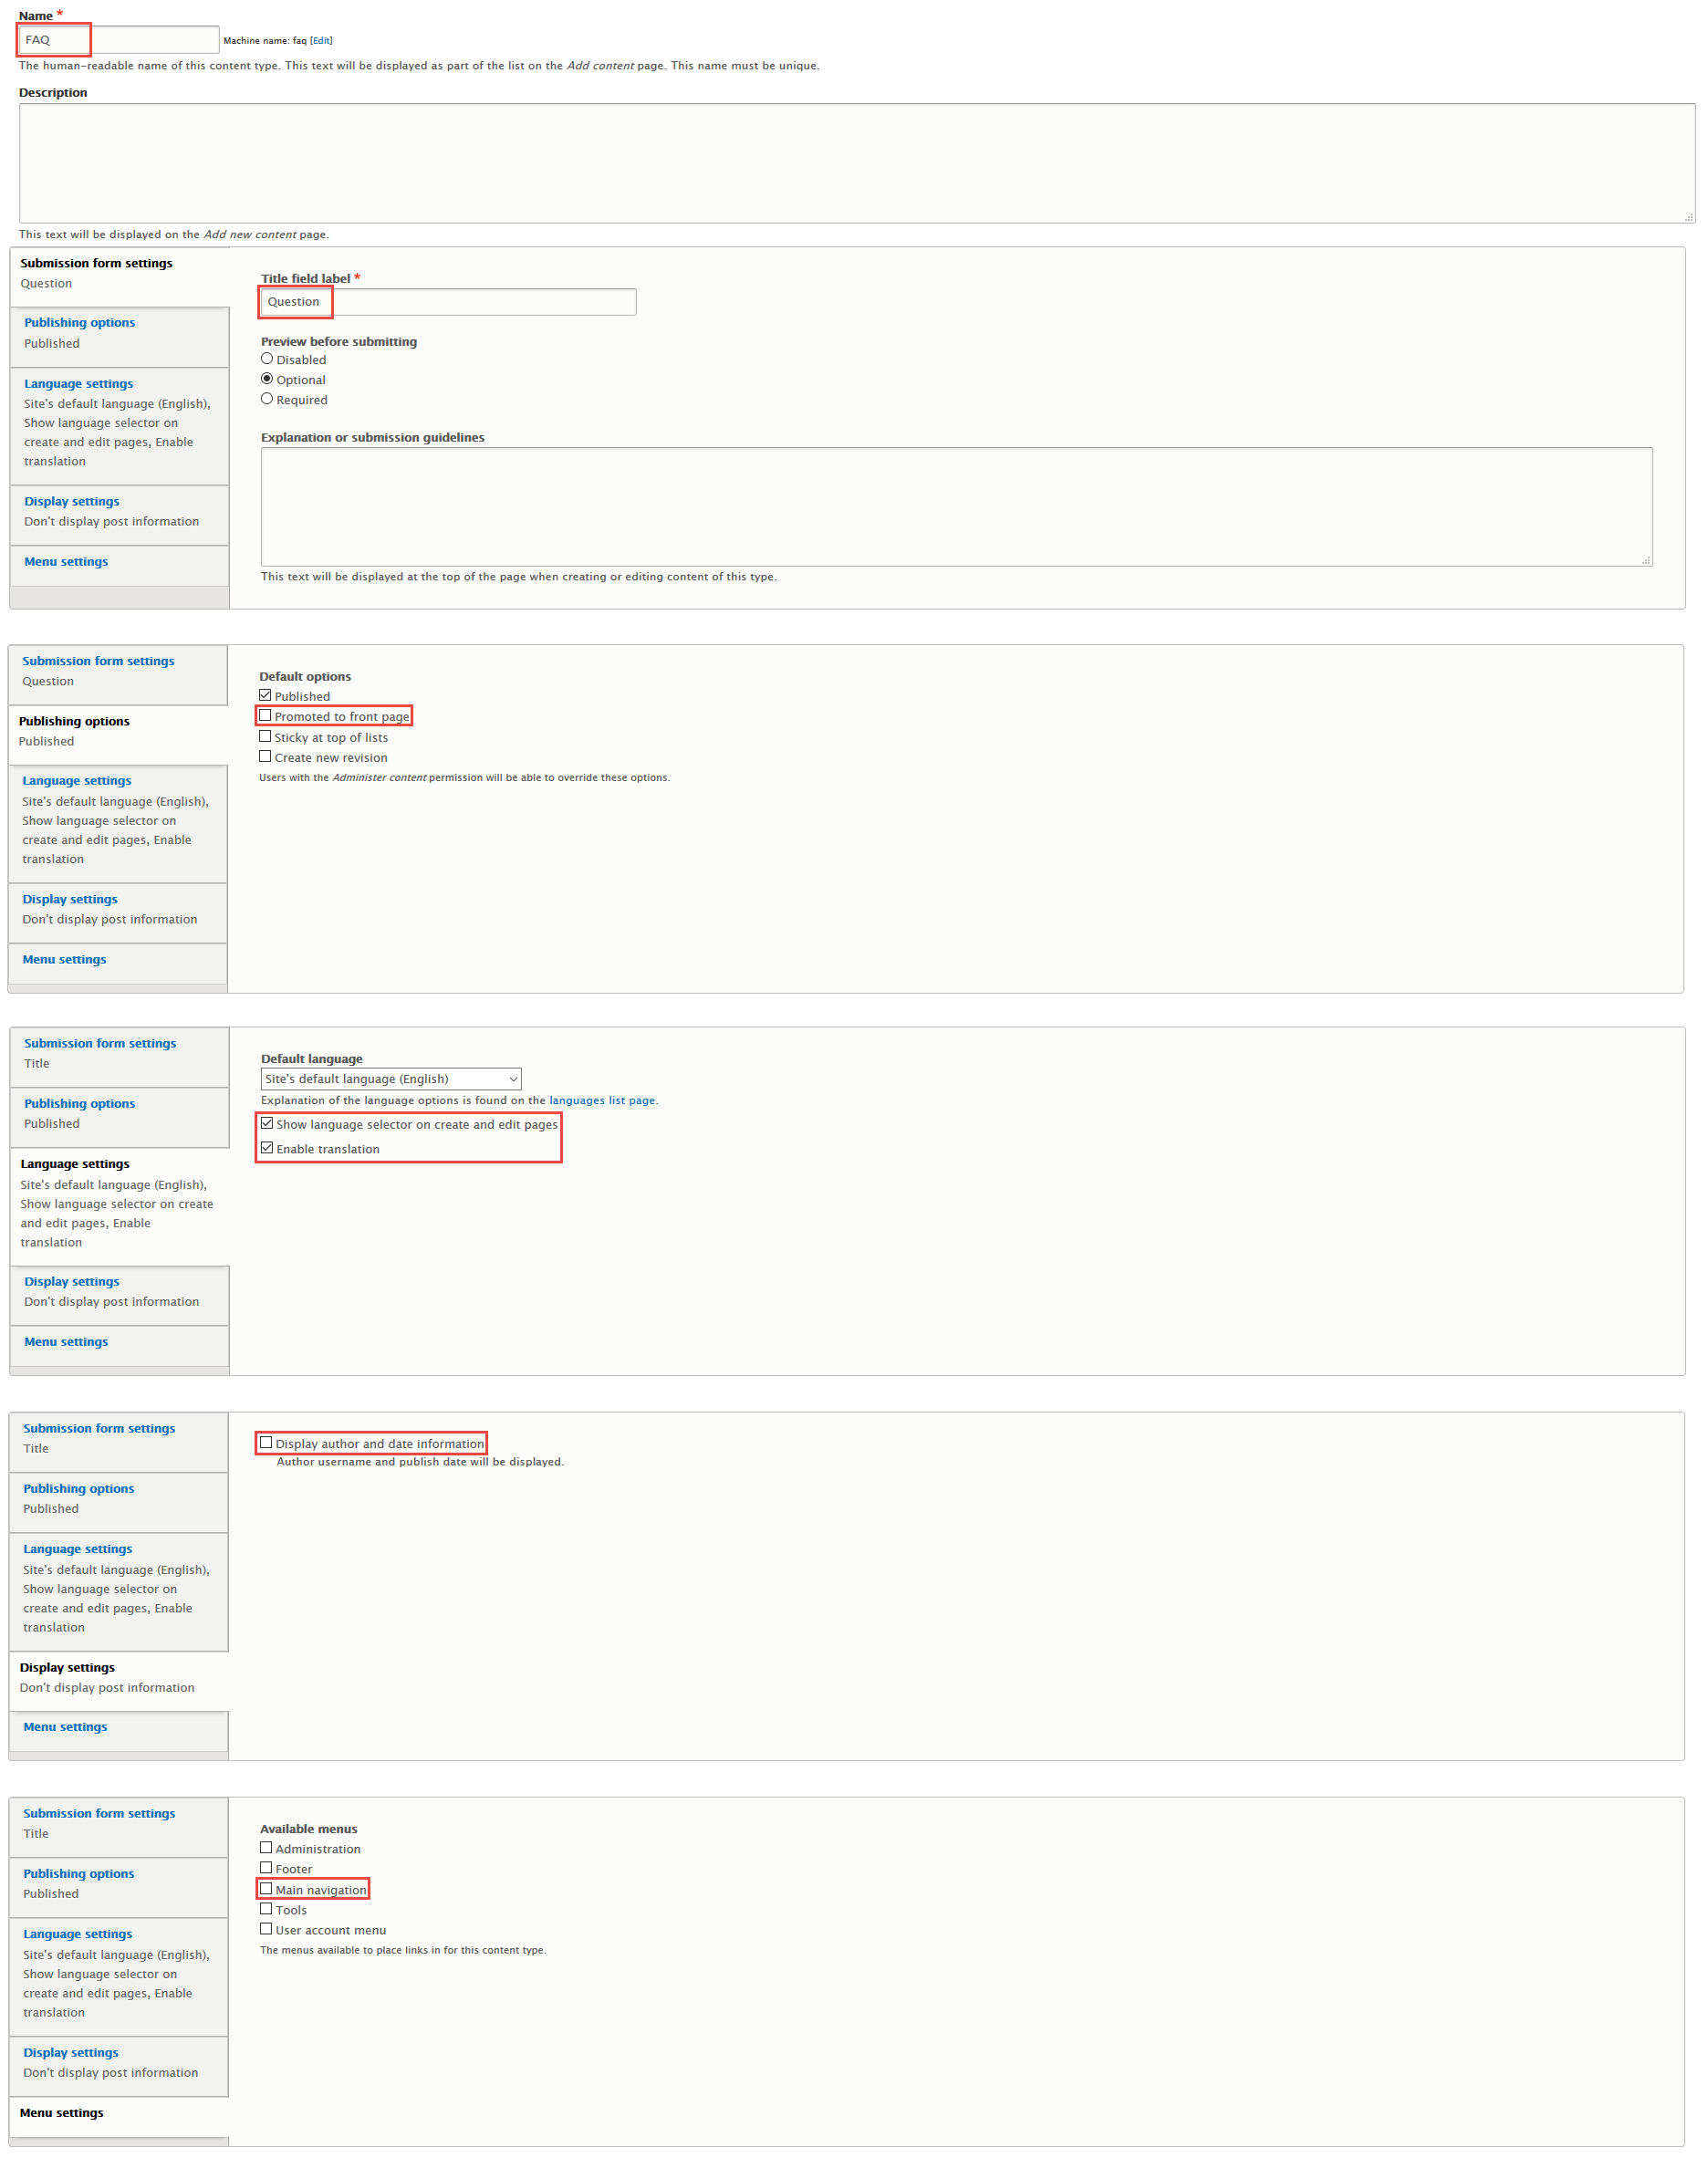
Step 3: Click Save content type button.
Create Product type
Step 1: Navigate to Structure > Content Type
Step 2: Click Add Content Type link to create Product type
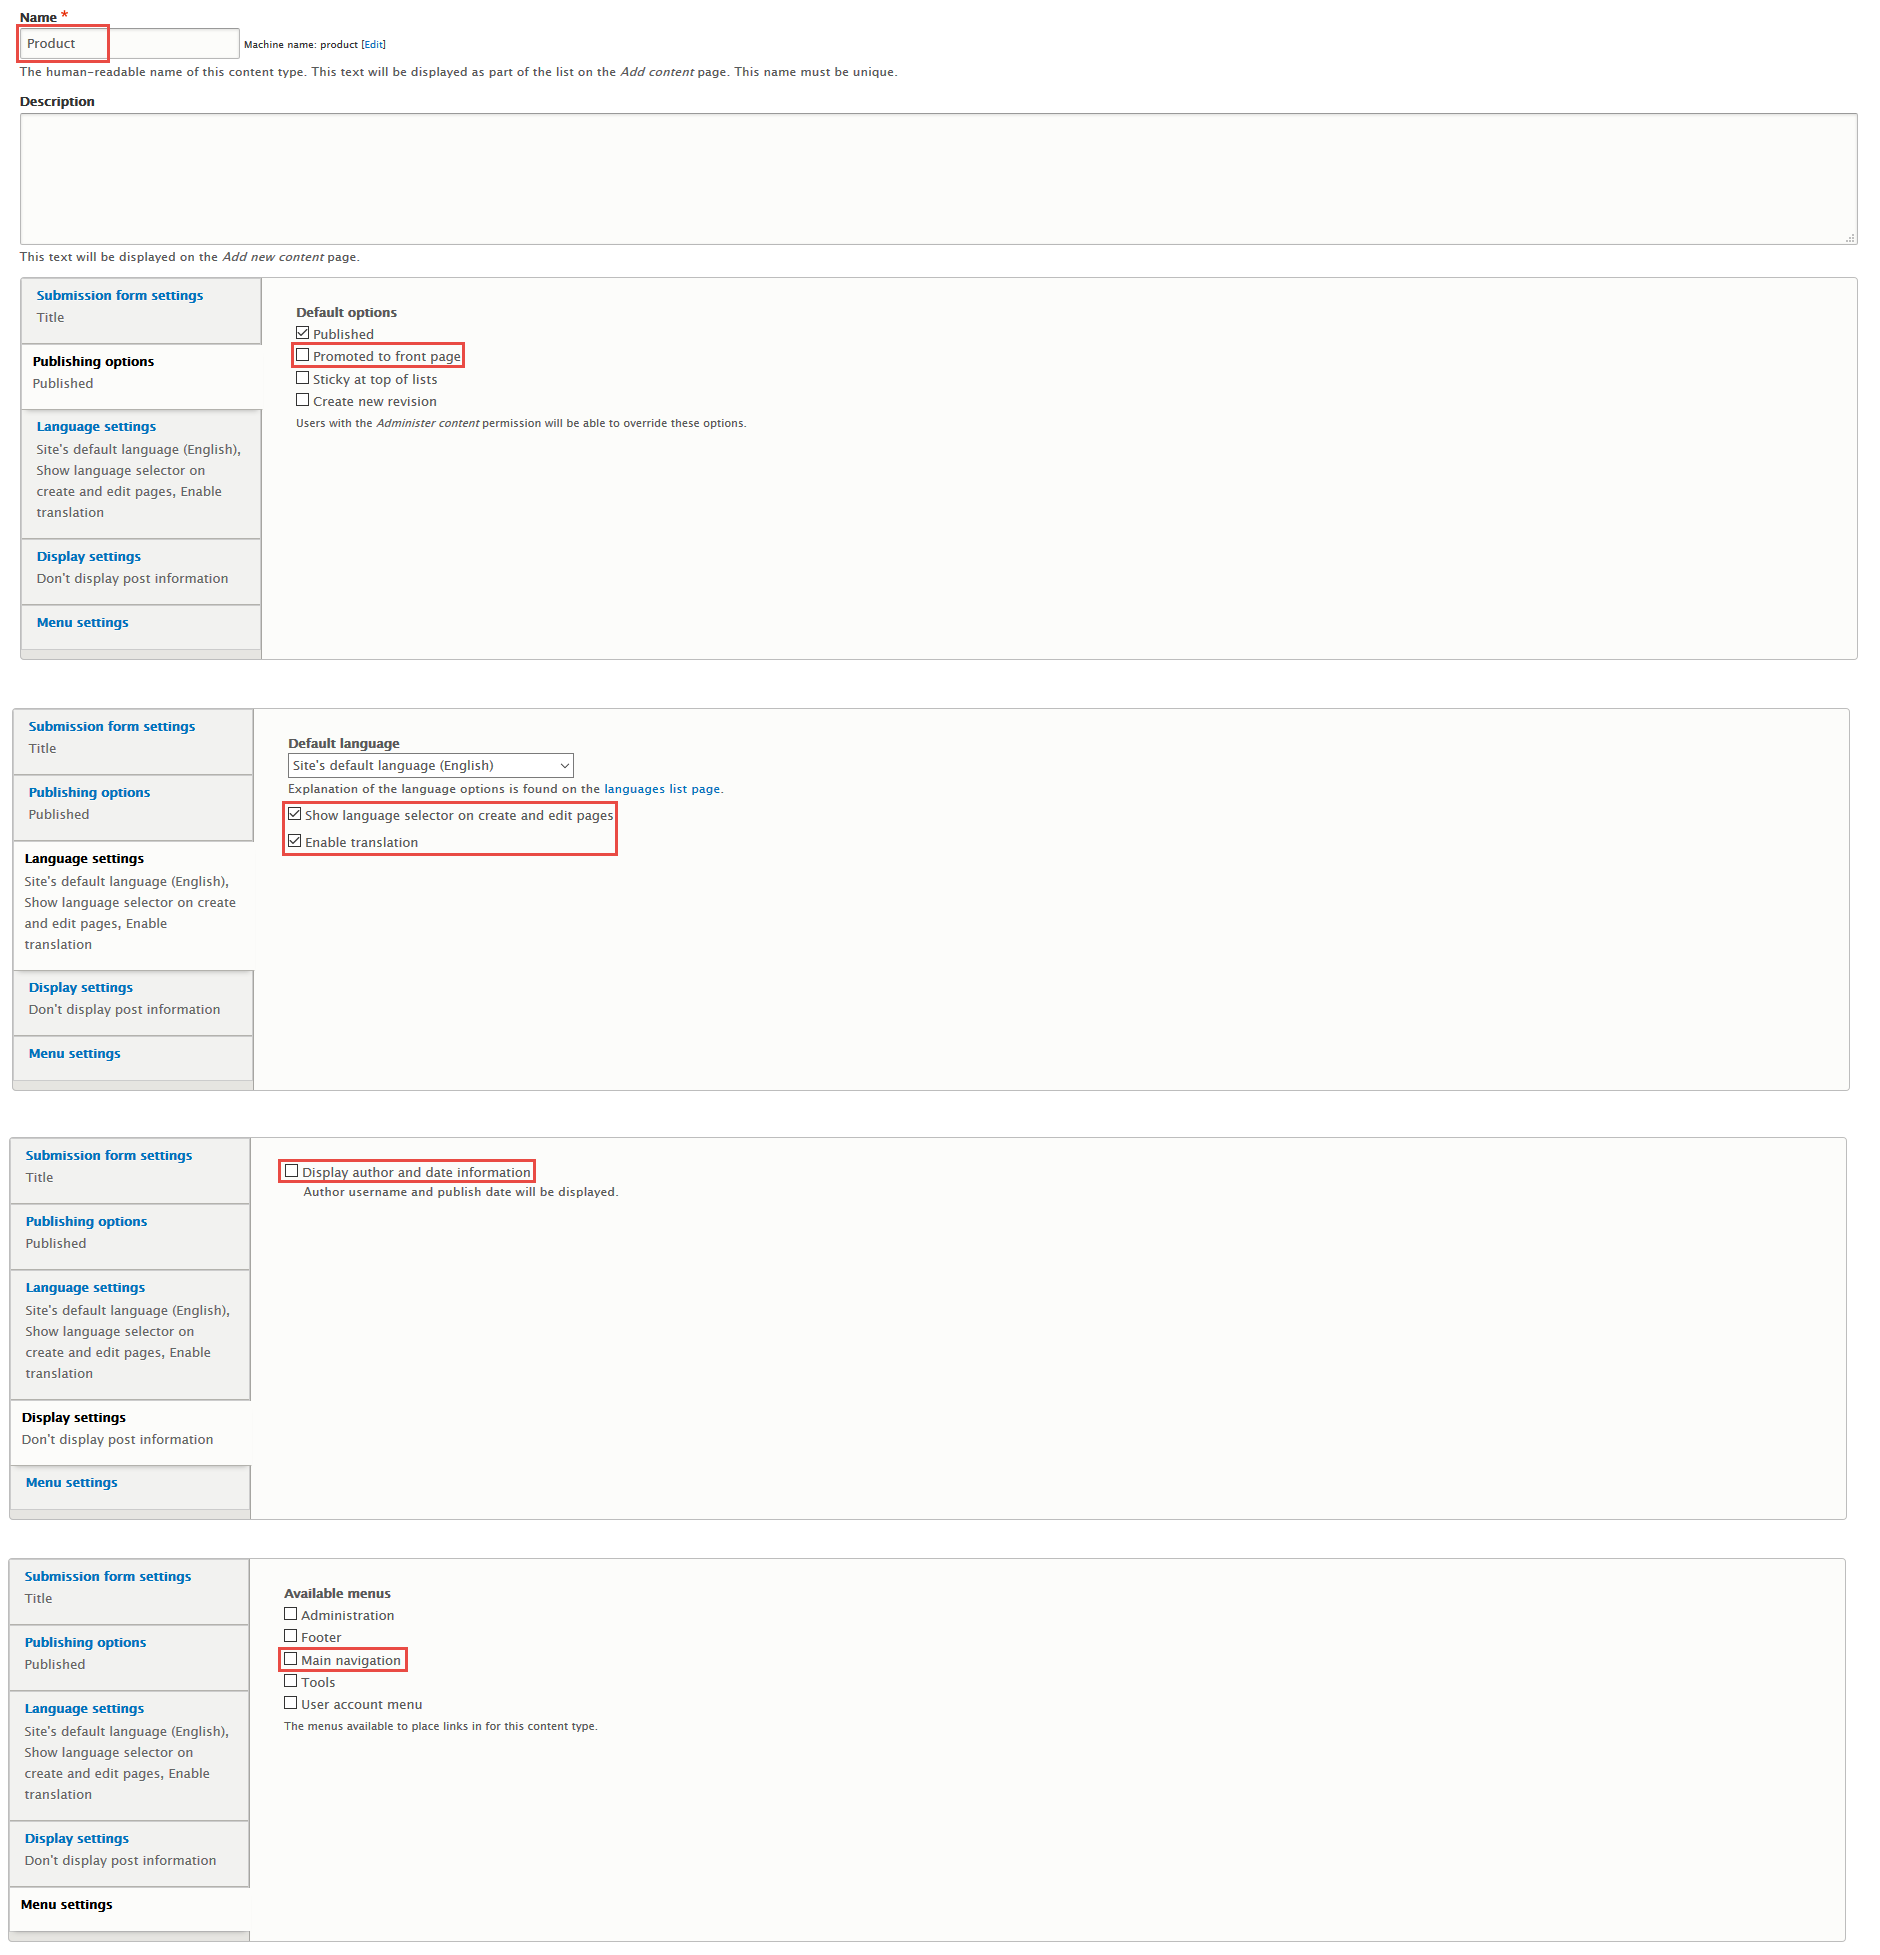
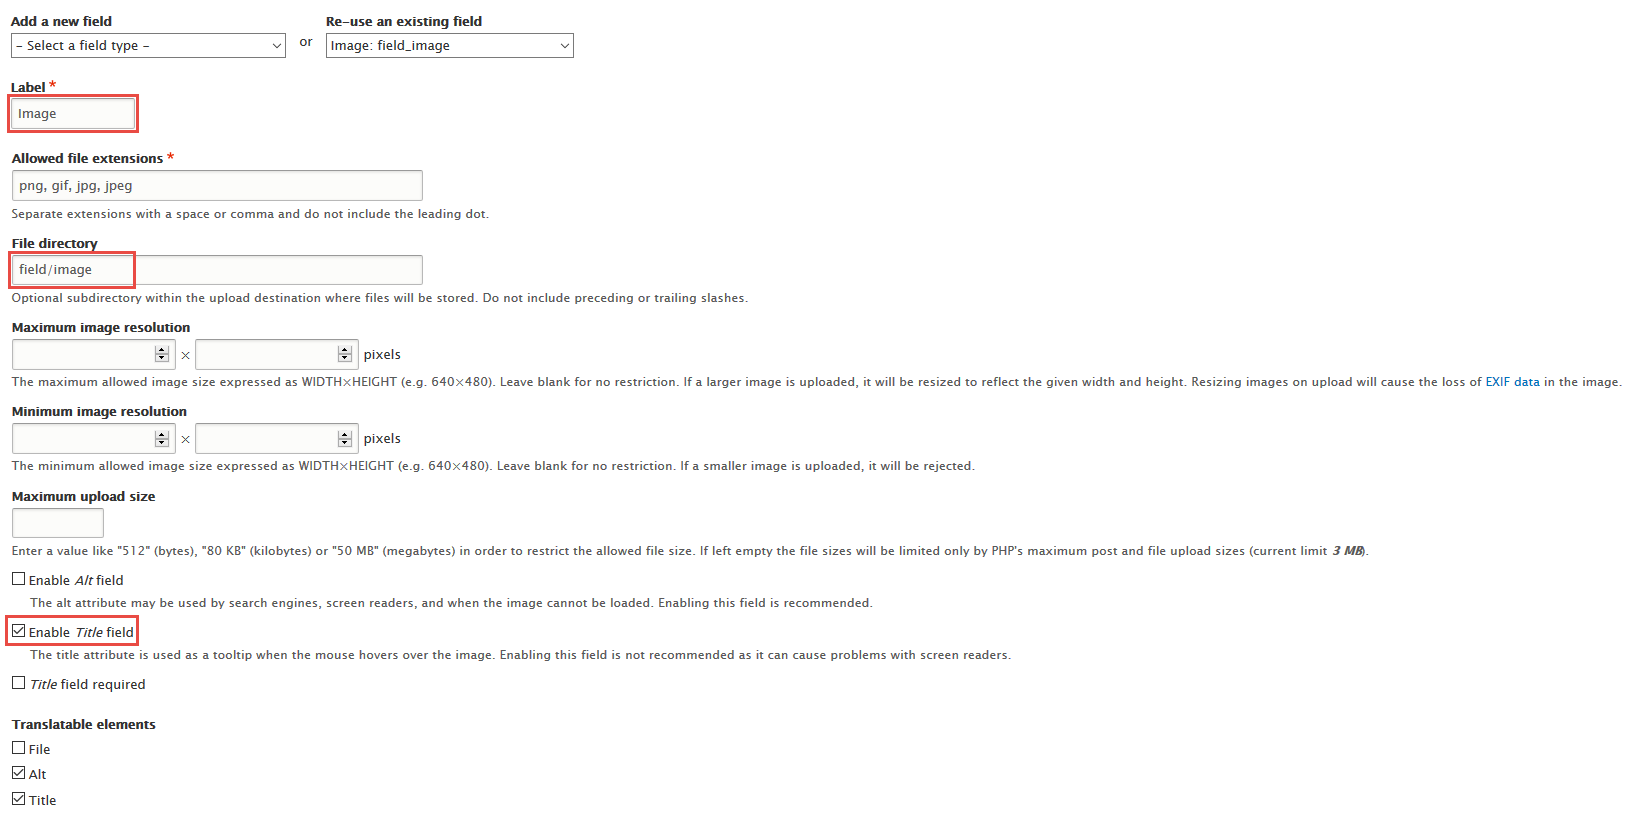
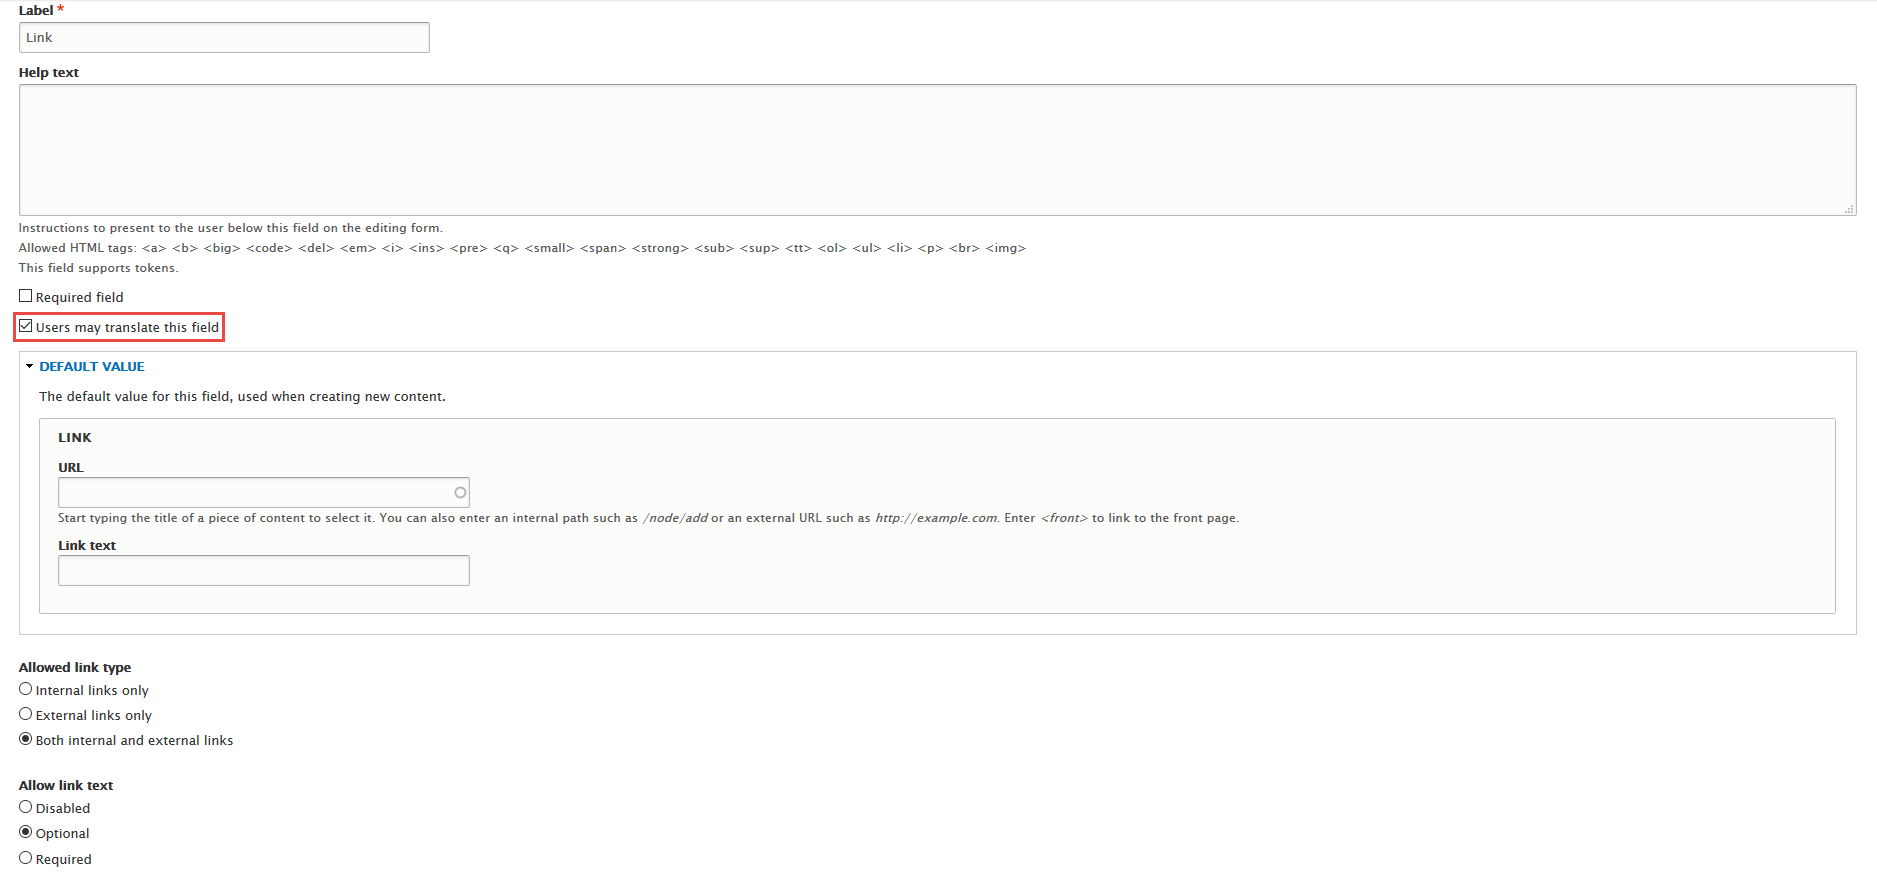
Step 3: Click Save content type button, then add following fields:

Step 4: Set properties for Image field
Step 5: Set properties for Link field
Step 6: Click Save button
Create Homepage
Social Menu block
Front end Display

1. Create Social Menu block
Step 1: Navigate to Structure > Block layout, click Custom block library tab.
Step 2: Click Add block link. Create Social Menu block with following properties:
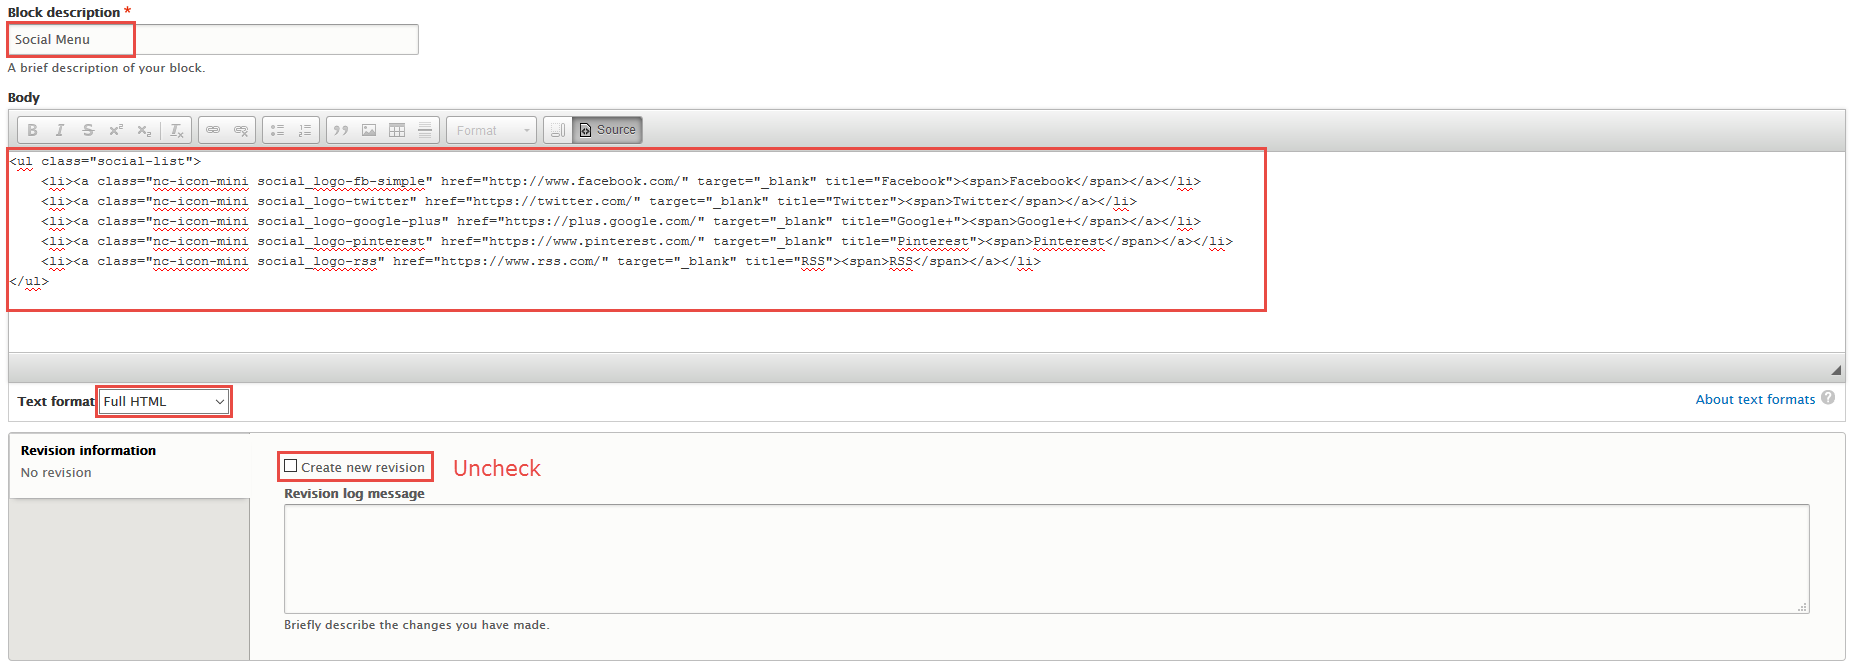
Step 3: Click Save button
Refer to following HTML code:
2. Configure Social Menu block
Step 1: Navigate to Structure > Block layout
Step 2: At Headline block, click Place block link.
Step 3: Find Social Menu click Place block link, set following properties
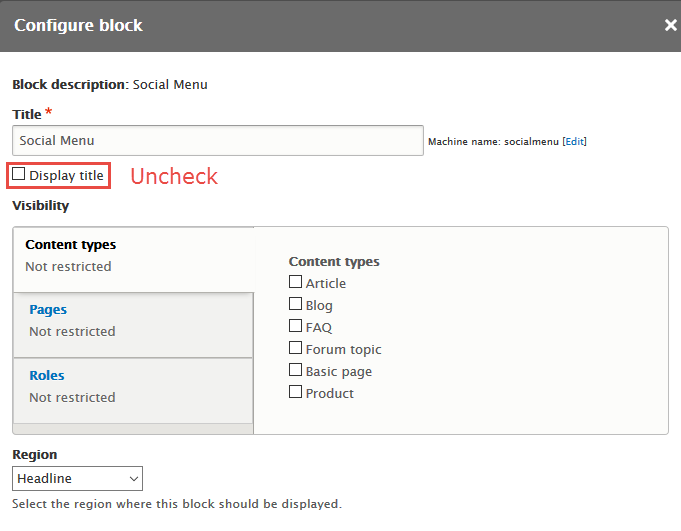
Step 4: Click Save block button.
Search form block
Front end Display

Step 1: Navigate to Structure > Block layout
Step 2: At Headline block, click Place block link.
Step 3: Find Search form click Place block link, set following properties
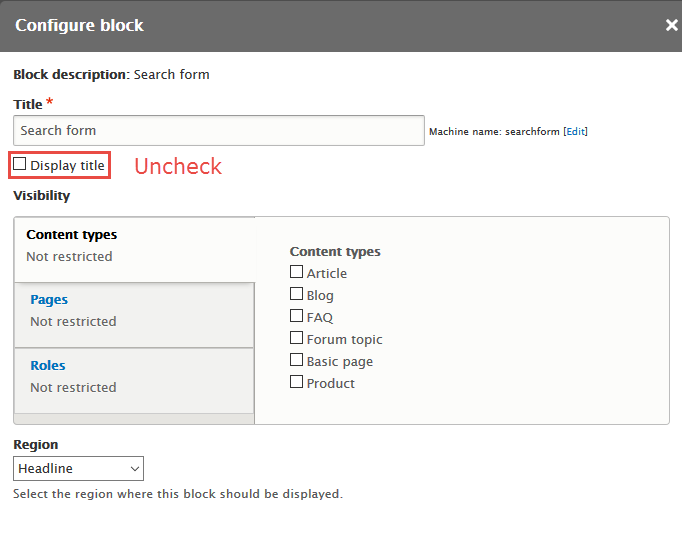
Step 4: Click Save block button.
Menu User account menu link
1. Create User account menu block
Step 1: Navigate to Structure > Menu, find and click User account menu link
Step 2: Find Add link button , then click add Log out menu item
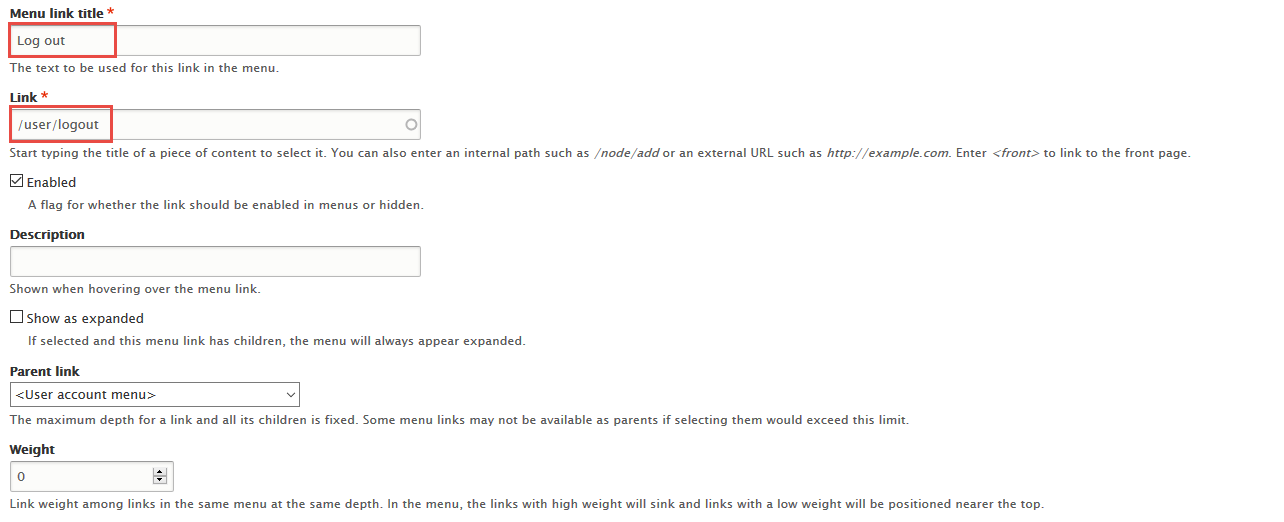
Step 3: Click Save button
2. Configure User account menu block
Step 1: Navigate to Structure > Block layout
Step 2: At Headline block, click Place block link.
Step 3: Find User account menu click Place block link, set following properties
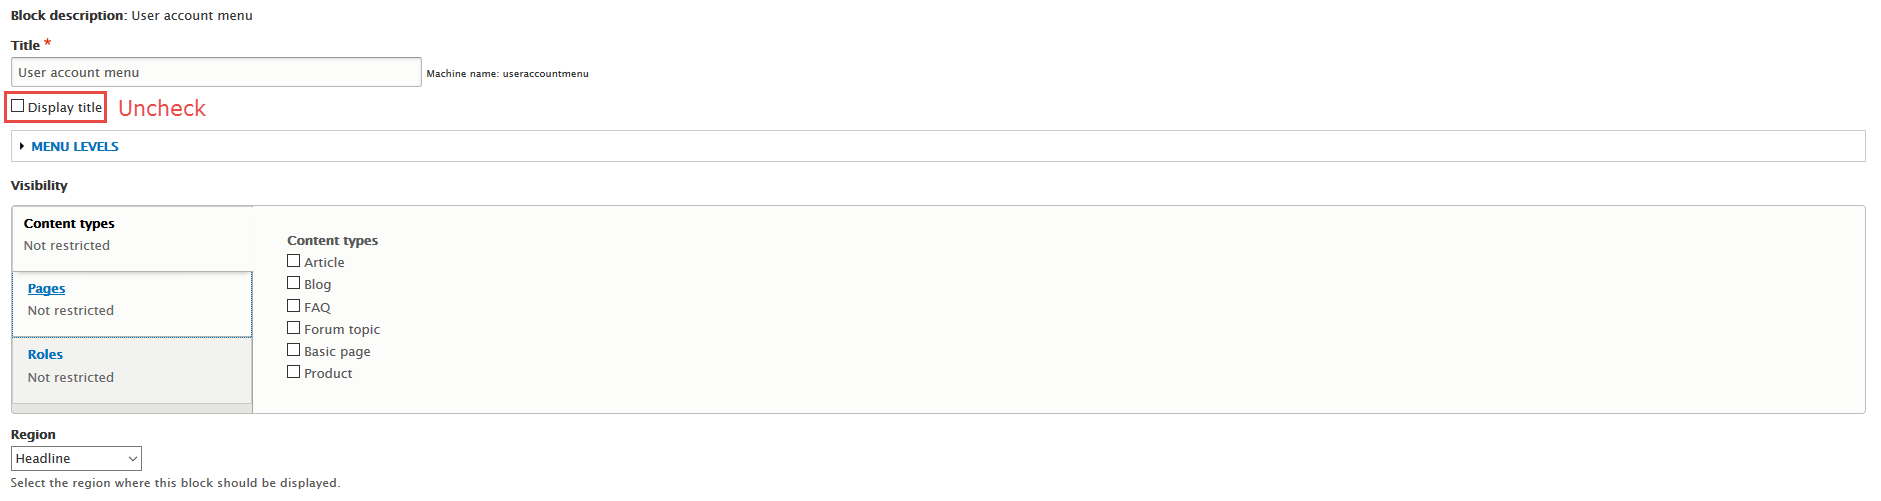
Step 4: Click Save block button.
Anonymous Menu link
1. Create Anonymous Menu block
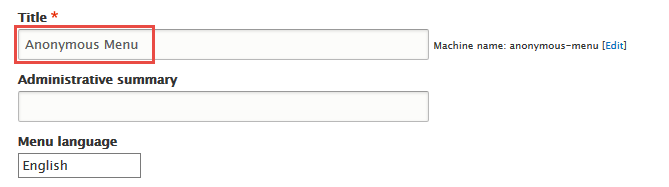
Step 1: Navigate to Structure > Menu, find and click Anonymous Menu link
Step 2: Find Add link button , then click add Login menu item

Step 3: Click Save button
2. Configure Anonymous Menu block
Step 1: Navigate to Structure > Block layout
Step 2: At Headline block, click Place block link.
Step 3: Find Anonymous Menu click Place block link, set following properties
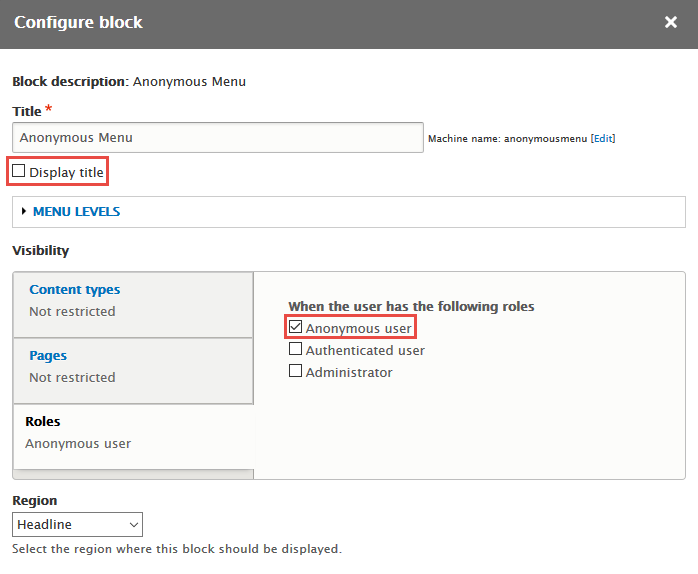
Step 4: Click Save block button.
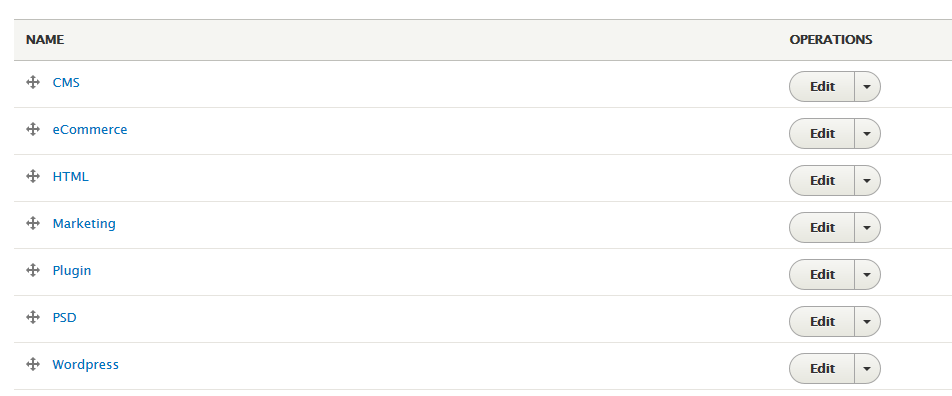
Categories Menu link
1. Create Categories Menu block
Step 1: Navigate to Structure > Menu, find and click Categories Menu link

Step 3: Click Save button
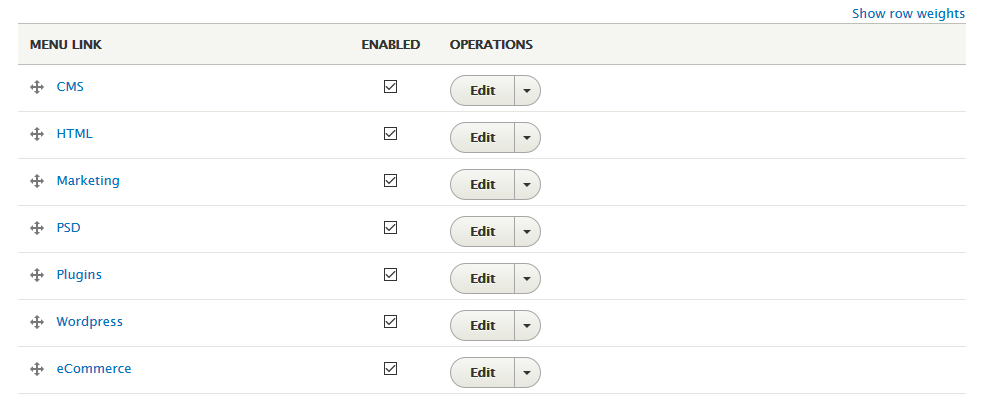
Find Add link button , then click add CMS menu item

Find Add link button , then click add HTML menu item
Find Add link button , then click add Marketing menu item

Find Add link button , then click add PSD menu item
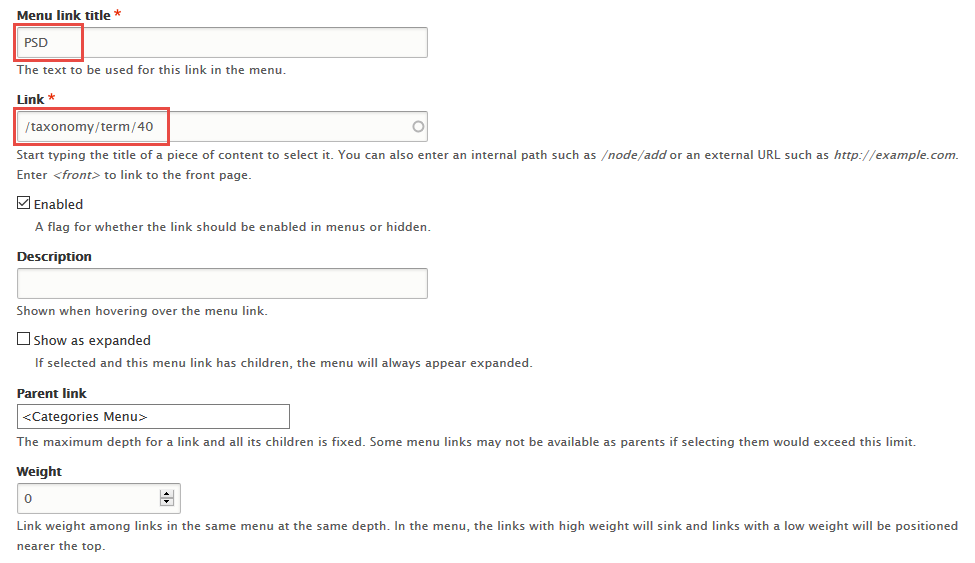
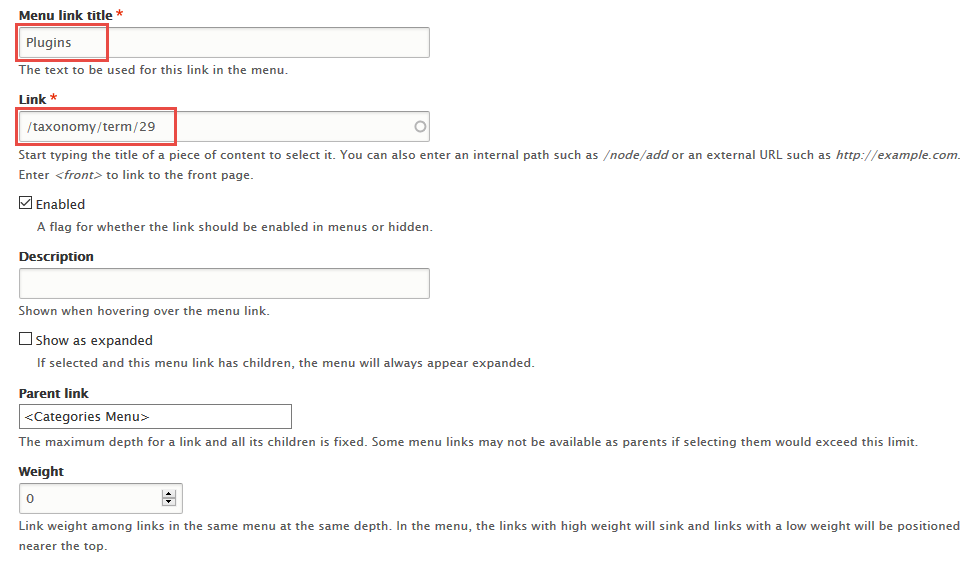
Find Add link button , then click add Plugins menu item
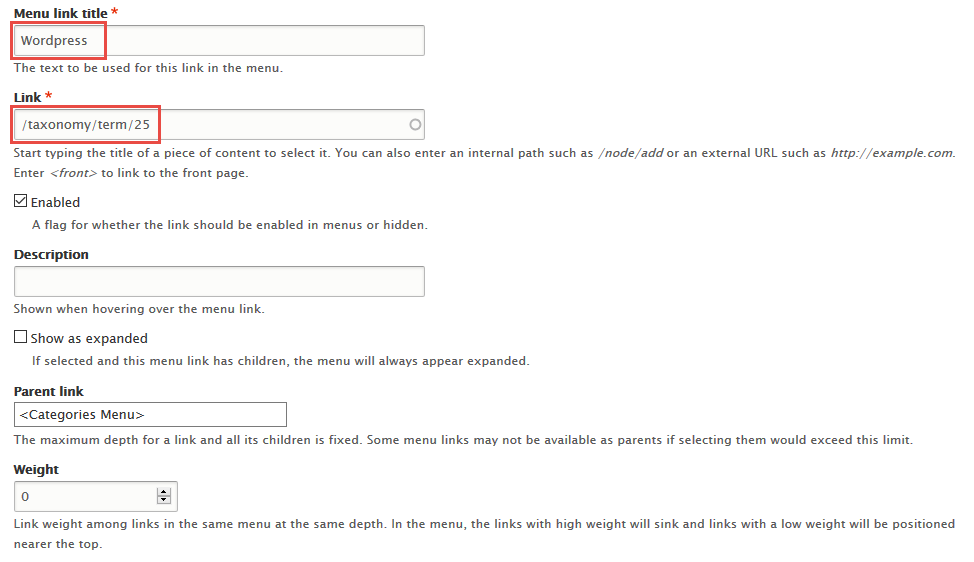
Find Add link button , then click add Wordpress menu item
Find Add link button , then click add eCommerce menu item

2. Configure Categories Menu block
Step 1: Navigate to Structure > Block layout
Step 2: At Sidebar first block, click Place block link.
Step 3: Find Categories Menu click Place block link, set following properties
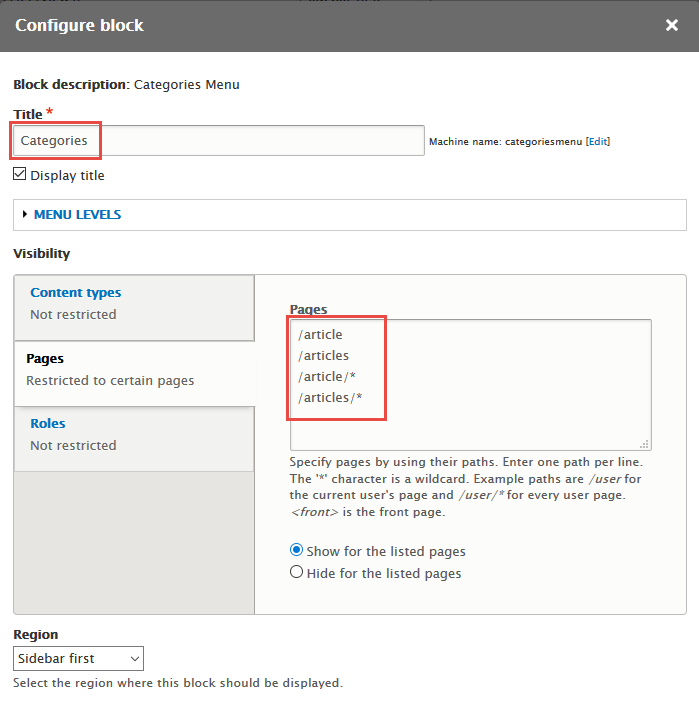
Step 4: Click Save block button.
Sections Menu link
1. Create Sections Menu block
Step 1: Navigate to Structure > Menu, find and click Sections Menu link
Step 3: Click Save button
Find Add link button , then click add Documentation menu item
Find Add link button , then click add Graphic design menu item

Find Add link button , then click add Themes menu item

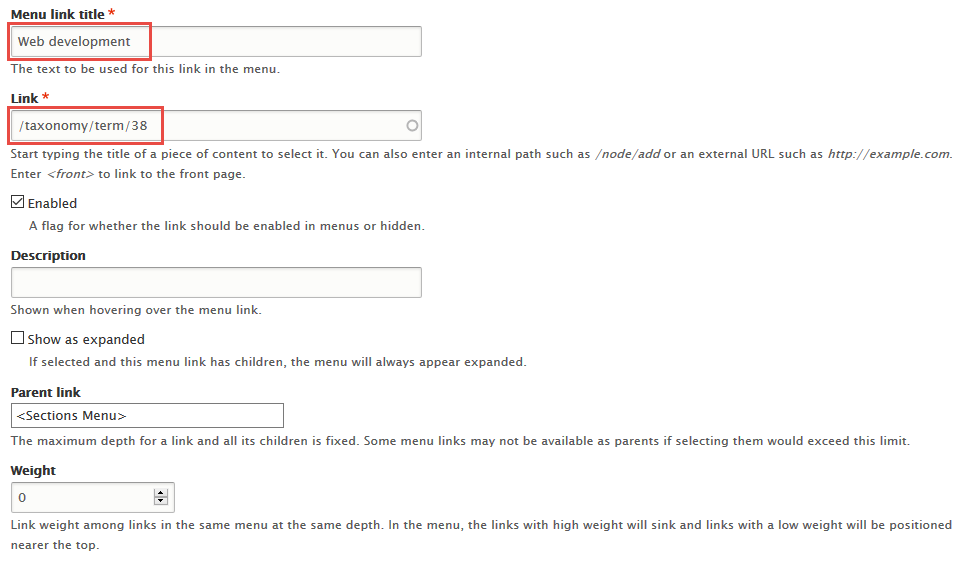
Find Add link button , then click add Web development menu item
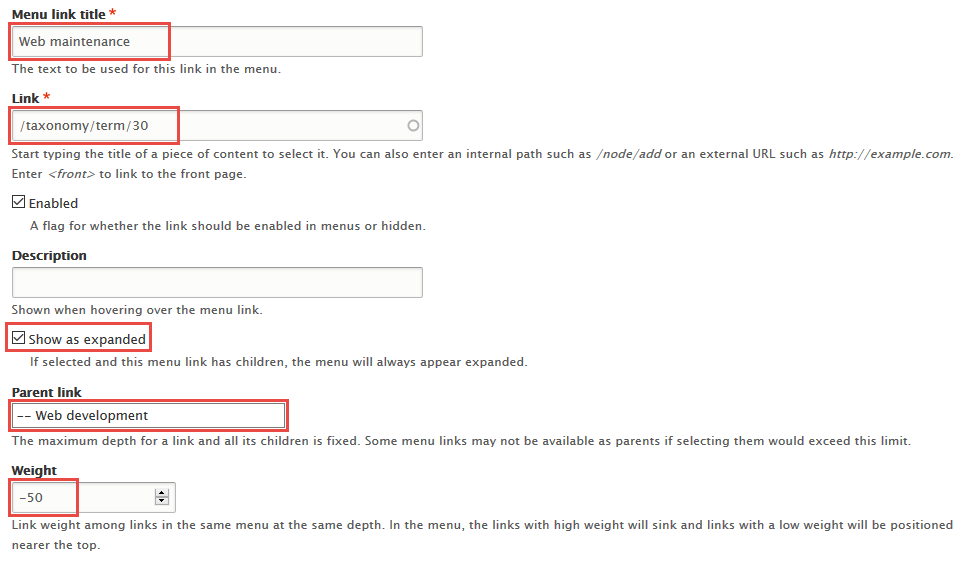
Find Add link button , then click add Web maintenance menu item
Find Add link button , then click add Web services menu item
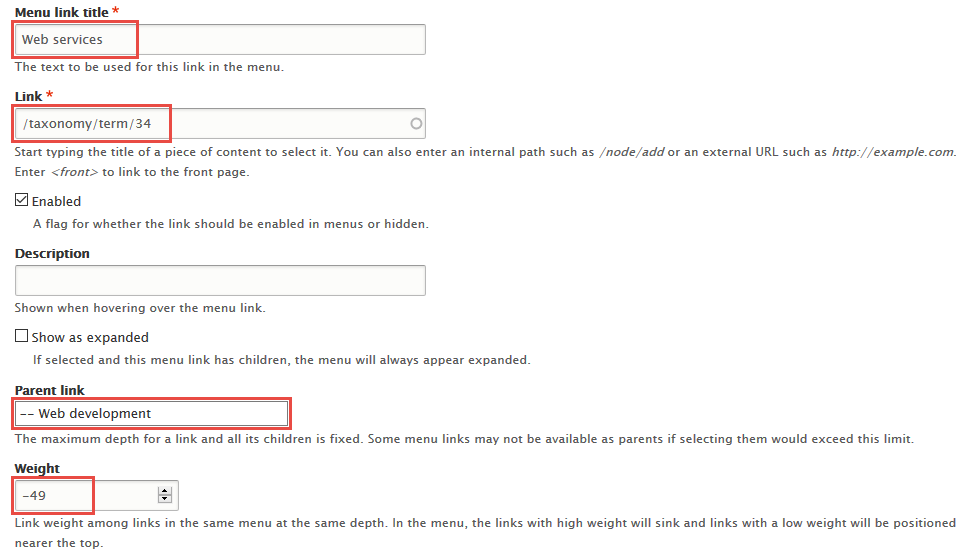
2. Configure Sections Menu block
Step 1: Navigate to Structure > Block layout
Step 2: At Sidebar first block, click Place block link.
Step 3: Find Sections Menu click Place block link, set following properties

Step 4: Click Save block button.
Real time block
Front end Display

1. Create Real time block
Step 1: Navigate to Structure > Block layout, click Custom block library tab.
Step 2: Click Add block link. Create Real time block with following properties:
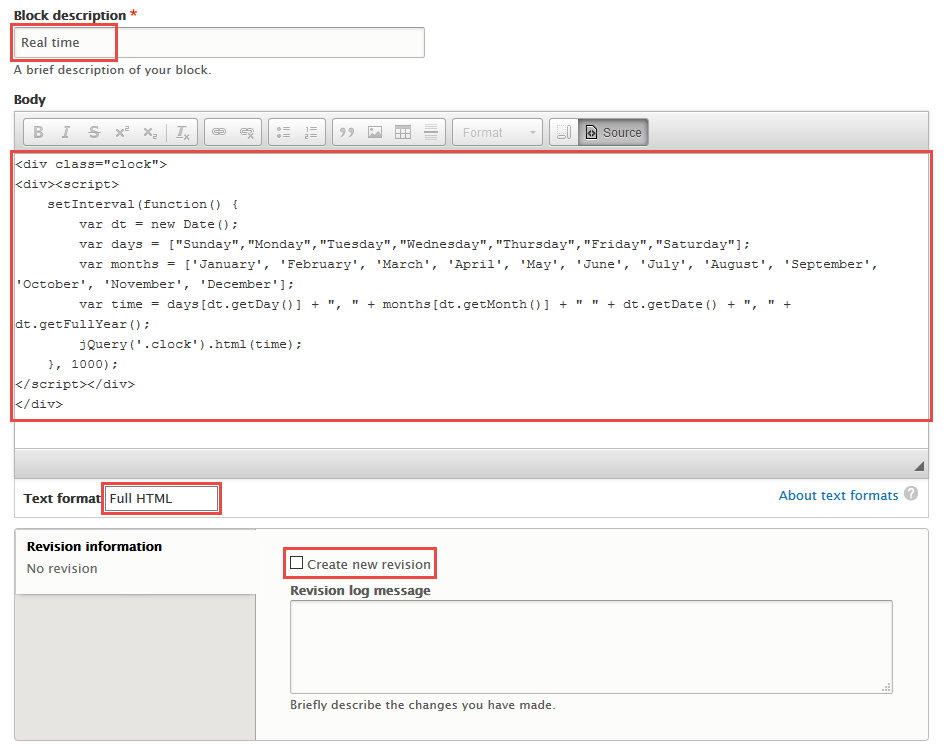
Step 3: Click Save button
This isn't refer to following HTML code, because it is Full HTML
2. Configure Real time block
Step 1: Navigate to Structure > Block layout
Step 2: At Header block, click Place block link.
Step 3: Find Real time click Place block link, set following properties

Step 4: Click Save block button.
Welcome message block
Front end Display

1. Create Welcome message block
Step 1: Navigate to Structure > Block layout, click Custom block library tab.
Step 2: Click Add block link. Create Welcome message block with following properties:

Step 3: Click Save button
Refer to following HTML code:
2. Configure Welcome message block
Step 1: Navigate to Structure > Block layout
Step 2: At Welcome block, click Place block link.
Step 3: Find Welcome message click Place block link, set following properties
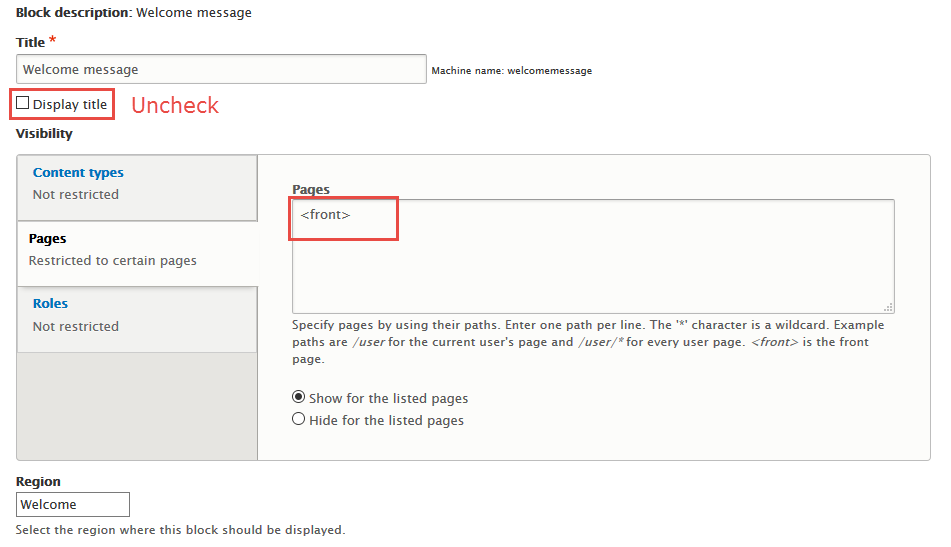
Step 4: Click Save block button.
Introduction block
Front end Display

1. Create Introduction block
Step 1: Navigate to Structure > Block layout, click Custom block library tab.
Step 2: Click Add block link. Create Introduction block with following properties:
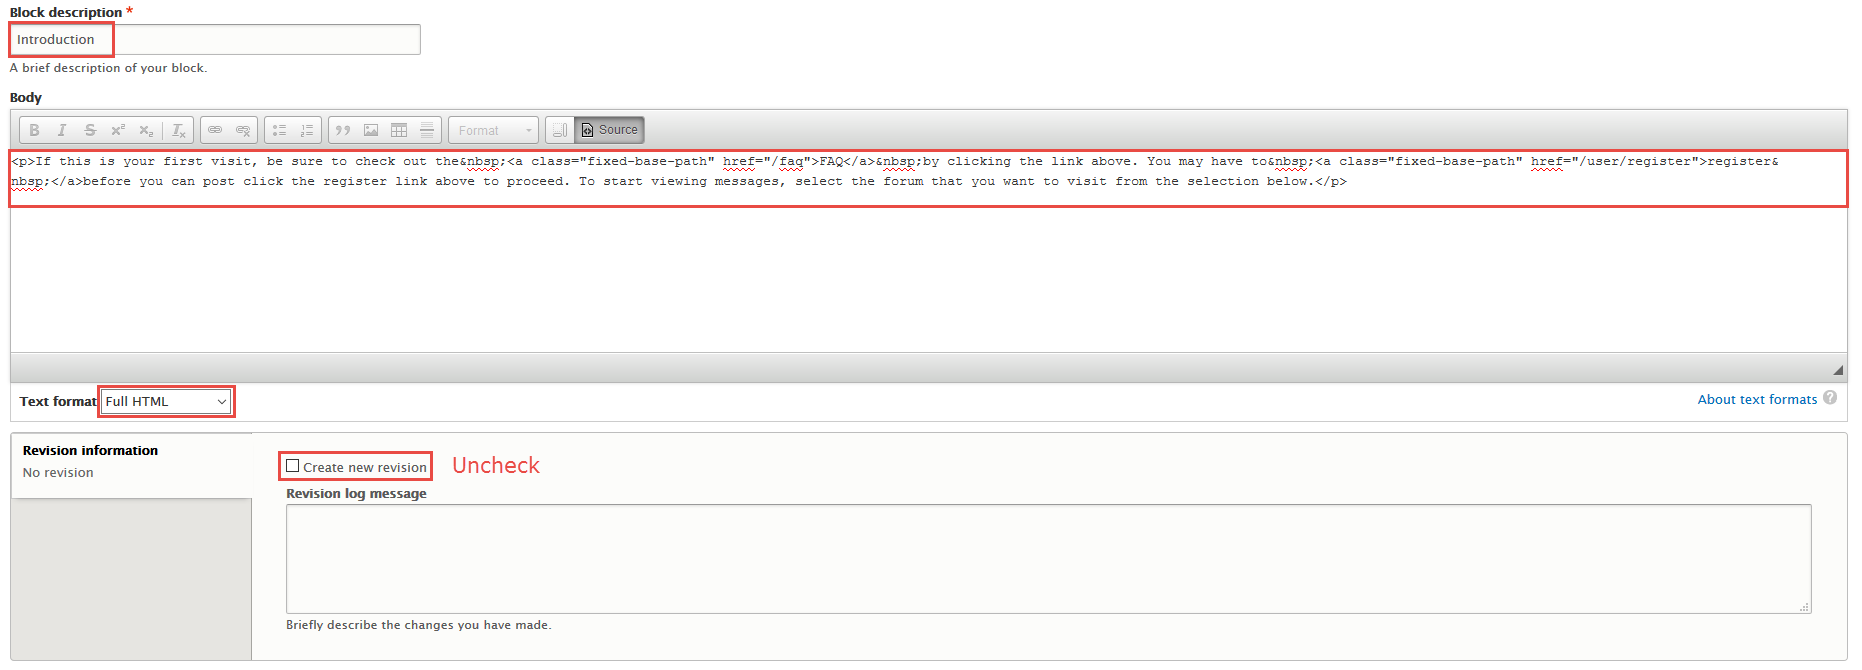
Step 3: Click Save button
Refer to following HTML code:
If this is your first visit, be sure to check out the FAQ by clicking the link above. You may have to register before you can post click the register link above to proceed. To start viewing messages, select the forum that you want to visit from the selection below.
2. Configure Introduction block
Step 1: Navigate to Structure > Block layout
Step 2: At Panel first block, click Place block link.
Step 3: Find Introduction click Place block link, set following properties
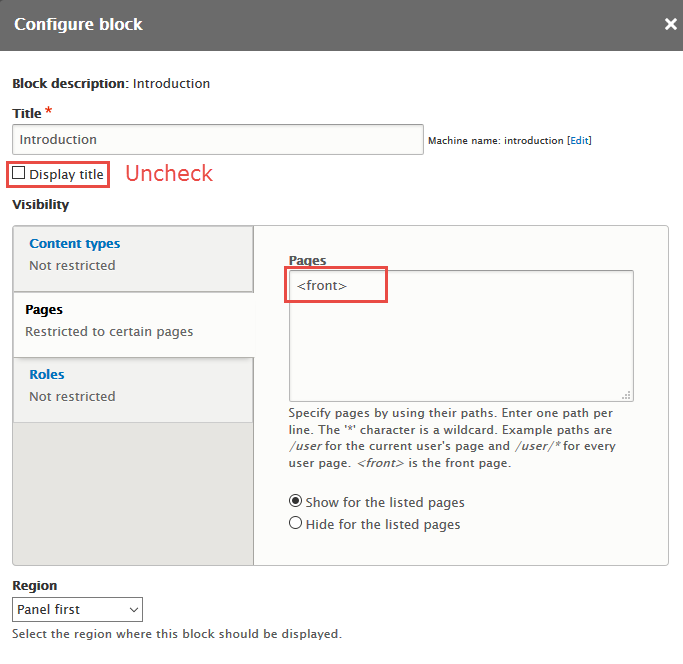
Step 4: Click Save block button.
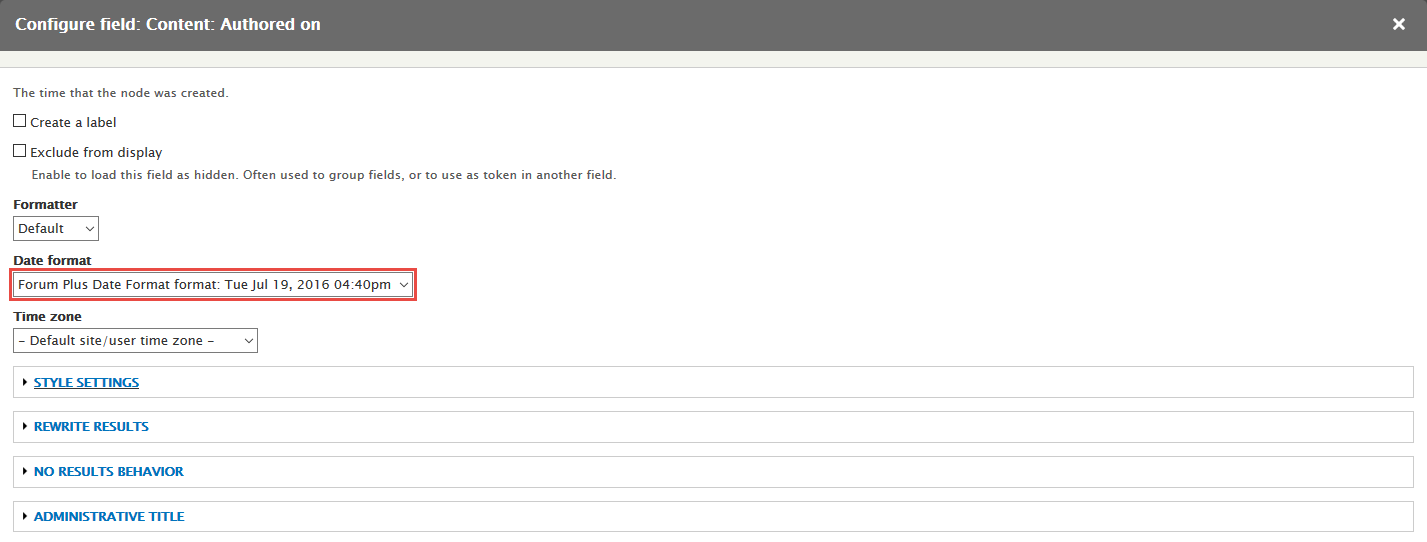
Date and time formats
Configure Date and time formats
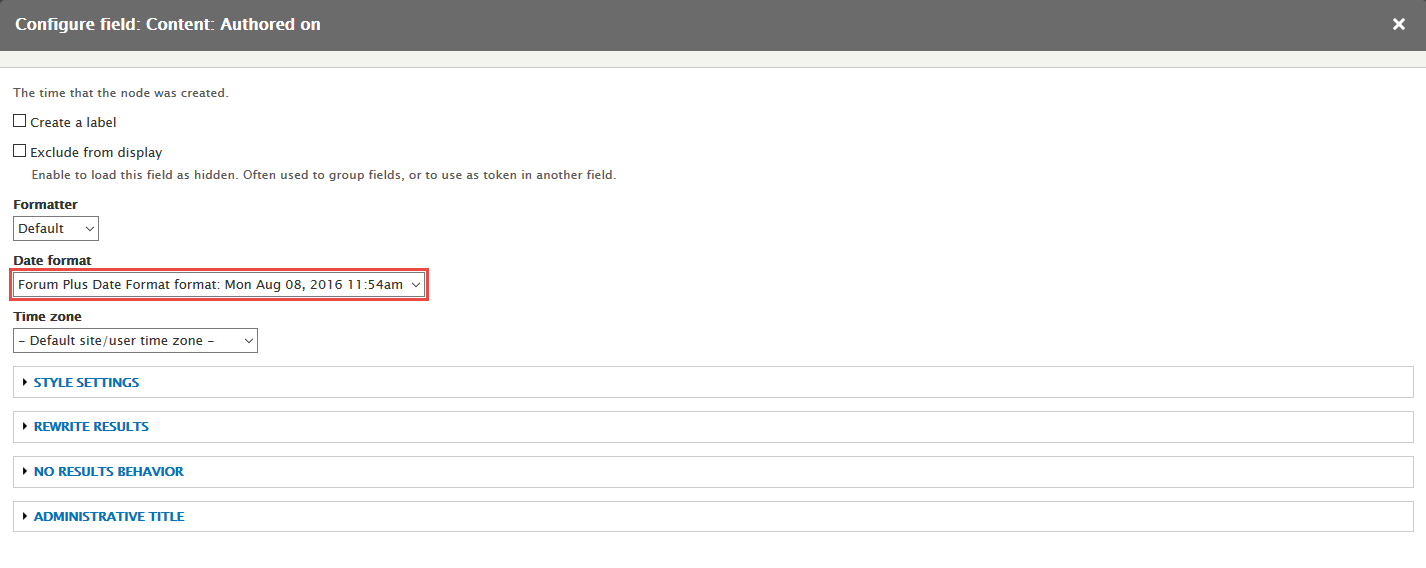
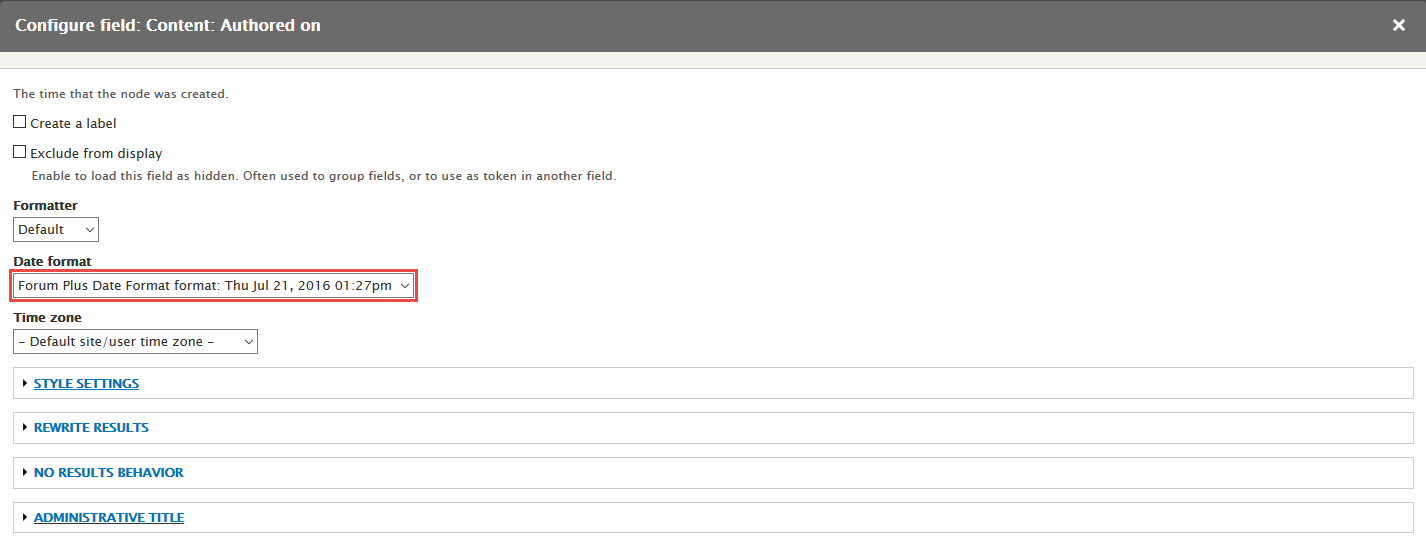
Step 1: Navigate to Configuration > Regional and language > Date and time formats link, click Add format, then create Forum Plus Date Format set with following settings:
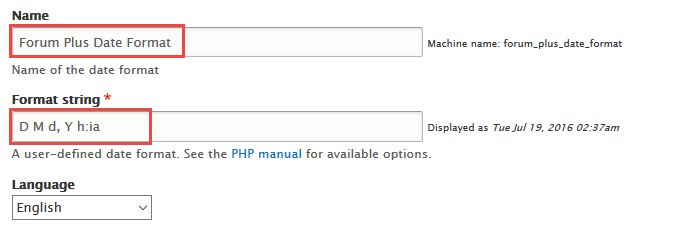
Step 2: Click Save format button.
New forum posts block
Front end Display

1. Create New forum posts block
Step 1: Navigate to Structure > Views, click Add new view, create New forum posts view with following settings:
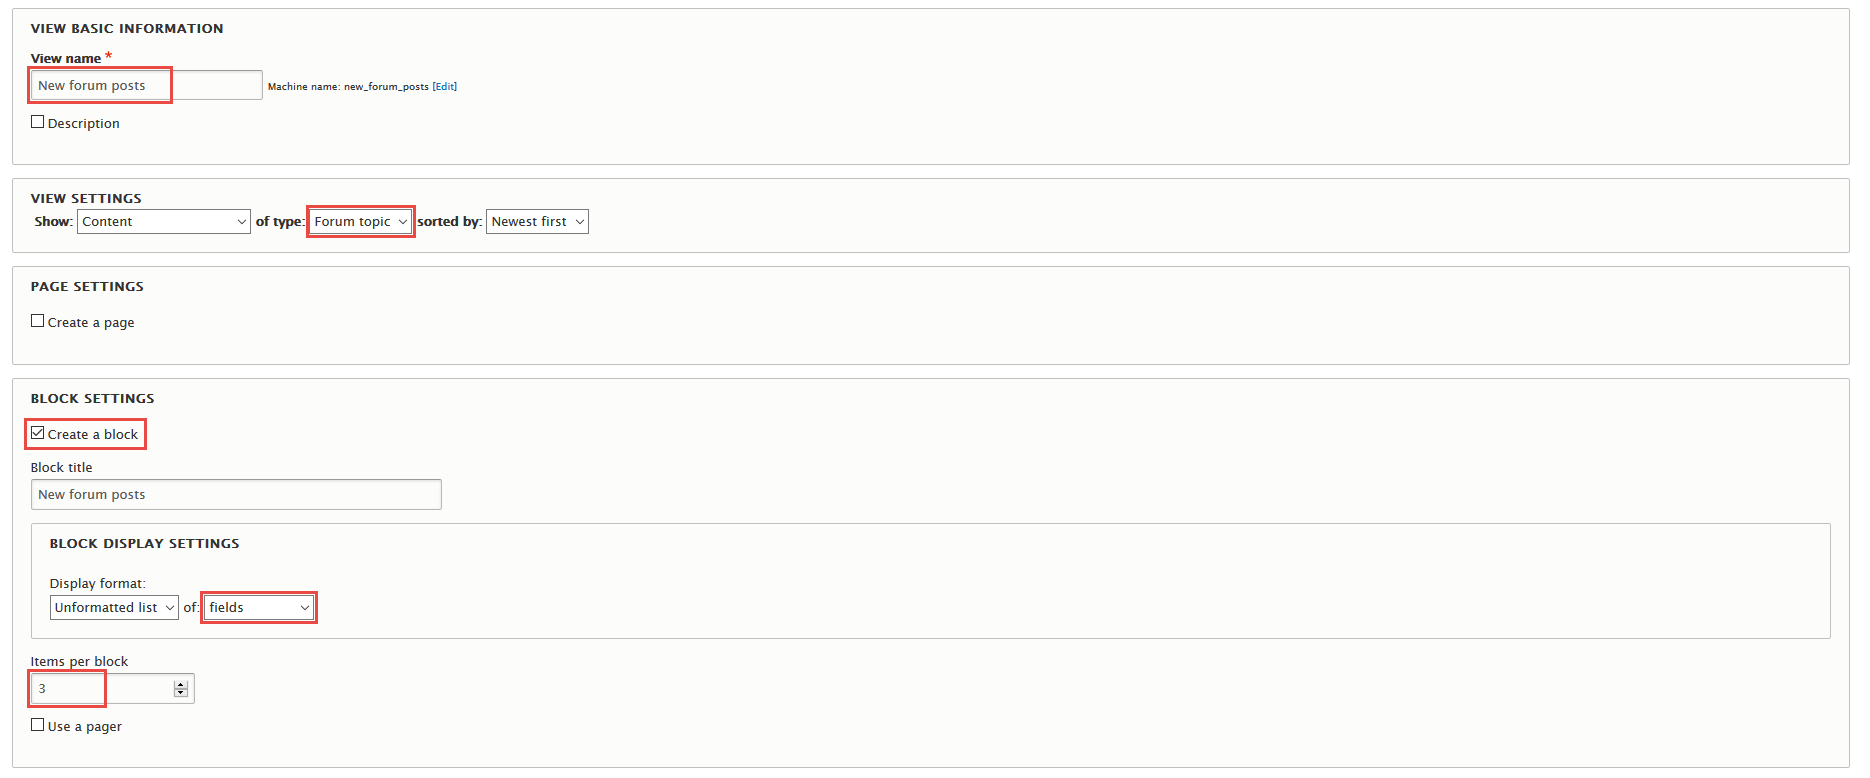
Step 2: Click Save and edit button. Next to steps below to set properties for following fields:
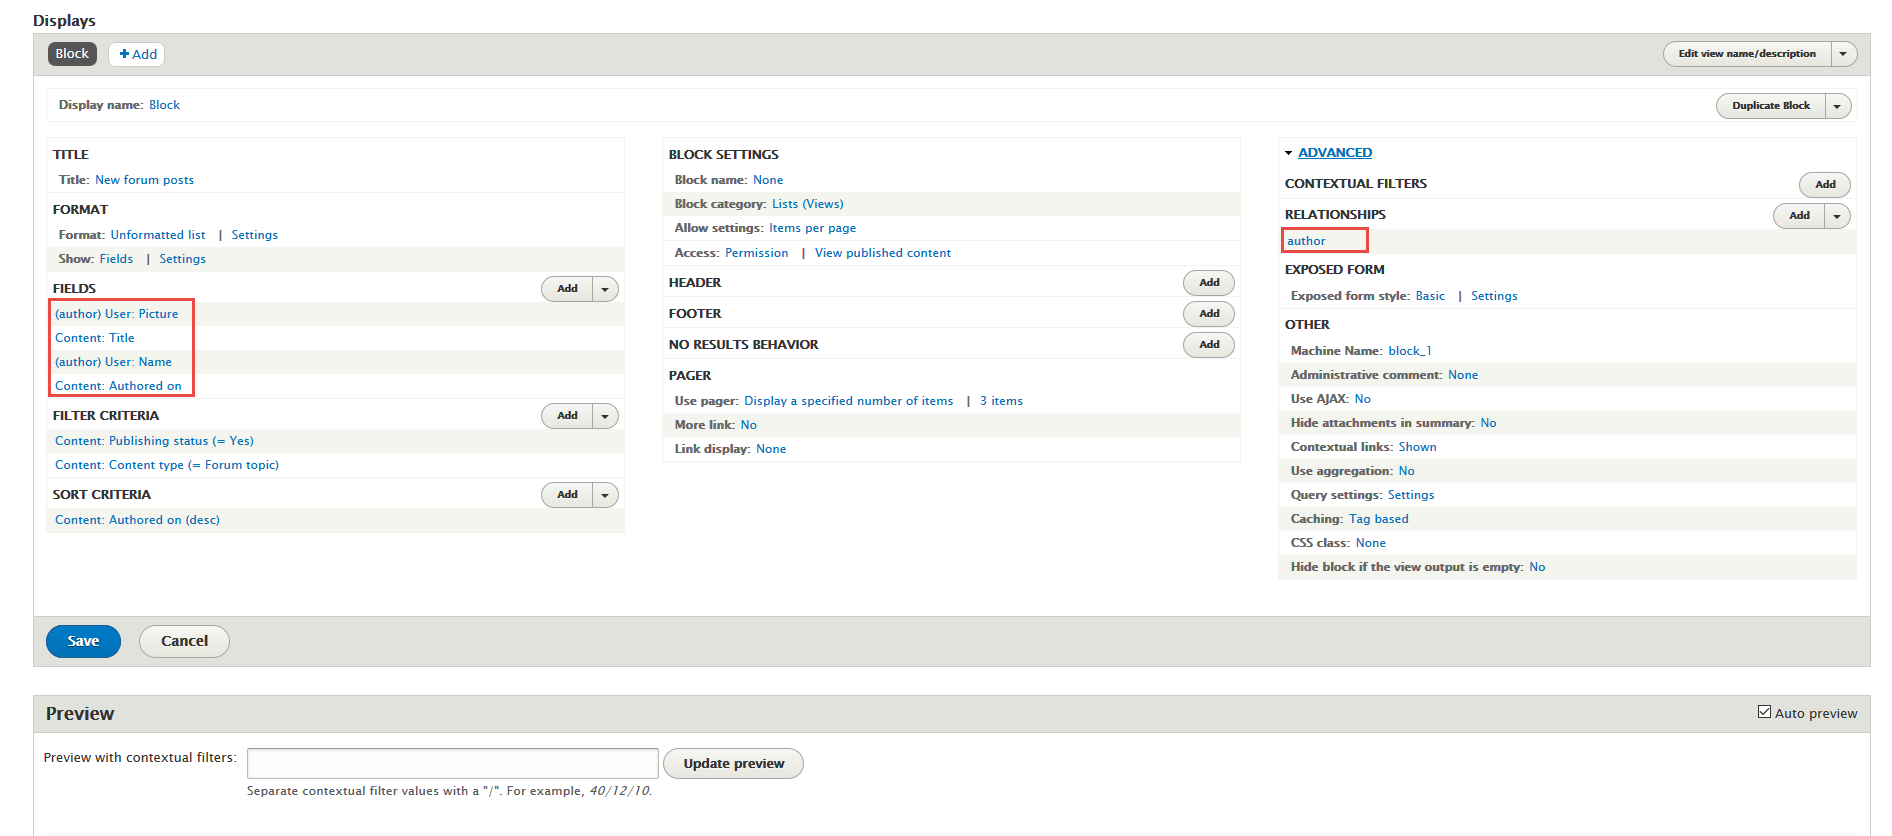
Step 3: Expand Advanced panel, at RELATIONSHIPS area, click Add to add relationship Content author
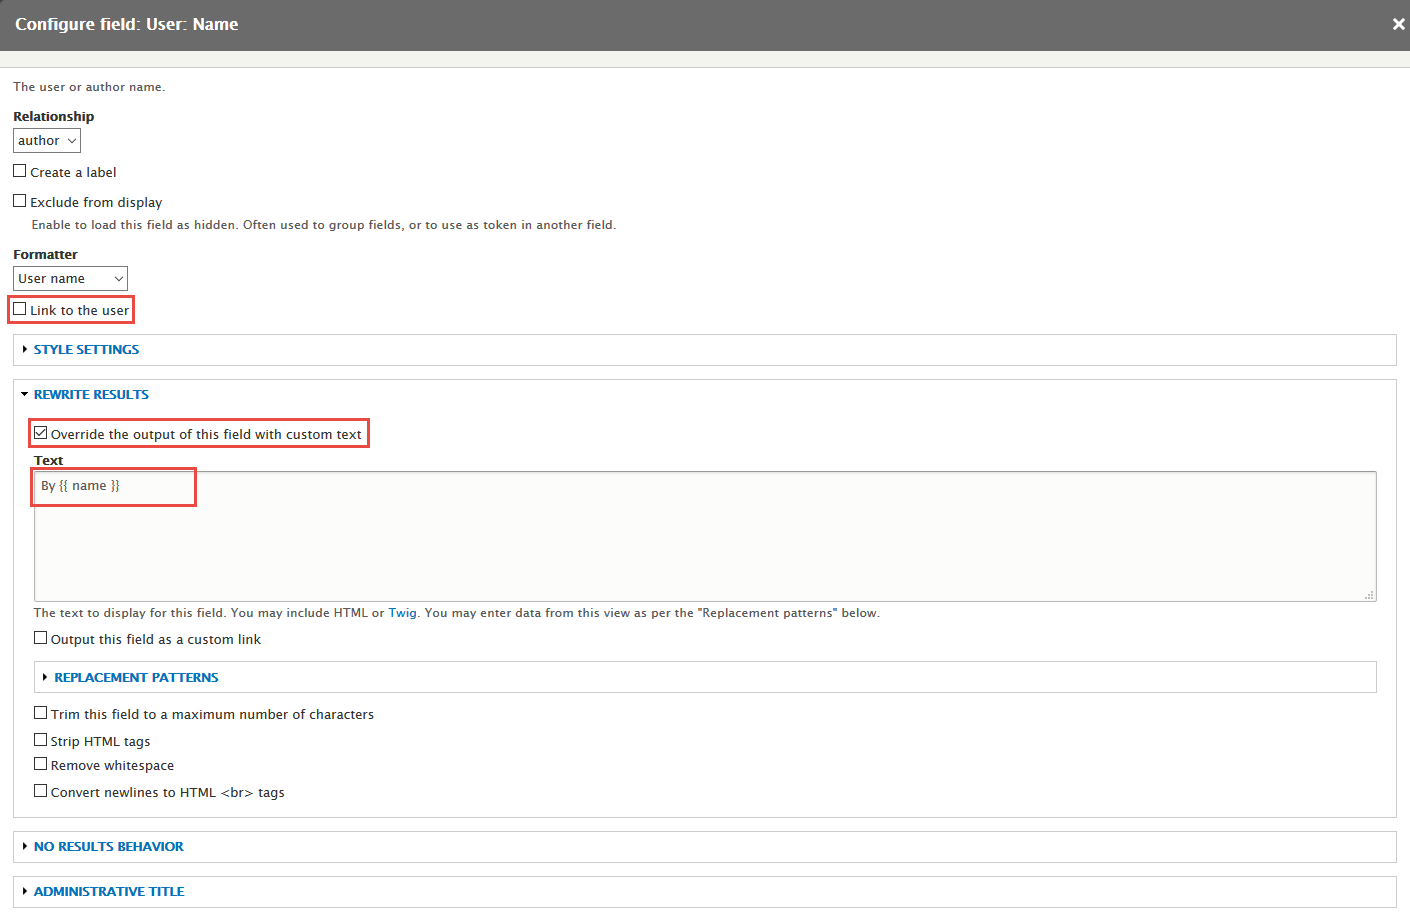
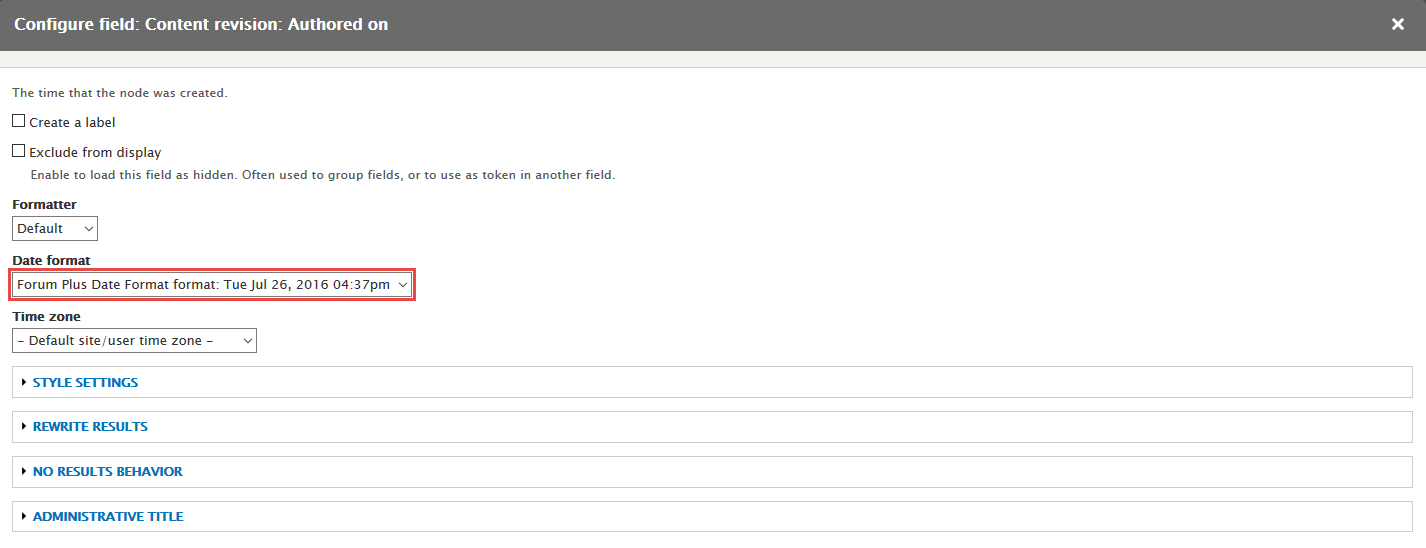
Step 4: At FIELDS area, click Add button to add fields: User: Picture, User: Name, Content: Authored on
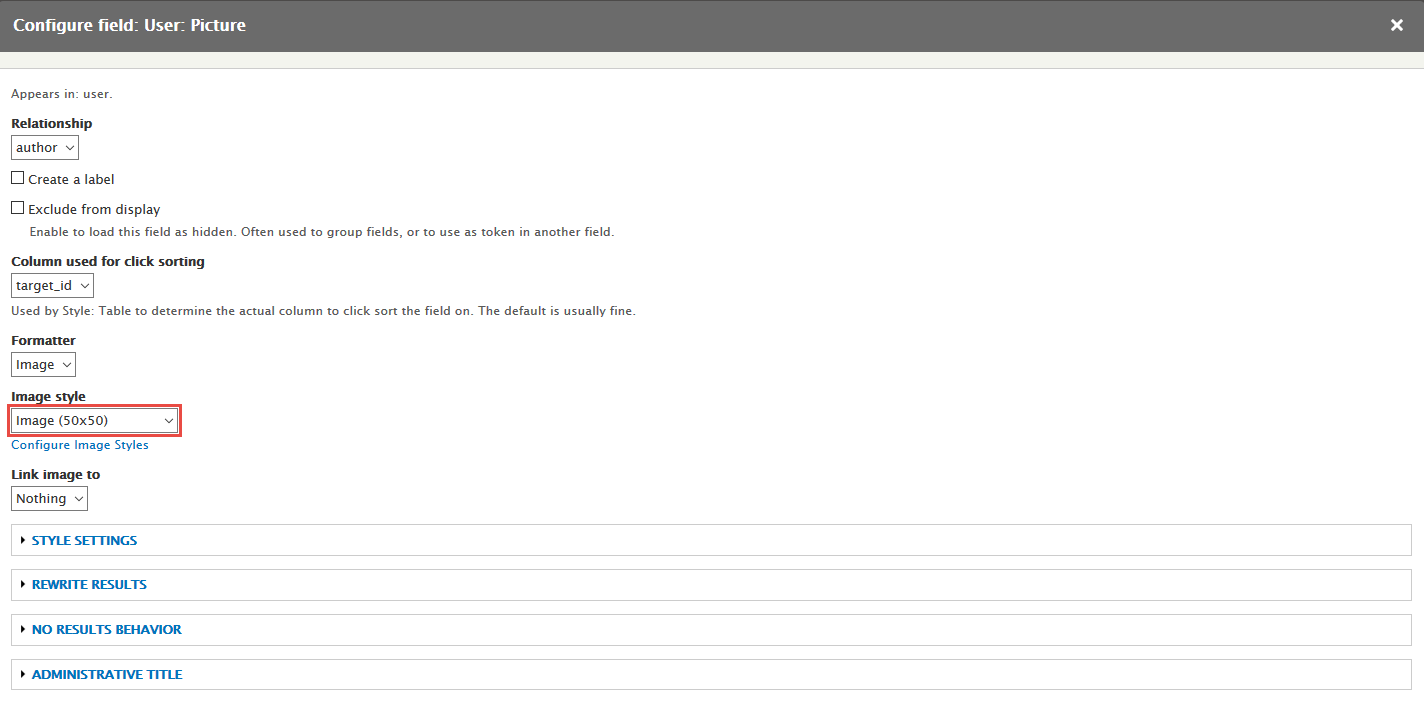
Step 5: Set properties for User: Picture
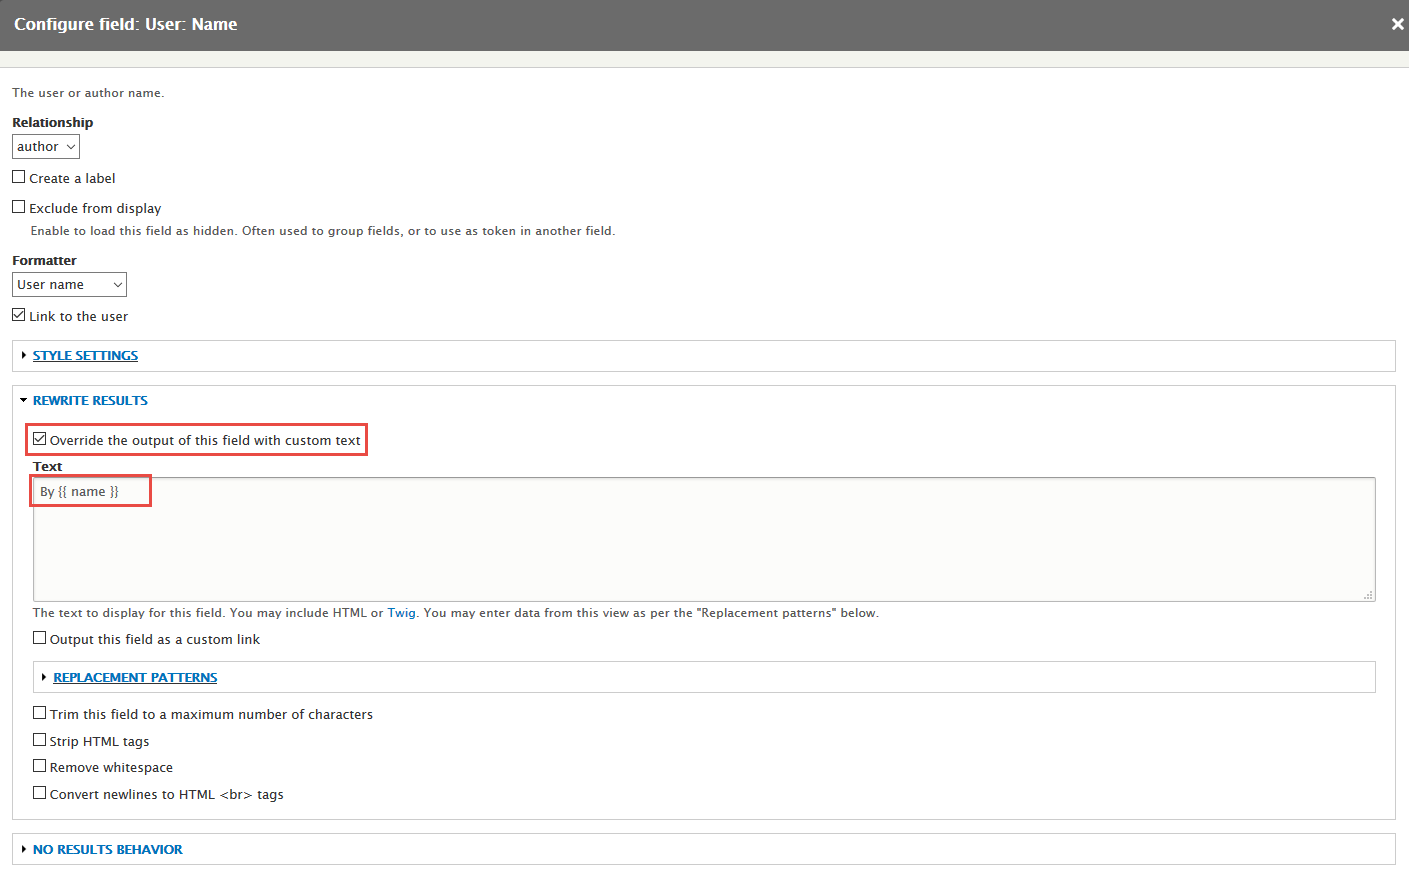
Step 6: Set properties for User: Name
Step 7: Set properties for Content: Authored on
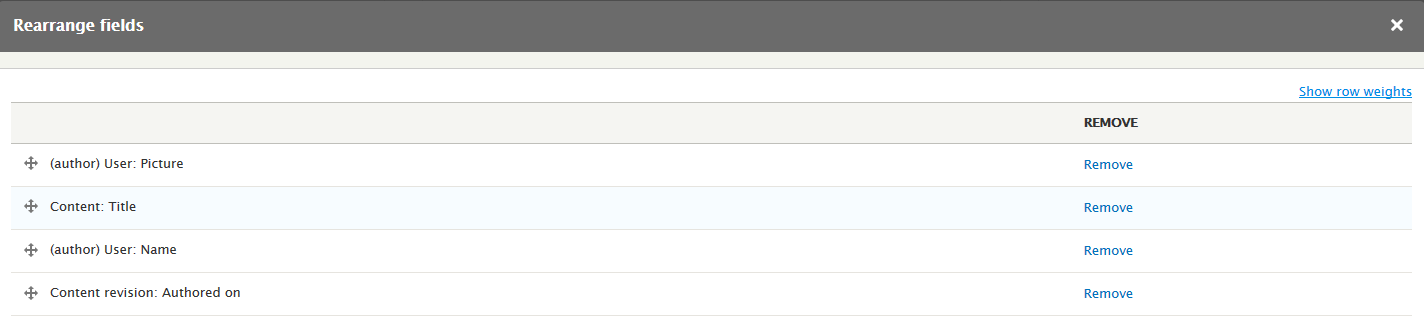
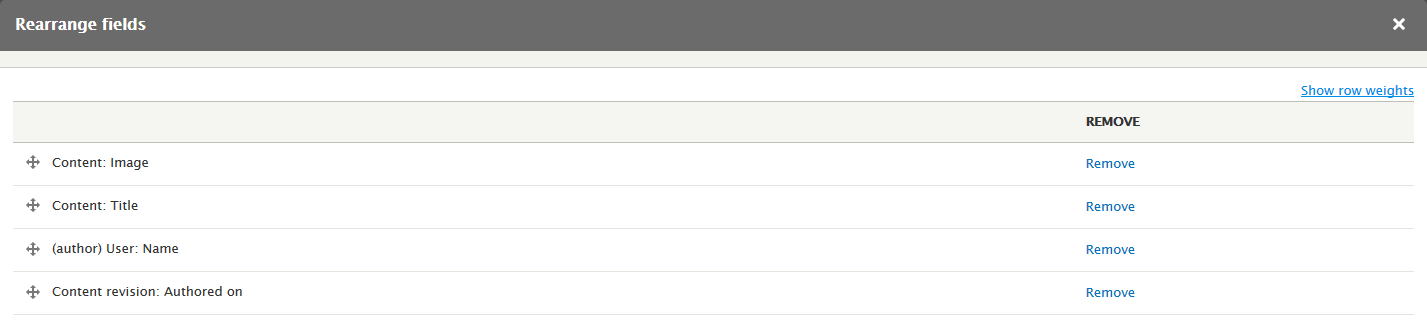
Step 8: At FIELDS area, click Rearrange button and set following arrange

Step 9: Click Save to save view
2. Configure View: New forum posts block
Step 1: Navigate to Structure > Block layout
Step 2: Find Sidebar first click Place block button
Step 3: Find New forum posts click Place block button and set following properites:
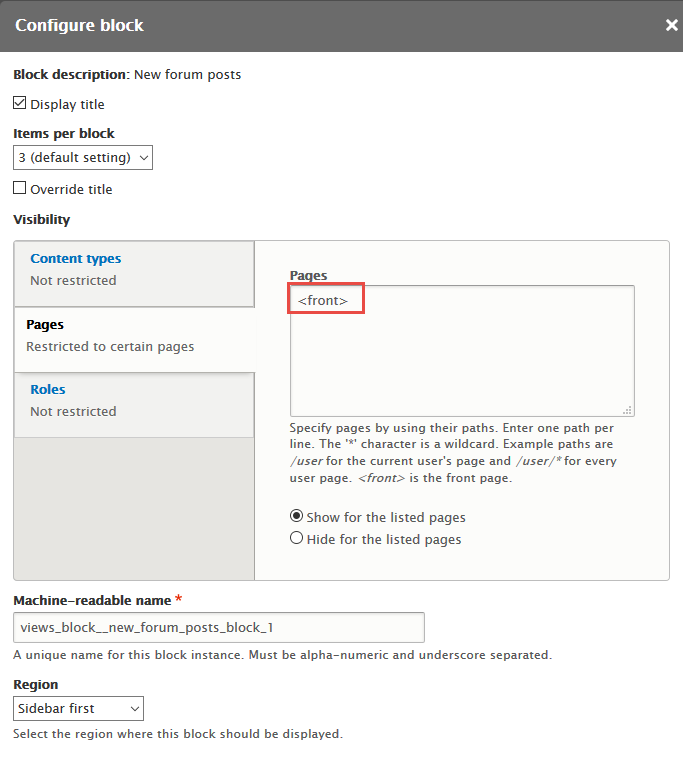
Step 4: Click Save block button.
Forum topic
Front end Display
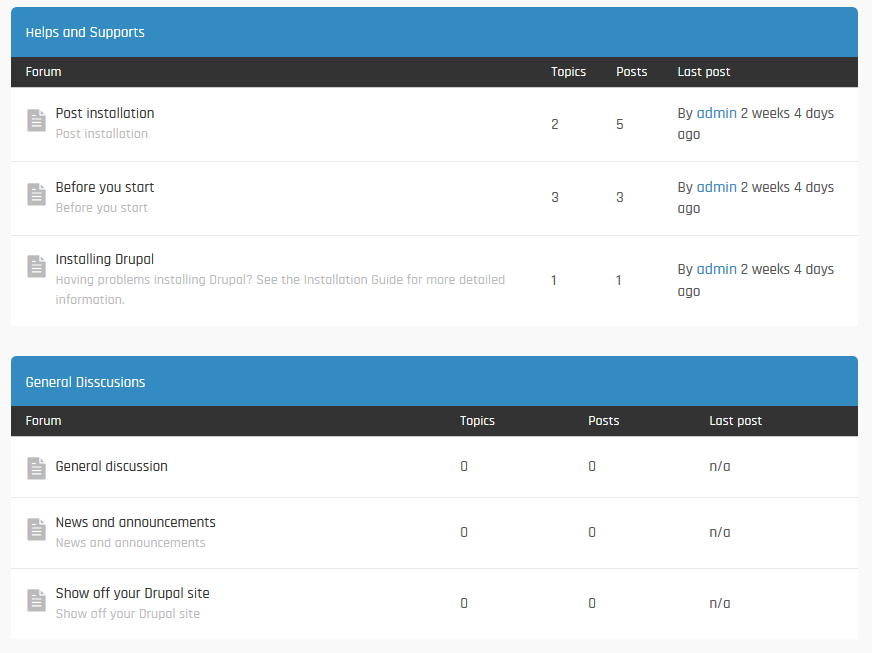
Configure Forum topic
Step 1: Navigate to Structure > Forums, click Add forum, Add container, to create topic as following settings:
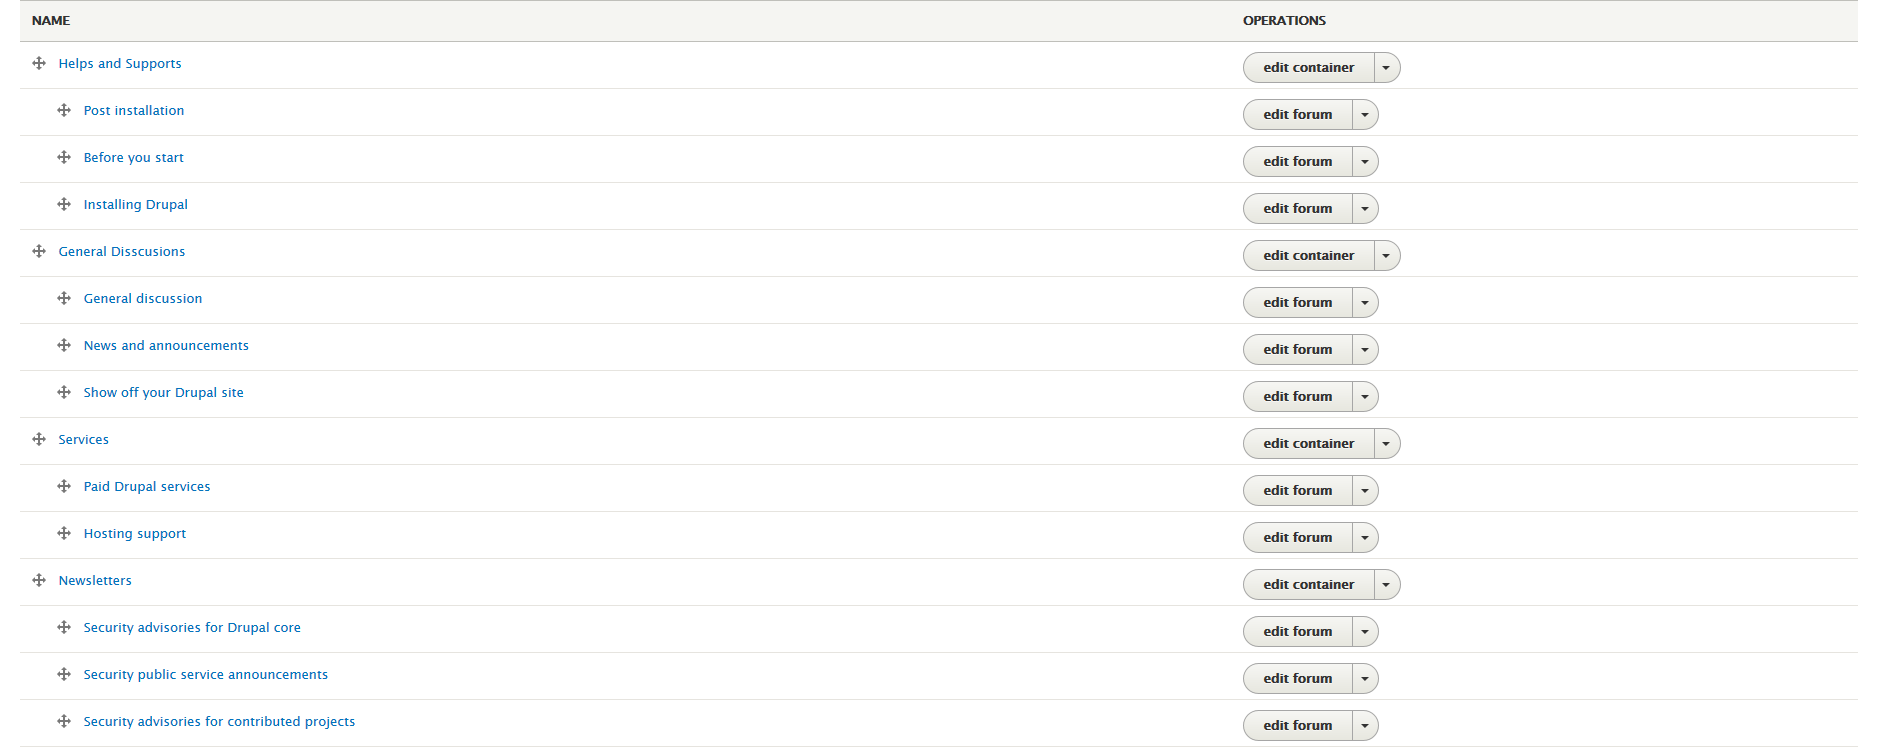
Step 2: Click Save button.
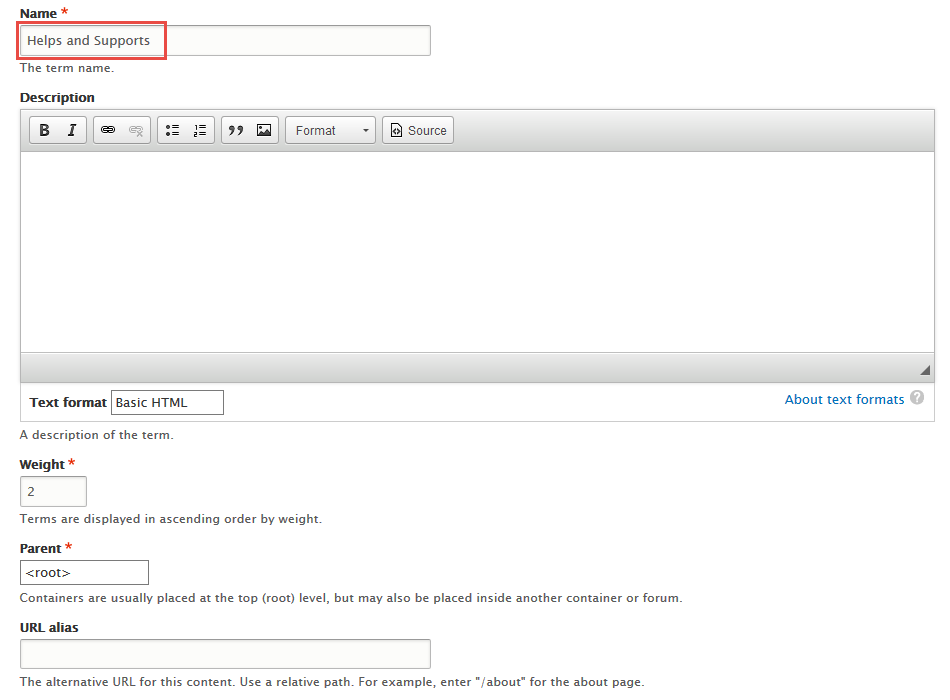
Find Add container button , then click add Helps and Supports menu item
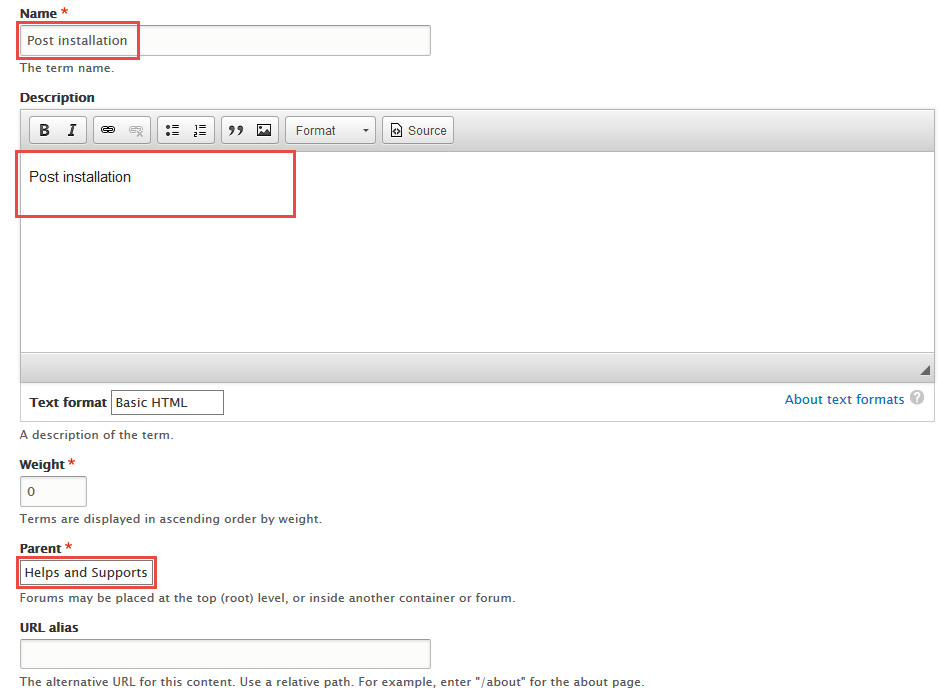
Find Add forum button , then click add Post installation menu item
Refer to following HTML code:
Post installation
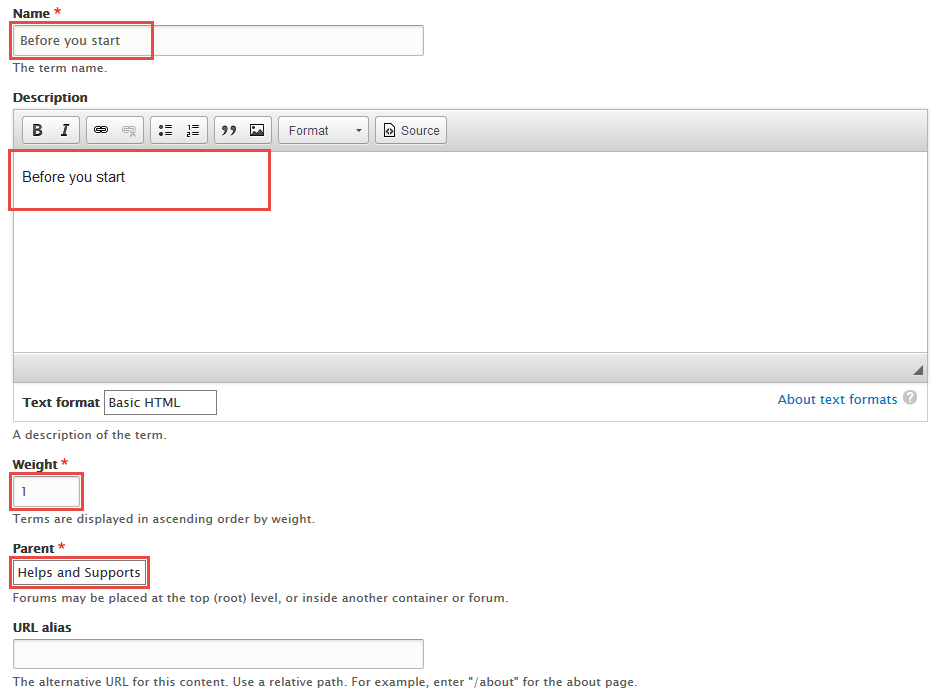
Find Add forum button , then click add Before you start menu item
Refer to following HTML code:
Before you start
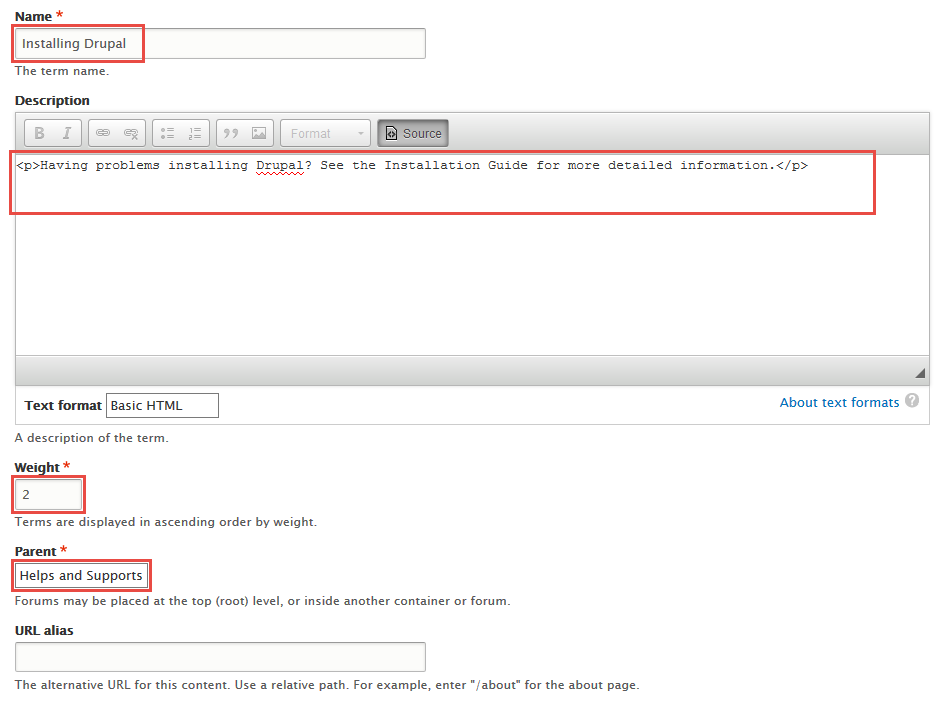
Find Add forum button , then click add Installing Drupal menu item
Refer to following HTML code:
Having problems installing Drupal? See the Installation Guide for more detailed information.
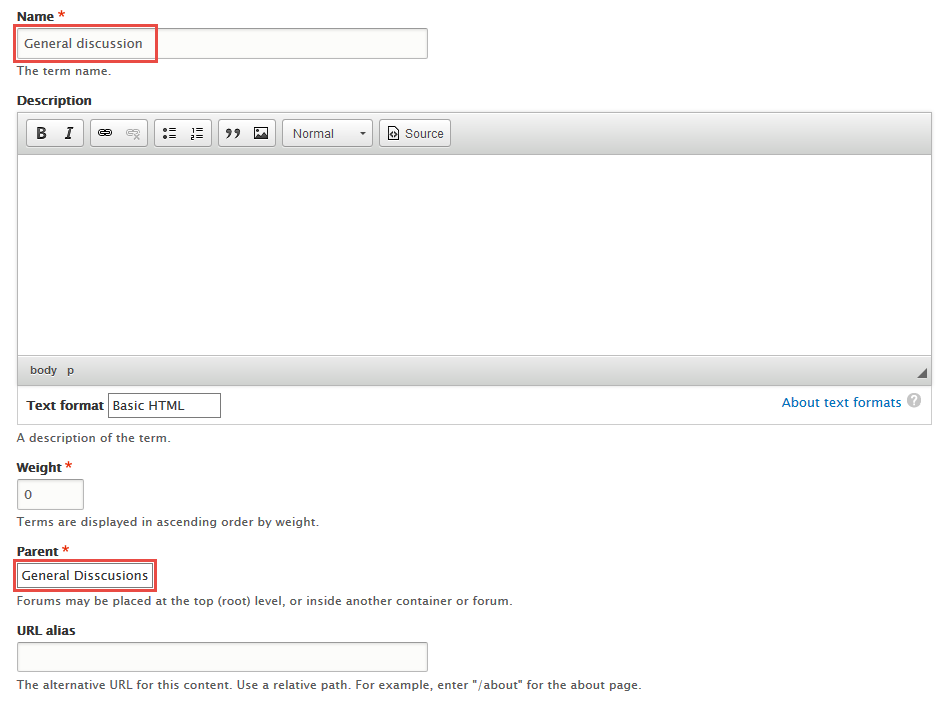
Find Add container button , then click add General Disscusions menu item

Find Add forum button , then click add General discussion menu item
Tags block
Front end Display
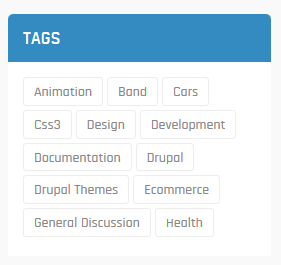
1. Create Tags block
Step 1: Navigate to Structure > Views, click Add new view, then create Tags view with following settings:
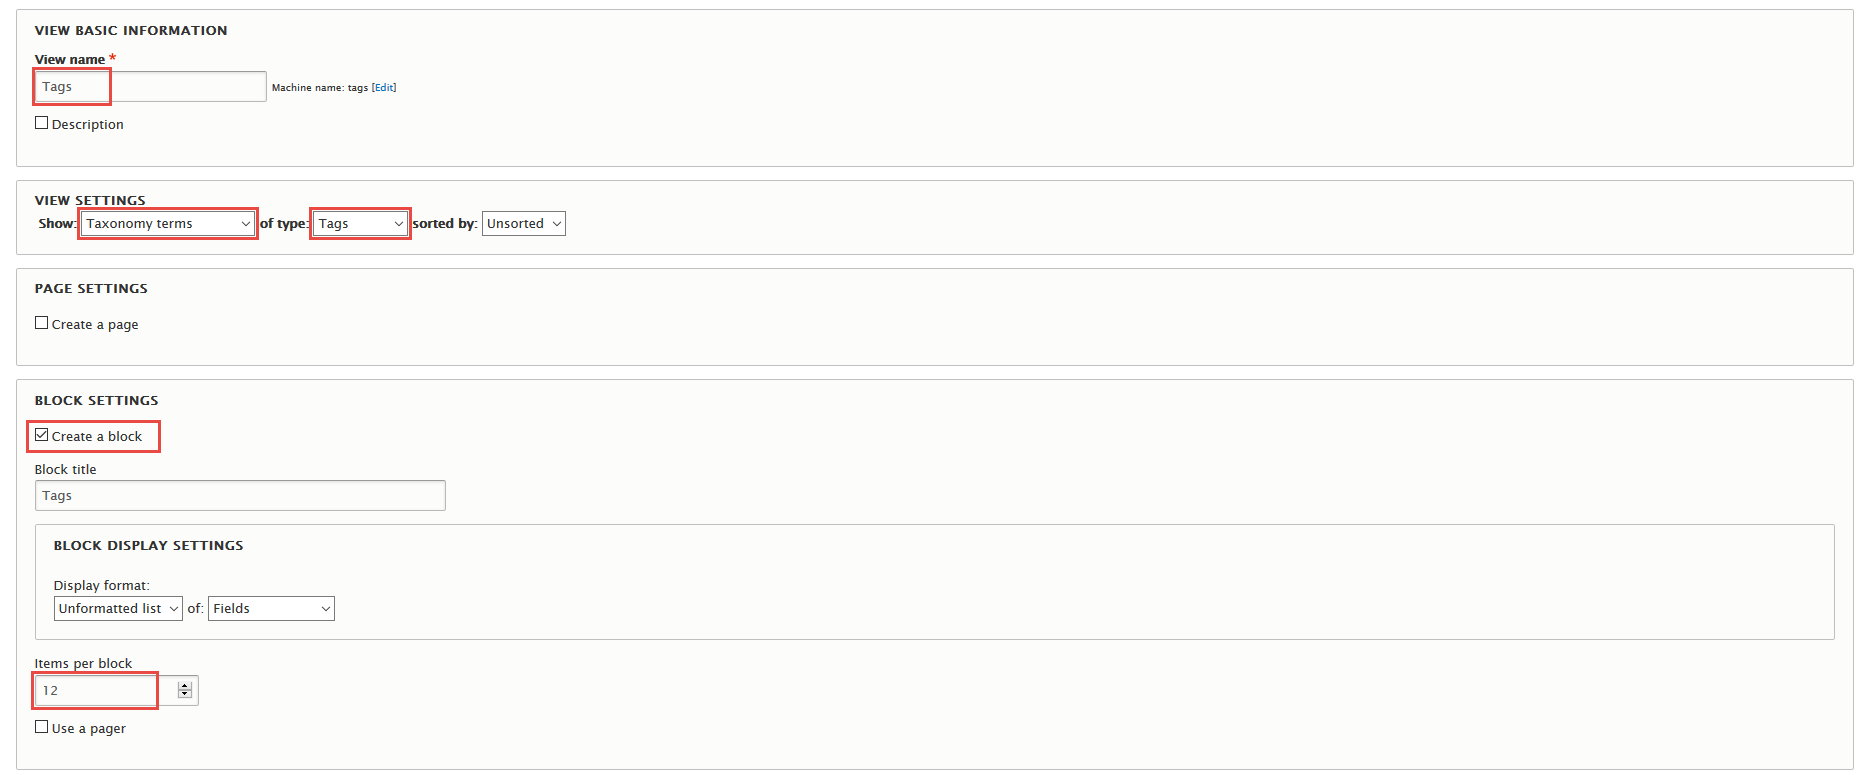
Step 2: Click Save and edit button. Next to steps below to set properties for following fields:
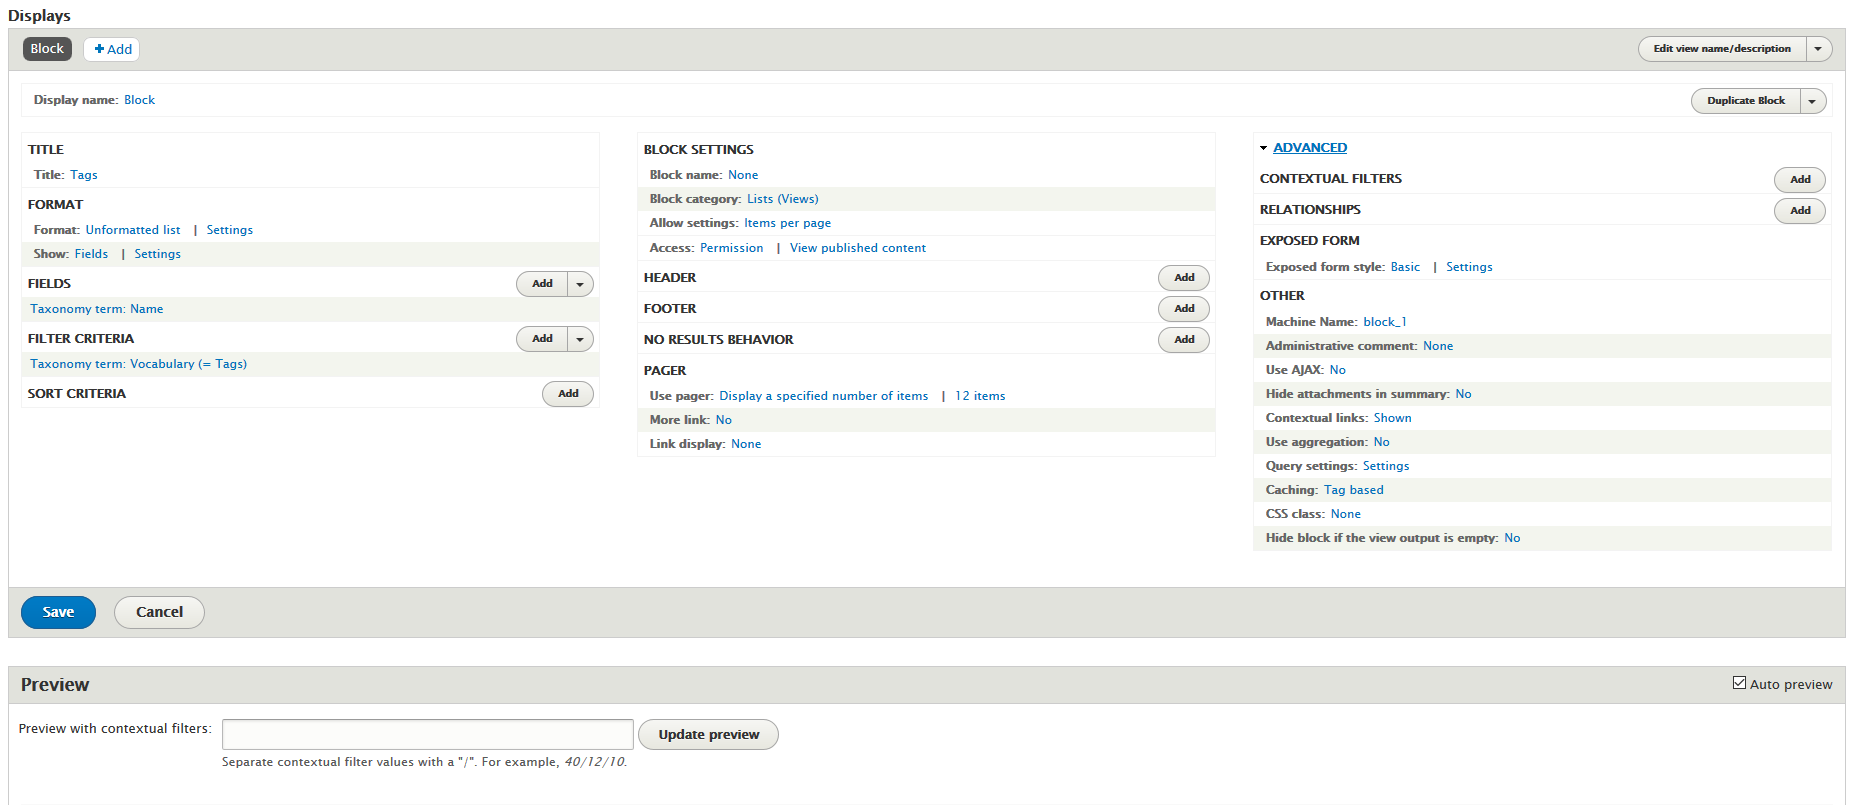
Step 3: Click Save to save view
2. Configure View: Tags block
Step 1: Navigate to Structure > Block layout
Step 2: Find Sidebar first click Place block button
Step 3: Find Tags click Place block button and set following properites:
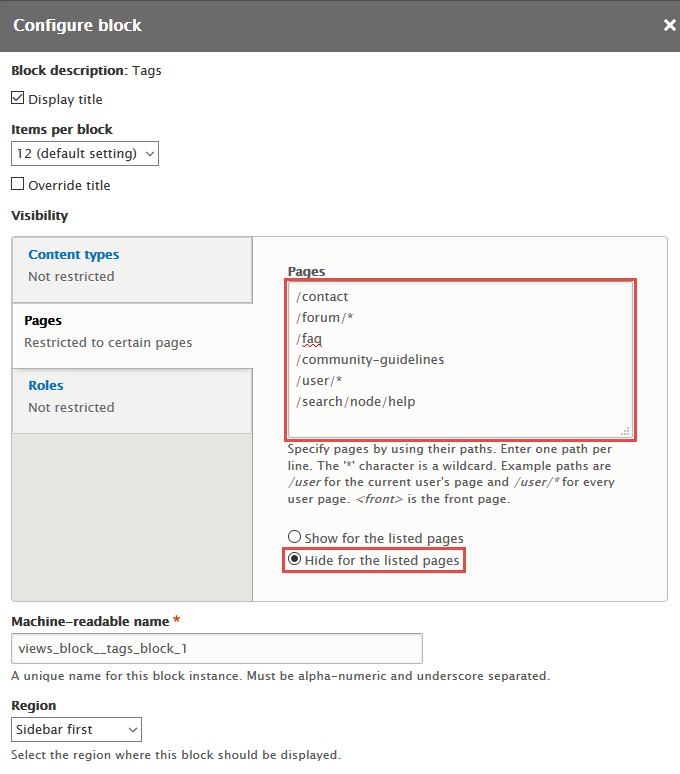
Step 4: Click Save block button.
Get product block
Front end Display
1. Create Get product block
Step 1: Navigate to Structure > Views, click Add new view, then create Get product view with following settings:
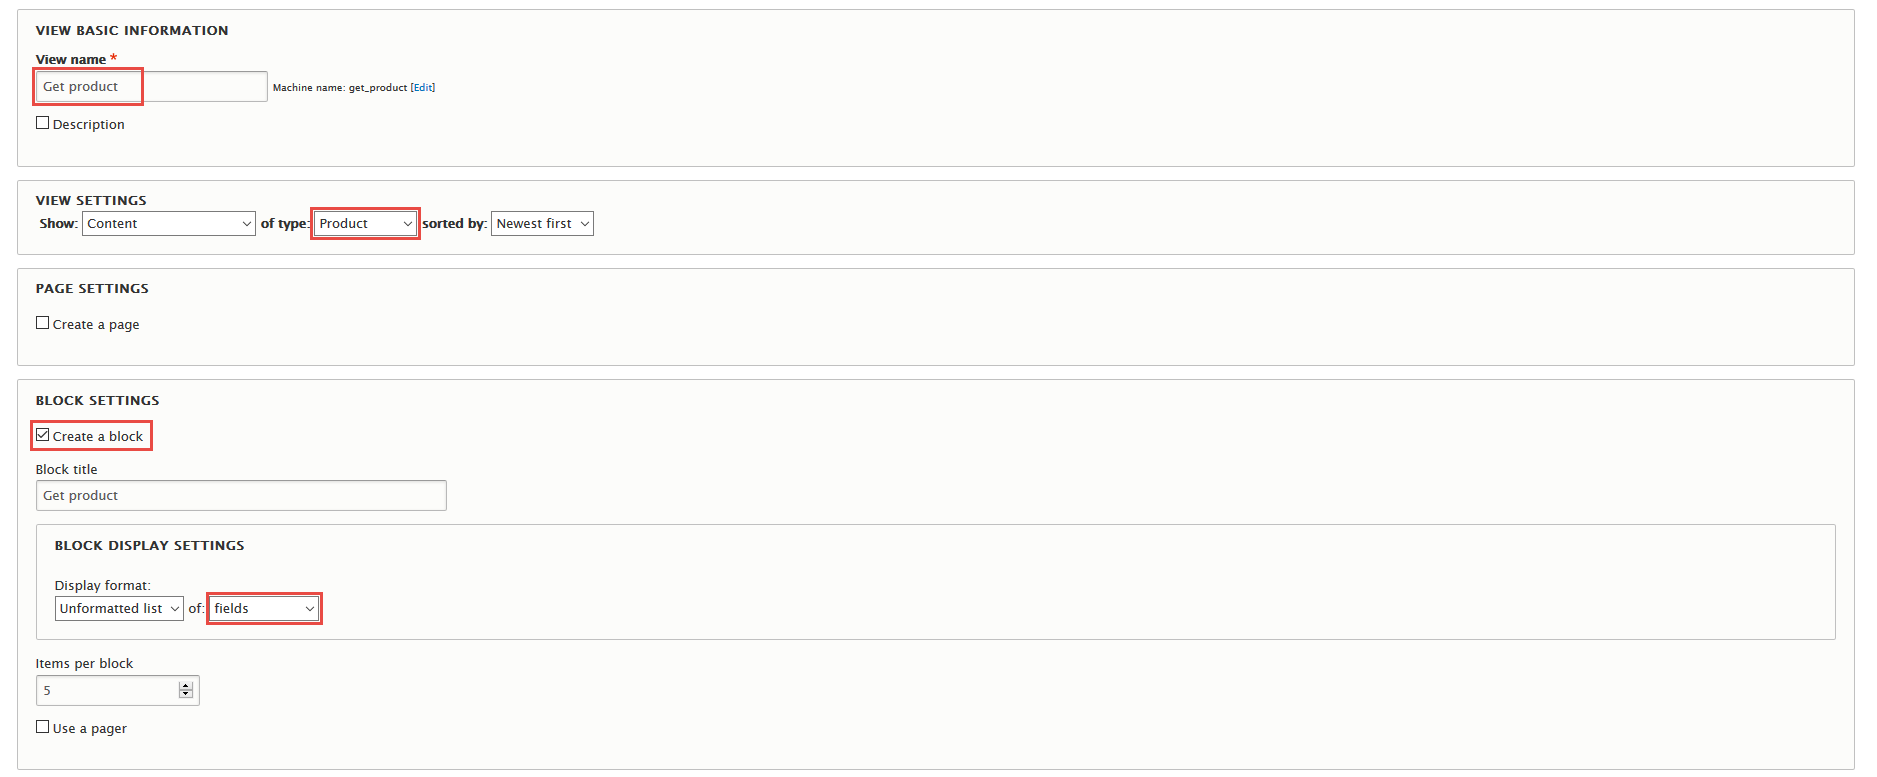
Step 2: Click Save and edit button. Next to steps below to set properties for following fields:
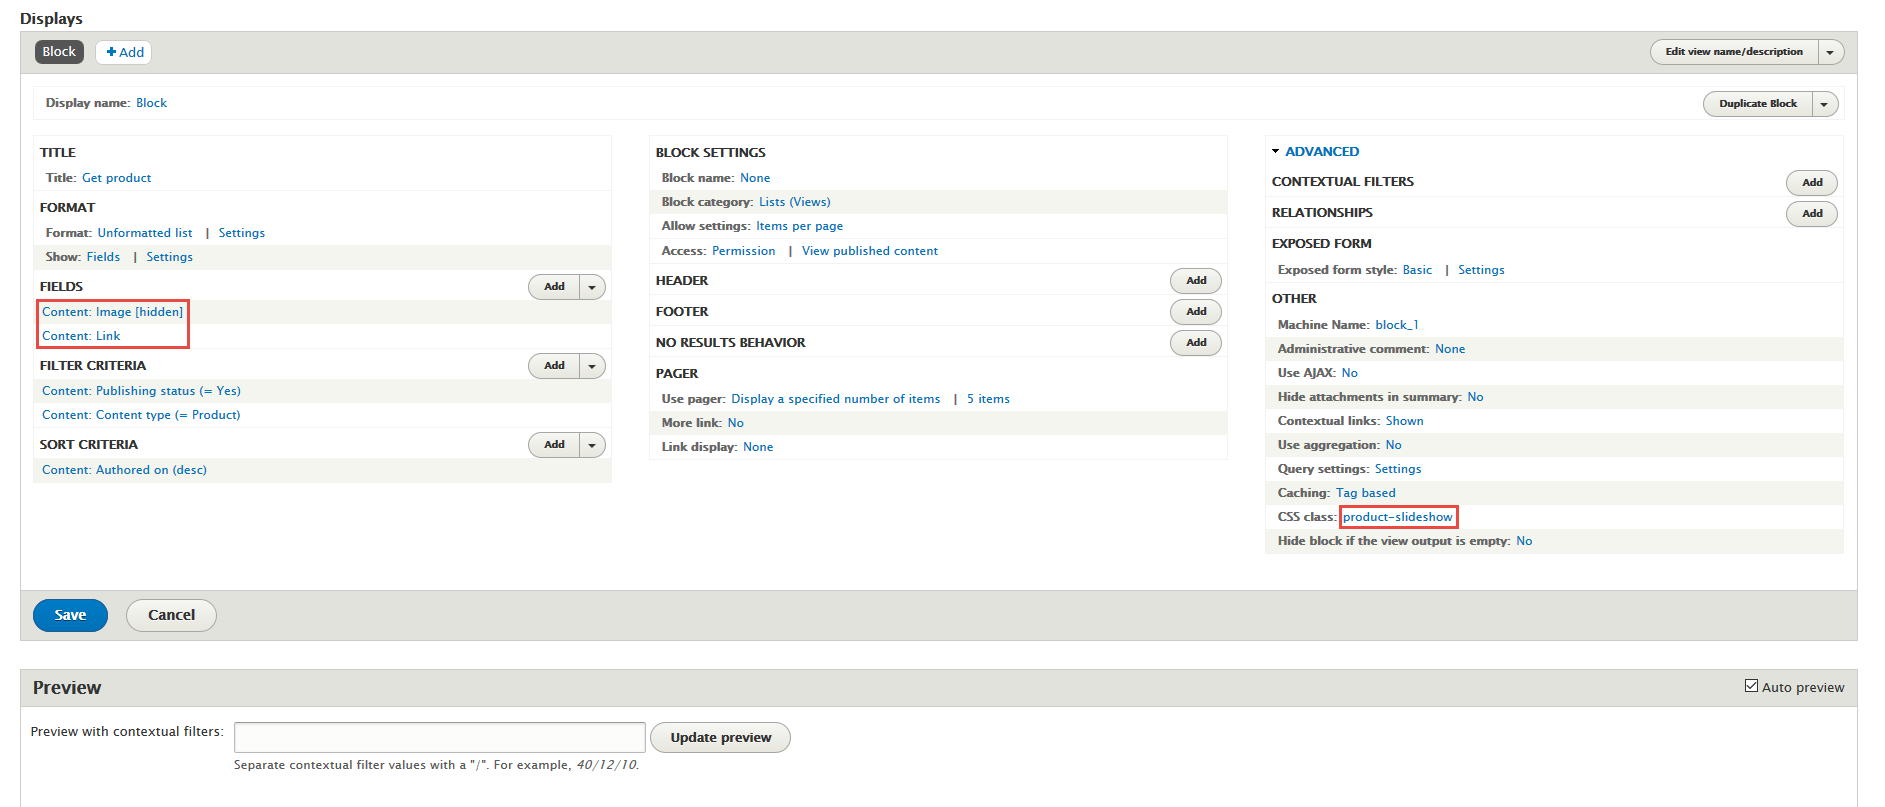
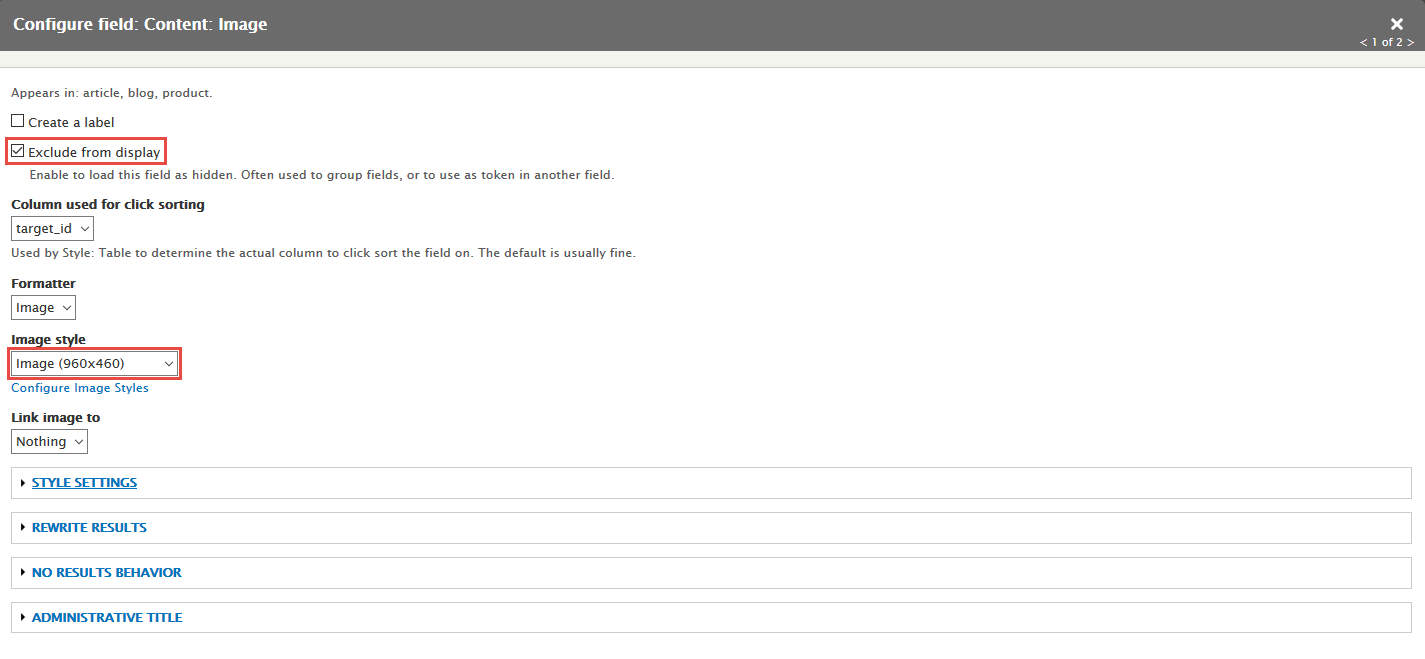
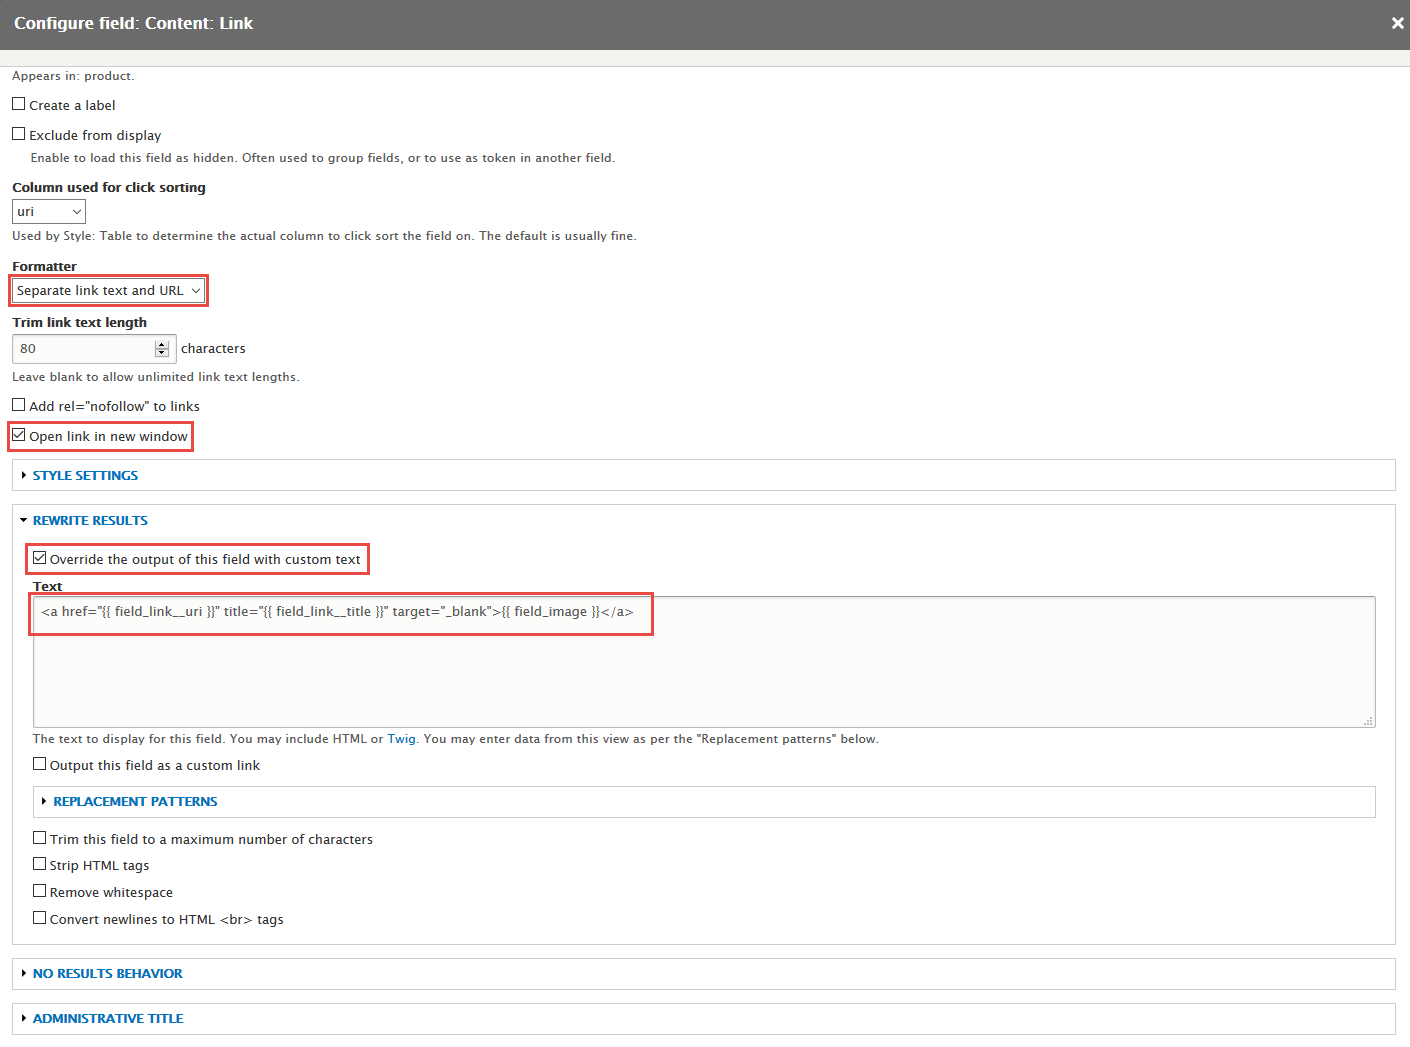
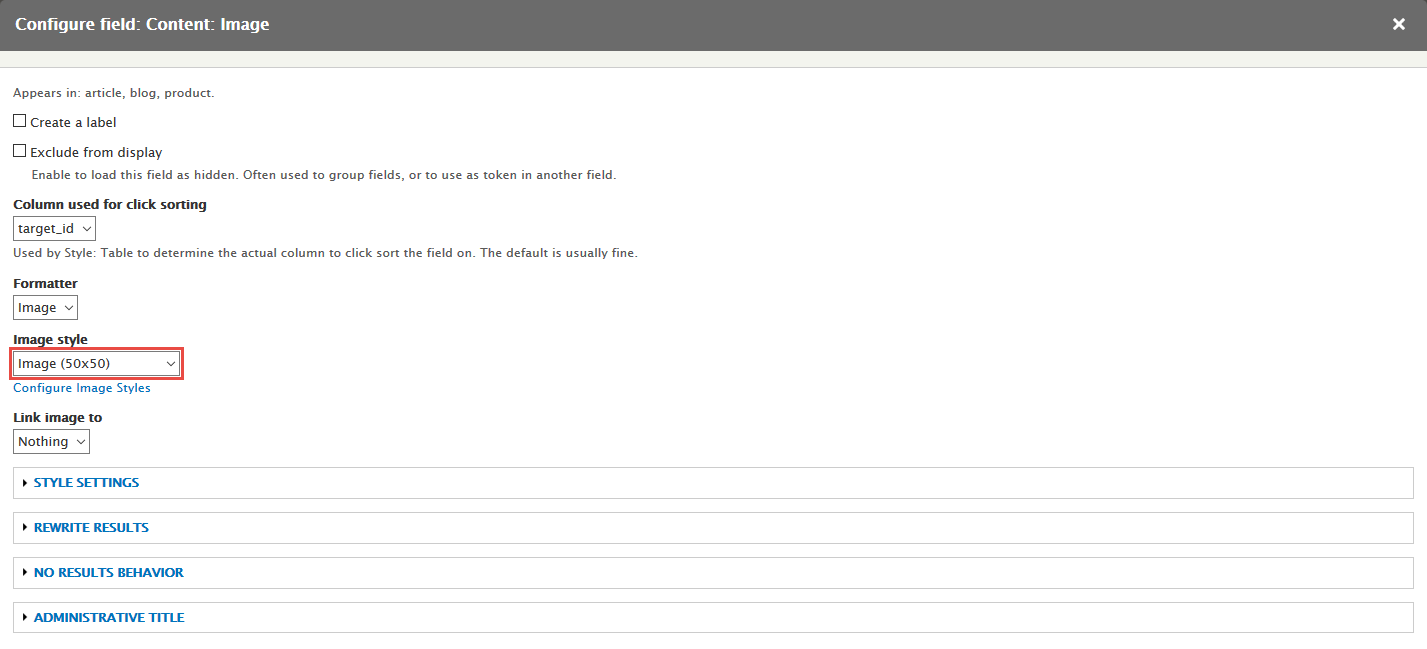
Step 3: At FIELDS area, click Add button to add fields: Content: Image, Content: Link
Step 4: Set properties for Content: Image
Step 5: Set properties for Content: Link
Step 6: At FIELDS area, click Rearrange set following arrange:

Step 7: At Advanced > OTHER area, add CSS class:

Step 8: Click Save to save view
Refer to following HTML code:
{{ field_image }}
2. Configure View: Get product block
Step 1: Navigate to Structure > Block layout
Step 2: Find Sidebar first click Place block button
Step 3: Find Get product click Place block button and set following properites:
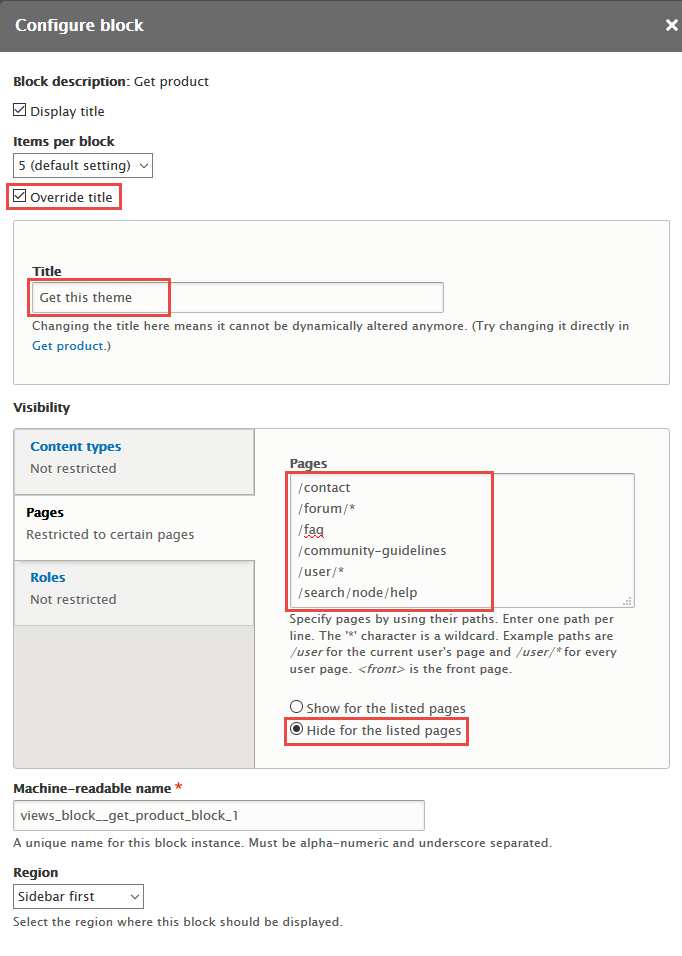
Step 4: Click Save block button.
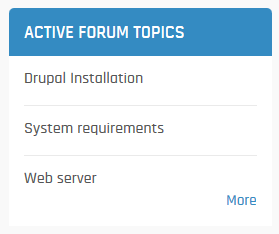
Active forum topics block
Front end Display
1. Create Active forum topics view
Step 1: Navigate to Structure > Views, click Add new view, then create Active forum topics view with following settings:
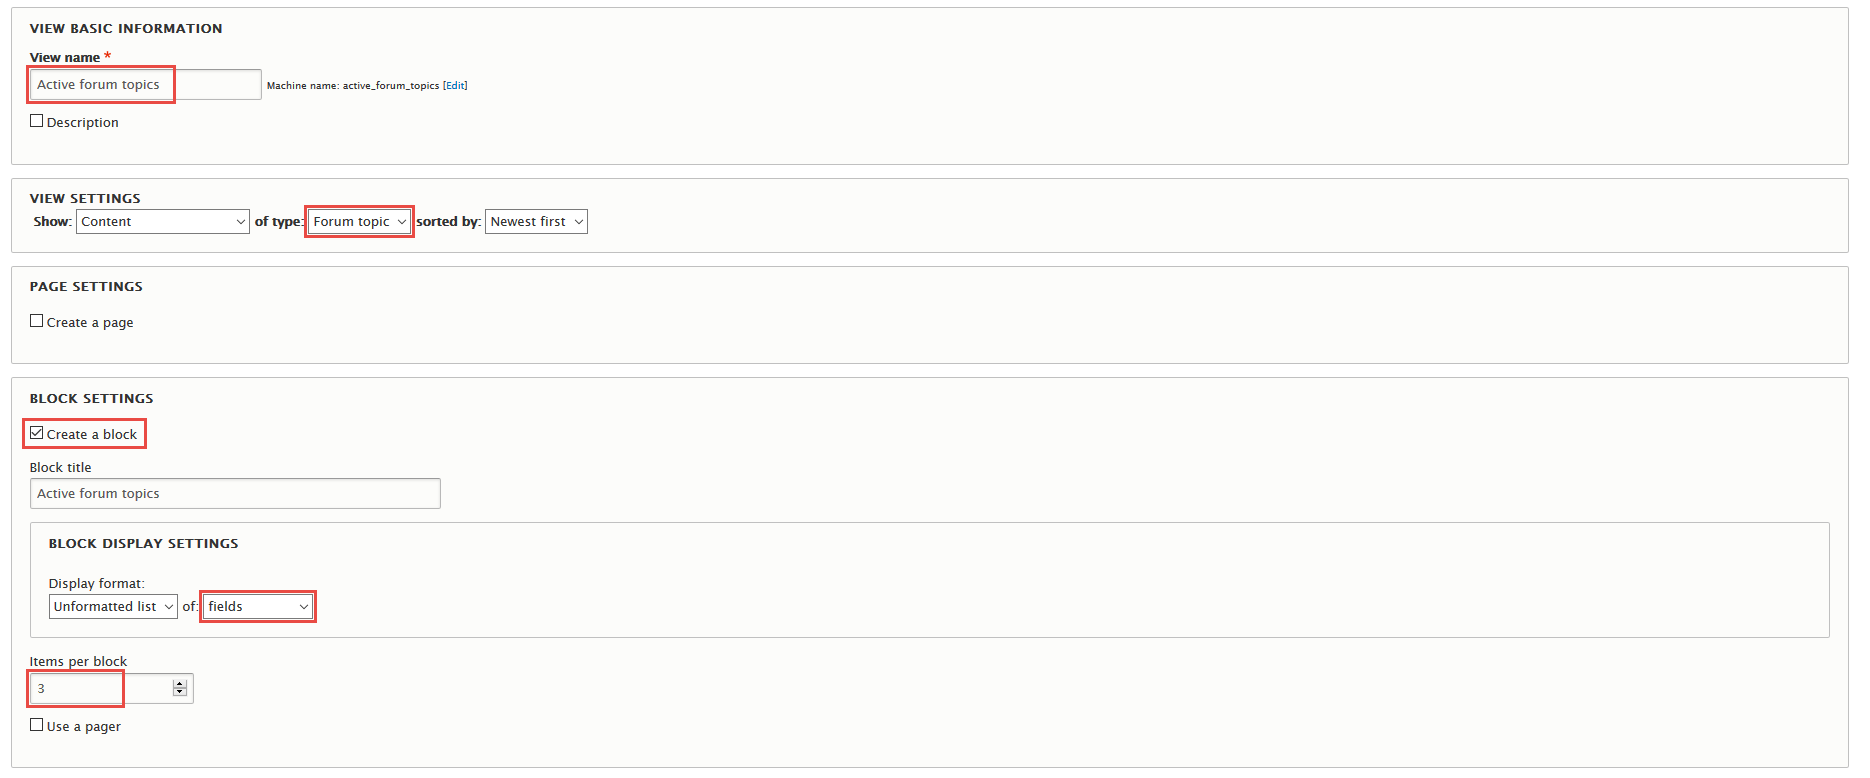
Step 2: Click Save and edit button. Next to steps below to set properties for following fields:
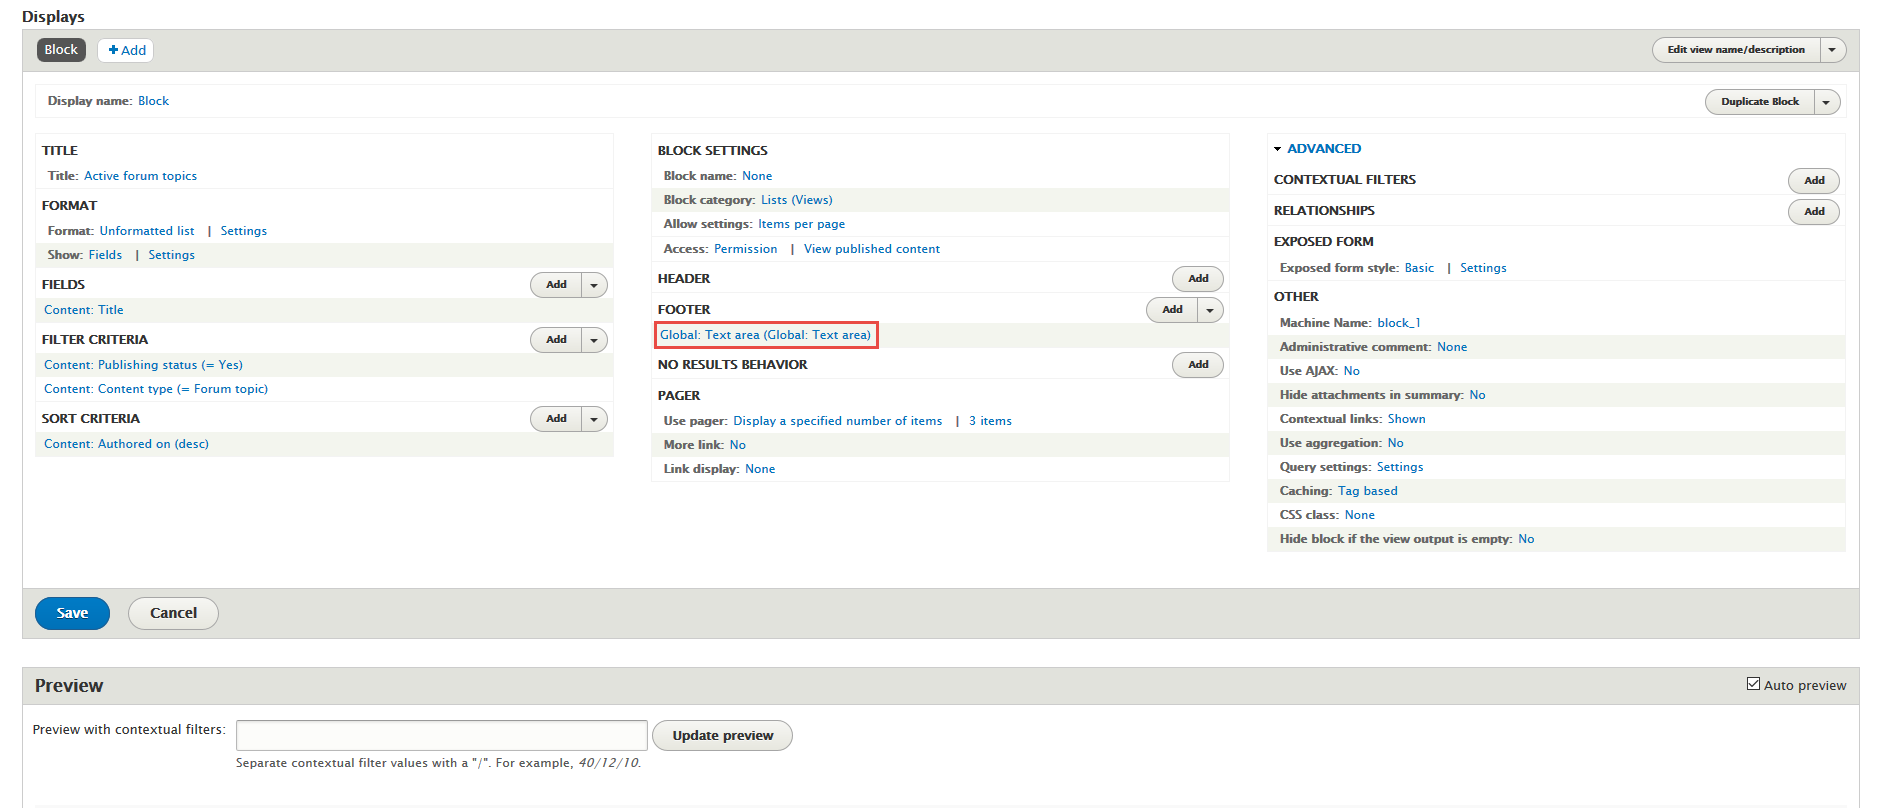
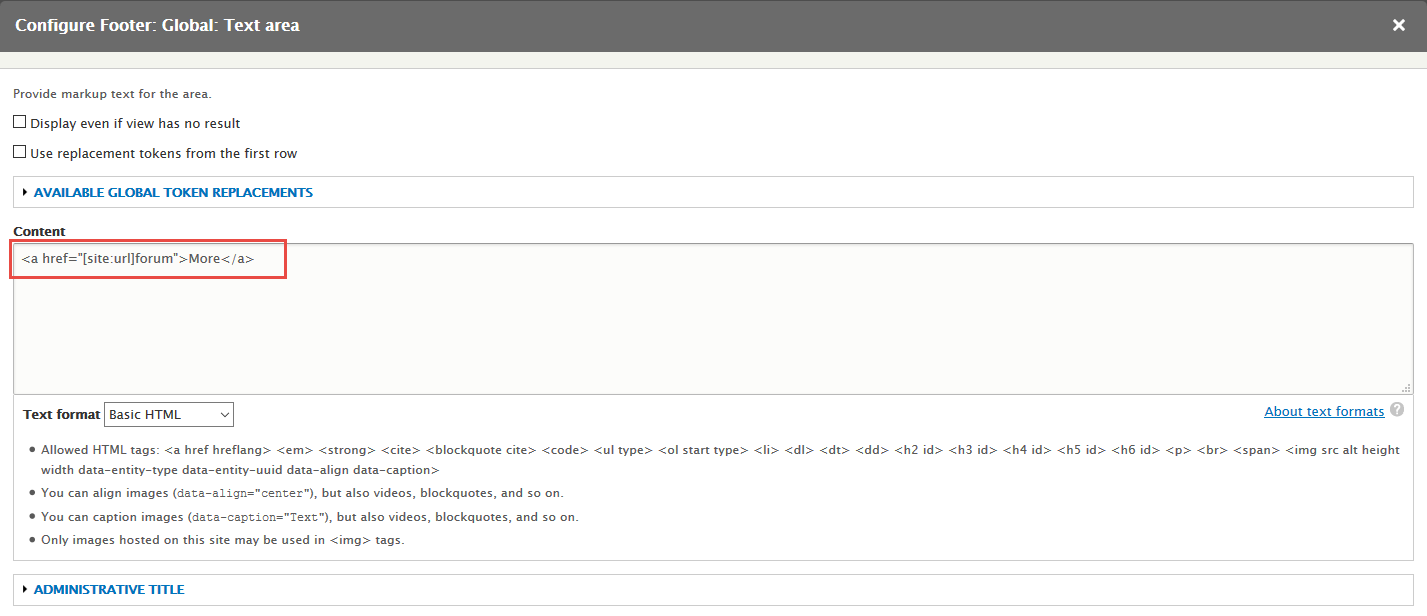
Step 3: At FOOTER area, click Add button to add field Global: Text area with following properties:
Step 4: Click Save to save view
Refer to following HTML code:
More
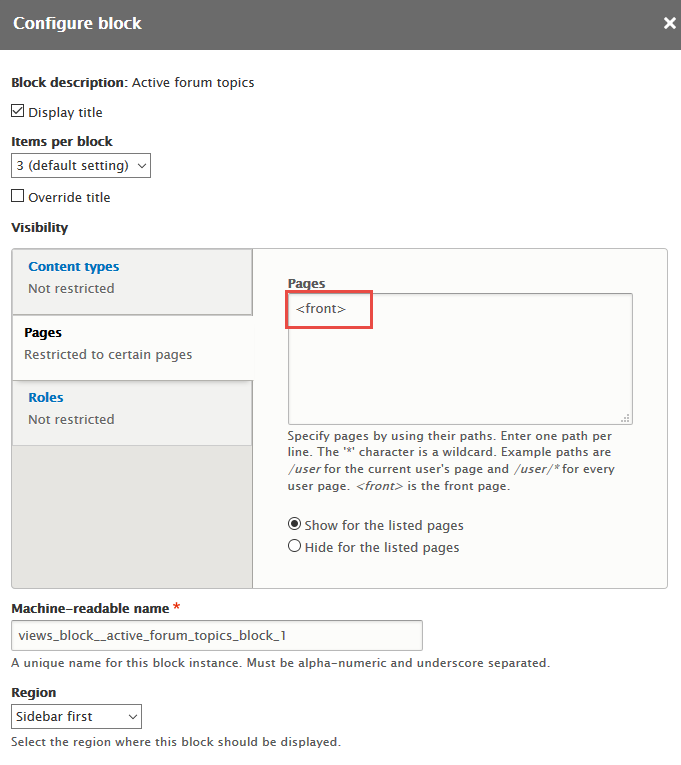
2. Configure View: Active forum topics block
Step 1: Navigate to Structure > Block layout
Step 2: Find Sidebar first click Place block button
Step 3: Find Active forum topics click Place block button and set following properites:
Step 4: Click Save block button.
Recent topics block
Front end Display
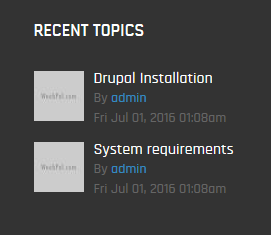
1. Create Recent topics view
Step 1: Navigate to Structure > Views, click Add new view, then create Recent topics view with following settings:
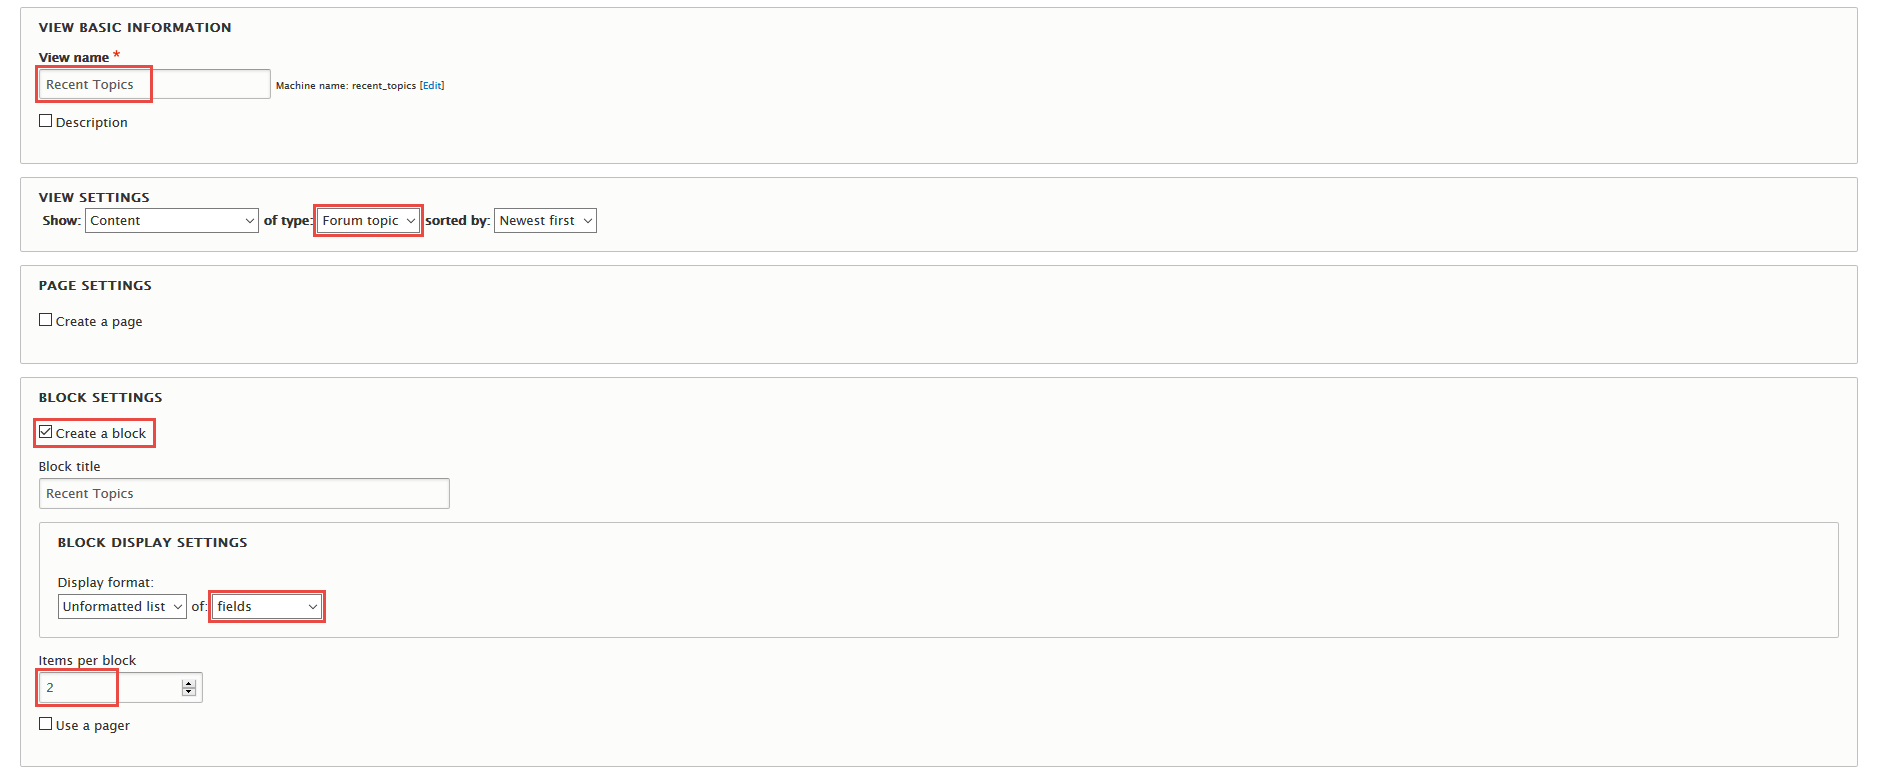
Step 2: Click Save and edit button. Next to steps below to set properties for following fields:
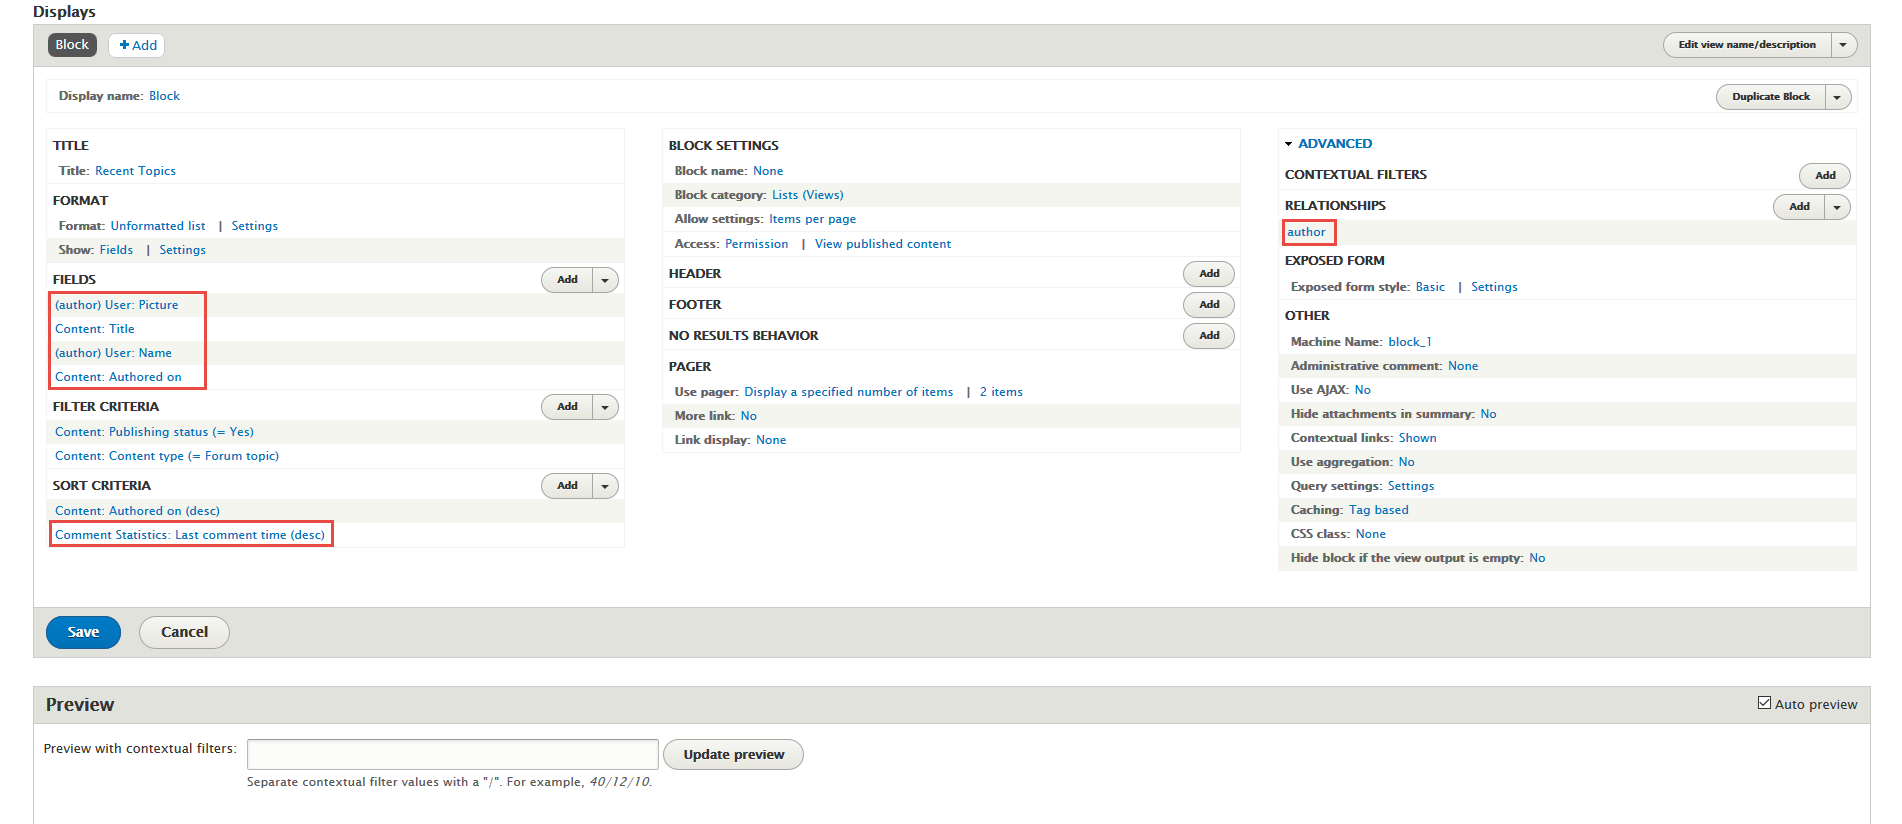
Step 3: Expand Advanced panel, at RELATIONSHIPS area, click Add to add relationship Content author
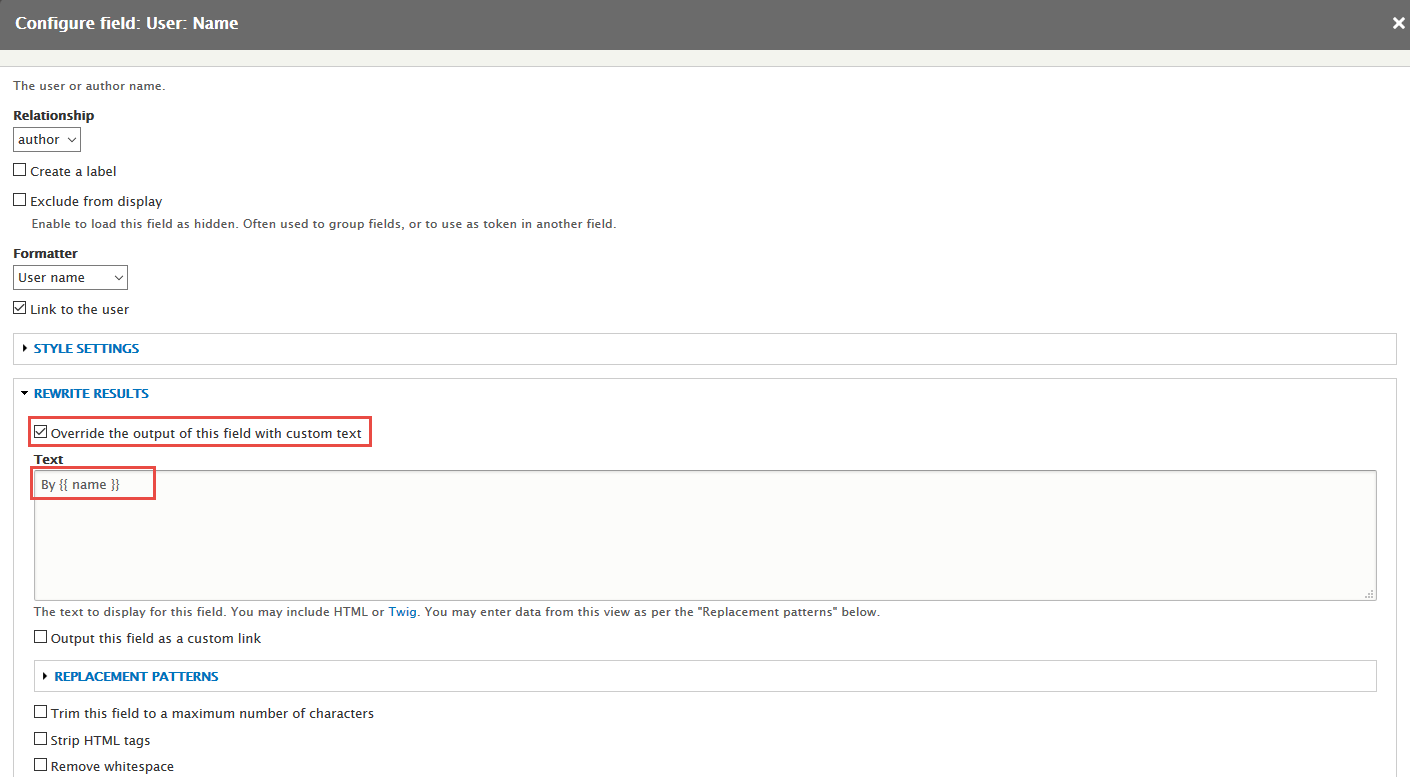
Step 4: At FIELDS area, click Add button to add fields: User: Picture, User: Name, Content: Authored on
Step 5: Set properties for User: Picture

Step 6: Set properties for User: Name
Step 7: Set properties for Content: Authored on
Step 8: At FIELDS area, click Rearrange set following arrange:
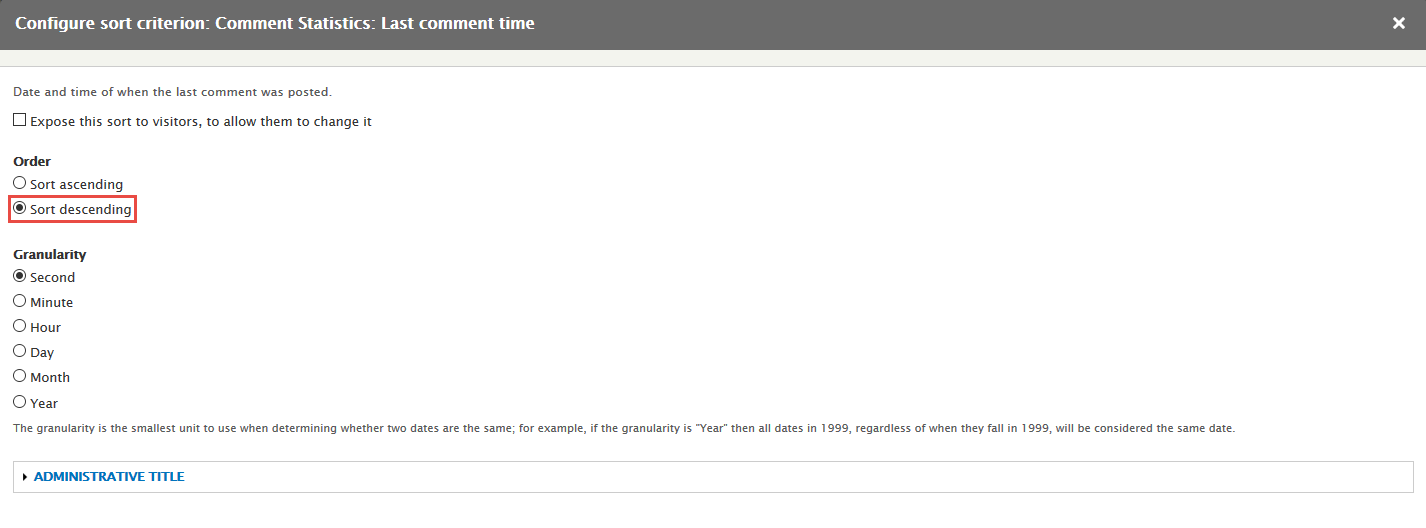
Step 8: At SORT CRITERIA area, click Add button and add file Last comment time set the following properties:
Step 9: Click Save to save view
2. Configure View: Recent topics block
Step 1: Navigate to Structure > Block layout.
Step 2: Find Footer first click Place block button
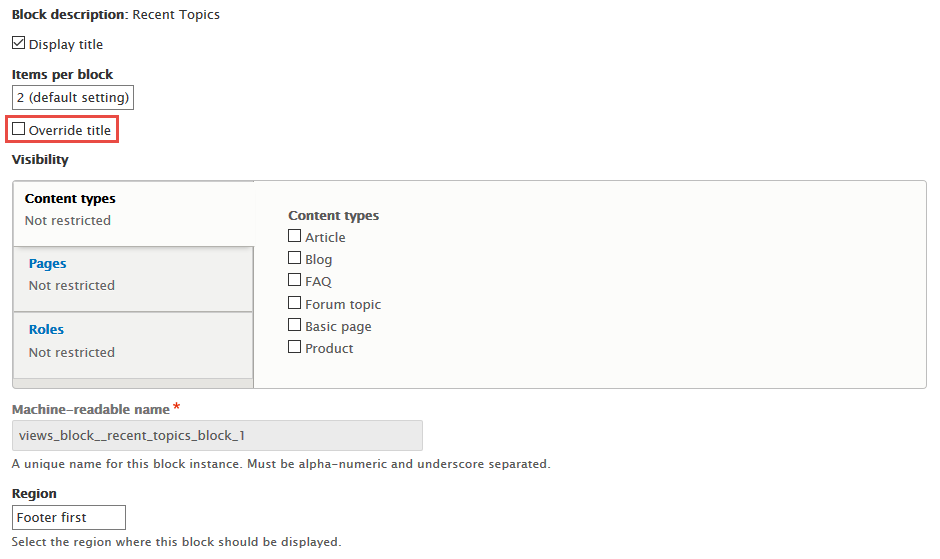
Step 3: Find Recent topics click Place block button and set following properites:
Step 4: Click Save block button.
Links menu link
1. Create Links menu block
Step 1: Navigate to Structure > Menu, click Add menu, then create Links view with following settings:
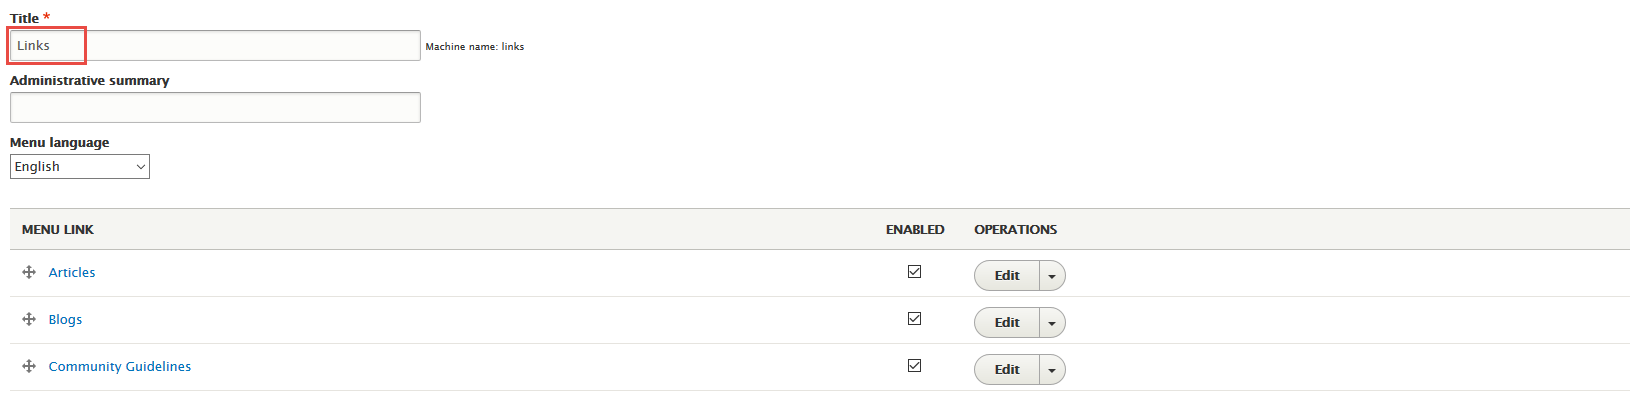
Step 2: Click Save button
2. Configure Links menu block
Step 1: Navigate to Structure > Block layout
Step 2: At Footer second block, click Place block link.
Step 3: Find Links click Place block link, set following properties
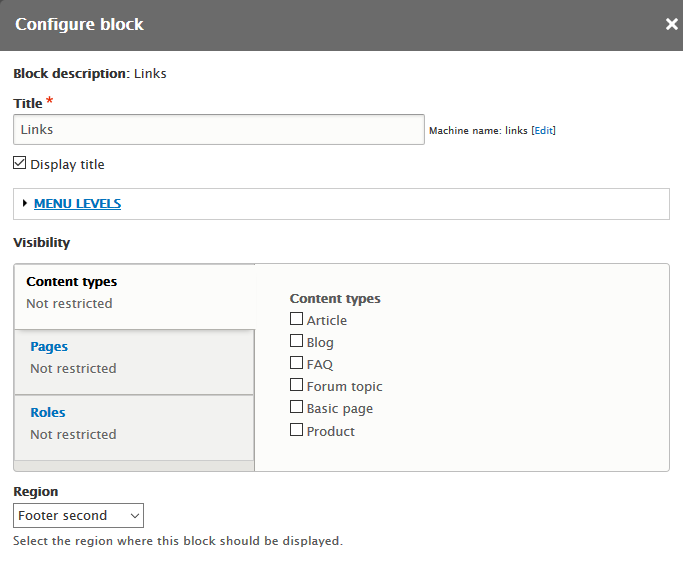
Step 4: Click Save block button.
About us block
Front end Display
1. Create About us block
Step 1: Navigate to Structure > Block layout, click Custom block library tab.
Step 2: Click Add custom block link. Create About us block with following properties:

Step 3: Click Save button
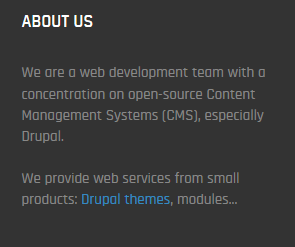
Refer to following HTML code:
						We are a web development team with a concentration on open-source Content Management Systems (CMS), especially Drupal.
						We provide web services from small products: Drupal themes, modules...
2. Configure View: About us block
Step 1: Navigate to Structure > Block layout
Step 2: Find Footer third click Place block button
Step 3: Find About us click Place block button and set following properites:
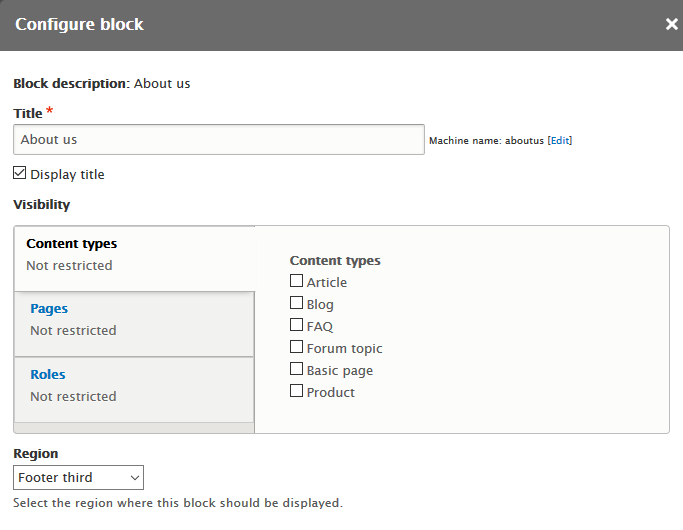
Step 4: Click Save block button.
Contact block
Front end Display
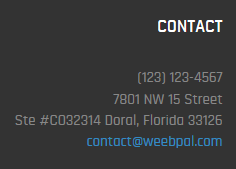
1. Create Contact block
Step 1: Navigate to Structure > Block layout, click Custom block library tab.
Step 2: Click Add custom block link. Create Contact block with following properties:
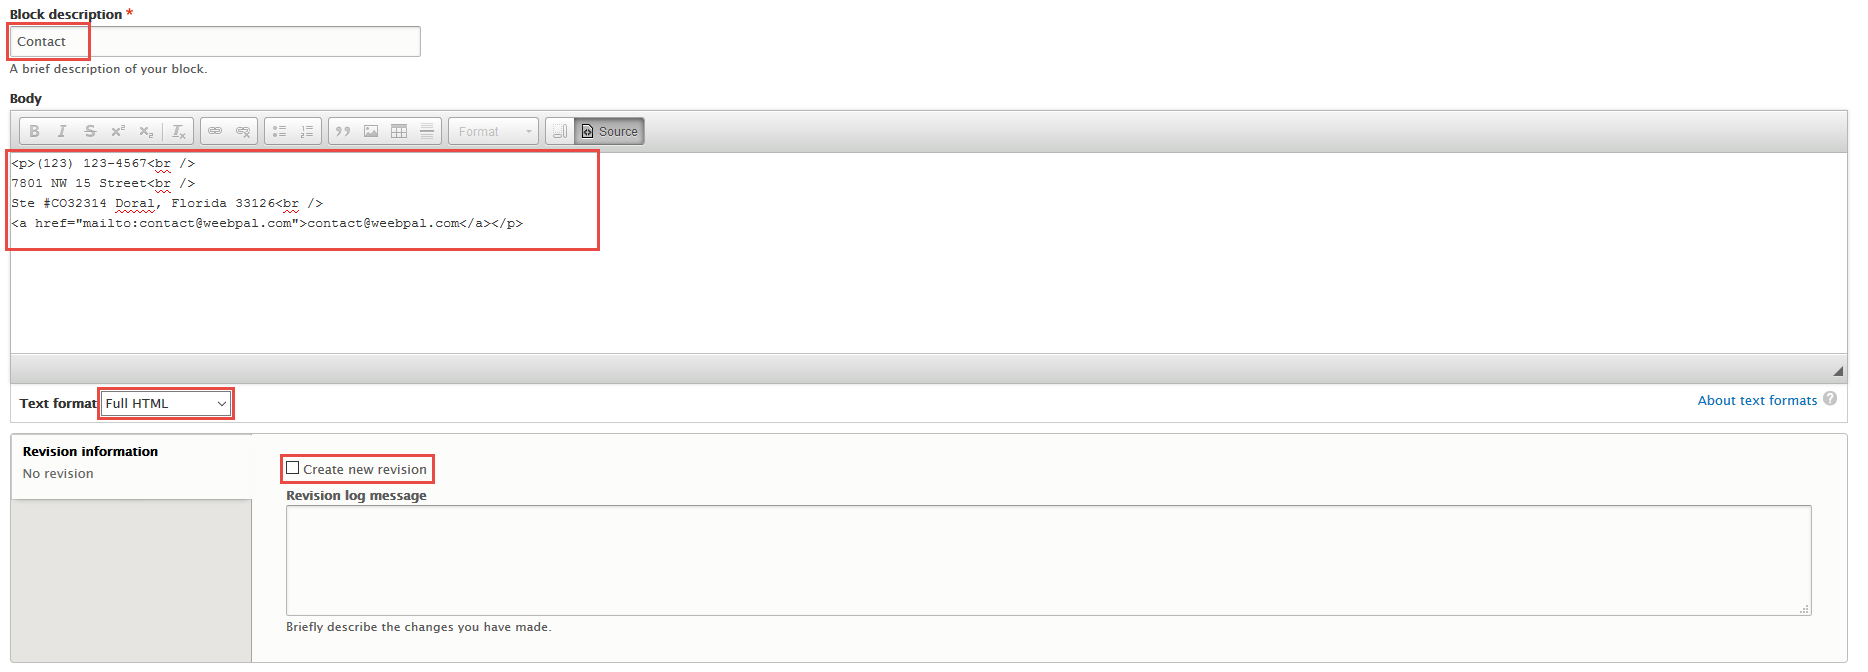
Step 3: Click Save button
Refer to following HTML code:
						(123) 123-4567

						7801 NW 15 Street

						Ste #CO32314 Doral, Florida 33126

						[email protected]
2. Configure View: Contact block
Step 1: Navigate to Structure > Block layout
Step 2: Find Footer fourth click Place block button
Step 3: Find Contact click Place block button and set following properites:

Step 4: Click Save block button.
Footer menu link
1. Create Footer menu block
Step 1: Navigate to Structure > Menu, click Add menu, then create Footer Menu view with following settings:
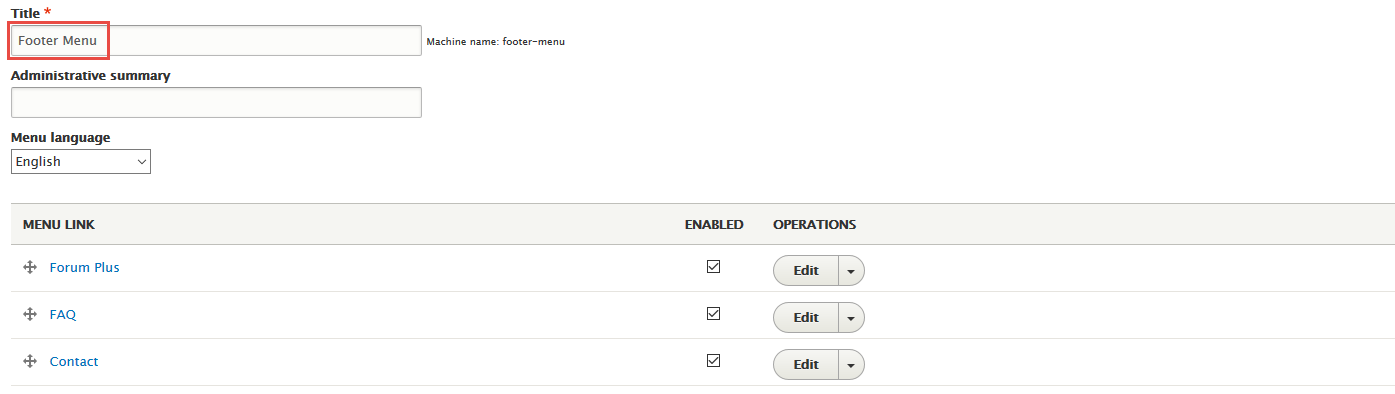
Step 2: Click Save button
2. Configure Footer menu block
Step 1: Navigate to Structure > Block layout
Step 2: At Footer block, click Place block link.
Step 3: Find Footer Menu click Place block link, set following properties
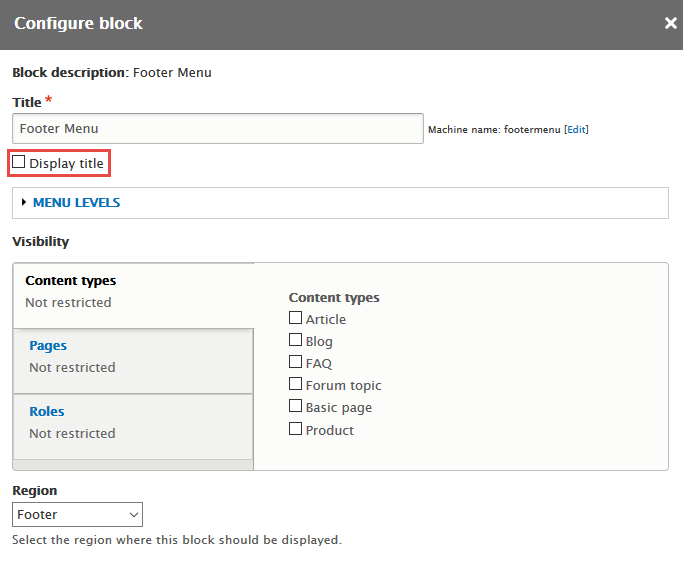
Step 4: Click Save block button.
Copyright block
Front end Display

1. Create Copyright block
Step 1: Navigate to Structure > Block layout, click Custom block library tab.
Step 2: Click Add custom block link. Create Copyright block with following properties:
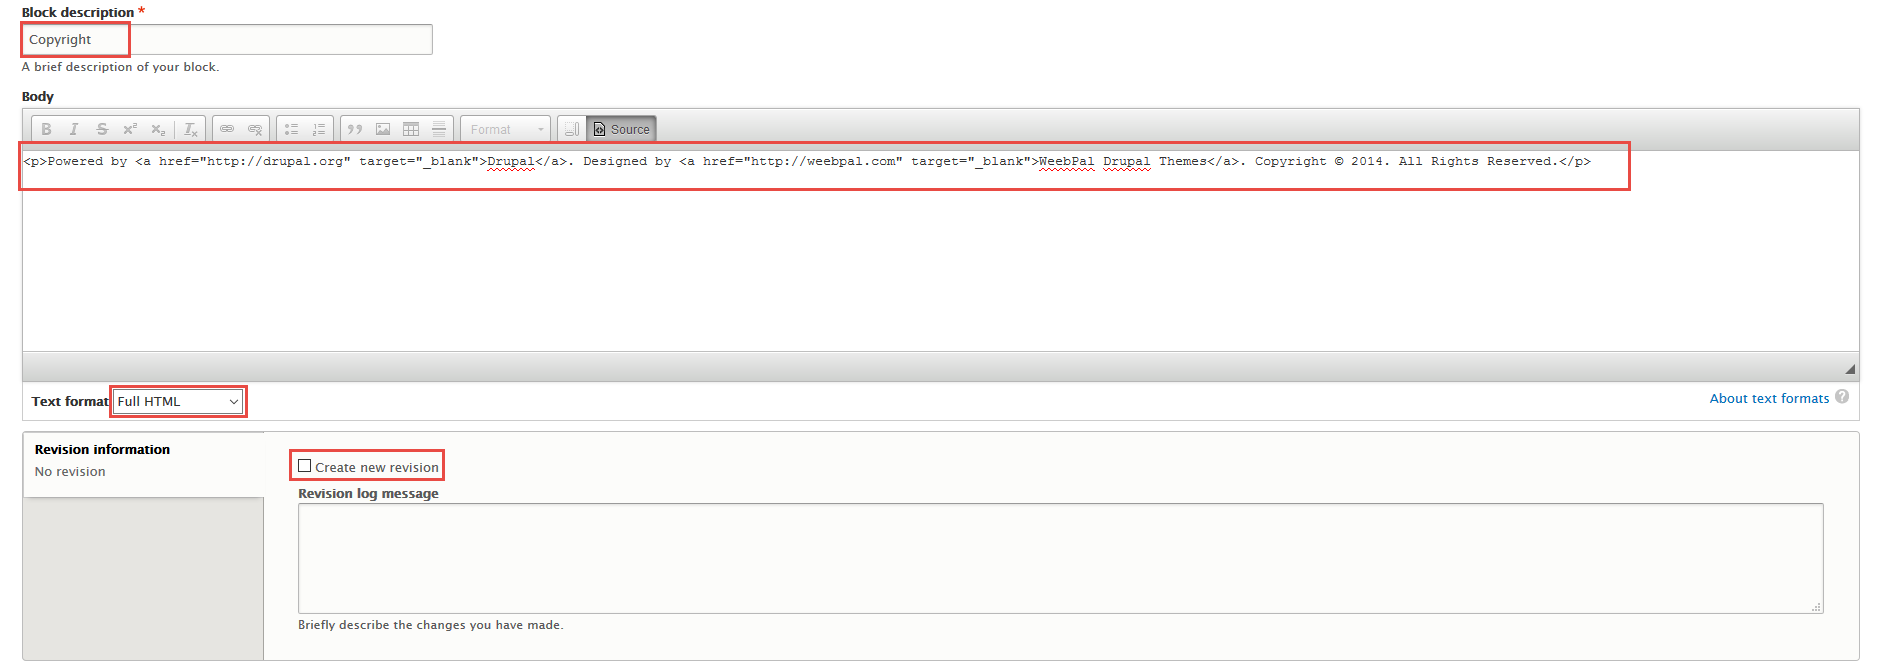
Step 3: Click Save button
Refer to following HTML code:
Powered by Drupal. Designed by WeebPal Drupal Themes. Copyright © 2014. All Rights Reserved.
2. Configure View: Copyright block
Step 1: Navigate to Structure > Block layout
Step 2: Find Footer click Place block button
Step 3: Find Copyright click Place block button and set following properites:
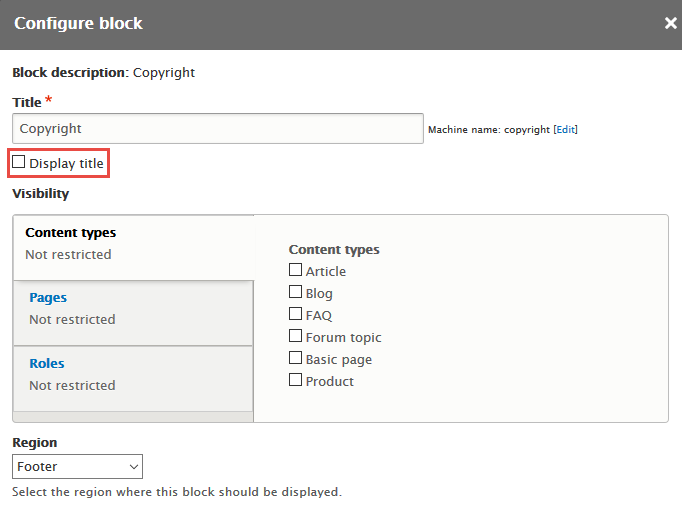
Step 4: Click Save block button.
Main navigation link
1. Create Main navigation block
Step 1: Navigate to Structure > Menu, find and click Main navigation link
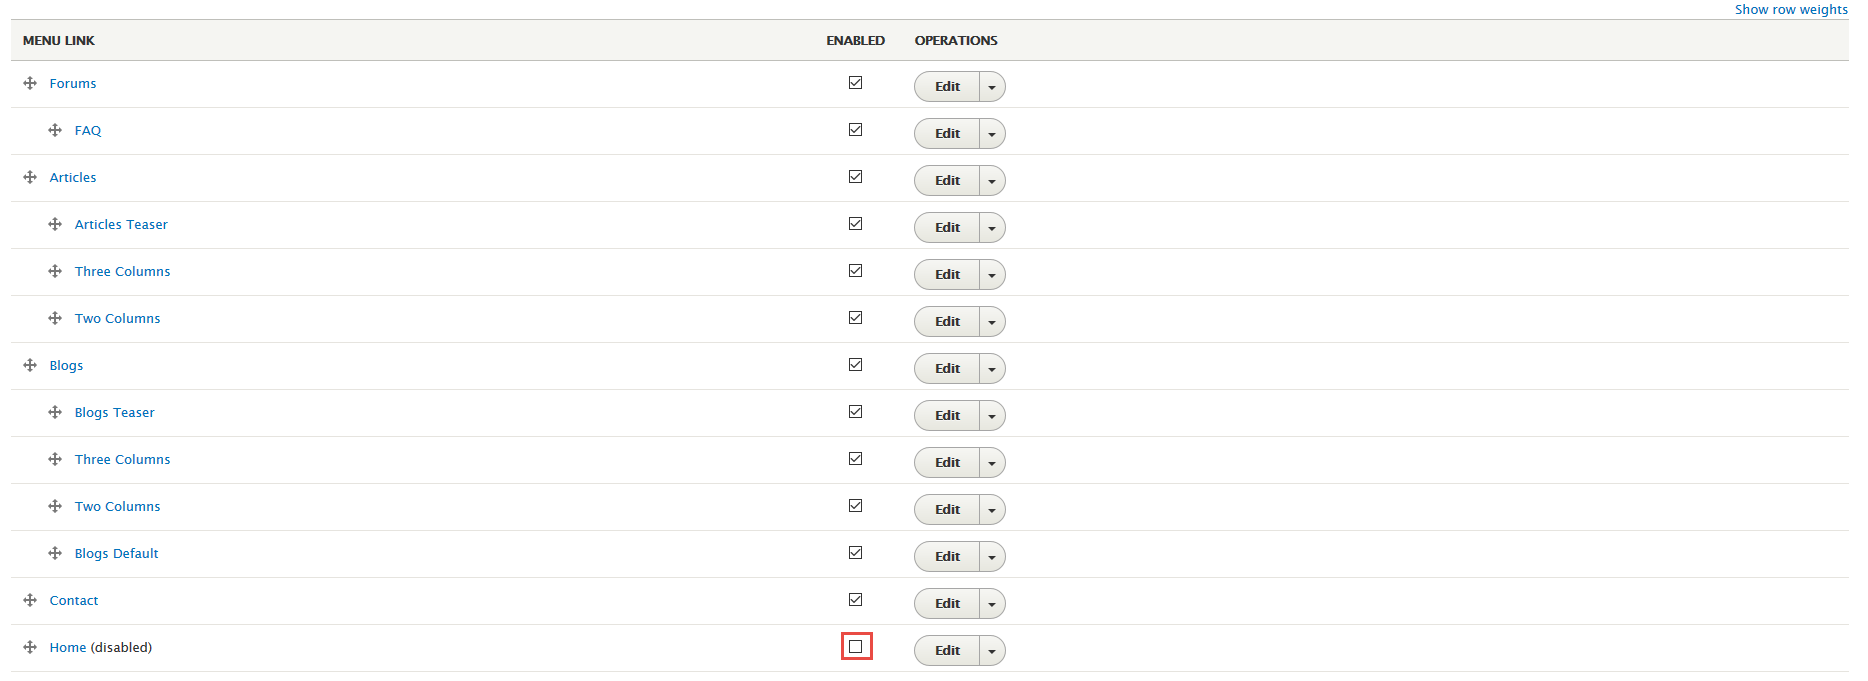
Step 2: Click Save button
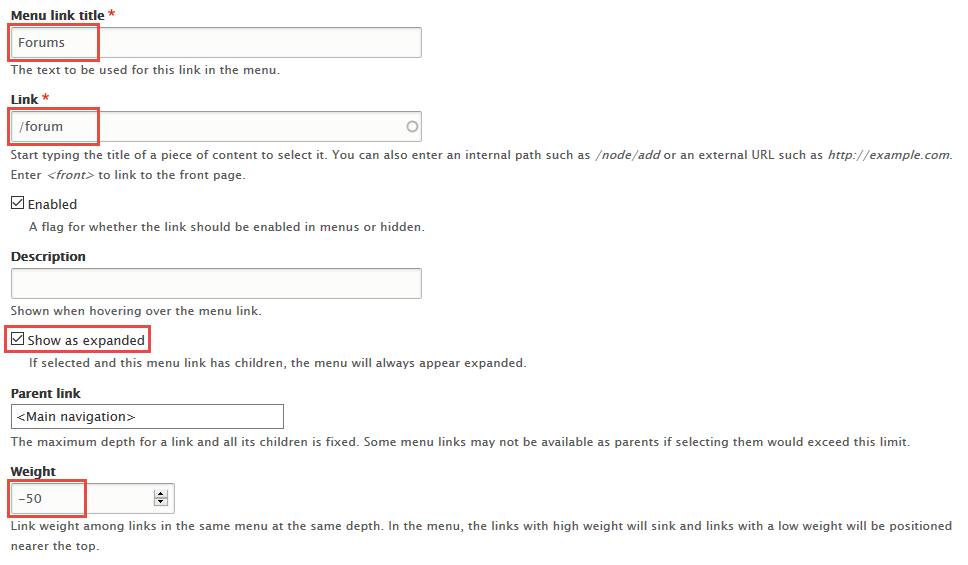
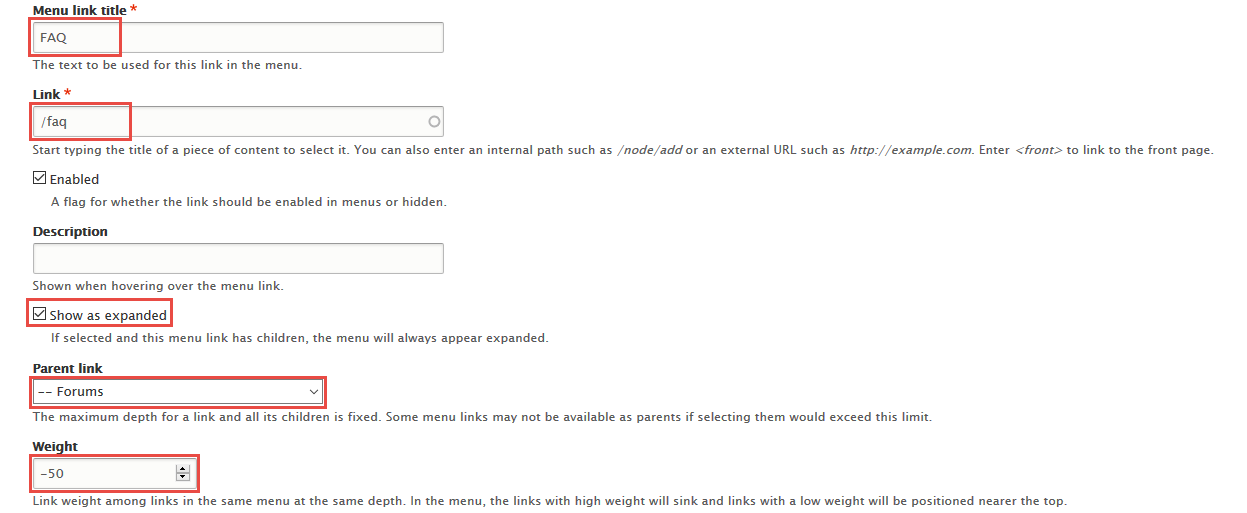
Find Add link button , then click add Forums menu item
Find Add link button , then click add FAQ menu item
Find Add link button , then click add Articles menu item

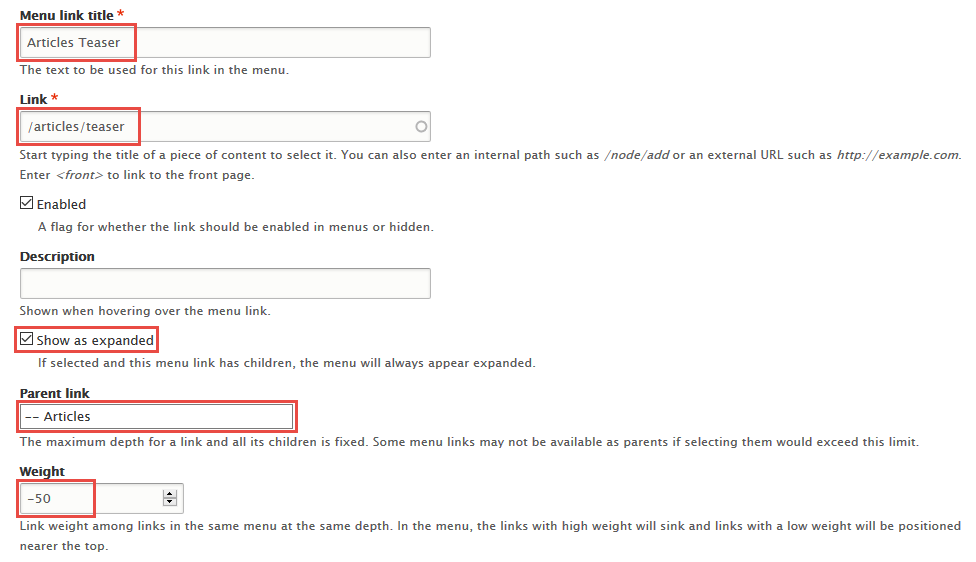
Find Add link button , then click add Articles Teaser menu item
Find Add link button , then click add Three Columns menu item

Find Add link button , then click add Two Columns menu item

2. Configure Main navigation block
Step 1: Navigate to Structure > Block layout
Step 2: At Primary menu block, click Place block link.
Step 3: Find Main navigation click Place block link, set following properties
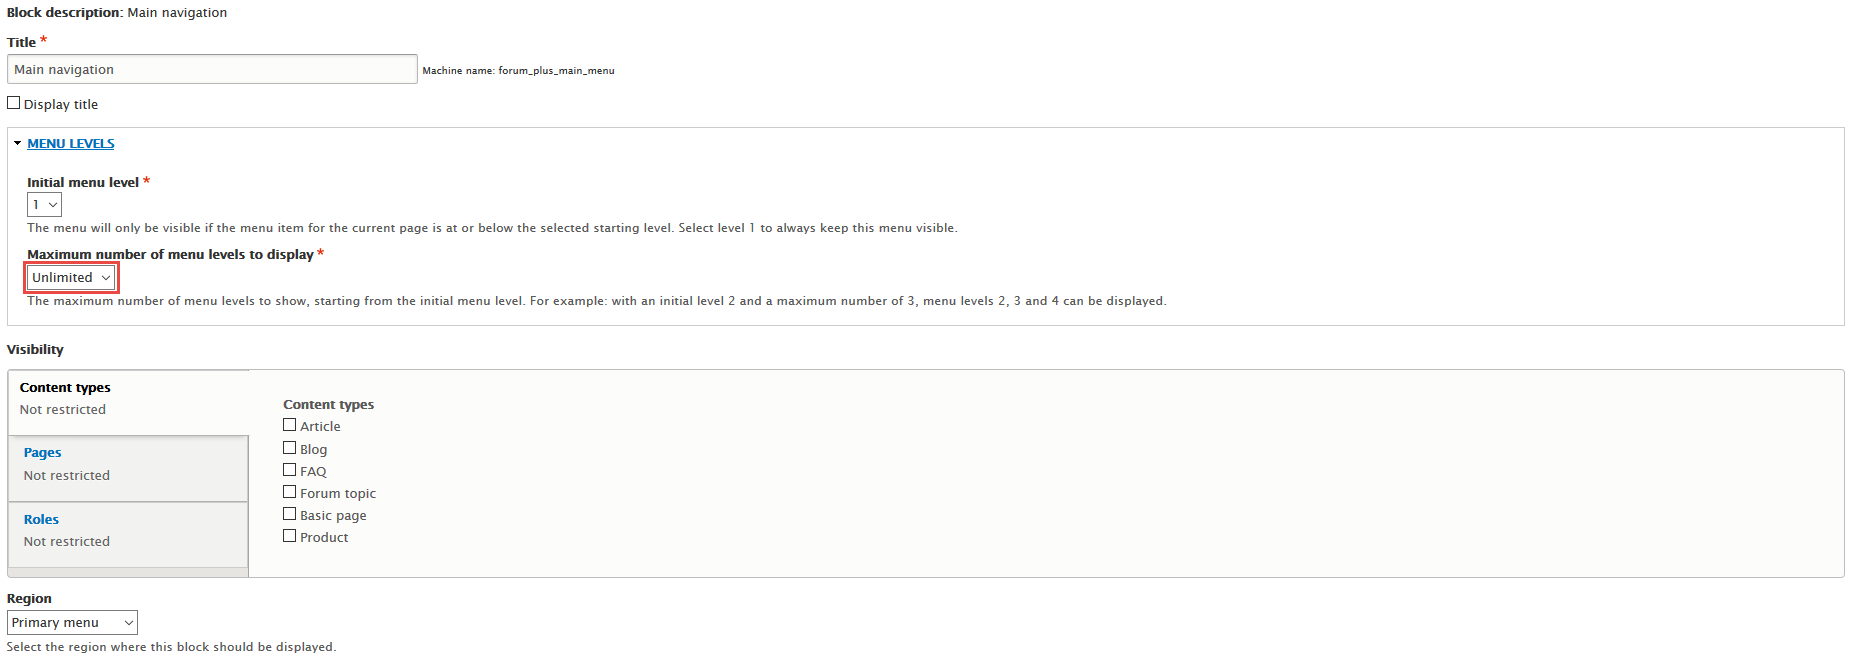
Step 4: Click Save block button.
Create Subpages
Articles view
Front end Display
1. Create Articles view
Step 1: Navigate to Structure > Views, click Add new view, then create Articles view with following settings:

Step 2: Click Continue and edit button. Next to below steps to set properties for following fields:
Step 3: At Display name area, set following properties:

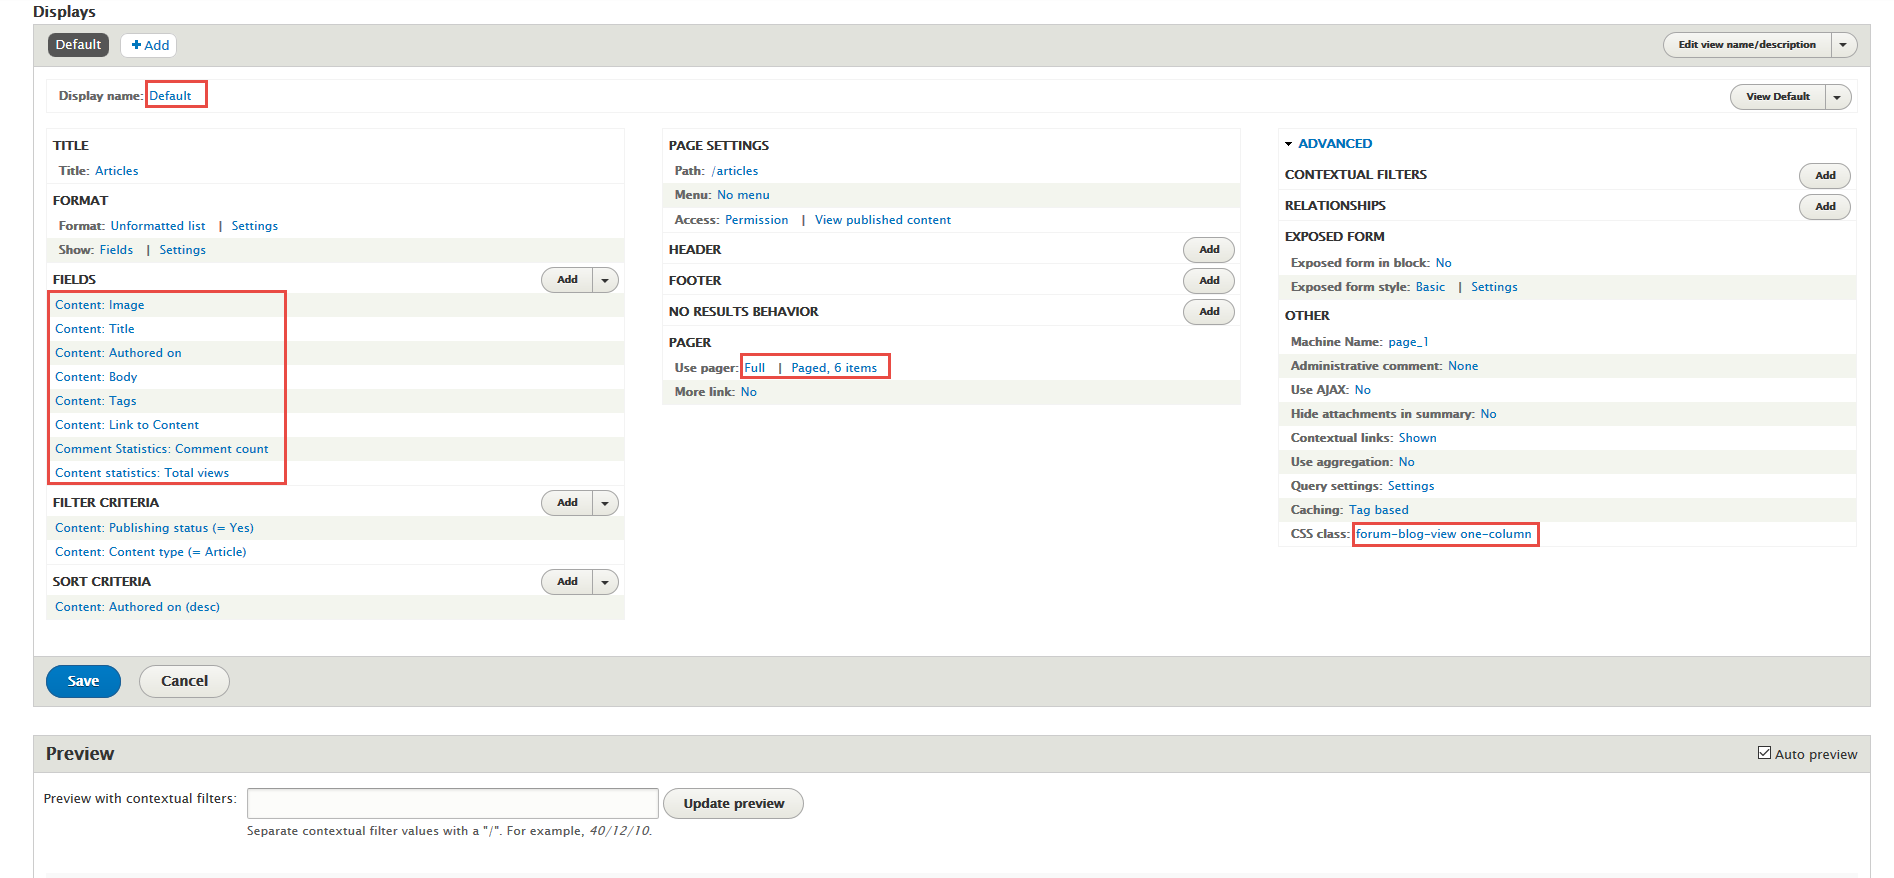
Step 4: At FIELDS area, click Add button to add fields: Content: Image, Content: Authored on, Content: Body, Content: Tags, Content: Link to Content, Comment Statistics: Comment count, Content statistics: Total views
Step 5: Set following properties for Content: Image

Step 6: Set following properties for Content: Authored on
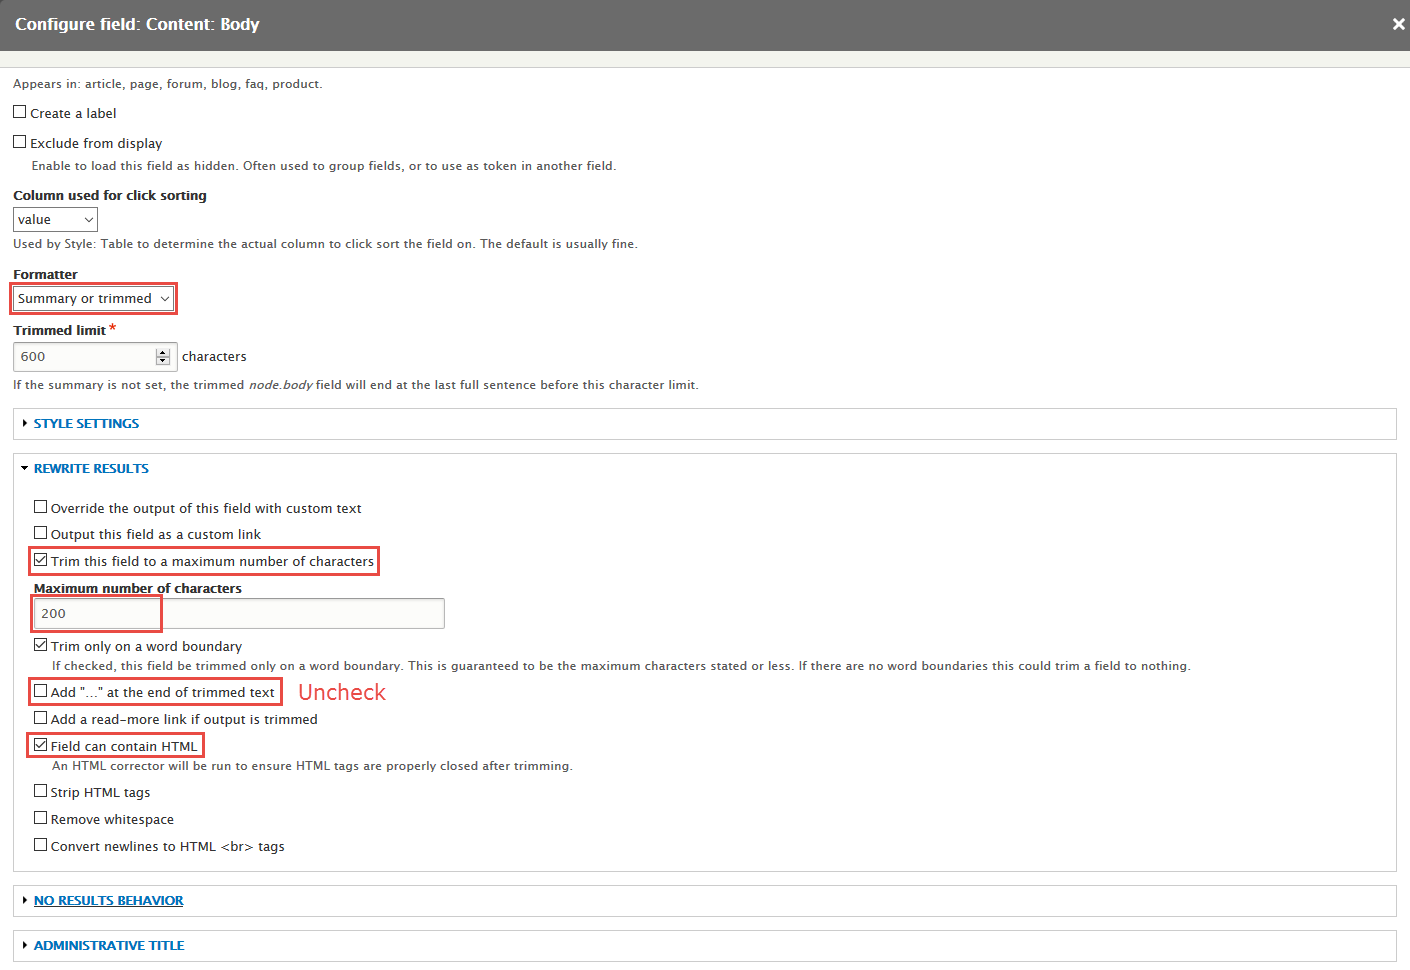
Step 7: Set following properties for Content: Body
Step 7: Set following properties for Content: Tags

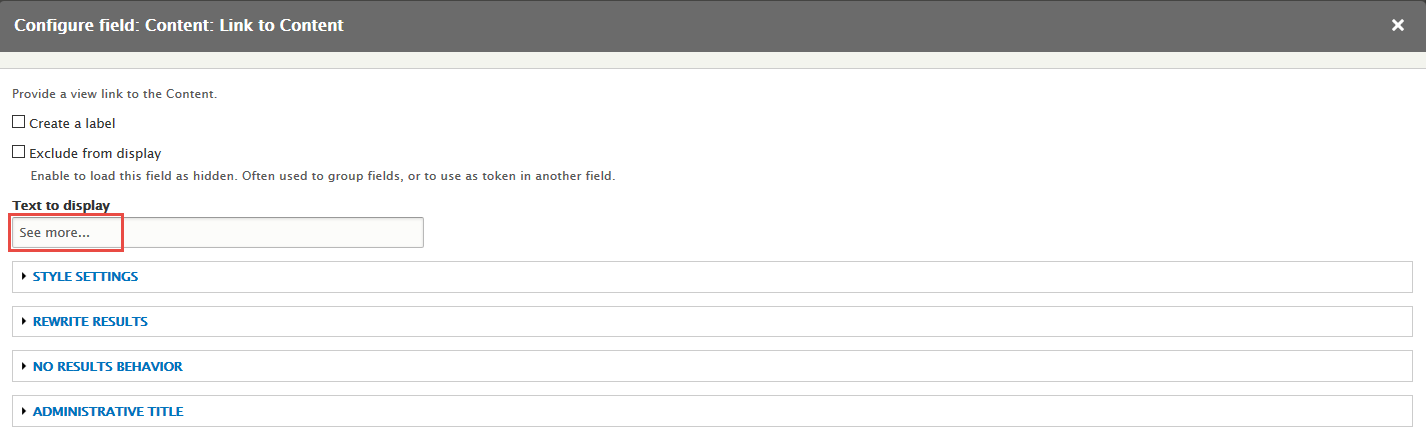
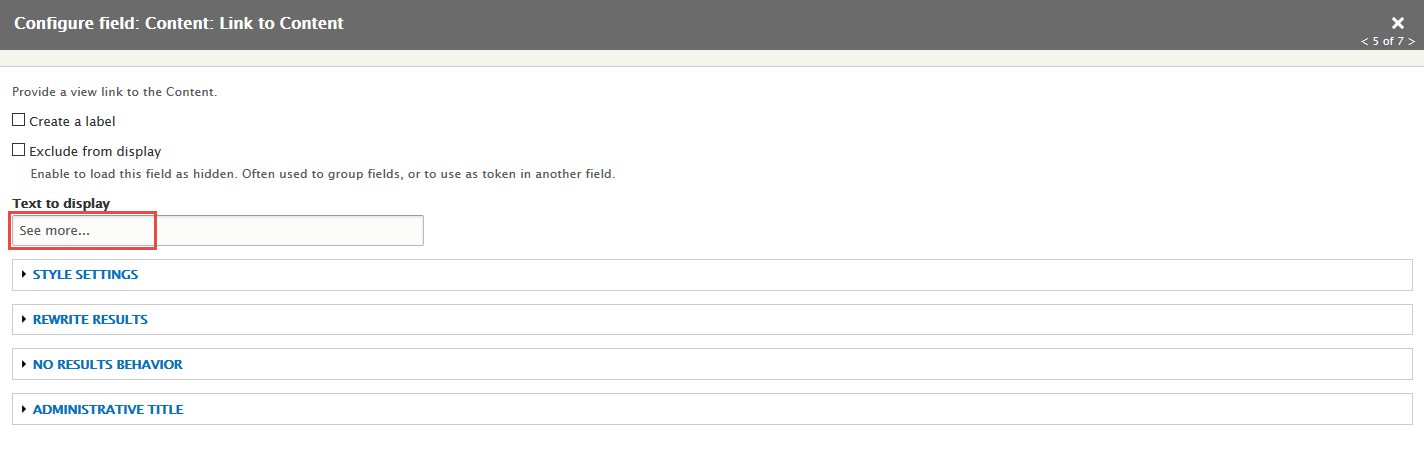
Step 8: Set following properties for Content: Link to Content
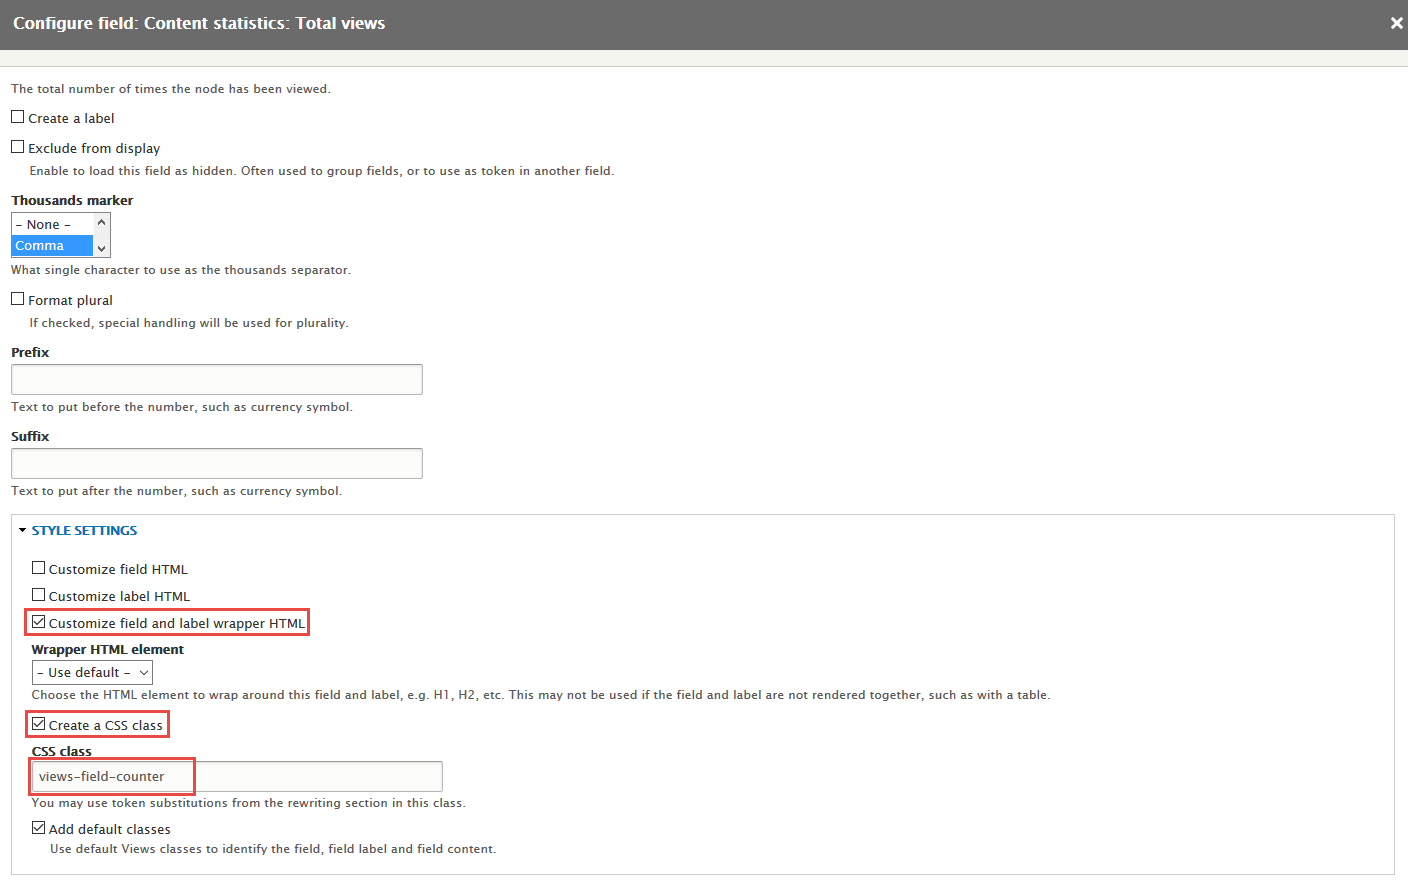
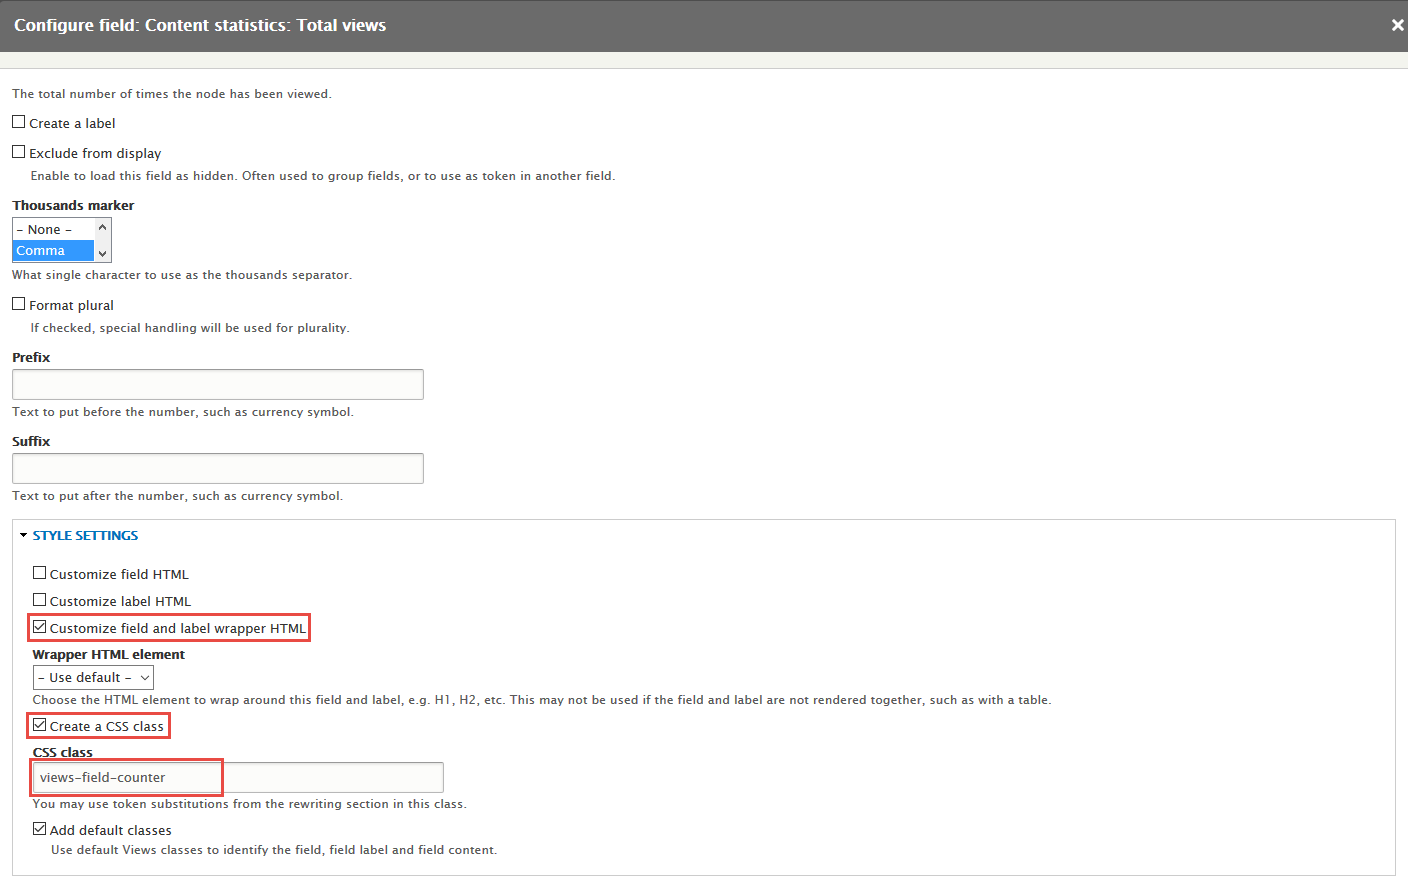
Step 9: Set following properties for Content statistics: Total views
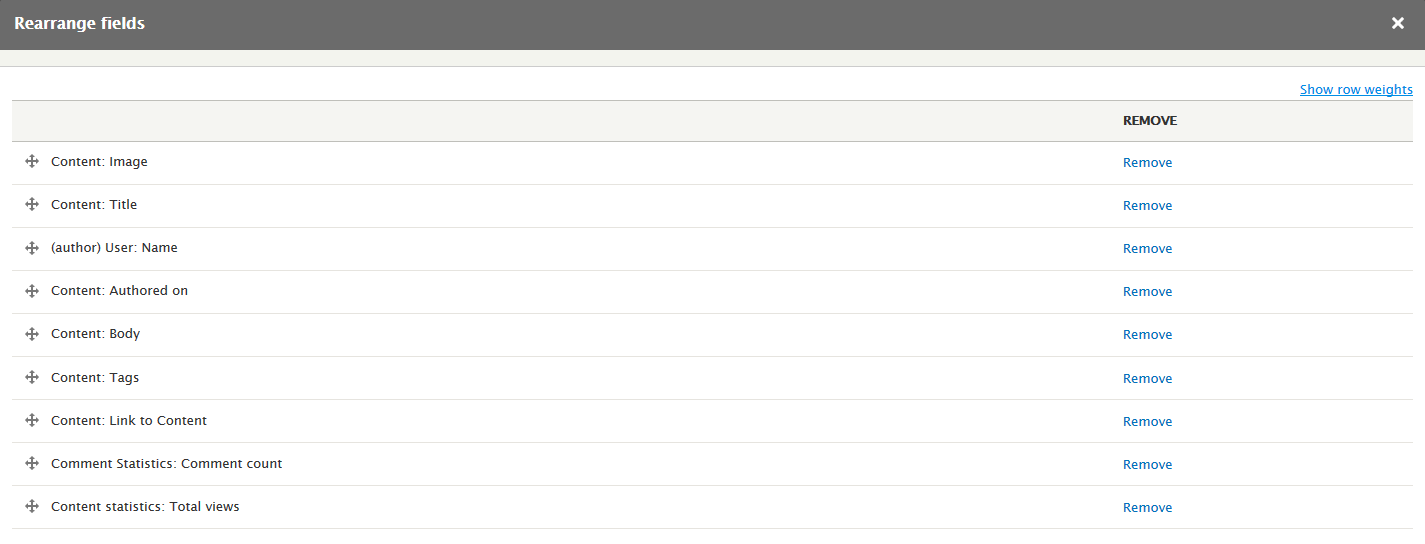
Step 10: At FIELDS area, click Rearrange button and set following arrange

Step 11: At PAGER > Use pager area, click link

Step 12: At Advanced > OTHER area, add CSS class

Step 13: Click Save button
2. Create Articles Teaser view
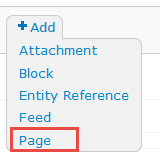
Stay open Articles view, click Add button add Page new.
Step 1: Next to steps below to set properties for the following fields:
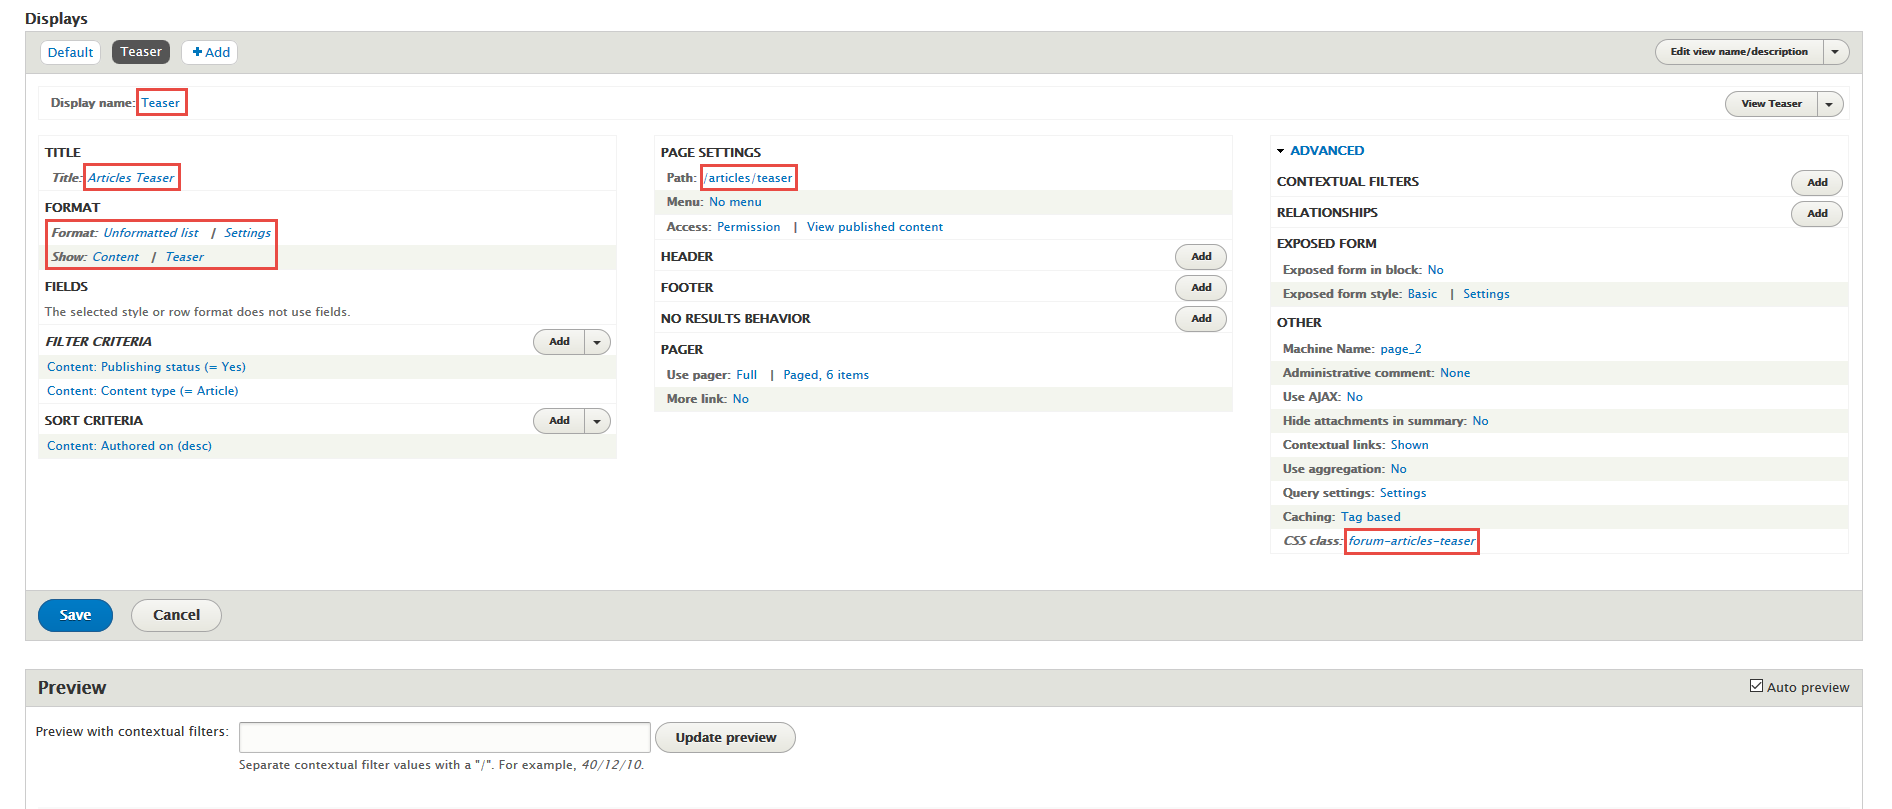
Step 2: At Display name area, set following properties:

Step 3: At Title area, set following properties:

Step 4: At FORMAT show: Fields area, click Settings and set following properties:


Step 5: At PAGE SETTINGS > Path area, set the following properties:

Step 6: At Advanced > OTHER area, add CSS class

Step 7: Click Save button
Front end Display
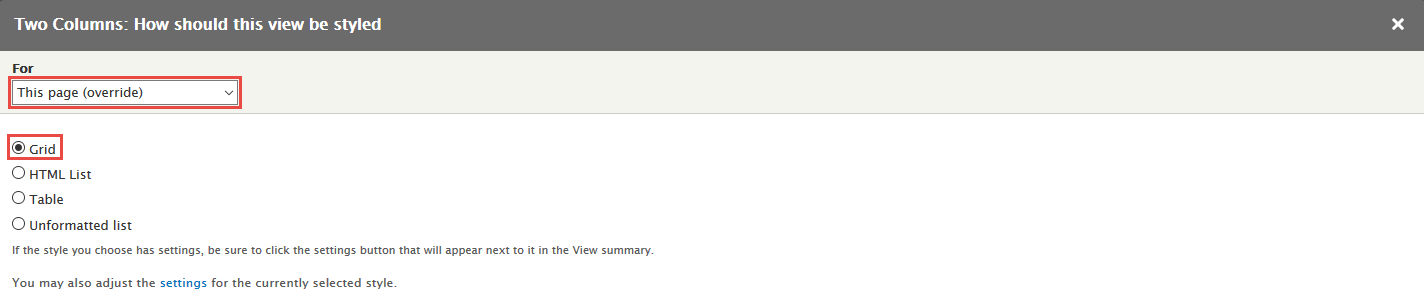
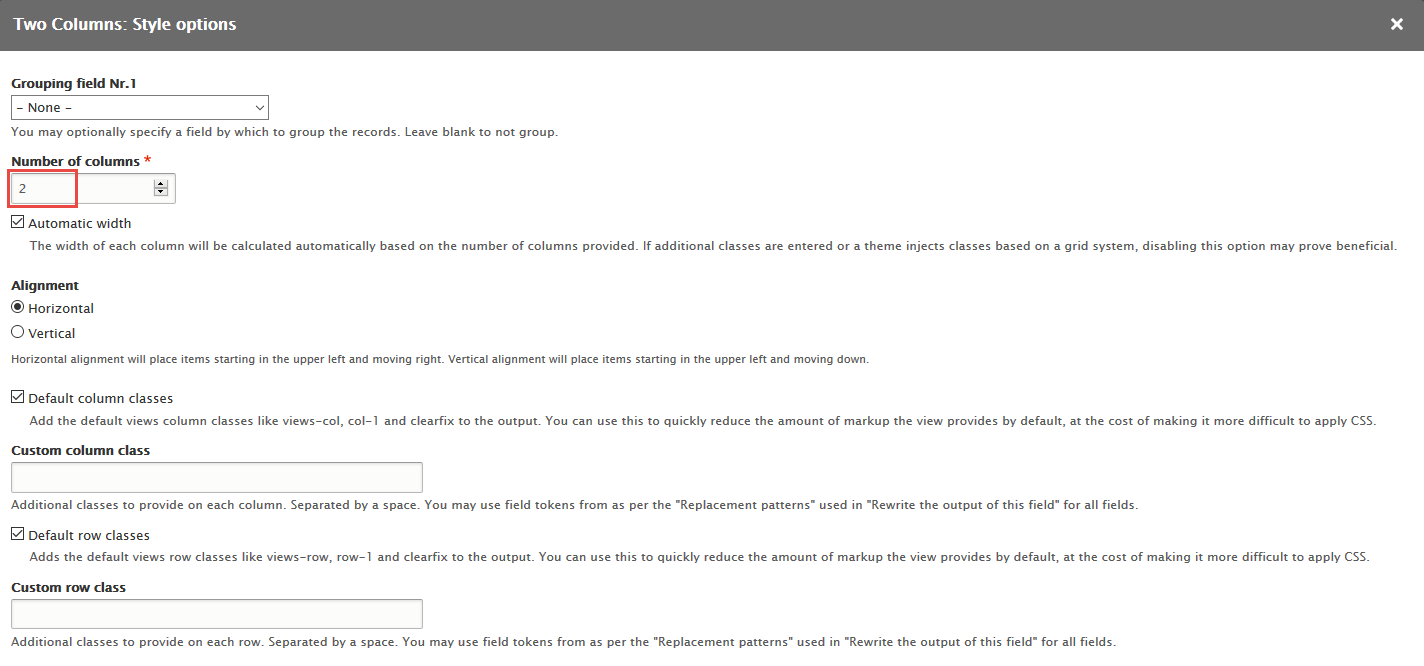
3. Create Two Columns view
Stay open Articles view, click Add button add Page new.
Step 1: Next to steps below to set properties for the following fields:
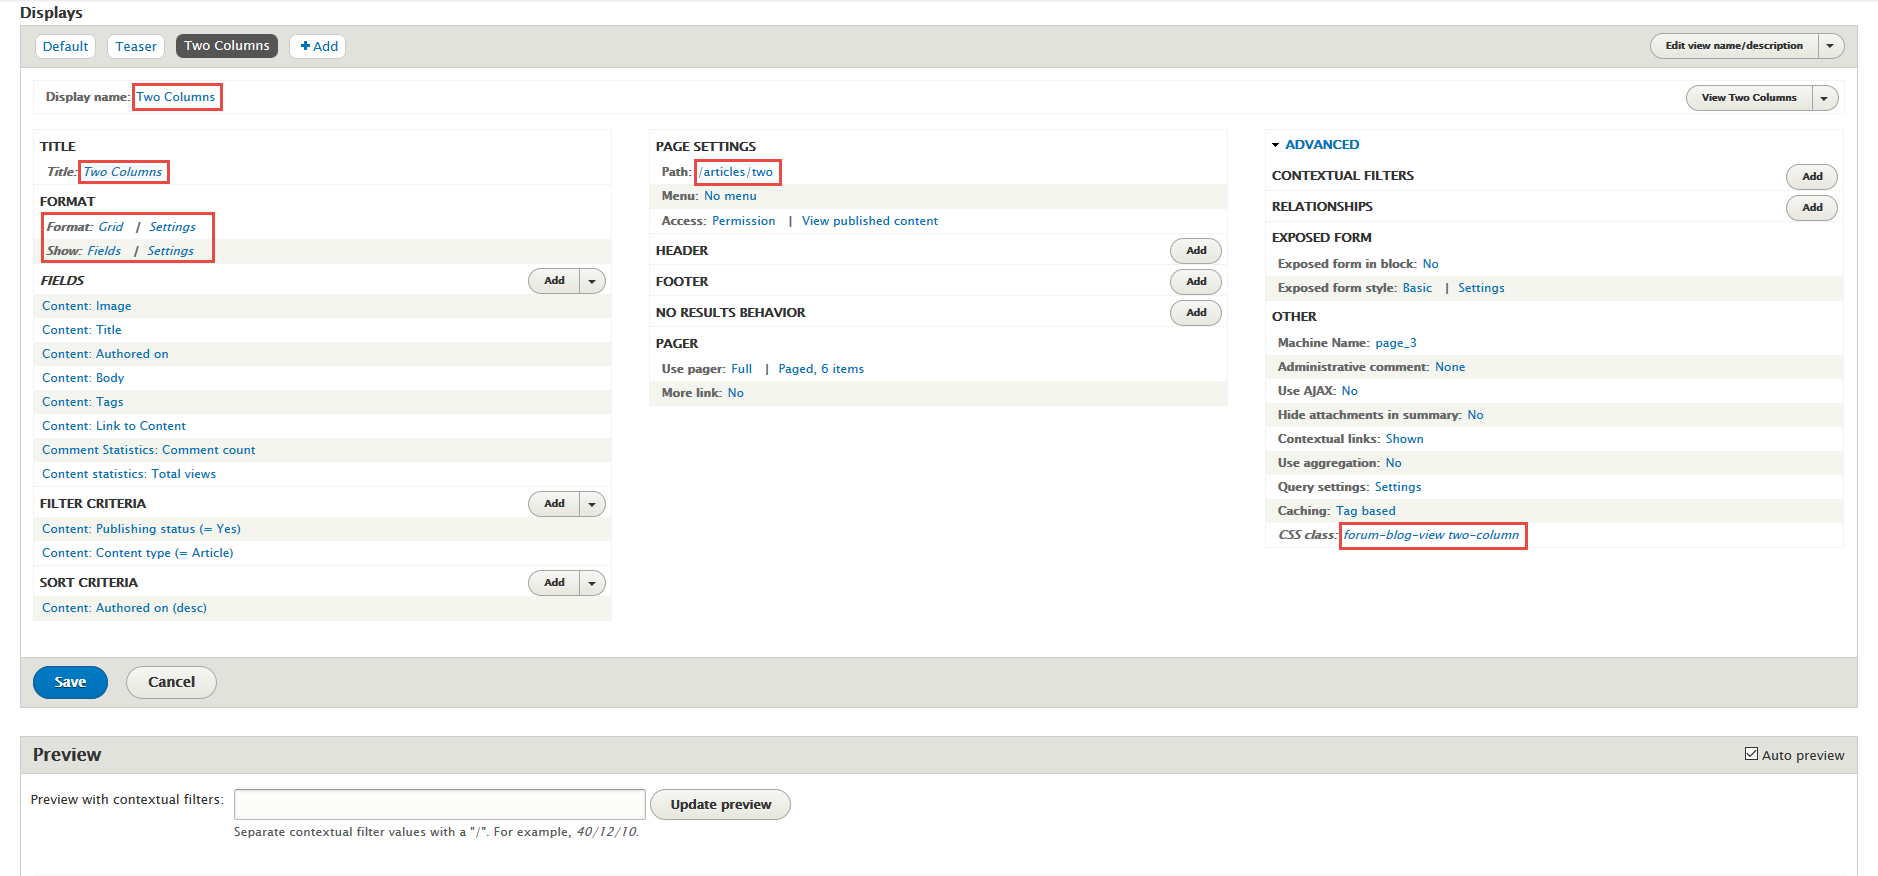
Step 2: At Display name area, set following properties:

Step 3: At Title area, set following properties:

Step 4: At FORMAT format: Grid area, click Settings and set following properties:


Step 5: At FIELDS area, set properties for the following fields:
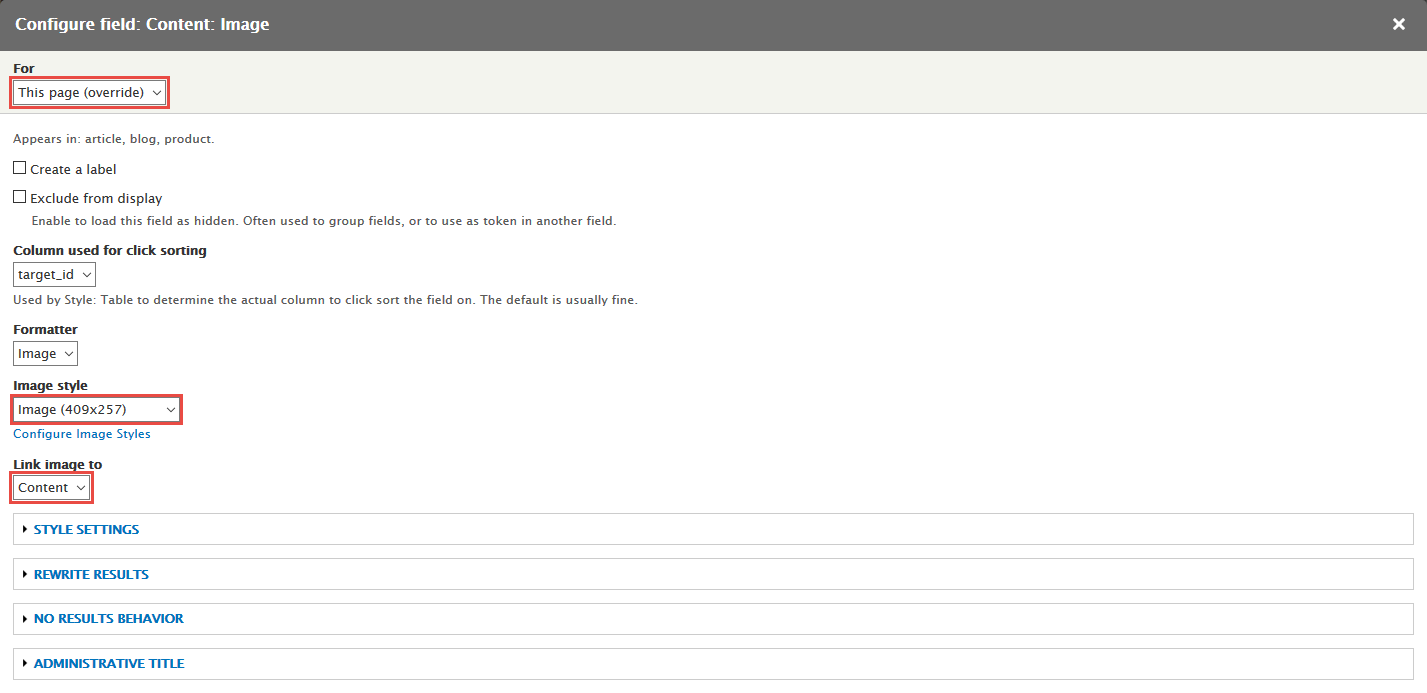
Step 6: Set following properties for Content: Image
Step 7: At PAGE SETTINGS > Path area, set the following properties:

Step 8: At Advanced > OTHER area, add CSS class

Step 9: Click Save button
Front end Display
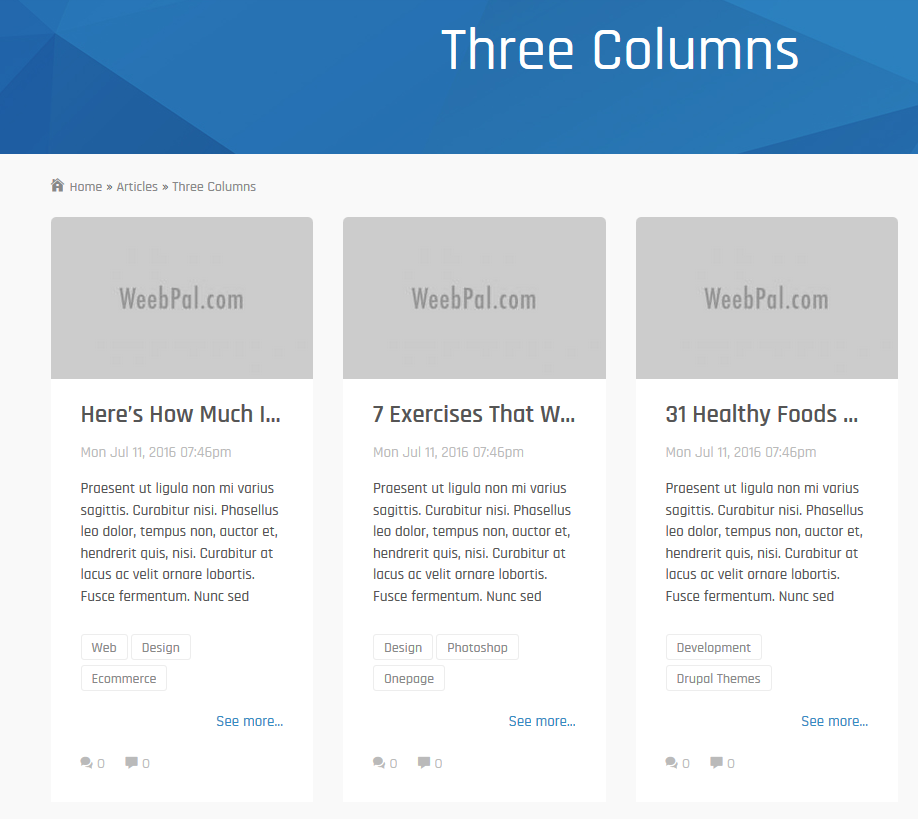
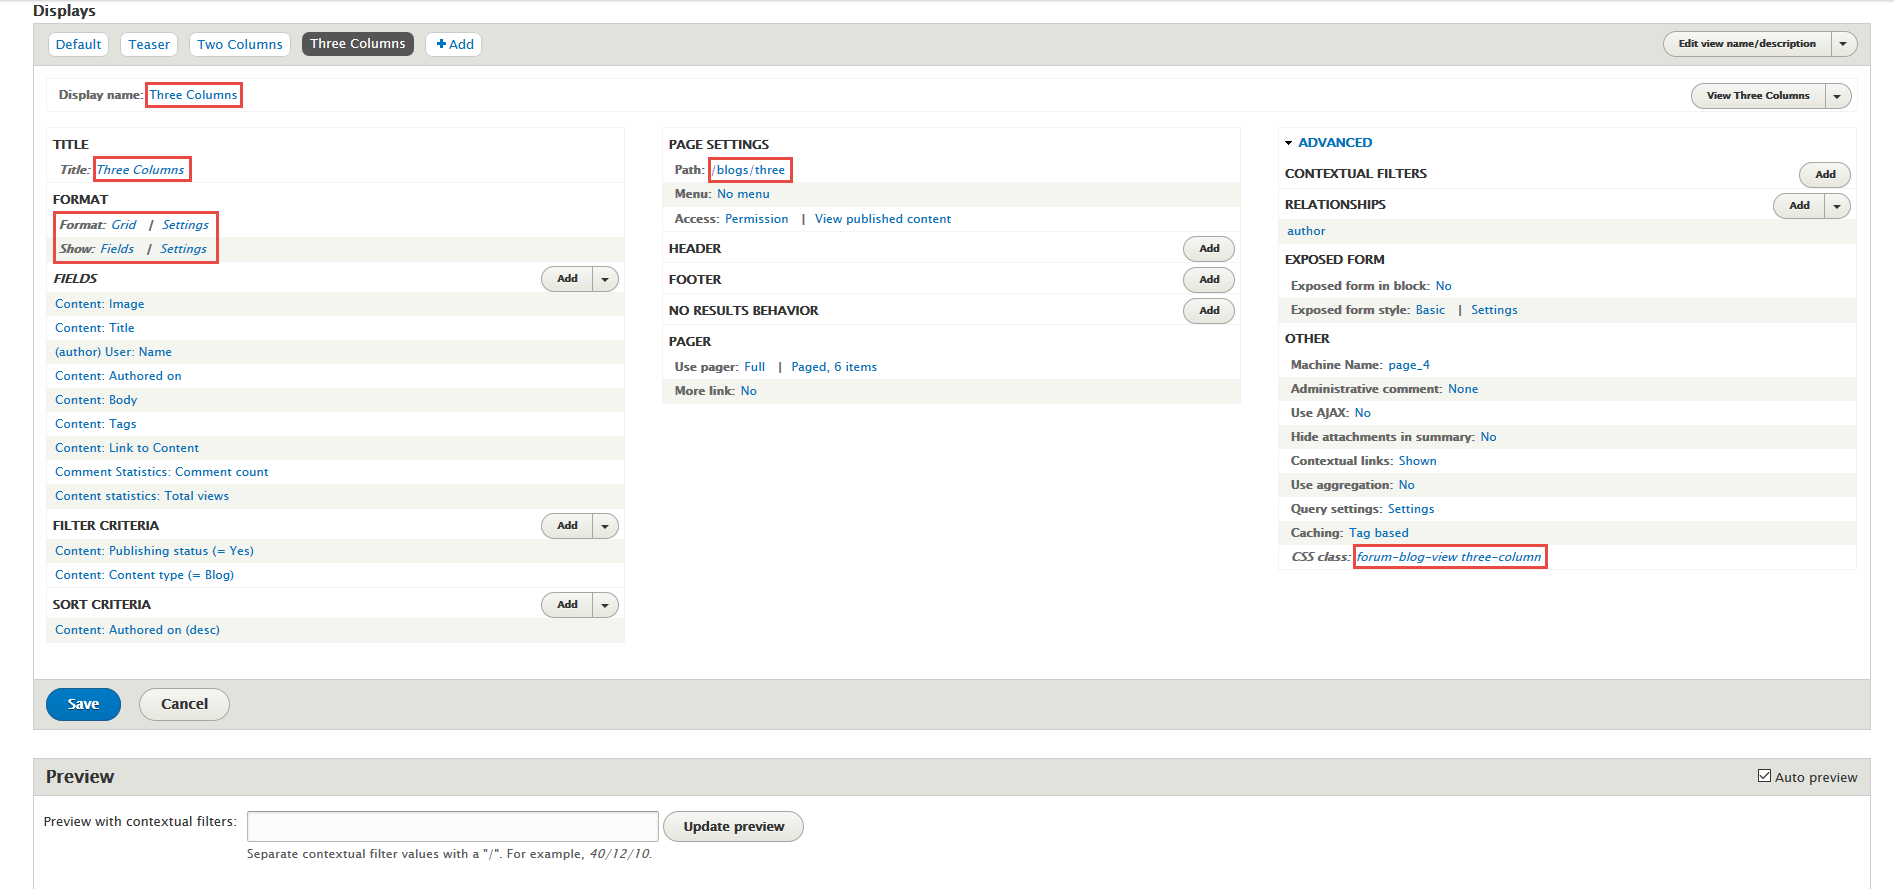
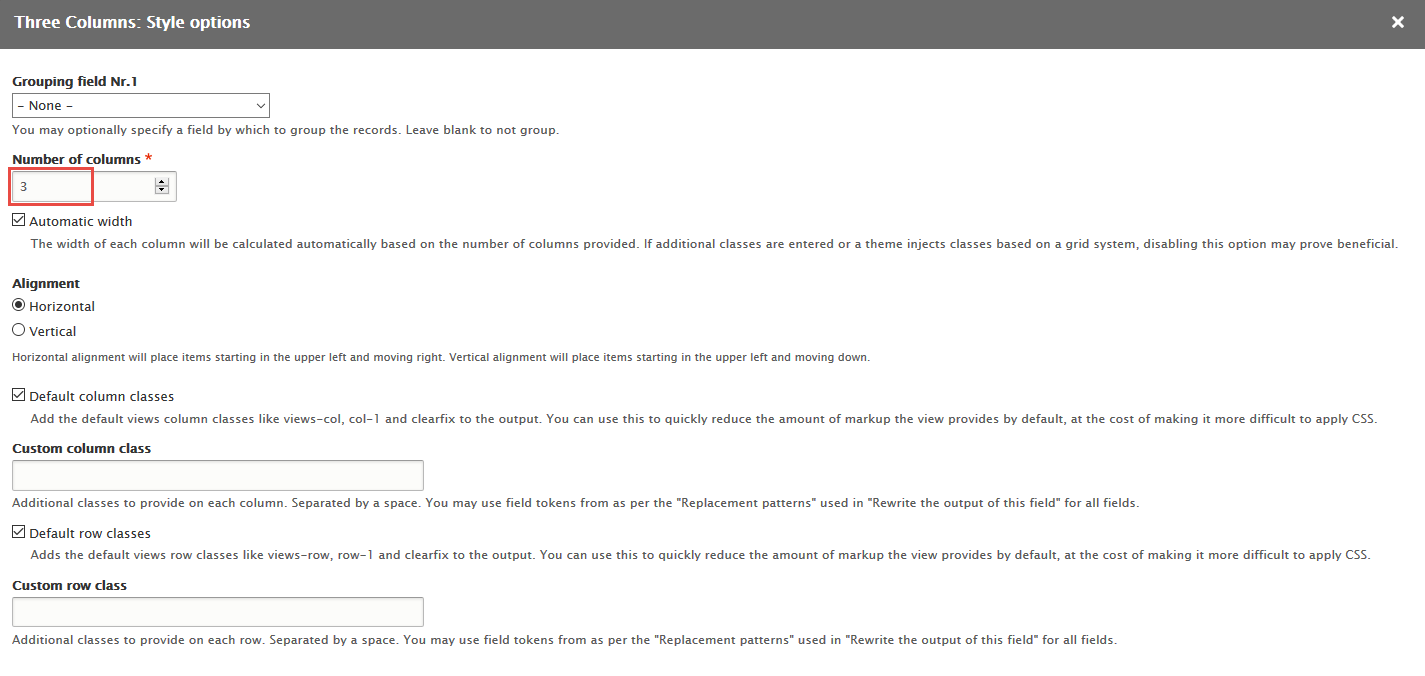
4. Create Three Columns view
Stay open Articles view, click Add button add Page new.
Step 1: Next to steps below to set properties for the following fields:
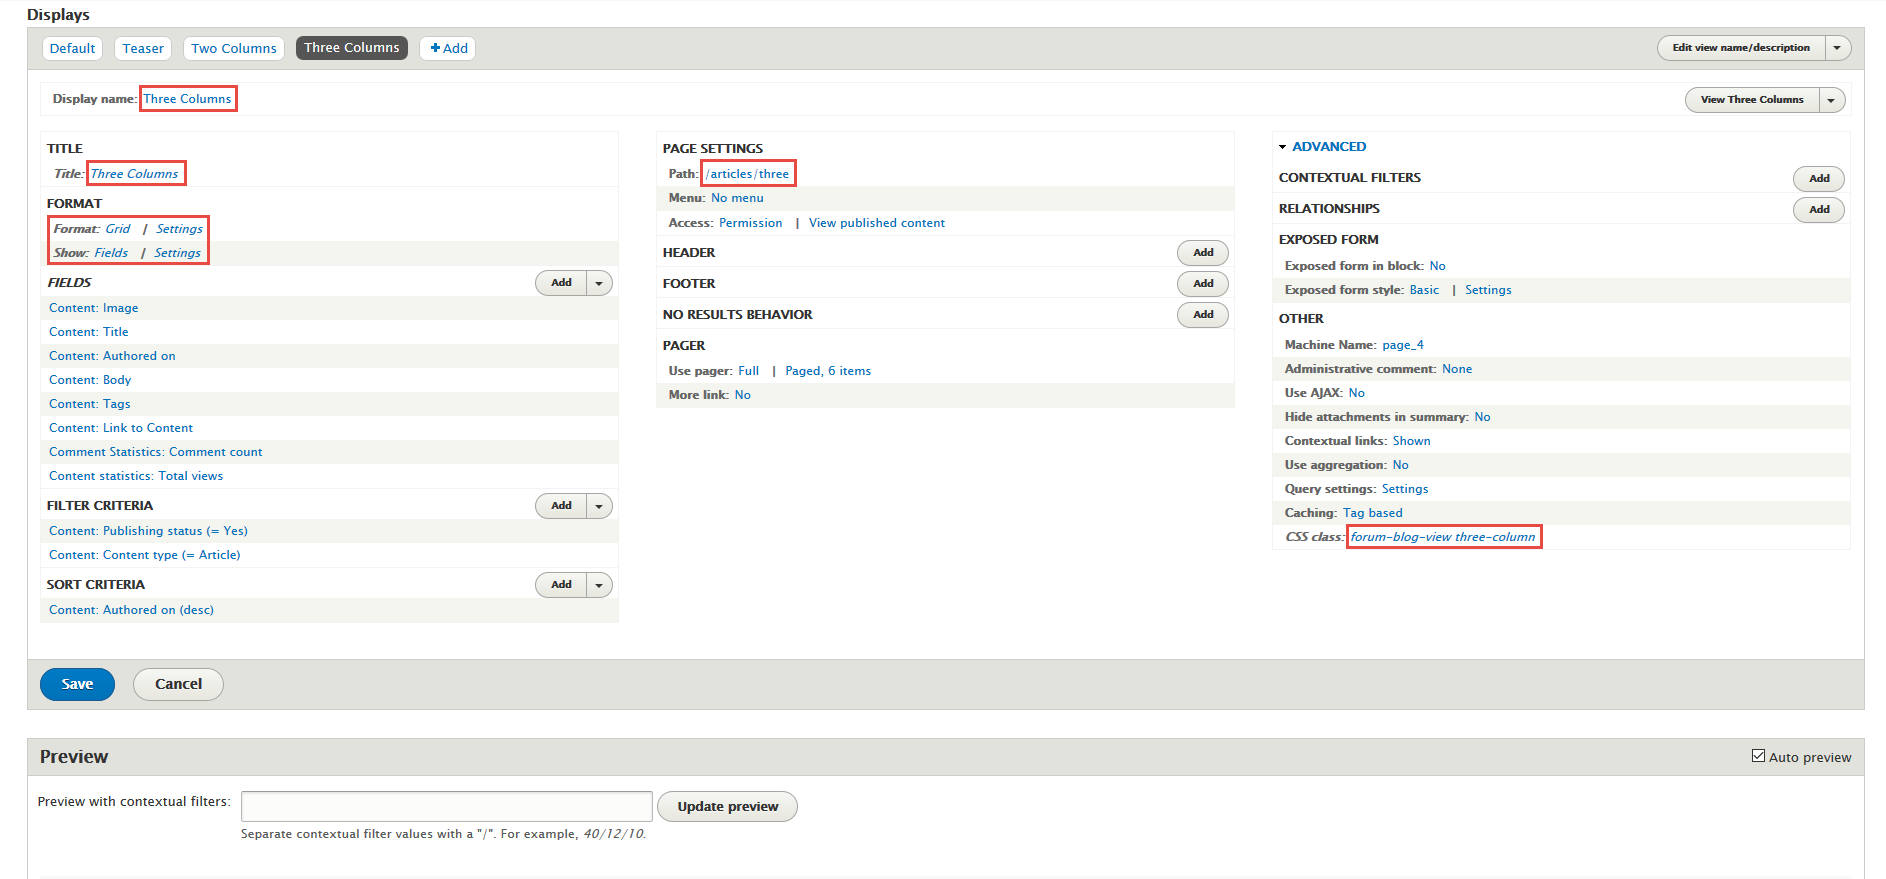
Step 2: At Display name area, set following properties:

Step 3: At Title area, set following properties:

Step 4: At FORMAT format: Grid area, click Settings and set following properties:
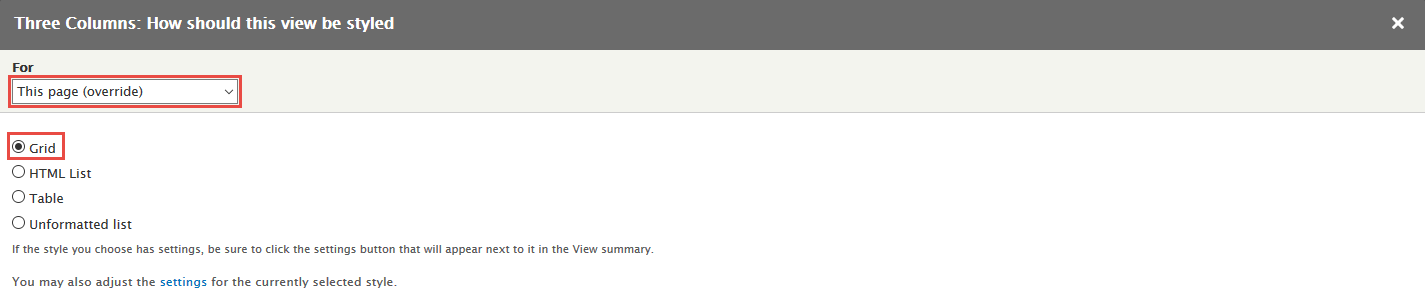
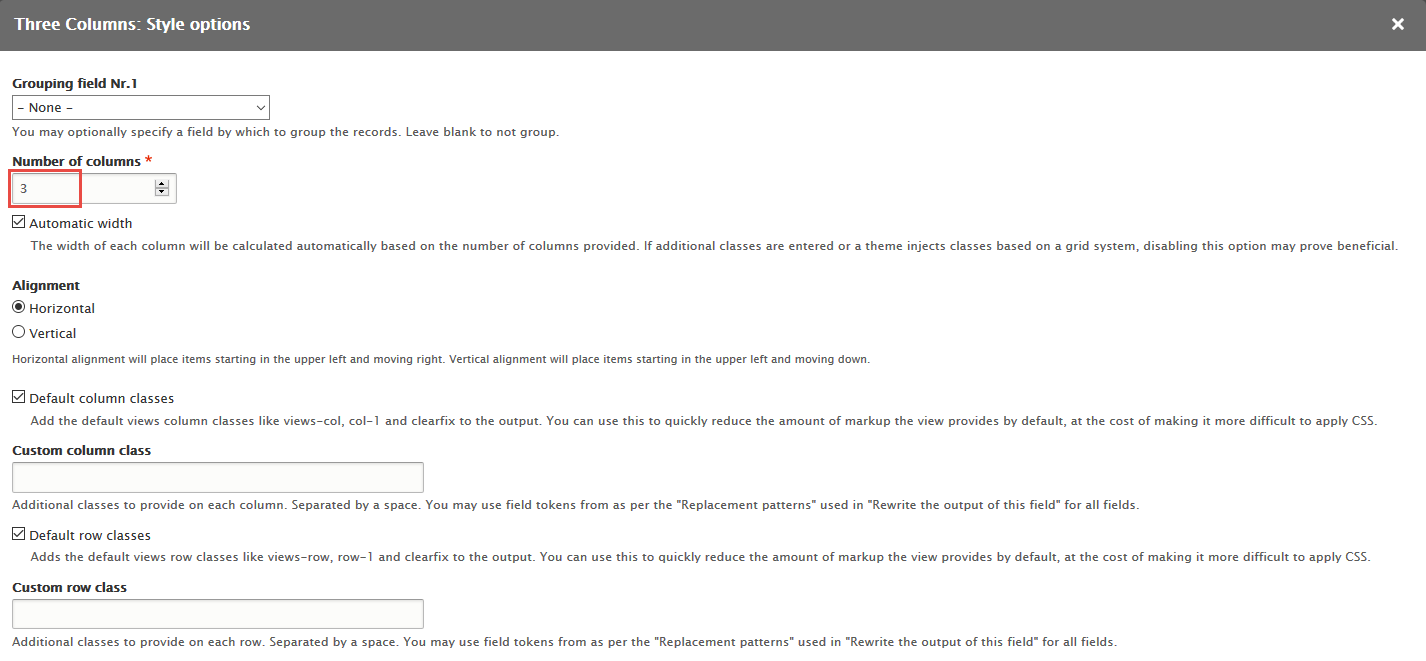
Step 5: At FIELDS area, set properties for the following fields:
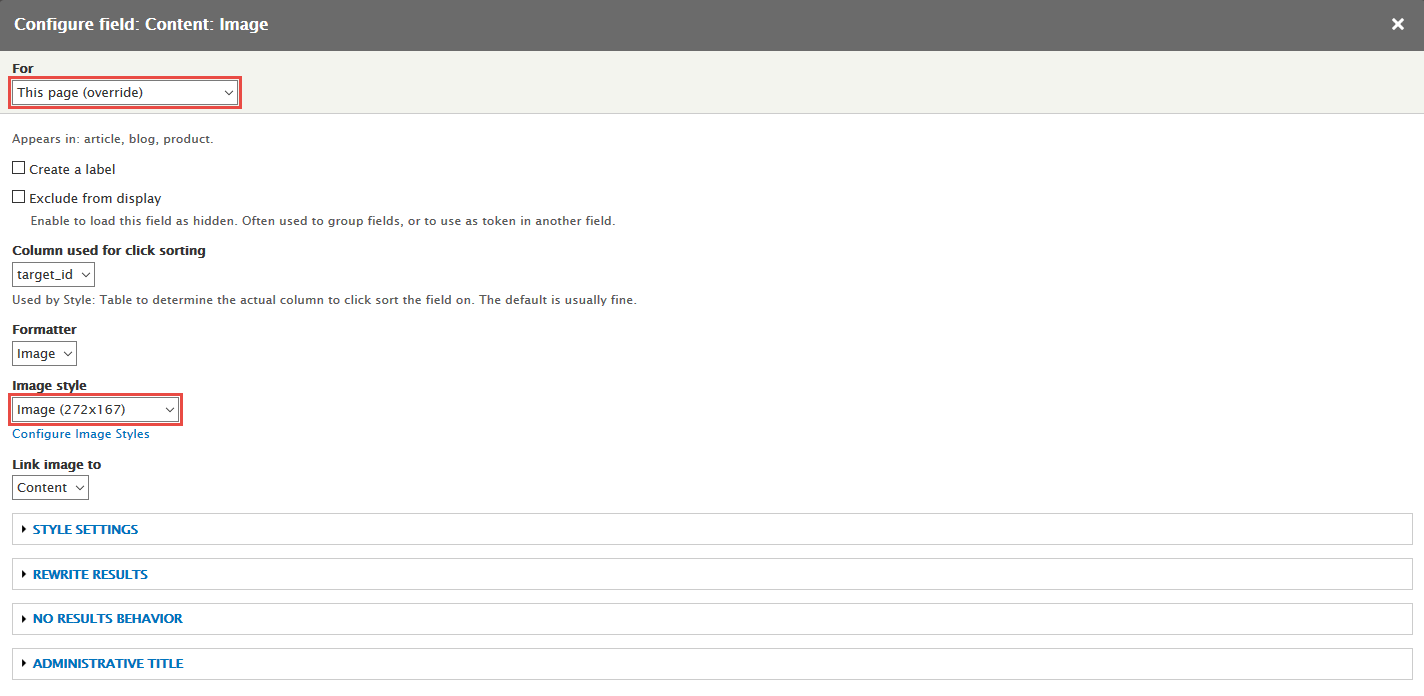
Step 6: Set following properties for Content: Image
Step 7: At PAGE SETTINGS > Path area, set the following properties:

Step 8: At Advanced > OTHER area, add CSS class

Step 9: Click Save button
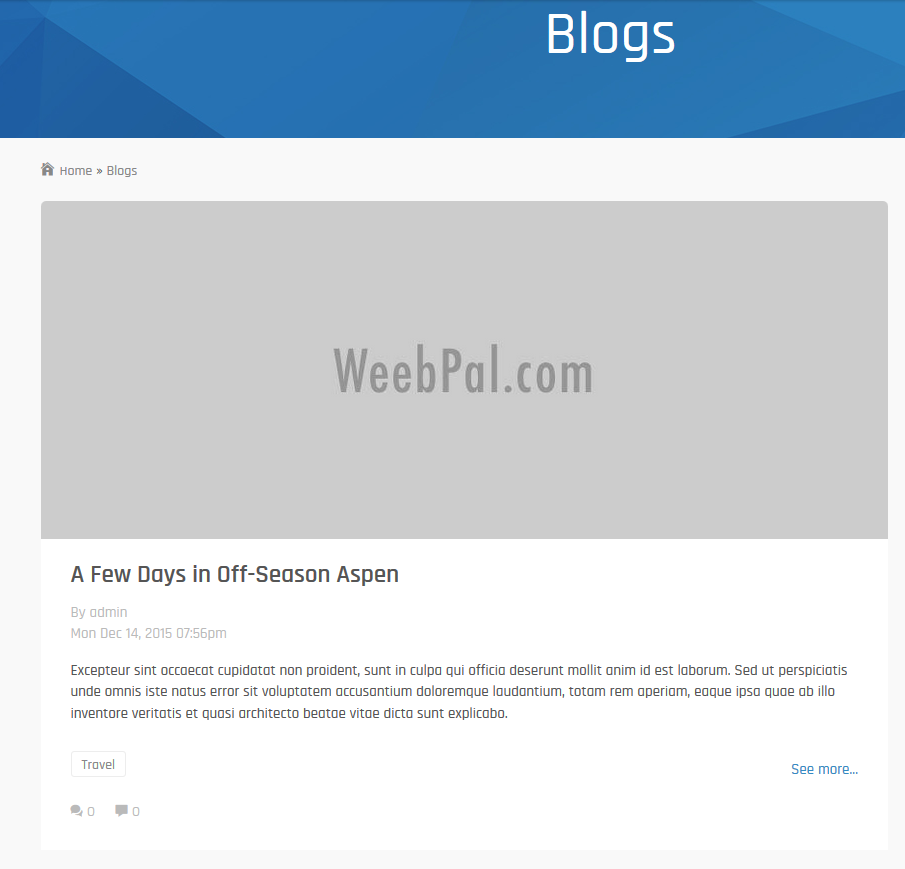
Blogs view
Front end Display
1. Create Blogs view
Step 1: Navigate to Structure > Views, click Add new view, then create Blogs view with following settings:
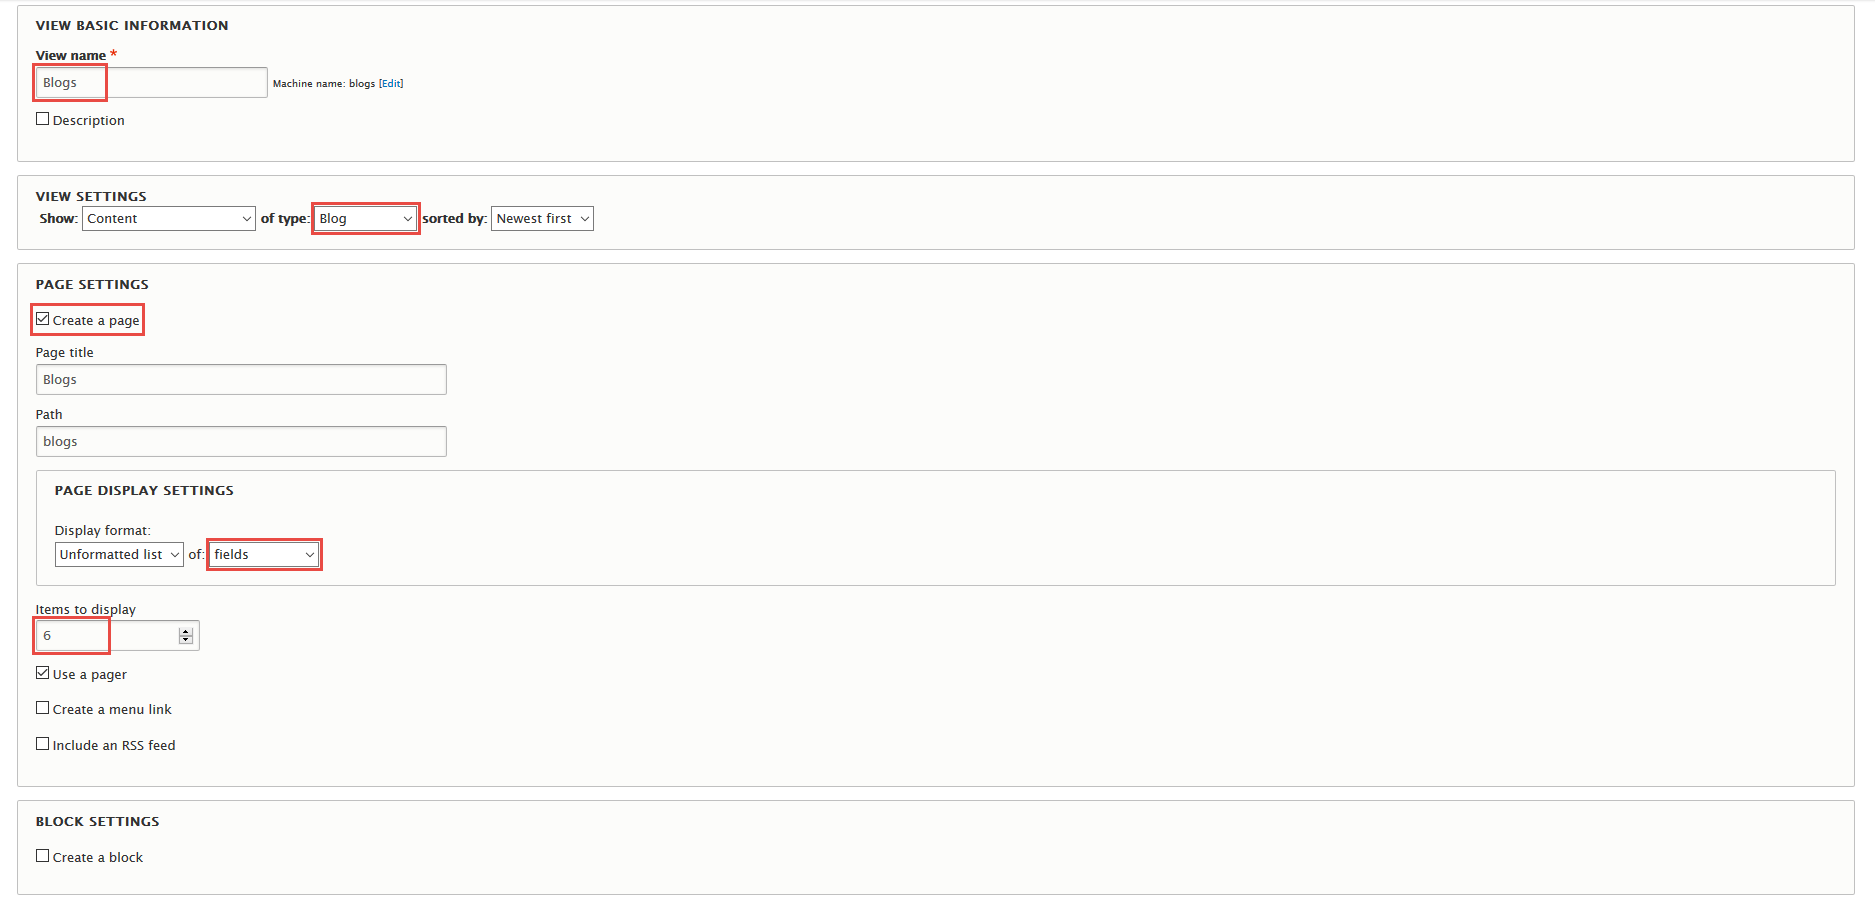
Step 2: Click Continue and edit button. Next to below steps to set properties for following fields:
Step 3: At Display name area, set following properties:

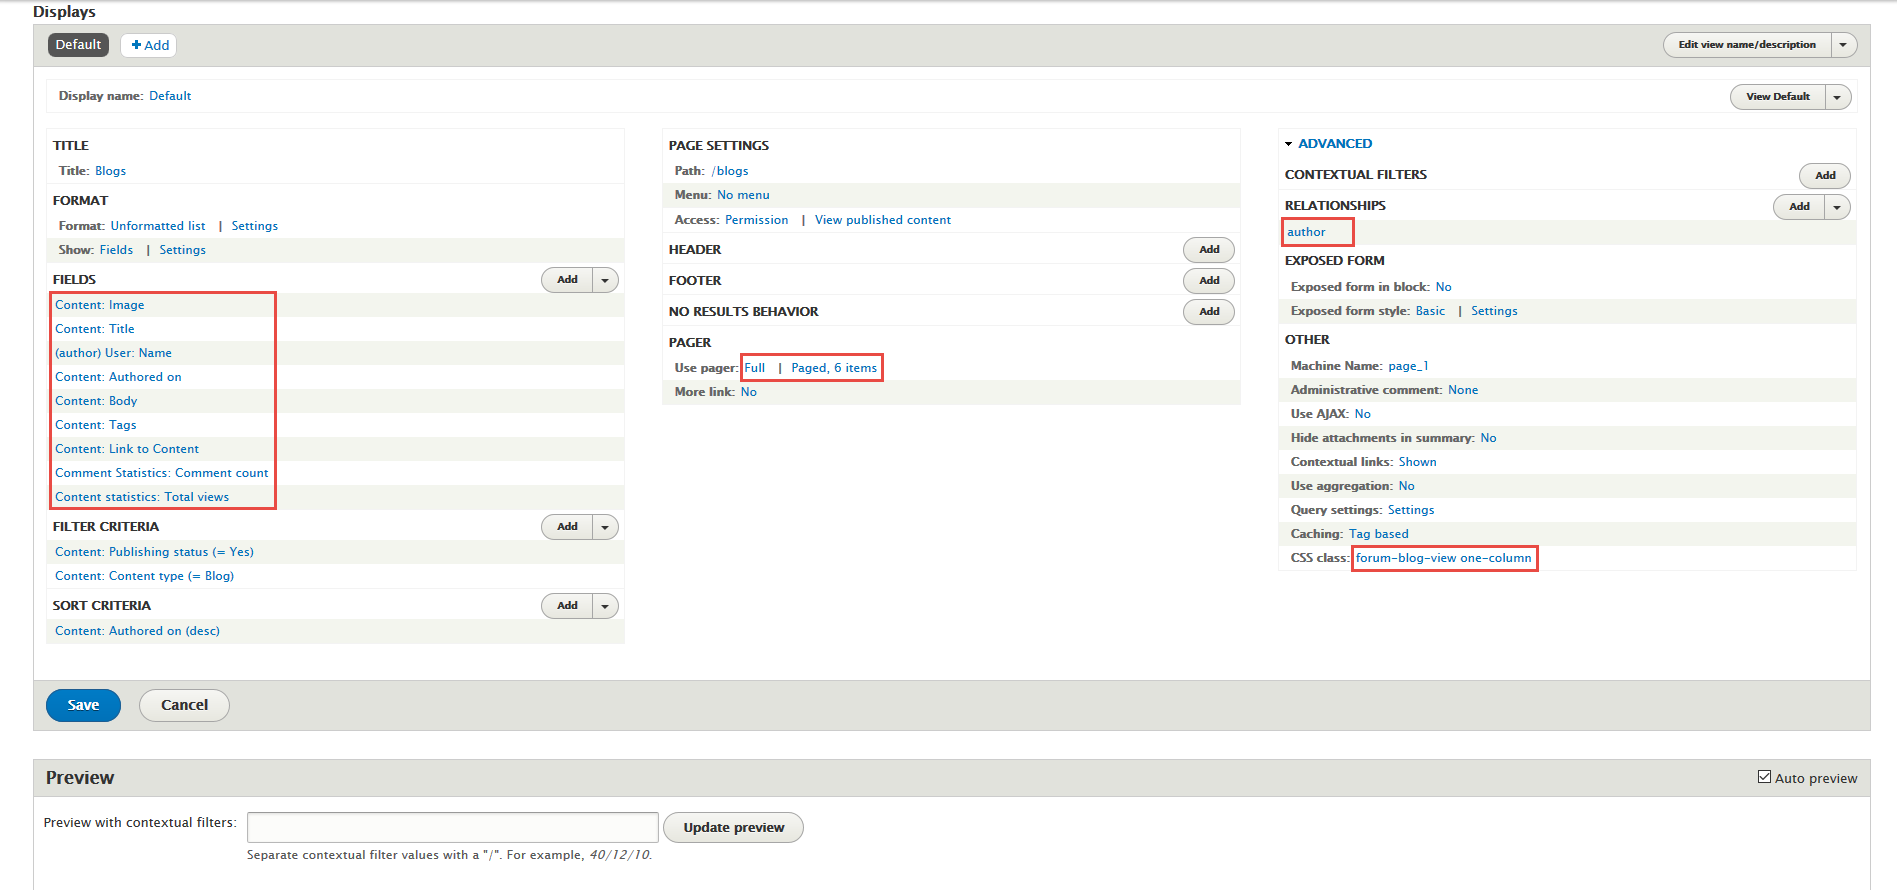
Step 4: Expand Advanced panel, at RELATIONSHIPS area, click Add to add relationship Content author
Step 5: At FIELDS area, click Add button to add fields: Content: Image, User: Name, Content: Authored on, Content: Body, Content: Tags, Content: Link to Content, Comment Statistics: Comment count, Content statistics: Total views
Step 6: Set following properties for Content: Image

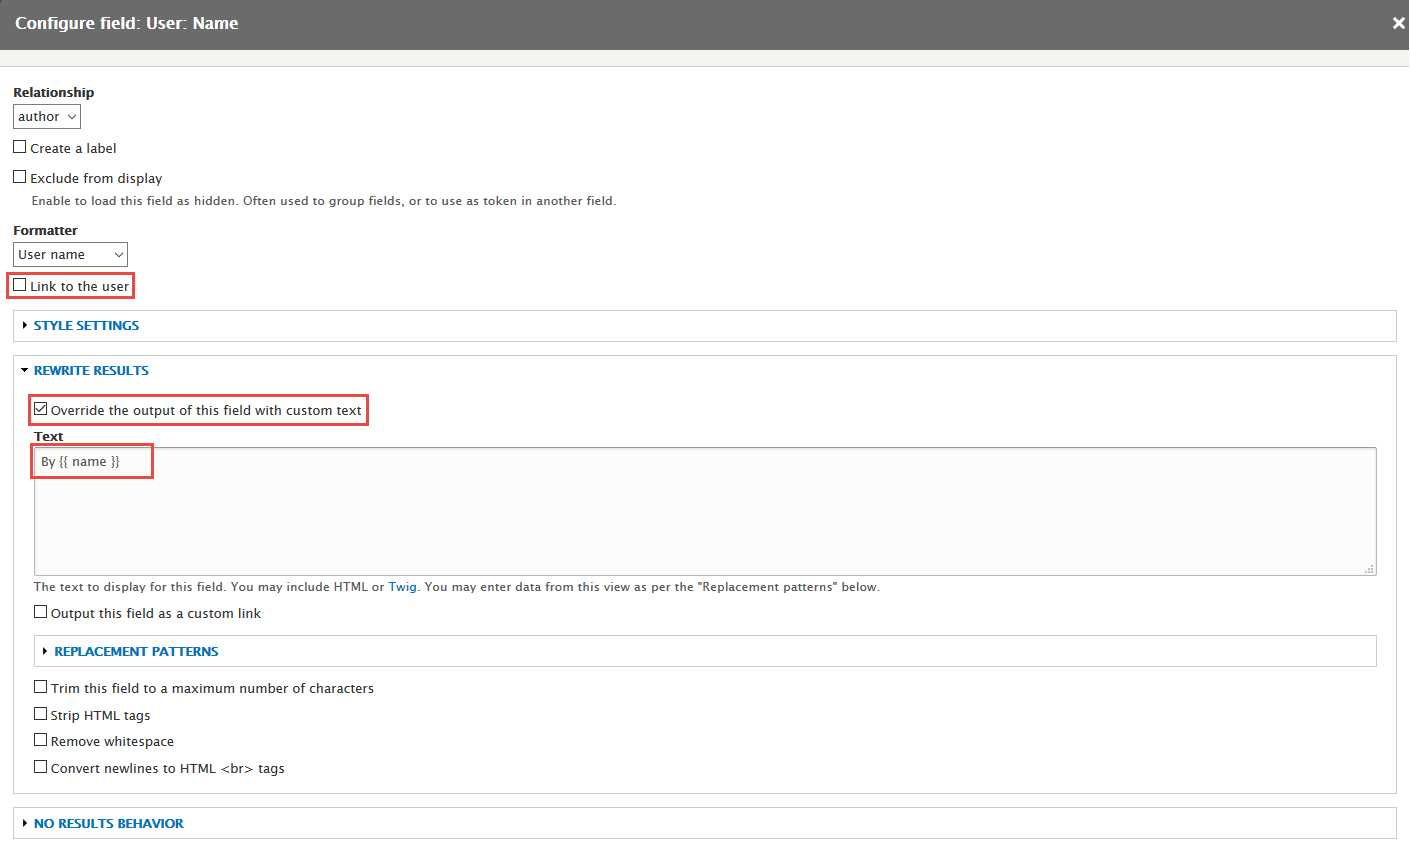
Step 7: Set following properties for User: Name
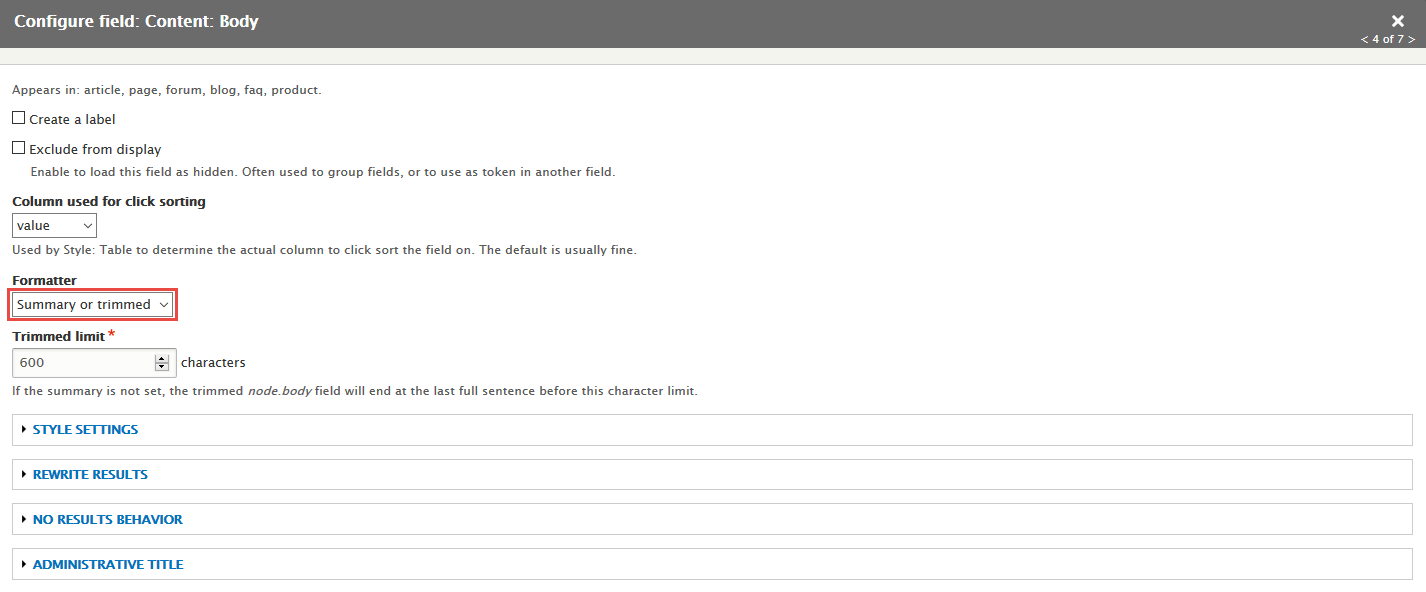
Step 8: Set following properties for Content: Body
Step 8: Set following properties for Content: Tags

Step 9: Set following properties for Content: Link to Content
Step 10: Set following properties for Content statistics: Total views
Step 11: At FIELDS area, click Rearrange button and set following arrange
Step 12: At PAGER > Use pager area, click link

Step 13: At Advanced > OTHER area, add CSS class

Step 14: Click Save button
2. Create Blogs Teaser view
Stay open Blogs view, click Add button add Page new.
Step 1: Next to steps below to set properties for the following fields:
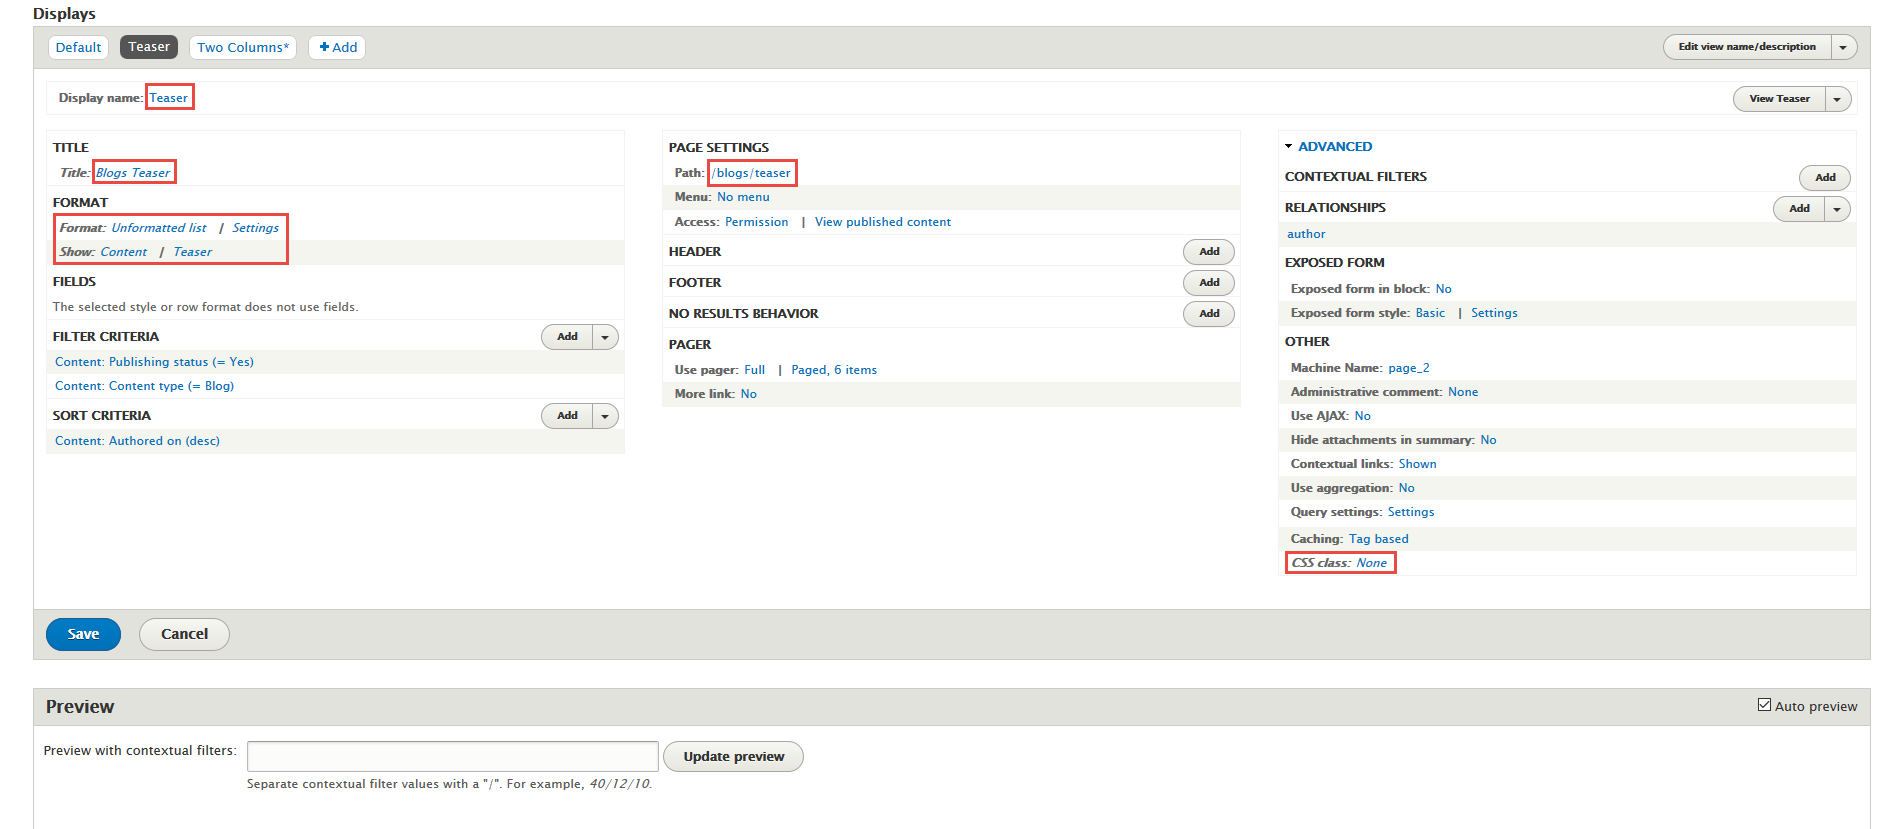
Step 2: At Display name area, set following properties:

Step 3: At Title area, set following properties:

Step 4: At FORMAT format: Unformatted list area, click Settings and set following properties:

Step 5: At PAGE SETTINGS > Path area, set the following properties:

Step 6: At Advanced > OTHER area, add CSS class

Step 7: Click Save button
3. Create Two Columns view
Stay open Blogs view, click Add button add Page new.
Step 1: Next to steps below to set properties for the following fields:

Step 2: At Display name area, set following properties:

Step 3: At Title area, set following properties:

Step 4: At FORMAT format: Grid area, click Settings and set following properties:
Step 5: At FIELDS area, set properties for the following fields:
Step 6: Set following properties for Content: Image

Step 7: At PAGE SETTINGS > Path area, set the following properties:

Step 8: At Advanced > OTHER area, add CSS class

Step 9: Click Save button
4. Create Three Columns view
Stay open Blogs view, click Add button add Page new.
Step 1: Next to steps below to set properties for the following fields:
Step 2: At Display name area, set following properties:

Step 3: At Title area, set following properties:

Step 4: At FORMAT format: Grid area, click Settings and set following properties:

Step 5: At FIELDS area, set properties for the following fields:
Step 6: Set following properties for Content: Image

Step 7: At PAGE SETTINGS > Path area, set the following properties:

Step 8: At Advanced > OTHER area, add CSS class

Step 9: Click Save button
5. Create Blogs Default view
Stay open Blogs view, click Add button add Page new.
Step 1: Next to steps below to set properties for the following fields:
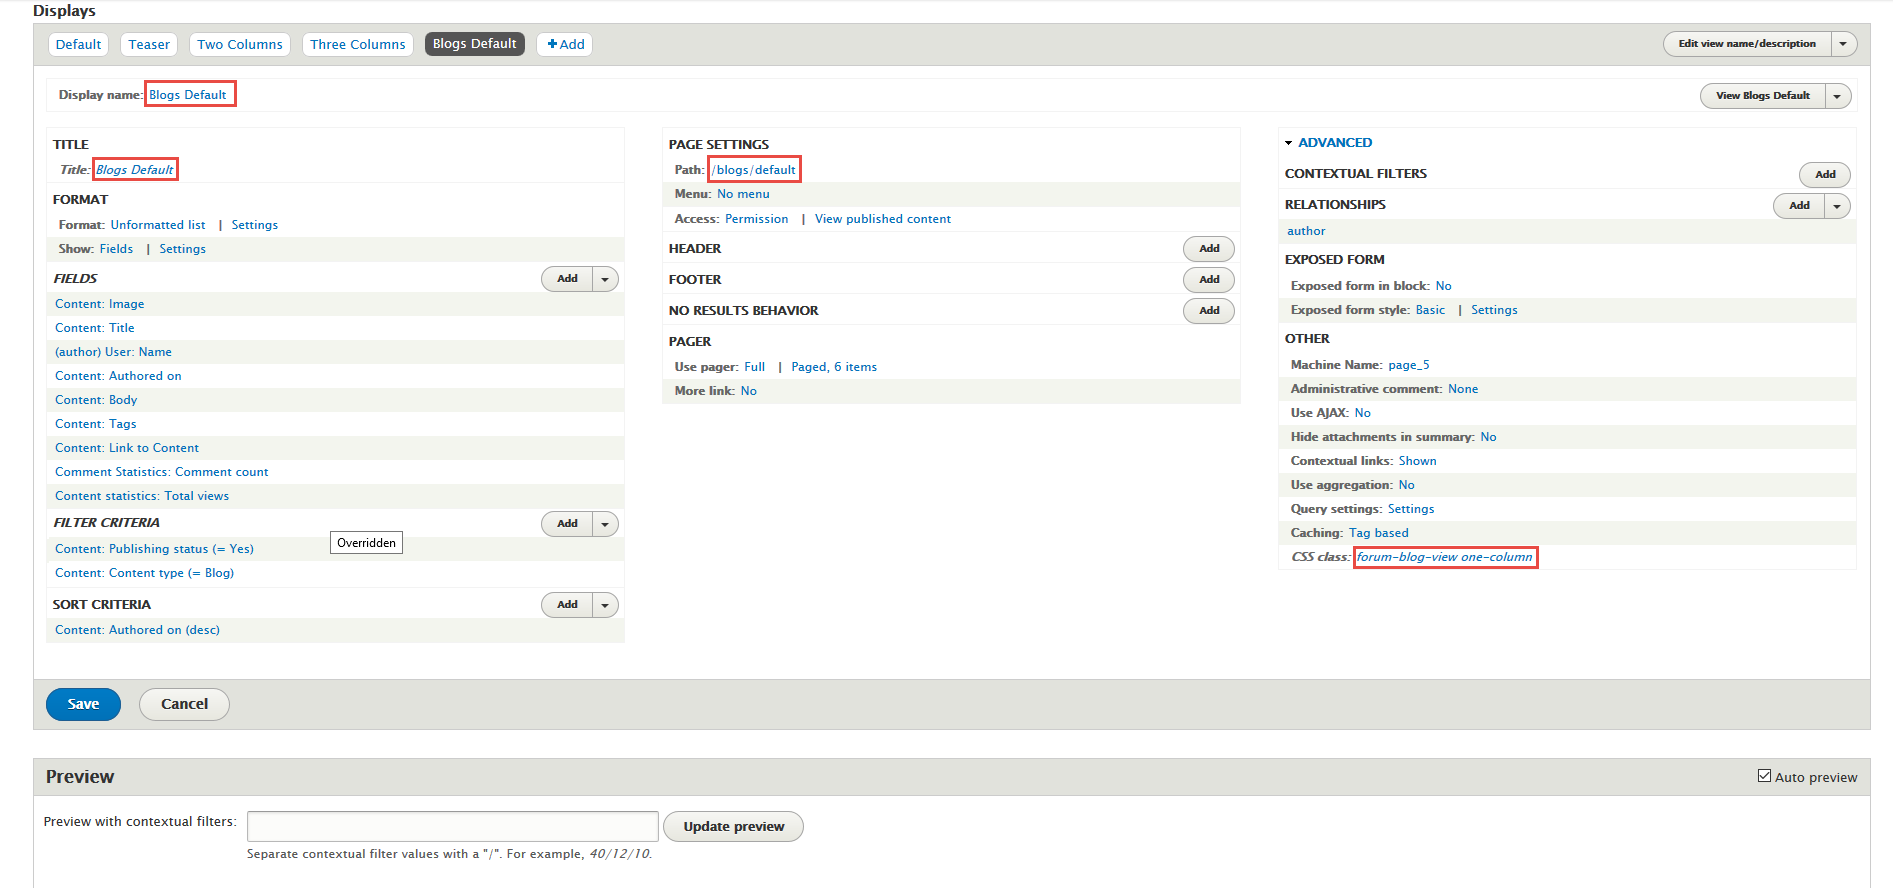
Step 2: At Display name area, set following properties:

Step 3: At Title area, set following properties:

Step 4: At FORMAT format: Grid area, click Settings and set following properties:
Step 5: At FIELDS area, set properties for the following fields:
Step 6: Set following properties for Content: Image

Step 7: At PAGE SETTINGS > Path area, set the following properties:

Step 8: At Advanced > OTHER area, add CSS class

Step 9: Click Save button
FAQ view
Front end Display
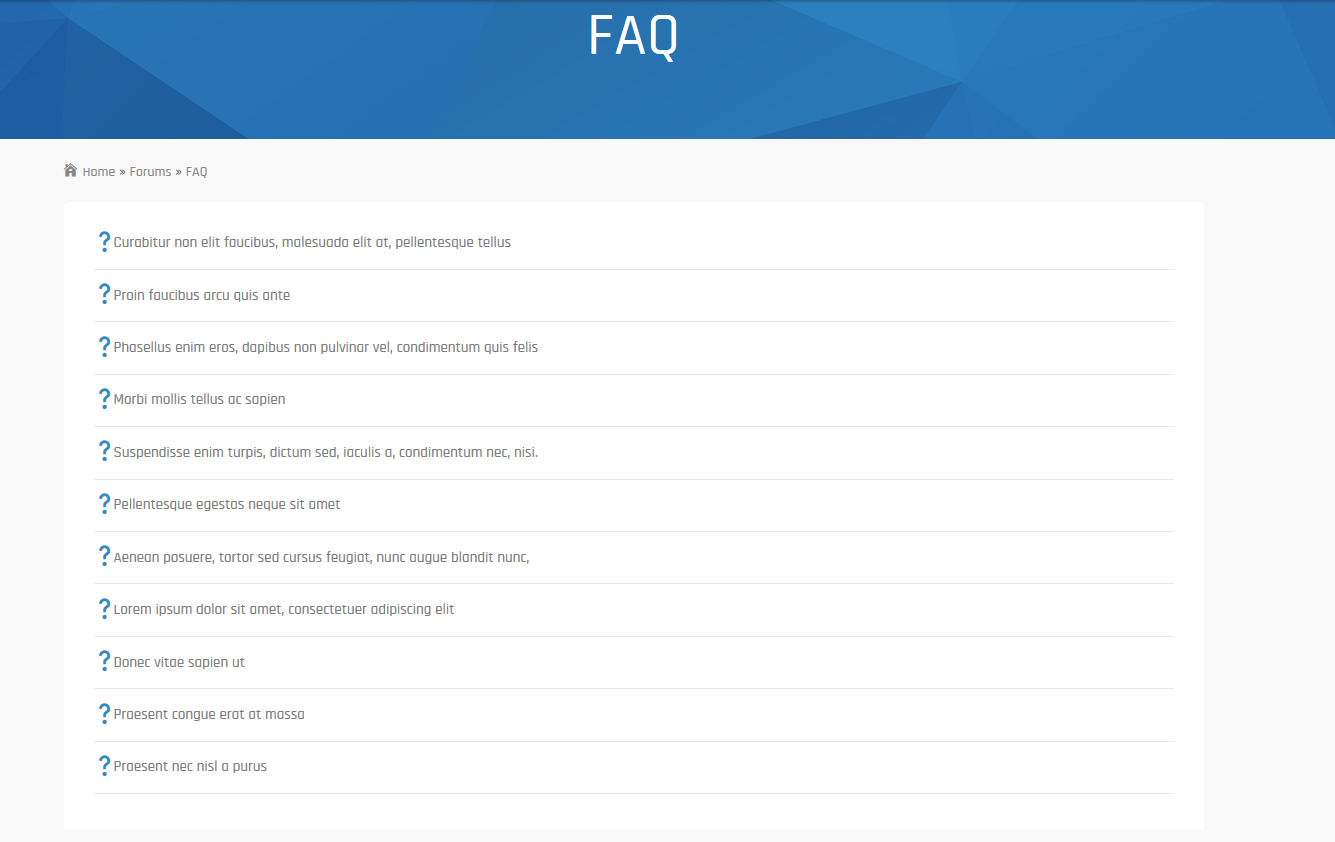
Create FAQ view
Step 1: Navigate to Structure > Views, click Add new view, then create FAQ view with following settings:
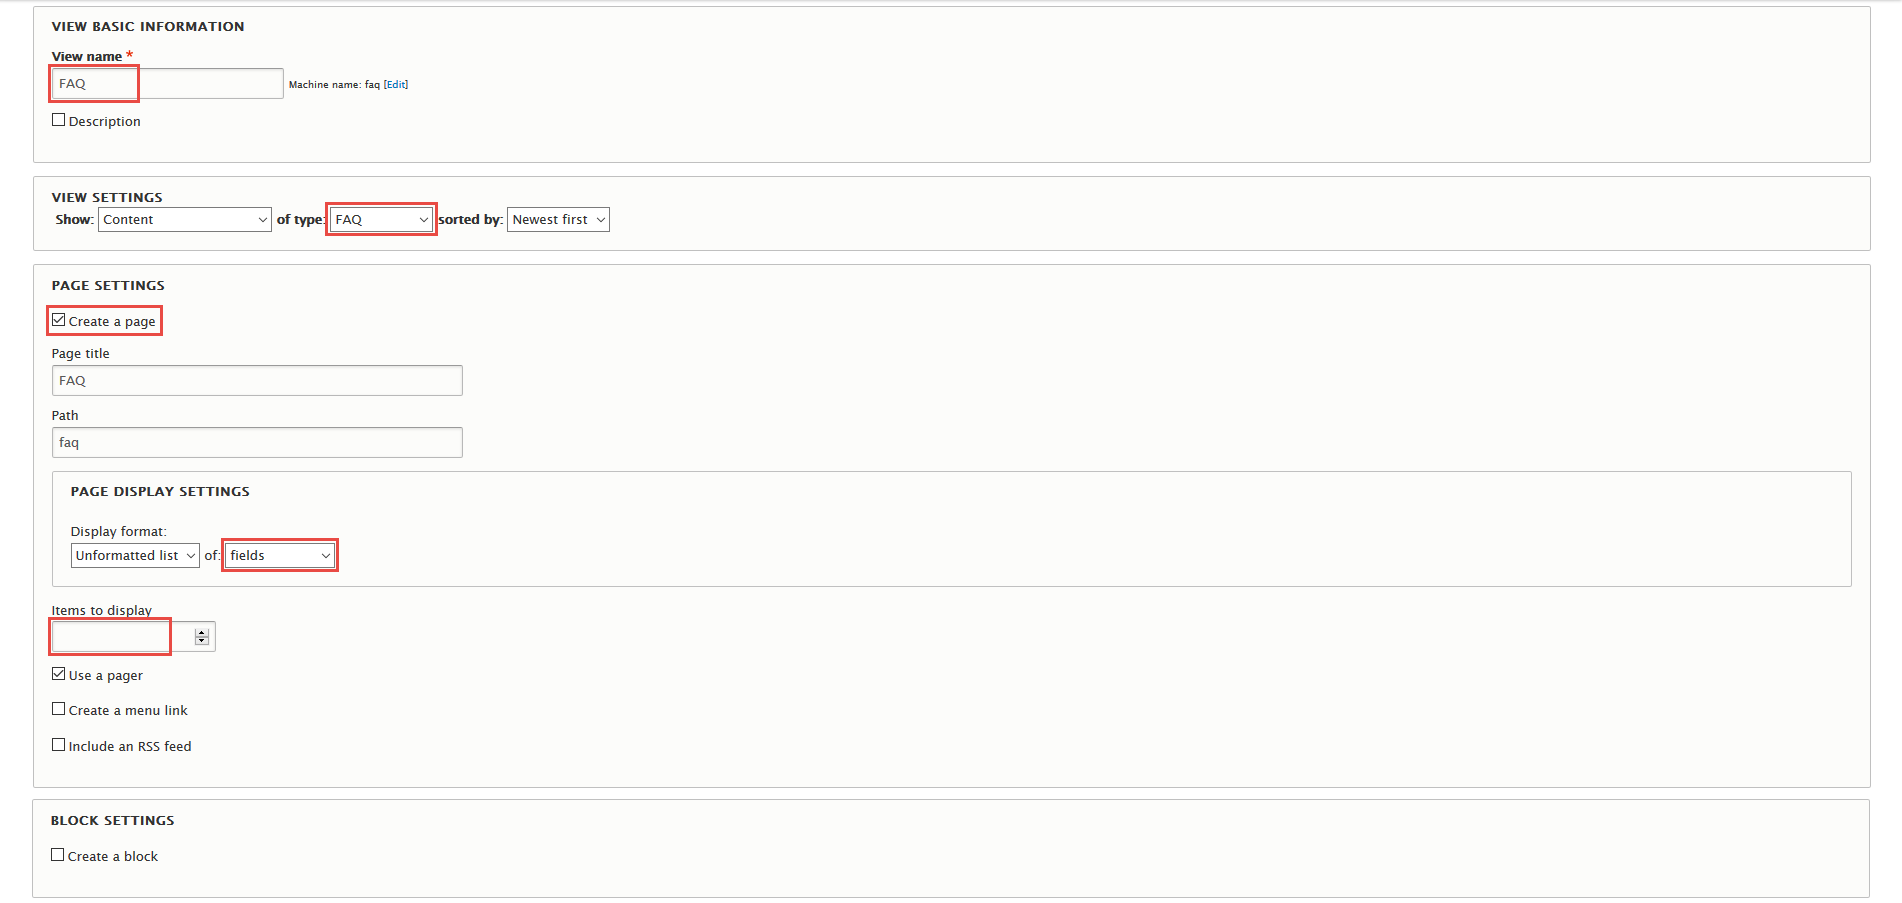
Step 2: Click Continue and edit button. Next to below steps to set properties for following fields:
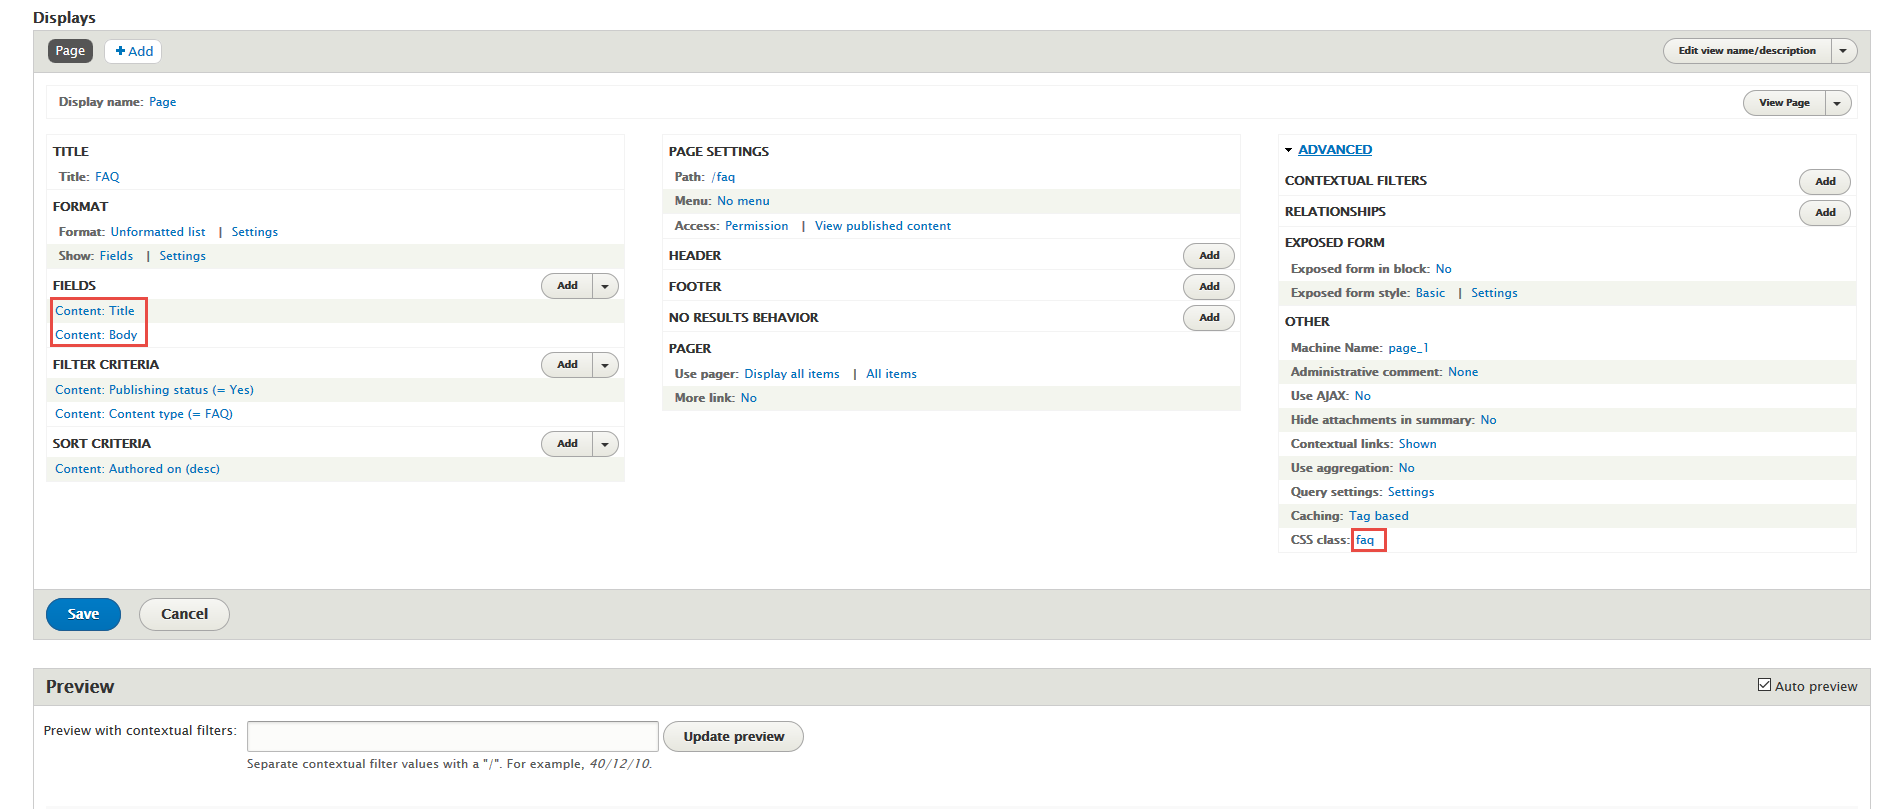
Step 3: At FIELDS area, click Add button to add fields: Content: Body
Step 4: Set following properties for Content: Title
Step 5: At Advanced > OTHER area, add CSS class

Step 6: Click Save button
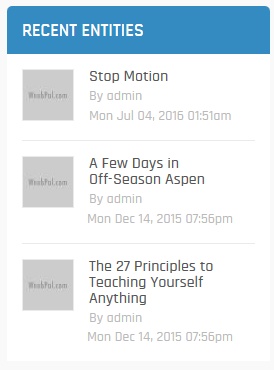
Recent Entities block
Front end Display
1. Create Recent Entities view
Step 1: Navigate to Structure > Views, click Add new view, then create Recent Entities view with following settings:
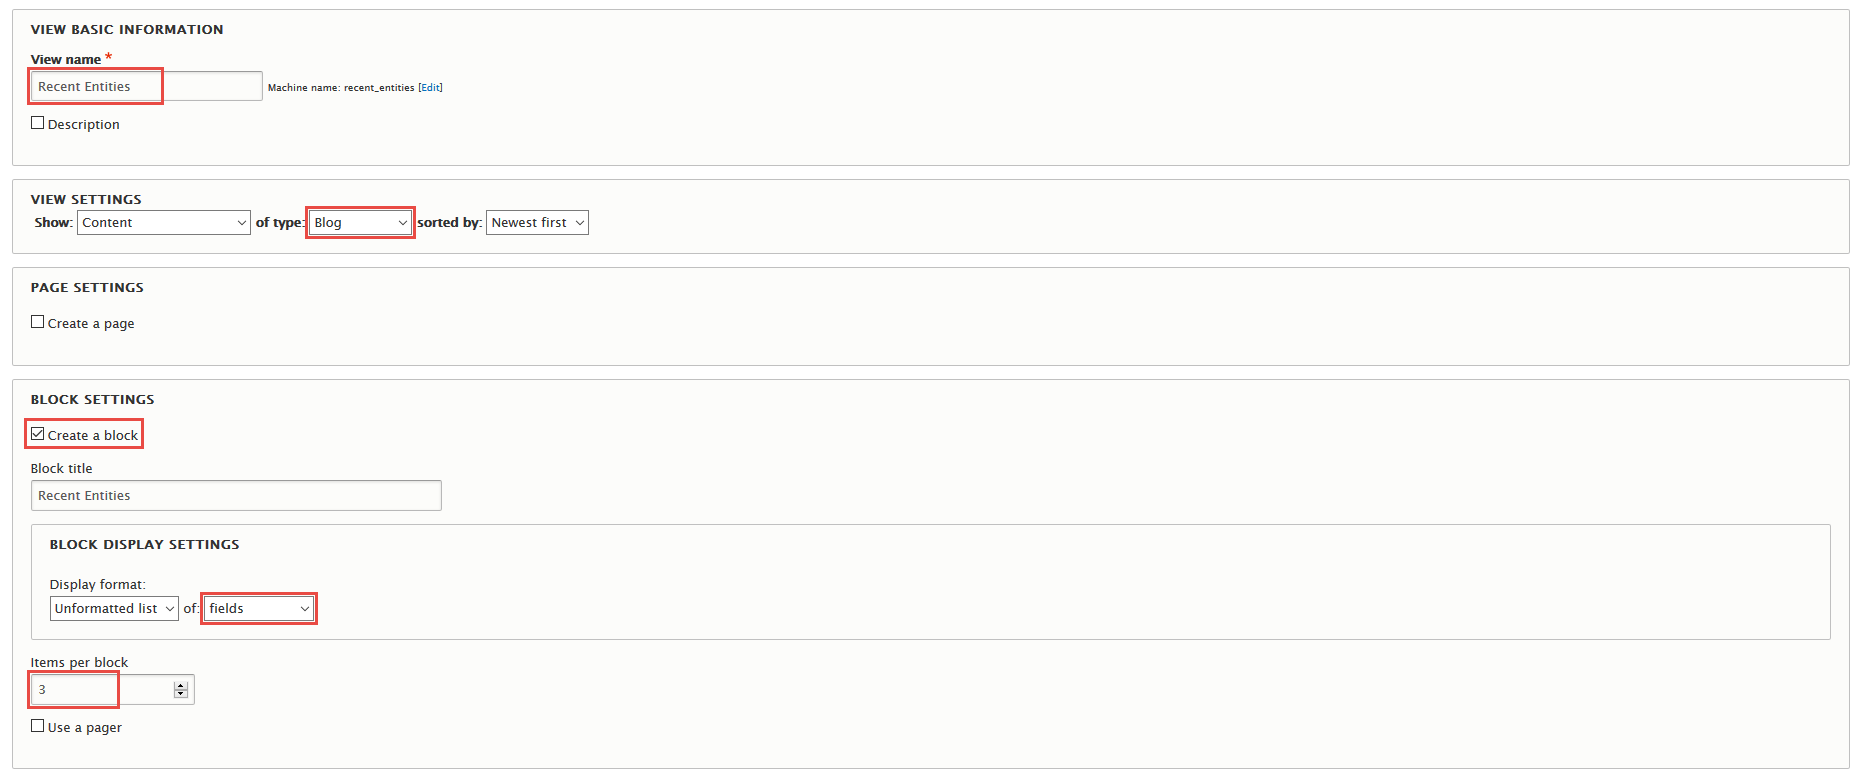
Step 2: Click Save and edit button. Next to steps below to set properties for following fields:
Step 3: Expand Advanced panel, at RELATIONSHIPS area, click Add to add relationship Content author
Step 4: At FIELDS area, click Add button to add fields: Content: Image, User: Name, Content: Authored on
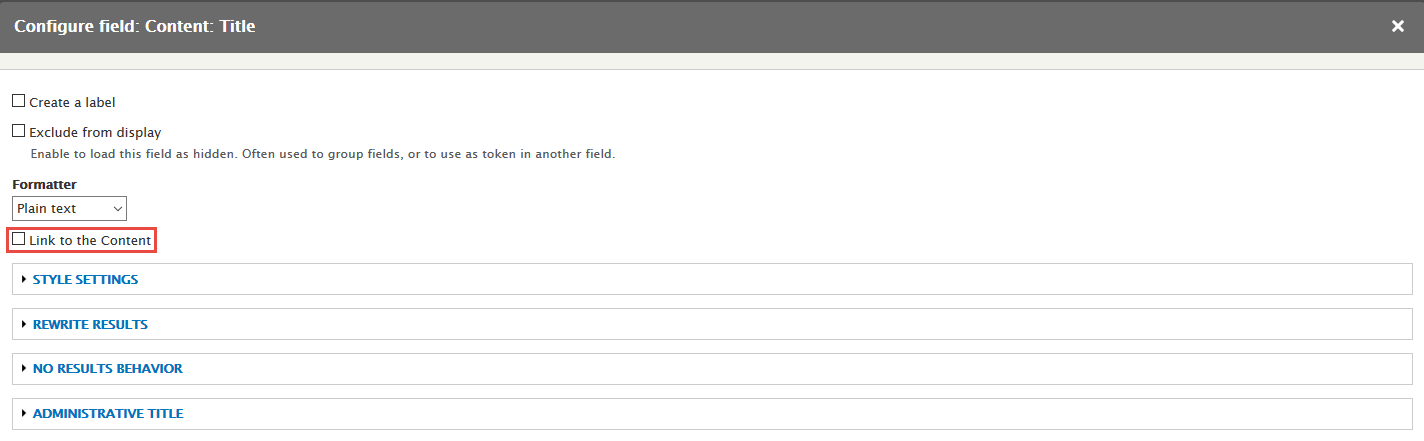
Step 5: Set properties for Content: Image
Step 6: Set properties for User: Name
Step 7: Set properties for Content: Authored on
Step 8: At FIELDS area. Click Rearrange button and set following properties:
Step 9: Click Save block button.
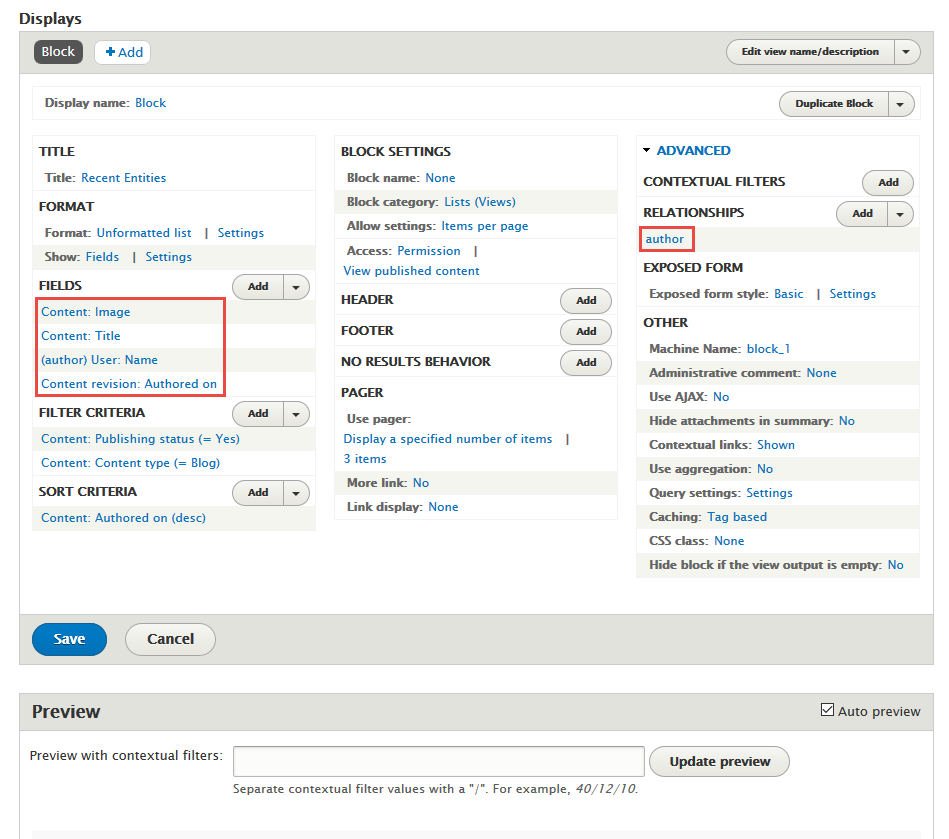
2. Configure View: Recent Entities block
Step 1: Navigate to Structure > Blocks
Step 2: Find Sidebar first click Place block button
Step 3: Find Recent Entities click Place block button and set following properites:
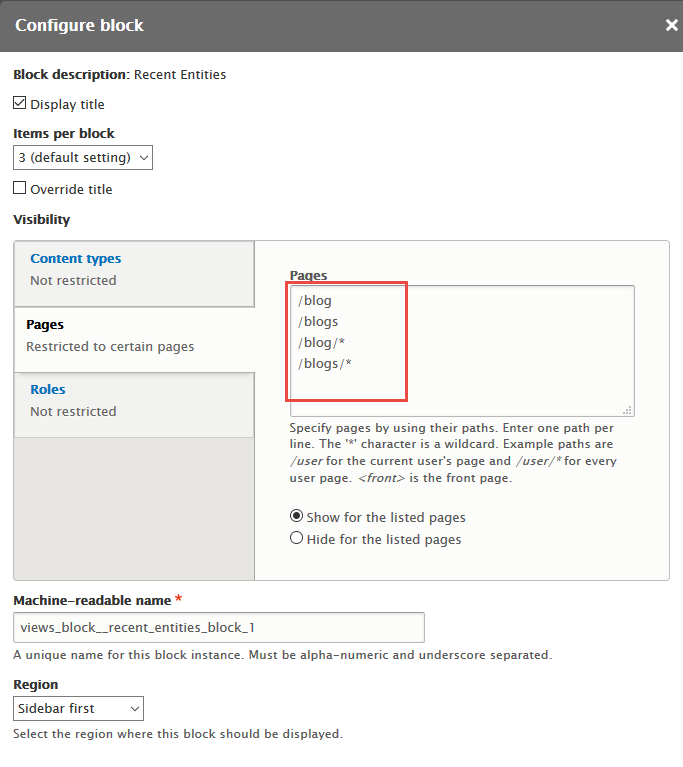
Step 4: Click Save block button.
Get In Touch block
Front end Display
1. Create Get In Touch block
Step 1: Navigate to Structure > Block layout, click Custom block library tab.
Step 2: Click Add block link. Create Get In Touch block with following properties:
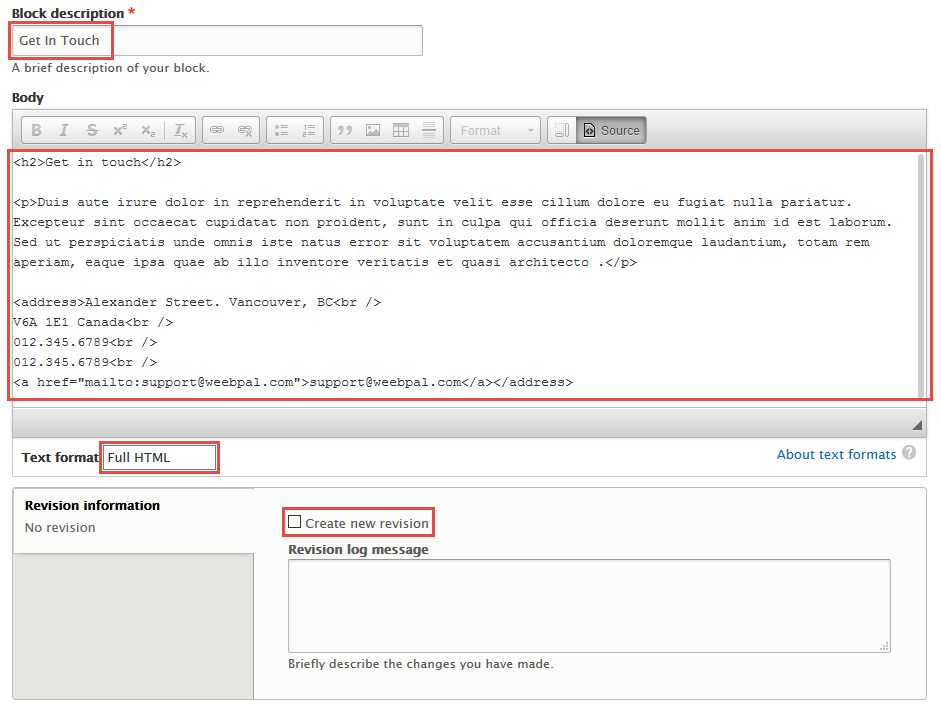
Step 3: Click Save button
Refer to following HTML code:
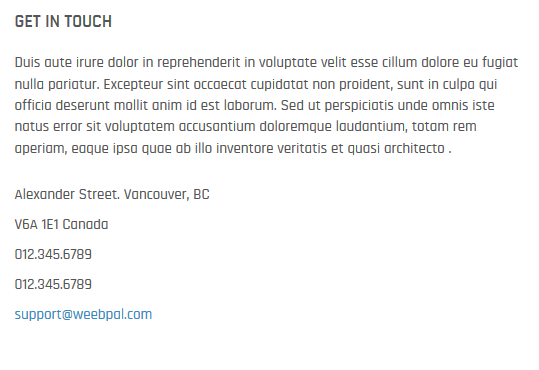
                    Get in touch
					Duis aute irure dolor in reprehenderit in voluptate velit esse cillum dolore eu fugiat nulla pariatur. Excepteur sint occaecat cupidatat non proident, sunt in culpa qui officia deserunt mollit anim id est laborum. Sed ut perspiciatis unde omnis iste natus error sit voluptatem accusantium doloremque laudantium, totam rem aperiam, eaque ipsa quae ab illo inventore veritatis et quasi architecto .

					Alexander Street. Vancouver, BC

					V6A 1E1 Canada

					012.345.6789

					012.345.6789

					[email protected]
2. Configure Get In Touch block
Step 1: Navigate to Structure > Block layout
Step 2: At Content block, click Place block link.
Step 3: Find Get In Touch click Place block link, set following properties
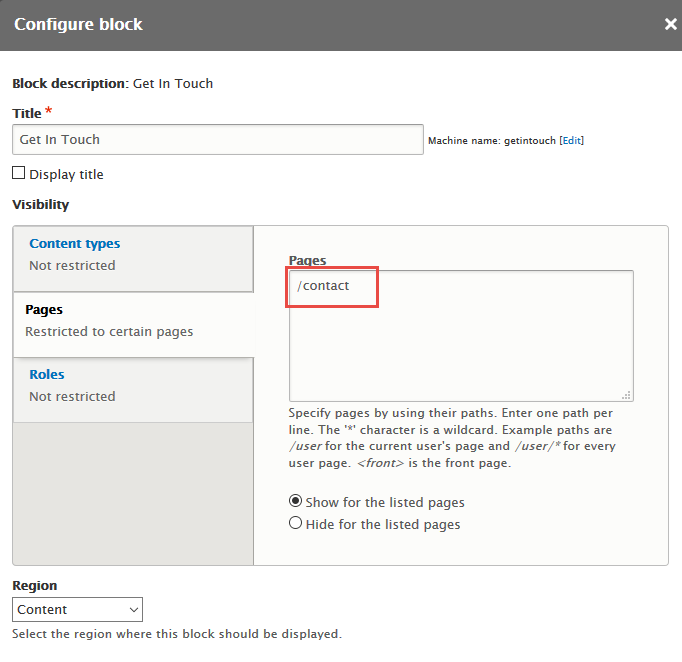
Step 4: Click Save block button.
Gmap block
Front end Display
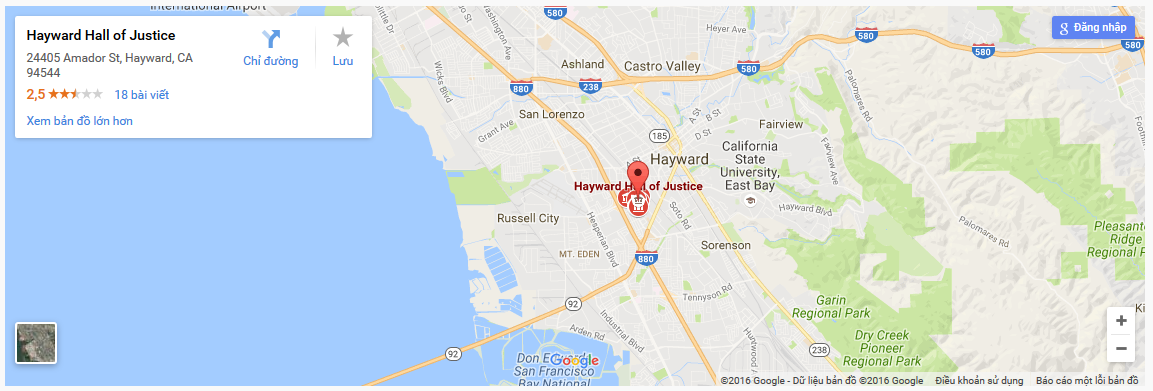
1. Create Gmap block
Step 1: Navigate to Structure > Block layout, click Custom block library tab.
Step 2: Click Add block link. Create Gmap block with following properties:
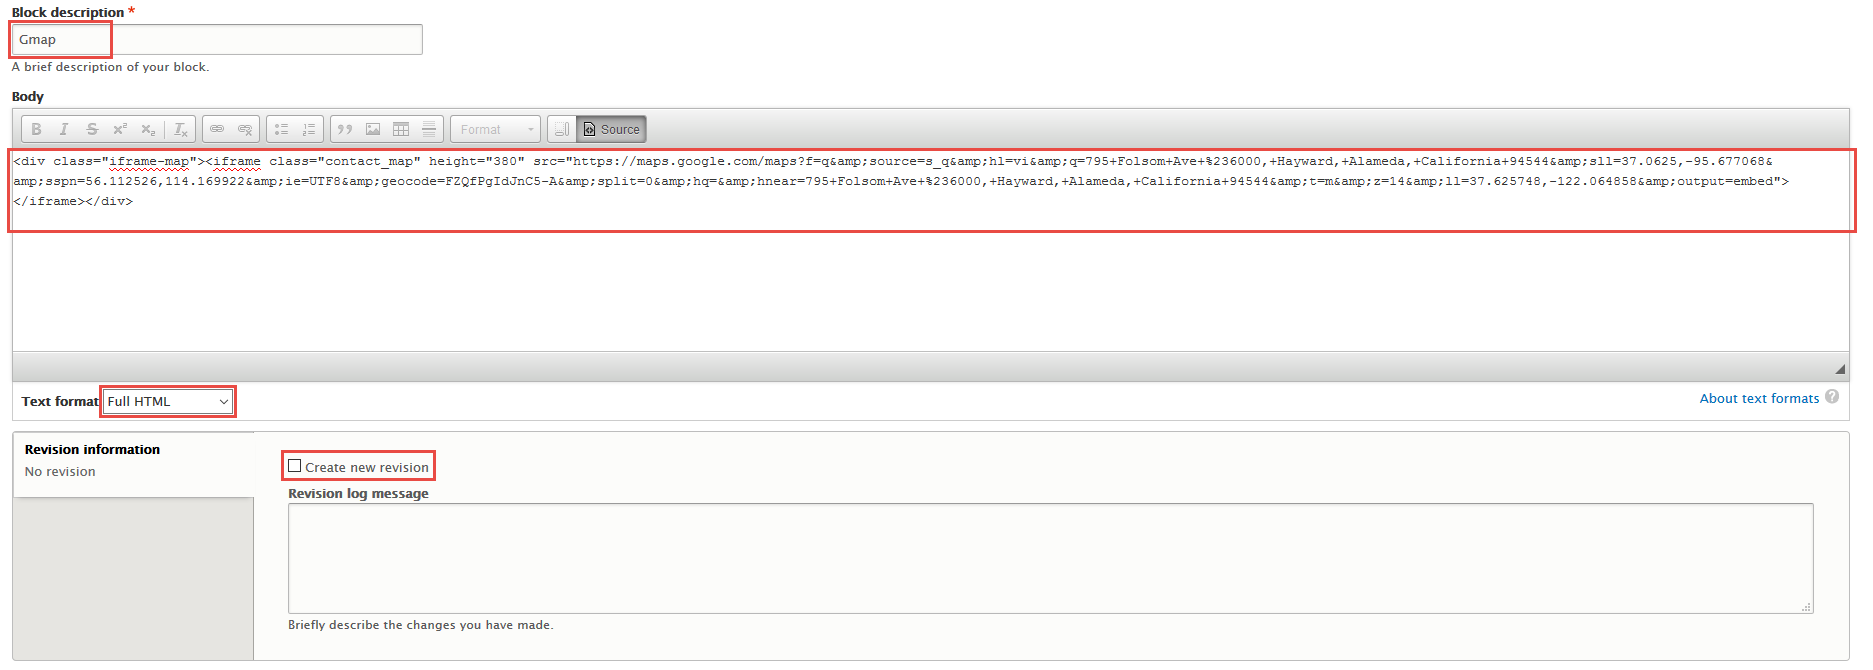
Step 3: Click Save button
Refer to following HTML code:
2. Configure Gmap block
Step 1: Navigate to Structure > Block layout
Step 2: At Gmap block, click Place block link.
Step 3: Find Gmap click Place block link, set following properties
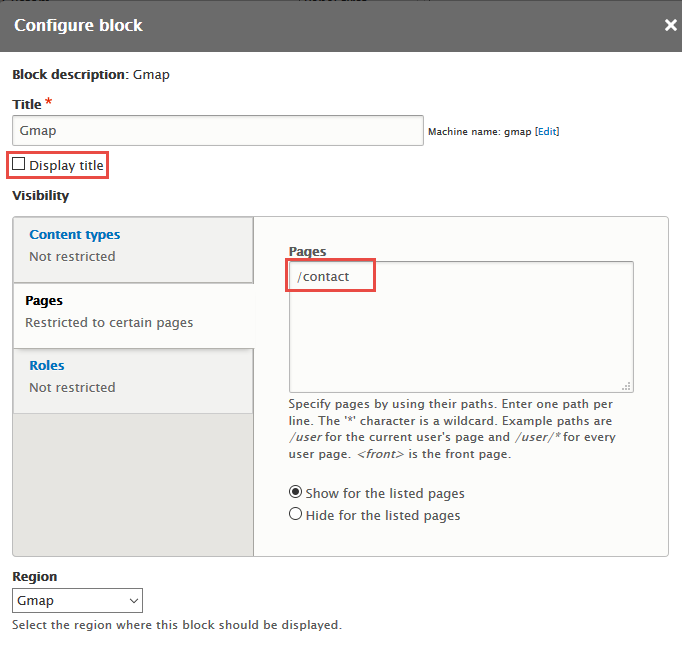
Step 4: Click Save block button.
More Configurations
Site Information
In this section, you can change basic settings, such as the site name, slogan, e-mail address.
1. Log in to Administration site page by administrator account
2. Navigate to the Site Information page Configuration > System:Basic site setting
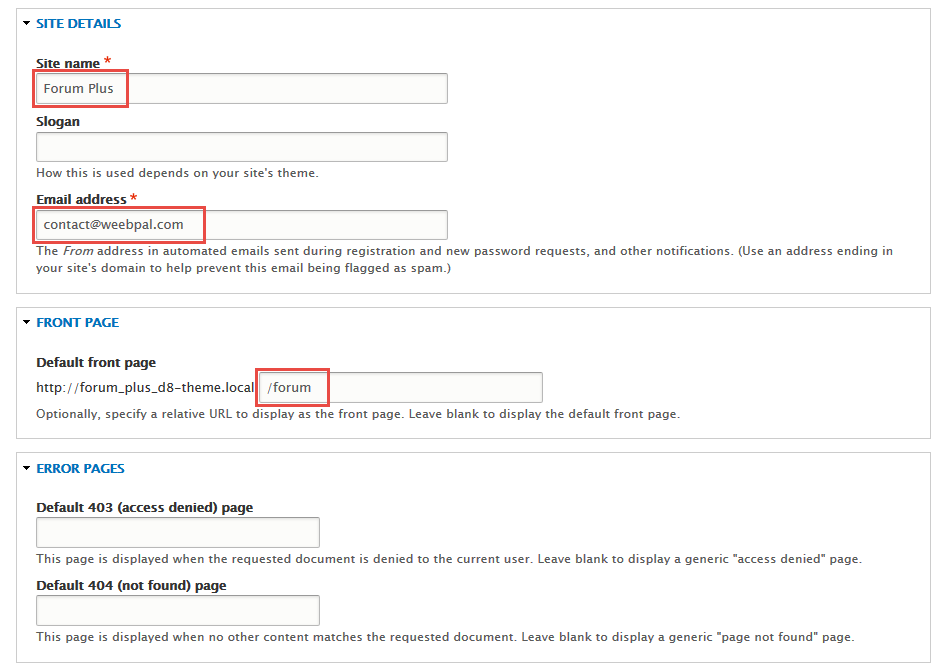
3. Change site details from the view:
- Site name
- Slogan
- E-mail address
- Set Default Front page
4. Click on Save configuration to finish editing.
Appearance Settings
Step 1: Log into website by administrator account.
Step 2: Go to Appearance find Forum Plus 8.x, click on Settings and set following properites:
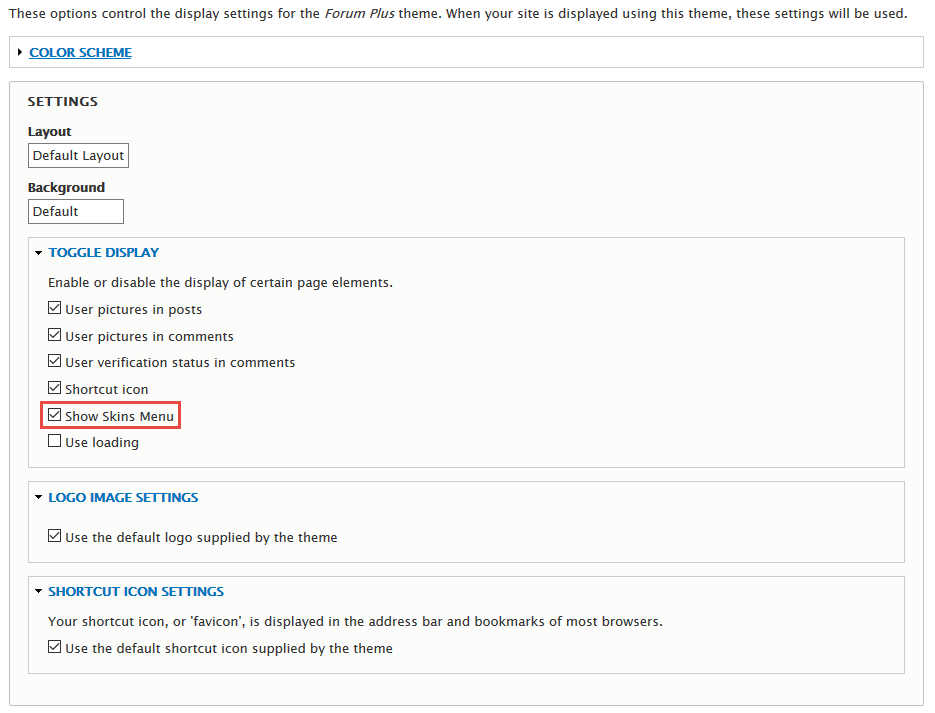
Step 3: Click on Save configuration button.