

- Doc Navigation
- Taxonomy Configurations
- Media Configurations
Overview
Starting with a new theme, it's sometimes takes a lot of time for first time users to really understand how it works. You may want to know how to customize layouts, typography, block styles and make it look the way you want.
In most cases you won't need to know PHP or database queries, but basic knowledge would be very helpful to get great results.
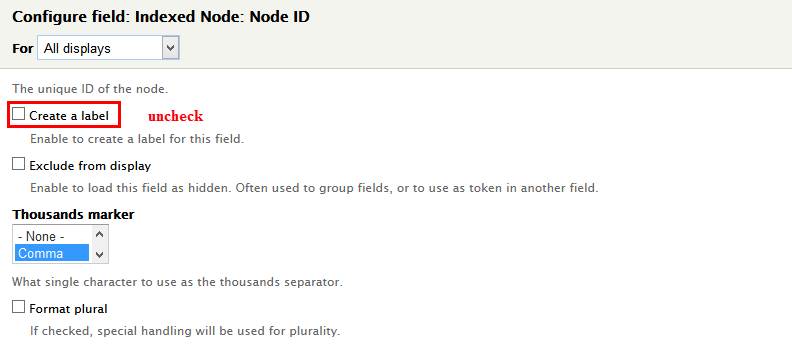
If you're an experienced Drupal developer or if you want to build the theme from zero with only the basic appearance of your theme, find this guide in handy. This guide will give you the detailed step by step installation guide to help you start building the content for Marketplace to look exactly like the demo site.
1. Marketplace Package
Included content:
- README.txt
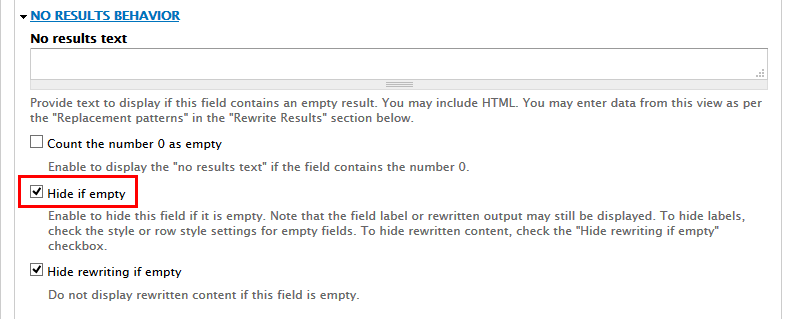
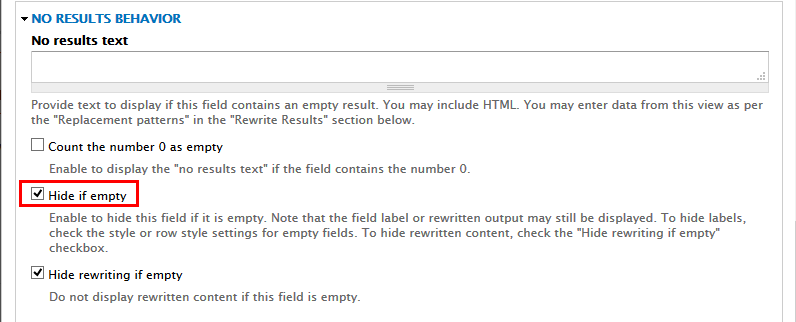
- Marketplace theme: marketplace-7.x-1.0.zip
- Demo Profile for Marketplace: marketplace-profile-7.x-1.0.zip
2. Features
- Documentation included.
- Browser compatibility
- Web Technology (Html5/Css3, Twitter Bootstrap 3.1.1, Font Awesome 4.0.3,…)
- Fully responsive.
- Megamenu
- Color variations (5 skin colors).
- Easy customization.
- High usability
- Support both Left to Right and Right to Left Languages
3. System Configuration
Database
- MySQL 5.0.15 or higher with PDO
- PostgreSQL 8.3 or higher with PDO
- SQLite 3.3.7 or higher
PHP
- PHP 5.2.5 or higher (5.4 or higher recommended)
- PHP5 GD library installed
- Disabled error_reporting flag on production server
- Enabled mod_rewrite in Apache for clean URLs
- Memory limit set up at least 128MB
If you are new to Drupal, please take a reference to System requirements on drupal.org.
4. Screenshots
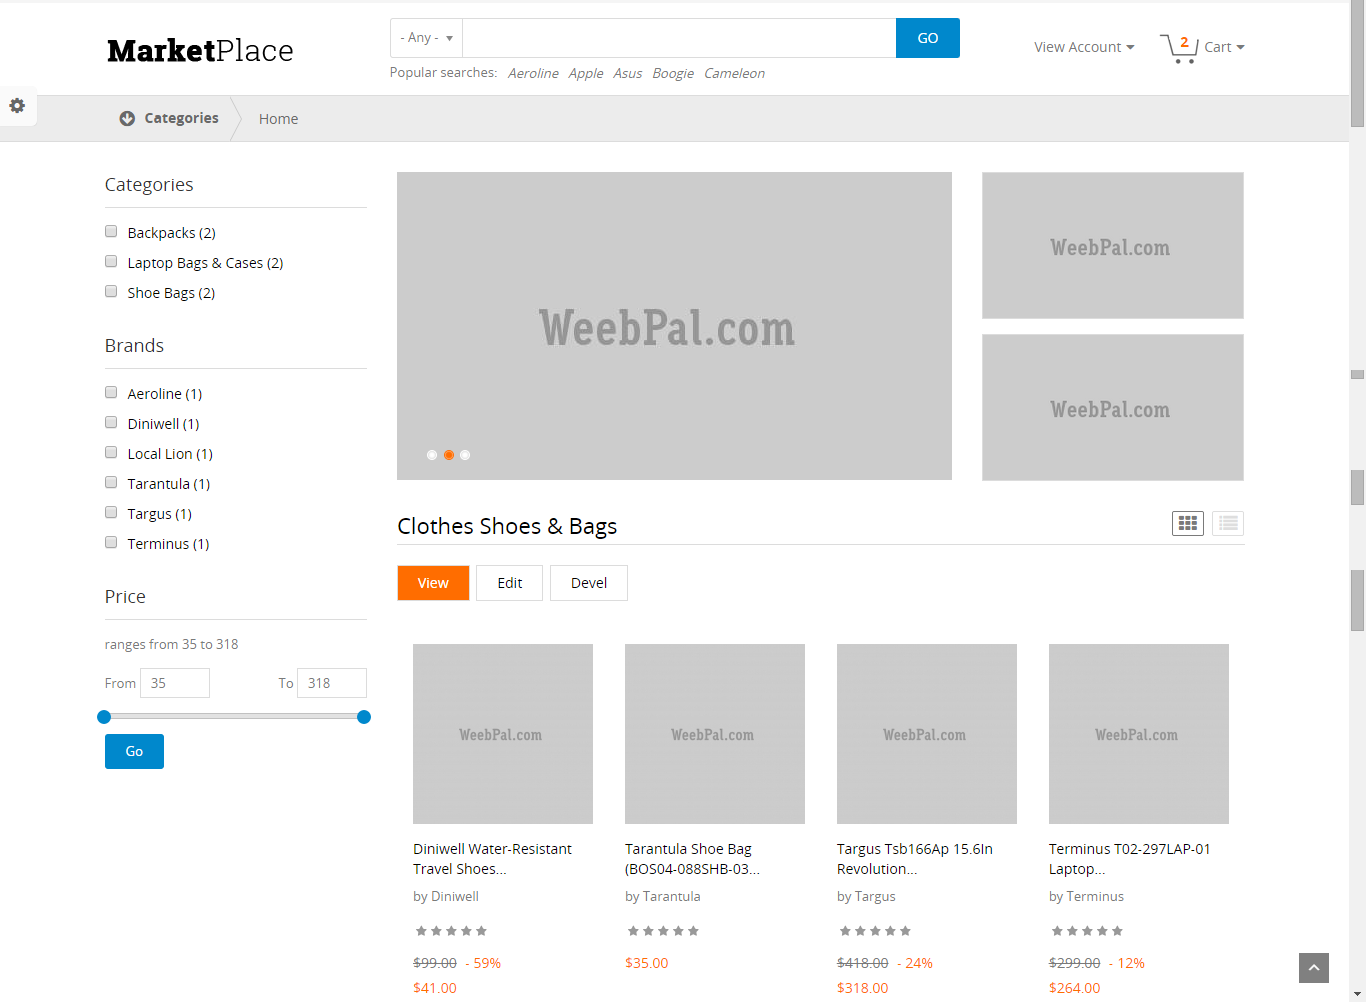
Let's glance through the theme's design & some features:
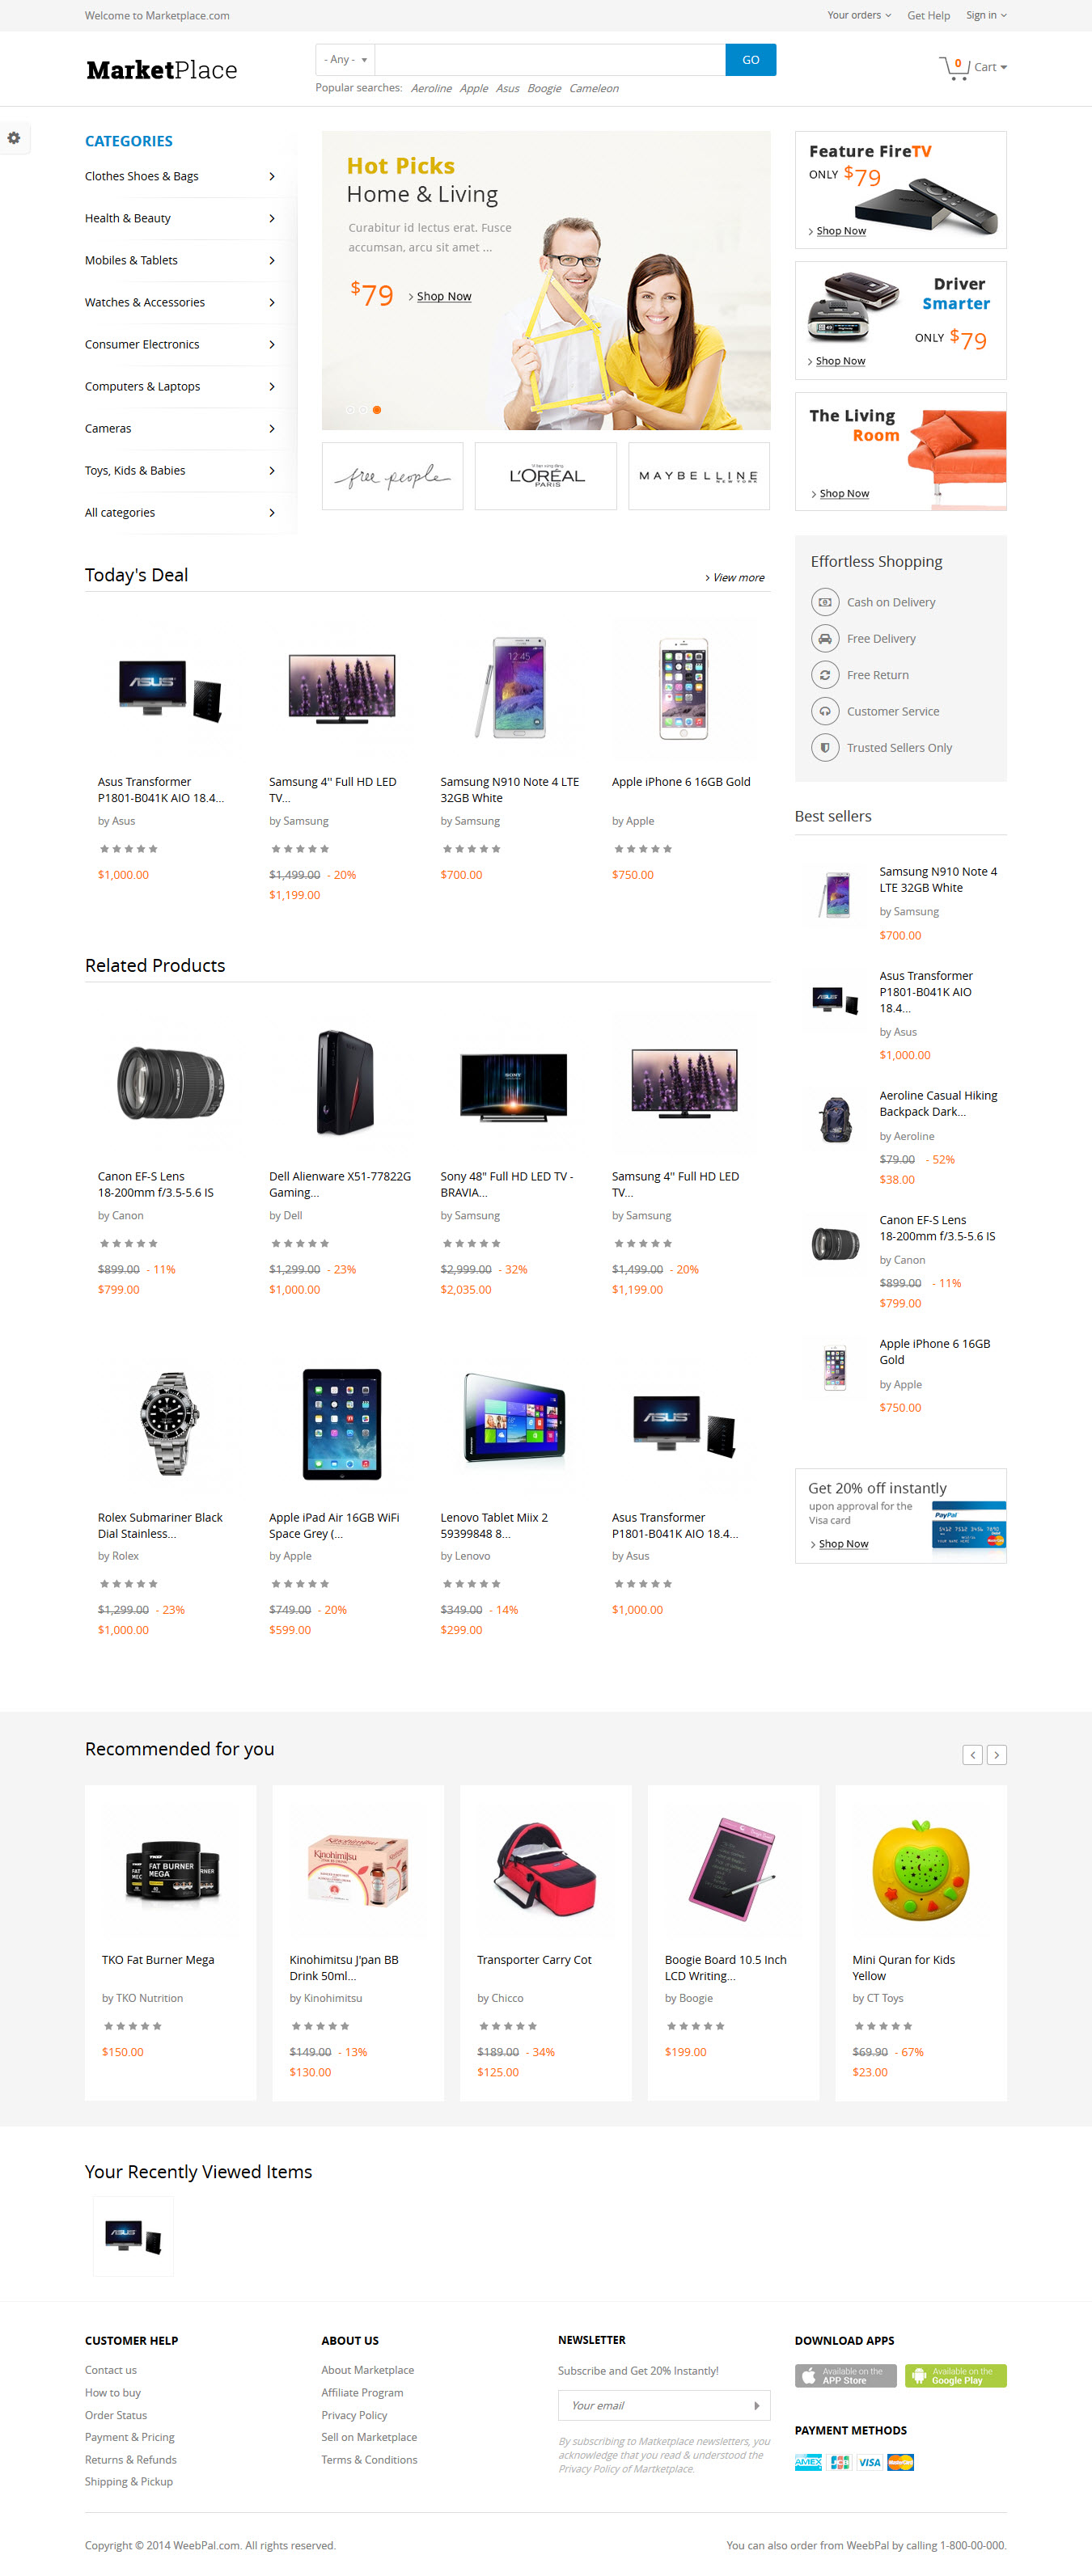
Home
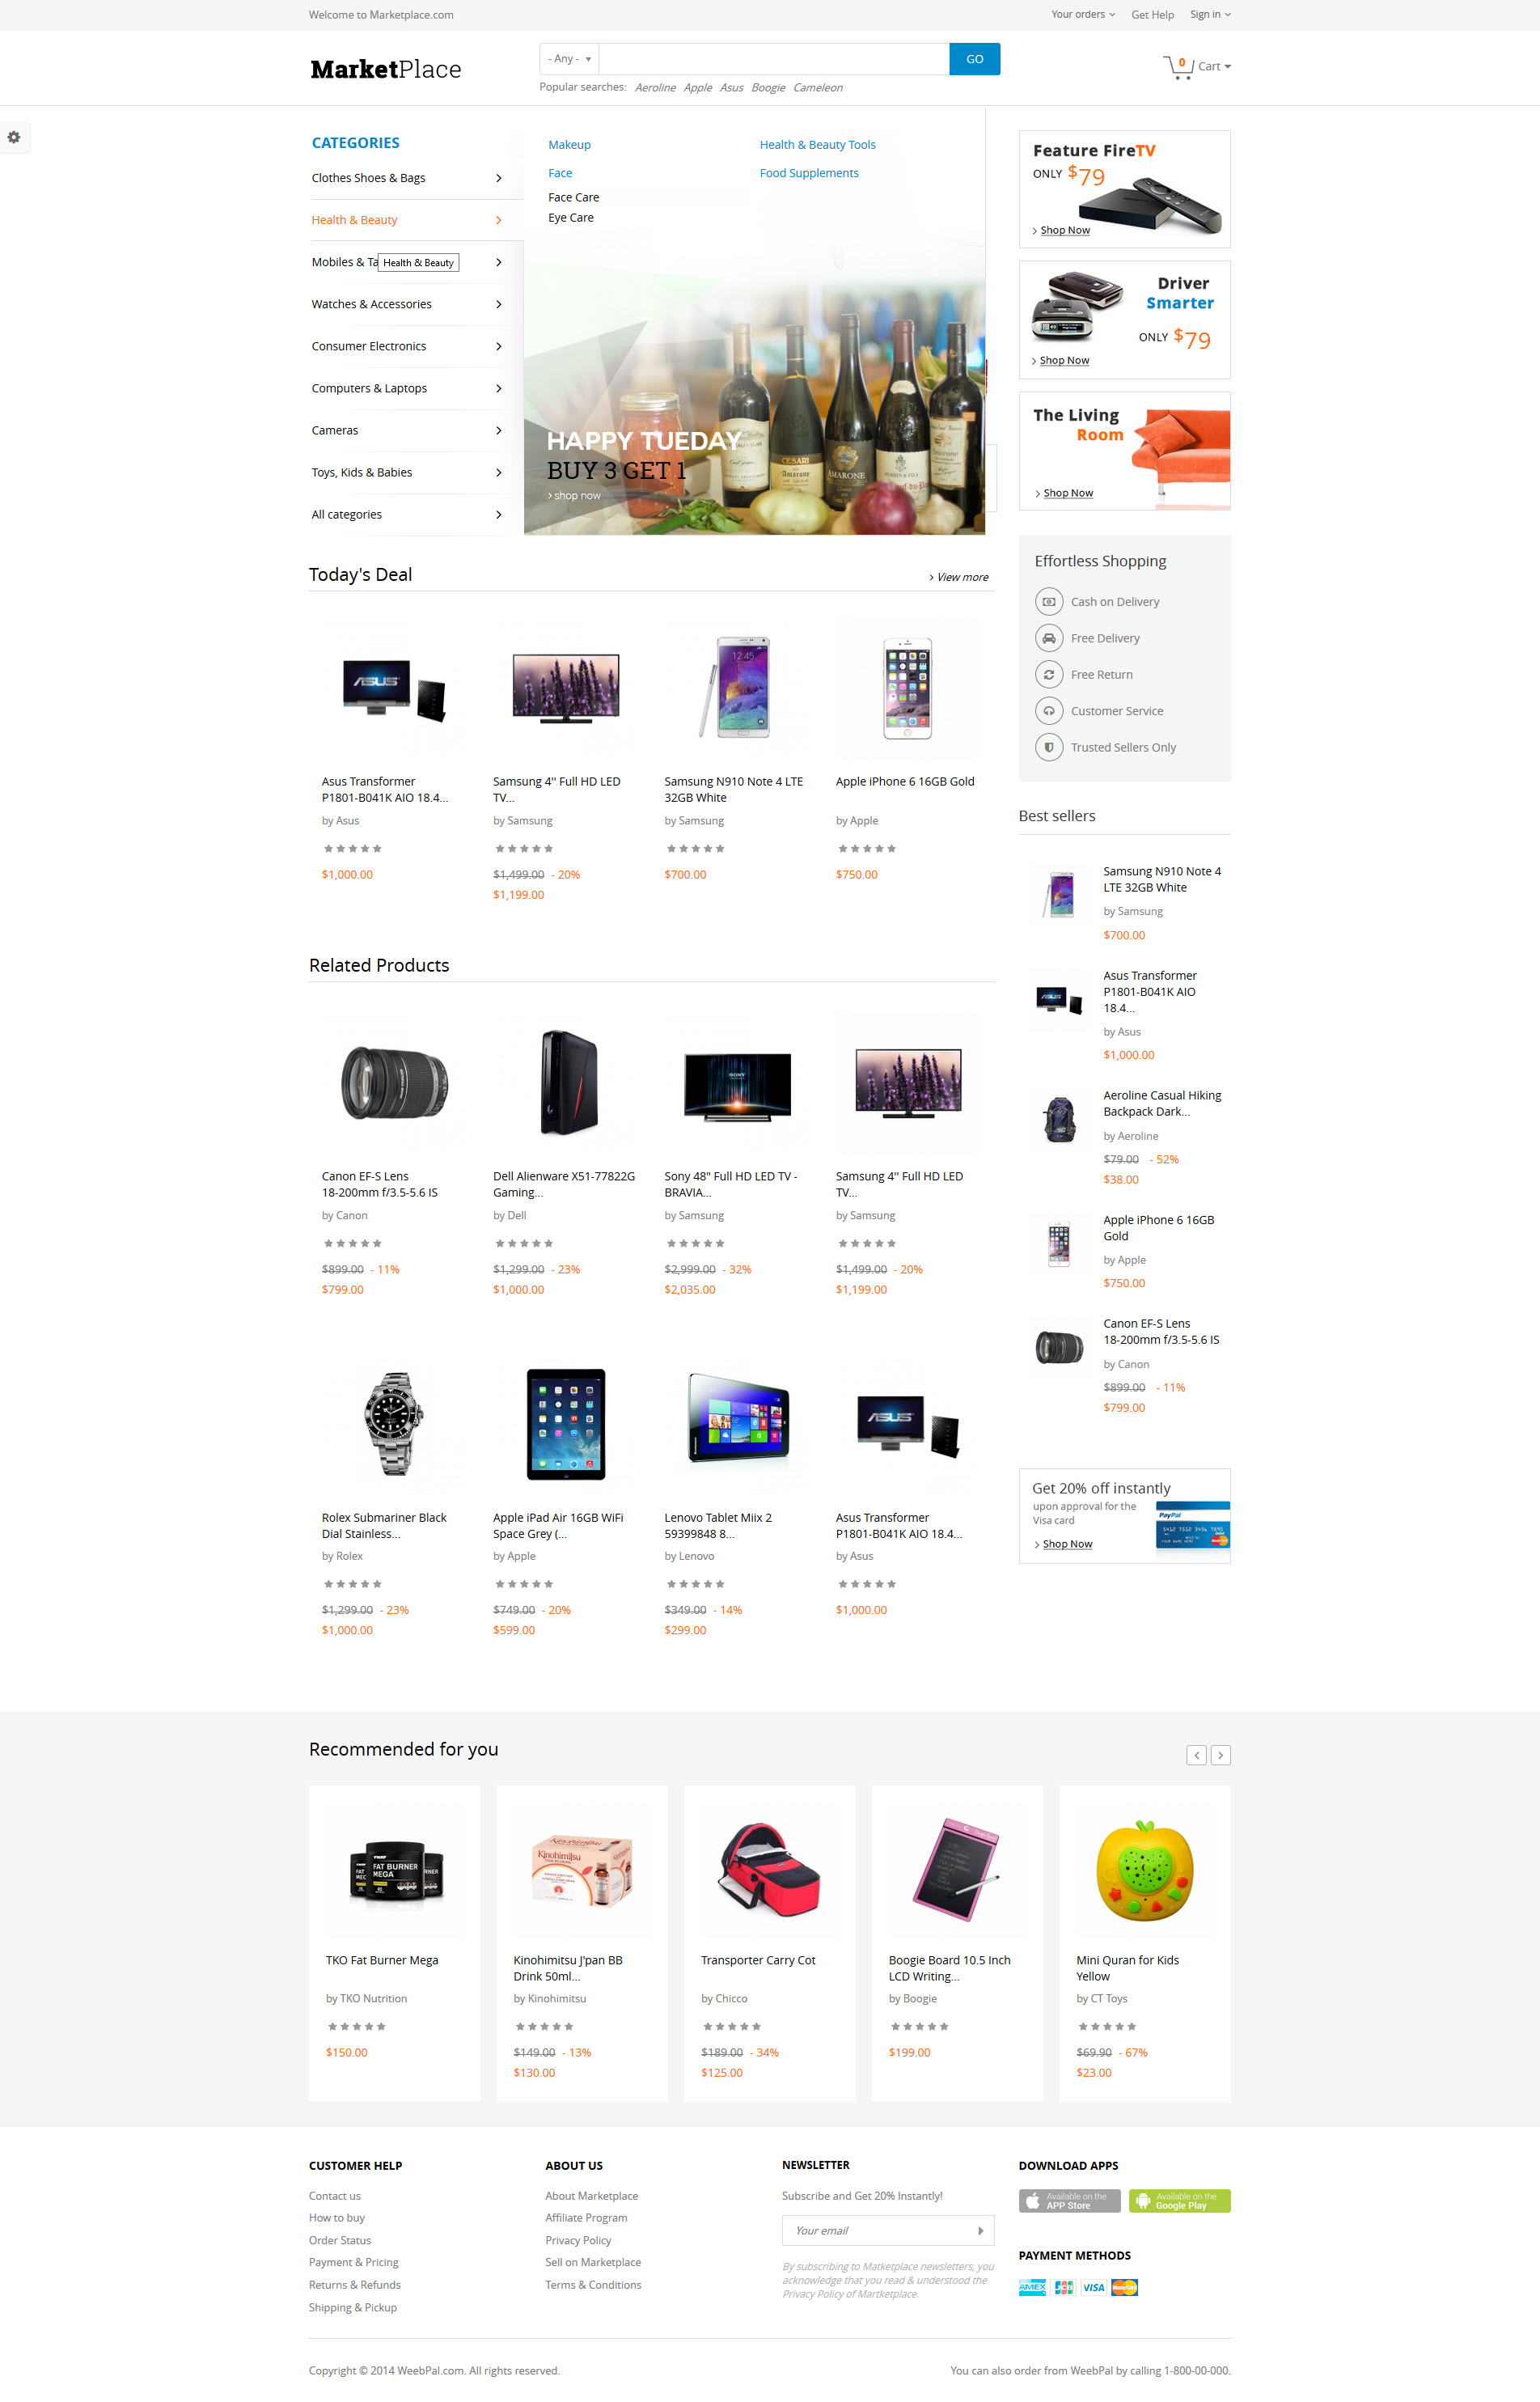
Submenu Page
Categories page
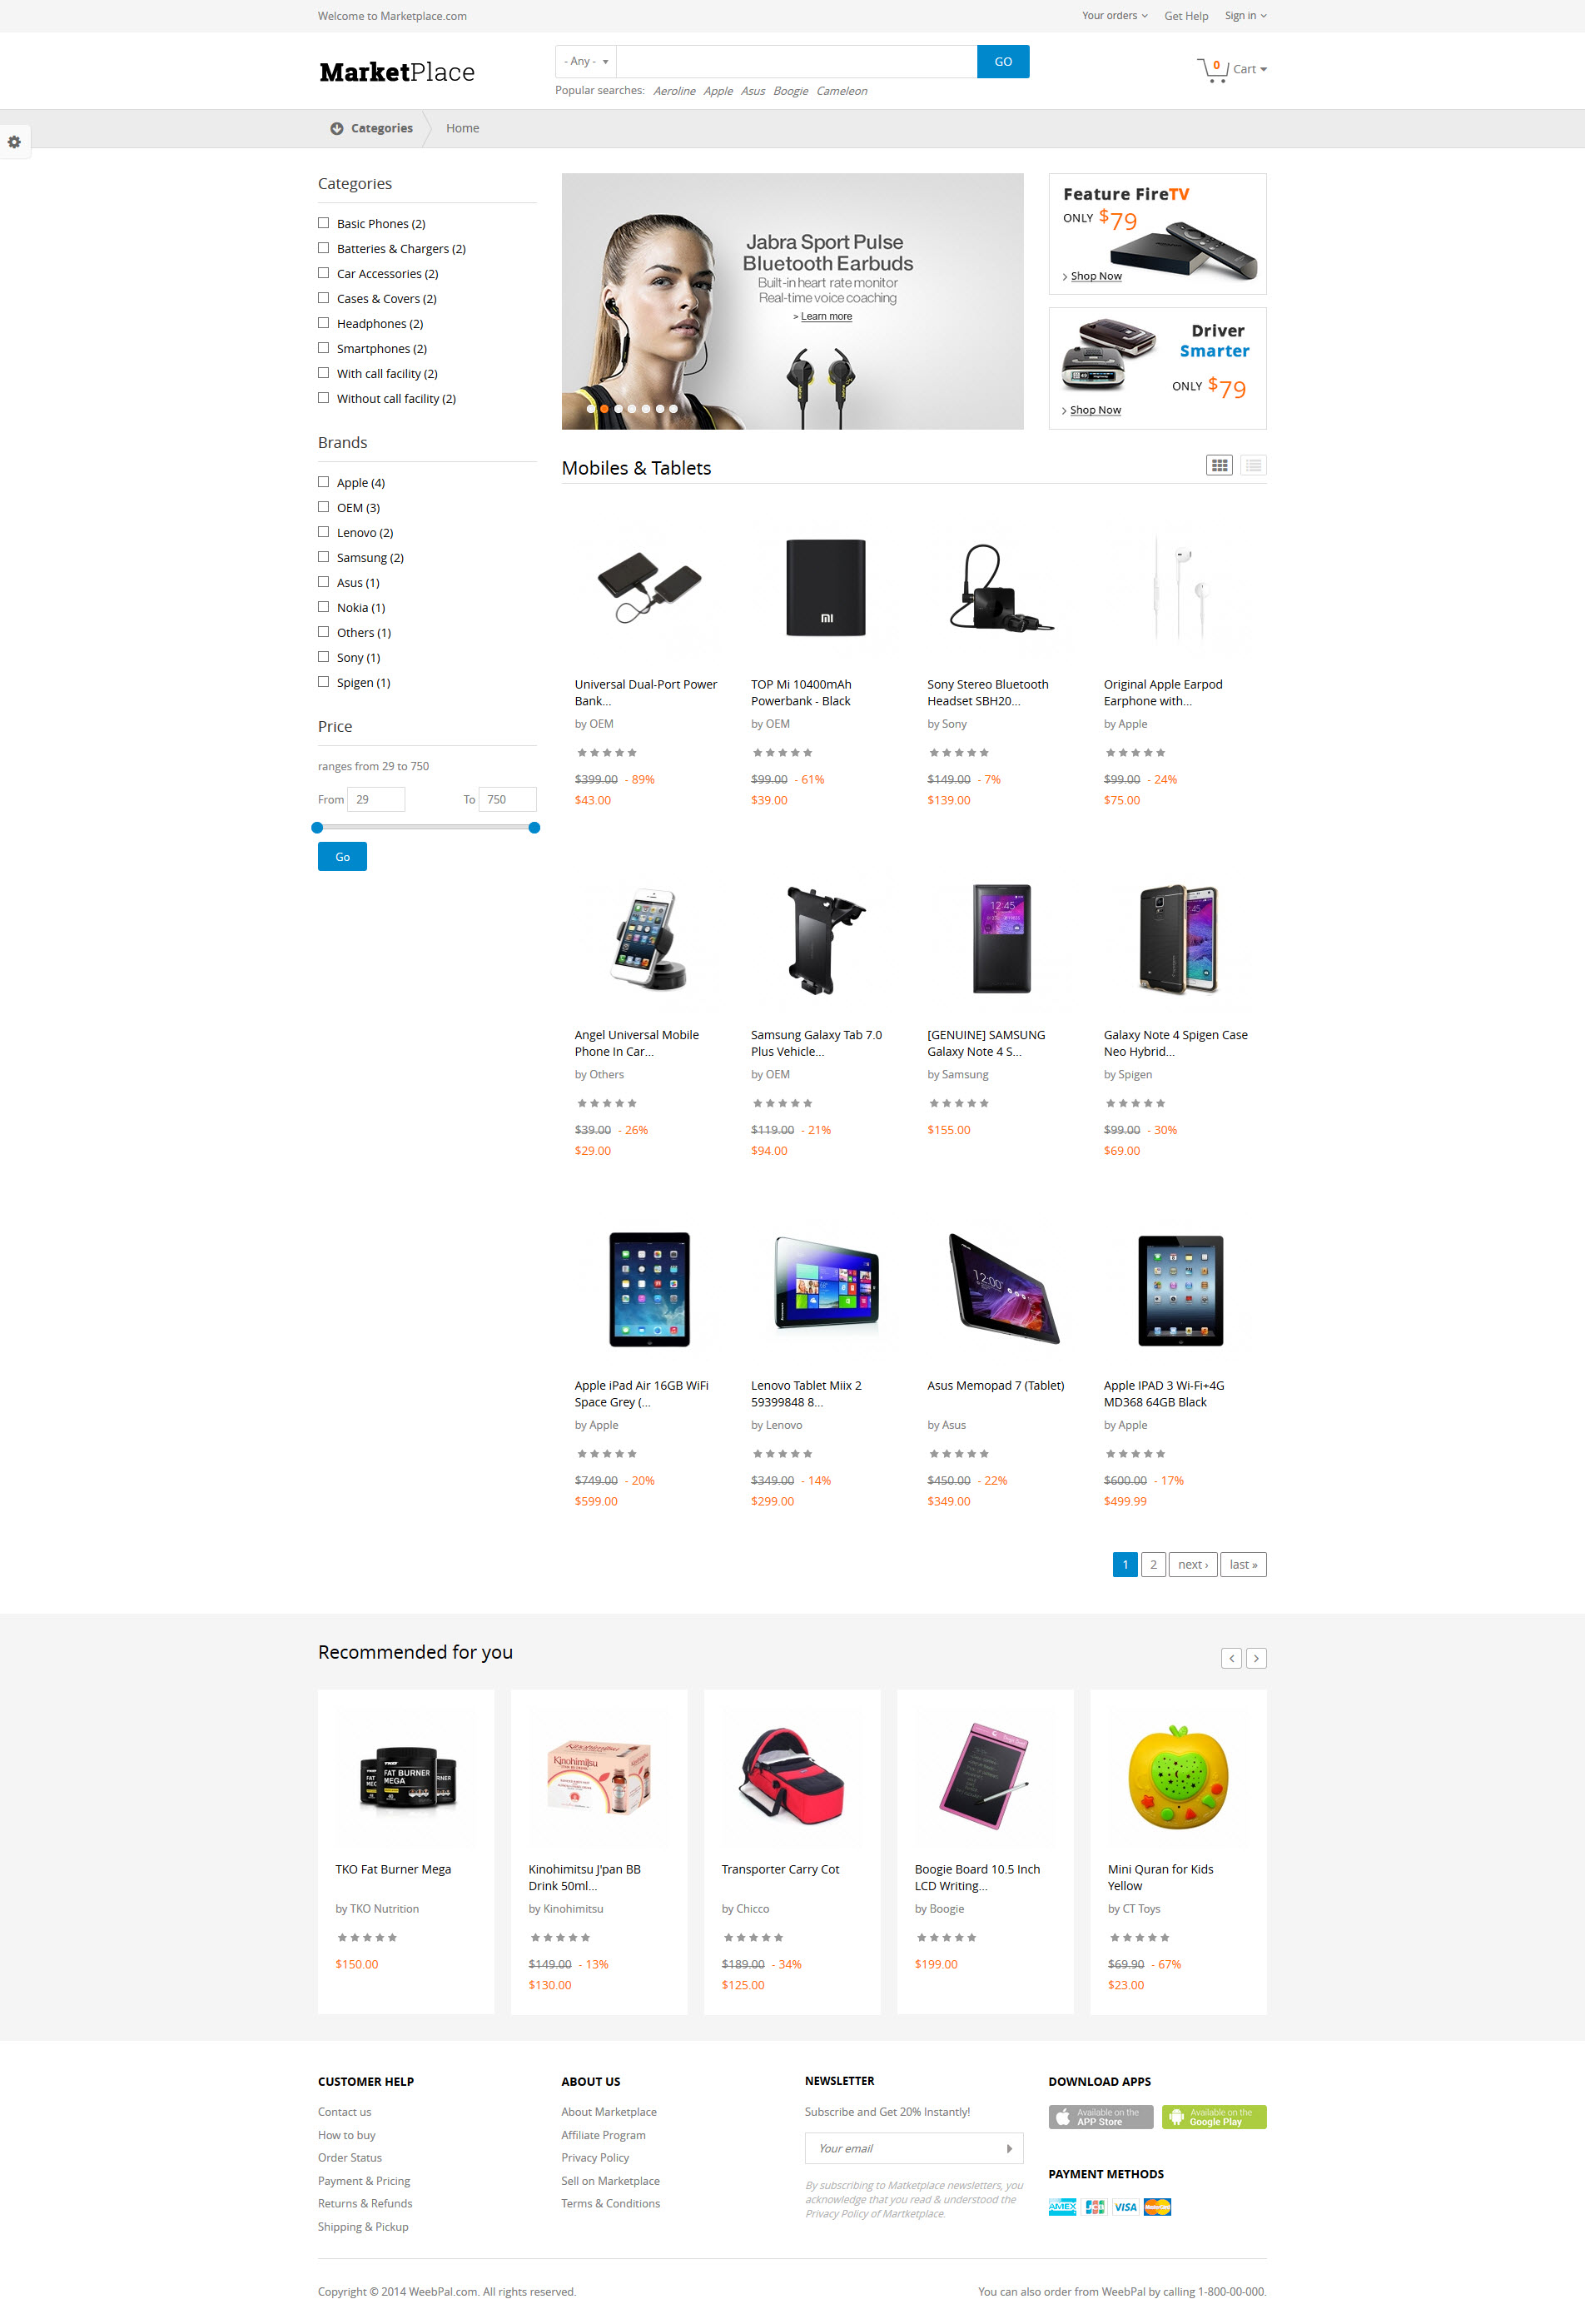
Categories list new page

Product detail page

Shopping cart

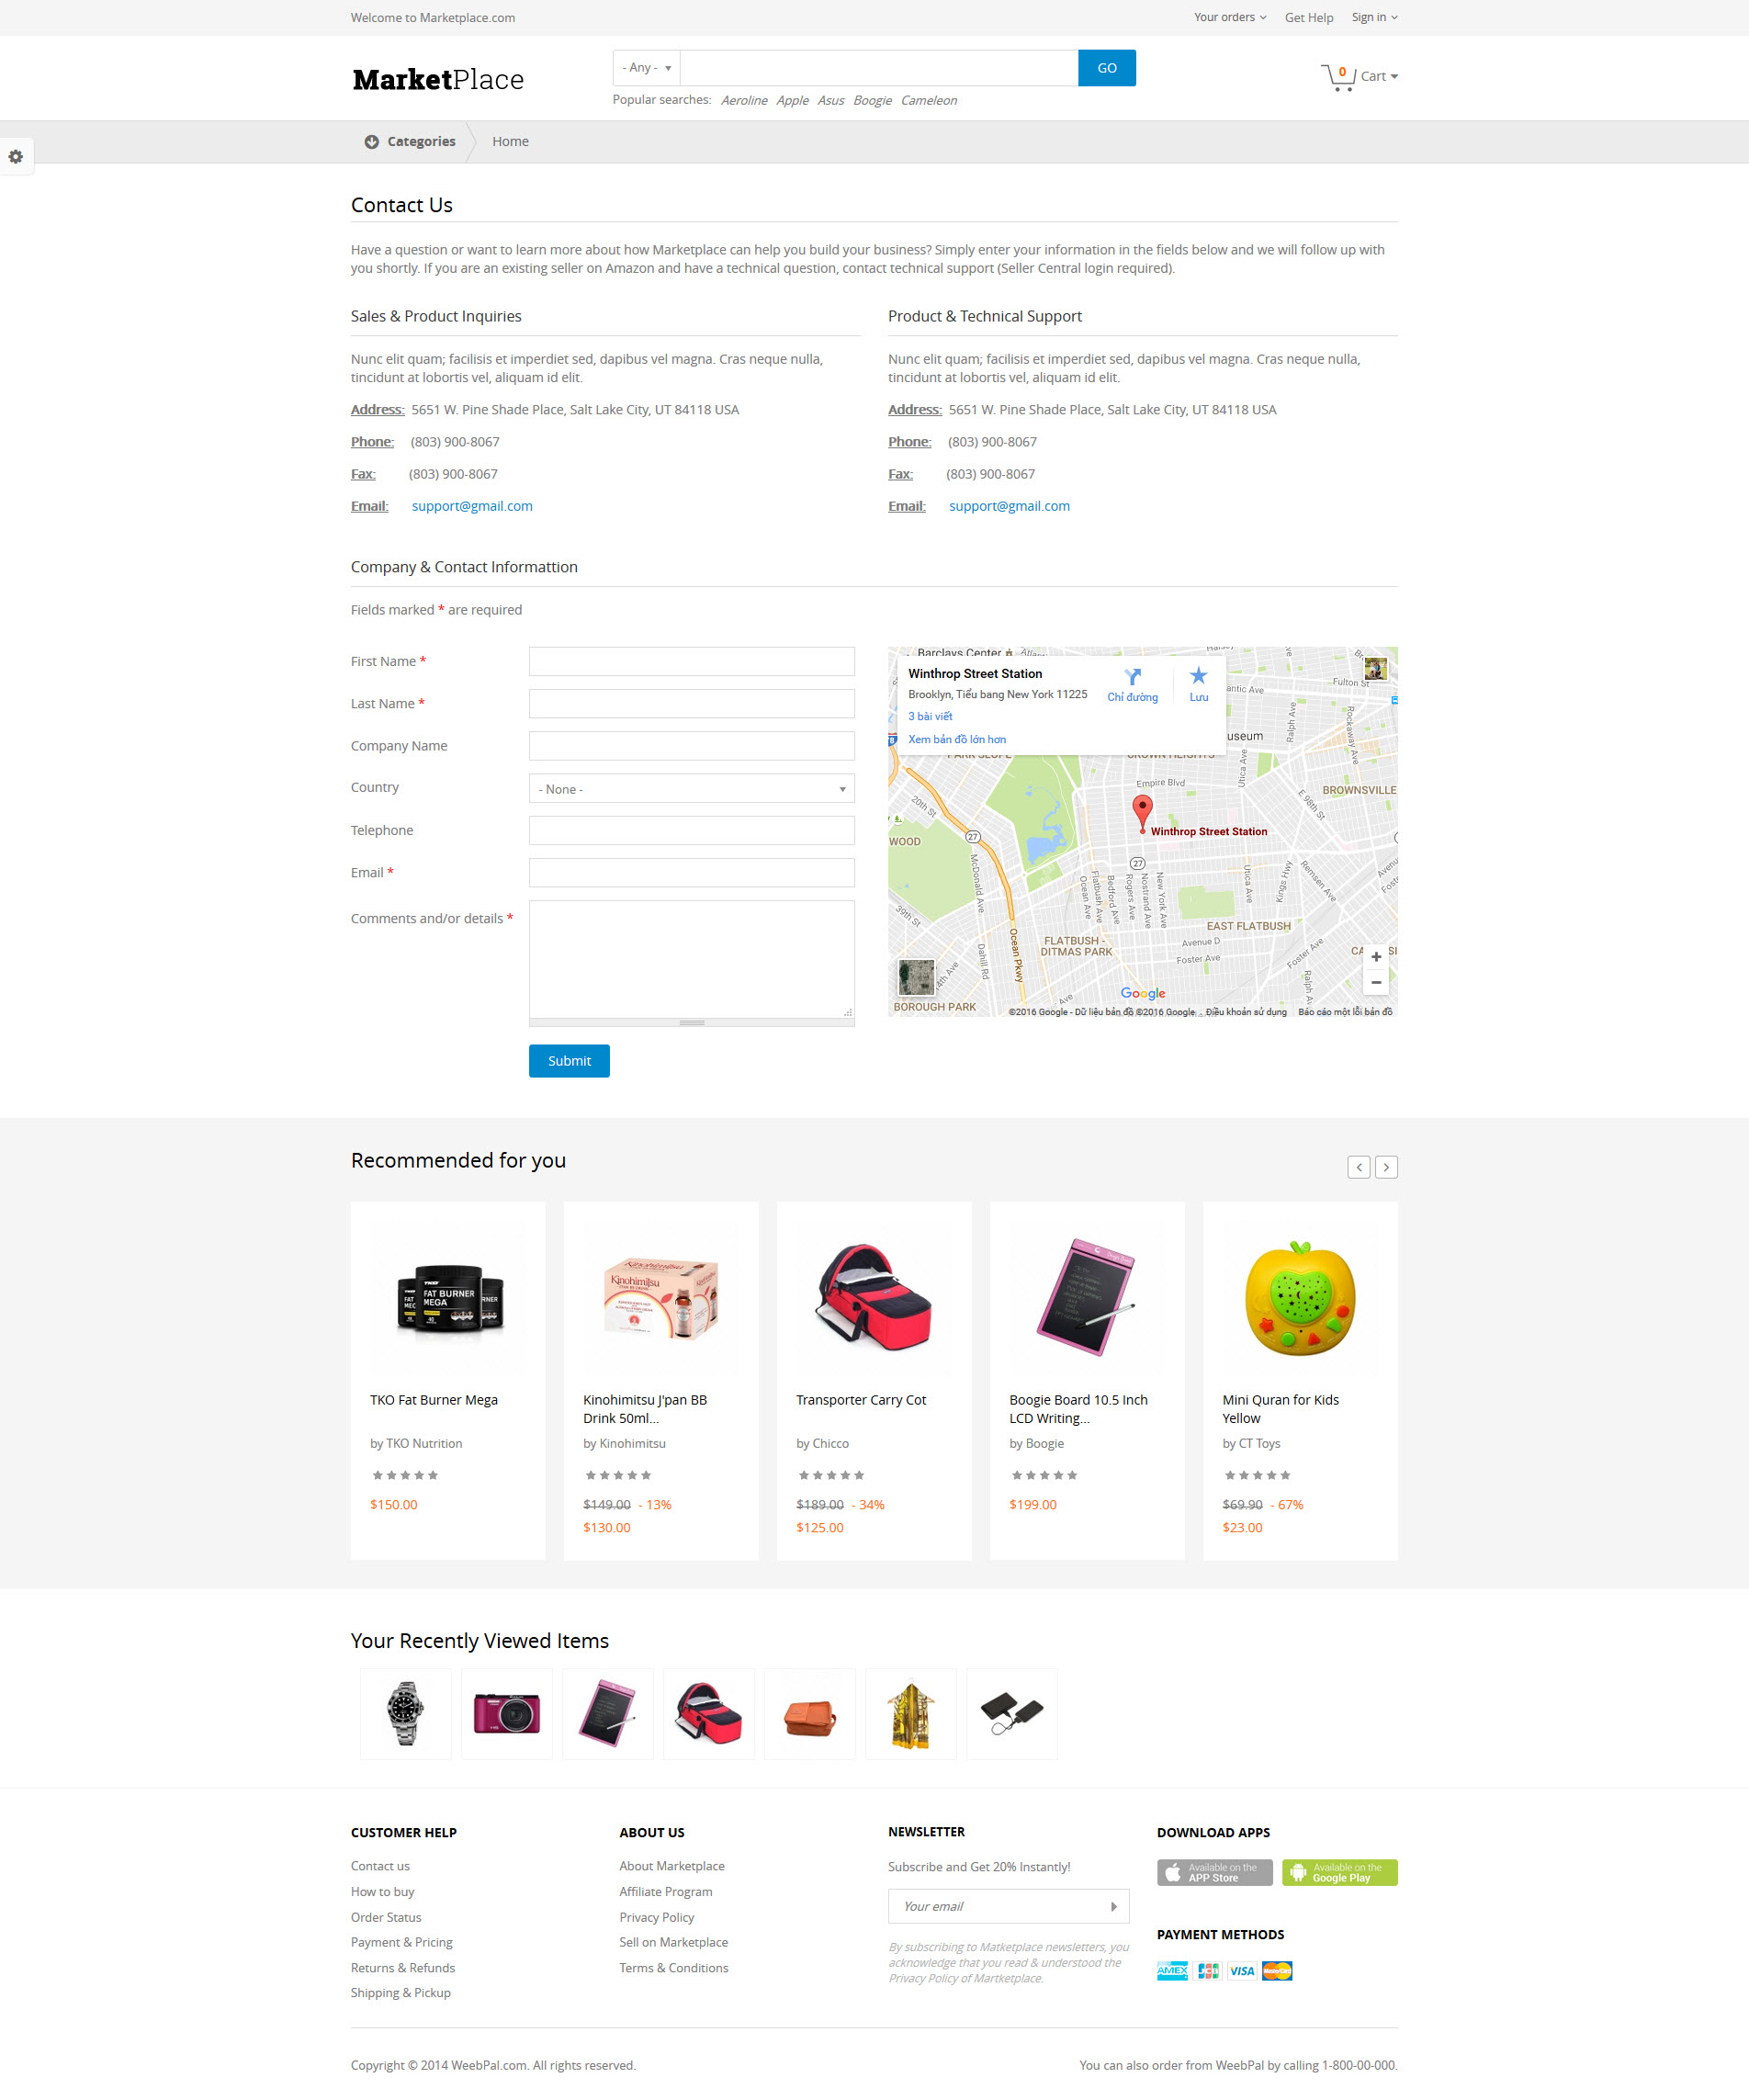
Contact
Multi colors

5. Module requirements
Core Modules
- Blog
- Contact
- Poll
- Forum
Third-party Modules
- Address Field
- Admin Menu
- Backup Migrate
- Bean
- Better Exposed Filters
- Block Class
- Ckeditor
- Cloud Zoom
- Commerce Cop
- Commerce
- Commerce Fancy Attributes
- Commerce Flat Rate
- Commerce Marketplace
- Commerce PayPal
- Commerce Saleprice
- Commerce Search API
- Commerce Shipping
- Commerce Stock
- Context
- Context Mobile Detect
- Countries
- Chaos tools
- Custom Breadcrumbs
- Chosen
- Devel
- Eck
- Entity
- Entity Reference
- Exclude Node Title
- Facet Api
- FAQ
- Features
- Field Collection
- Field Collection Table
- Field Formatter Class
- Field Formatter Settings
- Field Group
- Field Slideshow
- Fivestar
- Flexslider
- Fontawesome
- Icon
- Image Delta Formatter
- Image Link Formatter
- Imce
- Inline Entity Form
- Jcarousel
- Jquery Update
- Lang Dropdown
- Language Icons
- Libraries
- Link
- Megamenus
- Memcache
- Menu Attributes
- Menu Descriptions
- Module Filter
- Menu Token
- Module Filter
- Node Class
- Page Title
- Path Auto
- Quicktabs
- Recently Read
- Rules
- Search Api
- Search Api DB
- Search Api Ranges
- Search Api Solr
- Search Api Sorts
- Search Facet Api
- Select Or Other
- Session Api
- Sharethis
- Shortcode
- Simplenews
- Tag Clouds
- Taxonomy Menu
- TB Megamenu
- Title
- Token
- Variable
- Variable
- Video Embed Field
- Views Bootstrap
- Views
- Views Bulk Operations
- Views Field View
- Views Fieldsets
- Views Slideshow
- Votingapi
- Webform
- Weight
Required libraries by the modules
- Cloud Zoom
- Chosen
- Ddslick
- Flexslider
- Fontawesome
- Jquery Cycle
- Jquery Jcarousel
- Jquery Imagesloaded
Download Drupal core files, and extend your site with modules at here.
Installation
Quick Installation Demo Profile
We created an installation profile with demo content for each of our theme, so that you can quickly download and reproduce the whole site content as presented on our live demo. This way you will get a quicker overview of the features. If it's convenient you may also use the given demo content as a starting point to build your custom sites.
1. Marketplace package included
- README.txt
- Marketplace theme: marketplace-7.x-1.0.zip
- Demo Profile for Marketplace: marketplace-profile-7.x-1.0.zip
The below steps will give you the installation guide so that you can build your website to look exactly like the Forum Plus Full Demo.
- marketplace-profile-7.x-1.0.zip
2. Extract marketplace-profile-7.x-1.0.zip above and copy it into your host, and rename the directory
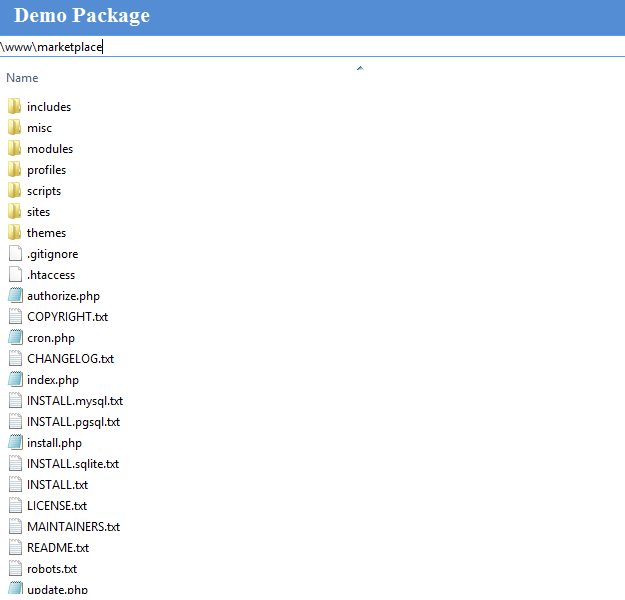
3. Access your MySQL database and create a new database (e.g.marketplace) and user account. Don't forget to add correct permissions to new user to access the database
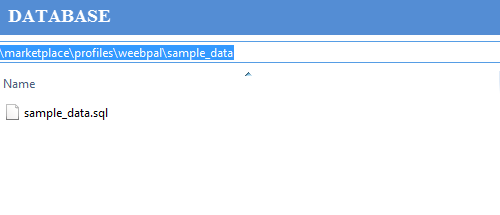
4. In the demo directory database/ (latest version of package) or profiles/weebpal/ (old version), you can find database dump named sample_data.sql. Import this file into new database.
5. Now, you need to modify sites/default/default.settings.php file. Clone default.settings.php file, then rename it "settings.php"
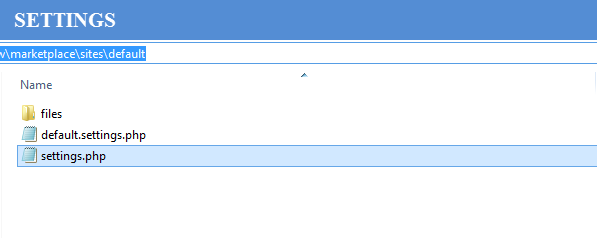
6. Open settings.php, then locate the $database array and set proper credentials.

                     $databases['default']['default'] = array(
                      'driver' => 'mysql',
                      'database' => 'databasename',
                      'username' => 'username',
                      'password' => 'password',
                      'host' => 'localhost',
                      'prefix' => '',
                    );
When using this installation, you are installing everything from our preview server. So don't forget to set proper values to access to your database: db name, db admin username, db admin password, host, etc.
7. Open the browser and visit your website with the prepopulated content & layout exactly like our Marketplace Demo
Now, you can visit administrator site with the admin account admin/admin to delete the unnecessary contents and add the new ones.
Installation Marketplace Theme for Drupal developers
If you're an experienced Drupal user or if you want to build the theme from zero with only the basic appearance of Marketplace Theme, find this guide in handy.
1. Install Drupal
-
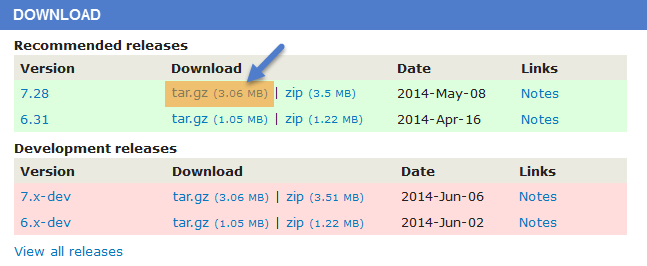
Go to Drupal download page and download the latest version of Drupal 7.
- Extract and copy Drupal folder to your host and rename the directory.
- Follow this tutorial to install Drupal with the standard profile.
2. Install Marketplace Theme
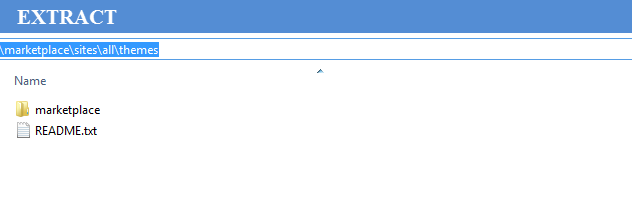
- Extract Marketplace theme .ZIP file:
- marketplace-7.x-1.1.zip
-
Move this theme into your Drupal folder: sites/all/themes
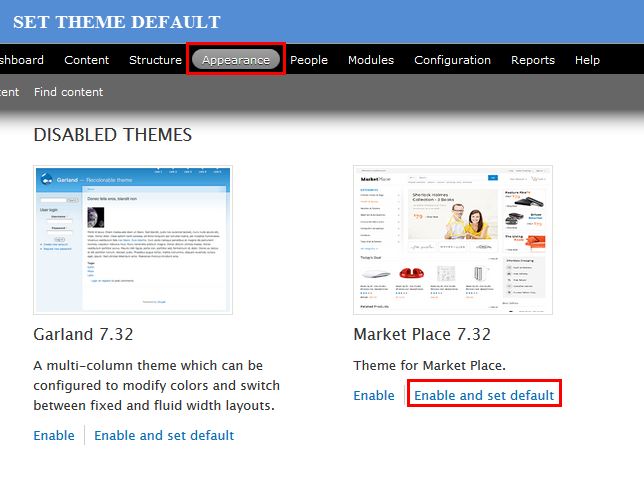
-
Navigate to Appearance > Choose Enable and set default Marketplace theme
3. Install Required Modules
Now that you've enabled Marketplace theme, you will install and enable the required modules (listed in the Module Requirements section) to customize and use them.
If you don't know how to install the contributed modules, this tutorial is an essential guide.
Cheat to install modules & theme:
- Extract marketplace-profile-7.x-1.0.zip
- Open extracted folder, go to sites/all and copy all folders inside (modules, themes, libraries)
- Paste them to your host, folder sites/all
Note: See this guide to get more details about installation
Taxonomy configuration
Quick Information
- Taxonomy: Taxonomy can be simply understood as category management using organizational keywords known in other systems as categories, tags or metadata. It allows you to connect, relate and classify your website's content. In Drupal, these terms are gathered within "vocabularies". The Taxonomy module allows you to create, manage and apply those vocabularies.
- Vocabulary: for example product category, tag, provider name, ...
- Term: the items in each vocabulary. For example: vocabulary product category has some terms: laptop, pc, mobile, tablet, camera, headphone, ...
- For more information about taxonomy, please see: Organizing content with taxonomies
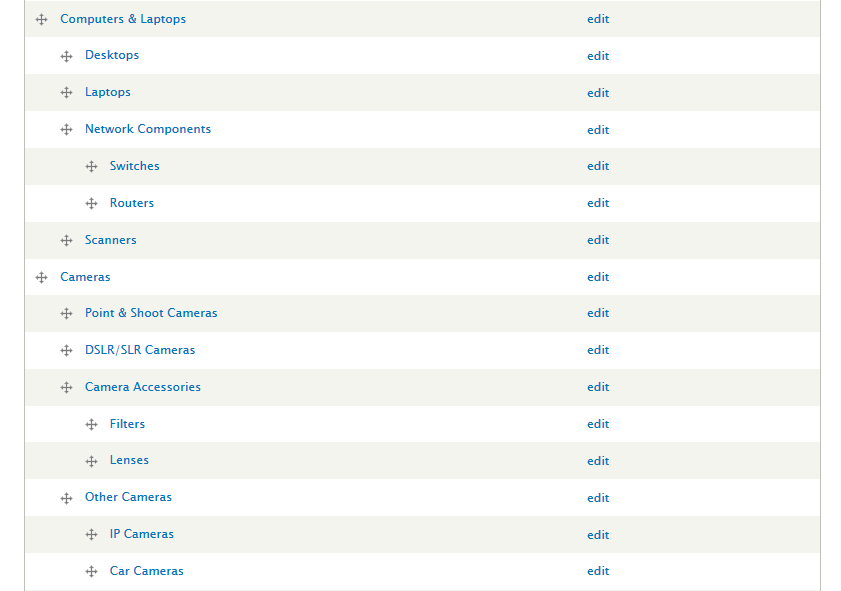
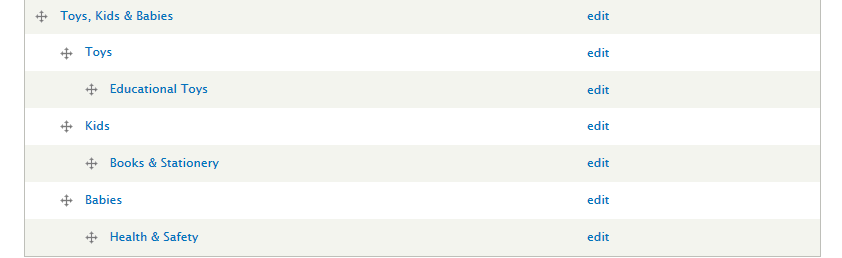
1. Navigate to Structure > Taxonomy to create vocabularies as the following:
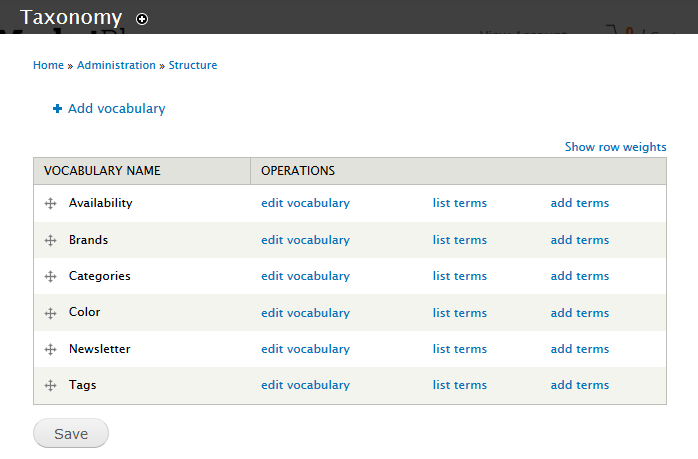
Then, add terms for each vocabulary
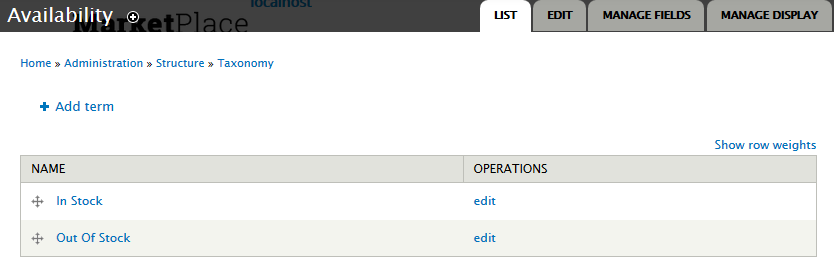
2. Terms of Availability:
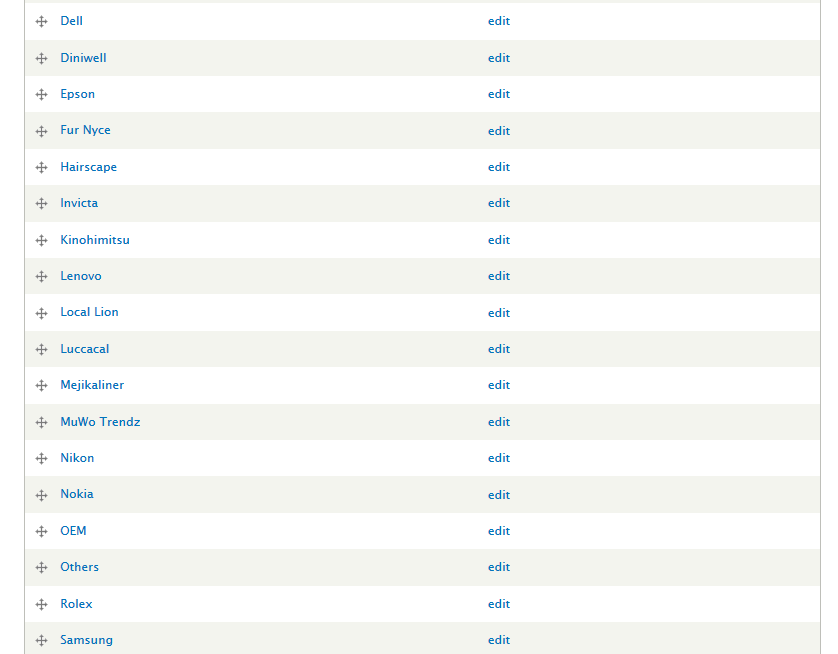
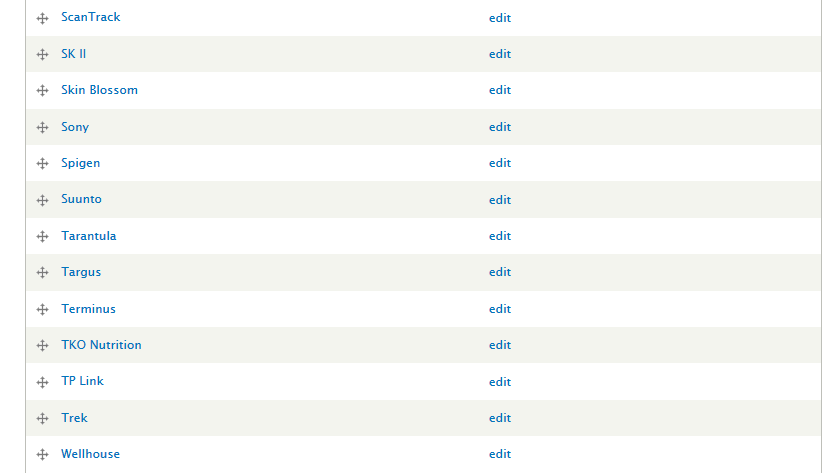
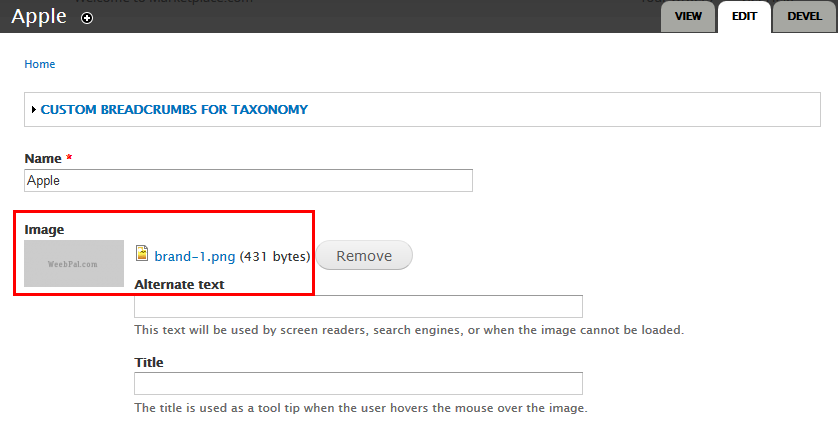
3. Terms of Brands:
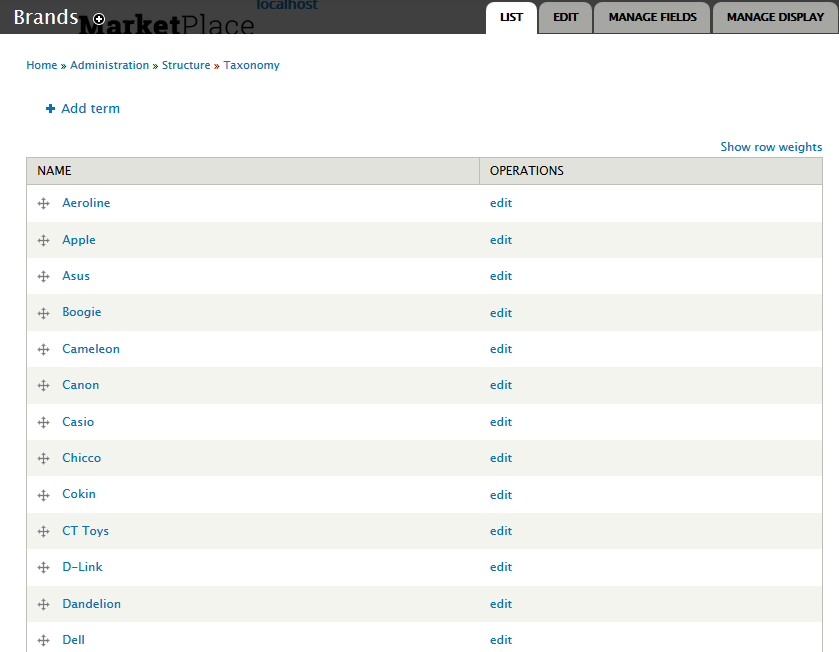
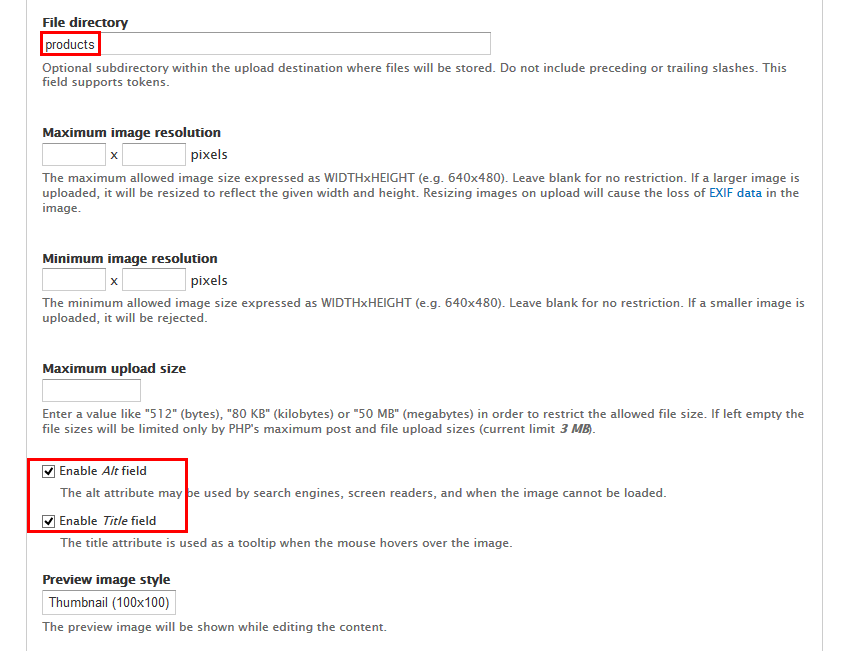
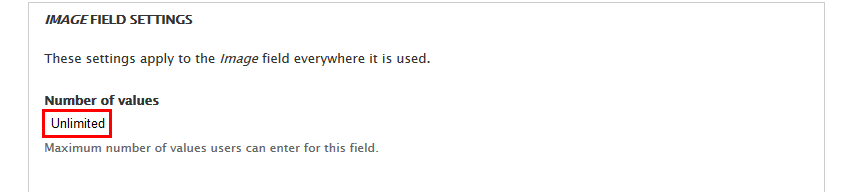
Then, Go to tab MANAGE FIELDS, add the following fields:
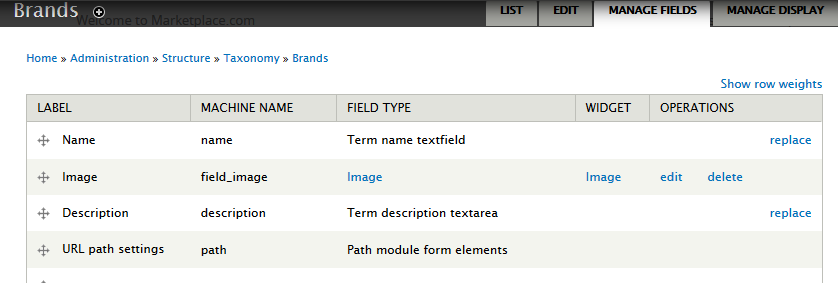
Set properties Image field
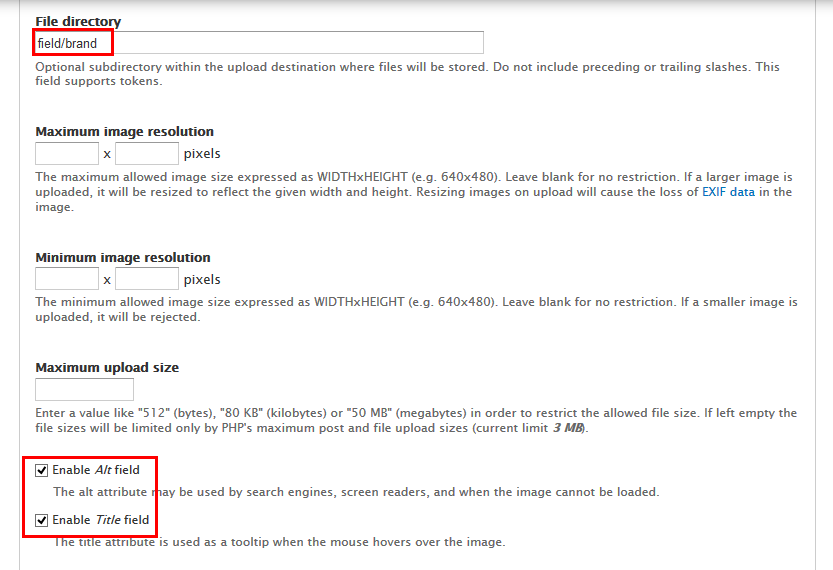
Then, Go to tab LIST click about link and add field for Image of term item
Note: See this guide to get more details about taxonomy configuration
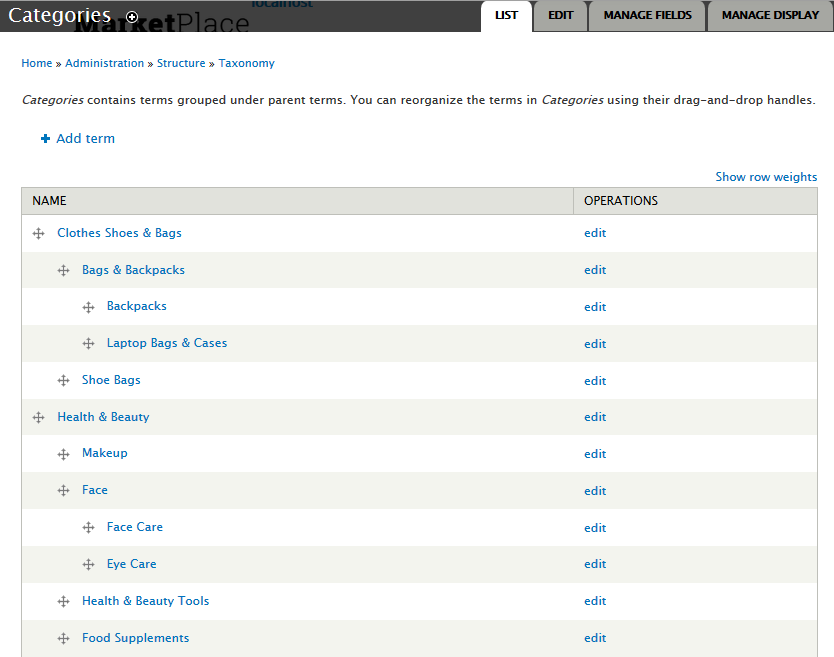
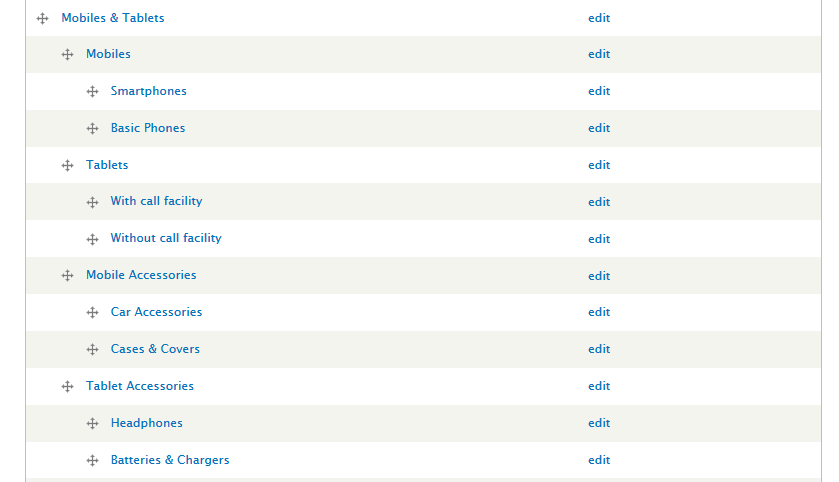
4. Terms of Categories:

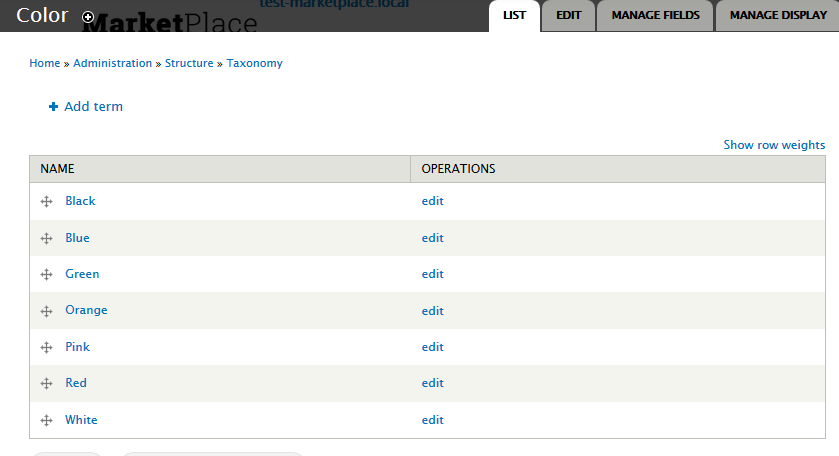
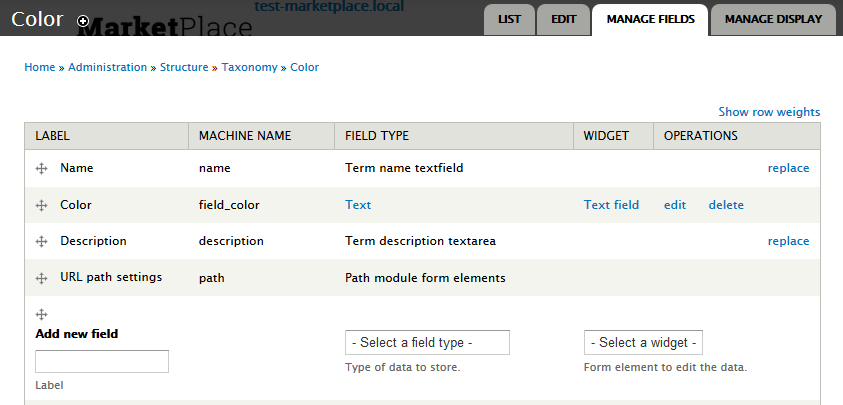
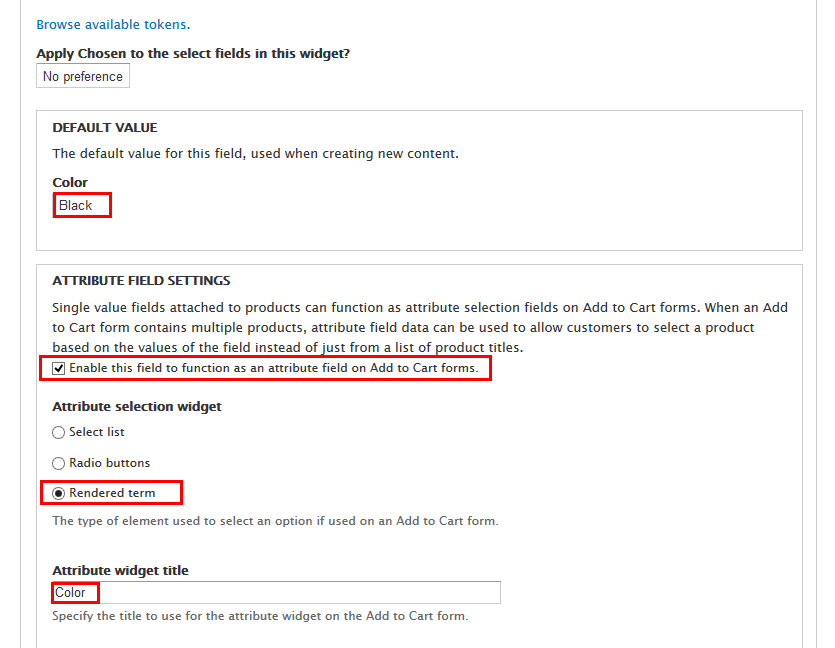
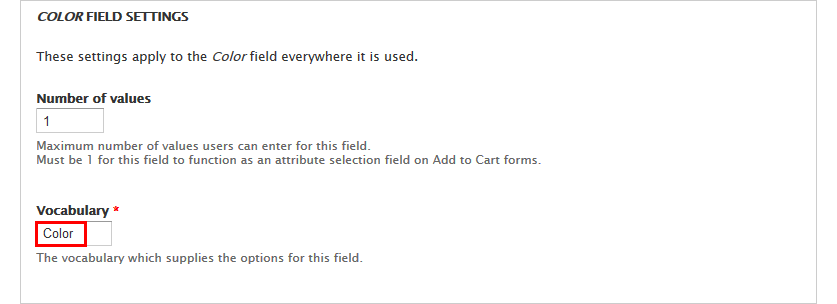
5. Terms of Color:
Then, Go to tab MANAGE FIELDS, add the following fields:
Then, Go to tab MANAGE DISPLAY. Click tab Add to Cart form - Attribute set the following format:
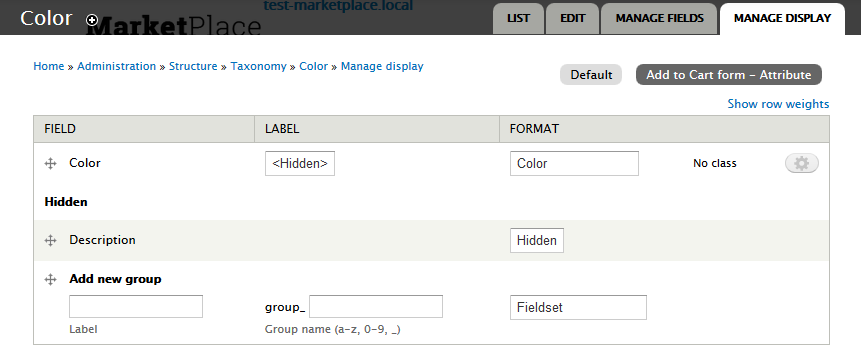
Note: See this guide to get more details about taxonomy configuration
Media configuration
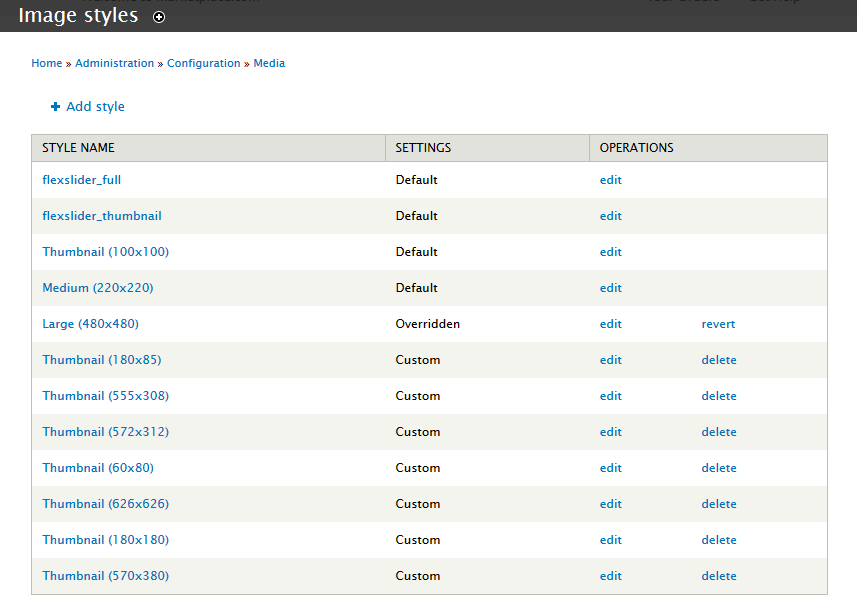
Image Style Configuration
Image styles are the presets of image settings. Image styles are used to define how the images are shown.
Navigate to Configuration, In MEDIA area, click Image styles, then create image styles as the following:
Content type configuration
Configure store
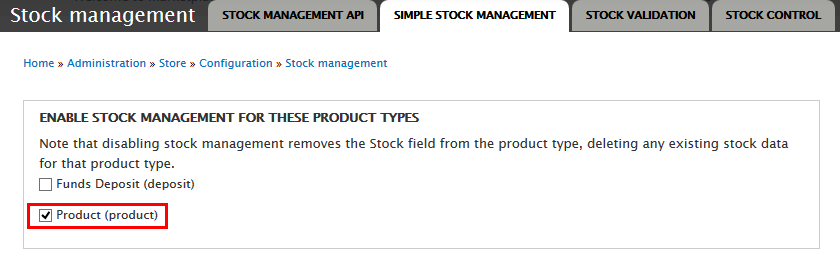
1. Configure Modules : Commerce stock UI
To configure this future, you must install Commerce stock UI module, then click Configure and following fields
Note You can read this article to understand more about Commerce Discount.
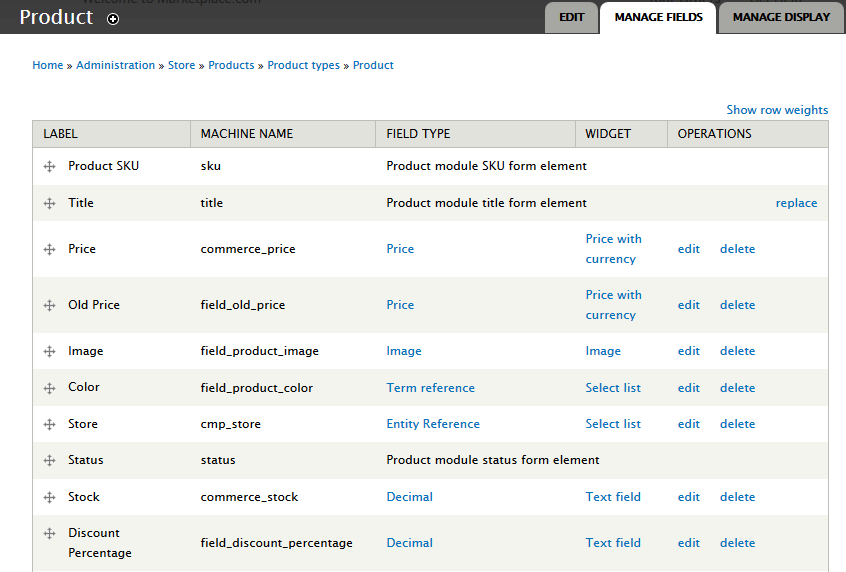
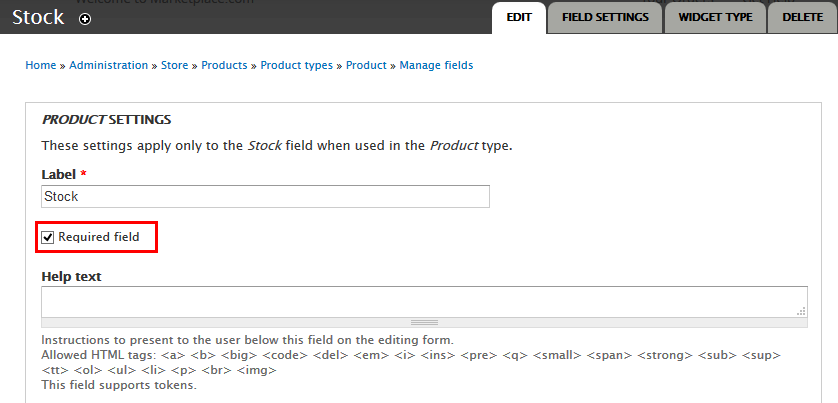
2. Configure Product type
1. Navigate to Store > Products > Product Types
2. In Product row, click "manage fields" link, add following fields:
3. Set properties for Old Price field

4. Set properties for Images field

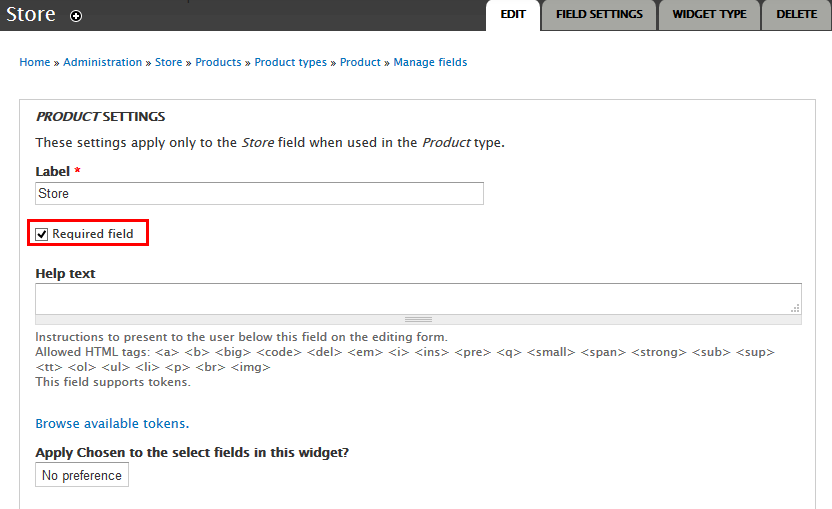
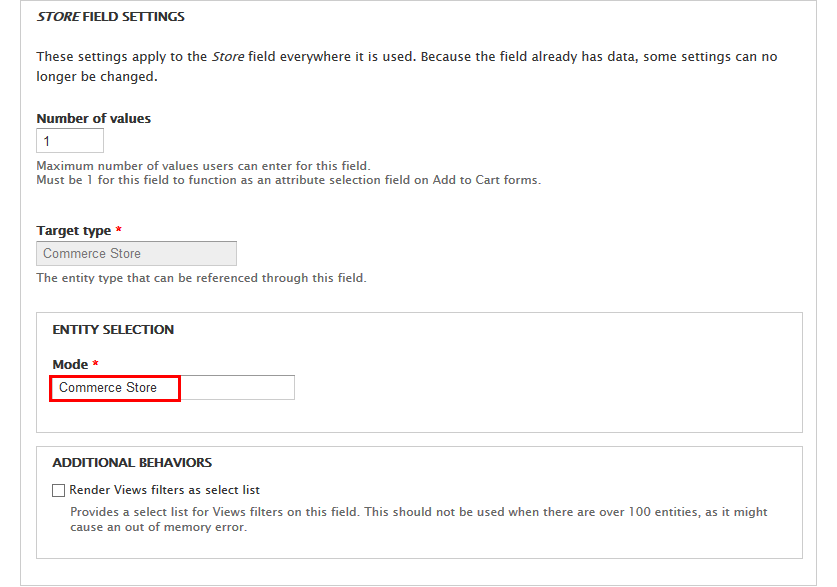
5. Set properties for Store field
6. Set properties for Color field
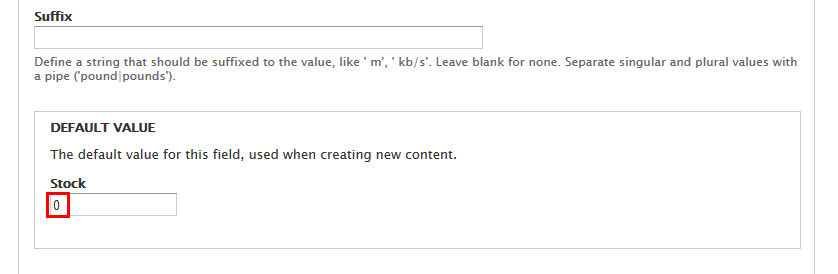
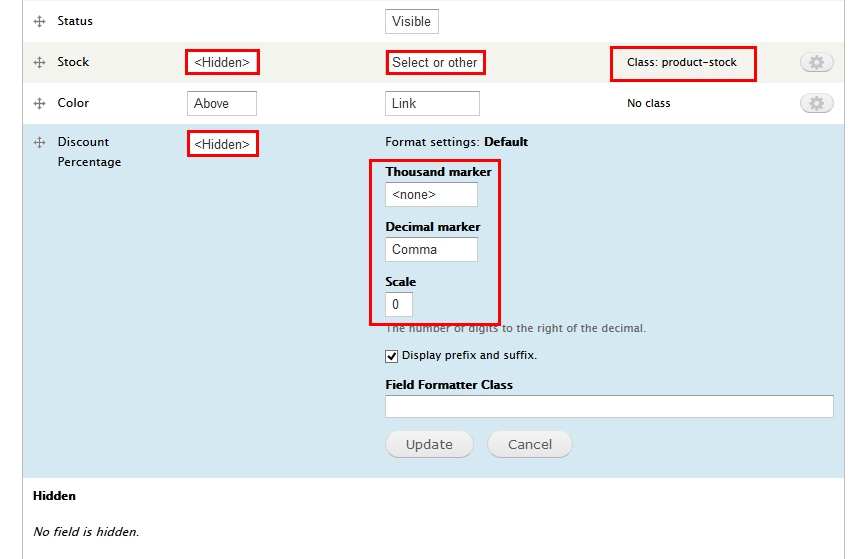
7. Set properties for Stock field
8. Set properties for Discount Percentage field
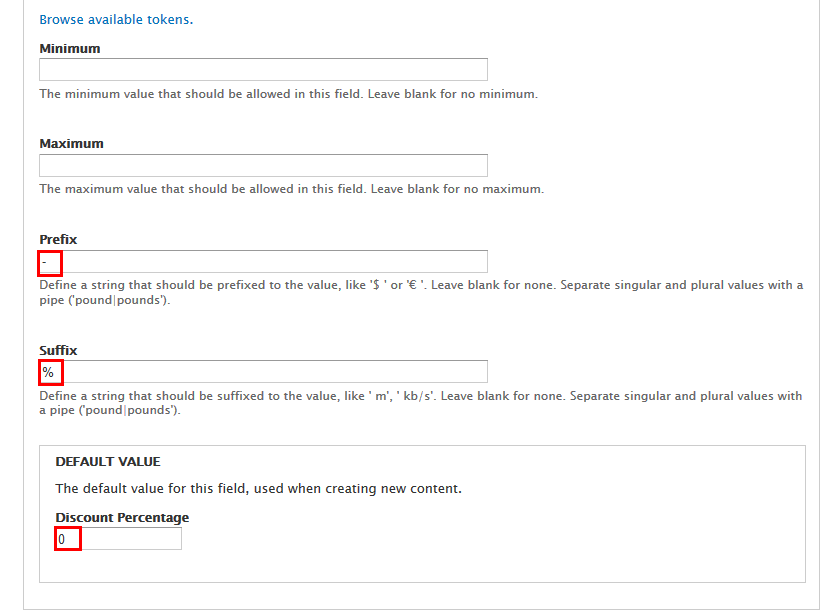
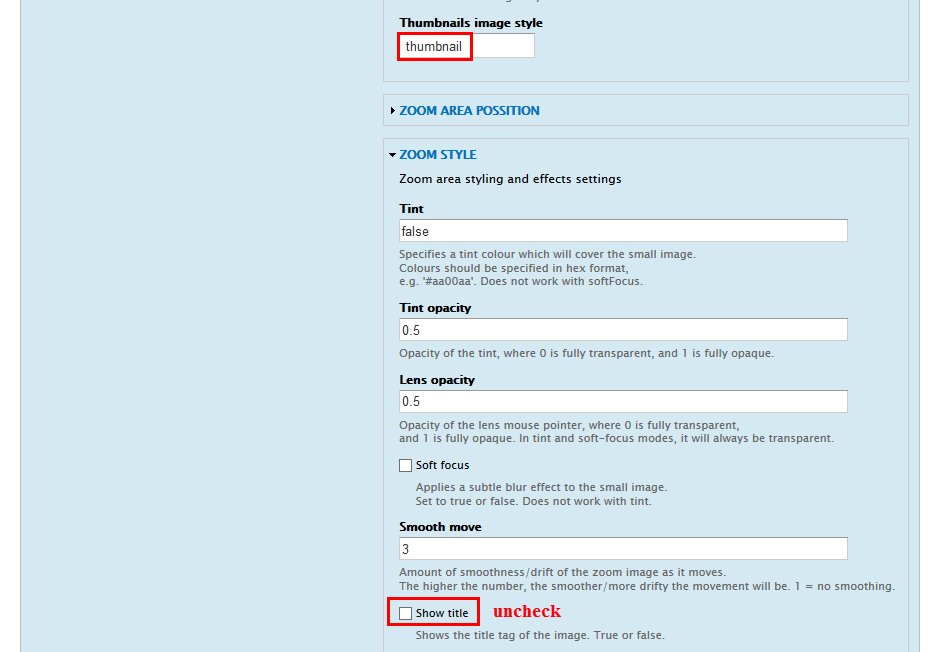
9. In Product row, click "manage display" link, add following fields:
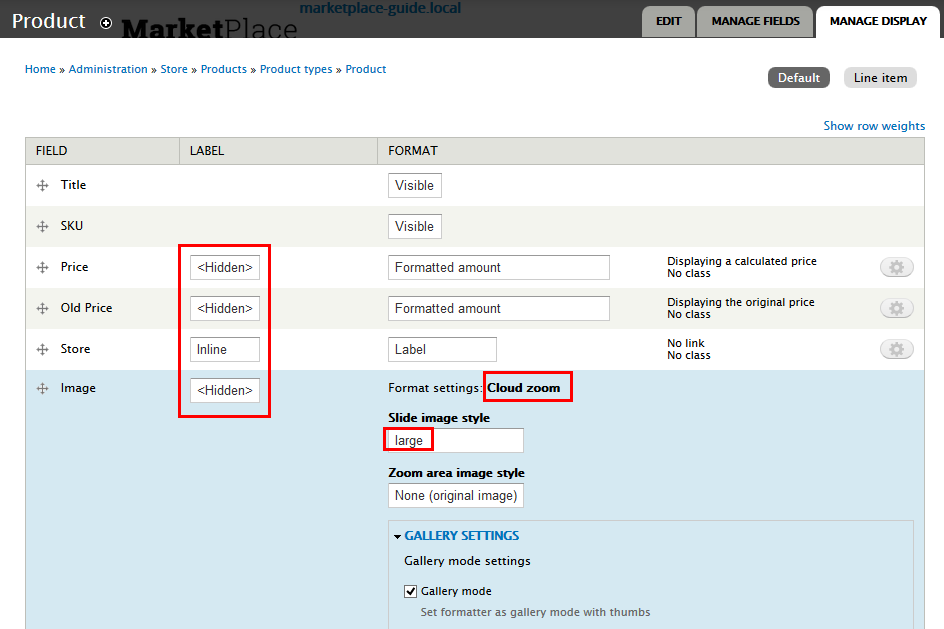
Note
After you finish these steps, you can add some products but they weren't displayed anywhere because you should create a content type for their display.
We built Marketplace based on Drupal Commerce, so you should read Drupal commerce guide to understand more how to use our Product .
Configure URL aliases : Patterns
1. Navigate to Configuration > Search and metadata > URL aliases
2. Go to PATTERNS tab and following properties:
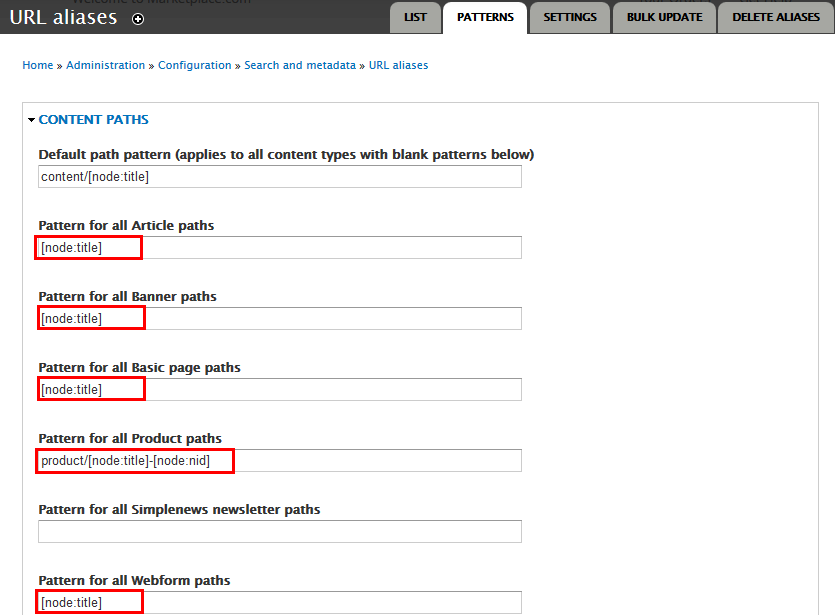
3. Click Save button
Modify Article type
1. Navigate to Structure > Content Type
2. In Article entry row, click "manage fields" link, Add "Image" field with following settings:
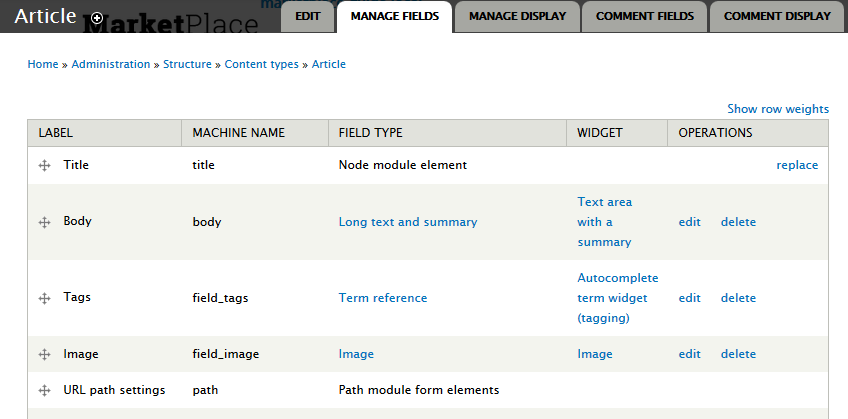
3. Click Save button
4. Go to Manage display tab > Default tab, set following properties:
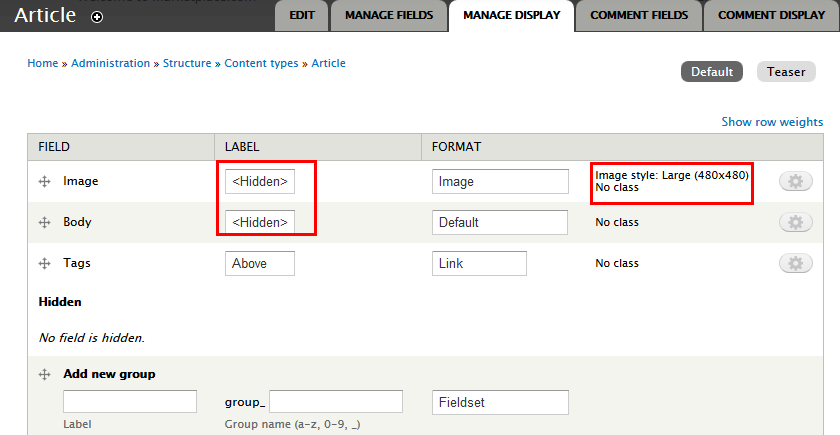
5. Modify Teaser tab, set following properties:

6. Click Save button
Modify Webform type
1. Navigate to Structure > Content Type
2. In Article entry row, click "manage fields" link, Add "Image" field with following settings:
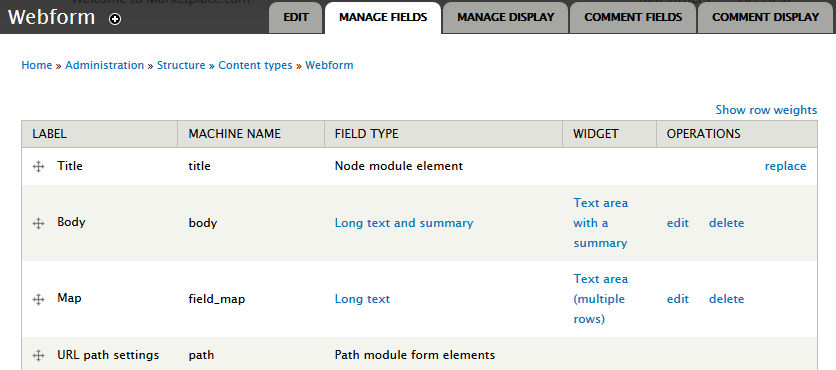
3. Click Save button, then click Save field settings button > Set following properties: Map, Body fields
4. Set following properties: Map fields
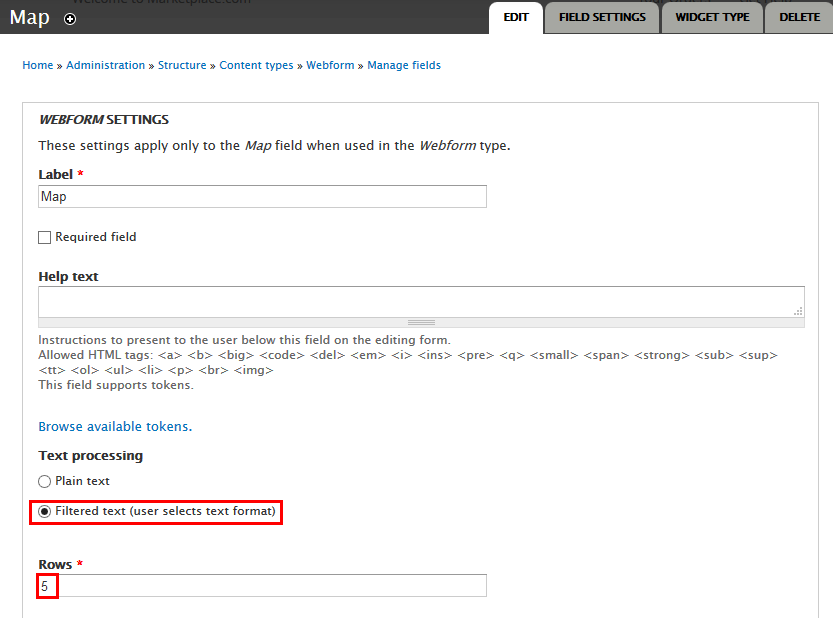
5. Set following properties: Body fields
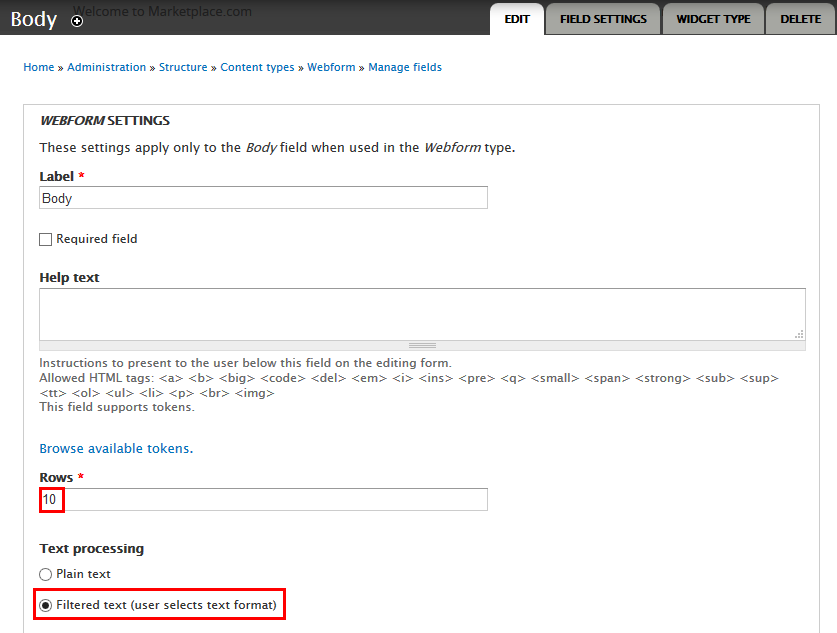
6. Click Save Settings button
7. Go to Manage display tab > Default tab, set following properties:
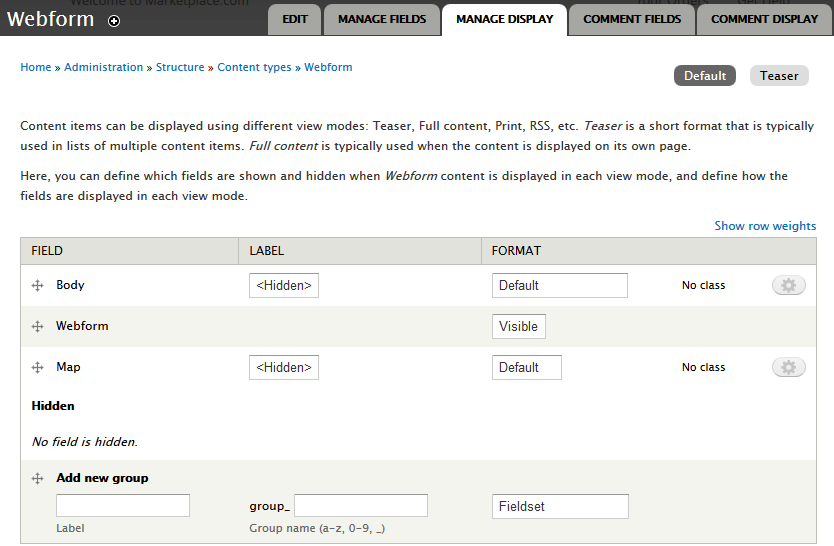
8. Click Save button
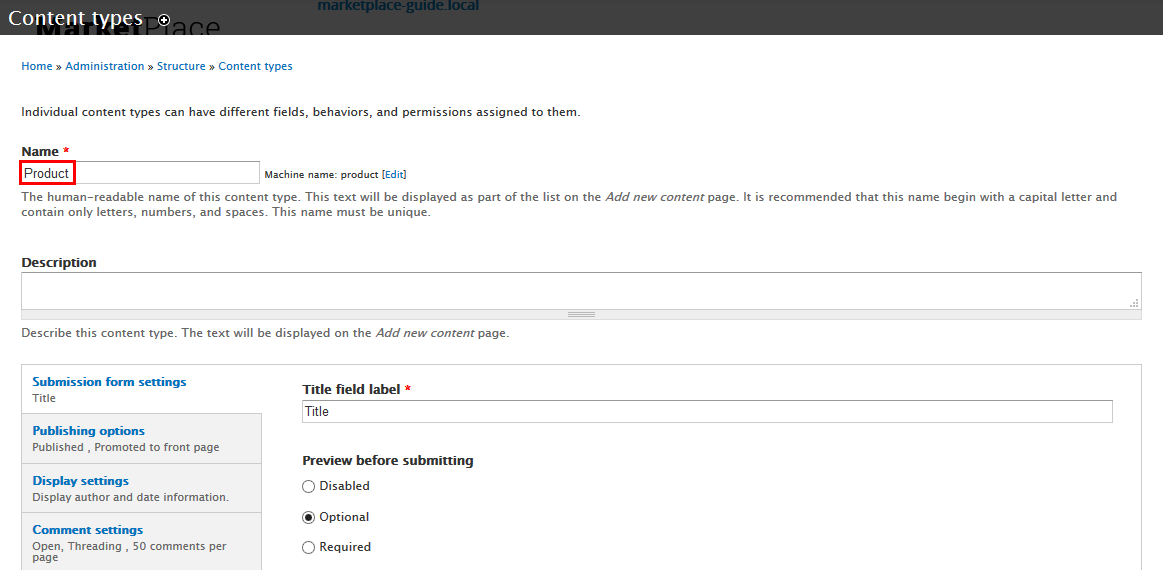
Create Product type
1. Navigate to Structure > Content Type
2. Click Add Content Type link to create Product type with following properties:
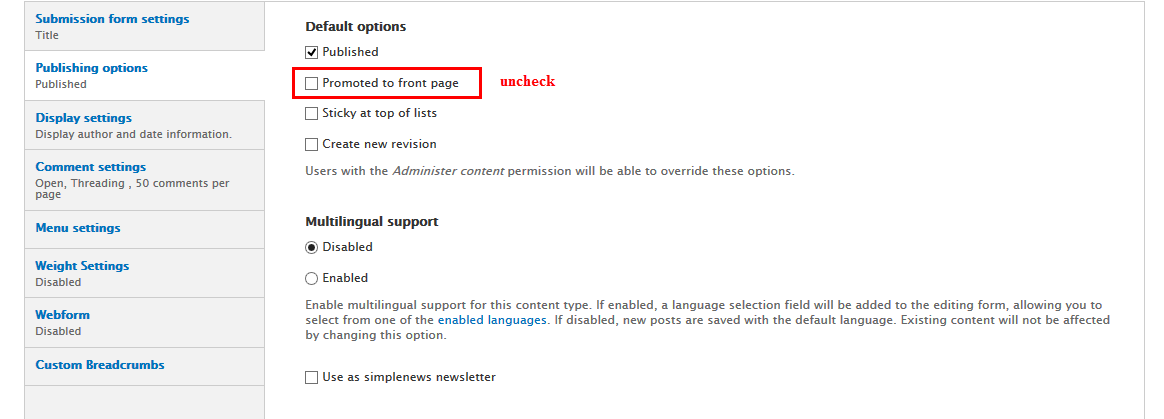
3.Go to click Publishing options link and set properties
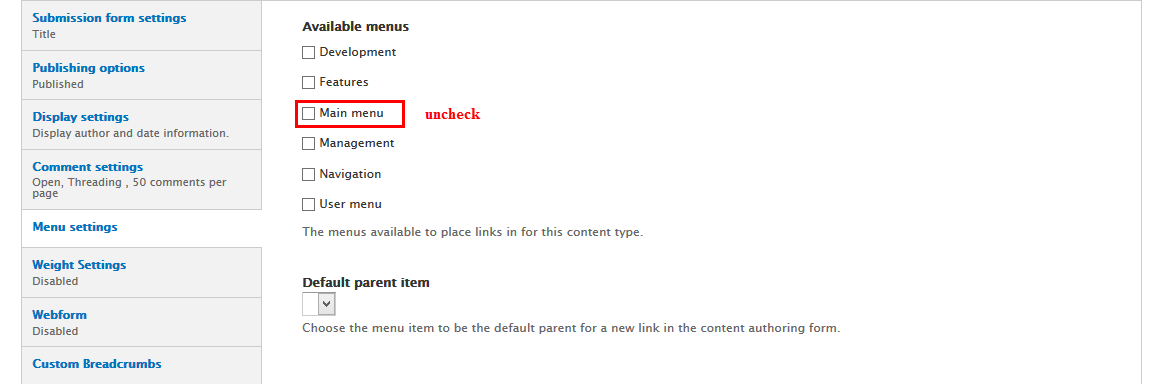
4.Go to click Menu settings link and set properties
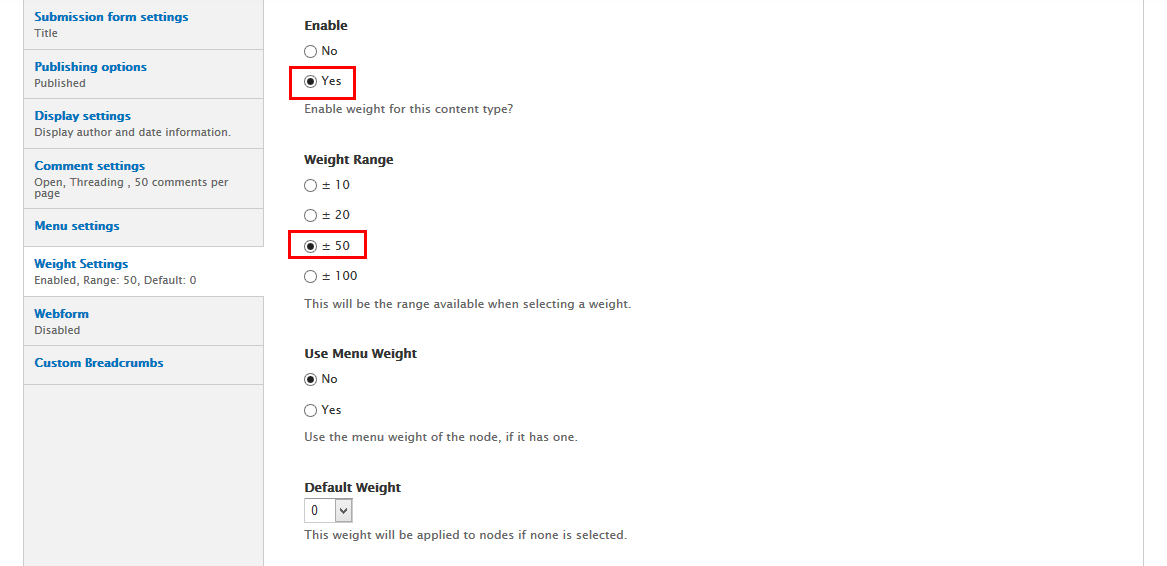
5.Go to click Weight settings link and set properties
6. Click Save and add fields button, then add following fields:
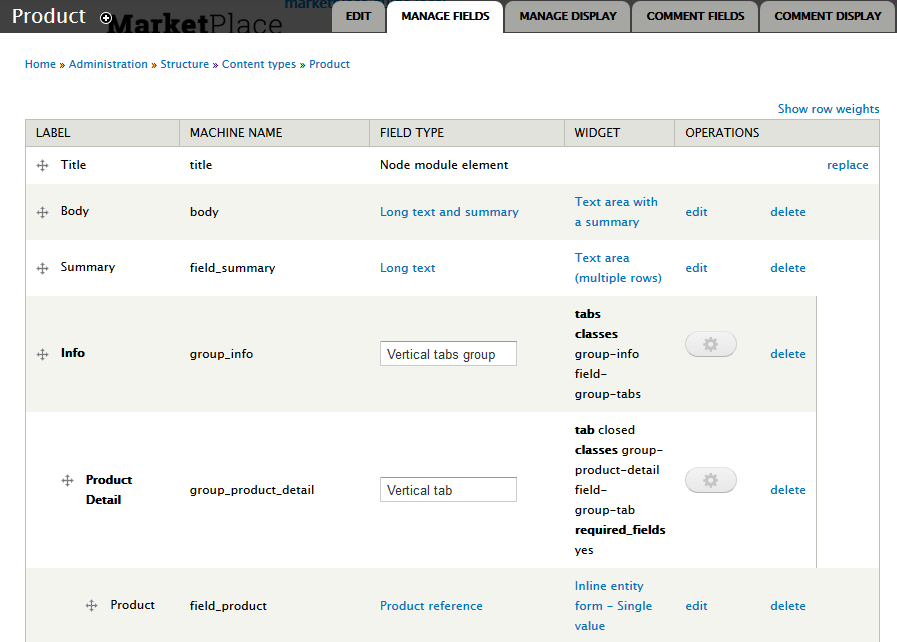
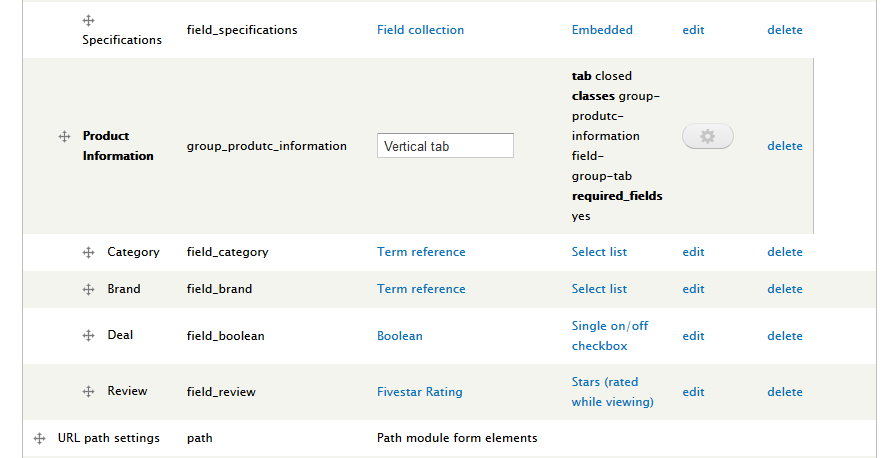
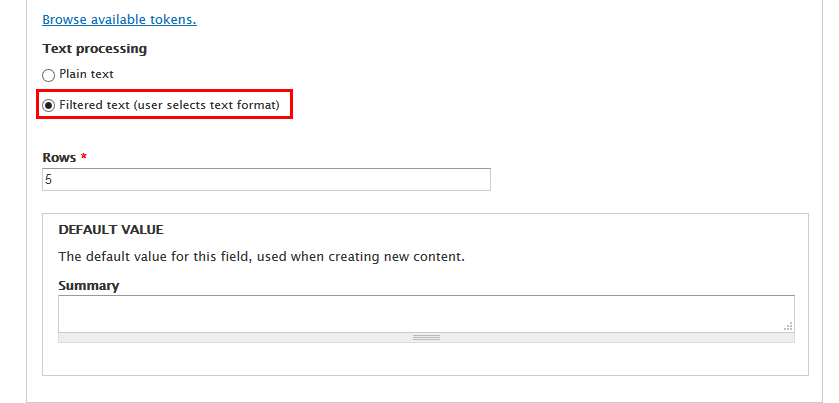
7. Set properties for Summary field
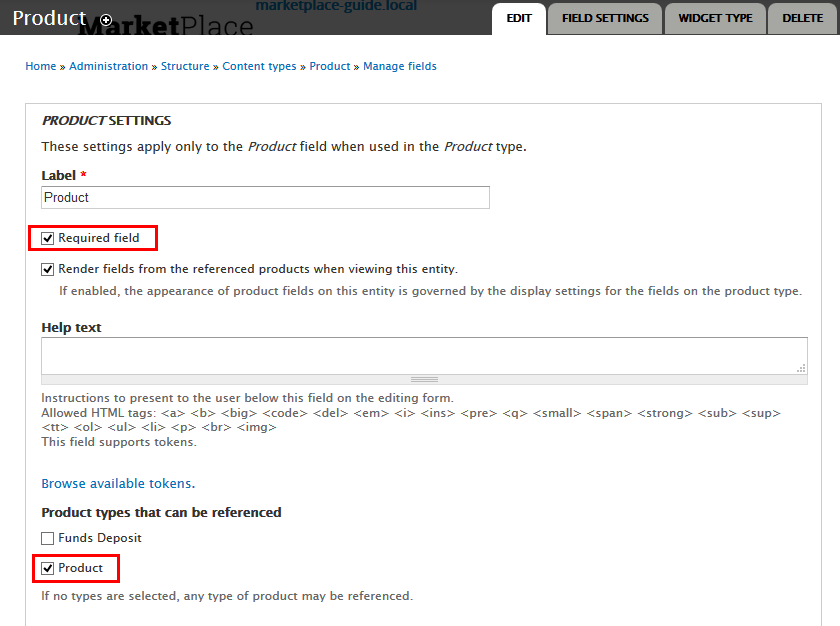
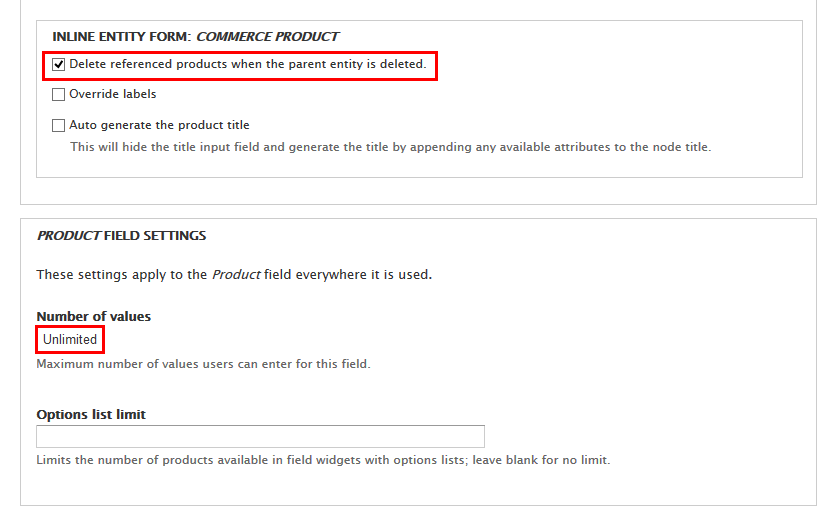
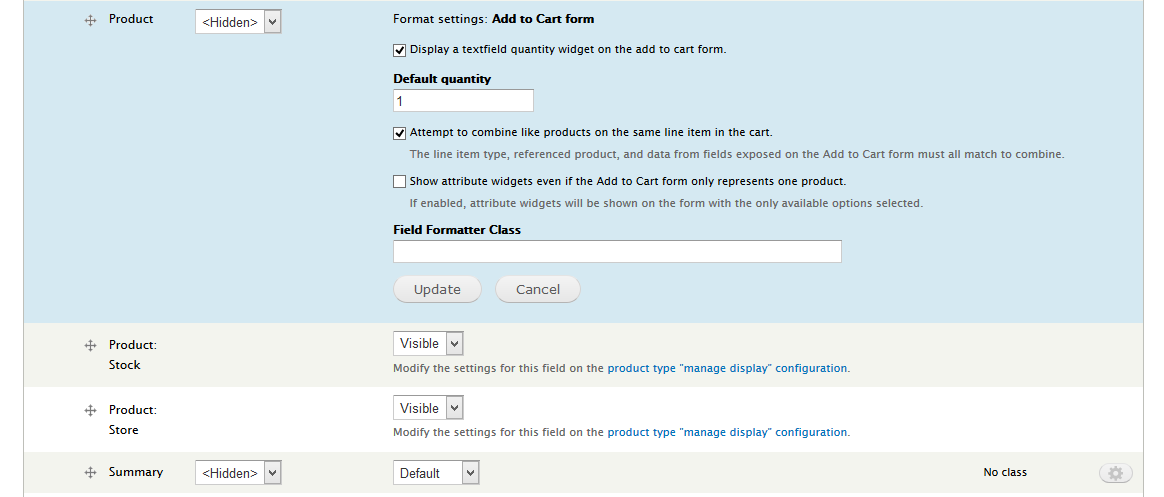
8. Set properties for Product field
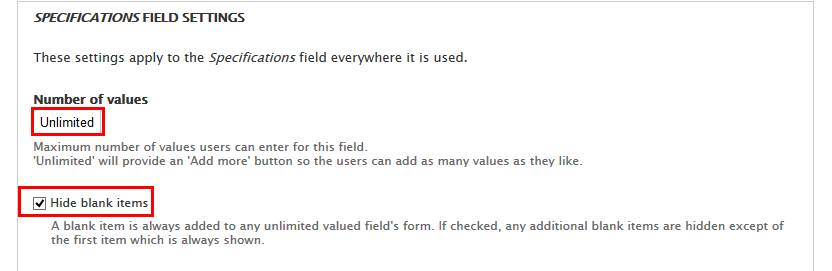
9. Set properties for Specifications field
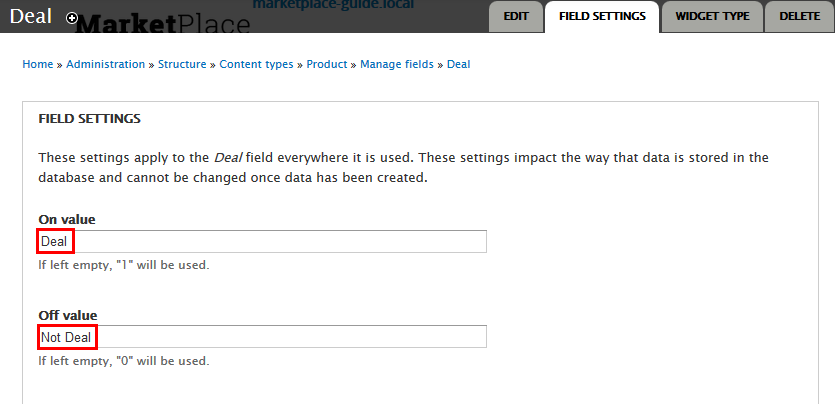
10. Set properties for Deal field
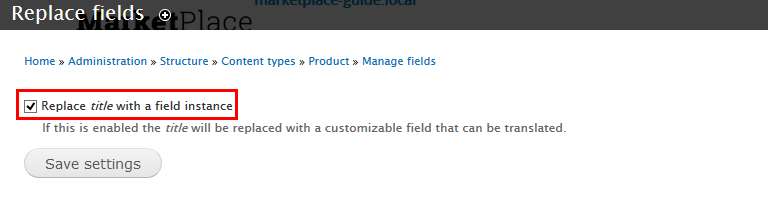
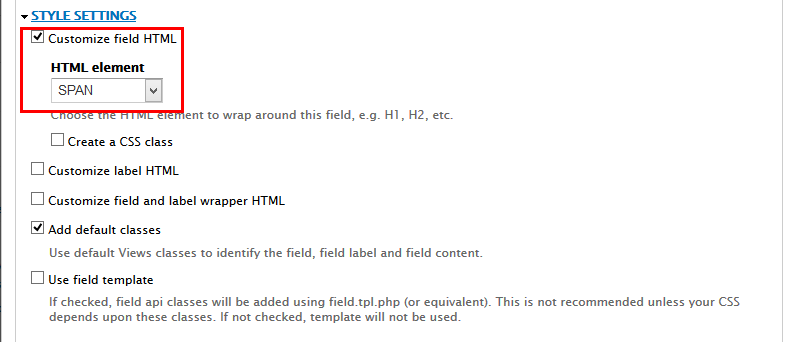
11. At Title row, Click replace link to set following settings:
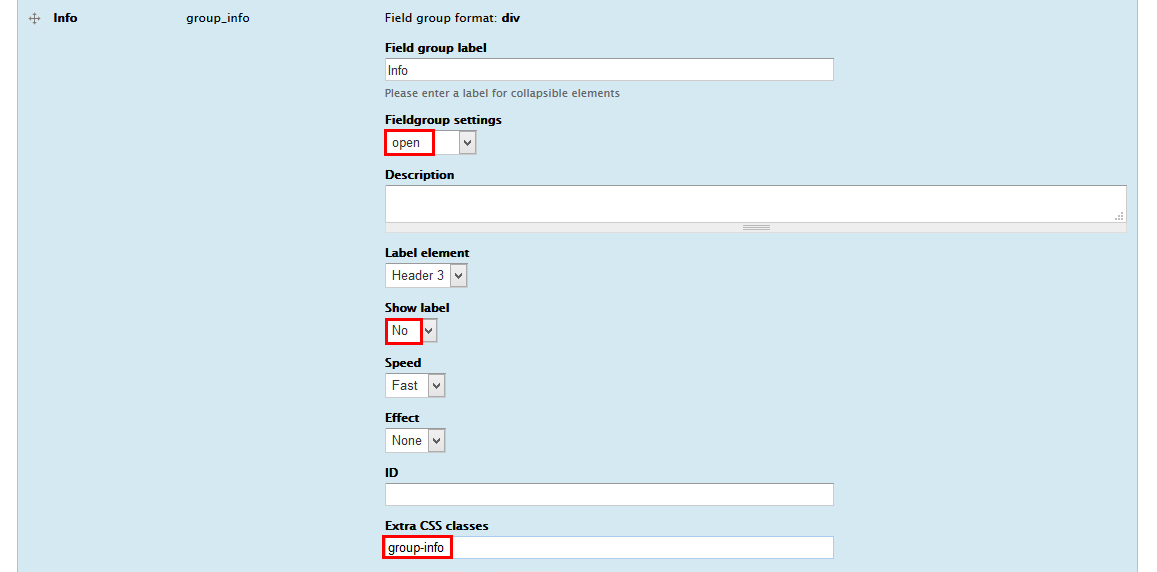
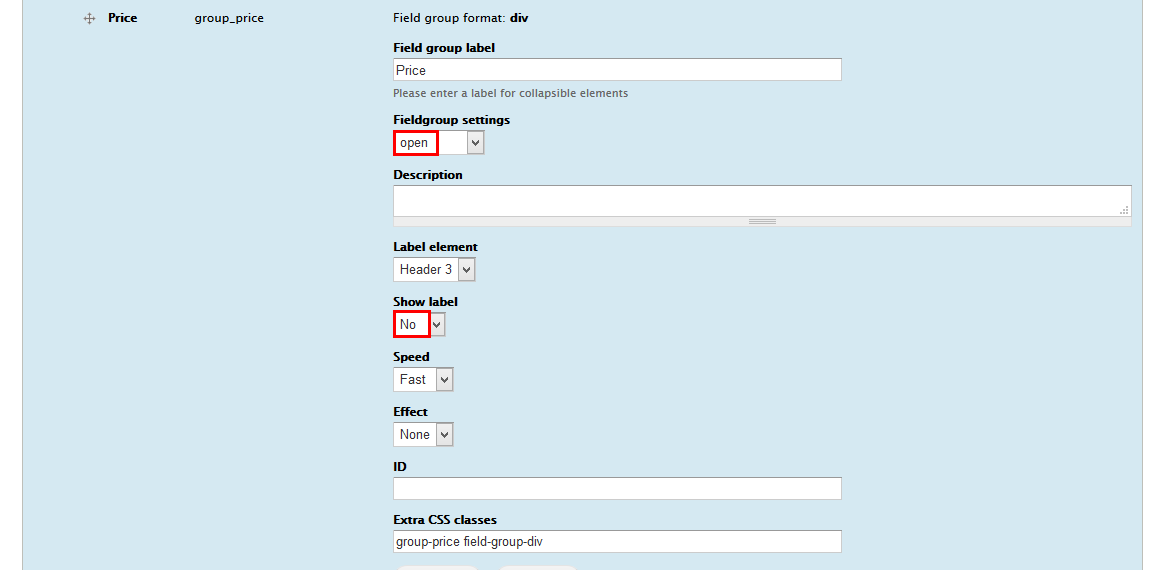
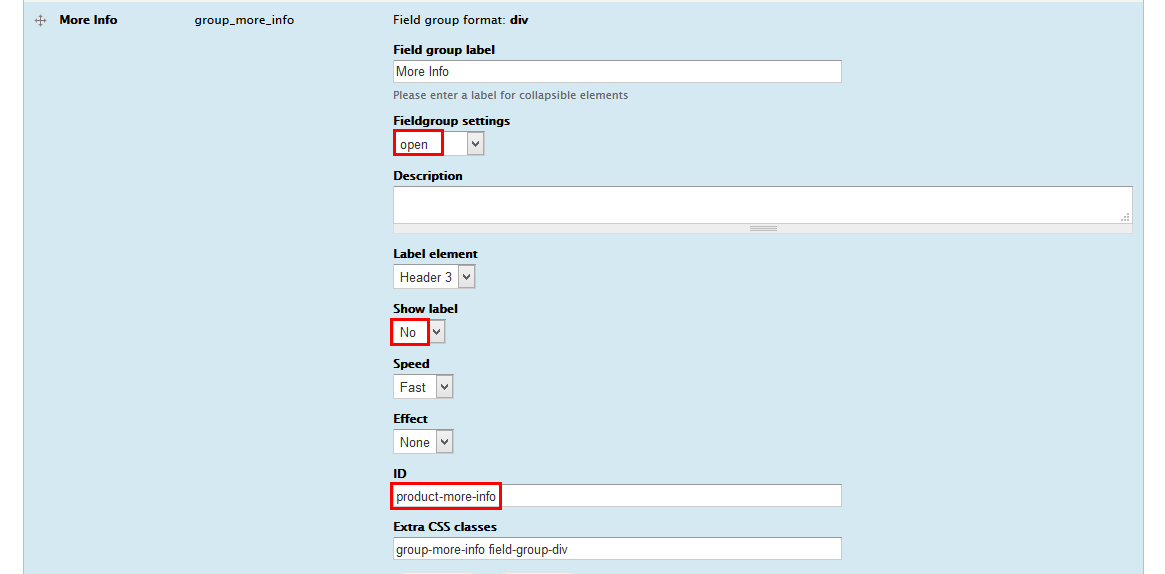
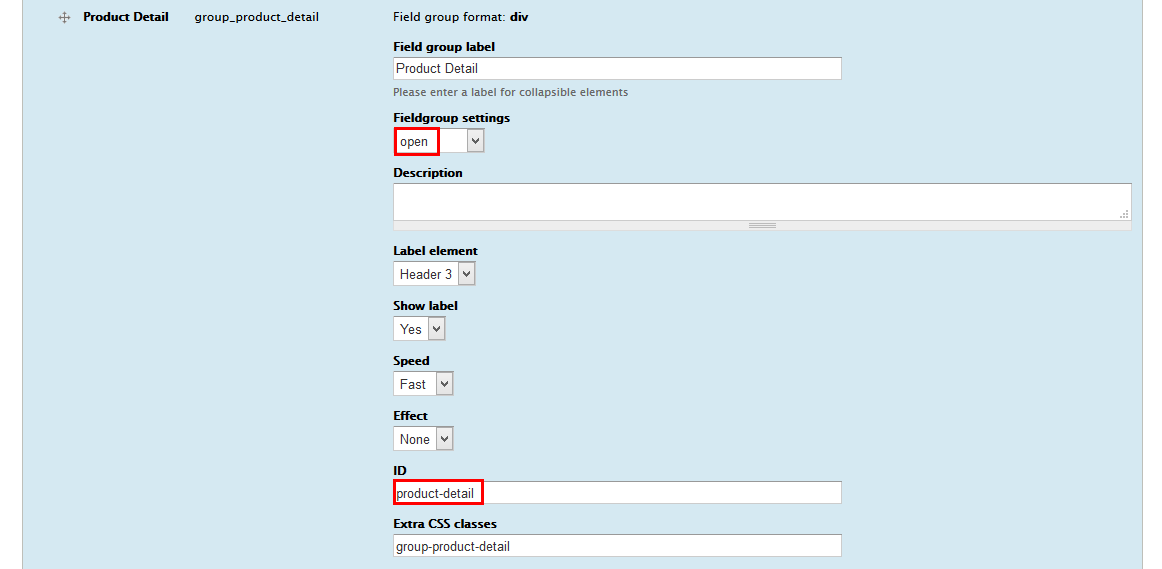
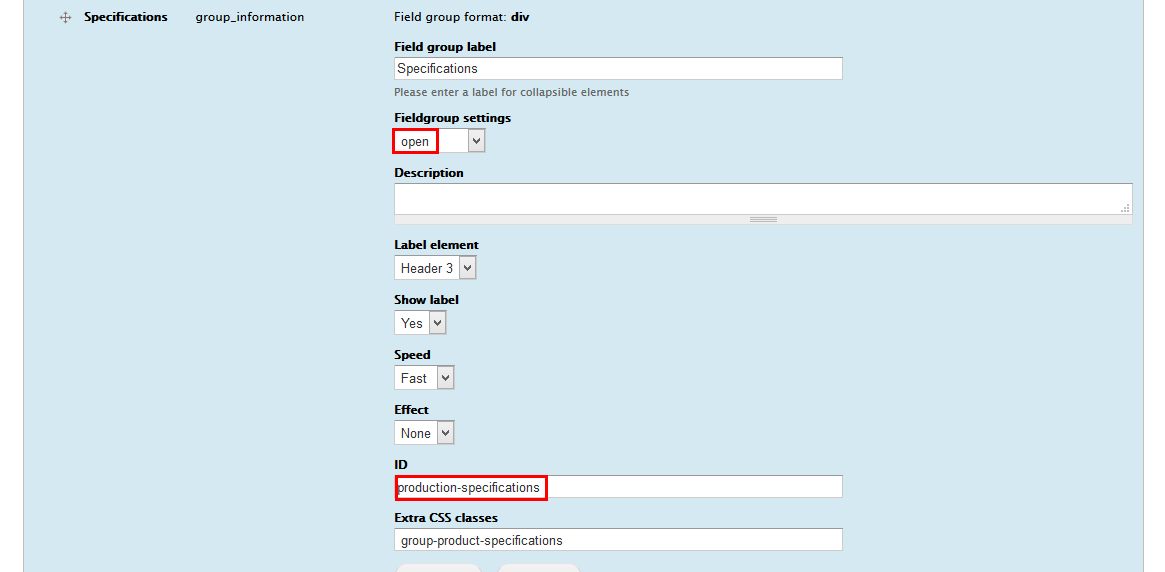
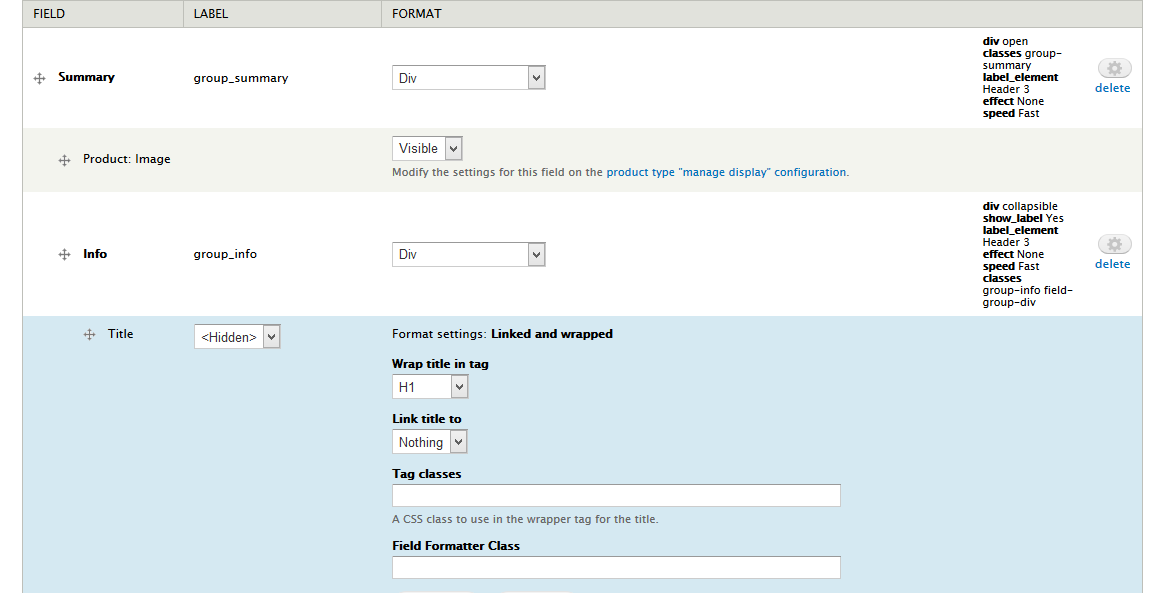
12. Go to Manage display tab > Default tab. Add group fields: Summary, Info, Price, More Info, Product Detail, Specifications.
13. Set properties for Summary field

14. Set properties for Info field
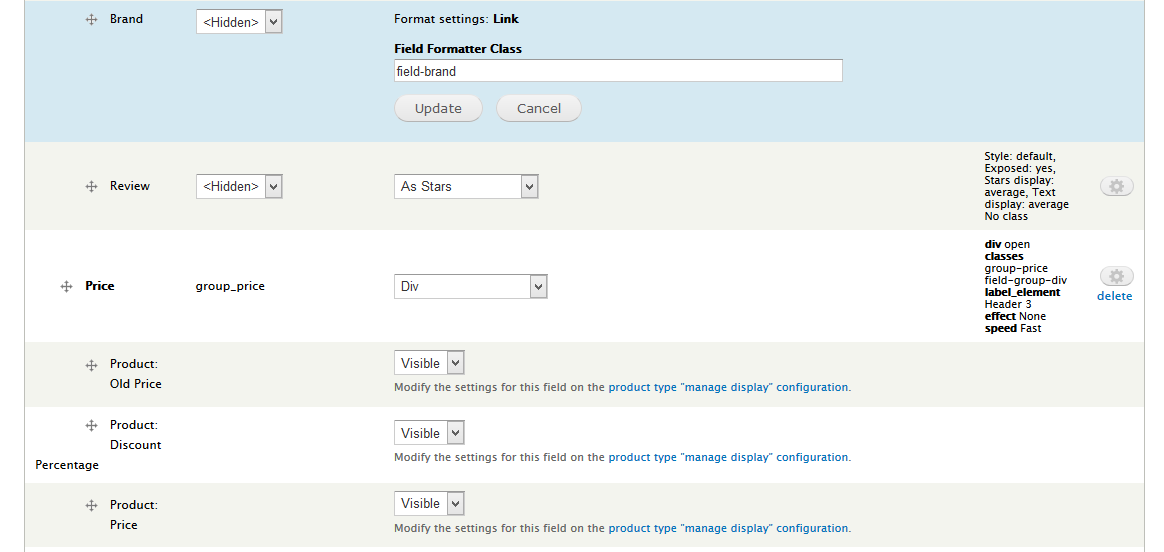
15. Set properties for Price field
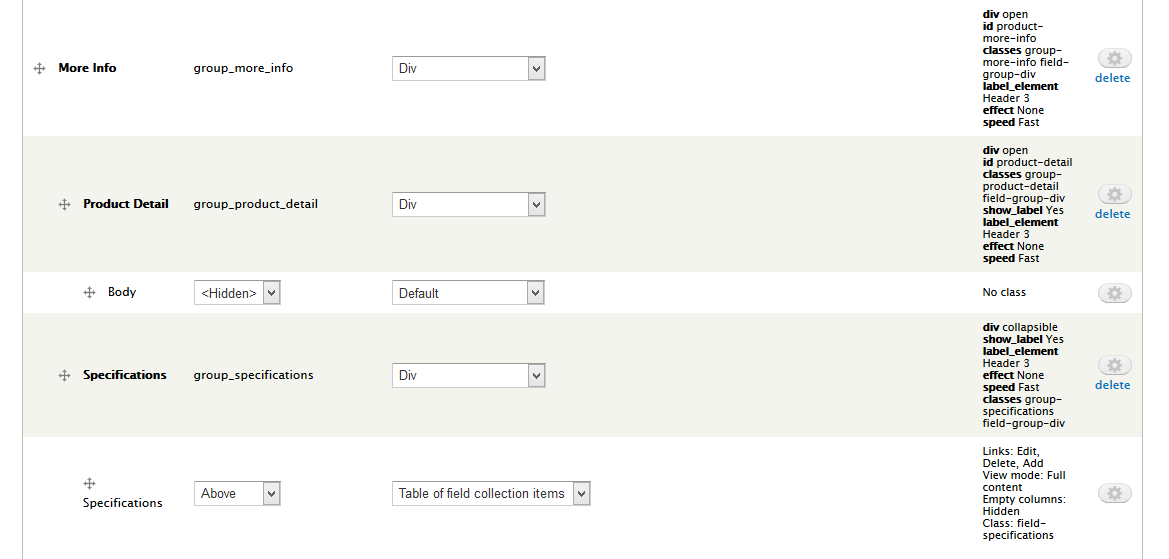
16. Set properties for More Info field
17. Set properties for Product Detail field
18. Set properties for Specifications field
19. At Manage display tab set following properties:
20. Click Save button
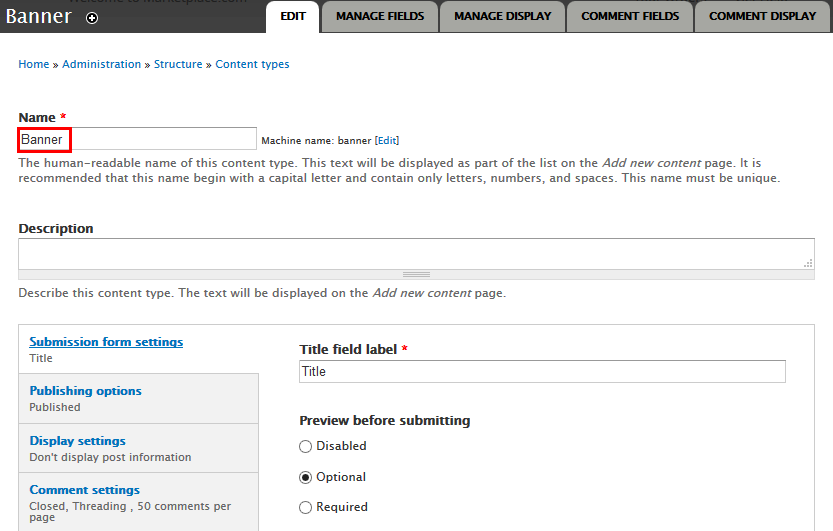
Create Banner type
1. Navigate to Structure > Content Type
2. Click Add Content Type link to create Brands type with following properties:
3.Go to click Publishing options link and set properties
4.Go to click Menu settings link and set properties
5.Go to click Weight settings link and set properties
6. Click Save and add fields button, then add following fields:

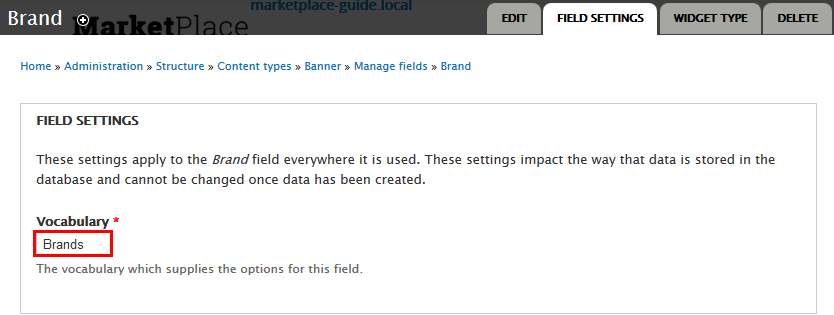
7. Set properties for Brand field
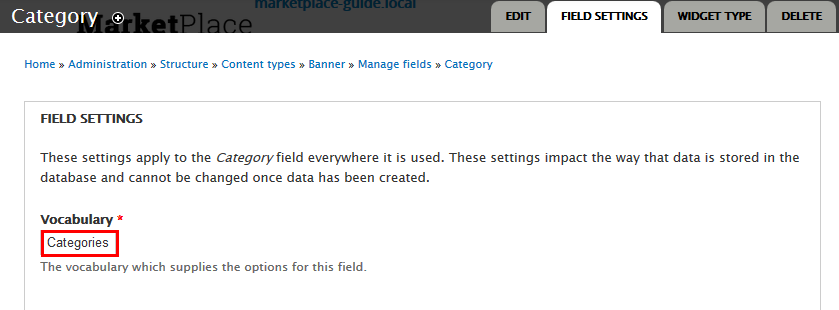
8. Set properties for Category field
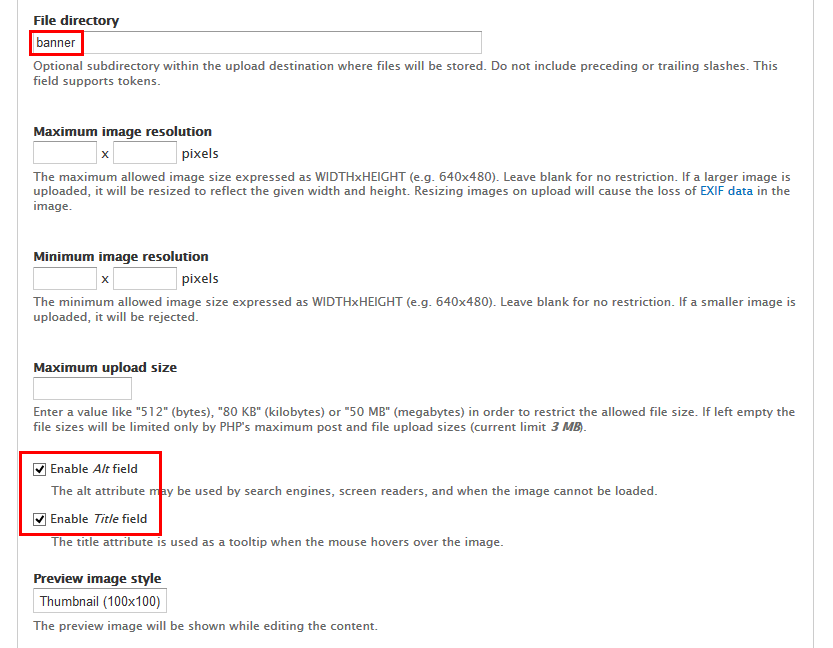
9. Set properties for Image field
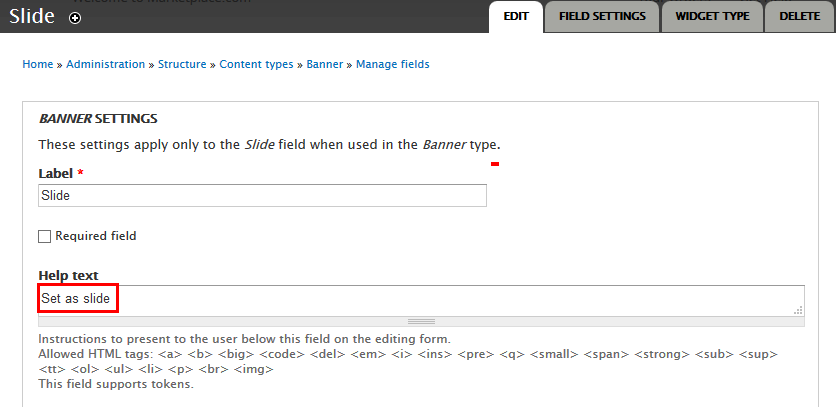
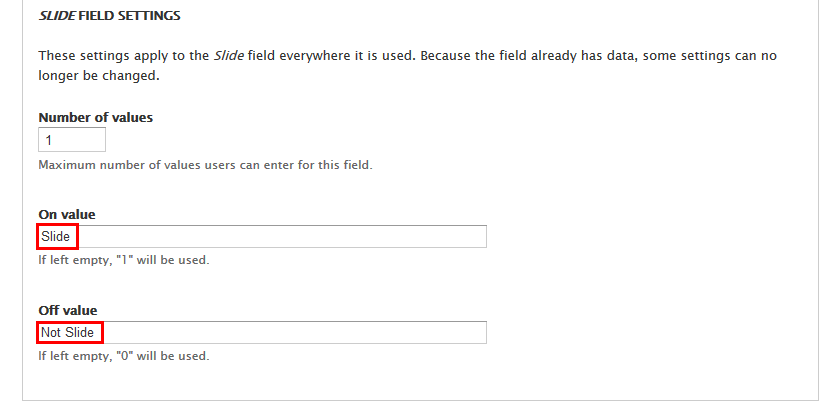
10. Set properties for Slide field
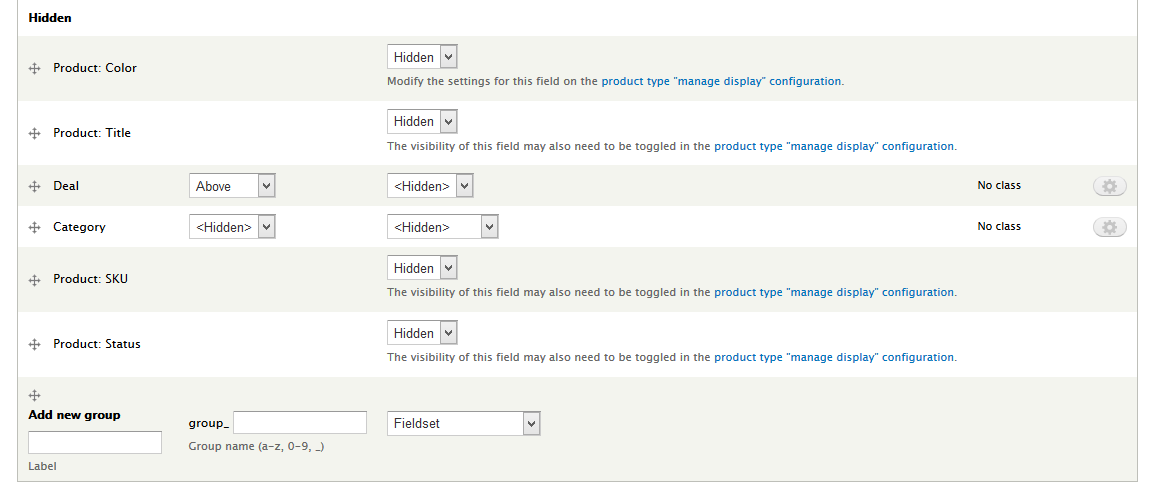
11. Go to Manage display tab > Default tab. Set following properties:
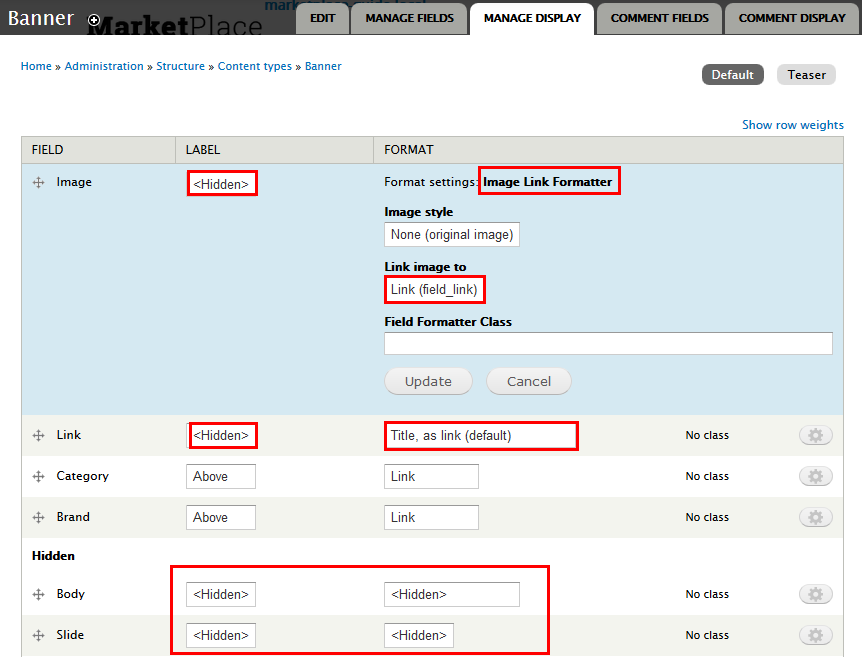
12. Click Save button
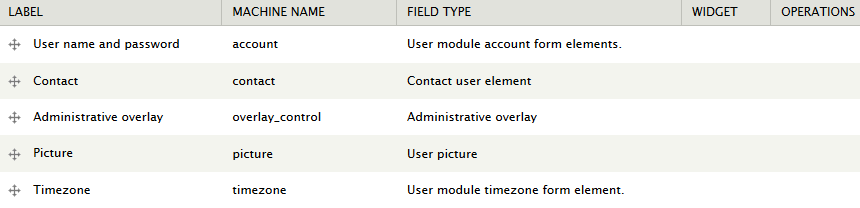
Modify Users Profile structure
Navigate to Configuration > People section > Account settings > Manage Fields to view fields
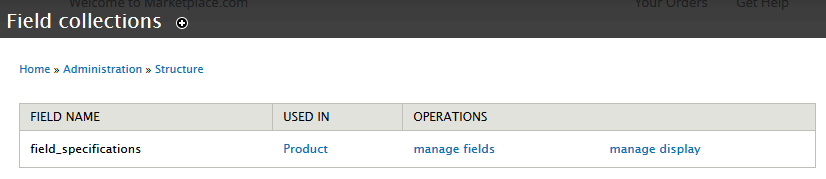
Configure Field Collection
To configure this future, you must install Field Collection module, then navigating to Structure > Field Collection and edit field collection :
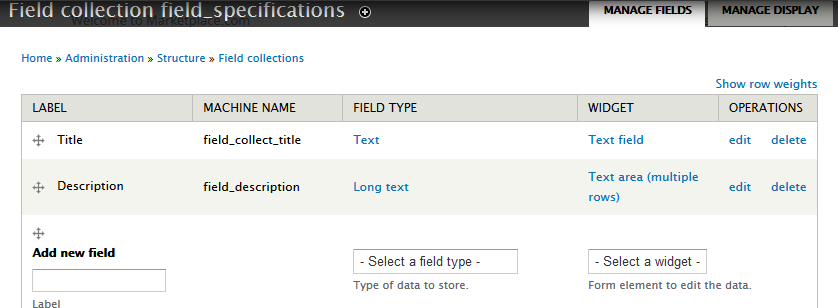
1. In field_specifications. Click manage fields tab, add following fields:
2. Set properties for Description field
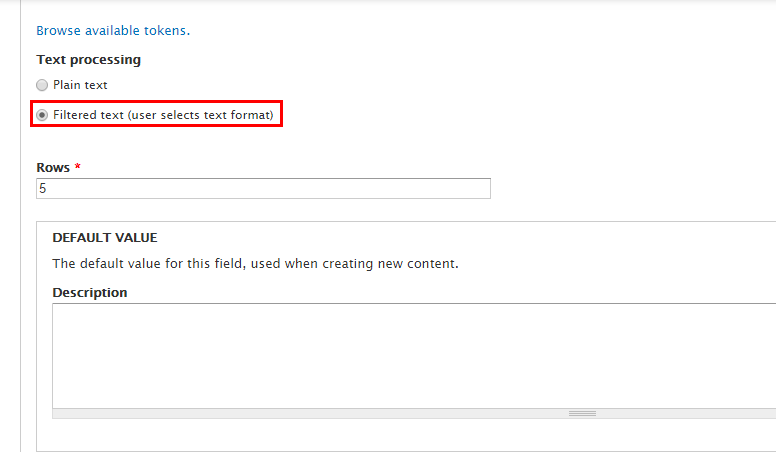
3. Modify Manage Display tab, set following properties:
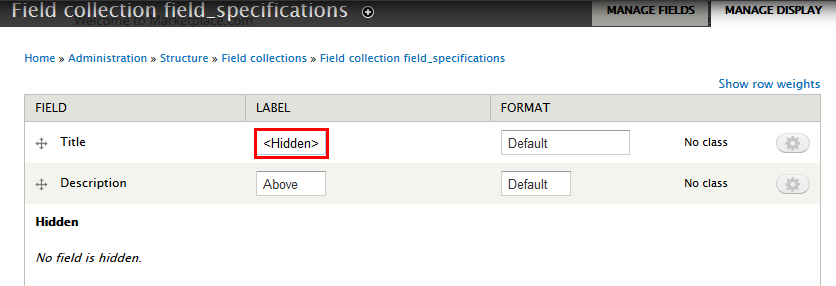
4. Click Save button
Note You can read this article to understand more about Field Collection.
Create Homepage
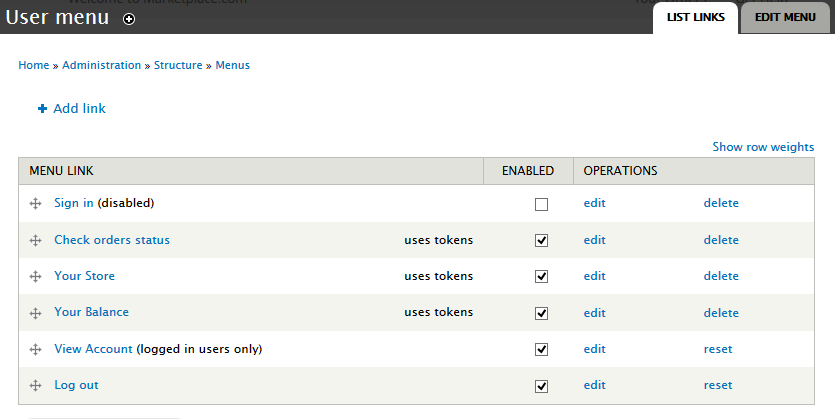
User menu
1. Add menu link
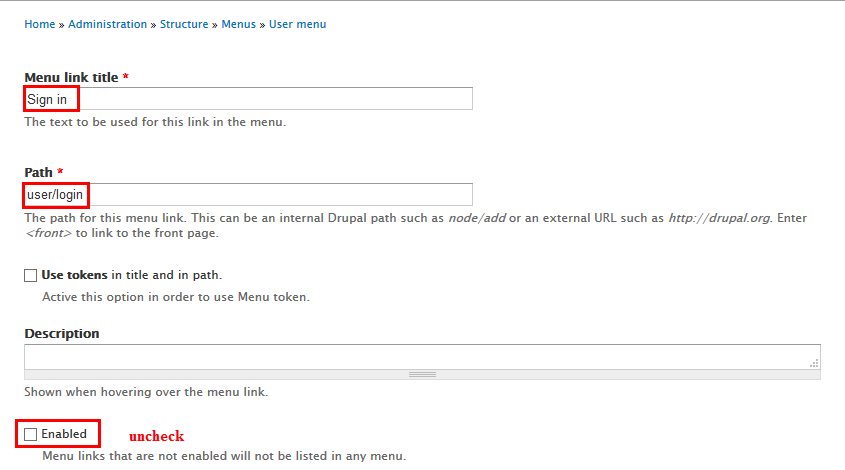
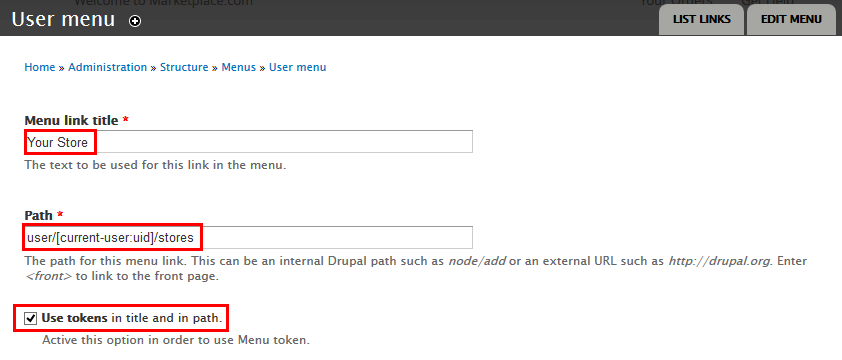
1. Navigate to Structure >Menu, find User menu link. Add menu link following:
2. Set properties for Singn in
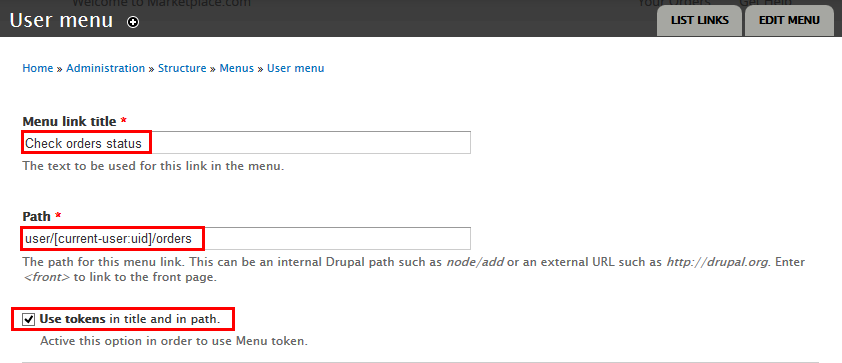
3. Set properties for Check orders status
4. Set properties for Your Store
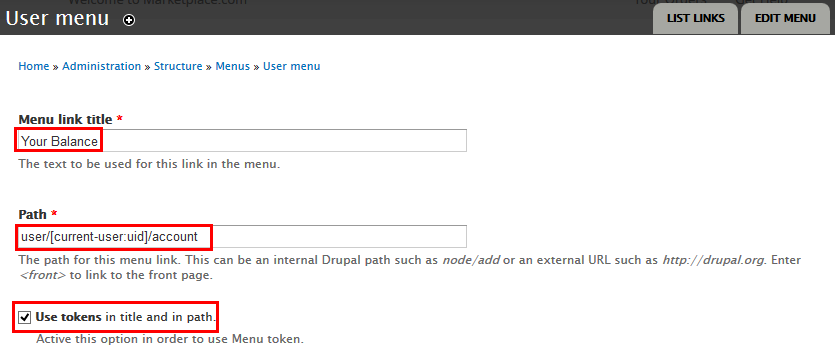
5. Set properties for Your Balance
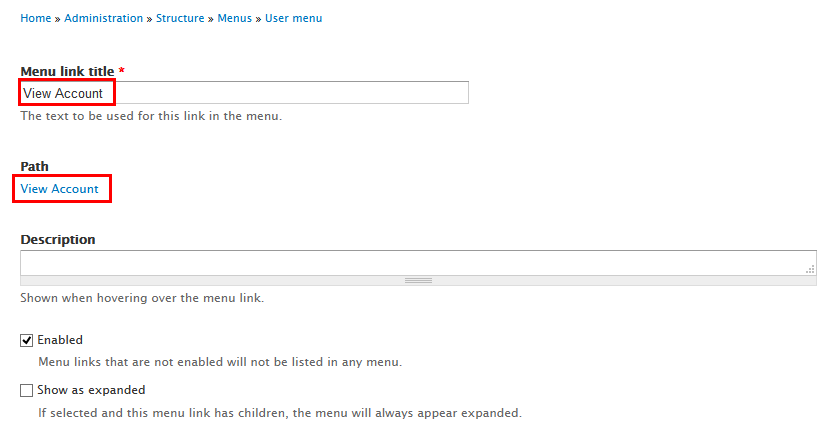
6. Set properties for View Account
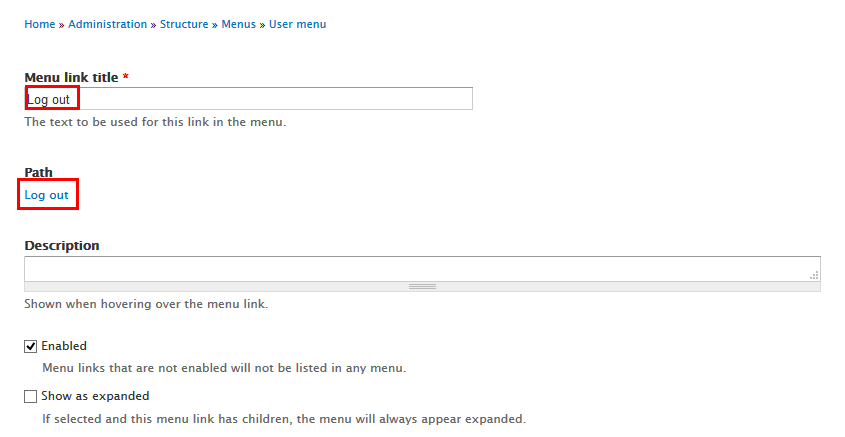
7. Set properties for Log out
8. Click Save button.
2. Configure: User menu
1. Navigate to Structure > Blocks, find User menu block. Click configure button and setfollowing properties:
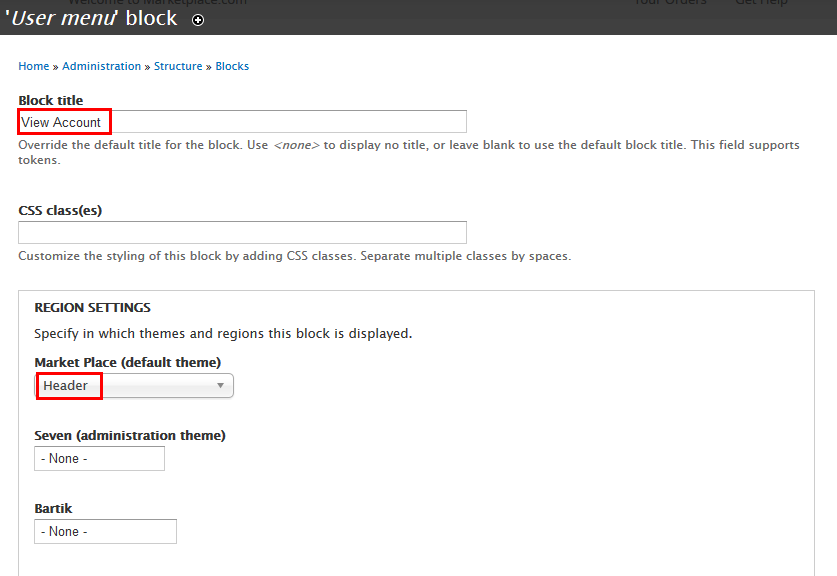
2. Click Save button.
Headerline
Front end Display

1. Configure block: Headline menu
1. Navigate to Structure > Menus, click Add menu link, Create Headline menu with following properties:
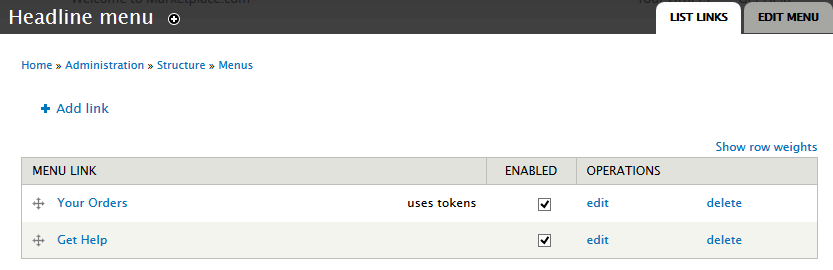
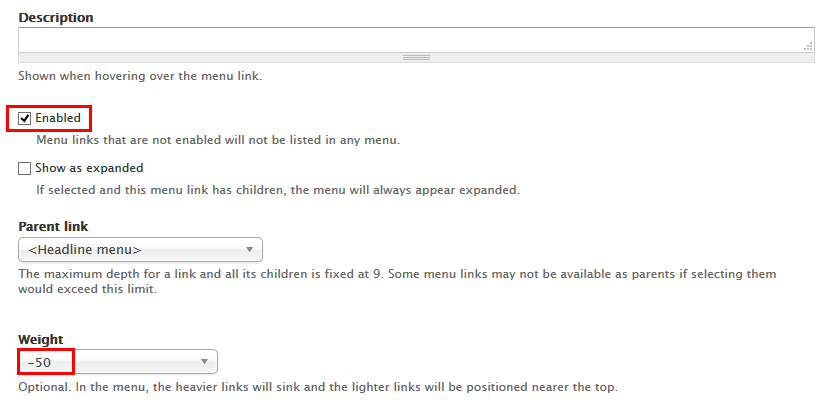
2. Set following Your Order link:

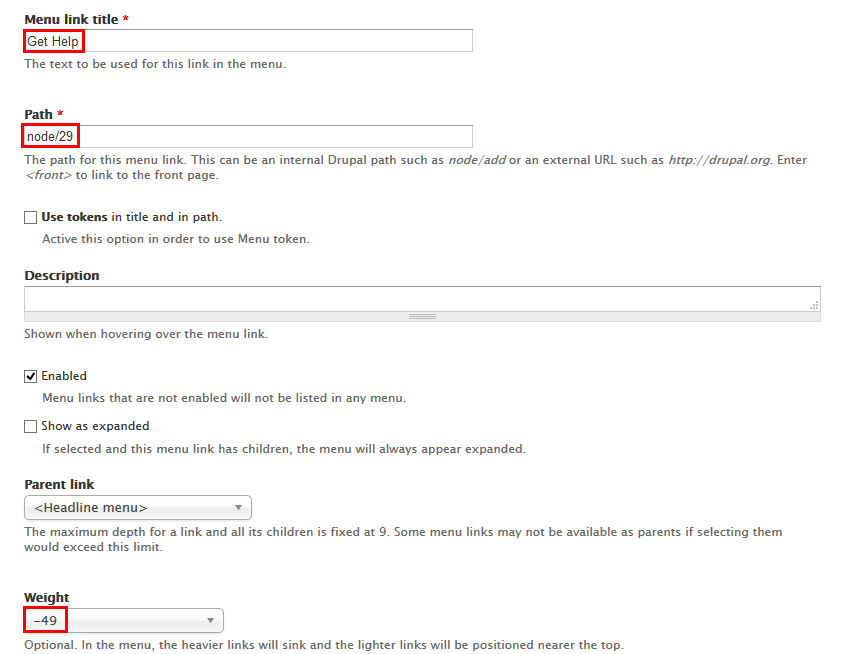
3. Set following Get Help link:
4. Navigate to Structure > Blocks, find Headerline Menu block, click configure link and set the following properties:

5. Click Save block button.
2. Configure block: Welcome
1. Navigate to Structure > Blocks, find Welcome block with following properties:
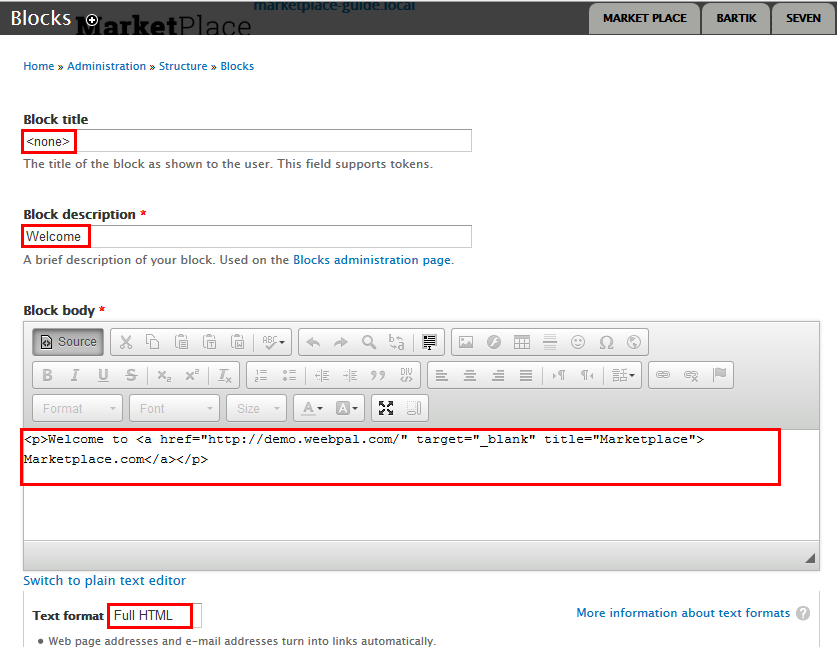

2. Click Save block button.
3. Configure block: User login
1. Navigate to Structure > Blocks, find User login with following properties:
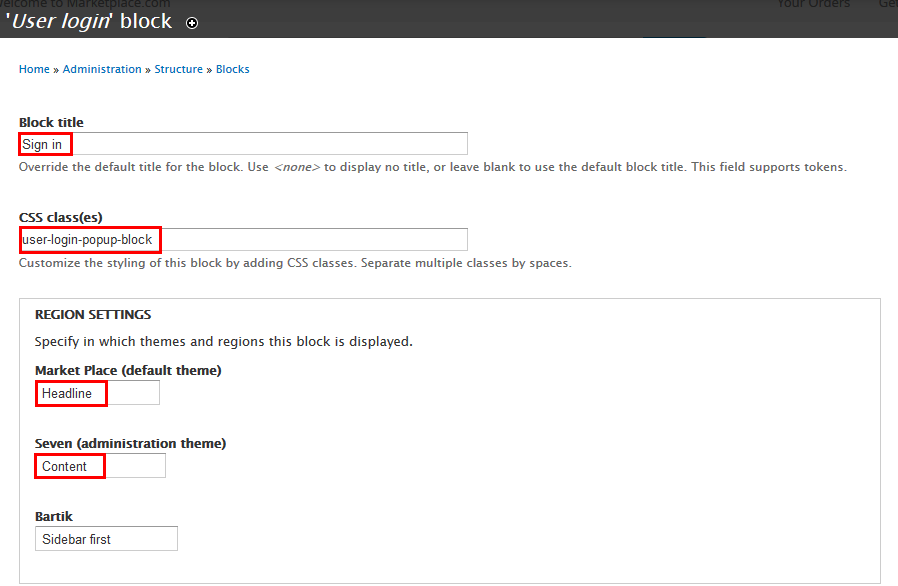
2. Click Save block button.
4. Create Login to view your cart block
1. Navigate to Structure > Blocks, click Add block link, create Login to view your cart block with following properties:
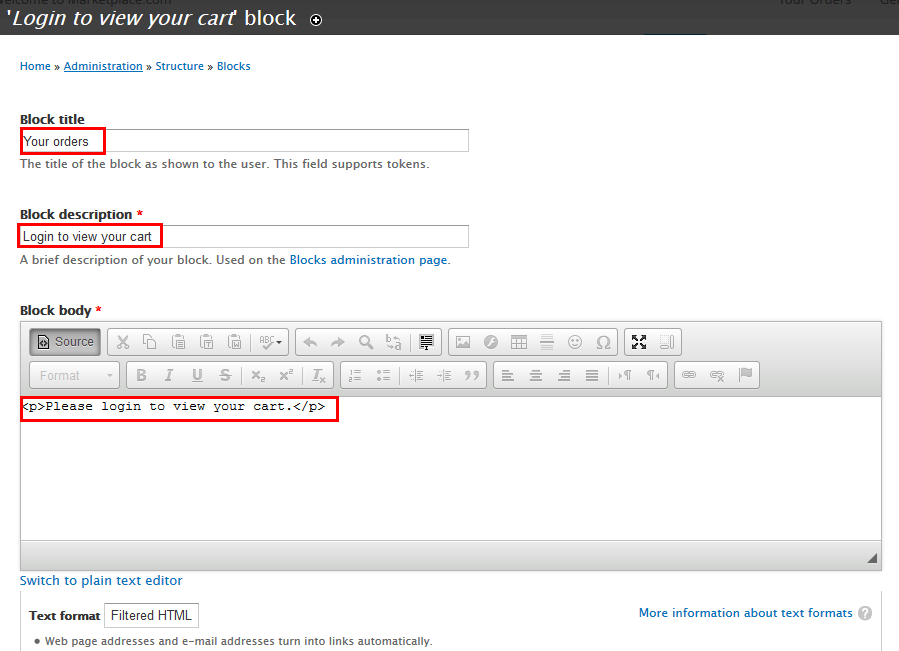
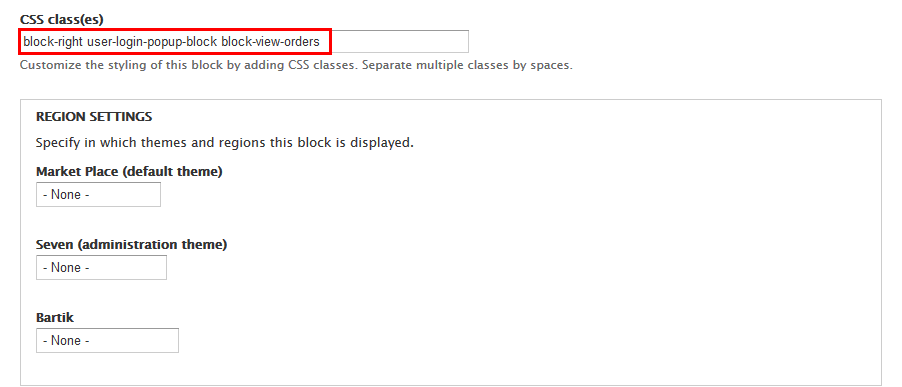
2. Click Save block button.
5. Create Vieworder context
1. Navigate to Structure > Context, click Add link, create Vieworder context with following properties:
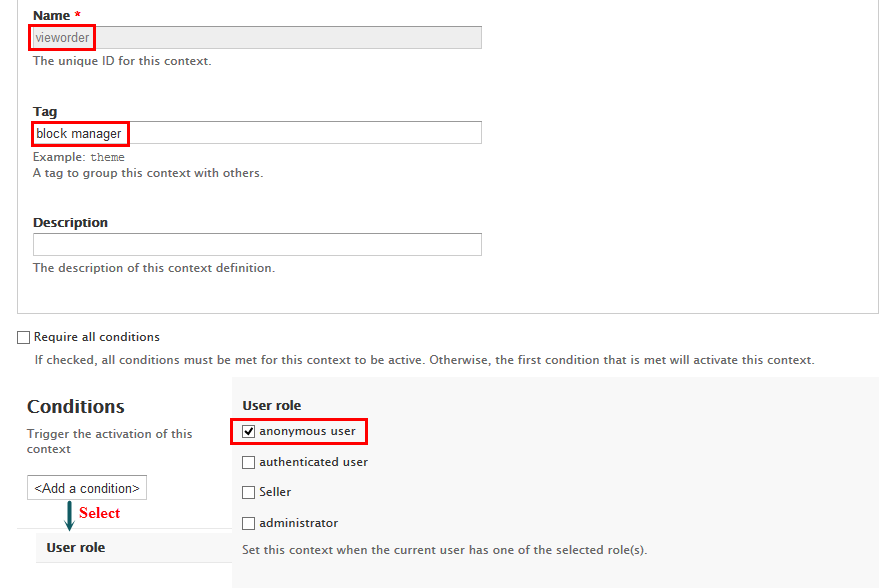
2. Click Save button.
Header
Front end Display

1. Configure block: User menu
1. Navigate to Structure > Menus, find User menu with following properties:

2. Navigate to Structure > Blocks, find User menu - Long descriptions block, click configure link and set the following properties:
3. Click Save block button.
2.1. Shopping cart block view
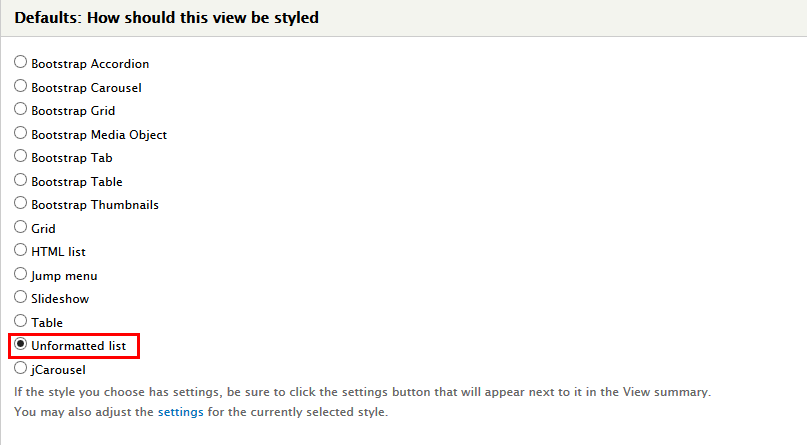
1. Navigate to Structure > Views, find Shopping cart block view link, set following properties:
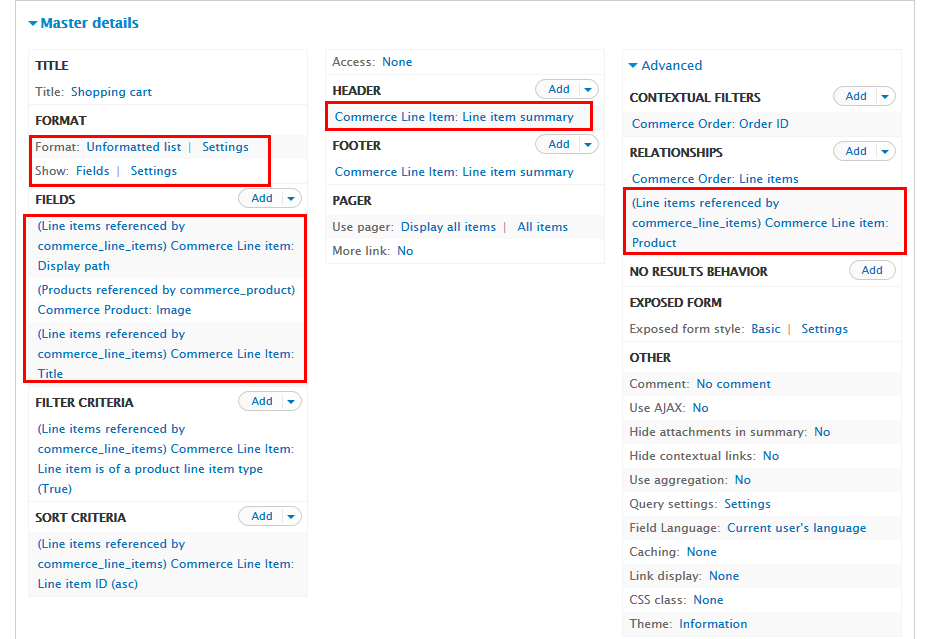
2. At FORMAT > Format area, click Settings link and set properties:
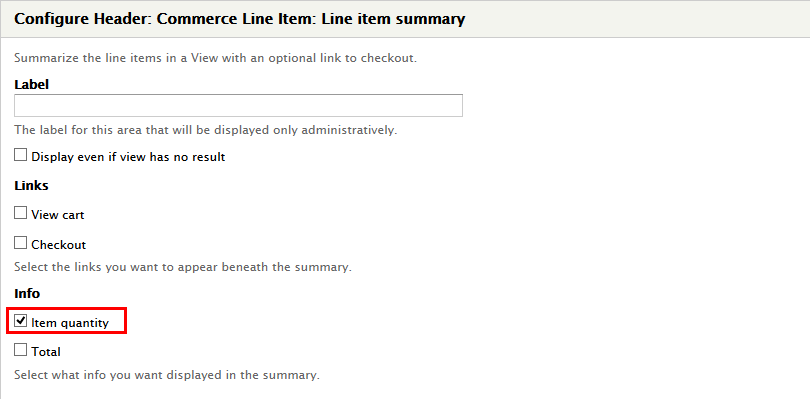
3. At HEADER area, click Add button to filed Commerce Line Item: Line item summary :
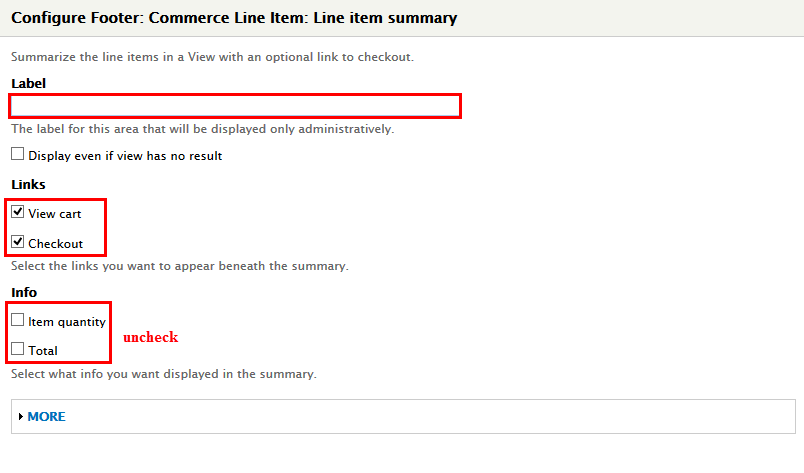
4. At FOOTER area, set properties file Commerce Line Item: Line item summary :
5. At Advanced > RELATIONSHIPS area, add Commerce Line Item: Product field:
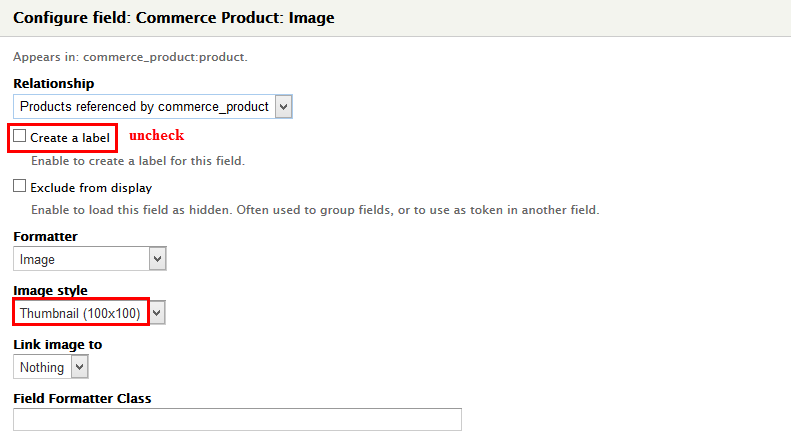
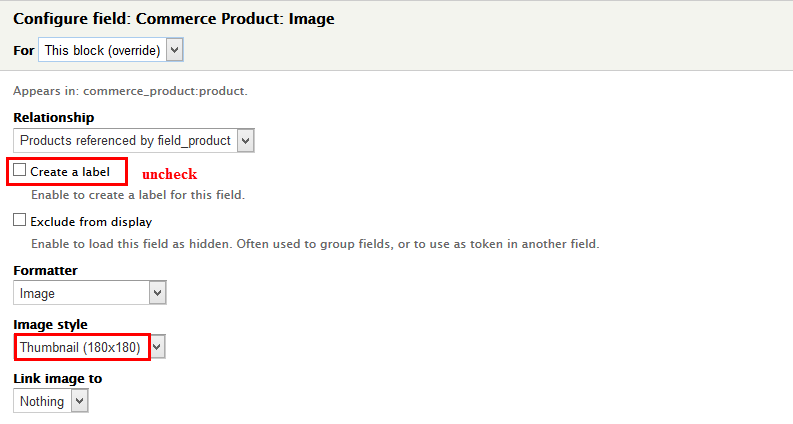
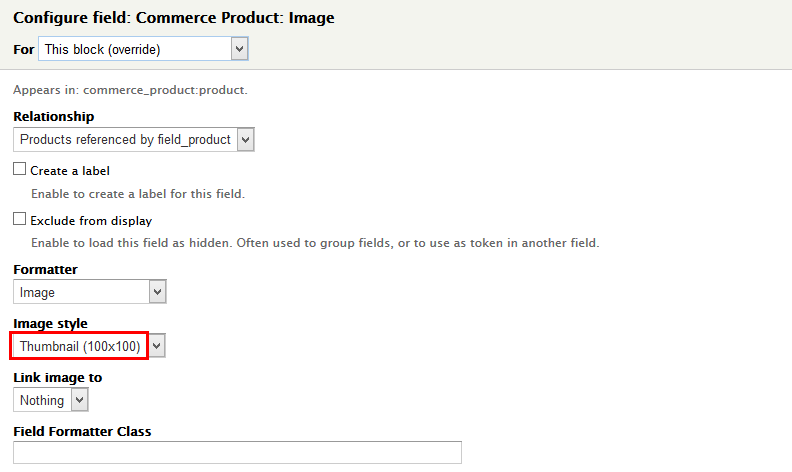
6. At FIELDS area, click Add button to add fields: Commerce Product: Image
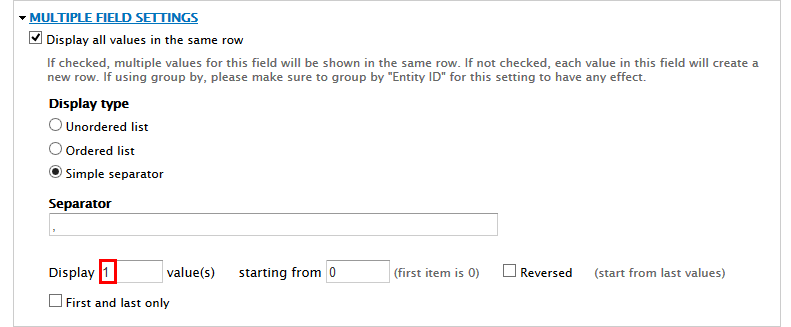
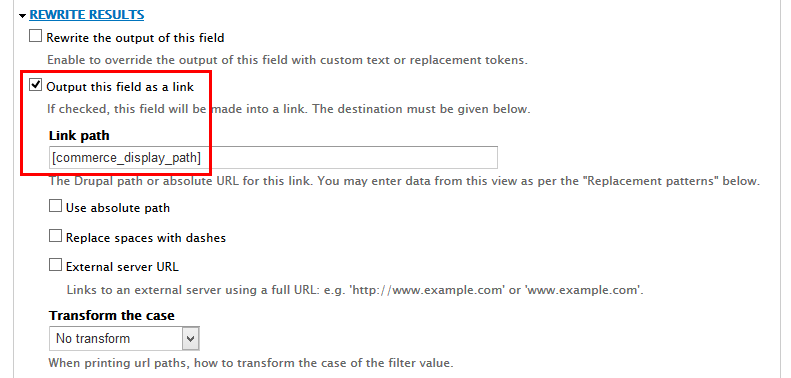
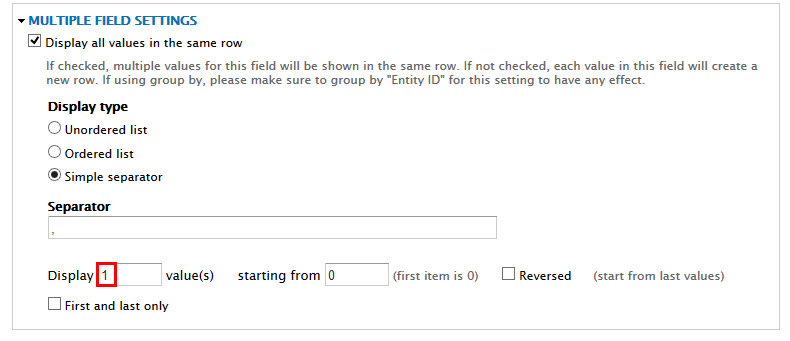
7. Set properties for Commerce Product: Image field
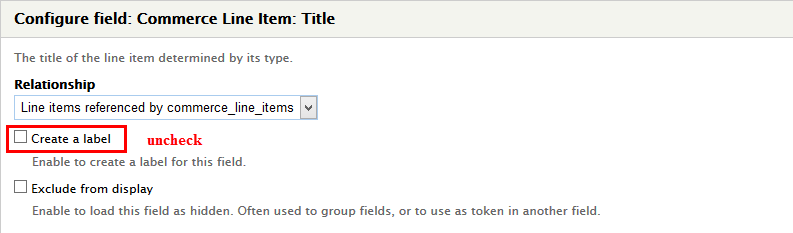
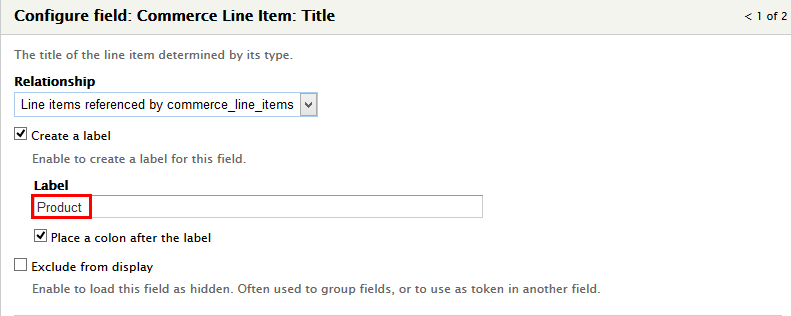
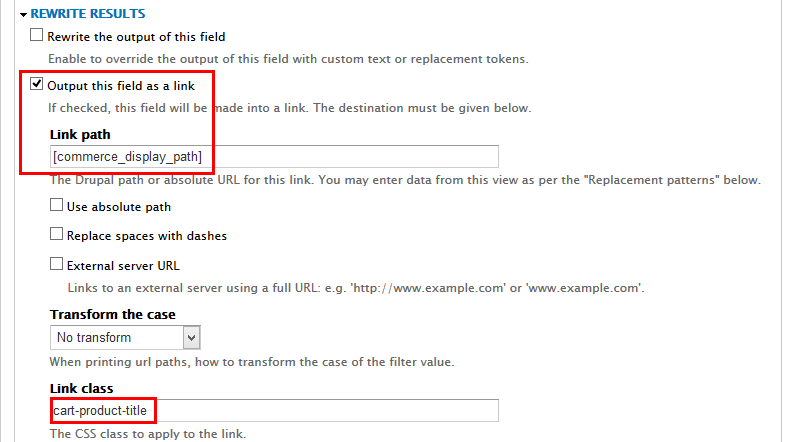
8. Set properties for Commerce Line Item: Title field
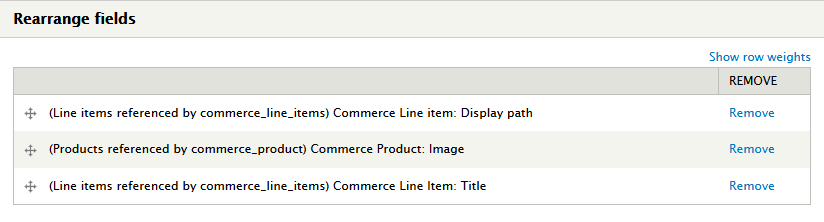
9. At FIELDS area, click Rearrange button removeCommerce Line item: Total, Commerce Line Item: Quantityfield and set properties:
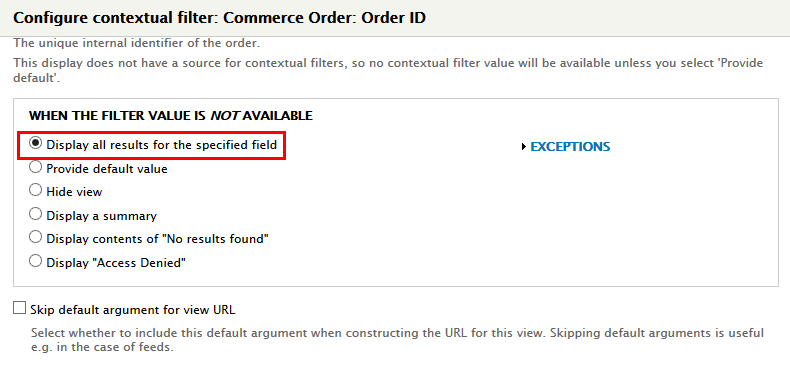
10. At Advanced > CONTEXTUAL FILTERS area, set properties field Commerce Order: Order ID :
11. Click Save to save all settings
2.2. Configure block: Shopping cart
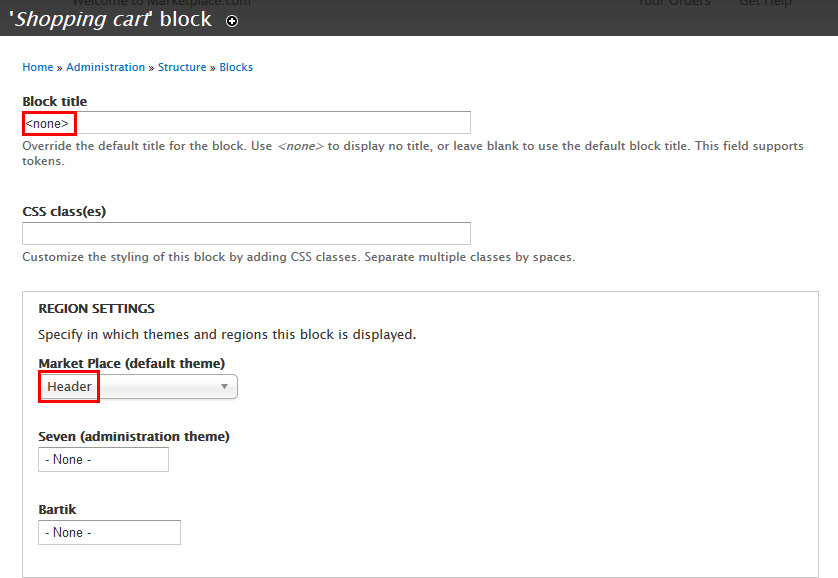
1. Navigate to Structure > Blocks, find Shopping cart block, click configure link and set the following properties:
2. Click Save block button.
3. Search page view
1. Create Product Display page view
1. Navigate to Structure > View, click Add new view link. Create Product Display view and set the following properties:
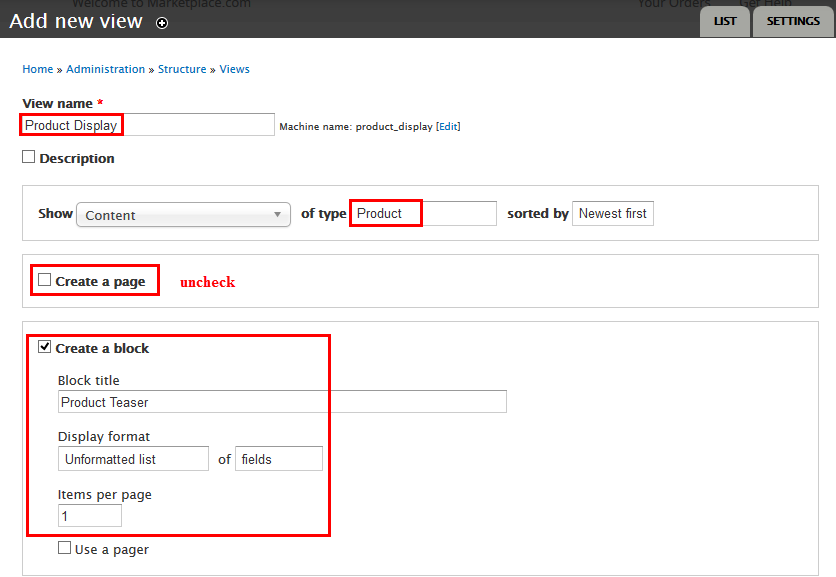
2.Click Continue and edit button. Next to below steps to set properties for following fields:
3.At Continue and edit button. Next to below steps to set properties for following fields:
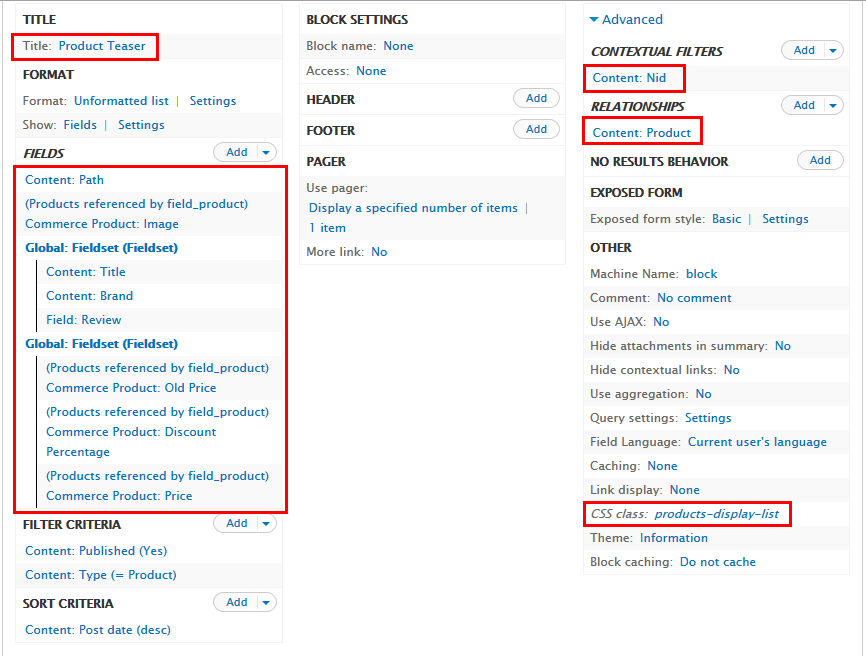
5. At Advanced > REALATIONSHIPS area, click Add button to add fields: Content: Product
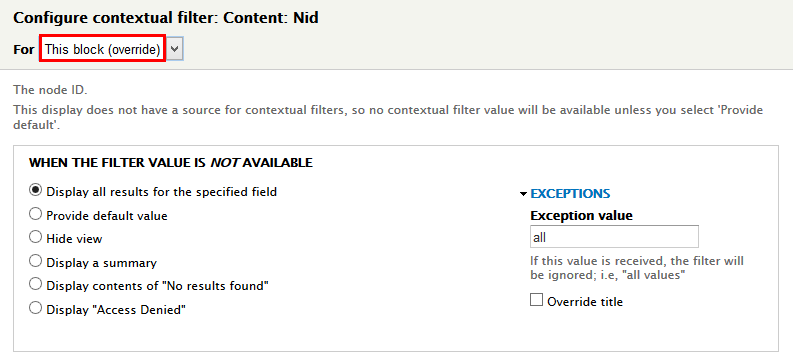
6. At Advanced > CONTEXTUAL FILTERS area, click Add button to add fields: Content: Nid
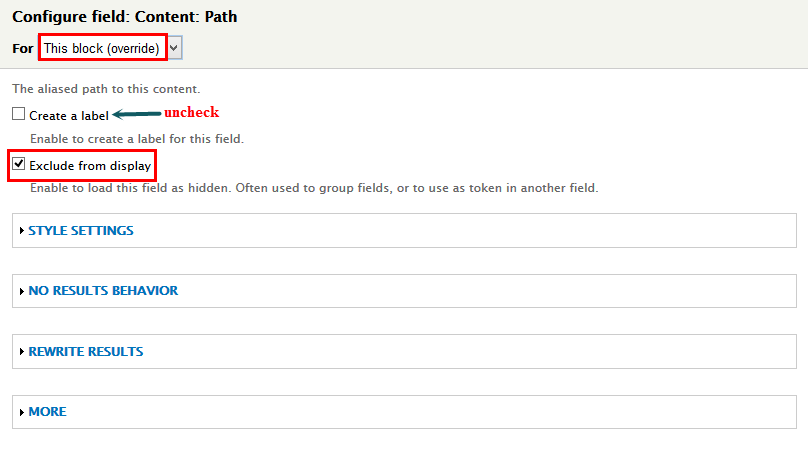
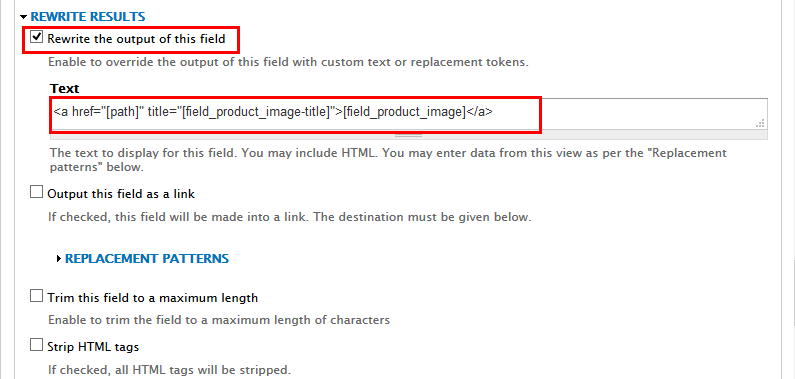
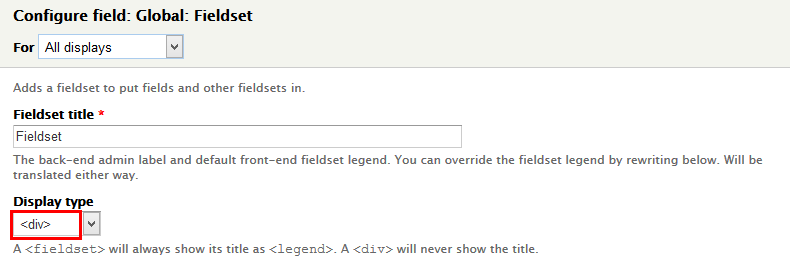
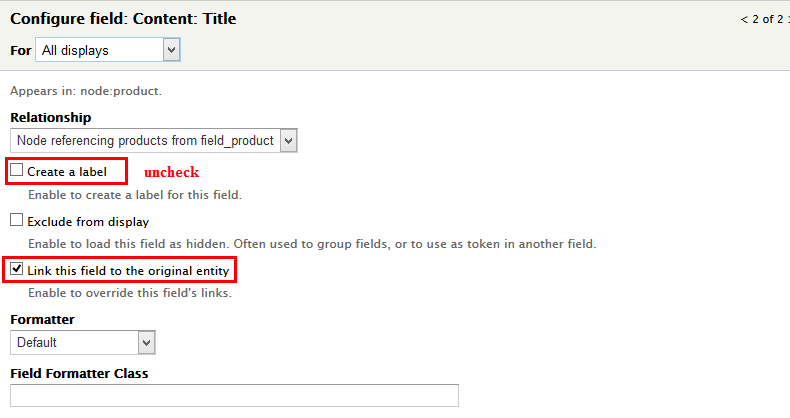
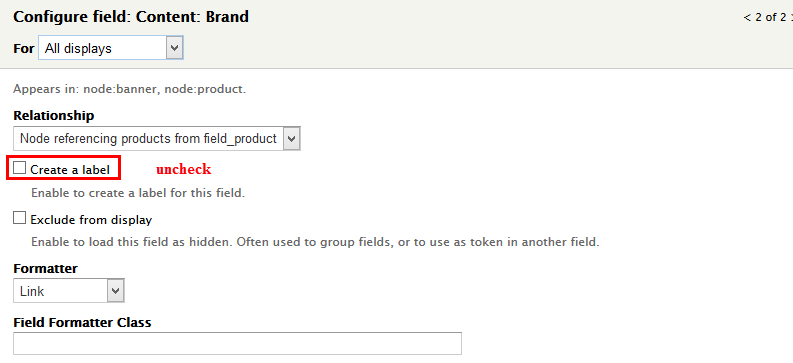
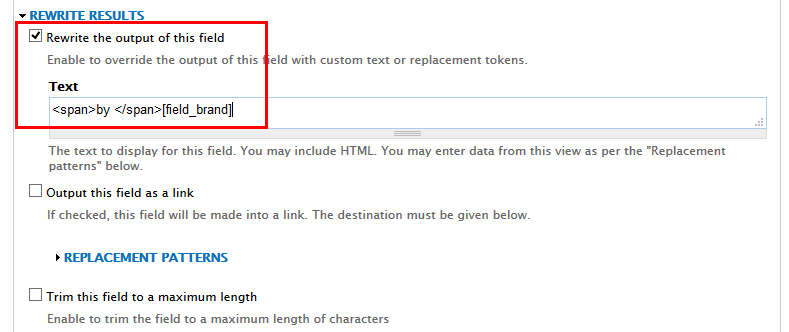
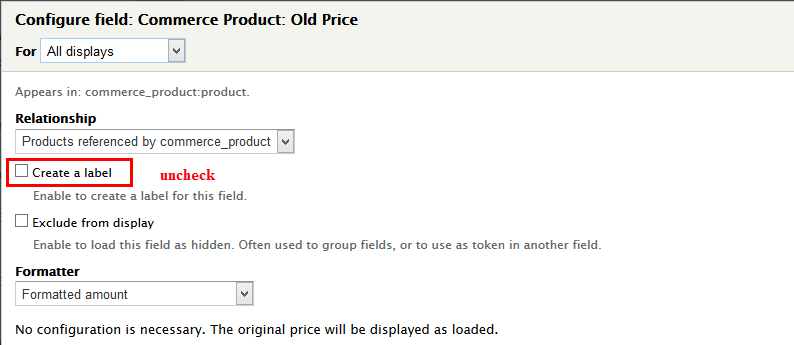
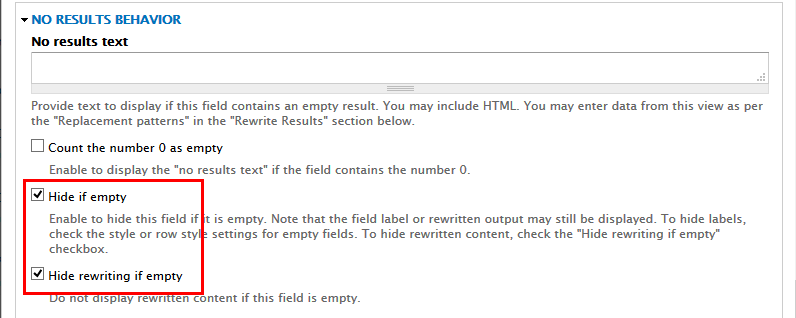
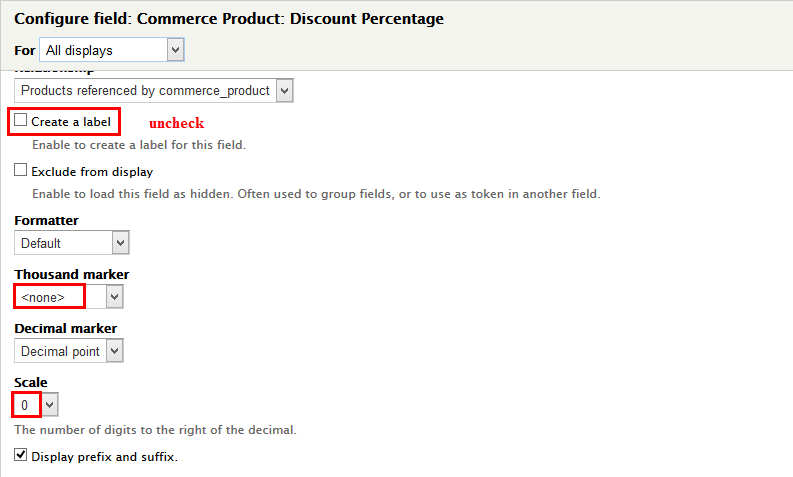
7. At FIELDS area, click Add button to add fields: Content: Path,Commerce Product: Image, Global: Fieldset,Content: Brand,Content: Review,Global: Fieldset,Commerce Product: Old Price,Commerce Product: Discount Percentage,Commerce Product: Price
8. Set properties for Content: Path
9. Set properties for Commerce Product: Image
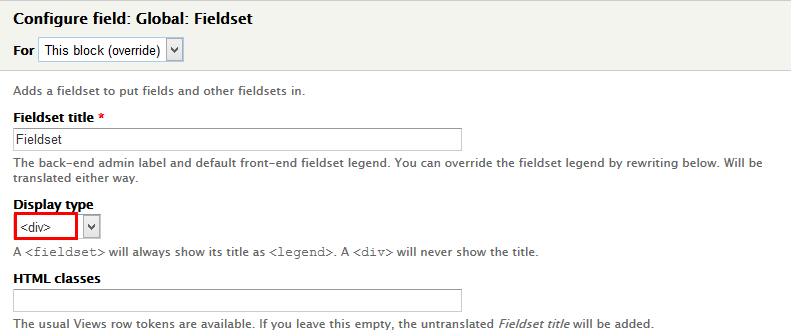
10. Set properties for Global: Fieldset
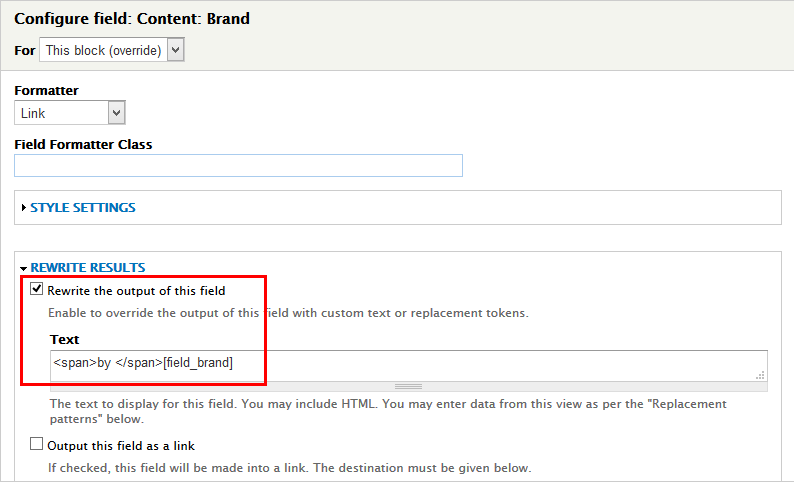
11. Set properties for Content: Brand
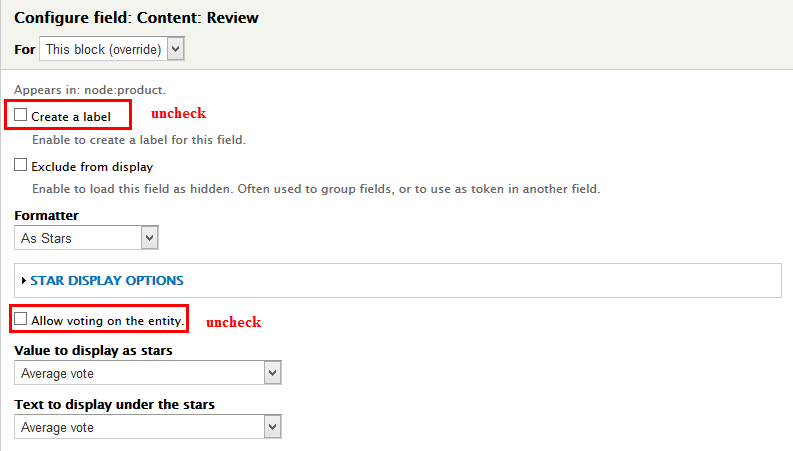
12. Set properties for Content: Review
13. Set properties for Global: Fieldset

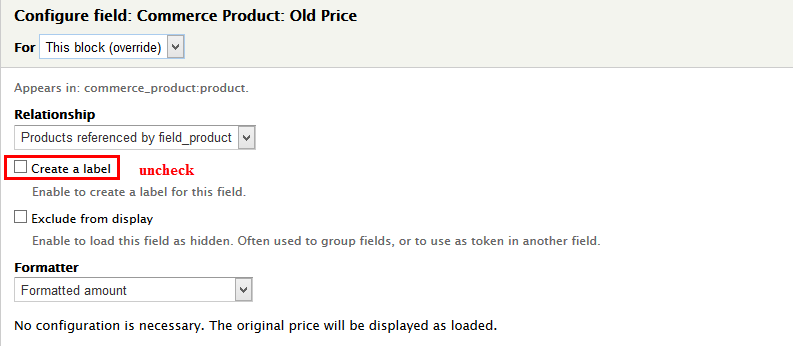
14. Set properties for Commerce Product: Old Price
15. Set properties for Commerce Product: Discount Percentage,Commerce Product: Price

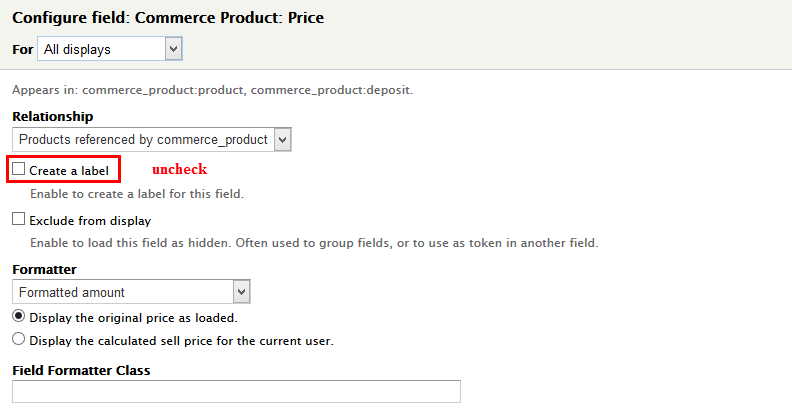
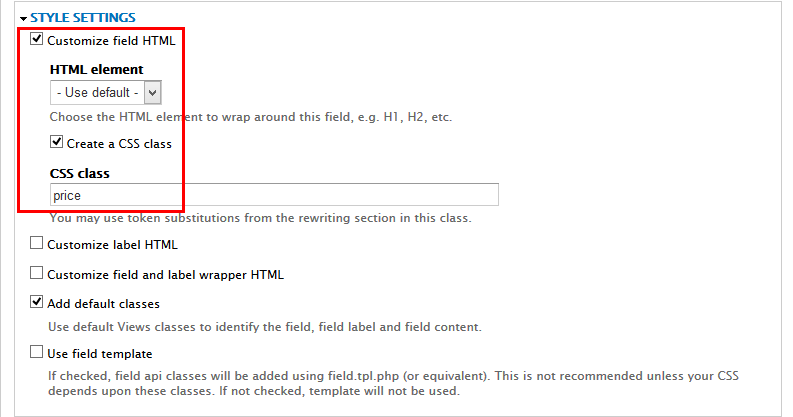
16. Set properties for Commerce Product: Price
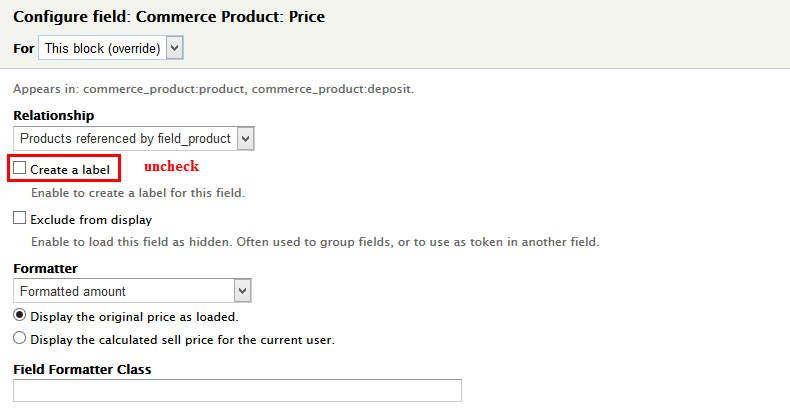
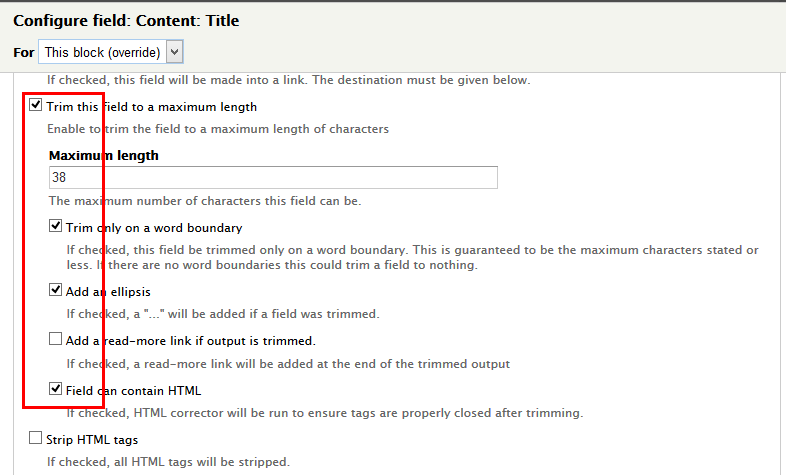
17. Set properties for Content: Title
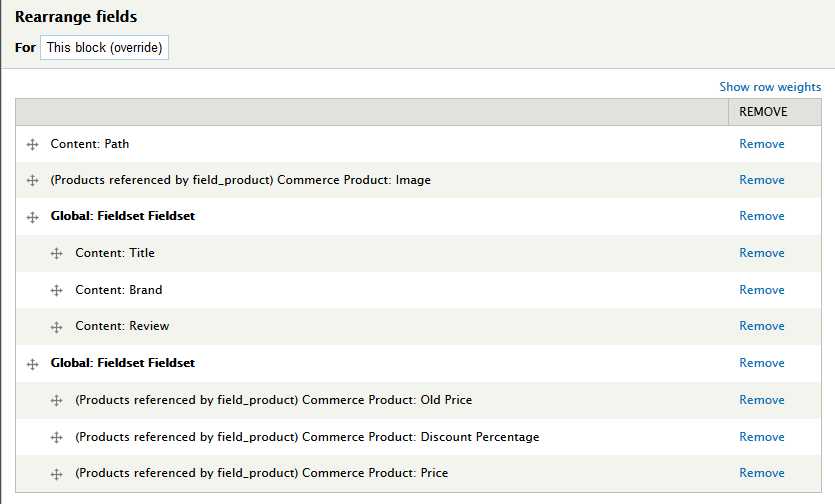
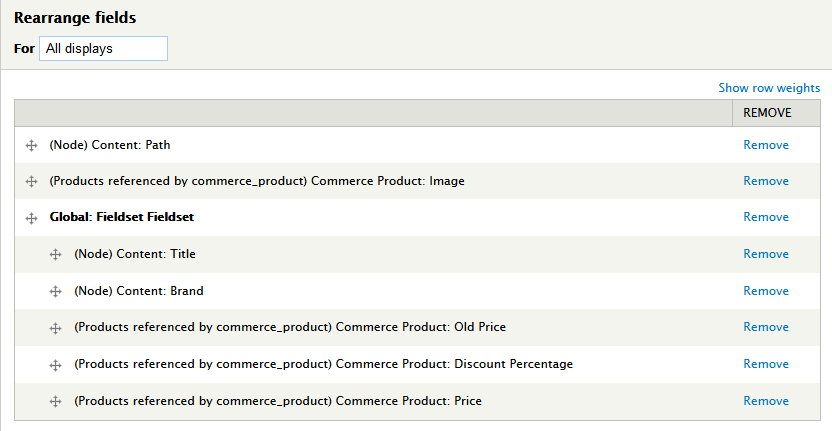
18.At FIELDS area, click Rearrange button and set following:
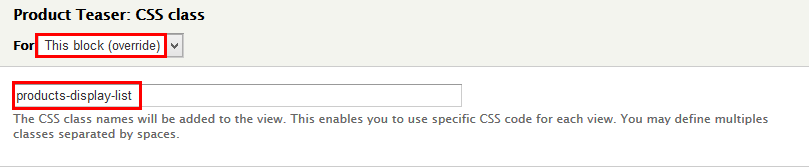
19.At Advanced > OTHER area, add CSS class:
20.At Display name click link and set name to Product Teaser
21.Click Save button
2.Configure : Search API
1. Navigate to Configuration > Search and metadata , find Search API link. At Type: Index click Edit and set the following properties:
2.Click Save button
3. Create Search page view
1. Navigate to Structure > View, click Add new view link. Create Search view and set the following properties:
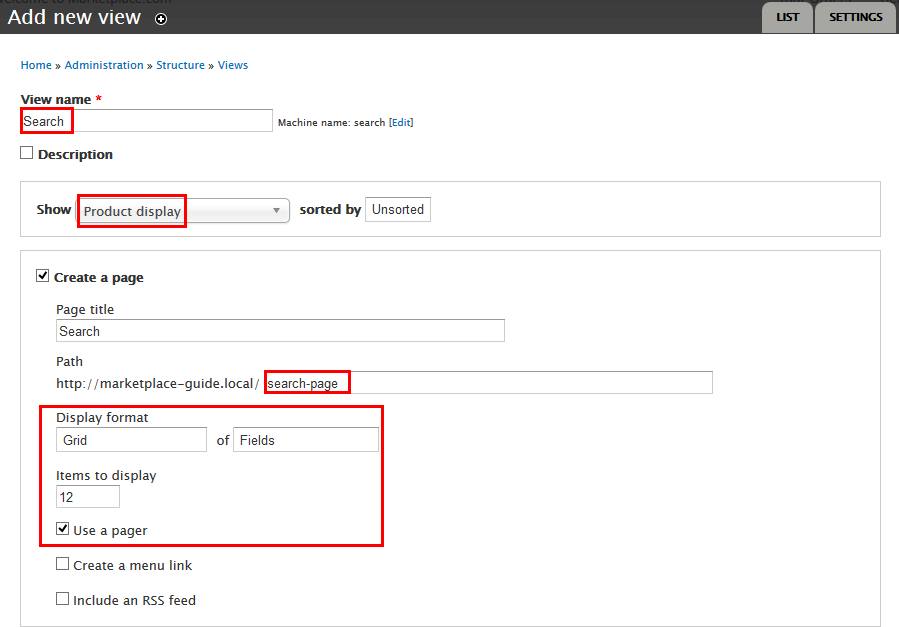
2.Click Continue and edit button. Next to below steps to set properties for following fields:
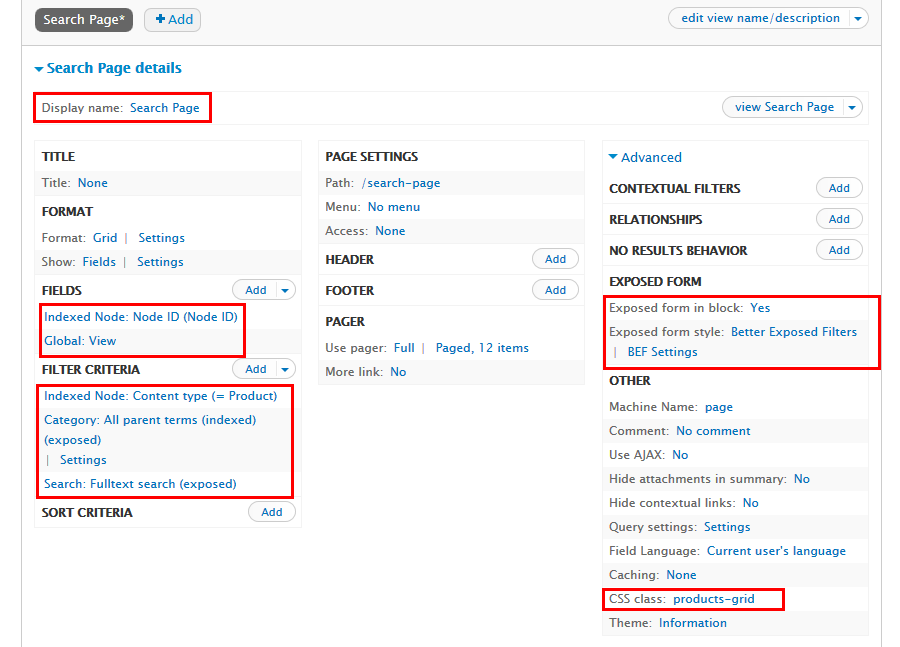
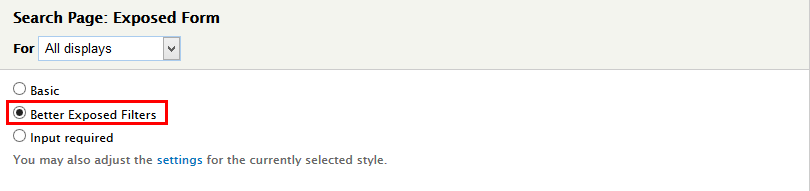
3. At Advanced > EXPOSED FORM area, click Exposed form in block link, set properties to Yes
4. At Advanced > EXPOSED FORM area, click Exposed form style link, set properties:
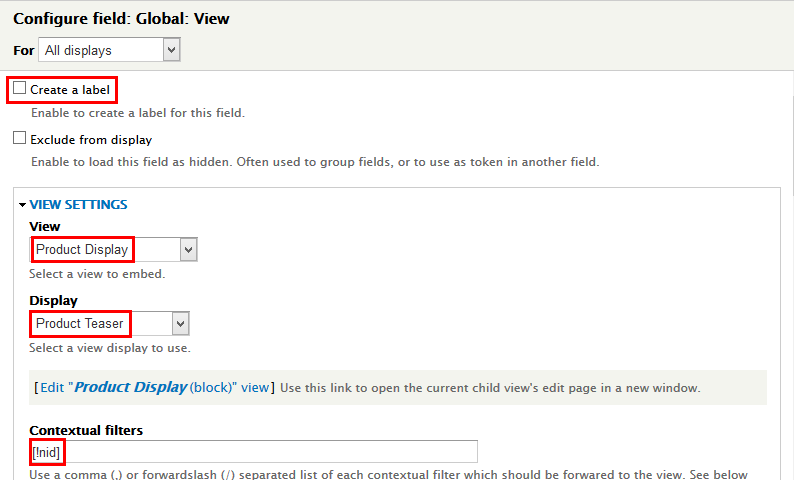
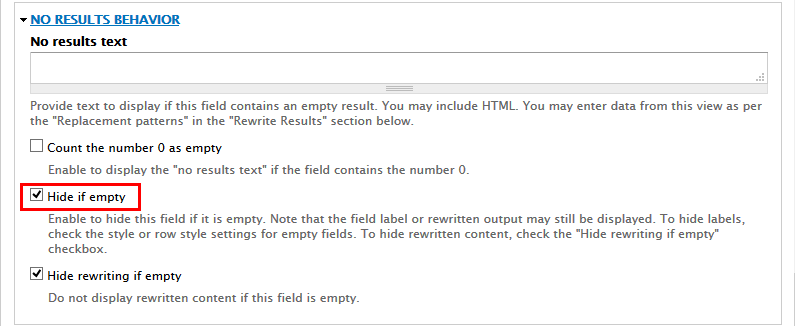
5. At FIELDS area, click Add button to add fields: Global: View and set properties:
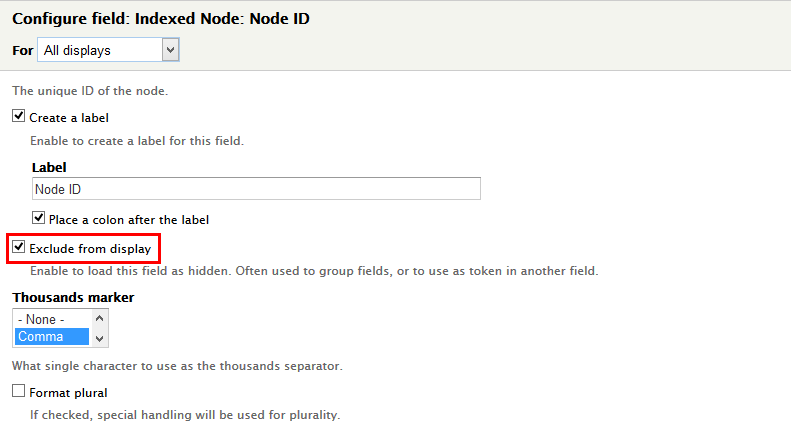
6. Set properties for Indexed Node: Node ID
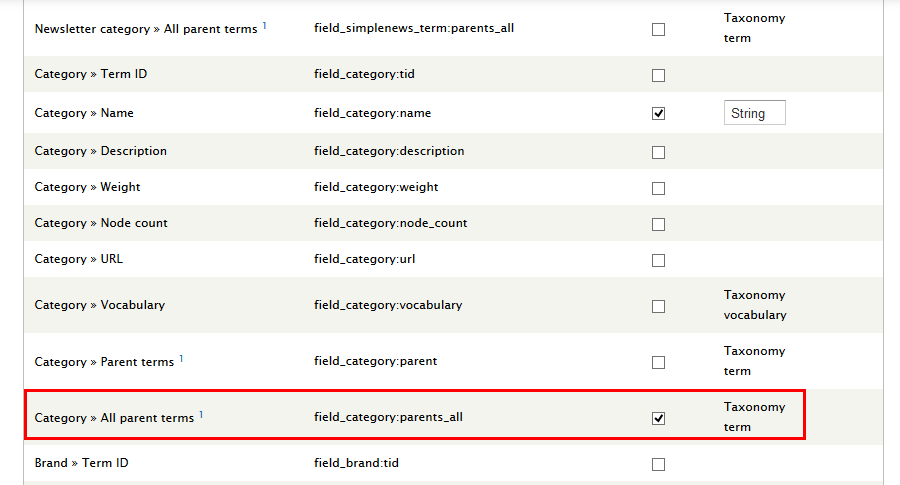
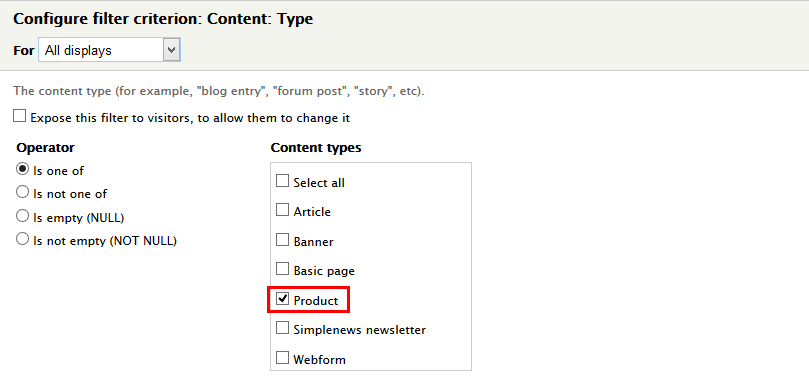
7. At FILTER CRITERIA area, click Add button to add fields: Indexed Node: Content type,Category: All parent terms,Search: Fulltext search and set properties:
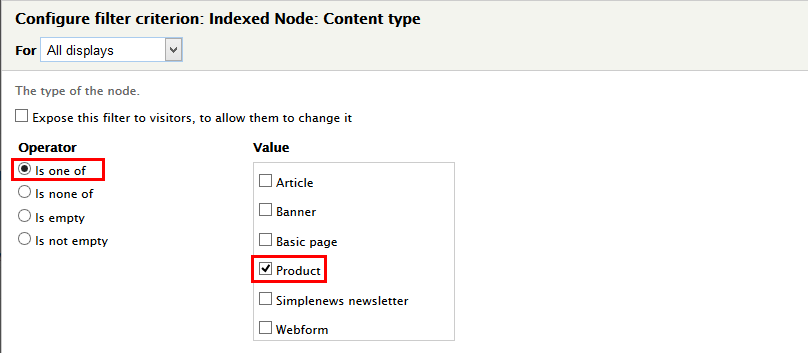
8. Set properties for Indexed Node: Content type
9. Set properties for Category: All parent terms
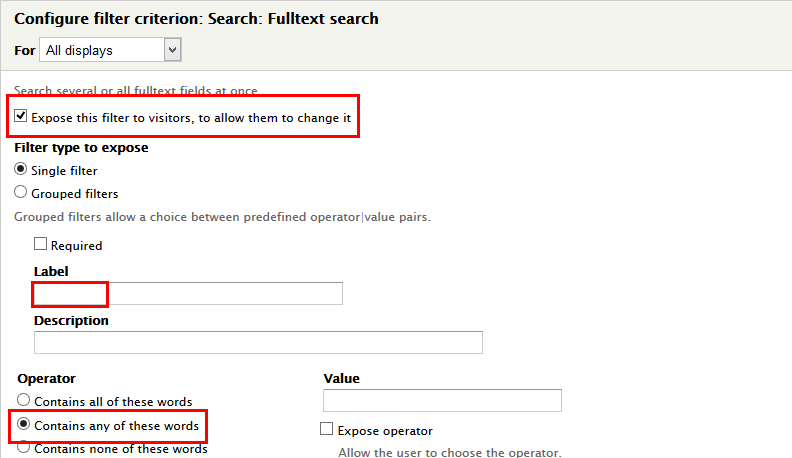
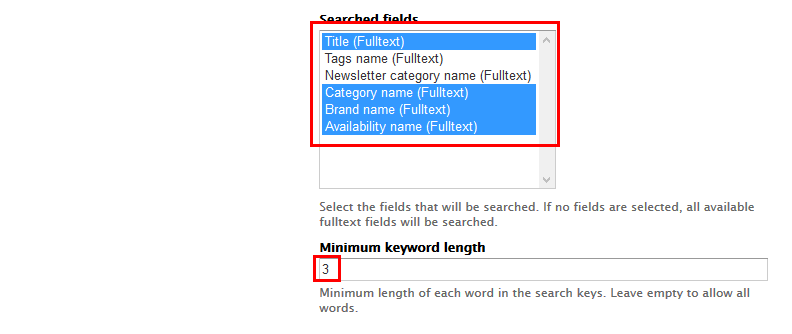
10. Set properties for Search: Fulltext search
11.At Advanced > OTHER area, add CSS class:
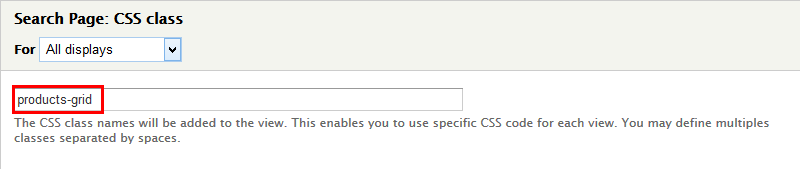
12.At Display name click link and set name to Search Page
13.Click Save button
4.Configure: Exposed form: search-page block
1. Navigate to Structure > Blocks, find Exposed form: search-page block, click configure link and set the following properties:
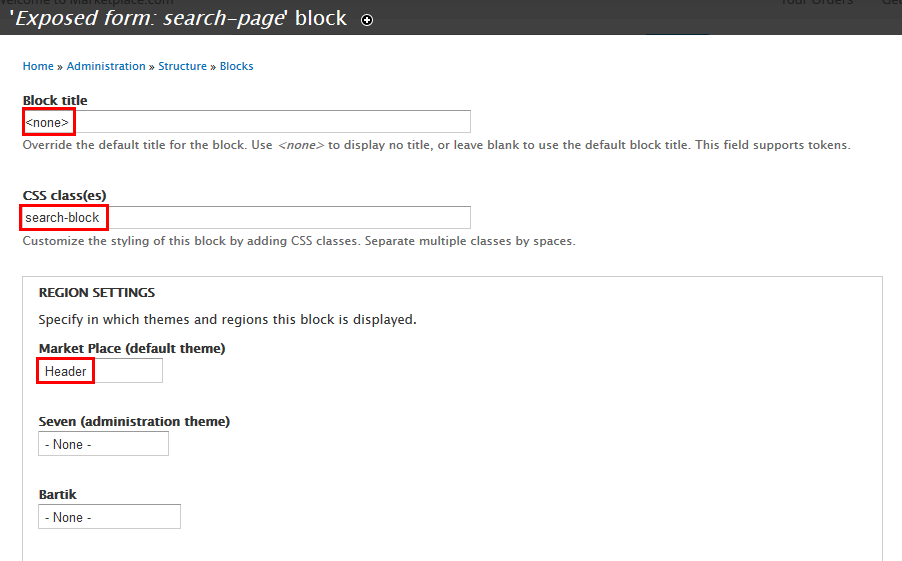
2. Click Save block button.
Slideshow block
1. Create Slideshow view
1. Navigate to Structure > Views, click Add new view, then create Slideshow view with following settings:
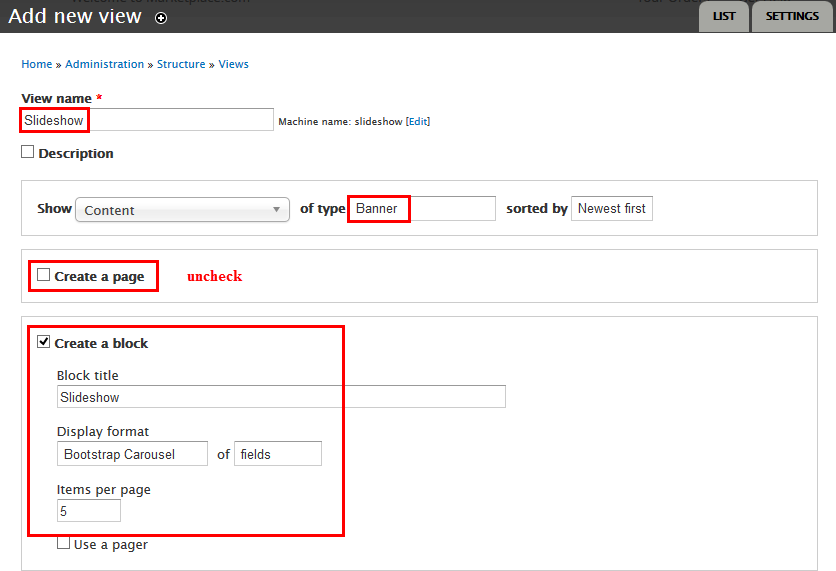
2. Click Continue and edit button. Next to steps below to set properties for following fields:
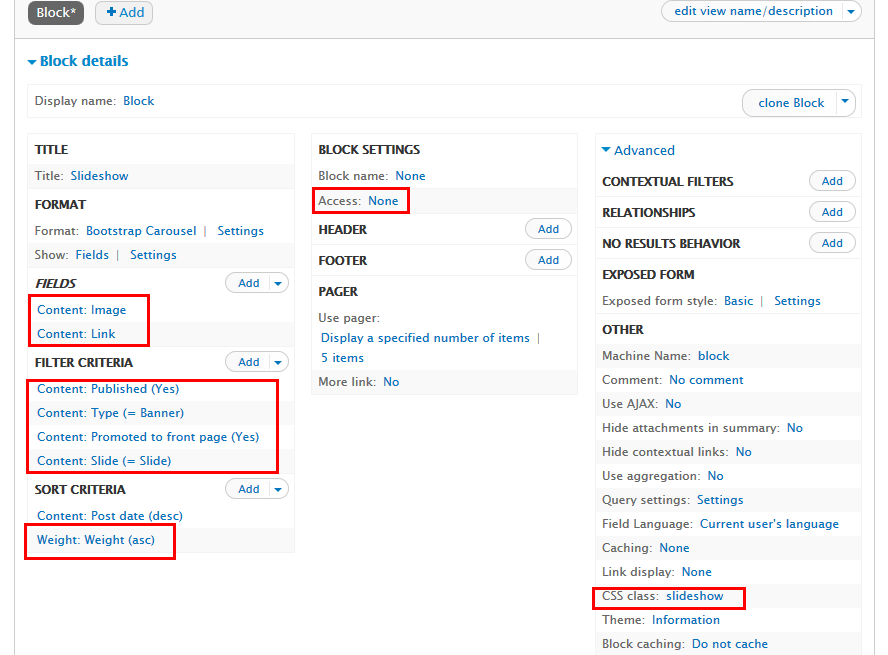
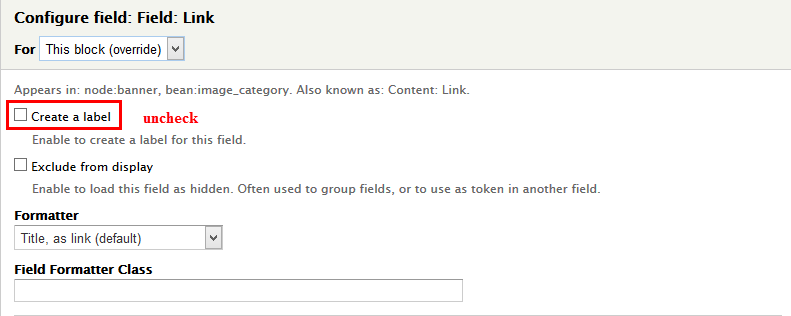
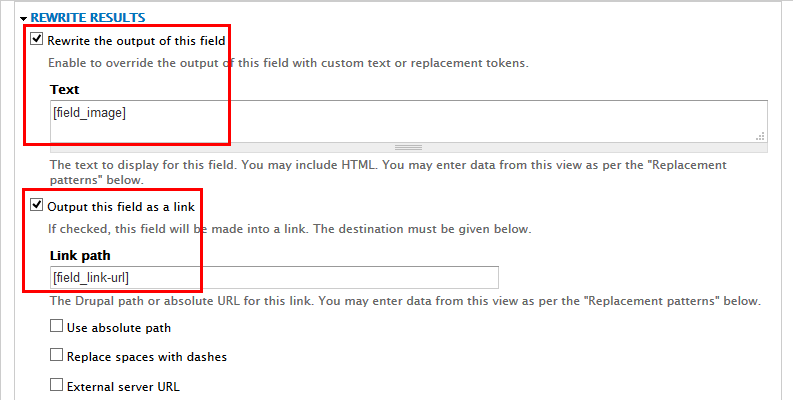
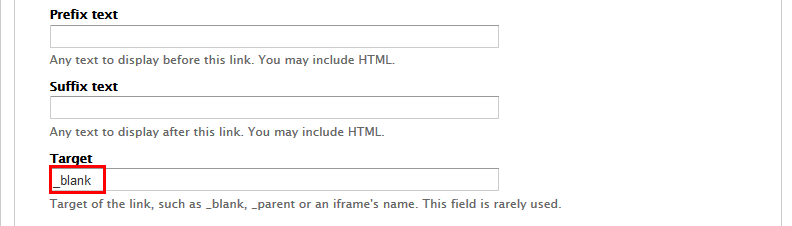
3. At FIELDS area, click Add button to add fields: Field: Image, Field: Link
4. Set properties for Field: Image

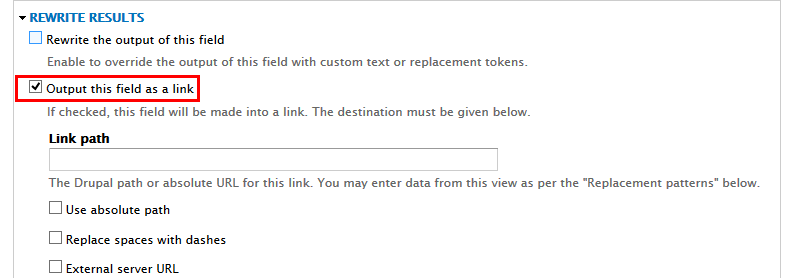
5. Set properties for Field: Link
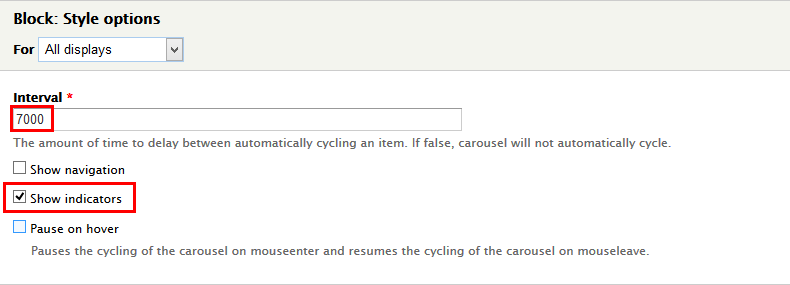
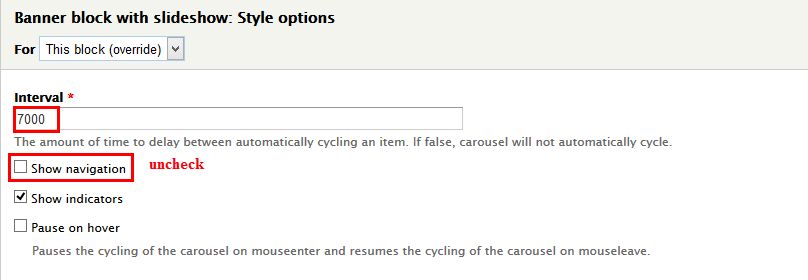
6. At FORMAT area, set following properties:
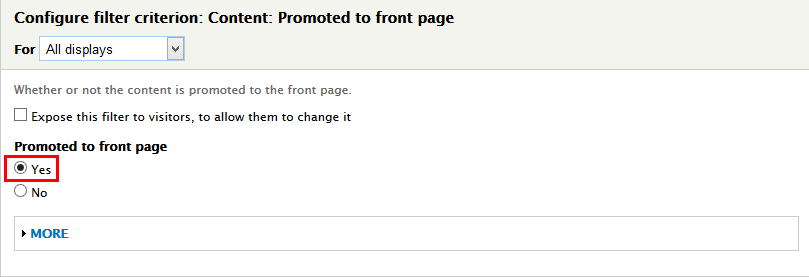
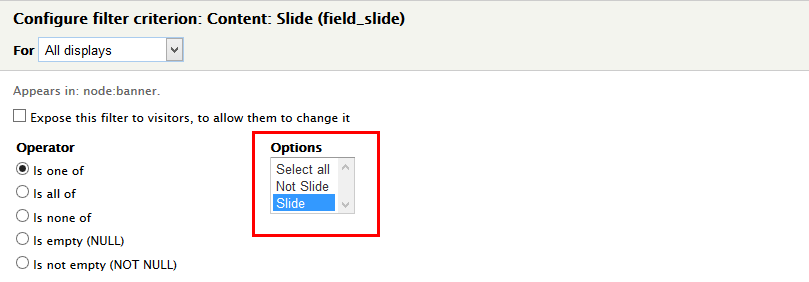
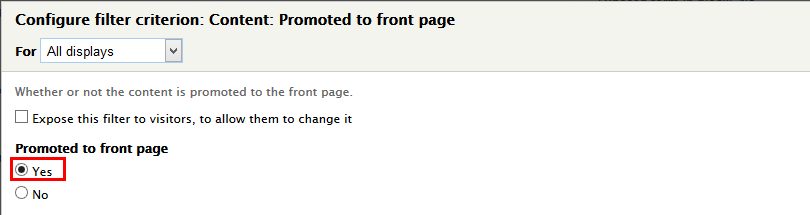
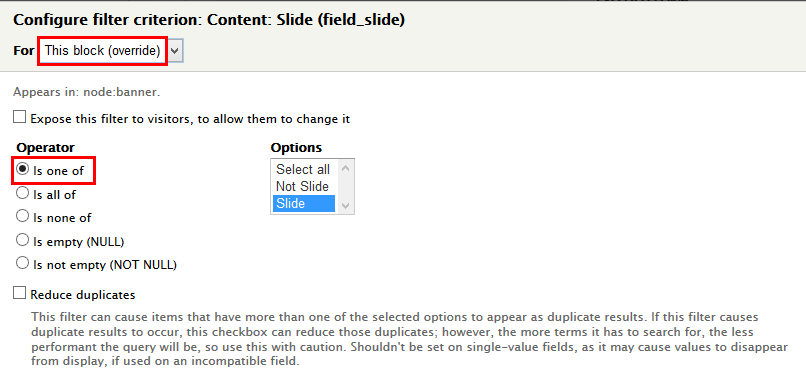
7. At FILTER CRITERIA area, Click Add button to add Content: Promoted to front page, Content: Slide
8.Set properties: Content: Promoted to front page
9.Set properties: Content: Slide
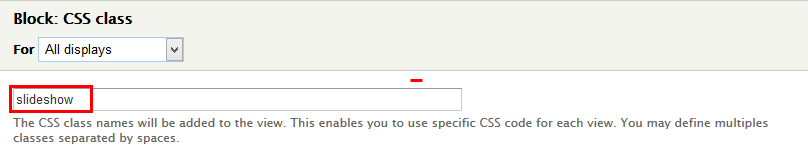
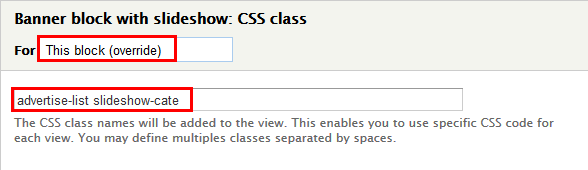
10. At Advanced > OTHER area, add CSS class:
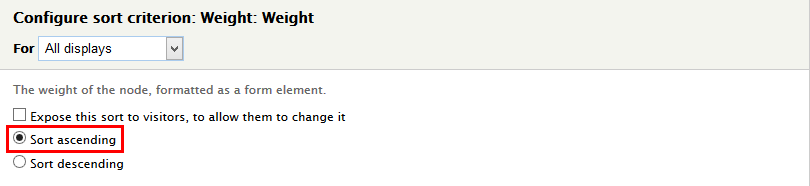
11. At SORT CRITERIA area, add Weight: Weight:
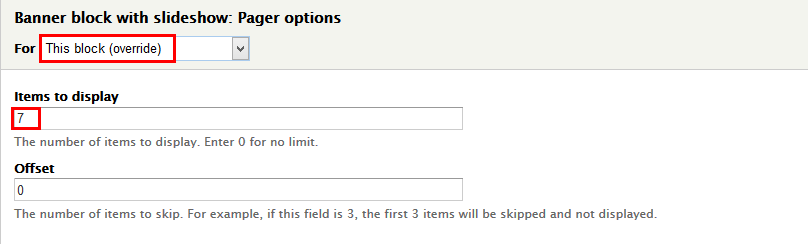
12. At BLOCK SETTINGS area, find Access , then set properties:
13. Click Save to save view
2. Configure Slideshow block
1. Navigate to Structure > Blocks
2. Find View: Slideshow click configure link, set following properties
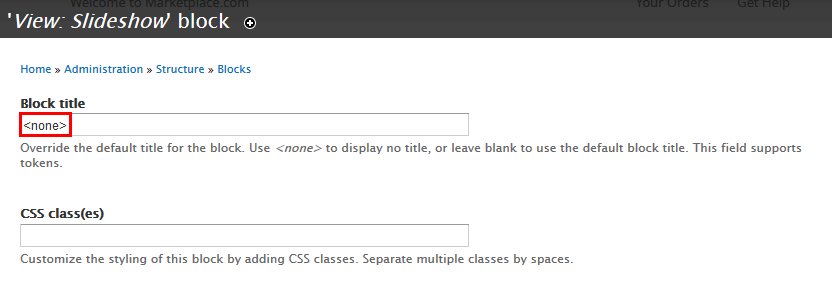
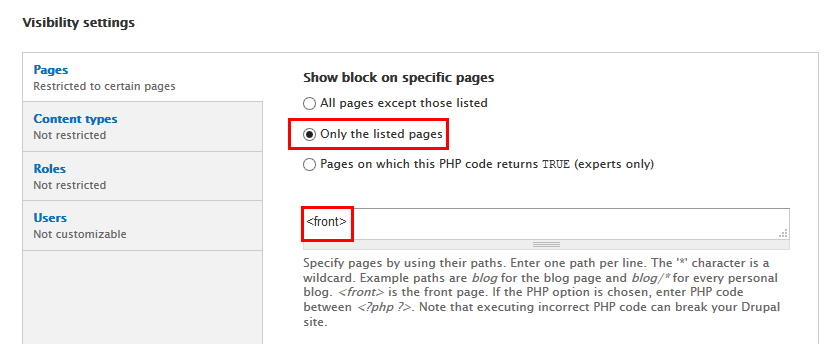
3. Click Save block button.
Brands block
1. Create Brands view
1. Navigate to Structure > Views, click Add new view, then create Brands view with following settings:
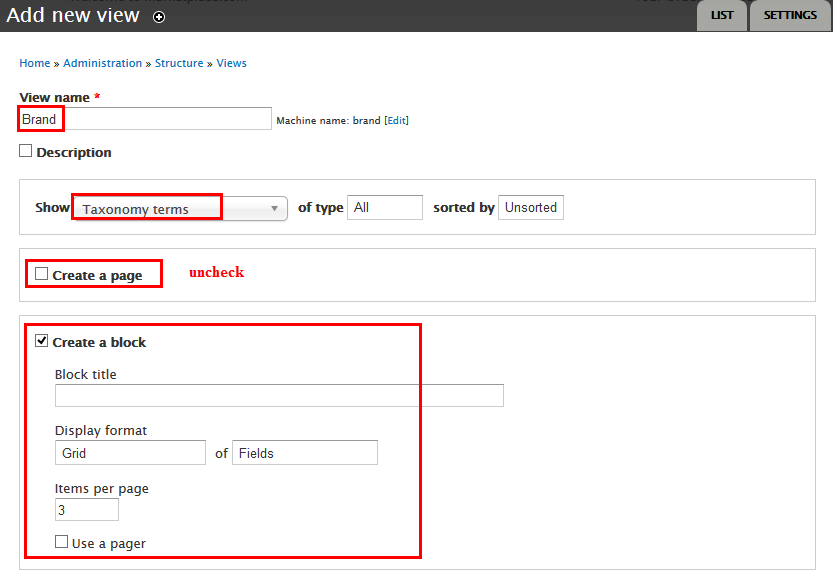
2. Click Continue and edit button. Next to steps below to set properties for following fields:
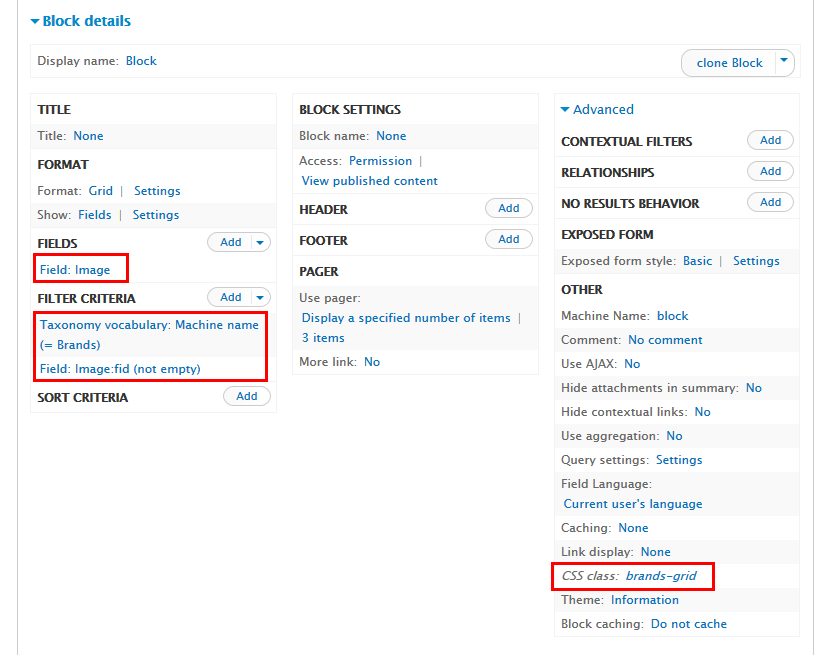
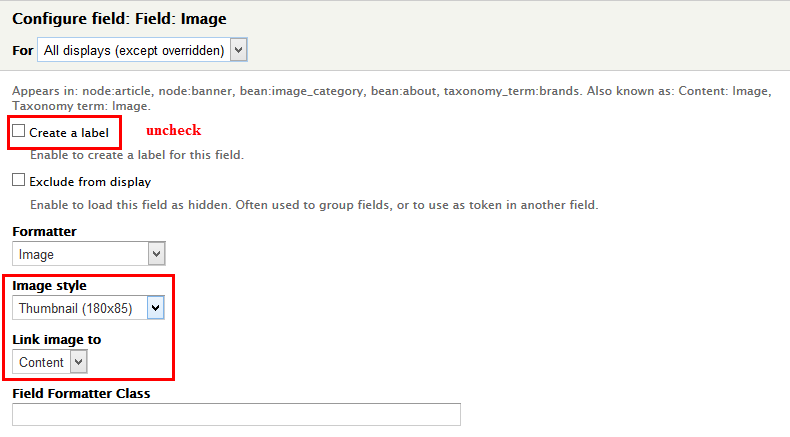
3. At FIELDS area, click Add button to add fields: Field: Image
4. Set properties for Field: Image
5. At FIELDS area. Click remove Taxonomy term: Name
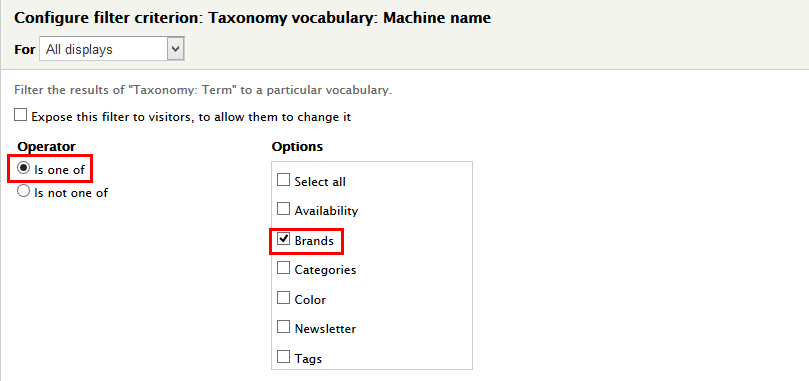
6. At FILTER CRITERIA area, Click Add button to add Taxonomy vocabulary: Machine name,Field: Image:fid
7.Set properties: Taxonomy vocabulary: Machine name
8.Set properties: Field: Image:fid

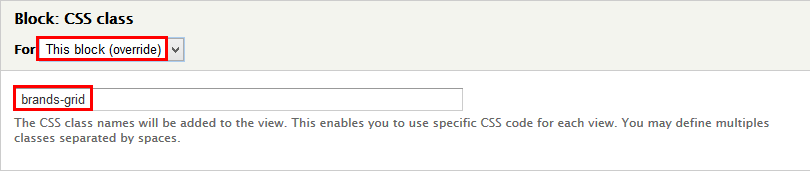
9. At Advanced > OTHER area, add CSS class:
10. Click Save to save view
2. Configure View: Brands block
1. Navigate to Structure > Blocks
2. Find View: Brands click configure link, set following properties
3. Click Save block button.
Brands: Popular searches
1. Create Brands: Popular searches block view
1. Navigate to Structure > Views, find Brand view, then click Add Block view with following settings:
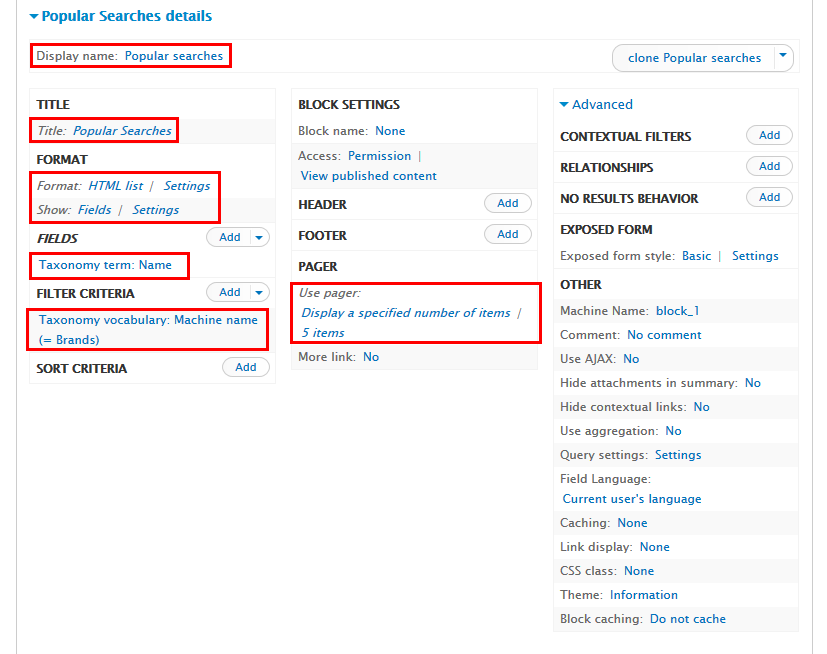
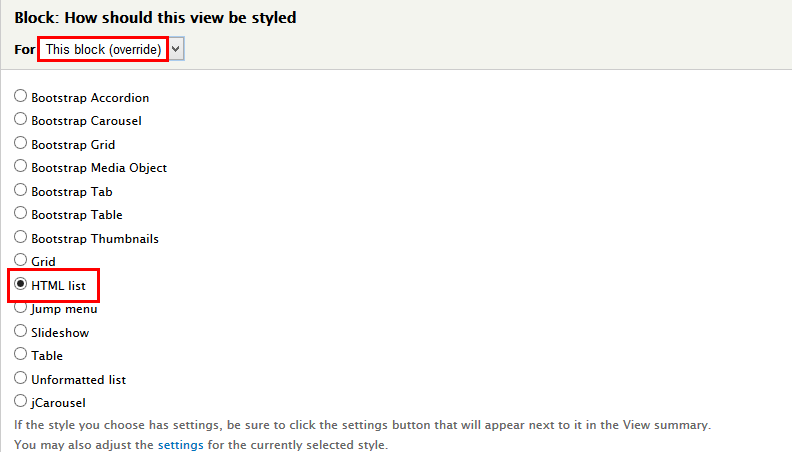
2. At FORMAT > Format area, set following properties
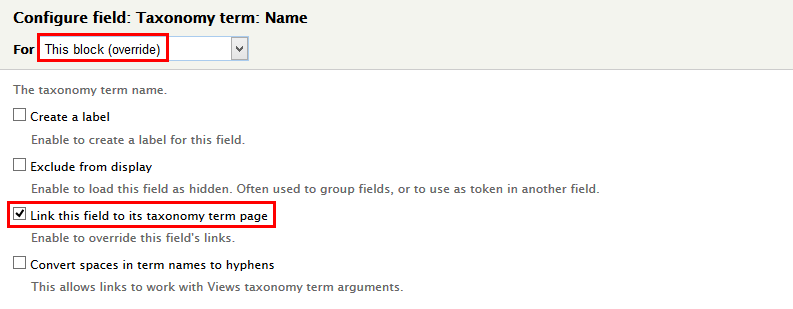
3. At FIELDS area, click Add button to add fields: Taxonomy term: Name and set properties
4. At FIELDS area. Click remove Field: Image
5. At FILTER CRITERIA area, Click Remove field Field: Image:fid
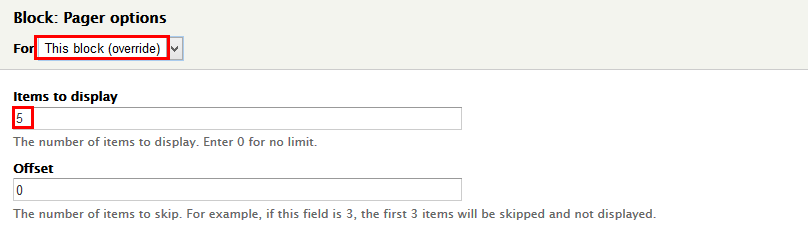
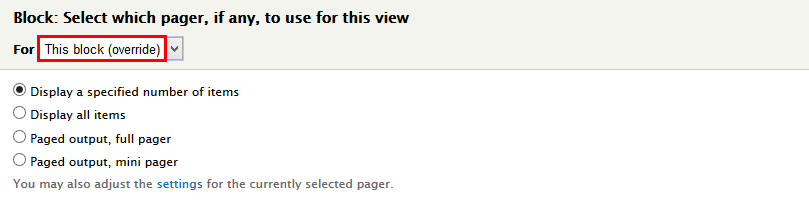
6. At PAGE area, find Use pager field and set properties:
7. At Display name change name display to Popular searches
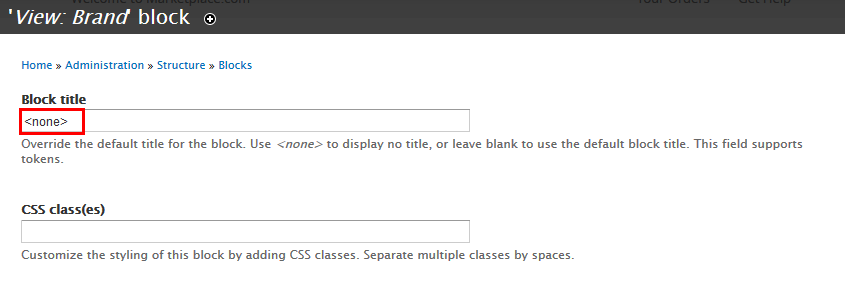
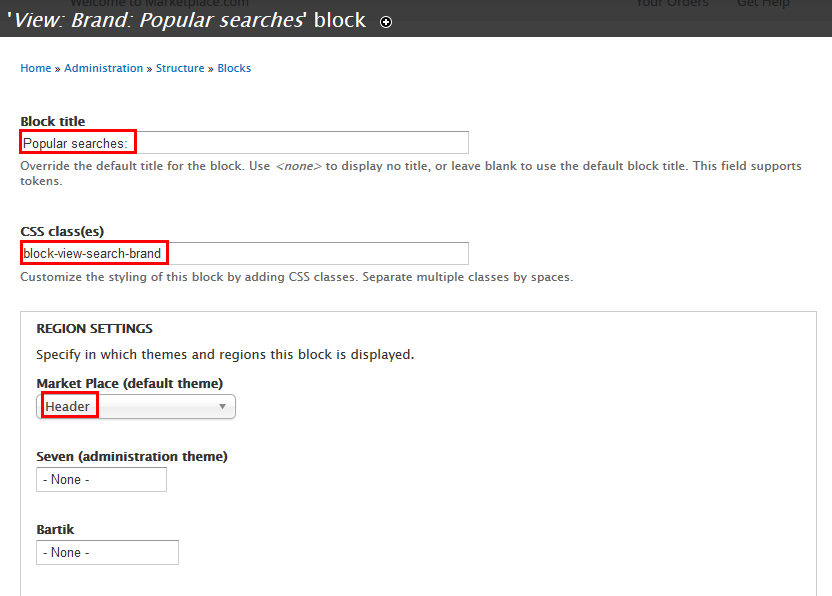
8. At TITLE area, set properties:

9. Click Save to save view
2. Configure View: Brand: Popular searches block
1. Navigate to Structure > Blocks
2. Find View: Brand: Popular searches blocks click configure link, set following properties
3. Click Save block button.
Mega Menus: Main menu
Front end Display

1. Add menu link
1. Navigate to Structure >Menu, find Main menu link. Add menu link following:
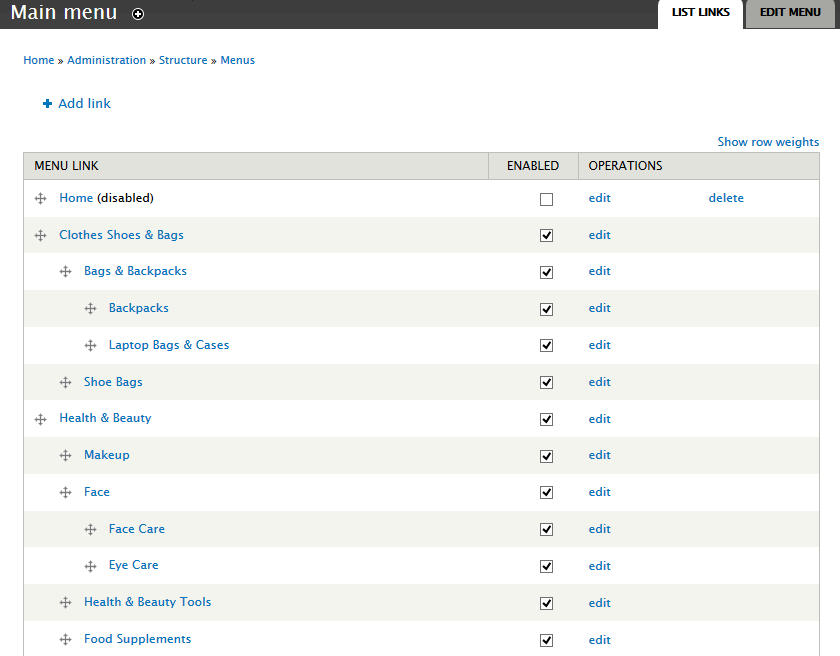
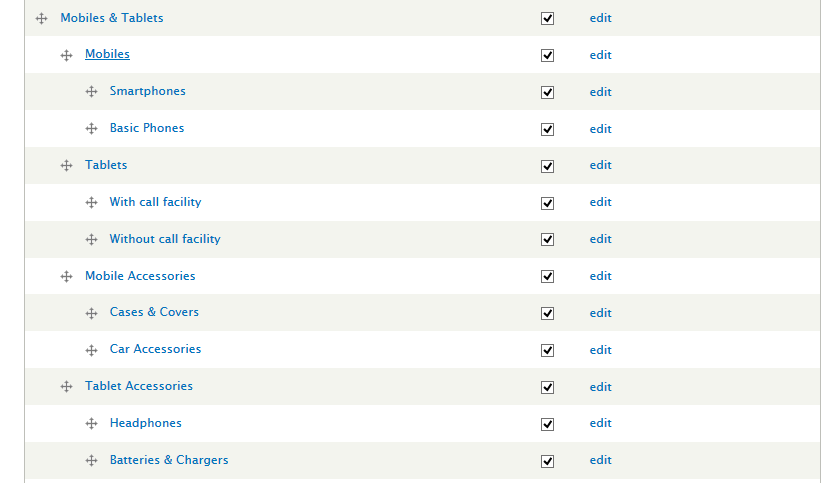
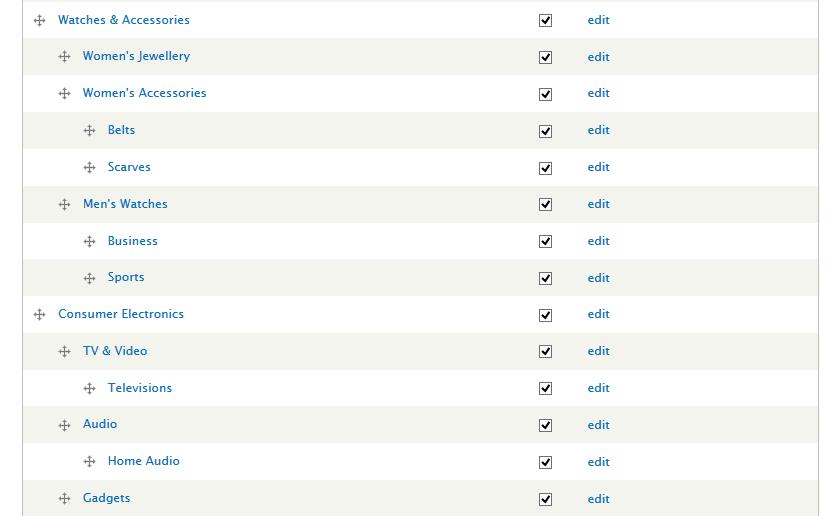
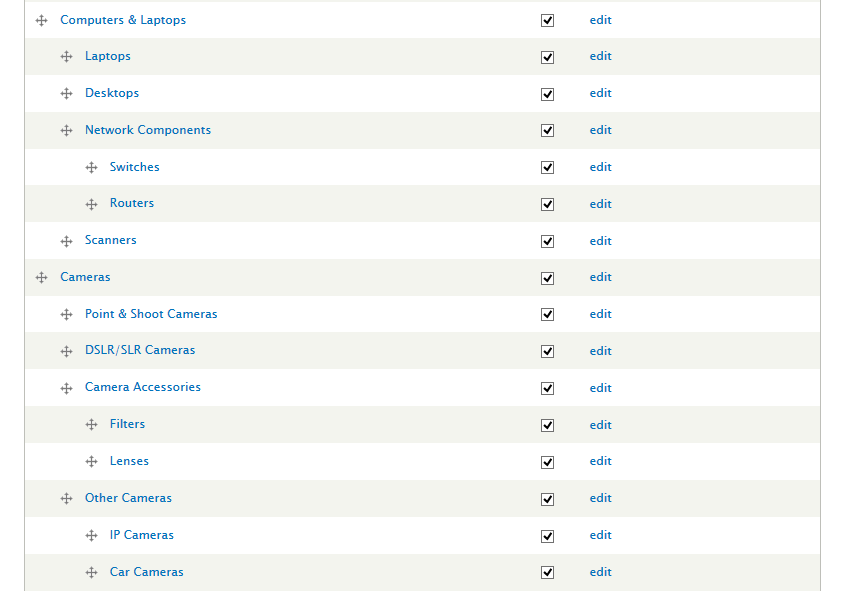
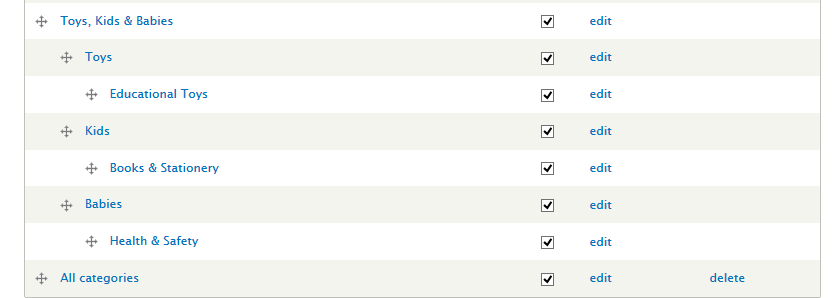
2. Click Save button.
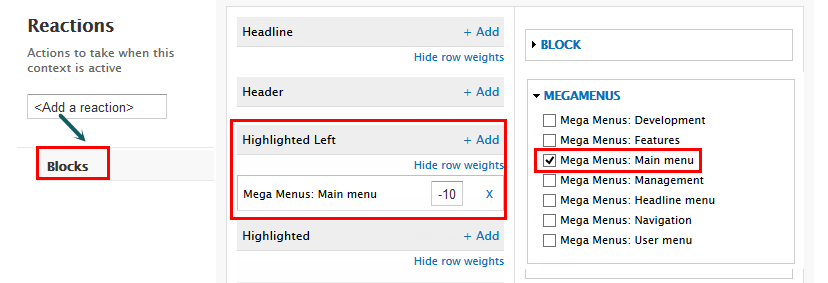
2. Configure: Mega Menus :Main menu
1. Navigate to Structure > Blocks, find Mega Menus :Main menu block with following properties:
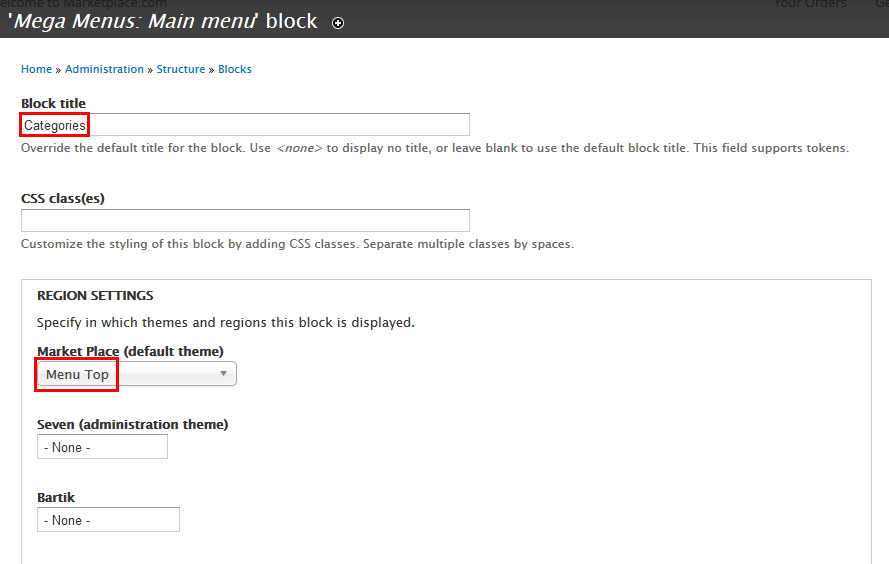
2. Click Save button.
3. Add Context Home
1. Navigate to Structure > Context, click Add link. Create home context with following properties:
2. Click Save button.
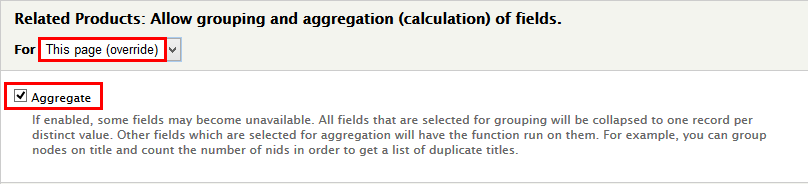
Today's Deal
1. Create Today's Deal view
1. Navigate to Structure > Views, click Add new view, then create Today's Deal view with following settings:
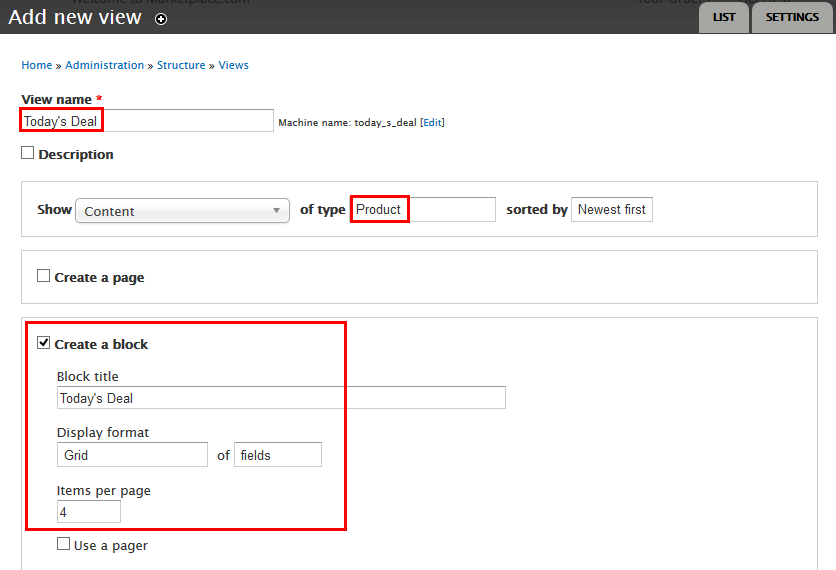
2. Click Continue and edit button. Next to steps below to set properties for following fields:
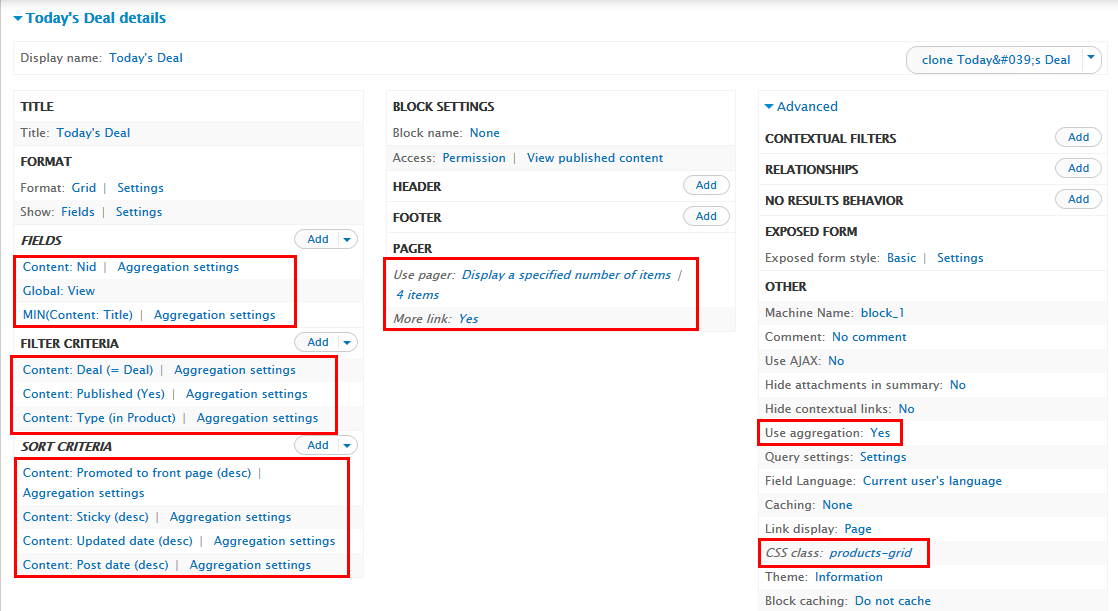
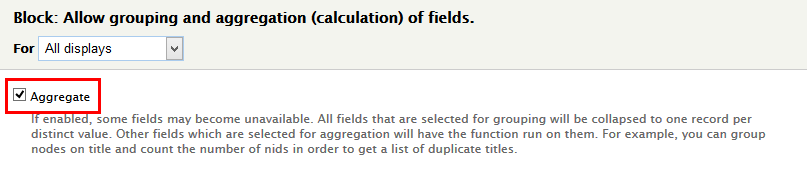
3. At Advanced > OTHER area, find Use aggregation set proprties:
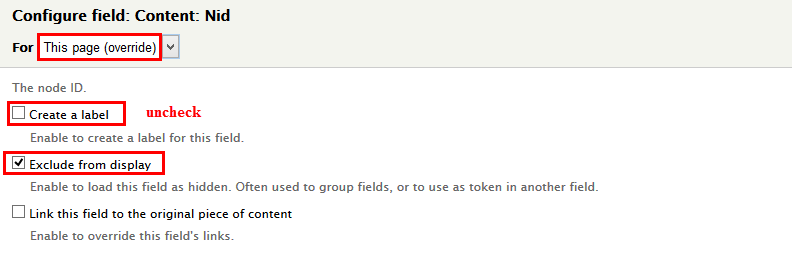
4. At FIELDS area, click Add button to add fields: Content: Nid, Global: View
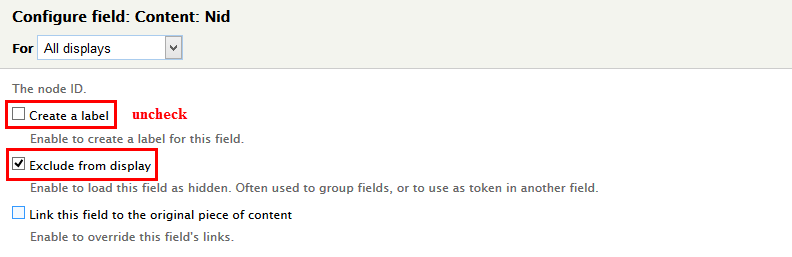
5. Set properties for Content: Nid
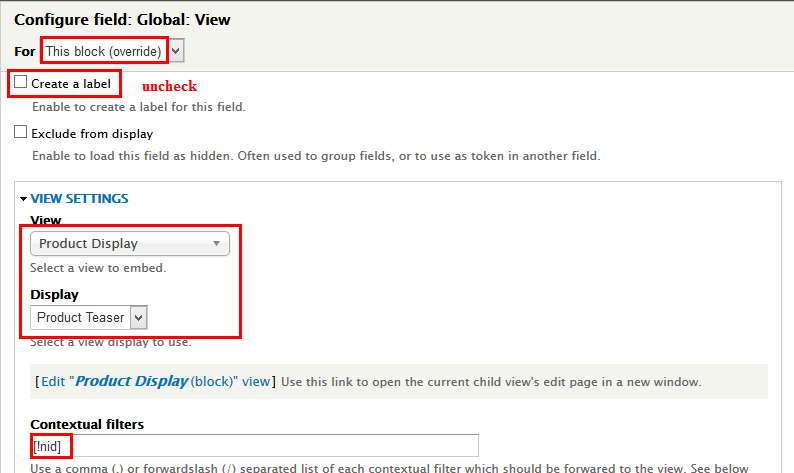
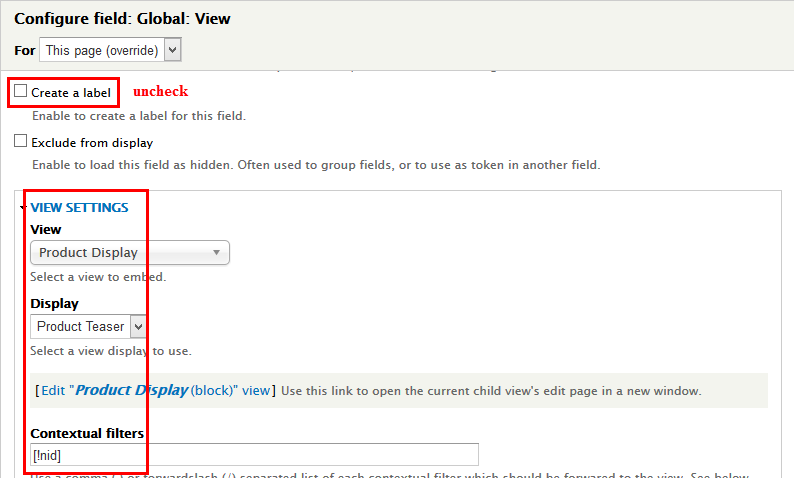
6. Set properties for Global: View
7. Set properties for Content: Title

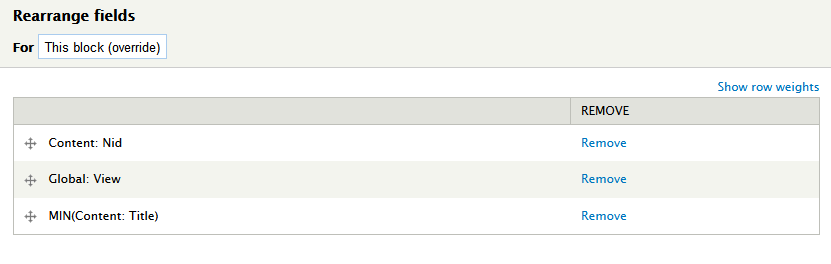
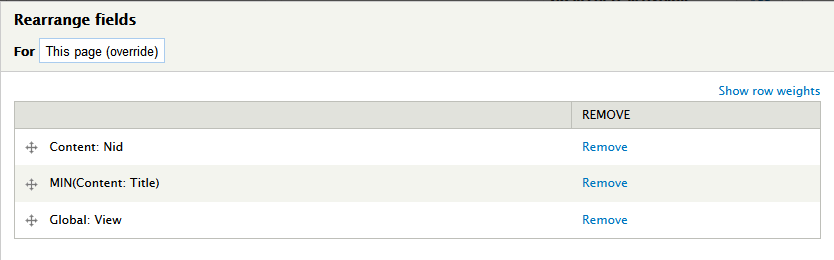
8. At FIELDS area. Click Rearrange button and set following properties:
9. At FILTER CRITERIA area, Click Add button to add Content: Deal
10.Set properties: Content: Deal
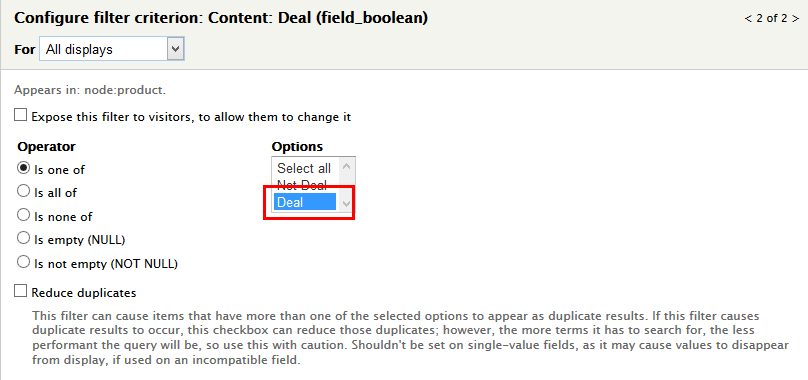
11. At FILTER CRIRETIA area. Click Rearrange button and set following properties:
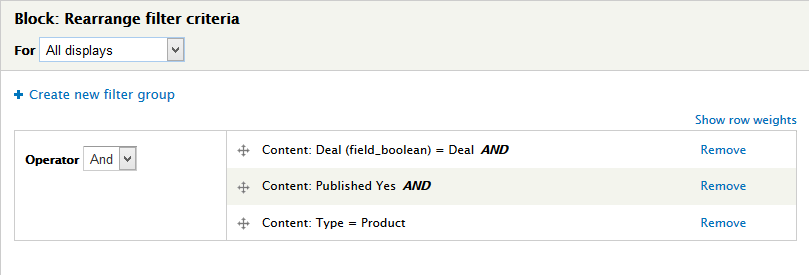
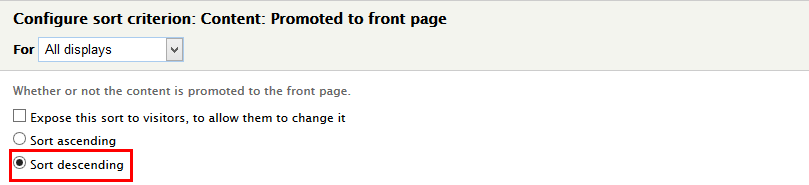
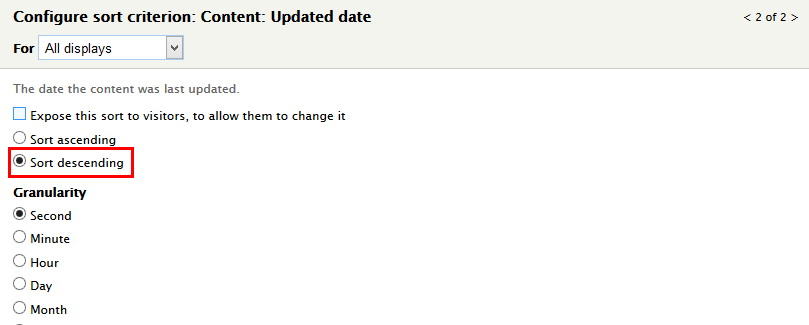
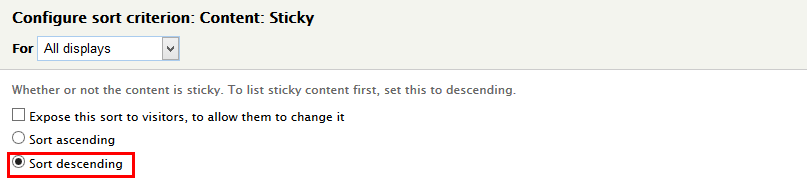
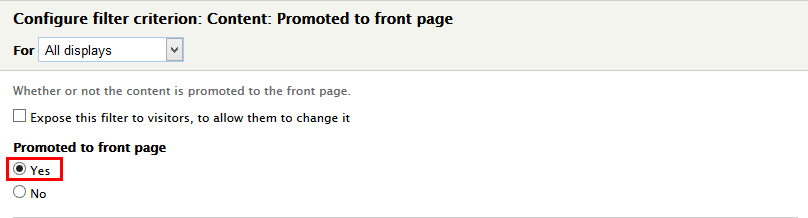
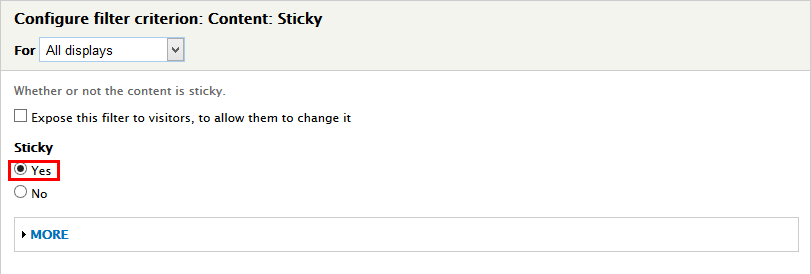
12. At SORT CRITERIA area, Click Add button to add Content: Promoted to front page, Content: Sticky, Content: Updated date
13.Set properties: Content: Promoted to front page
14.Set properties: Content: Sticky
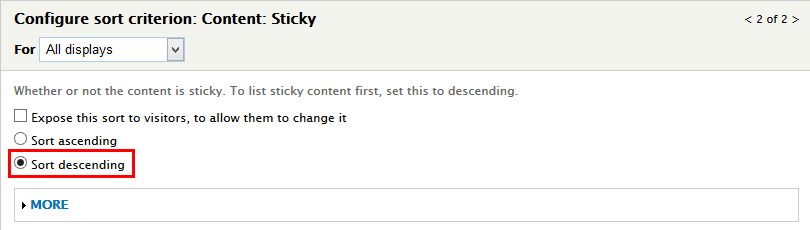
15.Set properties: Content: Updated date
16. At Advanced > OTHER area, add CSS class:

17. At PAGE area, find Use pager set properties:

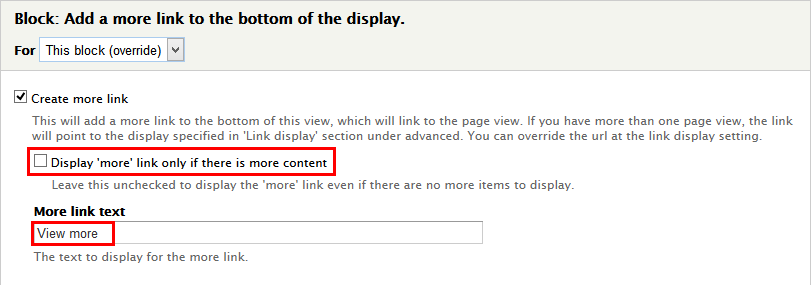
18. At PAGE area, find More link set properties:
19. Click Save to save view
2. Configure View: Today's Deal: Today's Deal block
1. Navigate to Structure > Blocks
2. Find View: Today's Deal: Today's Deal' block click configure link, set following properties

3. Click Save block button.
Bestsellers block
1. Create Bestsellers view
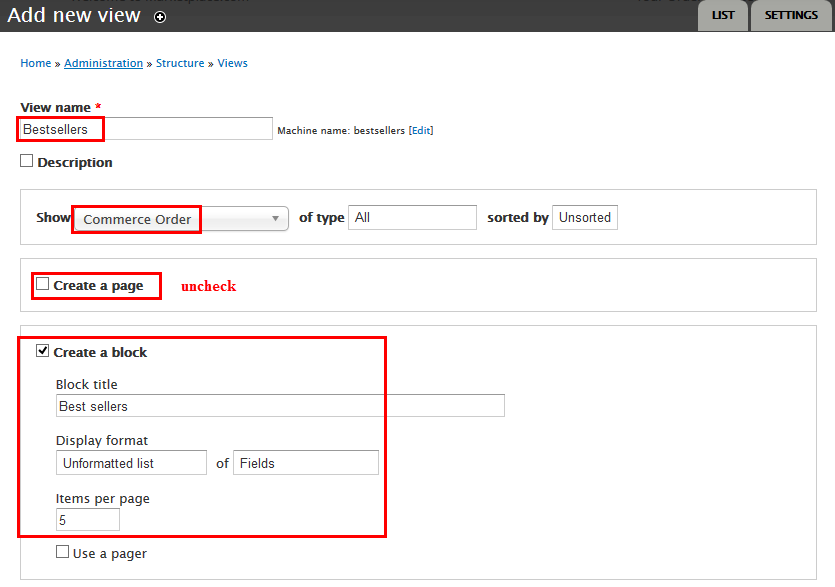
1. Navigate to Structure > Views, click Add new view, then create Bestsellers view with following settings:
2. Click Continue and edit button. Next to steps below to set properties for following fields:
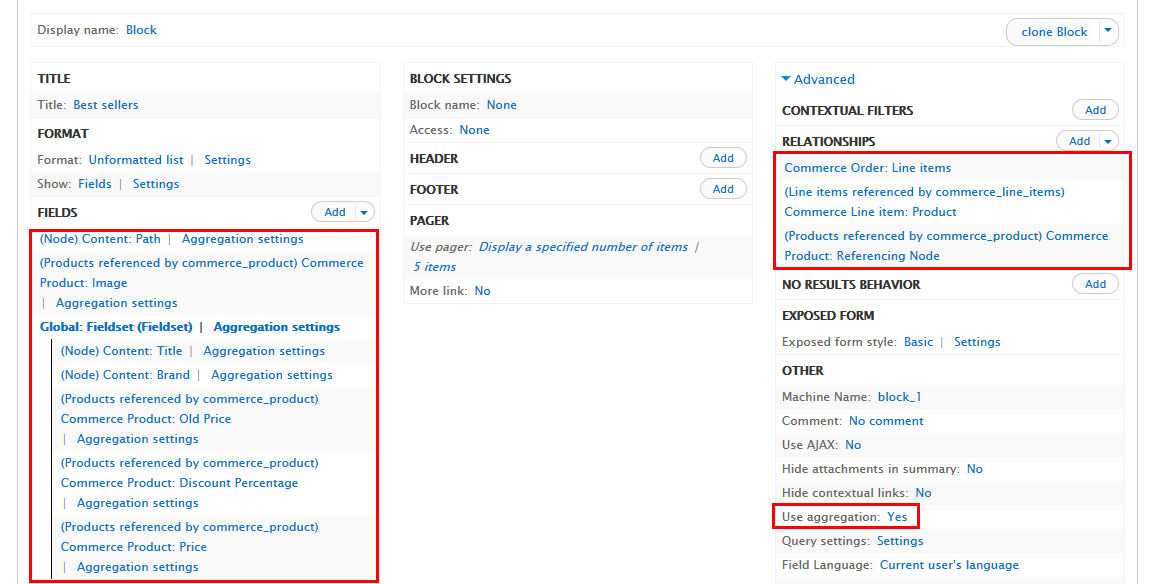
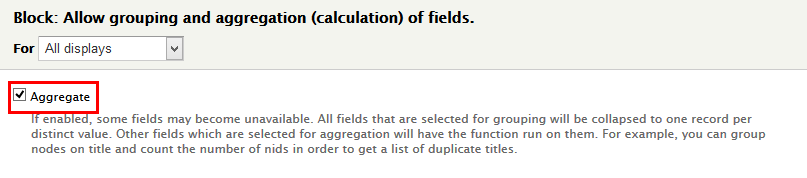
3. At Advanced > OTHER area, find Use aggregation set proprties:
4. At FIELDS area, click Add button to add fields: Content: Path, Commerce Product: Image, Global: Fieldset, Content: Title, Content: Brand, Commerce Product: Old Price, Commerce Product: Discount Percentage, Commerce Product: Price
5. Set properties for Content: Path

6. Set properties for Commerce Product: Image
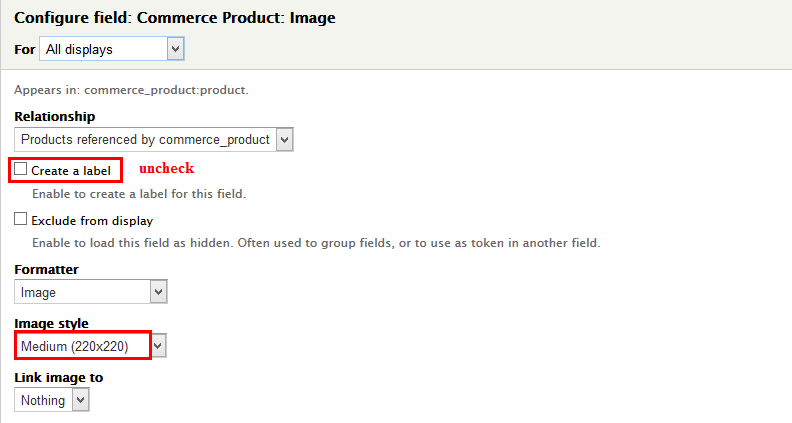
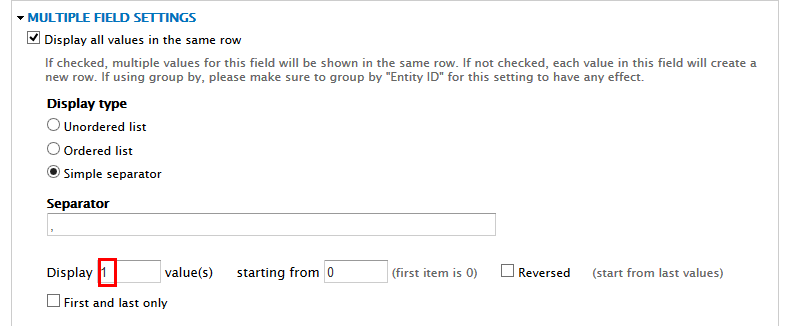
7. Set properties for Global: Fieldset
8. Set properties for Content: Title
9. Set properties for Content: Brand
10. Set properties for Commerce Product: Old Price
11. Set properties for Commerce Product: Discount Percentage
12. Set properties for Commerce Product: Price
13. At FIELDS area. Click Rearrange button and set following properties:
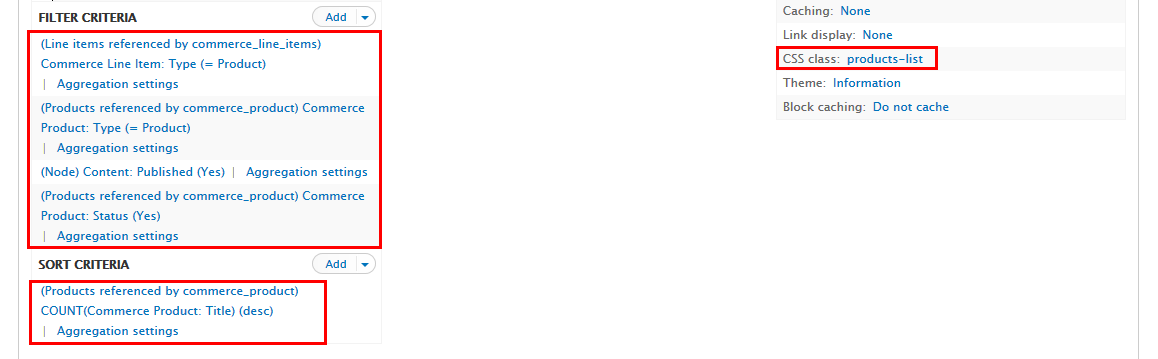
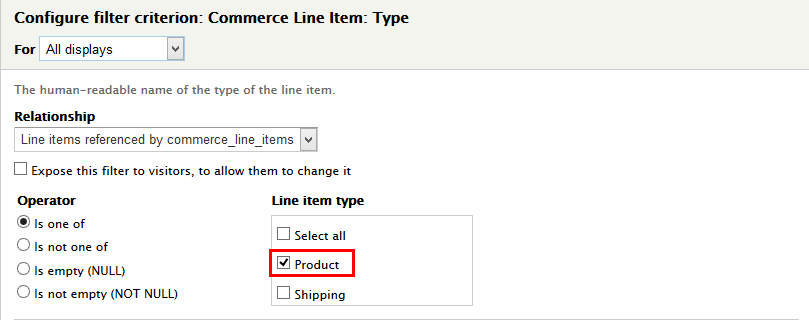
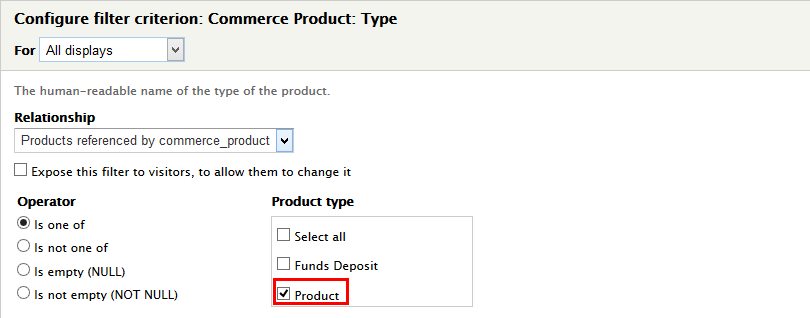
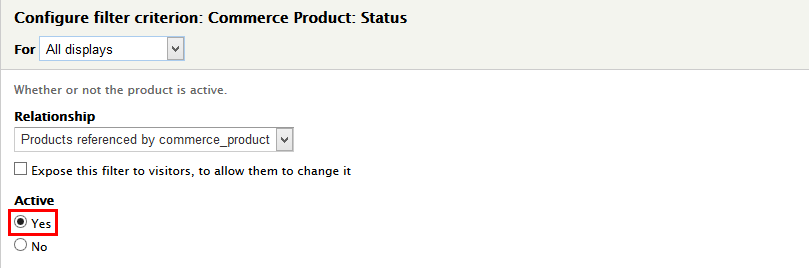
14. At FILTER CRITERIA area, Click Add button to add Commerce Line Item: Type, Commerce Product: Type, Content: Published, Commerce Product: Status
15.Set properties: Commerce Line Item: Type
16.Set properties: Commerce Product: Type
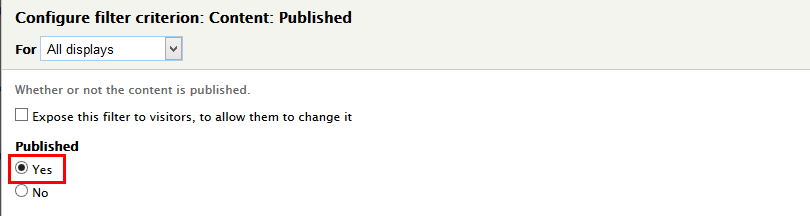
17.Set properties: Content: Published

18.Set properties: Commerce Product: Status
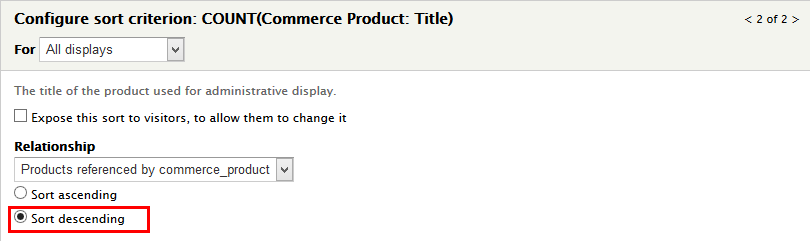
19. At SORT CRITERIA area, Click Add button to add Commerce Product: Title
20.Set properties: Commerce Product: Title

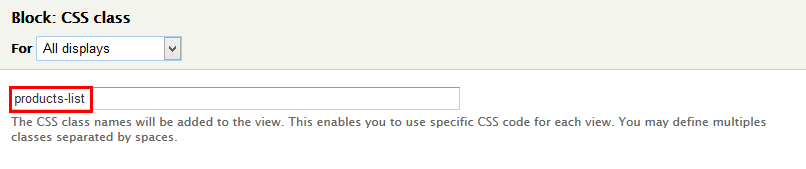
21. At Advanced > OTHER area, add CSS class:
22. At PAGE area, find Use pager set properties:
23. Click Save to save view
Related Products block
Front end Display
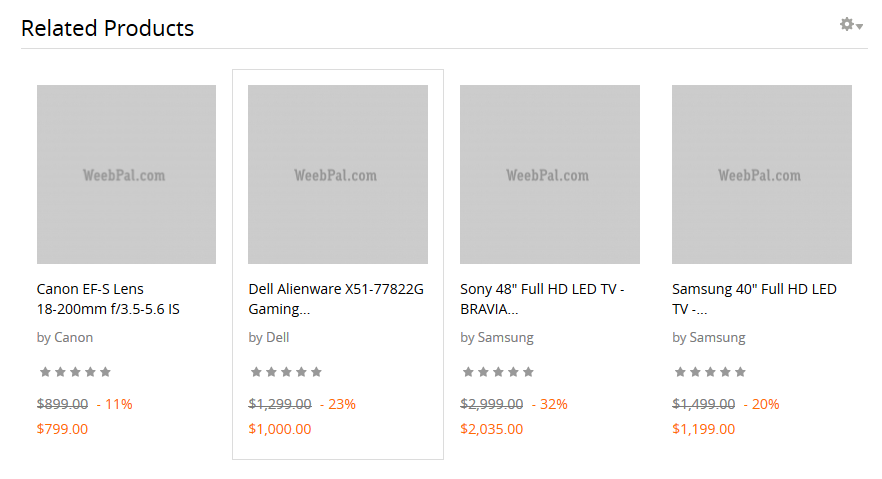
Configure Related Products view
1. Navigate to Structure > Views, find Front page. Click Enable button and set following prooerties page:
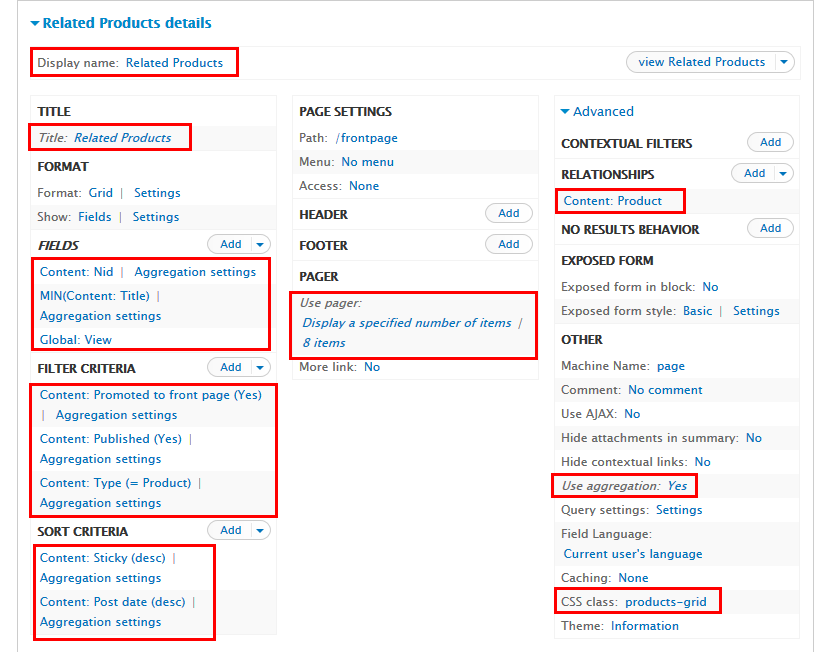
2. At FORMAT Format: HTLM area, click Settings and set following properties:
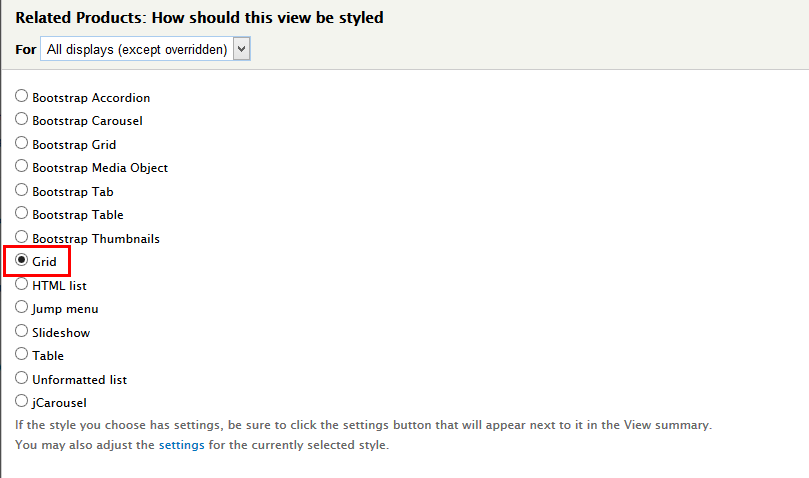
3. At RELATIONSHIPS area, click Add button, add Content:Product field
4. At Advanced > OTHER area, find Use aggregationset properties:
5. At FILTER CRITERIA area, Click Add button to add Content: Nid, Global: View
6. Set properties for Content: Nid
7. Set properties for Global: View
8. Set properties for Content: Title


9. At FIELDS area. Click Rearrange button and set following properties:
10. At FILTER CRITERIA area, Click Add button to add Content: Promoted to front page, Content: Published, Commerce Product: Type,
11.Set properties: Content: Promoted to front page
12.Set properties: Content: Published
13.Set properties: Commerce Product: Type
14. At SORT CRITERIA area, Click Add button to add Content: Sticky
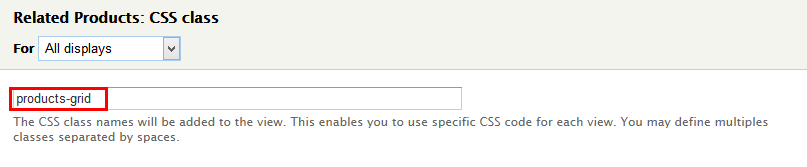
15. At Advanced > OTHER area, add CSS class
16. At PAGE area, find Use pager and set following properties:
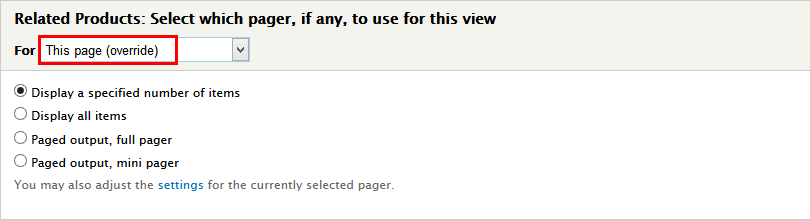
17. At TITLE area, set following properties:

18. At Display name area, change name page to Related Products
19. Click Save to save view
Banner block
Front end Display
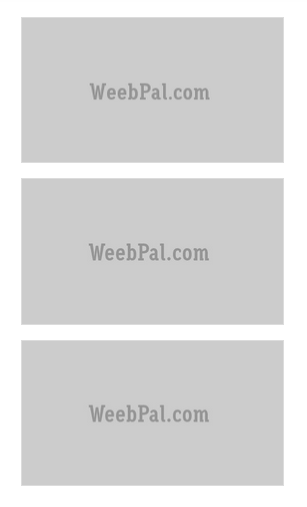
1. Create Banner view (3 tiem)
1. Navigate to Structure > Views, click Add new view, then create Banner view with following settings:
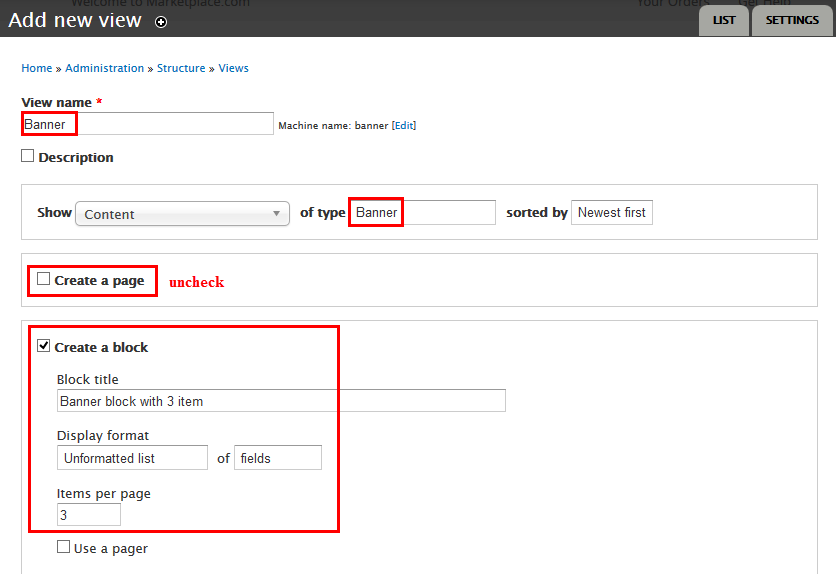
2. Click Continue and edit button. Next to steps below to set properties for following fields:
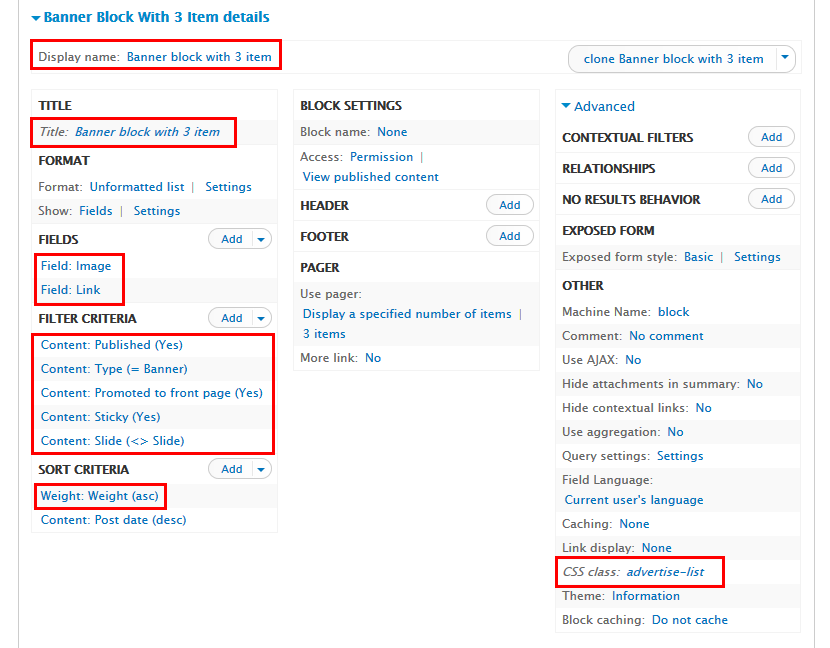
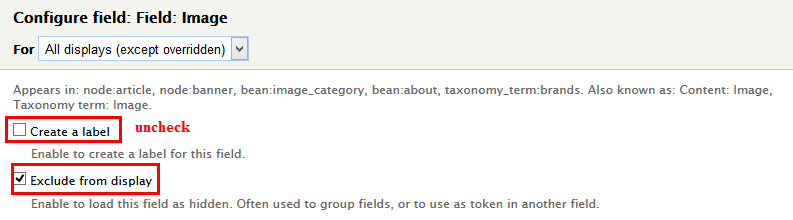
3. At FIELDS area, click Add button to add fields: Field: Image, Field: Link
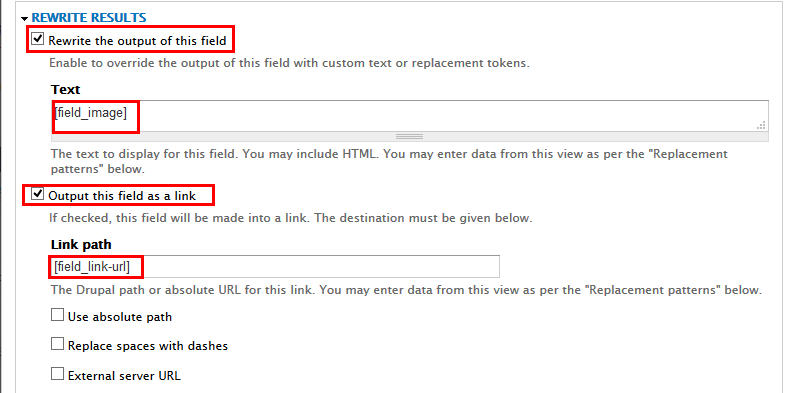
4. Set properties for Field: Image
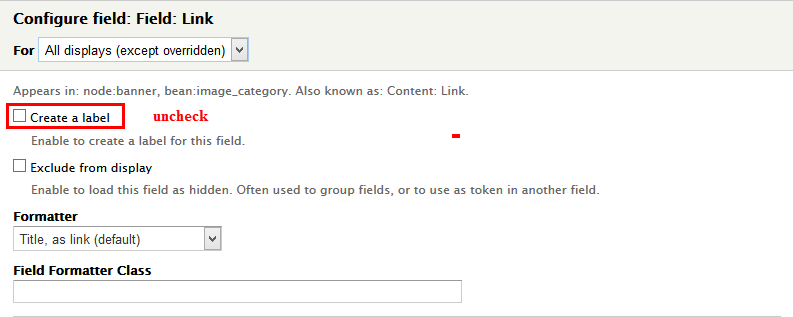
5. Set properties for Field: Link
6. At FILTER CRITERIA area, Click Add button to add Content: Published, Content: Promoted to front page, Content: Sticky, Content: Slide
7. Set properties for Content: Published

8. Set properties for Content: Promoted to front page
9. Set properties for Content: Sticky
10. Set properties for Content: Slide
11. At FILTER CRITERIA area, Click Rearrange button set following properties:

12. At SORT CRITERIA area, Click Add button to add Weight: Weight
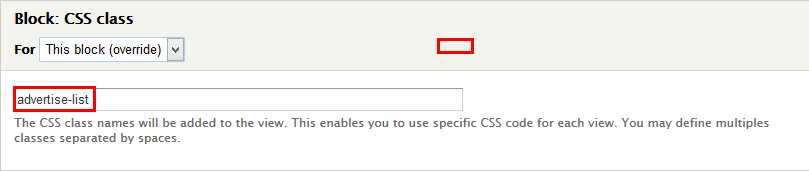
13. At Advanced > OTHER area, add CSS class
14. At Display name click change name to Banner block with 3 item
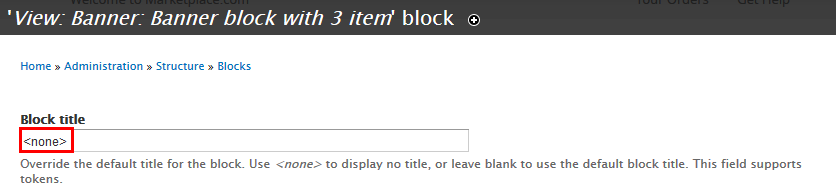
15. At TITLE set properties:

16. Click Save to save view
2. Configure View: Banner: Banner block with 3 item block
1. Navigate to Structure > Blocks
2. Find View: Banner: Banner block with 3 item block, click configure link, set following properties
3. Click Save block button.
Clone Banner page block
Front end Display

1. Clone page view
1. Navigate to Structure > Views, find Banner view, then click clone Banner block with 3 item button with following settings:
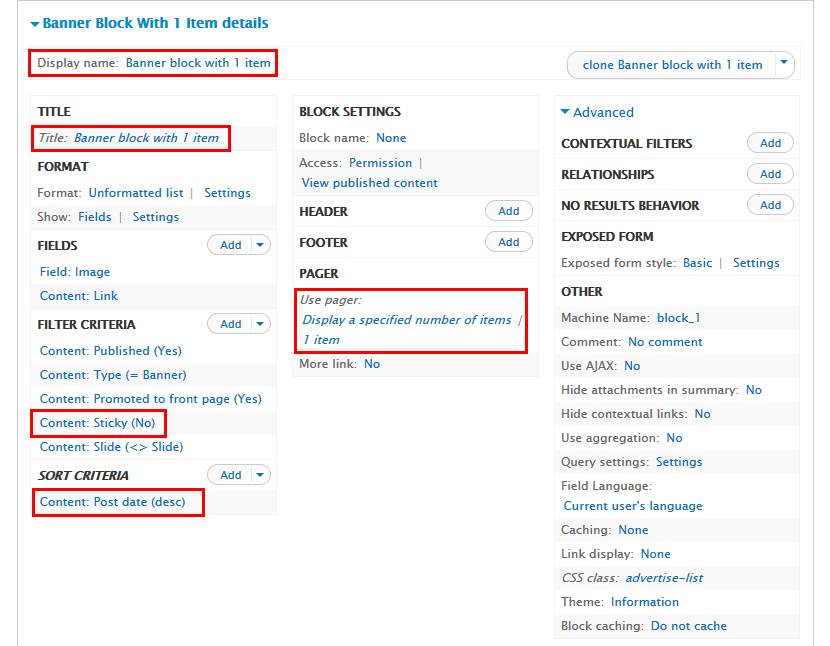
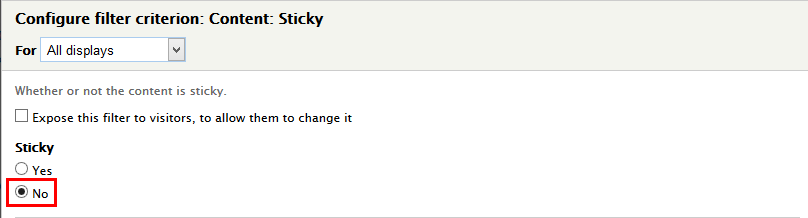
2. At FILTER CRITERIA area.Set properties for Content: Sticky
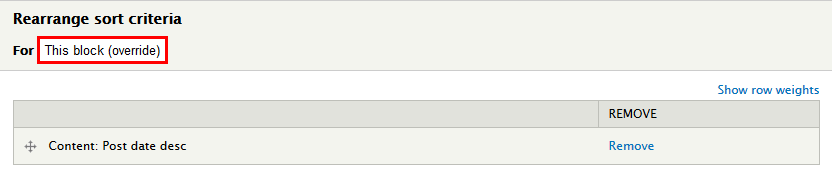
3. At SORT CRITERIA area, Click Rearrange button to remove Weight: Weight and set following properties:
4. At Advanced > OTHER area, add CSS class
5. At Display name click change name to Banner block with 1 item
6. At TITLE set properties:

7. Click Save to save view
2. Configure View: Banner: Banner block with 1 item block
1. Navigate to Structure > Blocks
2. Find View: Banner: Banner block with 1 item block, click configure link, set following properties
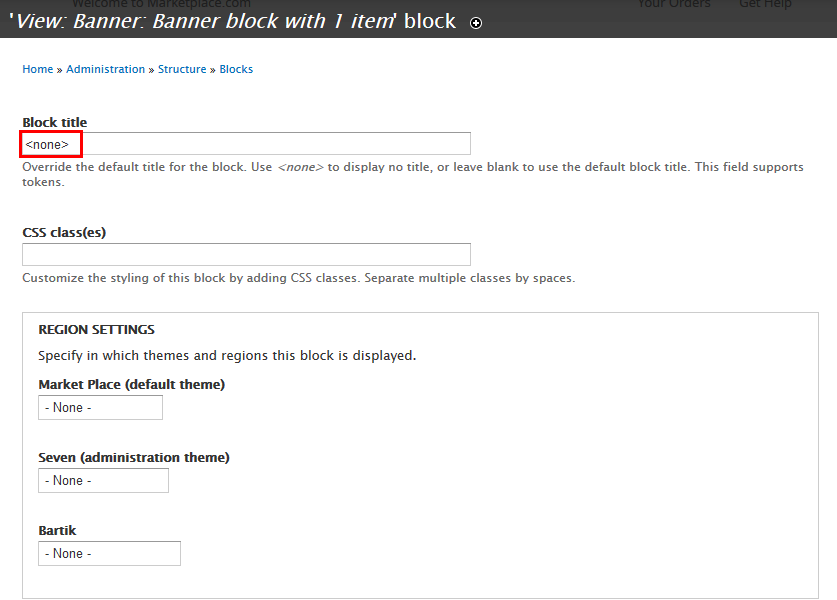
3. Click Save block button.
Your Recently Viewed Items
Front end Display

1. Clone page view
1. Navigate to Structure > View, find Product Display view. Click clone Product Teaser block button and set the following properties:
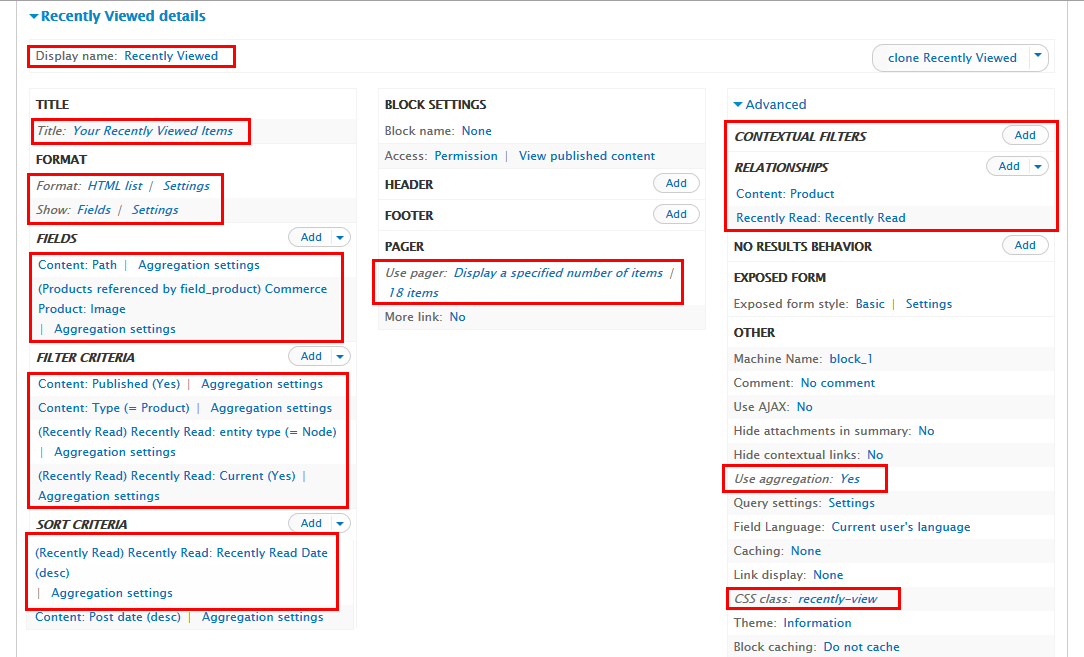
2 . At Advanced > REALATIONSHIPS area, click Add button to add fields: Recently Read: Recently Read

3. At Advanced > CONTEXTUAL FILTERS area, click Remove button fields: Content: Nid
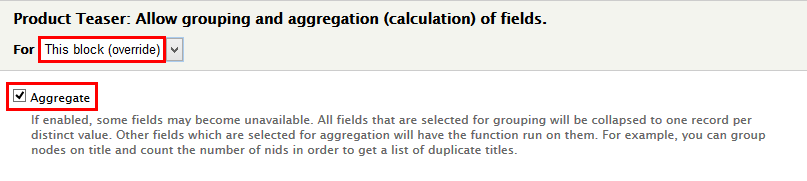
4.At Advanced > OTHER area, find Use aggregation set properties:
5. At FIELDS area, click Remove button Global: Fieldset, Content: Brand, Content: Review, Global: Fieldset, Commerce Product: Old Price, Commerce Product: Discount Percentage, Commerce Product: Price fields:
6. Set properties for Commerce Product: Image
7.At FIELDS area, click Rearrange button and set following:
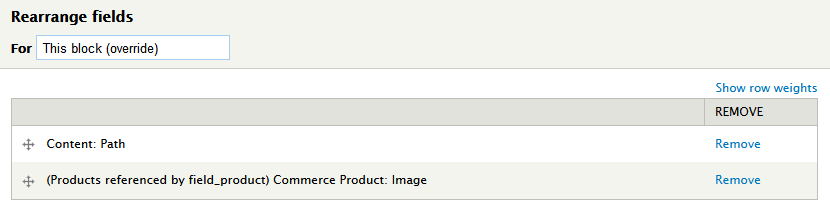
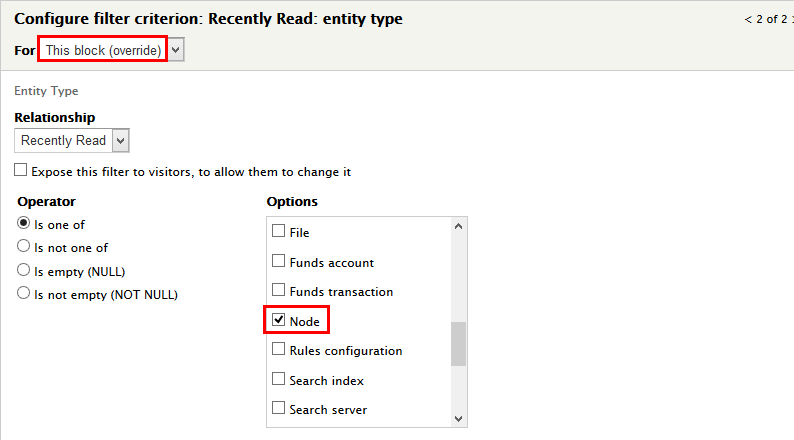
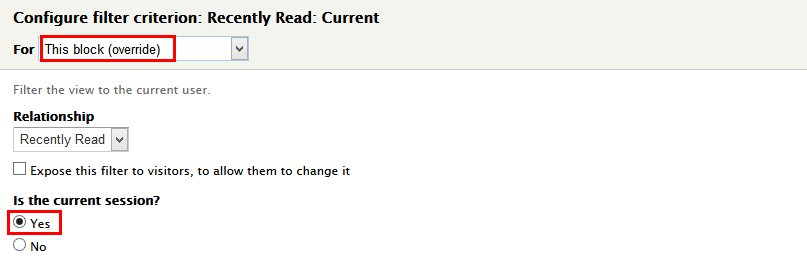
8. At FILTER CRITERIA area.Click Add add button to fileds Recently Read: entity type , Recently Read: Current
9. Set properties forRecently Read: entity type
10. Set properties forRecently Read: Current
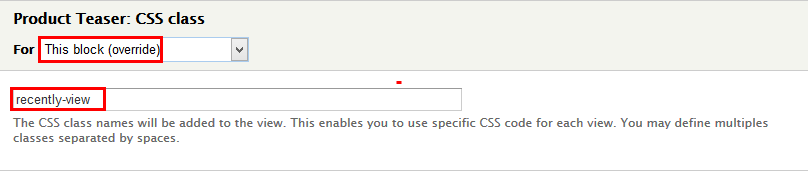
11.At Advanced > OTHER area, add CSS class:
12.At FORMAT -> Fomat area, Click Settingd and set properties:
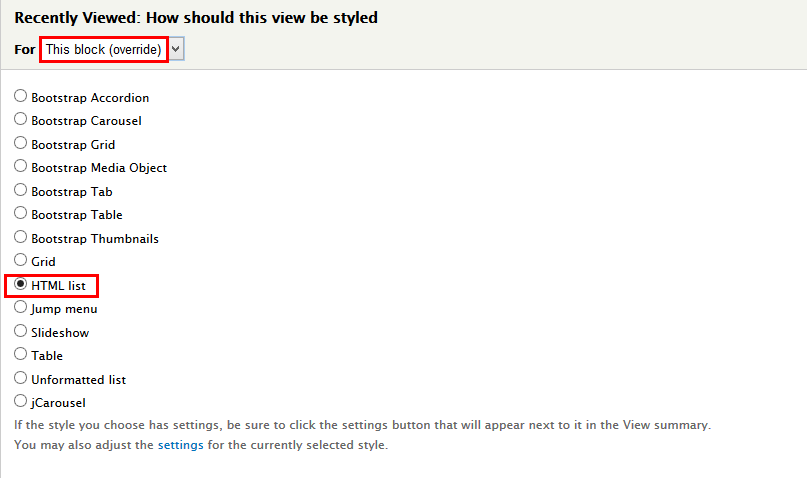
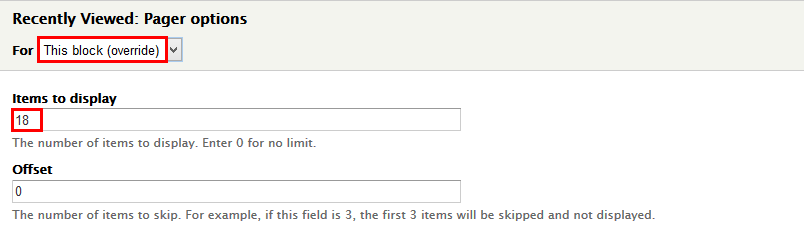
13.At PAGE area, finds User page and set properties:
14.At Display name click link and set name to Recently Viewed
15.At TITLE click link and set name to Recently Viewed

16. At FIELDS area, click Add button to add Recently Read Date ans set properteis:
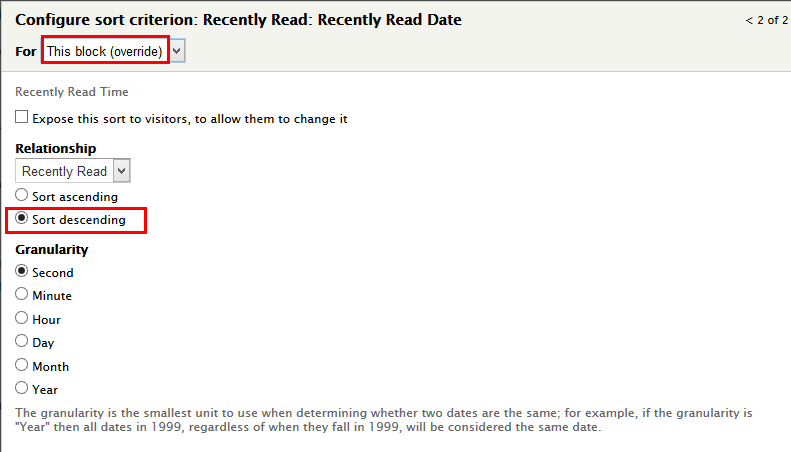
17.Click Save button
2. Configure View: Product Display: Recently Viewed block
1. Navigate to Structure > Blocks
2. Find View: Product Display: Recently Viewed block, click configure link, set following properties
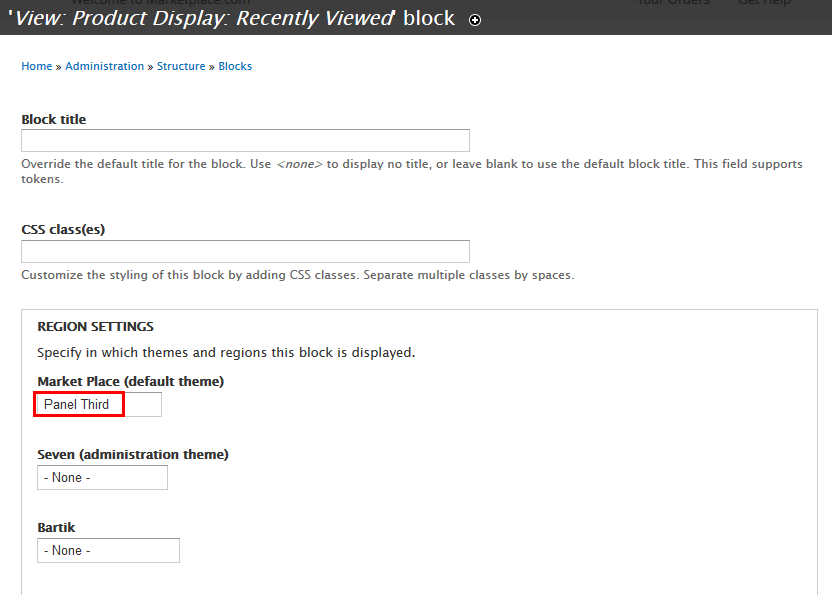
3. Click Save block button.
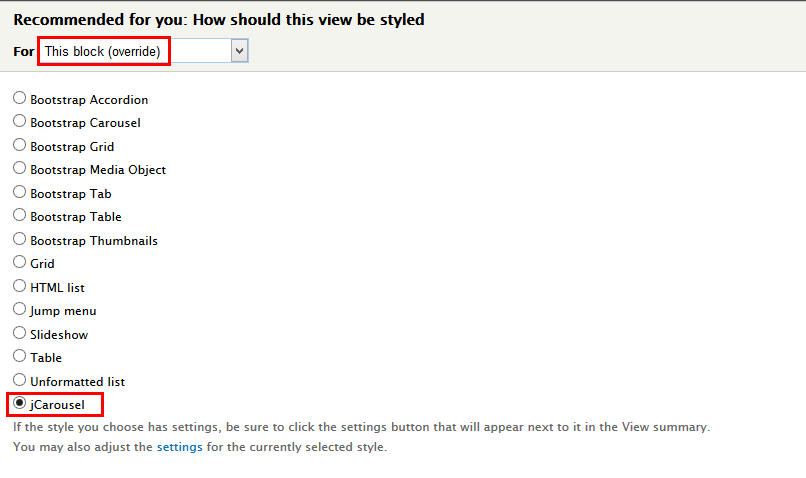
Recommended for you
Front end Display
1. Create blog Recommended for you view
1. Navigate to Structure > View, find Product Display view. Click Add > Block button and set the following properties:
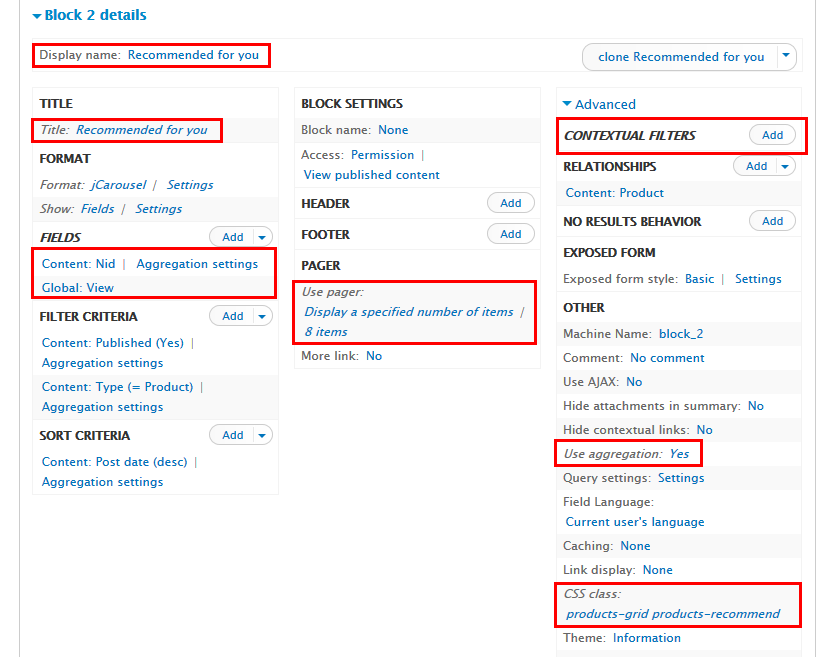
2. At Advanced > CONTEXTUAL FILTERS area, click Remove button fields: Content: Nid
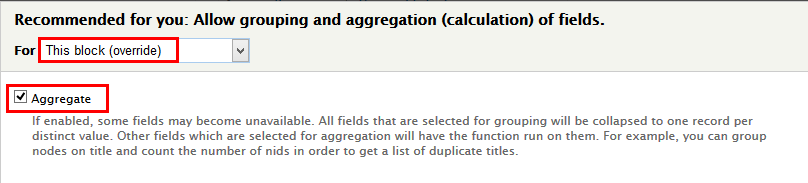
3. At Advanced > OTHER area, find Use aggregation set properties:
4. At FIELDS area, click Remove button Content: Title, Content: Path fields. Then click Add button to add Content: Nid, Global: View
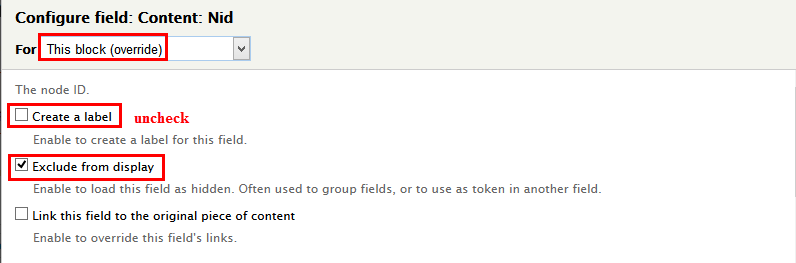
5. Set properties for Content: Nid
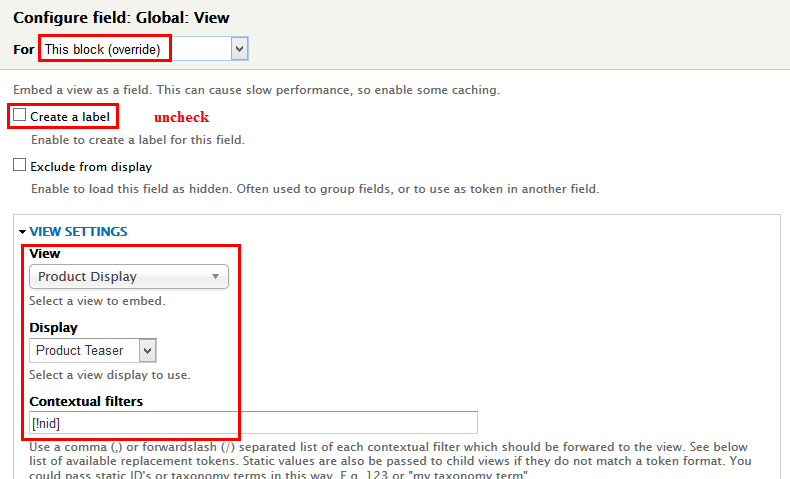
6. Set properties for Global: View
7. At Advanced > OTHER area, add CSS class:

8. At FORMAT > Fomat area, Click Settingd and set properties:
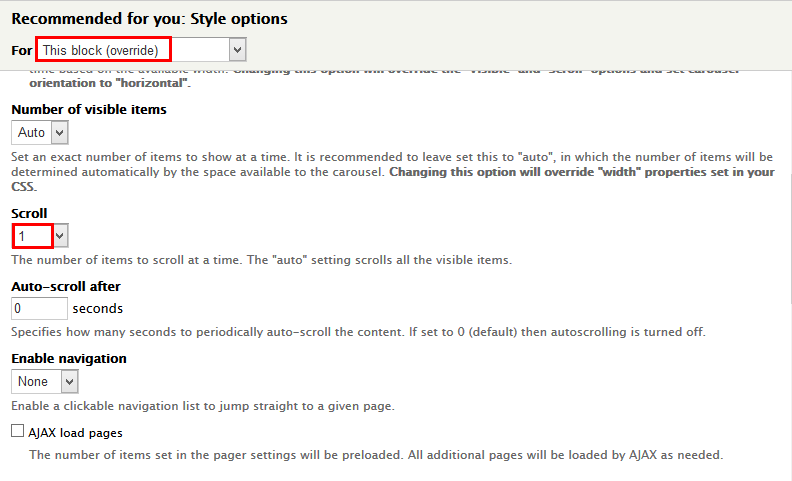
9. At PAGE area, finds User page and set properties:
10. At Display name click link and set name to Recommended for you
11. At TITLE click set properties.

12. Click Save button
2. Configure View: Product Display: Recommended for you block
1. Navigate to Structure > Blocks
2. Find View: Product Display: Recommended for you block, click configure link, set following properties
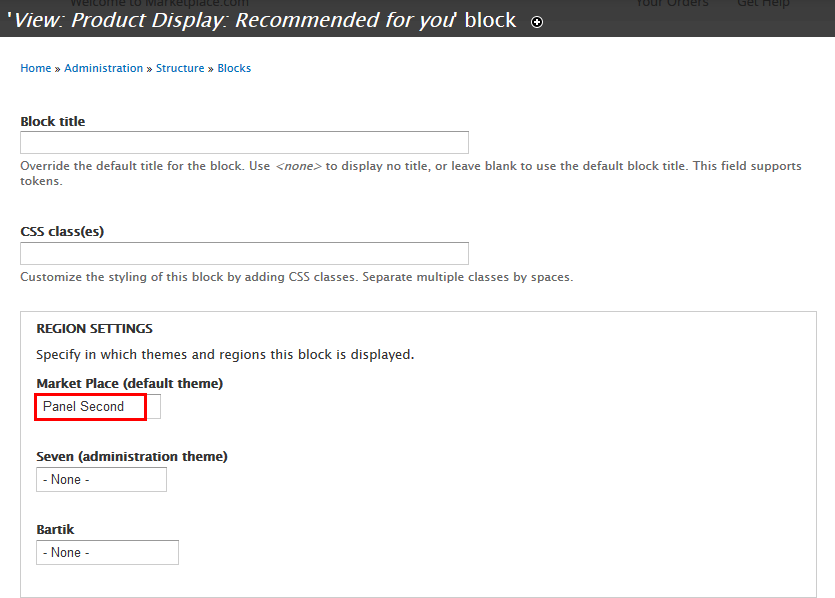
3. Click Save block button.
Footer 4
Front end Display
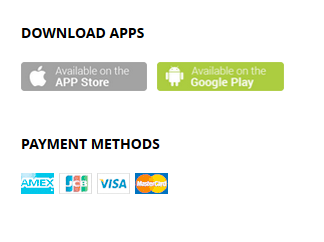
1. Dowload Apps
Create and configure block
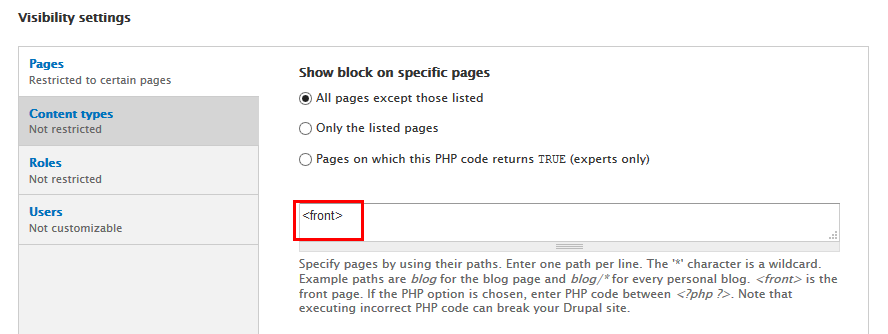
1. Navigate to Structure > Blocks, click Add block link, Create Dowload Apps block with following properties:
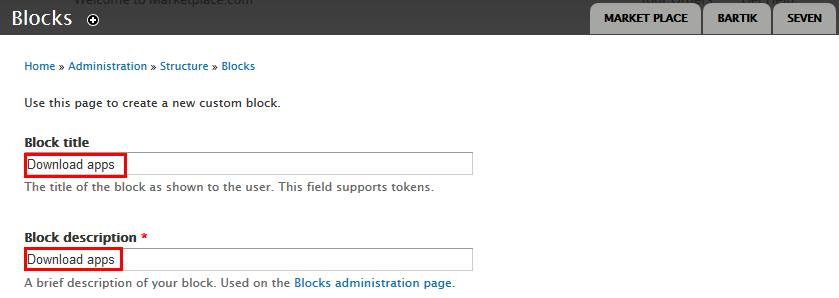
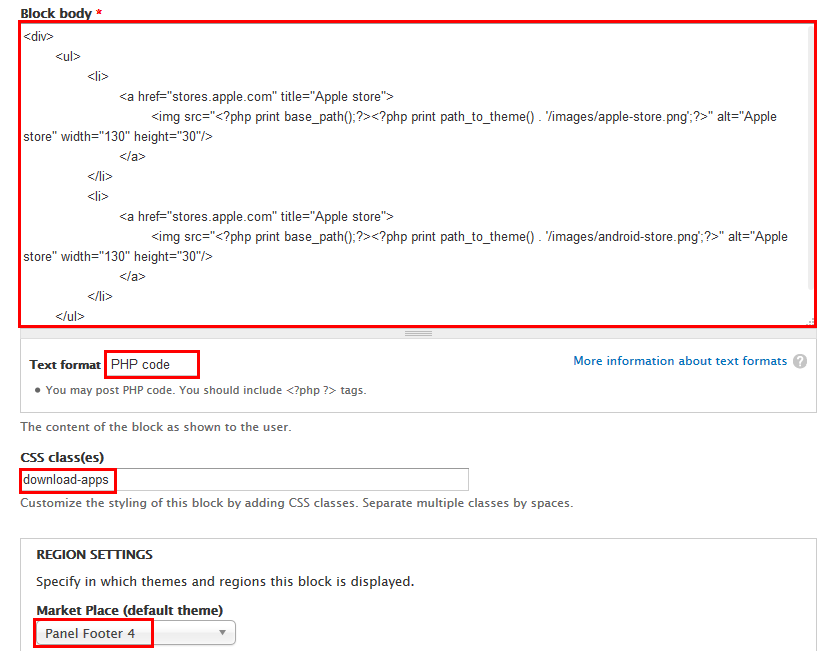
2. Click Save block button.
Refer to following PHP code:
2.Payment methods
Create and configure block
1. Navigate to Structure > Blocks, click Add block link, Create Payment methods block with following properties:
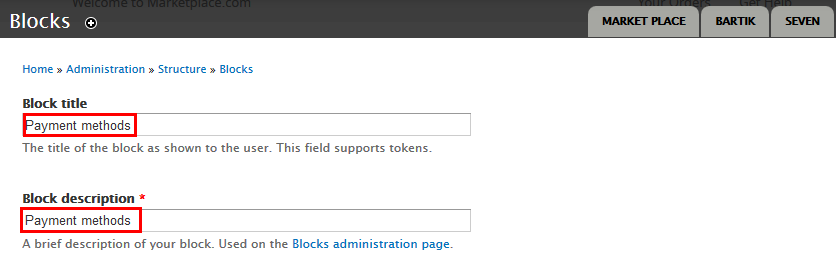
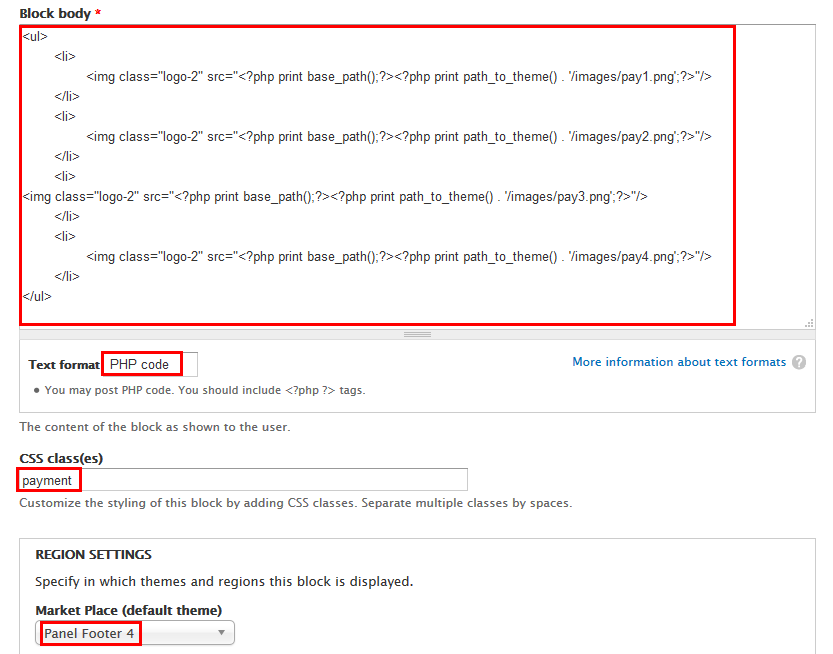
2. Click Save block button.
Refer to following PHP code:
;?><?php print path_to_theme() . '/images/pay1.png';?>)
;?><?php print path_to_theme() . '/images/pay2.png';?>)
;?><?php print path_to_theme() . '/images/pay3.png';?>)
;?><?php print path_to_theme() . '/images/pay4.png';?>)
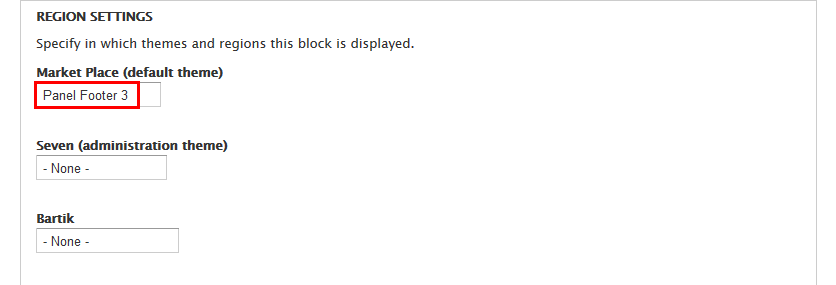
Footer 3
Front end Display
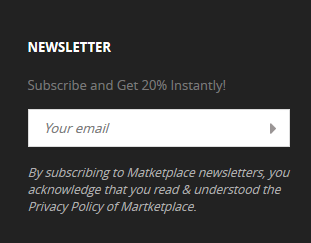
1. Newsletter: Azastore newsletter block
Configure block
1. Go to Module, find Newsletter module. Click Enable button
2. Go to Structure > Blocks, find Newsletter block. Click Configure link and set following properties:
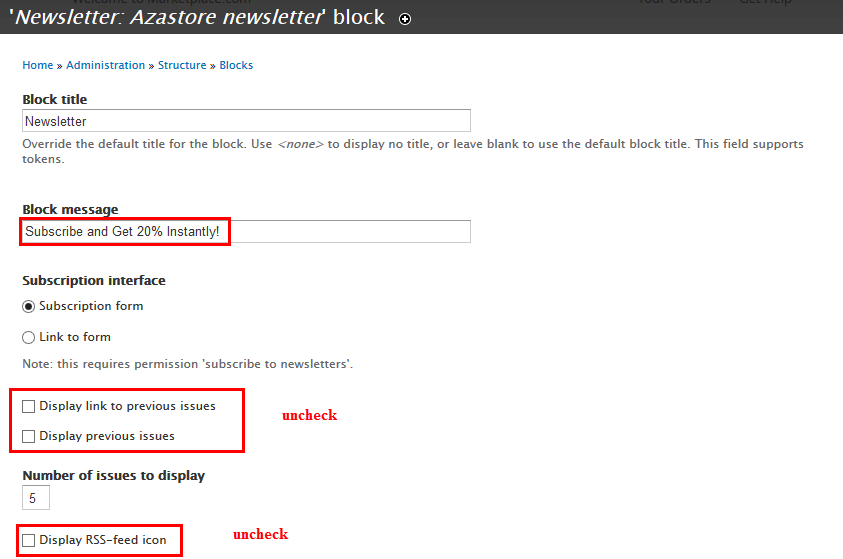
3. Click Save block button.
2. Newsletter message block
Configure block
1. Navigate toStructure > Blocks, click Add block link. Create Newsletter message block and set following properties:
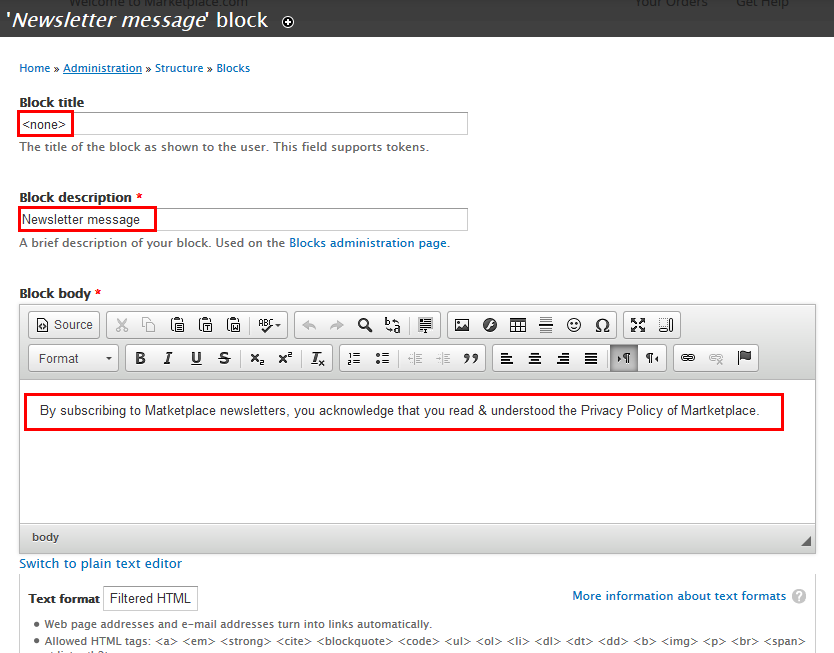
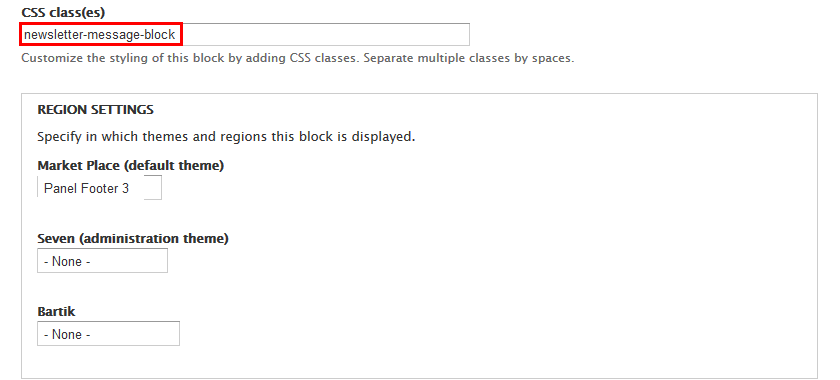
2. Click Save block button.
Footer 2: About us: Menu block
Front end Display
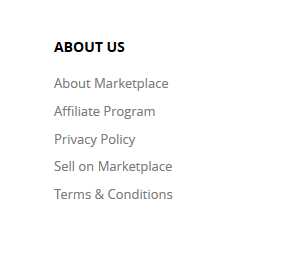
Configure block
1. Navigate to Structure > Menus, click Add menu link, Create About us menu
2. Click Add link for About us menu
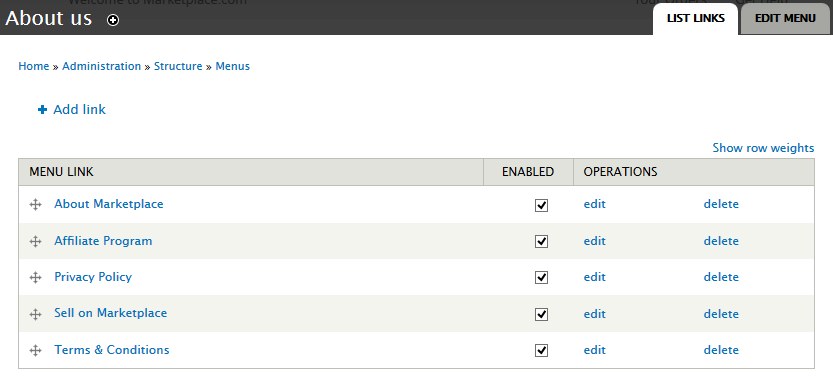
3. Click Save configuration button.
4. Go to Structure > Blocks, find About us block. Click Configure link and set following properties:
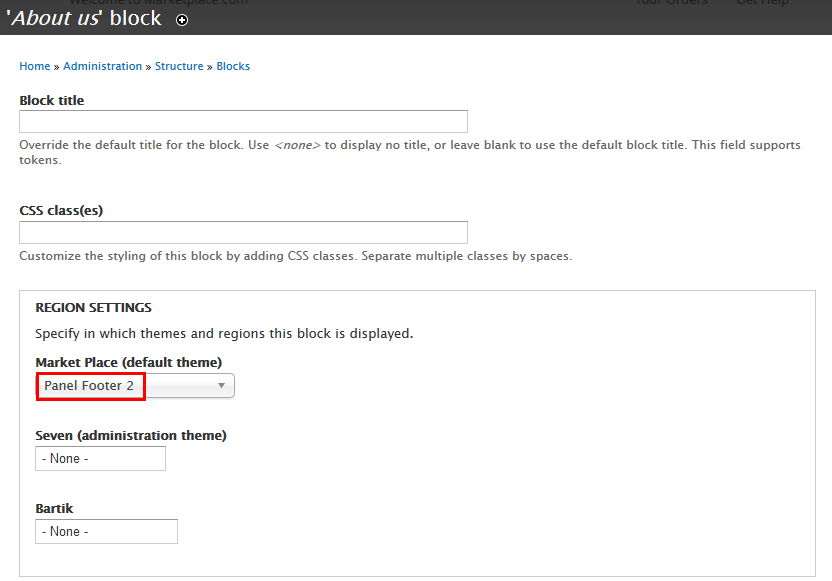
5. Click Save configuration button.
Footer 1: Customer help: Menu block
Front end Display
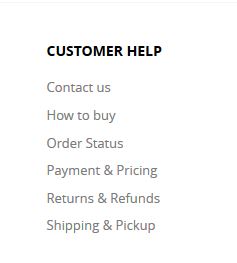
Configure block
1. Navigate to Structure > Menus, click Add menu link, Create Customer help menu
2. Click Add link links for Customer help menu
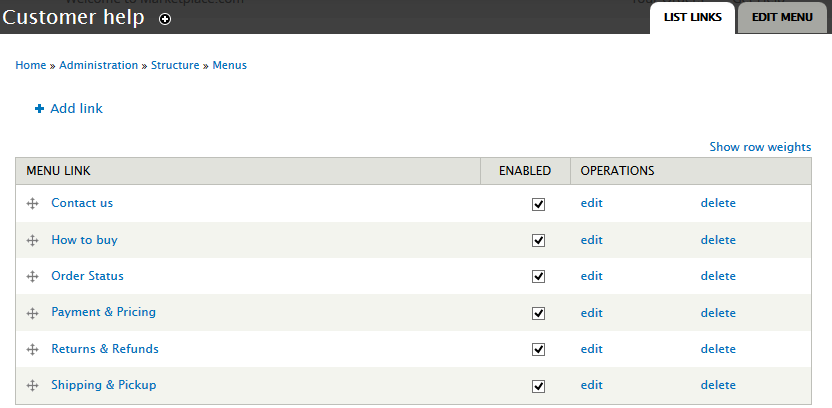
3. Click Save configuration button.
4. Go to Structure > Blocks, find Customer help block. Click Configure link and set following properties:
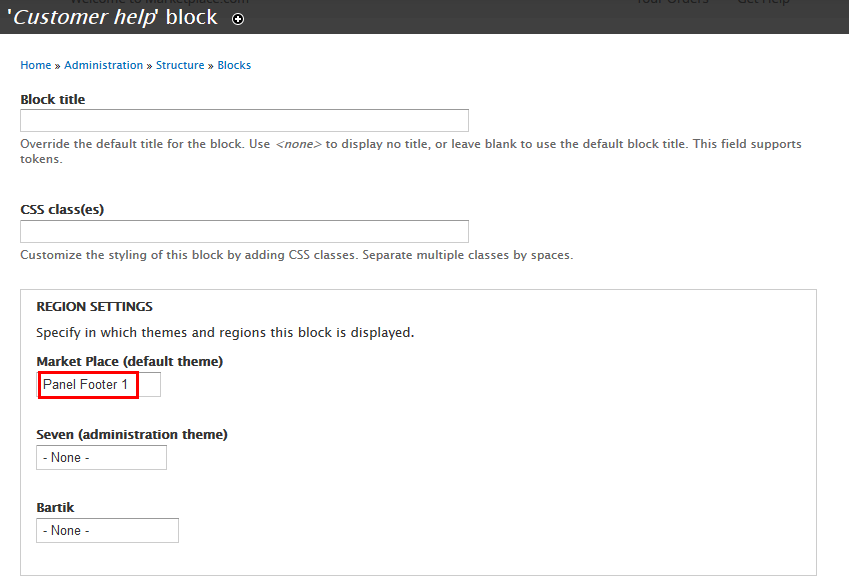
5. Click Save configuration button.
Footer Menu block
Front end Display

1. Create Copyright block
1. Navigate toStructure > Blocks, click Add block link. Create Copyright block and set following properties:
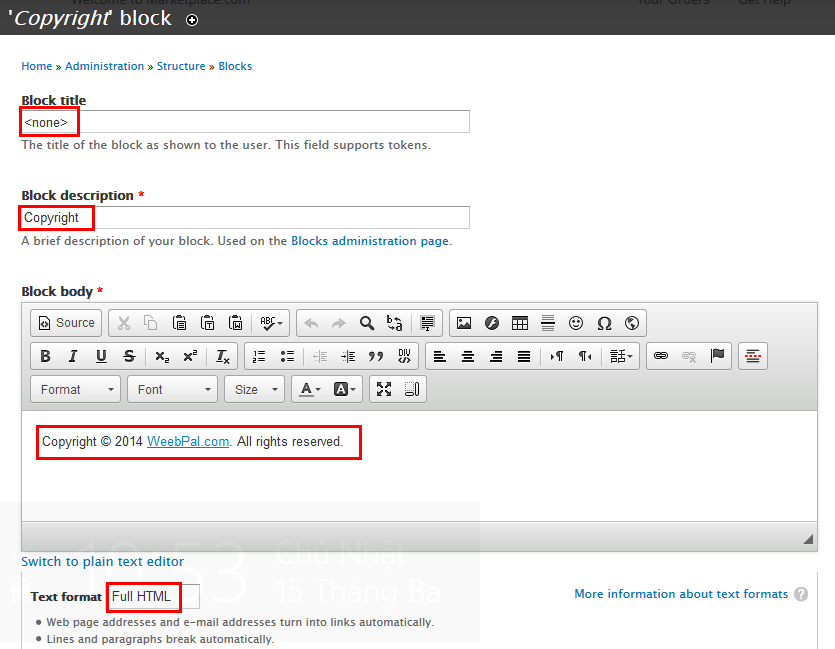
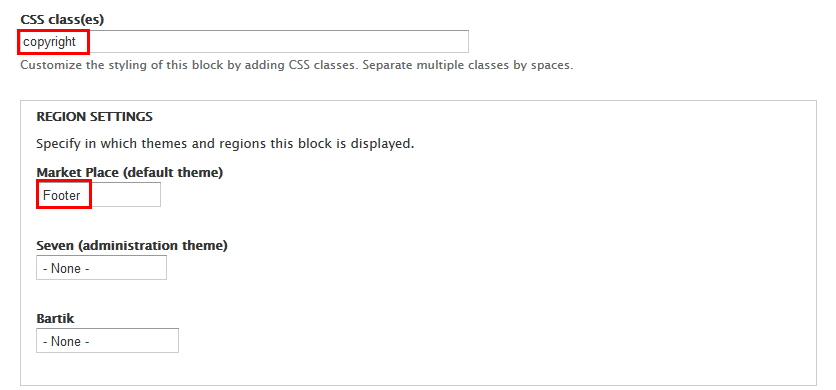
2. Click Save block button.
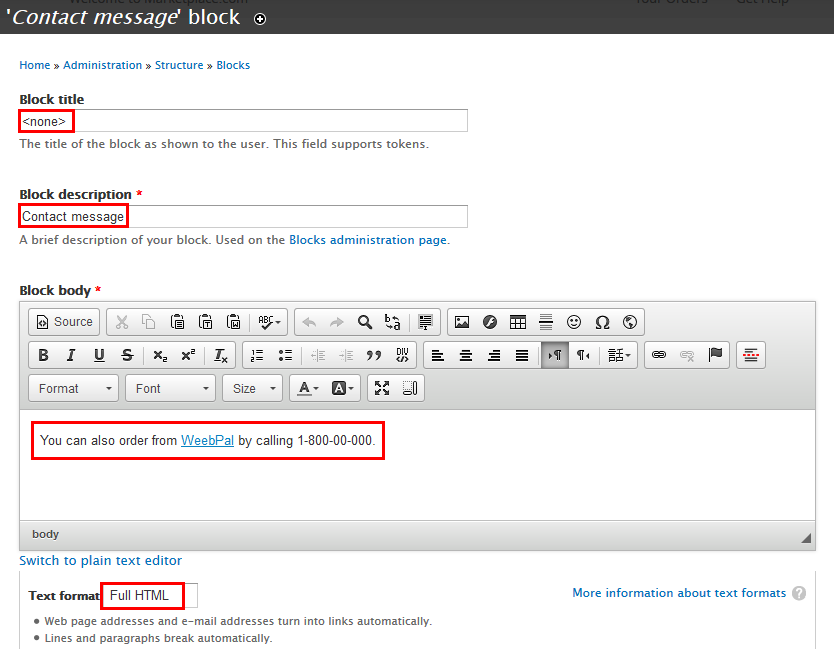
2. Create Contact message block
1. Navigate toStructure > Blocks, click Add block link. Create Contact message block and set following properties:
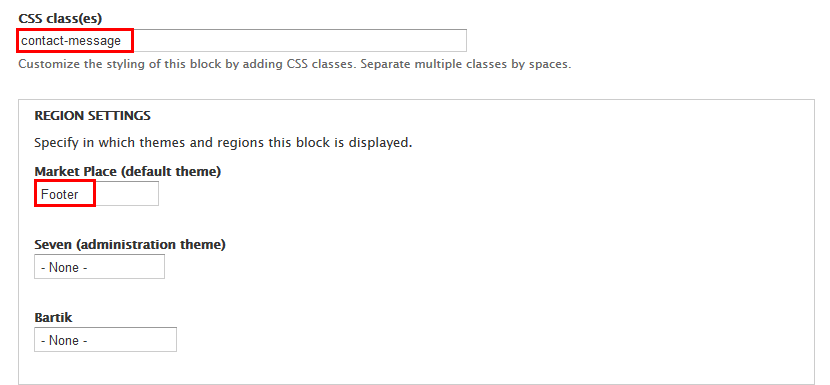
2. Click Save block button.
Add context: Home
1. Navigate to Structure > Conetxt click Add link, create Home context and set following properties


2. Click Save button
Create Subpages
Sidebar first region
Front end Display

1. Configure Search API
After Search API Index configuration steps, we have many facets blocks. Move them to Sidebar first region and order them as you want.
1. Navigate to Configuration > Search and metadata > Search API , find Product display, click Edit link. Go to FACETS tab, check Product » Price » Amount, remove check Product » Color
2. Configure display Category

3. Configure display Brand

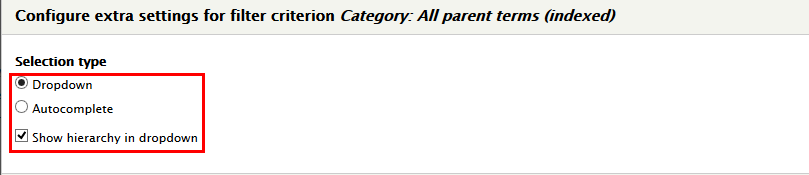
4. Configure filters Category

5. Configure filters Brand

6. Click Save configuration button.
2. Configure block
1. Navigate to Structure > Block find Facet API: Search service: Product display : Brand click configure link, set following properties

2. Navigate to Structure > Block find Facet API: Search service: Product display : Category about click configure link, set following properties

3. Navigate to Structure > Block find Facet API: Search service: Product display : Product > Price > Amount (decimal) about click configure link, set following properties

4. Click Save block button
3. Add context: Search
1. Navigate to Structure > Conetext click Add link, create Search context and set following properties


2. Click Save button
Category page
Front end Display
1. Create Category view
1. Navigate to Structure > Views, click Add block link, create Category block with following properties:
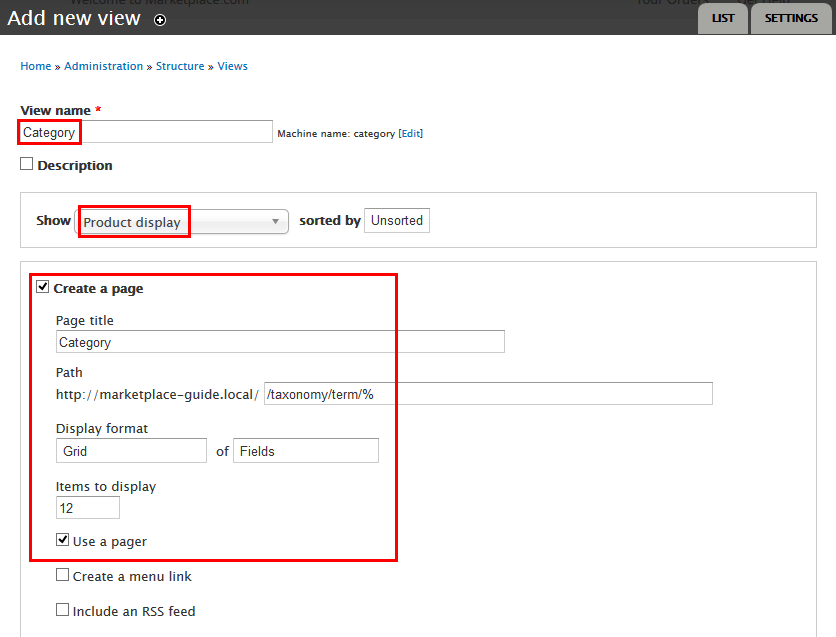
2. Click Continue and edit button. Next to below steps to set properties for following fields:
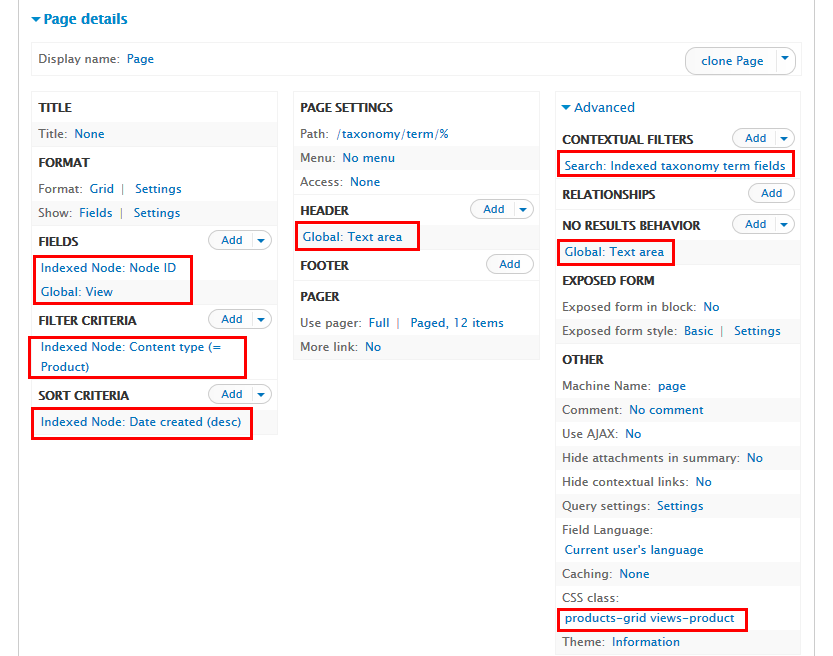
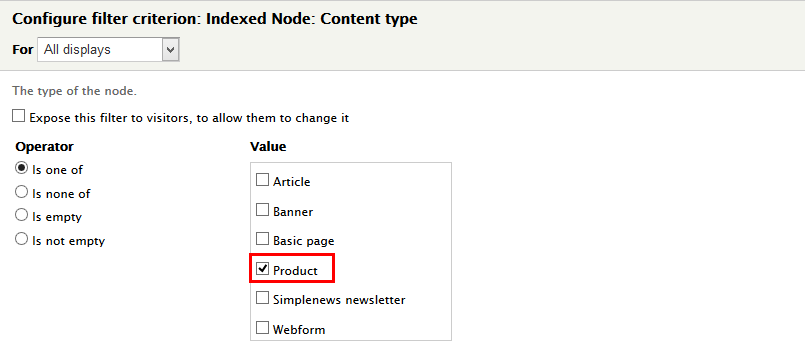
3. At FILTER CRITERIA area, Click Add button to add Indexed Node: Content type field with following properties:
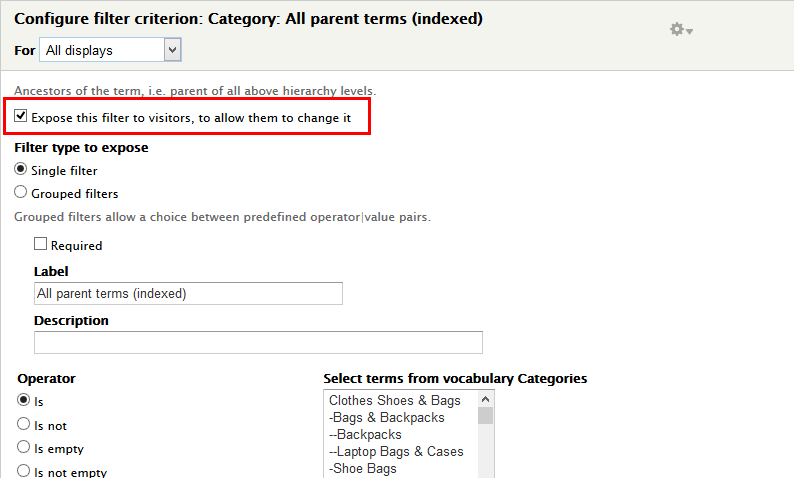
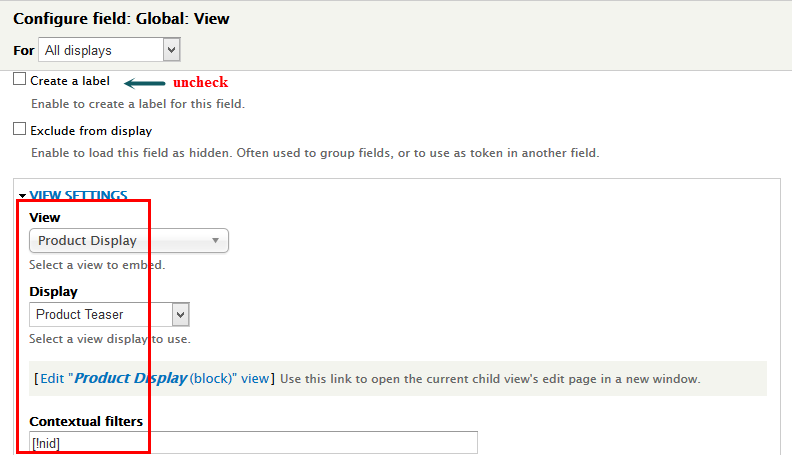
4. At FIELDS area, click Add button to add fields: Global: View
5. Set properties for Global: View field
6. Set properties for Indexed Node: Node ID field
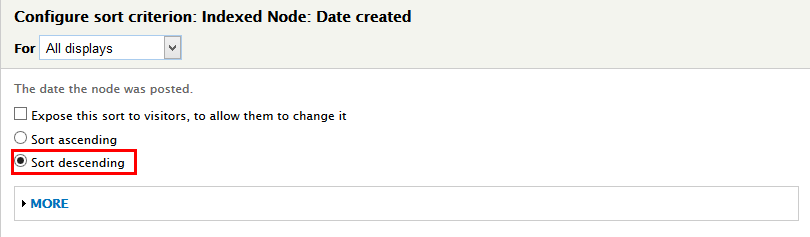
7. At SORT CRITERIA area, add Indexed Node: Date created field:
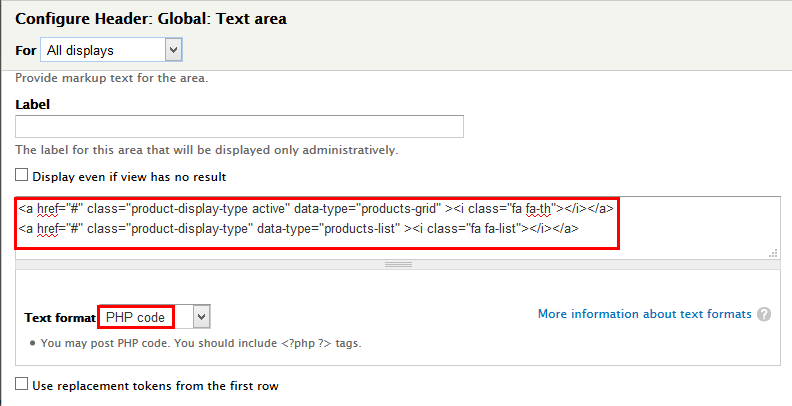
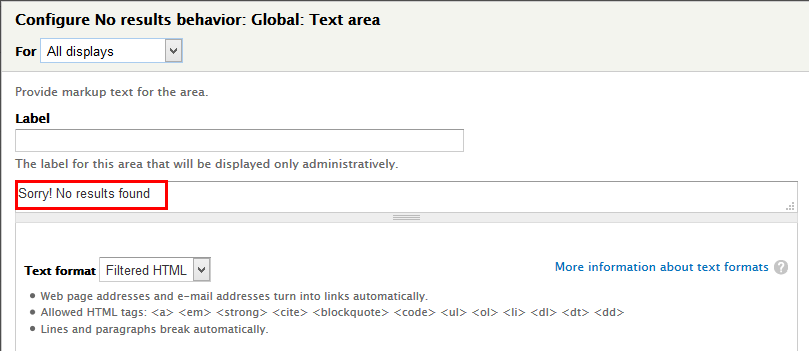
8. At PAGE > User page area, add Global: Text area field:
9. At Advanced > CONTEXTUAL FILTERS area, add Search: Indexed taxonomy term fields field:
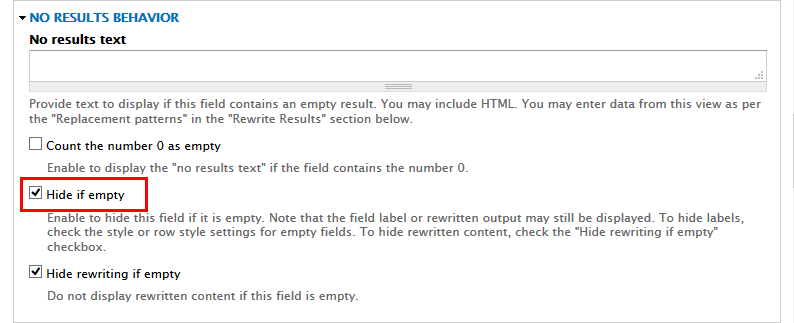
10. At Advanced > NO RESULTS BEHAVIOR area, add Global: Text area field:
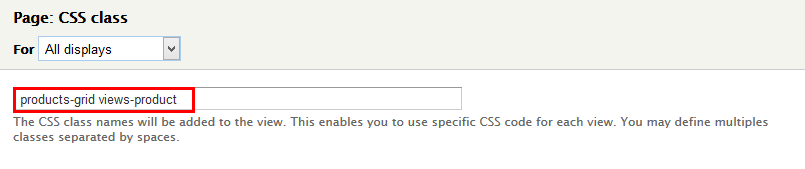
11. At Advanced > OTHER area, add CSS class:
12. Click Save to save all settings
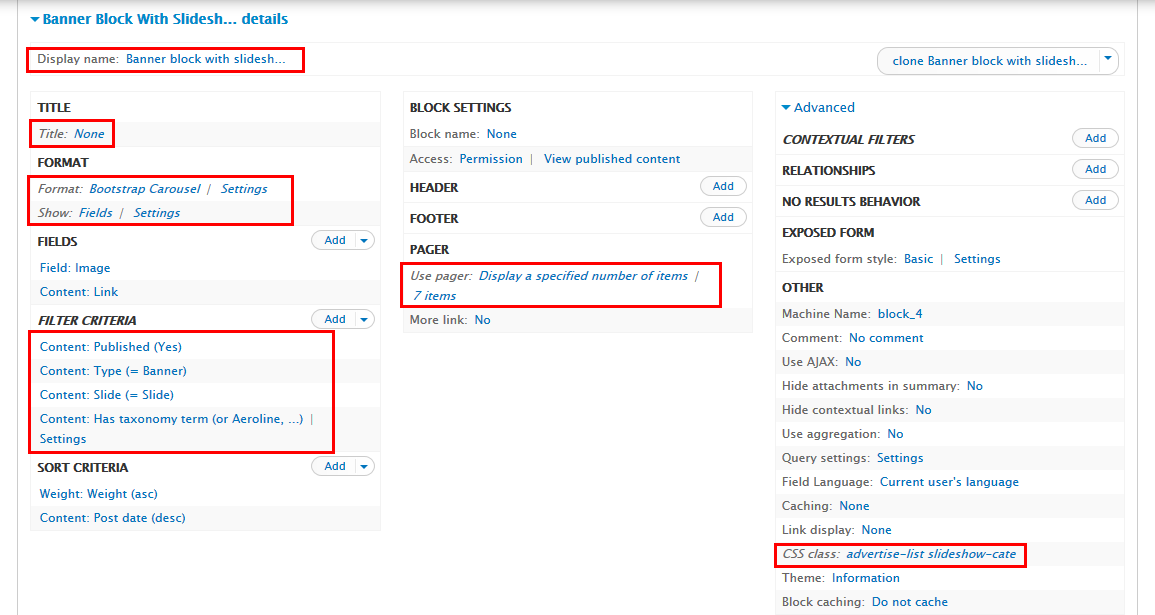
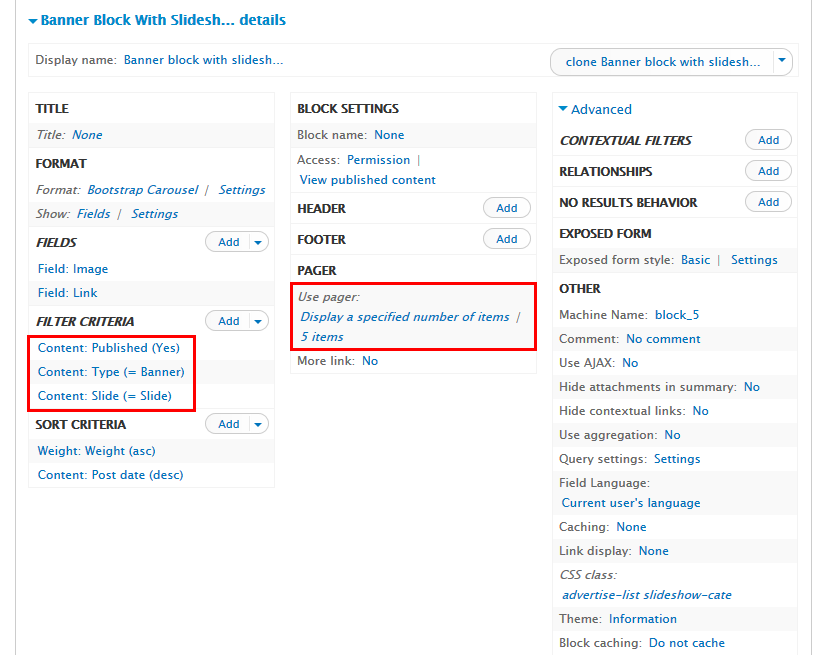
2.1. Clone Banner block with slideshow block view
1. Navigate to Structure > Views, find Banner link, Click clone Banner block with 3 item button with following properties:
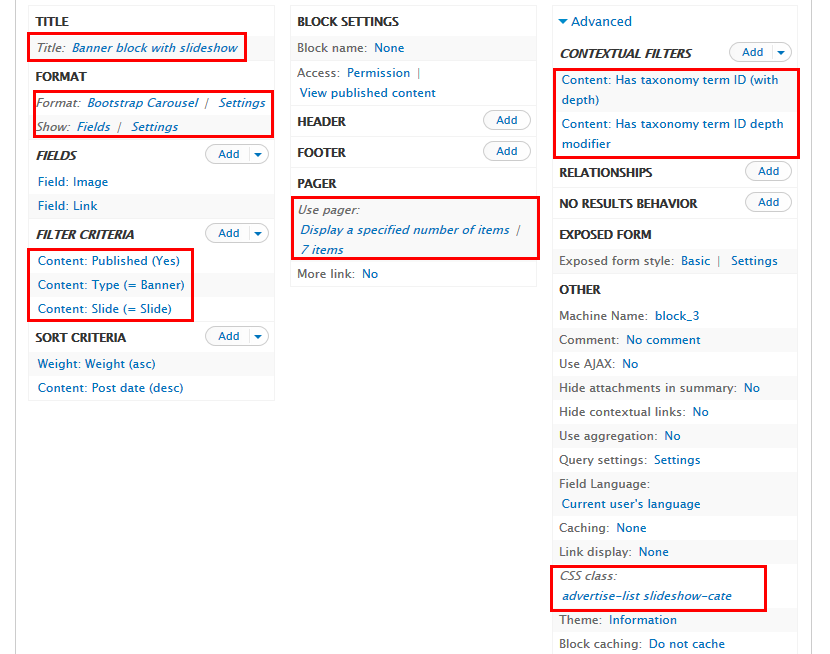
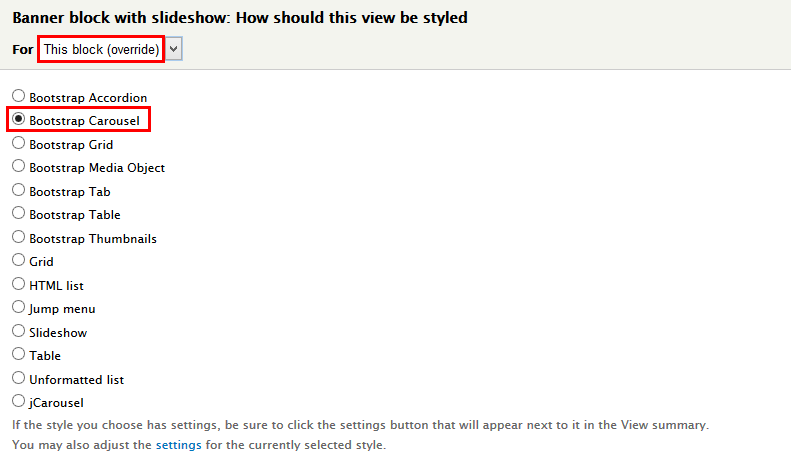
2. At FORMAT > Format aere, click Settings and set properties:
3. At TITLE set properties:

4. At Display change name display to Banner block with slideshow
5.At FIELDS area, Click Field: Image field and set properties

6.At FILTER CRITERIA area, Click Remove following field: Content: Promoted to front page, Content: Sticky
7.Set properties Content: Slide
8. At Advanced > CONTEXTUAL FILTERS area, add Content: Has taxonomy term ID,Content: Has taxonomy term ID depth modifier field
9.Set properties Content: Has taxonomy term ID


10. At Advanced > OTHER area, add CSS class:
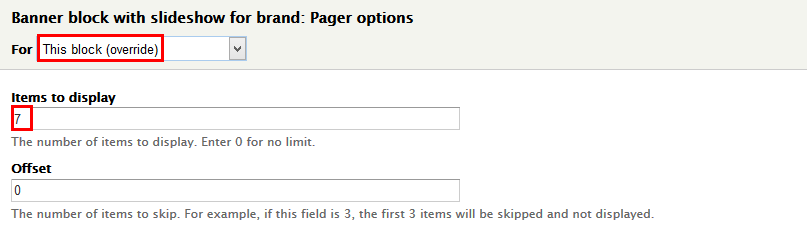
11.At PAGE area, find User page and set properties:
12. Click Save to save all settings
2.2. Configure: View: Banner: Banner block with slideshow block
1. Navigate to Structure > Blocks, find View: Banner: Banner block with slideshow block, click configure link and set the following properties:

2. Click Save block button.
3.1. Clone Banner block with 2 item block view
1. Navigate to Structure > Views, find Banner link, Click Add > Block button with following properties:

2. At TITLE set properties:

3. At Display change name display to Banner block with 2 item
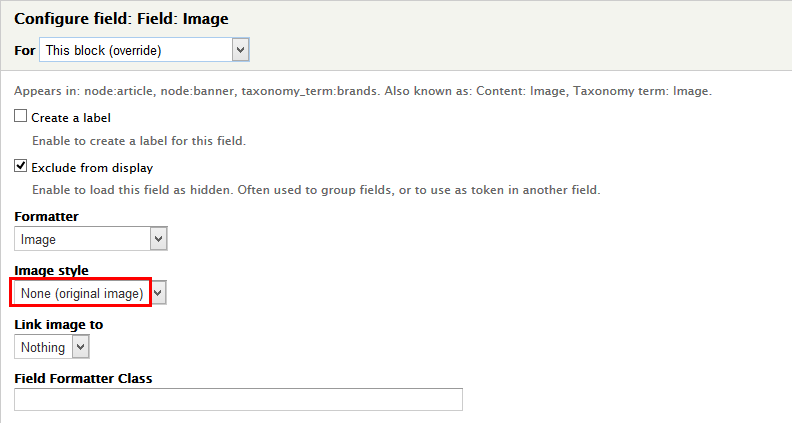
4.At FIELDS area, Click Field: Image field and set properties
5. At Advanced > CONTEXTUAL FILTERS area, click remove Content: Has taxonomy term ID field
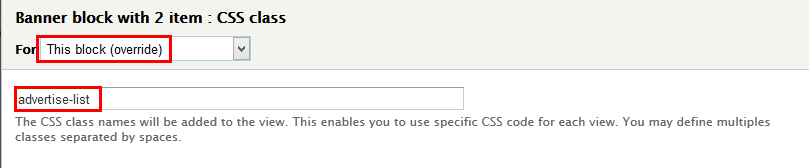
6. At Advanced > OTHER area, add CSS class:
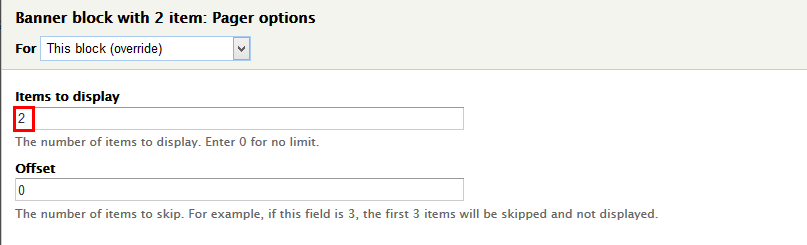
7.At PAGE area, find User page and set properties:
8. Click Save to save all settings
3.2. Configure: View: Banner: Banner block with 2 item block
1. Navigate to Structure > Blocks, find View: Banner: Banner block with 2 item block, click configure link and set the following properties:
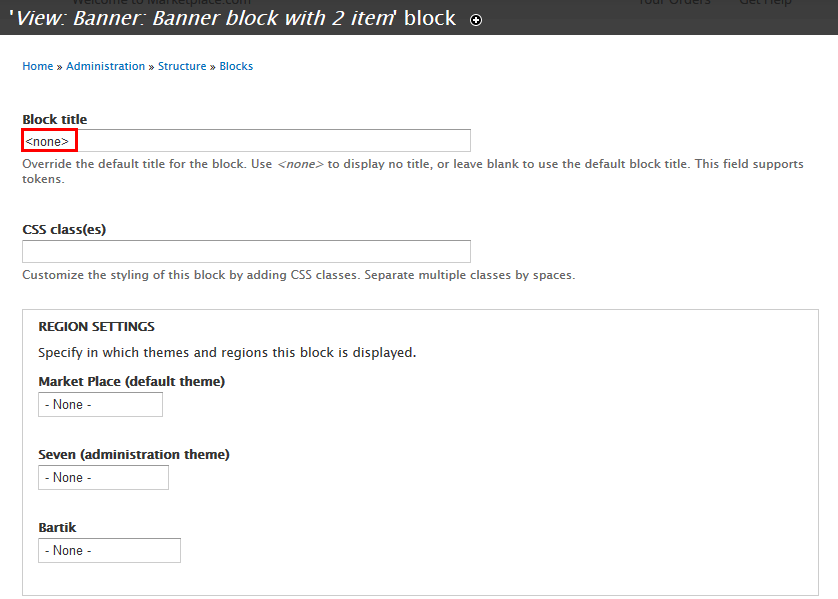
2. Click Save block button.
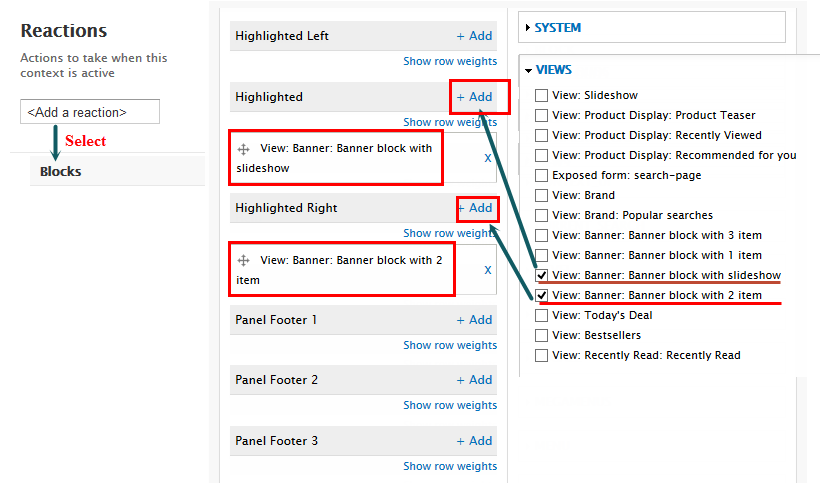
4. Add context: Banner
1. Navigate to Structure > Context click Add link, create Banner context and set following properties
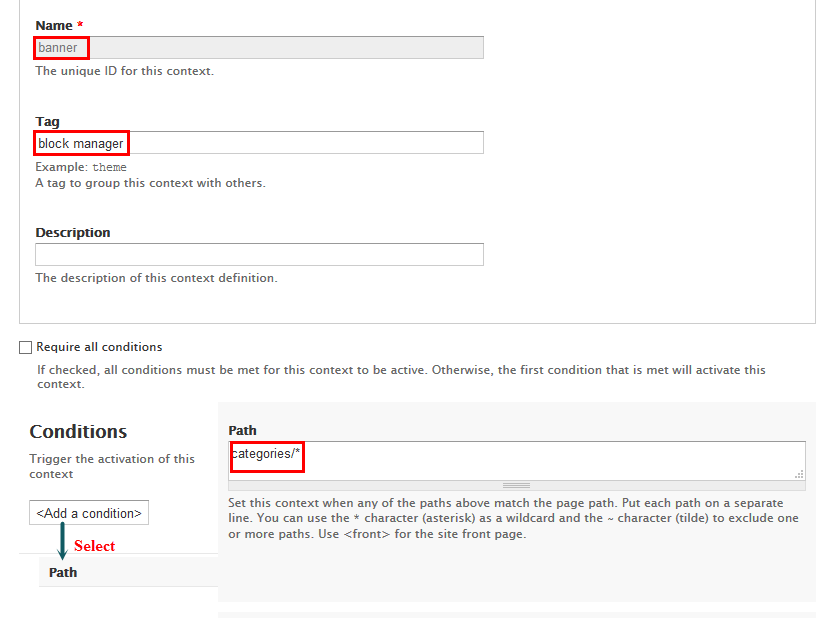
2. Click Save button
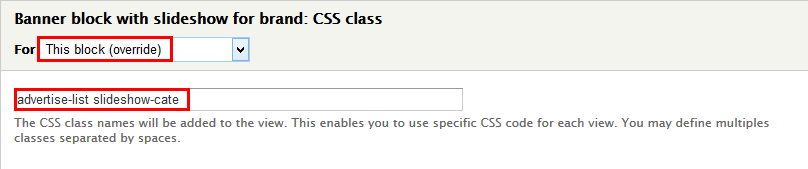
Banner block with slideshow for brand
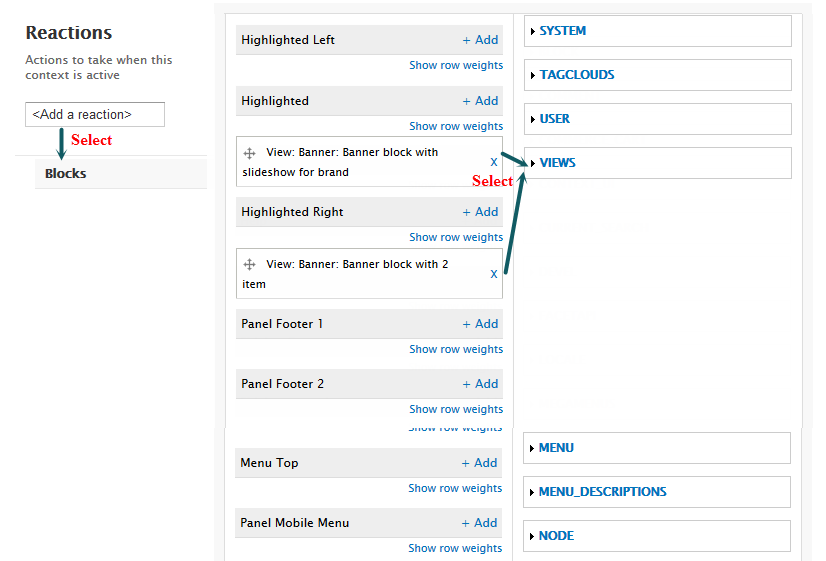
1. Add Block : Banner block with slideshow for brand
1. Navigate to Structure > Views, find Banner link, Click Add > Block button with following properties:
2. At TITLE set properties:

3. At Display change name display to Banner block with slideshow for brand
4. At Advanced > CONTEXTUAL FILTERS area, click remove Content: Has taxonomy term ID field
5. At Advanced > OTHER area, add CSS class:
6.At PAGE area, find User page and set properties:
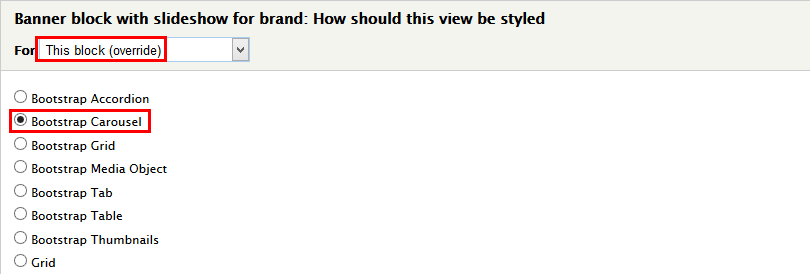
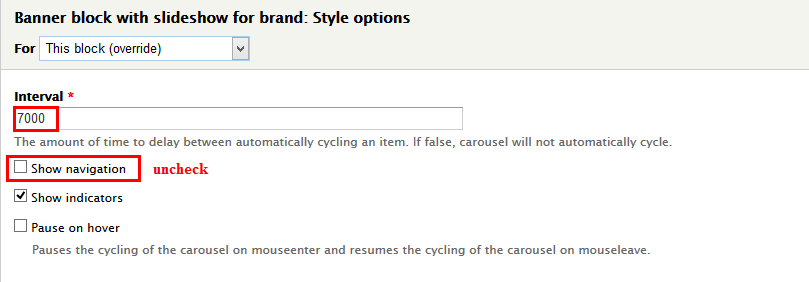
7. At FORMAT > Format area, click link and set following properties:
8. At FILTER CRITERIA area, click REMOVE Content: Promoted to front page, Content: Sticky field
9. At FILTER CRITERIA area, click Add button to add Content: Has taxonomy term field:
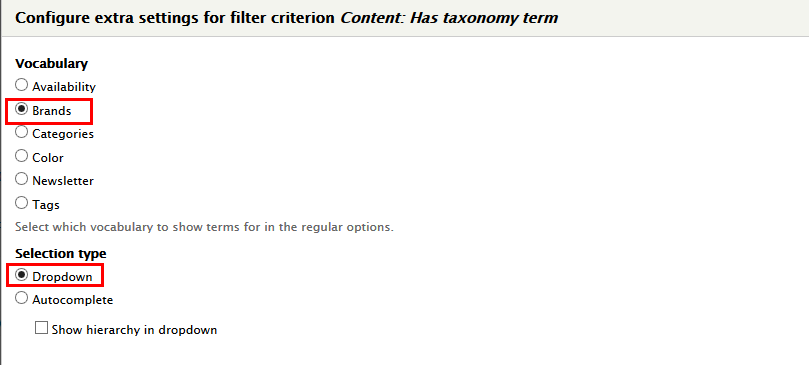

10. Set properties Content: Slide field:
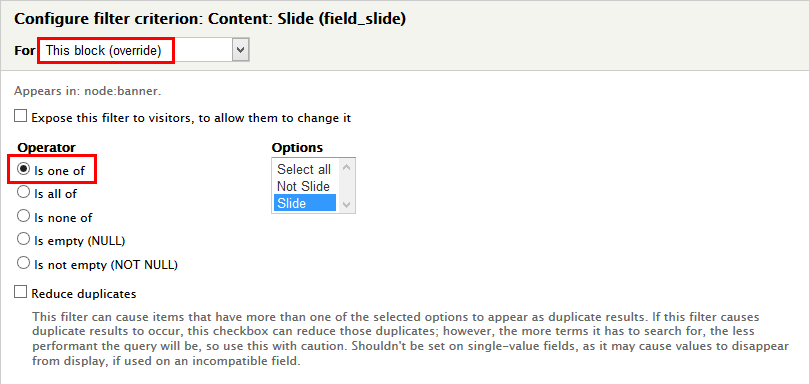
11. Click Save to save all settings
2. Create bannerforbrand context
1. Navigate to Structure > Context click Add link, create bannerforbrand context and set following properties
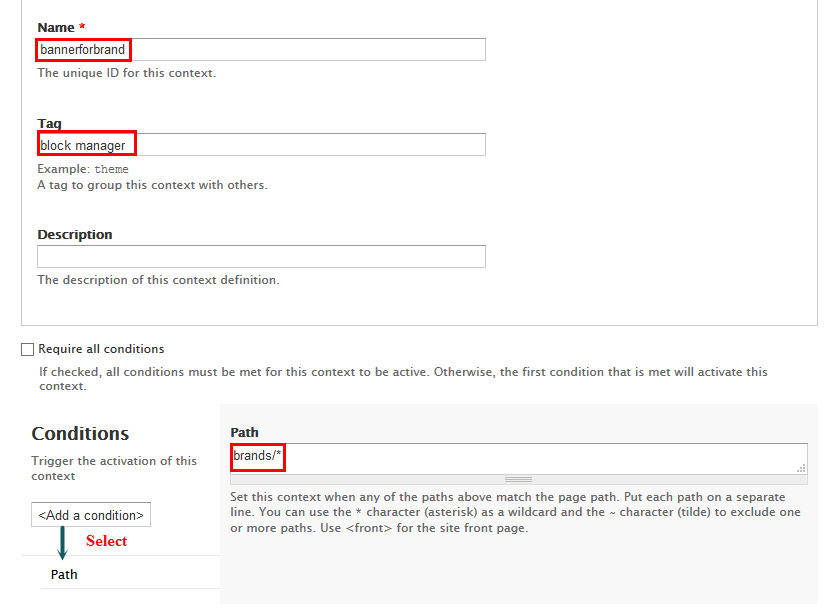
2. Click Save button
Banner block with slideshow for all categories
1. Add Block: Banner block with slideshow for all categories
1. Navigate to Structure > Views, find Banner link, Click clone Banner block with slideshow for brand button with following properties:
2. At Display change name display to Banner block with slideshow for all categories
3.At PAGE area, find User page and set properties:
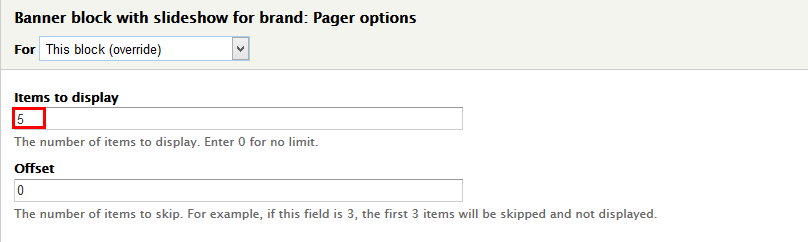
4. At FILTER CRITERIA area, click REMOVE Content: Has taxonomy termfield
5. Click Save to save all settings
2. Create banner-all-product context
1. Navigate to Structure > Conetxt click Add link, create banner-all-product context and set following properties
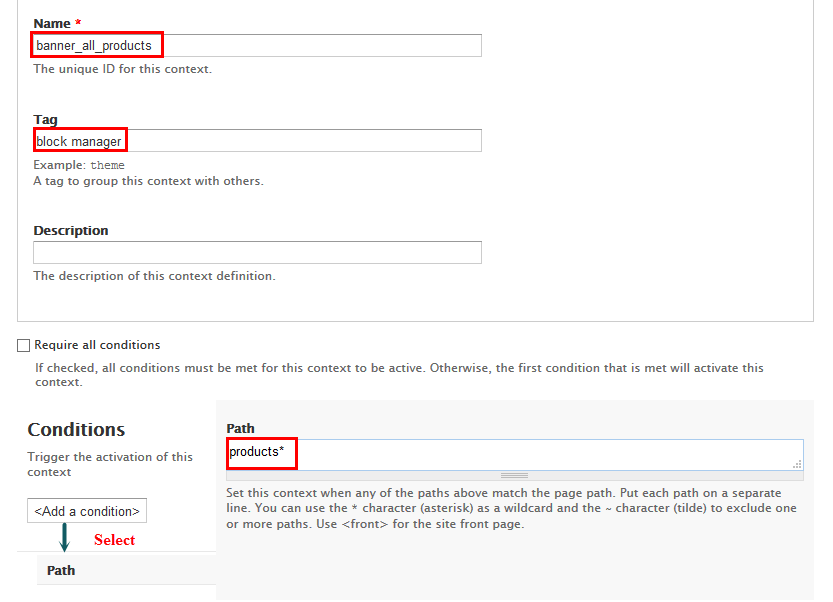

2. Click Save button
Shopping cart page
Front end Display
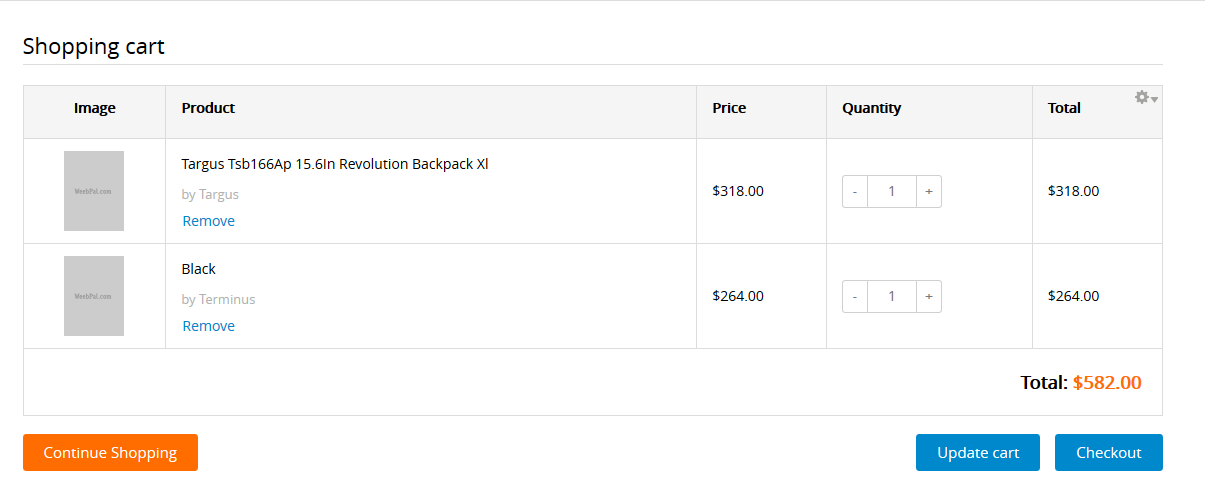
Shopping cart form view
1. Navigate to Structure > Views, find Shopping cart form view, click Edit link and set following properties:
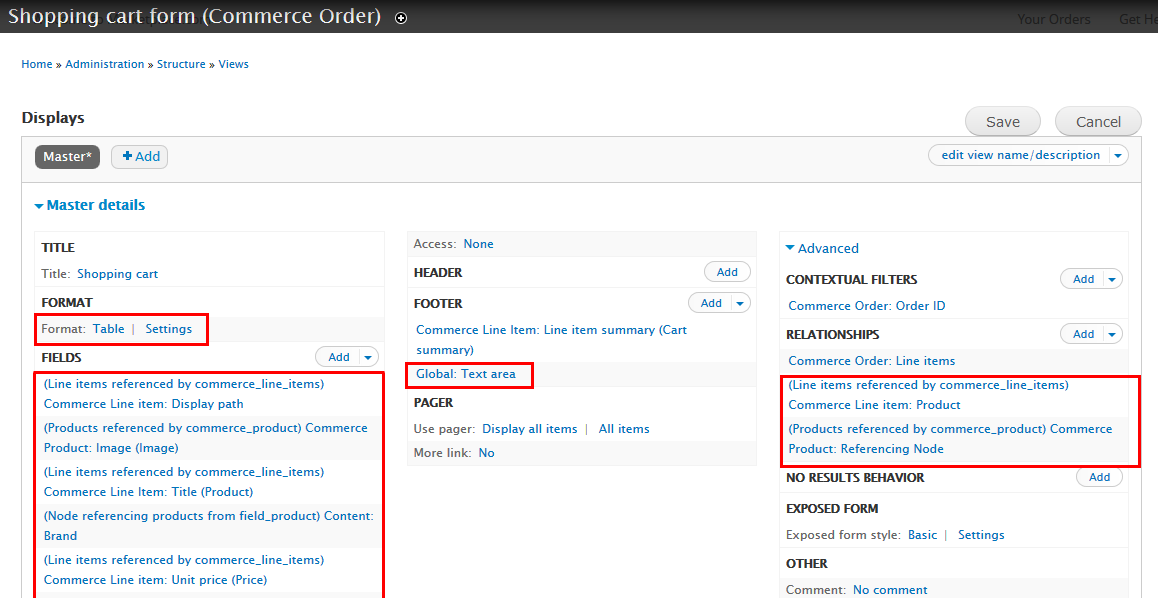
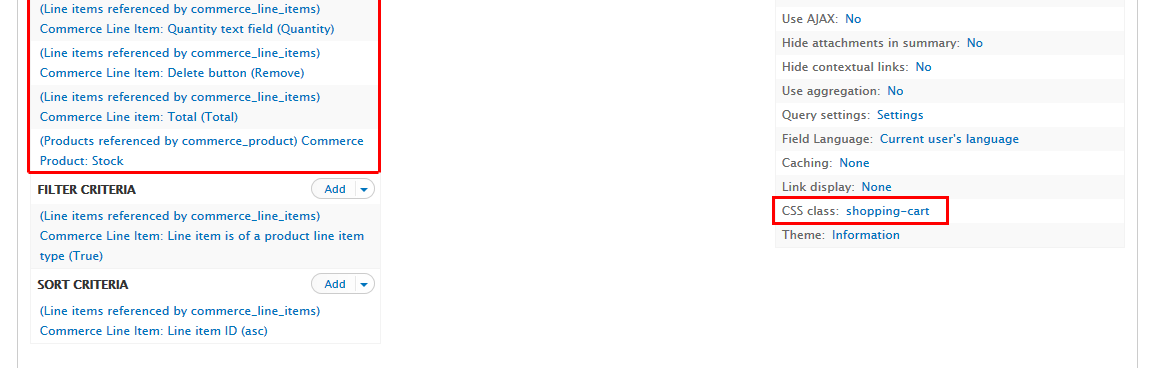
2. At Advanced > REALATIONSHIPS area, click Add button to add fields: Commerce Line item: Referenced products, Commerce Product: Referencing Node.
3. At FIELDS area, click Add button to add fields: Commerce Product: Image, Content: Brand, Commerce Product: Stock
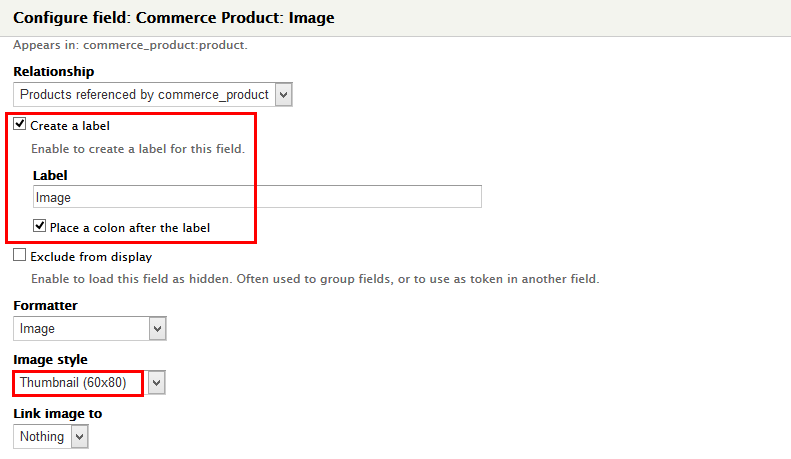
4. Set properties for Commerce Product: Image
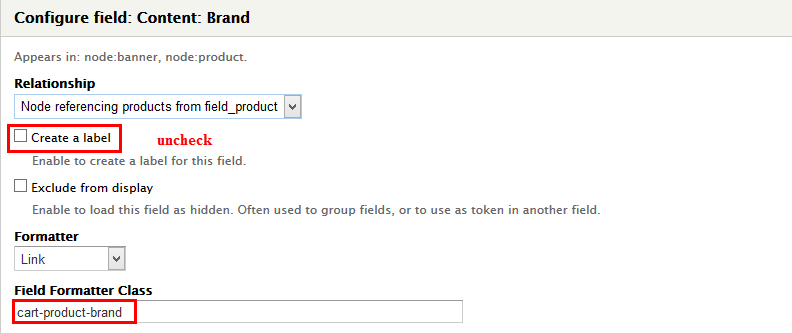
5. Set properties for Content: Brand
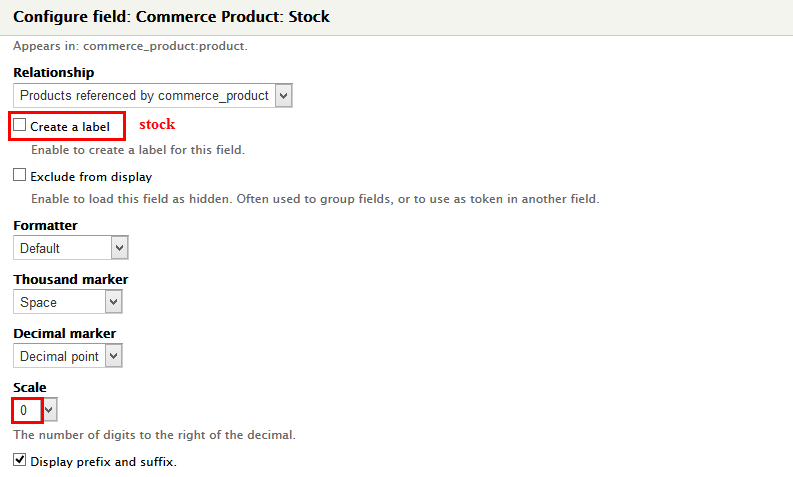
6. Set properties for Commerce Product: Stock
7. Set properties for Commerce Line Item: Title

8. Set properties for Commerce Line item: Unit price

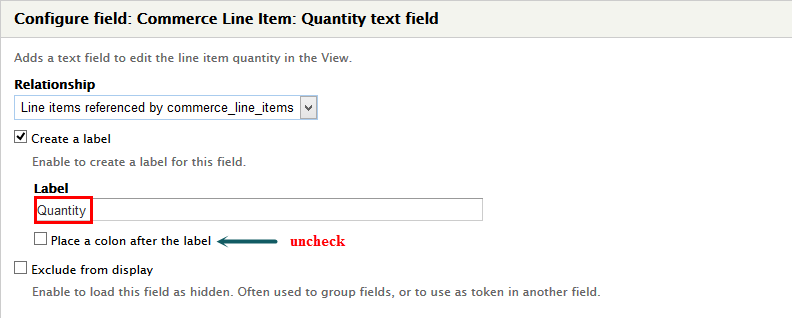
9. Set properties for Commerce Line Item: Quantity text field
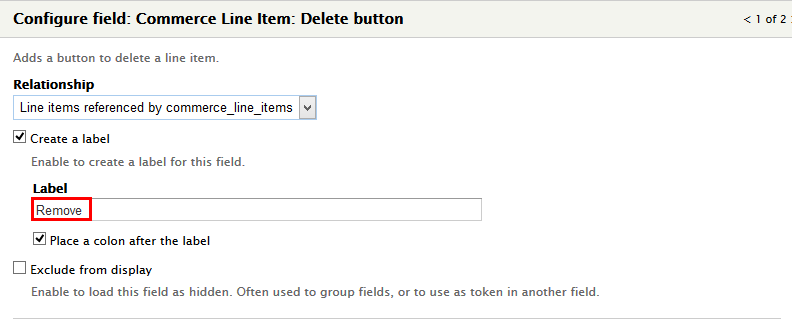
10. Set properties for Commerce Line Item: Delete button
11. Set properties for Commerce Line item: Total

12. At FIELDS area, click Rearrange button and set following arrange

13. At FOOTER area, click Add button to add Global: Text area field with following properties:

14. At FORMAT > Format area, click Settings link an set properties:
15. At Advanced > OTHER area, add CSS class:

16. Click Save to save all settings
Checkout page
Front end Display
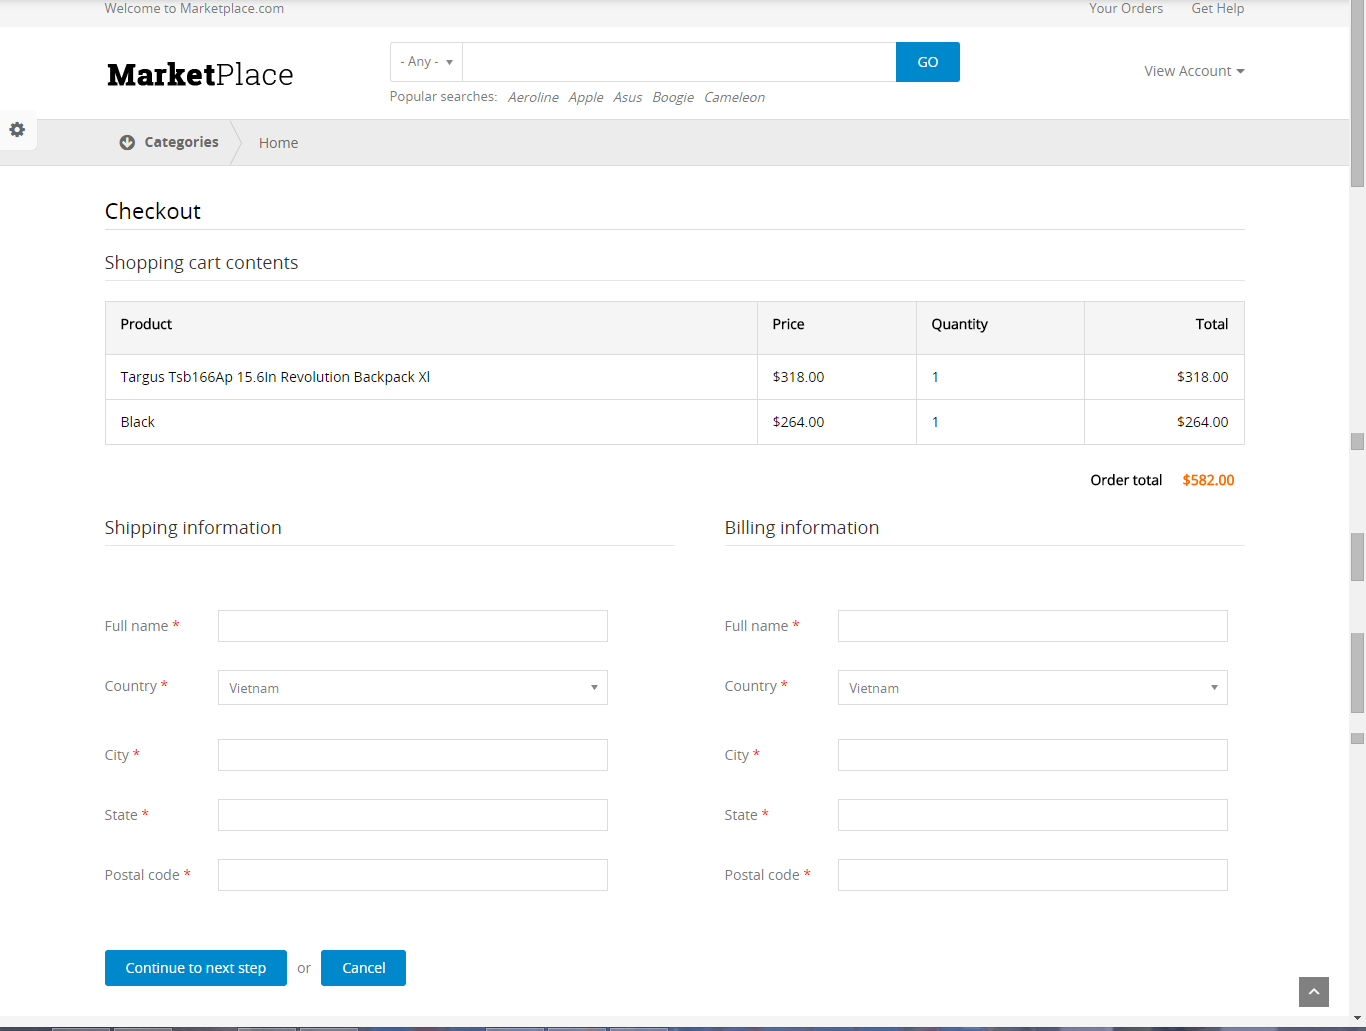
1. Shopping cart sumary view
1. Navigate to Structure > Views, find Shopping cart summary view, click Edit link and set following properties:
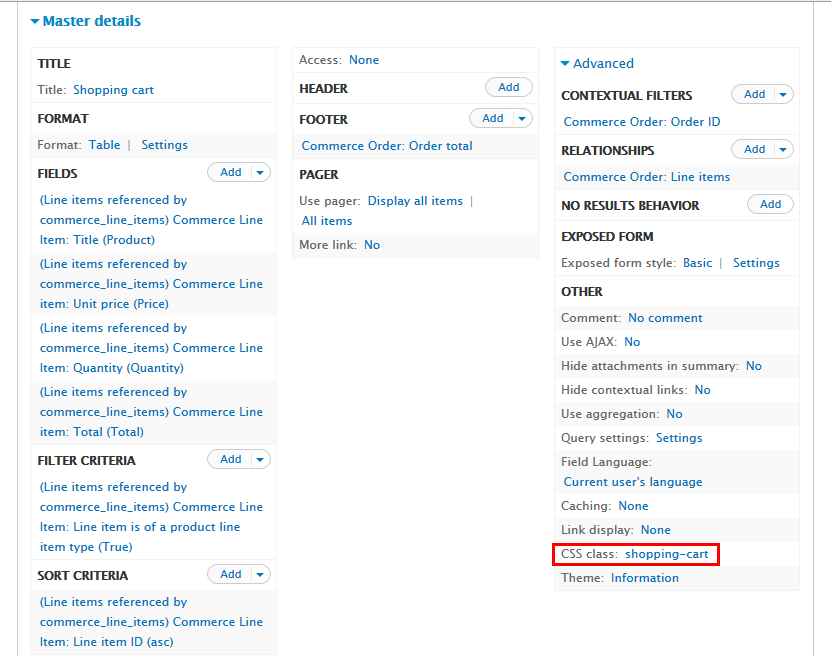
2 At Advanced > OTHER area, add CSS class:

3. Click Save to save all settings
2. Configurate Store Payment methods
1. Navigate to Store > Configuration, click link.
2. Find PayPal WPS, then click Enable link.
How can we help page
1. Add menu link
1. Navigate to Structure >Menu, create Help topic new.
2. Navigate to Structure >Menu, find Help topic link. Add menu link following:
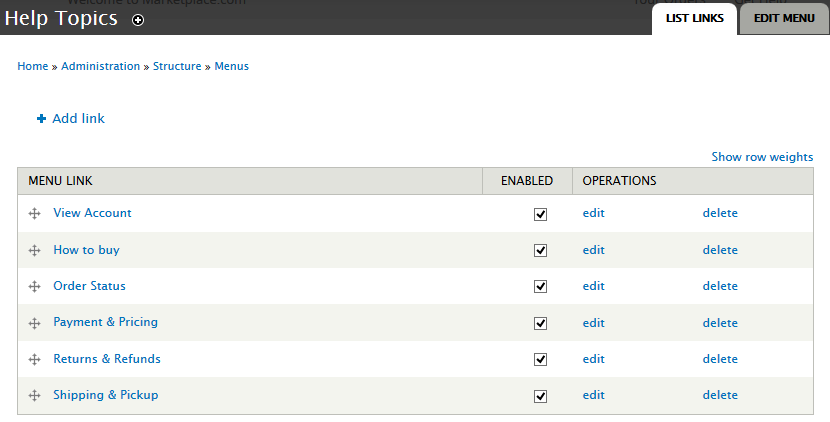
3. Click Save button.
2. Configure: Menu :Help topic block
1. Navigate to Structure > Blocks, find Menu: Help topic block. Click configure button and setfollowing properties:
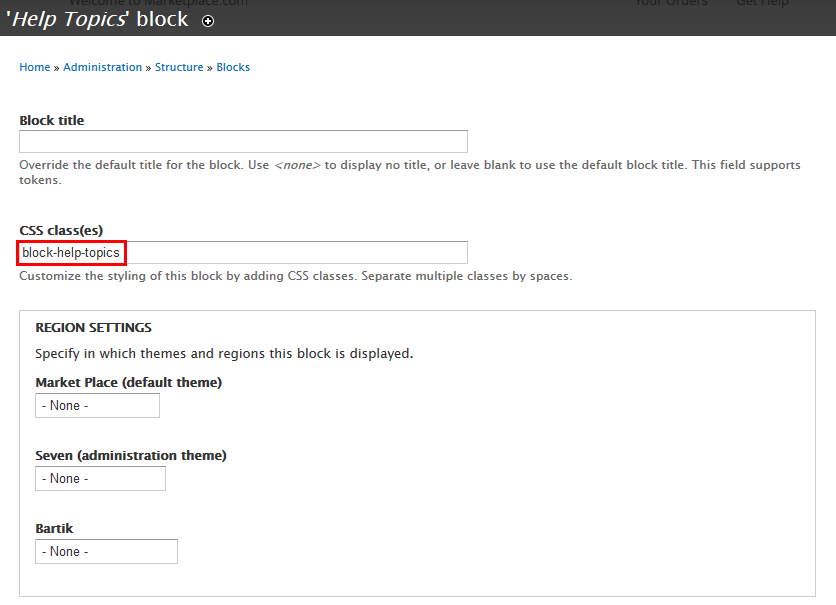
2. Click Save button.
3. Configure: Search form block
1. Navigate to Structure > Blocks, find Search form block. Click configure button and setfollowing properties:
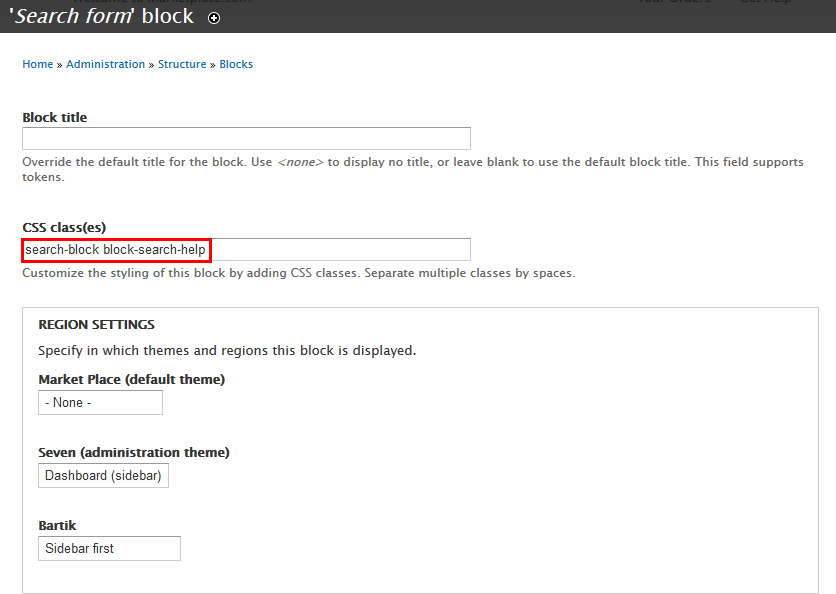
2. Click Save button.
4. Create Help context
1. Navigate to Structure > Context click Add link, create Help context and set following properties
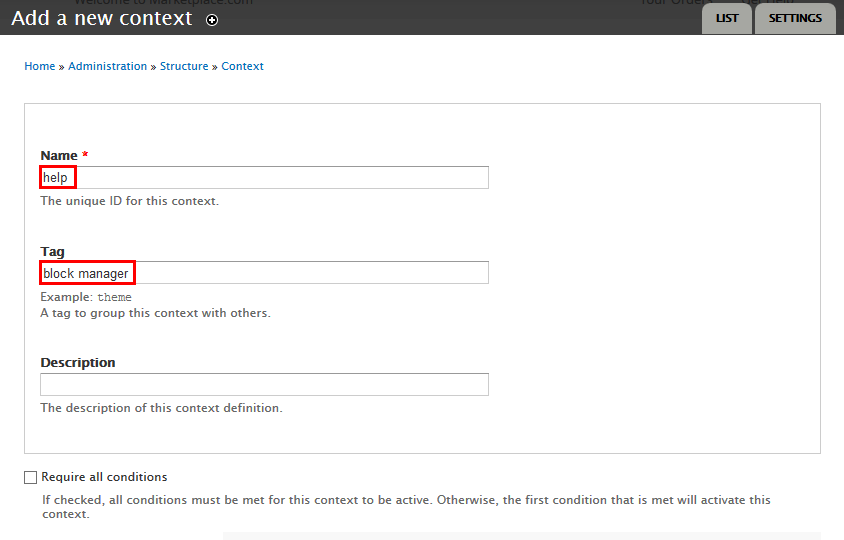
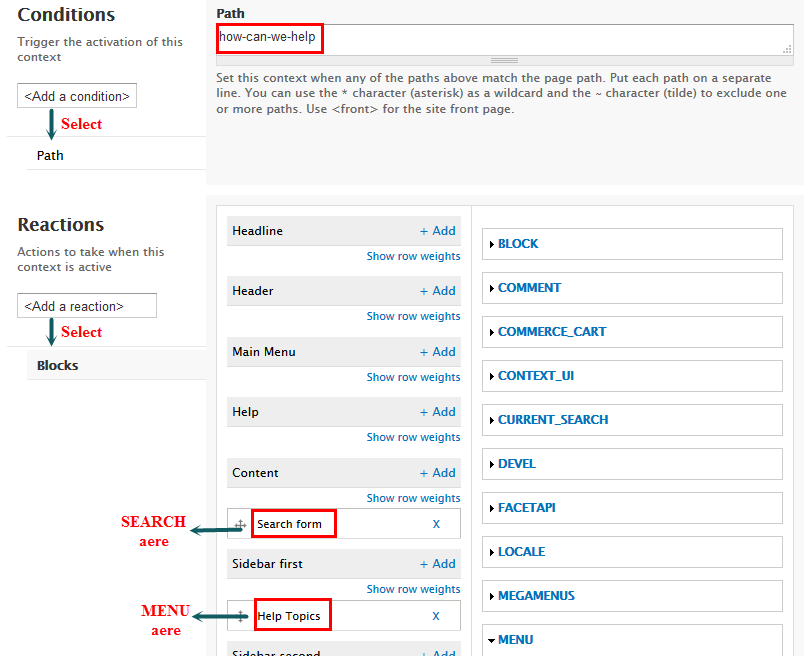
2. Click Save button.
5. Create How can we help? content
1. Navigate to Structure > Content > Basic page click Add link, create How can we help? content and set following properties
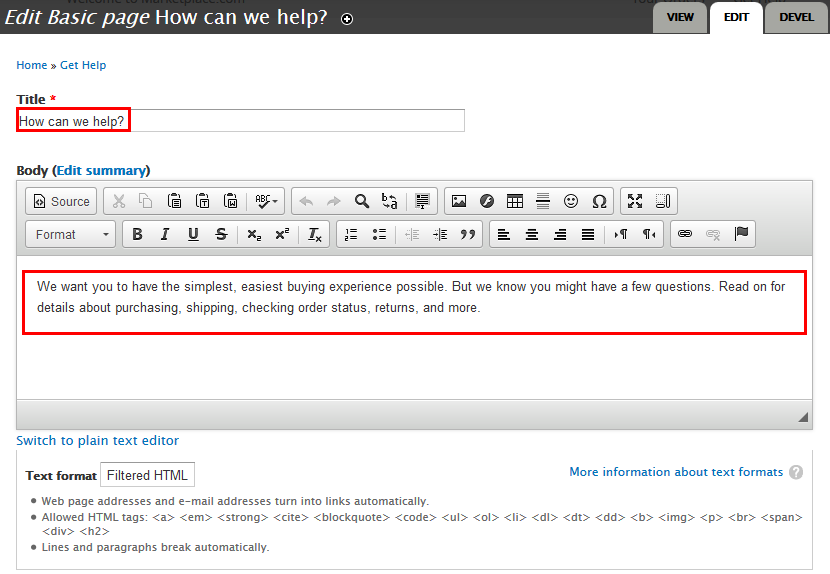
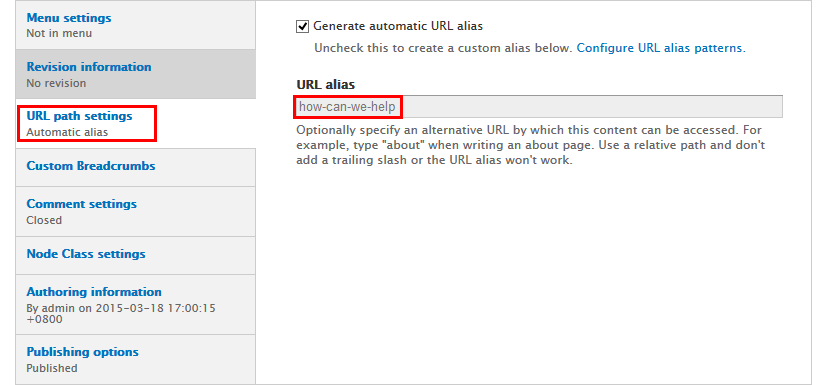
2. Click Save button.
Shipping page
Configurate Store Shipping
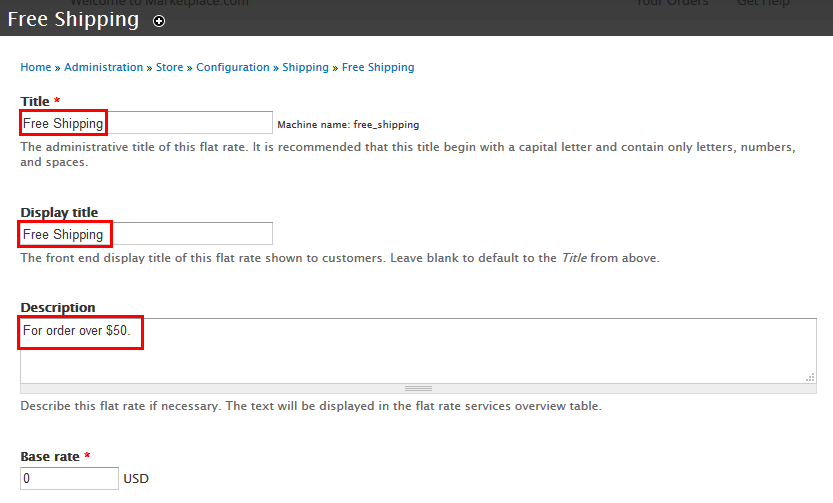
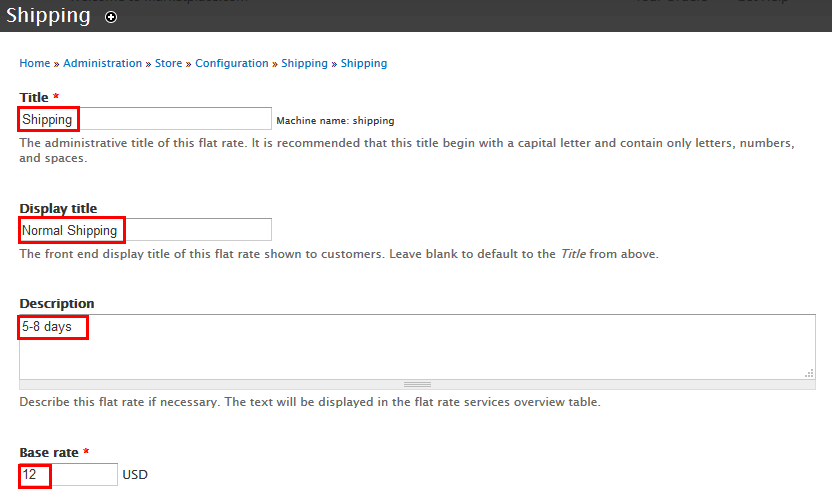
1. Navigate to Store > Configuration > Shipping click Add a flat rate service link, create Free Shipping, Shipping fields
2. Set properties Free Shipping field
3. Set properties Shipping field
4. Click Save button.
Contact page
First, we need to make sure that webform module installed.
Front end Display
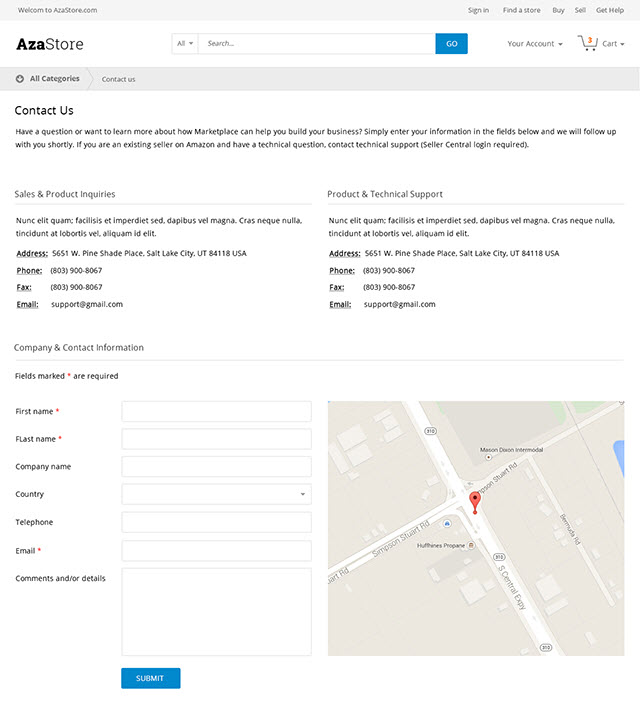
Create Contact US content
1. Navigate to Content > Add content create Contact US content
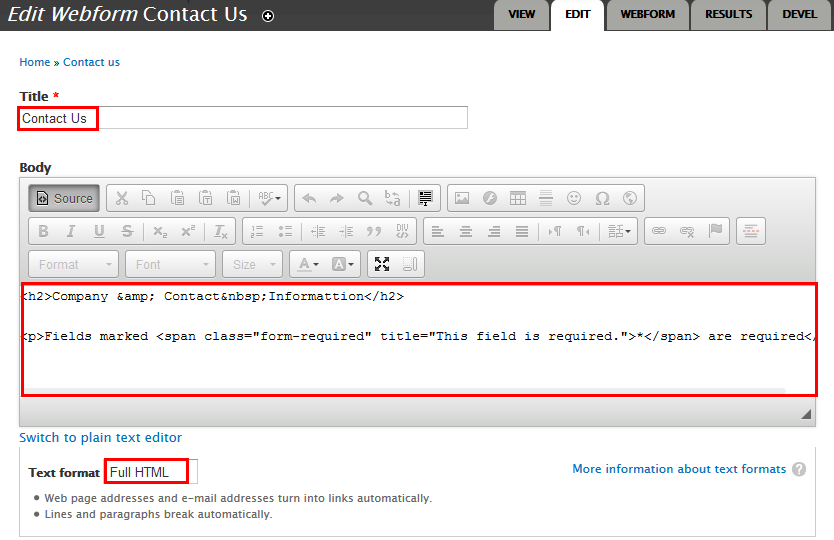
Refer to following HTML code:
Company & Contact Informattion
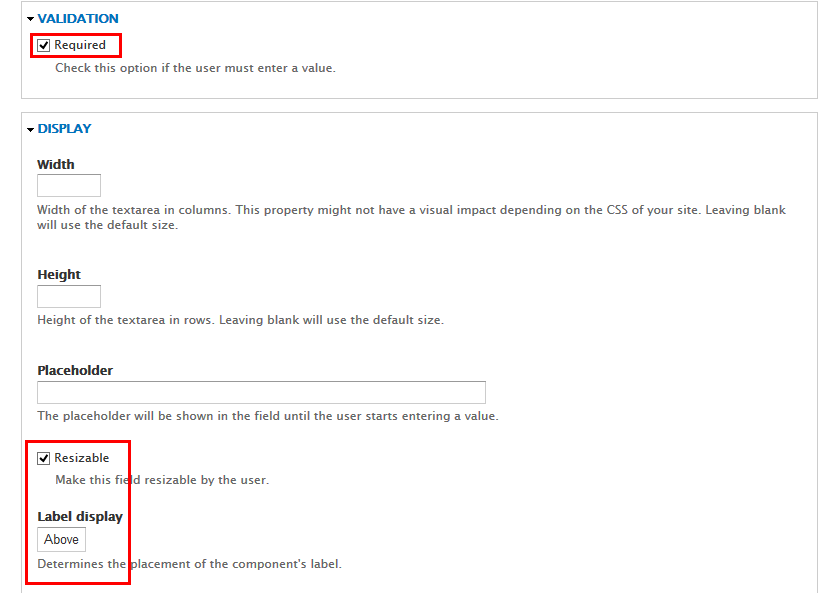
Fields marked * are required

Refer to the following HTML code:
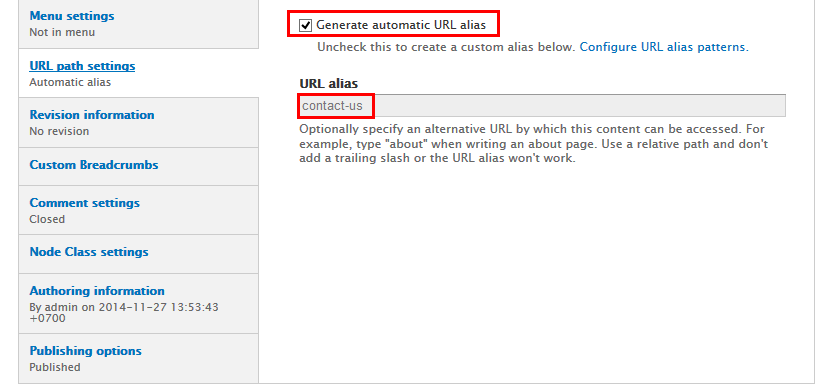
2. Click URL path settings tab, set the following properties:
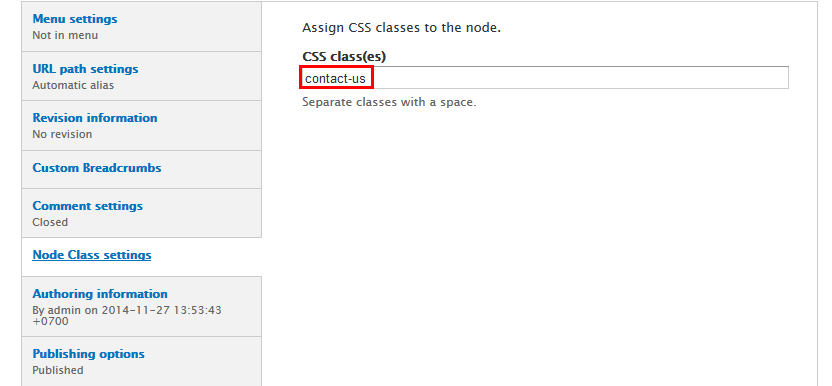
3. Click Node Class settings tab, set the following properties:
4. Click Save button.
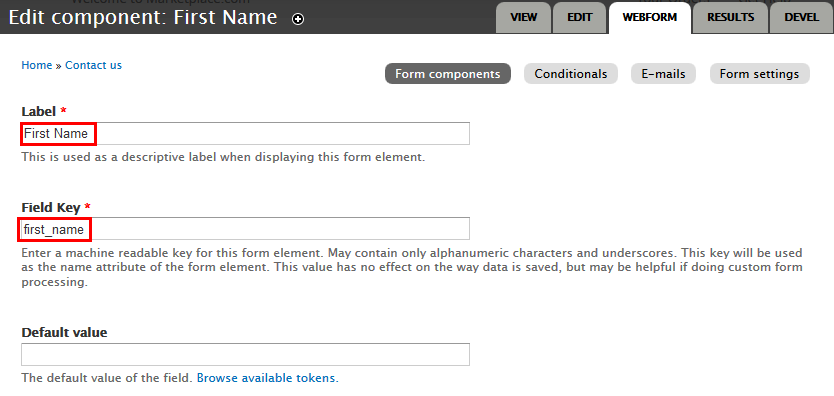
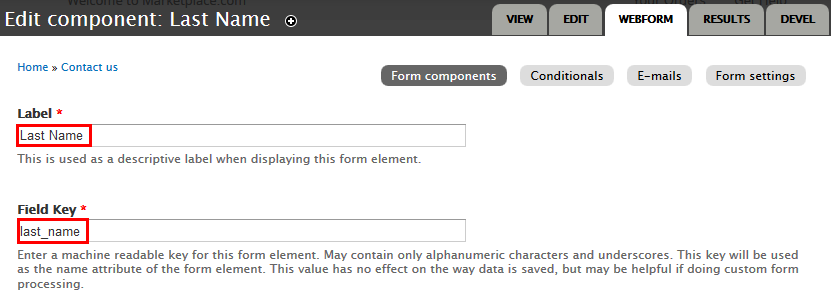
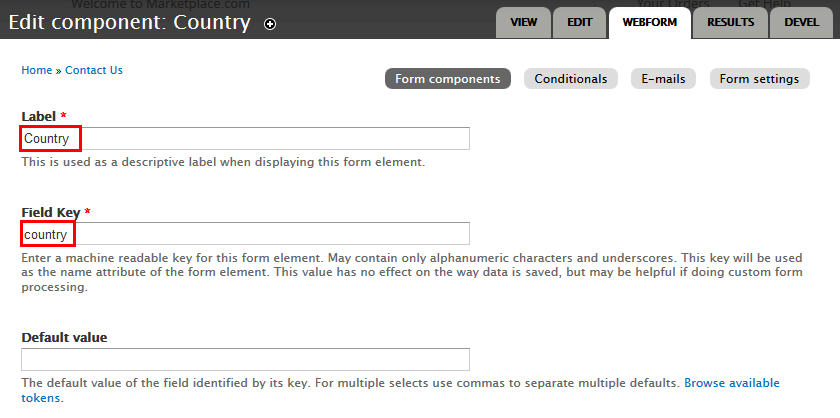
5. Navigate to Webform tab and Add fields:
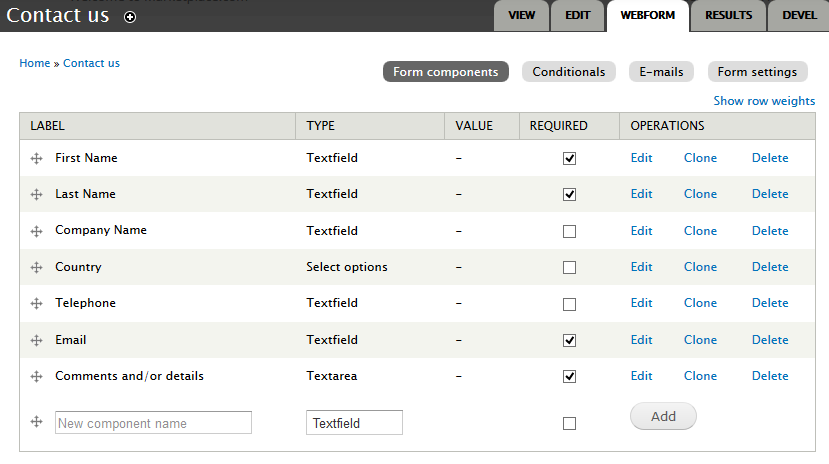
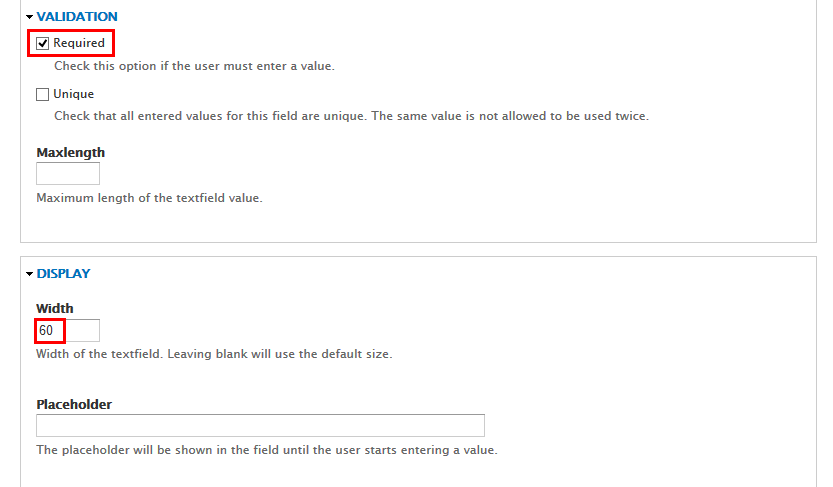
6. Set properties First Name field

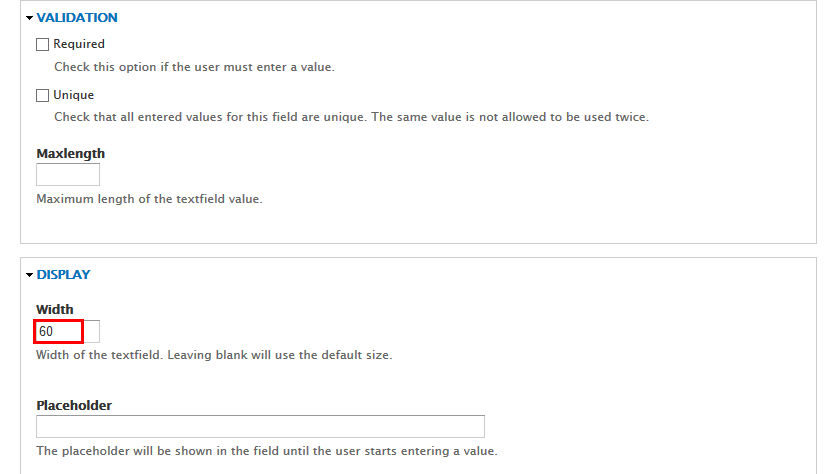
7. Set properties Last Name field
8. Set properties Company Name field

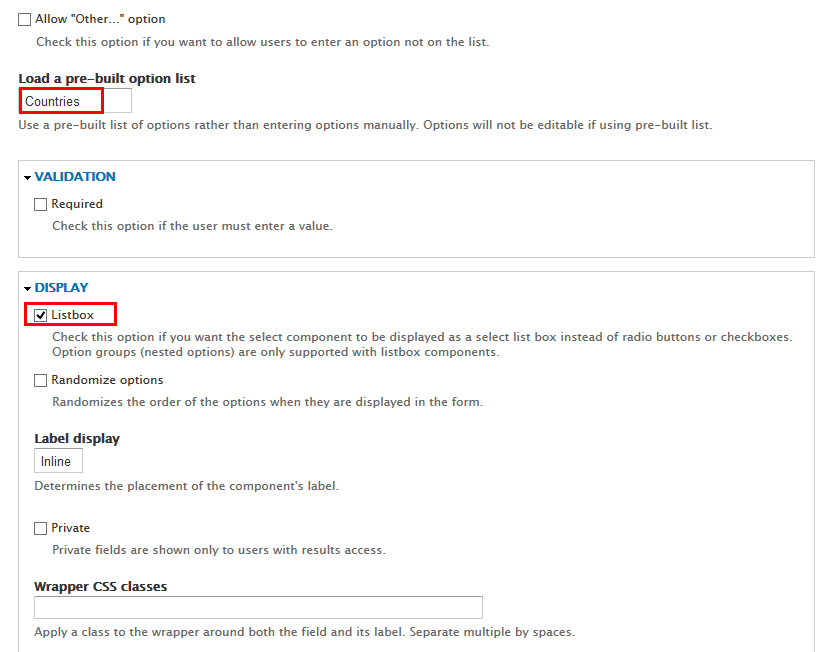
9. Set properties Country field
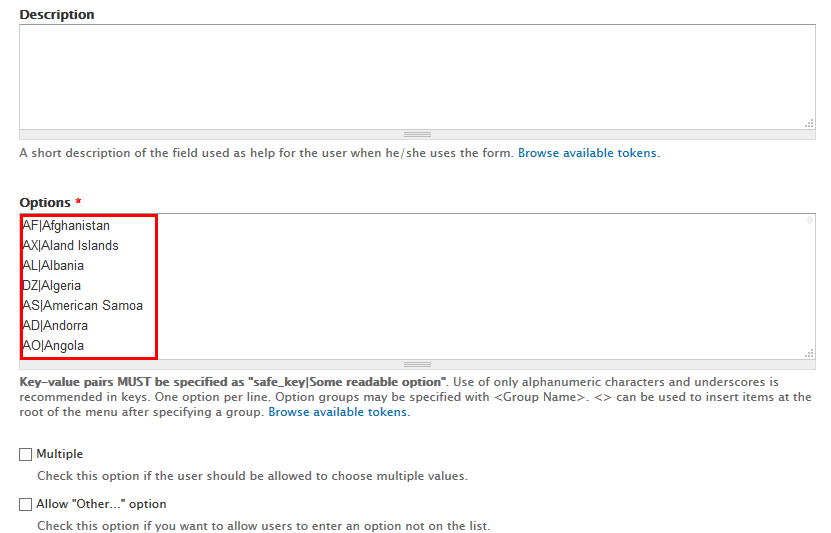
Refer to following HTML code:
							AF|Afghanistan
							AX|Aland Islands
							AL|Albania
							DZ|Algeria
							AS|American Samoa
							AD|Andorra
							AO|Angola
							AI|Anguilla
							AQ|Antarctica
							AG|Antigua and Barbuda
							AR|Argentina
							AM|Armenia
							AW|Aruba
							AU|Australia
							AT|Austria
							AZ|Azerbaijan
							BS|Bahamas
							BH|Bahrain
							BD|Bangladesh
							BB|Barbados
							BY|Belarus
							BE|Belgium
							BZ|Belize
							BJ|Benin
							BM|Bermuda
							BT|Bhutan
							BO|Bolivia
							BA|Bosnia and Herzegovina
							BW|Botswana
							BV|Bouvet Island
							BR|Brazil
							IO|British Indian Ocean Territory
							VG|British Virgin Islands
							BN|Brunei
							BG|Bulgaria
							BF|Burkina Faso
							BI|Burundi
							KH|Cambodia
							CM|Cameroon
							CA|Canada
							CV|Cape Verde
							BQ|Caribbean Netherlands
							KY|Cayman Islands
							CF|Central African Republic
							TD|Chad
							CL|Chile
							CN|China
							CX|Christmas Island
							CC|Cocos (Keeling) Islands
							CO|Colombia
							KM|Comoros
							CG|Congo (Brazzaville)
							CD|Congo (Kinshasa)
							CK|Cook Islands
							CR|Costa Rica
							HR|Croatia
							CU|Cuba
							CW|Curaçao
							CY|Cyprus
							CZ|Czech Republic
							DK|Denmark
							DJ|Djibouti
							DM|Dominica
							DO|Dominican Republic
							EC|Ecuador
							EG|Egypt
							SV|El Salvador
							GQ|Equatorial Guinea
							ER|Eritrea
							EE|Estonia
							ET|Ethiopia
							FK|Falkland Islands
							FO|Faroe Islands
							FJ|Fiji
							FI|Finland
							FR|France
							GF|French Guiana
							PF|French Polynesia
							TF|French Southern Territories
							GA|Gabon
							GM|Gambia
							GE|Georgia
							DE|Germany
							GH|Ghana
							GI|Gibraltar
							GR|Greece
							GL|Greenland
							GD|Grenada
							GP|Guadeloupe
							GU|Guam
							GT|Guatemala
							GG|Guernsey
							GN|Guinea
							GW|Guinea-Bissau
							GY|Guyana
							HT|Haiti
							HM|Heard Island and McDonald Islands
							HN|Honduras
							HK|Hong Kong S.A.R., China
							HU|Hungary
							IS|Iceland
							IN|India
							ID|Indonesia
							IR|Iran
							IQ|Iraq
							IE|Ireland
							IM|Isle of Man
							IL|Israel
							IT|Italy
							CI|Ivory Coast
							JM|Jamaica
							JP|Japan
							JE|Jersey
							JO|Jordan
							KZ|Kazakhstan
							KE|Kenya
							KI|Kiribati
							KW|Kuwait
							KG|Kyrgyzstan
							LA|Laos
							LV|Latvia
							LB|Lebanon
							LS|Lesotho
							LR|Liberia
							LY|Libya
							LI|Liechtenstein
							LT|Lithuania
							LU|Luxembourg
							MO|Macao S.A.R., China
							MK|Macedonia
							MG|Madagascar
							MW|Malawi
							MY|Malaysia
							MV|Maldives
							ML|Mali
							MT|Malta
							MH|Marshall Islands
							MQ|Martinique
							MR|Mauritania
							MU|Mauritius
							YT|Mayotte
							MX|Mexico
							FM|Micronesia
							MD|Moldova
							MC|Monaco
							MN|Mongolia
							ME|Montenegro
							MS|Montserrat
							MA|Morocco
							MZ|Mozambique
							MM|Myanmar
							NA|Namibia
							NR|Nauru
							NP|Nepal
							NL|Netherlands
							AN|Netherlands Antilles
							NC|New Caledonia
							NZ|New Zealand
							NI|Nicaragua
							NE|Niger
							NG|Nigeria
							NU|Niue
							NF|Norfolk Island
							MP|Northern Mariana Islands
							KP|North Korea
							NO|Norway
							OM|Oman
							PK|Pakistan
							PW|Palau
							PS|Palestinian Territory
							PA|Panama
							PG|Papua New Guinea
							PY|Paraguay
							PE|Peru
							PH|Philippines
							PN|Pitcairn
							PL|Poland
							PT|Portugal
							PR|Puerto Rico
							QA|Qatar
							RE|Reunion
							RO|Romania
							RU|Russia
							RW|Rwanda
							BL|Saint Barthélemy
							SH|Saint Helena
							KN|Saint Kitts and Nevis
							LC|Saint Lucia
							MF|Saint Martin (French part)
							PM|Saint Pierre and Miquelon
							VC|Saint Vincent and the Grenadines
							WS|Samoa
							SM|San Marino
							ST|Sao Tome and Principe
							SA|Saudi Arabia
							SN|Senegal
							RS|Serbia
							SC|Seychelles
							SL|Sierra Leone
							SG|Singapore
							SX|Sint Maarten
							SK|Slovakia
							SI|Slovenia
							SB|Solomon Islands
							SO|Somalia
							ZA|South Africa
							GS|South Georgia and the South Sandwich Islands
							KR|South Korea
							SS|South Sudan
							ES|Spain
							LK|Sri Lanka
							SD|Sudan
							SR|Suriname
							SJ|Svalbard and Jan Mayen
							SZ|Swaziland
							SE|Sweden
							CH|Switzerland
							SY|Syria
							TW|Taiwan
							TJ|Tajikistan
							TZ|Tanzania
							TH|Thailand
							TL|Timor-Leste
							TG|Togo
							TK|Tokelau
							TO|Tonga
							TT|Trinidad and Tobago
							TN|Tunisia
							TR|Turkey
							TM|Turkmenistan
							TC|Turks and Caicos Islands
							TV|Tuvalu
							VI|U.S. Virgin Islands
							UG|Uganda
							UA|Ukraine
							AE|United Arab Emirates
							GB|United Kingdom
							US|United States
							UM|United States Minor Outlying Islands
							UY|Uruguay
							UZ|Uzbekistan
							VU|Vanuatu
							VA|Vatican
							VE|Venezuela
							VN|Vietnam
							WF|Wallis and Futuna
							EH|Western Sahara
							YE|Yemen
							ZM|Zambia
							ZW|Zimbabwe
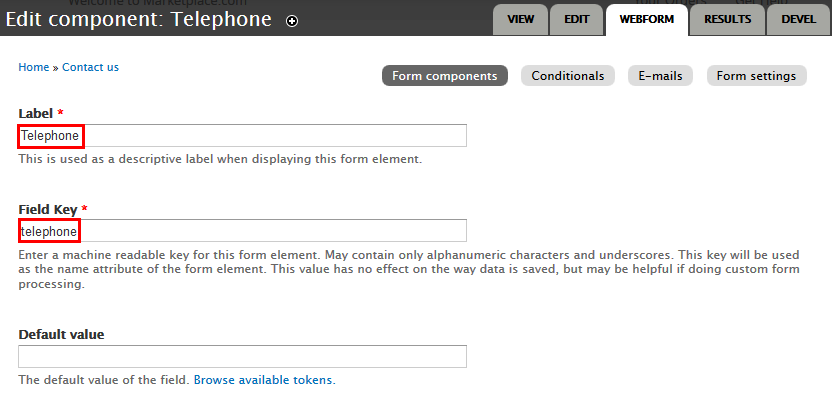
10. Set properties Telephone field
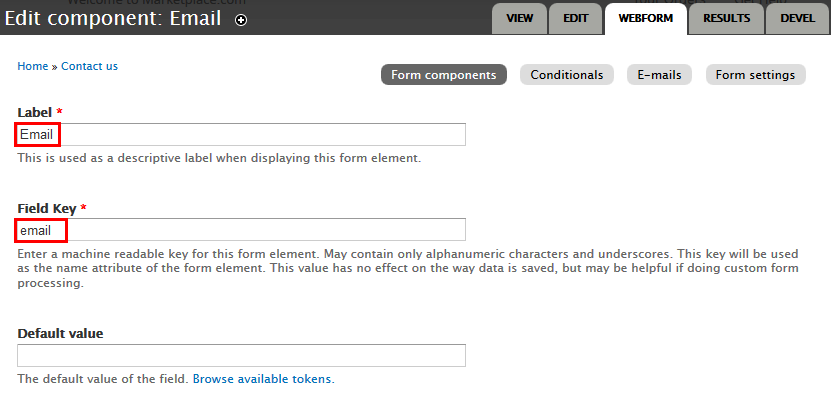
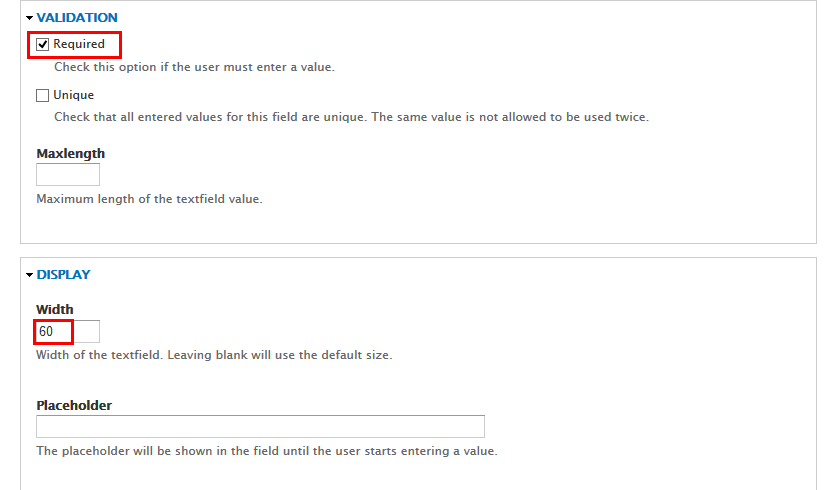
11. Set properties Email field
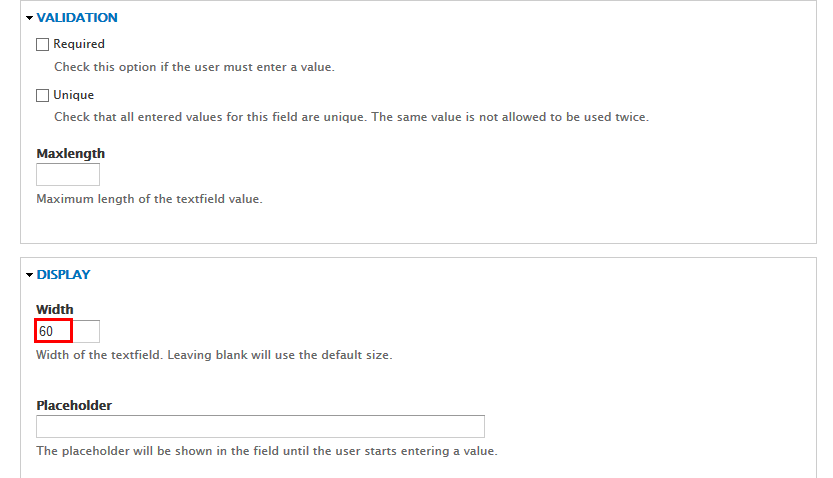
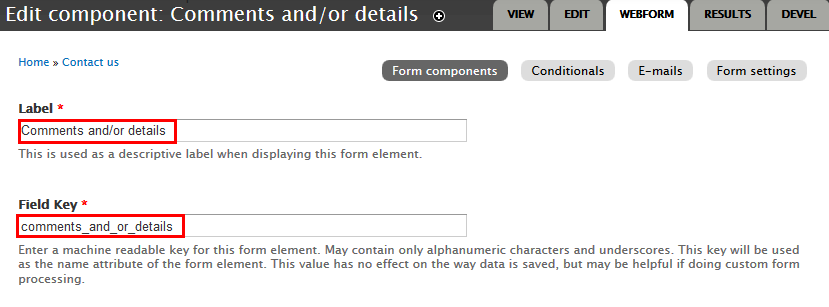
12. Set properties Comments and/or details field
13. Click Save button.
How to buy page
Create How to buy content
1. Navigate to Content > Add content create How to buy content
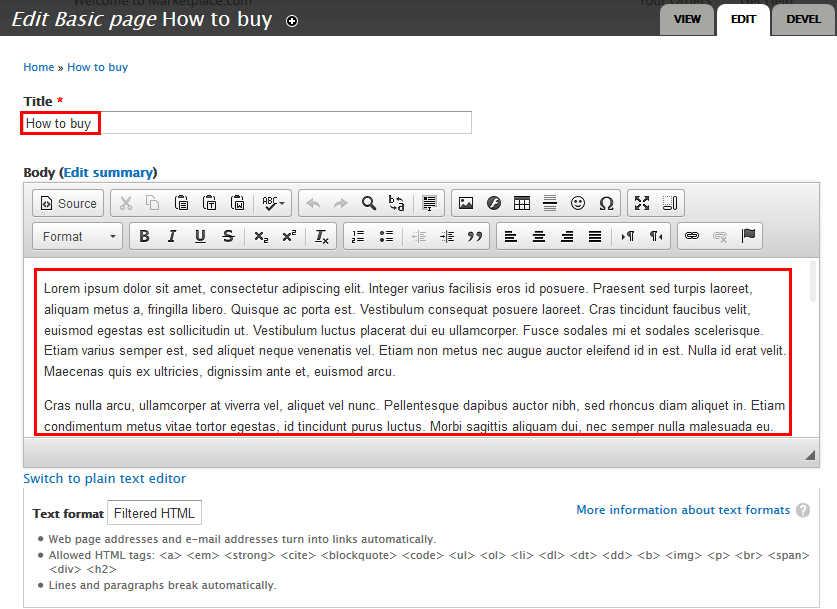
Refer to following HTML code:
Lorem ipsum dolor sit amet, consectetur adipiscing elit. Integer varius facilisis eros id posuere. Praesent sed turpis laoreet, aliquam metus a, fringilla libero. Quisque ac porta est. Vestibulum consequat posuere laoreet. Cras tincidunt faucibus velit, euismod egestas est sollicitudin ut. Vestibulum luctus placerat dui eu ullamcorper. Fusce sodales mi et sodales scelerisque. Etiam varius semper est, sed aliquet neque venenatis vel. Etiam non metus nec augue auctor eleifend id in est. Nulla id erat velit. Maecenas quis ex ultricies, dignissim ante et, euismod arcu.
Cras nulla arcu, ullamcorper at viverra vel, aliquet vel nunc. Pellentesque dapibus auctor nibh, sed rhoncus diam aliquet in. Etiam condimentum metus vitae tortor egestas, id tincidunt purus luctus. Morbi sagittis aliquam dui, nec semper nulla malesuada eu. Donec eleifend molestie justo. Pellentesque habitant morbi tristique senectus et netus et malesuada fames ac turpis egestas. Nullam gravida turpis at ullamcorper porta.
Aenean ac magna felis. Nulla blandit urna non aliquam tempus. Fusce ultricies laoreet velit, tempus condimentum purus aliquet a. Nullam ut sapien vel neque ornare convallis sit amet ut felis. Donec convallis consectetur lorem, dictum lobortis ex pretium vitae. Proin hendrerit feugiat vulputate. Duis ultricies, erat ut tincidunt feugiat, sapien ipsum pulvinar purus, eu bibendum tellus leo consequat metus. Donec quis dictum nisl. Quisque non lectus tellus. Etiam sit amet tincidunt leo. Morbi pretium rhoncus purus, et rhoncus orci sollicitudin vel. Mauris efficitur nisl eu leo imperdiet elementum. Duis ut consectetur augue. Etiam rutrum placerat volutpat. Suspendisse vitae tempor urna, a hendrerit sapien.
Sed molestie imperdiet dolor et varius. Aliquam id metus bibendum, pulvinar erat eget, posuere elit. Aenean mattis id orci ac feugiat. Nunc pharetra congue lectus at sollicitudin. Donec ultricies, nunc a varius tincidunt, nulla odio tincidunt justo, nec malesuada augue nulla in purus. Nullam id quam orci. Mauris eu ante at elit malesuada dictum.
Maecenas bibendum, odio et porta euismod, neque augue tristique velit, sit amet imperdiet felis sapien sed ante. Nullam consequat libero libero, id tempus tortor blandit eget. Nam aliquet nisi orci, sed placerat velit volutpat quis. Donec pulvinar magna et turpis auctor aliquam. Suspendisse et diam dignissim, maximus tellus eget, maximus ligula. Vivamus feugiat pellentesque metus, sit amet accumsan ligula posuere quis. Sed vitae metus sit amet neque iaculis cursus. Fusce luctus at massa sed euismod. Phasellus mollis suscipit purus, quis facilisis leo maximus in. Sed sagittis mi sed diam gravida laoreet. Praesent scelerisque, mi efficitur dictum imperdiet, elit massa volutpat ipsum, non venenatis felis lectus eu est. Aliquam libero justo, lobortis eget felis vel, tincidunt ultricies quam. Nunc et augue lacinia, dignissim augue sit amet, vehicula nisi. Duis varius elit a tellus imperdiet, vel ultricies mi viverra. Suspendisse aliquet eu justo id eleifend. Ut consequat ac lectus nec tincidunt.
2. Click Save button.
Order Status page
Create Order Status content
1. Navigate to Content > Add content create Order Status content
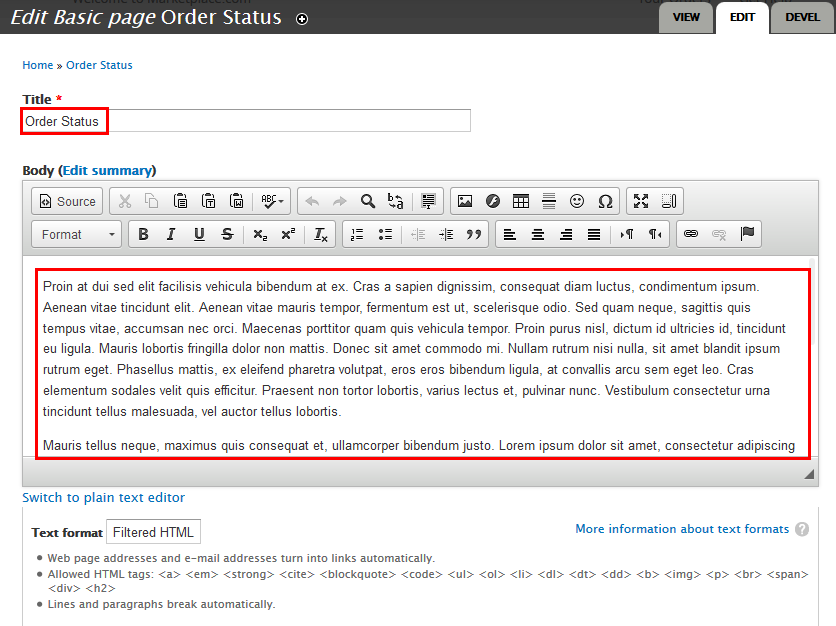
Refer to following HTML code:
Proin at dui sed elit facilisis vehicula bibendum at ex. Cras a sapien dignissim, consequat diam luctus, condimentum ipsum. Aenean vitae tincidunt elit. Aenean vitae mauris tempor, fermentum est ut, scelerisque odio. Sed quam neque, sagittis quis tempus vitae, accumsan nec orci. Maecenas porttitor quam quis vehicula tempor. Proin purus nisl, dictum id ultricies id, tincidunt eu ligula. Mauris lobortis fringilla dolor non mattis. Donec sit amet commodo mi. Nullam rutrum nisi nulla, sit amet blandit ipsum rutrum eget. Phasellus mattis, ex eleifend pharetra volutpat, eros eros bibendum ligula, at convallis arcu sem eget leo. Cras elementum sodales velit quis efficitur. Praesent non tortor lobortis, varius lectus et, pulvinar nunc. Vestibulum consectetur urna tincidunt tellus malesuada, vel auctor tellus lobortis.
Mauris tellus neque, maximus quis consequat et, ullamcorper bibendum justo. Lorem ipsum dolor sit amet, consectetur adipiscing elit. Morbi tristique sed nulla in tempor. Etiam sed quam sit amet massa suscipit consequat nec eget ligula. Aenean ac diam tincidunt, condimentum enim eget, ultrices lacus. Maecenas lacinia rutrum metus. Suspendisse viverra nibh pharetra mauris lacinia, ac lobortis dolor suscipit.
Curabitur ac placerat dui, sit amet luctus ex. Curabitur a tellus lorem. Pellentesque interdum vitae velit nec sodales. Donec nec justo ac eros finibus ultrices. Sed convallis posuere tellus sit amet laoreet. Sed dignissim nisl vel pulvinar tempor. In vestibulum dui convallis, auctor metus et, facilisis nulla. Proin dolor lorem, dignissim et velit nec, dictum vehicula ex. Maecenas ornare et turpis ac laoreet. Ut convallis est sit amet arcu porttitor laoreet. Vivamus ultrices velit in justo hendrerit, eu facilisis dolor efficitur. Integer quis tellus posuere, euismod tortor at, dictum eros. Maecenas ut arcu leo.
2. Click Save button.
Payment & Pricing page
Create Payment & Pricing content
1. Navigate to Content > Add content create Payment & Pricing content

Refer to following HTML code:
Read about the variety of payment options offered on the Apple Online Store, and how the tax on your order is calculated. Also, get more information about special pricing, offers, promotions, and other great deals with limited time availability.
Payment
The Apple Online Store accepts a variety of payment methods. Click on a payment method below to find out more:
Note: Business lease, wire transfers, cashier's checks, and money orders are ineligible payment methods for pickup items.
Some payment types are ineligible for orders shipping to multiple addresses. If you are using an ineligible payment type for an order shipping to multiple addresses, you will need to change the payment method, or ship your order to a single address.
Some customers may qualify for other forms of payment. Please call an Our Store Specialist at 1-800 for more information.
Tax
In accordance with state and local law, your Apple Online Store purchases will be taxed using the applicable sales tax or seller's use tax rate for your shipping address, or the Apple Store address where the item is picked up.
The tax listed during checkout is only an estimate. In California and Rhode Island, sales tax is collected on the unbundled price of the iPhone.
- Aliquam erat volutpat
- Phasellus facilisis nulla lacus
Your invoice will reflect the final total tax, which includes state and local taxes, as well as any applicable rebates or fees.
Pricing
In accordance with state and local law, your Apple Online Store purchases will be taxed using the applicable sales tax or seller's use tax rate for your shipping address, or the Apple Store address where the item is picked up.
The tax listed during checkout is only an estimate. In California and Rhode Island, sales tax is collected on the unbundled price of the iPhone.
Your invoice will reflect the final total tax, which includes state and local taxes, as well as any applicable rebates or fees.
Promotions, Rebates, and Coupons
In accordance with state and local law, your Apple Online Store purchases will be taxed using the applicable sales tax or seller's use tax rate for your shipping address, or the Apple Store address where the item is picked up.
2. Click Save button.
Returns & Refunds page
1. Create Returns & Refunds content
1. Navigate to Content > Add content create Returns & Refunds content
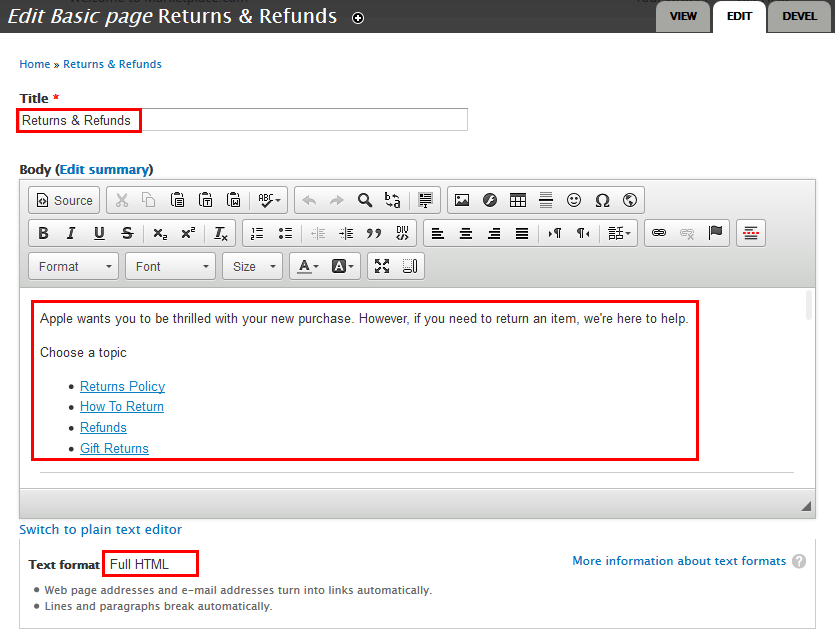
Refer to following HTML code:
Apple wants you to be thrilled with your new purchase. However, if you need to return an item, we're here to help.
Returns & Refunds Policy
The Apple Online Store accepts a variety of payment methods. Click on a payment method below to find out more:
Note: Business lease, wire transfers, cashier's checks, and money orders are ineligible payment methods for pickup items.
Some payment types are ineligible for orders shipping to multiple addresses. If you are using an ineligible payment type for an order shipping to multiple addresses, you will need to change the payment method, or ship your order to a single address.
Some customers may qualify for other forms of payment. Please call an Our Store Specialist at 1-800 for more information.
How to Return An Item
In accordance with state and local law, your Apple Online Store purchases will be taxed using the applicable sales tax or seller's use tax rate for your shipping address, or the Apple Store address where the item is picked up.
The tax listed during checkout is only an estimate. In California and Rhode Island, sales tax is collected on the unbundled price of the iPhone.
- Aliquam erat volutpat
- Phasellus facilisis nulla lacus
Your invoice will reflect the final total tax, which includes state and local taxes, as well as any applicable rebates or fees.
Refunds
In accordance with state and local law, your Apple Online Store purchases will be taxed using the applicable sales tax or seller's use tax rate for your shipping address, or the Apple Store address where the item is picked up.
The tax listed during checkout is only an estimate. In California and Rhode Island, sales tax is collected on the unbundled price of the iPhone.
Your invoice will reflect the final total tax, which includes state and local taxes, as well as any applicable rebates or fees.
Gift Returns
In accordance with state and local law, your Apple Online Store purchases will be taxed using the applicable sales tax or seller's use tax rate for your shipping address, or the Apple Store address where the item is picked up.
2. Click Save button.
2. Create Shipping context
1. Navigate to Structure > Context click Add link, create Shipping context and set following properties
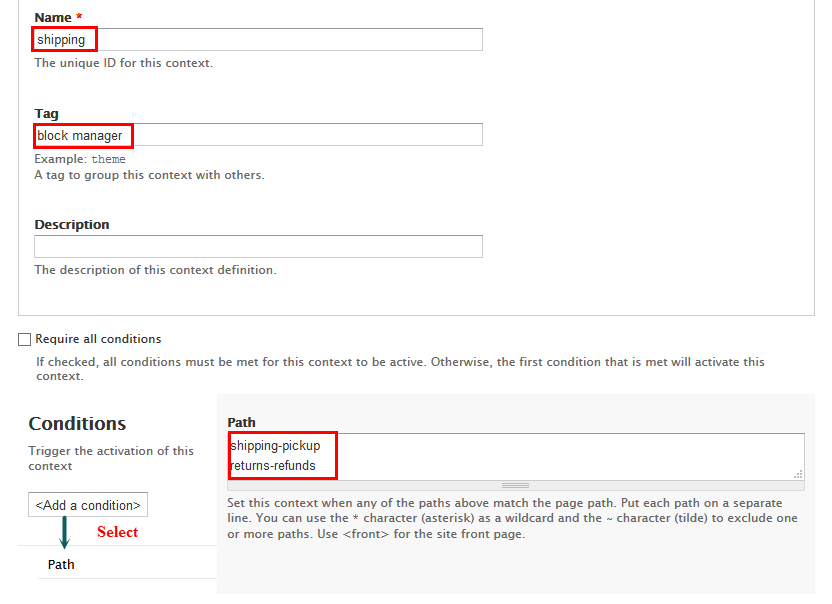

2. Click Save button.
Shipping & Pickup page
Create Shipping & Pickup content
1. Navigate to Content > Add content create Shipping & Pickup content
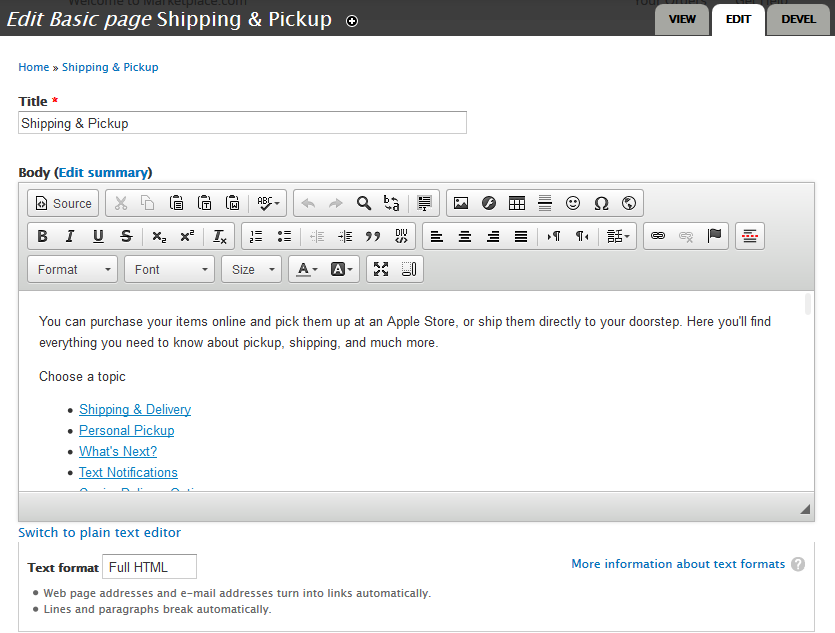
Refer to following HTML code:
You can purchase your items online and pick them up at an Apple Store, or ship them directly to your doorstep. Here you'll find everything you need to know about pickup, shipping, and much more.
Shipping & Delivery
The Apple Online Store accepts a variety of payment methods. Click on a payment method below to find out more:
Note: Business lease, wire transfers, cashier's checks, and money orders are ineligible payment methods for pickup items.
Some payment types are ineligible for orders shipping to multiple addresses. If you are using an ineligible payment type for an order shipping to multiple addresses, you will need to change the payment method, or ship your order to a single address.
Some customers may qualify for other forms of payment. Please call an Our Store Specialist at 1-800 for more information.
Personal Pickup
In accordance with state and local law, your Apple Online Store purchases will be taxed using the applicable sales tax or seller's use tax rate for your shipping address, or the Apple Store address where the item is picked up.
The tax listed during checkout is only an estimate. In California and Rhode Island, sales tax is collected on the unbundled price of the iPhone.
- Aliquam erat volutpat
- Phasellus facilisis nulla lacus
Your invoice will reflect the final total tax, which includes state and local taxes, as well as any applicable rebates or fees.
What's Next?
In accordance with state and local law, your Apple Online Store purchases will be taxed using the applicable sales tax or seller's use tax rate for your shipping address, or the Apple Store address where the item is picked up.
The tax listed during checkout is only an estimate. In California and Rhode Island, sales tax is collected on the unbundled price of the iPhone.
Your invoice will reflect the final total tax, which includes state and local taxes, as well as any applicable rebates or fees.
Text Notifications
In accordance with state and local law, your Apple Online Store purchases will be taxed using the applicable sales tax or seller's use tax rate for your shipping address, or the Apple Store address where the item is picked up.
Carrier Delivery Options
Proin eget lacus ac eros dapibus mattis. Quisque a dui tellus. Aenean lorem velit, porttitor sed rutrum vitae, faucibus non lacus. Cum sociis natoque penatibus et magnis dis parturient montes, nascetur ridiculus mus. Vivamus imperdiet aliquet justo blandit vestibulum. Nunc et venenatis dolor, et fringilla felis.
Shipping Policies
Sed porta, ligula vitae ullamcorper commodo, sapien ipsum convallis quam, ut semper quam sem vitae sem. Nulla congue mauris non dolor egestas gravida. Mauris justo dui, vulputate id tempor at, mollis non massa. Integer sit amet diam id nunc porttitor consequat. Maecenas id erat pretium, efficitur neque a, congue nisi. Donec interdum lacus nec risus ullamcorper auctor.
- Aliquam erat volutpat
- Phasellus facilisis nulla lacus
2. Click Save button.
About us page
Create About us content
1. Navigate to Content > Add content create About us content
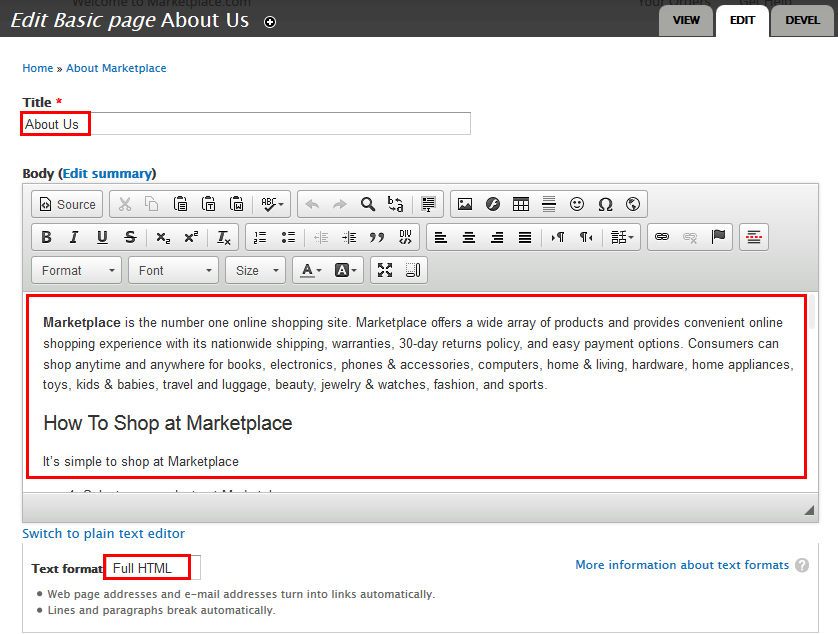
Refer to following HTML code:
Marketplace is the number one online shopping site. Marketplace offers a wide array of products and provides convenient online shopping experience with its nationwide shipping, warranties, 30-day returns policy, and easy payment options. Consumers can shop anytime and anywhere for books, electronics, phones & accessories, computers, home & living, hardware, home appliances, toys, kids & babies, travel and luggage, beauty, jewelry & watches, fashion, and sports.
How To Shop at Marketplace
It’s simple to shop at Marketplace
- Select your products at Marketplace.
- Register with us and pick a payment option.
- Have your products delivered quickly and safely.
Safe and Secure Shoppinge
After making your selection, check out and pick a payment method – PayPal, credit card (installments available), and cash on delivery. After a successful transaction, you will get an order status and tracking number that lets you keep track of your order until it is delivered to you.
Safe and Secure Delivery
Your orders take utmost priority and will be delivered between 3-5 working days for Metro Manila and 5-10 working days for provincial orders. Should you have any questions on your order, please contact our customer service representatives between 8am to 9pm (Monday to Friday) or between 9am to 6pm (Saturday, Sunday, and holiday) at the contact page or (02) 795 8900 and we shall gladly assist you.
Returns
If your product is damaged or incomplete upon delivery, please contact MARKETPLACE’S customer service representatives (contact page or (02) 795 8900) WITHIN 24 hours of delivery to initiate the return. You have 30 (thirty) days from day of delivery to return your order with a completed Return Form. The cost of return will be refunded after your return has been processed.
Comprehensive and Personal Service
Our customers can contact us between 8am to 9pm (Monday to Friday) or between 9am to 6pm (Saturday, Sunday, and Holiday) at contact page or (02) 795 8900 to check the status of your order, ask any question about Lazada or give feedback on your shopping experience.
Marketplace part of Online Revolution
Marketplace is a participant of the Online Revolution e-commerce event, a Southeast Asian month-long online sale event similar to Black Friday and Cyber Monday, aiming to support the evolution of the Asian online culture thanks to fast-growing ventures and adapting consumers. In the Philippines, our partner ventures include Zalora: The country’s leading online fashion store, Lamido: The online marketplace for buyers to meet sellers, Carmudi: The online car dealership, Lamudi: The online real-estate listing, and Easy Taxi: Your Taxi is 1 Click Away.
2. Click Save button.
Affiliate Program page
Create Affiliate Program content
1. Navigate to Content > Add content create Affiliate Program content

Refer to following HTML code:


Earn up to 8% commision on sales with Marketplace no.1 online shopping mall
Advertise
Whether you are a large network, content site or blogger, we have simple linking tools to meet your advertising needs and help you monetize your web site.
Earn
Earn advertising fees from Qualifying Purchases, not just the products you advertised.
Plus, our competitive conversion rates help you maximize your earnings.
Join
Get up and running today. Just one approval to join—no third-party advertiser approvals.
2. Click Save button.
Privacy Policy page
Create Privacy Policy content
1. Navigate to Content > Add content create Privacy Policy content
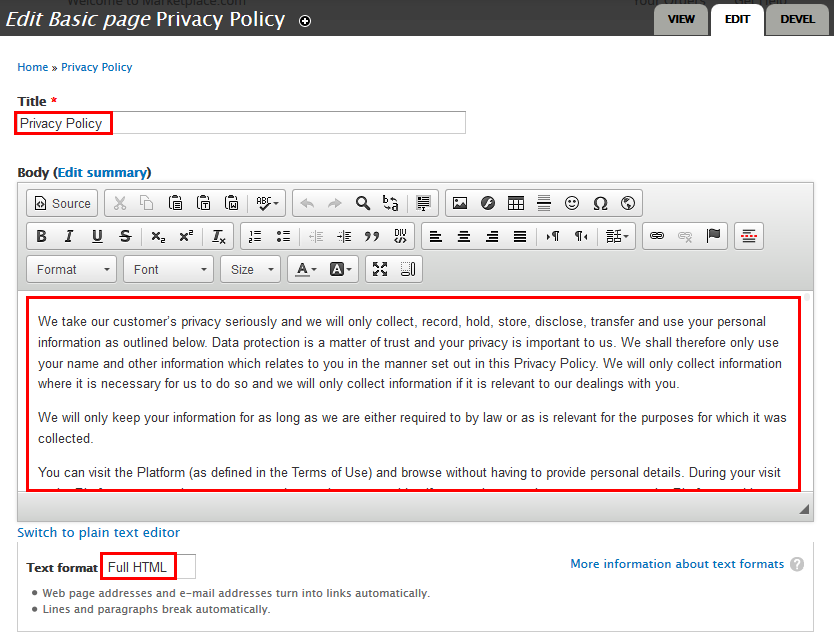
Refer to following HTML code:
We take our customer’s privacy seriously and we will only collect, record, hold, store, disclose, transfer and use your personal information as outlined below. Data protection is a matter of trust and your privacy is important to us. We shall therefore only use your name and other information which relates to you in the manner set out in this Privacy Policy. We will only collect information where it is necessary for us to do so and we will only collect information if it is relevant to our dealings with you.
We will only keep your information for as long as we are either required to by law or as is relevant for the purposes for which it was collected.
You can visit the Platform (as defined in the Terms of Use) and browse without having to provide personal details. During your visit to the Platform you remain anonymous and at no time can we identify you unless you have an account on the Platform and log on with your user name and password.
If you have any comments, suggestions or complaints, you may contact us (and our Data Protection Officer) at [email protected]
Collection of Personal Information
When you create a Marketplace account, or otherwise provide us with your personal information through the Platform, the personal information we collect may include your:
- Name
- Delivery Address
- Email Address
- Contact Number
- Mobile Number
- Date of Birth
- Gender
You must only submit to us, our authorized agent or the Platform, information which is accurate and complete and not misleading and you must keep it up to date and inform us of changes (more information below). We reserve the right to request for documentation to verify the information provided by you.
We will only be able to collect your personal information if you voluntarily submit the information to us. If you choose not to submit your personal information to us or subsequently withdraw your consent to our use of your personal information, we may not be able to provide you with our Services. You may access and update your personal information submitted to us at any time as described below.
If you provide personal information of any third party to us, we assume that you have obtained the required consent from the relevant third party to share and transfer his/her personal information to us.
If you sign up for Marketplace using your social media account or link your Marketplace account to your social media account or use certain other Marketplace social media features, we may access information about you which you have voluntarily provided under your social media account via that social media provider in accordance with the provider's policies and we will manage your personal data which we have collected in accordance with Marketplace privacy policy
Use and Disclosure of Personal Information
The personal information we collect from you will be used, or shared with third parties (including related companies, third party service providers, and third party sellers), for some or all of the following purposes:
- To facilitate your use of the Services (as defined in the Terms of Use) and/or access to the Platform;
- To process orders you submit through the Platform, whether the products are sold by Marketplace or a third party seller. Payments that you make through the Platform for products, whether sold by Marketplace or a third party seller, will be processed by our agent;
- To deliver the products you have purchased through the Platform, whether sold by Marketplace or a third party seller. We may pass your personal information on to a third party in order to make delivery of the product to you (for example to our courier or supplier), whether the product is sold through the Platform by Marketplace or a third party seller;
- To update you on the delivery of the products, whether sold through the Platform by Marketplace or a third party seller, and for customer support purposes;
- To compare information, and verify with third parties in order to ensure that the information is accurate;
- Further, we will use the information you provide to administer your account (if any) with us; verify and carry out financial transactions in relation to payments you make online; audit the downloading of data from the Platform; improve the layout and/or content of the pages of the Platform and customize them for users; identify visitors on the Platform; carry out research on our users’ demographics and behavior; provide you with information we think you may find useful or which you have requested from us, including information about our or third party sellers’ products and services, provided you have indicated that you have not objected to being contacted for these purposes;
- When you register an account with Marketplace or otherwise provide us with your personal information through the Platform, we will also use your personal information to send you marketing and/or promotional materials about our or third party sellers’ products and services from time to time. You can unsubscribe from receiving marketing information at any time by using the unsubscribe function within the electronic marketing material. We may use your contact information to send newsletters from us and from our related companies; and
- In exceptional circumstances Marketplace may be required to disclose personal information, such as when there are grounds to believe that the disclosure is necessary to prevent a threat to life or health, for law enforcement purposes, or for fulfillment of legal and regulatory requirements and requests.
Marketplace may share your personal information with third parties and our affiliates for the abovementioned purposes, specifically, completing a transaction with you, managing your account and our relationship with you, marketing and fulfilling any legal or regulatory requirements and requests as deemed necessary by Marketplace. In sharing your personal information with them, we endeavor to ensure that the third parties and our affiliates keep your personal information secure from unauthorized access, collection, use, disclosure, or similar risks and retain your personal information only for as long as they need your personal information to achieve the abovementioned purposes.
In disclosing or transferring your personal information to third parties and our affiliates located overseas, Marketplace take steps to ensure that the receiving jurisdiction has in place a standard of protection accorded to personal information that is comparable to the protection under or up to the standard of the Philippine Data Privacy Act.
Marketplace does not engage into the business of selling customers’ personal information to third parties.
Withdrawal of Consent
You may communicate your objection to our continual use and/or disclosure of your personal information for any of the purposes and in the manner as stated above at any time by contacting us at our e-mail address below.
Please note that if you communicate your objection to our use and/or disclosure of your personal information for the purposes and in the manner as stated above, depending on the nature of your objection, we may not be in a position to continue to provide our products or services to you or perform on any contract we have with you. Our legal rights and remedies are expressly reserved in such event.
Updating Your Personal Information
You can update your personal information anytime by accessing your account on the Marketplace Platform. If you do not have an account with us, you can do so by contacting us at our e-mail address below.
We take steps to share the updates to your personal information with third parties and our affiliates with whom we have shared your personal information if your personal information is still necessary for the above stated purposes.
Accessing Your Personal Information
If you would like to view the personal information we have on you or inquire about the ways in which your personal information has been or may have been used or disclosed by Marketplace within the past year, please contact us at our e-mail address below. We reserve the right to charge a reasonable administrative fee for retrieving your personal information records.
If you have an account with Marketplace, you may access details of your order by logging into your account on the Platform. Here you can view the details of your orders that have been completed, those which are open and those which are shortly to be dispatched and administer your address details, bank details and any newsletter to which you may have subscribed. You undertake to treat your Marketplace username, password and order details confidentially and not make it available to unauthorized third parties. We cannot assume any liability for misuse of your Marketplace username, password or order details, except as stated in the Terms of Use.
Security of Your Personal Information
Marketplace ensures that all information collected will be safely and securely stored. We protect your personal information by:
- Restricting access to personal information
- Maintaining technology products to prevent unauthorized computer access
- Securely destroying your personal information when it is no longer needed for any legal or business purpose
Marketplace uses 128-bit SSL (secure sockets layer) encryption technology when processing your financial details. 128-bit SSL encryption is approximated to take at least one trillion years to break, and is the industry standard.
If you believe that your privacy has been breached by Marketplace, please contact us at our e-mail address below.
Your password is the key to your account. Please use unique numbers, letters and special characters, and do not share your Marketplace password to anyone. If you do share your password with others, you will be responsible for all actions taken in the name of your account and the consequences. If you lose control of your password, you may lose substantial control over your personal information and other information submitted to Marketplace. You could also be subject to legally binding actions taken on your behalf. Therefore, if your password has been compromised for any reason or if you have grounds to believe that your password has been compromised, you should immediately contact us and change your password. You are reminded to log off of your account and close the browser when finished using a shared computer.
Minor
Marketplace does not sell products for purchase by children. If you are under 18 years old, you may use our website only with the involvement of a parent or guardian.
Collection of Computer Data
Marketplace or our authorized service providers may use cookies, web beacons, and other similar technologies for storing information to help provide you with a better, faster, safer and personalized experience when you use the Services and/or access the Platform.
When you visit Marketplace, our company servers will automatically record information that your browser sends whenever you visit a website. This data may include:
- Your computer's IP address
- Browser type
- Webpage you were visiting before you came to our Platform
- The pages within the Platform which you visit
- The time spent on those pages, items and information searched for on the Platform, access times and dates, and other statistics.
This information is collected for analysis and evaluation in order to help us improve the Platform and the services and products we provide.
Cookies are small text files (typically made up of letters and numbers) placed in the memory of your browser or device when you visit a website or view a message. They allow us to recognize a particular device or browser and help us to personalize the content to match your preferred interests more quickly, and to make our Services and Platform more convenient and useful to you.
Web beacons are small graphic images that may be included on our Service and the Platform. They allow us to count users who have viewed these pages so that we can better understand your preference and interests.
No Spam, Spyware, or Virus
Spam, spyware or virus is not allowed on Platform. Please set and maintain your communication preferences so that we send communications to you as you prefer. You are not licensed or otherwise allowed to add other users (even a user who has purchased an item from you) to your mailing list (email or physical mail) without their express consent. You should not send any messages which contain spam, spyware or virus via the Platform. If you would like to report any suspicious messages, please contact us at our email address below.
Changes to the Privacy Policy
Marketplace shall regularly review the sufficiency of this Privacy Policy. We reserve the right to modify and change the Privacy Policy at any time. Any changes to this policy will be published on the Platform.
Marketplace's Right
YOU ACKNOWLEDGE AND AGREE THAT MARKETPLACE HAS THE RIGHT TO DISCLOSE YOUR PERSONAL INFORMATION TO ANY LEGAL, REGULATORY, GOVERNMENTAL, TAX, LAW ENFORCEMENT OR OTHER AUTHORITIES OR THE RELEVANT RIGHT OWNERS, IF MARKETPLACE HAS REASONABLE GROUNDS TO BELIEVE THAT DISCLOSURE OF YOUR PERSONAL INFORMATION IS NECESSARY FOR THE PURPOSE OF MEETING ANY OBLIGATIONS, REQUIREMENTS OR ARRANGEMENTS, WHETHER VOLUNTARY OR MANDATORY, AS A RESULT OF COOPERATING WITH AN ORDER, AN INVESTIGATION AND/OR A REQUEST OF ANY NATURE BY SUCH PARTIES. TO THE EXTENT PERMISSIBLE BY APPLICABLE LAW, YOU AGREE NOT TO TAKE ANY ACTION AND/OR WAIVE YOUR RIGHTS TO TAKE ANY ACTION AGAINST MARKETPLACE FOR THE DISCLOSURE OF YOUR PERSONAL INFORMATION IN THESE CIRCUMSTANCES.
Contacting Marketplace
If you wish to withdraw your consent to our use of your personal information, request access and/or correction of your personal information, have any queries, comments or concerns, or require any help on technical or cookie-related matters, please feel free to contact us (and our Data Protection Officer) at [email protected]
2. Click Save button.
Sell on Marketplace page
Create Sell on Marketplace content
1. Navigate to Content > Add content create Sell on Marketplace content
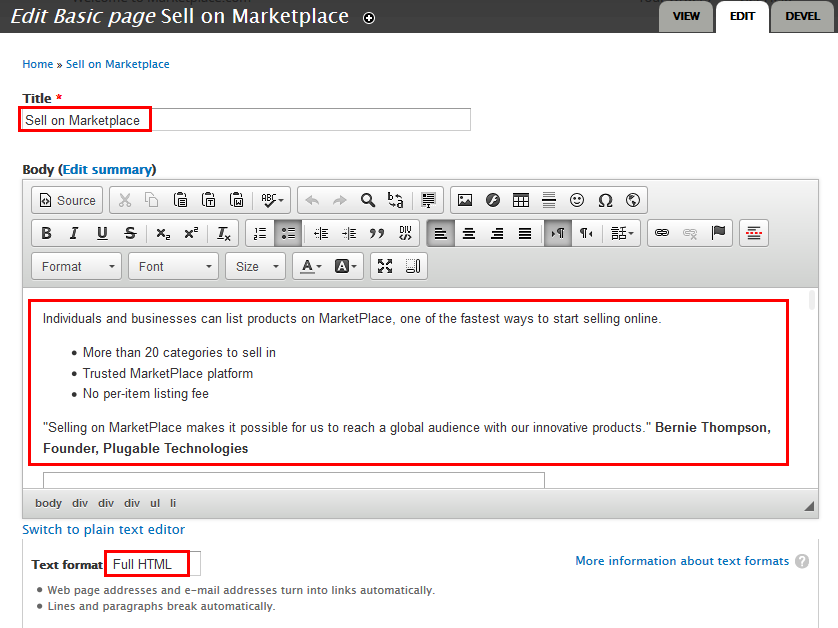
Refer to following HTML code:
Individuals and businesses can list products on MarketPlace, one of the fastest ways to start selling online.
- More than 20 categories to sell in
- Trusted MarketPlace platform
- No per-item listing fee
"Selling on MarketPlace makes it possible for us to reach a global audience with our innovative products." Bernie Thompson, Founder, Plugable Technologies
How Selling on MarketPlace Works
Upload your listings
Add your offers to the MarketPlace catalog using feeds, spreadsheets, and other tools.
Customers can see your products on marketplace.com
With features like 1-Click and a brand millions trust, MarketPlace helps customers make quick, easy, worry-free purchases.
Ship products to customers
MarketPlace notifies you when customers place an order. Use Fulfillment by MarketPlace and let MarketPlace do the shipping for you — or handle shipping yourself.
MarketPlace transfers payments to you
MarketPlace deposits payment into your bank account at regular intervals and notifies you that your payment has been sent.

"Selling on MarketPlace makes it possible for us to reach a global audience with our innovative products." Bernie Thompson, Founder, Plugable Technologies
* Offer limited to new Professional Selling on Amazon subscriptions only. Offer is not available to sellers who have previously registered to list on Amazon.com. Offer includes one month of subscription fees only (you will be charged other fees, including referral fees, for items that sell on Amazon.com). A credit of $39.99 will be posted to your seller account to offset one month of subscription fees charged. Other limitations apply. After the trial period, we will automatically charge your credit card the monthly subscription fee at the beginning of every month thereafter.
2. Click Save button.
Terms & Conditions page
Create Terms & Conditions content
1. Navigate to Content > Add content create Terms & Conditions content
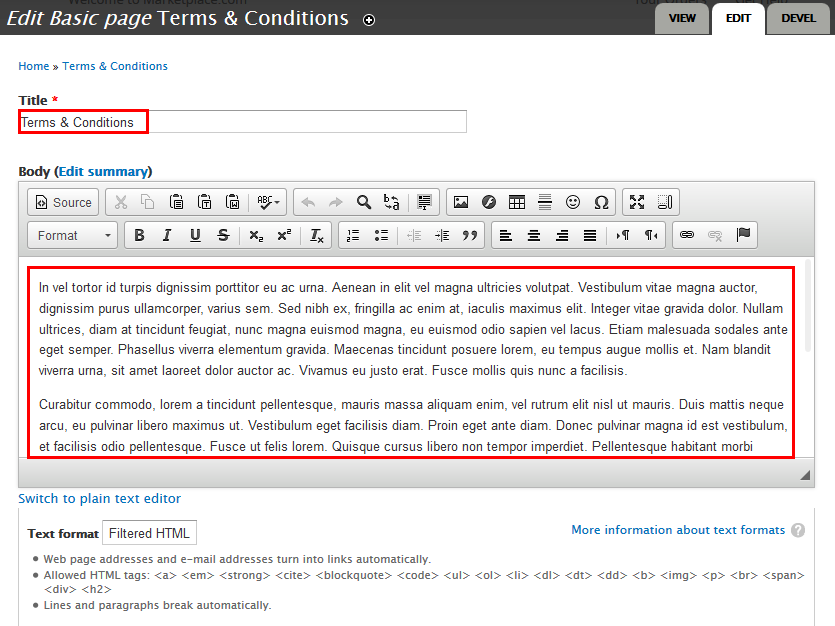
Refer to following HTML code:
In vel tortor id turpis dignissim porttitor eu ac urna. Aenean in elit vel magna ultricies volutpat. Vestibulum vitae magna auctor, dignissim purus ullamcorper, varius sem. Sed nibh ex, fringilla ac enim at, iaculis maximus elit. Integer vitae gravida dolor. Nullam ultrices, diam at tincidunt feugiat, nunc magna euismod magna, eu euismod odio sapien vel lacus. Etiam malesuada sodales ante eget semper. Phasellus viverra elementum gravida. Maecenas tincidunt posuere lorem, eu tempus augue mollis et. Nam blandit viverra urna, sit amet laoreet dolor auctor ac. Vivamus eu justo erat. Fusce mollis quis nunc a facilisis.
Curabitur commodo, lorem a tincidunt pellentesque, mauris massa aliquam enim, vel rutrum elit nisl ut mauris. Duis mattis neque arcu, eu pulvinar libero maximus ut. Vestibulum eget facilisis diam. Proin eget ante diam. Donec pulvinar magna id est vestibulum, et facilisis odio pellentesque. Fusce ut felis lorem. Quisque cursus libero non tempor imperdiet. Pellentesque habitant morbi tristique senectus et netus et malesuada fames ac turpis egestas. Donec at nibh nec lacus varius dapibus. Duis a lectus a augue interdum tempor sed ut arcu.
Aenean fermentum lectus diam, quis fermentum mi cursus ut. Pellentesque turpis nunc, tempor et ullamcorper ac, pellentesque in nibh. Maecenas quis risus et nibh varius iaculis ac vel leo. Nam quis facilisis odio. Vestibulum commodo sed est ut porta. Cras ut porta neque, ac aliquam quam. Proin vel purus facilisis, rhoncus nibh eget, tincidunt nisi. Cras in posuere mi. Vivamus a convallis leo. Quisque in nisl venenatis, rutrum odio vel, gravida lacus. Vivamus id mauris nec ante dictum consectetur. Nullam vulputate nisi sit amet lectus pulvinar, eu pretium ante sodales.
2. Click Save button.
More Configurations
Site Information
In this section, you can change basic settings, such as the site name, slogan, e-mail address.
1. Log in to Administration site page by administrator account
2. Navigate to the Site Information page Configuration > System: Site information
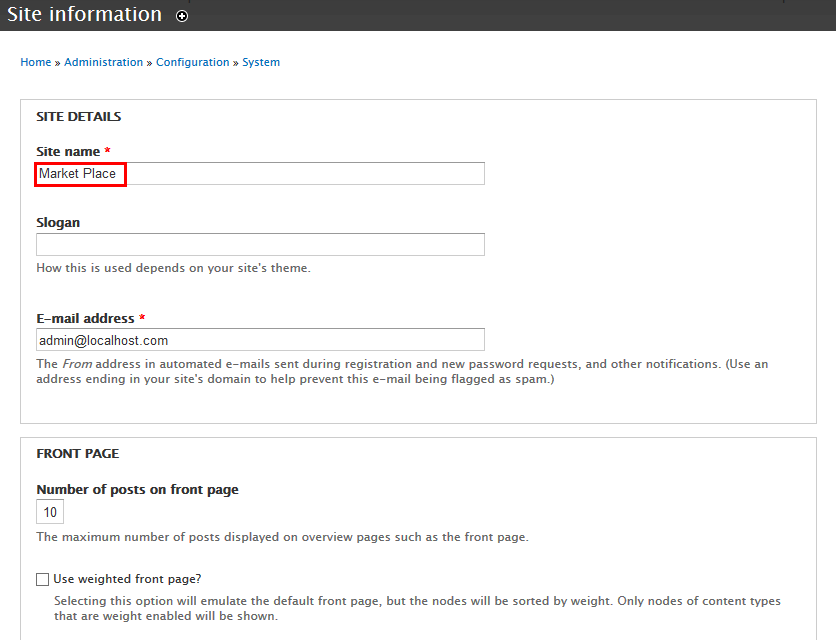
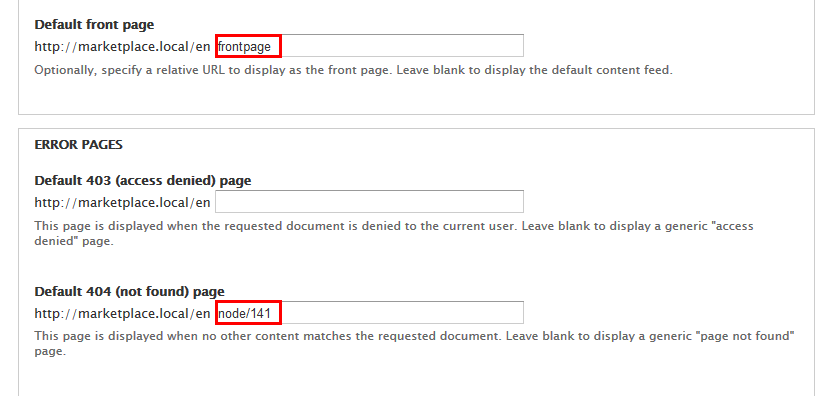
3. Change site details from the view:
- Site name
- Slogan
- E-mail address
- Set Default Front page
4. Click on Save configuration to finish editing.
Appearance Settings
1. Create a new color.
1. Navigate to the directory: marketplace/sites/all/themes/marketplace, you can find file marketplace.info, open this file.
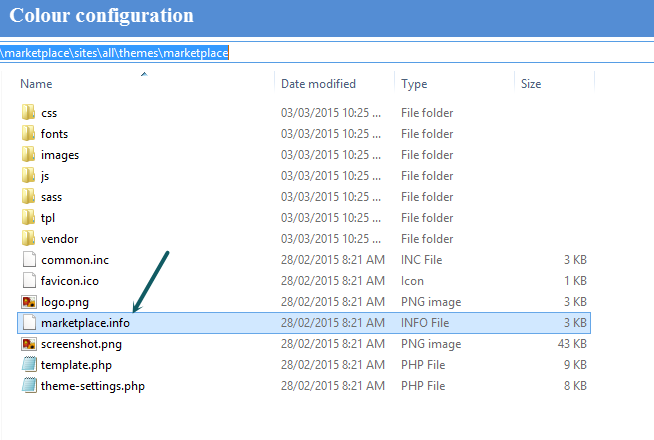
2. Locate the skins[ ] arrays and add new code row:
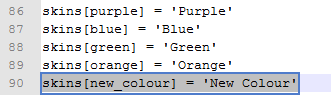
3. Save file.
4. Navigate to the directory: marketplace/sites/all/themes/marketplace/css/colors, clone a folder, then rename it "new_color"
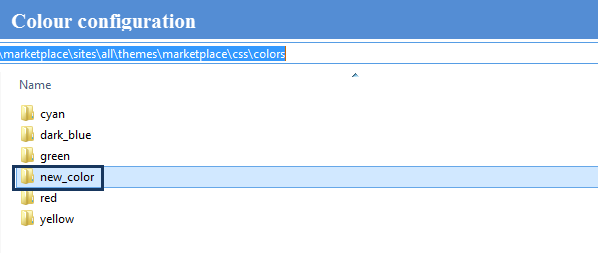
5. new_color folder includes images folder and style.css file.
Now, you can style new color for theme by modifying style.css file.
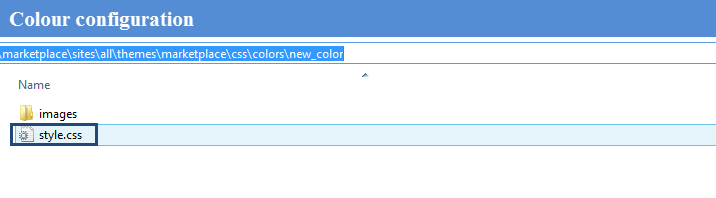
2. Create a new background.
1. Navigate to the directory: marketplace/sites/all/themes/marketplace, you can find file, open file marketplace.info
2. Locate the backgrounds[ ] arrays and add new code row:
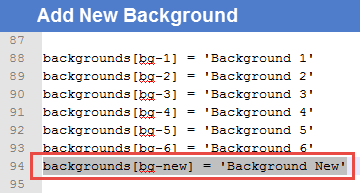
3. Save file.
4. Move your background image into the directory: marketplace/sites/all/themes/marketplace/images

5. Navigate to the directory: marketplace/sites/all/themes/marketplace/css, open file base.css, and add new code row:
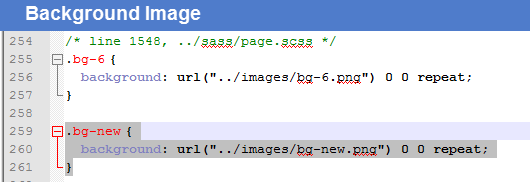
6. Save file.
3. Configuration.
1. Log into website by administrator account.
2. Go to Appearance find marketplace 7.34, click on Settings
3. At CONFIGS area, select one of options for Layout, Skin, Background to set default, (e.g: New Color), and at TOGGLE DISPLAY area, check Show Skins Menu option if you want to display Skins menu on front-end pages.
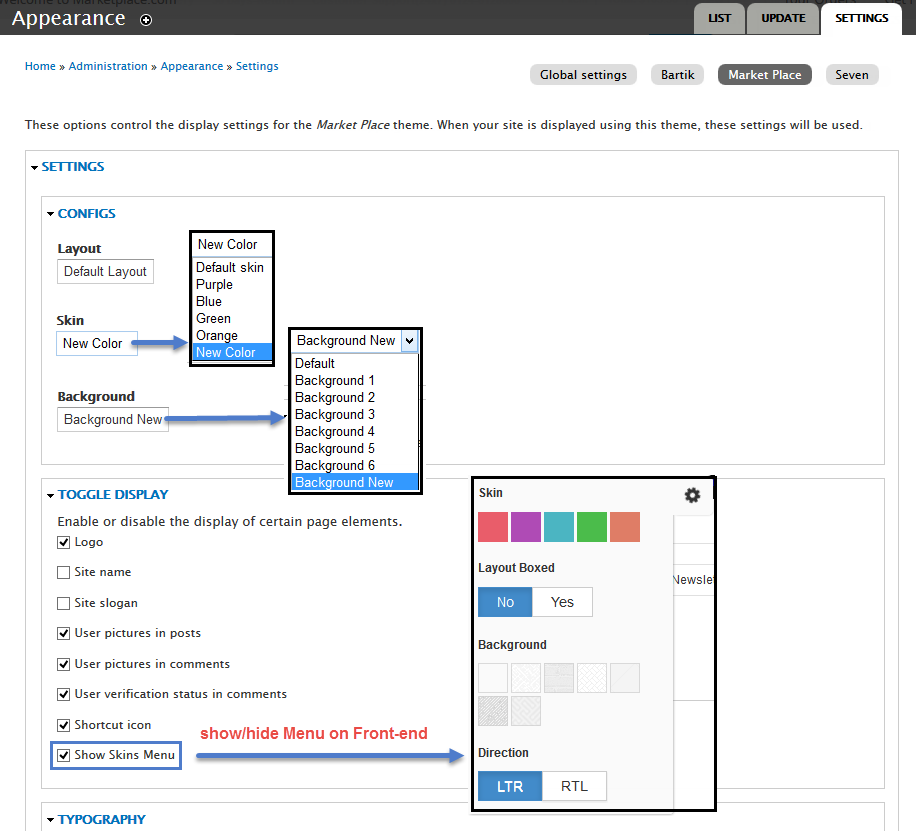
Language Configuration
This section guides you how to have multiple languages for your site. Marketplace Theme supports both Left to Right and Right to Left languages.
1. Navigate to Configuration > Regional and Language > Languages then add new language.

2. Check to enable and set default language
3. Go to Detection and selection tab
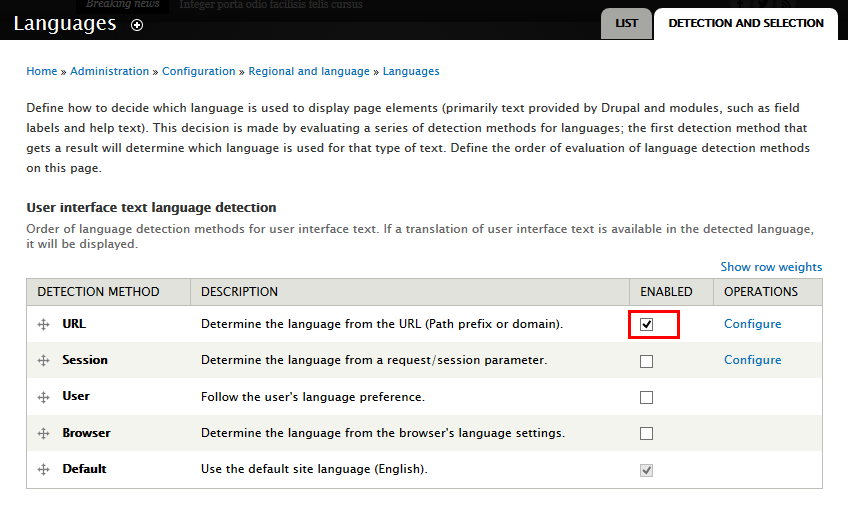
4. Save configuration