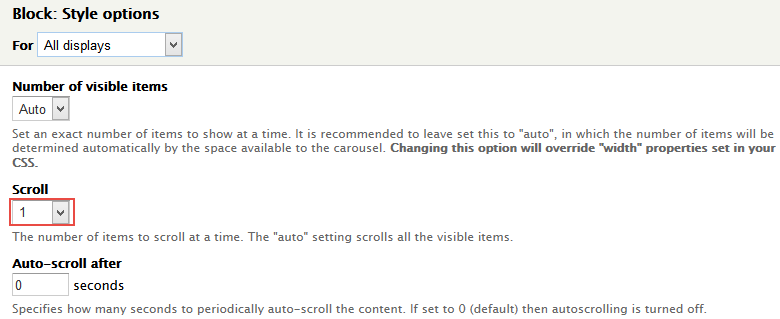
The basics - Before you start
Theme content
Included content:
- demo\flatize-demo-7.x-1.0.zip: demo profile for Flatize.
- theme\flatize-7.x-1.0.zip: Flatize theme
- README.txt: quick information of Flatize
- documentation: assets and the full guide for Flatize installation
System Requirements
Database
- MySQL 5.0.15 or higher with PDO
- PostgreSQL 8.3 or higher with PDO
- SQLite 3.3.7 or higher
PHP
- PHP 5.2.5 or higher (5.3 recommended)
- PHP5 GD library installed
- Disabled error_reporting flag on production server
- Enabled mod_rewrite in Apache for clean URLs
- Memory limit set up at least 128MB
If you are new to Drupal, please take a reference to System requirements on drupal.org.
Module requirements
Core Modules
- Blog
- Contact
- Poll
- Forum
Third-party Modules
- Administration menu
- Backup Migrate
- Bean
- Better Exposed Filters
- Block Class
- Captcha
- Checklist API
- Colorbox
- Contact Form
- Contact Form Blocks
- Countries
- Chaos tools
- Date
- Devel
- Entity tokens
- Entity Reference
- Facet api
- Field Collection
- Fieldgroup
- FlexSlider
- Font Awesome
- Faq
- flickr
- Fivestar
- Gallery Formatter
- Google Analytics
- GMap Taxonomy Markers
- jCarousel
- jQuery Update
- Jump Menu
- Libraries
- Link
- Language Dropdown
- Language Icons
- Memcache
- Menu Clone
- Menu Token
- Menu attributes
- Metatags Quick
- Manage Multiple Terms
- Modal forms
- Module filter
- Newsletter
- Node Class
- Phone
- Pathauto
- Page Title
- Quicktabs
- Rate
- Recaptcha
- References
- Rules
- Search 404
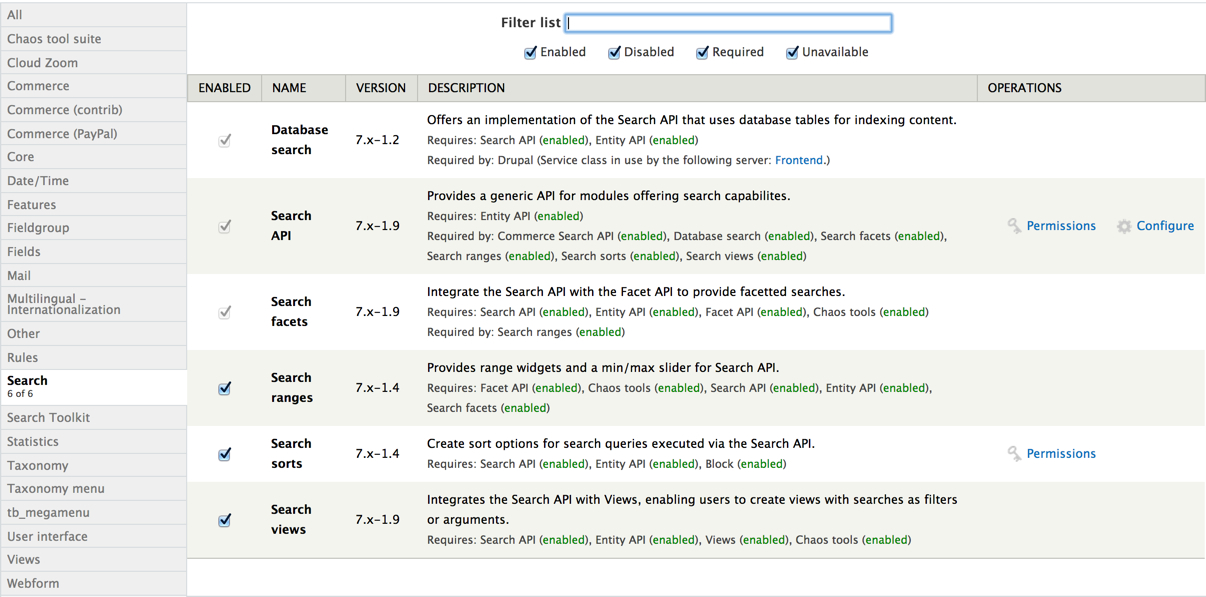
- Search API
- Search API DB
- Search API Ranges
- Search API Solr
- Search API Sorts
- Search Facet API
- Share This
- Short Code
- Site map
- Superfish
- TagClouds
- Taxonomy menu
- TB Mega Menu
- Title
- Token
- Tvi
- User Reference
- Ubercart
- Ubercart Discount Coupons
- Ubercart Devel
- Ubercart Global Quote
- UC Wish List
- Variable
- Video Embed Field
- Views
- Views Bulk Operations
- Views Field View
- Views Accordion
- Views fieldsets
- Views Slideshow
- Views UI
- Voting API
- Webform
- Wee Shortcode
- Wishlist
Required libraries by the modules
- ddslick
- Colorbox
- FlexSlider
- Fontawesome
- Jcarousel
- Jquery Cycle
- Jquery Jcarousel
- Superfish
Download Drupal core files, and extend your site with modules at here.
Installation
Quick Installation
Using demo content
Now that you've downloaded Flatize package. You will use flatize-demo-7.x-1.0.zip in the folder demo. This ZIP file contains the demo installation with all source codes and content, including sample images.
The below steps will give you the installation guide so that you can build your website to look exactly like the Flatize Full Demo Theme.
1. Flatize package included:
- Flatize theme: flatize-7.x-1.0.zip
- Demo Profile for Flatize: flatize-profile-7.x-1.0.zip
The below steps will give you the installation guide so that you can build your website to look exactly like the Flatize Full Demo.
- flatize-profile-7.x-1.0.zip
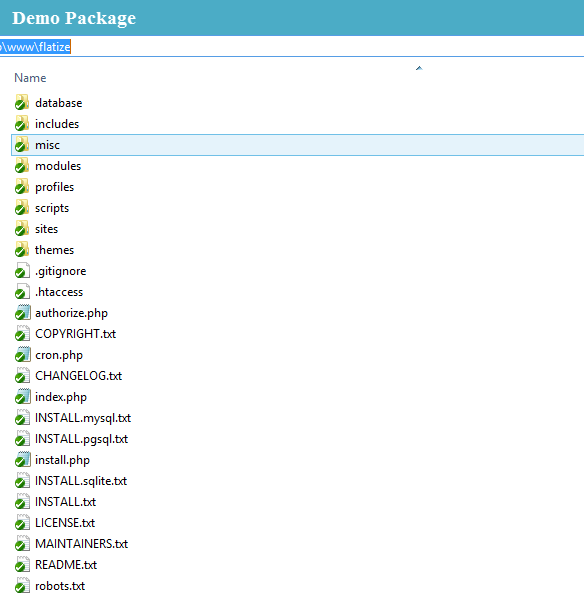
2. Extract flatize-profile-7.x-1.0.zip above and copy it into your host, and rename the directory
3. Access your MySQL database and create a new DB (e.g. Flatize) and user account. Don't forget to add correct permissions to new user to access the database
4. In the demo directory database/ (latest version of package) or profiles/weebpal/ (old version), you can find database dump named sample_data.sql. Import this file into new database.
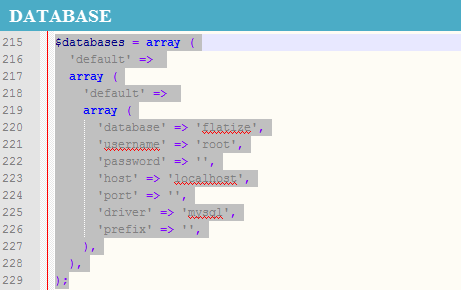
5. Now, you need to modify sites/default/default.settings.php file. Clone default.settings.php file, then rename it "settings.php"
6. Open settings.php, then locate the $database array and set proper credentials.
$databases['default']['default'] = array( 'driver' => 'mysql', 'database' => 'databasename', 'username' => 'username', 'password' => 'password', 'host' => 'localhost', 'prefix' => '', );
When using this installation, you are installing everything from our preview server. So don't forget to set proper values to access to your database: db name, db admin username, db admin password, host, etc.
7. Open the browser and visit your website with the prepopulated content & layout exactly like our Flatize Demo
Now, you can visit administrator site with the admin account admin/admin to delete the unnecessary contents and add the new ones.
Detailed installation
If you're an experienced Drupal user or if you want to build the theme from zero with only the basic appearance of Flatize Theme, find this guide in handy.
Preparation
1. Install Drupal
-
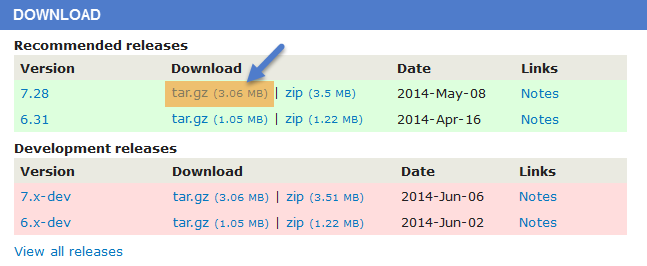
Go to Drupal download page and download the latest version of Drupal 7.
- Extract and copy Drupal folder to your host and rename the directory.
- Follow this tutorial to install Drupal with the standard profile.
2. Install Flatize Theme
- Extract flatize theme .ZIP file:
- flatize-7.x-1.0.zip
-
Move this theme into your Drupal folder: sites/all/themes
-
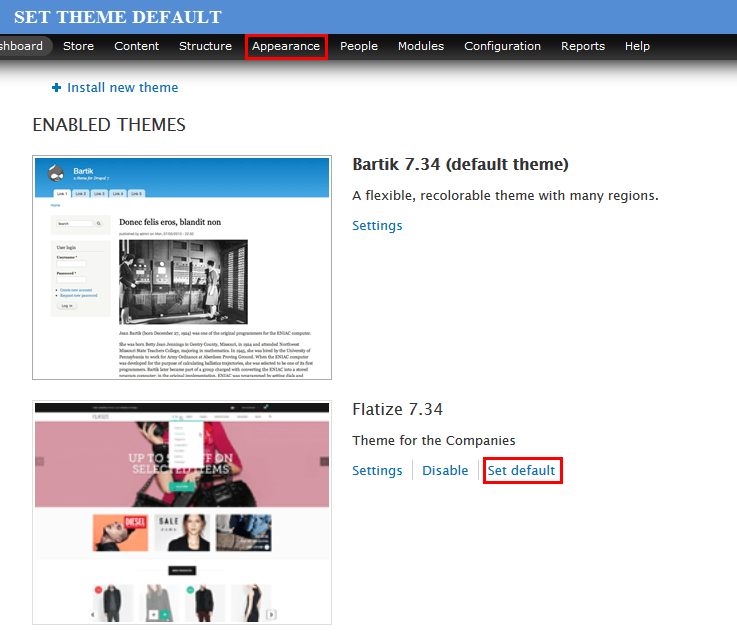
Navigate to Appearance > Choose Enable and set default flatize theme
3. Install Required Modules
Now that you've enabled Flatize theme, you will install and enable the required modules (listed in the Module Requirements section) to customize and use them.
If you don't know how to install the contributed modules, this tutorial is an essential guide.
Cheat to install modules & theme:
- Extract flatize-demo-7.x-1.0.zip
- Open extracted folder, go to sites/all and copy all folders inside (modules, themes, libraries)
- Paste them to your host, folder sites/all
Note: See this guide to get more details about installation
Taxonomy configuration
Quick Information
- Taxonomy: Taxonomy can be simply understood as category management using organizational keywords known in other systems as categories, tags or metadata. It allows you to connect, relate and classify your website's content. In Drupal, these terms are gathered within "vocabularies". The Taxonomy module allows you to create, manage and apply those vocabularies.
- Vocabulary: for example product category, tag, provider name, ...
- Term: the items in each vocabulary. For example: vocabulary product category has some terms: laptop, pc, mobile, tablet, camera, headphone, ...
- For more information about taxonomy, please see: Organizing content with taxonomies
Create Taxonomy for Category
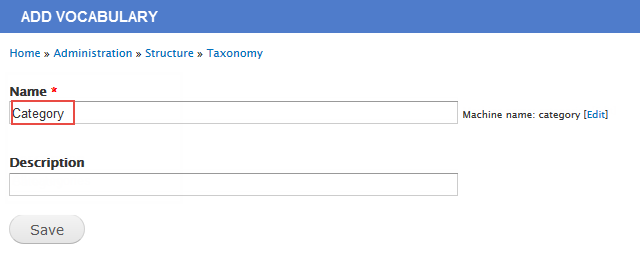
Step 1: Go to Structure > Taxonomy > Add vocabulary to create "Category" object with the following settings:
Step 2: Click Save button
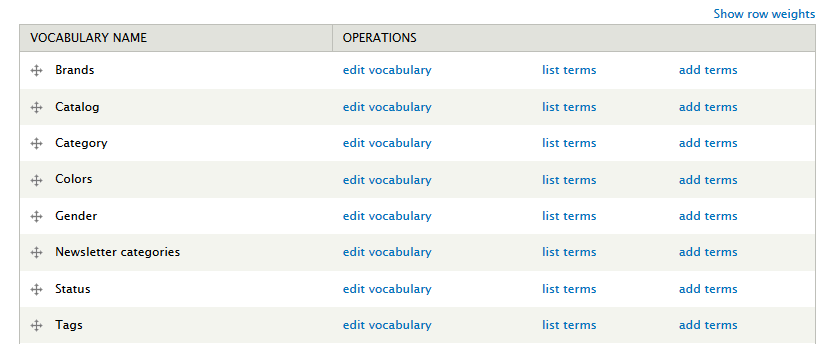
Do the same to create the following vocabularies
Create terms for Gender
At "Gender" line, click list terms, and add the following terms:
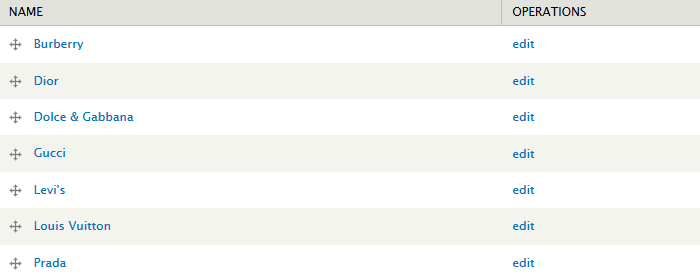
At "Brands" line, click list terms, and add the following terms:
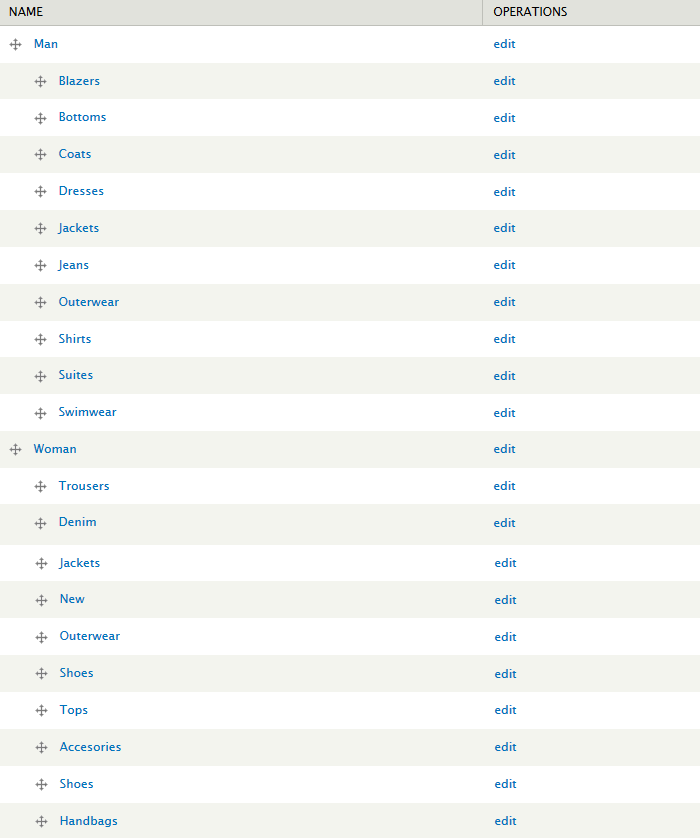
At "Category" line, click list terms, and add the following terms:
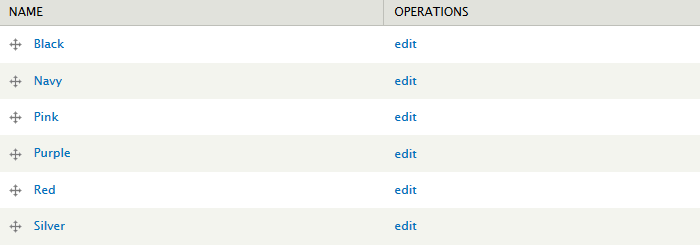
At "Color" line, click list terms, and add the following terms:
At "Status" line, click list terms, and add the following terms:
Create terms and fields for Catalog
At "Catalog" line, click list terms, and add the following terms:
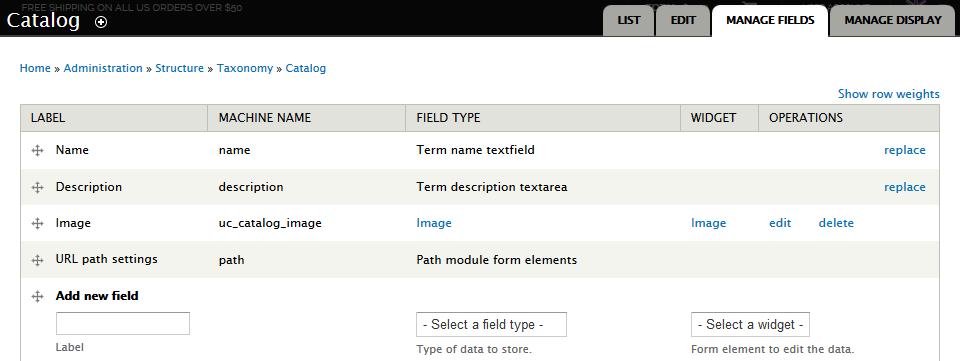
Navigate to Manage Fields tab, add the following fields:
Navigate to Manage Display tab, set the following properties:
Note: See this guide to get more details about taxonomy configuration
Media configuration
Image style configuration
Image styles are the presets of image settings. Image styles are used to define how the images are shown.
1. Override a default image style
Step 1: Navigate to Configuration > MEDIA, click Image styles
Step 2: At uc_cart row, click edit
Step 3: In EFFECT table, click Override defaults button
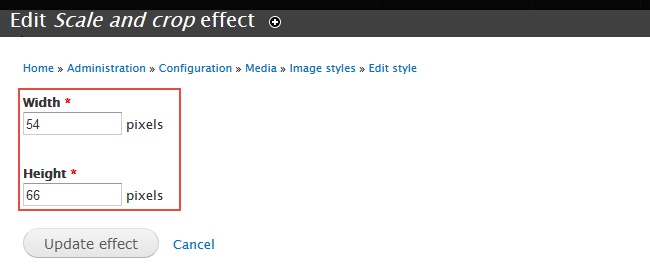
Step 4: At Scale 50x50 row, click edit then set the following properties:
Do steps above to set effects Scale and Crop 80x118 for uc_thumbnail and Scale and Crop 470x700 for uc_product_full
2. Create a new image style
Step 1: Navigate to Configuration > MEDIA, click Image styles
Step 2: Click Add style to create a new style with the following properties:
Step 3: Click Create new style
Step 4: Under Effect , Select Scale and crop
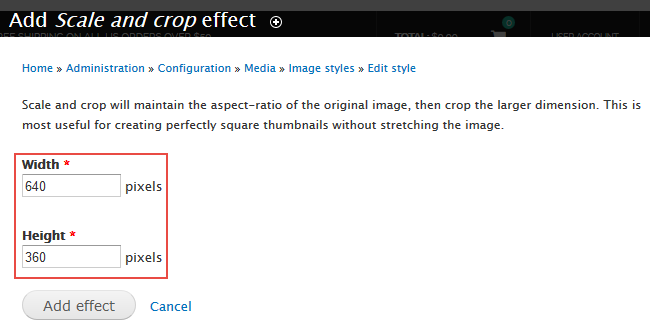
Step 5: Click Add button > New popup is opened, Set the following properties:
Step 6: Click Add effect button
Step 7: Finally click Update style button to save all configs
Do steps above to create the following image styles:
Content type configuration
Configure store
1. Configure Catalog
After installing many modules of Drupal Ubercart, you will see the Store menu in administrator menu bar. Now you can manipulate store through it.
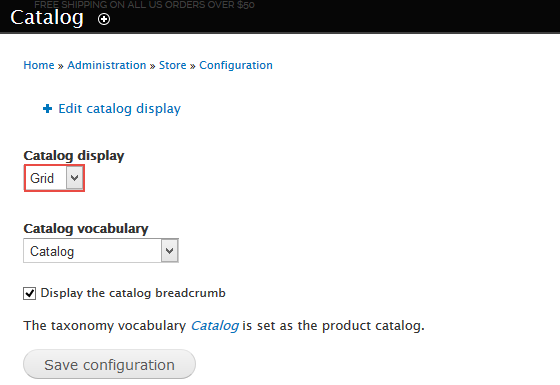
Navigate to Store > CONFIGURATION > Catalog and set the following properties:
2. Configure Products
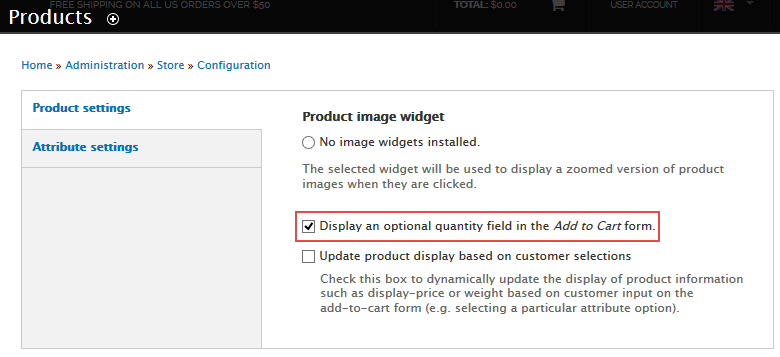
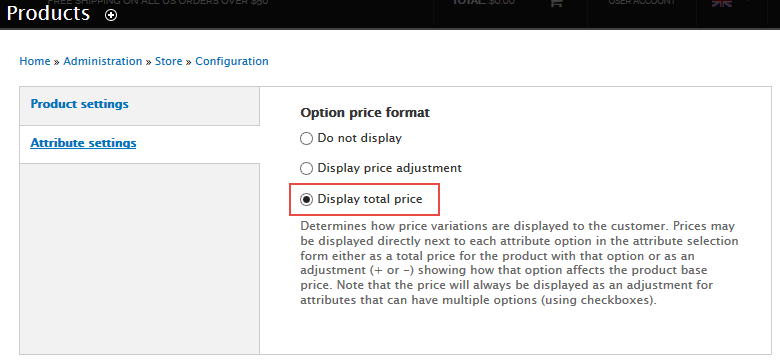
Navigate to Store > CONFIGURATION > Products
Set properties for Products setting tab
Set properties for Attributes setting tab
Modify Article type
Step 1: Navigate to Structure > Content Type
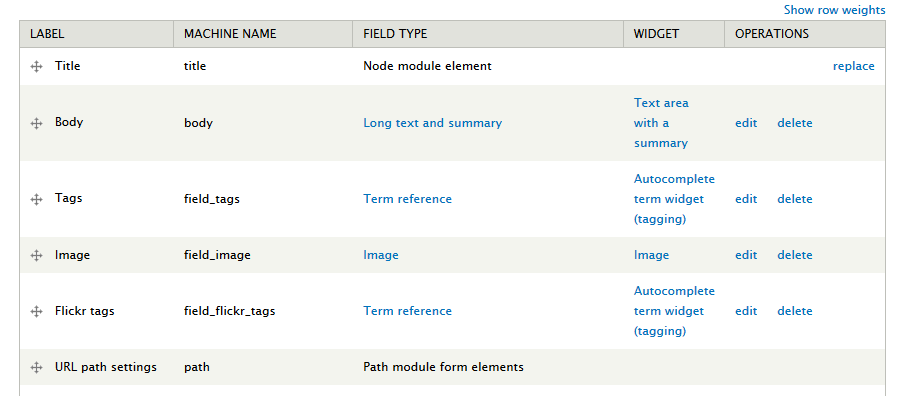
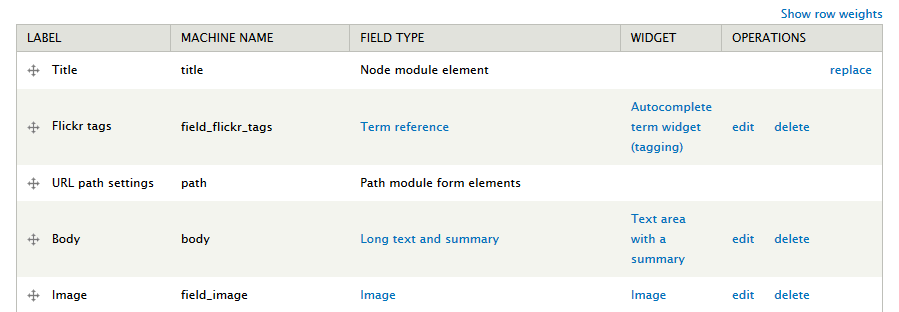
Step 2: In Article row, go to Manage fields tab, then add following fields
Step 3: Set properties for Image
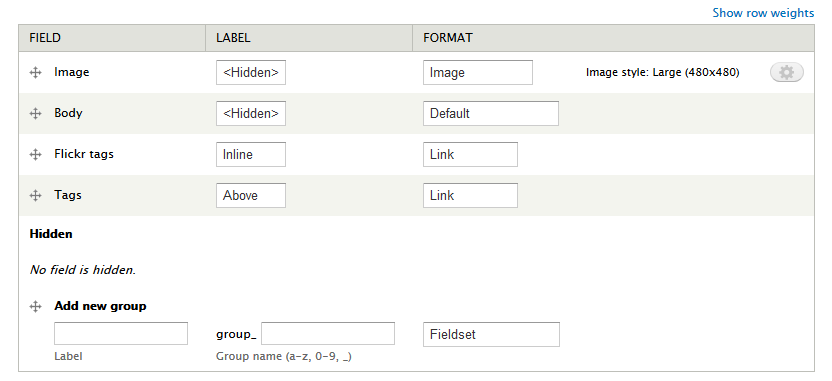
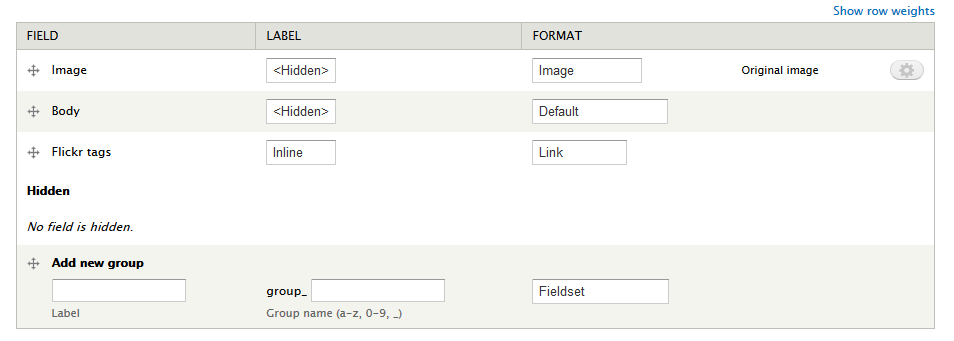
Step 4: Go to Manage display tab > Default tab, set the following properties:
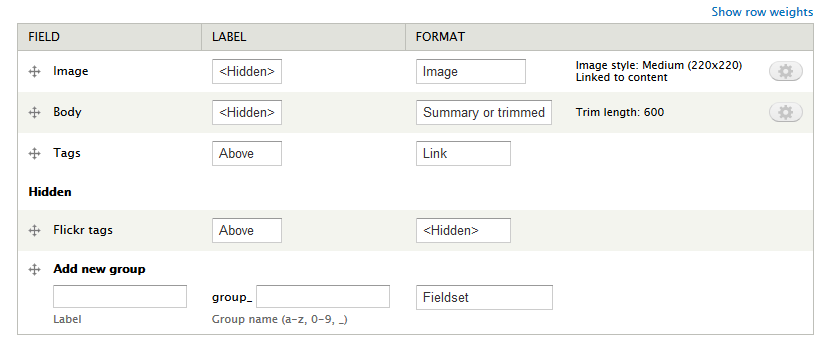
Step 5: Modify Teaser tab, set the following properties:
Step 6: Click Save button
Modify Blog entry type
Step 1: Navigate to Structure > Content Type
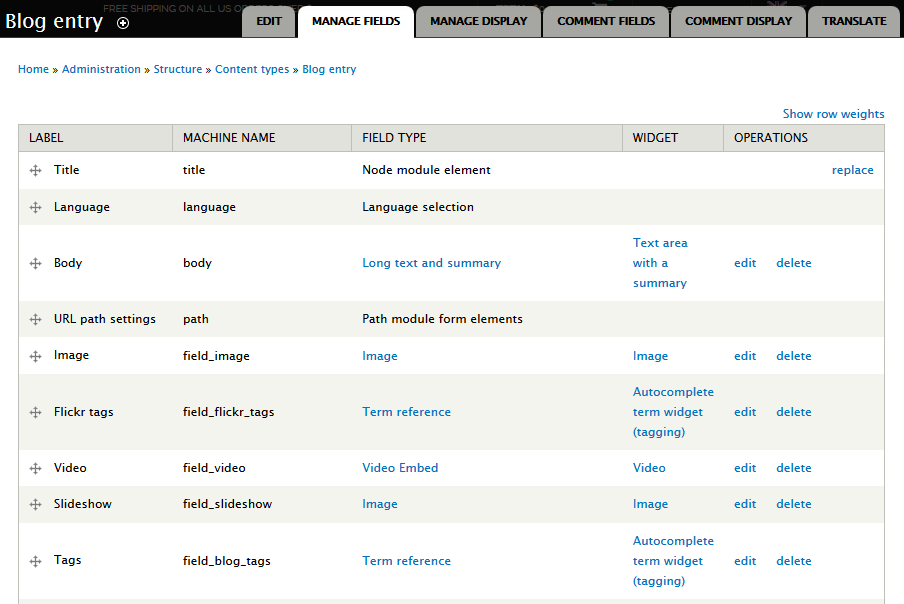
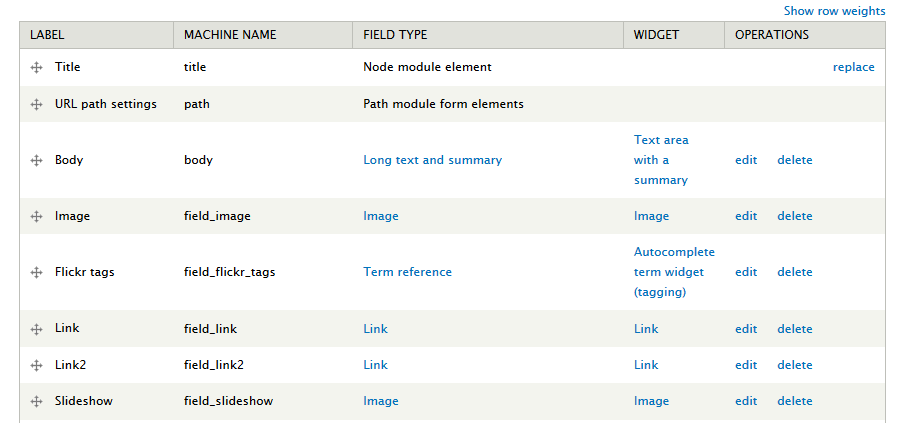
Step 2: In Blog entry row, go to Manage fields tab, then add following fields:
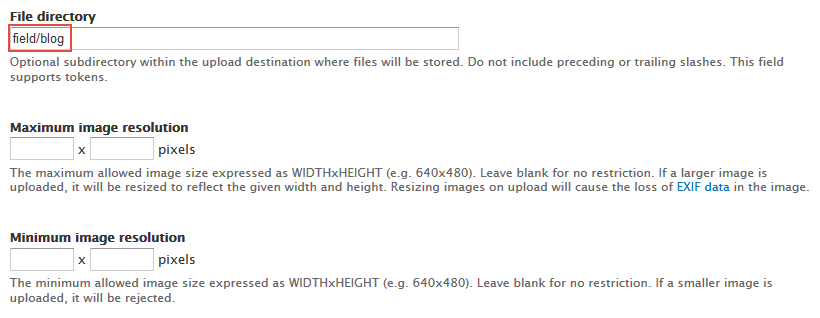
Step 3: Set properties for Image
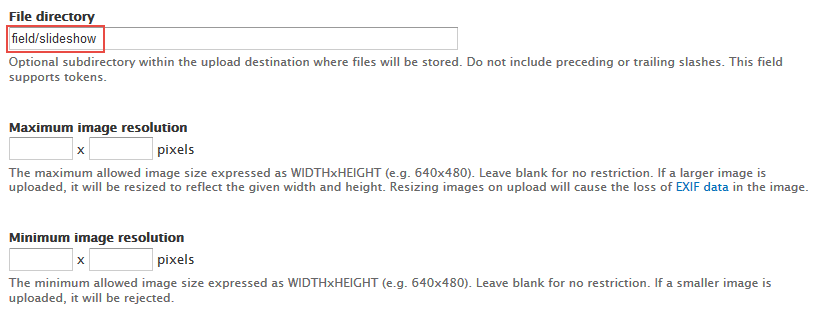
Step 4: Set properties for Slideshow
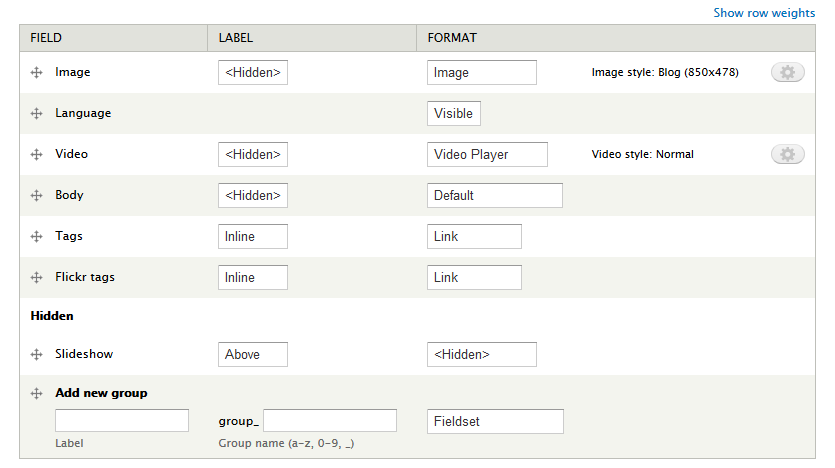
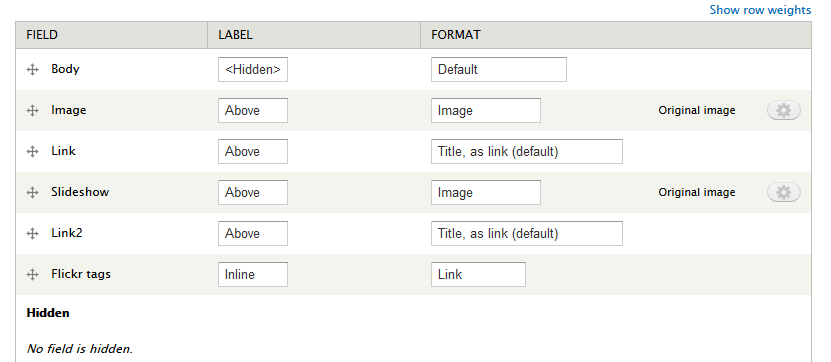
Step 5: Go to Manage display tab > Default tab, set the following properties:
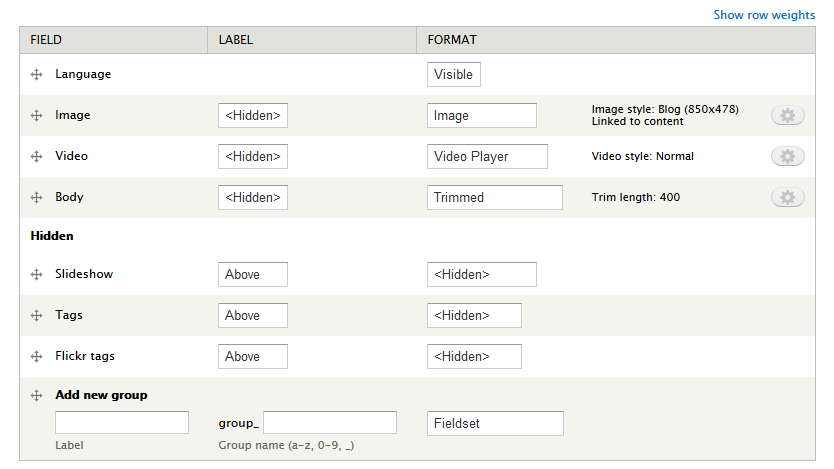
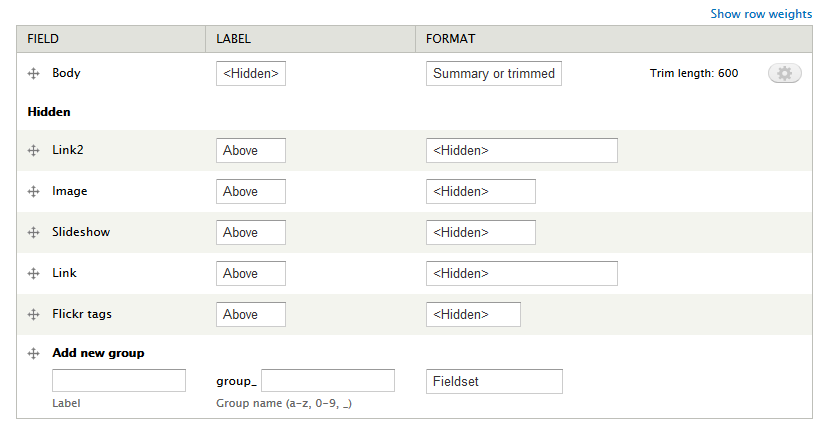
Step 6: Modify Teaser tab, set the following properties:
Step 7: Click Save button
Modify Product type
Step 1: Navigate to Structure > Content Type
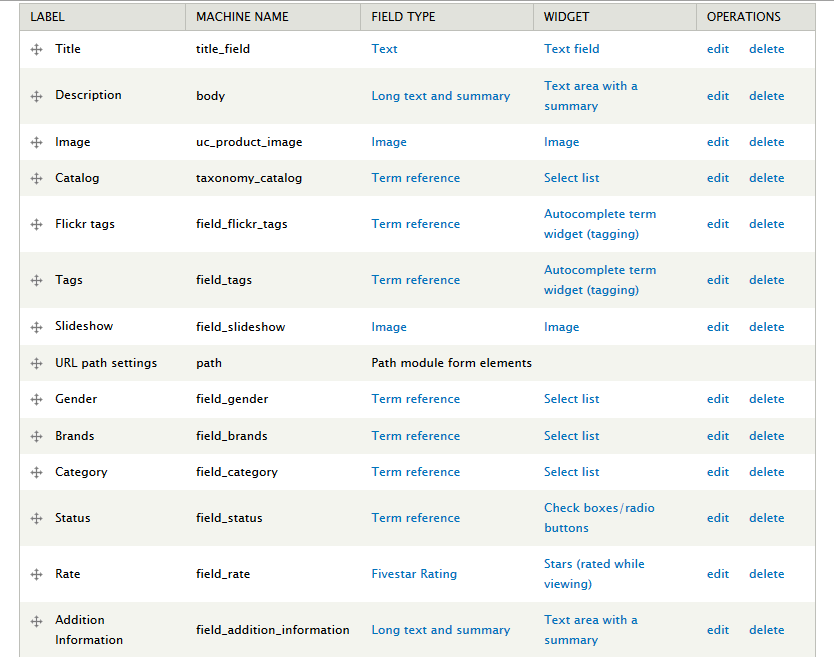
Step 2: In Product row, go to Manage fields tab, then add following fields:
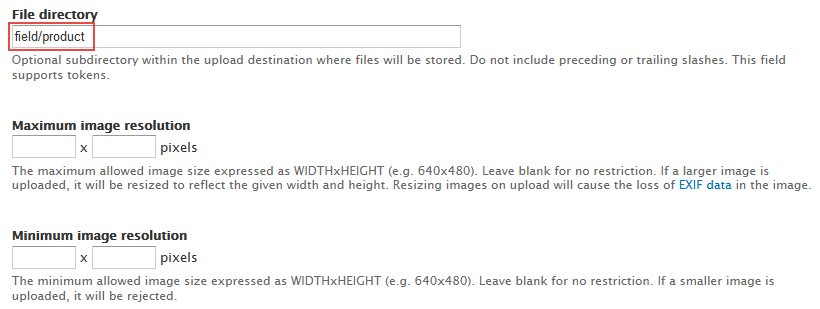
Step 4: Set properties for Image
Step 5: Set properties for Catalog
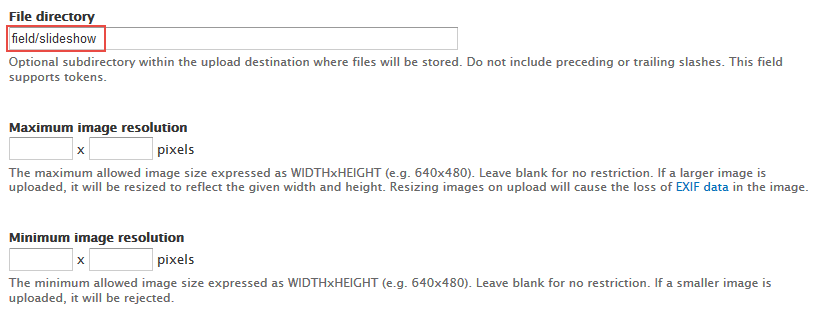
Step 6: Set properties for Slideshow
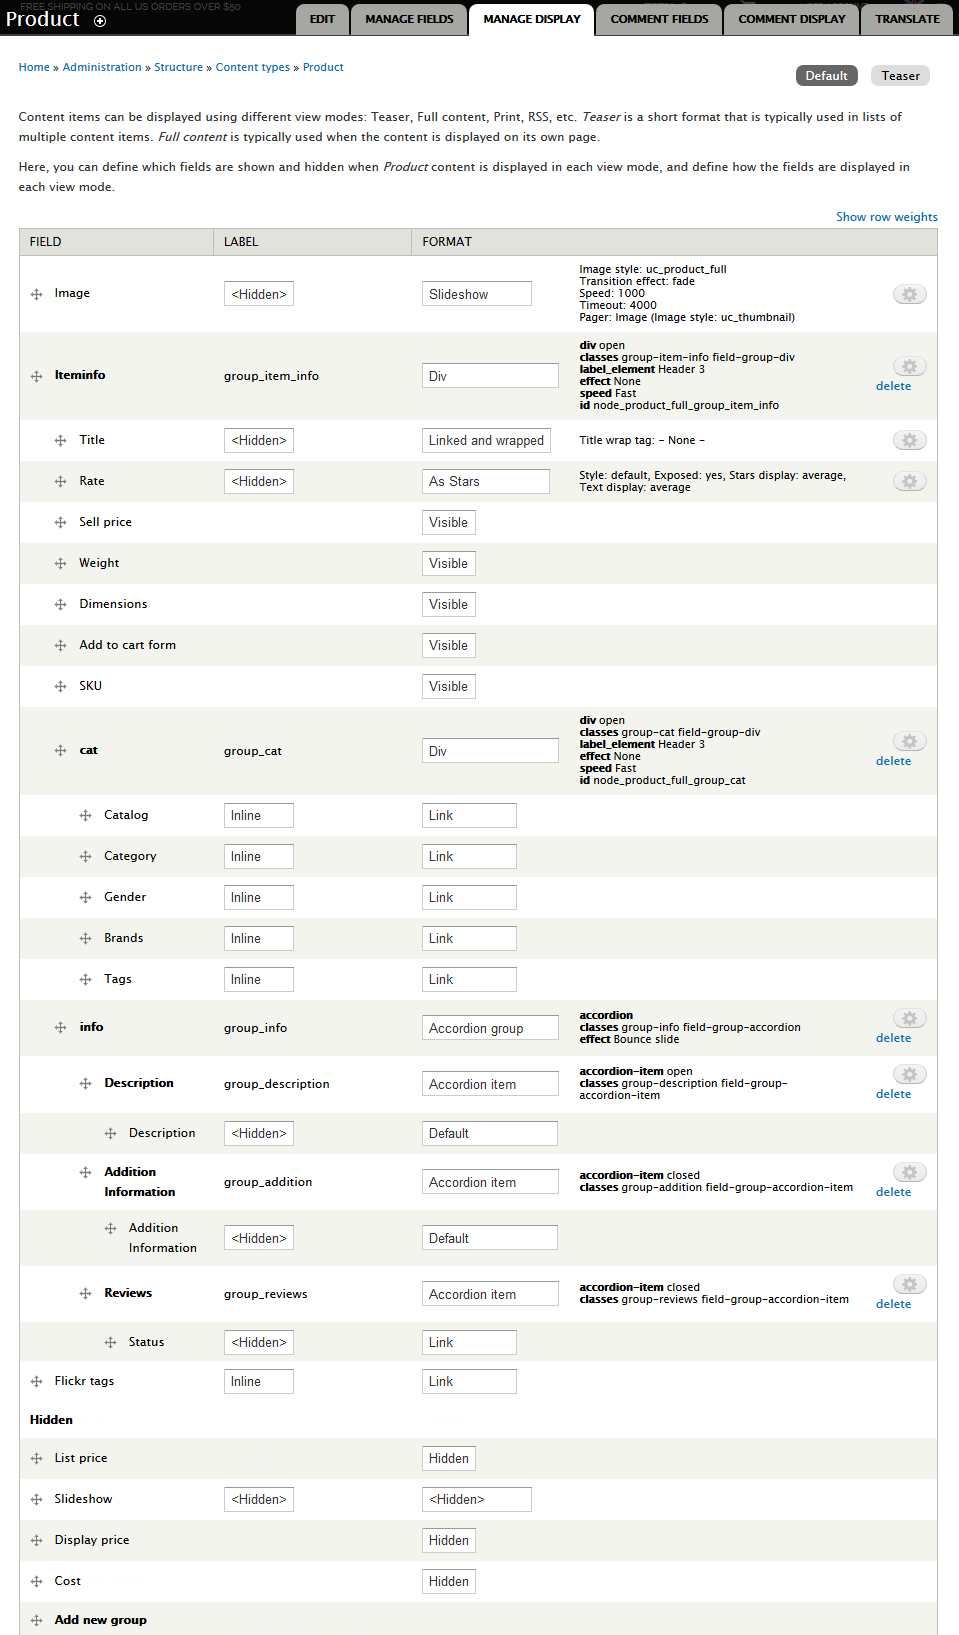
Step 7: Go to Manage display tab > Default tab, set the following properties:
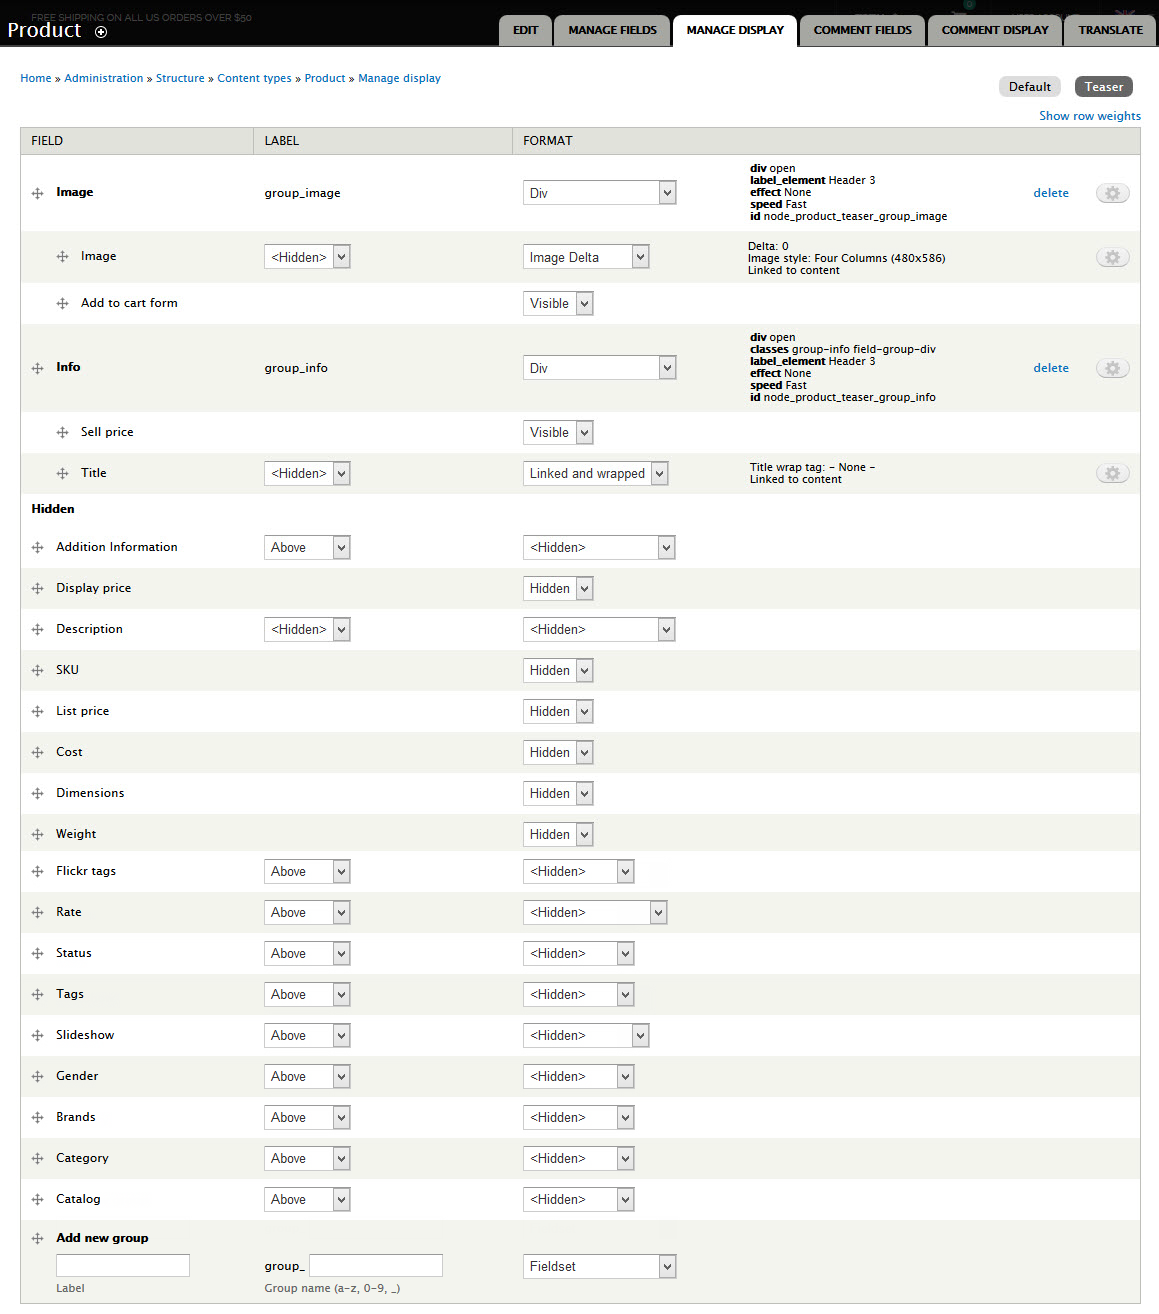
Step 8: Modify Teaser tab, set the following properties:
Step 9: Click Save button
Create Testimonials type
Step 1: Navigate to Structure > Content Type
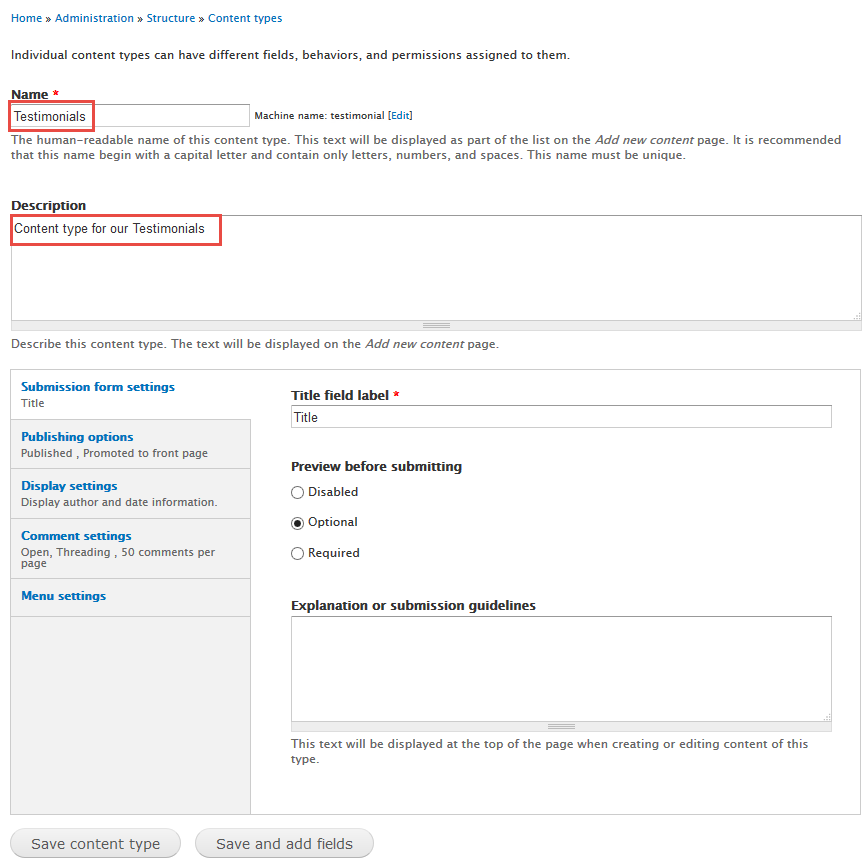
Step 2: Click Add Content Type link to create Testimonials type with the following properties:
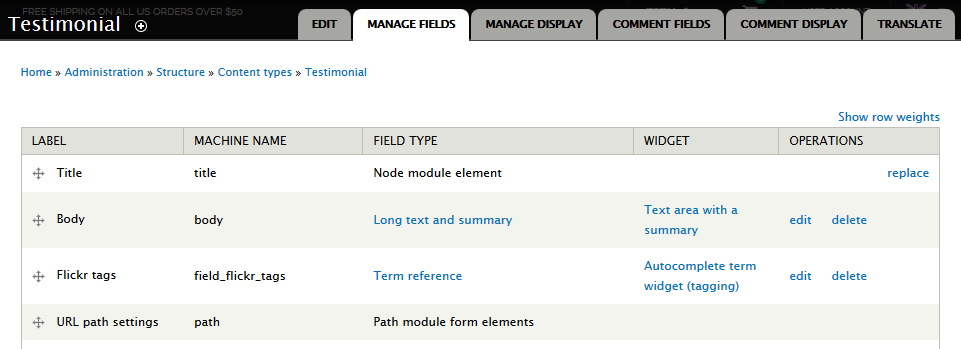
Step 3: Click Save content type button. These are fields of Testimonials type.
Step 4: Click Save button
Create Ads type
Step 1: Navigate to Structure > Content Type
Step 2: Click Add Content Type link to create Ads type
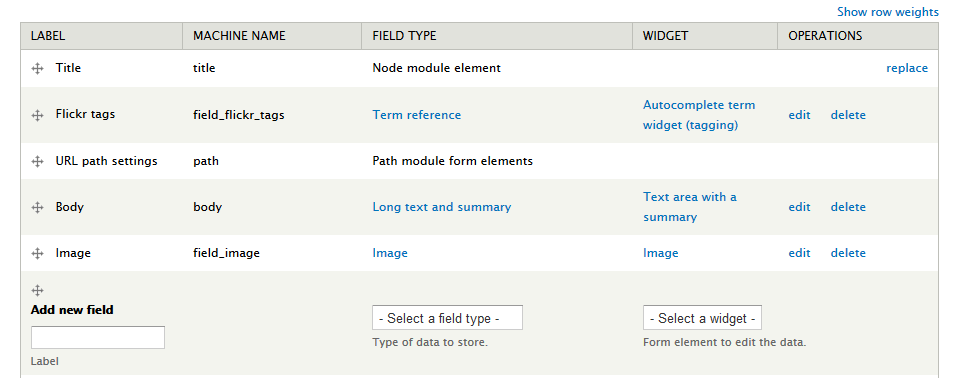
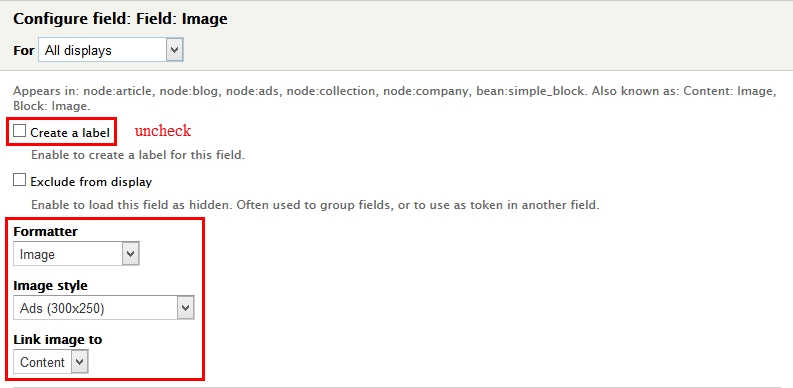
Step 3: Click Save and add fields button, then add the following fields:
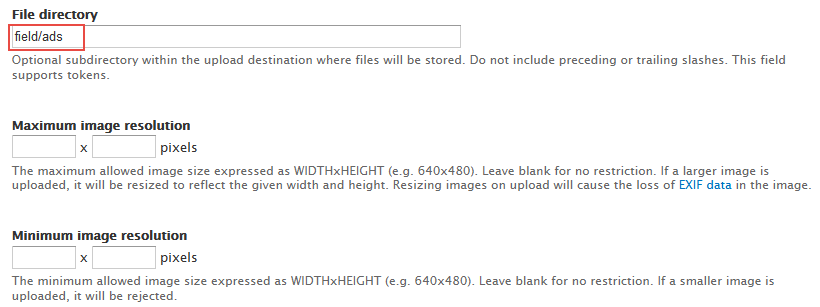
Step 4: Set properties for Image
Step 5: Go to Manage display tab > Default tab, set the following properties:
Step 6: Modify Teaser tab, set the following properties:
Step 7: Click Save button
Create Collection type
Step 1: Navigate to Structure > Content Type
Step 2: Click Add Content Type link to create Collection type
Step 3: Click Save and add fields button, then add the following fields:
Step 4: Set properties for Image
Step 5: Set properties for Slideshow
Step 6: Go to Manage display tab > Default tab, set the following properties:
Step 7: Modify Teaser tab, set the following properties:
Step 8: Click Save button
Create Company type
Step 1: Navigate to Structure > Content Type
Step 2: Click Add Content Type link to create Company type
Step 3: Click Save and add fields button, then add the following fields:
Step 4: Set properties for Image
Step 5: Go to Manage display tab > Default tab, set the following properties:
Step 6: Modify Teaser tab, set the following properties:
Step 7: Click Save button
Create FAQ type
Step 1: Navigate to Structure > Content Type
Step 2: Click Add Content Type link to create FAQ type
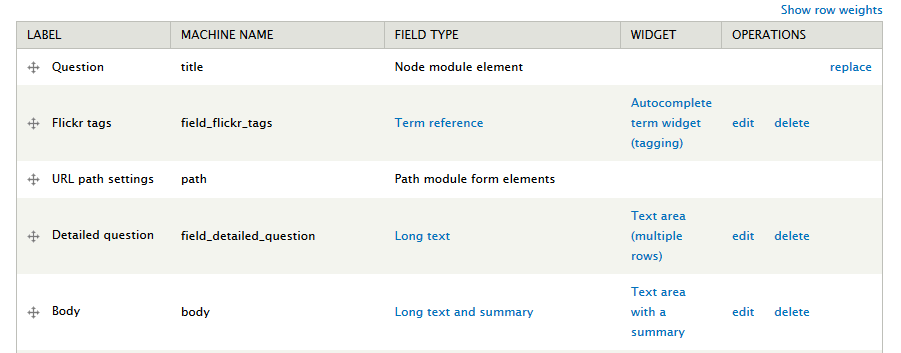
Step 3: Click Save and add fields button, then add the following fields:
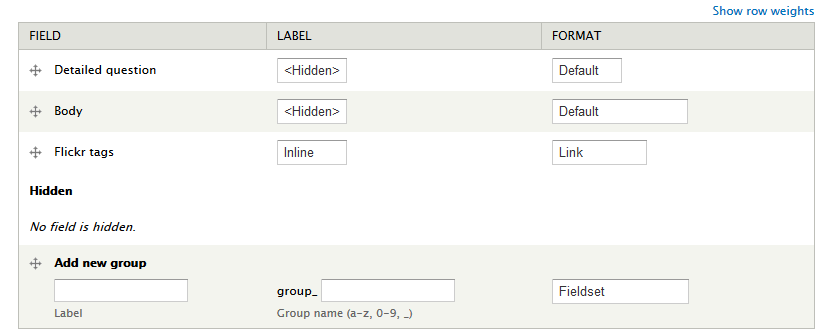
Step 4: Go to Manage display tab > Default tab, set the following properties:
Step 5 Modify Teaser tab, set the following properties:
Step 7: Click Save button
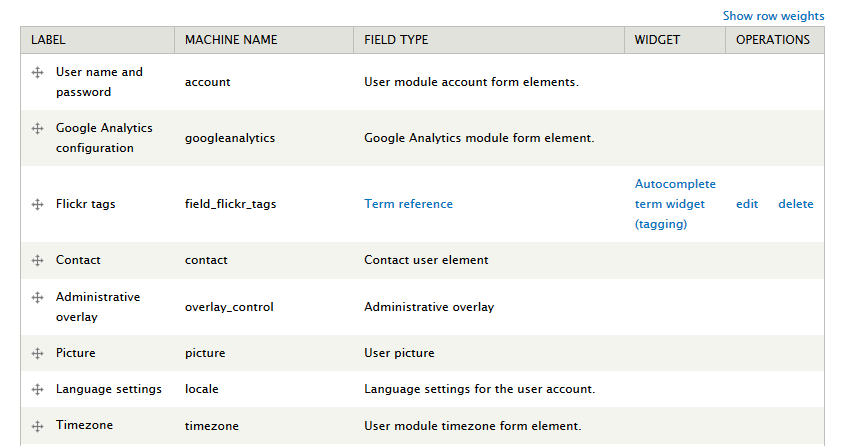
Modify Users Profile structure
Home Page
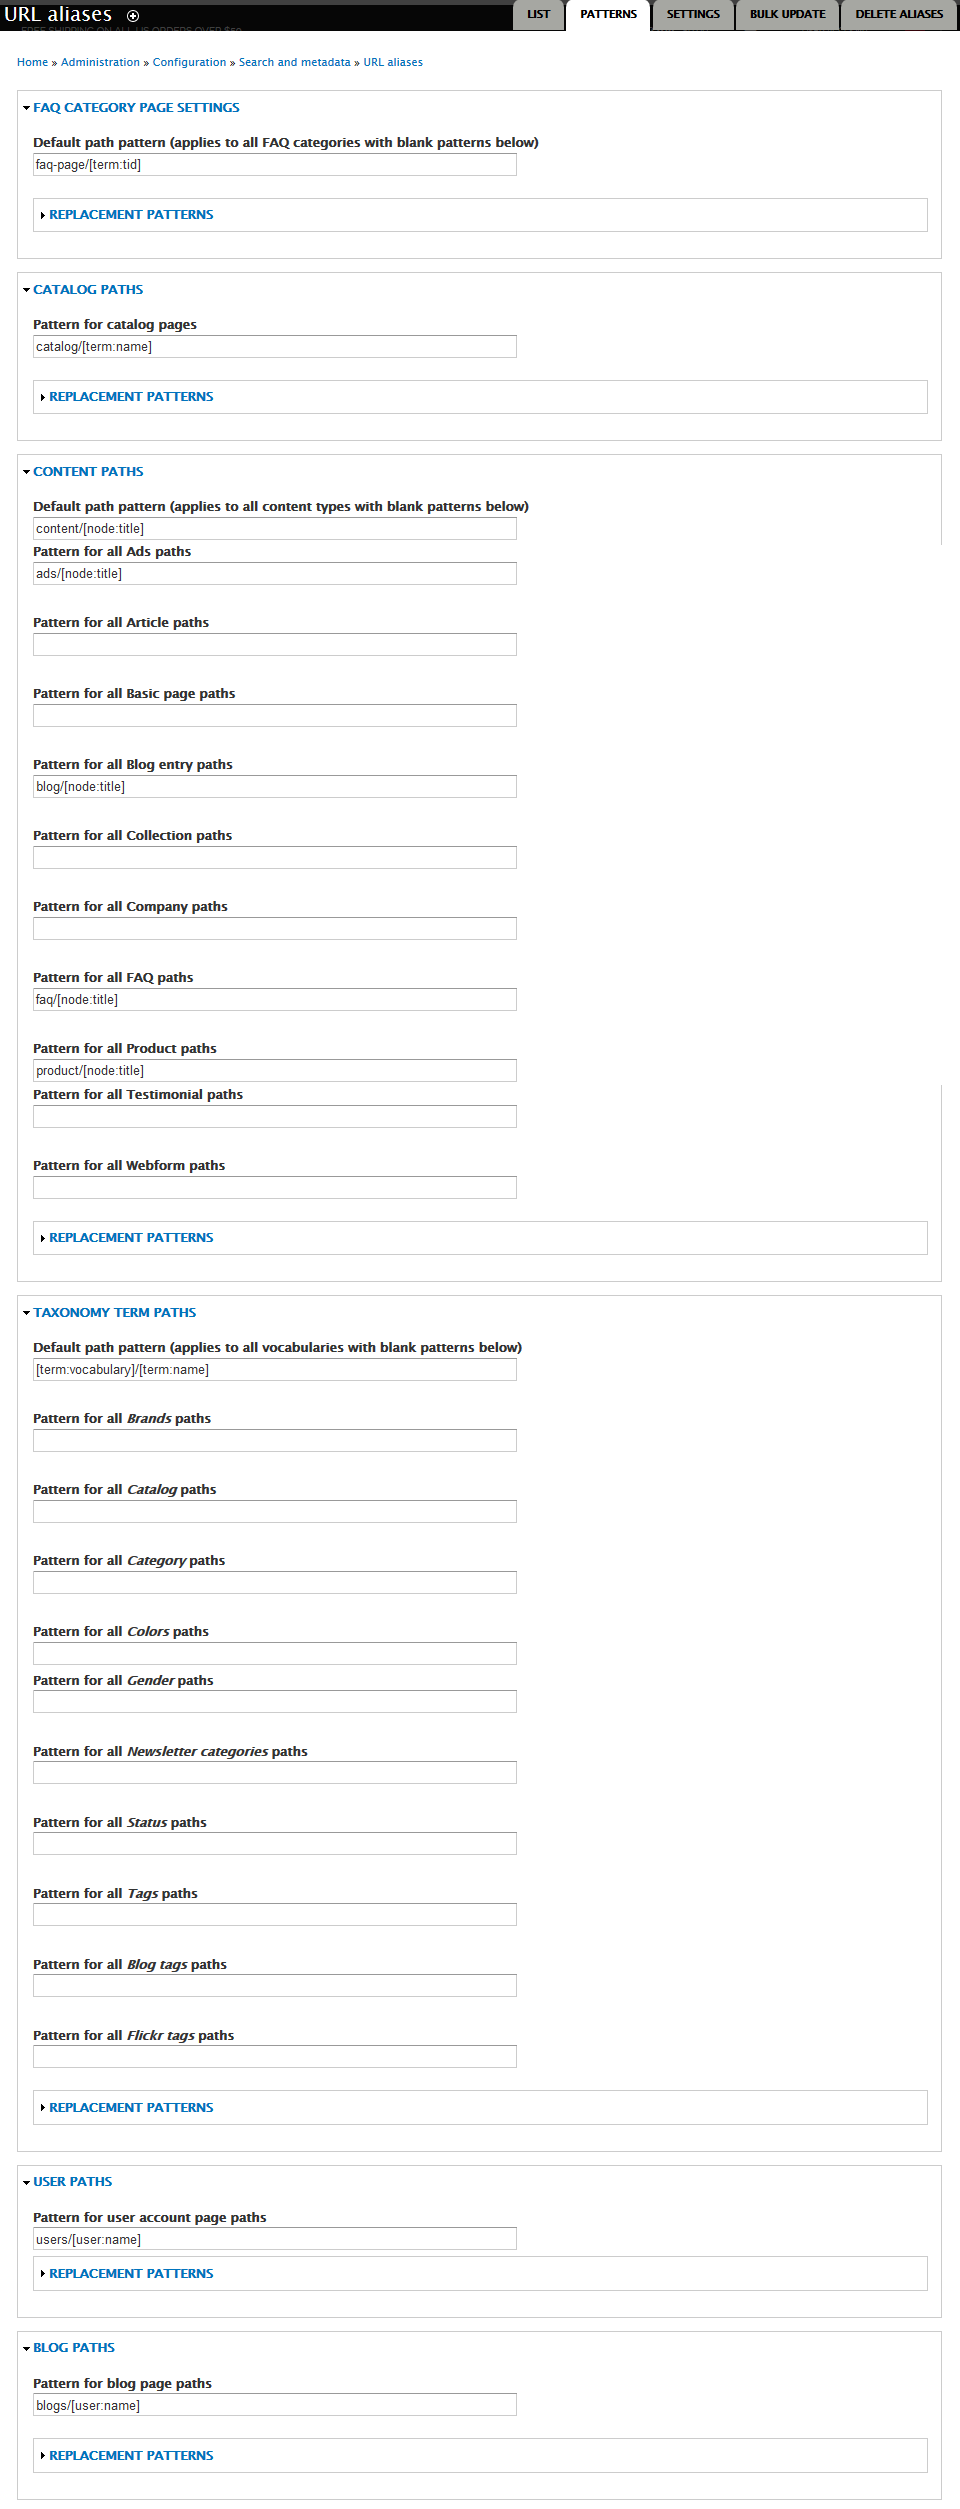
URL Aliases Configuration
Navigate to Configuration > Search and metadata > URL Aliases, switch to PATTERNS and set the following properties:
You can read this article to understand more about URL Aliases.
Headline region
Front end Display
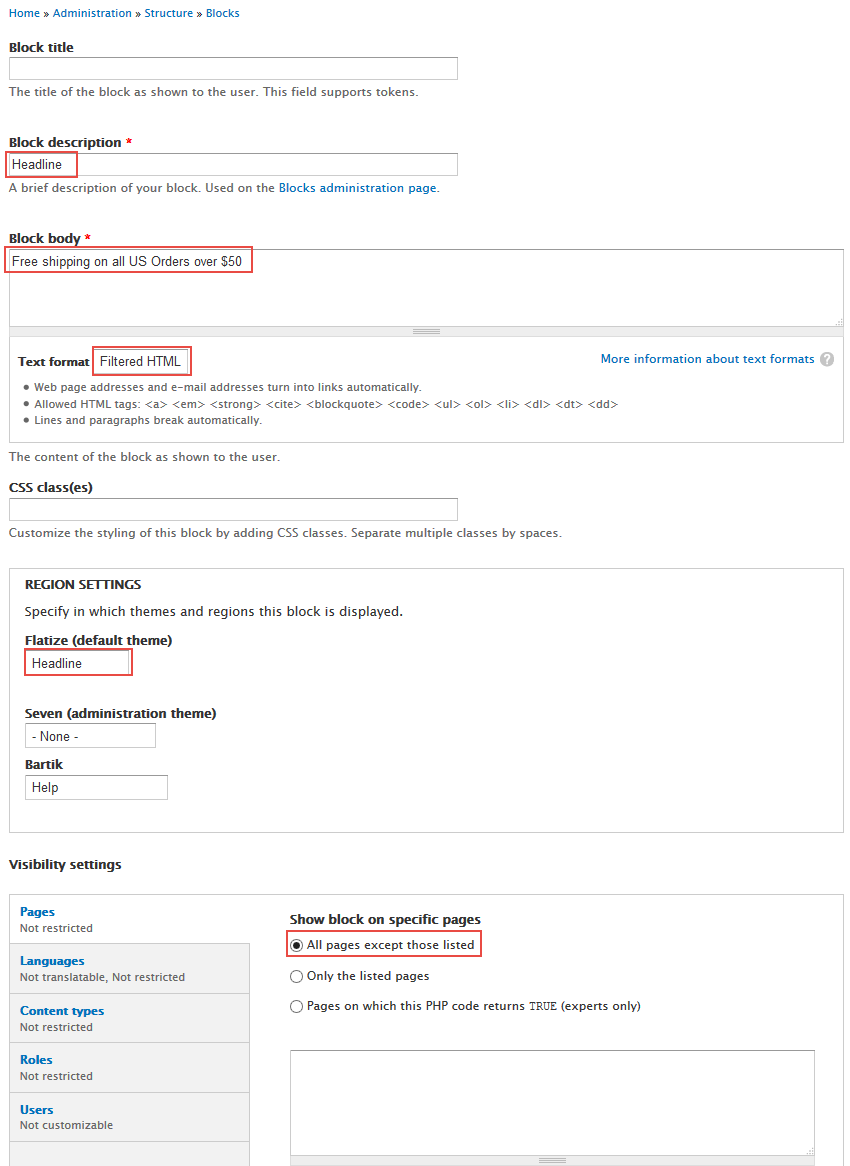
1. Headline: Custome block
Step 1: Navigate to Structure > Blocks, click Add block link, Create Headline block with following properties:
Step 2: Click Save block button.
2. Language switcher dropdown
Step 1: Navigate to Configuration > Regional and language > Language, click Add language link and add these following languages:
Step 2: Click Save configuration button.
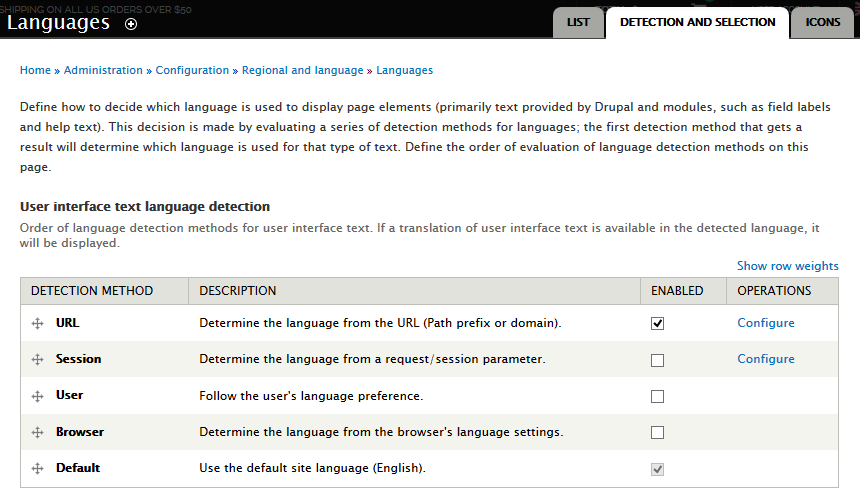
Step 3: Navigate to DETECTION AND SELECTION tab, set the following properties:
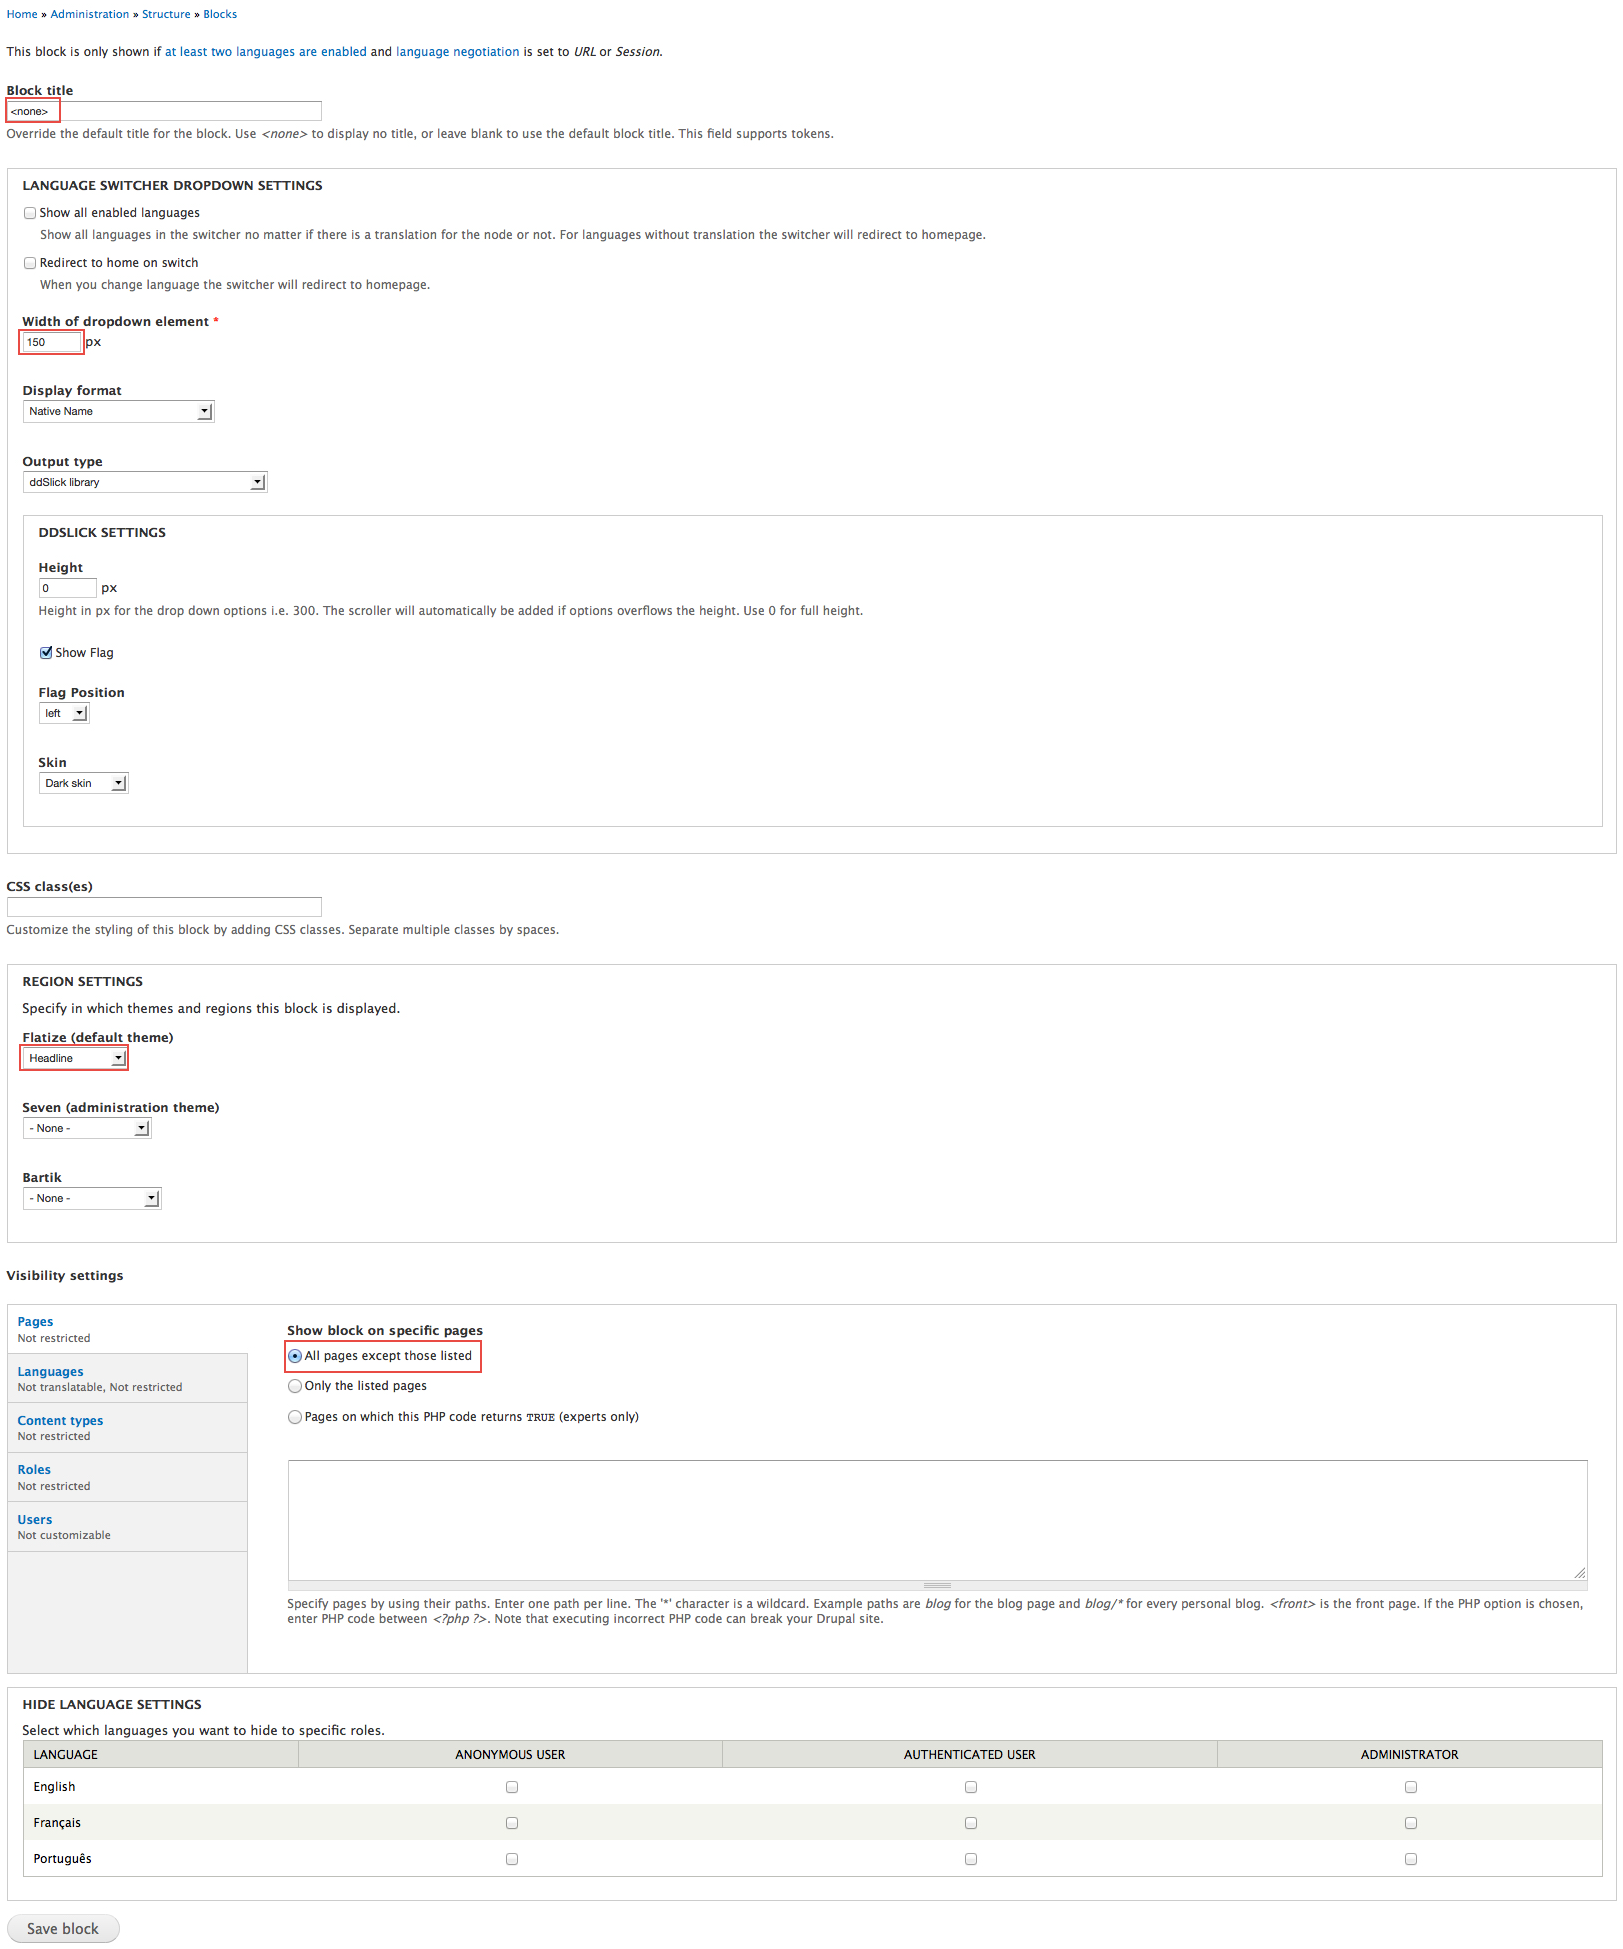
Step 4: Navigate to Structure > Blocks, Find block Language switcher dropdown (User interface text) , Click Configure link and set following properties:
Step 5: Click Save block button.
3. Shopping Cart
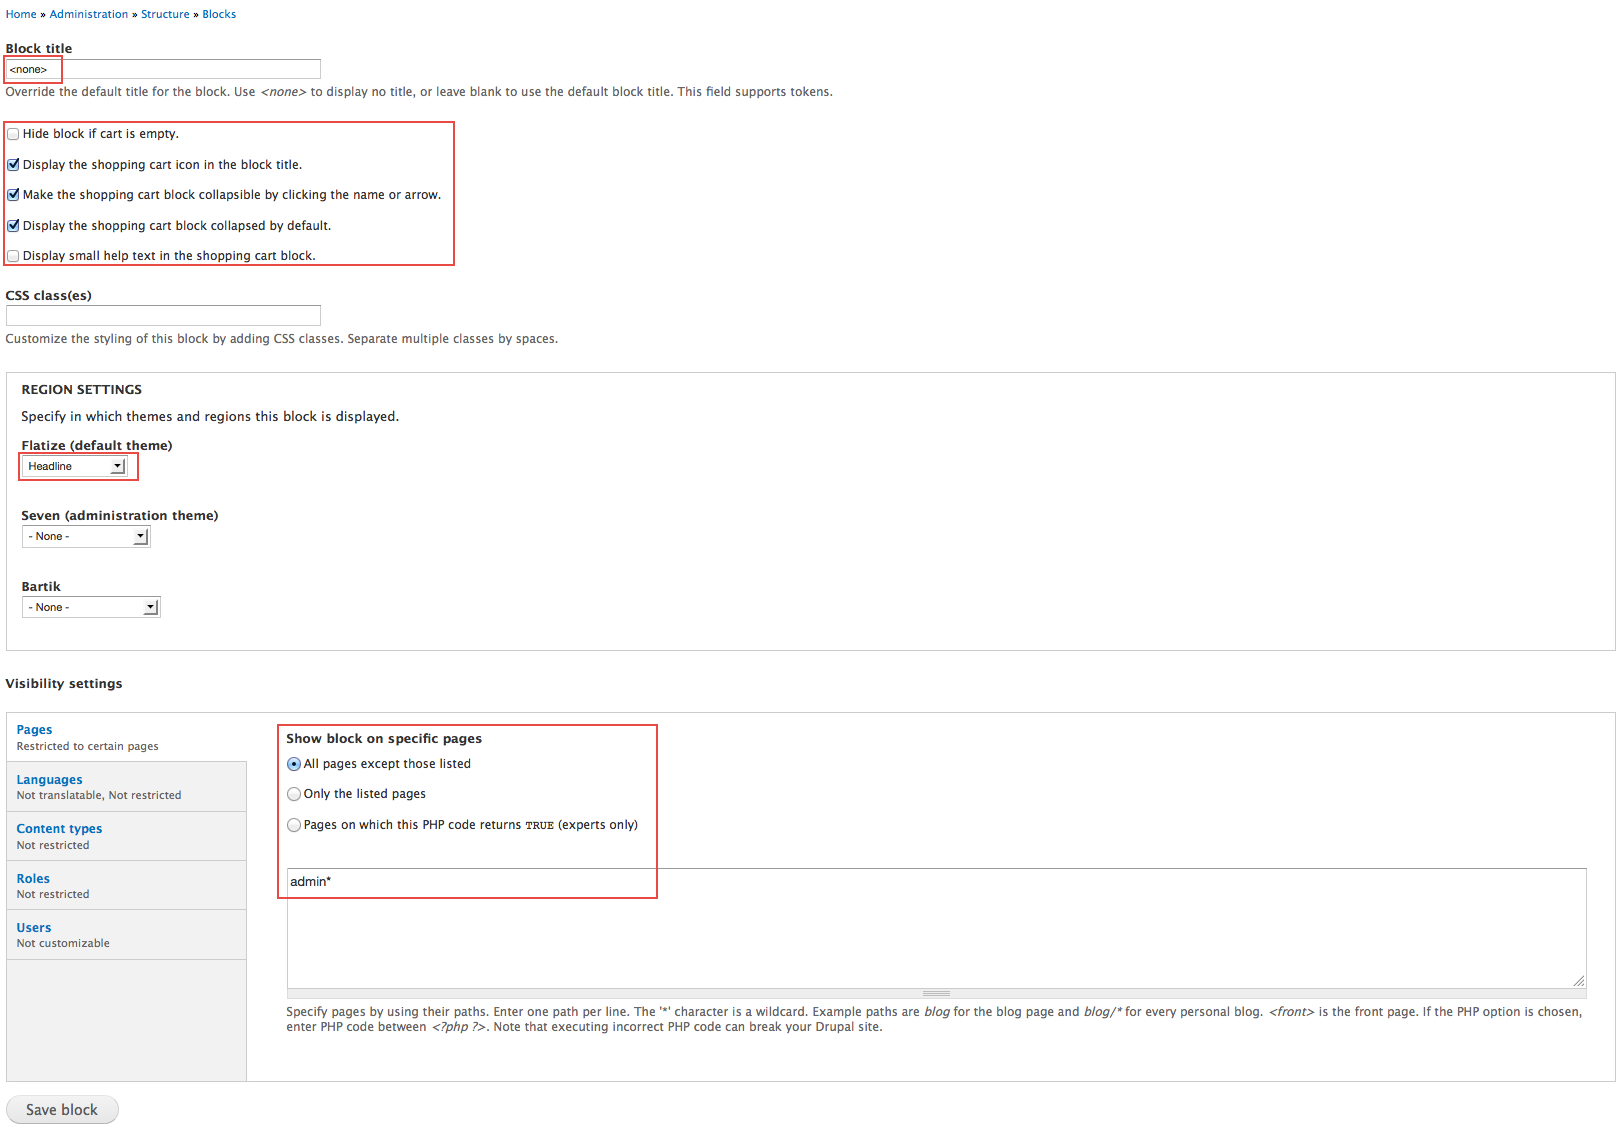
Step 1: Navigate to Structure > Blocks, Find block Shopping Cart, Click Configure link and set following properties:
Step 2: Click Save block button.
4. Cart Status: Custome block
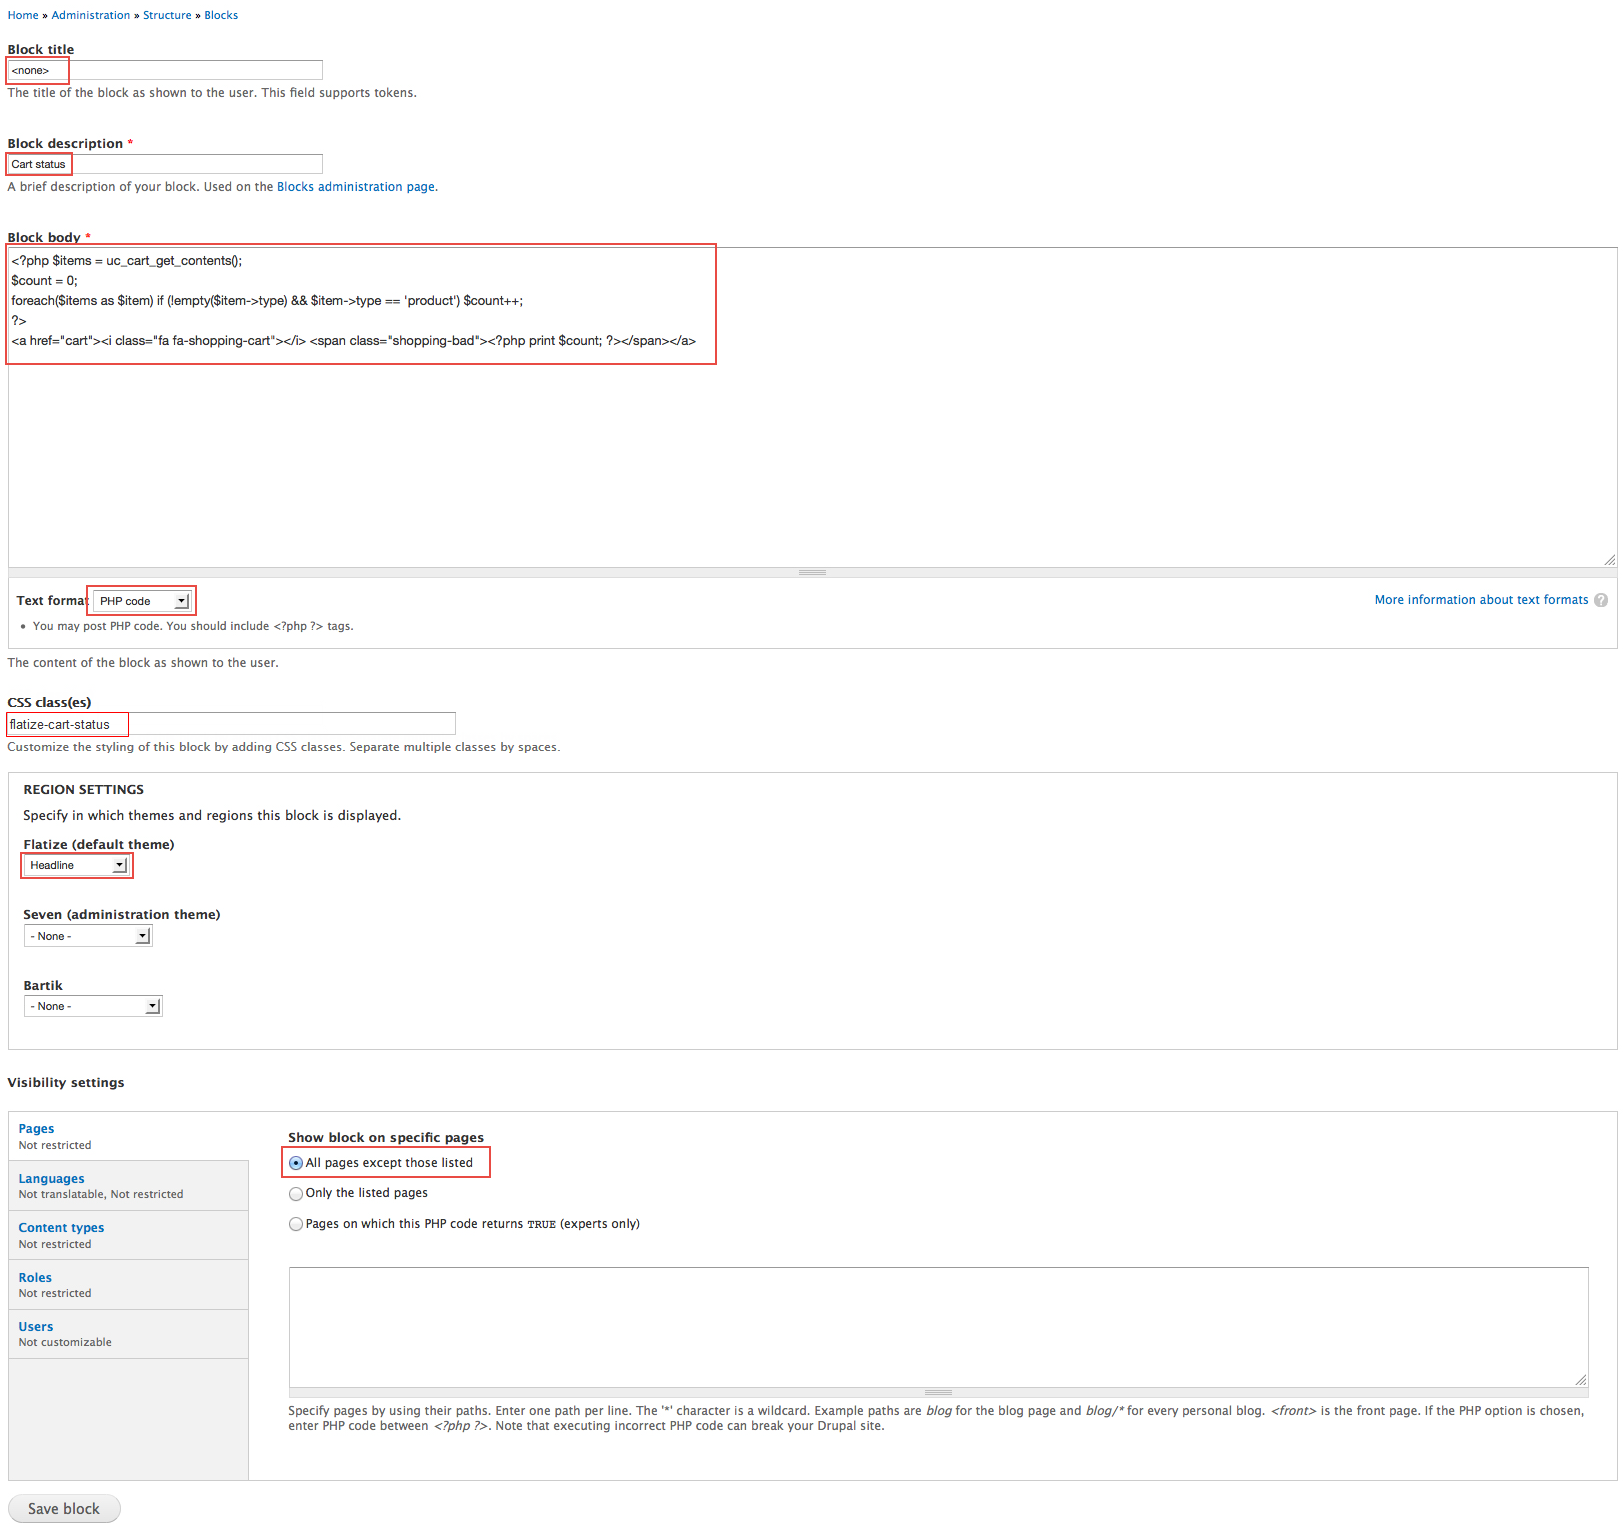
Step 1: Navigate to Structure > Blocks, click Add block link, create Cart Status block with following properties:
Step 2: Click Save block button.
Refer to the following HTML code:
                        type) && $item->type == 'product') $count++;
                        ?>
5. User Account
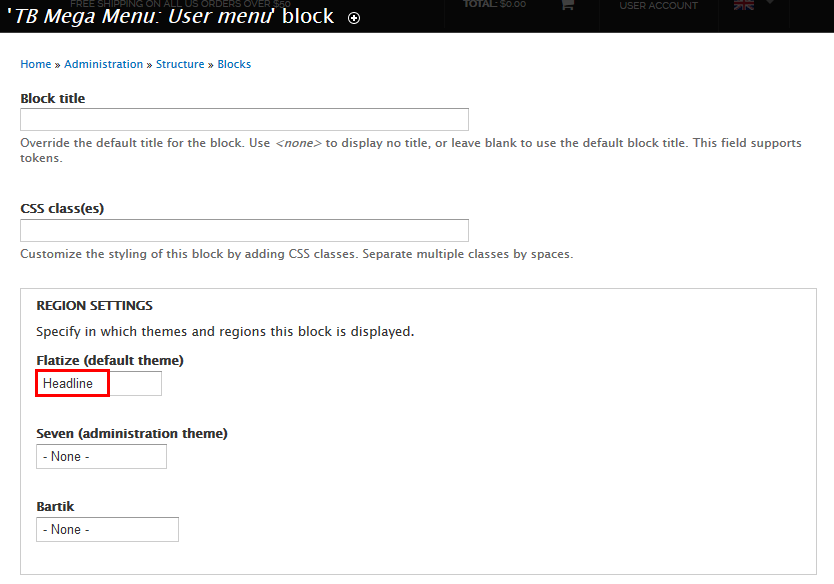
Step 1: Navigate to Structure > Blocks, Find blockTB Mega Menu: User menu , Click Configure link and set following properties:
Step 2: Click Save block button.
Search form block
Step 1: Navigate to Structure > Blocks
Step 2: Find block Search form and set region "Header"
Step 3: Click Save block button.
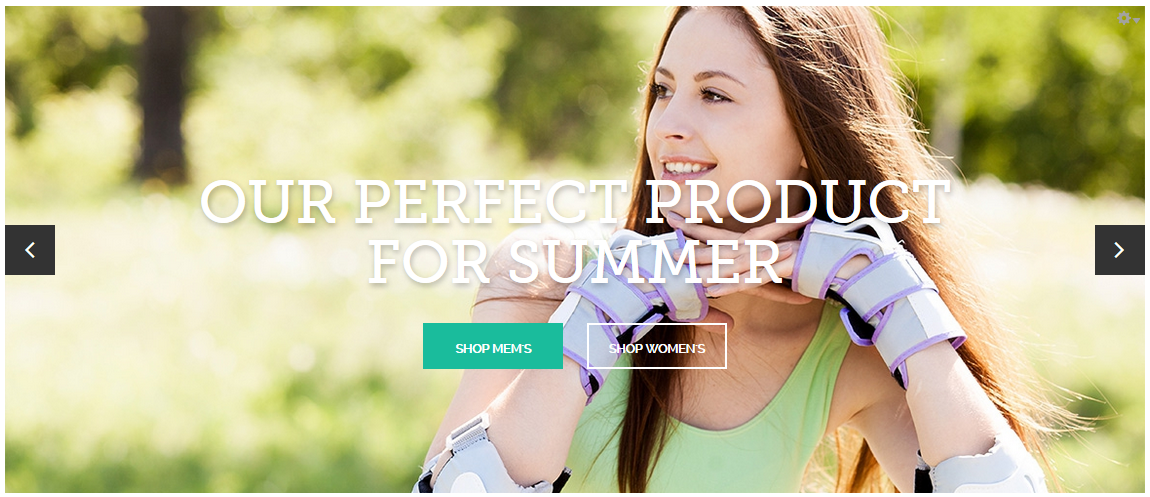
Bootstrap Slideshow
1. Create Bootstrap Slideshow view
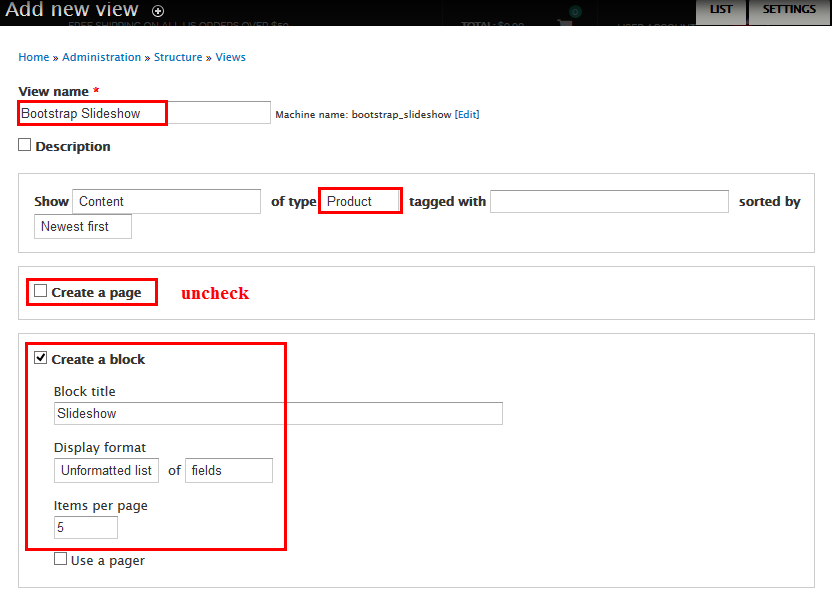
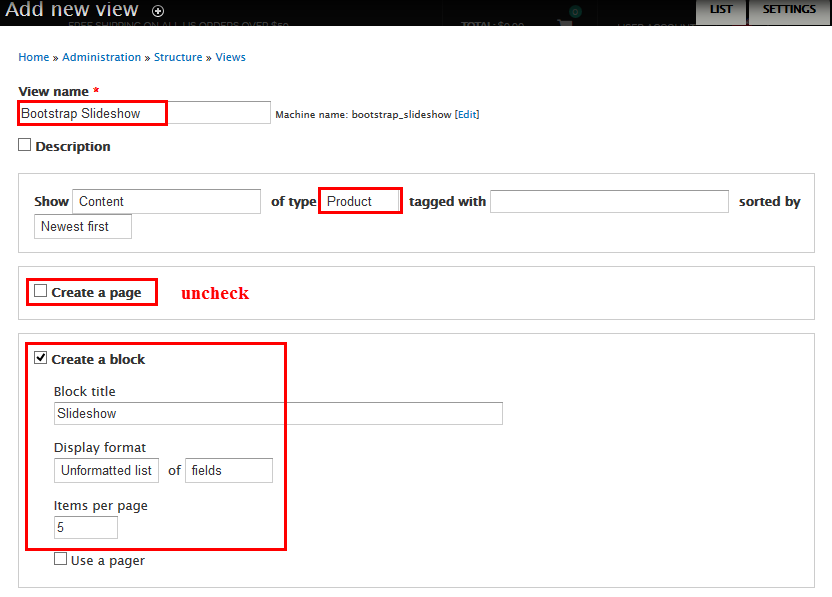
Step 1: Navigate to Structure > Views, click Add new view, then create Bootstrap Slideshow view with following settings:
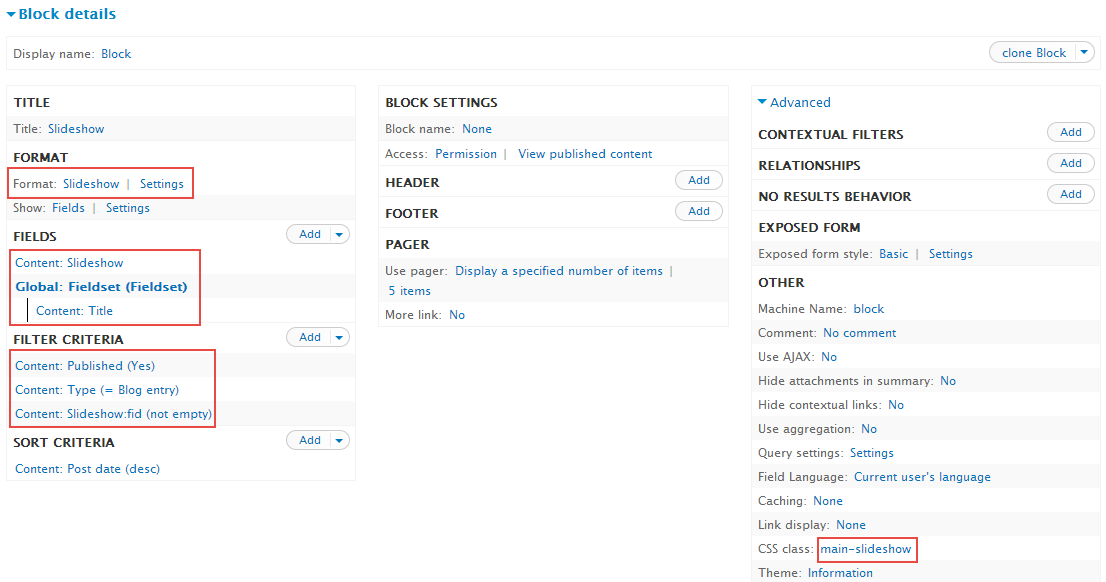
Step 2: Click Continue and edit button. Next to below steps to set properties for following fields:
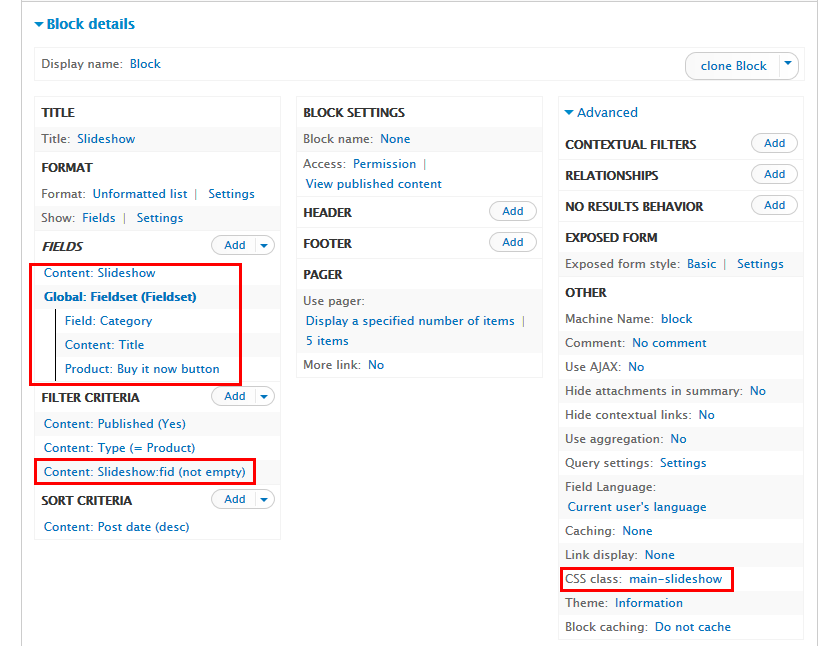
Step 3: At FIELDS area, click Add button to add fields: Content: Slideshow, Global: Fieldset, Field: Category, Product: Buy it now button
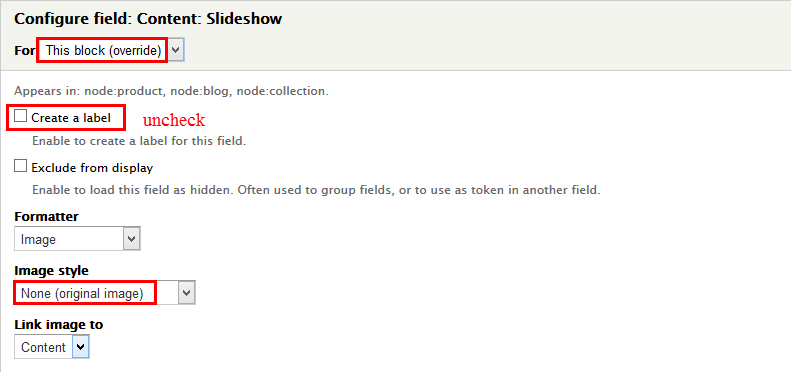
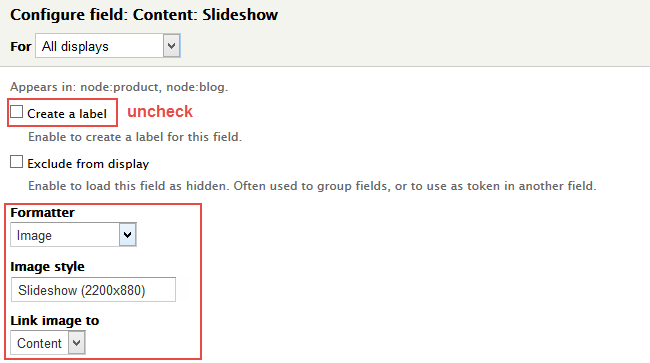
Step 4: Set properties for Content: Slideshow
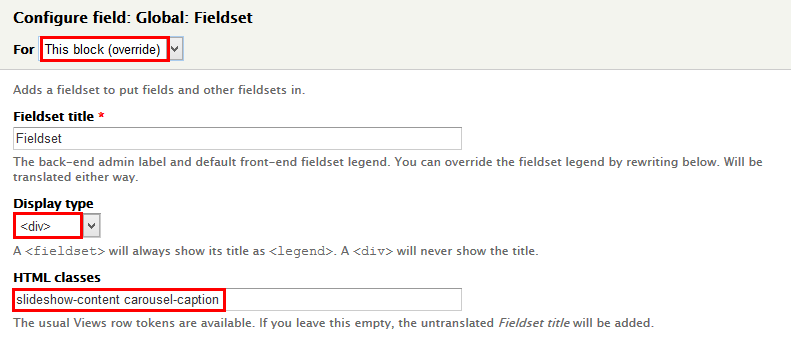
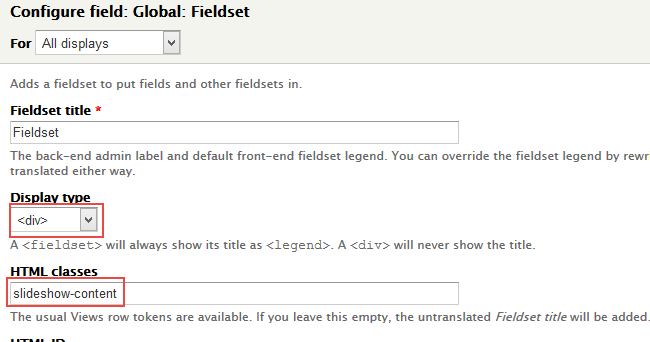
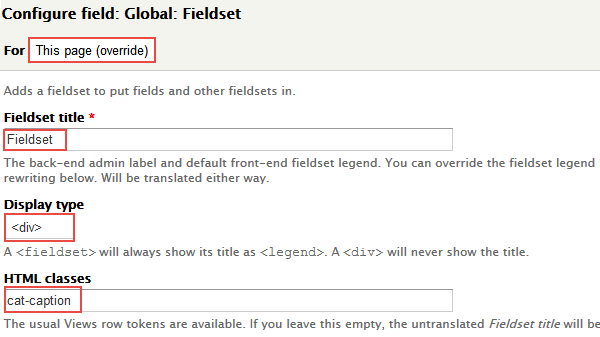
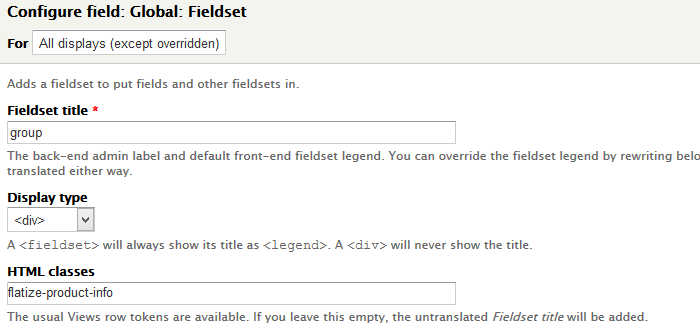
Step 5: Set properties for Global: Fieldset
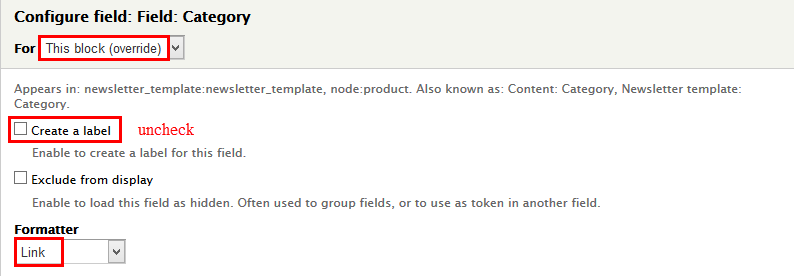
Step 6: Set properties for Field: Category
Step 7: Set properties for Product: Buy it now button
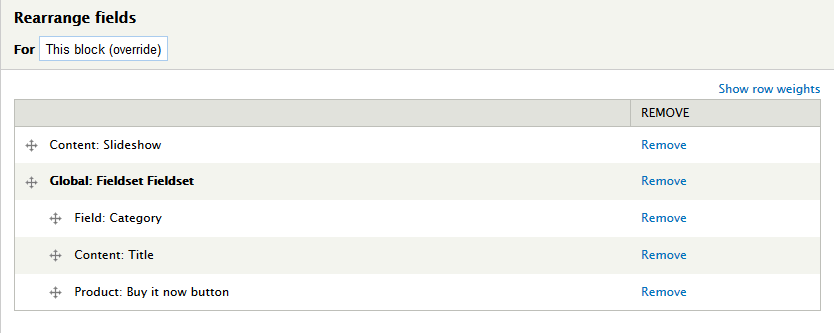
Step 8: At FIELDS area, click Rearrange button and set the following arrangements
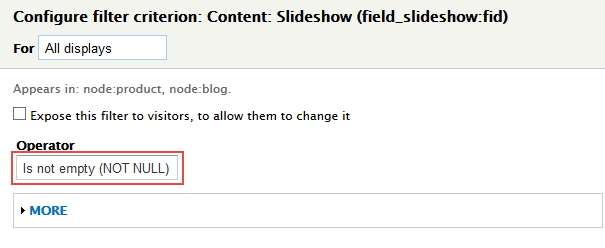
Step 9: At FILTER CRITERIA area, Click Add button to add fields: Slideshow(field_slideshow:fid)
Step 10: Set properties for Content: Slideshow (field_slideshow:fid)
Step 11: At Advanced > CSS Class area, set following properties:
Step 12: Click Save to save view
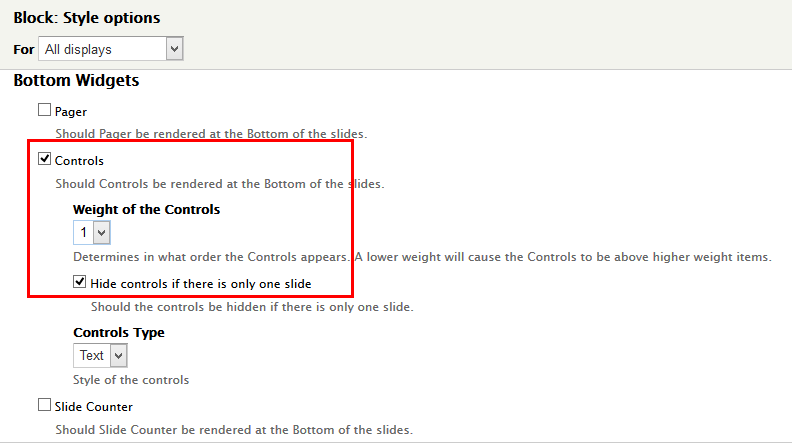
2. Configure Bootstrap Slideshow block
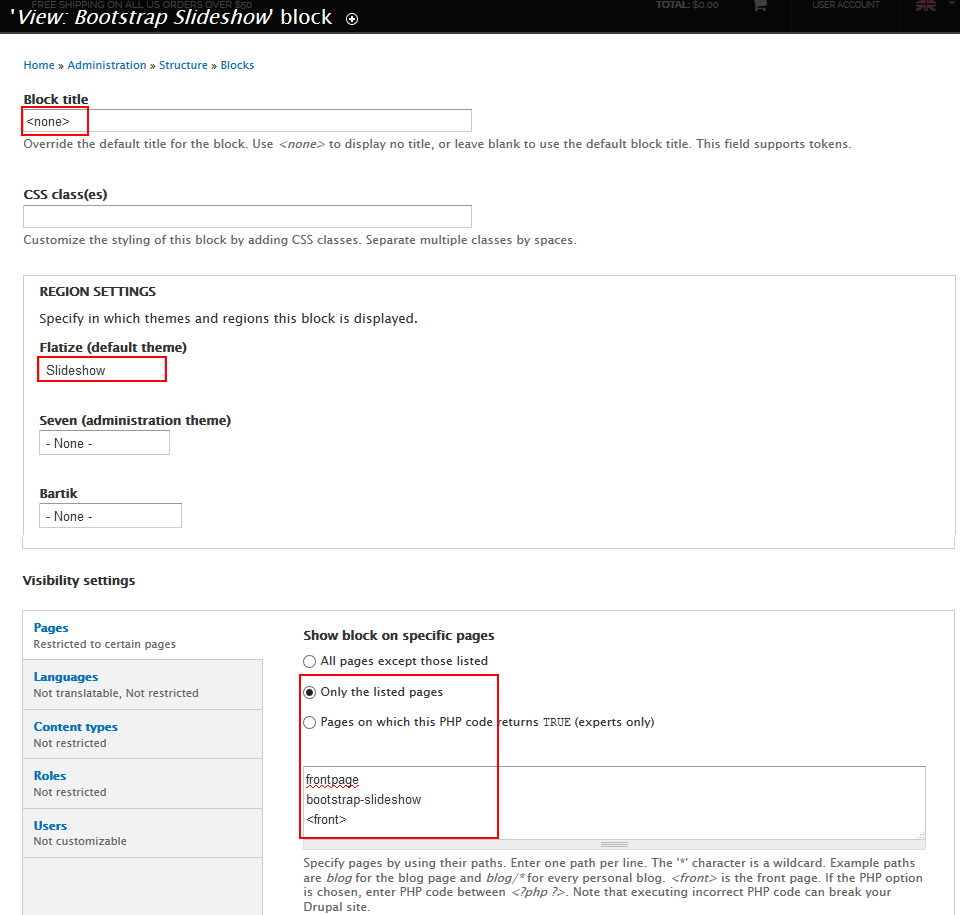
Step 1: Navigate to Structure > Blocks
Step 2: Find View: Bootstrap Slideshow click configure link, set following properties
Step 3: Click Save block button.
Slideshow
Front end Display
1. Create Slideshow view
Step 1: Navigate to Structure > Views, click Add new view, then create Slideshow view with following settings:
Step 2: Click Continue and edit button. Next to below steps to set properties for following fields:
Step 3: At FORMAT Format area, click Settings button and set following properties:
Step 4: At FIELDS area, click Add button to add fields: Content: Slideshow, Global: Fieldset
Step 5: Set properties for Content: Slideshow
Step 6: Set properties for Global: Fieldset
Step 7: At FIELDS area, click Rearrange button and set the following arrangements
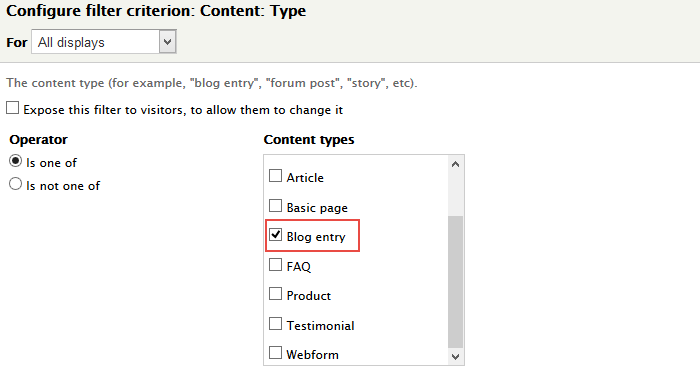
Step 8: At FILTER CRITERIA area, Click Add button to add fields: Content: Slideshow, Content: Type
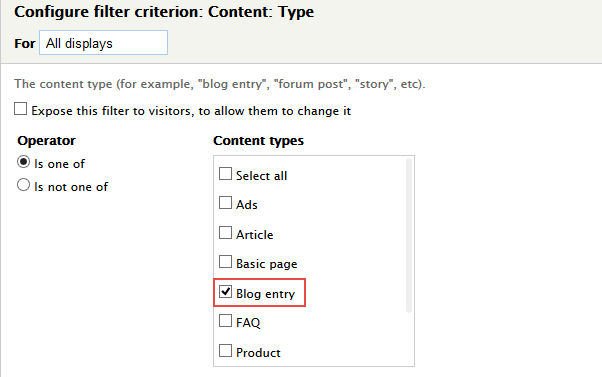
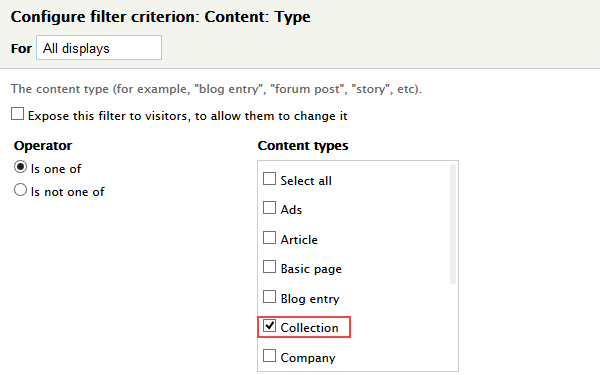
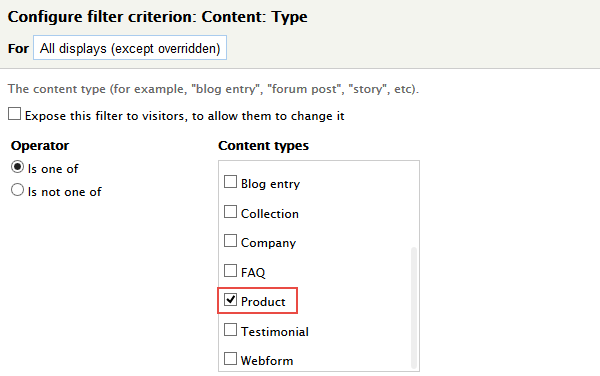
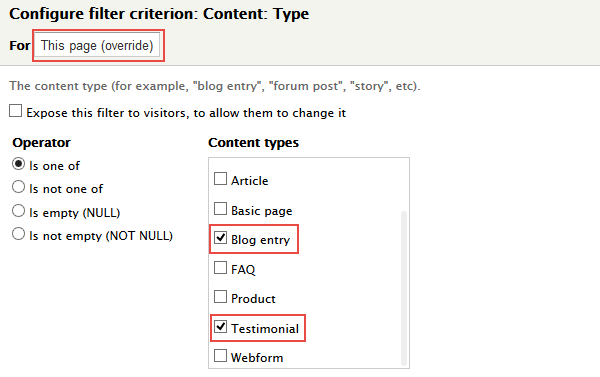
Step 9: Set properties for Content: Type
Step 10: Set properties for Content: Slideshow
Step 11: At Advanced > CSS Class area, set following properties:
Step 12: Click Save to save view
2. Configure Slideshow block
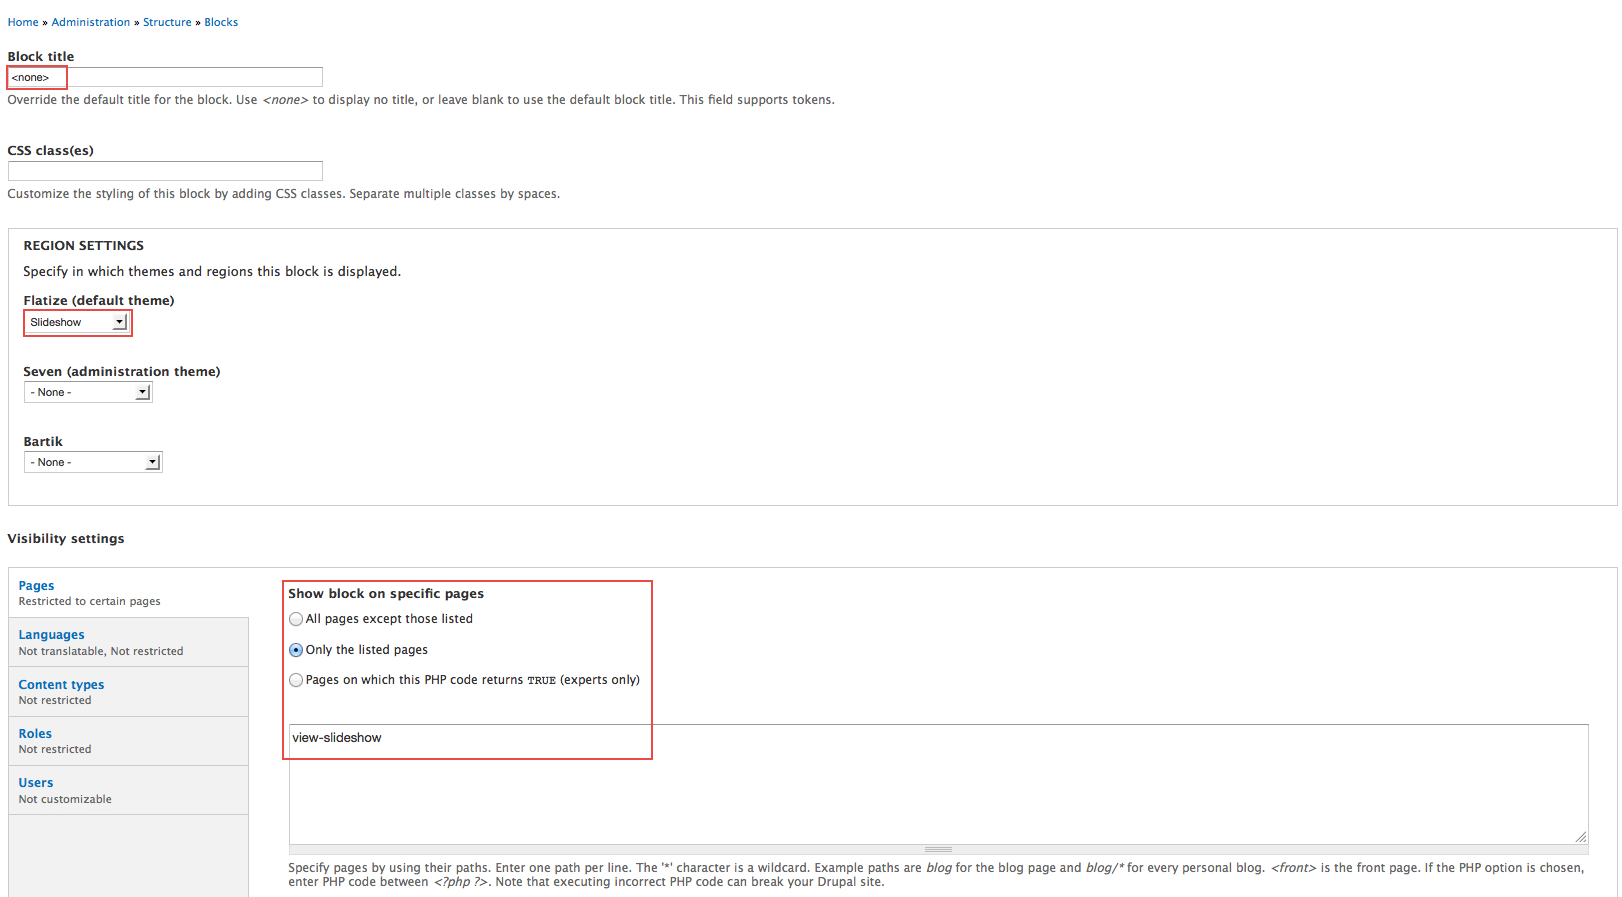
Step 1: Navigate to Structure > Blocks
Step 2: Find View: Slideshow click configure link, set following properties
Step 3: Click Save block button.
Modify Main Content: Frontpage view
1. Configure view
Step 1: Navigate to Structure > Views
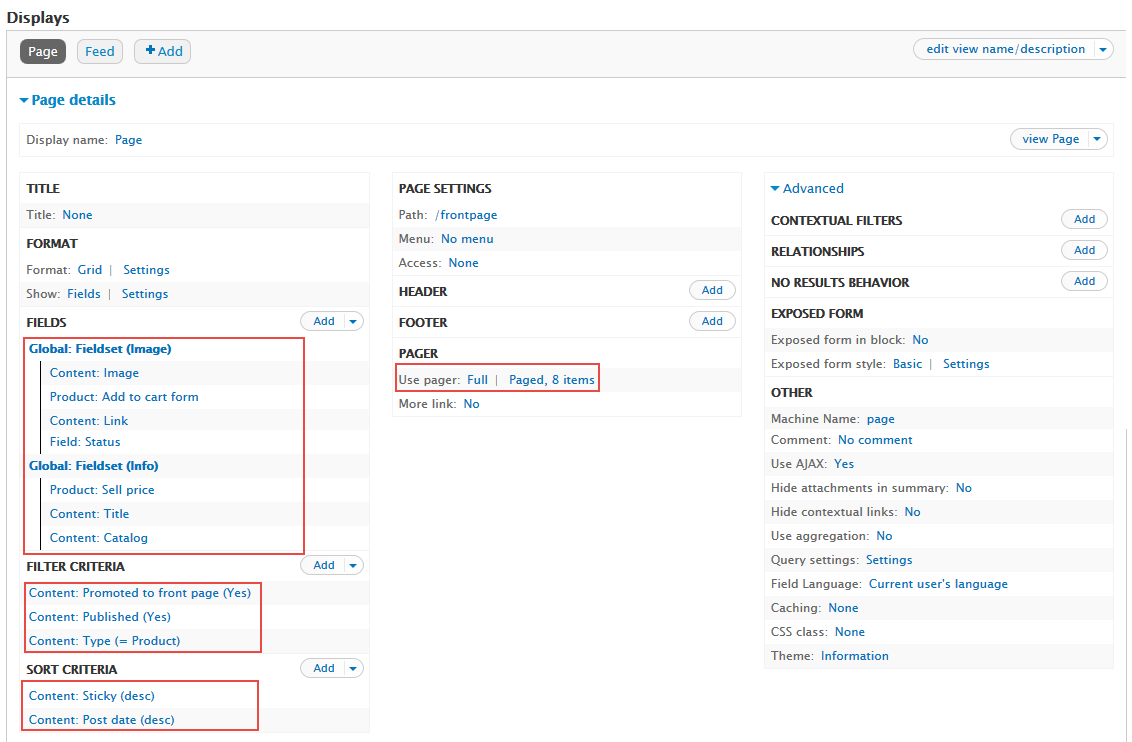
Step 2: Enable to Frontpage view, then Edit front page view with following fields:
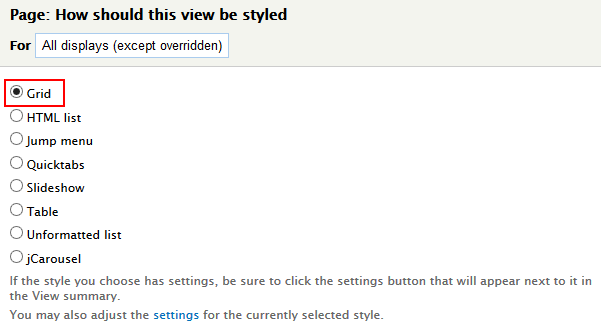
Step 3: At FORMAT Format area, set the following properties:
Step 4: At FORMAT Show area, set the following properties:
Step 5: At FIELDS area, click Add button to add fields: Global: Fieldset (Image), Content: Image, Content: Link, Field: Status, Product: Sell price, Global: Fieldset (Info), Product: Add to cart form, Content: Title, Content: Catalog
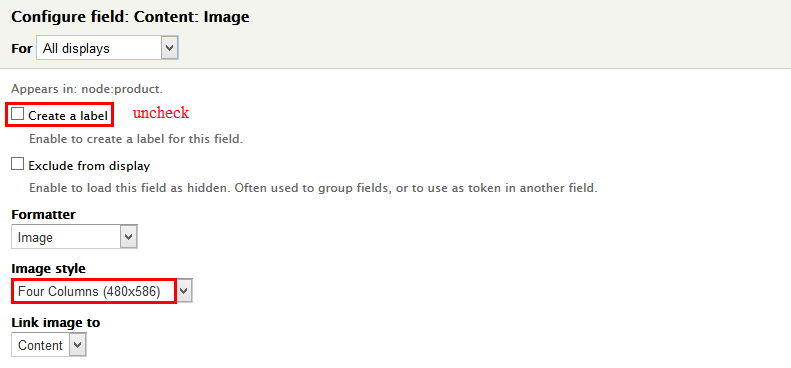
Step 6: Set properties for Content: Image
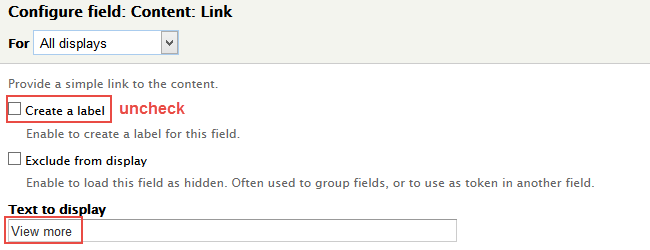
Step 7: Set properties for Content: Link
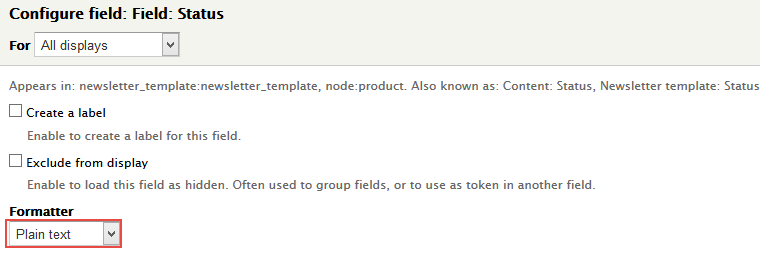
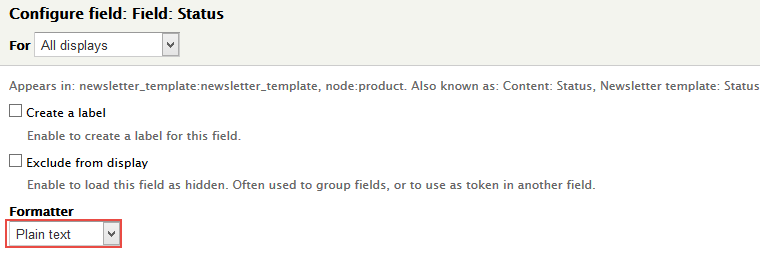
Step 8: Set properties for Field: Status
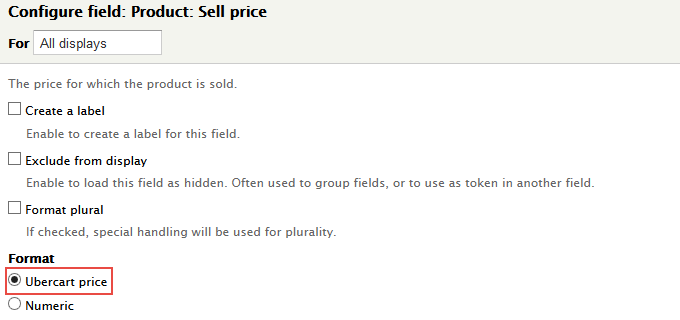
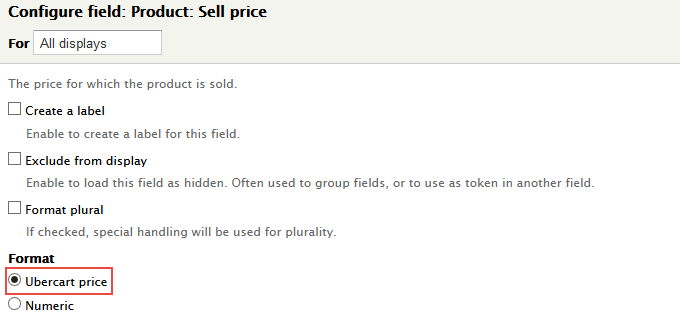
Step 9: Set properties for Product: Sell Price
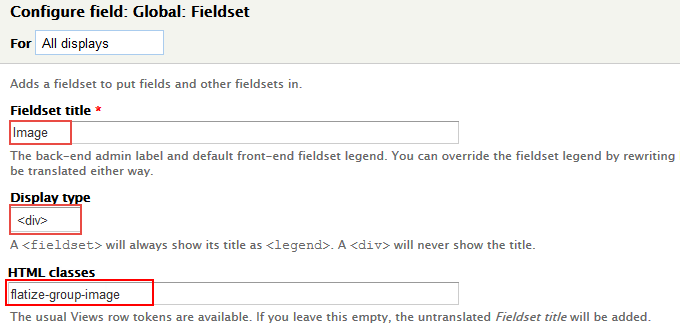
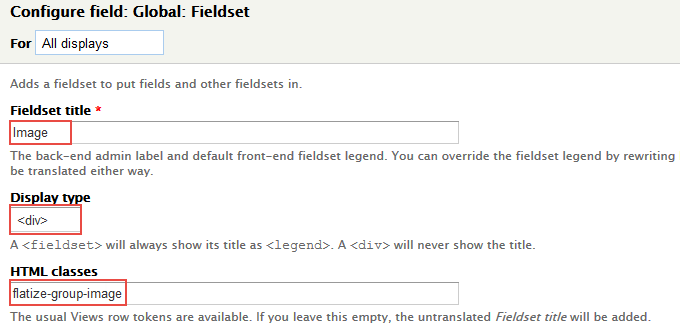
Step 10: Set properties for Global: Fieldset (Image)
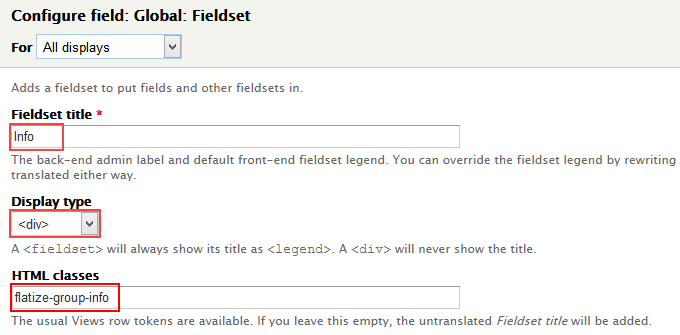
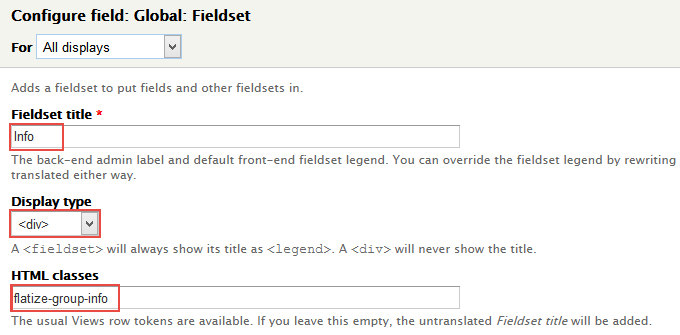
Step 11: Set properties for Global: Fieldset (Info)
Step 12: Set properties for Product: Add to cart form
Step 13: Set properties for Content: Catalog
Step 14: Set properties for Content: Title
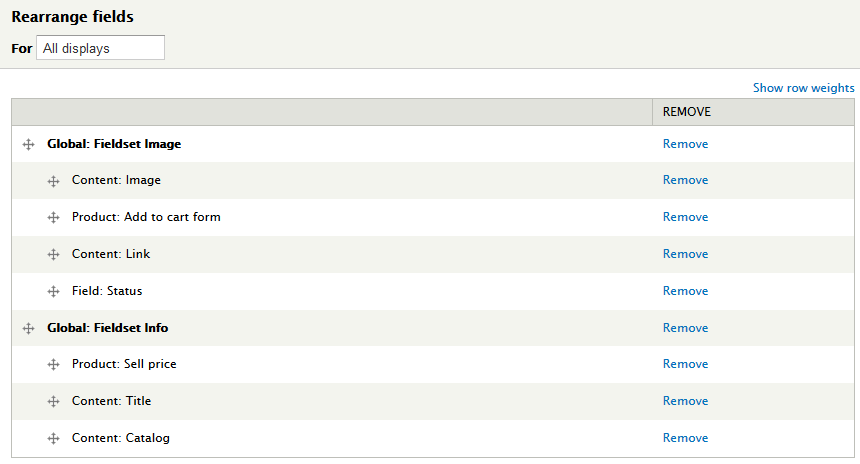
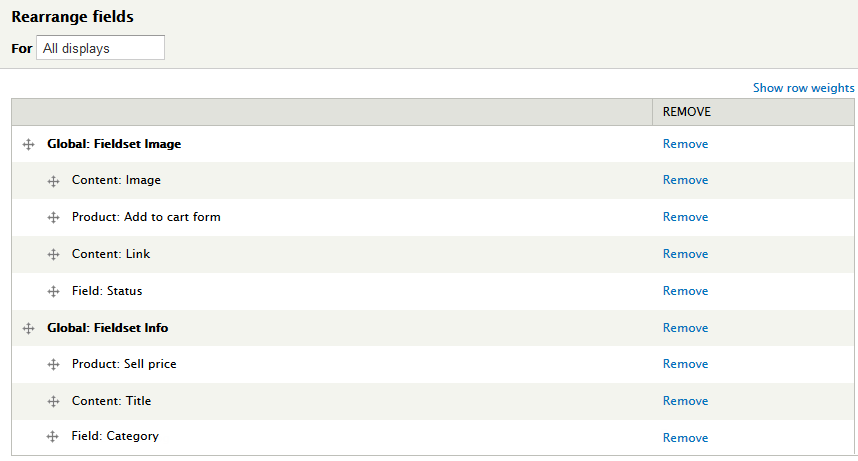
Step 15: At FIELDS area, click Rearrange button and set the following arrangements
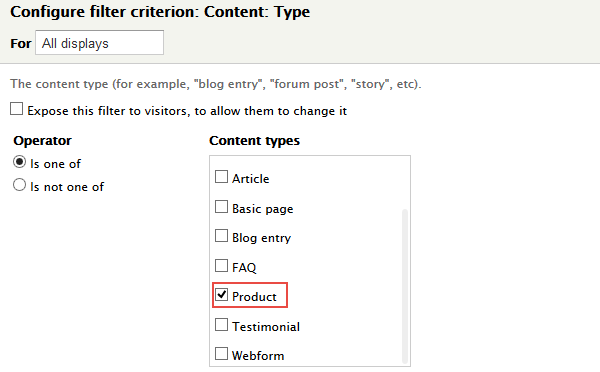
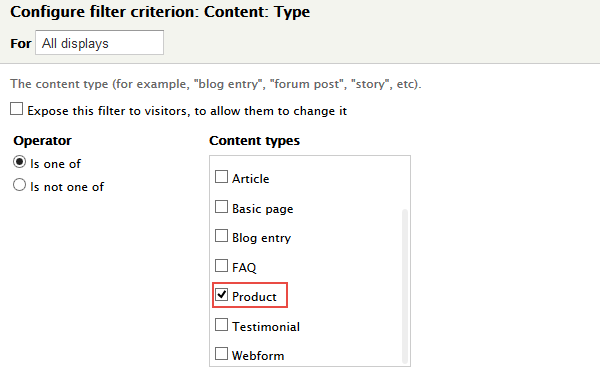
Step 16: At FILTER CRITERIA area, Click Add button to add field Content: Type with following properties:
Step 17: Click Save to save view
2. Configure for frontpage
Panel first: Catalog block
Front end Display
1. Create Catalog view
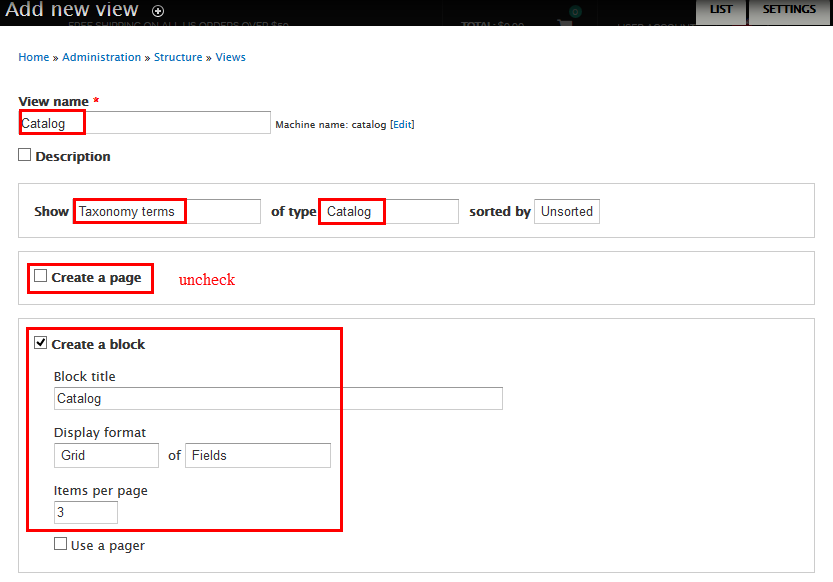
Step 1: Navigate to Structure > Views, click Add new view, then create Catalog view with following settings:
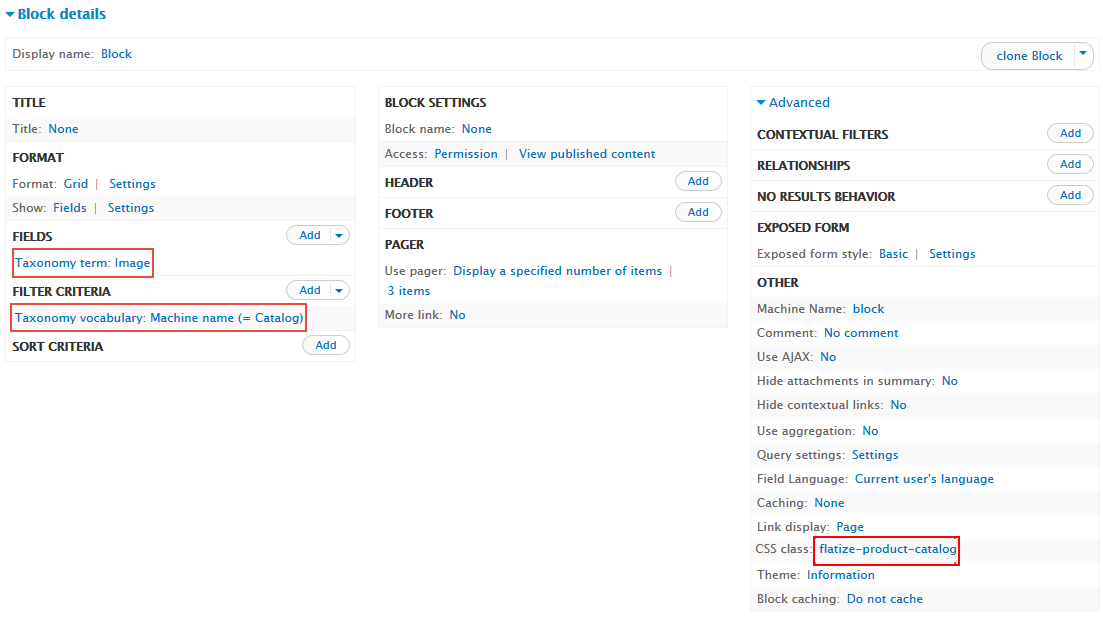
Step 2: Click Continue and edit button. Next to below steps to set properties for following fields:
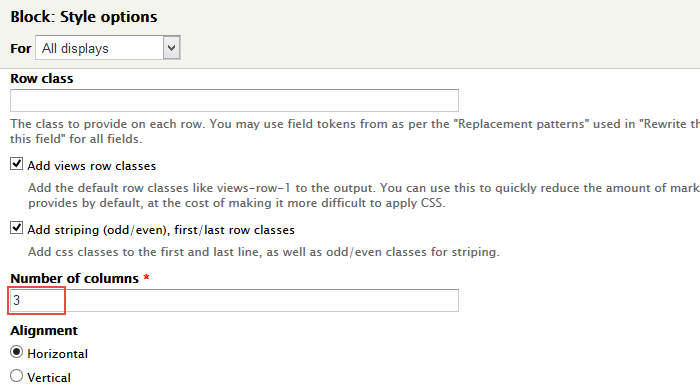
Step 3: At FORMAT area, click Settings link, set following properties:
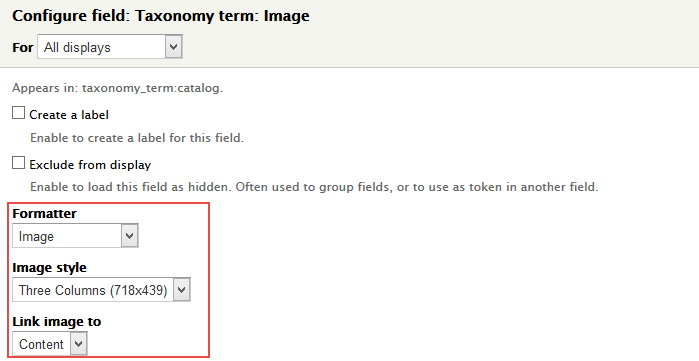
Step 4: At FIELDS area, click Add button to add field: Taxonomy term: Image
Step 5: At FIELDS area, click Rearrange, remove field Taxonomy term: Name
Step 6: At CSS Class area, set following properties:
Step 7: Click Save to save view
2. Configure block
Step 1: Navigate to Structure > Blocks
Step 2: Find View: Catalog, click configure link, set following properties
Step 3: Click Save block button.
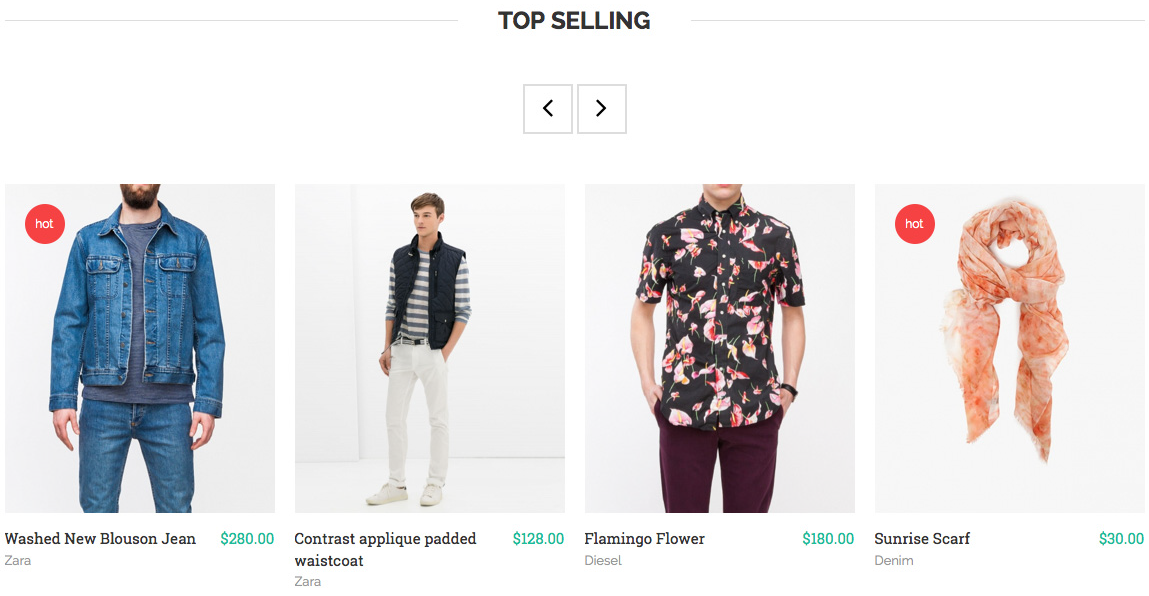
Panel second: Top Selling
Front end Display
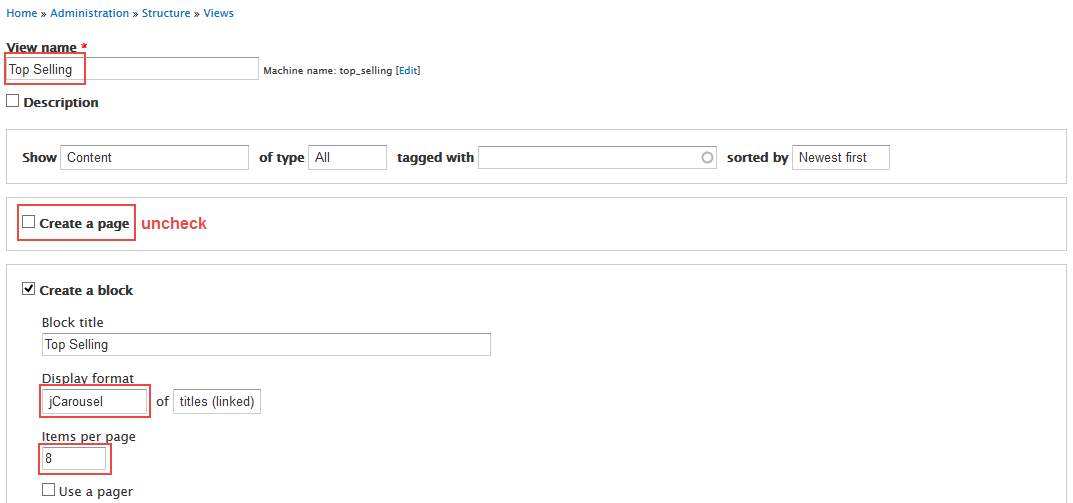
1. Create Top Selling view
Step 1: Navigate to Structure > Views, click Add new view, then create Top Selling view with following settings:
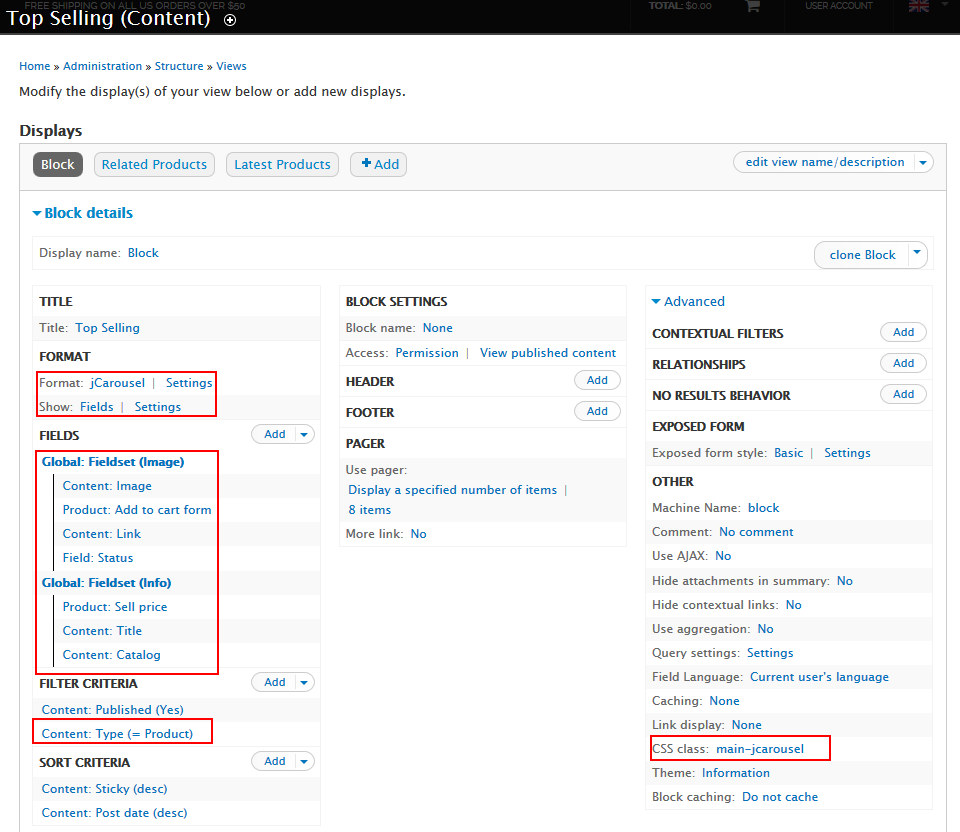
Step 2: Click Continue and edit button. Next to below steps to set properties for following fields:
Step 3: At FORMAT Format area, click Settings link, then set following properties:
Step 4: At FIELDS area, click Add button to add fields: Global: Fieldset (Image), Content: Image, Content: Link, Field: Status, Product: Sell price, Global: Fieldset (Info), Product: Add to cart form, Content: Catalog
Step 5: Set properties for Content: Image
Step 6: Set properties for Content: Link
Step 7: Set properties for Field: Status
Step 8: Set properties for Product: Sell Price
Step 9: Set properties for Global: Fieldset (Image)
Step 10: Set properties for Global: Fieldset (Info)
Step 11: Set properties for Product: Add to cart form
Step 12: Set properties for Content: Catalog
Step 13: At FIELDS area, click Rearrange button and set the following arrangements
Step 14: At FILTER CRITERIA area, Click Add button to add field Content: Type with following properties:
Step 15: At Advanced > CSS Class, set following properties:
Step 16: Click Save to save view
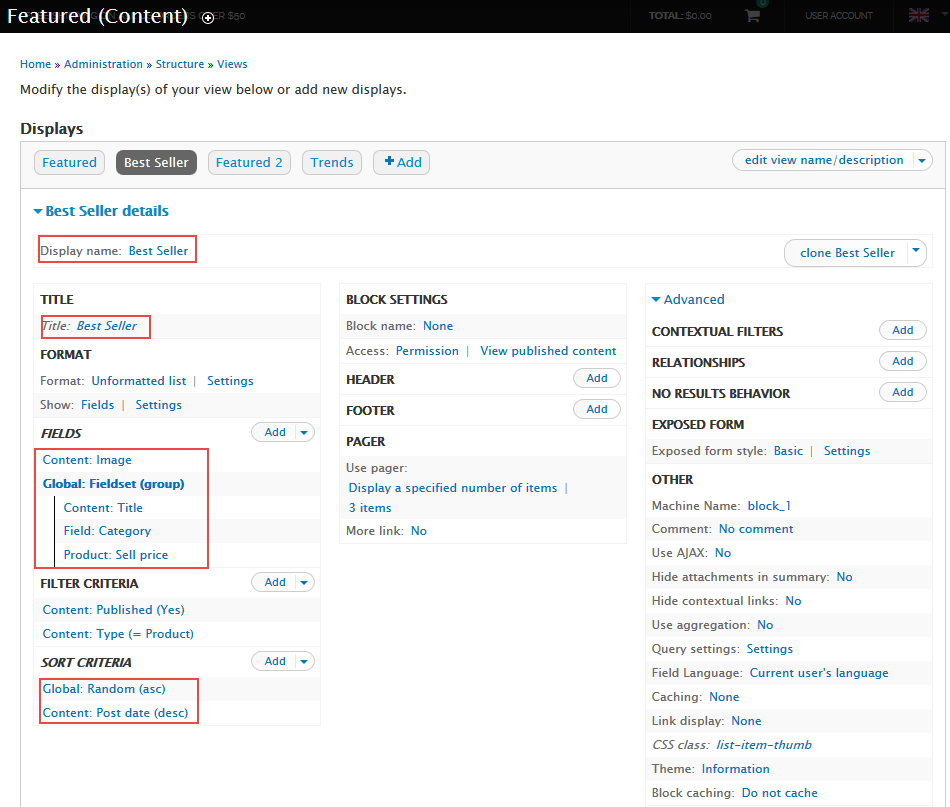
2. Clone Top Selling block to create Related Products block
Step 1: Stay open Product collection view, click Clone page.
Next to steps below to set properties for the following fields:
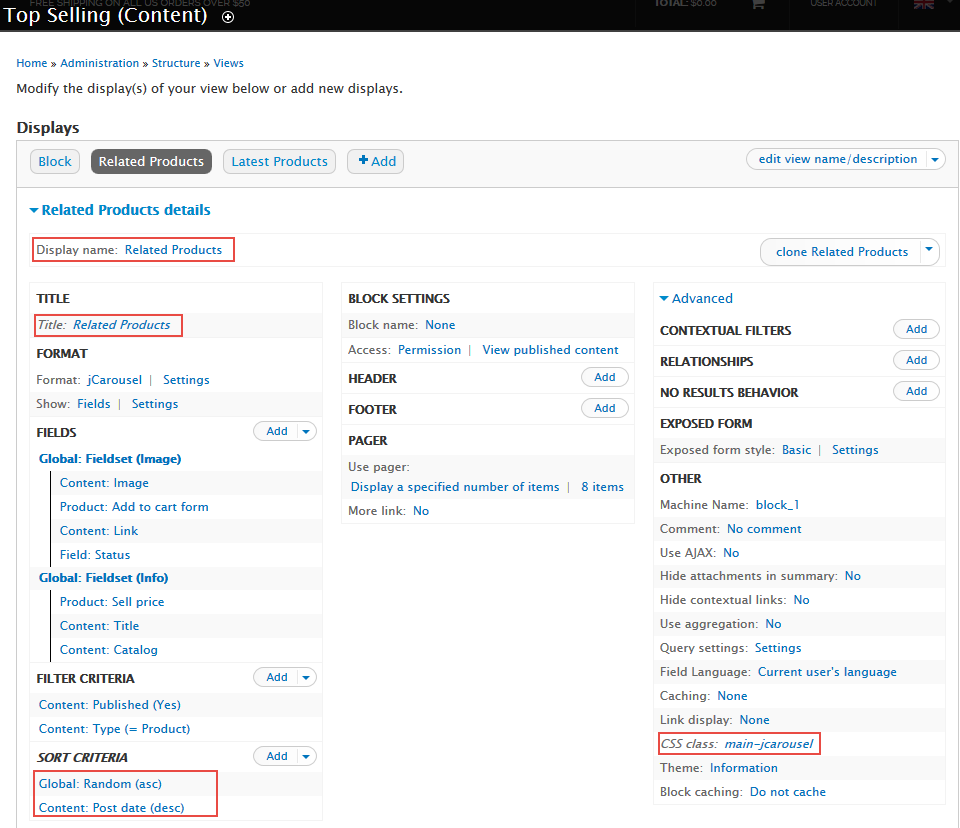
Step 2: Change Display name
Step 3: Change TITLE Title
Step 4: At SORT CRITERIA area, Click Add button to add fields Global: Random (asc)
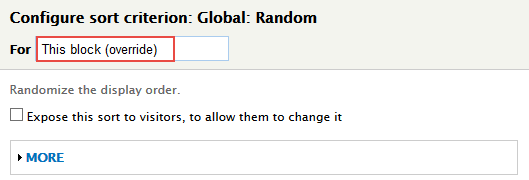
Step 5: Set properties for Global: Random (asc)
Step 6: At SORT CRITERIA area, Click Rearrange button and delete Content: Sticky (asc)
Step 7: At Advanced > CSS Class, set following properties:
Step 8: Click Save to save view
3. Clone Top Selling block to create Latest Products block
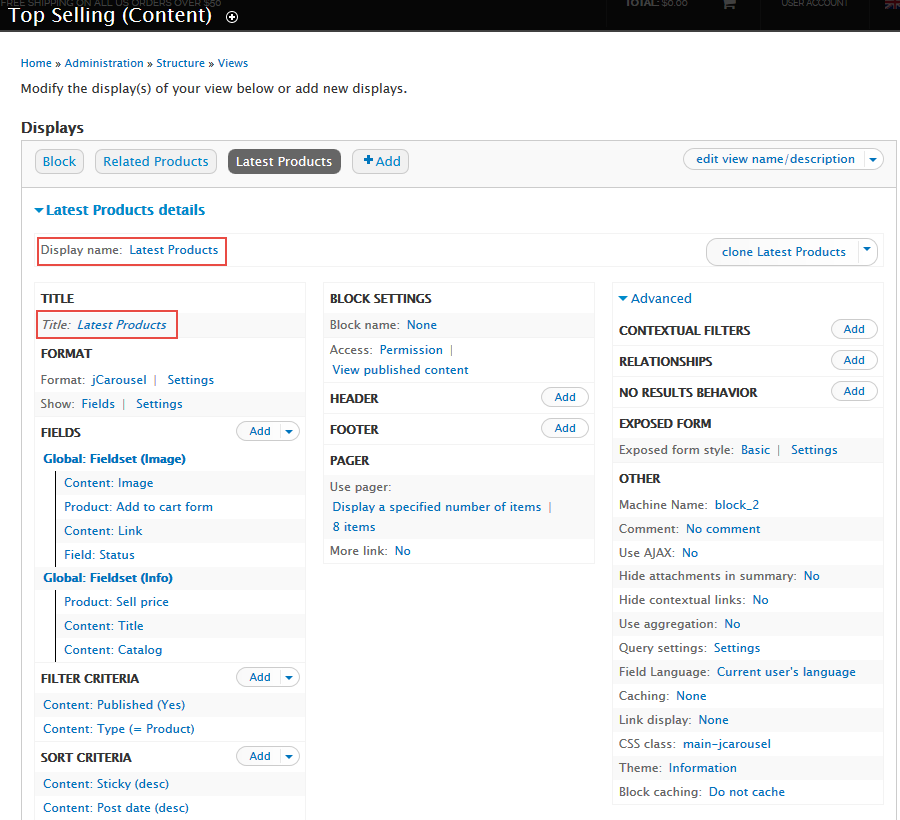
Step 1: Stay open Product collection view, click Clone block.
Step 2: Change Display name and Title
Step 3: Click Save to save view
4. Configure blocks
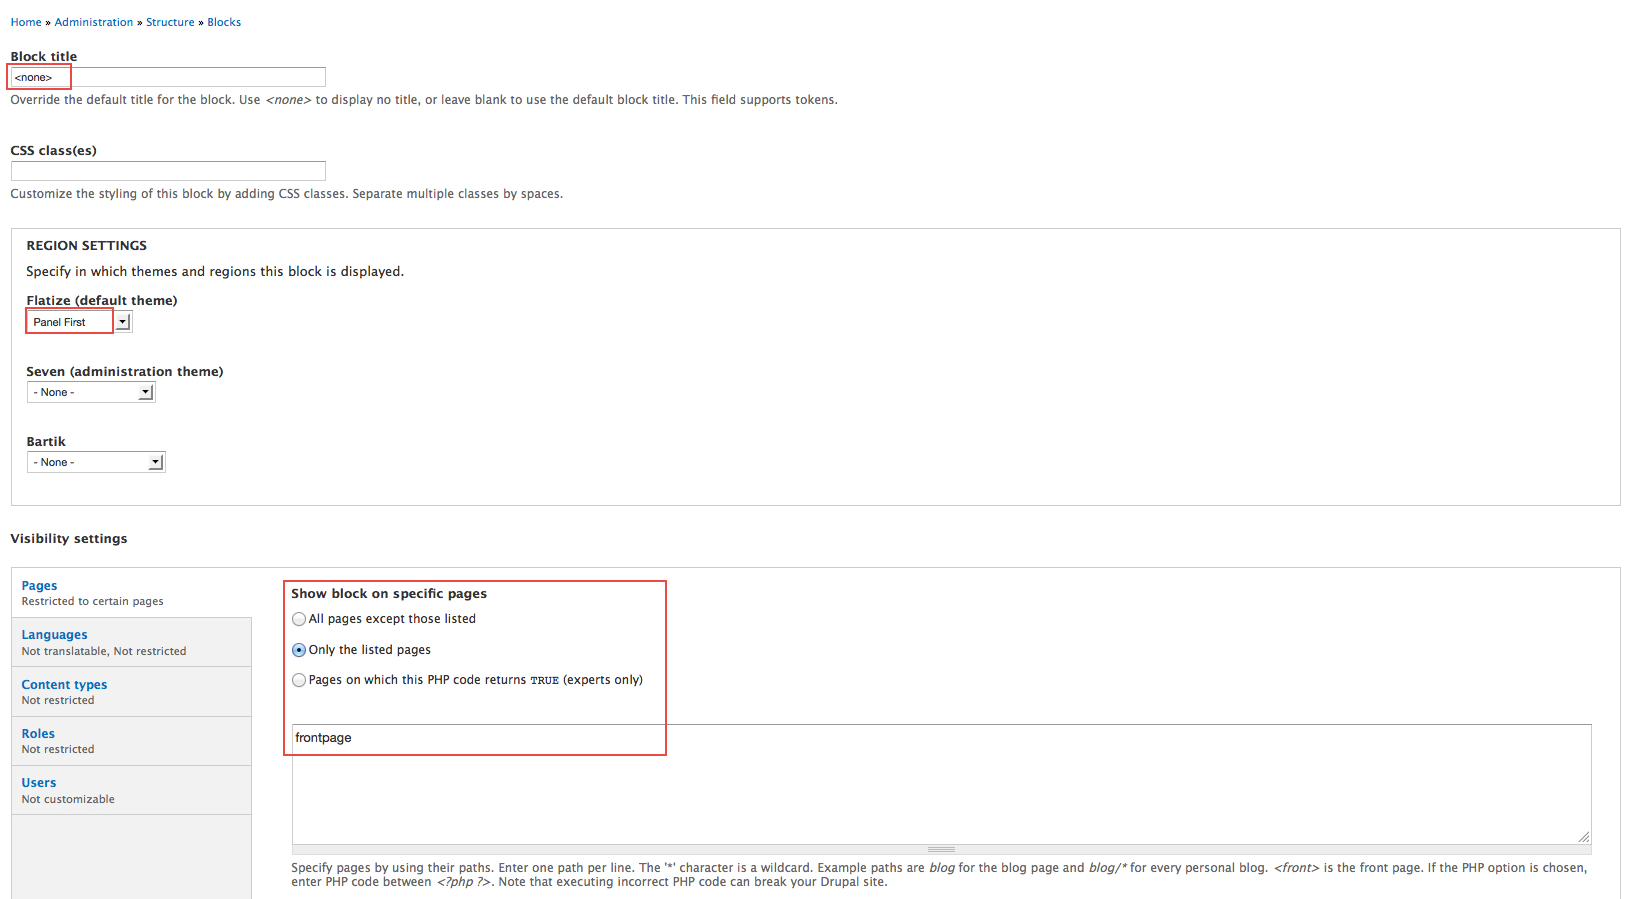
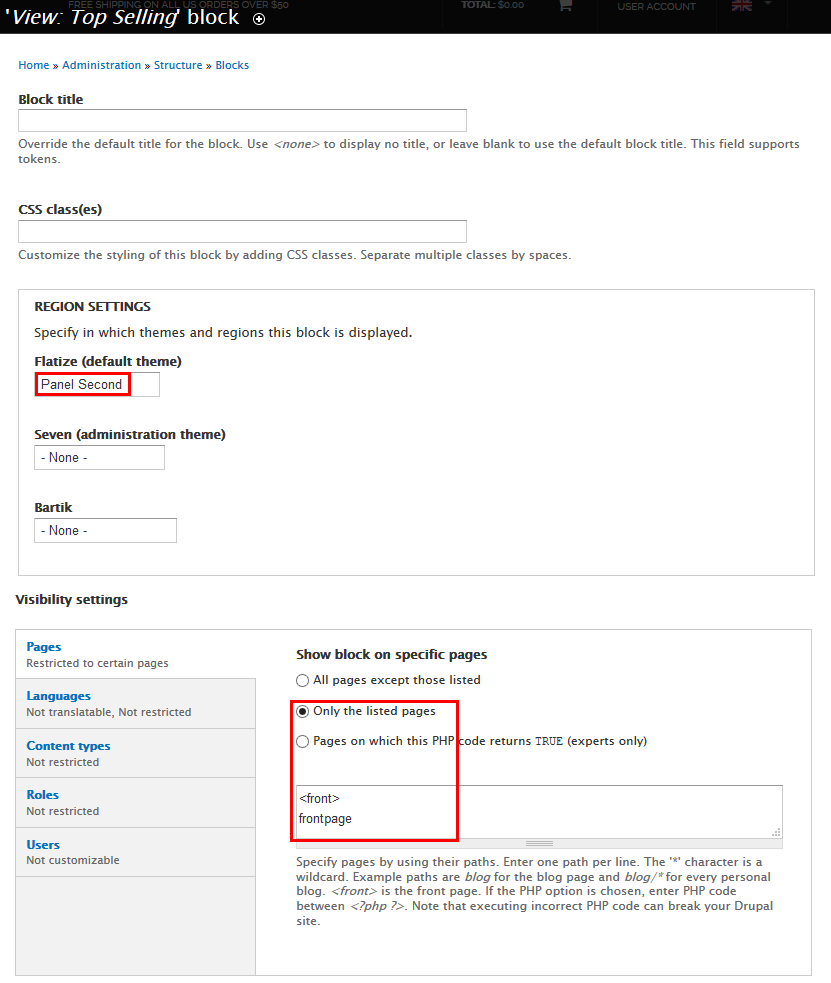
Step 1: Navigate to Structure > Blocks
Step 2: Find View: Top Selling click configure link, set following properties
Step 3: Click Save block button.
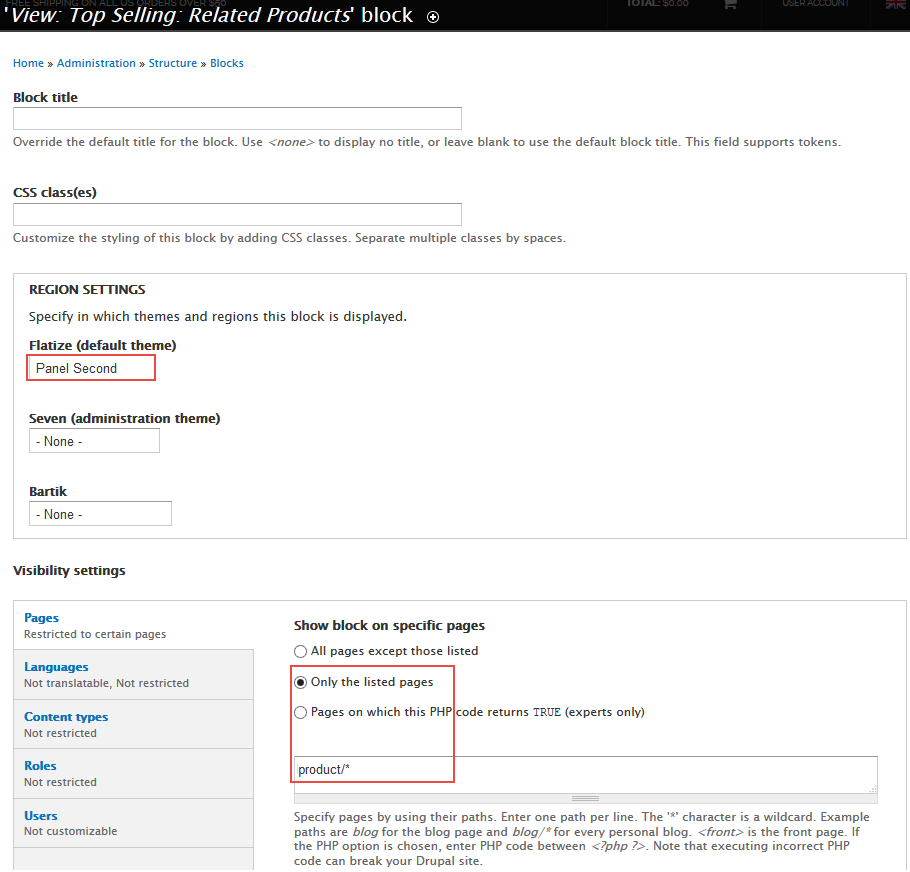
Step 4: Find View: Top Selling: Related Products click configure link, set following properties
Step 5: Click Save block button.
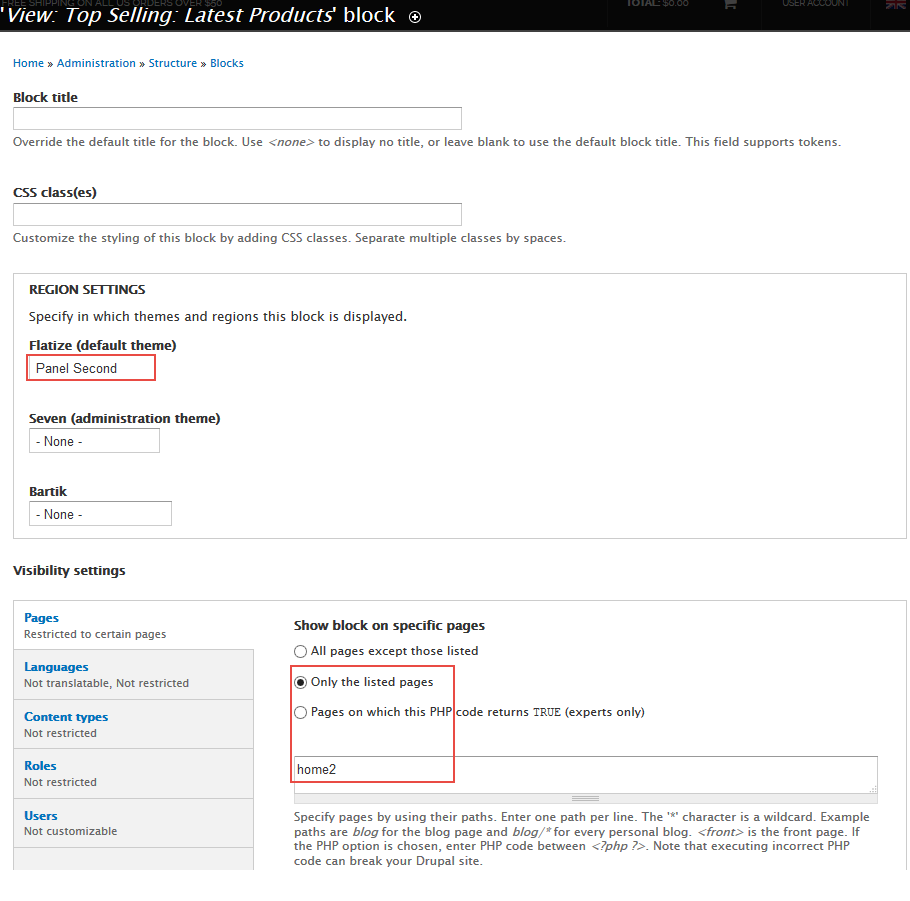
Step 6: Find View: Top Selling: Latest Products click configure link, set following properties
Step 7: Click Save block button.
Panel Third: LookBook Women custom block
Front end Display
Create and configure block
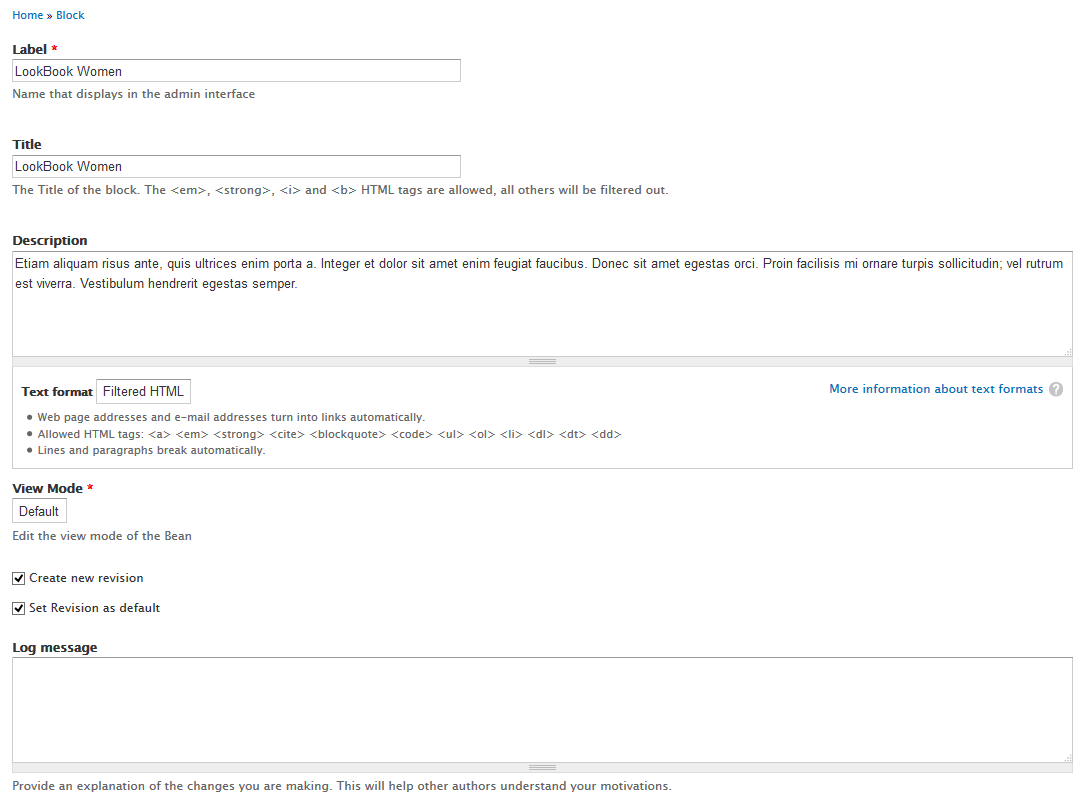
Step 1: Navigate to Structure > Blocks, click Add block link, Create LookBook Women block with following properties:
Step 2: Click Save block button.
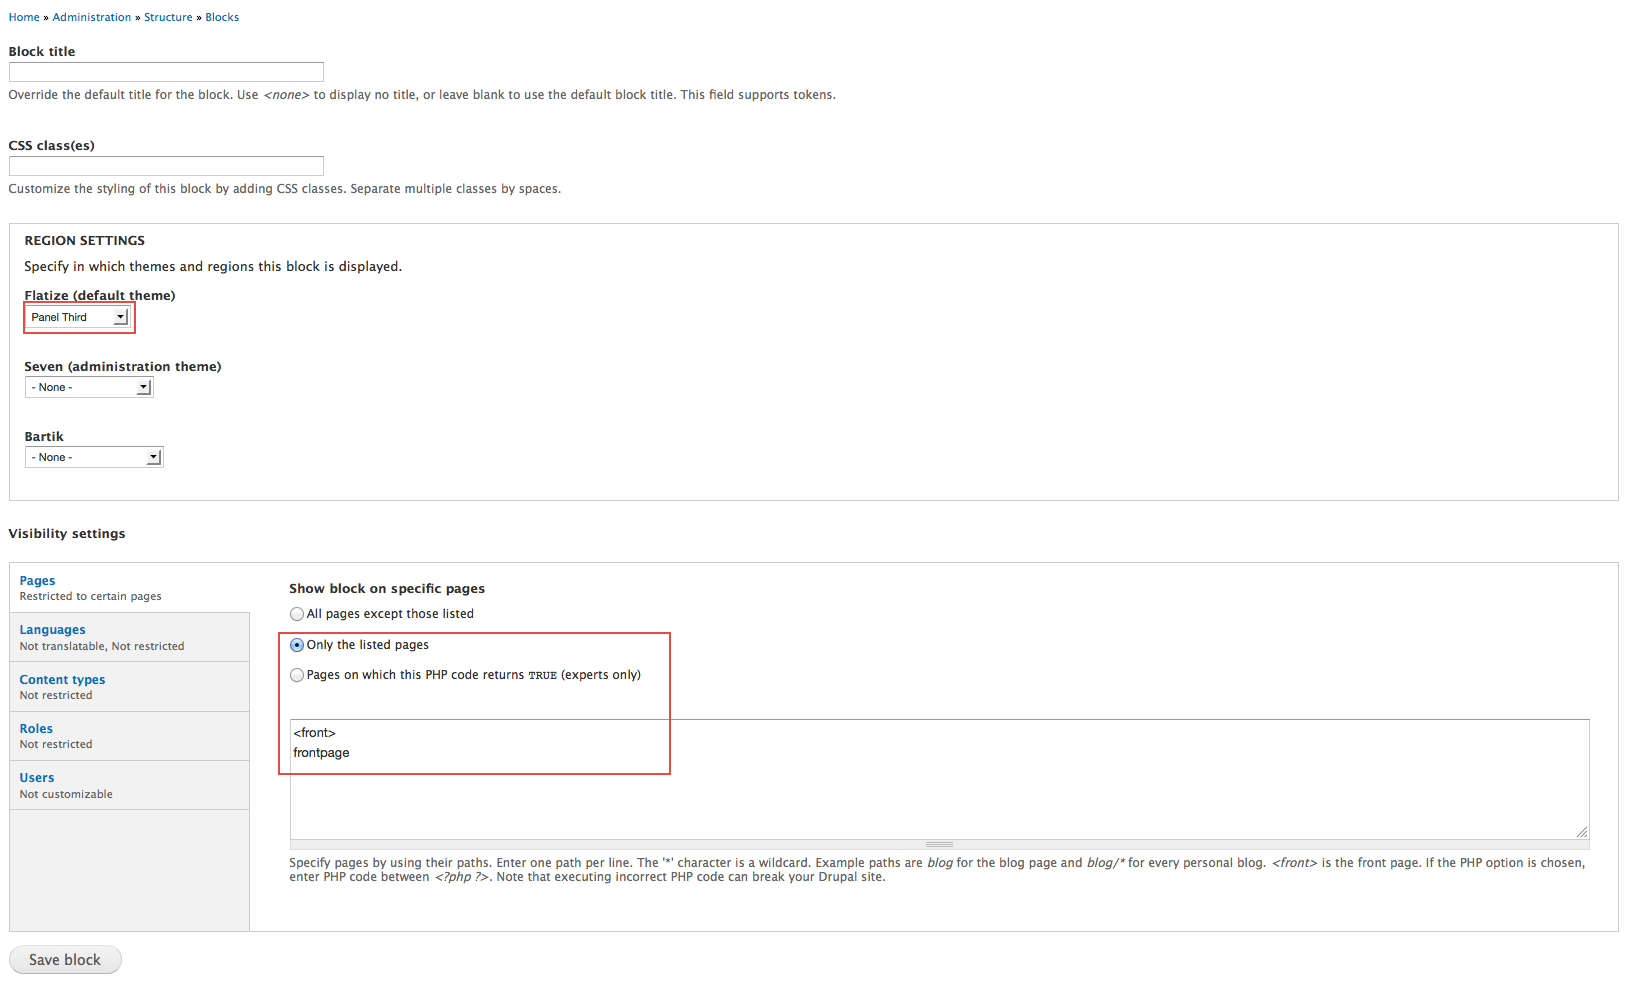
Step 3: Navigate to Structure > Blocks, Find LookBook Women click configure link, set following properties
Step 4: Click Save block button.
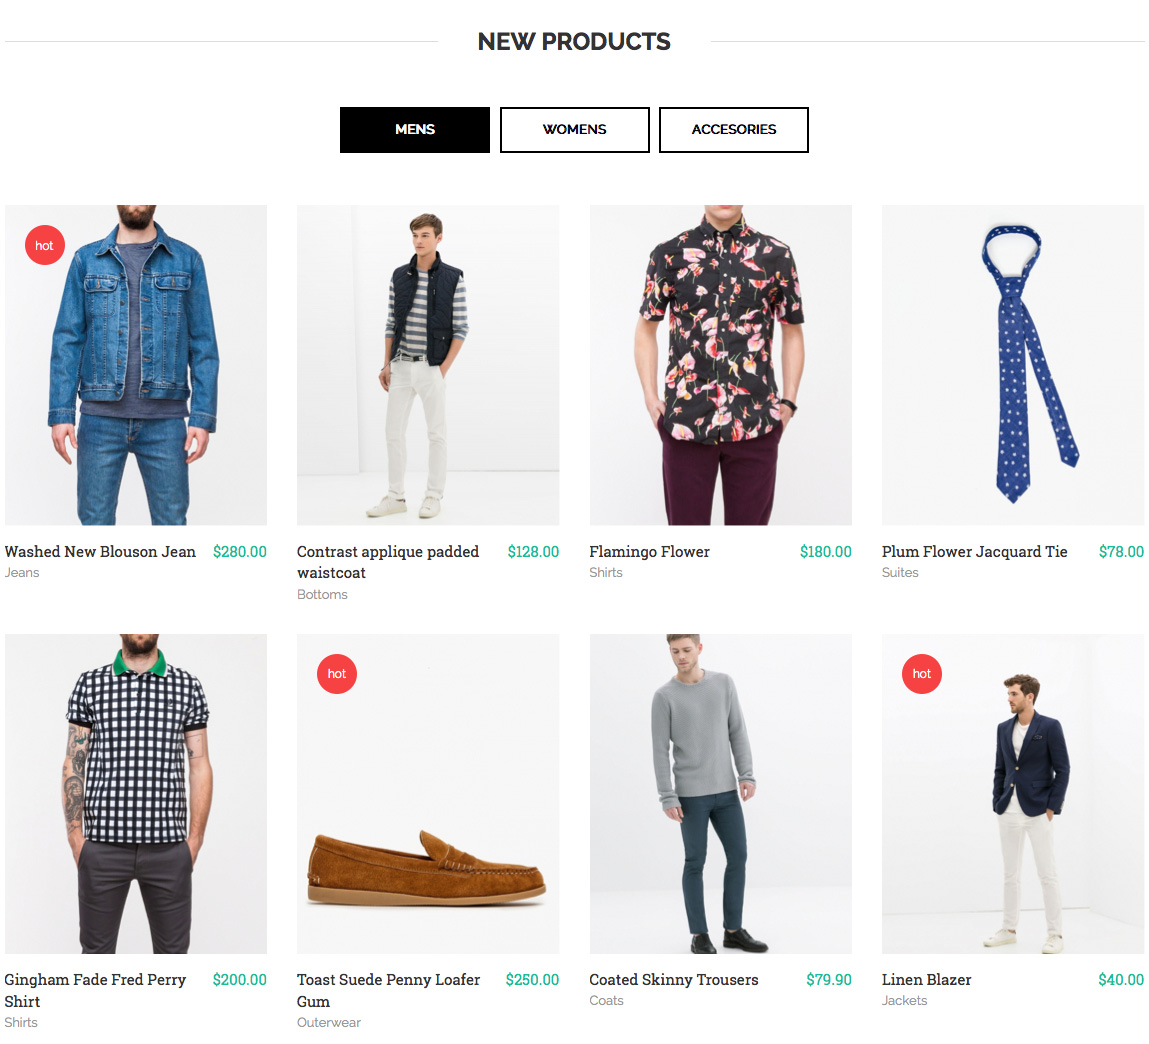
New Product: Quicktabs
Front end Display
1. Create and configure Quicktabs
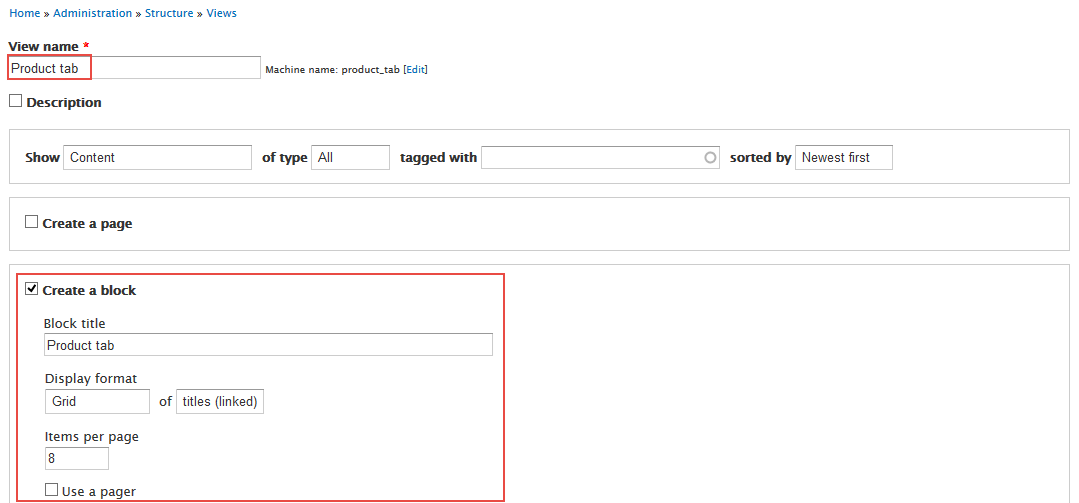
Step 1: Navigate to Structure > Views, click Add new view, then create Product tab view with following settings:
Step 2: Click Continue and edit button. Next to below steps to set properties for following fields:
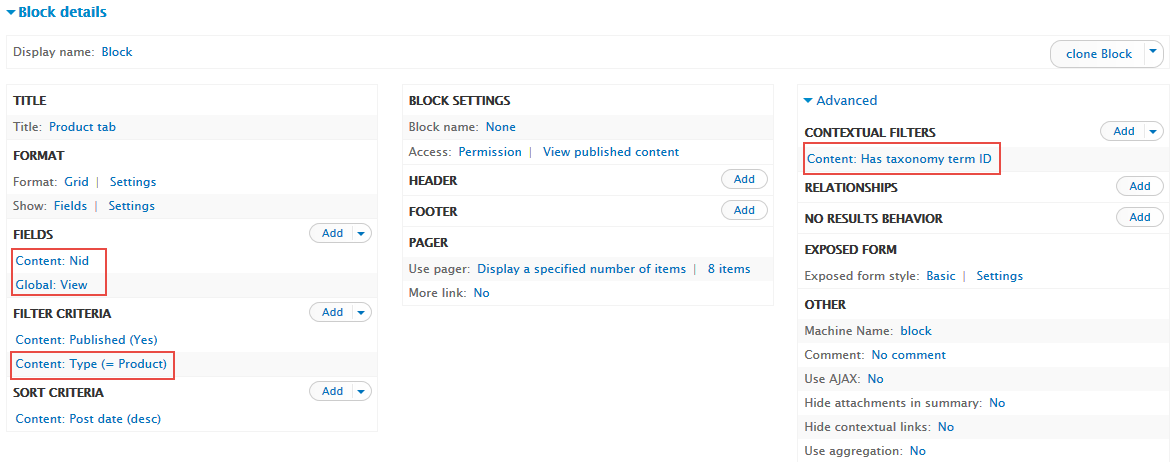
Step 3: At FIELDS area, click Add button to add fields: Content: Nid, Global: View
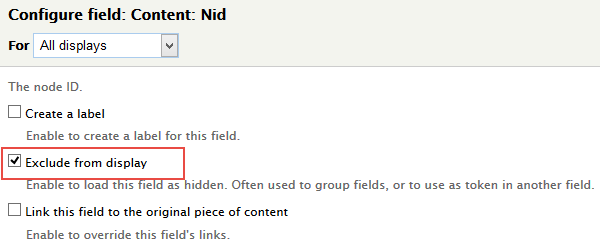
Step 4: Set properties for Content: Nid
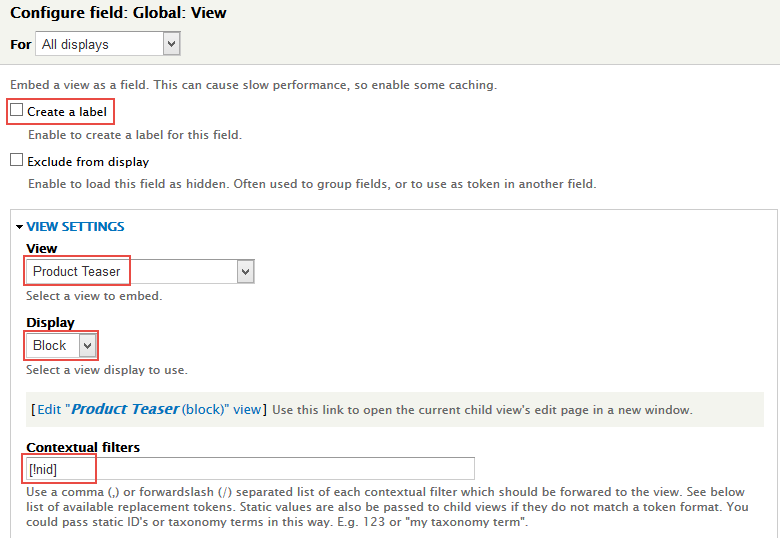
Step 5: Set properties for Global: View
Step 6: At FIELDS area, click Rearrange, remove Content: Title, then set the following arrangements:
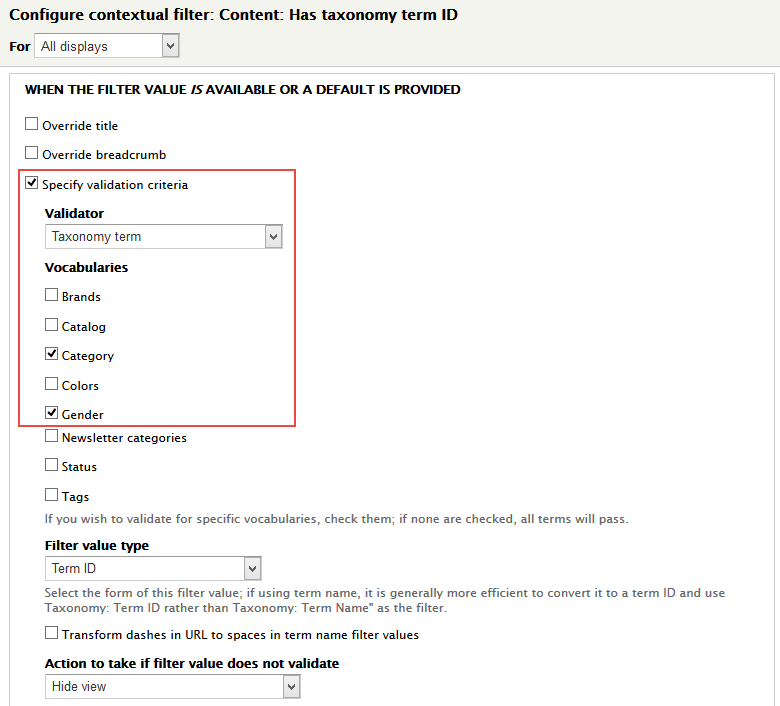
Step 7: At Advanced > CONTEXTUAL FILTERS, click Add button to add fields: Content: Has taxonomy term ID with following properties:
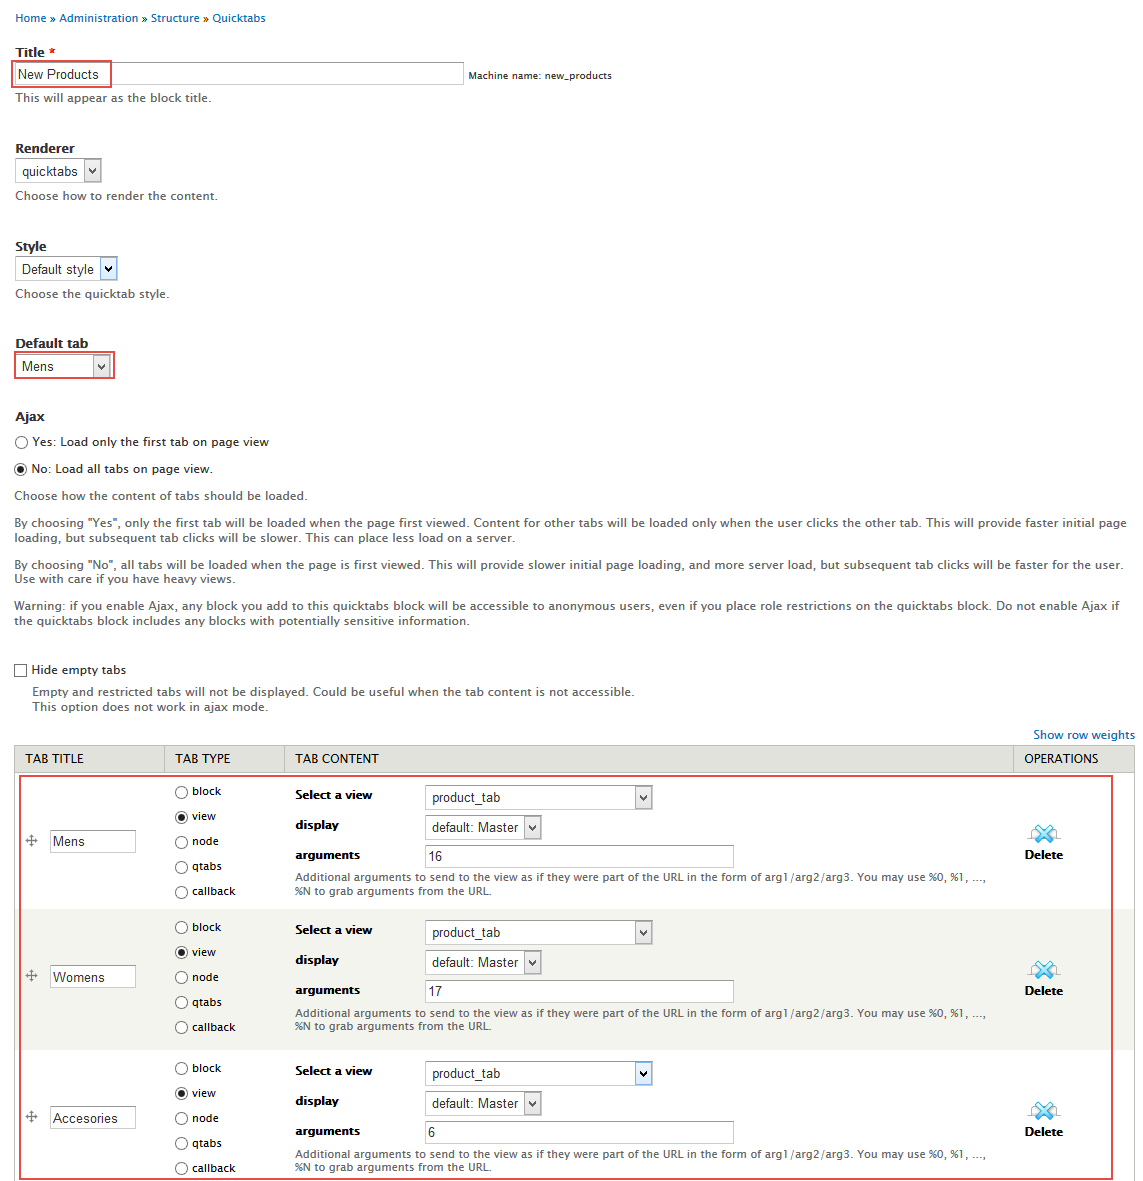
Step 8: Navigate to Structure > Quicktabs, click Add Quicktabs Instance, create New Products quicktabs with following settings:
Step 9: Click Save block button.
Configura New Products block
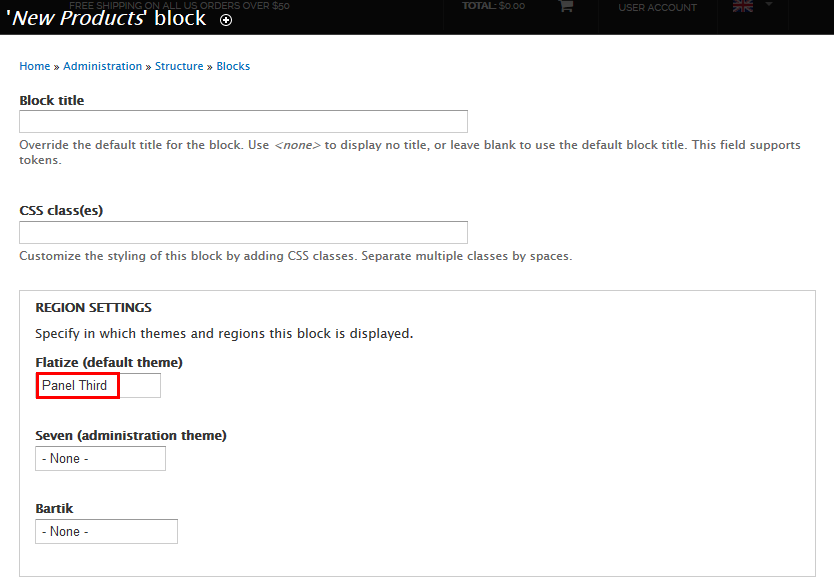
Step 1: Navigate to Structure > Blocks, Find New Products block click configure link, set following properties
Step 2: Click Save button.
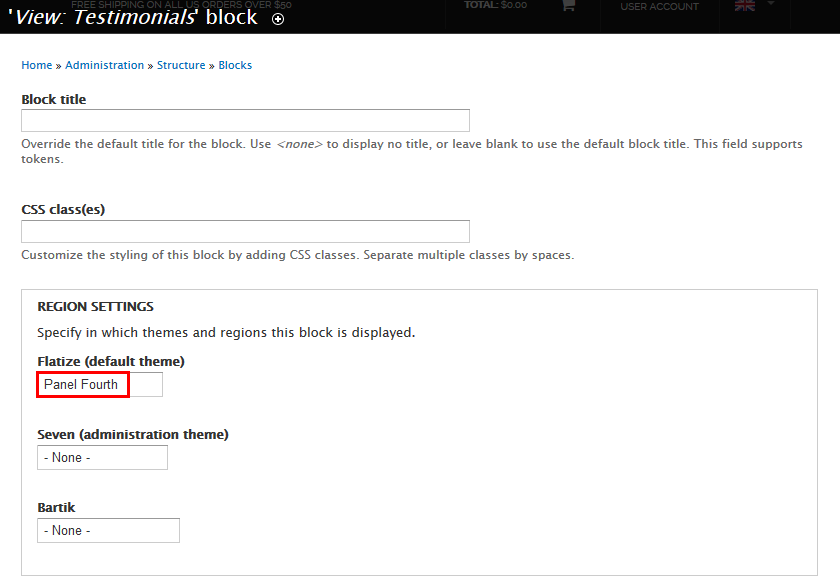
Testimonials: view unformatted list block
Front end Display
1. Create Testimonials view
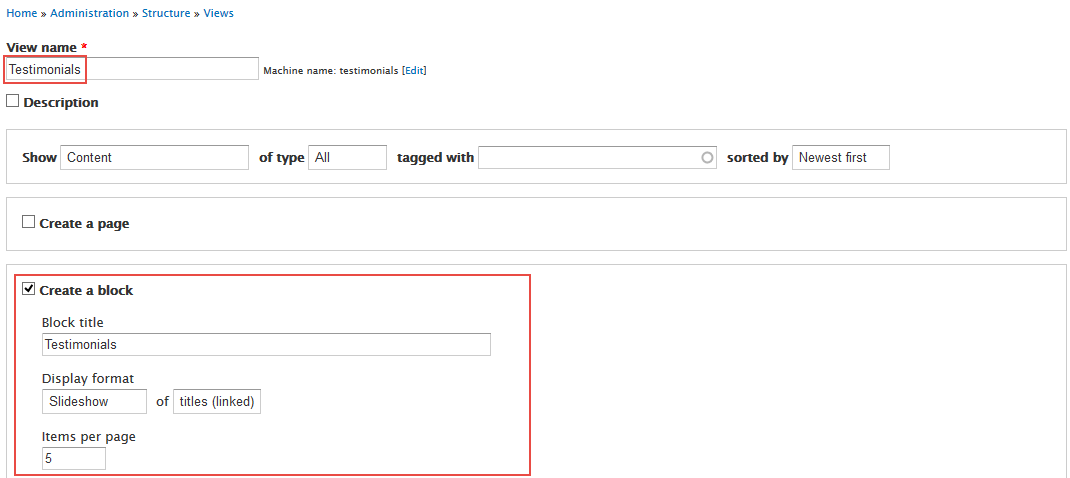
Step 1: Navigate to Structure > Views, click Add new view, then create Testimonials view with following settings:
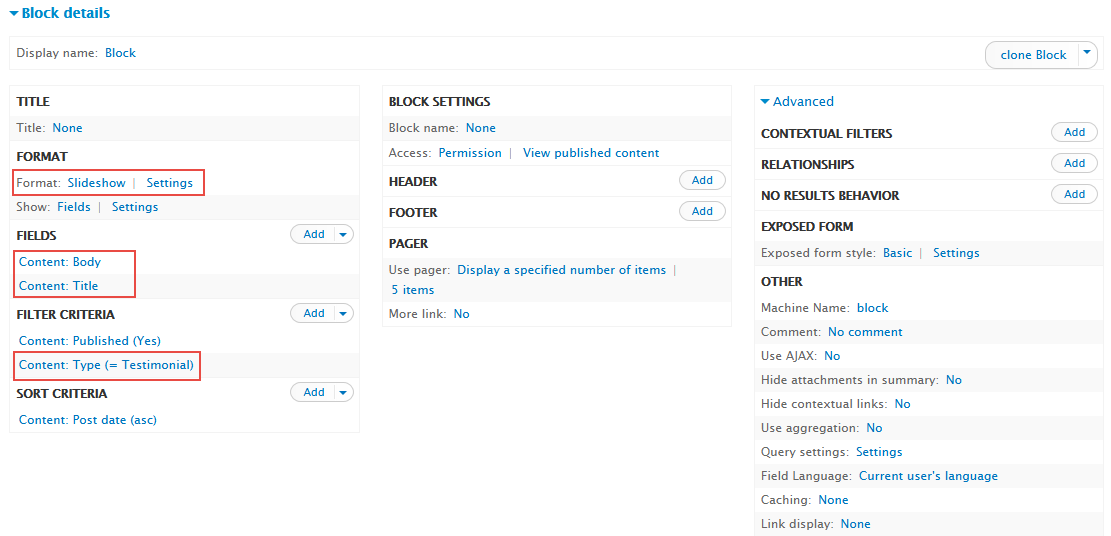
Step 2: Click Continue and edit button. Next to below steps to set properties for following fields:
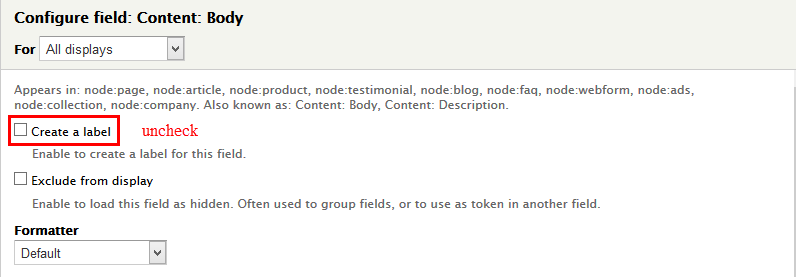
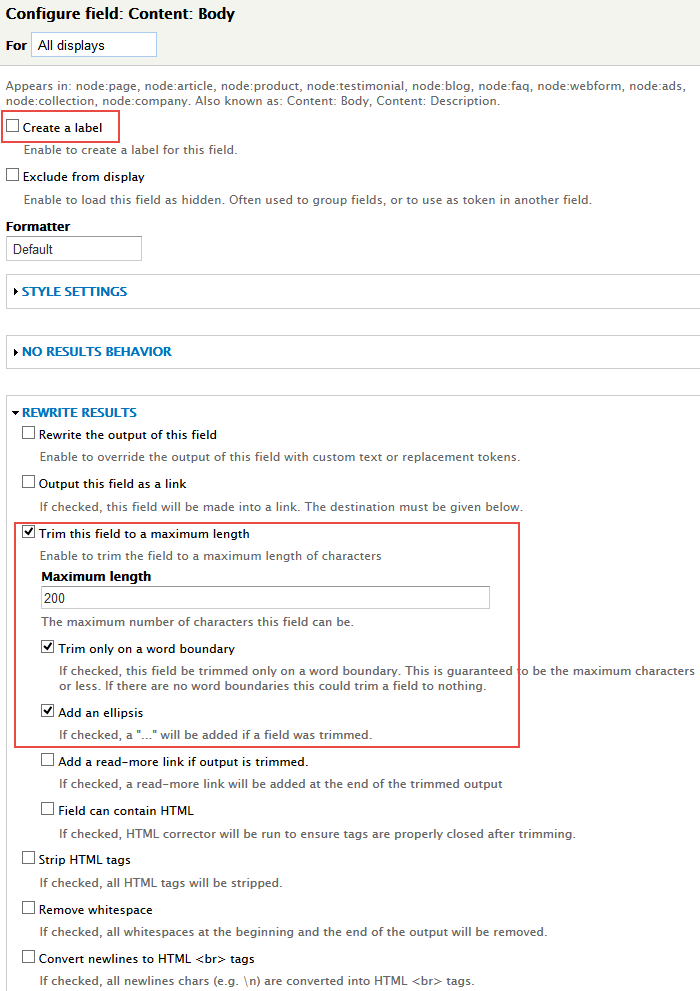
Step 3: At FIELDS area, click Add button to add fields: Content: Body and set properties:
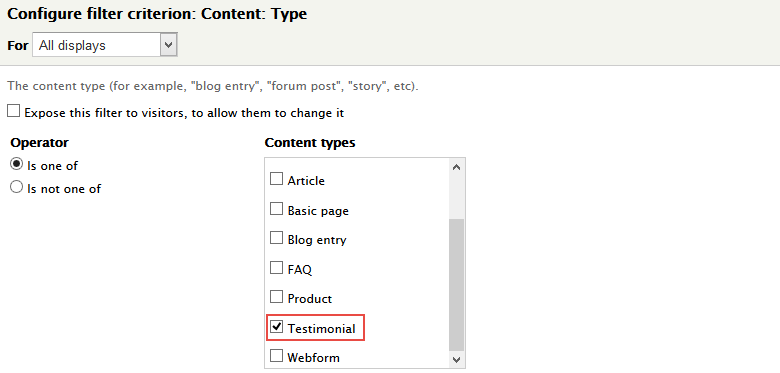
Step 4: At FILTER CRITERIA area, Click Add button to add fields: Content: Type
Step 5: Click Save to save view
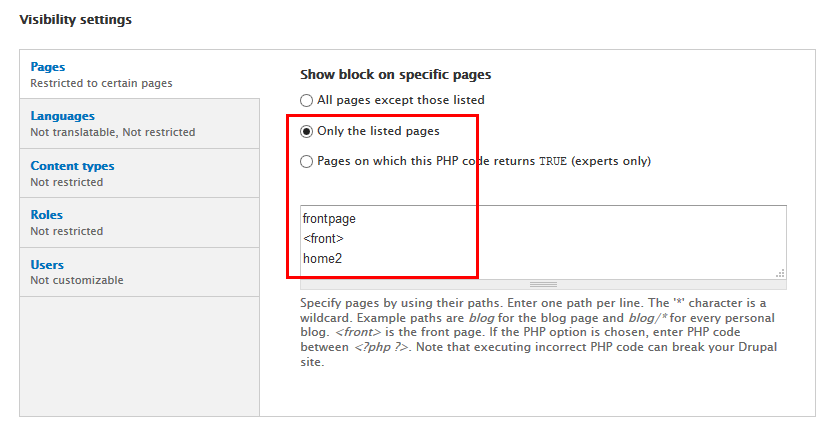
2. Configure block
Step 1: Navigate to Structure > Blocks
Step 2: Find View: Testimonials, click configure link, set following properties
Step 3: Click Save block button.
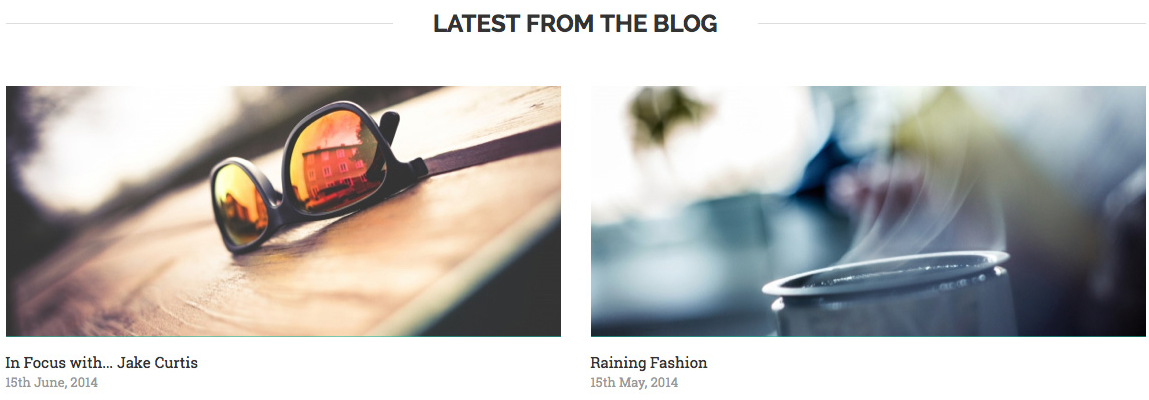
Latest From The Blog
Front end Display
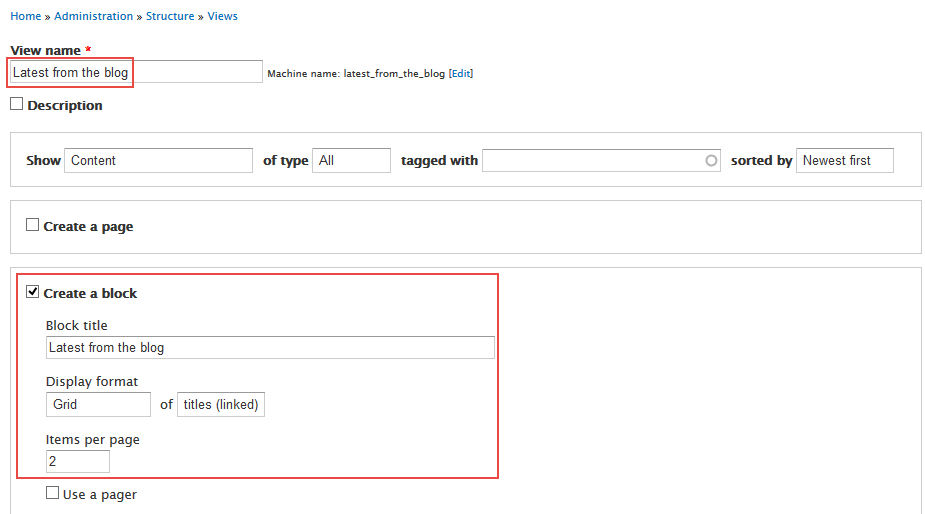
1. Create Latest from the blog view
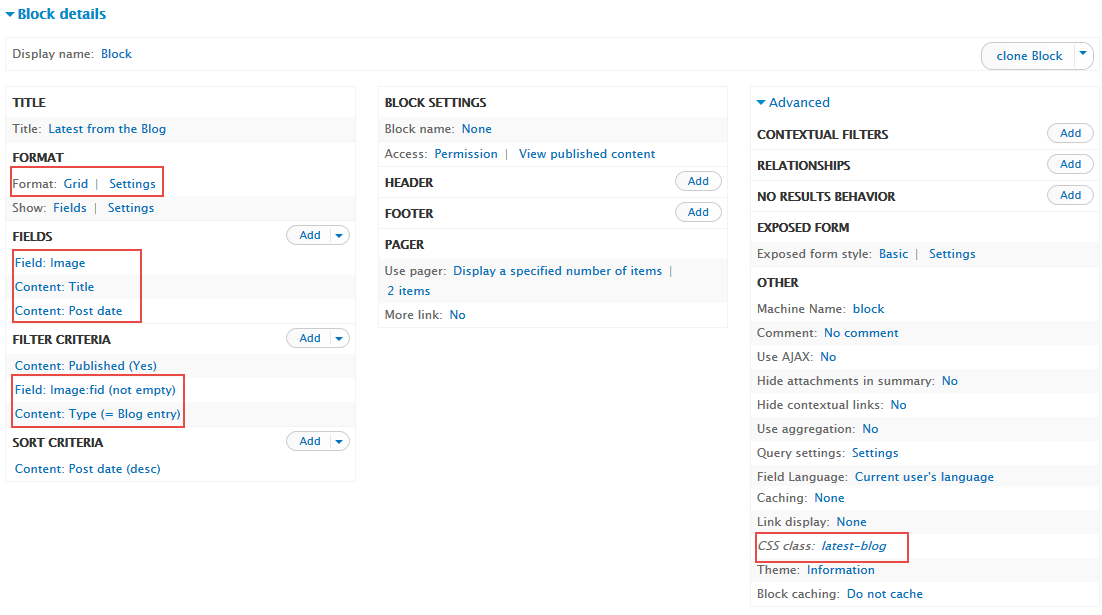
Step 1: Navigate to Structure > Views, click Add new view, then create Latest from the blog view with following settings:
Step 2: Click Continue and edit button. Next to below steps to set properties for following fields:
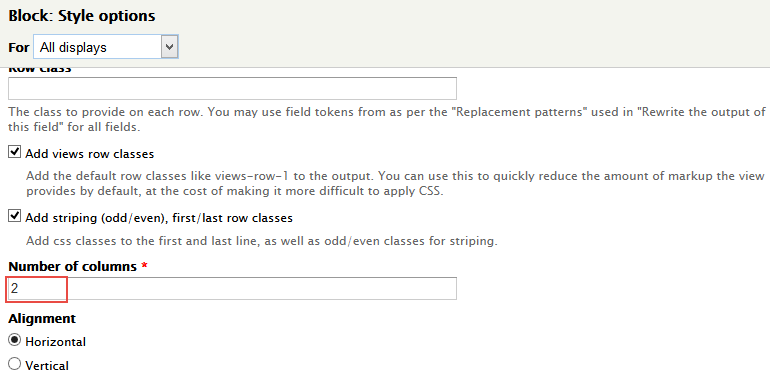
Step 3: At FORMAT area, click Settings link, set following properties:
Step 4: At FIELDS area, click Add button to add fields: Field: Image, Content: Post date
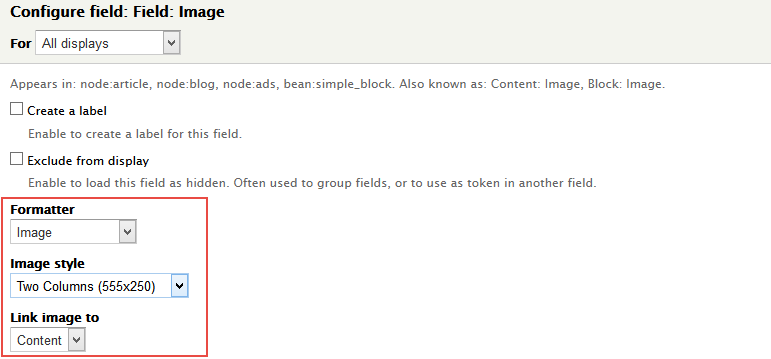
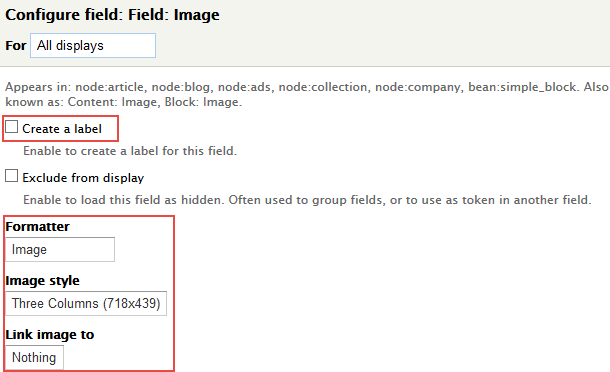
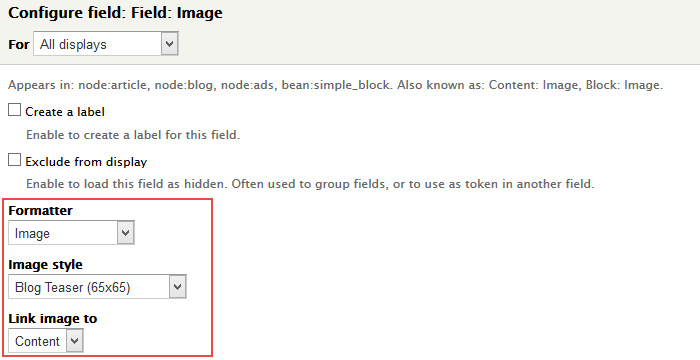
Step 5: Set properties for Field: Image
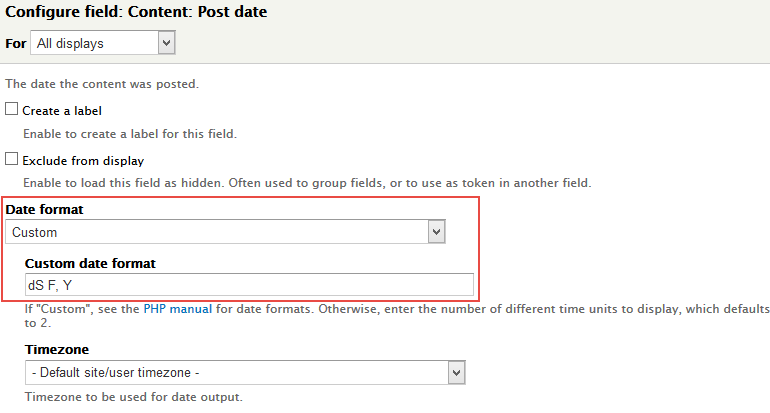
Step 6: Set properties for Content: Post date
Step 7: At FIELDS area, click Rearrange set the following arrangements:
Step 8: At FILTER CRITERIA area, Click Add button to add field: Content: Type, Field: Image:fid
Step 9: Set properties for Field: Image
Step 10: Set properties for Content: Type
Step 11: At CSS Class area, set following properties:
Step 12: Click Save to save view
2. Configure block
Step 1: Navigate to Structure > Blocks
Step 2: Find View: Catalog, click configure link, set following properties
Step 3: Click Save block button.
Contact Detail: Custom block
Front end Display
Create & configure block
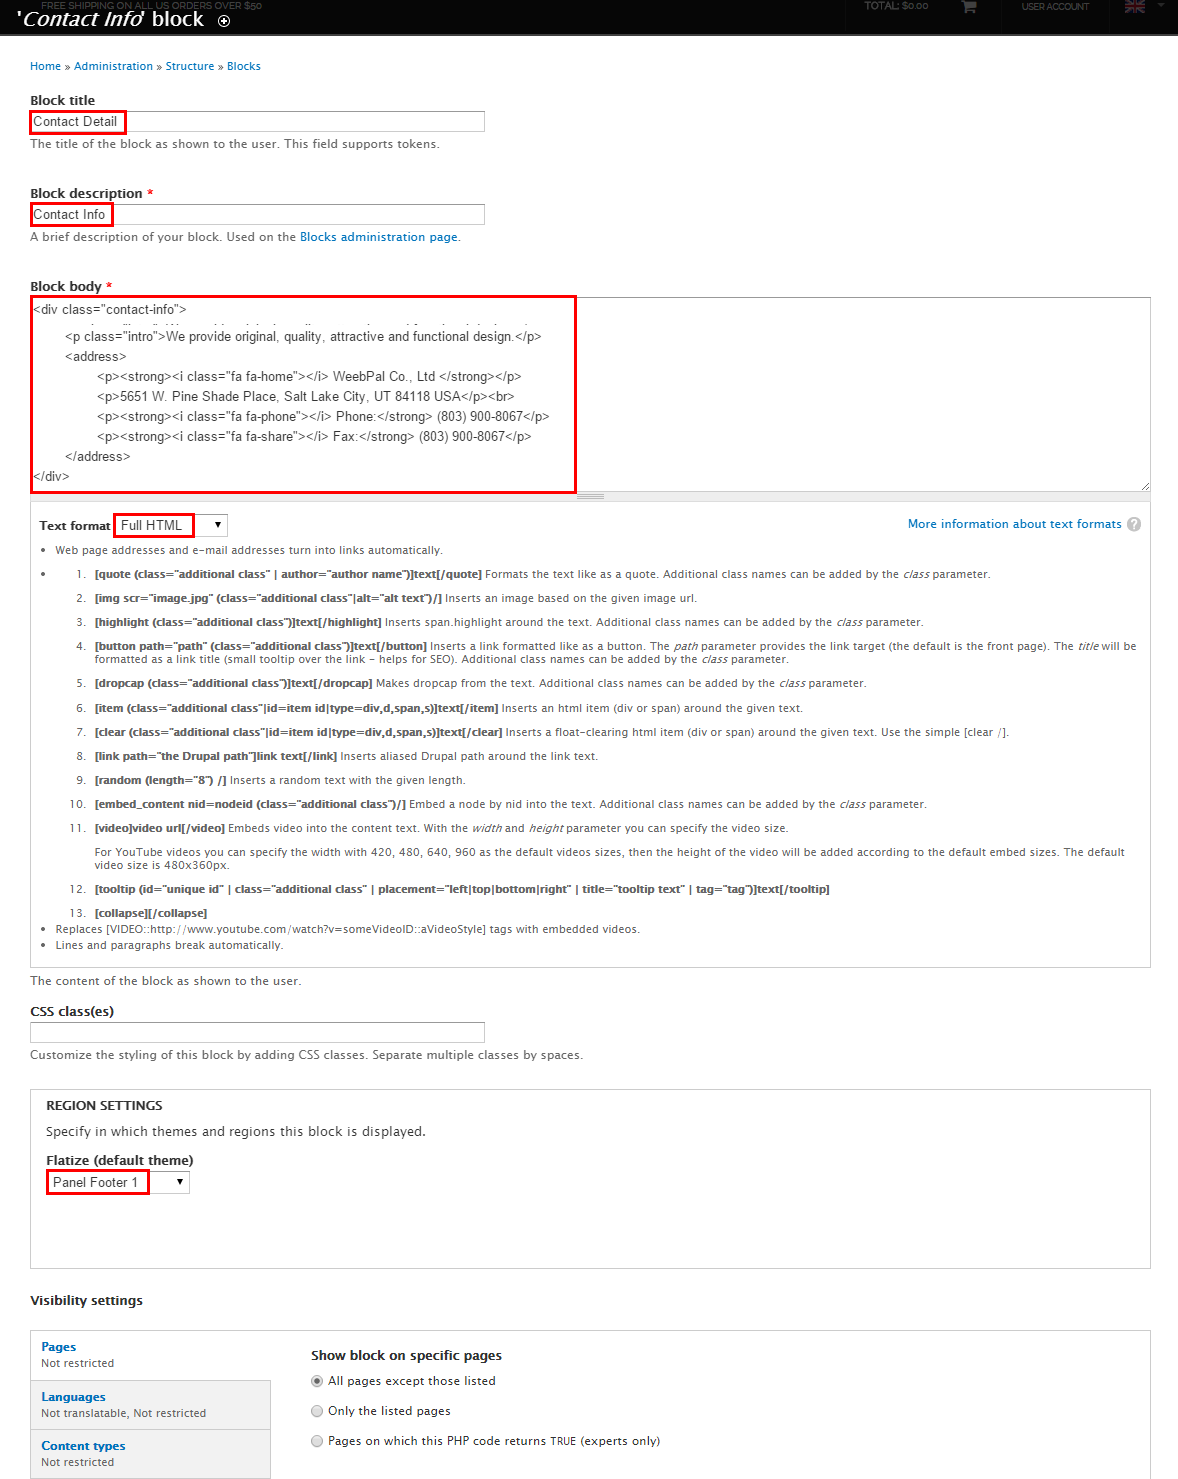
Step 1: Navigate to Structure > Blocks, click Add block link, Create Contact Detail block with following properties:
Refer to following HTML code:
We provide original, quality, attractive and functional design.
WeebPal Co., Ltd5651 W. Pine Shade Place, Salt Lake City, UT 84118 USA
Phone: (803) 900-8067
Fax: (803) 900-8067
Step 2: Click Save block button.
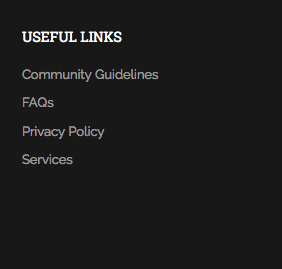
Useful Links: Menu block
Front end Display
Configure block
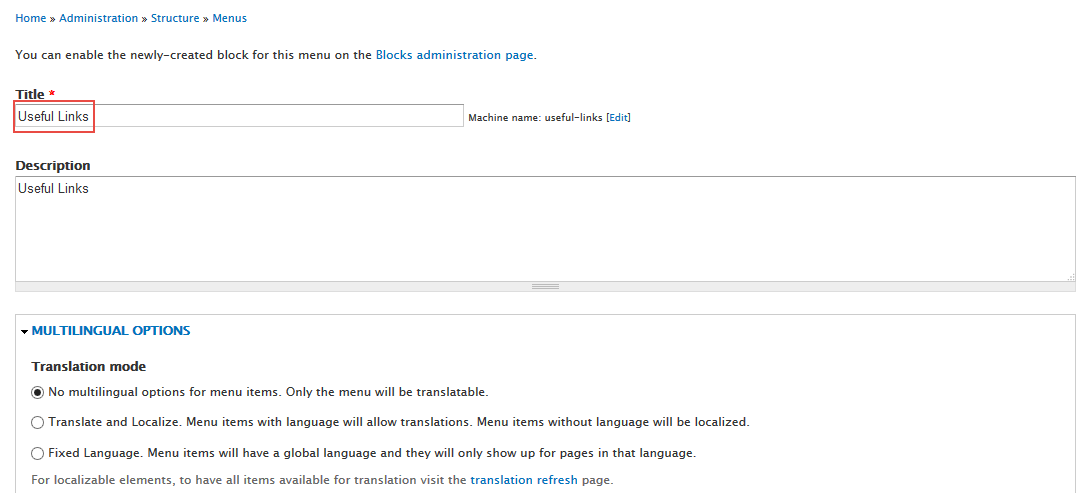
Step 1: Navigate to Structure > Menus, click Add menu link, Create Useful Links menu with following properties:
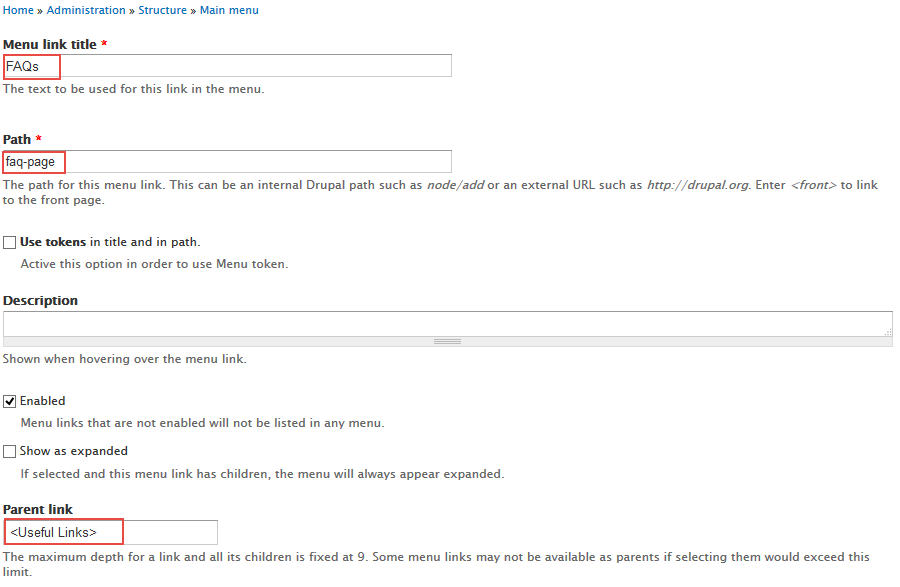
Step 2: Click Add link Create a link with following properties:
You can refer to URL Aliases list to get correct paths, by navigating toConfiguration > Search and metadata > URL Aliases > LIST
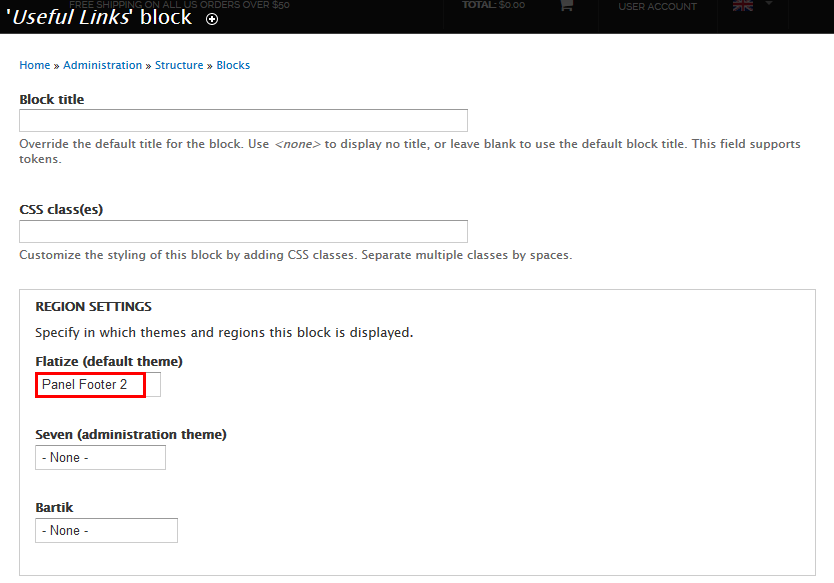
Step 3: Navigate to Structure > Blocks, find Useful Links block, click configure link and set the following properties:
Step 4: Click Save block button.
Step 5: Navigate to Structures > Content type, at Basic page row, click edit link.
Step 6: At Menu setting > Available menus section, check Useful Links menu
Step 7: Click Save content type button.
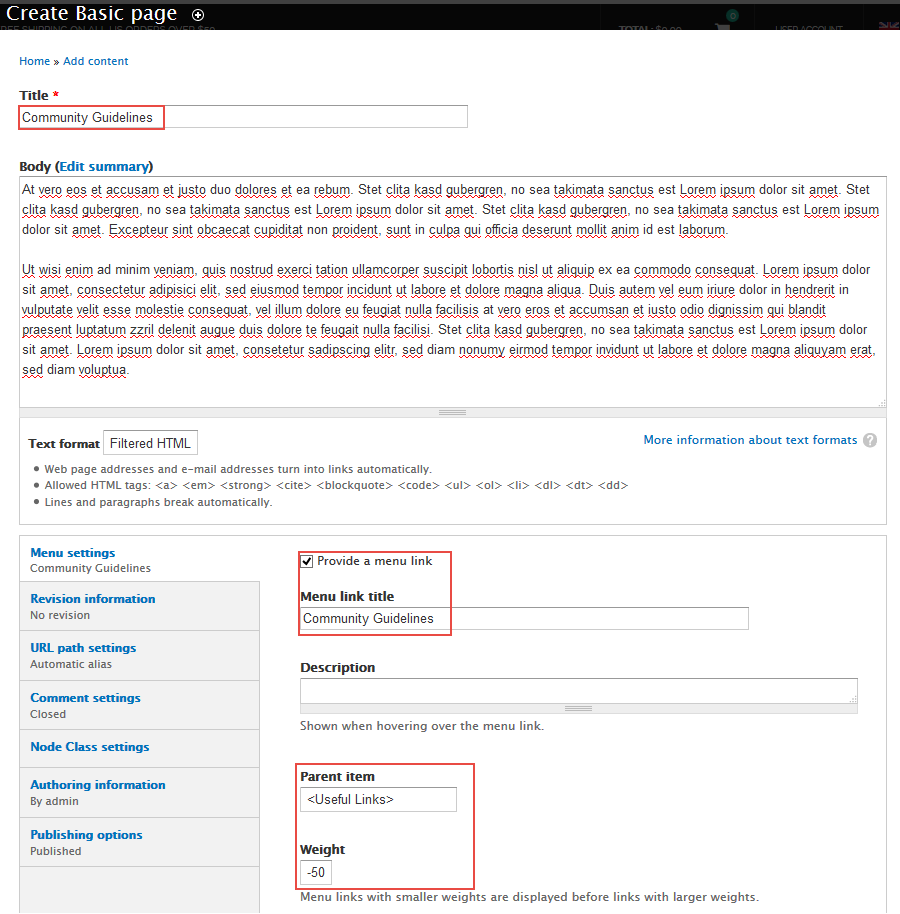
Step 8: Navigate to Content > Add Content , choose Basic page and create a page with the following properties:
Do the steps above to create links of Useful Links menu.
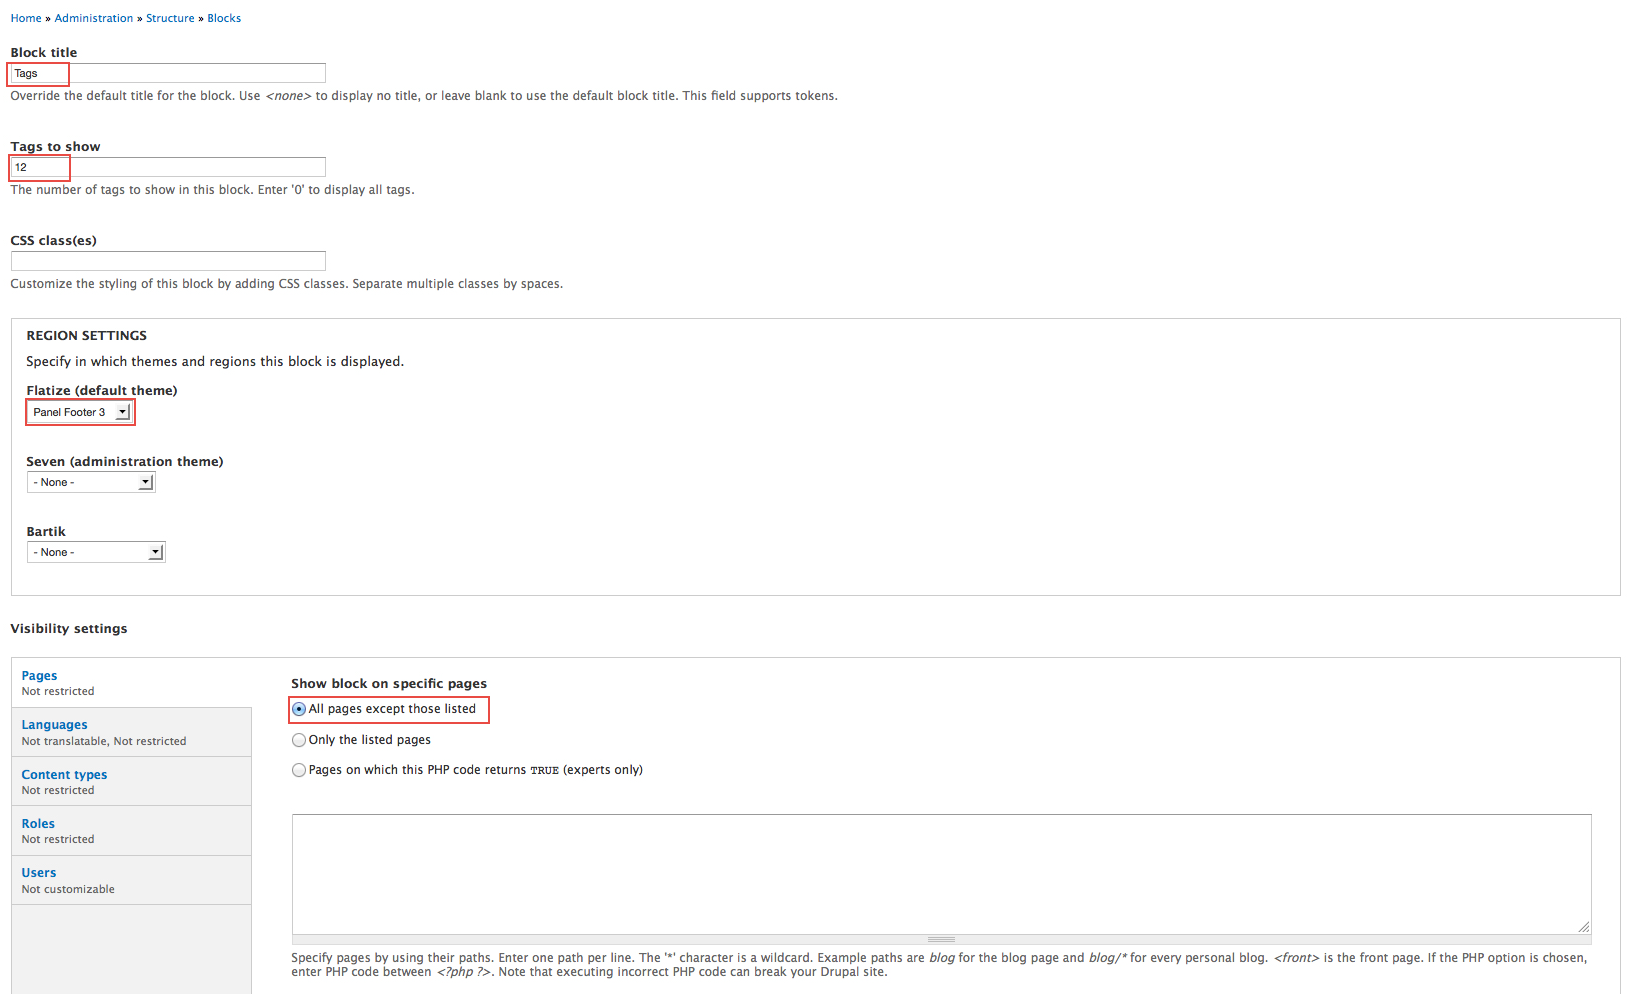
Tags block
Front end Display
Configure block
Step 1: Navigate to Structure > Blocks
Step 2: Find block Tags in tags , click Configure link and set following properties:
Step 3: Click Save block button.
Newsletter: Subscribe block
Front end Display
Configure block
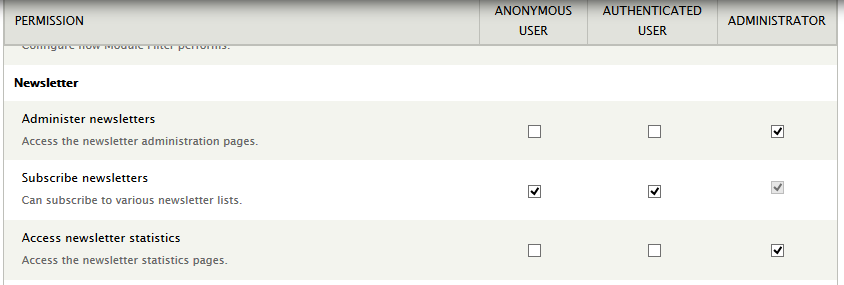
Step 1: Go to Module, find Newsletter module. Click Permission link
Step 2: Find Newsletter section, set following properties:
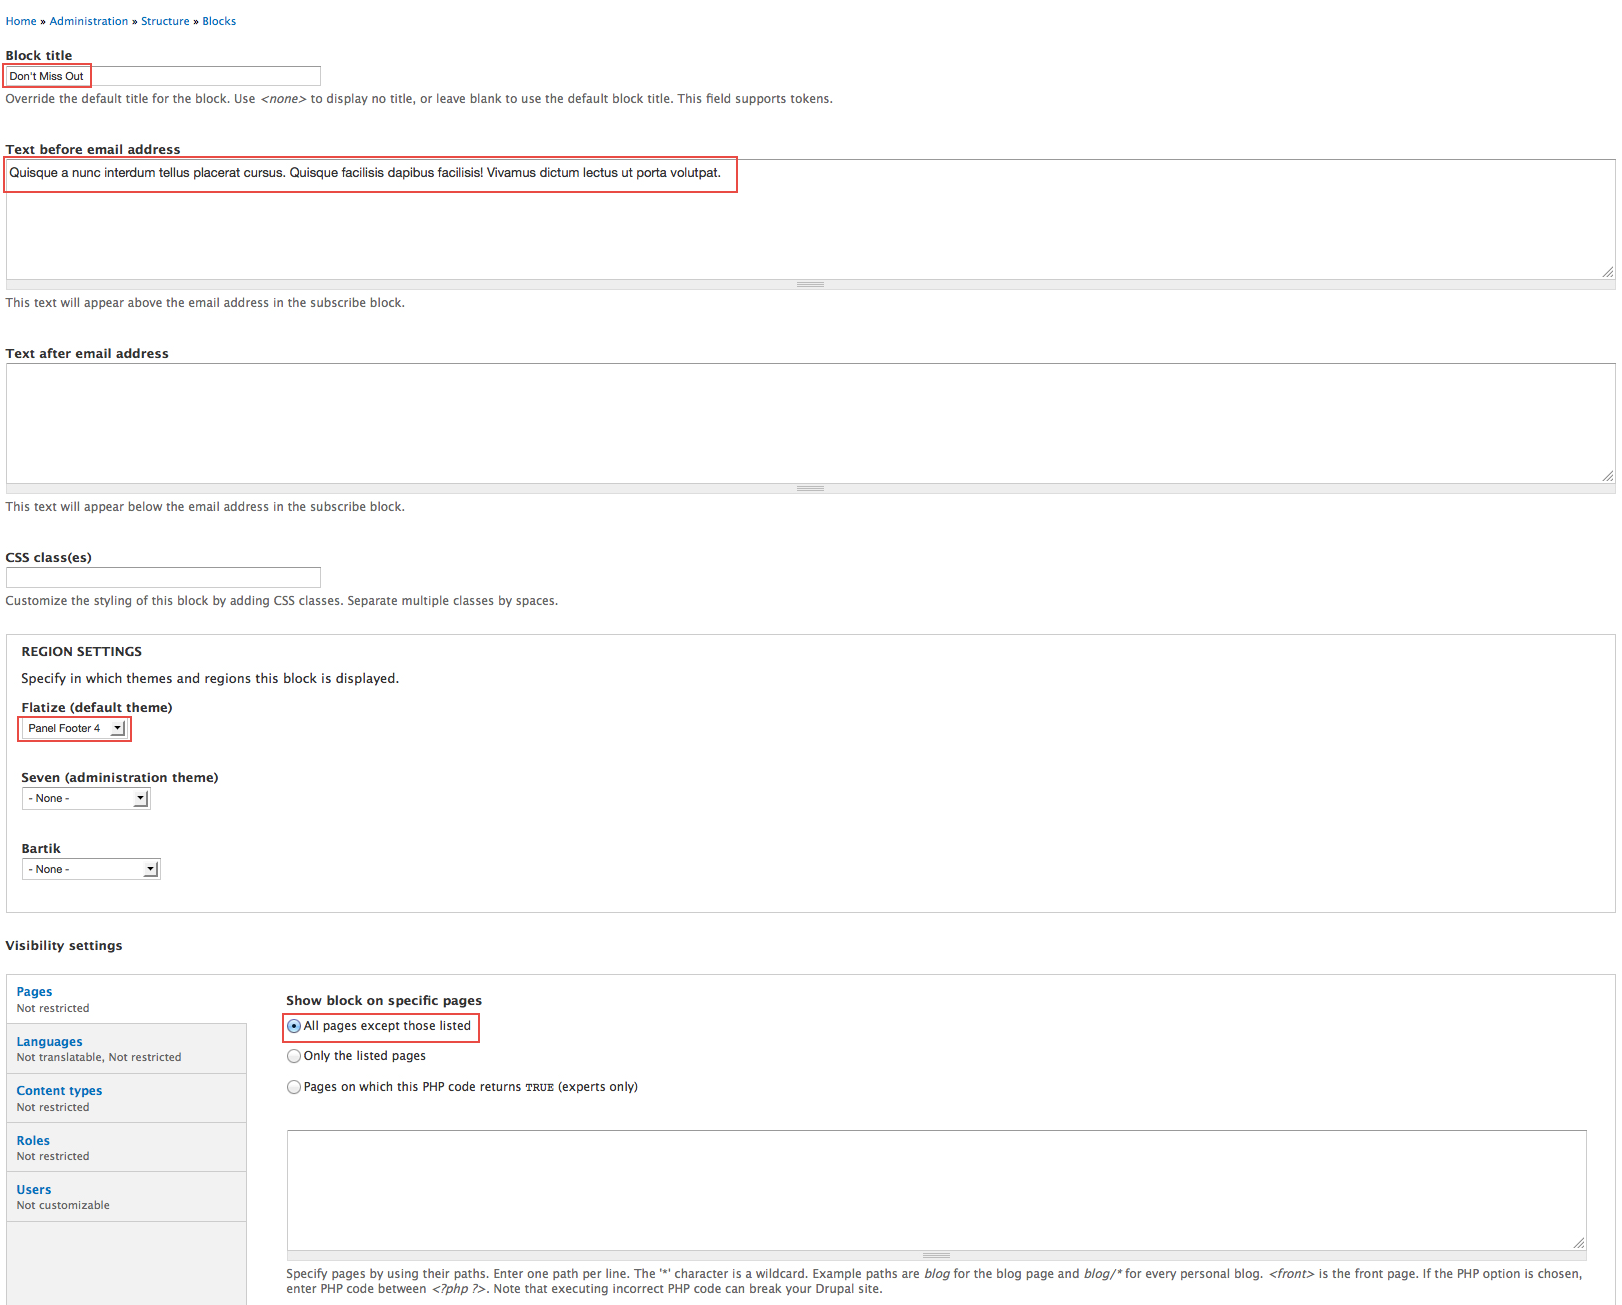
Step 3: Go to Module, find Newsletter module. Click Configure link
Step 4: Find SUBSCRIBE FORM section, set following properties:
Step 5: Click on Configure link, set following properties
Step 6: Go to Structure > Blocks, find Newsletter block. Click Configure link and set following properties:
Step 7: Click Save block button.
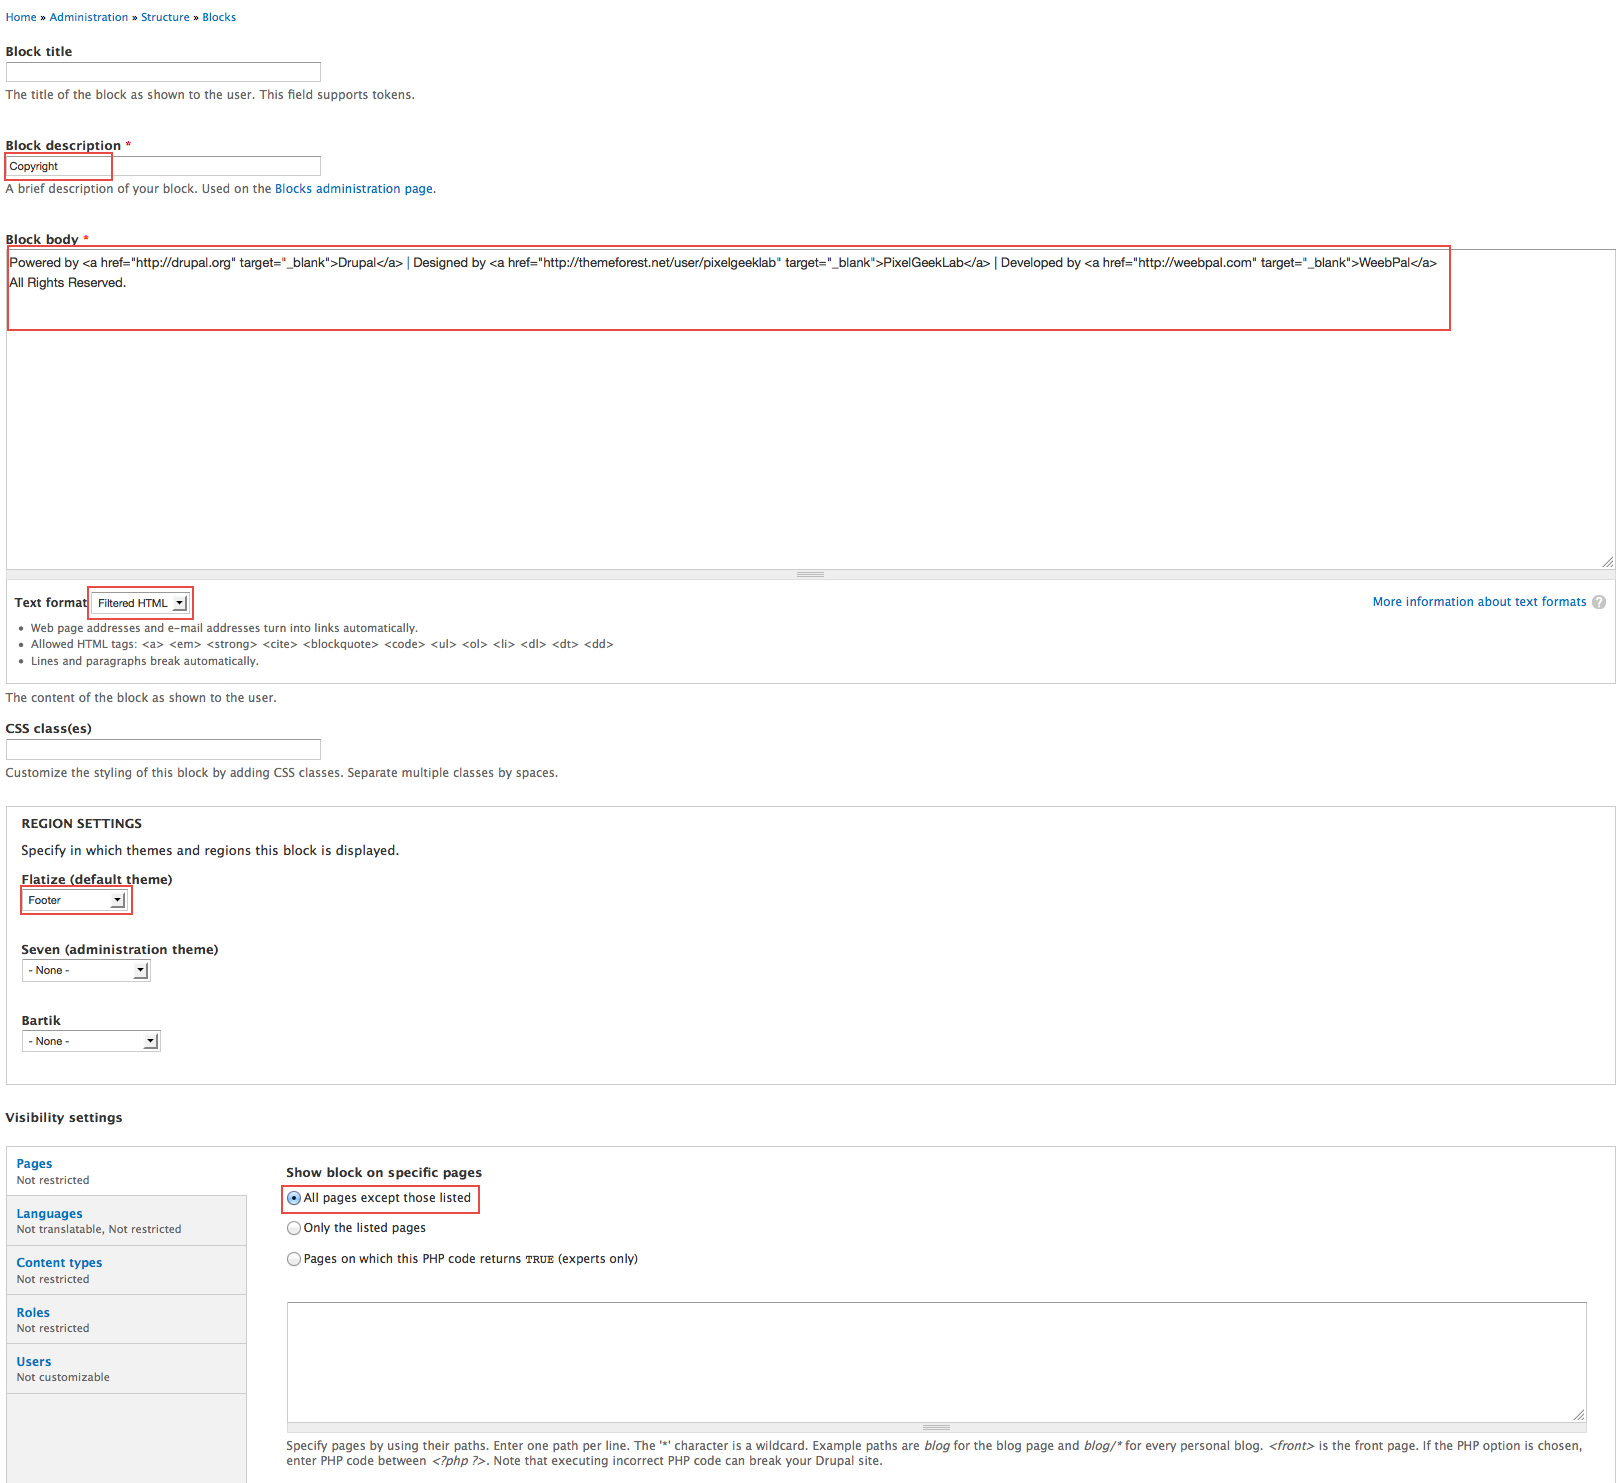
Copyright: Custom block
Front end Display
Create & configure block
Step 1: Navigate to Structure > Blocks, click Add block link, Create Copyright block with following properties:
Refer to following HTML code:
Powered by Drupal | Designed by PixelGeekLab | Developed by WeebPal All Rights Reserved.
Step 2: Click Save block button.
Social Menu: Custom block
Front end Display
Create & configure block
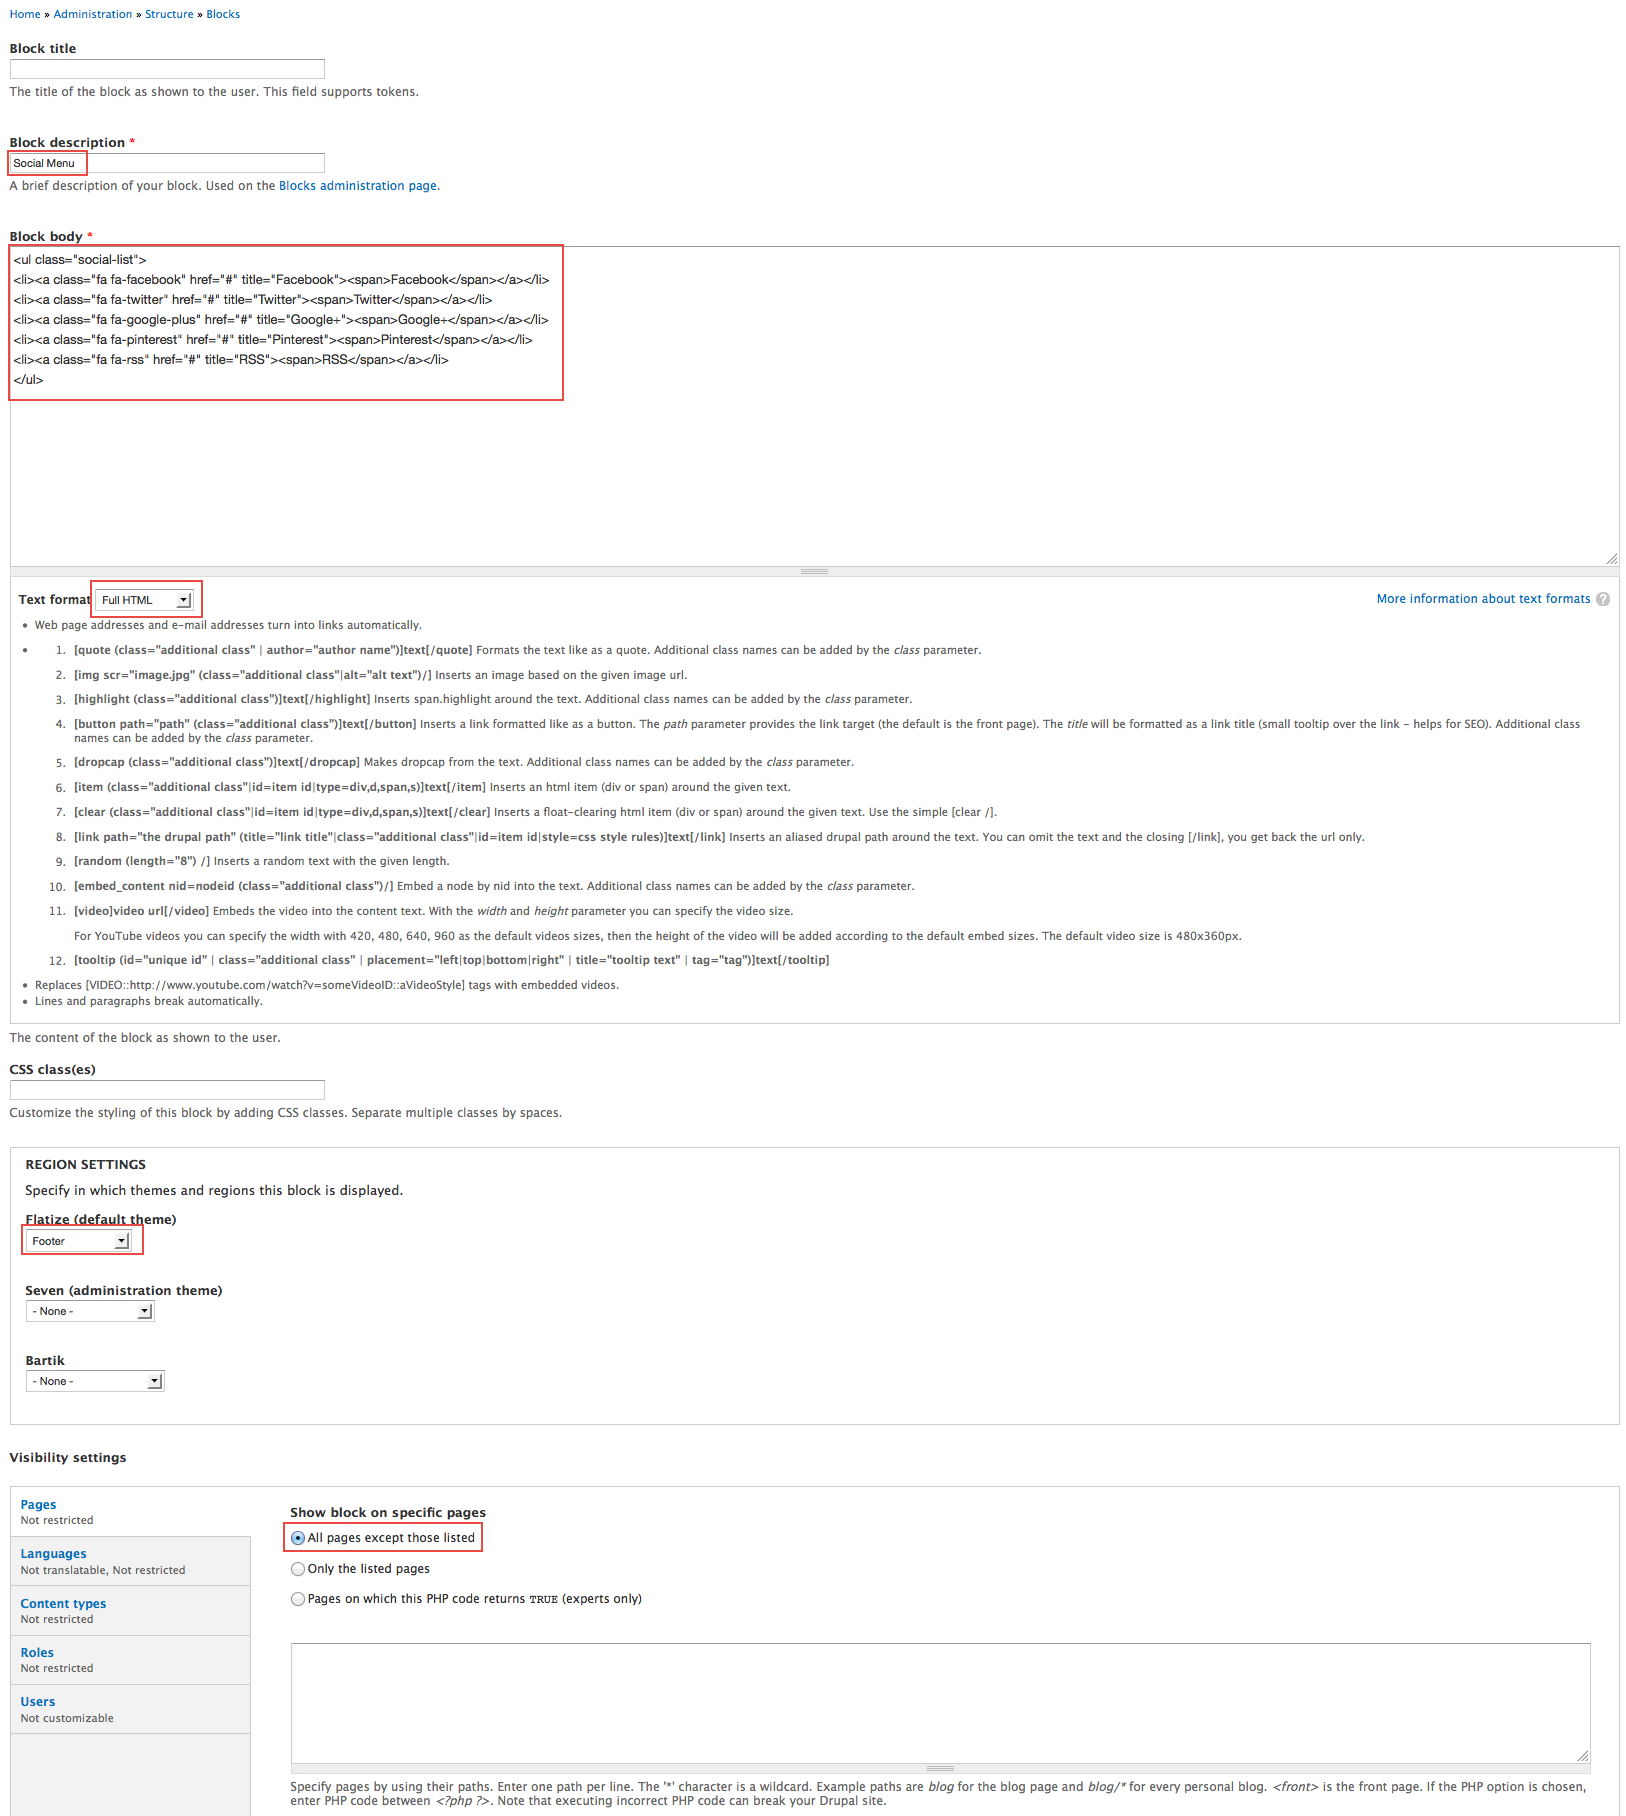
Step 1: Navigate to Structure > Blocks, click Add block link, Create Social Menu block with following properties:
Refer to following HTML code:
Step 2: Click Save block button.
Home2 page
Front end Display
1. Create & configure view
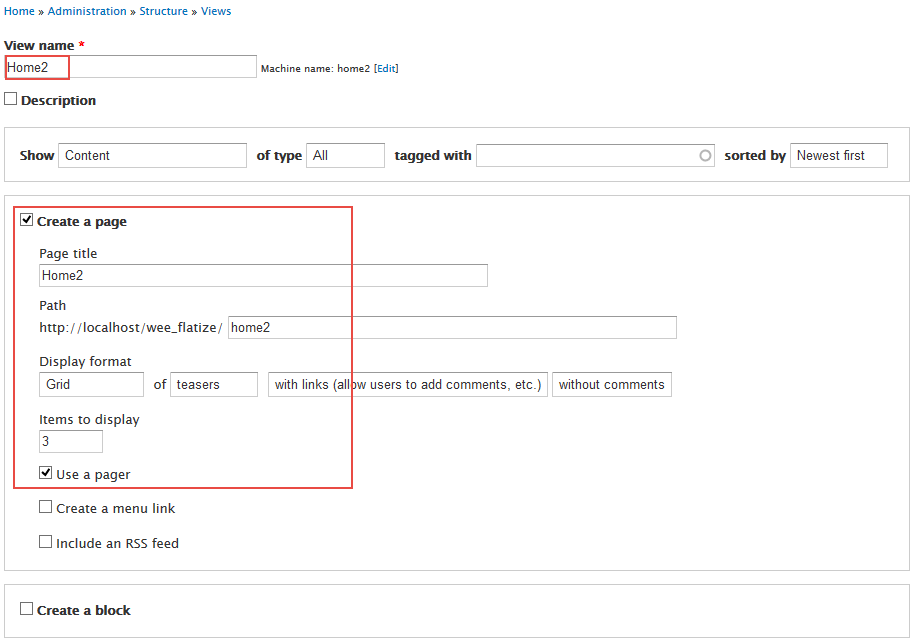
Step 1: Navigate to Structure > Views, click Add new view, create Home2 view with the following settings:
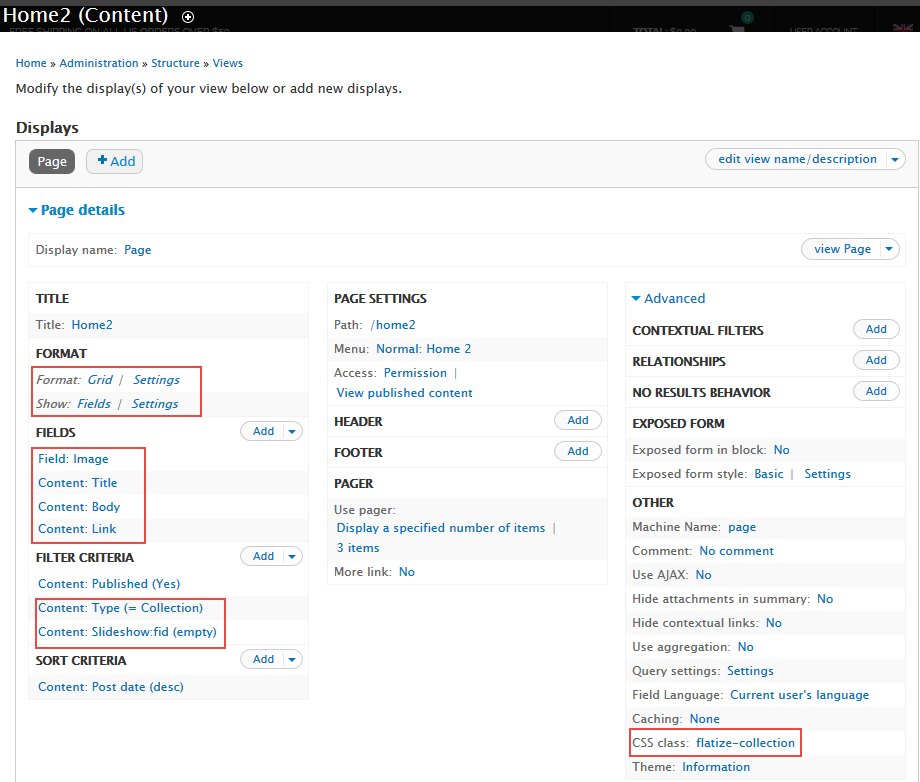
Step 2: Click Continue and edit button. Add fields with the following properties:
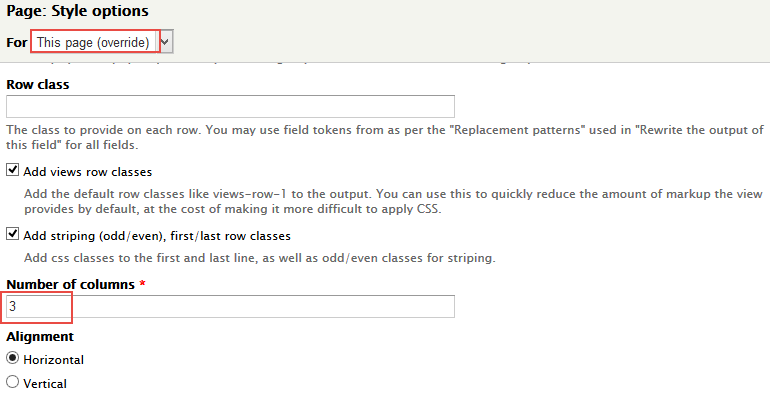
Step 3: At FORMAT > format area, click Settings button, set properties:
Step 4: At FORMAT > Show area, click Settings, set properties:
Step 5: At FIELDS area, click Add button to add fields: Field: Image, Content: Body, Content: Link
Step 6: Set properties for Field: Image
Step 7: Set properties for Content: Body
Step 8: Set properties for Content: Link
Step 9: At FILTER CRITERIA area, Click Add button to add field Content: Type, Content: Slideshow:fid
Step 10: Set properties for Content: Type
Step 11: Set properties for Content: Slideshow:fid
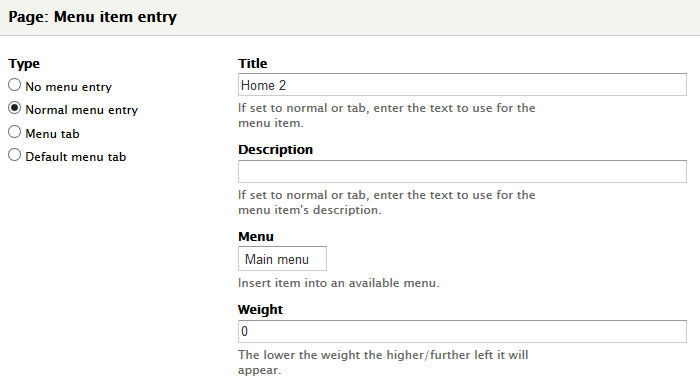
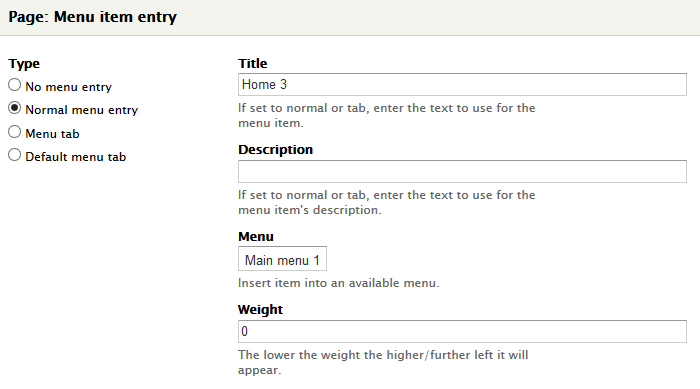
Step 12: At PAGE SETTINGS Menu, set the following properties:
Step 13: At Advanced > CSS Class, set the following properties:
Step 14: Click Save to save view
1. Create & configure view
Home3 page
Front end Display
Create & configure view
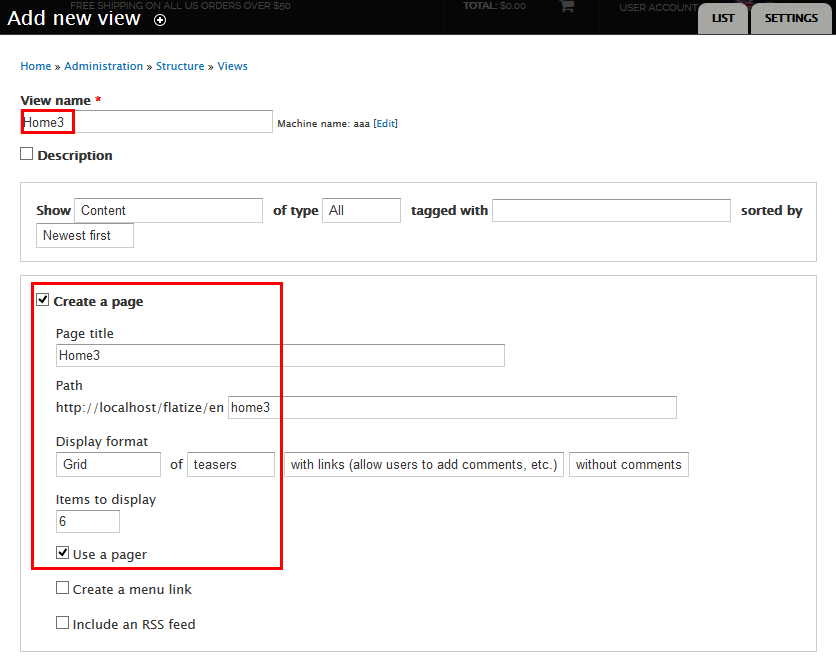
Step 1: Navigate to Structure > Views, click Add new view, create Home3 view with the following settings:
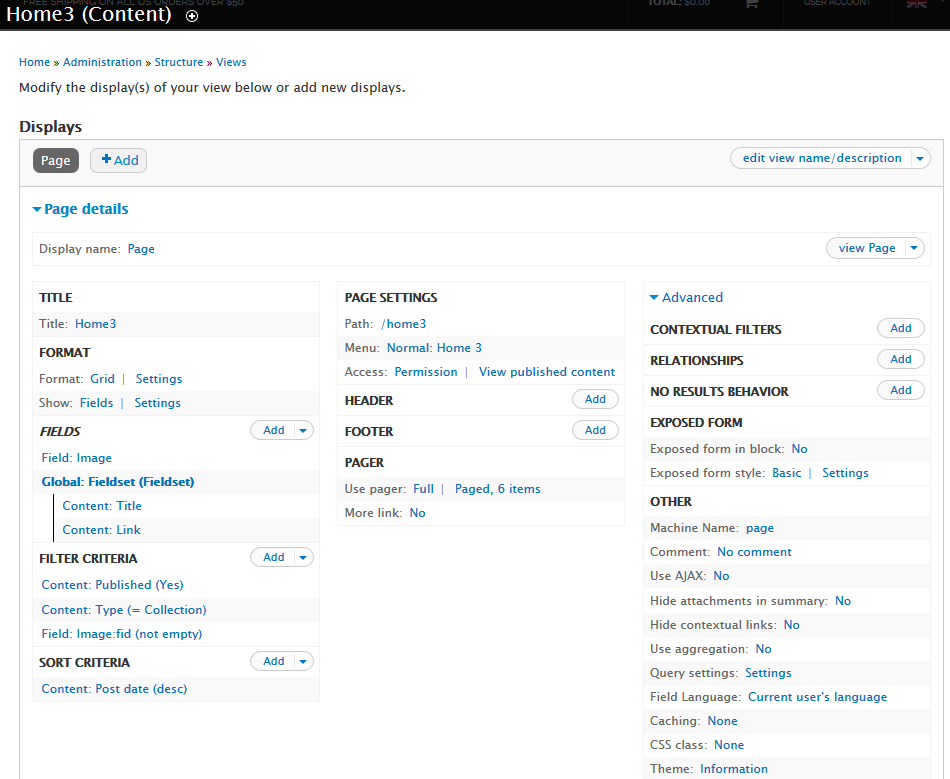
Step 2: Click Continue and edit button. Add fields with the following properties:
Step 3: At FORMAT > format area, click Settings button, set properties:
Step 4: At FORMAT > Show area, click Settings, set properties:
Step 5: At FIELDS area, click Add button to add fields: Field: Image, Global: Fieldset, Content: Link
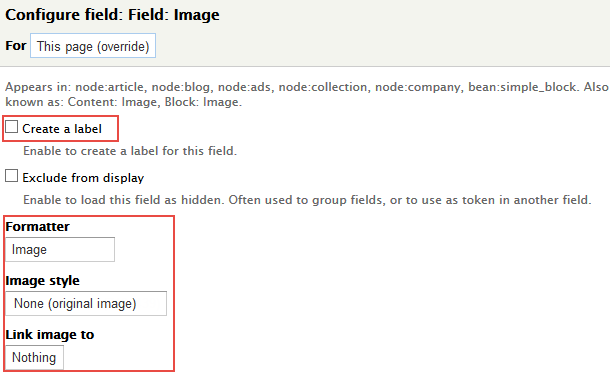
Step 6: Set properties for Field: Image
Step 7: Set properties for Global: Fieldset
Step 8: At FILTER CRITERIA area, Click Add button to add field Content: Type, Content: Slideshow:fid
Step 9: Set properties for Content: Type
Step 10: Set properties for Content: Slideshow:fid
Step 11: At PAGE SETTINGS Menu, set the following properties:
Step 12: Click Save to save view
Home2, Home3: Slideshow2
Front end Display
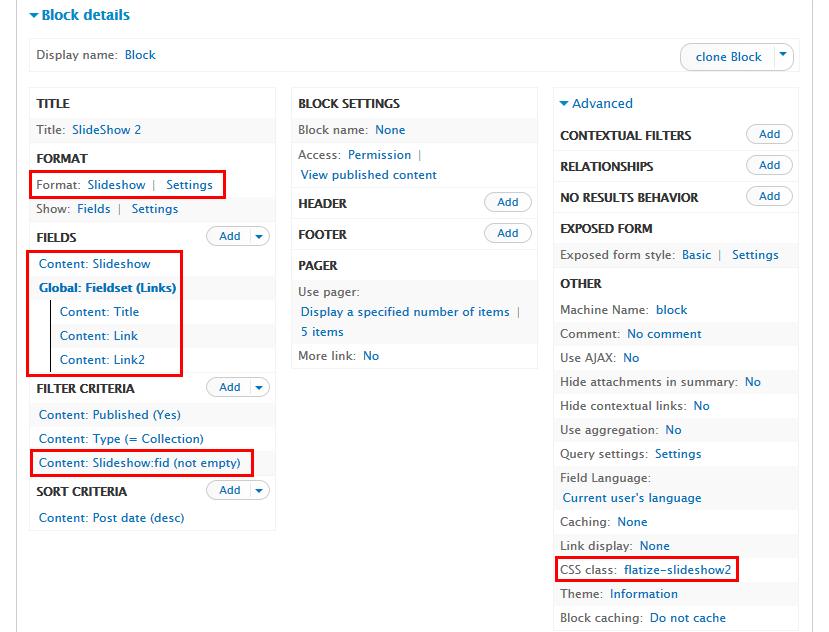
1. Create Slideshow2 view
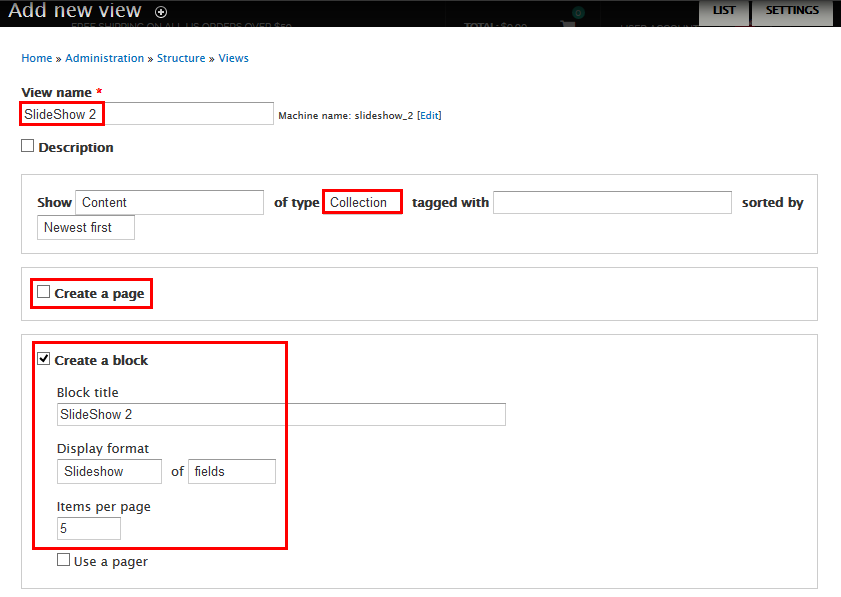
Step 1: Navigate to Structure > Views, click Add new view, then create Slideshow2 view with following settings:
Step 2: Click Continue and edit button. Next to below steps to set properties for following fields:
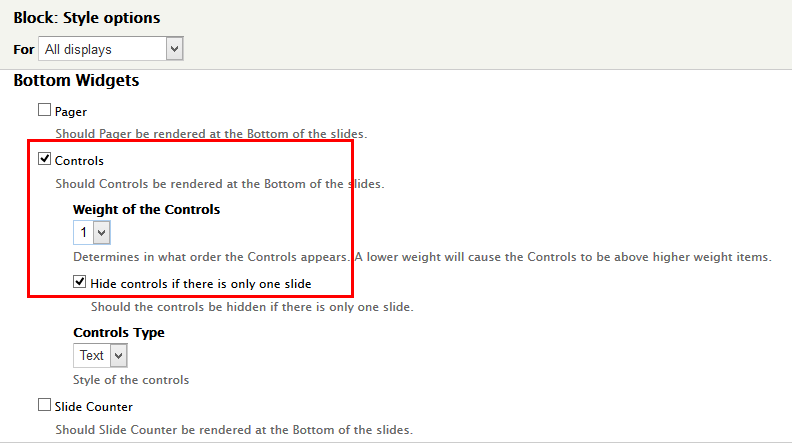
Step 3: At FORMAT Format area, click Settings button and set following properties:
Step 4: At FIELDS area, click Add button to add fields: Content: Slideshow, Global: Fieldset, Content: Link, Content: Link2 (Content: Link & Content Link2 appear in: node:collection)
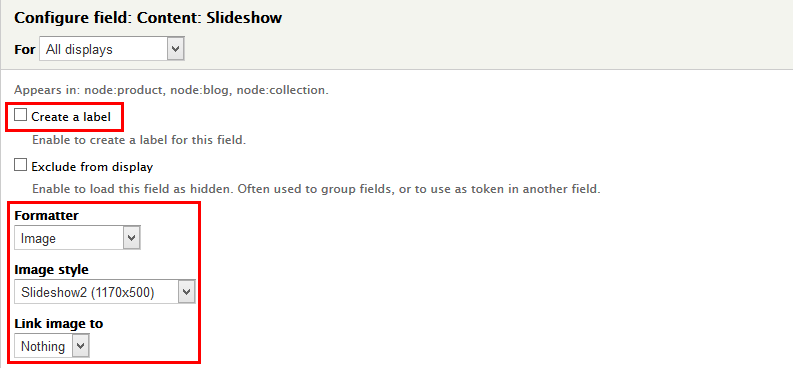
Step 5: Set properties for Content: Slideshow
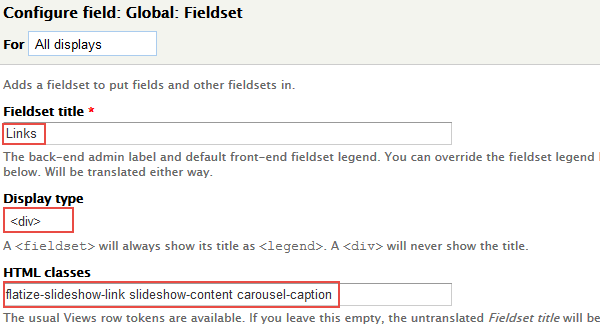
Step 6: Set properties for Global: Fieldset
Step 7: Set properties for Content: Link
Step 8: Set properties for Content: Link2
Step 9: Set properties for Content: Title
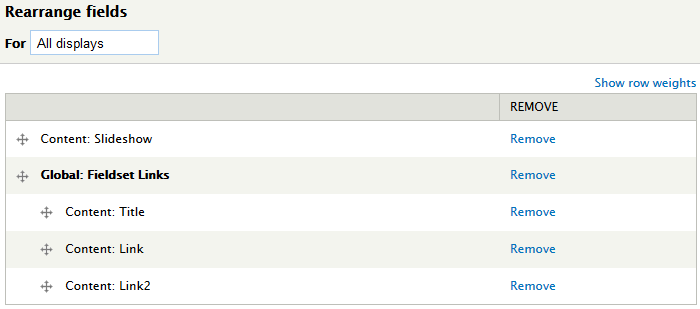
Step 10: At FIELDS area, click Rearrange button and set the following arrangements
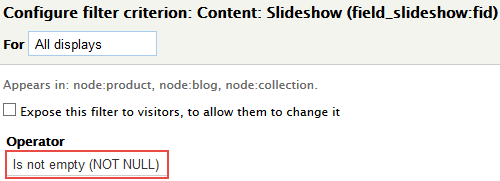
Step 11: At FILTER CRITERIA area, Click Add button to add fields: Content: Slideshow and set properties
Step 12: At Advanced > CSS Class area, set following properties:
Step 13: Click Save to save view
2. Configure Slideshow2 block
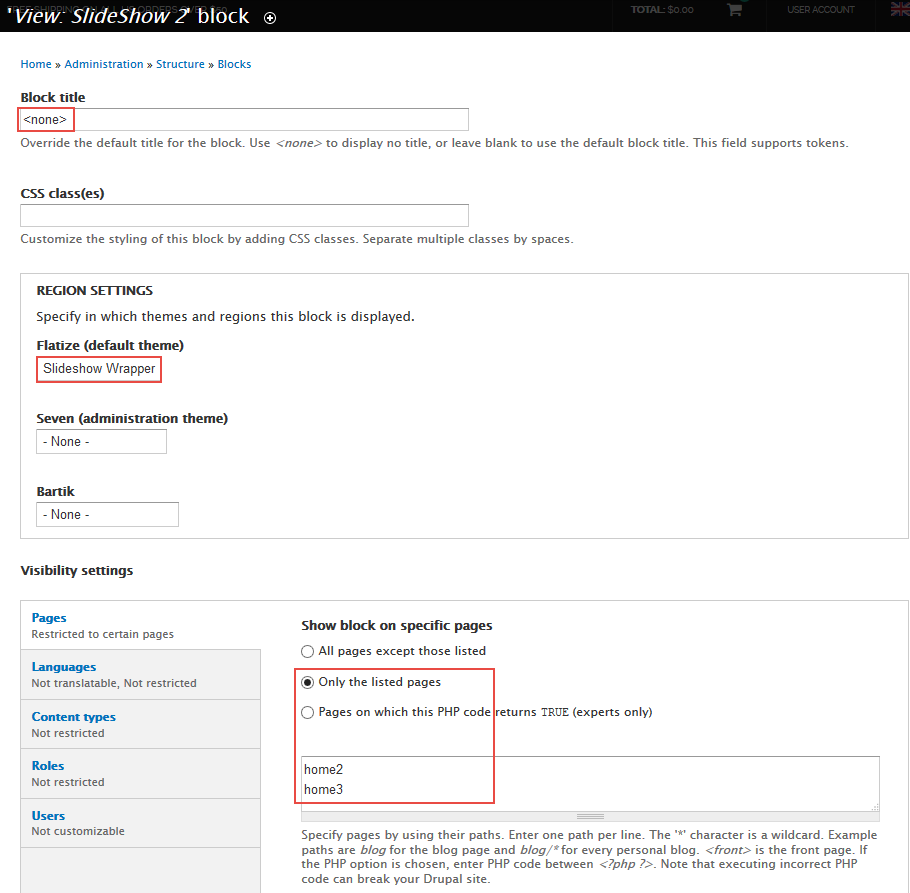
Step 1: Navigate to Structure > Blocks
Step 2: Find View: Slideshow2 click configure link, set following properties
Step 3: Click Save block button.
Home2: Ads
Front end Display
Create & configure block
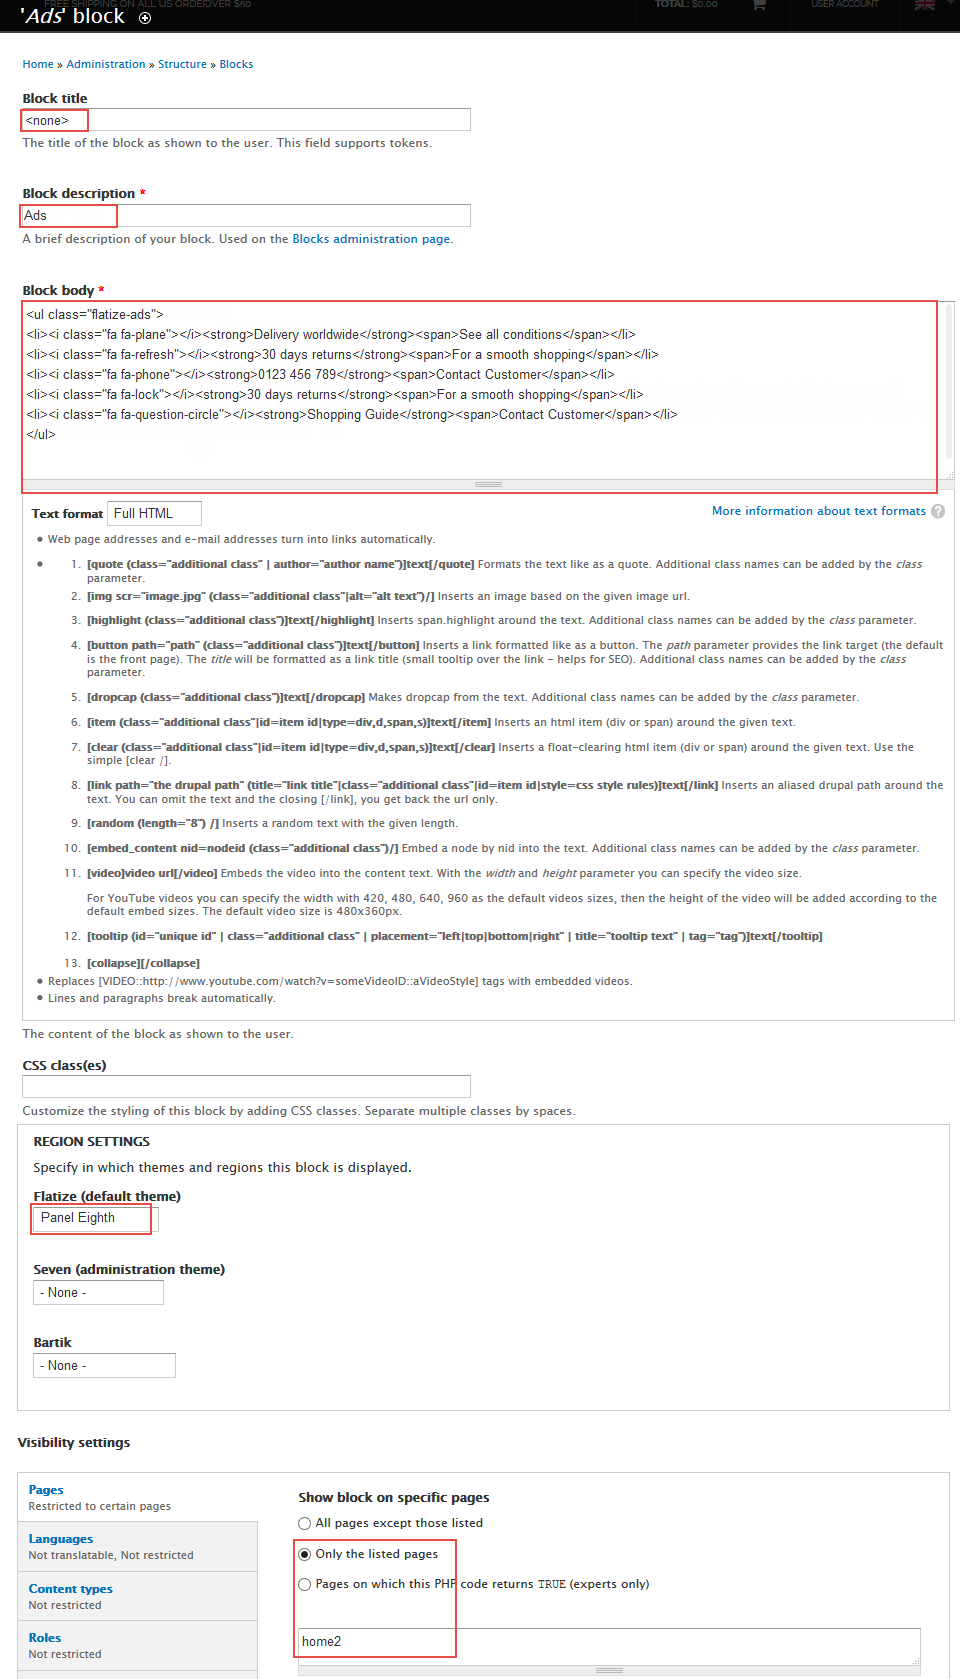
Step 1: Navigate to Structure > Blocks, click Add block link, Create Ads block with following properties:
Refer to following HTML code:
- Delivery worldwideSee all conditions
- 30 days returnsFor a smooth shopping
- 0123 456 789Contact Customer
- 30 days returnsFor a smooth shopping
- Shopping GuideContact Customer
Step 2: Click Save block button.
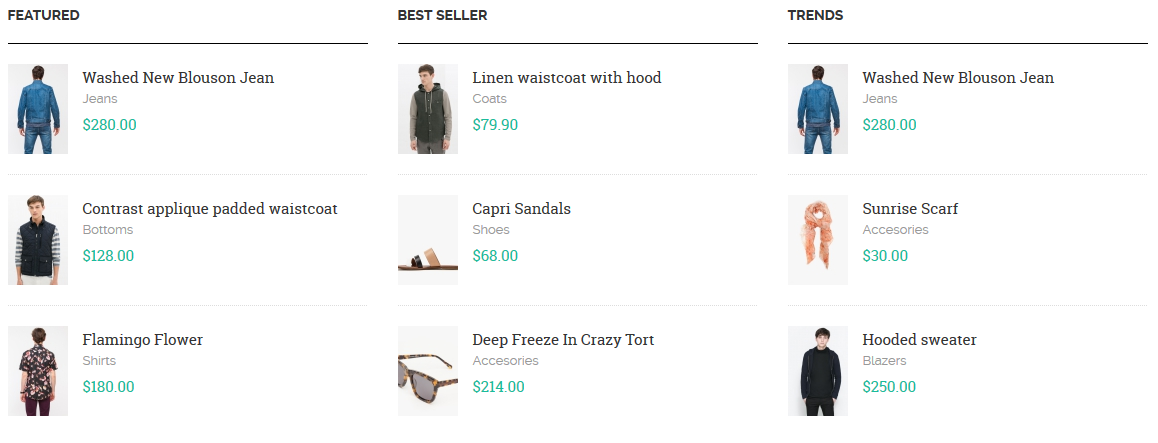
Home2 & Home3 : Best Sellers, Featured , Trends block
Front end Display
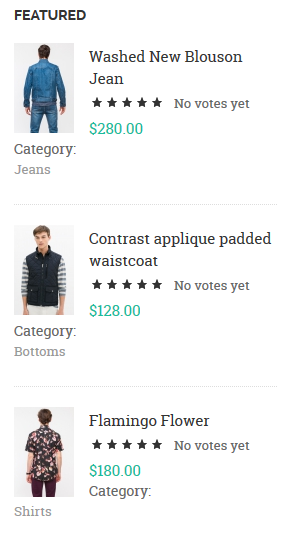
1. Create Featured view
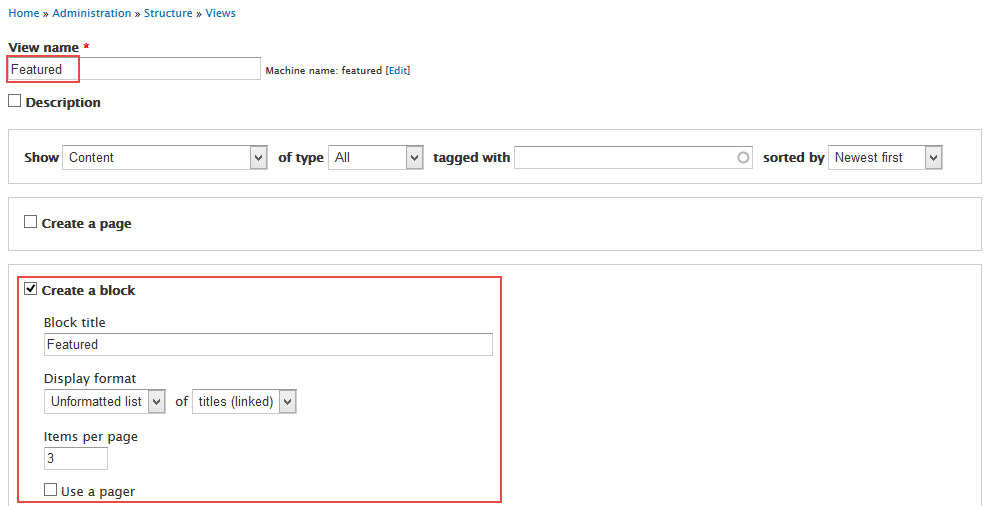
Step 1: Navigate to Structure > Views, click Add new view, create Featured view with the following settings:
Step 2: Click Continue and edit button. Next to below steps to set properties for following fields:
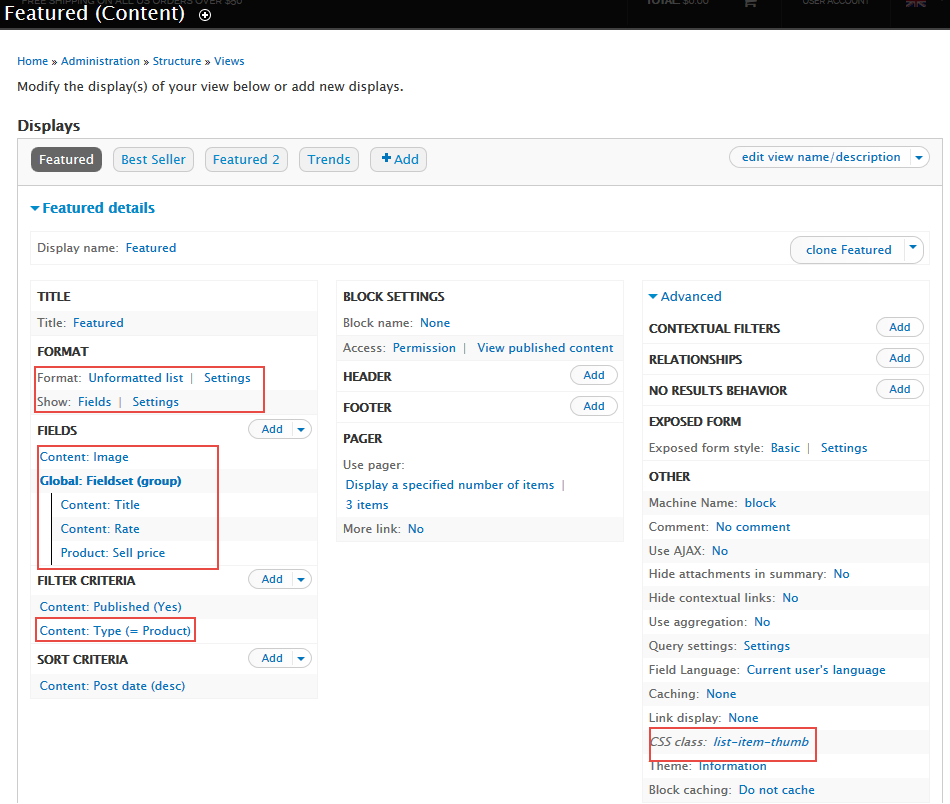
Step 3: At FIELDS area, click Add button to add field: Content: Image, Global: Fieldset, Content: Rate, Product: Sell price
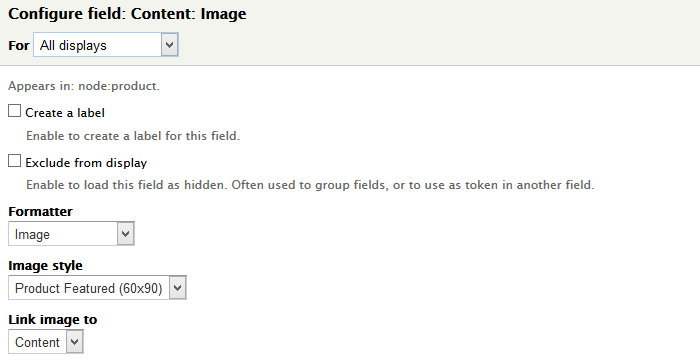
Step 4: Set properties for Content: Image
Step 5: Set properties for Global: Fieldset
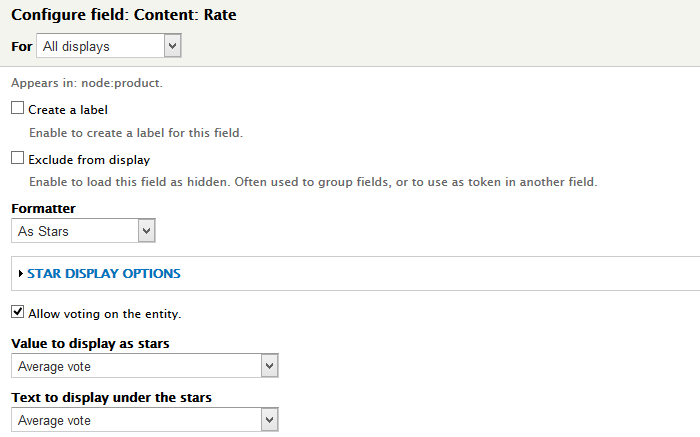
Step 6: Set properties for Content: Rate
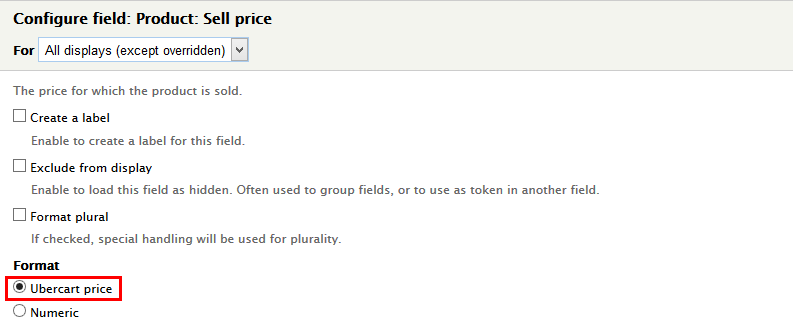
Step 7: Set properties for Product: Sell price
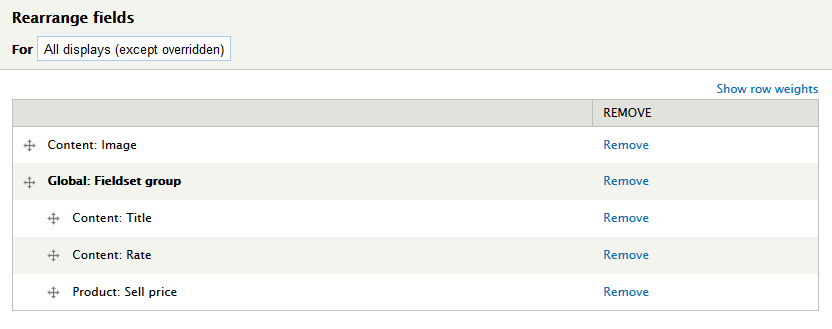
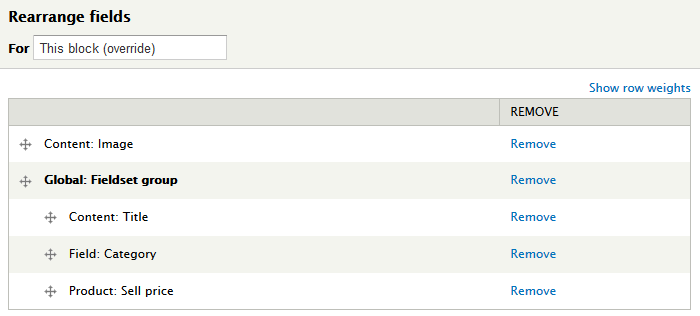
Step 8: At FIELDS area, click Rearrange button and set the following arrangements
Step 9: At FILTER CRITERIA area, Click Add button to add field Content: Type with the following properties:
Step 10: At Advanced > CSS Class, set following properties:
Step 11: Click Save to save view
Step 12: Navigate to Structure > Blocks, find View: Featuredclick configure and set following properties:
2. Clone Featured view to create Best Sellers view
Step 1: Stay open Featured view, click clone Block.
Next to steps below to set properties for the following fields:
Step 2: Change Display name
Step 3: Change TITLE Title
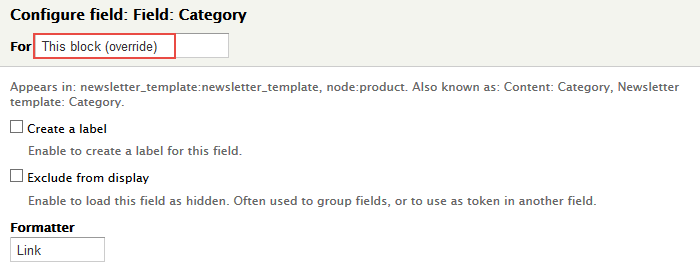
Step 4: At FIELDS area, click Add button to add field: Field: Category with the following properties:
Step 5: At FIELDS area, click Rearrange button, remove Content: Rate and set following arrangements
Step 6: At SORT CRITERIA area, Click Add button to add fields Global: Random
Step 7: Click Save to save view
3. Configure View: Featured: Featured 2 block
Step 1: Navigate to Structure > Blocks
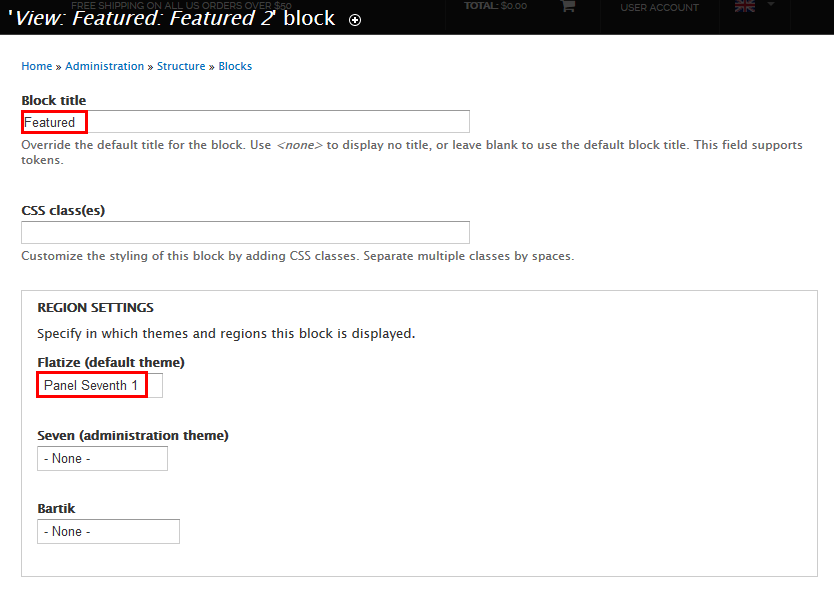
Step 2: Find View: View: Featured: Featured 2 click configure link, set following properties
Step 3: Click Save block button.
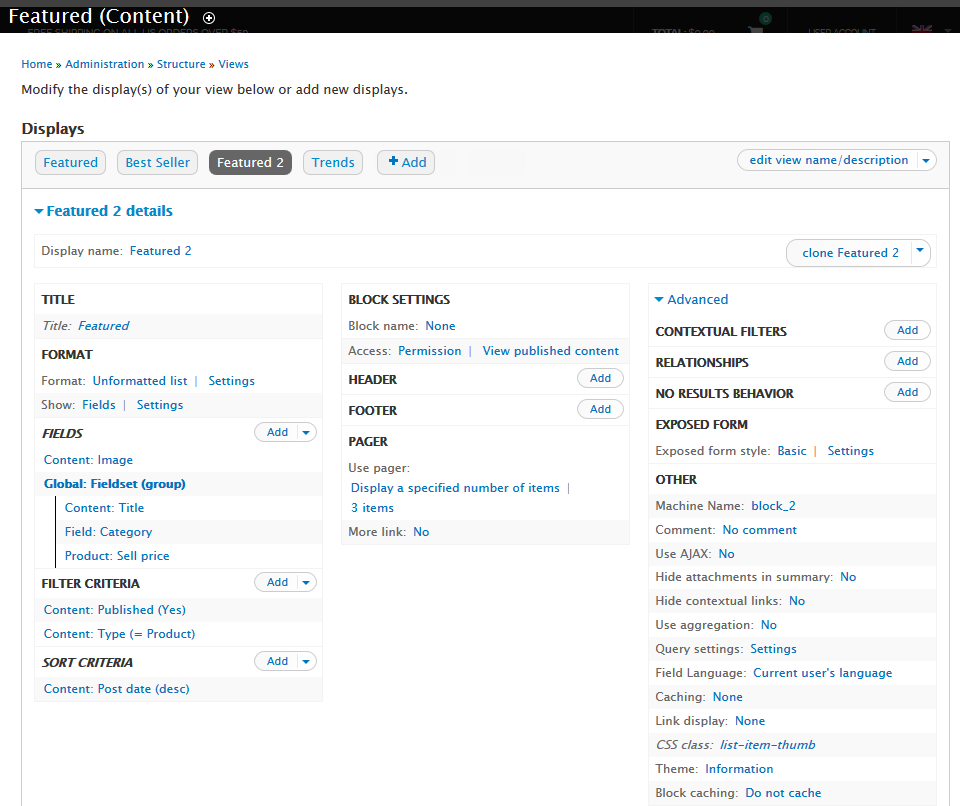
4. Clone Best Sellers view to create Featured 2 view
Step 1: Stay open Best Sellers view, click clone Best Sellers.
Next to steps below to set properties for the following fields:
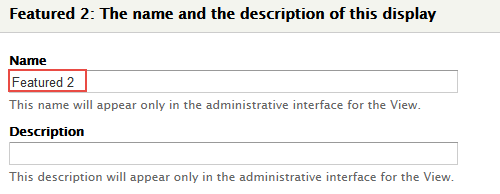
Step 2: Change Display name
Step 3: Change TITLE Title
Step 4: At SORT CRITERIA area, Click Rearrange and remove field Global: Random
Step 5: Click Save to save view
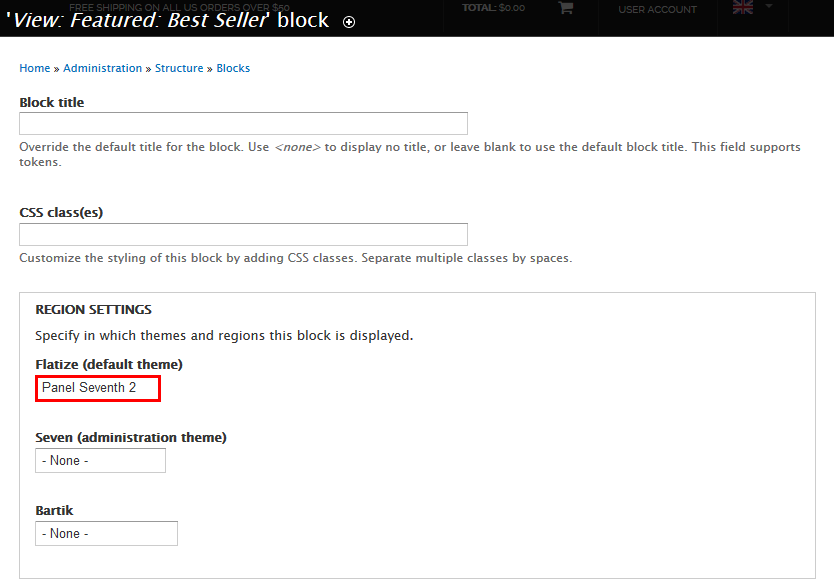
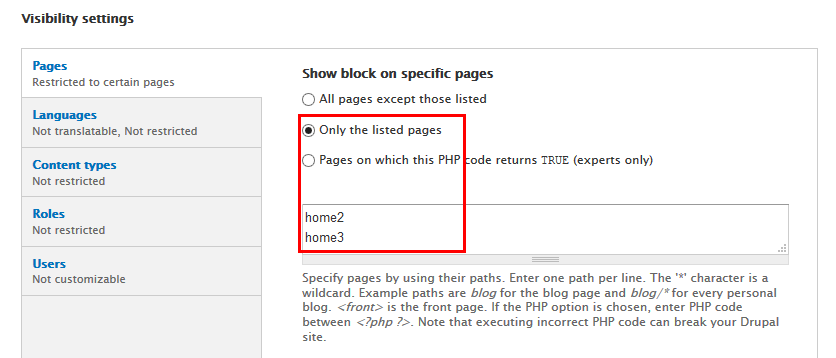
5. Configure View: Featured: Best Seller block
Step 1: Navigate to Structure > Blocks
Step 2: Find View: View: Featured: Best Seller click configure link, set following properties
Step 3: Click Save block button.
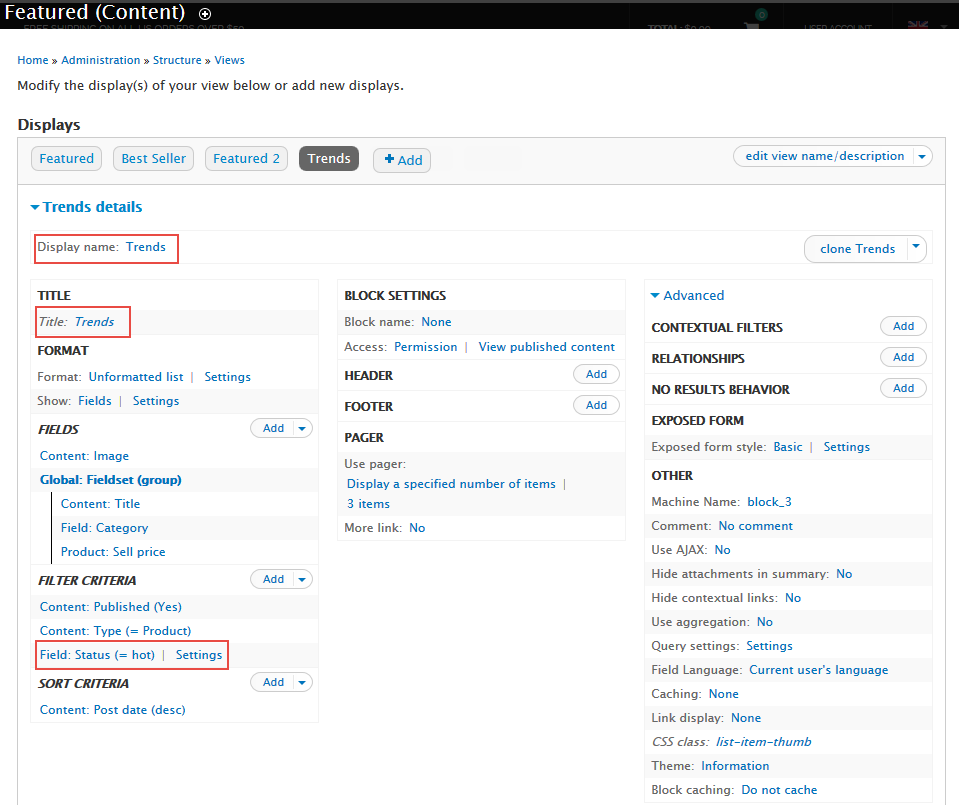
6. Clone Featured 2 view to create Trends view
Step 1: Stay open Featured 2 view, click clone Featured 2.
Next to steps below to set properties for the following fields:
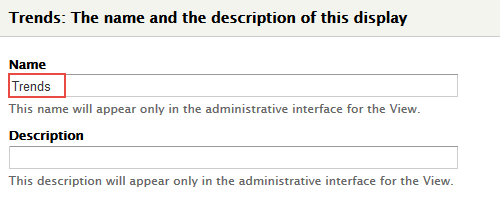
Step 2: Change Display name
Step 3: Change TITLE Title
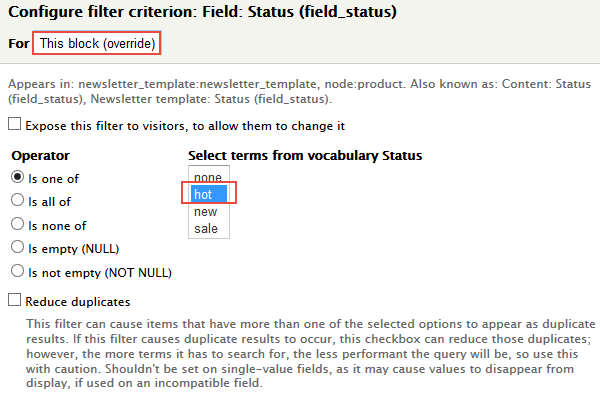
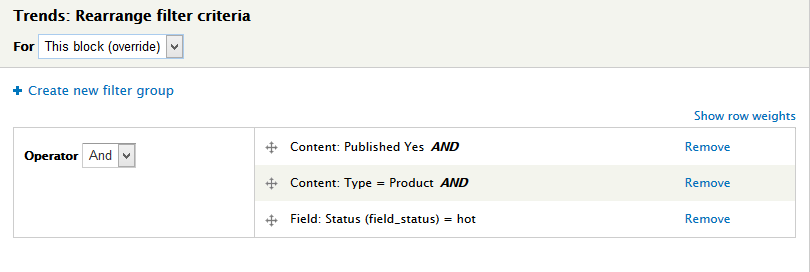
Step 4: At FILTER CRITERIA area, Click Add button to add fields: Field: Status, Content: Published
Step 5: Set properties Field: Status
Step 6: Set properties Content: Published
Step 7: At SORT CRITERIA area, Click Rearrange and set following properties:
Step 8: Click Save to save view
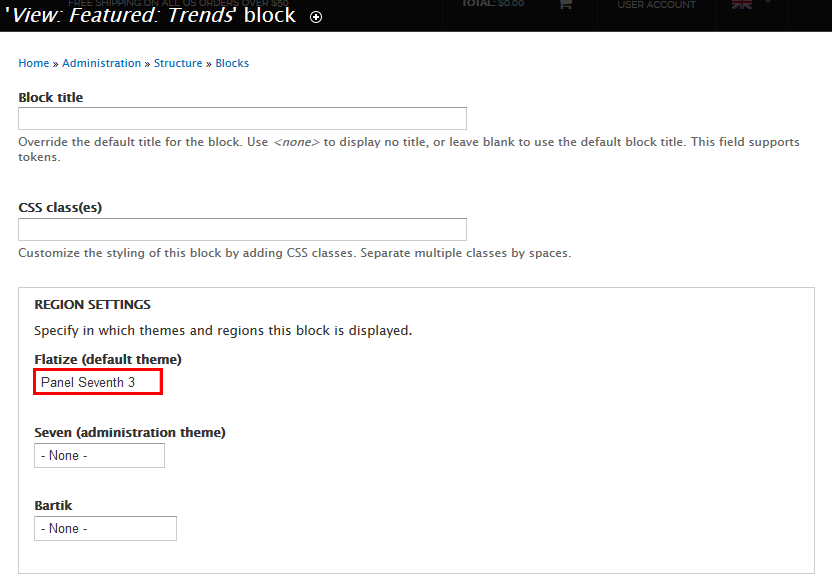
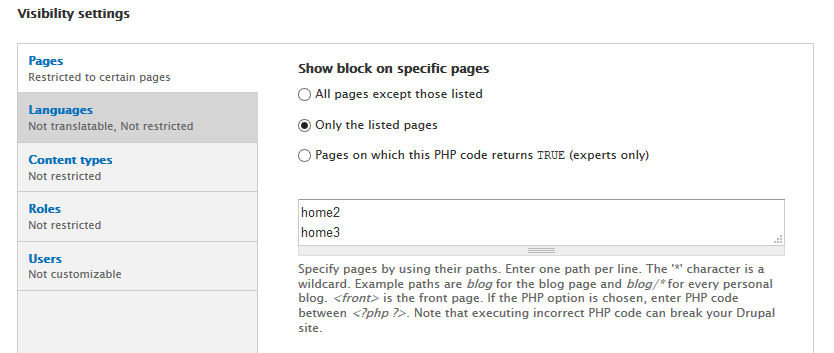
7. Configure View: Featured: Trends block
Step 1: Navigate to Structure > Blocks
Step 2: Find View: Featured: Trends click configure link, set following properties
Step 3: Click Save block button.
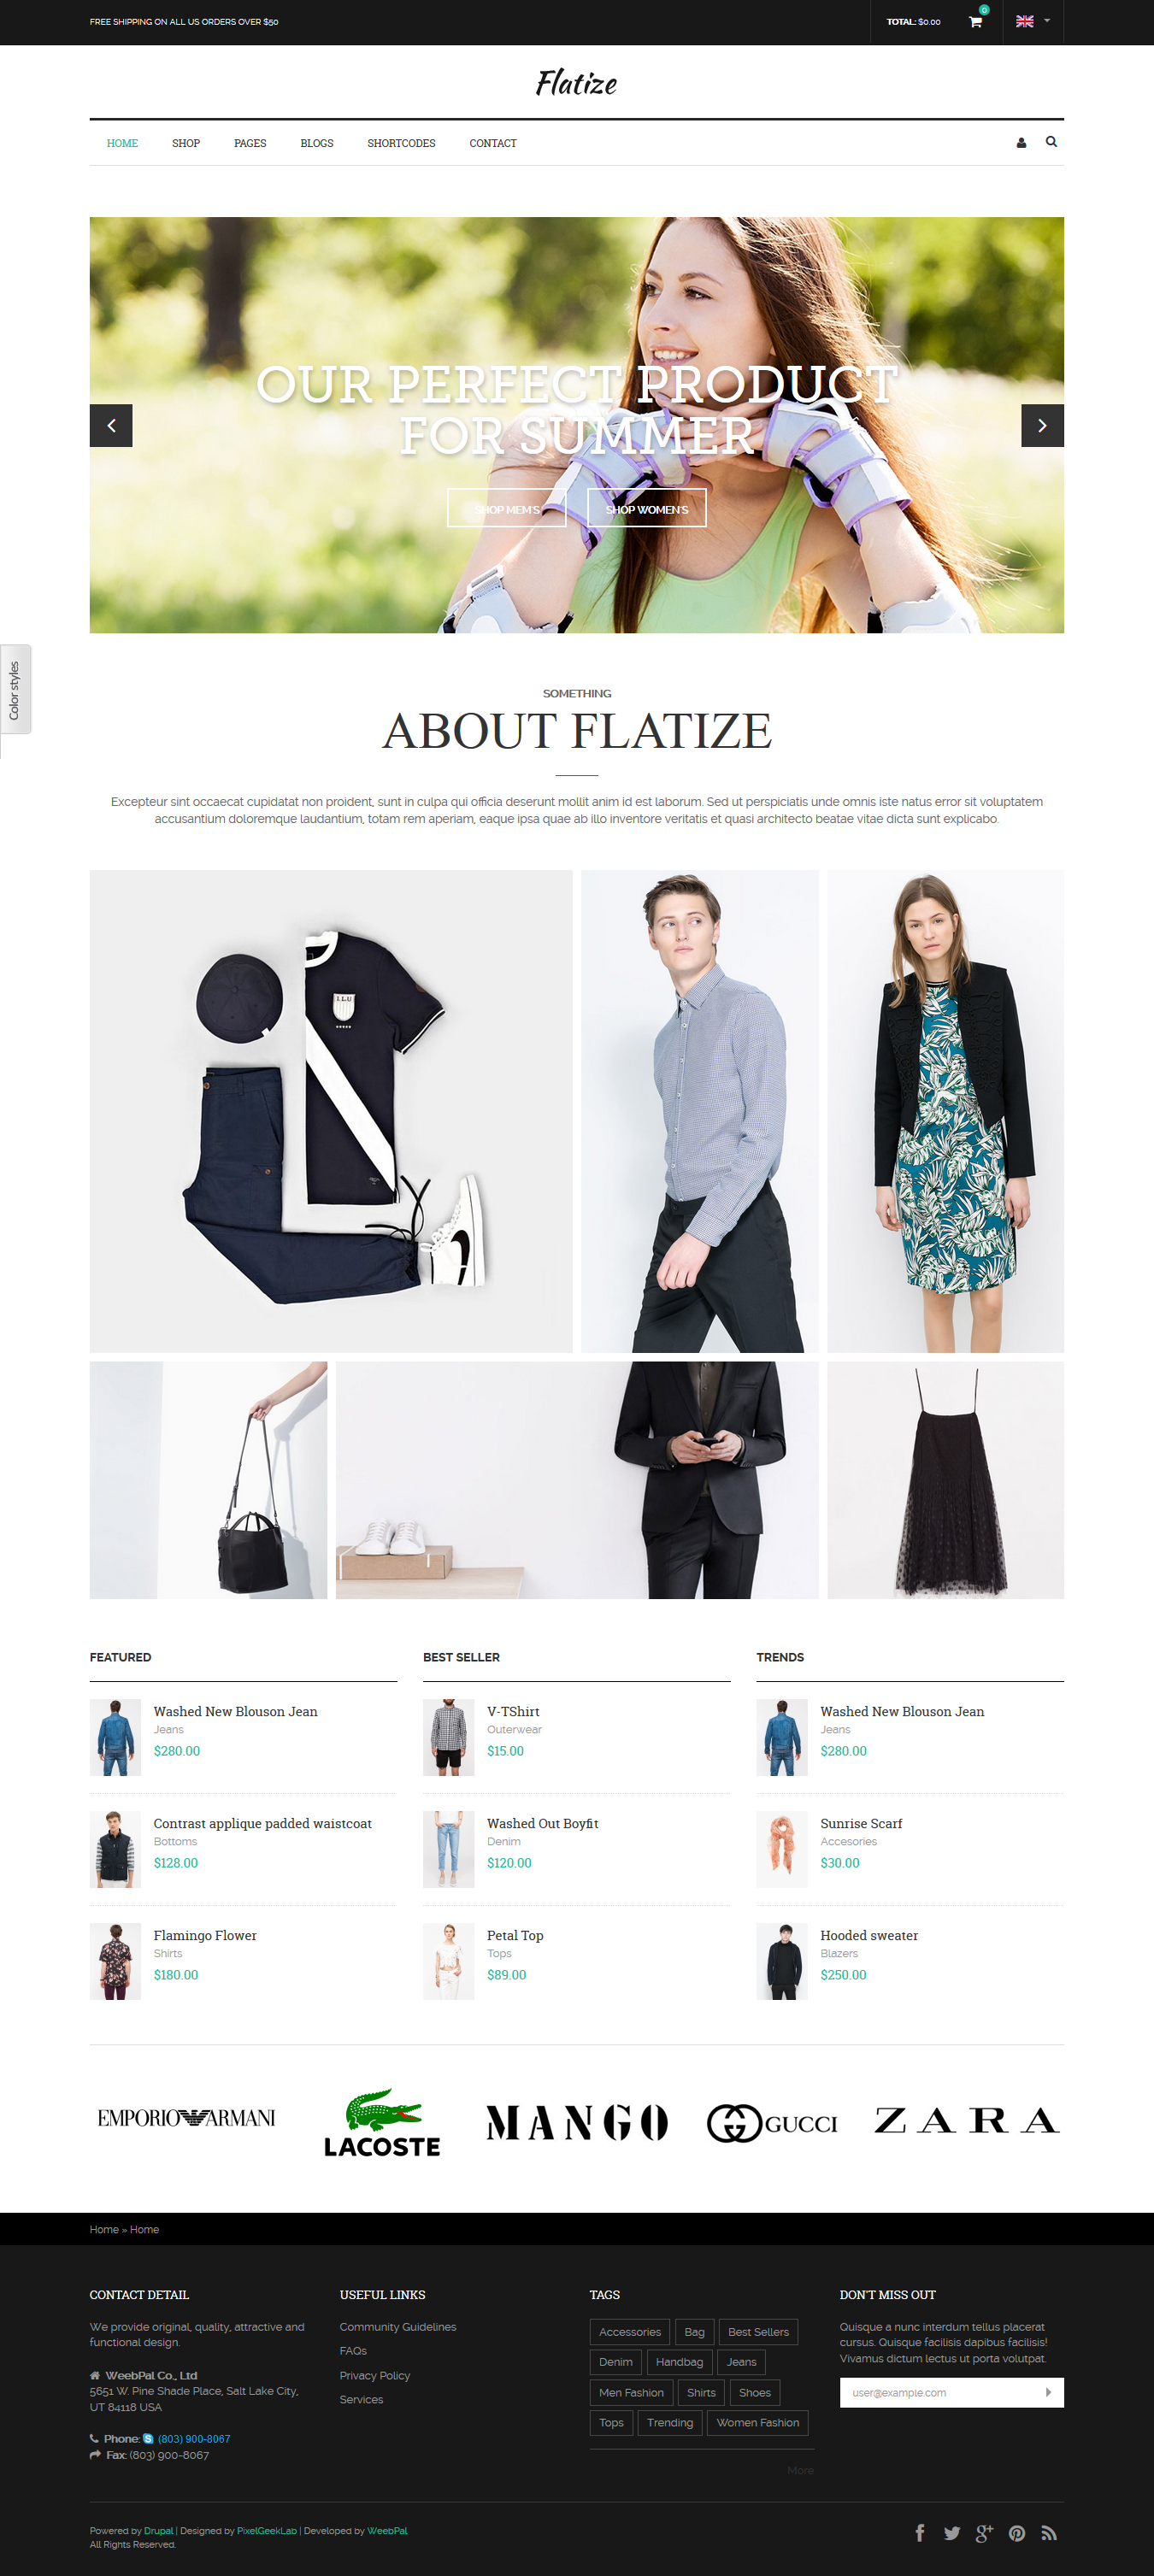
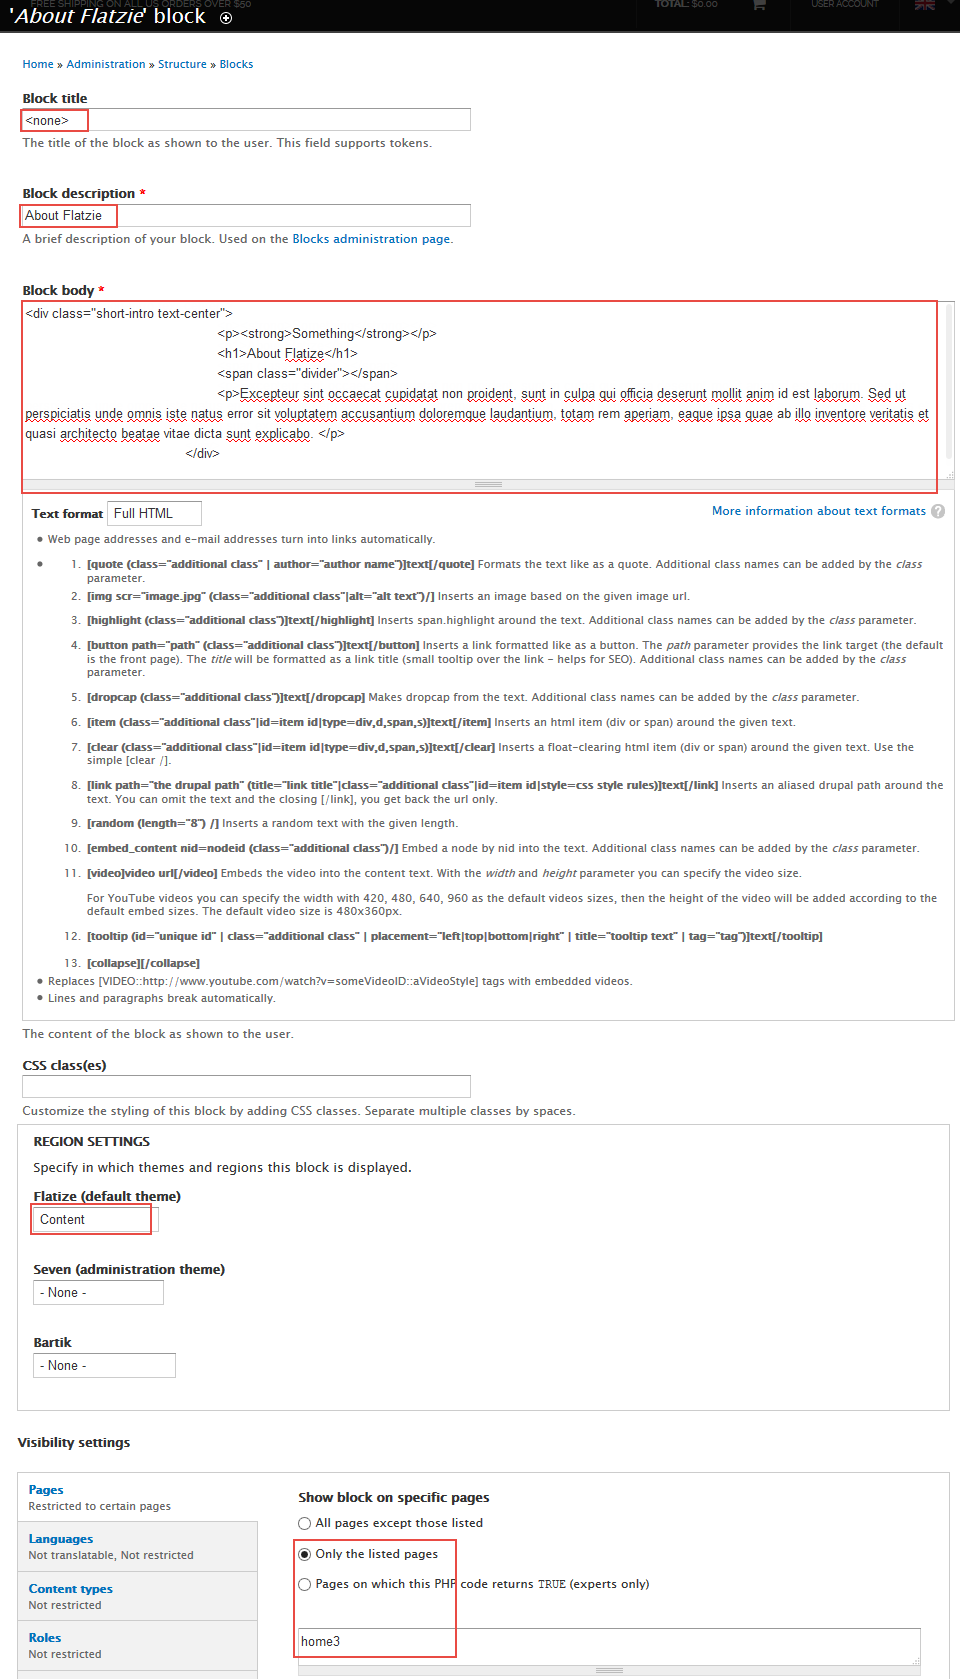
Home3: About Flatize
Front end Display
Create & configure block
Step 1: Navigate to Structure > Blocks, click Add block link, Create About Flatize block with following properties:
Refer to following HTML code:
Something
About Flatize
Excepteur sint occaecat cupidatat non proident, sunt in culpa qui officia deserunt mollit anim id est laborum. Sed ut perspiciatis unde omnis iste natus error sit voluptatem accusantium doloremque laudantium, totam rem aperiam, eaque ipsa quae ab illo inventore veritatis et quasi architecto beatae vitae dicta sunt explicabo.
Step 2: Click Save block button.
Home3: Company
Front end Display
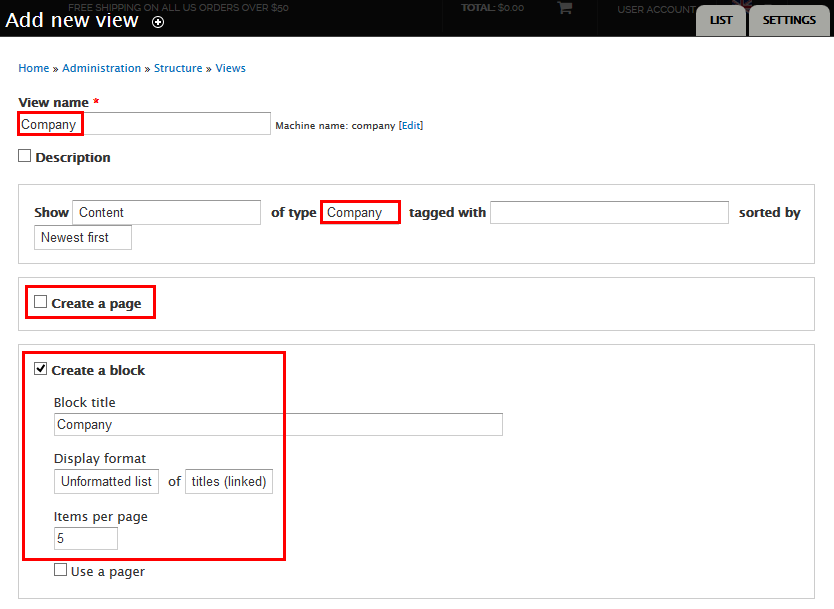
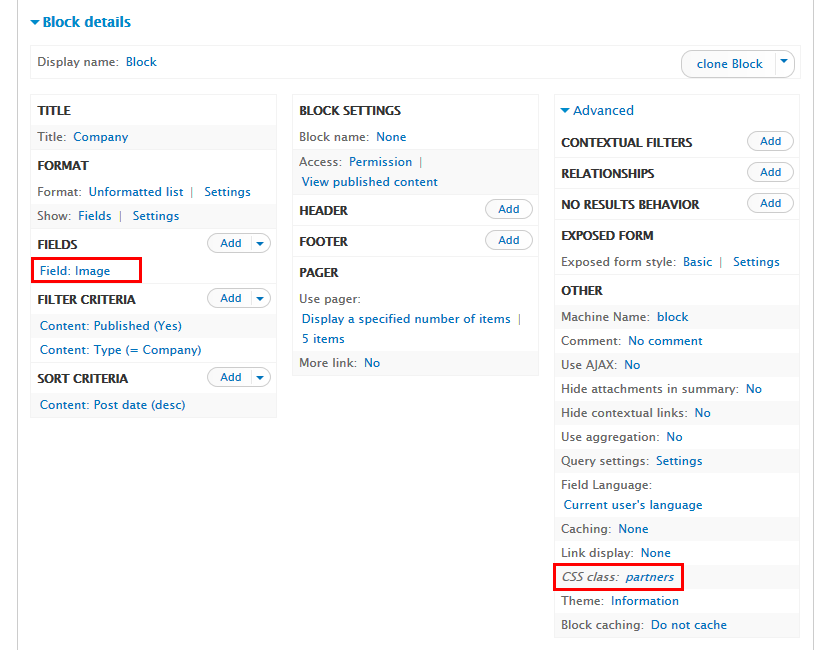
1. Create Company view
Step 1: Navigate to Structure > Views, click Add new view, then create Company view with following settings:
Step 2: Click Continue and edit button. Next to below steps to set properties for following fields:
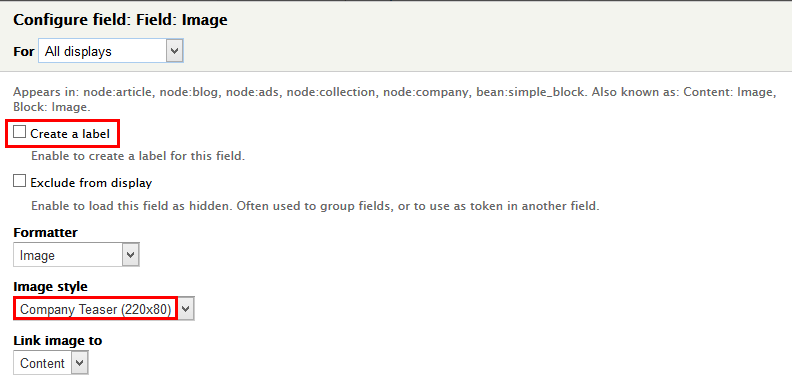
Step 3: At FIELDS area, click Add button to add fields: Field : Imageand set propeties:
Step 4: At FIELDS area, click Rearrange button. Click Remove button to remove Content: Title
Step 5: At Advanced > CSS Class area, set following properties:
Step 6: Click Save to save view
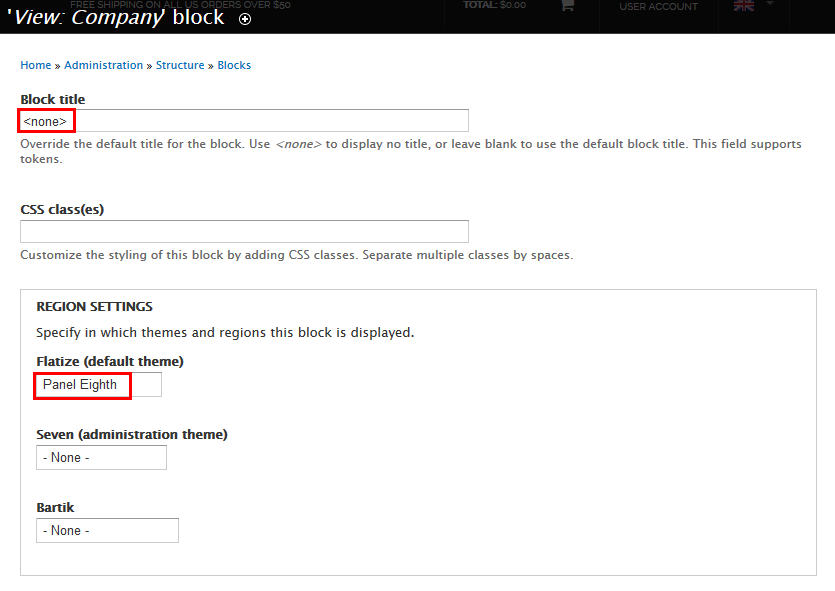
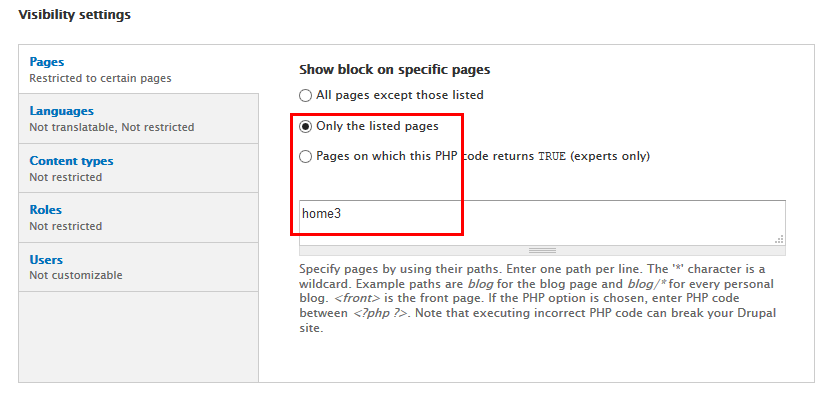
2. Configure Company block
Create Subpages
Search API configuration
Preparation
Create a Search API Index
1. Create a Search API Server
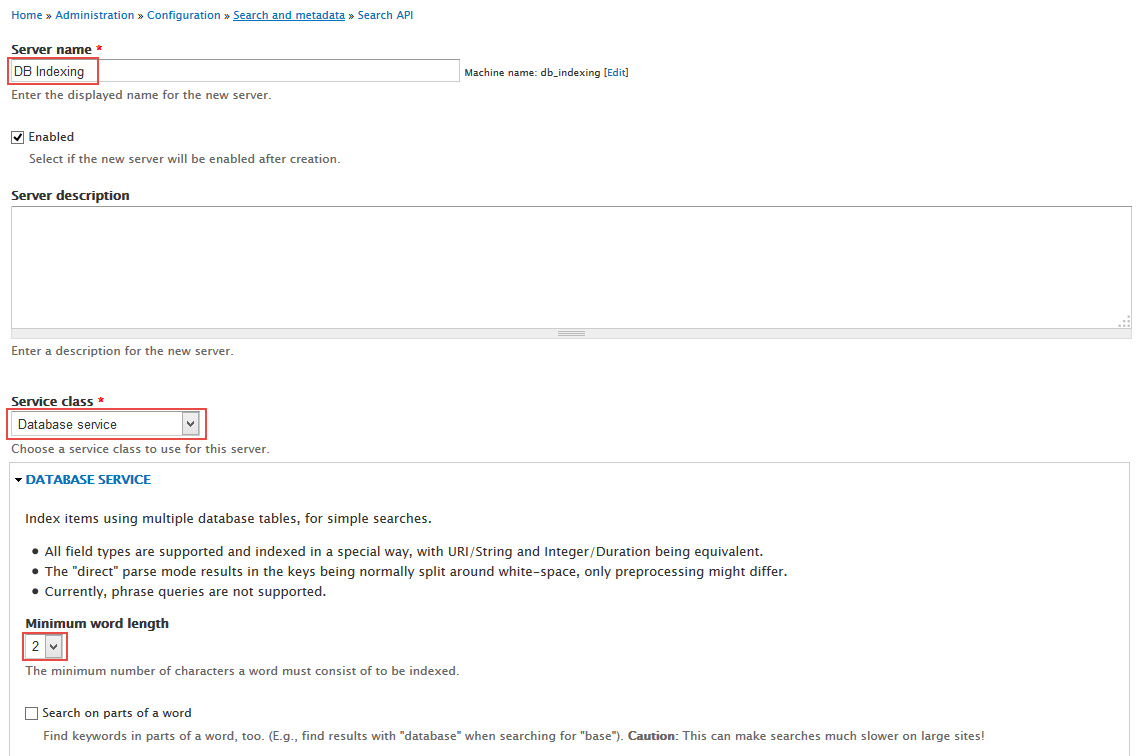
The first step required for our search page, is to create a Search API server. This will let Search API know how and where the index will be stored.
Step 1: Navigate to Configuration > Search API, click Add server link, Create DB Indexing server with following properties:
Step 2: Click Save button
2. Create a Search API Index
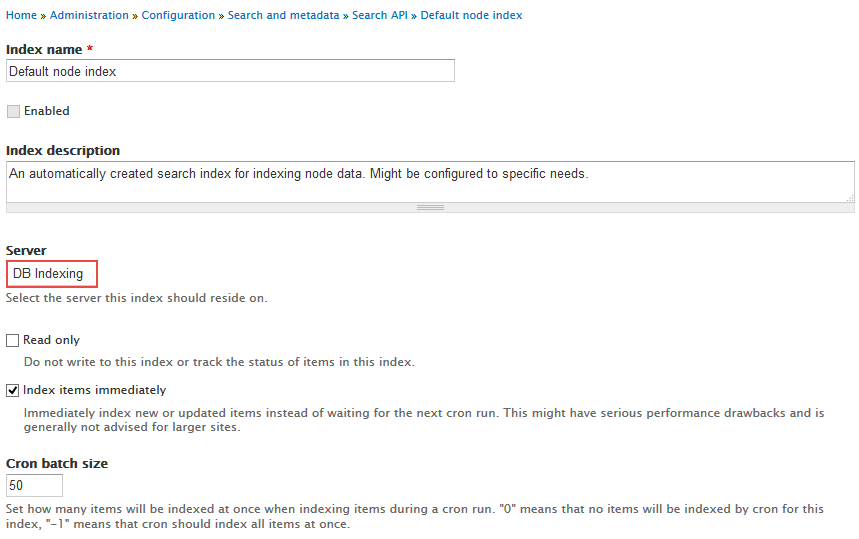
Now, we need to create a Search API index and define which fields should be stored in the index.
Step 1: Navigate to Configuration > Search API, at Default node index row, click Edit link, then set the following properties:
Step 2: Click Save settings
Step 3: Click Enable to enable this index.
3. Define Index fields
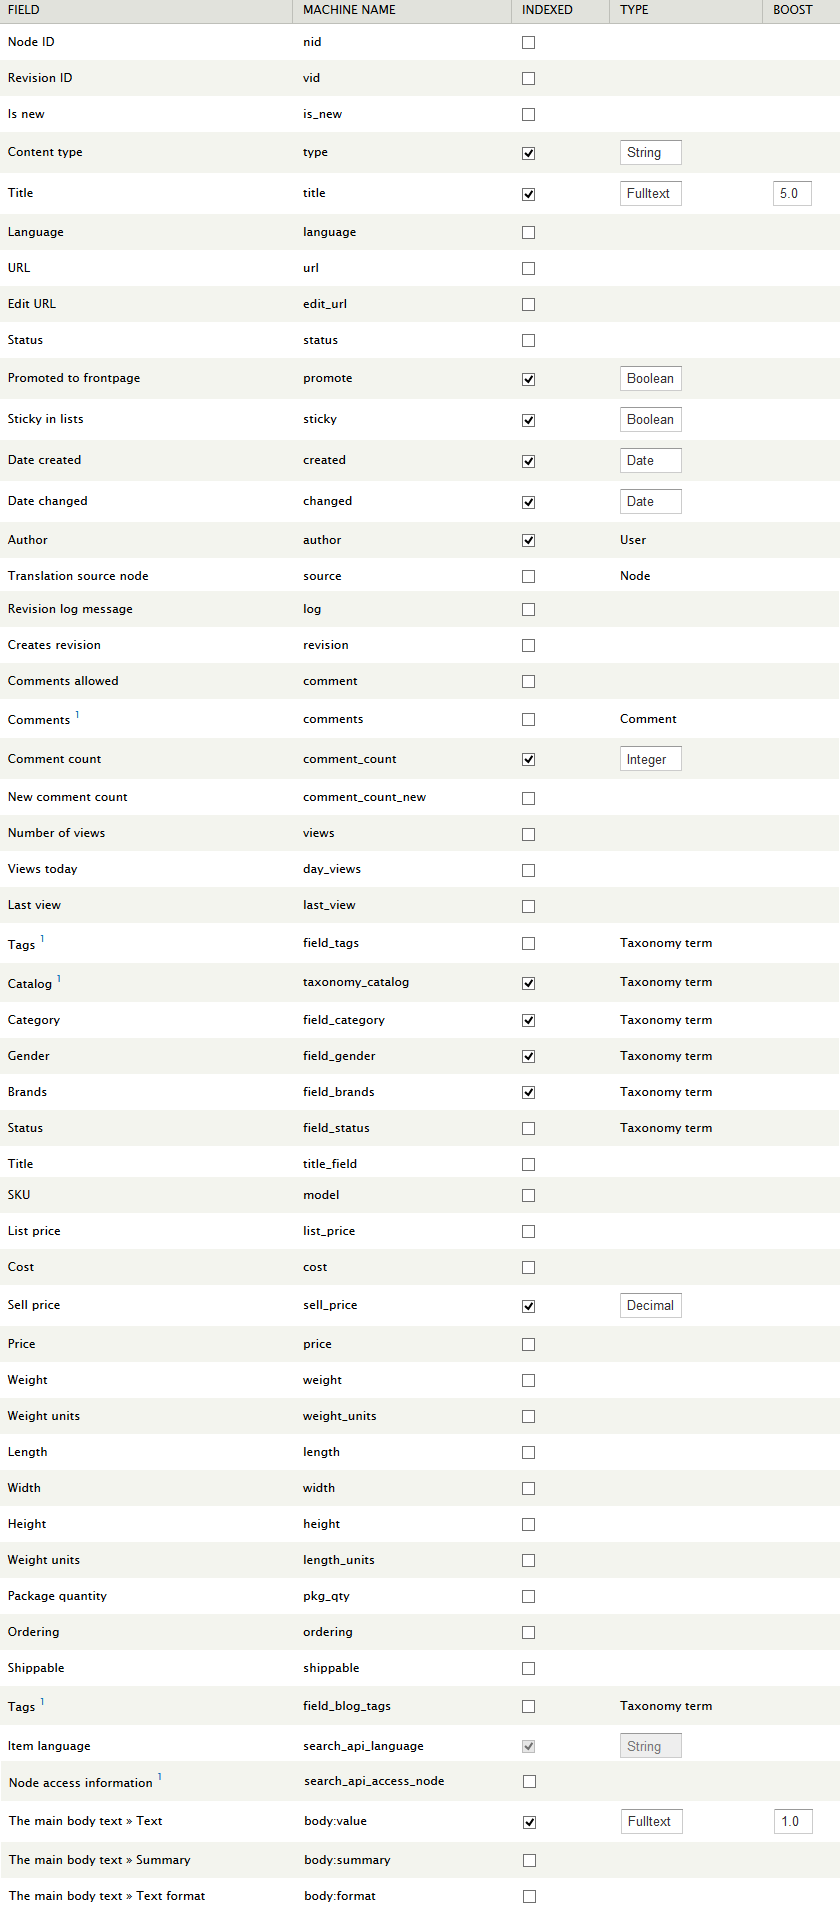
On the Fields page, we have to define which fields will be indexed.
Step 1: Navigate to Configuration > Search API, at Default node index index row, click Edit
Step 2: Navigate to Fields tab, choose whatever fields you want index for searching by checking on them
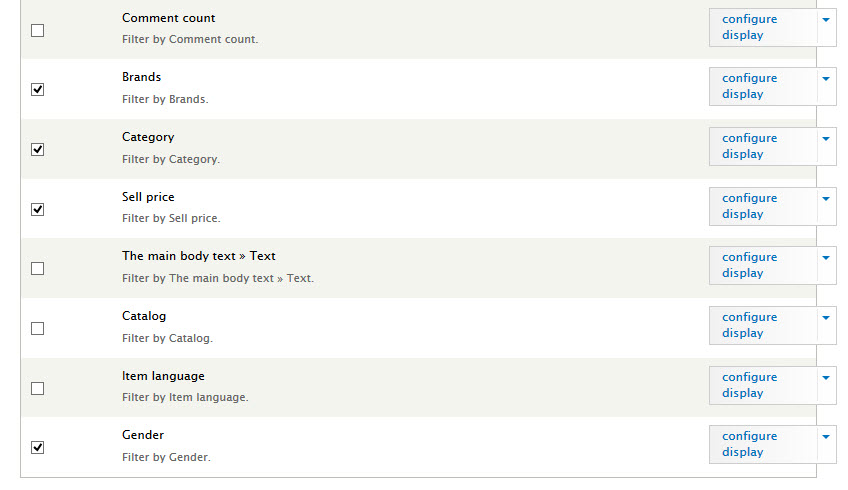
Step 3: In Facets tab, choose whatever facets you want to use to search
Note: What is facet? It is block content which is help you customize the searching
Configure blocks
After Search API Index configuration steps, we have many facets blocks. Move them to Sidebar first region and order them as you want.
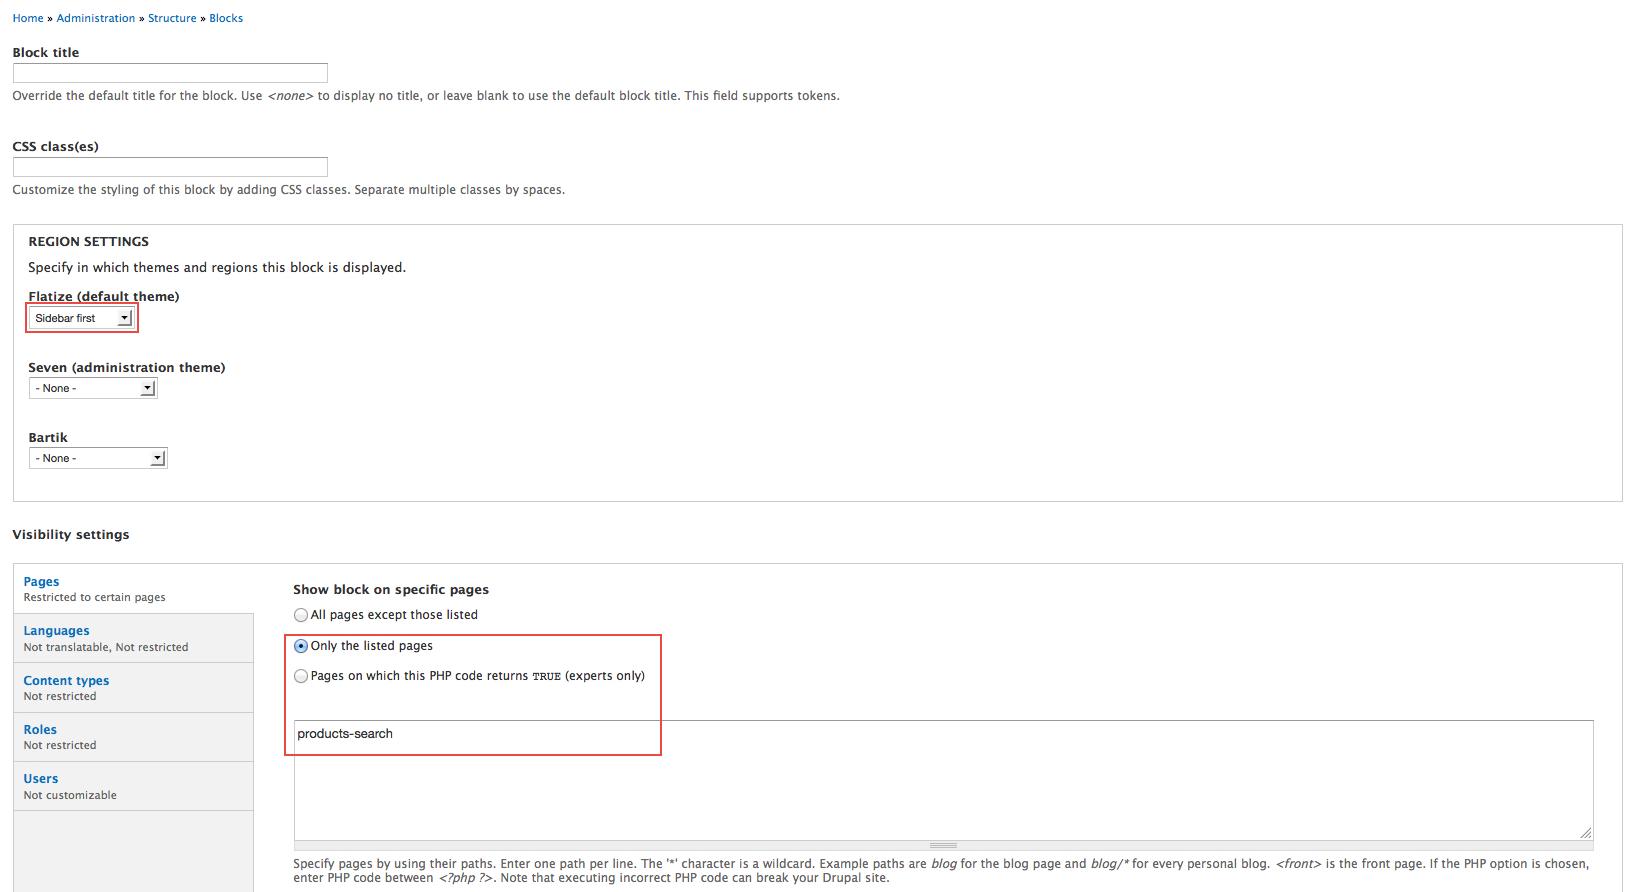
Step 1: Navigate to Structure > Blocks, find facets blocks, and set Sidebar first region
Step 2: Click Save blocks button.
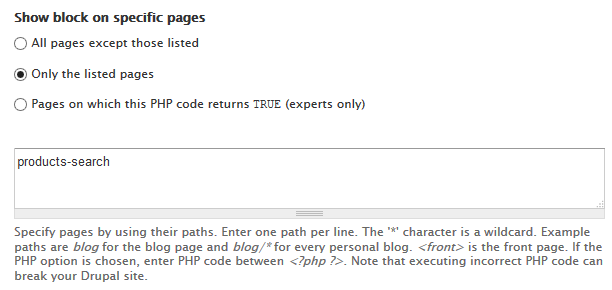
Step 3: Each block, click configure link, set following properties
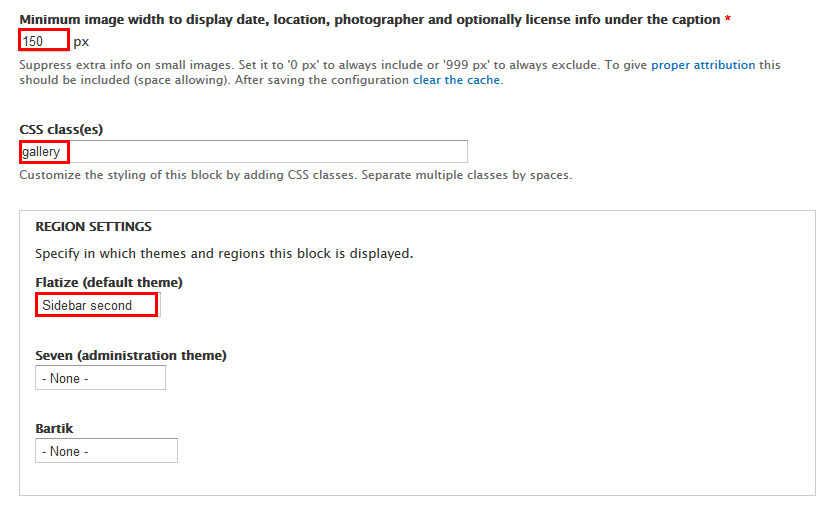
Set CSS class(es) for only block Facet API: Search service: Default node index : Sell price (Filter by Price).
Sidebar second: Ads
Front end Display
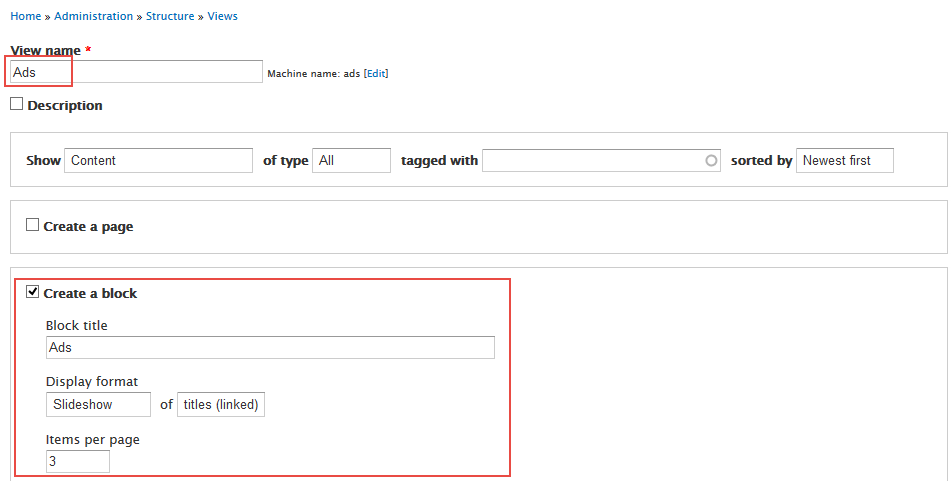
1. Create & configure Ads view
Step 1: Navigate to Structure > Views, click Add new view, create Ads view with the following settings:
Step 2: Click Continue and edit button. Next to below steps to set properties for the following fields:
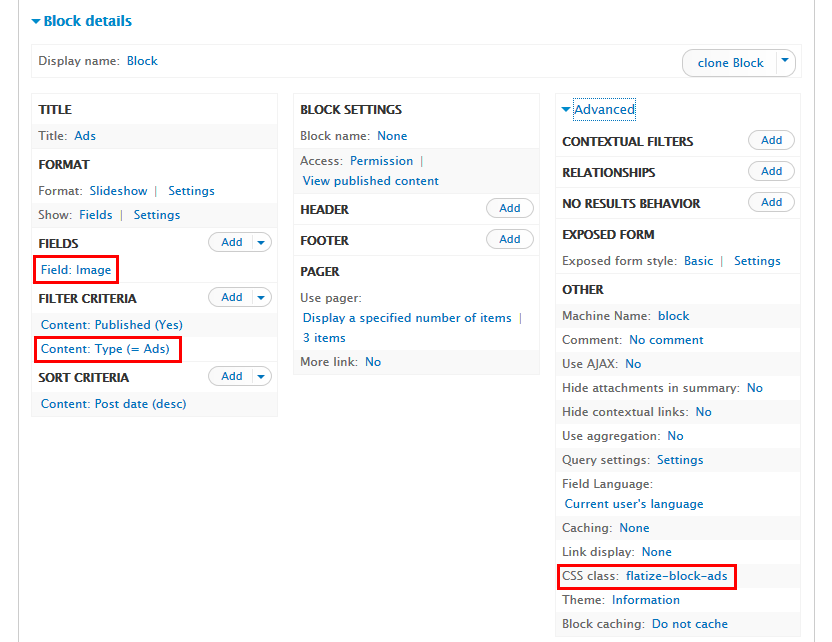
Step 3: At FIELDS area, click Add button to add fields: Field: Image and set the following properties:
Step 4: At FIELDS area, click Rearrange button, then click Remove link to remove Content: Title field
Step 5: At Advanced > CSS Class, set the following properties:
Step 6: Click Save to save view
2. Configure View : Ads block
Sidebar second: Blog Video
Front end Display
1. Create & configure view
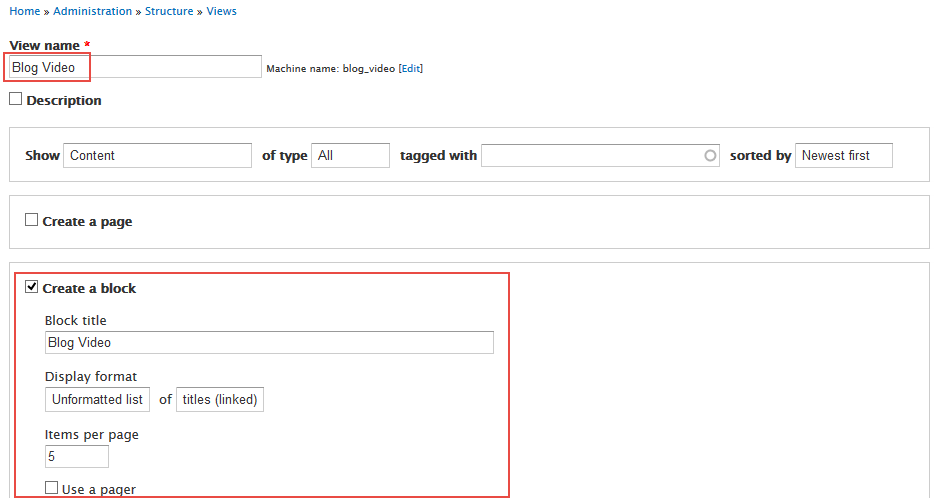
Step 1: Navigate to Structure > Views, click Add new view, create Blog Video view with the following settings:
Step 2: Click Continue and edit button. Add fields with the following properties:
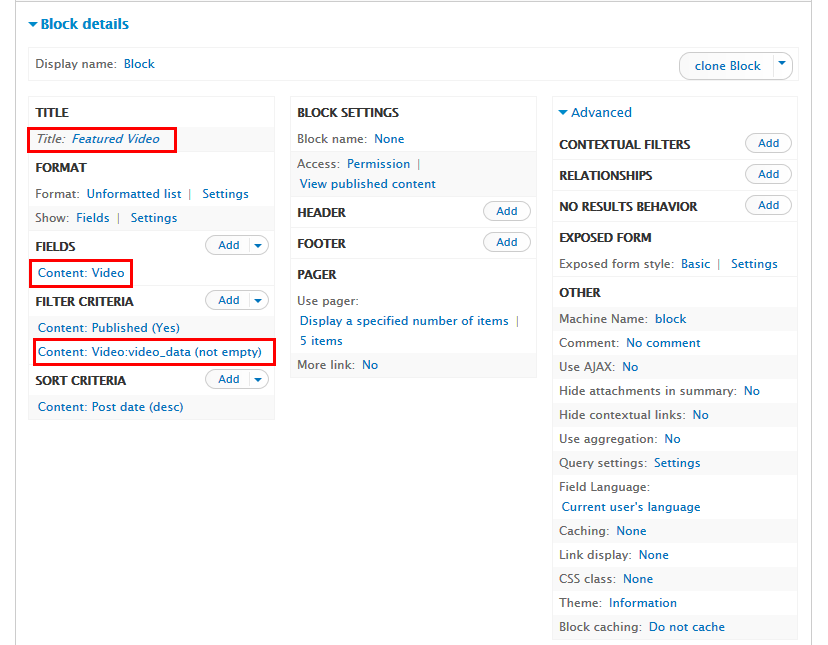
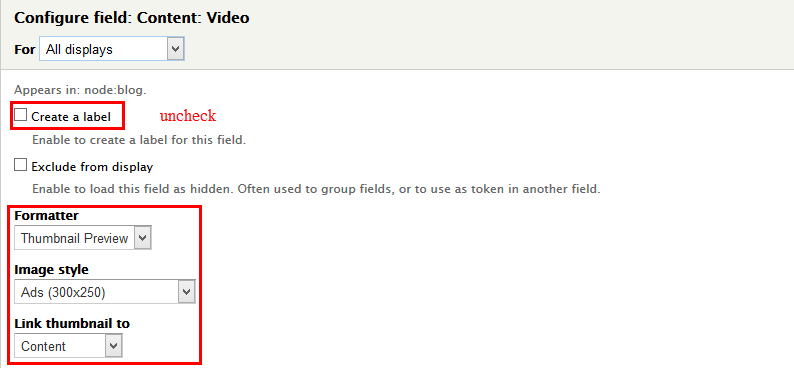
Step 3: At FIELDS area, click Add button to add fields: Content: Video and set the following properties:
Step 4: At FIELDS area, click Rearrange button, then click Remove link to remove Content: Title field
Step 5: At FILTER CRITERIA area, click Add button to add field Content: Video and following properties:
Step 6: At TITLE Title area, set properties:
Step 7: Click Save to save view
2. Configure View: Blog Video
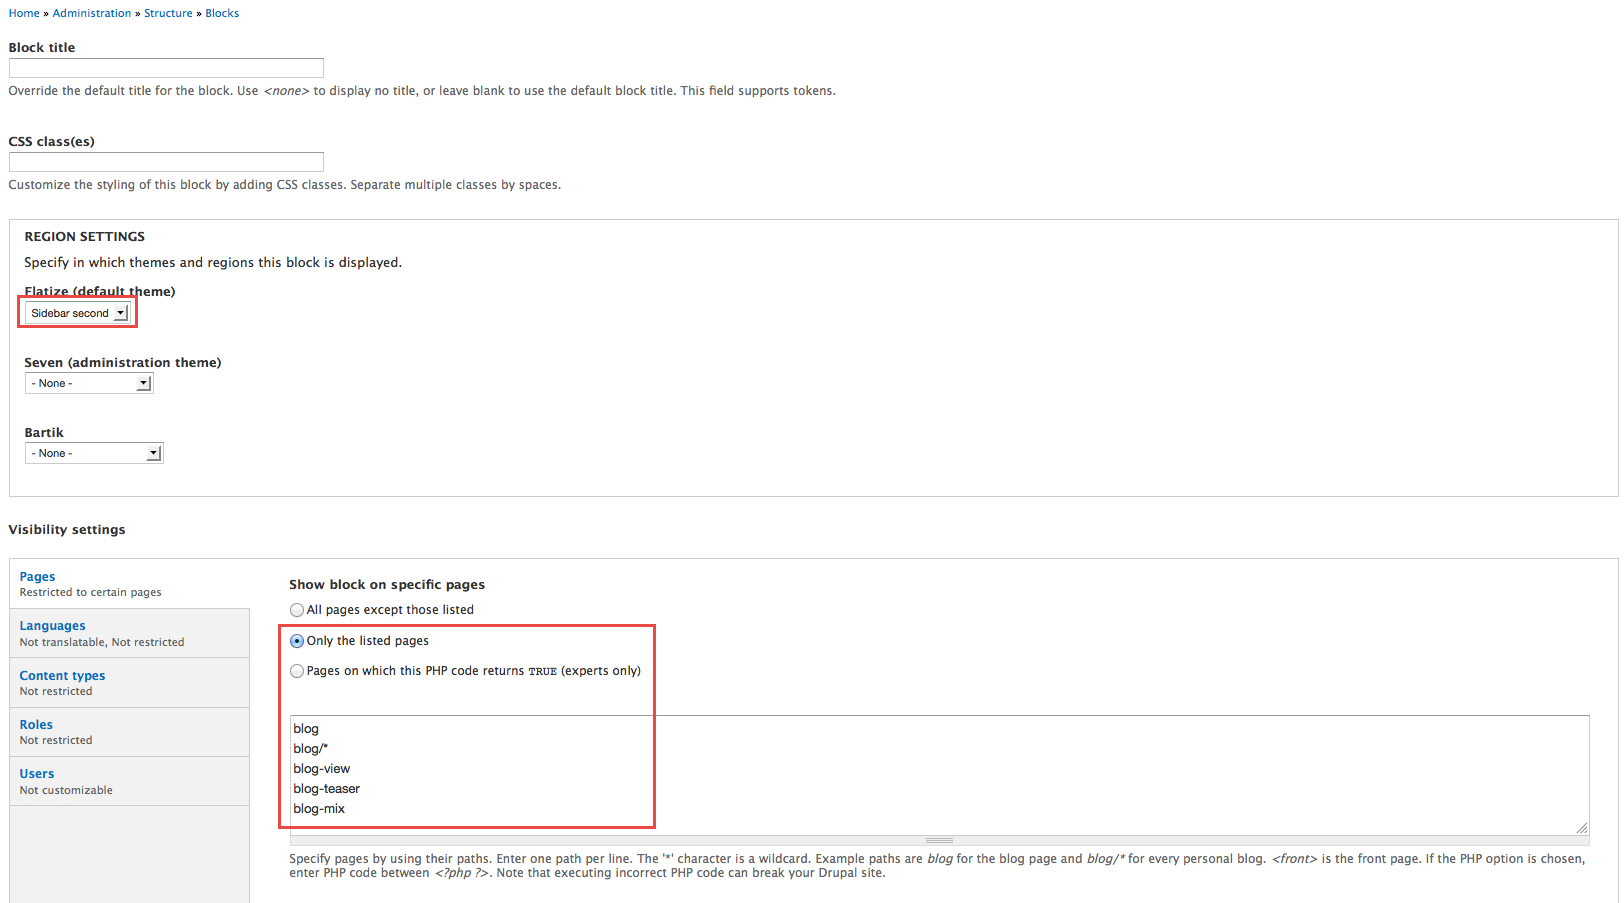
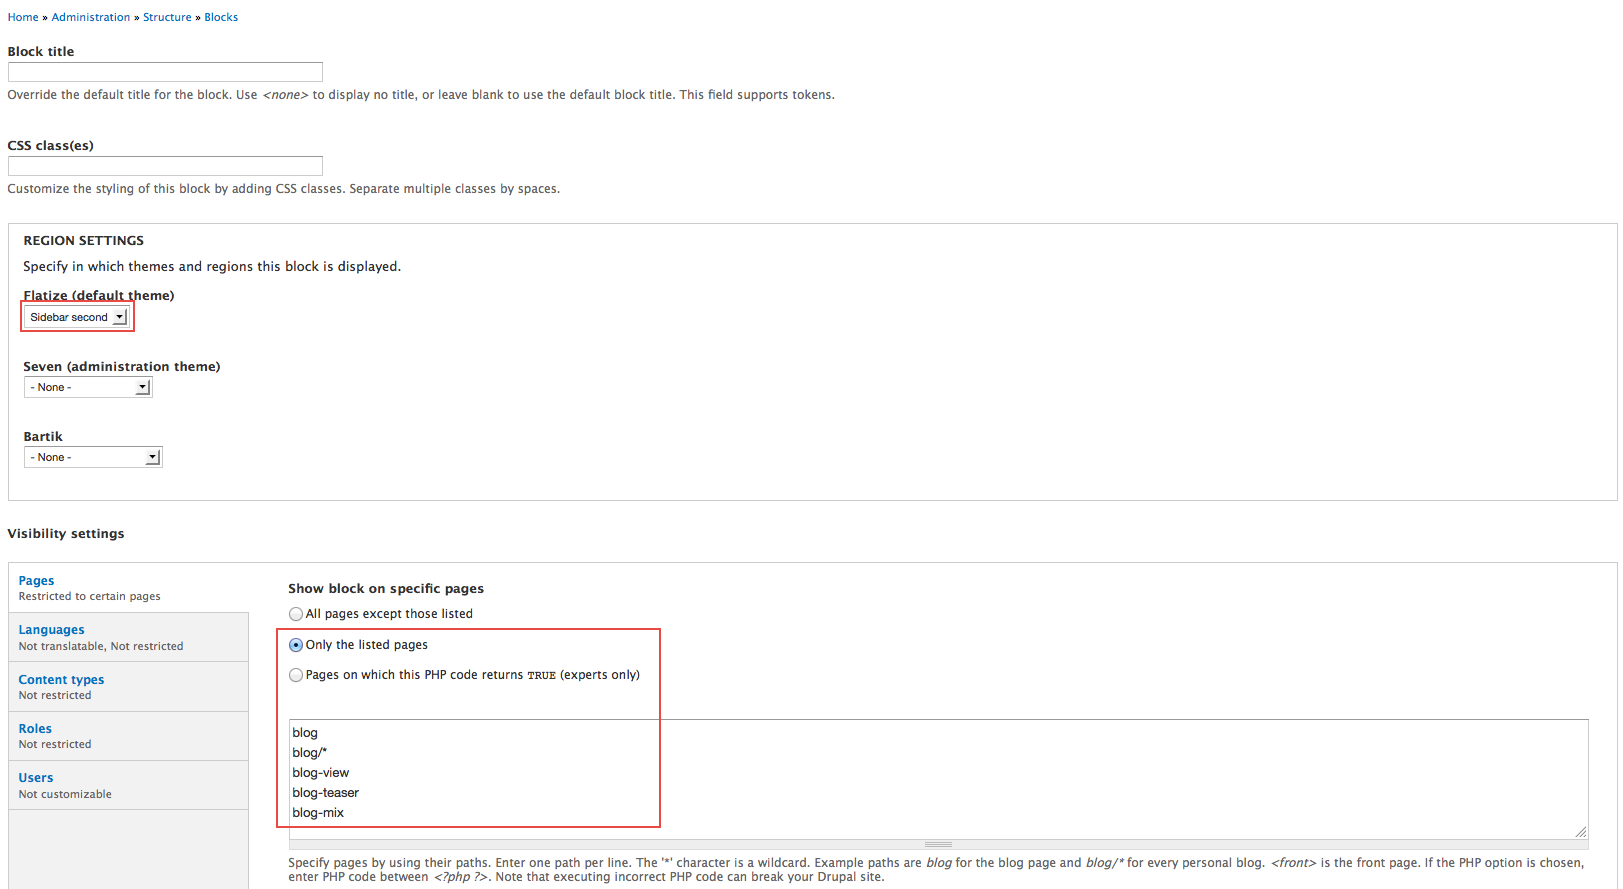
Step 1: Navigate to Structure > Blocks, find View: Blog Video and configure:
Step 2: Click Save button
Sidebar second: Quicktab
Front end Display
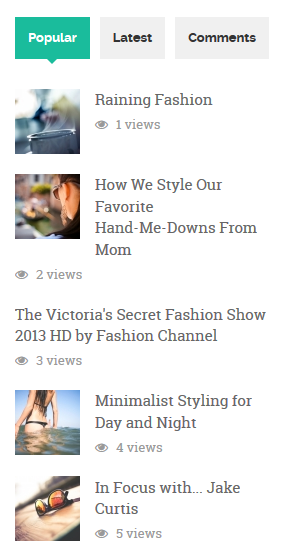
1. Create Popular tab
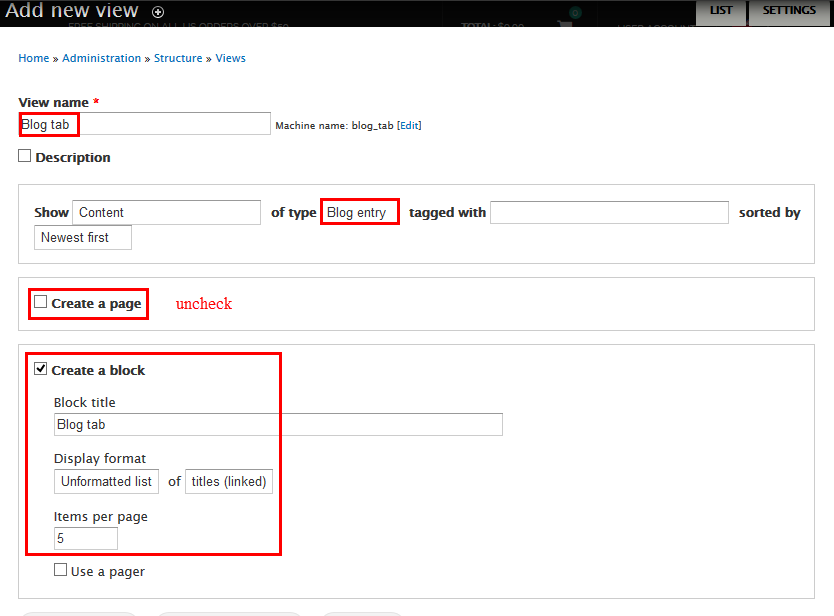
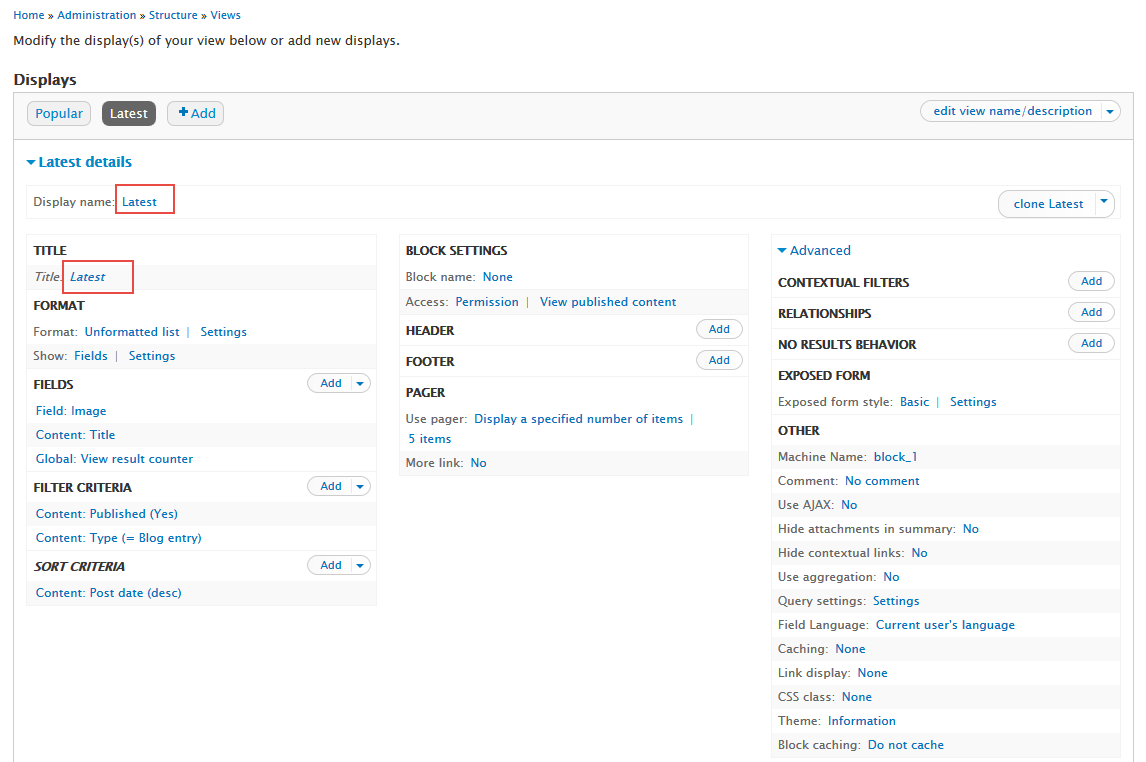
Step 1: Navigate to Structure > Views, click Add new view, create Blog tab view with the following settings:
Step 2: Click Continue and edit button. Add fields with the following properties:
Step 3: At Display name area, set properties:
Step 4: At Title area, set properties:
Step 5: At FIELDS area, click Add button to add field: Field: Image, Content: Video, Global: View result counter
Step 6: Set properties for Field: Image
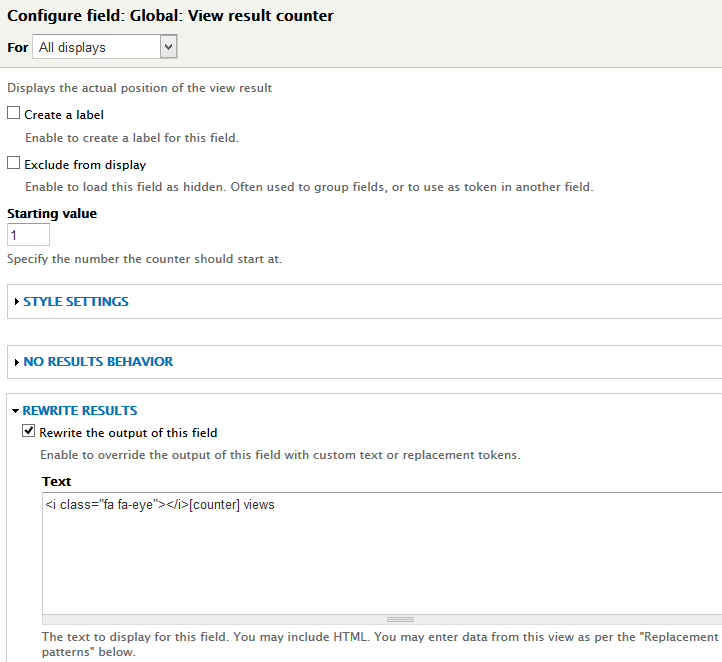
Step 7: Set properties for Global: View result counter
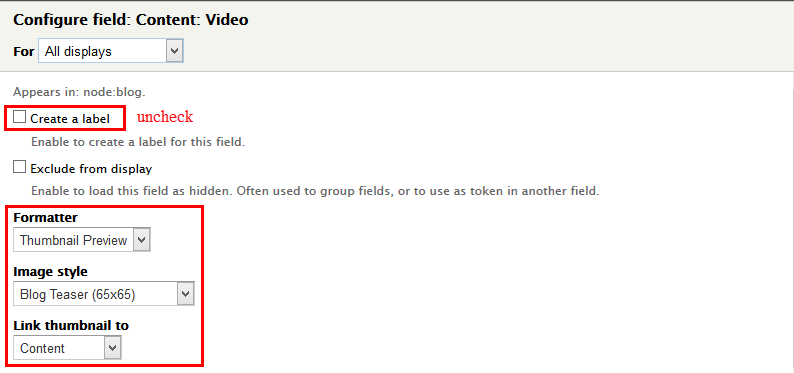
Step 8: Set properties for Content: Video
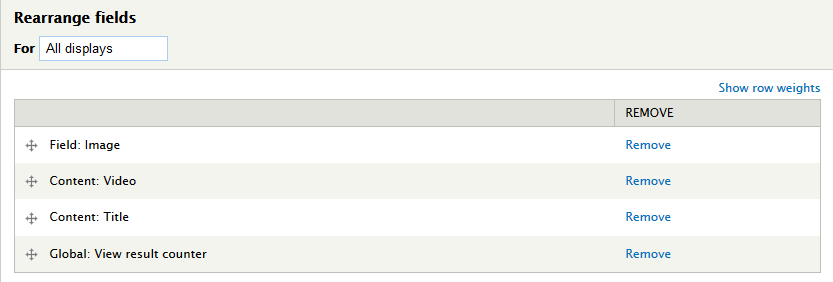
Step 9: At FIELDS area, click Rearrange button and set following properties field
Step 10: Click Save to save view
2. Create Latest tab
Step 1: Navigate to Structure > Views, find Blog tab
Step 2: Click Add > Block. Next to below steps to set properties for following fields:
Step 3: At Display name area, set properties:
Step 4: At Title area, set properties:
Step 5: Click Save to save view
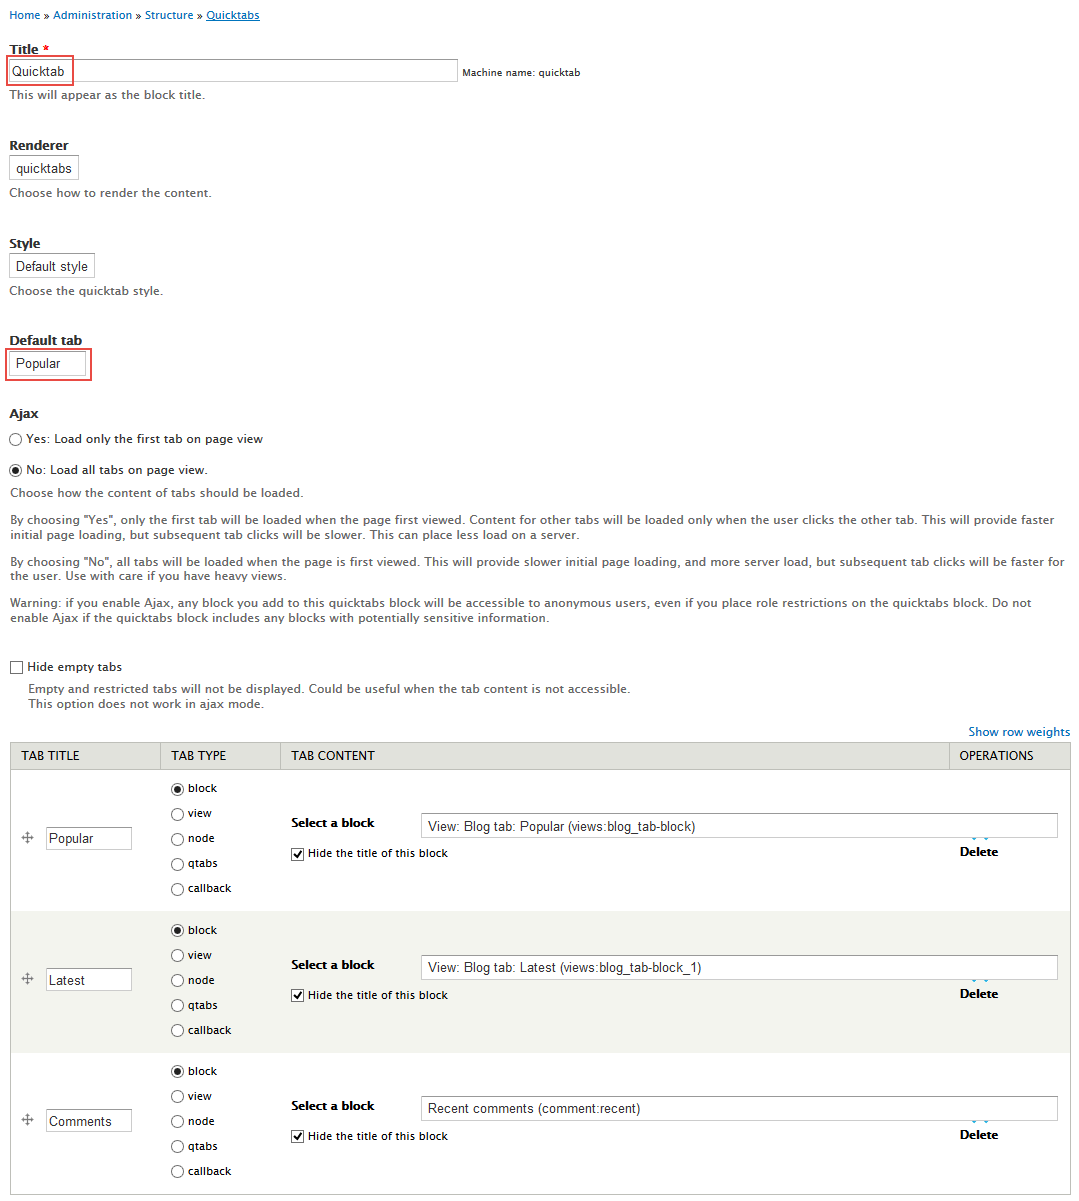
3. Create Quicktab
Step 1: Navigate to Structure > Quicktabs, click Add Quicktabs Instance, create Quicktab with following settings:
Step 2: Click Save button.
4. Configure Quicktab block
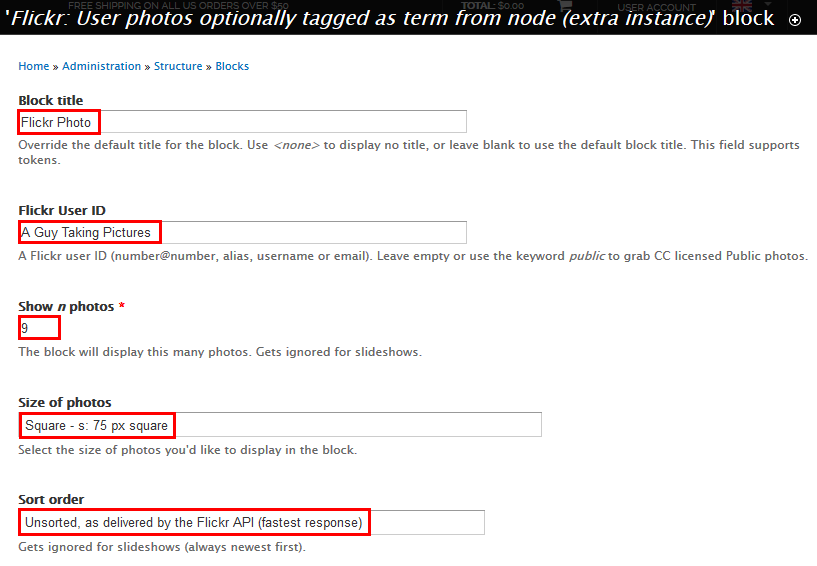
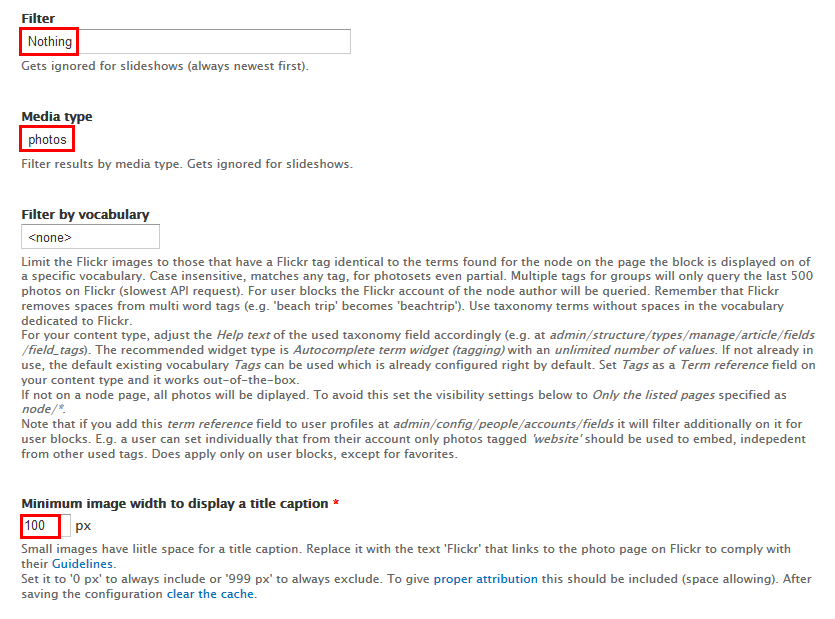
Sidebar second: Flickr Photo
Configure Flickr: User photos optionally tagged as term from node block
Step 1: Navigate to Structure > Blocks, find Flickr: User photos optionally tagged as term from node block and configure:
Step 2: Click Save button
Shop page
Front end Display
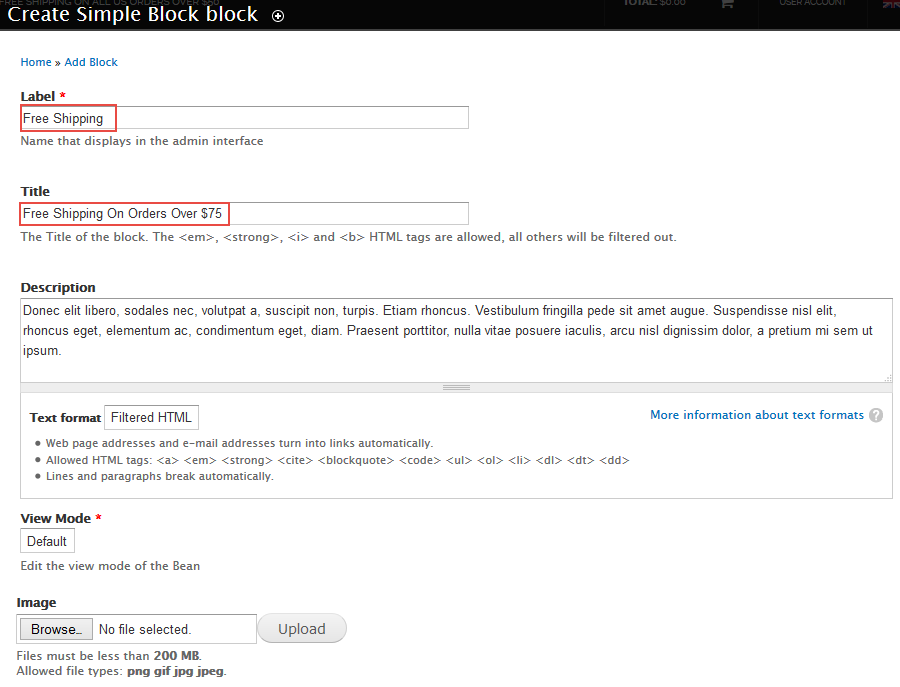
1. Create Simple Block: FREE SHIPPING ON ORDERS OVER $75
Step 1: Navigate to Content > Add Block > Simple Block, click Add new view, then create Free Shipping block with the following settings:
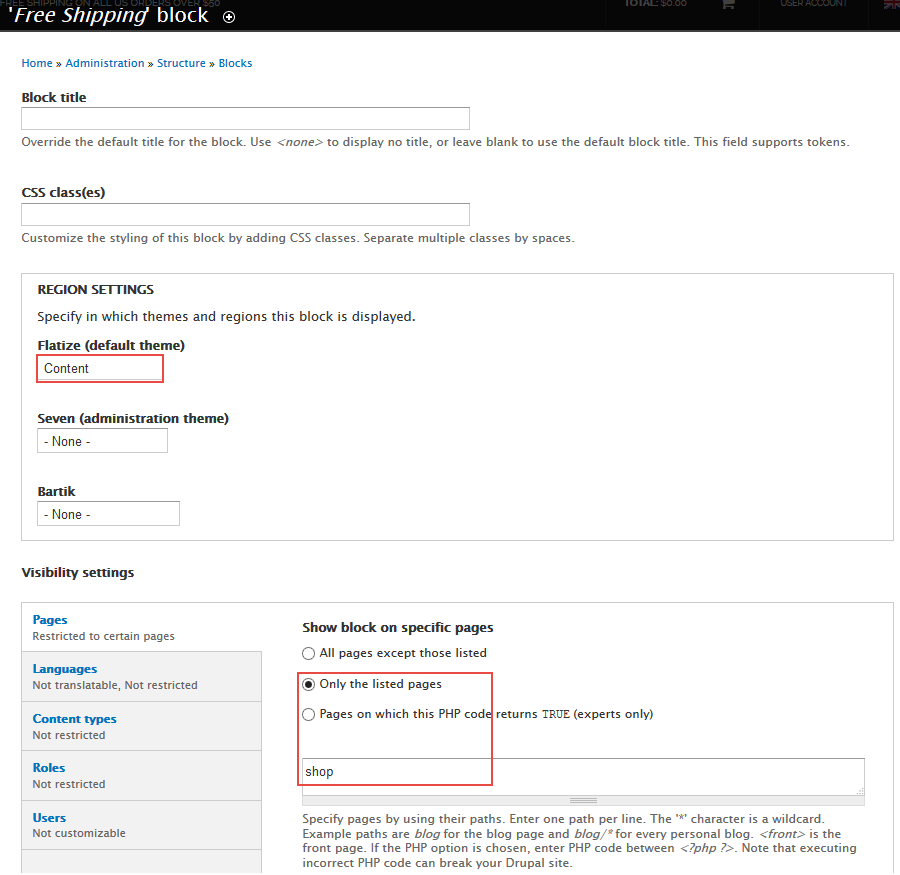
Step 2: Navigate to Structure > Blocks, find Free Shipping block, click configure then set the following properties:
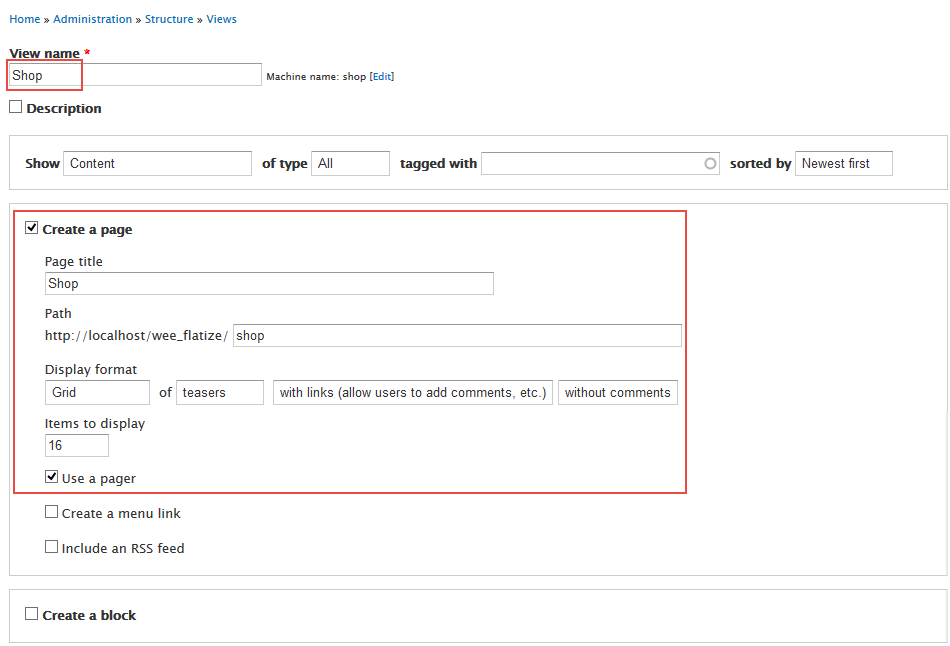
2. Create Shop view
Step 1: Navigate to Structure > Views, click Add new view, then create Shop view with the following settings:
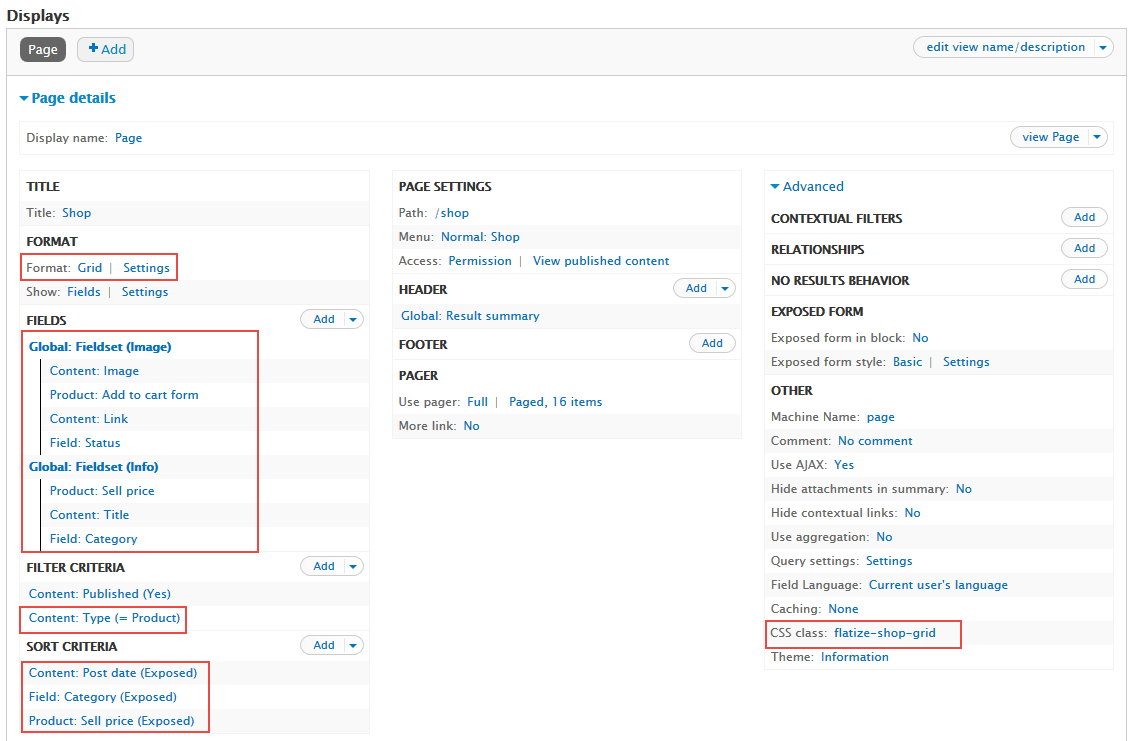
Step 2: Click Continue and edit button. Next to below steps to set properties for the following fields:
Step 4: At FIELDS area, click Add button to add fields: Content: Image, Global: Fieldset, Content: Link, Product: Add to cart form, Field: Status, Product: Sell price, Field: Category
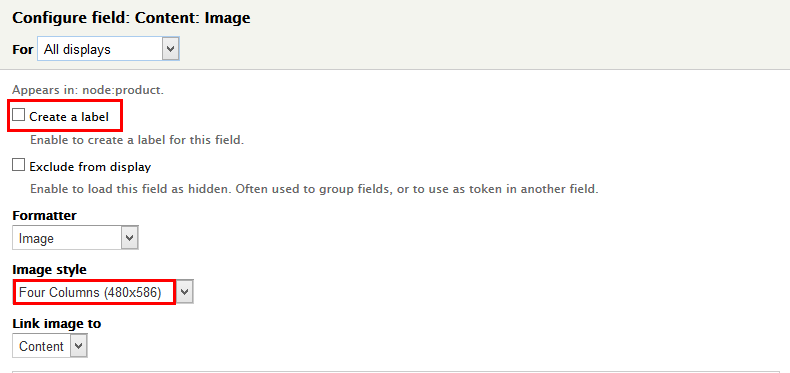
Step 5: Set properties for Content: Image
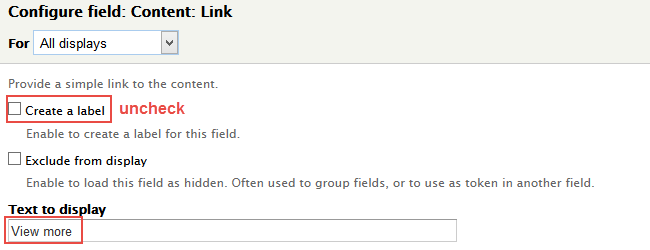
Step 6: Set properties for Content: Link
Step 7: Set properties for Field: Status
Step 8: Set properties for Product: Sell Price
Step 9: Set properties for Global: Fieldset (Image)
Step 10: Set properties for Global: Fieldset (Info)
Step 11: At FIELDS area, click Rearrange button and set the following arrangements
Step 12: At FILTER CRITERIA area, Click Add button to add field Content: Type with the following properties:
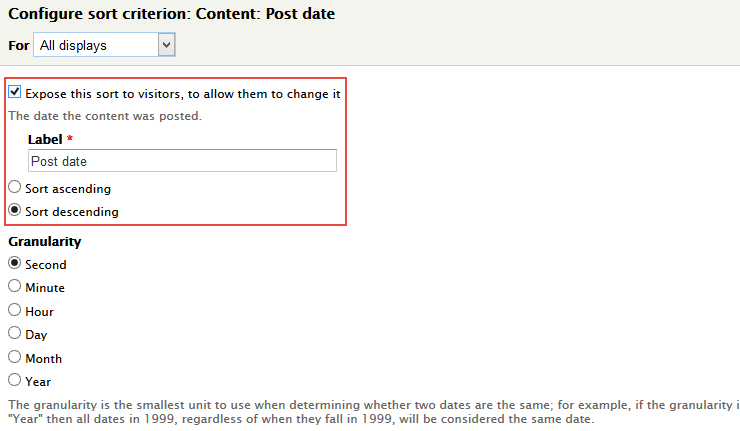
Step 11: At SORT CRITERIA area, Click Add button to add fields Field: Category, Product: Sell Price
Step 13: Set properties for Content: Post date
Step 14: Set properties for Field: Category
Step 15: Set properties for Product: Sell Price
Step 16: At Advanced > CSS Class, set the following properties:
Step 17: Click Save to save view
Contact
Front end Display
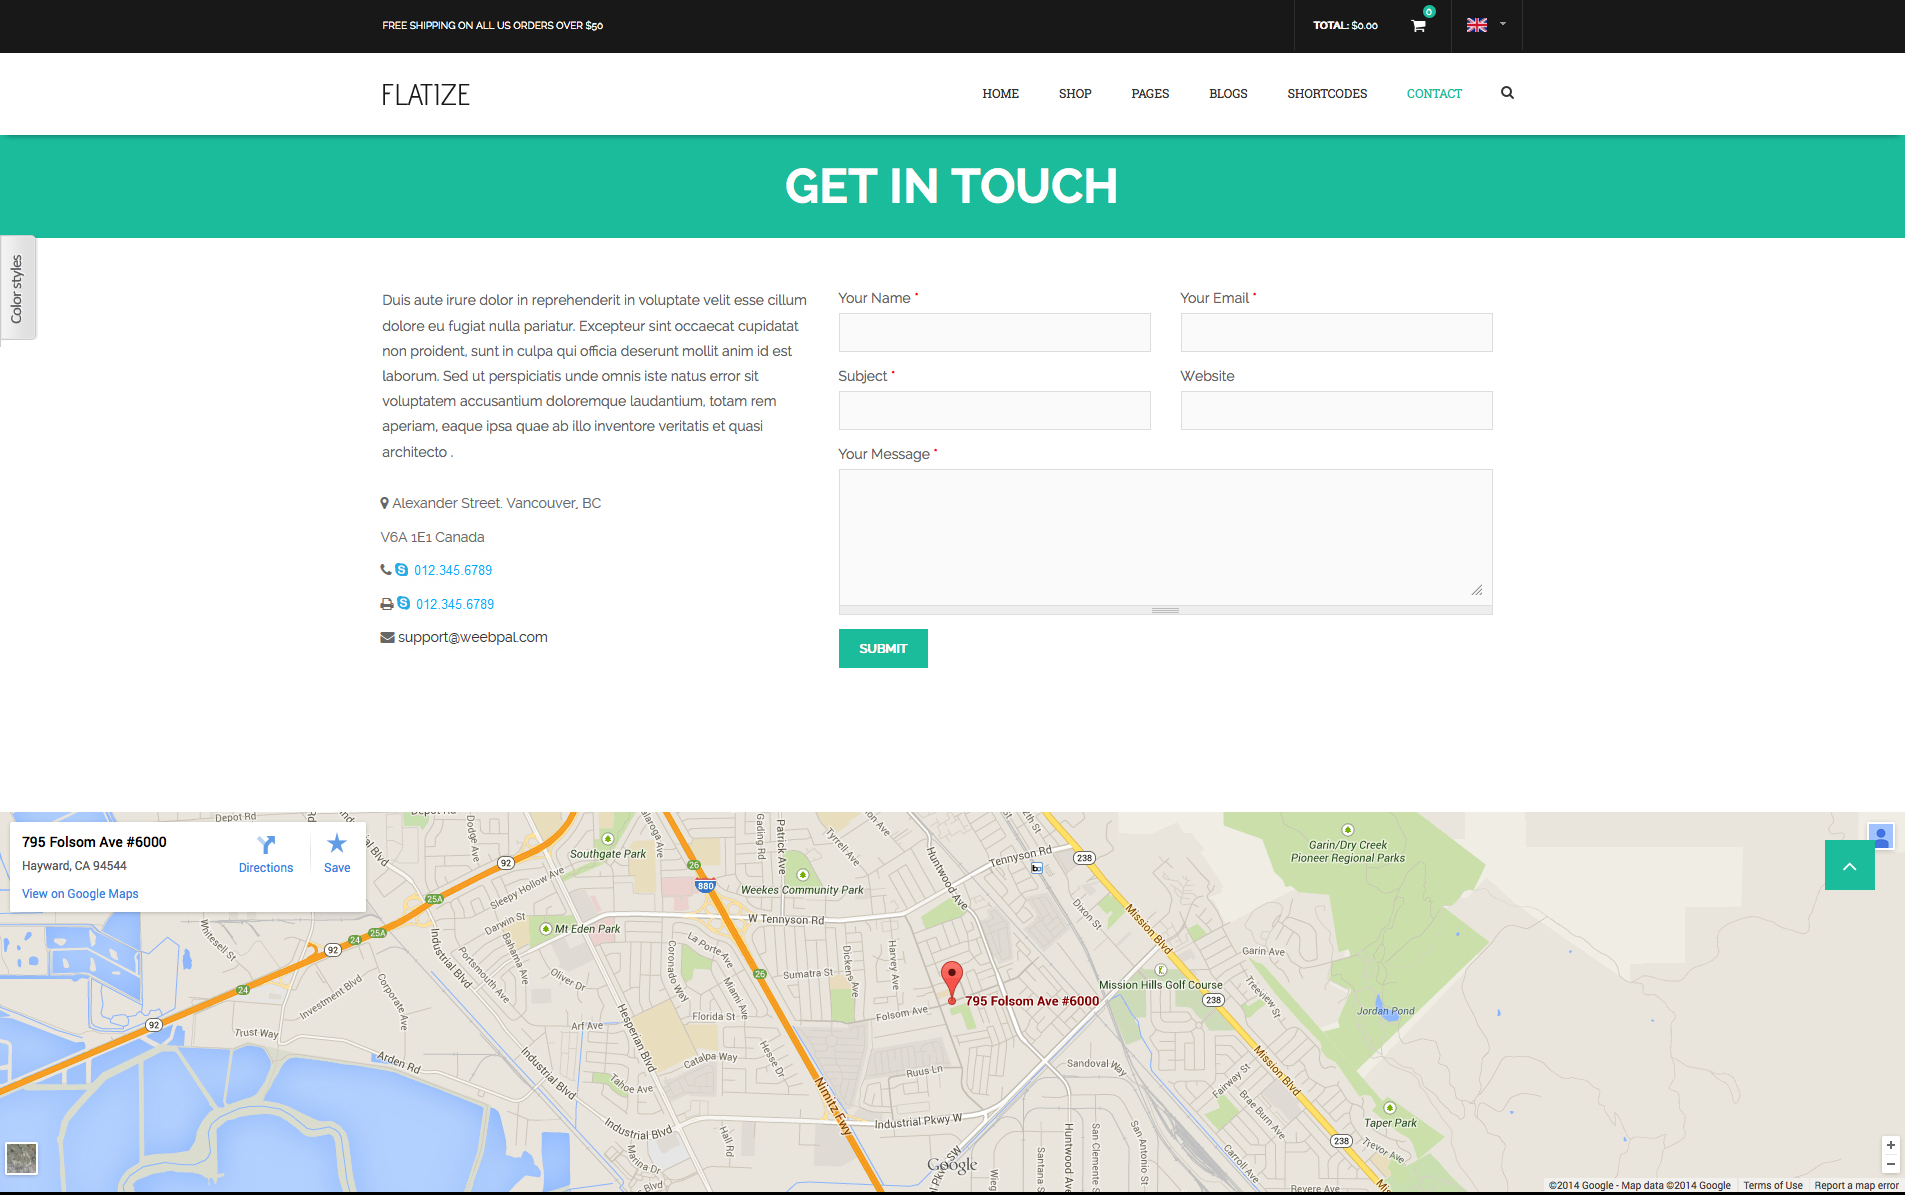
1. Get In Touch block
Make sure Contact module was installed.
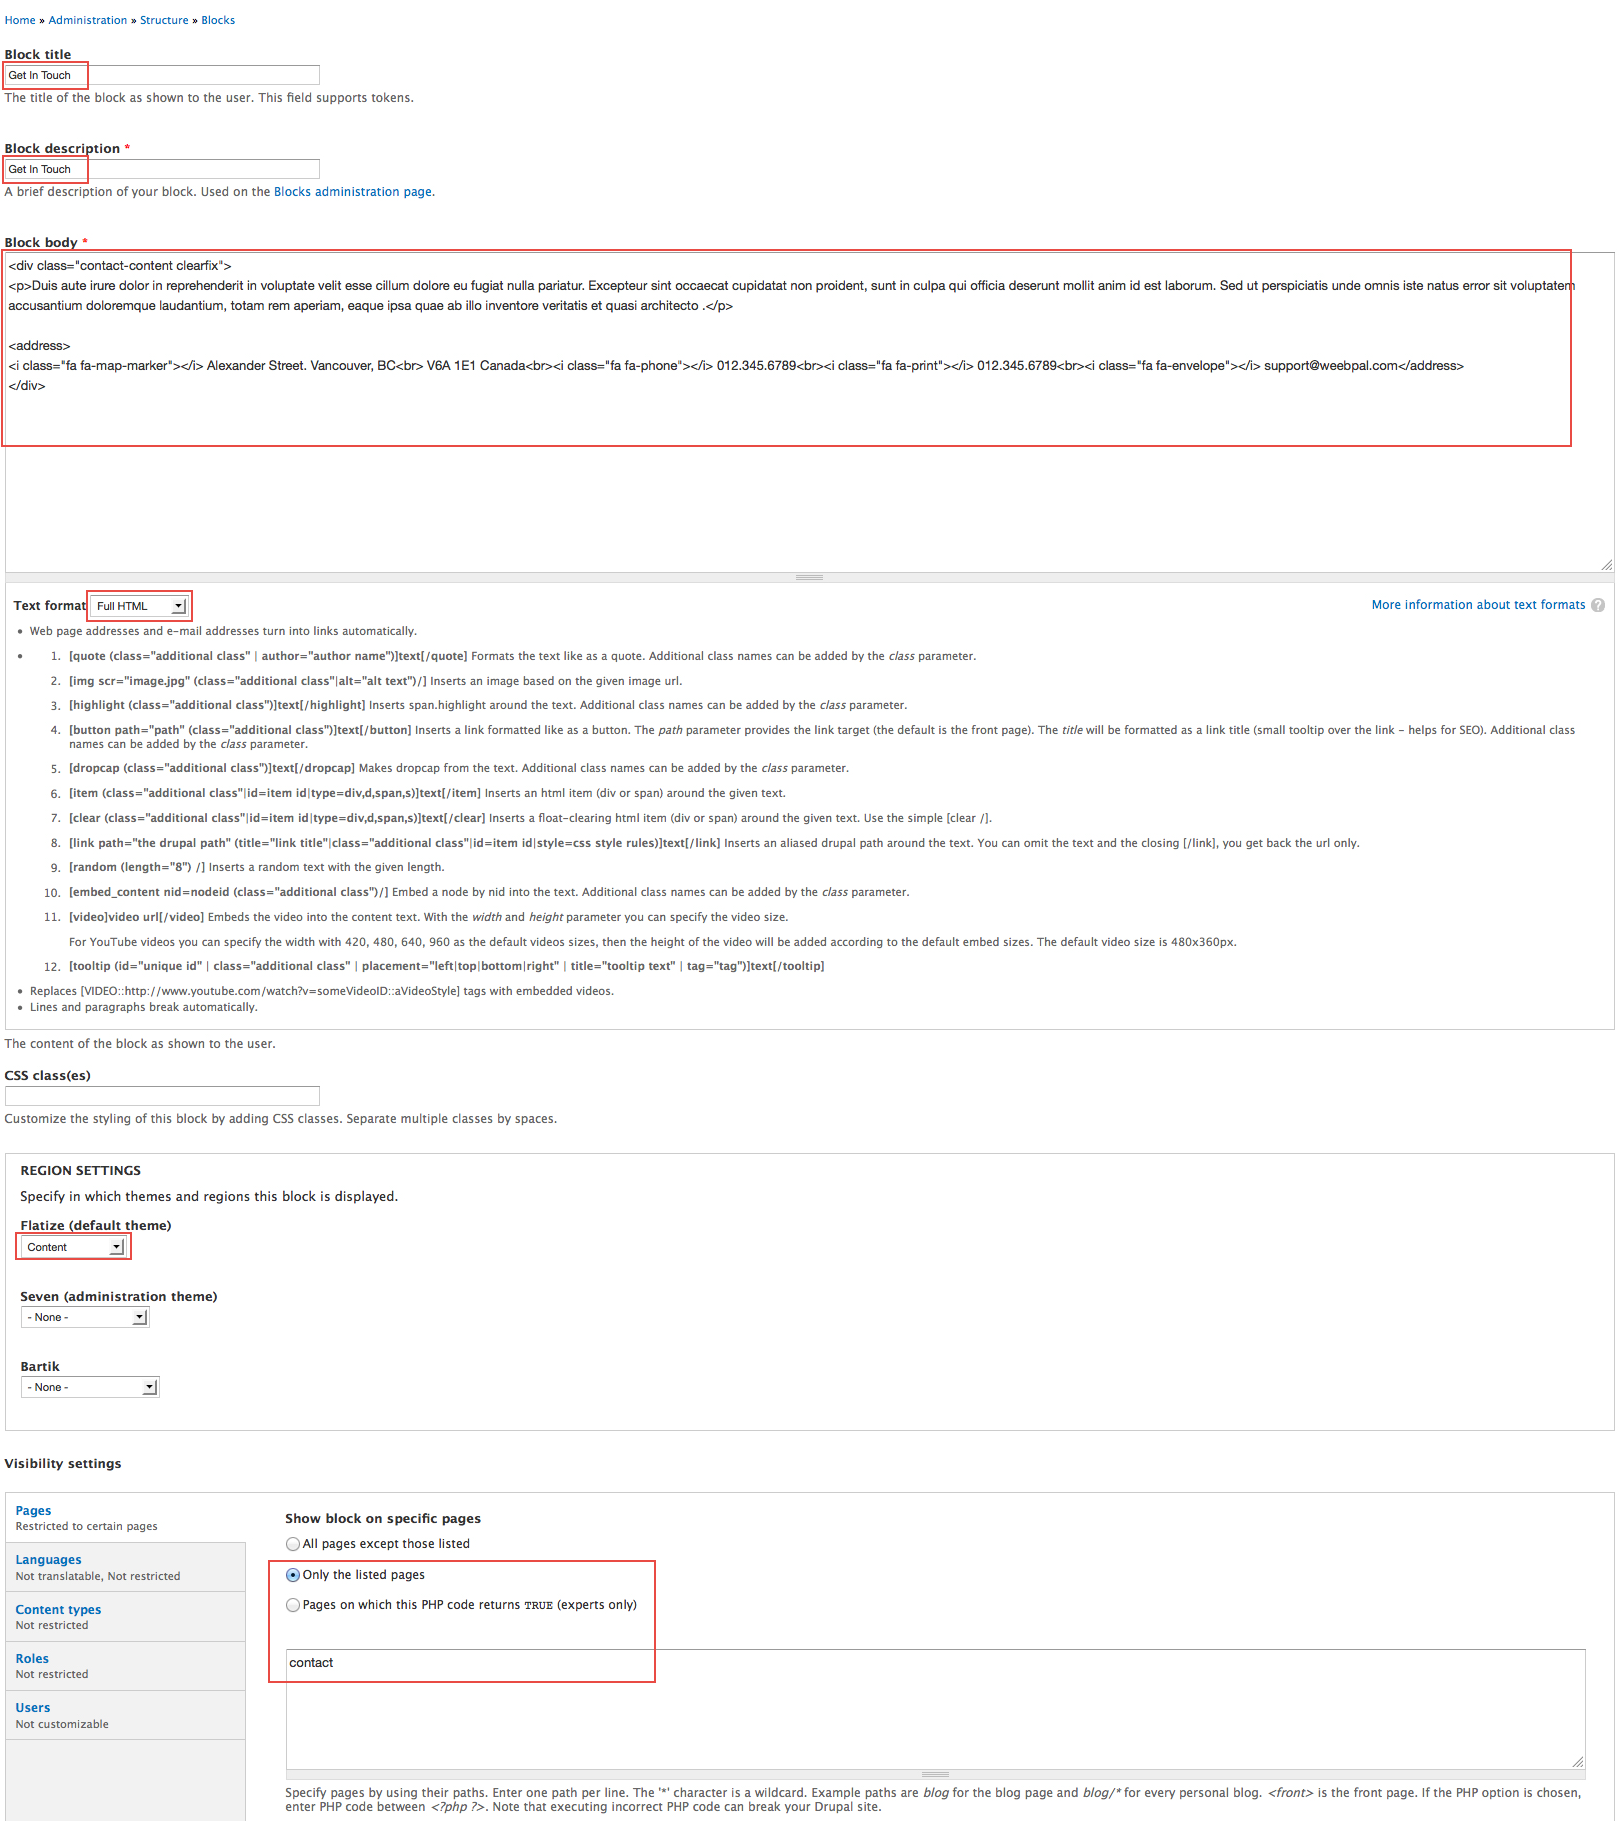
Step 1: Navigate to Structure > Blocks, click Add block, then create Get In Touch block with the following settings:
Refer to the following HTML code:
Duis aute irure dolor in reprehenderit in voluptate velit esse cillum dolore eu fugiat nulla pariatur. Excepteur sint occaecat cupidatat non proident, sunt in culpa qui officia deserunt mollit anim id est laborum. Sed ut perspiciatis unde omnis iste natus error sit voluptatem accusantium doloremque laudantium, totam rem aperiam, eaque ipsa quae ab illo inventore veritatis et quasi architecto .
Alexander Street. Vancouver, BCV6A 1E1 Canada
012.345.6789
012.345.6789
[email protected]
Step 2: Click Save block button.
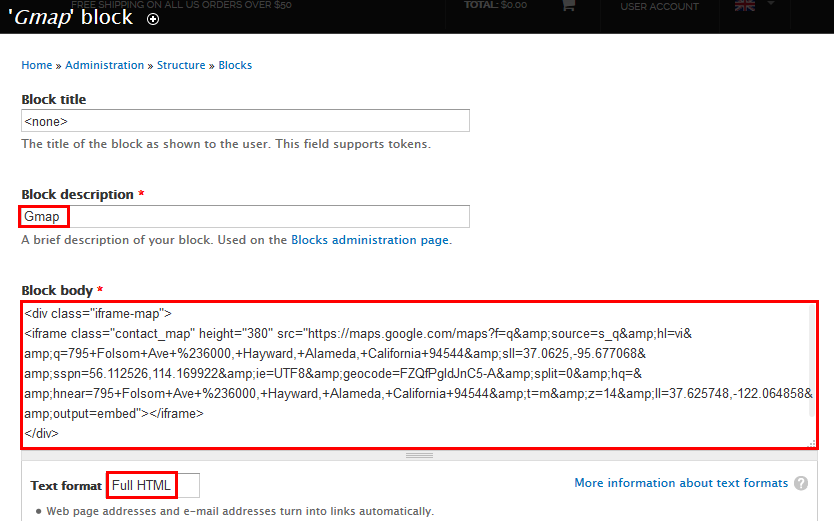
2. Gmap block
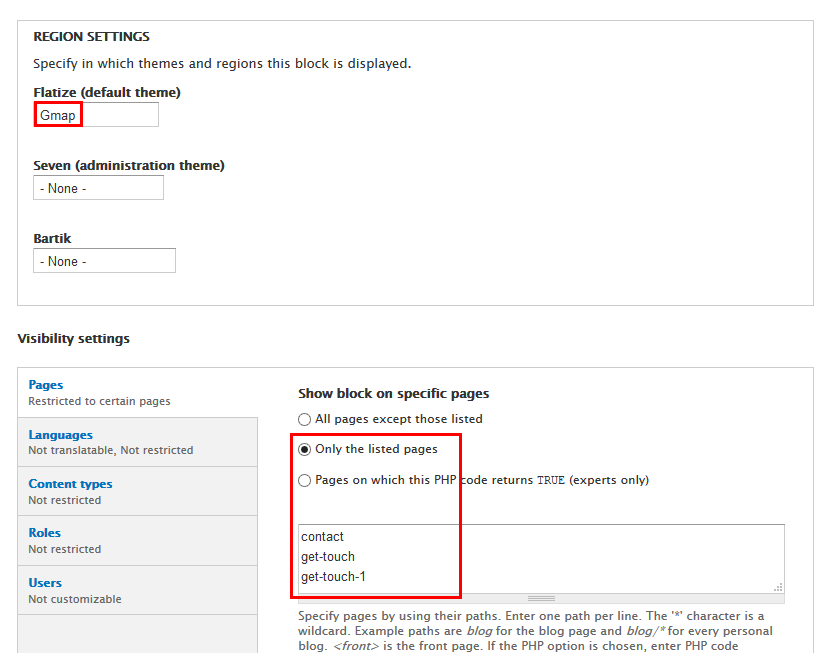
Step 1: Navigate to Structure > Blocks, click Add block, then create Gmap block with the following settings:
Refer to the following HTML code:
Step 2: Click Save block button.
Get In Touch 1
Front end Display
Create webform type
Step 1: Navigate to Content > Add content > Webform
Refer to the following HTML code:
Duis aute irure dolor in reprehenderit in voluptate velit esse cillum dolore eu fugiat nulla pariatur. Excepteur sint occaecat cupidatat non proident, sunt in culpa qui officia deserunt mollit anim id est laborum. Sed ut perspiciatis unde omnis iste natus error sit voluptatem accusantium doloremque laudantium, totam rem aperiam, eaque ipsa quae ab illo inventore veritatis et quasi architecto .
Alexander Street. Vancouver, BCV6A 1E1 Canada
012.345.6789
012.345.6789
[email protected]
Step 2: Click Save button.
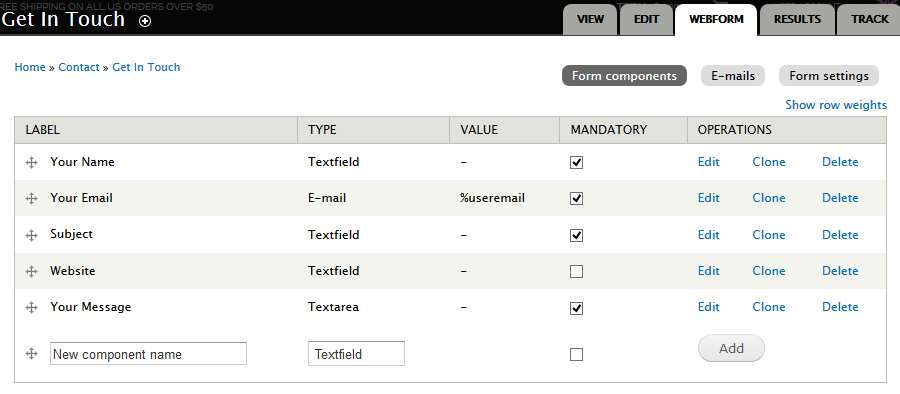
Step 3: At WEBFORM > Form components add fields:
Step 4: Click Save button.
Get In Touch 2
Front end Display
Create webform type
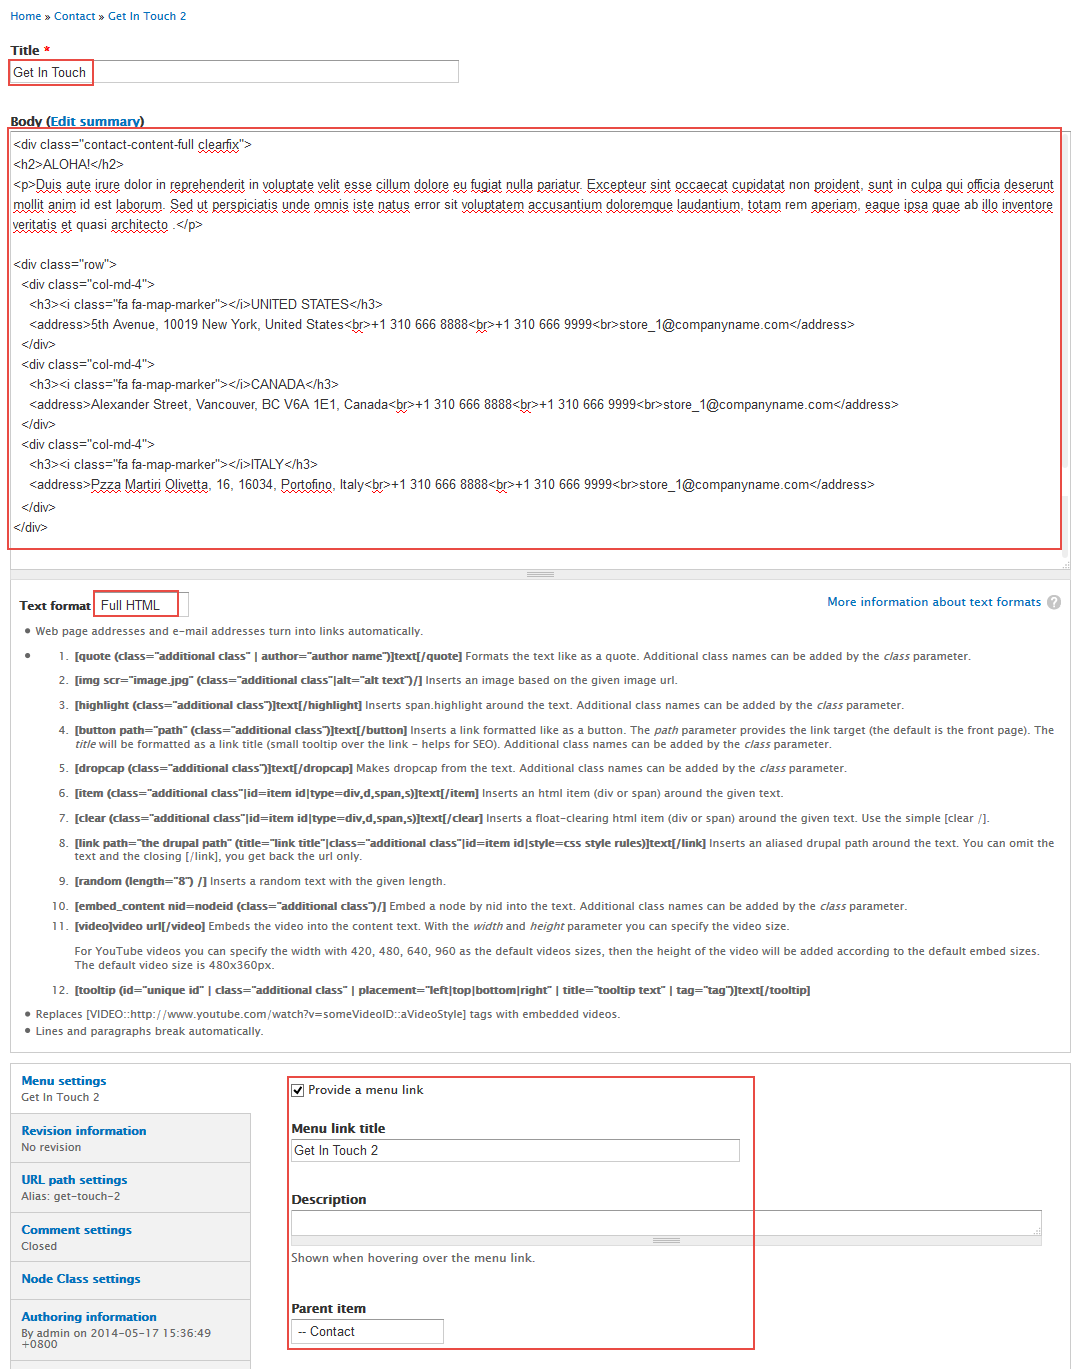
Step 1: Navigate to Content > Add content > Webform
Refer to the following HTML code:
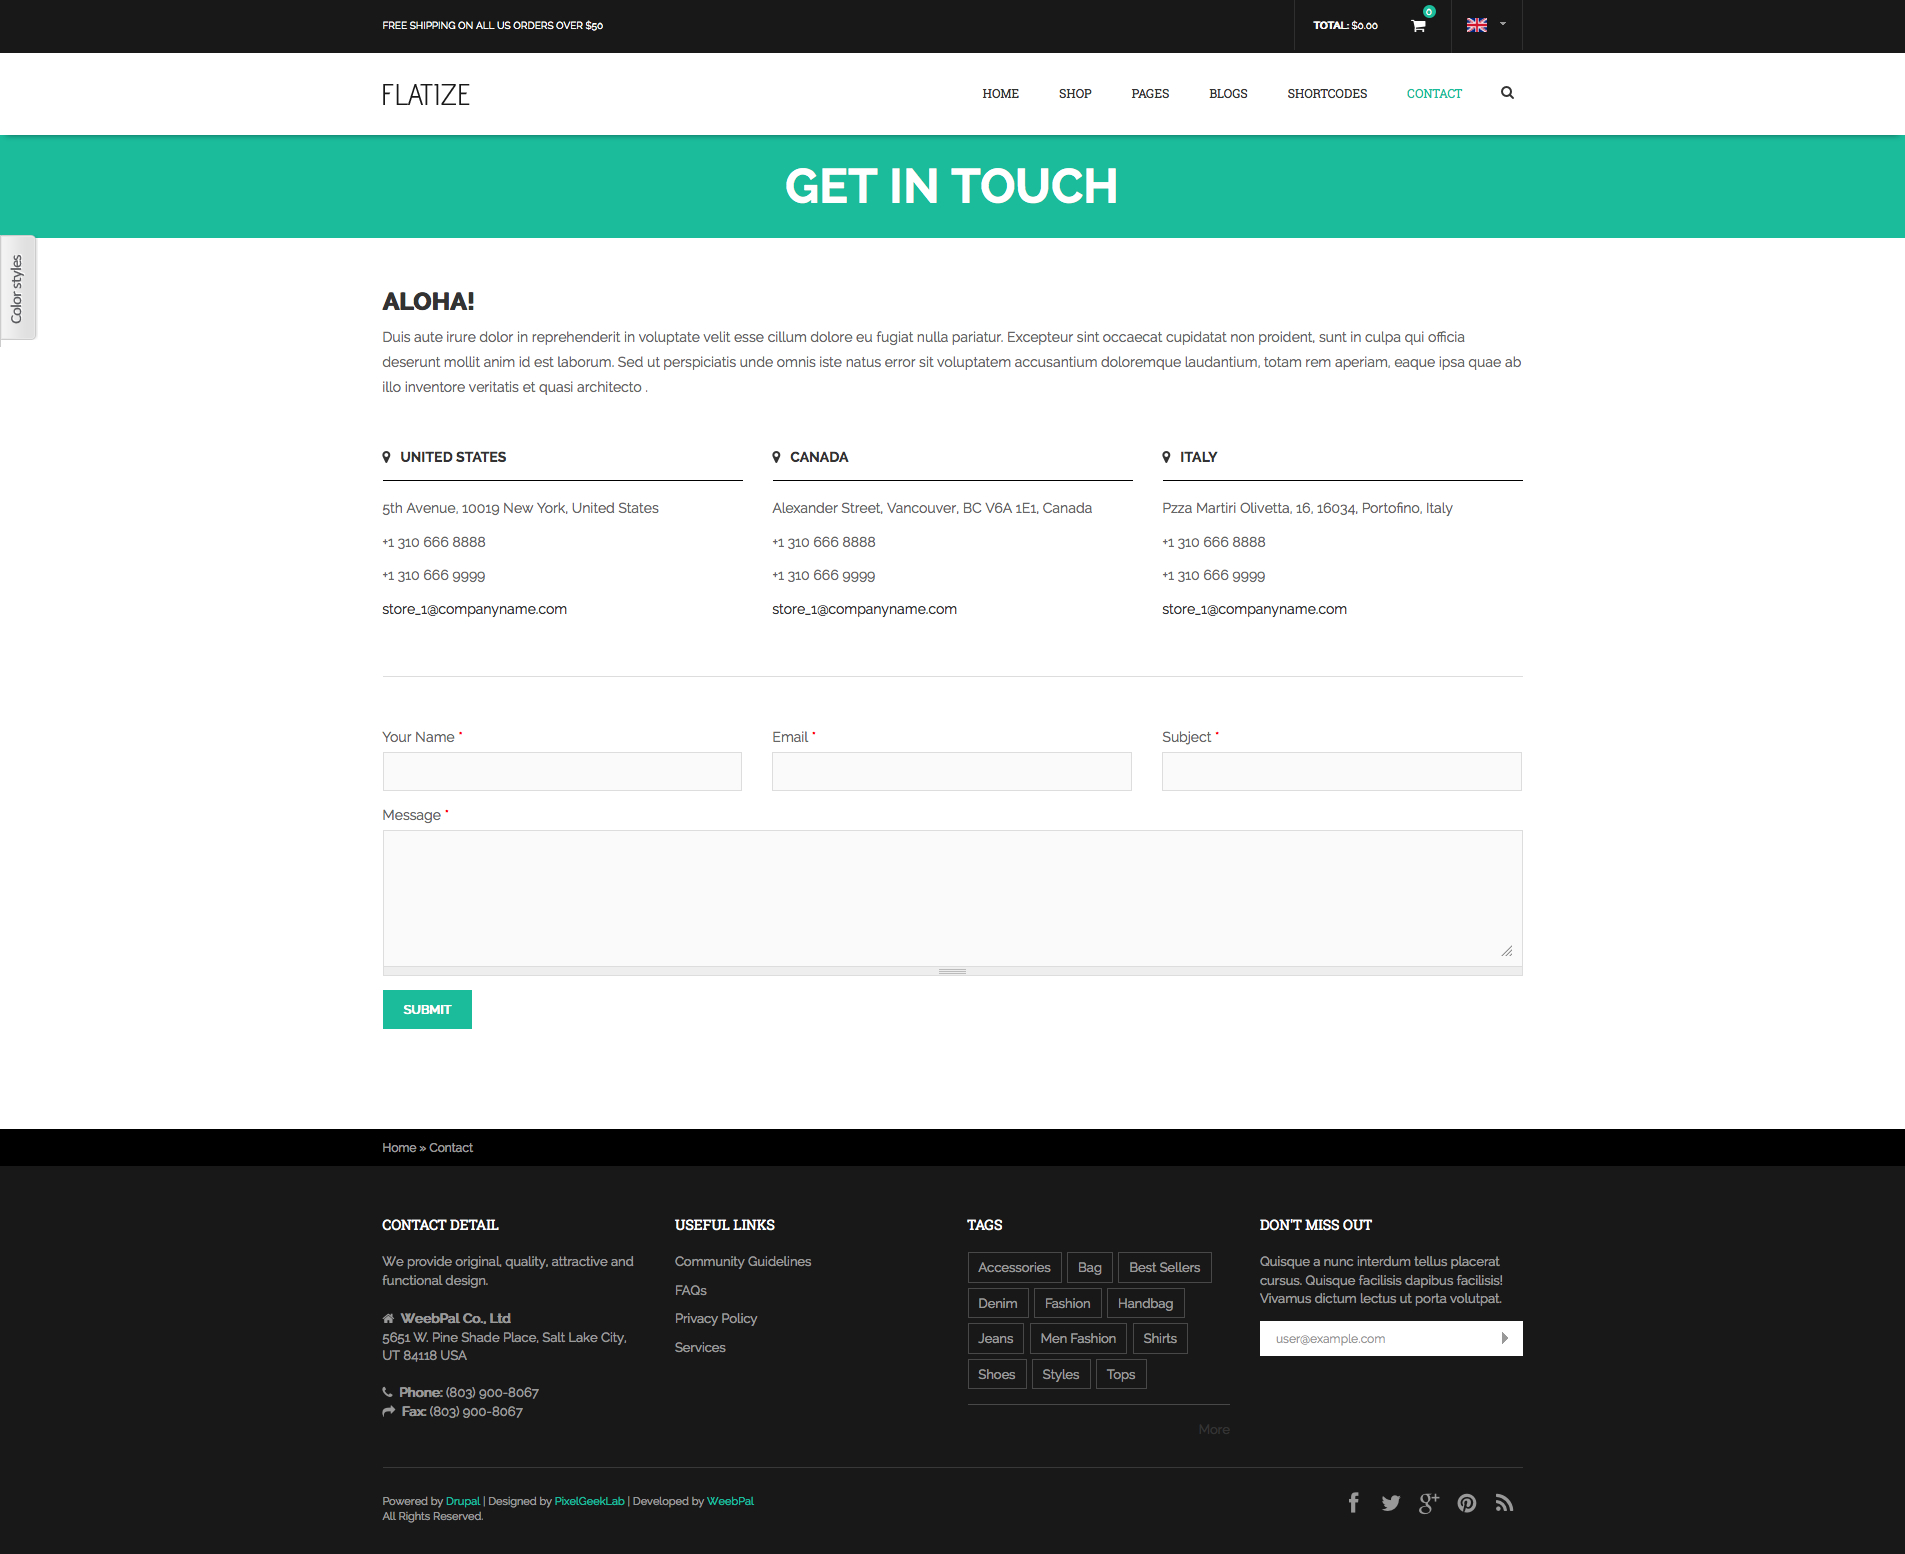
ALOHA!
Duis aute irure dolor in reprehenderit in voluptate velit esse cillum dolore eu fugiat nulla pariatur. Excepteur sint occaecat cupidatat non proident, sunt in culpa qui officia deserunt mollit anim id est laborum. Sed ut perspiciatis unde omnis iste natus error sit voluptatem accusantium doloremque laudantium, totam rem aperiam, eaque ipsa quae ab illo inventore veritatis et quasi architecto .
UNITED STATES
5th Avenue, 10019 New York, United States+1 310 666 8888
+1 310 666 9999
[email protected]
CANADA
Alexander Street, Vancouver, BC V6A 1E1, Canada+1 310 666 8888
+1 310 666 9999
[email protected]
ITALY
Pzza Martiri Olivetta, 16, 16034, Portofino, Italy+1 310 666 8888
+1 310 666 9999
[email protected]
Step 2: Click Save block button.
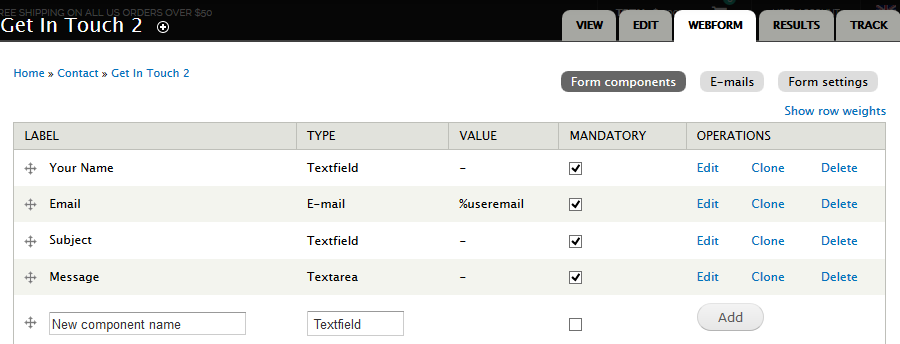
Step 3: At WEBFORM > Form components add fields:
Step 4: Click Save button.
Shop - Sidebar: Products Search view
Front end Display
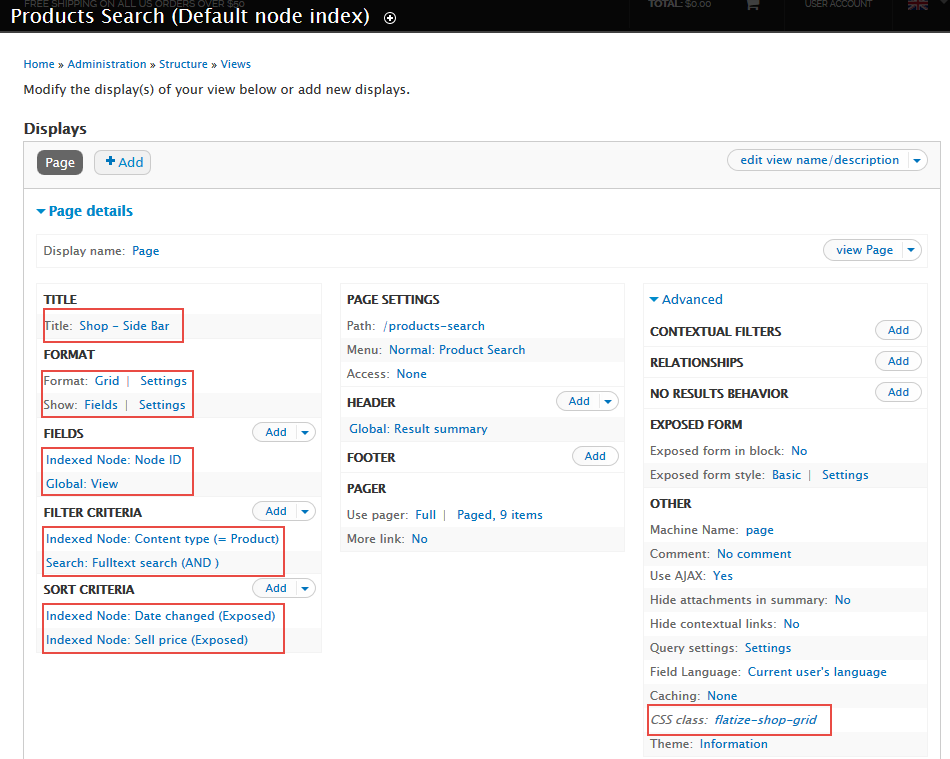
1. Create Products Search view page
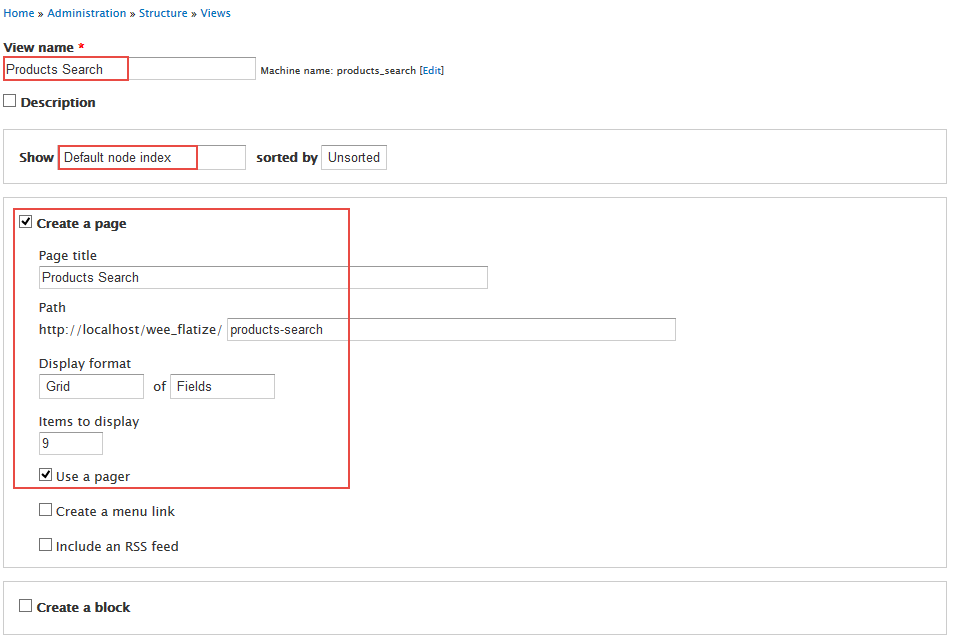
Step 1: Navigate to Structure > Views, click Add new view, then create Products Search view with the following settings:
Step 2: Click Continue and edit button. Next to below steps to set properties for the following fields:
Step 3: At TITLE area, set page title "Shop - Side Bar"
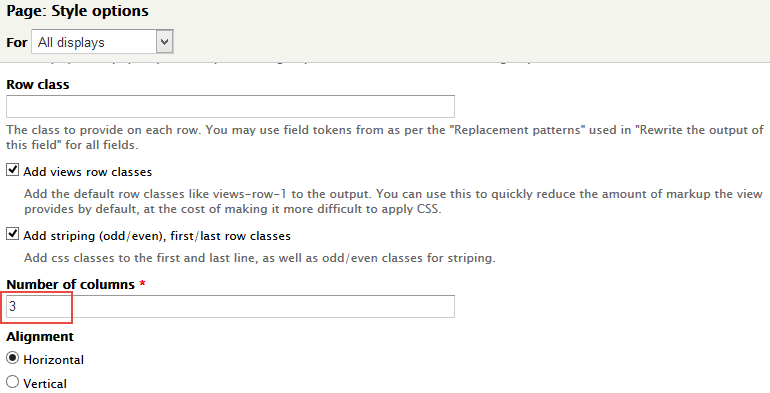
Step 4: At FORMAT > format area, click Settings button, set properties:
Step 5: At FORMAT > Show area, click Settings, set properties:
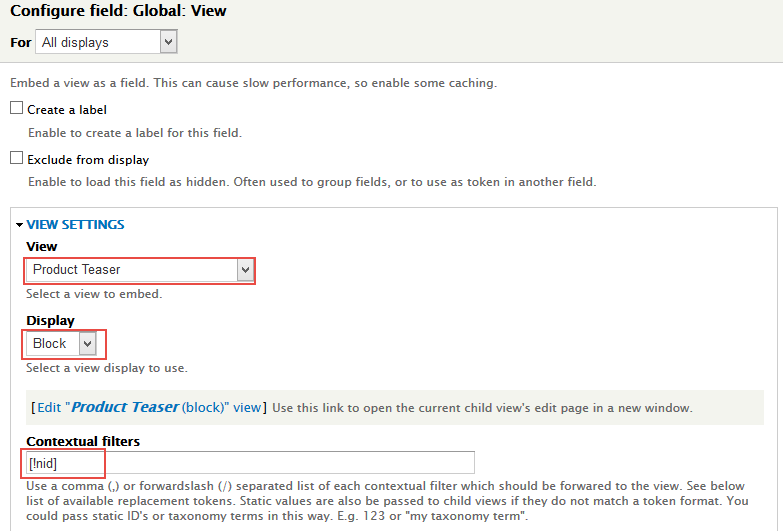
Step 6: At FIELDS area, click Add button to add fields: Indexed Node: Node ID, Global: View
Step 7: Set properties for Global: View
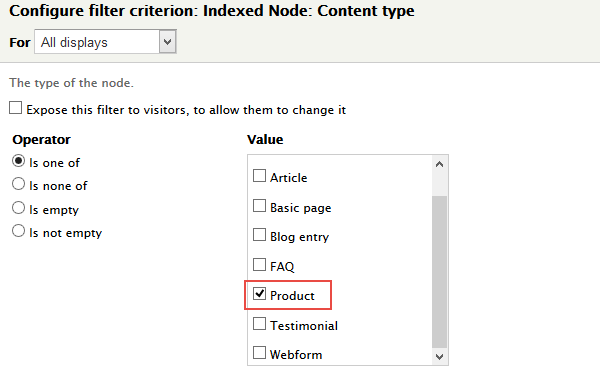
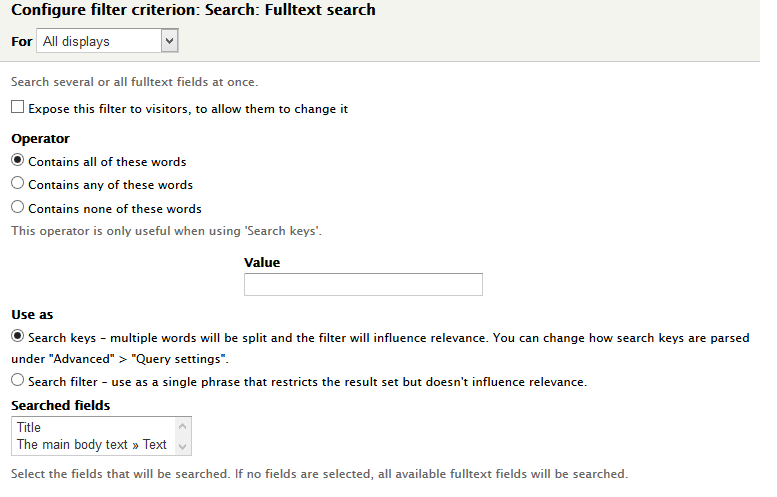
Step 8: At FILTER CRITERIA area, Click Add button to add field Indexed Node: Content type, Search: Fulltext search with the following properties:
Step 9: Set properties for Indexed Node: Content type
Step 9: Set properties for Search: Fulltext search
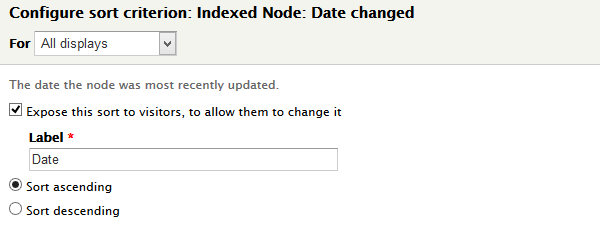
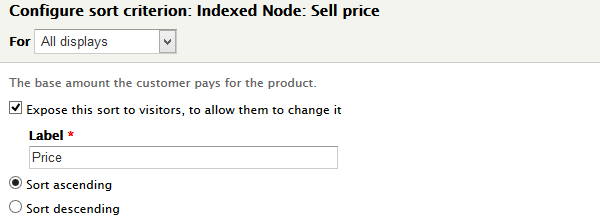
Step 10: At SORT CRITERIA area, Click Add button to add fields Indexed Node: Date changed, Indexed Node: Sell price
Step 11: Set properties for Indexed Node: Date changed
Step 12: Set properties for Indexed Node: Sell price
Step 13: At Advanced > CSS Class, set the following properties:
Step 14: Click Save to save view
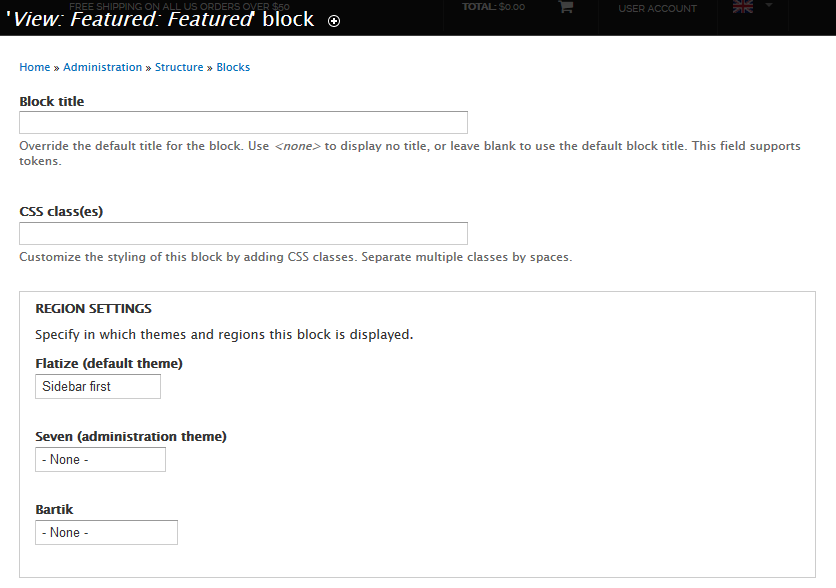
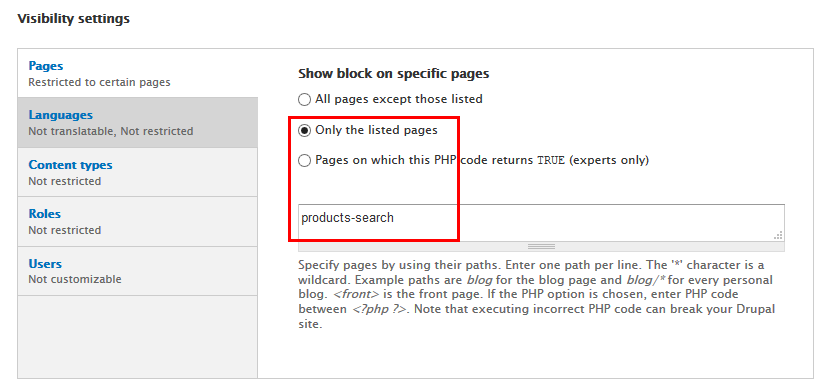
2. Configure View: Featured : Featured block
Front end Display
Step 1: Navigate to Structure > Blocks
Step 2: Find View: Featured : Featured click configure link, set following properties
Step 3: Click Save block button.
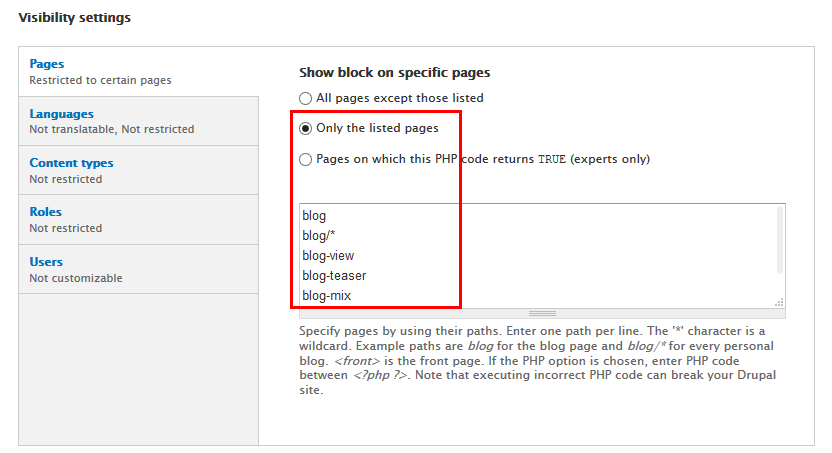
Blog View page
Create Blog View
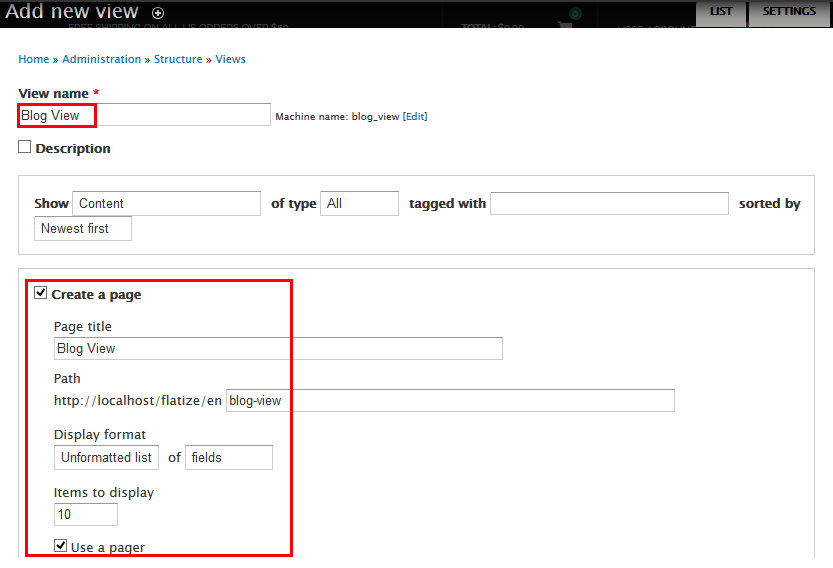
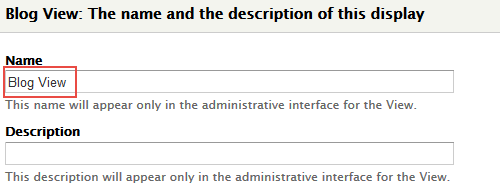
Step 1: Navigate to Structure > Views, click Add new view, then create Blog View view with the following settings:
Step 2: Click Continue & edit. Next to below steps to set properties for the following fields:
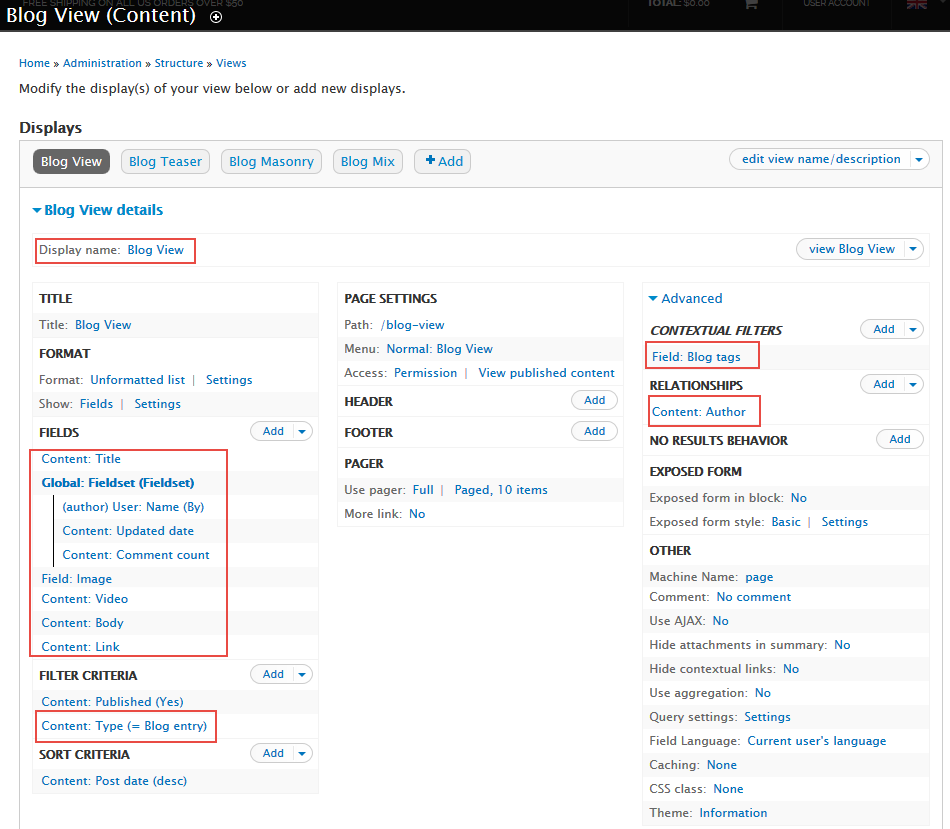
Step 3: At Display name area, click block link, set the following properties:
Step 4: Expand Advanced panel, at RELATIONSHIPS area, click Add to add relationship Content: Author
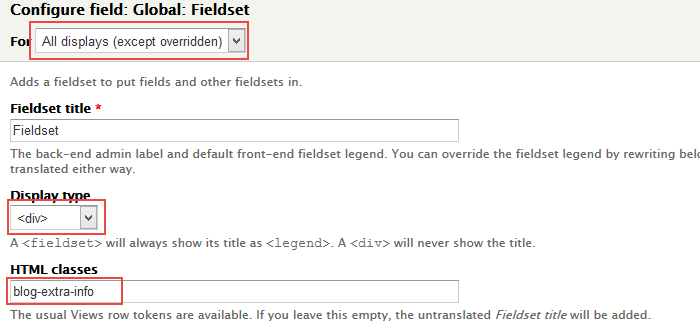
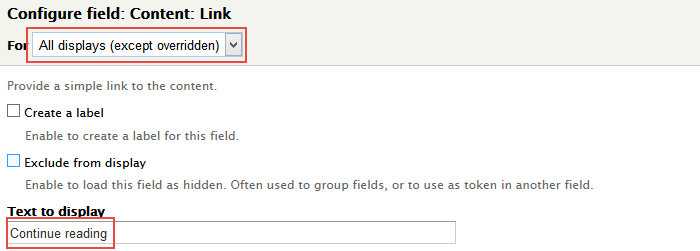
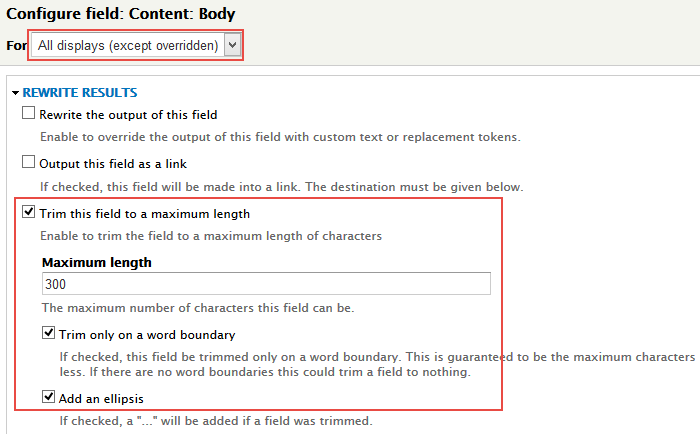
Step 5: At FIELDS area, click Add button to add fields: Global: Fieldset, Content: Link, Content: Body, Content: Video, Content: Update date, Content: Comment Count, Field: Image, User: Name
Step 6: Set properties for Global: Fieldset
Step 7: Set properties for Content: Link
Step 8: Set properties for Content: Body
Step 9: Set properties for Content: Video
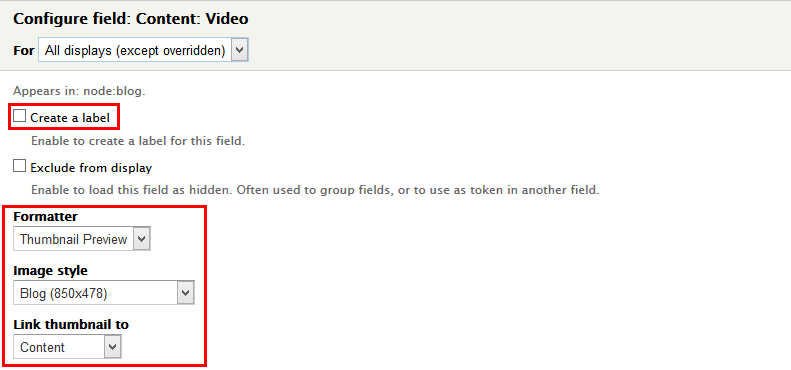
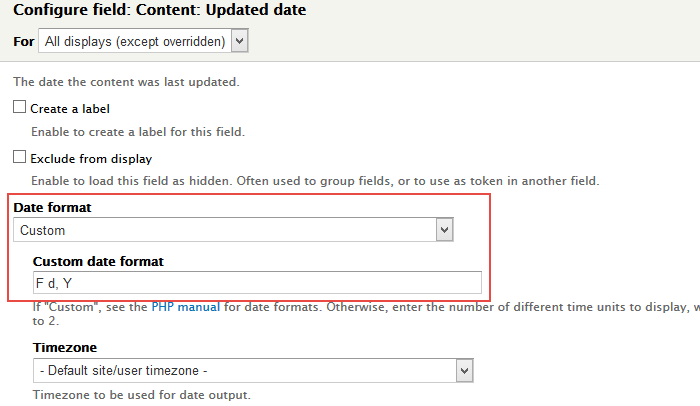
Step 10: Set properties for Content: Update date
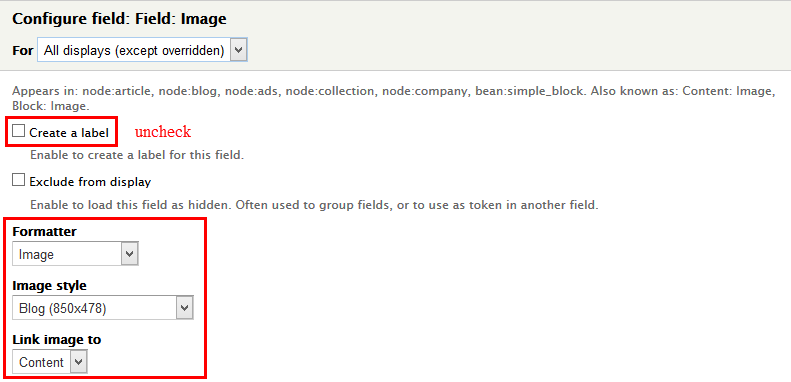
Step 11: Set properties for Field: Image
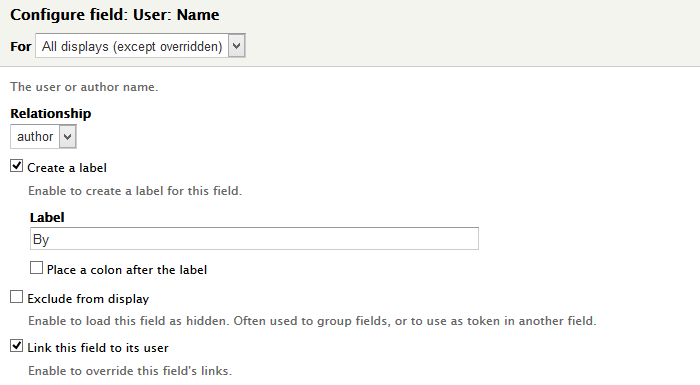
Step 12: Set properties for User: Name
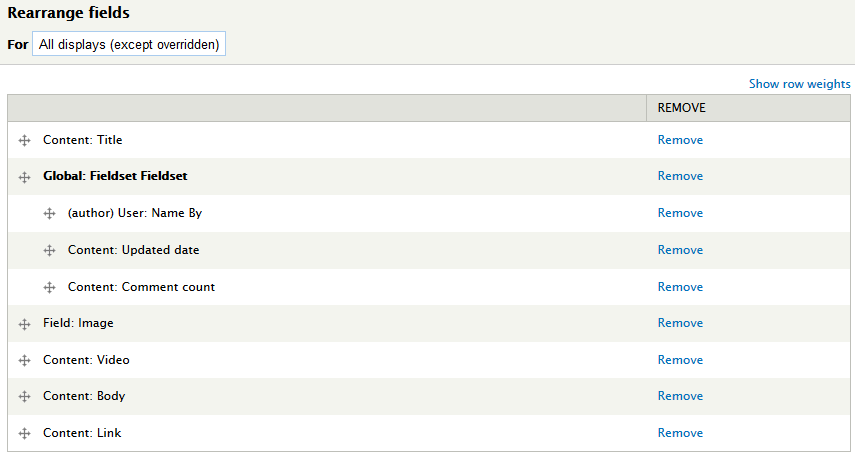
Step 13: At FIELDS area, click Rearrange button and set the following arrangements
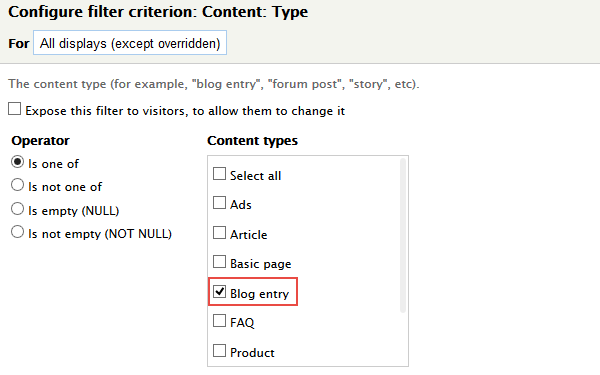
Step 14: At FILTER CRITERIA area, Click Add button to add field Content: Type with the following properties:
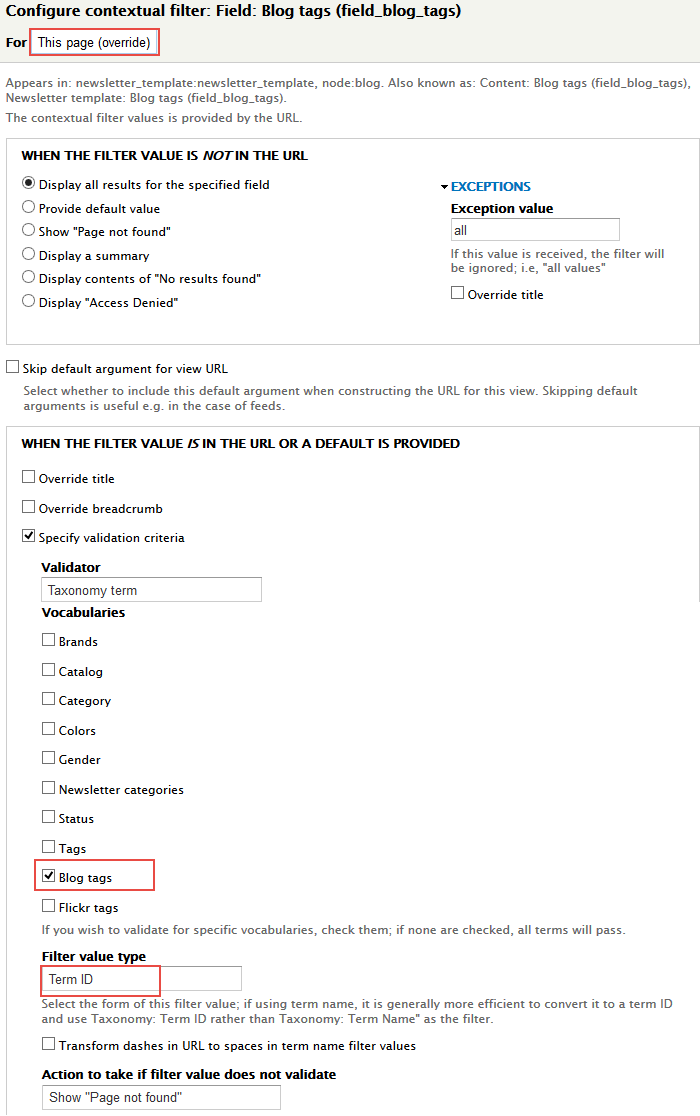
Step 15: At CONTEXTUAL FILTER area, Click Add button to add field Field: Blog tags with the following properties:
Step 16: Click Save button to save settings.
Blog Teaser page
Clone Blog view to create Blog Teaser view
Step 1: Navigate to Structure > Views, find Blog View click clone Block.
Next to steps below to set properties for the following fields:
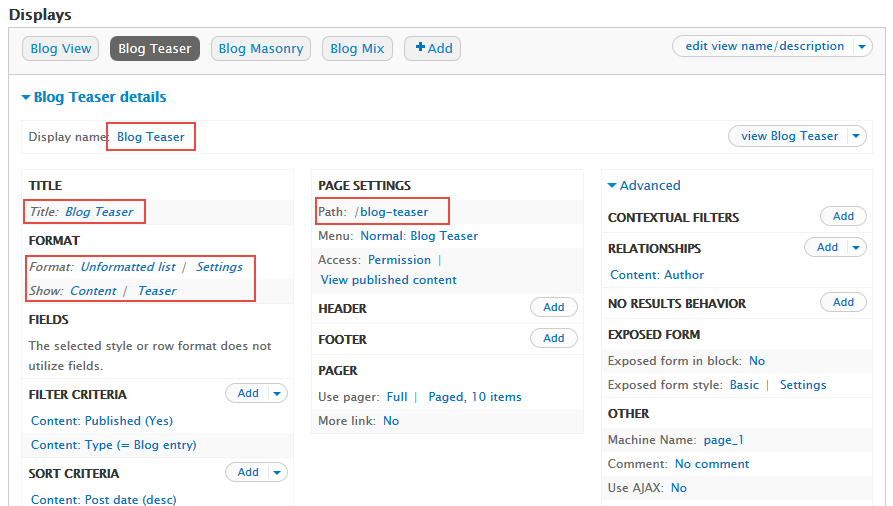
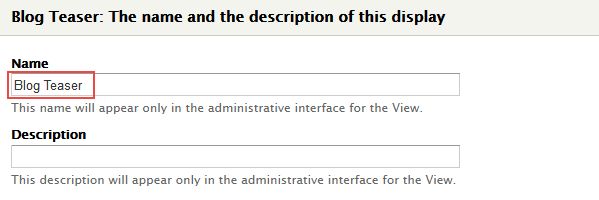
Step 2: Change Display name
Step 3: Change TITLE Title
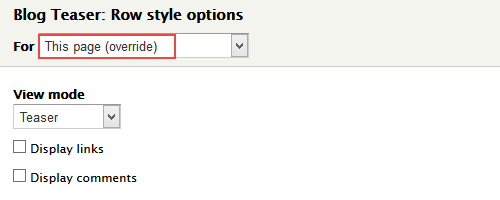
Step 4: At FORMAT show area, set the following properties:
Step 6: At PAGE SETTINGS area, click Path link, set the following properties:
Step 7: At CONTEXTUAL FILTERS area, click Rearrange link, click remove Field: Blog tagsfield
Step 8: Click Save button to save settings.
Blog Masonry page
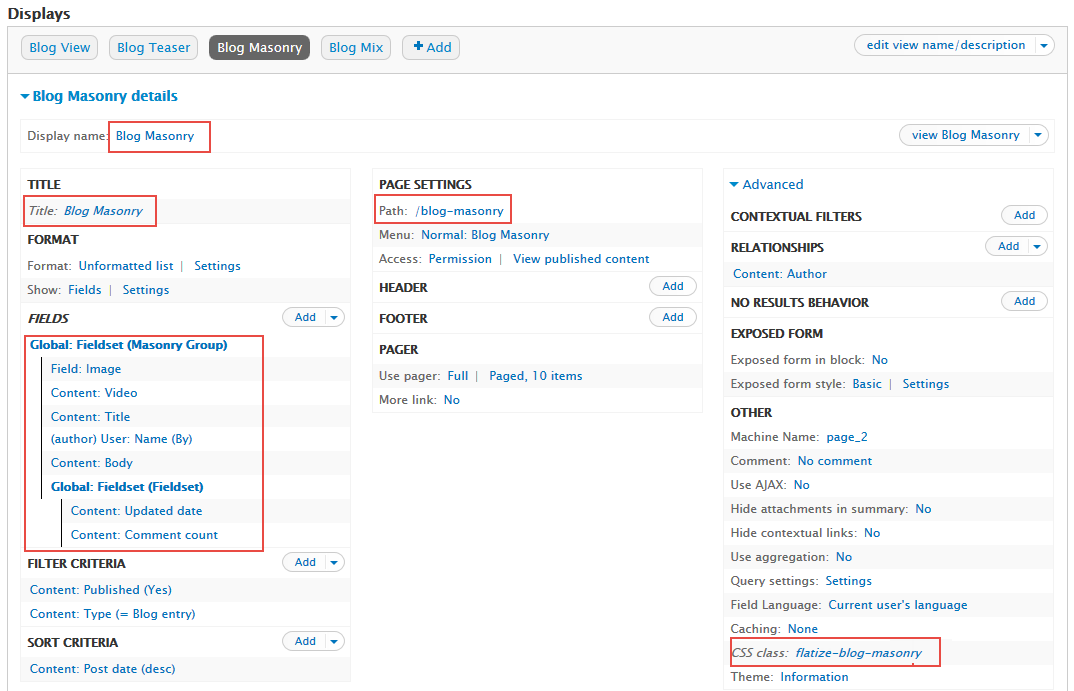
Clone Blog view to create Blog Masonry view
Step 1: Navigate to Structure > Views, find Blog View click clone Block.
Next to steps below to set properties for the following fields:
Step 2: Change Display name
Step 3: Change TITLE Title
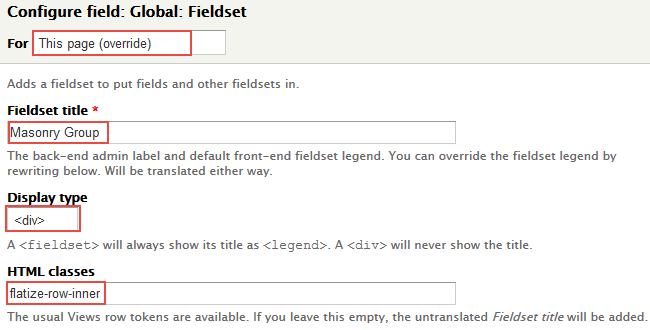
Step 4: At FIELDS area, click Add button to add fields: Global: Fieldset
Step 4: Set properties Global: Fieldset field
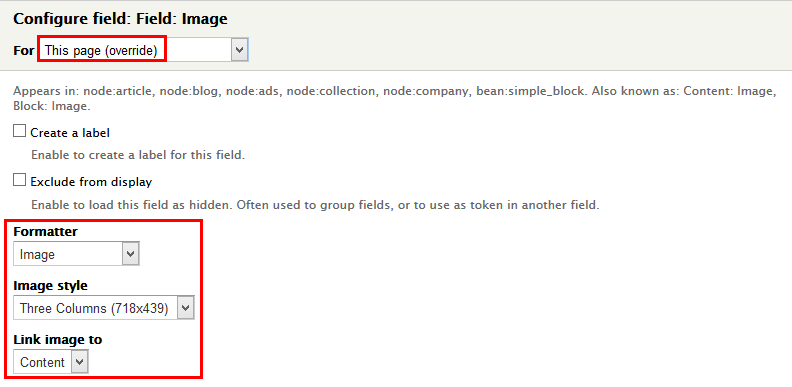
Step 5: Set properties Field : Image field
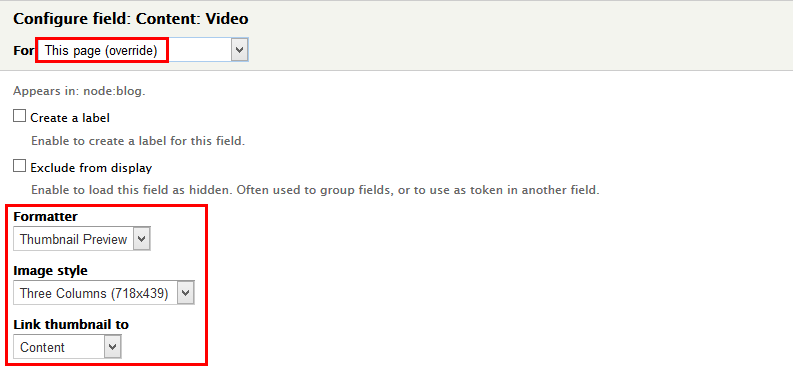
Step 6: Set properties Content: Video fields
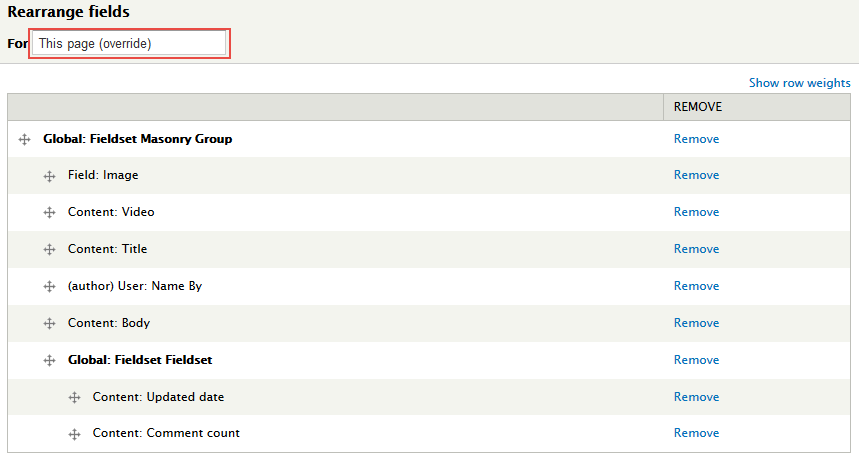
Step 7: At FIELDS area, click Rearrange button and set the following arrangements
Step 8: At PAGE SETTINGS area, click Path link, set the following properties:
Step 9: At Advanced > CSS Class, set the following properties:
Step 10: Click Save button to save settings.
Blog Mix page
Clone Blog view to create Blog Mix view
Step 1: Navigate to Structure > Views, find Blog View click clone Block.
Next to steps below to set properties for the following fields:
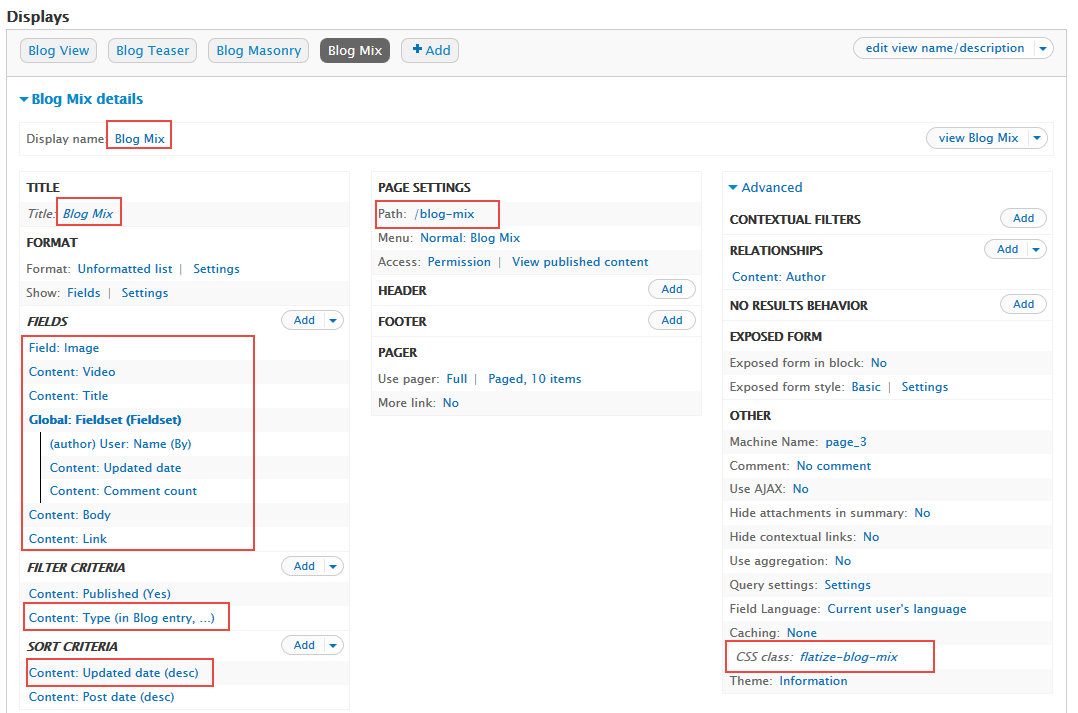
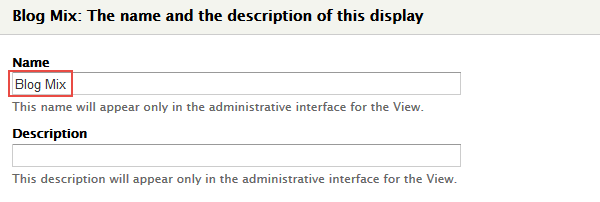
Step 2: Change Display name
Step 3: AT TITLE area, change Title
Step 4: At FIELDS area
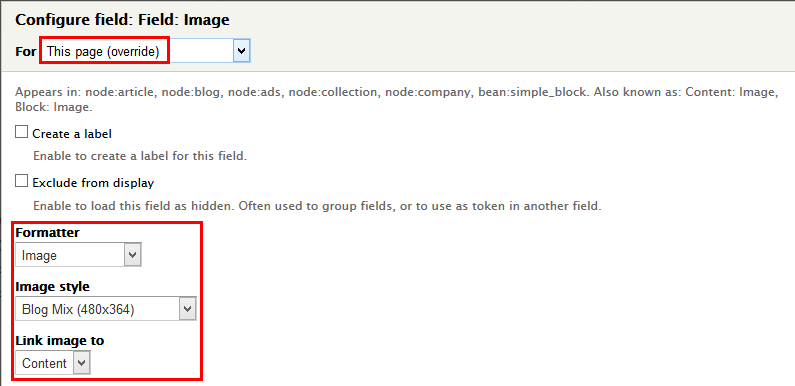
Step 5: Set properties Field : Image field
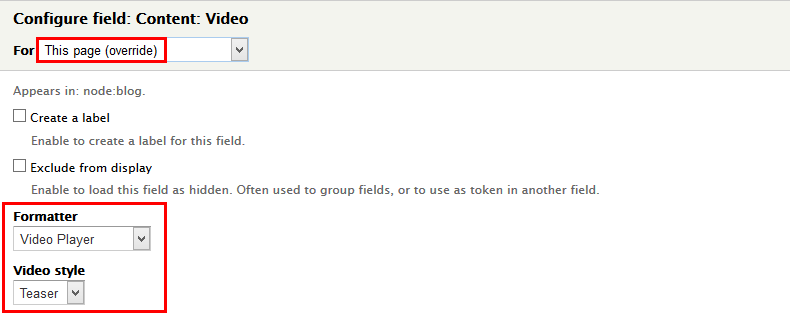
Step 6: Set properties Content: Video fields
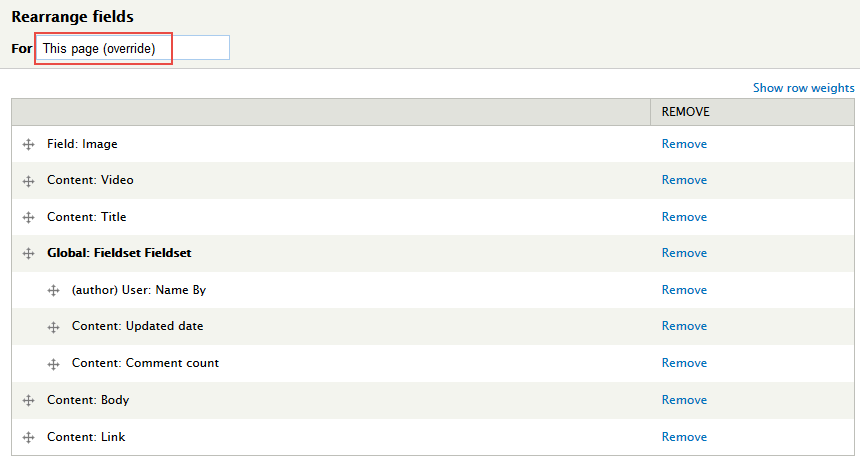
Step 7: At FIELDS area, click Rearrange button and set the following arrangements
Step 8: At PAGE SETTINGS area, click Path link, set the following properties:
Step 9: At Advanced > CSS Class, set the following properties:
Step 10: At FILTER CRITERIA area, click Content: Type, set the following properties:
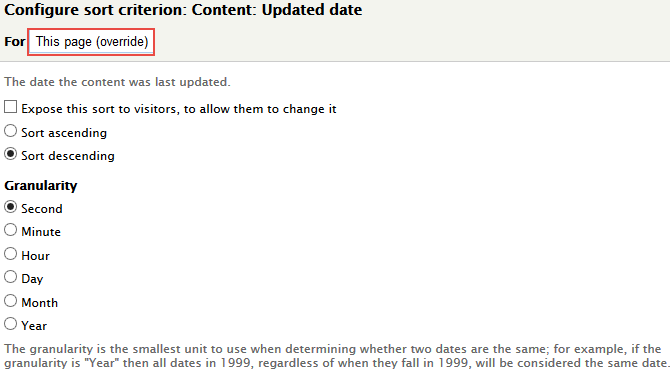
Step 11: At SORT CRITERIA area, Click Add and add field Content: Updated date
Step 12: Click Save button to save settings.
Shortcode : Tooltip page
Front end Display
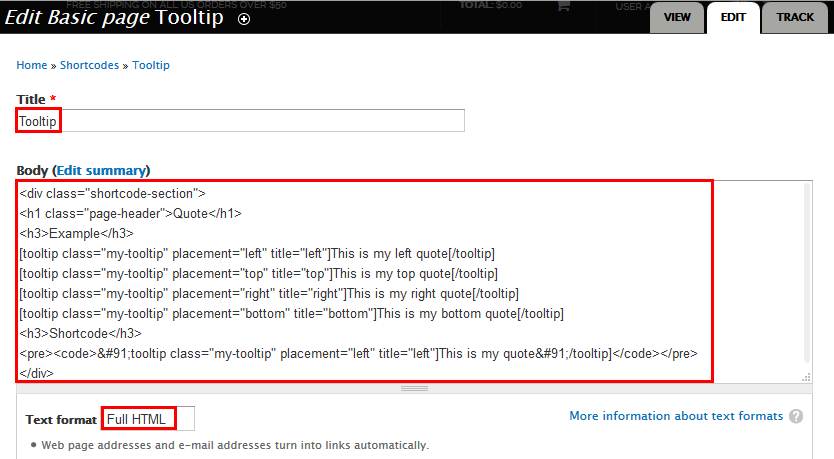
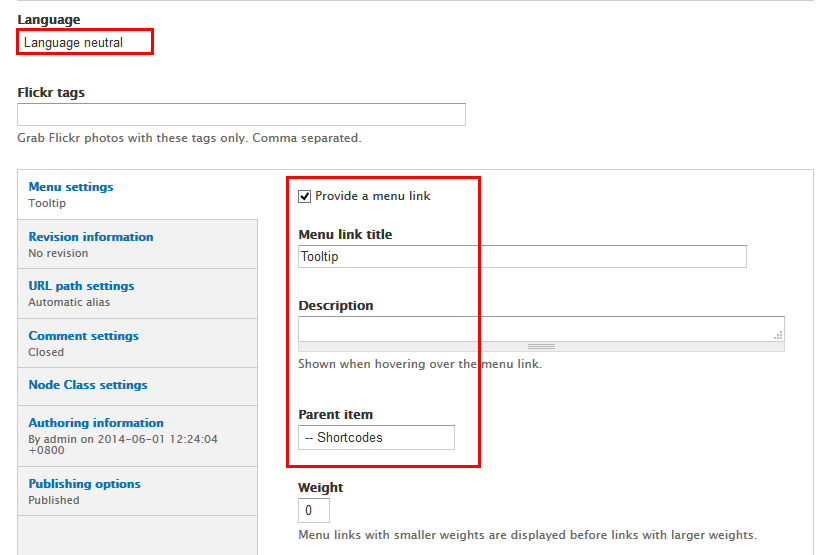
Step 1: Navigate to Content > Add content find Basic page, then create content Tooltip and set following properties:
Step 2: Click Save button
Refer to the following HTML code:
Quote
Example
[tooltip class="my-tooltip" placement="left" title="left"]This is my left quote[/tooltip] [tooltip class="my-tooltip" placement="top" title="top"]This is my top quote[/tooltip] [tooltip class="my-tooltip" placement="right" title="right"]This is my right quote[/tooltip] [tooltip class="my-tooltip" placement="bottom" title="bottom"]This is my bottom quote[/tooltip]Shortcode
[tooltip class="my-tooltip" placement="left" title="left"]This is my quote[/tooltip]
Shortcode : Collapse page
Front end Display
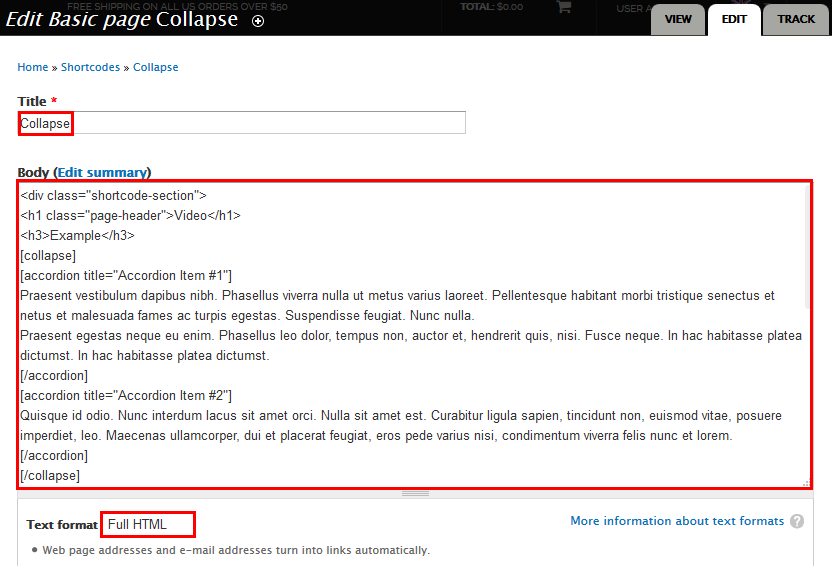
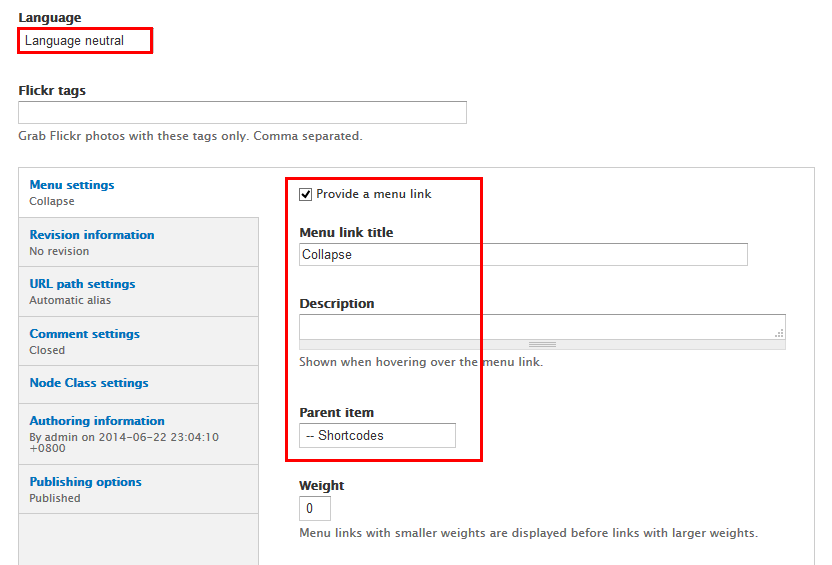
Step 1: Navigate to Content > Add content find Basic page, then create content Collapse and set following properties:
Step 2: Click Save button
Refer to the following HTML code:
Video
Example
[collapse] [accordion title="Accordion Item #1"] Praesent vestibulum dapibus nibh. Phasellus viverra nulla ut metus varius laoreet. Pellentesque habitant morbi tristique senectus et netus et malesuada fames ac turpis egestas. Suspendisse feugiat. Nunc nulla. Praesent egestas neque eu enim. Phasellus leo dolor, tempus non, auctor et, hendrerit quis, nisi. Fusce neque. In hac habitasse platea dictumst. In hac habitasse platea dictumst. [/accordion] [accordion title="Accordion Item #2"] Quisque id odio. Nunc interdum lacus sit amet orci. Nulla sit amet est. Curabitur ligula sapien, tincidunt non, euismod vitae, posuere imperdiet, leo. Maecenas ullamcorper, dui et placerat feugiat, eros pede varius nisi, condimentum viverra felis nunc et lorem. [/accordion] [/collapse]Shortcode
[collapse] [accordion title="Accordion Item #1"] Praesent vestibulum dapibus nibh. Phasellus viverra nulla ut metus varius laoreet. Pellentesque habitant morbi tristique senectus et netus et malesuada fames ac turpis egestas. Suspendisse feugiat. Nunc nulla. Praesent egestas neque eu enim. Phasellus leo dolor, tempus non, auctor et, hendrerit quis, nisi. Fusce neque. In hac habitasse platea dictumst. In hac habitasse platea dictumst. [/accordion] [accordion title="Accordion Item #2"] Quisque id odio. Nunc interdum lacus sit amet orci. Nulla sit amet est. Curabitur ligula sapien, tincidunt non, euismod vitae, posuere imperdiet, leo. Maecenas ullamcorper, dui et placerat feugiat, eros pede varius nisi, condimentum viverra felis nunc et lorem. [/accordion] [/collapse]
Shortcode : Video page
Front end Display
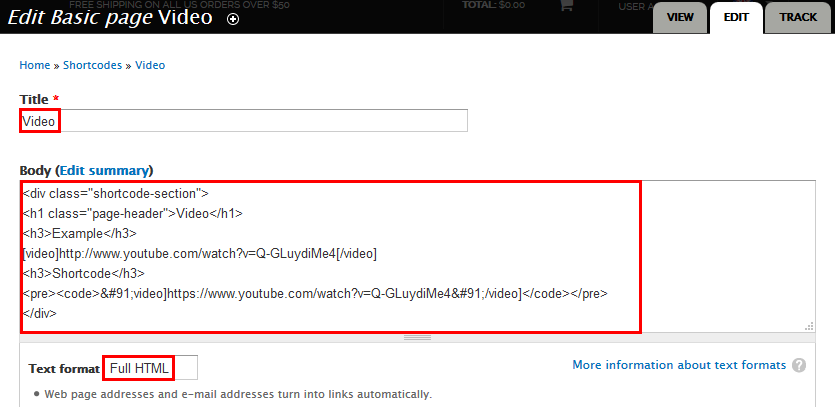
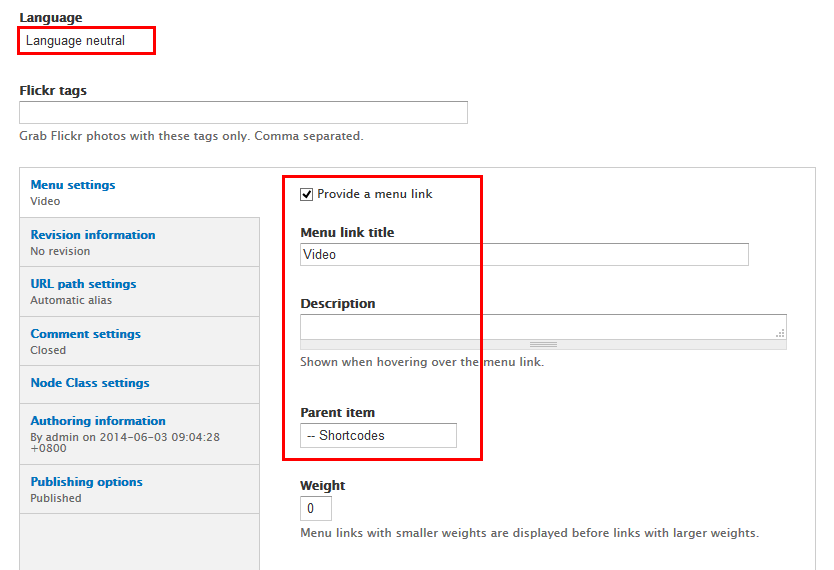
Step 1: Navigate to Content > Add content find Basic page, then create content Video and set following properties:
Step 2: Click Save button
Refer to the following HTML code:
Video
Example
[video]http://www.youtube.com/watch?v=Q-GLuydiMe4[/video]Shortcode
[video]https://www.youtube.com/watch?v=Q-GLuydiMe4[/video]
Site Information Configuration
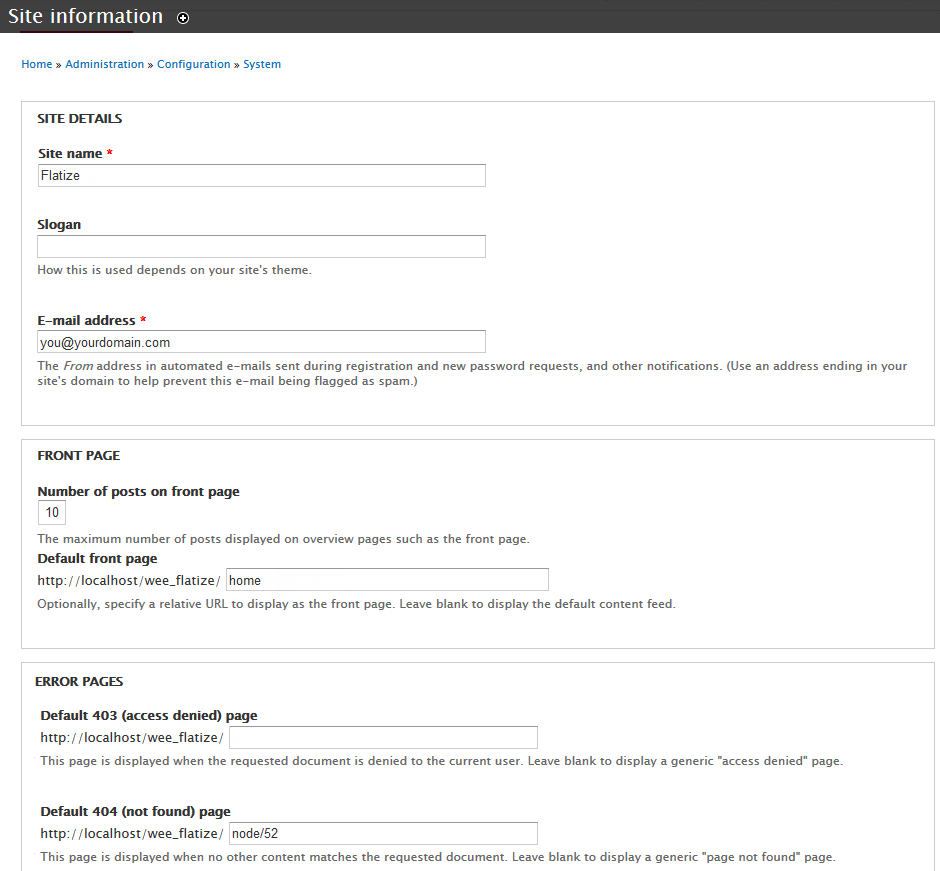
In this section, you can change basic settings, such as the site name, slogan, e-mail address.
1. Log in to Administration site page by administrator account
2. Navigate to the Site Information page Configuration > System: Site information
3. Change site details from the view:
- Site name
- Slogan
- E-mail address
- Set Default Front page
4. Click on Save configuration to finish editing.
Color Configuration
1. Create a new color.
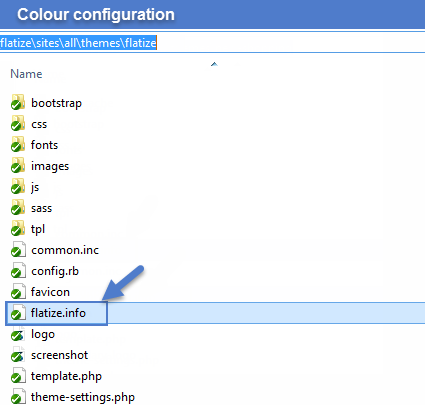
Step 1: Navigate to the directory: flatize/sites/all/themes/flatize, you can find file flatize.info, open this file.
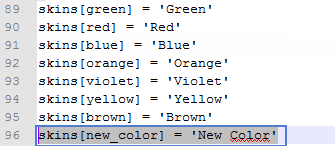
Step 2: Locate the skin[ ] arrays and add new code row:
Step 3: Save file.
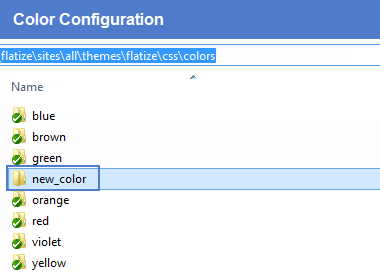
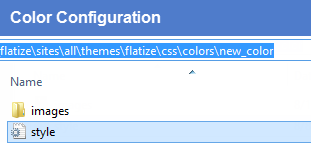
Step 4: Navigate to the directory: flatize/sites/all/themes/flatize/css/colors, clone a folder, then rename it "new_color"
Step 5: new_color folder includes images folder and style.css file.
Now, you can style new color for theme by modifying style.css file.
2. Colors configuration.
Step 1: Log into website by administrator account.
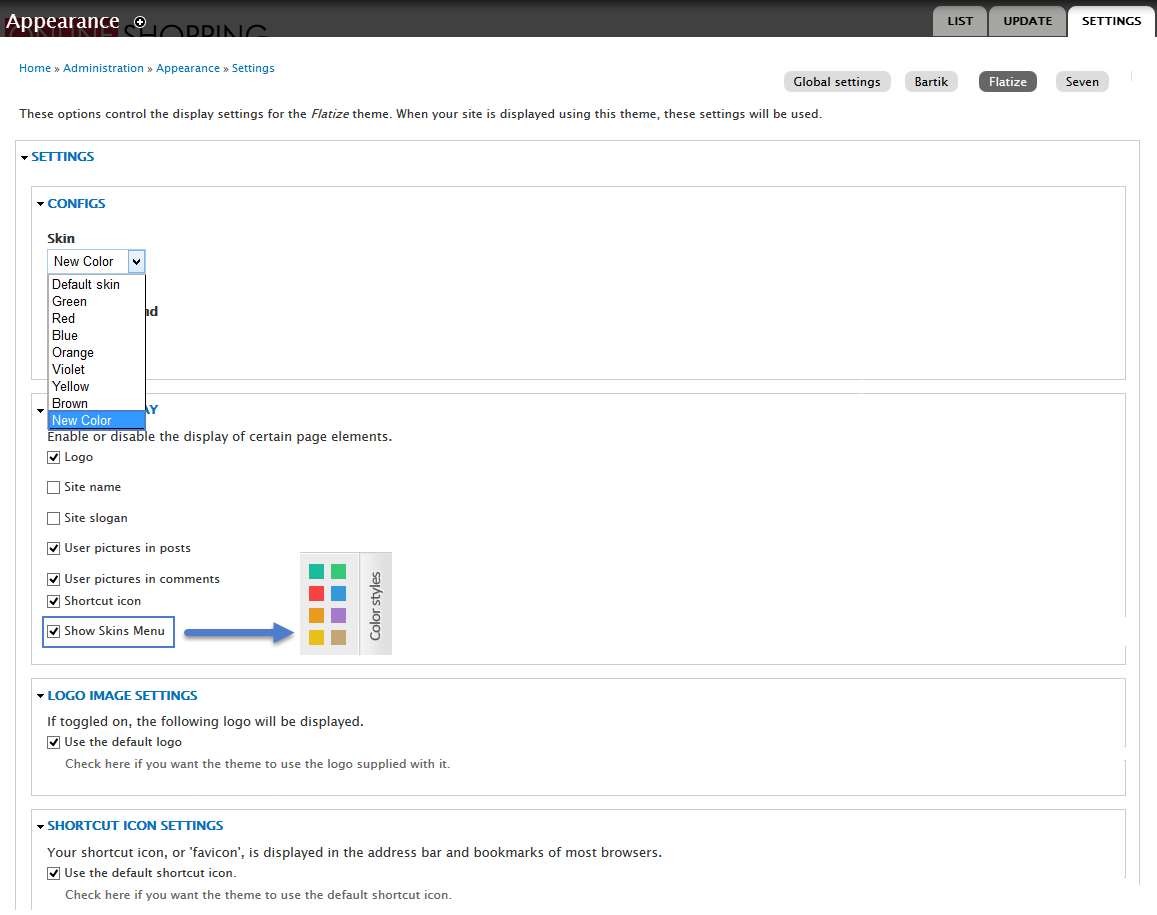
Step 2: Go to Appearance find Flatize theme, click on Settings
Step 3: At CONFIGS area, select a color from Skin drop-down list to set as default, (e.g: New Color). At TOGGLE DISPLAY area, check Show Skins Menu option if you want to display Skins menu on front page.
Main Menu
Flatize theme supports three menu types: default menu, superfish, tb megamenu
Create Default Menu
We have created views. You can visit [your website]/admin/content with the admin account to add some new contents.
And now, you can follow the steps below to create a menu structure
Step 1: Navigate to Structure > Menus
Step 2: In Main Menu area, click list links operator
Step 3: Click Add link to add a new link
Step 4: Add following links structure


