Overview
Starting with a new theme, it's sometimes takes a lot of time for first time users to really understand how it works. You may want to know how to customize layouts, typography, block styles and make it look the way you want.
In most cases you won't need to know PHP or database queries, but basic knowledge would be very helpful to get great results.
If you're an experienced Drupal developer or if you want to build the theme from zero with only the basic appearance of your theme, find this guide in handy. This guide will give you the detailed step by step installation guide to help you start building the content for Eventive Theme to look exactly like the demo site.
1. Package
Eventive - Event and Online Booking Drupal Theme
With its boldly styled strong design, embedded with Drupal commerce module, Eventive Drupal theme helps companies or individuals have a full function website to show their profile, to announce what’ll be happening in the upcoming time. What’s more? You can book a ticket to join the event.
We think this will be of great use for companies to celebrate their events, for online booking ticket website, or for business with a continuously updated information channel.
Included content:
- README.txt
- Eventive theme: events-7.x-1.0.zip
- Demo Profile for Eventive: events-profile-7.x-1.0.zip
2. Features
- Documentation included.
- Browser compatibility
- Web Technology (Html5/Css3, Twitter Bootstrap 3.1.1, Font Awesome 4.0.3,…)
- Fully responsive.
- Megamenu
- Color variations (4 skin colors).
- Easy customization.
- High usability
- Support both Left to Right and Right to Left Languages
3. System Configuration
Database
- MySQL 5.0.15 or higher with PDO
- PostgreSQL 8.3 or higher with PDO
- SQLite 3.3.7 or higher
PHP
- PHP 5.2.5 or higher (5.4 or higher recommended)
- PHP5 GD library installed
- Disabled error_reporting flag on production server
- Enabled mod_rewrite in Apache for clean URLs
- Memory limit set up at least 128MB
If you are new to Drupal, please take a reference to System requirements on drupal.org.
4. Screenshots
Let's glance through the theme's design & some features:
Homepage
About Us
Events Gird
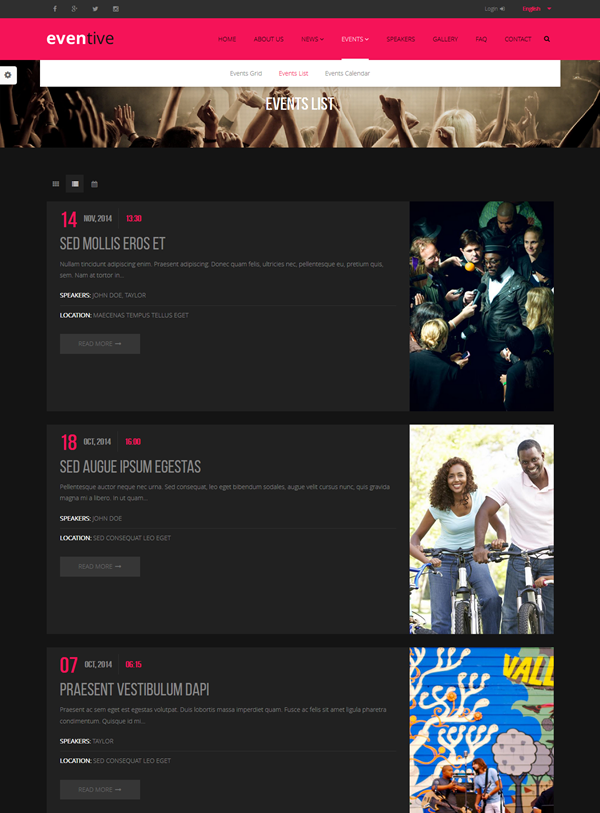
Events List
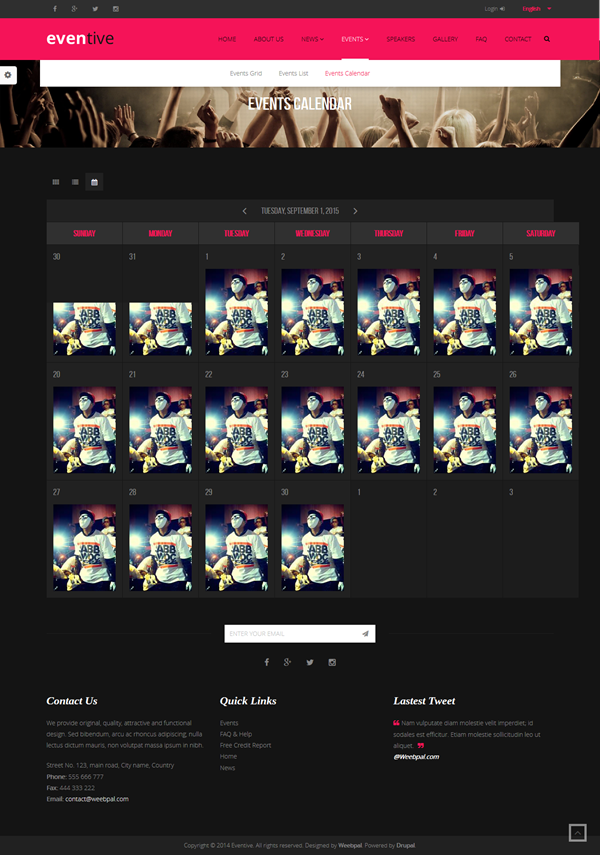
Events Calendar
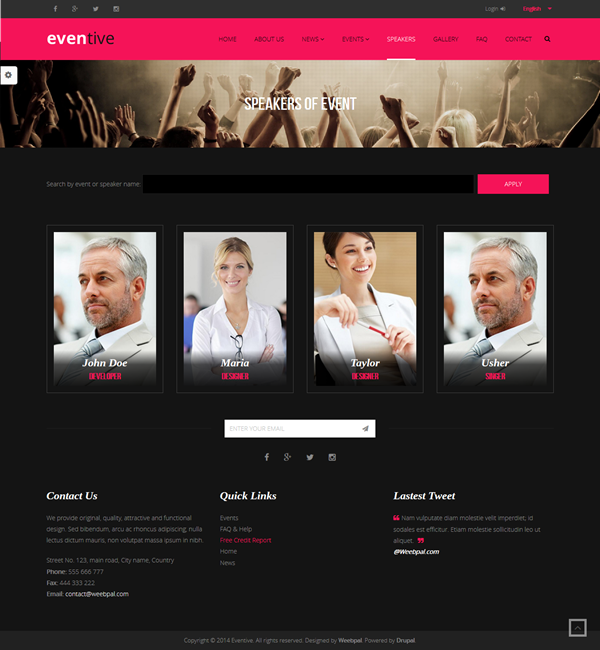
Speakers
Gallery
FAQ
Contact
Multi colors
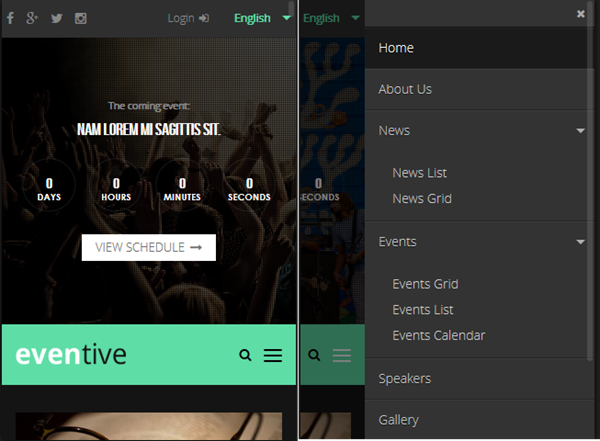
Responsive layout
5. Module requirements
Core Modules
- Contact
- PHP filter
- Statistics
Third-party Modules
- Addressfield
- Admin Menu
- Backup Migrate
- Bean
- Better Exposed Filters
- Block Class
- Calendar
- Commerce
- Commerce Donate
- Commerce Paypal
- Chaos tools
- Date
- Devel
- Dynamic Banner
- Entity
- Entity Reference
- Facetapi
- FAQ
- Field Collection
- Field Collection Table
- Field Collection Class
- Field Collection Settings
- Field Group
- Field Slideshow
- File Entity
- Flexslider
- Flickr
- Fontawesome
- Geocoder
- Geofield
- Geophp
- i18n
- Icon
- Image Delta Formatter
- Inline Entity Form
- Jcarousel
- Jquery Update
- Lang Dropdown
- Language Icons
- Libraries
- Link
- Magnific Popup
- Modal Forms
- Module Filter
- Node Class
- Page Title
- Path Auto
- Quicktabs
- References
- Rules
- Search Api
- Search Api Db
- Search Api Ranges
- Search Api Solr
- Search Api Sorts
- Search Facetapi
- Select Or Other
- Sharethis
- Shortcode
- Simplenews
- Superfish
- Tag Clouds
- Taxonomy Menu
- TB Megamenu
- Title
- Token
- Variable
- Video Embed Field
- Views
- Views Bootstrap
- Views Bulk Operations
- Views Field View
- Views Fieldsets
- Views Slideshow
- Webform
- Wee Shortcode
- Weebpal Banner
Required libraries by the modules
- Ddslick
- Flexslider
- Fontawesome
- Jcarousel
- Jquery Cycle
- Jquery Jcarousel
- Magnific Popup
- Superfish
Download Drupal core files, and extend your site with modules at here.
Installation
Quick Installation Demo Profile
We created an installation profile with demo content for each of our theme, so that you can quickly download and reproduce the whole site content as presented on our live demo. This way you will get a quicker overview of the features. If it's convenient you may also use the given demo content as a starting point to build your custom sites.
1. Eventive package included:
- README.txt
- Eventive theme: events-7.x-1.0.zip
- Demo Profile for Eventive: events-profile-7.x-1.0.zip
The below steps will give you the installation guide so that you can build your website to look exactly like the Eventive Demo.
- events-profile-7.x-1.0.zip
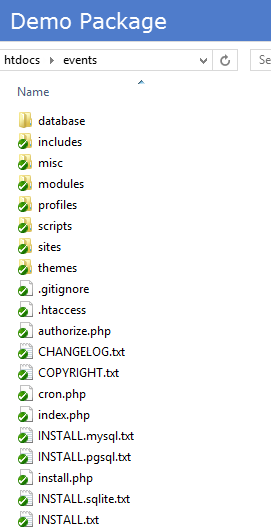
2. Extract events-profile-7.x-1.0.zip above and copy it into your host, and rename the directory
3. Access your MySQL database and create a new DB (e.g. events) and user account. Don't forget to add correct permissions to new user to access the database
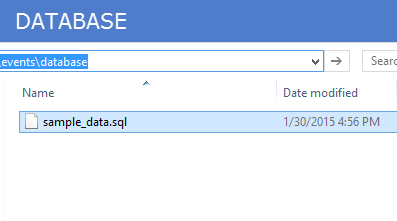
4. In the demo directory database or profiles/weebpal/sample_data you can find database dump named sample_data.sql. Import this file into new BD
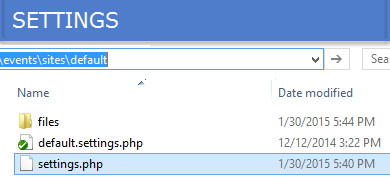
5. Now, you need to modify sites/default/default.settings.php file. Clone default.settings.php file, then rename it "settings.php"
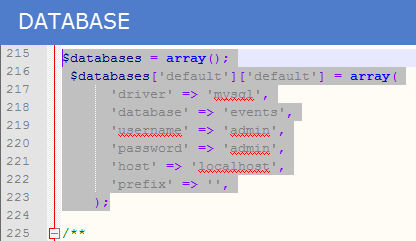
6. Open settings.php, then locate the $database array and set proper credentials.
                    $databases['default']['default'] = array(
	                    'driver' => 'mysql',
	                    'database' => 'databasename',
	                    'username' => 'username',
	                    'password' => 'password',
	                    'host' => 'localhost',
	                    'prefix' => '',
                	);
When using this installation, you are installing everything from our preview server. So don't forget to set proper values to access to your database: db name, db admin username, db admin password, host, etc.
7. Open the browser and visit your website with the prepopulated content & layout exactly like our Events Demo
Now, you can visit administrator site with the admin account admin/admin to delete the unnecessary contents and add the new ones.
Installation Events Theme for Drupal developers
If you're an experienced Drupal user or if you want to build the theme from zero with only the basic appearance of Events Theme, find this guide in handy.
1. Install Drupal
-
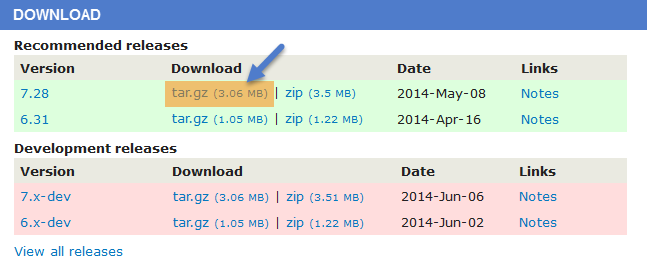
Go to Drupal download page and download the latest version of Drupal 7.
- Extract and copy Drupal folder to your host and rename the directory.
- Follow this tutorial to install Drupal with the standard profile.
2. Install Events Theme
- Extract Events theme .ZIP file:
- events-7.x-1.0.zip
-
Move this theme into your Drupal folder: sites/all/themes
-
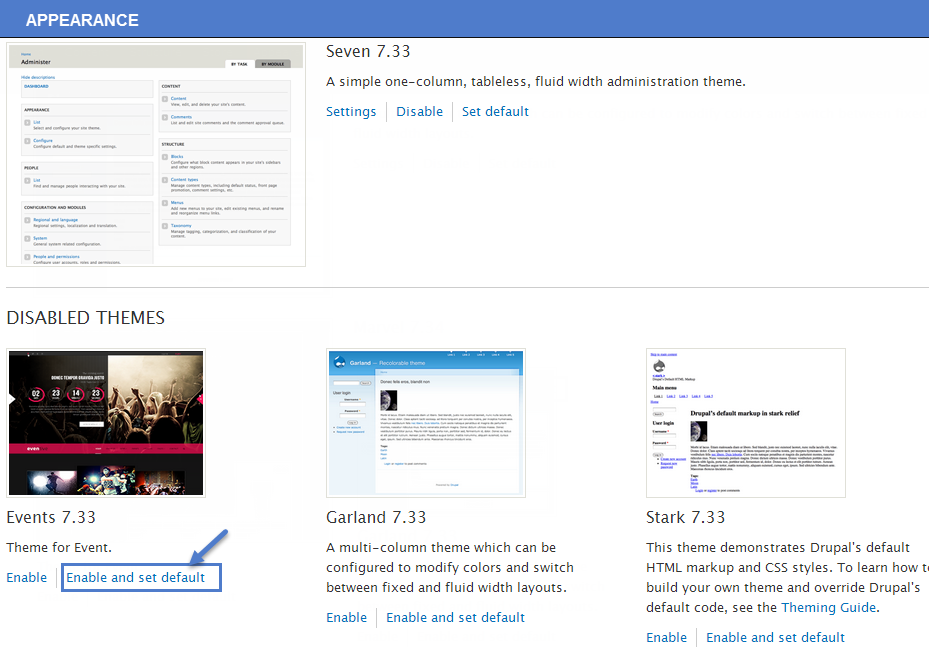
Navigate to Appearance > Choose Enable and set default Events theme
3. Install Required Modules
Now that you've enabled Events theme, you will install and enable the required modules (listed in the Module Requirements section) to customize and use them.
If you don't know how to install the contributed modules, this tutorial is an essential guide.
Cheat to install modules & theme:
- Extract events-profile-7.x-1.0.zip
- Open extracted folder, go to sites/all and copy all folders inside (modules, themes, libraries)
- Paste them to your host, folder sites/all
Note: See this guide to get more details about installation
Taxonomy configuration
Quick Information
- Taxonomy: Taxonomy can be simply understood as category management using organizational keywords known in other systems as categories, tags or metadata. It allows you to connect, relate and classify your website's content. In Drupal, these terms are gathered within "vocabularies". The Taxonomy module allows you to create, manage and apply those vocabularies.
- Vocabulary: for example product category, tag, provider name, ...
- Term: the items in each vocabulary. For example: vocabulary product category has some terms: laptop, pc, mobile, tablet, camera, headphone, ...
- For more information about taxonomy, please see: Organizing content with taxonomies
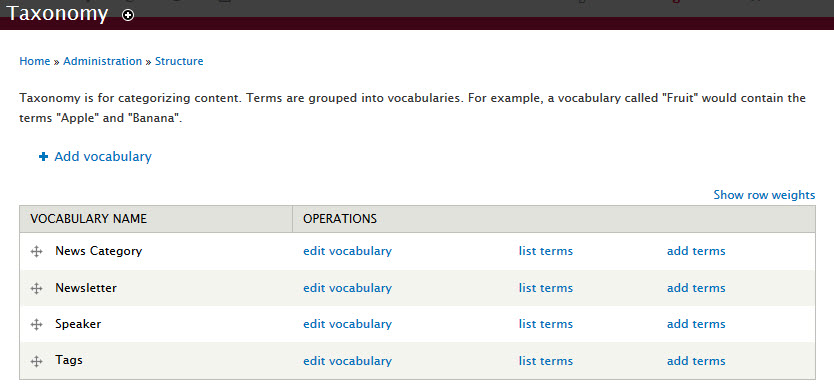
Step 1: Navigate to Structure > Taxonomy to create vocabularies as the following:
Then, add terms for each vocabulary
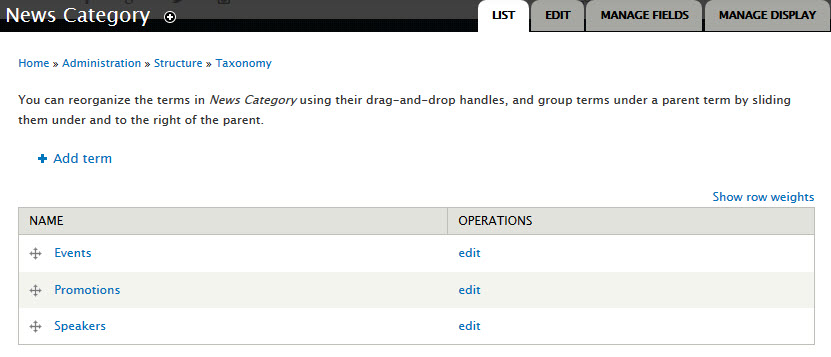
Step 2 :Terms of News Category:
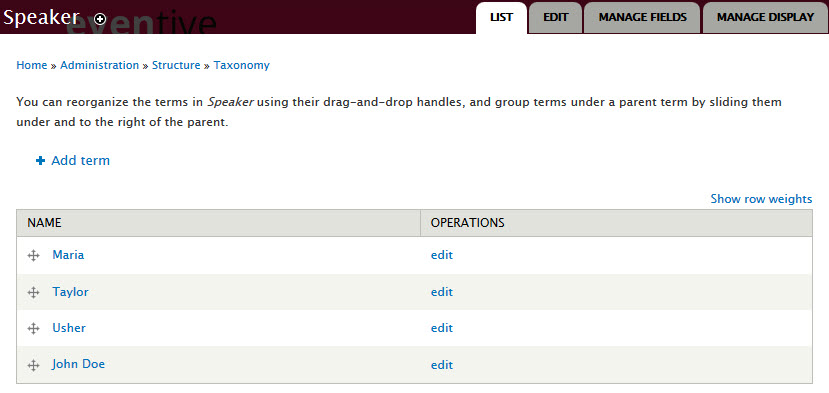
Step 3:Terms of: Speaker
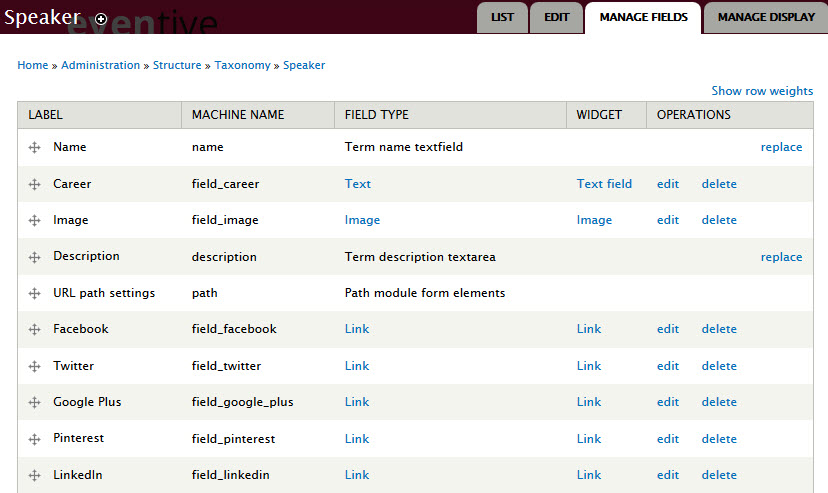
Step 4:Navigate to Structure > Taxonomy > Speaker > Manage Fields click link and add following field:
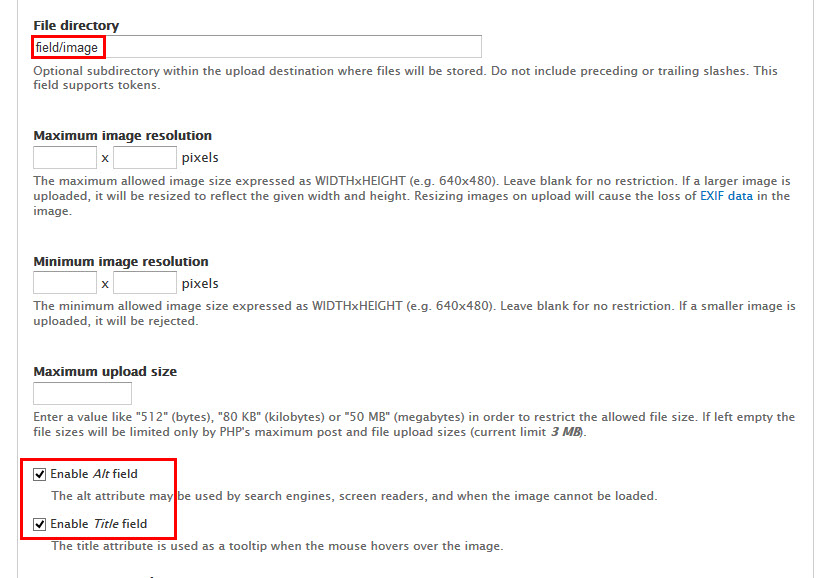
Step 5:Set properties for Images field
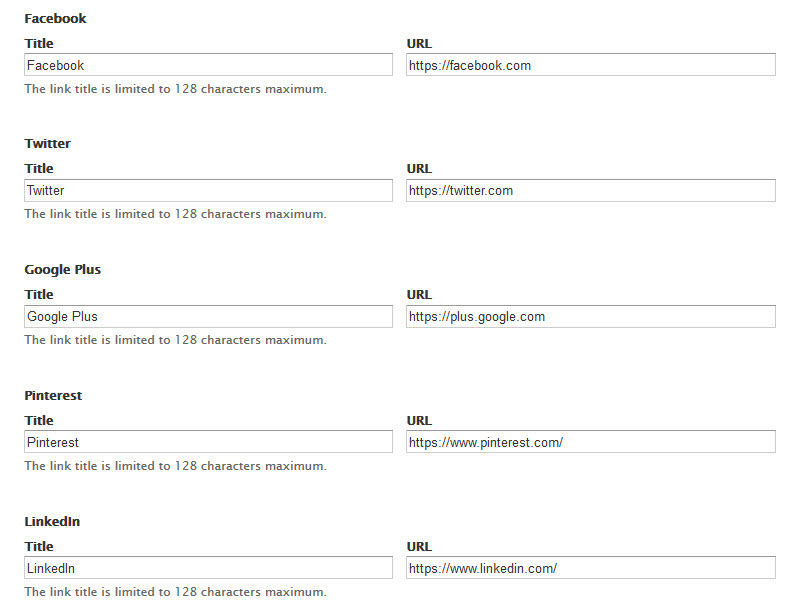
Step 6:Set properties for Facebook field
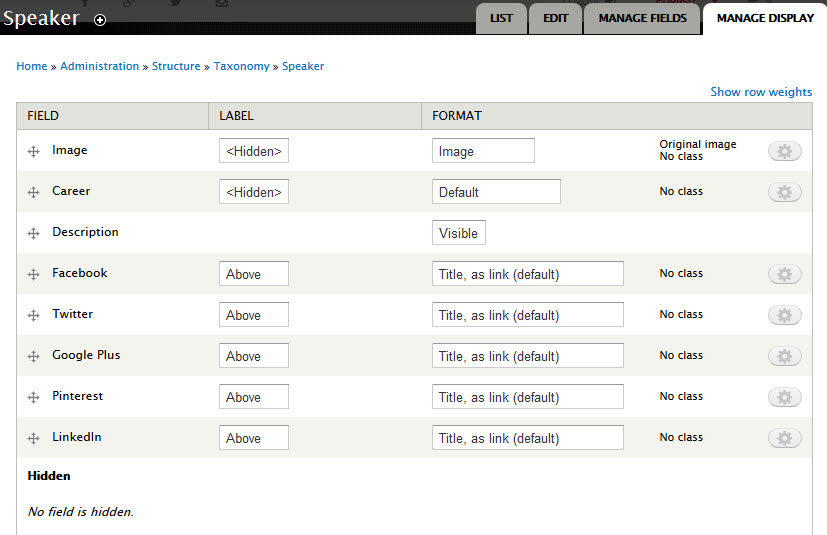
Step 7:Go to Manage Display tab and set following fields:
Step 8:Go to List tab and set following fields all term
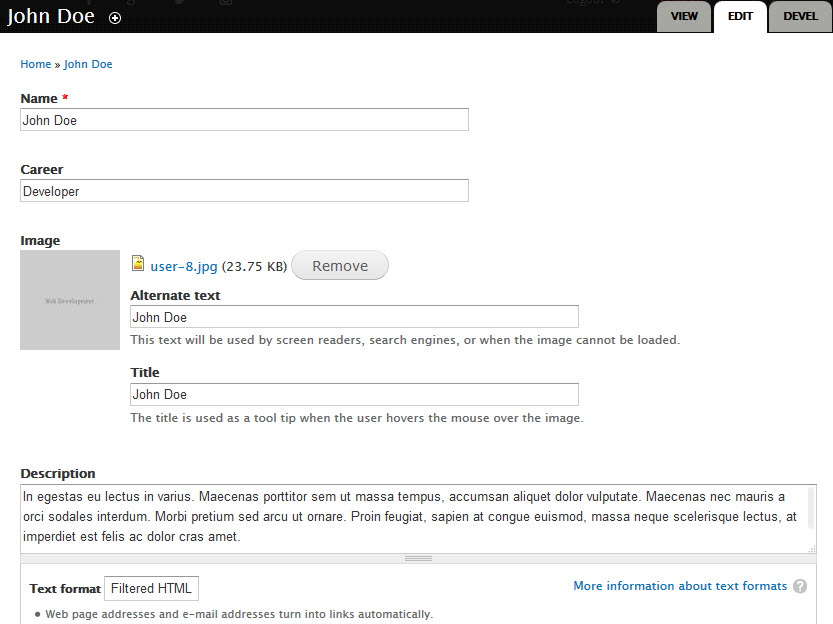
Step 9:Find John Doe term list and set following fields:
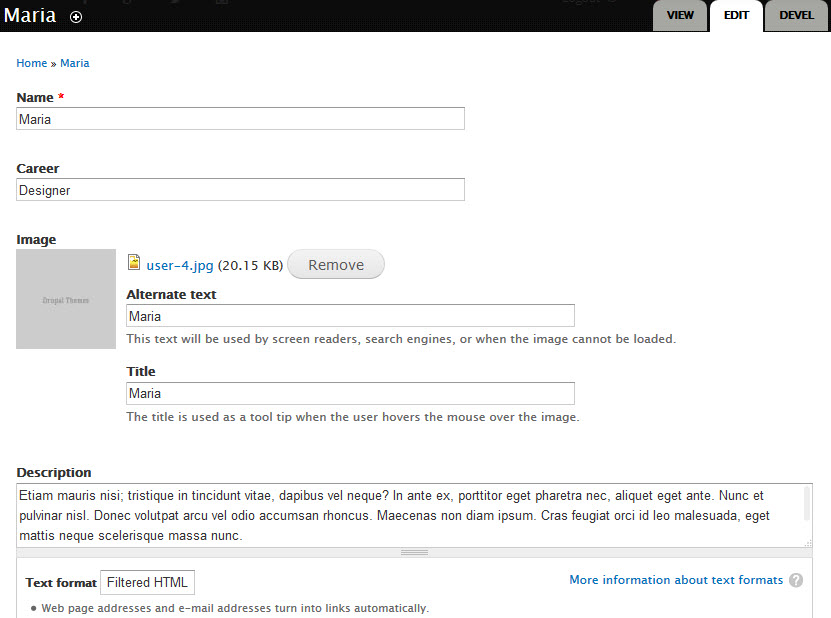
Step 10:Find Maria term list and set following fields:
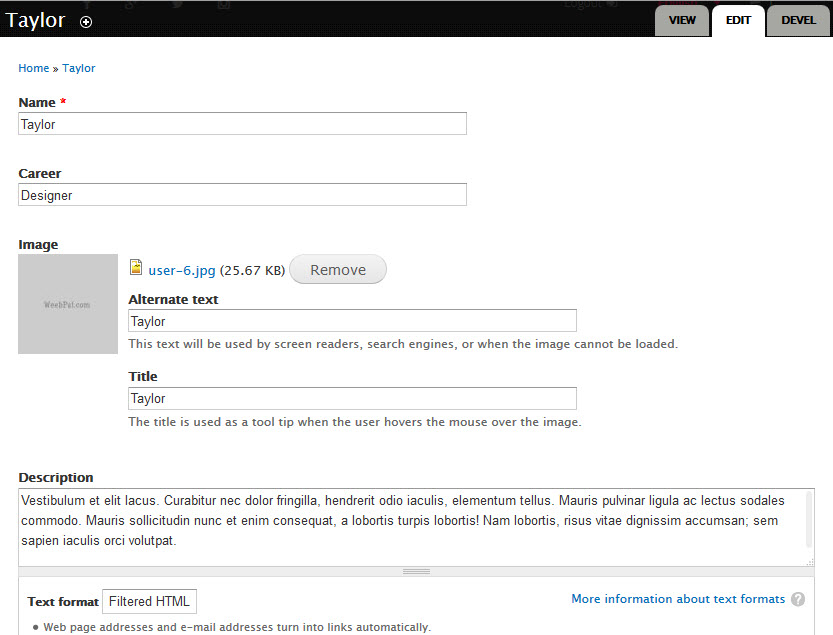
Step 11:Find Taylor term list and set following fields:
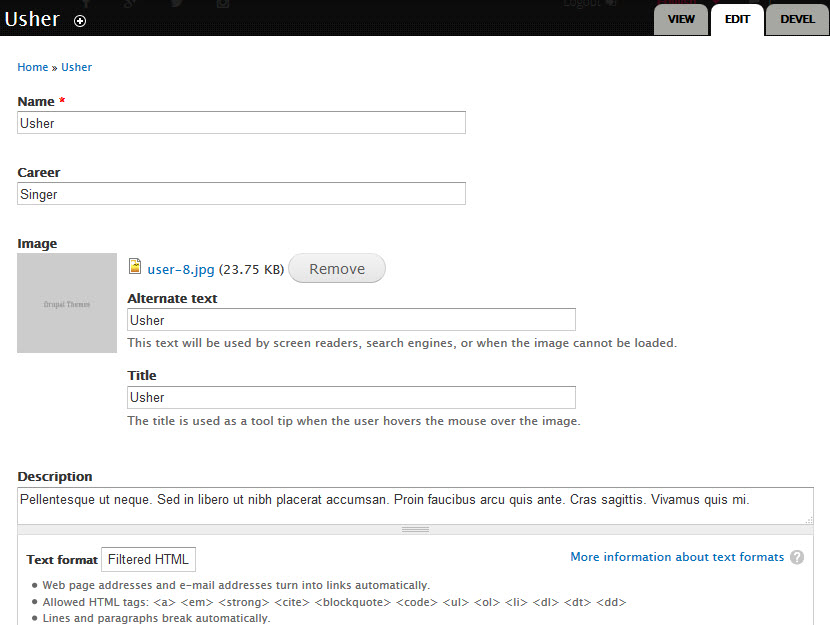
Step 12:Find Usher term list and set following fields:
Note: See this guide to get more details about taxonomy configuration
Media configuration
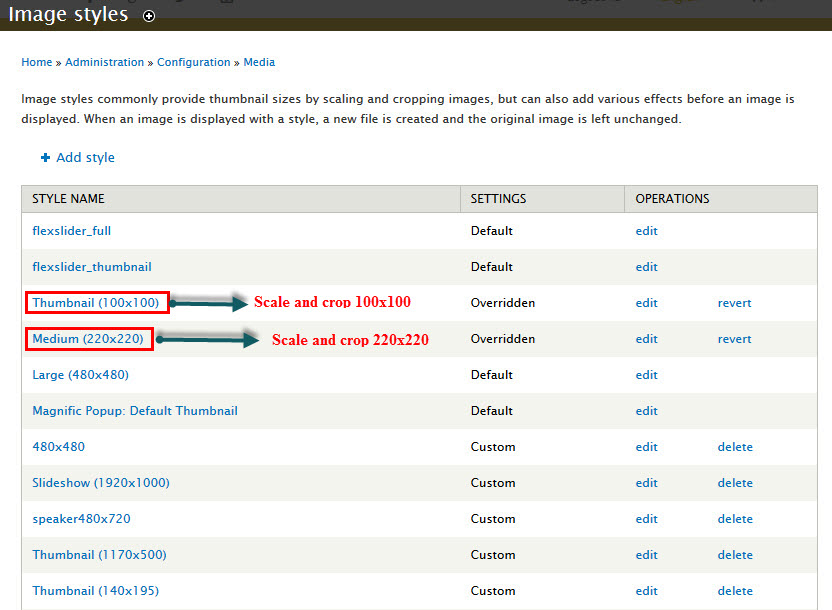
Image Style Configuration
Image styles are the presets of image settings. Image styles are used to define how the images are shown.
Image styles are the presets of image settings. Image styles are used to define how the images are shown.
Navigate to Configuration, In MEDIA area, click Image styles, then create image styles as the following:
Content type configuration
Configure Date and time
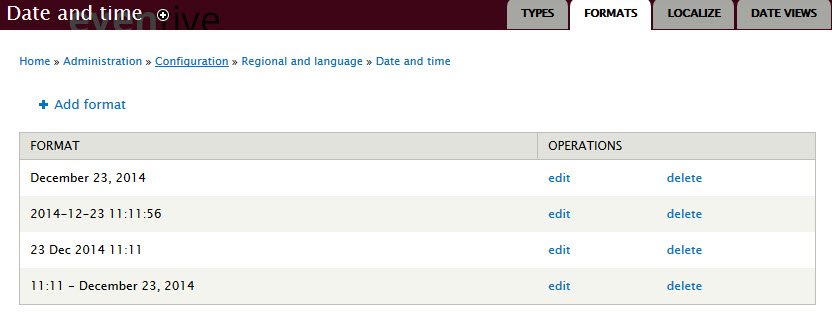
Step 1: Navigate to Configuration > Regional and language > Date and time. Then click Format tab and add format following:
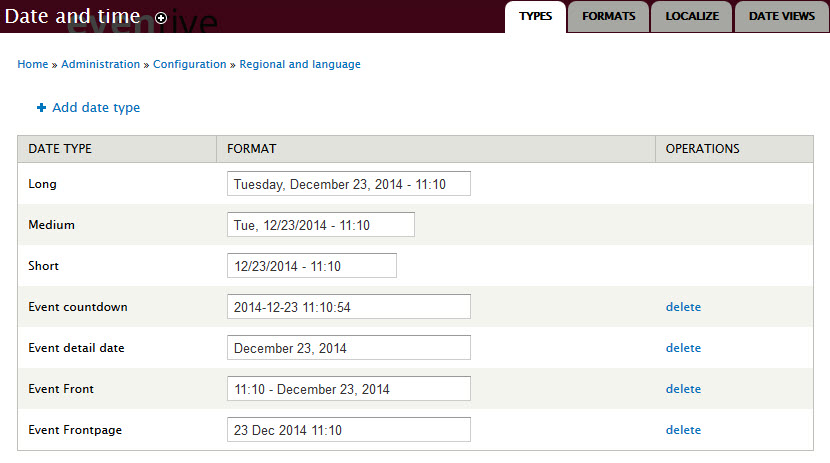
Step 2: Go to Types tab and set following properties:
Step 3: Click Save button
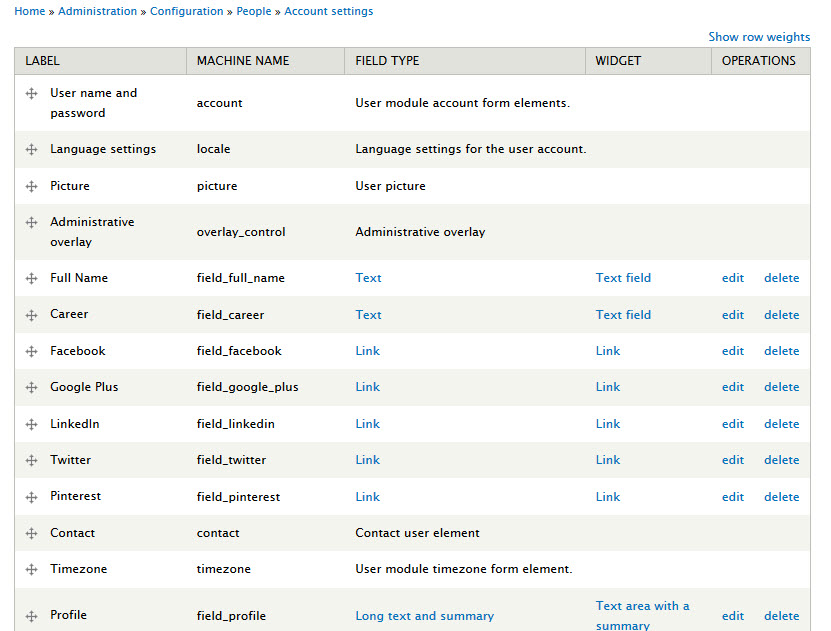
Configuration People
Step 1:Navigate to Configuration > People > Account settings > Manage Field link and add following field:
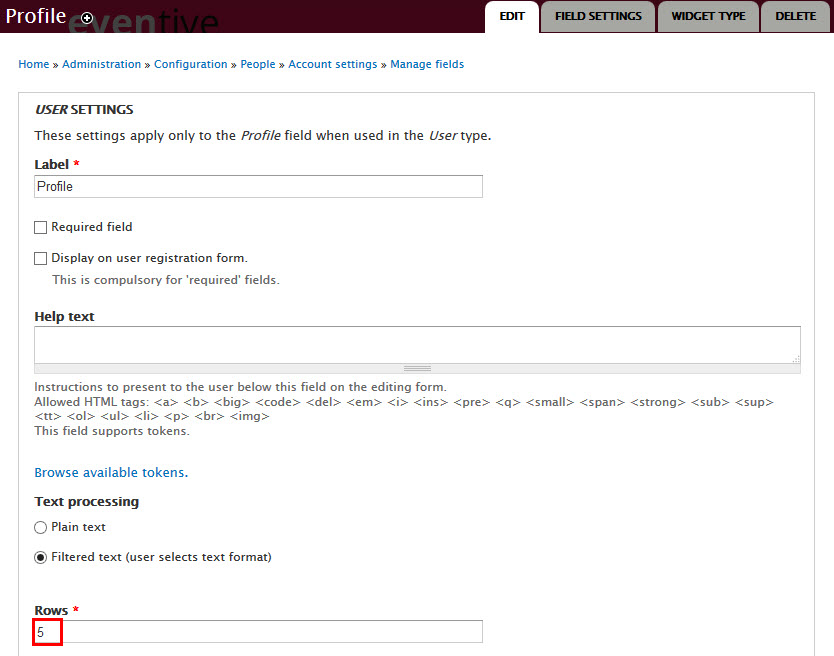
Step 2: Set properties for Profile field
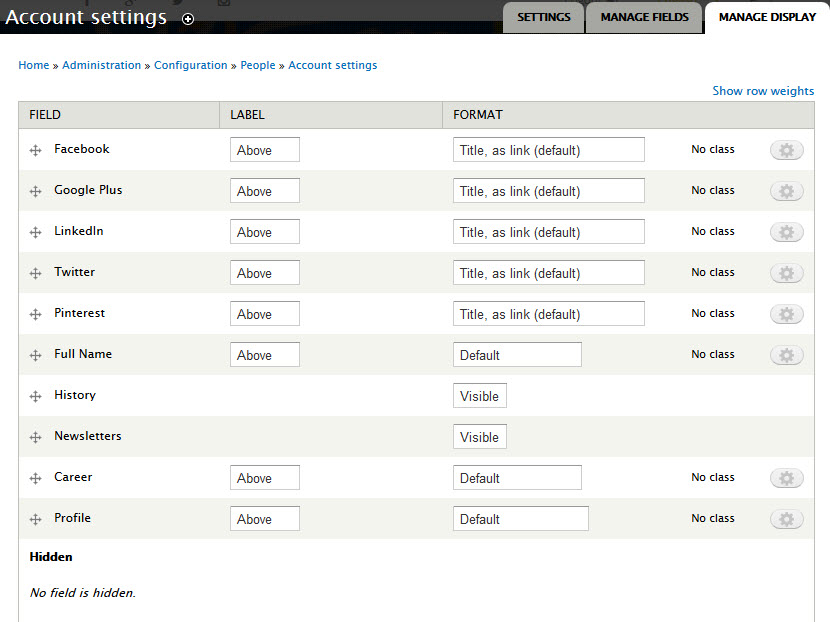
Step 3: Go to Manage Display link and set following fields:
Step 4: Click Save button
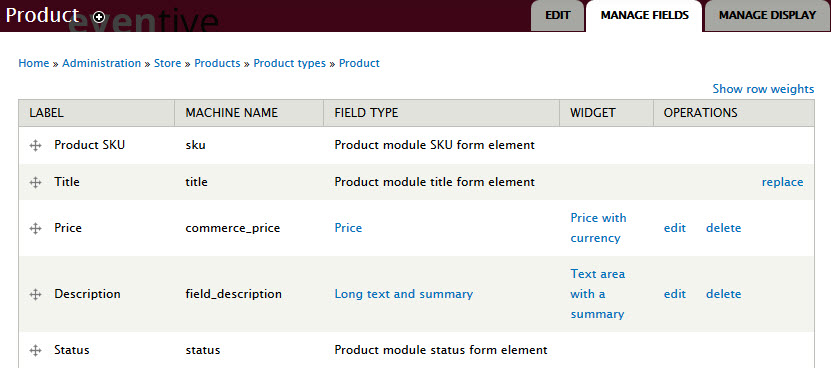
Configuration Store Product
Step 1:Navigate to Store > Product > Product types link, then click Manage fields link and add following field:
Step 2: Set properties for Description field
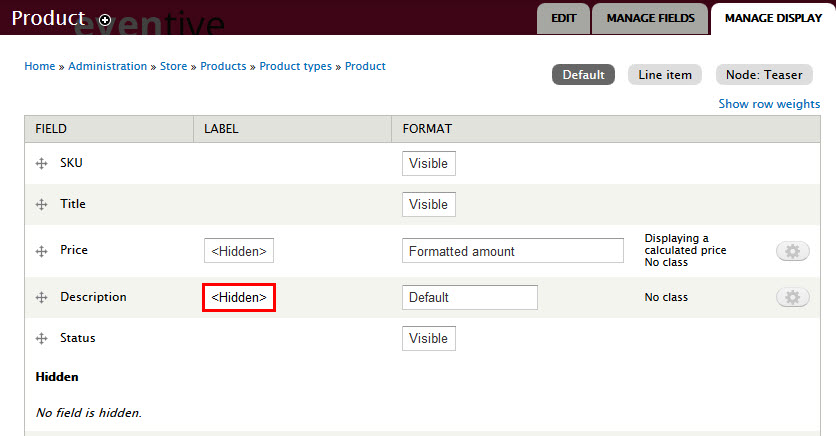
Step 3: Go to Manage Display link and set following fields:
Step 4: Click Save button
Add Store Products
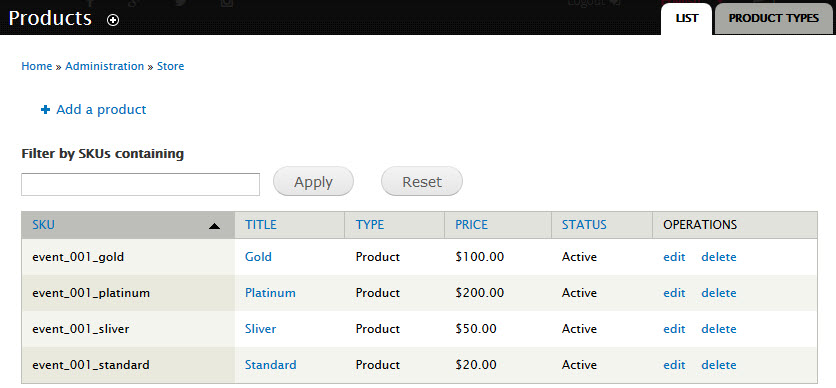
Step 1:Navigate to Store > Product link, then click Add a product link and add following field:
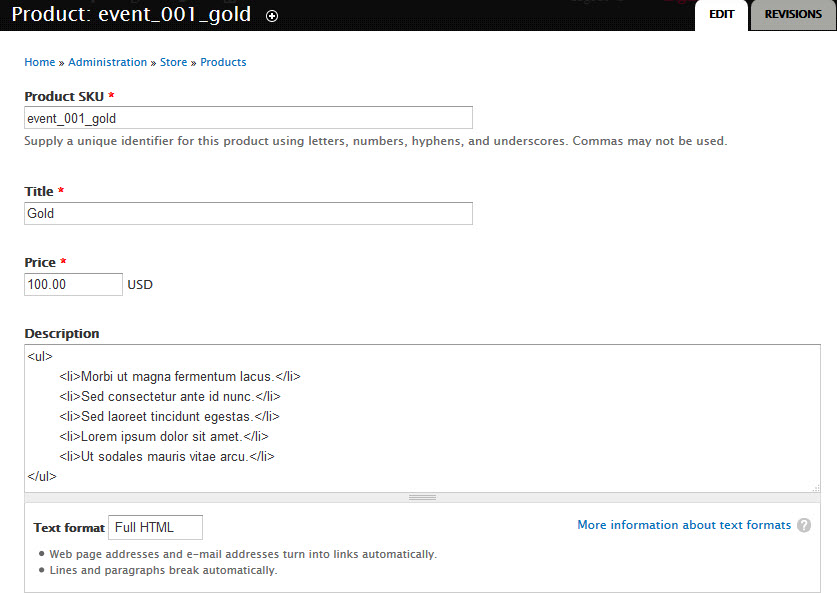
Step 2: Set properties for Gold field
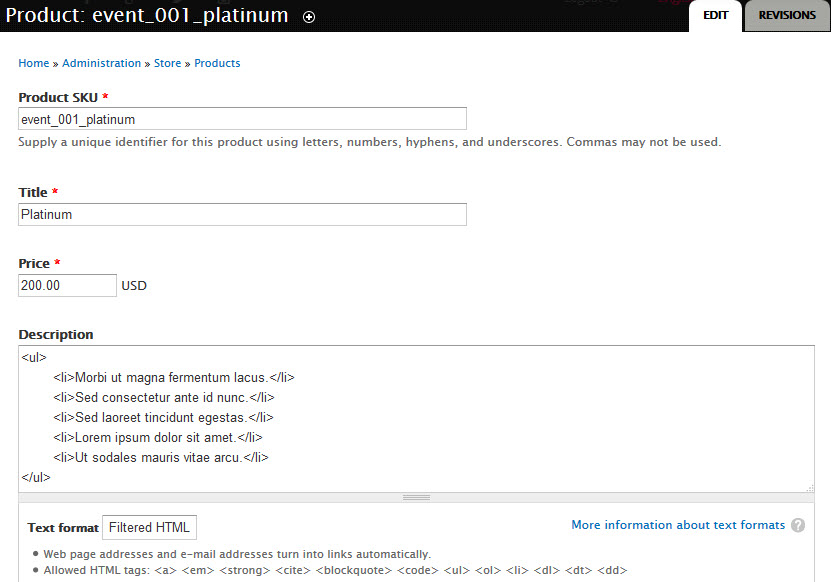
Step 3: Set properties for Platinum field
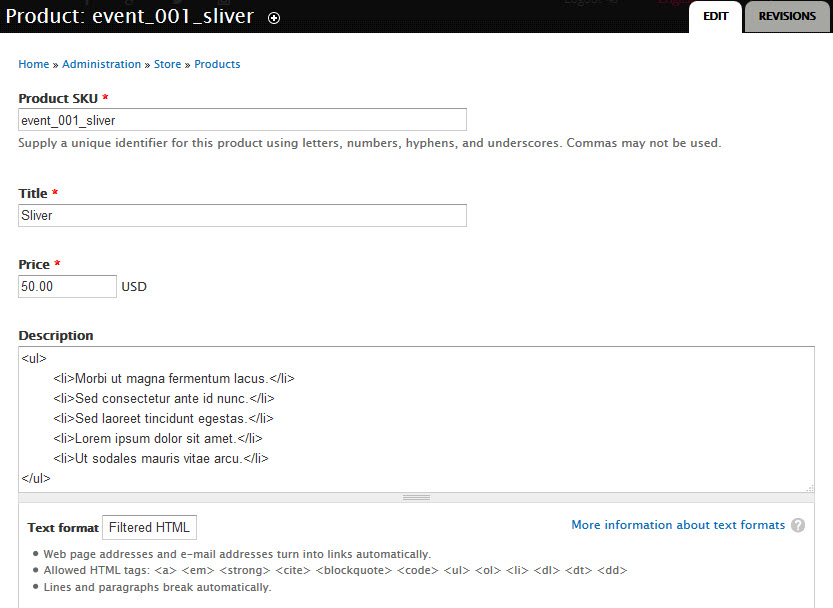
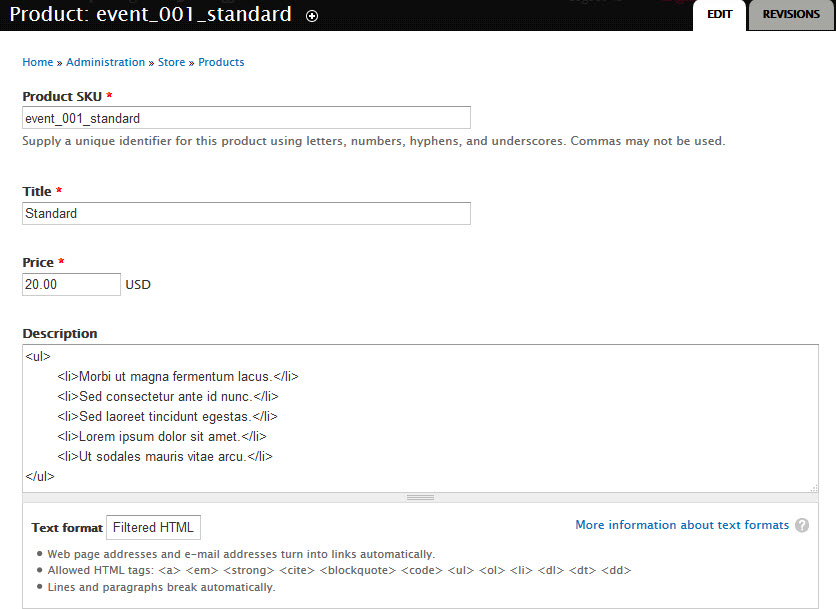
Step 4: Set properties for Sliver field
Step 5: Set properties for Standard field
Step 6: Click Save button
Modify Simplenews newsletter type
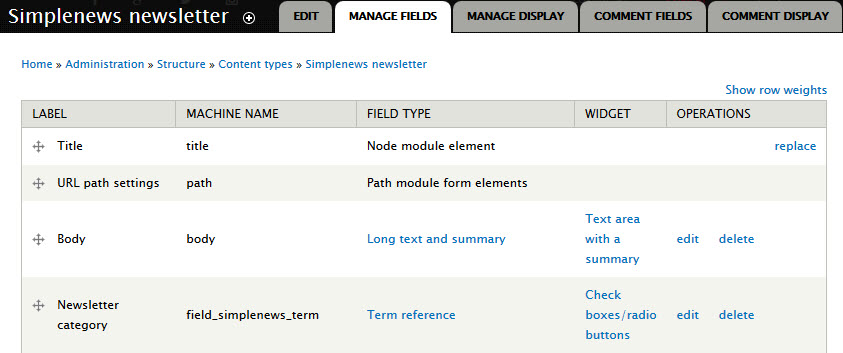
Step 1: Navigate to Structure > Content Type. Find Simplenews newsletter type and click manage fields link to set following fields:
Step 2: Click Save button
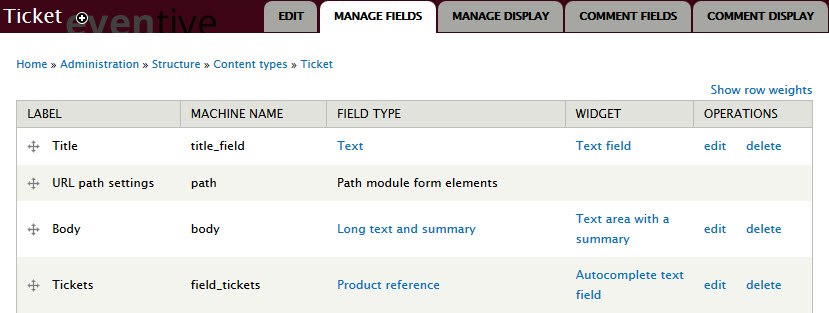
Create Ticket type
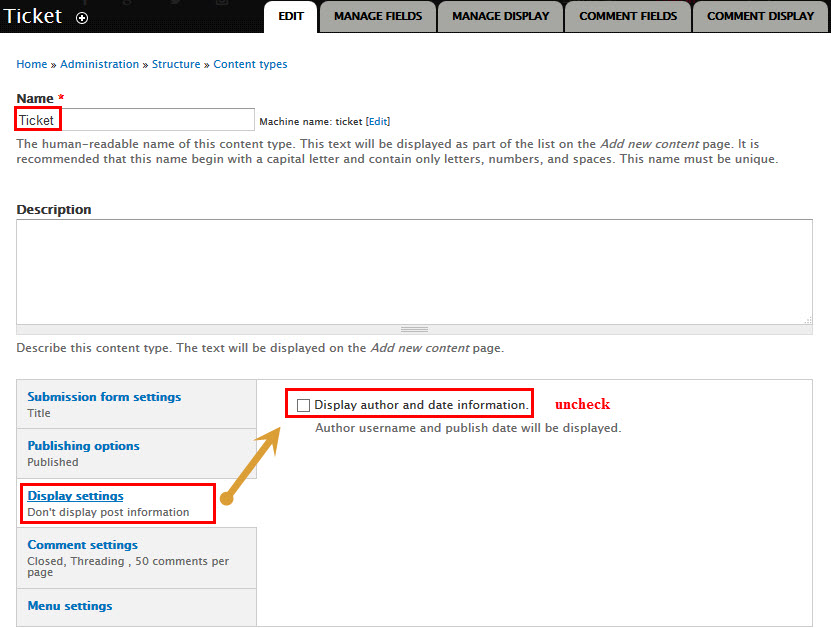
Step 1: Navigate to Structure > Content Type > link, then click Add content type link to create content type Ticket
Step 2:Go to Manage Fields and and set following fields:
Step 3:Find Title fields click replace link and set following properties field:
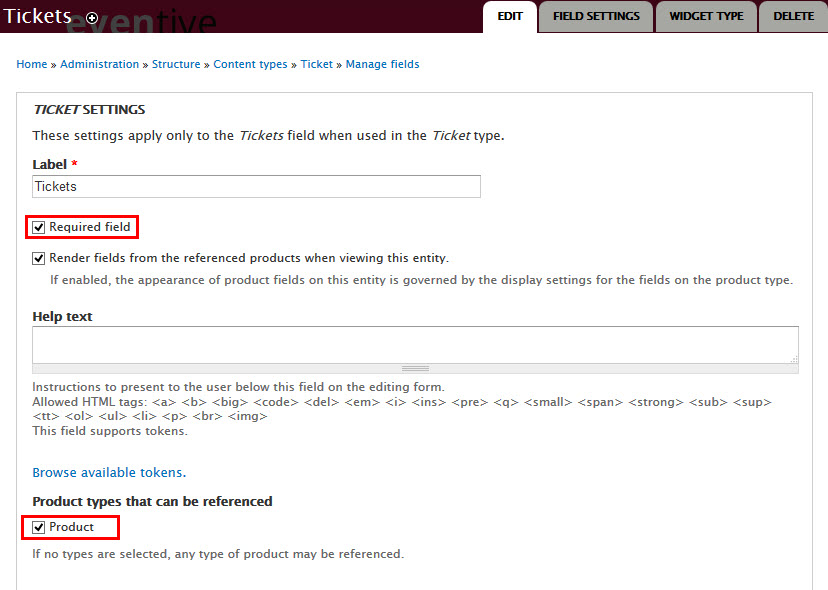
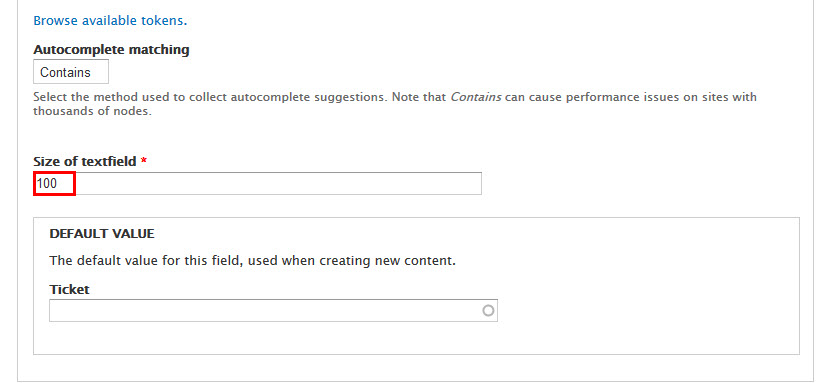
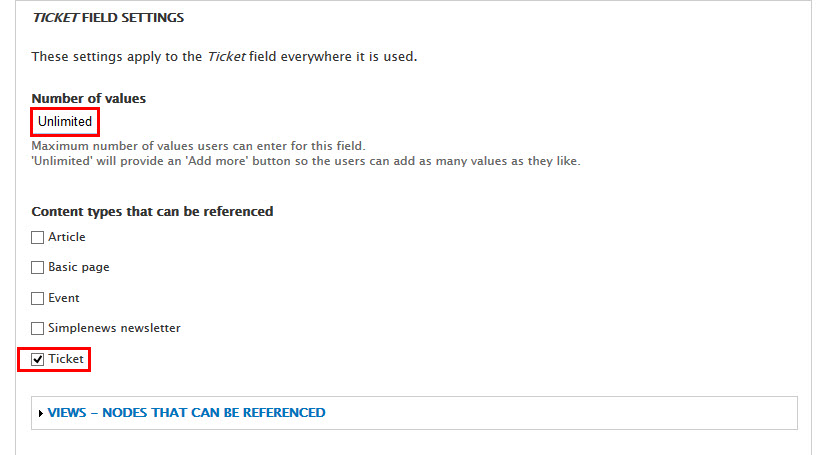
Step 4:Set properties for Tickets field
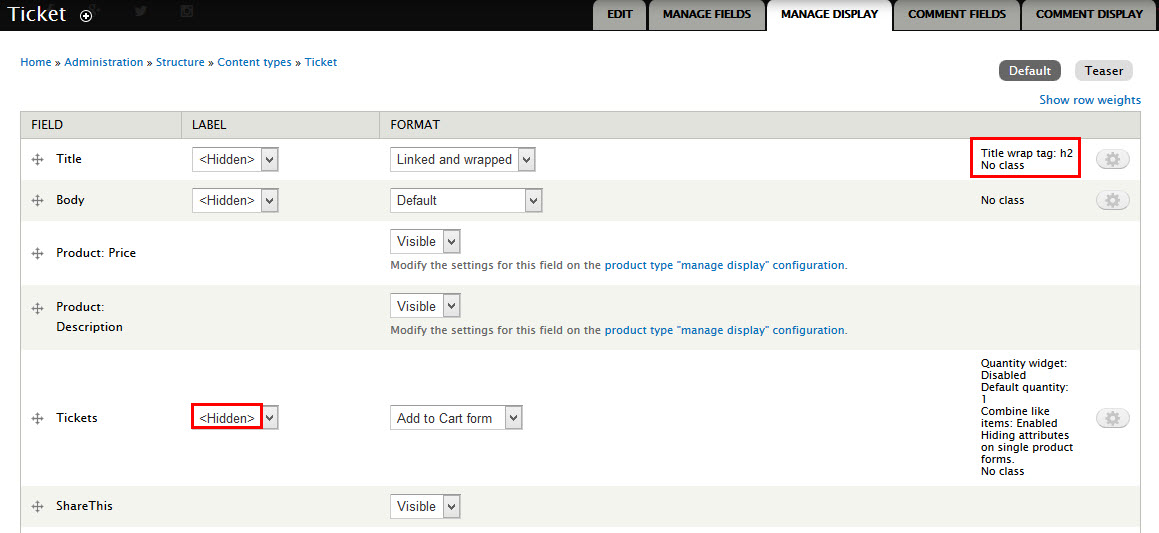
Step 5:Go to Manage Display and set following fields:
Step 6: Click Save button
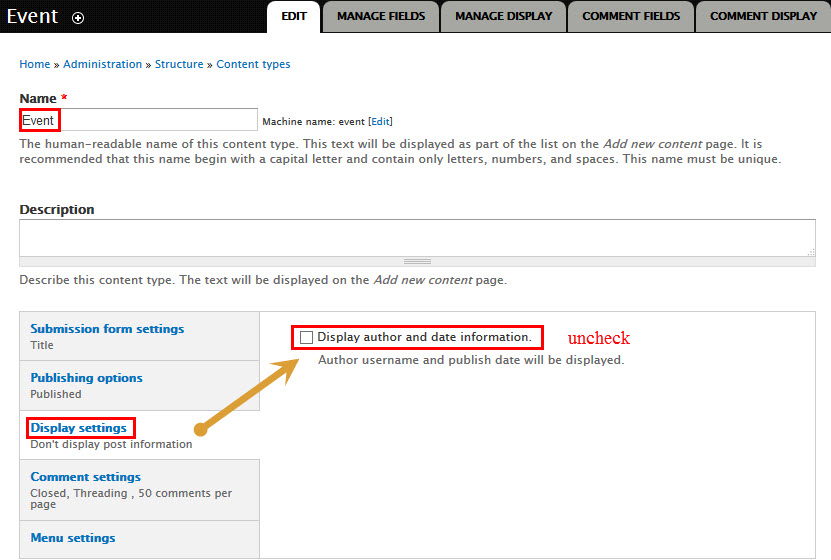
Create Events type
Step 1: Navigate to Structure > Content Type. Click Add Content Type link to create content type Events
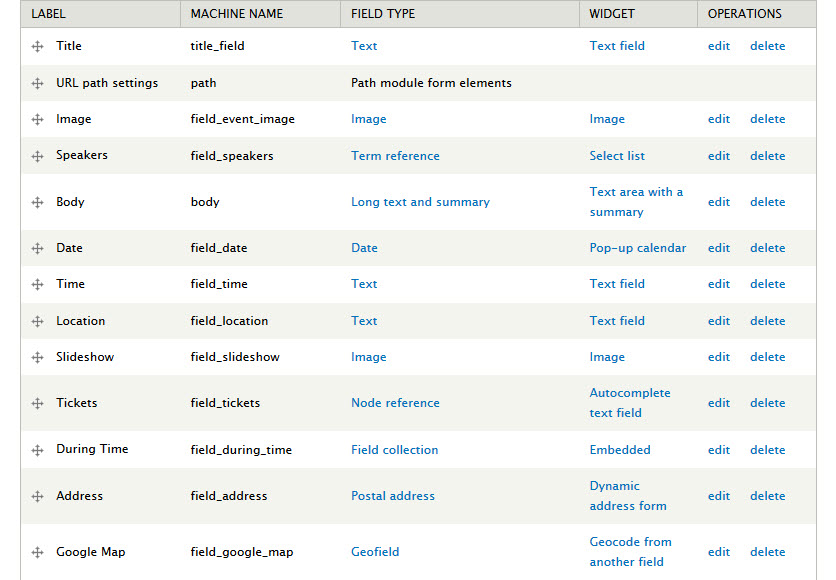
Step 2:Go to Manage Fields and add following fields:
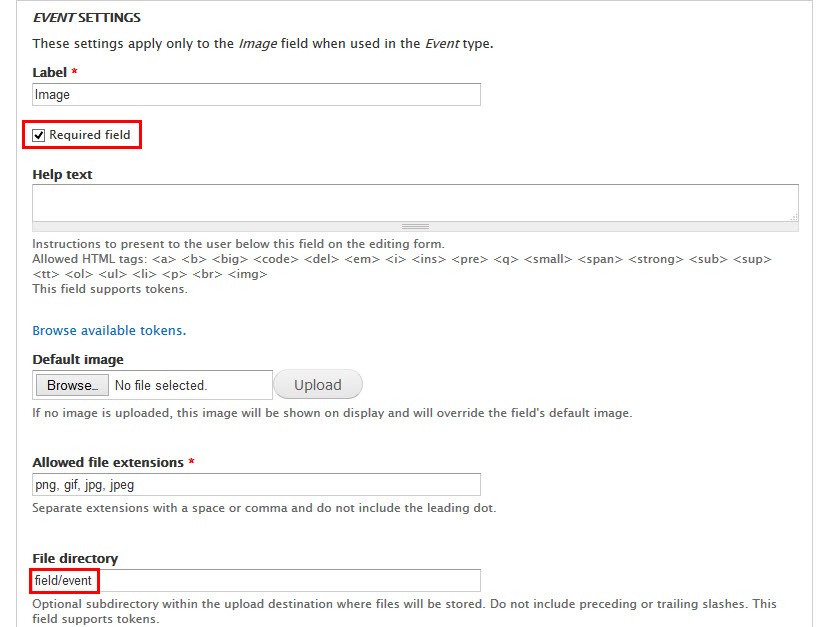
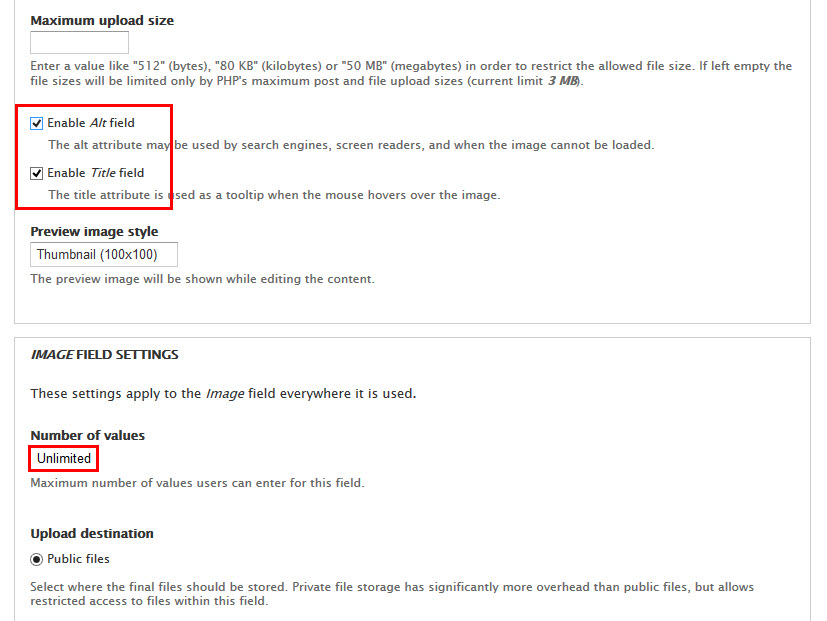
Step 3:Set properties for Image fields:
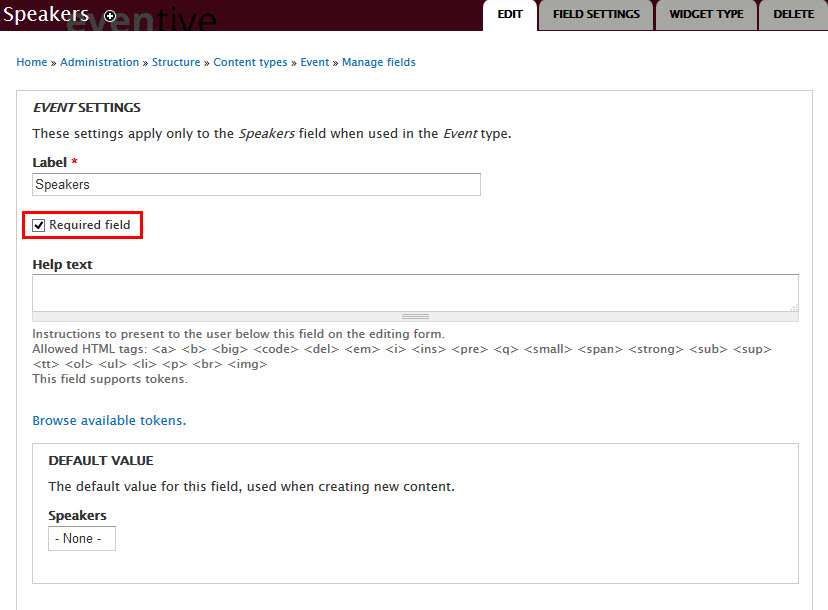
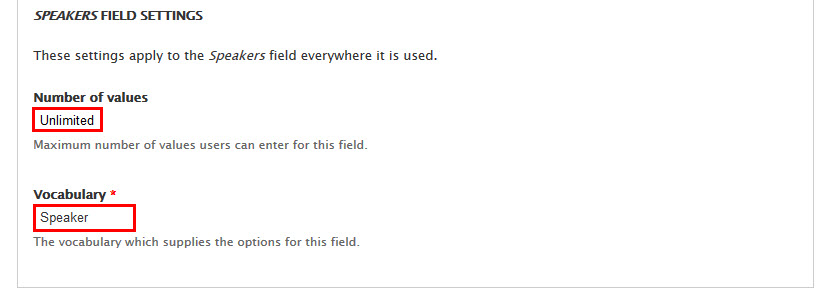
Step 4:Set properties for Speaker fields:
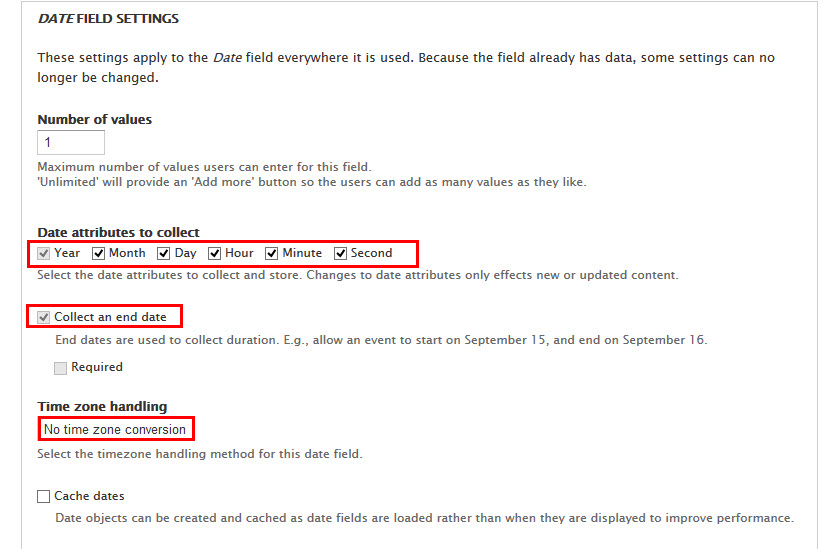
Step 5:Set properties for Date fields:
Step 6:Set properties for Time fields:
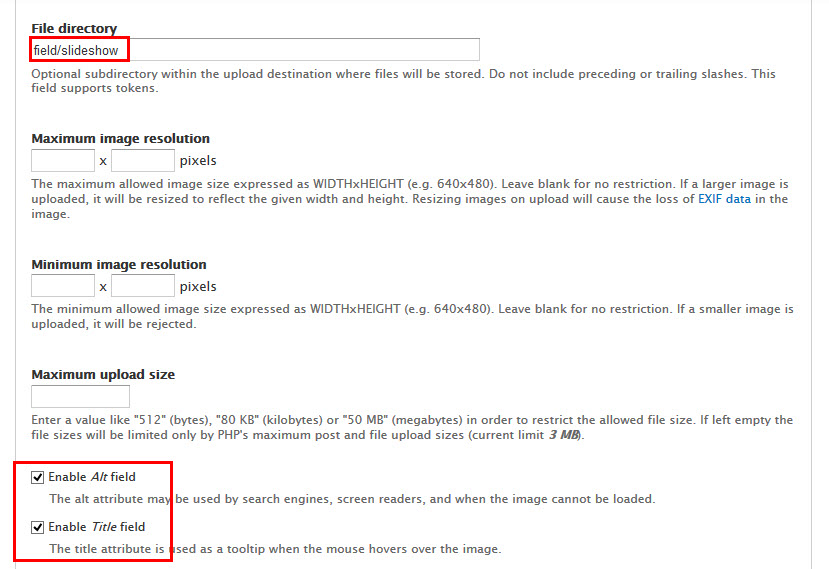
Step 7:Set properties for Slideshow fields:
Step 8:Set properties for Ticket fields:
Step 9:Set properties for During Time fields:
Step 10:Set properties for Google Maps fields:
Step 11:Find Title fields click replace link and set following properties field:
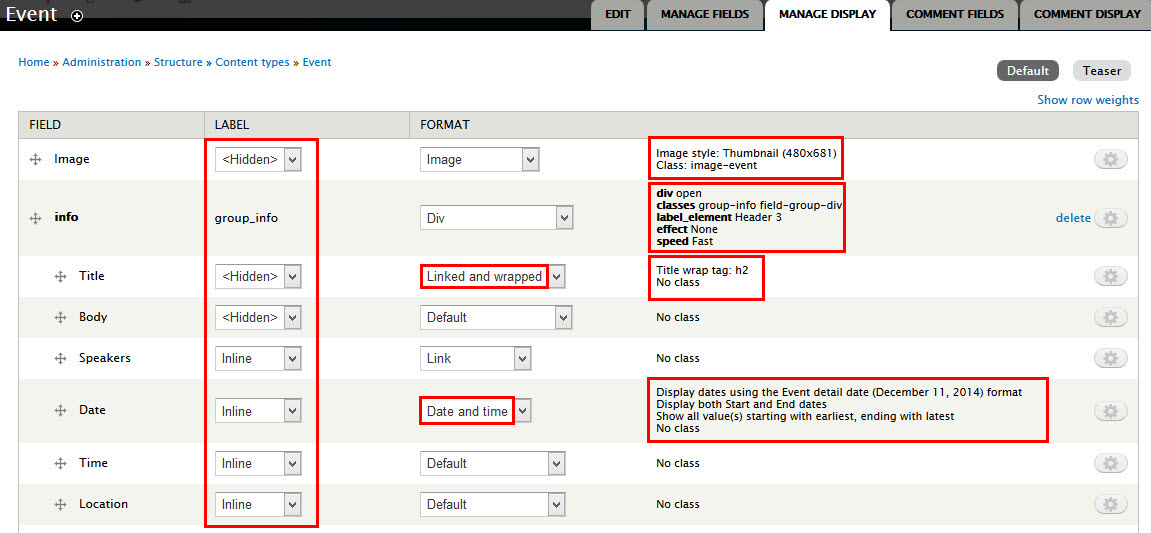
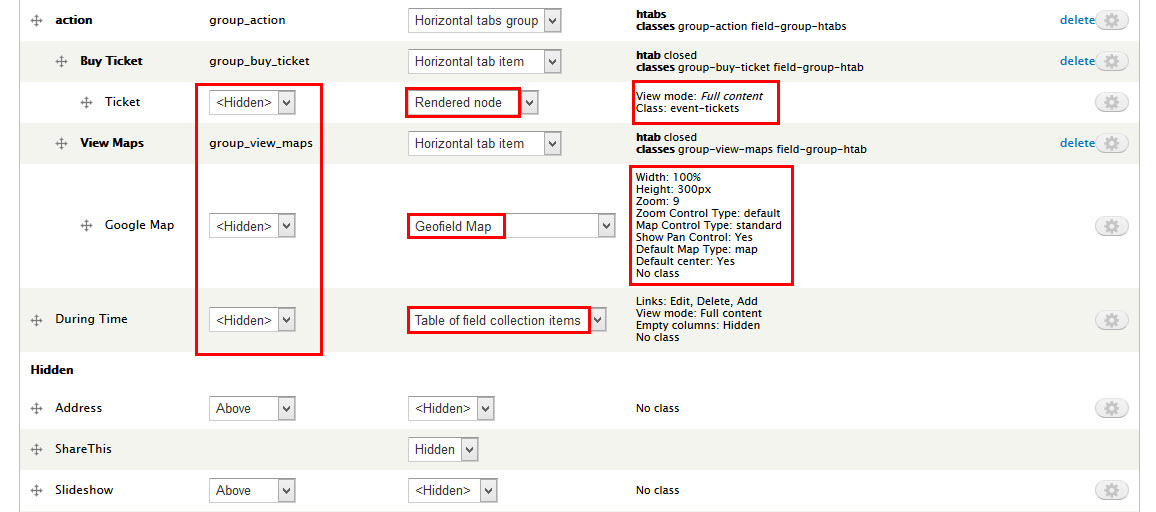
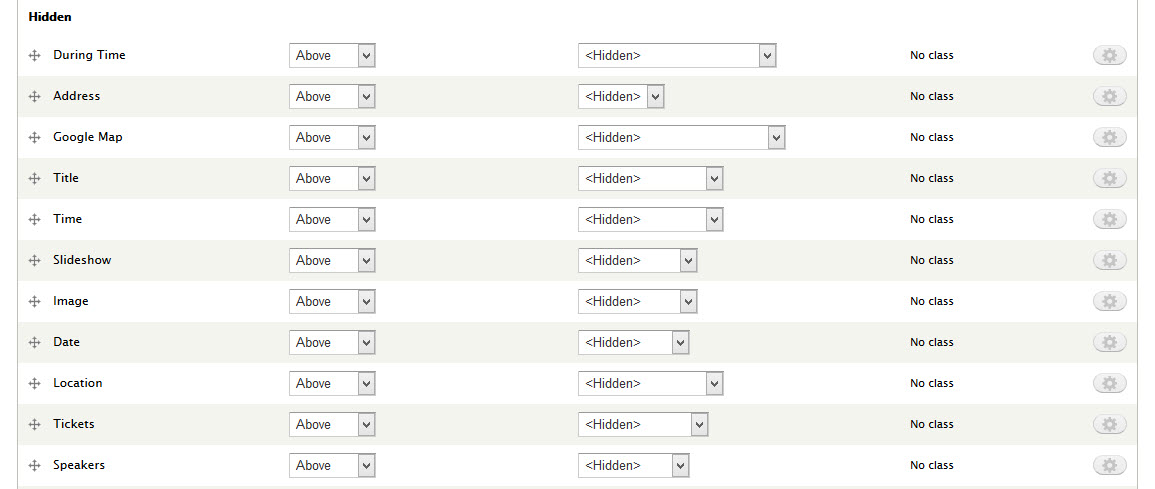
Step 12:Go to Manage Display > Default and set following fields:
Step 13:Go to Manage Display > Teaser and set following fields:
Step 14: Click Save button
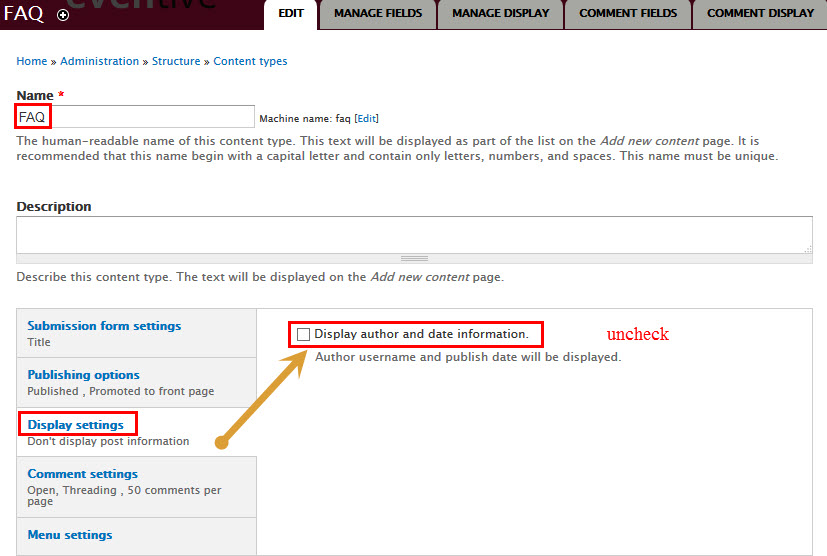
Create FAQ type
Step 1: Navigate to Structure > Content Type. Click Add Content Type link to create content type FAQ
Step 2:Go to Manage Fields and set following fields:
Step 3: Click Save button
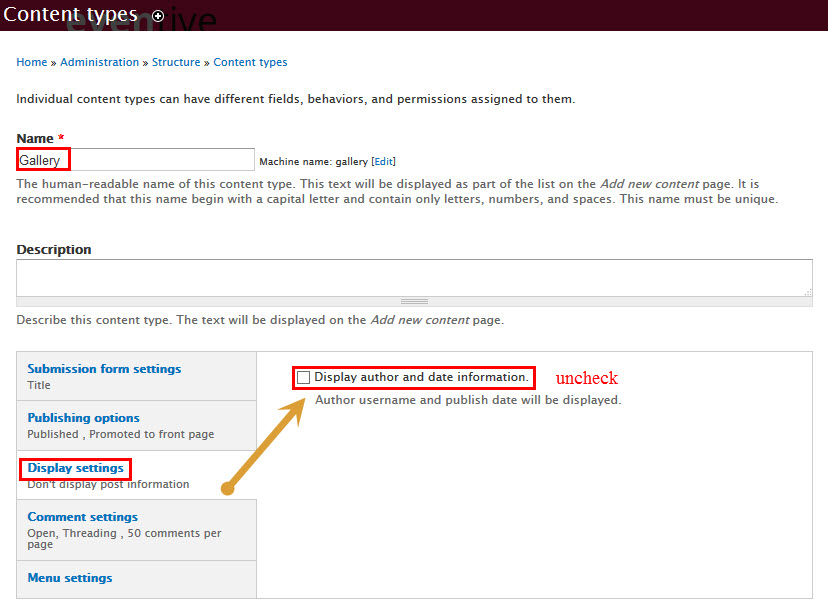
Create Gallery type
Step 1: Navigate to Structure > Content Type. Click Add Content Type link to create content type Gallery
Step 2:Go to Manage Fields and add following fields:
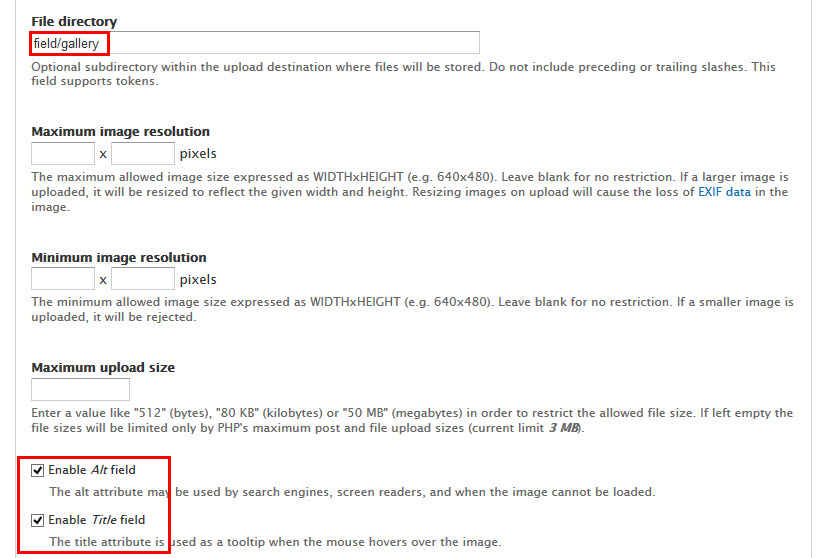
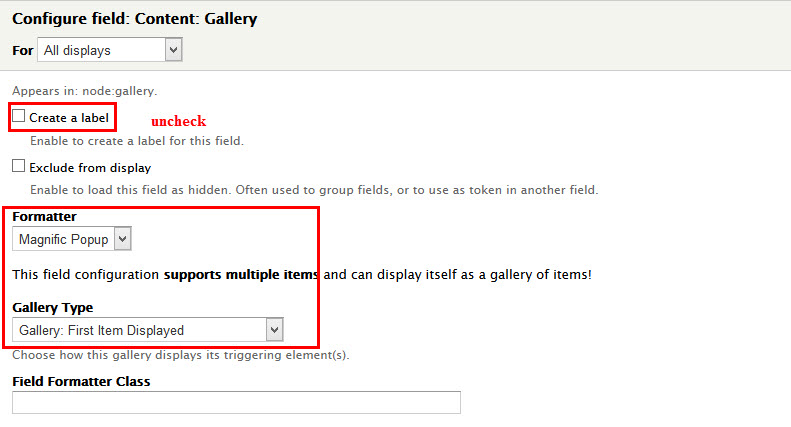
Step 3:Set properties for Gallery fields:
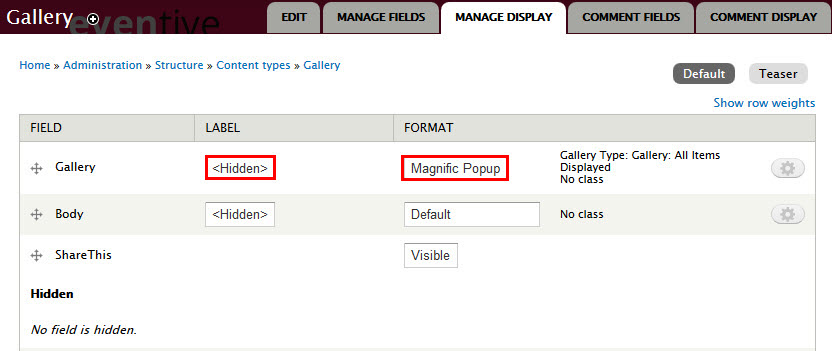
Step 4:Go to Manage Display tab > Default, add and set following fields:
Step 5: Click Save button
Create News type
Step 1: Navigate to Structure > Content Type. Click Add Content Type link to create content type News
Step 2:Go to Manage Fields and add following fields:
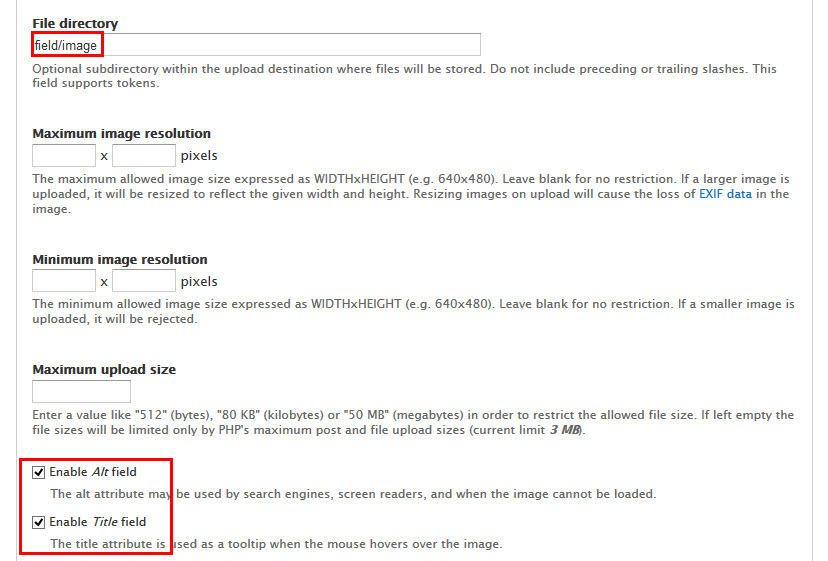
Step 3:Set properties for Image fields:
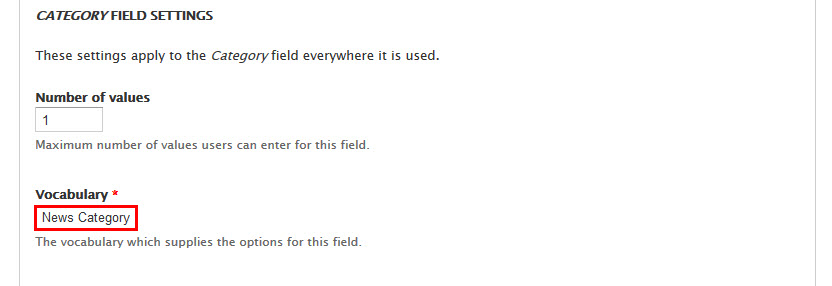
Step 4:Set properties for Category fields:
Step 5:Set properties for Content fields:
Step 6:Find Title fields click replace link and set following properties field:
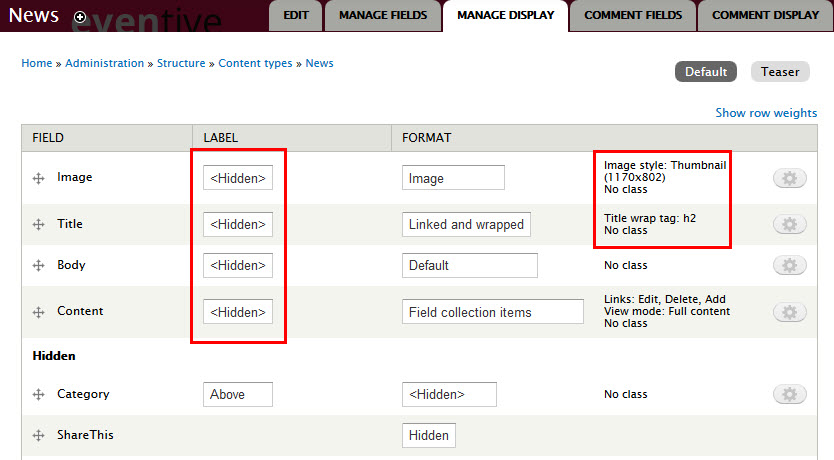
Step 7:Go to Manage Display tab > Default, add and set following fields:
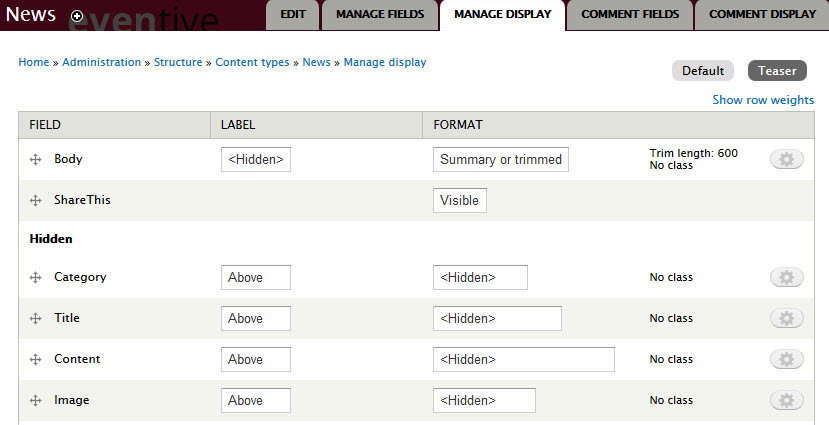
Step 8:Go to Manage Display tab > Teaser, add and set following fields:
Step 9: Click Save button
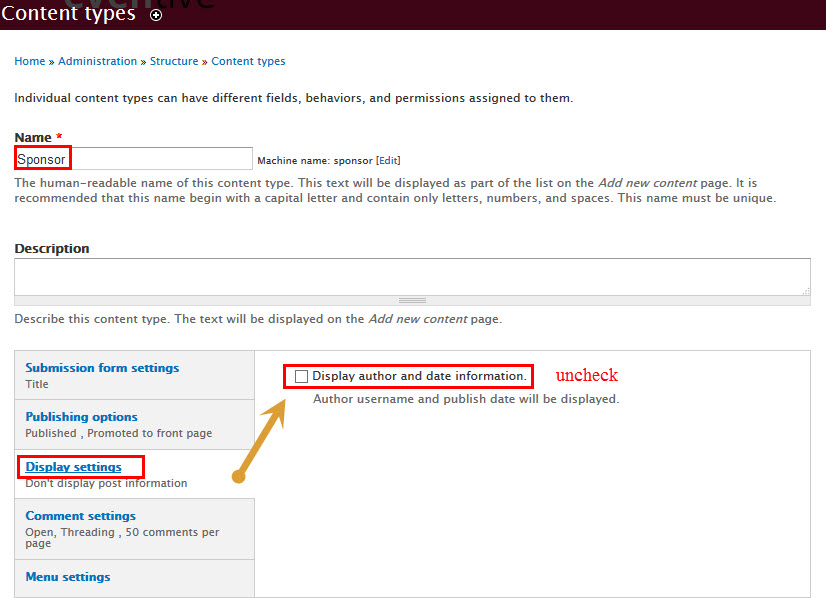
Create Sponsor type
Step 1: Navigate to Structure > Content Tpe. Click Add Content Type link to create content type Sponsor
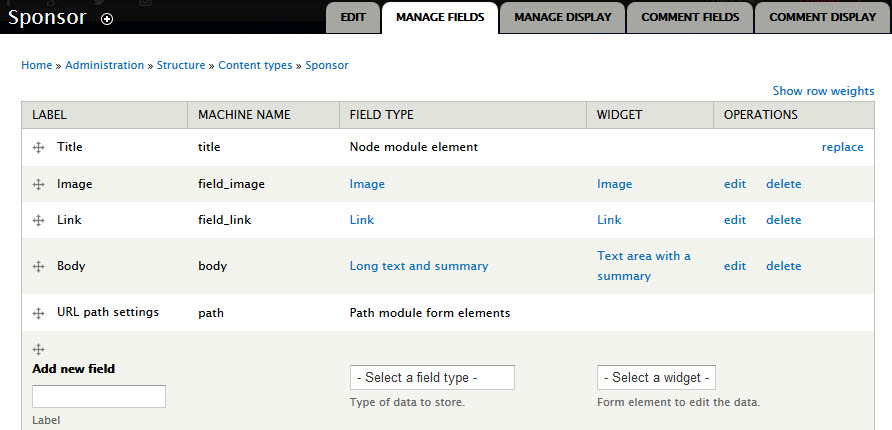
Step 2:Go to Manage Fields and add following fields:
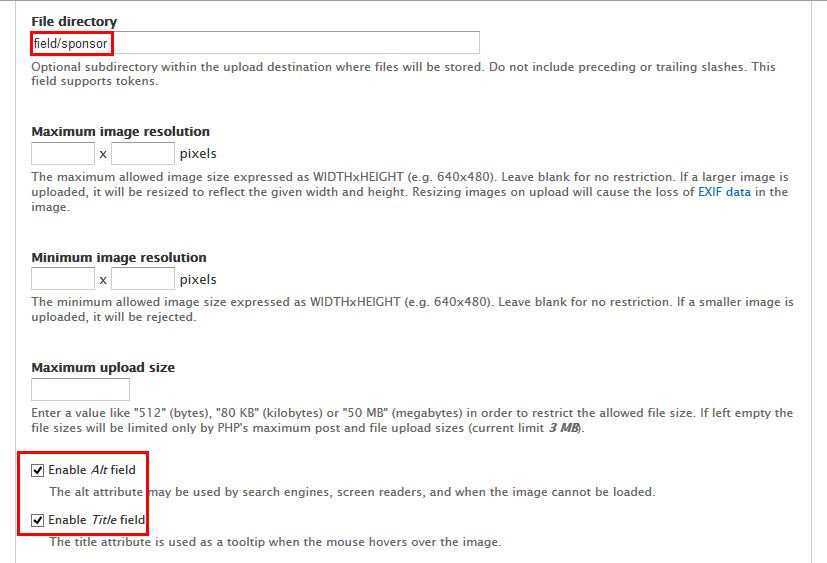
Step 3:Set properties for Image fields:
Step 4: Click Save button
Create Testimonials type
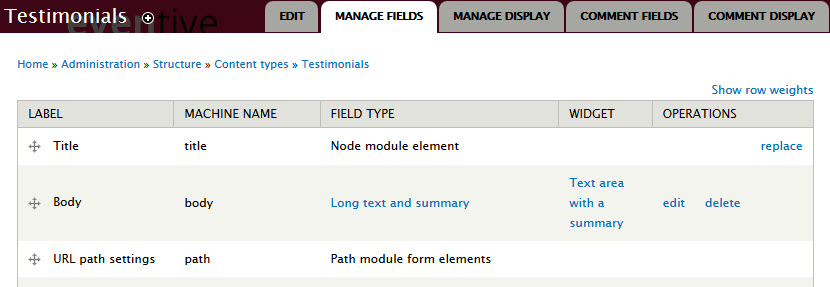
Step 1: Navigate to Structure > Content Type. Click Add Content Type link to create content type Testimonials
Step 2: Click Save and add fiels button, then set following properties:
Step 3: Click Save button
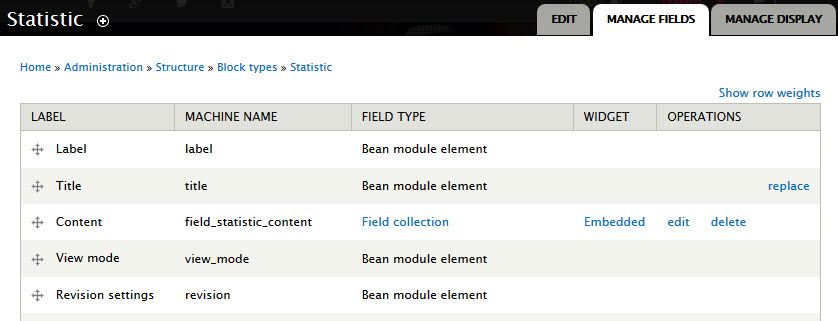
Configure Block types: Satatistic
To configure this future, you must install Bean module, then navigating to Structure > Block types . Go to Manage Fields link, click add field block types:
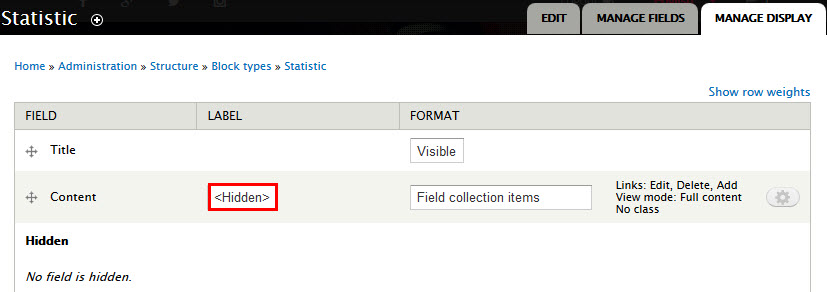
Step 2:Modify Manage Display tab, set following properties:
Step 3:Click Save button
Configure Field Collection
To configure this future, you must install Field Collection module, then navigating to Structure > Field Collection and edit field collection :
Step 1: In field_content. Click manage fields tab, add following fields:
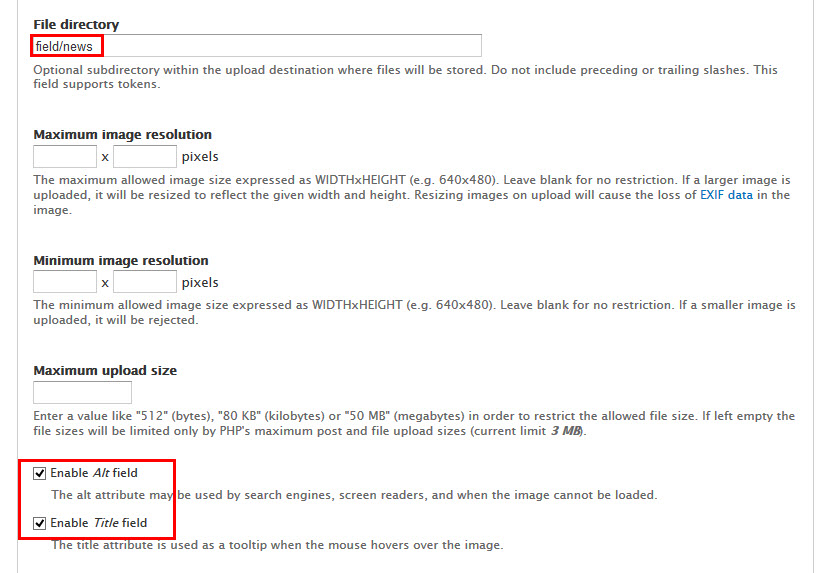
Step 2:Set properties for Images field
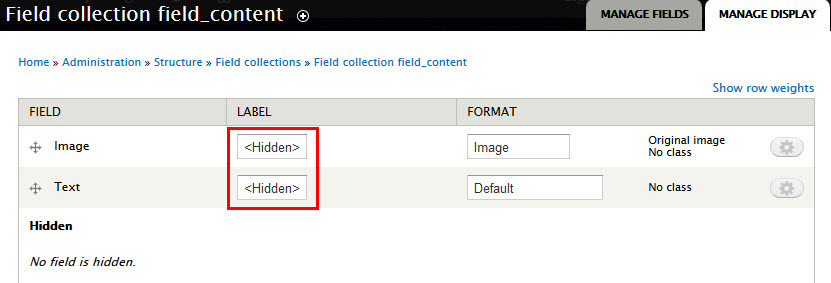
Step 3:Modify Manage Display tab, set following properties:
Step 4:Click Save button
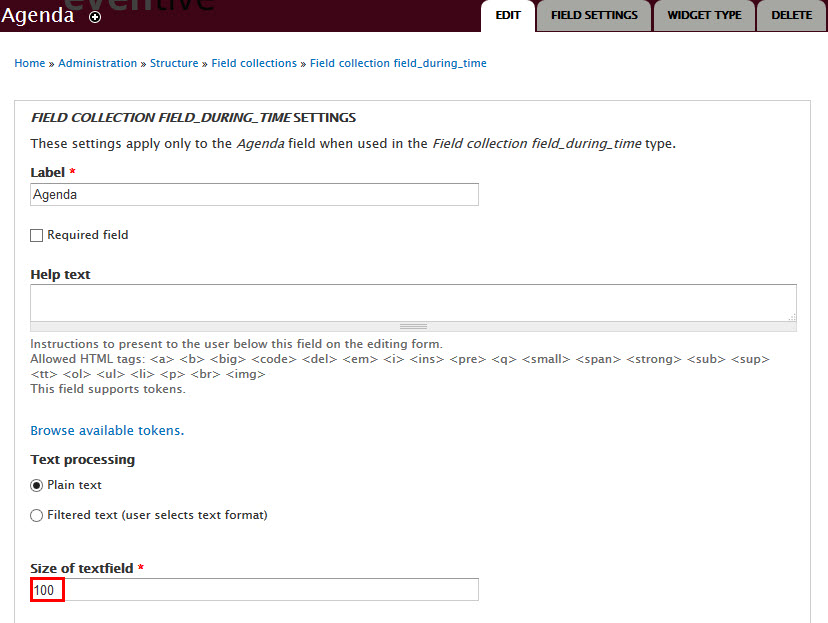
Step 5: In field_during_time. Click manage fields tab, add following fields:
Step 6:Set properties for Agenda field
Step 7:Click Save button
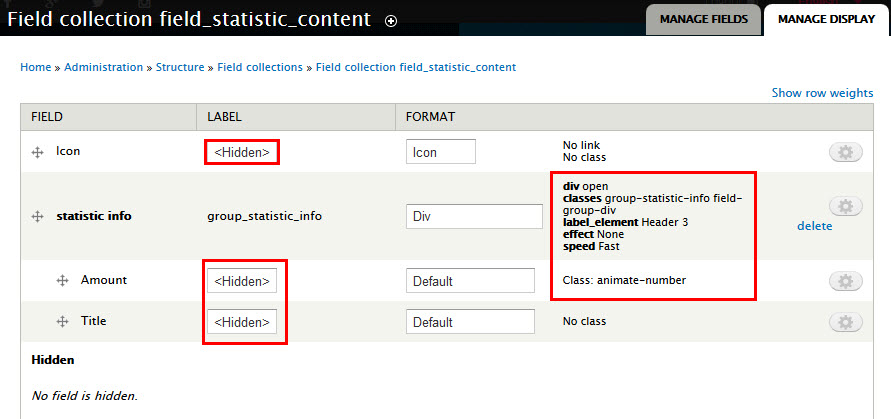
Step 8: In field_statistic_content. Click manage fields tab, add following fields:
Step 9:Modify Manage Display tab, set following properties:
Step 10:Click Save button
Note You can read this article to understand more about Field Collection.
Create Homepage
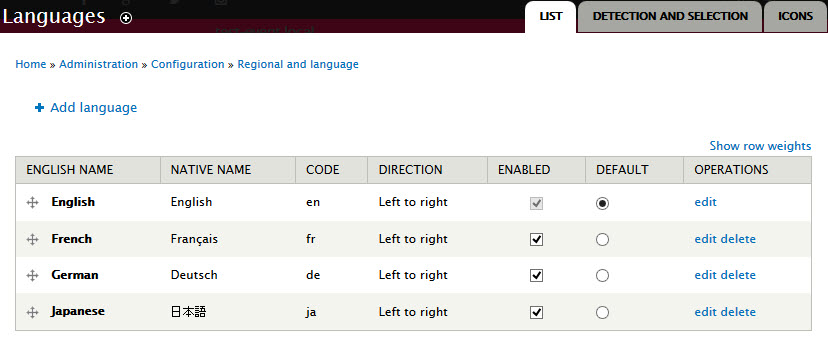
Configure Languages
Step 1: Navigate to Configuration > Regional and language > Languages click Add languages link with following properties:
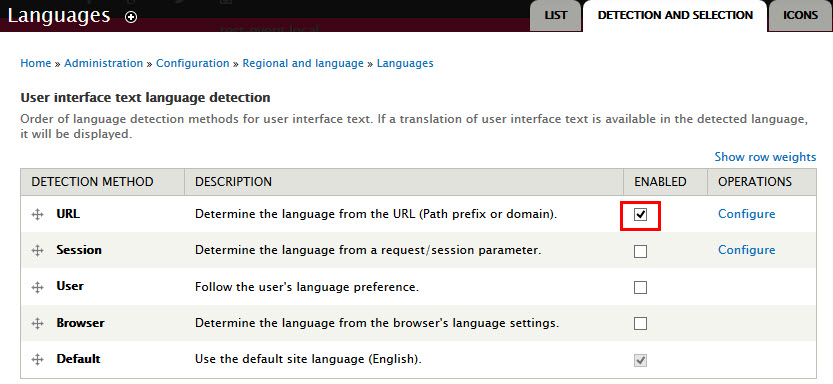
Step 2: Go to Detection and selection tab and set following properties:
Step 3: Click Save button
Add FlexSlider
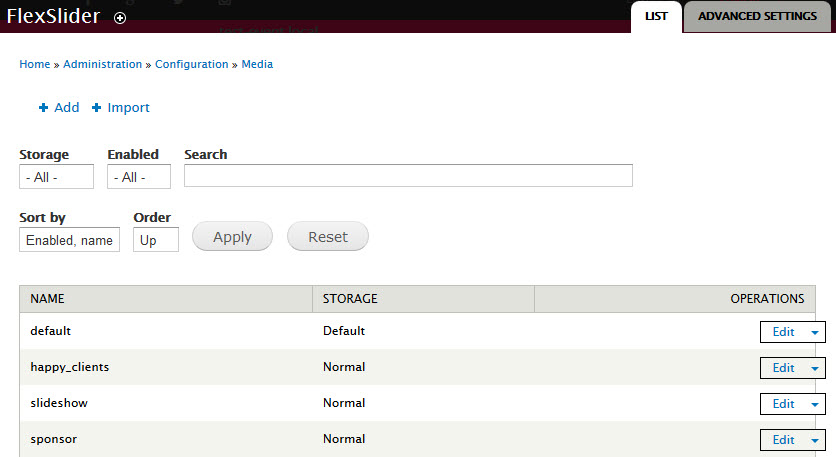
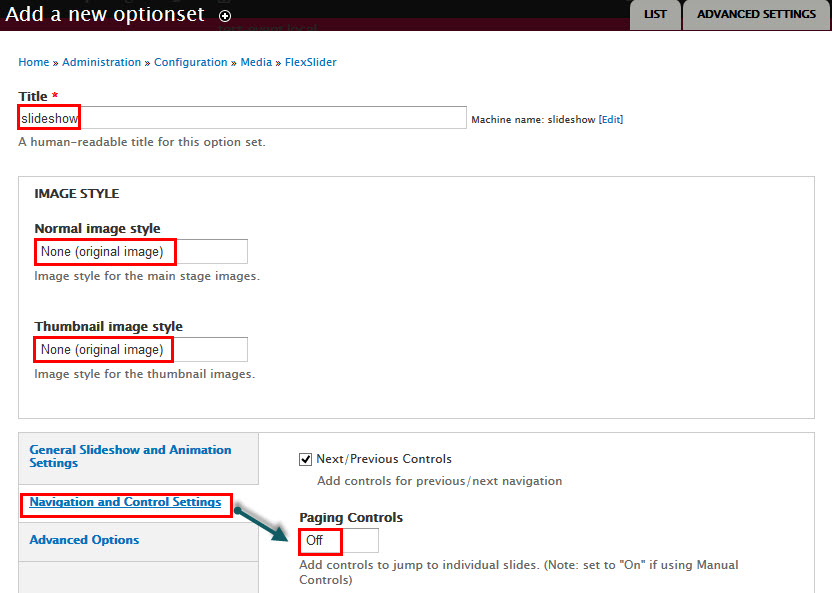
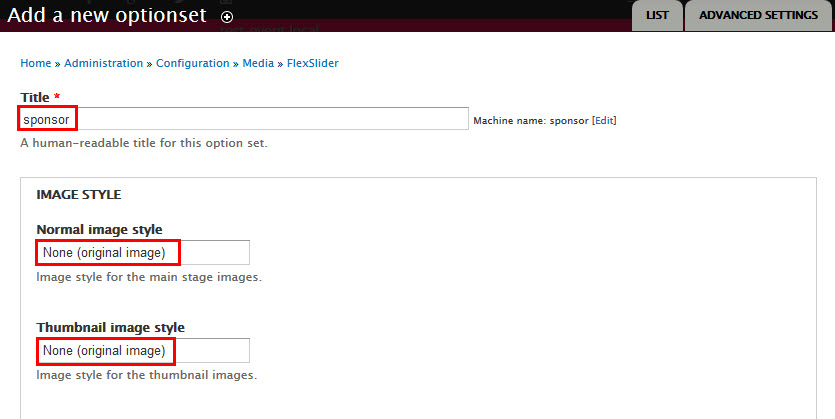
Step 1: Navigate to Configuration > Media > FlexSlider click Add link with following properties:
Step 2: Set properties slideshow field:
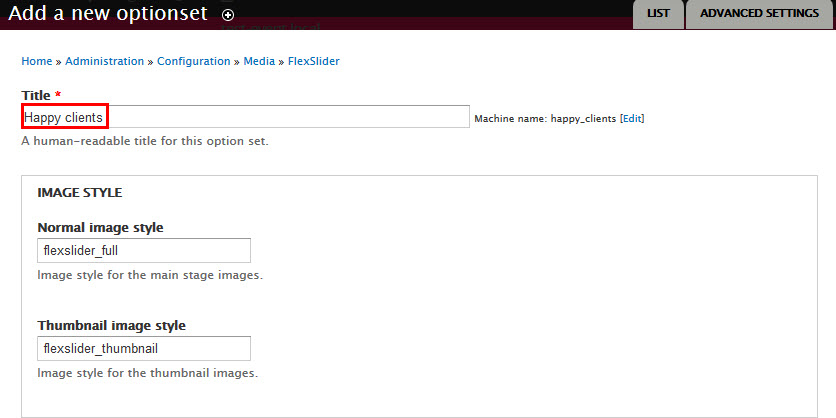
Step 3: Set properties Happy clients field:
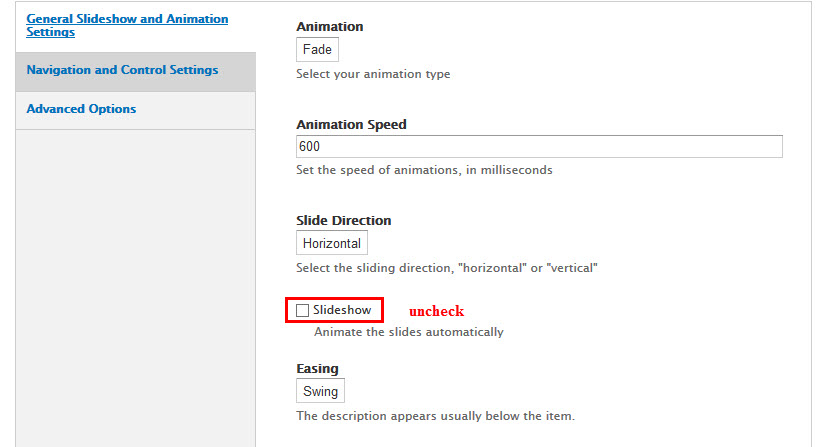
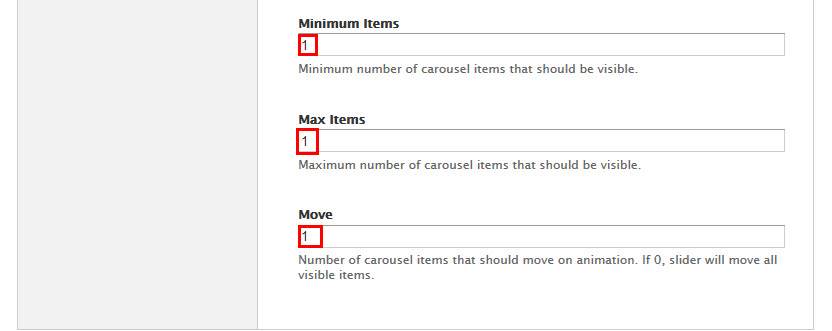
Step 4: Go to General Slideshow and Animation Settings click link and set following:
Step 5: Go to Navigation and Control Settings click link and set following:
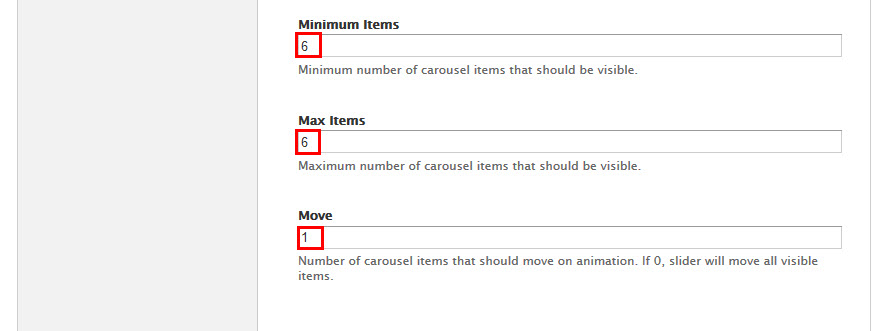
Step 6: Set properties sponsor field:
Step 7: Go to General Slideshow and Animation Settings click link and set following:
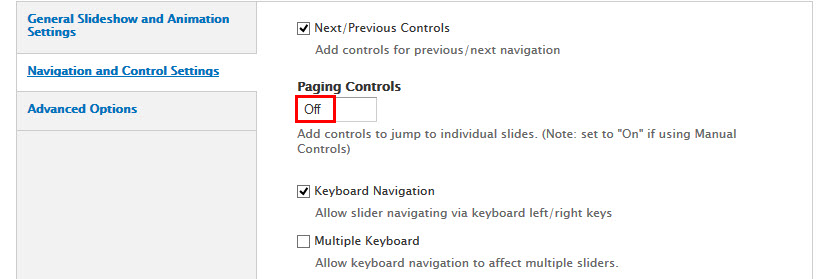
Step 8: Go to Navigation and Control Settings click link and set following:
Step 9: Click Save button
Headline
Front end Display
1. Create and add link Headline Link menu
Step 1: Navigate to Structure > Menu, click Add menu link, Create Headline Link link with following properties:
Step 2: Click Add link link and add link following: Login, Logout
Step 3: Set properties Login link
Step 4: Set properties Logout link
Step 5: Click Save button
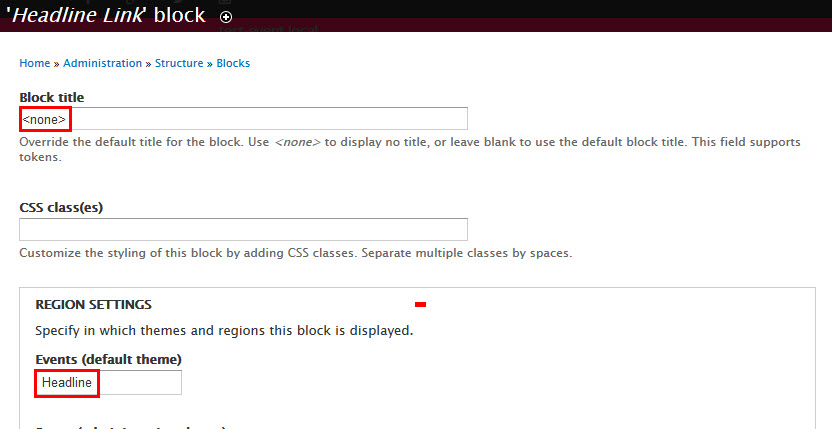
2. Configure Headline Link block
Step 1: Navigate to Structure > Blocks, find Headline Link , then click configure and set with following properties:
Step 2: Click Save button
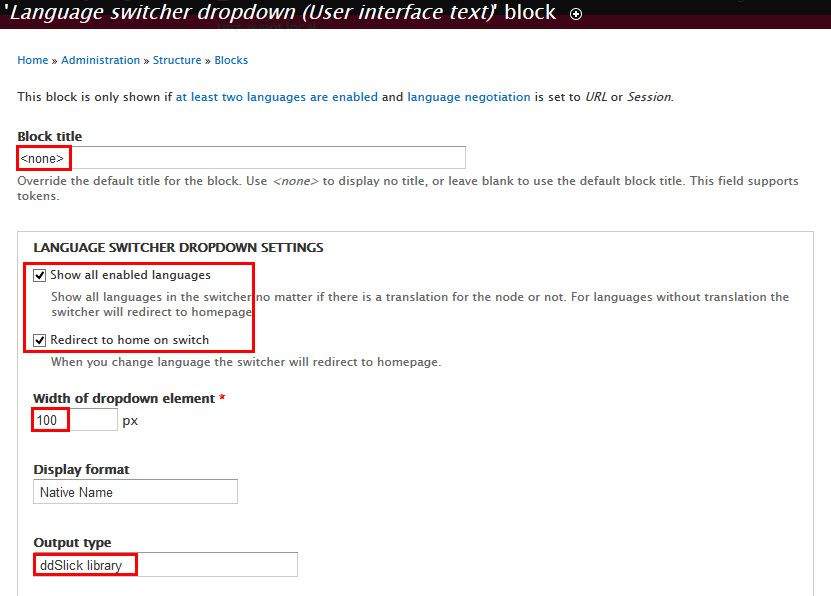
3. Configure Language switcher dropdown block
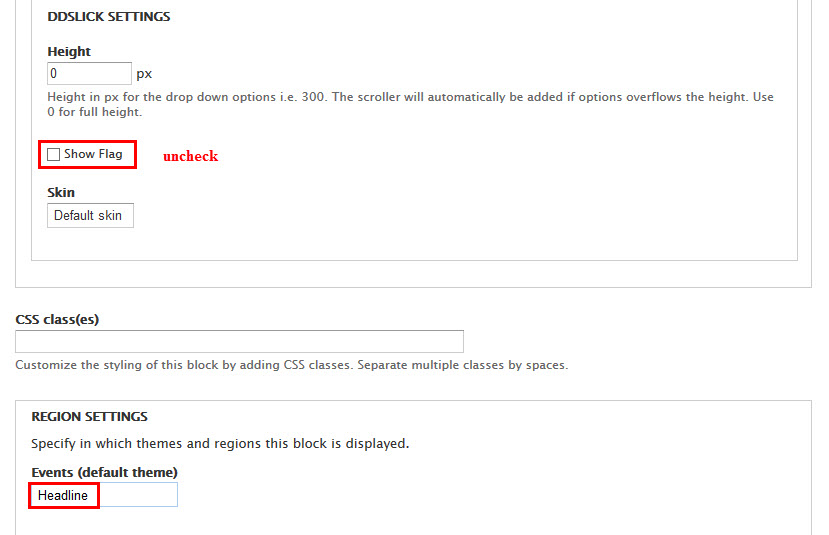
Step 1: Navigate to Structure > Blocks find Language switcher dropdown, then click configure and set with following properties:
Step 2: Click Save button
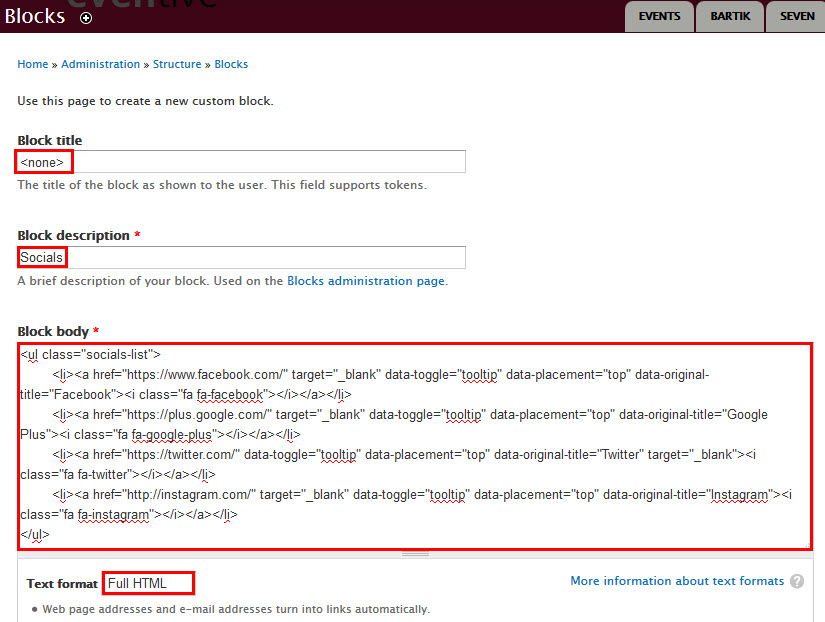
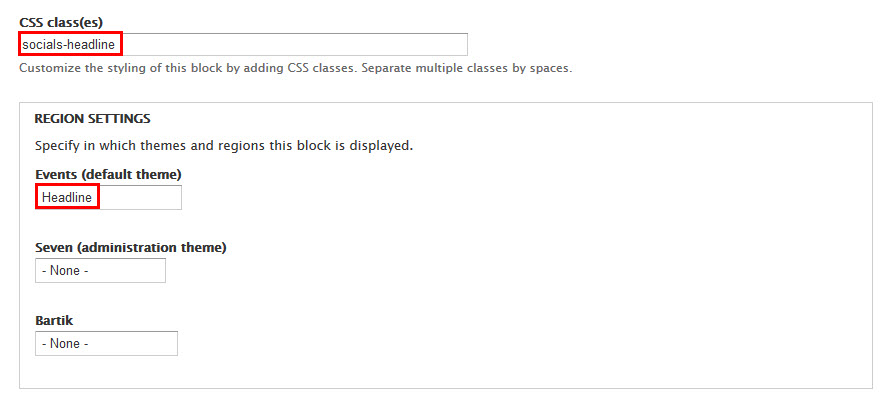
4. Create and Configure Socials block
Step 1: Navigate to Structure > Blocks click Add block link, then create Socials and set with following properties:
Step 2: Click Save button
Refer to following HTML code:
5. Configure Shopping cart block view
Step 1: Navigate to Structure > Views, find Shopping cart block view and set following properties:
Step 2: At Advanced > OTHER area, add CSS class
Step 3: Click Save button
6. Configure Shopping cart block block
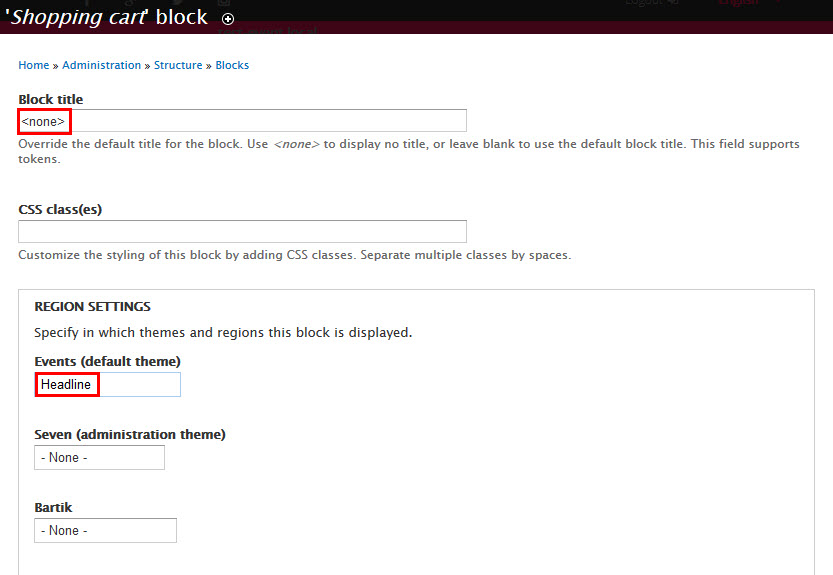
Step 1: Navigate to Structure > Blocks find Shopping cart block, then click configure and set with following properties:
Step 2: Click Save button
Main menu
Front end Display
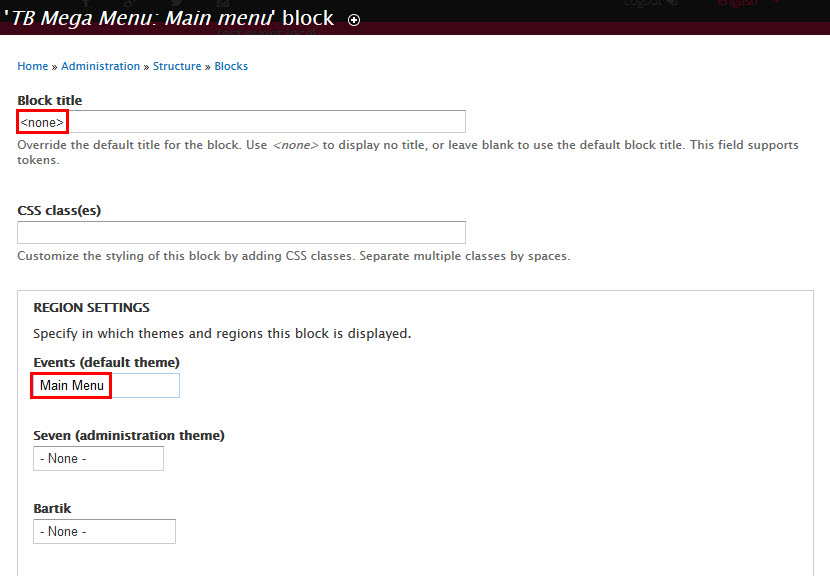
Step 1: Navigate to Structure > Blocks, find TB Mega Menu: Main menu block, click configure link and set the following properties:
Step 2: Click Save button
Search form
Front end Display
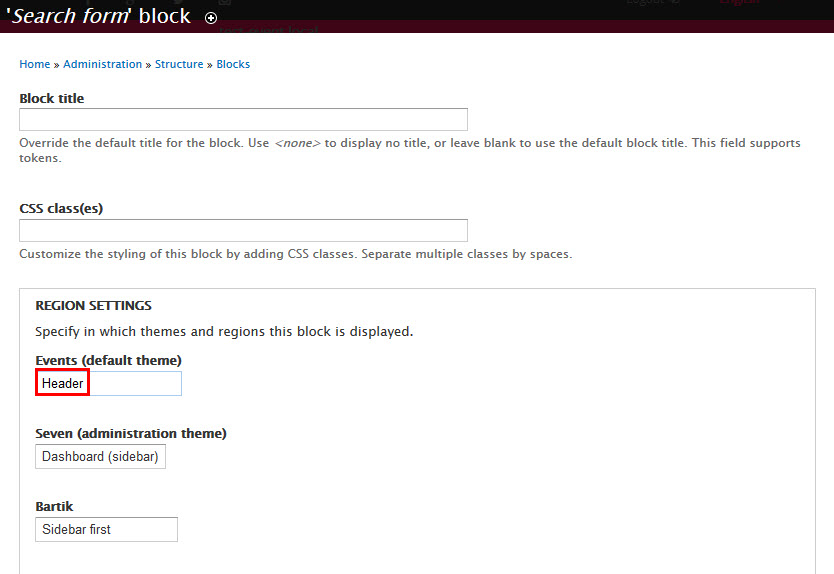
Step 1: Navigate to Structure > Blocks, find Search form block, click configure link and set the following properties:
Step 2: Click Save button
Slideshow
Front end Display
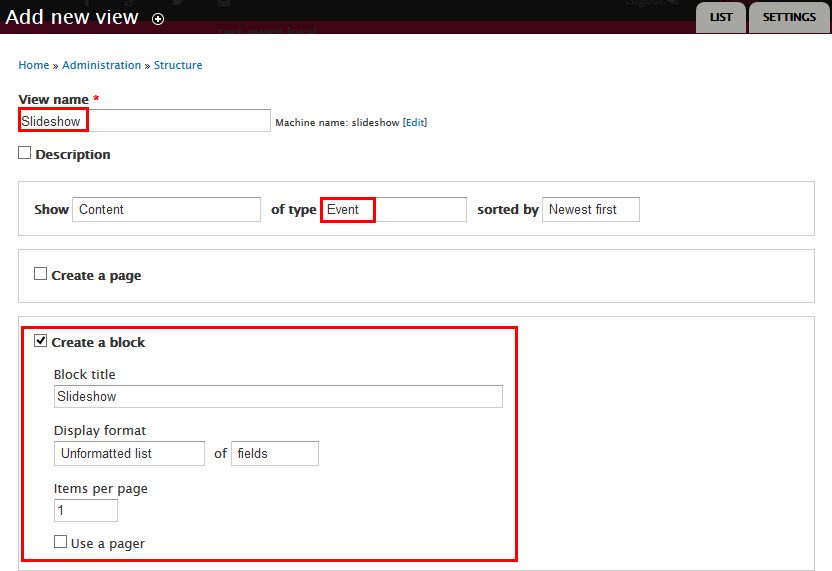
1. Create Slideshow view
Step 1: Navigate to Structure > Views, click Add views link, Create Slideshow view with following properties:
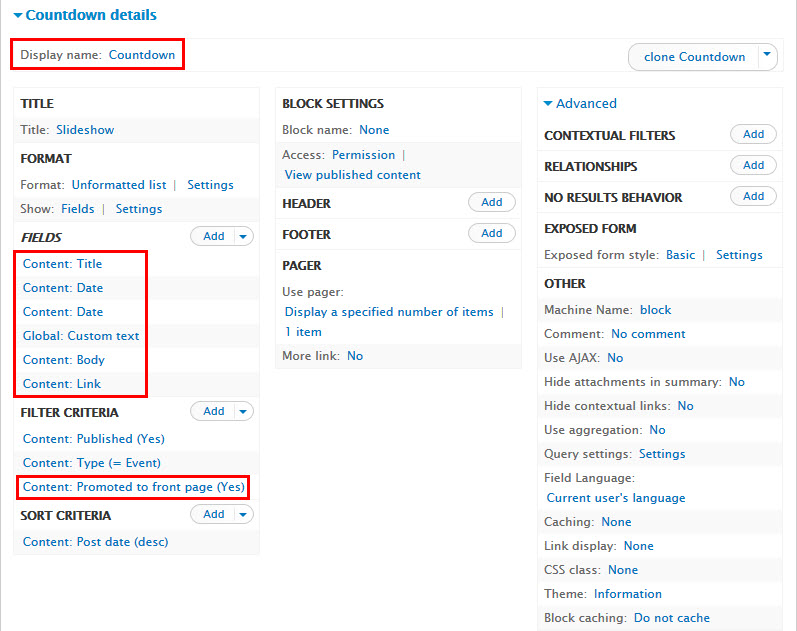
Step 2: Click Continue and edit button. Next to steps below to set properties for following fields:
Step 3: At Display name set following properties:
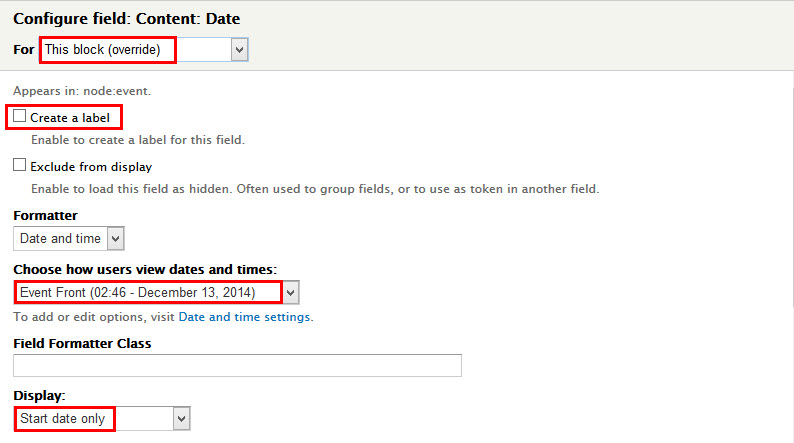
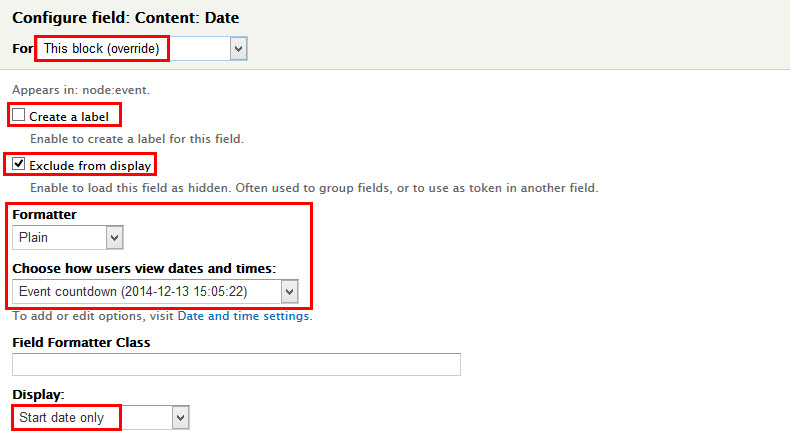
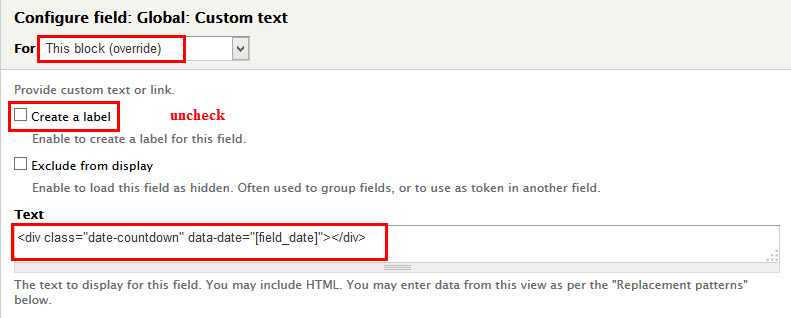
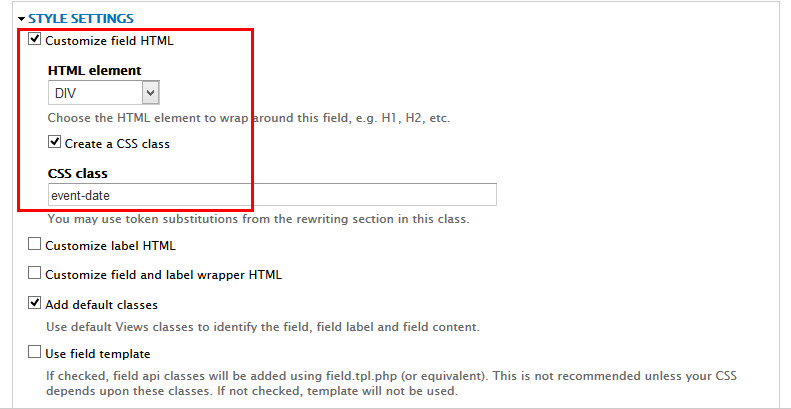
Step 4: At FIELDS area, click Add button to add fields: Content: Date, Content: Date, Global: Custom text,Content: Body, Content: Link.
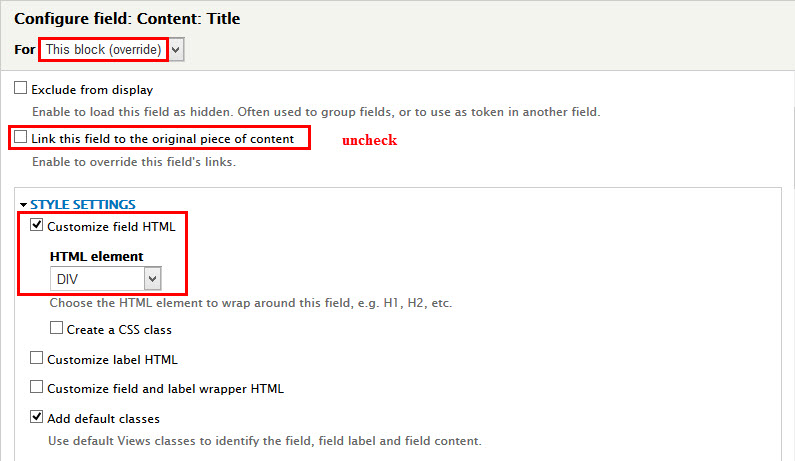
Step 5: Set properties for Content: Title
Step 6: Set properties for Date
Step 7: Set properties for Date
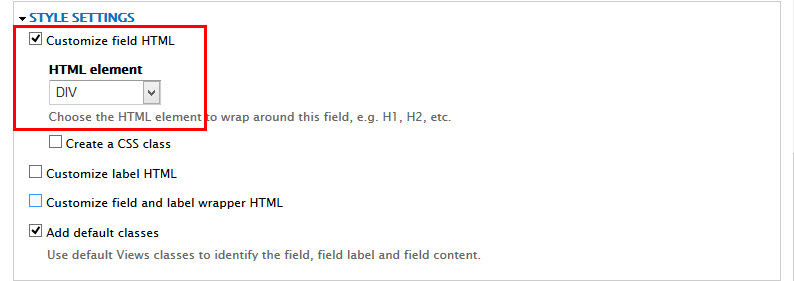
Step 8: Set properties for Global: Custom text
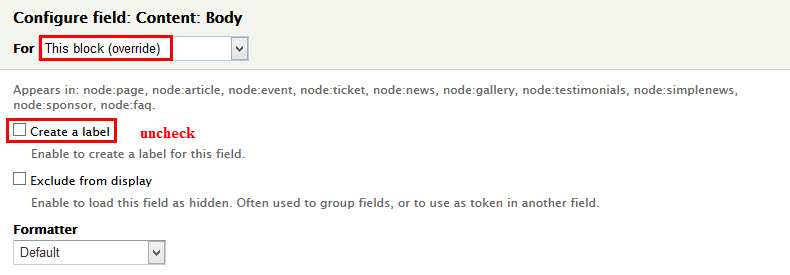
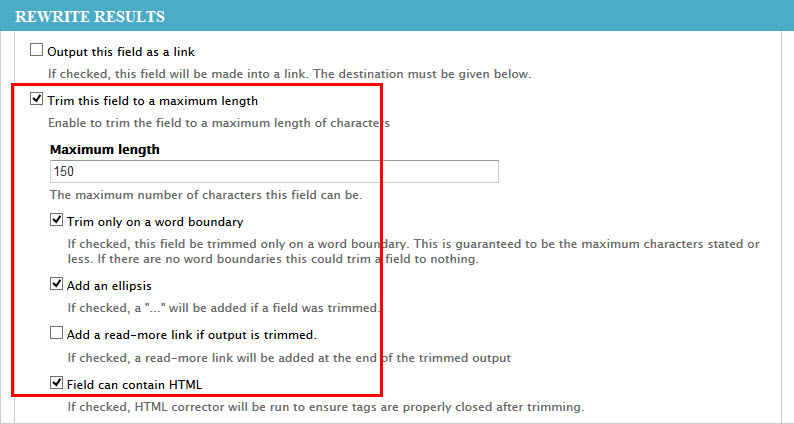
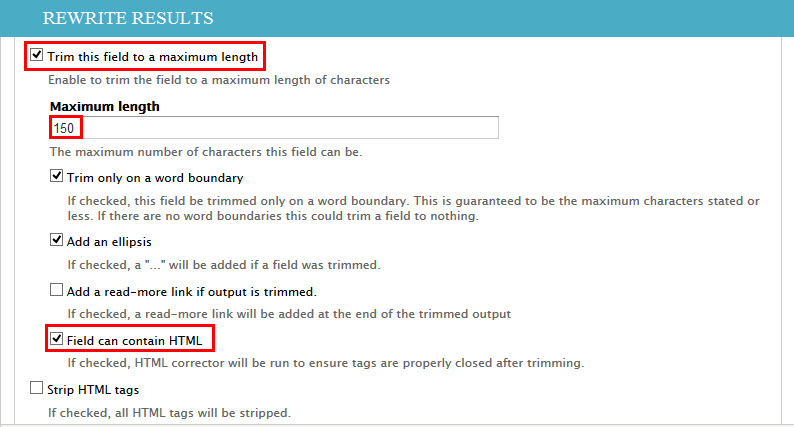
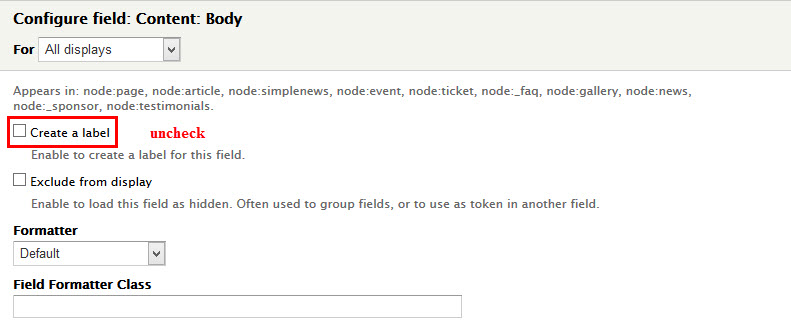
Step 9: Set properties for Content: Body
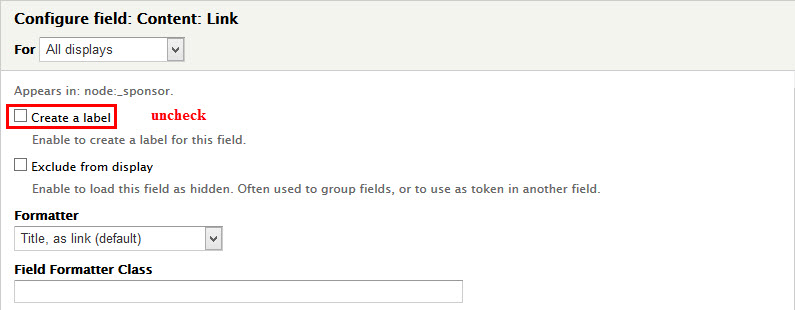
Step 10: Set properties for Content: Link
Step 11: At FILTER CRITERIA area, click Add button to add fields: Content: Promoted to front page and set following properties:
Step 12: Click Save button
2. Add Block view
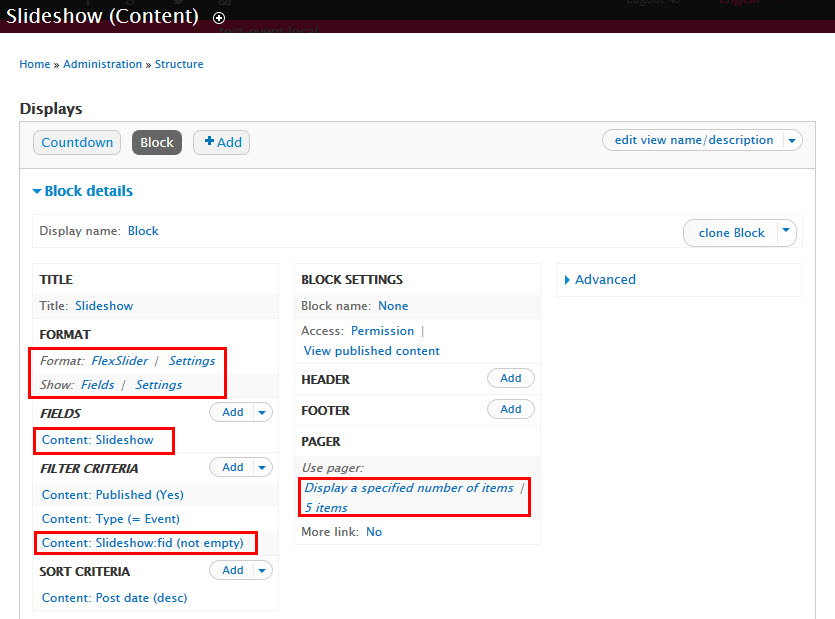
Step 1: Go to Add button, then click Block link to create block view with following properties:
Step 2: At FORMAT > Fomat area, click Unformatted list link and set following properties:
Step 3: At PAGER > Use pager area, click 1 items link and set following properties:
Step 4: At FIELDS area, click Add button to add fields: Content: Slideshow .
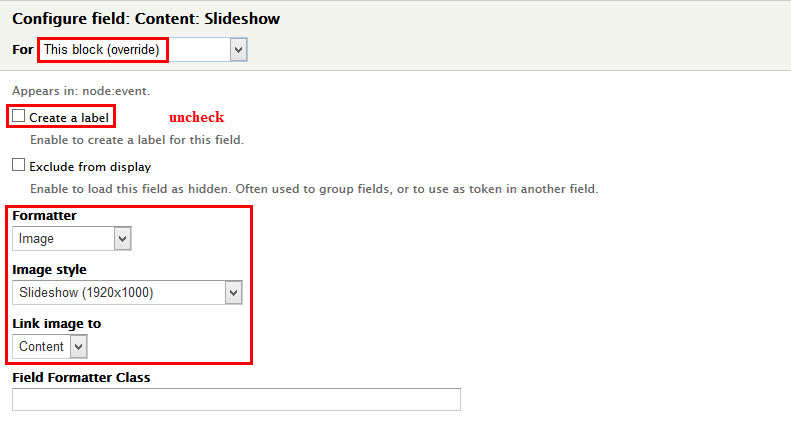
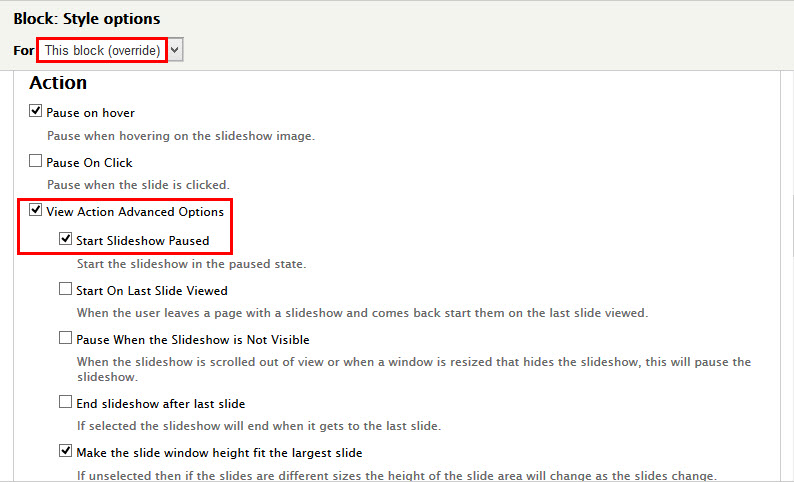
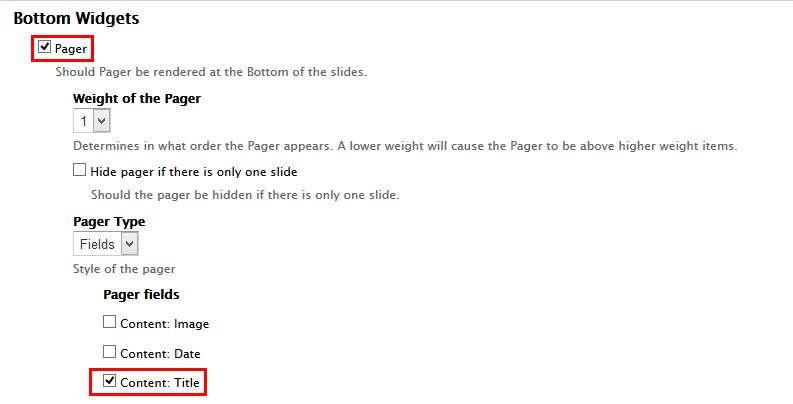
Step 5: Set properties for Content: Slideshow
Step 6: At FIELDS area, click Rearrange button and click Remove link of Content : Title, Content: Date and set following properties
Step 7: At FILTER CRITERIA area, click Add button to add fields: Content: Slideshow:fid and set following properties:
Step 8: At FIELDS CRITERIA area, click Rearrange button and click Remove link of Content: Promoted to front page and set following properties
Step 9: Click Save button
3. Configure View: Slideshow
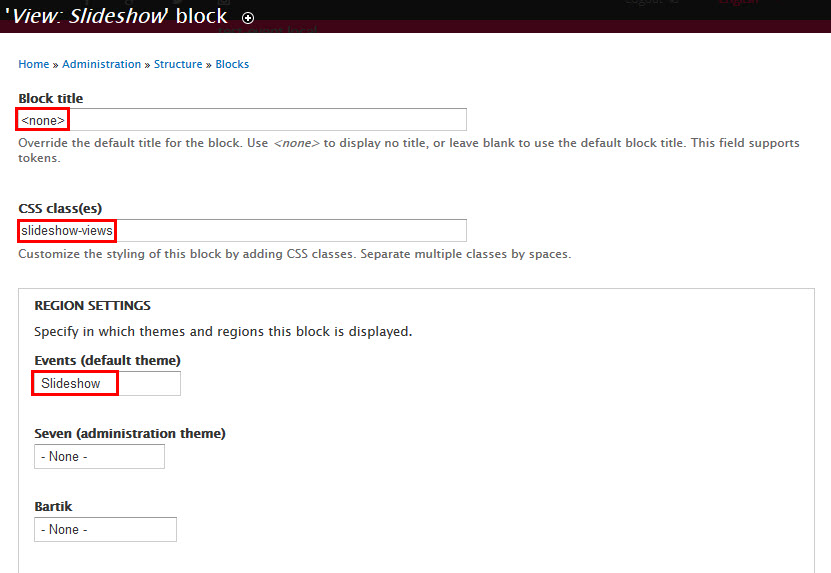
Step 1: Navigate to Structure > Blocks, find View: Slideshow block, click configure link and set the following properties:
Step 2: Click Save button
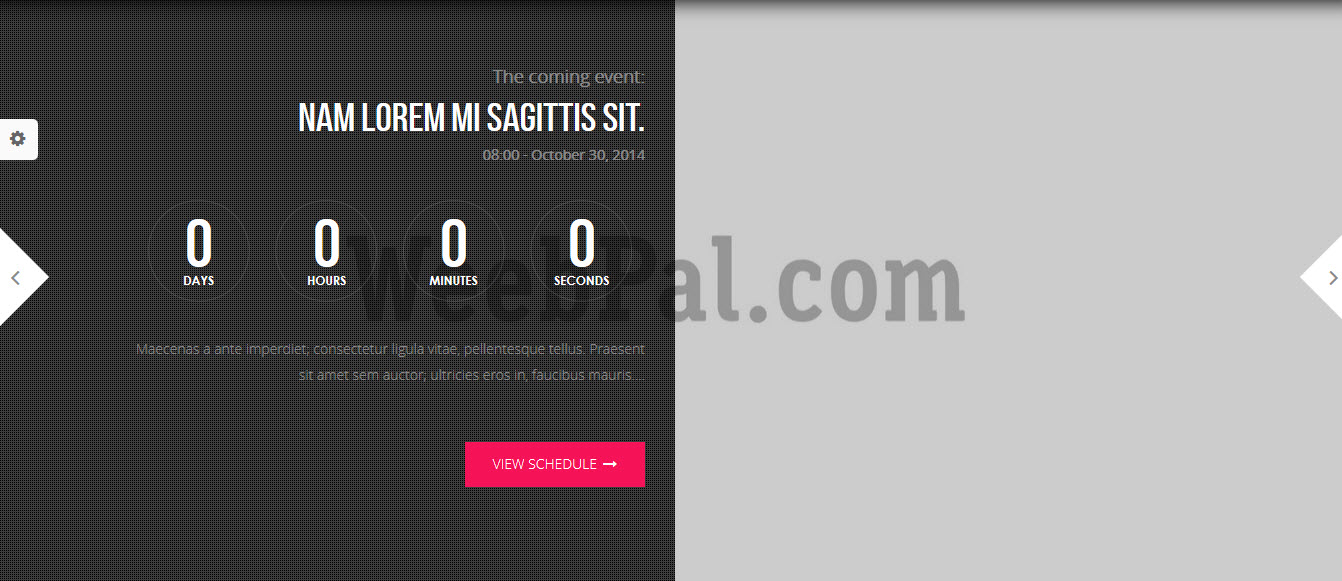
4. Configure View: Slideshow: Countdown
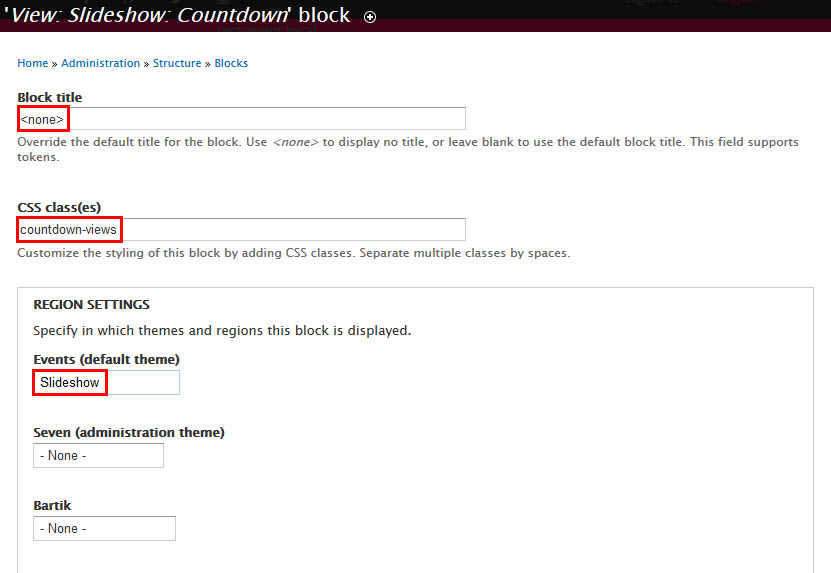
Step 1: Navigate to Structure > Blocks, find View: Slideshow: Countdown block, click configure link and set the following properties:
Step 2: Click Save button
Events block view
Step 1: Navigate to Structure > View click Add new view link, then create Events view and set following properties:
Step 2: Click Continue and edit button. Next to steps below to set properties for following fields:
Step 3: At FORMAT > Format area, click link and set following properties:
Step 4: At FIELDS area, click Add button to add fields: Content: Image, Content: Date, Content: Body, Content: Link .
Step 5: Set properties for Content: Image
Step 6: Set properties for Content: Date
Step 7: Set properties for Content: Body
Step 8: Set properties for Content: Link
Step 9: At Advanced > OTHER area, add CSS class
Step 10: Click Save to view button
Speakers block
Front end Display
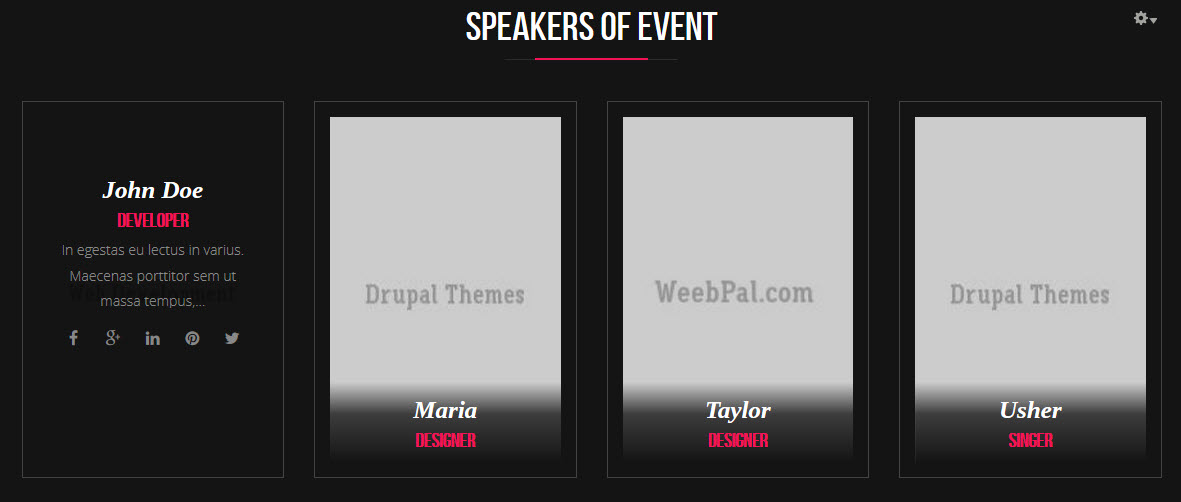
Create Speakers view
Step 1: Navigate to Structure > Views, click Add views link, Create Speakers view with following properties:
Step 2: Click Continue and edit button. Next to steps below to set properties for following fields:
Step 3: At TITLE > Title area, click Settings:
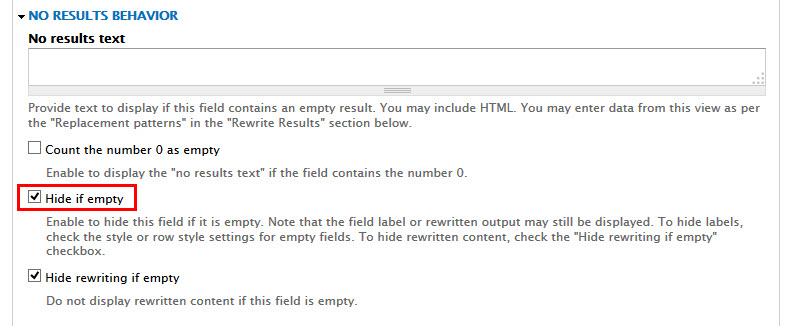
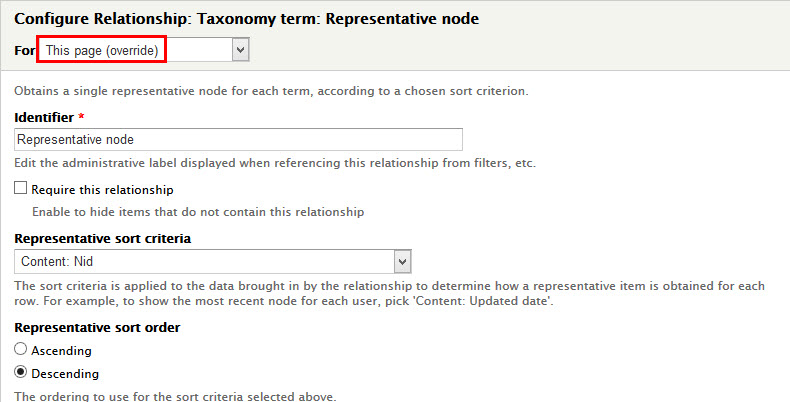
Step 4: At Advanced > RELATIONSHIPS area, add Taxonomy term: Representative node
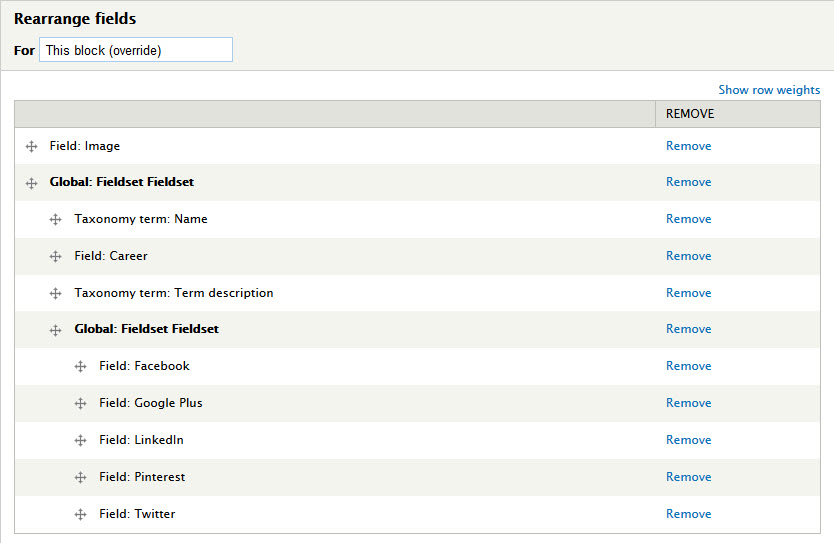
Step 5: At FIELDS area, click Add button to add fields: Field: Image, Global: Fieldset, Field: Career, Taxonomy term: Term description, Global: Fieldset, Field: Facebook, Field: Google Plus, Field: LinkedIn, Field: Pinterest, Field: Twitter .
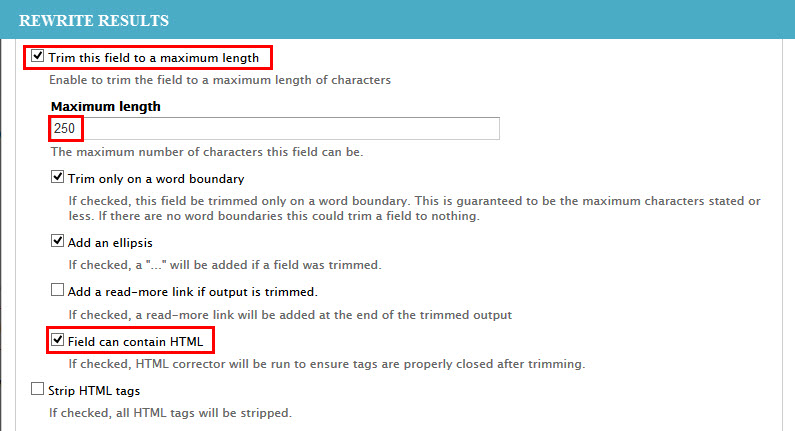
Step 6: Set properties for Field: Image
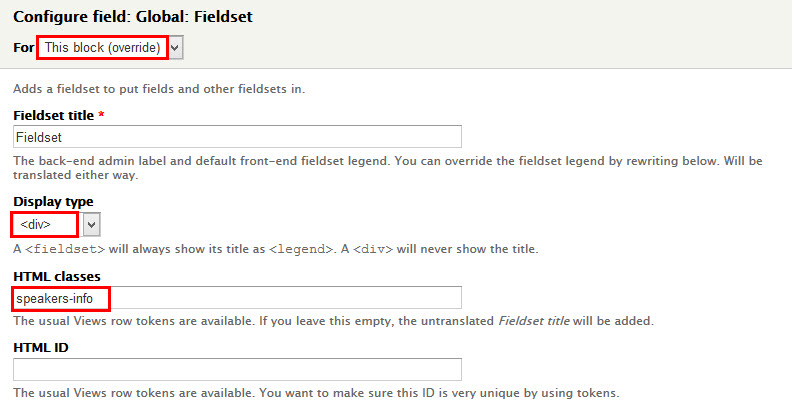
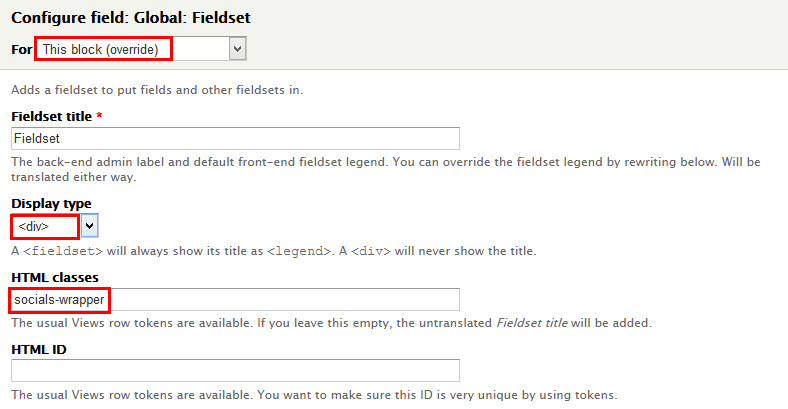
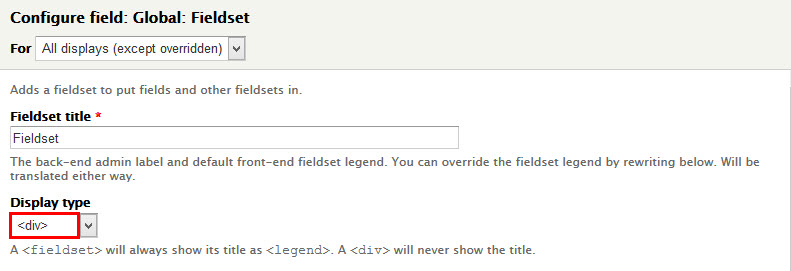
Step 7: Set properties for Global: Fieldset
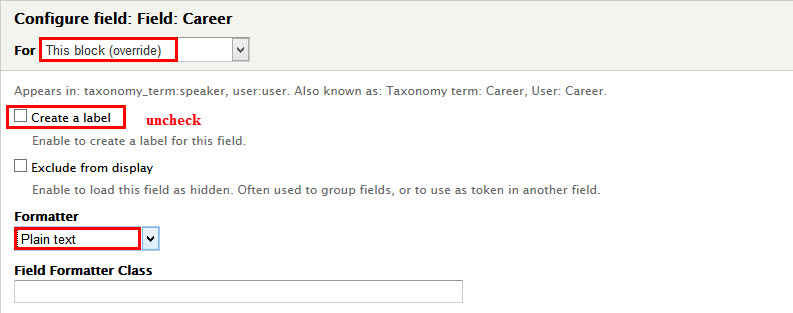
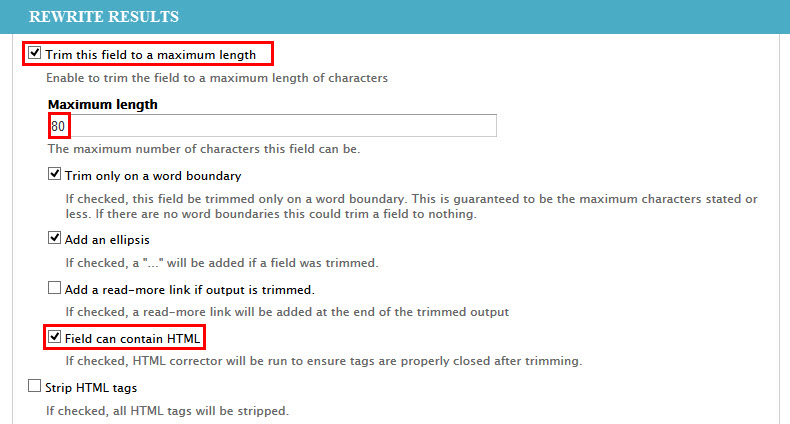
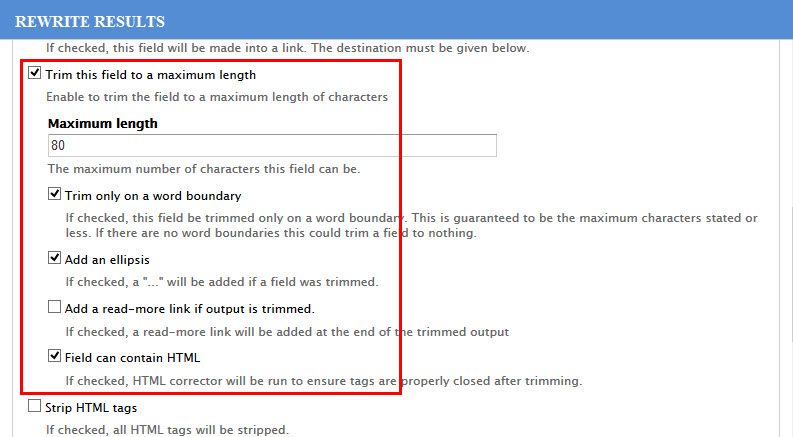
Step 8: Set properties for Field: Career
Step 9: Set properties for Taxonomy term: Term description
Step 10: Set properties for Global: Fieldset
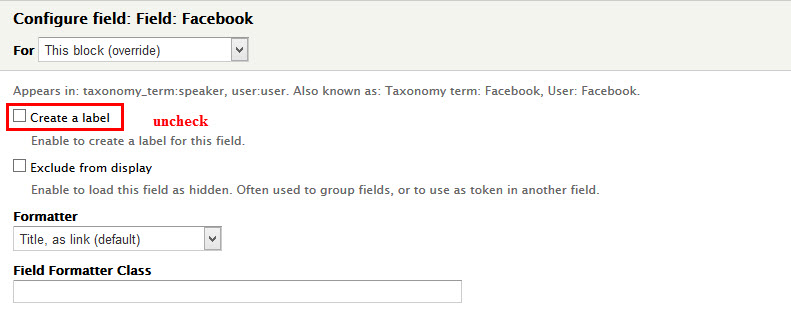
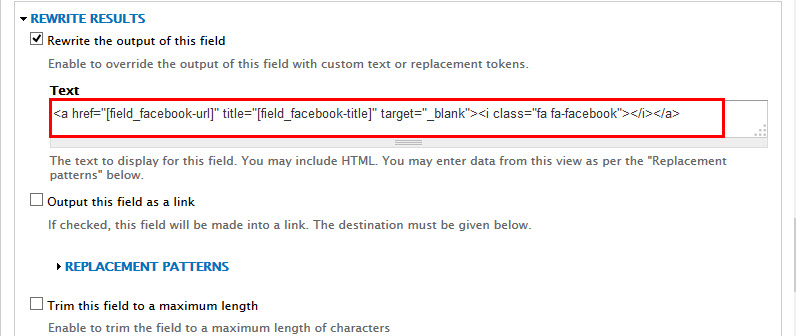
Step 11: Set properties for Field: Facebook
Refer to following HTML code:
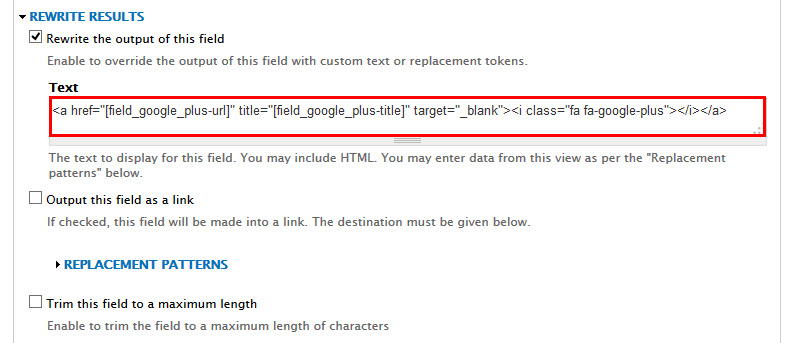
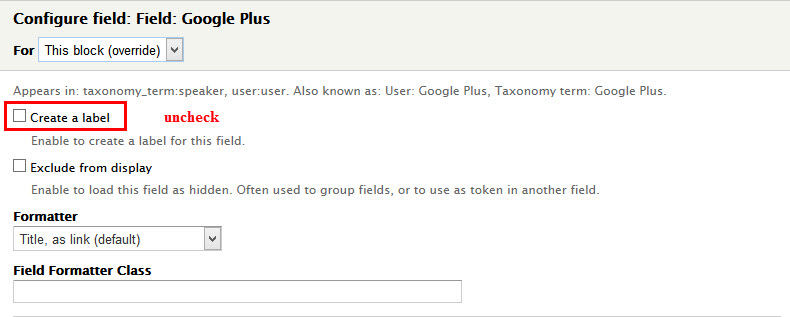
Step 12: Set properties for Field: Google Plus
Refer to following HTML code:
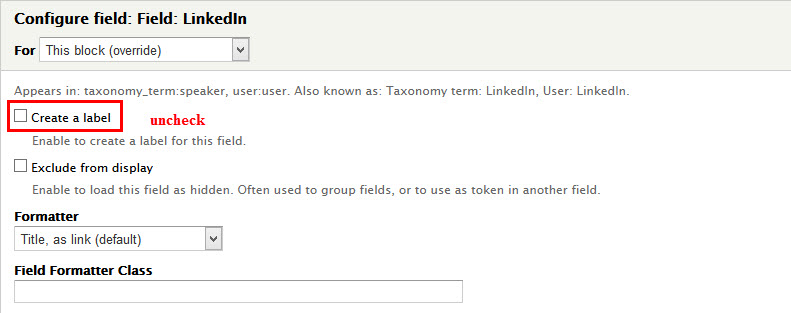
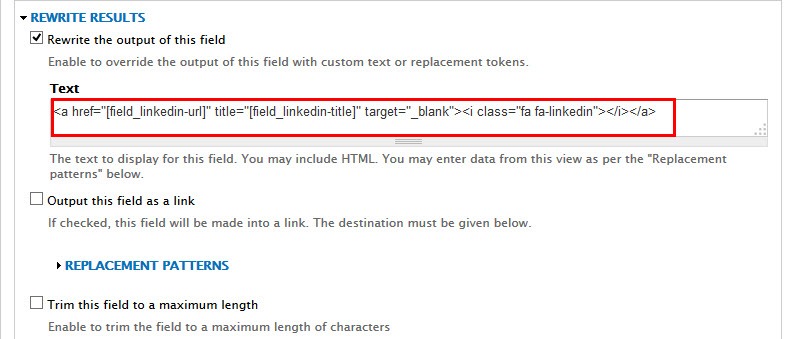
Step 13: Set properties for Field: LinkedIn
Refer to following HTML code:
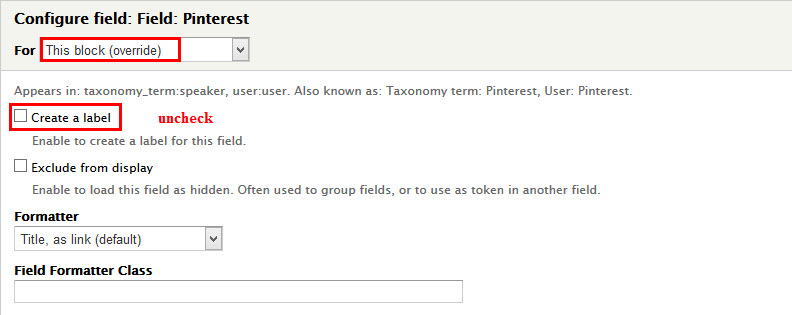
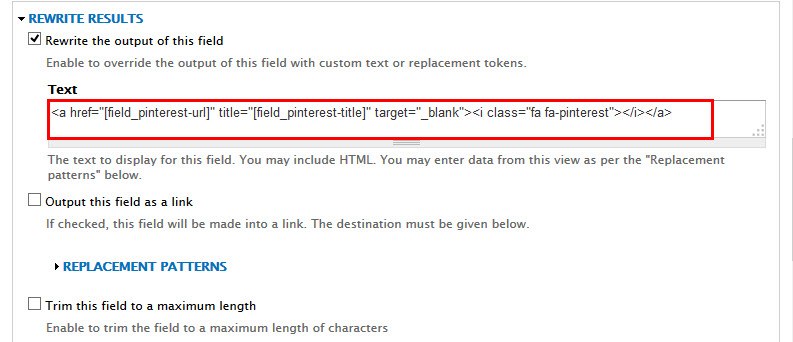
Step 14: Set properties for Field: Pinterest
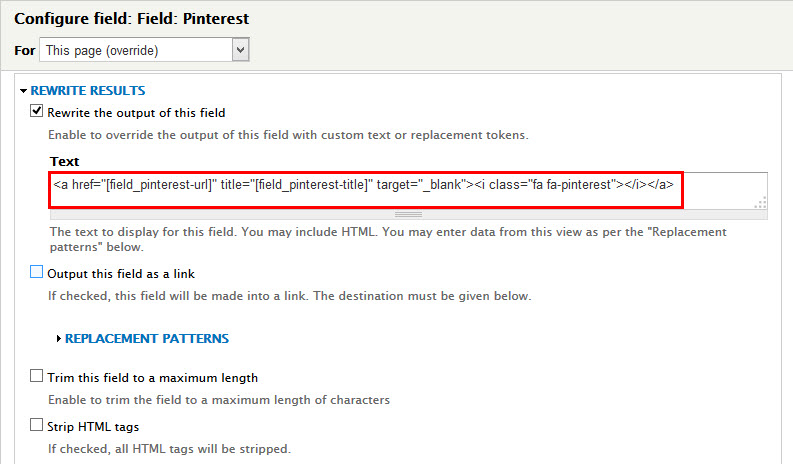
Refer to following HTML code:
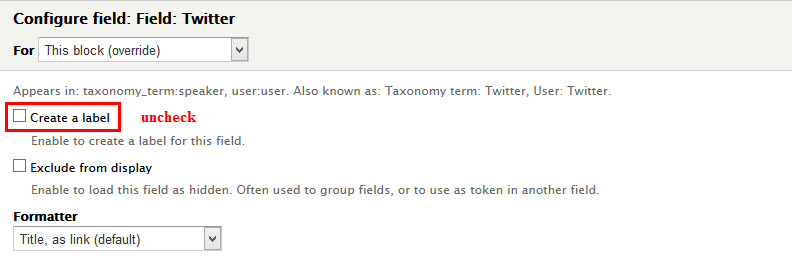
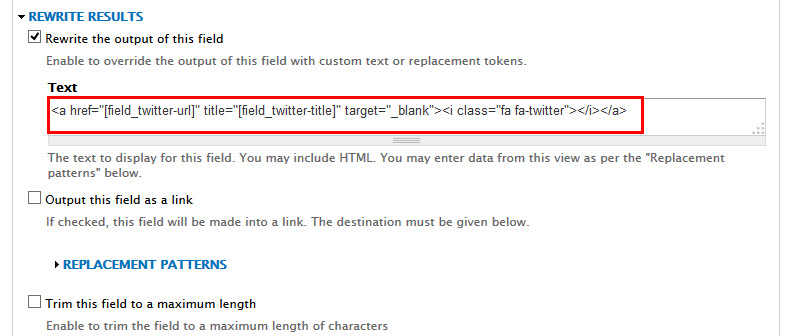
Step 15: Set properties for Field: Twitter
Refer to following HTML code:
Step 16: Set properties for Taxonomy term: Name
Step 17: At FIELDS area, click Rearrange button and set following arrange
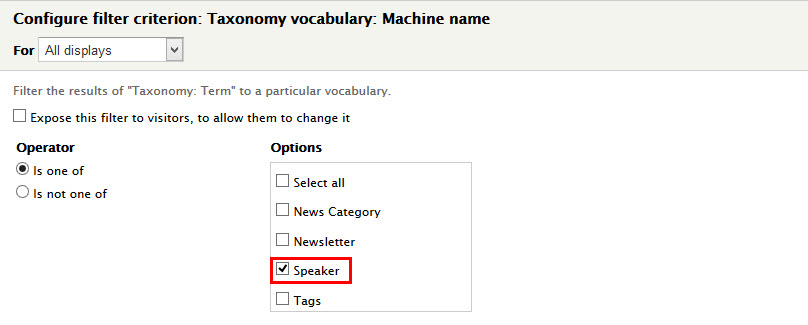
Step 18: At FILTER CRITERIA area, click Add button add field Taxonomy term: Vocabulary and set following properties:
Step 19: At Advanced > OTHER area, add CSS class
Step 20: Click Save button
Configure View: Speakers
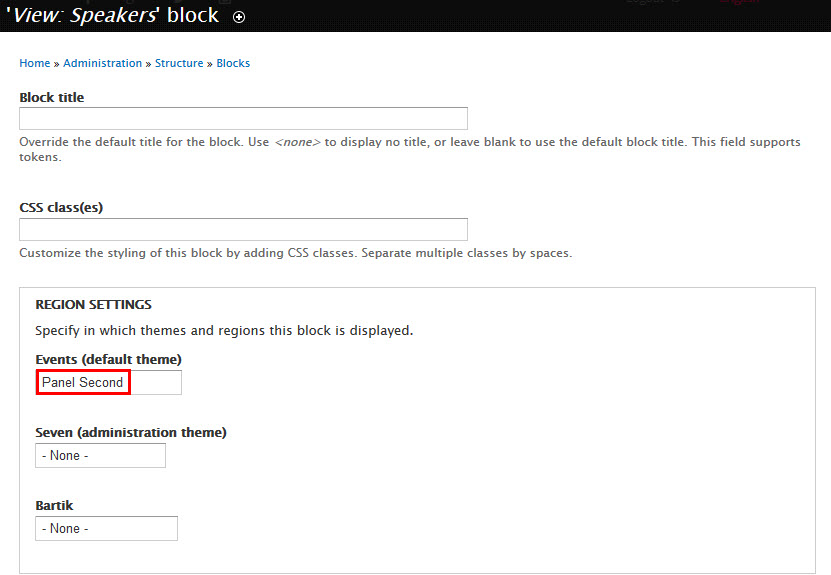
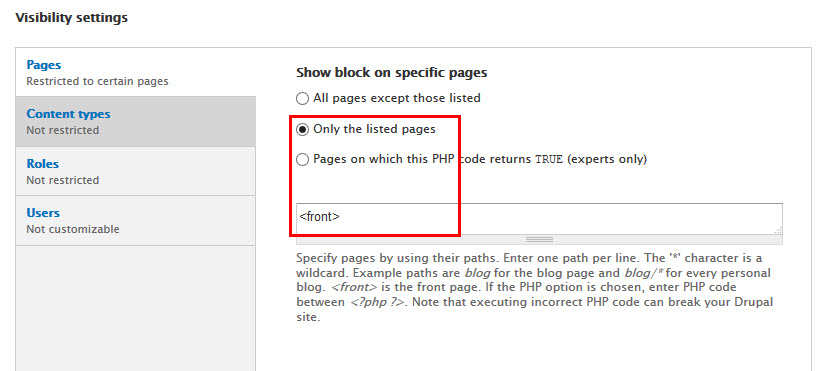
Step 1: Navigate to Structure > Blocks, find View: Speakers block, click configure link and set the following properties:
Step 2: Click Save button
Gallery block
Front end Display
Create Gallery view
Step 1: Navigate to Structure > Views, click Add views link, Create Gallery view with following properties:
Step 2: Click Continue and edit button. Next to steps below to set properties for following fields:
Step 3: At FIELDS area, click Add button to add fields: Content: Gallery .
Step 4: Set properties for Content: Gallery
Step 5: At FIELDS area, click Rearrange button. Find Content: Title field and click Remove link
Step 6: At FILTER CRITERIA area, click Add button add field Content: Gallery:fid
Step 7: At Advanced > OTHER area, add CSS class
Step 8: Click Save button
Configure View: Gallery
Step 1: Navigate to Structure > Blocks, find View: Gallery block, click configure link and set the following properties:
Step 2: Click Save button
Tickets block
Front end Display
Create Tickets view
Step 1: Navigate to Structure > Views, click Add views link, Create Tickets view with following properties:
Step 2: Click Continue and edit button. Next to steps below to set properties for following fields:
Step 3: At FIELDS area, click Add button to add fields: Content: Tickets .
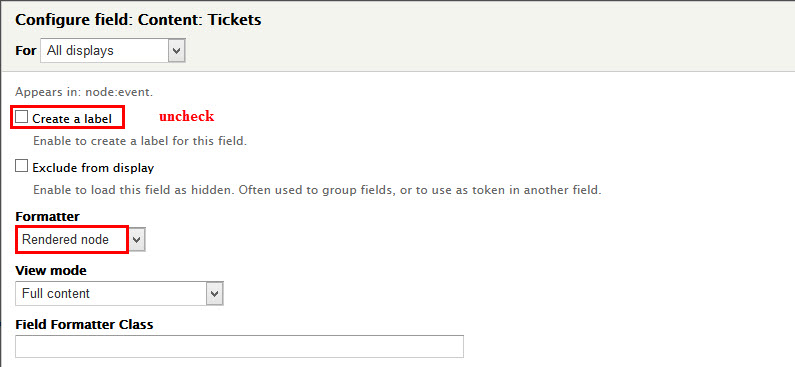
Step 4: Set properties for Content: Tickets
Step 5: At FIELDS area, click Rearrange button. Find Content : Title field and click Remove link
Step 6: At FILTER CRITERIA area, click Add button. Then add Content: Promoted to front page and set following field:
Step 7: At TITLE > Title area, click link and setting
Step 8: At Advanced > OTHER area, add CSS class
Step 9: Click Save button
Configure View: Tickets
Step 1: Navigate to Structure > Blocks, find View: Tickets block, click configure link and set the following properties:
Step 2: Click Save button
Happy Clients block
Front end Display
Create Happy Clients view
Step 1: Navigate to Structure > Views, click Add views link, Create Happy Clients view with following properties:
Step 2: Click Continue and edit button. Next to steps below to set properties for following fields:
Step 3: At Advanced > RELATIONSHIP area, add Content: Author
Step 4: At FIELDS area, click Add button to add fields: User: Picture, Global: Fieldset, Content: Body.
Step 5: Set properties for User: Picture
Step 6: Set properties for Global: Fieldset
Step 7: Set properties for Content: Body
Step 8: At FIELDS area, click Rearrange button. Find Content: Title field , then click Remove link and set following arrange
Step 9: At Advanced > OTHER area, add CSS class
Step 10: Click Save button
Configure View: Happy Clients
Step 1: Navigate to Structure > Blocks, find View: Happy Clients block, click configure link and set the following properties:
Step 2: Click Save button
Sponsor block
Front end Display
Create Sponsor view
Step 1: Navigate to Structure > Views, click Add views link, Create Sponsor view with following properties:
Step 2: Click Continue and edit button. Next to steps below to set properties for following fields:
Step 3: At FORMAT > Fomat area, click Settings:
Step 4: At FIELDS area, click Add button to add fields: Field: Image, Content: Link.
Step 5: Set properties for Field: Image
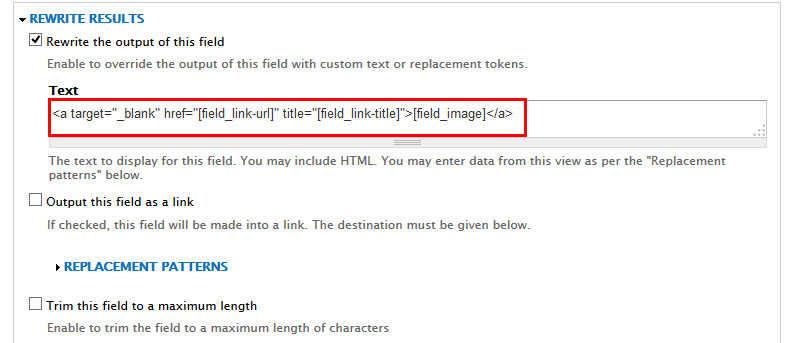
Step 6: Set properties for Content: Link
Refer to following HTML code:
[field_image]
Step 7: At FIELDS area, click Rearrange button. Find Content: Title field, then click Removelink field
Step 8: At Advanced > OTHER area, add CSS class
Step 9: Click Save button
Configure View: Sponsor
Step 1: Navigate to Structure > Blocks, find View: Sponsor block, click configure link and set the following properties:
Step 2: Click Save button
Configure Newsletter: Subscribe : Custom block
Front end Display
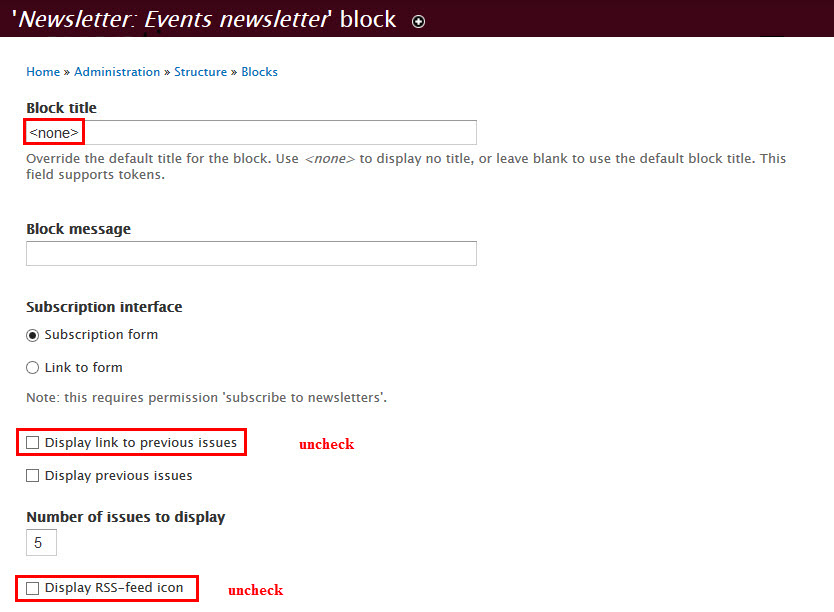
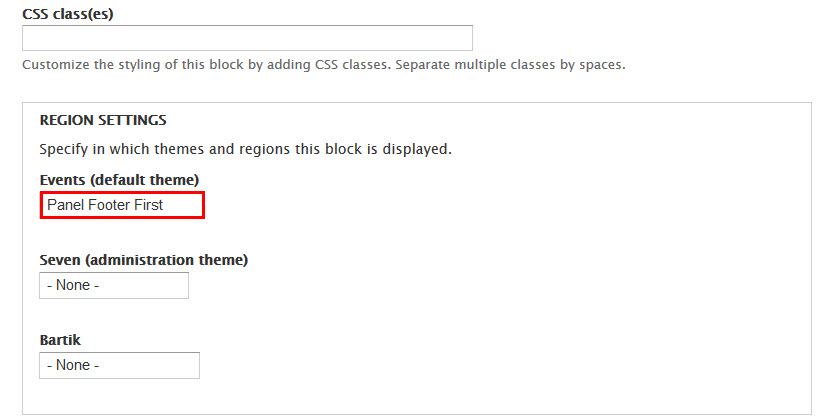
Step 1: Navigate to Structure > Blocks, find Newsletter: Subscribe block, click configure link with following properties:
Step 2: Click Save block button.
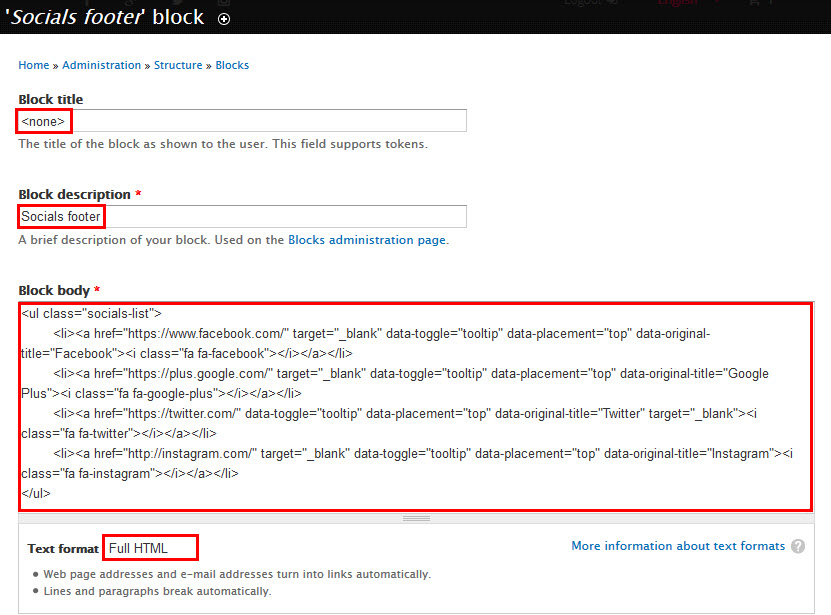
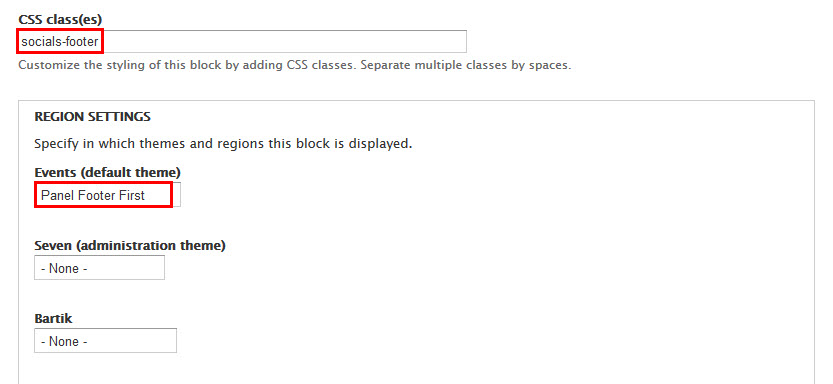
Socials Footer block
Front end Display
Create Socials Footer block view
Step 1: Navigate to Structure > Blocks, click Add Block link, Create Socials Footer block with following properties:
Step 2: Click Save button
Refer to following HTML code:
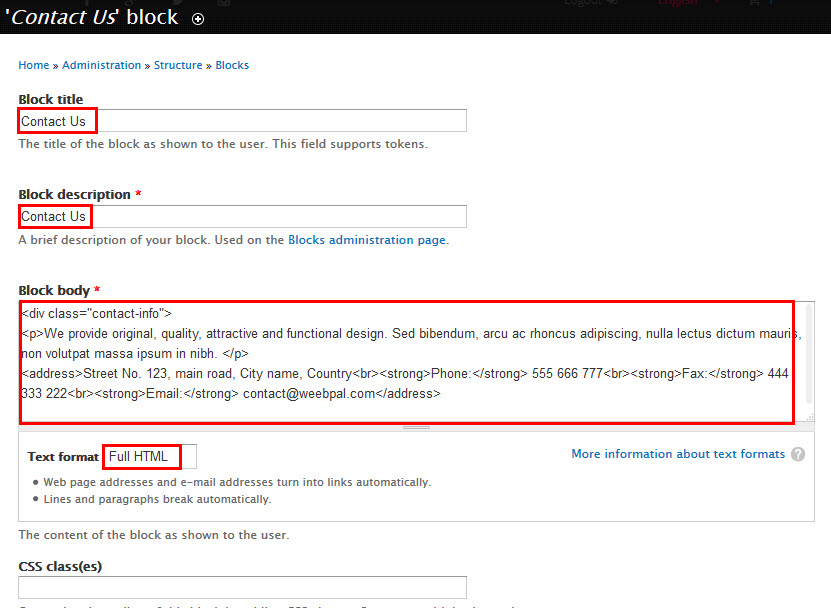
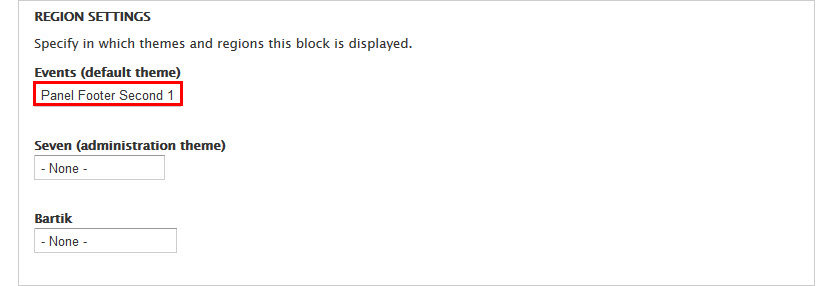
Contact Us block
Front end Display
1.Create and configure Contact Us block
Step 1: Navigate to Structure > Blocks, click Add block link, Create Contact Us block with following properties:
Step 2: Click Save block button.
Refer to following HTML code:
We provide original, quality, attractive and functional design. Sed bibendum, arcu ac rhoncus adipiscing, nulla lectus dictum mauris, non volutpat massa ipsum in nibh.
Street No. 123, main road, City name, CountryPhone: 555 666 777
Fax: 444 333 222
Email: [email protected]
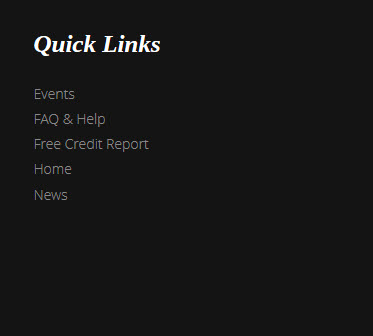
Quick Links Menu
Front end Display
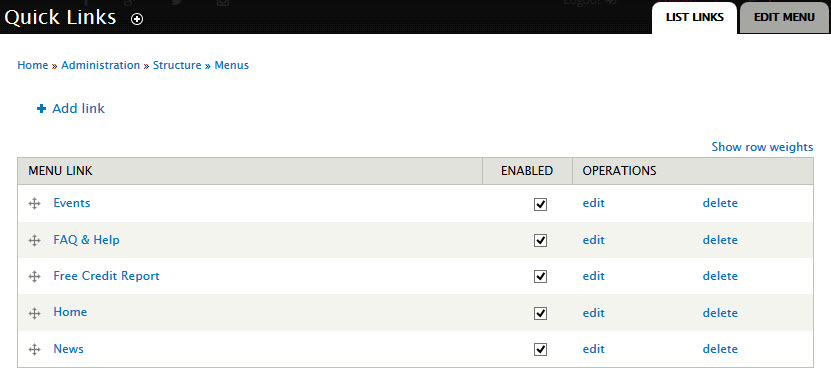
1. Create Quick Links Menu
Step 1: Navigate to Structure > Menu, click Add menu, then create Quick Links Menu and add following field link:
Step 2: Click Save button
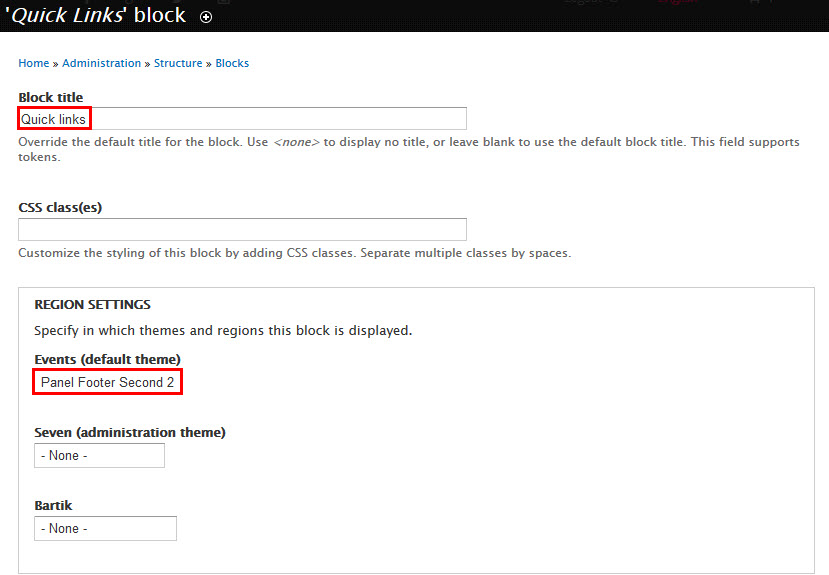
2. Configure Quick Links Menu
Step 1: Navigate to Structure > Blocks, find Quick Links Menu block, click configure link and set the following properties:
Step 2: Click Save button
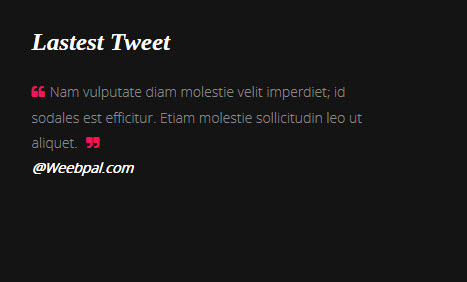
Lastest Tweet block
Front end Display
1.Create and configure Lastest Tweet block
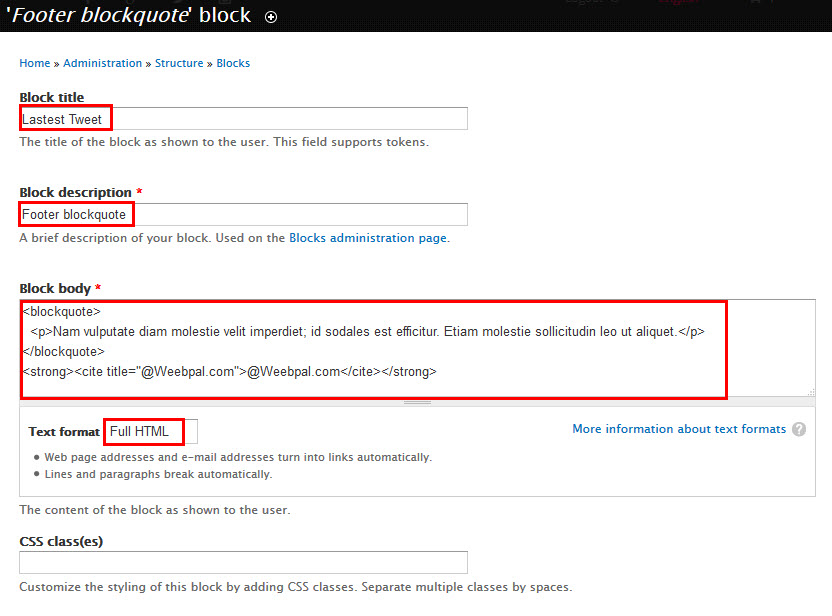
Step 1: Navigate to Structure > Blocks, click Add block link, Create Lastest Tweet block with following properties:
Step 2: Click Save block button.
Refer to following HTML code:
@Weebpal.comNam vulputate diam molestie velit imperdiet; id sodales est efficitur. Etiam molestie sollicitudin leo ut aliquet.
Copyright block
Front end Display
Create & configure Copyright block
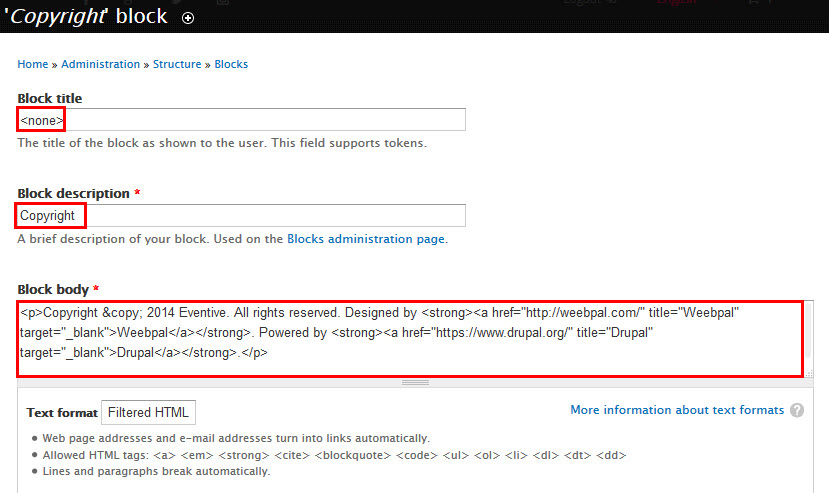
Step 1: Navigate to Structure > Blocks, click Add block link, Create Copyright block with following properties:
Step 2: Click Save block button.
Refer to following HTML code:
Copyright © 2014 Eventive. All rights reserved. Designed by Weebpal. Powered by Drupal.
Frontpage view
Front end Display
1. Edit Frontpage page view
Step 1: Navigate to Structure > View ,find Frontpage view, click Enable button. Then click Edit button , find and click Page button and set following properties:
Step 2:At FORMAT area, findFormat click link and set following properties:
Step 3:At FORMAT area, find Show click link and set following properties:
Step 4:At FOOTER area, click Add button to add field:
Step 5: At FIELDS area, click Add button to add fields: Field: Image, Content: Link, Global: Fieldset, Content: Title, Content :Body field:
Step 6: Set properties for Field: Image
Step 7: Set properties for Content: Link
Step 8: Set properties for Global: Fieldset
Step 9: Set properties for Content: Title
Step 10: Set properties for Content: Body
Step 11: At FIELDS area, click Rearrange button and set following arrange
Step 12: At FILTER CRITERIA area, click Add button to add fields: Content: Type field:
Step 13: Set properties for Content: Type
Step 14: At PAGER > User Pager area, click link and set properties
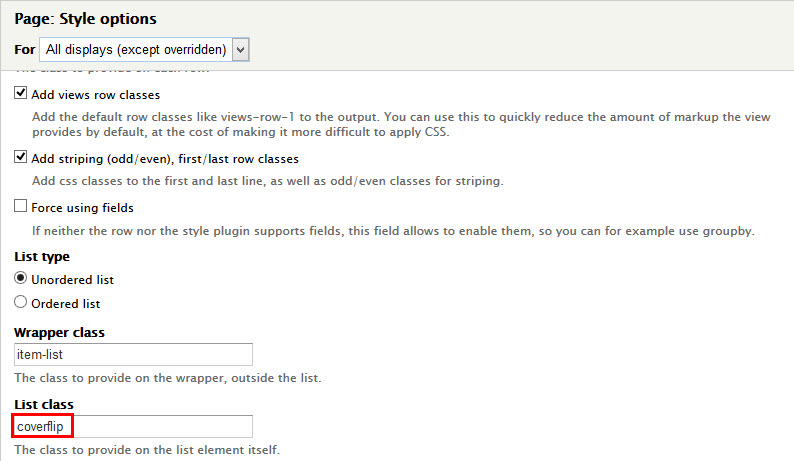
Step 15: At Advanced > OTHER area, add CSS class:
Step 16: Click Save to save view
2. Edit Frontpage Feed view
Step 1: Go to Feed button. Click button and find Filter criteria at. Then remove Content: Promoted to front page field
Step 2: Click Save to save view
Create Subpages
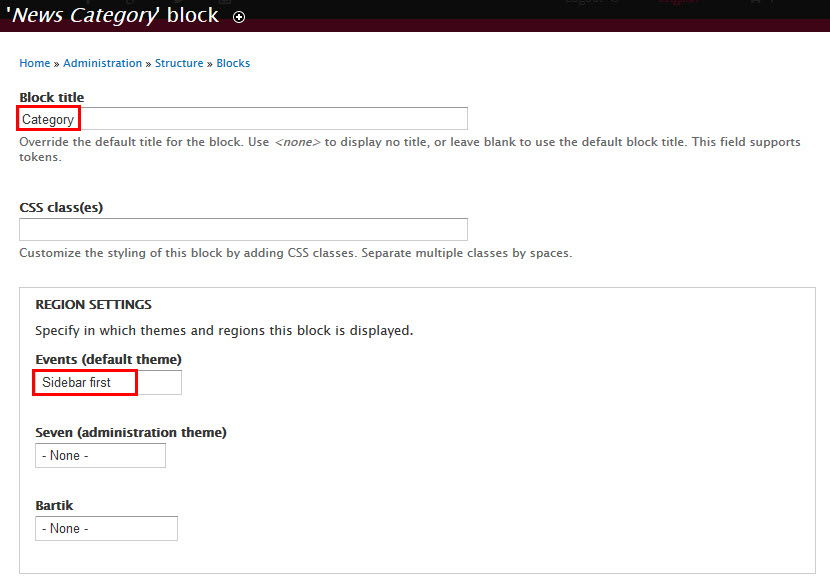
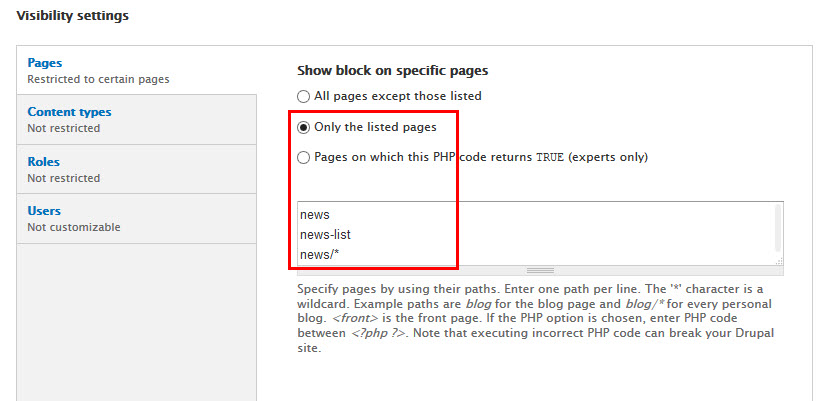
Sidebar first: Category
Front end Display
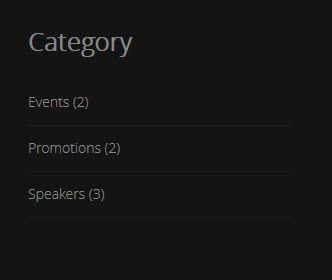
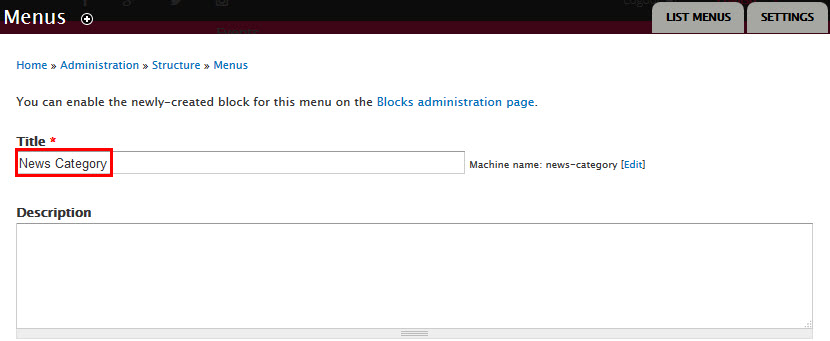
Step 1: Navigate to Structure > Menu click Add menu, create News Category menu
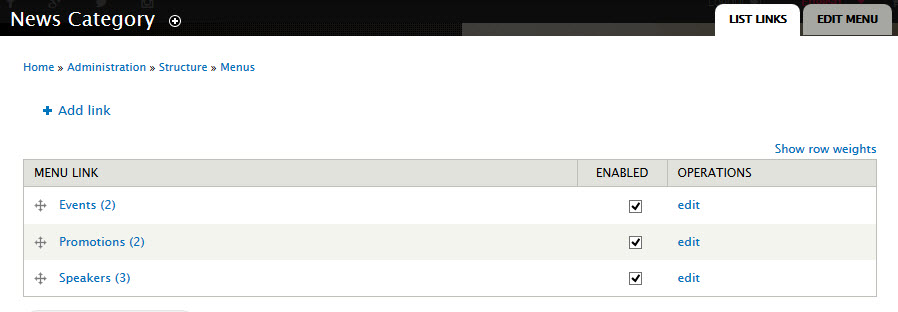
Step 2: Click Add link link, create link following:
Step 3: Navigate to Structure > Block find News Category, then click configure and set following properties:
Step 4: Click Save button
News Menu block
Front end Display
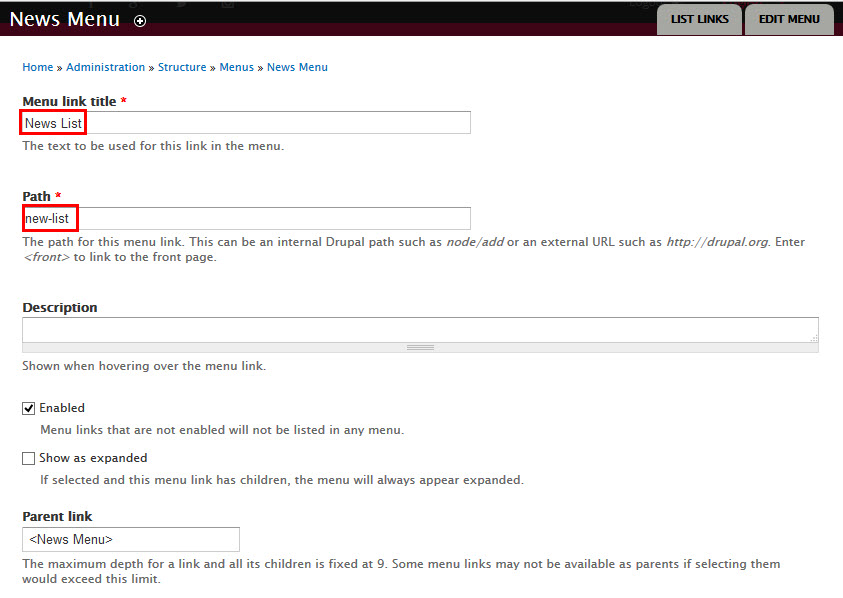
1. Create and add link News Menu
Step 1: Navigate to Structure > Menu click Add menu, create News Menu menu and add link menu
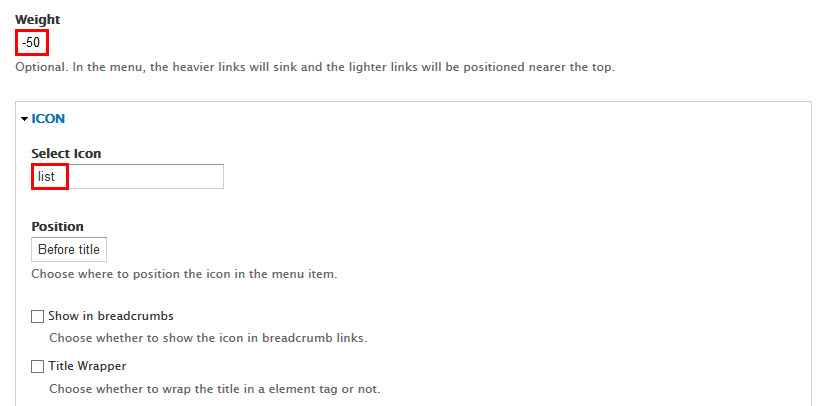
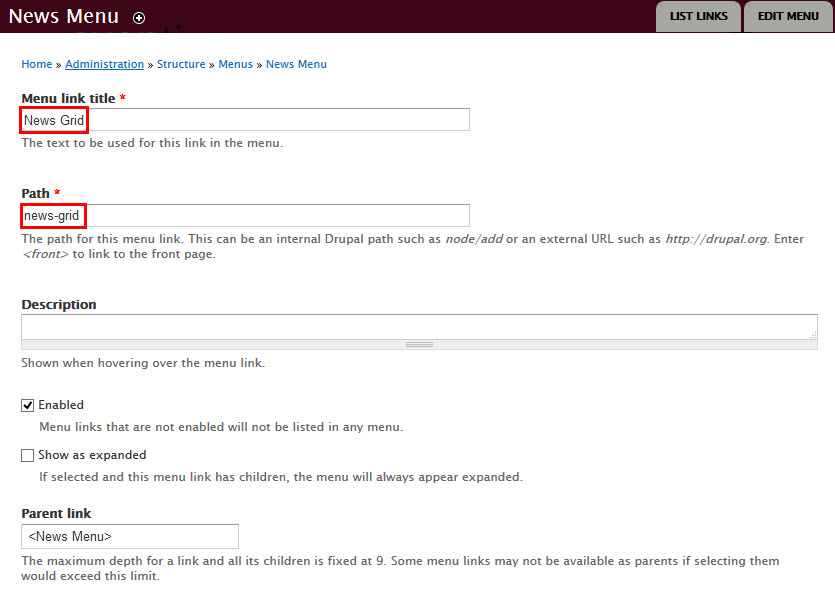
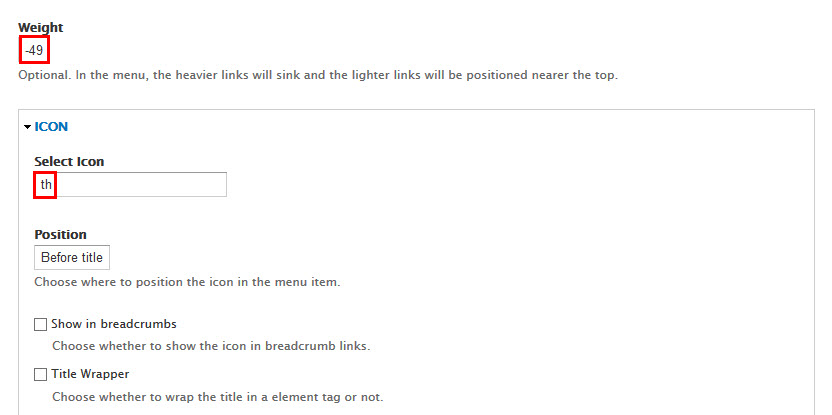
Step 2: Set properties News List link
Step 3: Set properties News Grid link
Step 4: Click Save button
2. Configure News Menu
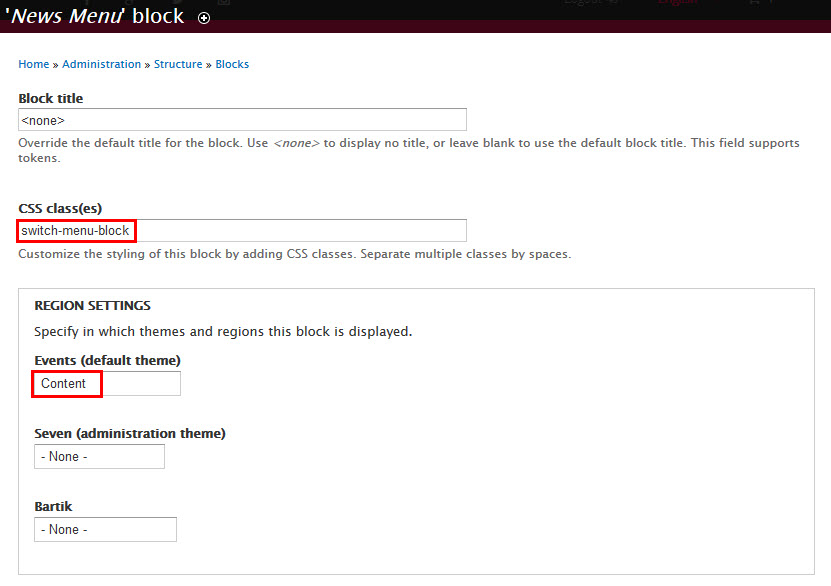
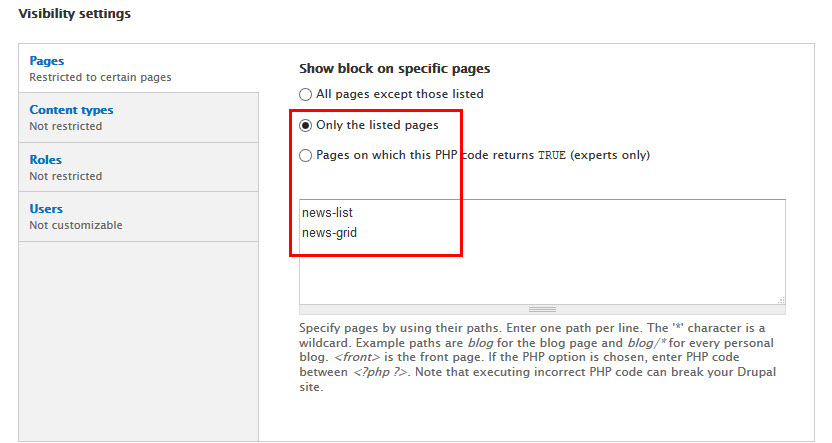
Step 1: Navigate to Structure > Block findNews Menu, then click configure and set following properties:
Step 2: Click Save button
Banner Page
Front end Display
1. Add and Configure Dynamic Banner
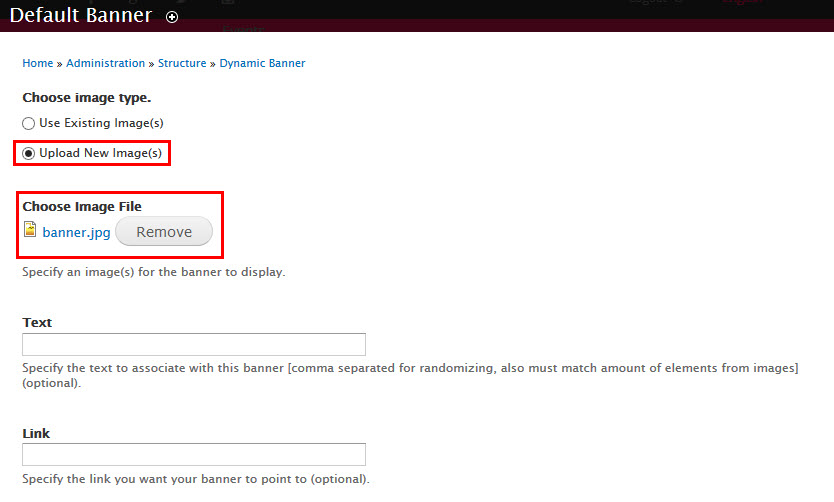
Step 1: Navigate to Structure > Dynamic Banner click Add Banner link, then create Banner new and set following properties:
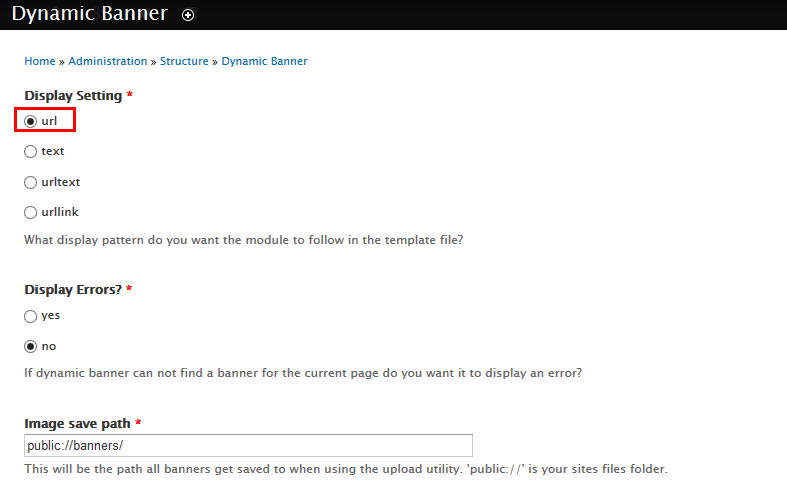
Step 2:Go to Setting link , then click and set following properties:
Step 3: Click Save button
2. Configure The default display of Dynamic Banner block
Step 1: Navigate to Structure > Block find The default display of Dynamic Banner, then click configure and set following properties:
Step 2: Click Save button
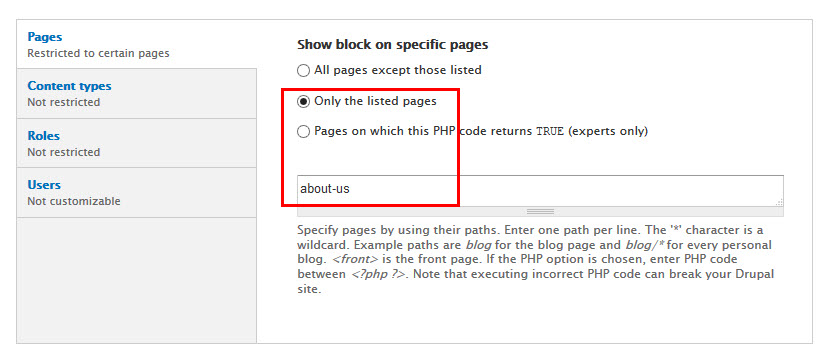
About us Page
1. About us
Front end Display
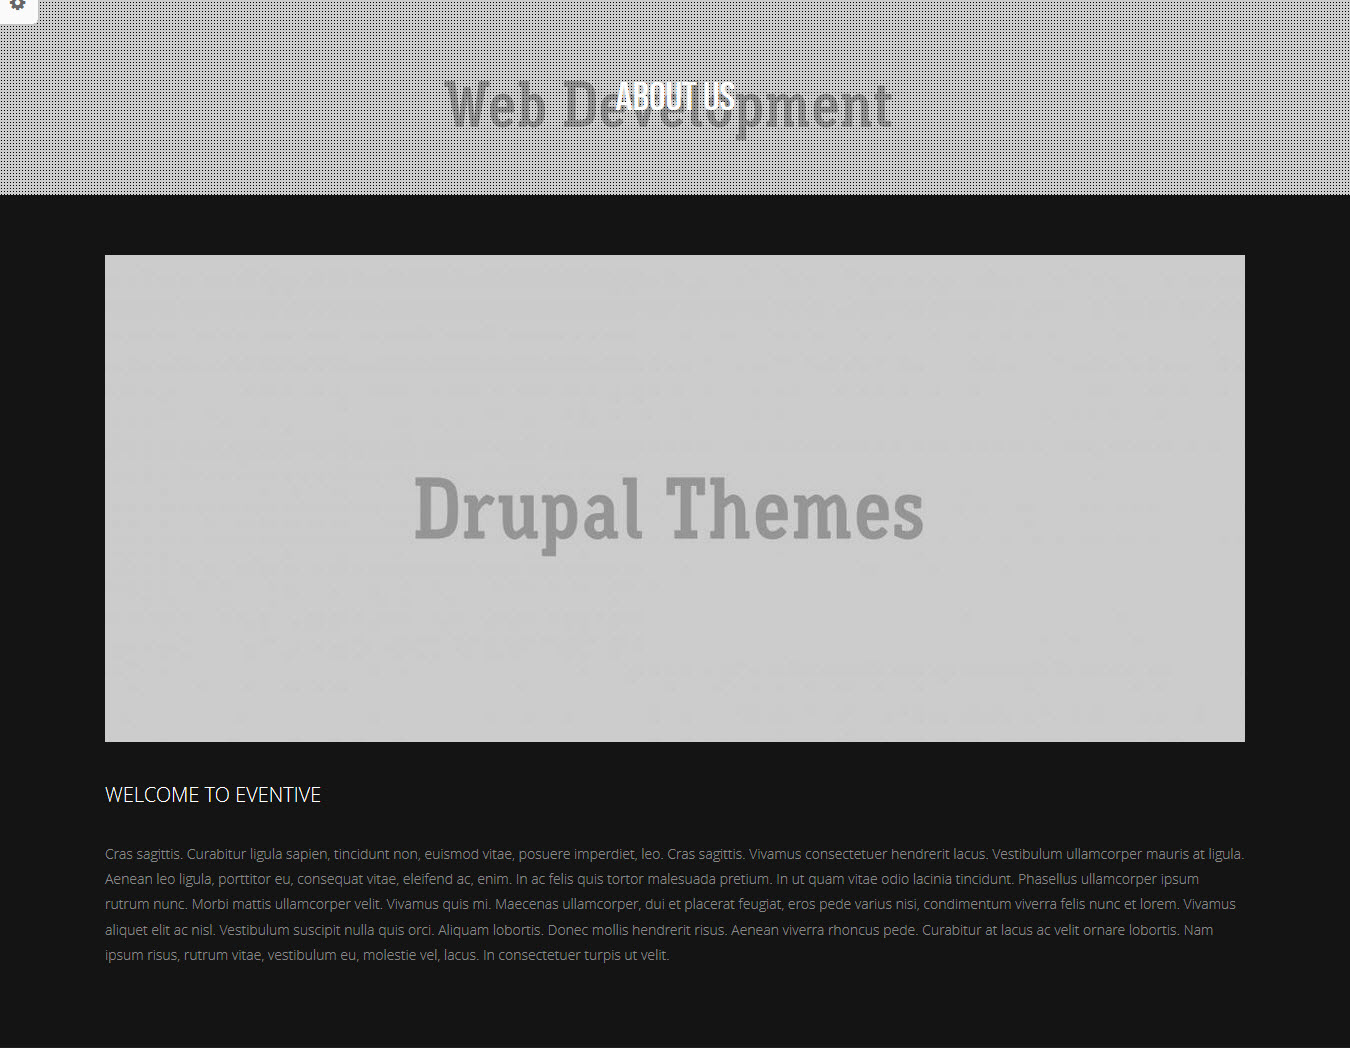
Step 1: Navigate to Structure > View click Add new view link, then create About us view and set following properties:
Step 2: Click Continue and edit button. Next to steps below to set properties for following fields:
Step 3: At FIELDS area, click Add button to add fields: Field: Image, Content: Body .
Step 4: Set properties for Field: Image
Step 5: Set properties for Content: Body
Step 6: Set properties for Content: Title
Step 7: At FIELDS area, click Rearrange button and set following arrange
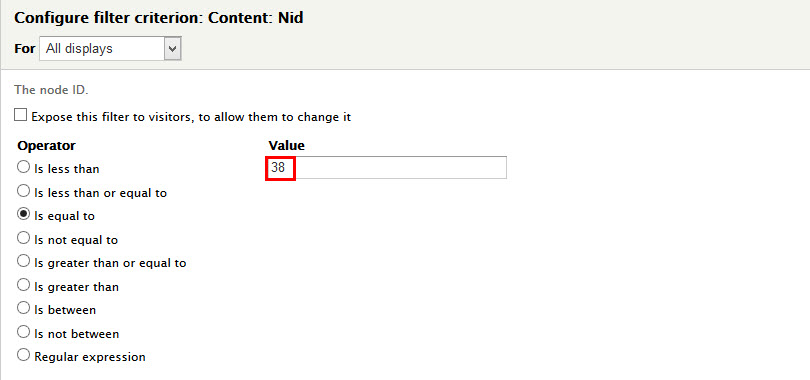
Step 8: At FILTER CRITERIA area, click Add button to add fields: Content: Nid and set following properties:
Step 9: At Advanced > OTHER area, add CSS class
Step 10: Click Save button
2. Content About us
Step 1: Navigate to Content > Add content > Article click link , create Welcome to eventivecontent and with following properties:
Step 2: Click Save button
Refer to following HTML code:
Cras sagittis. Curabitur ligula sapien, tincidunt non, euismod vitae, posuere imperdiet, leo. Cras sagittis. Vivamus consectetuer hendrerit lacus. Vestibulum ullamcorper mauris at ligula. Aenean leo ligula, porttitor eu, consequat vitae, eleifend ac, enim. In ac felis quis tortor malesuada pretium. In ut quam vitae odio lacinia tincidunt. Phasellus ullamcorper ipsum rutrum nunc. Morbi mattis ullamcorper velit. Vivamus quis mi. Maecenas ullamcorper, dui et placerat feugiat, eros pede varius nisi, condimentum viverra felis nunc et lorem. Vivamus aliquet elit ac nisl. Vestibulum suscipit nulla quis orci. Aliquam lobortis. Donec mollis hendrerit risus. Aenean viverra rhoncus pede. Curabitur at lacus ac velit ornare lobortis. Nam ipsum risus, rutrum vitae, vestibulum eu, molestie vel, lacus. In consectetuer turpis ut velit.
3.Statistic block
Front end Display
3.1. Create Blocks
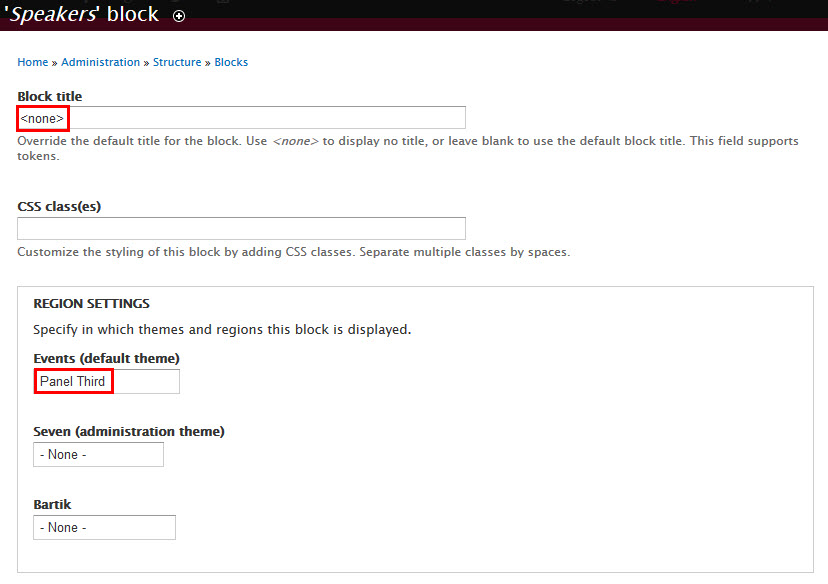
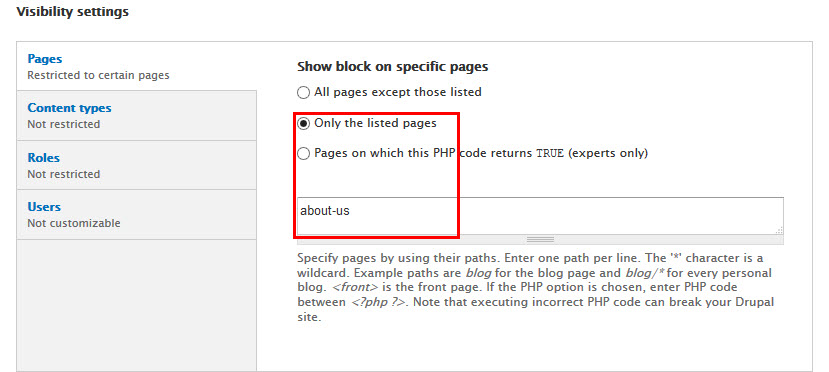
Step 1: Navigate to Content > Blocks , click Add block link. Create Speakers block and set following properties:
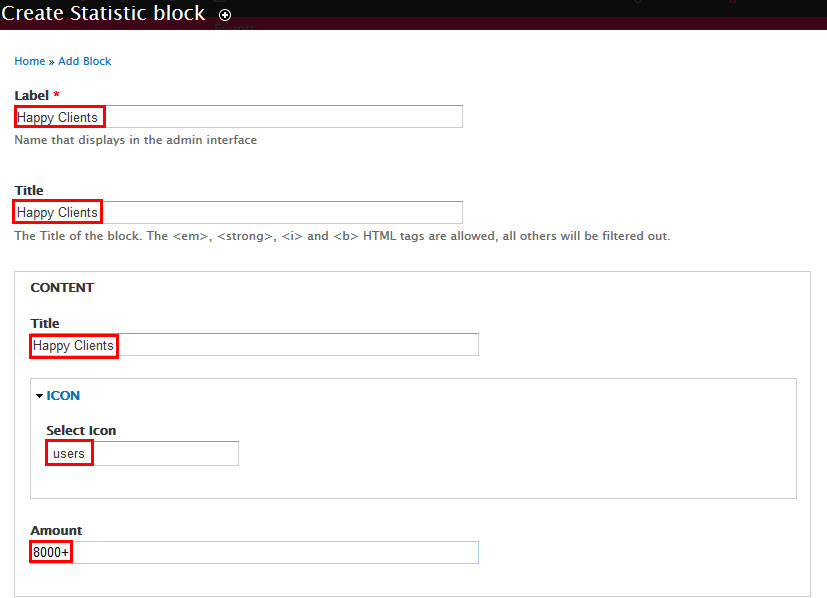
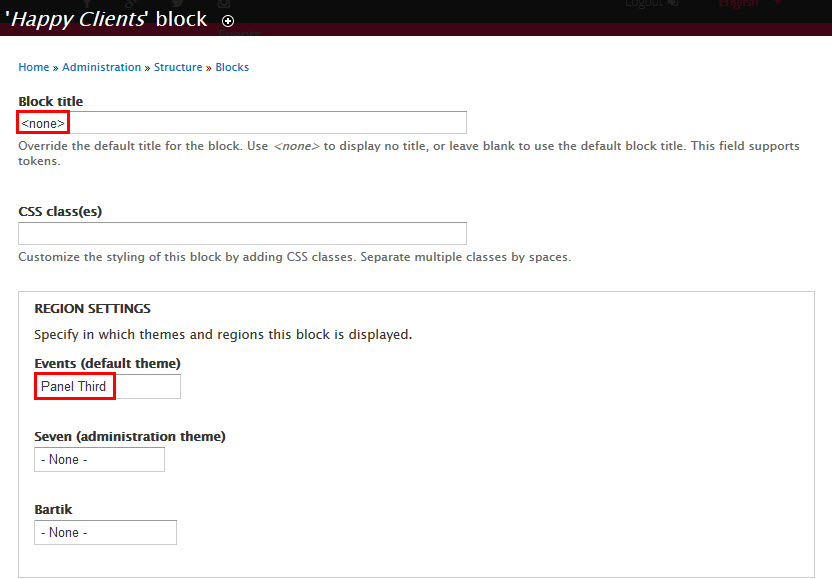
Step 2: Go to click Add block link. Create Happy Clients block and set following properties:
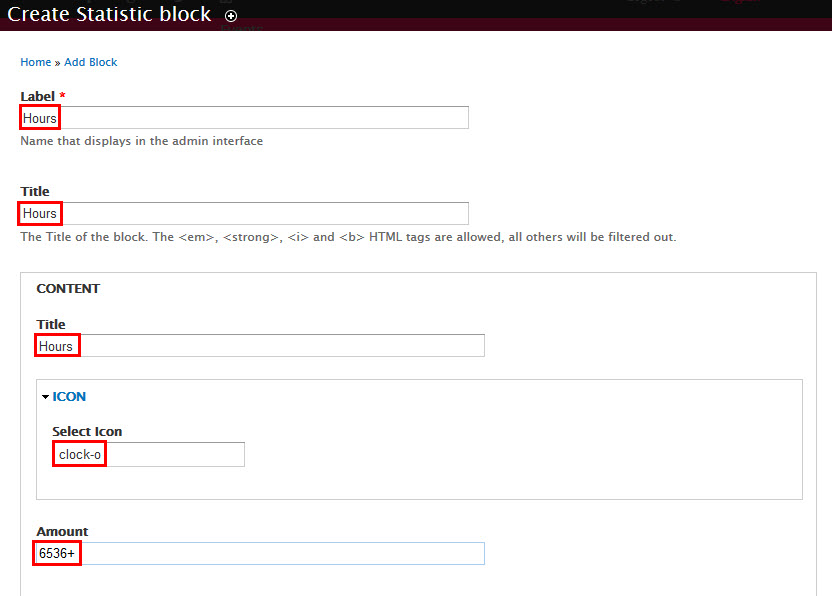
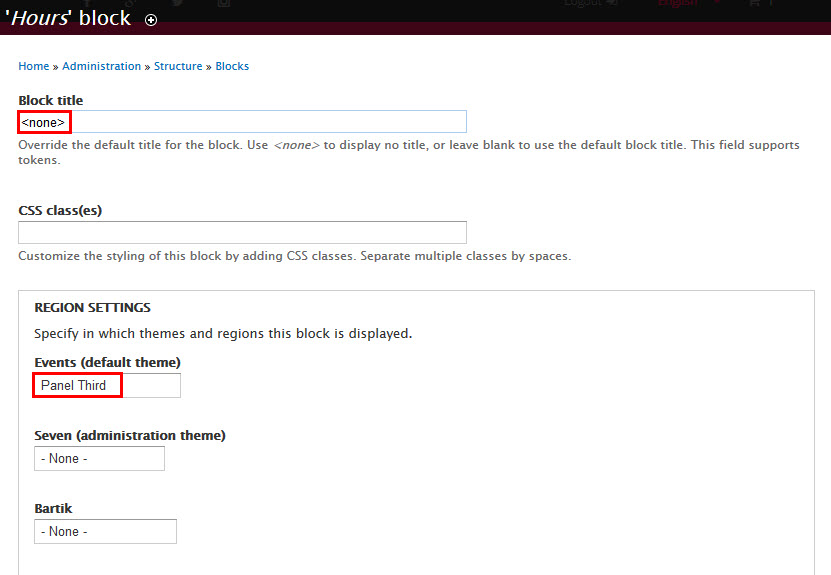
Step 3: Go to click Add block link. Create Hours block and set following properties:
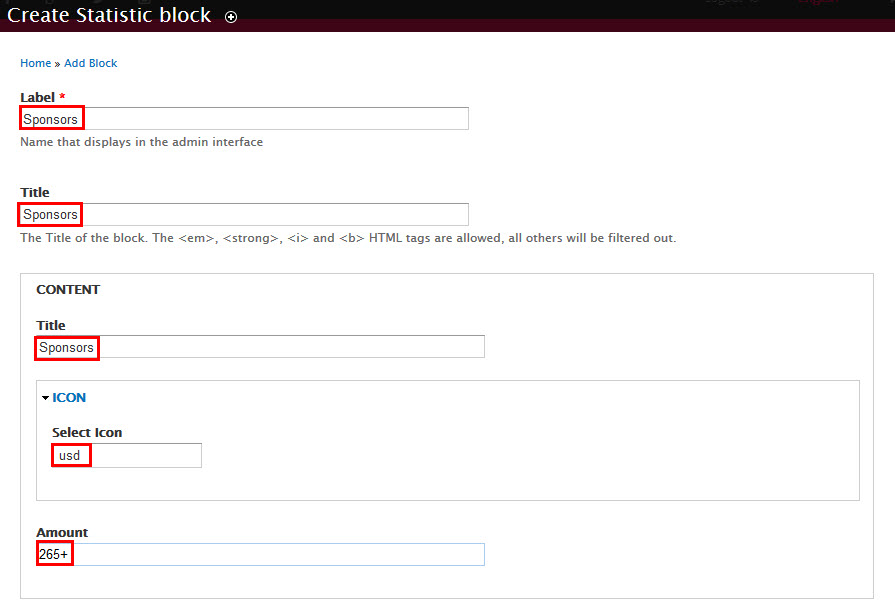
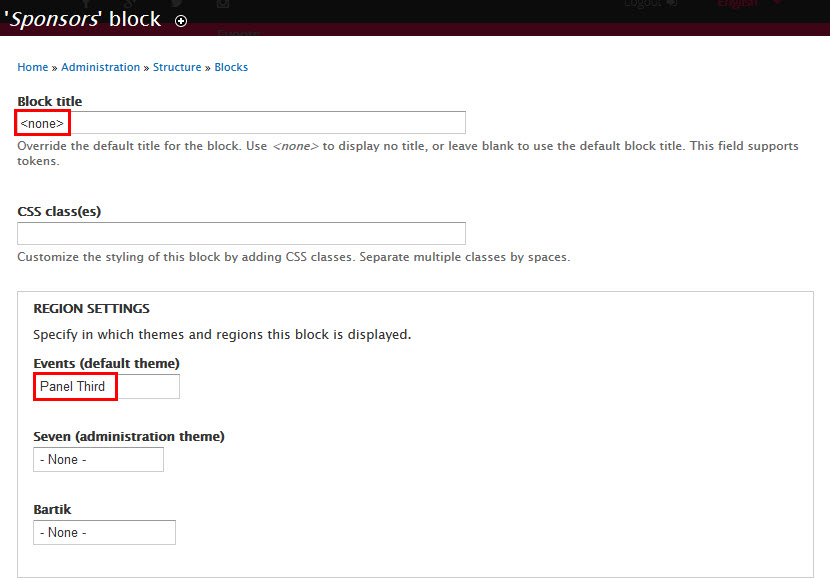
Step 4: Go to click Add block link. Create Sponsors block and set following properties:
Step 5: Click Save button
3.2. Configure Blocks
Step 1: Navigate to Structure > Blocks find Speakers block and set with following properties:
Step 2: Find Happy Clients block and set with following properties:
Step 3: Find Hours block and set with following properties:
Step 4: Find Sponsors block and set with following properties:
Step 5: Click Save button
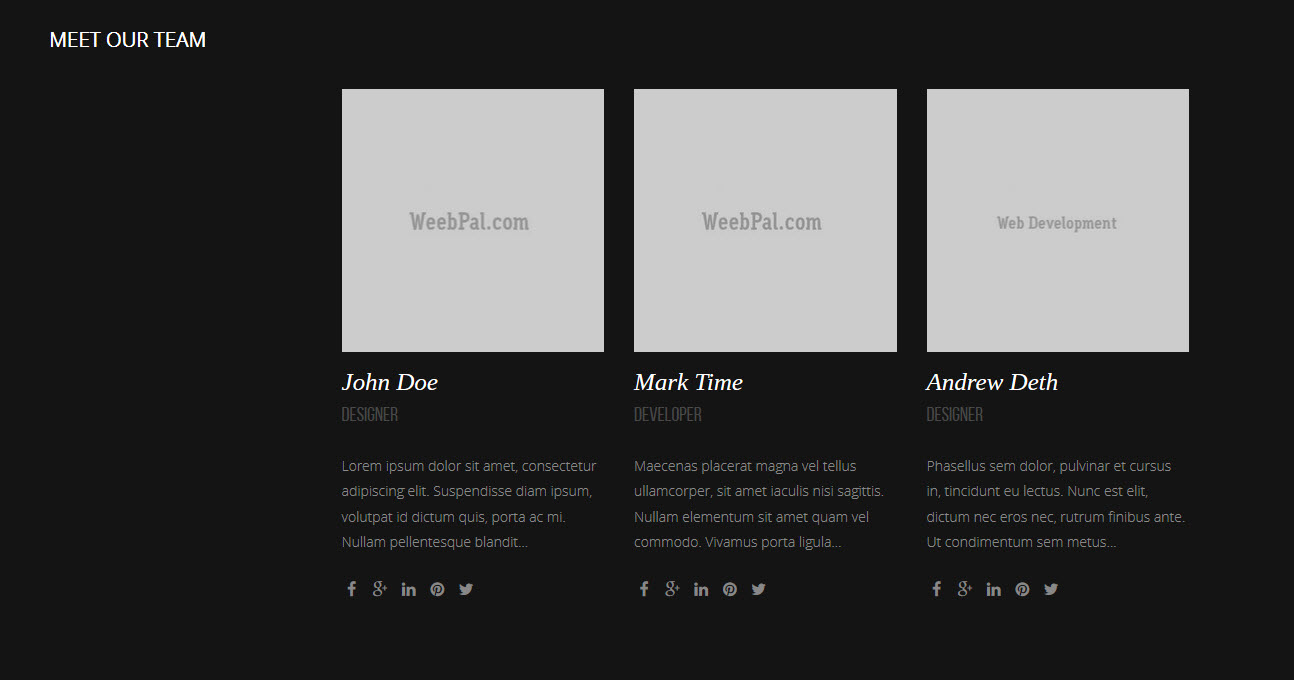
Meet Our Team block
Front end Display
4.1 Create view Our Term
Step 1: Navigate to Structure > View click Add new view link, then create Our Team view and set following properties:
Step 2: Click Continue and edit button. Next to steps below to set properties for following fields:
Step 3: Att TITLE area, click Title link add set name title
Step 4: At FIELDS area, click Add button to add fields: User: Picture, User: Full Name, Field: Career, User: Profile, Global: Fieldset, Field: Facebook, Field: Google Plus, Field: LinkedIn, Field: Pinterest, Field: Twitter.
Step 5: Set properties for User: Picture
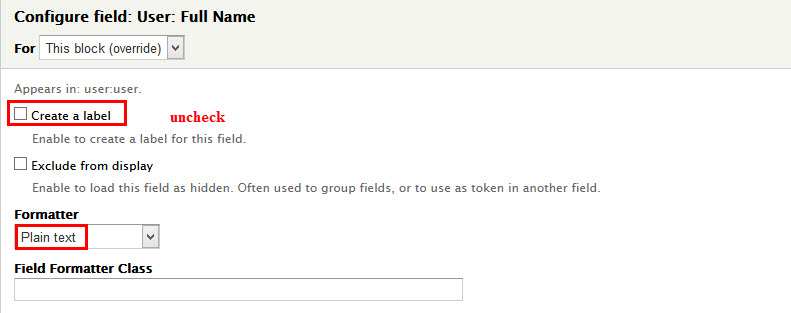
Step 6: Set properties for User: Full Name
Step 7: Set properties for Field: Career
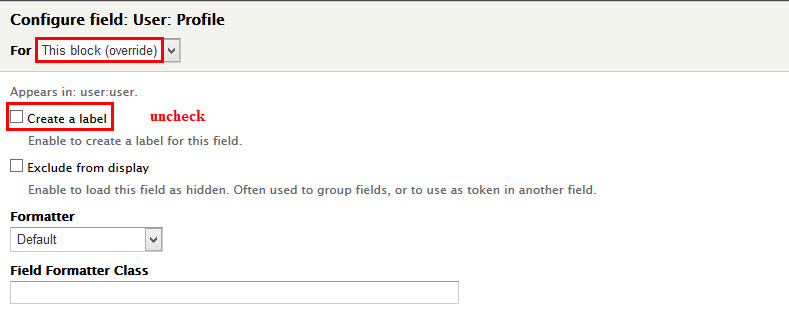
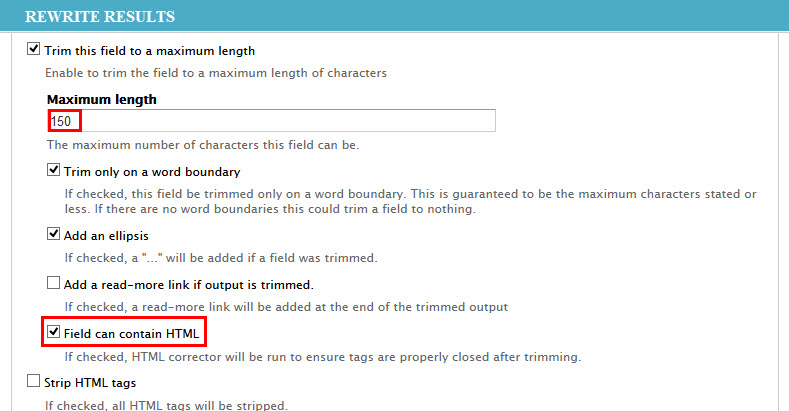
Step 8: Set properties for User: Profile
Step 9: Set properties for Global: Fieldset
Step 10: Set properties for Field: Facebook
Refer to following HTML code:
Step 11: Set properties for Field: Google Plus
Refer to following HTML code:
Step 12: Set properties for Field: LinkedIn
Refer to following HTML code:
Step 13: Set properties for Field: Pinterest
Refer to following HTML code:
Step 14: Set properties for Field: Twitter
Refer to following HTML code:
>
Step 15: At FIELDS area, click Rearrange button and click Remove link of User: Name and set following properties
Step 16: At Advanced > OTHER area, add CSS class:
Step 17: Click Save to save view
4.2 Configure block : View: Our Term
Step 1: Navigate to Structure > Blocks, find View: Our Term block, click configure link and set the following properties:
Step 2: Click Save button
Happy Clients block
Front end Display
1 Clone block view
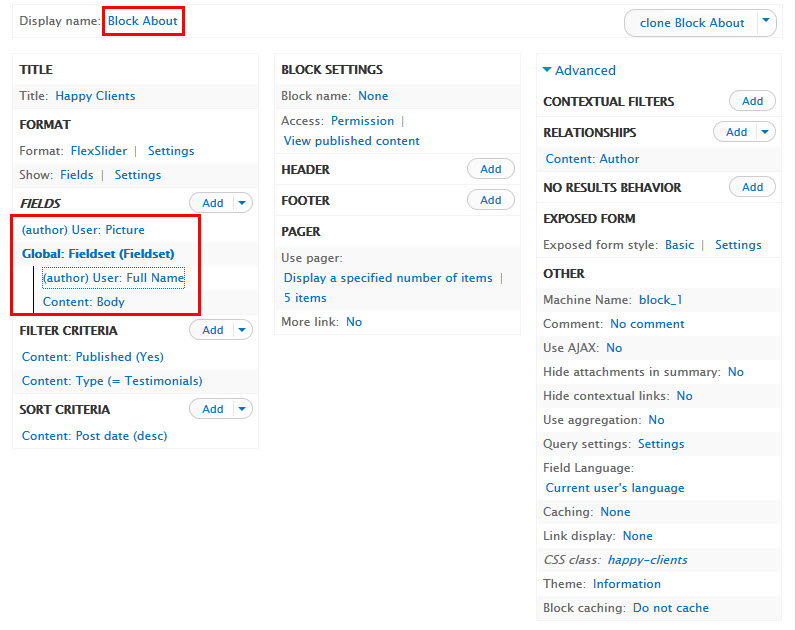
Step 1: Navigate to Structure > View Find Happy Clients view. Click Edit view, then click Clone block button and set following properties:
Step 2: Att Display name area, click and change name display
Step 3: At FIELDS area, click Add button to add fields: User: Full Name.
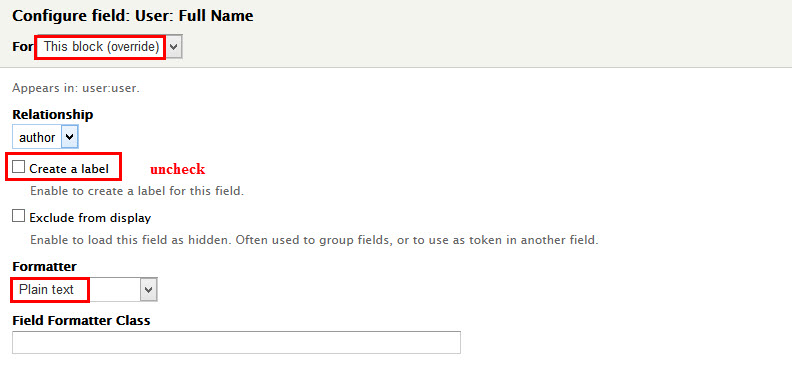
Step 4: Set properties for User: Full Name
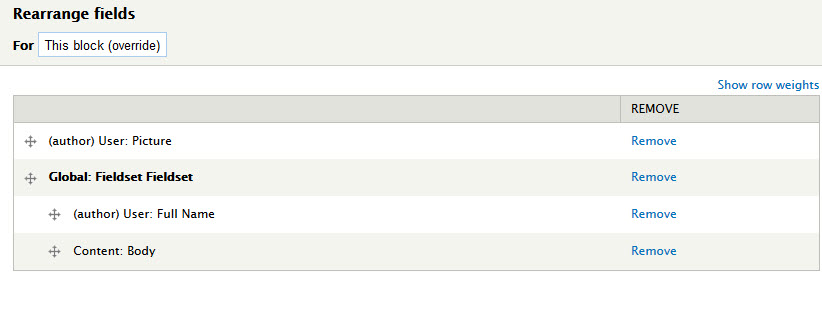
Step 5: At FIELDS area, click Rearrange button and set following arrange
Step 6: Click Save to save view
2 Configure block : View: Happy Clients: Block About
Step 1: Navigate to Content > Blocks Find View: Happy Clients: Block About block view and set following properties:
Step 2: Click Savebutton
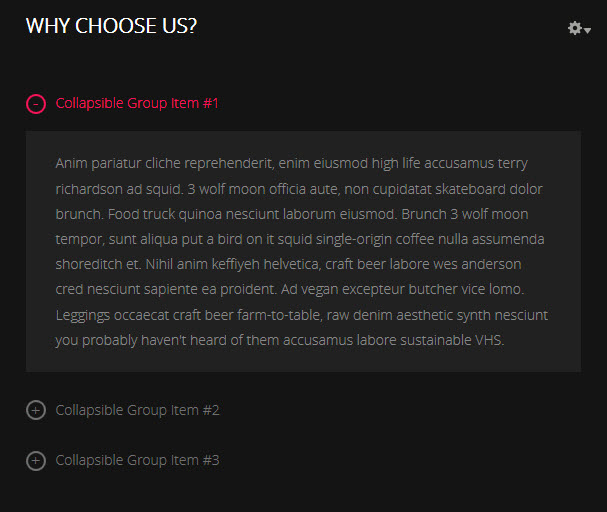
Why Choose Us? block
Front end Display
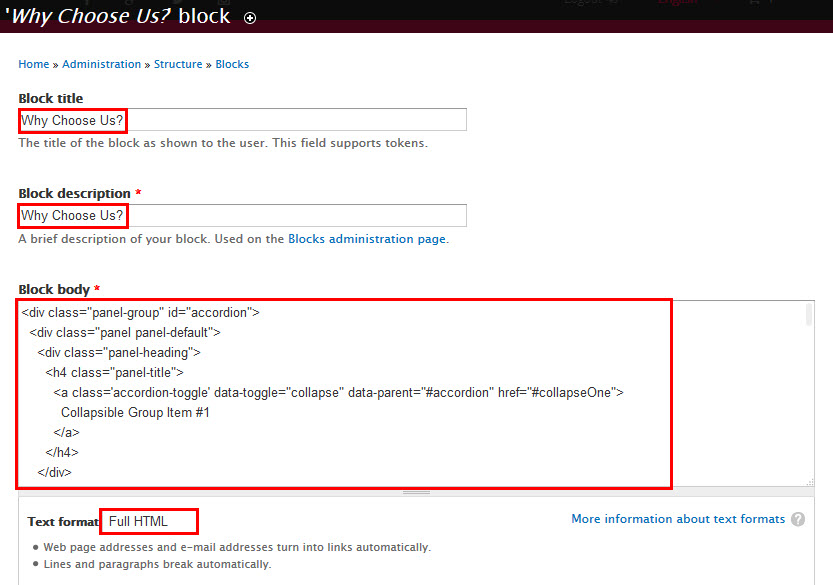
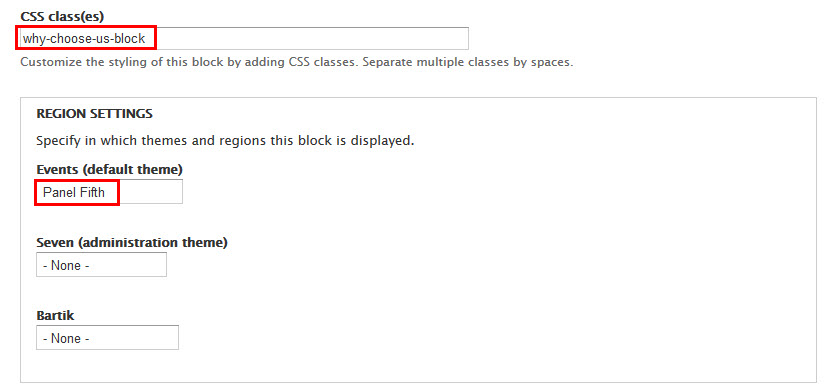
Step 1: Navigate to Structure > Blocks , click Add block link. Create Why Choose Us block and set following properties:
Step 2: Click Save button
Refer to following HTML code:
News page
Step 1: Navigate to Structure > View click Add new view link, then create News view and set following properties:
Step 2: Click Continue and edit button. Next to steps below to set properties for following fields:
Step 3: At Display name area, click link and set following properties:
Step 4: At TITLE > Title area, click link and set following properties:
Step 5: At PAGE > User Page area, click link and set following properties:
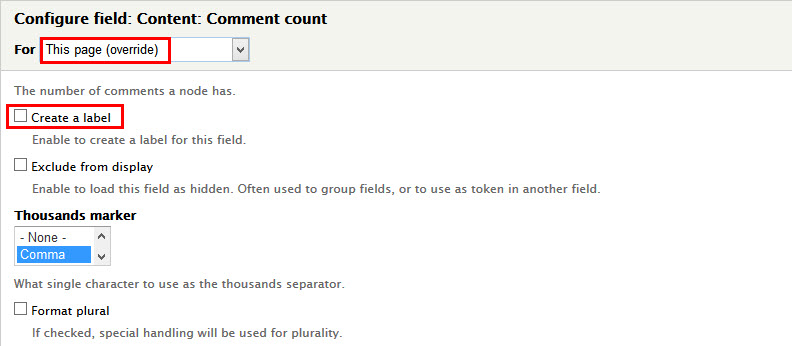
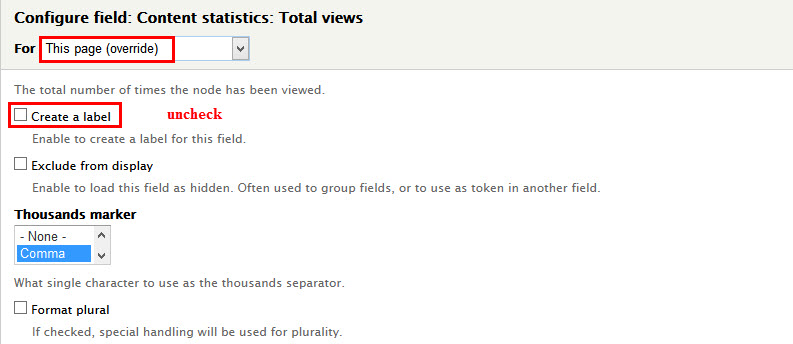
Step 6: At FIELDS area, click Add button to add fields: Field: Image, Content: Body, Global: Fieldset, Content: Comment count, Content statistics: Total views, Content: Link .
Step 7: Set properties for Field: Image
Step 8: Set properties for Content: Body
Step 9: Set properties for Global: Fieldset
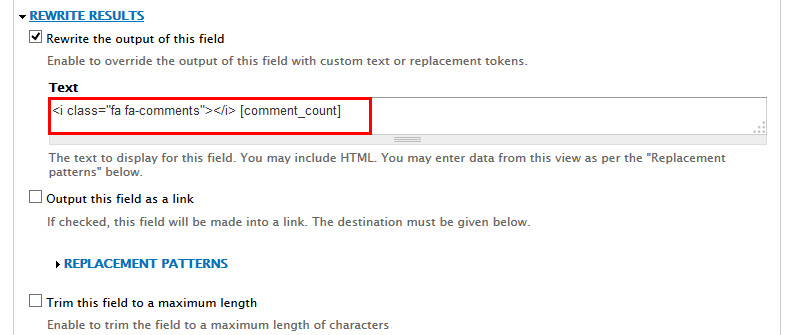
Step 10: Set properties for Content: Comment count
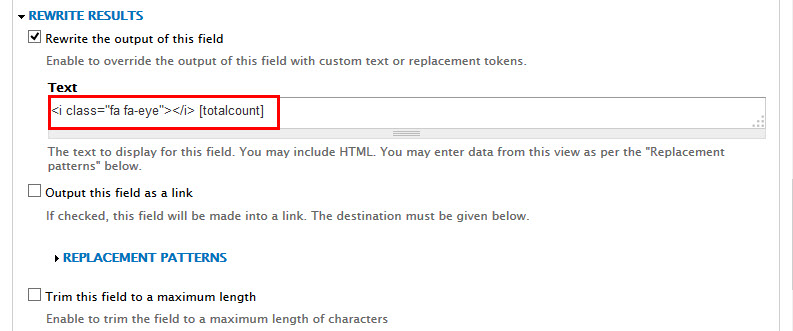
Step 11: Set properties for Content statistics: Total views
Step 12: Set properties for Content: Link
Step 13: At FIELDS area, click Rearrange button and set following arrange
Step 14: At Advanced > OTHER area, add CSS class:
Step 15: Click Save button
News Grid page
Step 1: Navigate to Structure > View find New List view, then click Clone page button and set following properties:
Step 2: At Display name area, click link and set following properties:
Step 3: At TITLE > Title area, click link and set following properties:
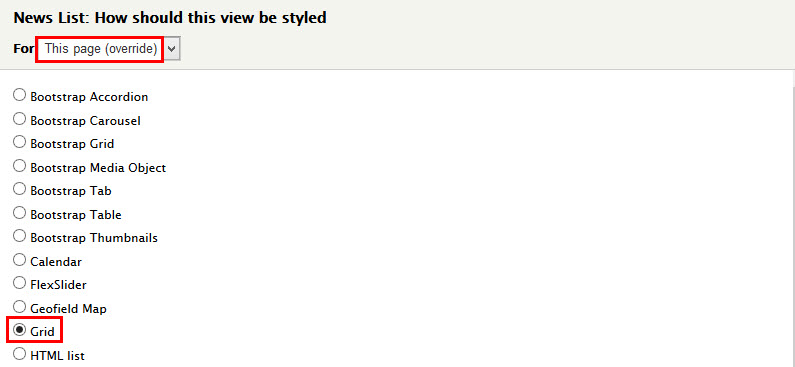
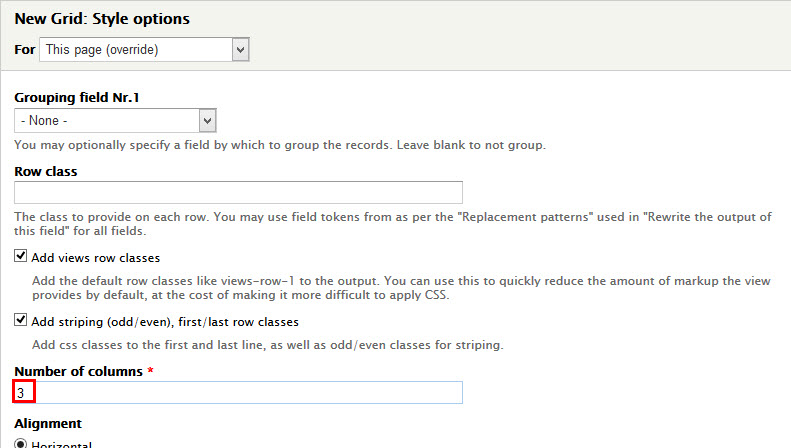
Step 4: At FORMAT > Format area, click link and set following properties:
Step 5: At PAGER SETTINGS area, find Path click link and set following properties:
Step 6: At PAGER area, find User page click link and set following properties:
Step 7: At Advanced > OTHER area, add CSS class:
Step 8: Click Save to view button
Block : Laster New
1. Add new Block view
Step 1: Navigate to Structure > View find News view, click Edit view link. Click Add Block and set following properties:
Step 2: At TITLE > Title area, click link and set following properties:
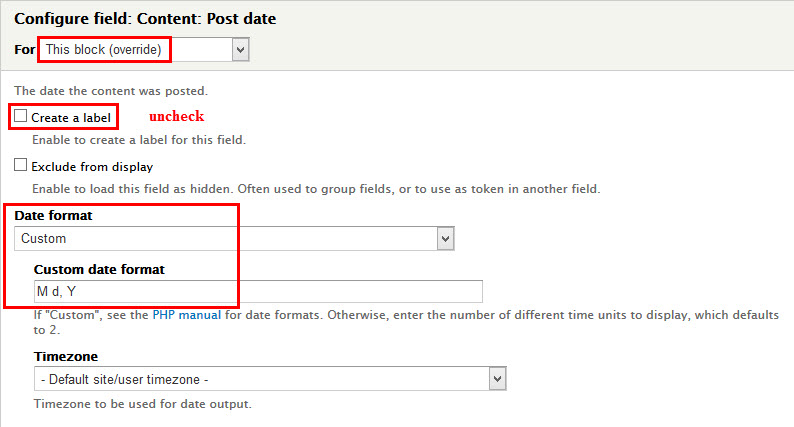
Step 3 : At FIELDS area, click Add button to add fields: Content: Post Date.
Step 4: Set properties for Field: Image
Step 5: Set properties for Content: Post Date
Step 6: At FIELDS area, click Rearrange button.Click Remove link Content: Body, Global: Fieldset, Content: Comment count, Content statistics: Total views and set following arrange
Step 7: At PAGER area, find User Page click link and set following properties:
Step 8: At Advanced > OTHER area, add CSS class:
Step 9: Click Save to view button
2. Configure View: News block
Step 1: Navigate to Structure > Blocks ,find View: News block. Click configure link and set following properties:
Step 2: Click Save to block button
Events Grid page
Step 1: Navigate to Structure > View find Events view, then click Add > Page button and set following properties:
Step 2: At FORMAT > Fomat area, click link and set following properties:
Step 3: At PAGER SETTINGS area, find Path click link and set following properties:
Step 4: At PAGER SETTINGS > PAGE area, find User page click link and set following properties:
Step 5: At Display name area, click link and set following properties:
Step 6: At TITLE > Title area, click link and set following properties:
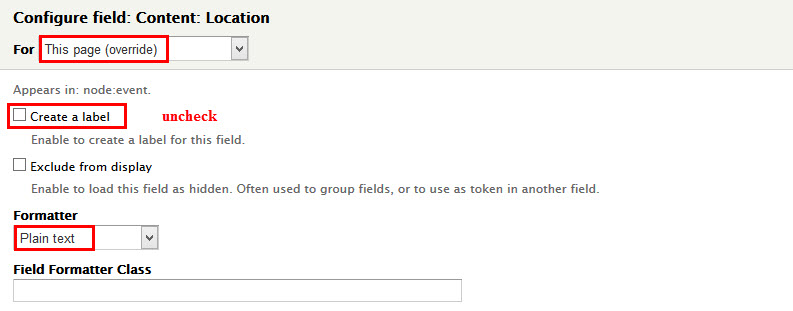
Step 7: At FIELDS area, click Add button to add fields: Content: Speakers, Content: Location, Global: Fieldset .
Step 8: Set properties for Content: Speakers
Step 9: Set properties for Content: Location
Step 10: Set properties for Global: Fieldset
Step 11: Set properties for Content: Body
Step 12 Set properties for Content: Title
Step 13: Set properties for Content: Date
Step 14: Set properties for Content: Link
Step 15: At FIELDS area, click Rearrange button and set following arrange
Step 16: At Advanced > OTHER area, add CSS class
Step 17: Click Save to view button
Events List page
Step 1: Navigate to Structure > View find Events view, then find Events Gird page views button. Click Clone page buton and set following properties:
Step 2: At FORMAT > Fomat area, click link and set following properties:
Step 3: At PAGER SETTINGS area, find Path click link and set following properties:
Step 4: At PAGER area, find User Page click link and set following properties:
Step 5: At Display name area, click link and set following properties:
Step 6: At TITLE > Title area, click link and set following properties:
Step 7: At FIELDS area, click and set properties the following fields: Content: Body, Global: Fieldset, Content: price.
Step 8: Set properties for Content: Body
Step 9: Set properties for Content : Image
Step 10: At Advanced > OTHER area, add CSS class
Step 11: Click Save to view button
Events Calendar page
Step 1: Navigate to Structure > View find Events view, then find Add button. Click Add Page button and set following properties:
Step 2: At FORMAT > Fomat area, click link and set following properties:
Step 3: At FORMAT > Show area, click link and set following properties:
Step 4: At PAGER SETTINGS area, find Path click link and set following properties:
Step 5: At PAGER area, find User Page click link and set following properties:
Step 5: At Display name area, click link and set following properties:
Step 6: At TITLE > Title area, click link and set following properties:
Step 7: At Advanced > CONTEXTUAL FILTERS area, add Date: Date (node) files and set following properties:
Step 8: At FIELDS area, click and set properties the following fields: Content: Image.
Step 9: At FIELDS area, click Remove the following fields Content: Date, Content: Title, Content: Body, Content: Link, Content: Location.
Step 10: At Advanced > OTHER area, add CSS class
Step 11: Click Save to view button
Speakers Page
Step 1: Navigate to Structure > View find Speakers view, then click Add > Page button and set following properties:
Step 2: At PAGER SETTINGS area, find Path click link and set following properties:
Step 3: At PAGER > Use pager area, click link
Step 4: At Advanced > RELATIONSHIPS area, add Taxonomy term: Representative node fields
Step 5: At FIELDS area, click Add button to add fields: Content: Title .
Step 6: Set properties for Content: Title
Step 7: Set properties for Field: Image
Step 8: Set properties for Global: Fieldset
Step 9: Set properties for Taxonomy term: Name
Step 10: Set properties for Field: Career
Step 11: Set properties for Taxonomy term: Term description
Step 12: Set properties for Global: Fieldset
Step 13: Set properties for Field: Facebook
Refer to following HTML code:
Step 14: Set properties for Field: Google Plus
Refer to following HTML code:
Step 15: Set properties for Field: Pinterest
Refer to following HTML code:
Step 16: Set properties for Field: Twitter
Refer to following HTML code:
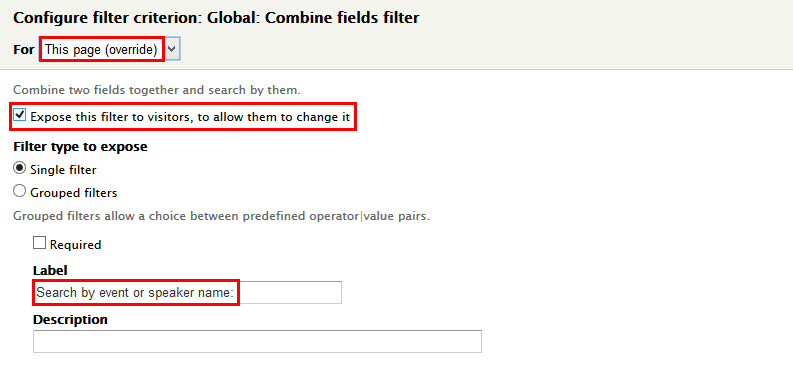
Step 17: At FILTER CRITERIA area, click Add button to add fields: Global: Combine fields filter .
Step 18: At Advanced > OTHER area, add CSS class
Step 19: Click Save to view button
Gallery page
1. Create Gallery Page view
Step 1: Navigate to Structure > View find Gallery view, then click Add Page view button and set following properties:
Step 2: At PAGER SETTINGS area, find Path click link and set following properties:
Step 3: At PAGER area, find User Page click link and set following properties:
Step 4: Click Save to view button
FAQ Page
Step 1: Navigate to Structure > View click Add new view link, then create FAQ view and set following properties:
Step 2: Click Continue and edit button. Next to steps below to set properties for following fields:
Step 3: At FIELDS area, click Add button to add fields: Content: Body and set following properties:
Step 4: Click Save button
Contact page
1. Contact Address
Front end Display
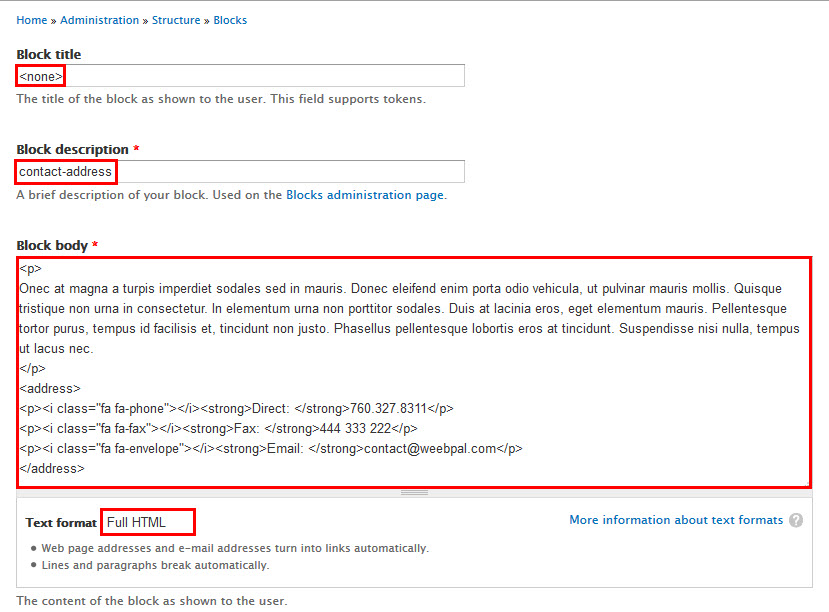
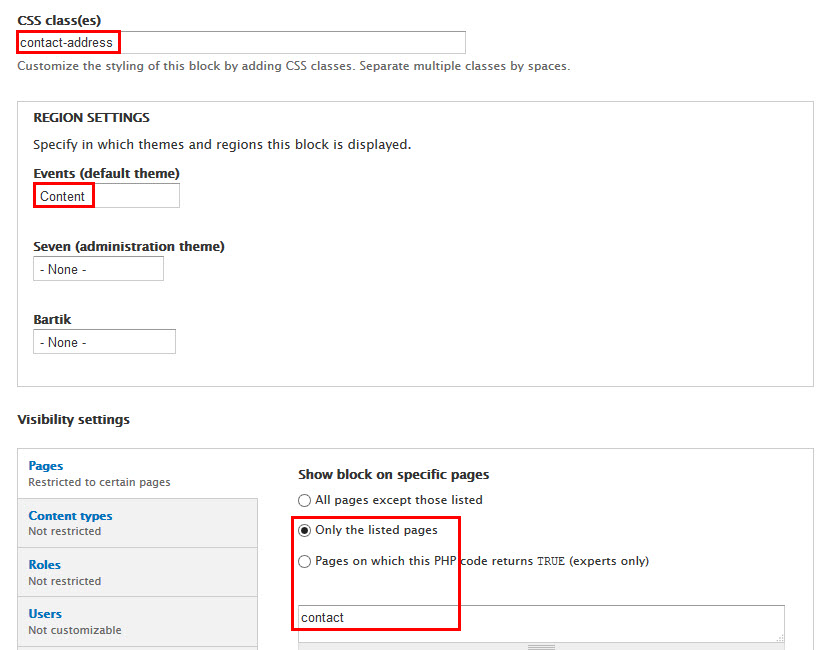
Step 1: Navigate to Structure > Blocks click Add Block link, then create Contact Address block and set the following properties:
Step 2: Click Save button
Refer to following HTML code:
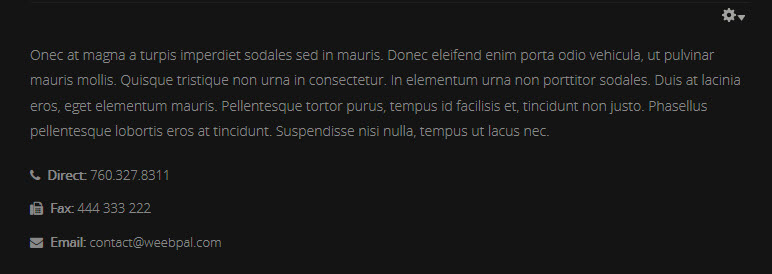
Onec at magna a turpis imperdiet sodales sed in mauris. Donec eleifend enim porta odio vehicula, ut pulvinar mauris mollis. Quisque tristique non urna in consectetur. In elementum urna non porttitor sodales. Duis at lacinia eros, eget elementum mauris. Pellentesque tortor purus, tempus id facilisis et, tincidunt non justo. Phasellus pellentesque lobortis eros at tincidunt. Suspendisse nisi nulla, tempus ut lacus nec.
Direct: 760.327.8311
Fax: 444 333 222
Email: [email protected]
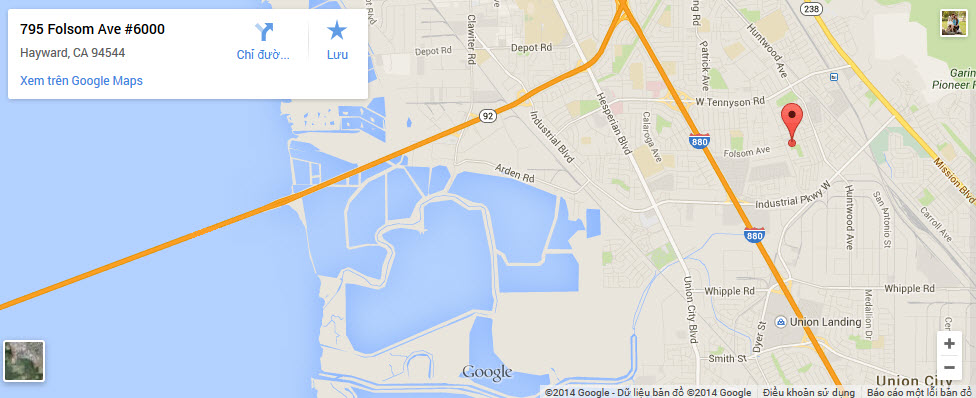
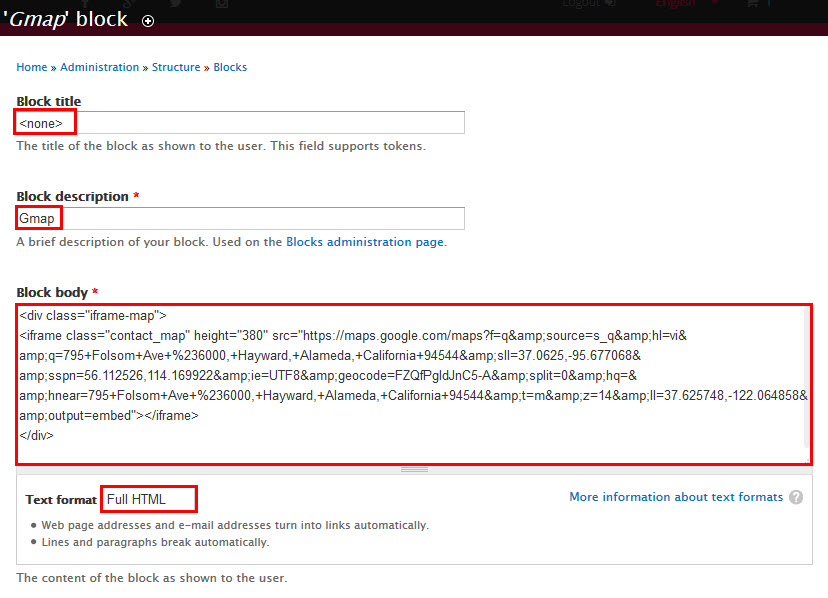
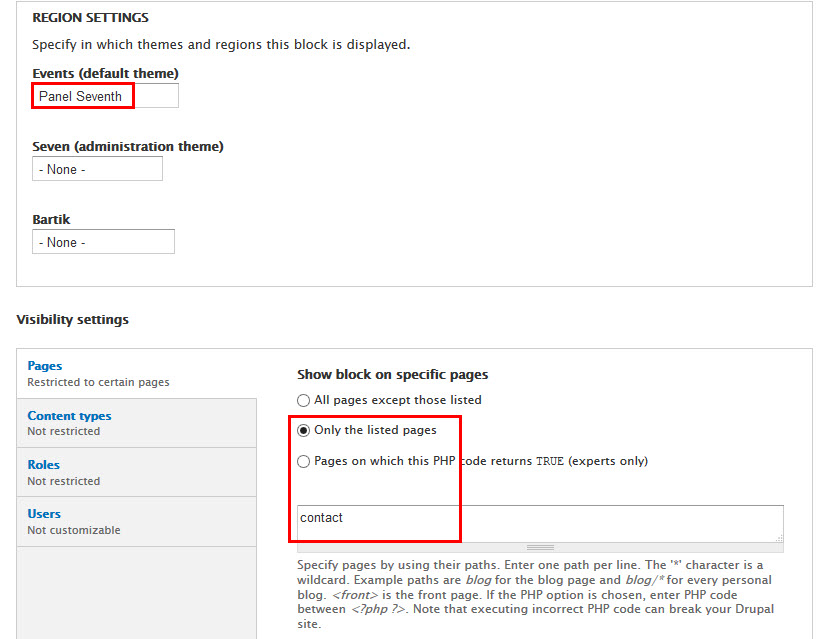
2. Gmap
Front end Display
More Configurations
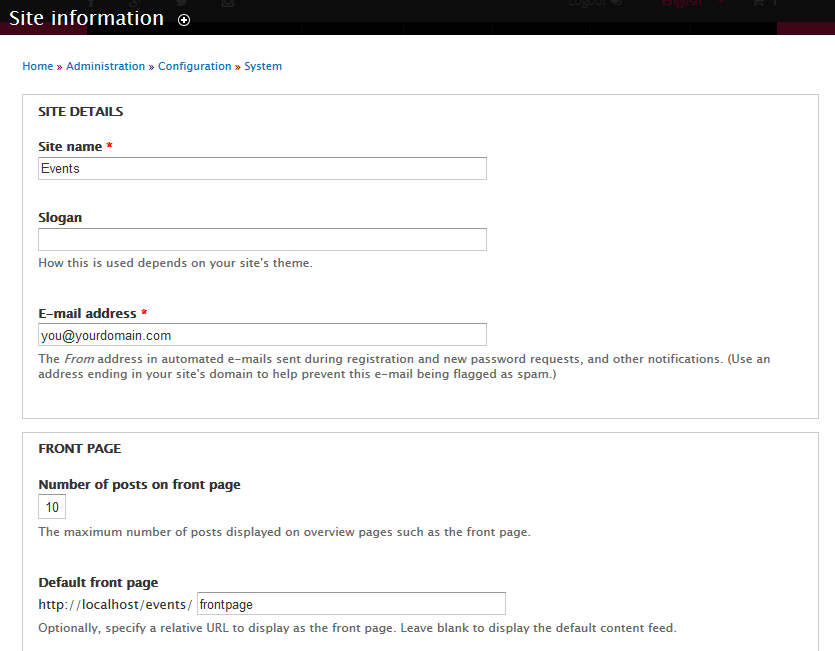
Site Information
In this section, you can change basic settings, such as the site name, slogan, e-mail address.
1. Log in to Administration site page by administrator account
2. Navigate to the Site Information page Configuration > System: Site information
3. Change site details from the view:
- Site name
- Slogan
- E-mail address
- Set Default Front page
4. Click on Save configuration to finish editing.
Appearance Settings
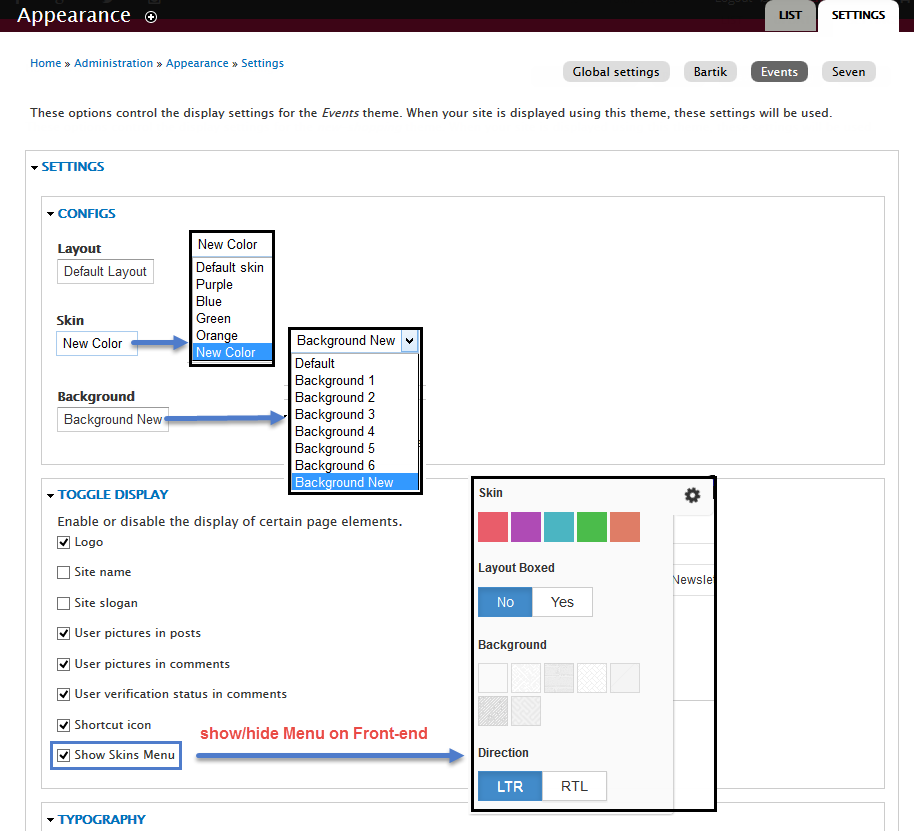
1. Create a new color.
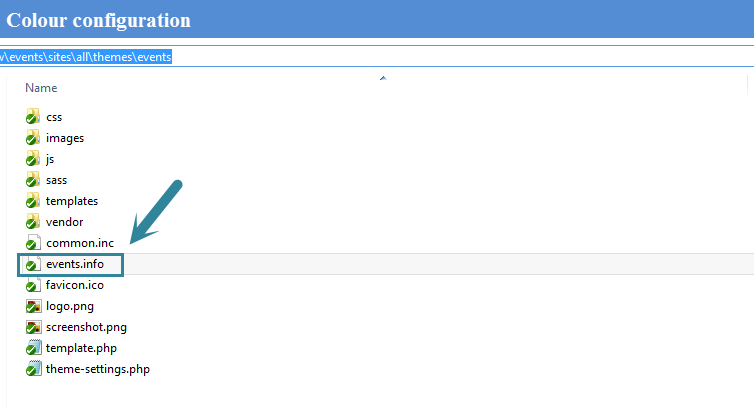
Step 1: Navigate to the directory: events/sites/all/themes/events, you can find file events.info, open this file.
Step 2: Locate the skins[ ] arrays and add new code row:
Step 3: Save file.
Step 4: Navigate to the directory: events/sites/all/themes/events/css/colors, clone a folder, then rename it "new_color"
Step 5: new_color folder includes images folder and style.css file.
Now, you can style new color for theme by modifying style.css file.
2. Create a new background.
Step 1: Navigate to the directory: events/sites/all/themes/events, you can find file, open file events.info
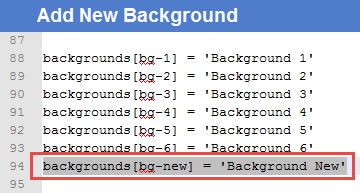
Step 2: Locate the backgrounds[ ] arrays and add new code row:
Step 3: Save file.
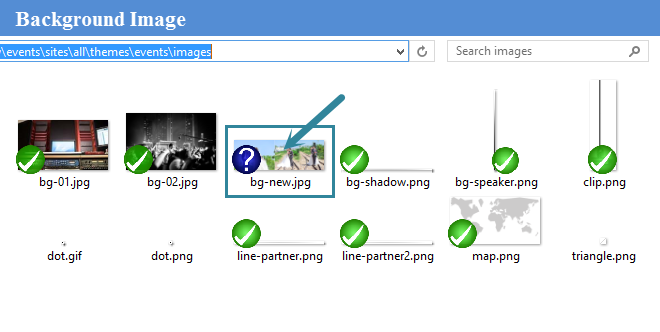
Step 4: Move your background image into the directory: events/sites/all/themes/events/images
Step 5: Navigate to the directory: events/sites/all/themes/events/css, open file base.css, and add new code row:
Step 6: Save file.
3. Configuration.
Step 1: Log into website by administrator account.
Step 2: Go to Appearance find events 7.28, click on Settings
Step 3: At CONFIGS area, select one of options for Layout, Skin, Background to set default, (e.g: New Color), and at TOGGLE DISPLAY area, check Show Skins Menu option if you want to display Skins menu on front-end pages.
Language Configuration
This section guides you how to have multiple languages for your site. New Shopping Theme supports both Left to Right and Right to Left languages.
Step 1: Navigate to Configuration > Regional and Language > Languages then add new language.
Step 2: Check to enable and set default language
Step 3: Save configuration


