Overview
Starting with a new theme, it's sometimes takes a lot of time for first time users to really understand how it works. You may want to know how to customize layouts, typography, block styles and make it look the way you want.
In most cases you won't need to know PHP or database queries, but basic knowledge would be very helpful to get great results.
If you're an experienced Drupal developer or if you want to build the theme from zero with only the basic appearance of your theme, find this guide in handy. This guide will give you the detailed step by step installation guide to help you start building the content for Business to look exactly like the demo site.
1. Package
Business, as the name has implied, is a theme wholly dedicated for shopping only. The template can serve well as a B2B, or B2C ecommerce website. It comes with a clean simple design with fully responsive layout, easy to use template which is conforming to Drupal best practice & standard.
Drupal can build a strong Business website, and this theme proves the point.
Included content:
- README.txt
- business theme: business-7.x-1.0.zip
- Demo Profile for business: business-profile-7.x-1.0.zip
2. System Requirements
Database
- MySQL 5.0.15 or higher with PDO
- PostgreSQL 8.3 or higher with PDO
- SQLite 3.3.7 or higher
PHP
- PHP 5.2.5 or higher (5.4 or higher recommended)
- PHP5 GD library installed
- Disabled error_reporting flag on production server
- Enabled mod_rewrite in Apache for clean URLs
- Memory limit set up at least 128MB
If you are new to Drupal, please take a reference to System requirements on drupal.org.
3. Screenshots
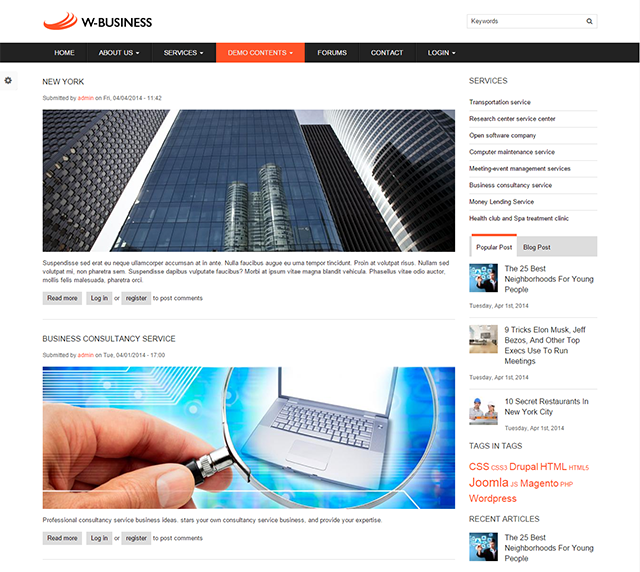
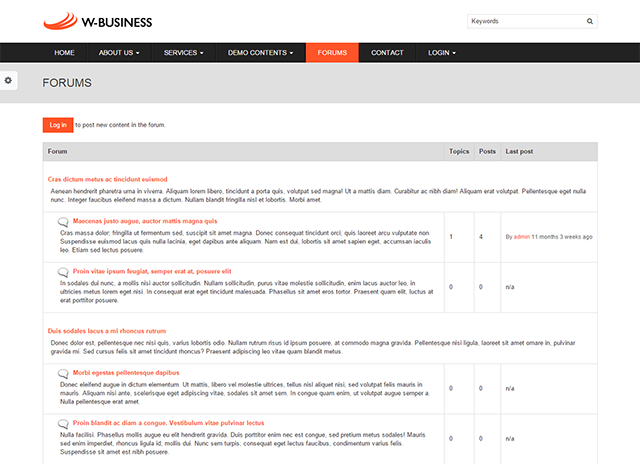
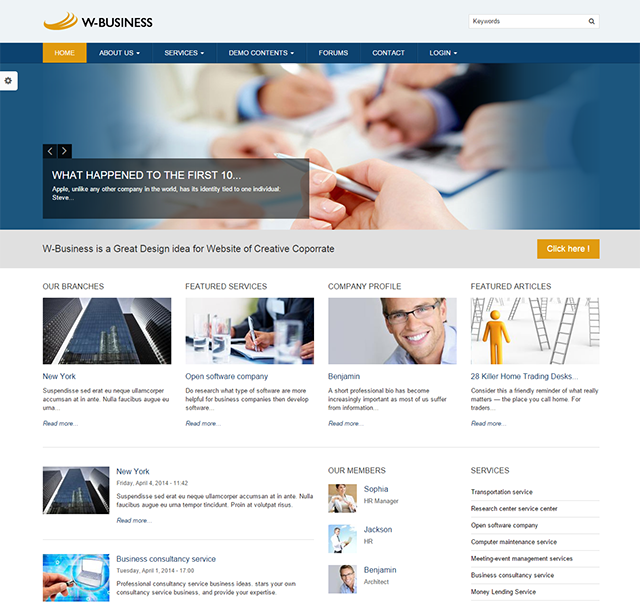
Let's glance through the theme's design & some features:
Home
About us page
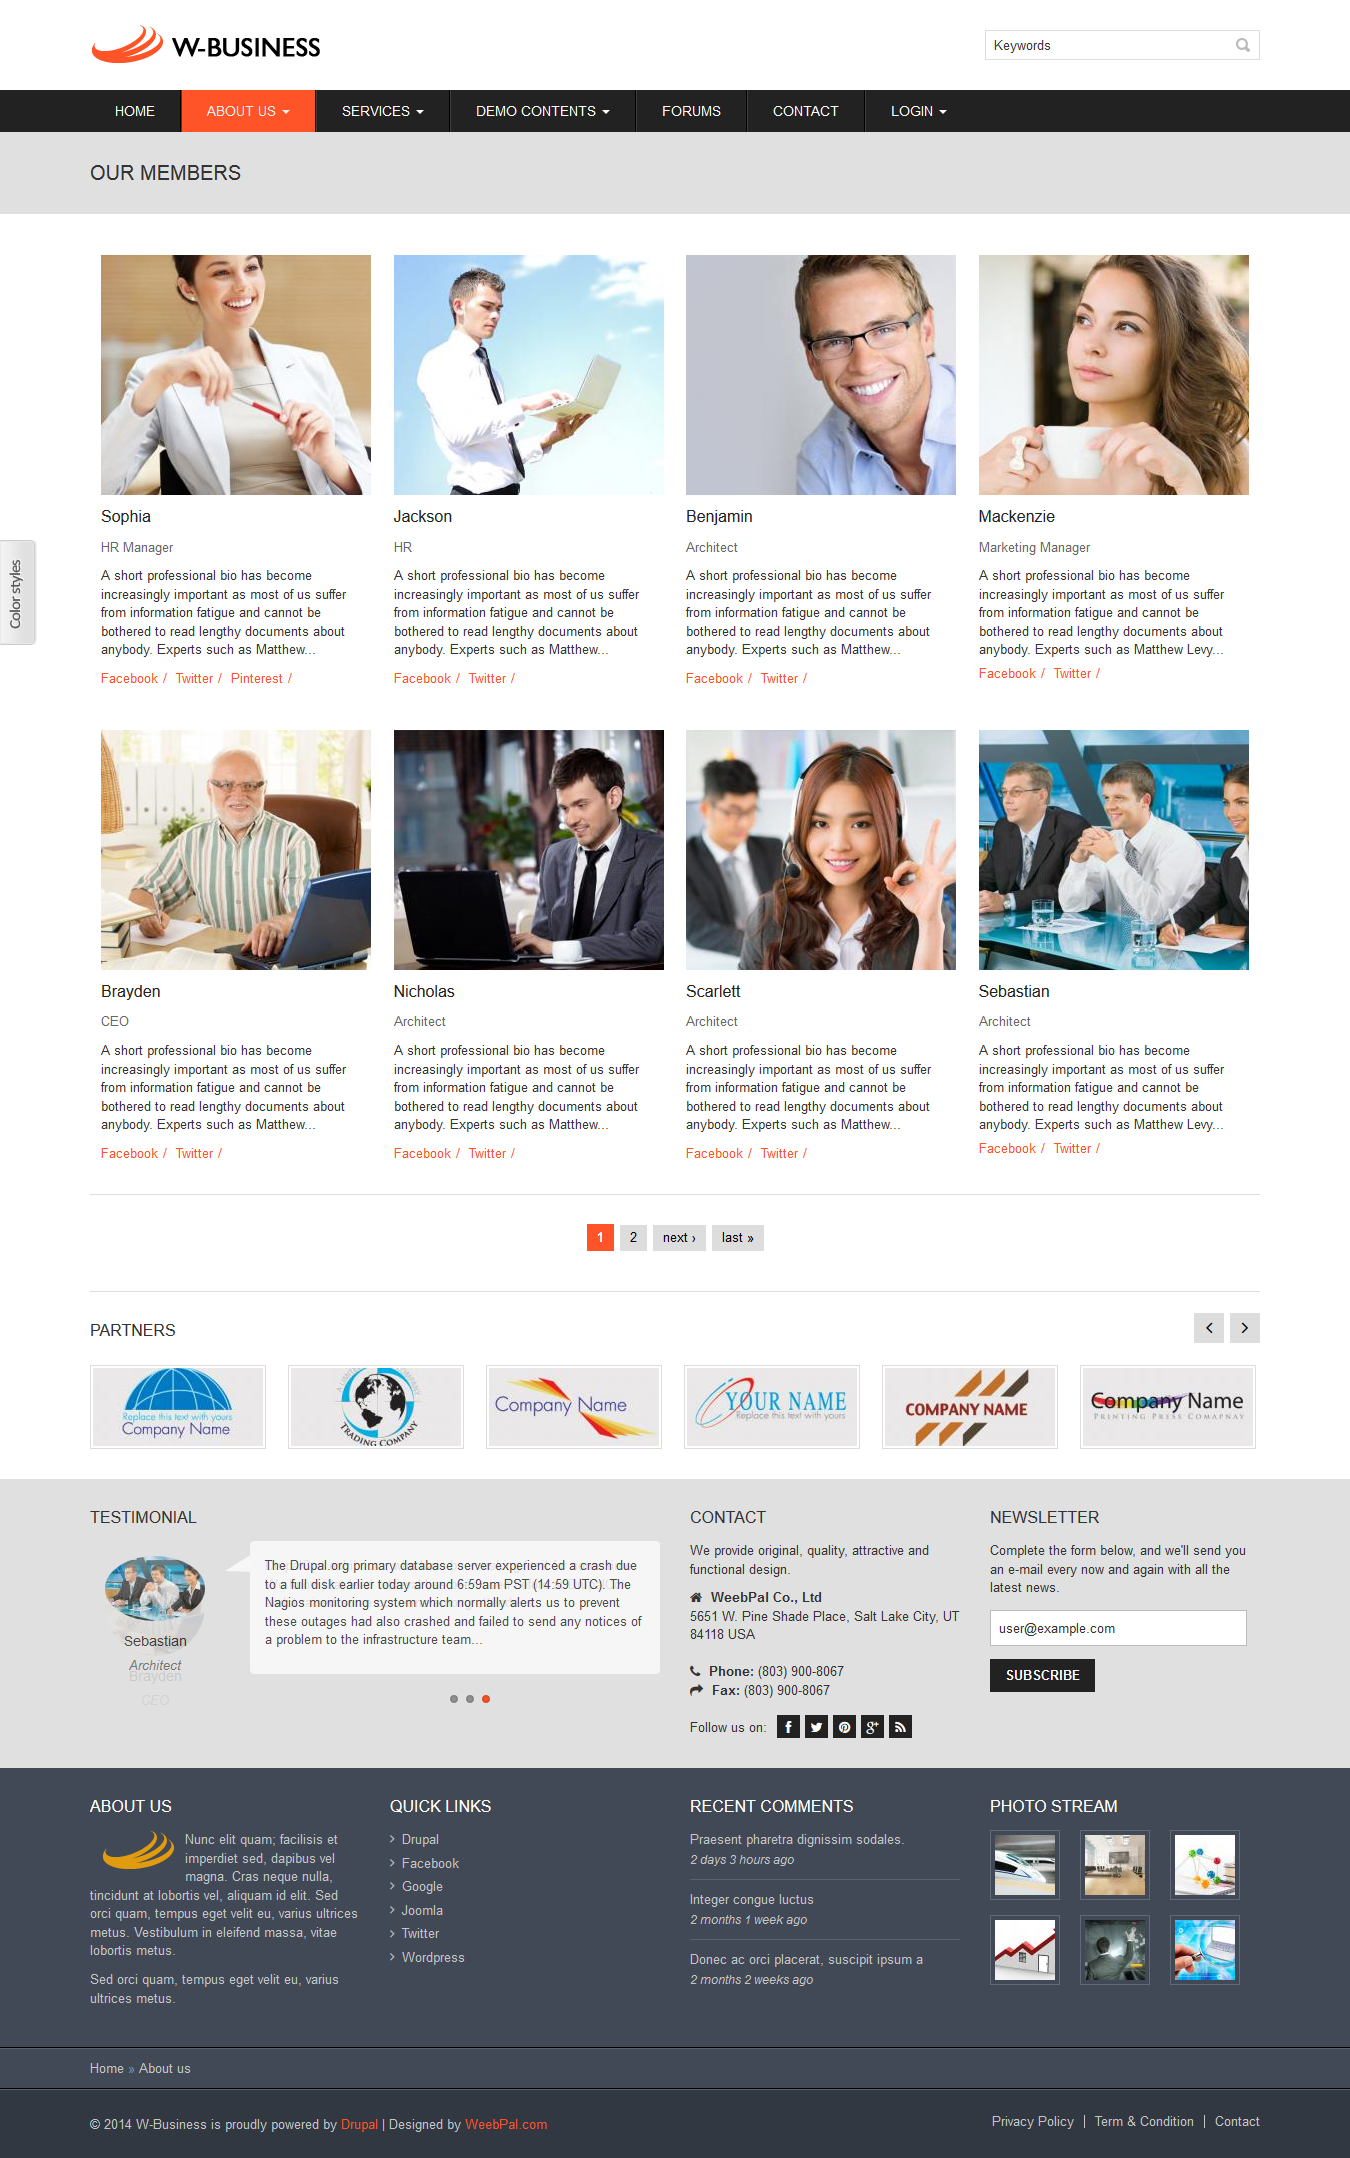
Members page
Partners page
Services page
Demo Contents page
Content Detail page
Forums page
Contact
TB Megamenu
Multi colors
Responsive layout
4. Module requirements
Core Modules
- Blog
- Locale
- PHP Filter
- Update manager
Third-party Modules
- Admin Menu
- Block Class
- Colorbox
- Context
- Chaos tools
- Chosen
- Entity
- Entity Reference
- Fb Likebox
- Features
- Field Slideshow
- Flexslider
- Fontawesome
- Google Analytics
- Jcarousel
- Jquery Update
- Libraries
- Link
- Megamenus
- Memcache
- Menu Attributes
- Menu Breadcrumb
- Module Filter
- Newsletter
- Path Auto
- Quicktabs
- Site Map
- Socialmedia
- Superfish
- Tag Clouds
- Taxonomy Menu
- TB Megamenu
- Token
- Twitter Block
- Views
- Views Accordion
- Views Isotope
- Views Metro
- Views Fieldsets
- Views Slideshow
- Webform
- Webform Hints
- Widgets
Required libraries by the modules
- Autopager
- Colorbox
- FlexSlider
- Fontawesome
- Jcarousel
- Jquery Cycle
- Jquery Jcarousel
- Superfish
Download Drupal core files, and extend your site with modules at here.
Installation
Quick Installation Demo Profile
We created an installation profile with demo content for each of our theme, so that you can quickly download and reproduce the whole site content as presented on our live demo. This way you will get a quicker overview of the features. If it's convenient you may also use the given demo content as a starting point to build your custom sites.
1. Business package included:
- README.txt
- Business theme: business-7.x-1.0.zip
- Demo Profile for business: business-profile-7.x-1.0.zip
The below steps will give you the installation guide so that you can build your website to look exactly like the Business Full Demo.
- business-profile-7.x-1.0.zip
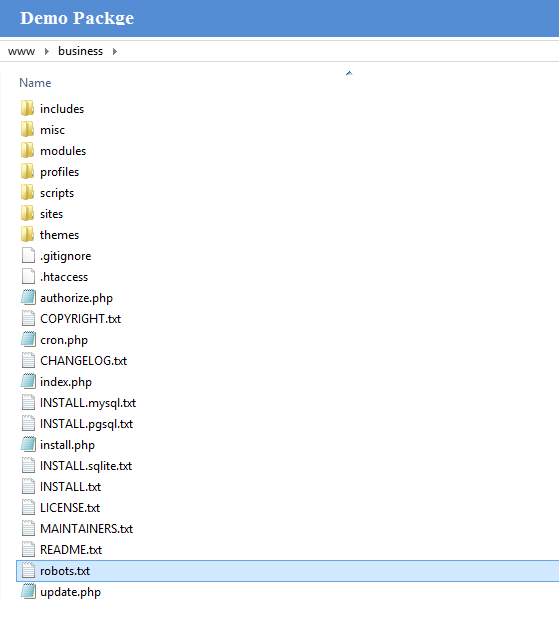
2. Extract business-profile-7.x-1.0.zip above and copy it into your host, and rename the directory
3. Access your MySQL database and create a new database (e.g.business) and user account. Don't forget to add correct permissions to new user to access the database
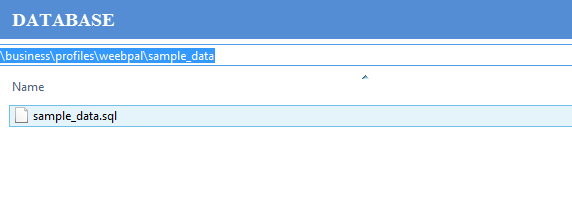
4. In the demo directory database/ (latest version of package) or profiles/weebpal/ (old version), you can find database dump named sample_data.sql. Import this file into new database.
5. Now, you need to modify sites/default/default.settings.php file. Clone default.settings.php file, then rename it "settings.php"
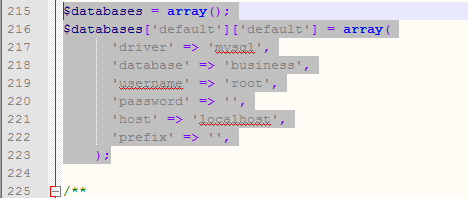
6. Open settings.php, then locate the $database array and set proper credentials.
                    $databases['default']['default'] = array(
                        'driver' => 'mysql',
                        'database' => 'databasename',
                        'username' => 'username',
                        'password' => 'password',
                        'host' => 'localhost',
                        'prefix' => '',
                    );
When using this installation, you are installing everything from our preview server. So don't forget to set proper values to access to your database: db name, db admin username, db admin password, host, etc.
7. Open the browser and visit your website with the prepopulated content & layout exactly like our Business Demo
Now, you can visit administrator site with the admin account admin/admin to delete the unnecessary contents and add the new ones.
Installation Business Theme for Drupal developers
If you're an experienced Drupal user or if you want to build the theme from zero with only the basic appearance of business Theme, find this guide in handy.
1. Install Drupal
-
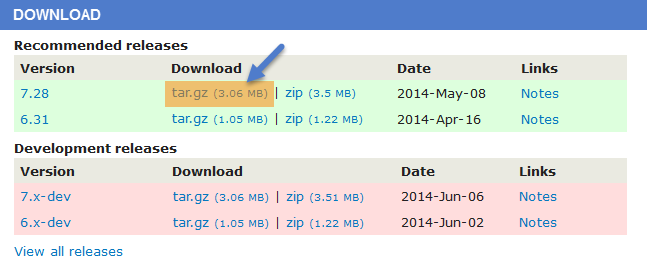
Go to Drupal download page and download the latest version of Drupal 7.
- Extract and copy Drupal folder to your host and rename the directory.
- Follow this tutorial to install Drupal with the standard profile.
2. Install business Theme
- Extract Business theme .ZIP file:
- business-7.x-1.1.zip
-
Move this theme into your Drupal folder: sites/all/themes
-
Navigate to Appearance > Choose Enable and set default business theme
3. Install Required Modules
Now that you've enabled business theme, you will install and enable the required modules (listed in the Module Requirements section) to customize and use them.
If you don't know how to install the contributed modules, this tutorial is an essential guide.
Cheat to install modules & theme:
- Extract business-profile-7.x-1.0.zip
- Open extracted folder, go to sites/all and copy all folders inside (modules, themes, libraries)
- Paste them to your host, folder sites/all
Note: See this guide to get more details about installation
Taxonomy configuration
Quick Information
- Taxonomy: Taxonomy can be simply understood as category management using organizational keywords known in other systems as categories, tags or metadata. It allows you to connect, relate and classify your website's content. In Drupal, these terms are gathered within "vocabularies". The Taxonomy module allows you to create, manage and apply those vocabularies.
- Vocabulary: for example product category, tag, provider name, ...
- Term: the items in each vocabulary. For example: vocabulary product category has some terms: laptop, pc, mobile, tablet, camera, headphone, ...
- For more information about taxonomy, please see: Organizing content with taxonomies
Step 1: Navigate to Structure > Taxonomy to create vocabularies as the following:
Then, add terms for each vocabulary
Step 2 :Terms of Gender:
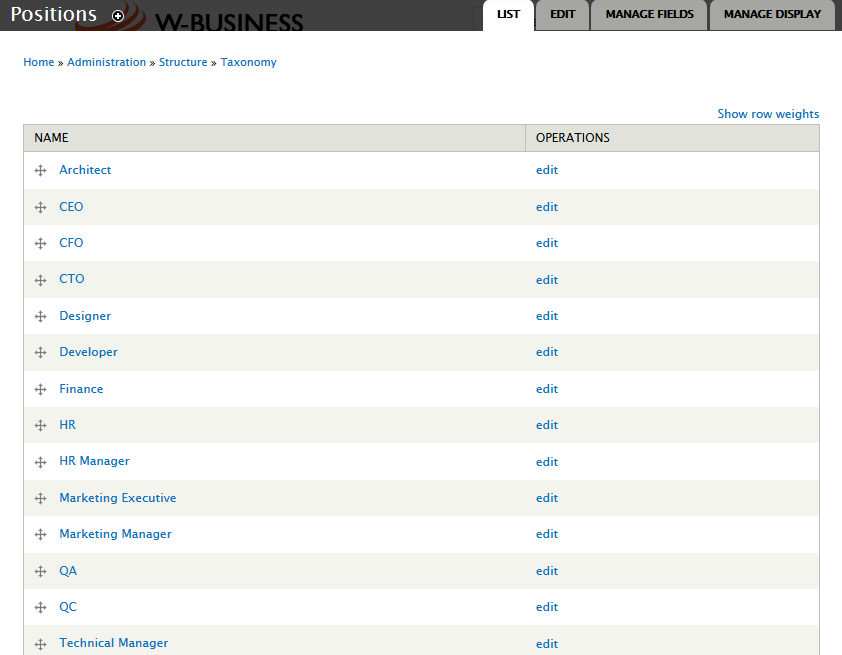
Step 3:Terms of: Positions
Note: See this guide to get more details about taxonomy configuration
Media configuration
Image Style Configuration
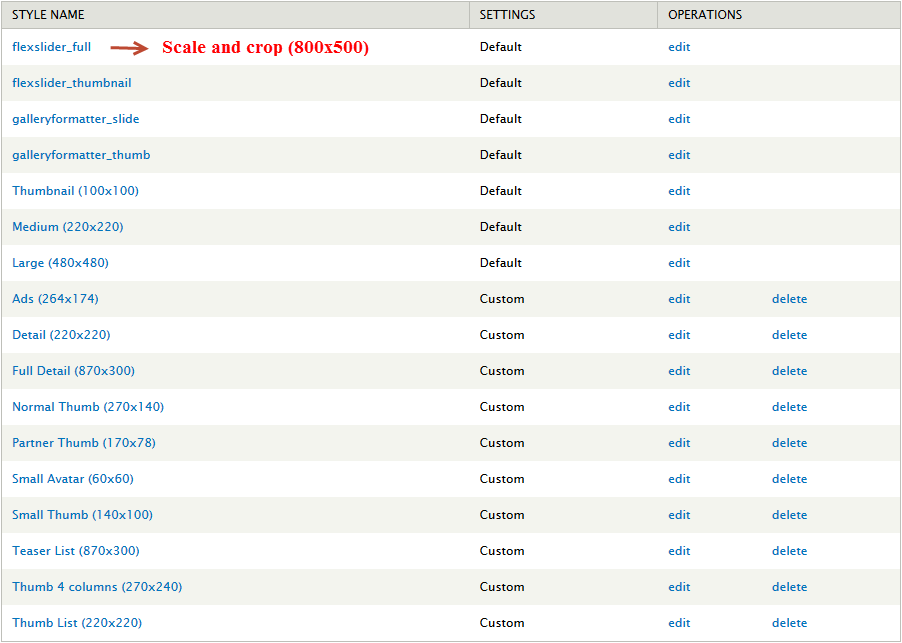
Image styles are the presets of image settings. Image styles are used to define how the images are shown.
Navigate to Configuration, In MEDIA area, click Image styles, then create image styles as the following:
Content type configuration
Modify Article type
Step 1: Navigate to Structure > Content Type
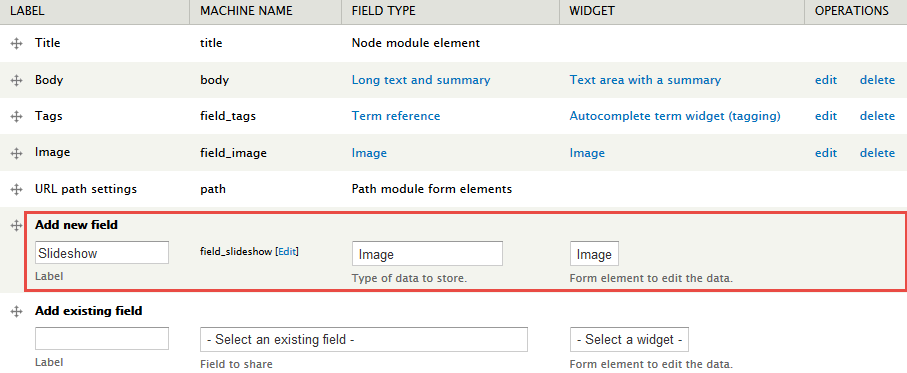
Step 2: In Article row, click "manage fields" link, Add "Slideshow" field with following settings:
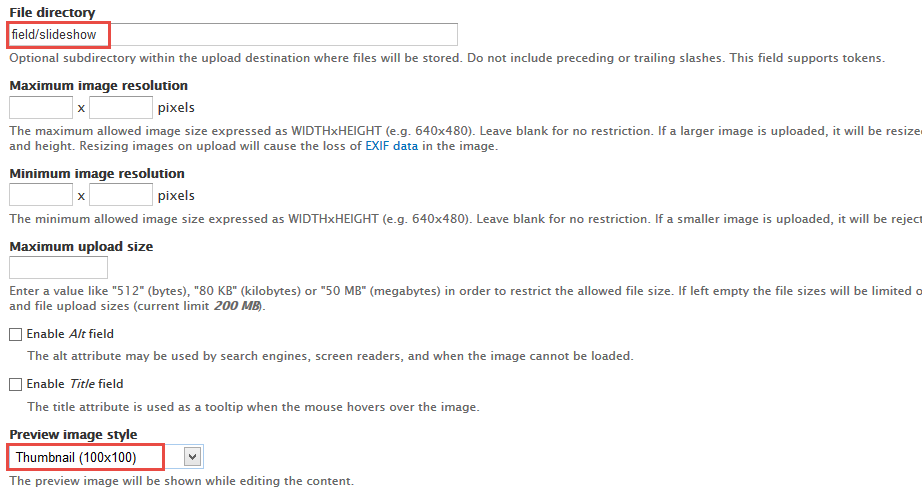
Step 3: Click Save button, then click Save field settings button > Set following properties:
Step 4: Click Save Settings button
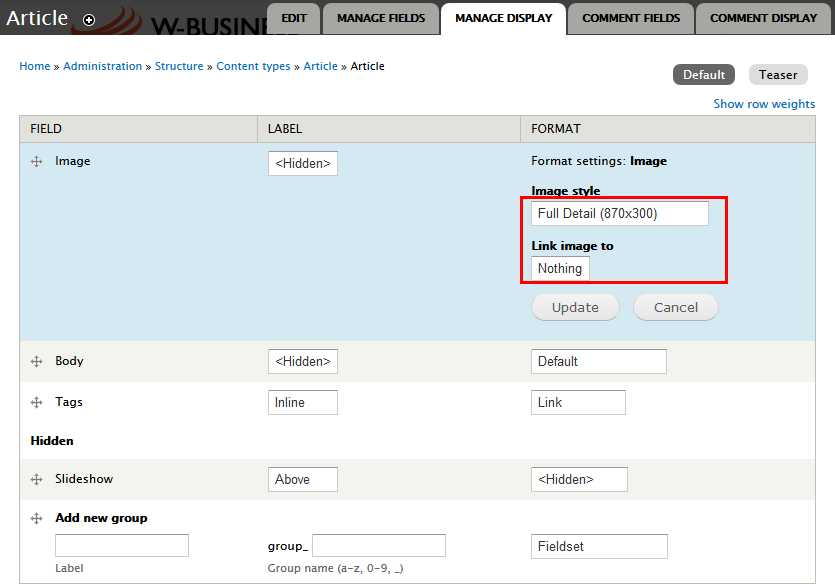
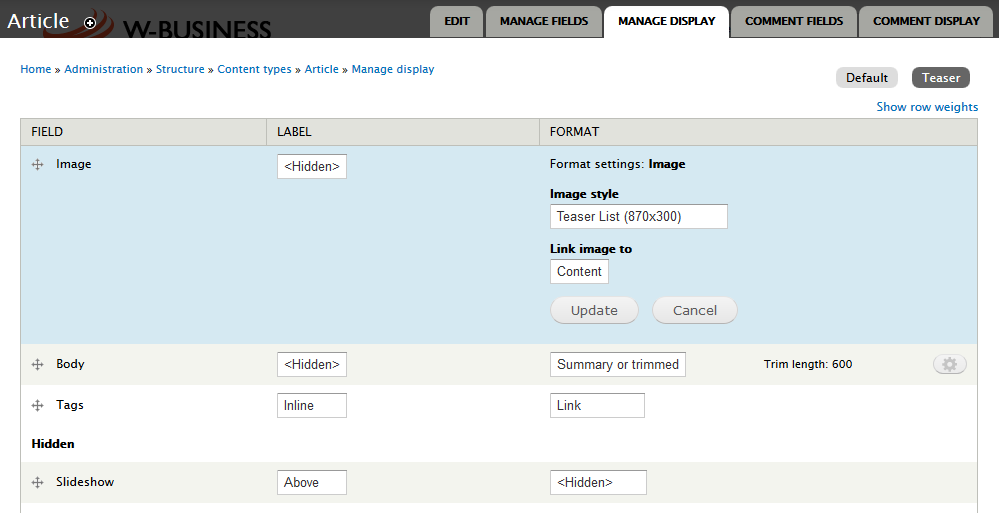
Step 5: Go to Manage display tab > Default tab, set following properties:
Step 6: Modify Teaser tab, set following properties:
Step 7: Click Save button
Modify Basic page type
Step 1: Navigate to Structure > Content Type
Step 2: In Basic page row, click "manage fields" link, Add "Image" field with following settings:
Step 3: Click Save button, then click Save field settings button > Set following properties:
Step 4: Click Save Settings button
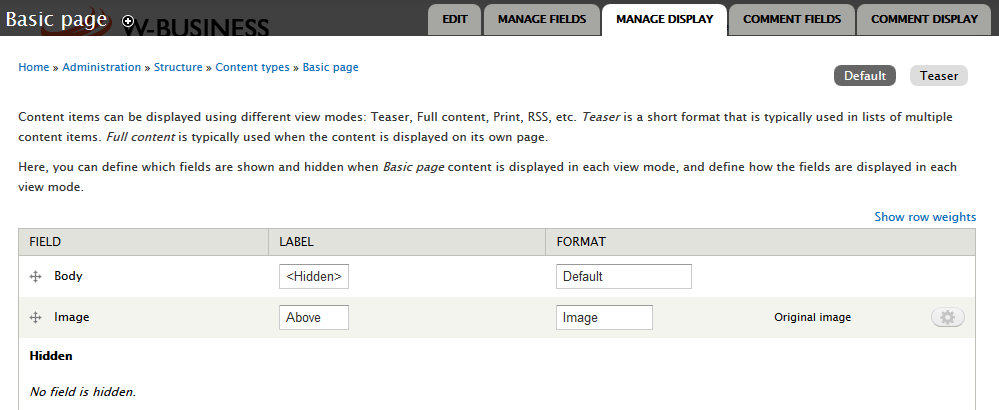
Step 5: Go to Manage display tab > Default tab, set following properties:
Step 6: Modify Teaser tab, set following properties:
Step 7: Click Save button
Modify Blog entry type
Step 1: Navigate to Structure > Content Type
Step 2: In Blog entry row, click "manage fields" link, Add "Image" field with following settings:
Step 3: Click Save button, then click Save field settings button > Set following properties:
Step 4: Click Save Settings button
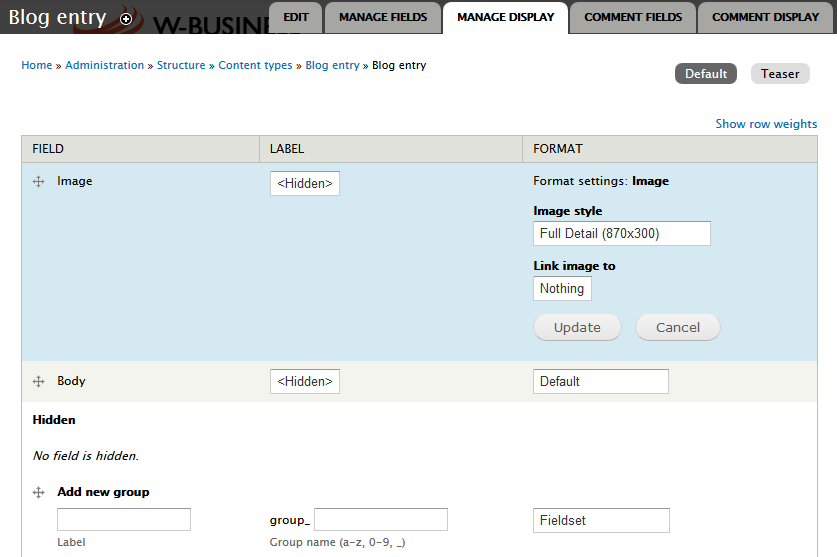
Step 5: Go to Manage display tab > Default tab, set following properties:
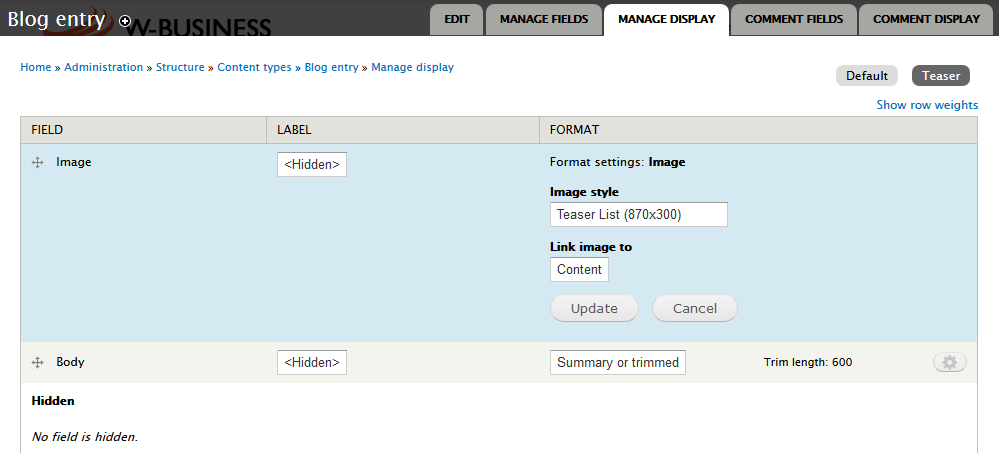
Step 6: Modify Teaser tab, set following properties:
Step 7: Click Save button
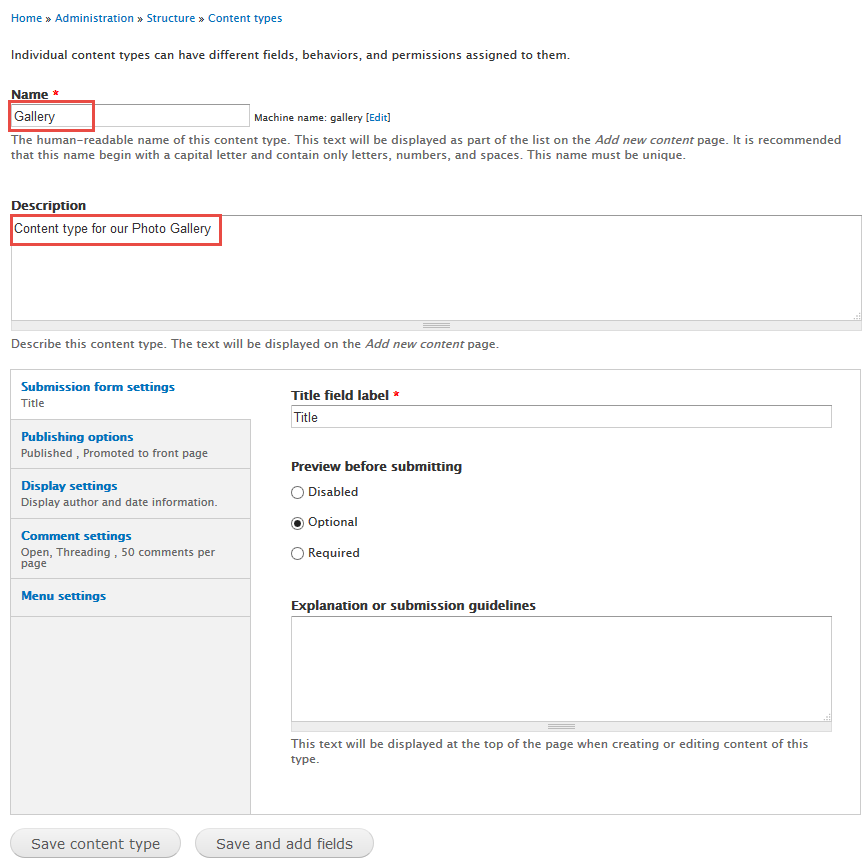
Create Gallery type
Step 1: Navigate to Structure > Content Type
Step 2: Click Add Content Type link to create Gallery type with following properties:
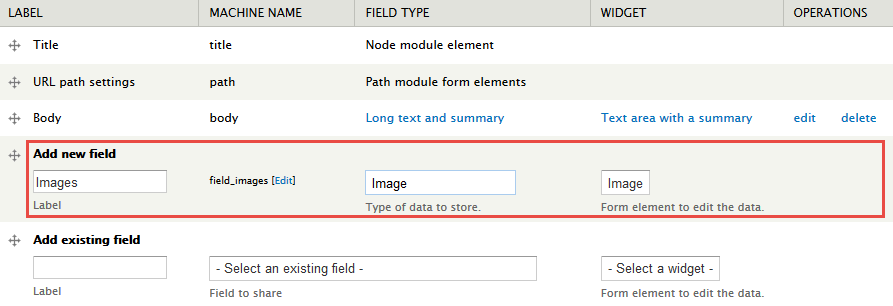
Step 3: Click Save and add fields button, then Add "Images" field with following settings:
Step 4: Click Save button, then click Save field settings button > Set following properties:
Set Images field
Step 5: Click Save Settings button
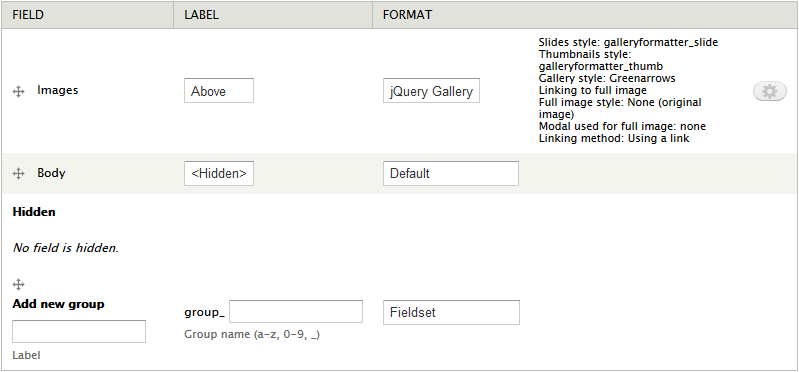
Step 6: Go to Manage display tab > Default tab, set following properties:
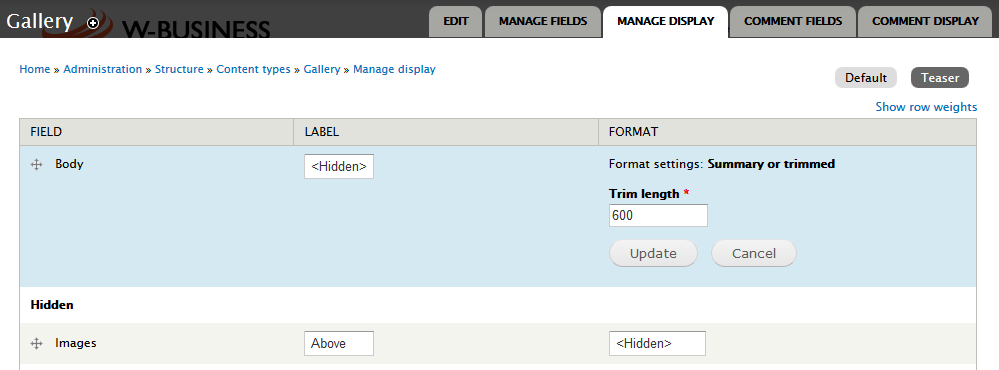
Step 7: Modify Teaser tab, set following properties:
Step 8: Click Save button
Create Services type
Step 1: Navigate to Structure > Content Type
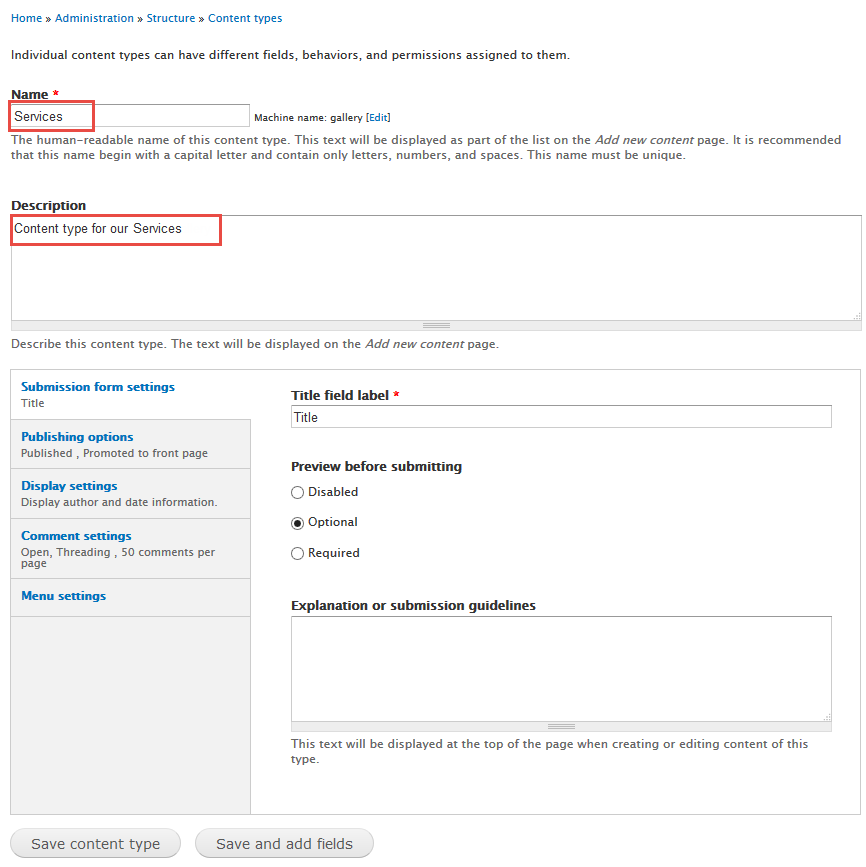
Step 2: Click Add Content Type link to create Services type with following properties:
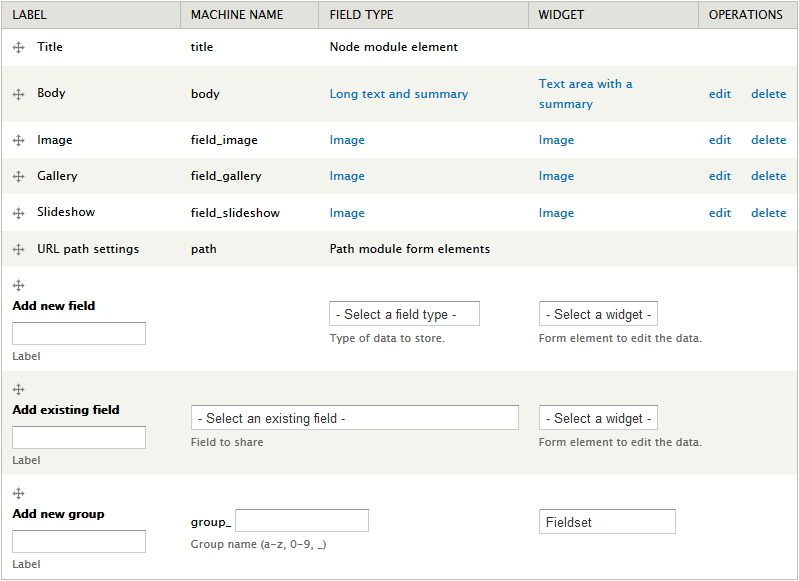
Step 3: Click Save and add fields button, then Add following fields
Set Gallery field
Step 4: Click Save Settings button
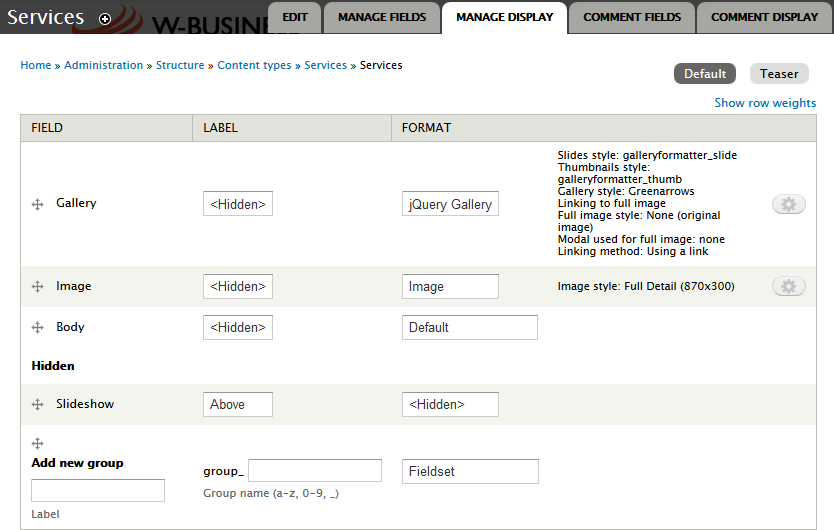
Step 5: Go to Manage display tab > Default tab, set following properties:
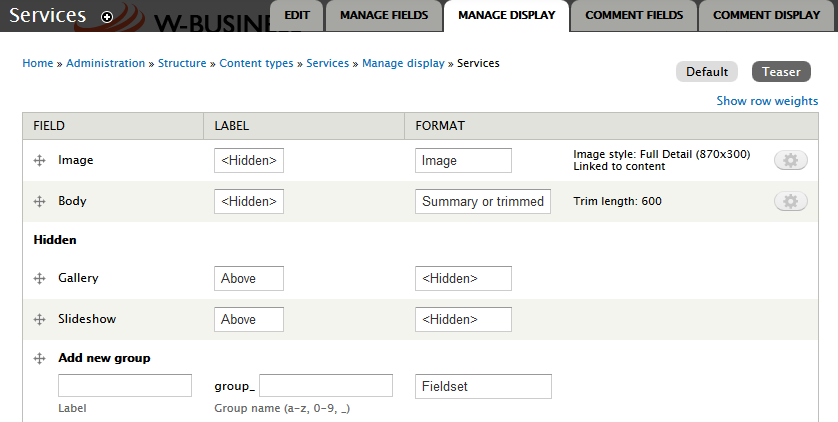
Step 6: Modify Teaser tab, set following properties:
Step 7: Click Save button
Create Branches type
Step 1: Navigate to Structure > Content Type
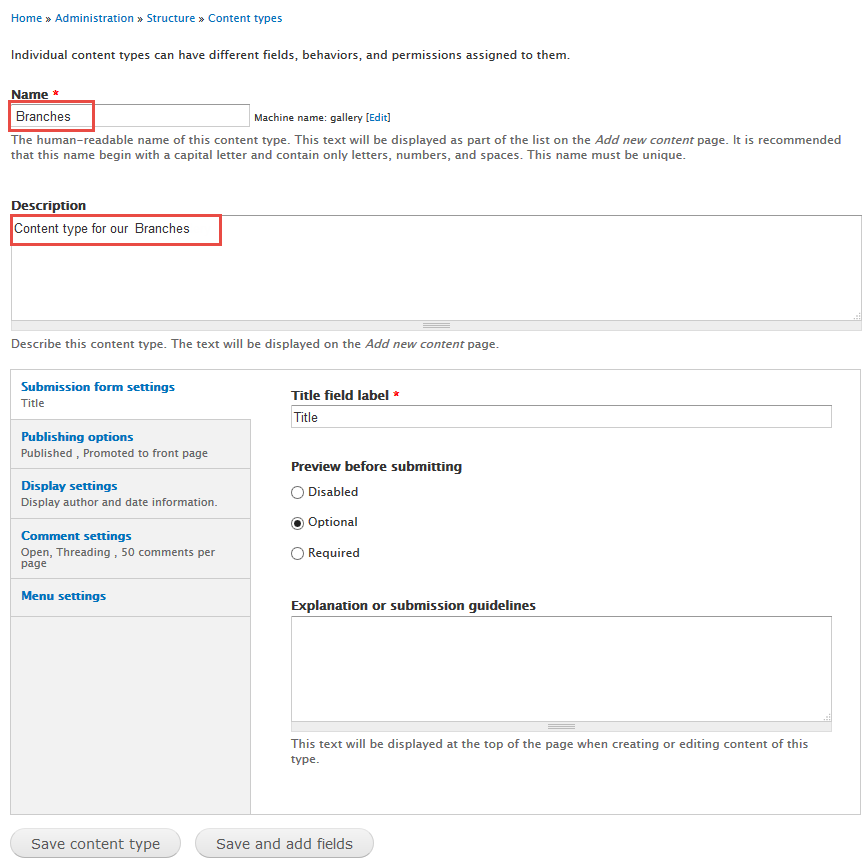
Step 2: Click Add Content Type link to create Branches type with following properties:
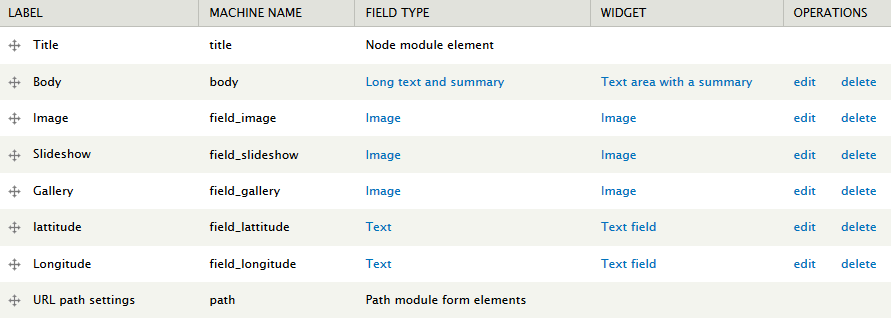
Step 3: Click Save and add fields button, then Add following fields
Step 4: Click Save Settings button
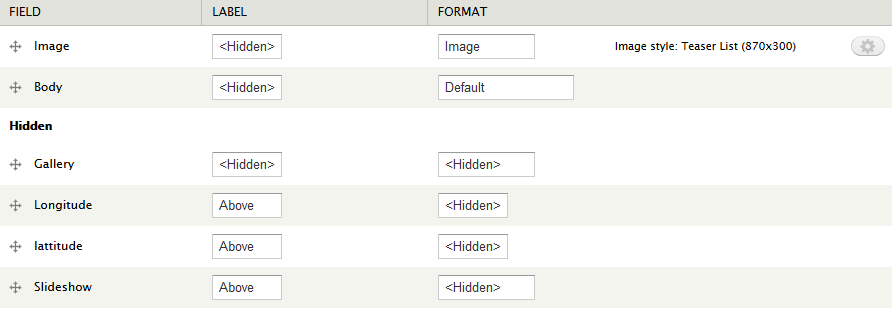
Step 5: Go to Manage display tab > Default tab, set following properties:
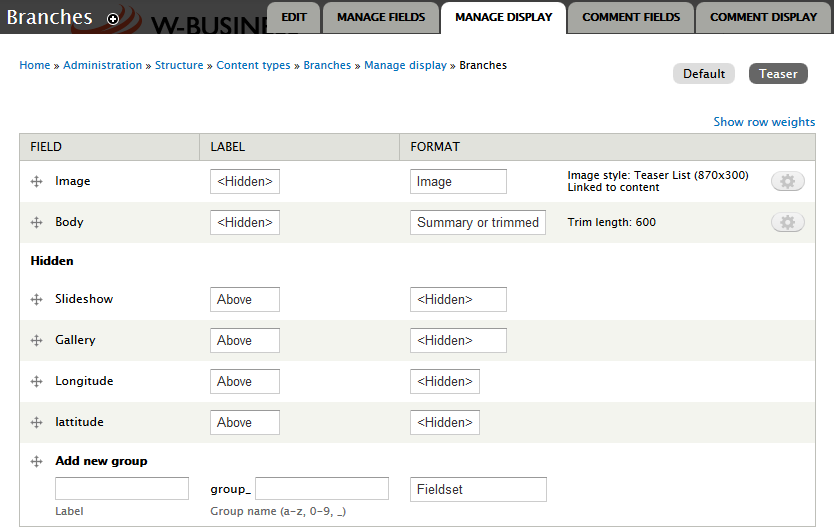
Step 6: Modify Teaser tab, set following properties:
Step 7: Click Save button
Create Partners type
Step 1: Navigate to Structure > Content Type
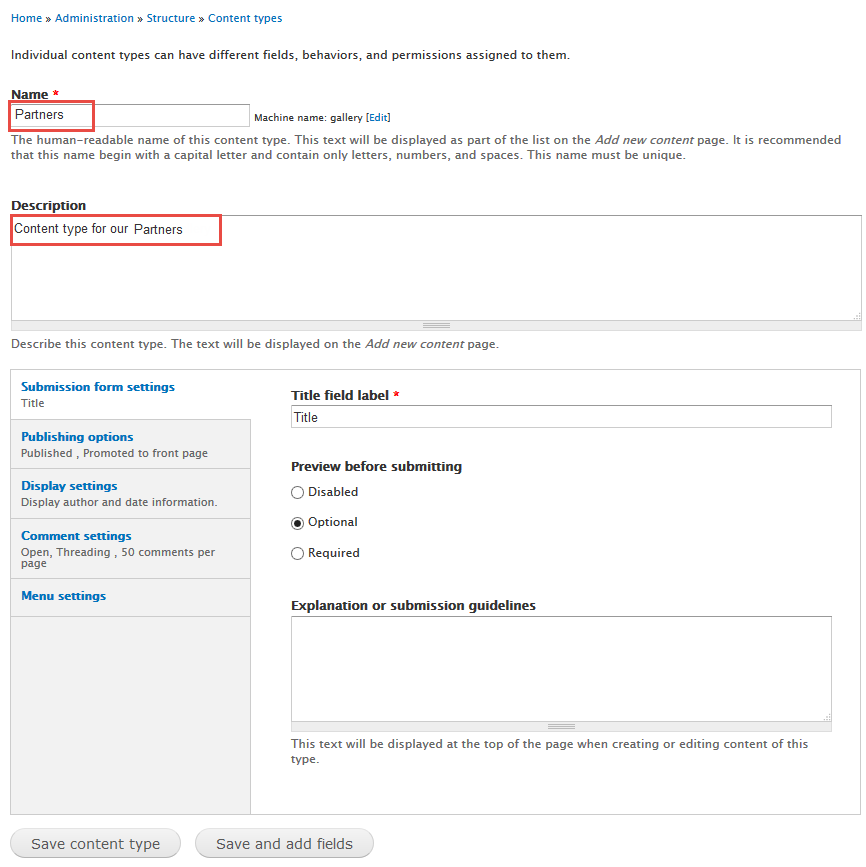
Step 2: Click Add Content Type link to create Partners type with following properties:
Step 3: Click Save and add fields button, then Add following fields
Step 4: Click Save Settings button
Step 5: Go to Manage display tab > Default tab, set following properties:
Step 6: Modify Teaser tab, set following properties:
Step 7: Click Save button
Create Testimonials type
Note Enable modules User reference
Step 1: Navigate to Structure > Content Type
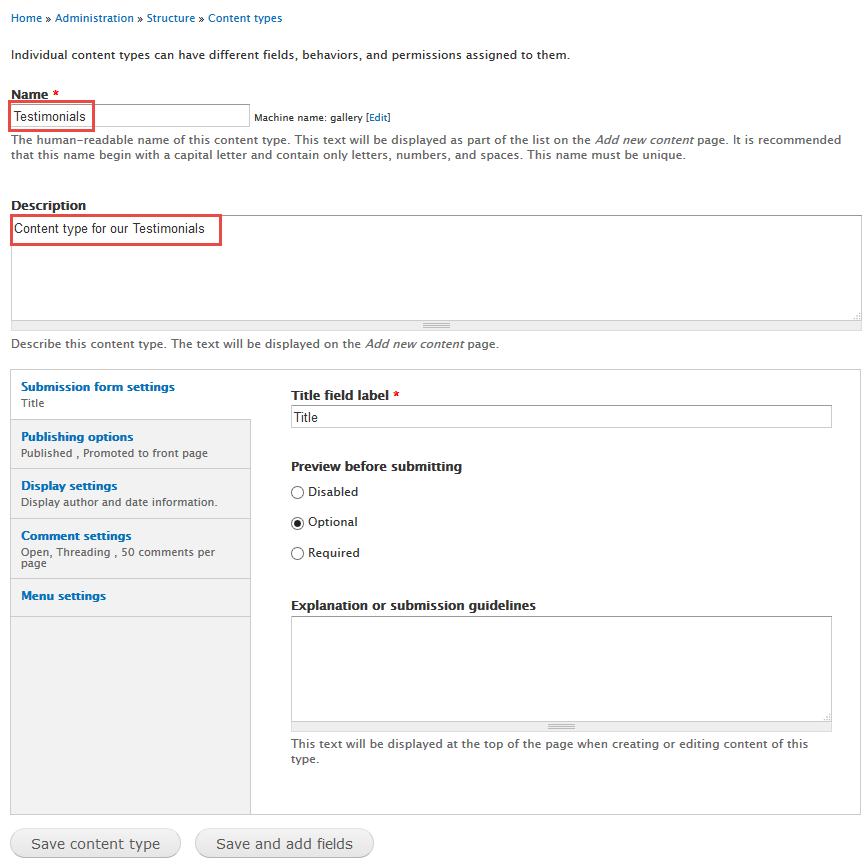
Step 2: Click Add Content Type link to create Testimonials type with following properties:
Step 3: Click Save and add fields button, then Add following fields
Step 4: Click Save Settings button
Step 5: Click Save button
Create Ads type
Step 1: Navigate to Structure > Content Type
Step 2: Click Add Content Type link to create Ads type
Step 3: Click Save and add fields button, then add the following fields:
Step 4: Set properties for Image
Step 5: Go to Manage display tab > Default tab, set the following properties:
Step 6: Modify Teaser tab, set the following properties:
Step 7: Click Save button
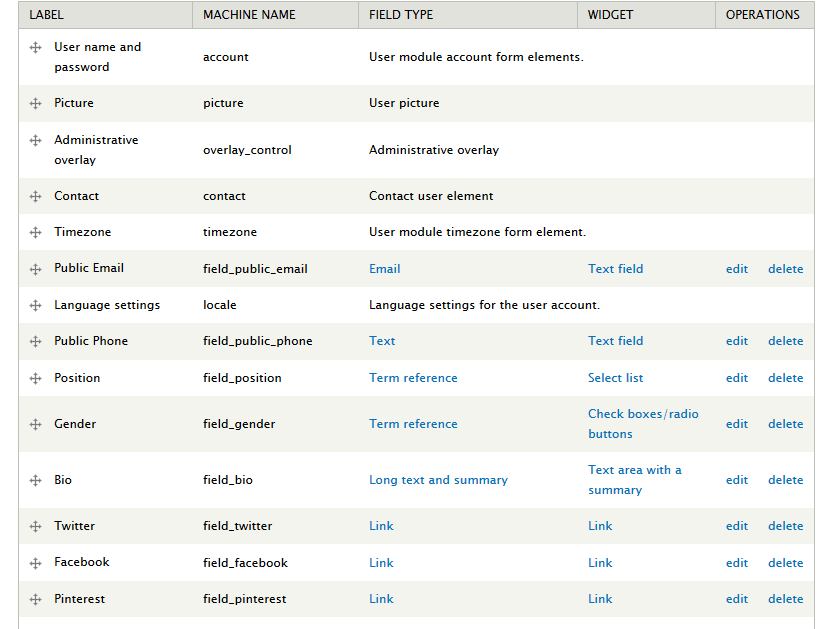
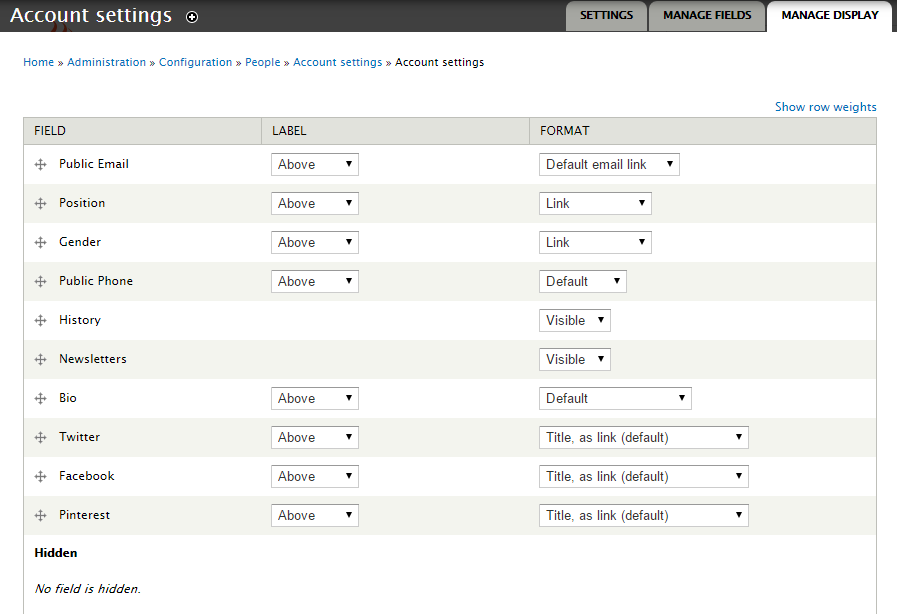
Modify Users Profile structure
Create Homepage
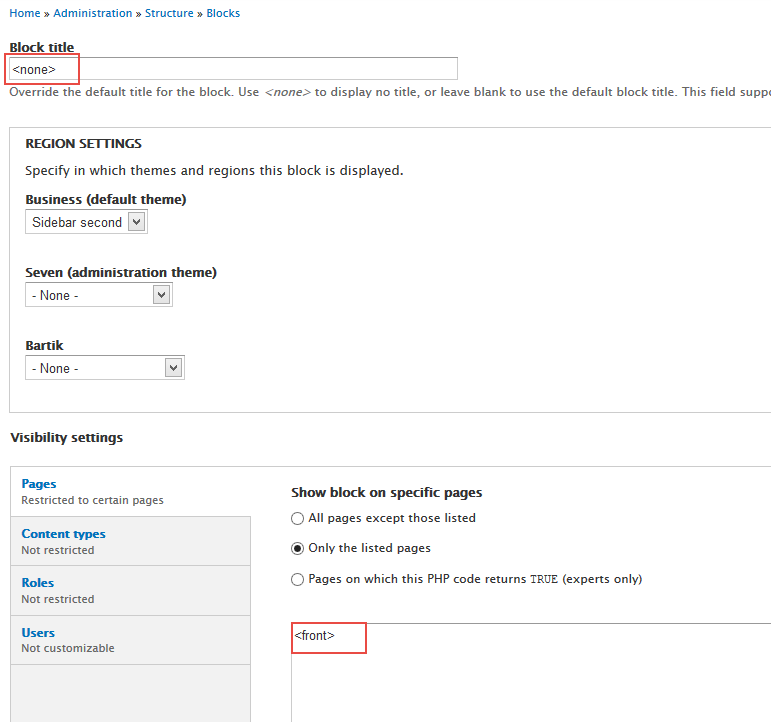
Header region: Search form block
Step 1: Navigate to Structure > Blocks
Step 2: Find block Search form and set region "Header"
Step 3: Click Save block button.
Slideshow
1. Create Slideshow view
Front end Display
Note Enable modules View Slideshow, Views Slideshow: Cycle, View fieldsets
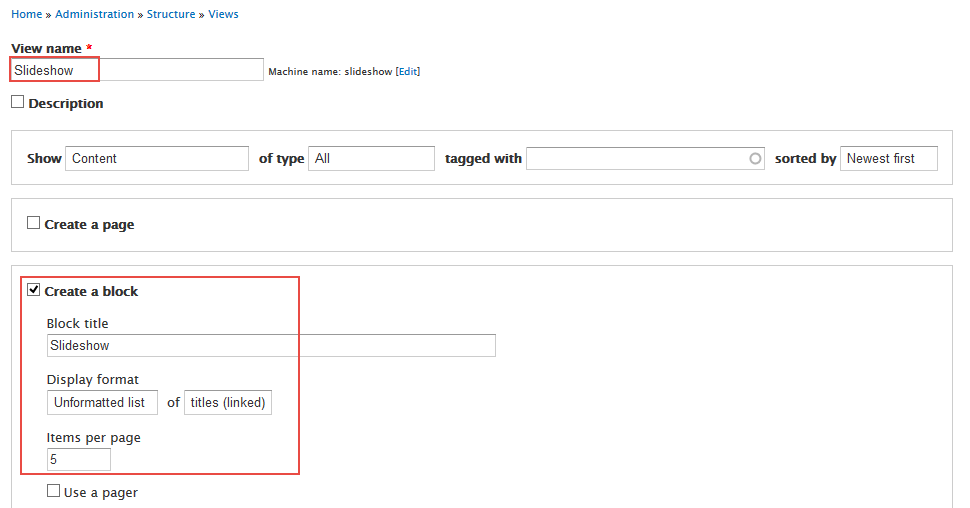
Step 1: Navigate to Structure > Views, click Add new view, then create Slideshow view with following settings:
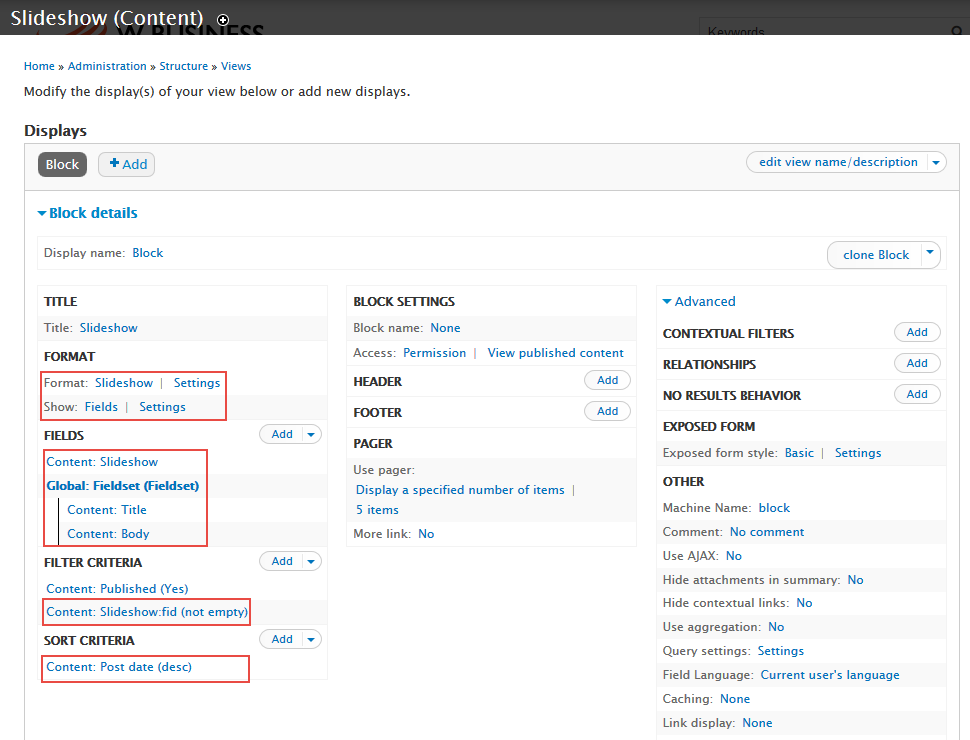
Step 2: Click Continue and edit button. Next to below steps to set properties for following fields:
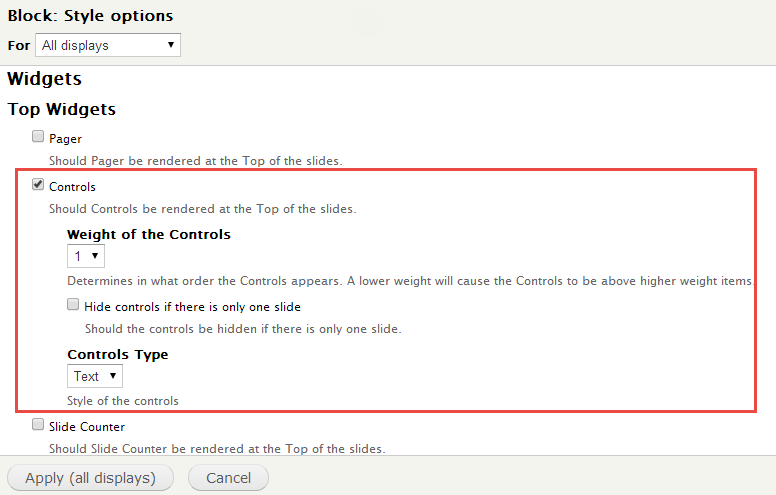
Step 3: At FORMAT: Format area, click Settings and set following properties:
Step 4: At FIELDS area, click Add button to add fields: Content: Body, Content: Slideshow, Global: Fieldset
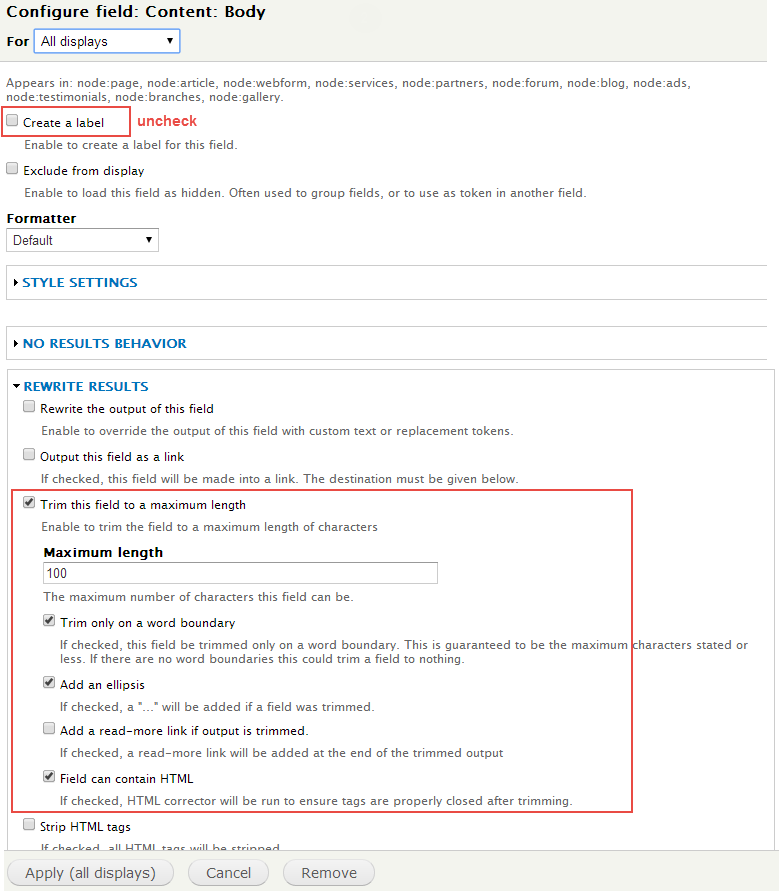
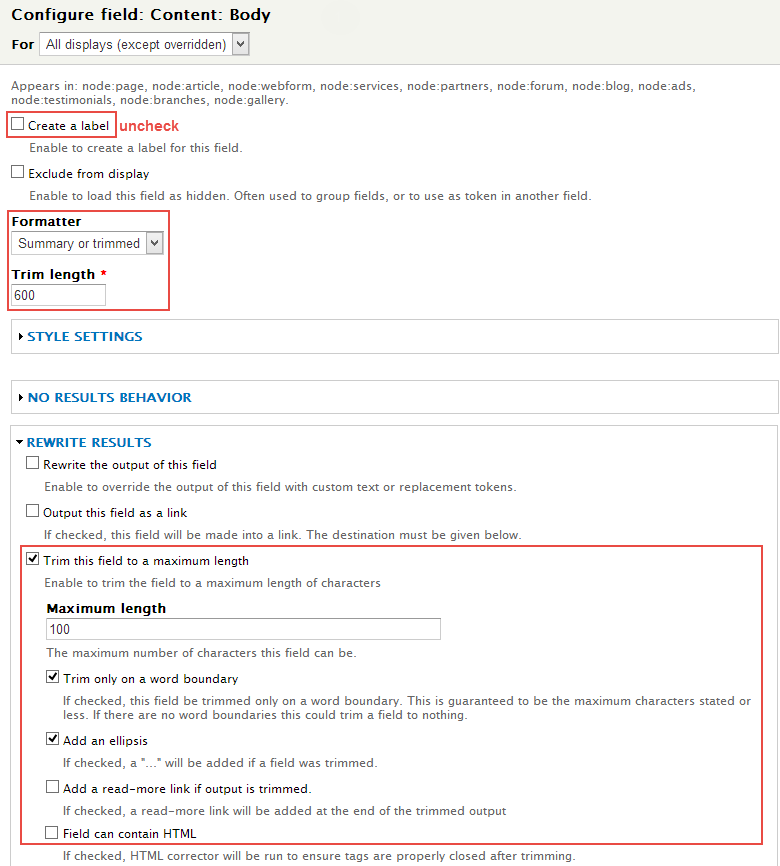
Step 5: Set properties for Content: Body
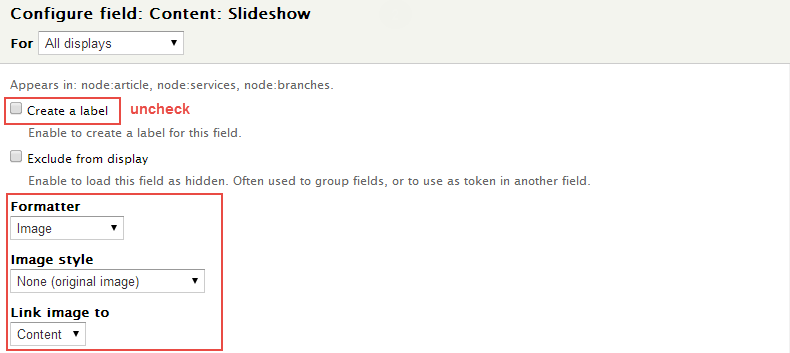
Step 6: Set properties for Content: Slideshow
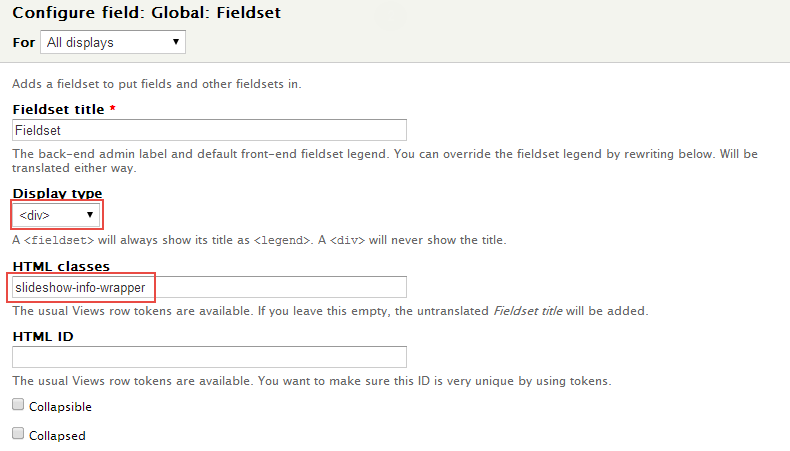
Step 7: Set properties for Global: Fieldset
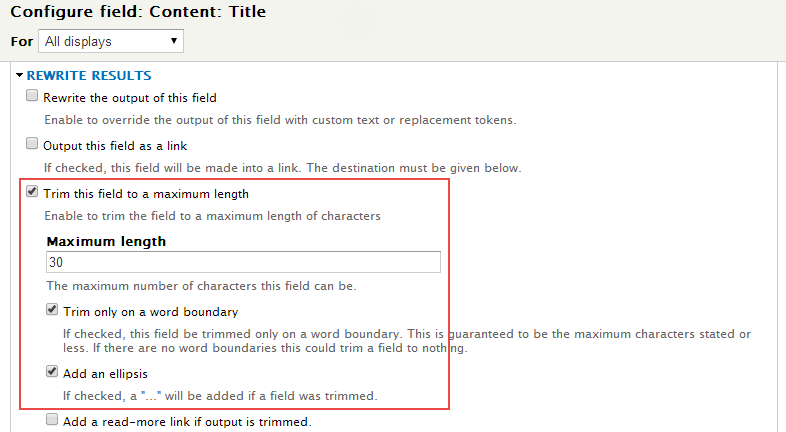
Step 8: At FIELDS area, click Content: Title field and set following properties
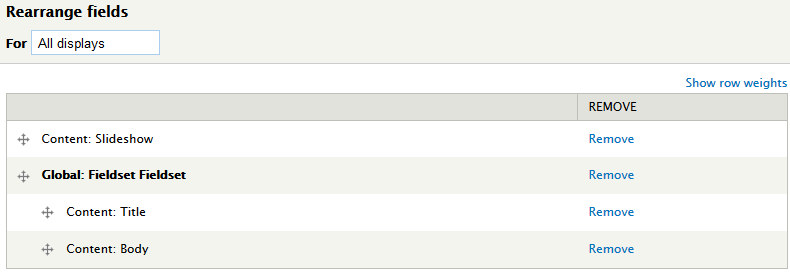
Step 9: At FIELDS area, click Rearrange button and set following arrange
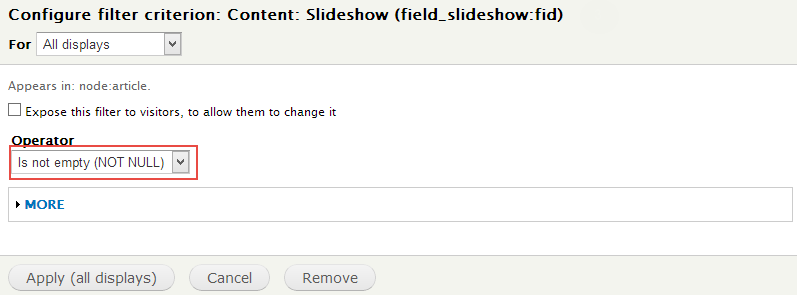
Step 10: At FILTER CRITERIA area (3), Click Add button to add Content: Slideshow field with following properties:
Step 11: Click Save to save view
2. Configure Slideshow block
Step 1: Navigate to Structure > Blocks
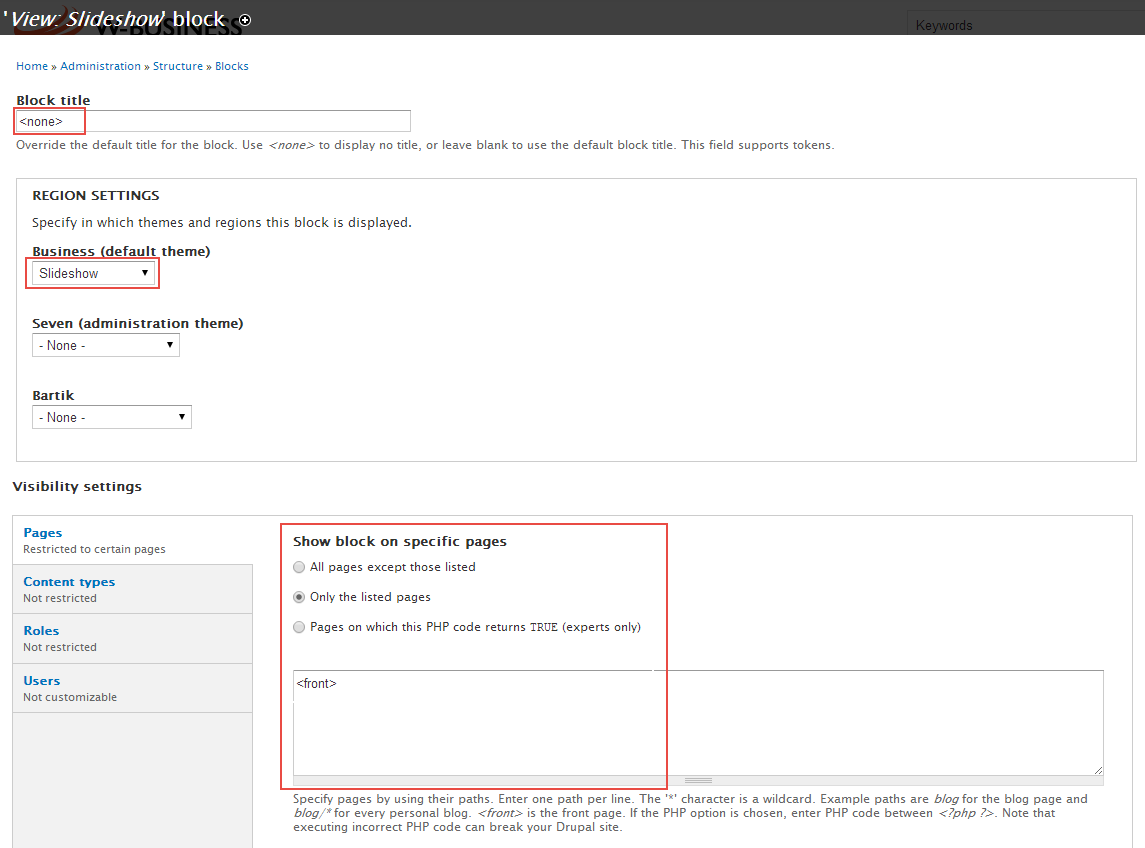
Step 2: Find View: Slideshow click configure link, set following properties
Step 3: Click Save block button.
Highlighted: Custom block
Front end Display
Create and configure block
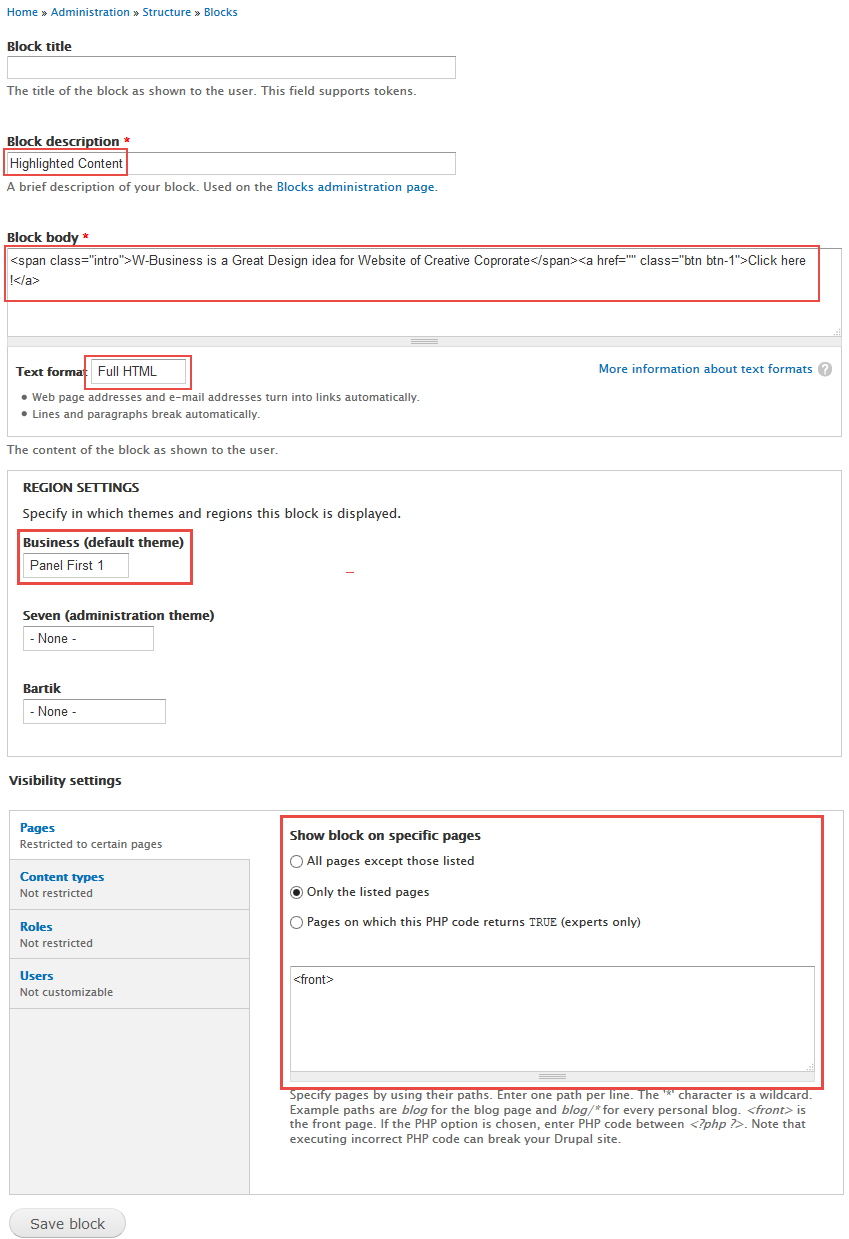
Step 1: Navigate to Structure > Blocks, click Add block link, Create Highlighted Content block with following properties:
Step 2: Click Save block button.
Refer to following HTML code:
W-Business is a Great Design idea for Website of Creative CoprorateClick here !
Four Featured Columns: view unformatted list blocks
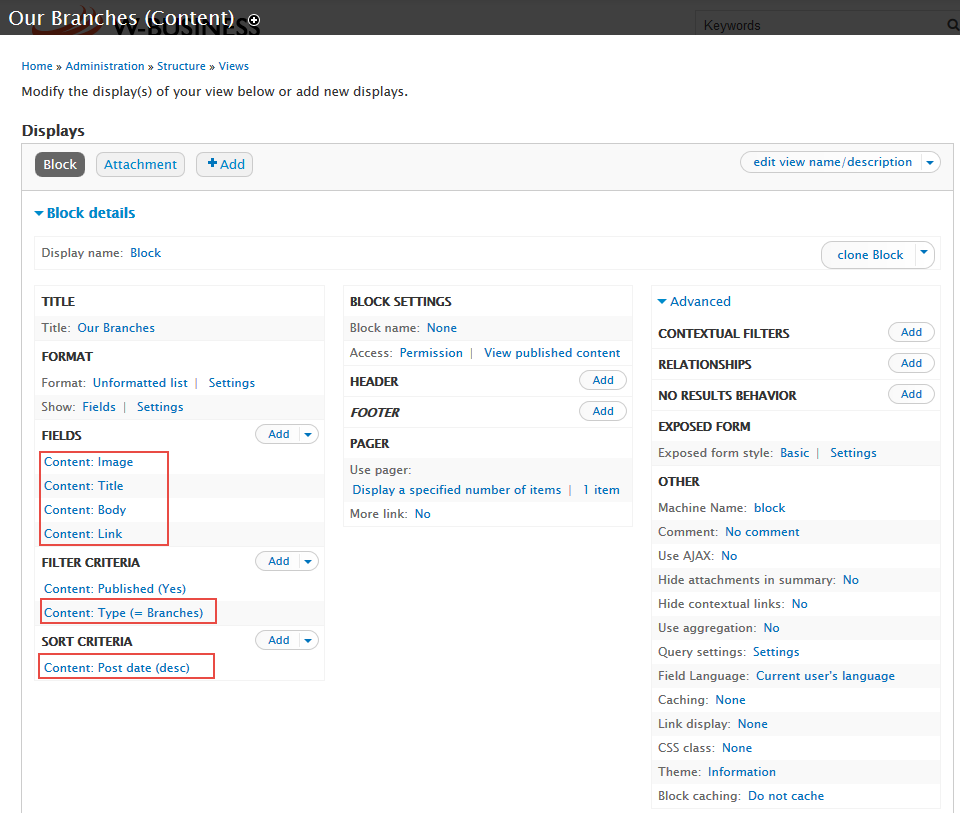
1. Our Branches block
Front end Display
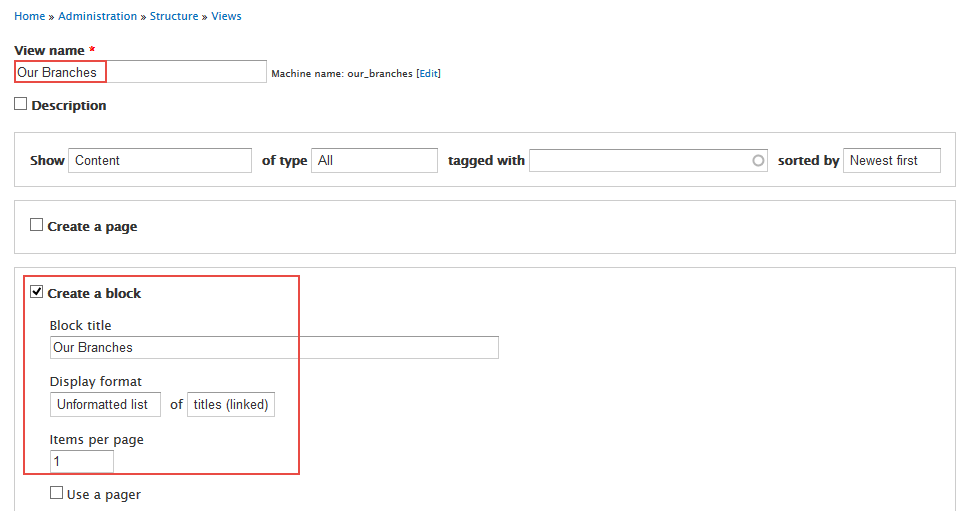
Step 1: Navigate to Structure > Views, click Add new view, then create Our Branches view with following settings:
Step 2: Click Continue and edit button. Next to below steps to set properties for following fields:
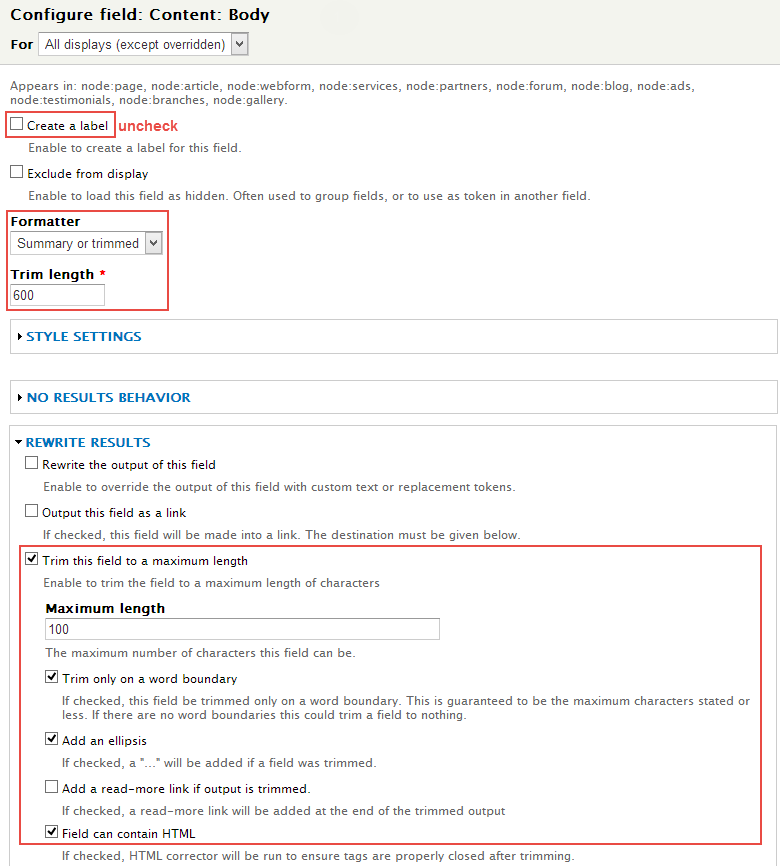
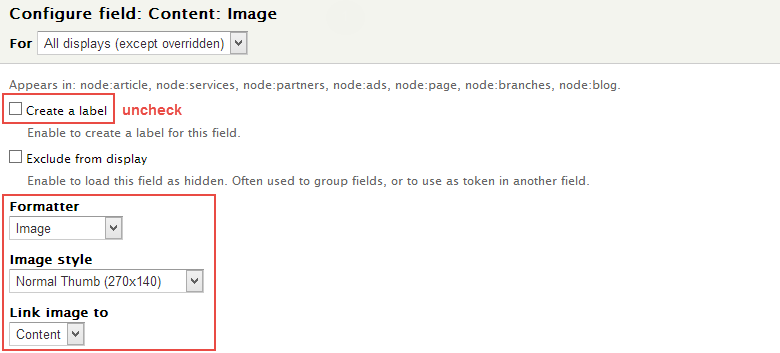
Step 3: At FIELDS area, click Add button to add fields: Content: Body, Content: Image, Content: Link
Step 4: Set properties for Content: Body
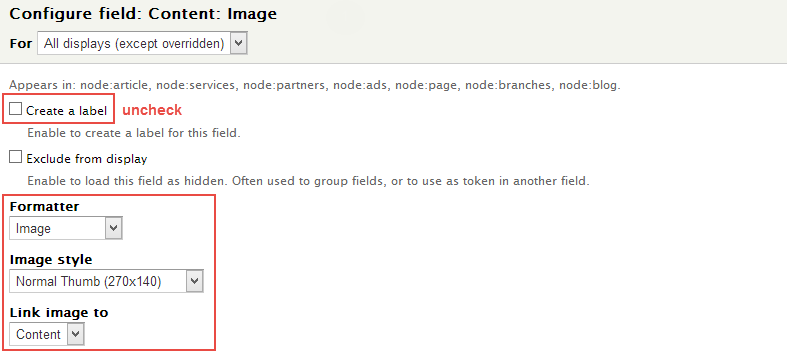
Step 6: Set properties for Content: Image
Step 7: Set properties for Content: Link
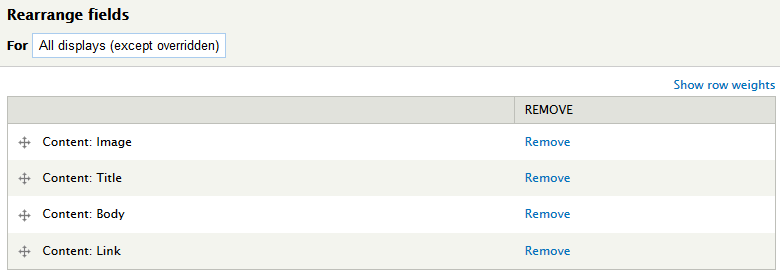
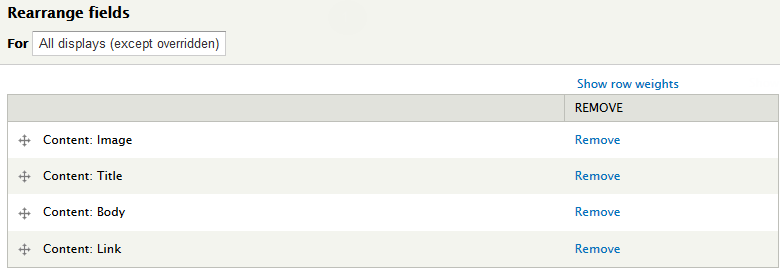
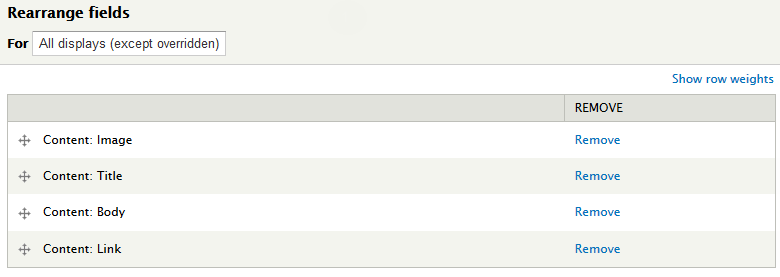
Step 8: At FIELDS, click Rearrange button and set following arrange
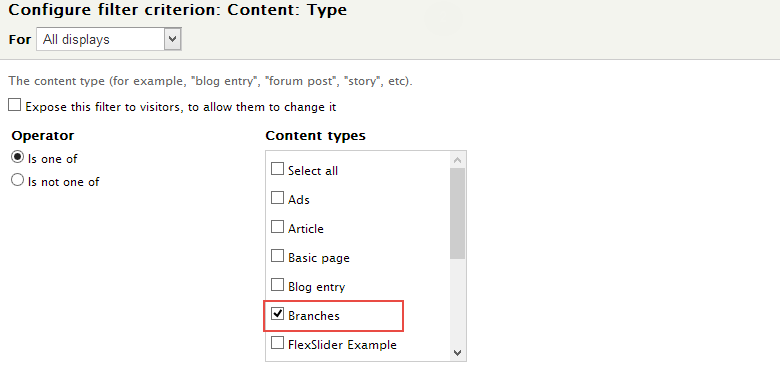
Step 9: At FILTER CRITERIA area, Click Add button to add Content: Type field, then choose type is Branches
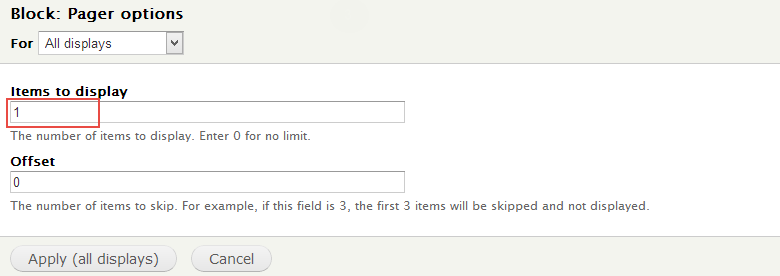
Step 10: At PAGE area, click 5 items link and set page option
Step 11: Click Save to save view
2. Featured Services block
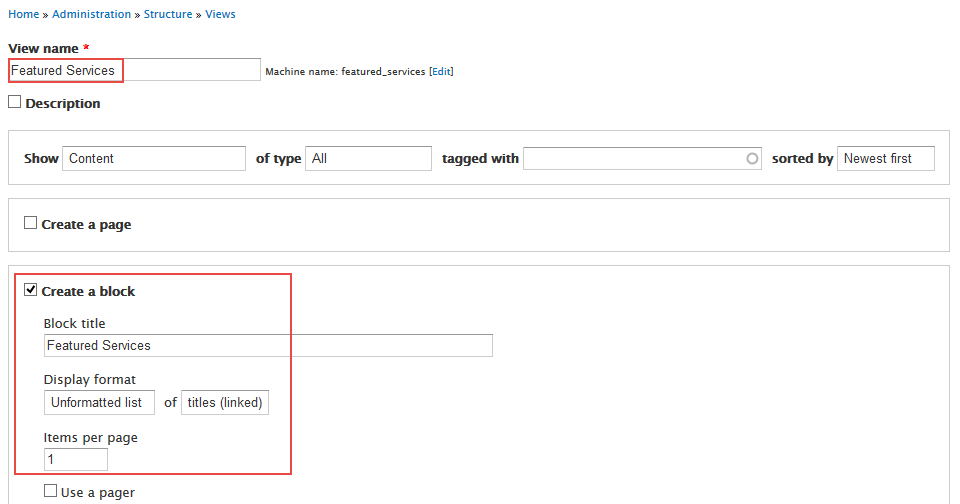
Step 1: Navigate to Structure > Views, click Add new view, then create Featured Services view with following settings:
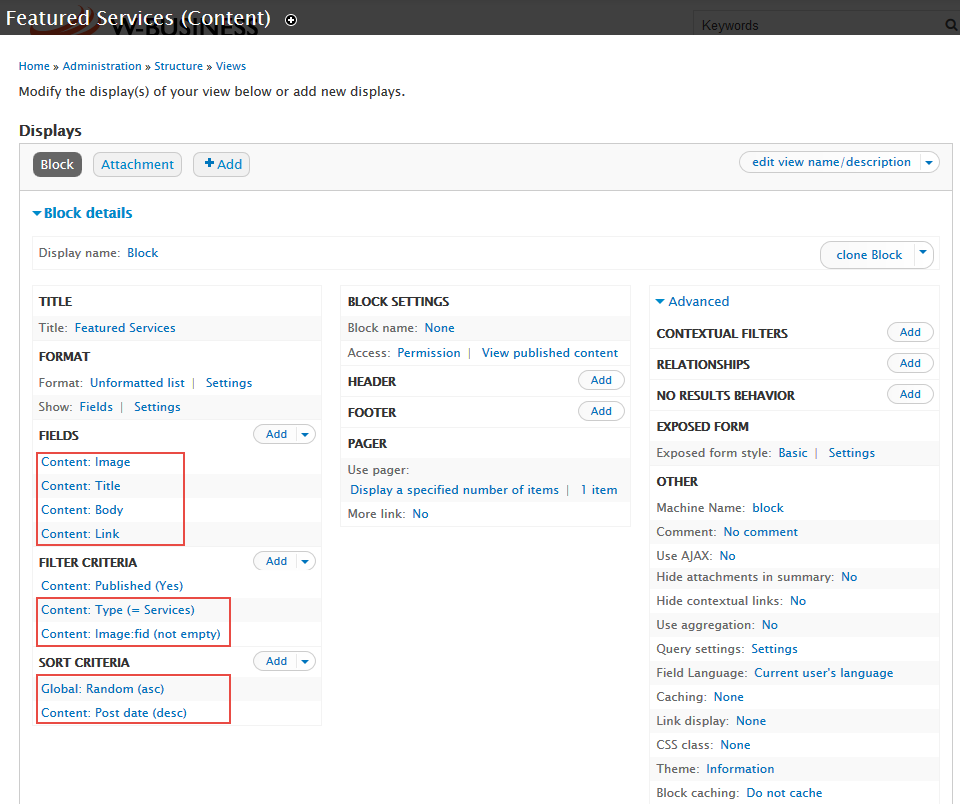
Step 2: Click Continue and edit button. Next to below steps to set properties for following fields:
Step 3: At FIELDS area, click Add button to add fields: Content: Body, Content: Image, Content: Link
Step 4: Set properties for Content: Body
Step 6: Set properties for Content: Image
Step 7: Set properties for Content: Link
Step 8: At FIELDS area, click Rearrange button and set following arrange
Step 9: At FILTER CRITERIA area, Click Add button to add Content: Type field, then choose type is Services
Step 10: At SORT CRITERIA area, Click Add button to add Global: Random field, choose sort ascending
Step 11: Click Save to save view
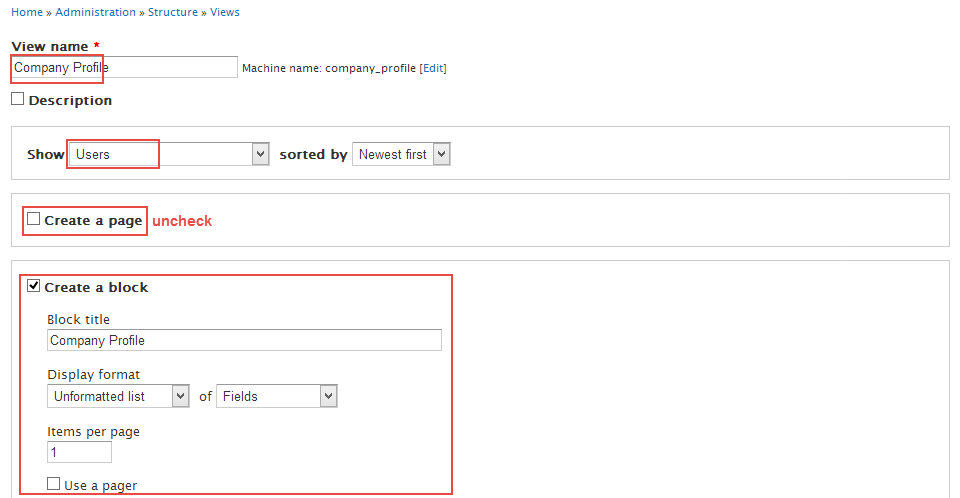
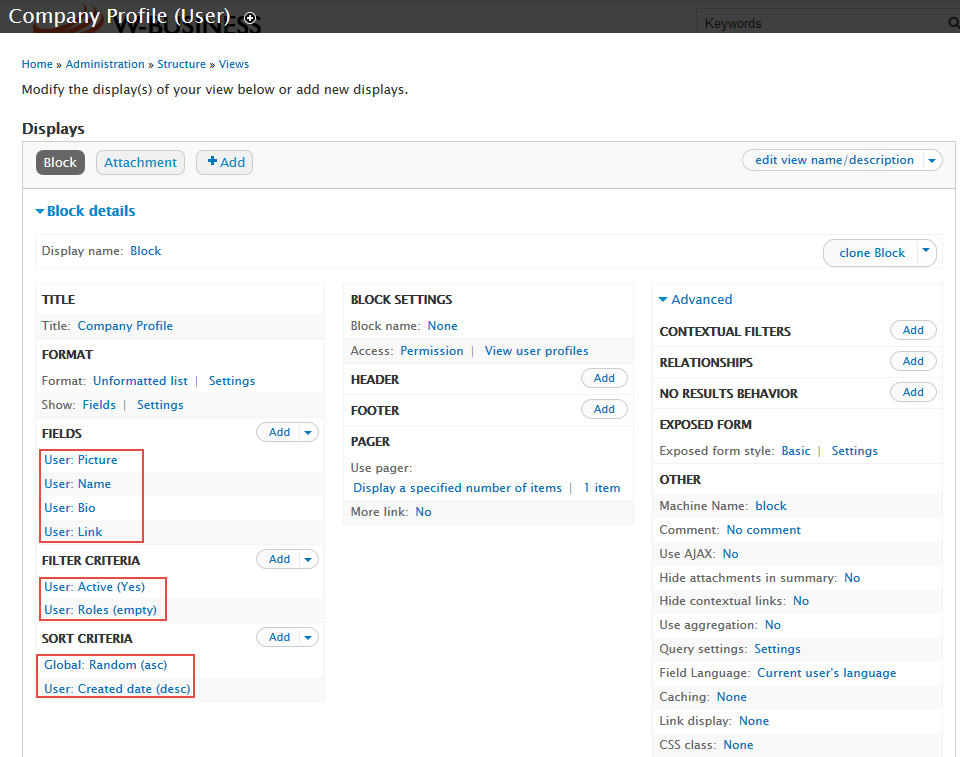
3. Company Profile
Step 1: Navigate to Structure > Views, click Add new view, then create Company Profile view with following settings:
Step 2: Click Continue and edit button. Next to below steps to set properties for following fields:
Step 3: At FIELDS area, click Add button to add fields: User: Picture, User: Bio, User: Link
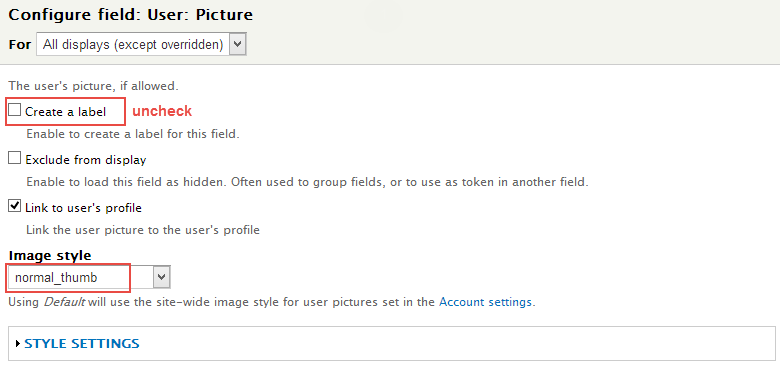
Step 4: Set properties for User: Picture
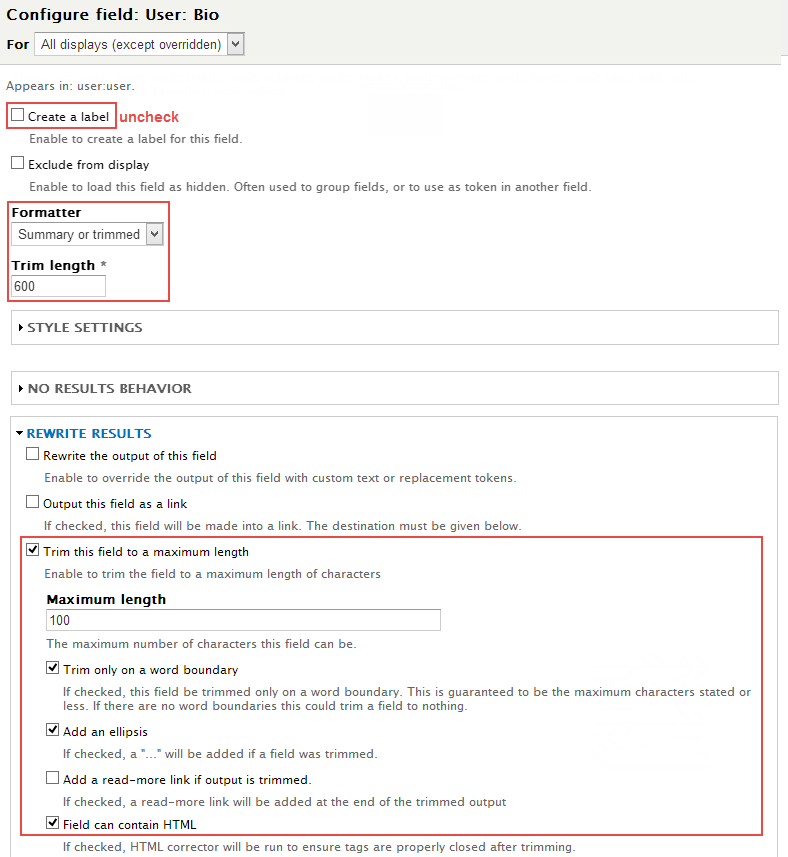
Step 6: Set properties for User: Bio
Step 7: Set properties for User: Link
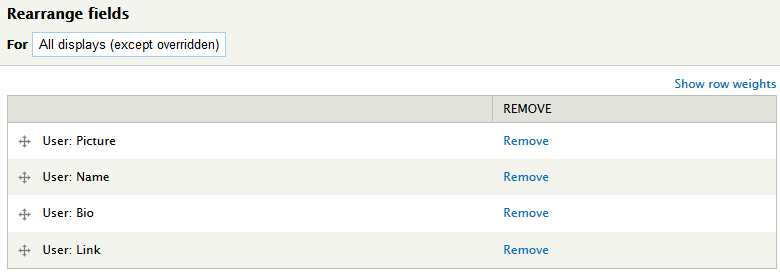
Step 8: At FIELDS area, click Rearrange button and set following arrange
Step 9: At FILTER CRITERIA area, Click Add button to add User: Roles field, then choose operator is Only has the 'authenticated user'
Step 10: At SORT CRITERIA area, Click Add button to add Global: Random field, choose sort ascending
Step 11: Click Save to save view
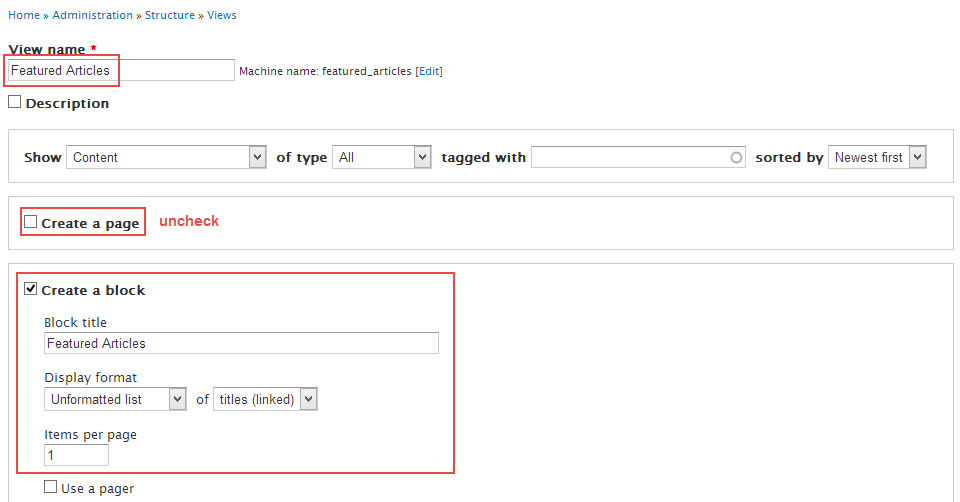
4. Featured Articles
Step 1: Navigate to Structure > Views, click Add new view, then create Featured Articles view with following settings:
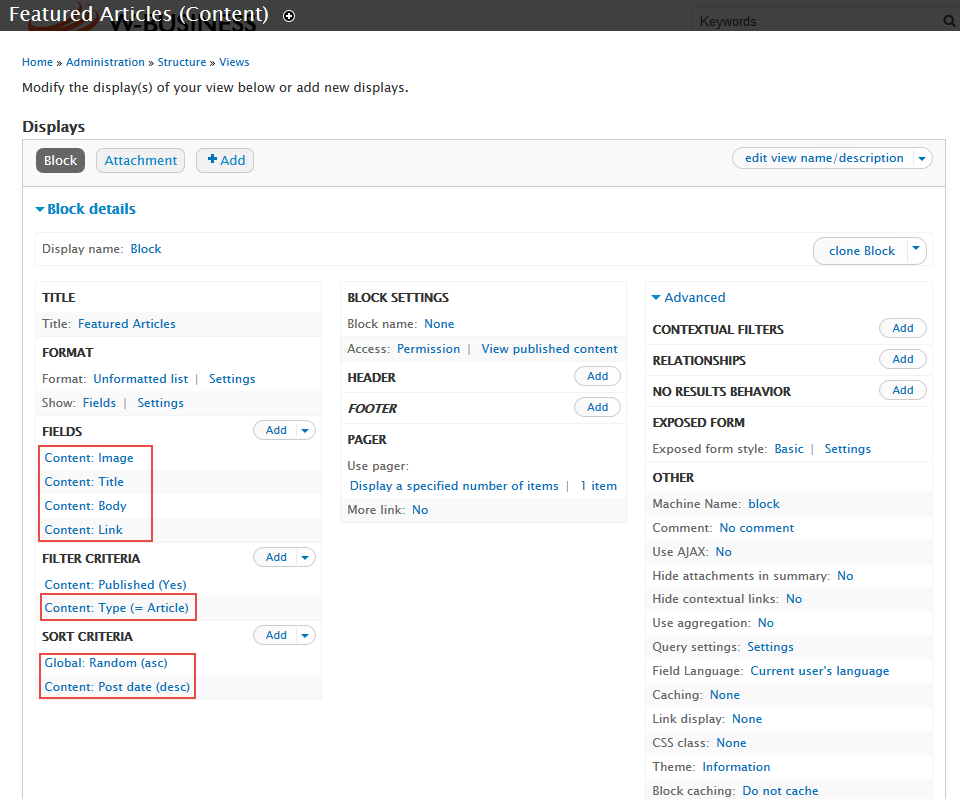
Step 2: Click Continue and edit button. Next to below steps to set properties for following fields:
Step 3: At FIELDS area, click Add button to add fields: Content: Body, Content: Image, Content: Link
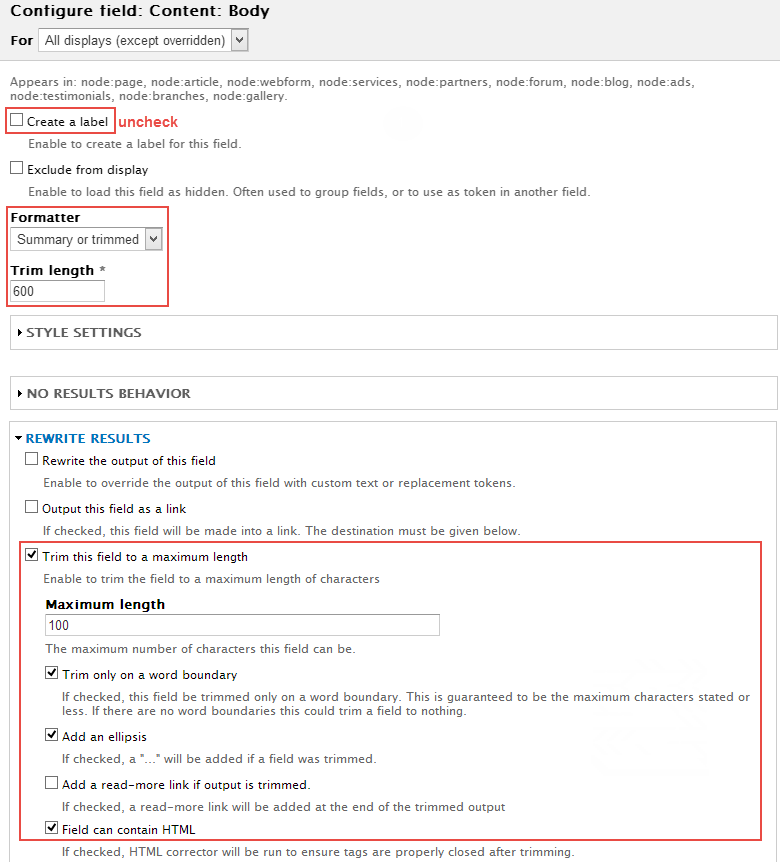
Step 4: Set properties for Content: Body
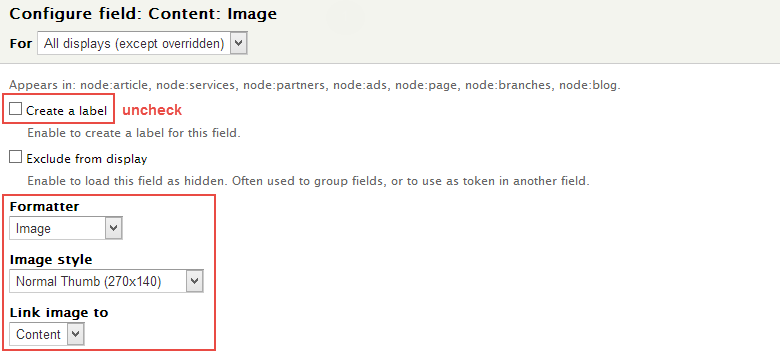
Step 6: Set properties for Content: Image
Step 7: Set properties for Content: Link
Step 8: At FIELDS area, click Rearrange button and set following arrange
Step 9: At FILTER CRITERIA area, Click Add button to add Content: Type field, then choose type is Articles
Step 10: At SORT CRITERIA area, Click Add button to add Global: Random field, choose sort ascending
Step 11: Click Save to save view
5. Configure blocks
Step 1: Navigate to Structure > Blocks
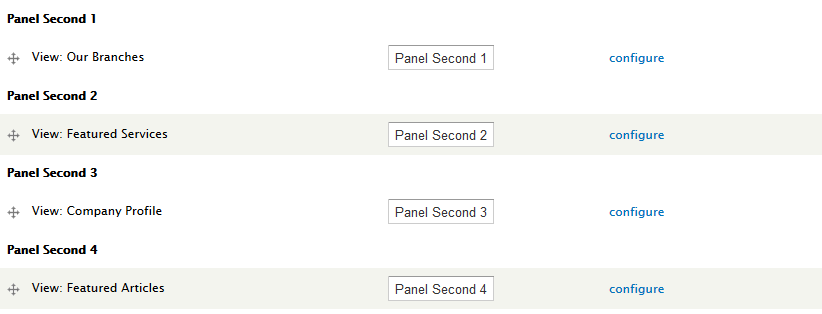
Step 2: Find View: Our Branches, View: Featured Services, View: Company Profile, View: Featured Articles and set following regions
Step 3: Click Save block button.
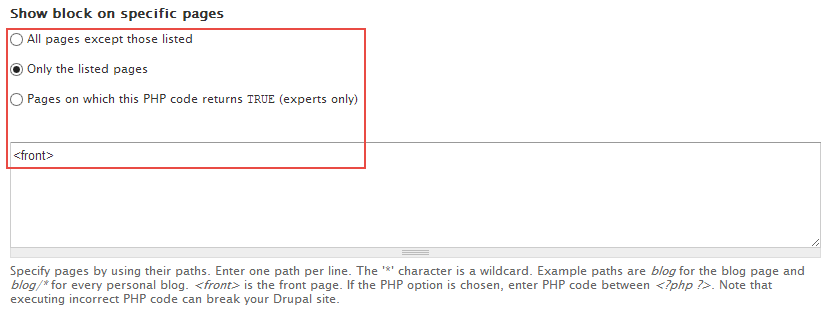
Step 4: Click on Configure link of each block, set following properties
Our Members: view unformatted list block
1. Create Our Members view
Front end Display
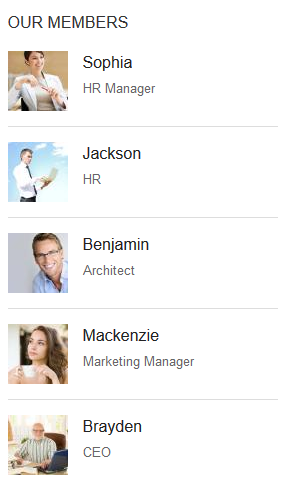
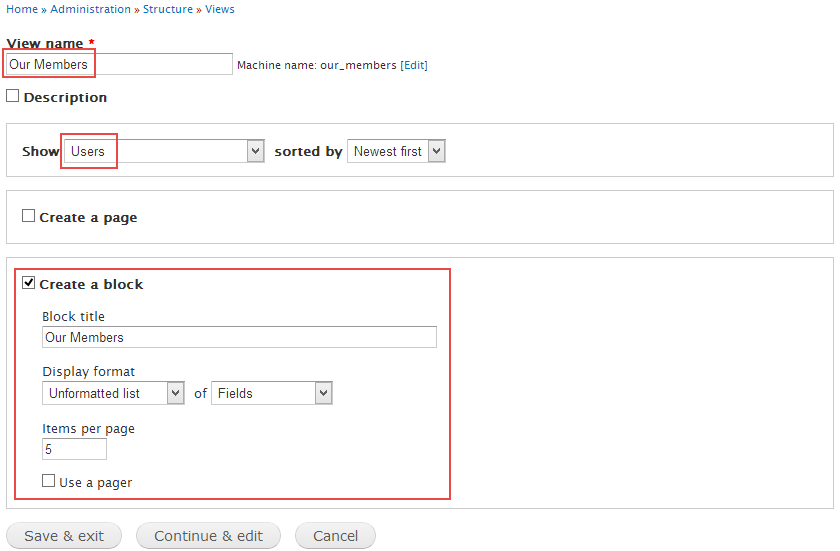
Step 1: Navigate to Structure > Views, click Add new view, then create Our Members view with following settings:
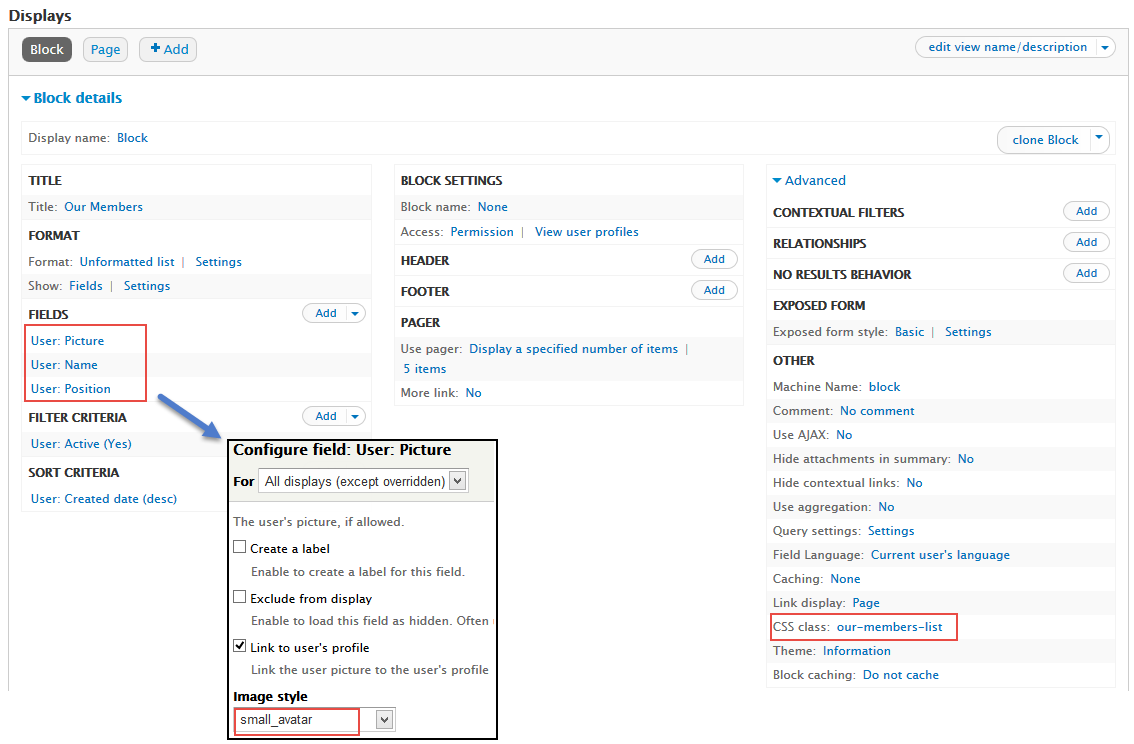
Step 2: Click Continue and edit button. Add following fields:
Step 3: Click Save to save view
2. Configure block
Step 1: Navigate to Structure > Blocks
Step 2: Find View: Our Branches and set region
Step 3: Click Save block button.
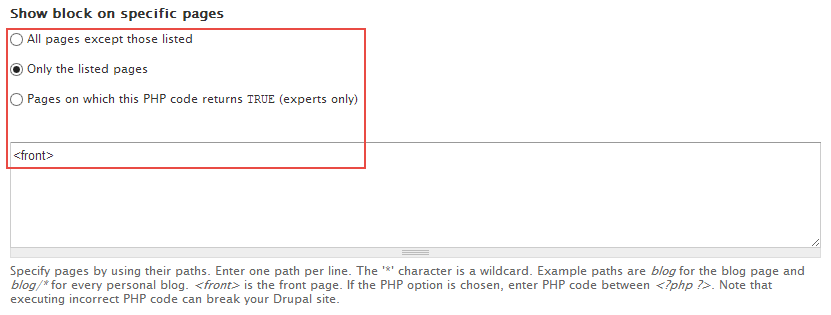
Step 4: Click on Configure link, set following properties
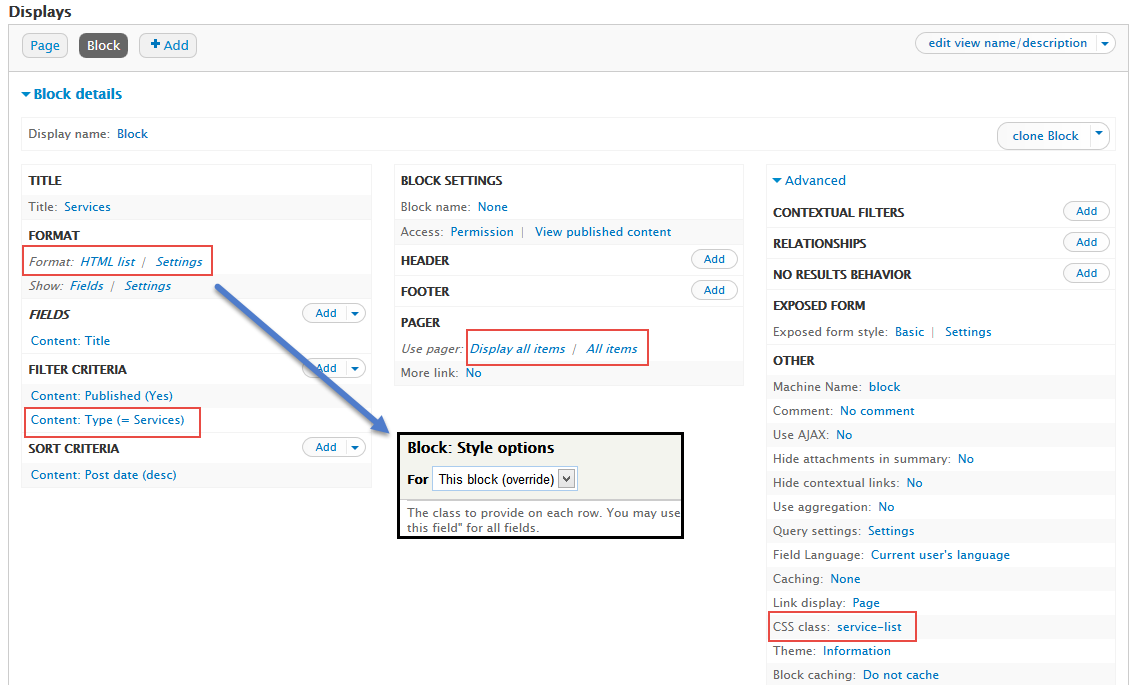
Services: view html list block
1. Create Services view
Front end Display
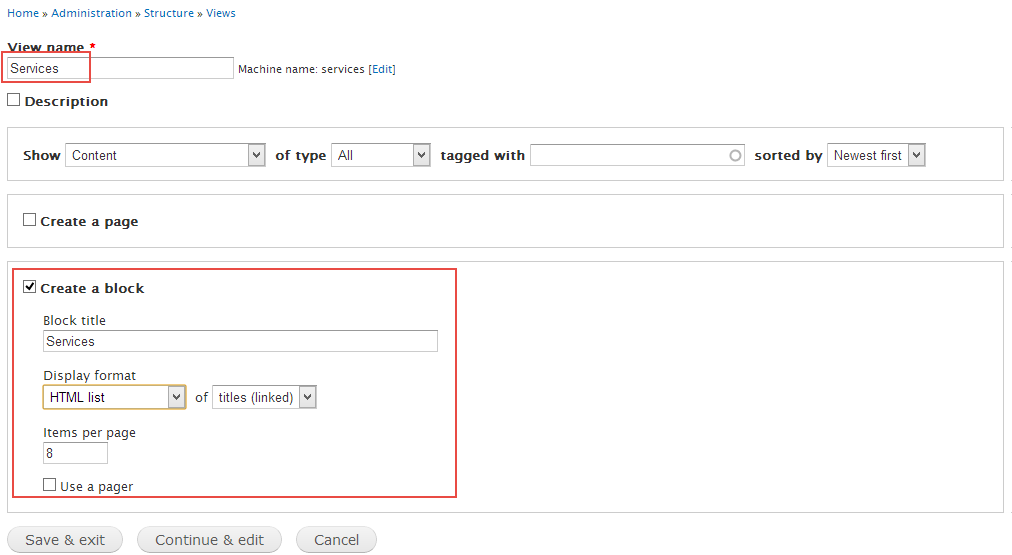
Step 1: Navigate to Structure > Views, click Add new view, create Services view with following settings:
Step 2: Click Continue and edit button. Add fields with following properties:
Step 3: Click Save to save view
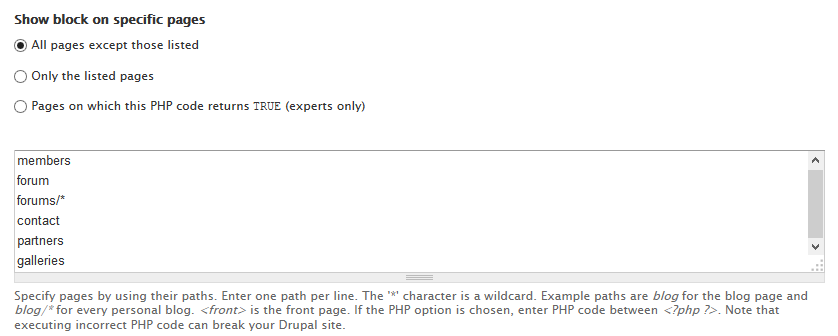
2. Configure block
Step 1: Navigate to Structure > Blocks
Step 2: Find View: Services and set region
Step 3: Click Save block button.
Step 4: Click on Configure link, set following properties
Ads: view slideshow block
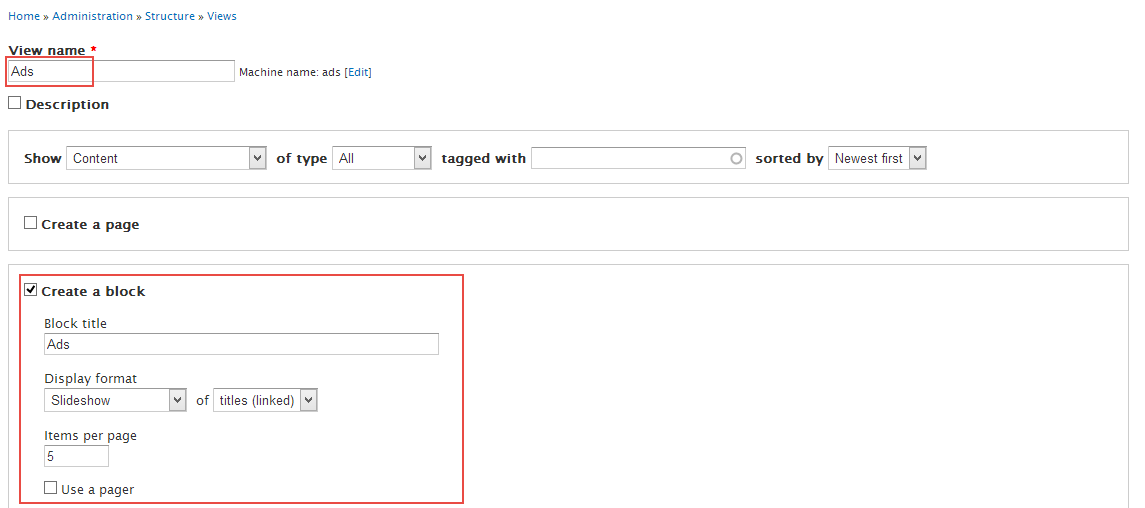
1. Create Ads view
Front end Display
Step 1: Navigate to Structure > Views, click Add new view, create Ads view with following settings:
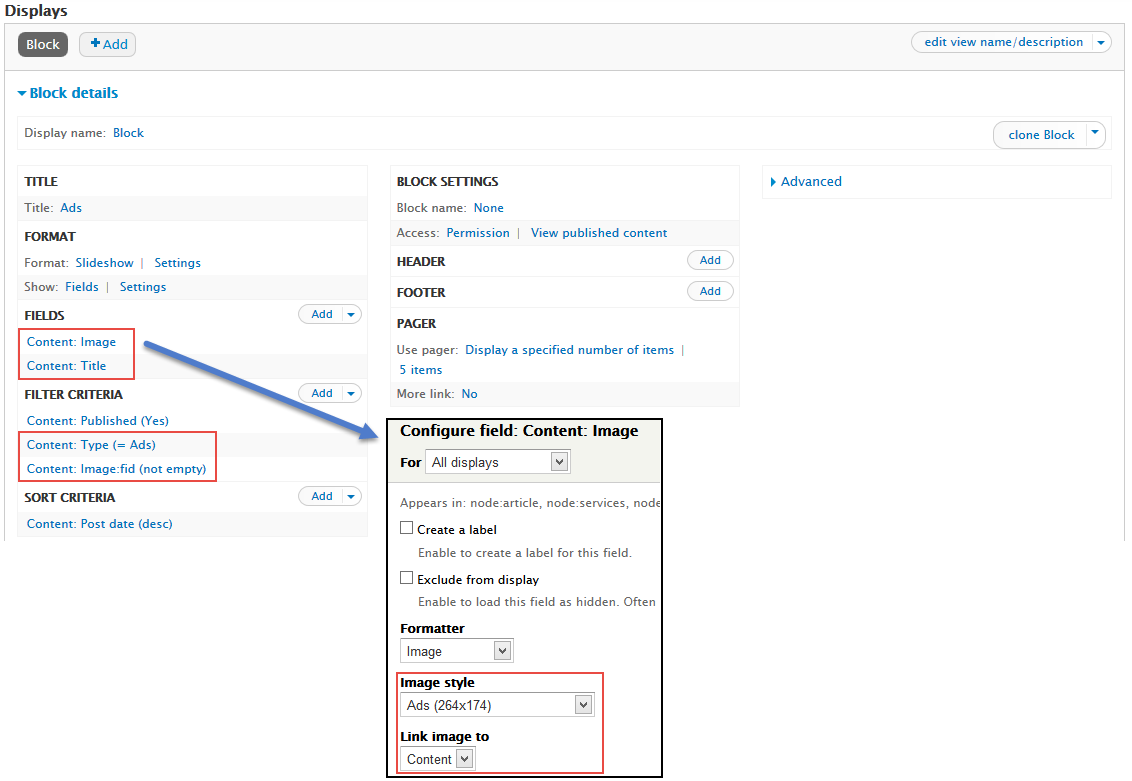
Step 2: Click Continue and edit button. Add fields with following properties:
Step 3: Click Save to save view
2. Configure block
Step 1: Navigate to Structure > Blocks
Step 2: Find View: Ads and set region
Step 3: Click Save block button.
Step 4: Click on Configure link, set following properties
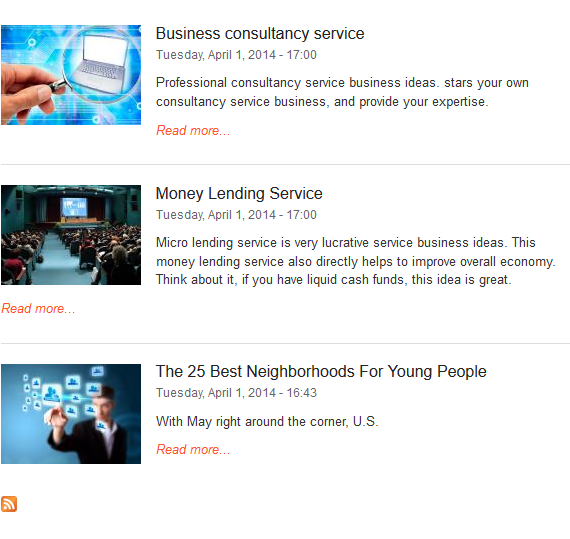
Modify Main Content: view Frontpage
Front end Display
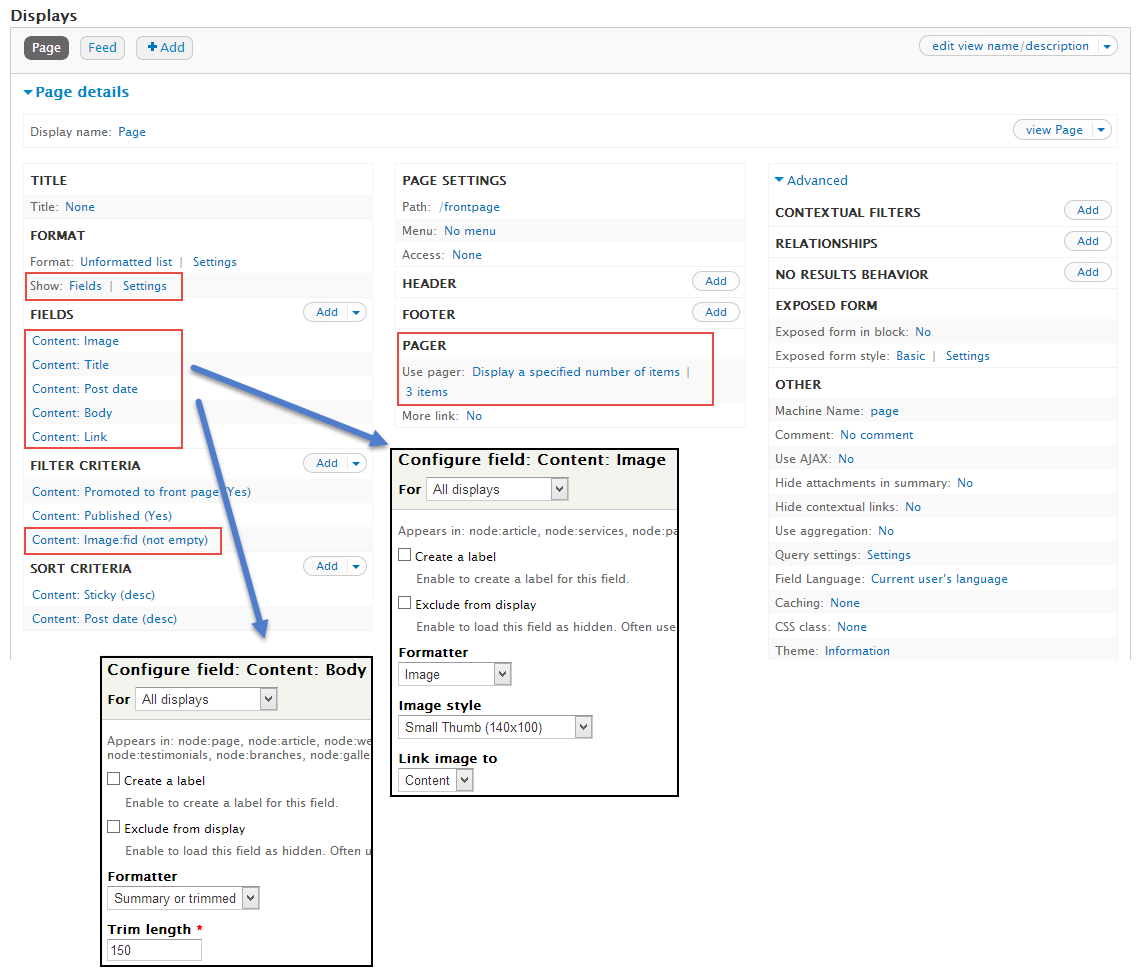
1. Configure view
Step 1: Navigate to Structure > Views
Step 2: Enable to Frontpage view, then Edit front page view with following fields:
2. Configure for frontpage
Partners: view jCarousel block
Front end Display
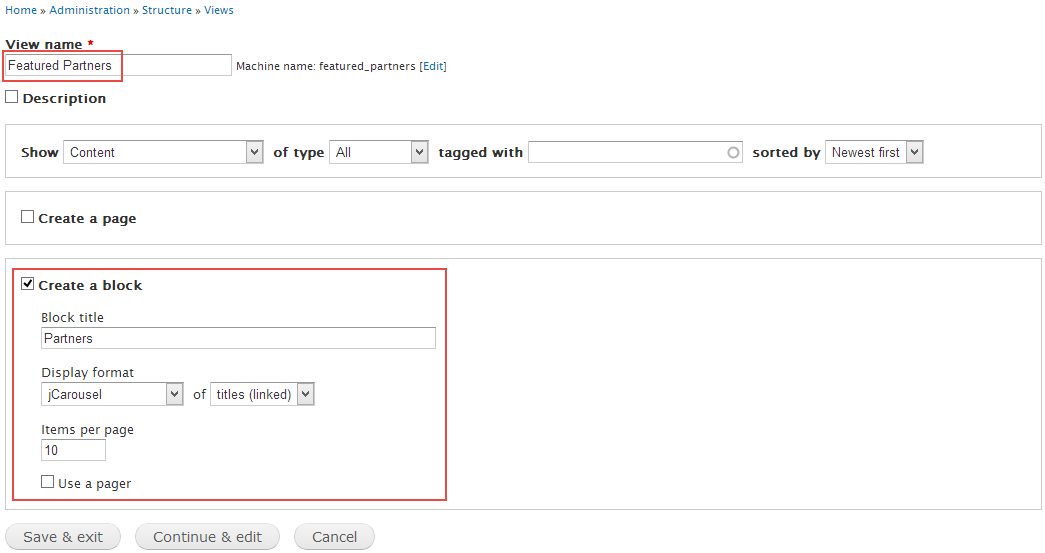
1. Configure view
Step 1: Navigate to Structure > Views, click Add new view, create Featured Partners view with following settings:
Step 2: Click Continue and edit button. Next to below steps to set properties for following fields:
Step 3: At FORMAT area, click Settings button, set properties for jCarousel field:
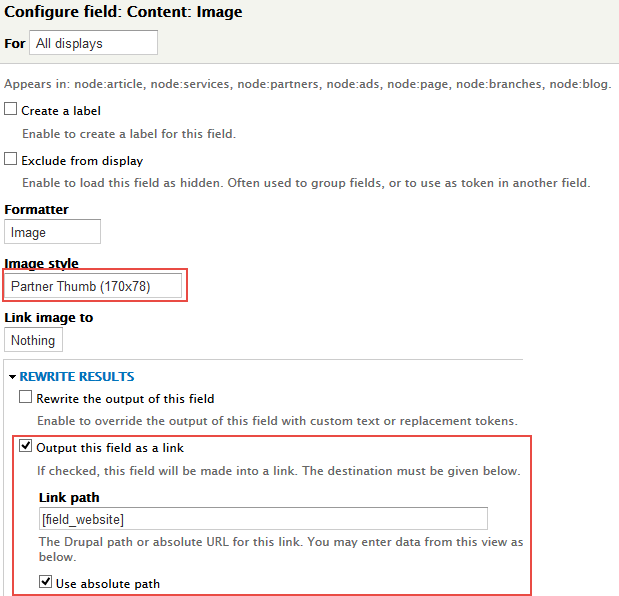
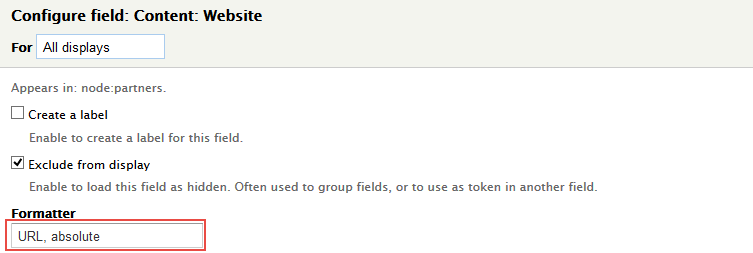
Step 4: At FIELDS area, click Add button to add fields: Content: Image, Content: Website
Step 5: Set properties for Content: Image
Step 5: Set properties for Content: Website
Step 6: At FIELDS area, click Rearrange button and remove Content: Title field, then set following arrange:
Step 7: Click Apply (all display) button.
Step 8: At FILTER CRITERIA area, Click Add button to add Content: Type with type is Partners
Step 9: Click Apply (all display) button.
Step 10: Click Save to save view
2. Configure block
Step 1: Navigate to Structure > Blocks
Step 2: Find View: Featured Partners and set region
Step 3: Click Save block button.
Testimonial: FlexSlider block view
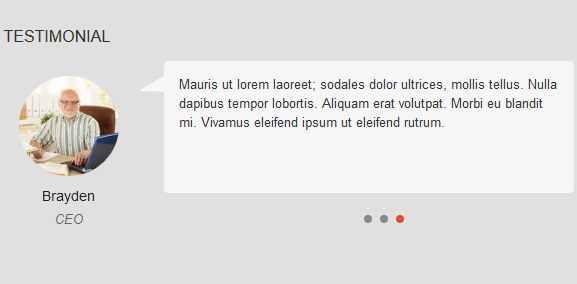
Front end Display
1. Create view
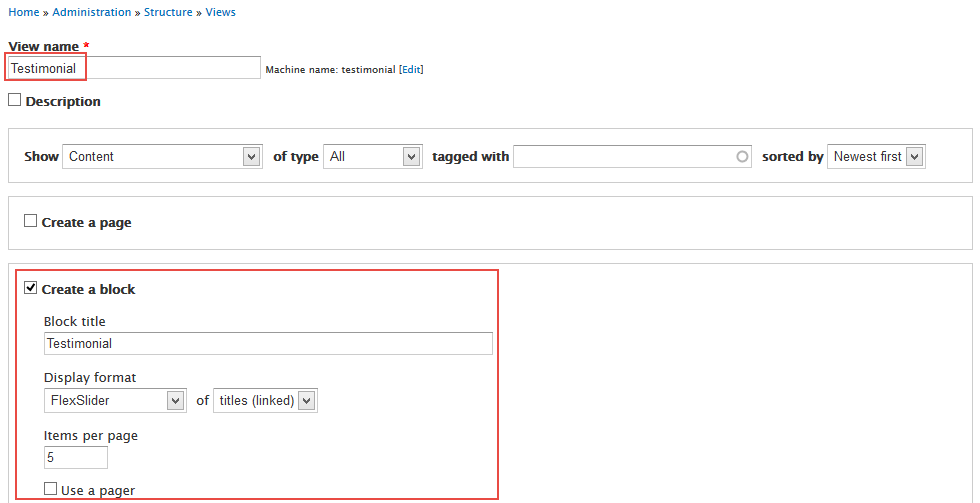
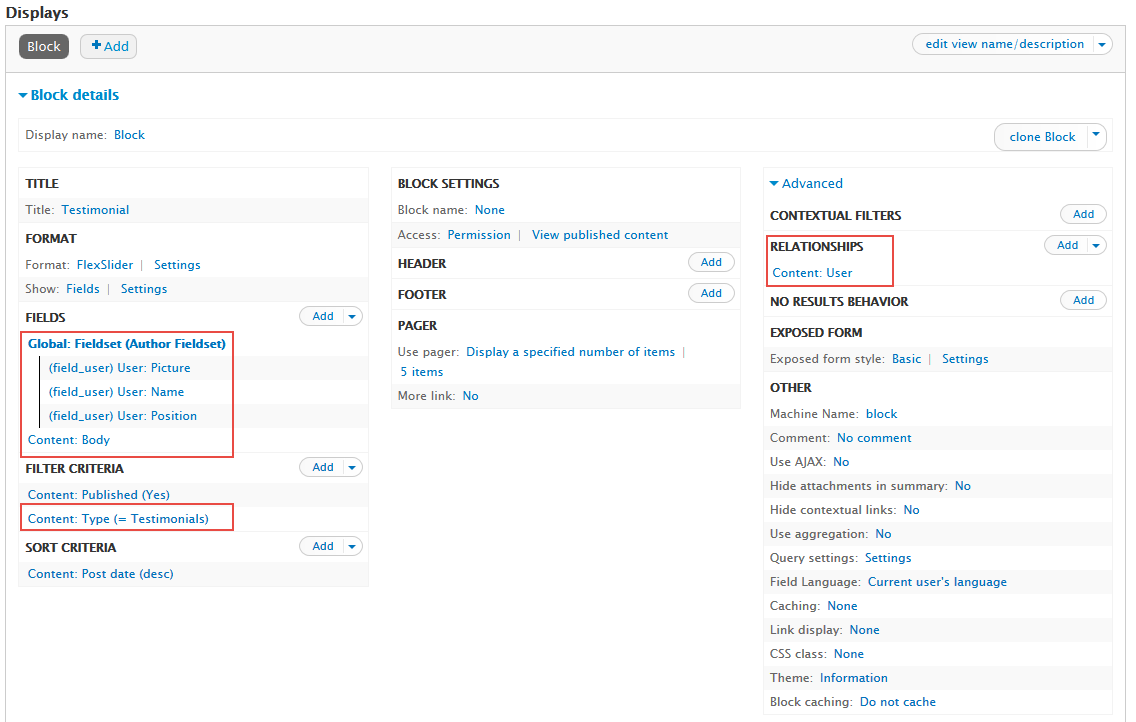
Step 1: Navigate to Structure > Views, click Add new view, create Testimonials view with following settings:
Step 2: Click Continue and edit button. Next to below steps to set properties for following fields:
Step 3: Expand Advanced panel, at RELATIONSHIPS area, click Add to add relationship Content: user (field_user)
Step 4: At FIELDS area, click Add button to add fields: Global: Fieldset, User: Picture, User: Name, User: Position
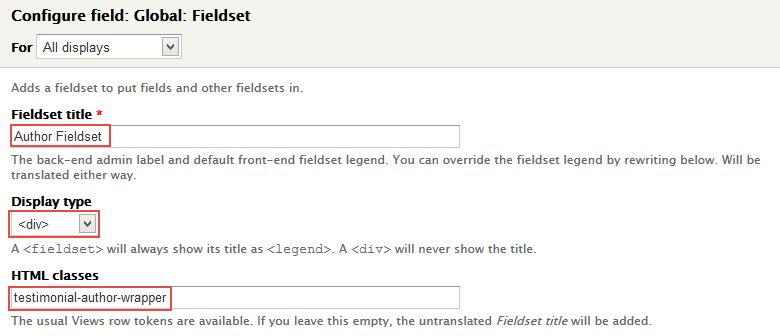
Step 5: Set following properties for Global: Fieldset
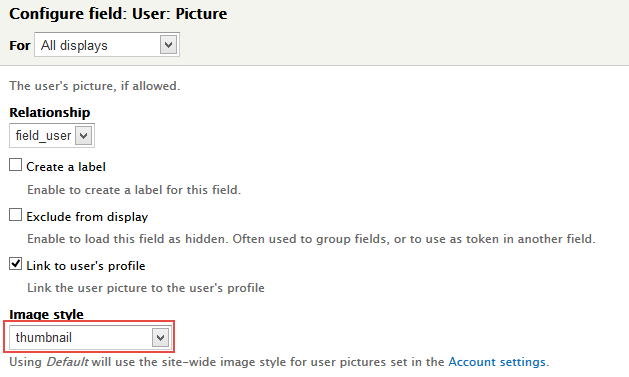
Step 6: Set following properties for Global: Picture
Step 7: At FIELDS area, click Rearrange button, remove Content: Title then set following arrange
Step 9: At FILTER CRITERIA area, Click Add button to add Content: Type field, then choose type is Testimonials
Step 10: Click Save button to save view.
2. Configure block
Step 1: Navigate to Structure > Blocks
Step 2: Find View: Testimonials and set region
Step 3: Click Save block button.
Business Newsletter: Subscribe block
Front end Display
Configure block
Note EnableSimplenewsmodule
Step 1: Go to Module, find Simplenews module. Click Configure link
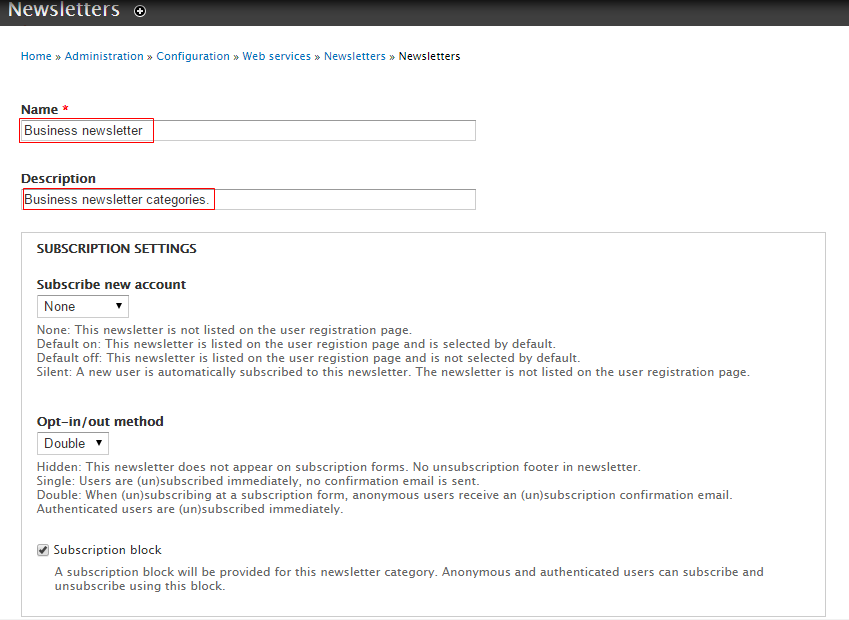
Step 2:Click Add newsletter category link. Then create Business newsletter , set following properties:
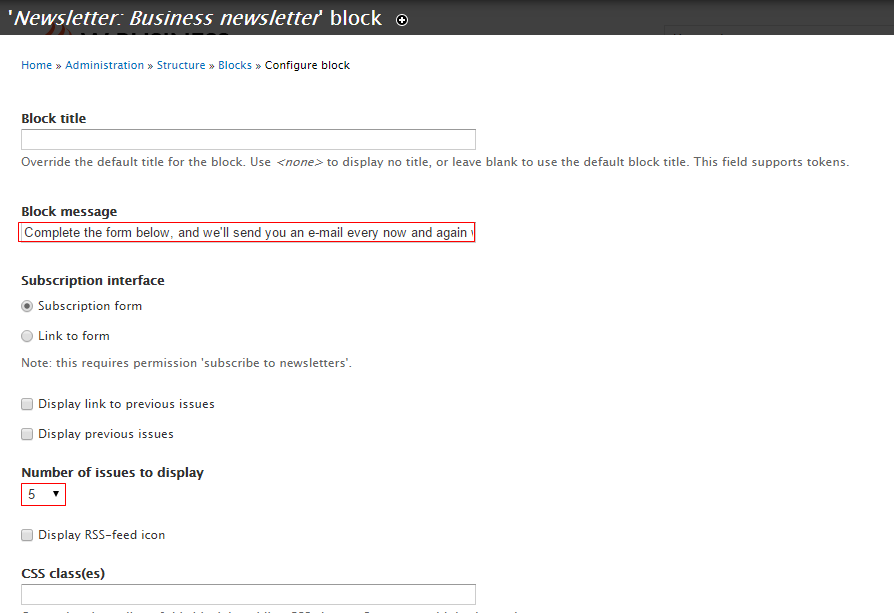
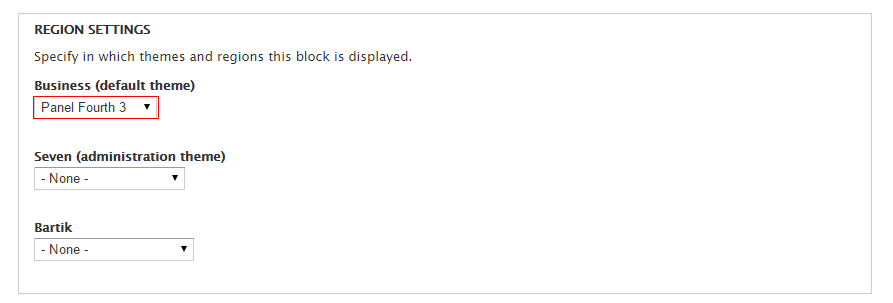
Step 3: Go to Structure > Blocks, find Newsletter: Business newsletter block. Click Configure link and set following properties:
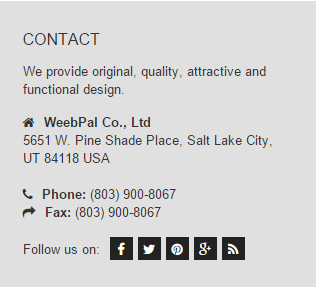
Contact: Custom block
Front end Display
Create & configure block
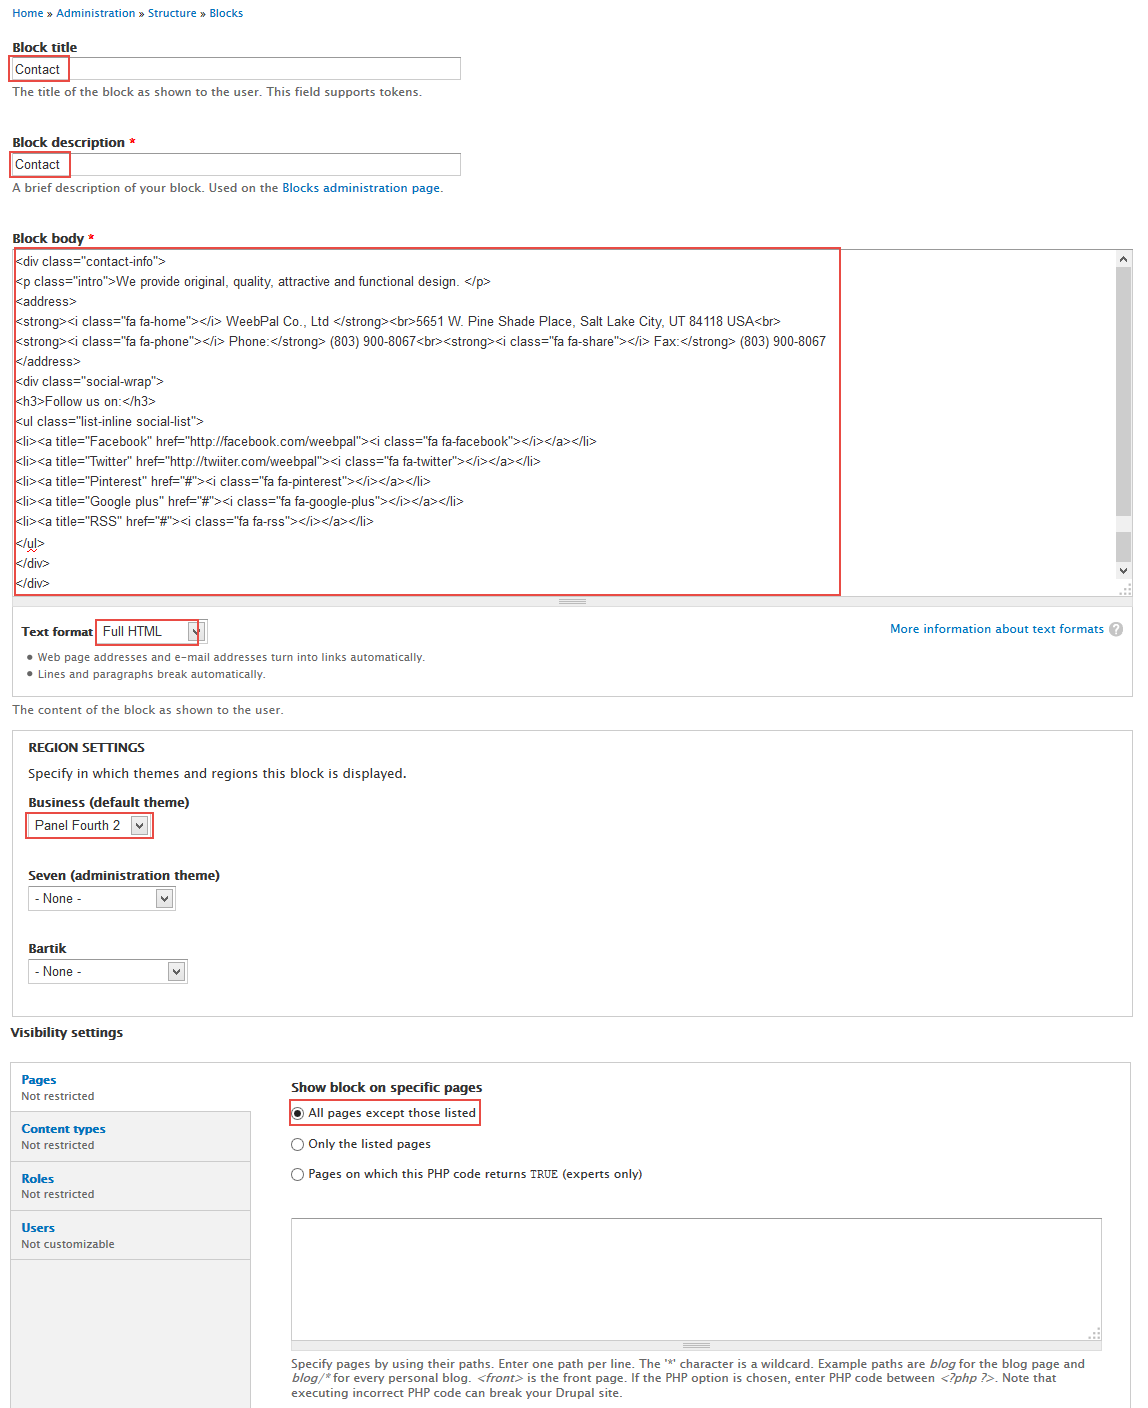
Step 1: Navigate to Structure > Blocks, click Add block link, Create Contact block with following properties:
Step 2: Click Save block button.
Refer to following HTML code:
We provide original, quality, attractive and functional design.
WeebPal Co., Ltd5651 W. Pine Shade Place, Salt Lake City, UT 84118 USA
Phone: (803) 900-8067
Fax: (803) 900-8067
About: Custom block
Front end Display
Create & configure block
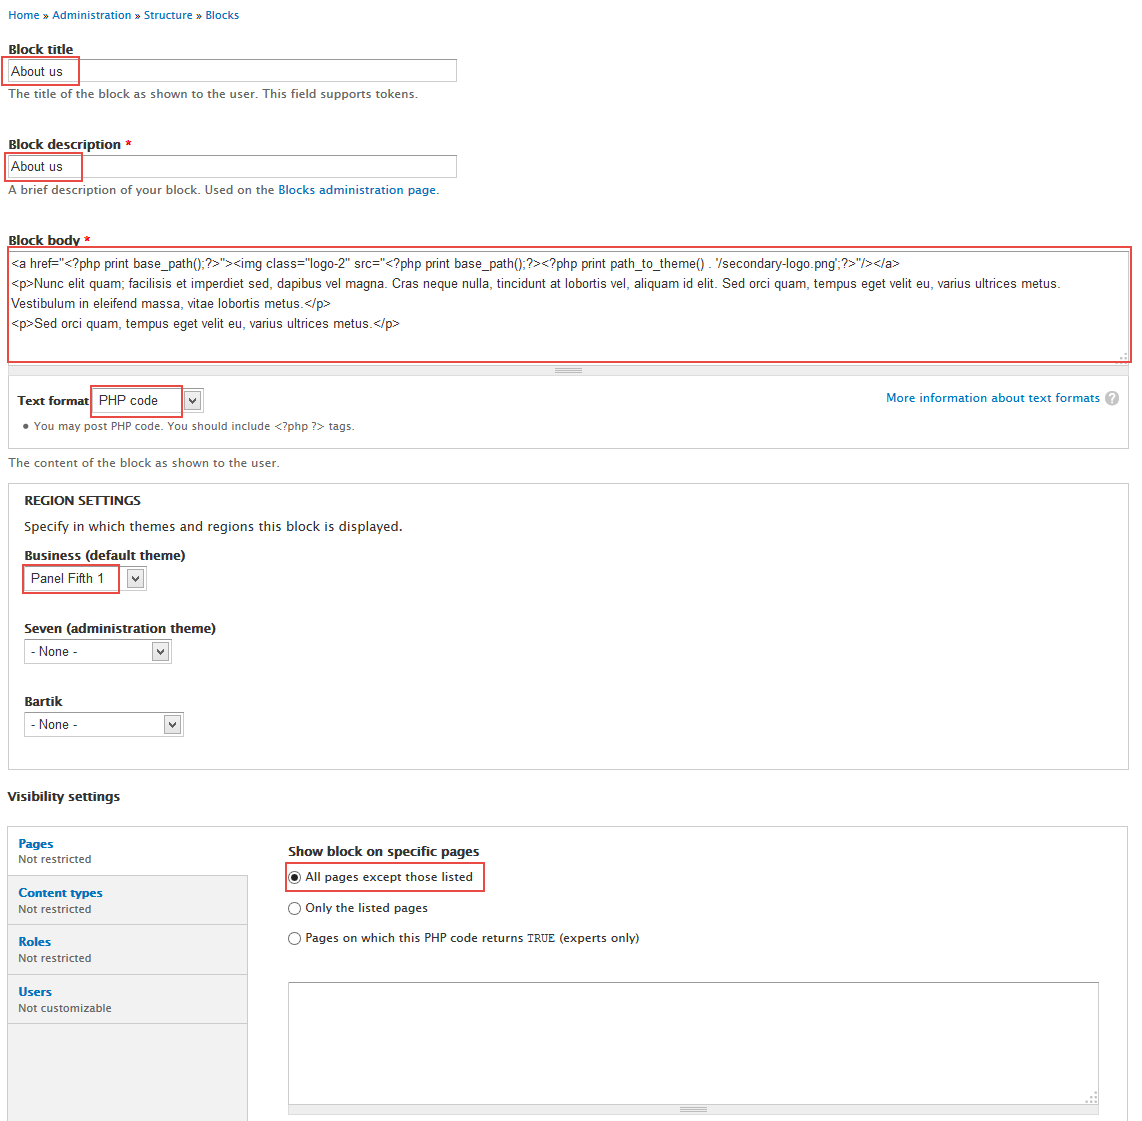
Step 1: Navigate to Structure > Blocks, click Add block link, Create About block with following properties:
Step 2: Click Save block button.
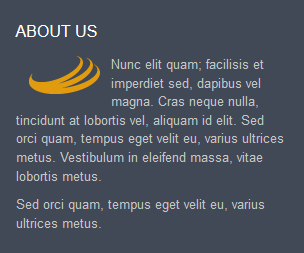
Refer to following HTML code:
;?><?php print path_to_theme() . '/secondary-logo.png';?>)
Nunc elit quam; facilisis et imperdiet sed, dapibus vel magna. Cras neque nulla, tincidunt at lobortis vel, aliquam id elit. Sed orci quam, tempus eget velit eu, varius ultrices metus. Vestibulum in eleifend massa, vitae lobortis metus.
Sed orci quam, tempus eget velit eu, varius ultrices metus.
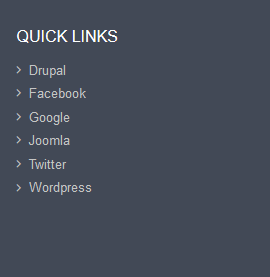
Quick link: Menu block
Front end Display
Configure block
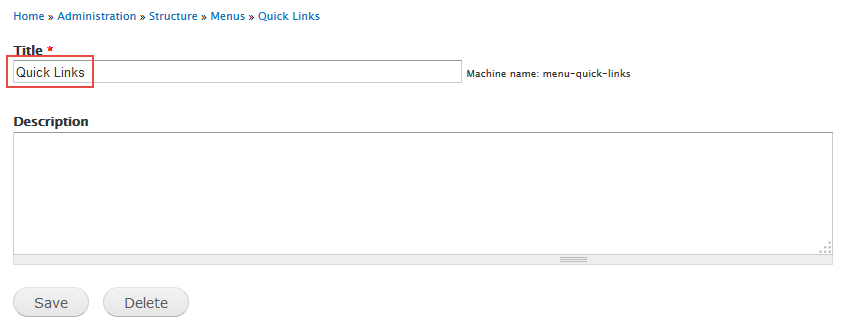
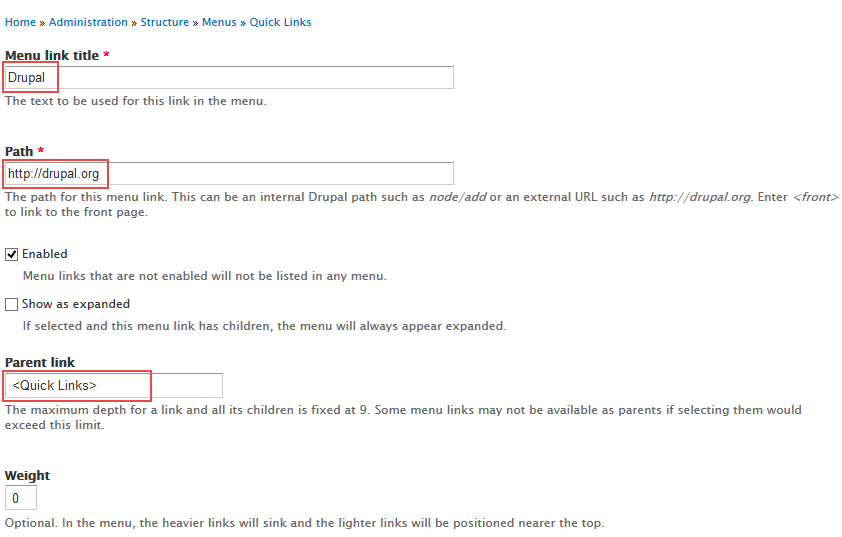
Step 1: Navigate to Structure > Menus, click Add menu link, Create Quick Links menu with following properties:
Step 2: Click Add link Create a link with following properties:
Do the steps above to create other links for Quick Links menu
Step 3: Click Save configuration button.
Step 4: Go to Structure > Blocks, find Newsletter block. Click Configure link and set following properties:
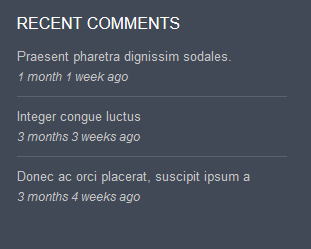
Recent Comments: the recent comment block
Front end Display
Configure block
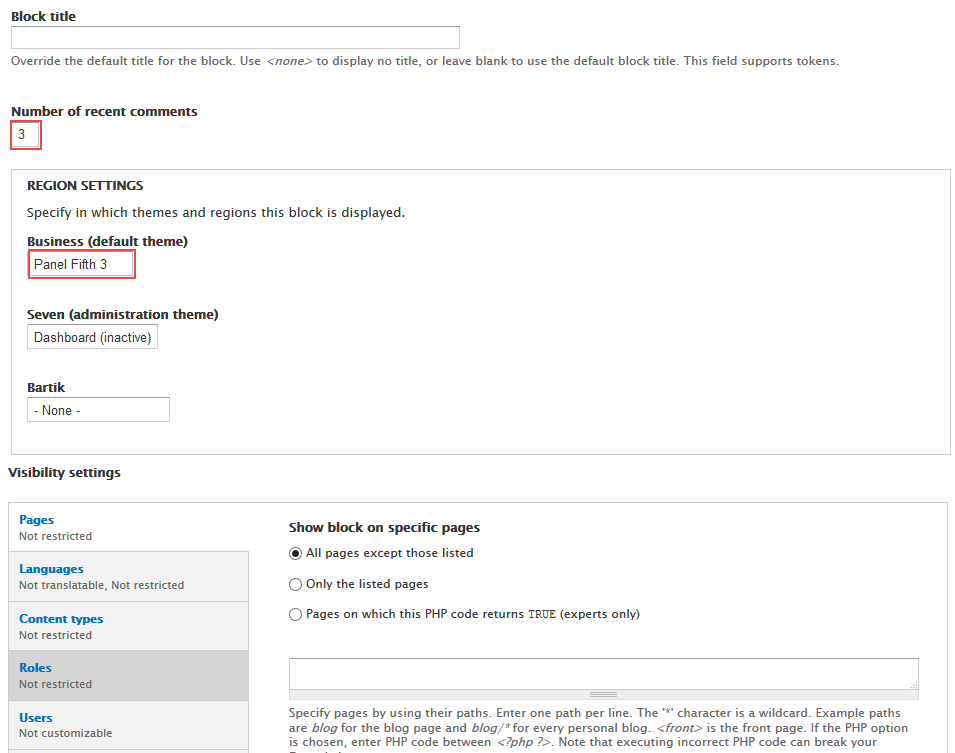
Step 1: Navigate to Structure > Blocks
Step 2: Find block Recent comments, click Configure link and set following properties:
Step 3: Click Save block button.
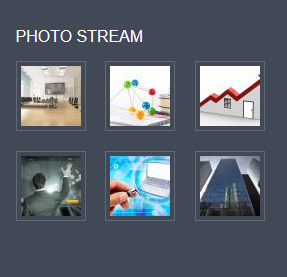
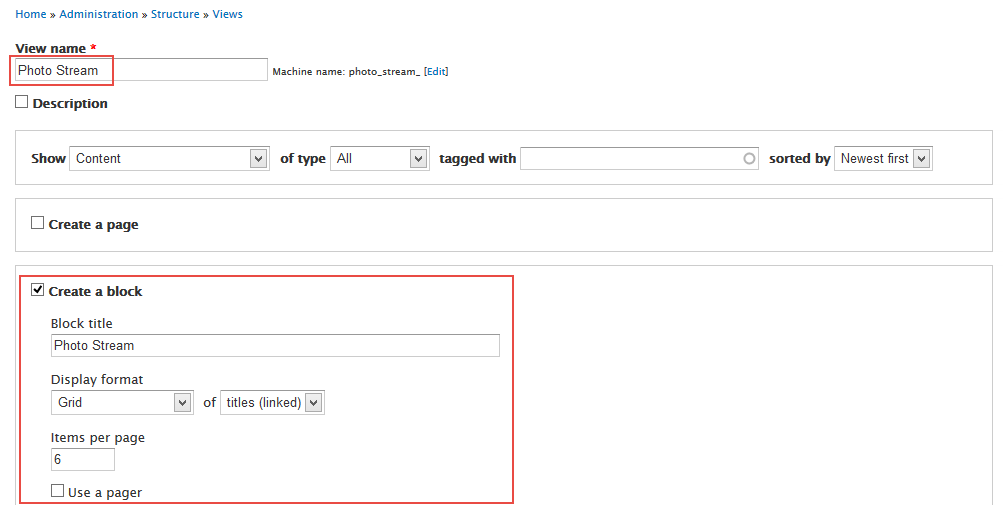
Photo Stream: view grid block
Front end Display
1. Create view
Step 1: Navigate to Structure >View, click Add new view link, Create Photo Stream view with following properties:
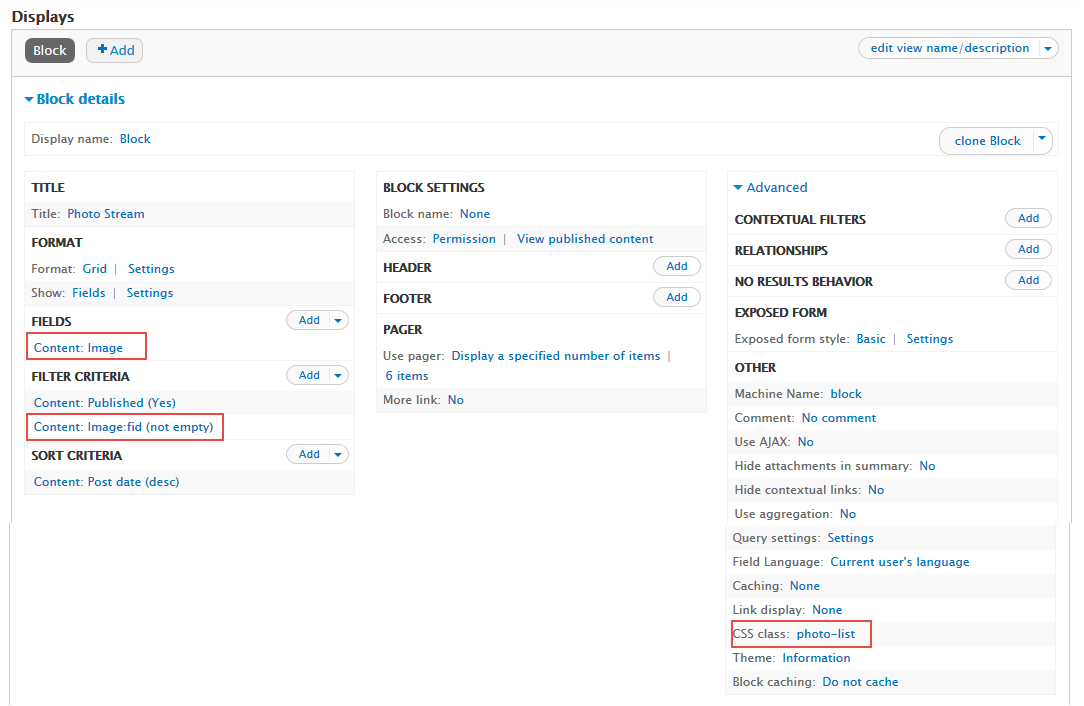
Step 2: Click Continue and edit button. Next to below steps to set properties for following fields:
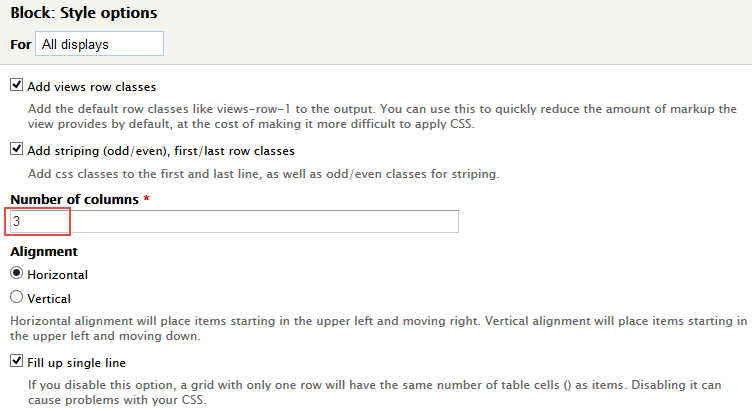
Step 3: At FORMAT area, click Settings button, set properties for Grid field:
Step 4: At FIELDS area, click Add button to add fields: Content: Image
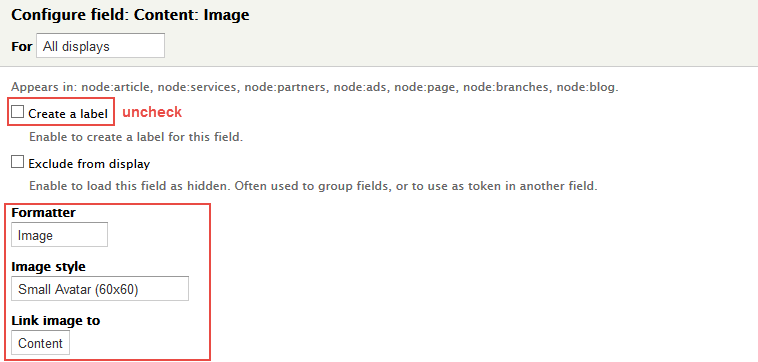
Step 5: Set properties for Content: Image
Step 6: At FIELDS area, click Rearrange button and remove Content: Title field
Step 7: Click Apply (all display) button.
Step 8: At FILTER CRITERIA area, Click Add button to add Content: Image field with following properties:
Step 9: Expand Advanced panel, add following properties for CSS class:
Step 10: Click Apply (all display) button.
Step 11: Click Save to save view
2. Configure block
Step 1: Navigate to Structure > Blocks
Step 2: Find block View: Photo Stream and set region "Panel Fifth 4"
Step 3: Click Save block button.
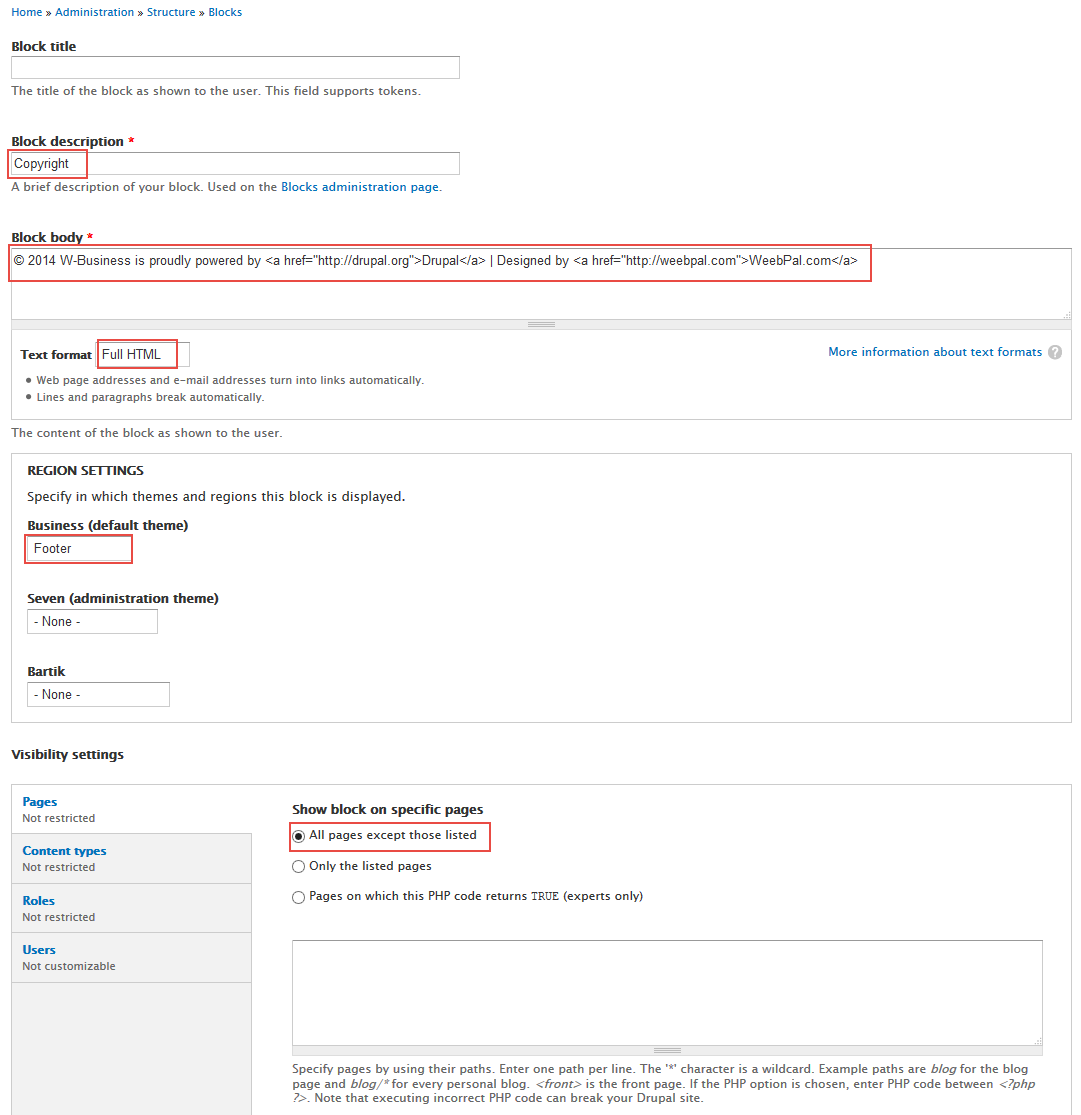
Copyright: Custom block
Front end Display
Create & configure block
Step 1: Navigate to Structure > Blocks, click Add block link, Create Copyright block with following properties:
Step 2: Click Save block button.
Refer to following HTML code:
© 2014 W-Business is proudly powered by Drupal | Designed by WeebPal.com
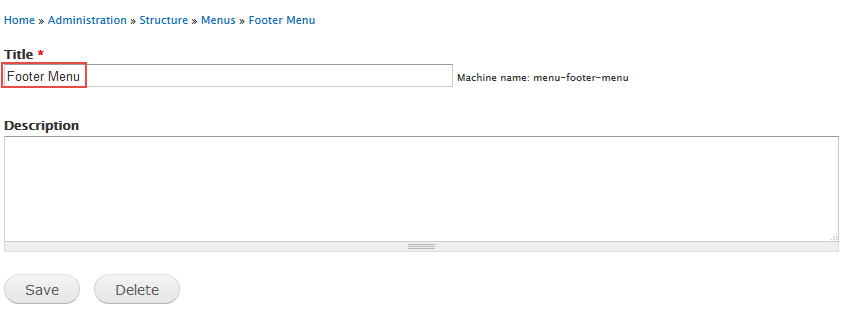
Footer Menu block
Front end Display
Configure block
Step 1: Navigate to Structure > Menus, click Add menu link, Create Quick Links menu with following properties:
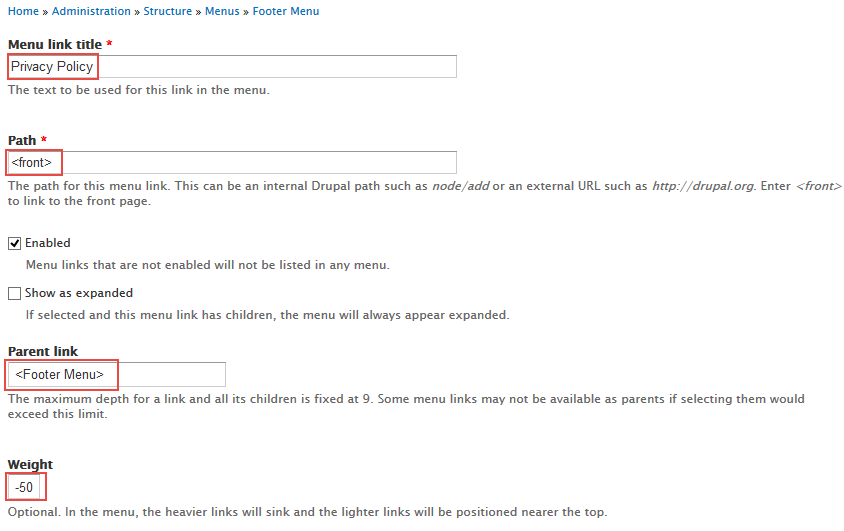
Step 2: Click Add link Create a link with following properties:
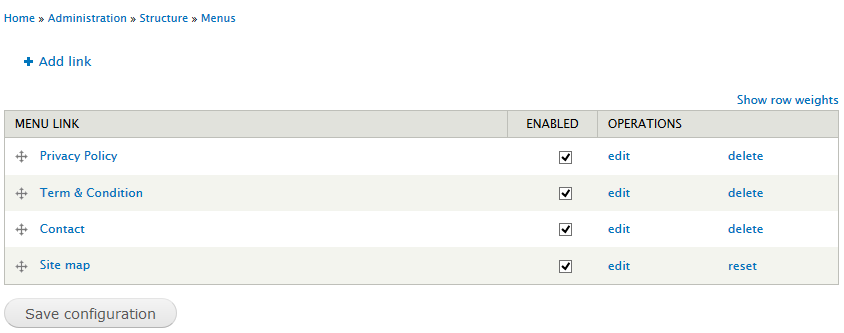
Do the steps above to create other links for Footer menu
Step 3: Click Save configuration button.
Step 4: Go to Structure > Blocks, find Footer Menu block. Set Footer region.
Step 5: Click Save block button.
Main Menu: main-menu block or TB Mega Menu
Drupal Main Menu block
Support menu types: Default Menu, TB Megamenu
TB Mega Menu
Create Subpages
Members: view grid page
Front end Display
Create and configure block
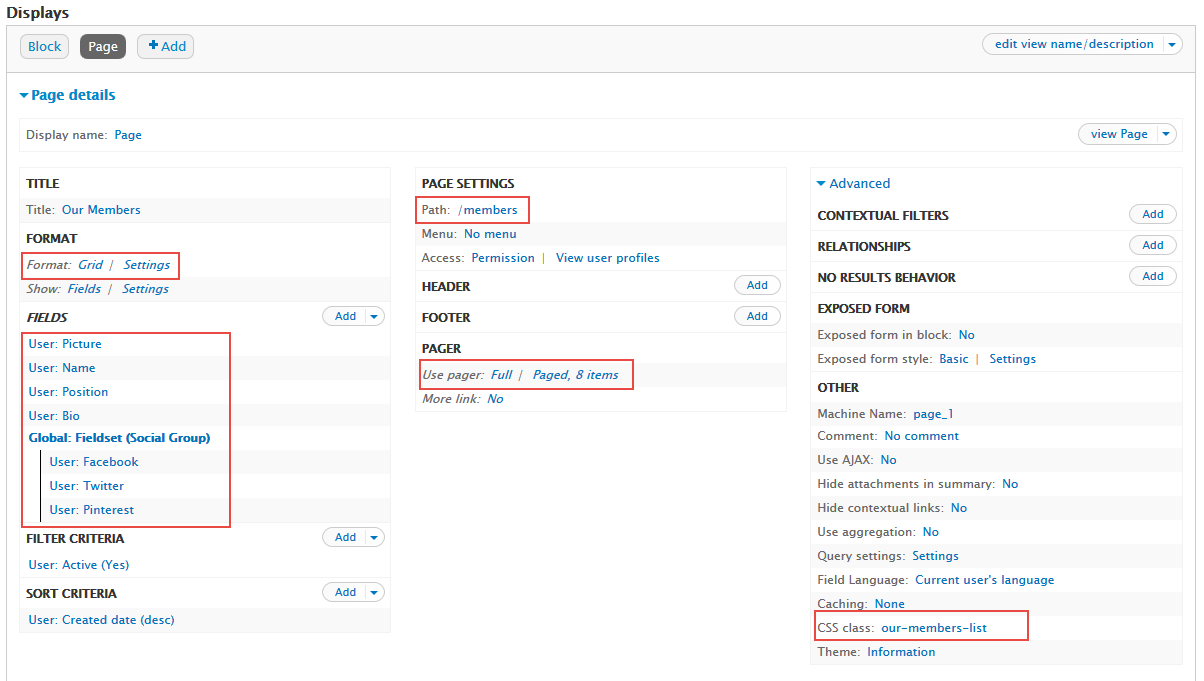
Step 1: Navigate to Structure > Views, find Our Members view, click Edit
Step 2: Click Add > Page. Next to below steps to set properties for following fields:
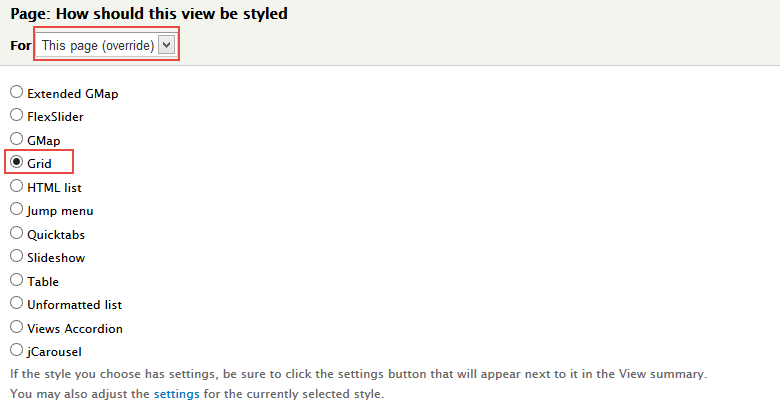
Step 3: At FORMAT area, click Unformatted list, set following properties:
Step 4: At FIELDS area, click Add button to add fields: Global: Fieldset, User: Bio, User: Facebook, User: Twitter, User: Pinterest
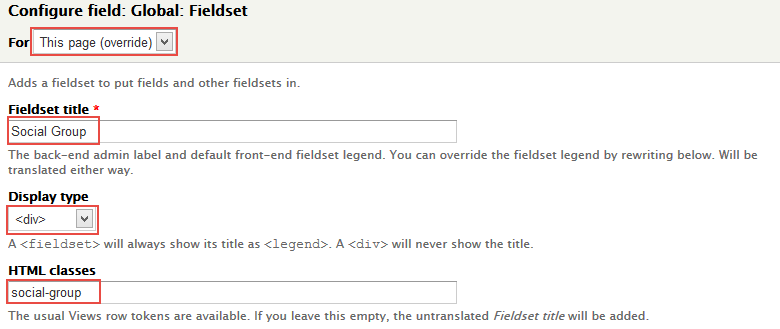
Step 5: Set properties for Global: Fieldset
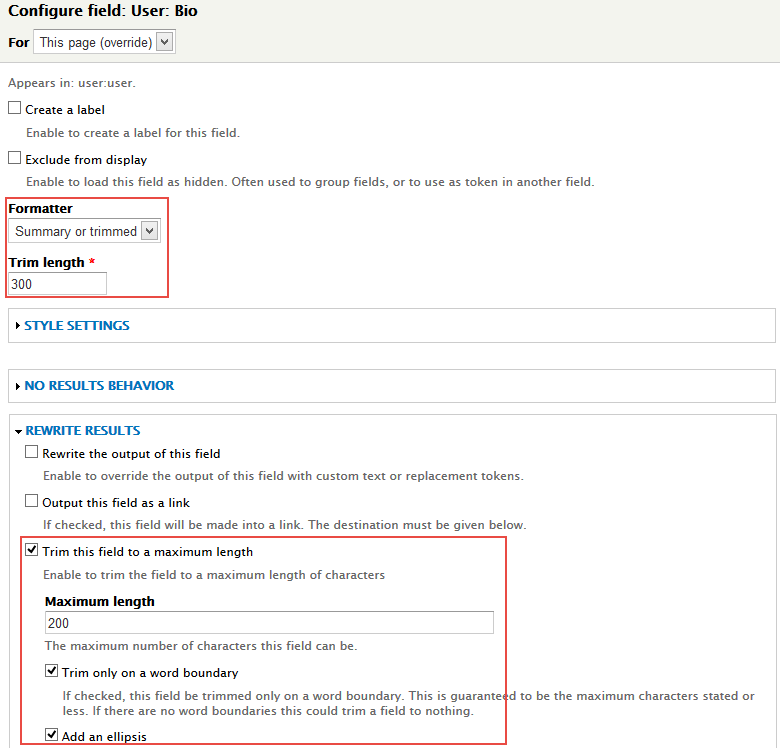
Step 6: Set properties for User: Bio
Step 7: Set properties for User: Facebook (set same properties for User: Twitter, User: Pinterest)
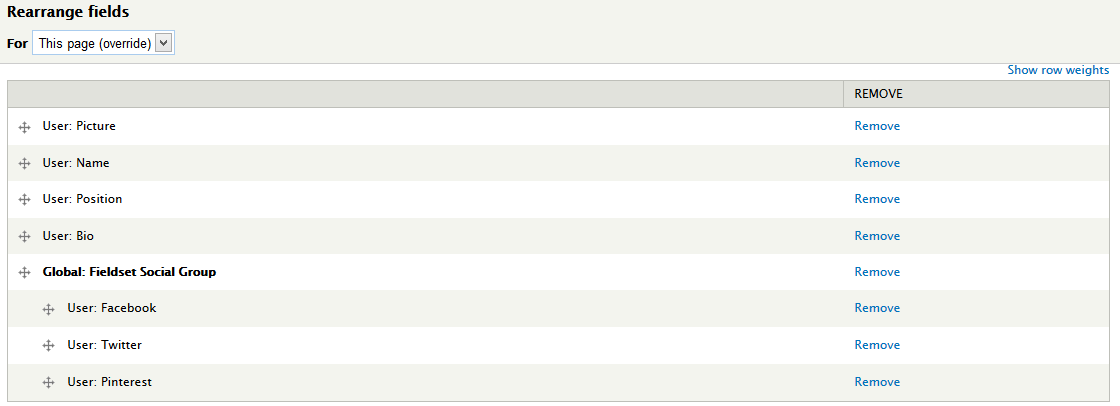
Step 8: At FIELDS area, click Rearrange set following arrange:
Step 9: At PAGE SETTINGS area, click Path link, then set path:
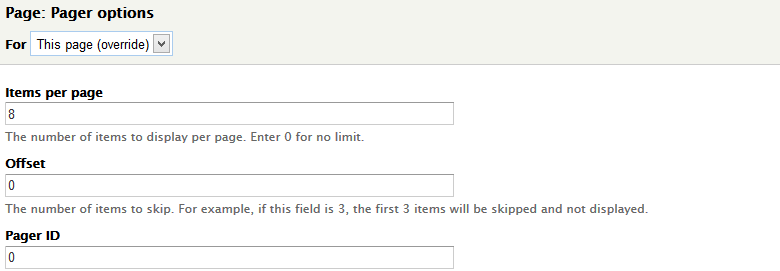
Step 10: At PAGER area, click User page link, then set following properties:
Step 11: Click Apply button, then set item number per page
Step 12: At CSS Class area, set following properties:
Step 13: Click Apply (all display) button
Step 14: Click Save button to save settings.
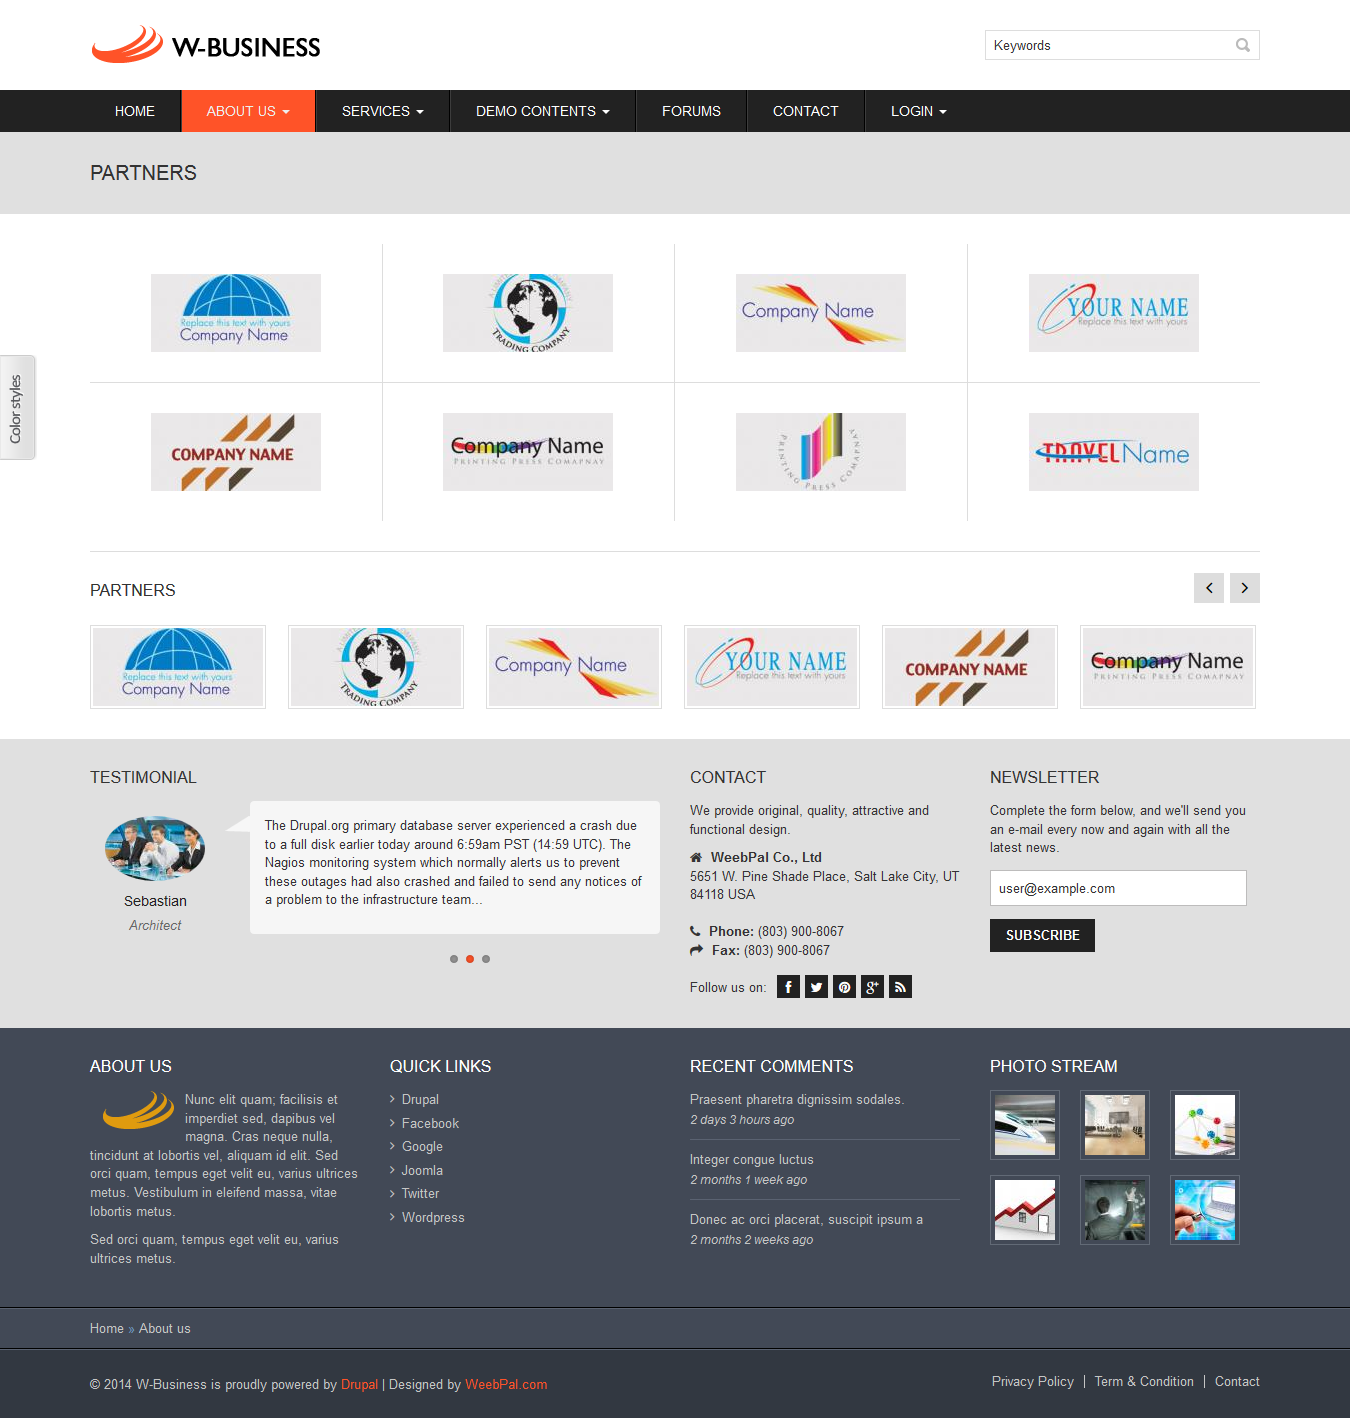
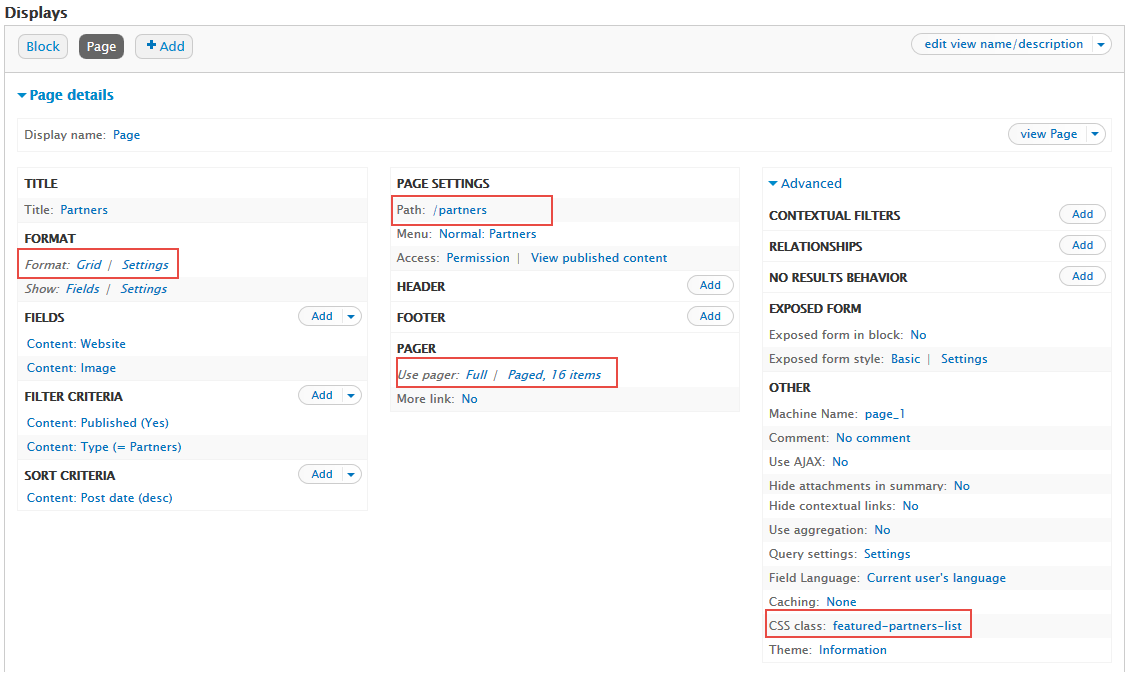
Partners: view grid page
Front end Display
Create and configure block
Step 1: Navigate to Structure > Views, find Featured Partners view, click Edit
Step 2: Click Add > Page. Next to below steps to set properties for following fields:
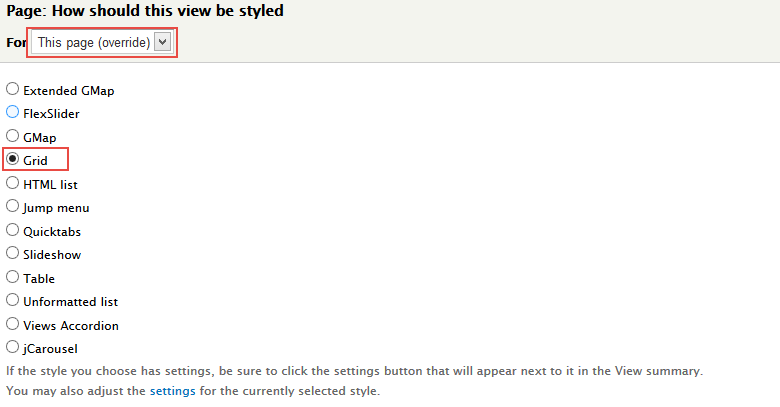
Step 3: At FORMAT area, click jCarousal, set following properties:
Step 4: At PAGE SETTINGS area, click Path link, then set path:
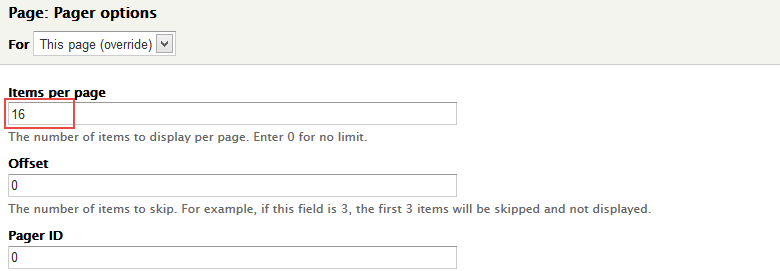
Step 5: At PAGER area, click User page link, then set following properties:
Step 6: Click Apply button, then set item number per page
Step 7: At CSS Class area, set following properties:
Step 8: Click Apply (all display) button
Step 9: Click Save button to save settings.
Articles: view unformatted list page
Front end Display
Create and configure block
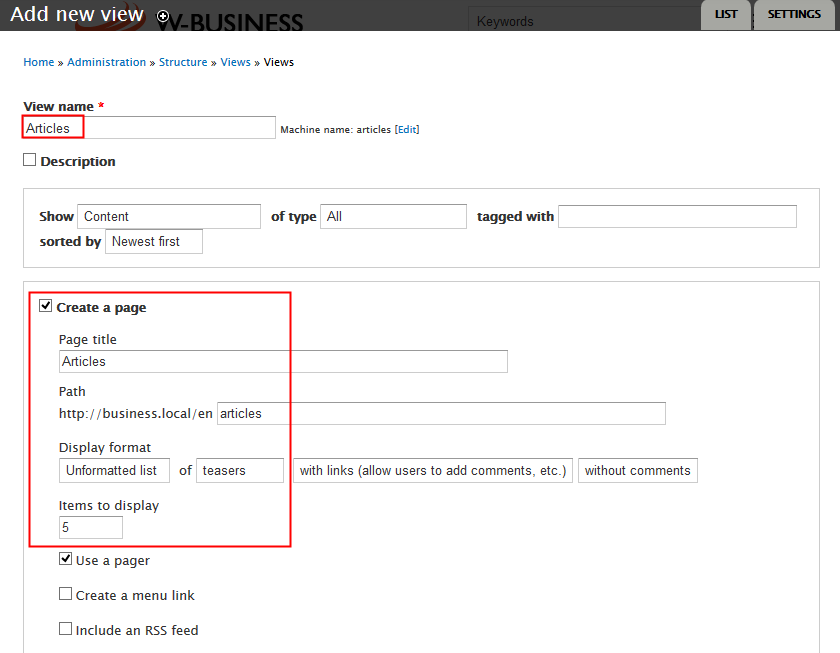
Step 1: Navigate to Structure > Views, click Add new view, then create Articles view with following settings:
Step 2: Click Continue and edit button. Next to below steps to set properties for following fields:
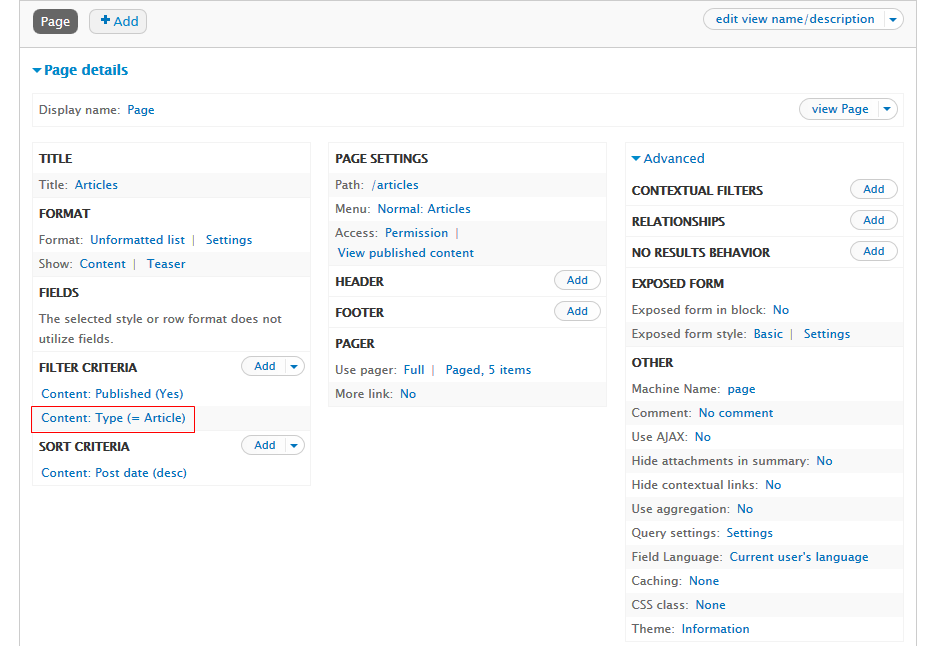
Step 3: At FILTER CRITERIA area, Click Add button to add Content: Type field, then choose type is Articles
Step 4: Click Apply (all display) button
Step 5: Click Save button to save settings.
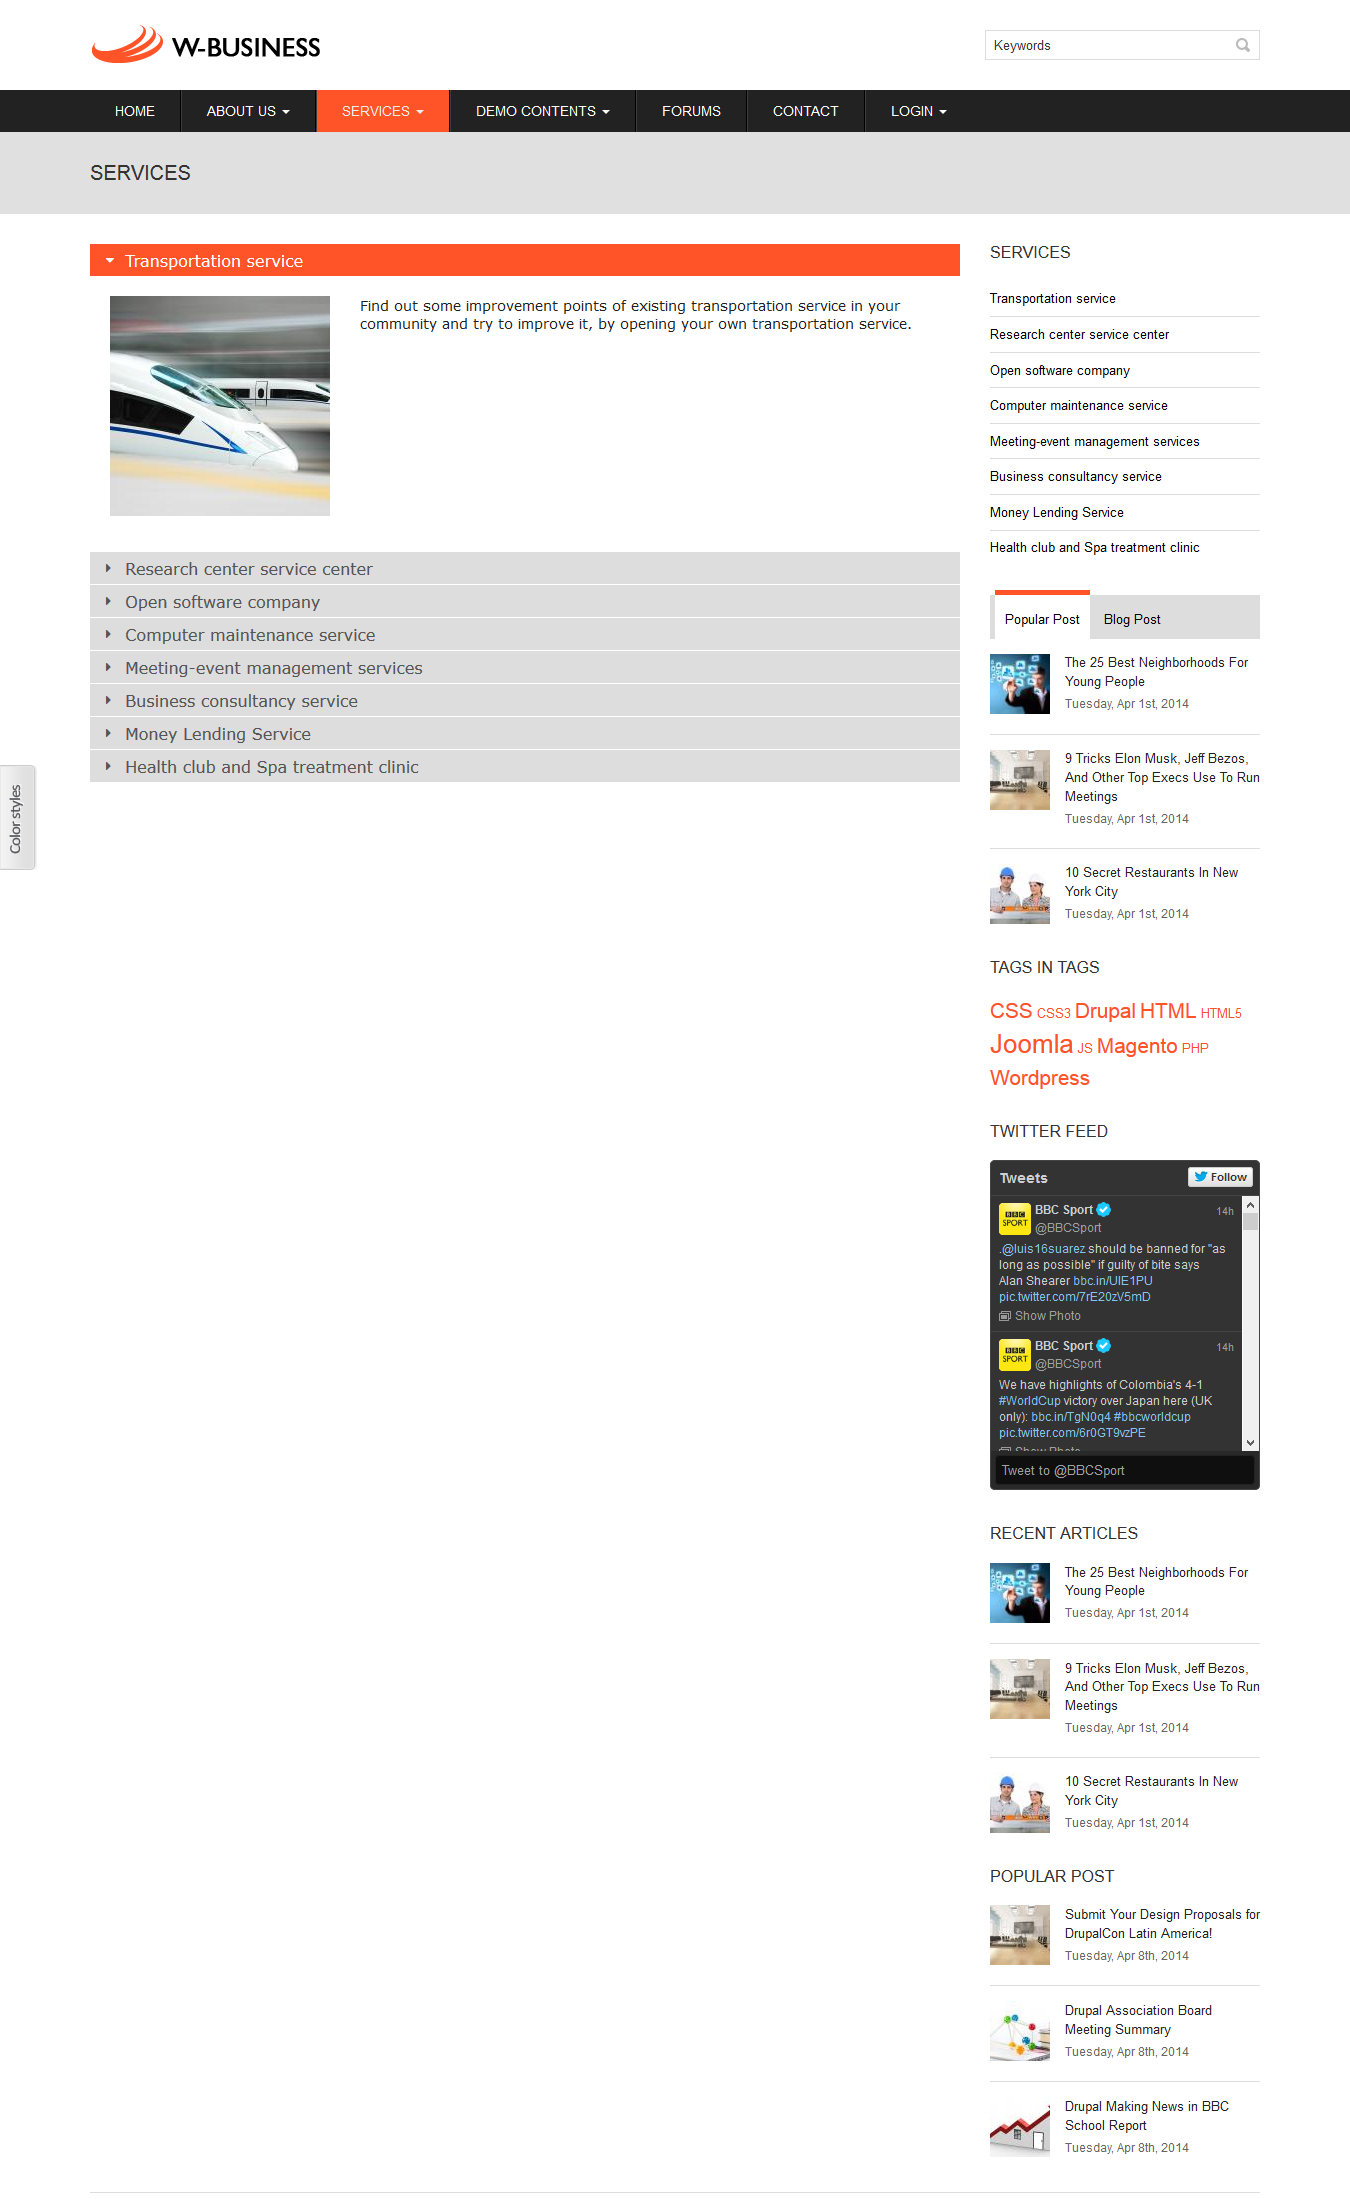
Services: view accordion page
Front end Display
Create and configure block
Step 1: Navigate to Structure > Views, find Services view, click Edit
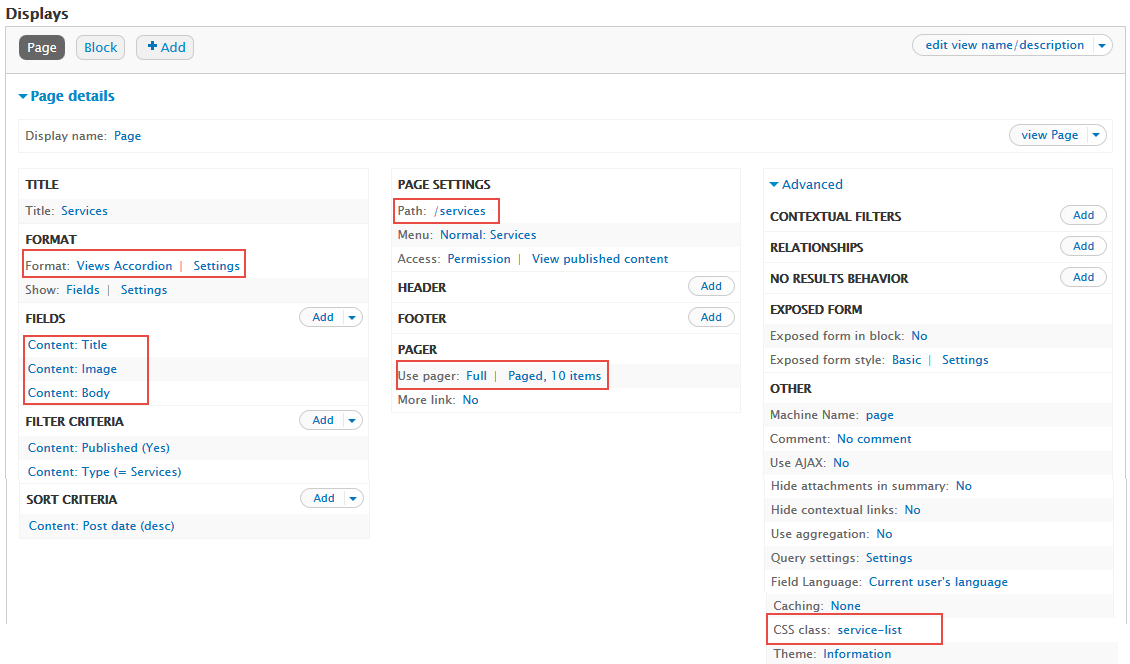
Step 2: Click Add > Page. Next to below steps to set properties for following fields:
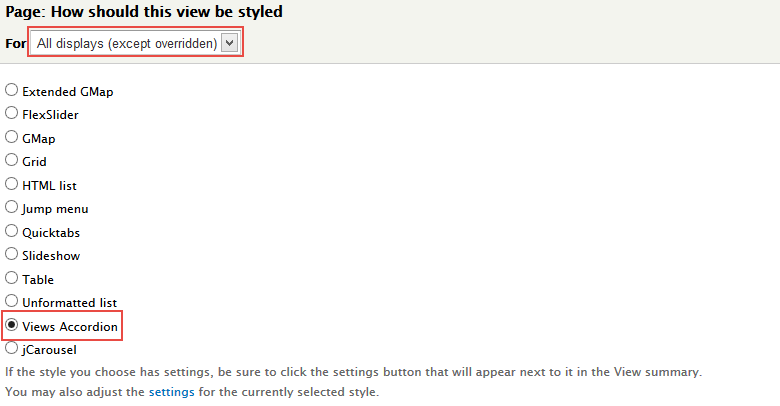
Step 3: At FORMAT area, click link, set following properties:
Step 4: At FIELDS area, click Add button to add fields: Content: Image, Content: Body
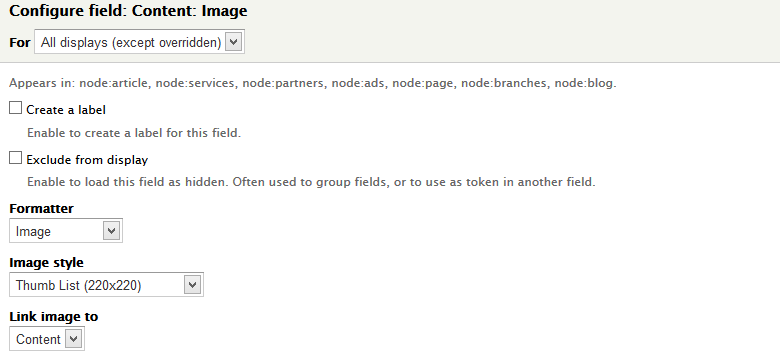
Step 5: Set properties for Content: Image
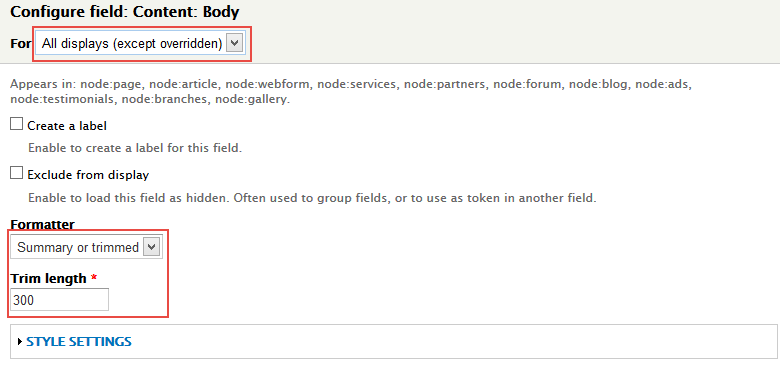
Step 6: Set properties for Content: Body
Step 7: At FIELDS area, click Rearrange set following arrange:
Step 8: At PAGE SETTINGS area, click Path link, then set path:
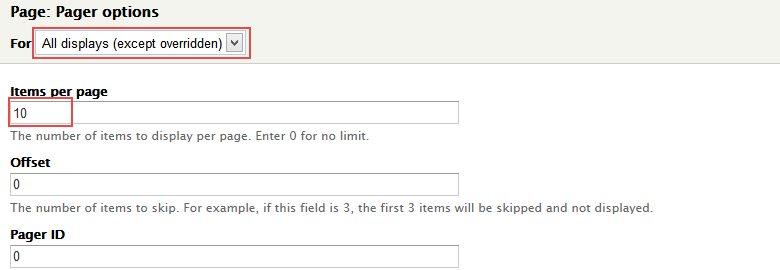
Step 9: At PAGER area, click User page link, then set following properties:
Step 10: Click Apply button, then set item number per page
Step 11: At CSS Class area, set following properties:
Step 12: Click Apply (all display) button
Step 13: Click Save button to save settings.
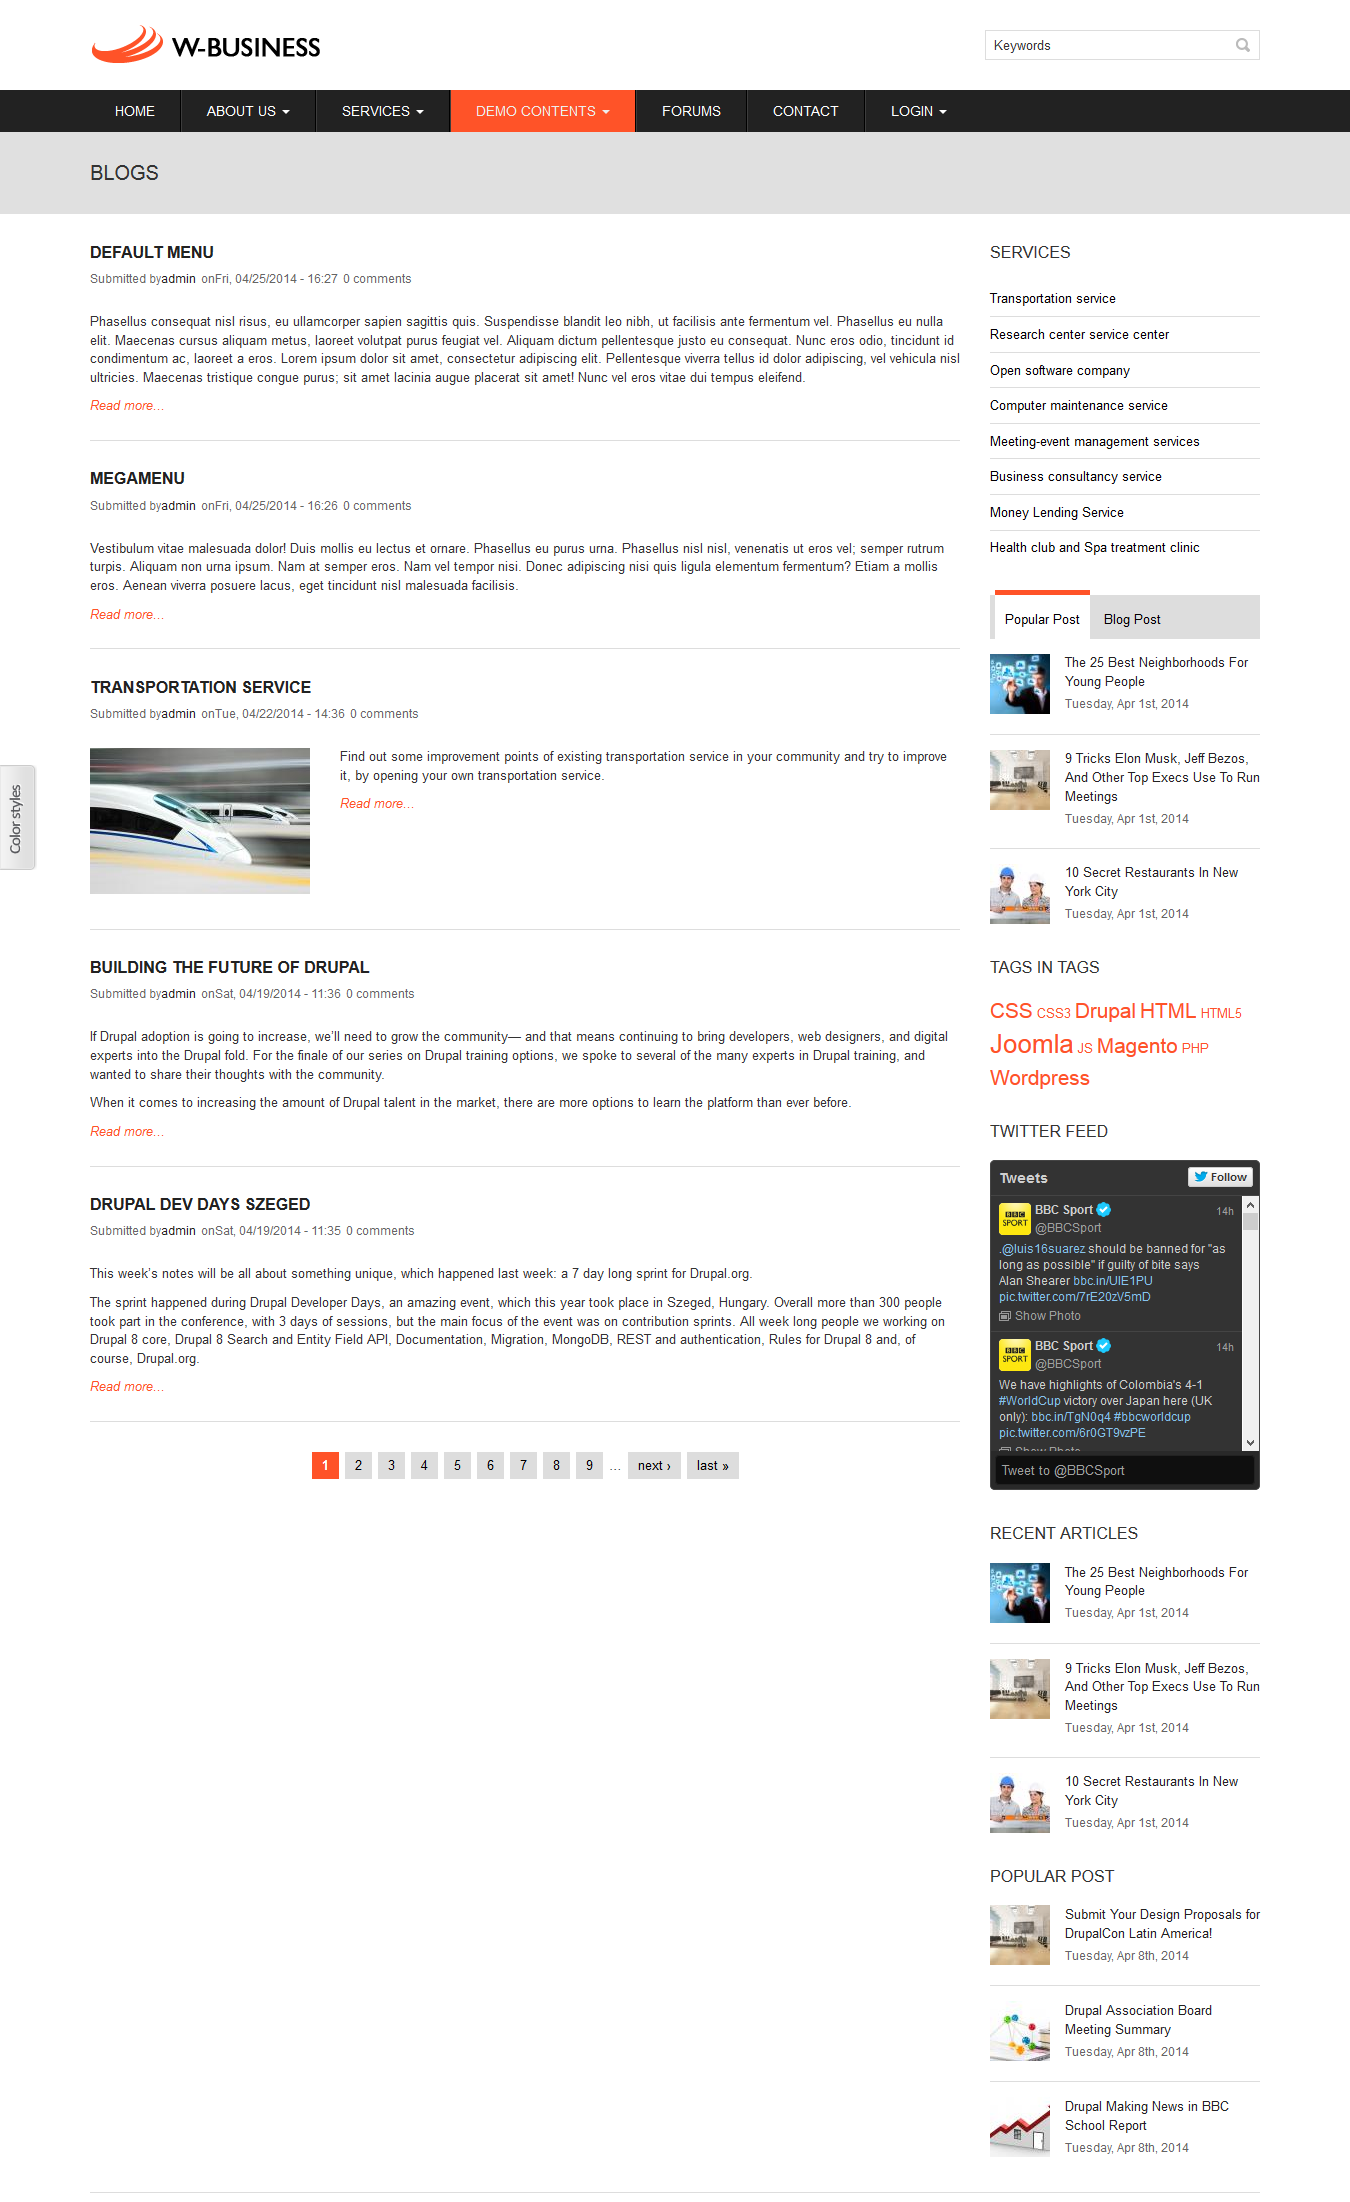
Blogs: view unformatted list page
Front end Display
Create and configure block
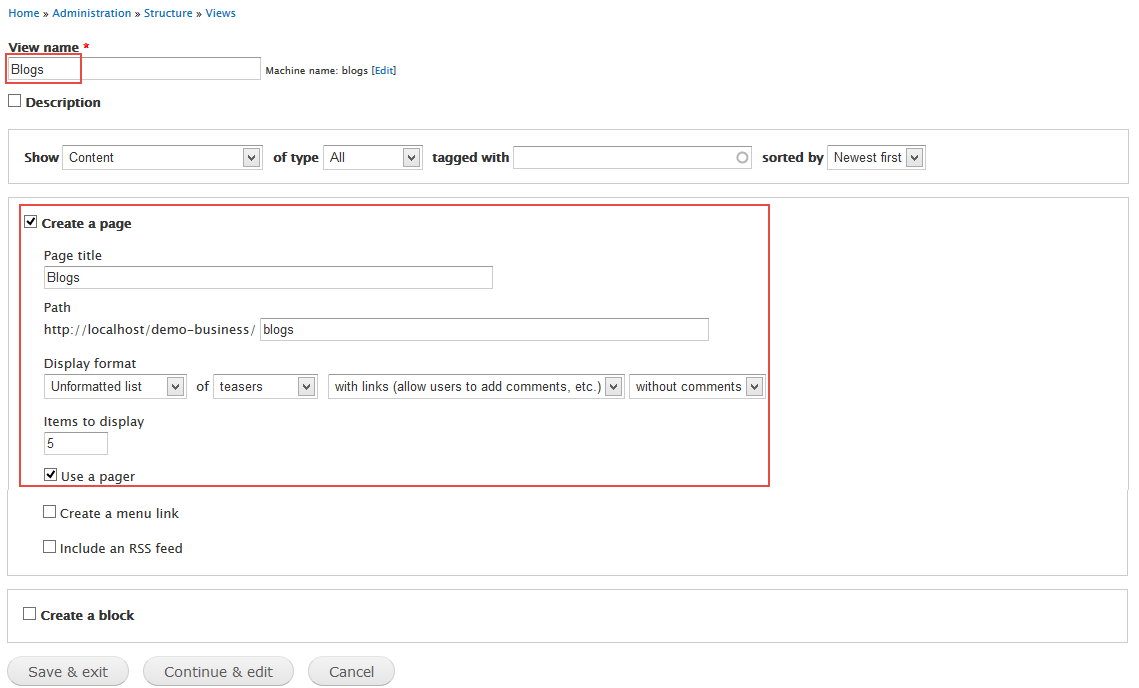
Step 1: Navigate to Structure > Views, click Add new view, then create Blogs view with following settings:
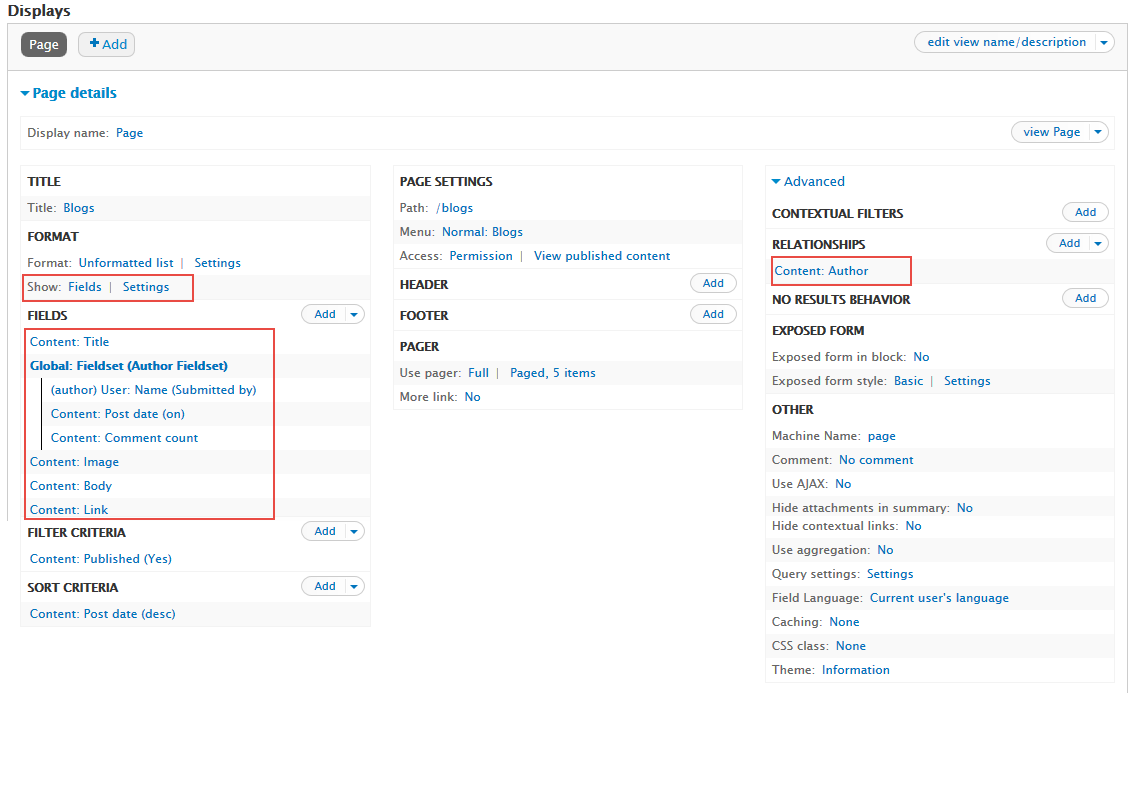
Step 2: Click Continue and edit button. Next to below steps to set properties for following fields:
Step 3: Expand Advanced panel, at RELATIONSHIPS area, click Add to add relationship Content: Author
Step 4: At FORMAT area, click Show link, set following properties:
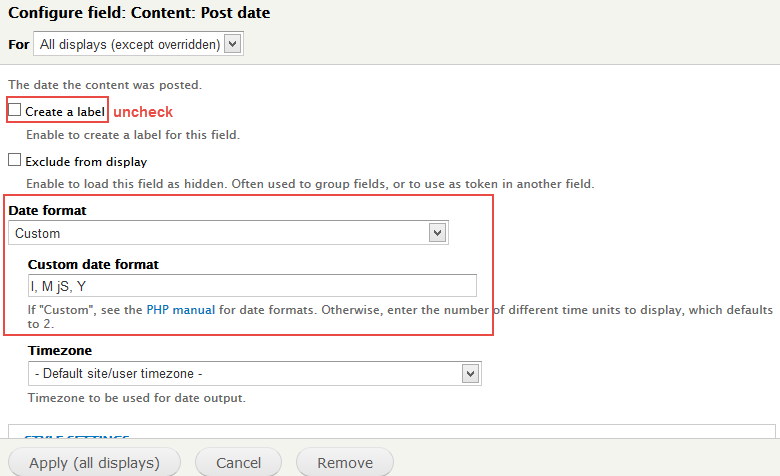
Step 5: At FIELDS area, click Add button to add fields: Global: Fieldset, User: Name, Content: Post date, Content: Comment count, Content: Image, Content: Body, Content: Link
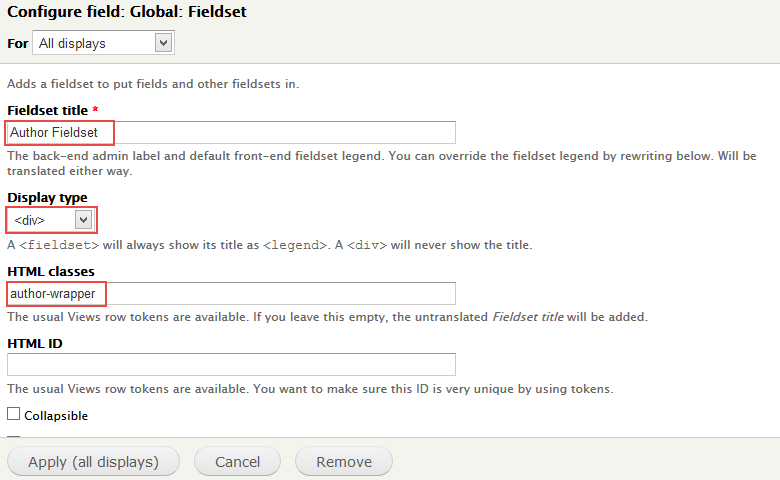
Step 6: Set properties for Global: Fieldset
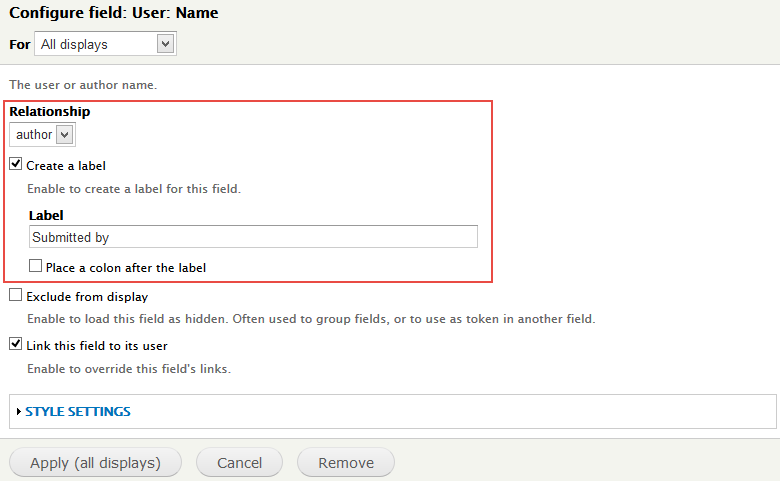
Step 7: Set properties for User: Name
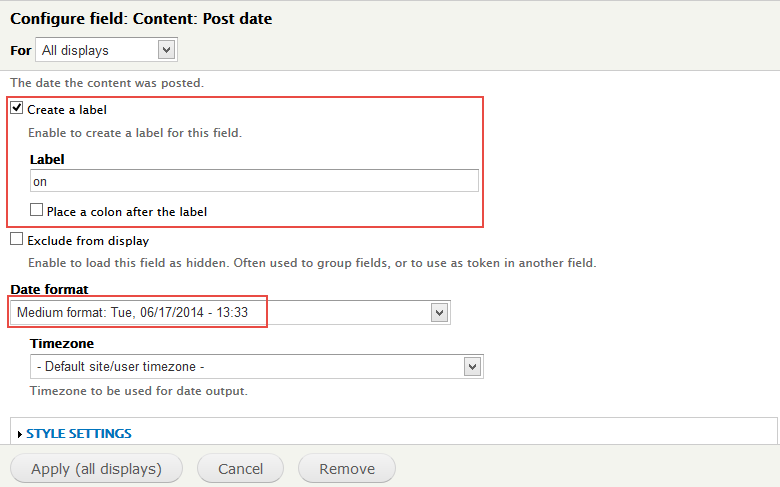
Step 8: Set properties for Content: Post date
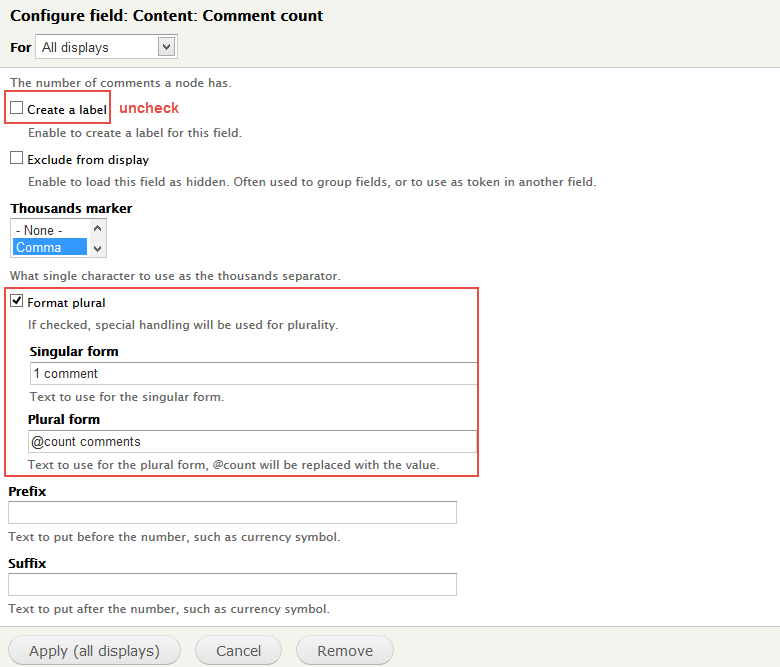
Step 9: Set properties for Content: Comment count
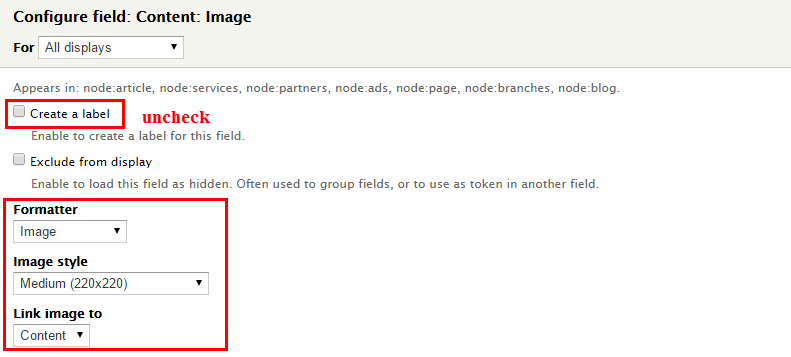
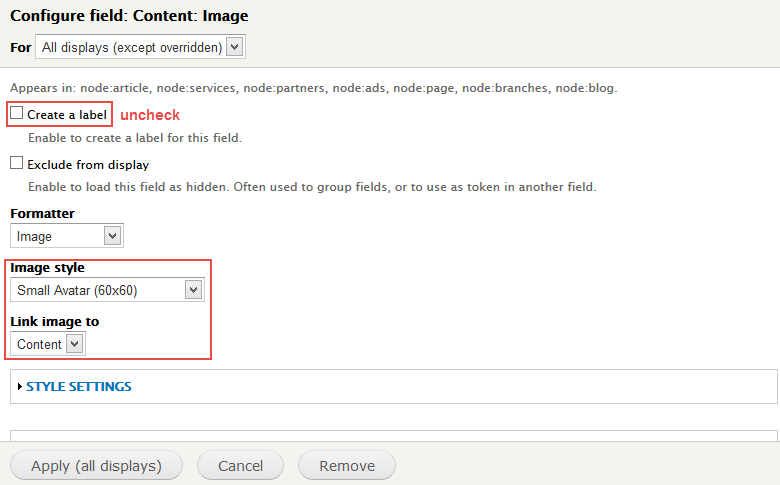
Step 10: Set properties for Content: Image
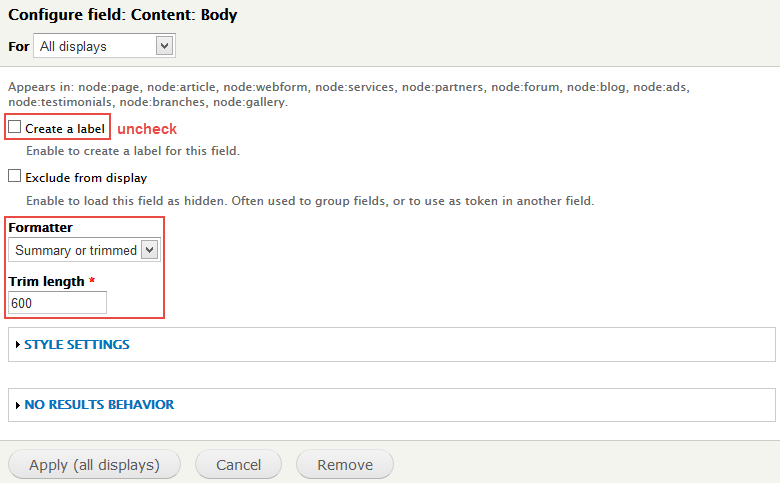
Step 11: Set properties for Content: Body
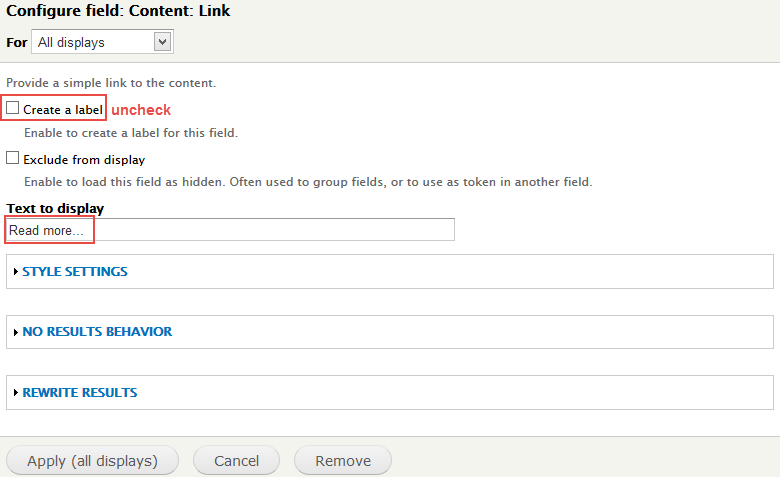
Step 12: Set properties for Content: Link
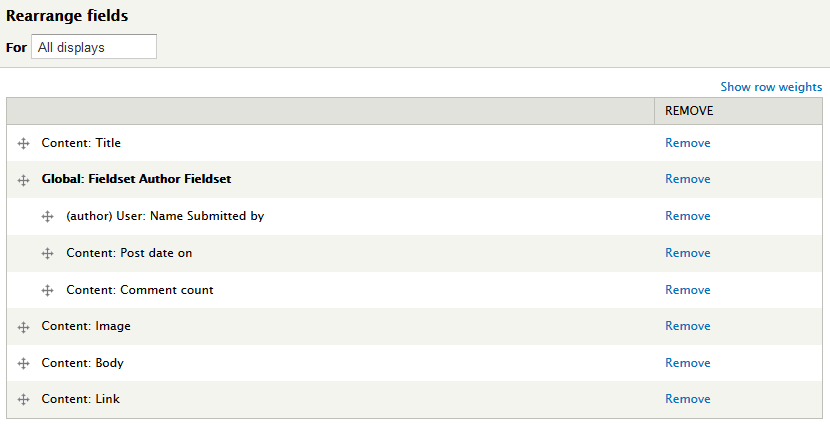
Step 13: At FIELDS area, click Rearrange set following arrange:
Step 14: At CSS Class area, set following properties:
Step 15: Click Save button to save settings.
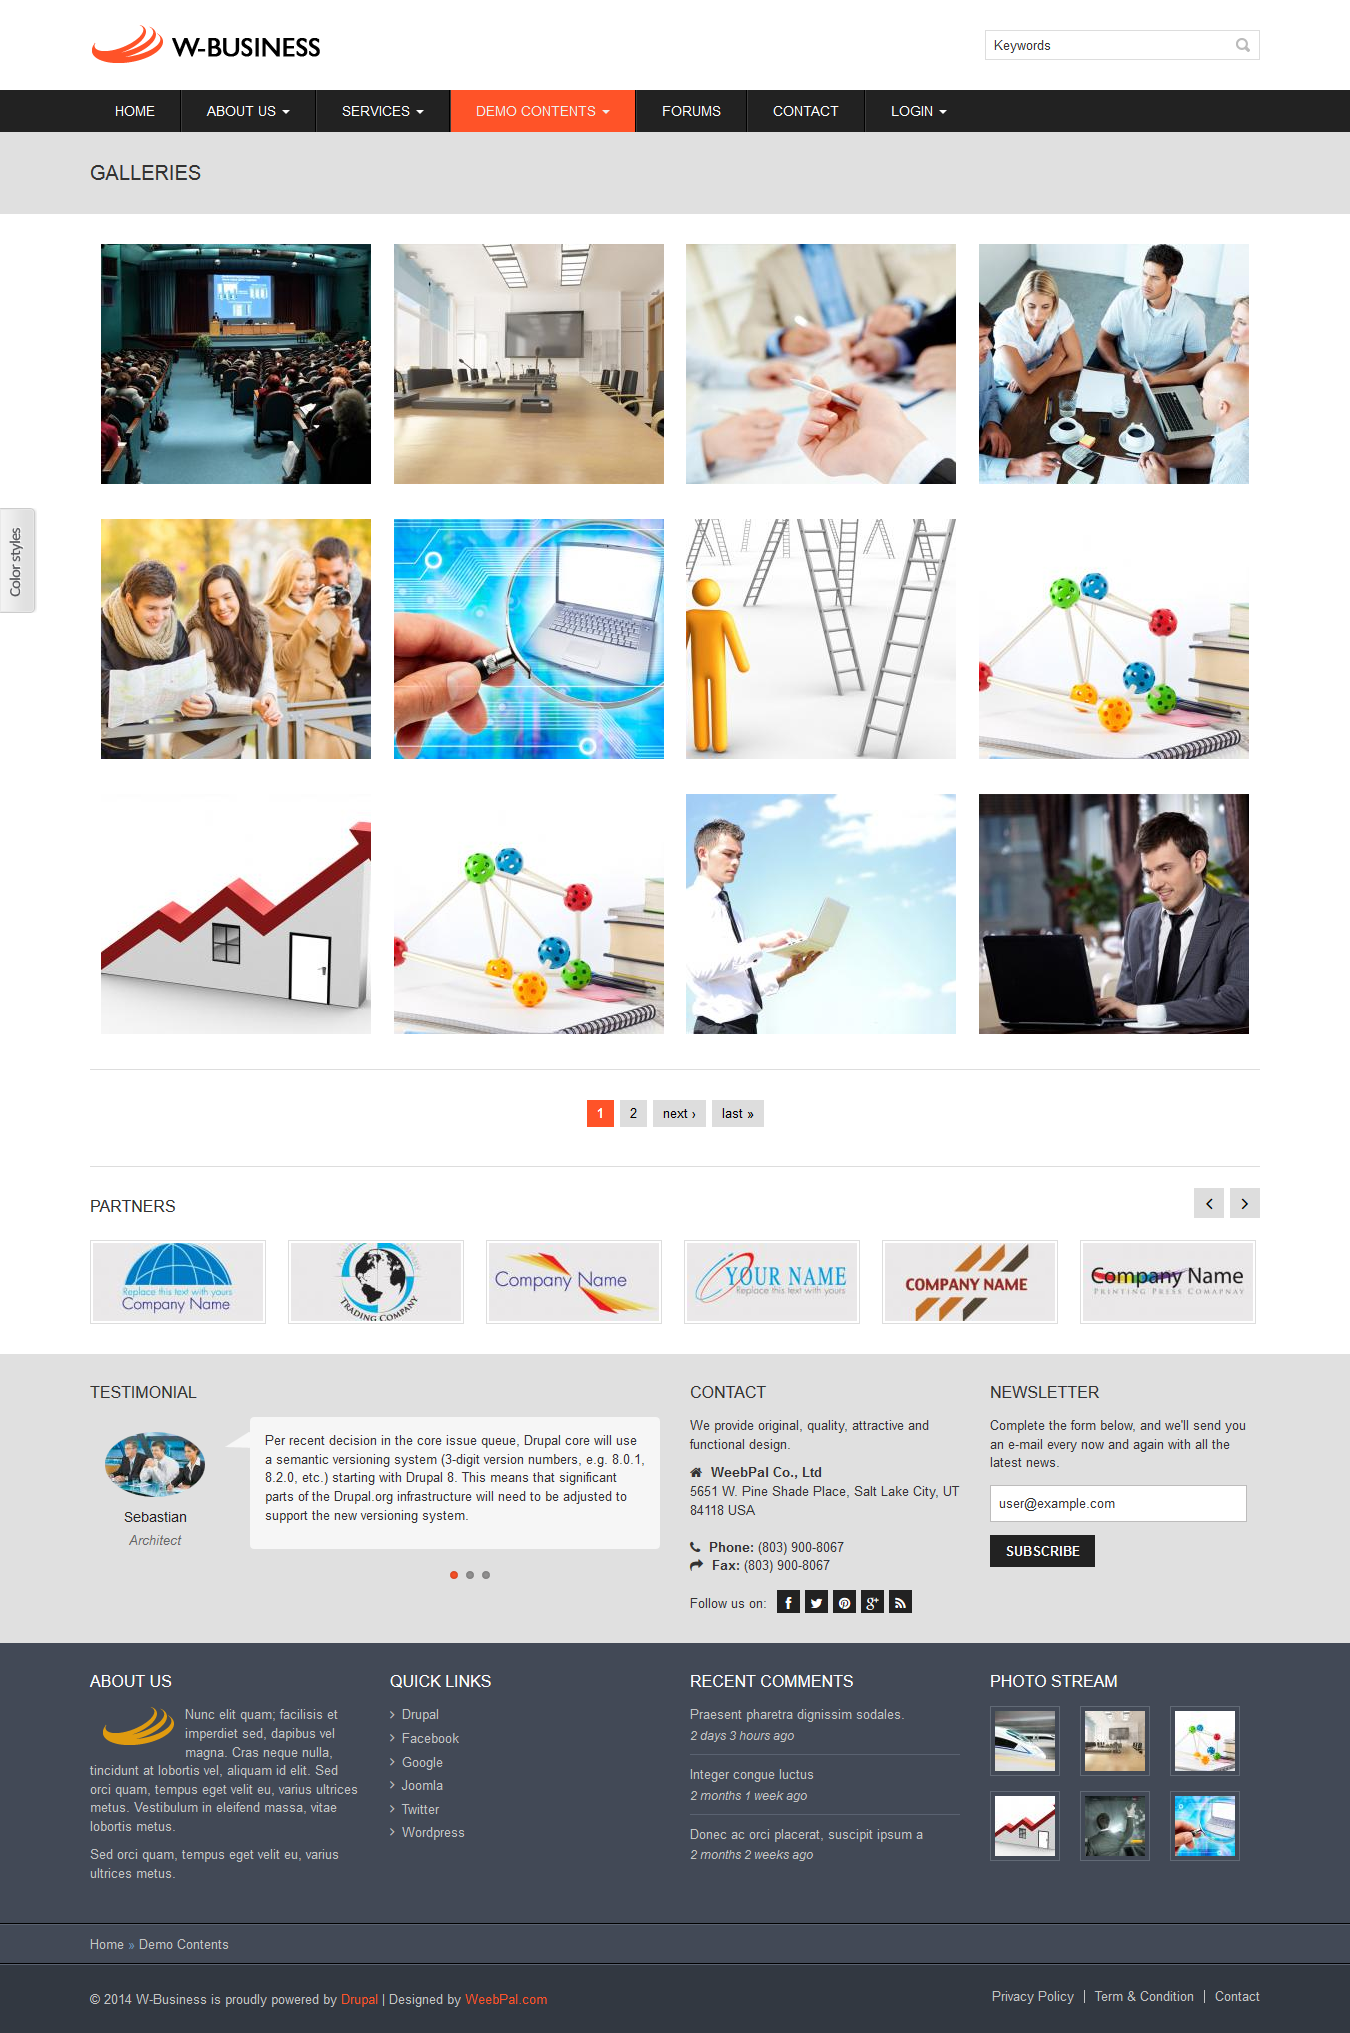
Galleries: Grid view
Front end Display
Create and configure block
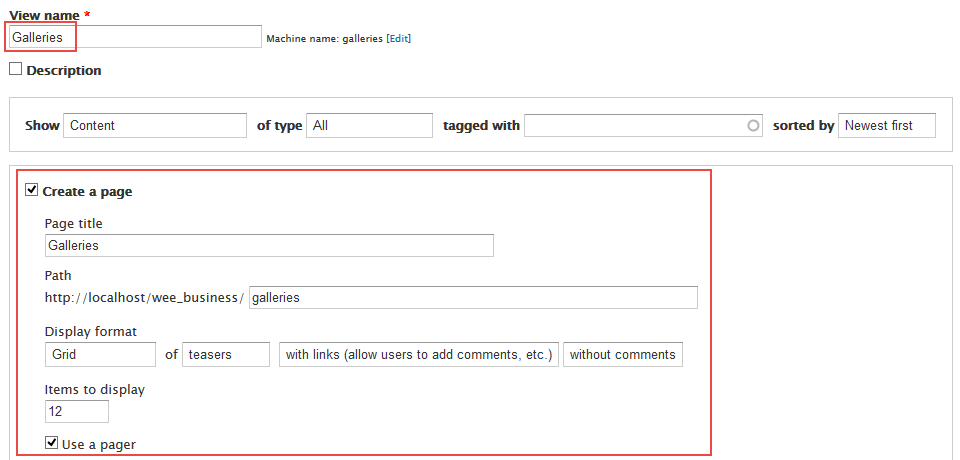
Step 1: Navigate to Structure > Views, click Add new view, then create Galleries view with following settings:
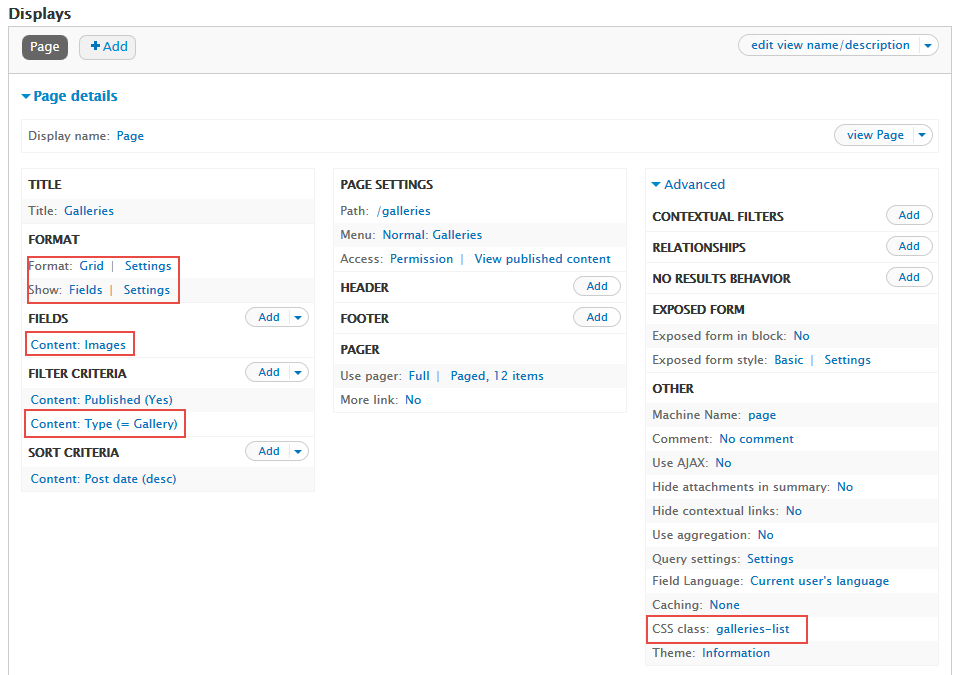
Step 2: Click Continue and edit button. Next to below steps to set properties for following fields:
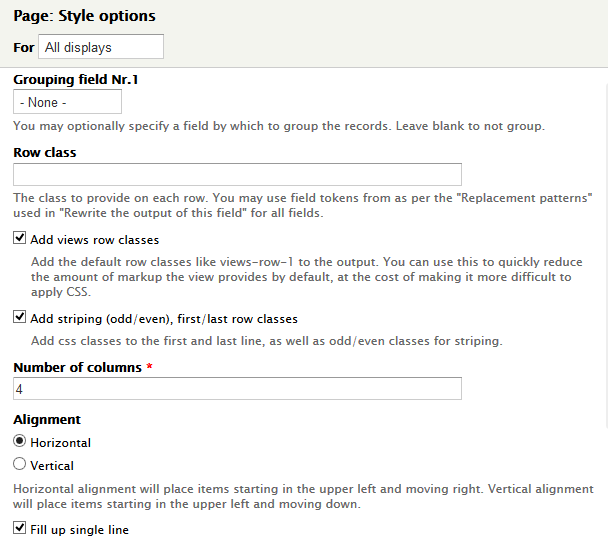
Step 3: At FORMAT area, click Settings link, set following properties:
Step 4: At FIELDS area, click Add button to add fields: Content: Image
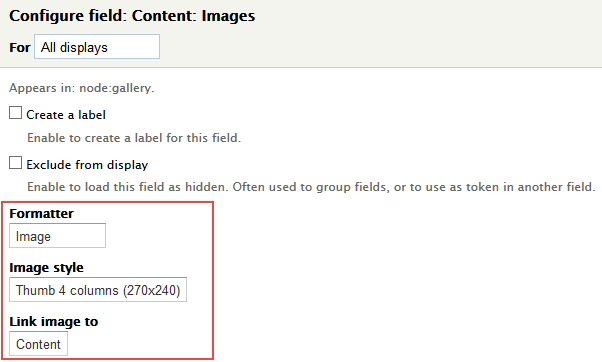
Step 5: Set properties for Content: Image
Step 6: At FIELDS area, click Rearrange, remove Content: Title field
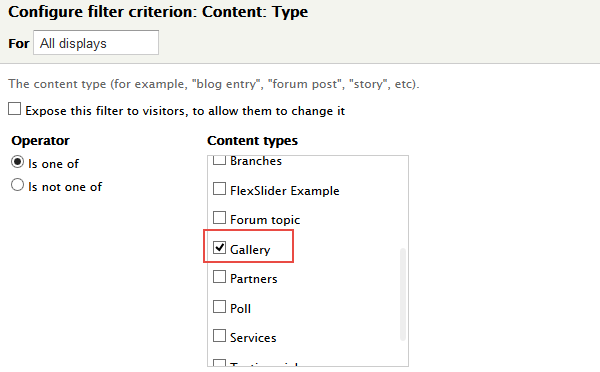
Step 7: At FILTER CRITERIA area, Click Add button to add fields Content: Type
Step 8: Set properties for Content: Type
Step 9: Expand Advanced panel, add following properties for CSS class:
Step 10: Click Save button to save settings.
Forums page
Front end Display
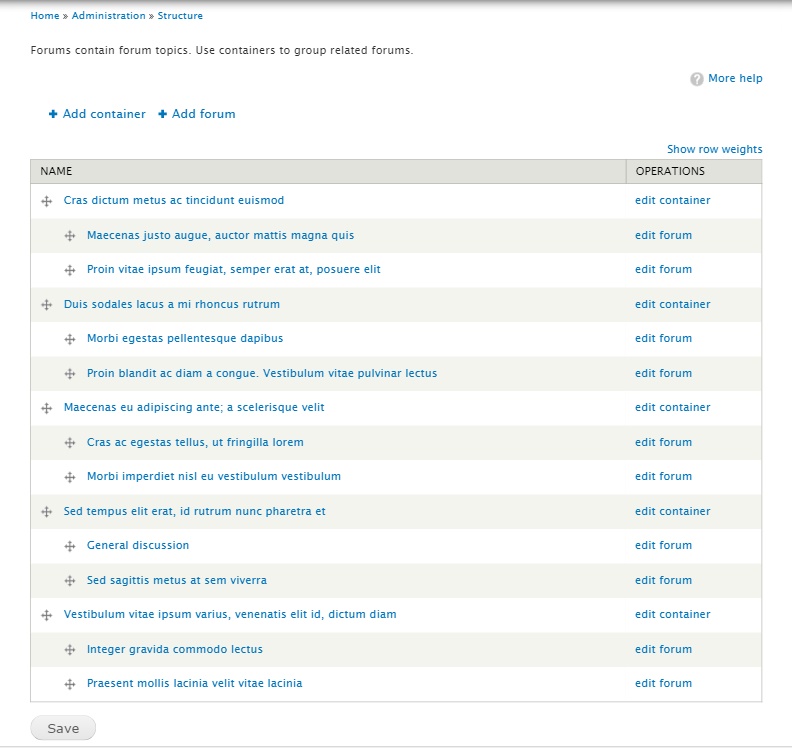
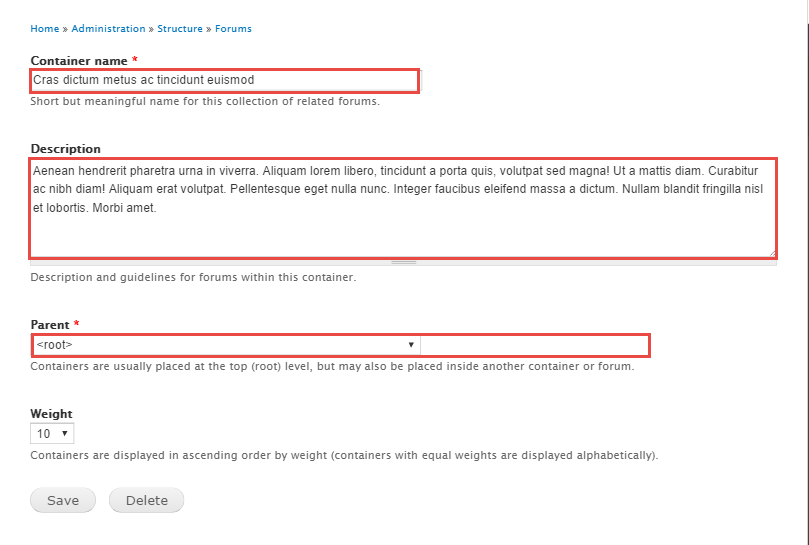
Enable module Forum1. Add Forums
1. Navigate to Structure > Forums, click Add container or Add forum
2. Click Save button
Configure container / forum itemContact
Front end Display
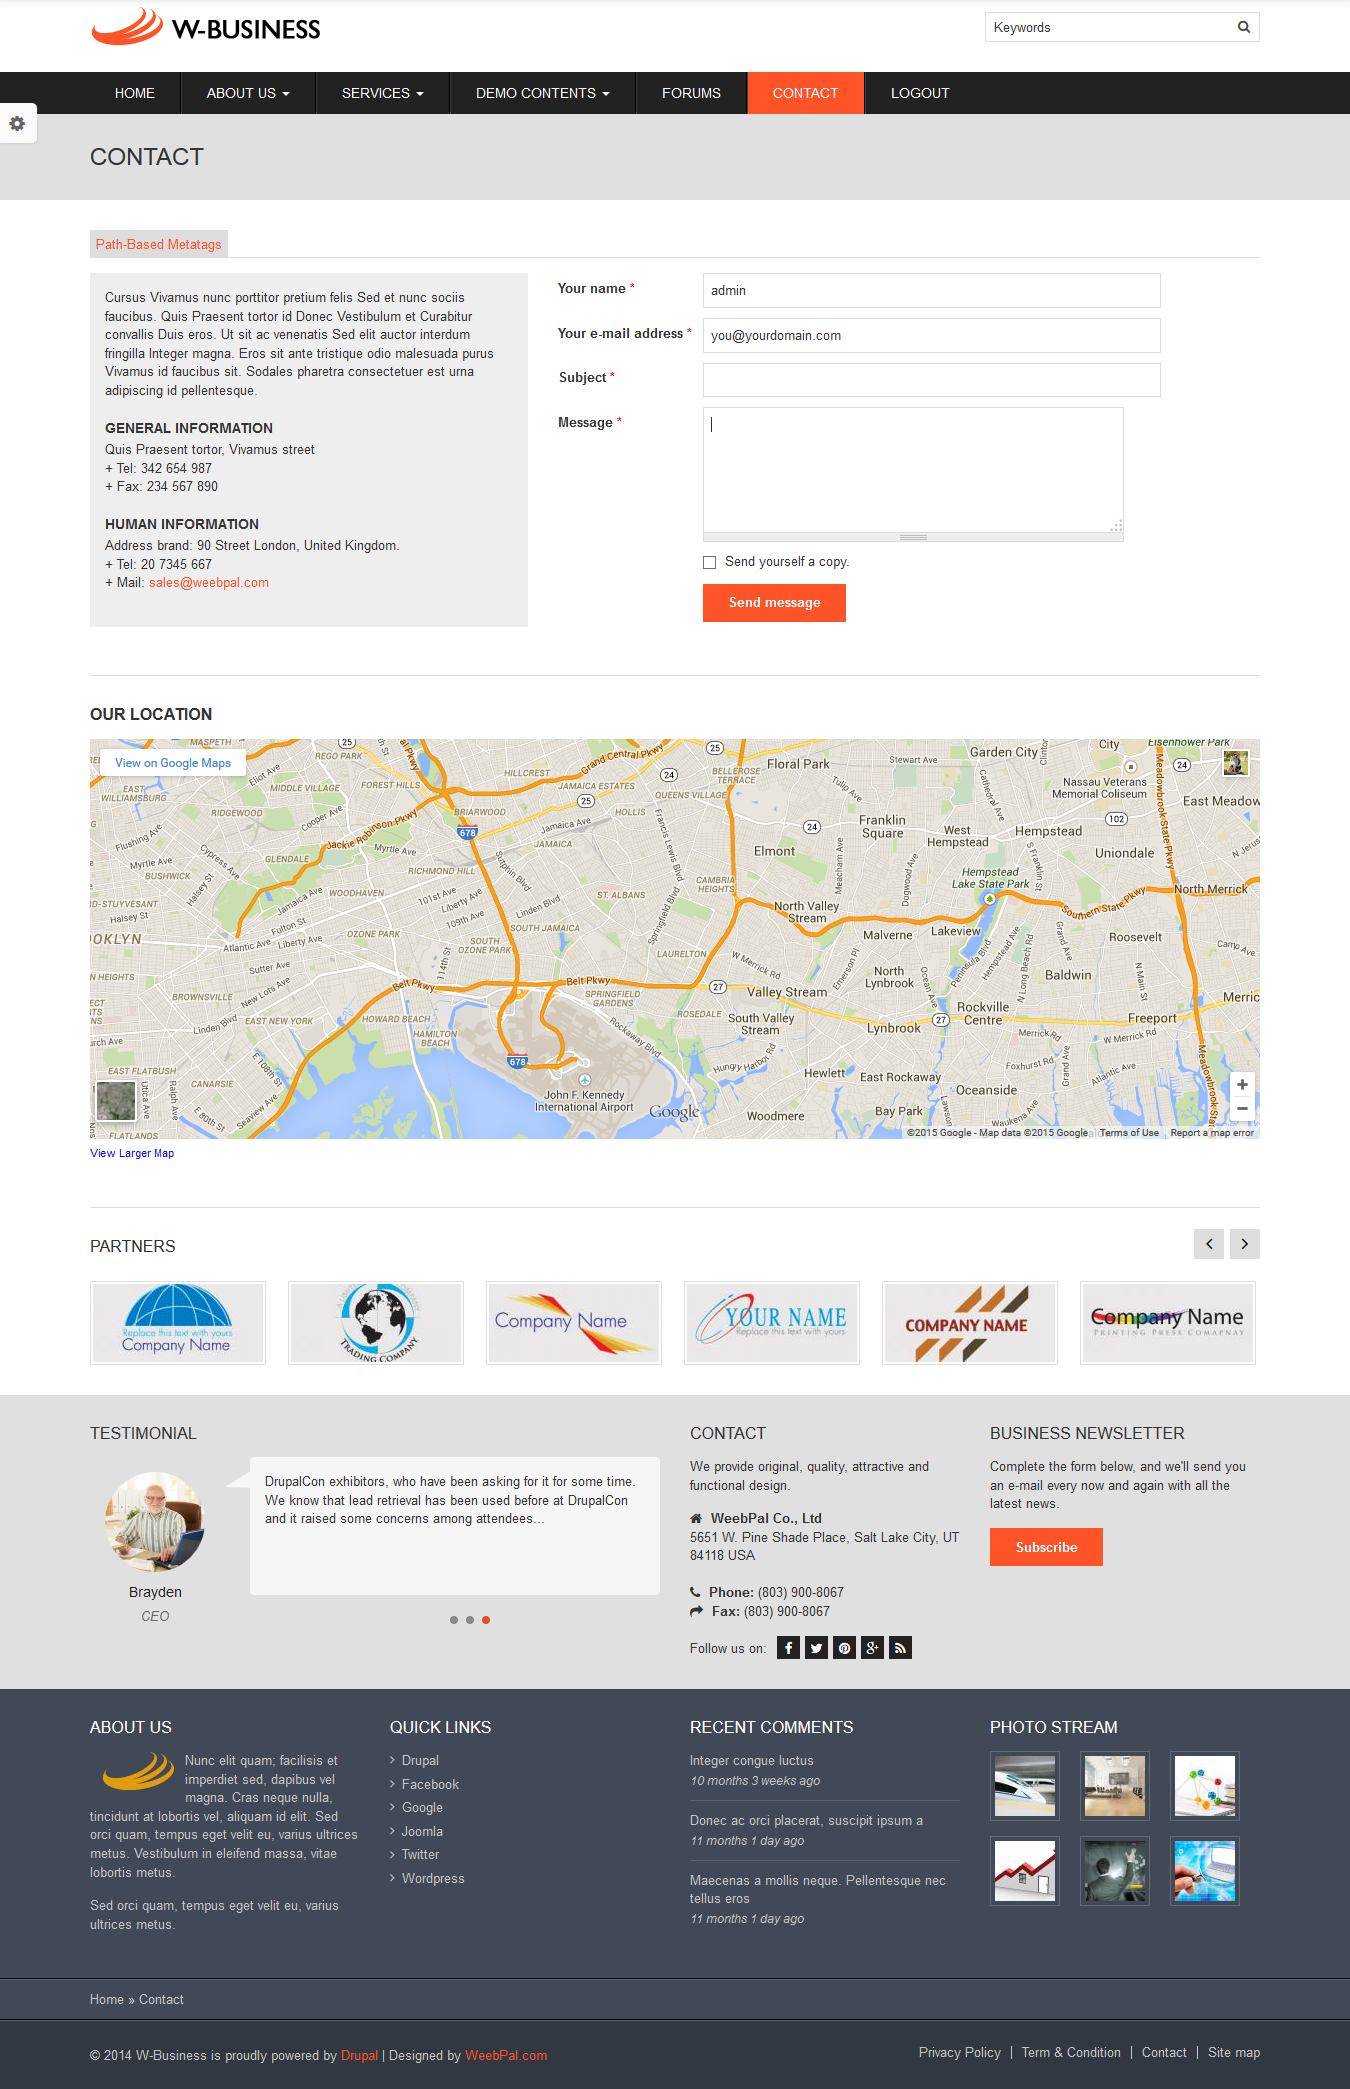
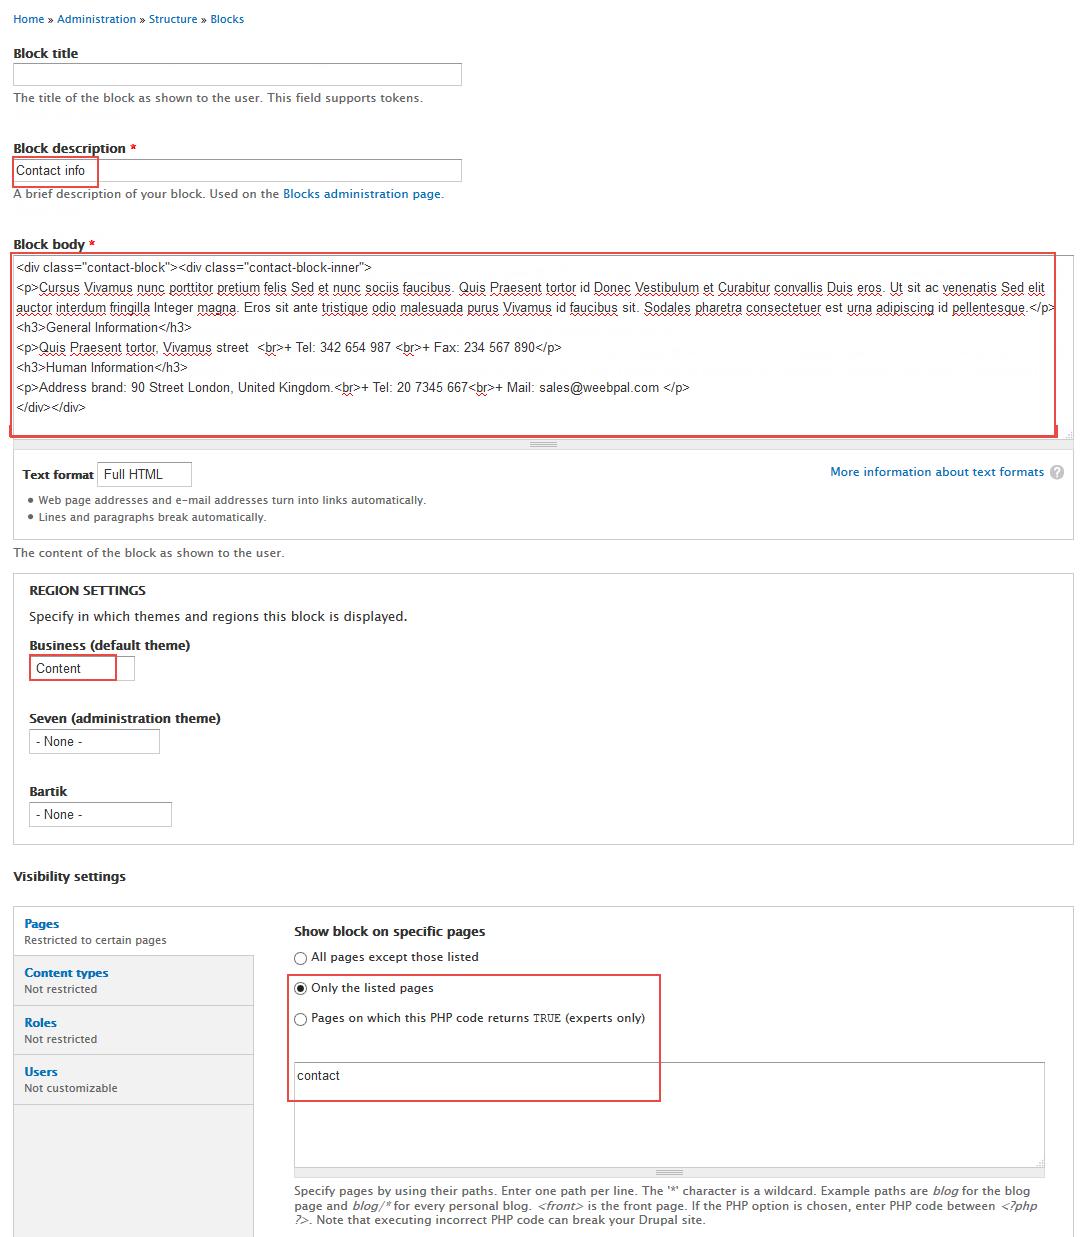
1. Contact Info block
Step 1: Navigate to Structure > Blocks, click Add block block, add Contact Info block with the following properties:
Step 2: Click Save block button.
Refer to following HTML code:
Cursus Vivamus nunc porttitor pretium felis Sed et nunc sociis faucibus. Quis Praesent tortor id Donec Vestibulum et Curabitur convallis Duis eros. Ut sit ac venenatis Sed elit auctor interdum fringilla Integer magna. Eros sit ante tristique odio malesuada purus Vivamus id faucibus sit. Sodales pharetra consectetuer est urna adipiscing id pellentesque.
General Information
Quis Praesent tortor, Vivamus street
+ Tel: 342 654 987
+ Fax: 234 567 890
Human Information
Address brand: 90 Street London, United Kingdom.
+ Tel: 20 7345 667
+ Mail: [email protected]
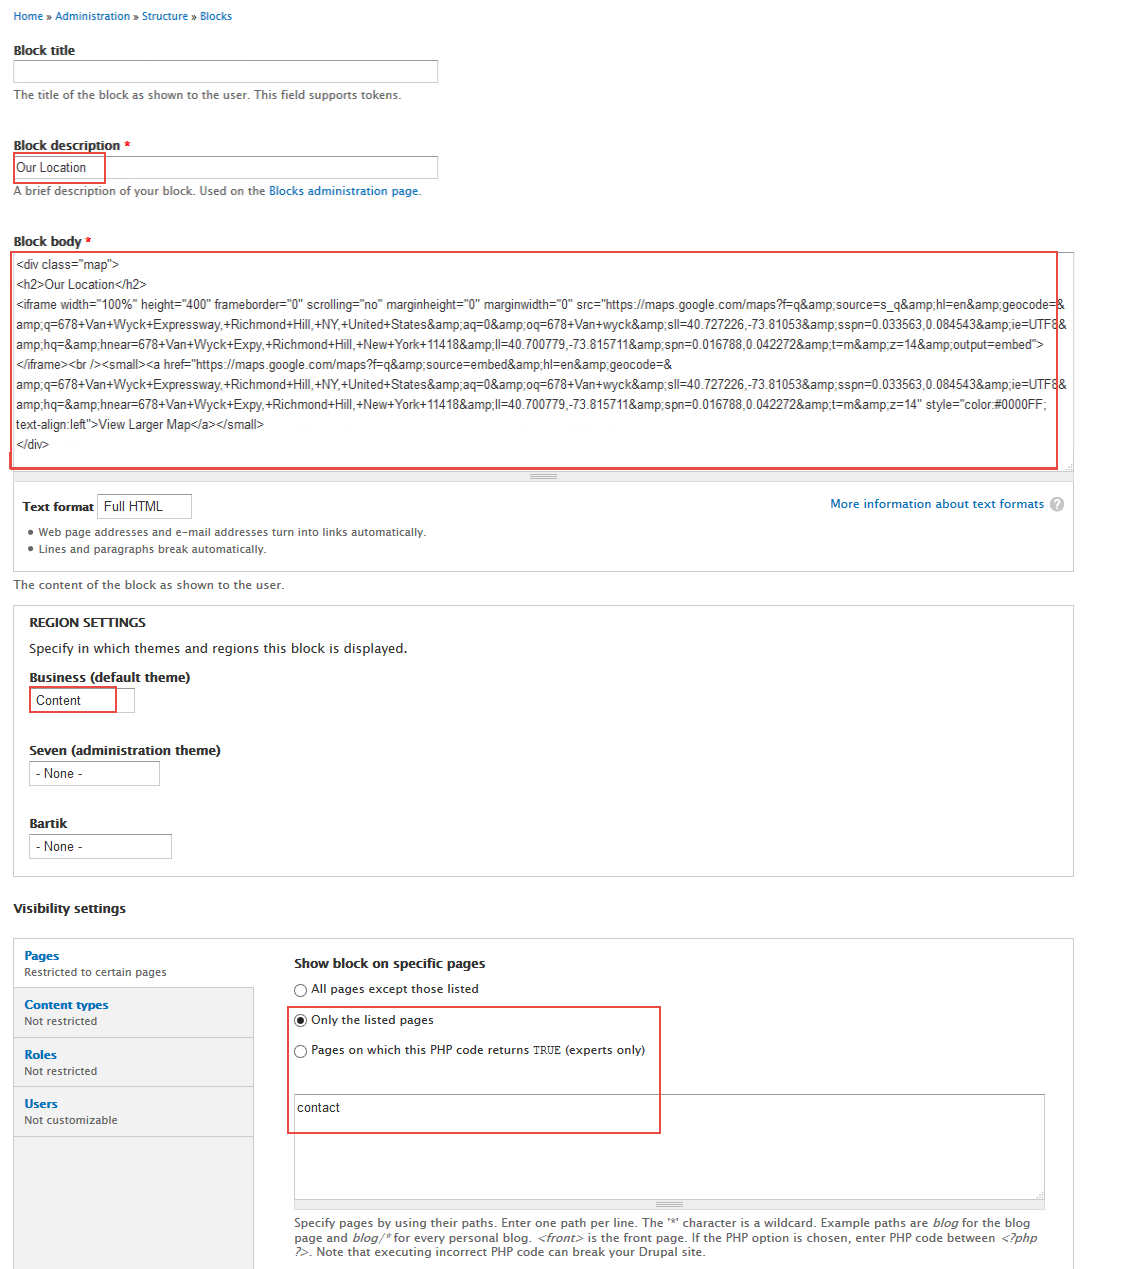
2. Our Location block
Step 1: Navigate to Structure > Blocks, click Add block block, add Contact Info block with the following properties:
Step 2: Click Save block button.
Refer to following HTML code:
Sidebar Views: Recent Articles, Popular Post, Blog Post
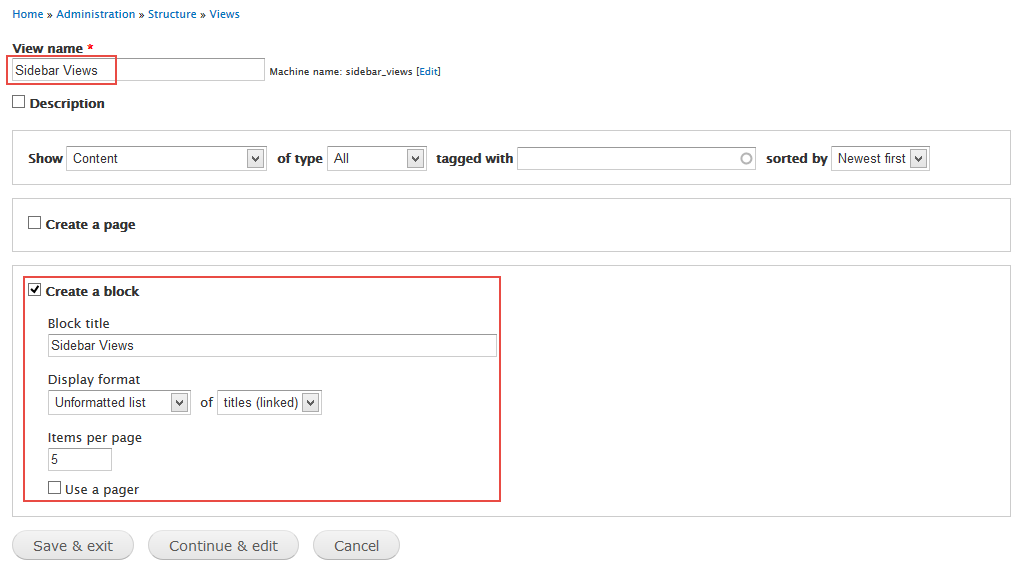
1. Create Recent Articles block
Step 1: Navigate to Structure > Views, click Add new view, then create Sidebar Views with following settings:
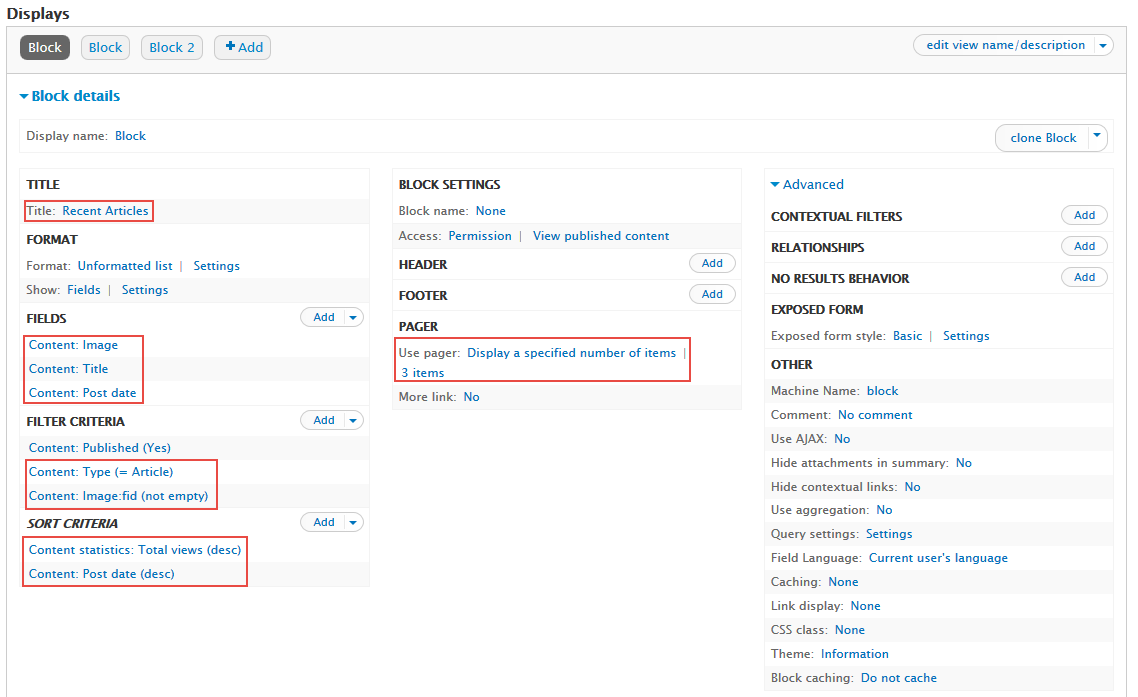
Step 2: Click Continue & edit button. Next to below steps to set properties for following fields:
Step 3: At TITLE area, click Title link, set following properties:
Step 4: At FIELDS area, click Add button to add fields: Content: Post date, Content: Image
Step 5: Set properties for Content: Post date
Step 6: Set properties for Content: Image
Step 7: At FIELDS area, click Rearrange set following arrange:
Step 8: At FILTER CRITERIA area, Click Add button to add fields Content: Type, Content: Image
Step 9: Set properties for Content: Type
Step 10: Set properties for Content: Image
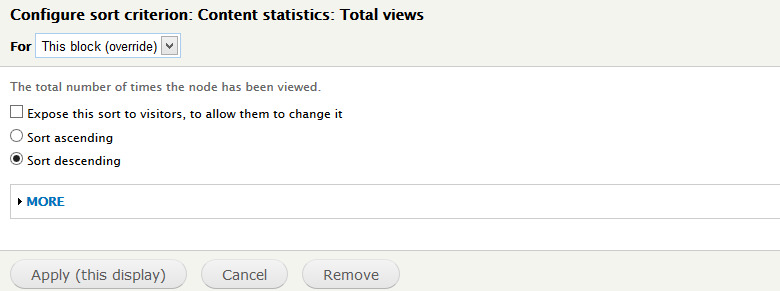
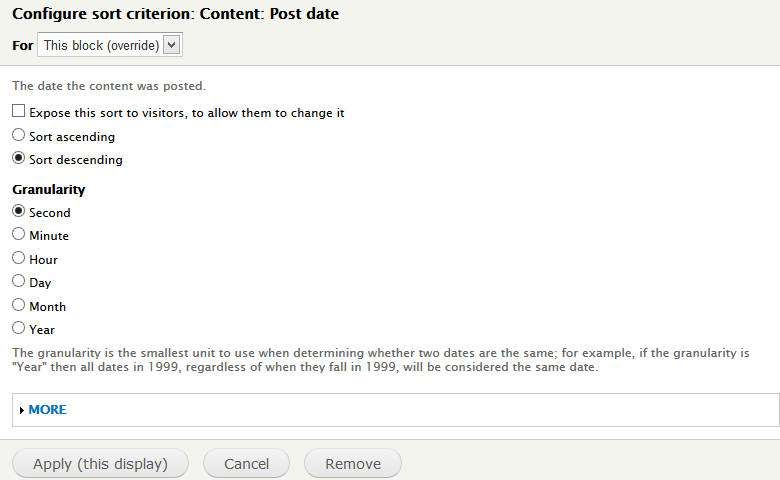
Step 11: At SORT CRITERIA area, Click Add button to add fields Content statistics: Total views, Content: Post date
Step 12: Set properties for Content statistics: Total views
Step 13: Set properties for Content: Post date
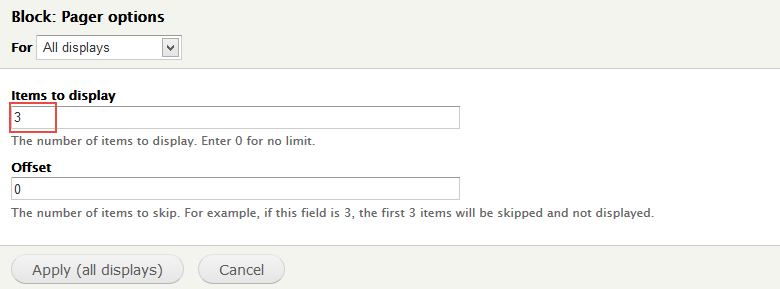
Step 14: At PAGER area, click User page link, set the number of items per page:
Step 15: Click Save button to save settings of Recent Articles block .
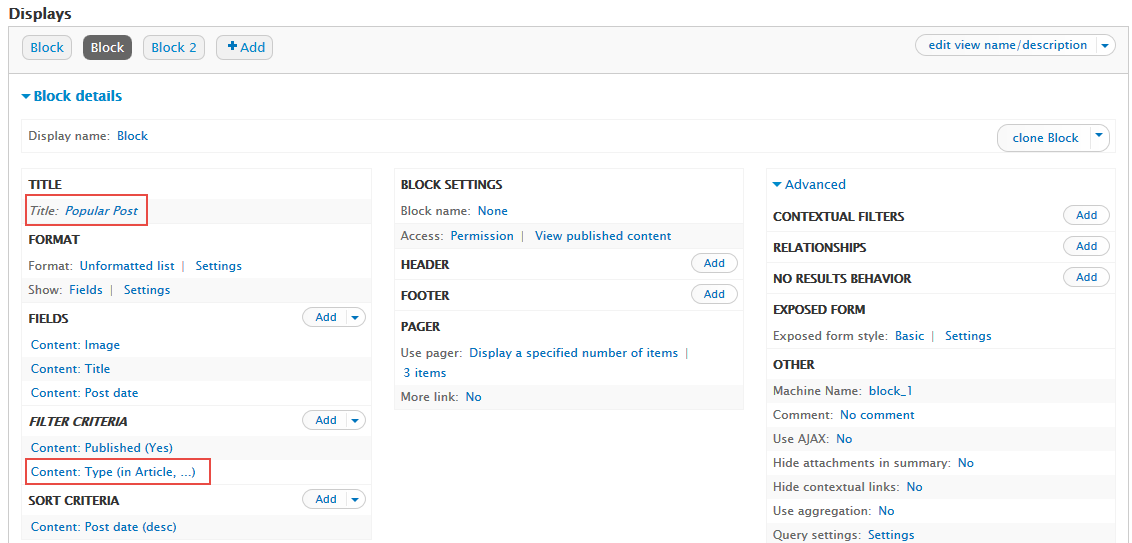
2. Create Popular block
Step 1: Navigate to Structure > Views, find Sidebar Views
Step 2: Click Add > Block. Next to below steps to set properties for following fields:
Step 3: At Title area, set properties:
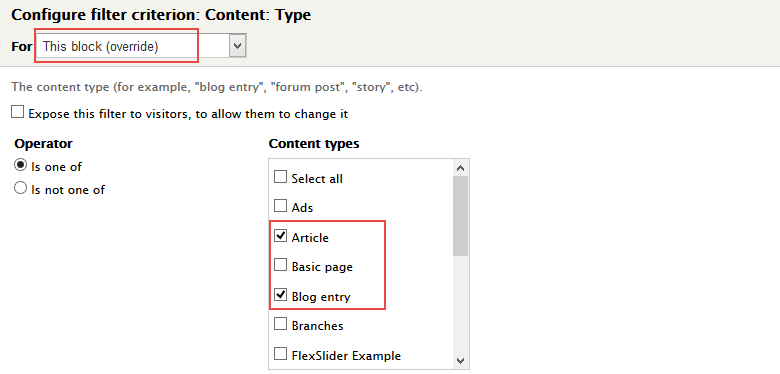
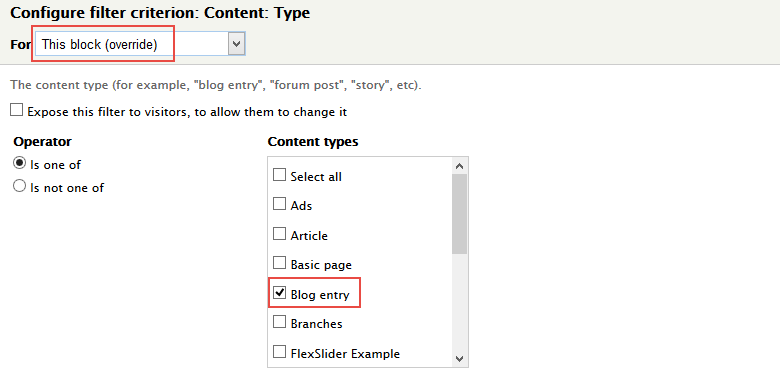
Step 4: At FILTER CRITERIA area, set properties for Content: Type
Step 5: Click Save to save view
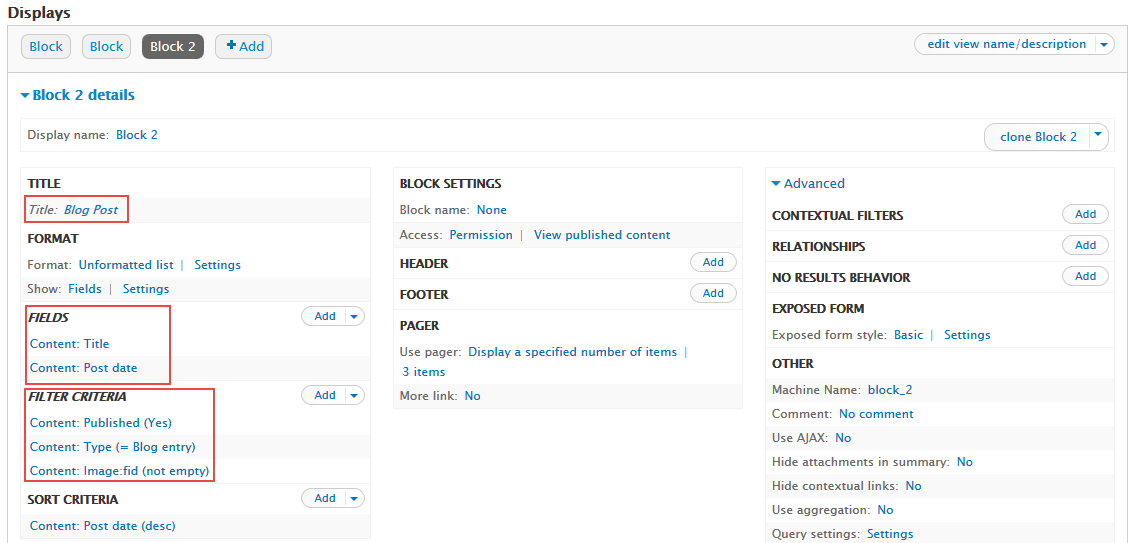
3. Create Blog Post block
Step 1: Navigate to Structure > Views, find Sidebar Views
Step 2: Click Add > Block. Next to below steps to set properties for following fields:
Step 3: At Title area, set properties:
Step 4: At FIELDS area, click Rearrange, remove Content: Image field, and set following arrange
Step 4: At FILTER CRITERIA area, set properties for Content: Type
Step 5: At FILTER CRITERIA area, click Rearrange, and set following properties:
Step 6: Click Save to save view
4. Configure Sidebar Views block
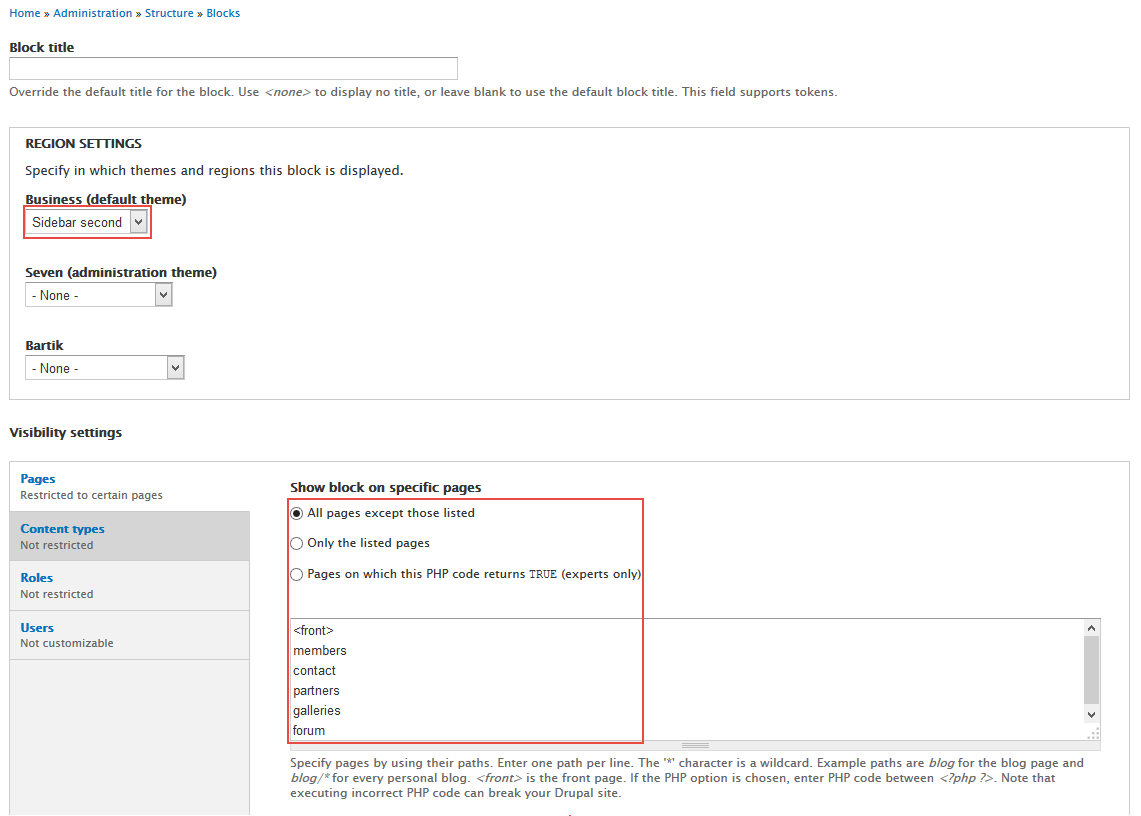
Step 1: Navigate to Structure > Blocks
Step 2: Find View: Sidebar Views click configure link, set following properties
Step 3: Click Save block button.
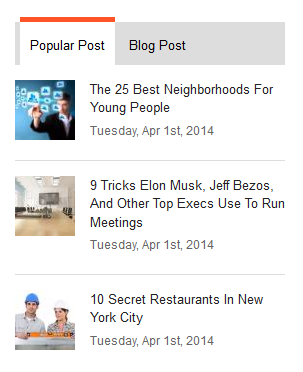
Sidebar tab: Quicktab
Front end Display
Configure block
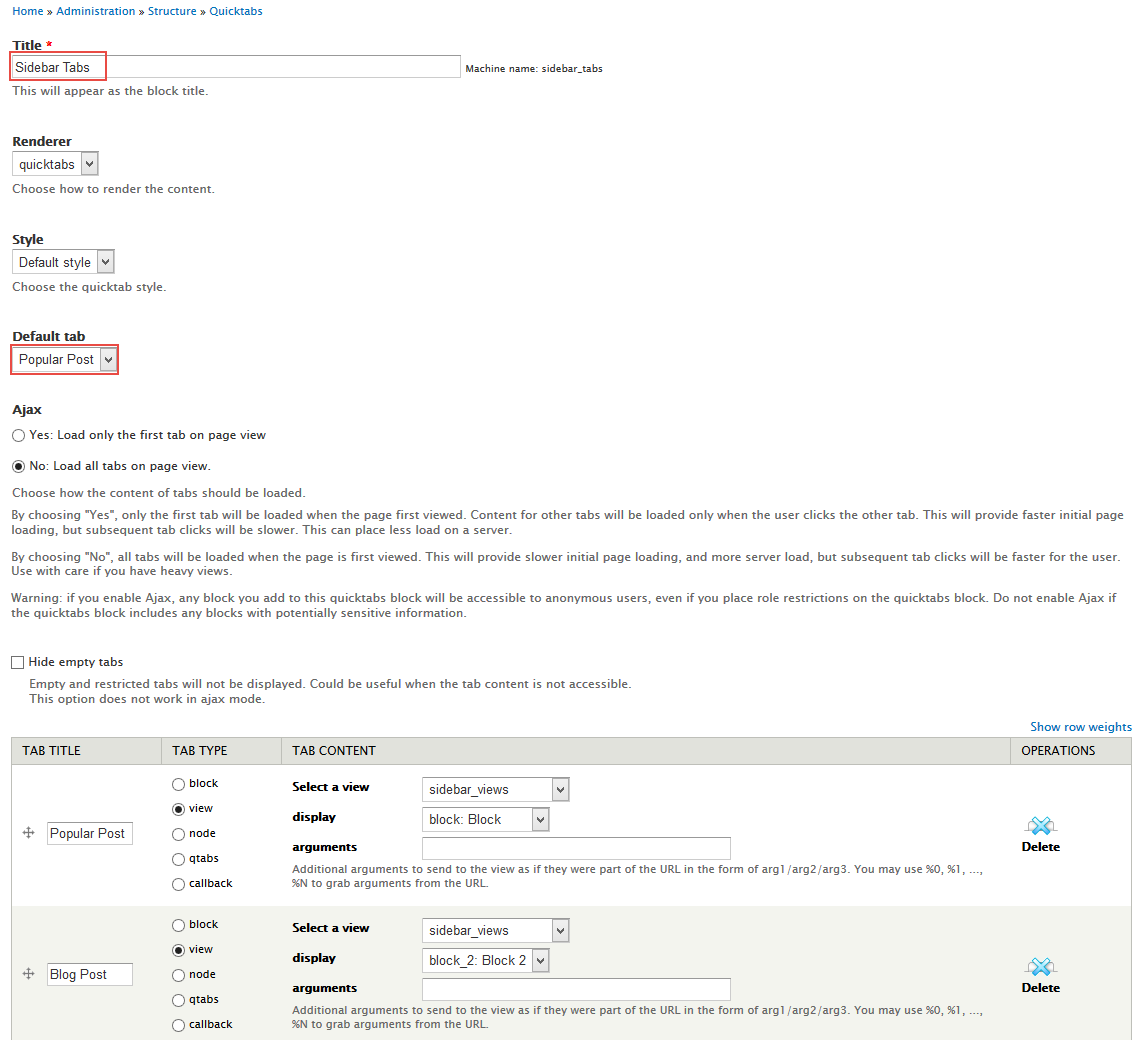
Step 1: Navigate to Structure > Quicktabs, click Add Quicktabs Instance, create Sidebar Tabs with following settings:
Step 2: Click Save button.
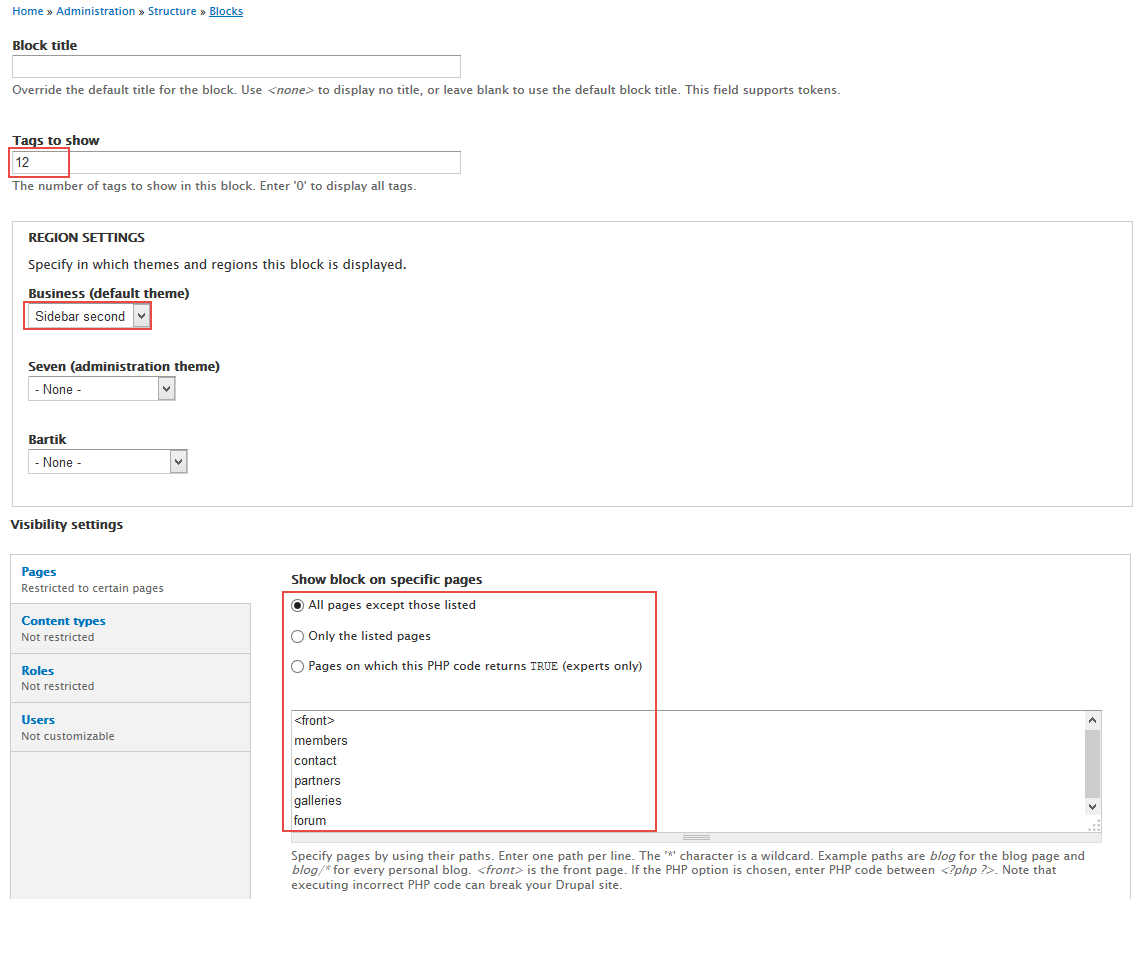
Tags block
Front end Display
Configure block
More Configurations
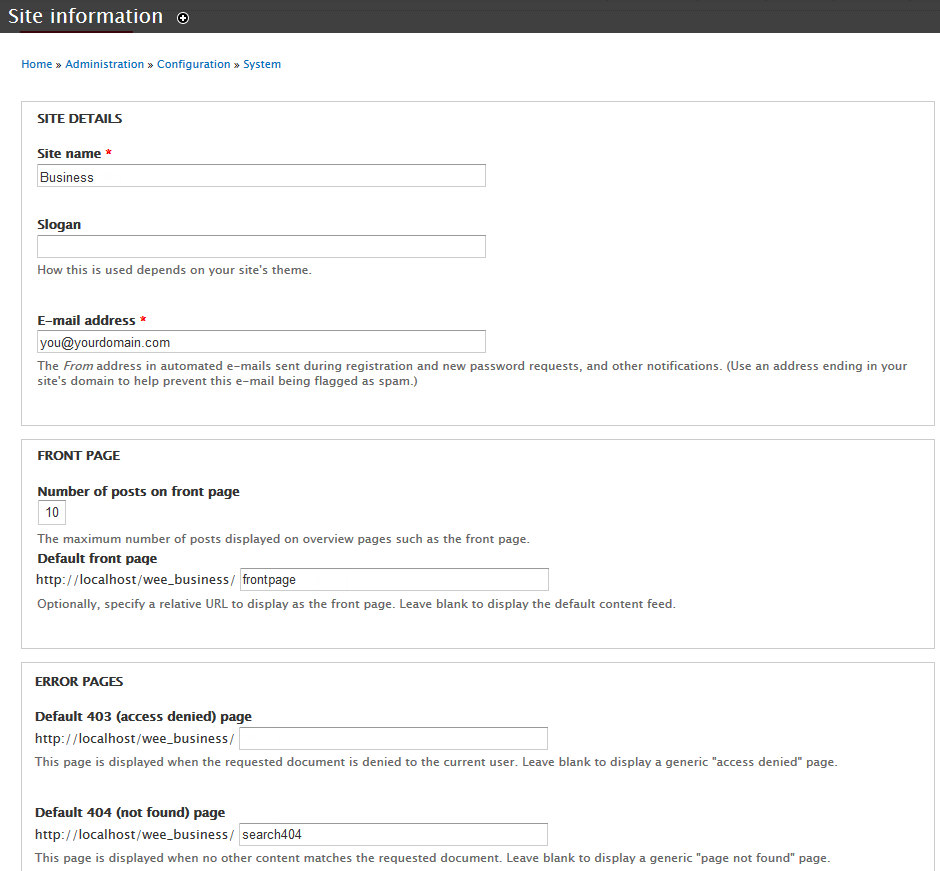
Site Information
In this section, you can change basic settings, such as the site name, slogan, e-mail address.
1. Log in to Administration site page by administrator account
2. Navigate to the Site Information page Configuration > System: Site information
3. Change site details from the view:
- Site name
- Slogan
- E-mail address
- Set Default Front page
4. Click on Save configuration to finish editing.
Appearance Settings
1. Create a new color.
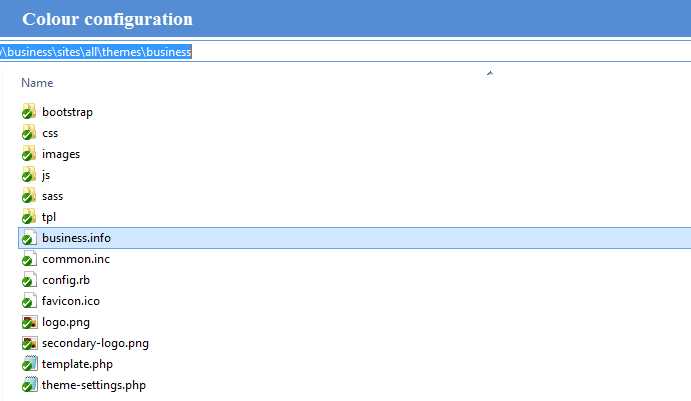
Step 1: Navigate to the directory: business/sites/all/themes/business, you can find file business.info, open this file.
Step 2: Locate the skins[ ] arrays and add new code row:
Step 3: Save file.
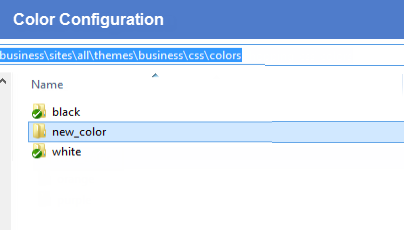
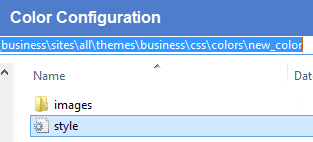
Step 4: Navigate to the directory: business/sites/all/themes/business/css/colors, clone a folder, then rename it "new_color"
Step 5: new_color folder includes images folder and style.css file.
Now, you can style new color for theme by modifying style.css file.
2. Create a new background.
Step 1: Navigate to the directory: business/sites/all/themes/business, you can find file, open file business.info
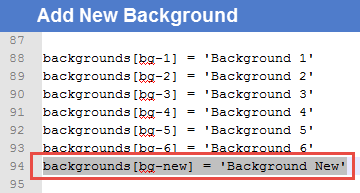
Step 2: Locate the backgrounds[ ] arrays and add new code row:
Step 3: Save file.
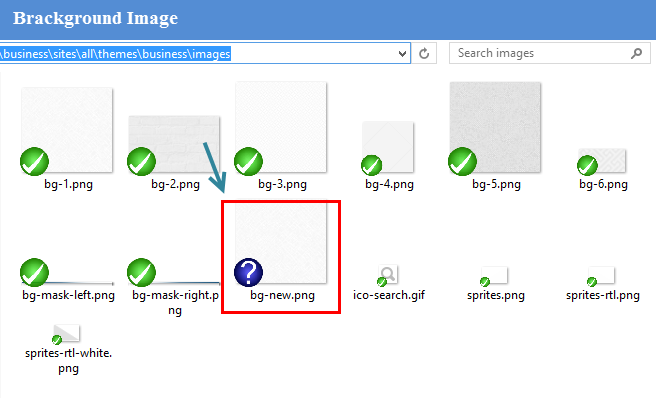
Step 4: Move your background image into the directory: business/sites/all/themes/business/images
Step 5: Navigate to the directory: business/sites/all/themes/business/css, open file base.css, and add new code row:
Step 6: Save file.
3. Configuration
Step 1: Log into website by administrator account.
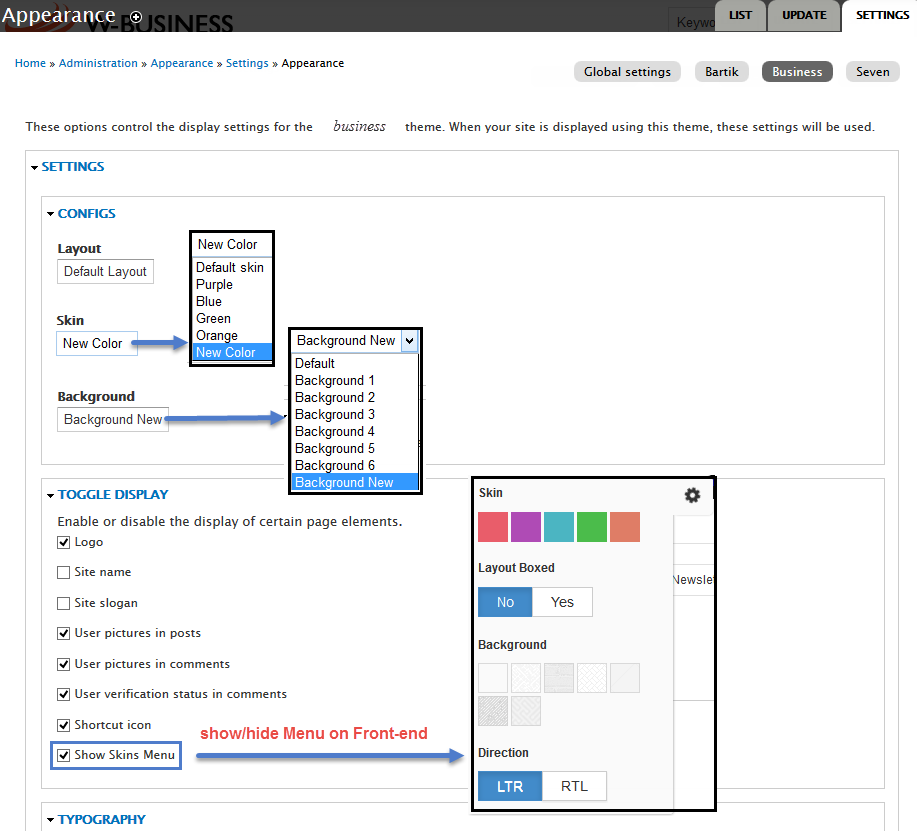
Step 2: Go to Appearance find business 7.34, click on Settings
Step 3: At CONFIGS area, select one of options for Layout, Skin, Background to set default, (e.g: New Color), and at TOGGLE DISPLAY area, check Show Skins Menu option if you want to display Skins menu on front-end pages.
Language Configuration
This section guides you how to have multiple languages for your site. Business Theme supports both Left to Right and Right to Left languages.
Step 1: Navigate to Configuration > Regional and Language > Languages then add new language.
Step 2: Check to enable and set default language
Step 3: Save configuration


