

- Doc Navigation
- Taxonomy Configurations
- Media Configurations
Overview
Starting with a new theme, it sometimes takes a lot of time for first time users to really understand how it works. You may want to know how to customize layouts, typography, block styles and make it look the way you want.
In most cases you won't need to know PHP or database queries, but basic knowledge would be very helpful to get great results.
If you're an experienced Drupal developer or if you want to build the theme from zero with only the basic appearance of your theme, find this guide in handy. This guide will give you the detailed step by step installation guide to help you start building the content for Zircon D8 to look exactly like the demo site.
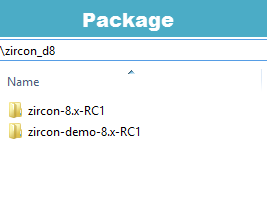
1. Zircon D8 Package
This is our first project for Drupal 8 themes. Based on the Zircon theme, the most popular Drupal theme of WeebPal in the Drupal community, our team has published the latest version of Zircon in Drupal 8.
We’ve taken advantage of all of the up to date web technologies, and designs for the theme. We believe this will be a good place to start your business or personal website in Drupal 8.
Included content:
- README.txt
- Zircon D8 theme: zircon_d8-8.0.0.zip
- Demo Profile for Zircon D8: zircon_d8-demo-8.0.0.zip
2. Features
- Documentation included.
- Browser compatibility
- Web Technology (Html5/Css3, Twitter Bootstrap 3.1.1, Font Awesome 4.0.3,…)
- Fully responsive.
- Color variations.
- Easy customization.
- High usability
- Support both Left to Right and Right to Left Languages
3. System Requirements
Database
- MySQL 5.5.3/MariaDB 5.5.20/Percona Server 5.5.8 or higher with PDO and an InnoDB-compatible primary storage engine,
- PostgreSQL 9.1.2 or higher with PDO,
- SQLite 3.6.8 or higher
PHP
- PHP 5.5.9 or higher
- PHP 5GD library installed
- Disabled error_reporting flag on production server
- Enabled mod_rewrite in Apache for clean URLs
- Memory limit set up at least 128MB
If you are new to Drupal, please take a reference to System requirements on drupal.org.
4. Screenshots
Let's glance through the theme's design & some features:
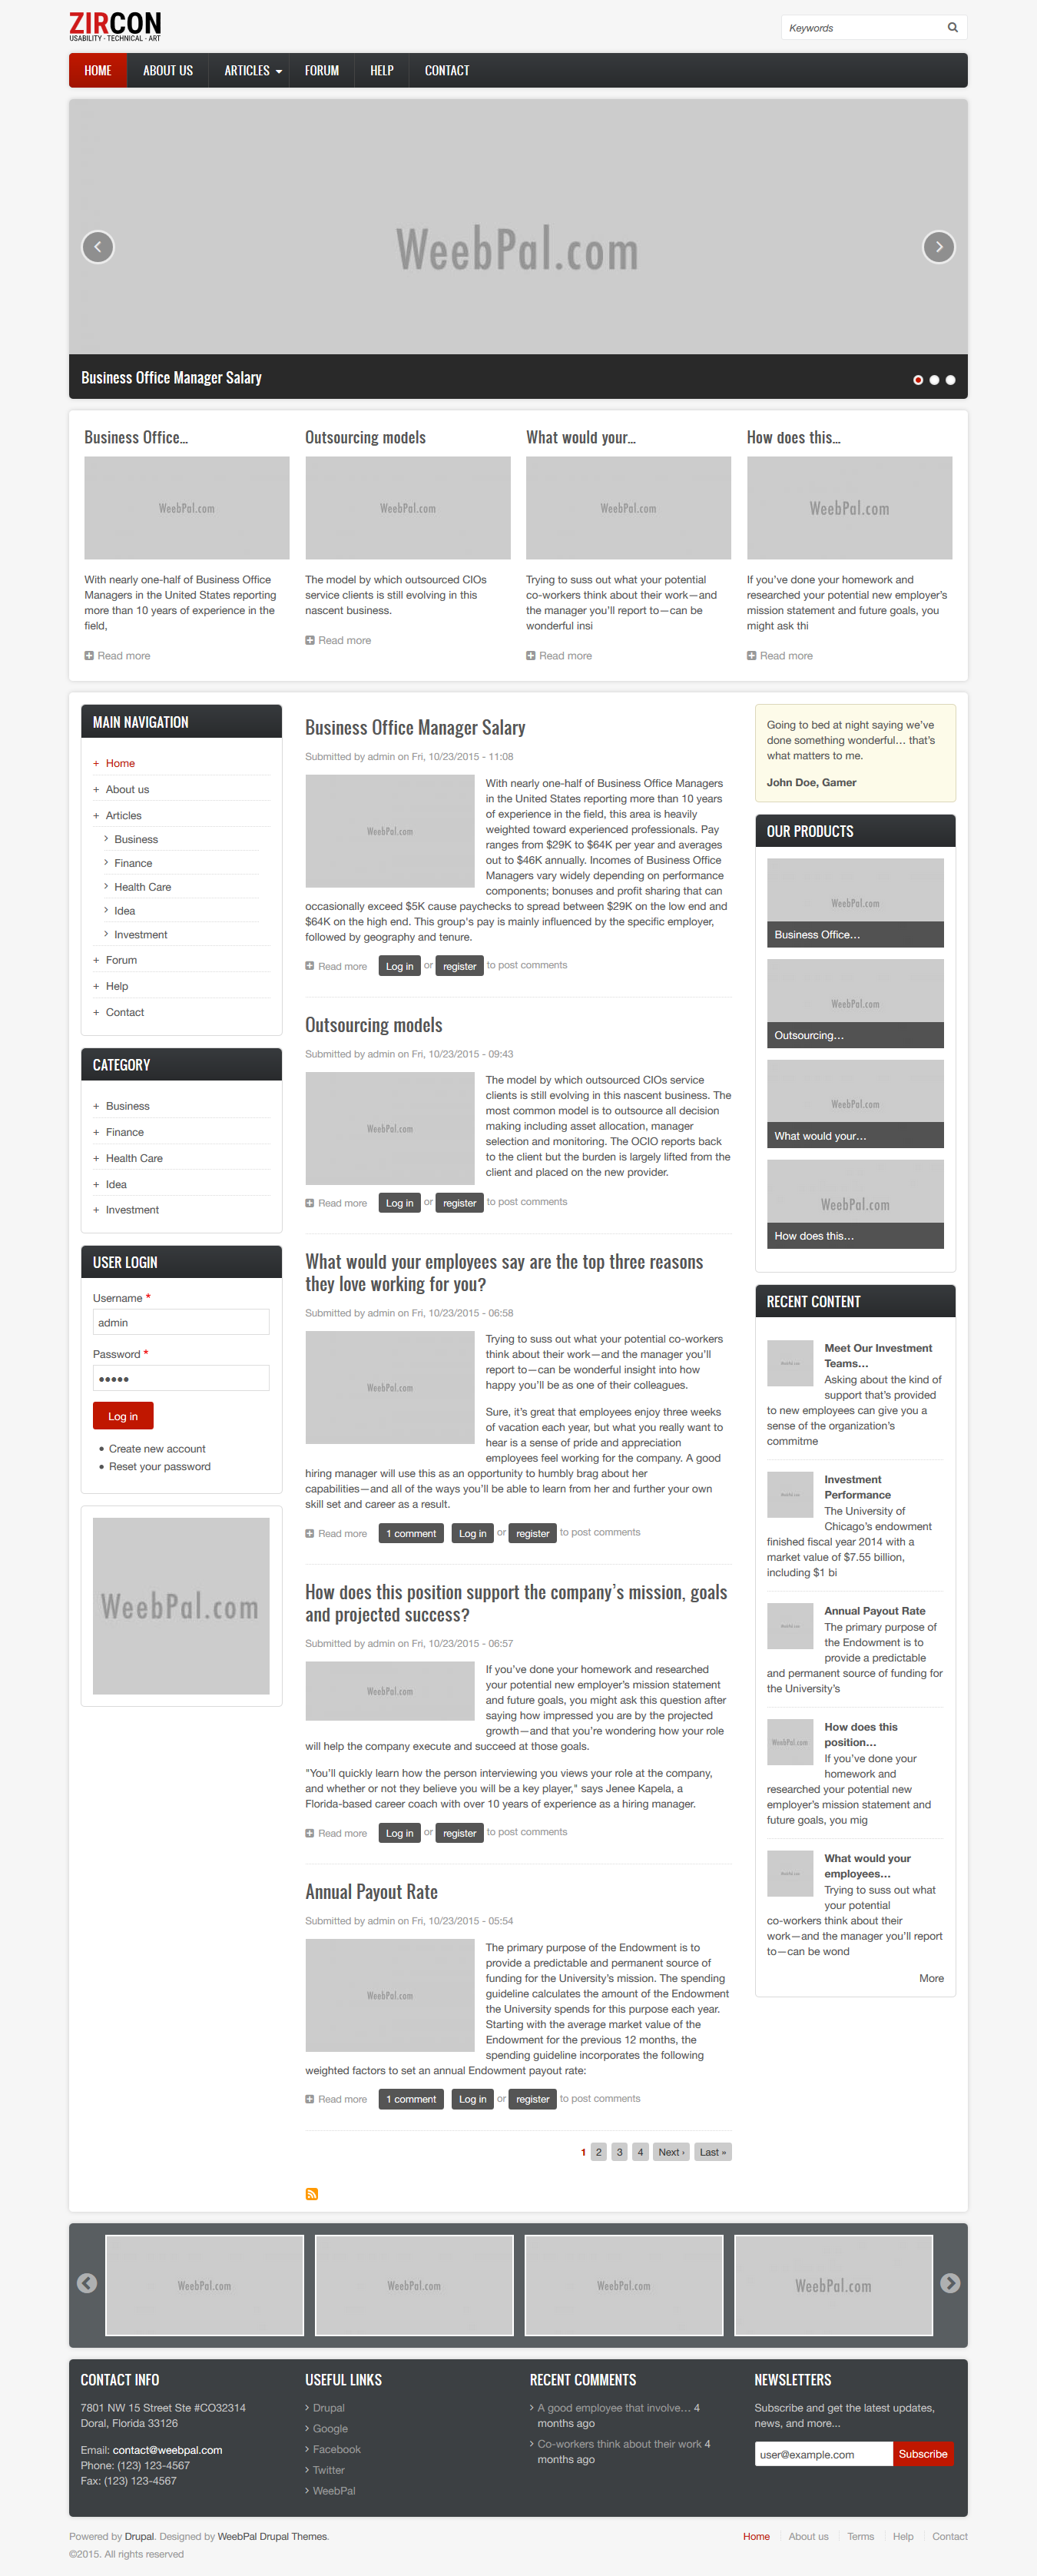
Home
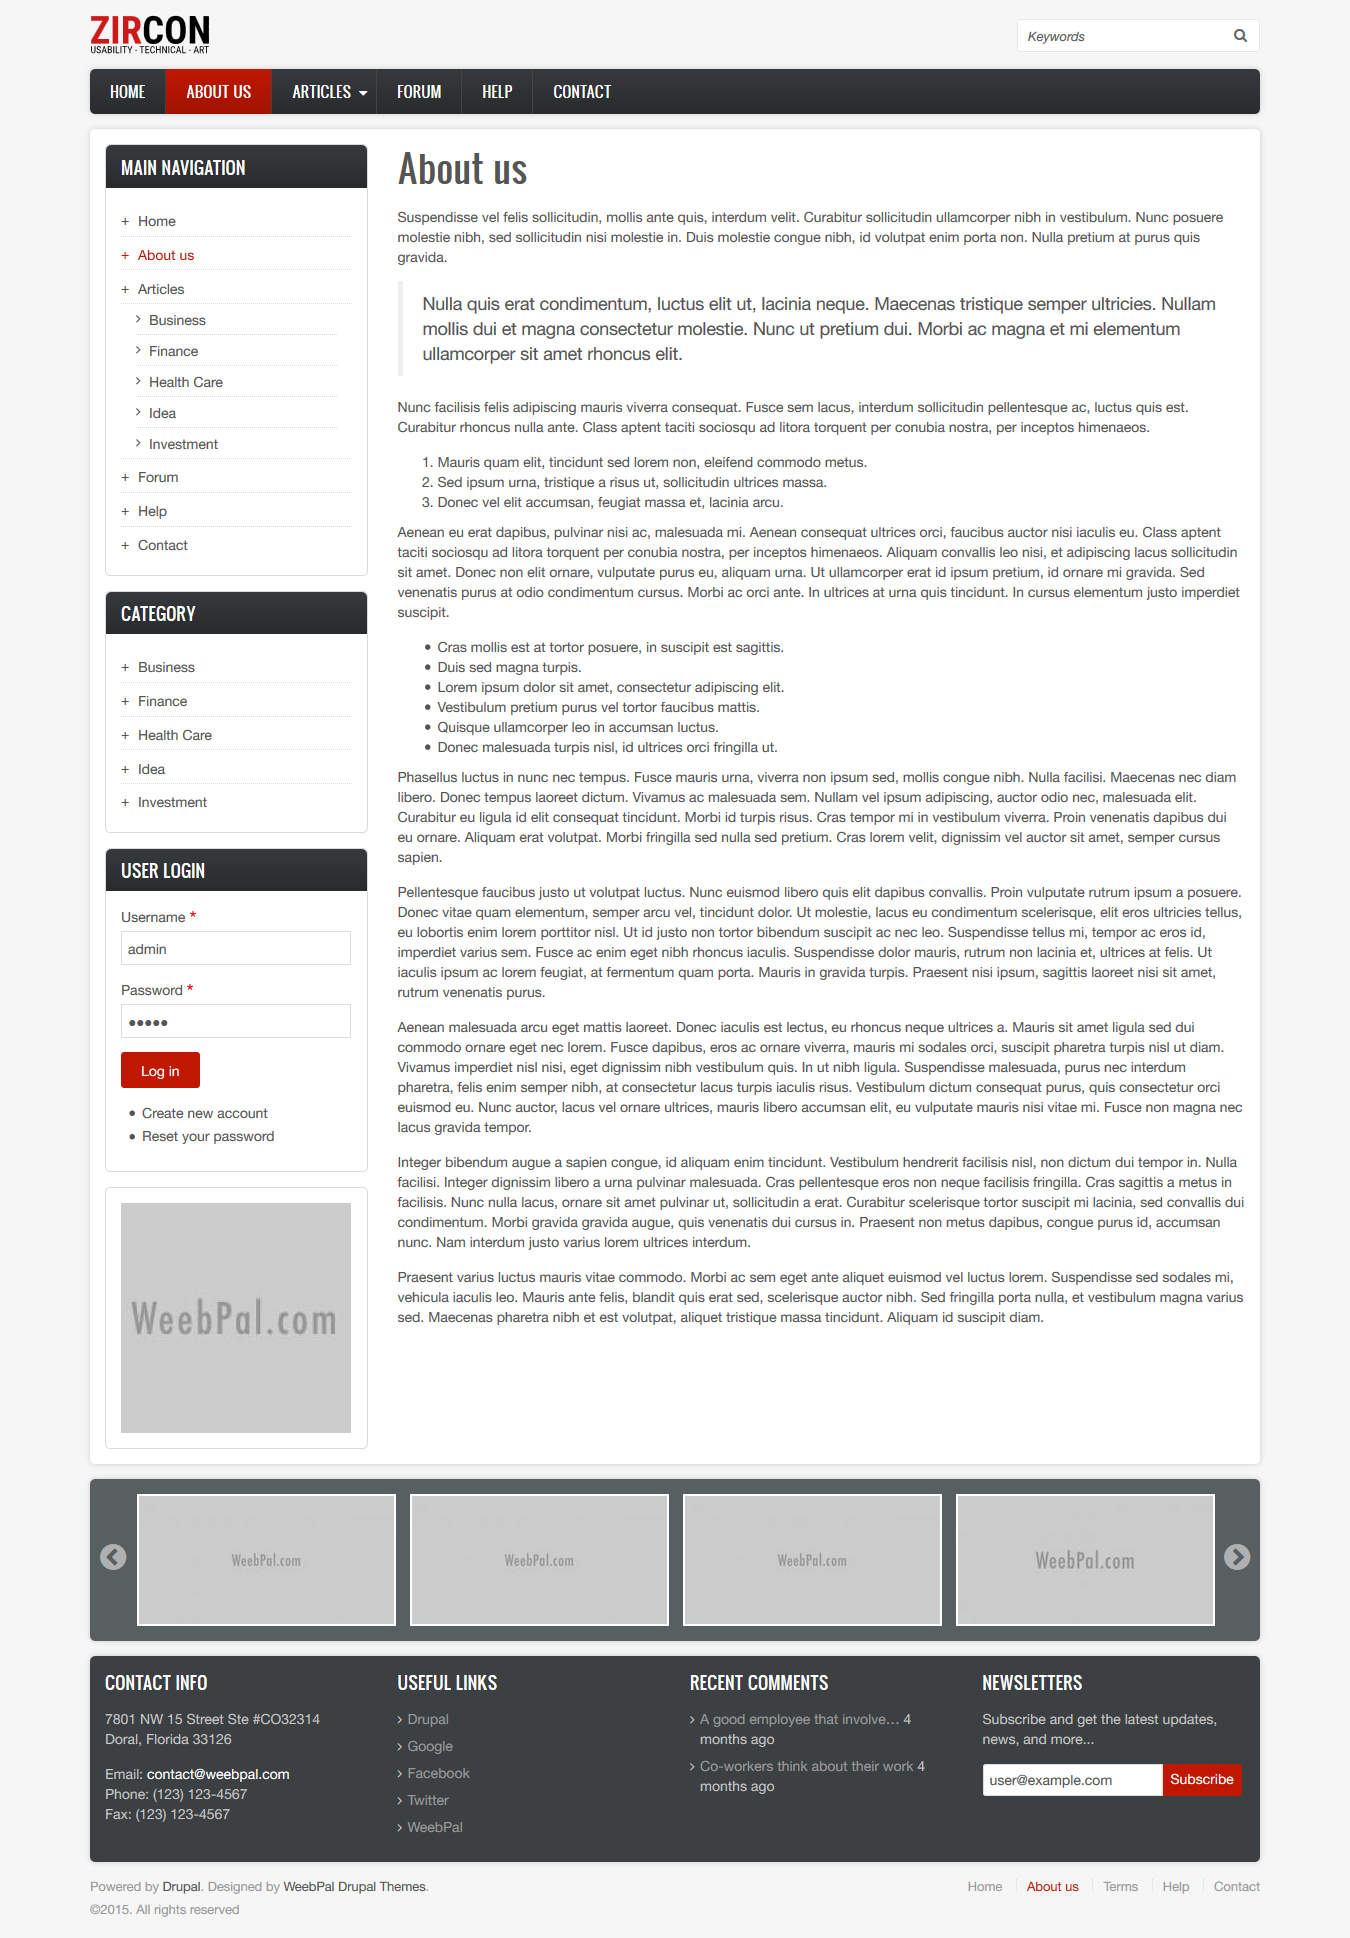
About Us page
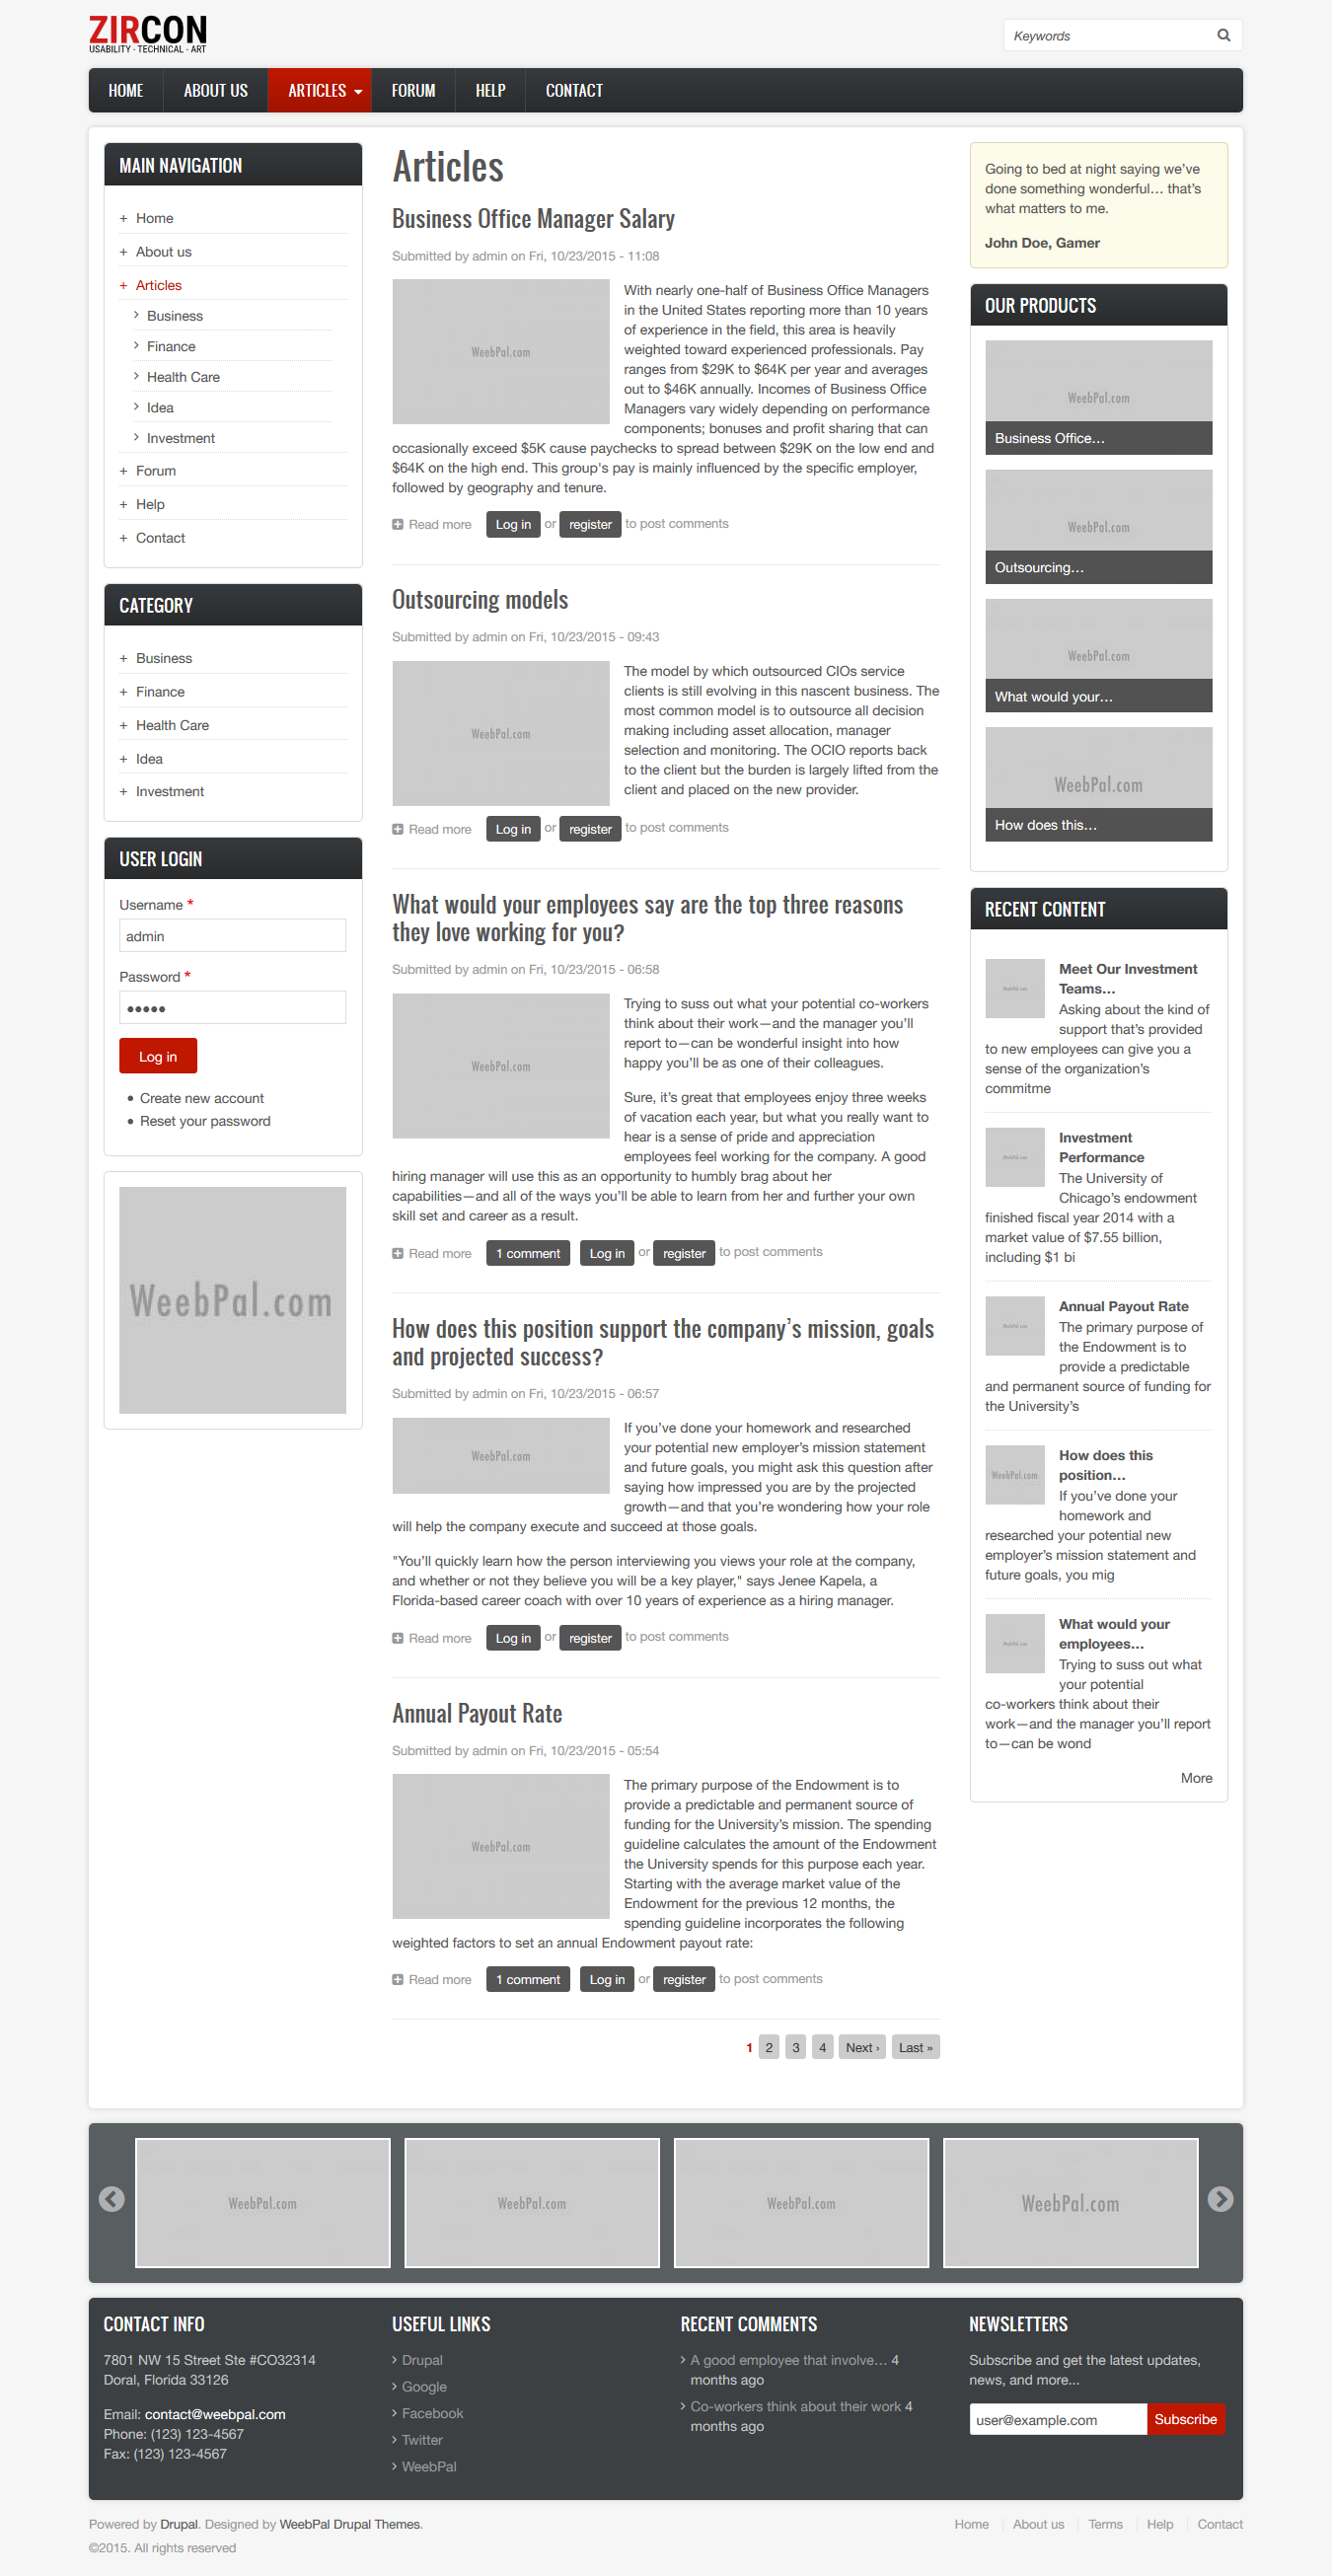
Articles page
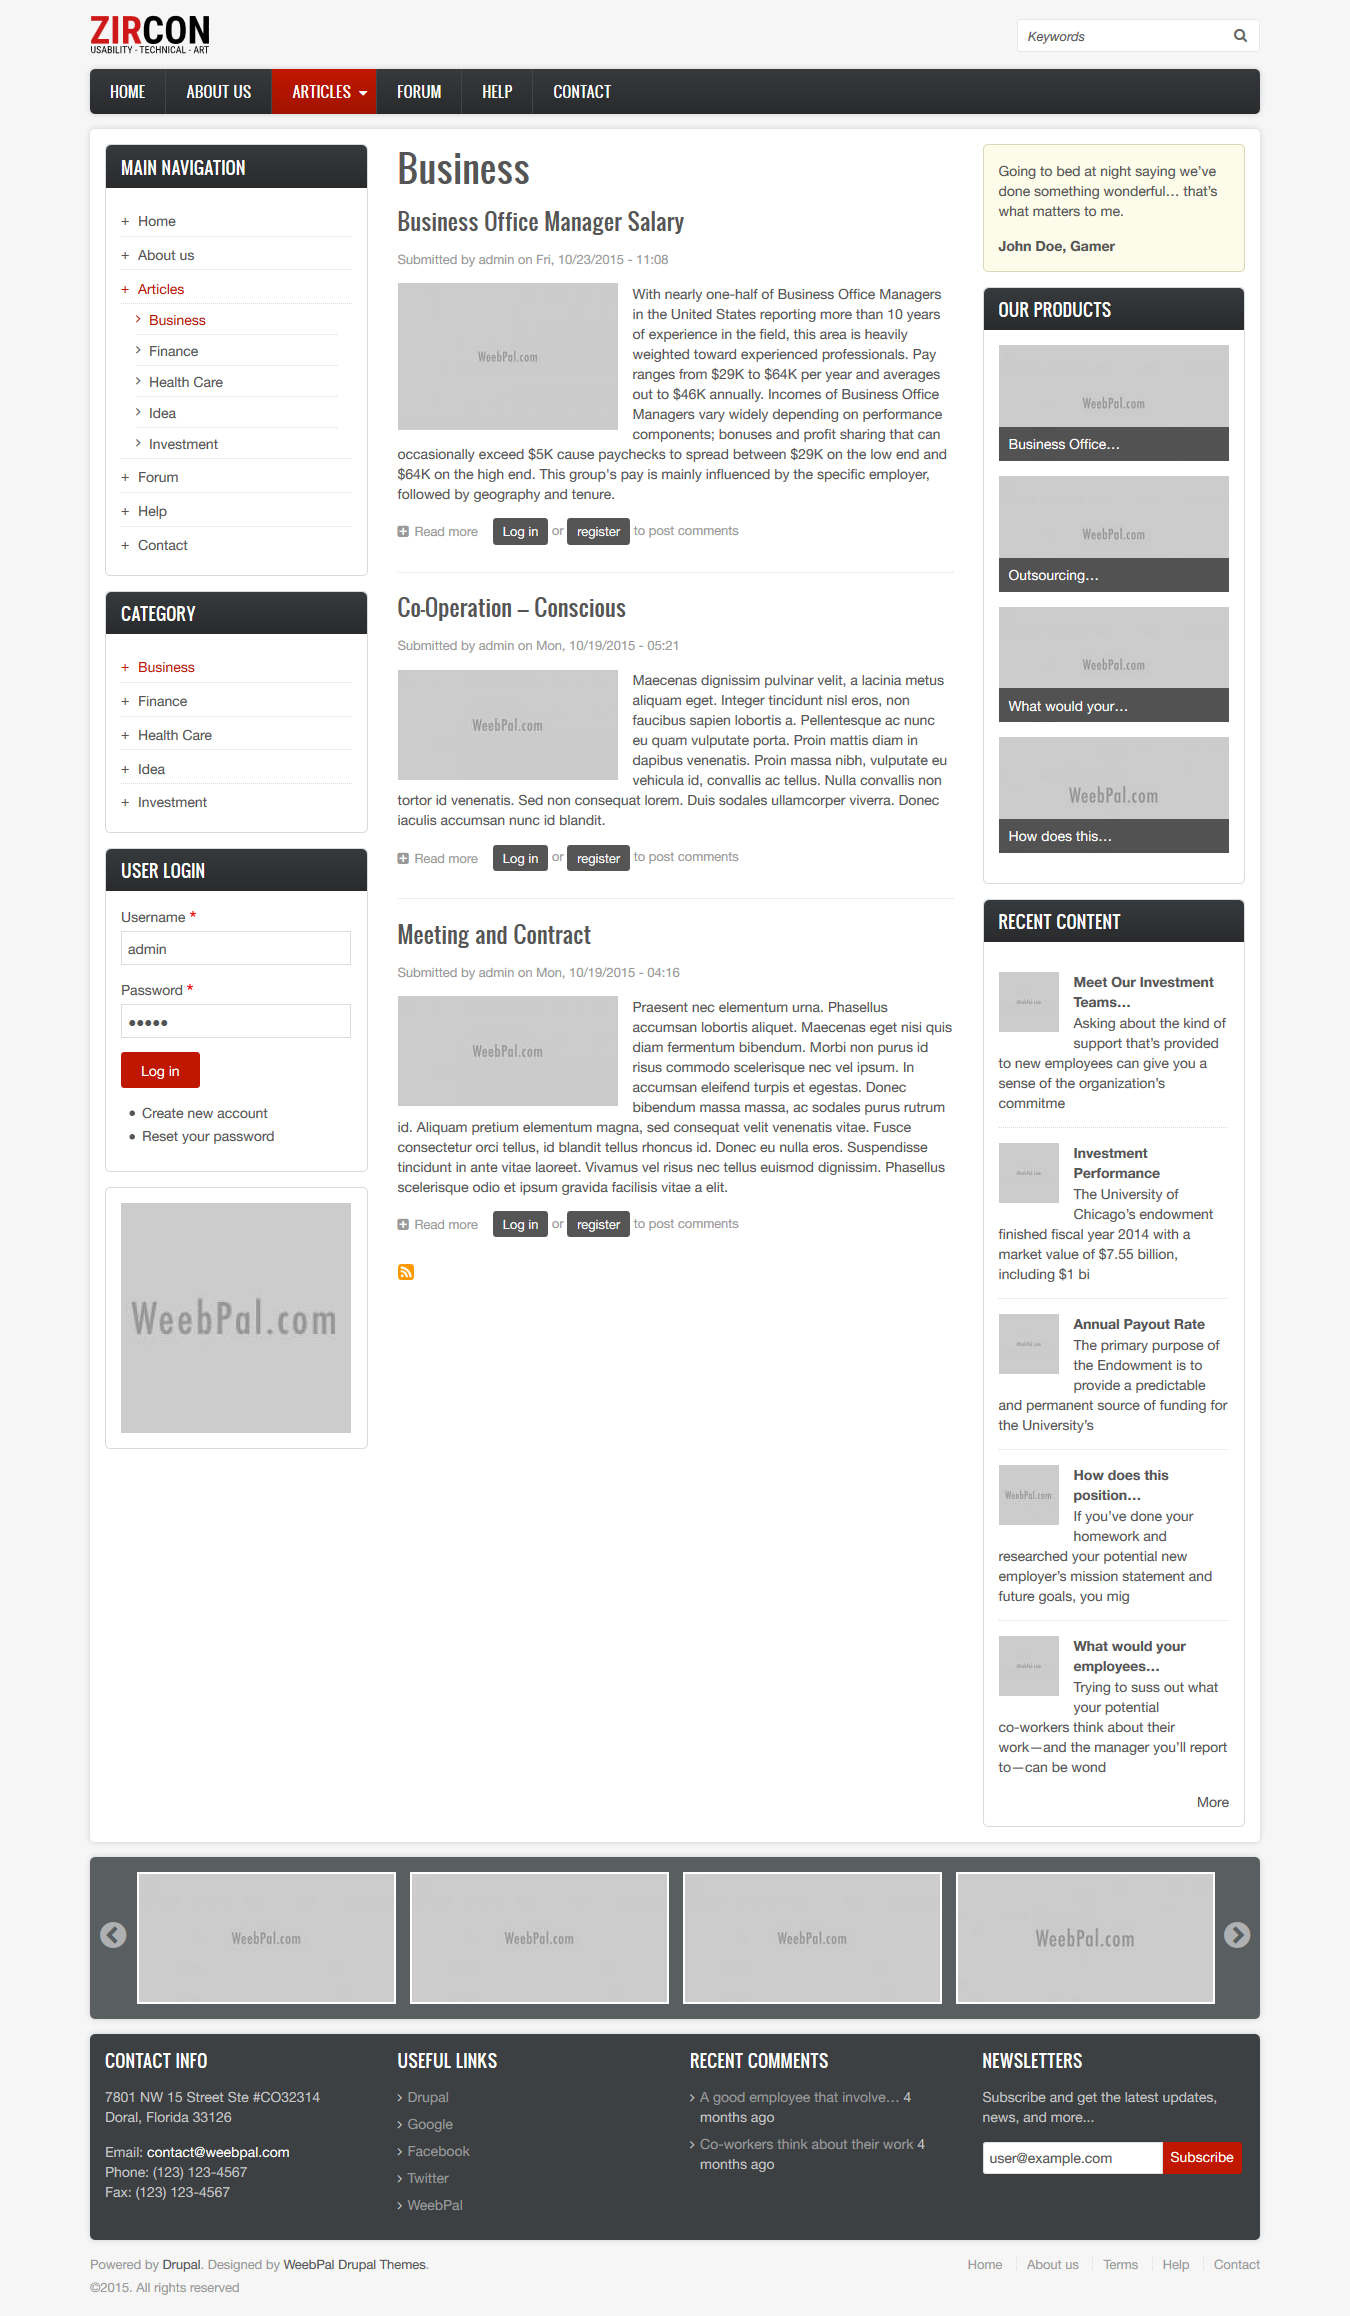
Business page
Finance page

Health Care page

Idea page

Investment page

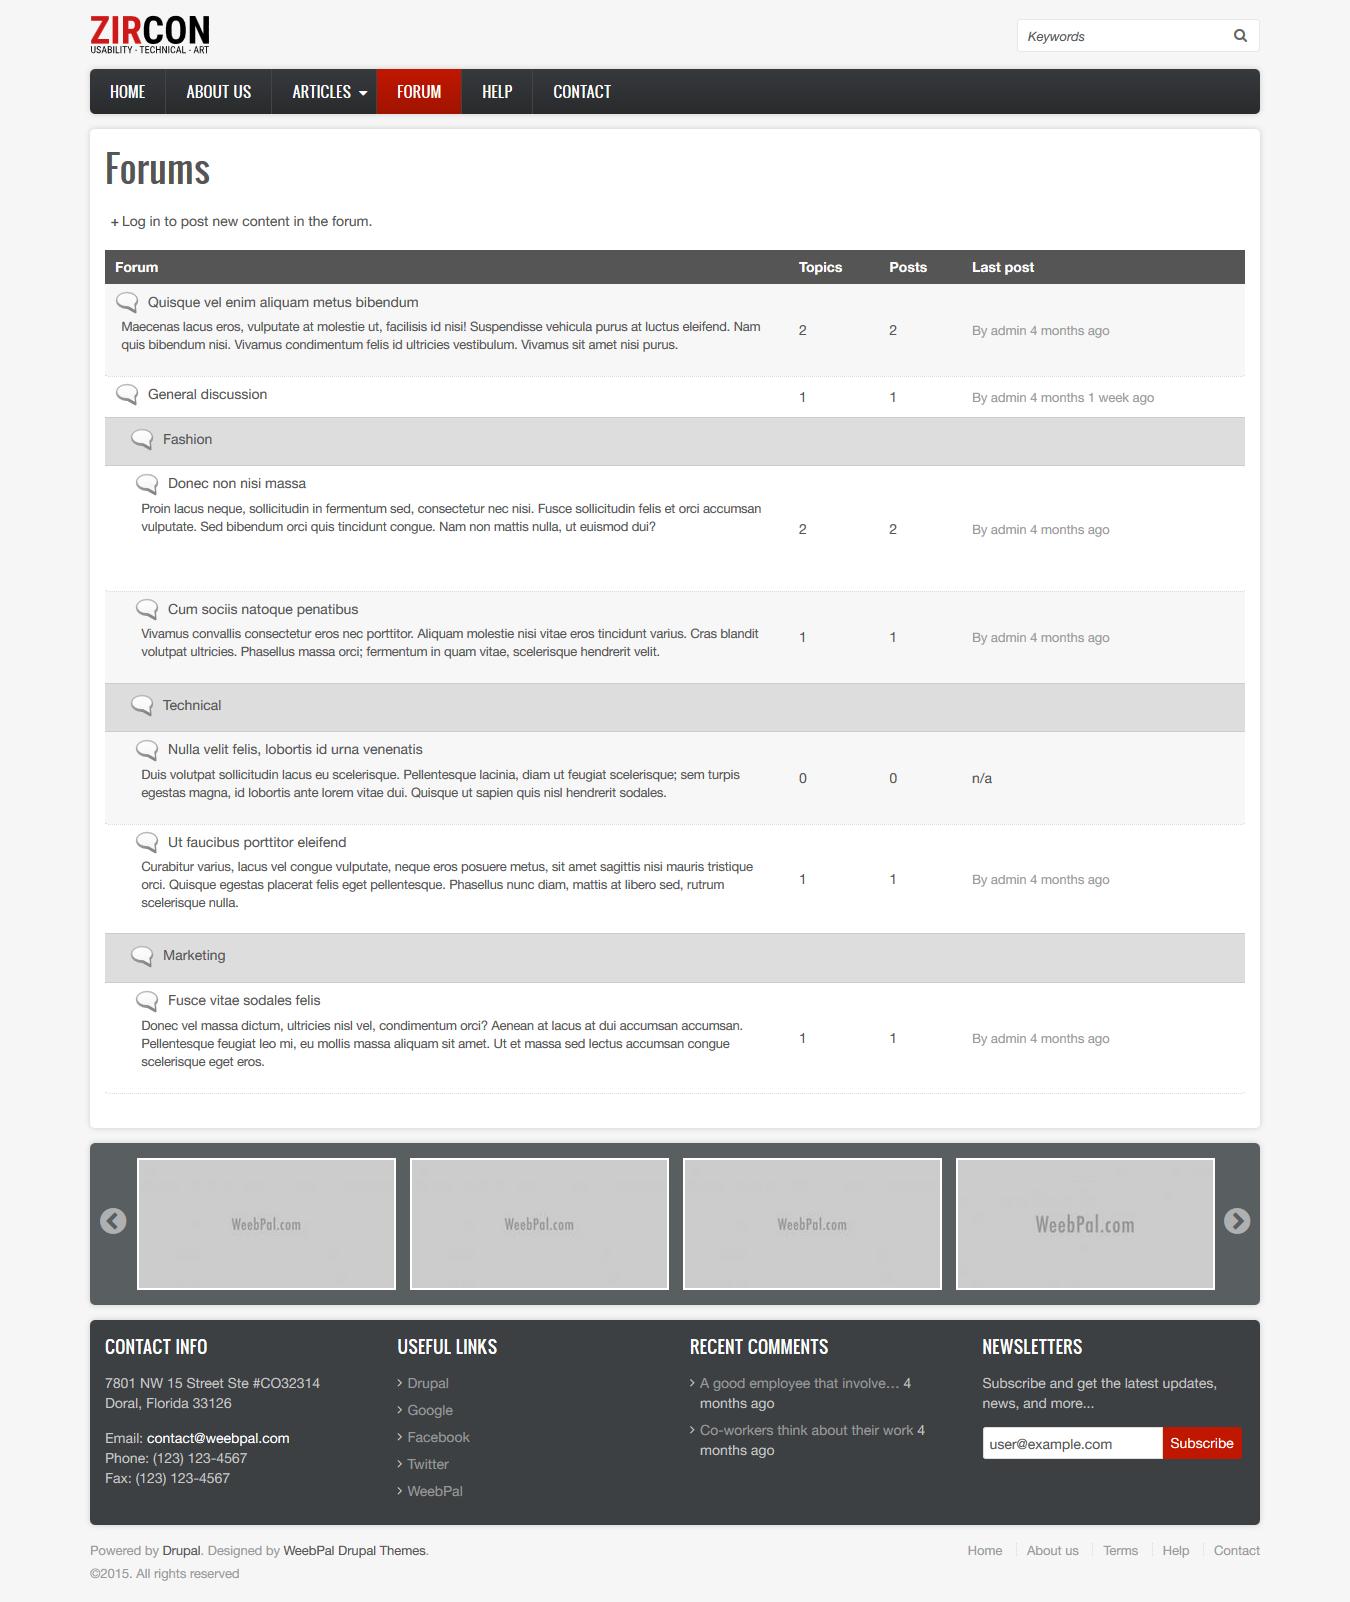
Forum page
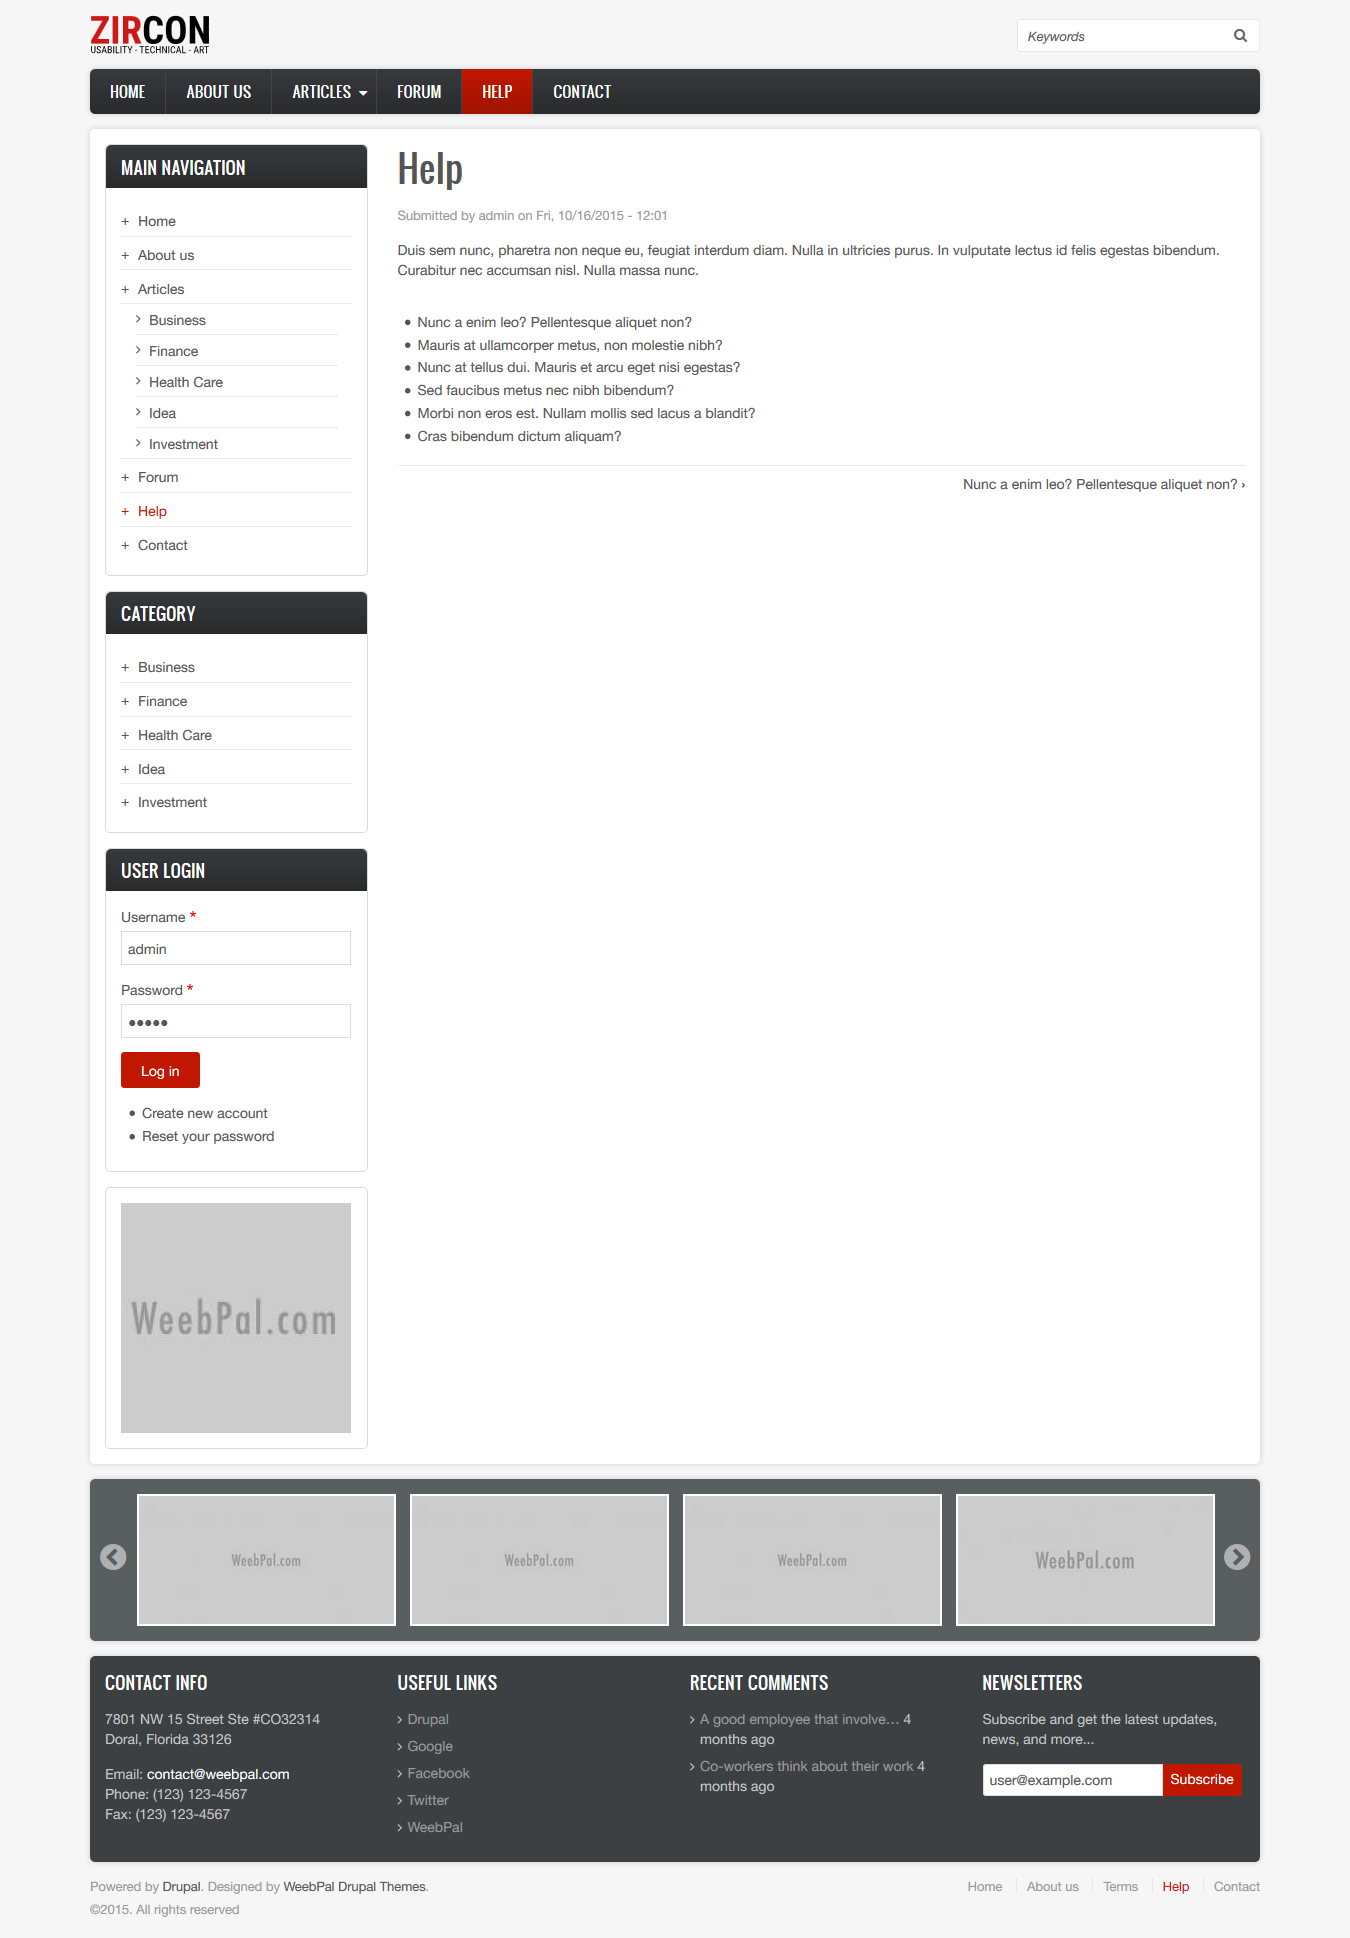
Help
Contact

5. Module requirements
Core Modules
- forum
- color
Two Modules
Download Drupal core files, and extend your site with modules at here.
Installation
How to install a WeebPal demo package
1. Download one theme package of your choice (e.g: Zircon D8)
Files included:
- README.txt
- Zircon D8 theme package: zircon_d8-8.0.0.zip
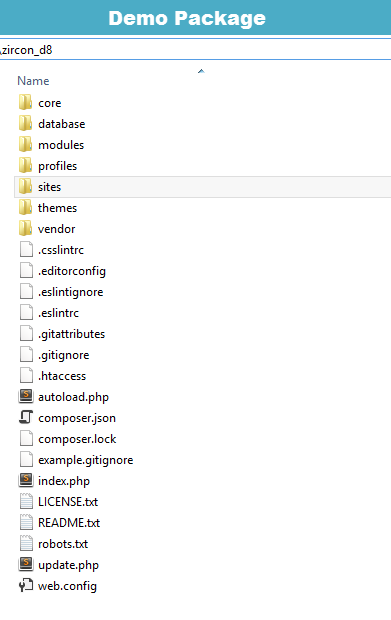
- Zircon D8 demo package: zircon_d8-demo-8.0.0.zip. This demo package includes all source codes and content, including sample images. This package will be used to build a site like our demo for the theme easily.
The below steps will give you the installation guide so that you can build your website to look exactly like the Zircon D8 Demo
- zircon_d8-demo-8.0.0.zip
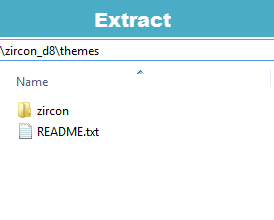
2. Extract zircon_d8-demo-8.0.0.zip above and copy it into your host, and rename the directory to zircon
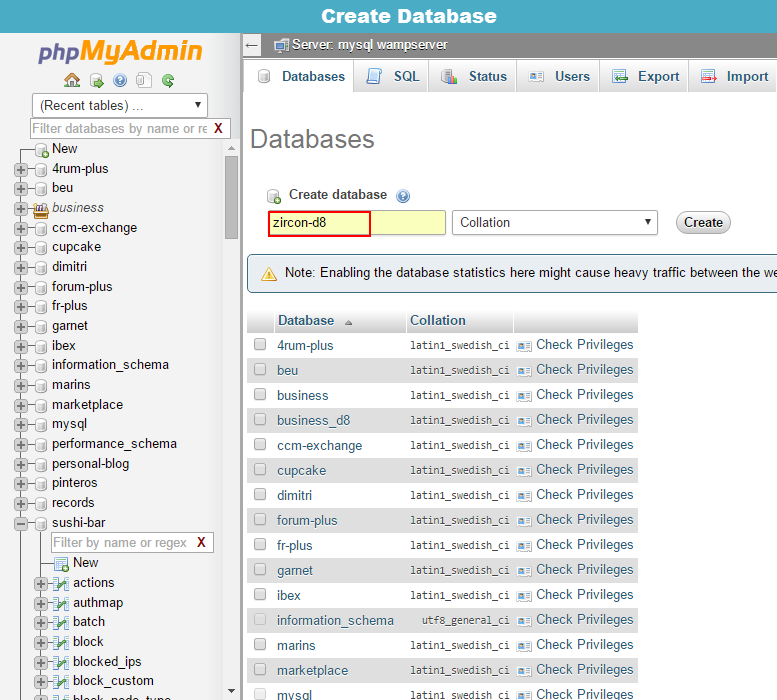
3. Access your MySQL database and create a new database (e.g: zircon-d8) and user account. Don't forget to add correct permissions to new user to access the database
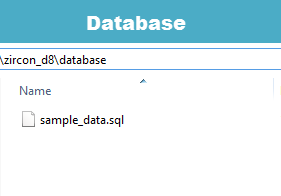
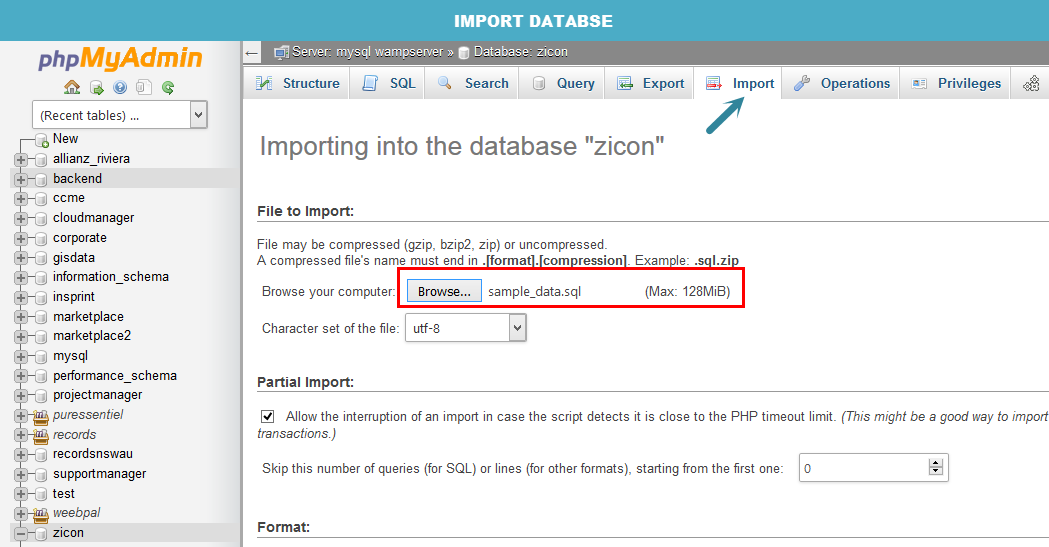
4. In the demo directory database/ , you can find database dump named sample_data.sql.
Import this file into new database.
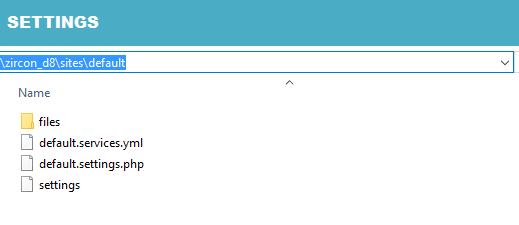
5. Now, you need to modify sites/default/default.settings.php file. Clone default.settings.php file, then rename it "settings.php"
6. Open settings.php, locate the $database array and set proper credentials. Then move the $database code to the bottom of the file.
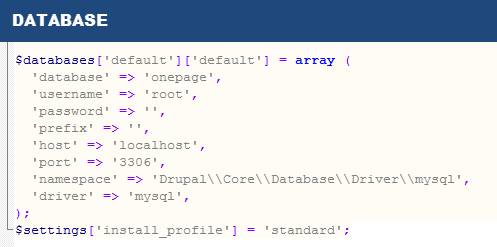
                    $databases['default']['default'] = array (
                      'database' => 'databasename',
                      'username' => 'username',
                      'password' => 'password',
                      'prefix' => '',
                      'host' => 'localhost',
                      'port' => '3306',
                      'namespace' => 'Drupal\\Core\\Database\\Driver\\mysql',
                      'driver' => 'mysql',
                       );
                   $settings['install_profile'] = 'standard';
When using this installation, you are installing everything from our preview server. So don't forget to set proper values to access to your database: db name, db admin username, db admin password, host, etc.
7. Open the browser and visit your website with the prepopulated content & layout exactly like our zircon_d8 Demo
Now, you can visit administrator site with the admin account admin/admin to delete the unnecessary contents and add the new ones.
How to install a WeebPal theme for Drupal developers
If you're an experienced Drupal user or if you want to build the theme from zero with only the basic appearance of zircon_d8 Theme, find this guide in handy.
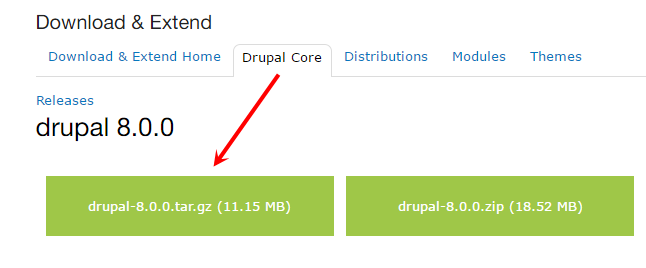
1. Install Drupal
1. Go to Drupal download page and download the latest version of Drupal 8.
2. Extract and copy Drupal folder to your host and rename the directory (e.g: zircon-d8)
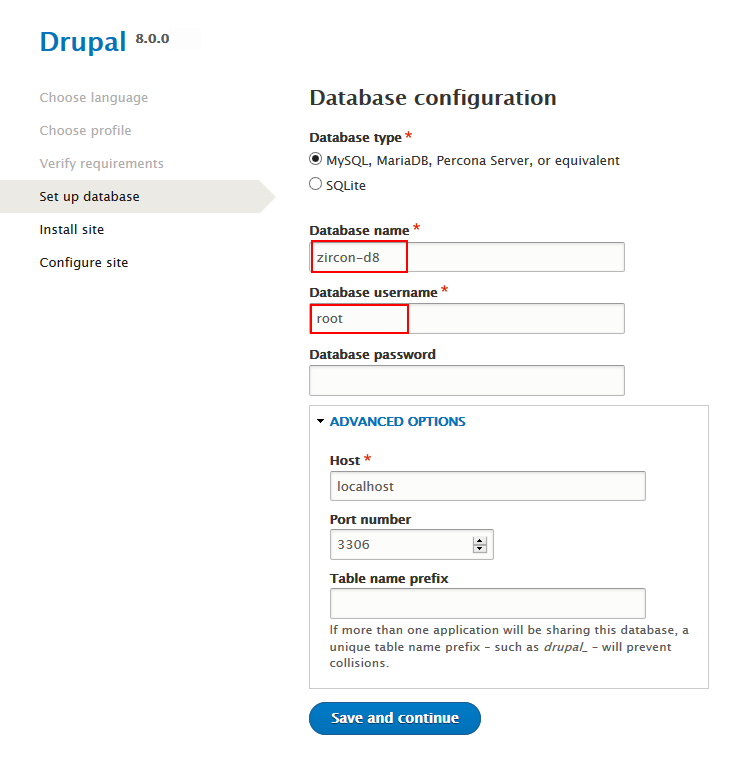
Follow steps below to install a Drupal site only:3. Access to database and create a new database with a name such as zircon-d8.
4. Open browser and navigate to your website.
5. Choose language => click Save and continue button.

6. Choose Standard => click Save and continue button.

7. Choose continue anyway => click link.

8. Enter Database configuration => click Save and continue button.
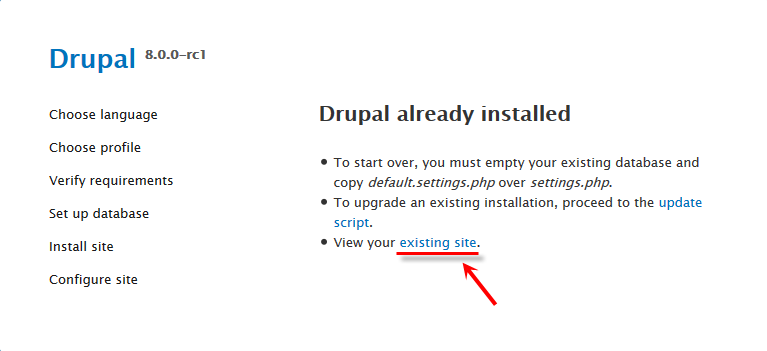
9. Click existing site and you will have a new site.
You can refer the guide from drupal.org to delve more details about drupal installation.
2. Install Zircon D8 Theme
- Extract Zircon D8 theme .ZIP file:
- zircon_d8-8.0.0.zip
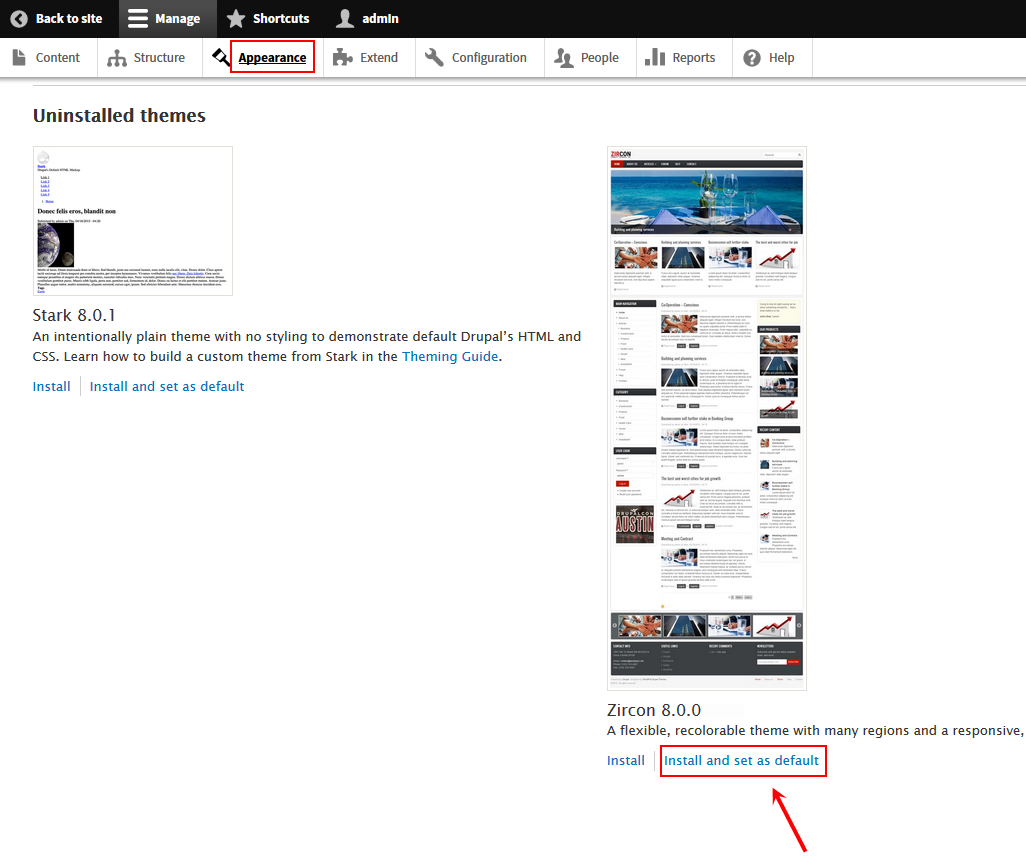
- Move this theme into your Drupal folder: zircon_d8/themes
- Navigate to Appearance > Choose Install and set default Zircon-D8 theme
3. Install Required Modules
Now that you've enabled Zircon II theme, you will install and enable the required modules (listed in the Module Requirements section) to customize and use them.
If you don't know how to install the contributed modules, this tutorial is an essential guide.
Cheat to install modules & theme:
- Extract zircon_d8-demo-8.0.0
- Open extracted folder, go to sites/all and copy all folders inside (modules, themes, libraries)
- Paste them to your host, folder sites/all
Note: See this guide to get more details about installation
Taxonomy configuration
Quick Information
- Taxonomy: Taxonomy can be simply understood as category management using organizational keywords known in other systems as categories, tags or metadata. It allows you to connect, relate and classify your website's content. In Drupal, these terms are gathered within "vocabularies". The Taxonomy module allows you to create, manage and apply those vocabularies.
- Vocabulary: for example product category, tag, provider name, ...
- Term: the items in each vocabulary. For example: vocabulary product category has some terms: laptop, pc, mobile, tablet, camera, headphone, ...
- For more information about taxonomy, please see: Organizing content with taxonomies
Step 1: Navigate to Structure > Taxonomy to create vocabularies as the following:
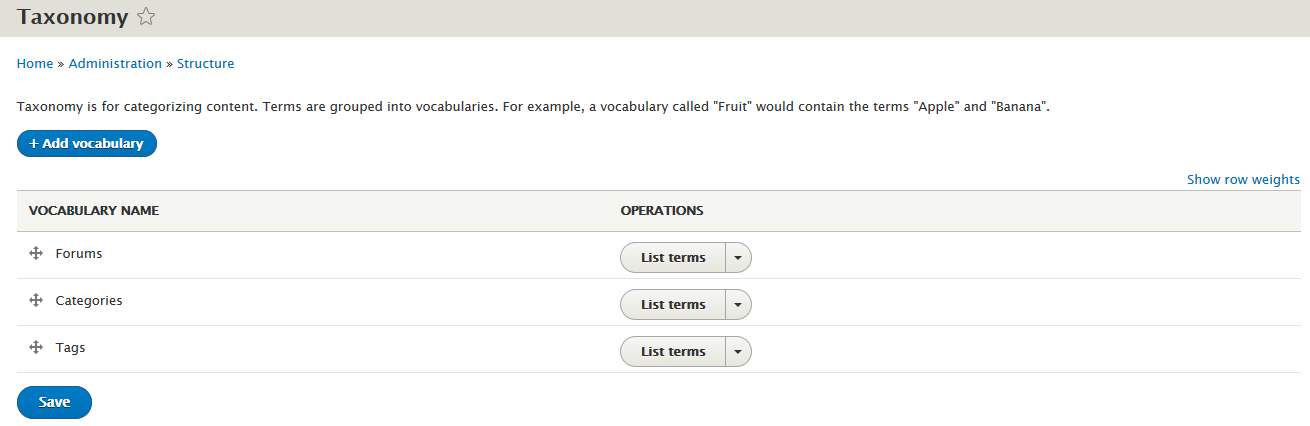
Then, add terms for each vocabulary
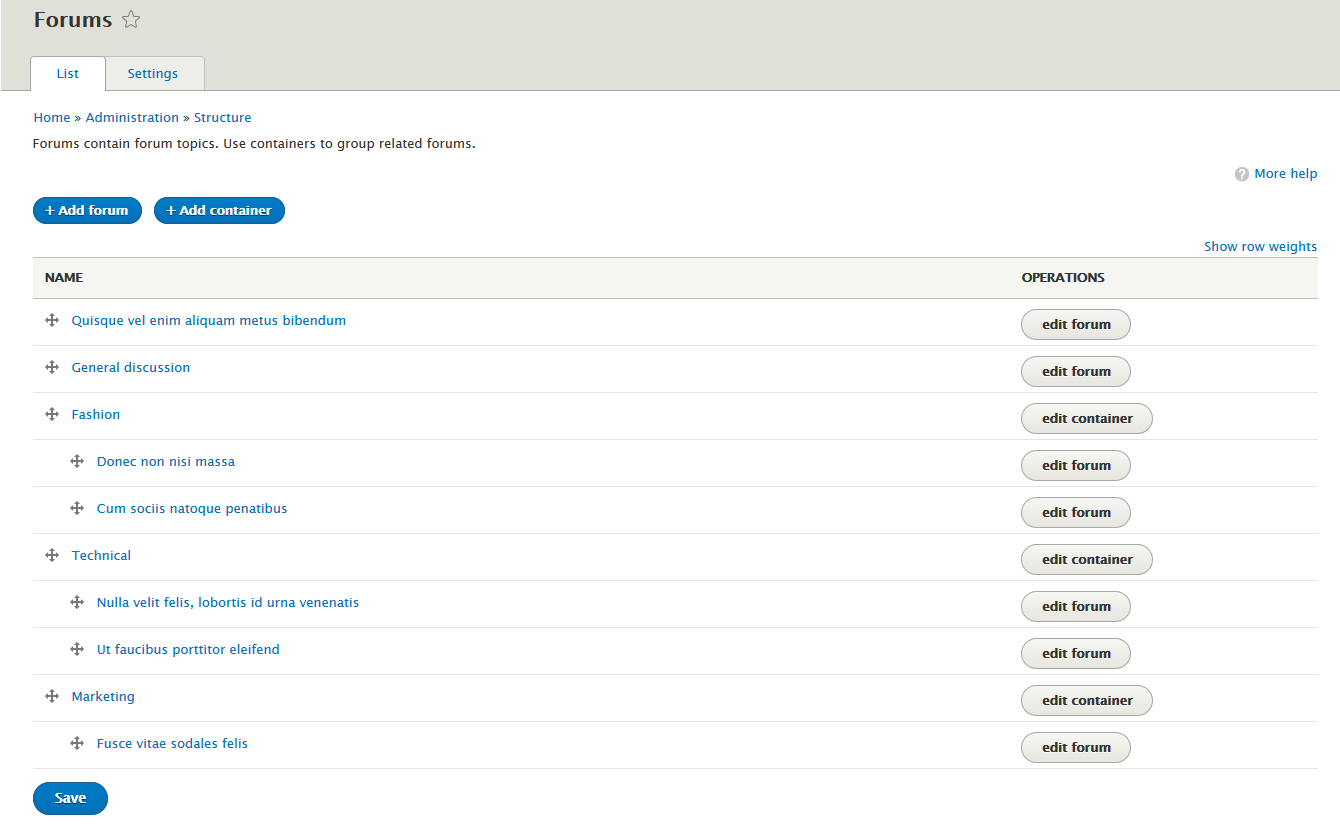
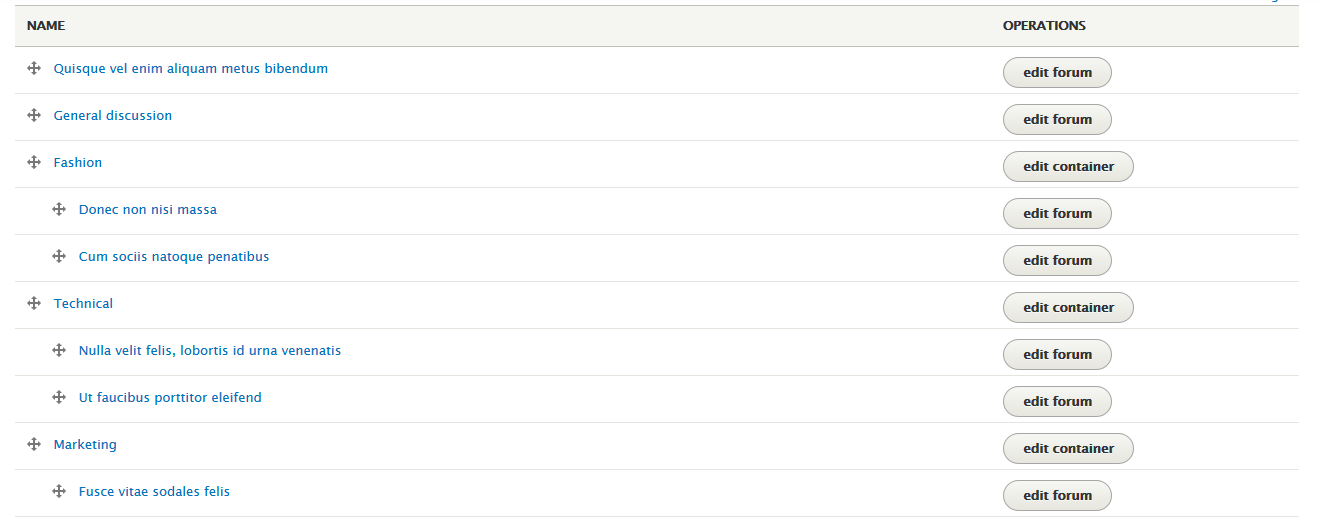
Step 2 :Terms of: Forums.
Navigate to Structure -> Forums to create add forum and add container as the following:
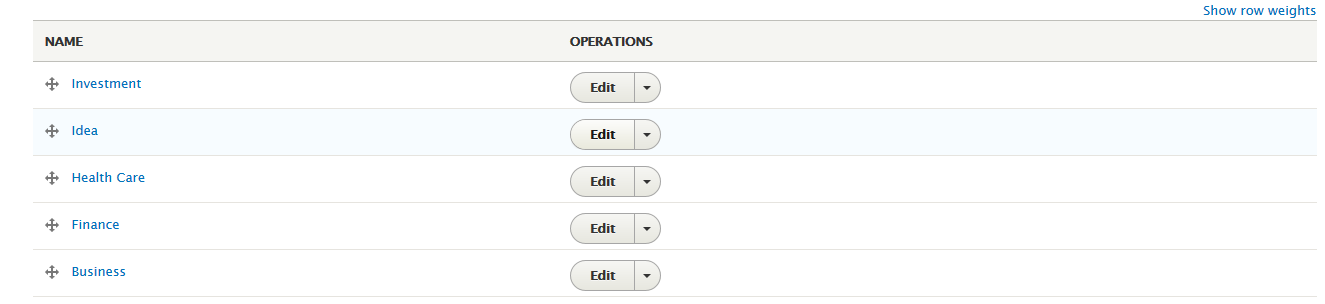
Step 3:Terms of: Categories
Note: See this guide to get more details about taxonomy configuration
Media configuration
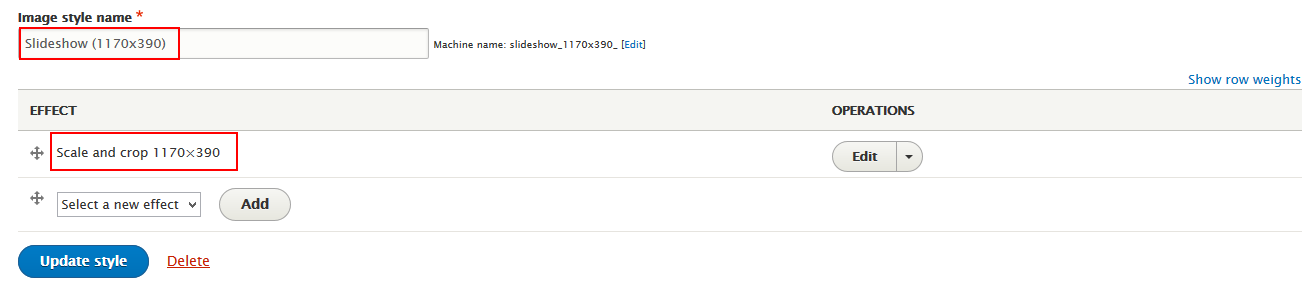
Image Style Configuration
Image styles are the presets of image settings. Image styles are used to define how the images are shown.
Navigate to Configuration -> MEDIA area -> Image styles, then create image styles as the following:

Configure for each image style:
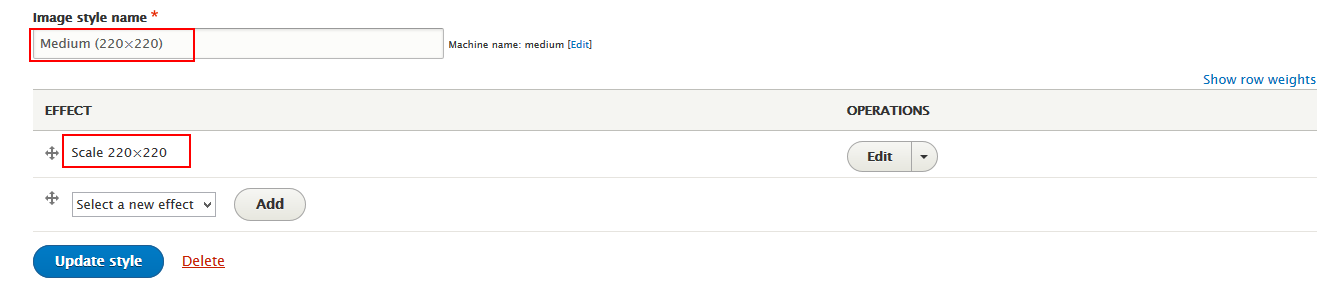
- Medium(200x200):
- Slideshow(1170x390)
Content type configuration
Modify Article type
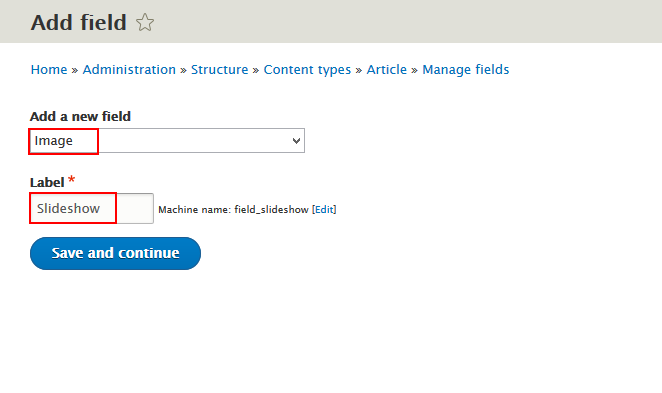
Step 1: Navigate to Structure > Content Type find Article to click link
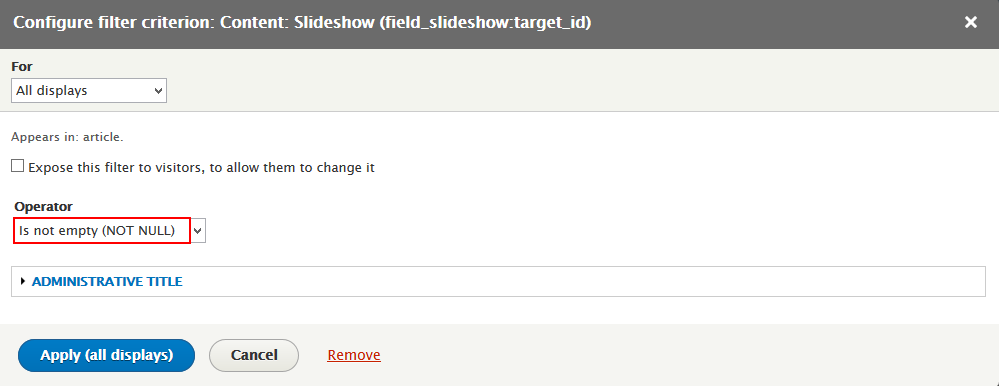
Step 2: In Article row, click "manage fields" --> add "Slideshow" field with following settings:
Step 3: Click Save and continue button, then click Save field settings button > Set following properties:
Step 4:Click Save setting button.
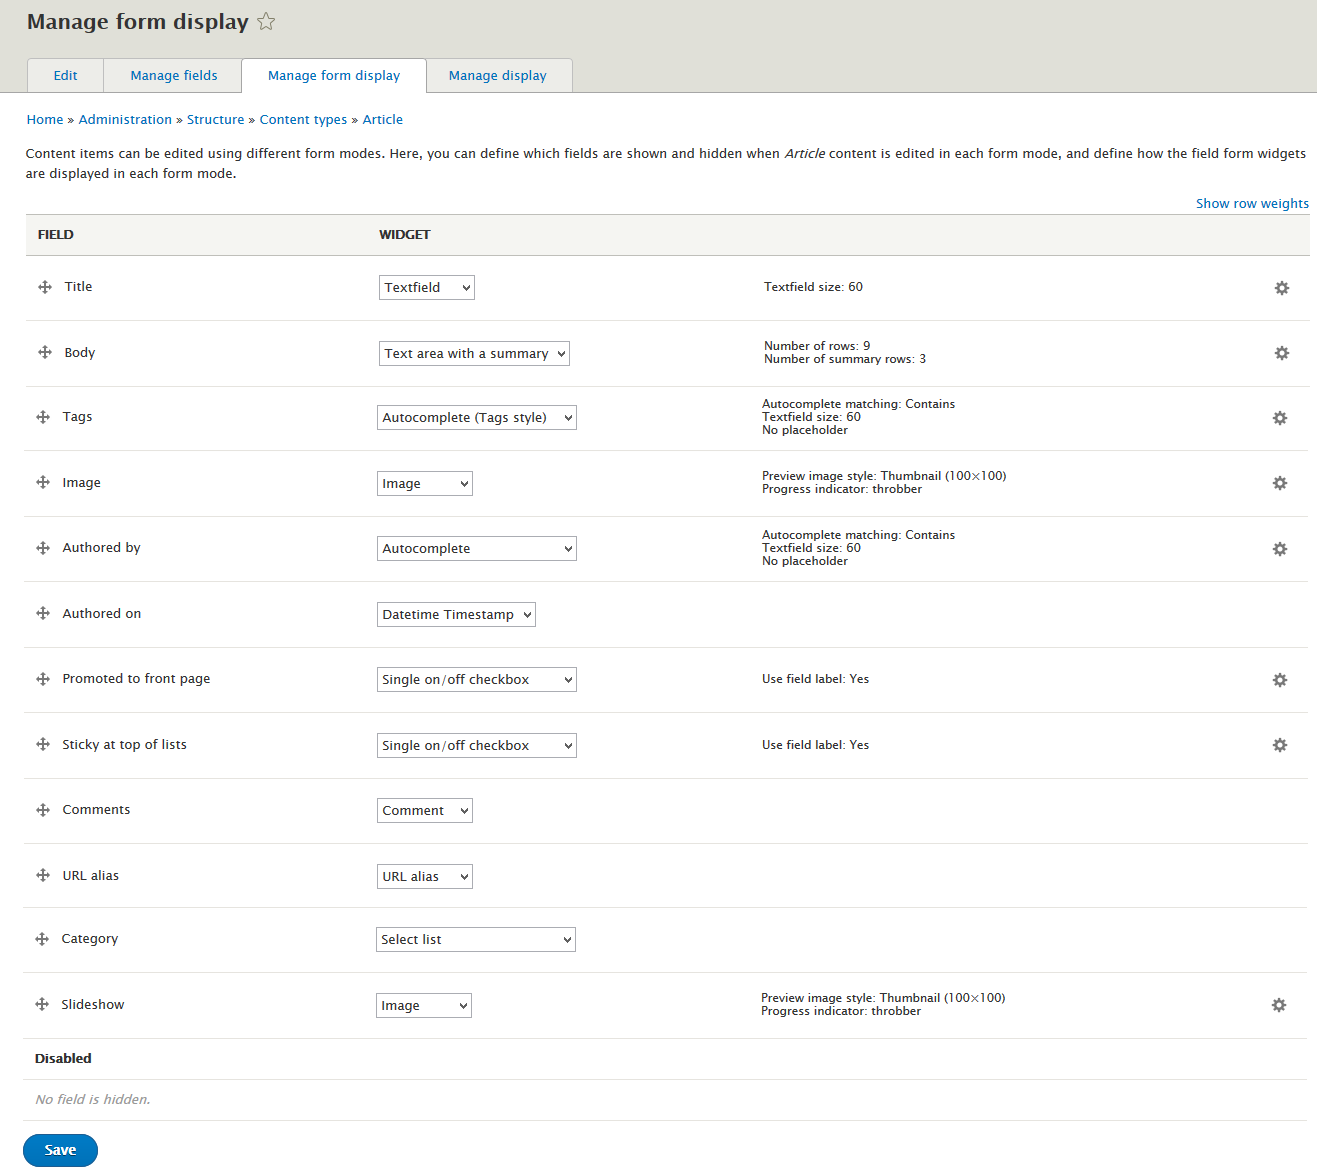
Step 5:Go to Manage form display tab, set following properties:
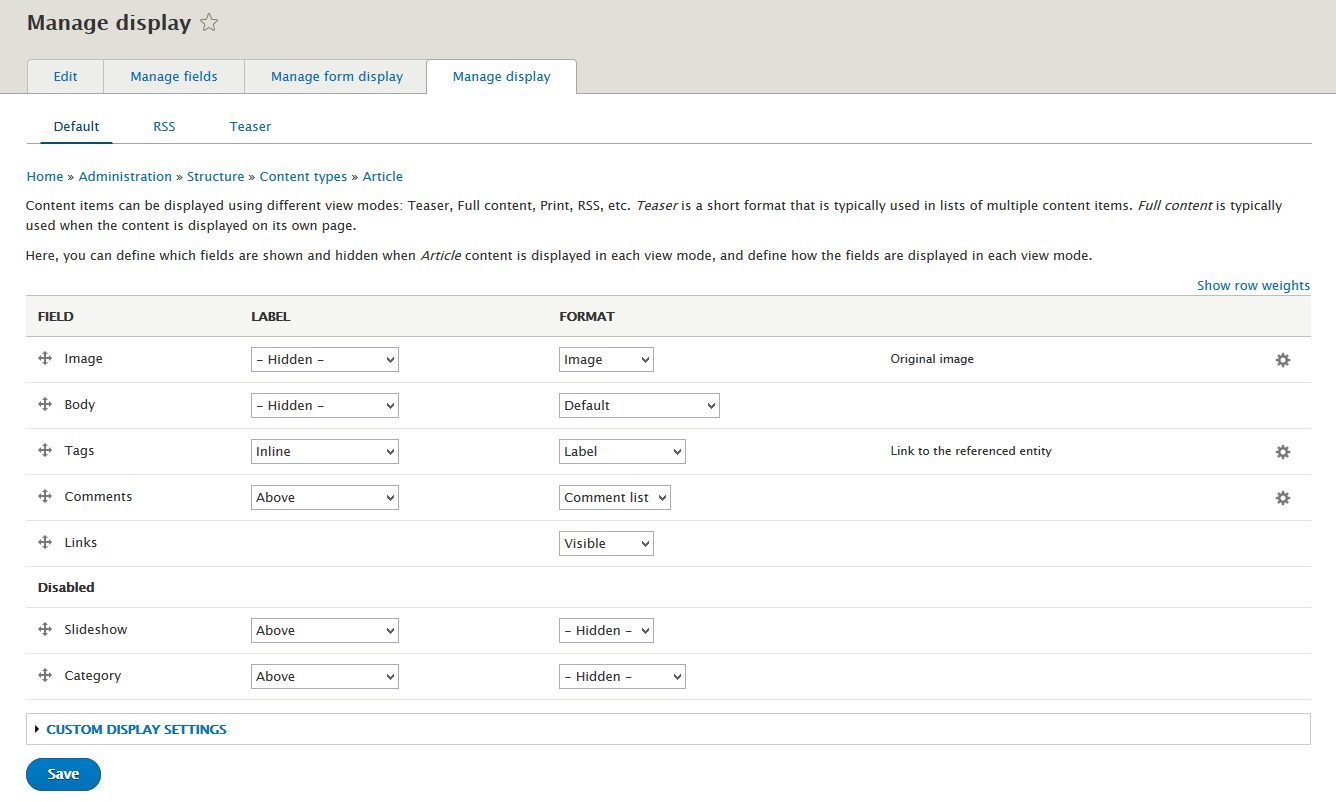
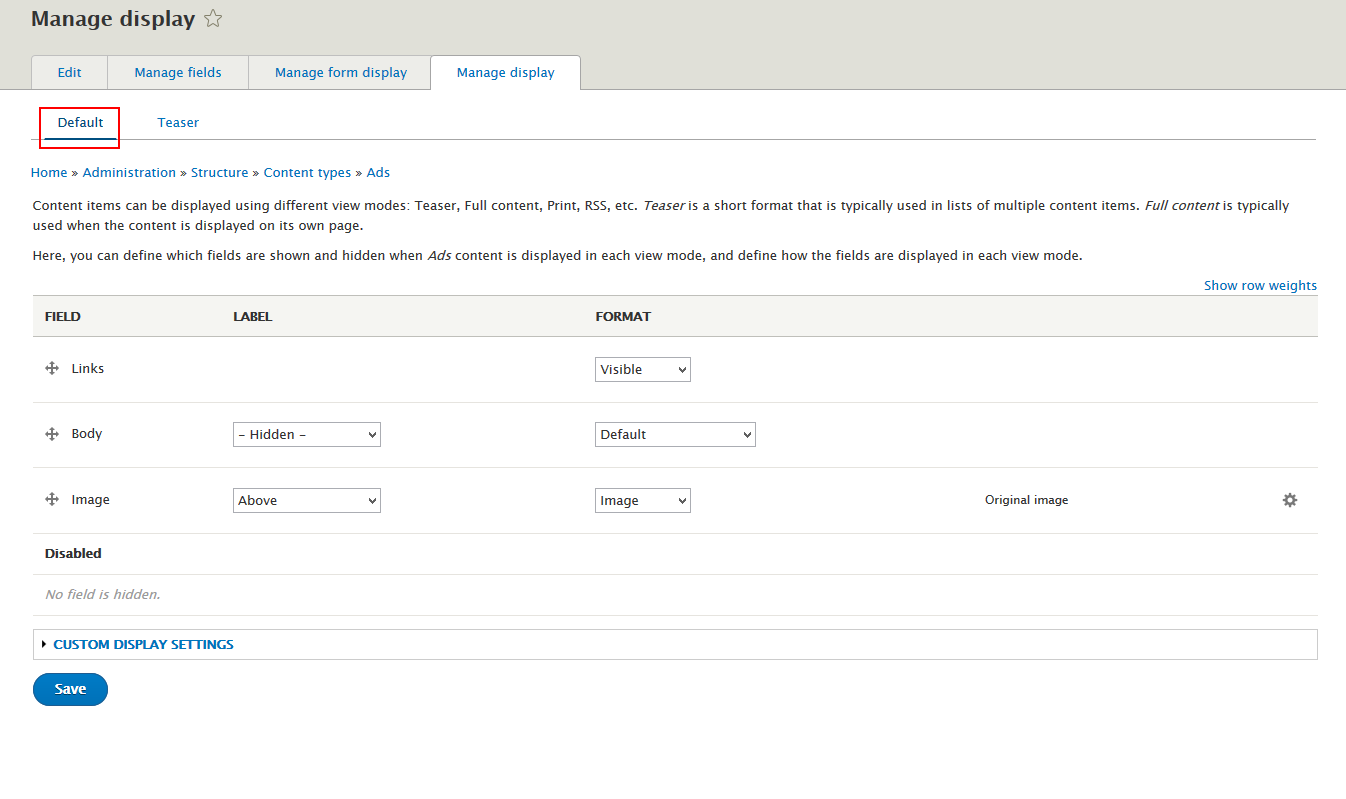
Step 6: Go to Manage display tab set following properties:
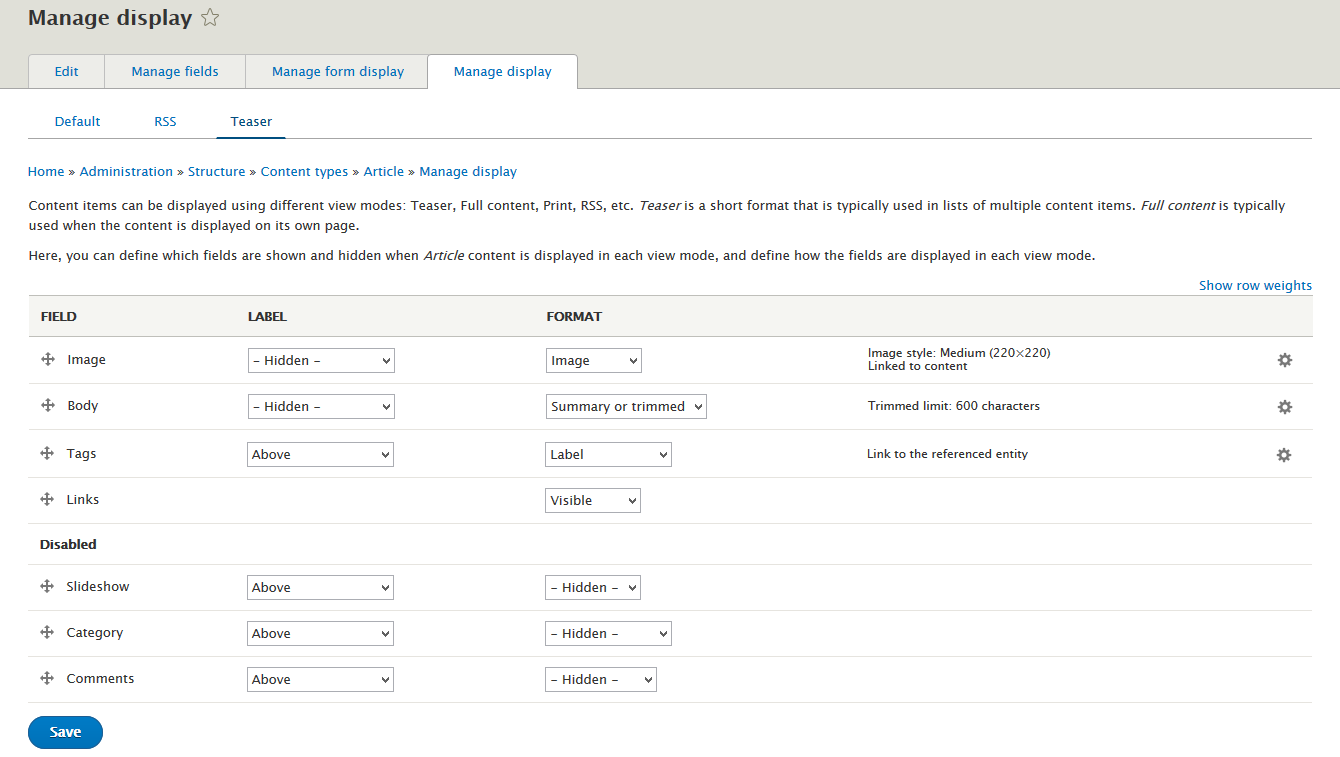
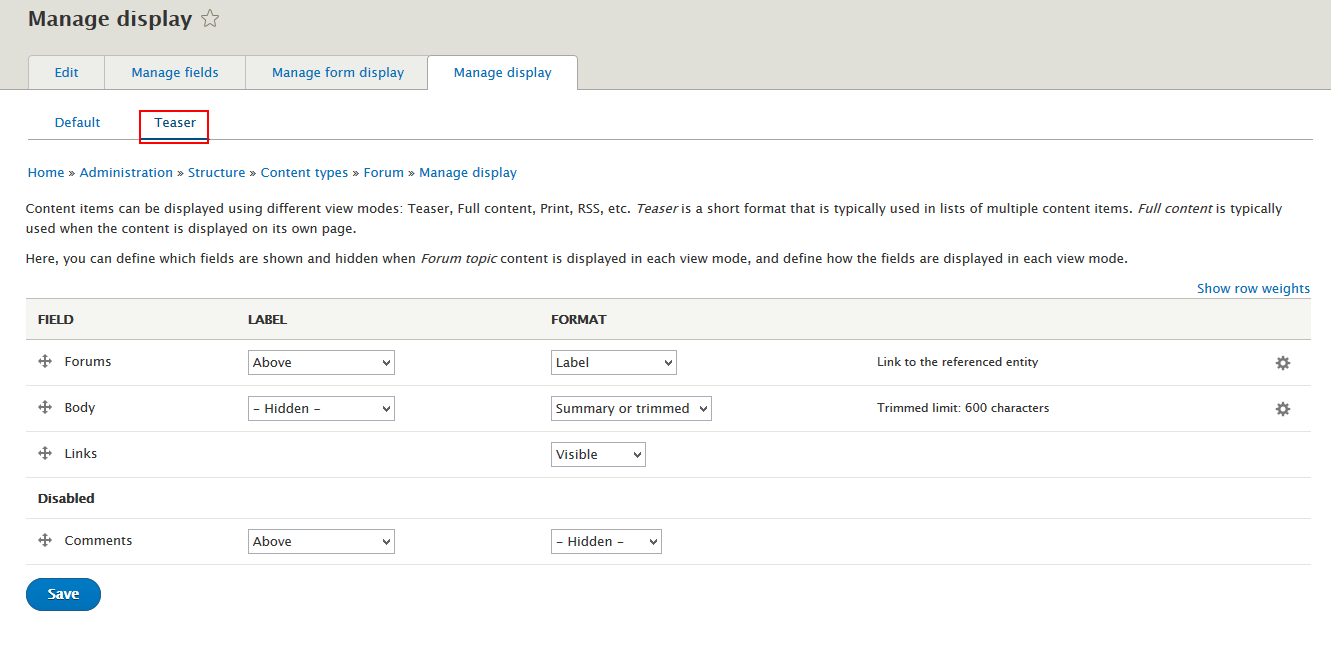
Step 7: Go to Manage display tab --> Teaser set following properties:
Step 8: Click Save button
Create Ads type
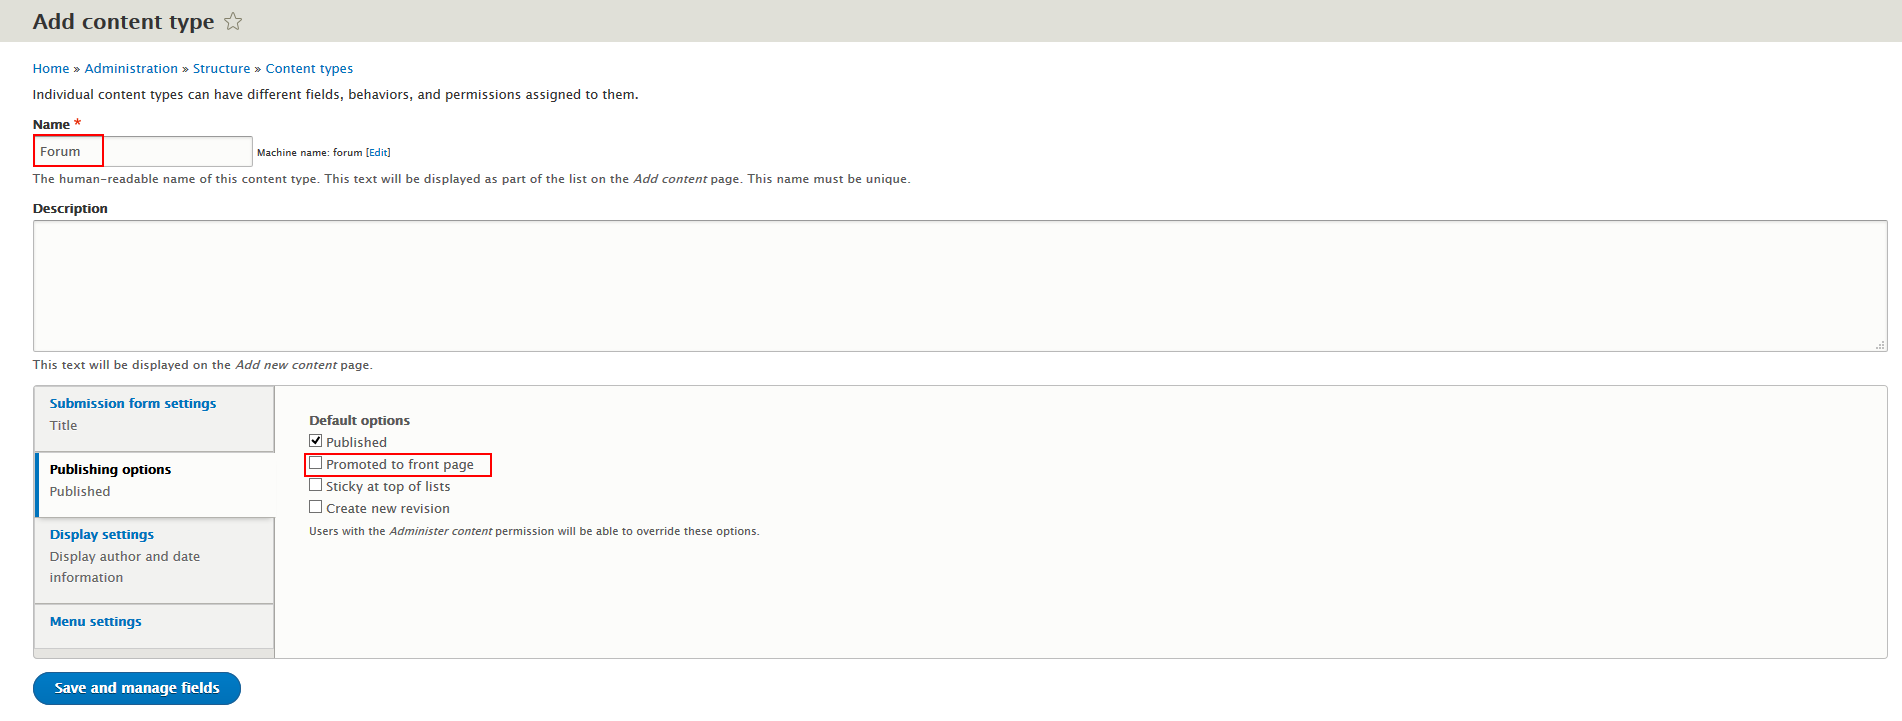
Step 1: Navigate to Structure > Content Type. Click Add Content Type link to create content type Ads with following properties:
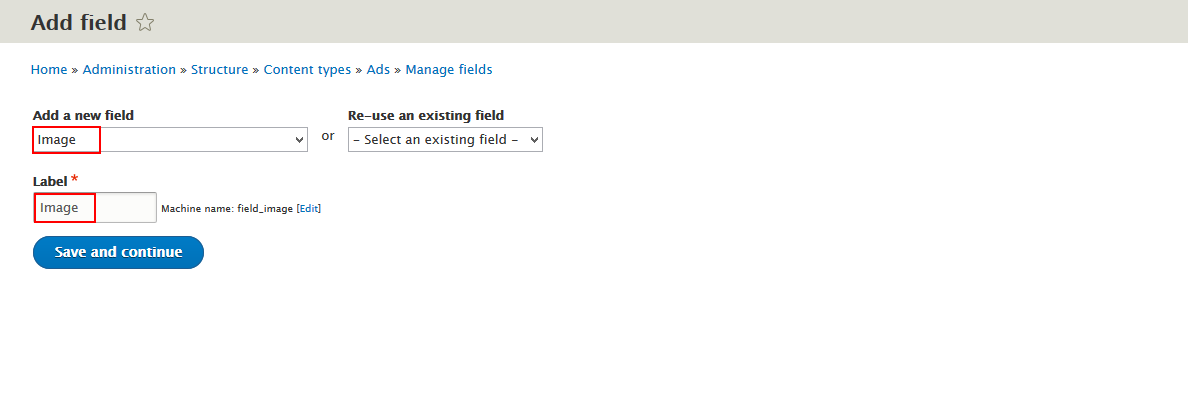
Step 2: Click Save and add fields button, then Add "Images" field with following settings:
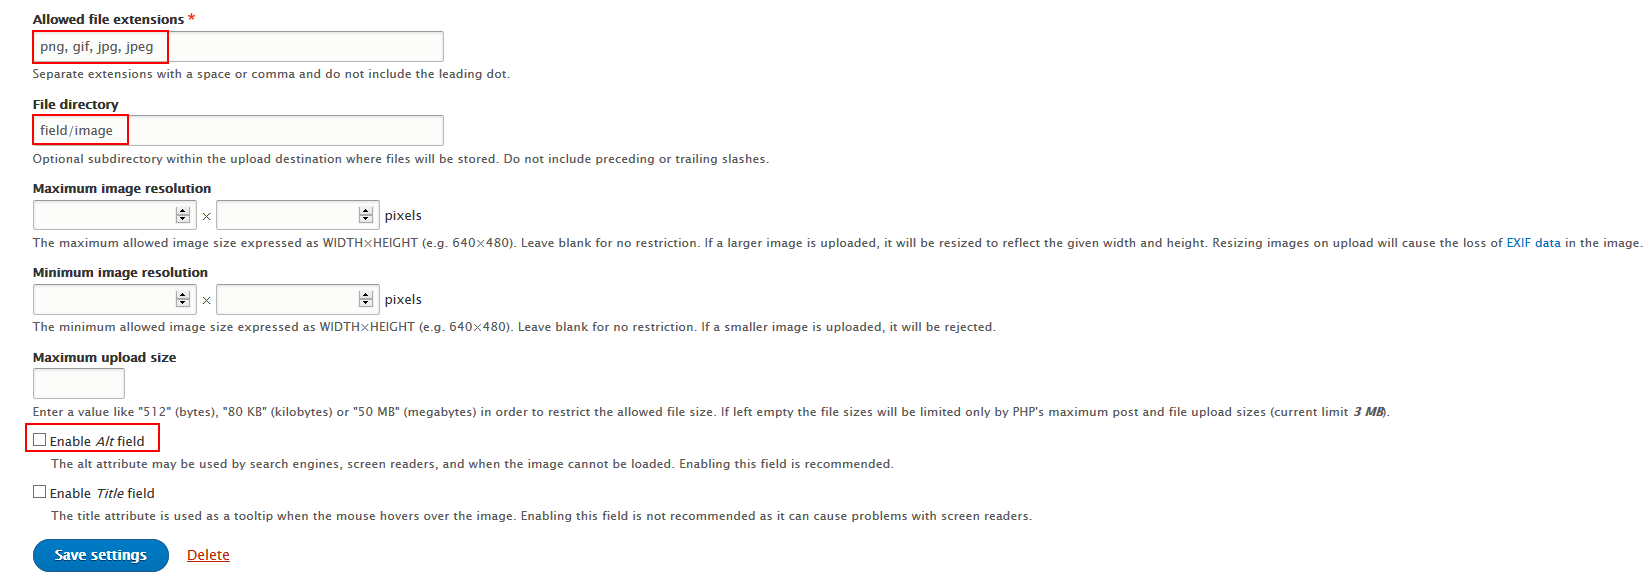
Step 3: Set properties for Image field
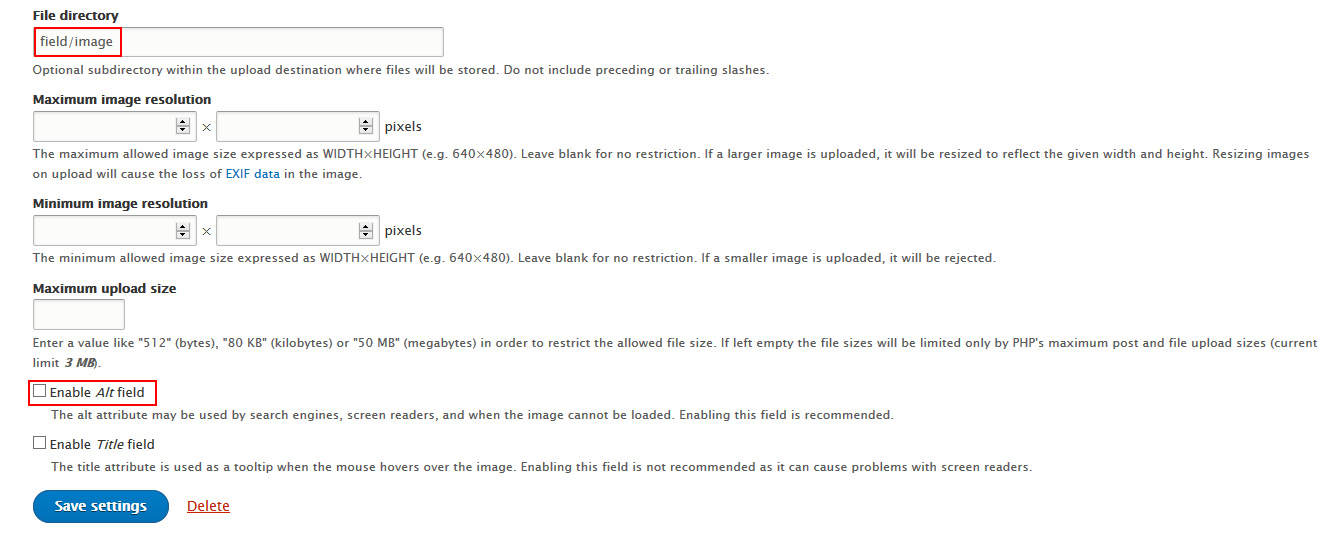
Step 4:Click Save setting button.
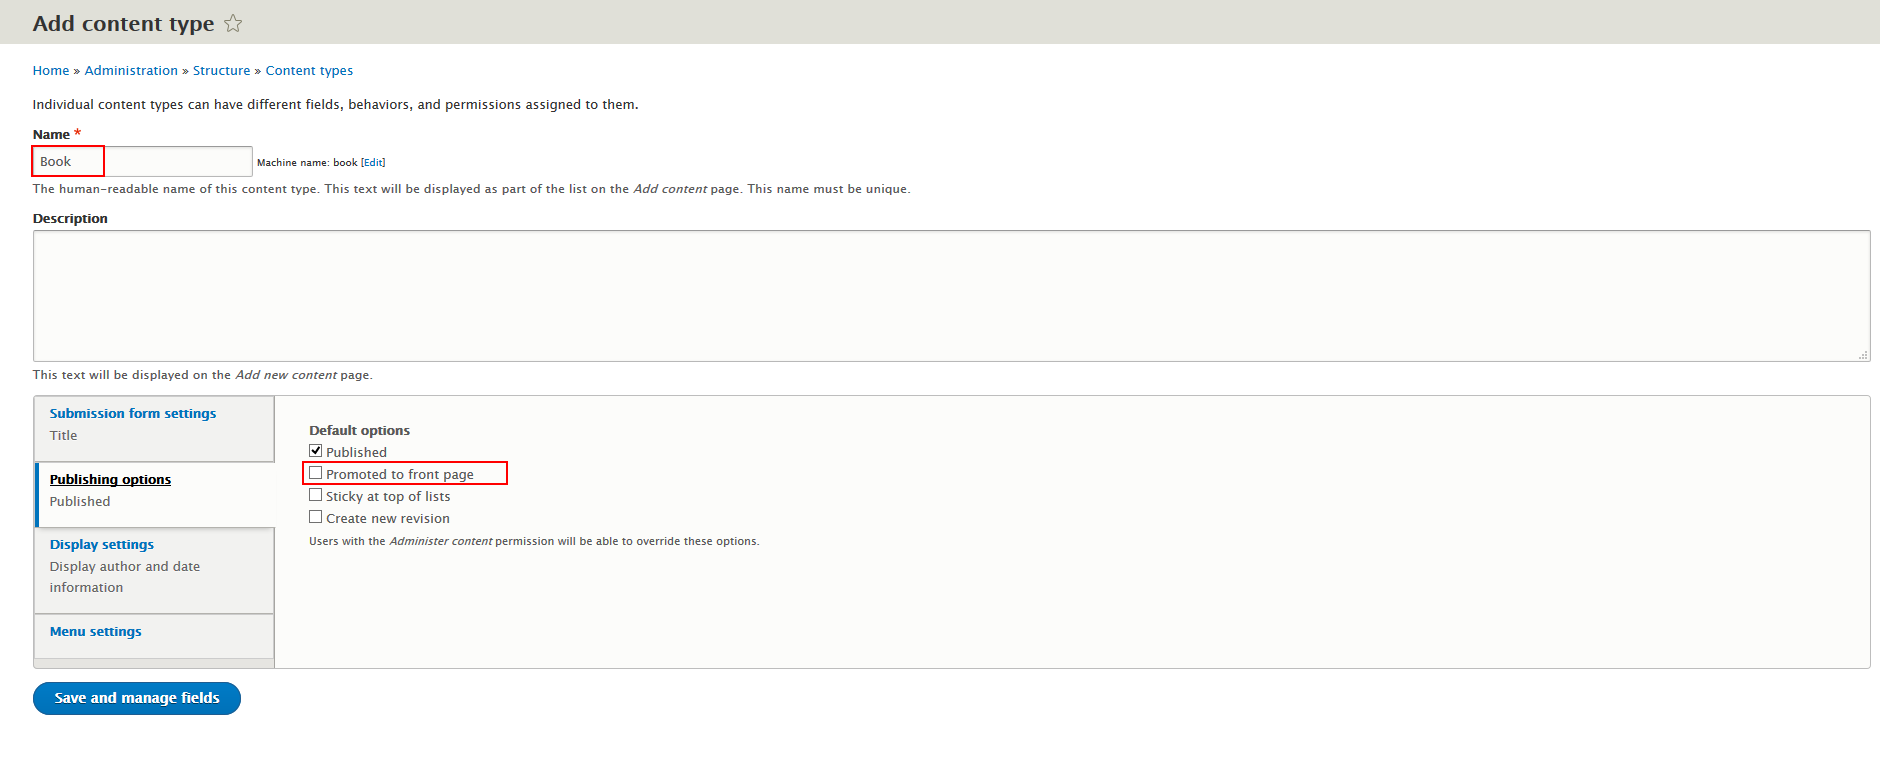
Create Book type

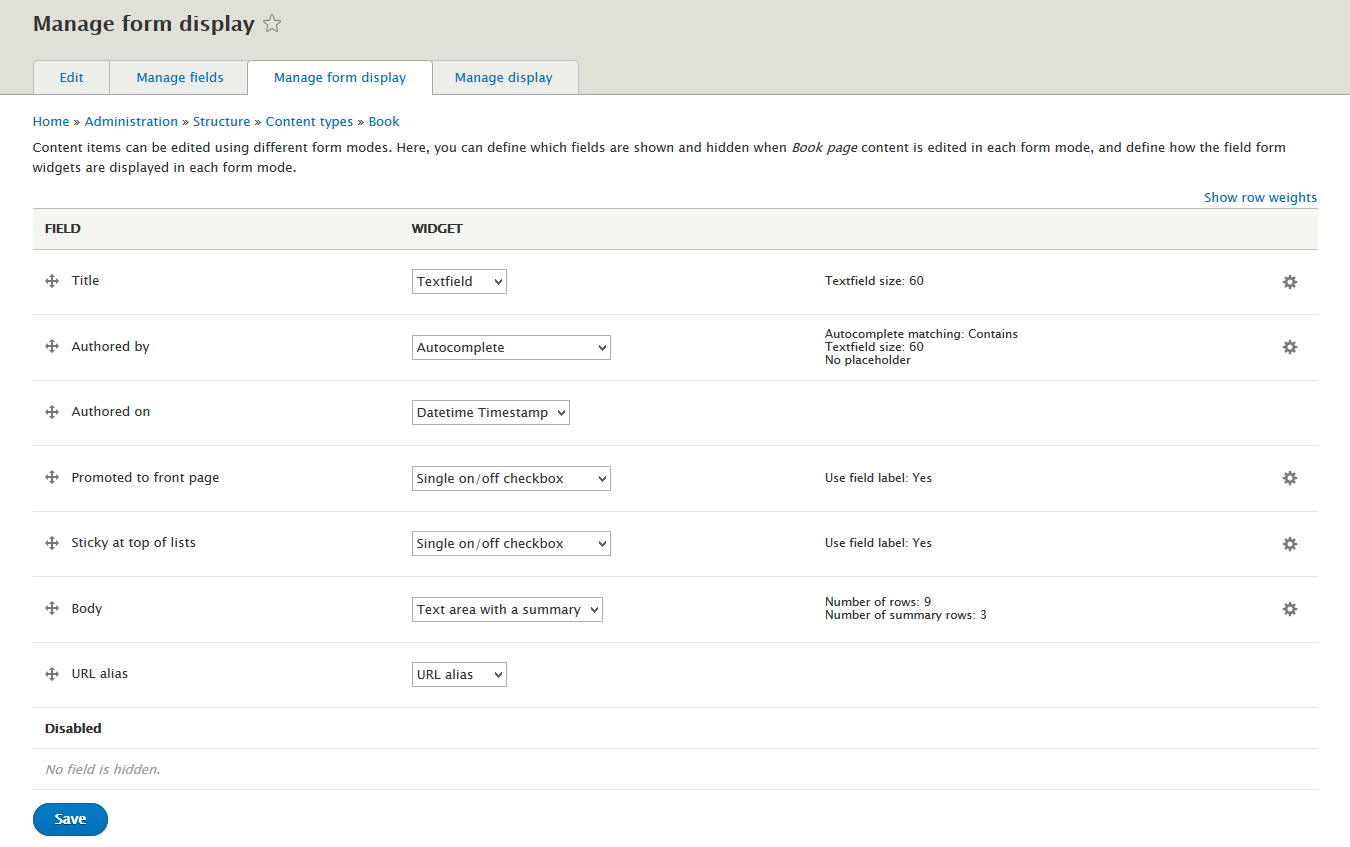
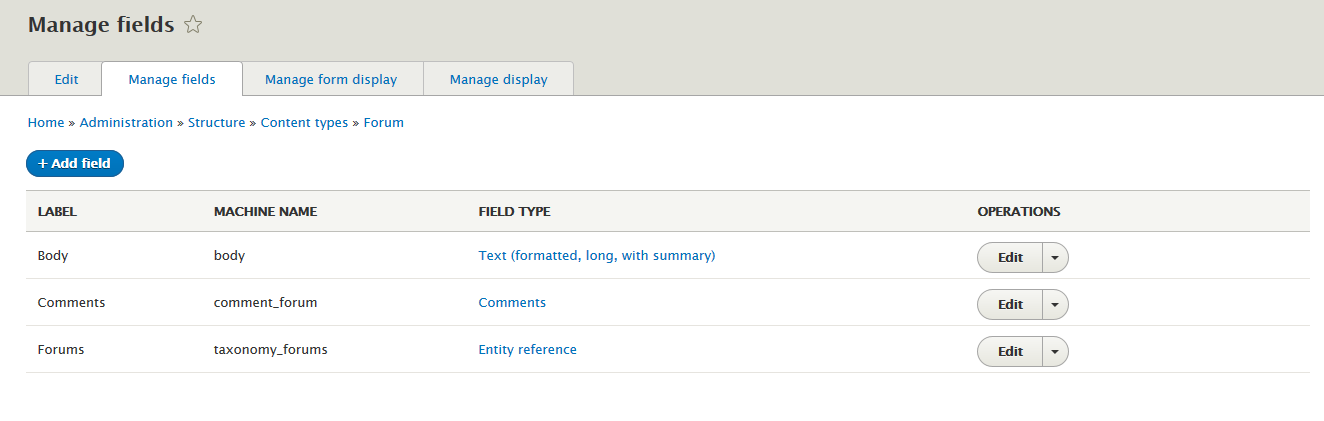
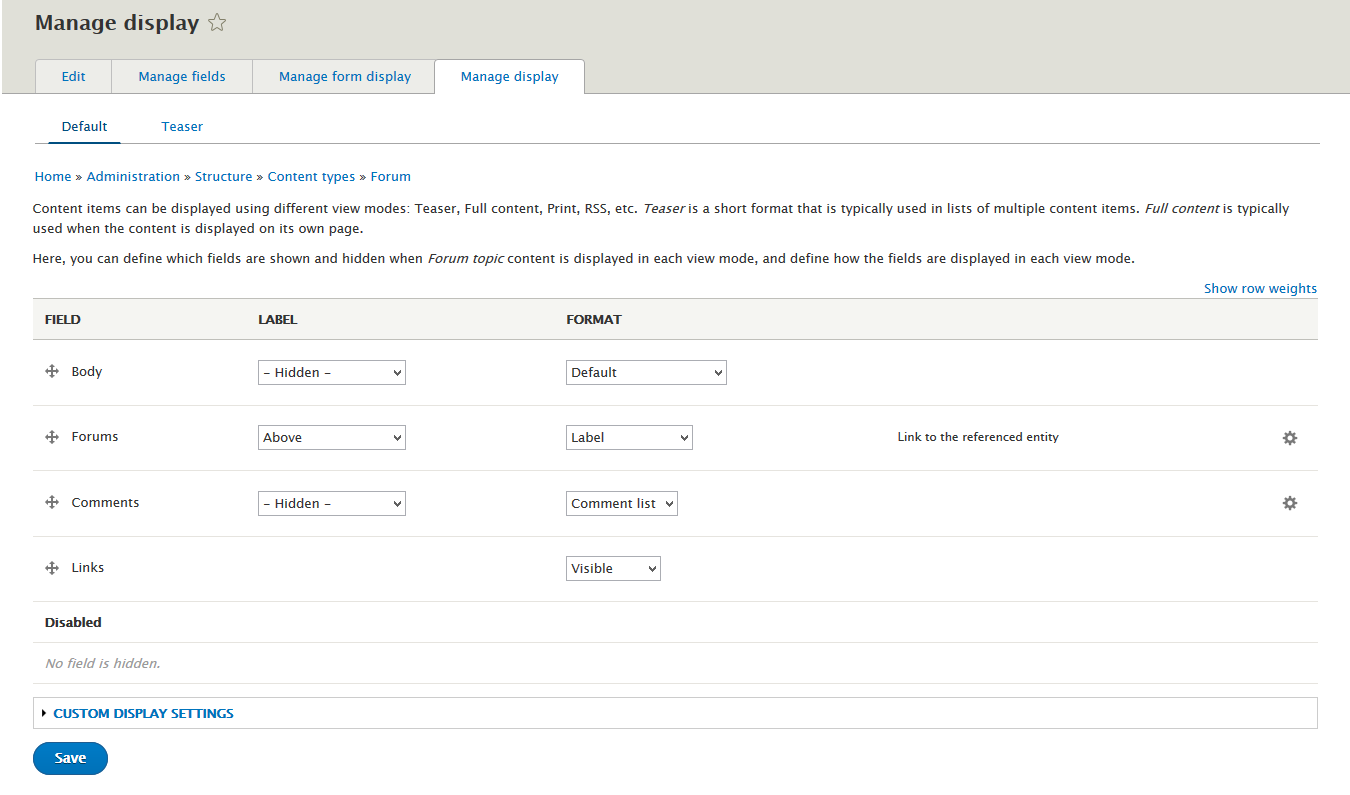
Create Forum type

Create Homepage
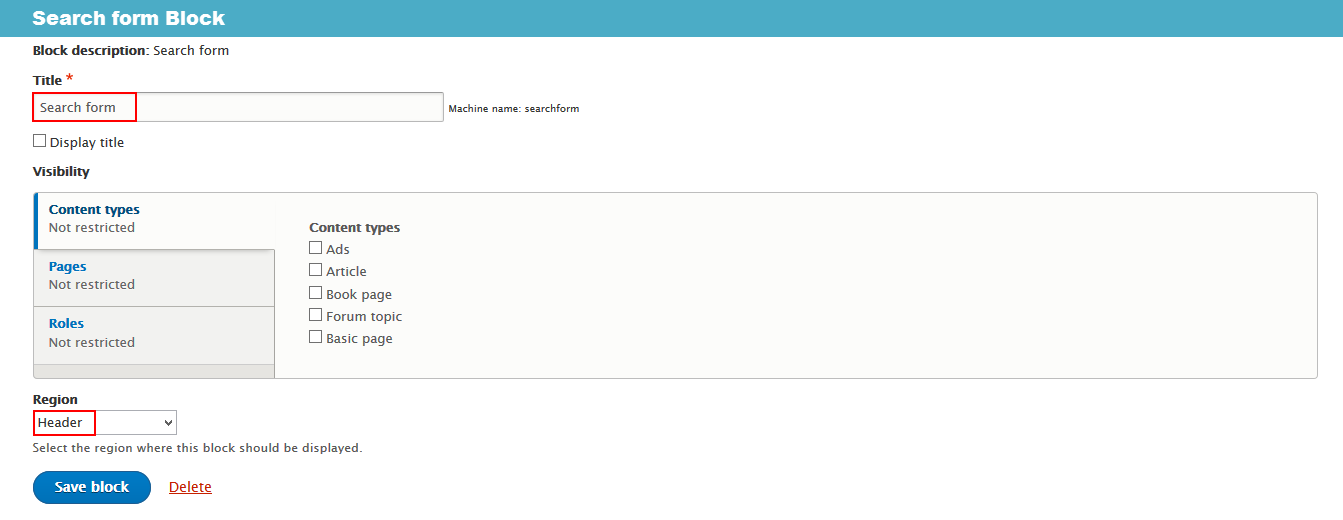
Search form block
Front end Display

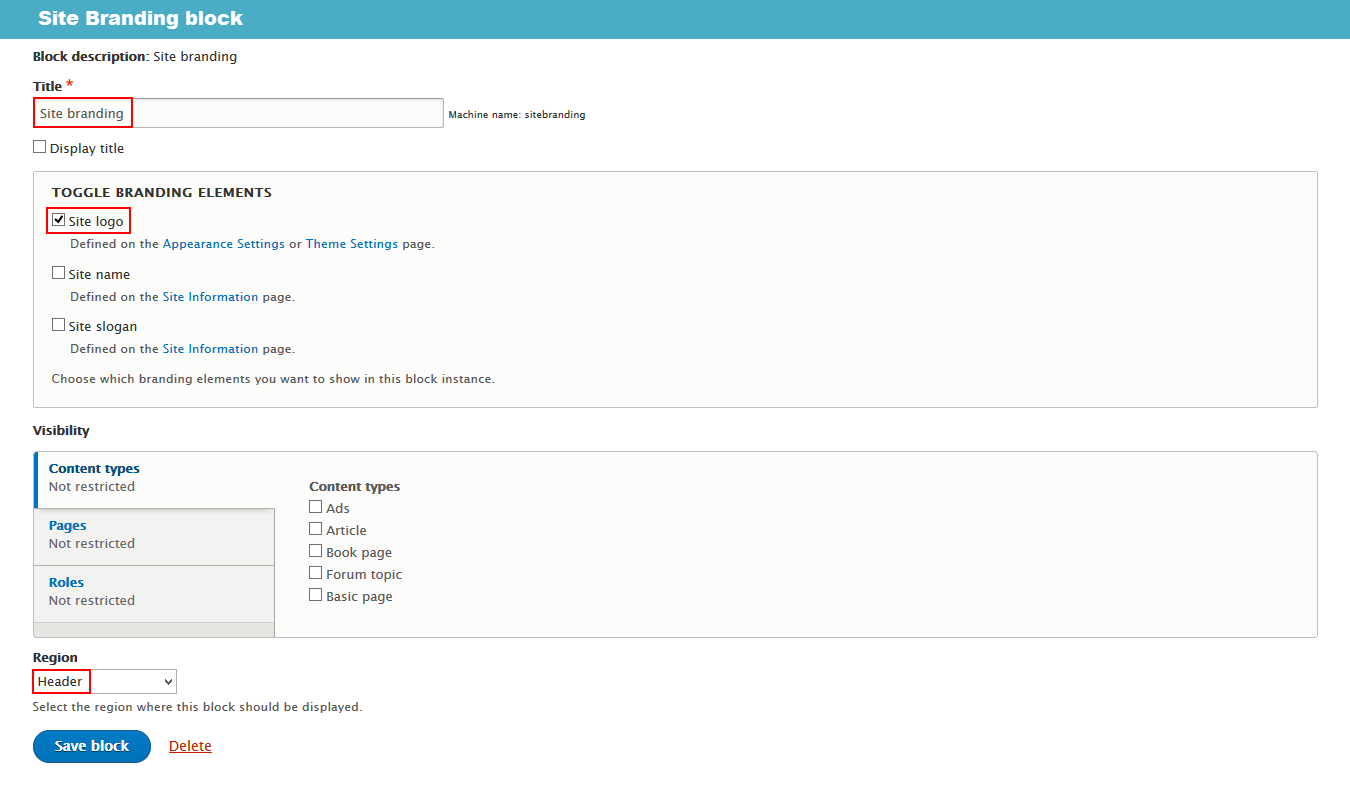
Site branding block
Front end Display

Main menu
Front end Display

Configure Main menu block

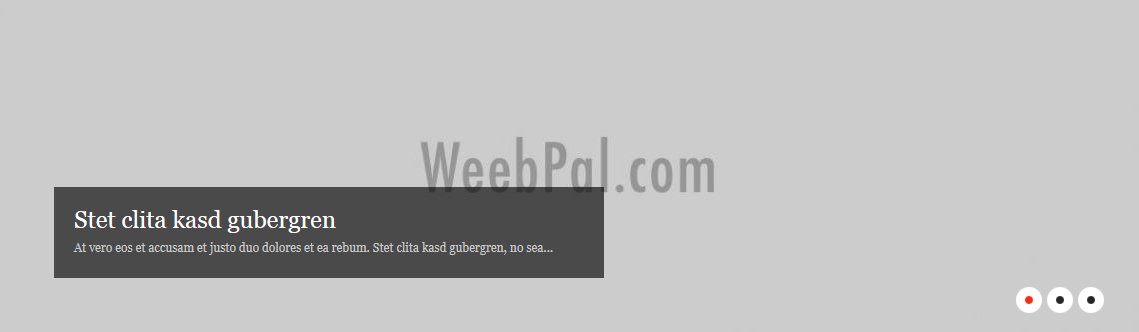
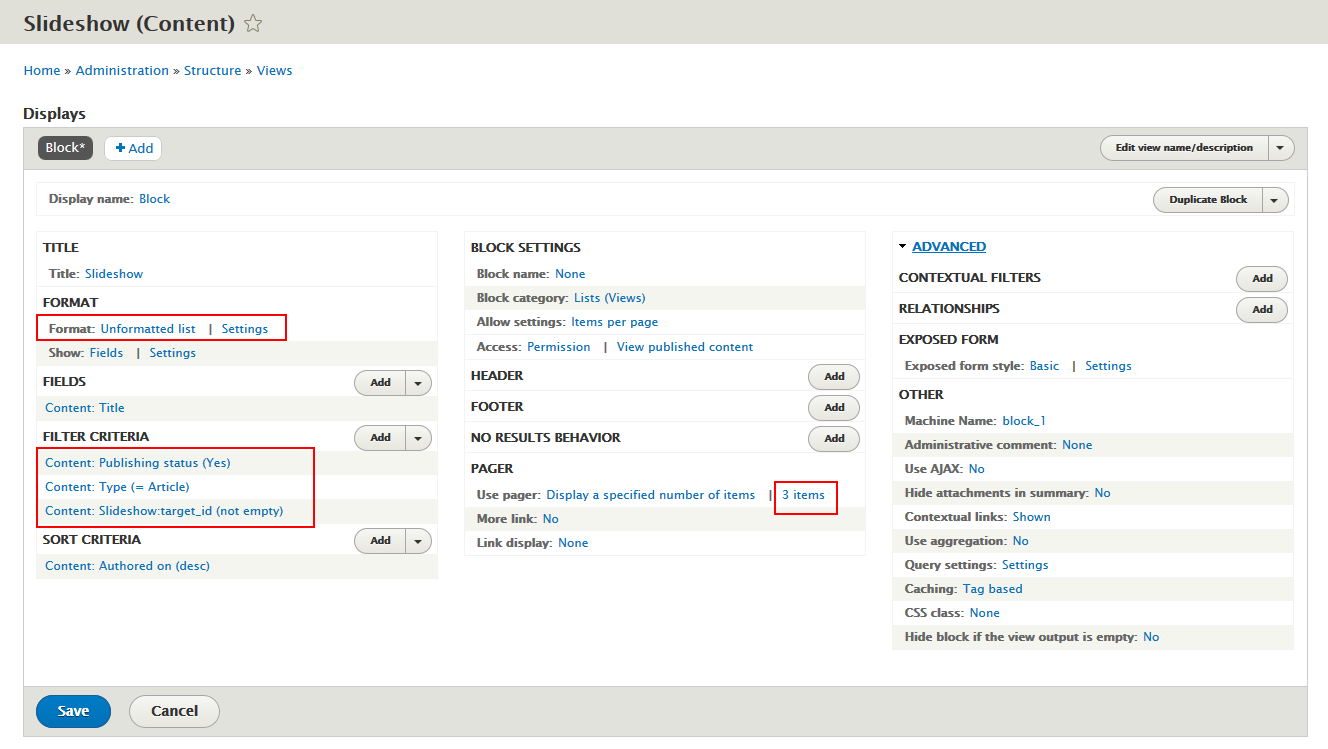
Slideshow block
Front end Display
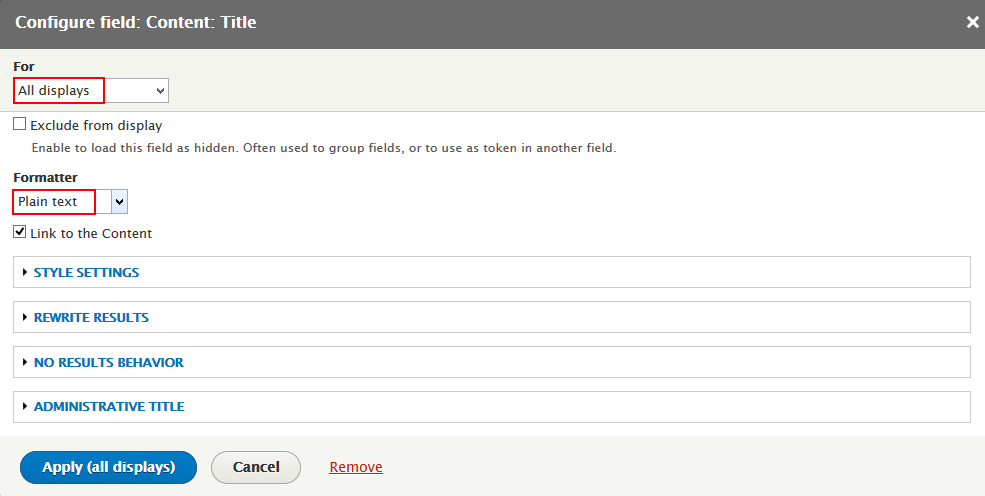
1. Create Slideshow view

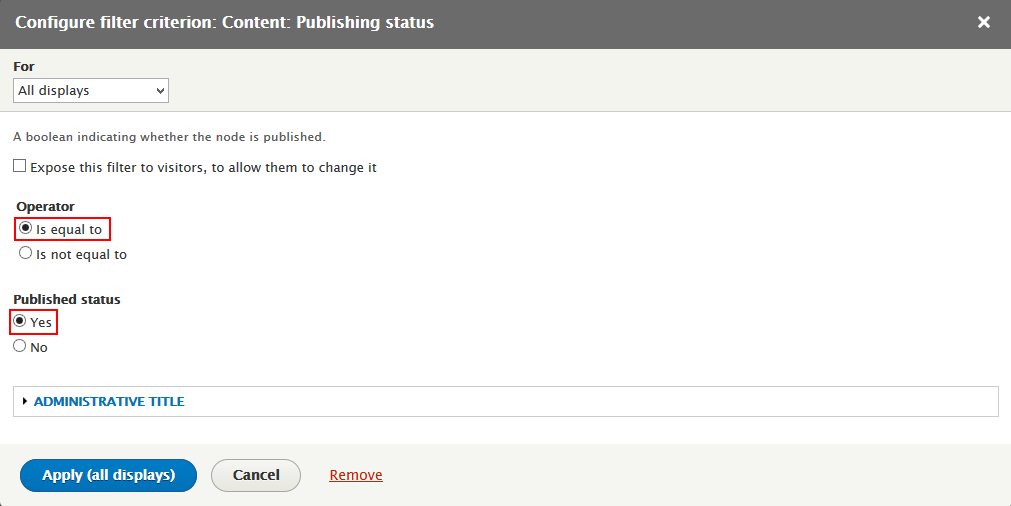
Step 4: Set properties for Content: Publishing status (Yes)

Step 8: Click Apply the button.
2. Configure View: Slideshow block
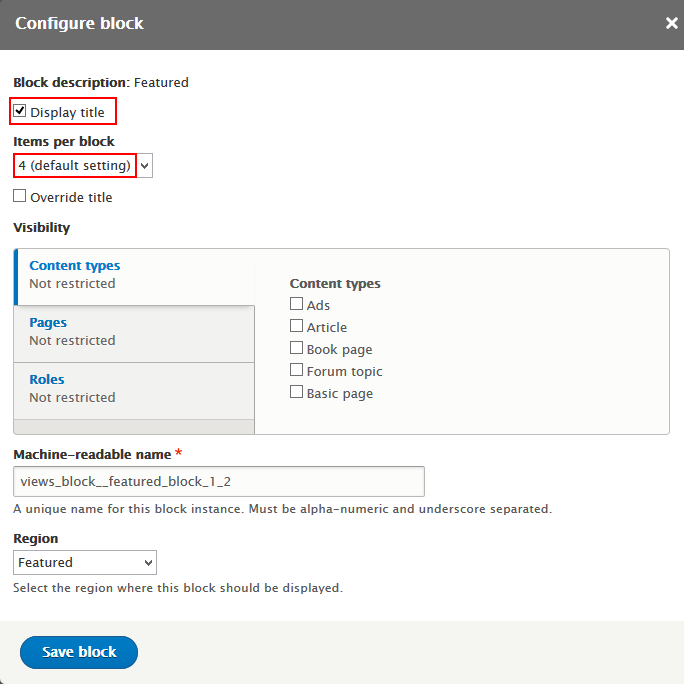
Step 2: Find View: Slideshow block, click Place block link, set following properties


Feature block
Front end Display
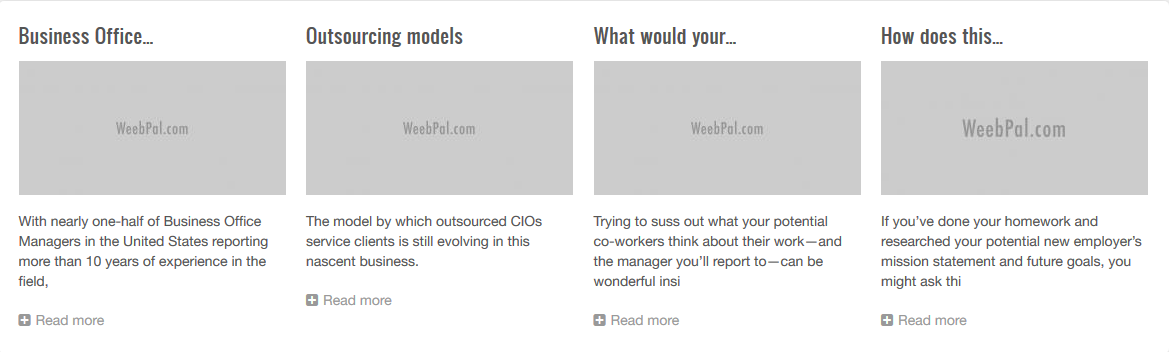
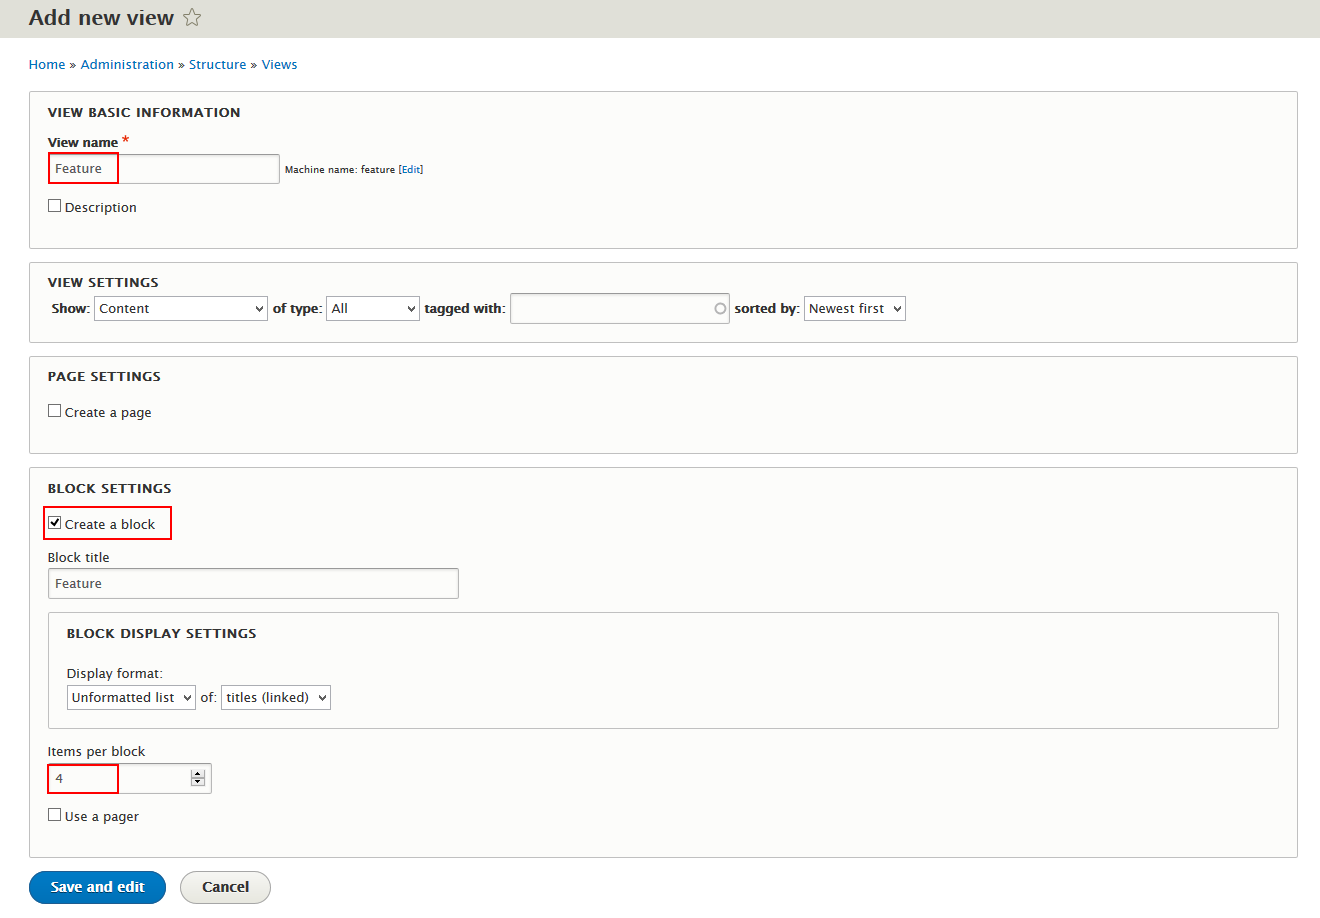
1. Create Feature view
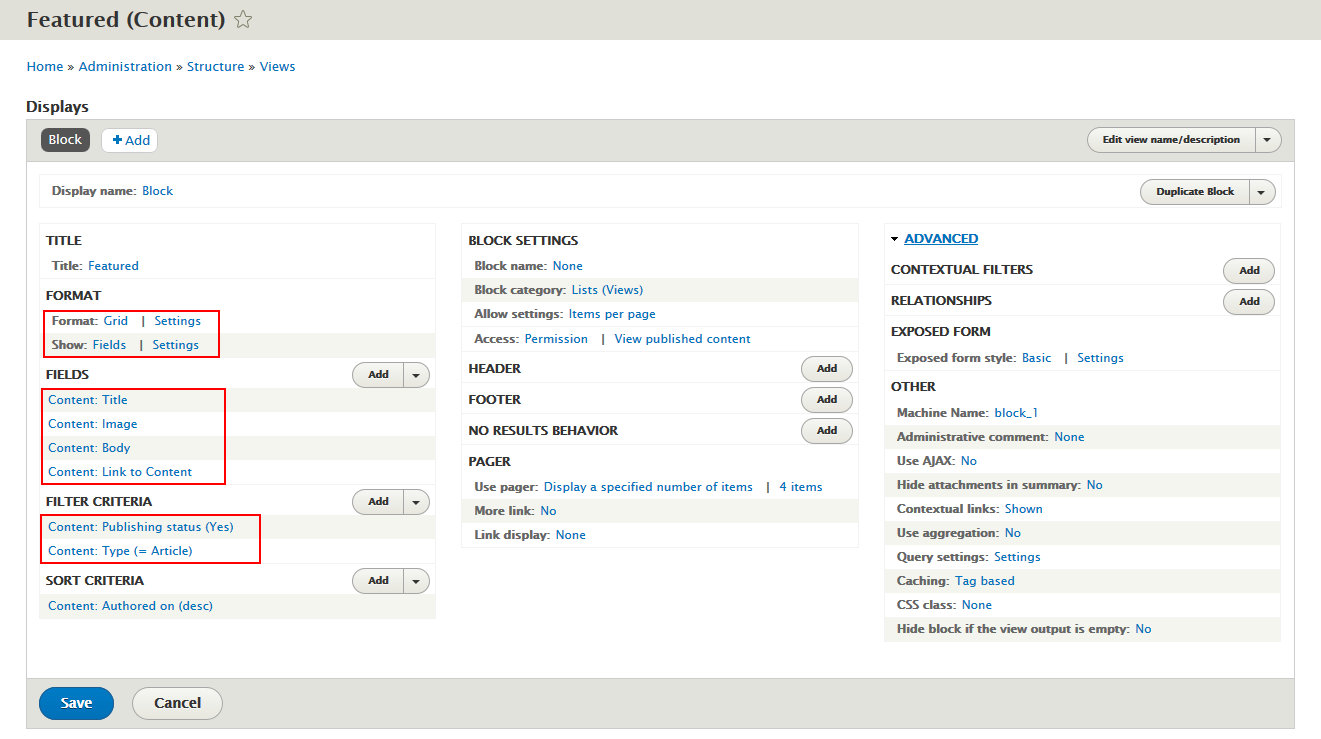
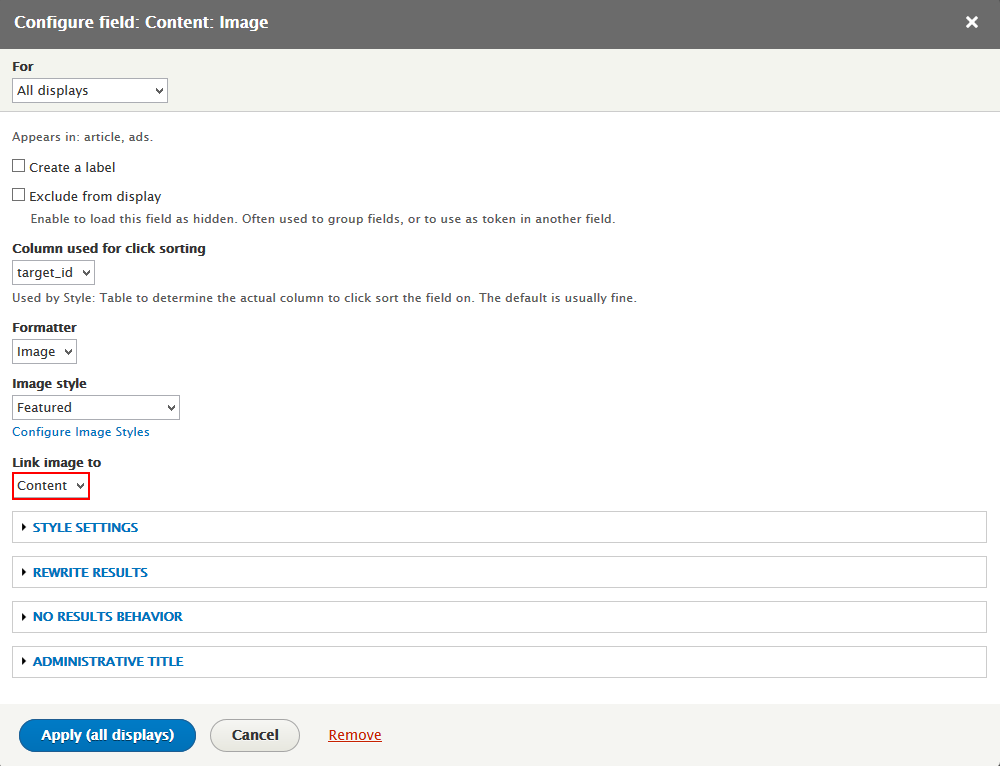
Step 4: Set properties for Content: Image
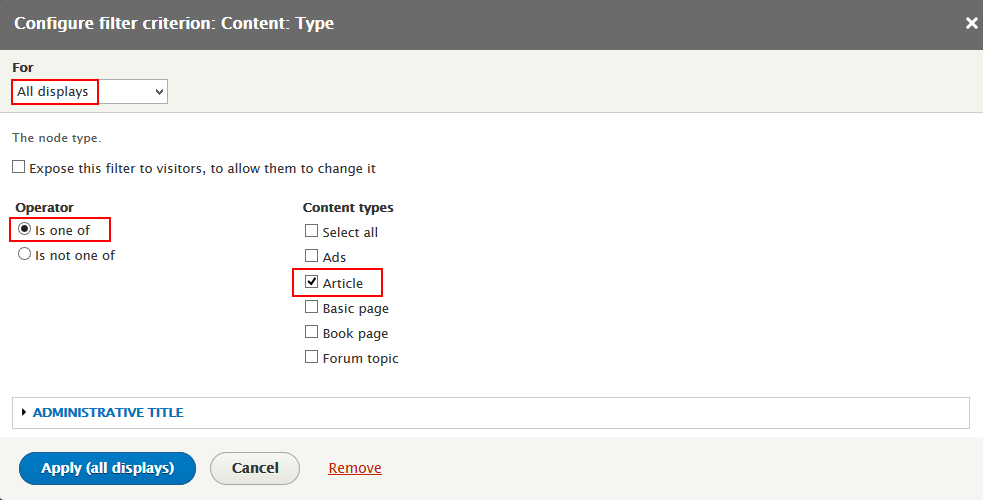
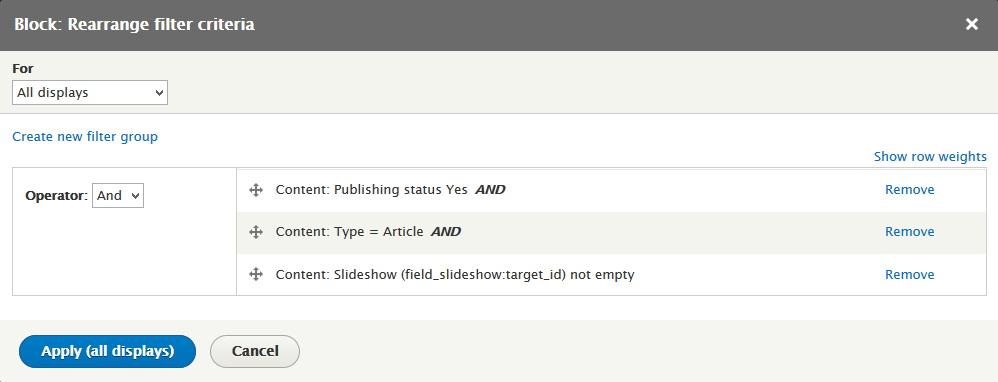
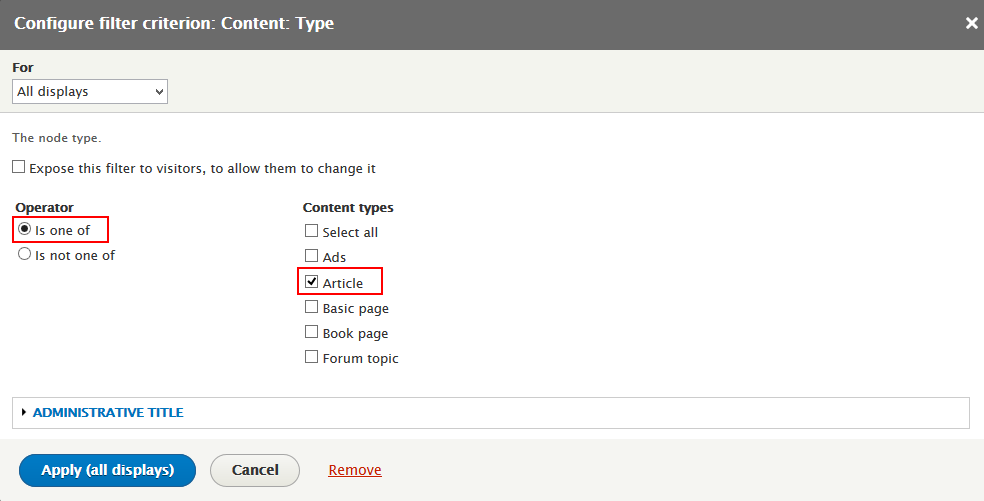
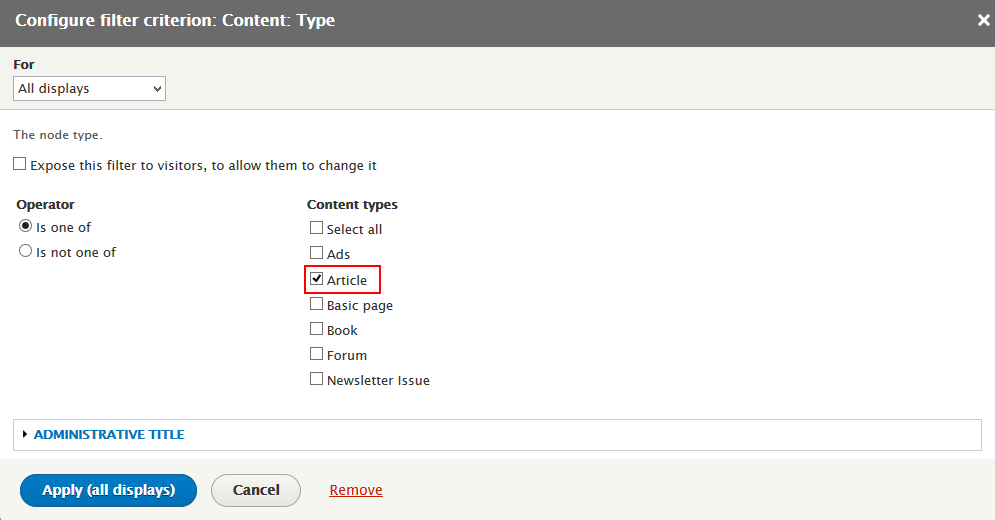
Step 8: At FILTER CRITERIA area, click Add button and add file Content: Publishing status (Yes),Content: Type (= Article)
Step 9: Set properties for Content: Publishing status (Yes)
Step 10: Set properties for Content: Type (= Article)

2. Configure View: Feature block
Step 2: Find View: Feature block, click place block link, set following properties
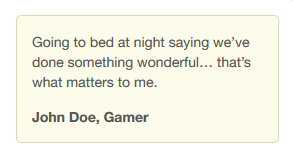
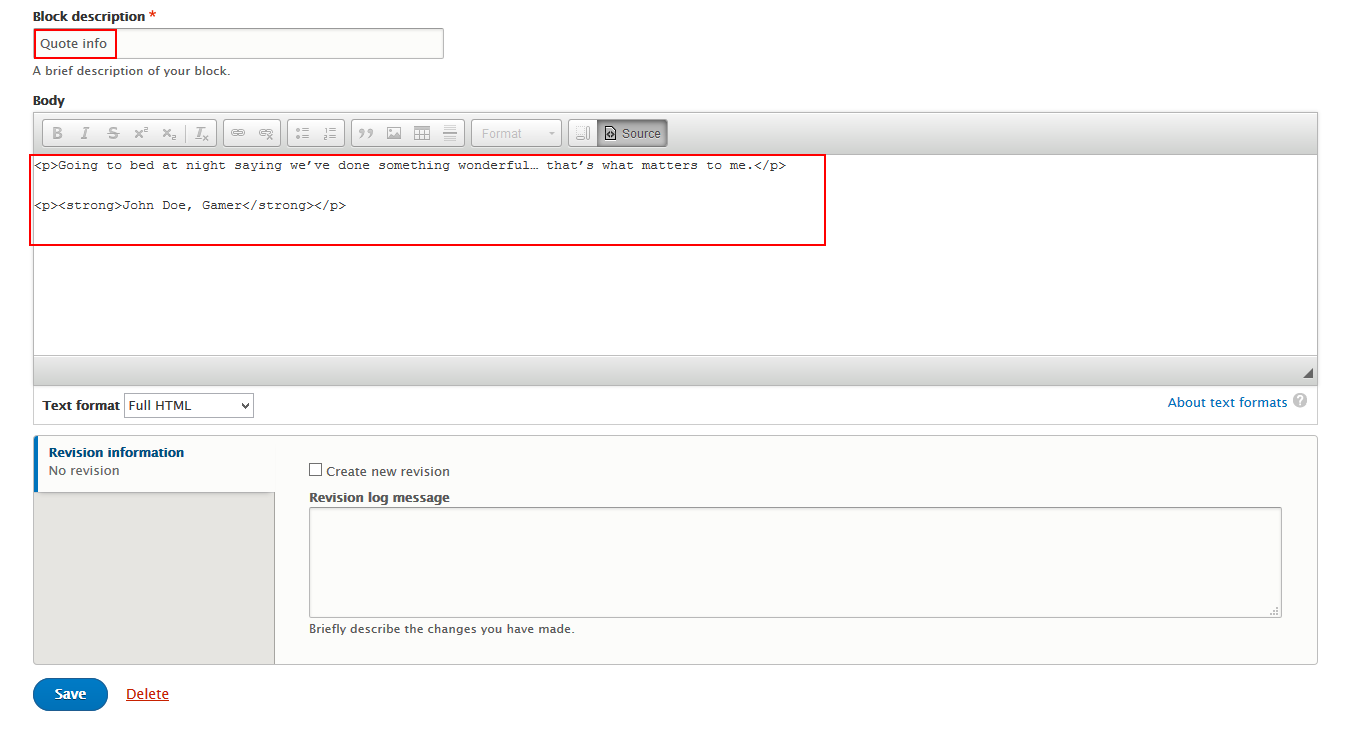
Sidebar second: Quote block
Front end Display
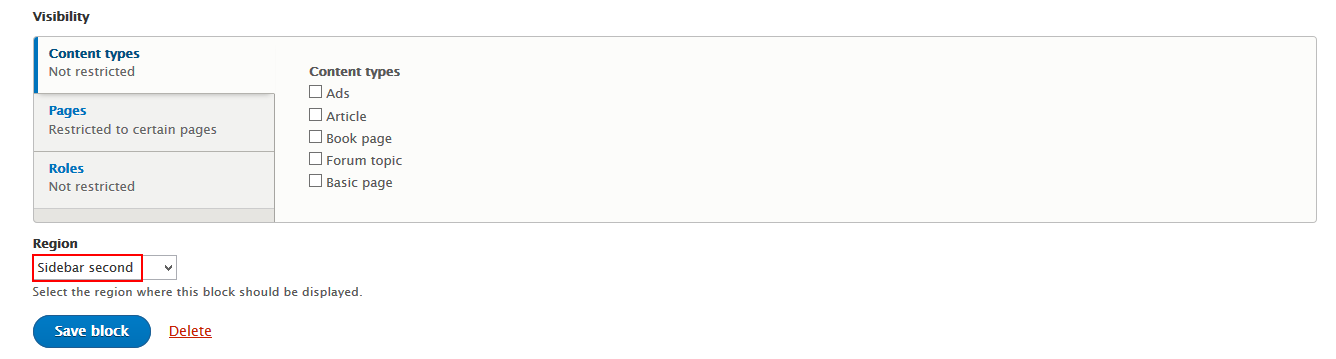
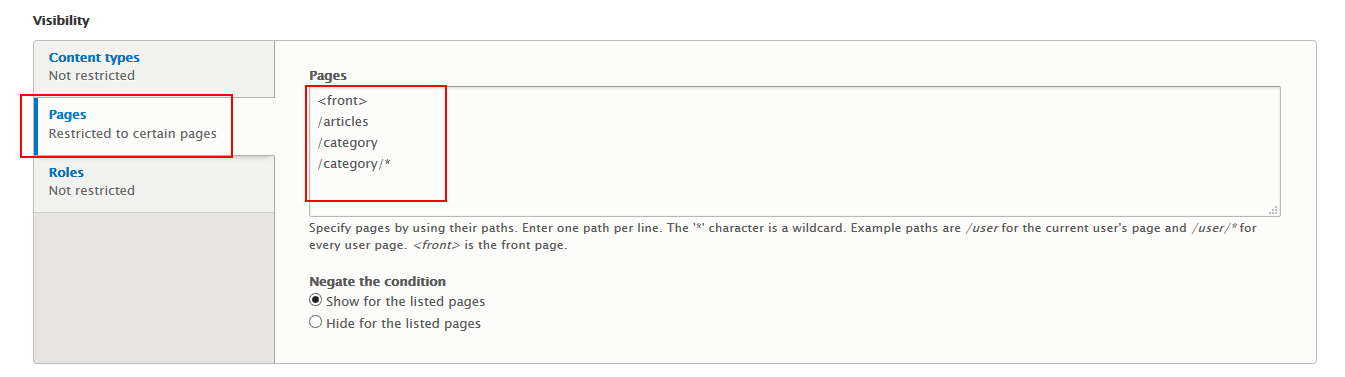
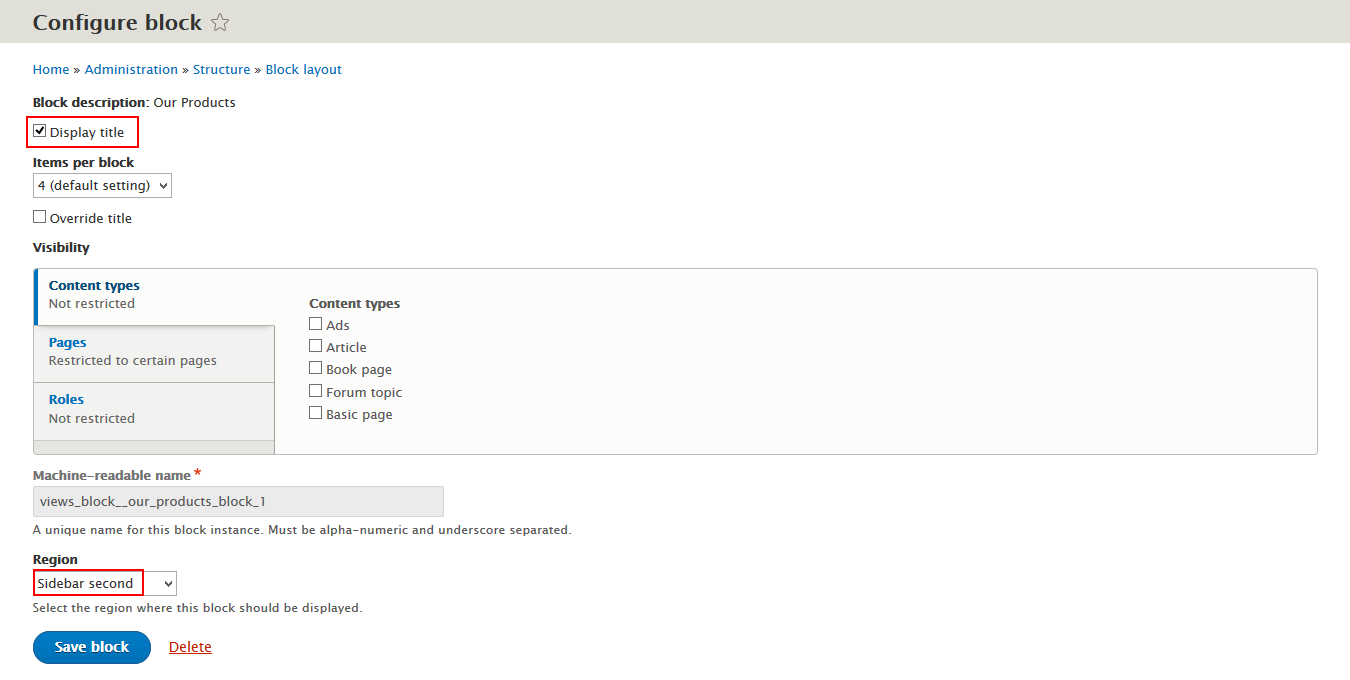
Sidebar second: Our Products block
Front end Display
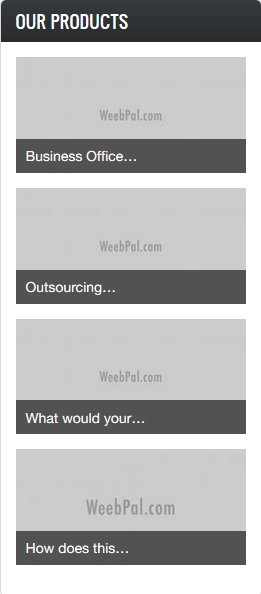
1. Create Our Products view

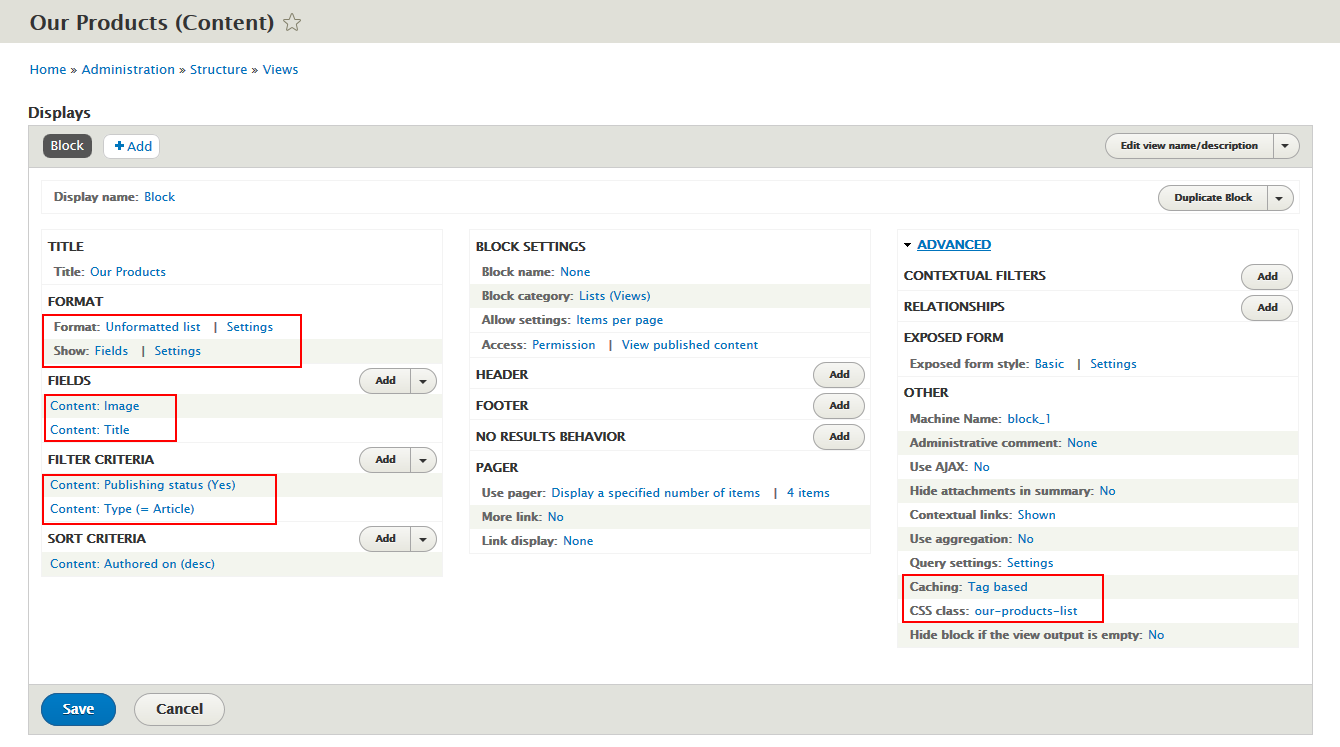
Step 4: Set properties for Content: Image
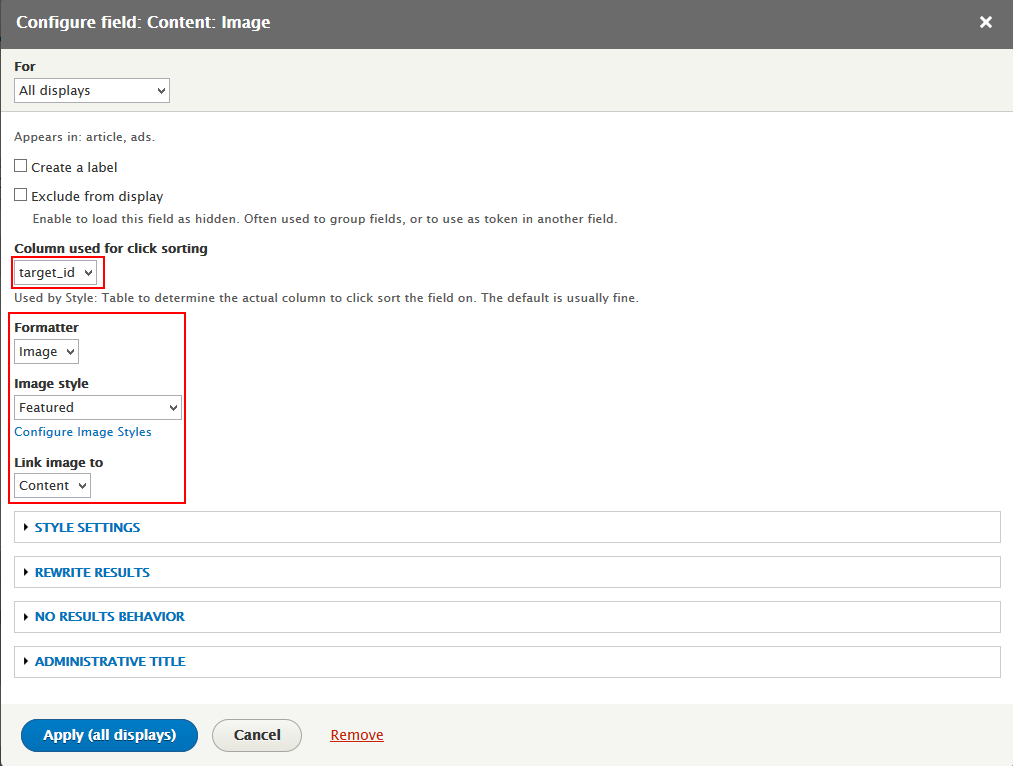


2. Configure View: Our Products block
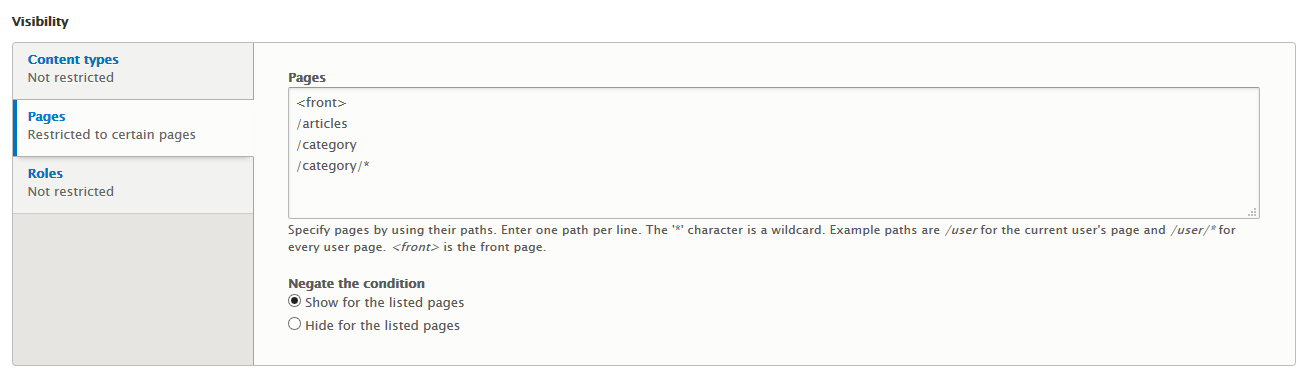
Step 2: Find View: Our Products block, click configure link, set following properties
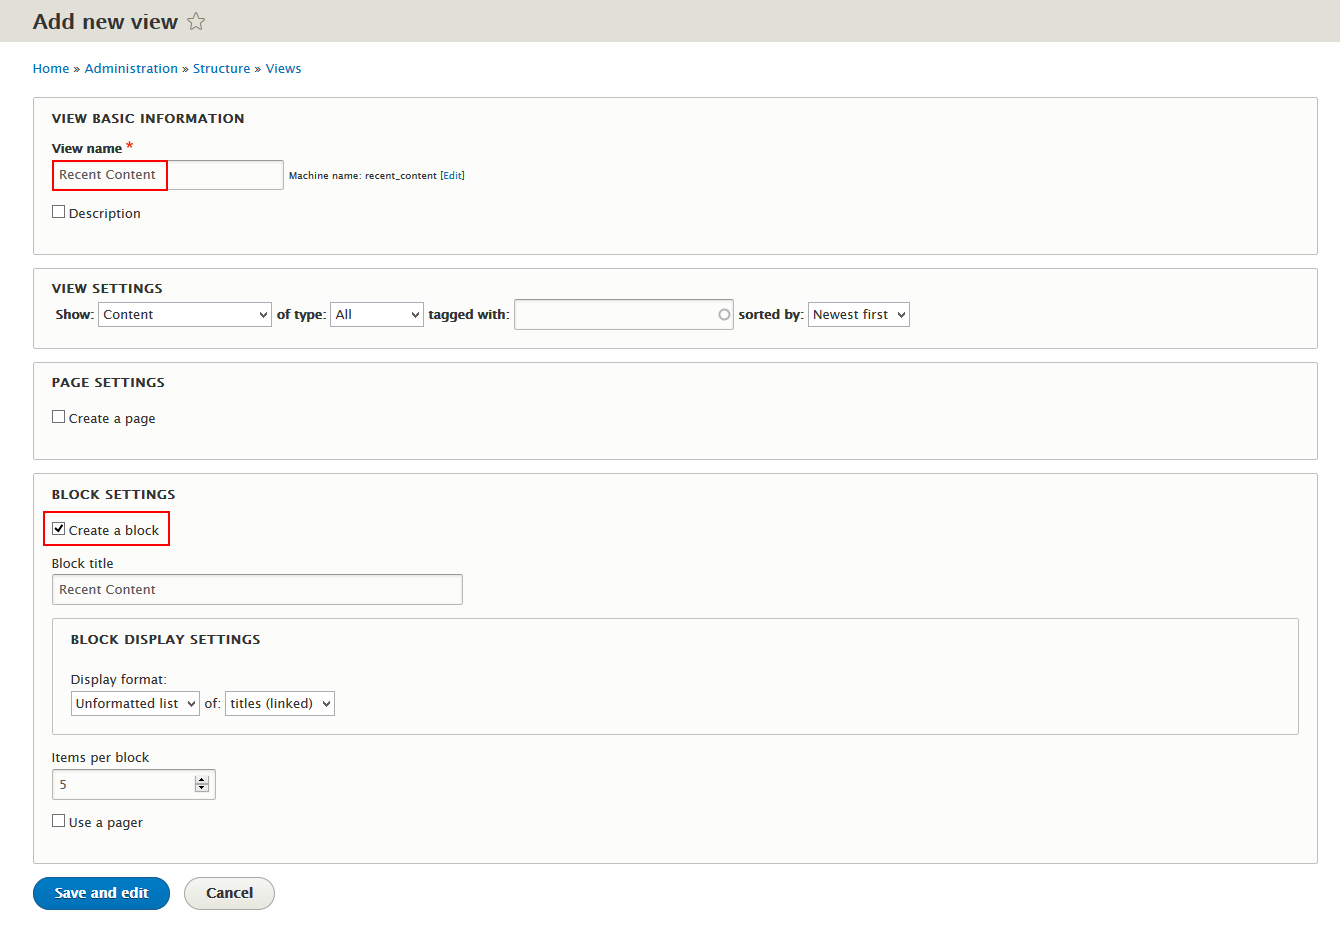
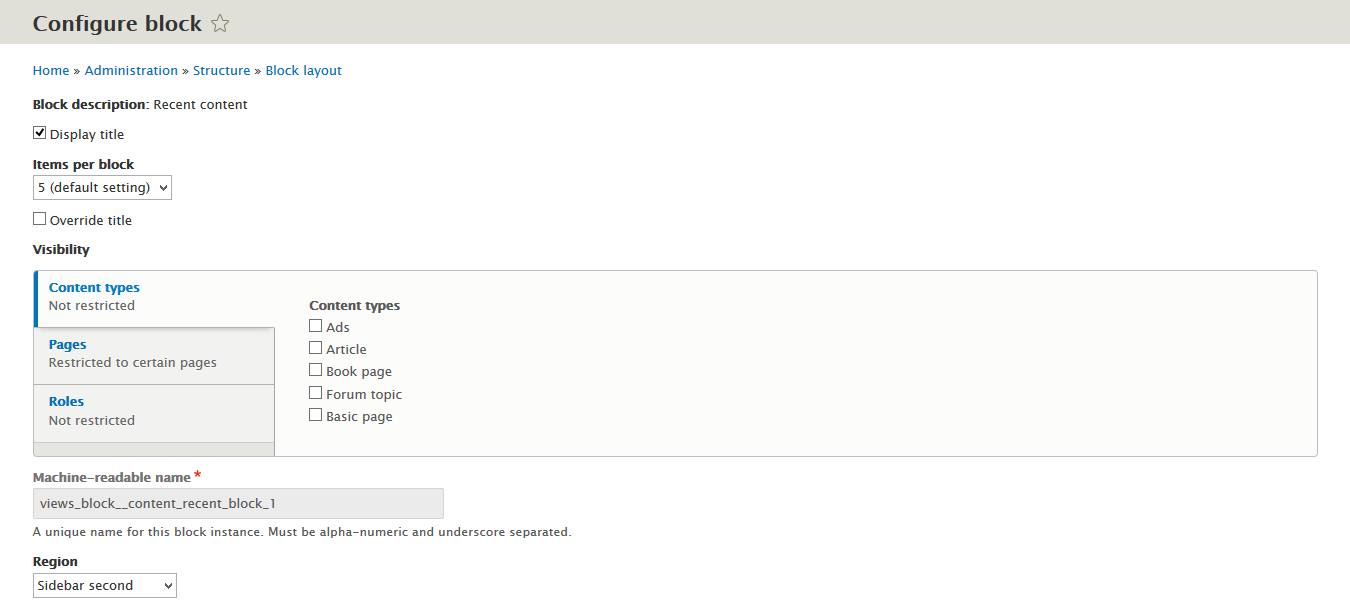
Sidebar second: Recent Content block
Front end Display

1. Create Recent Content view
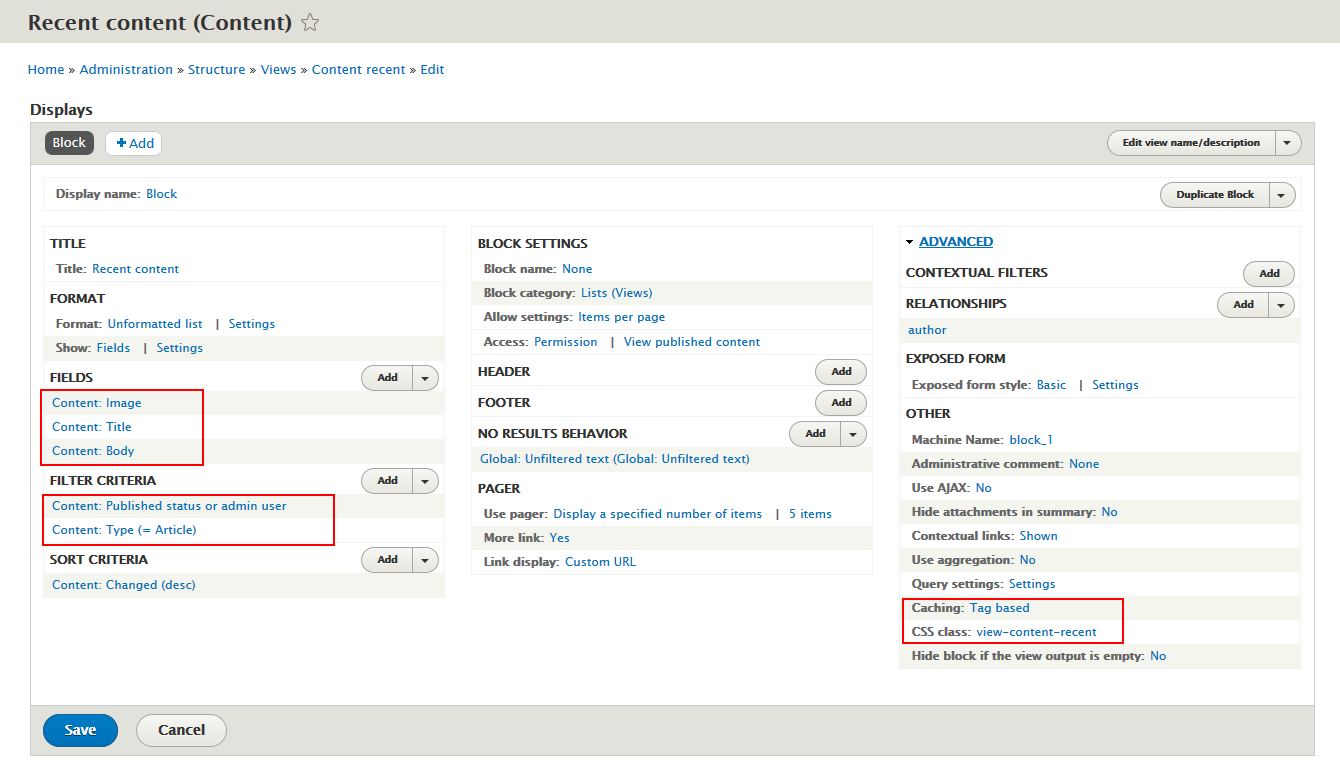
Step 4: Set properties for Content: Image


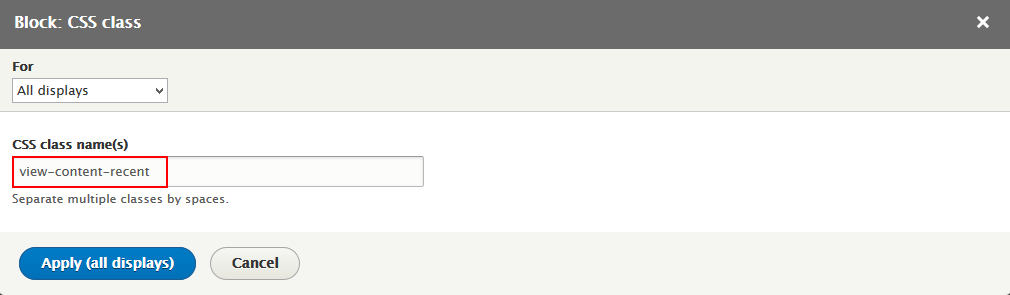
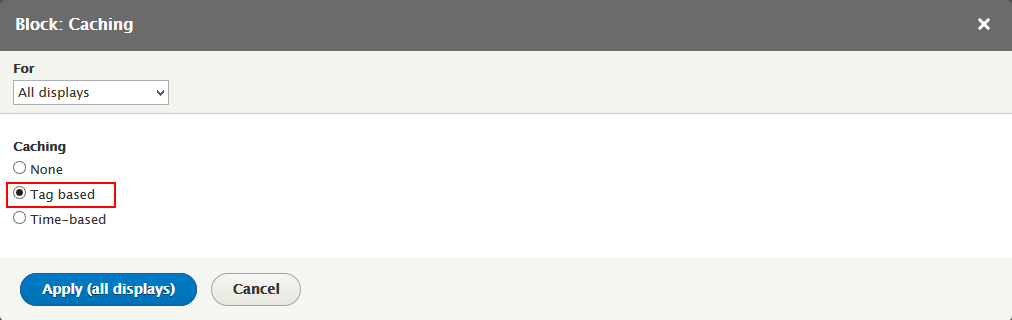
2. Configure View: Recent content block
Step 2: Find View: Recent content block, click configure link, set following properties

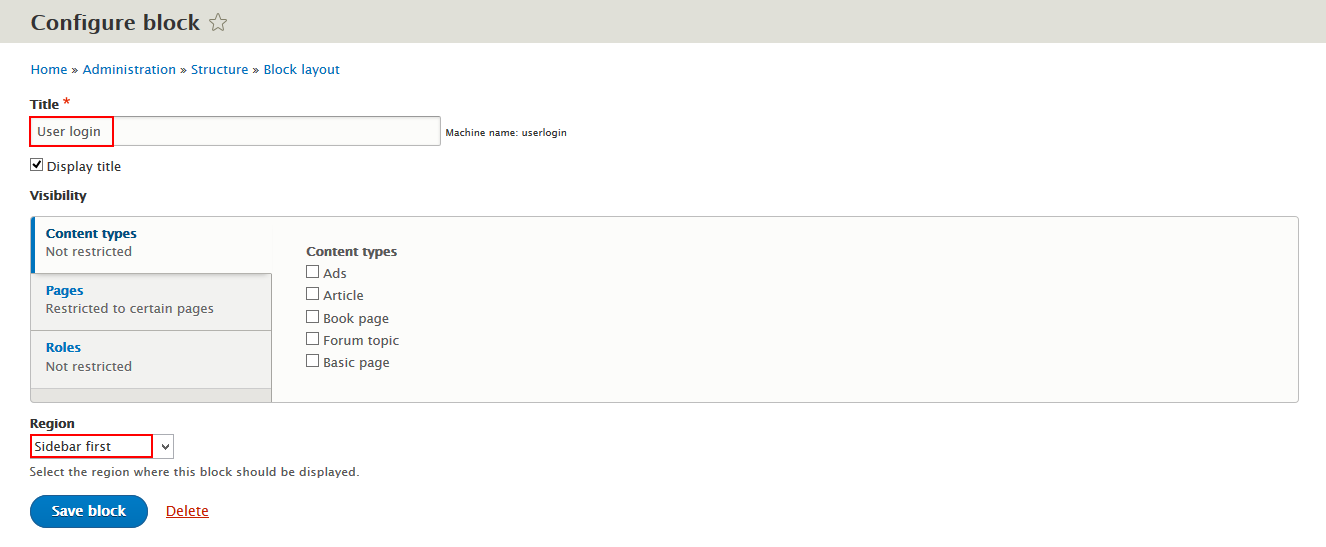
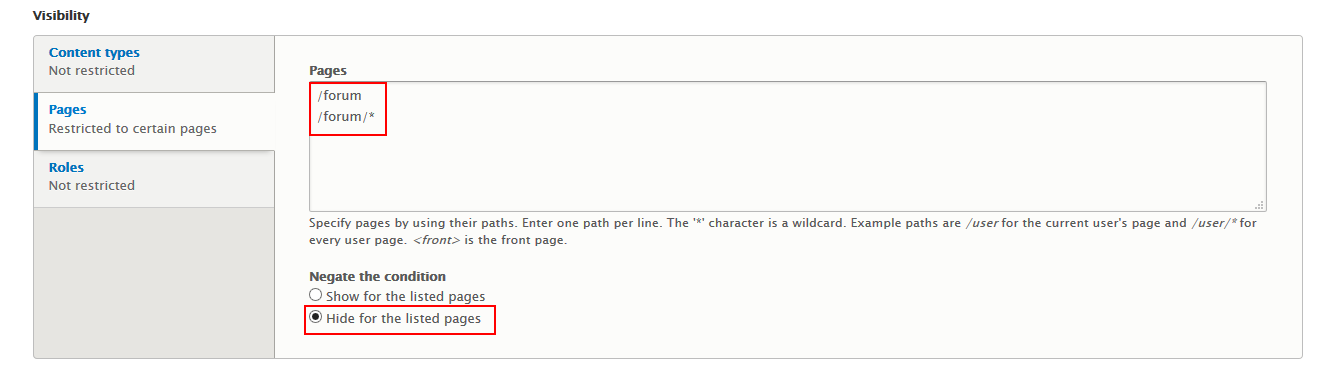
Sidebar First: User menu block
Front end Display
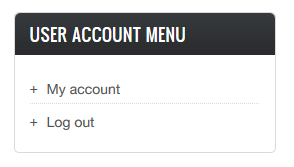
Configure User menu block
Sidebar first: Main Menu
Front end Display
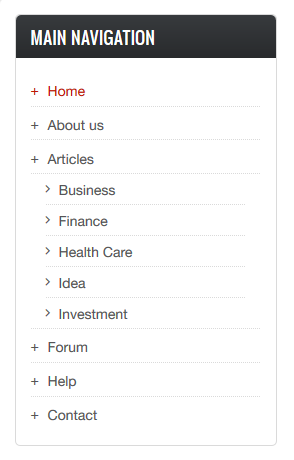
Step 2: Find Main Menu block, click configure link, set following properties

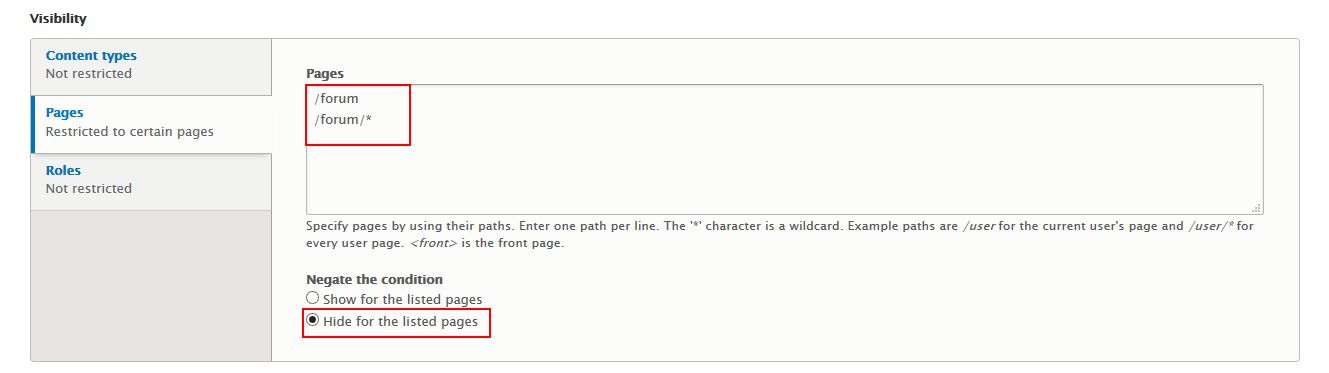
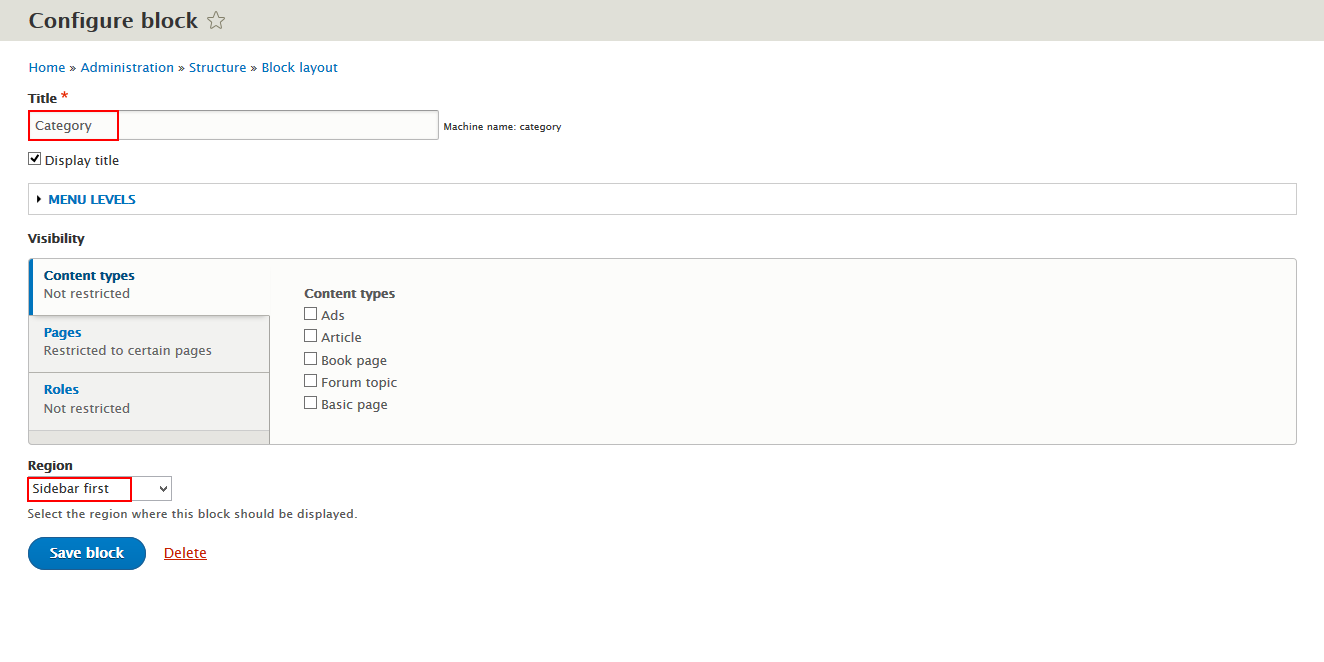
Sidebar first: Category block
Front end Display
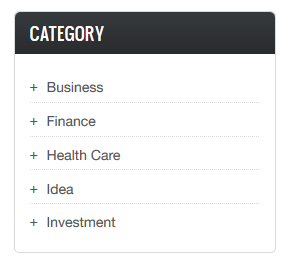
1. Configure Category block
Step 2: Find Category block, click configure link, set following properties

2. Add link for menu
Step 2: Find Poll content type link. Then click and create content with following properties:

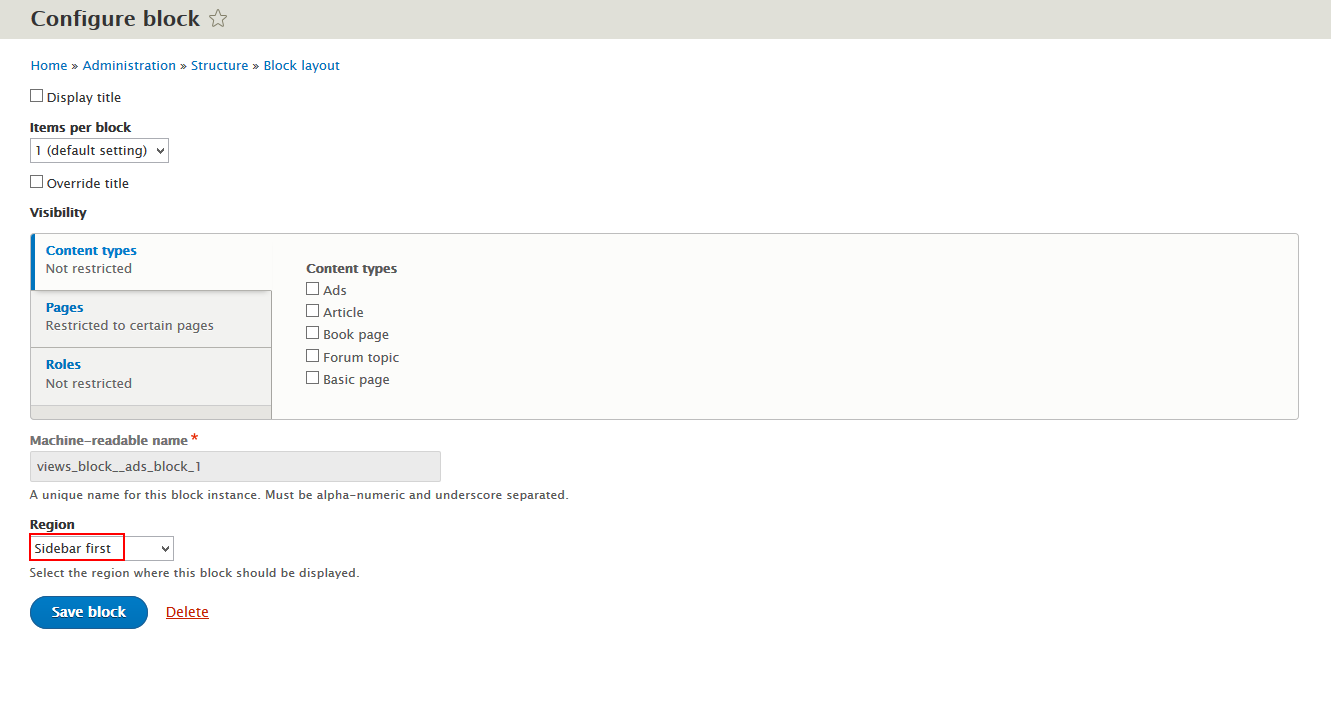
Sidebar first: Ads block
Front end Display

Step 2: Find Ads block, click configure link, set following properties
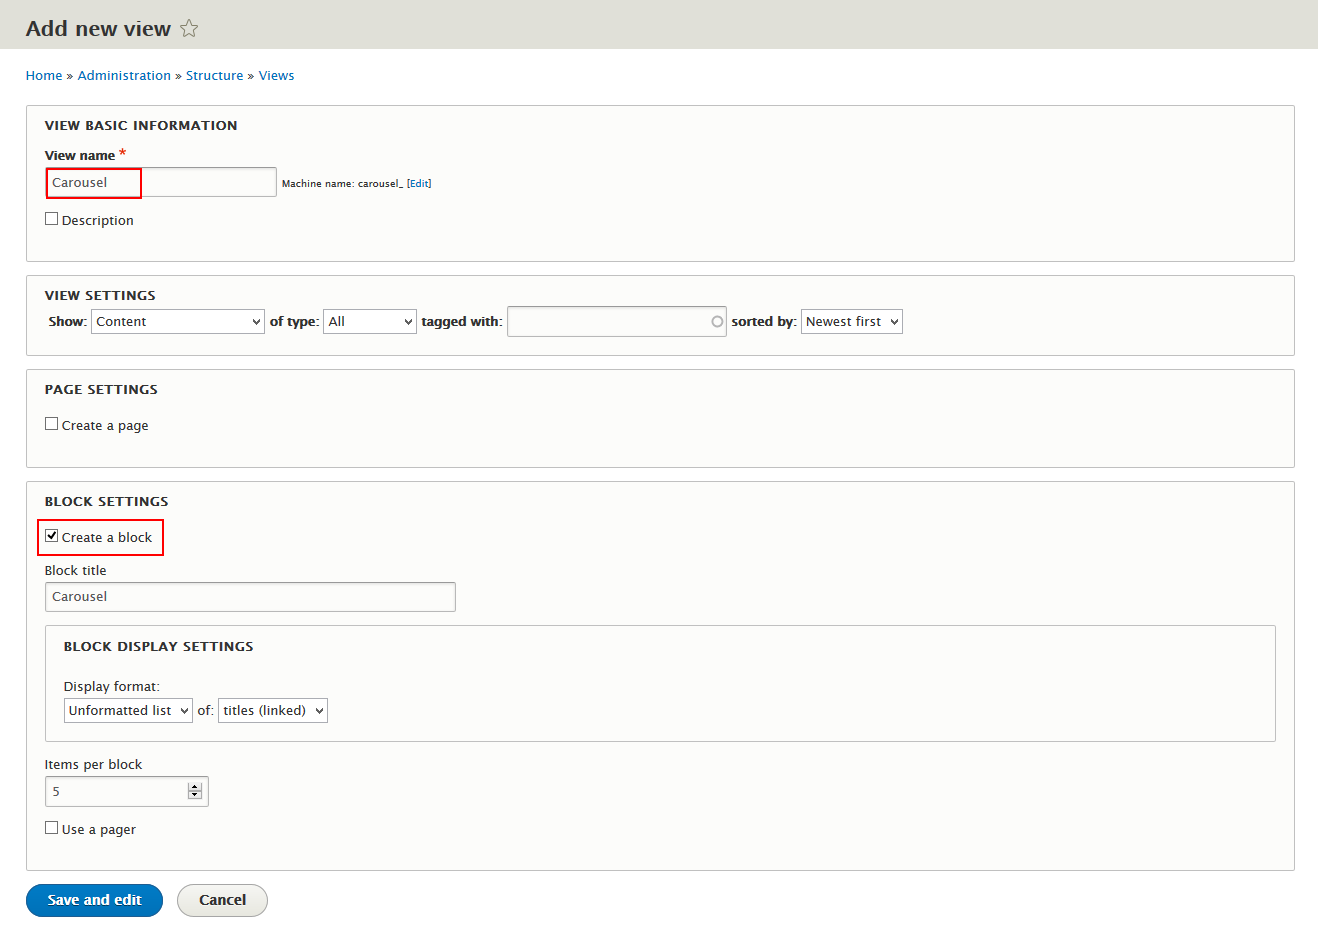
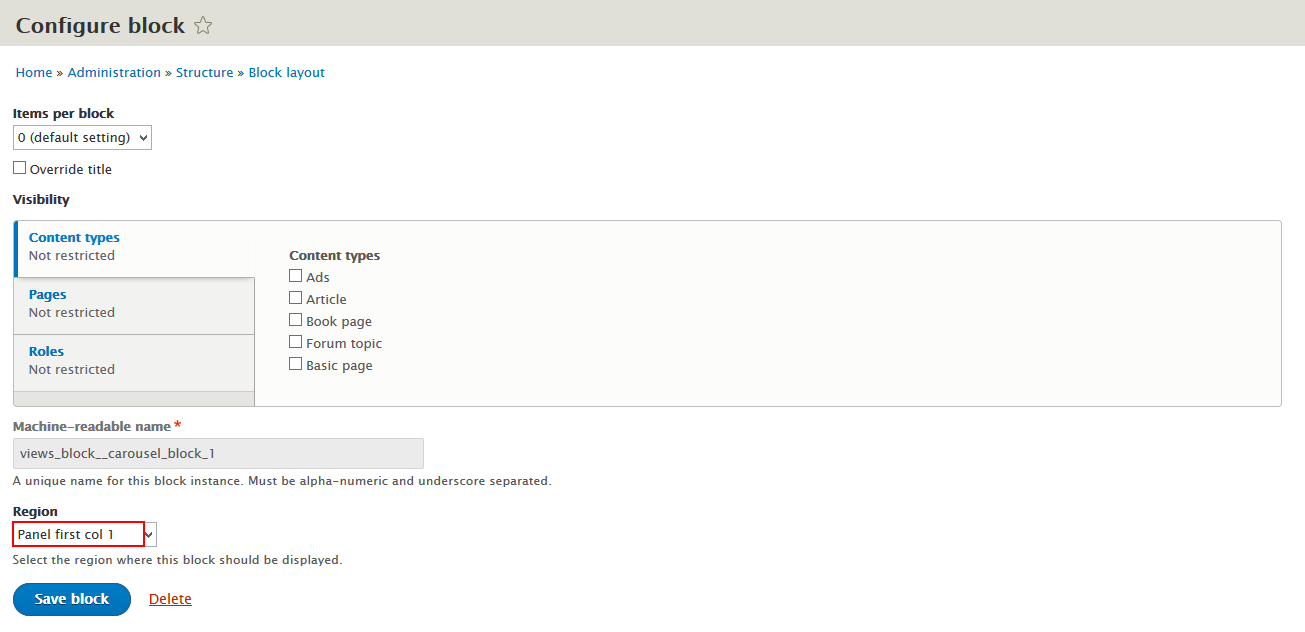
Pannel first col 1: Carousel block
Front end Display

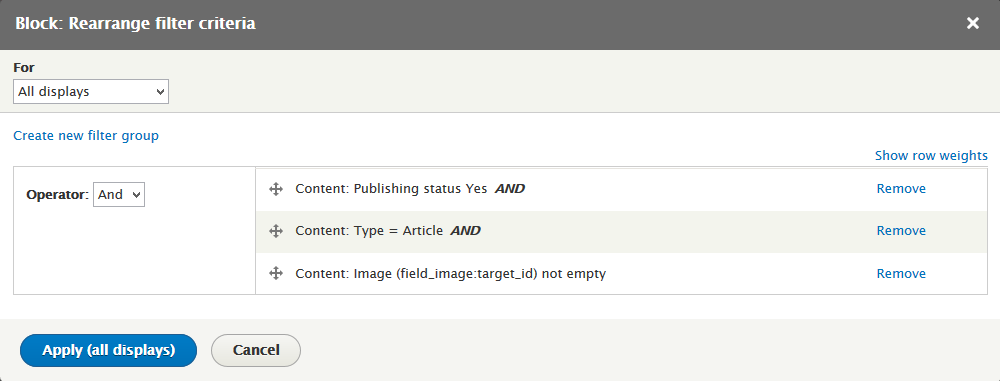
1. Create Carousel view
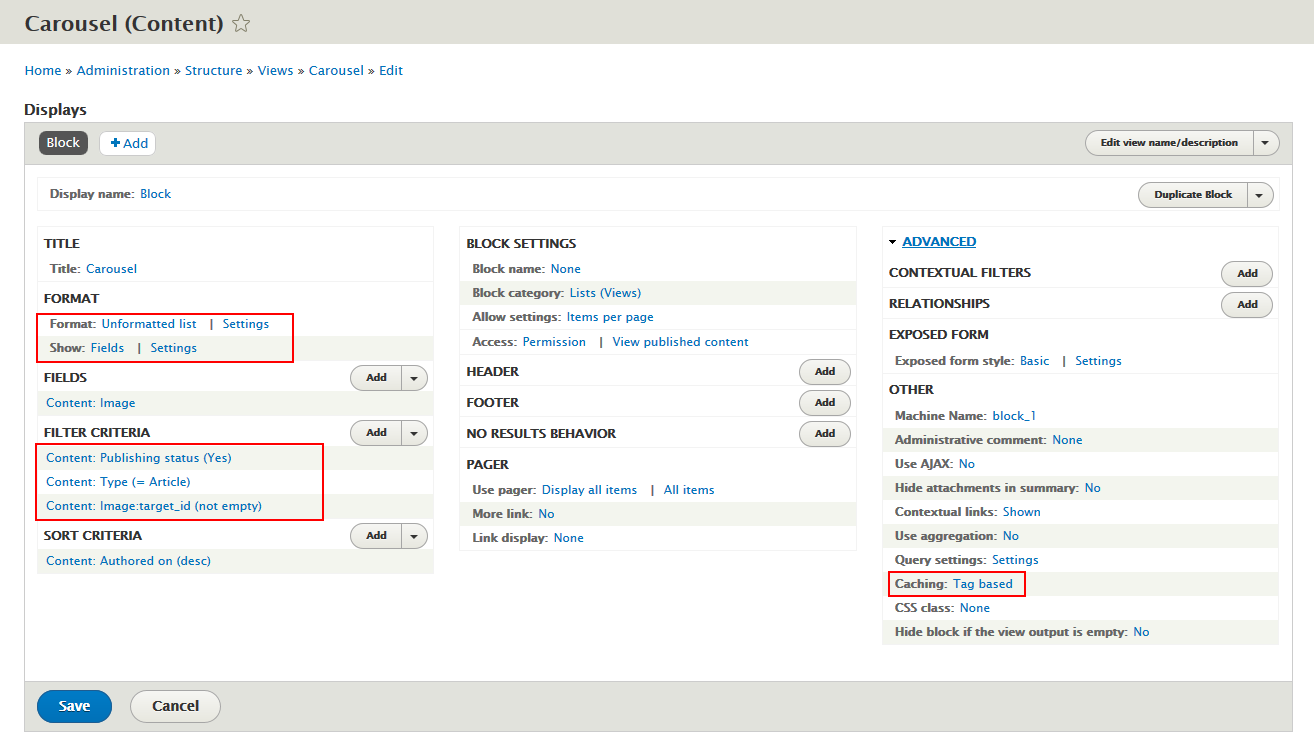
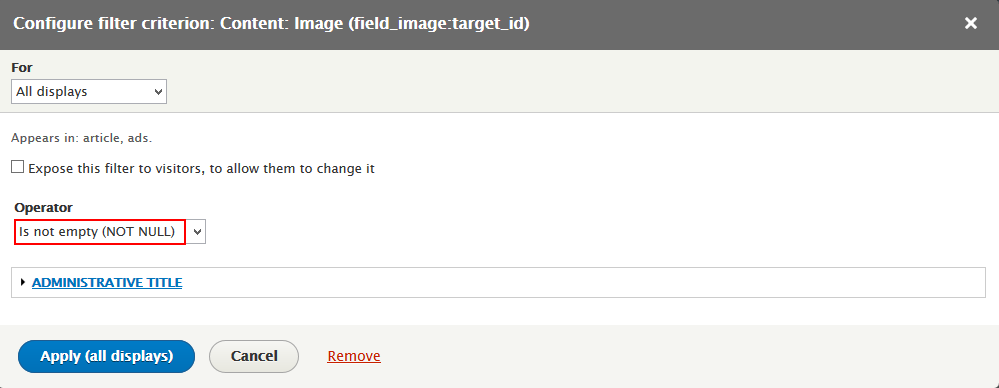
Step 3: At FIELDS area, click Add button to add fields: Content: Image, Content: Type, Content: Publishing status
Step 4:Content: Image
Step 5:Content: Type
Step 6:Content: Publishing status

2. Configure View: Carousel block
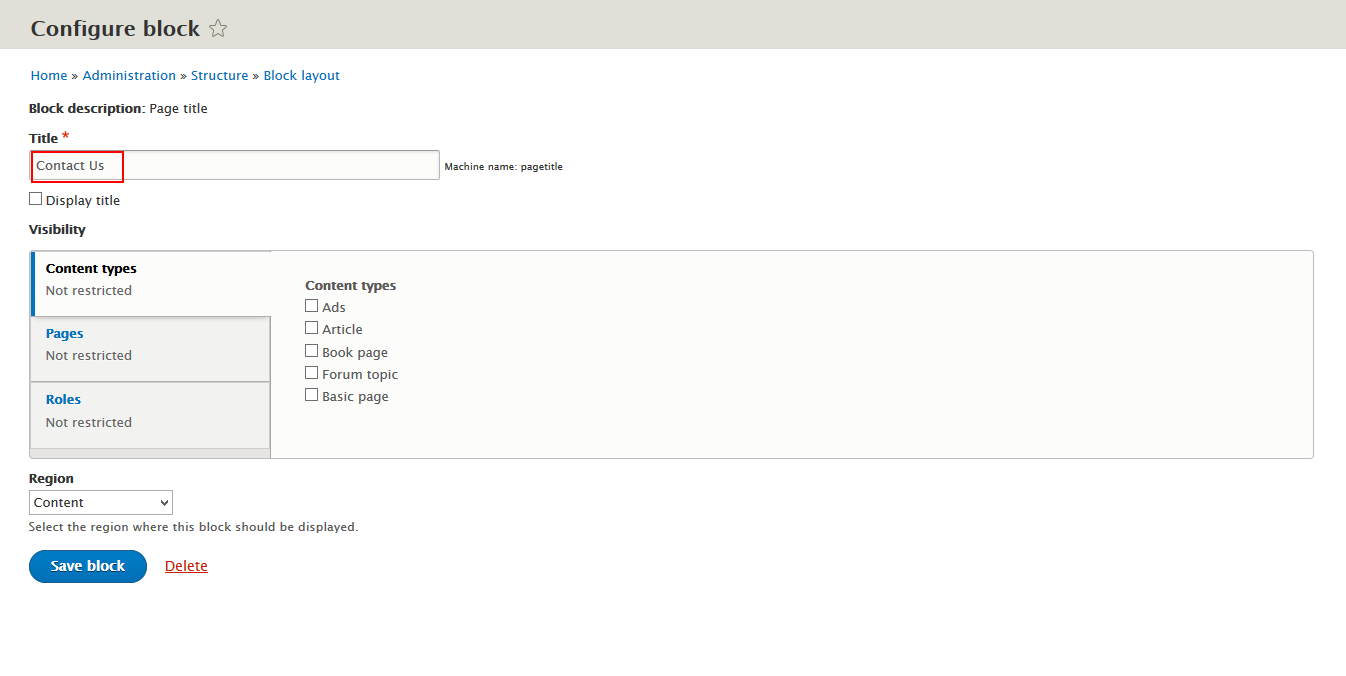
Pannel first col 1: Contact block
Front end Display
1. Create and configure Contact block
Step 1: Navigate to Structure > Blocks, click Custom block library tab.
Step 2: Click Add block link, Create Contact block with following properties:
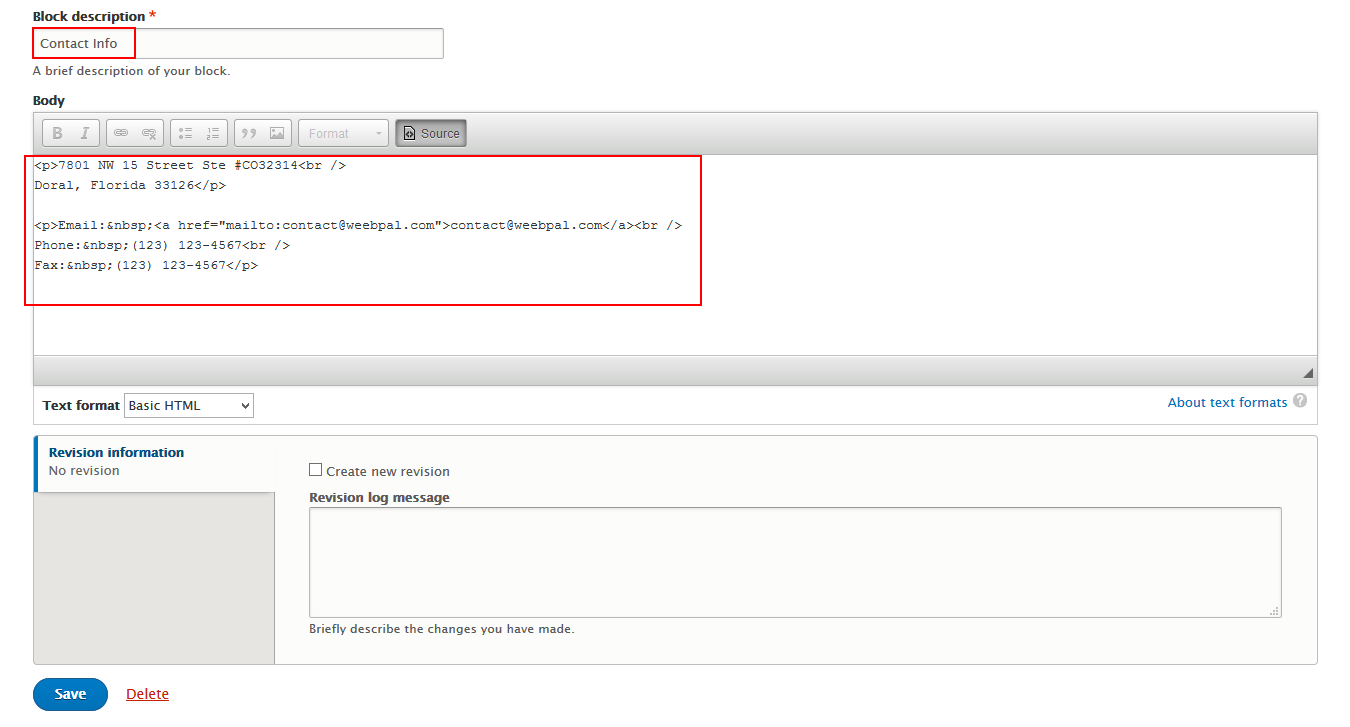
Refer to following PHP code:
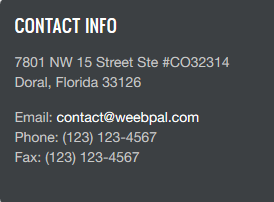
7801 NW 15 Street Ste #CO32314
Doral, Florida 33126
Email: [email protected]
Phone: (123) 123-4567
Fax: (123) 123-4567
Pannel second col 2: Useful Links block
Front end Display

Create and configure Useful block
Step 1:Navigate to Structure > Blocks, click Custom block library tab.
Step 2: Click Add block link, CreateUseful Links block with following properties:

Refer to following HTML code:
Pannel second col 3: Recent Comments block
Front end Display
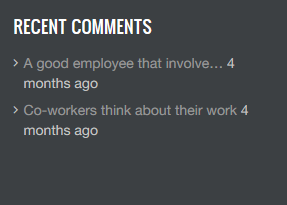
1. Create Recent Comments view

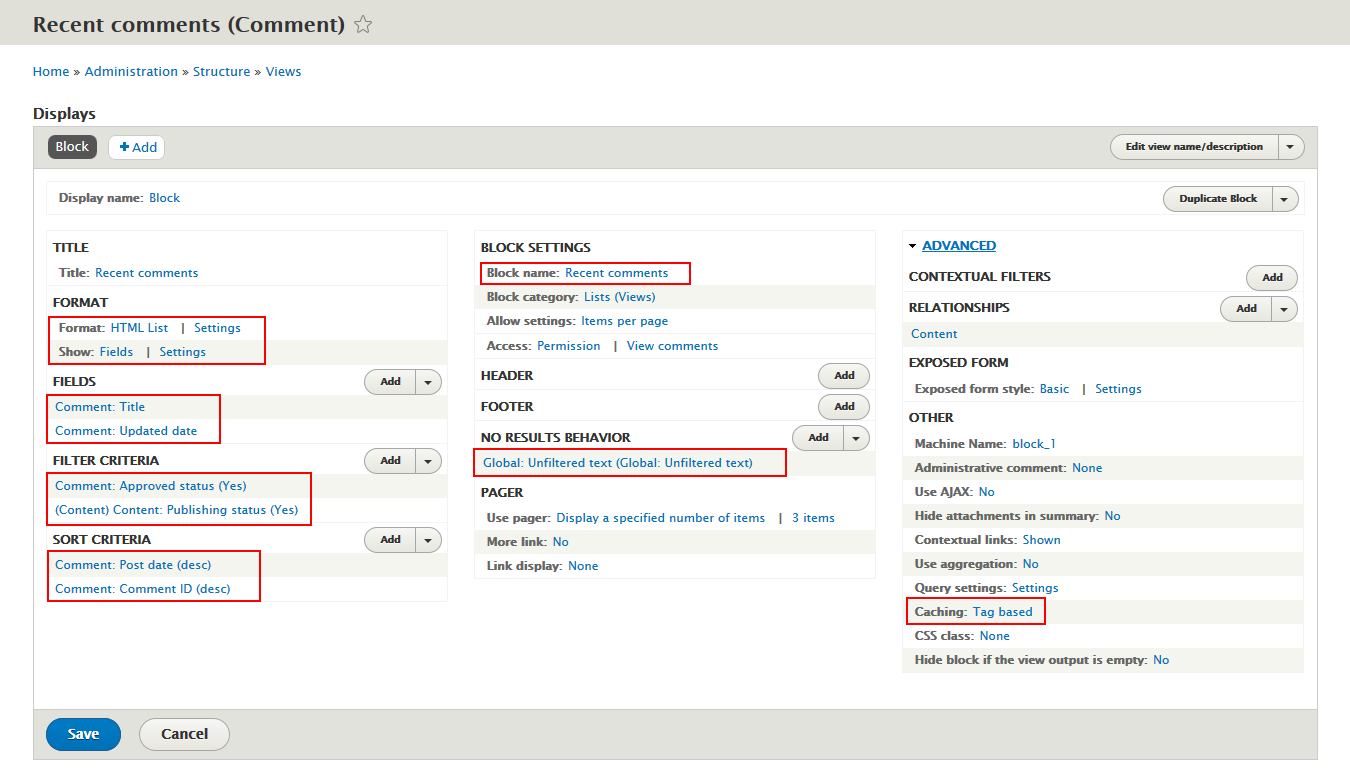
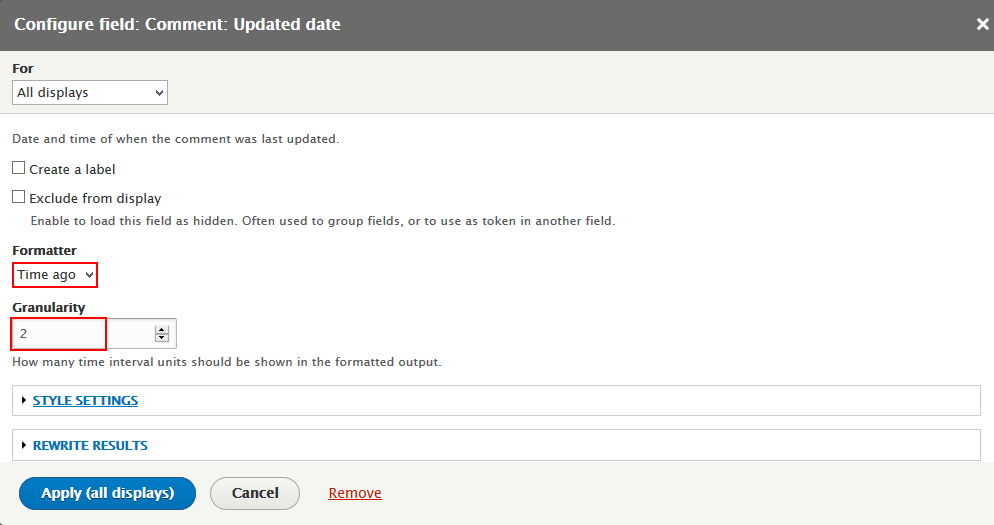
Step 4: Set properties for Content: Update date


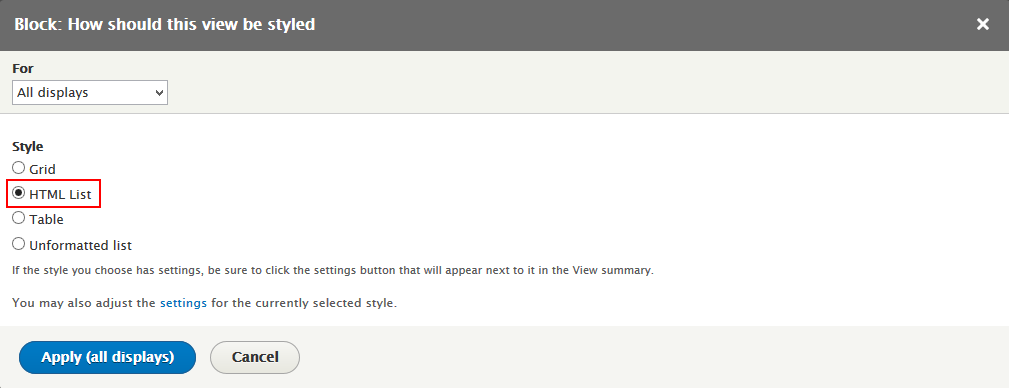
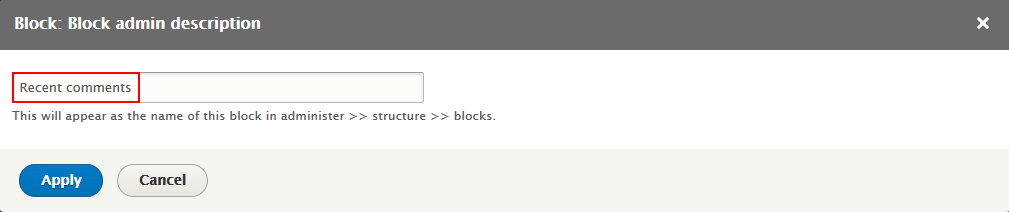


2. Configure View: Recent comments block

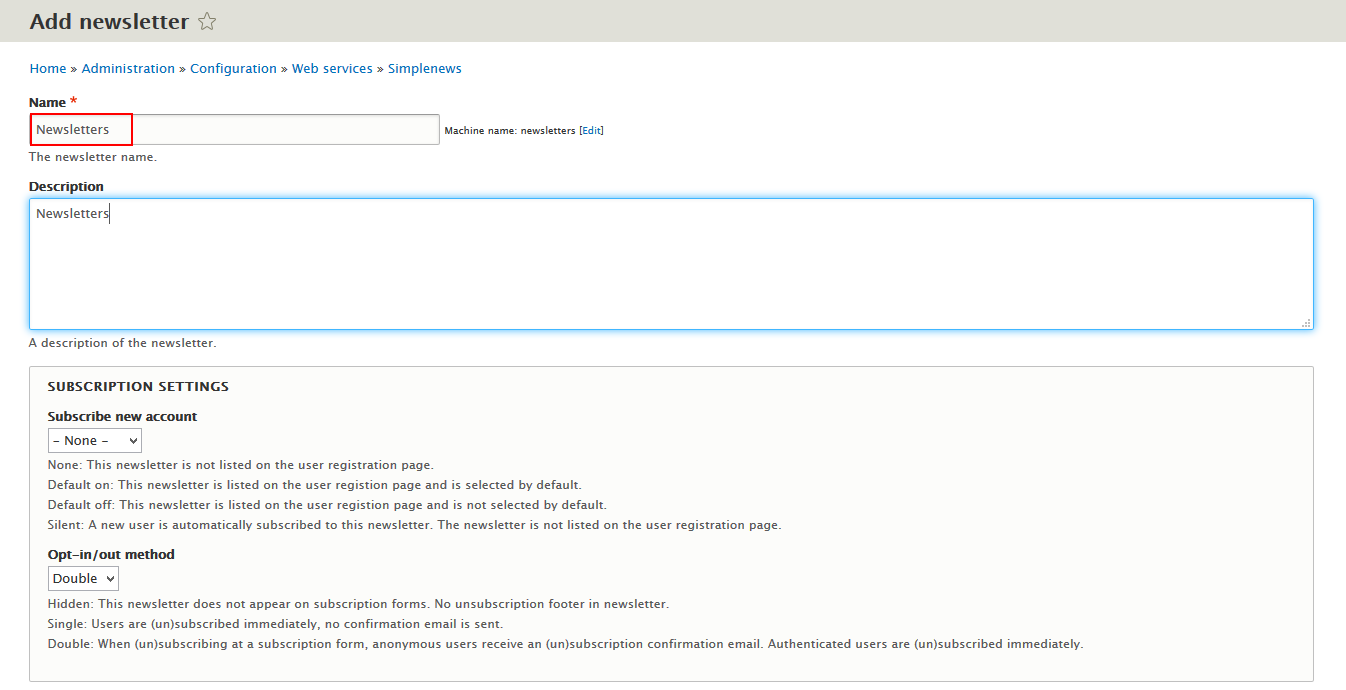
Pannel second col 4: Newsletters block
Front end Display
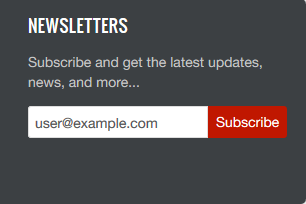
Create and configure Newsletters block
Step 2: Click Add Newsletter link. Then create Newsletter , set following properties:

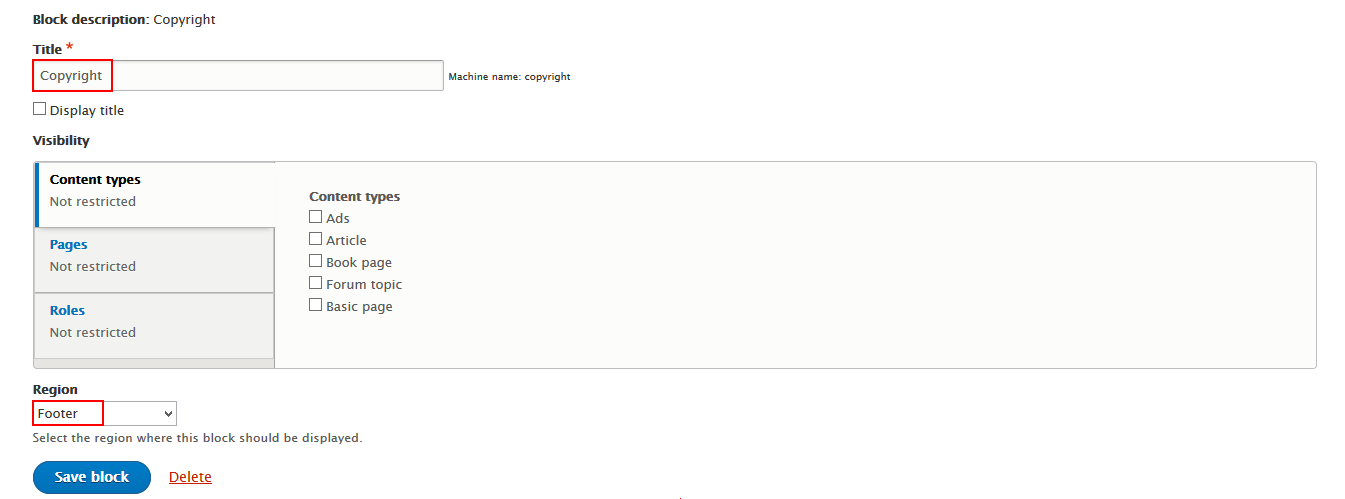
Footer: Coppyright block
Front end Display

Create and configure Coppyright block
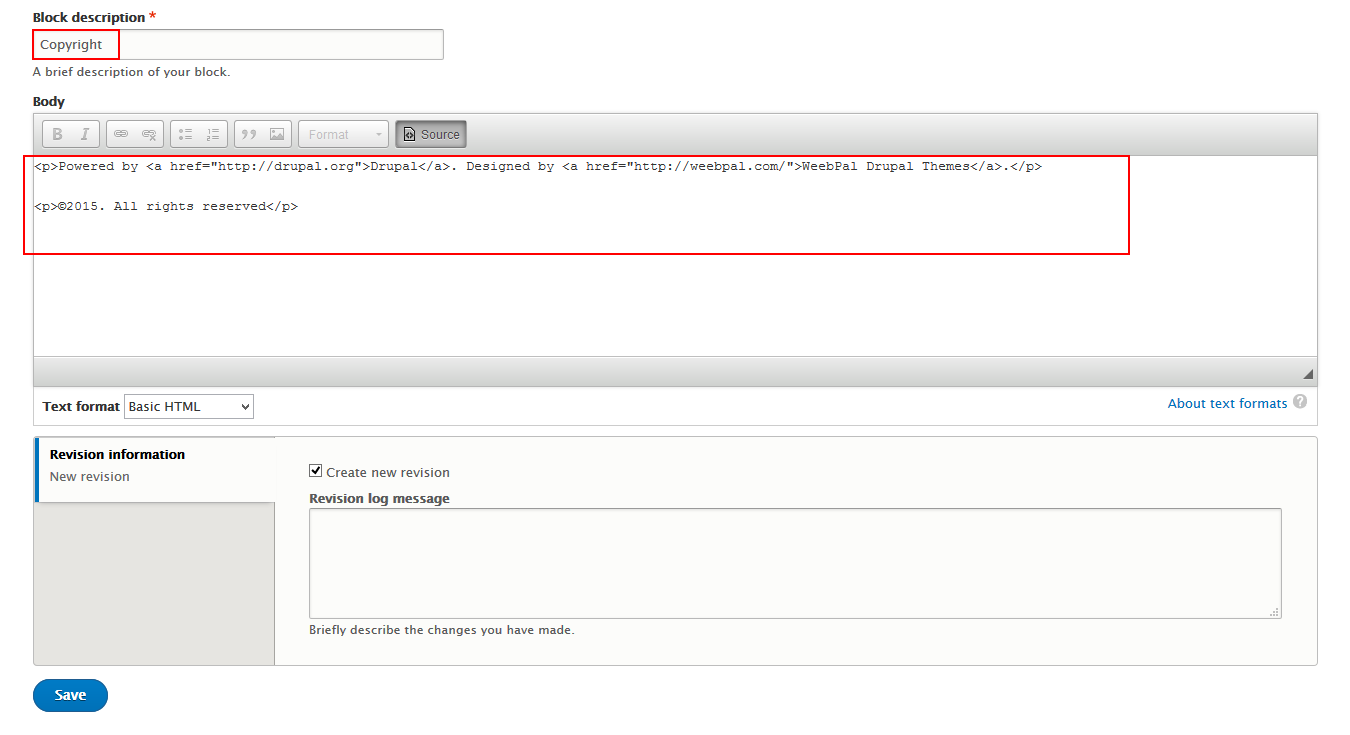
Refer to following HTML code:
Powered by Drupal. Designed by WeebPal Drupal Themes.
©2015. All rights reserved
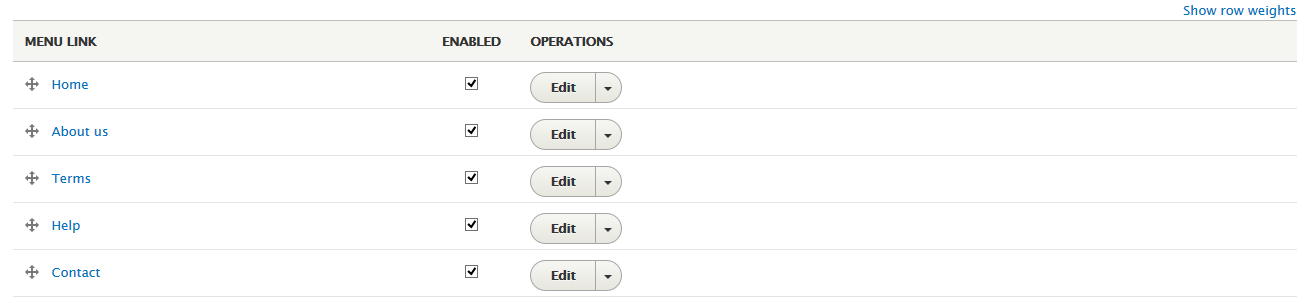
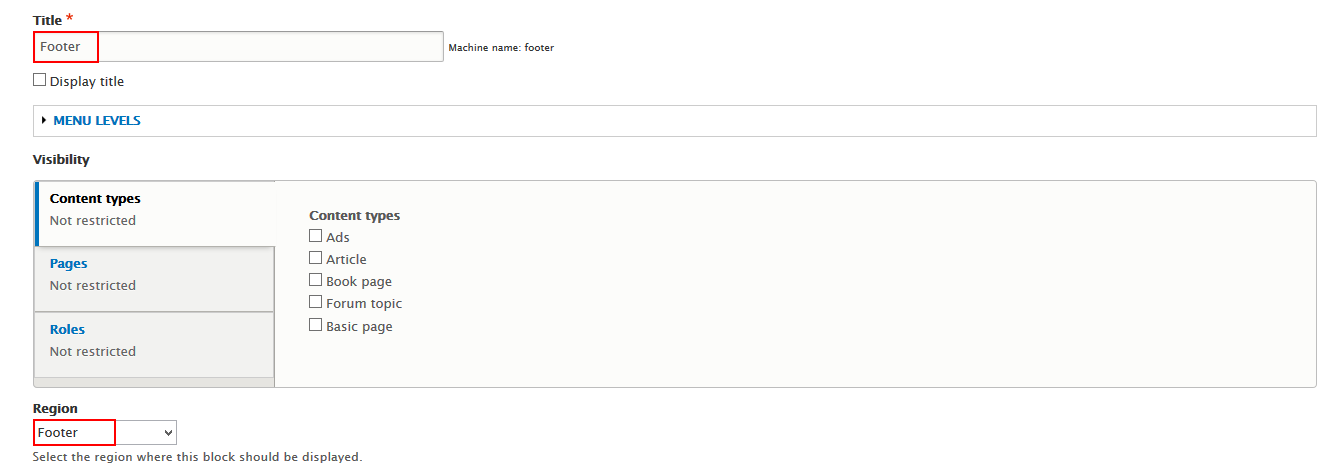
Footer: Footer menu block
Front end Display

Configure Footer menu block
Create Subpages
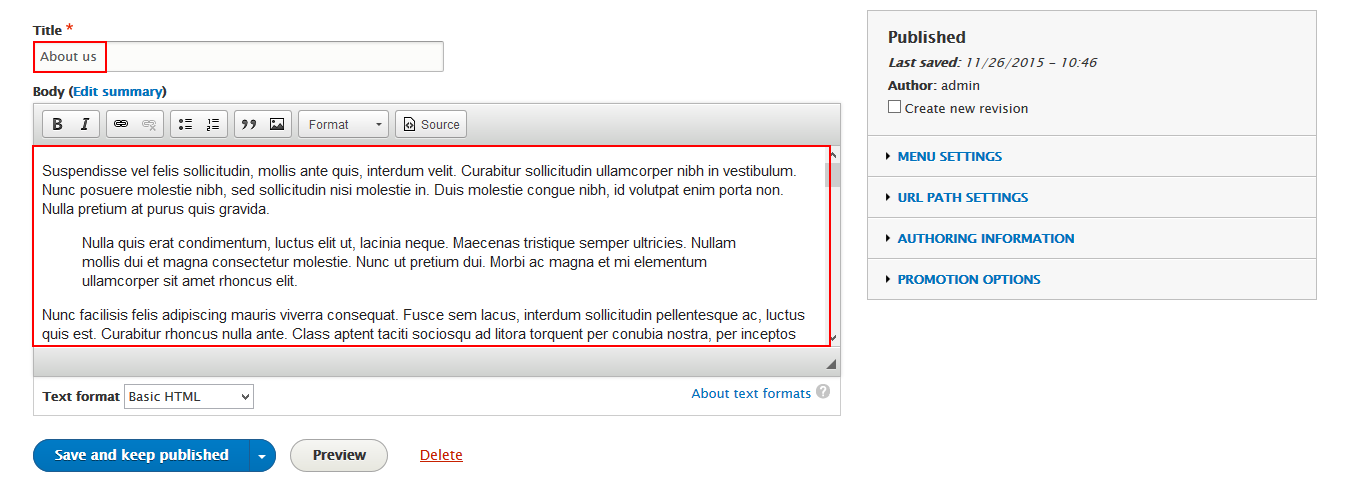
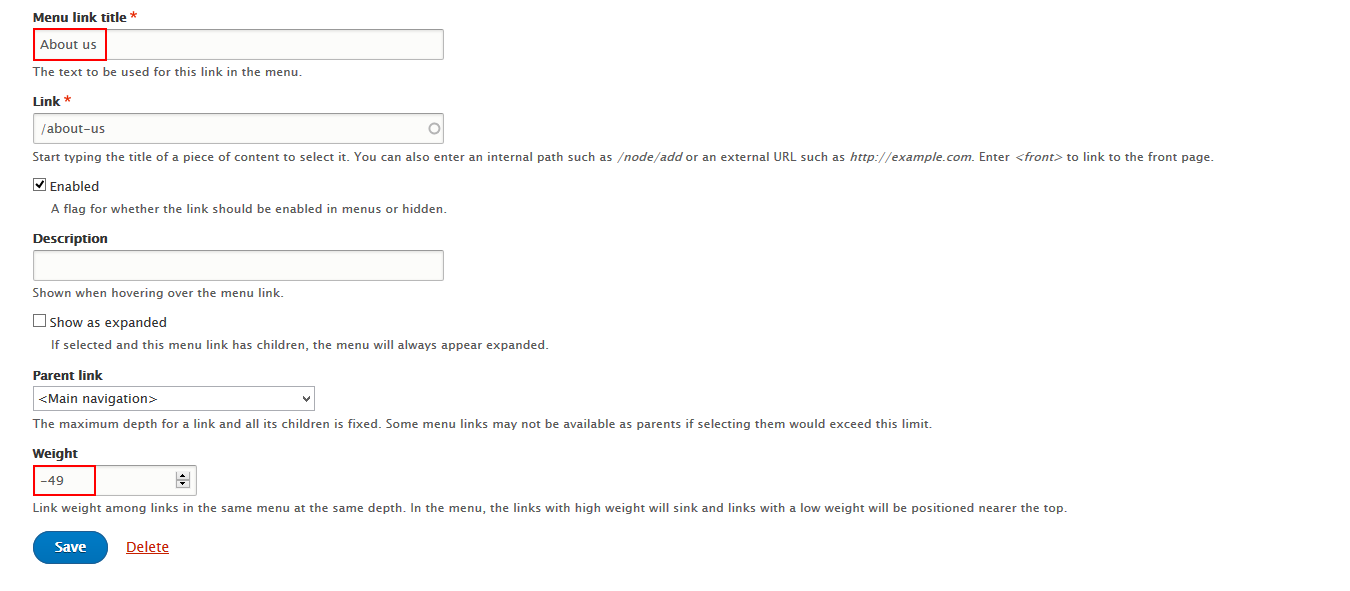
About Us page
Create and configure About Us content
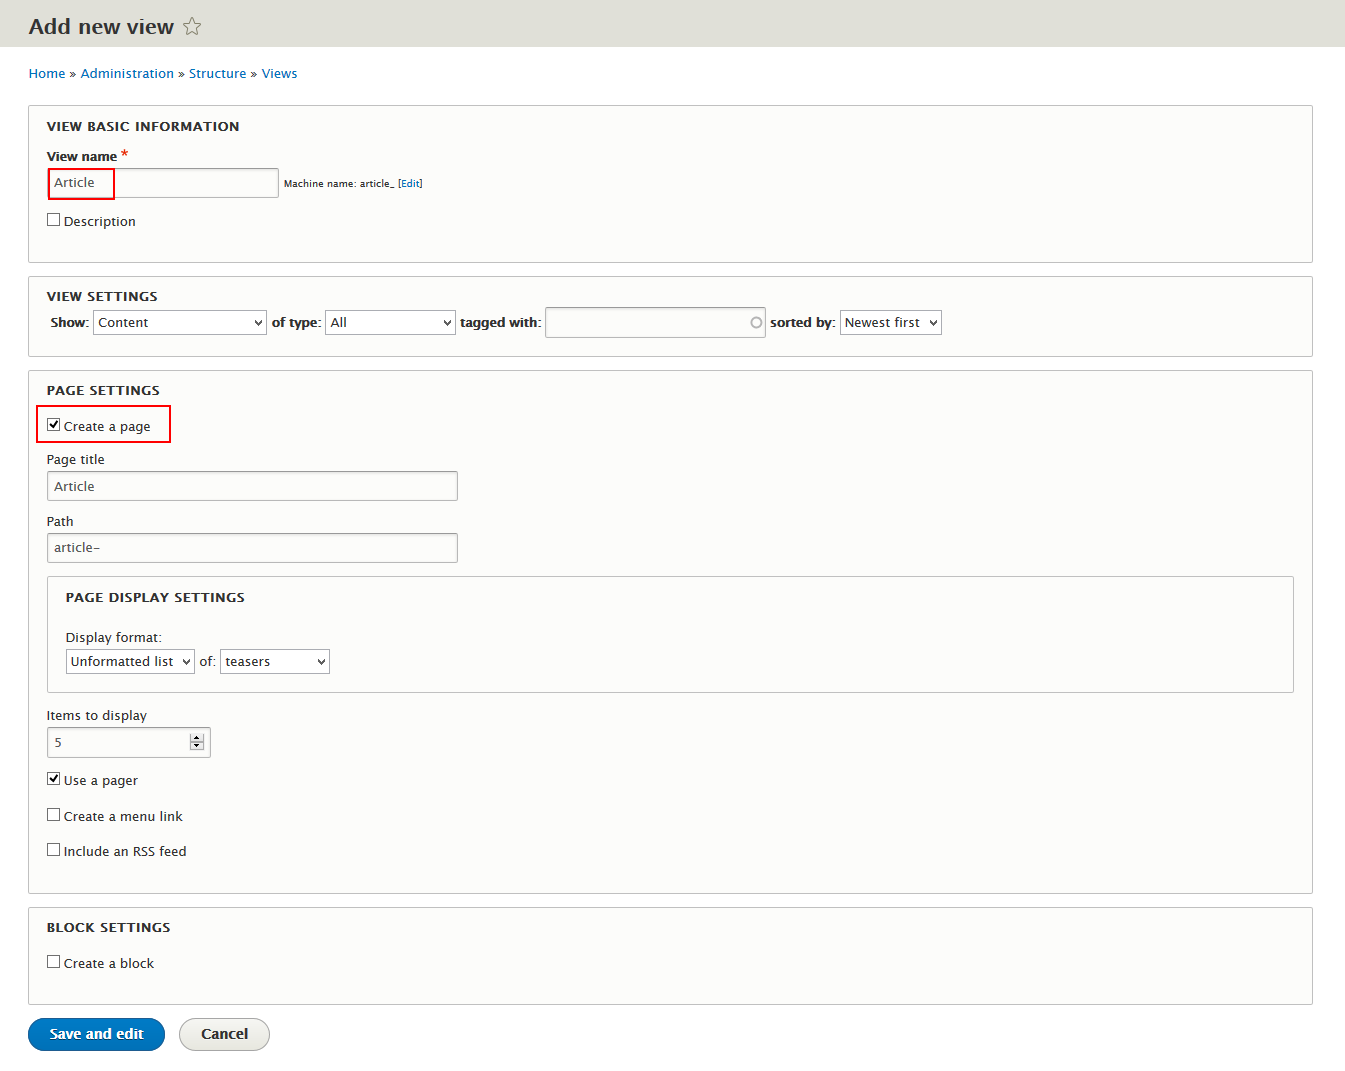
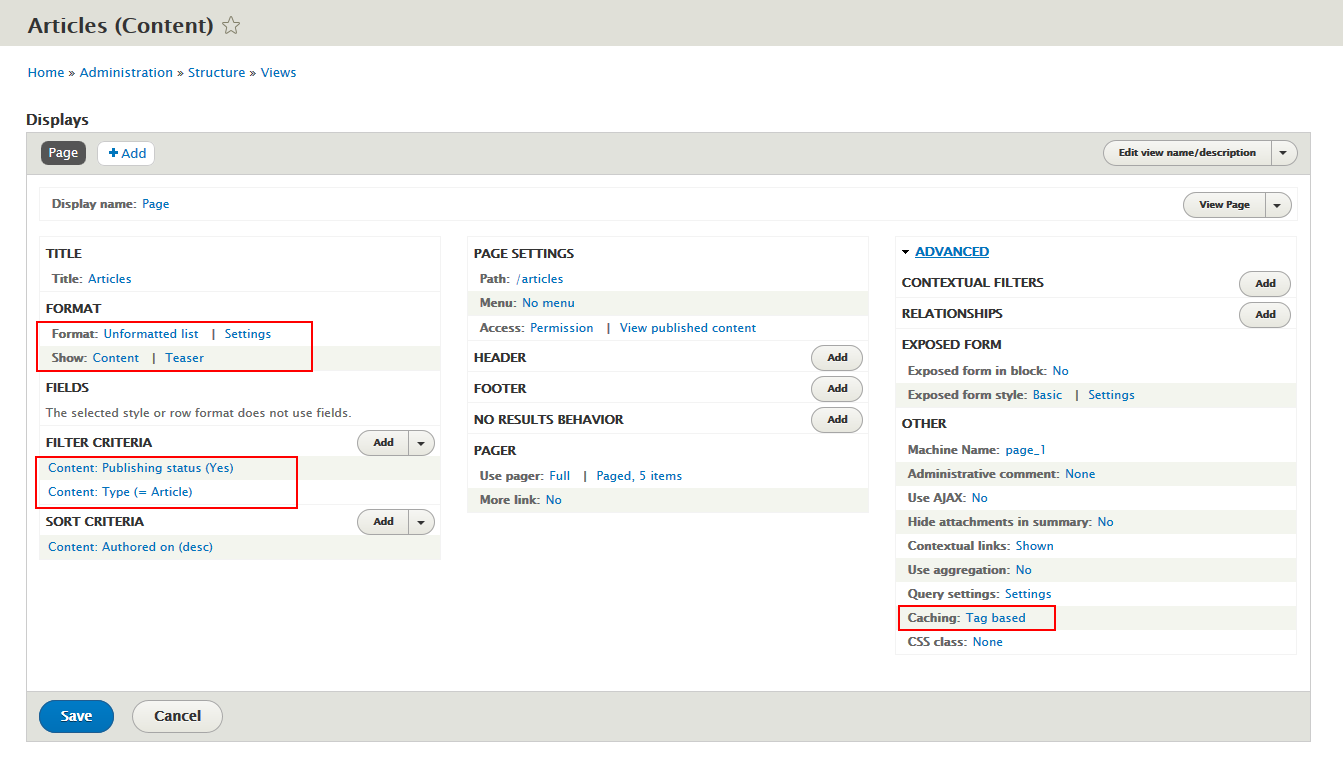
Articles page
Create and configure Article view
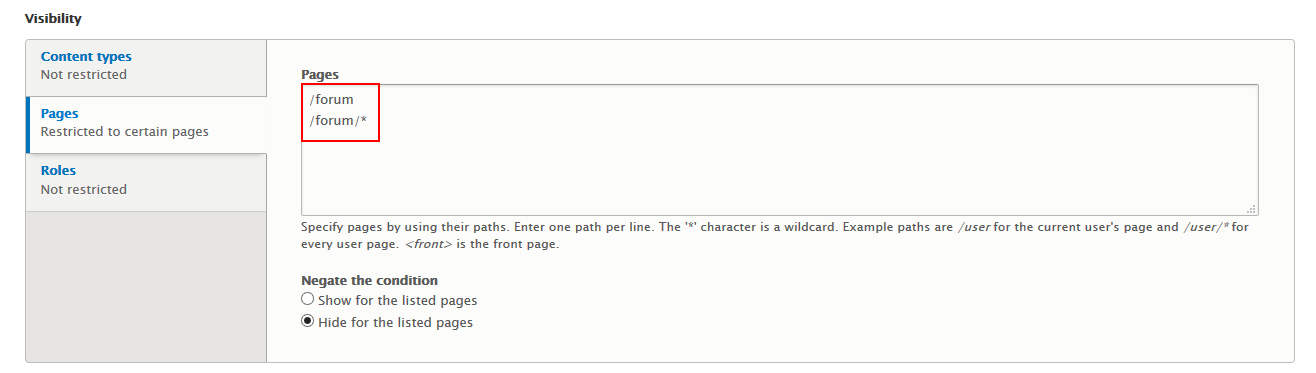
Forum page
Create and configure Forum block

Help page
Create and configure Help page block

Contact page
Add Contact view
More Configurations
Site Information
In this section, you can change basic settings, such as the site name, slogan, e-mail address.
1. Log in to Administration site page by administrator account
2. Navigate to the Site Information page Configuration > System: Site information

3. Change site details from the view:
- Site name
- Slogan
- E-mail address
- Set Default Front page
4. Click on Save configuration to finish editing.