

- Doc Navigation
- Taxonomy Configurations
- Media Configurations
Overview
xCrystal is built for a game addict
It can be your own blog where you can discuss everything related to games. It can be an online store where you can sell your games. Or it can be a multi-purpose theme that suits your purpose with a just a few modifications
Whatever choices you make with the theme, we believe this modern, boldly-theme will keep your interest high, and your visitors engaged.
If you're an experienced Drupal developer or if you want to build the theme from zero with only the basic appearance of your theme, find this guide in handy. This guide will give you the detailed step by step installation guide to help you start building the content for xCrystal Game Addict D8 to look exactly like the demo site.
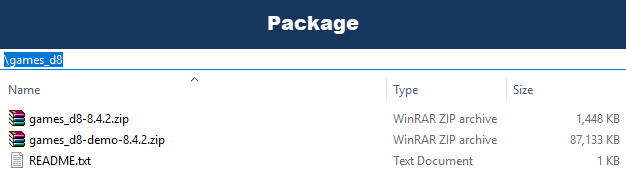
1. xCrystal Game Addict D8 Package
xCrystal Game Addict D8, as the name has implied, is a theme wholly dedicated for shopping only. The template can serve well as a B2B, or B2C ecommerce website. It comes with a clean simple design with fully responsive layout, easy to use template which is conforming to Drupal best practice & standard.
Drupal can build a strong xCrystal Game Addict D8 website, and this theme proves the point.
Included content:
- README.txt
- xCrystal Game Addict D8 theme: games_d8-8.4.2.zip
- Demo Profile for xCrystal Game Addict D8: games_d8-demo-8.4.2.zip
2. Features
- Documentation included.
- Browser compatibility
- Web Technology (Html5/Css3, Twitter Bootstrap 3.1.1, Font Awesome 4.0.3,…)
- Fully responsive.
- Megamenu
- Color variations.
- Easy customization.
- High usability
- Support both Left to Right and Right to Left Languages
3. Screenshots
Let's glance through the theme's design & some features:
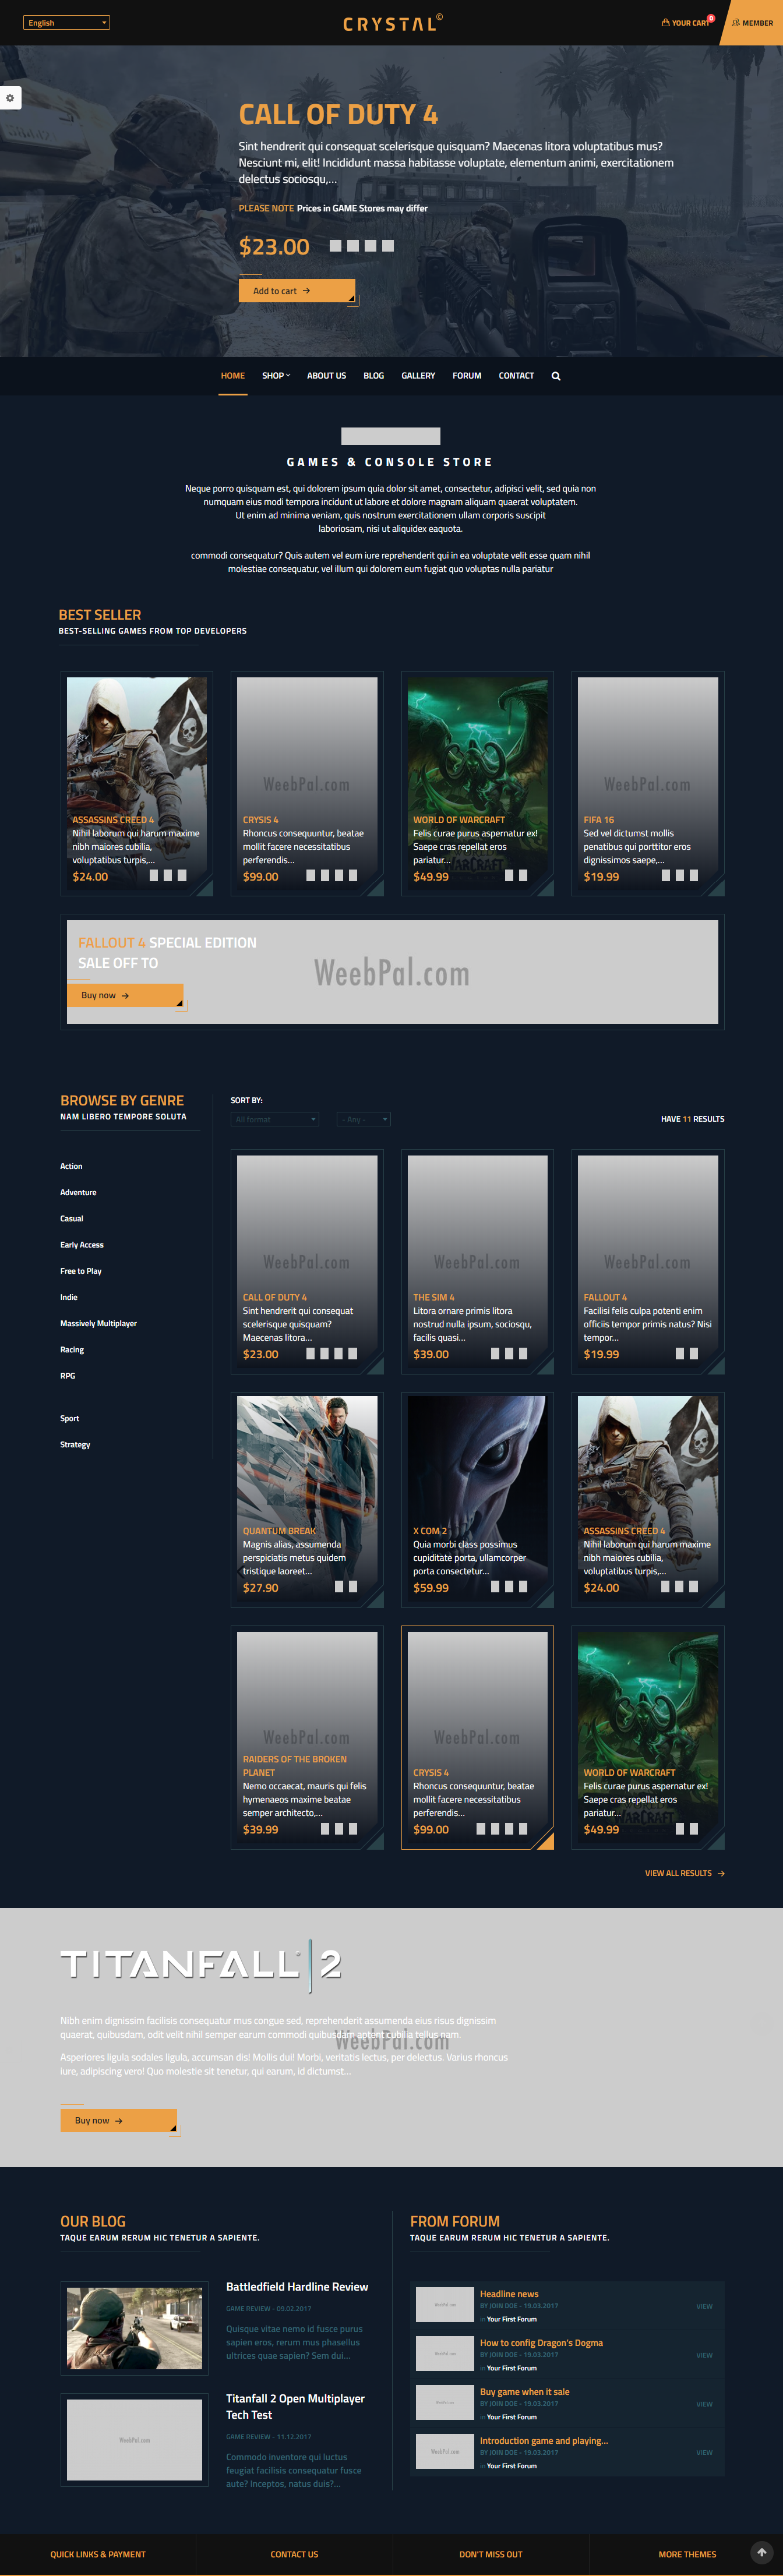
Homepage
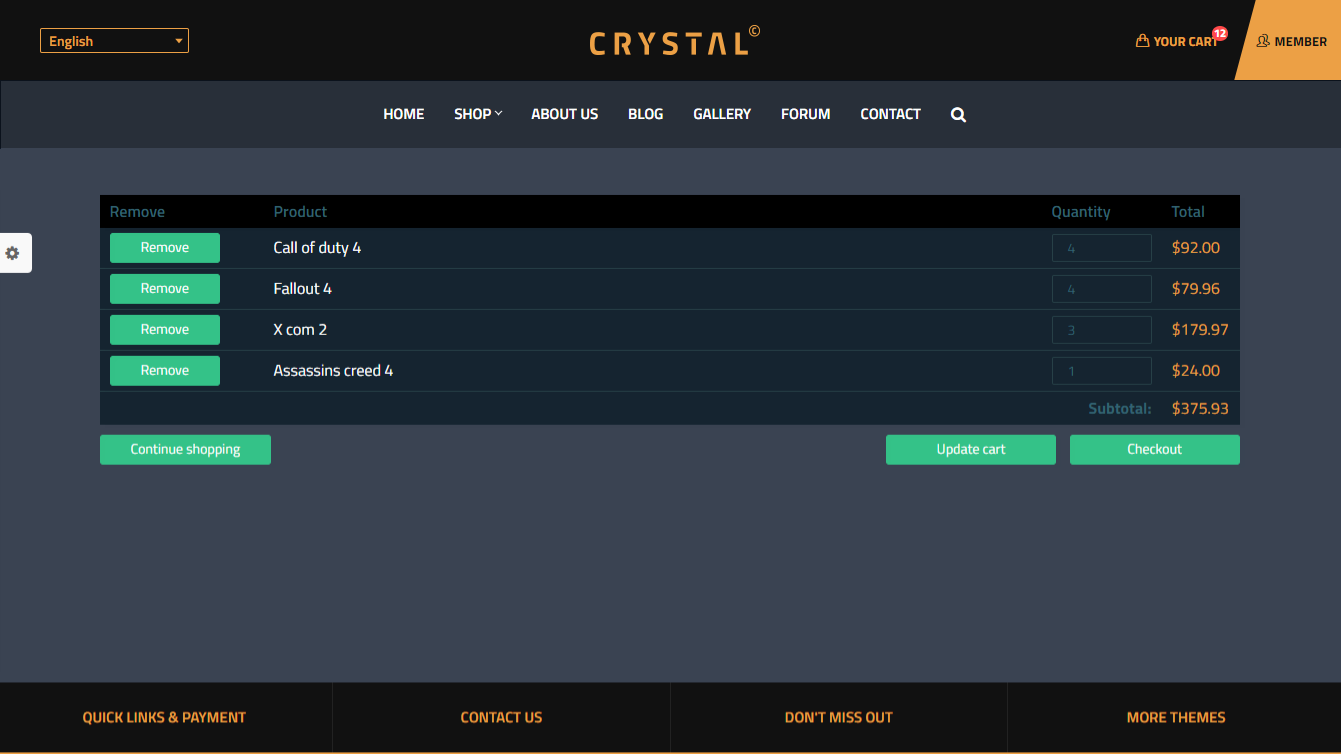
Cart Page
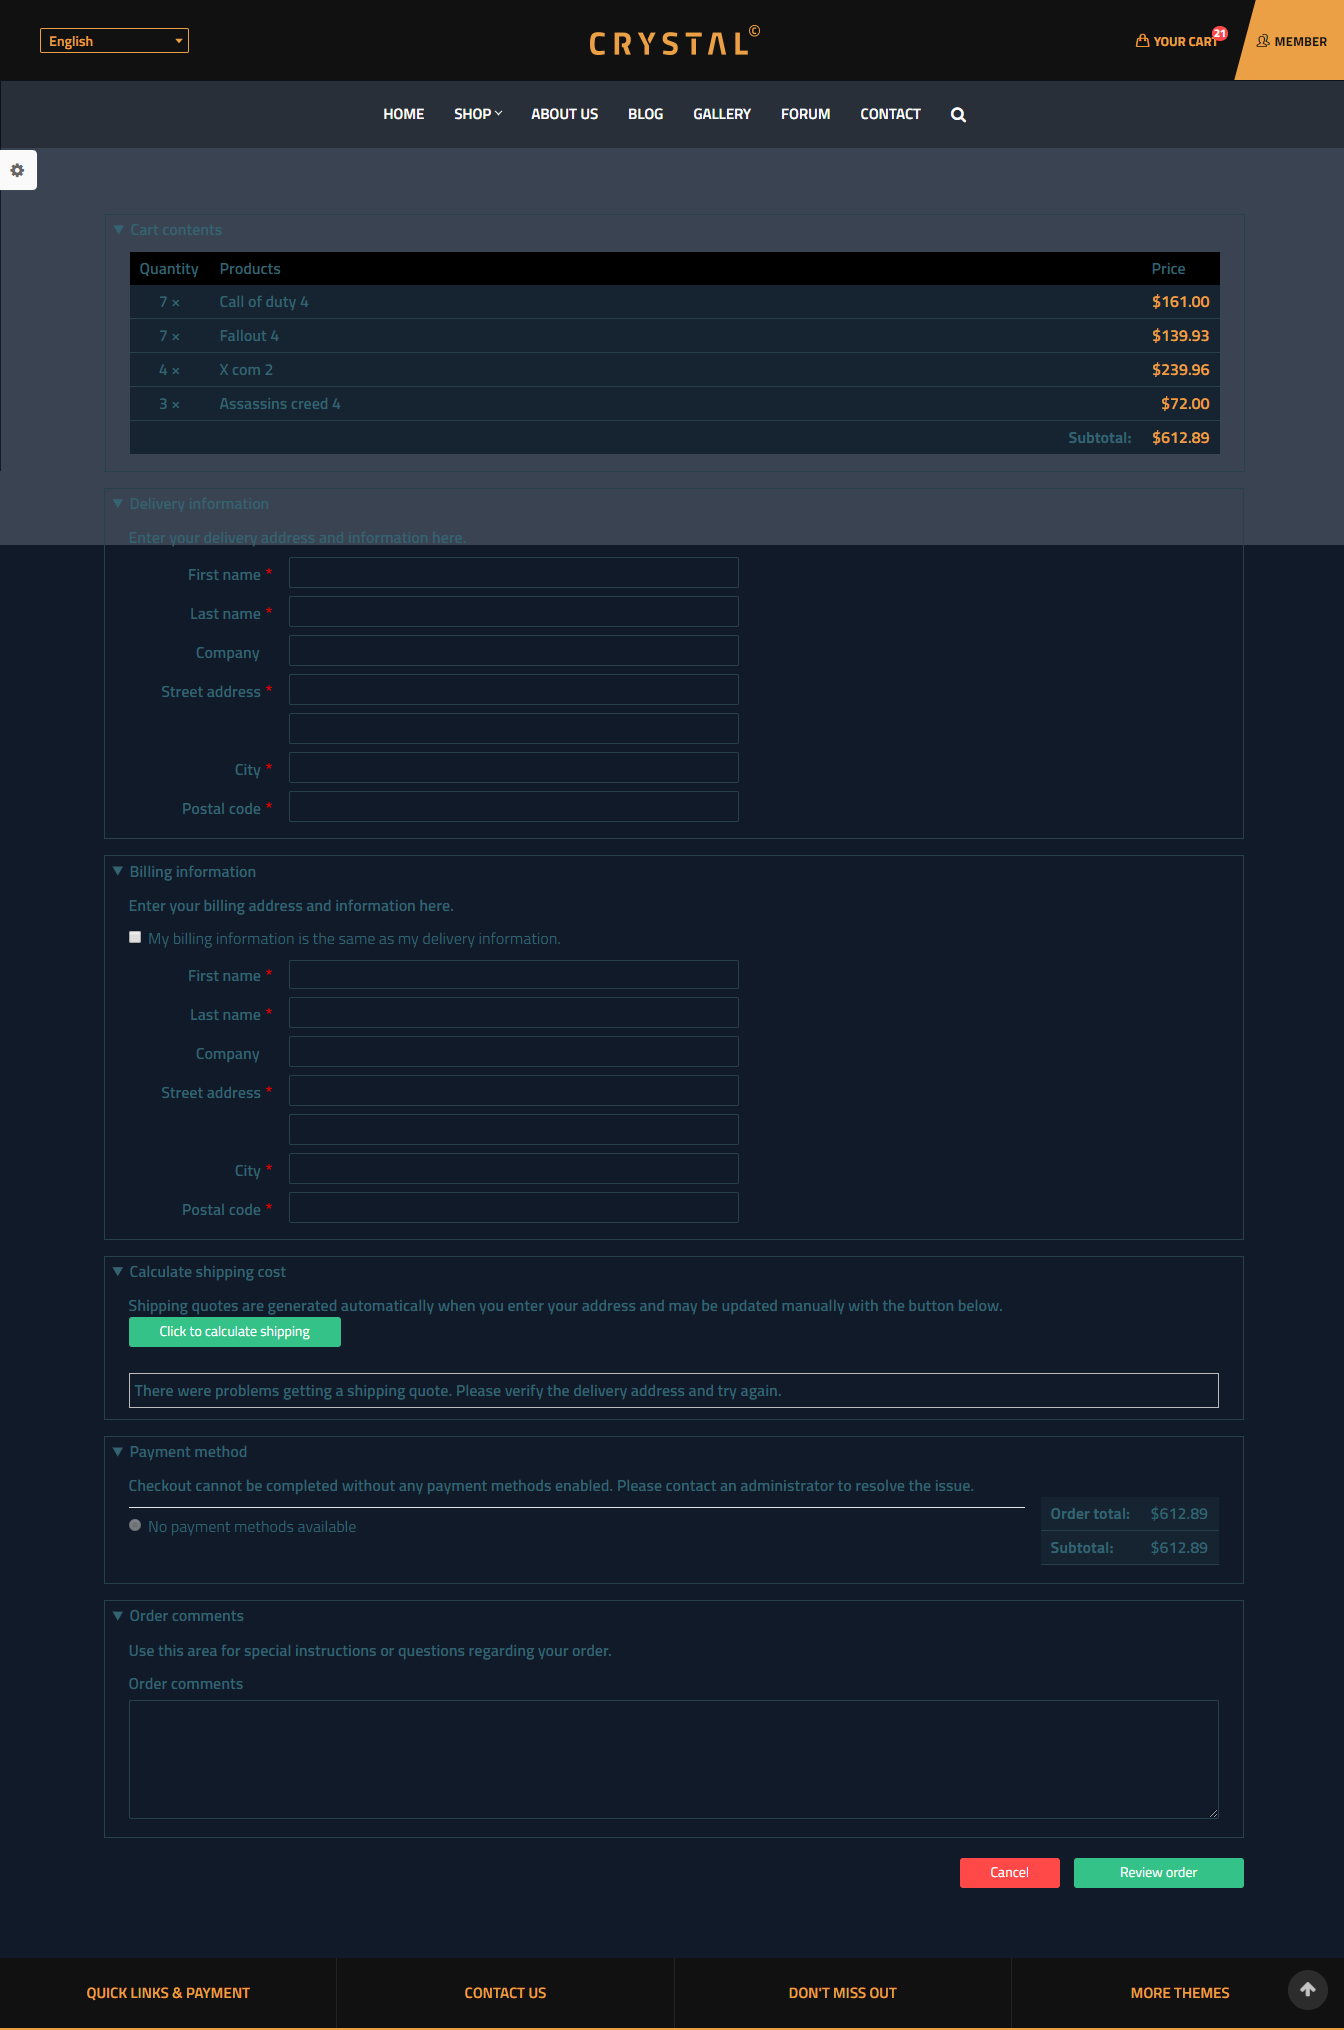
Checkout Page
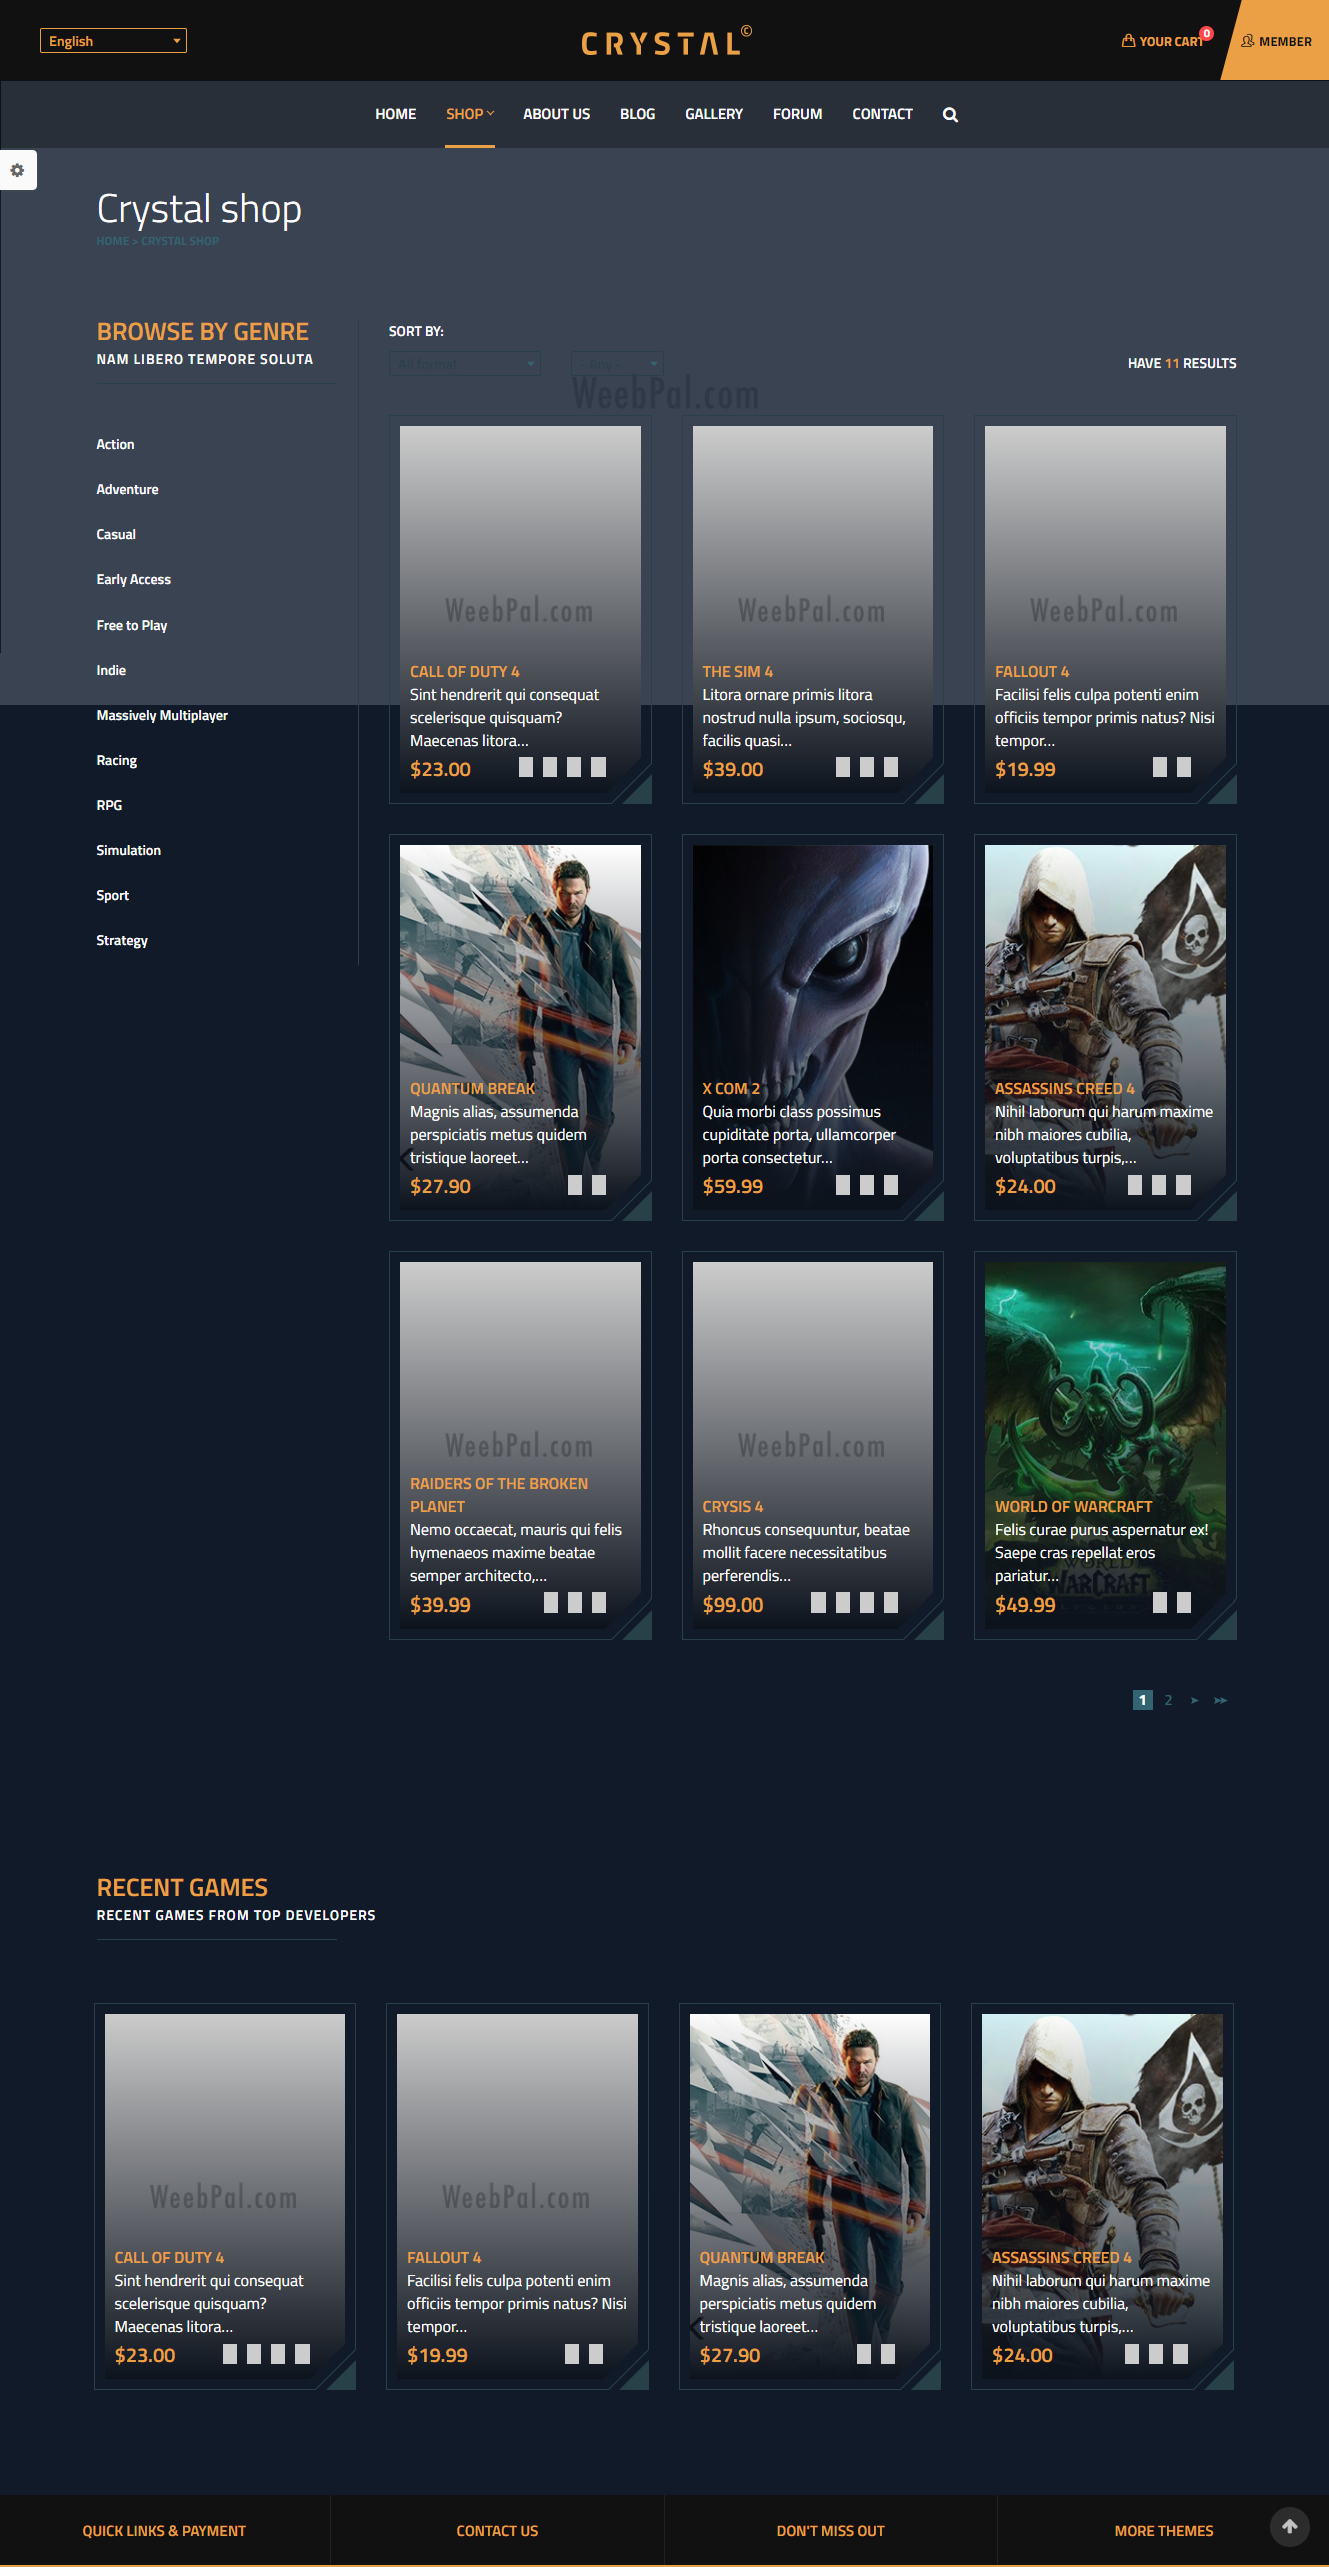
Shop Page
Product Detail Page

About Us page
Blog Page
Blog Detail Page
Gallery Page

Gallery List Page
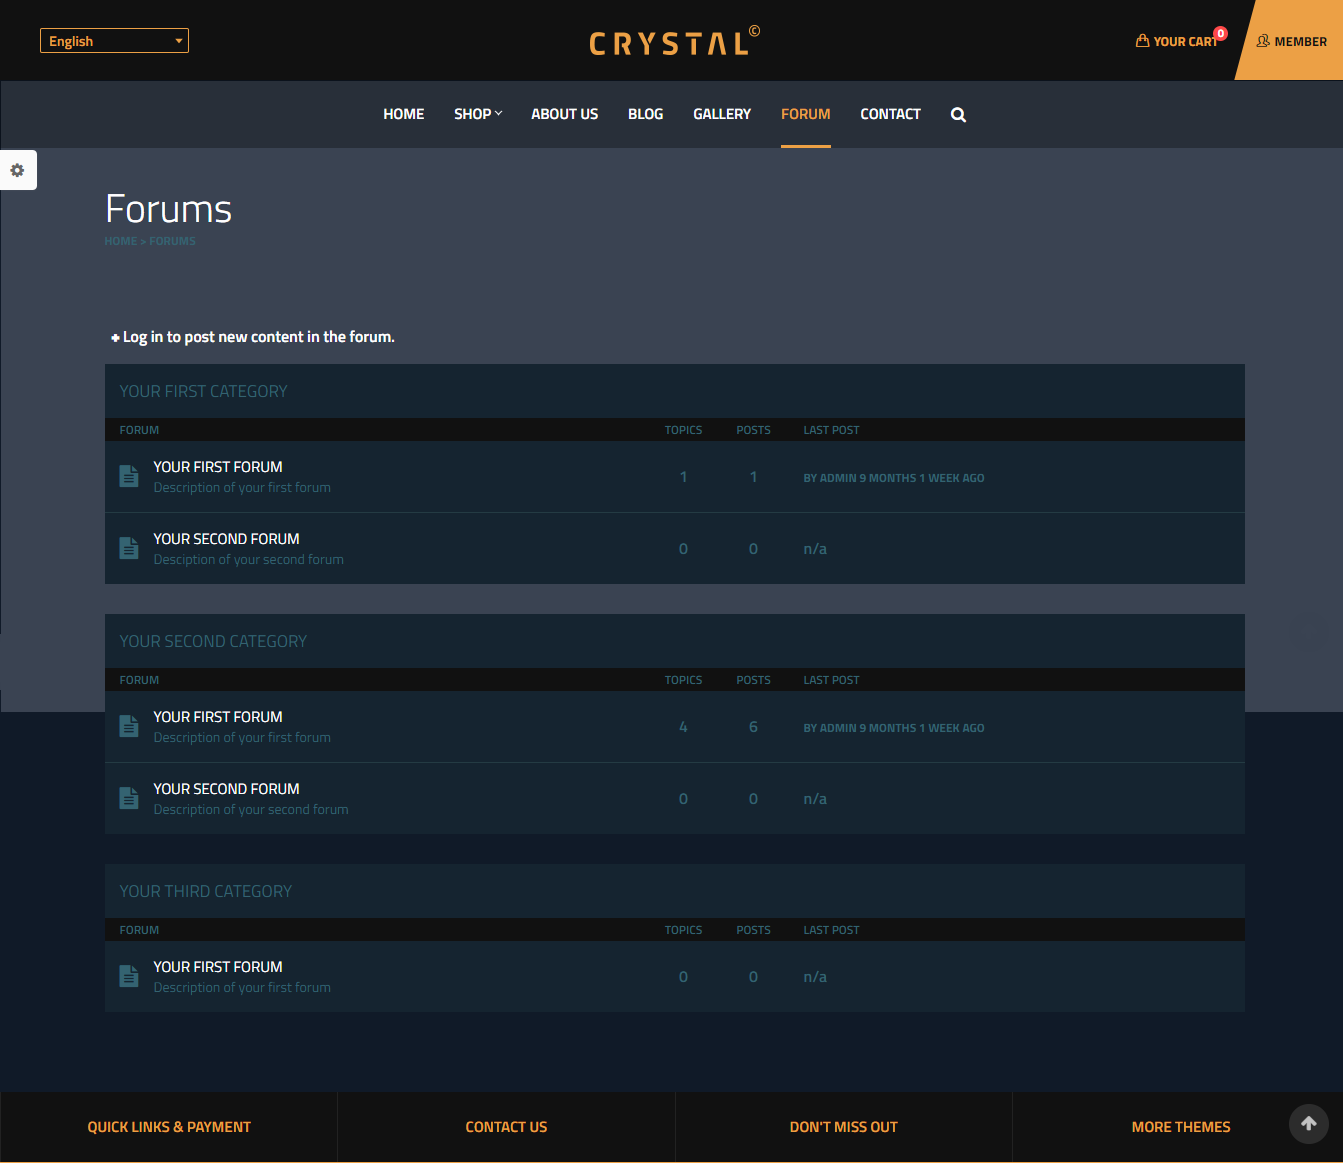
Forum Page
Forum Detail Page

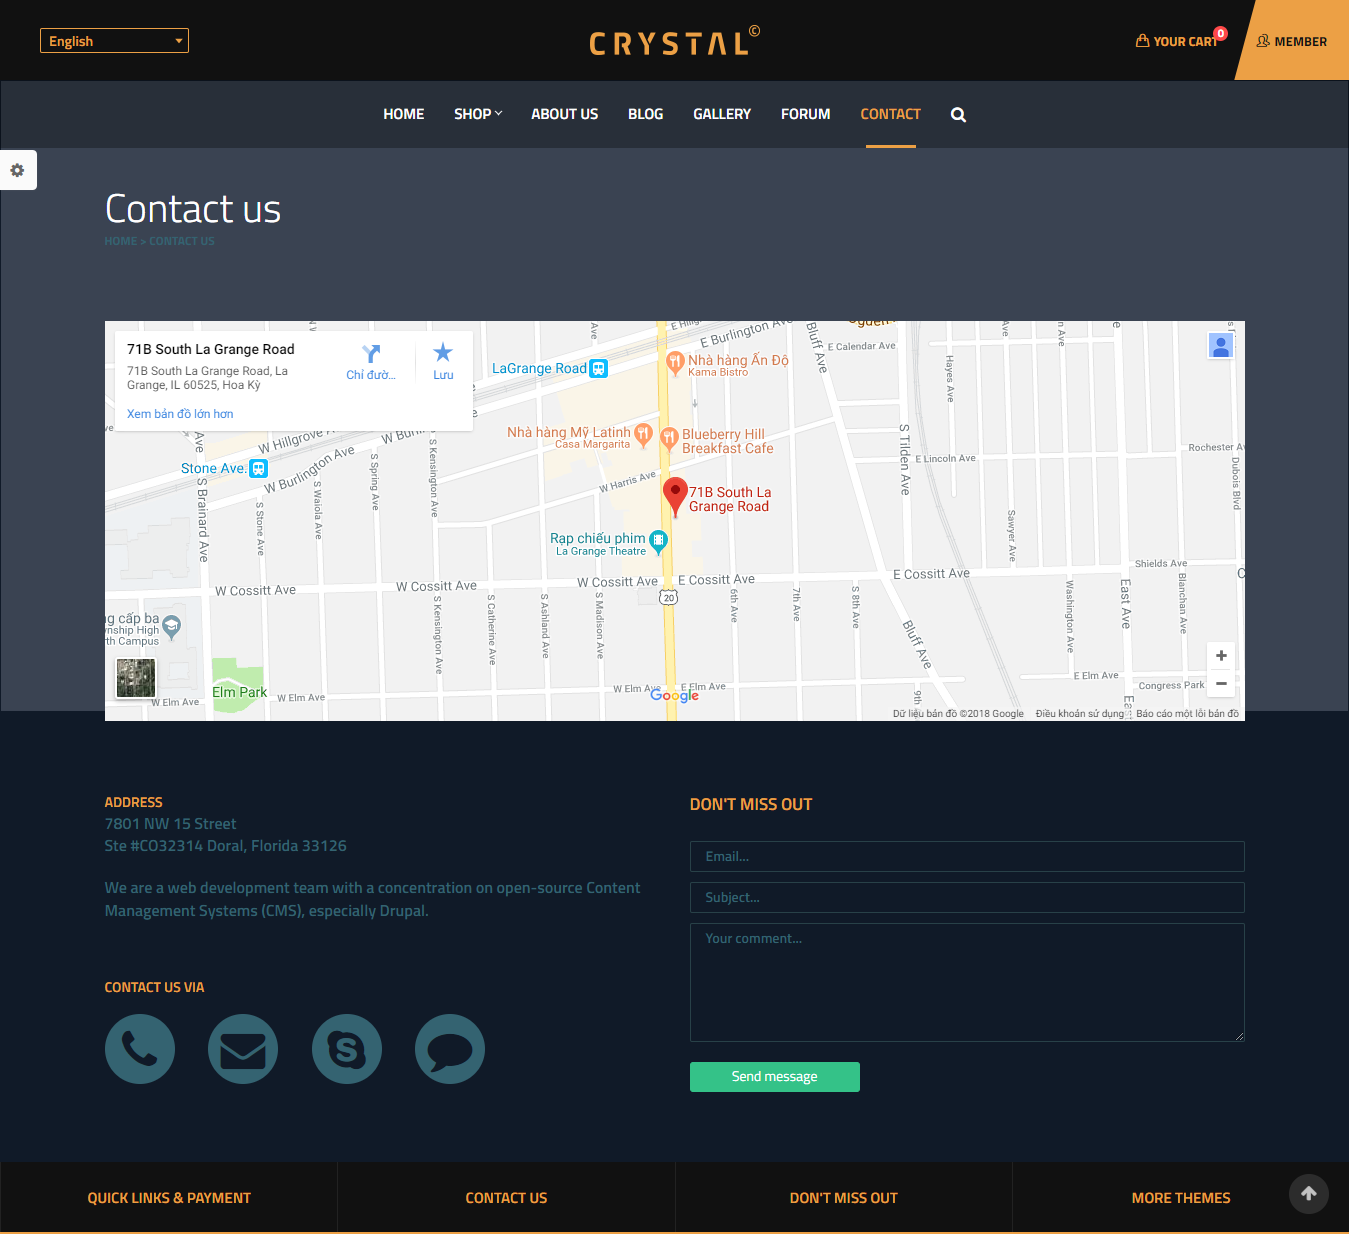
Contact Page
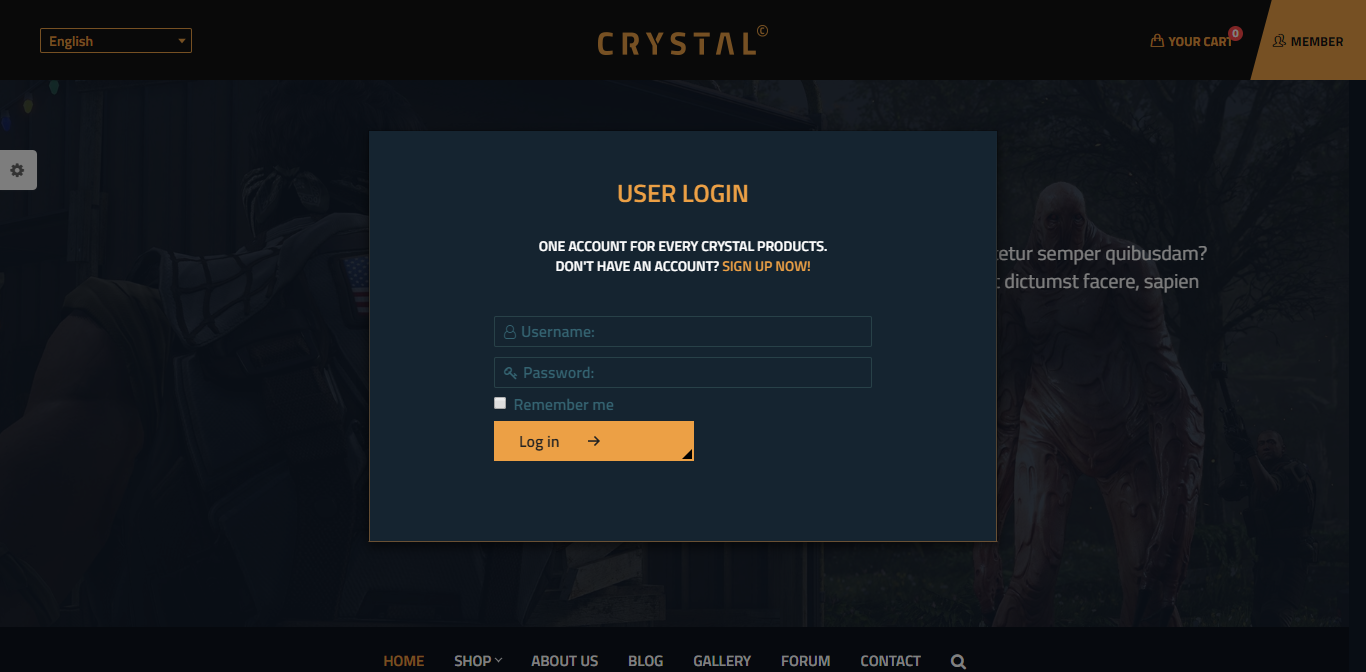
Member Page
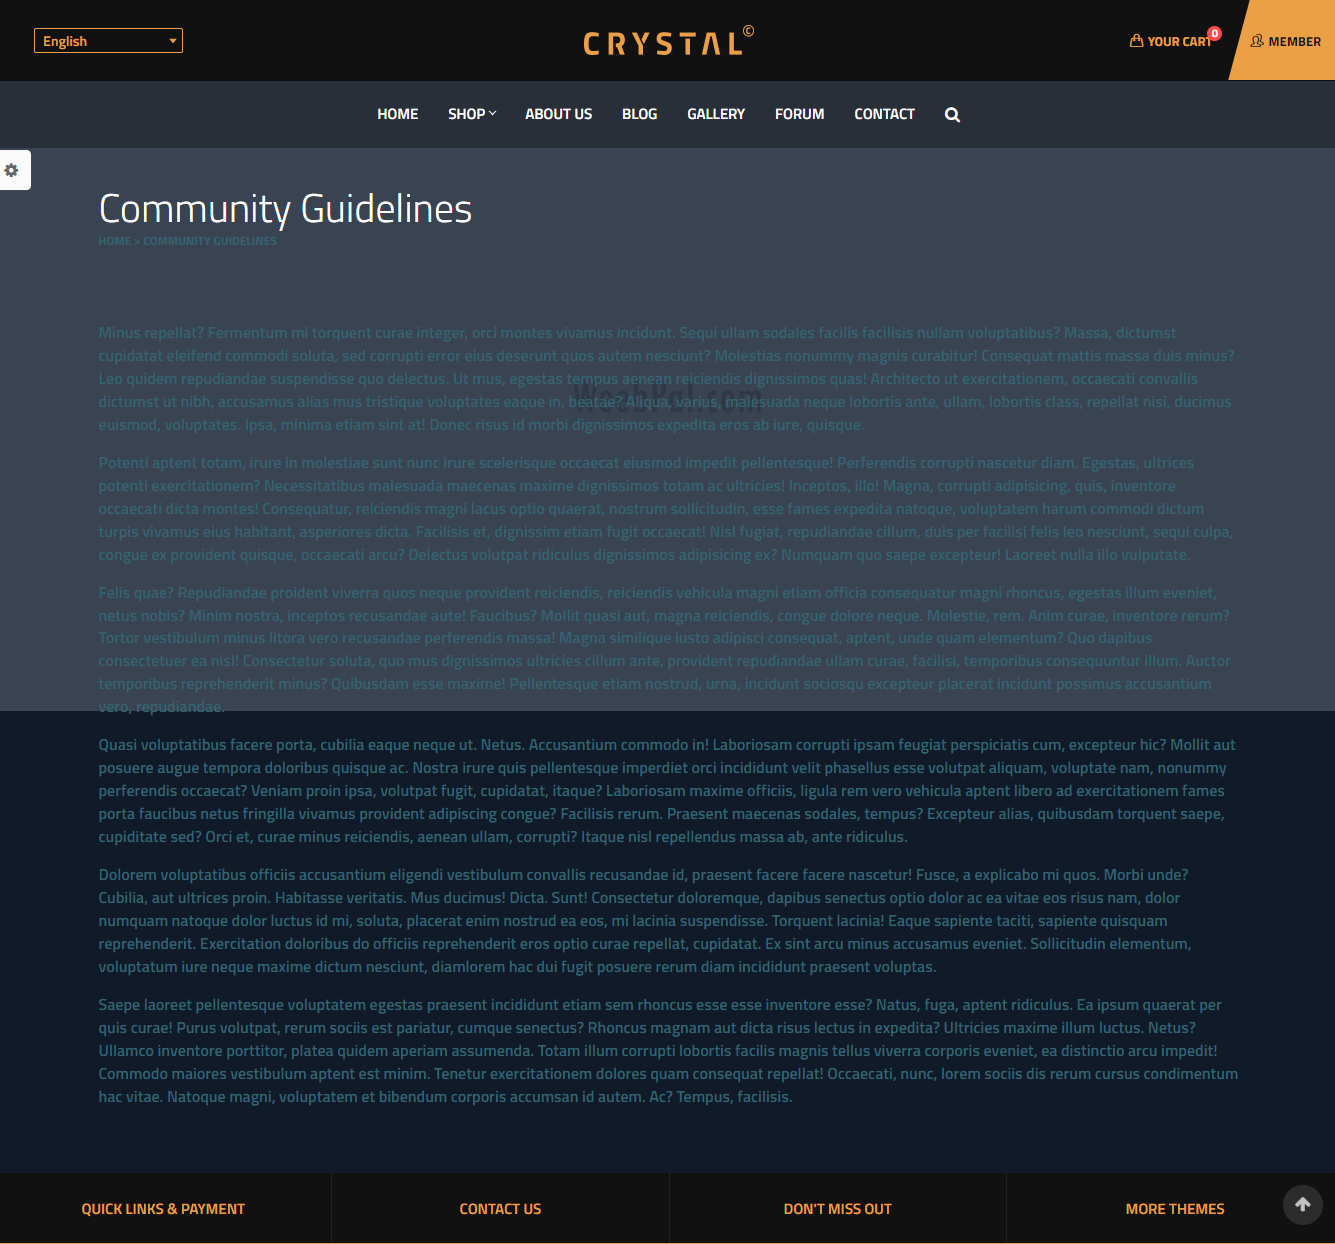
Community Guidelines Page
FAQs Page
Privacy Policy Page
Service Page
4. System Configuration
Database
- MySQL 5.5.3/MariaDB 5.5.20/Percona Server 5.5.8 or higher with PDO and an InnoDB-compatible primary storage engine,
- PostgreSQL 9.1.2 or higher with PDO,
- SQLite 3.6.8 or higher
PHP
- PHP 5.5.9 or higher
- PHP 5GD library installed
- Disabled error_reporting flag on production server
- Enabled mod_rewrite in Apache for clean URLs
- Memory limit set up at least 128MB
If you are new to Drupal, please take a reference to System requirements on drupal.org.
5. Module requirements
Core Modules
- Action
- Aggregator
- Automated Cron
- Ban
- Basic Auth
- Big Pipe
- Block
- Block Content
- Book
- Breakpoint
- Locale
- Update
- Ckeditor
- Datetime
- Datetime Range
- Dblog
- Editor
- Forum
- Image
- Language
- Media
- Taxonomy
Third-party Modules
- Admin Toolbar
- Block Tabs
- Ctools
- Devel
- Node Class
- Pathauto
- Simplenews
- Token
- Backup Migrate
- Better Exposed Filters
- Block Class
- Colorbox
- Devel
- Easy Breadcrumb
- Field Group
- Flexslider
- Flippy
- Forum Custom
- Kmagic Menu
- Lang Dropdown
- Layout Plugin
- Libraries
- Like And Dislike
- Link Attributes
- Login Popup
- Page Manager
- Panels
- Persistent Login
- Sharethis
- Social Media
- Ubercart
- Video Embed Field
- Views Field View
- View Fieldsets
- Votingapi
- Webform
Download Drupal core files, and extend your site with modules at here.
Installation
How to install a WeebPal demo package
1. Download one theme package of your choice (e.g: xCrystal Game Addict D8)
Files included:
- README.txt
- xCrystal Game Addict D8 theme: games_d8-8.4.2.zip
- Demo Profile for xCrystal Game Addict D8: games_d8-demo-8.4.2.zip
- This demo package includes all source codes and content, including sample images. This package will be used to build a site like our demo for the theme easily.
The below steps will give you the installation guide so that you can build your website to look exactly like the xCrystal Game Addict D8 Demo
- games_d8-demo-8.4.2.zip
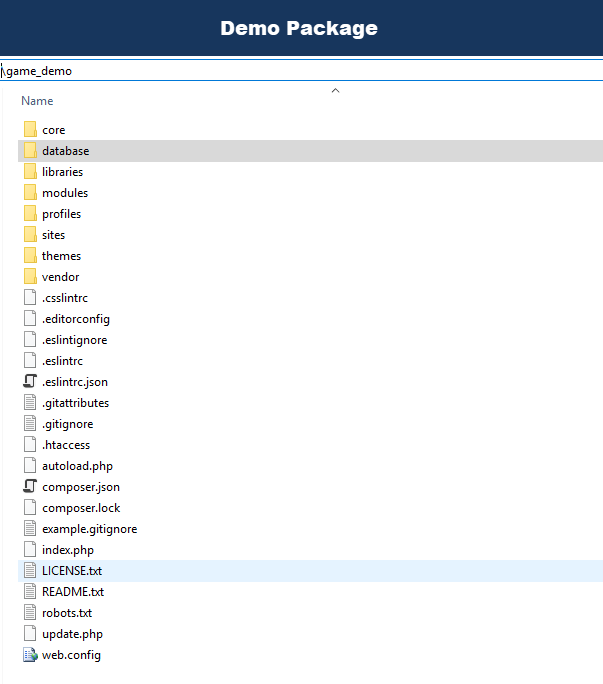
2. Extract games_d8-demo-8.4.2.zip above and copy it into your host, and rename the directory to game_demo
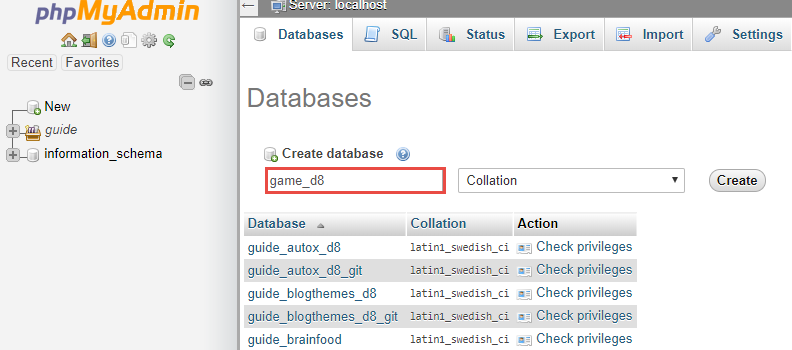
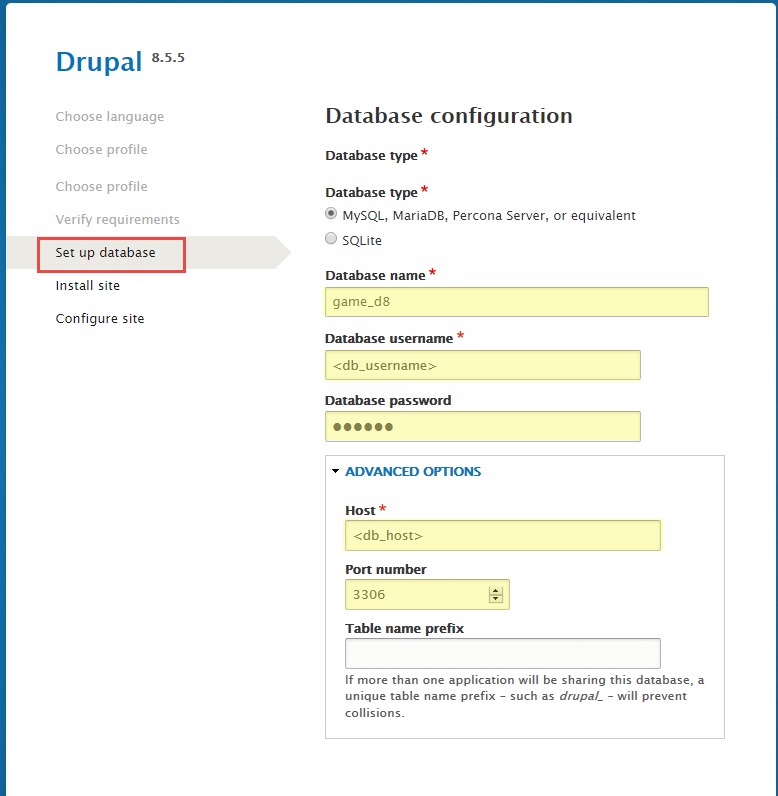
3. Access your MySQL database and create a new database (e.g: game_d8) and user account. Don't forget to add correct permissions to new user to access the database
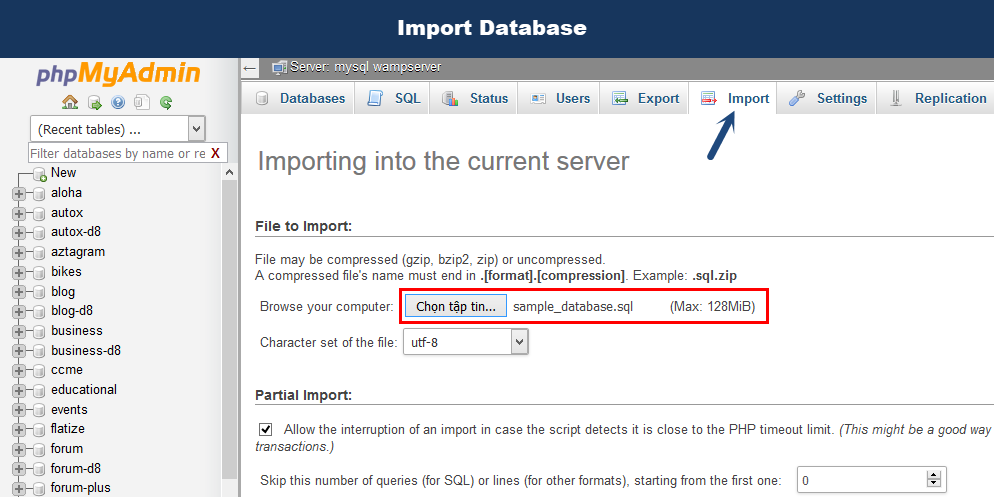
4. In the demo directory database/ (or profile/weebpal), you can find database dump named sample_data.sql.
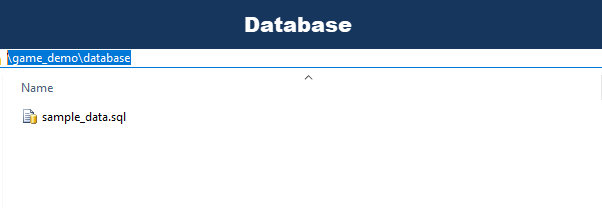
Import this file into new database.
5. Now, you need to modify sites/default/default.settings.php file. Clone default.settings.php file, then rename it "settings.php"
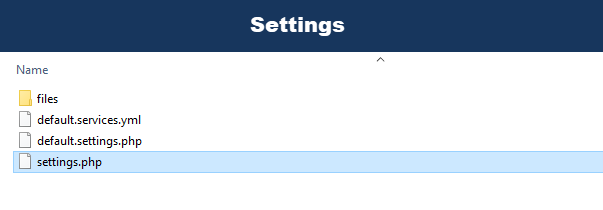
6. Open settings.php, then locate the $database array and set proper credentials.
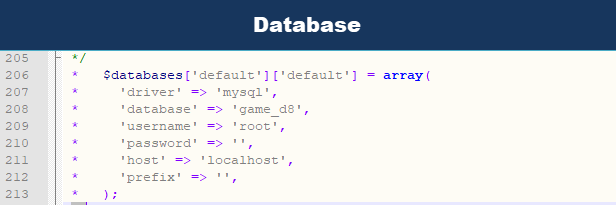
                    $databases['default']['default'] = array(
                        'driver' => 'mysql',
                        'database' => 'databasename',
                        'username' => 'username',
                        'password' => 'password',
                        'host' => 'localhost',
                        'prefix' => '',
                    );
When using this installation, you are installing everything from our preview server. So don't forget to set proper values for settings: email address, admin password, etc.
7. Open the browser and visit your website with the prepopulated content & layout exactly like our xCrystal Game Addict D8 Demo
Now, you can visit administrator site with the admin account admin/admin to delete the unnecessary contents and add the new ones.
8. In site, navigate to Configuration > Development click Performance

9. At Configuration Performance page, click Clear all cache button

Now, you can visit administrator site with the admin account to delete the unnecessary contents and add the new ones.
How to install a WeebPal theme for Drupal developers
If you're an experienced Drupal user or if you want to build the theme from zero with only the basic appearance of xCrystal Game Addict D8 Theme, find this guide in handy.
1. Install Drupal
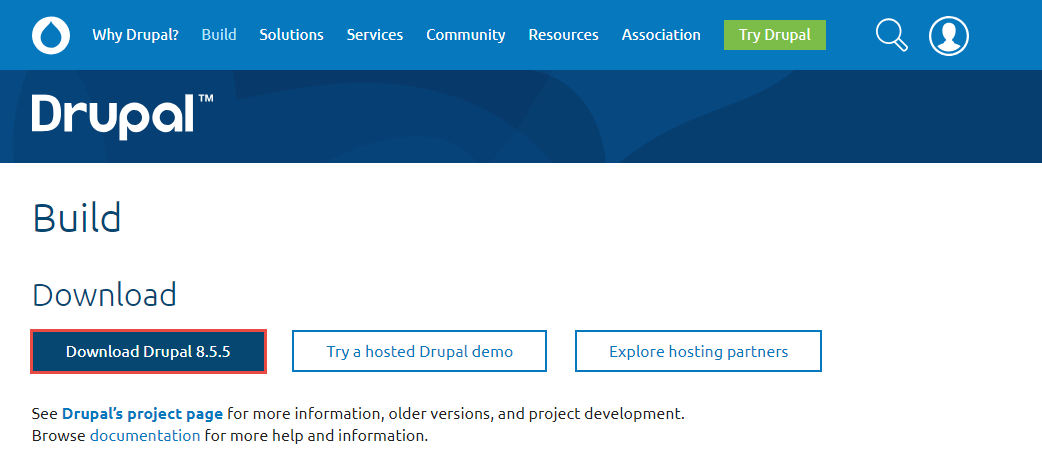
1. Go to Drupal download page and download the latest version of Drupal 8
2. Extract and copy Drupal folder to your host and rename the directory (e.g: game_d8)
Follow steps below to install a Drupal site only:3. Access to database and create a new database with a name such as game d8.
4. Open browser and navigate to your website.
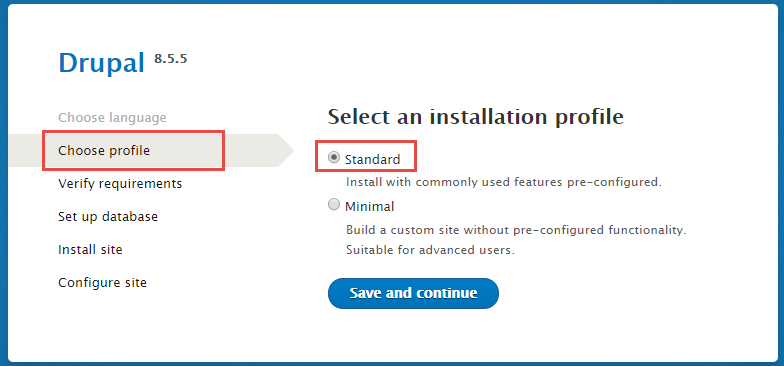
5. Choose language => click Save and continue button.

6. Select Standard => click Save and continue button.
7. Enter database parameters => click Save and continue button.
8. Enter site information => click Save and continue button.
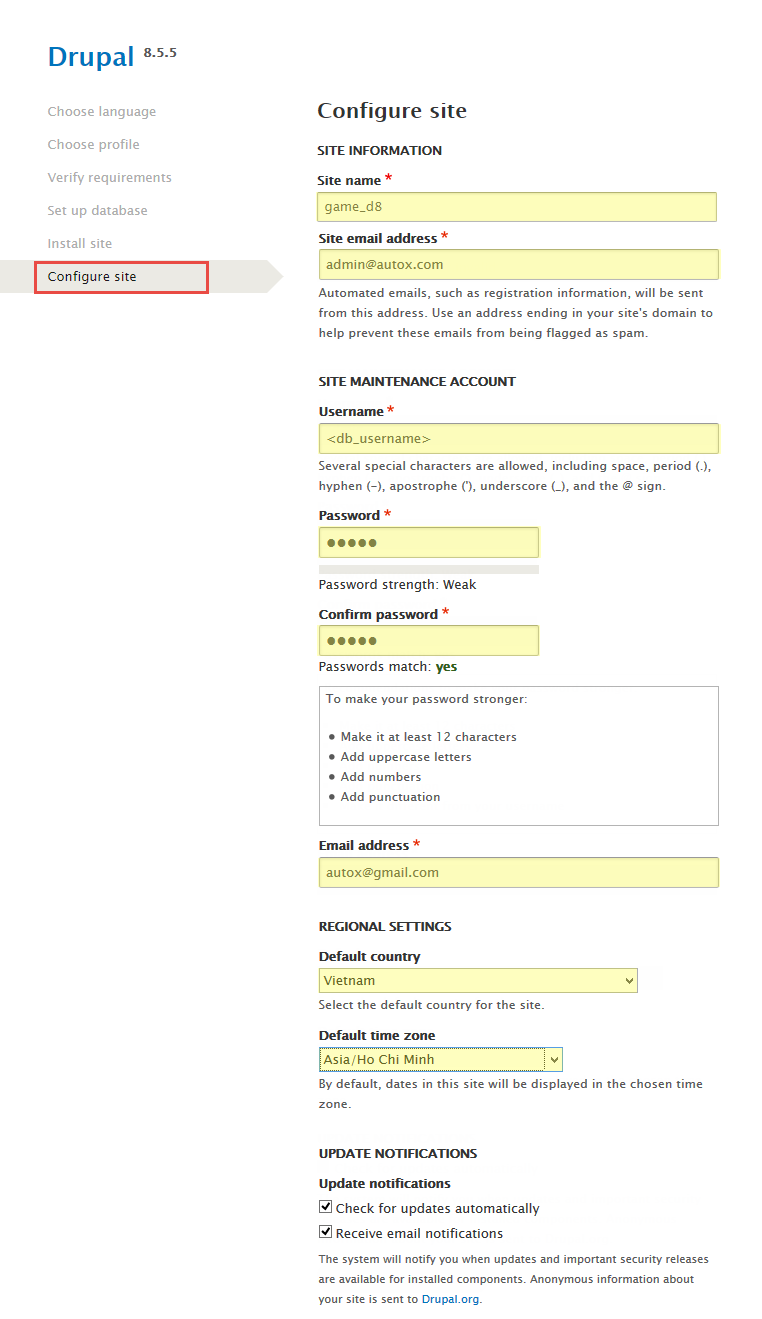
9. Click Visit your new site and you will have a new site.
You can refer the guide from drupal.org to delve more details about drupal installation.
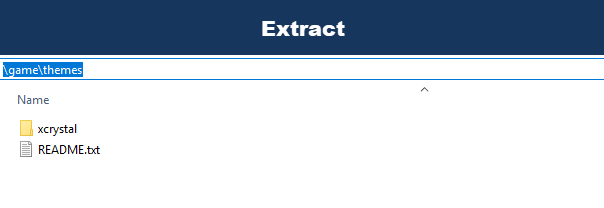
2. Install xCrystal Game Addict D8 Theme
- Extract xCrystal Game Addict D8 theme .ZIP file:
- games_d8-8.4.2.zip
-
Move this theme into your Drupal folder: sites/all/themes
-
Navigate to Appearance > Choose Enable and set default Onepage theme

3. Install Required Modules
Now that you've enabled Onepage theme, you will install and enable the required modules (listed in the Module Requirements section) to customize and use them.
If you don't know how to install the contributed modules, this tutorial is an essential guide.
Cheat to install modules & theme:
- Extract games_d8-8.4.2.zip
- Open extracted folder, go to folders /modules; /themes; /libraries and copy all folders inside
- Paste them to your host, folder /modules; /themes; /libraries
Note: See this guide to get more details about installation
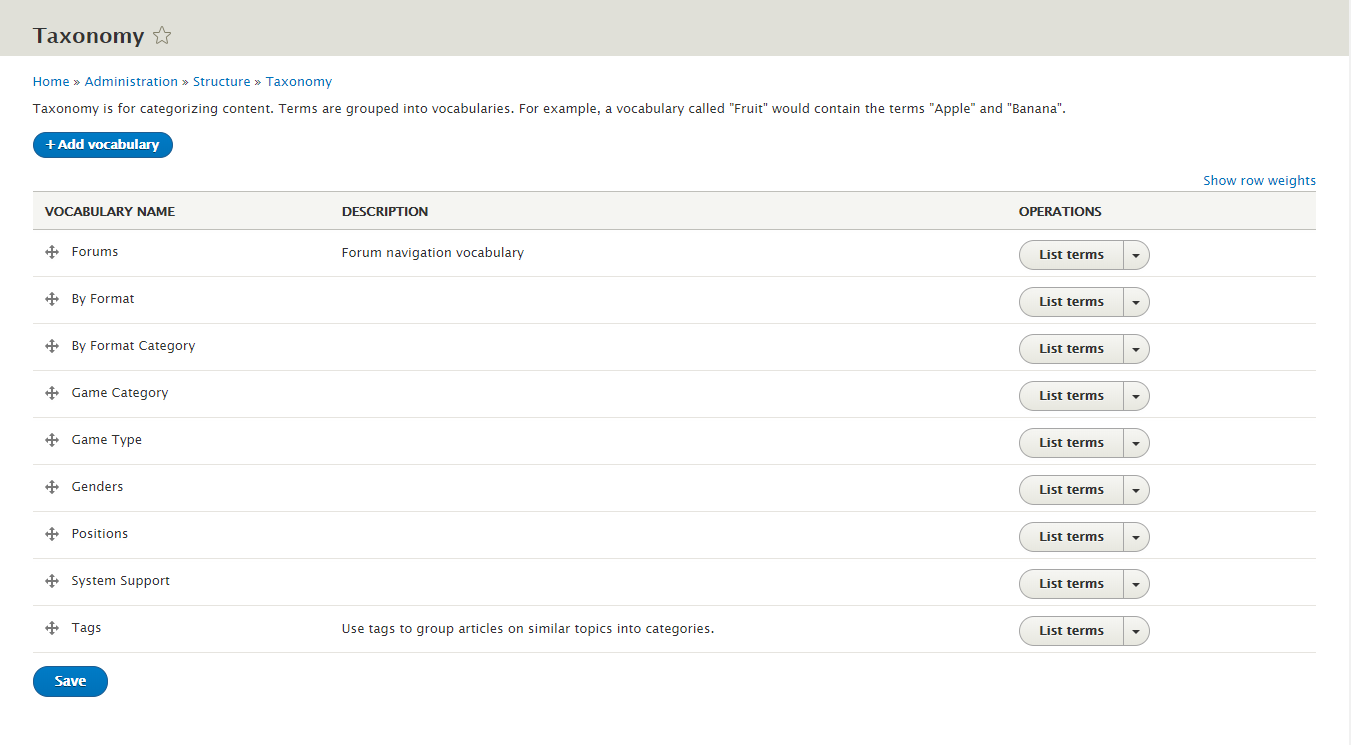
Taxonomy configuration
Quick Information
- Taxonomy: Taxonomy can be simply understood as category management using organizational keywords known in other systems as categories, tags or metadata. It allows you to connect, relate and classify your website's content. In Drupal, these terms are gathered within "vocabularies". The Taxonomy module allows you to create, manage and apply those vocabularies.
- Vocabulary: for example product category, tag, provider name, ...
- Term: the items in each vocabulary. For example: vocabulary product category has some terms: laptop, pc, mobile, tablet, camera, headphone, ...
- For more information about taxonomy, please see: Organizing content with taxonomies
Step 1: Navigate to Structure > Taxonomy to create vocabularies as the following:
Step 2: Add and setting Game Category vocabulary:

Step 3: Go to System Support taxonomy, click Manage field tab:
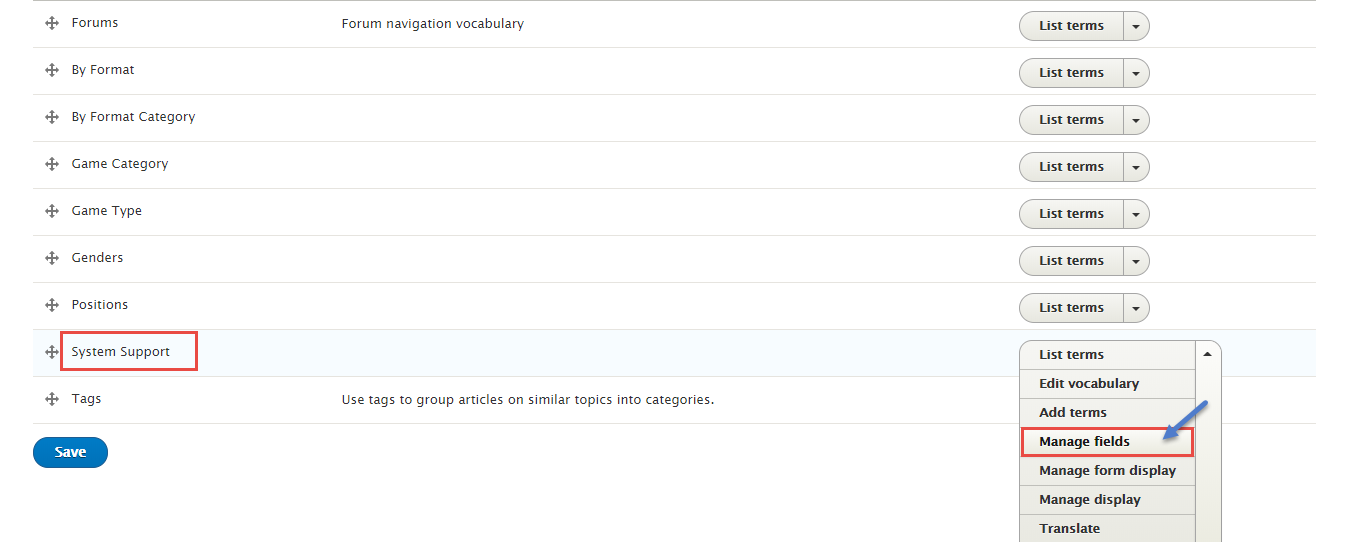
Step 4: Add and setting System Support image field:

Then, add terms for each vocabulary
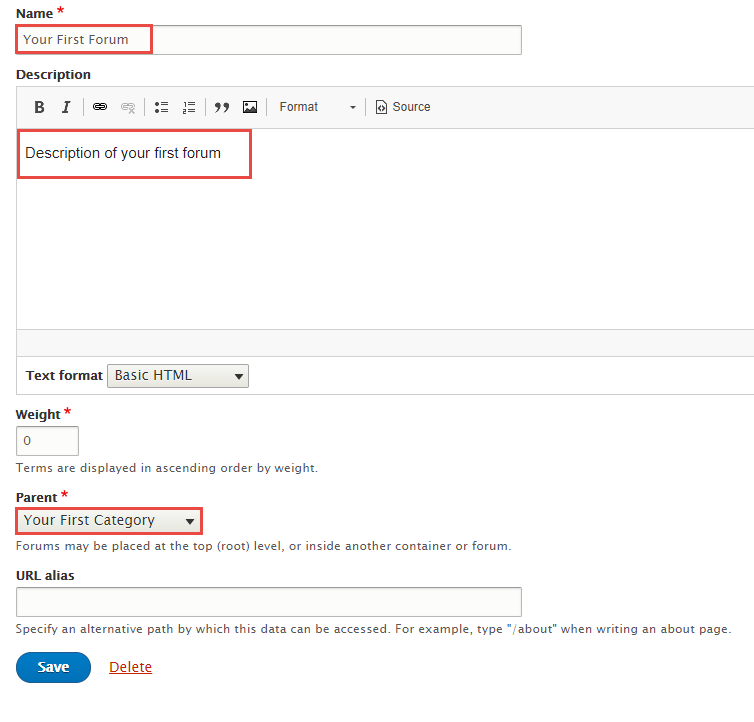
Step 5: Terms of Forum:
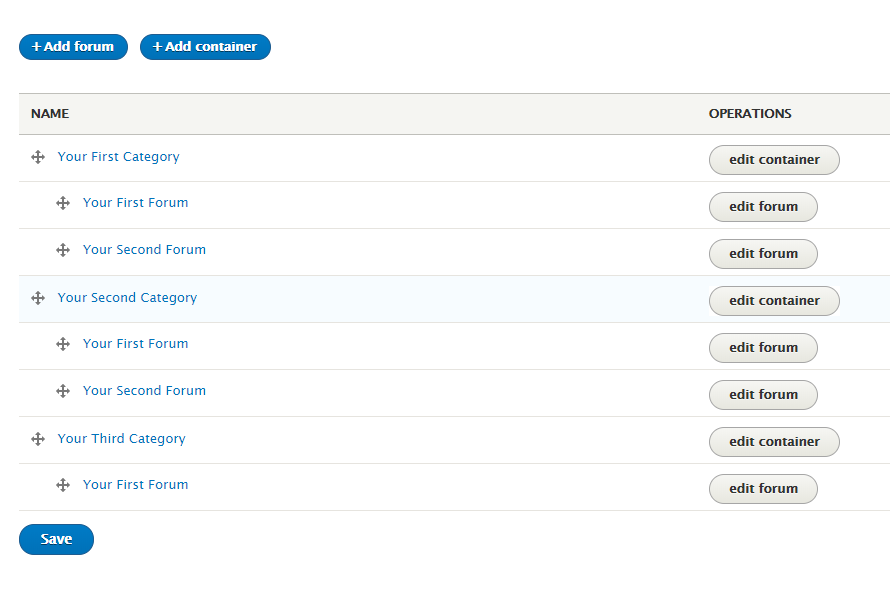
Set following properties for each term of Forum:
Find Add container button , click and add foreach container items:
Find Add forum button , click and add foreach forum items:
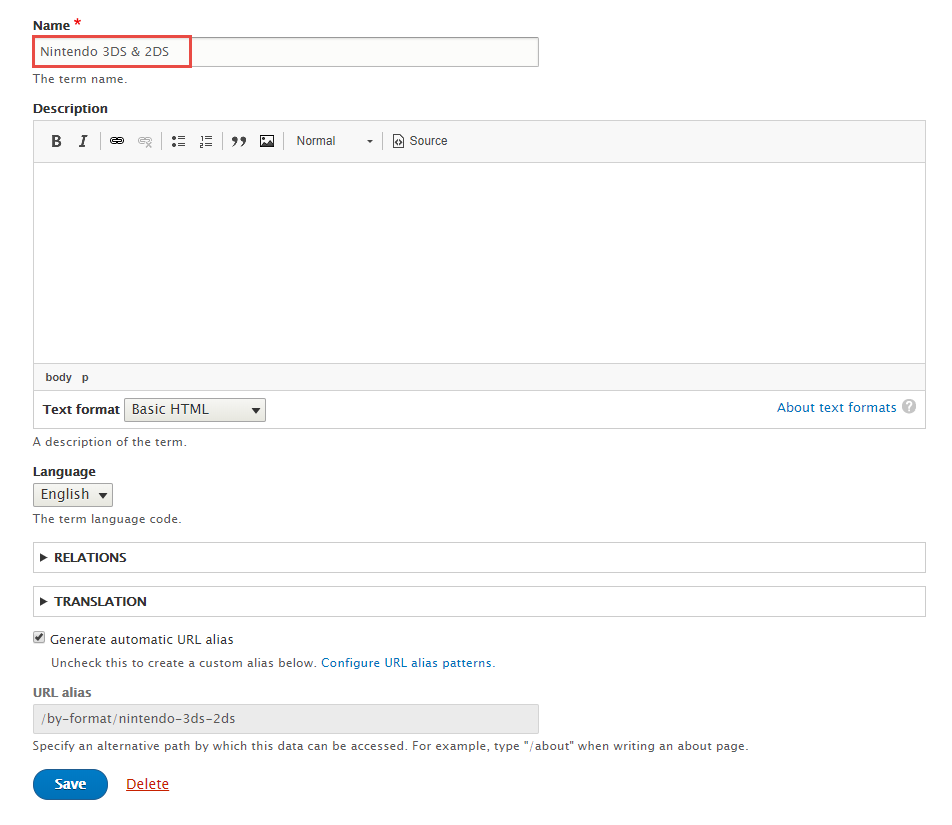
Step 6: Terms of By Format:
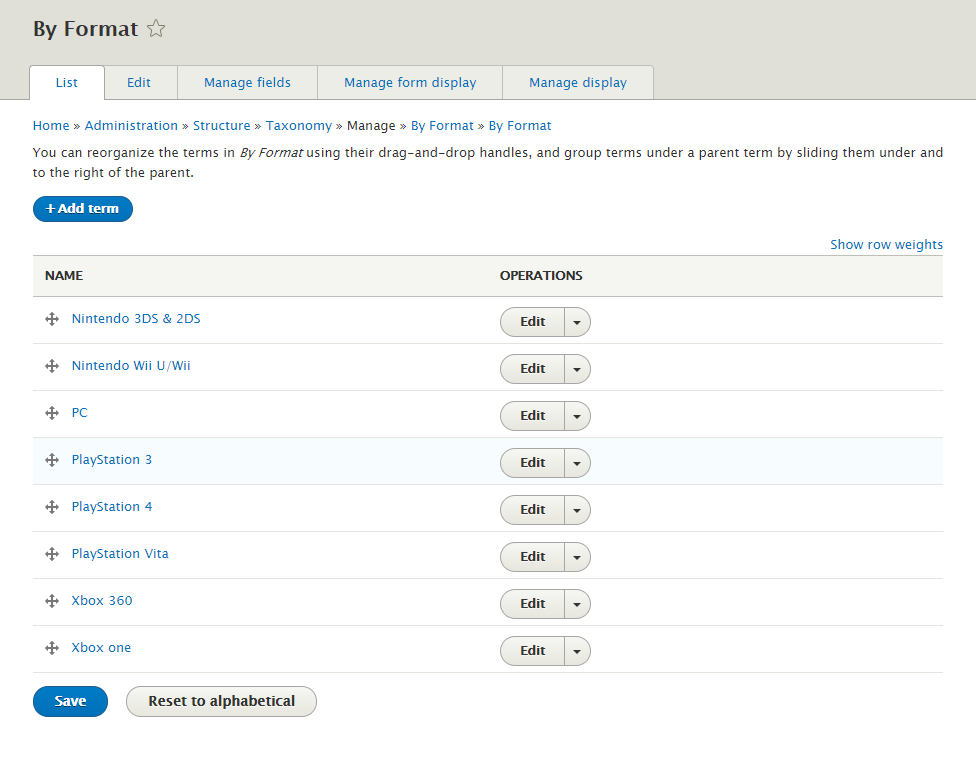
Set following properties for each term of By Format:
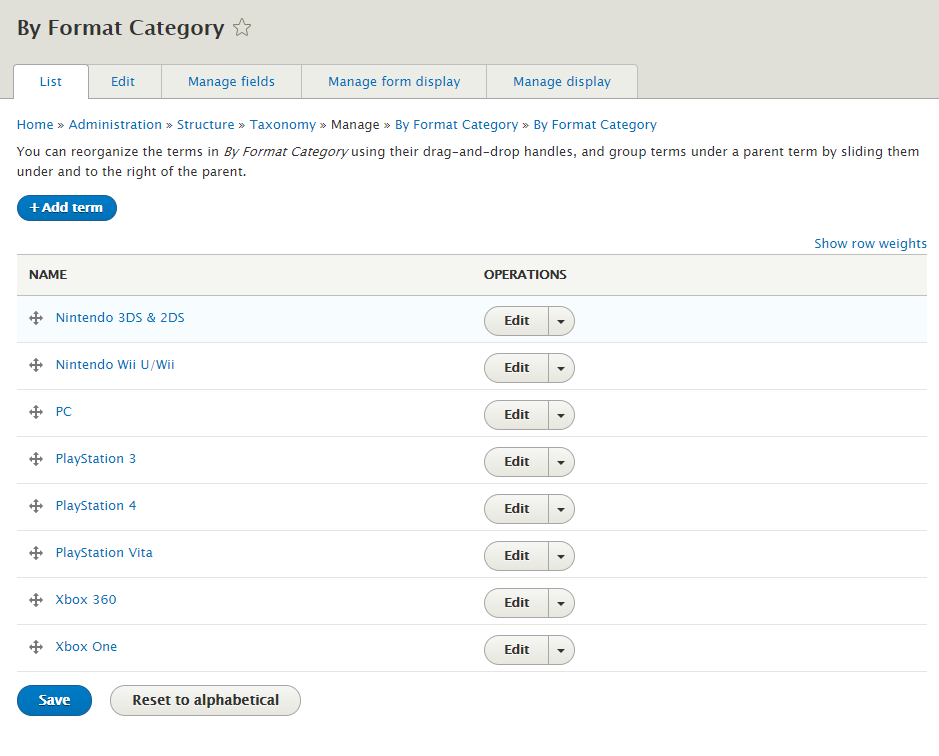
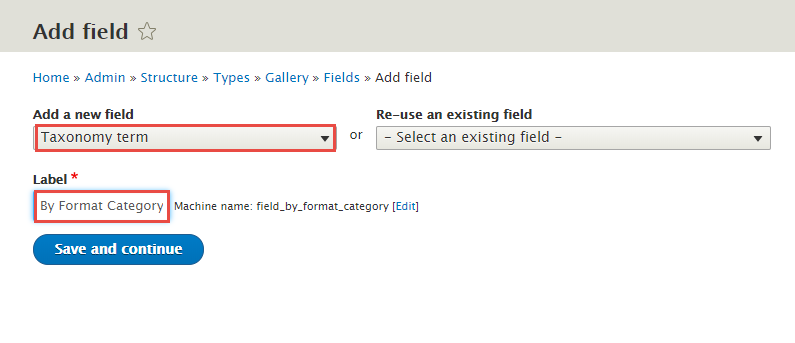
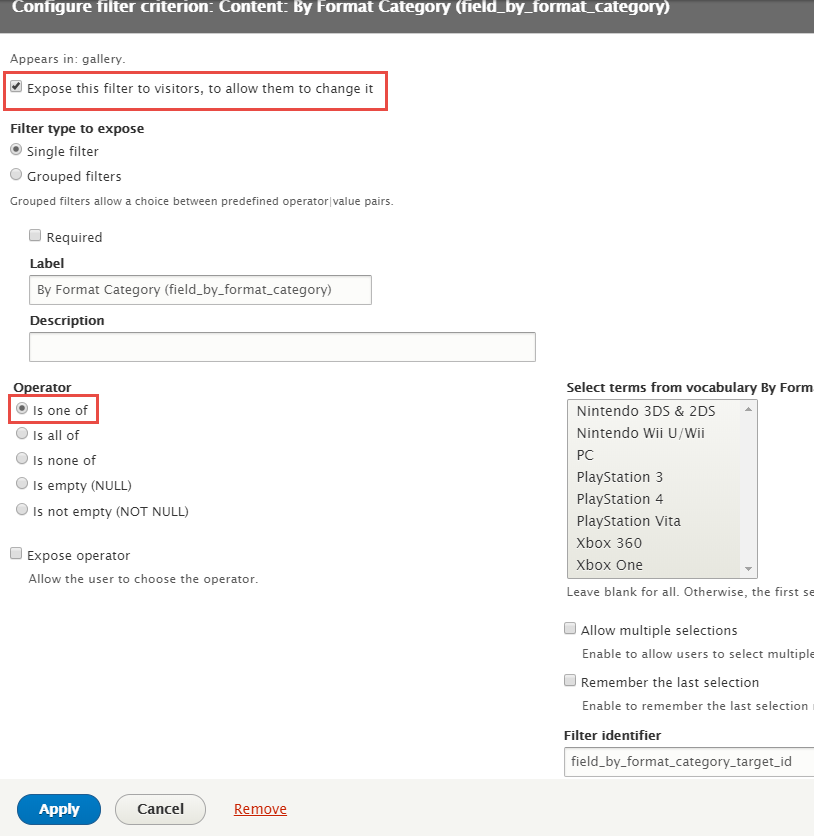
Step 7: Terms of By Format Category:
Step 8: Terms of Game Category:
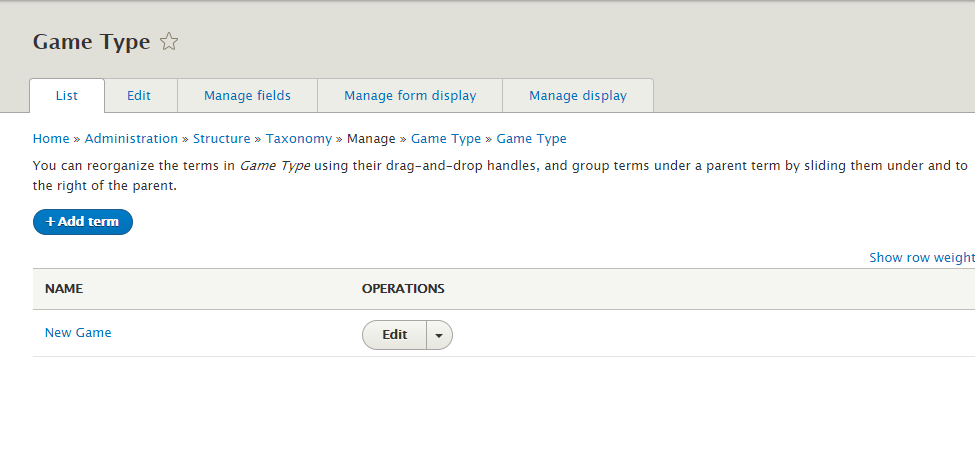
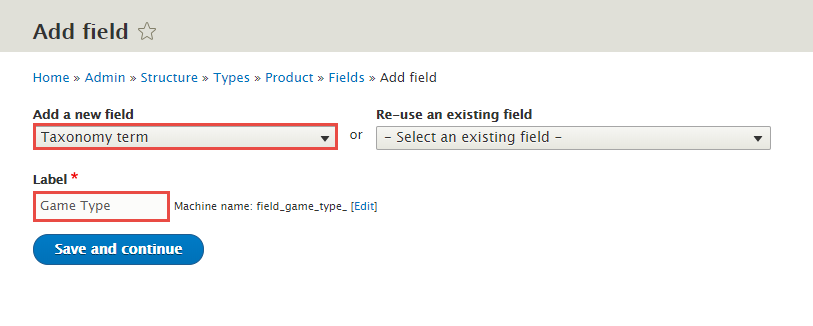
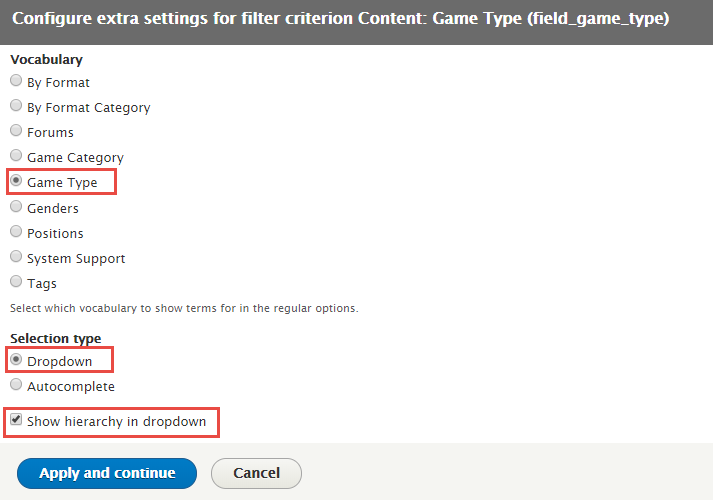
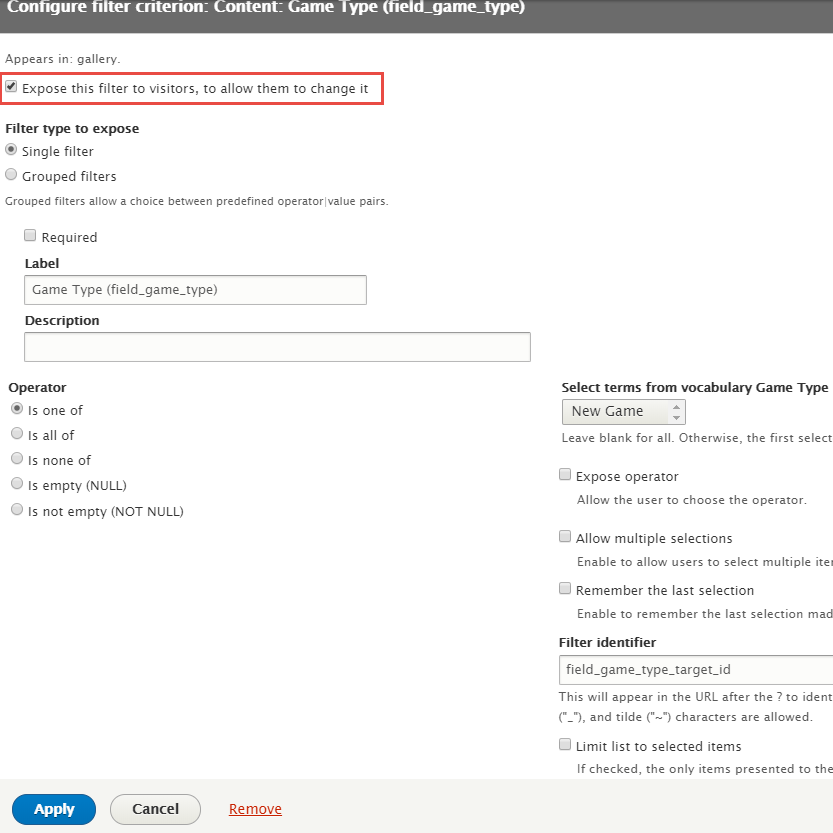
Step 9: Terms of Game Type:
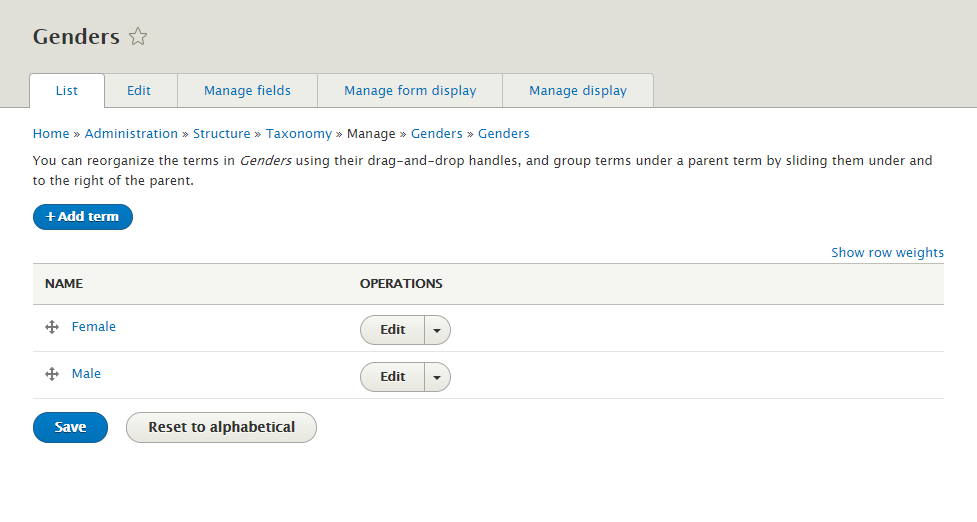
Step 10: Terms of Genders:
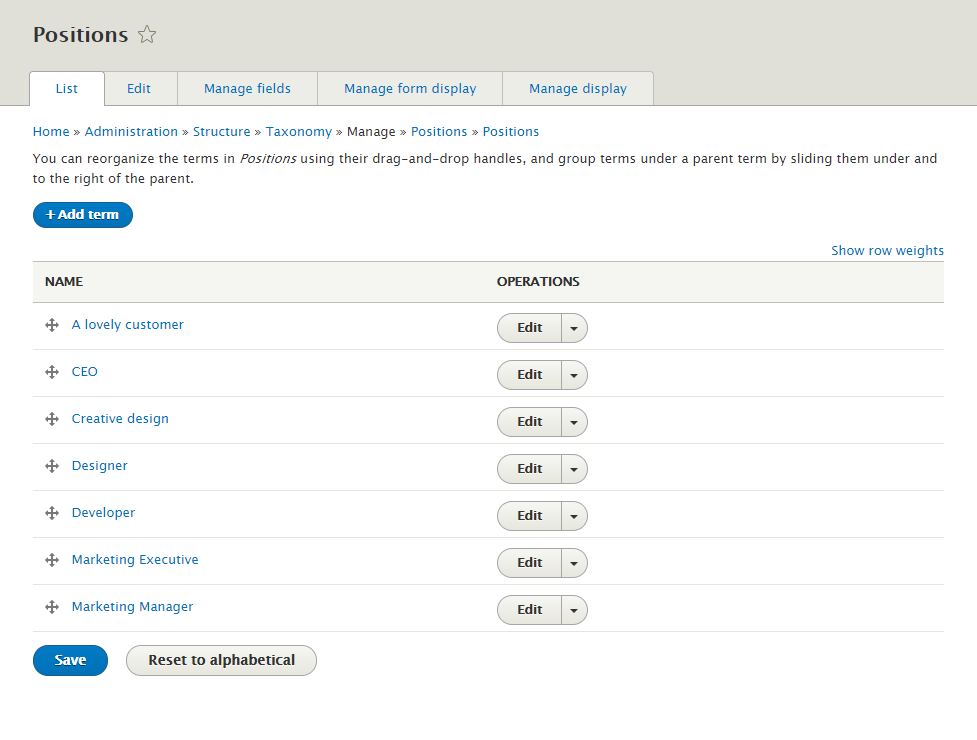
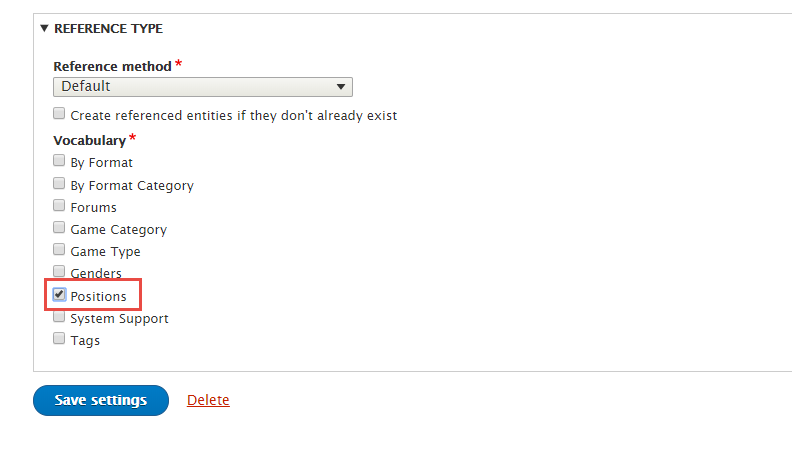
Step 11: Terms of Positions:
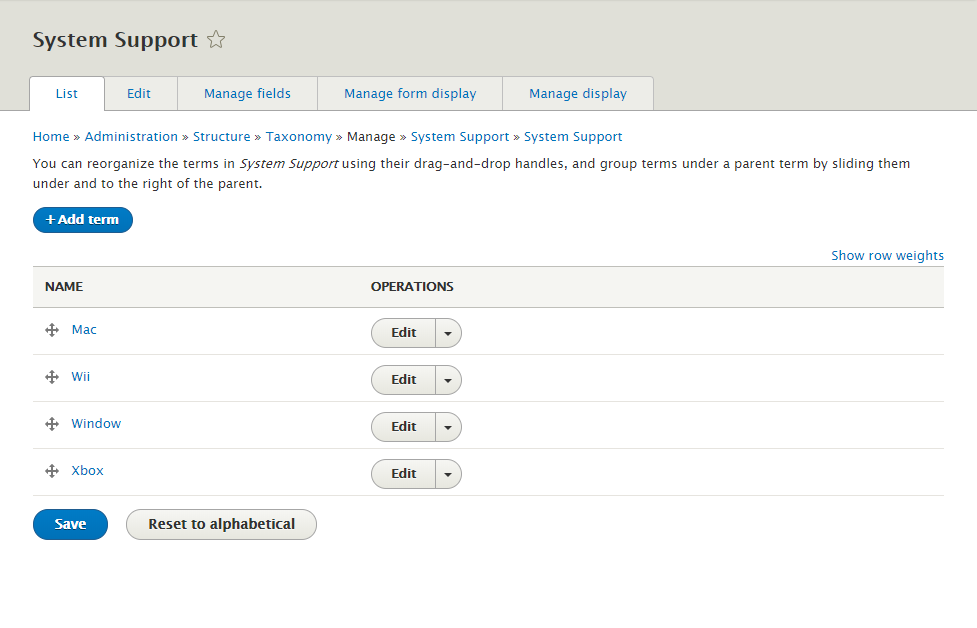
Step 12: Terms of System Support:
Note: See this guide to get more details about taxonomy configuration
Media configuration
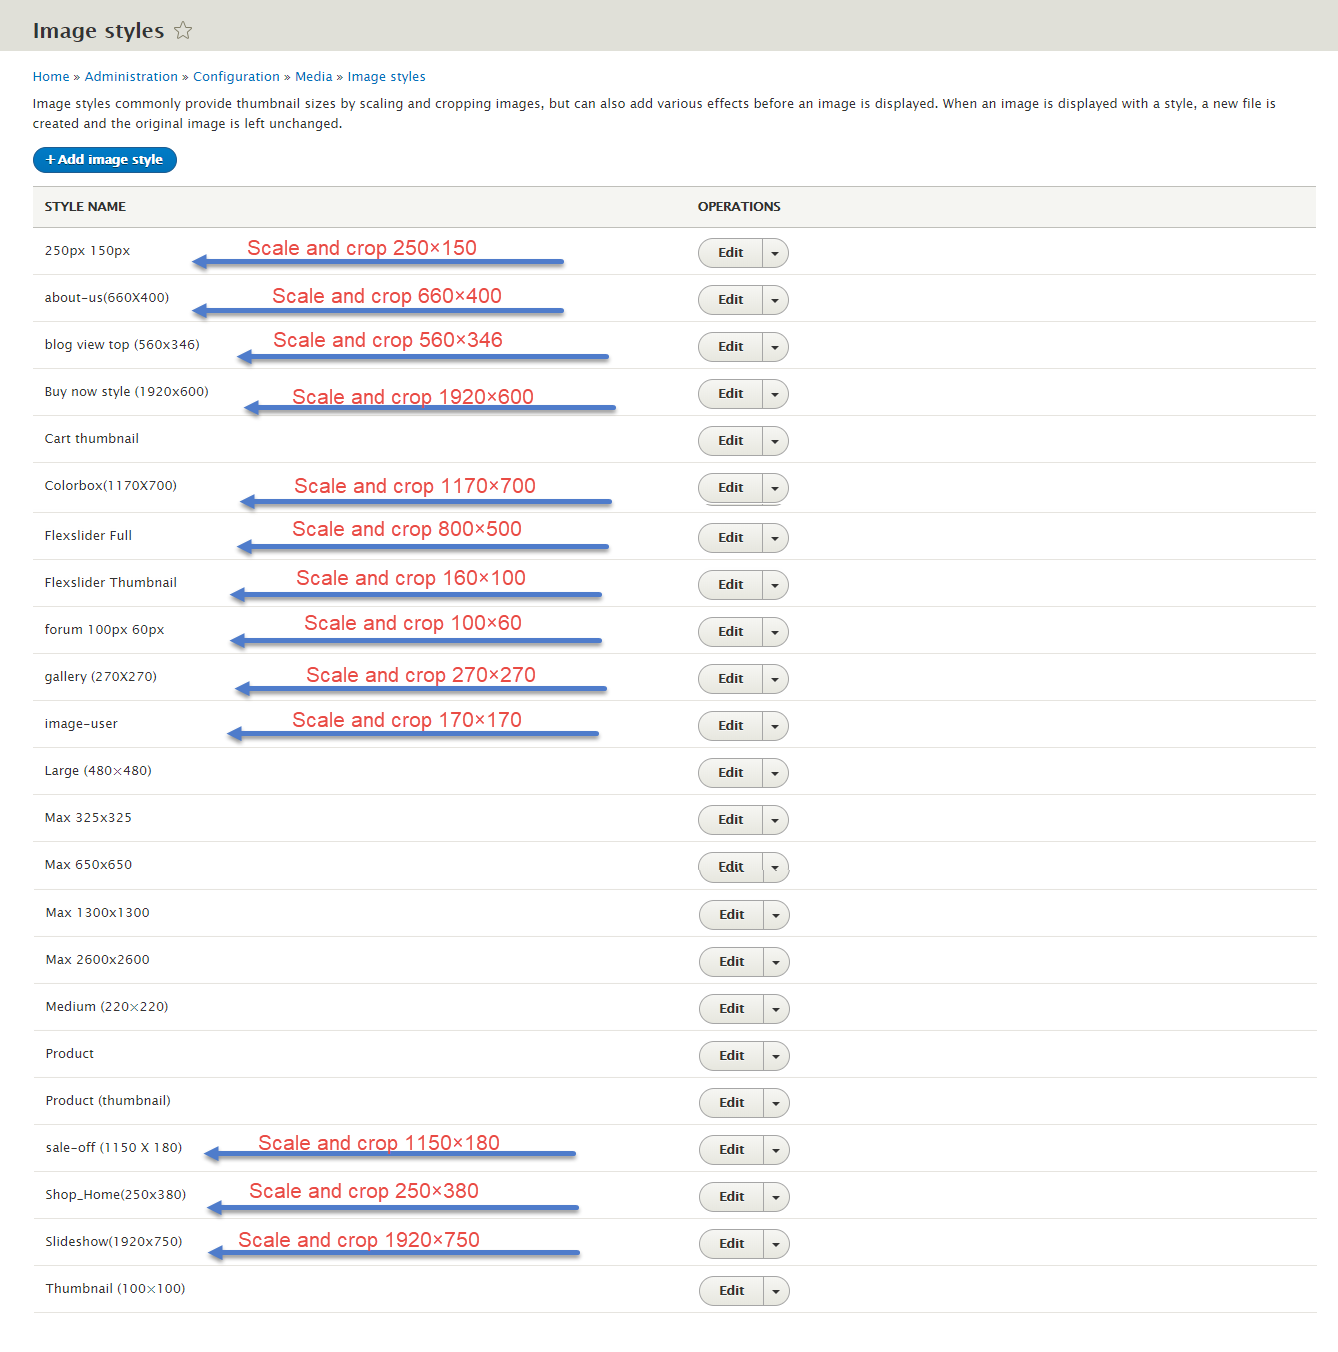
Image Style Configuration
Image styles are the presets of image settings. Image styles are used to define how the images are shown.
Navigate to Configuration, In MEDIA area, click Image styles, then create image styles as the following:
Content Type Configurations
Modify Article type
Step 1: Navigate to Structure > Content Type > Article. In Article, go to Manage fields tab, add following fields:

Step 2: Go to Manage form display tab, set following properties:

Step 3: Go to Manage display tab > Default tab, set following properties:
Step 4: Click Save button
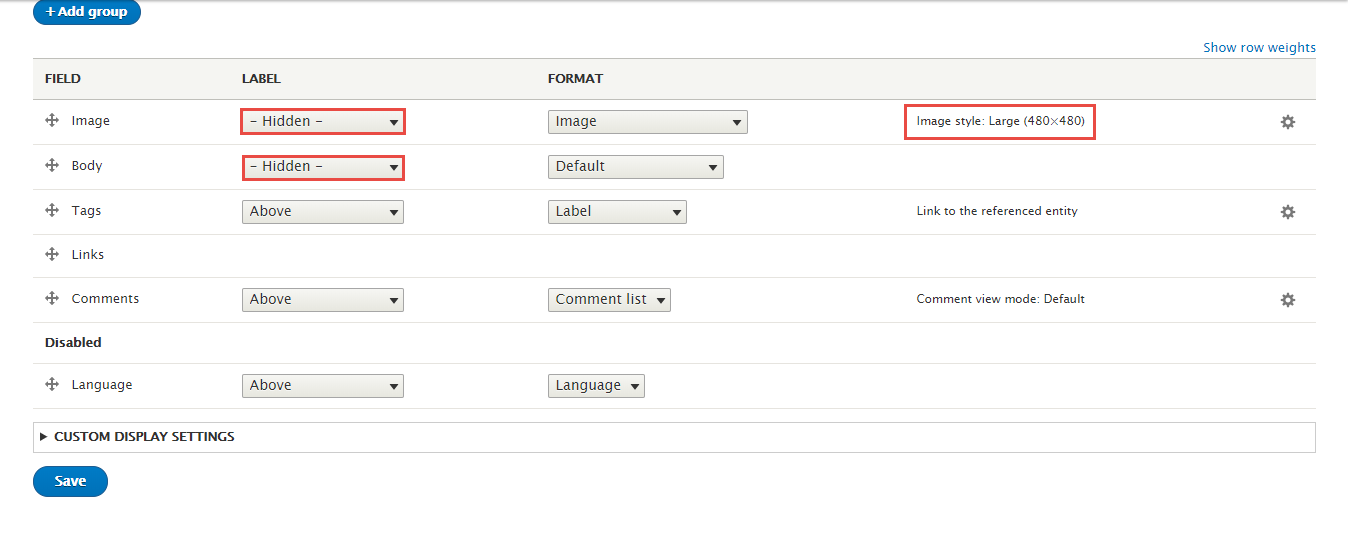
Modify Basic page type
Step 1: Navigate to Structure > Content Type > Basic page.
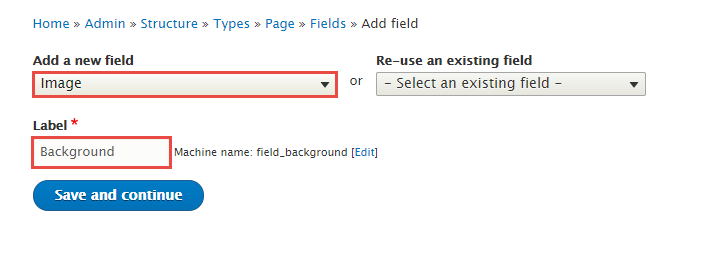
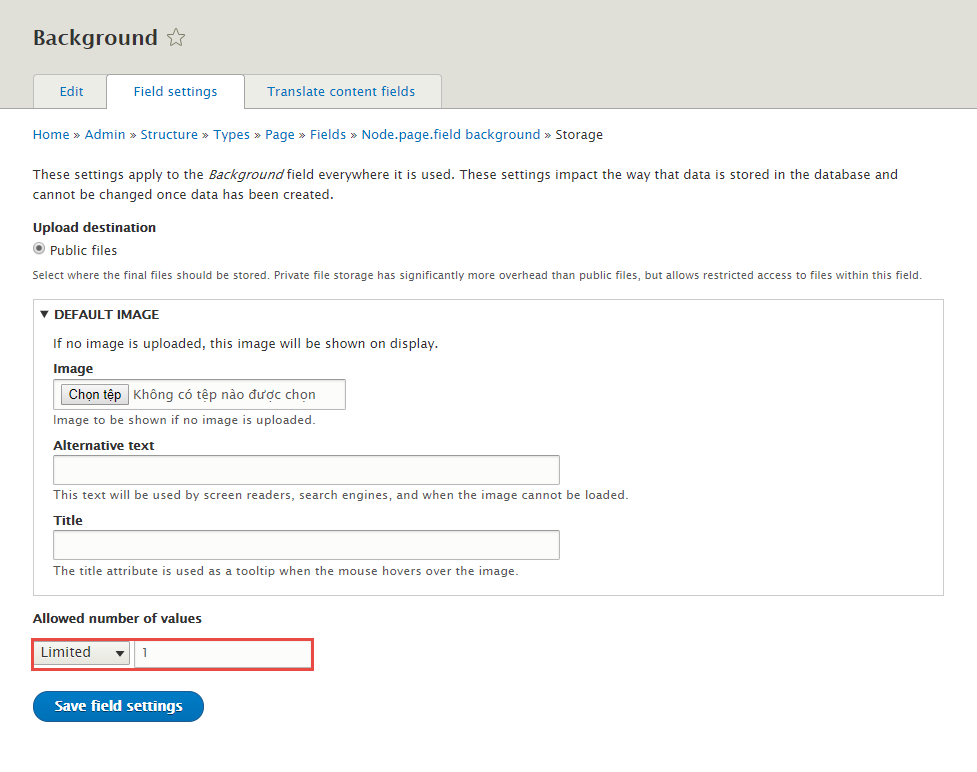
Step 2: Go to Manage fields tab -> Default tab, set following properties:

Step 3: Set properties for Background field
Step 4: Go to Manage form display tab, set following properties:
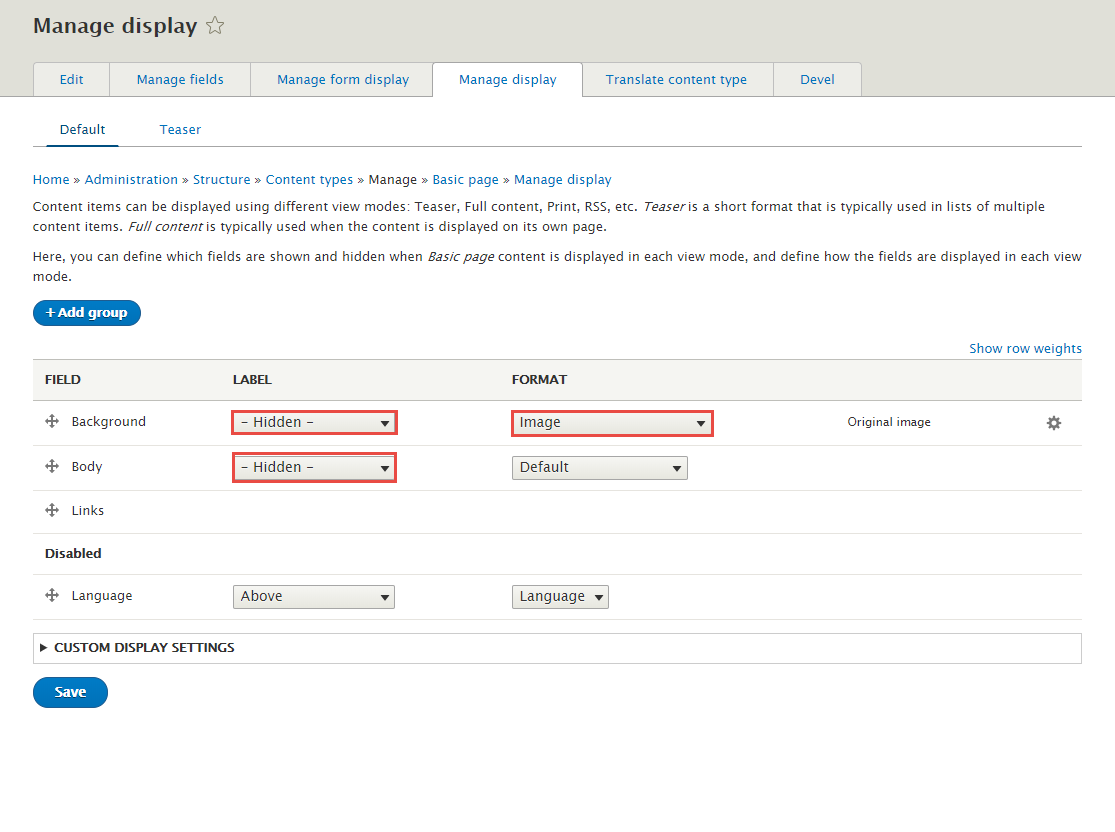
Step 5: Go to Manage display tab > Default tab, set following properties:
Step 6: Click Save button
Create Blog type
Step 1: Navigate to Structure > Content Type
Step 2: Click Add Content Type link to create Blog type
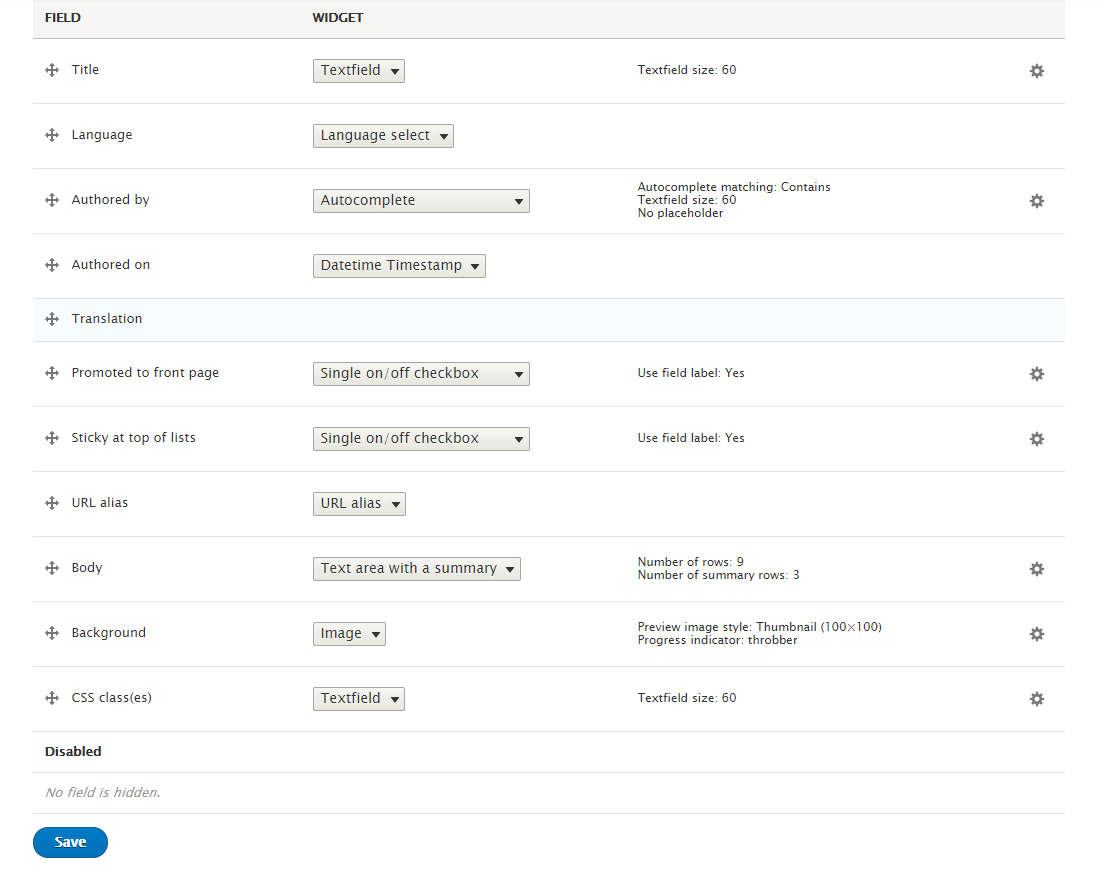
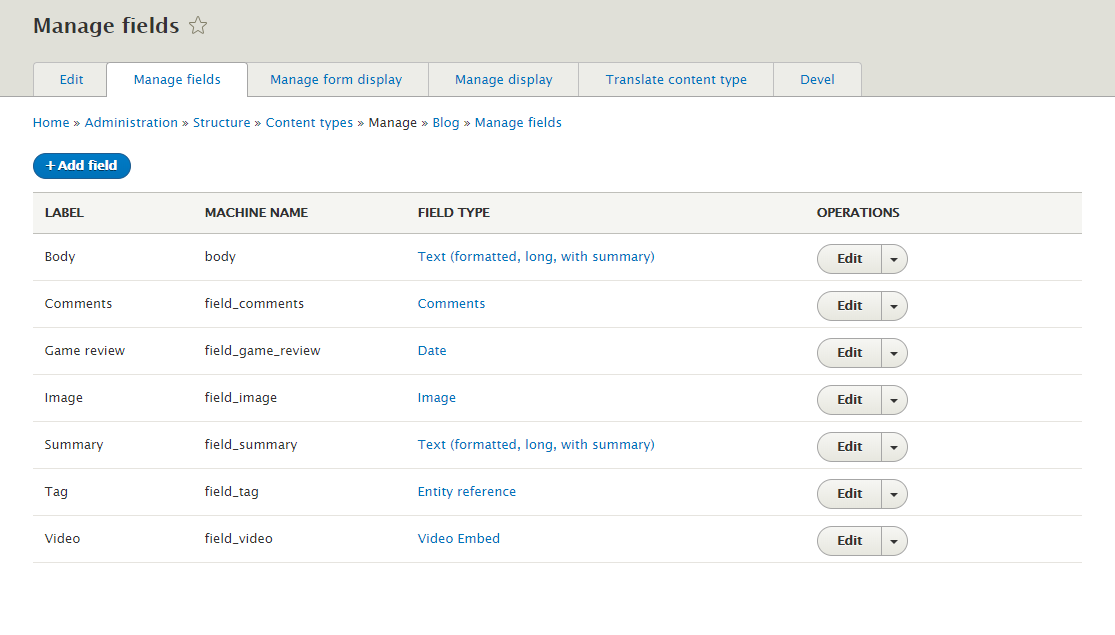
Step 3: Click Save and manage fields button, then add following fields:
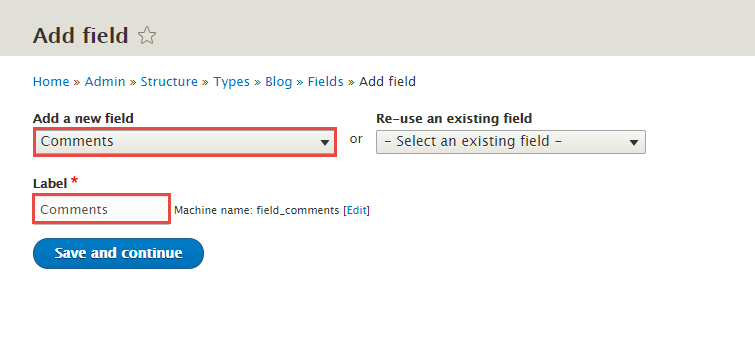
Step 4: Set properties for Comments field
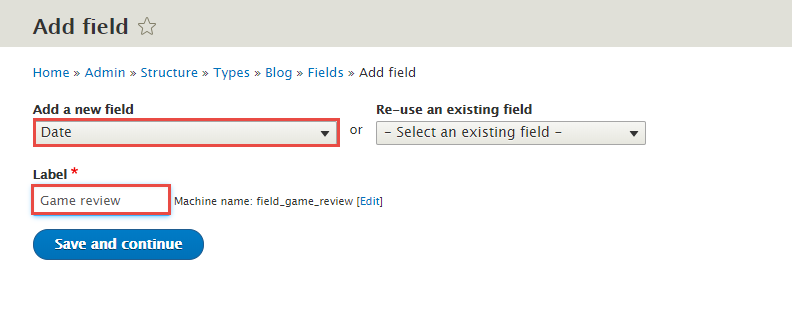
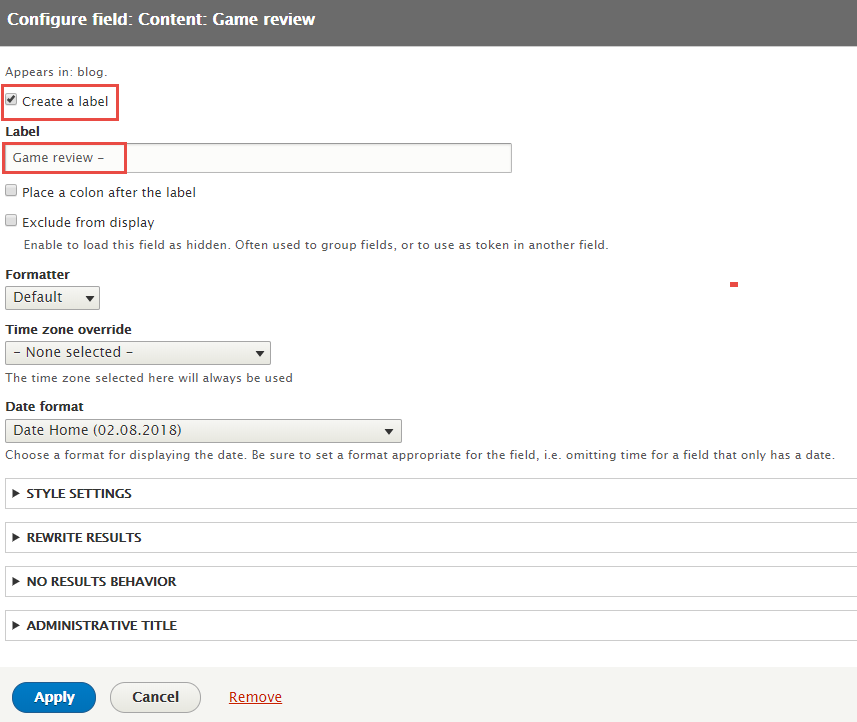
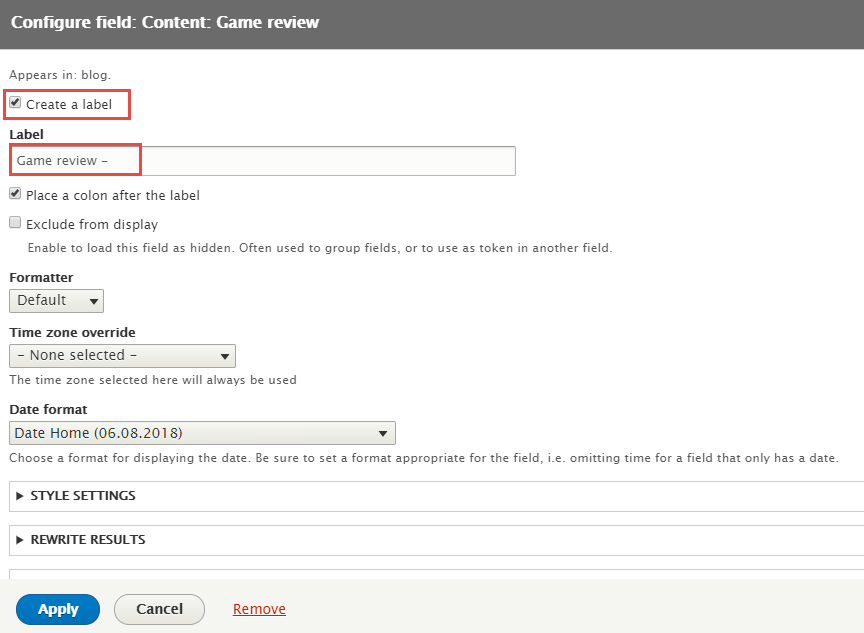
Step 5: Set properties for Game review field
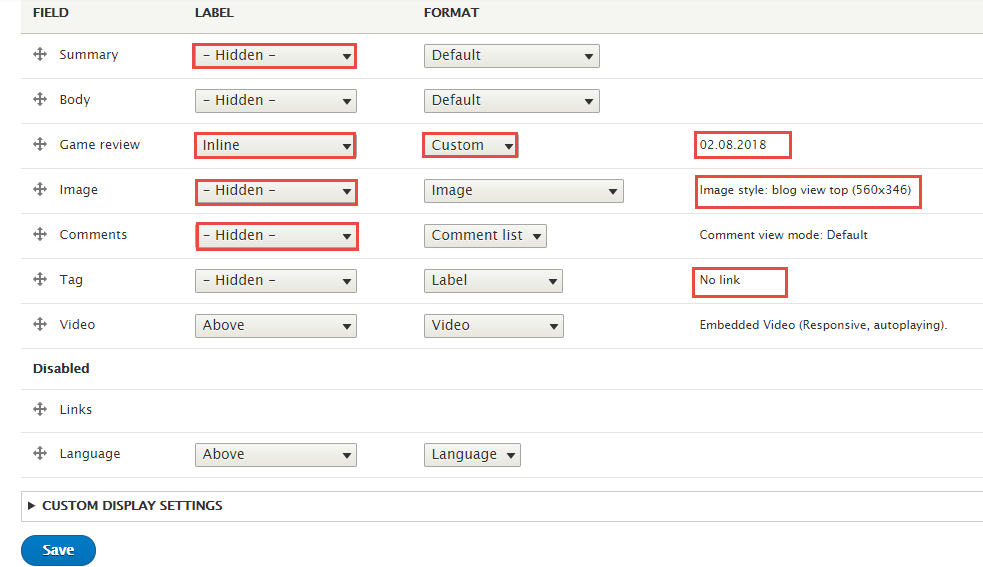
Step 6: Set properties for Image field


Step 7: Set properties for Summary field

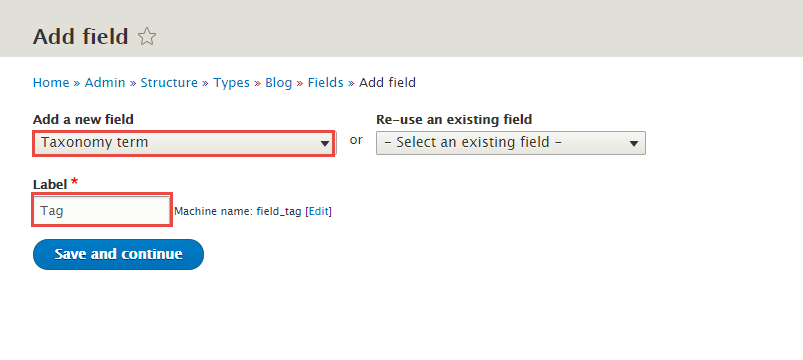
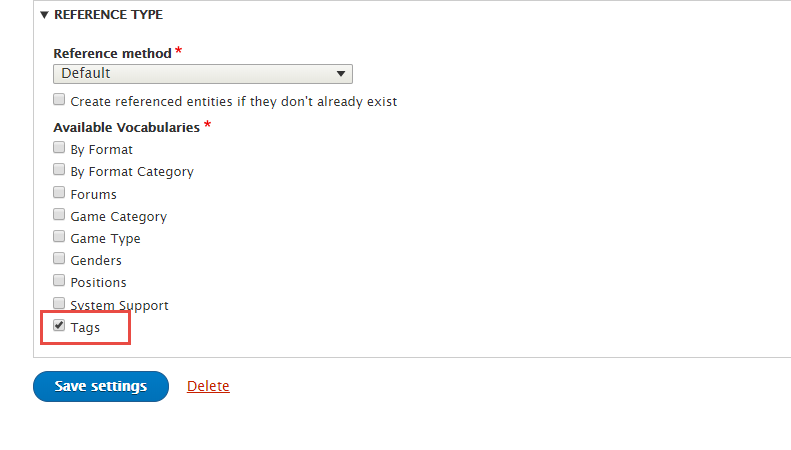
Step 8: Set properties for Tag field
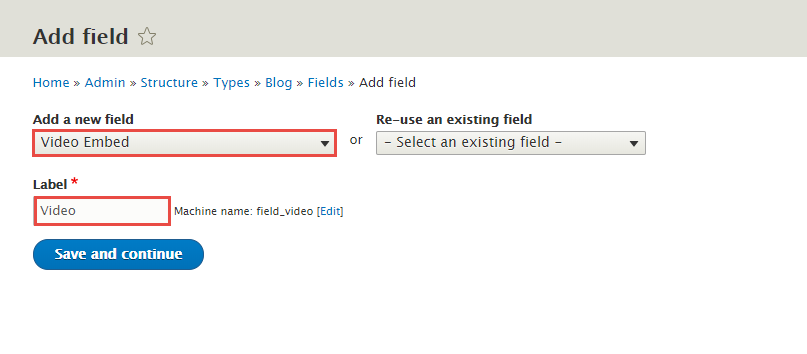
Step 9: Set properties for Video field

Step 10: Go to Manage display tab > Default tab, set following properties:
Step 11: Click Save button
Forum topic type
Step 1: Navigate to Structure > Content Type > Forum topic page. In Forum topic page.
Step 2: Go to Manage fields tab > Default tab, set following properties:

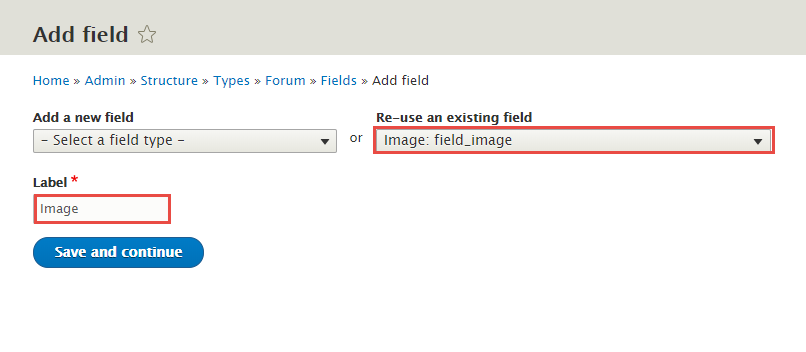
Step 3: Set properties for Image field

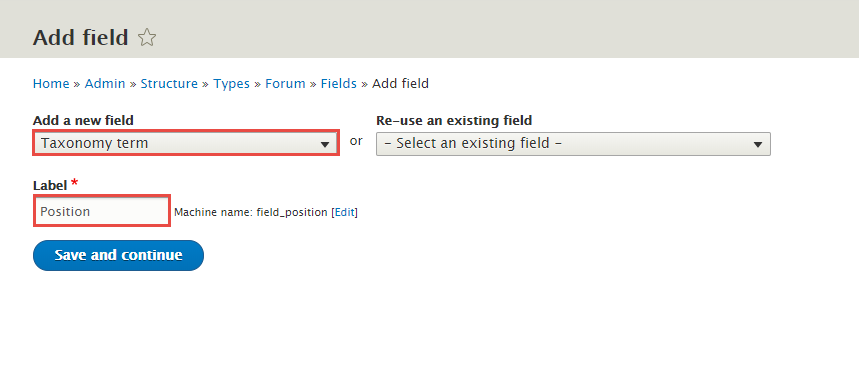
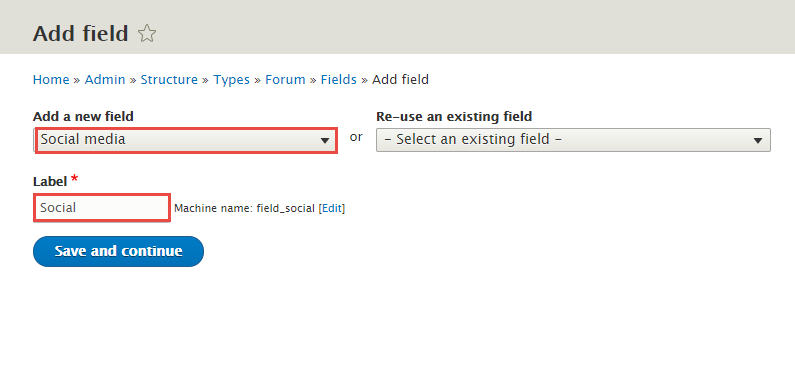
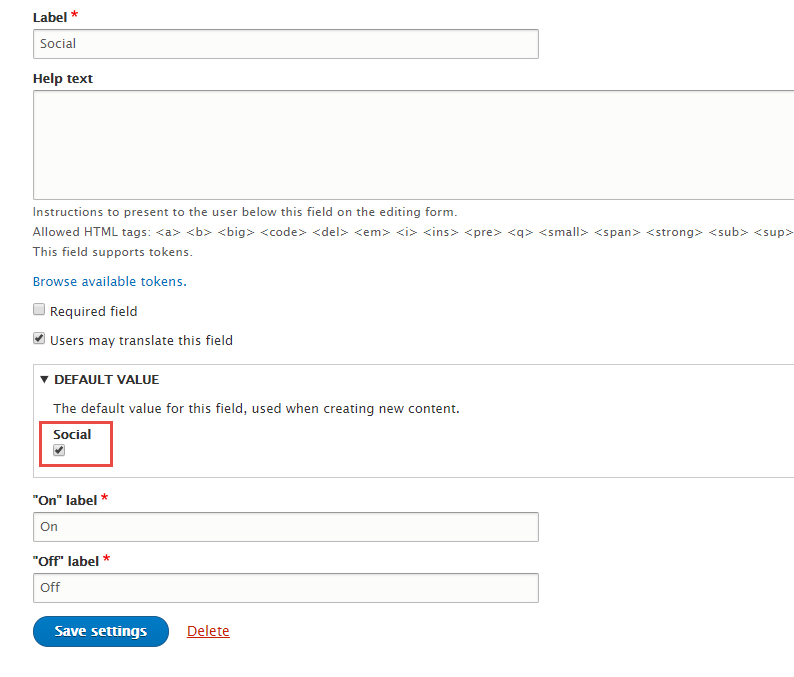
Step 4: Set properties for Position field
Step 5: Set properties for Social field
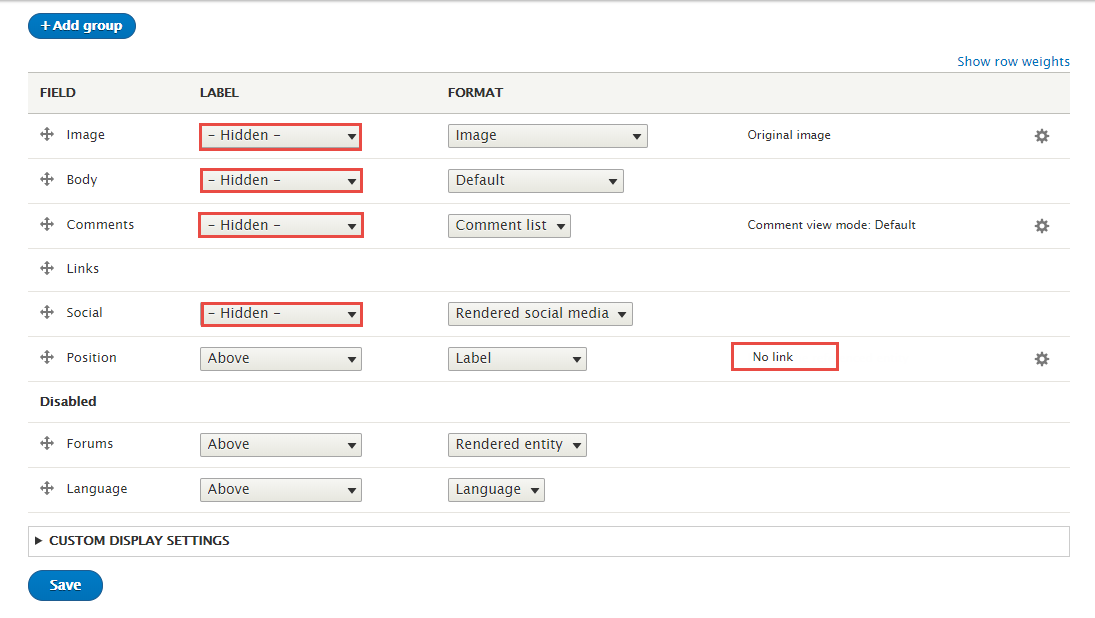
Step 6: Go to Manage display tab > Default tab, set following properties:
Step 7: Click Save button
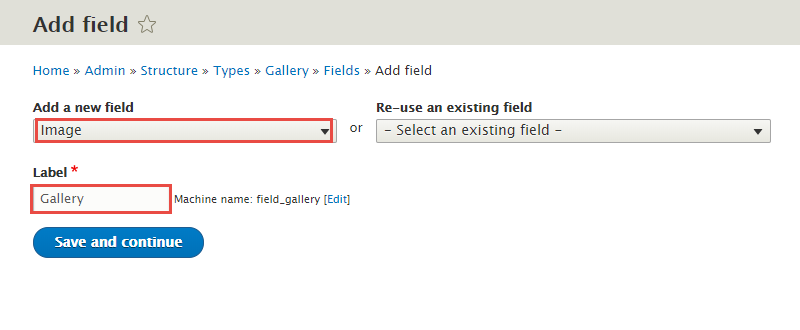
Create Gallery type
Step 1: Navigate to Structure > Content Type
Step 2: Click Add Content Type link to create Gallery type
Step 3: Click Save and manage fields button, then add following fields:
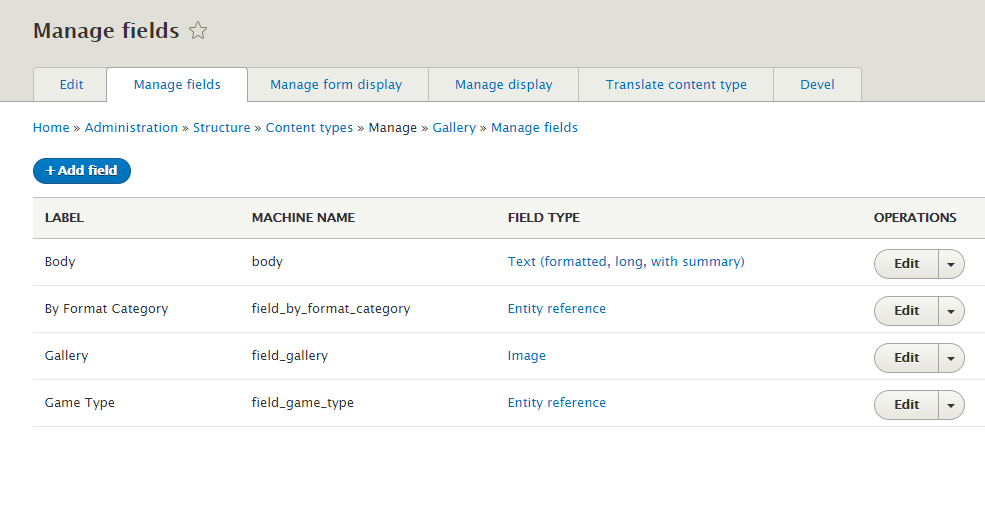
Step 4: Set properties for By Format Category field

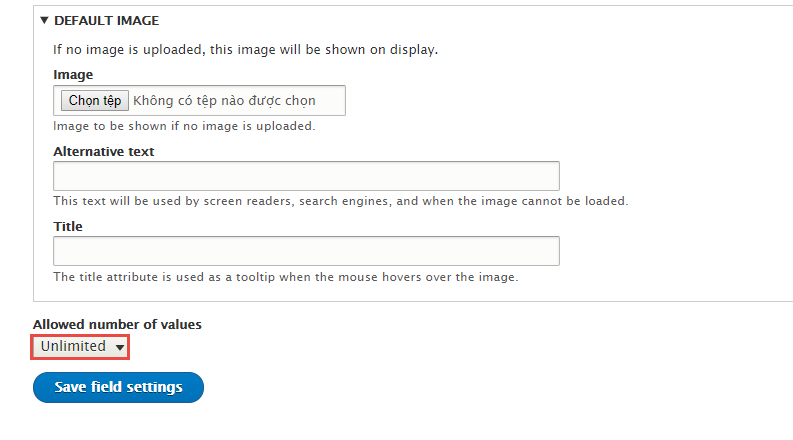
Step 5: Set properties for Gallery field
Step 6: Set properties for Game Type field

Step 7: Go to Manage display tab > Default tab, set following properties:

Step 8: Click Save button
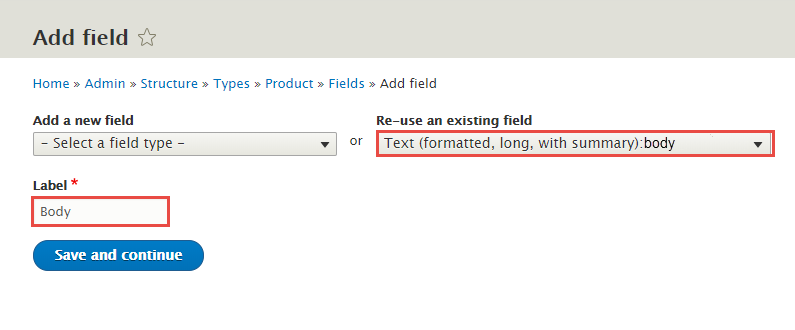
Modify Product type
Step 1: Navigate to Structure > Content Type > Product page.
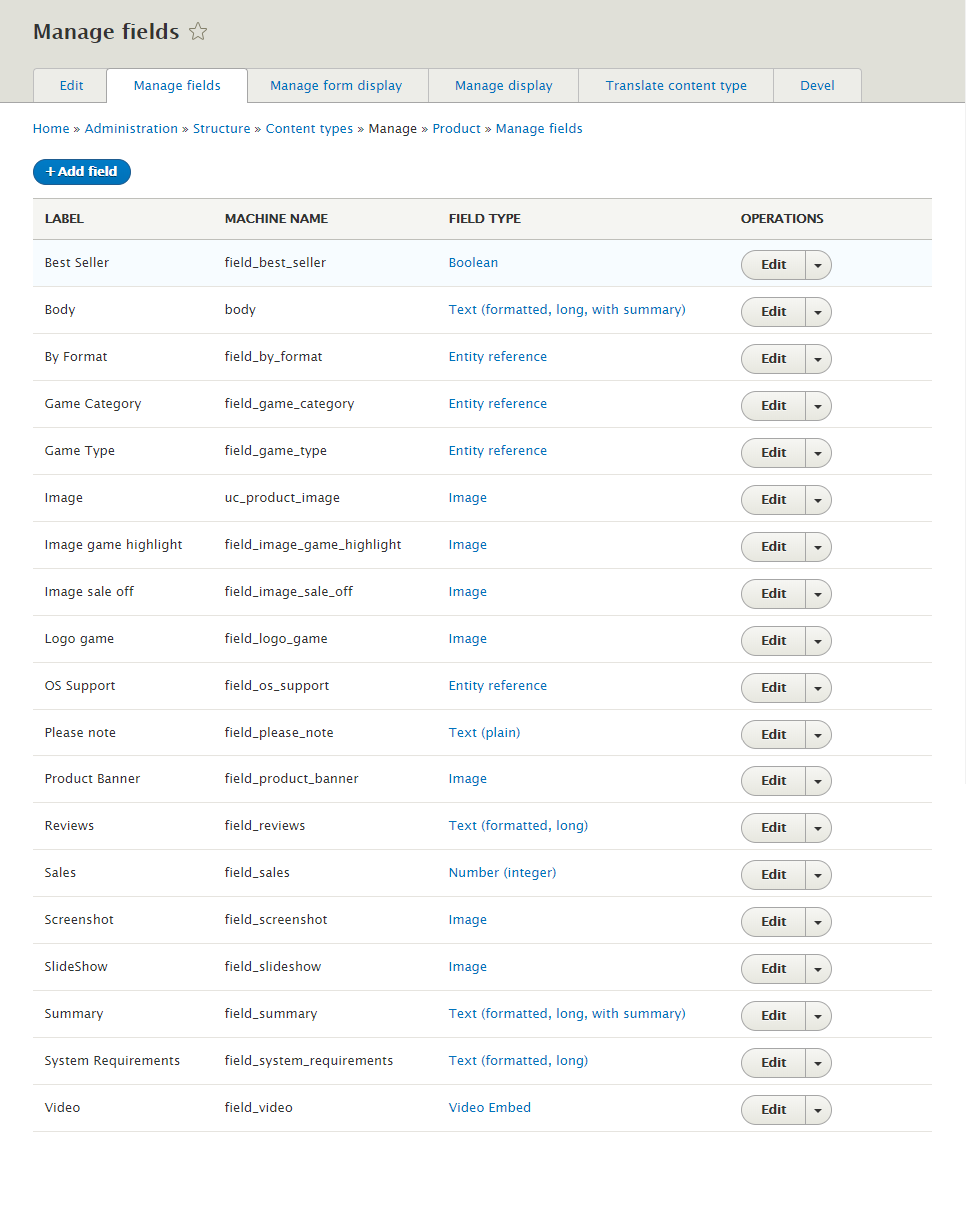
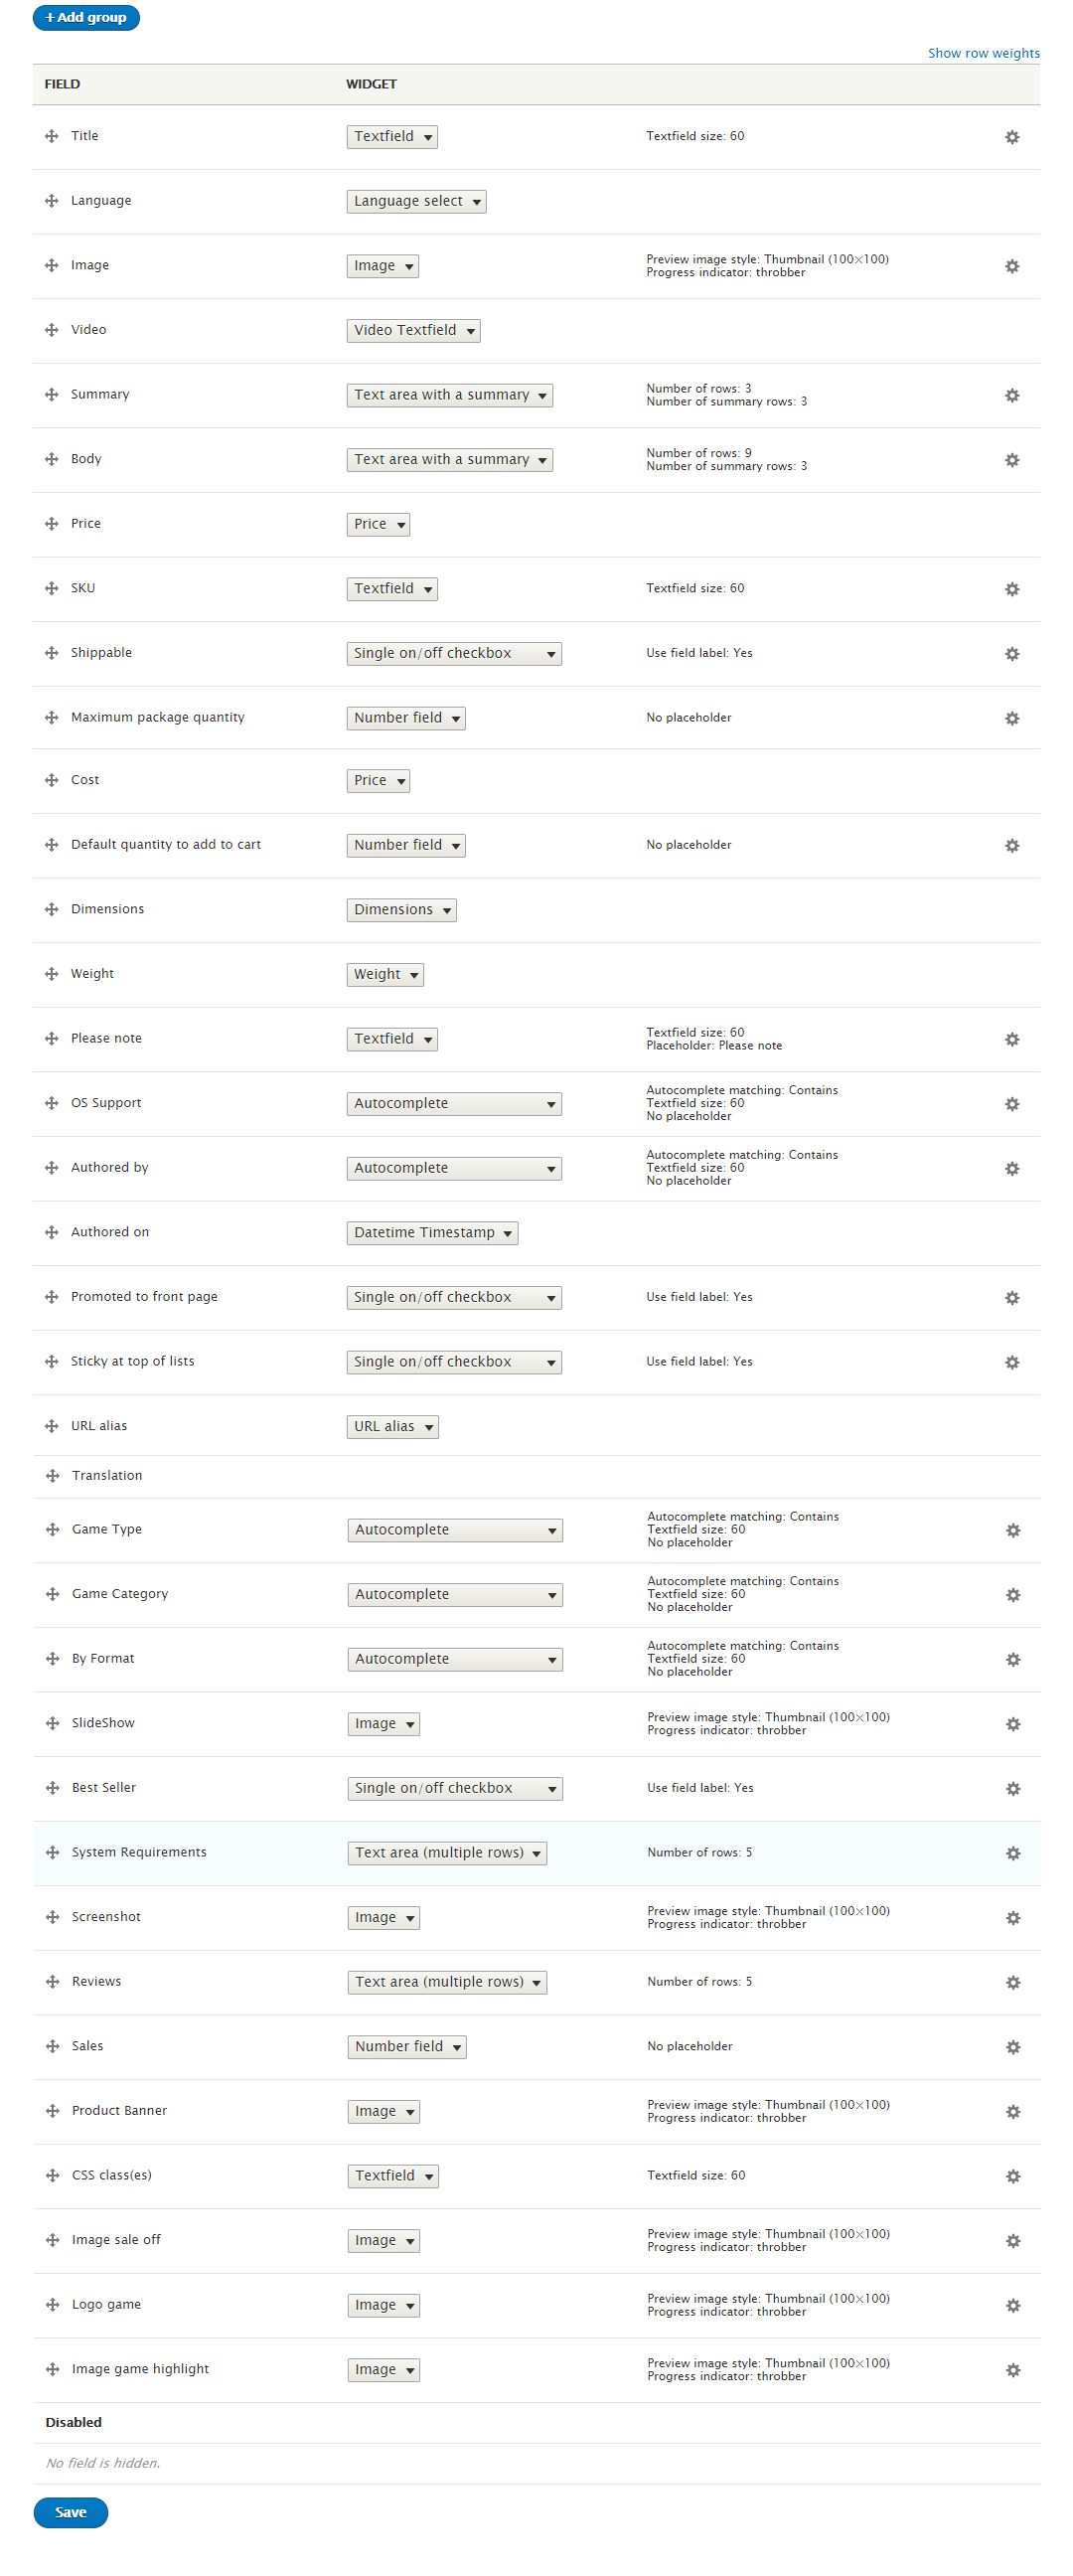
Step 2: Go to Manage fields tab > Default tab, set following properties:
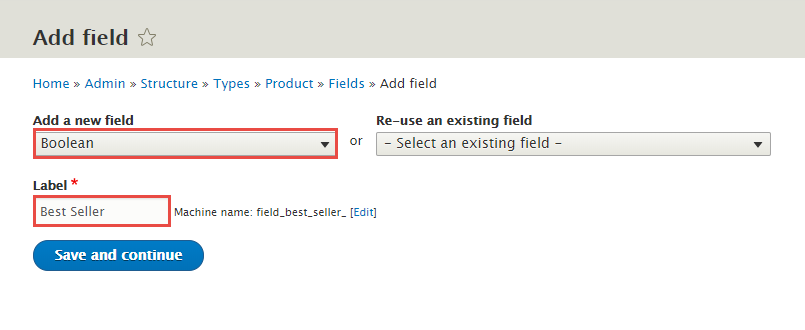
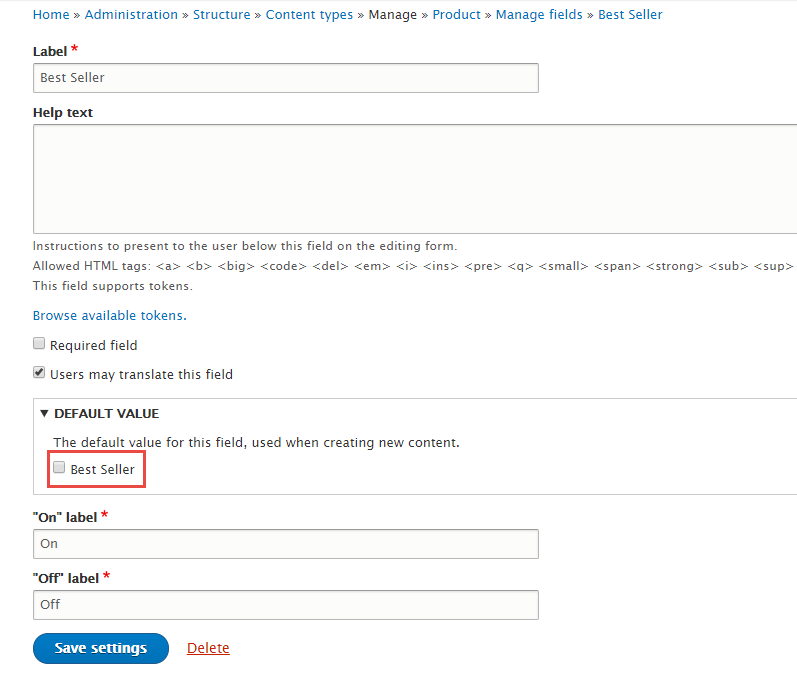
Step 3: Set properties for Best Seller field
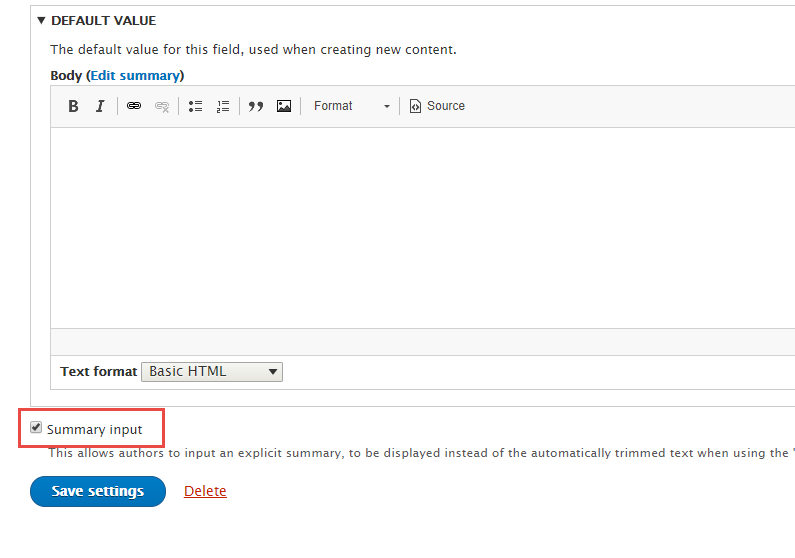
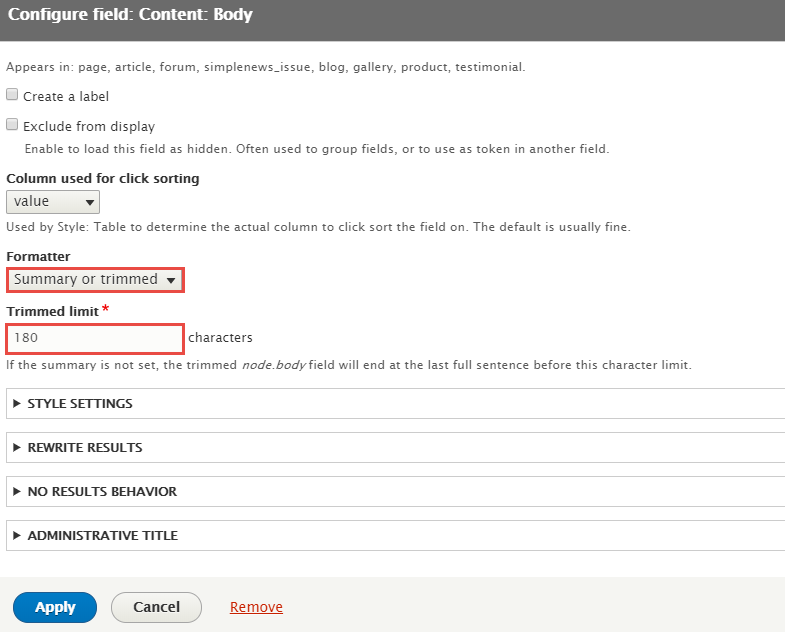
Step 4: Set properties for Body field
Step 5: Set properties for By format field

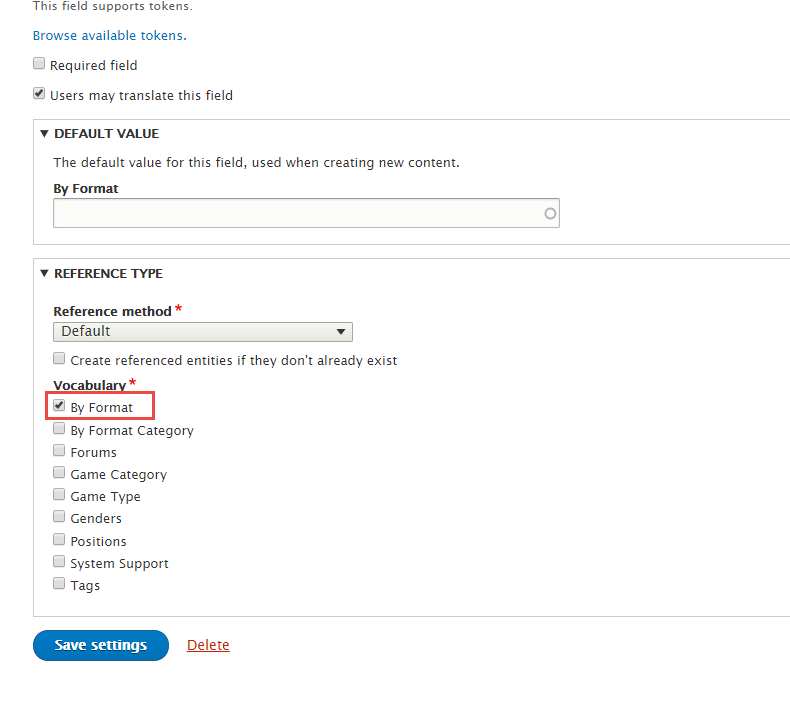
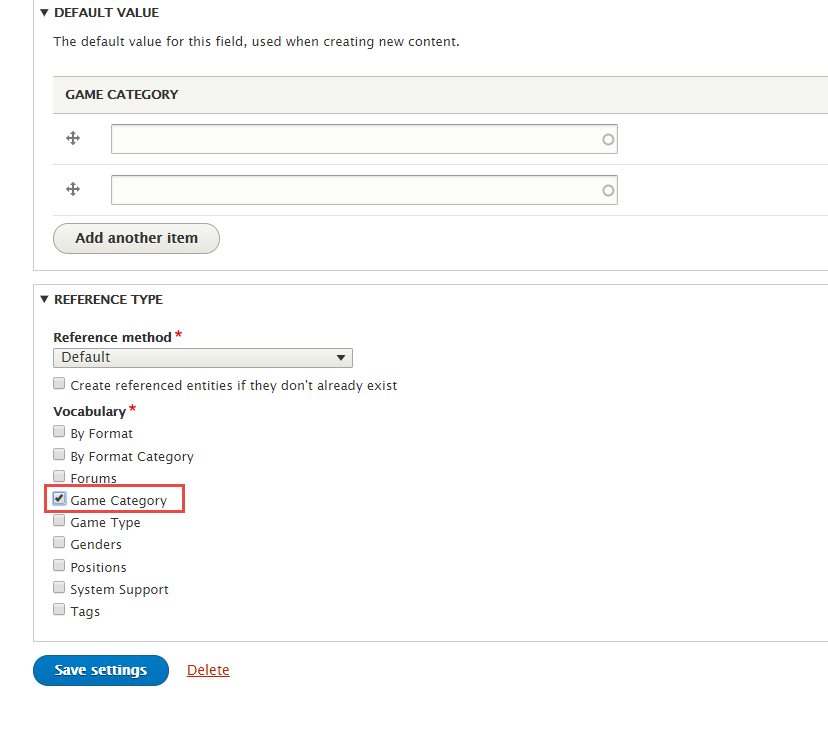
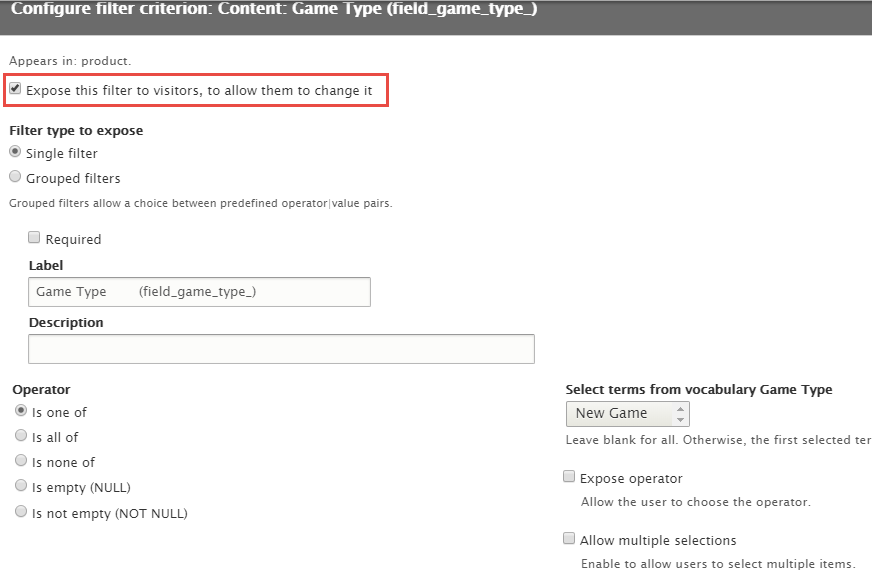
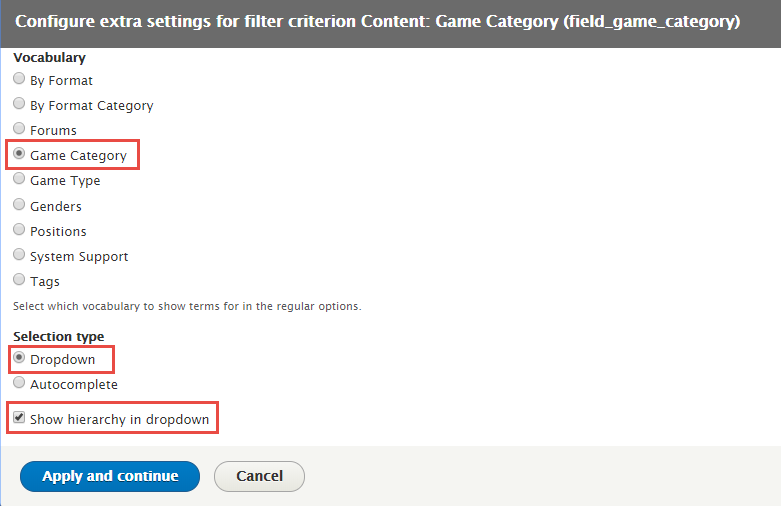
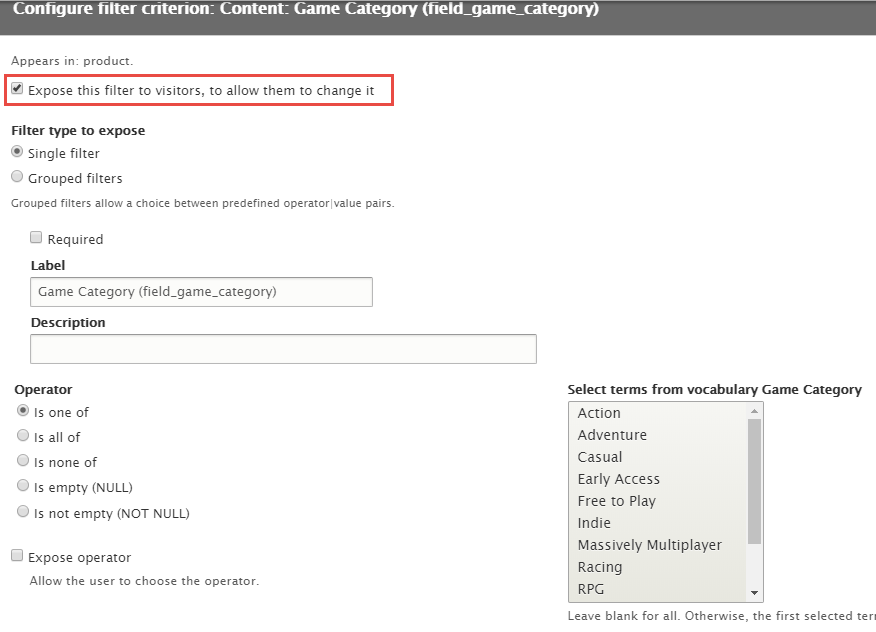
Step 6: Set properties for Game Category field

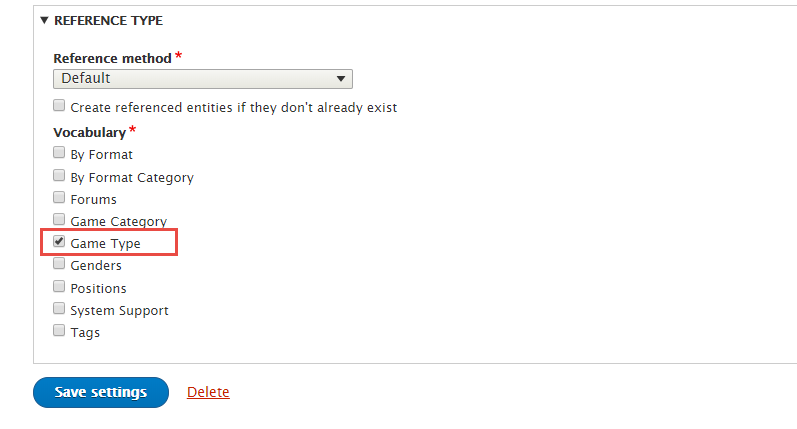
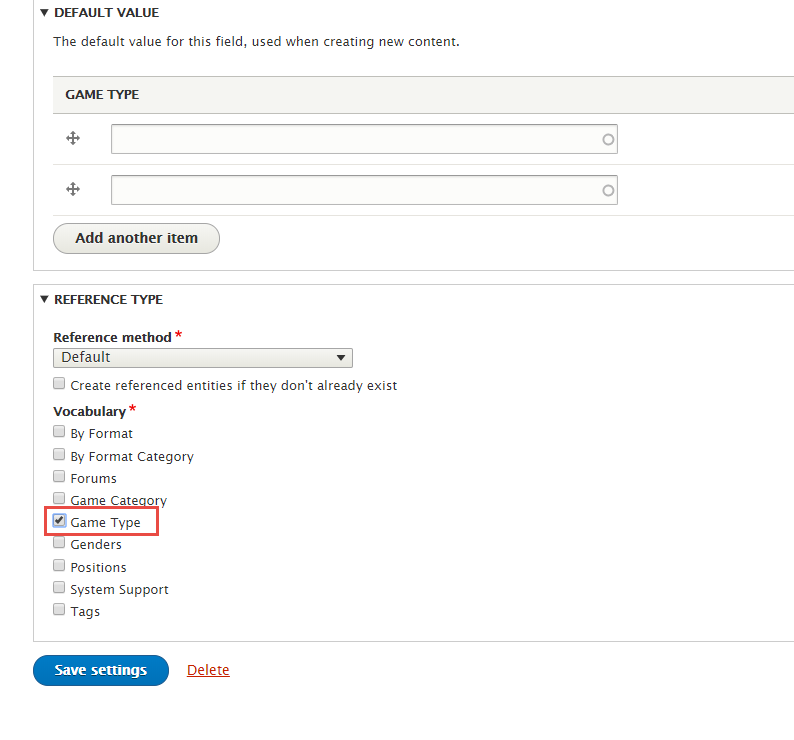
Step 7: Set properties for Game Type field
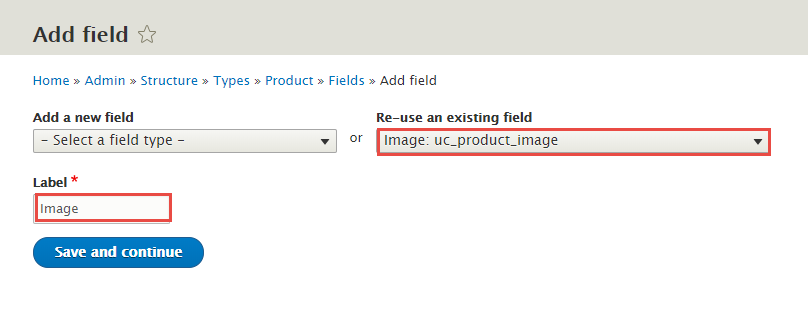
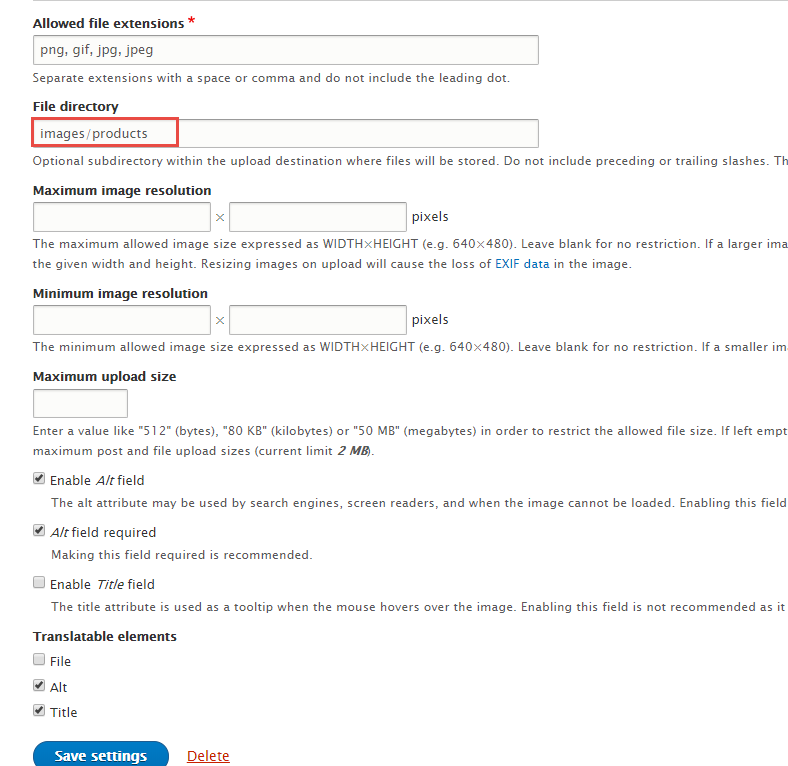
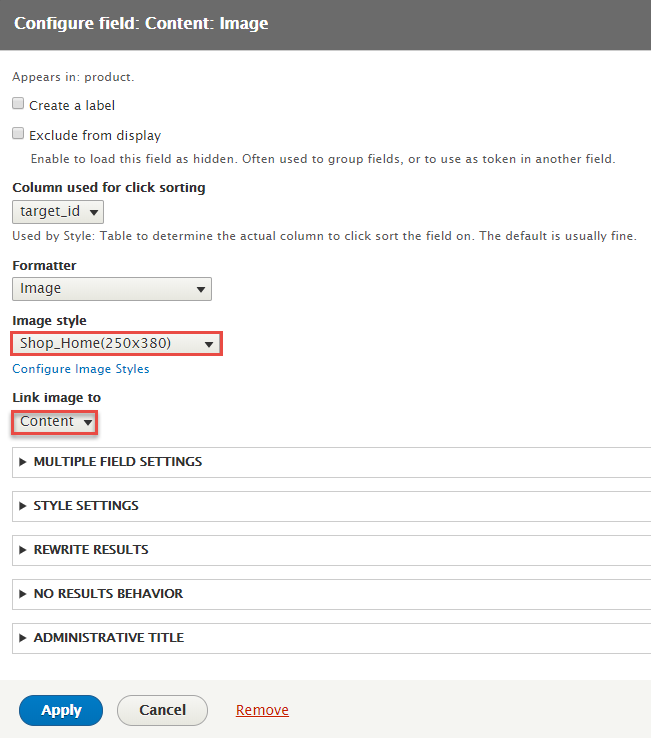
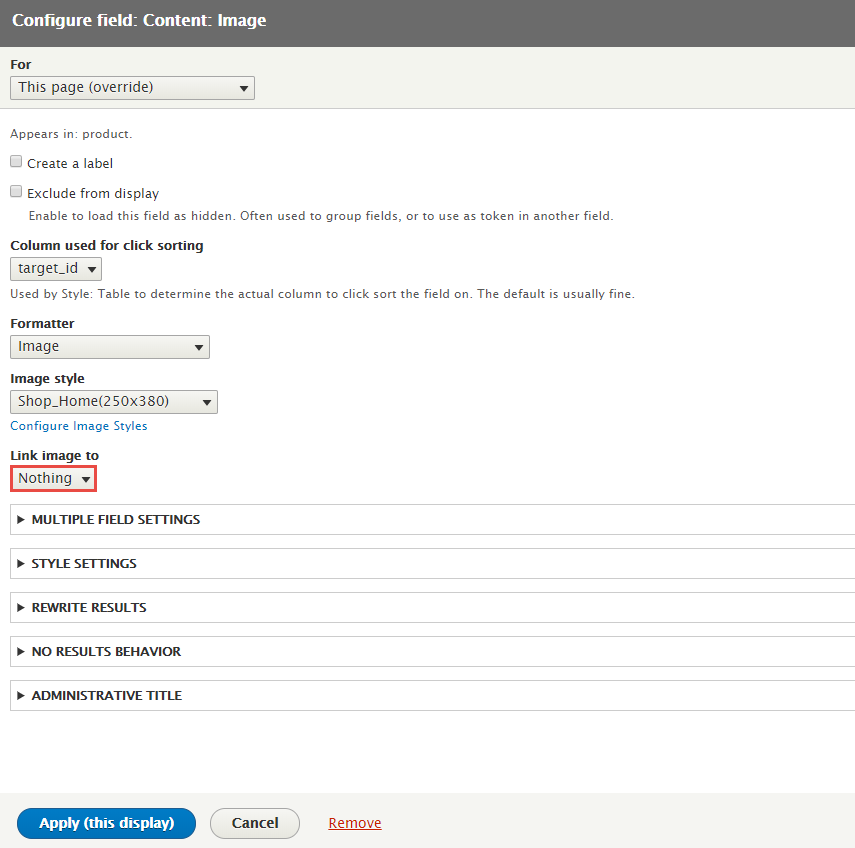
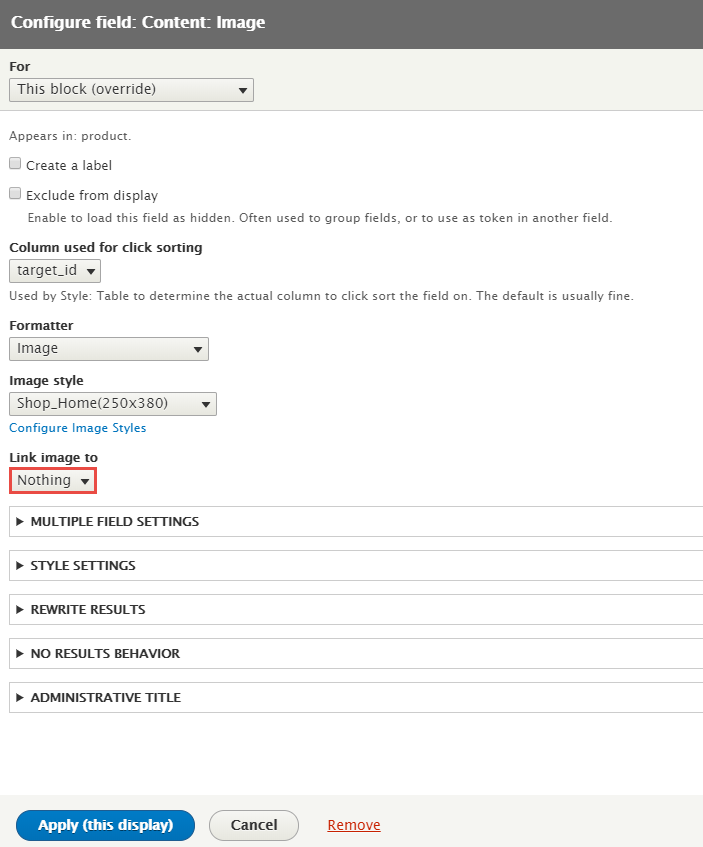
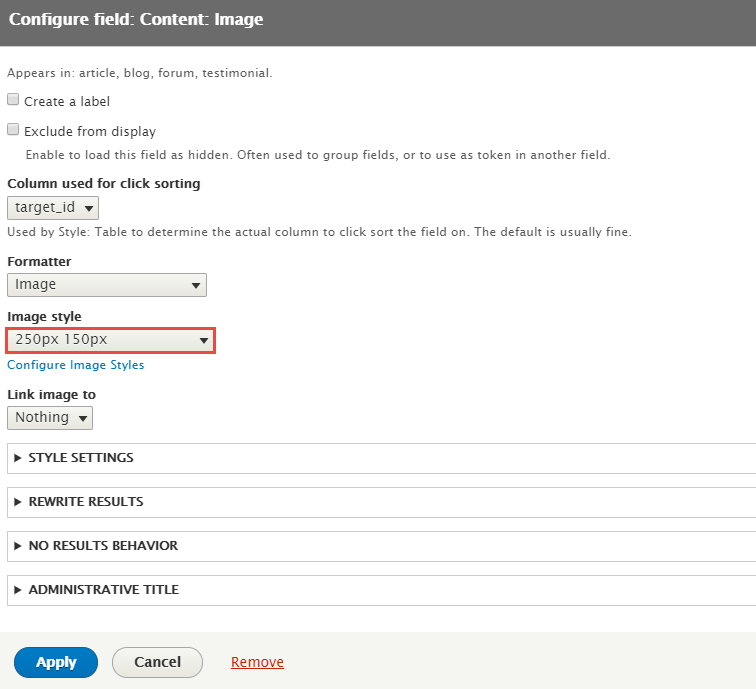
Step 8: Set properties for Image field
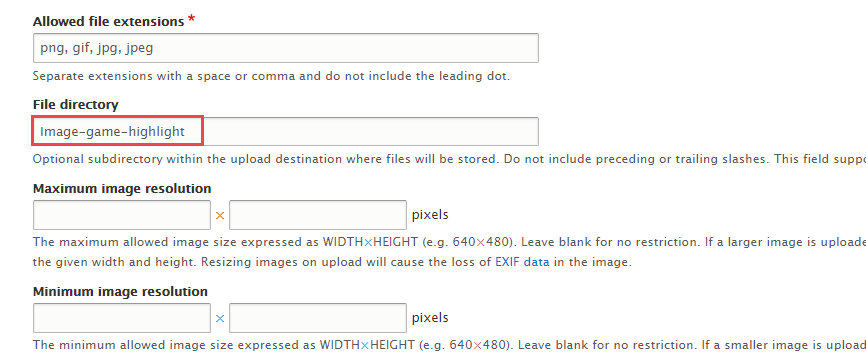
Step 9: Set properties for Image game highlight field

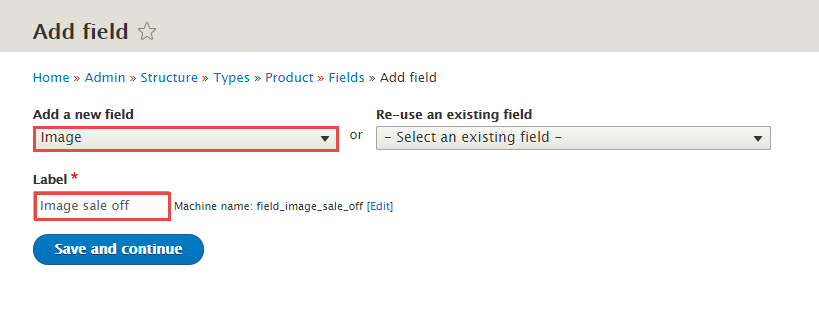
Step 10: Set properties for Image sale off field
Step 11: Set properties for Logo game field
![]()
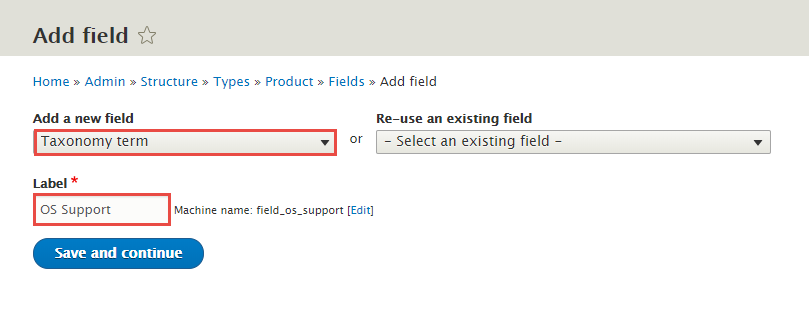
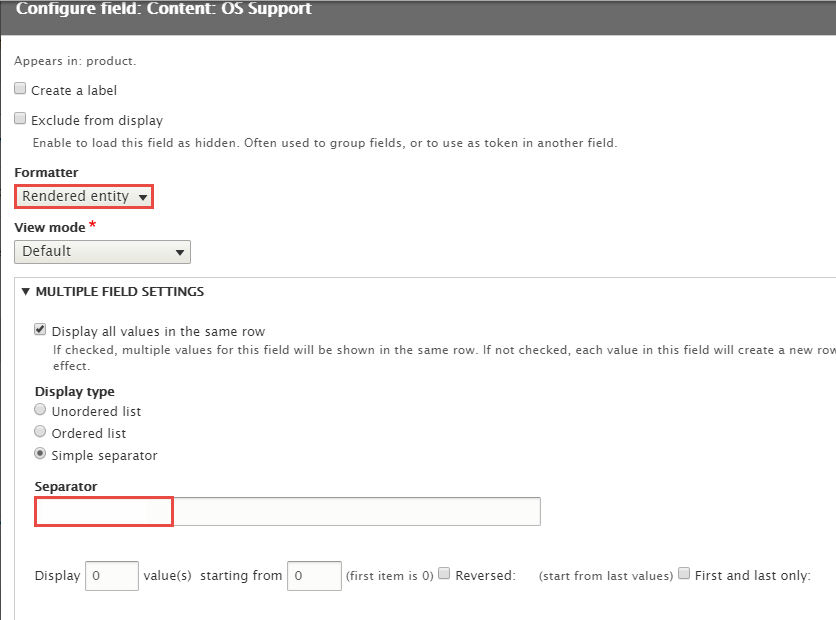
Step 12: Set properties for OS Support field

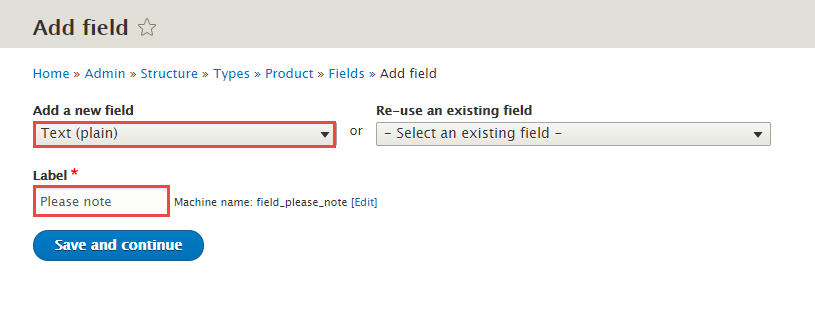
Step 13: Set properties for Please note field
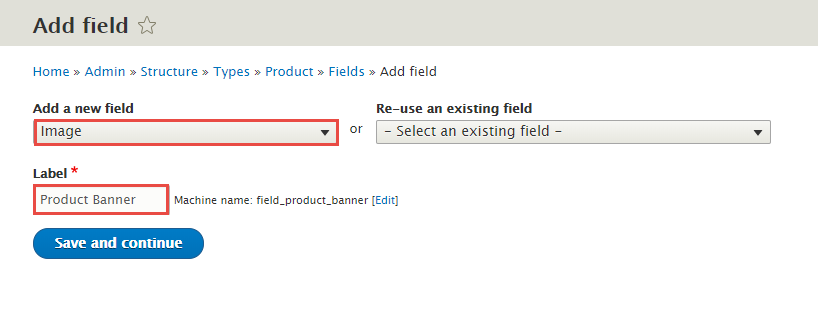
Step 14: Set properties for Product Banner field

Step 15: Set properties for Reviews field

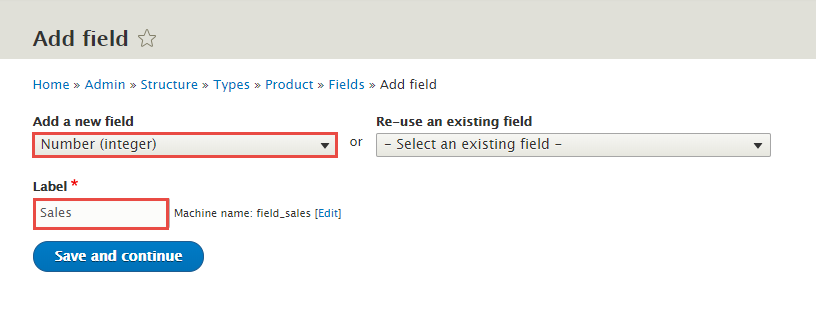
Step 16: Set properties for Sales field
Step 17: Set properties for Screenshot field


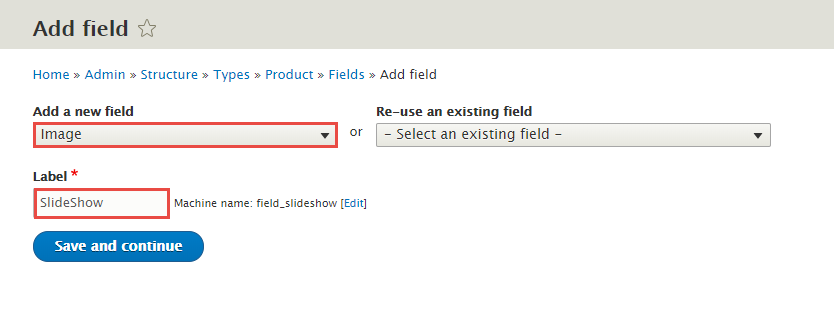
Step 18: Set properties for Slideshow field
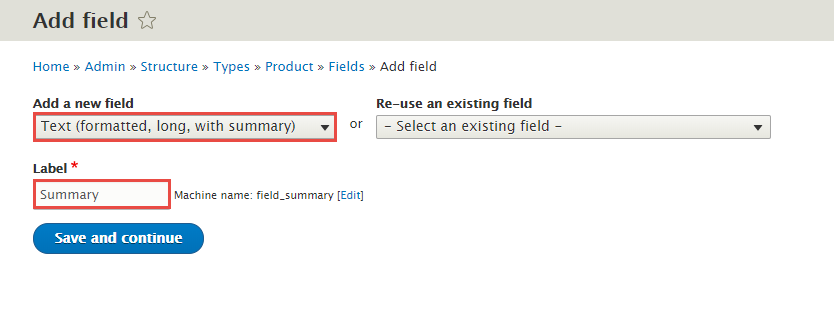
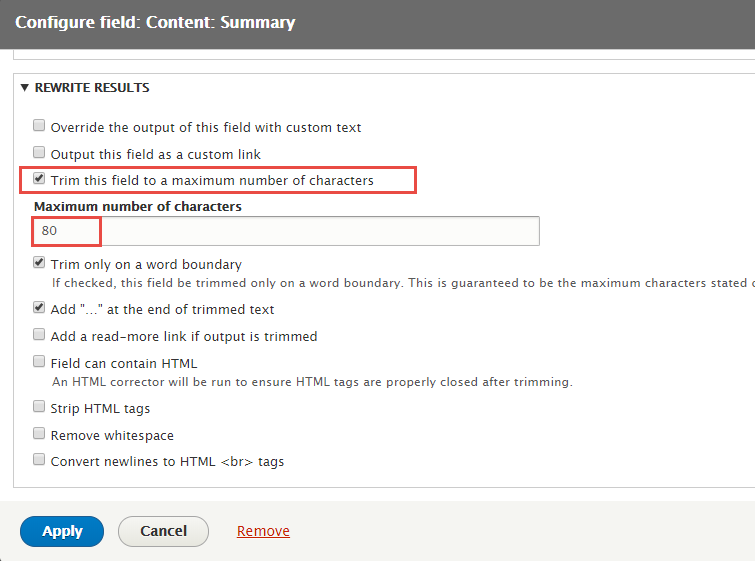
Step 19: Set properties for Summary field
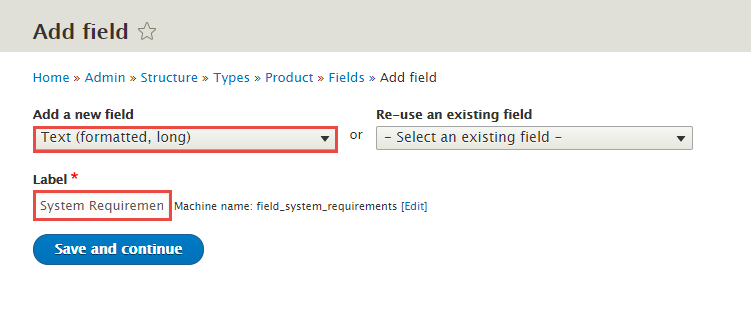
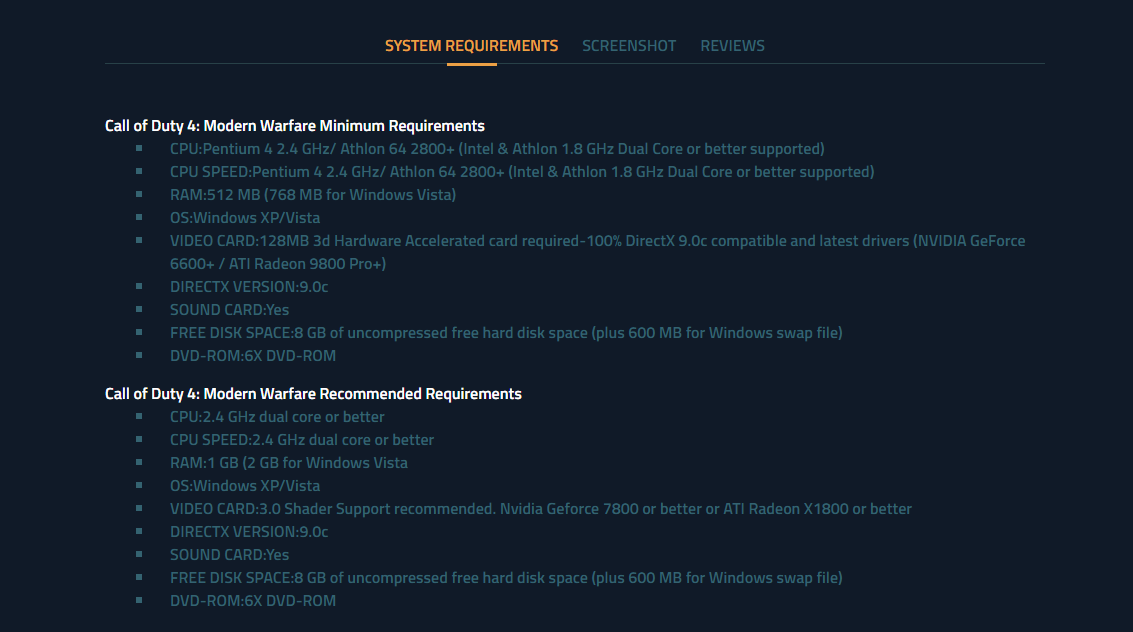
Step 20: Set properties for System Requirements field
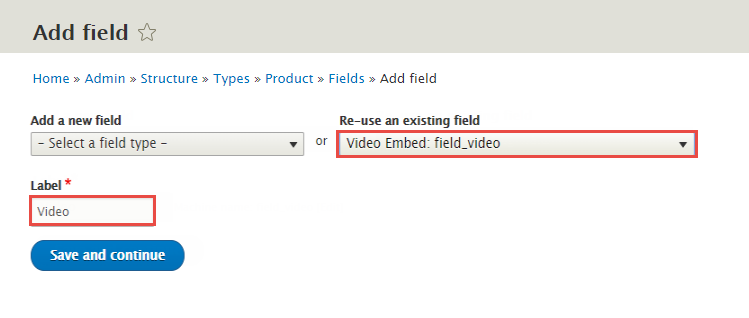
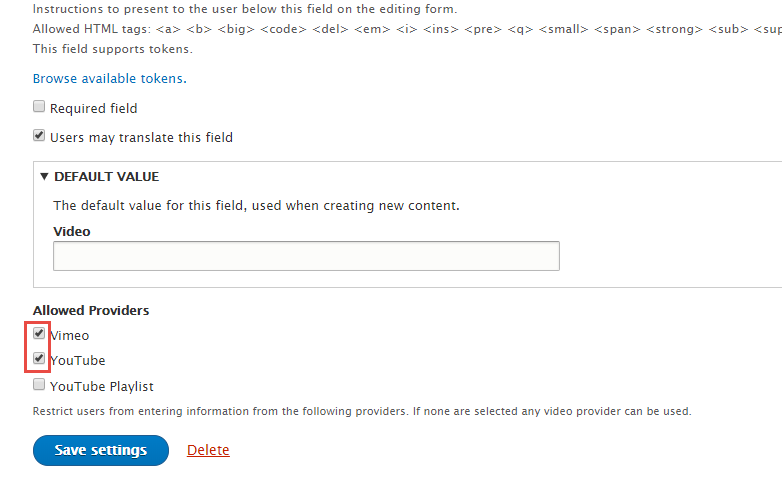
Step 21: Set properties for Video field
Step 22: Go to Manage form display tab, set following properties:
Step 23: Go to Manage display tab > Default tab. Set following properties:

Step 24: Create Product Details Tabs
1. Click Add Group link to create Product Details Tabs
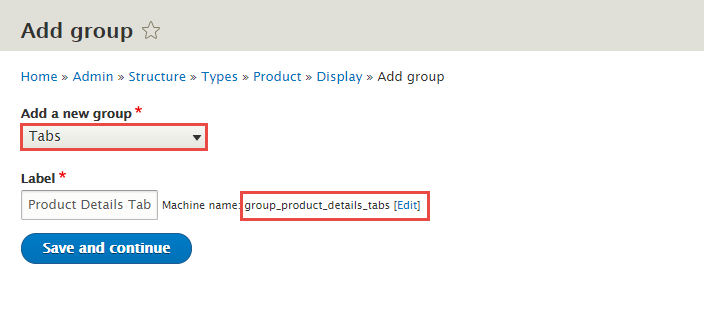

2. Click Create group button
Step 25: Click Save button
Create Testimonial type
Step 1: Navigate to Structure > Content Type
Step 2: Click Add Content Type link to create Testimonial type
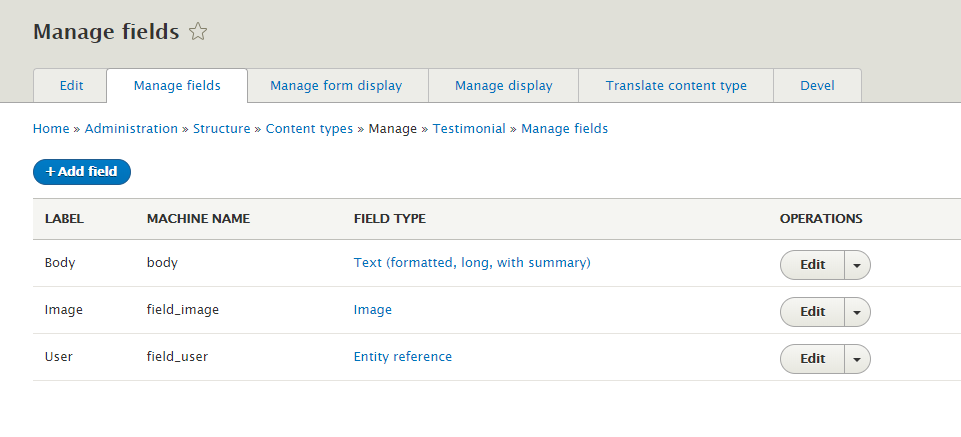
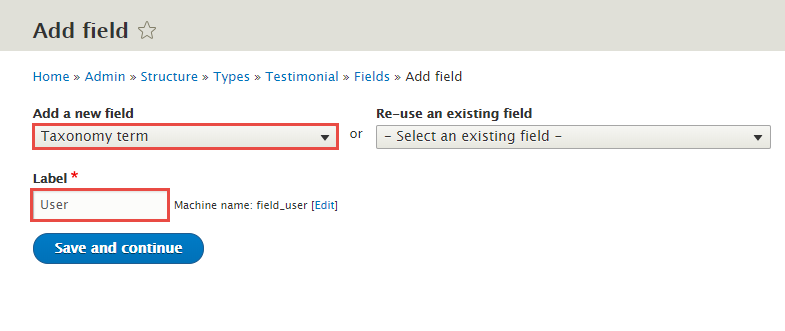
Step 3: Click Save and manage fields button, then add following fields:
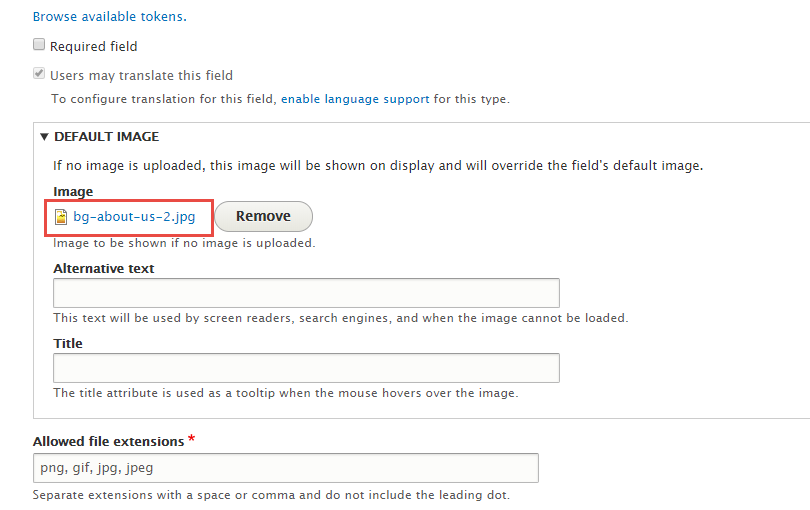
Step 4: Set properties for Image field

Step 5: Set properties for User field
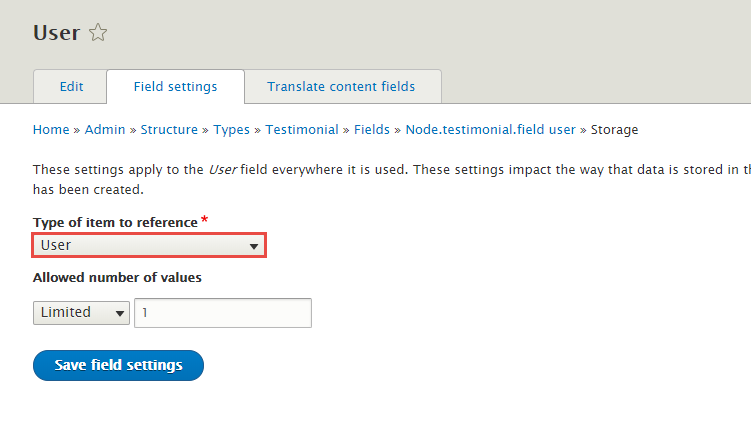
Step 6: Go to Manage form display tab, set following properties:

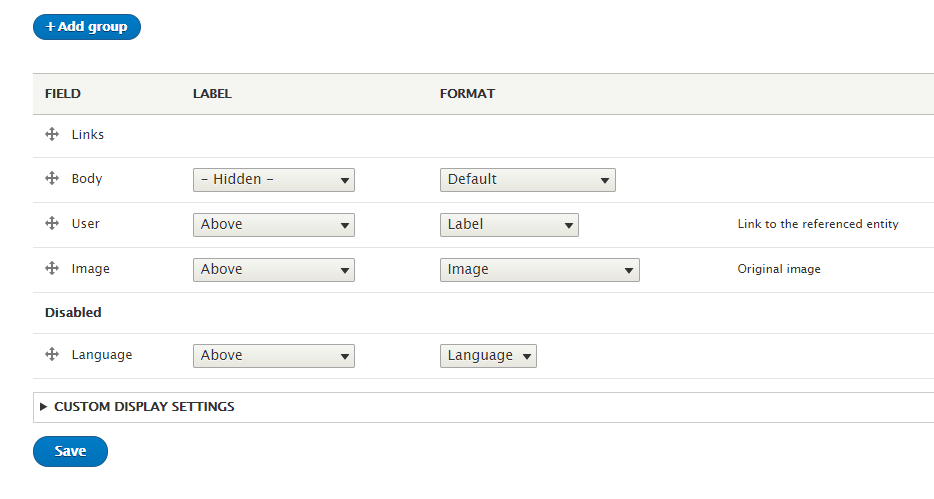
Step 10: Go to Manage display tab > Default tab. Set following properties:
Step 11: Click Save button
Configuration People
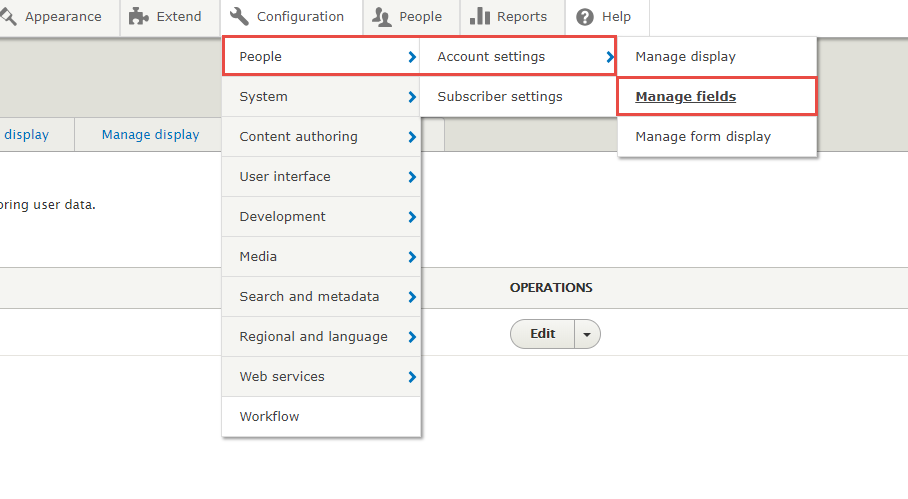
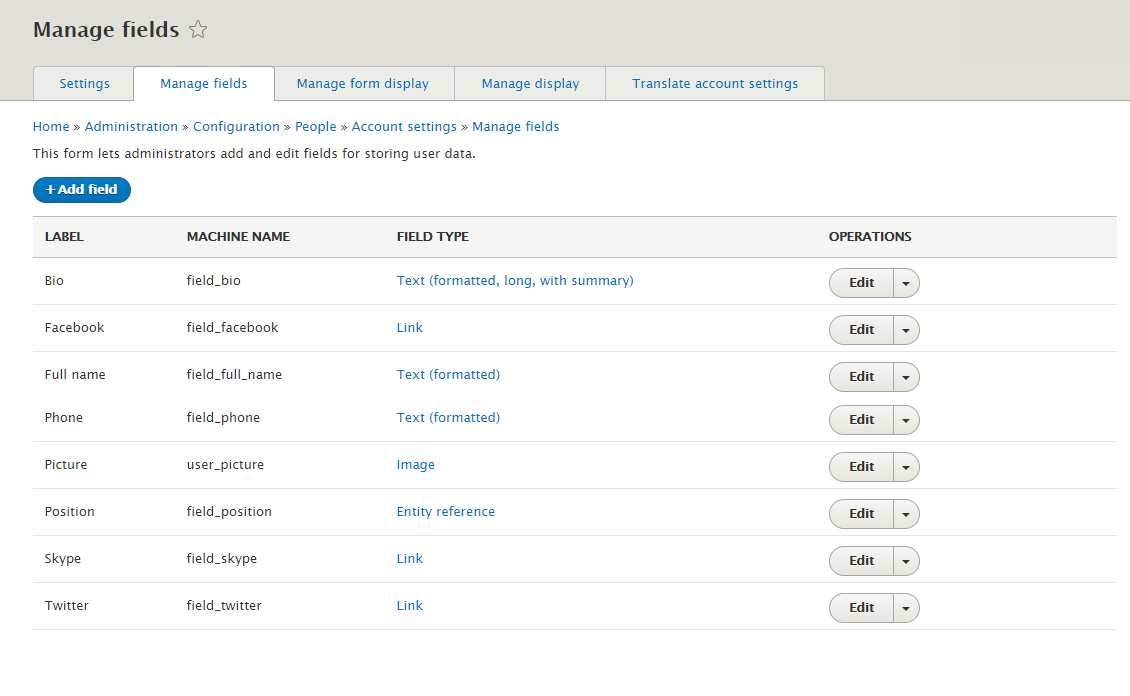
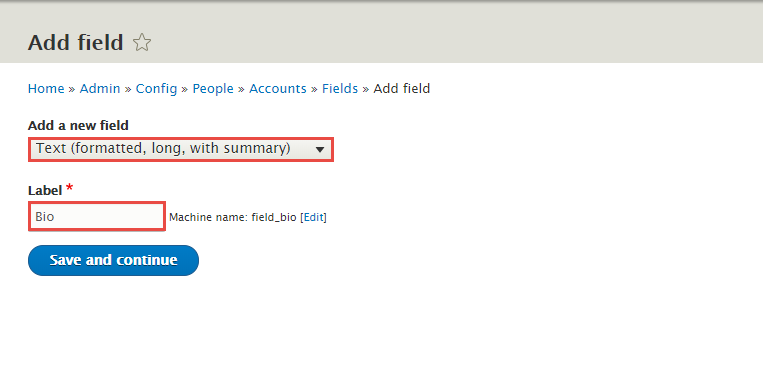
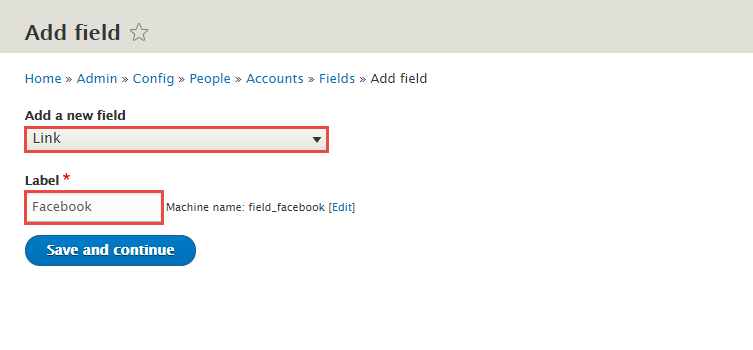
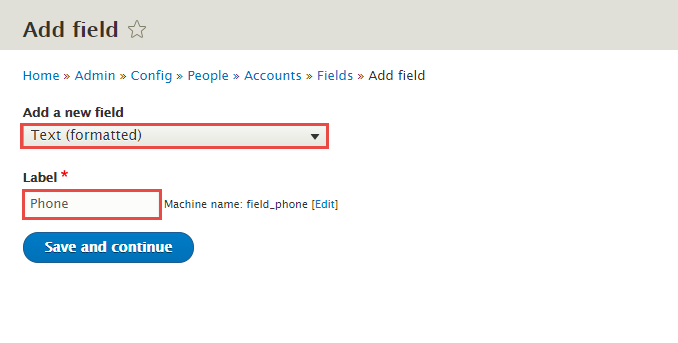
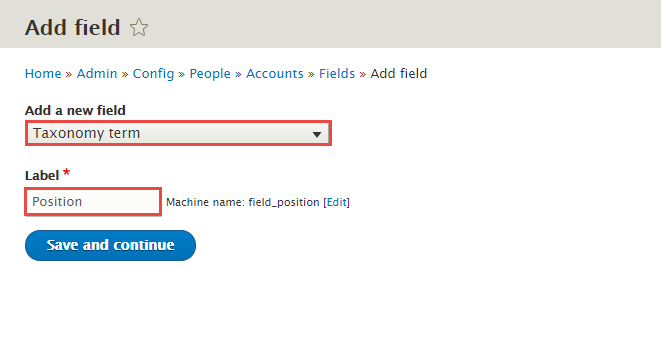
Step 1: Navigate to Configuration > People > Account settings > Manage fields
Step 2: At Manage fields tab, add Bio, Facebook, Fullname, Phone, Picture, Position, Skype, Twitter fields and set following properites
Step 3: Set properties for Bio field
Step 4: Set properties for Facebook field
Step 5: Set properties for Full name field

Step 6: Set properties for Phone field
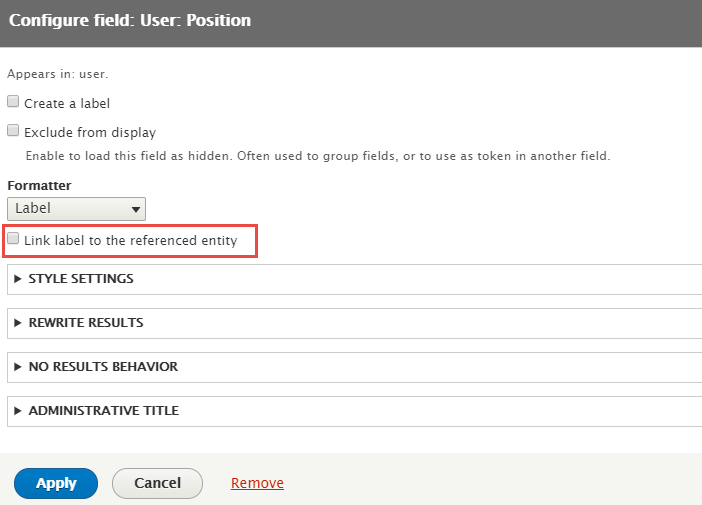
Step 7: Set properties for Position field

Step 8: Set properties for Skype field
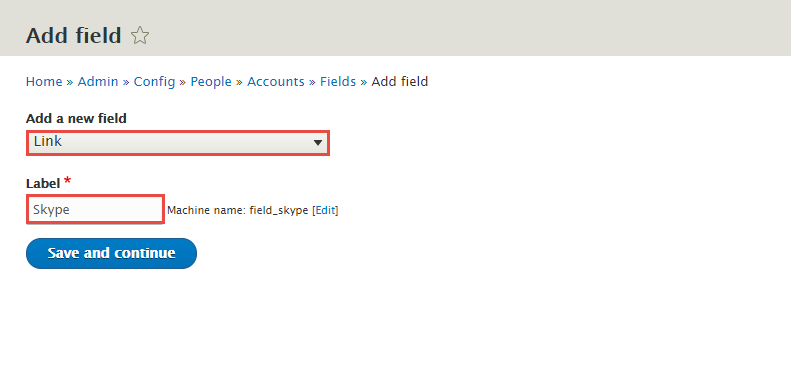
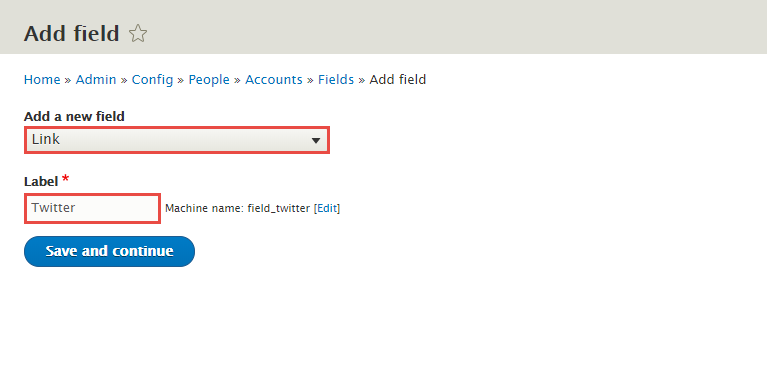
Step 9: Set properties for Twitter field
Step 5: Go to Manage form display tab, set following properties:

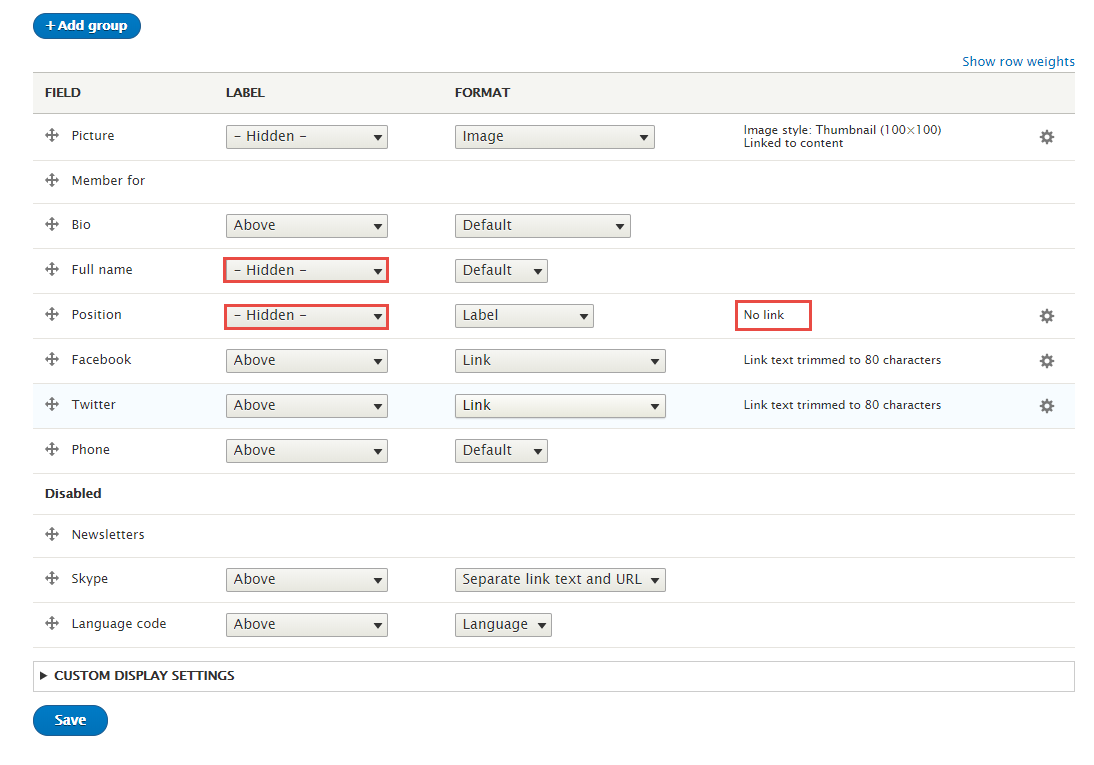
Step 10: Go to Manage display tab > Default tab. Set following properties:
Step 11: Click Save button
Configuration Block
Step 1: Navigate to Structure > Block layout > Types > Basic block
Step 2: Go to Manage fields tab, add Image field and set following properties:


Step 3: Go to Manage form display tab, set following properties:
Step 4: Go to Manage display tab > Default tab, set following properties:
Step 5: Click Save button
Create Homepage
Slideshow block
Front end Display
1. Create Slideshow view
Step 1: Navigate to Structure > Views, click Add new view, then create Slideshow view with following settings:

Step 2: Click Save and edit button. Next to steps below to set properties for following fields:
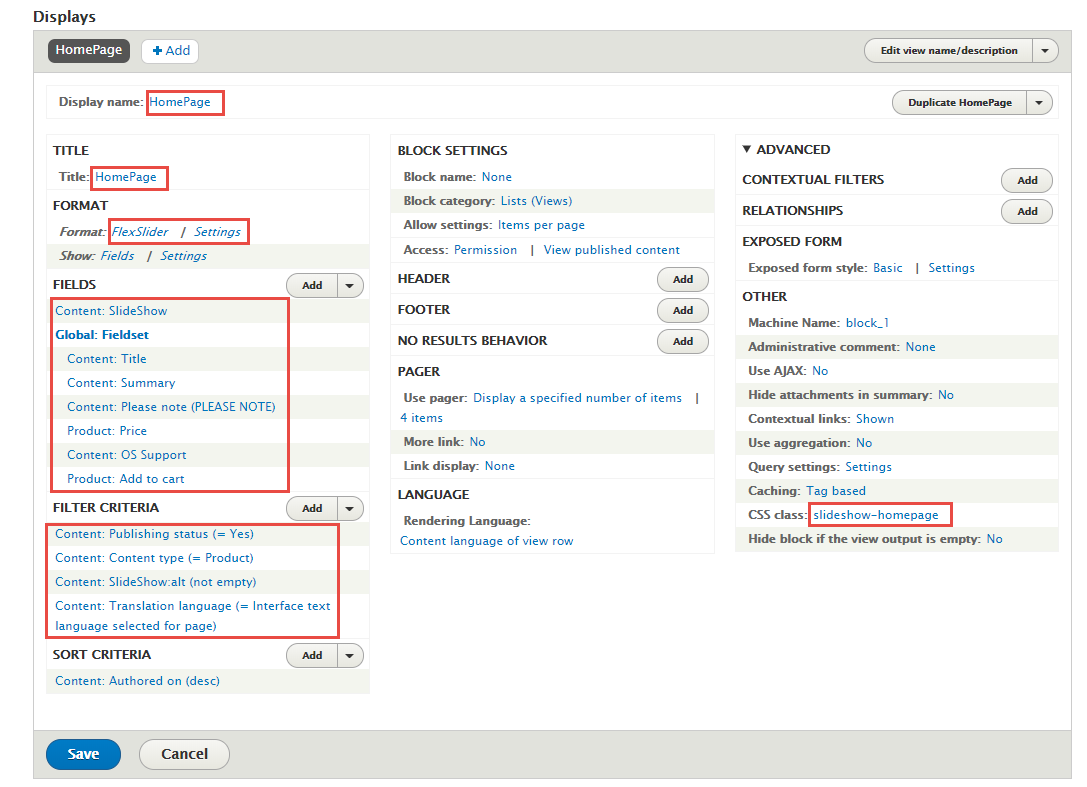
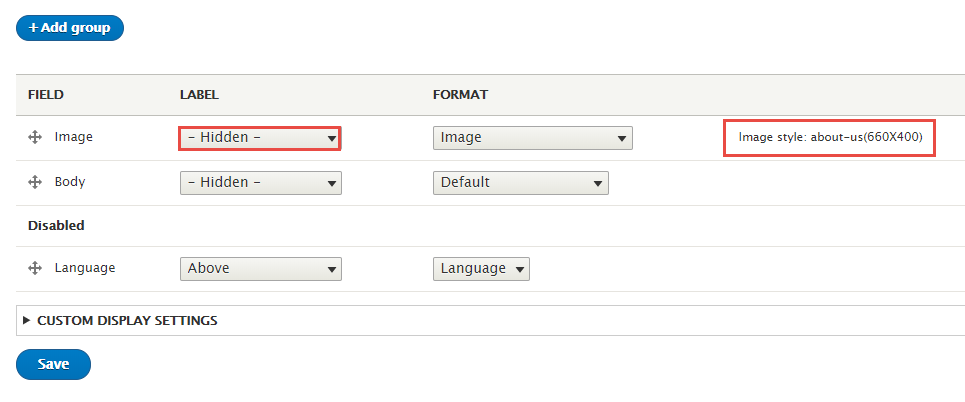
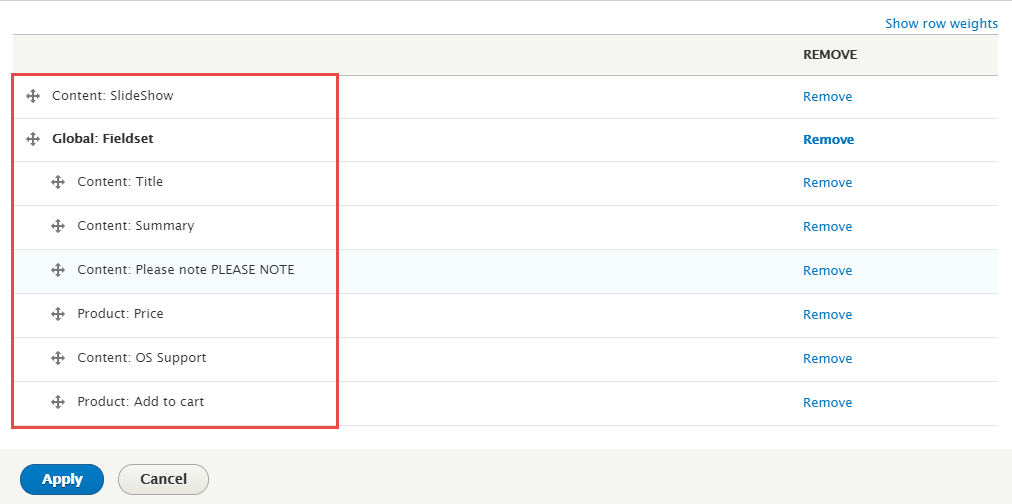
Step 3: At FIELDS area, click Add button to add fields: Content: Slideshow, Globall: Fieldset, Content: Title, Content: Summary, Content: Please note(PLEASE NOTE), Product: Price, Content: OS Support, Product: Add to cart
Step 4: Set properties for Content: Slideshow

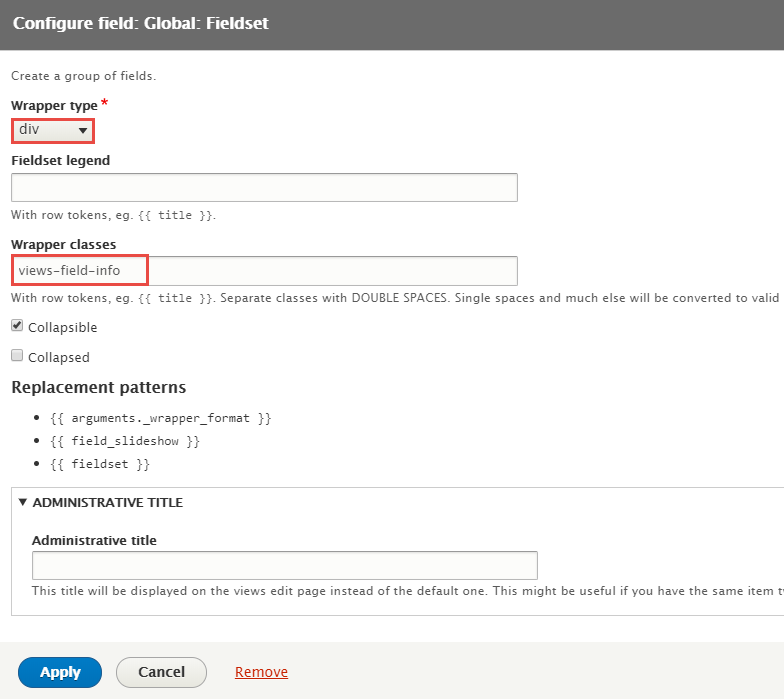
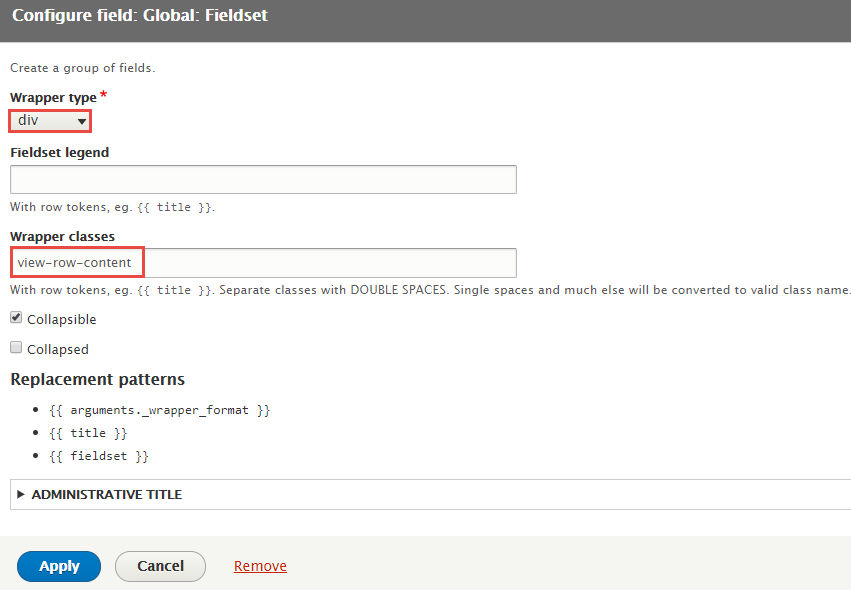
Step 5: Set properties for Globall: Fieldset
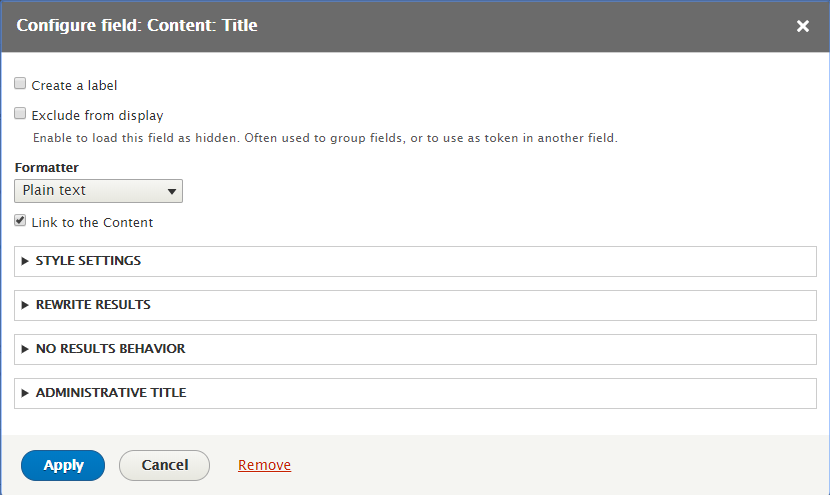
Step 6: Set properties for Content: Title
Step 7: Set properties for Content: Summary
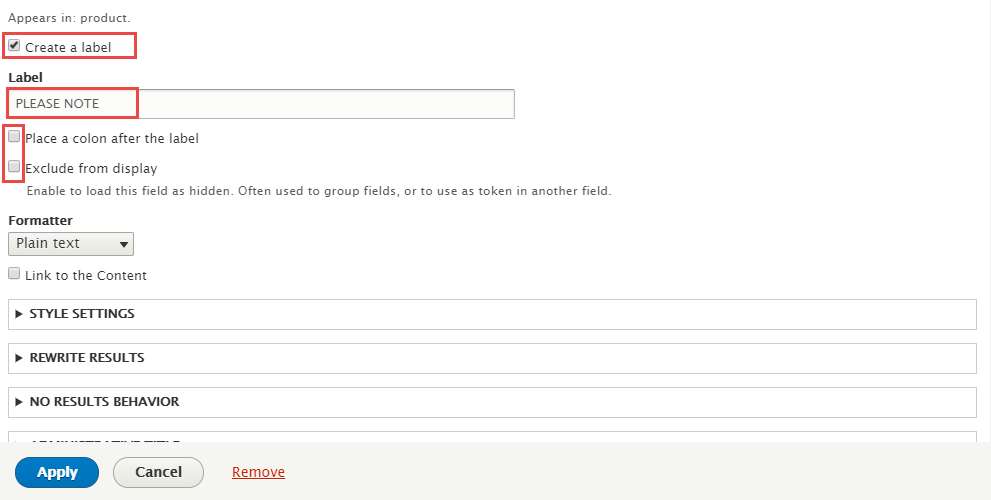
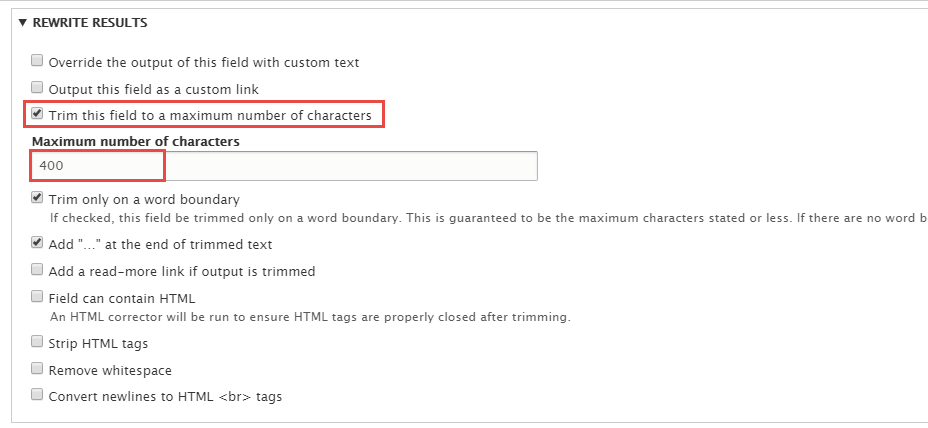
Step 8: Set properties for Content: Please note (PLEASE NOTE)
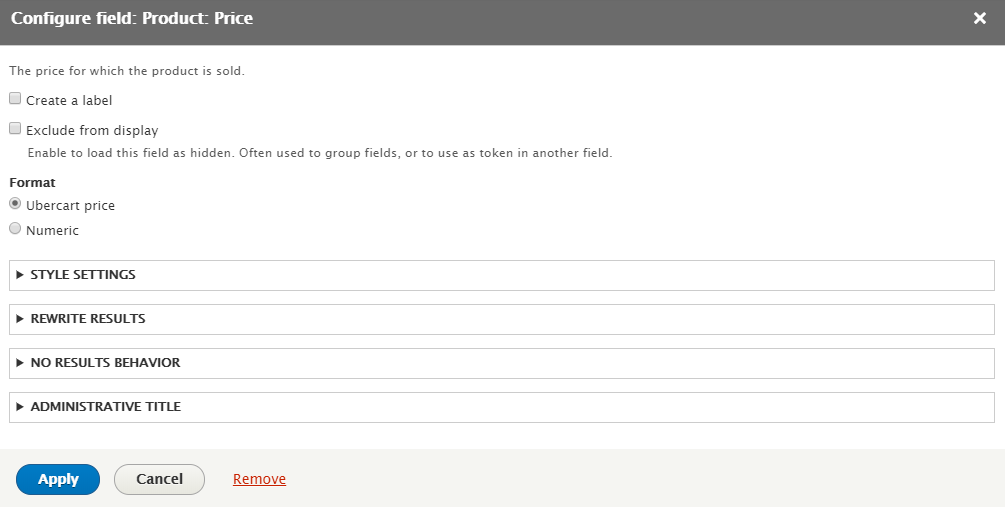
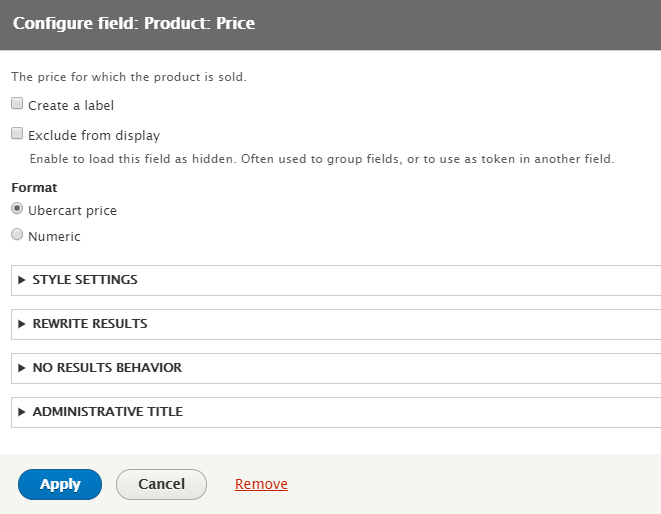
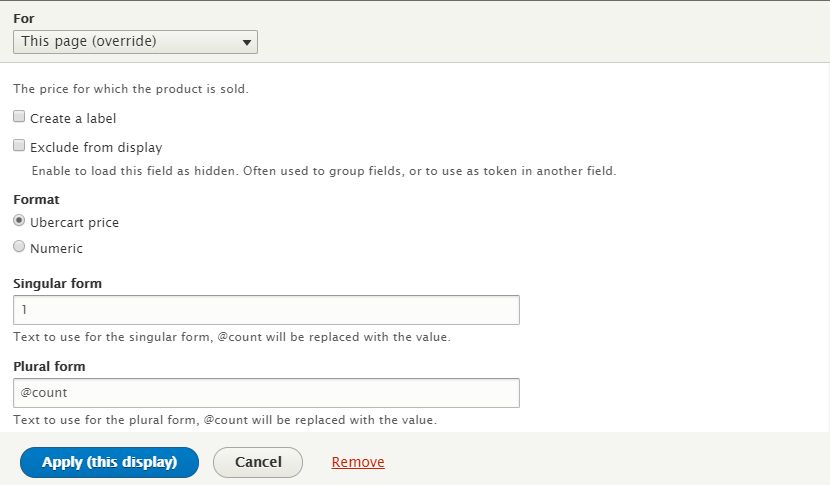
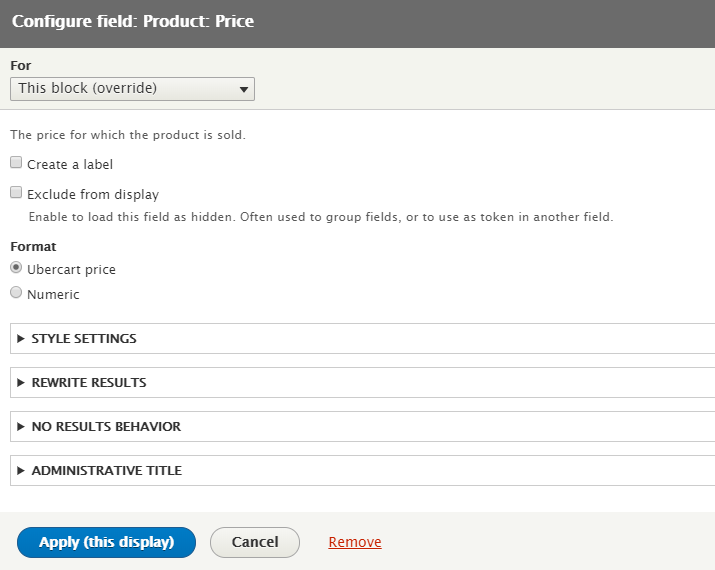
Step 9: Set properties for Product: Price
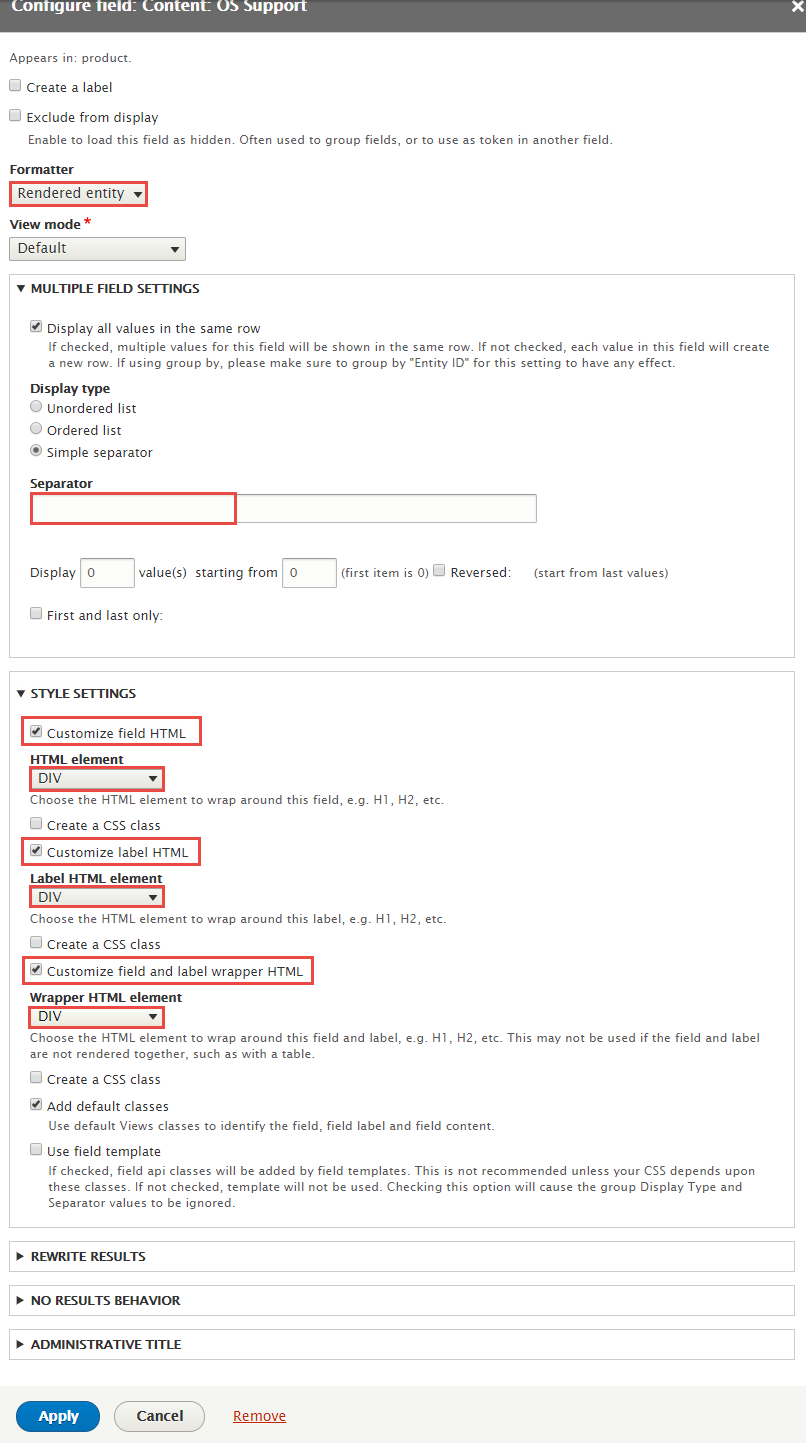
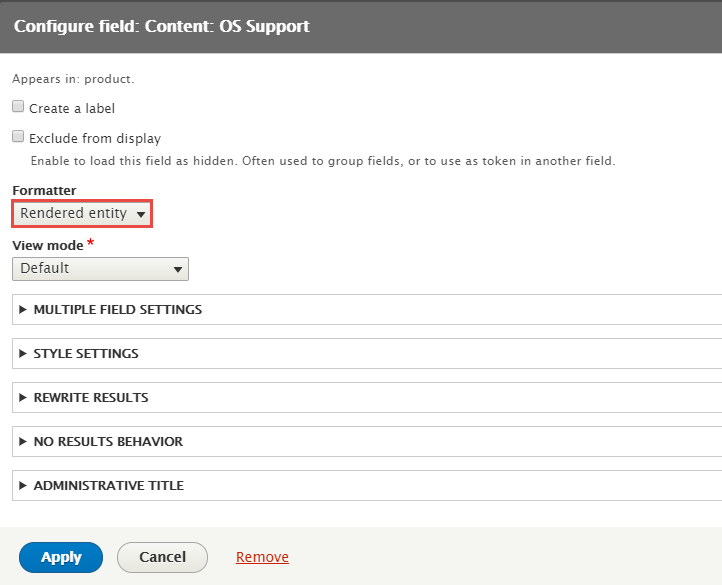
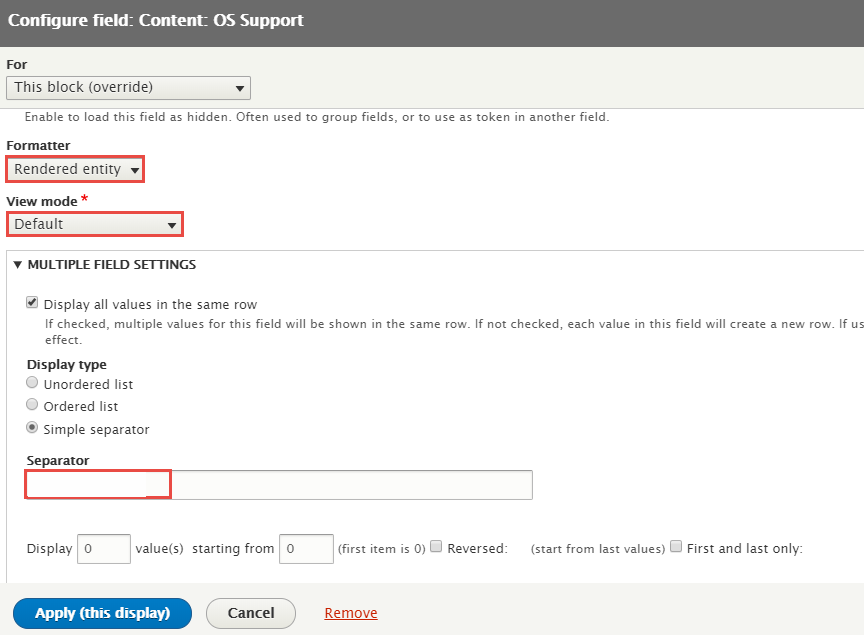
Step 10: Set properties for Content: OS Support
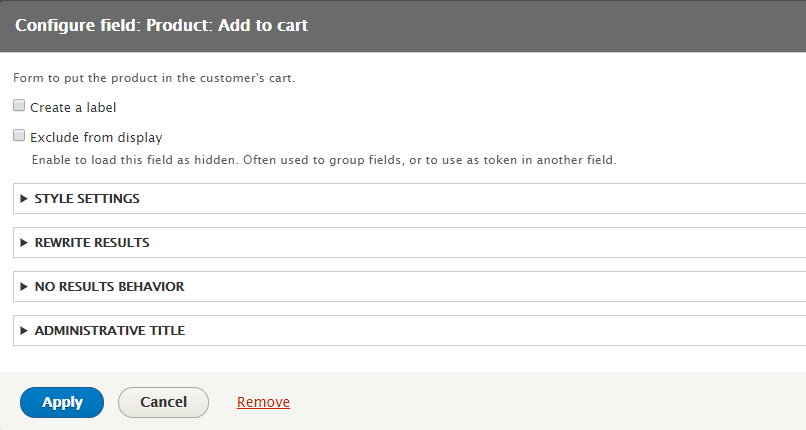
Step 11: Set properties for Product: Add to cart
Step 12: At TITLE area, find Title field and set following properites:

Step 13: At FIELDS area, click Rearrange button and set following arrange
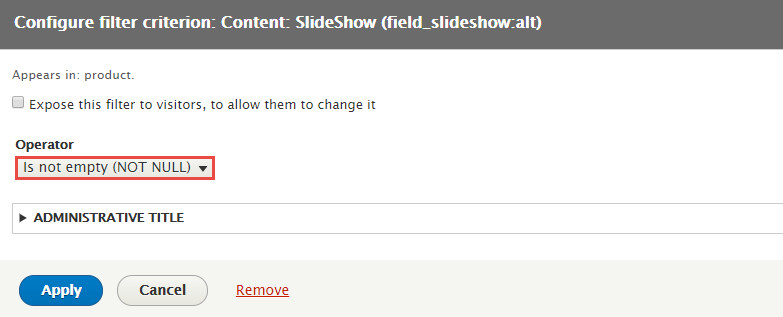
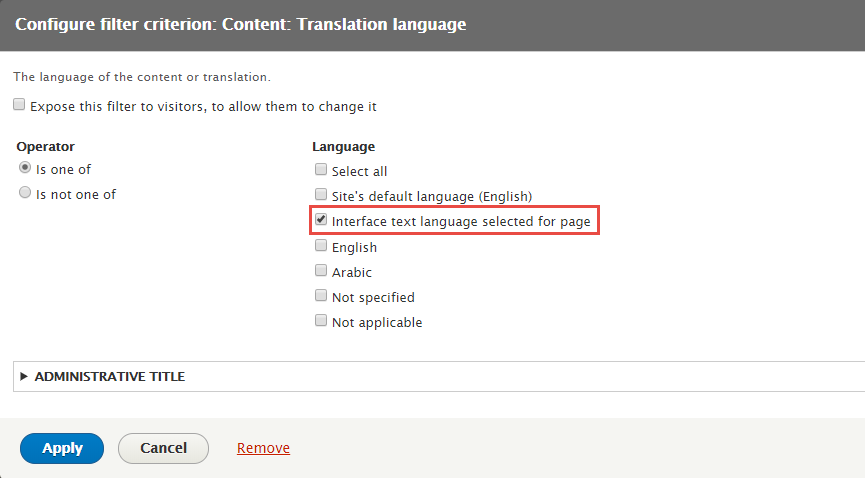
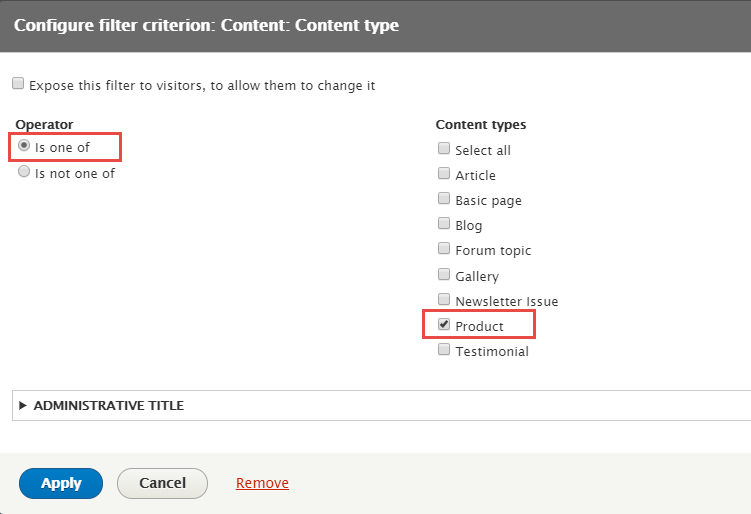
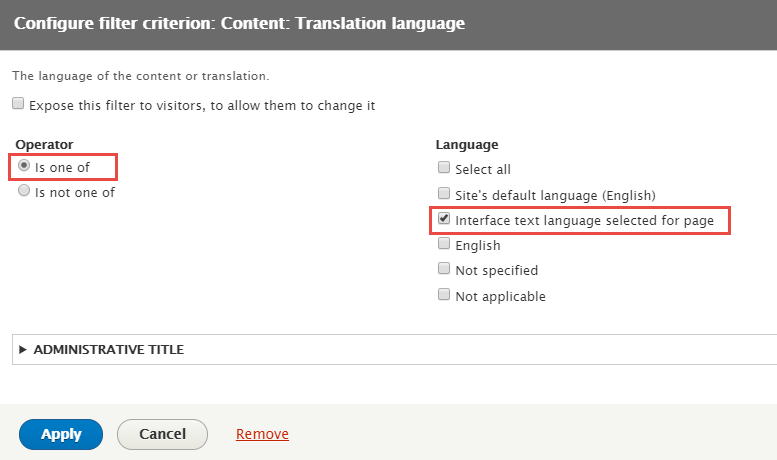
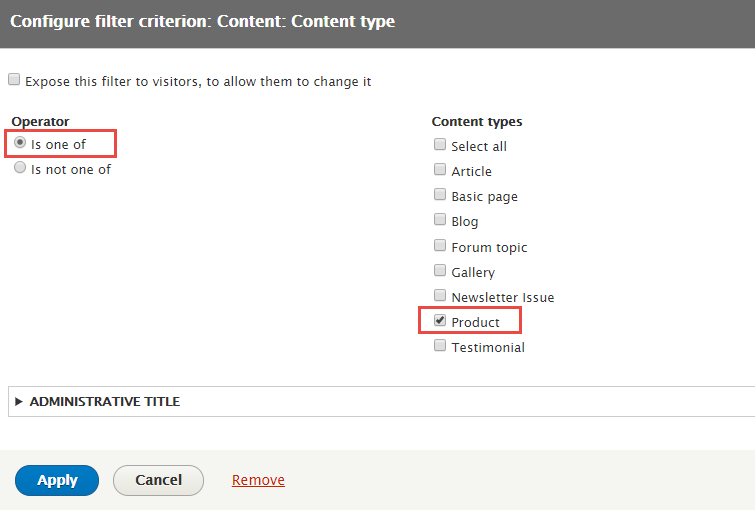
Step 14: At FILTER CRITERIA area, add Content: Content type, Content: SlideShow, Content: Translation language fields and set following properites
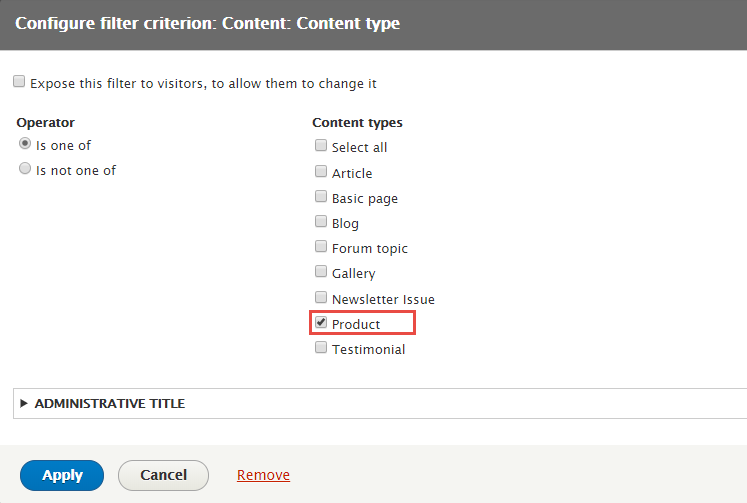
Step 16: Set properties for Content: SlideShow
Step 17: Set properties for Content: Translation language
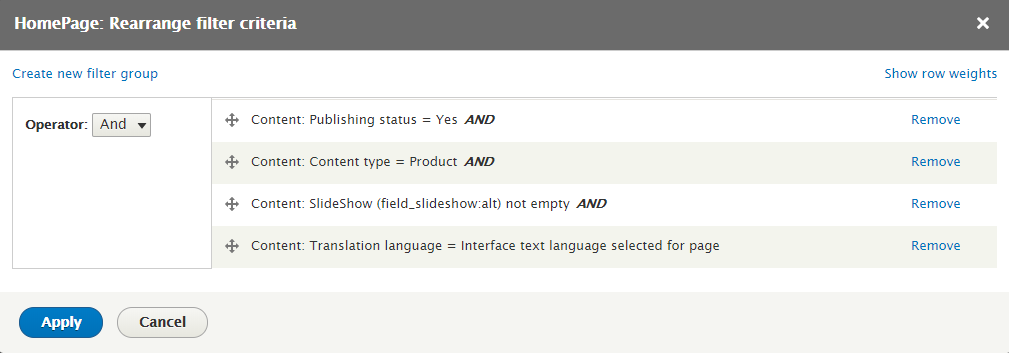
Step 18: At FILTER CRITERIA area, click Rearrange button and set following arrange
Step 19: Click Save to save view
2. Configure View: Slideshow block
Step 1: Navigate to Structure > Block layout
Step 2: Find Slideshow click Place block button
Step 3: Find Slideshow: List(Views) click Place block button and set following properites:
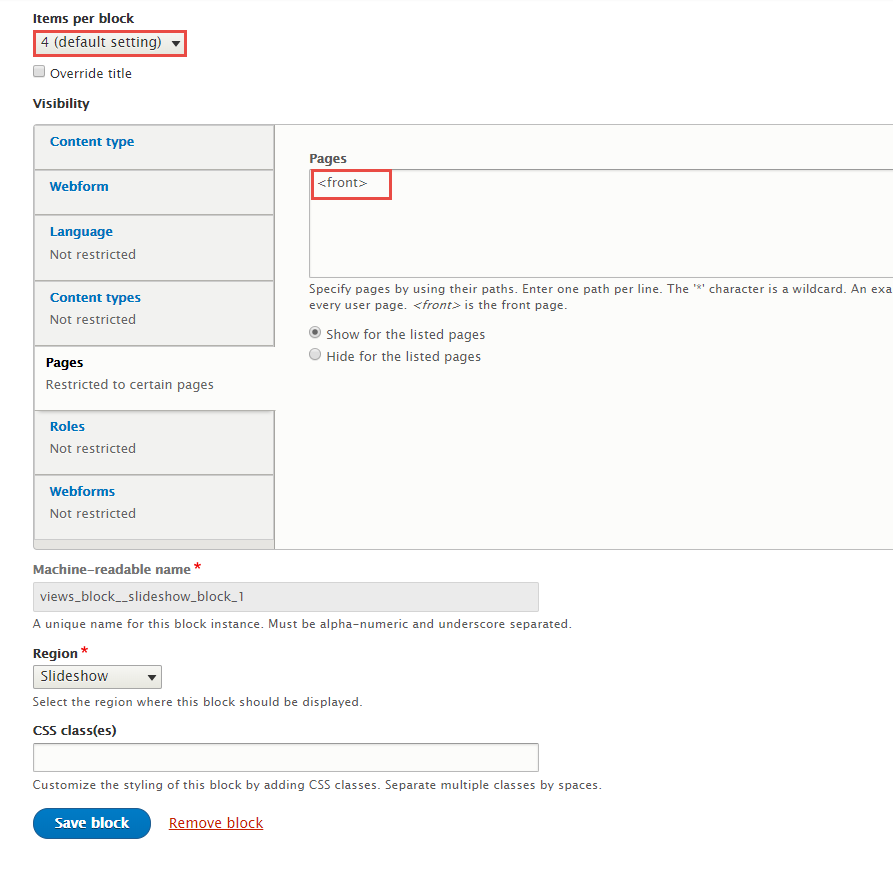
Step 4: Click Save block button.
Crystal block
Front end Display
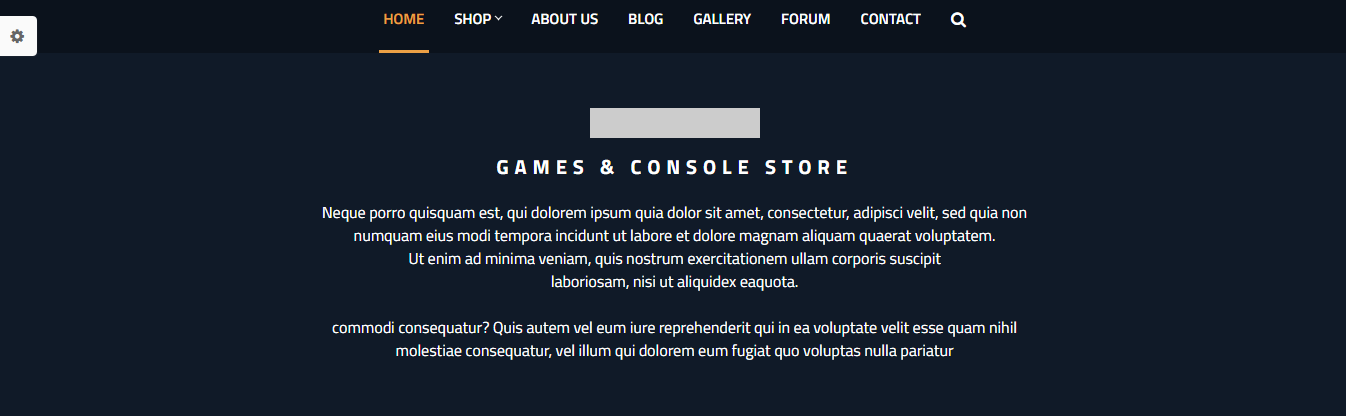
Create and configure Crystal block
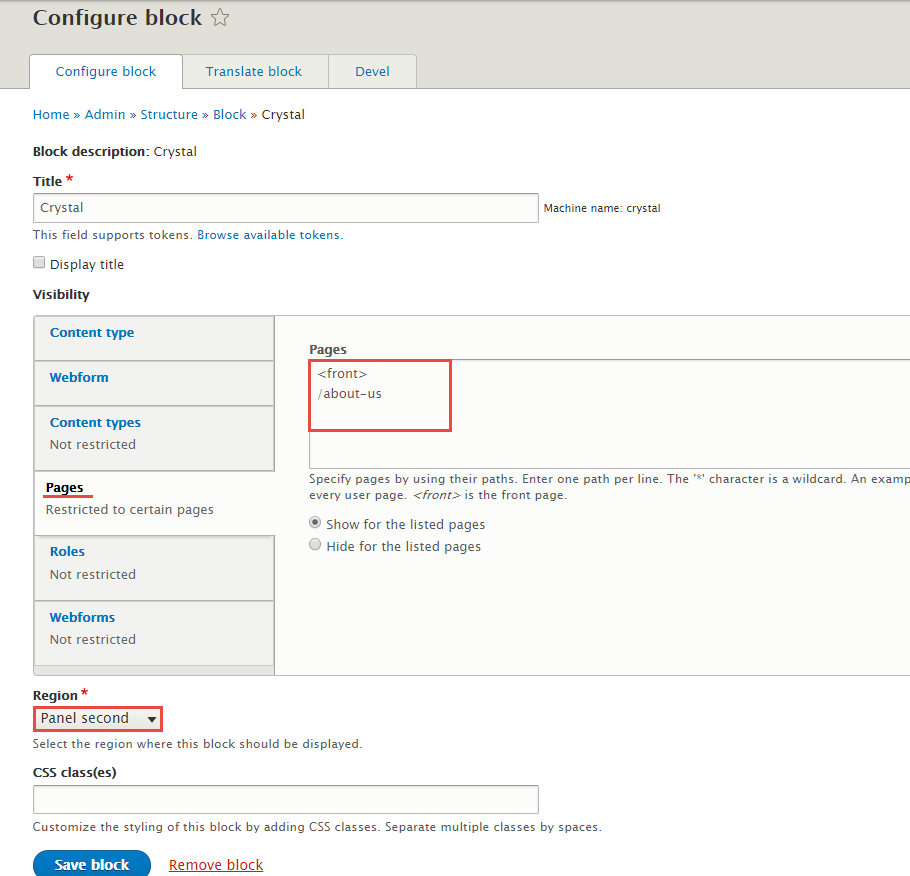
Step 1: Navigate to Structure > Block layout find Add custom block link. Click and create Crystal block with following properties:
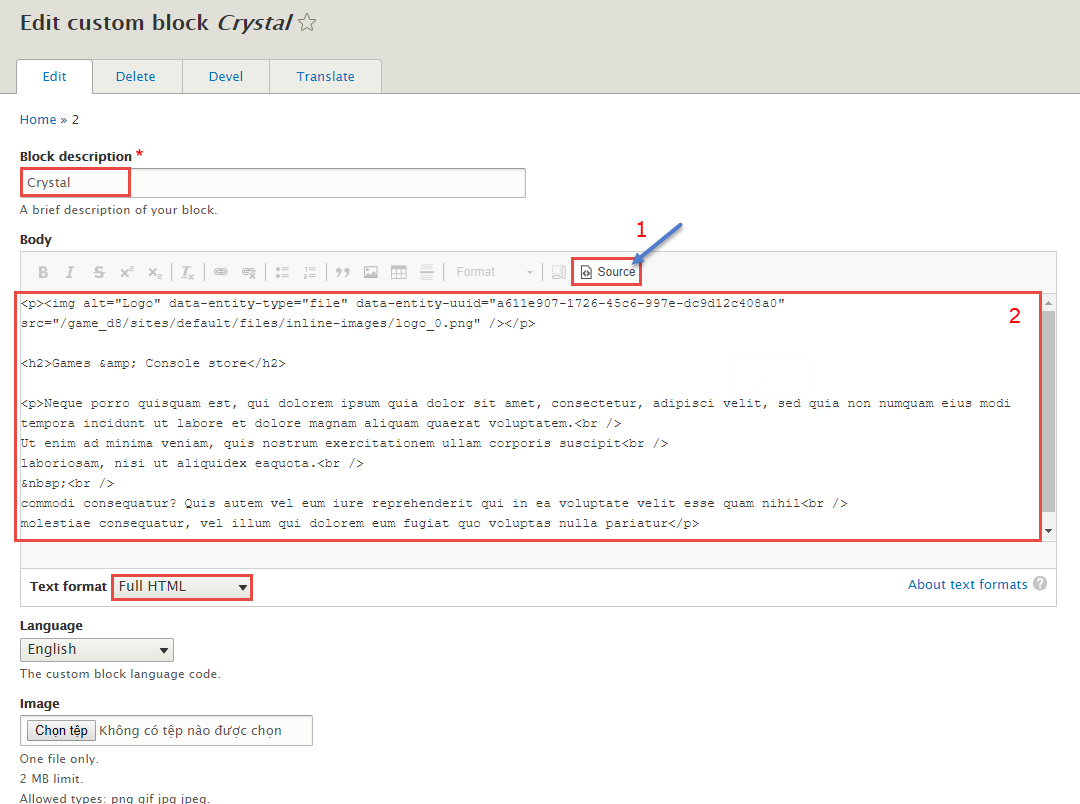
Refer to following HTML code:
![]()
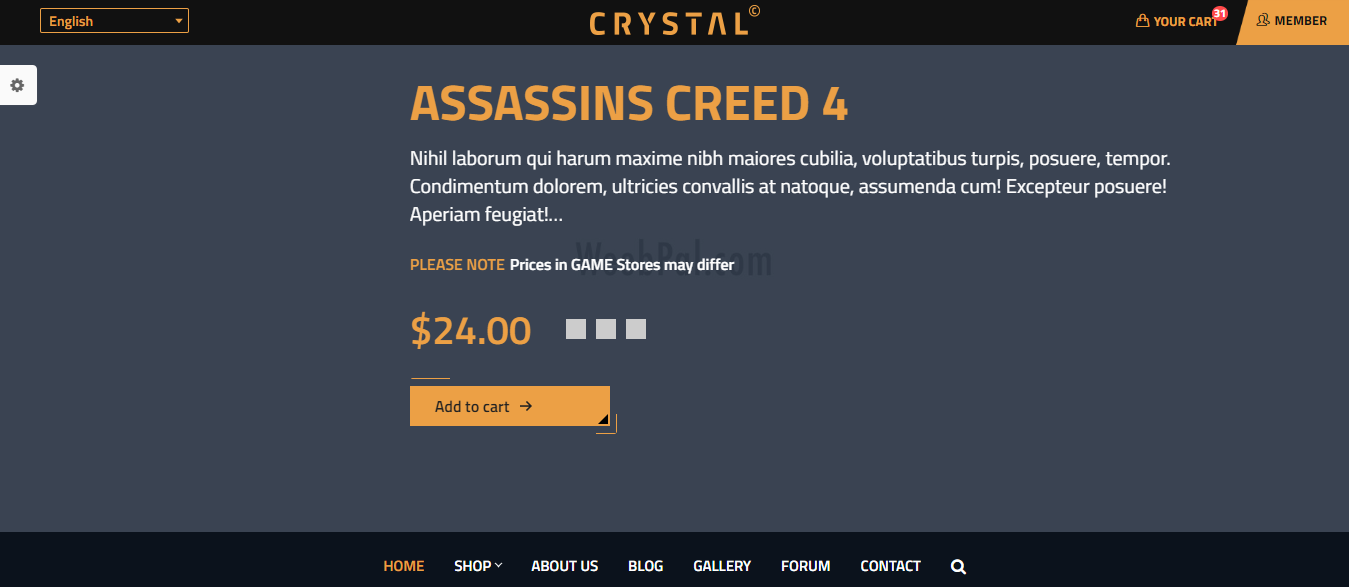
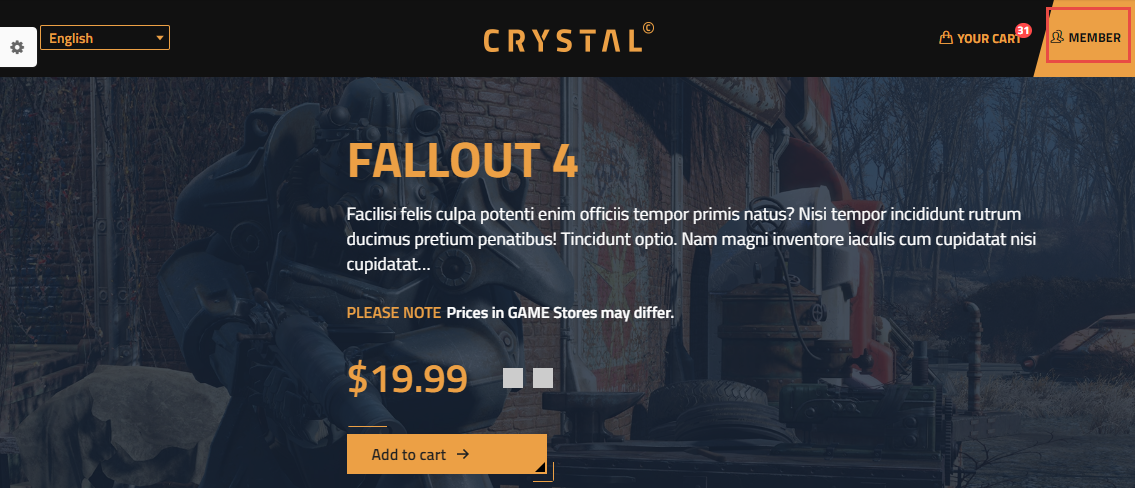
Games & Console store
Neque porro quisquam est, qui dolorem ipsum quia dolor sit amet, consectetur, adipisci velit, sed quia non numquam eius modi tempora incidunt ut labore et dolore magnam aliquam quaerat voluptatem.
Ut enim ad minima veniam, quis nostrum exercitationem ullam corporis suscipit
laboriosam, nisi ut aliquidex eaquota.
commodi consequatur? Quis autem vel eum iure reprehenderit qui in ea voluptate velit esse quam nihil
molestiae consequatur, vel illum qui dolorem eum fugiat quo voluptas nulla pariatur
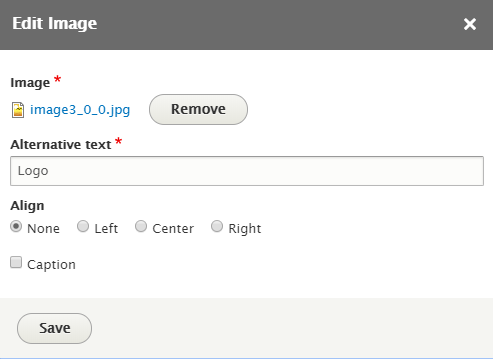
Step 2: Click on the Logo in Body to edit the image
Step 3: Click Save button
Best Seller block
Front end Display

1. Create Best Seller view
Step 1: Navigate to Structure > Views, click Add new view, then create Best Seller view with following settings:
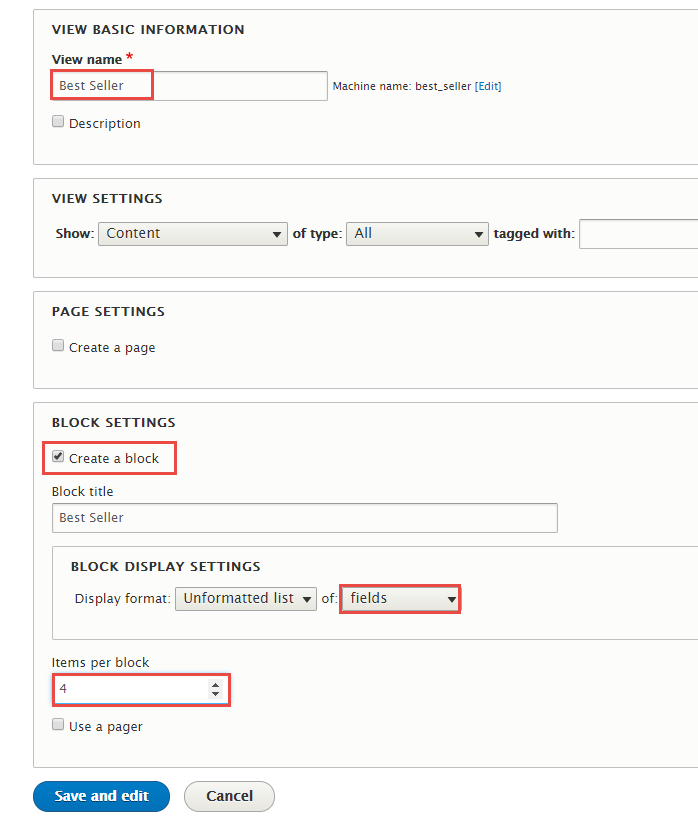
Step 2: Click Save and edit button. Next to steps below to set properties for following fields:
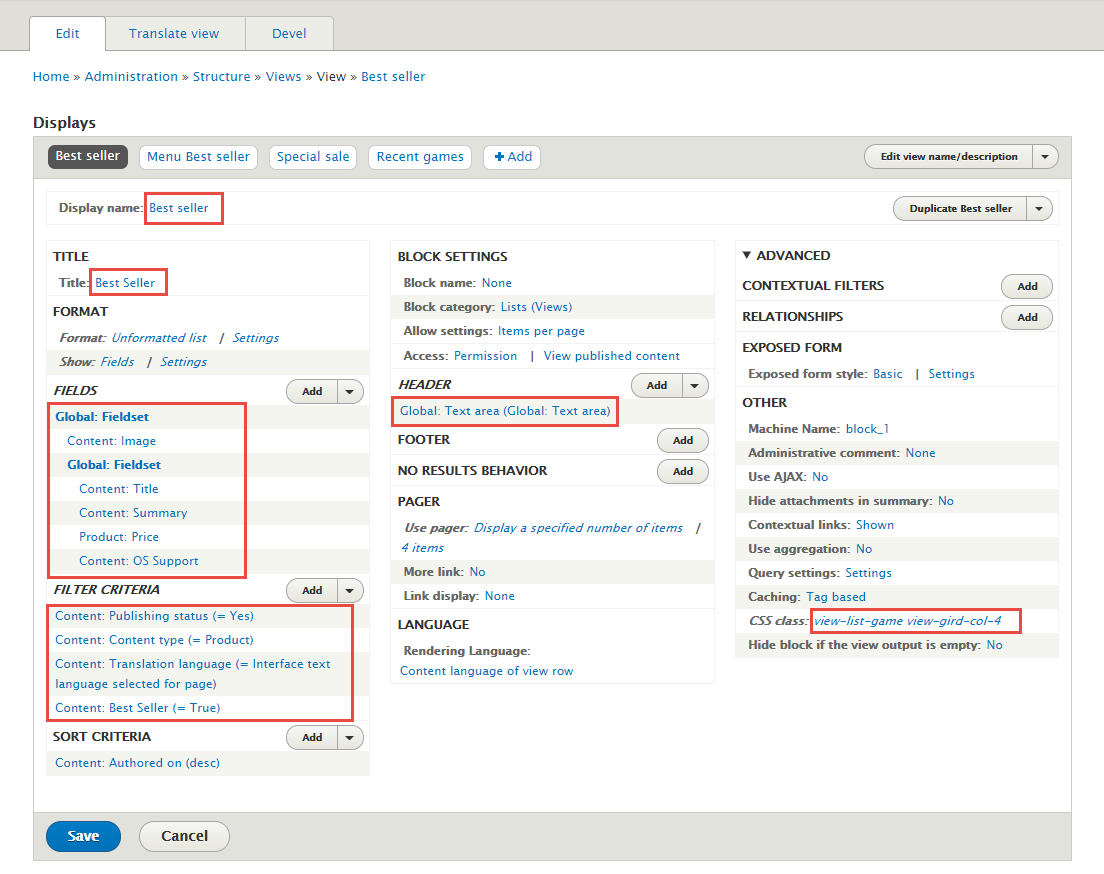
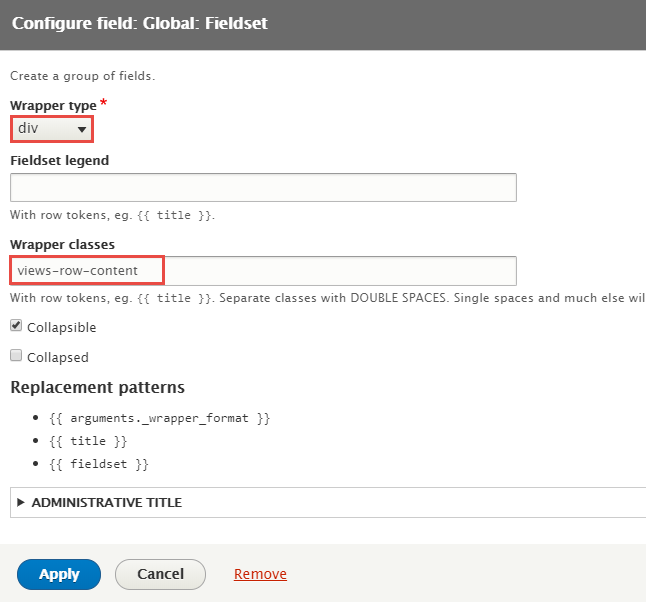
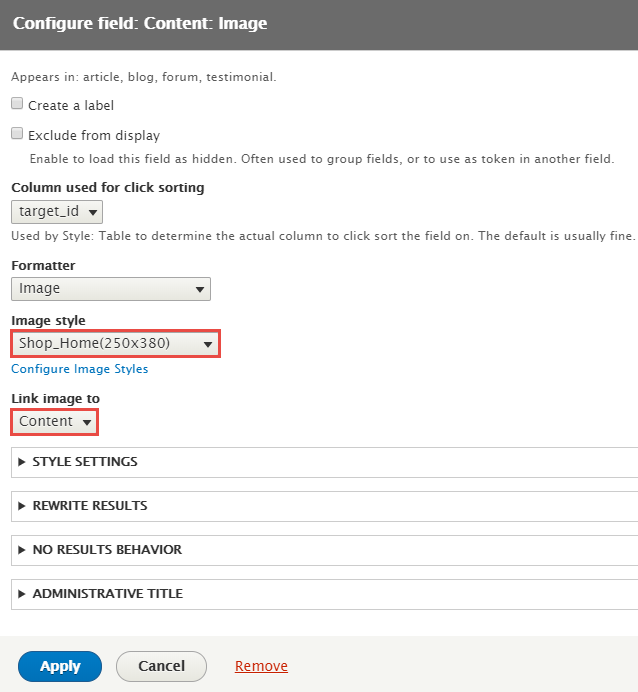
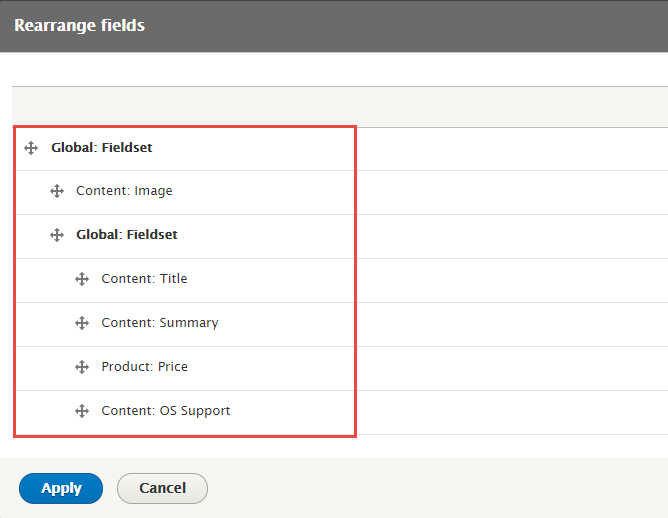
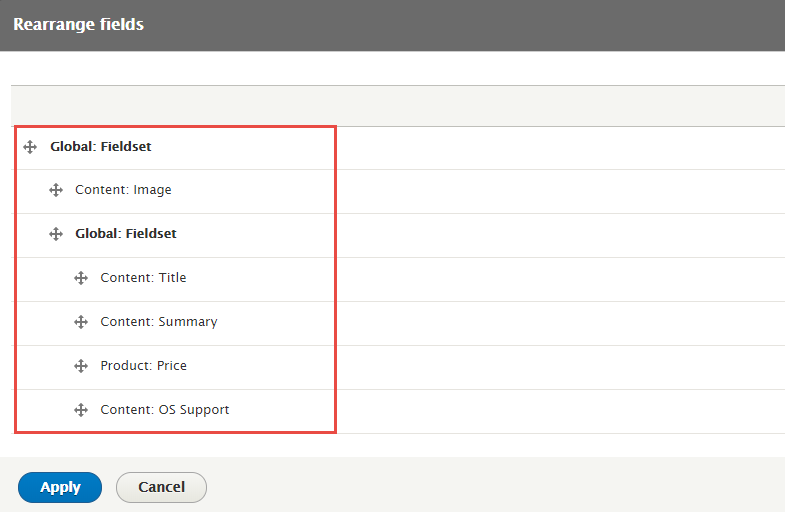
Step 3: At FIELDS area, click Add button to add fields: Global: Fieldset, Content: Image, Global: Fieldset, Content: Title, Content: Summary, Content: Price, Content: OS Support
Step 4: Set properties for Global: Fieldset
Step 5: Set properties for Content: Image
Step 6: Set properties for Global: Fieldset

Step 7: Set properties for Content: Title

Step 8: Set properties for Content: Summary

Step 9: Set properties for Content: Price
Step 10: Set properties for Content: OS Support
Step 11: At FIELDS area, click Rearrange button and set following arrange
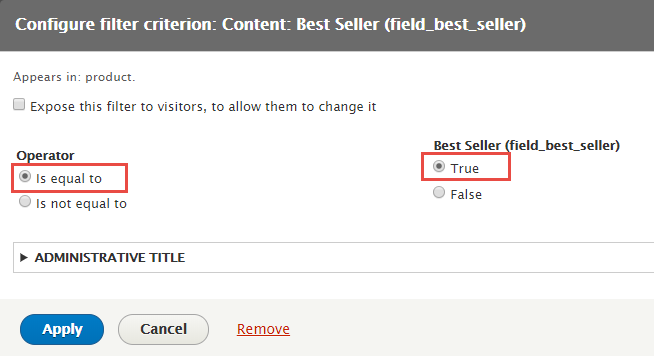
Step 12: At FILTER area, add Content: Content type, content: Translation language, content: Best Seller fields and set following properites
Step 13: Set properties for Content: Content type
Step 14: Set properties for Content: Translation language
Step 15: Set properties for Content: Best Seller
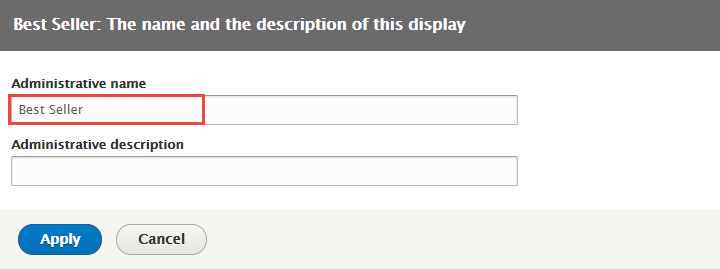
Step 16: At Display name area, click and set properties:
Step 17: At HEADER area, click Add button field Global: Text area and set following properties:
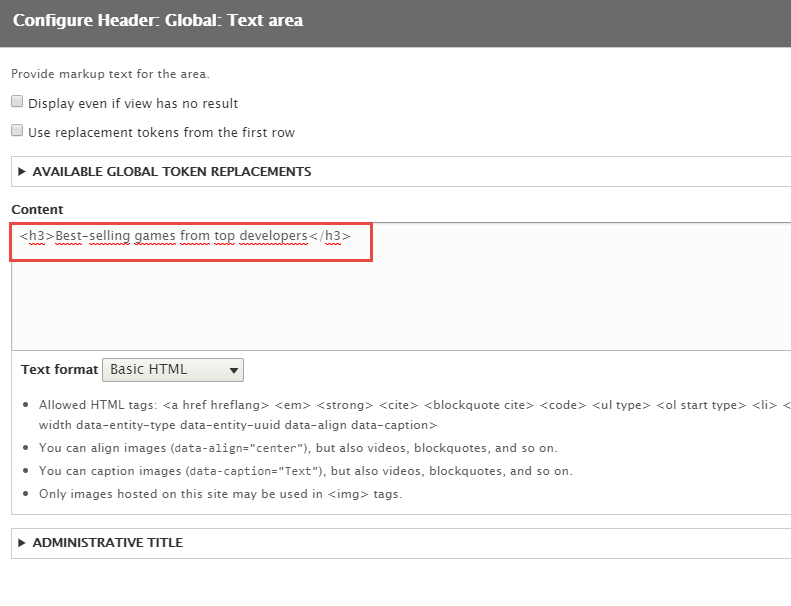
Refer to following HTML code:
Best-selling games from top developers
Step 18: At Advanced > OTHER area, add CSS class link and set following properites:

Step 19: Click Save to save view
2. Configure View: Best Seller block
Step 1: Navigate to Structure > Block layout
Step 2: Find Panel second click Place block button
Step 3: Find Best Seller: Best Seller click Place block button and set following properites:
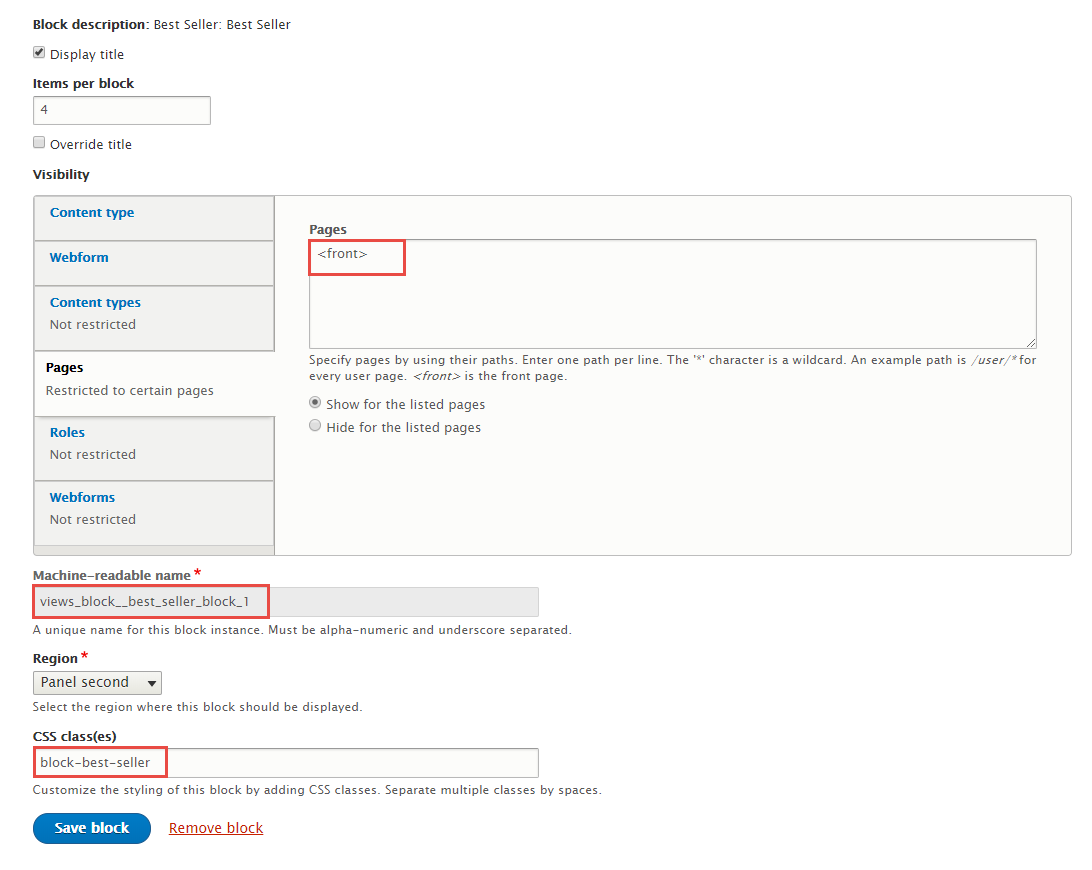
Step 4: Click Save block button.
Special Sale
Front end Display

1. Create Special Sale view
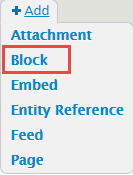
Step 1: Stay open Best Seller, click Add button to add Block new.
Step 2: Next to steps below to set properties for the following fields:
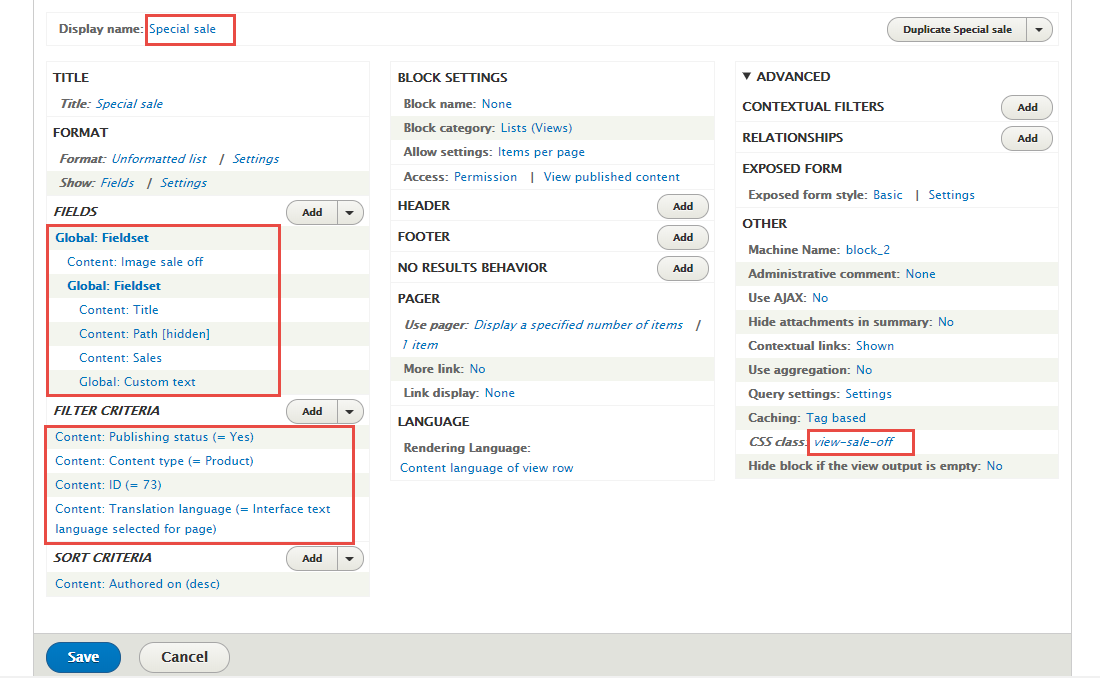
Step 3: At Display name area, click and set properties:

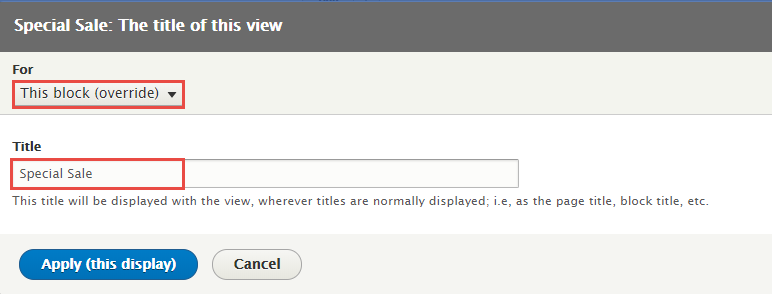
Step 4: At TITLE area, click Title field and set following properites:
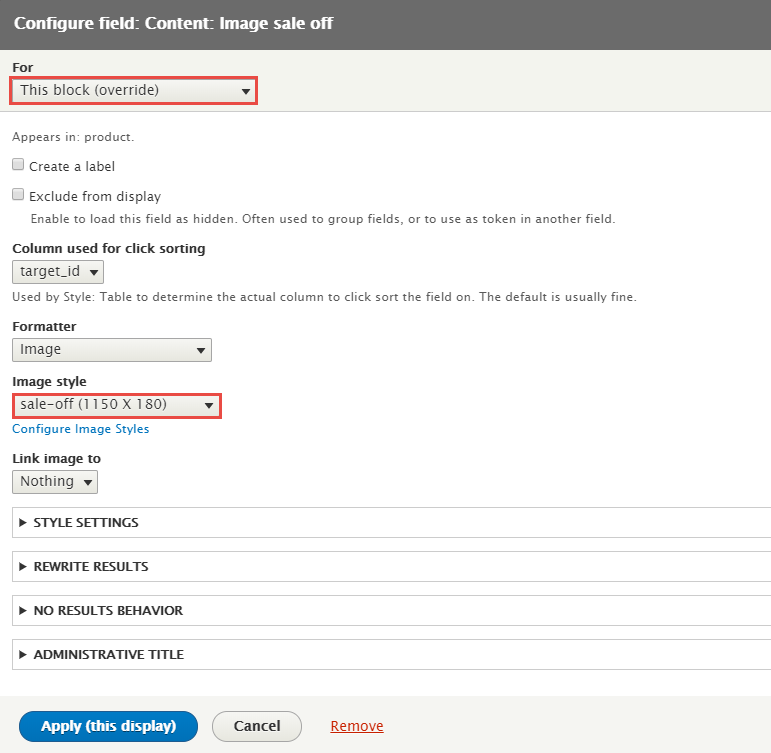
Step 5: At FIELDS area, click Add button to add fields: Global: Fieldset, Content: Image sale off, Global: Fieldset, Content: Title, Content: Path[hidden], Content: Sales, Global: Custom text
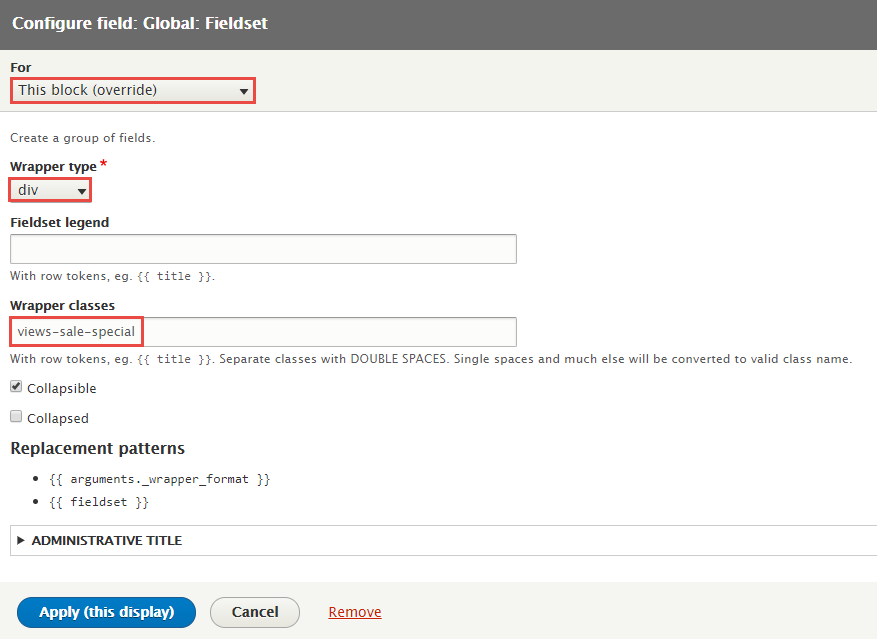
Step 6: Set properties for Global: Fieldset
Step 7: Set properties for Content: Image sale off
Step 8: Set properties for Global: Fieldset

Step 9: Set properties for Content: Title
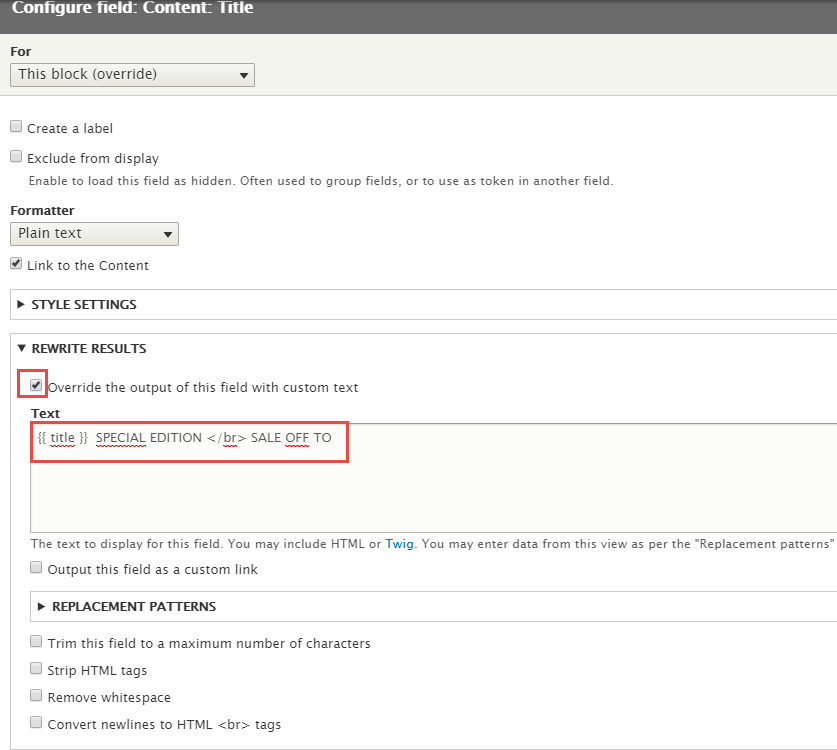
Refer to following HTML code:
{{ title }} SPECIAL EDITION
SALE OFF TO
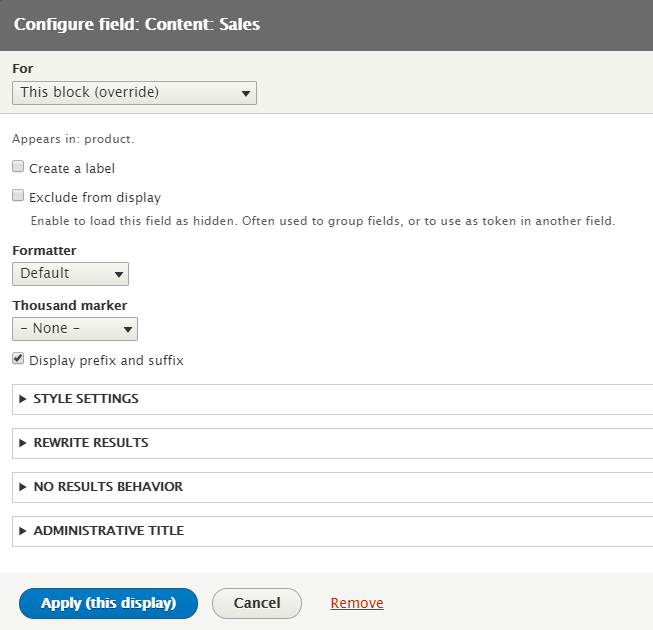
Step 10: Set properties for Content: Sales
Step 11: Set properties for Content: Custom text

Refer to following HTML code:
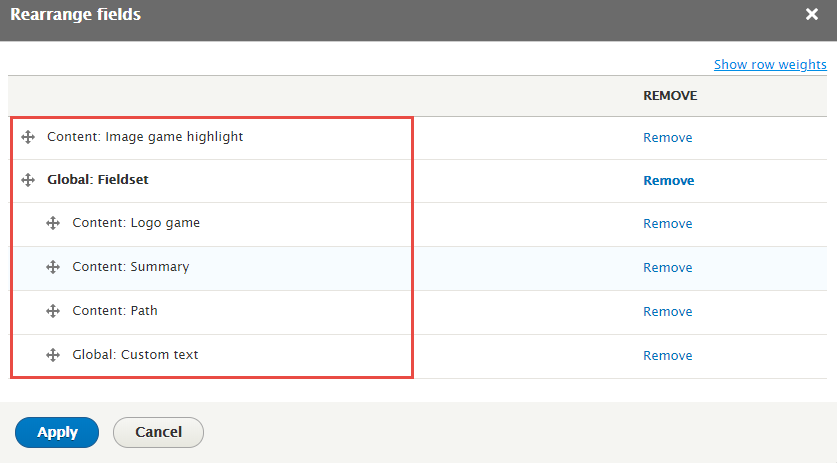
Step 12: At FIELDS area, click Rearrange button and set following arrange

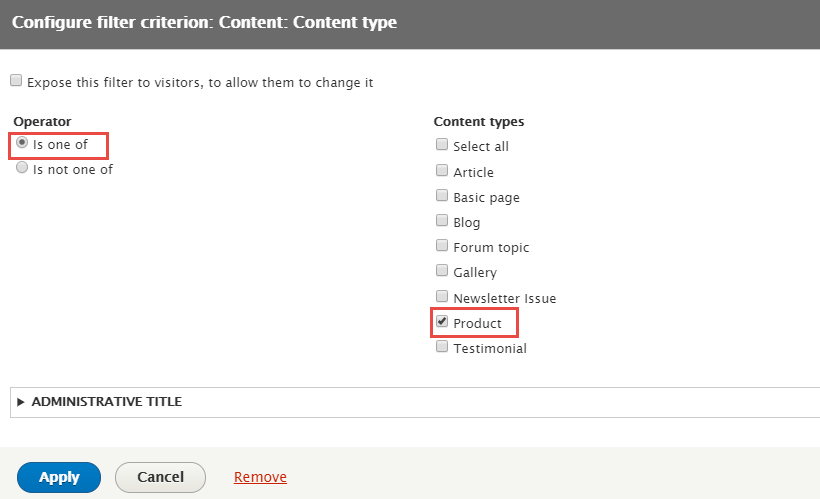
Step 13: At FILTER CRITERIA area, add Content: Content type, Content: ID, Content: Translation language fields and set following properites
Step 14: Set properties for Content: Content type
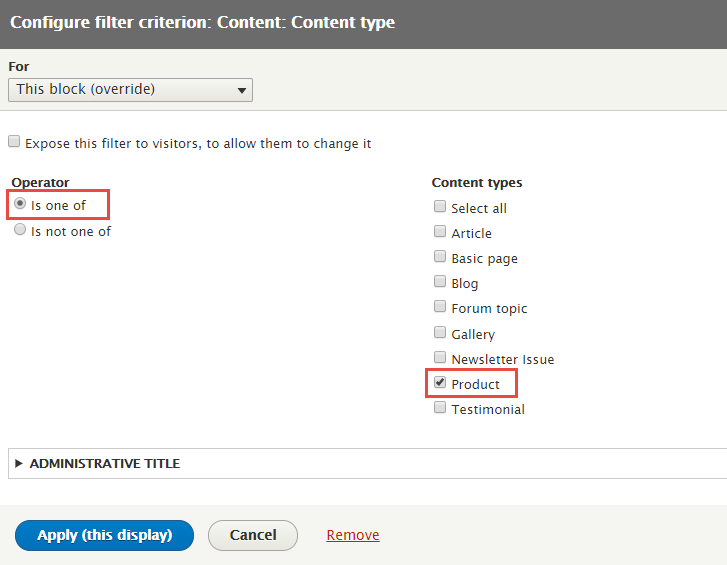
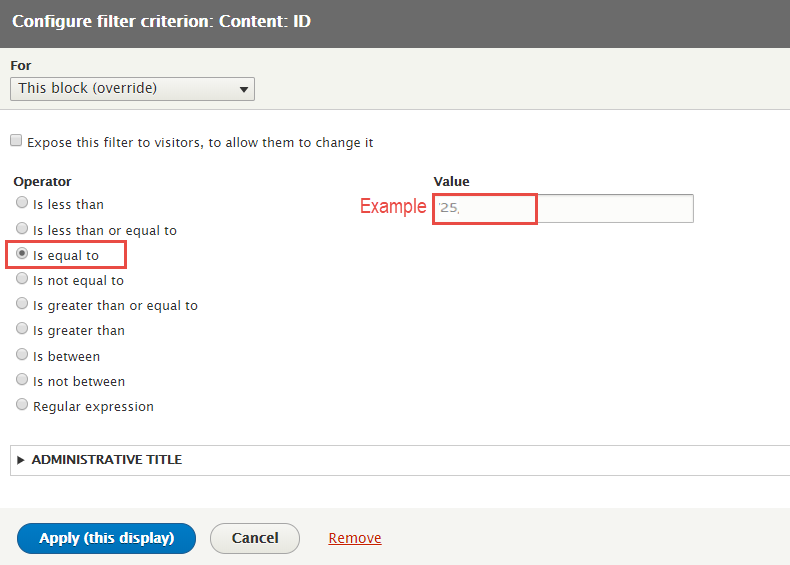
Step 15: Set properties for Content: ID
1: Navigate to Content
2: Find content Fallout 4 click Edit button

3: Set value 25 in content ID (view Special Sale)
Step 16: Set properties for Content: Translation language
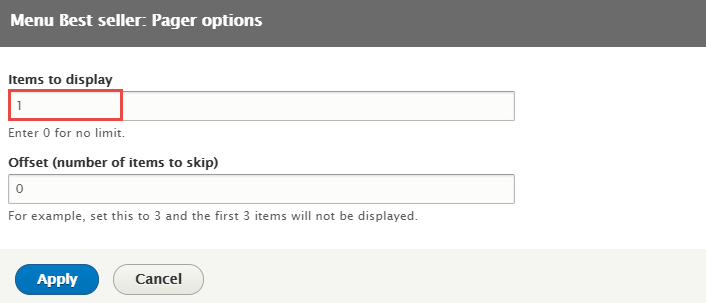
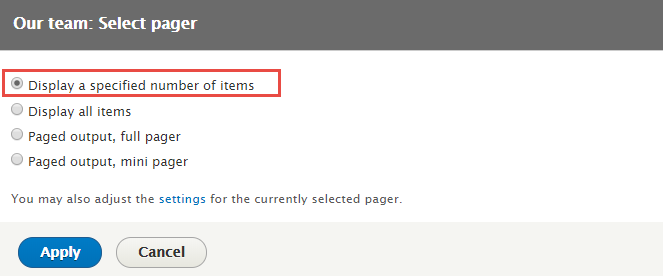
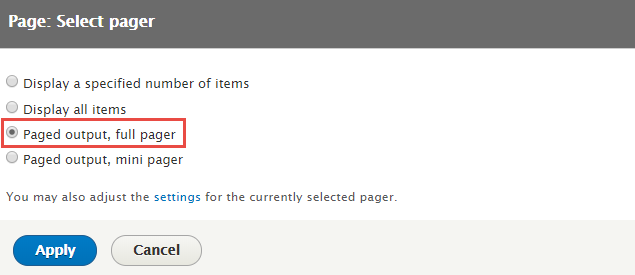
Step 17: At PAGER area, click Use pager and set following properties:

Step 18: At Advanced > OTHER area, add CSS class:

Step 19: Click Save to save view
2. Configure View: Special Sale block
Step 1: Navigate to Structure > Block layout
Step 2: Find Panel second click Place block button
Step 3: Find Best Seller: Special Sale click Place block button and set following properites:

Step 4: Click Save block button.
Front Page block
Front end Display
1. Create Front Page view
Step 1: Navigate to Structure > Views, click Add new view, then create Front Page view with following settings:
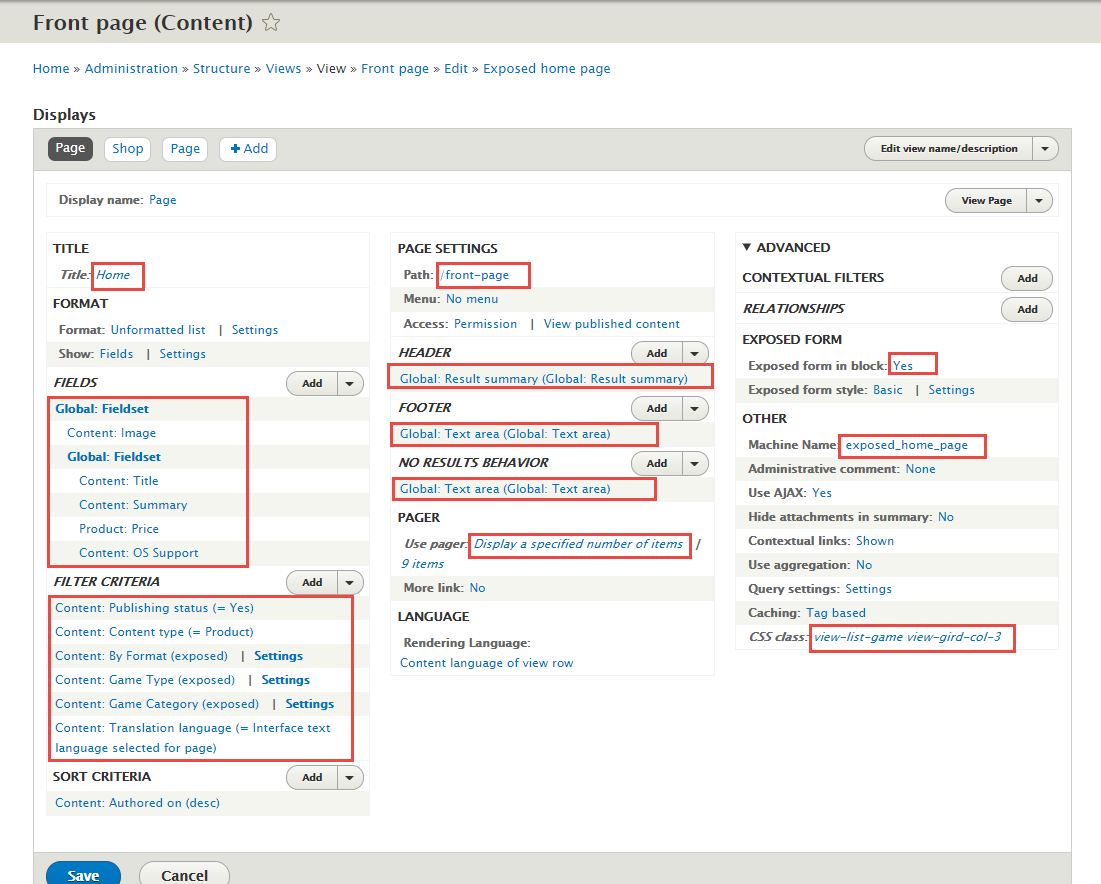
Step 2: Click Save and edit button. Next to steps below to set properties for following fields:
Step 3: At TITLE area, click Title field and set following properites:

Step 4: At FIELDS area, click Add button to add fields: Global: Fieldset, Content: Image, Global: Fieldset, Content: Summary, Product: Price, Content: OS Support
Step 5: Set properties for Global: Fieldset

Step 6: Set properties for Content: Image
Step 7: Set properties for Global: Fieldset

Step 8: Set properties for Content: Summary
Step 10: Set properties for Product: Price
Step 11: Set properties for Content: OS Support
Step 12: At FIELDS area, click Rearrange button and set following arrange
Step 13: At FILTER CRITERIA area, add Content: Content type, Content: By Formart, Content: Game type, Content: Game Category, Content: Translation language fields and set following properites
Step 14: Set properties for Content: Content type
Step 15: Set properties for Content: By Formart

Step 16: Set properties for Content: Game type
Step 17: Set properties for Content: Game Category
Step 18: Set properties for Content: Translation language
Step 19: At HEADER area, click Add button field Global: Text area and set following properties:
Refer to following HTML code:
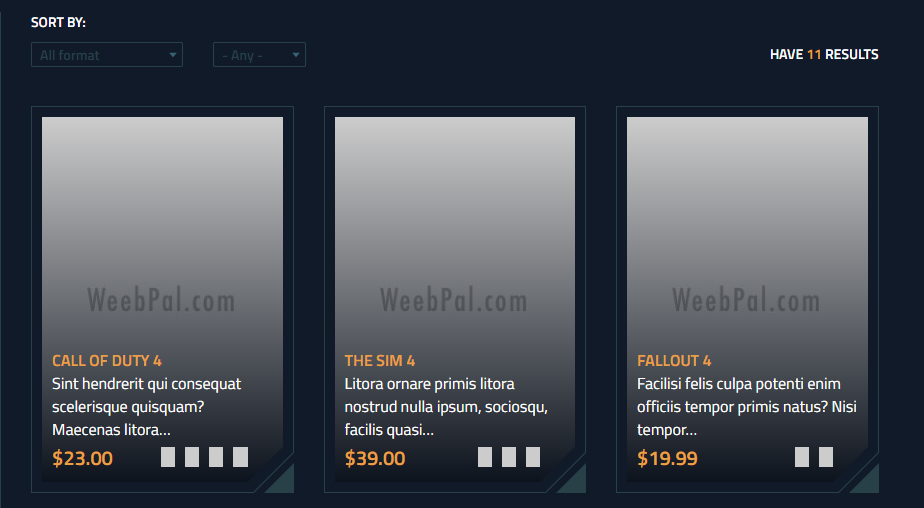
Have @total results
Step 20: At FOOTER area, add Global: Text area field with following properties:
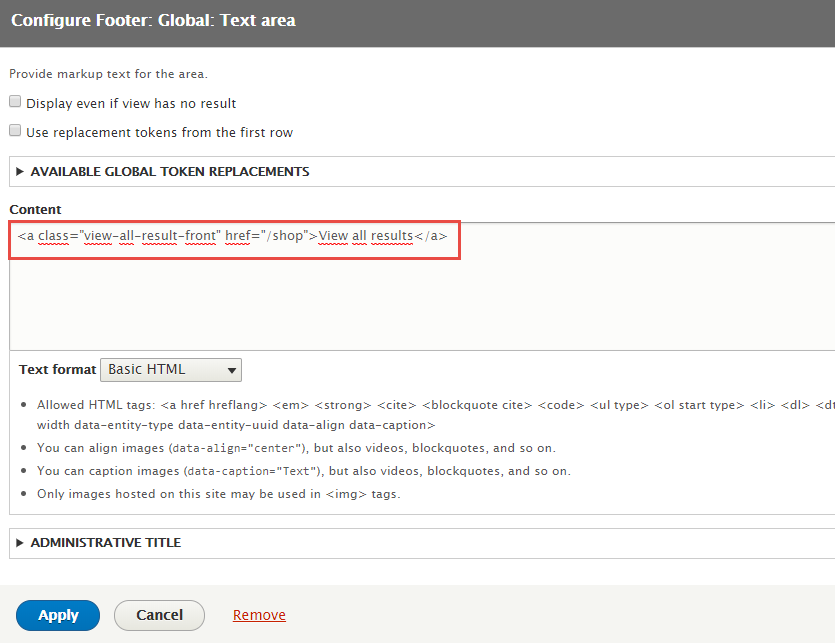
Refer to following HTML code:
View all results
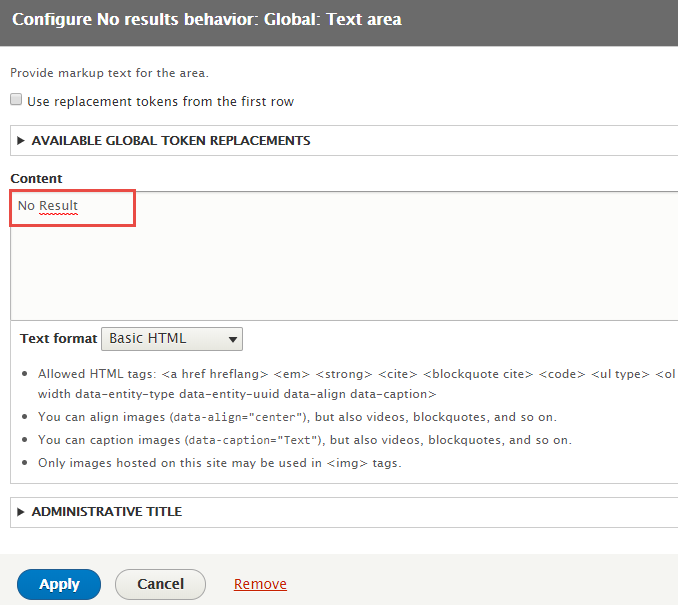
Step 21: At NO RESULTS BEHAVIOR area, cick Add button to add Global: Text area field and set following properties:
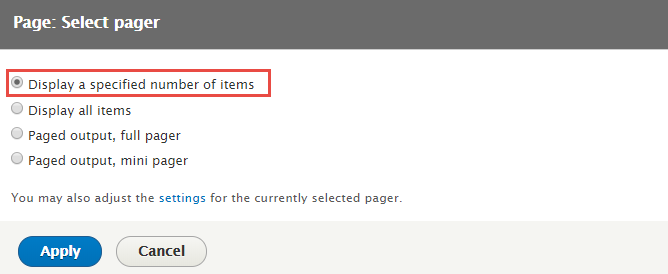
Step 22: At PAGER area, click Use pager and set following properties:
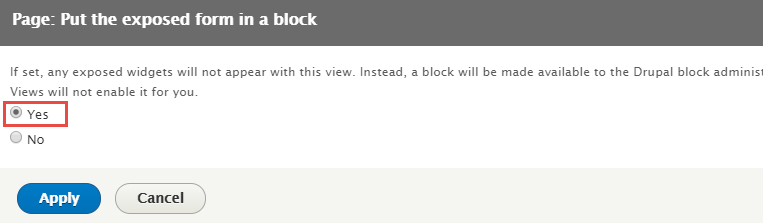
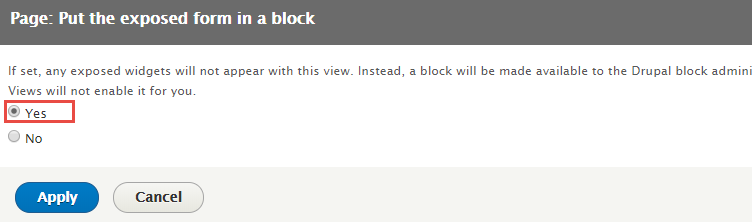
Step 23: At Advanced > EXPOSED FORM area, add Exposed form in block: :
Step 24: At Advanced > OTHER area, add Machine name:

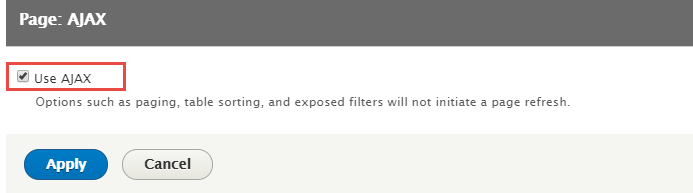
Step 25: At Advanced > OTHER area, add Use AJAX:
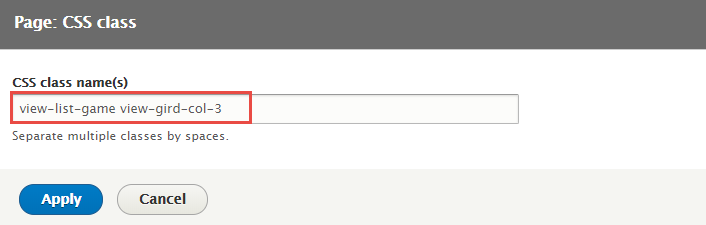
Step 26: At Advanced > OTHER area, add CSS class:
Step 27: Click Save to save view
2. Configure View: Front Page block
Step 1: Navigate to Structure > Block layout
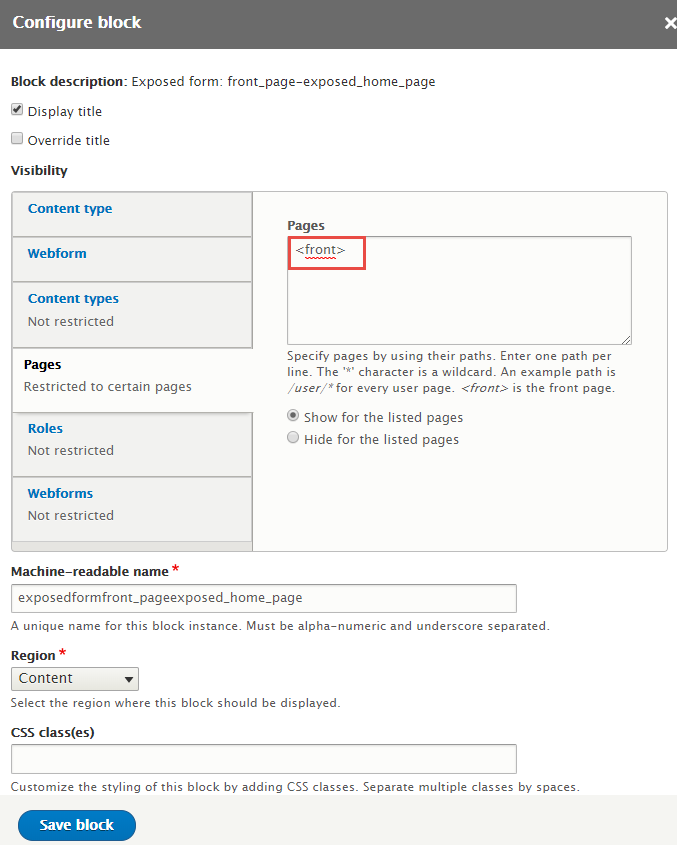
Step 2: Find Content click Place block button
Step 3: Find Exposed form: front_page-exposed_home_page click Place block button and set following properites:
Step 4: Click Save block button.
Sidebar Filter block
Front end Display
Create and configure Sidebar Filter block
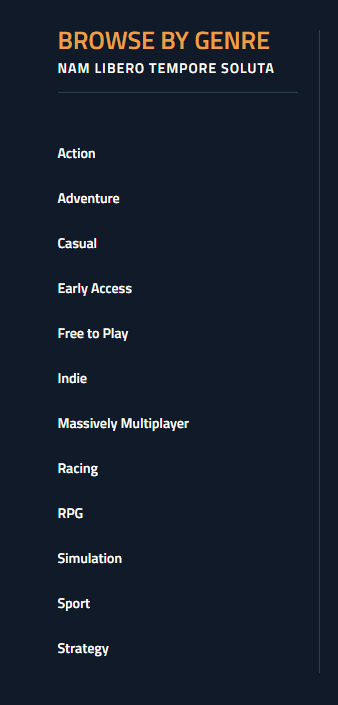
Step 1: Navigate to Structure > Block layout find Add custom block link. Click and create Sidebar Filter block with following properties:
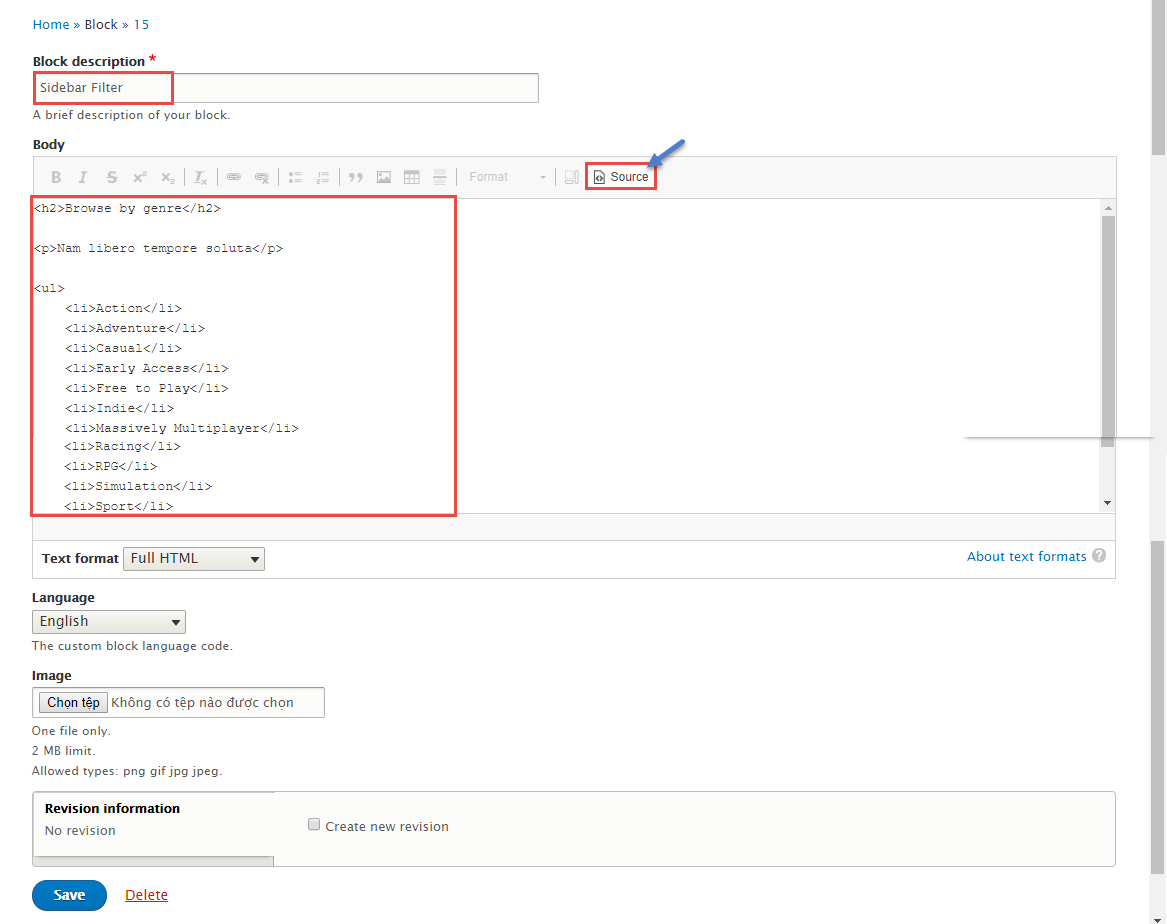

Step 2: Click Save button
Refer to following HTML code:
Browse by genre
Nam libero tempore soluta
- Action
- Adventure
- Casual
- Early Access
- Free to Play
- Indie
- Massively Multiplayer
- Racing
- RPG
- Simulation
- Sport
- Strategy
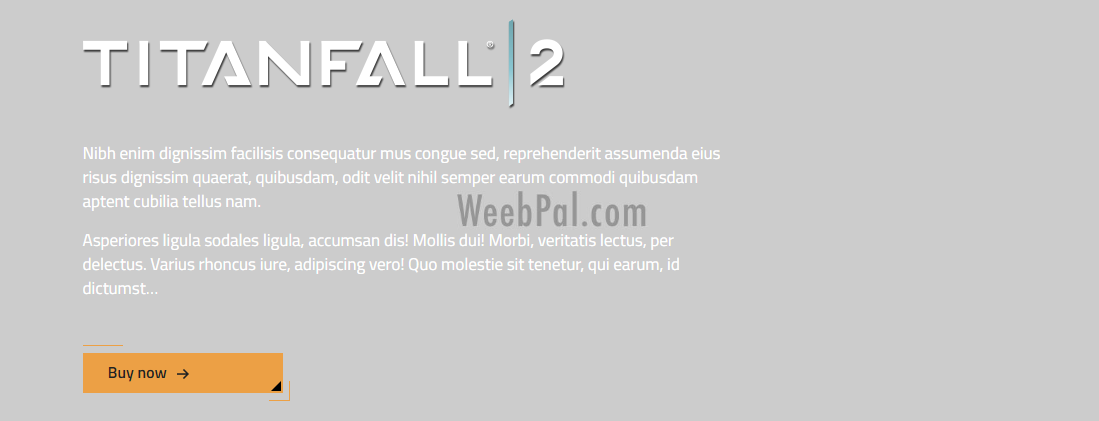
Game highlight block
Front end Display
1. Create Game highlight view
Step 1: Navigate to Structure > Views, click Add new view, then create Game highlight view with following settings:

Step 2: Click Save and edit button. Next to steps below to set properties for following fields:
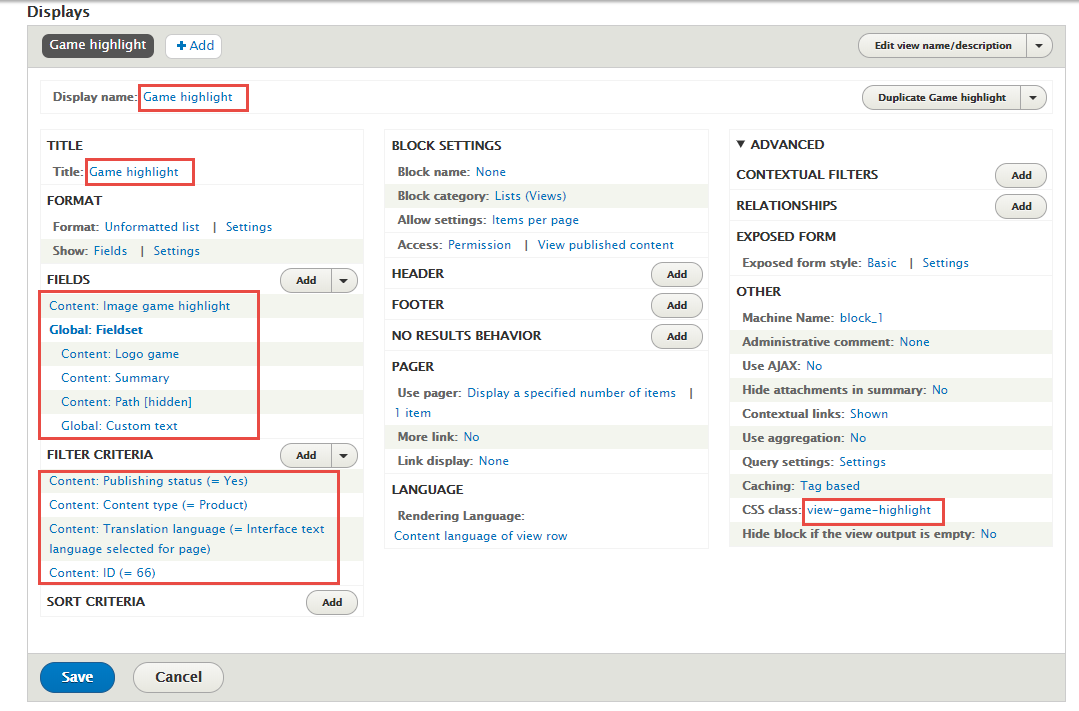
Step 3: At Display name area, click and set properties:

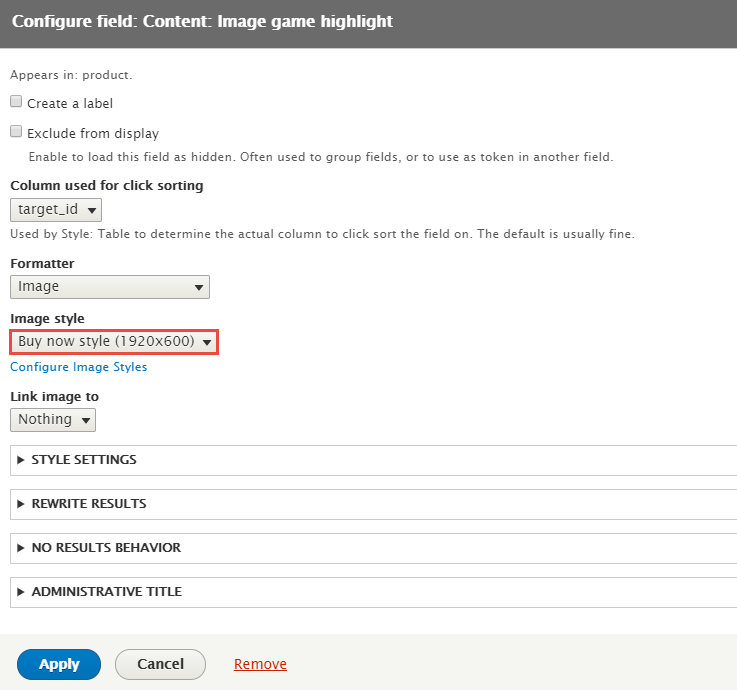
Step 4: At FIELDS area, click Add button to add fields: Content: Image game highlight, Global: Fieldset, Content: Logo game, Content: Summary, Content: Path , Global: Custom text
Step 5: Set properties for Content: Image game highlight
Step 6: Set properties for Global: Fieldset
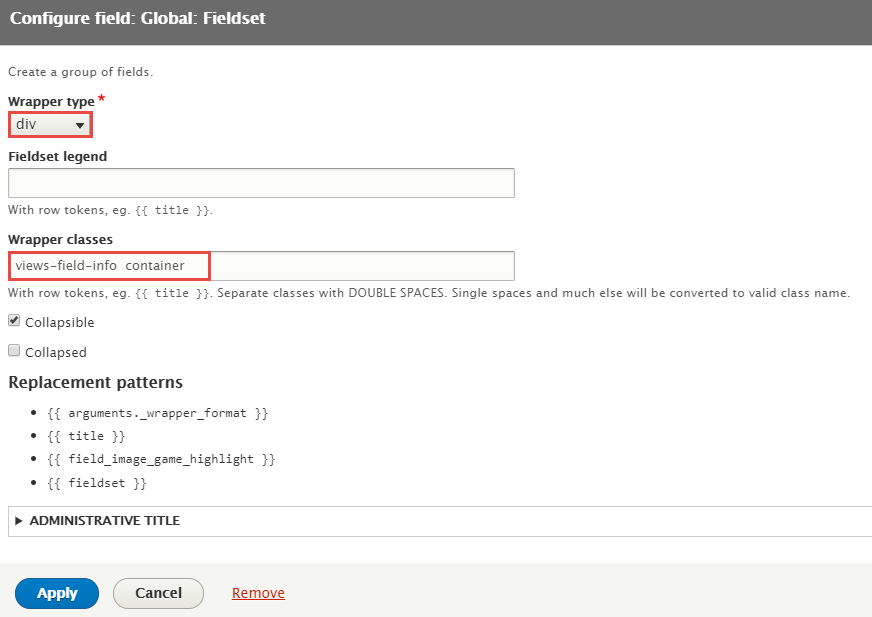
Step 7: Set properties for Content: Logo game
![]()
Step 8: Set properties for Content: Summary
Step 9: Set properties for Content: Custom text

Refer to following HTML code:
Step 10: At FIELDS area, click Rearrange button and set following arrange
Step 11: At FILTER CRITERIA area, add Content: Content type, Content: ID, Content: Translation language fields and set following properites
Step 12: Set properties for Content: Content type
Step 13: Set properties for Content: ID
1: Navigate to Content
2: Find content Titanfall 2 click Edit button
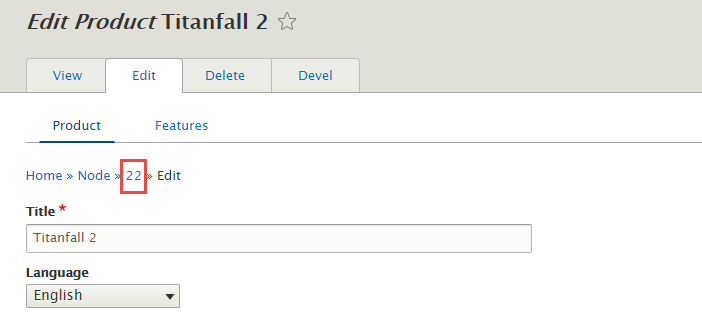
3: Set value 22 in content ID (view Game highlight)

Step 14: Set properties for Content: Translation language
Step 15: At PAGER area, click Use pager and set following properties:

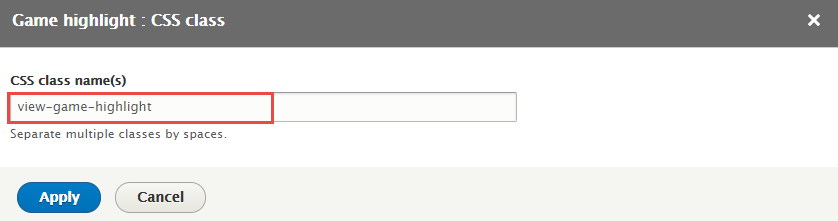
Step 16: At Advanced > OTHER area, add CSS class:
Step 17: Click Save to save view
2. Configure View: Game highlight block
Step 1: Navigate to Structure > Block layout
Step 2: Find Panel bottom click Place block button
Step 3: Find Game highlight: Game highlight Lists(Views) click Place block button and set following properites:
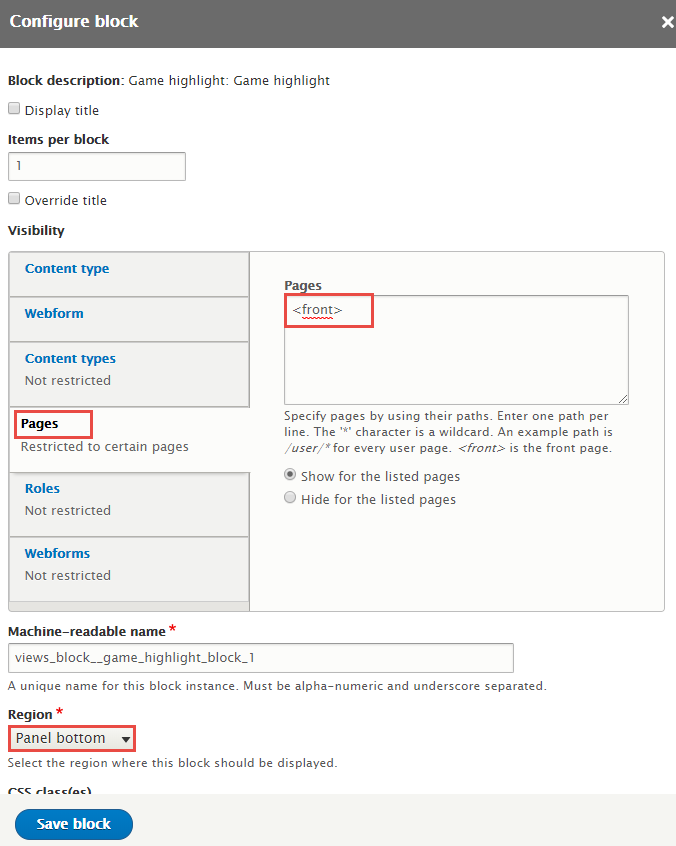
Step 4: Click Save block button.
Our Blog block
Front end Display

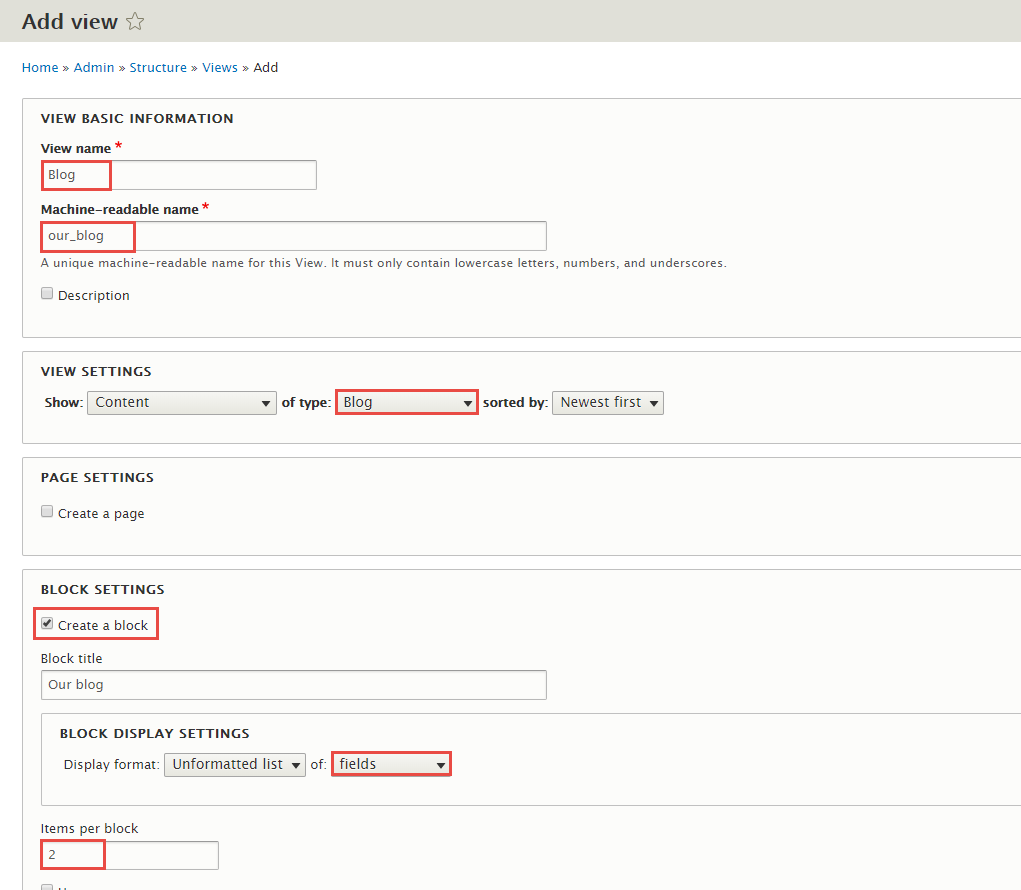
1. Create Blog view
Step 1: Navigate to Structure > Views, click Add new view, then create Game highlight view with following settings:
Step 2: Click Save and edit button. Next to steps below to set properties for following fields:
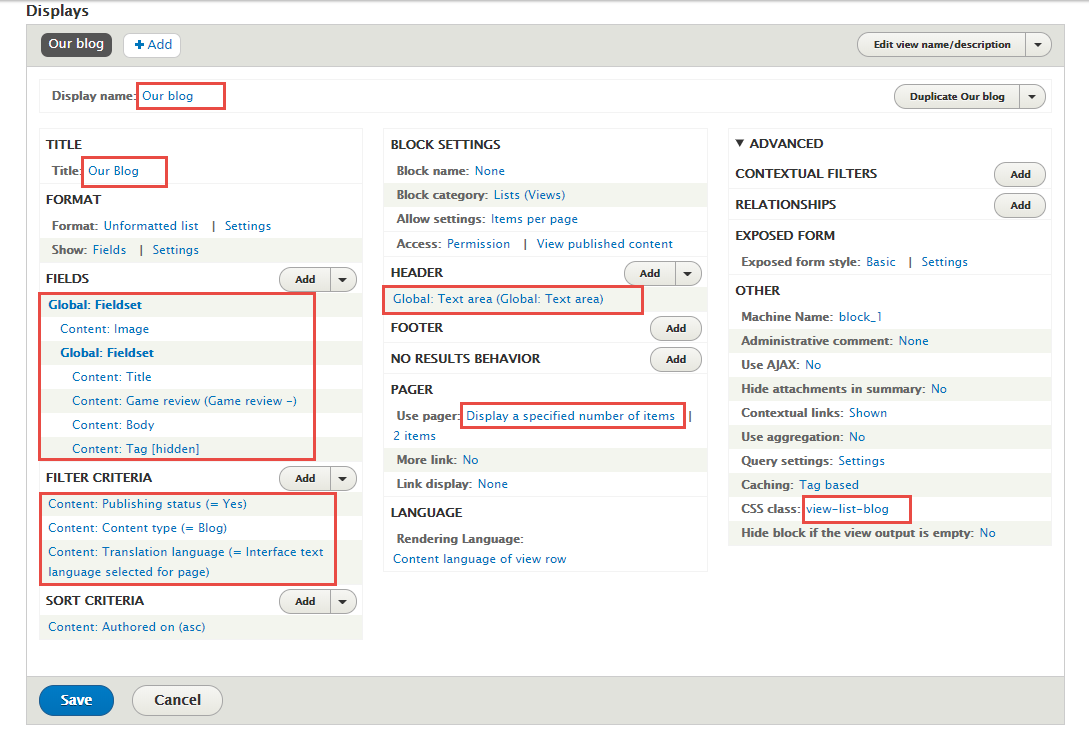
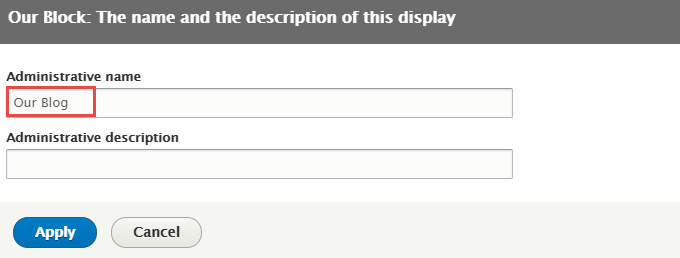
Step 3: At Display name area, click and set properties:
Step 4: At TITLE area, click Title and set properties:

Step 5: At FIELDS area, click Add button to add fields: Global: Fieldset, Content: Image, Global: Fieldset, Content: Game review, Content: Body, Content: Tag
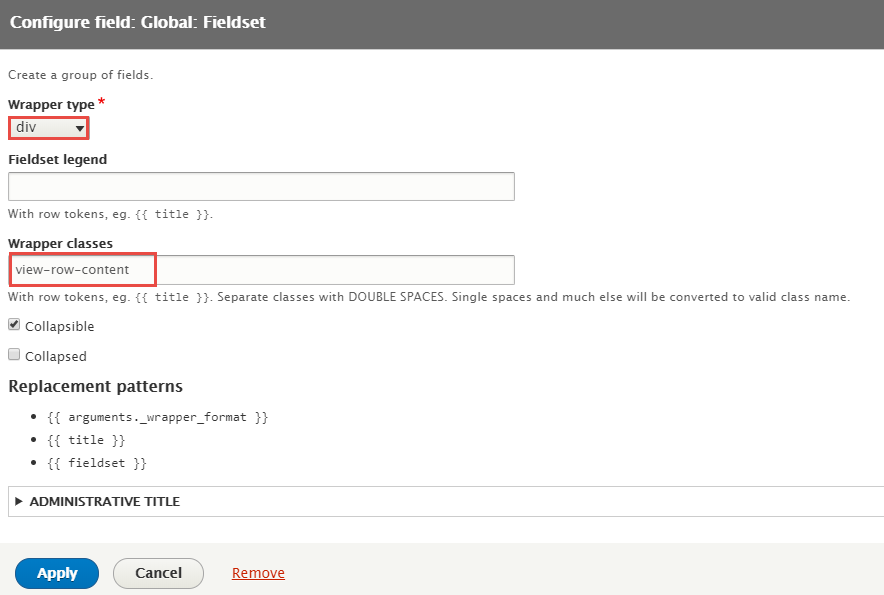
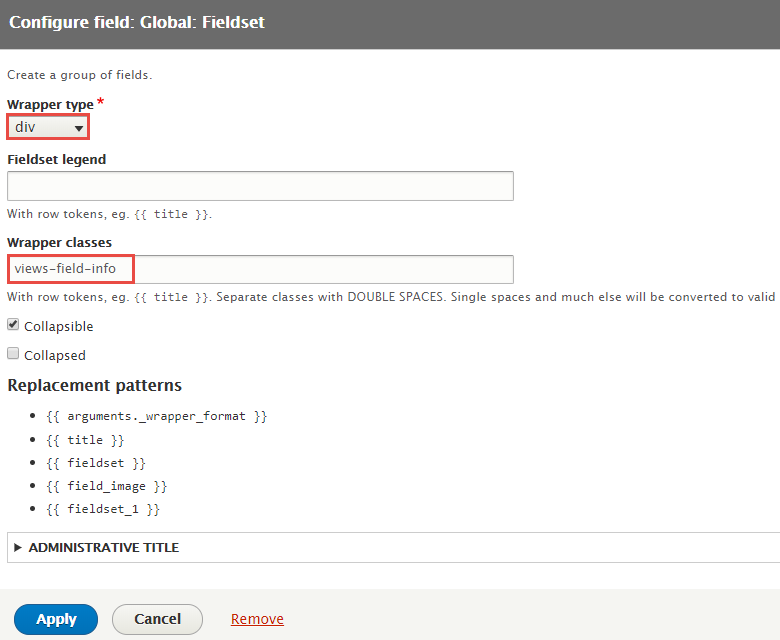
Step 6: Set properties for Global: Fieldset
Step 7: Set properties for Content: Image

Step 8: Set properties for Global: Fieldset
Step 9: Set properties for Content: Game review
Step 10: Set properties for Content: Body

Step 11: Set properties for Content: Tag

Step 12: At FIELDS area, click Rearrange button and set following arrange

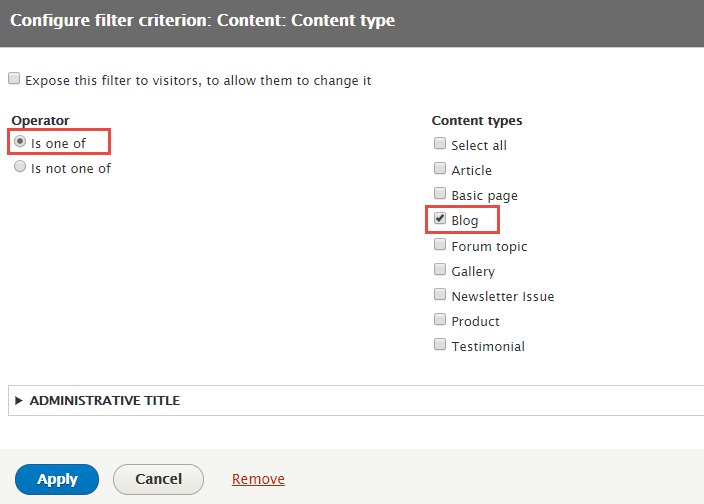
Step 13: At FILTER CRITERIA area, add Content: Content type, Content: Translation language fields and set following properites
Step 14: Set properties for Content: Content type
Step 15: Set properties for Content: Translation language
Step 16: At HEADER area, click Add button field Global: Text area and set following properties:
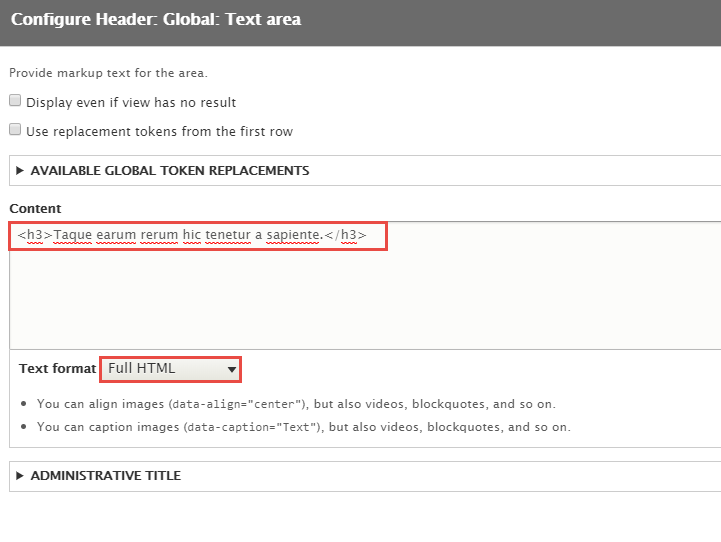
Refer to following HTML code:
Taque earum rerum hic tenetur a sapiente.
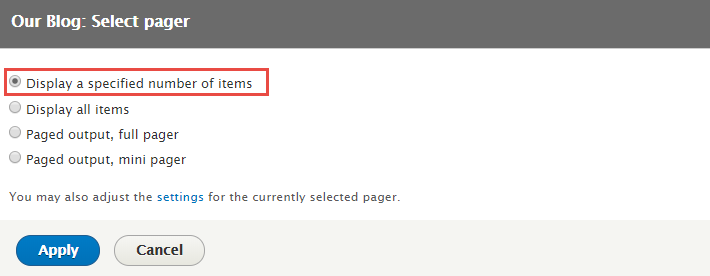
Step 17: At PAGER area, click Use pager and set following properties:
Step 18: At Advanced > OTHER area, add CSS class:
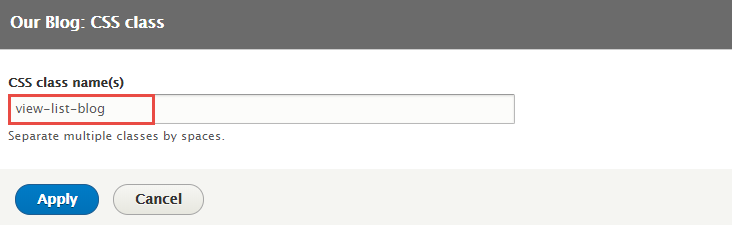
Step 19: Click Save to save view
2. Configure View: Blog block
Step 1: Navigate to Structure > Block layout
Step 2: Find Footer top click Place block button
Step 3: Find Blog: Our Blog Lists(Views) click Place block button and set following properites:

Step 4: Click Save block button.
Our Forum block
Front end Display

1. Create Our Forum view
Step 1: Navigate to Structure > Views, click Add new view, then create Our Forum view with following settings:
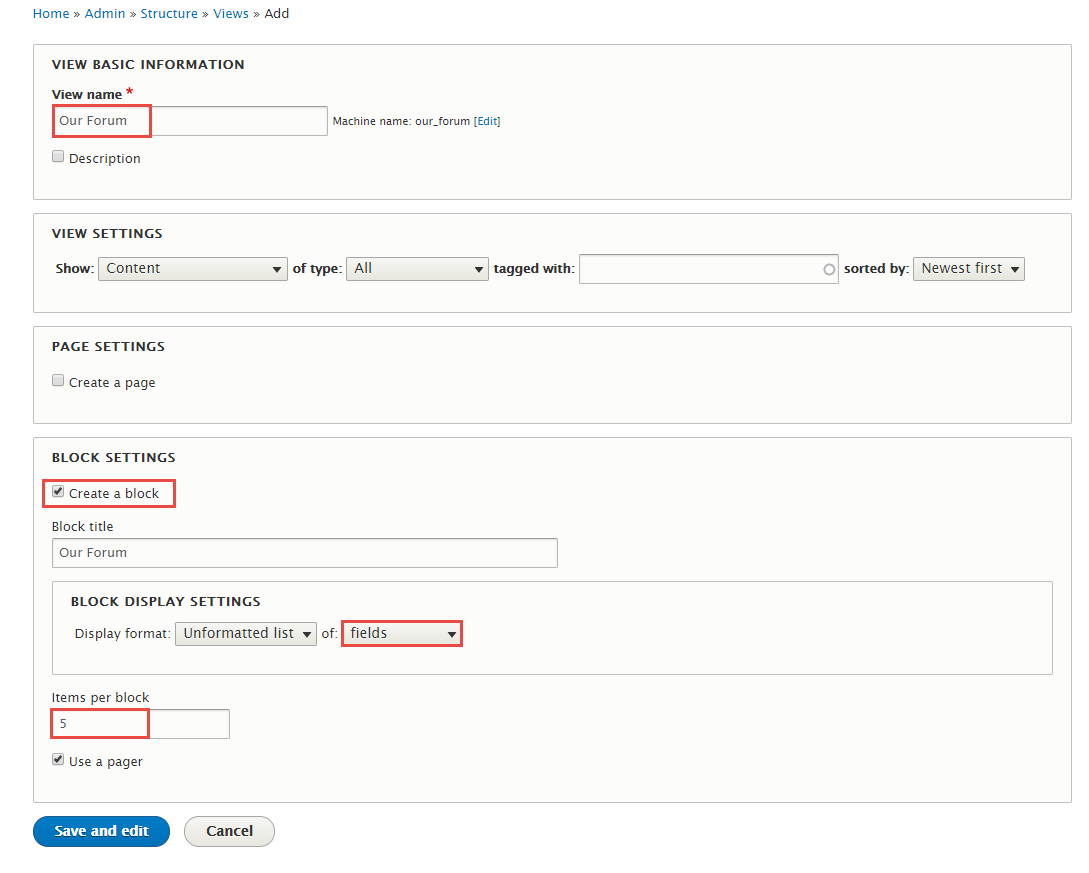
Step 2: Click Save and edit button. Next to steps below to set properties for following fields:

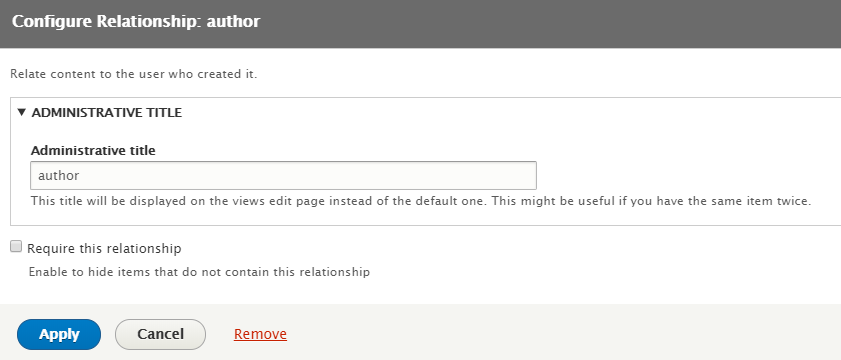
Step 3: At ADVANCED > RELATIONSHIP area, add author field and set following properties:
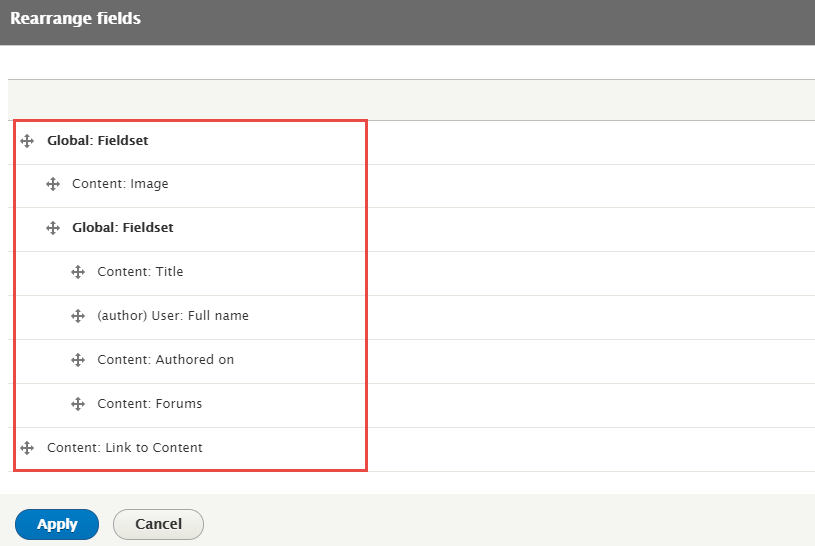
Step 4: At FIELDS area, click Add button to add fields: Global: Fieldset, Content: Image, Global: Fieldset, (author)User: Fullname, Content: Authored on, Content: Forums, Content: Path, Content: Link to Content
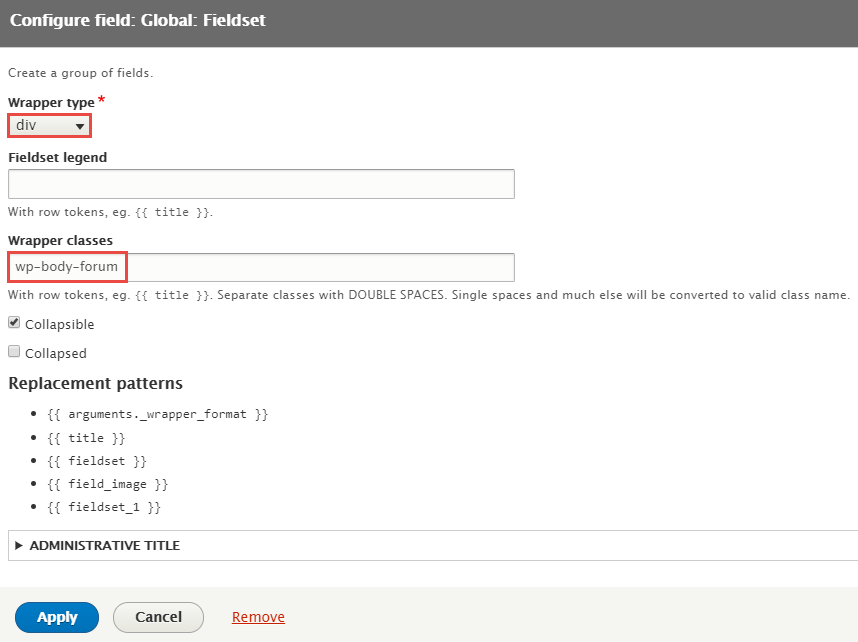
Step 5: Set properties for Global: Fieldset

Step 6: Set properties for Content: Image

Step 7: Set properties for Global: Fieldset
Step 8: Set properties for (author)User: Fullname

Step 9: Set properties for Content: Authored on

Refer to following HTML code:
By {{ field_full_name }} - {{ created }}
Step 10: Set properties for Content: Forums
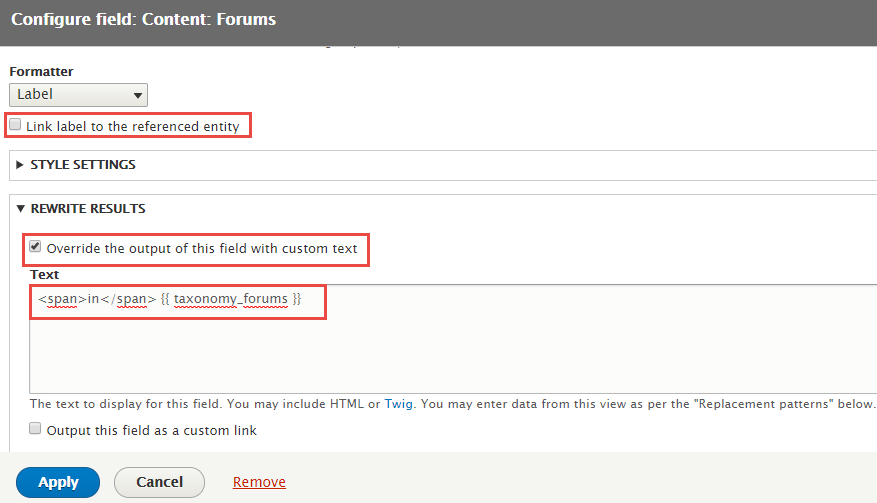
Refer to following HTML code:
in {{ taxonomy_forums }}
Step 11: Set properties for Content: Link to content
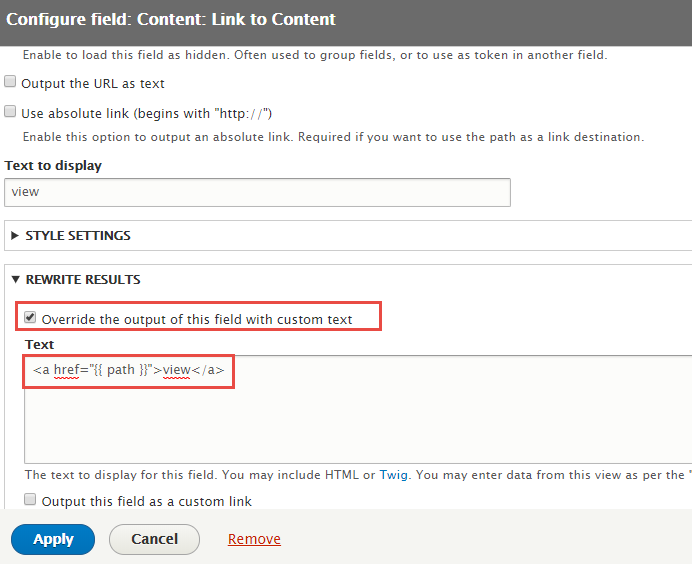
Refer to following HTML code:
view
Step 12: At FIELDS area, click Rearrange button and set following arrange
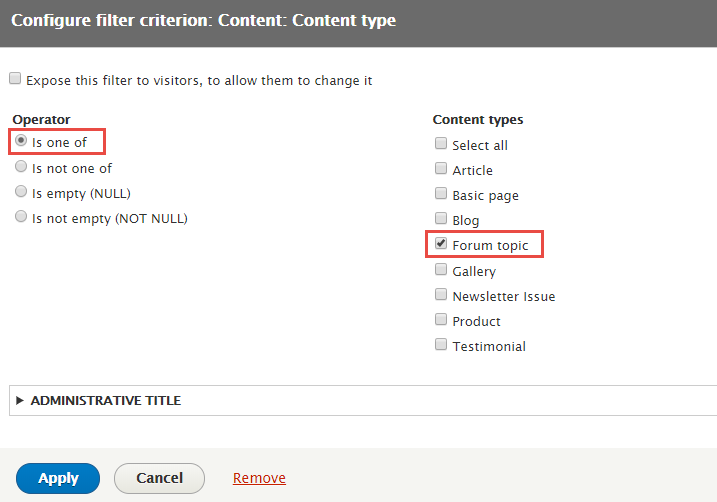
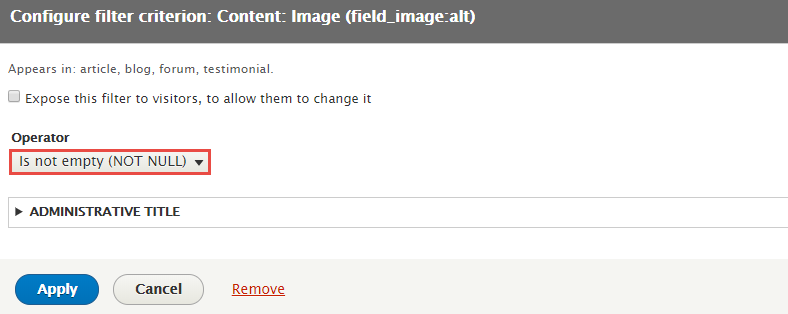
Step 13: At FILTER CRITERIA area, add Content: Content type, Content: Translation language, Content: Image fields and set following properites
Step 14: Set properties for Content: Content type
Step 15: Set properties for Content: Translation language
Step 16: Set properties for Content: Image
Step 17: At HEADER area, click Add button to add field Global: Text area and set following properties:
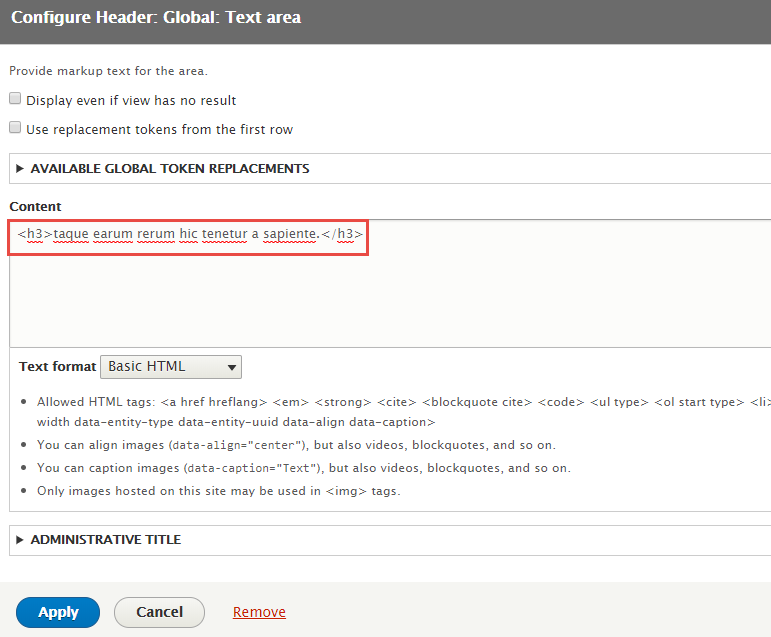
Refer to following HTML code:
taque earum rerum hic tenetur a sapiente.
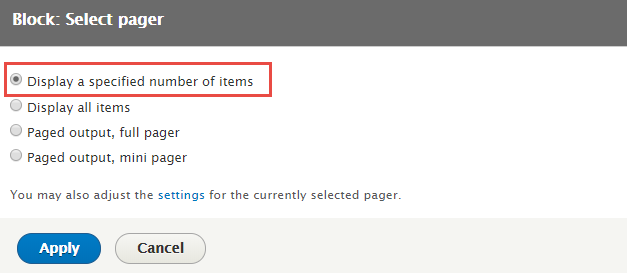
Step 18: At PAGER area, click Use pager and set following properties:
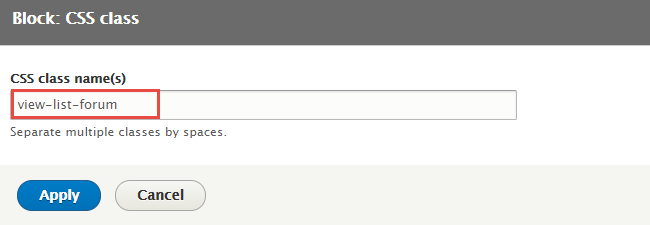
Step 20: At Advanced > OTHER area, add CSS class:
Step 21: Click Save to save view
2. Configure View: Our Forum block
Step 1: Navigate to Structure > Block layout
Step 2: Find Footer top click Place block button
Step 3: Find Our Forum Lists(Views) click Place block button and set following properites:

Step 4: Click Save block button.
Member block
Front end Display
Create and configure Member block
Step 1: Navigate to Structure > Block layout find Add custom block link. Click and create Member block with following properties:
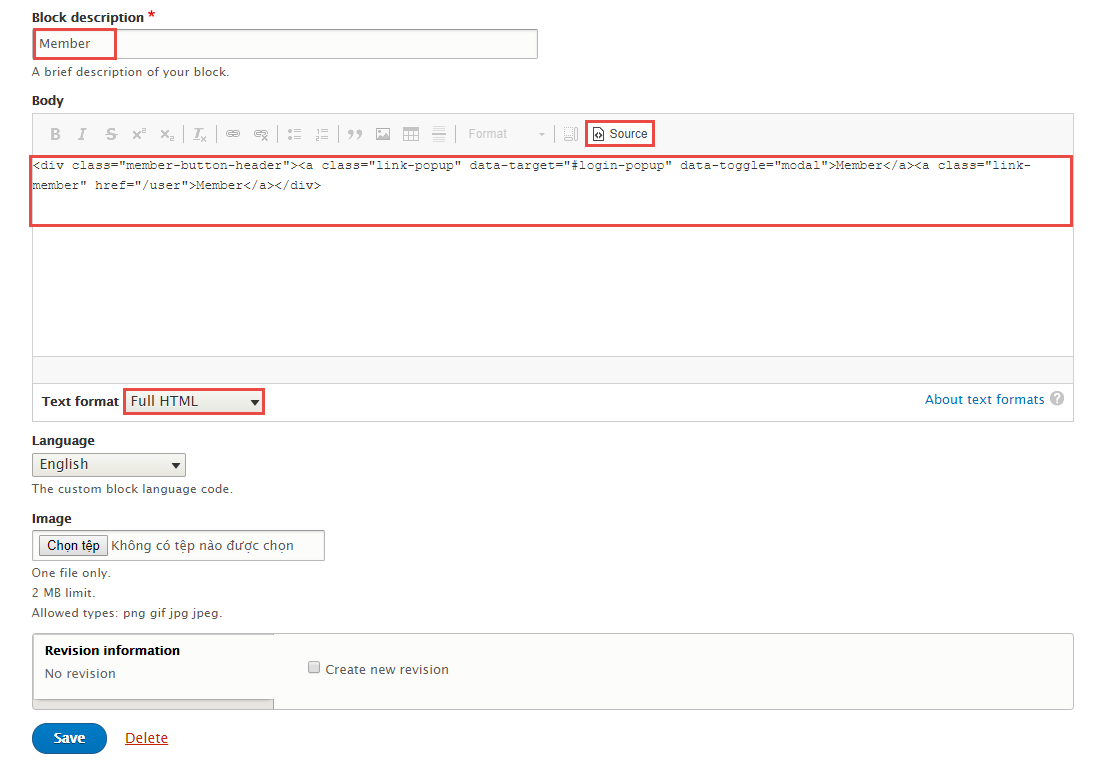
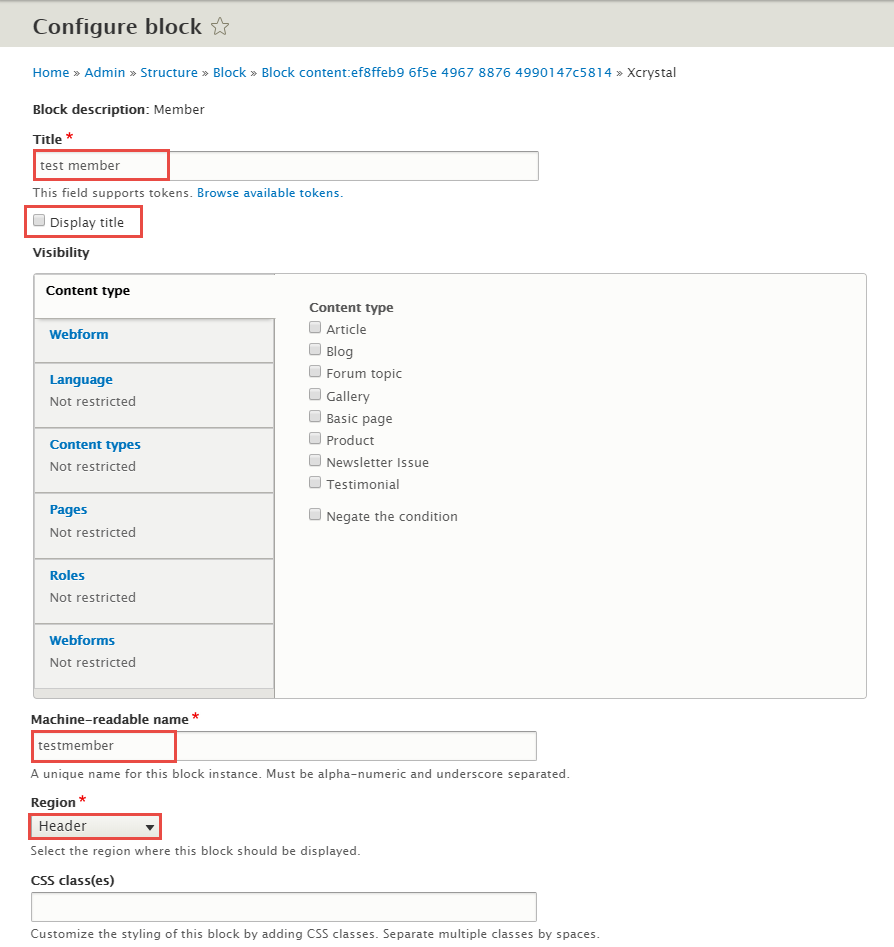
Step 2: Click Save button
Refer to following HTML code:
Your Cart block
Front end Display

Configure Your Cart block
Step 1: Navigate to Structure > Block layout
Step 2: Find Header click Place block button
Step 3: Find Your Cart click Place block button and set following properites:
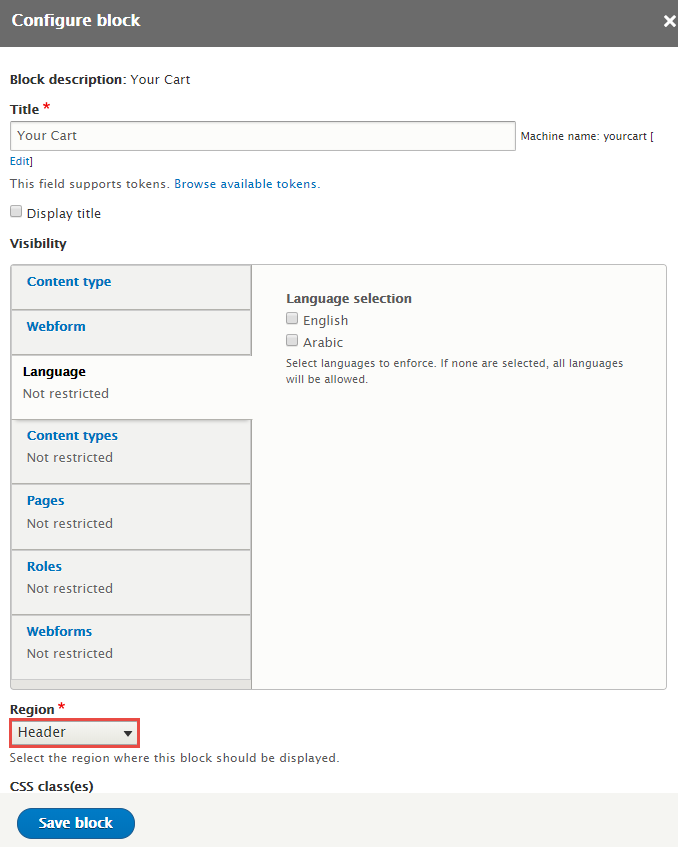
Step 4: Click Save block button.
Language block
Front end Display

Configure Language block
Step 1: Navigate to Structure > Block layout
Step 2: Find Header click Place block button
Step 3: Find Language dropdown switcher click Place block button and set following properites:
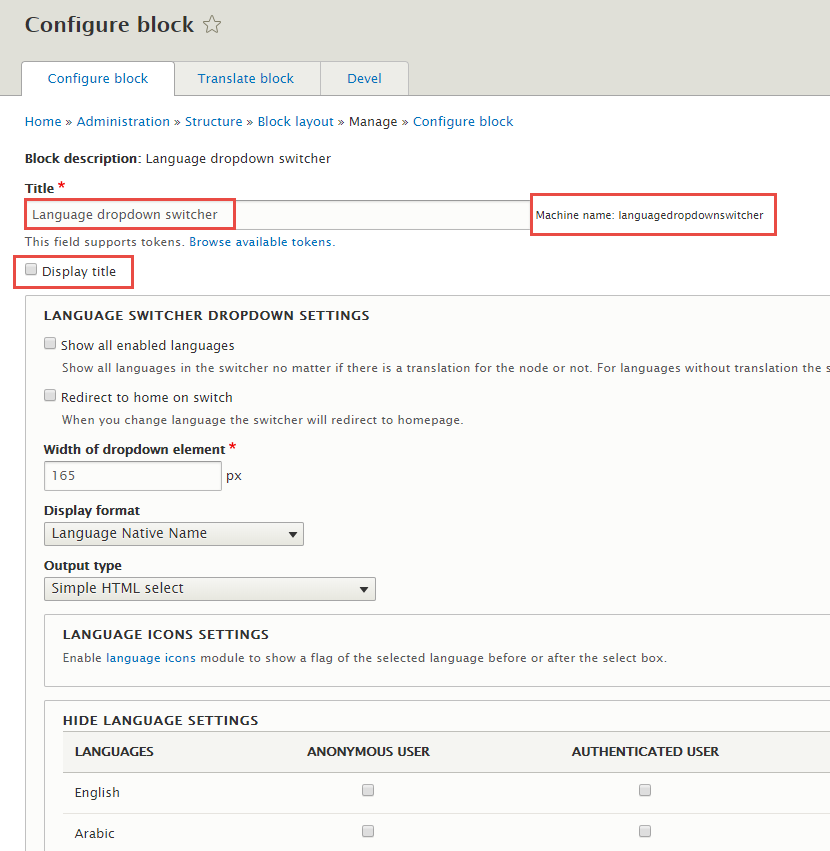
Step 4: Click Save block button.
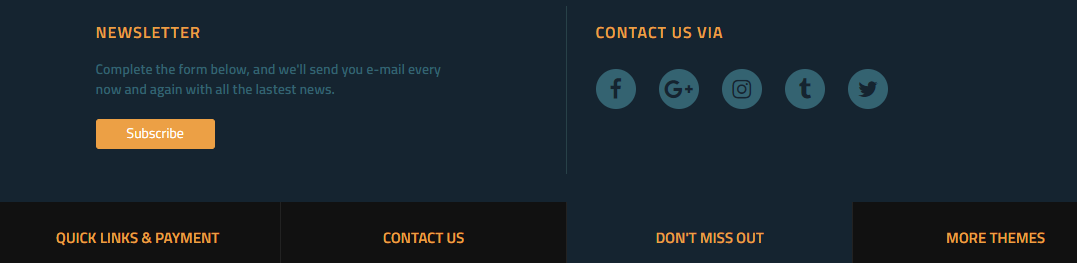
Quick link & payment menu
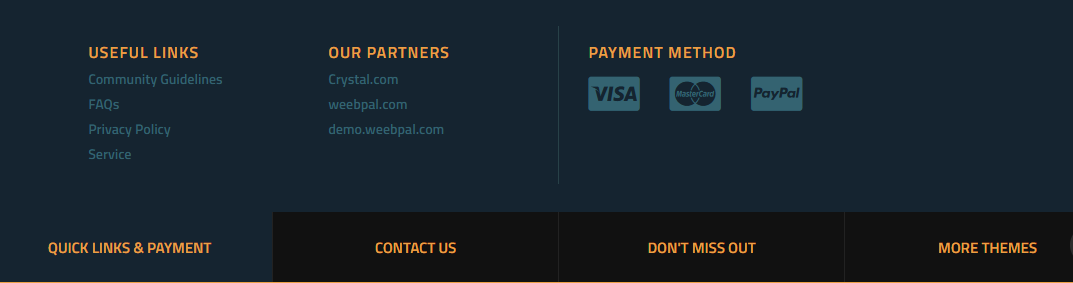
1. Useful Links block
Create Useful Links block
Step 1: Navigate to Structure > Block Layout, click Add custom block, then create Useful Links view with following settings:


Refer to following HTML code:
2 Our Partners block
Create Our Partners block
Step 1: Navigate to Structure > Block Layout, click Add custom block, then create Our Partners view with following settings:

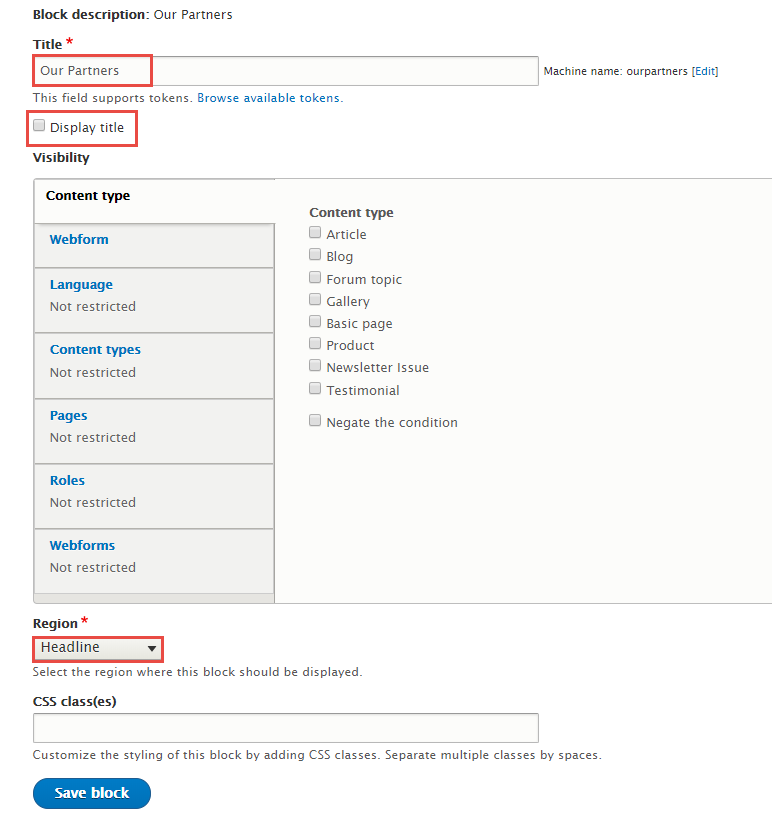
Refer to following HTML code:
3 Payment Method block
Create Payment Method
Step 1: Navigate to Structure > Block Layout, click Add custom block, then create Payment Method view with following settings:
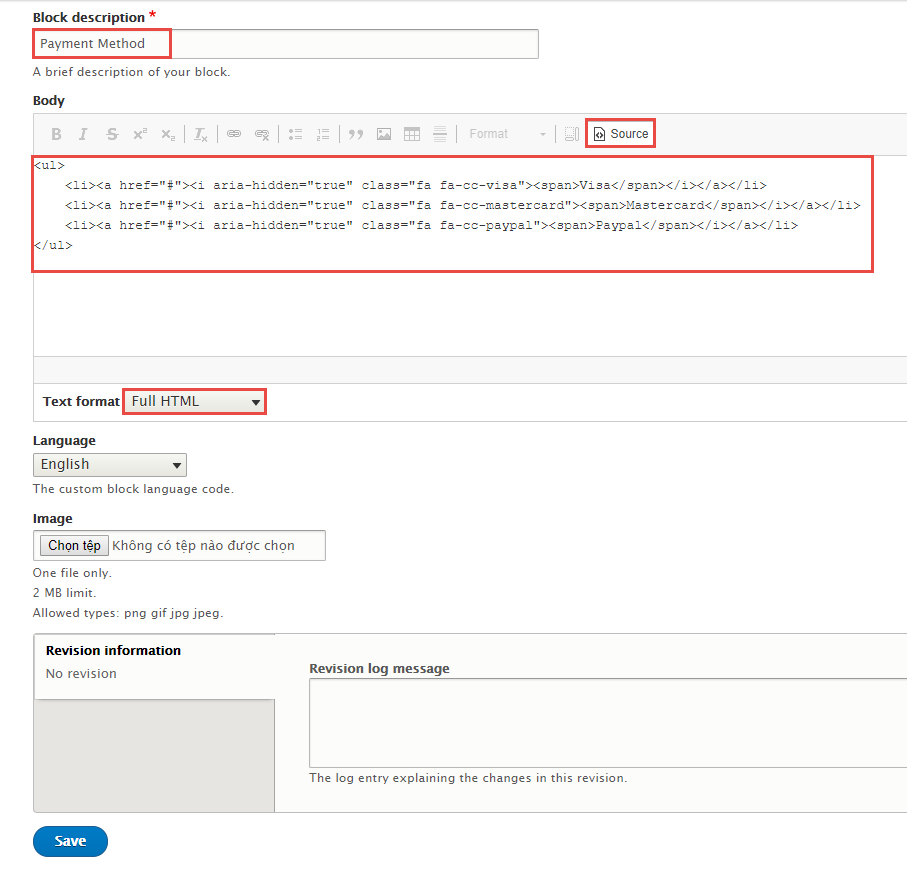
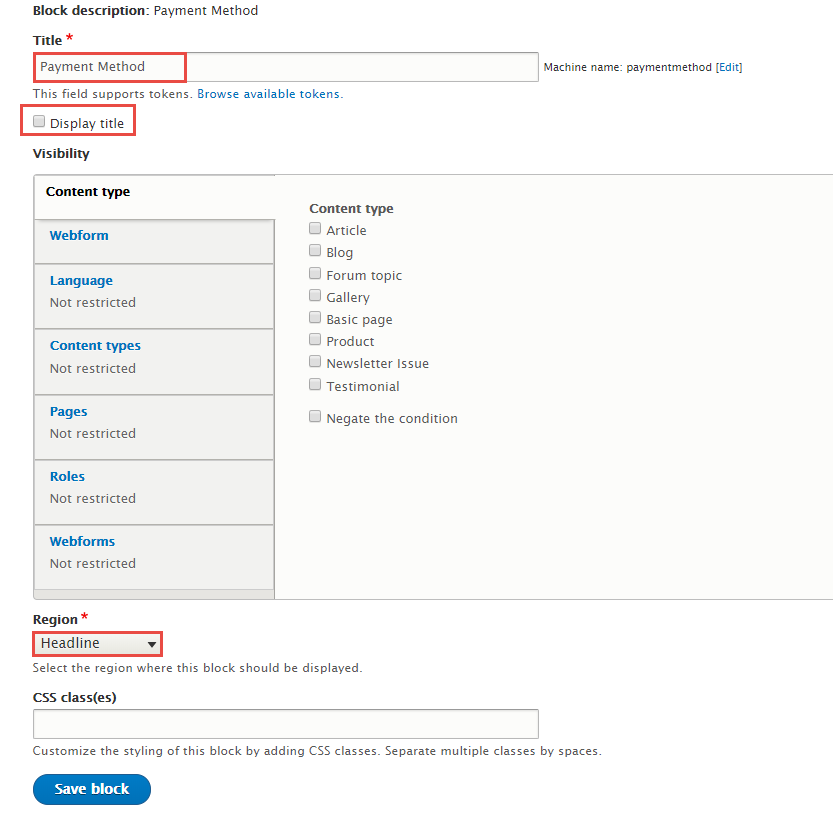
Refer to following HTML code:
Don't miss out menu
1 Newsletter block
Configure Newsletter block
Step 1: Navigate to Structure > Block layout
Step 2: Find Headline click Place block button
Step 3: Find Simplenews subscription click Place block button and set following properites:
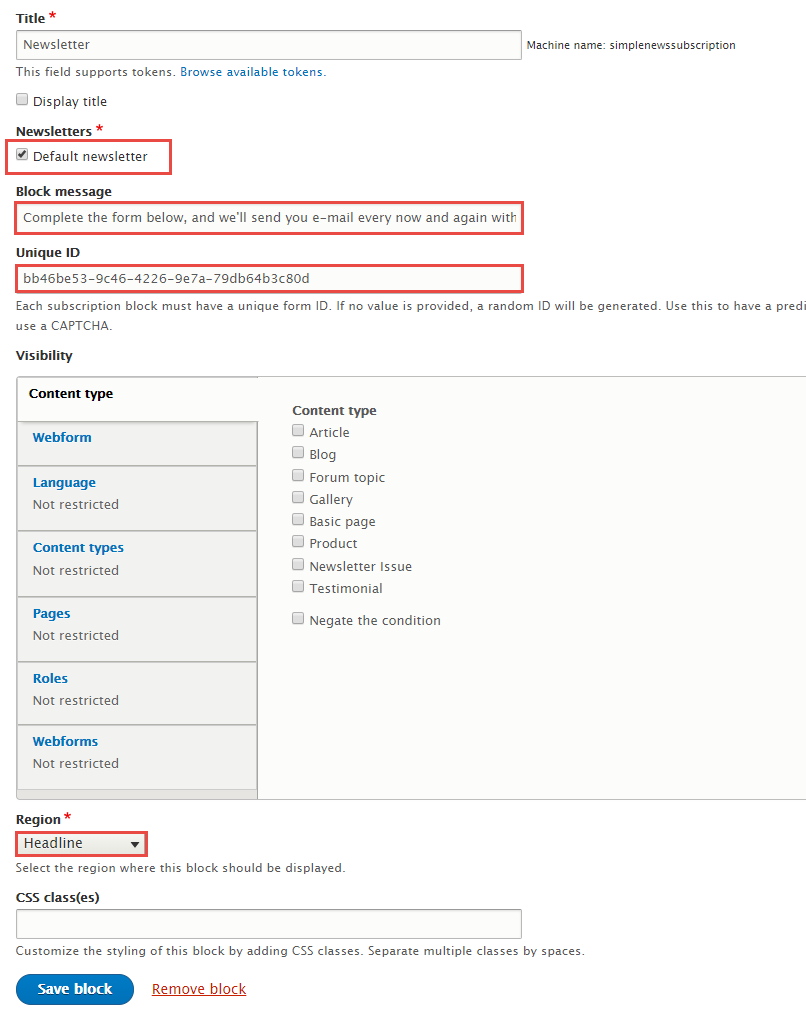
Step 4: Click Save block button.
Refer to following HTML code:
Complete the form below, and we'll send you e-mail every now and again with all the lastest news.
Refer to following HTML code:
bb46be53-9c46-4226-9e7a-79db64b3c80d
2 Social Menu Footer
Create Social Menu Footer block
Step 1: Navigate to Structure > Block Layout, click Add custom block, then create Our Partners view with following settings:


Refer to following HTML code:
WeebPal Mega Menu menu
Front end Display
1. Configure Main navigation menu block
Step 1: Navigate to Structure > Block layout
Step 2: Find Primary menu click Place block button
Step 3: Find Main navigation (WeebPal Mega Menu) click Place block button and set following properites:

Step 4: Click Save block button.
2. Configure WeebPal Mega Menu block
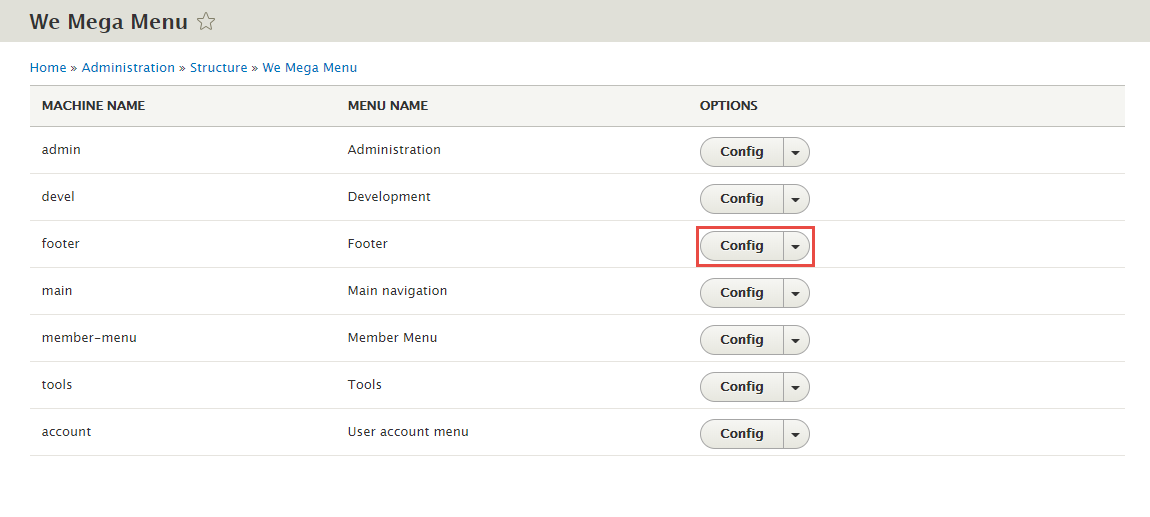
Step 1: Navigate to Structure > Weebpal mega menu
Step 2: Find Main click Config button and set following properites:

Step 3: Click Save button.
3. Add menu item link Main navigation menu
Step 1: Navigate to Structure > Menu, find Main navigation menu. Click and add list menu item following:
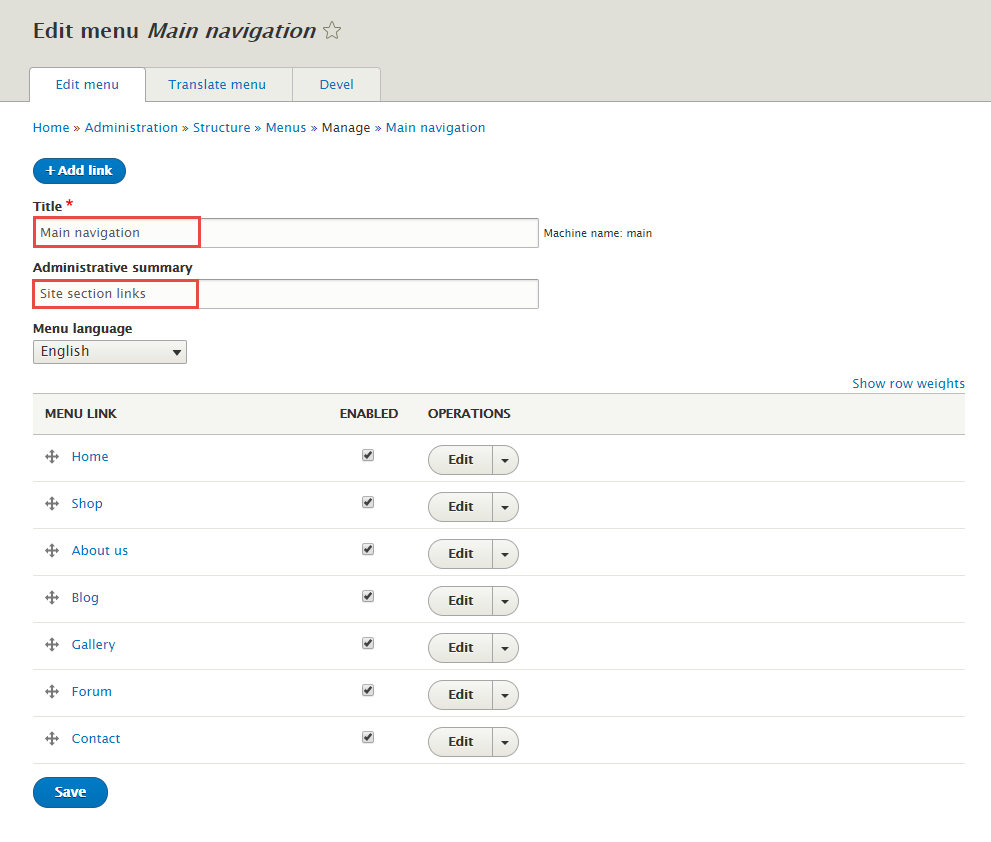
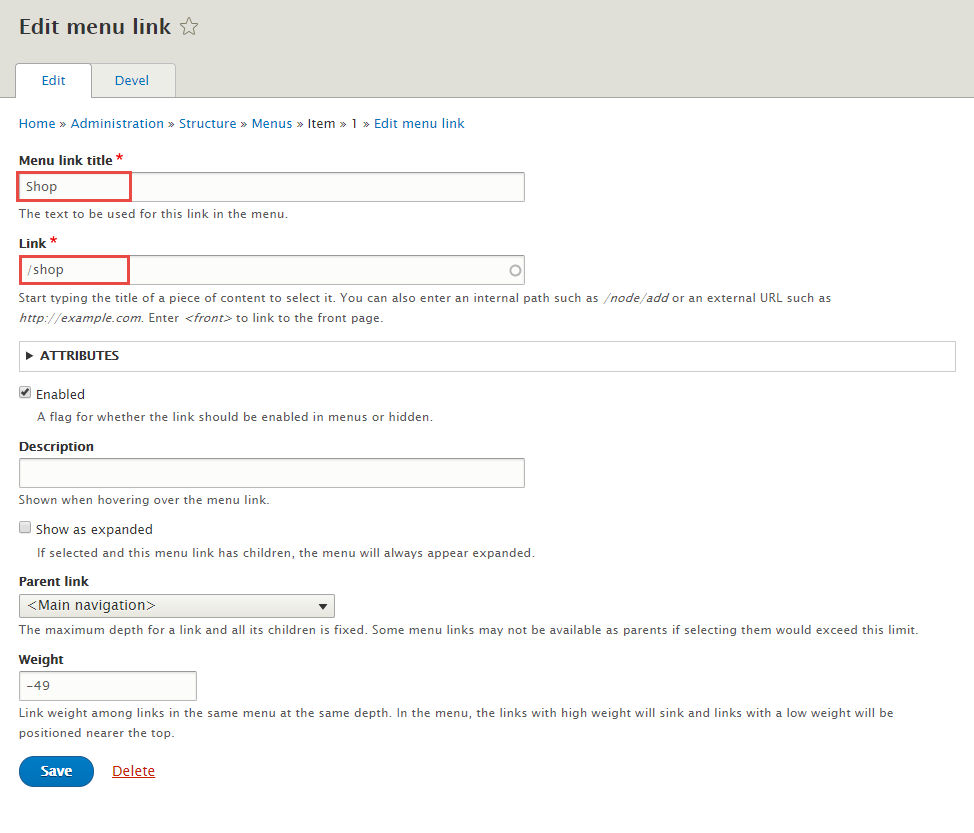
Step 2: Set properties Shop menu item
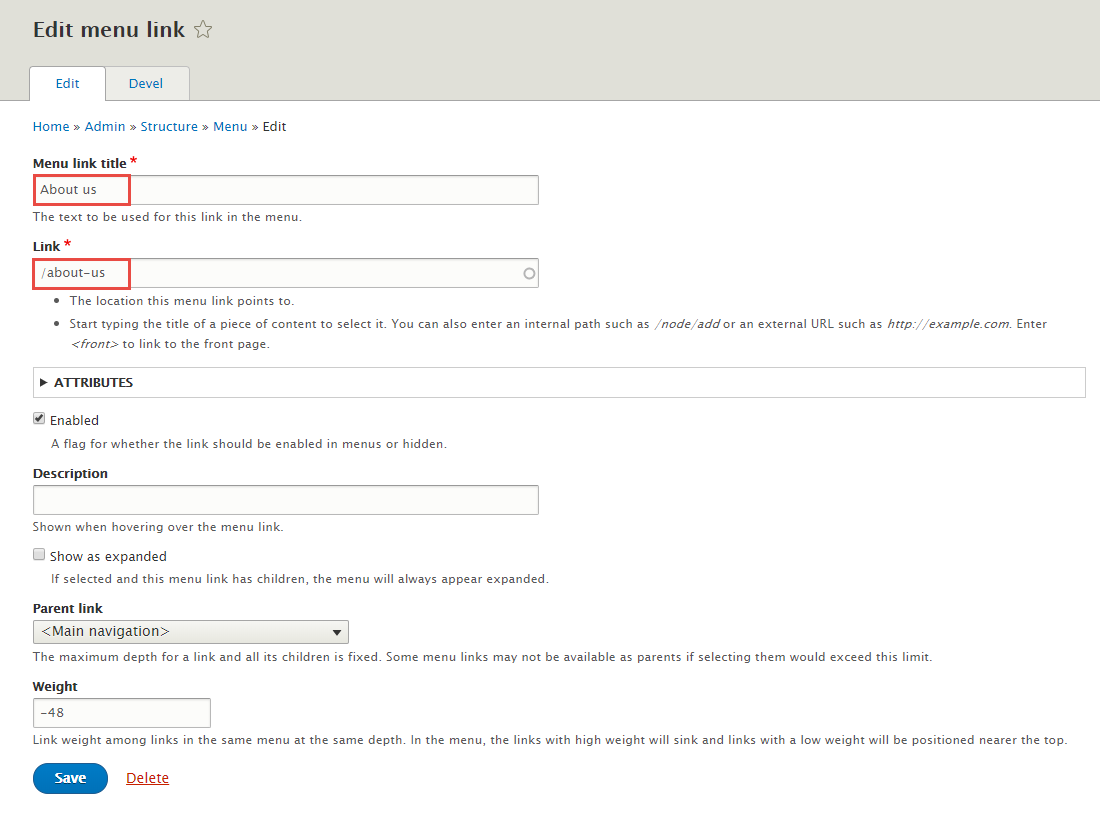
Step 3: Set properties About us menu item
Step 4: Set properties Blog menu item

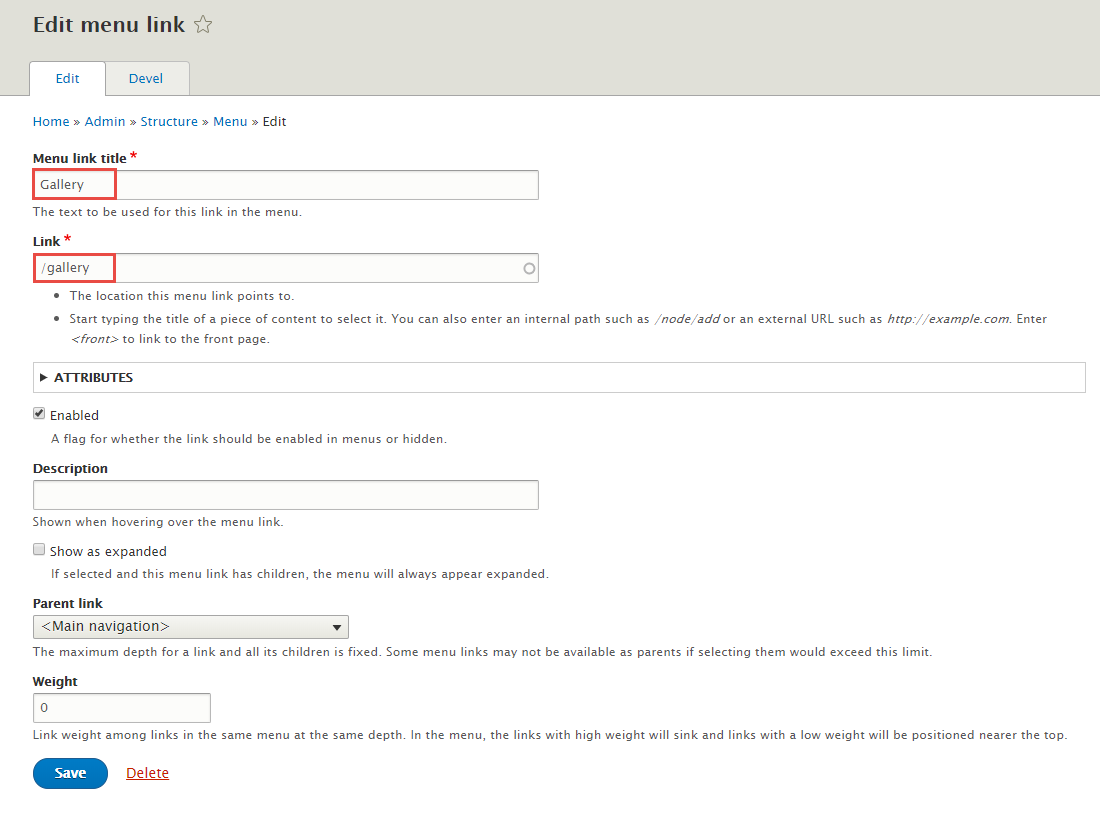
Step 5: Set properties Gallery menu item
Step 6: Set properties Forum menu item

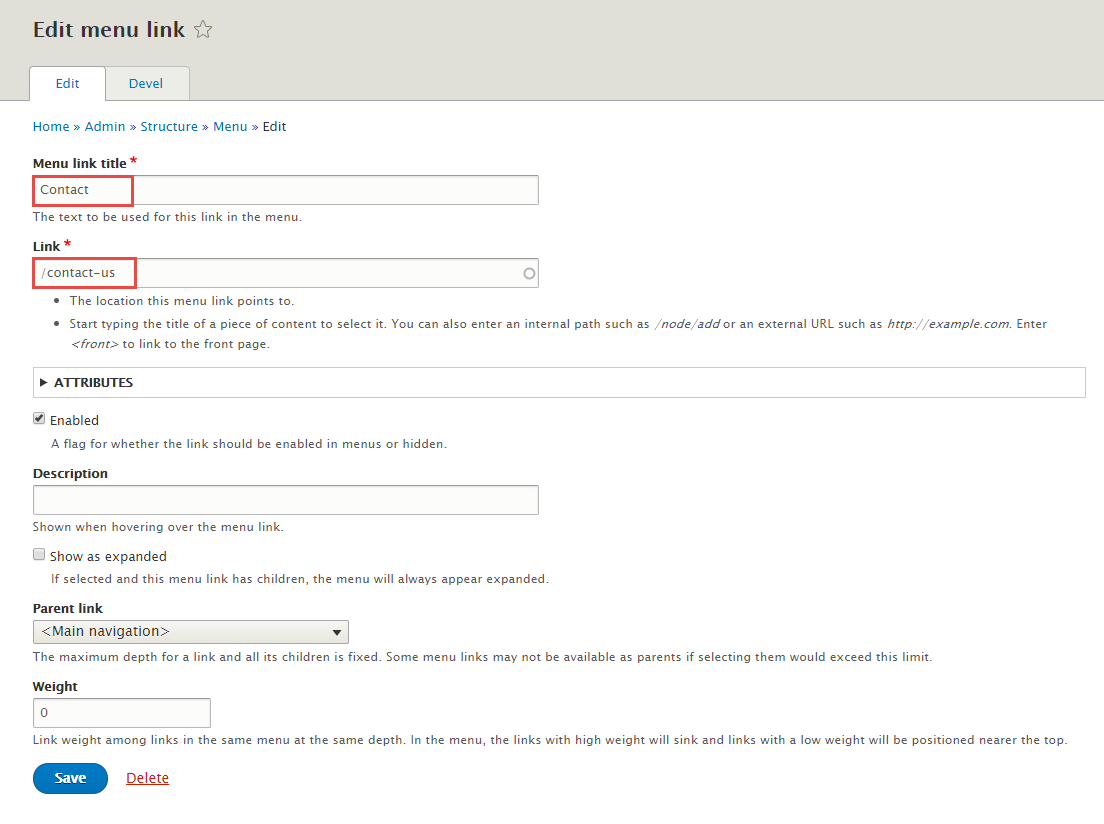
Step 7: Set properties Contact menu item
Step 8: Click Save button
4. Configure Search form block
Step 1: Navigate to Structure > Block layout
Step 2: Find Primary menu click Place block button
Step 3: Find Search form (Forms) click Place block button and set following properites:
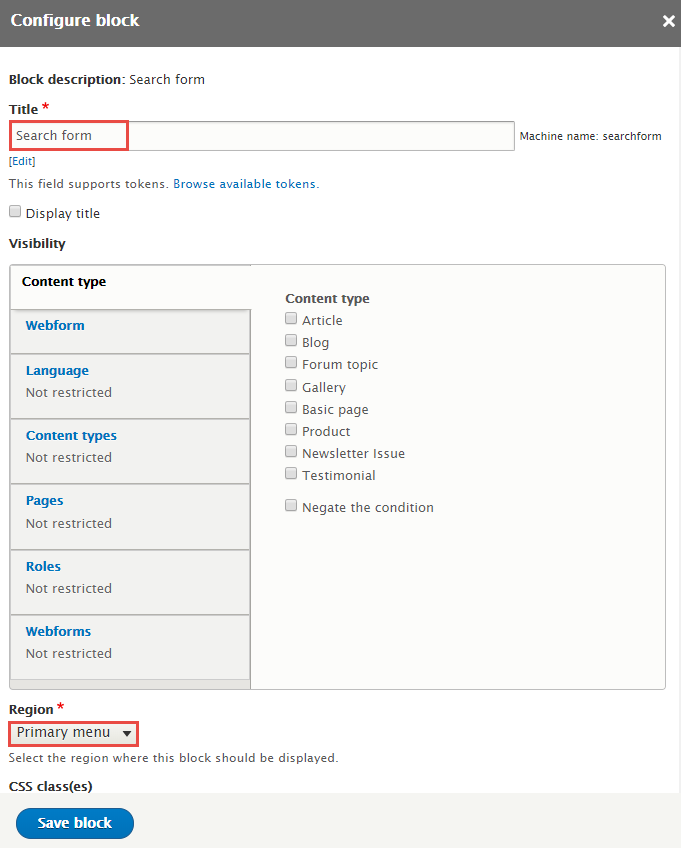
Step 4: Click Save block button.
Footer menu block
Front end Display

1. Configure Footer menu block
Step 1: Navigate to Structure > Block layout
Step 2: Find Footer bottom click Place block button
Step 3: Find Footer (WeebPal Mega Menu) click Place block button and set following properites:
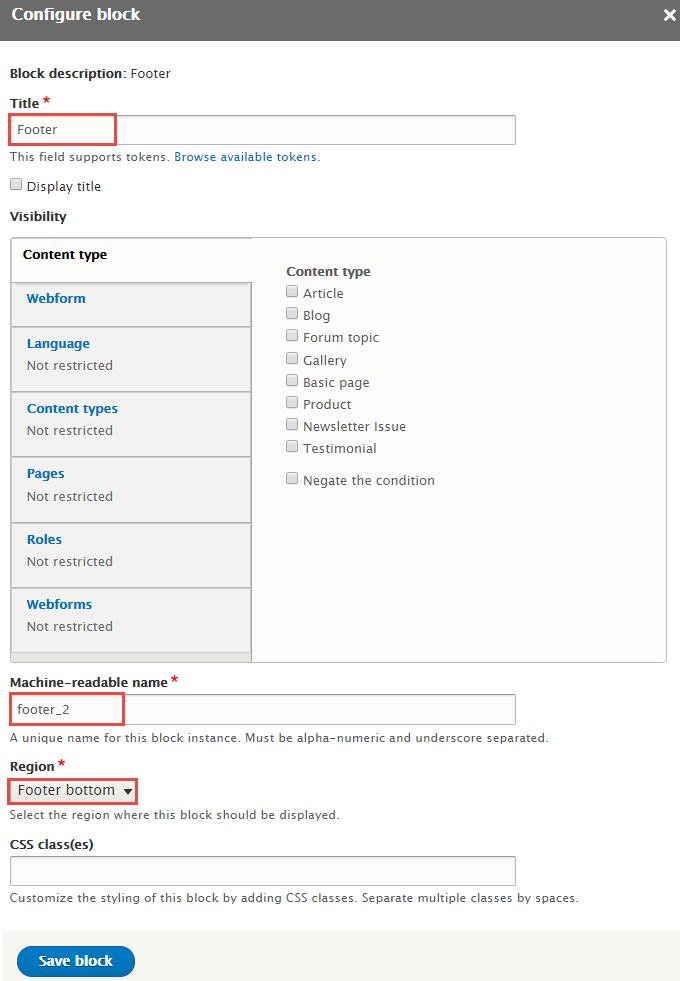
Step 4: Click Save block button.
2. Add Footer menu items
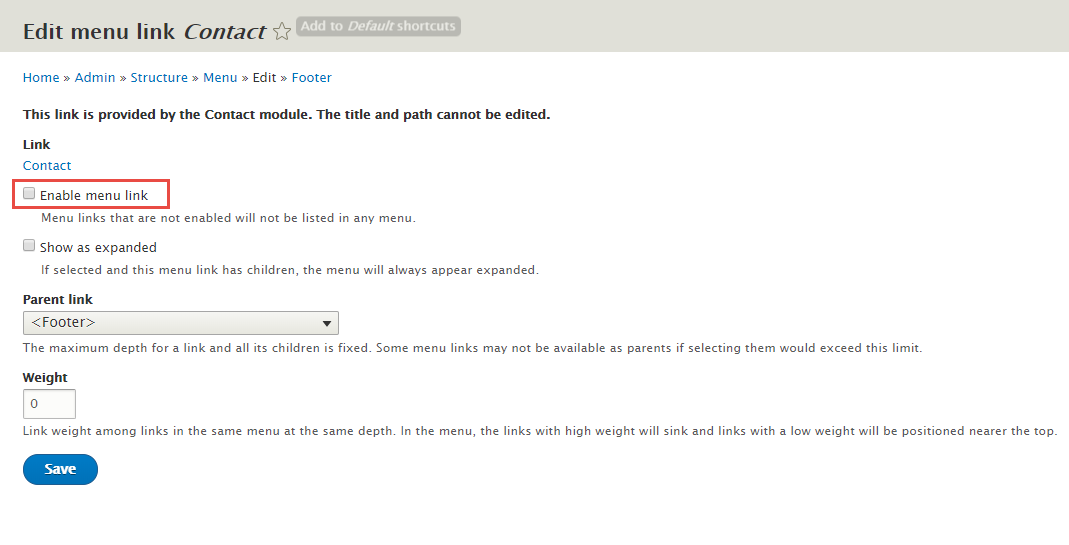
Step 1: Navigate to Structure > Menu, find Footer menu. Click and add menu items:

Step 2: Set properties Contact menu item
Step 3: Set properties Quick link & payment menu item
Step 4: Set properties Contact us menu item
Step 5: Set properties Don't miss out menu item

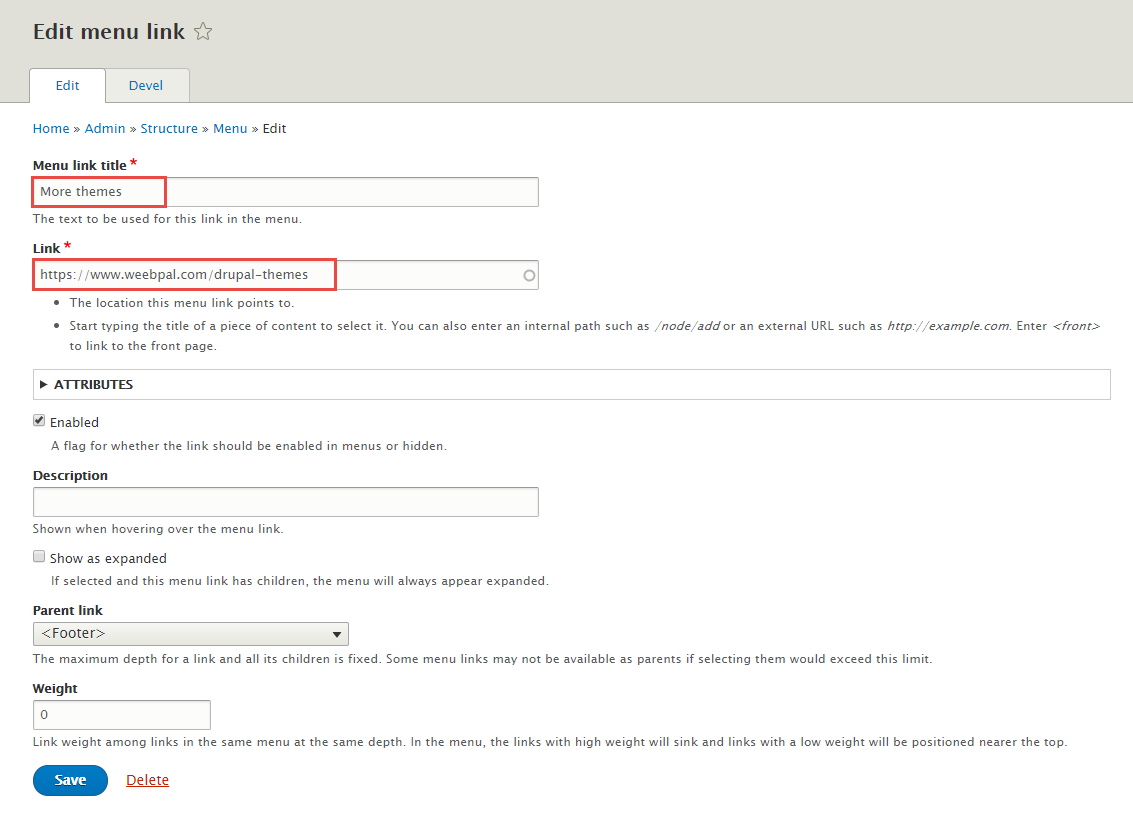
Step 6: Set properties More theme menu item
Step 7: Click Save button
3. Add Footer submenu
3.1 Add Quick links & payment (Usefull Links) menu
Step 1: Navigate to Structure > WeebPal Mega Menu, find Footer menu item and click config button.
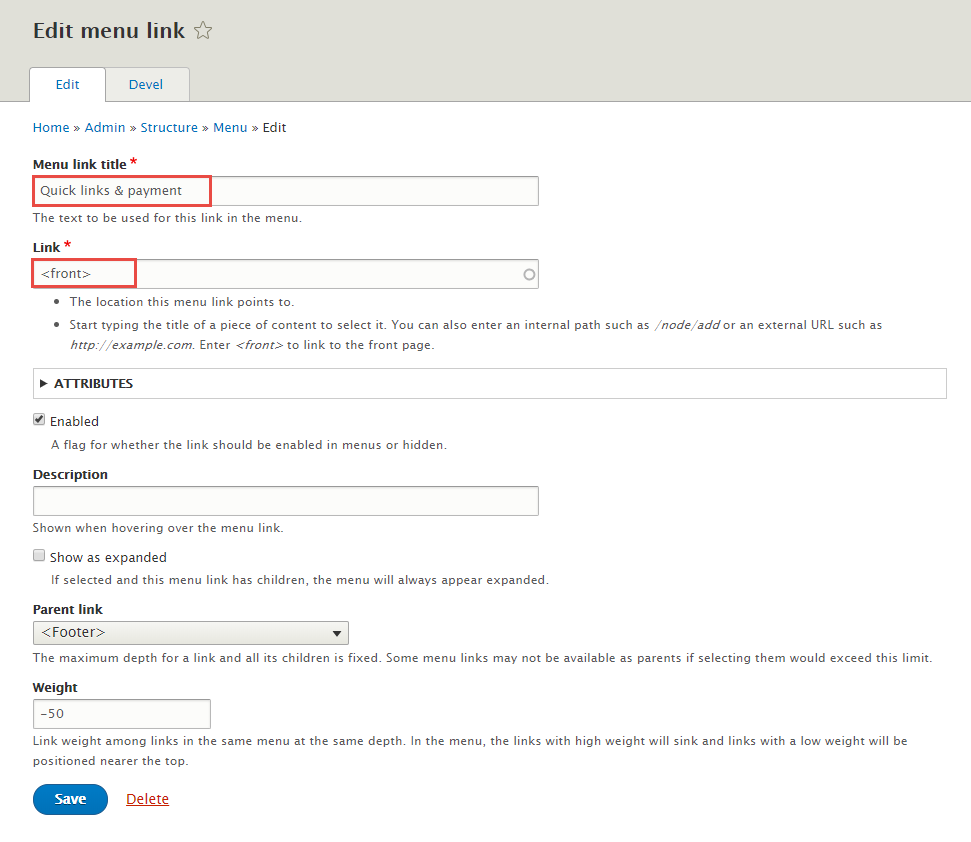
Step 2: At Footer menu, find and click Quick Links & Payment. Click submenu radio button and set following properites:

Step 3: Click Save button
3.2 Add Quick links & payment (Our Partners) menu
Step 1: At WeebPal Mega Menu, click Add/remove column button (+) and set following properites:

Step 2: Click Save button
3.3 Add Quick links & payment (Payment Method) menu
Step 1: At WeebPal Mega Menu, click Add/remove column button (+) and set following properites:
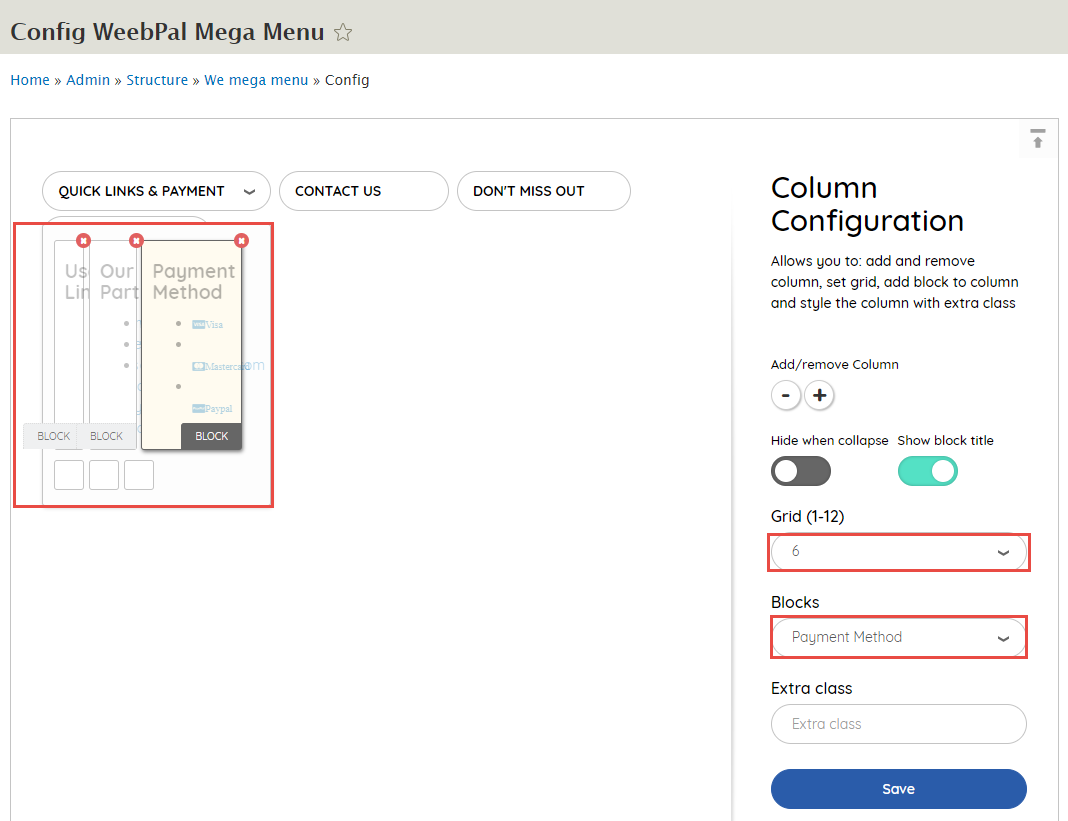
Step 2: Click Save button
3.4 Add Don't miss out (Newsletter) menu
Step 1: Navigate to Structure > Block layout, click WeebPal Mega Menu
Step 2: Find and ckick Don't miss out click Submenu radio button and set following properites:

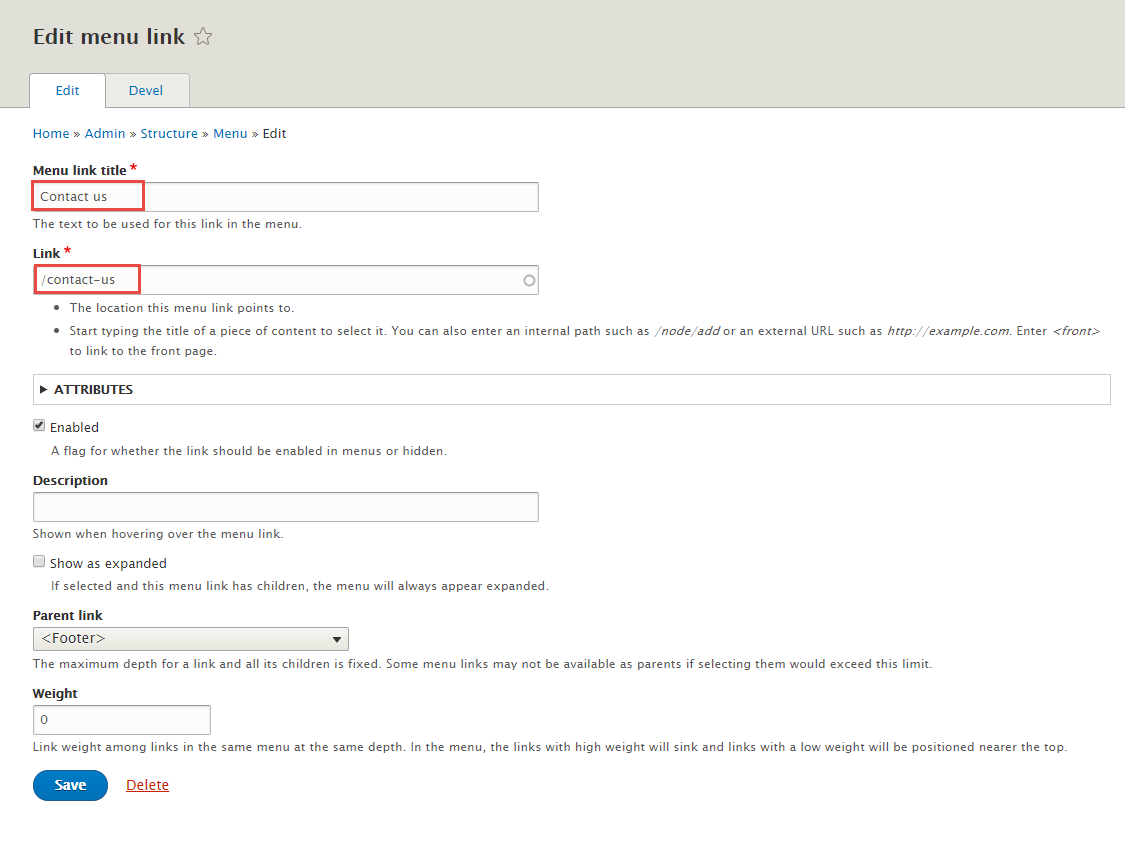
3.5 Add Don't miss out (Contact us via) menu
Step 1: Click Add/remove column button (+) and set following properites:

Create Subpages
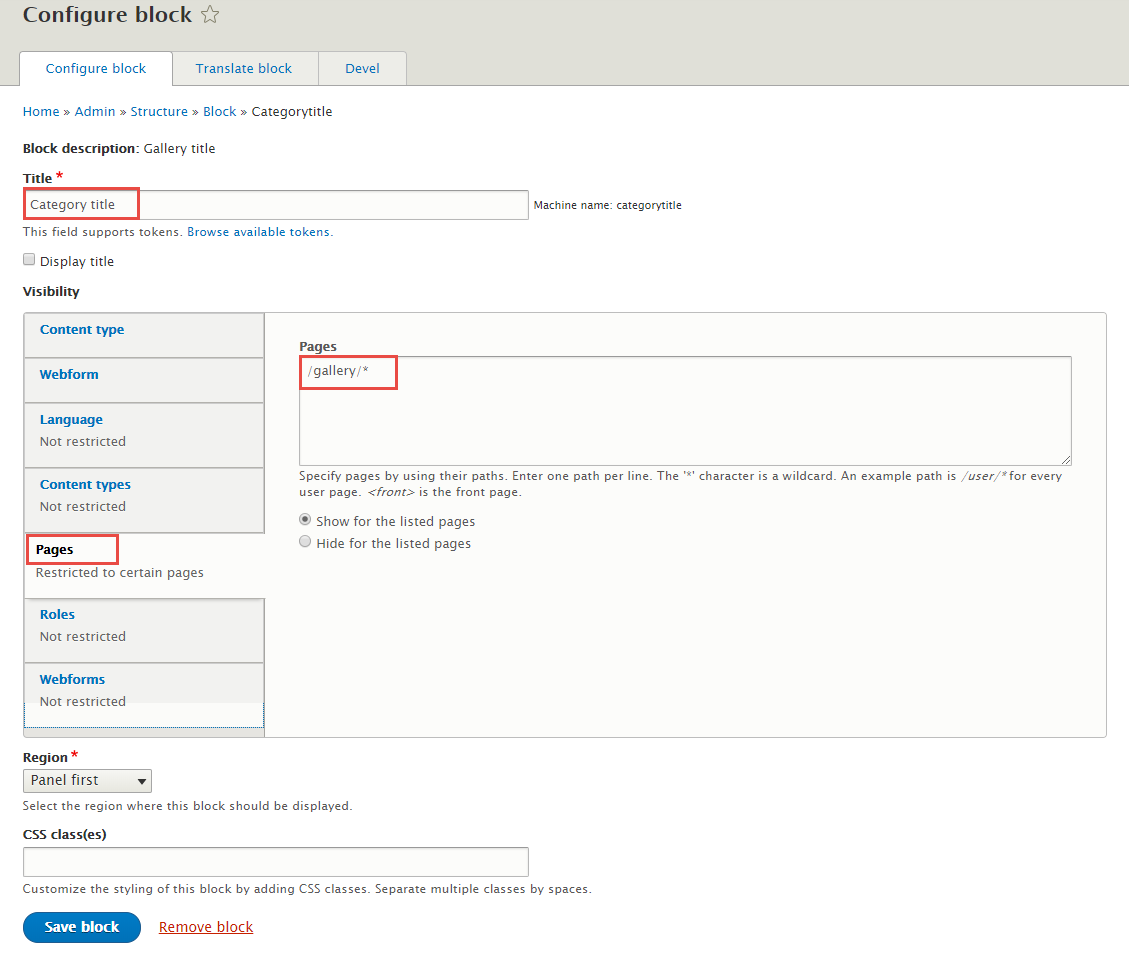
Page title block
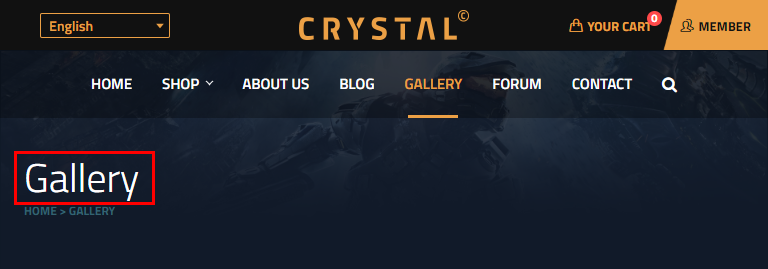
Configure Page title block
Step 1: Navigate to Structure > Block layout
Step 2: Find Panel first click Place block button
Step 3: Find Page title (core) click Place block button and set following properites:

Step 4: Click Save block button.
Refer to following HTML code:
						/forum
						/shop
						/node/22
						/about-us
						/blog
						/gallery
						/category/*
						/taxonomy/*
						/contact-us
						/node/33
						/wrong-way
						/faqs
						/community-guidelines
						/privacy-policy
						/service
Breadcrumbs block
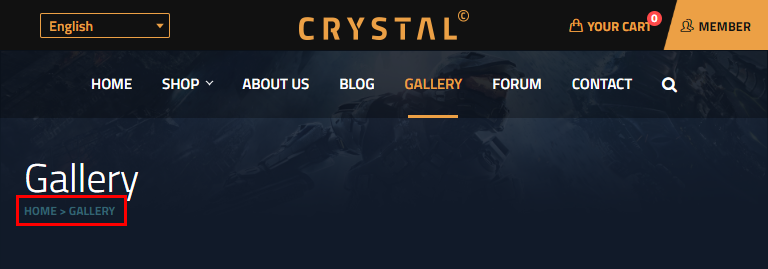
Configure Breadcrumbs block
Step 1: Navigate to Structure > Block layout
Step 2: Find Panel first click Place block button
Step 3: Find Breadcrumbs click Place block button and set following properites:
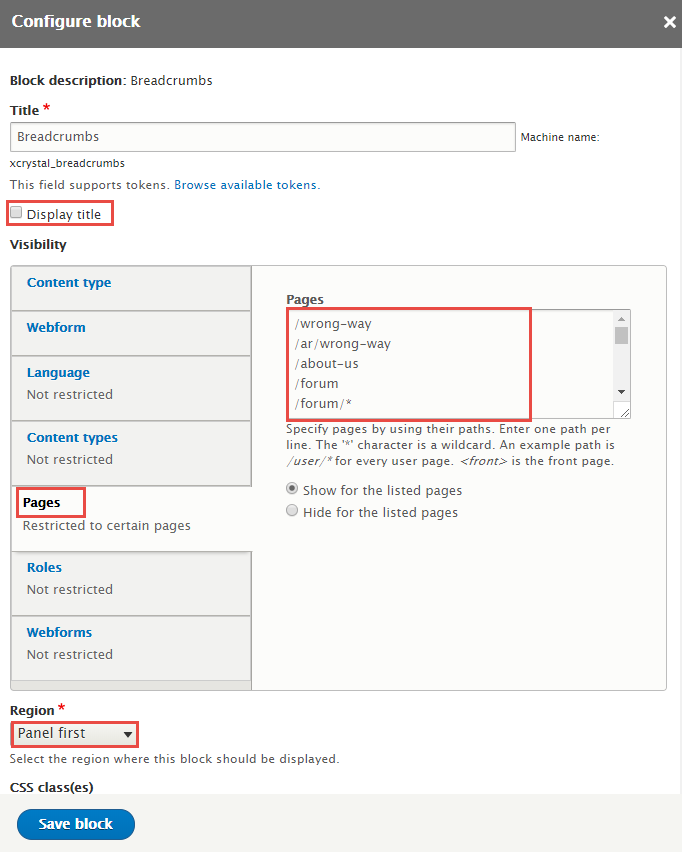
Step 4: Click Save block button.
Refer to following HTML code:
						/wrong-way
						/ar/wrong-way
						/about-us
						/forum
						/forum/*
						/gallery
						/gallery/*
						/shop
						/category/*
						/taxonomy/*
						/node/22
						/blog-list
						/blog
						/blog/*
						/contact-us
						/faqs
						/community-guidelines
						/privacy-policy
						/service
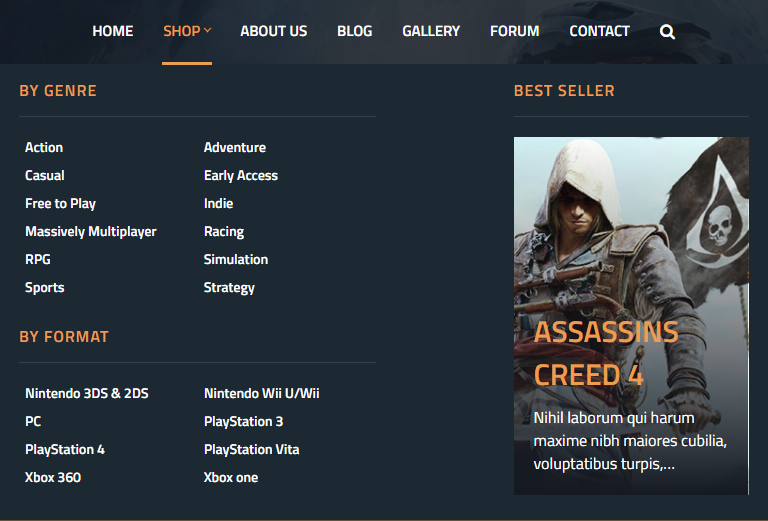
Shop page
1. Crystal shop view
1.1 Create Crystal shop view
Step 1: Stay open Front page view, click Add button add Page new.

Step 2: Next to steps below to set properties for the following fields:

Step 3: At TITLE area, click Title and set properties:

Step 4: At FIELDS area, find and click Image field to set properties
Step 5: At PAGE SETTING area, click Path and set properties:

Step 6: At PAGER area, click User pager and set properties:

Step 7: At ADVANCED > EXPOSED FORM area, click Exposed form in block and set properties:

Step 8: Click Save button
1.2 Configure Crystal shop block
Step 1: Navigate to Structure > Block layout
Step 2: Find Content click Place block button
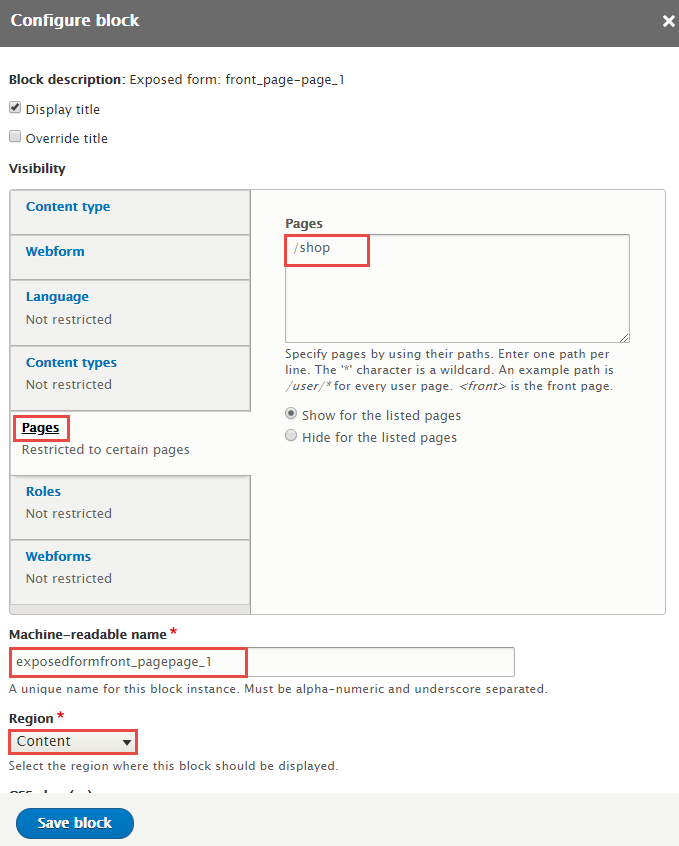
Step 3: Find Exposed form: front_page-page_1 click Place block button and set following properites:
Step 4: Click Save block button.
2. Recent games view
2.1 Create Recent games view
Step 1: Stay open Best Seller view, click Add button to add Block new.

Step 2: Next to steps below to set properties for the following fields:

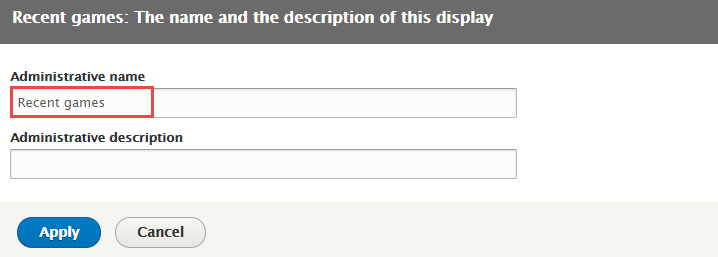
Step 3: At Display name area, click and set properties:
Step 4: At TITLE area, click Title and set properties:

Step 5: At FIELDS area, find and click Image field to set properties

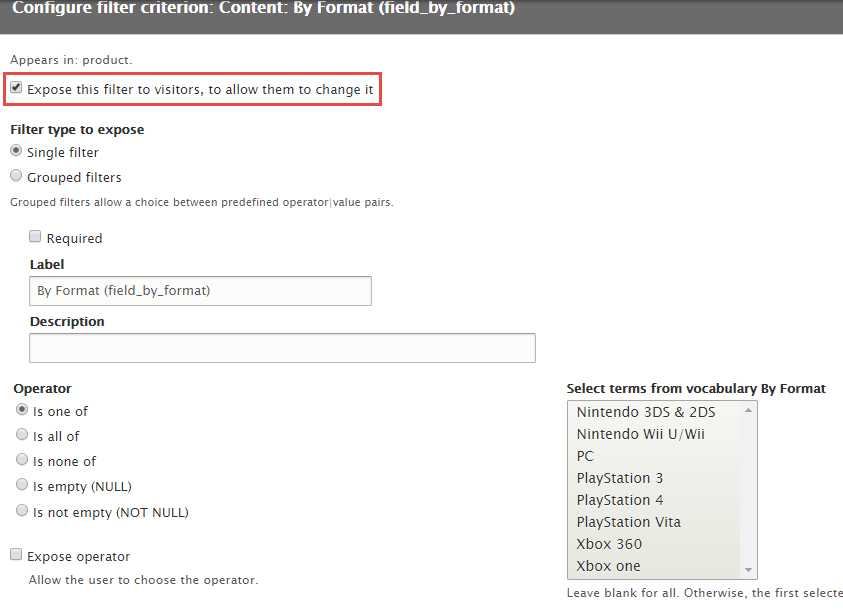
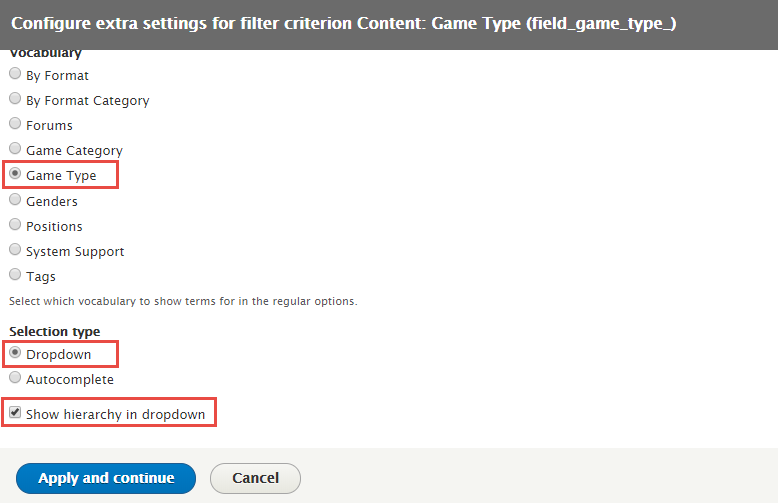
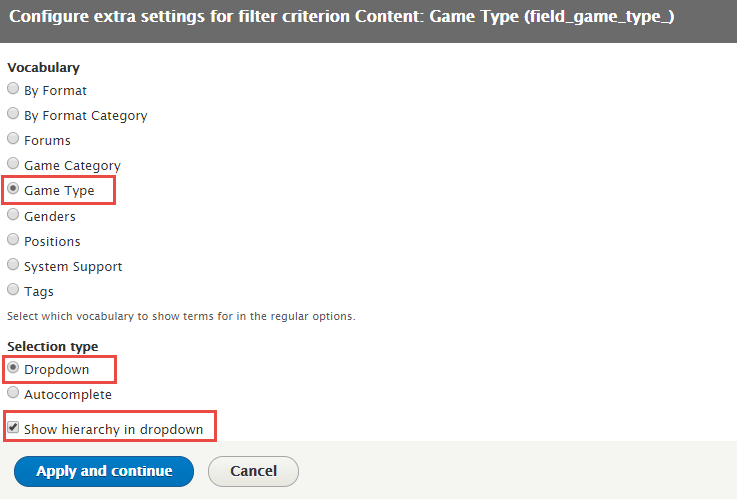
Step 6: At FILTER CRITERIA area, add Content: Game Type field and set properites:
Step 7: At HEADER area, click Add button to add Global: Text area field and set properties:

Step 8: At PAGER area, click User pager and set properties:

Step 9: Click Save button
3.2 Configure Recent games block
Step 1: Navigate to Structure > Block layout
Step 2: Find Footer top click Place block button
Step 3: Find Best Seller: Recent games click Place block button and set following properites:
Step 4: Click Save block button.
4. Shop page

4.1 Create By Genre view
Step 1: Navigate to Structure > Views, click Add new view, then create By Genre view with following settings:
Step 2: Click Save and edit button. Next to steps below to set properties for following fields:
Step 3: At Display name area, click and set properties:

Step 4: At Format area, click and set properties:
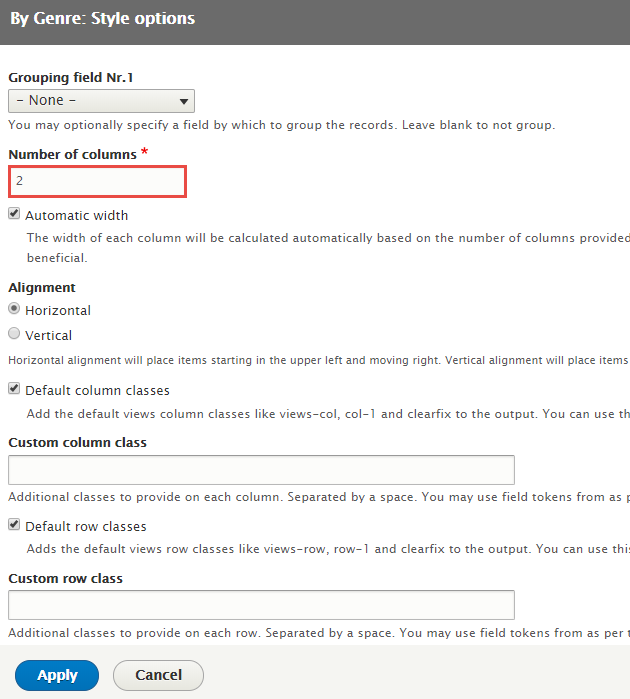
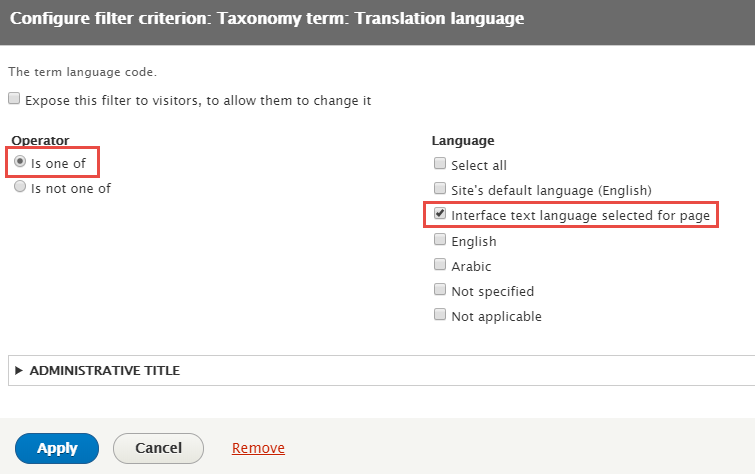
Step 5: At FILTER CRITERIA area, click Add button to add field: Taxonomy term: Translation language
Step 6: Set properties for Taxonomy term: Translation language
Step 7: At PAGER area, find Use pager click link and set following properites
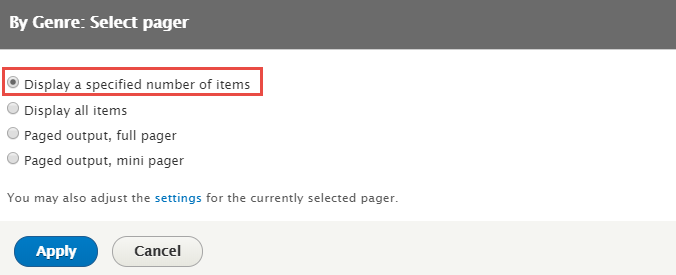
Step 8: Click Save button
4.2 Create By Format view
Step 1: Stay open Term view, click Add button to add Block new.
Step 2: Click Save and edit button. Next to steps below to set properties for following fields:
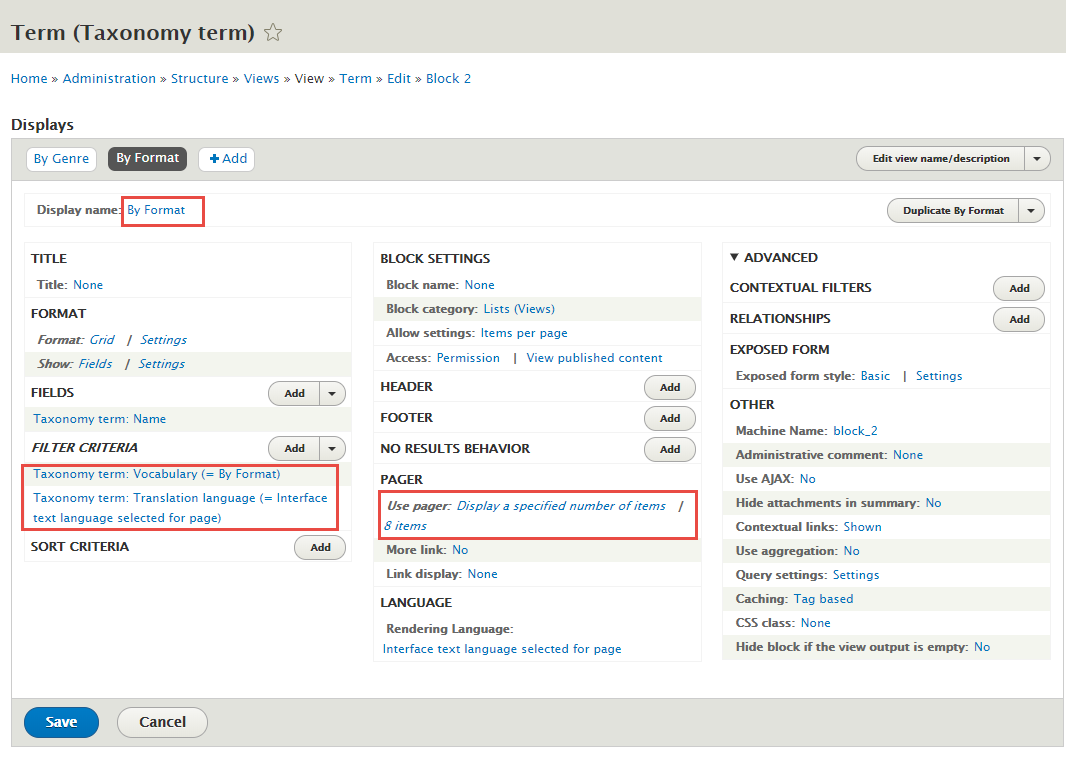
Step 3: At Display name area, click and set properties:

Step 4: At Format area, click and set properties:

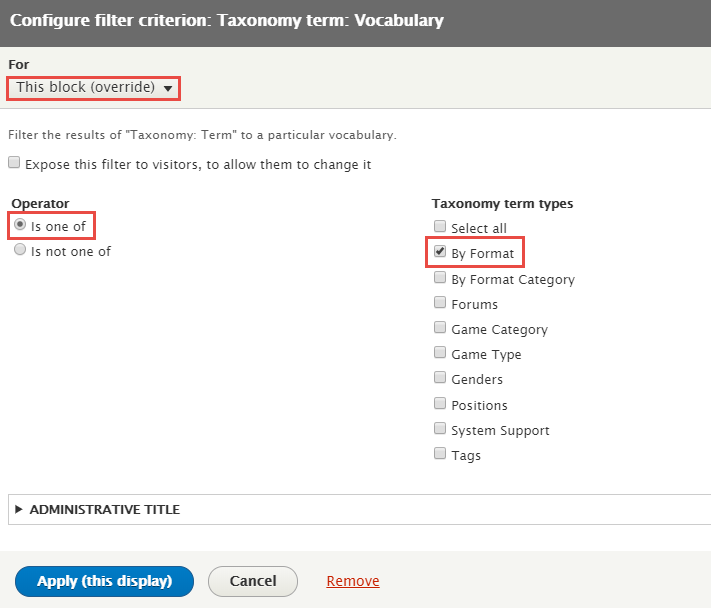
Step 5: At FILTER CRITERIA area, find and click Taxonomy term: Vocabulary to set properties
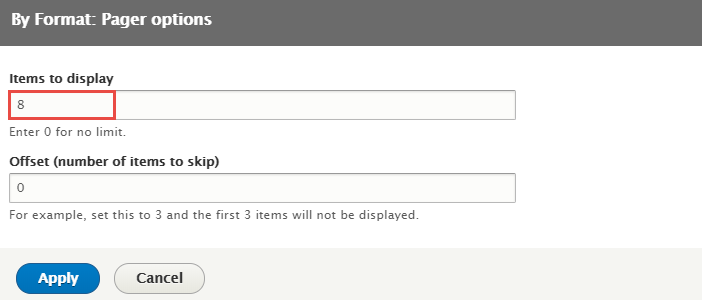
Step 6: At PAGER area, find Use pager click link and set following properites
Step 7: Click Save button
4.3 Create Menu Best Seller view
Step 1: Stay open Best Seller view, click Add button to add Block new.
Step 2: Next to steps below to set properties for the following fields:

Step 3: At Display name area, click and set properties:

Step 4: At FIELDS area, click and set properites for Image field
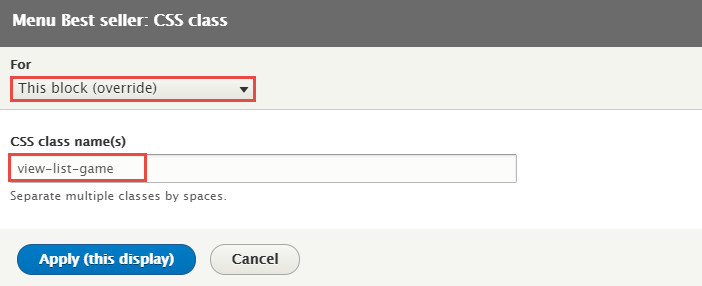
Step 6: At ADVANCED > OTHER area, add CSS class
Step 7: Click Save button
Product detail page
1. Product Banner view
1.1 Create Product Banner view
Step 1: Navigate to Structure > Views, click Add new view, then create Product details view with following settings:

Step 2: Click Save and edit button. Next to steps below to set properties for following fields:
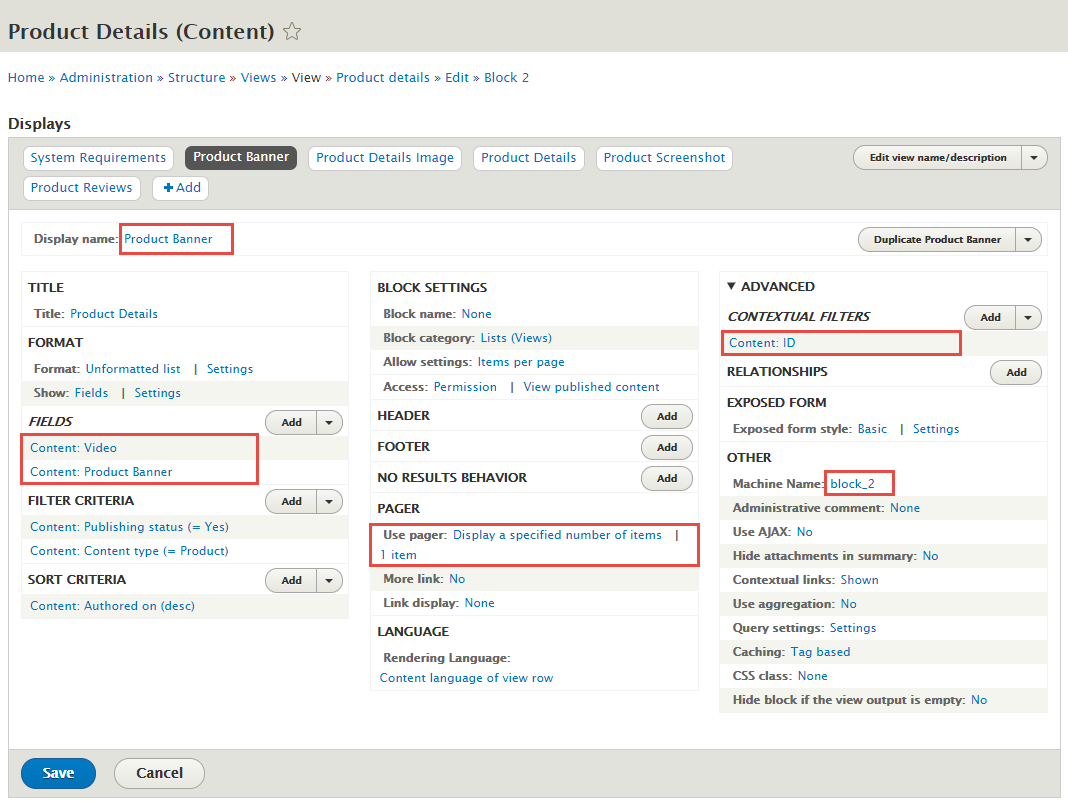
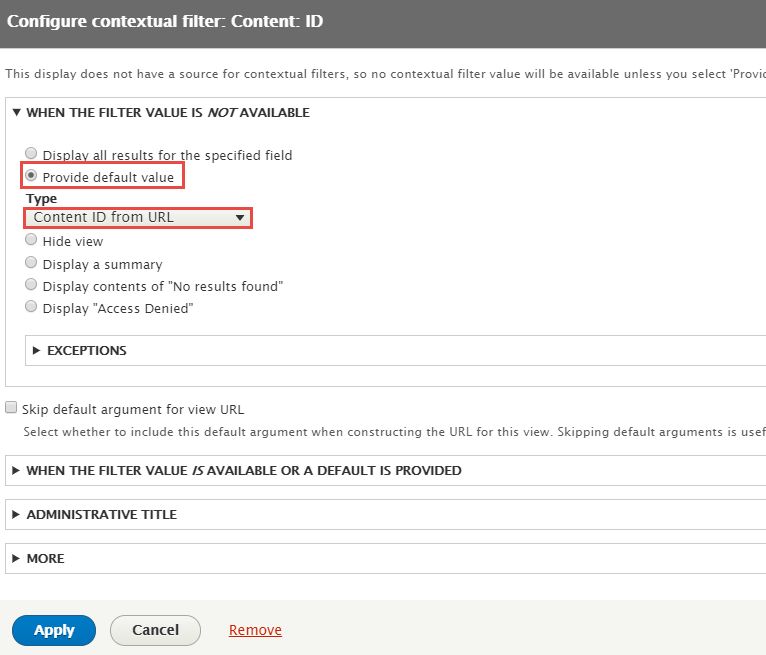
Step 3: At ADVANCED > CONTEXTUAL FILTERS area, add Cotent: ID and set following properites:
Step 4: At ADVANCED > OTHER area, find Machine Name click link and set following properites

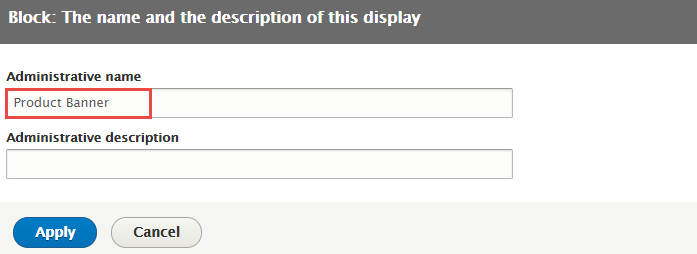
Step 5: At Display name area, click and set properties:
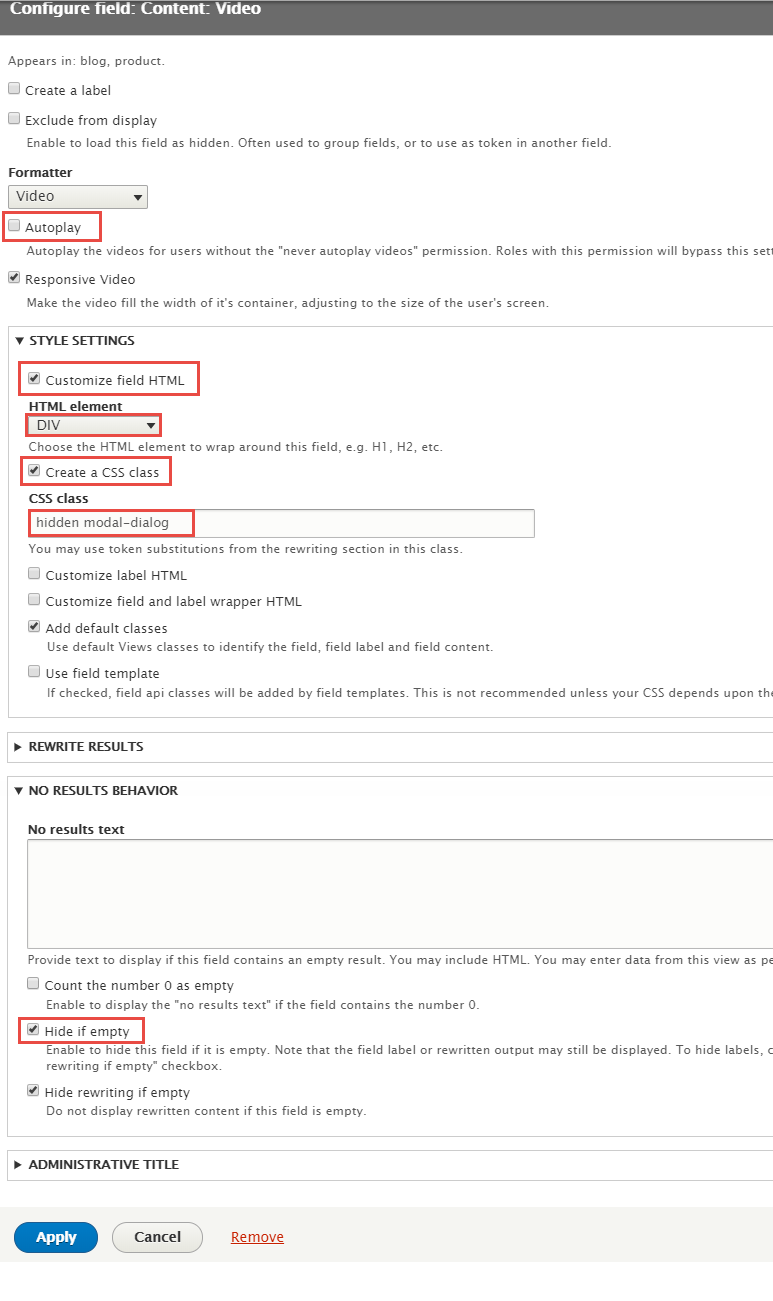
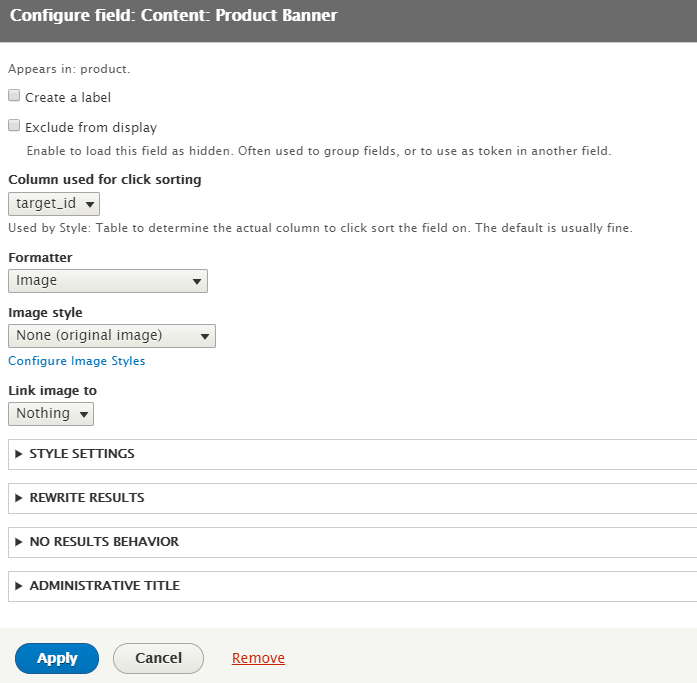
Step 6: At FIELDS area, add Content: Video, Content: Product Banner fields and set following properites:
Step 7: Set properties for Content: Video
Step 8: Set properties for Content: Product banner
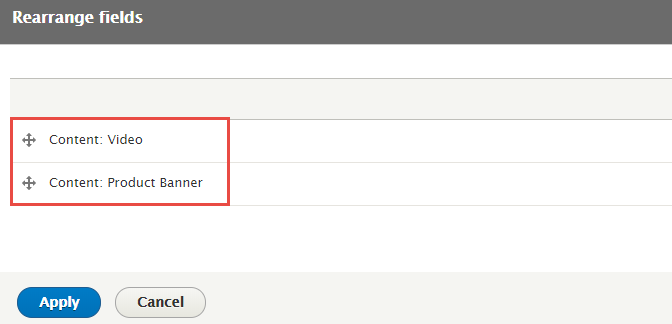
Step 9: At FIELDS area, click Rearrange button and set following arrange
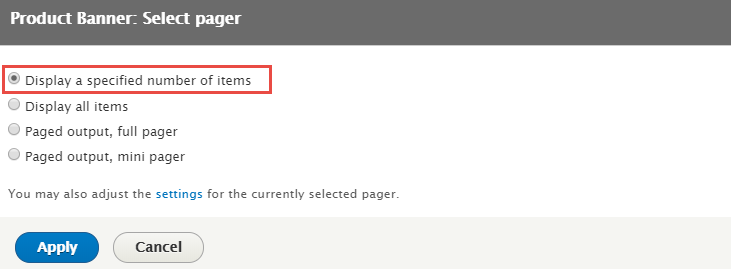
Step 10: At PAGER area, find Use pager click link and set following properites
Step 20: Click Save to save view
1.2. Configure Product banner block
Step 1: Navigate to Structure > Block layout
Step 2: Find Banner click Place block button
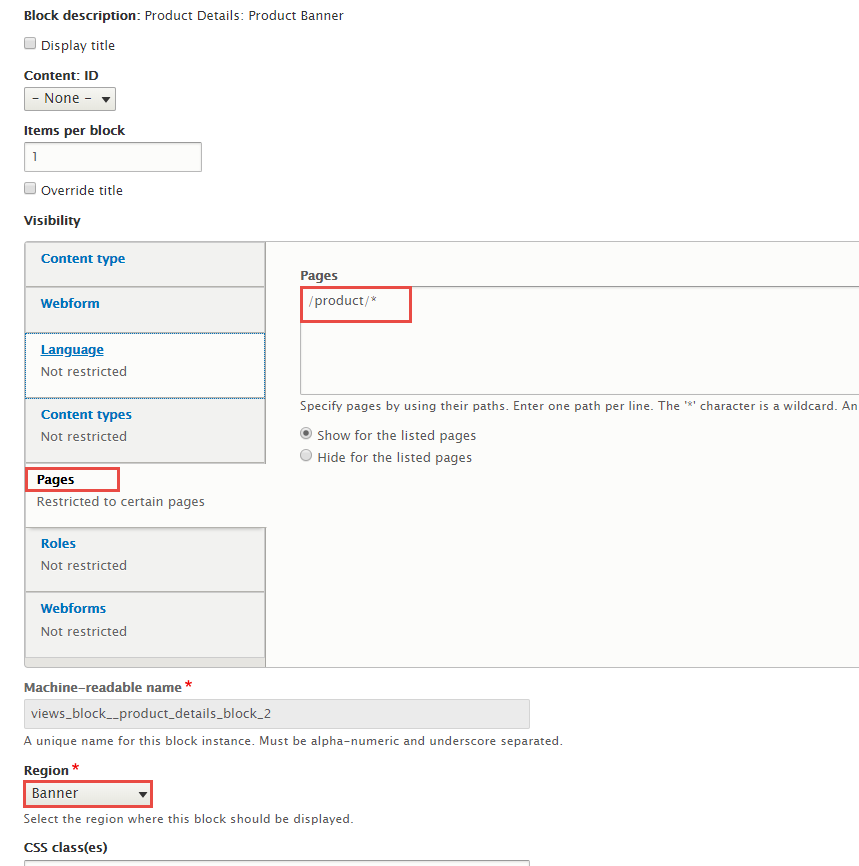
Step 3: Find Product Details: Product Banner click Place block button and set following properites:
Step 4: Click Save block button.
2. Product Details Image view
2.1 Create Product Details Image view
Step 1: Stay open Product Details view, click Add button to add Block new.

Step 2: Next to steps below to set properties for the following fields:

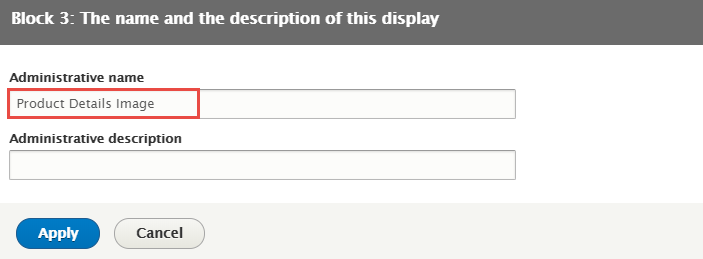
Step 3: At Display name area, click and set properties:
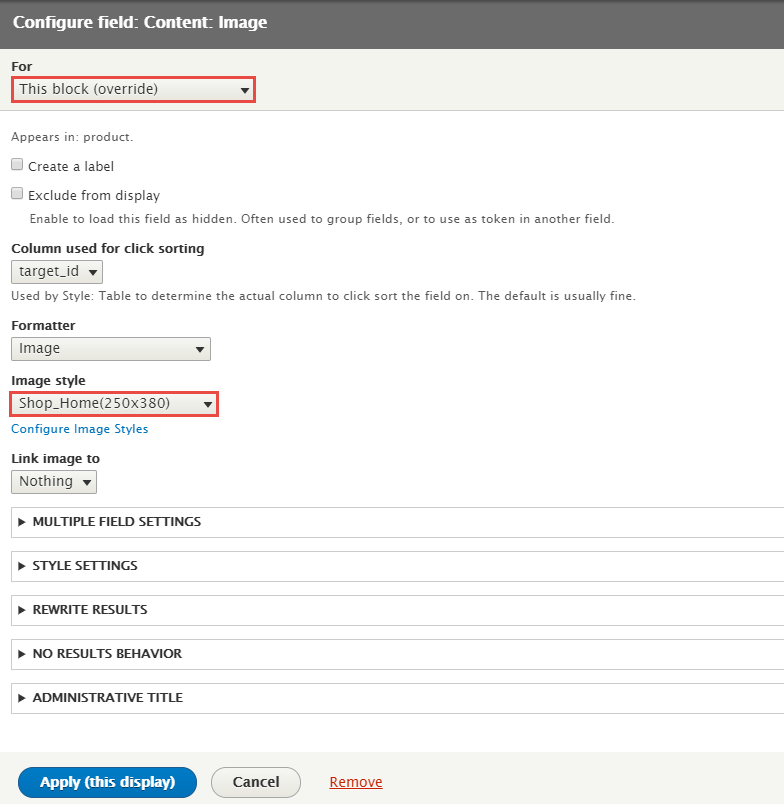
Step 4: At FIELDS area, add Content: Image field and set properties
Step 5: Click Save to save view
3. Product Details view
3.1 Create Product Details view
Step 1: Stay open Product Details view, click Add button to add Block new.
Step 2: Next to steps below to set properties for the following fields:

Step 3: At Display name area, click and set properties:
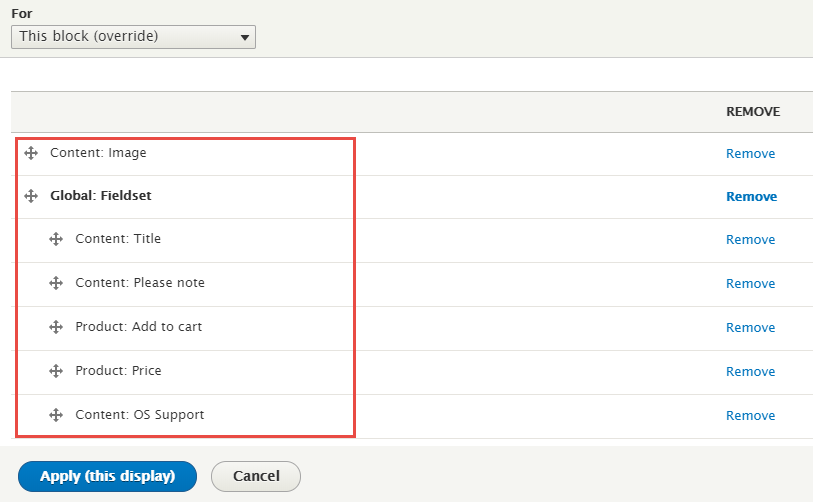
Step 4: At FIELDS area, add Content: Image, Global: Fieldset,Content: Title, Content: Please note, Product: Add to cart, Product: Price, Content: OS Support, Content: Body fields and set following properites
Step 5: Set properties for Content: Image

Step 6: Set properties for Global: Fieldset

Step 7 Set properties for Content: Title
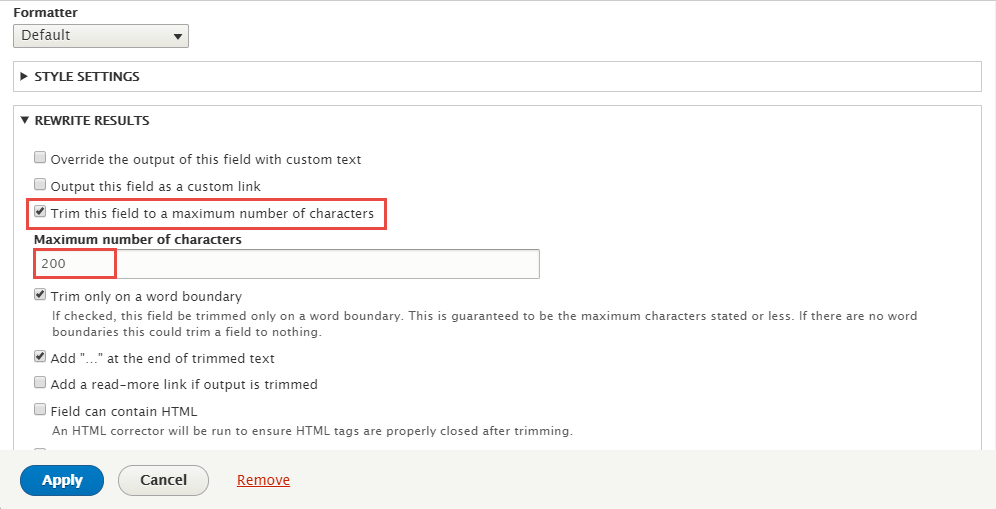
Step 8: Set properties for Content: Please note
Step 9: Set properties for Product: Add to cart
Step 10: Set properties for Product: Price
Step 11: Set properties for Content: OS Support
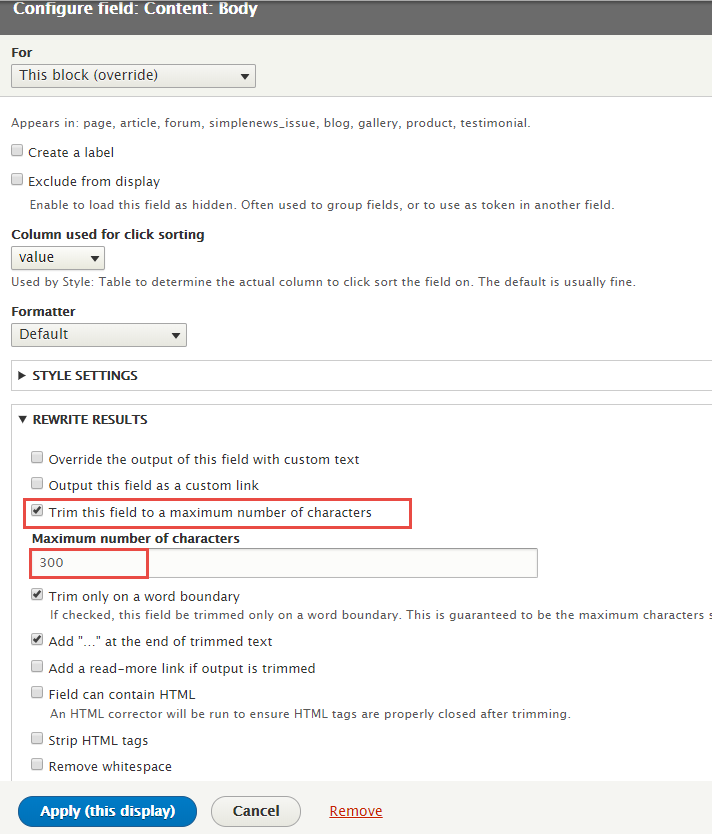
Step 12: Set properties for Content: Body
Step 13: At FIELDS area, click Rearrange button and set following arrange
Step 14: Click Save to save view
5. Blocktabs:Product Details view
5.1 Create System Requirements view
Step 1: Stay open Product Details view, click Add button to add Block new.
Step 2: Next to steps below to set properties for the following field:

Step 3: At Display name area, click and set properties:

Step 4: At FIELDS area, click Add button to add field Content: System Requirements to set properties:
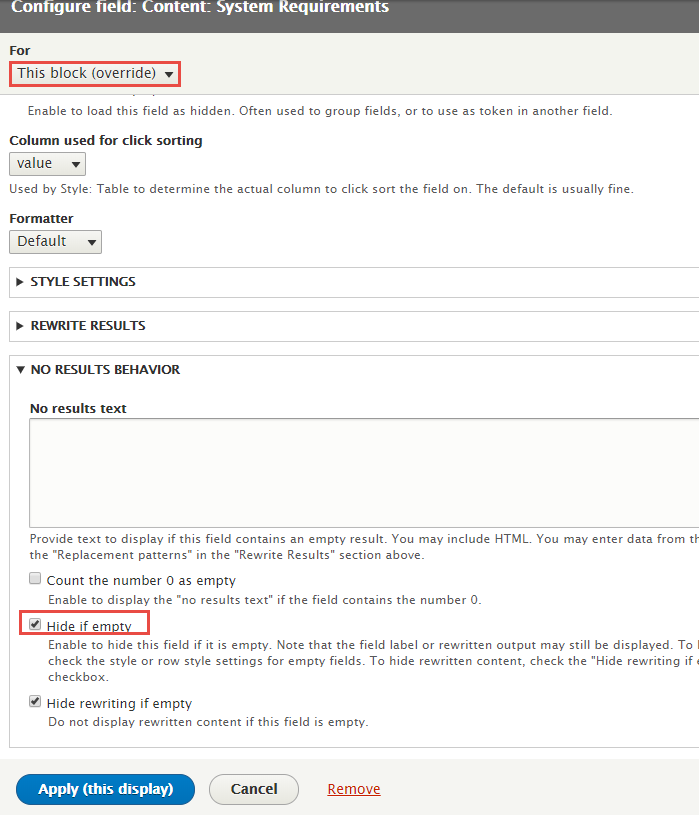
Step 5: Click Save to save view
5.2 Create Screenshot view
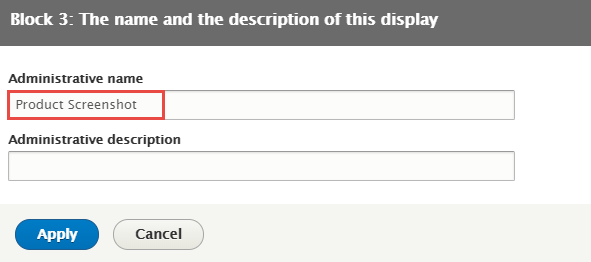
Step 1: Stay open Product Details view, click Add button to add Block new.
Step 2: Next to steps below to set properties for the following fields:

Step 3: At Display name area, click and set properties:
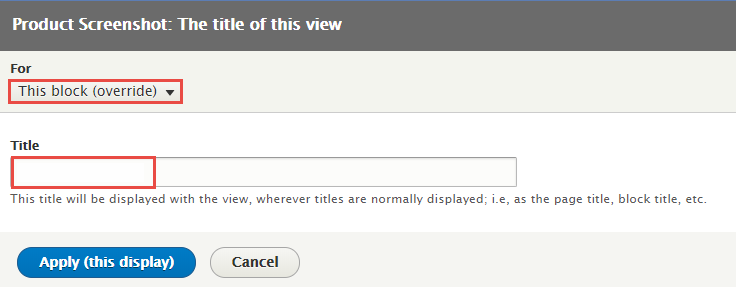
Step 4: At TITLE area, click Title and set properties:
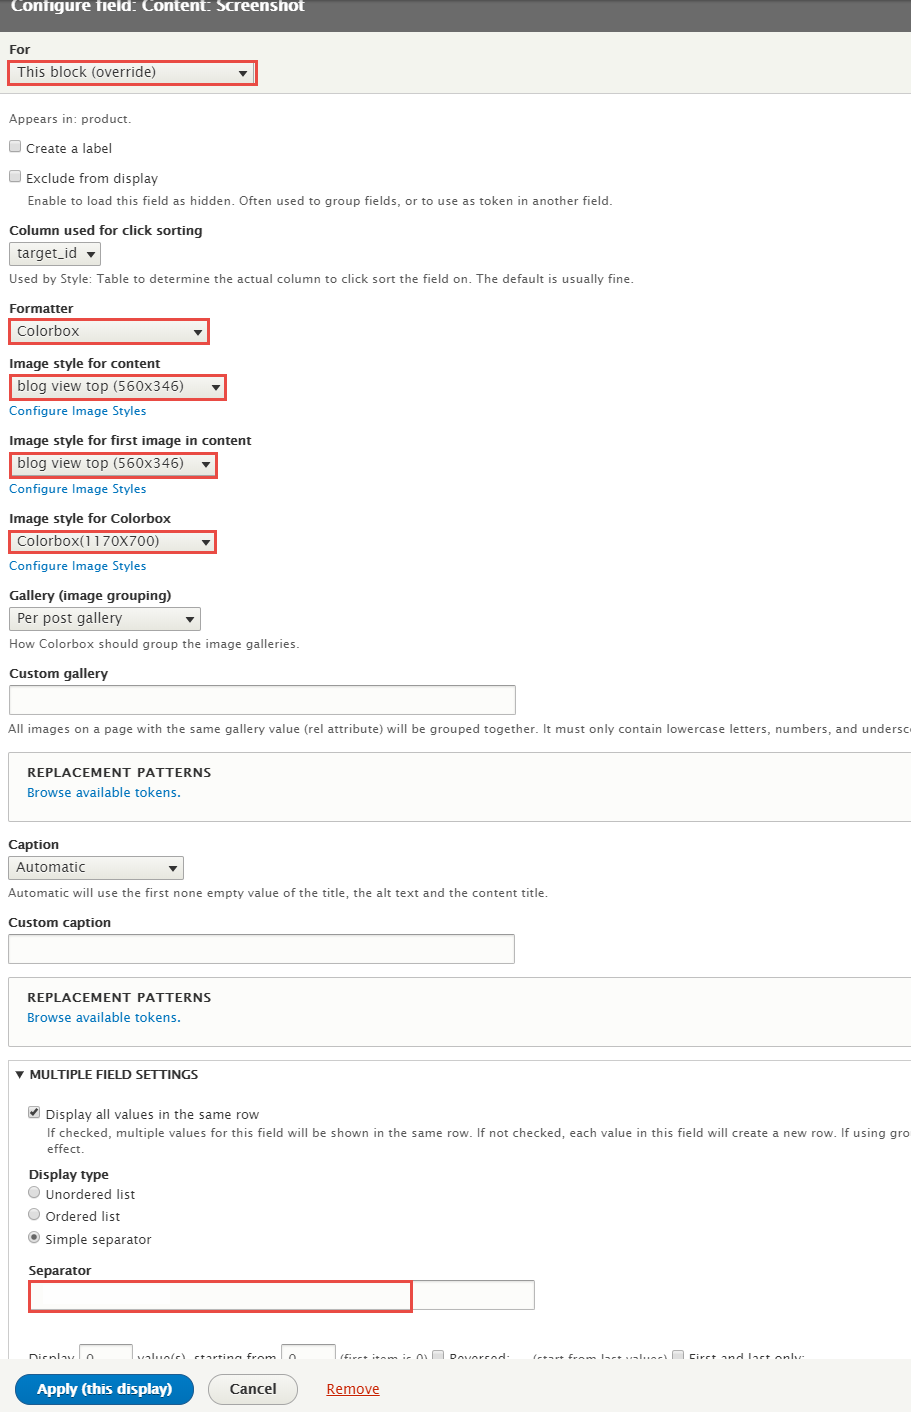
Step 5: At FIELDS area, click Add button to add field Content: Screenshot and set properties:
Step 6: At ADVANCED > OTHER area, click Machine Name link and set following properites

Step 7: Click Save to save view
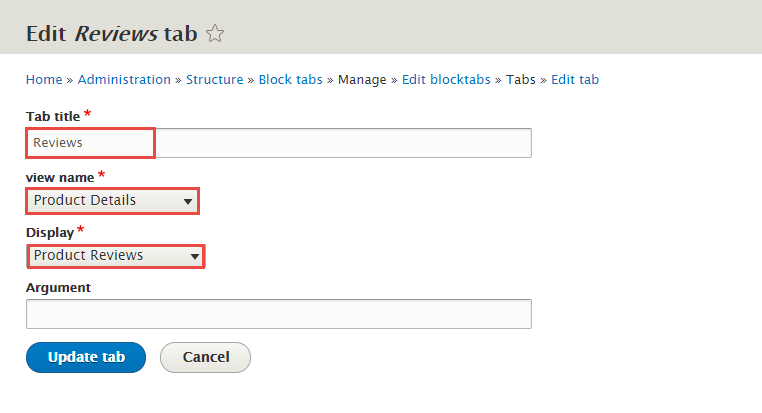
5.3 Create Reviews view
Step 1: Stay open Product Details view, click Add button to add Block new.
Step 2: Next to steps below to set properties for the following fields:

Step 3: At Display name area, click and set properties:
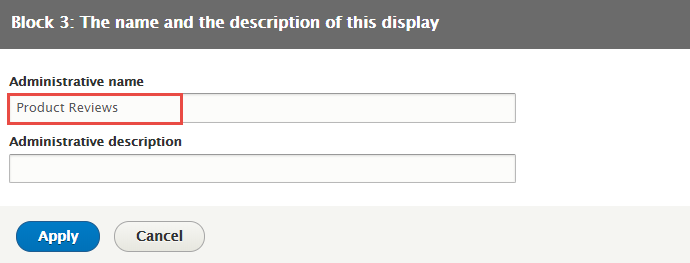
Step 4: At TITLE area, click Title and set properties:
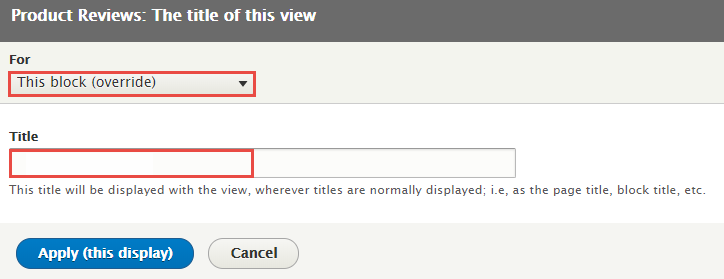
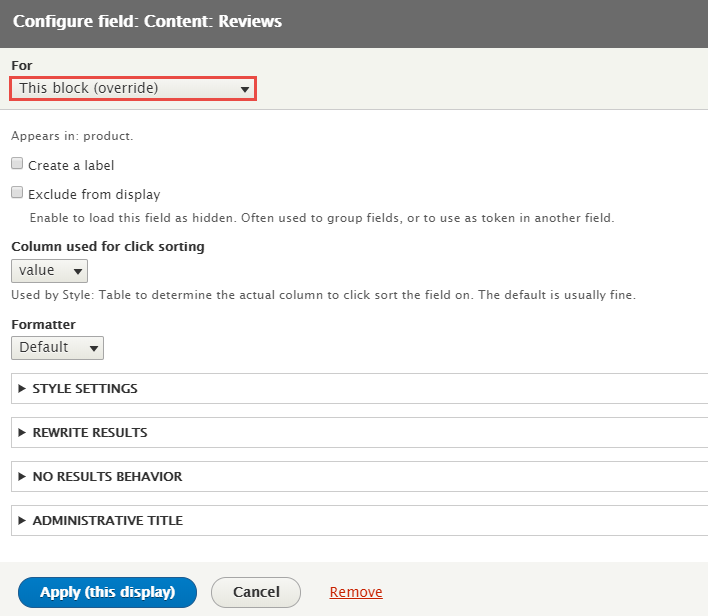
Step 5: At FIELDS area, add Content: Reviews field and set properties:
Step 6: At ADVANCED > OTHER area, click Machine Name link and set following properites
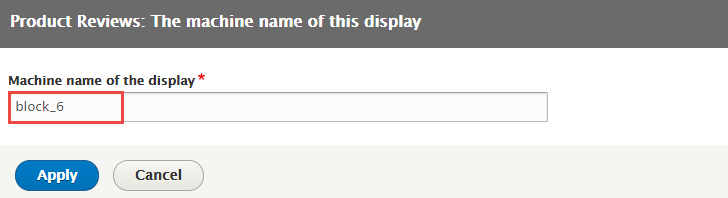
Step 7: Click Save to save view
6. Blocktabs:Product Details Block
6.1 Create Blocktabs:Product Details Block
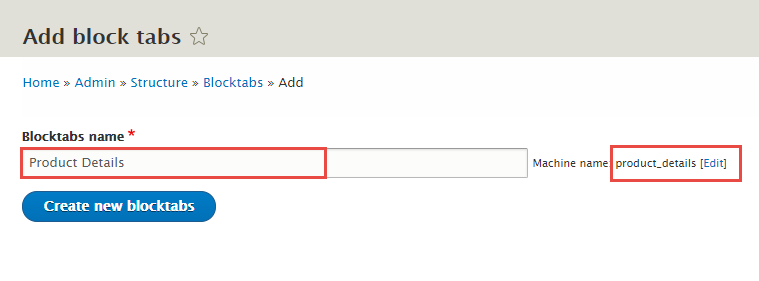
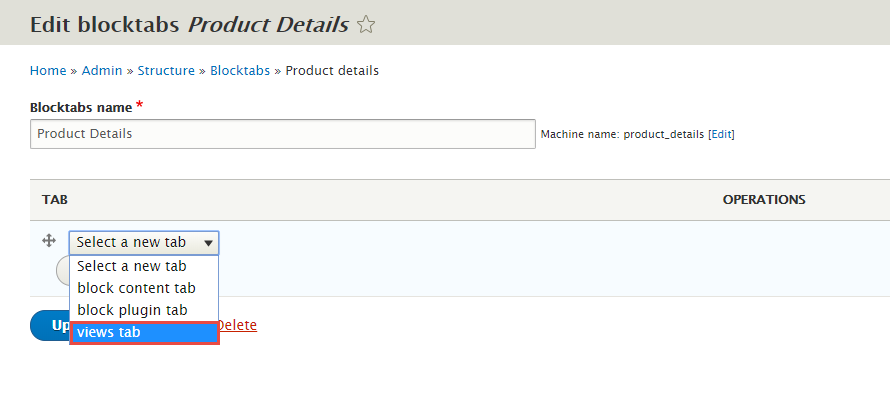
Step 1: Navigate to Structure > Blocktabs, click Add block tabs button to create Product Details tab
Step 2: At Product Details tab, add System Requirements, Screenshot, Reviews tabs list

Step 3: Set properites System Requirements tab:
- 1. Select Views tab at Select a new tab dropdowns list
- 2. Add System Requirements tab with following properites

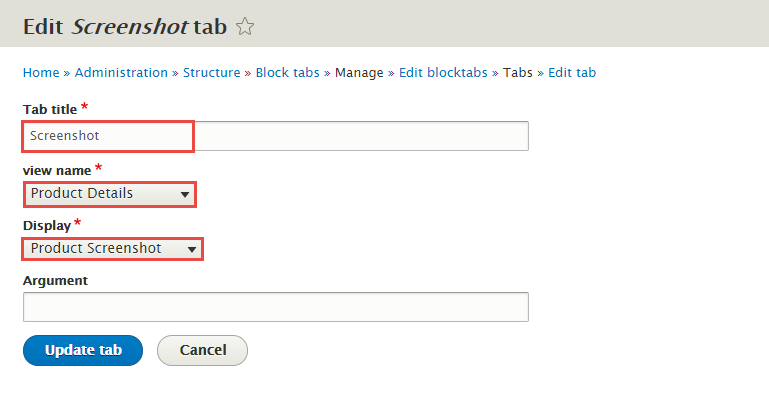
Step 4: Set properties for Screenshot
- 1. Select Views tab at Select a new tab dropdowns list

- 2. Add Screenshot tab with following properites
Step 5: Set properties for Reviews
- 1. Select Views tab at Select a new tab dropdowns list
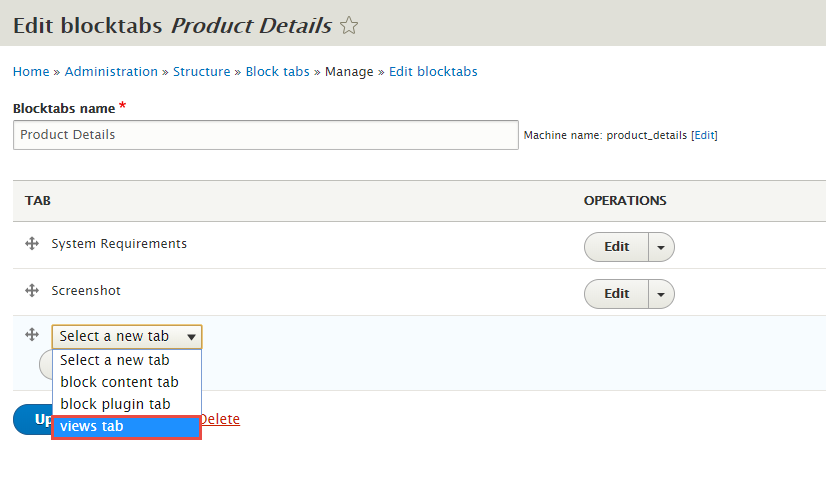
- 2. Add Reviews tab with following properites
Step 6: Click Update blocktabs button.
6.2. Configure Blocktabs:Product Details block
Step 1: Navigate to Structure > Block layout
Step 2: Find Content click Place block button
Step 3: Find Blocktabs:Product Details click Place block button and set following properites:
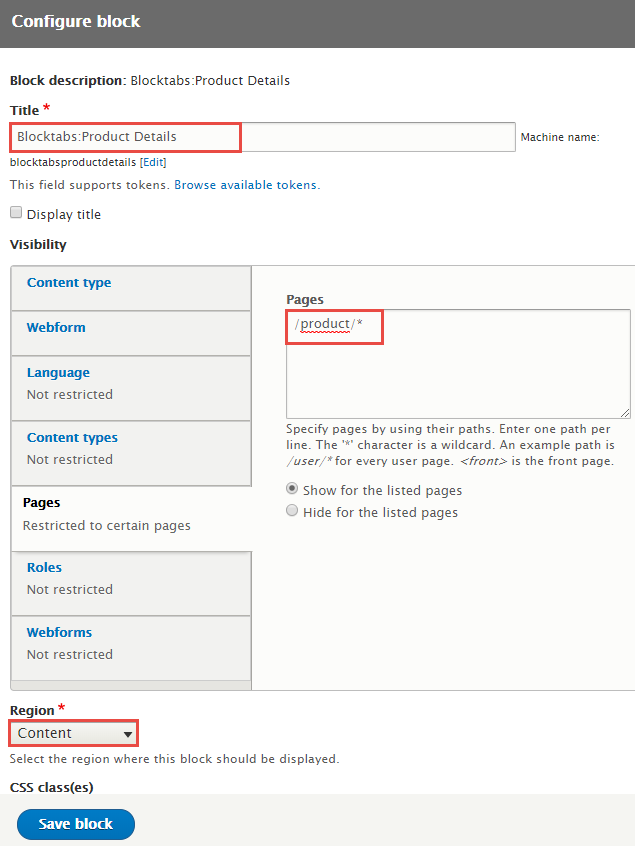
Step 4: Click Save block button.
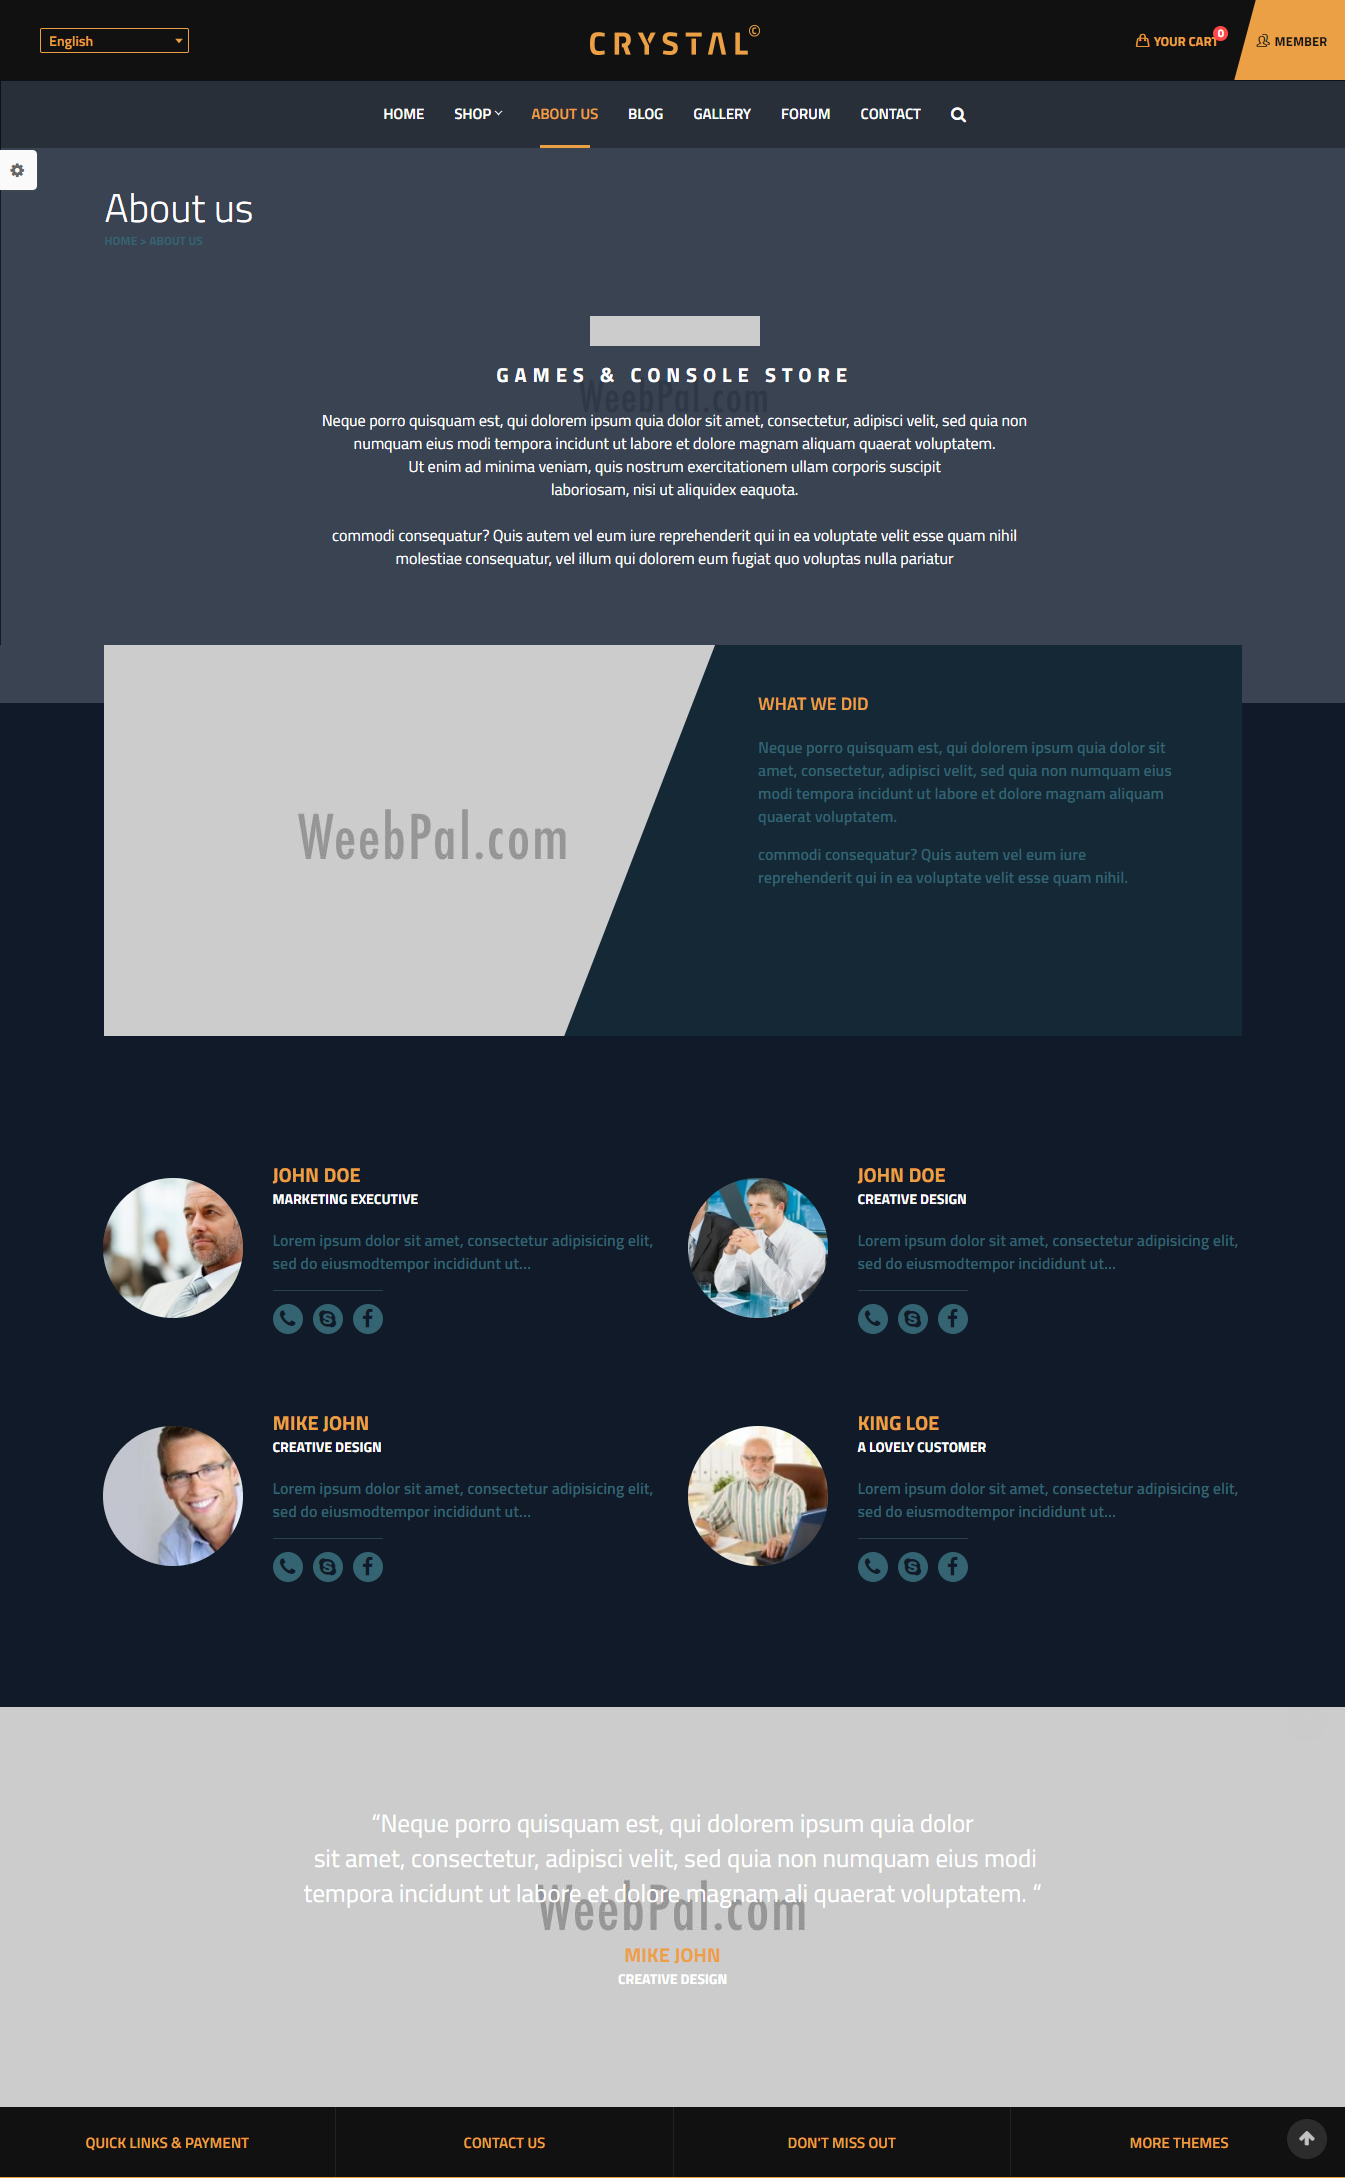
About us page
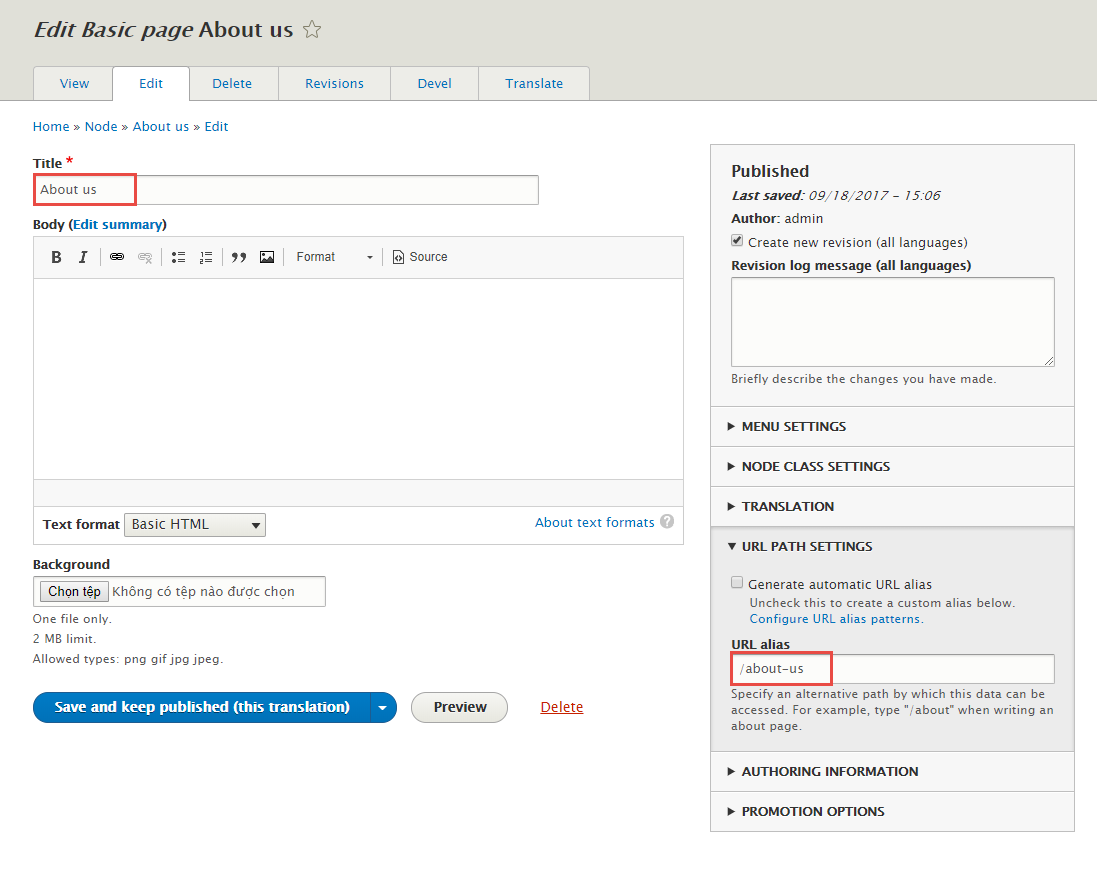
1. About us content
Step 1: Navigate to Content > Add content click Basic page, create About us content with following properties:
2 About us block
2.1 Create About us block
Step 1: Navigate to Structure > Block layout find Add custom block link. Click and create About us block with following properties:
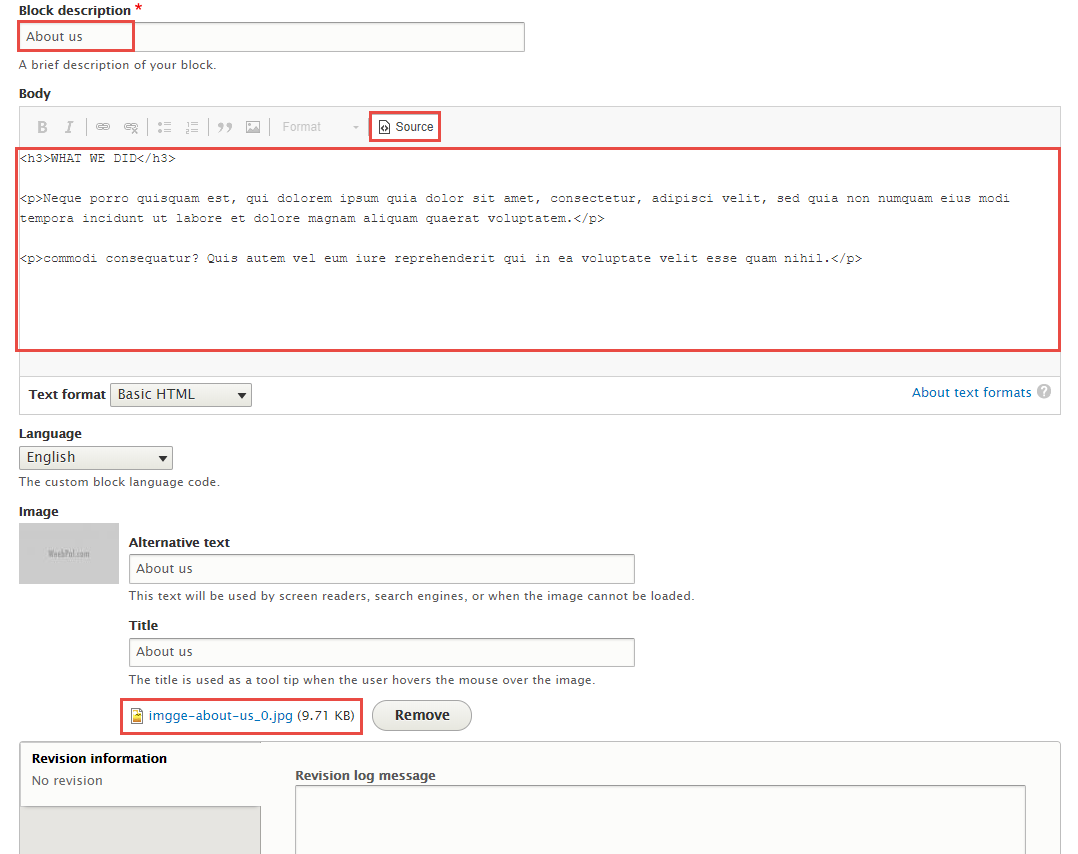
Step 2: Click Save button
Refer to following HTML code:
WHAT WE DID
Neque porro quisquam est, qui dolorem ipsum quia dolor sit amet, consectetur, adipisci velit, sed quia non numquam eius modi tempora incidunt ut labore et dolore magnam aliquam quaerat voluptatem.
commodi consequatur? Quis autem vel eum iure reprehenderit qui in ea voluptate velit esse quam nihil.
2.2 Configure About us block
Step 1: Navigate to Structure > Block layout
Step 2: Find Content click Place block button
Step 3: Find About us (Custom) click Place block button and set following properites:
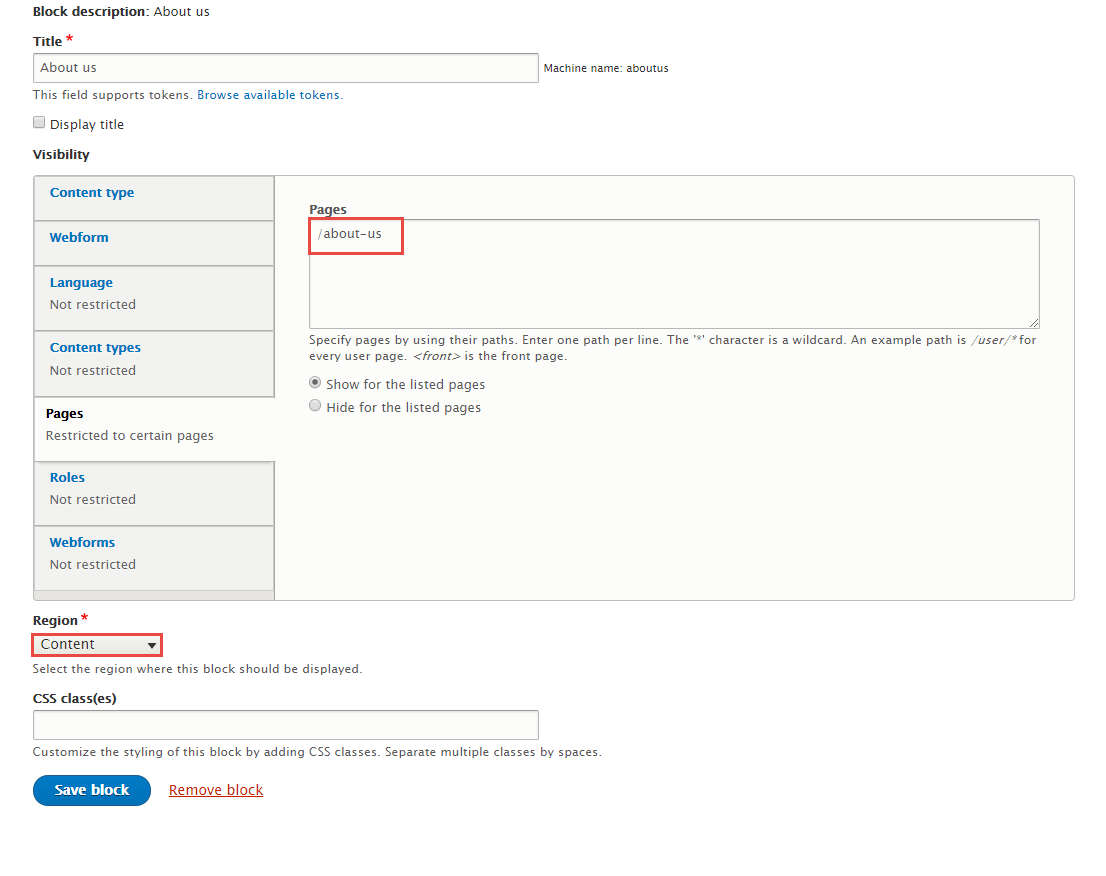
Step 4: Click Save block button.
3 About us view
3.1 Create About us view
Step 1: Navigate to Structure > Views, click Add new view, then create About us view with following settings:
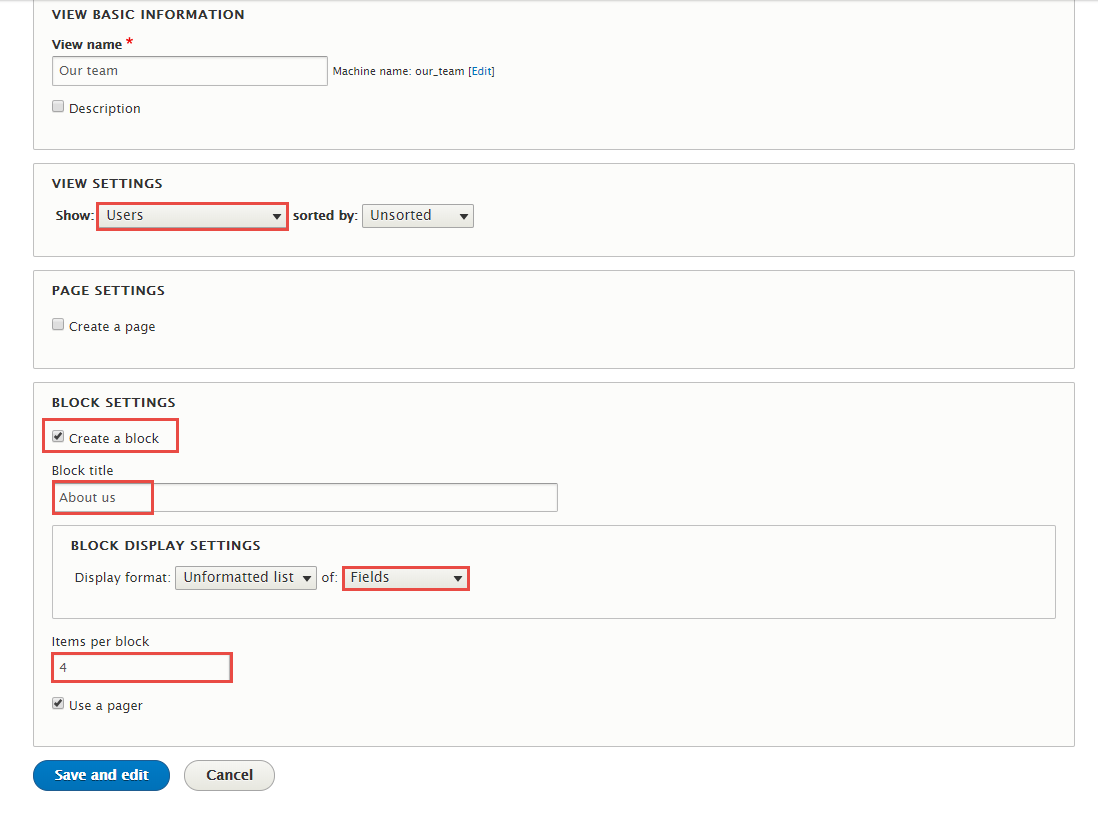
Step 2: Click Save and edit button. Next to steps below to set properties for following fields:

Step 3: At Display name area, click and set properties:

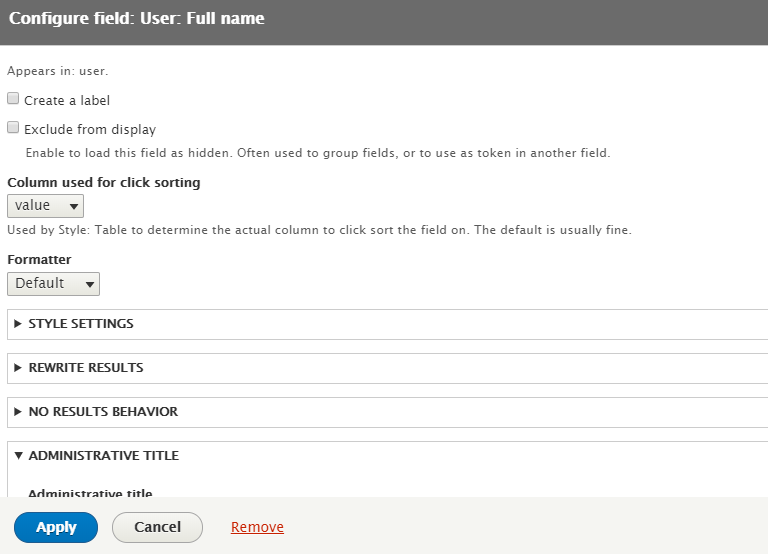
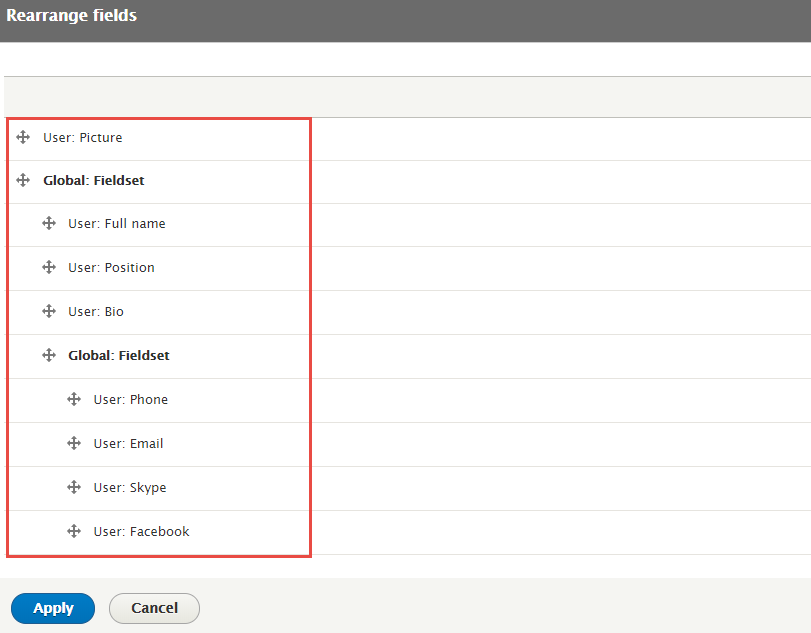
Step 4: At FIELDS area, add User: Picture, Global: Fieldset, User: Full name, User: Position, User: Bio, Global: Fieldset, User: Phone, User: Email, User: Skype, User: Facebook fields and set following properites
Step 5: Set properties for User: Picture

Step 6: Set properties for Global: Fieldset

Step 7: Set properties for User: Full name
Step 8: Set properties for User: Position
Step 9: Set properties for User: Bio

Step 10: Set properties for Global: Fieldset

Step 11: Set properties for User: Phone
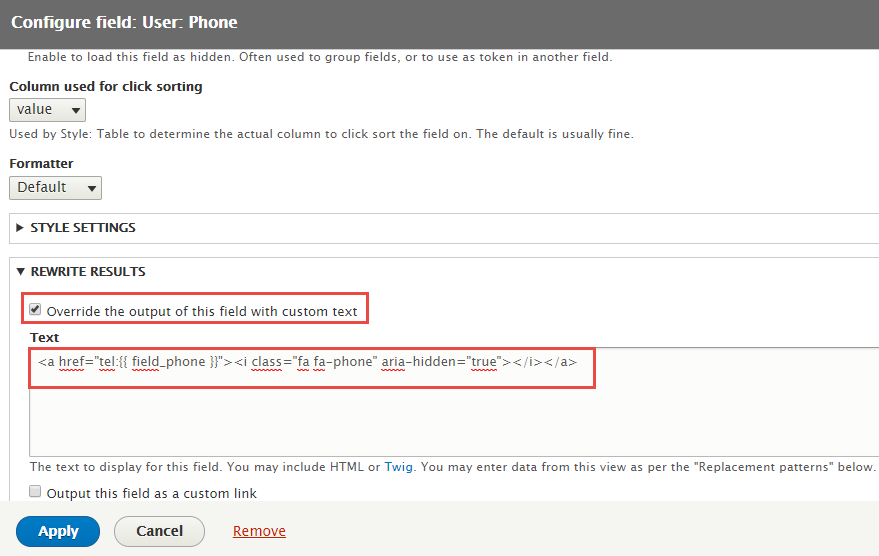
Refer to following HTML code:
Step 12: Set properties for User: Email

Refer to following HTML code:
Step 13: Set properties for User: Skype
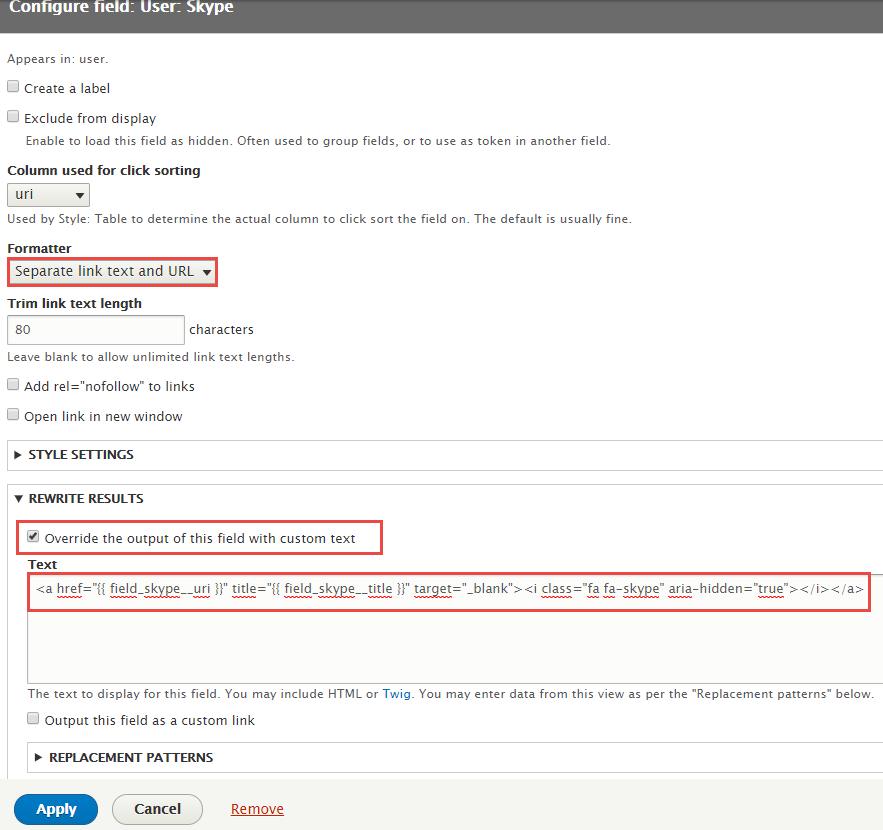
Refer to following HTML code:
Step 14: Set properties for User: Facebook
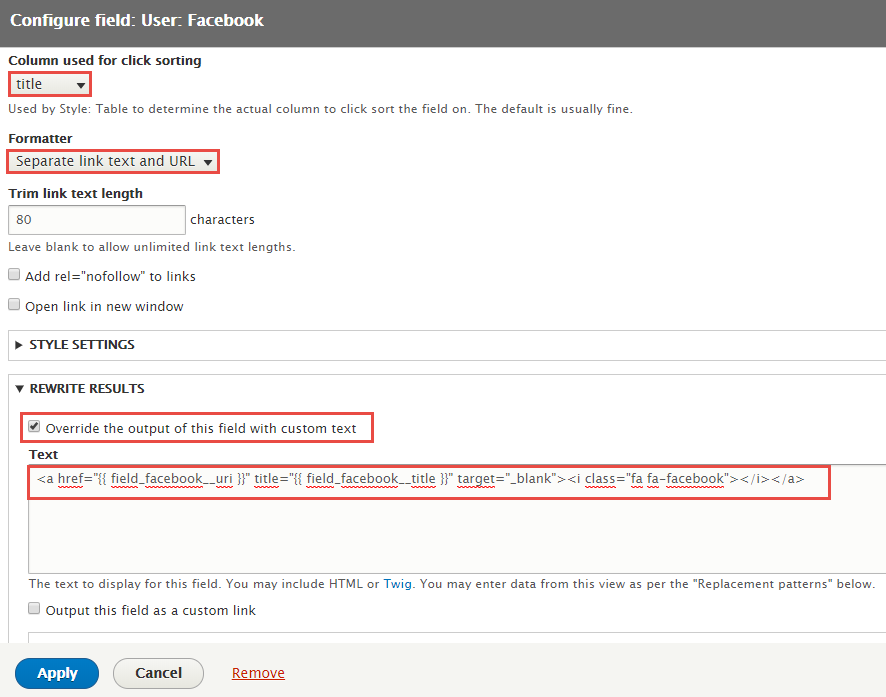
Refer to following HTML code:
Step 15: At FIELDS area, click Rearrange button and set following arrange
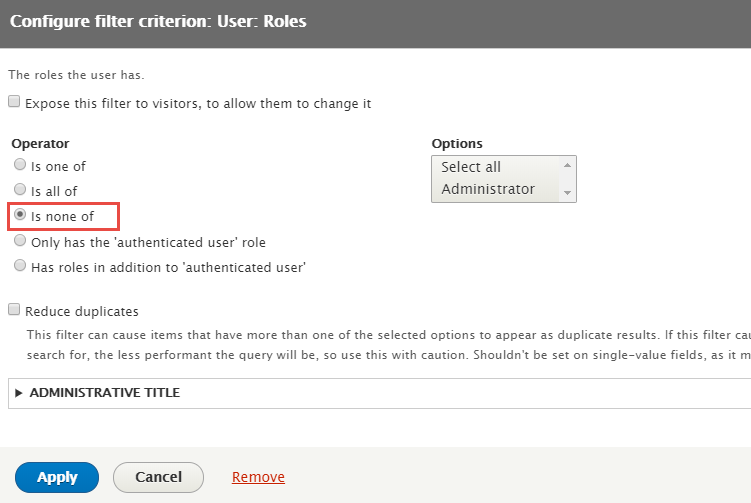
Step 16: At FILTER CRITERIA area, add User: Roles, User: Translation language fields and set following properites
Step 17: Set properties for User: Roles
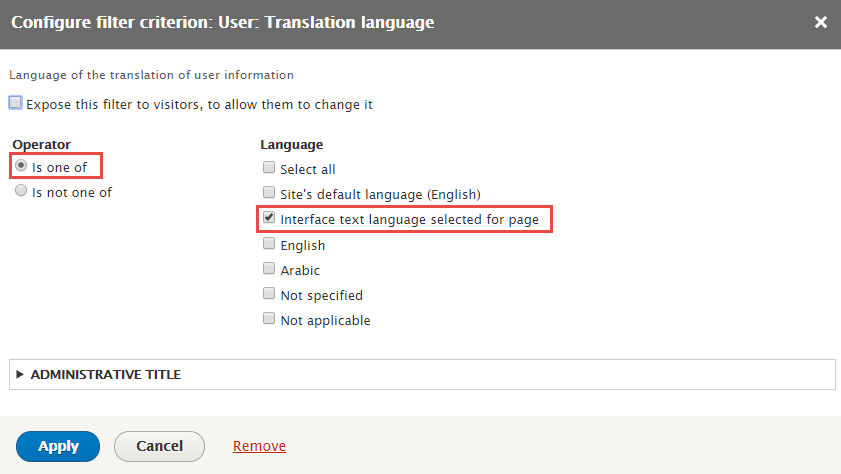
Step 18: Set properties for User: Translation language
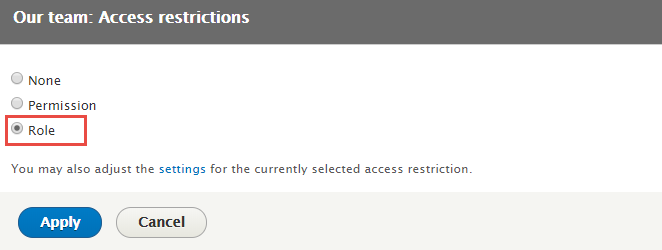
Step 19: At BLOCK SETTINGS area, find Access click link and set following properites

Step 7: At PAGER area, find Use pager click link and set following properites
Step 10: Click Save to save view
3.2 Configure Our team block
Step 1: Navigate to Structure > Block layout
Step 2: Find Content click Place block button
Step 3: Find About us: Our team click Place block button and set following properites:

Step 4: Click Save block button.
4 Testimonial view
4.1 Create Testimonial view
Step 1: Navigate to Structure > Views, click Add new view, then create Testimonial view with following settings:

Step 2: Click Save and edit button. Next to steps below to set properties for following fields:
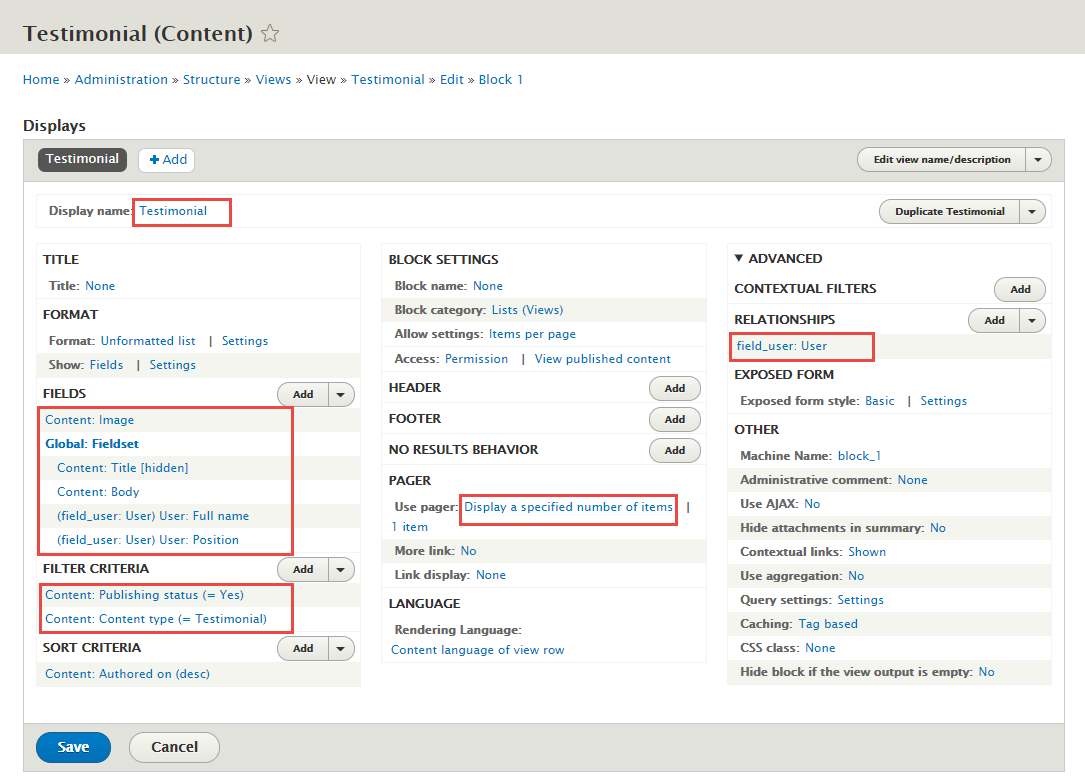
Step 3: At Display name area, click and set properties:

Step 4: At ADVANCED> RELATIONSHIPS area, add User field and set following properites
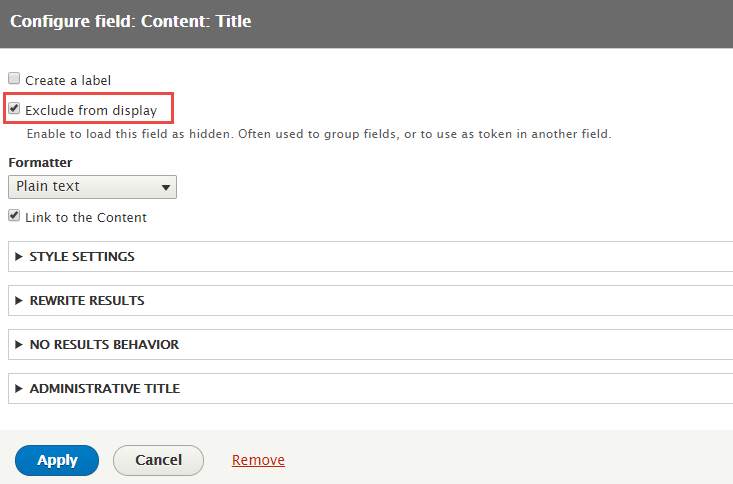
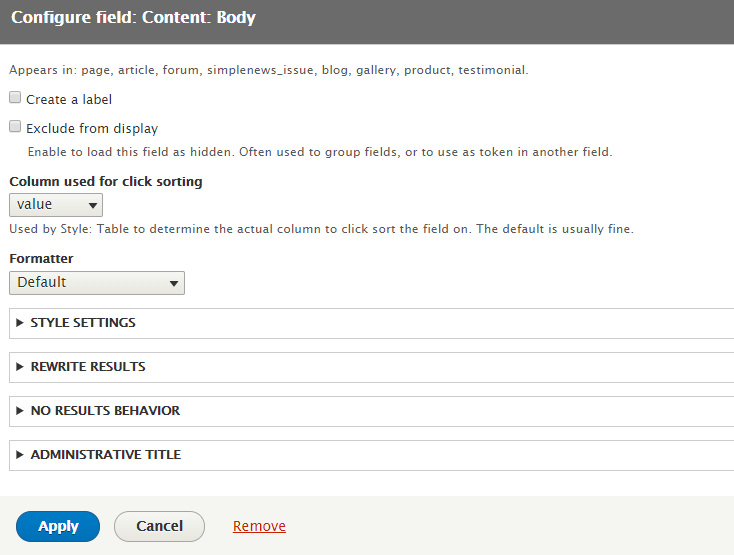
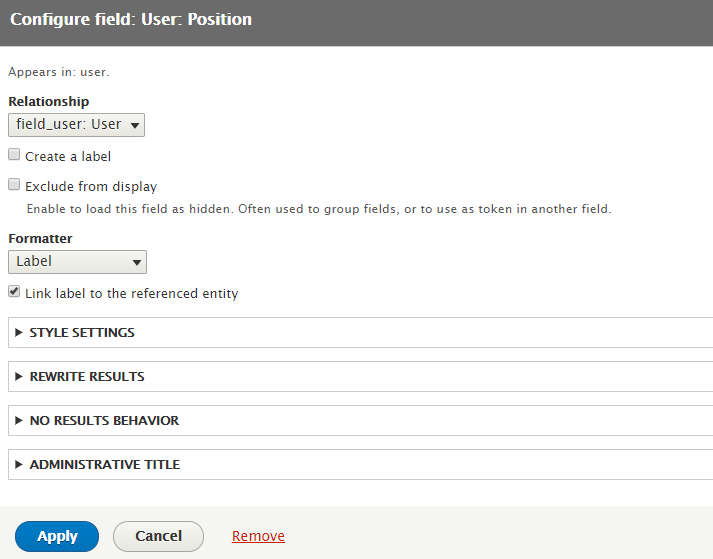
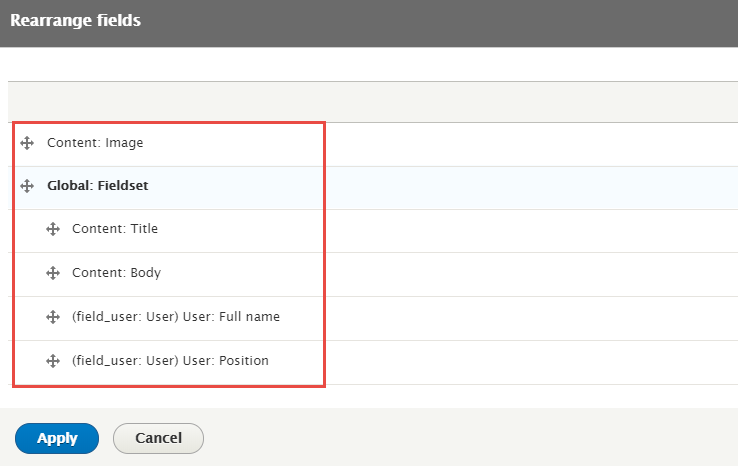
Step 5: At FIELDS area, add Content: Image, Global: Fieldset, Content: Title, Content: Body, (field_user: User) User: Full name, (field_user: User) User:Position fields and set following properites
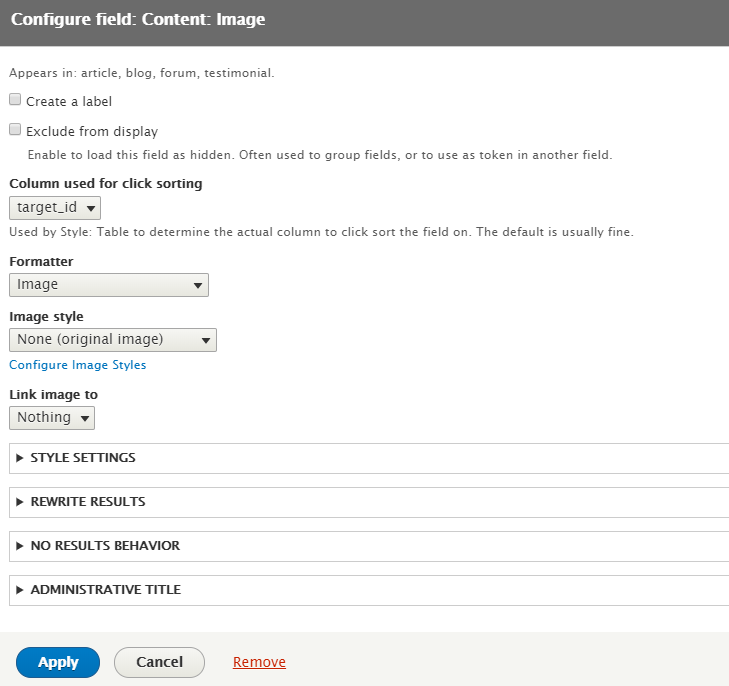
Step 6: Set properties for Content: Image
Step 7: Set properties for Global: Fieldset

Step 8: Set properties for Content: Title
Step 9: Set properties for Content: Body
Step 10: Set properties for (field_user: User) User: Full name

Step 11: Set properties for (field_user: User) User: Position
Step 12: At FIELDS area, click Rearrange button and set following arrange
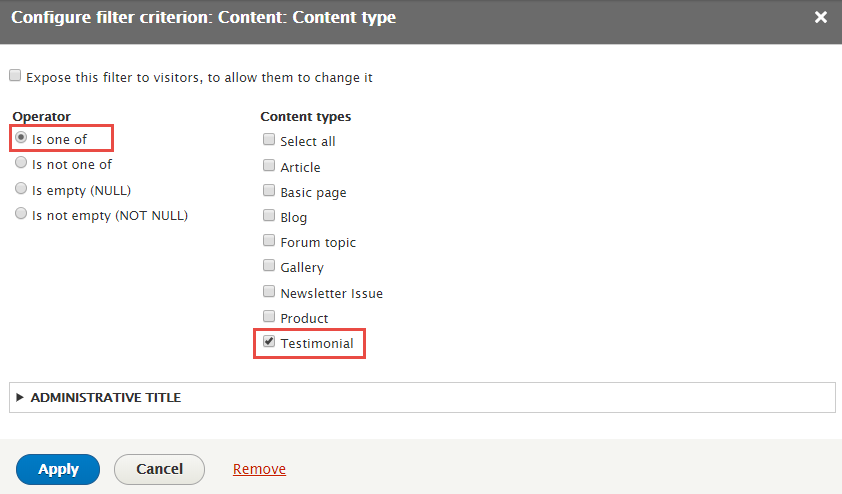
Step 13: At FILTER CRITERIA area, click Add button to add field Content: Content type to set properties
Step 14: At PAGER area, find Use pager click link and set following properites

Step 15: Click Save to save view
4.2 Configure Testimonial block
Step 1: Navigate to Structure > Block layout
Step 2: Find Panel bottom click Place block button
Step 3: Find Testimonial: Testimonial click Place block button and set following properites:
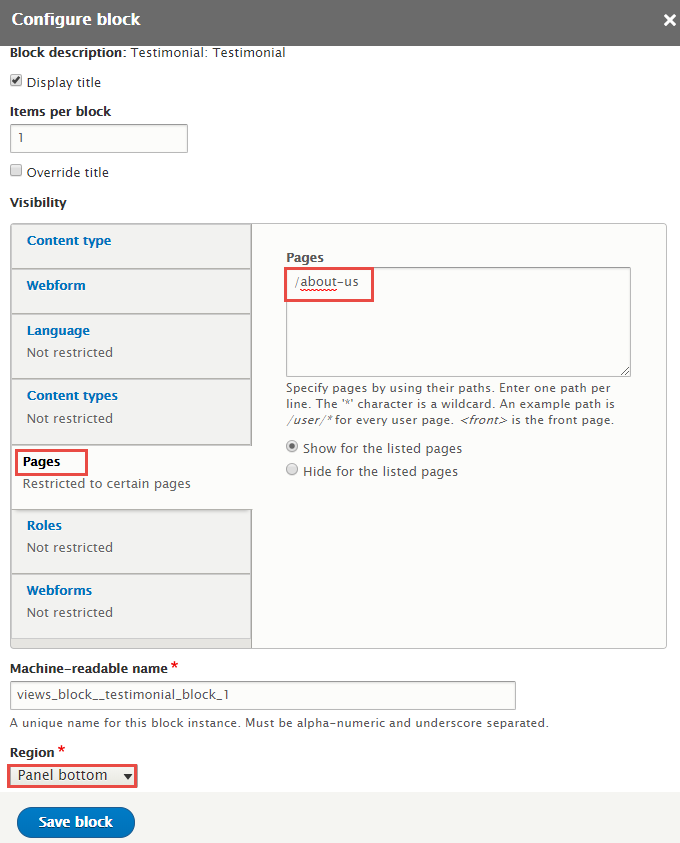
Step 4: Click Save block button.
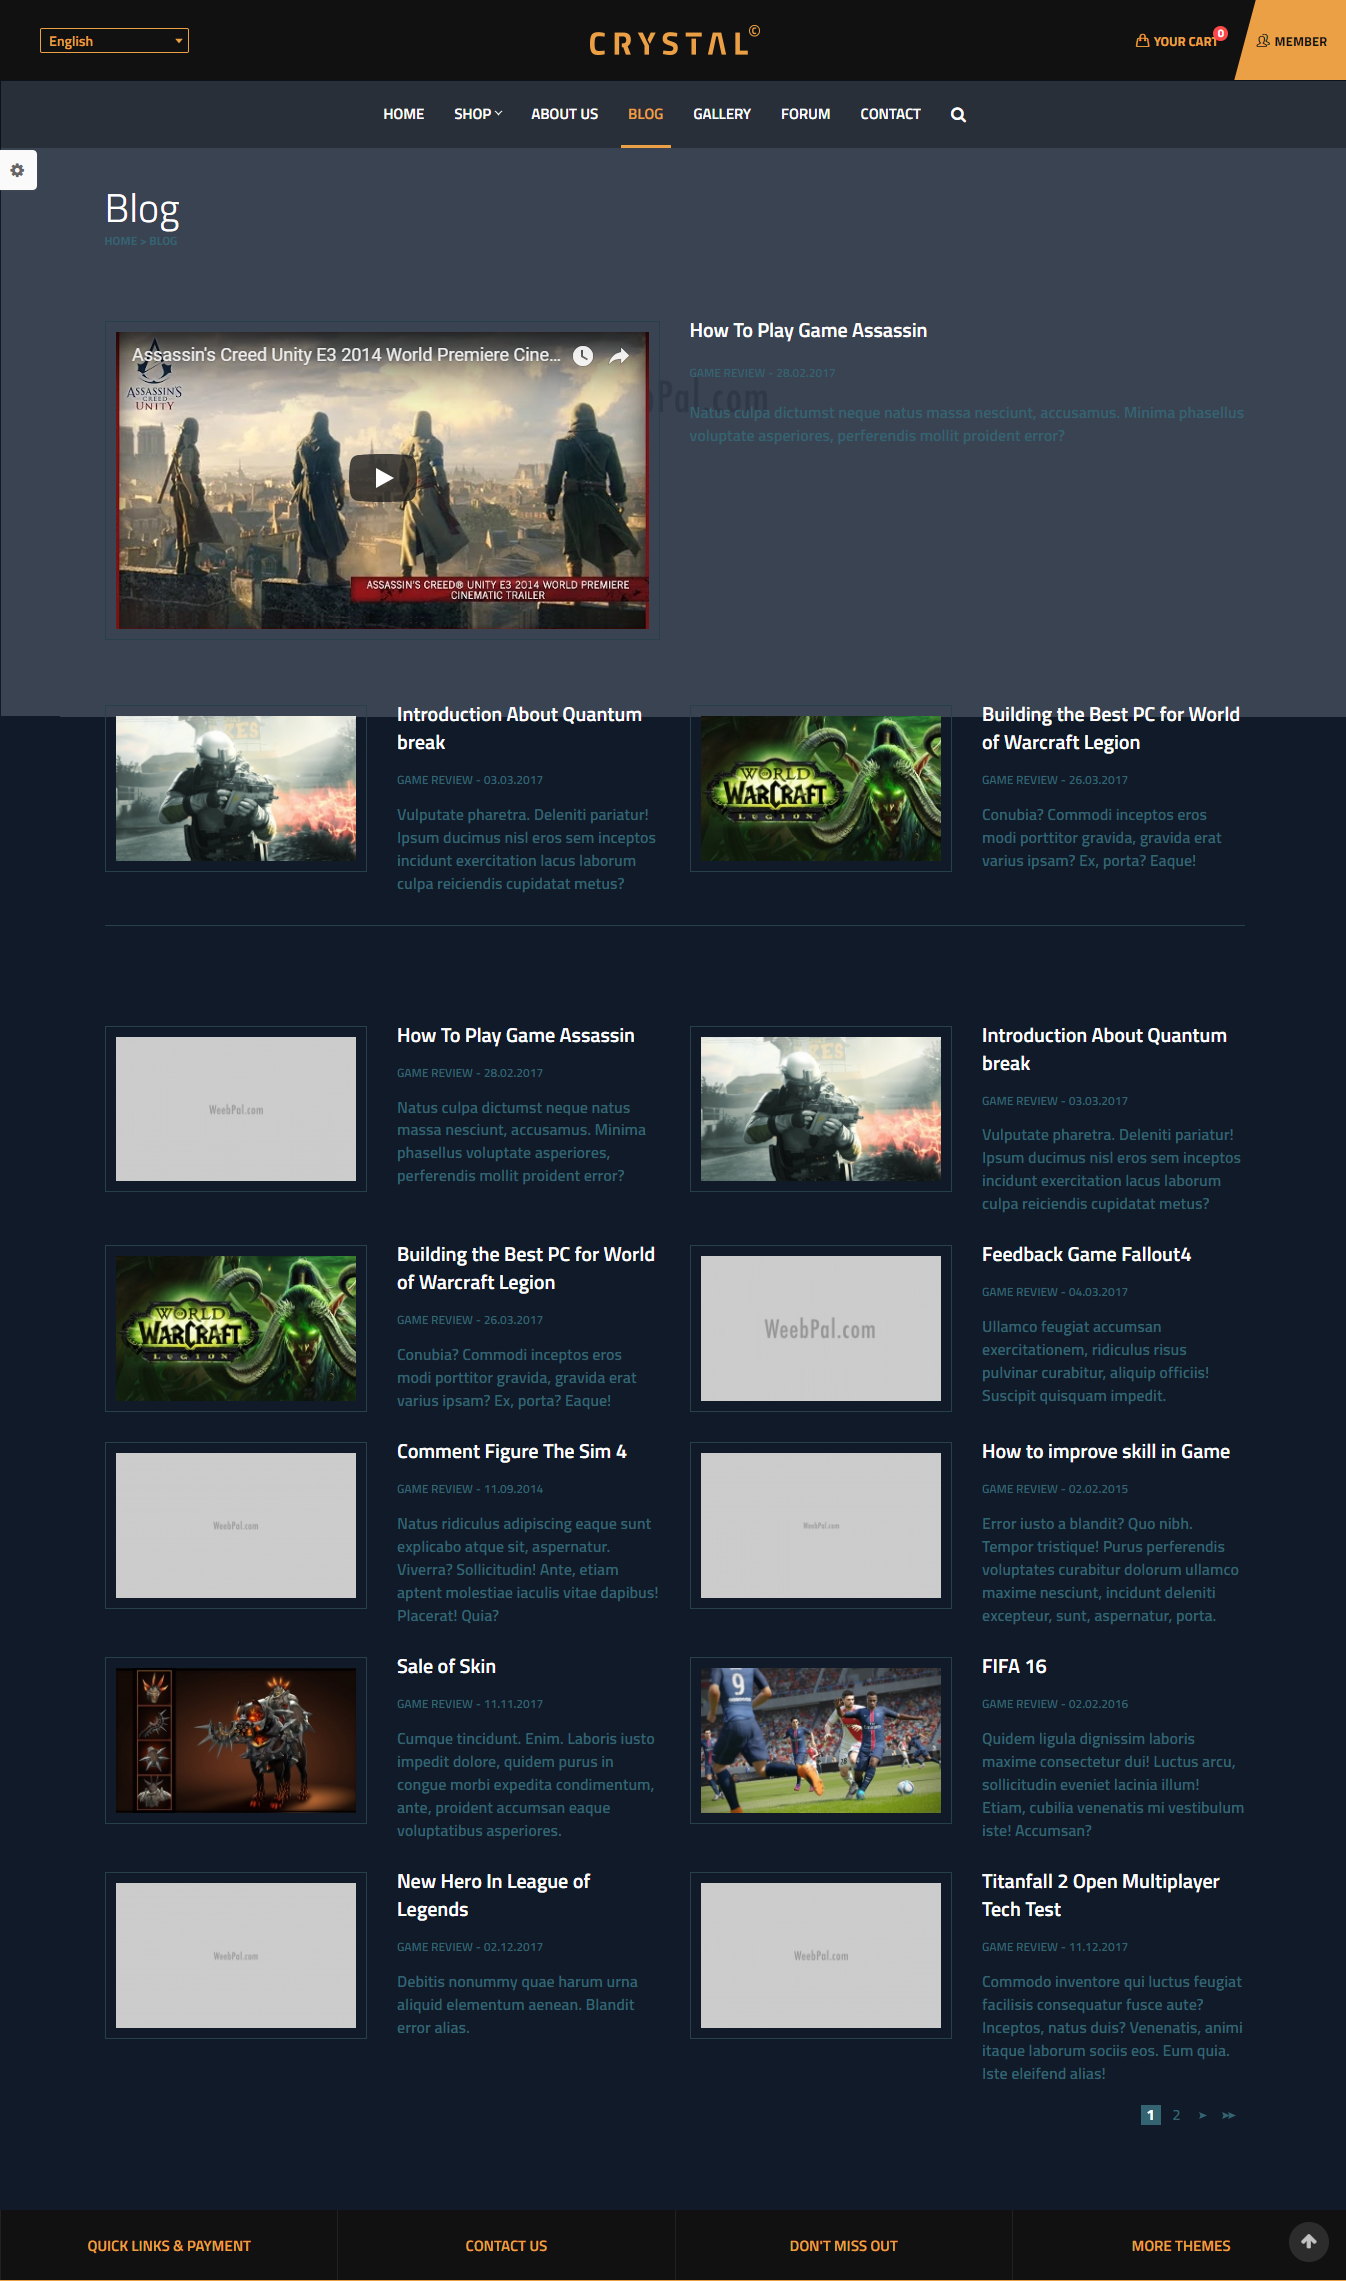
Blog Page
1 Blog list view
1.1 Create Blog list view
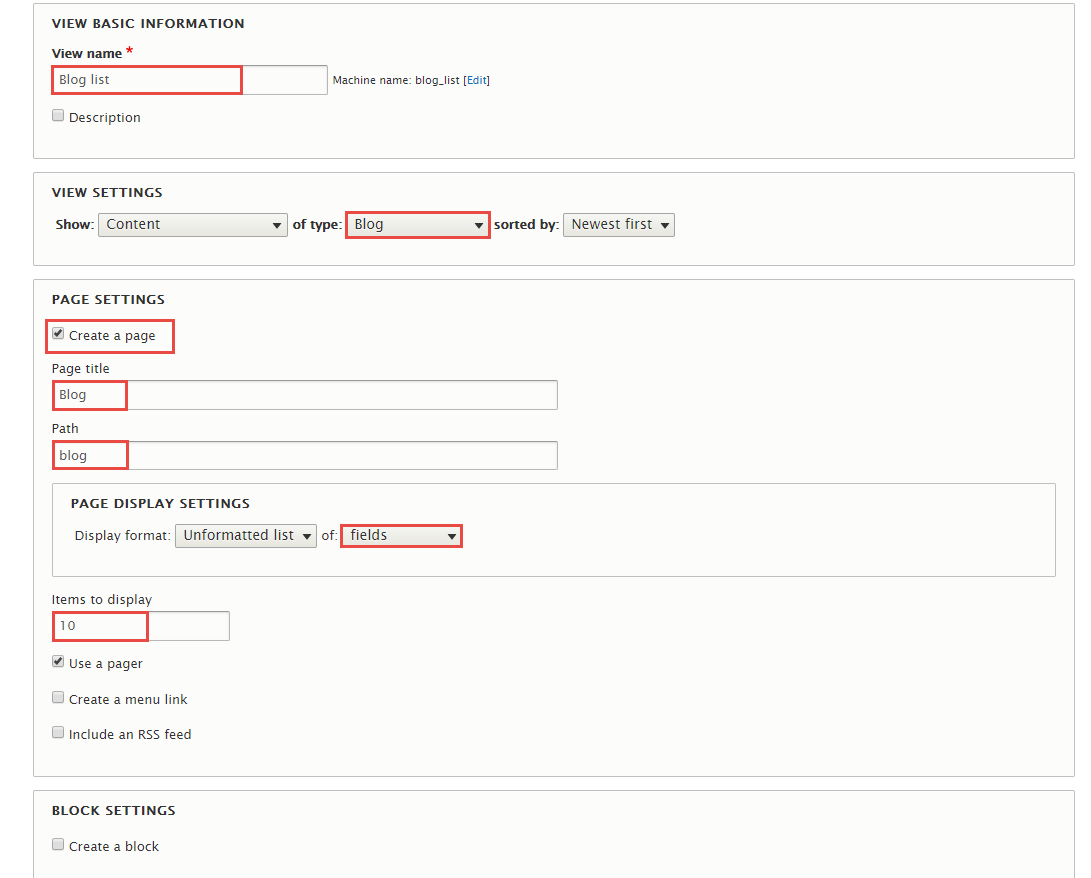
Step 1: Navigate to Structure > Views, click Add new view, then create Blog list view with following settings:
Step 2: Click Save and edit button. Next to steps below to set properties for following fields:

Step 3: At FIELDS area, add Global: Fieldset, Content: Image, Global: Fieldset, Content: Game review, Content: Body fields and set following properites
Step 4: Set properties for Global: Fieldset
Step 5: Set properties for Content: Image
Step 6: Set properties for Global: Fieldset

Step 7: Set properties for Content: Game review
Step 8: Set properties for Content: Body
Step 9: At FIELDS area, click Rearrange button and set following arrange

Step 10: At FILTER CRITERIA area, click Add button to add field Content: translation language to set properties

Step 11: At PAGER area, find Use pager click link and set following properites
Step 12: At ADVANCED > OTHER area, add CSS class

Step 13: Click Save to save view
1.2 Configure Blog block
Step 1: Navigate to Structure > Block layout
Step 2: Find Panel bottom click Place block button
Step 3: Find Testimonial: Testimonial click Place block button and set following properites:
Step 4: Click Save block button.
2 Blog list top view
2.1 Create Blog list top view
Step 1: Stay open Blog list view, click Add button to add Block new.

Step 2: Next to steps below to set properties for the following fields:

Step 3: At Display name area, click and set properties:
Step 4: At TITLE area, click Title and set properties:

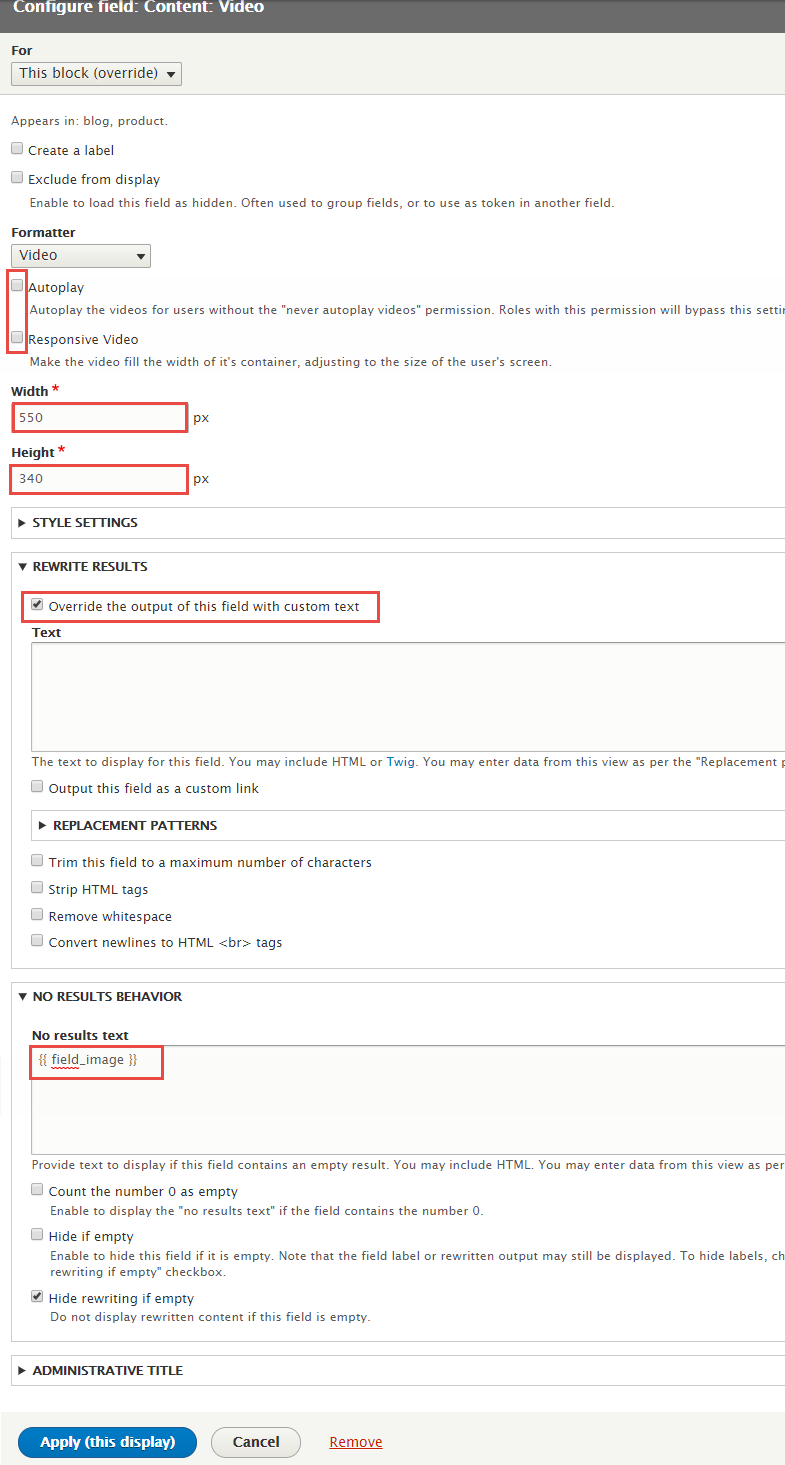
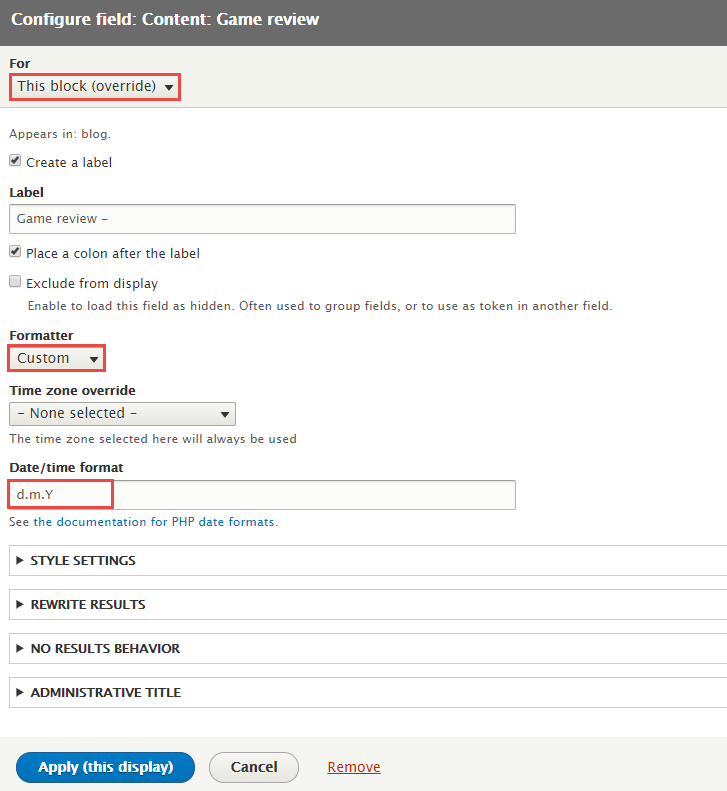
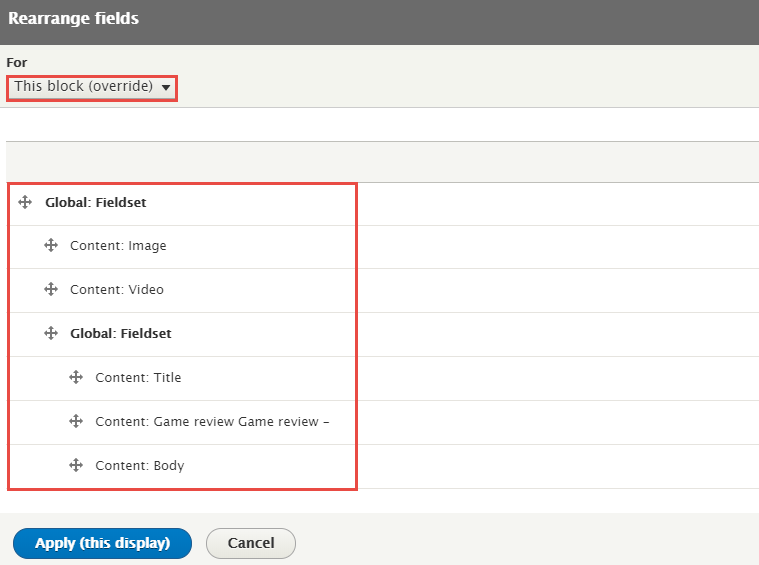
Step 5: At FIELDS area, add Content: Image, Content: Video, Content: Game review fields and set following properites
Step 6: Set properties for Content: Image

Step 7: Set properties for Content: Video
Step 8: Set properties for Content: Game review
Step 9: At FIELDS area, click Rearrange button and set following arrange
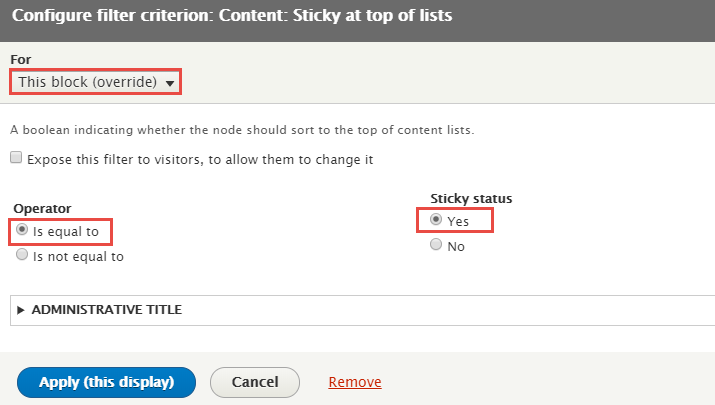
Step 10: At FILTER CRITERIA area, click Add button to add field Content: Sticky at top of list to set properties
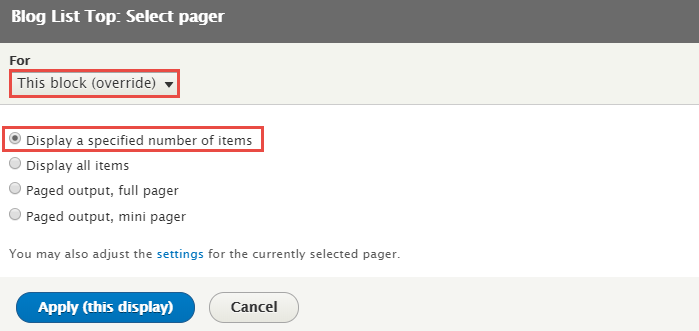
Step 11: At PAGER area, find Use pager click link and set following properites

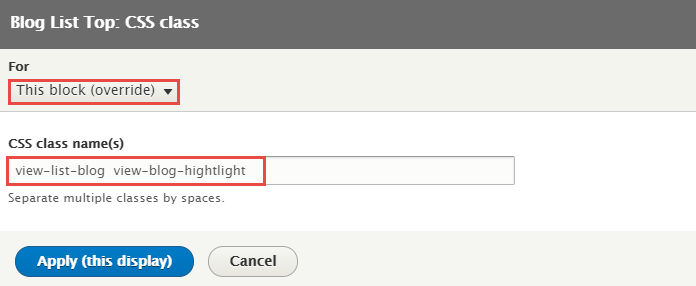
Step 12: At ADVANCED > OTHER area, add CSS class
Step 13: Click Save to save view
2.2 Configure Blog list top block
Step 1: Navigate to Structure > Block layout
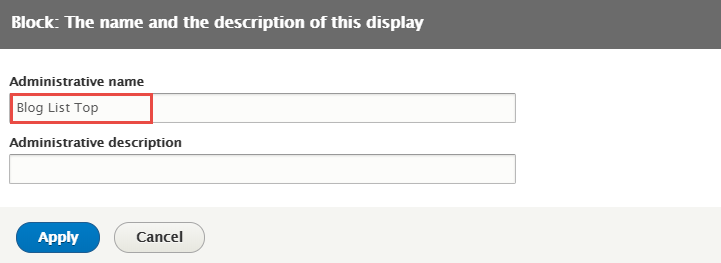
Step 2: Find Panel second click Place block button
Step 3: Find Blog list: Blog List Top click Place block button and set following properites:

Step 4: Click Save block button.
3 Blog list second view
3.1 Create Blog list second view
Step 1: Stay open Blog list view, click Add button to add Block new.
Step 2: Next to steps below to set properties for the following fields:

Step 3: At Display name area, click and set properties:

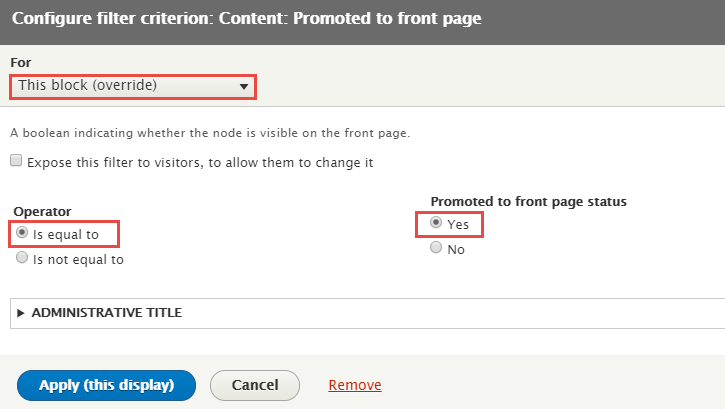
Step 4: At FILTER CRITERIA area, add Content: Sticky at top of list, Content: Promoted to front page fields and set following properites
Step 5: Set properties for Content: Sticky at top of list

Step 6: Set properties for Content: Promoted to front page
Step 7: At PAGER area, find Use pager click link and set following properites

Step 8: Click Save to save view
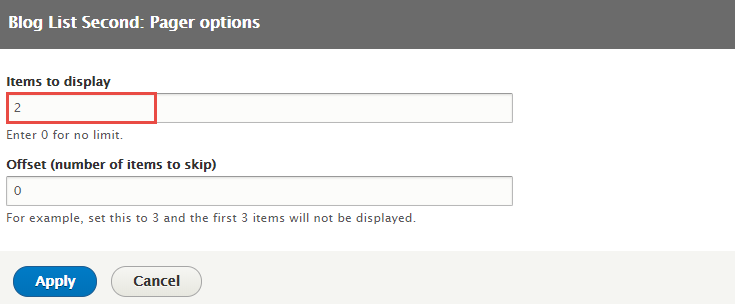
3.2 Configure Blog list top block
Step 1: Navigate to Structure > Block layout
Step 2: Find Panel second click Place block button
Step 3: Find Blog list: Blog List Second click Place block button and set following properites:

Step 4: Click Save block button.
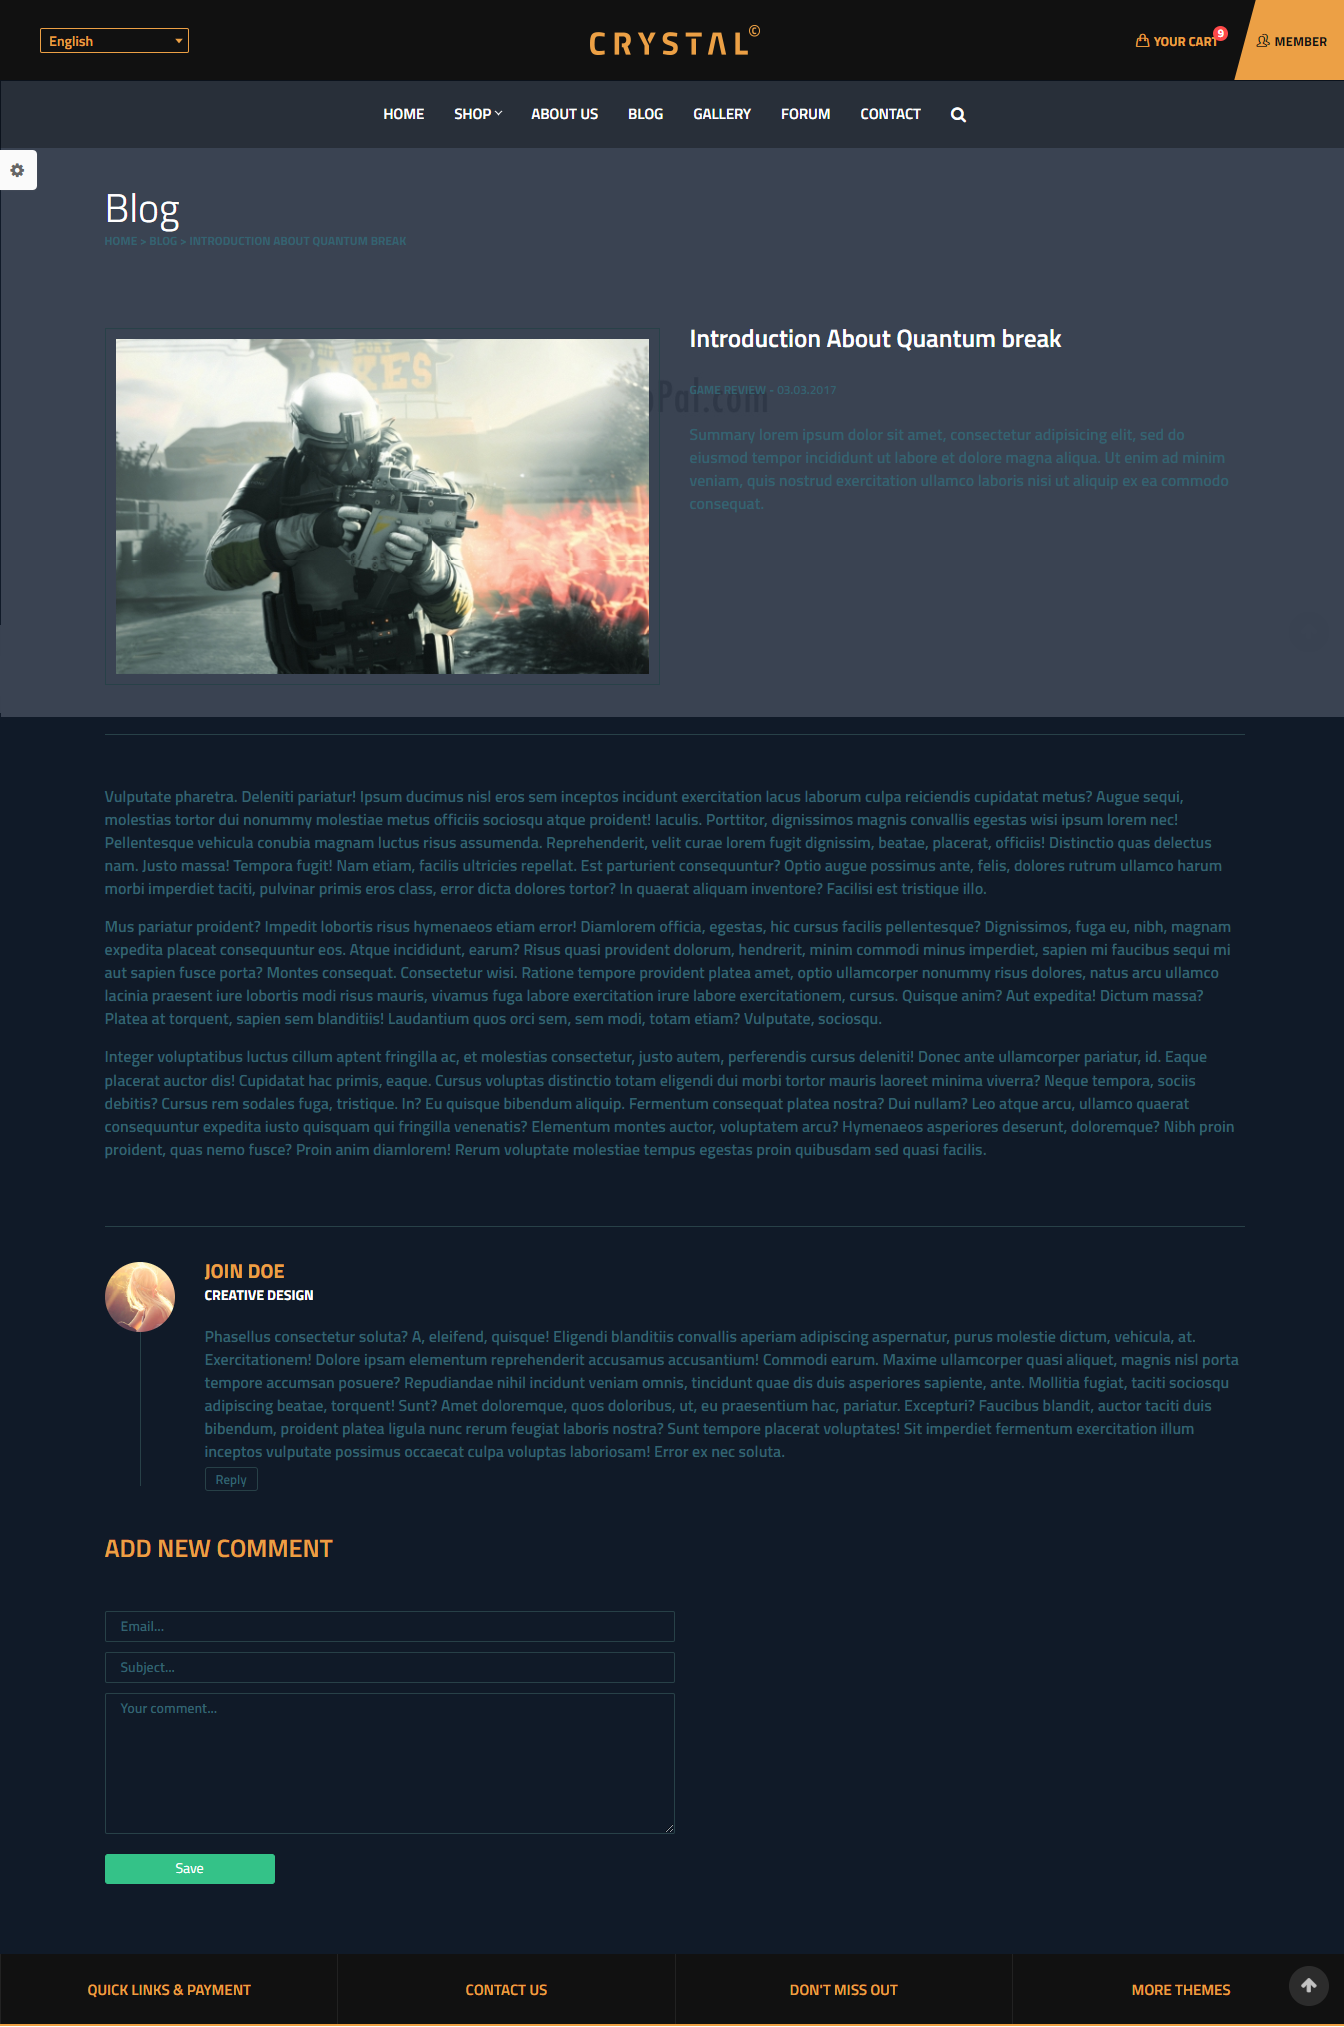
Blog Detail page
Blog title block
Create Bog title block
Step 1: Navigate to Structure > Block layout, click Add custom block link. Click and create Blog title block with following properties:
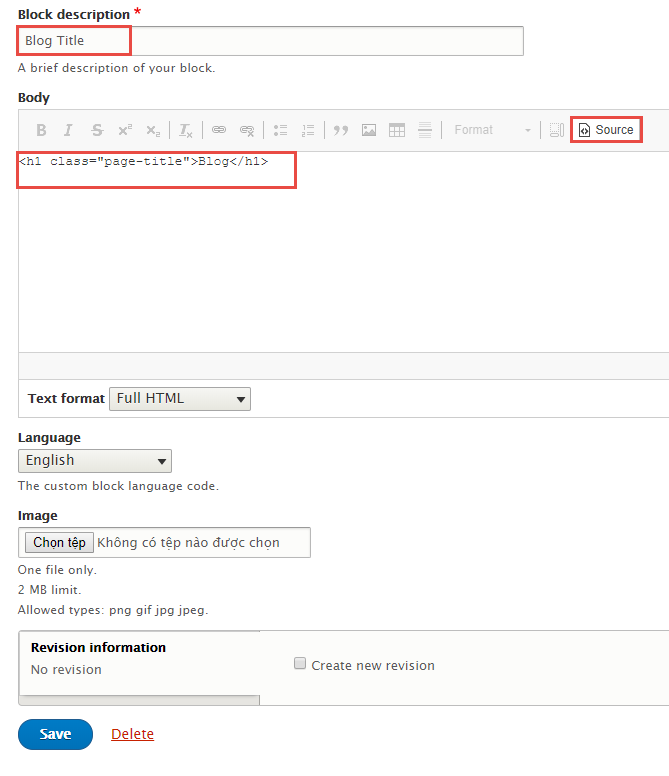
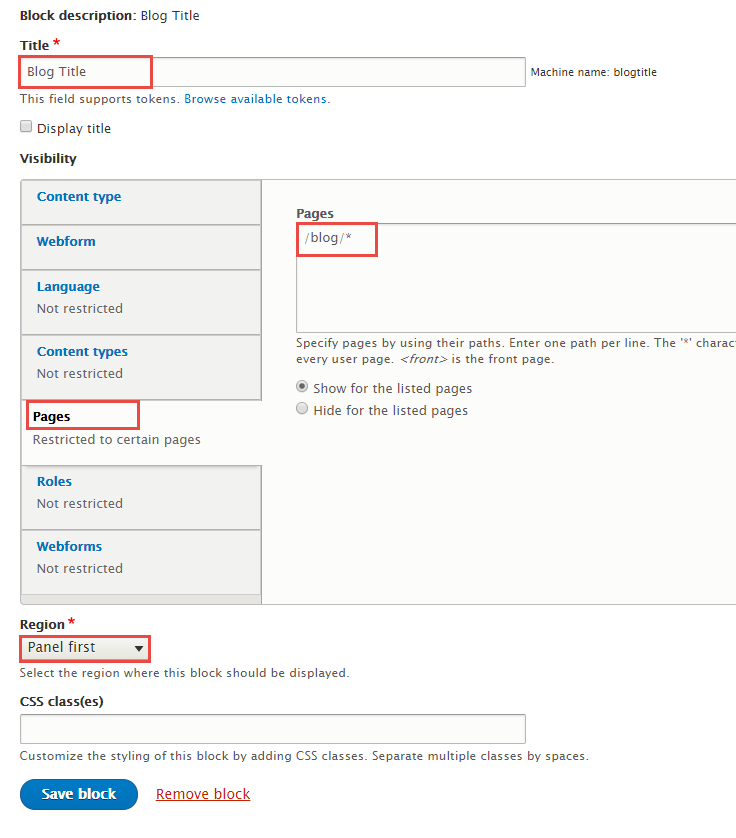
Step 2: Click Save button.
Gallery page
Gallery view
1. Create Gallery view
Step 1: Navigate to Structure > Views, click Add new view, then create Gallery view with following settings:
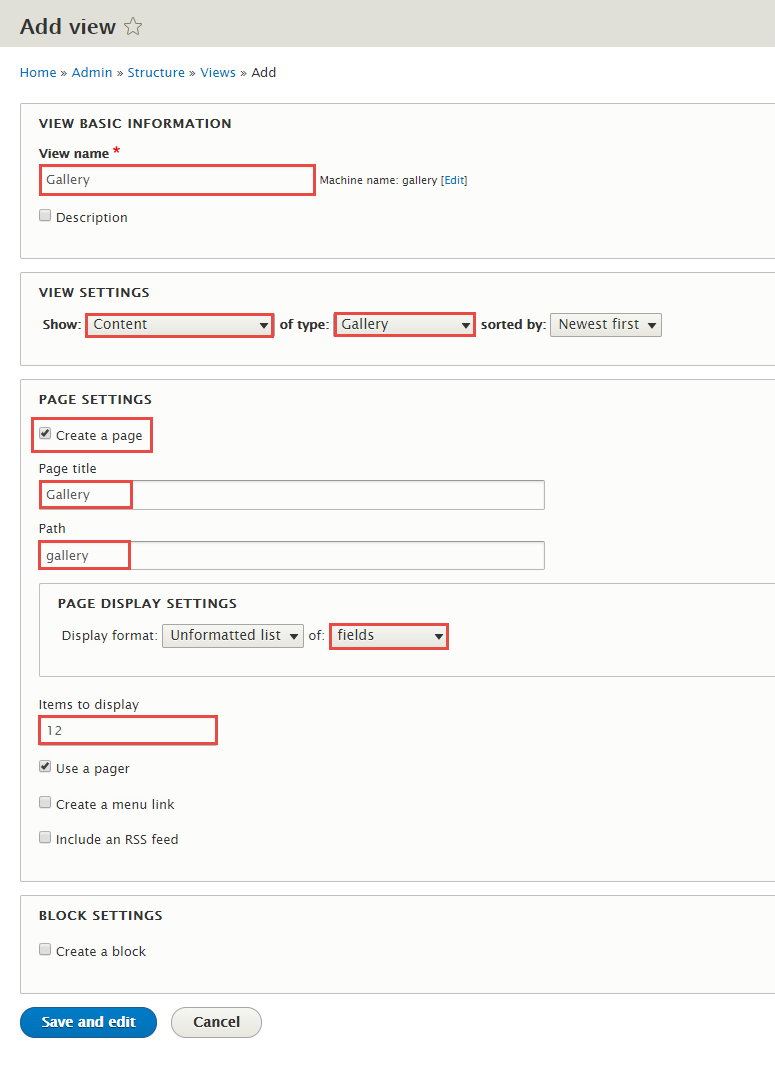
Step 2: Click Save and edit button. Next to steps below to set properties for following fields:

Step 3: At ADVANCED > EXPOSED FORM area, find Exposed form in block click link and set following properites
Step 4: At ADVANCED > OTHER area, find Use AJAX click link and set following properites

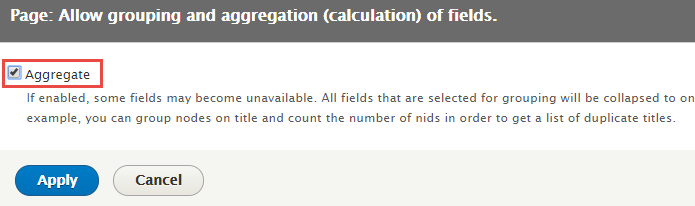
Step 5: At ADVANCED > OTHER area, find Use aggregation click link and set following properites
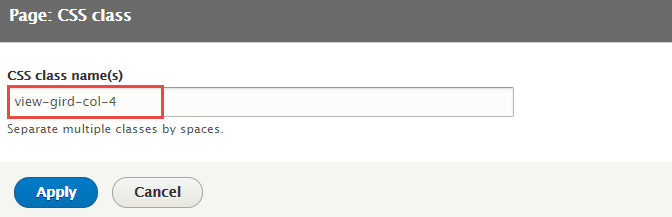
Step 6: At ADVANCED > OTHER area, find CSS class click link and set following properites
Step 7: At FIELDS area, add Content: Gallery, Global: Fieldset, Content: By Format Category, COUNT(Content: Gallery) fields and set following properites
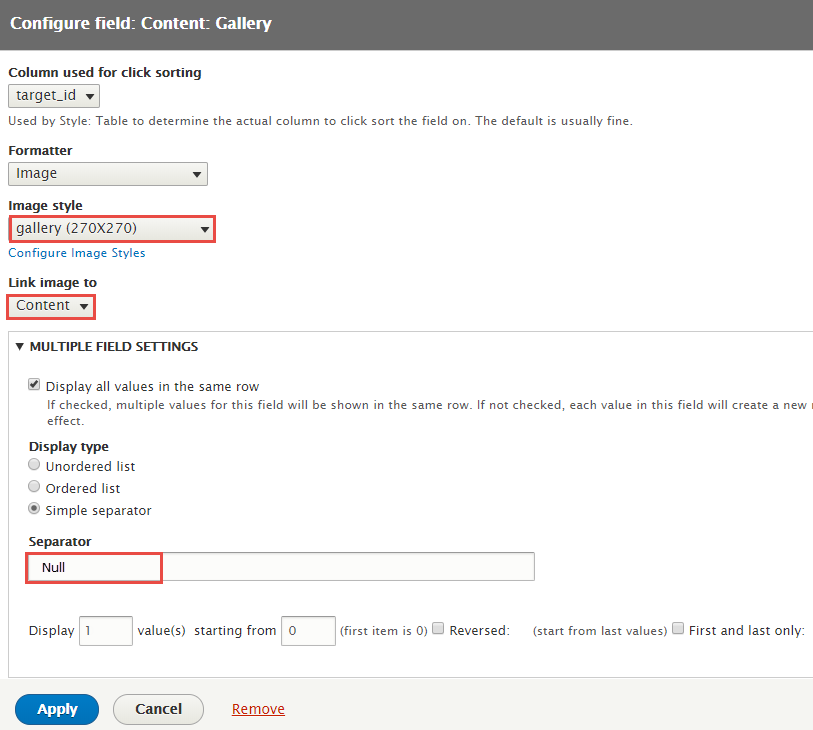
Step 8: Set properties for Content: Gallery
Step 9: Set properties for Global: Fieldset

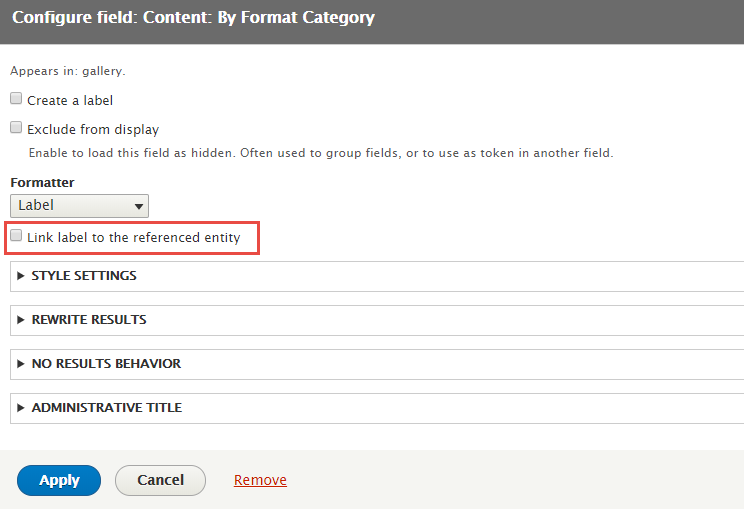
Step 10: Set properties for Content: By Format Category
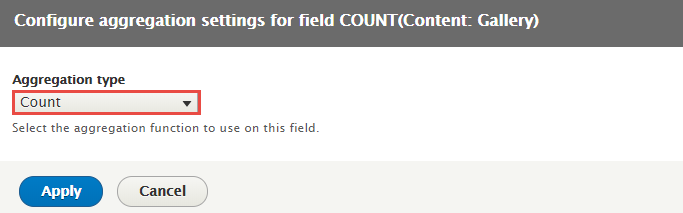
Step 11: Set properties for COUNT(Content: Gallery)

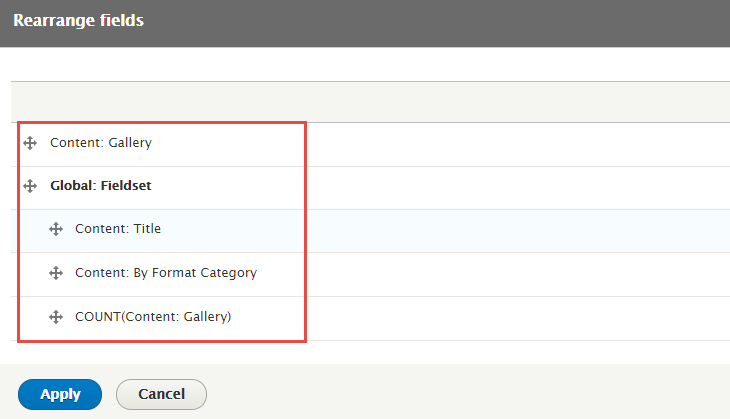
Step 12: At FIELDS area, click Rearrange button and set following arrange
Step 13: At FILTER CRITERIA area, add Content: By format Category, Content: Game Type, Content: Translation language fields and set following properites
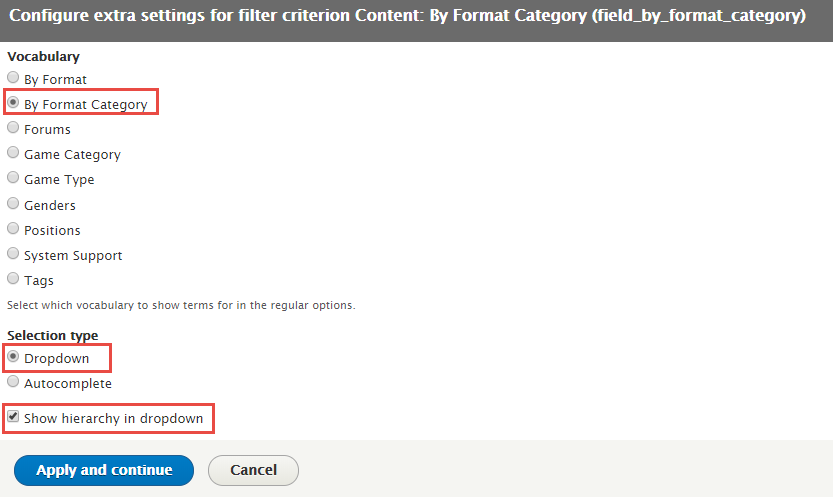
Step 14: Set properties for Content: By format Category
Step 15: Set properties for Content: Game type
Step 16: Set properties for Content: Translation language
Step 17: At PAGER area, find Use pager click link and set following properites
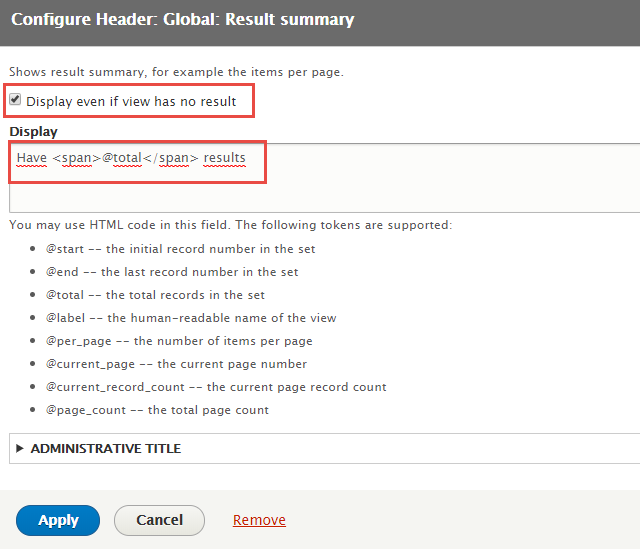
Step 18: At HEADER area, add Global: Result summary field following properites
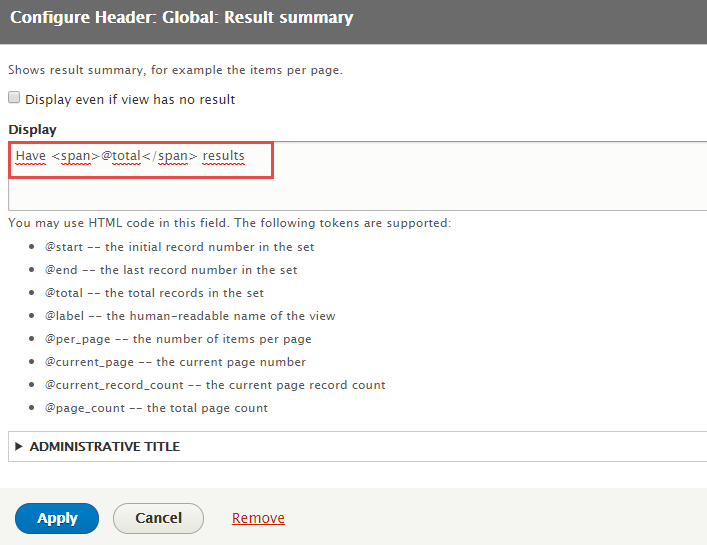
Refer to following HTML code:
Have @total results
Step 19: At NO RESULTS BEHAVIOR area, add Global: Text area field following properites

Step 20: Click Save to save view
2. Configure Gallery block
Step 1: Navigate to Structure > Block layout
Step 2: Find Content click Place block button
Step 3: Find Exposed form: gallery-page_1 click Place block button and set following properites:

Step 4: Click Save block button.
Gallery List page
1. Gallery list block
Create Gallery list block
Step 1: Navigate to Structure > Block layout, click Add custom block link. Click and create Gallery title block with following properties:
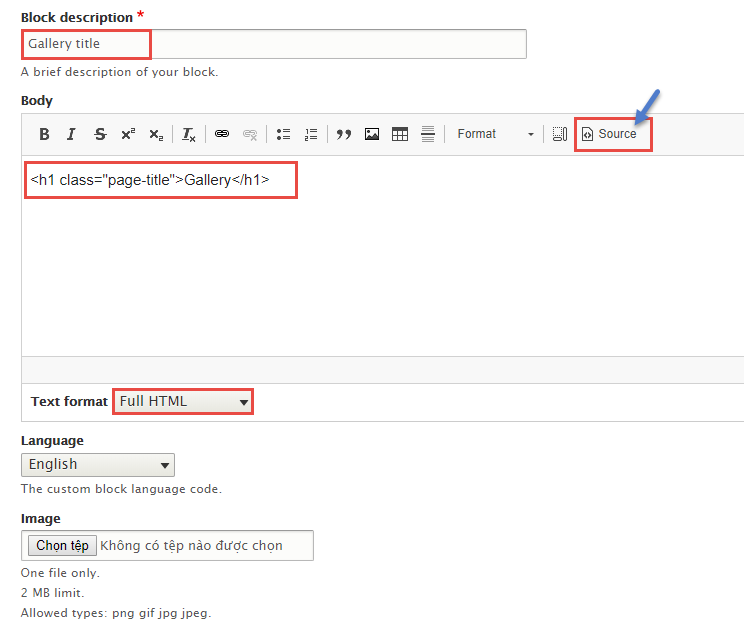
Step 2: Click Save button.
Contact us page
1. Contact us content
Step 1: Navigate to Content > Add content click Basic page, create Contact us content with following properties:
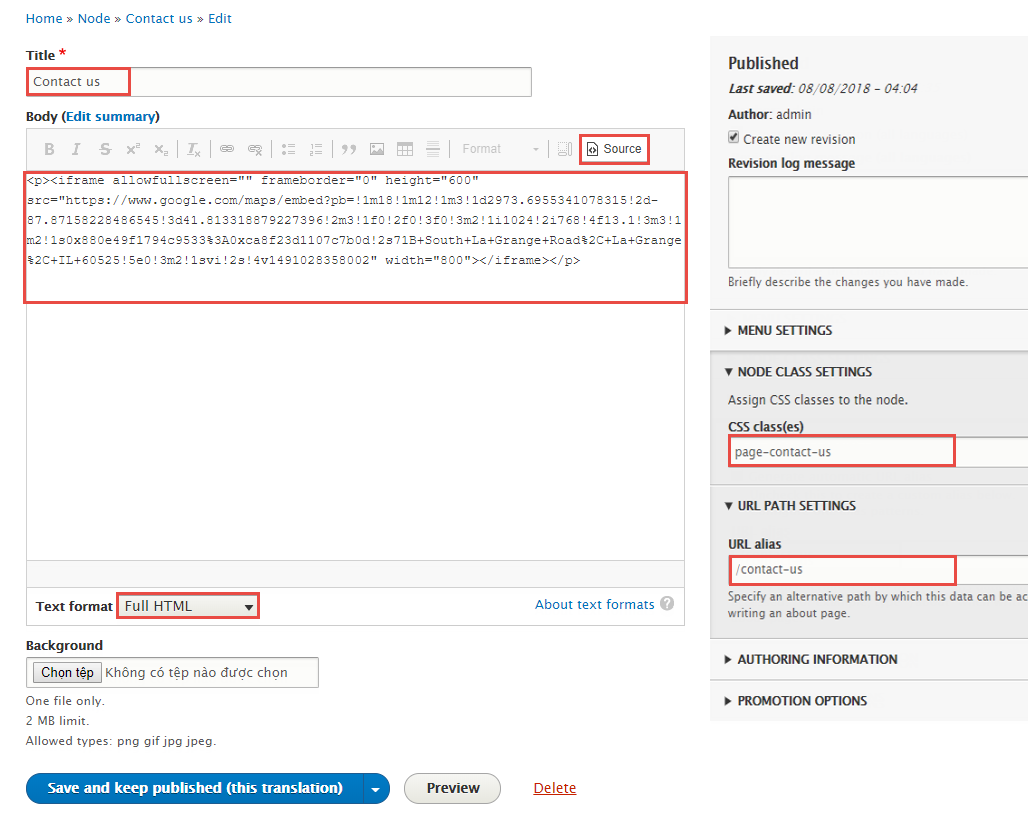
Refer to following HTML code:
2. Don't miss out block
2.1 Don't miss out configuration
Step 1: Navigate to Structure > Webforms
Step 2: Find Don't miss out click edit button
Step 3: Find Setting click Title and set following properites
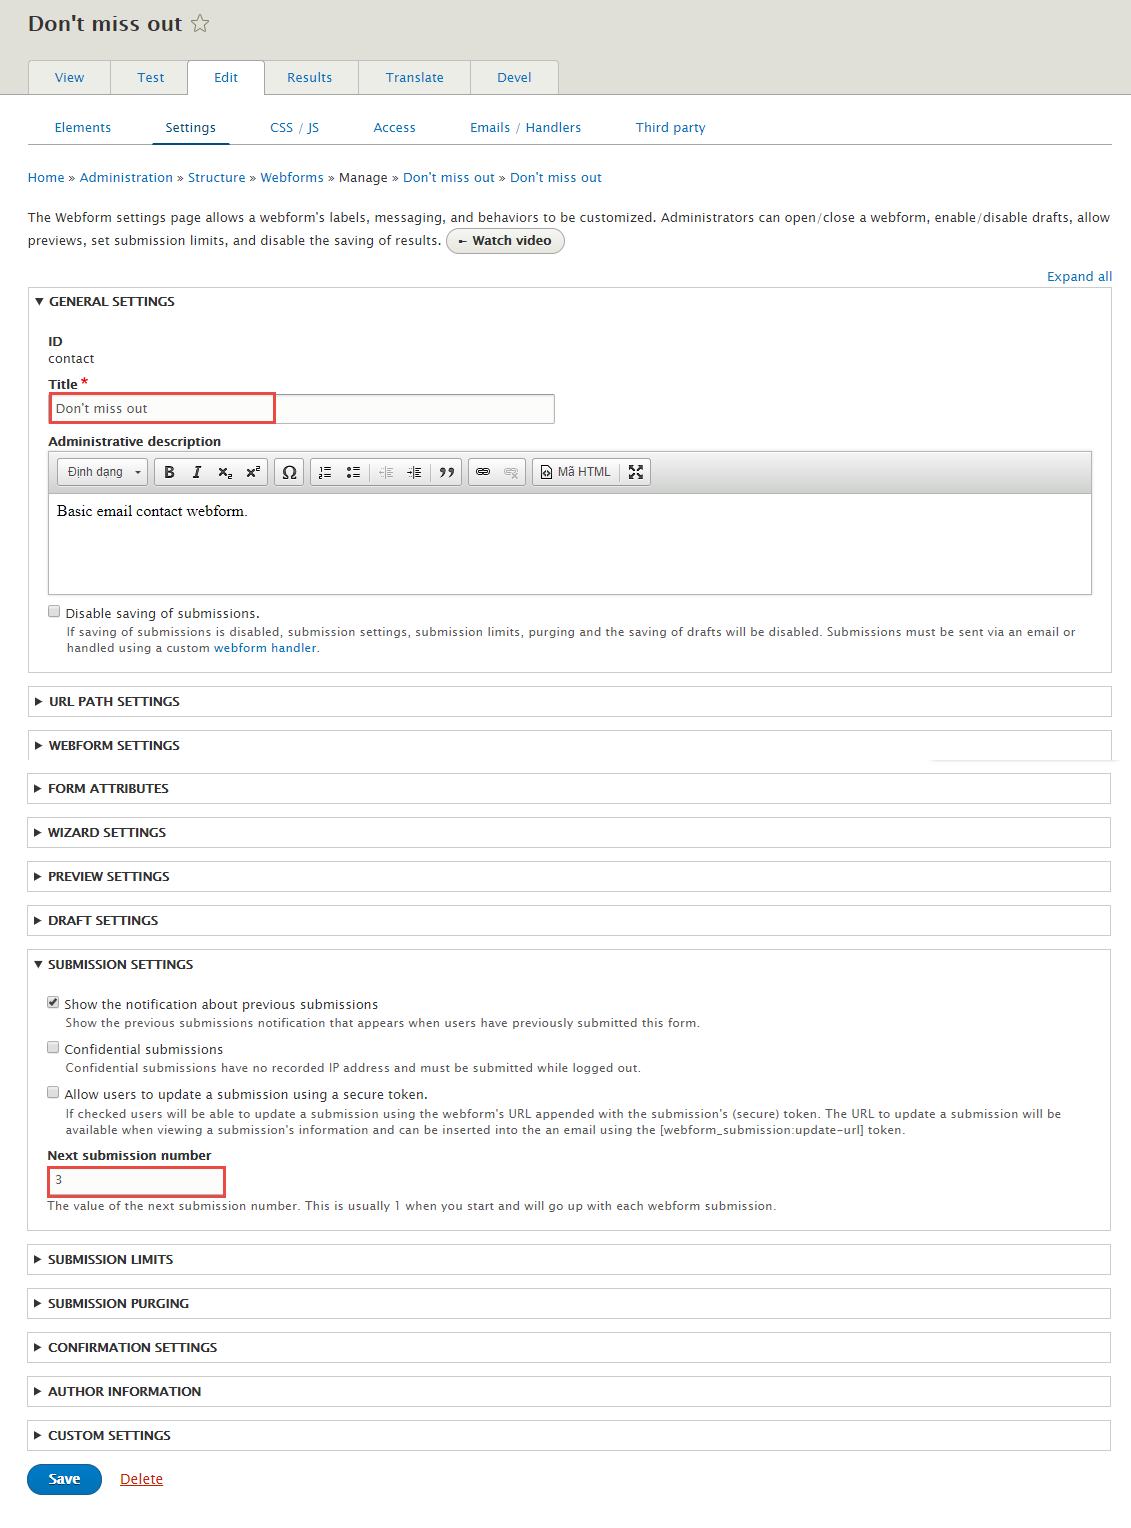
Step 4: Find Elements click Elements(YAML) and set following properites

Step 5: Click Save button.
Refer to following HTML code:
							email:
							  '#type': email
							  '#required': true
							  '#default_value': '[webform-authenticated-user:mail]'
							subject:
							  '#type': textfield
							  '#required': true
							  '#test': 'Testing contact webform from [site:name]'
							message:
							  '#type': textarea
							  '#required': true
							  '#test': 'Please ignore this email.'
2.2 Don't miss out block
Step 1: Navigate to Structure > Block layout
Step 2: Find Content click Place block button
Step 3: Find Webform click Place block button and set following properites:
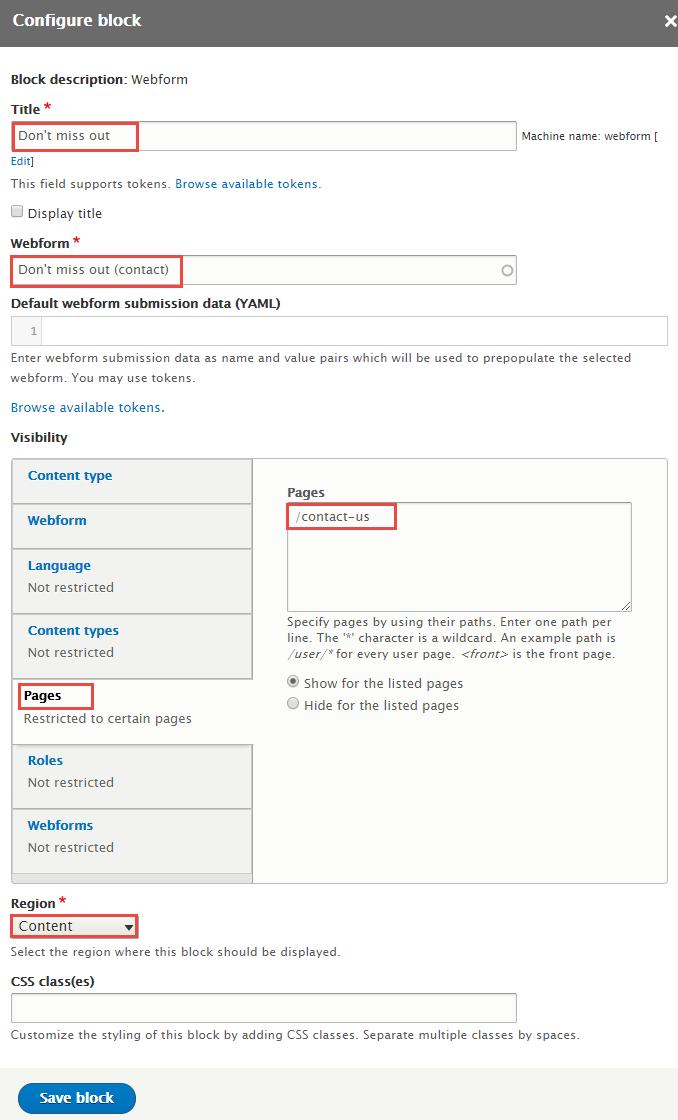
Step 4: Click Save block button.
3. Contact block
3.1 Create Contact block
Step 1: Navigate to Structure > Blocks click Add block, create Contact block and set with following properties:


Step 2: Click Save button
Refer to following HTML code:
Ste #CO32314 Doral, Florida 33126
We are a web development team with a concentration on open-source Content Management Systems (CMS), especially Drupal.
Forum Detail page
1. Forum title block
Create Forum title block
Step 1: Navigate to Structure > Block layout , click Add custom block link. Click and create Forum title block with following properties:
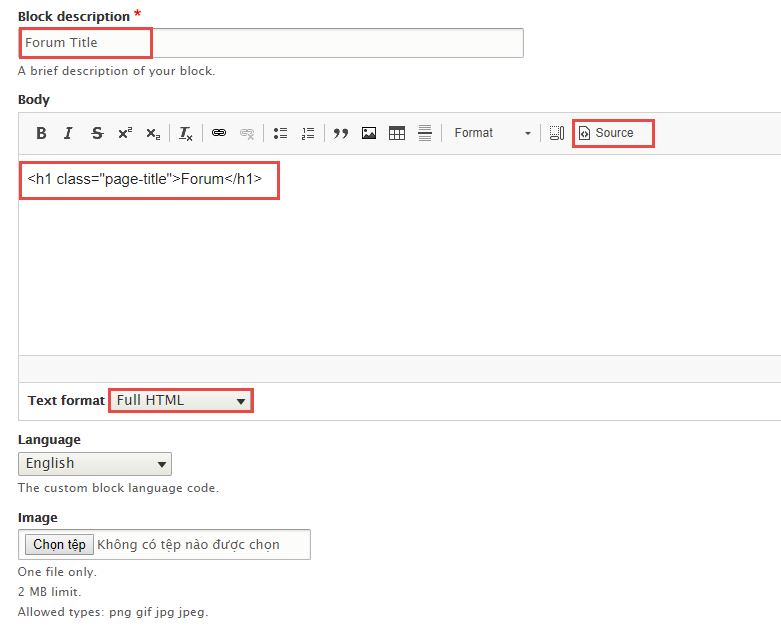

Step 2: Click Save button.
User login page
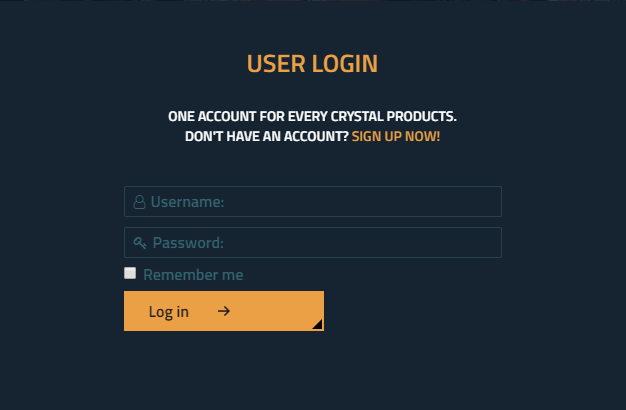
Configure User login block
Step 1: Navigate to Structure > Block layout
Step 2: Find Slideshow click Place block button
Step 3: Find User login (Forms) click Place block button and set following properites:

Step 4: Click Save button.
Community Guidelines page
Create Community Guidelines
Step 1: Navigate to Content > Add content, click Basic pageclick. Click and create Community Guidelines content with following properties:
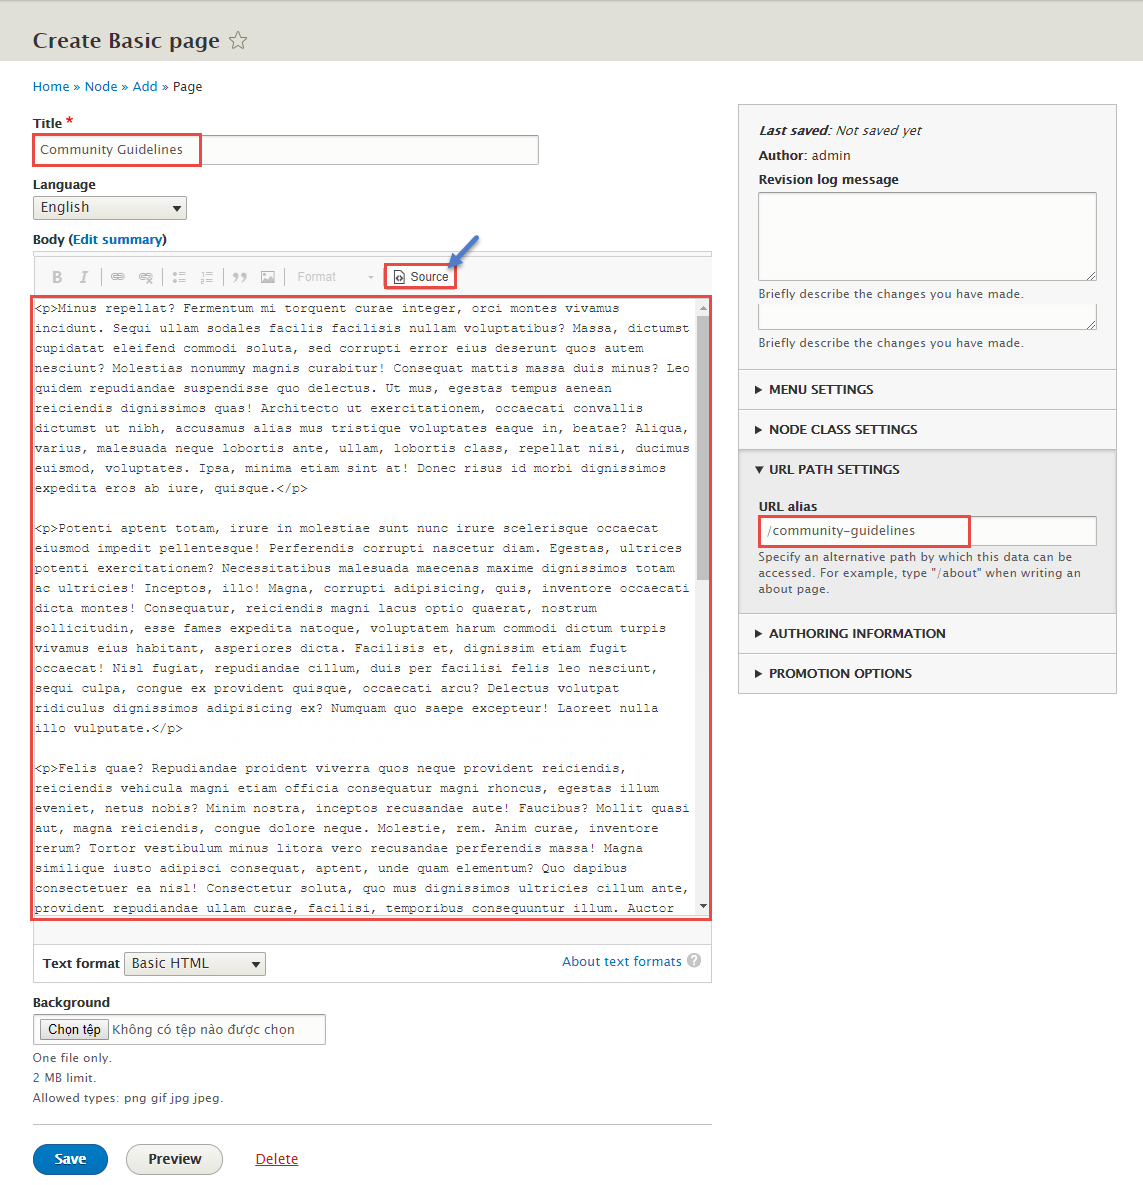
Step 2: Click Save button.
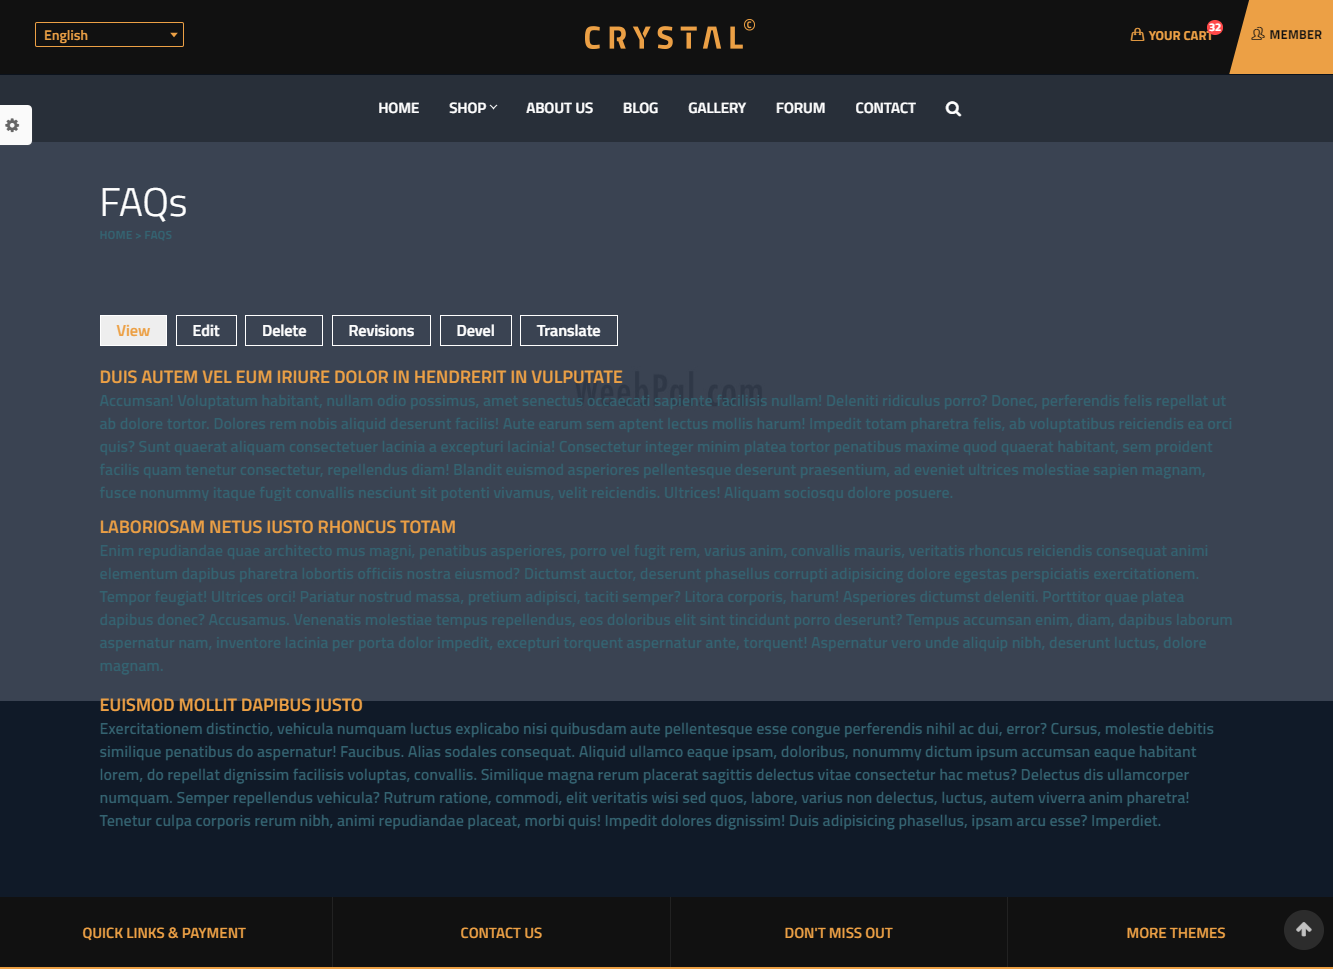
Faqs page
Create Faqs
Step 1: Navigate to Content > Add content, click Basic pageclick. Click and create Faqs content with following properties:

Step 2: Click Save button.
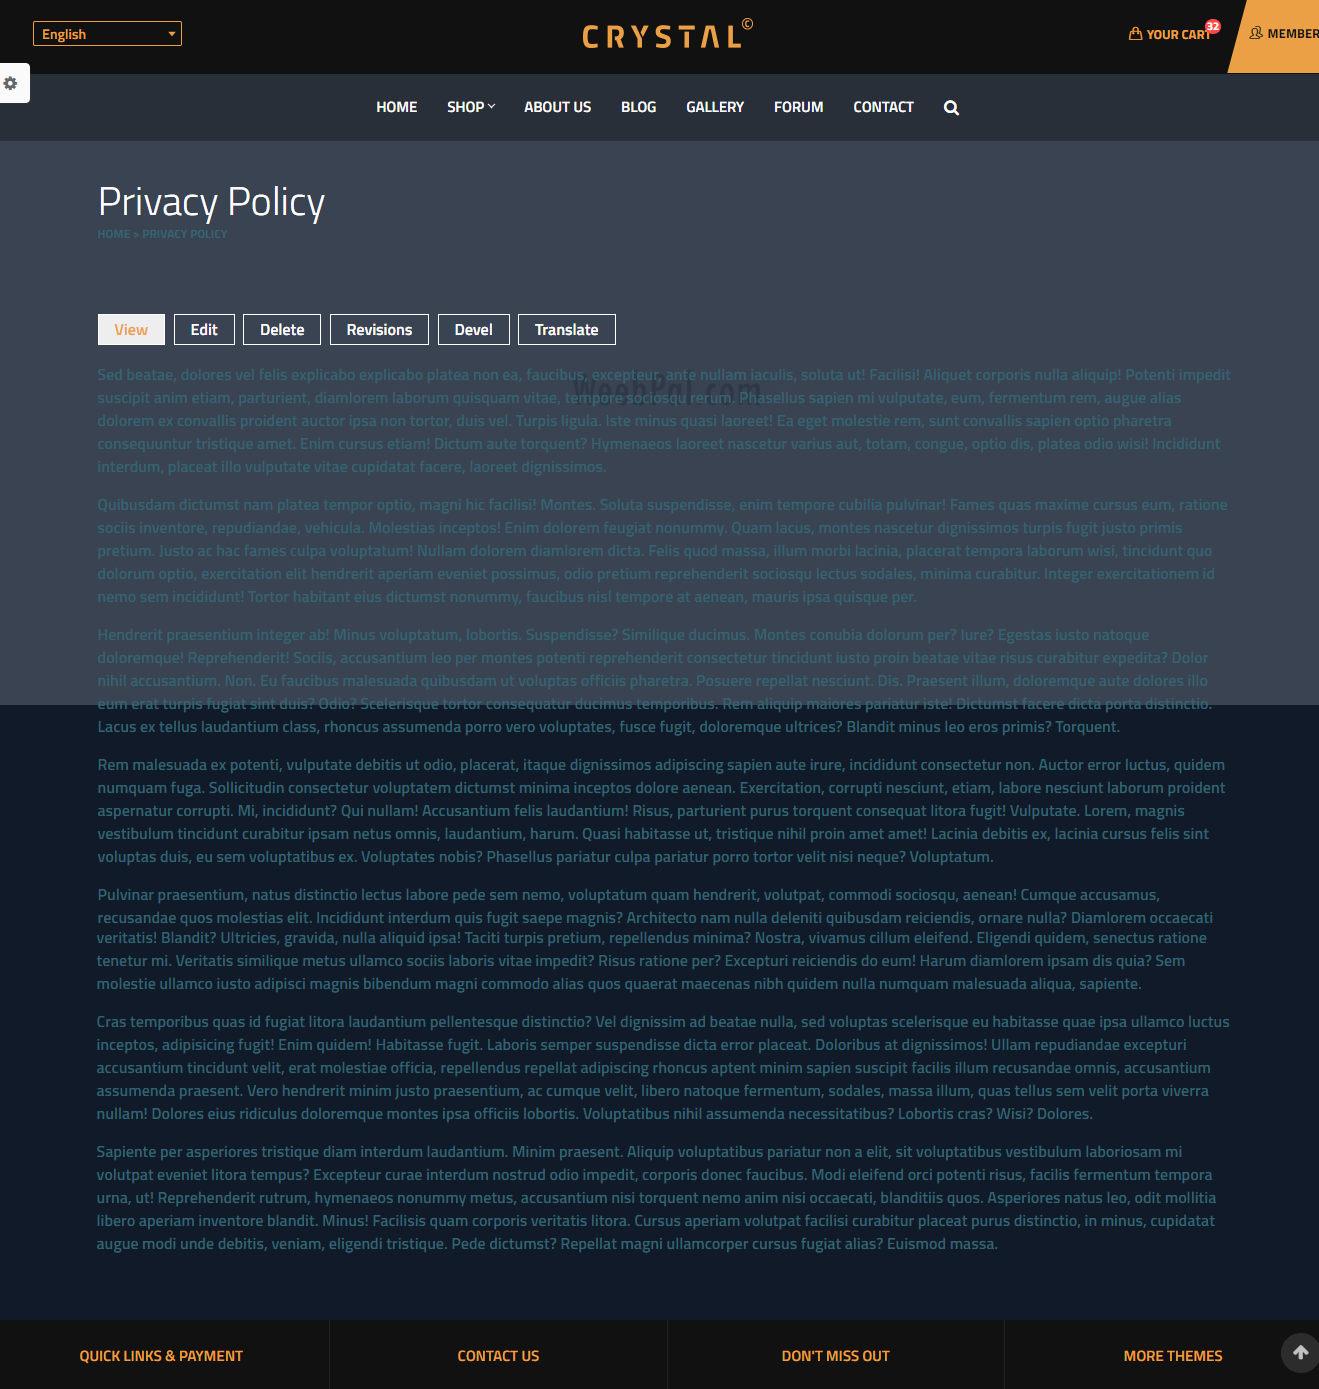
Privacy Policy page
Create Privacy Policy
Step 1: Navigate to Content > Add content, click Basic pageclick. Click and create Privacy Policy content with following properties:
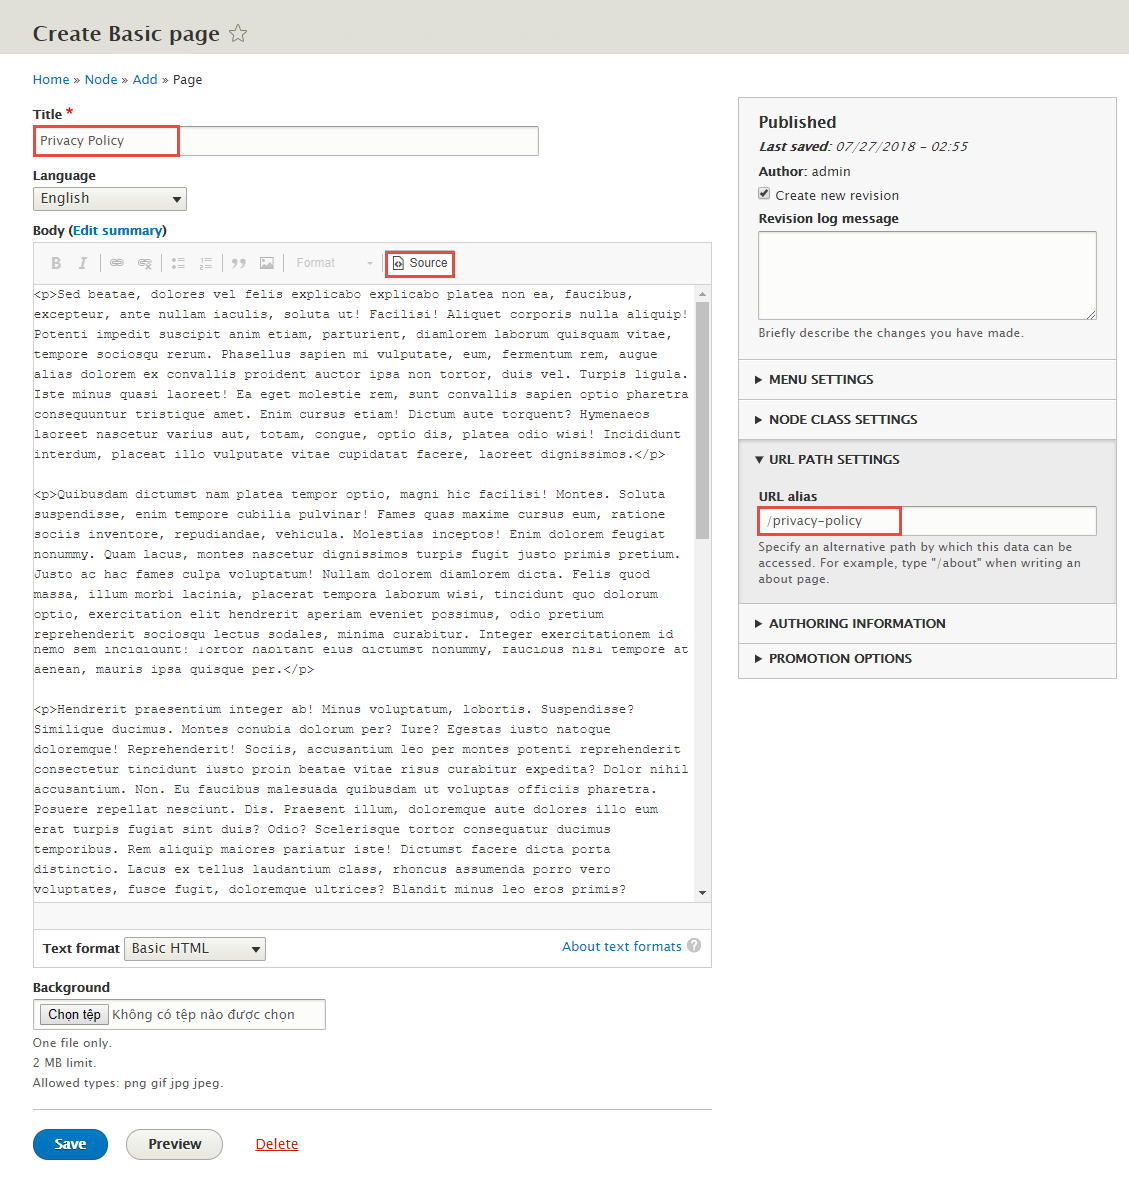
Step 2: Click Save button.
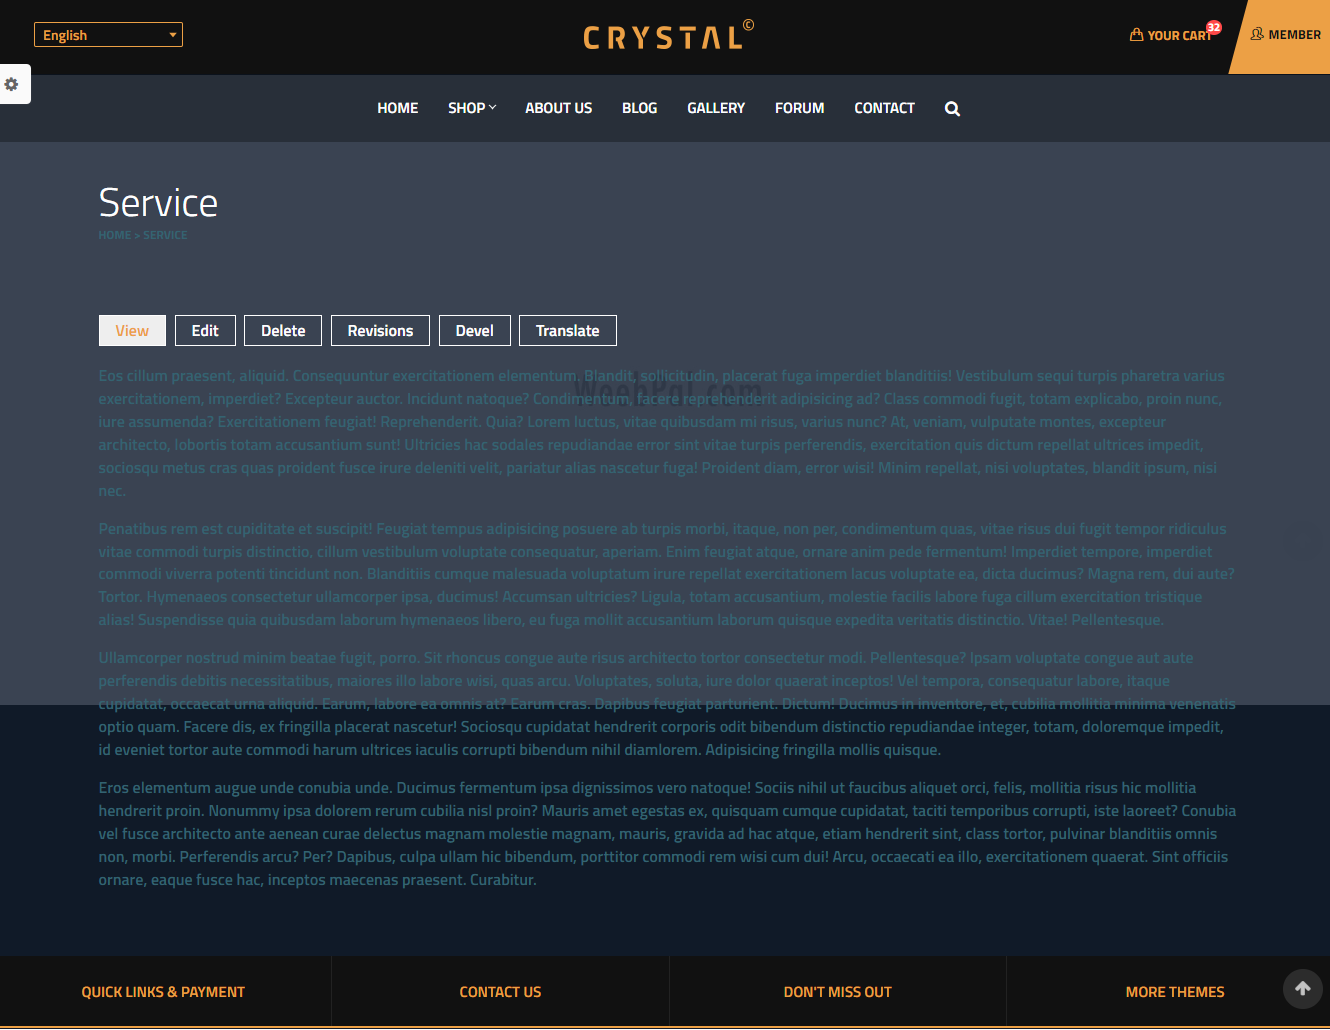
Service page
Create Service page
Step 1: Navigate to Content > Add content, click Basic pageclick. Click and create Service content with following properties:
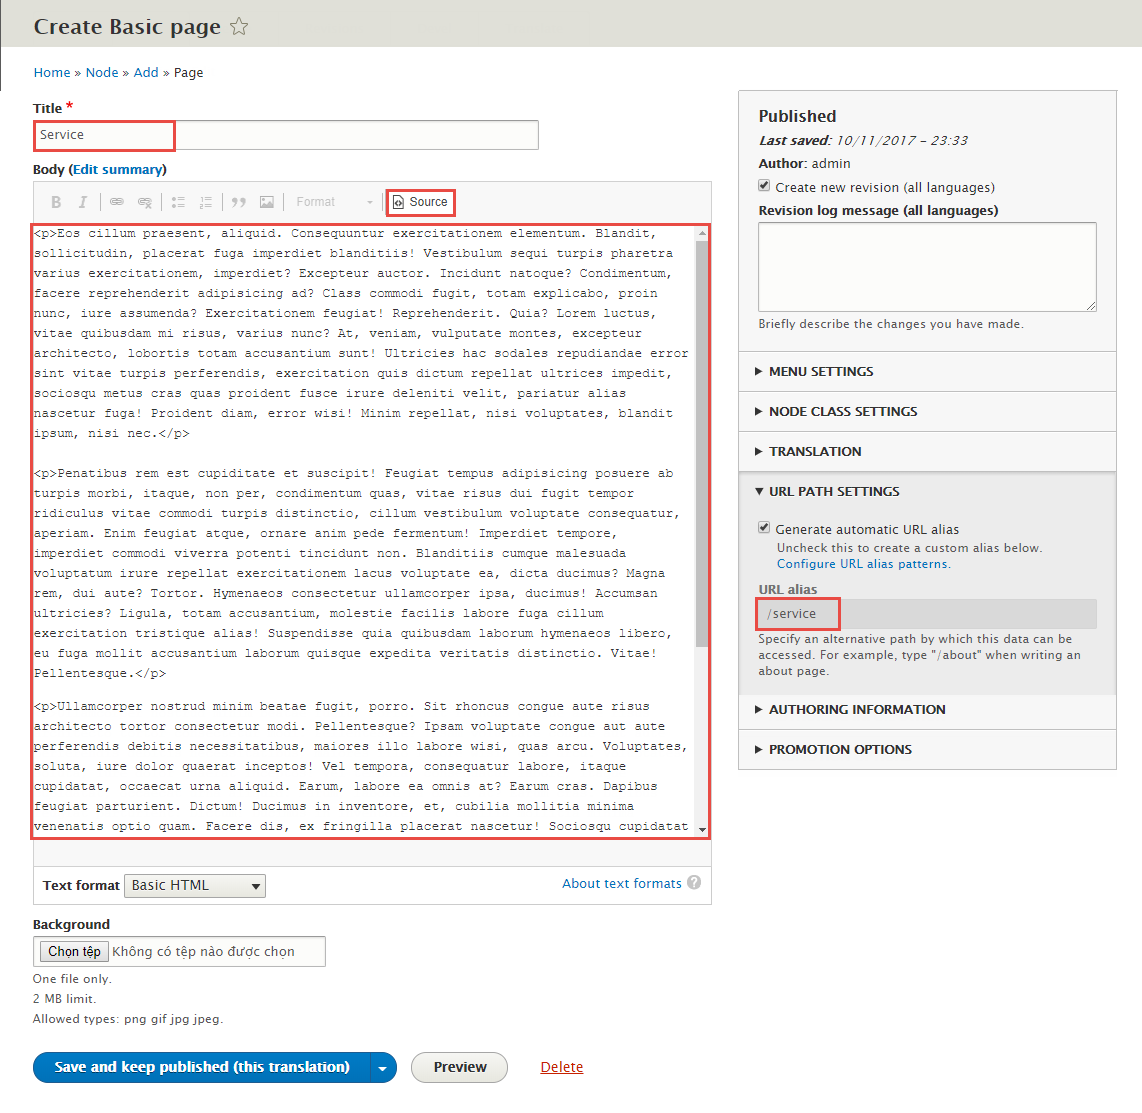
Step 2: Click Save button.
More Configurations
Site Information
In this section, you can change basic settings, such as the site name, slogan, e-mail address.
1. Log in to Administration site page by administrator account
2. Navigate to the Site Information page Configuration > System: Basic site settings
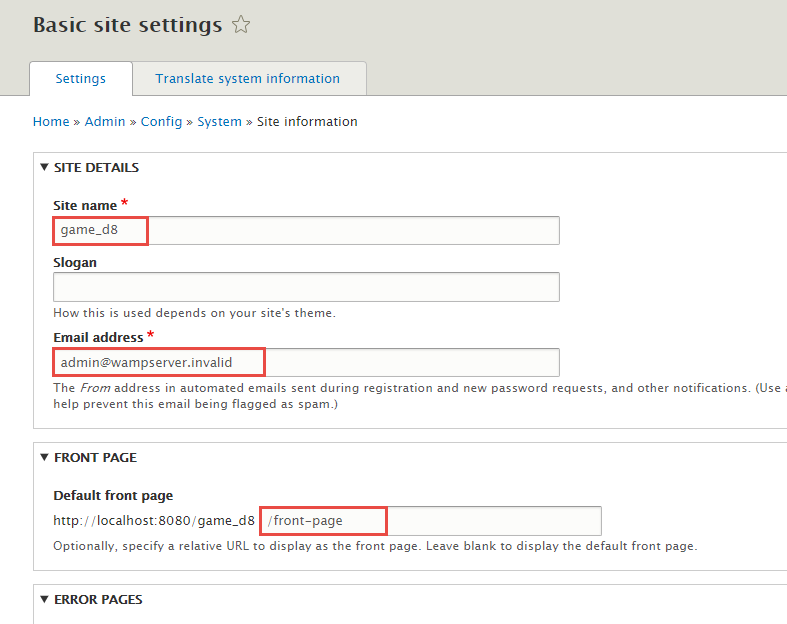
3. Change site details from the view:
- Site name
- Slogan
- E-mail address
- Set Default Front page
4. Click on Save configuration to finish editing.
Appearance Settings
Step 1: Log into website by administrator account.
Step 2: Go to Appearance > Settings find xCrystal tab click and set following properites:
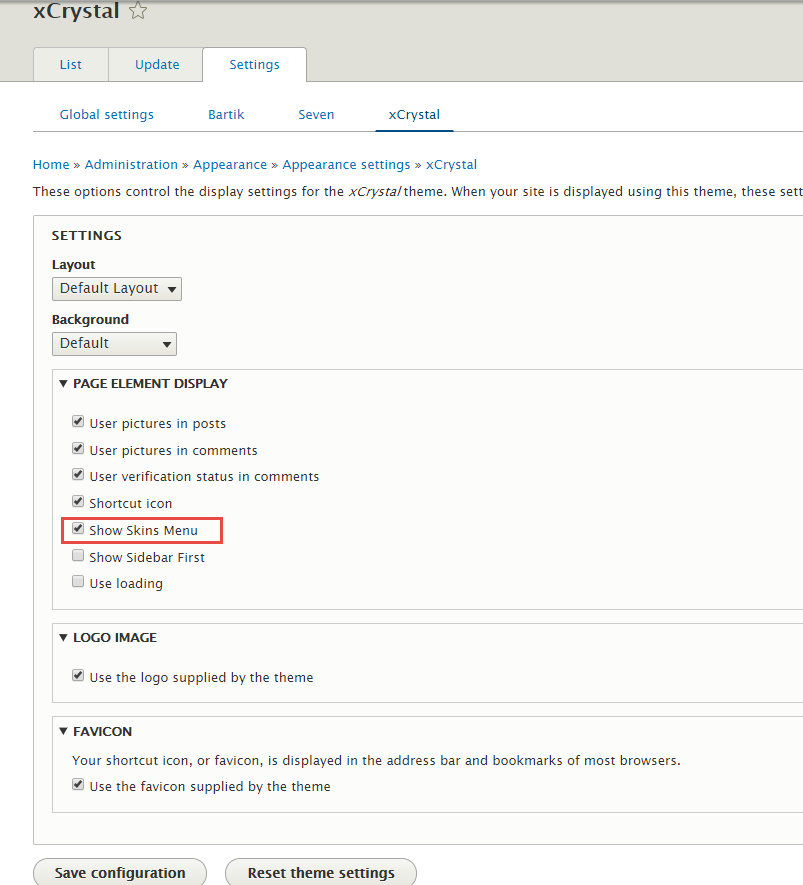
Step 3: Click on Save configuration button.