The basics - Before you start
Starting with a new theme, it sometimes takes a lot of time for first time users to really understand how it works. You may want to know how to customize layouts, typography, block styles and make it look the way you want.
In most cases you won't need to know PHP or database queries, but basic knowledge would be very helpful to get great results.
If you're an experienced Drupal developer or if you want to build the theme from zero with only the basic appearance of your theme, find this guide in handy. This guide will give you the detailed step by step installation guide to help you start building the content for Marvel to look exactly like the demo site.
1. Package
Included content:
- README.txt
- Marvel theme: marvel-7.x-1.0.zip
- Demo Profile for Marvel: marvel-profile-7.x-1.0.zip
2. System Requirements
Database
- MySQL 5.0.15 or higher with PDO
- PostgreSQL 8.3 or higher with PDO
- SQLite 3.3.7 or higher
PHP
- PHP 5.2.5 or higher (5.4 or higher recommended)
- PHP5 GD library installed
- Disabled error_reporting flag on production server
- Enabled mod_rewrite in Apache for clean URLs
- Memory limit set up at least 128MB
If you are new to Drupal, please take a reference to System requirements on drupal.org.
3. Screenshots
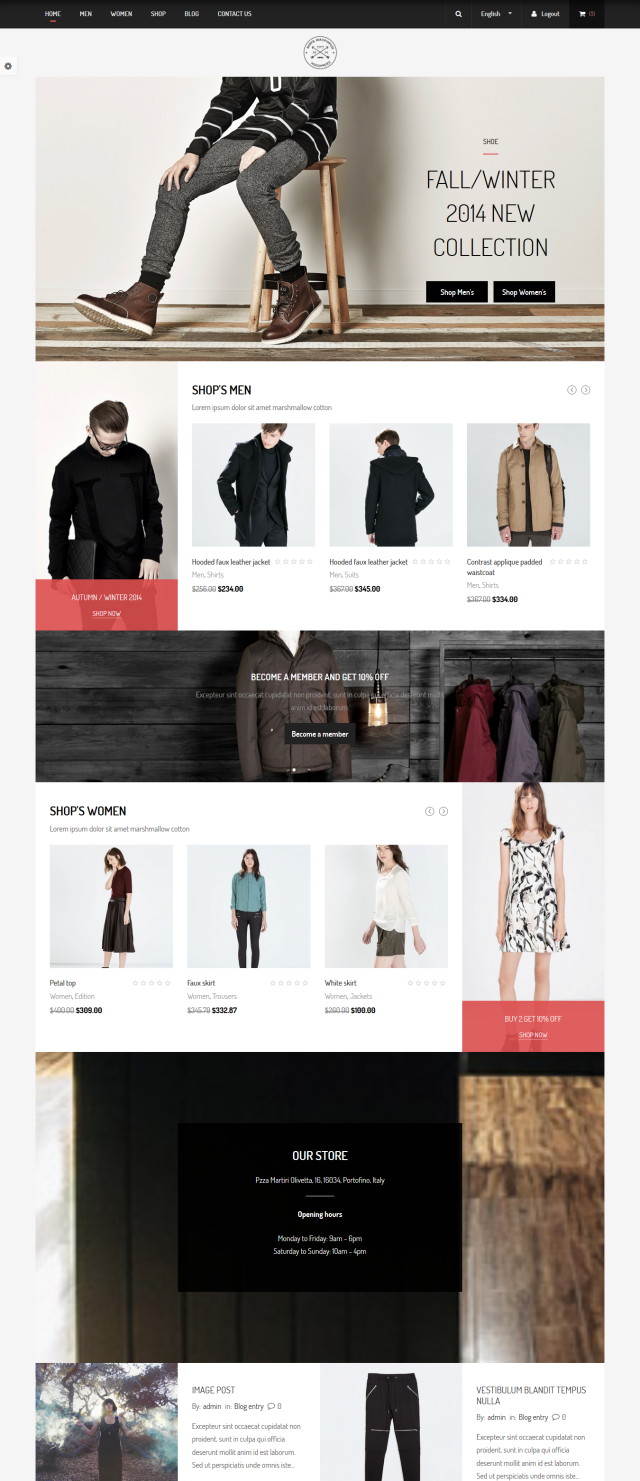
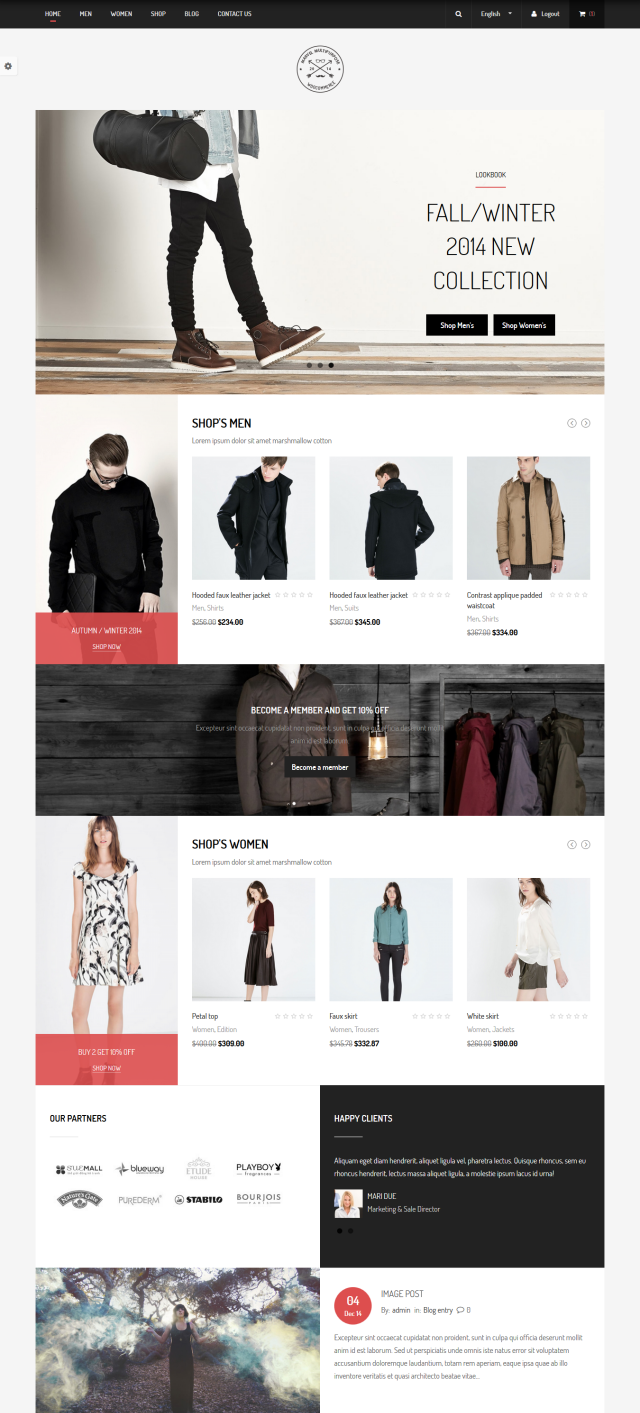
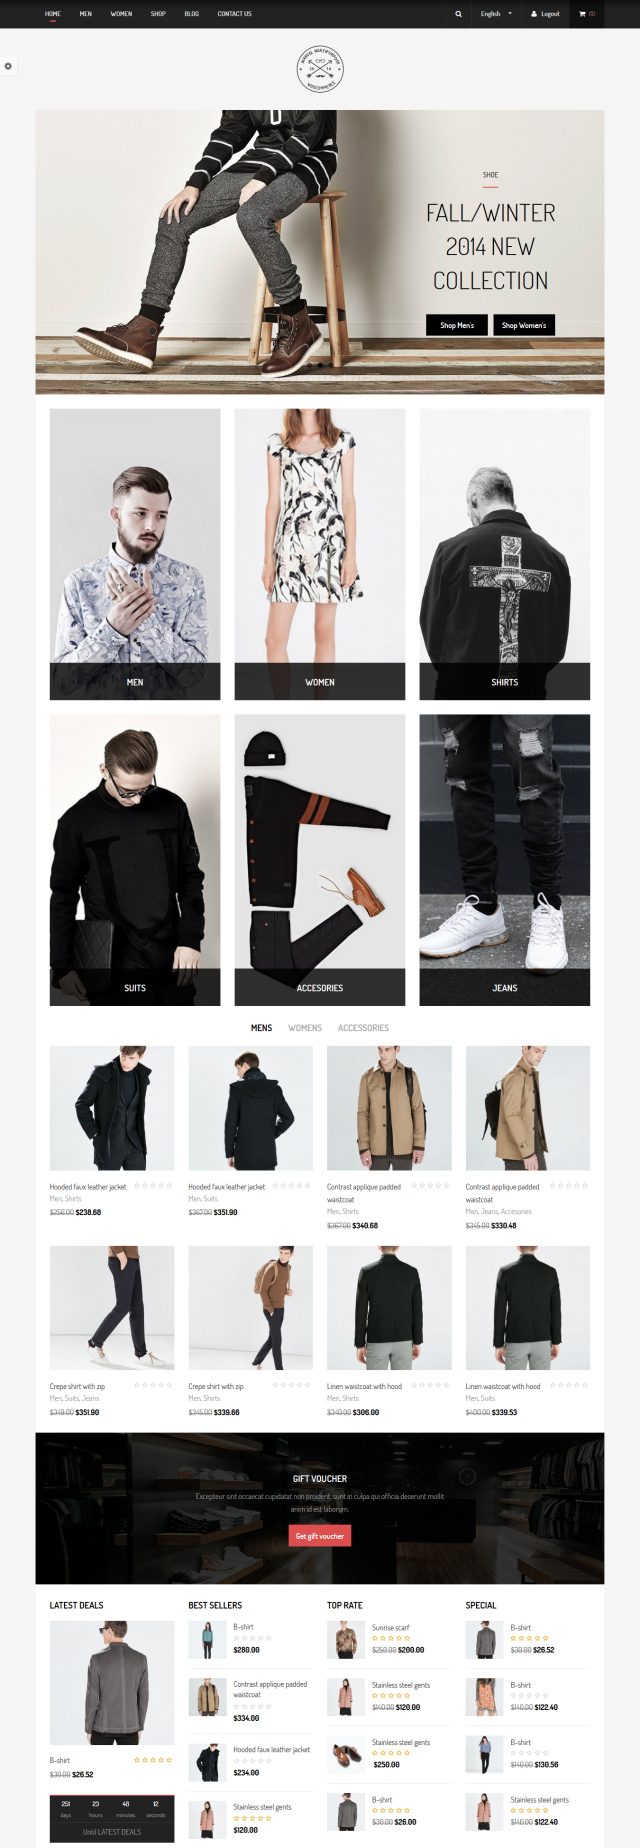
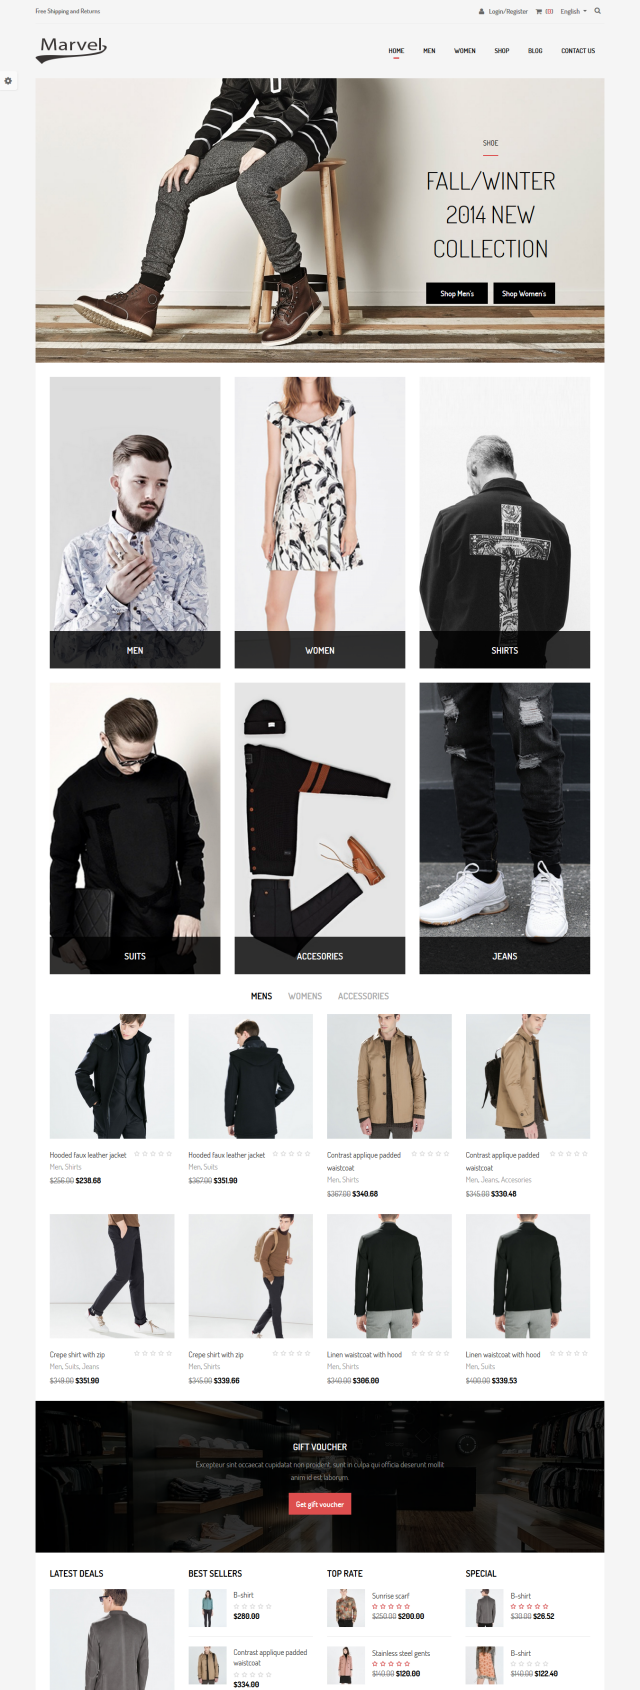
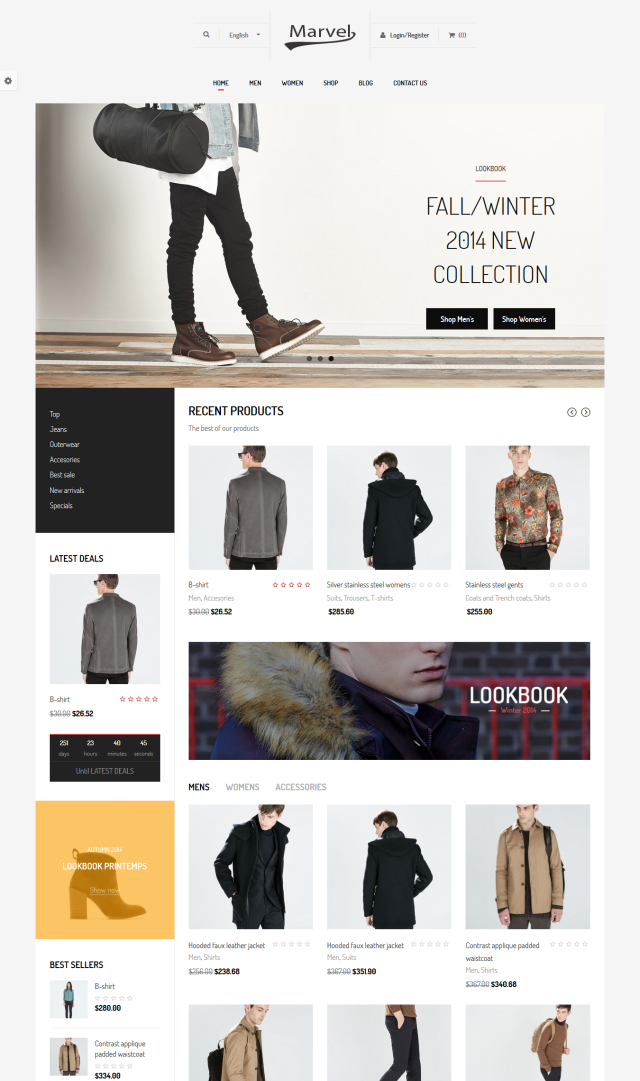
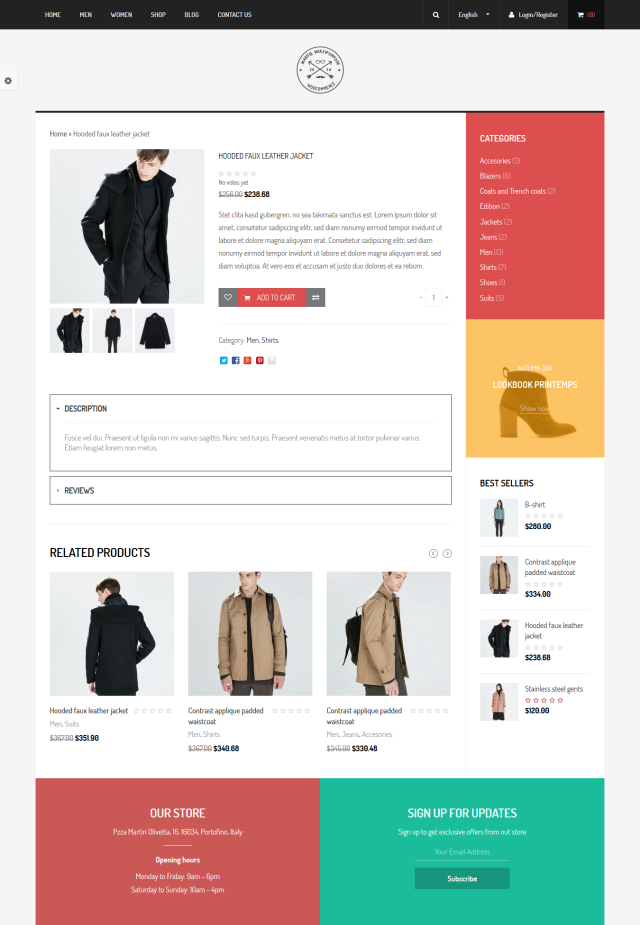
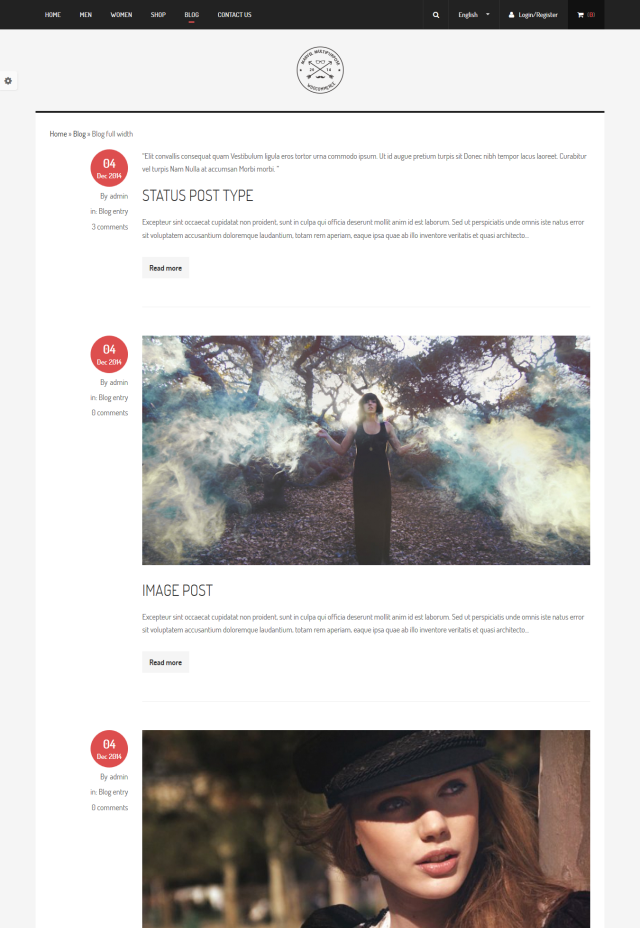
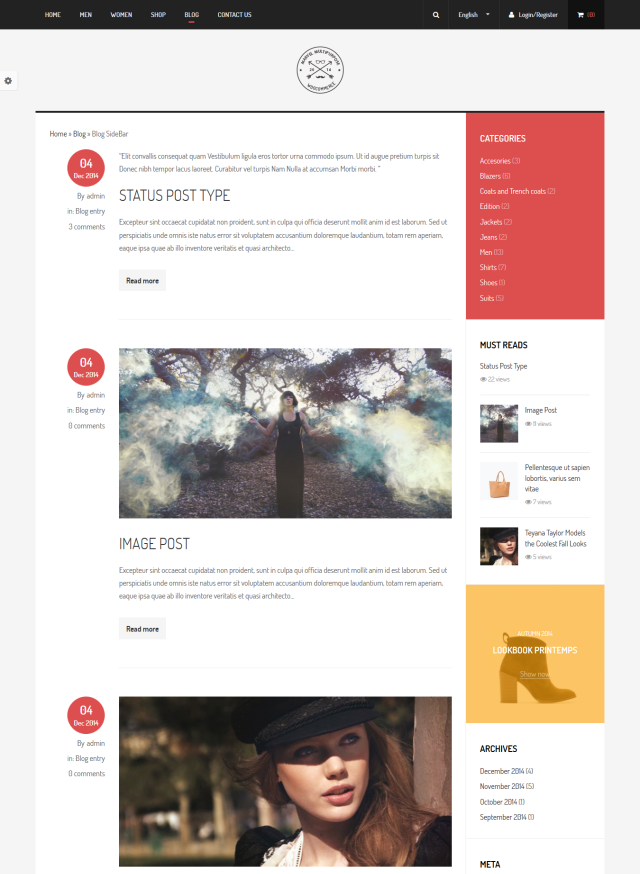
Let's glance through the theme's design & some features:
Home
Home 2
Home 3
Home 4
Home 5
Home 6
Home 7
Product
Product detail
Blog
Blog Full Width
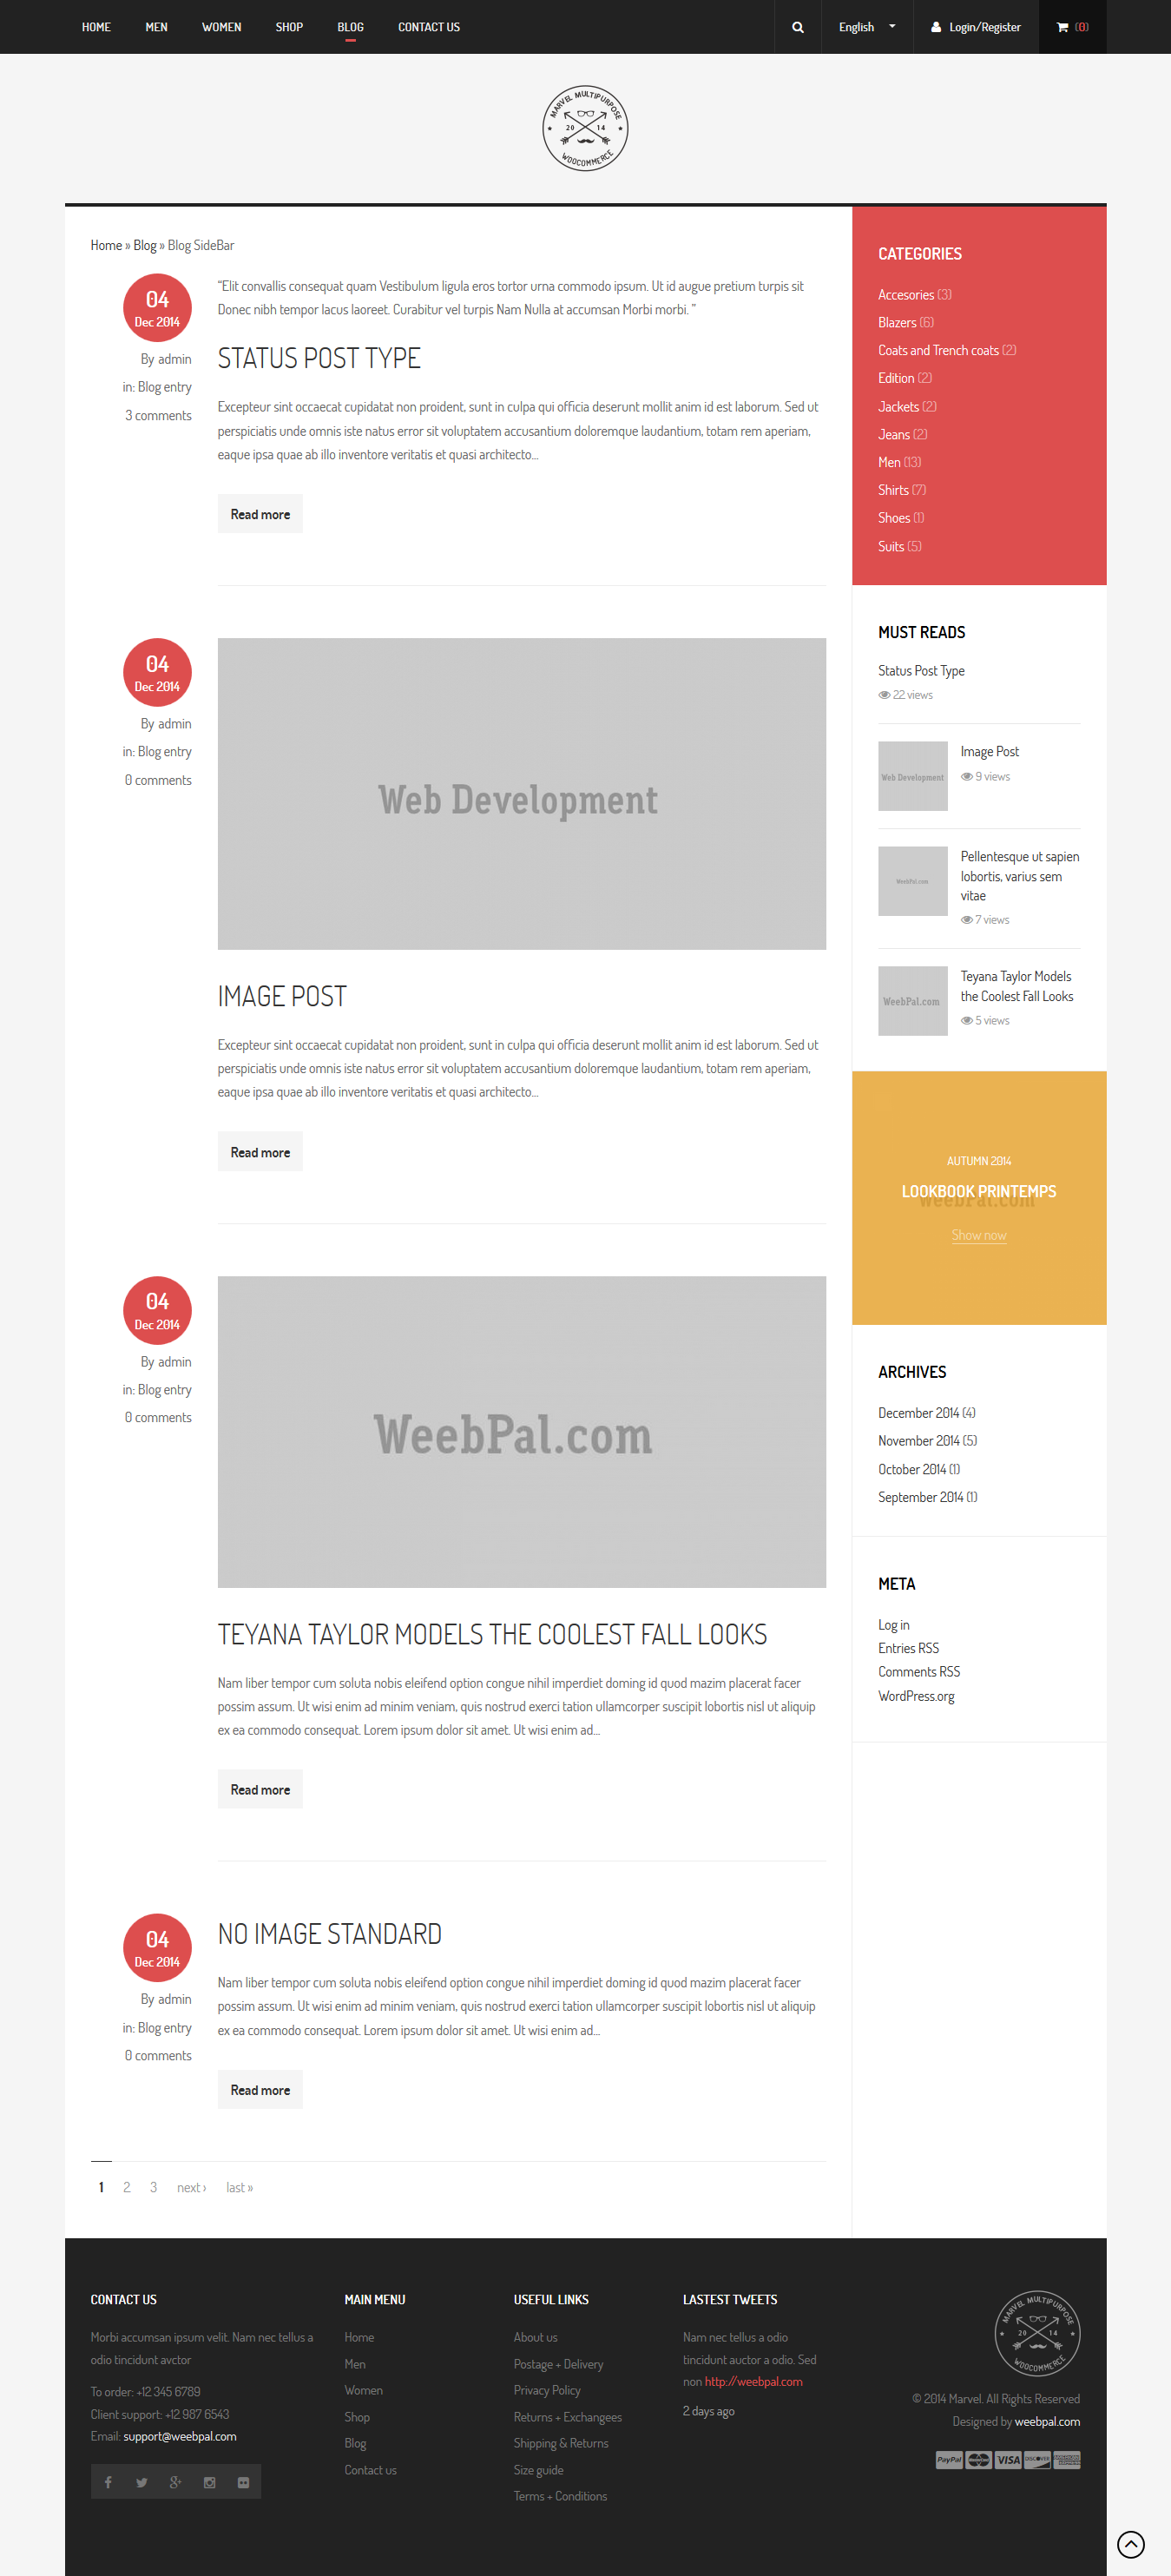
Blog Sidebar
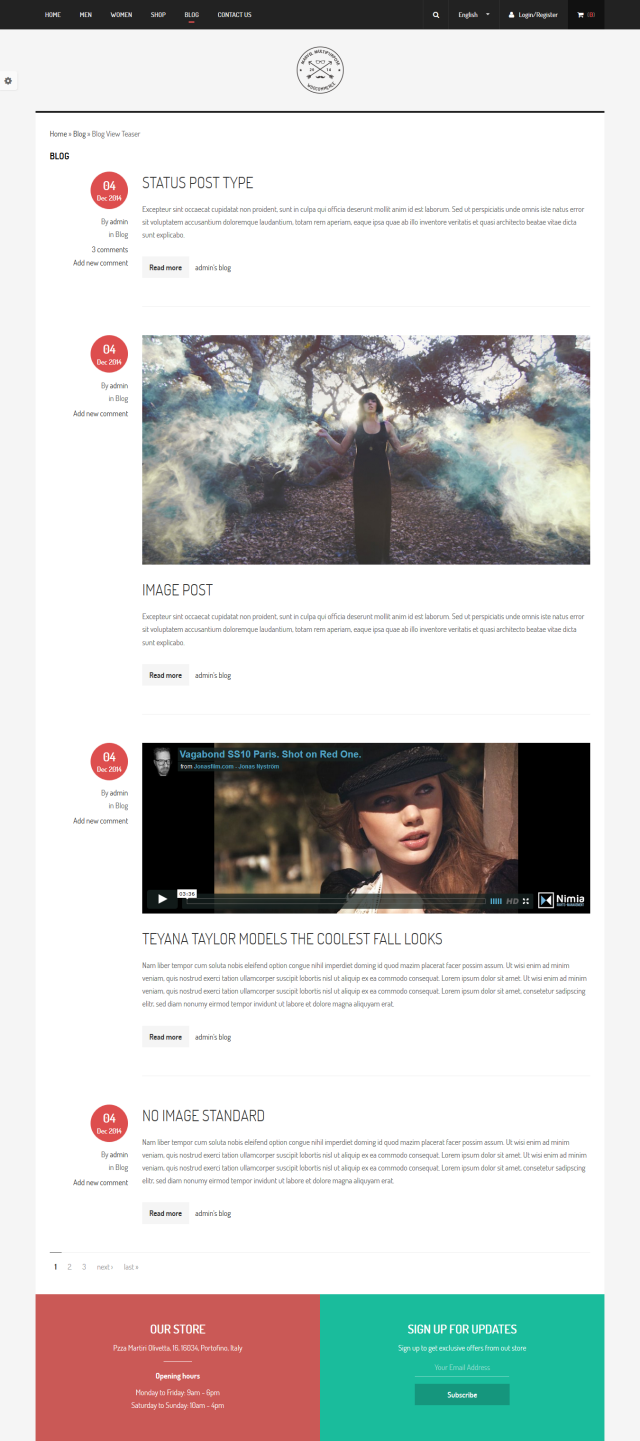
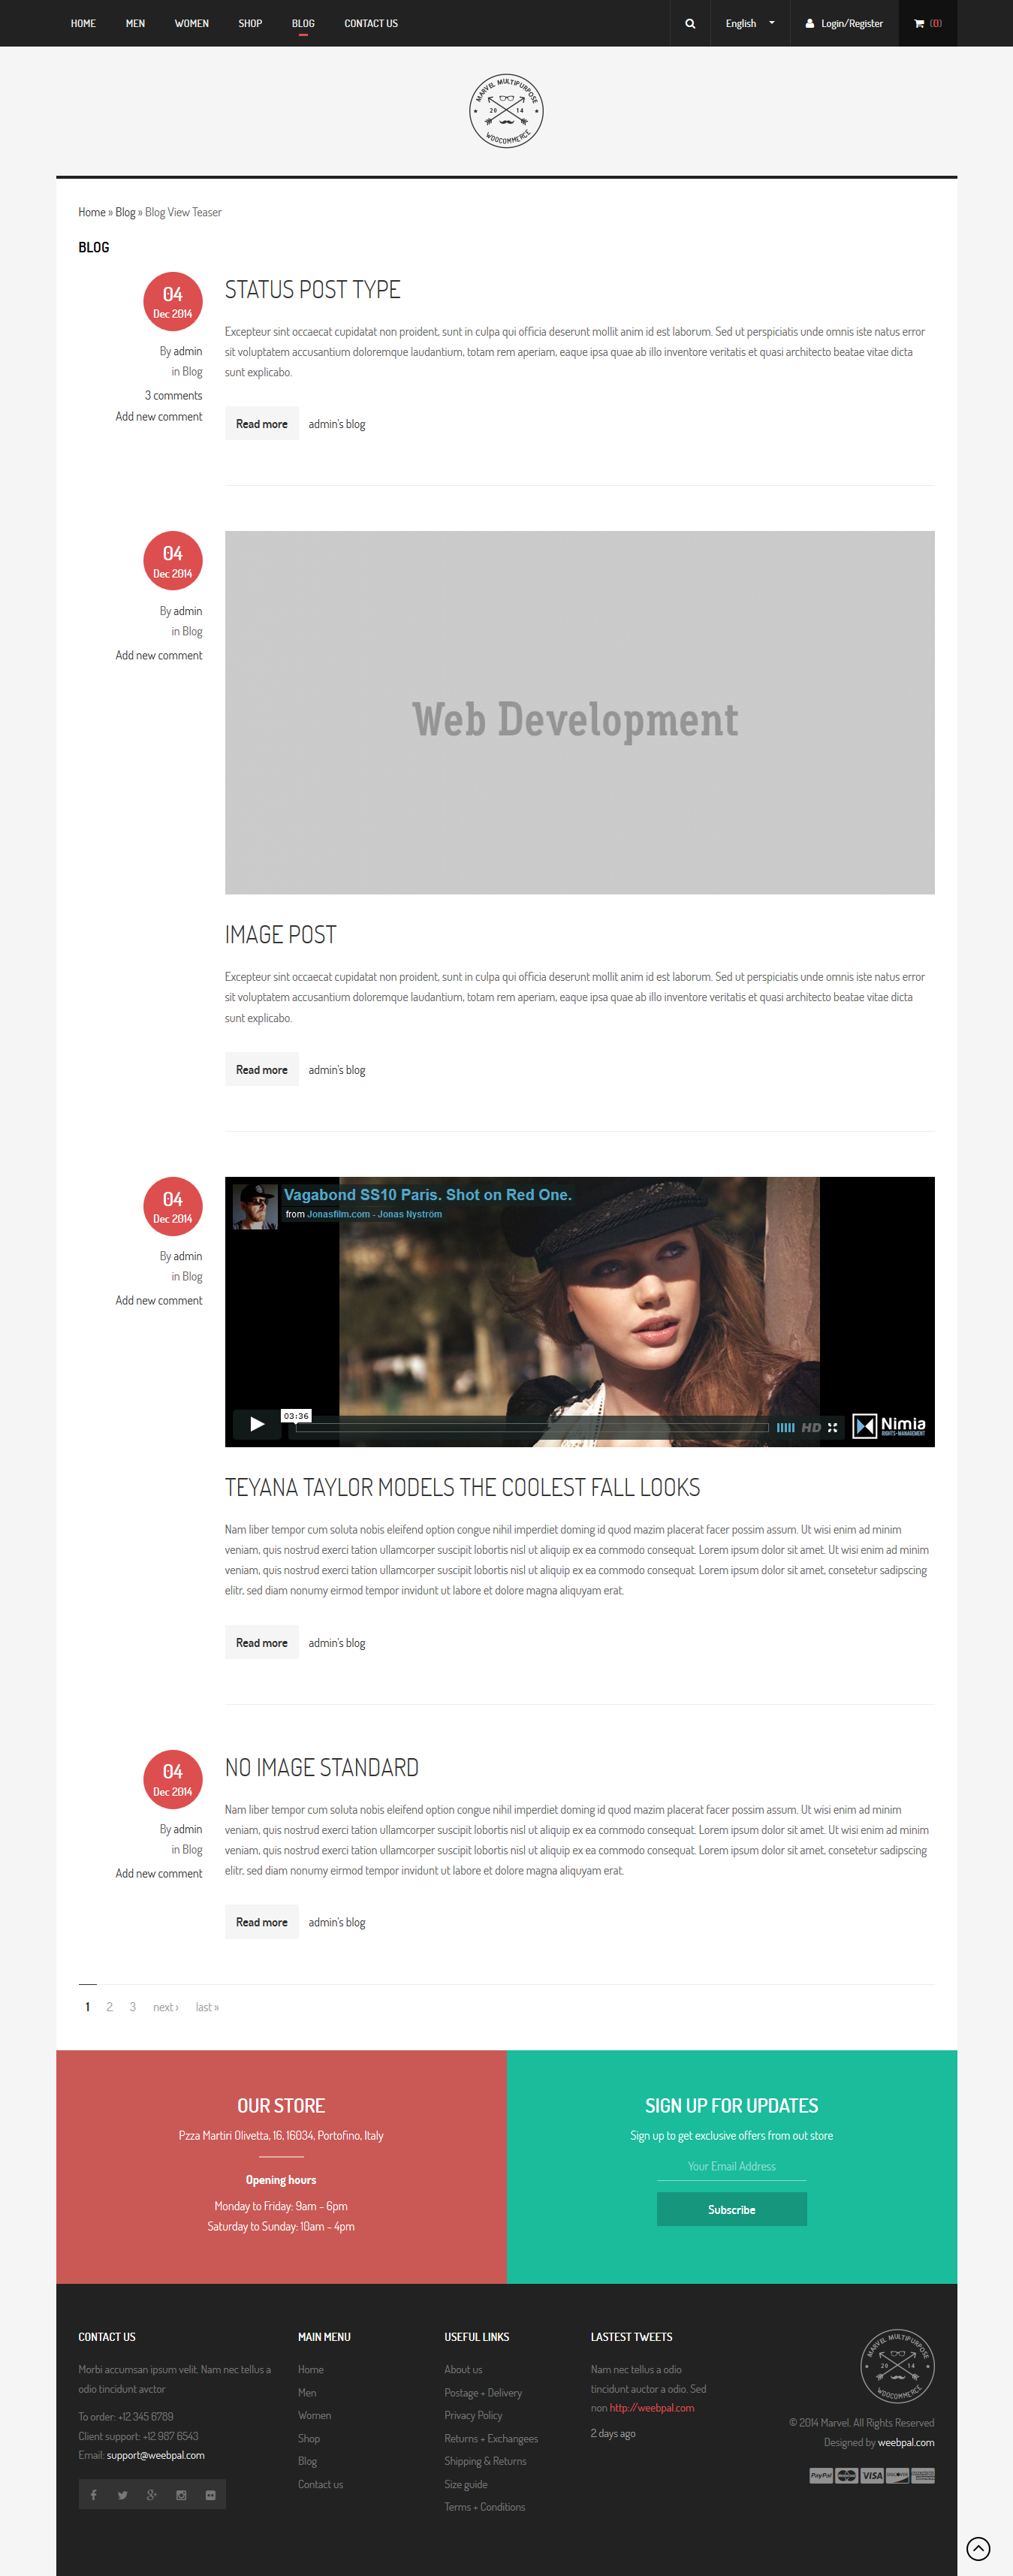
Blog View Teaser
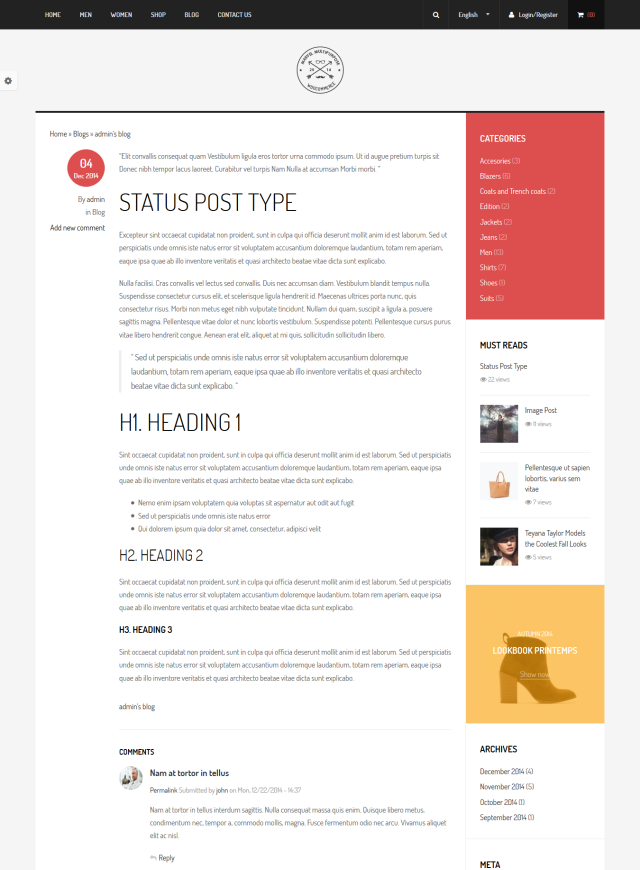
Blog Details
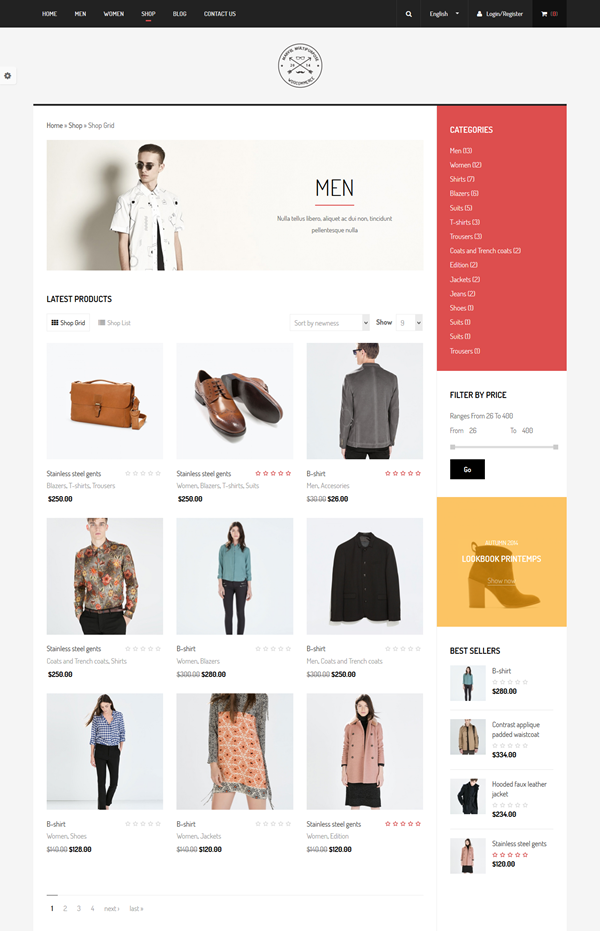
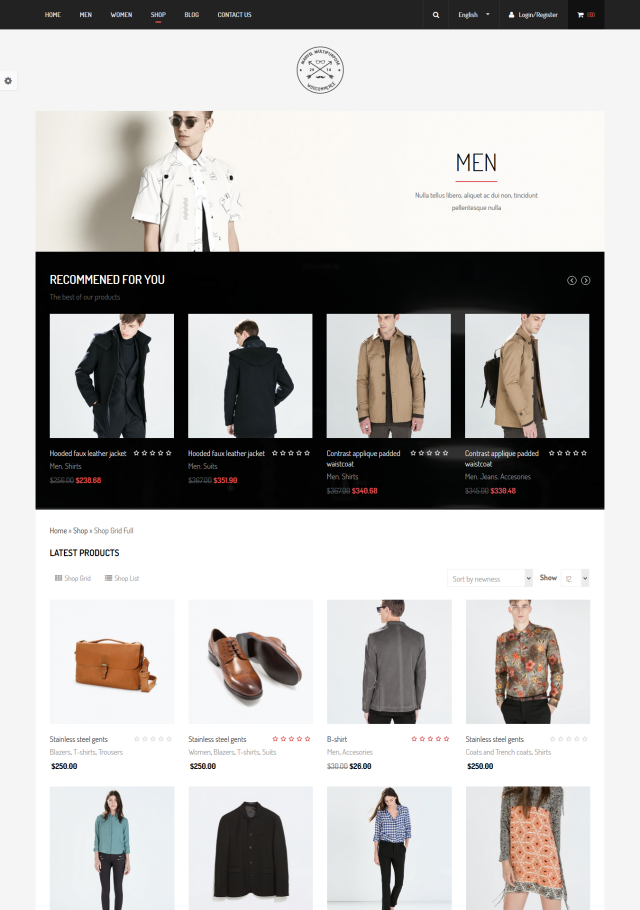
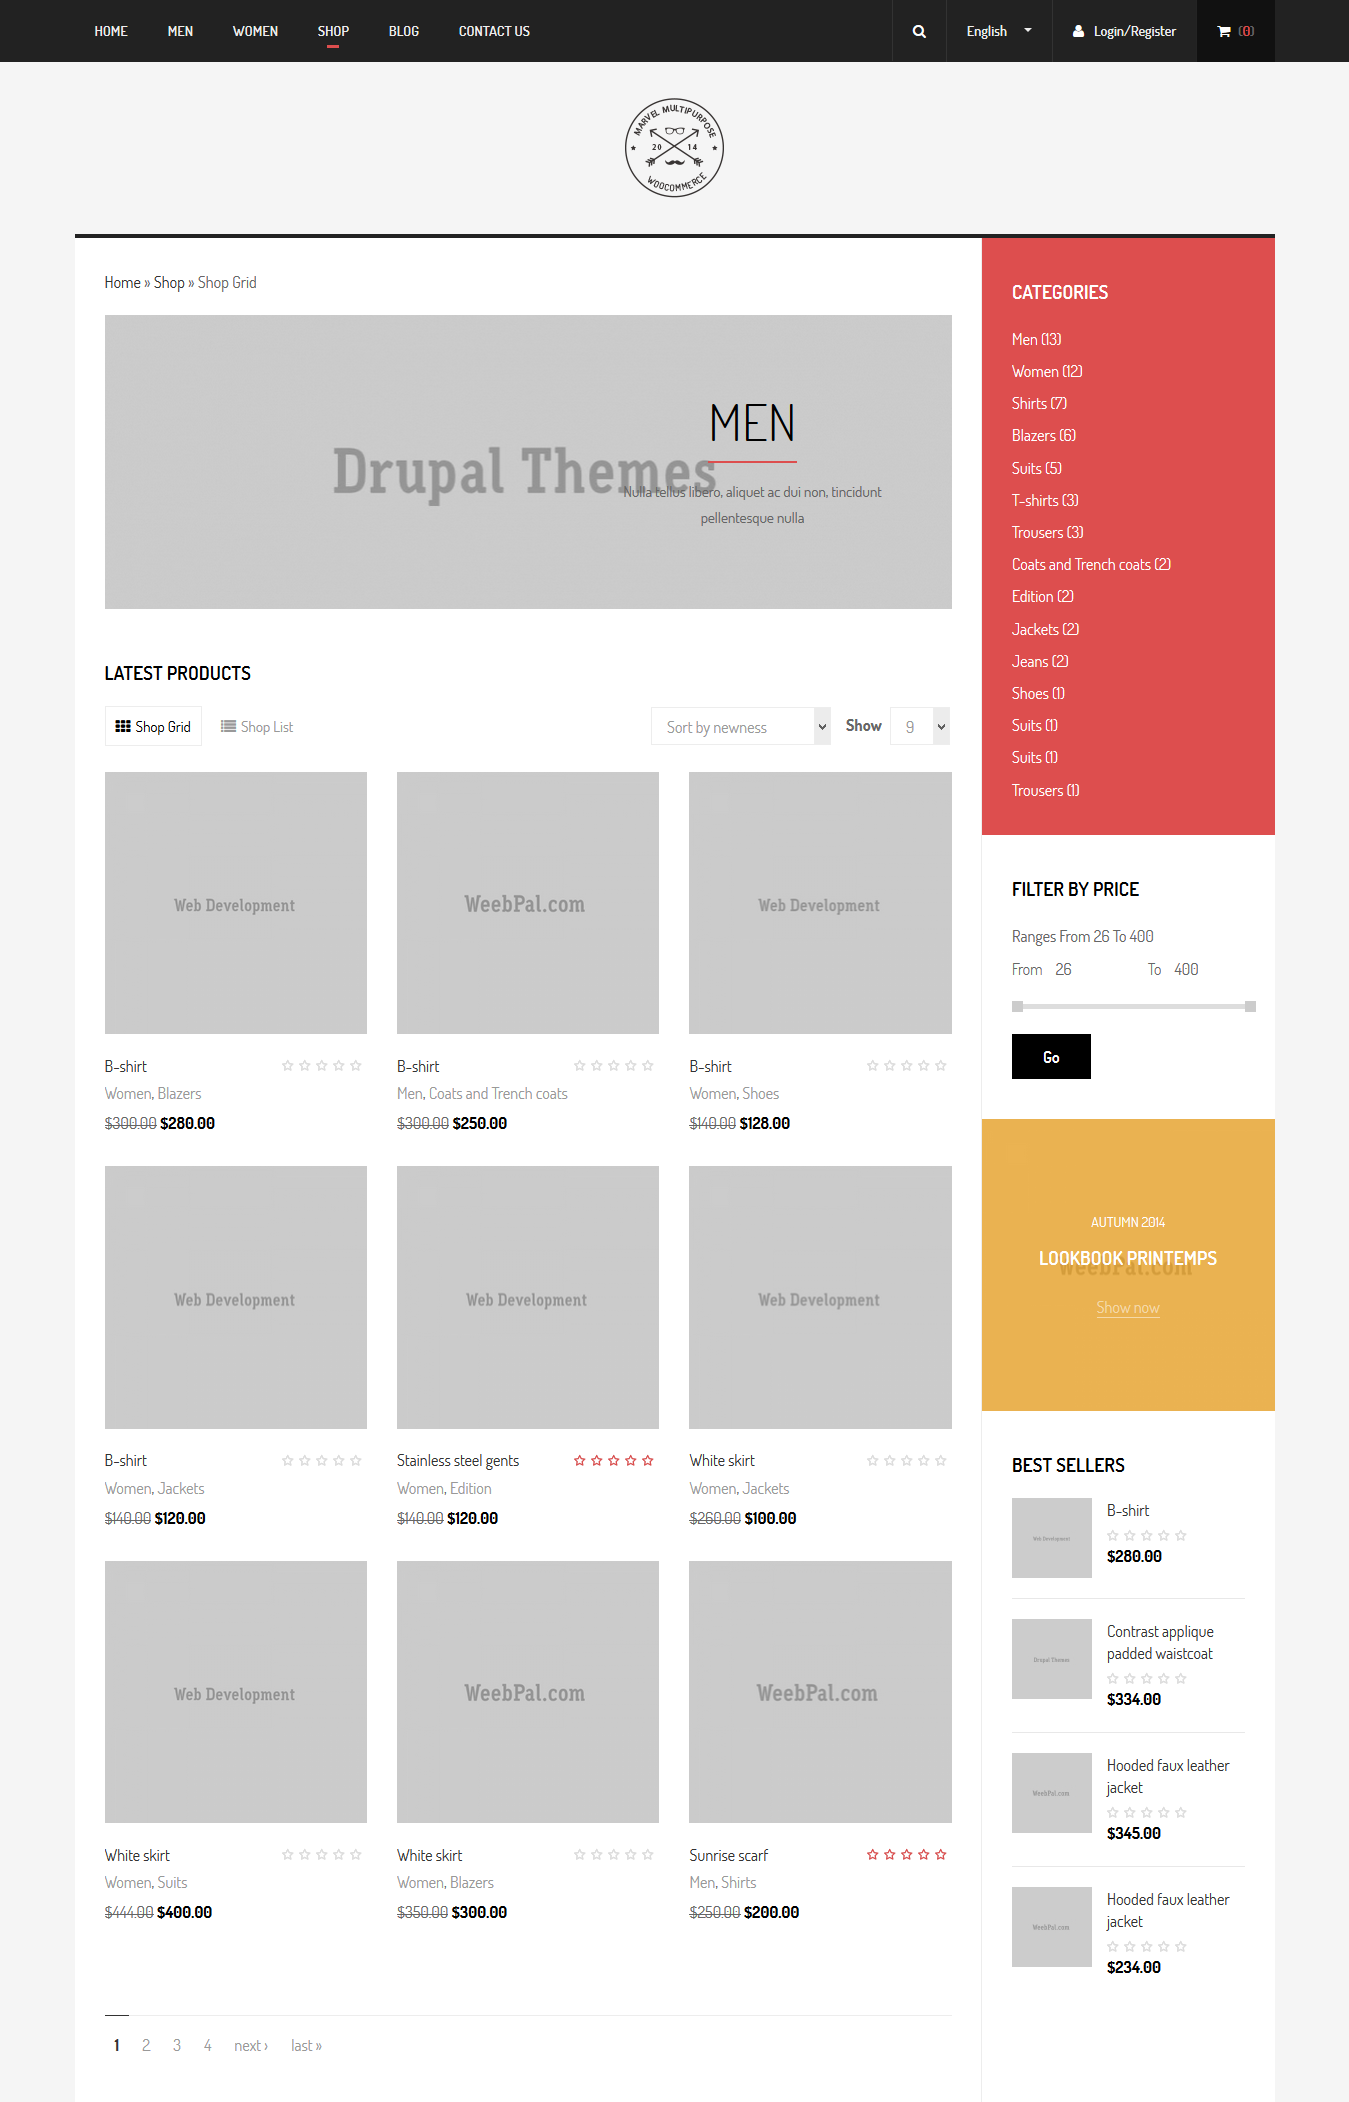
Shop Grid
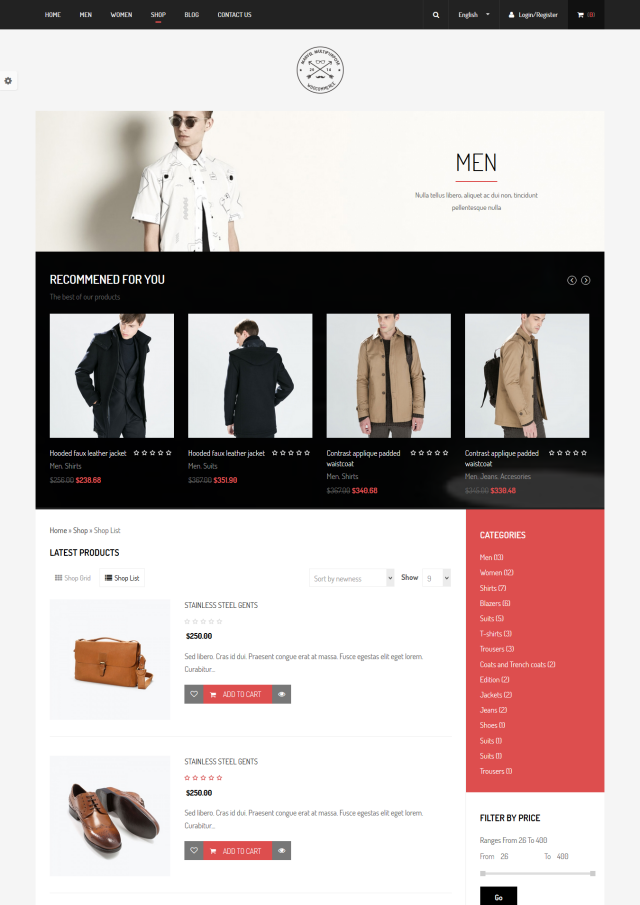
Shop List
Shop Grid Full
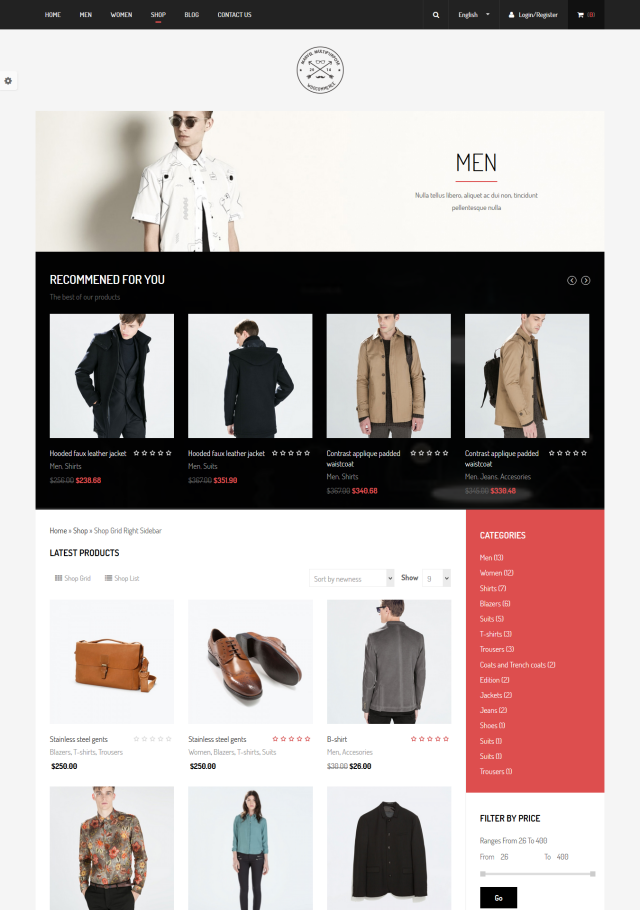
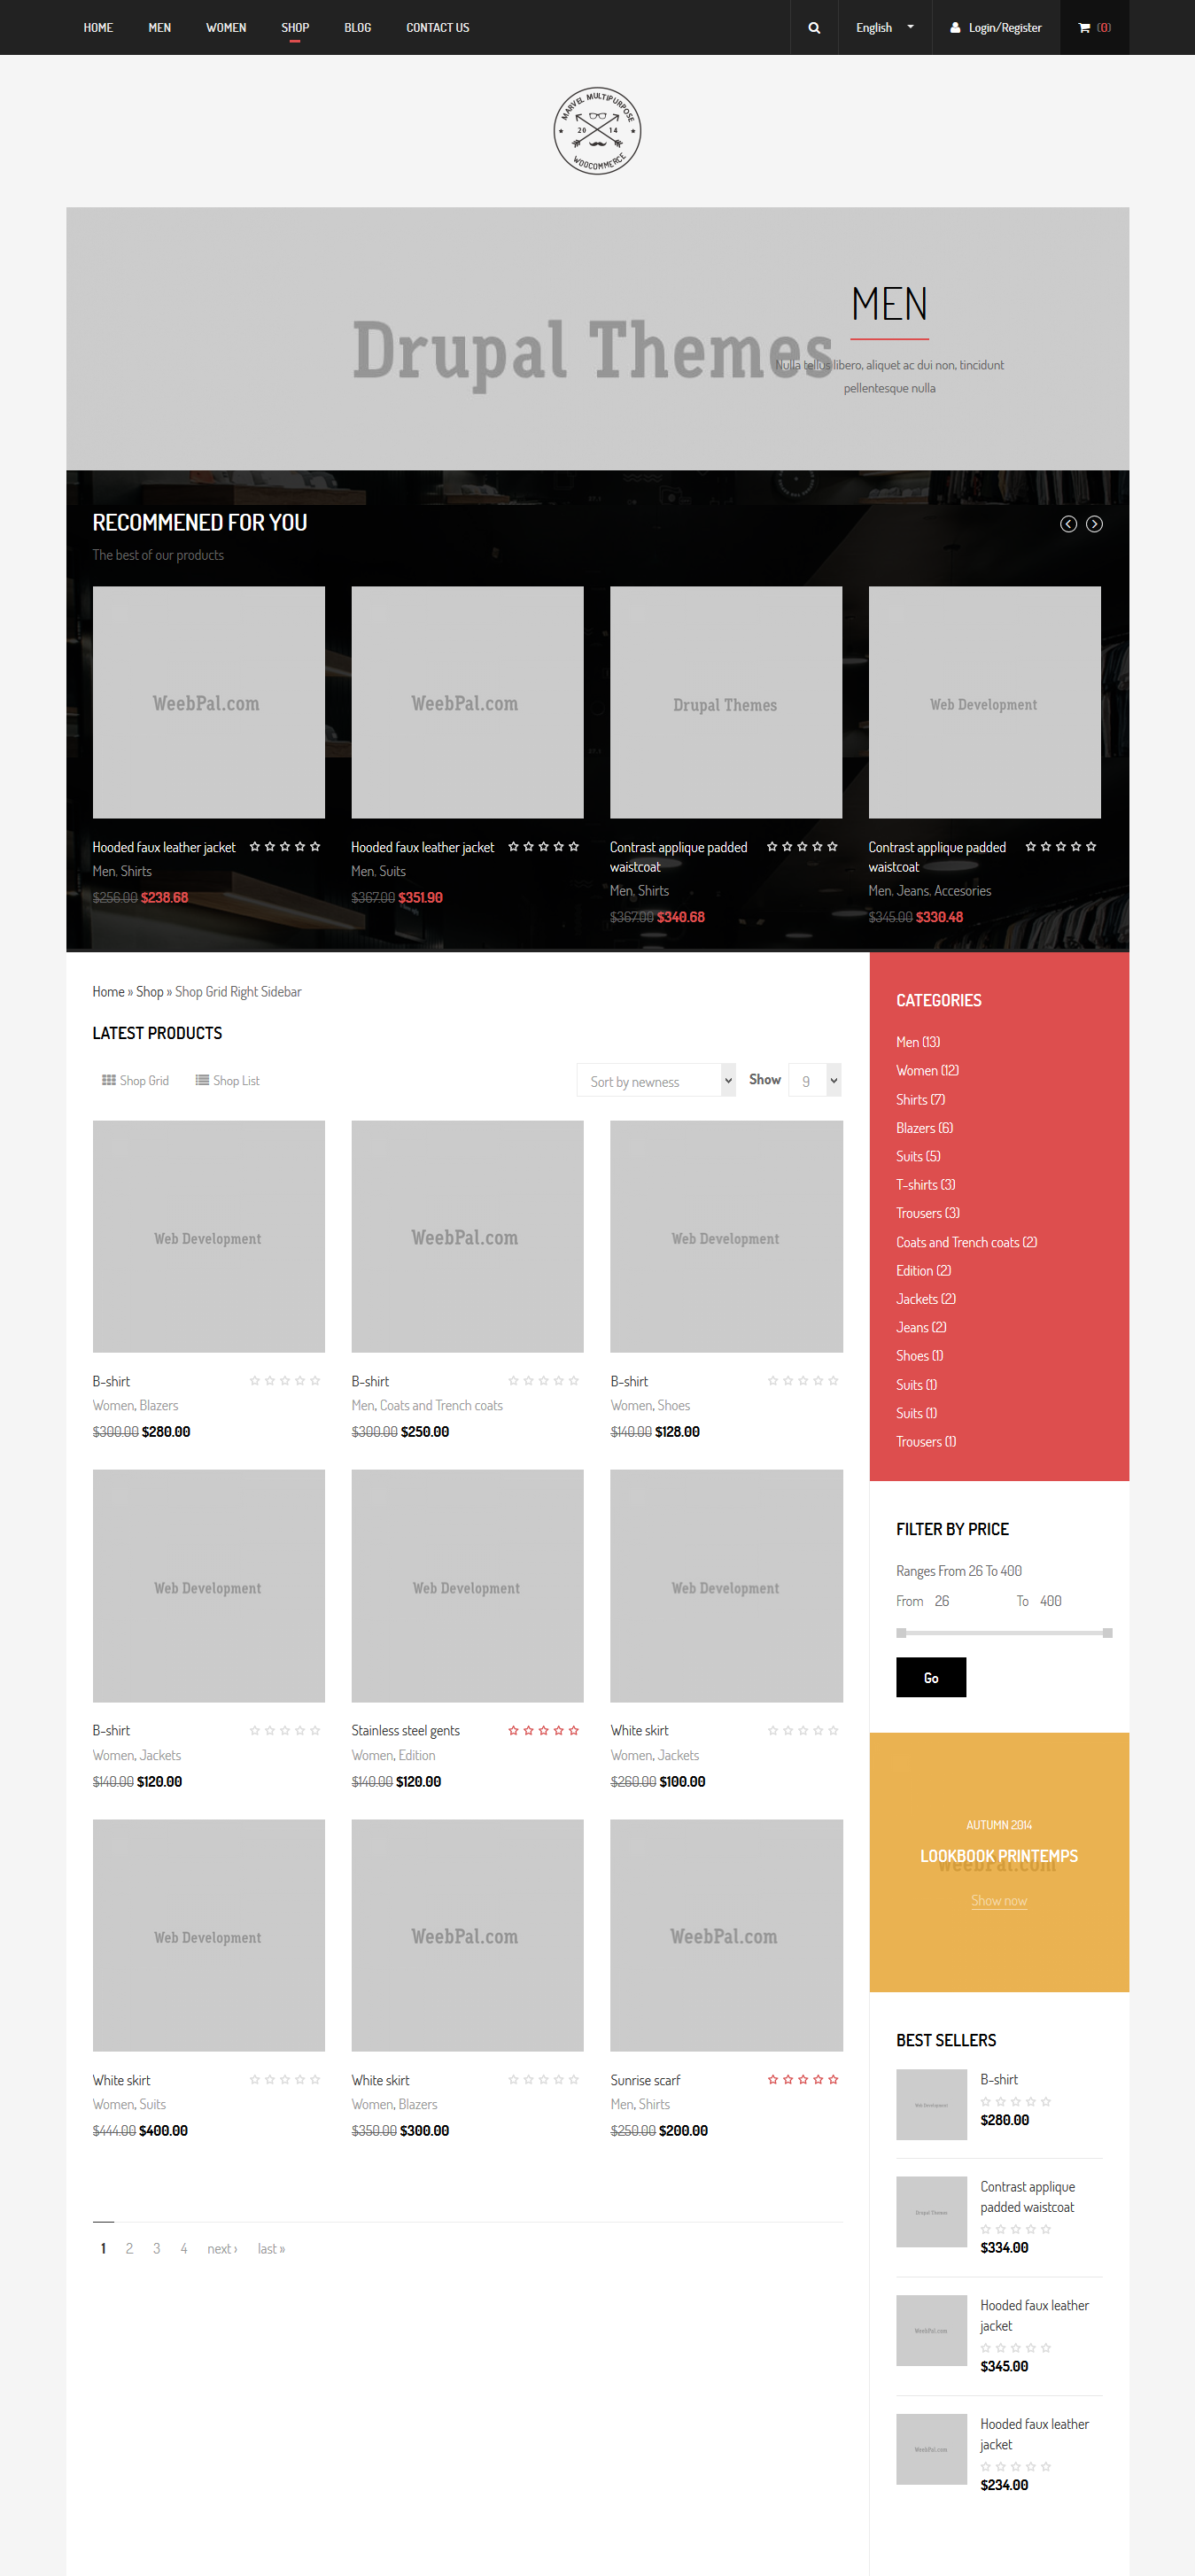
Shop Grid Right Sidebar
Contact Us
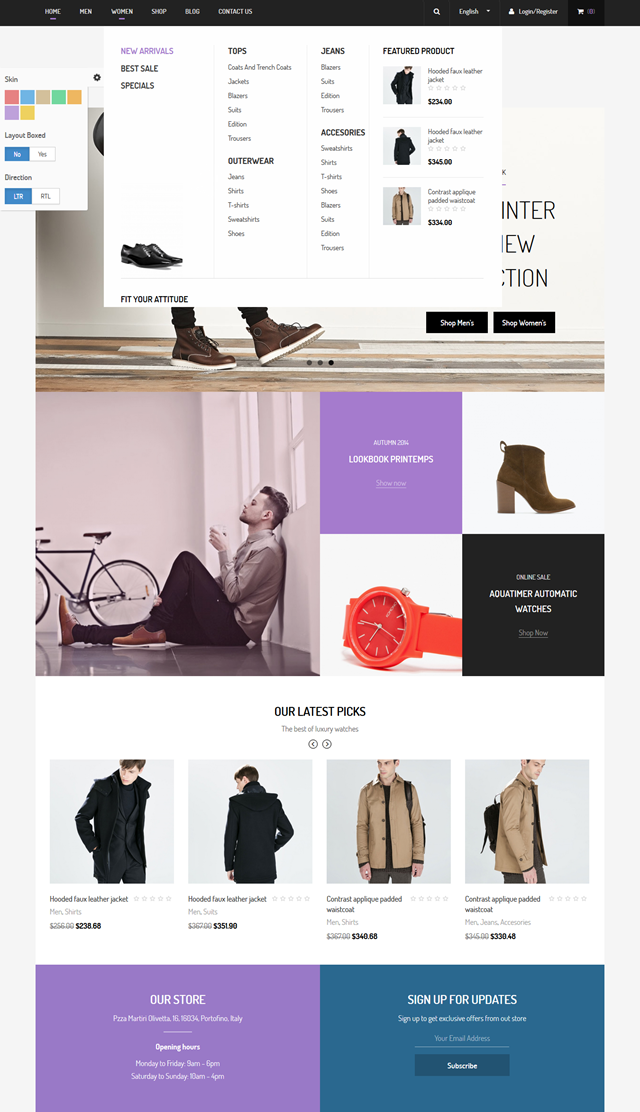
Multi colors & Megamenu
4. Module requirements
Core Modules
- Block
- Blog
- Color
- Comment
- Contact
Third-party Modules
- Address Field
- Administration menu
- Bean
- Block Class
- Chosen
- Cloud Zoom
- Colorbox
- Colorbox Node
- Drupal Commerce
- Commerce Coupon
- Commerce coupon fixed amount
- Commerce Discount
- Drupal Commerce Extra Price Formatters
- Commerce Product Option
- Commerce Pricing Attributes
- Commerce Product Attributes
- Commerce Search API
- Commerce Wishlist
- Context
- Chaos tools
- Date
- Entity
- Entity Reference
- Exclude Node Title
- Facet API
- Features
- Field collection
- Field Group
- Field Slideshow
- Fivestar
- Flex Slider
- Font Awesome Icons
- Gallery Formatter
- Internationalization
- Icon API
- Image Delta Formatter
- Image Link Formatter
- Inline Conditions
- Inline Entity Form
- Jcarousel
- jQuery Countdown
- Jquery Update
- Language Switcher Dropdown
- Language Switcher
- Language Icons
- Libraries
- Link
- Memcache API and Integration
- Menu block
- Menu Breadcrumb
- Module Filter
- Newsletter
- Node Compare
- Path Auto
- Popup
- Quicktabs
- Rules
- Search API
- Search API Database Search
- Search API ranges
- Search API sorts
- ShareThis
- Simplenews
- Statistics Counter
- Taxonomy Menu
- TB Megamenu
- Title
- Token
- Variable
- Video Embed Field
- Views
- Views Field View
- Views Fieldsets
- Views Isotope - jQuery Isotope
- Voting API
- Webform
Required libraries by the modules
- chosen
- cloud-zoom
- Colorbox
- ddslick
- flexslider
- fontawesome
- jquery.cycle
- jquery.imagesloaded
- jquery.isotope
Download Drupal core files, and extend your site with modules at here.
Installation
Quick Installation Demo Profile
We created an installation profile with demo content for each of our theme, so that you can quickly download and reproduce the whole site content as presented on our live demo. This way you will get a quicker overview of the features. If it's convenient you may also use the given demo content as a starting point to build your custom sites.
1. Marvel package included:
- Marvel theme: marvel-7.x-1.0.zip
- Demo Profile for Marvel: marvel-profile-7.x-1.0.zip
The below steps will give you the installation guide so that you can build your website to look exactly like the Marvel Full Demo.
- Demo Profile for Marvel: marvel-profile-7.x-1.0.zip
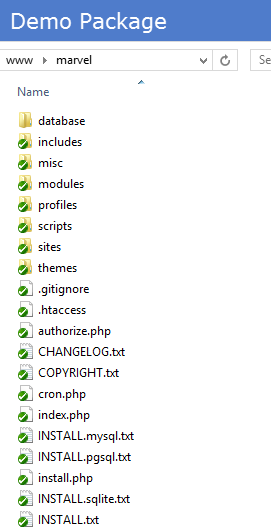
2. Extract marvel-profile-7.x-1.0.zip above and copy it into your host, and rename the directory
3. Access your MySQL database and create a new DB (e.g. marvel) and user account. Don't forget to add correct permissions to new user to access the database
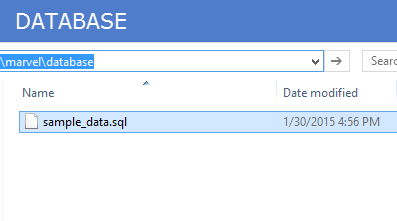
4. In the demo directory database/ (latest version of package) or profiles/weebpal/ (old version), you can find database dump named sample_data.sql. Import this file into new database.
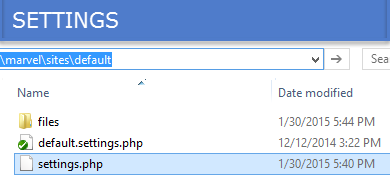
5. Now, you need to modify sites/default/default.settings.php file. Clone default.settings.php file, then rename it "settings.php"
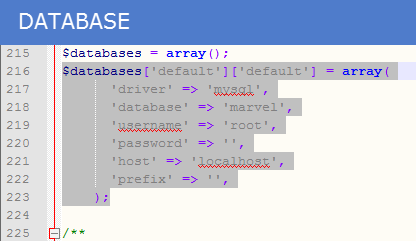
6. Open settings.php, then locate the $database array and set proper credentials.
						$databases['default']['default'] = array(
							'driver' => 'mysql',
							'database' => 'databasename',
							'username' => 'username',
							'password' => 'password',
							'host' => 'localhost',
							'prefix' => '',
							);
When using this installation, you are installing everything from our preview server. So don't forget to set proper values to access to your database: db name, db admin username, db admin password, host, etc.
7. Open the browser and visit your website with the prepopulated content & layout exactly like our Marvel Demo
Now, you can visit administrator site with the admin account admin/admin to delete the unnecessary contents and add the new ones.
2. Installation Marvel Theme for Drupal developers
If you're an experienced Drupal user or if you want to build the theme from zero with only the basic appearance of Marvel Theme, find this guide in handy.
1. Install Drupal
-
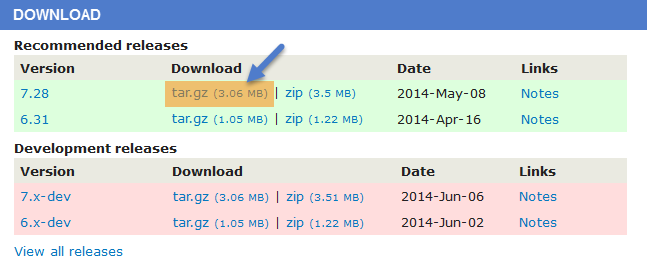
Go to Drupal download page and download the latest version of Drupal 7.
- Extract and copy Drupal folder to your host and rename the directory.
- Follow this tutorial to install Drupal with the standard profile.
2. Install Marvel Theme
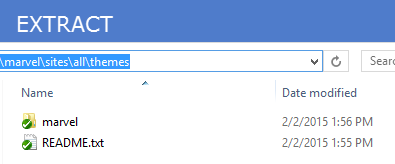
- Extract Marvel theme .ZIP file:
- marvel-7.x-1.0.zip
-
Move this theme into your Drupal folder: sites/all/themes
-
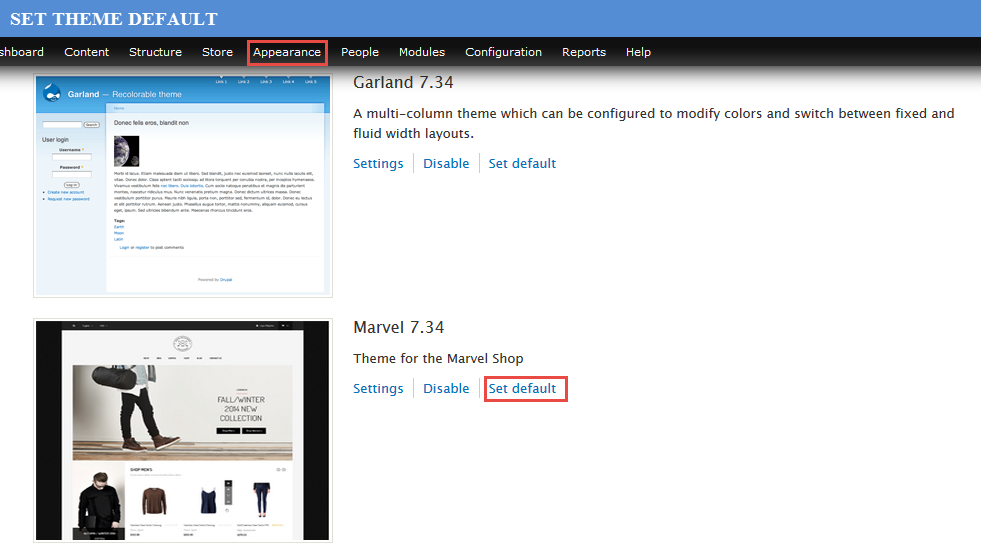
Navigate to Appearance > Choose Enable and set default Marvel theme
3. Install Required Modules
Now that you've enabled Marvel theme, you will install and enable the required modules (listed in the Module Requirements section) to customize and use them.
If you don't know how to install the contributed modules, this tutorial is an essential guide.
Cheat to install modules & theme:
- Extract marvel-profile-7.x-1.0.zip
- Open extracted folder, go to sites/all and copy all folders inside (modules, themes, libraries)
- Paste them to your host, folder sites/all
Note: See this guide to get more details about installation
Taxonomy configuration
Quick Information
- Taxonomy: Taxonomy can be simply understood as category management using organizational keywords known in other systems as categories, tags or metadata. It allows you to connect, relate and classify your website's content. In Drupal, these terms are gathered within "vocabularies". The Taxonomy module allows you to create, manage and apply those vocabularies.
- Vocabulary: for example product category, tag, provider name, ...
- Term: the items in each vocabulary. For example: vocabulary product category has some terms: laptop, pc, mobile, tablet, camera, headphone, ...
- For more information about taxonomy, please see: Organizing content with taxonomies
Navigate to Structure > Taxonomy to create vocabularies as the following:
Add terms for each vocabulary:
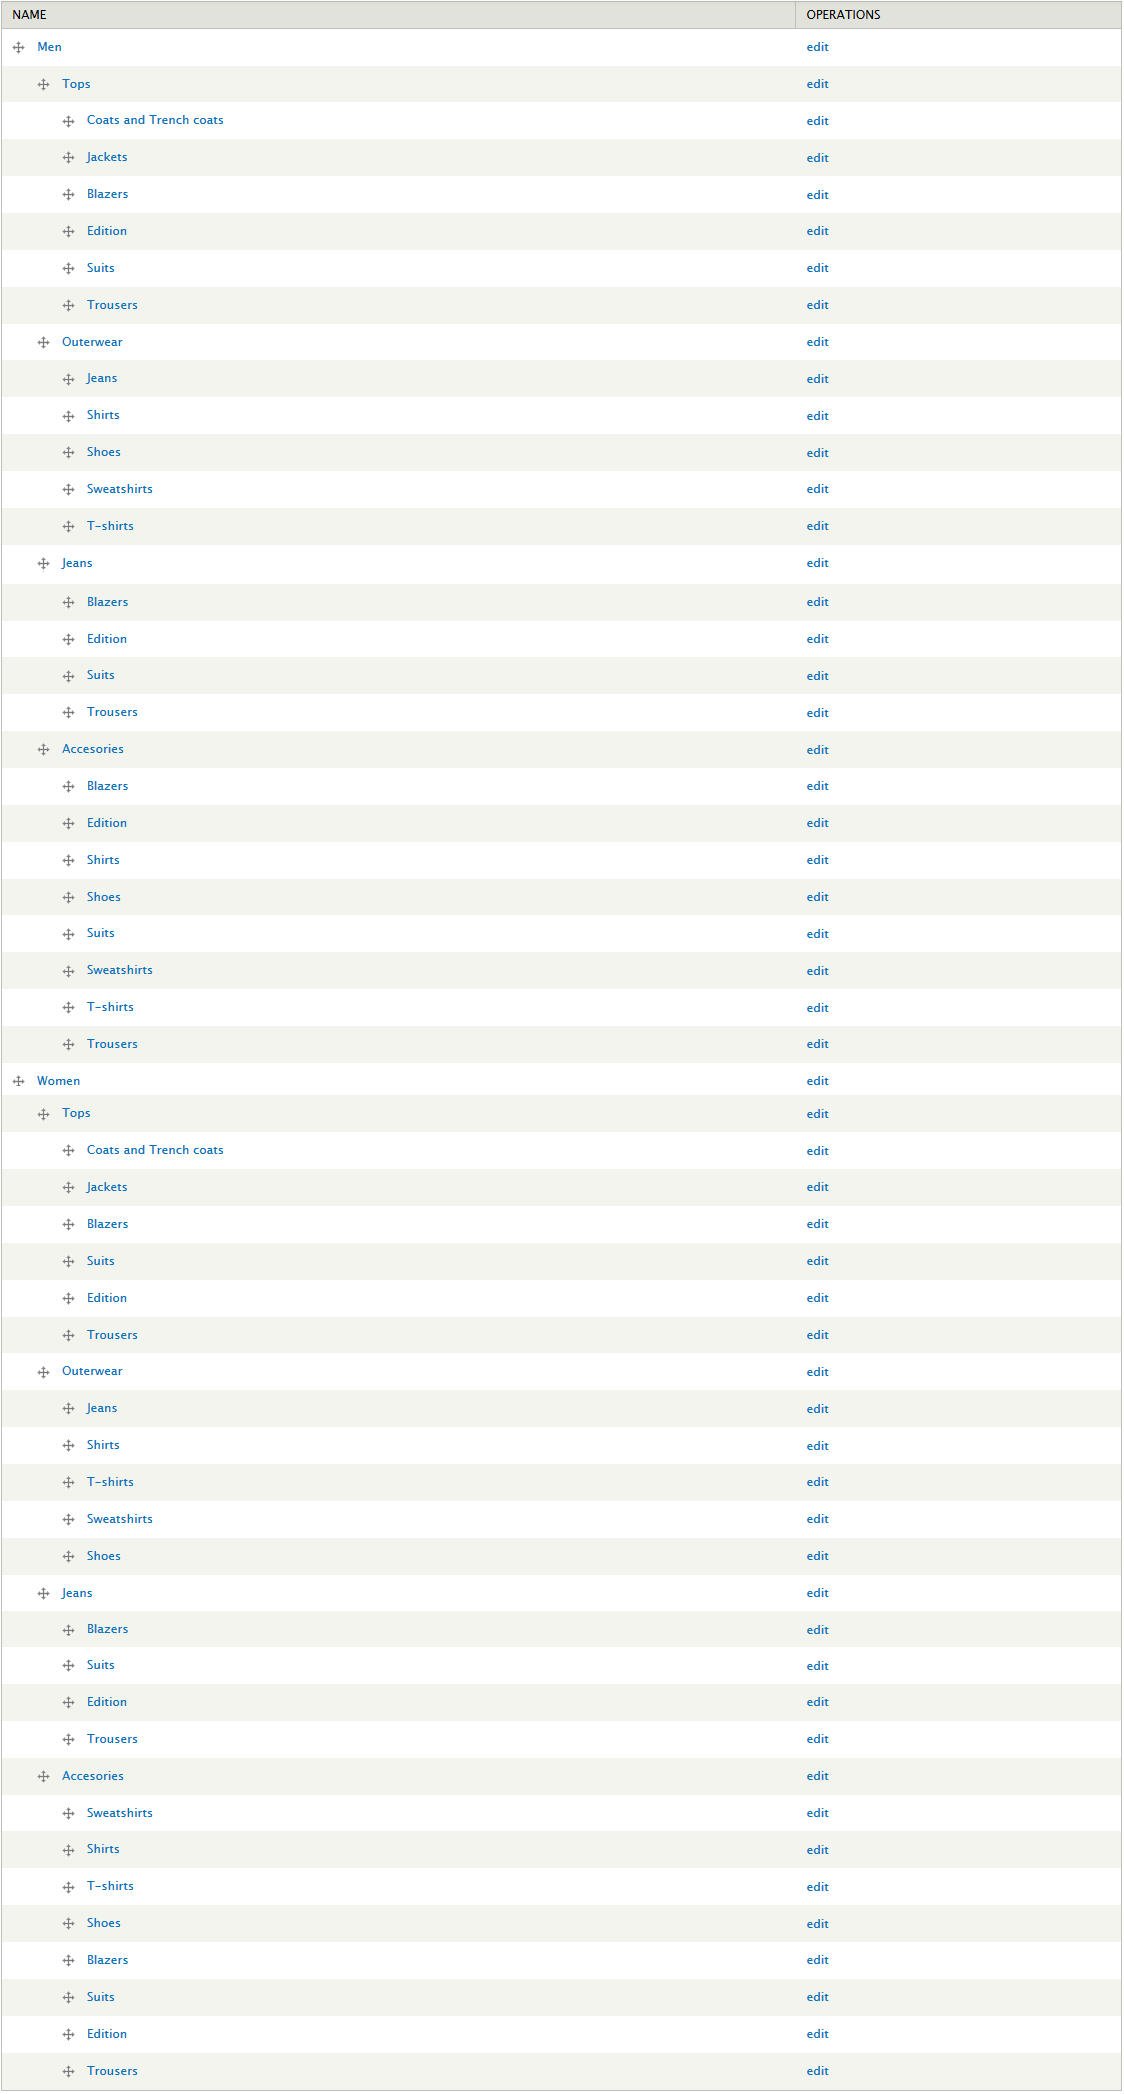
Terms of Category:
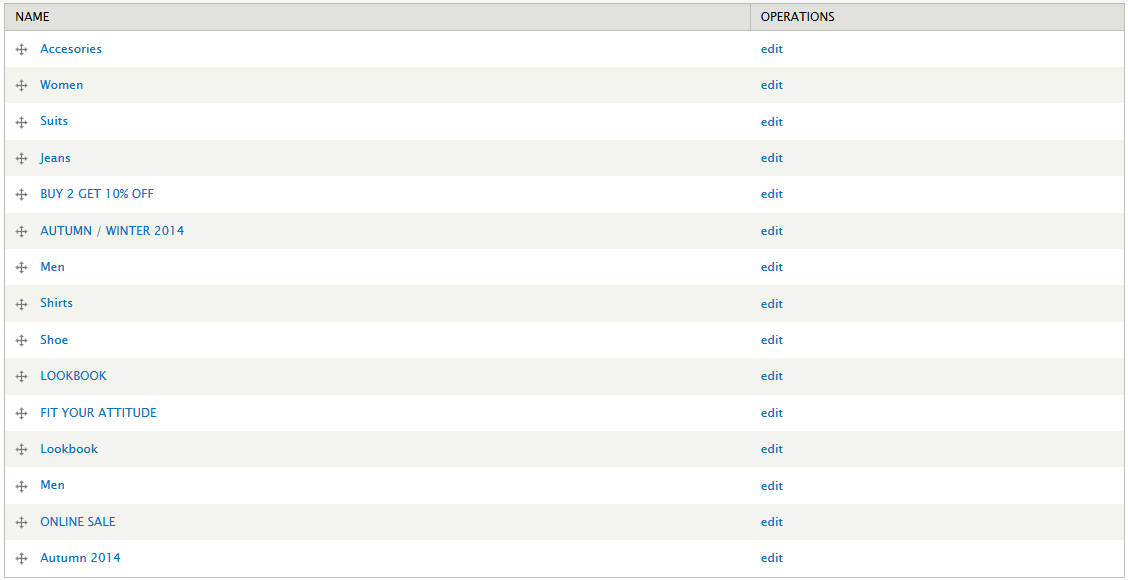
Terms of Collection:
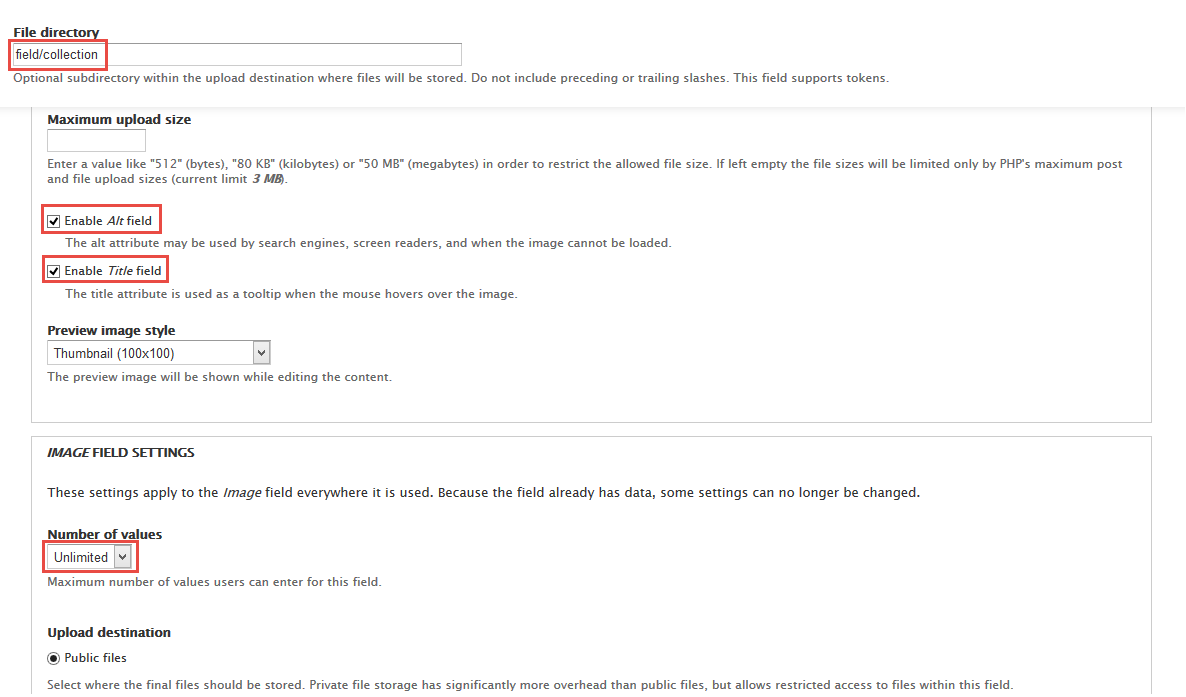
Step 1:Navigate to Structure > Taxonomy > Collection > Manage Fields click link and add following field:
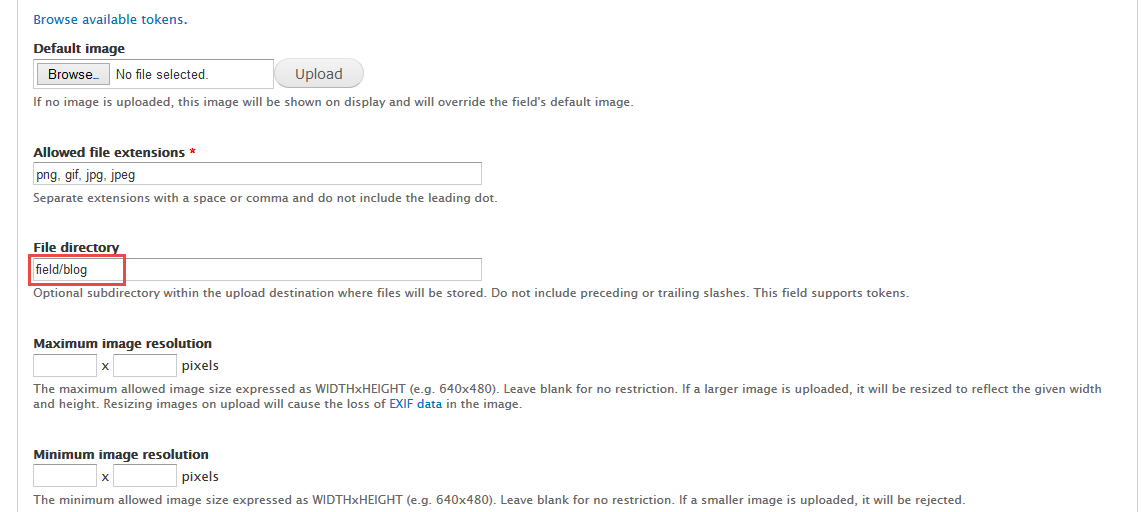
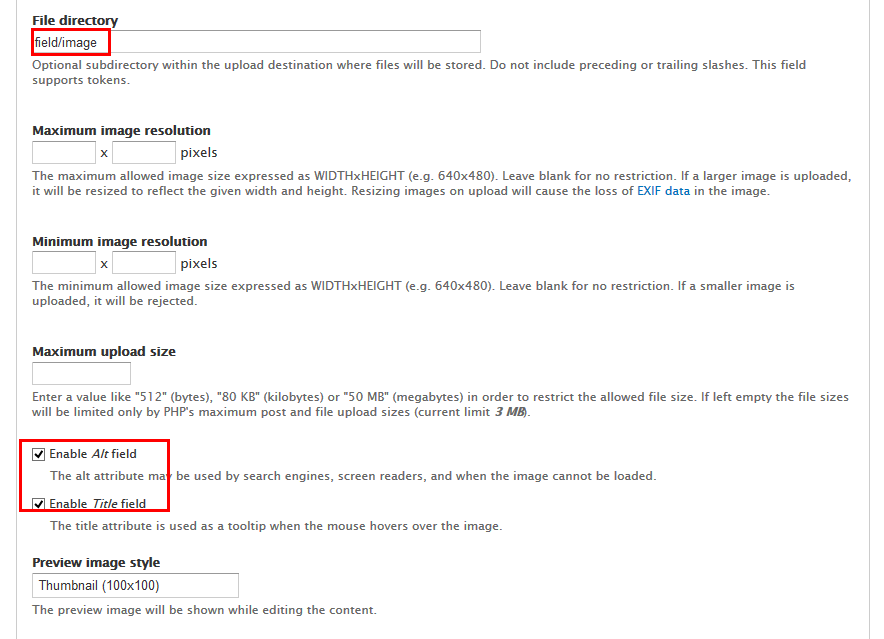
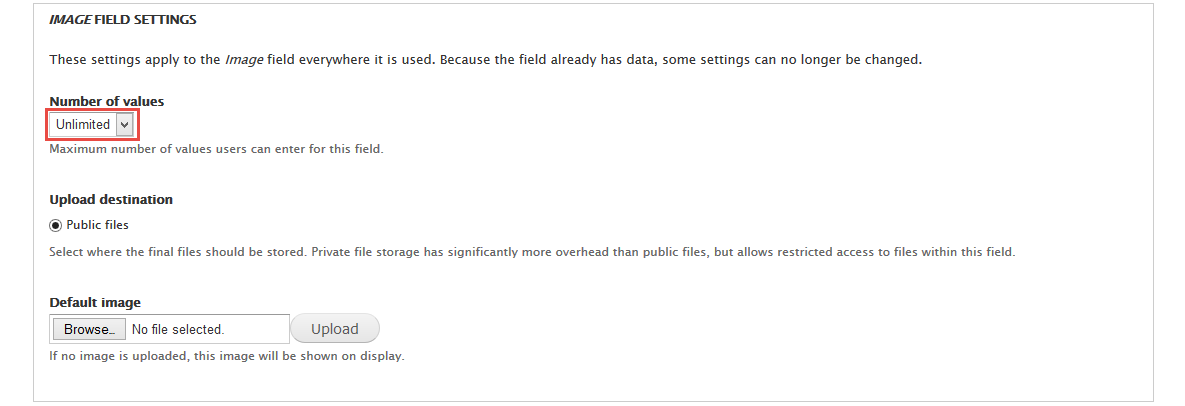
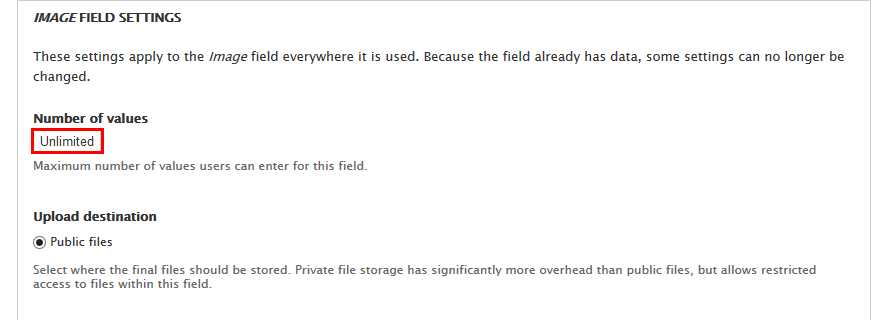
Step 2:Set properties for Image field
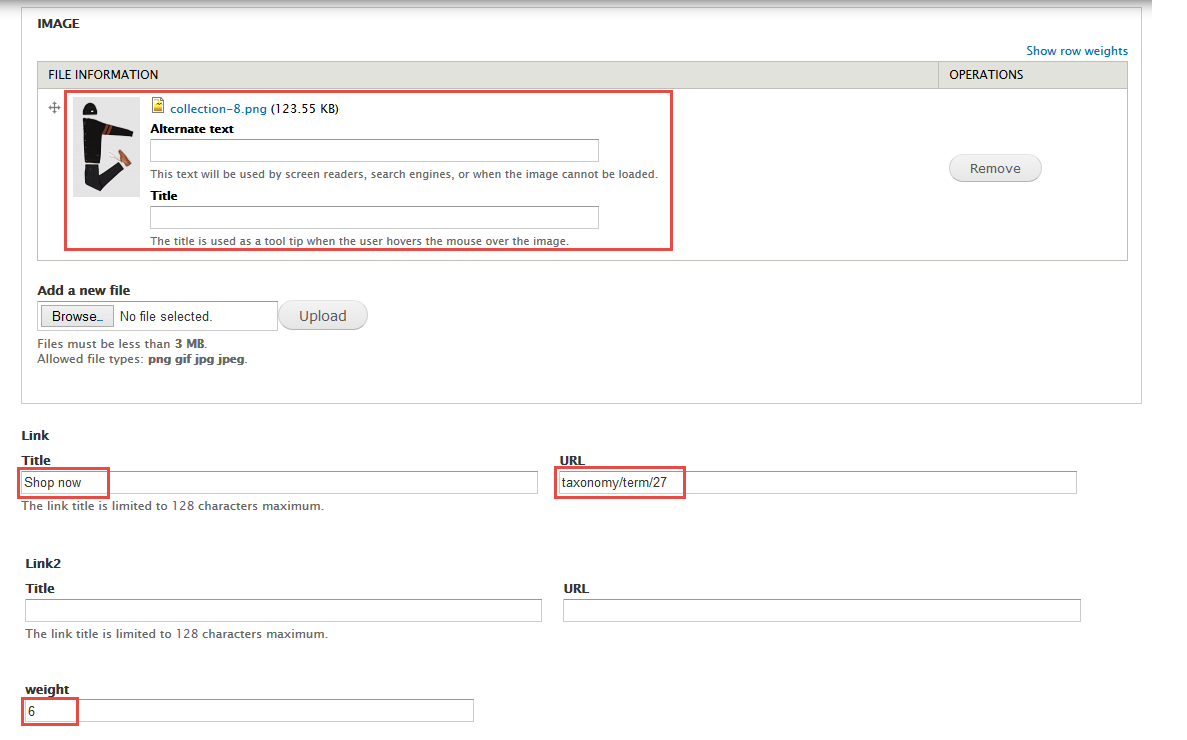
Step 3 :Go to List tab. Click Edit link and set following properties for each term of Collection:
Terms of Group Catagories:
Terms of Occupations:
Terms of Sale Off:
Terms of Status:
Note: See this guide to get more details about taxonomy configuration
Media configuration
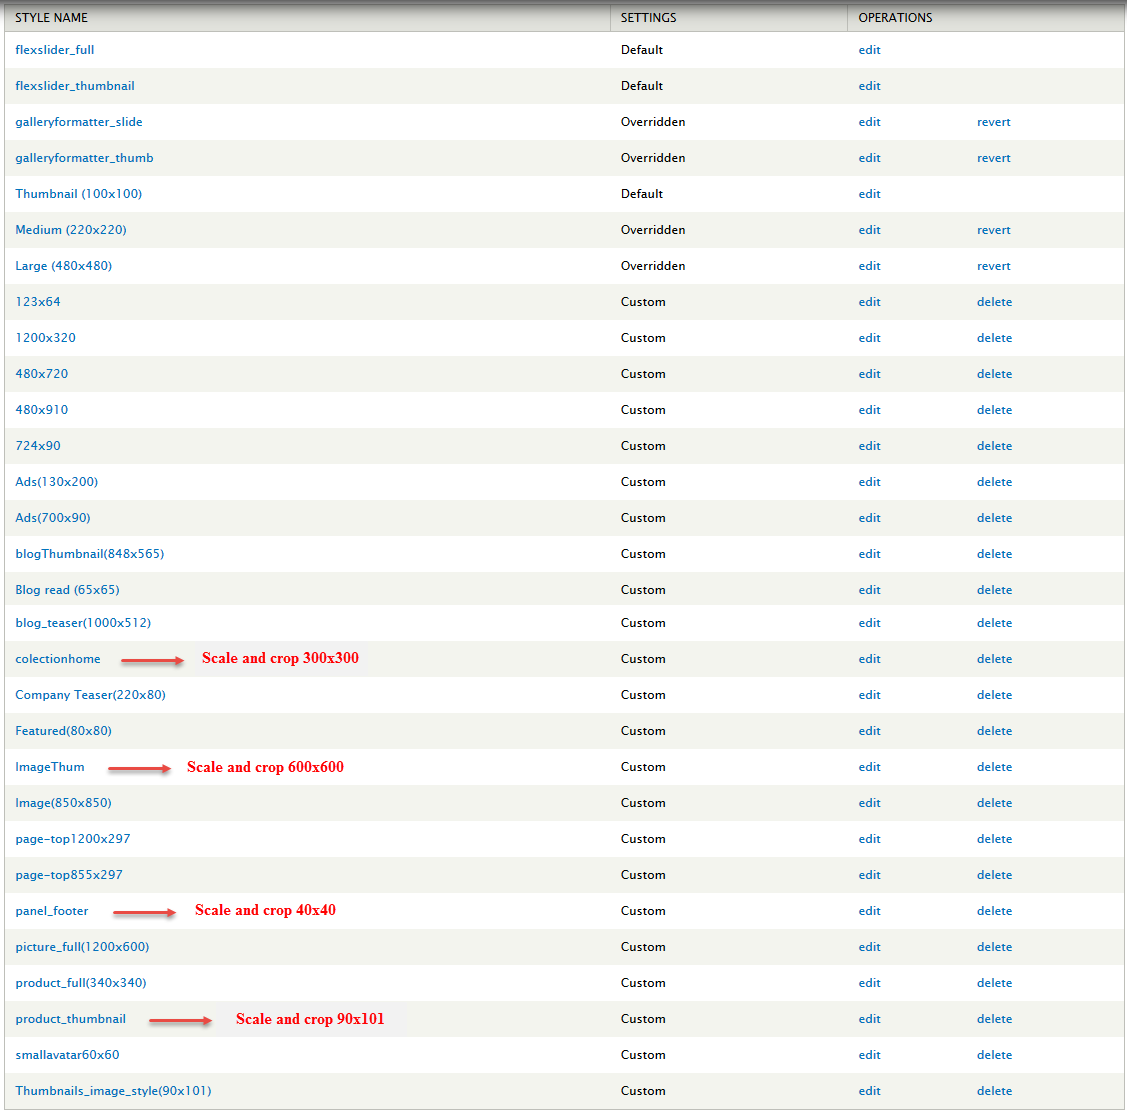
Image Style Configuration
Content type configuration
Configuration People
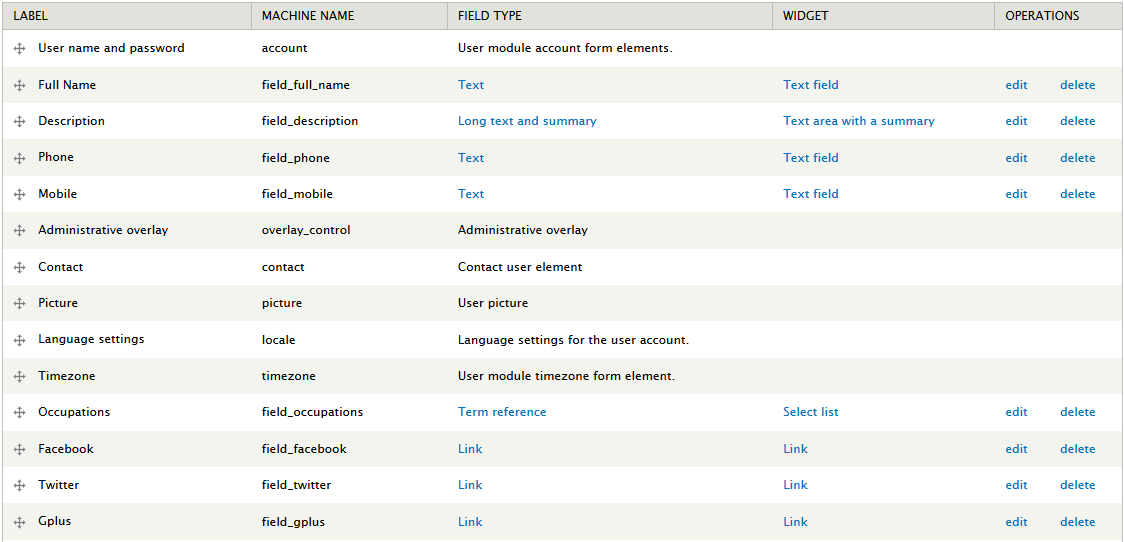
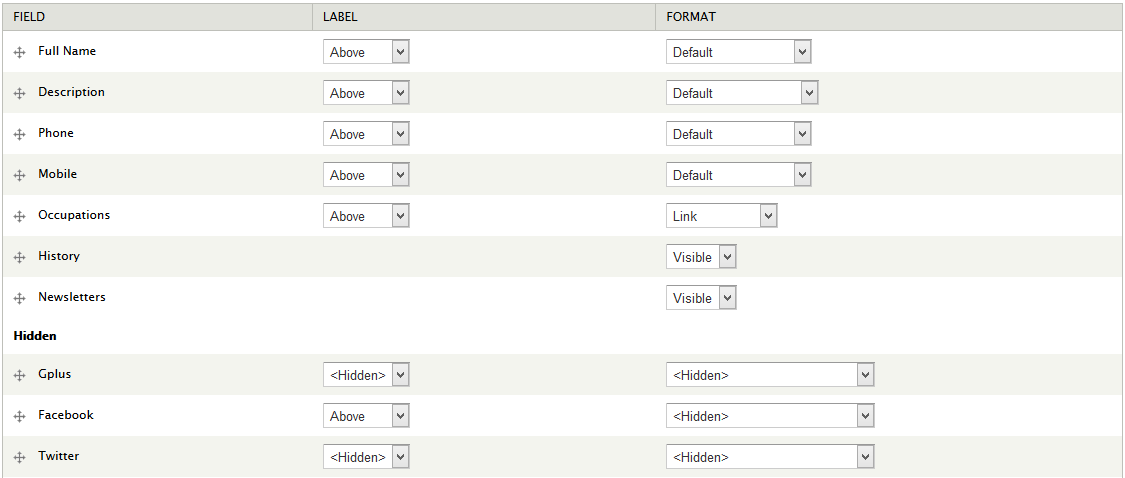
1. Navigate to Configuration > People > Account settings > Manage Field link and add following field:
2. Set properties for Occupations field
3. Go to Manage Display link and set following fields:
4. Click Save button
Configuration Field collection
1. Navigate to Structure > Field collection link and with following
2. In field_content row, click "manage fields" link.
3. To add new field, you can fill in "Add existing field" row
4. Set properties for Image field
5. Click Save button
6. Go to Manage Display link and set following fields:
7. Click Save button
Configure Store
1. Configure Discount
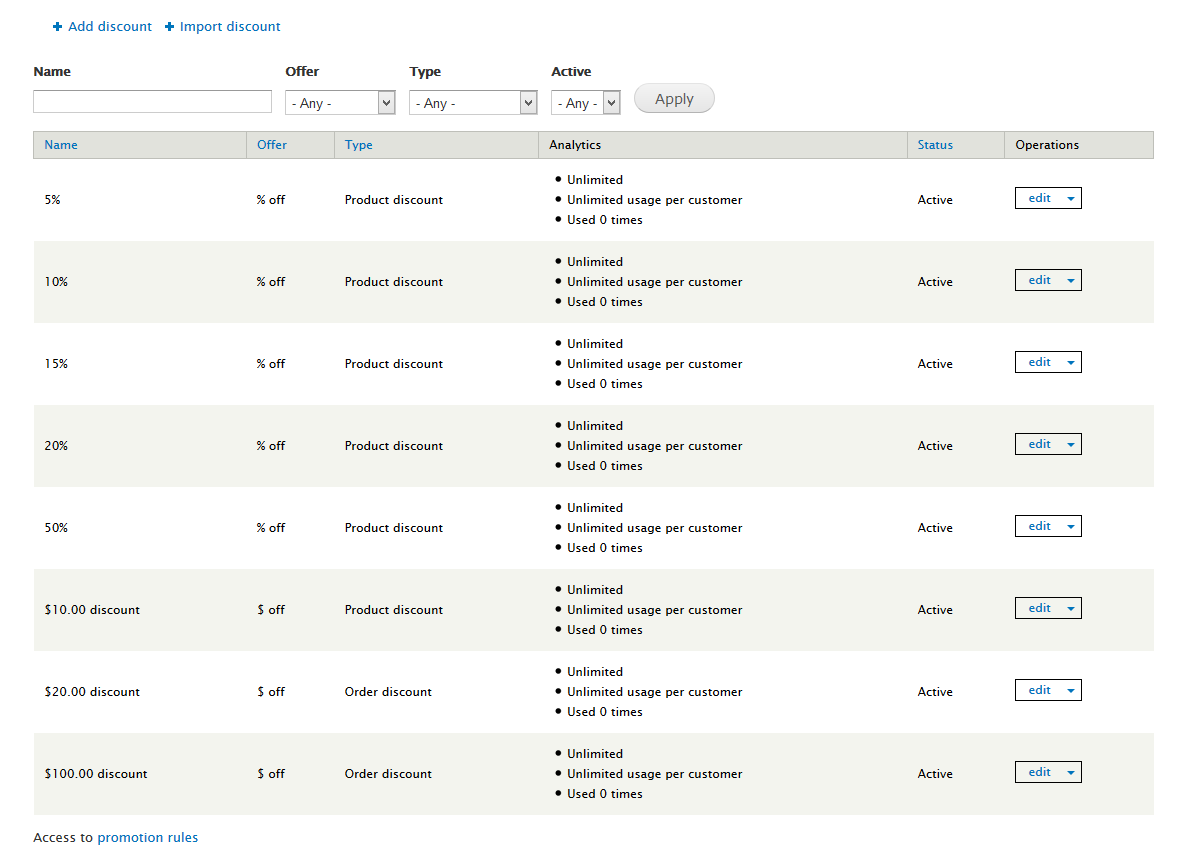
After installing many modules of Drupal Commerce, you will see the store menu in administrator menu bar. Now you can manipulate store through it.
To configure this future, you must install Commerce Discount module, then navigating to Store > Discounts and create some discount such as below image.
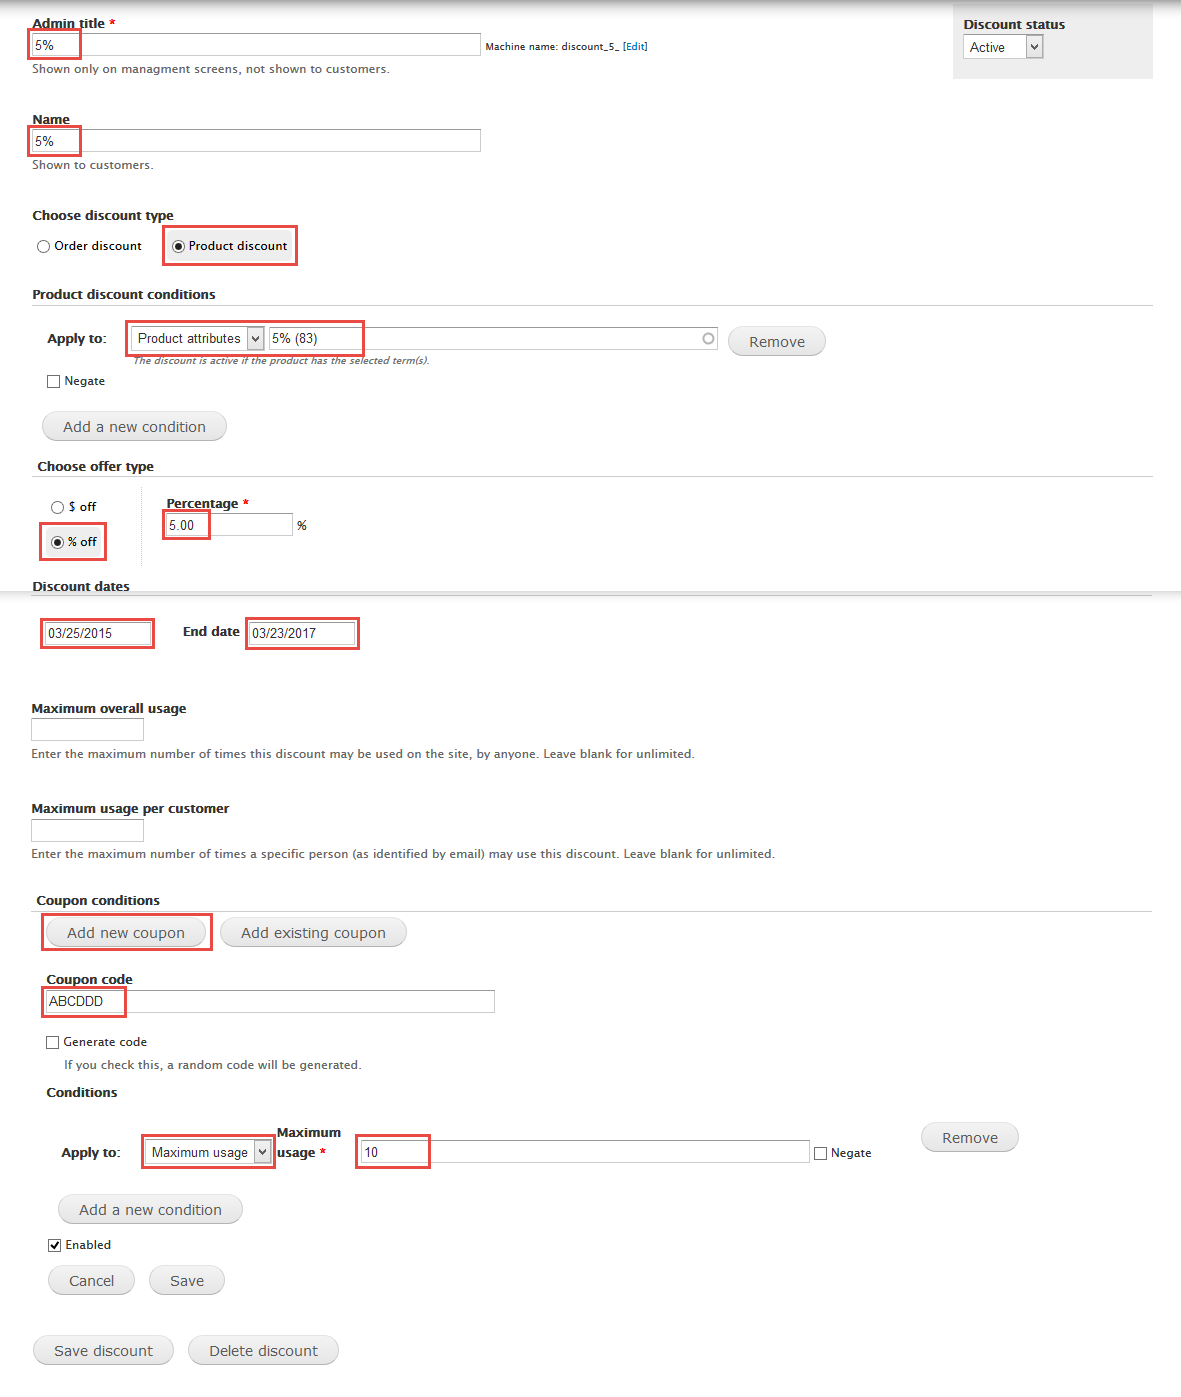
1. Navigate to Store > Discounts > Add discount with following properties
2. If click button Add new coupon the first click button Save.
3. After that, click button Save discount.
Note You can read this article to understand more about Commerce Discount.
2. Configure Product type
1. Navigate to Store > Products > Product Types
2. In Product row, click "manage fields" link, add following fields:
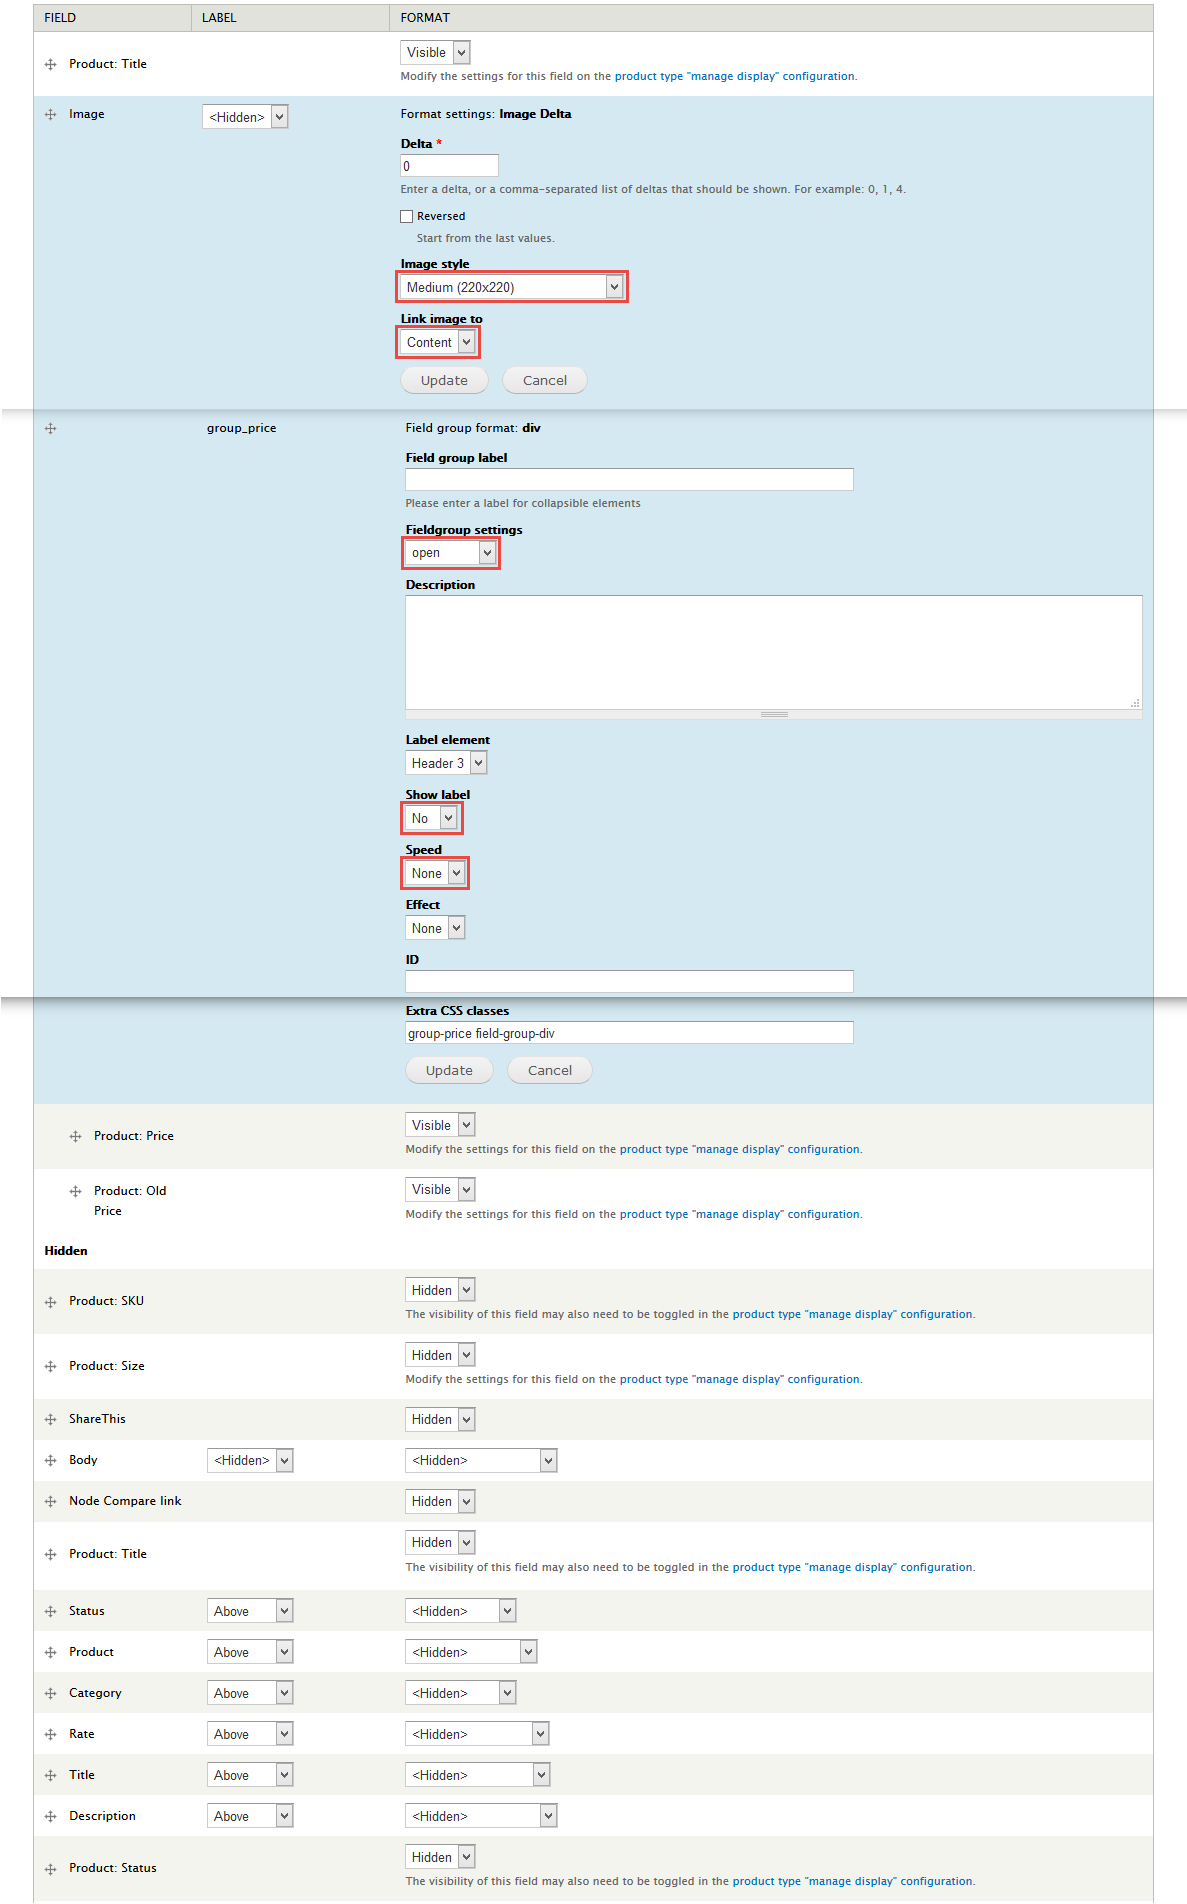
3. Go to Manage Display link and set following fields:
4. Click Save button
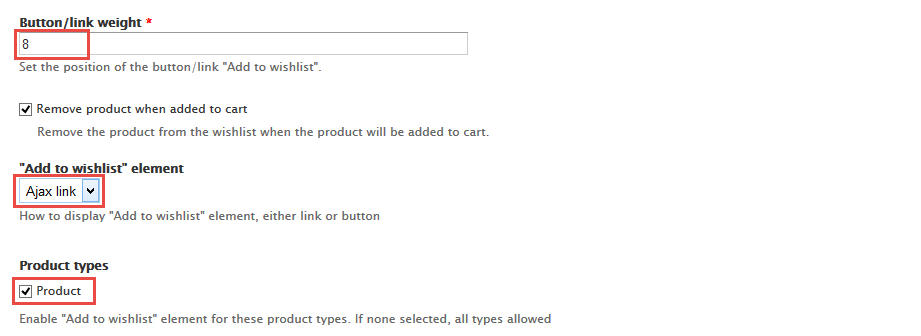
3. Configure Wishlist
Modify Article type
Note: Required Modules: Exclude Note Title
1. Navigate to Structure > Content Type
2. In Article row, click "manage fields" link.
3. To add new field, you can fill in "Add new field" row
4. Set properties for Image field
5. Go to Manage display tab > Default set following properties:
6. Go to Manage display tab > Teaser set following properties:
Modify Basic page type
Note: Required Modules: Exclude Note Title
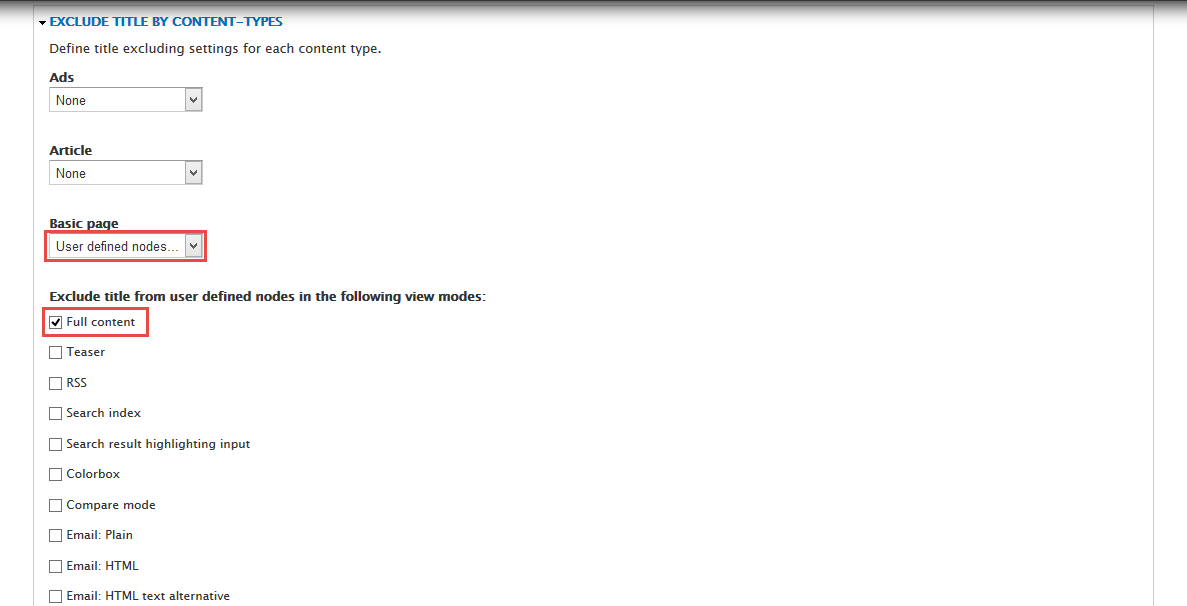
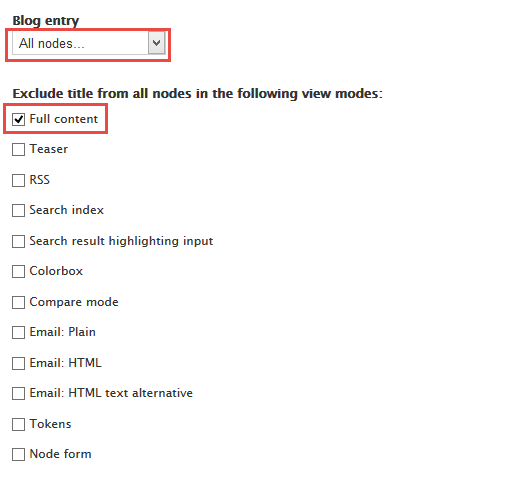
1. Configuration modules Exclude Node Title set following properties
2. Navigate to Structure > Content Type
3. In Basic row, click "manage fields" link.
4. To add new field, you can fill in "Add new field" row
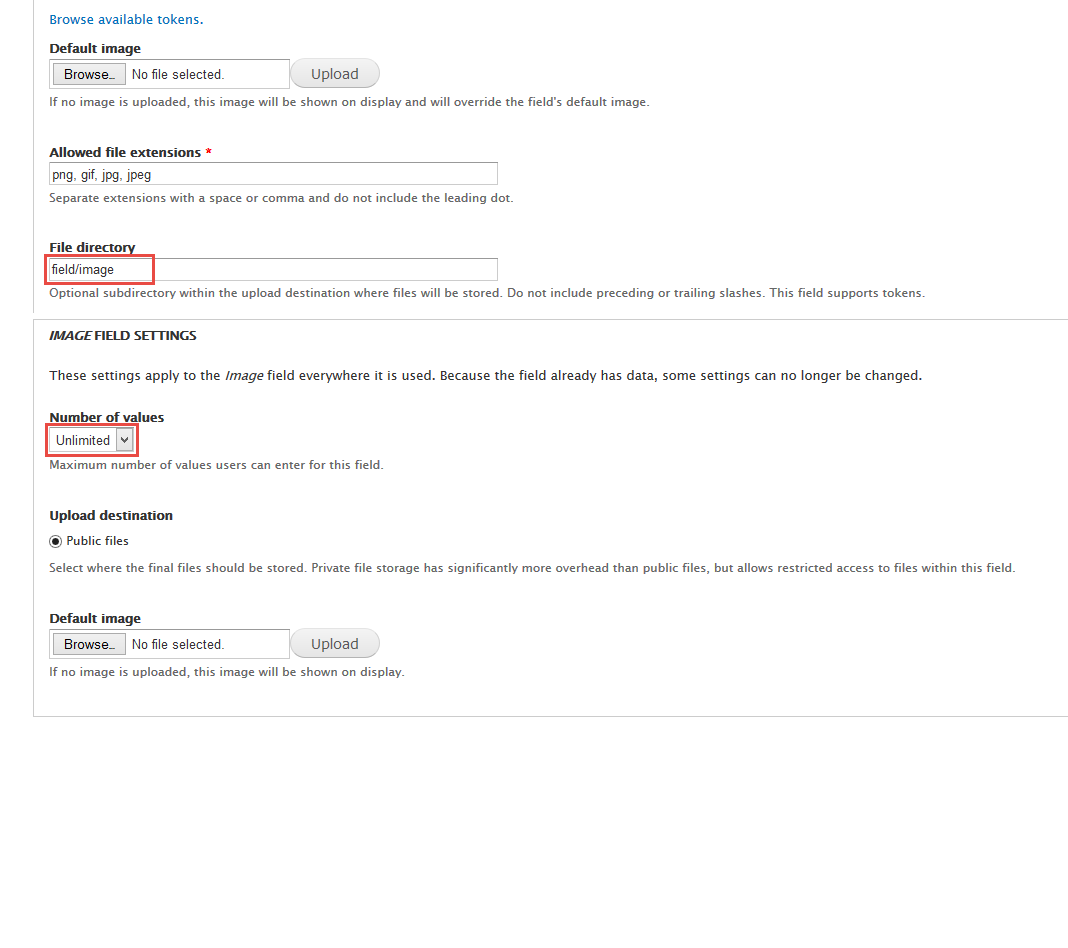
5. Set properties for Image field
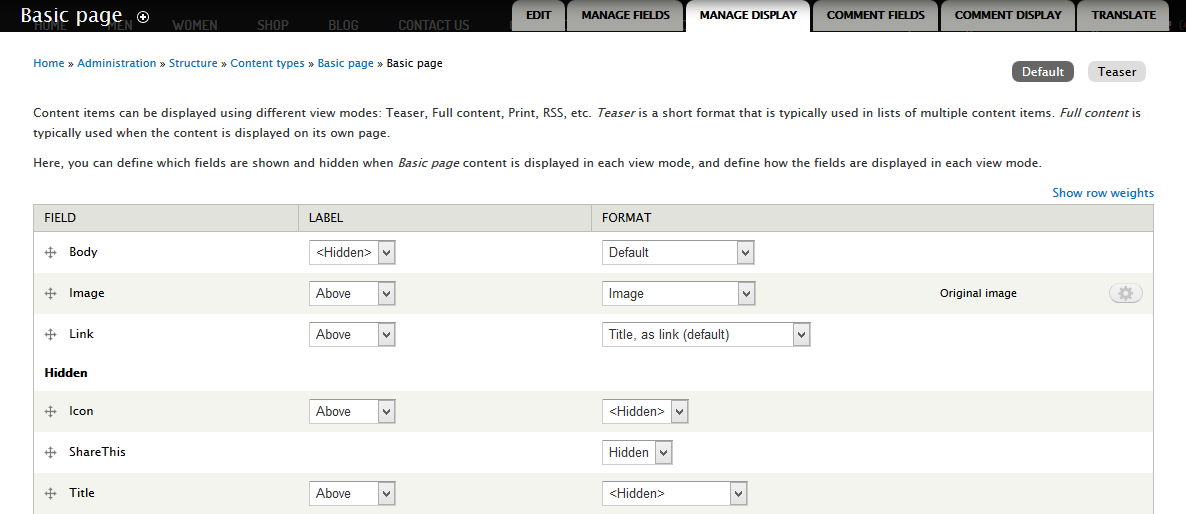
6. Go to Manage display tab > Default set following properties:
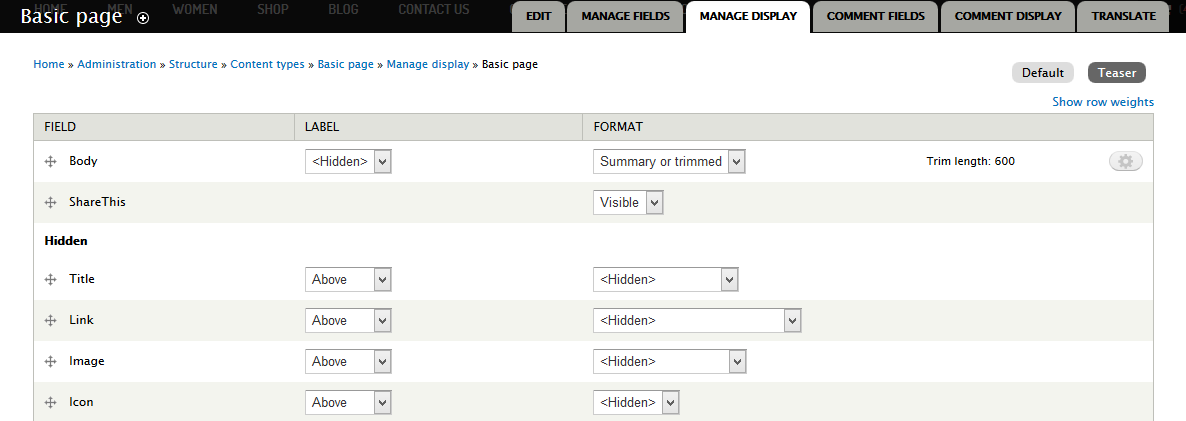
7. Go to Manage display tab > Teaser set following properties:
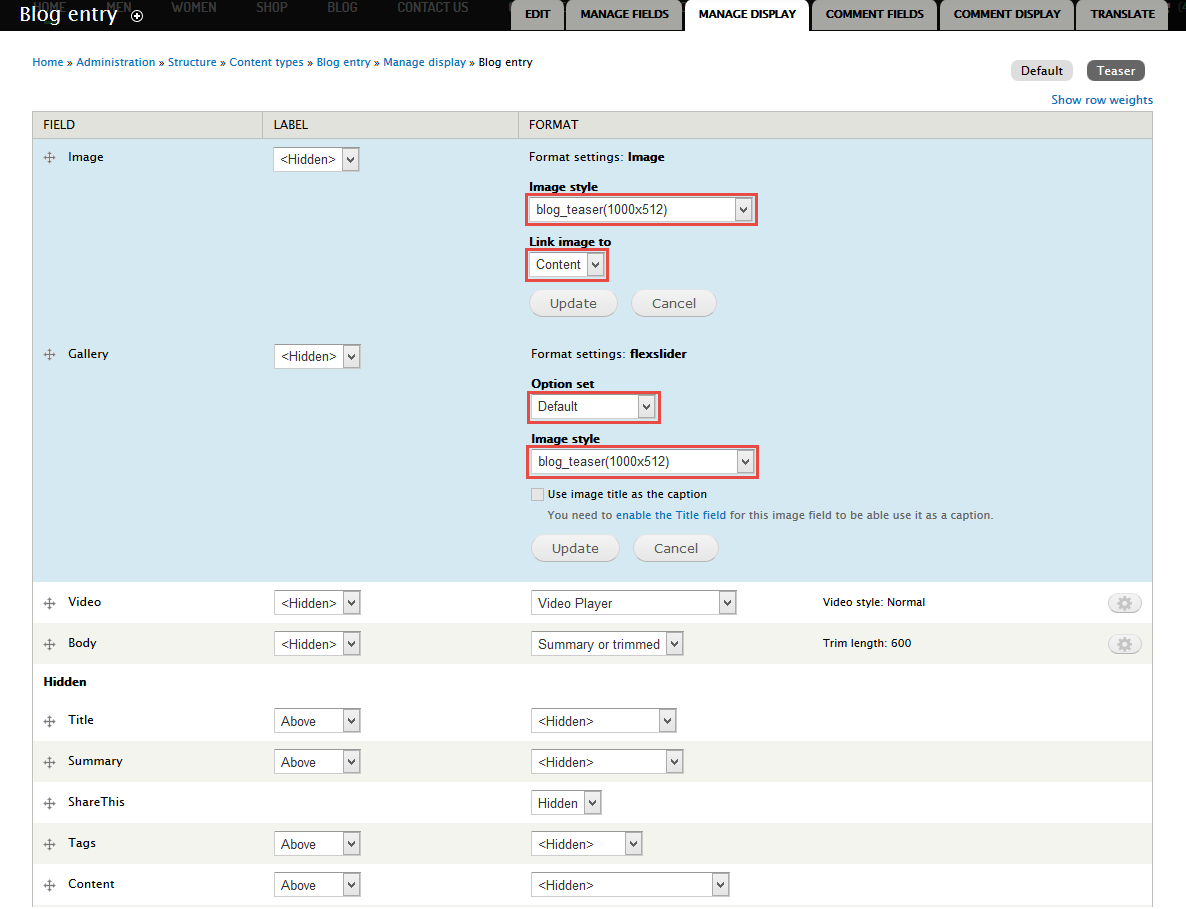
Modify Blog entry type
Note: Required Modules: Blog, Exclude Note Title
1. Configuration modules Exclude Node Title set following properties
2. Navigate to Structure > Content Type
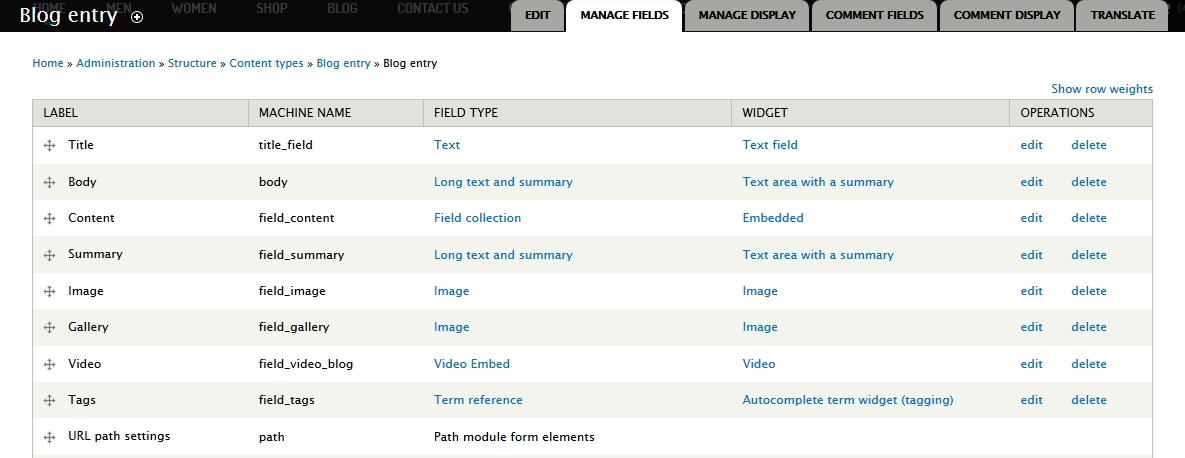
3. In Blog entry row, click "manage fields" link.
4. To add an existing field, you can take action on "Add existing field" row
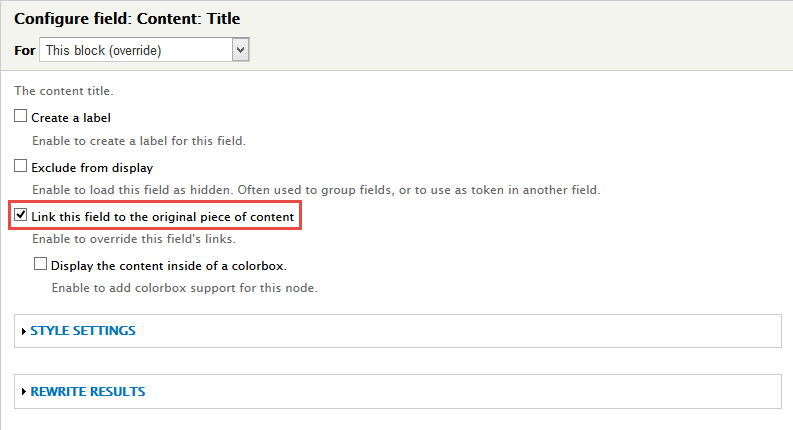
5. Set properties for Title field
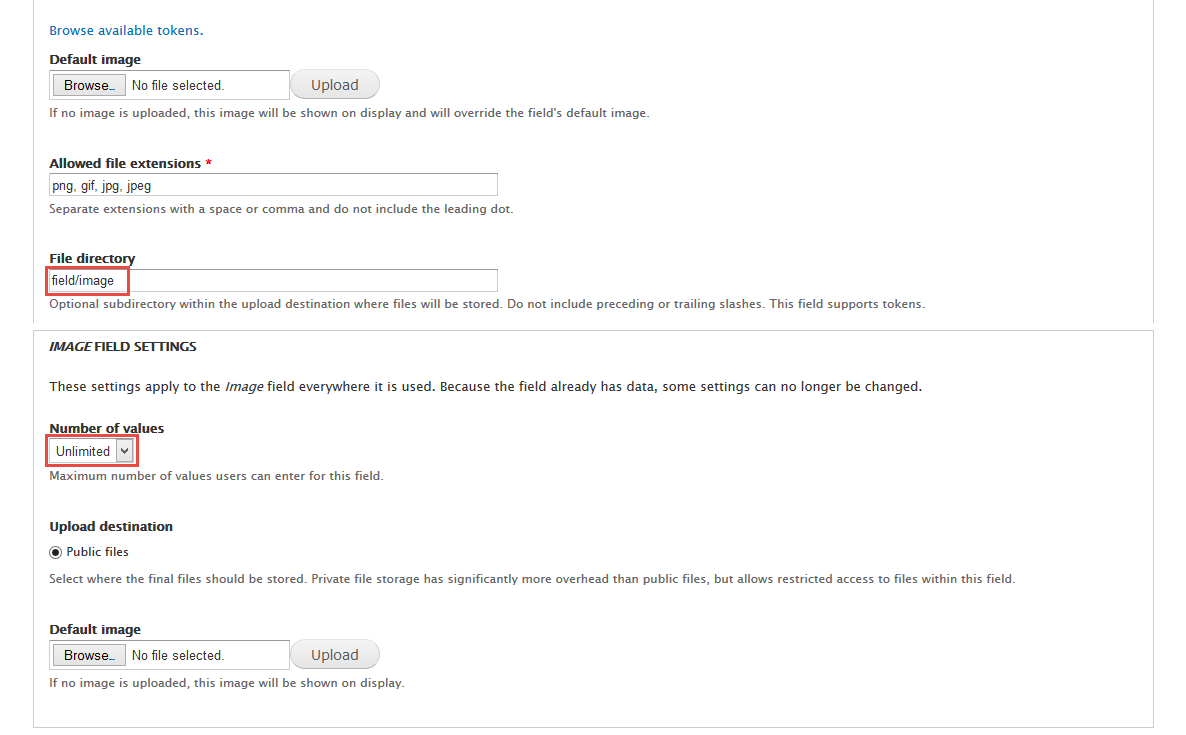
6. Set properties for Image field
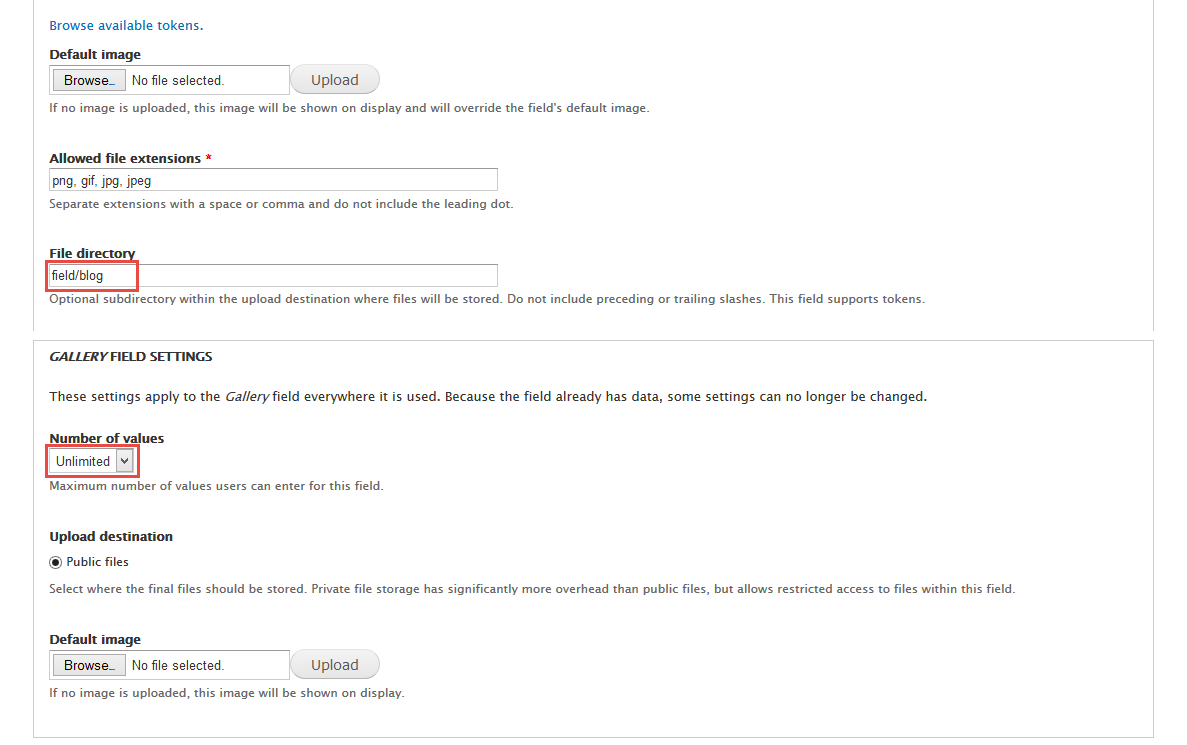
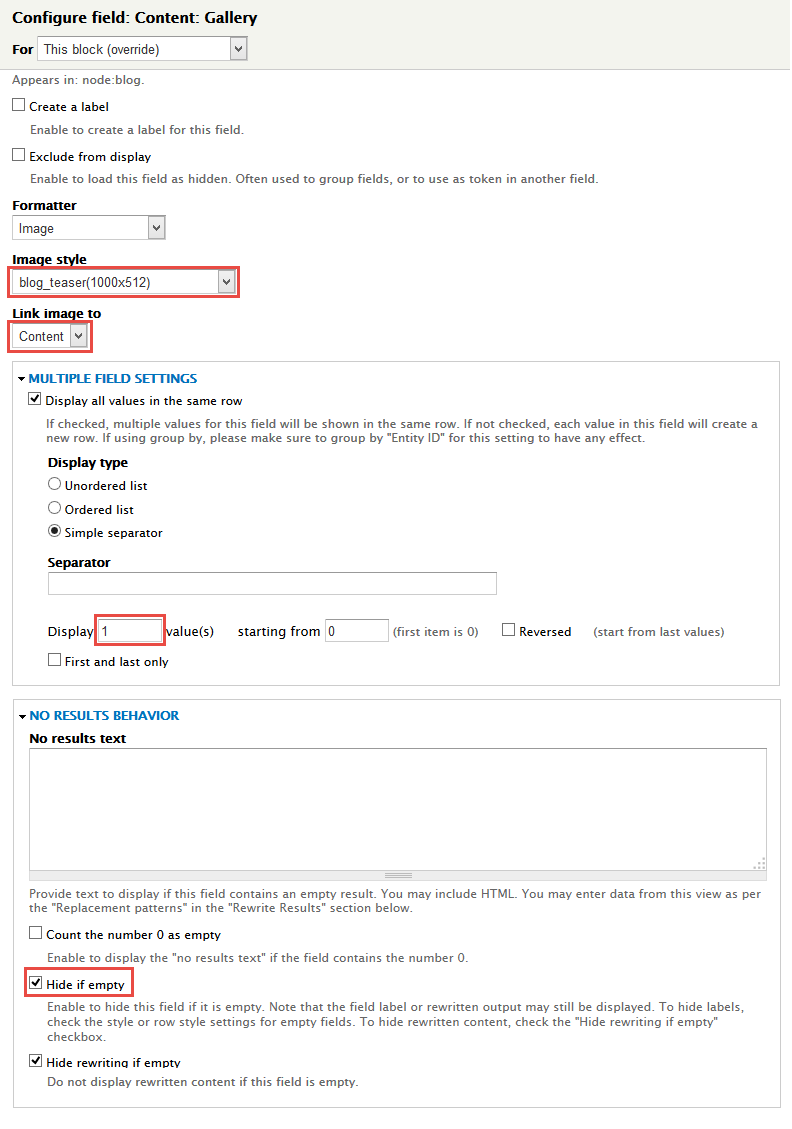
7. Set properties for Gallery field
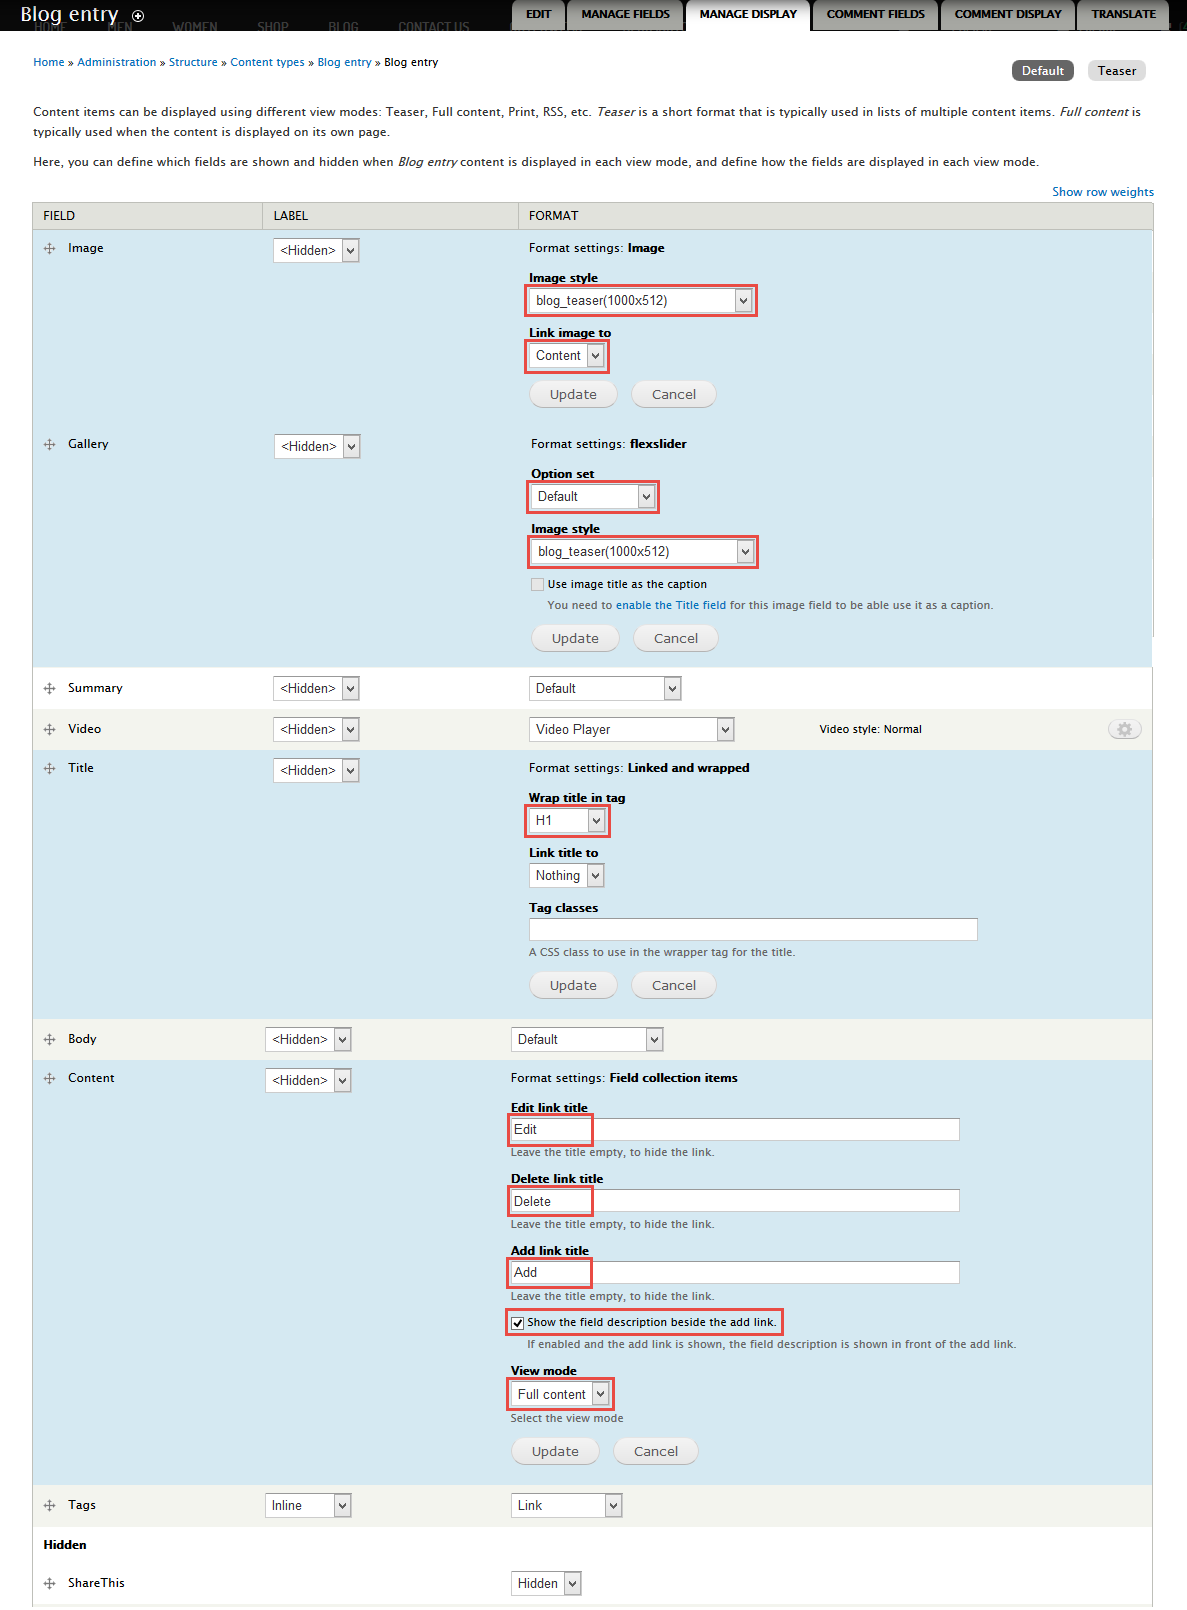
8. Go to Manage display tab > Default set following properties:
9. Go to Manage display tab > Teaser set following properties:
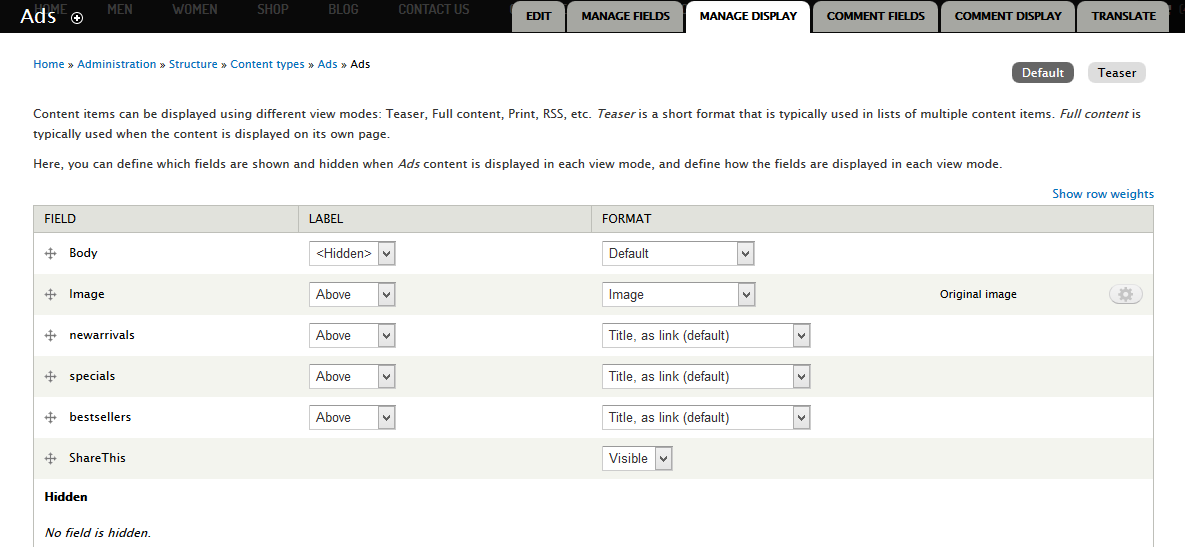
Create Ads type
1. Navigate to Structure > Content Type. Click Add Content Type link to create content type Ads
2. Go to Manage Fields and add following fields:
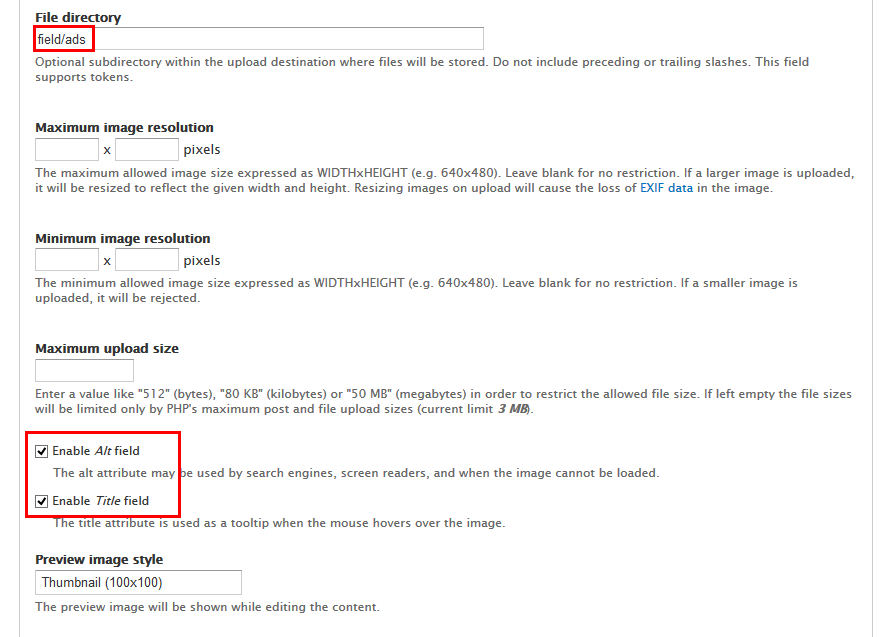
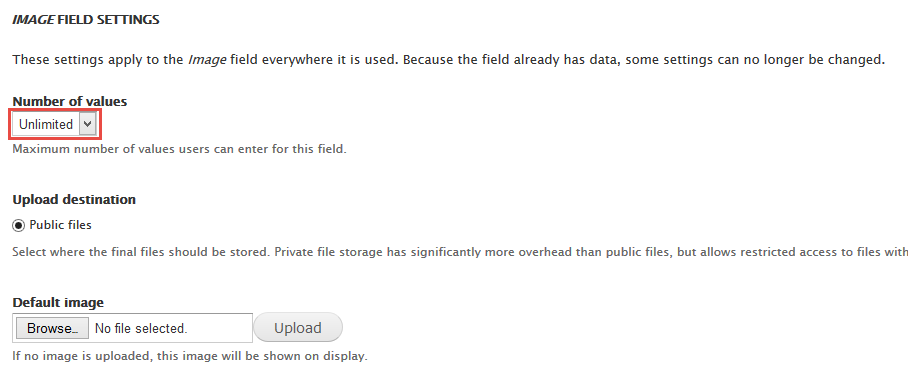
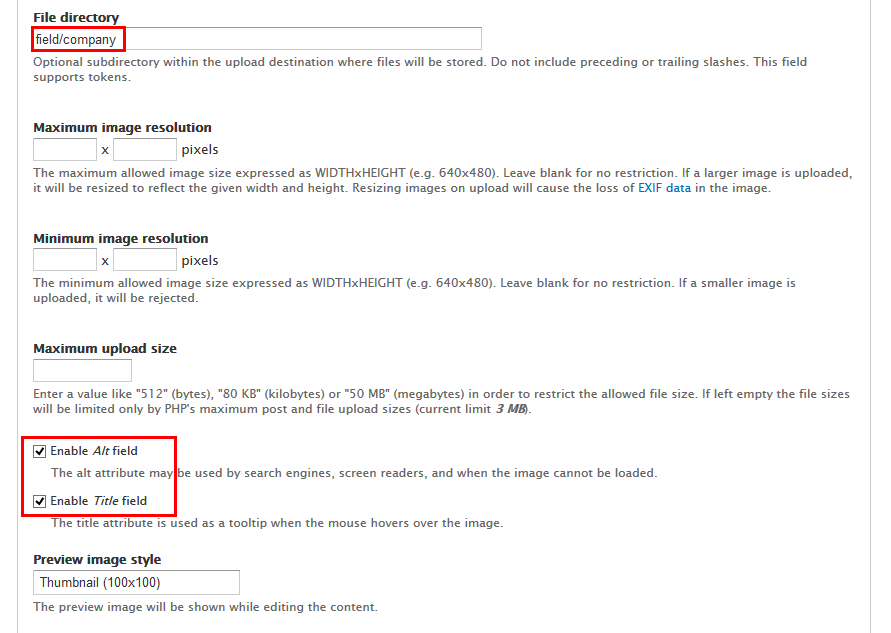
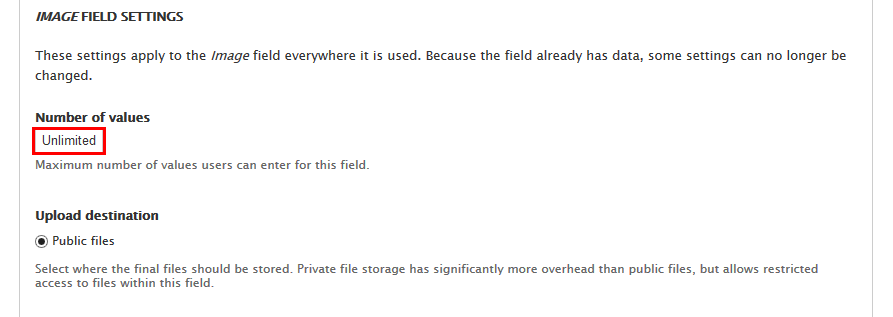
3. Set properties for Image field
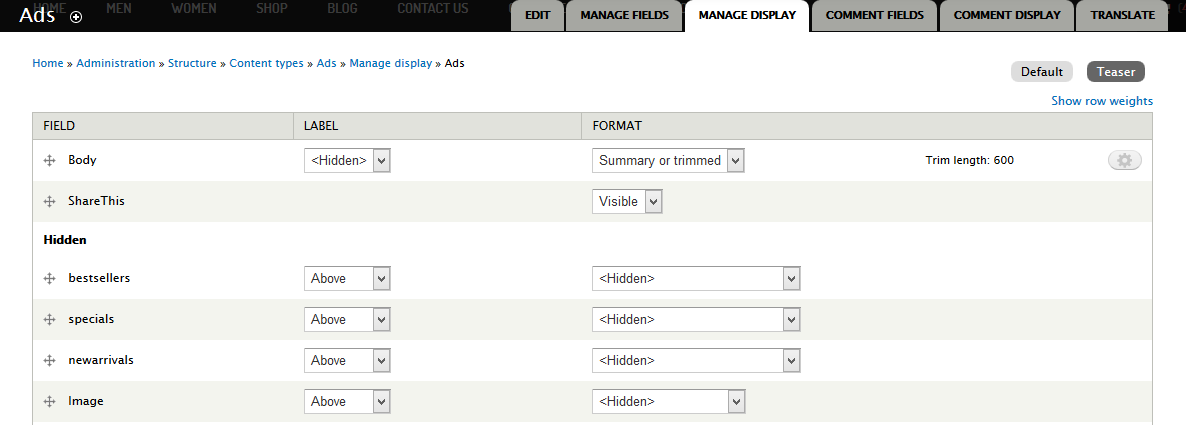
4. Go to Manage display tab > Default set following properties:
5. Go to Manage display tab > Teaser set following properties:
Create Company type
1. Navigate to Structure > Content Type. Click Add Content Type link to create content type Company
2. Go to Manage Fields and add following fields:
3. Set properties for Image field
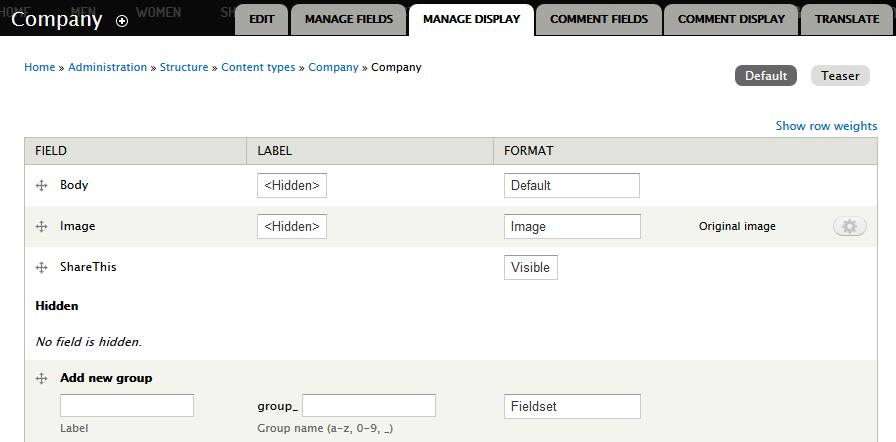
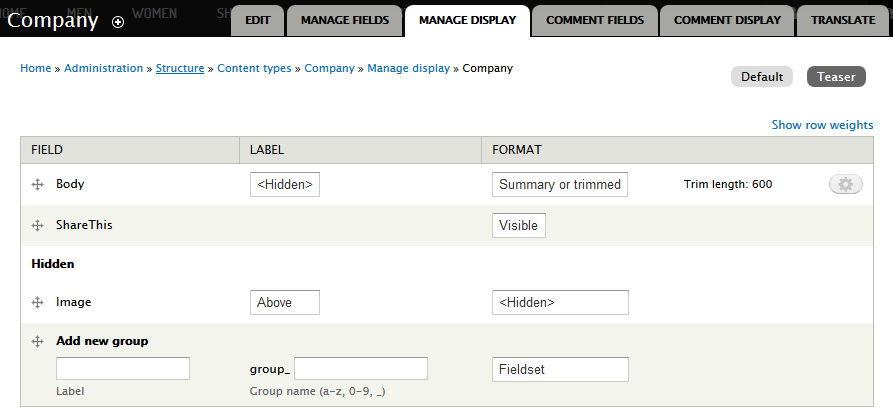
4. Go to Manage display tab > Default set following properties:
5. Go to Manage display tab > Teaser set following properties:
Create Product type
Note: Required Modules: Exclude Note Title, Node Compare
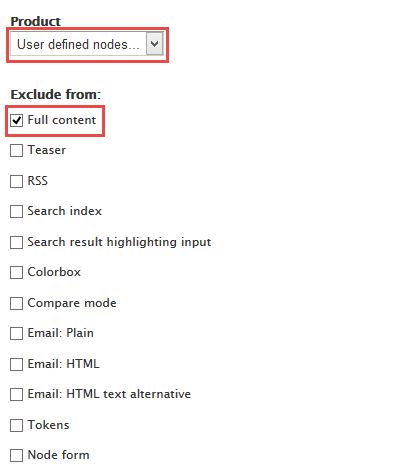
1. Configuration modules Exclude Node Title set following properties
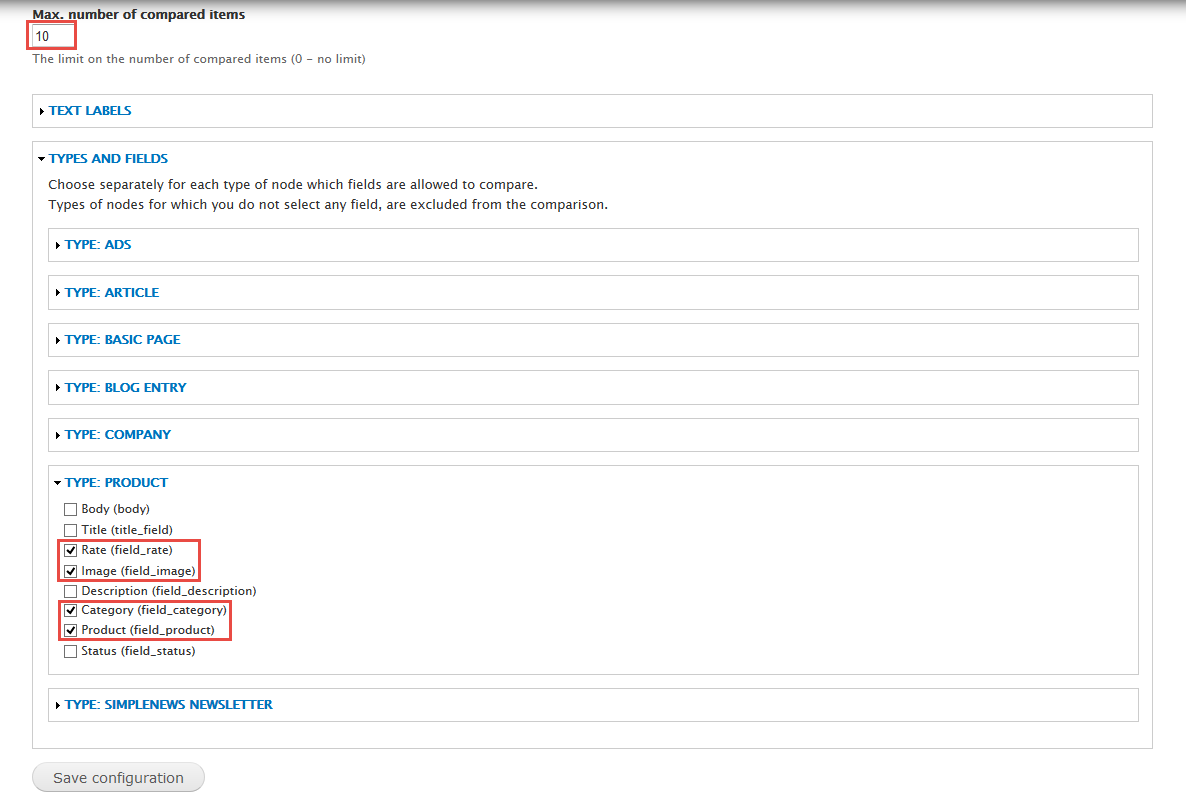
2. Configuration modules Node Compare set following properties
3. Navigate to Structure > Content Type. Click Add Content Type link to create content type Product
4. Go to Manage Fields and add following fields:
5. Set properties for Title field
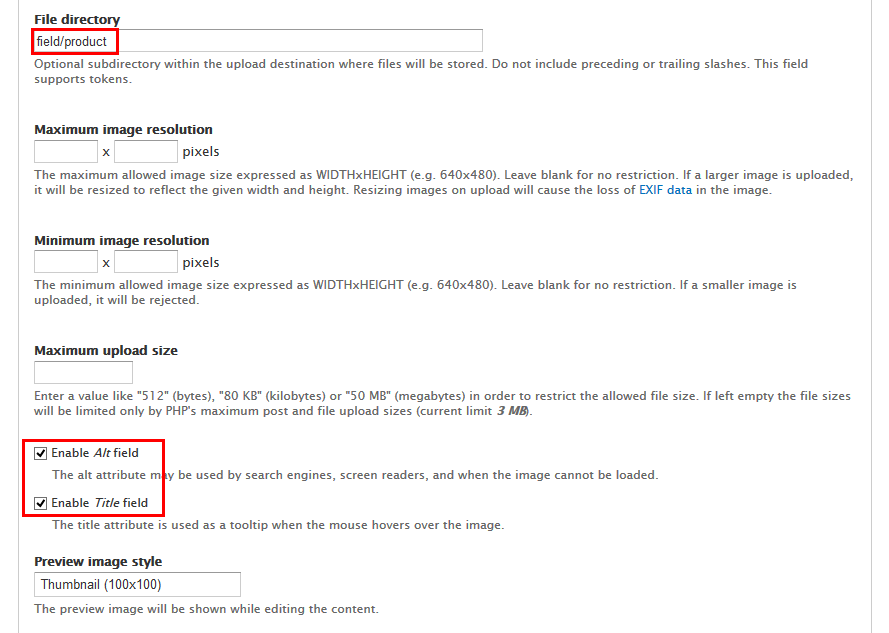
6. Set properties for Image field
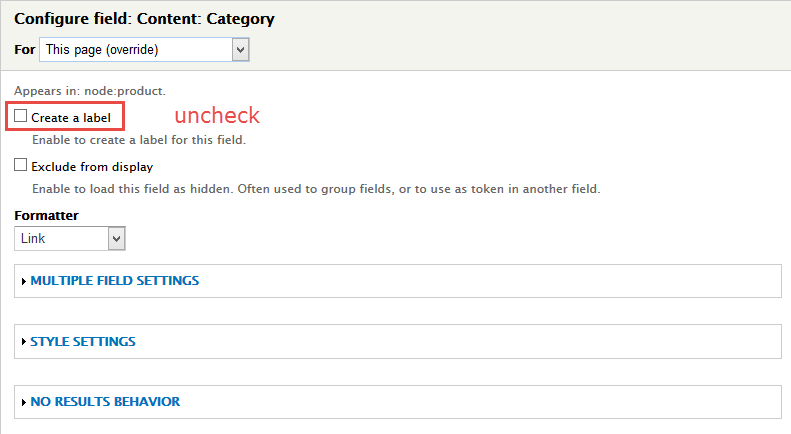
7. Set properties for Category field
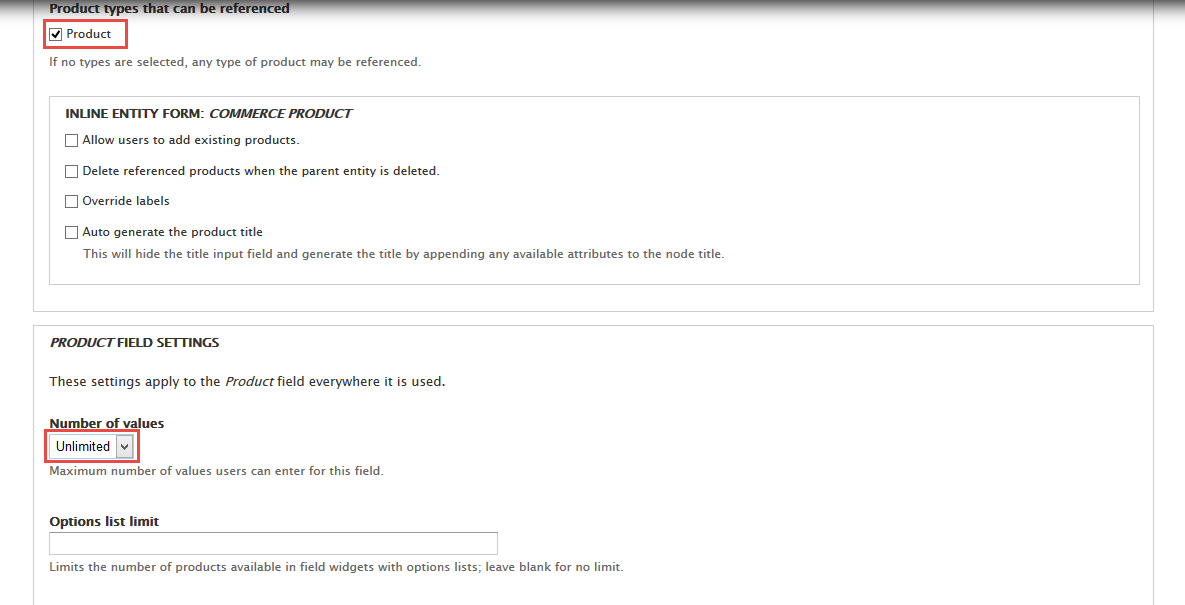
8. Set properties for Product field
9. Set properties for Status field
10. Click Save button
11. Go to Manage display tab > Default set following properties:
12. Click Save button
13. Go to Manage display tab > Teaser set following properties:
14. Click Save button
15. Go to Comment Fields and add following fields:
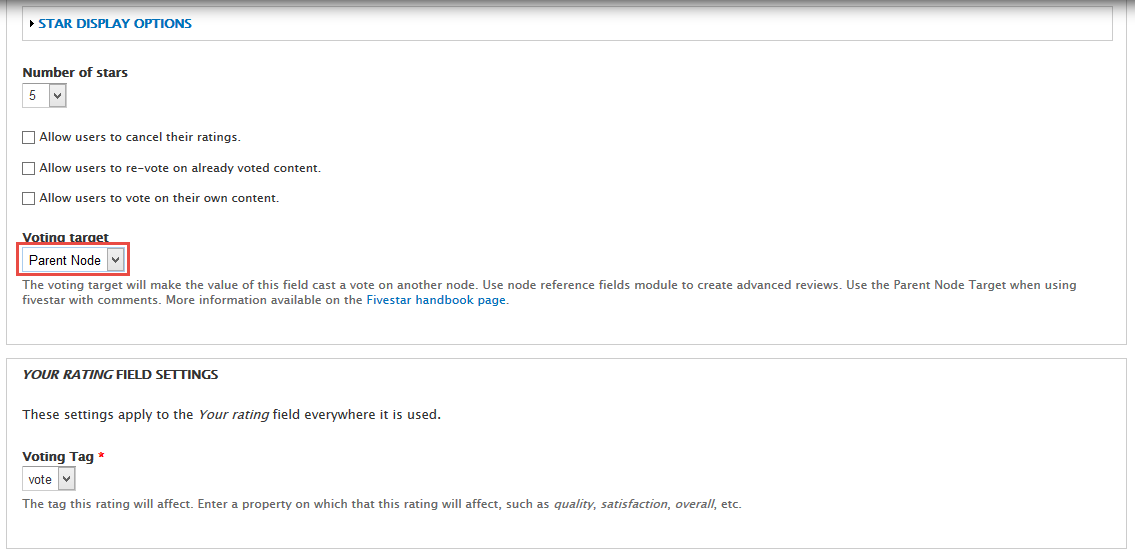
16. Set properties for Your rating field
17. Click Save button
Create Testimonials type
1. Navigate to Structure > Content Type. Click Add Content Type link to create content type Testimonials
2. Go to Manage Fields and add following fields:
3. Go to Manage display tab > Default set following properties:
4. Go to Manage display tab > Teaser set following properties:
5. Click Save button
Create VideoView type
1. Navigate to Structure > Content Type. Click Add Content Type link to create content type VideoView
2. Go to Manage Fields and add following fields:
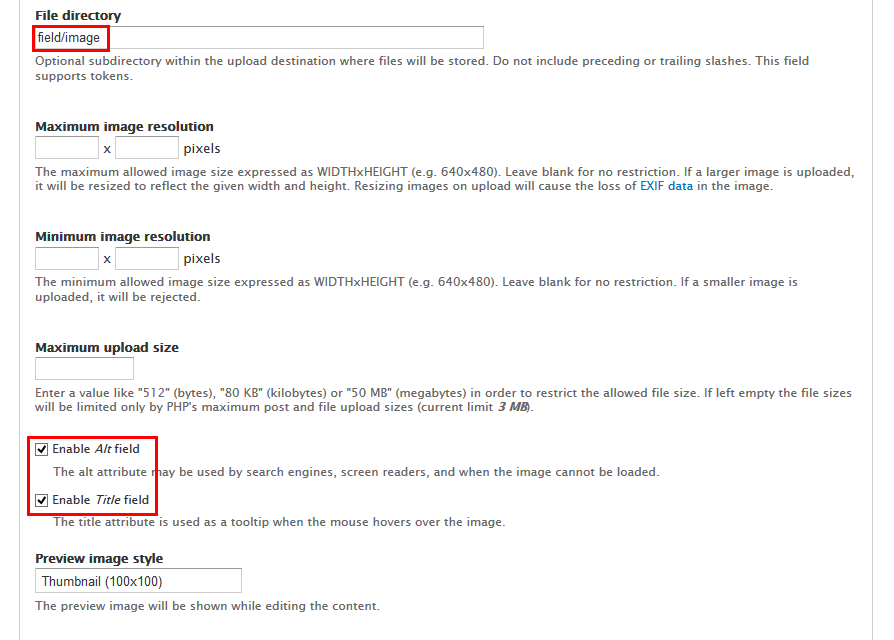
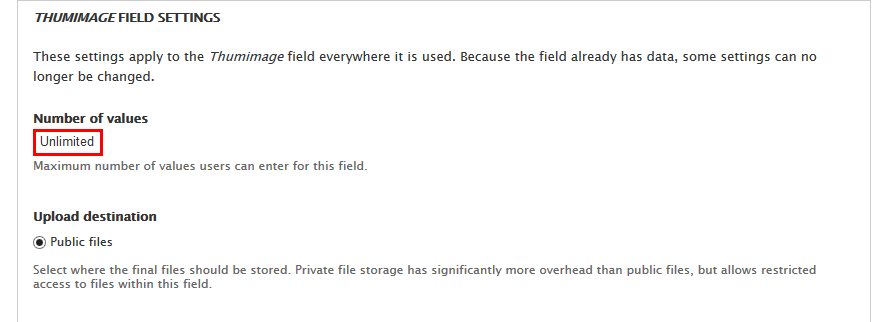
3. Set properties for Thumimage field
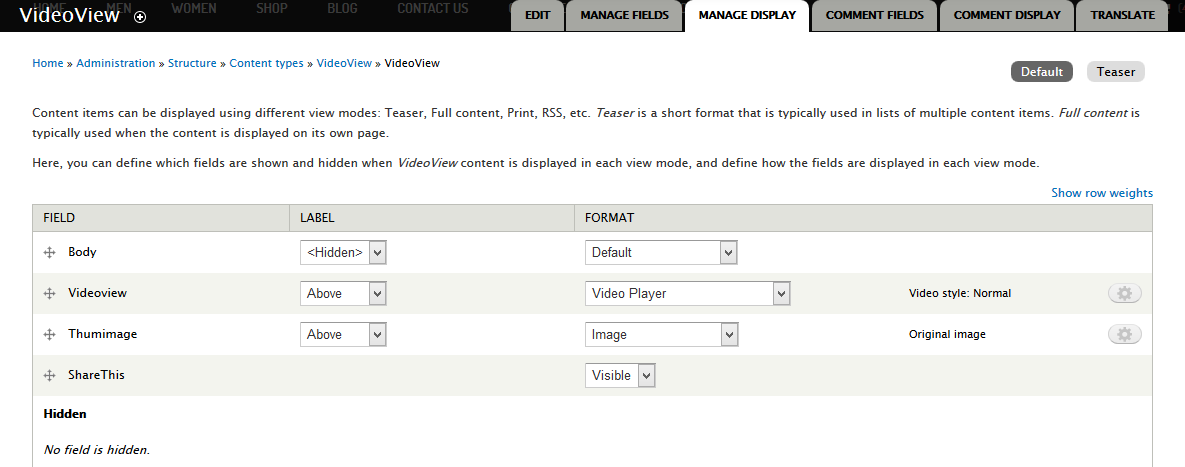
4. Go to Manage display tab > Default set following properties:
5. Go to Manage display tab > Teaser set following properties:
6. Click Save button
Create Homepage
Search form
Front end Display
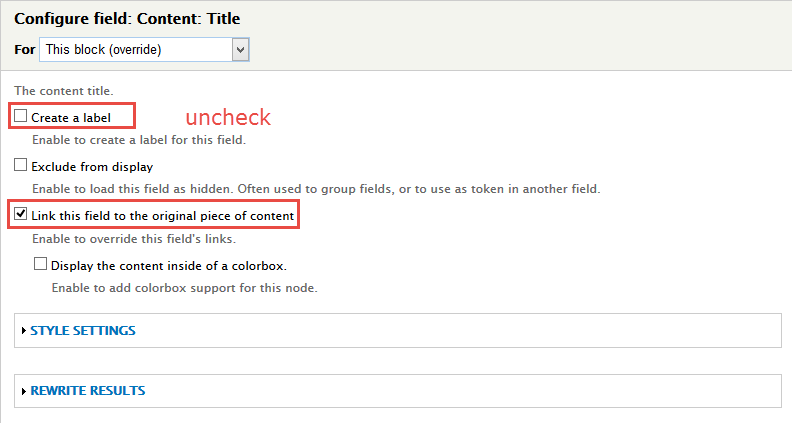
1. Navigate to Structure > Blocks, find Search form block, click configure link and set the following properties:
2. Click Save button
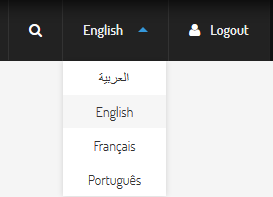
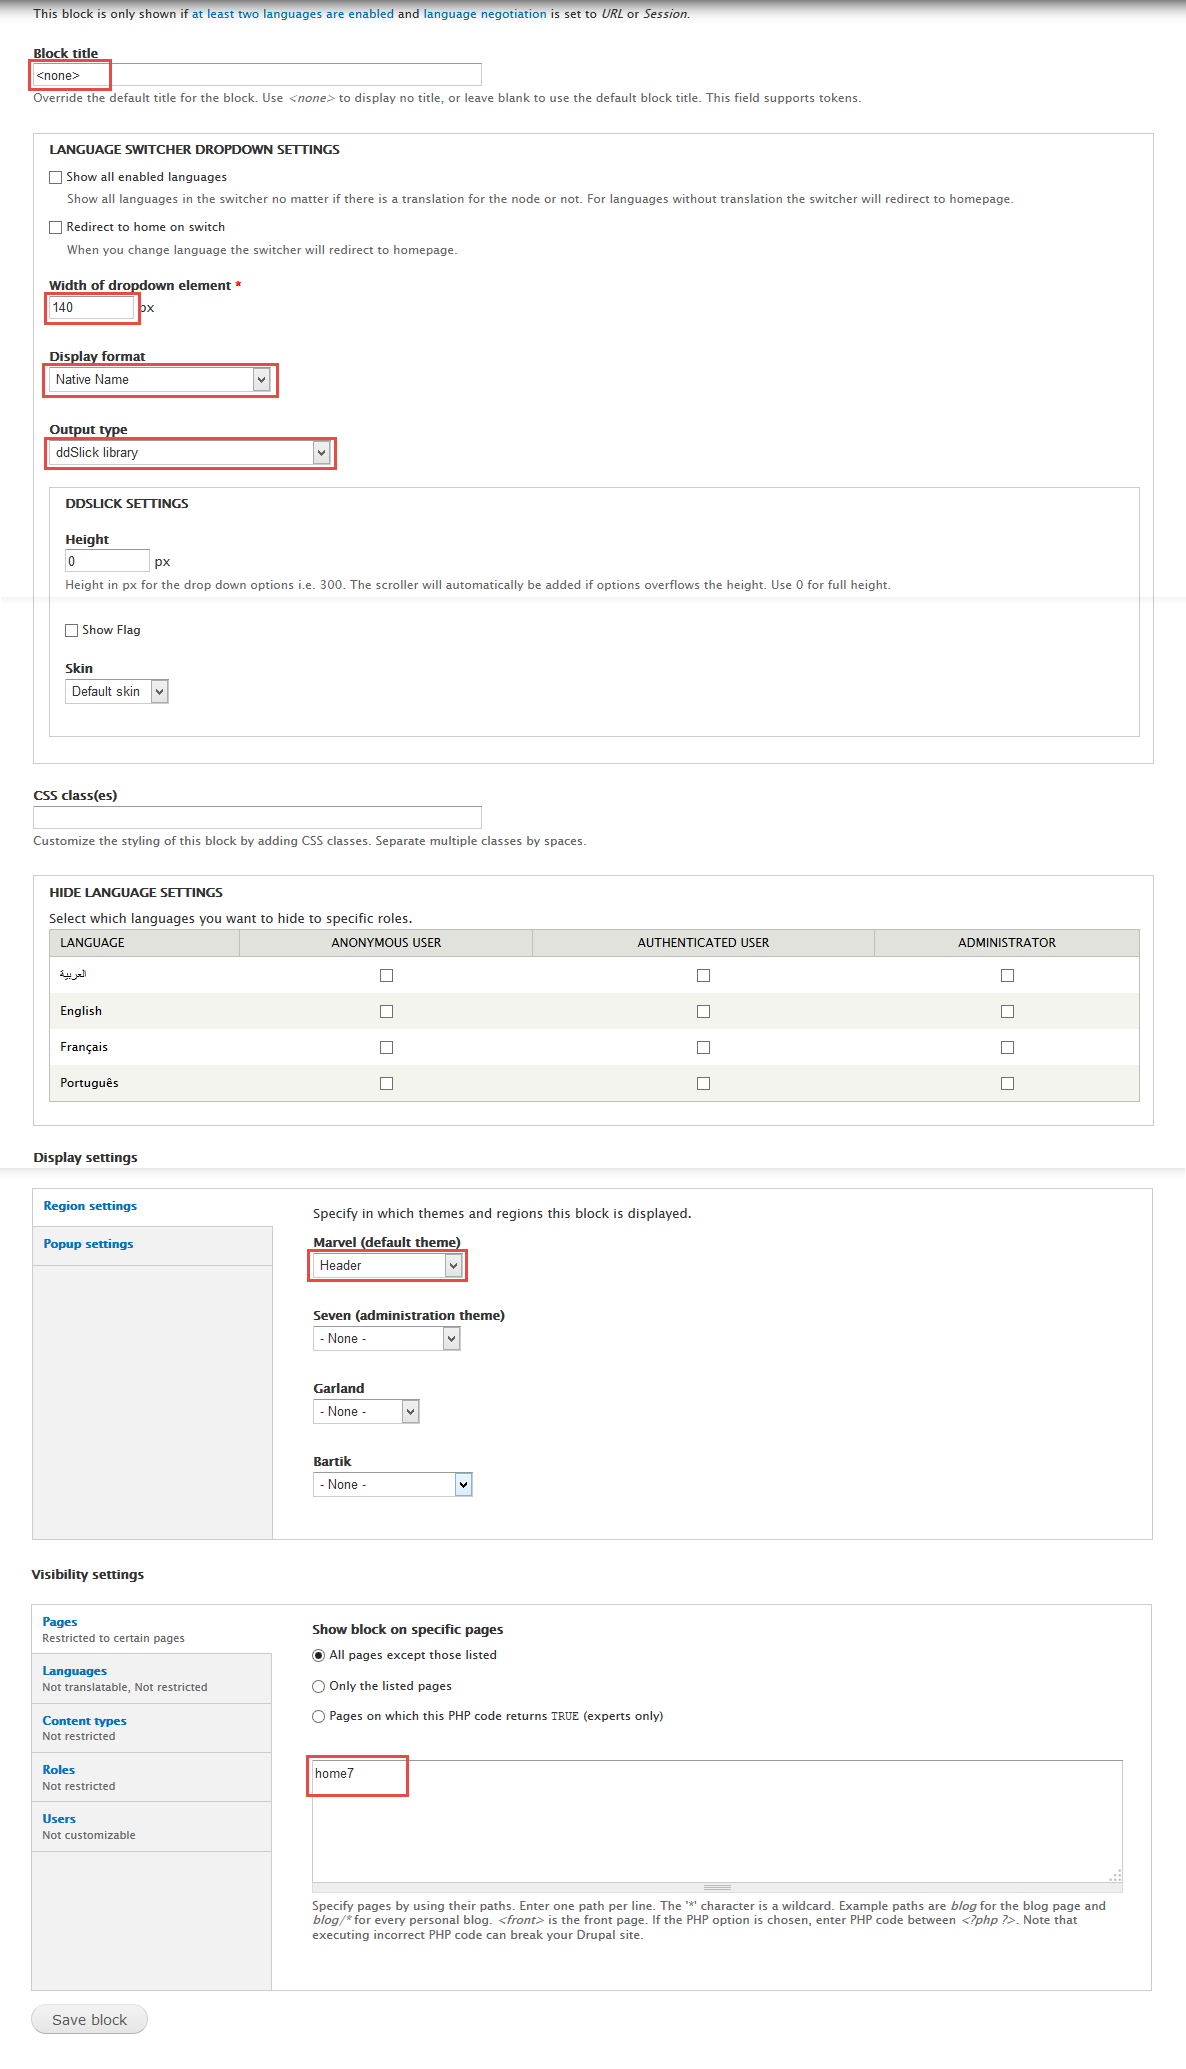
Languages form
Front end Display
1. Navigate to Structure > Blocks, find Languages block, click configure link and set the following properties:
2. Click Save button
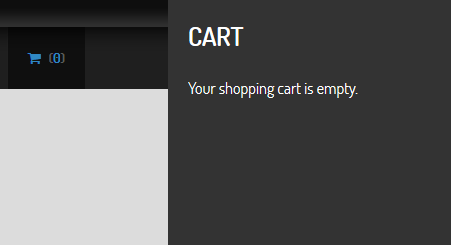
Shopping cart
Front end Display
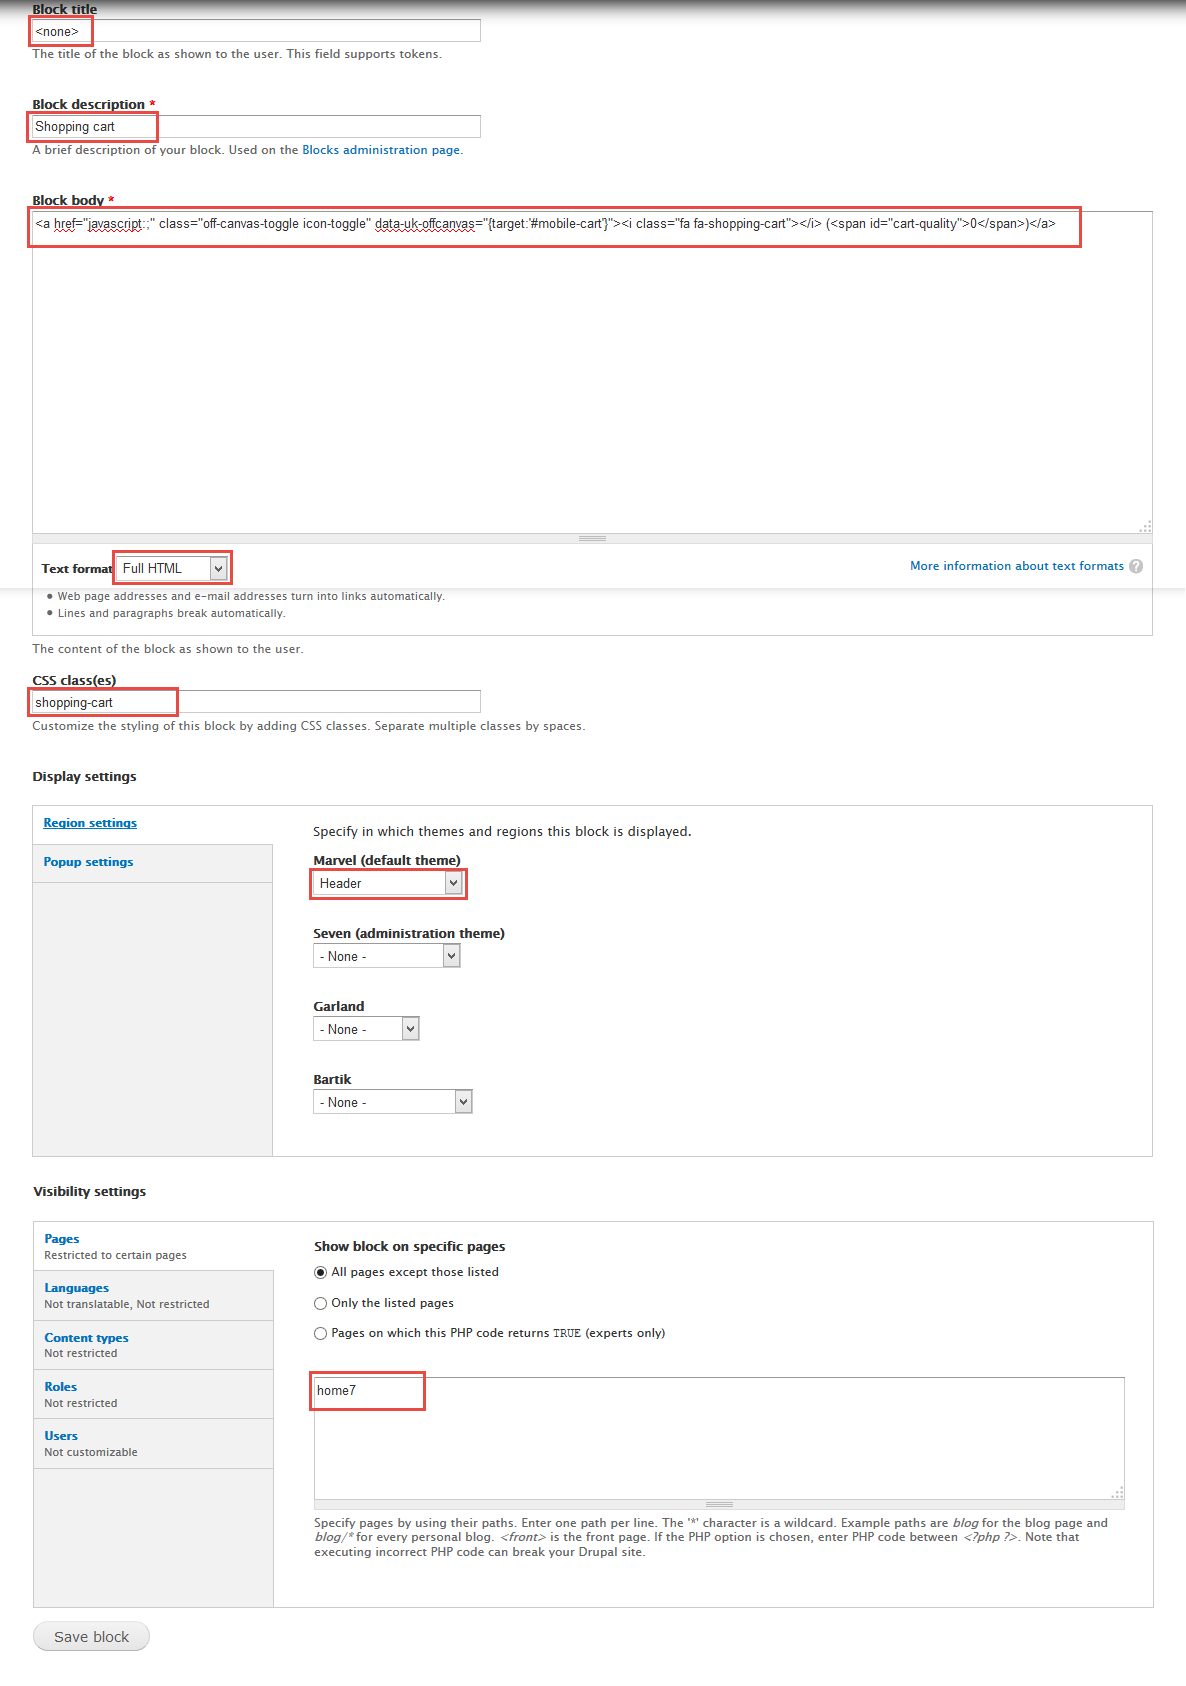
1. Navigate to Structure > Blocks
2. Click Add block link to create block, for example: Shopping cart block and set properties for them.
3. Click Save button
Refer to following HTML code:
(0)
SlideshowDisplay
Front end Display
1. Create SlideshowDisplay view
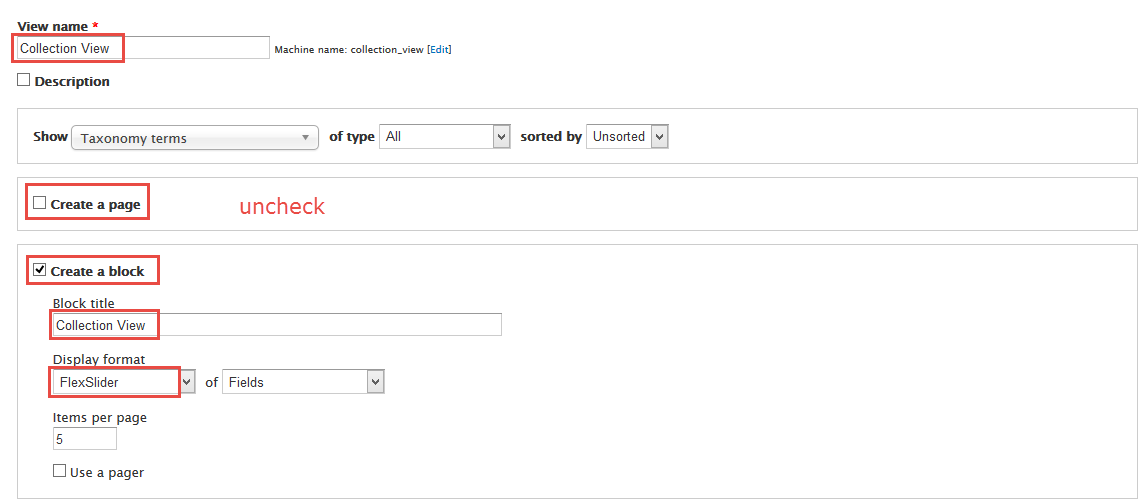
1. Navigate to Structure > Views, click Add views link, Create Collection View view with following properties:
2. Click Continue & edit button and set following properties:
3. At Display name area, set following properties:
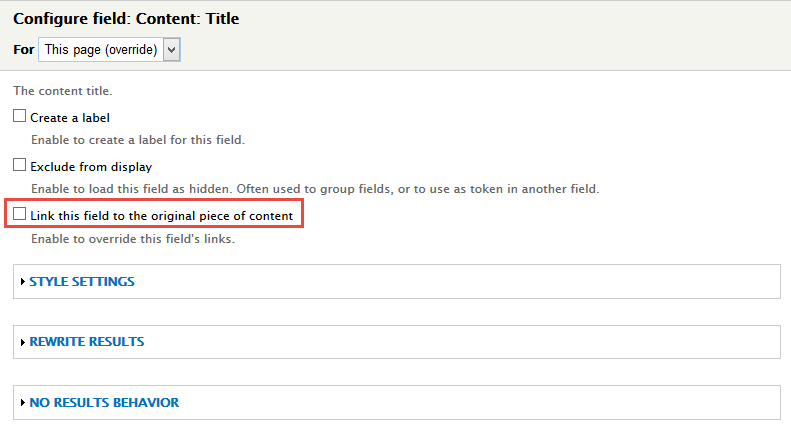
4. At Title area, set following properties:
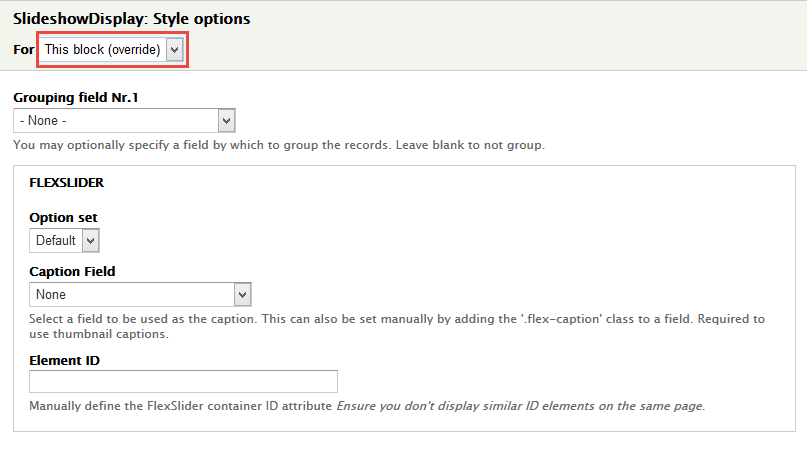
5. At FORMAT Format: FlexSlider, click Settings and set following properties:
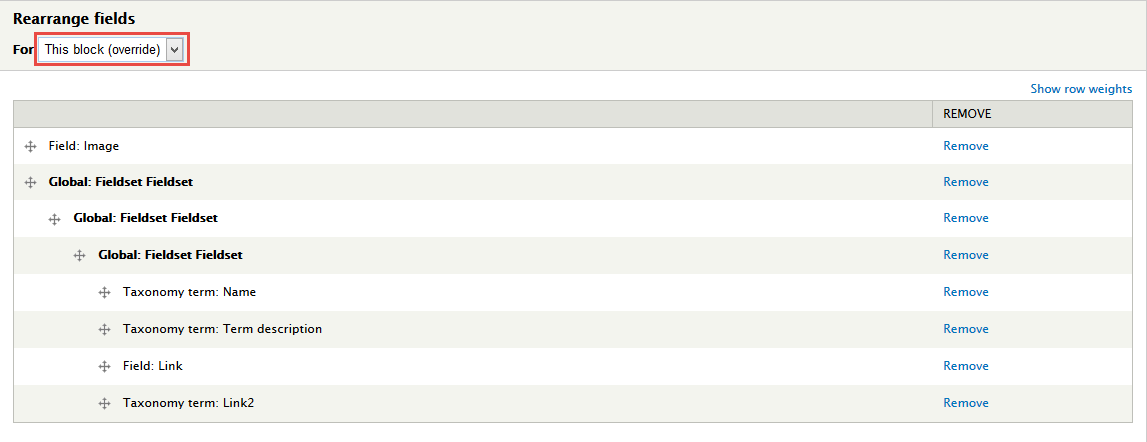
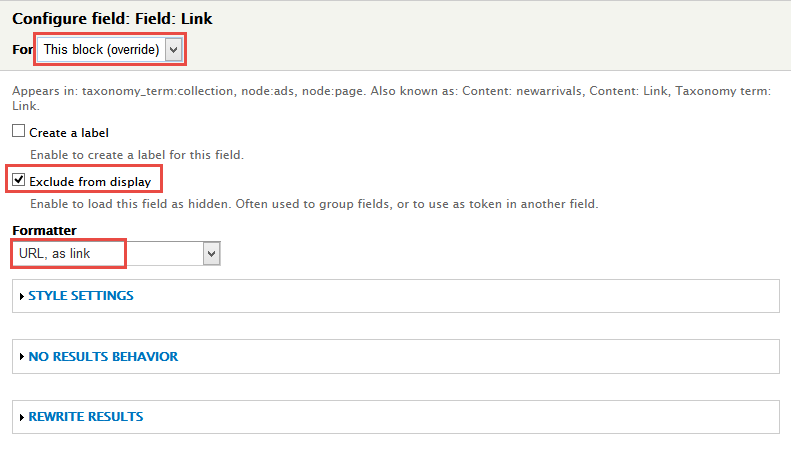
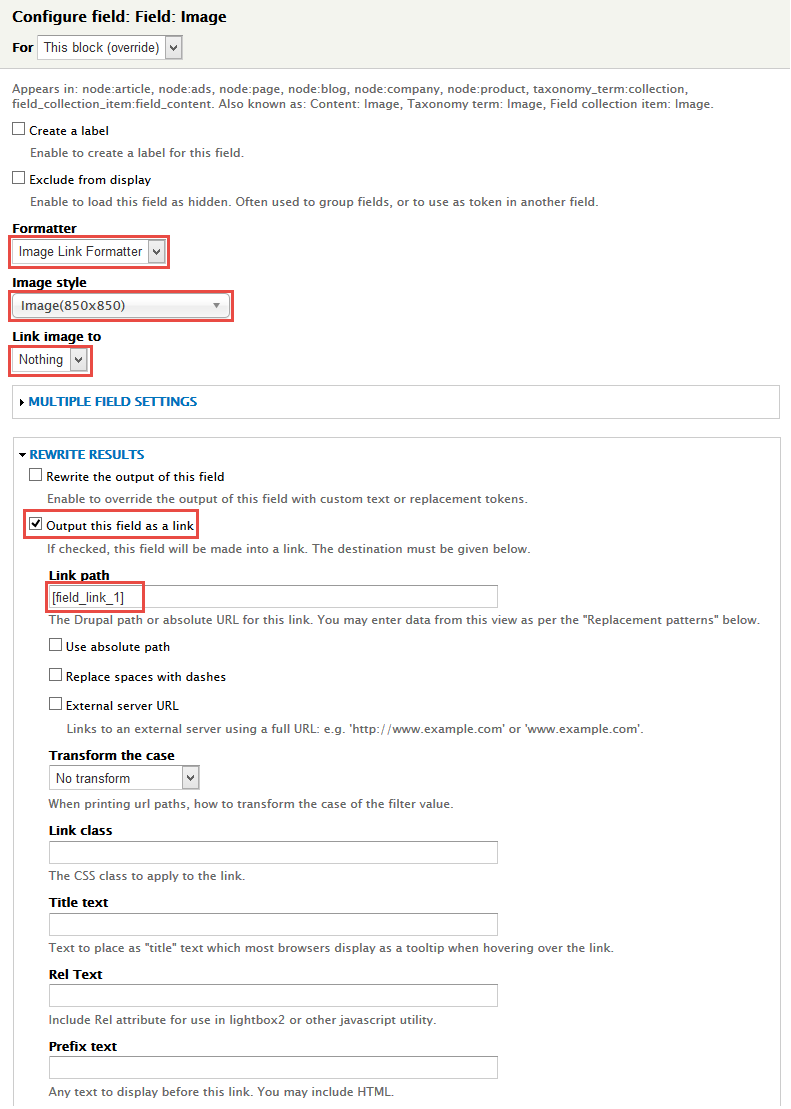
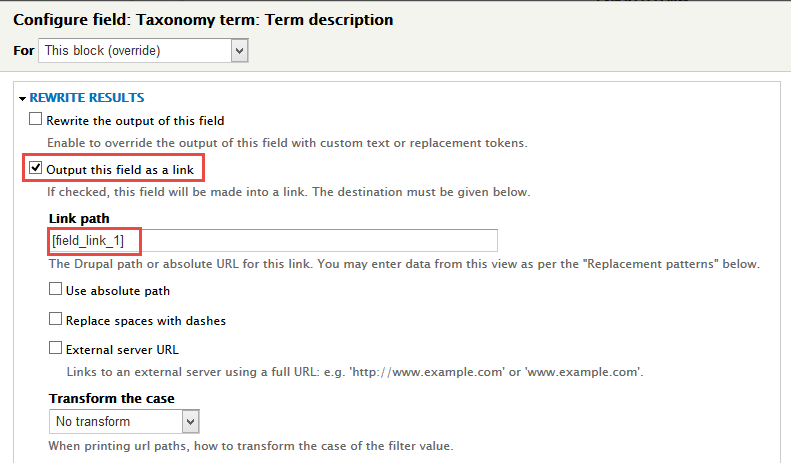
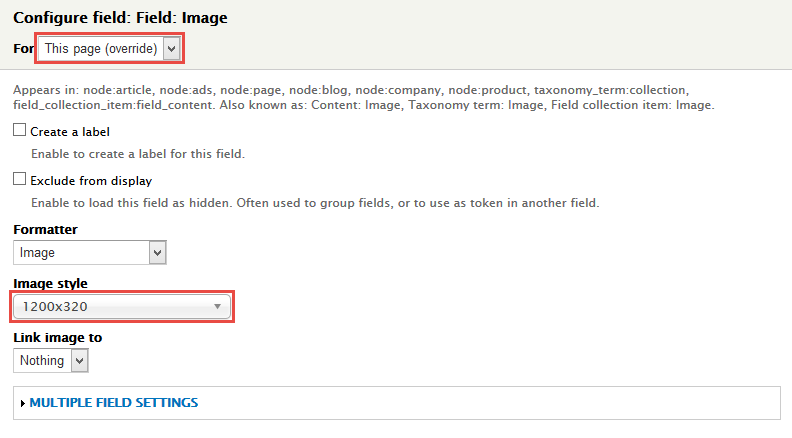
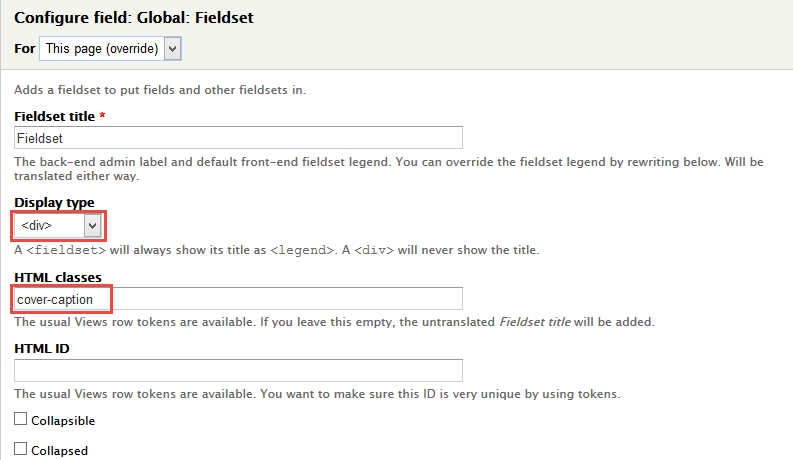
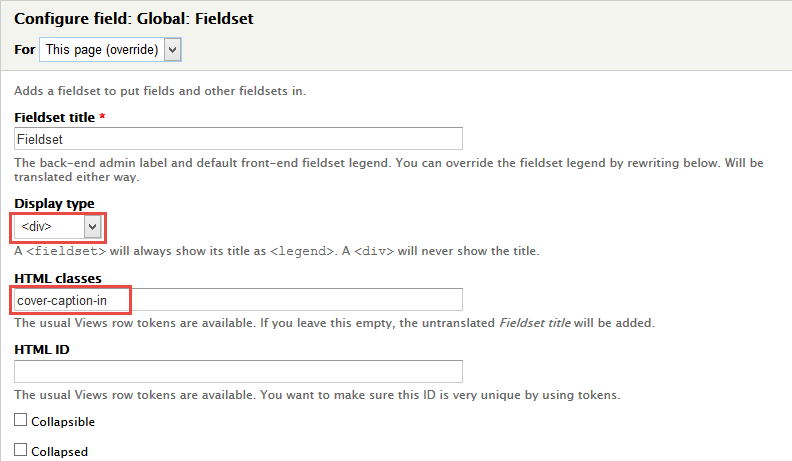
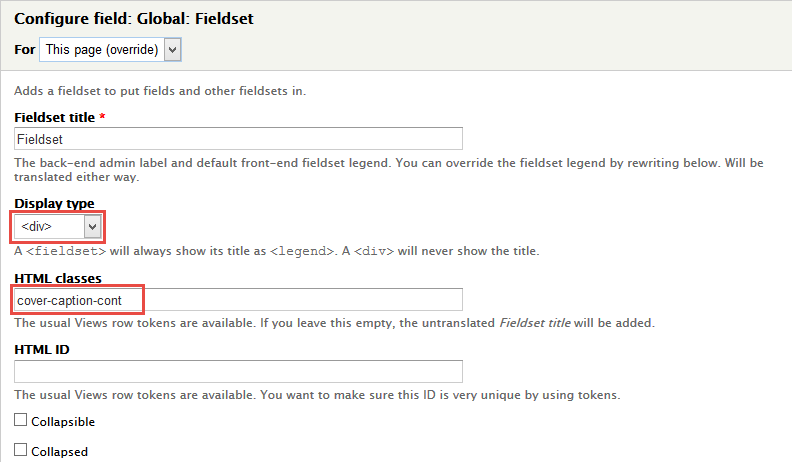
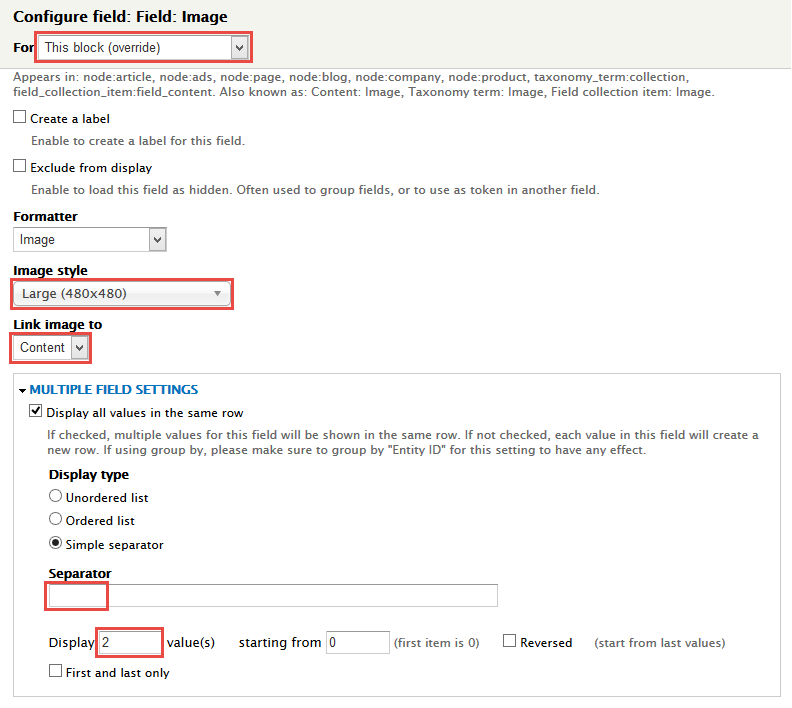
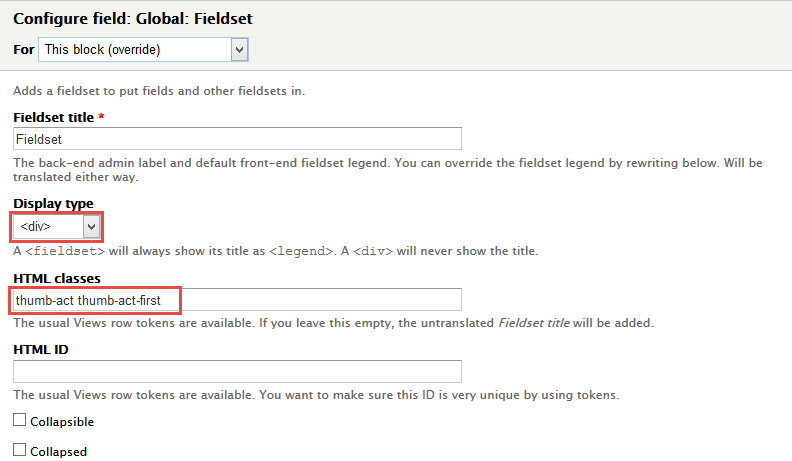
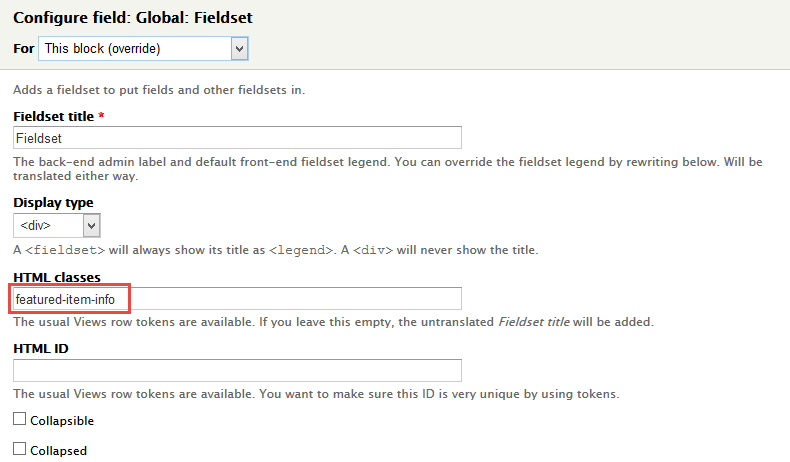
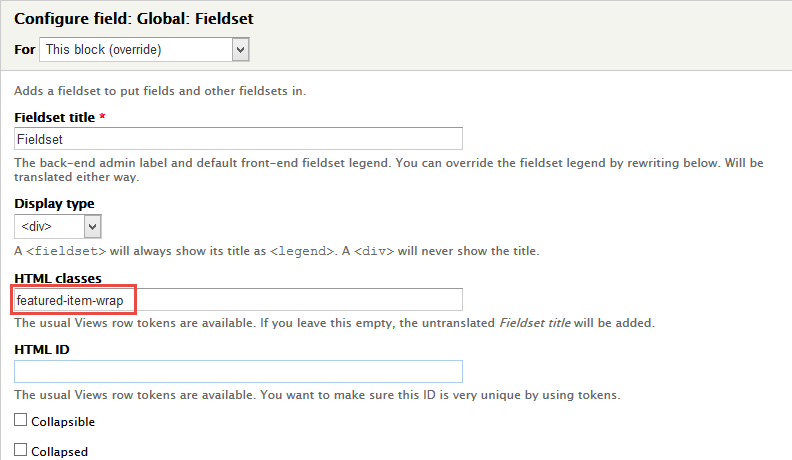
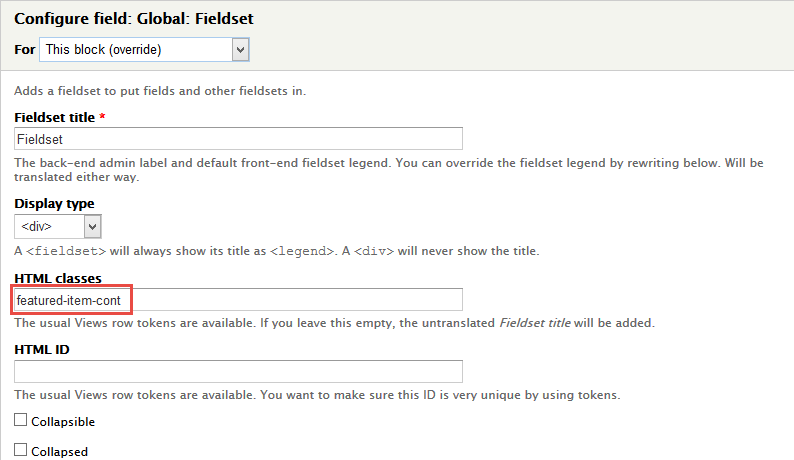
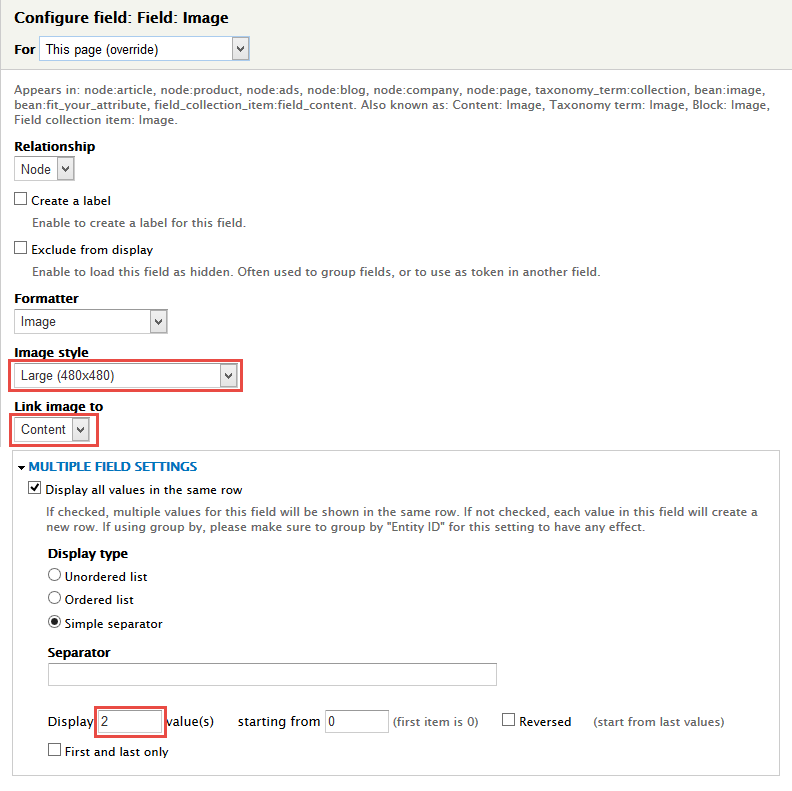
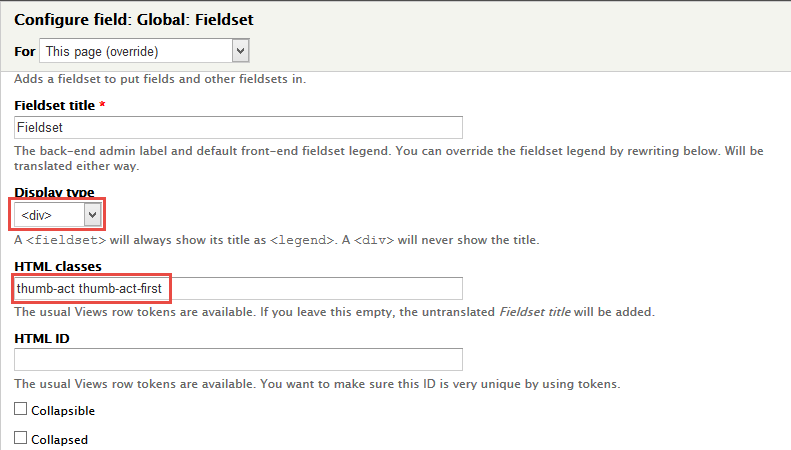
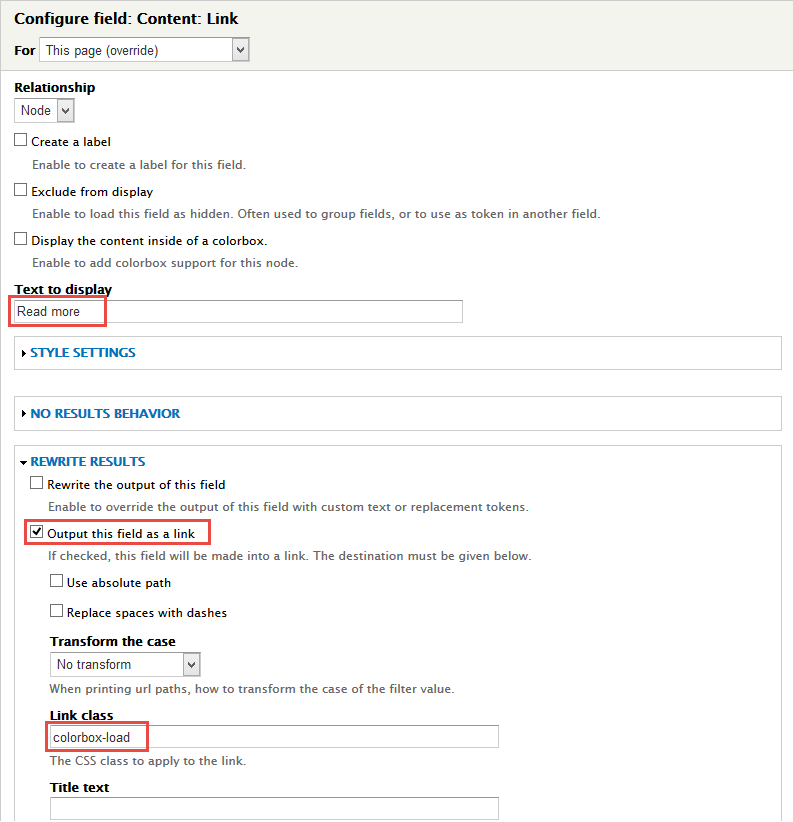
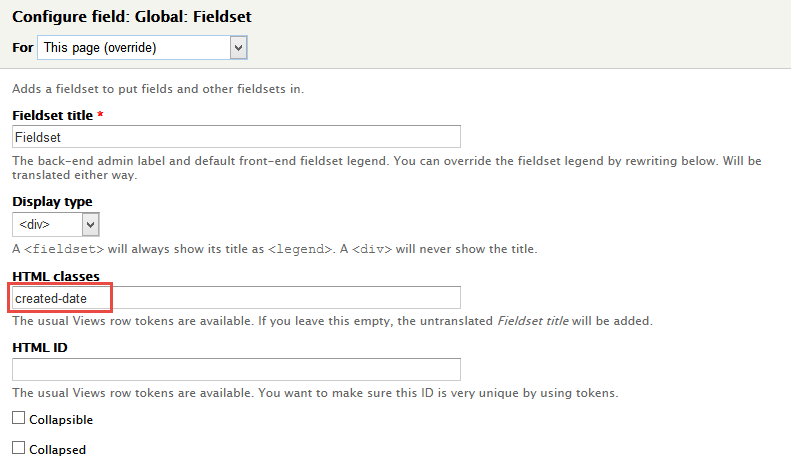
6. At FIELDS area, click Add button to add fields: Field: Image, Global: Fieldset, Global: Fieldset, Global: Fieldset, Taxonomy term: Term description, Field: Link, Taxonomy term: Link2 .
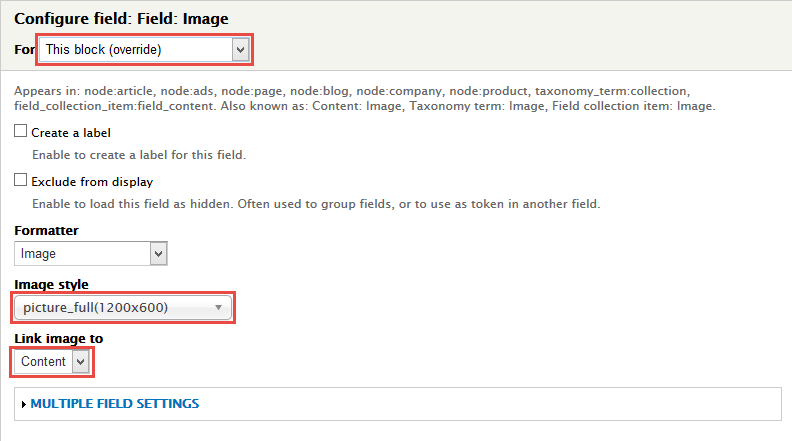
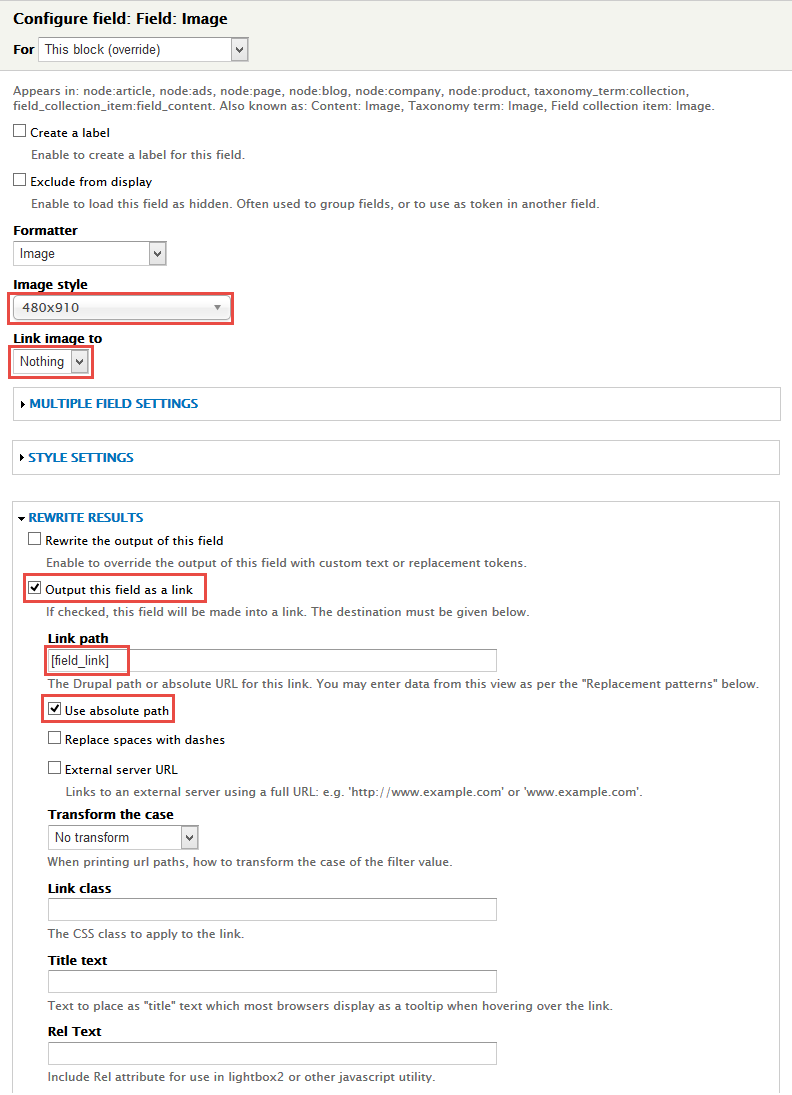
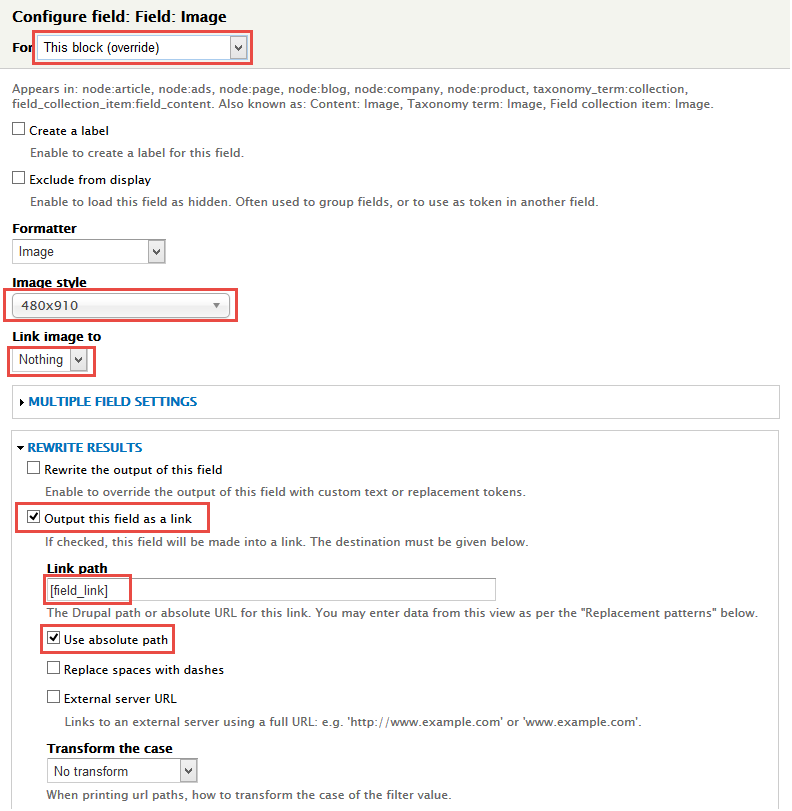
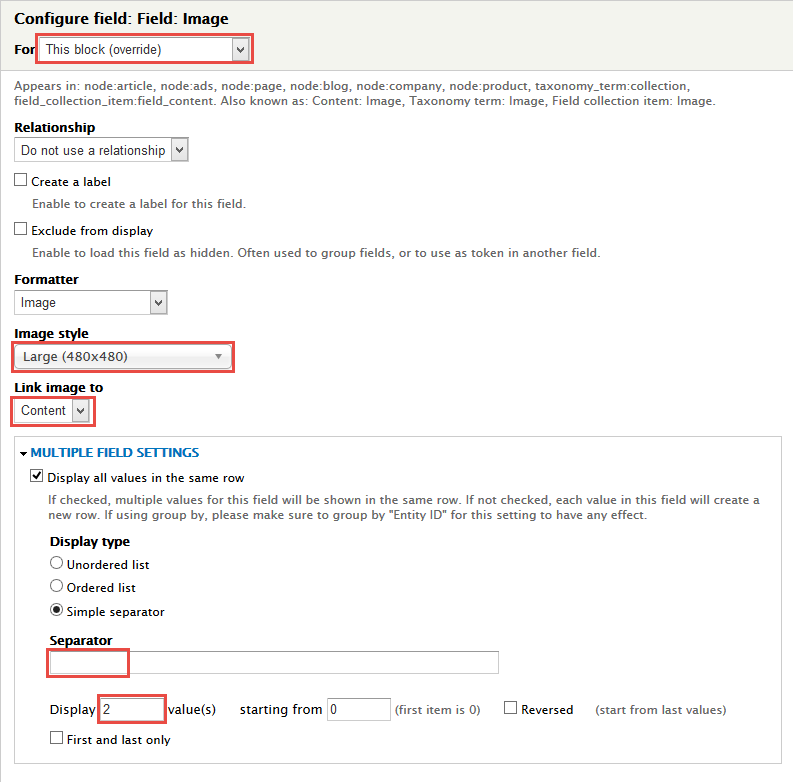
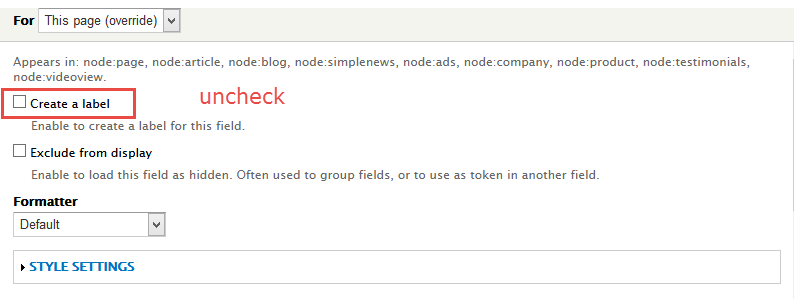
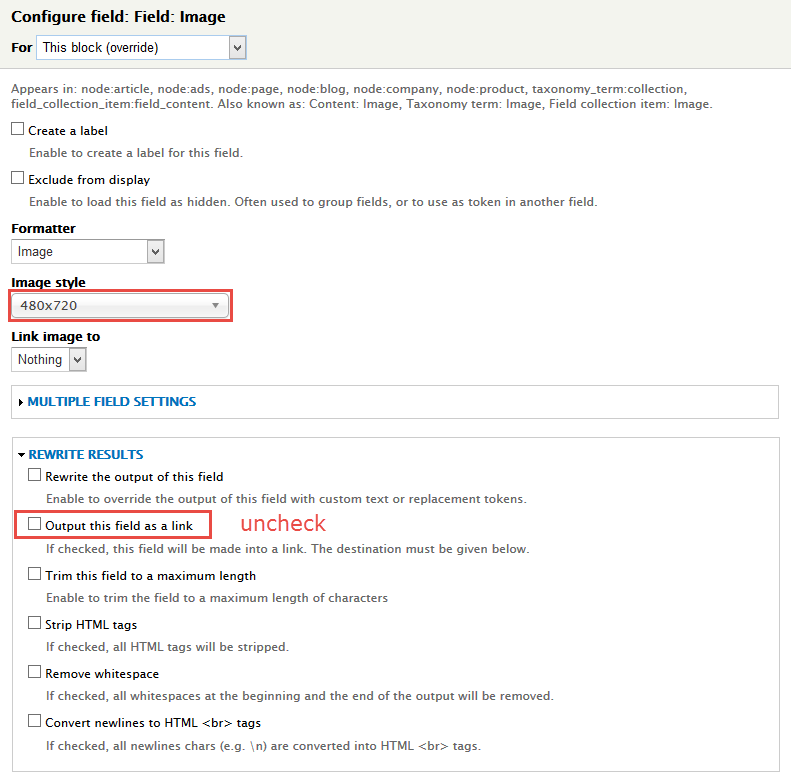
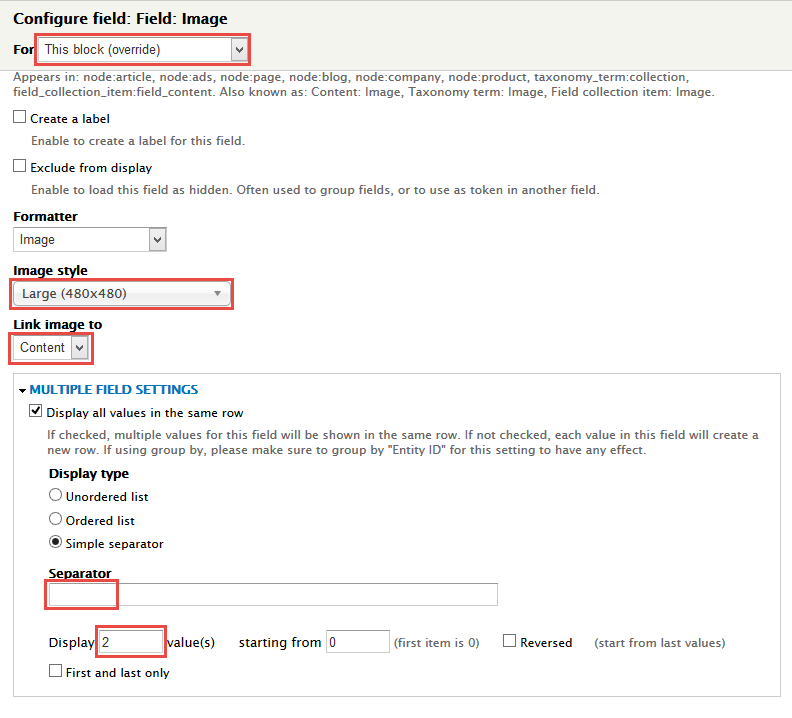
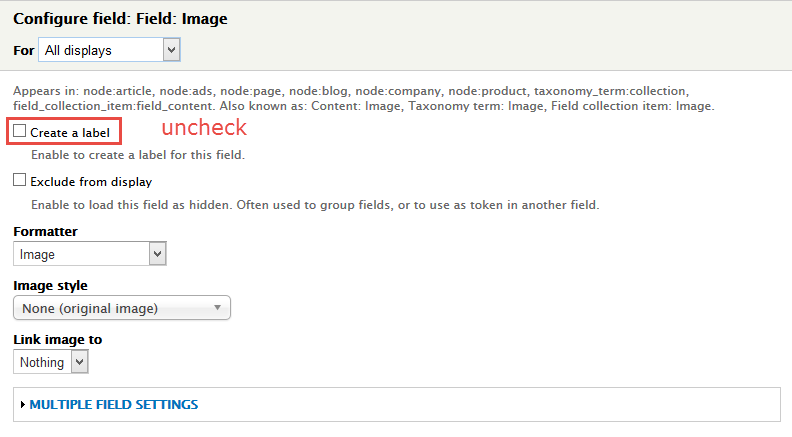
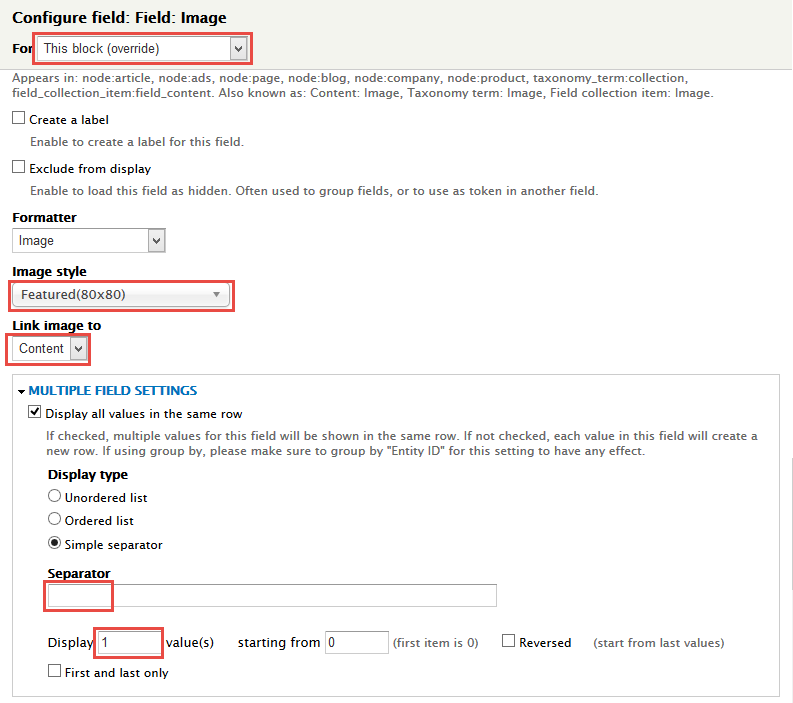
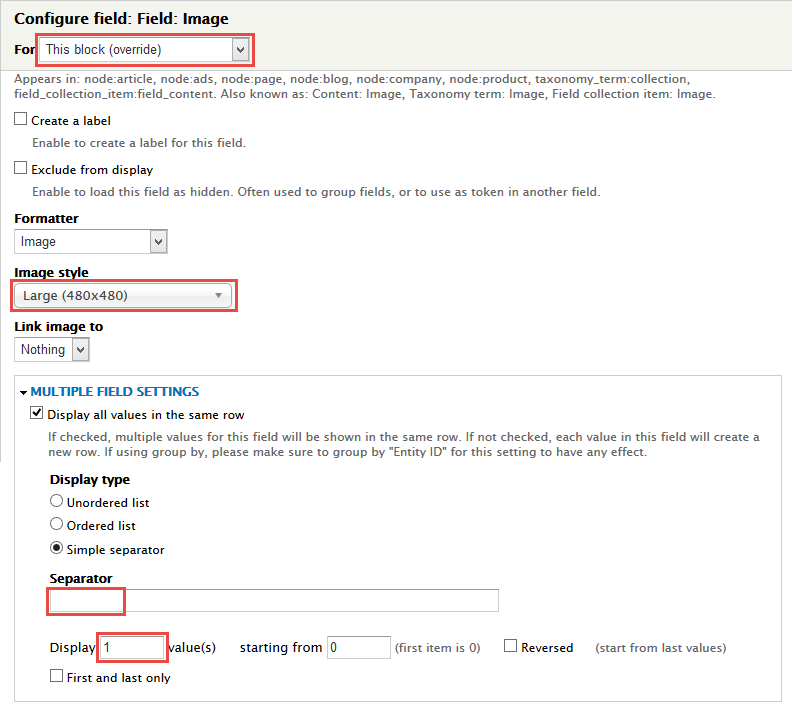
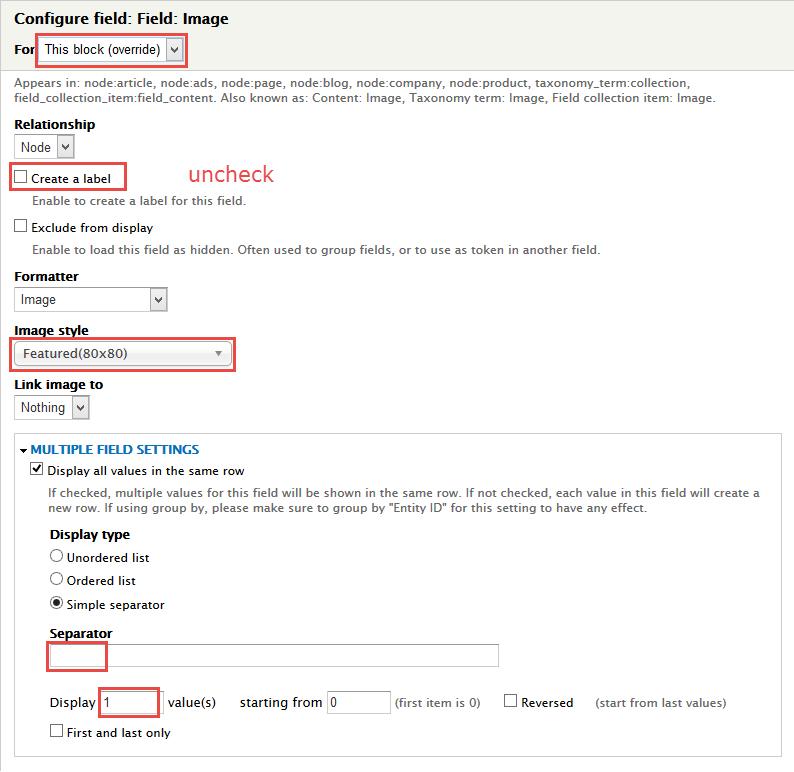
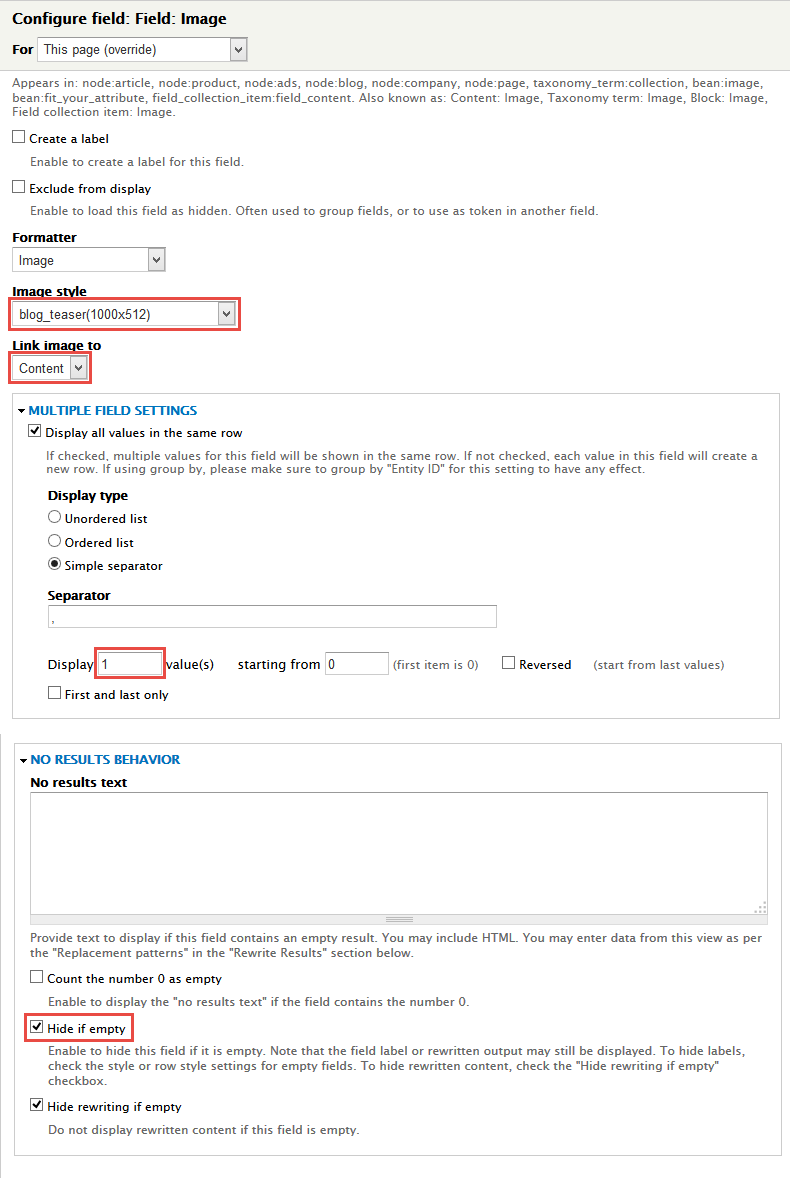
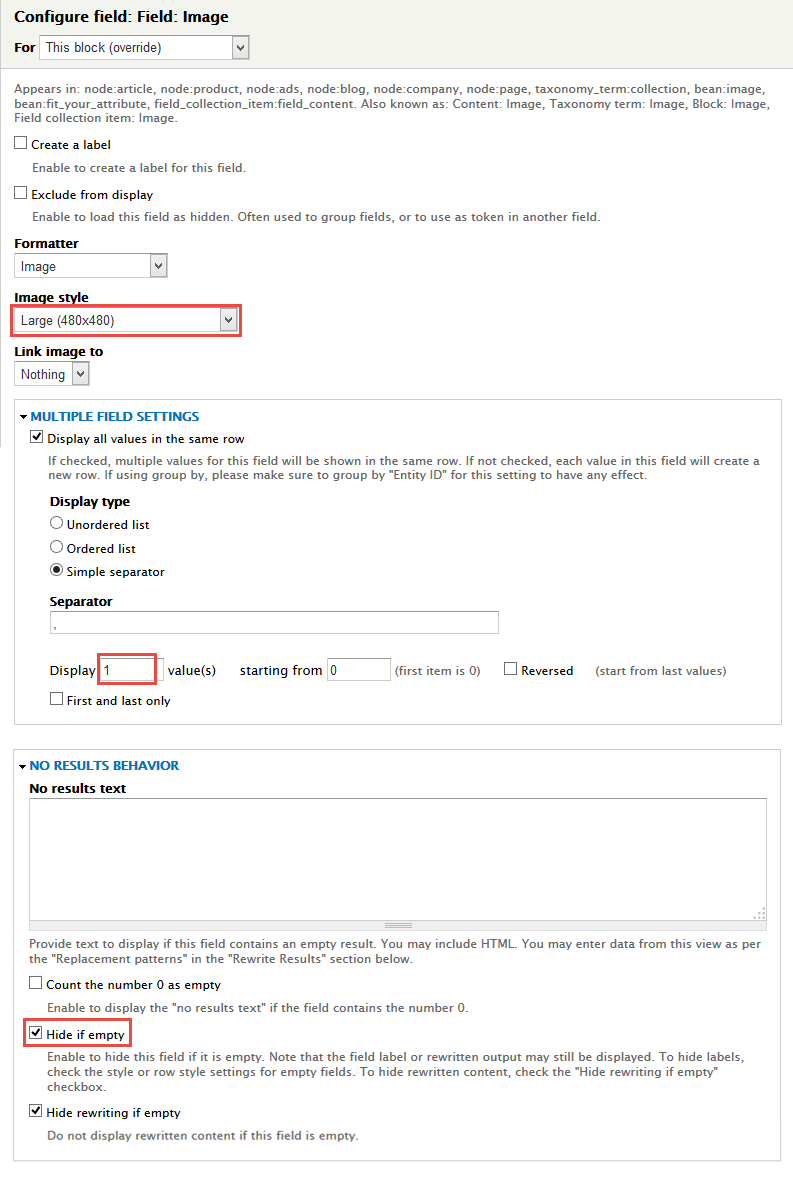
7. Set properties for Field: Image
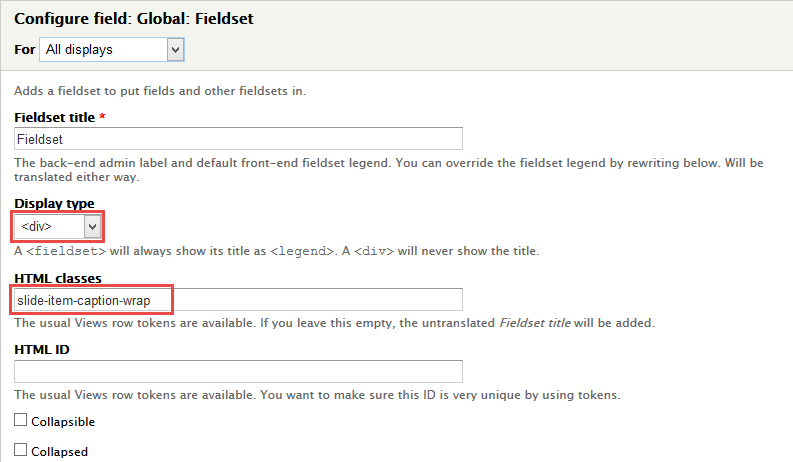
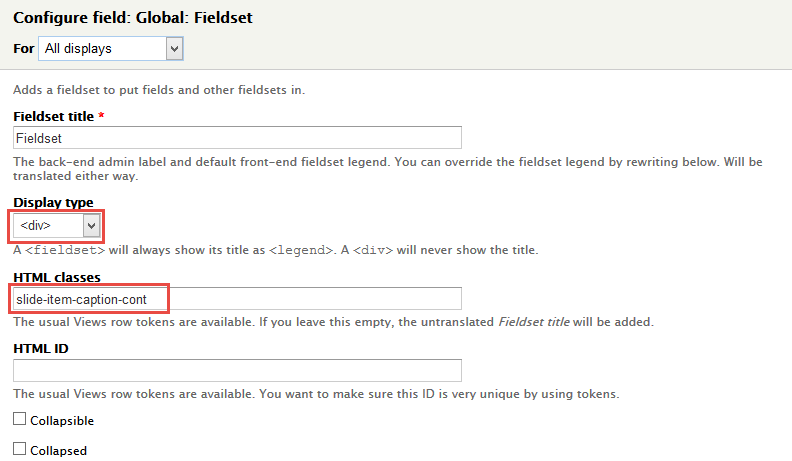
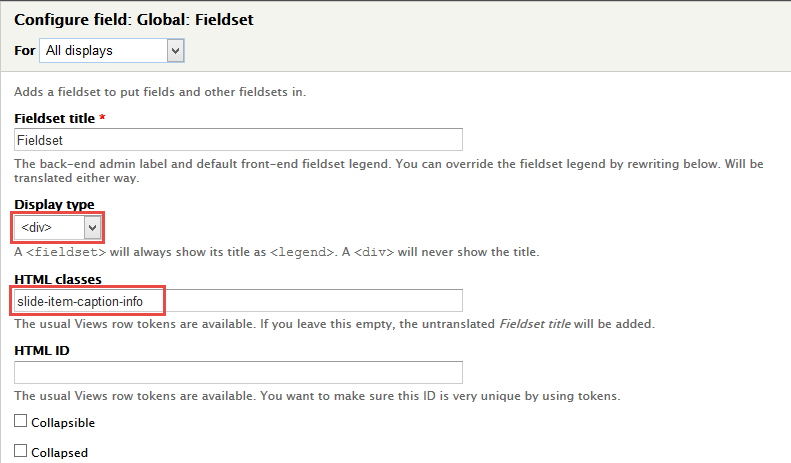
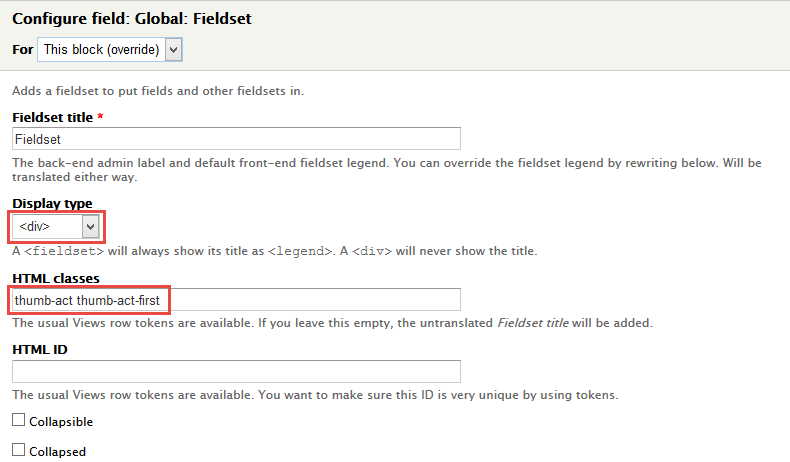
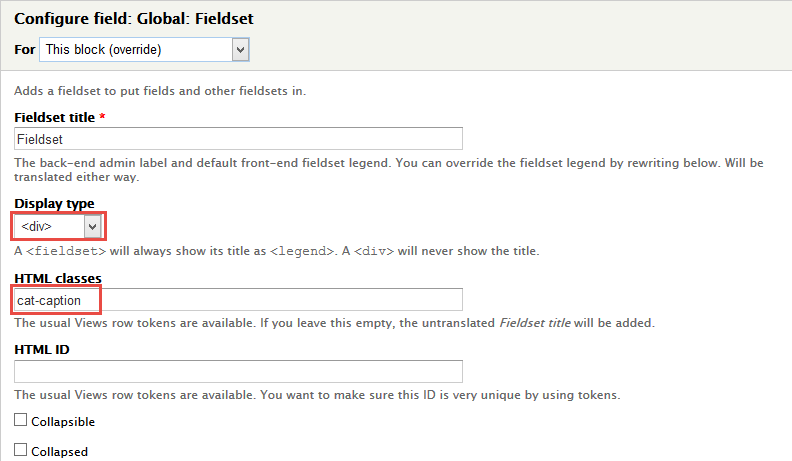
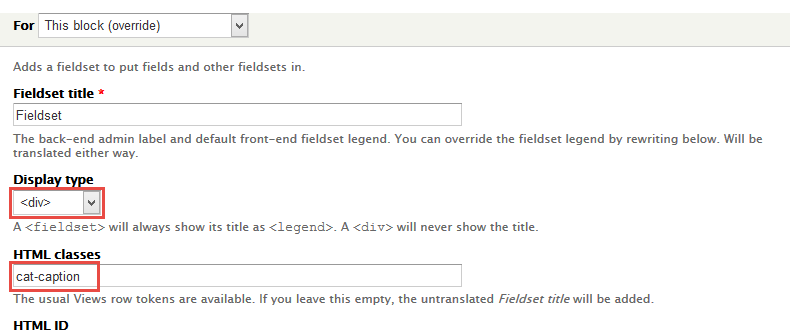
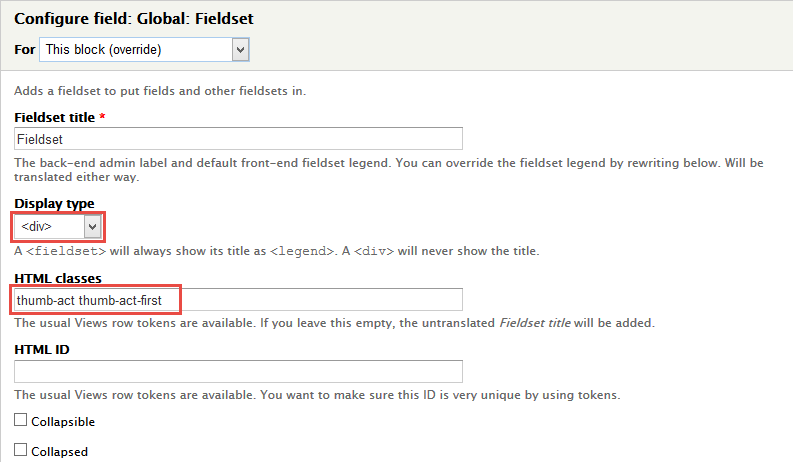
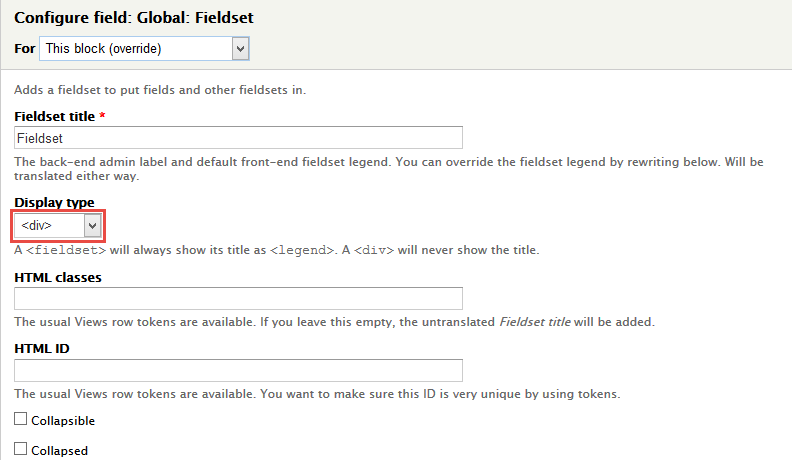
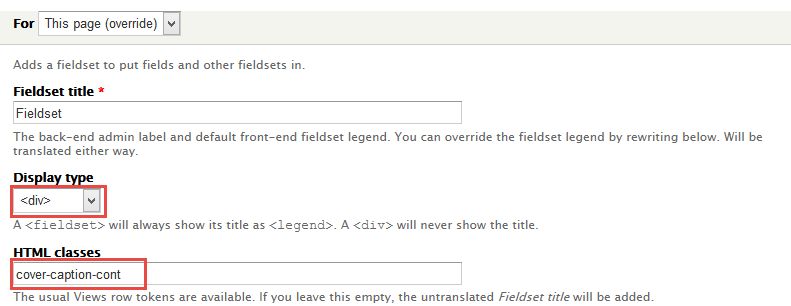
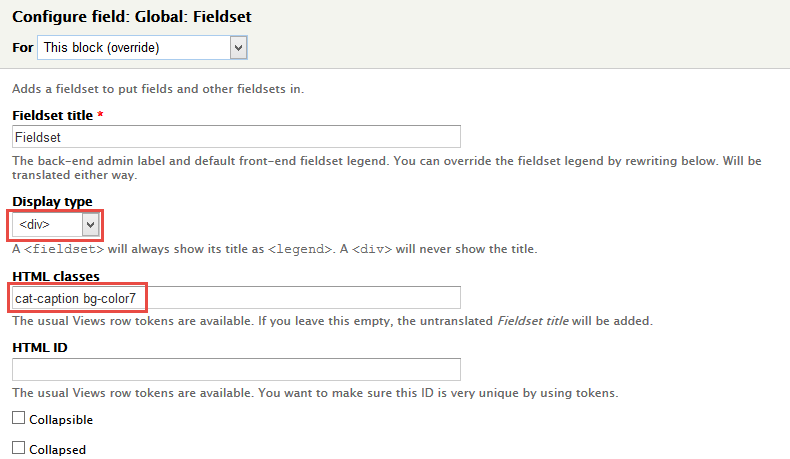
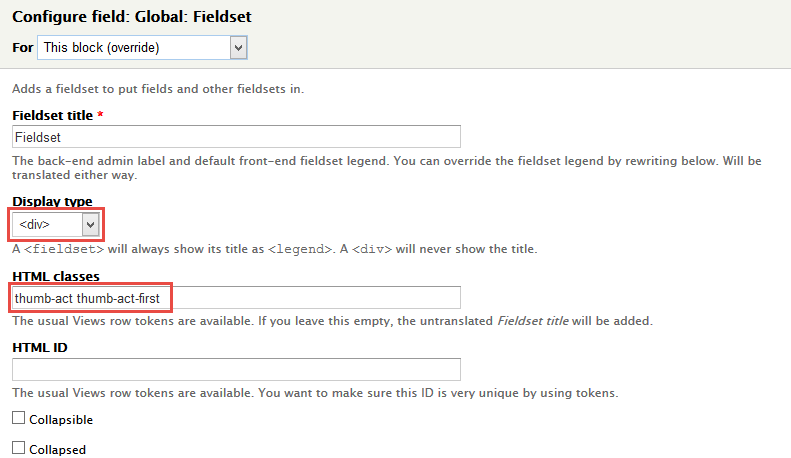
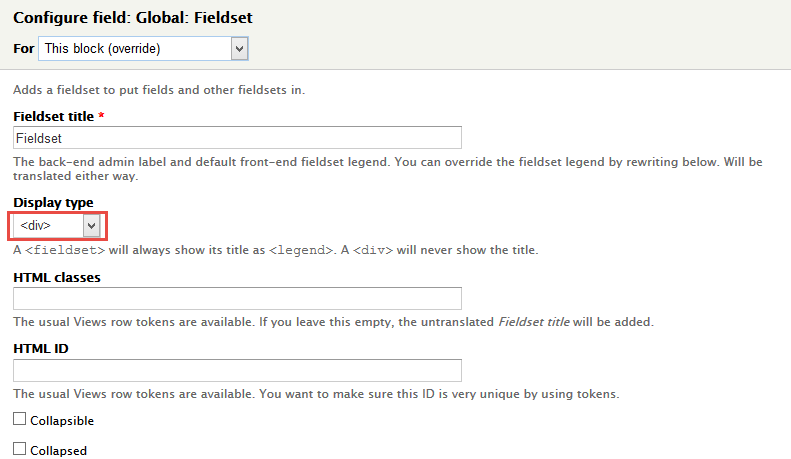
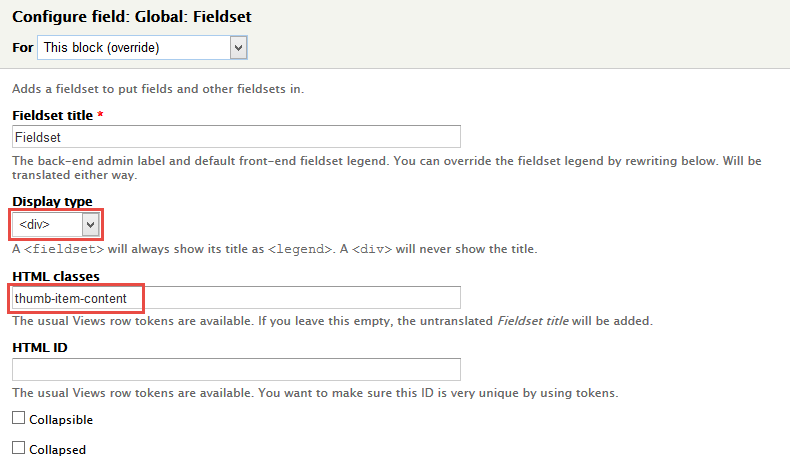
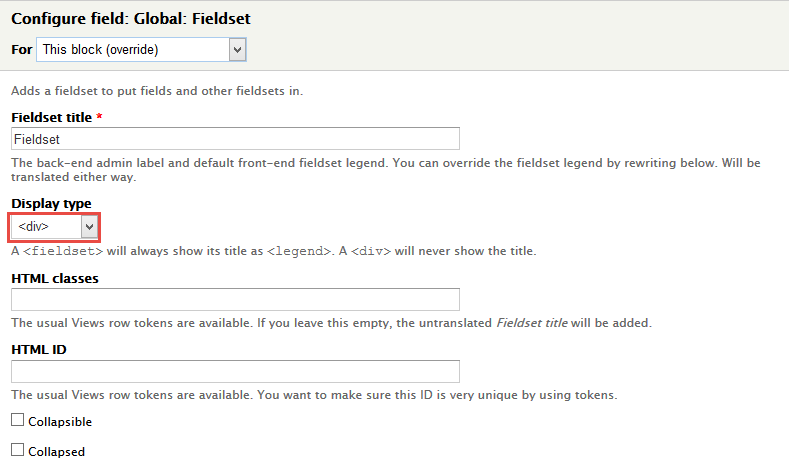
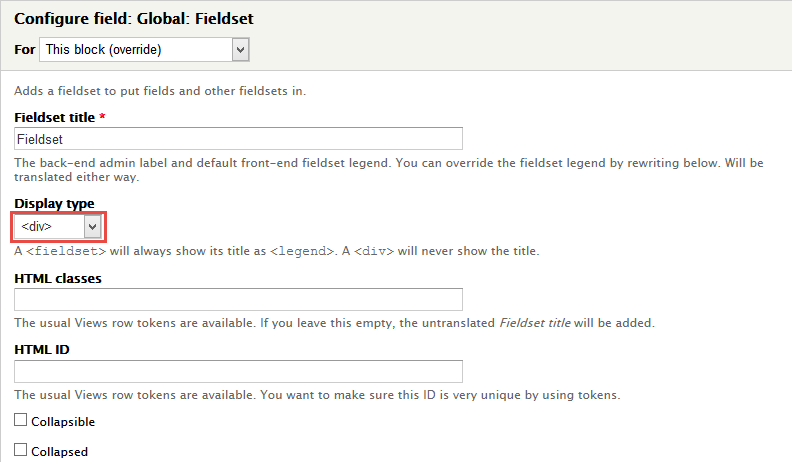
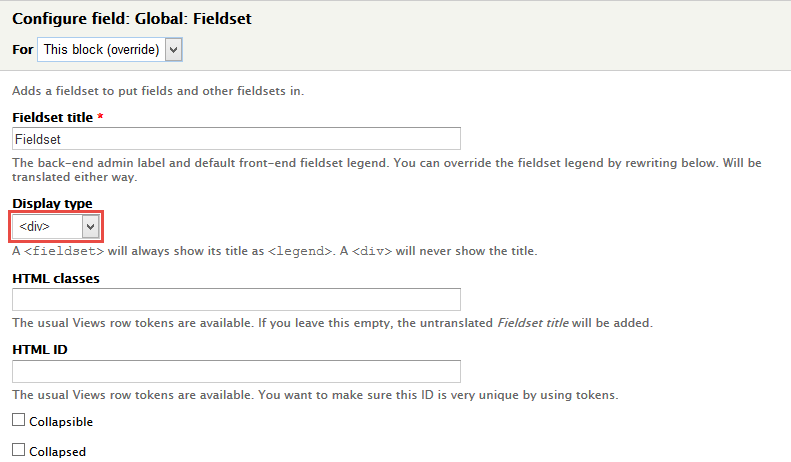
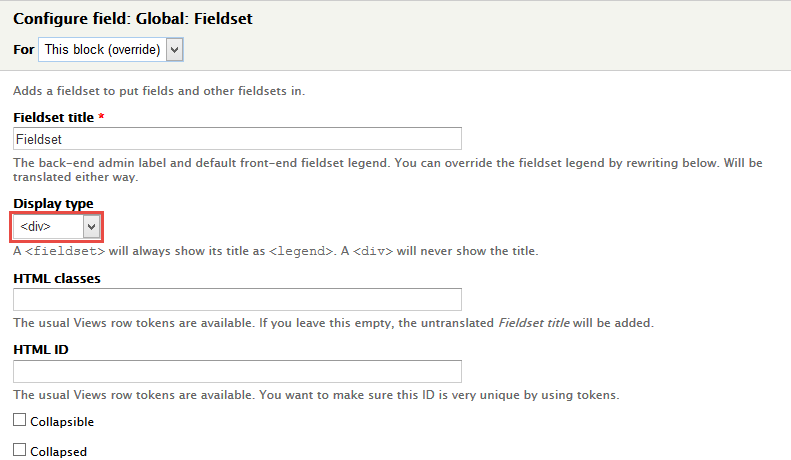
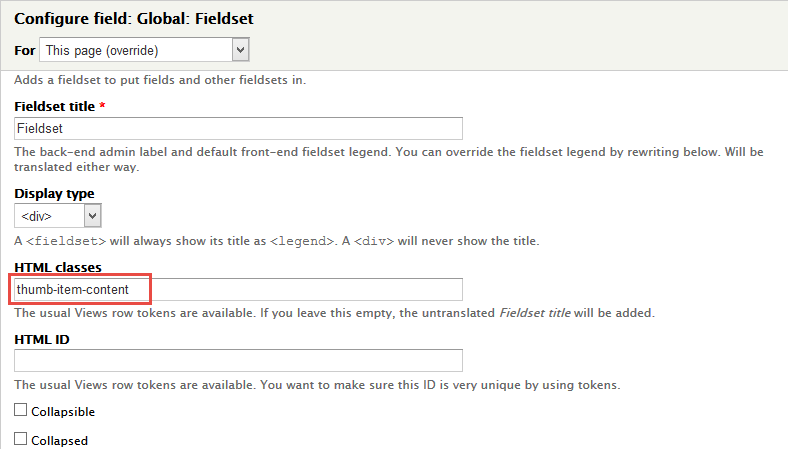
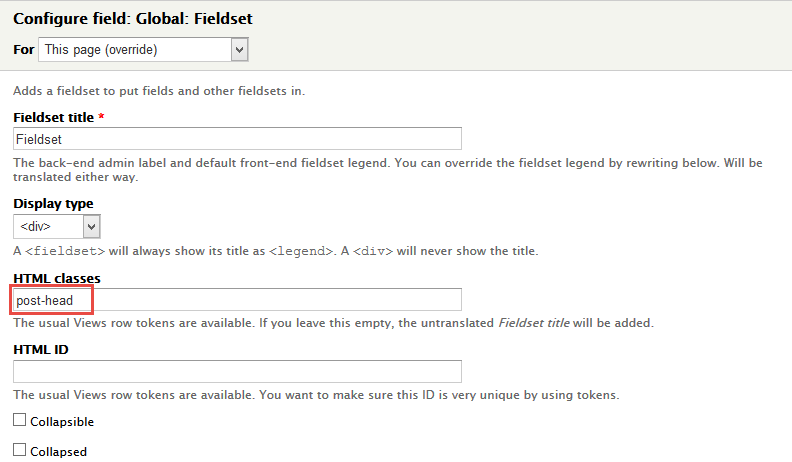
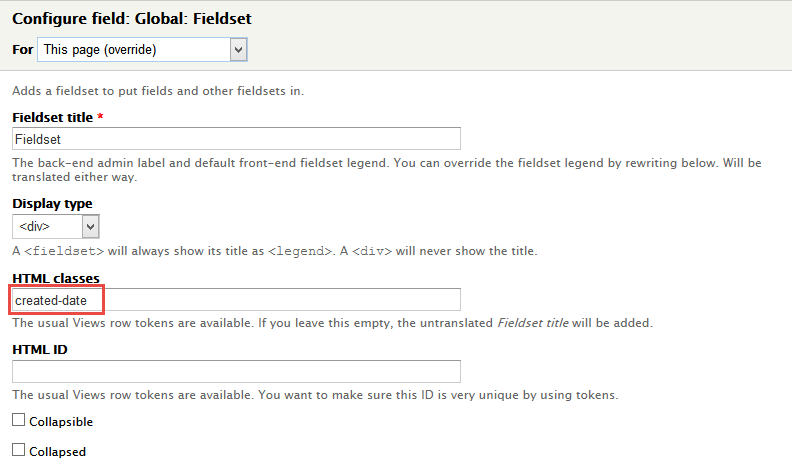
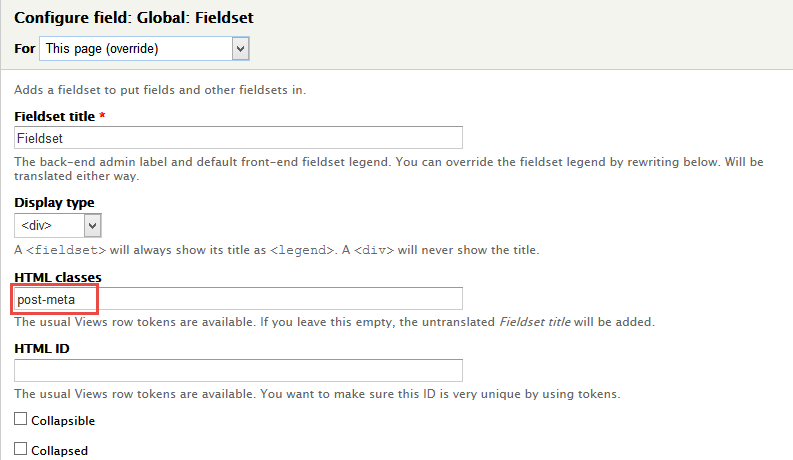
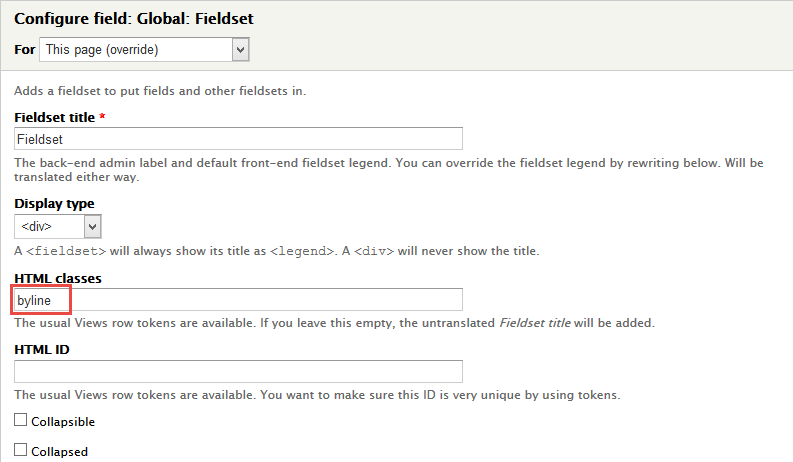
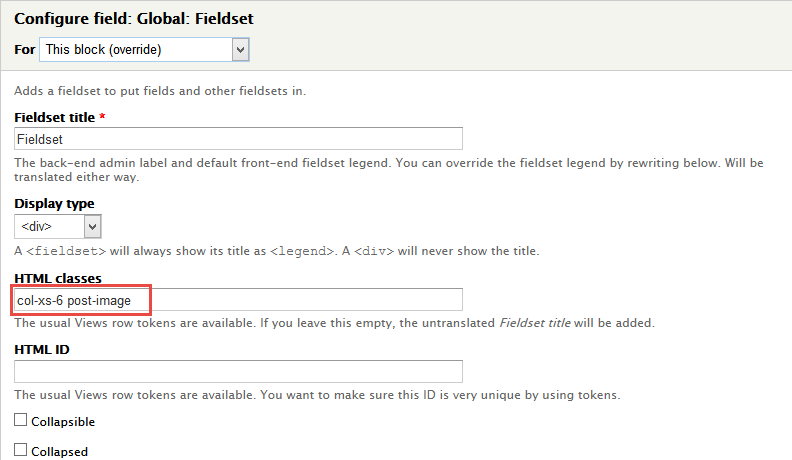
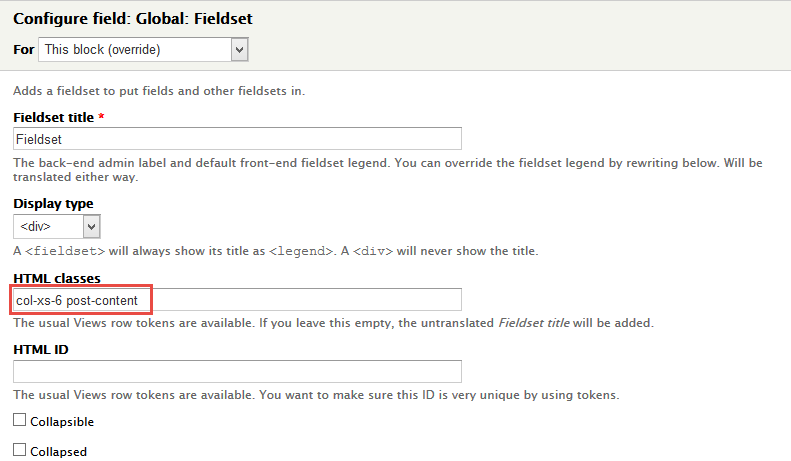
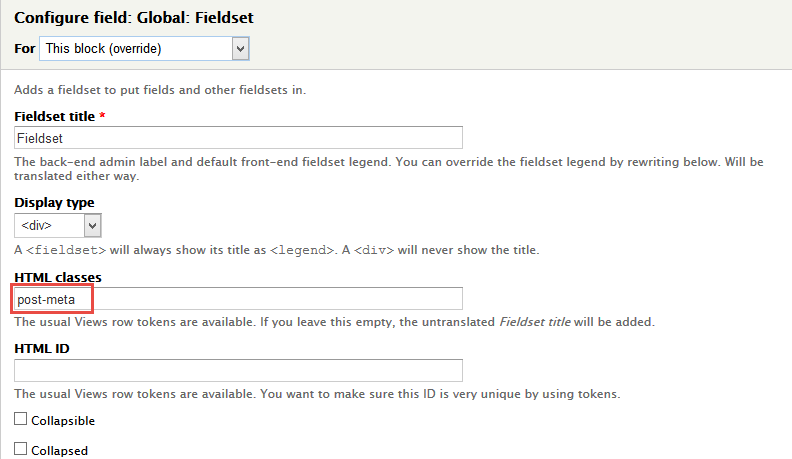
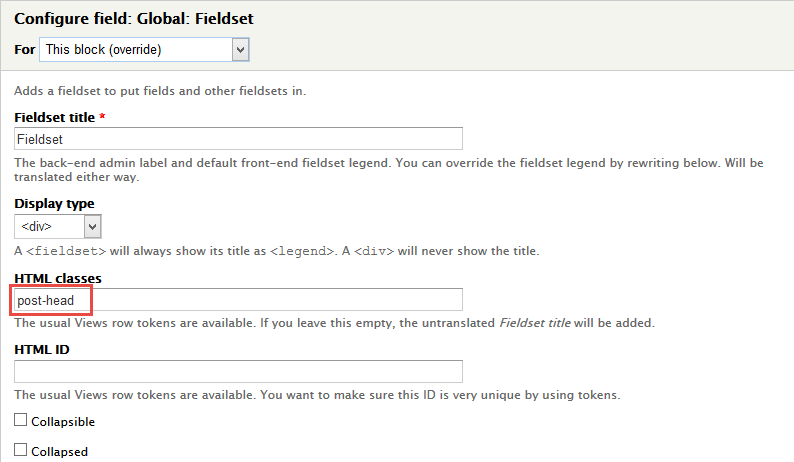
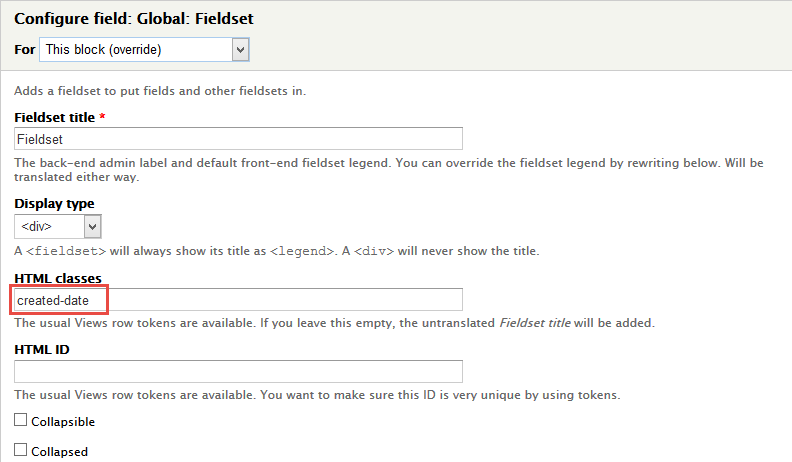
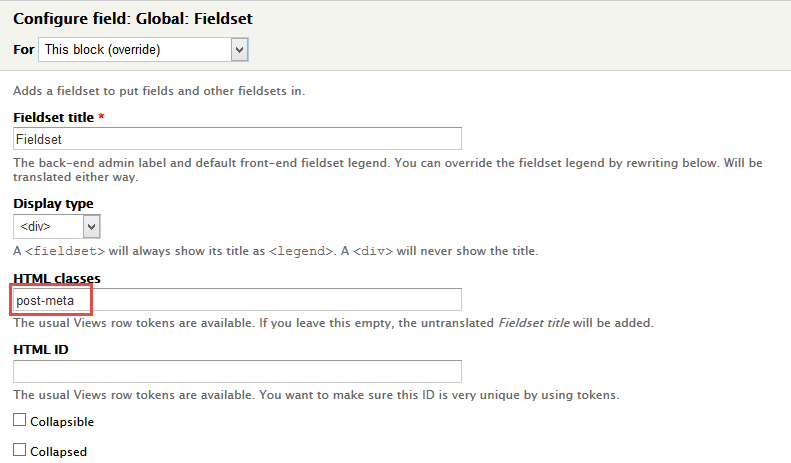
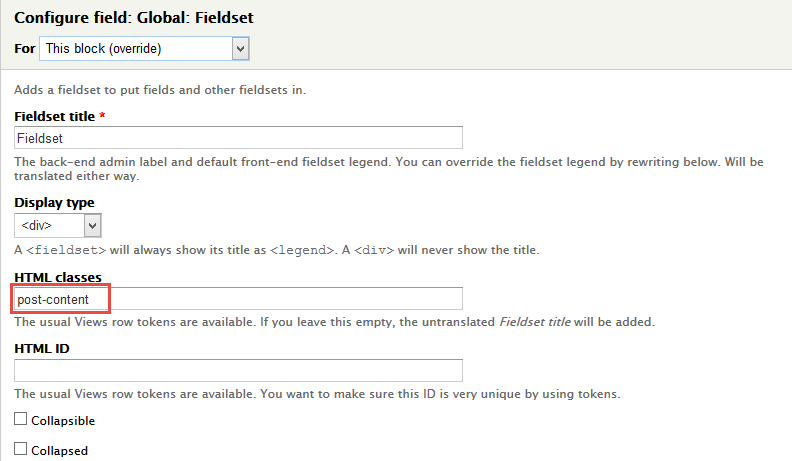
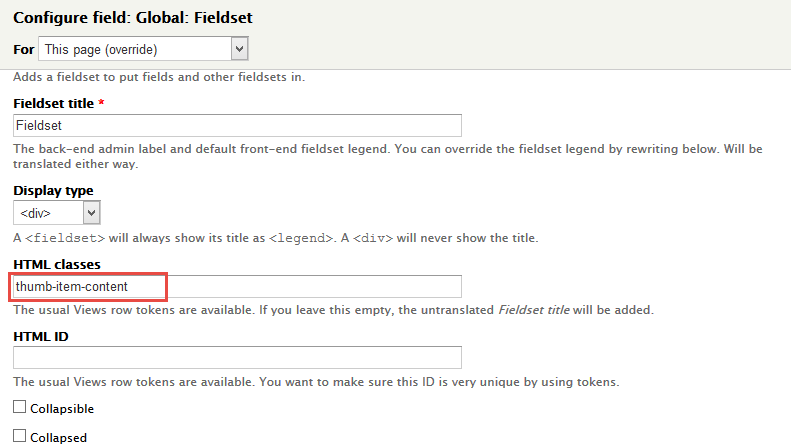
8. Set properties for Global: Fieldset
9. Set properties for Global: Fieldset
10. Set properties for Global: Fieldset
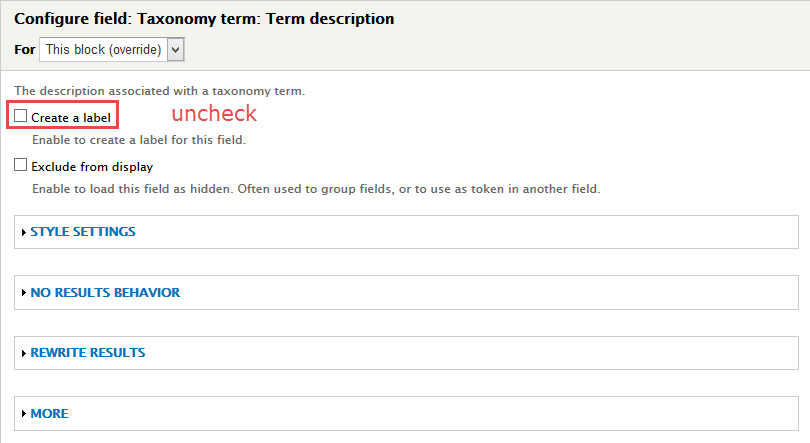
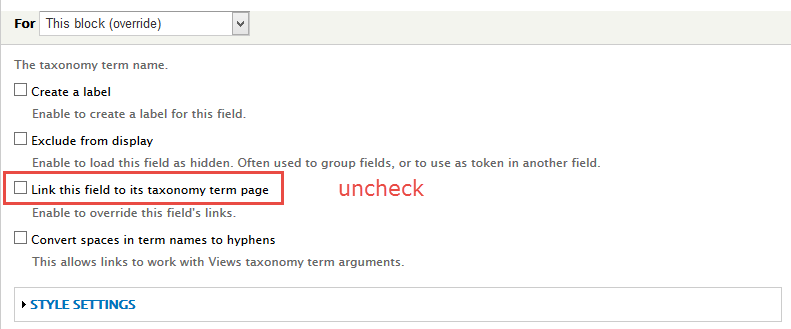
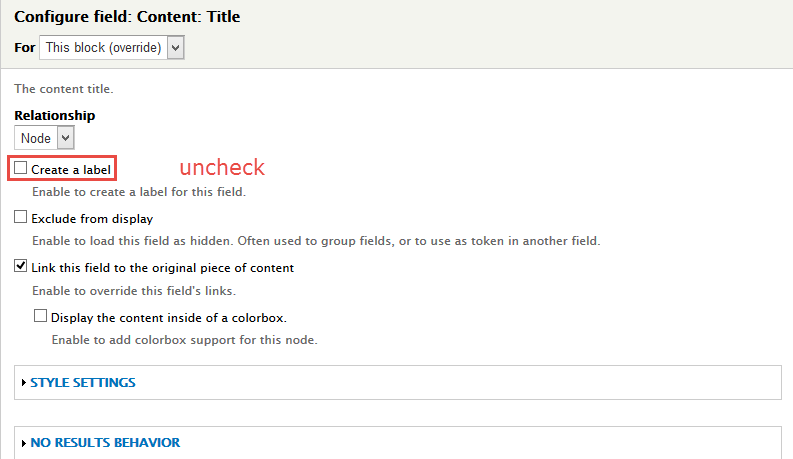
11. Set properties for Taxonomy term: Term description
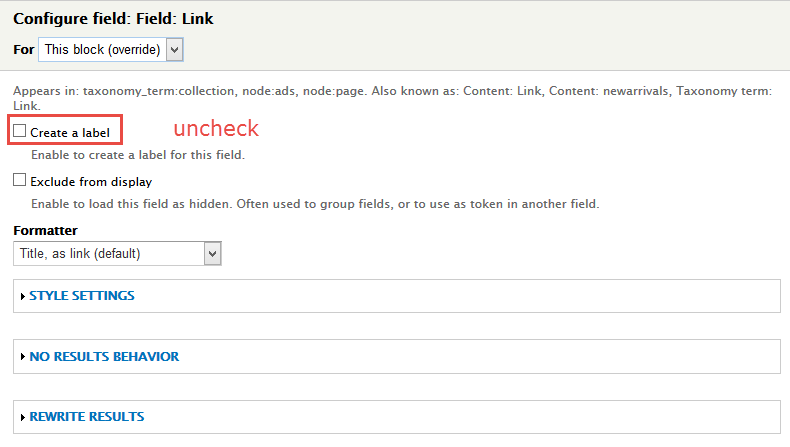
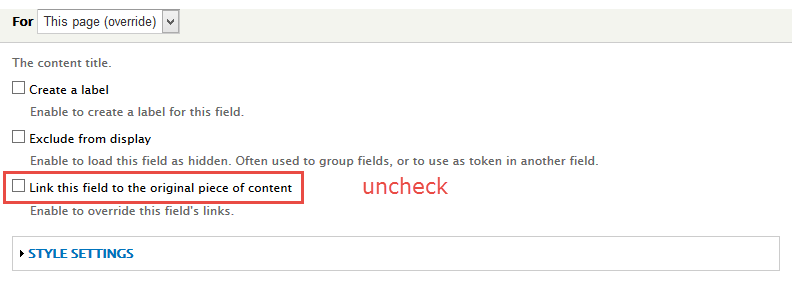
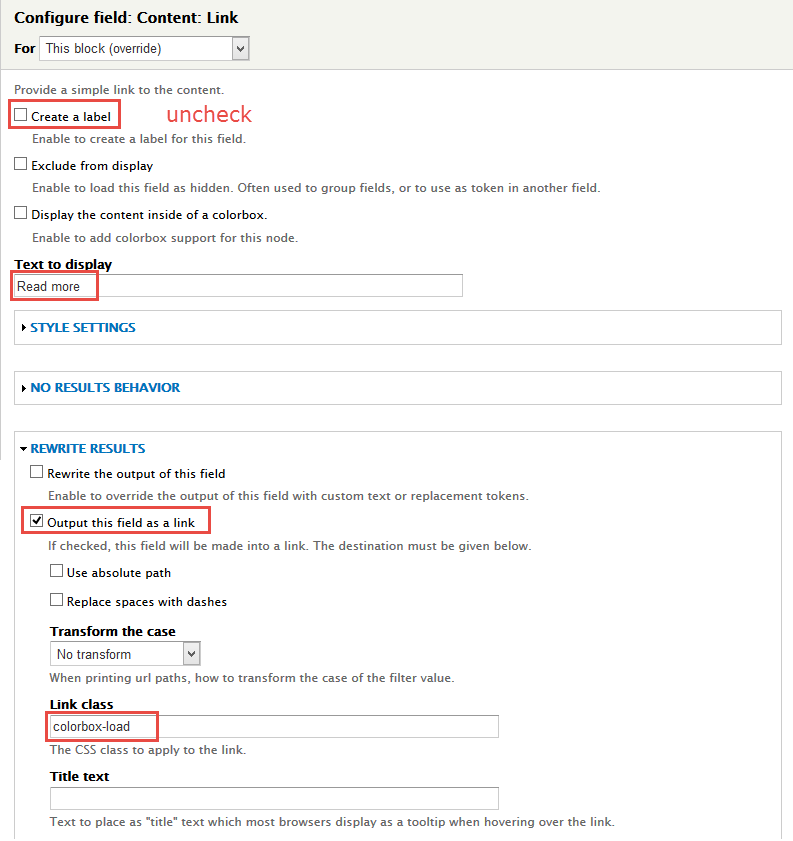
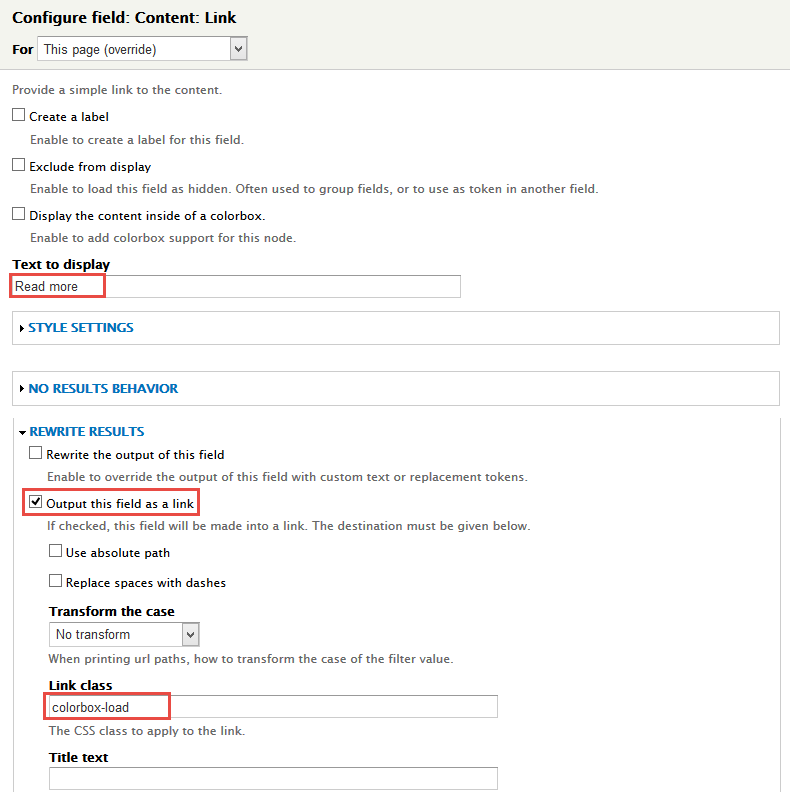
12. Set properties for Field: Link
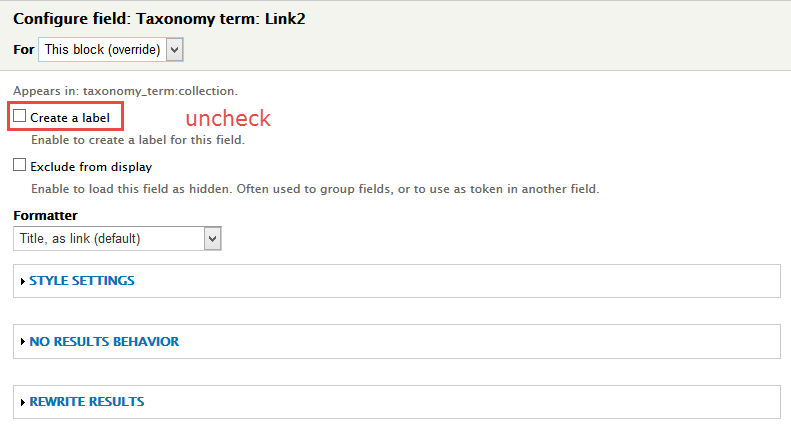
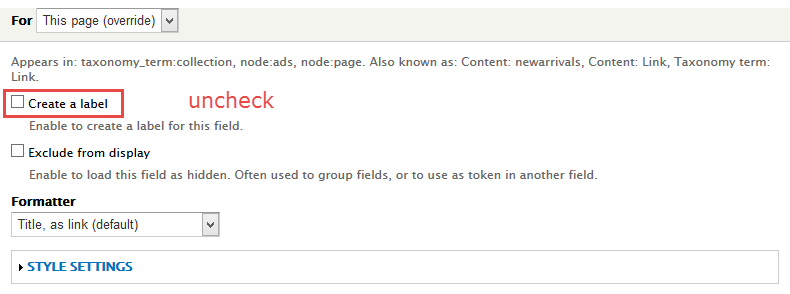
13. Set properties for Taxonomy term: Link2
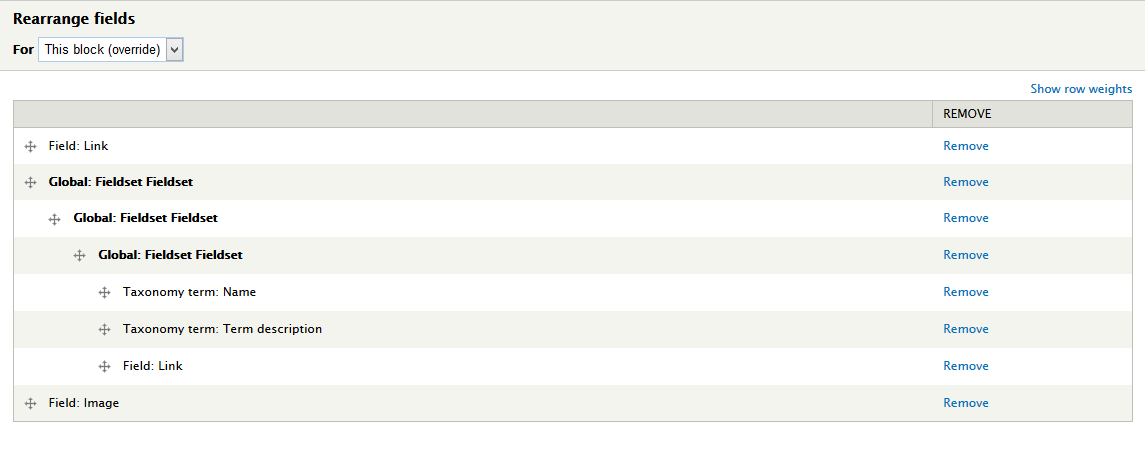
14. At FIELDS area, click Rearrange button, then remove Field: Link field and set following arrange
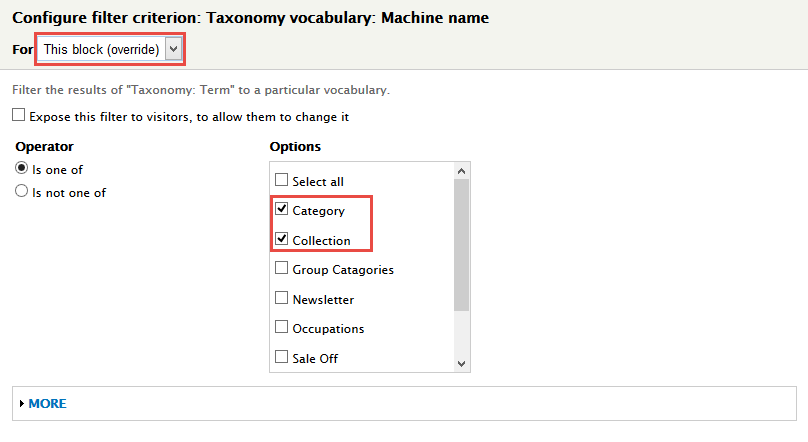
15. At FILTER CRITERIA area, click Add button and add file Taxonomy vocabulary: Machine name, Taxonomy term: Term ID, Taxonomy term: Term ID, Taxonomy term: Term ID
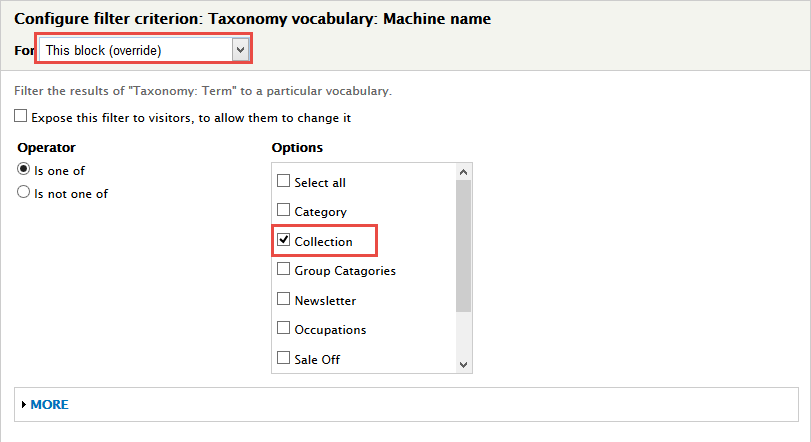
16. Set properties for Taxonomy vocabulary: Machine name
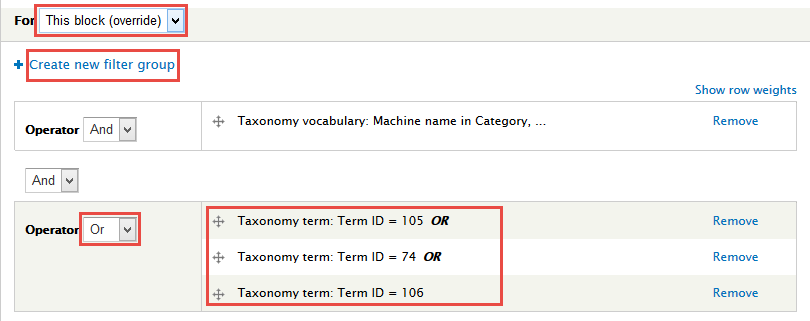
17. Set properties for Taxonomy term: Term ID
18. At FILTER CRITERIA area, click And/Or, Rearrange button and set following arrange
19. At SORT CRITERIA area, Click Add button to add Taxonomy term: Term ID
20. At Advanced > OTHER area, add CSS class
21. Click Save block button.
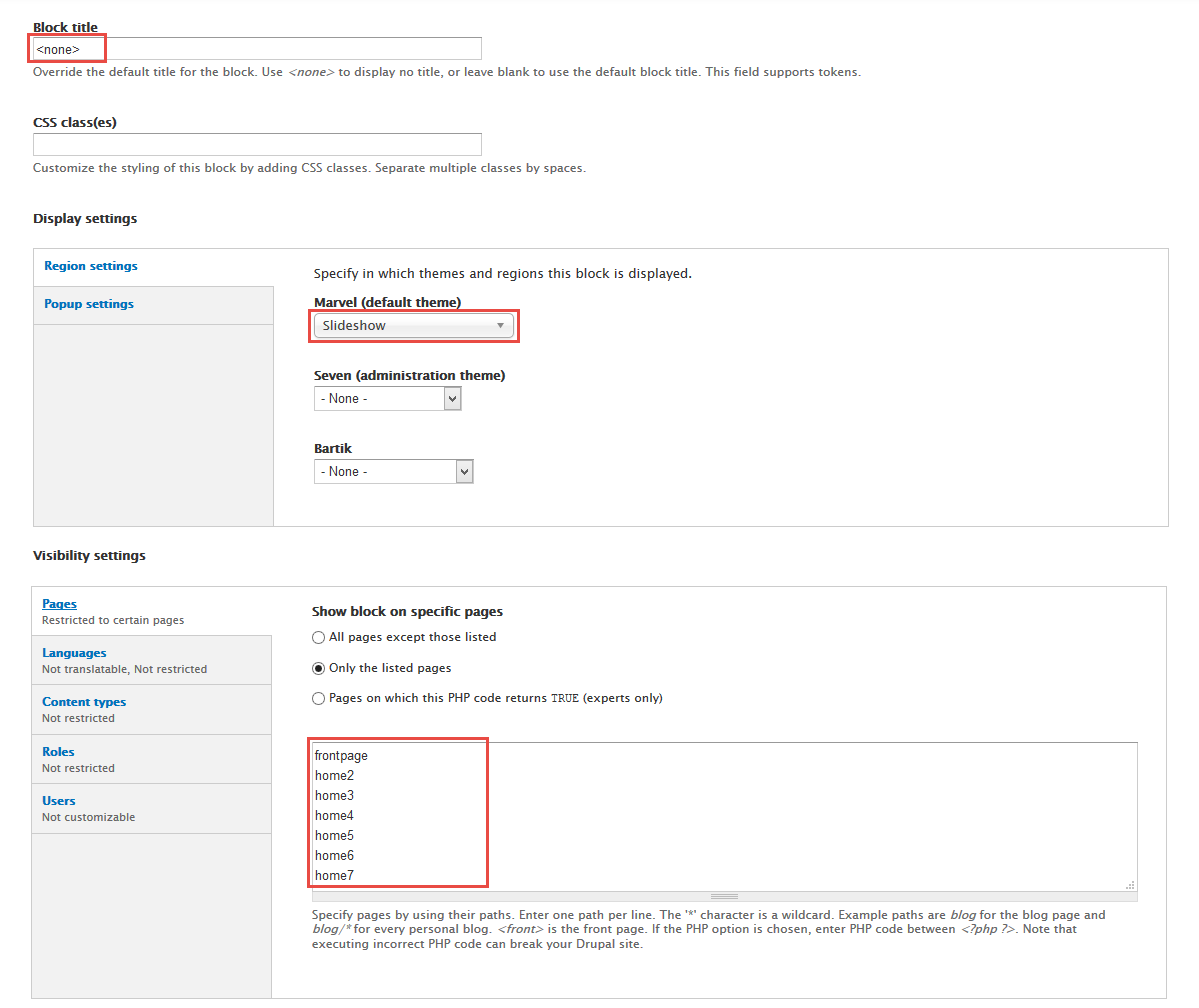
2. Configure SlideshowDisplay block
1. Navigate to Structure > Blocks
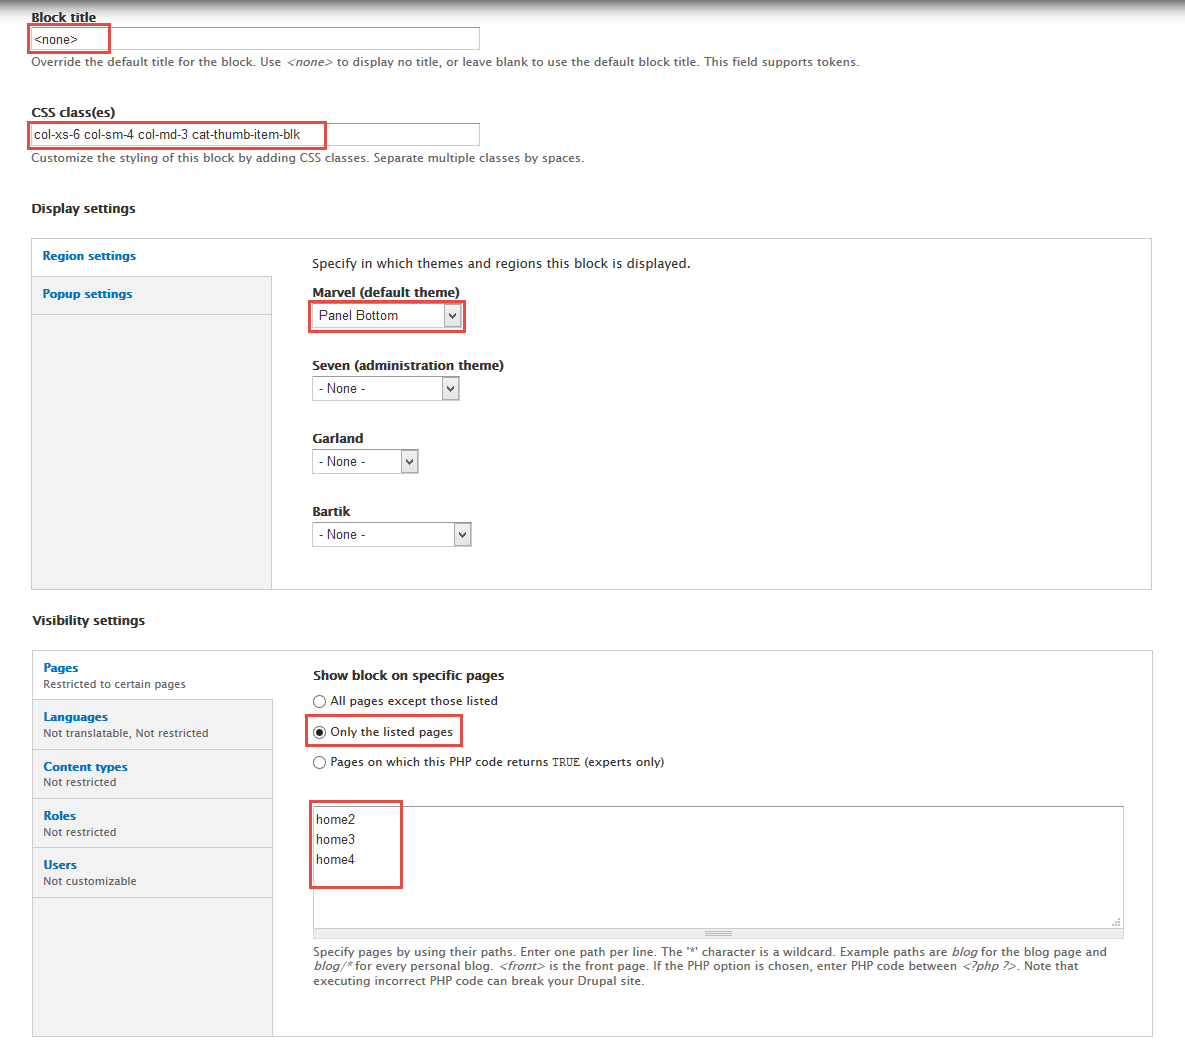
2. Find View: Collection View: SlideshowDisplay, click configure link, set following properties
3.Click Save block button.
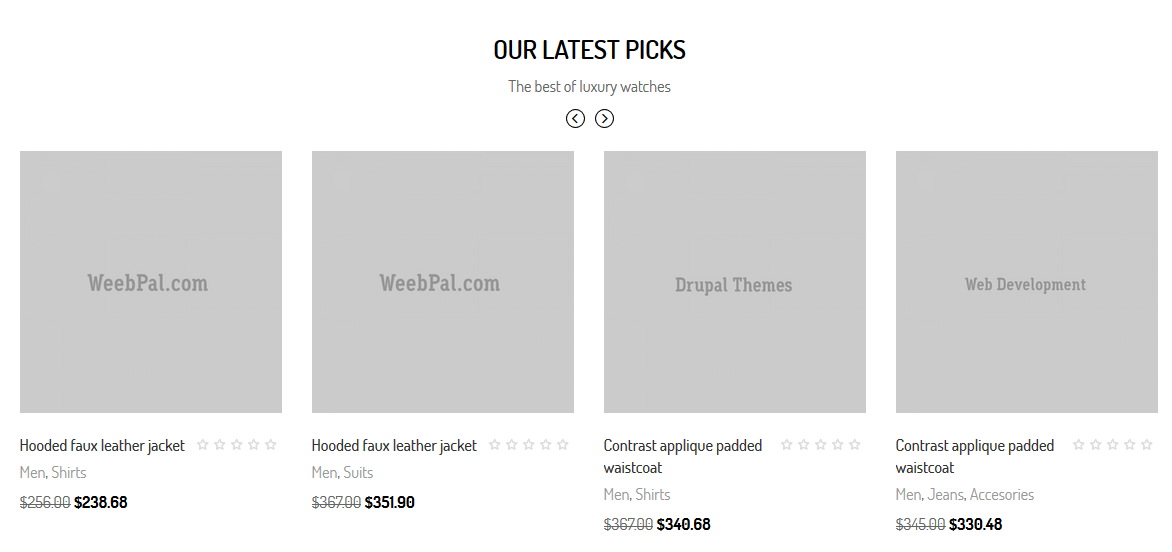
OUR LATEST PICKS
Front end Display
1. Create OUR LATEST PICKS view
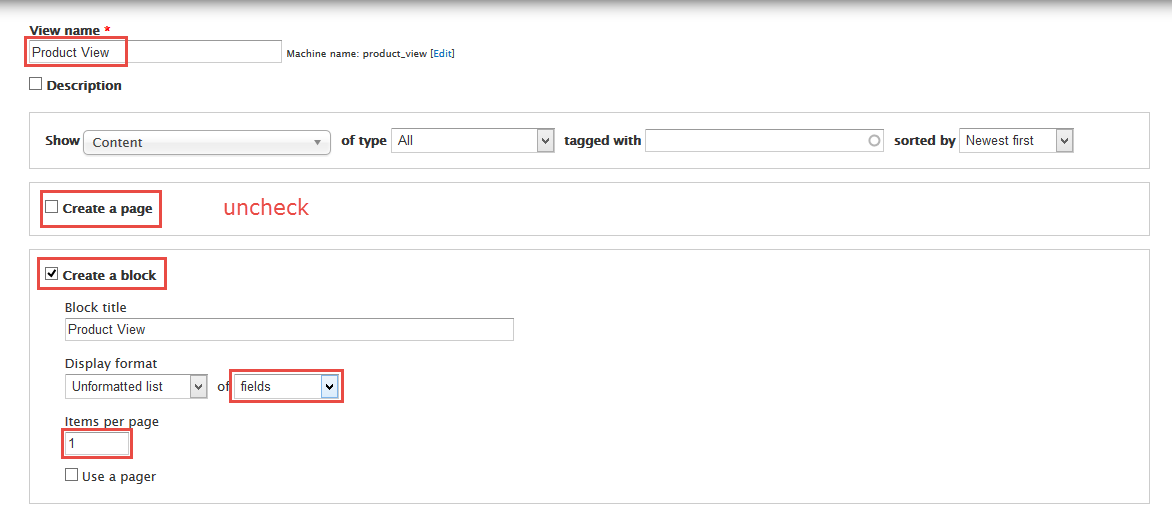
1. Navigate to Structure > Views, click Add views link, Create Product View view with following properties:
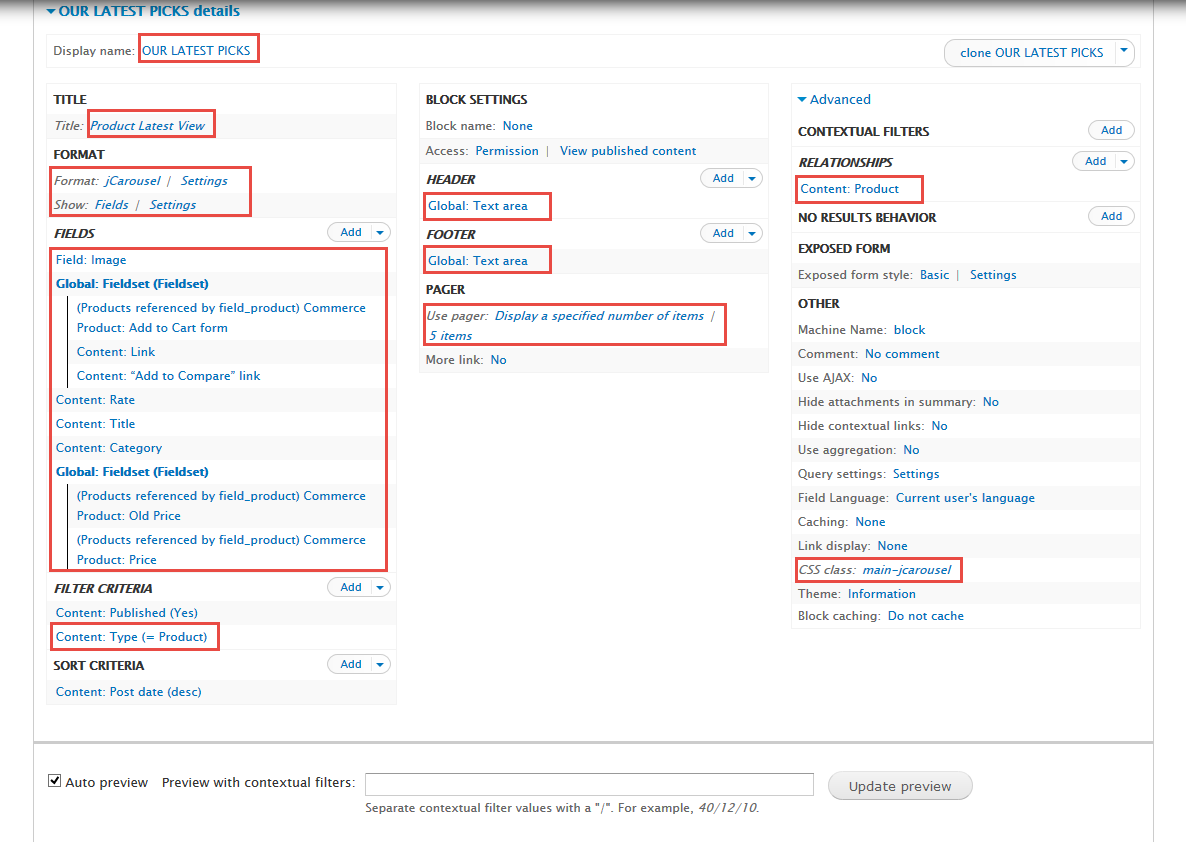
2. Click Continue & edit button and set following properties:
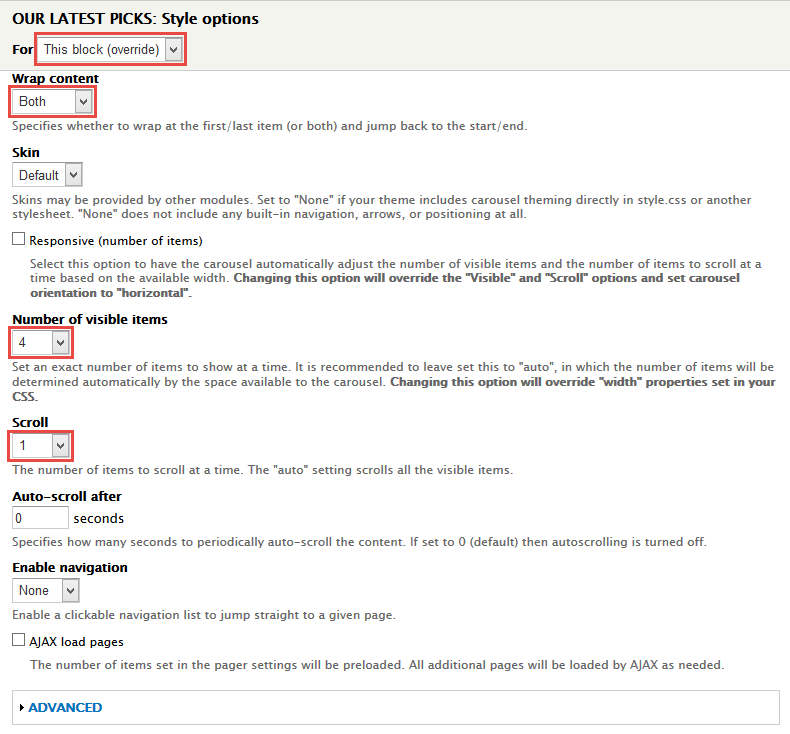
3. At FORMAT Format: jCarousel area, click Settings and set following properties:
4. At Advanced > Contextual filters area, click click Add button
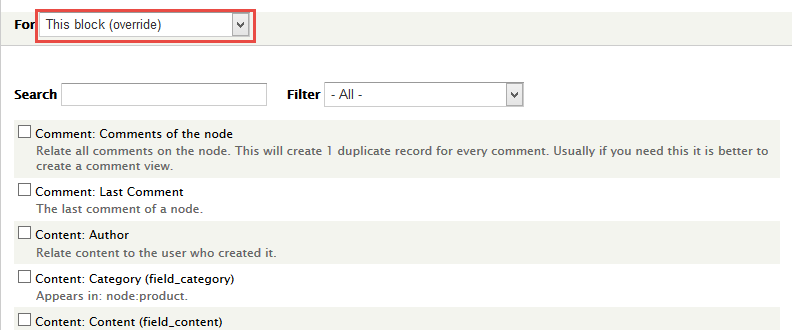
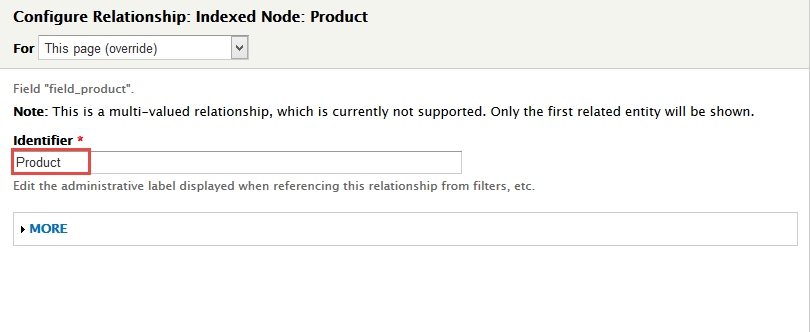
5. In Advanced > REALATIONSHIPS area, click Add button to add fields: Content: Product and set following properties:
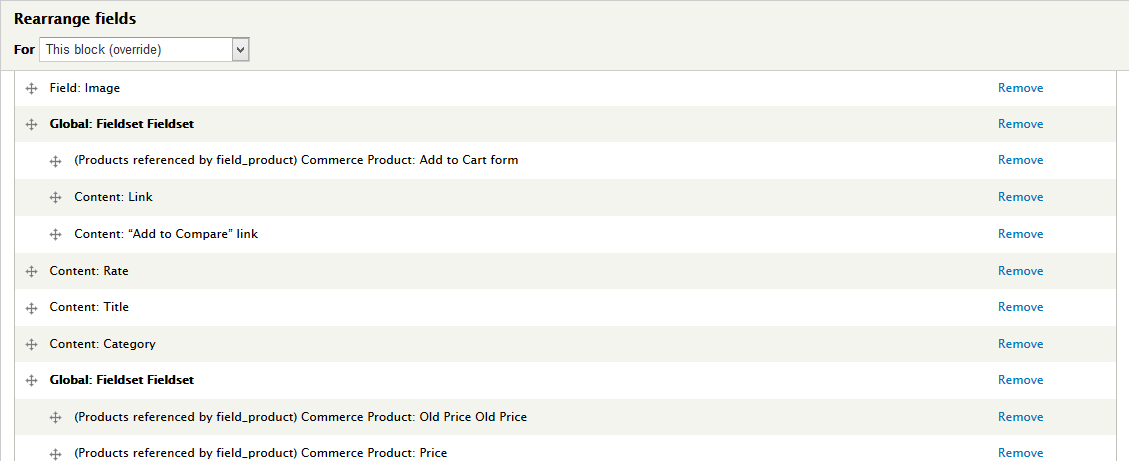
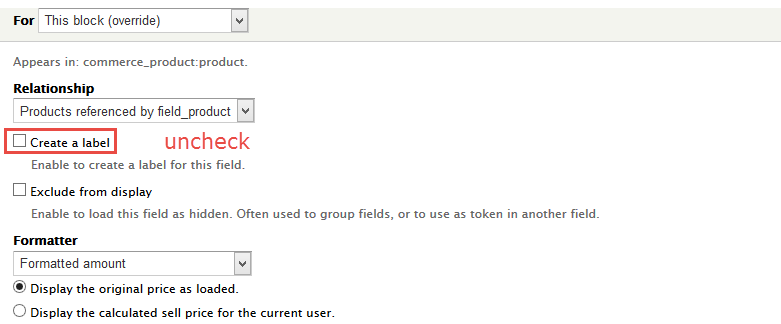
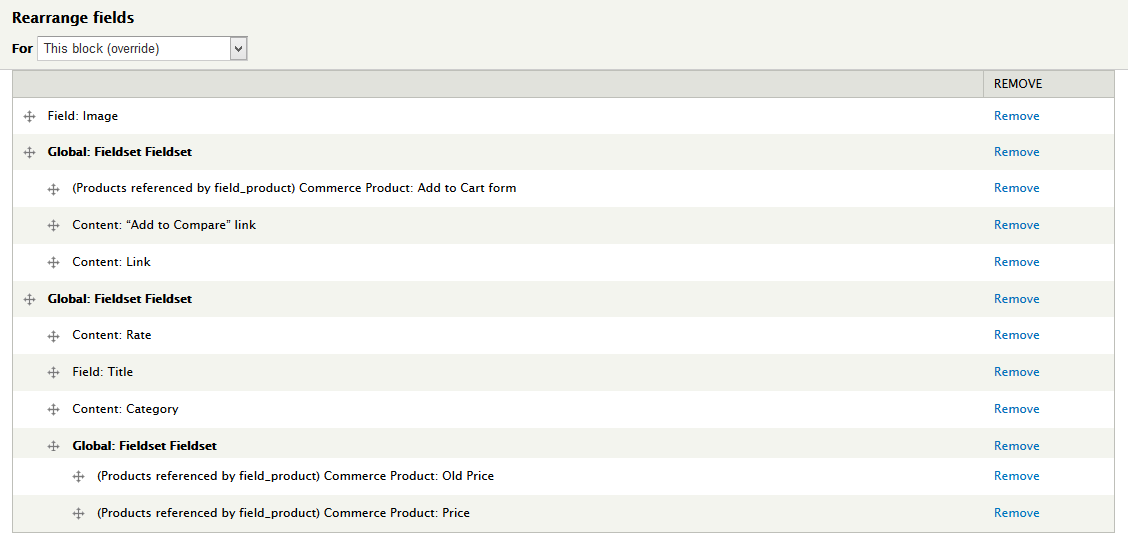
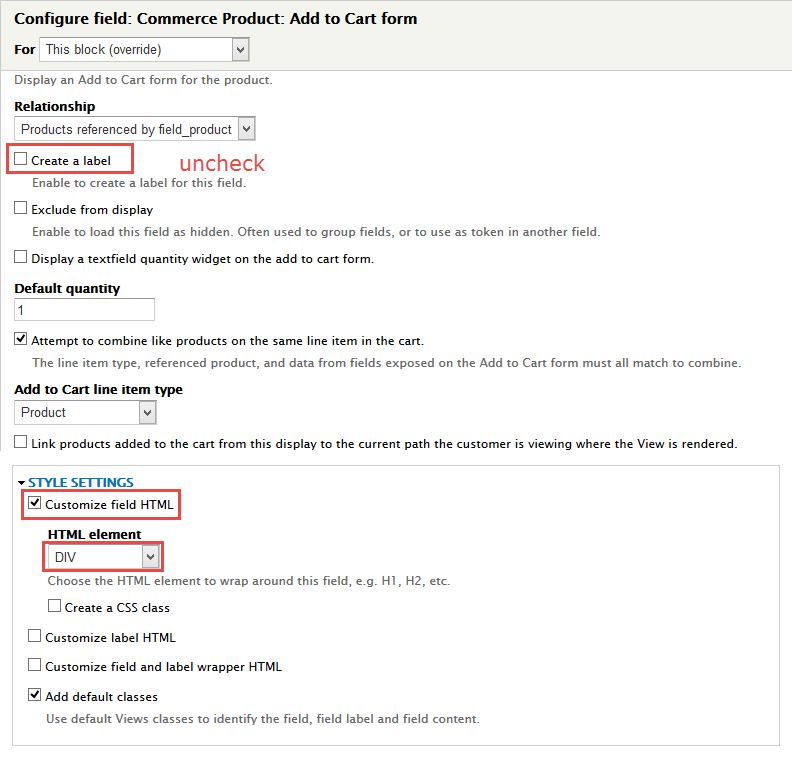
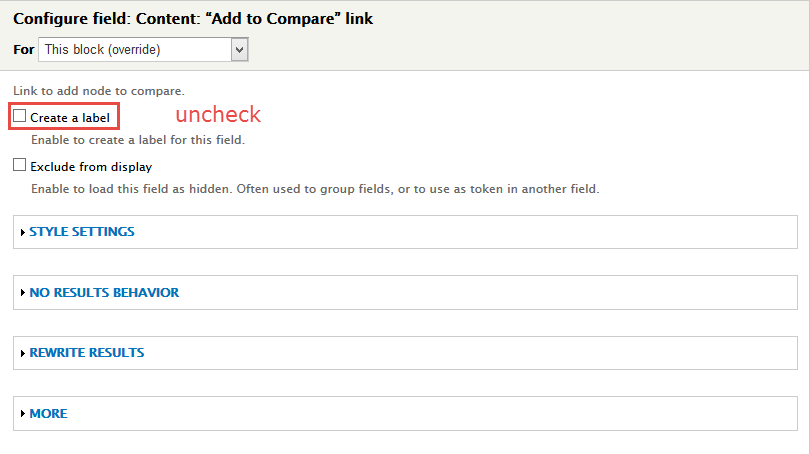
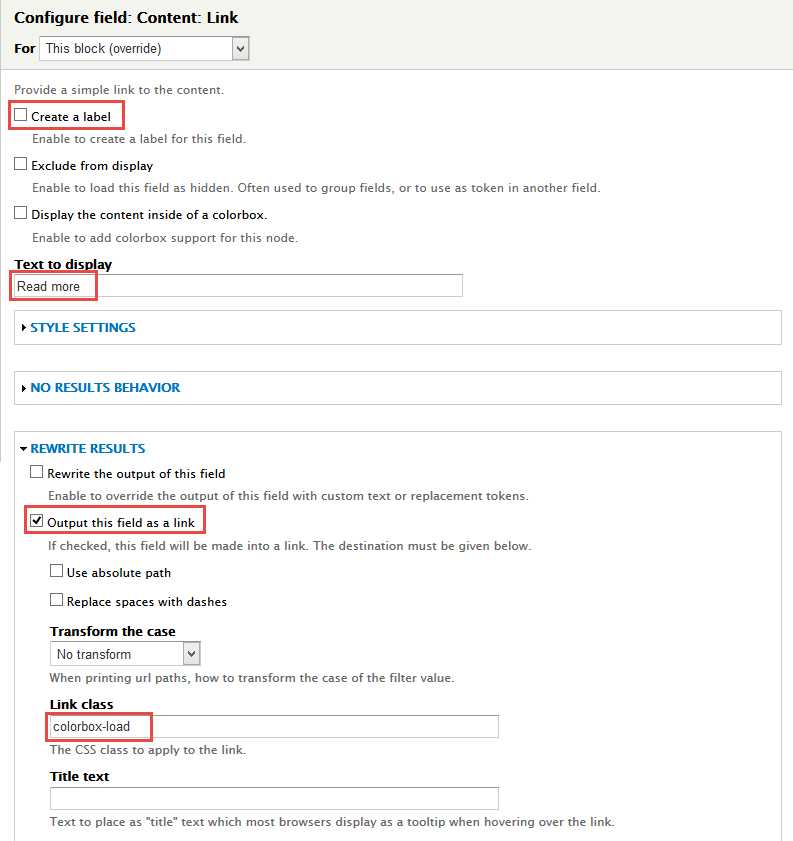
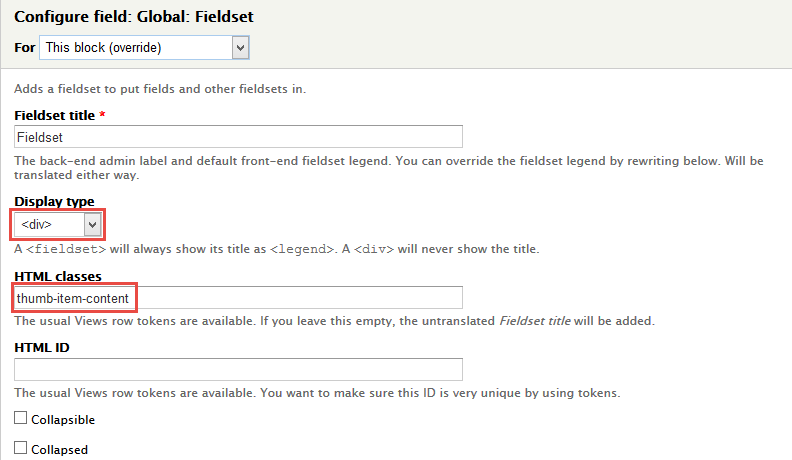
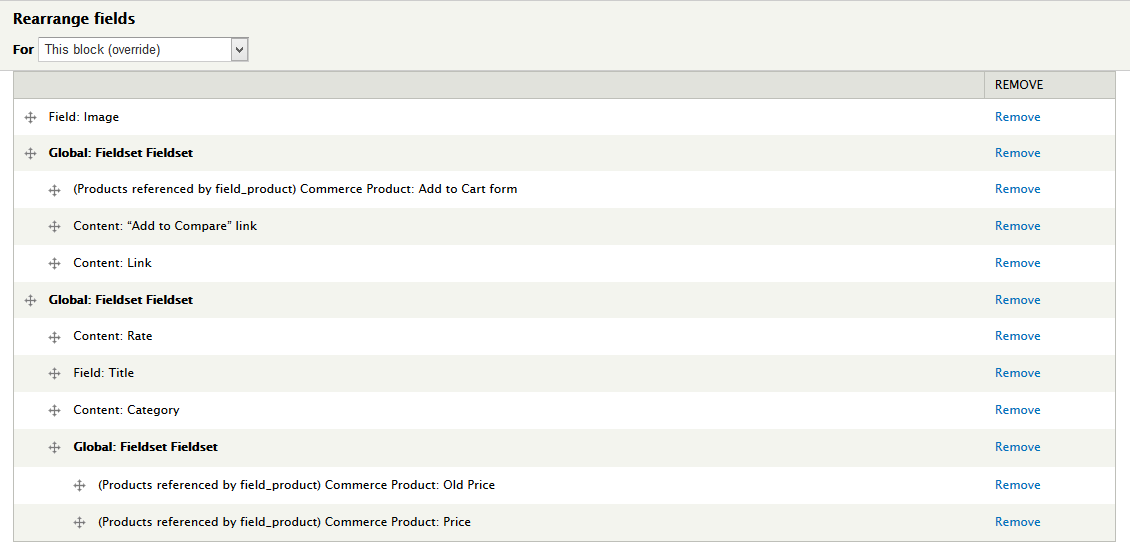
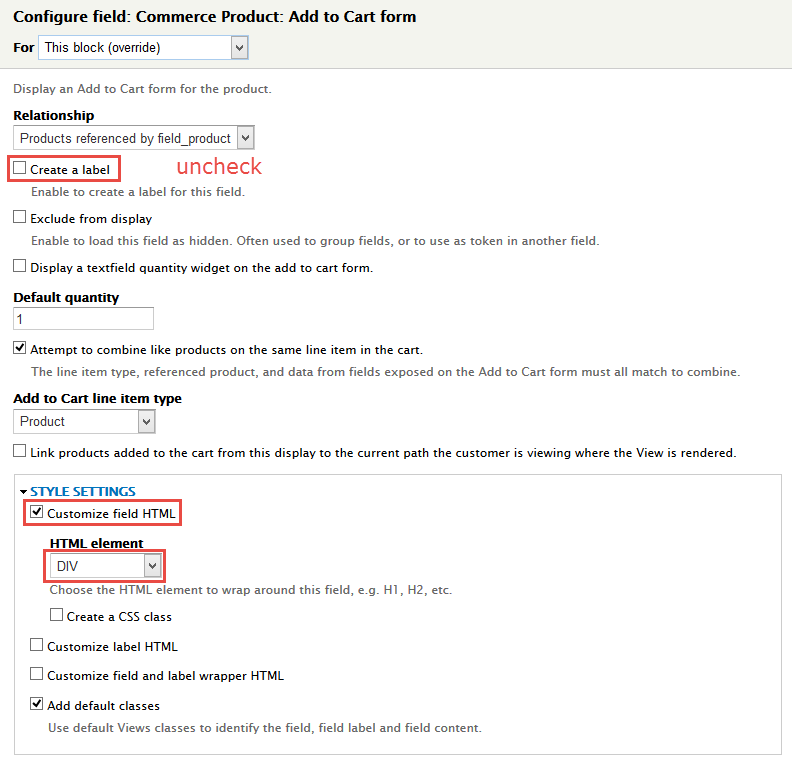
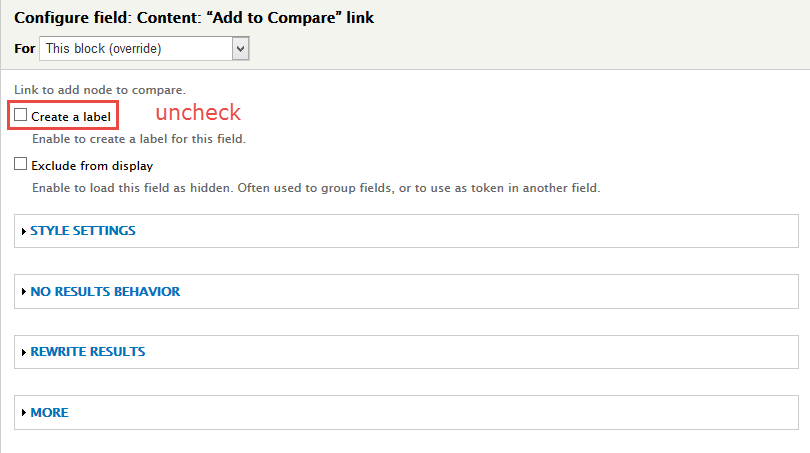
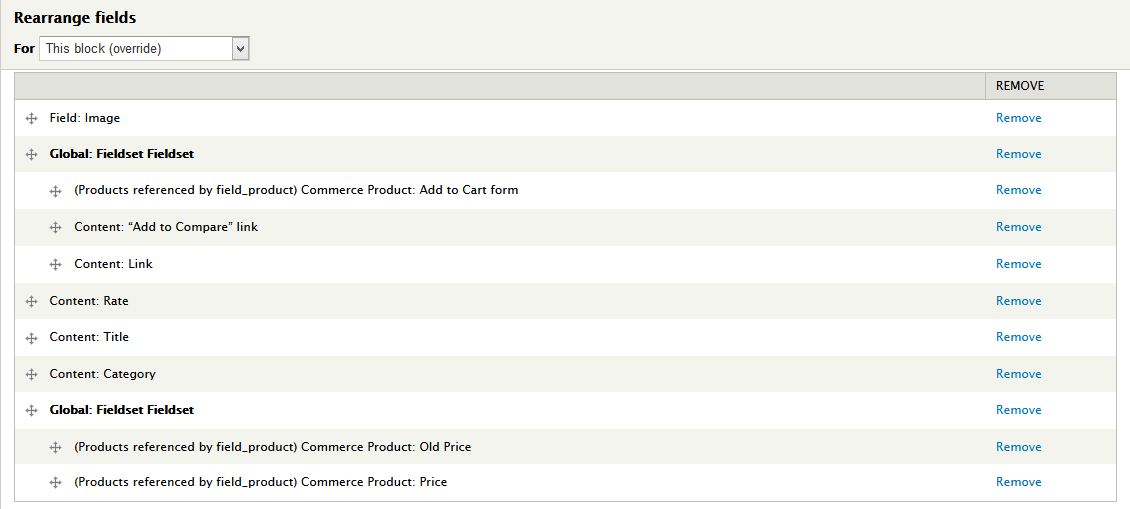
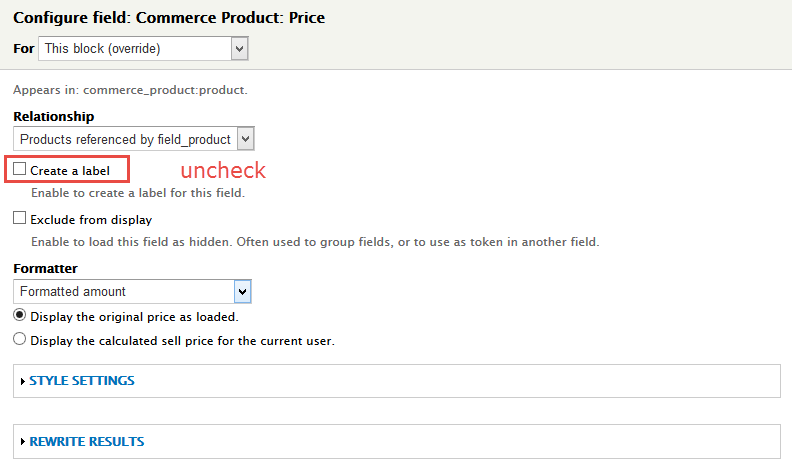
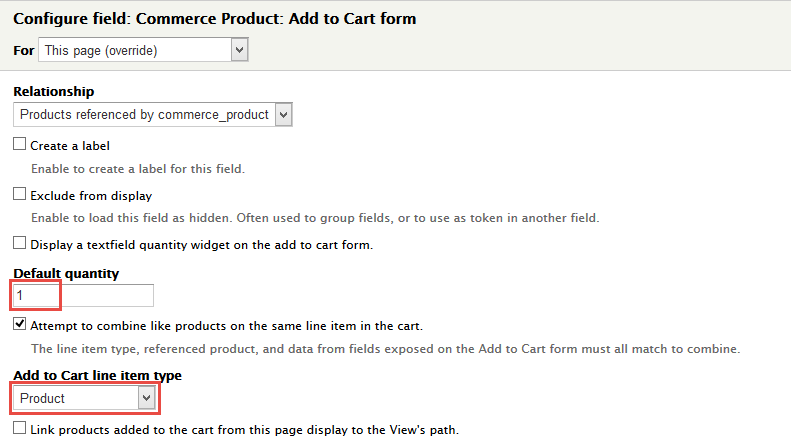
6. In FIELDS area, click Add button to add fields: Field: Image, Global: Fieldset (Fieldset), Commerce Product: Add to Cart form, Content: Link, Content: “Add to Compare” link, Content: Rate, Content: Category, Global: Fieldset (Fieldset), Commerce Product: Old Price, Commerce Product: Price field and set following properties:
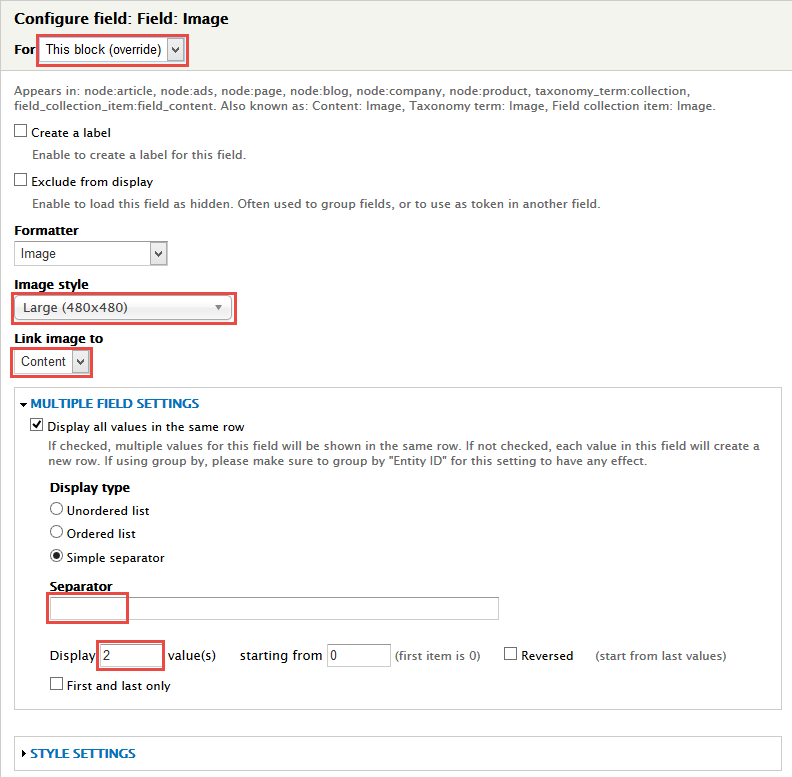
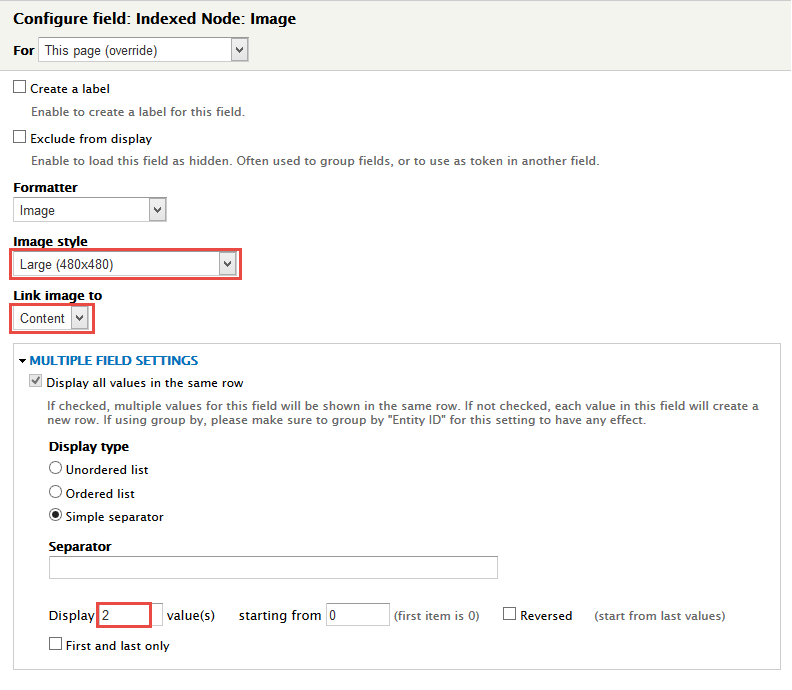
7. Set properties for Field: Image
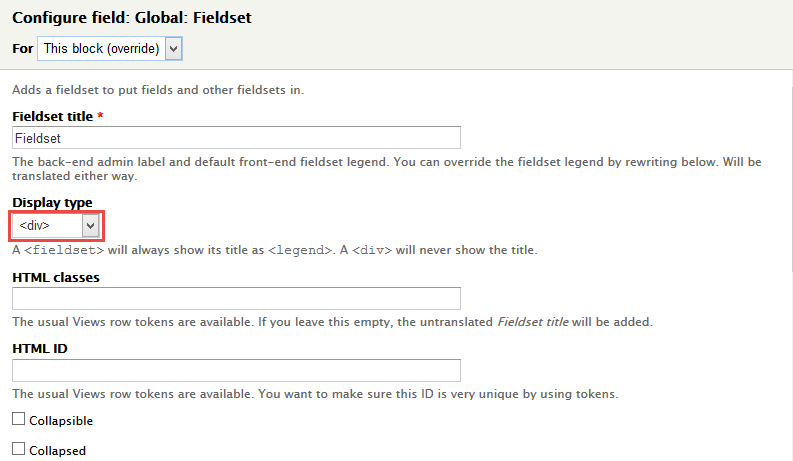
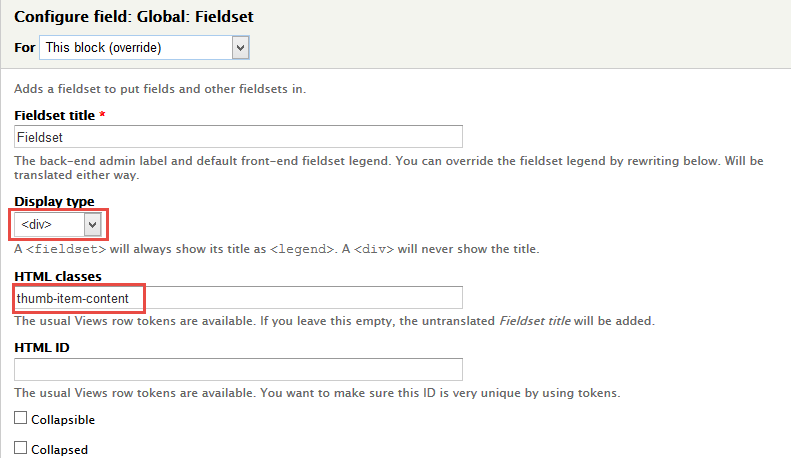
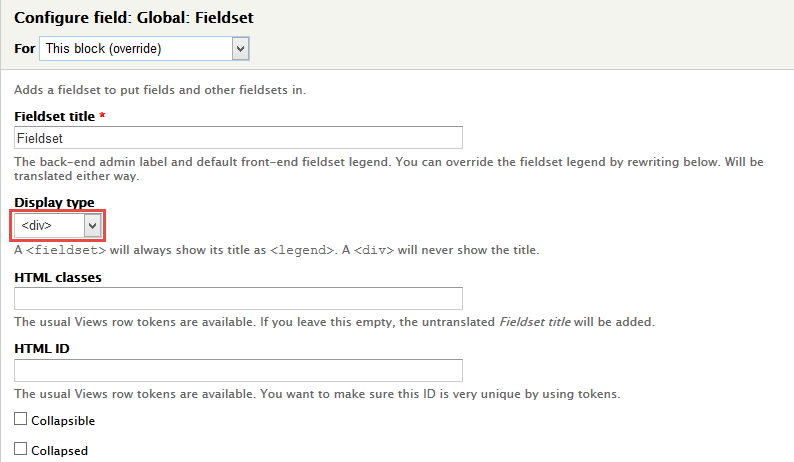
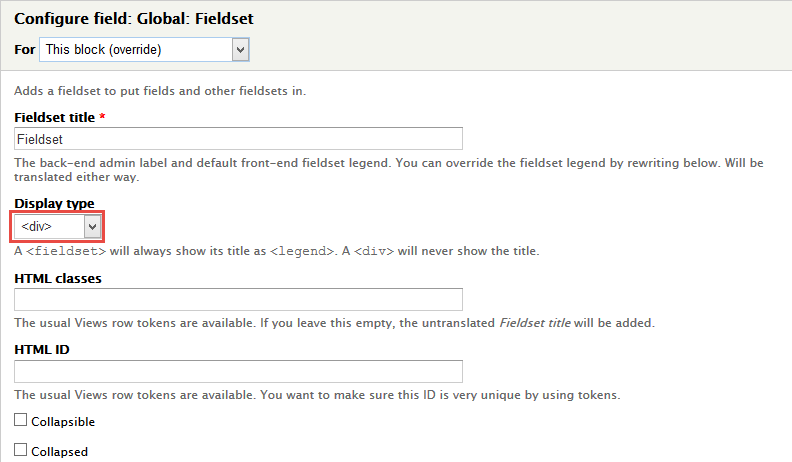
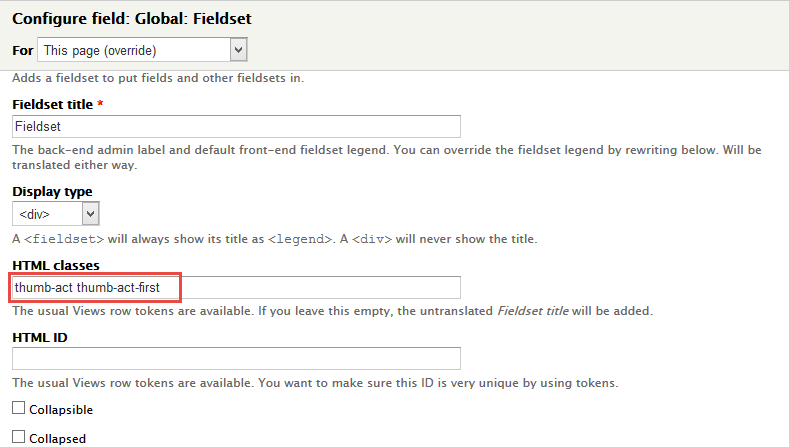
8. Set properties for Global: Fieldset (Fieldset)
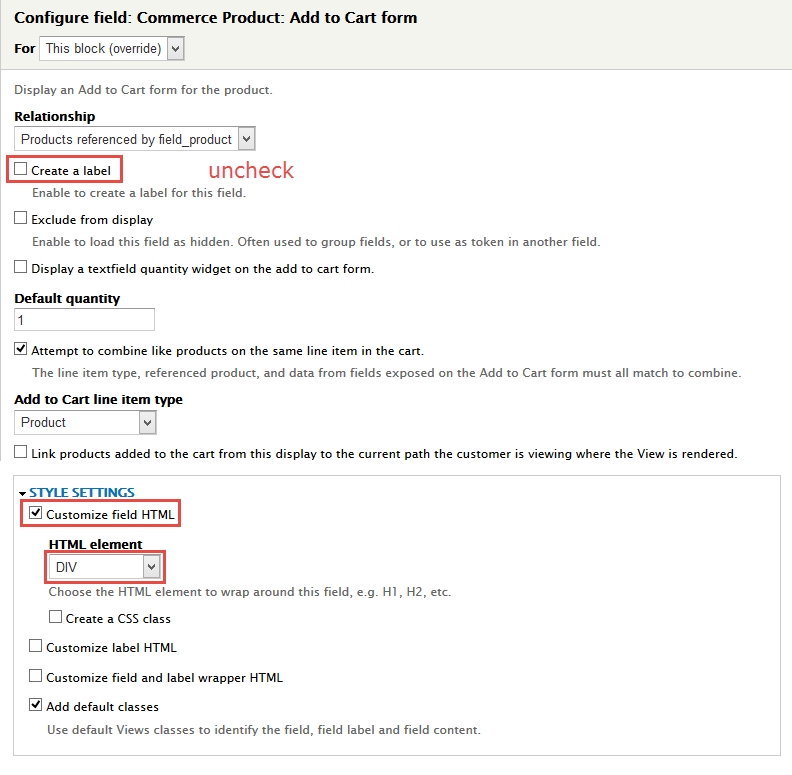
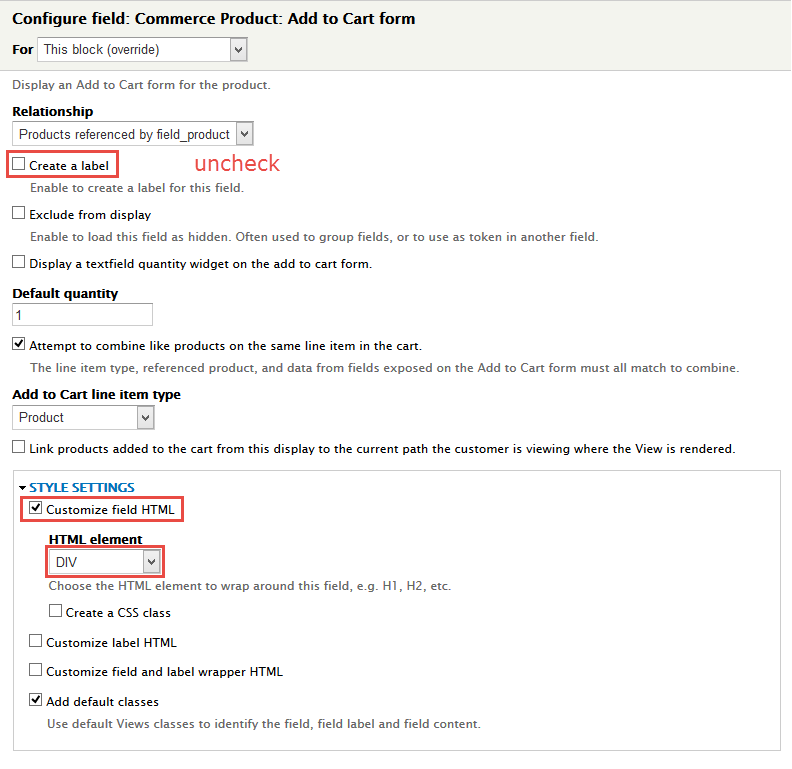
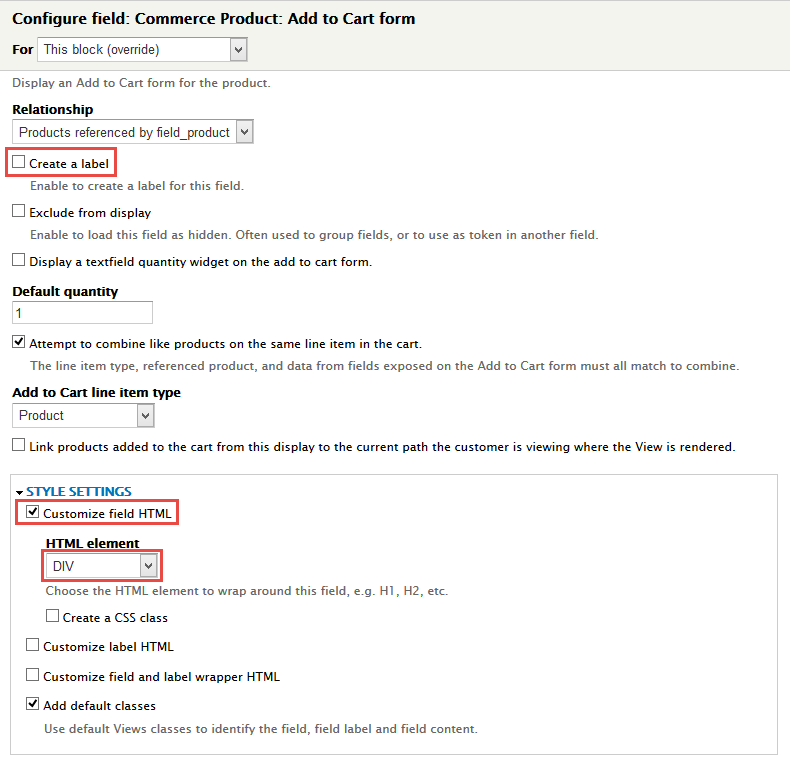
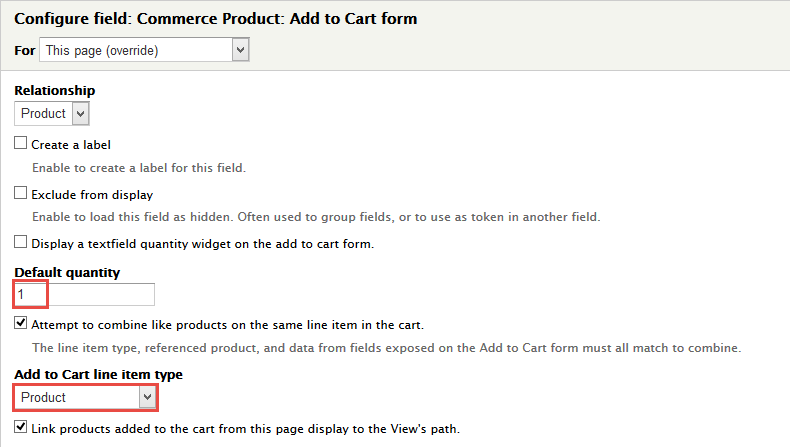
9. Set properties for Commerce Product: Add to Cart form
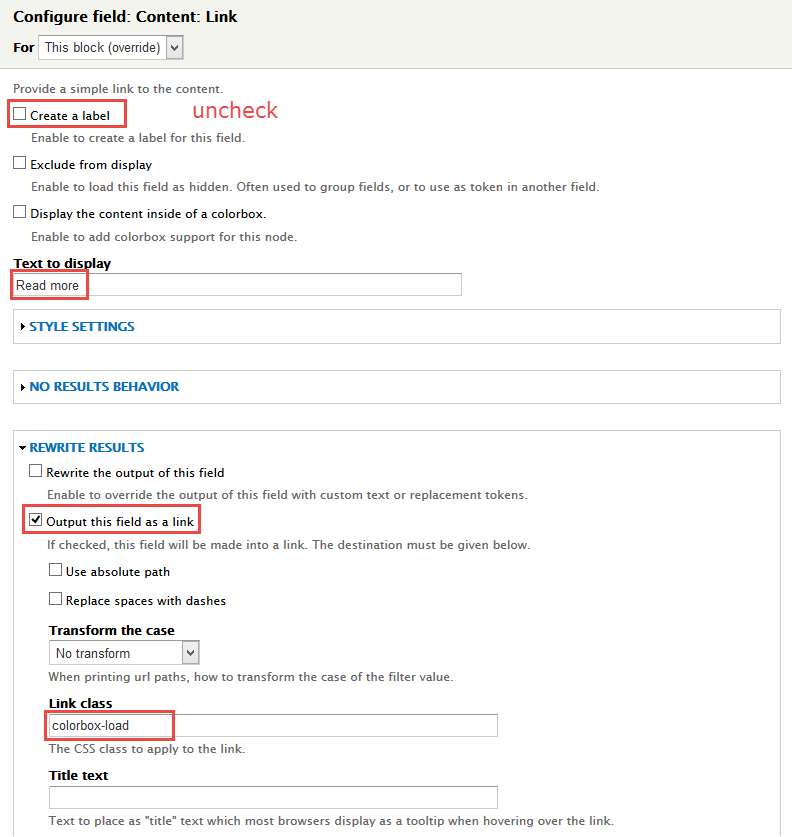
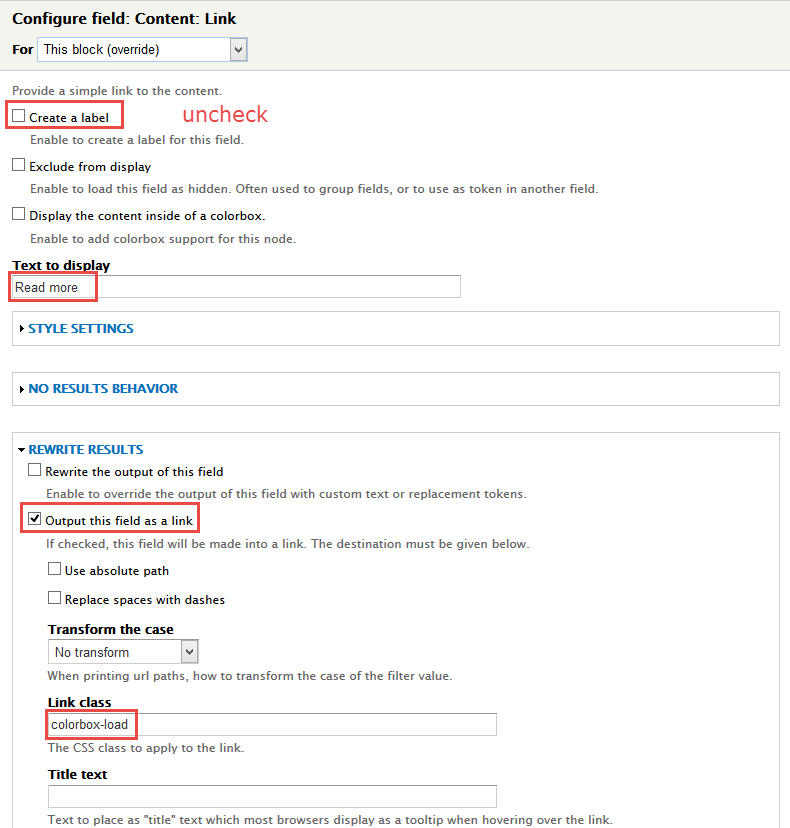
10. Set properties for Content: Link
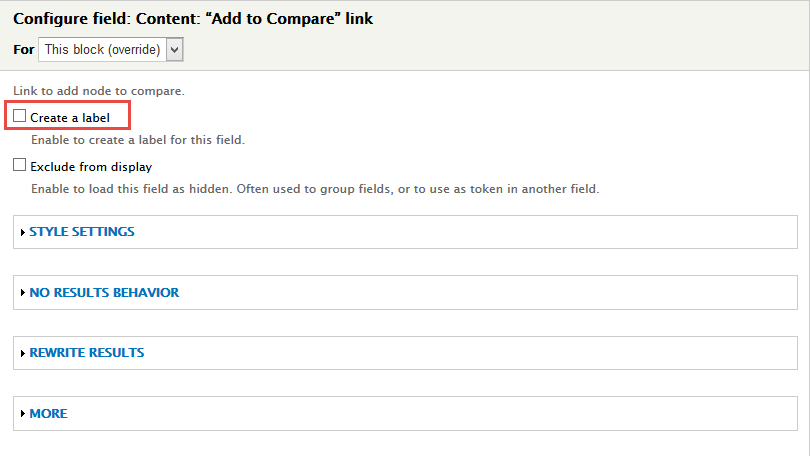
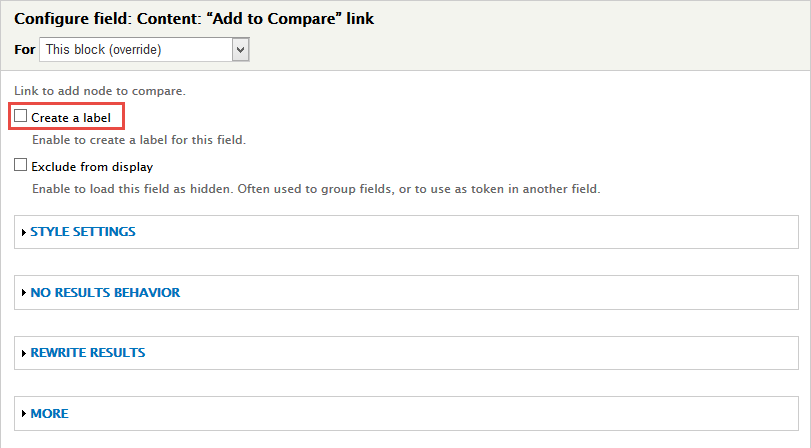
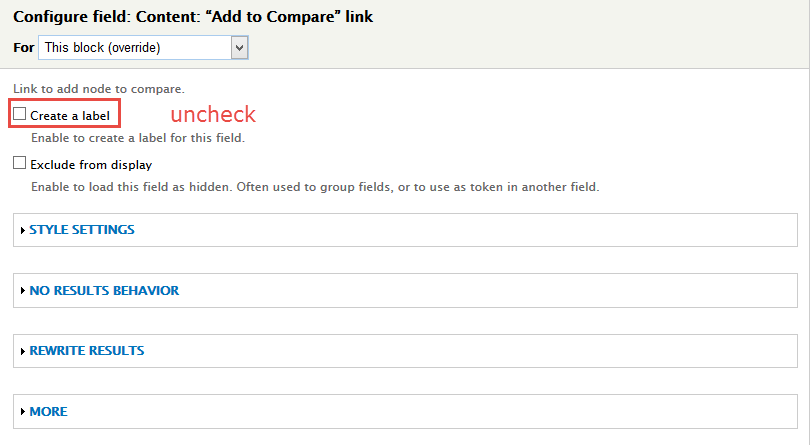
11. Set properties for Content: “Add to Compare” link
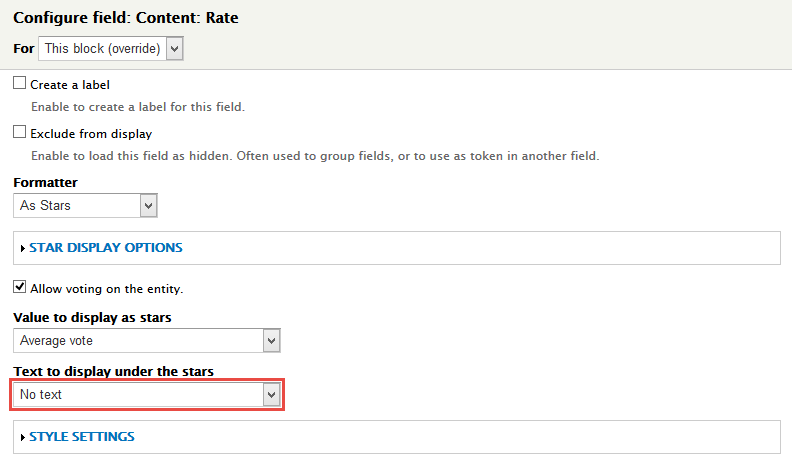
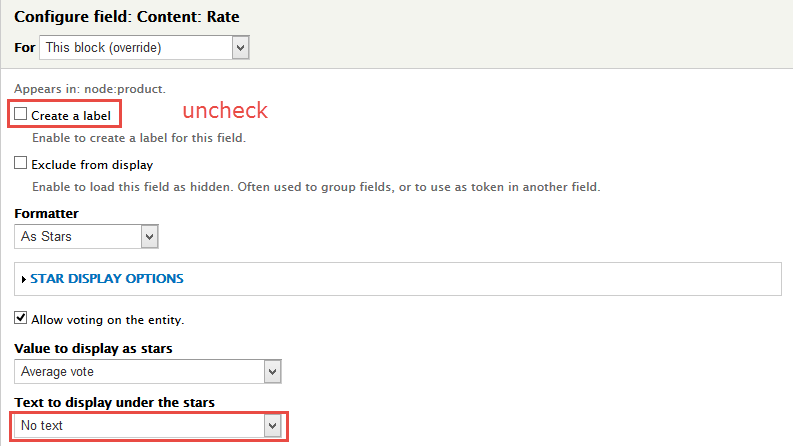
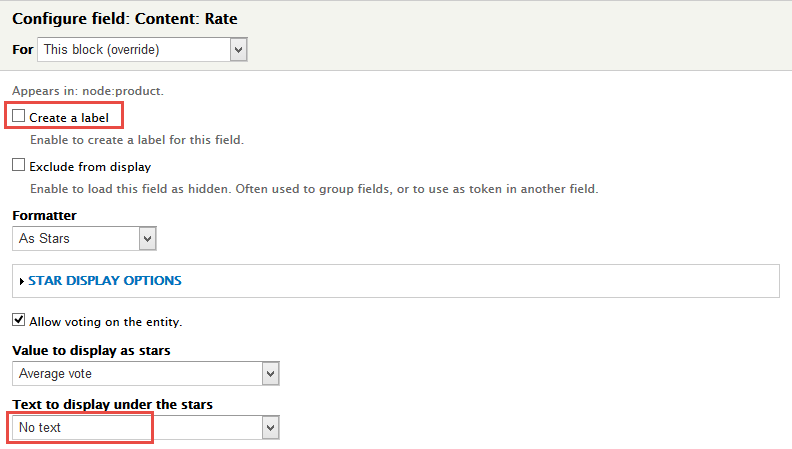
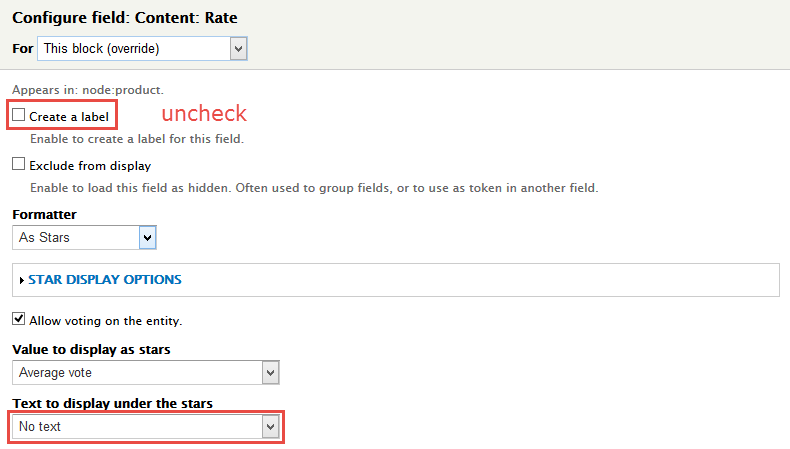
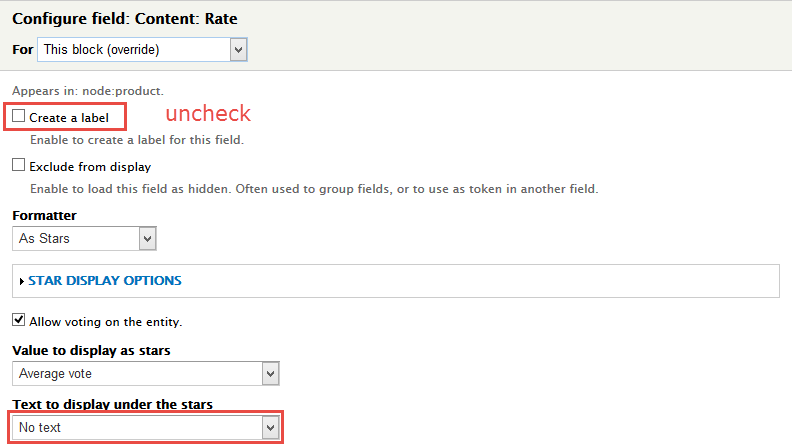
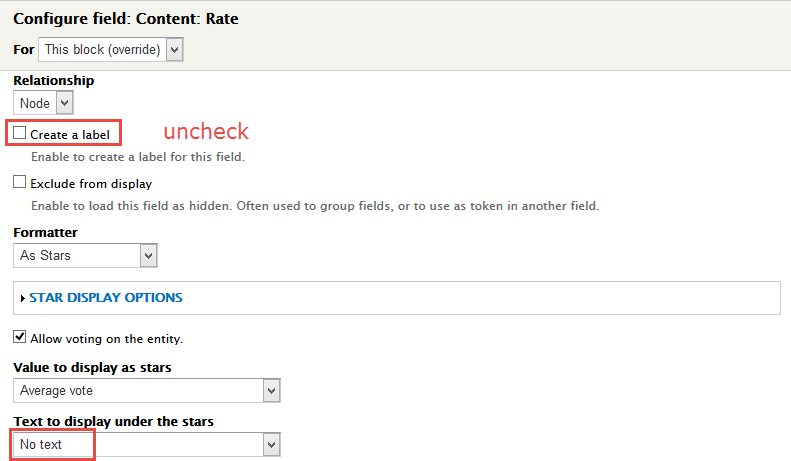
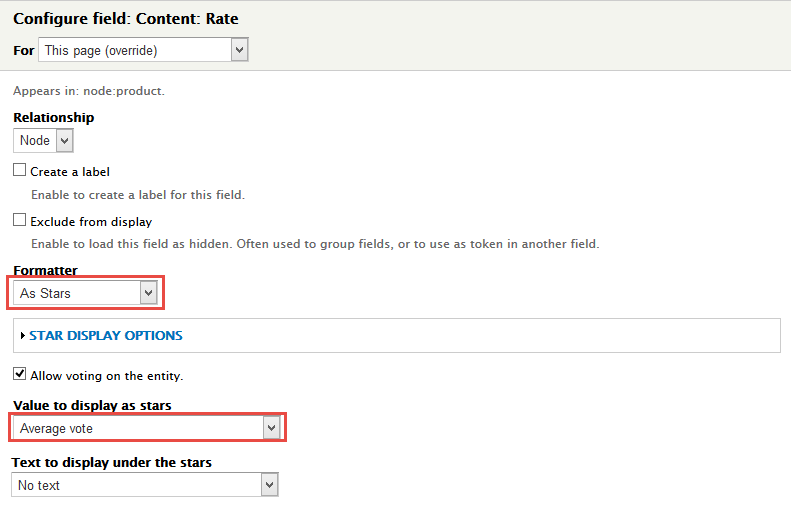
12. Set properties for Content: Rate
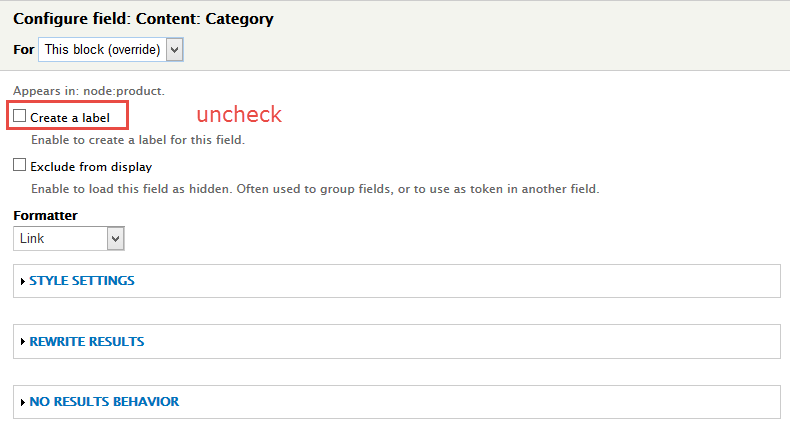
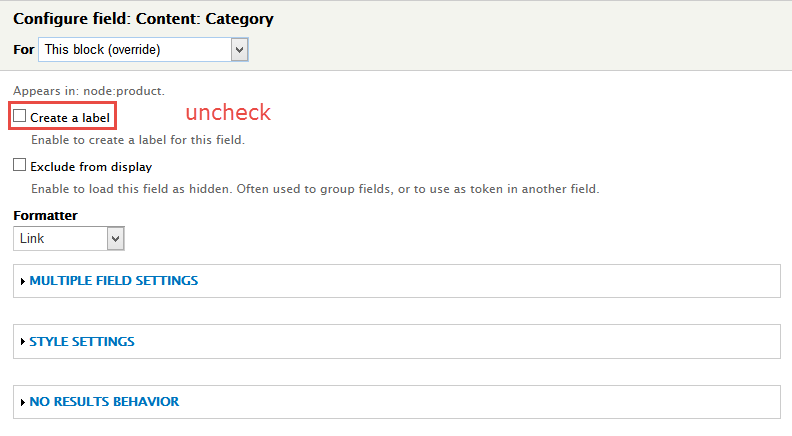
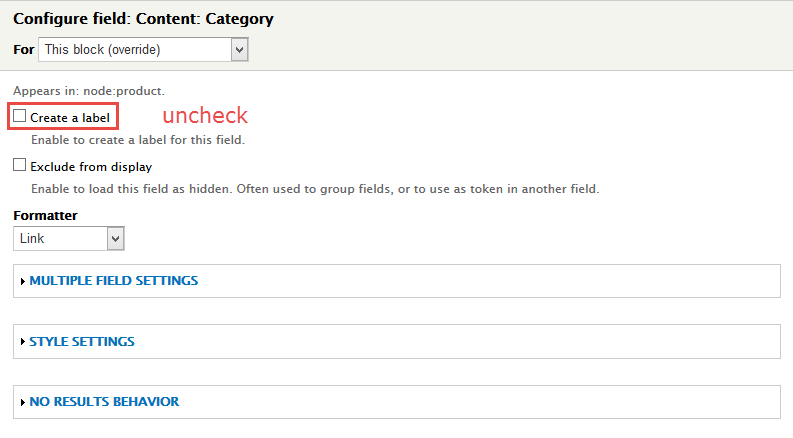
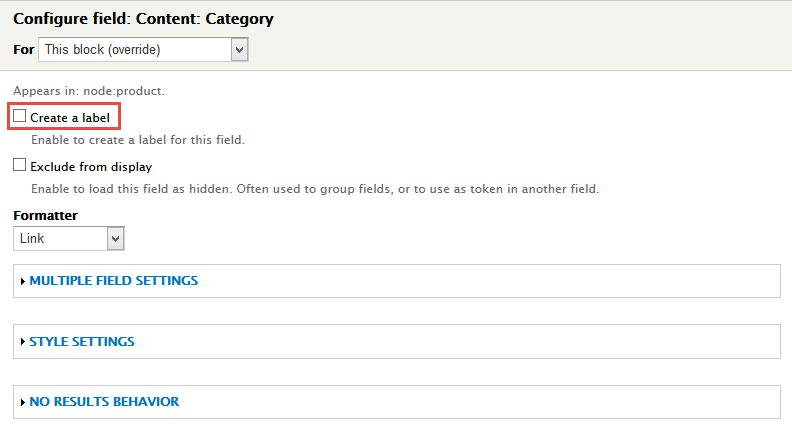
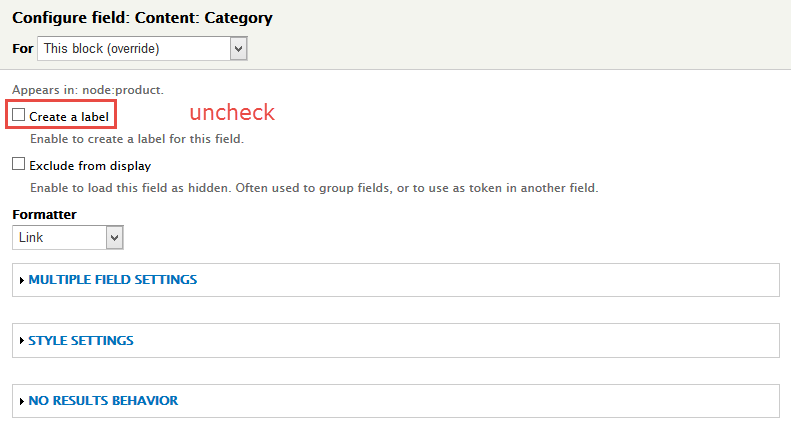
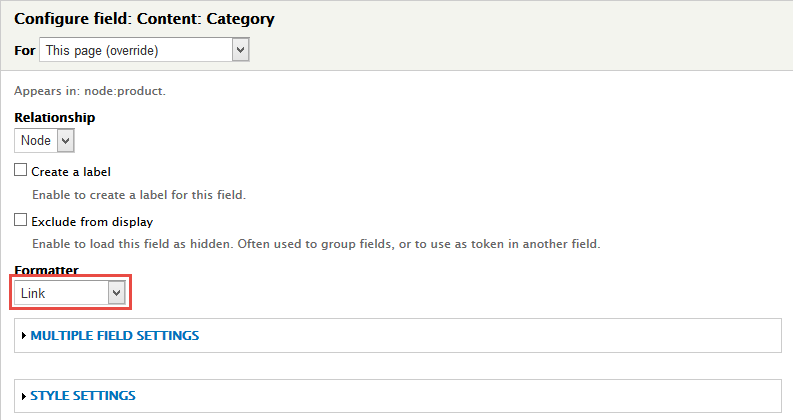
13. Set properties for Content: Category
14. Set properties for Global: Fieldset (Fieldset)
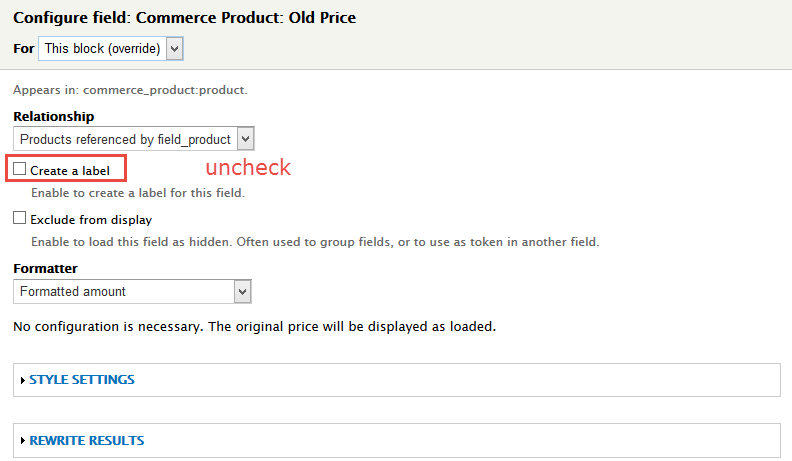
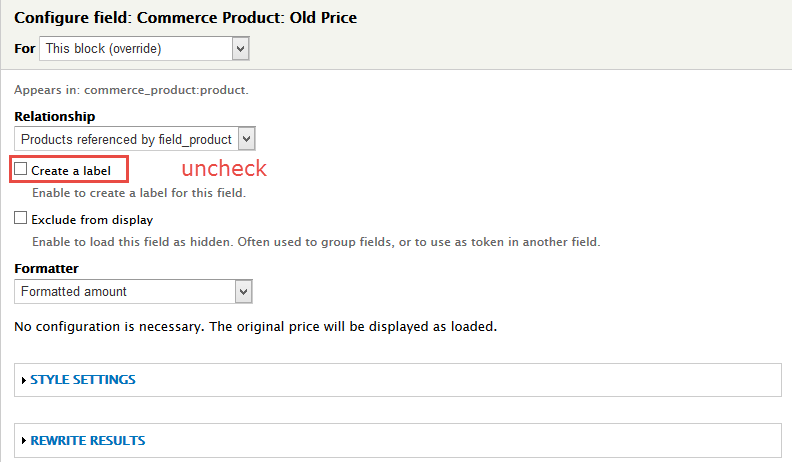
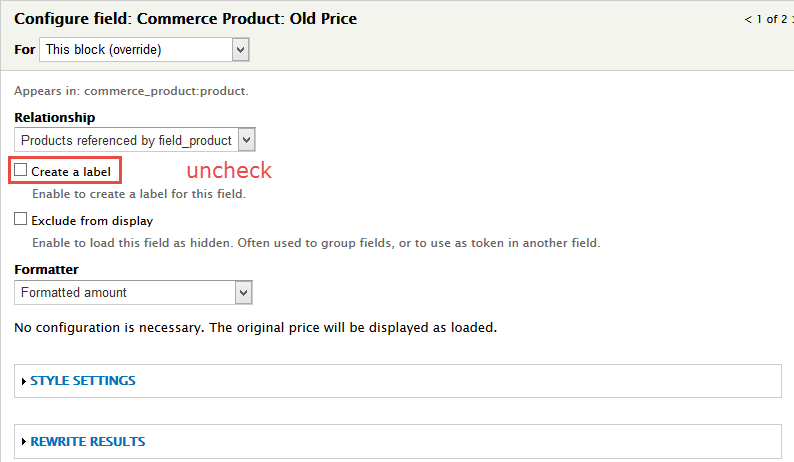
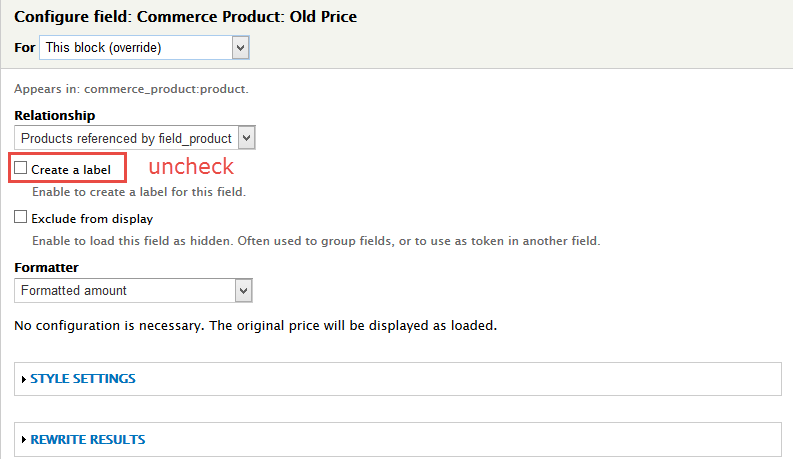
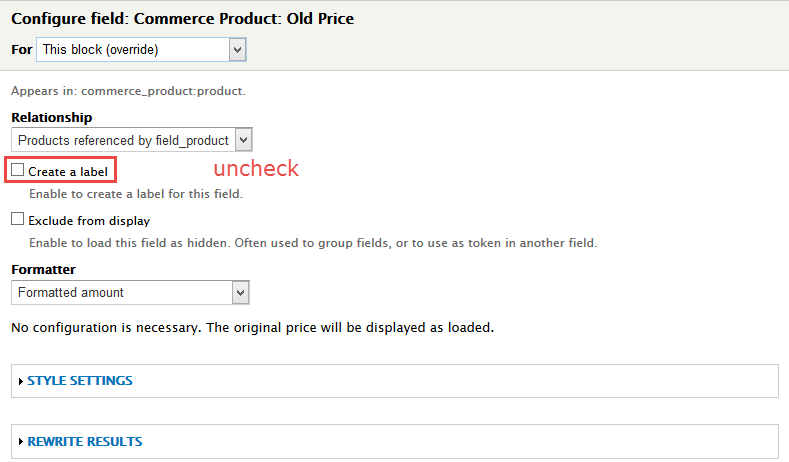
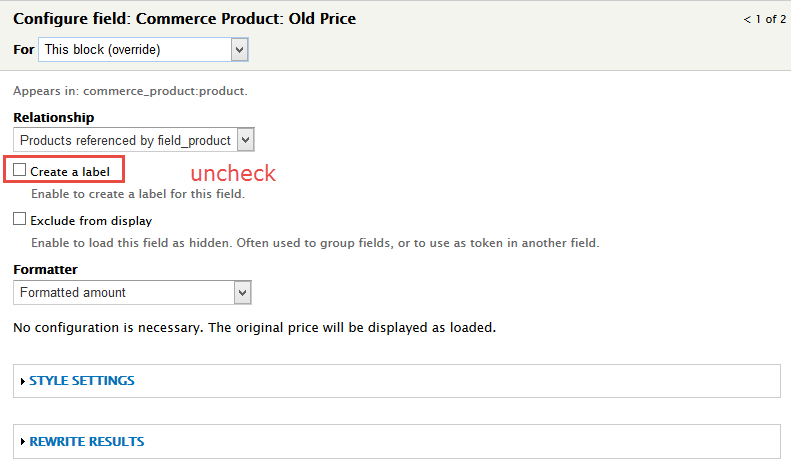
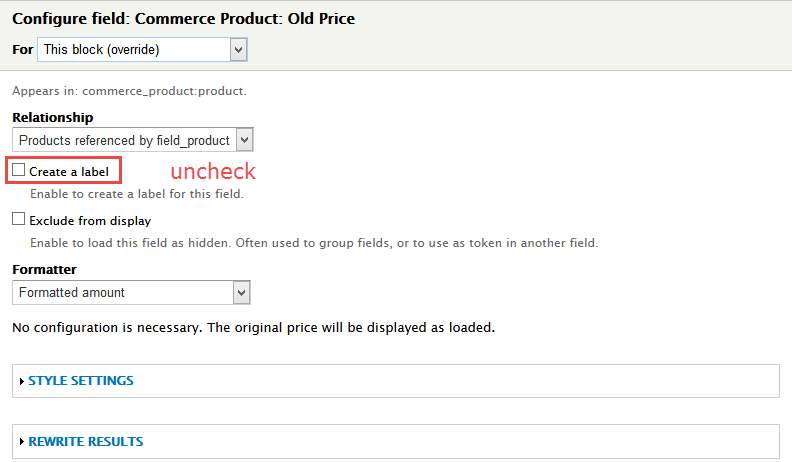
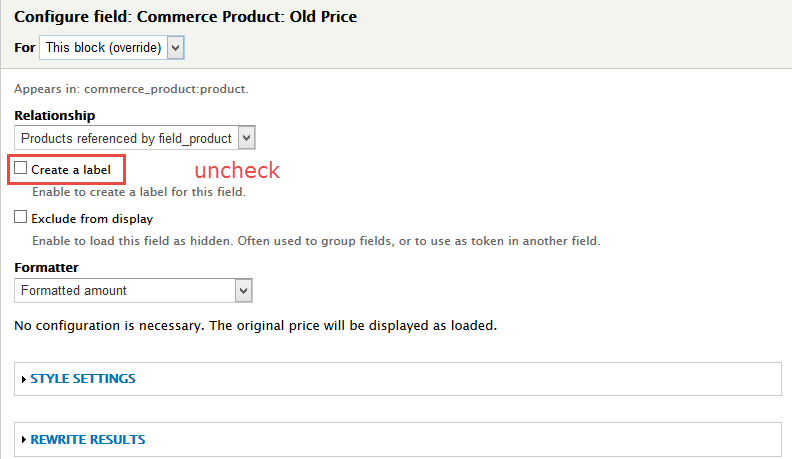
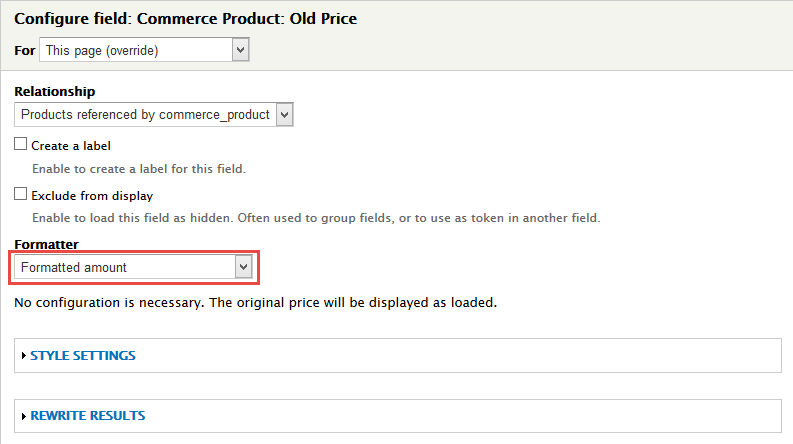
15. Set properties for Commerce Product: Old Price
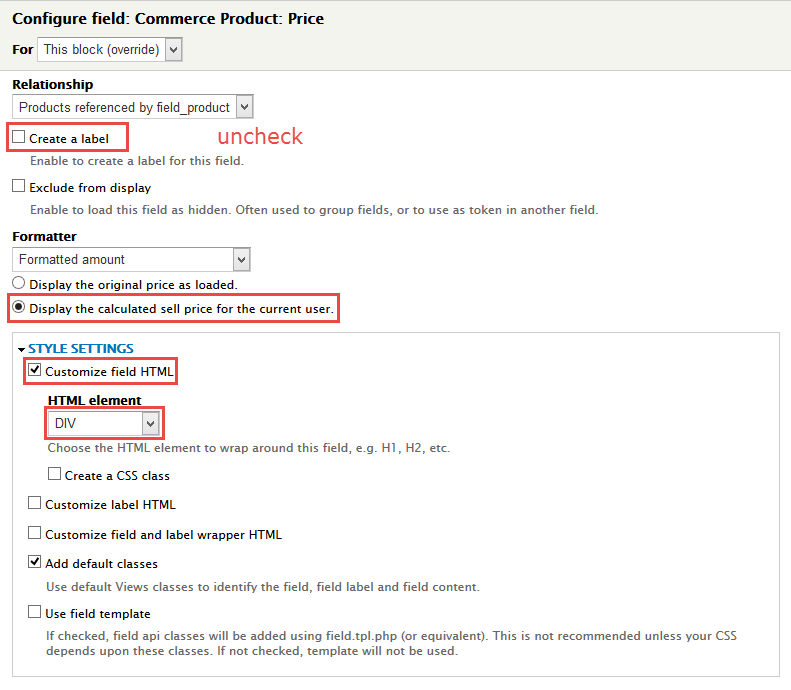
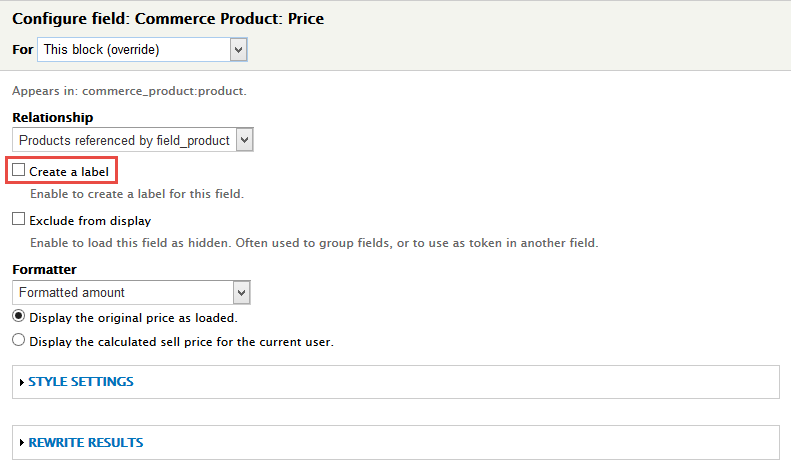
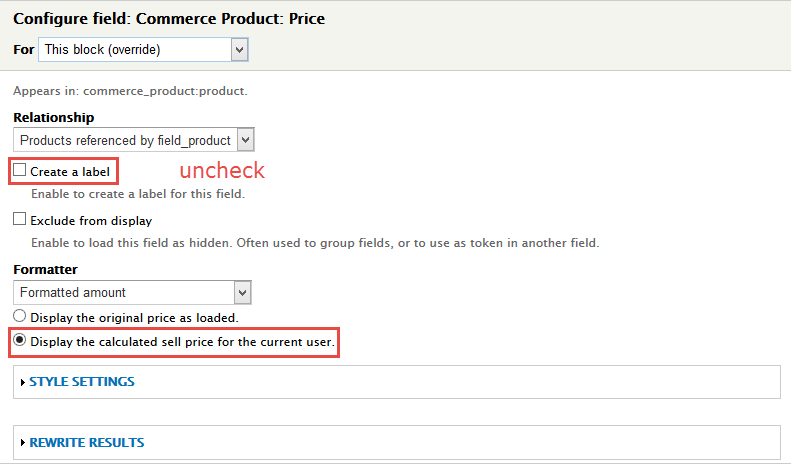
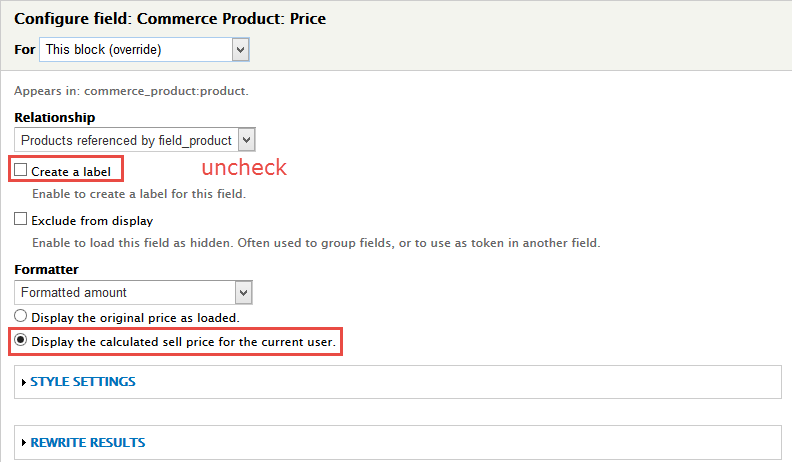
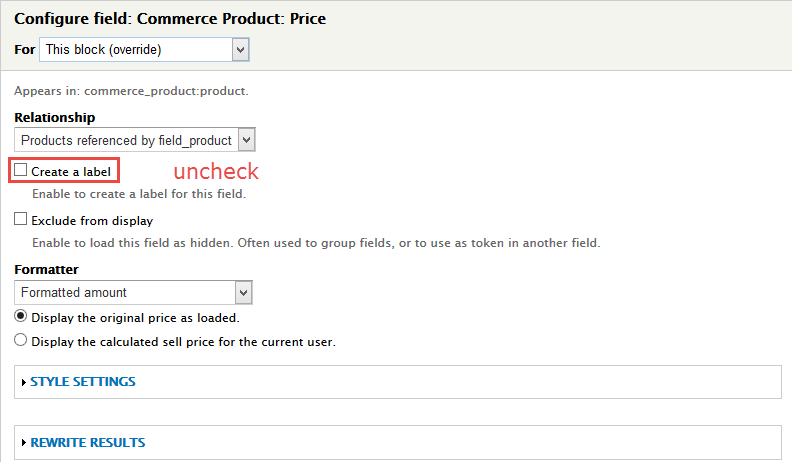
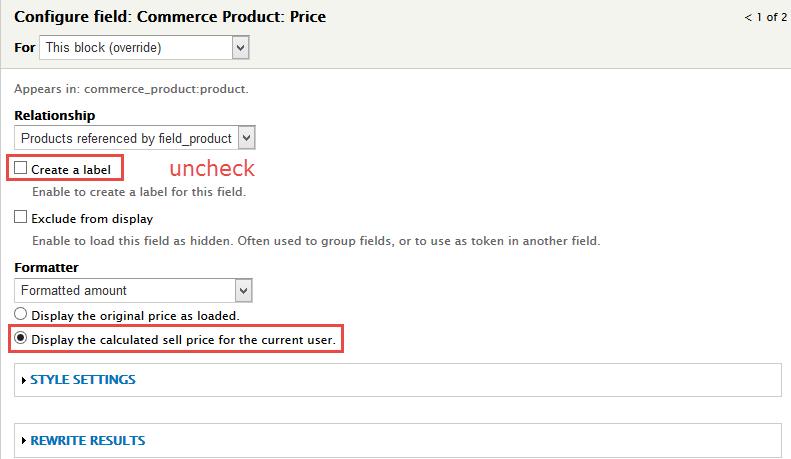
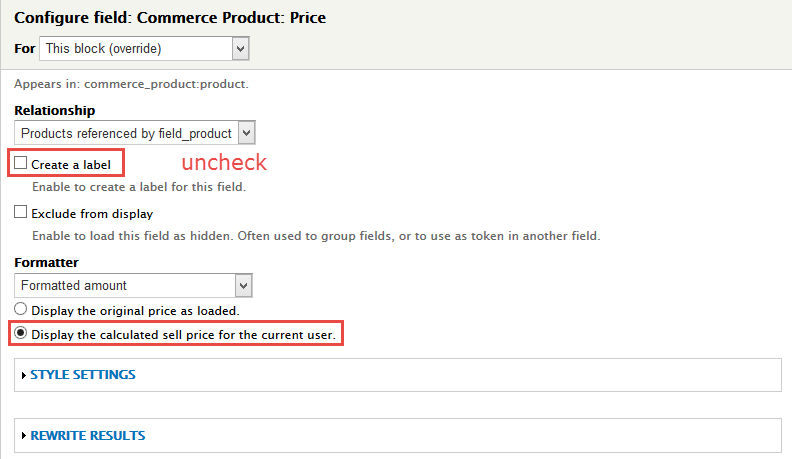
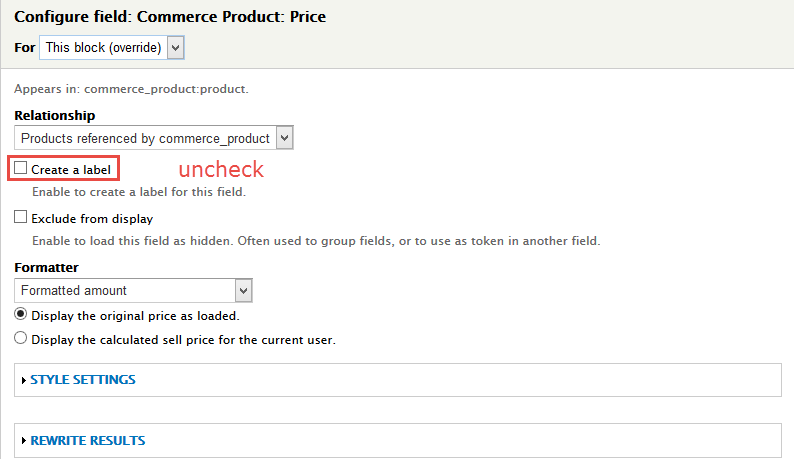
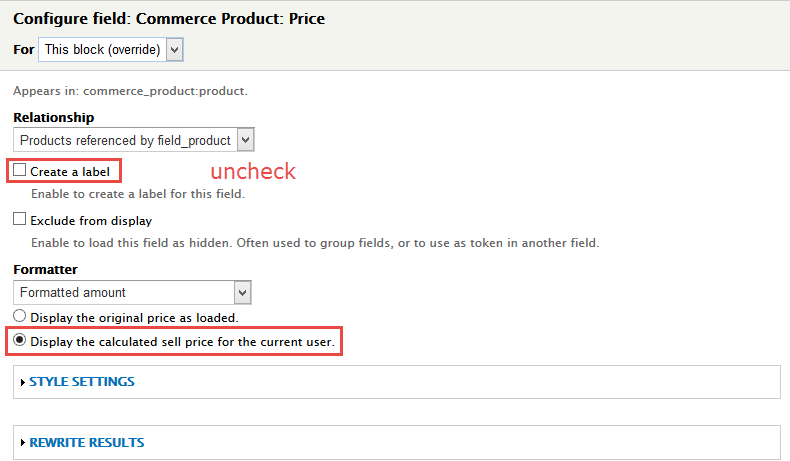
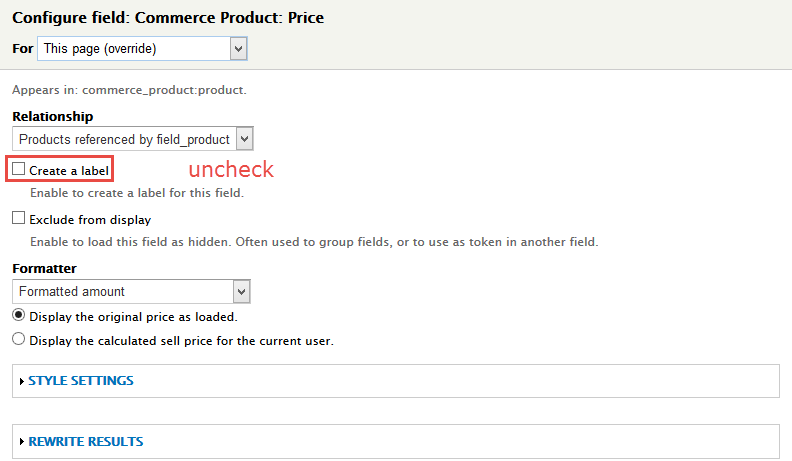
16. Set properties for Commerce Product: Price
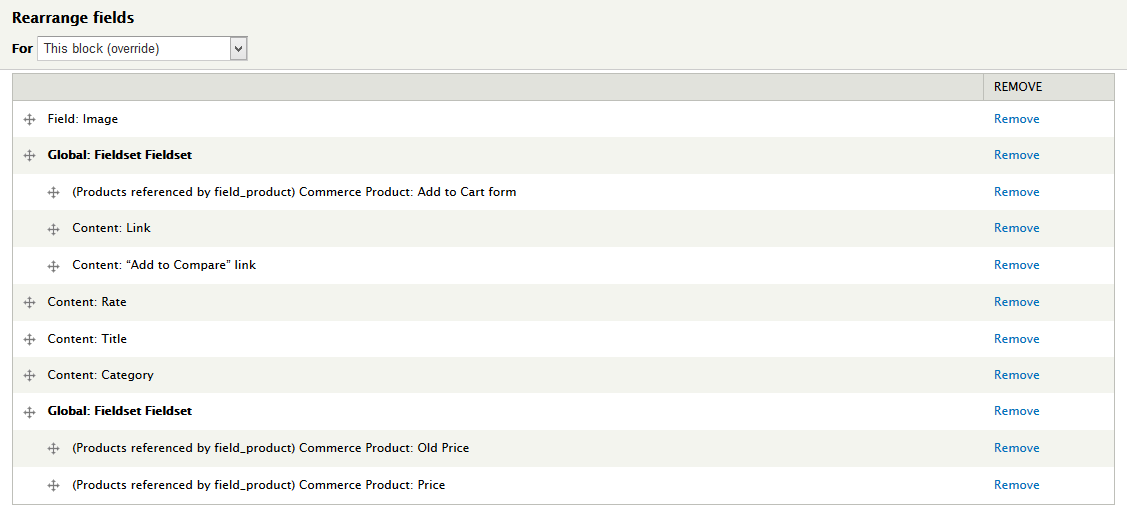
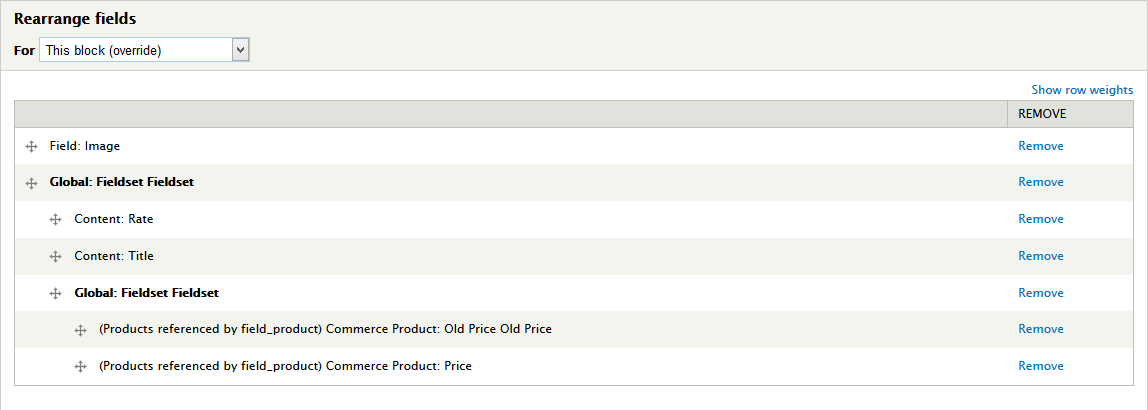
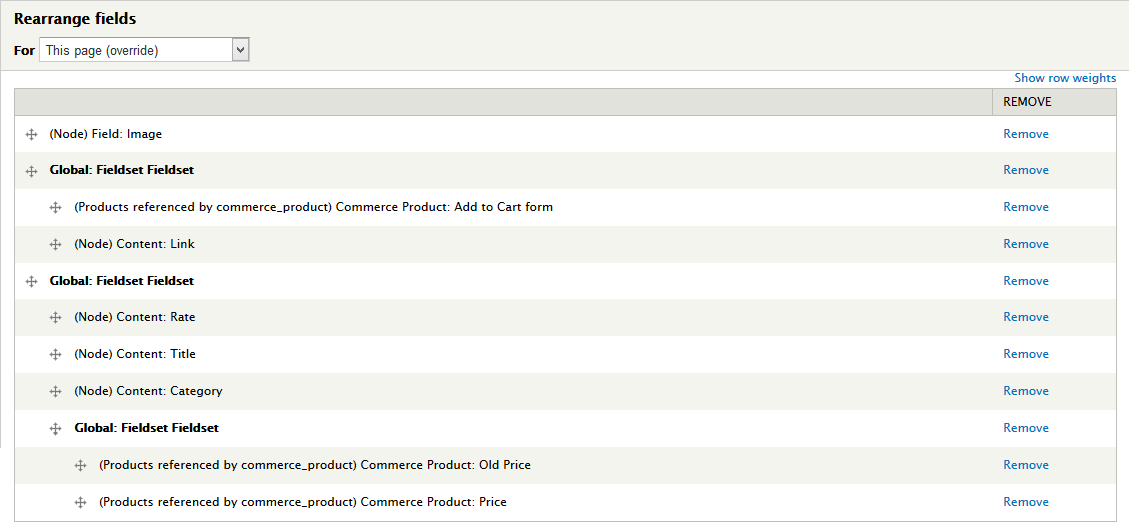
17. At FIELDS area, click Rearrange button and set following arrange
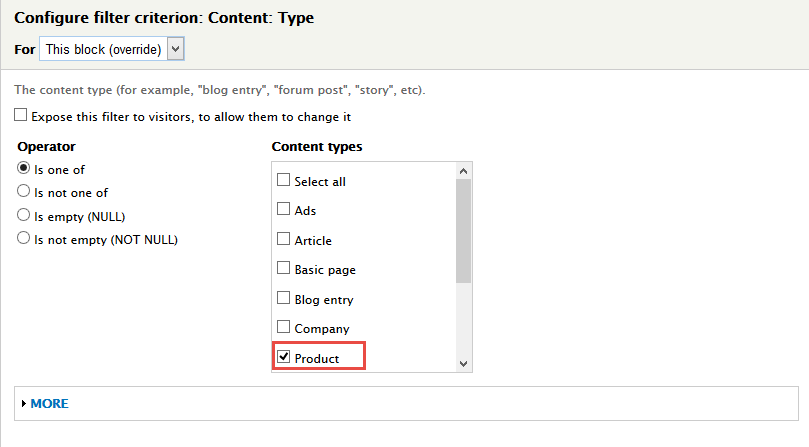
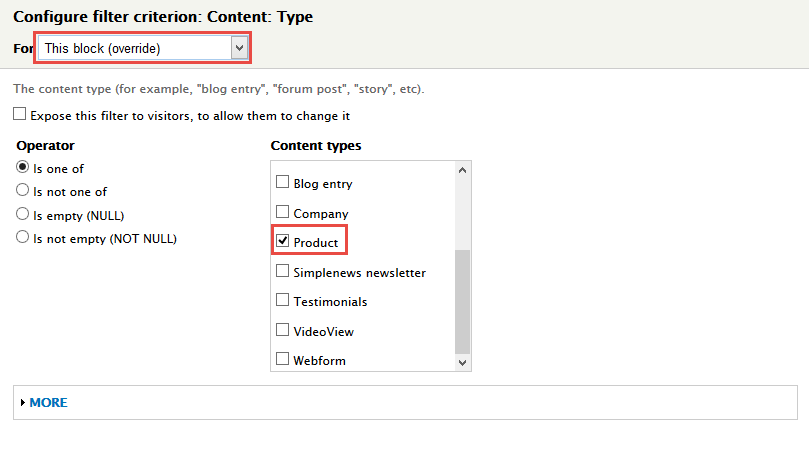
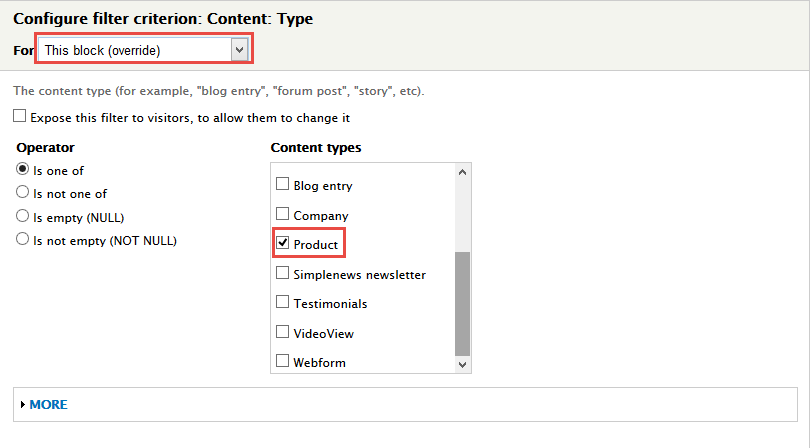
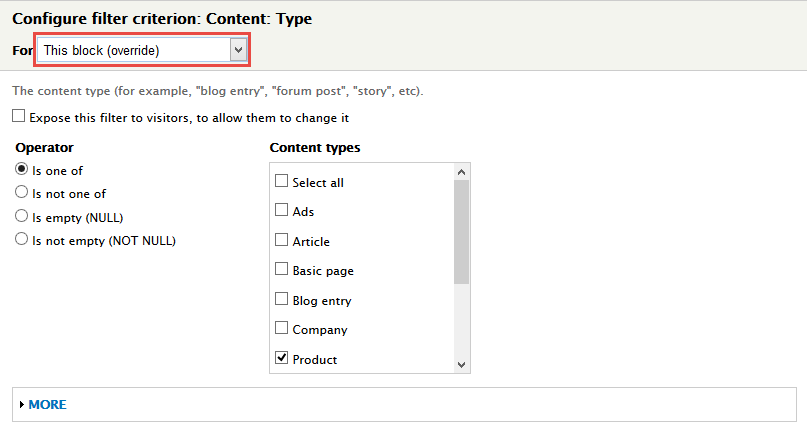
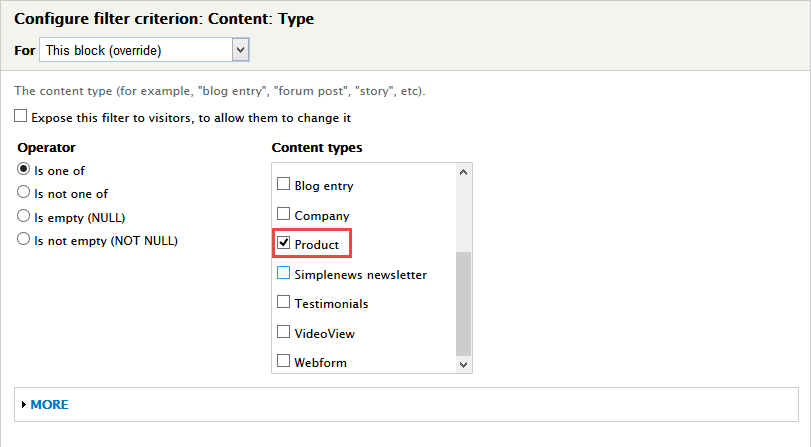
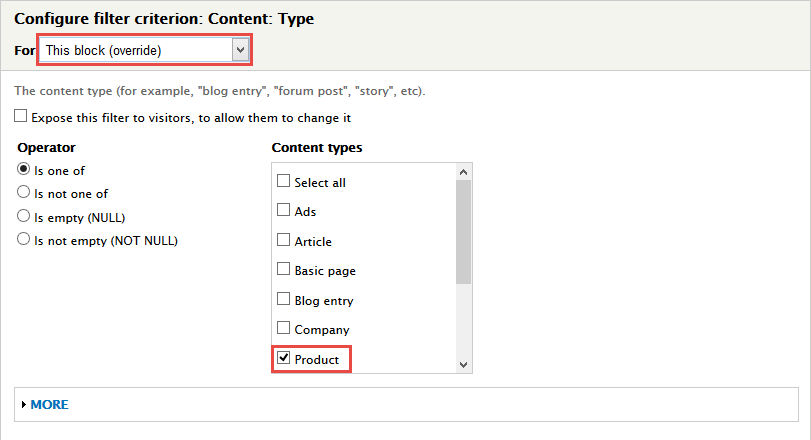
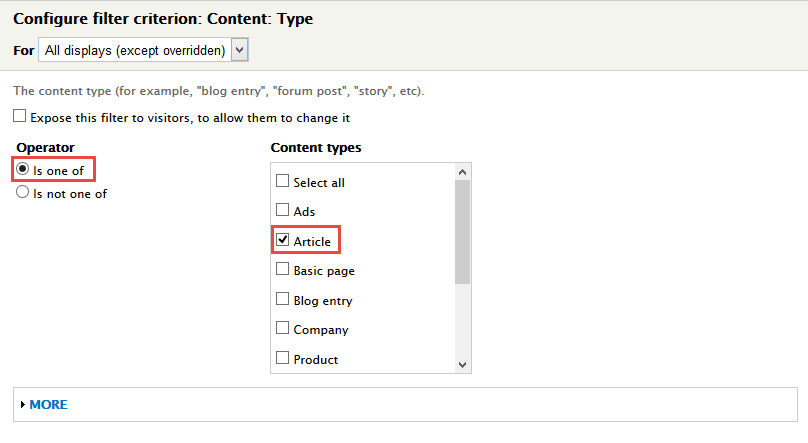
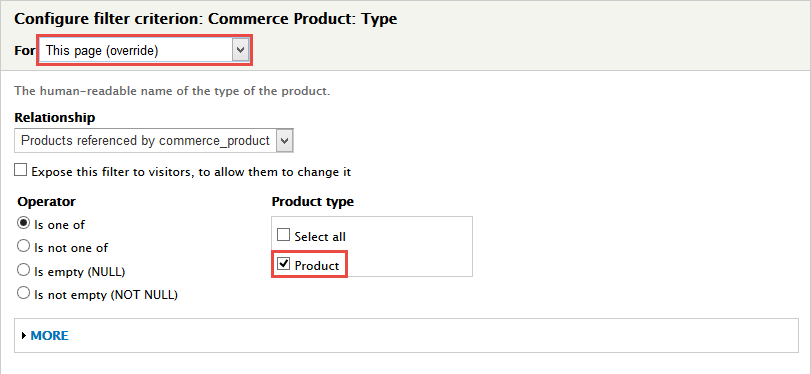
18. At FILTER CRITERIA area, click Add button and add file Content: Type set the following properties:
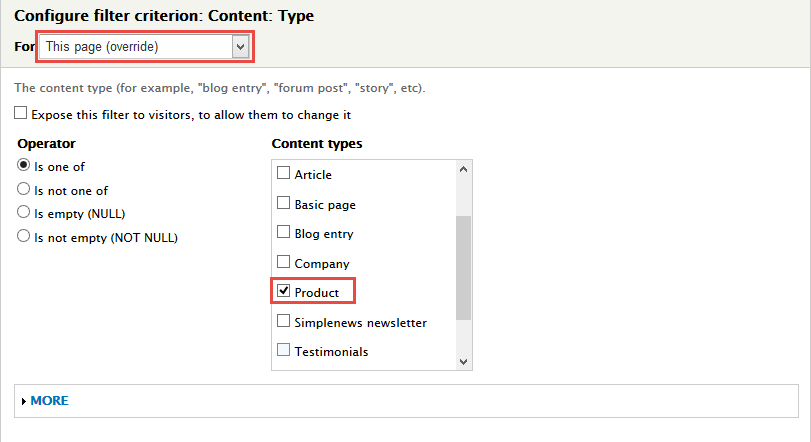
19. Set properties for Content: Type
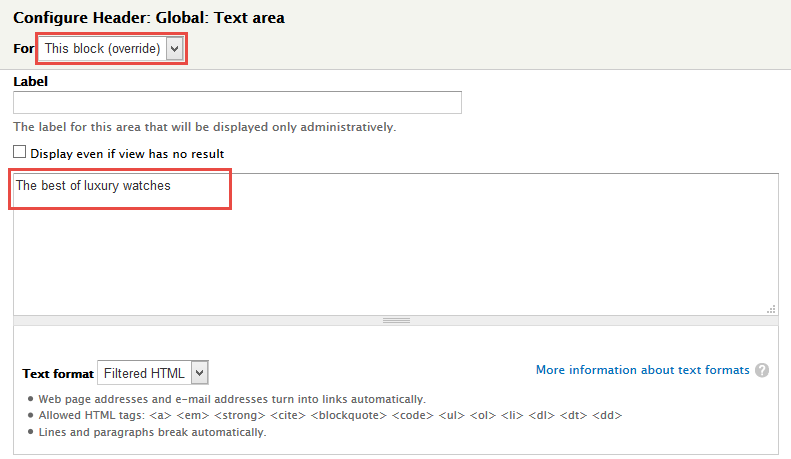
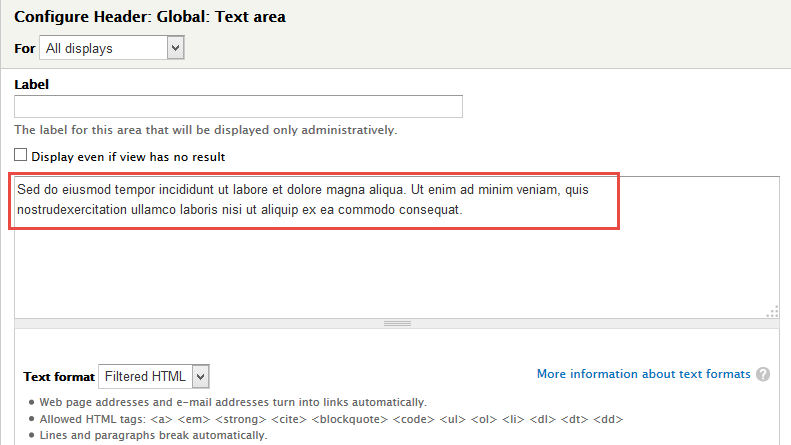
20. At HEADER area, click Add button field Global: Text area and set following properties:
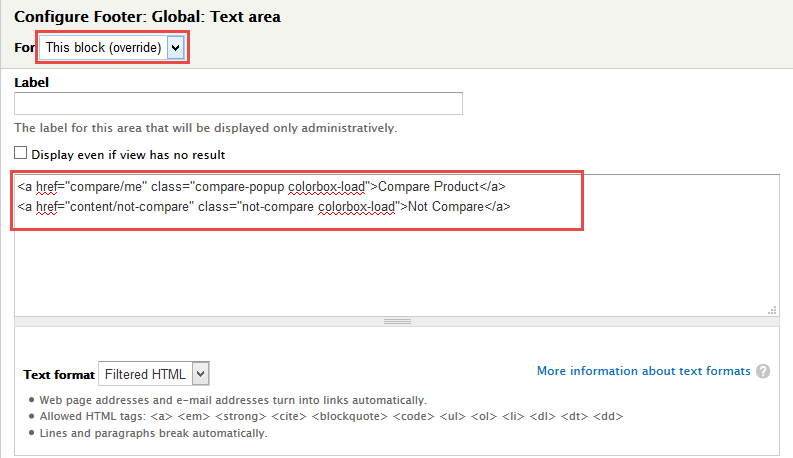
21. At FOOTER area, click Add button field Global: Text area and set following properties:
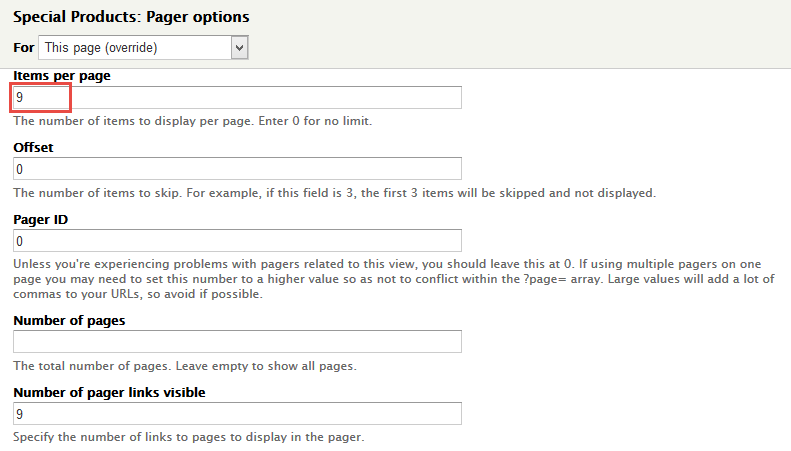
22. At PAGER > Use pager area, click link
23. In Advanced > OTHER area, add CSS class change following properties:
24.Click Save block button.
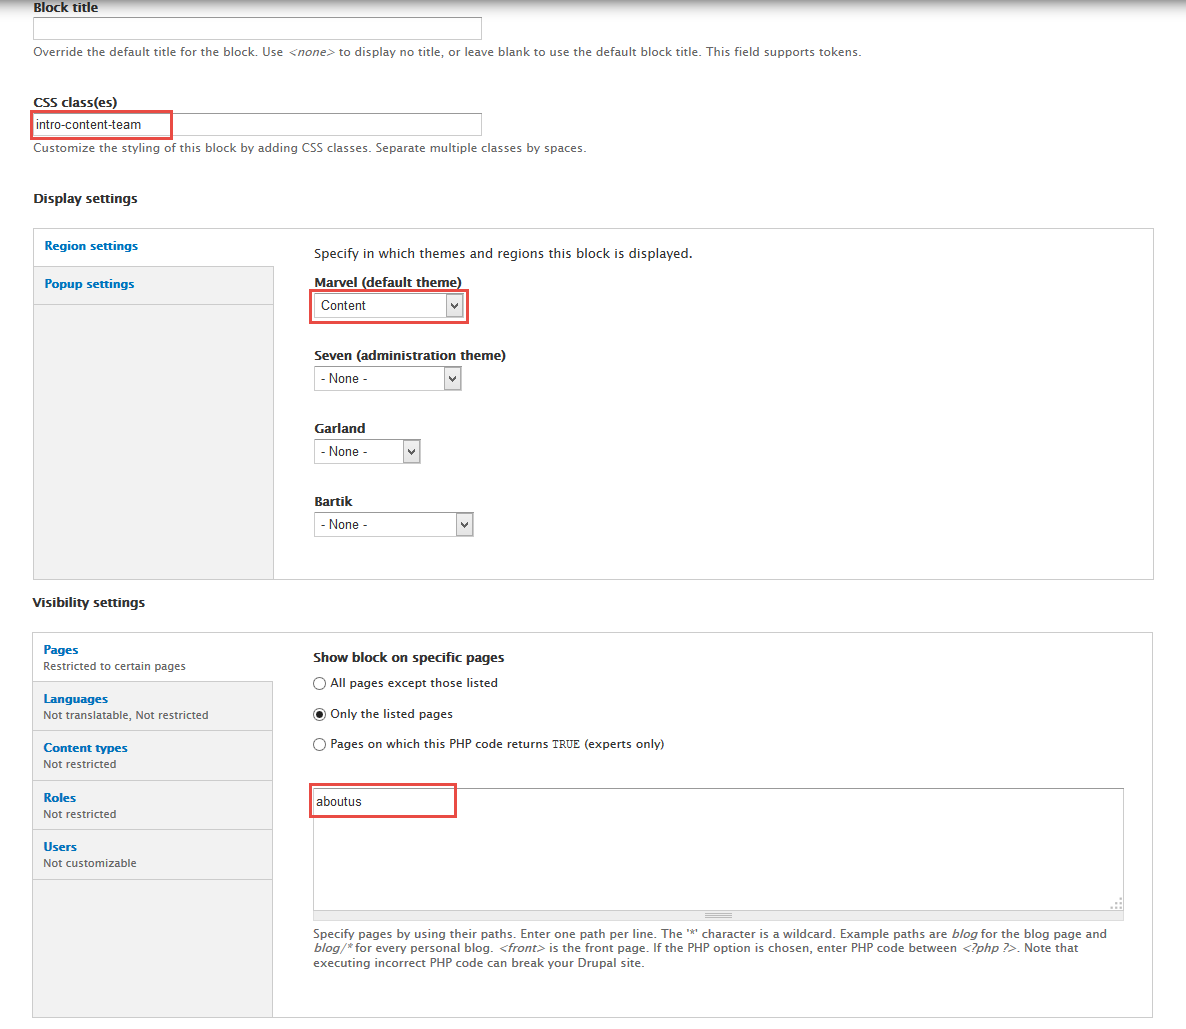
2. Configure OUR LATEST PICKS block
1. Navigate to Structure > Blocks
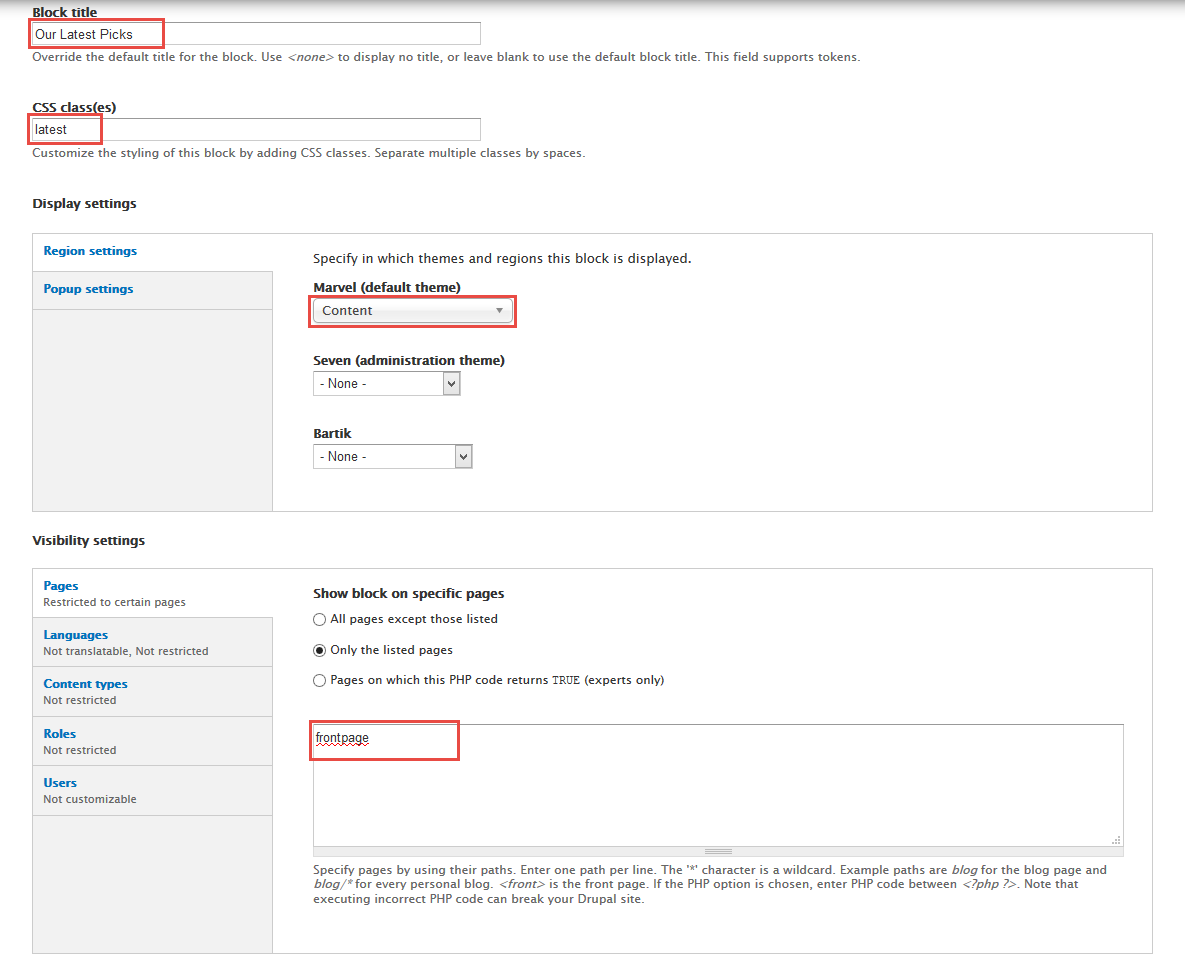
2. Find View: Product View: OUR LATEST PICKS, click configure link, set following properties
3.Click Save block button.
Featuer block
Front end Display
1. Create Video view block view
Stay open Product view, click Add button add Block new.
Front end Display
1. Next to steps below to set properties for the following fields:
2. At Display name area, set following properties:
3. At Title area, set following properties:
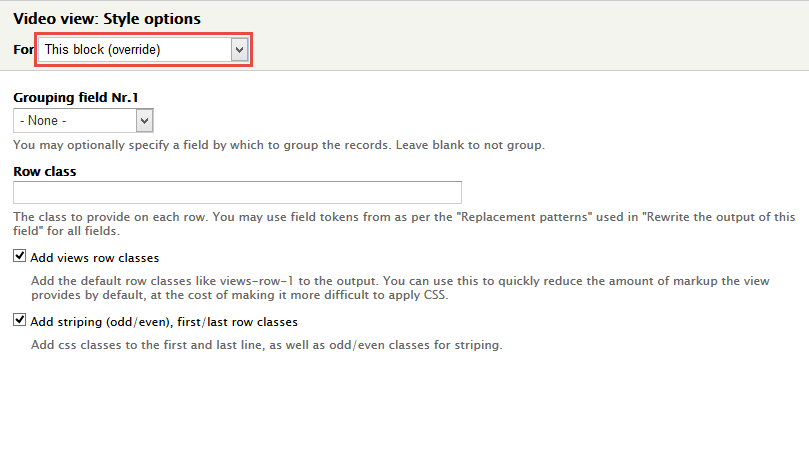
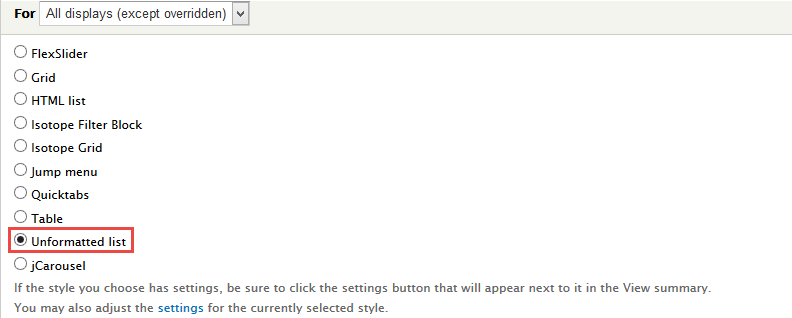
4. At FORMAT Format: Unformatted list, click Settings and set following properties:
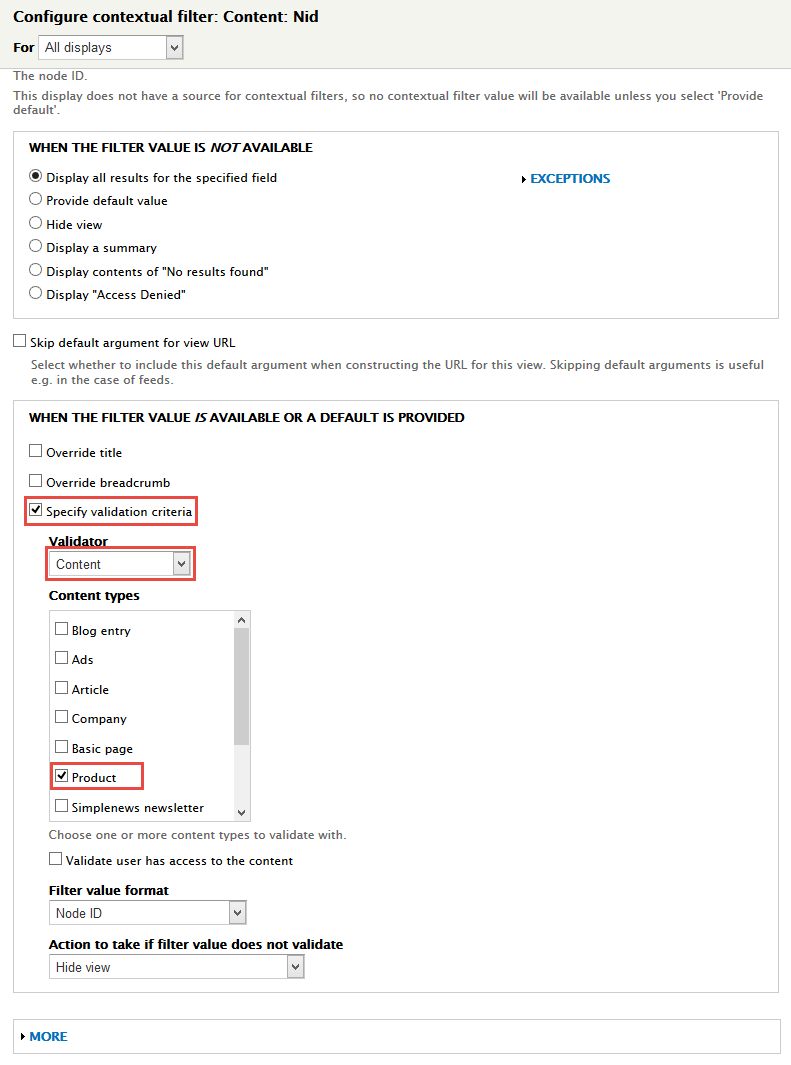
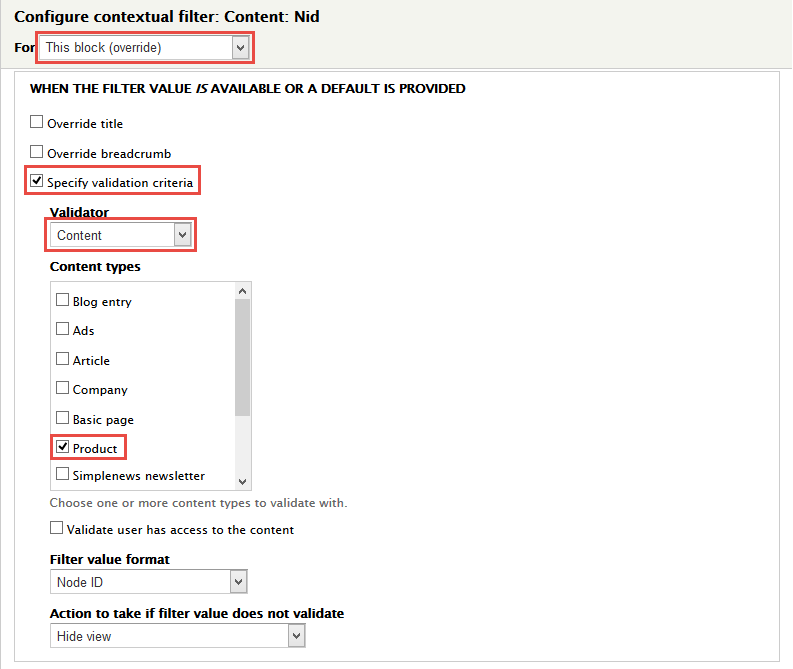
5. In Advanced > Contextual filters area, click Add button to add fields: Content: Nid and set following properties:
6. At Advanced > REALATIONSHIPS area, click Rearrange and remove content
7. At FIELDS area, click Add button to add fields: Content: Videoview, Field: Image .
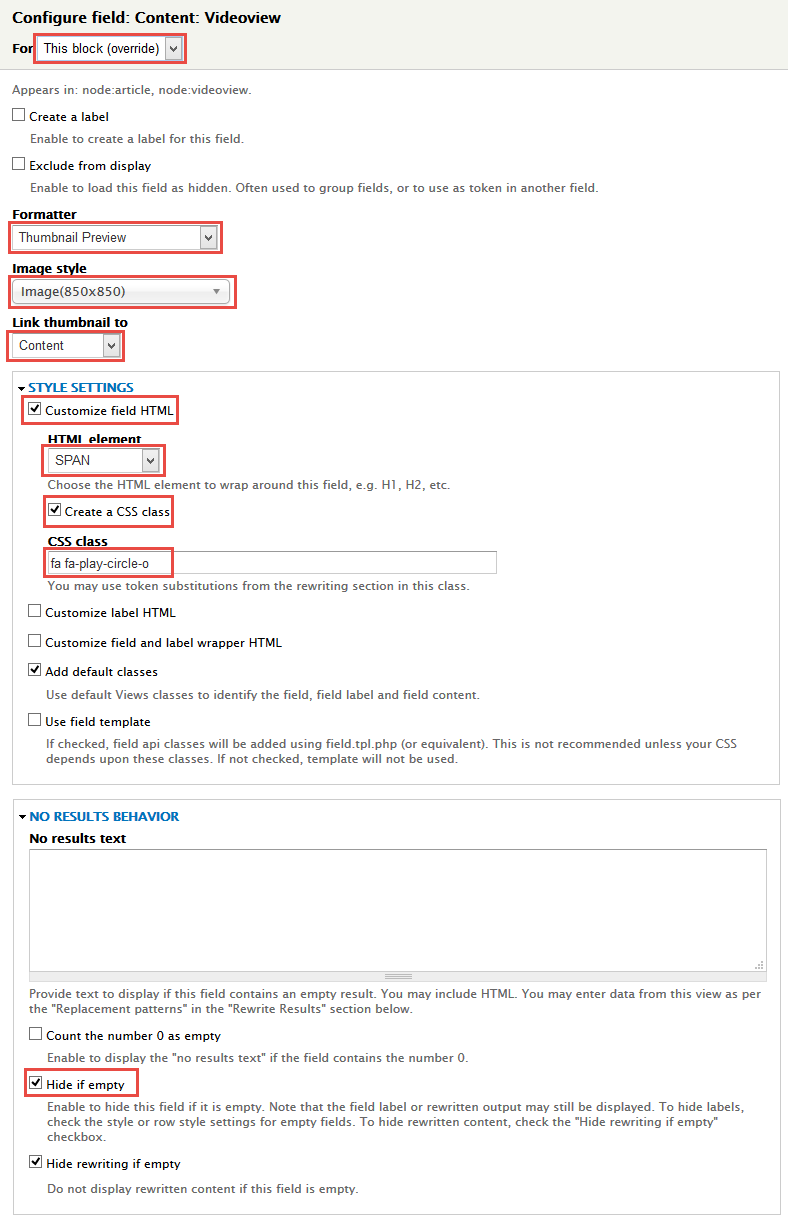
8. Set properties for Content: Videoview
9. Set properties for Field: Image
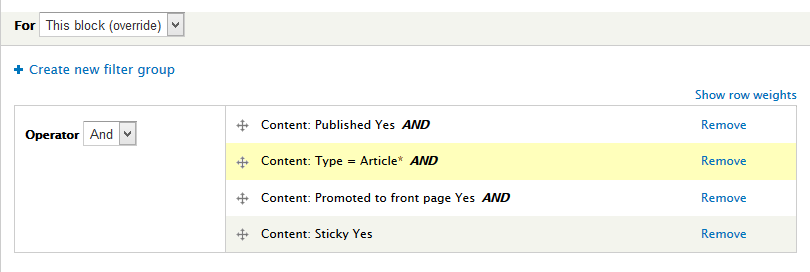
10. At FILTER CRITERIA area, click Add button and add file Content: Promoted to front page, Content: Sticky set the following properties:
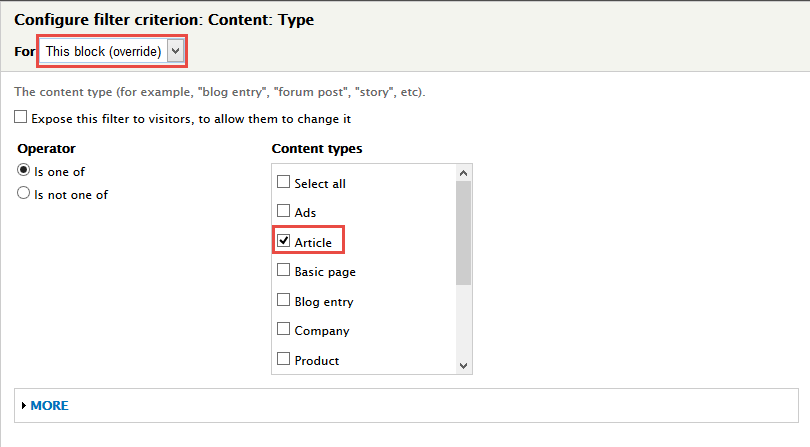
11. Set properties for Content: Type
12. Set properties for Content: Promoted to front page
13. Set properties for Content: Sticky
14. At FILTER CRITERIA area, click And/Or, Rearrange button and set following arrange
15. At PAGER > Use pager area, click link
16. At Advanced > OTHER area, add CSS class
17.Click Save block button.
2. Configure ViewColectionHompage block
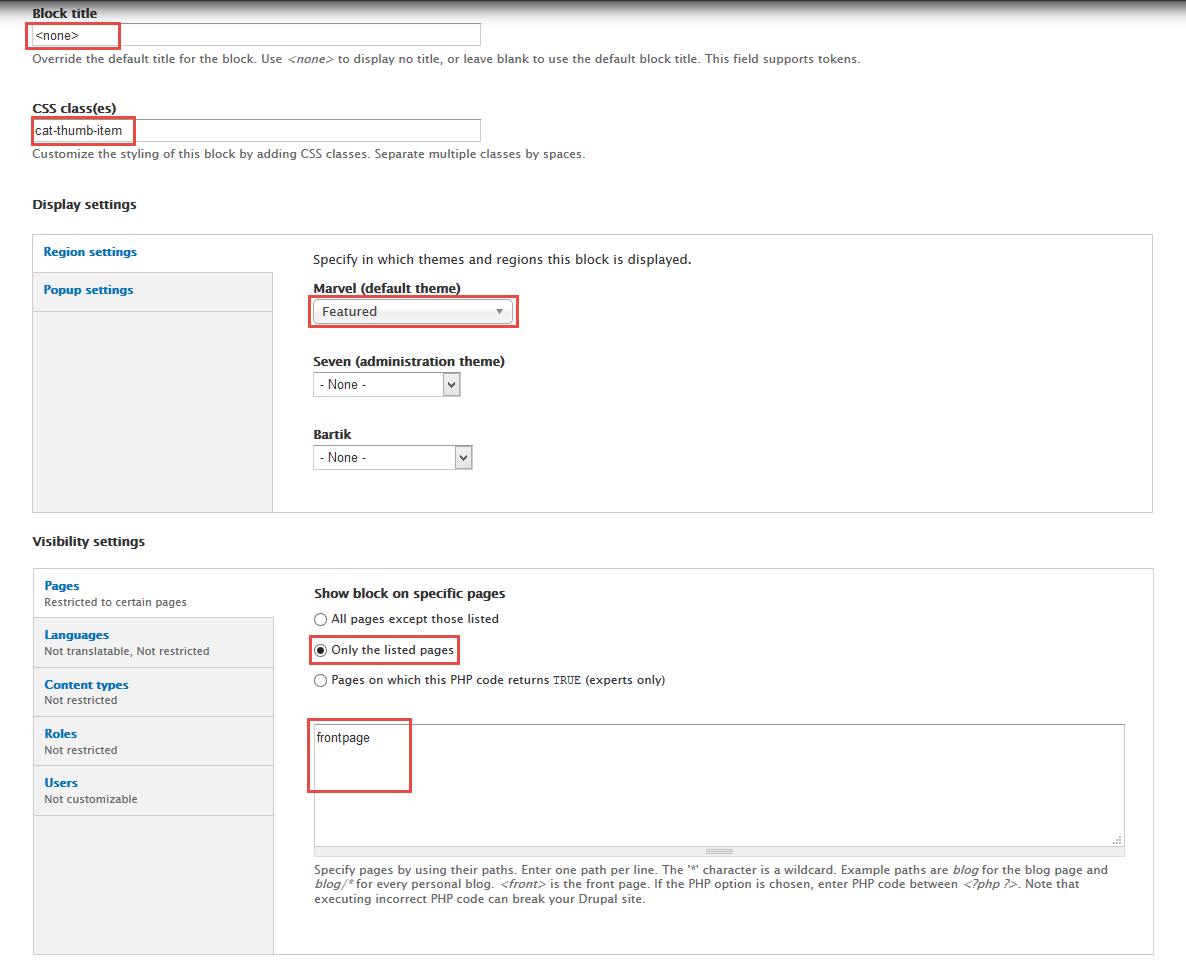
1. Navigate to Structure > Blocks
2. Find View: Product View: Video view block, click configure link, set following properties
3.Click Save block button.
3. Create ViewColectionHompage block view
Front end Display
Stay open Collection view, click Add button add Block new.
1. Next to steps below to set properties for the following fields:
2. At Display name area, set following properties:
3. At Title area, set following properties:
4. At FORMAT Format area, set properties:
5. At FIELDS area, click Add button to add fields: Field: Link.
6. Set properties for Field: Link
7. Set properties for Field: Image
8. Set properties for Taxonomy term: Term description
9. At FIELDS area, click Rearrange button and set following arrange
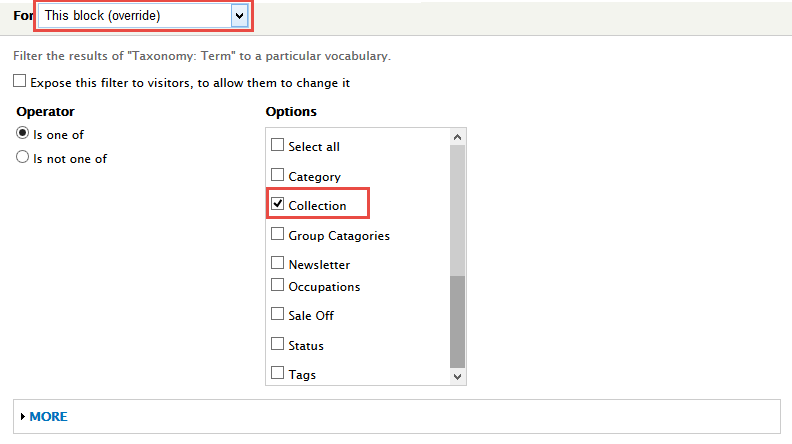
10. At FILTER CRITERIA area, click Taxonomy vocabulary: Machine name, Taxonomy term: Term ID set following properties:
11. Set properties for Taxonomy vocabulary: Machine name
12. Set properties for Taxonomy term: Term ID
13. At SORT CRITERIA area, Click Taxonomy term: Term IDset following properties:
14.Click Save block button.
4. Configure ViewColectionHompage block
1. Navigate to Structure > Blocks
2. Find View: Collection View: ViewColectionHompage block, click configure link, set following properties
3.Click Save block button.
Frontpage view
Edit Frontpage page view
1. Navigate to Structure > View ,find Frontpage view, click Enable button. Then click Editbutton , find and click Page button and set following properties:
2. At FORMAT Format area, set properties:
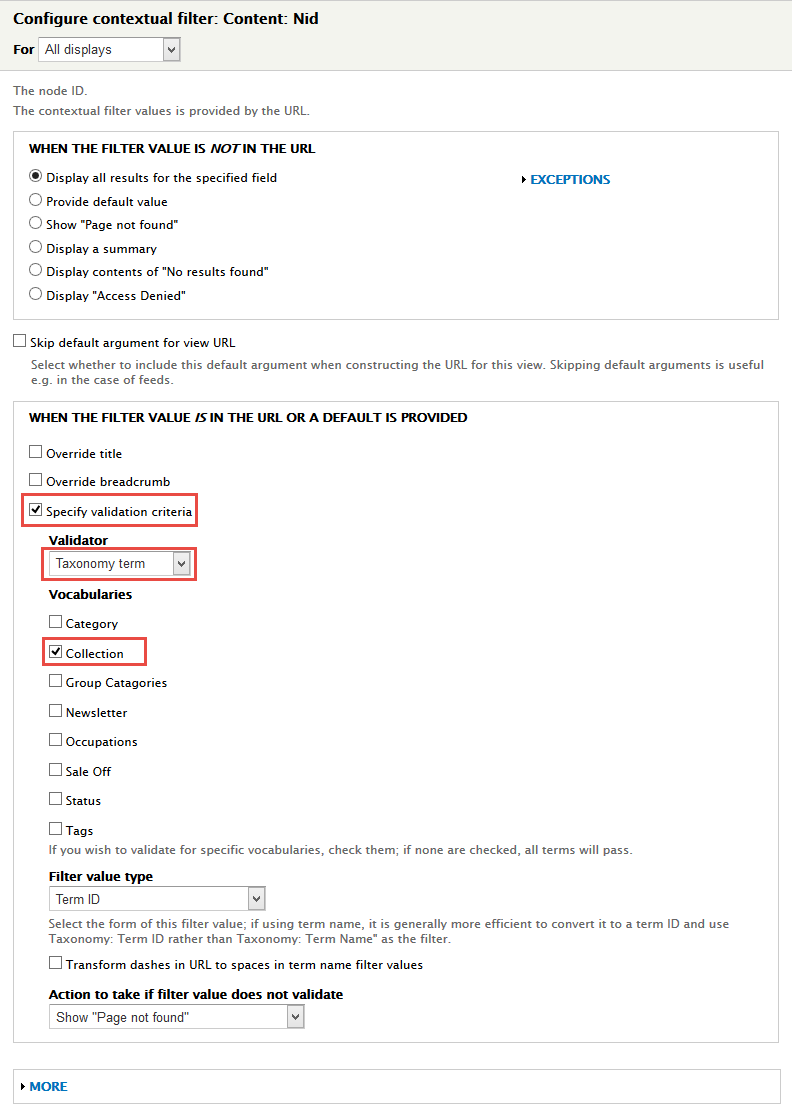
3. In Advanced > Contextual filters area, click Add button to add fields: Content: Nid and set following properties:
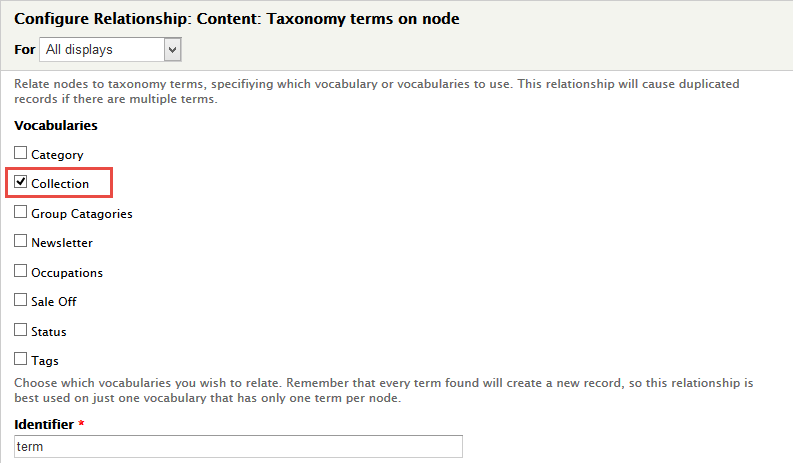
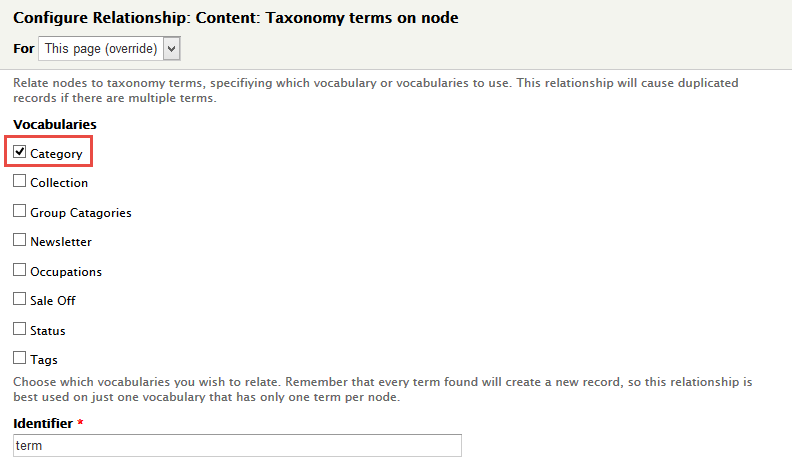
4. In Advanced > REALATIONSHIPS area, click Add button to add fields: Content: Taxonomy terms on node and set following properties:
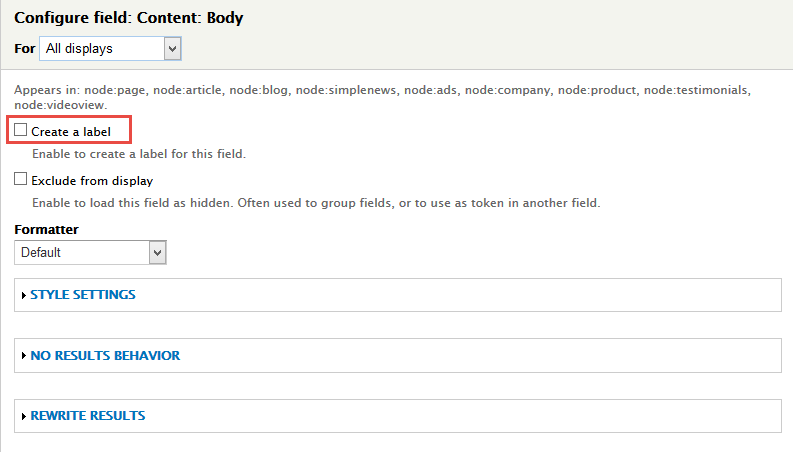
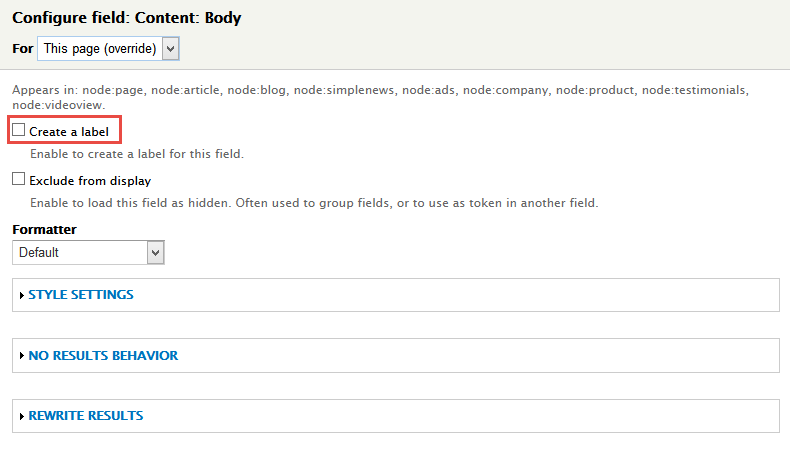
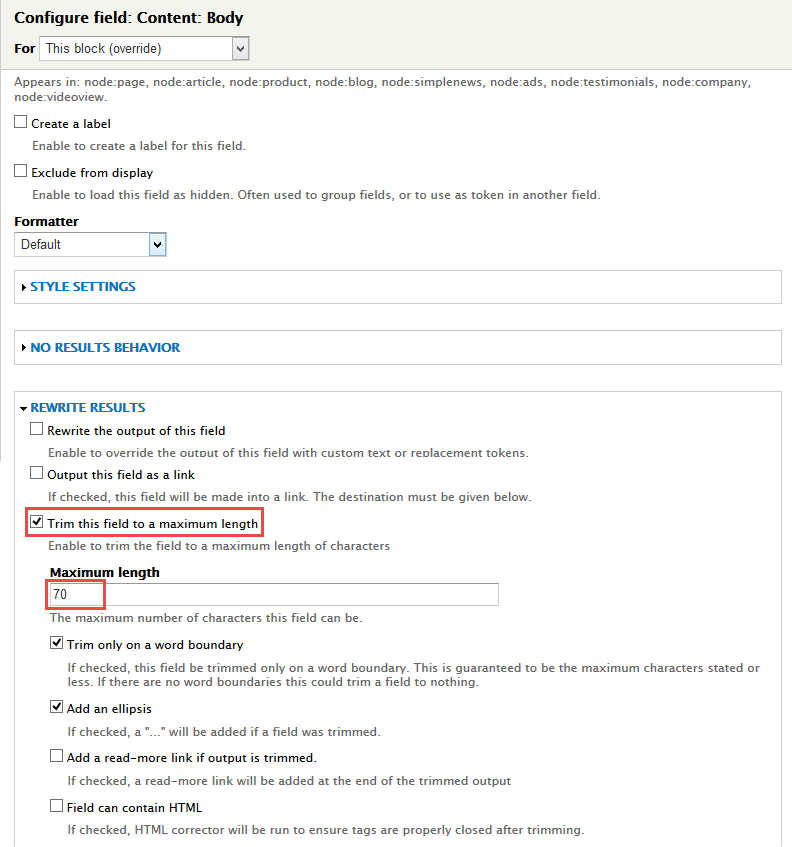
5. At FIELDS area, click Add button to add fields: Content: Body .
6. Set properties for Content: Body
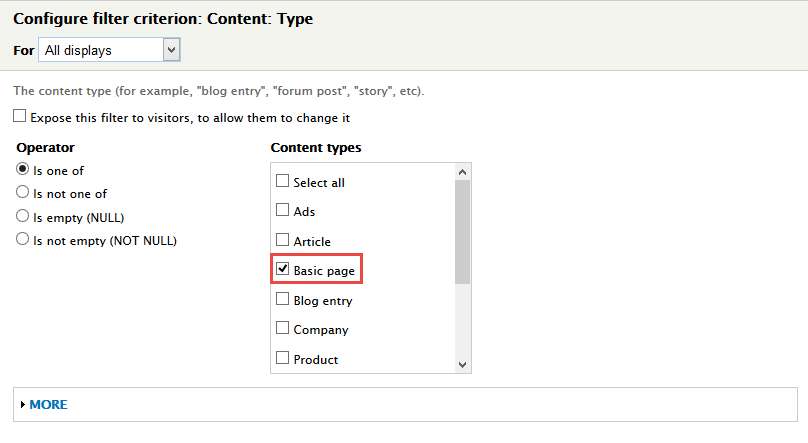
7. At FILTER CRITERIA area, click Add button and add file Content: Type set the following properties:
8. Set properties for Content: Type
9.Click Save block button.
Site Informations
1. Navigate to Configuration > System click Site information and set following properties:
2. Click Save button
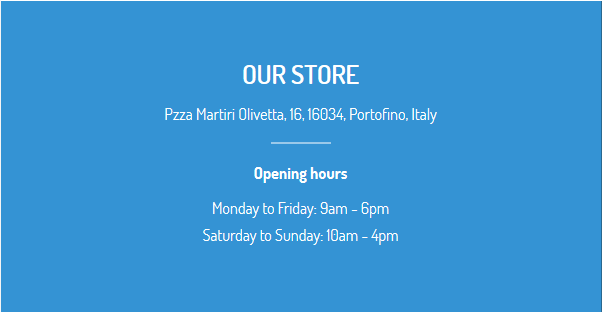
Our Store
Front end Display
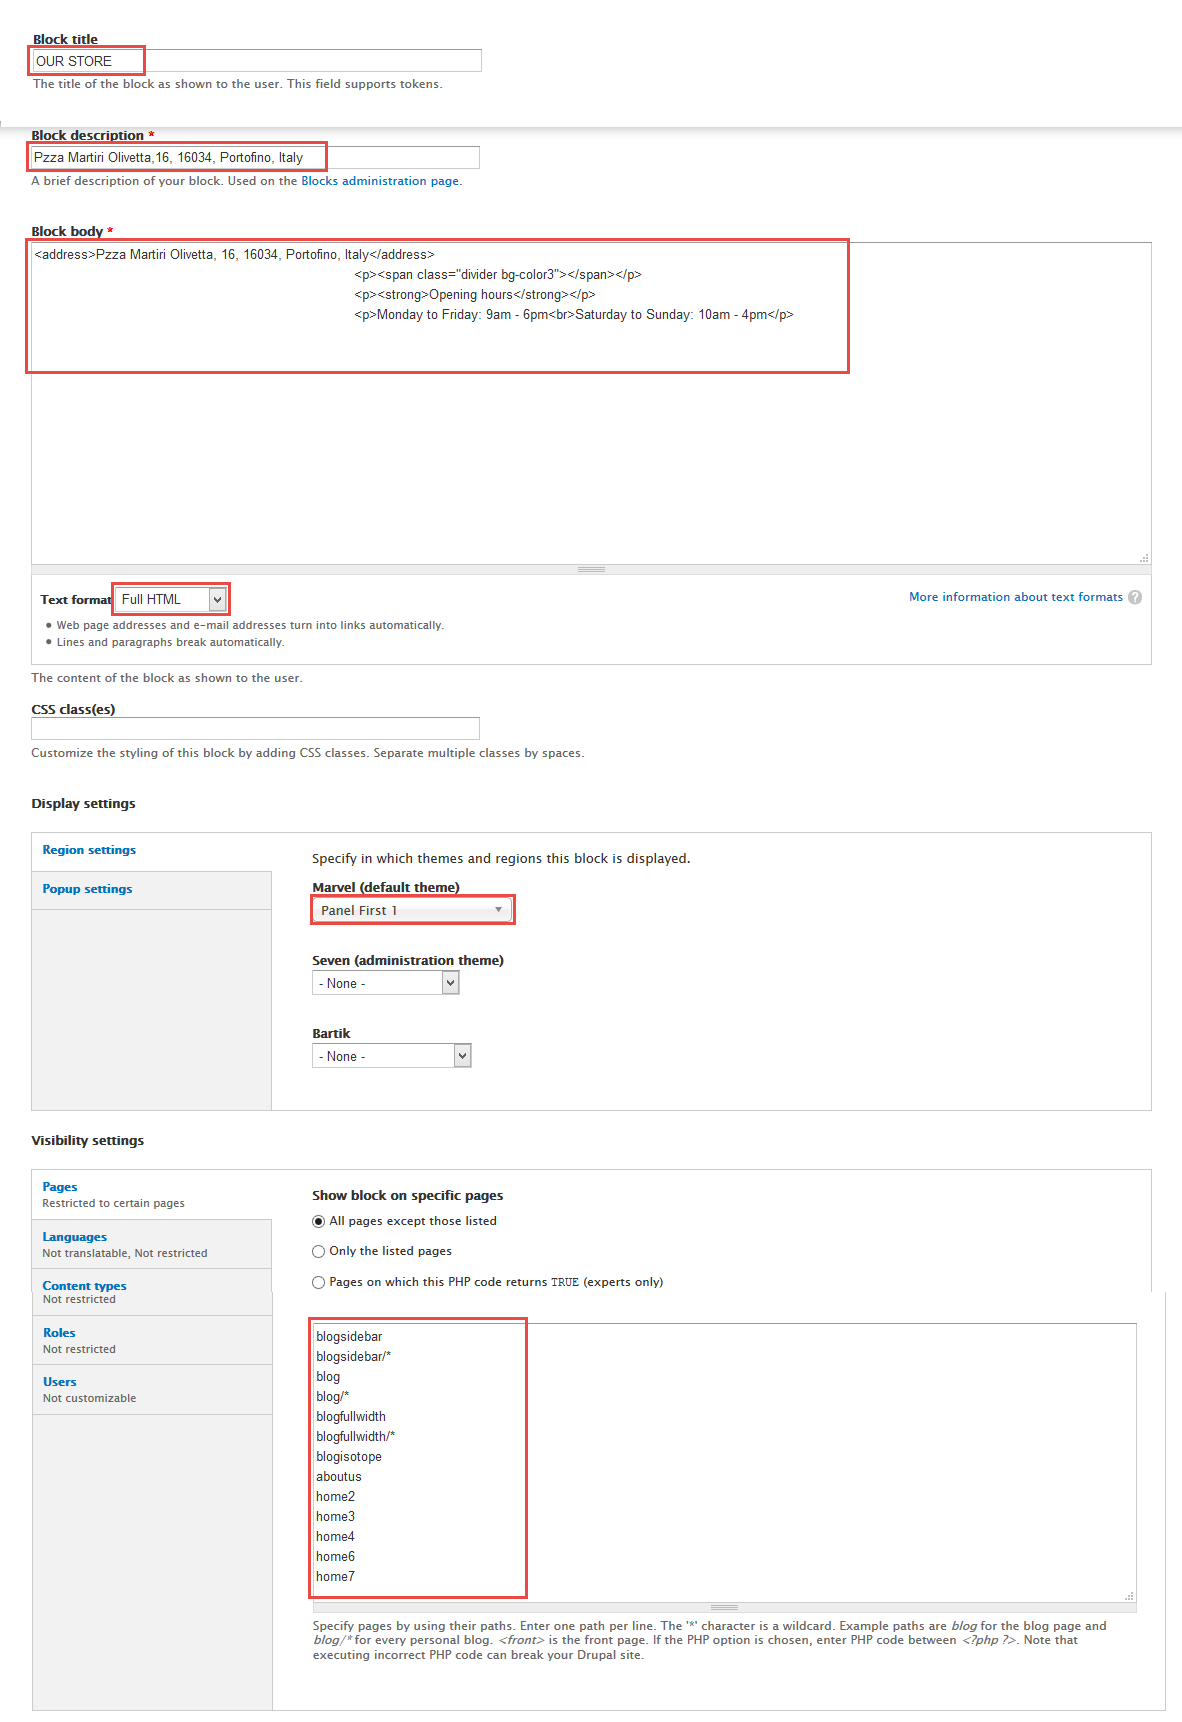
1. Navigate to Structure > Blocks
2. Click Add block link to create block, for example: Our Store block and set properties for them.
3. Click Save button
Refer to following HTML code:
Pzza Martiri Olivetta, 16, 16034, Portofino, Italy
Opening hours
Monday to Friday: 9am - 6pm
Saturday to Sunday: 10am - 4pm
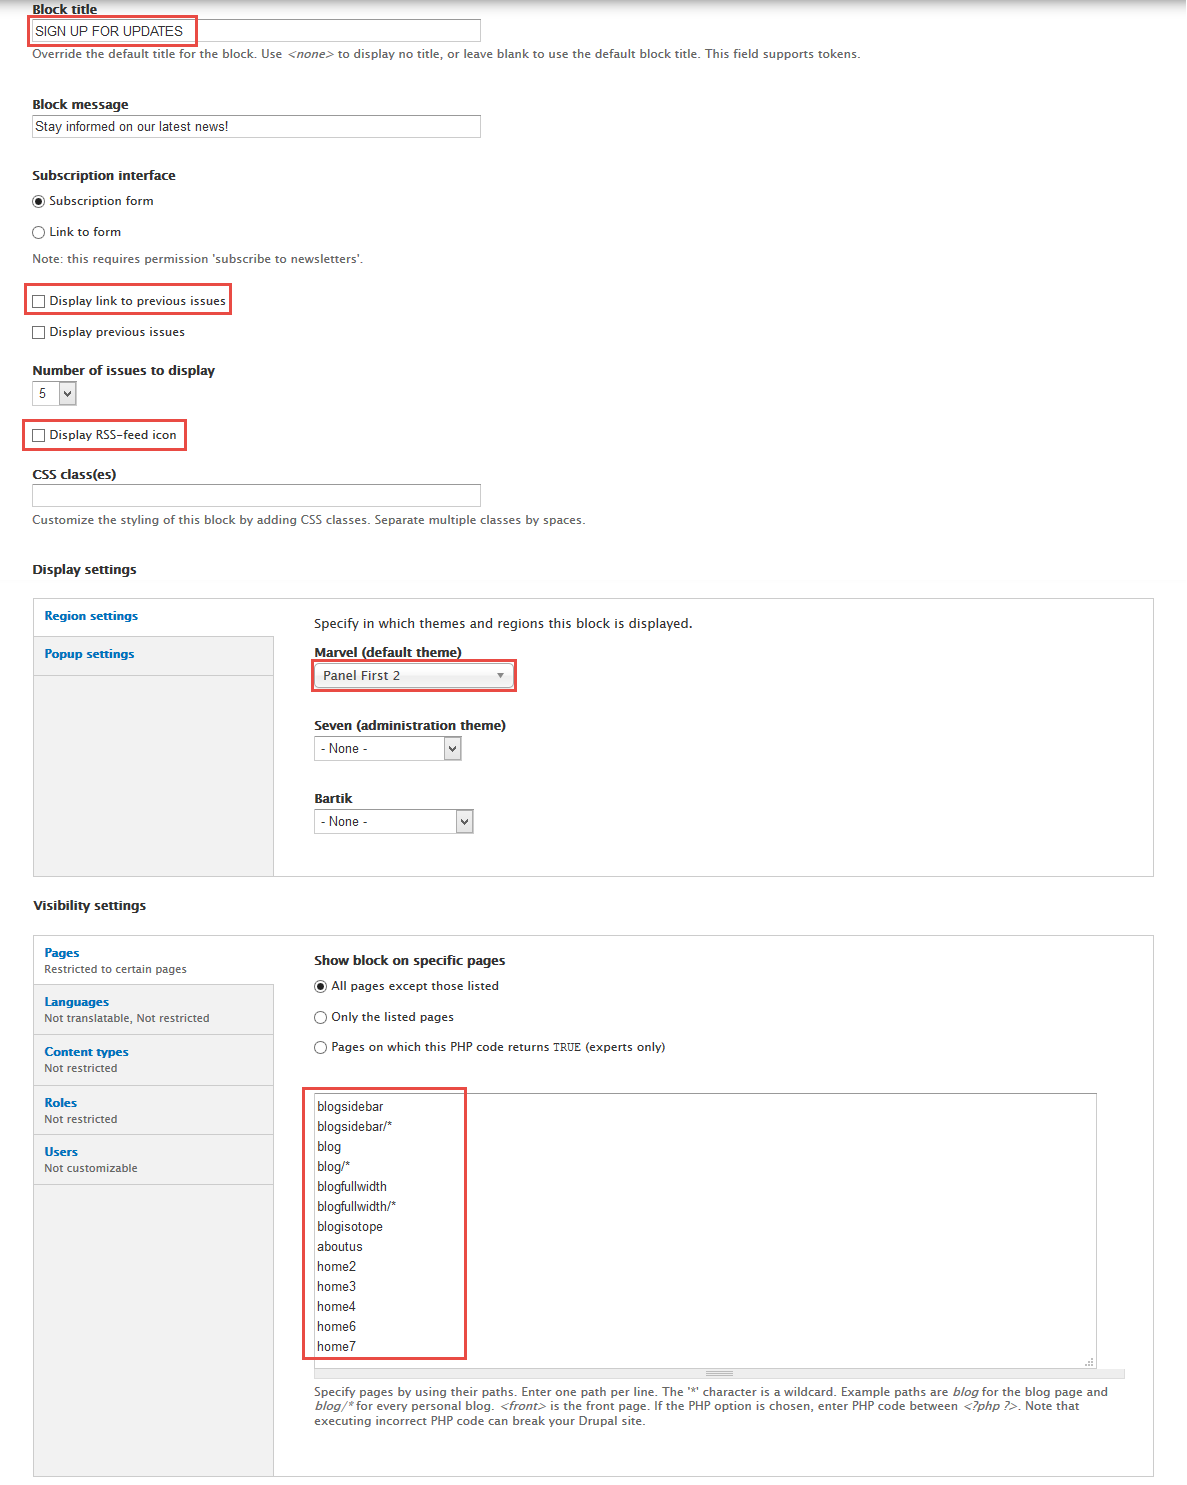
SIGN UP FOR UPDATES
Front end Display
1. Navigate to Structure > Blocks, find Newsletter: localhost newsletter block, click configure link and set the following properties:
2. Click Save button
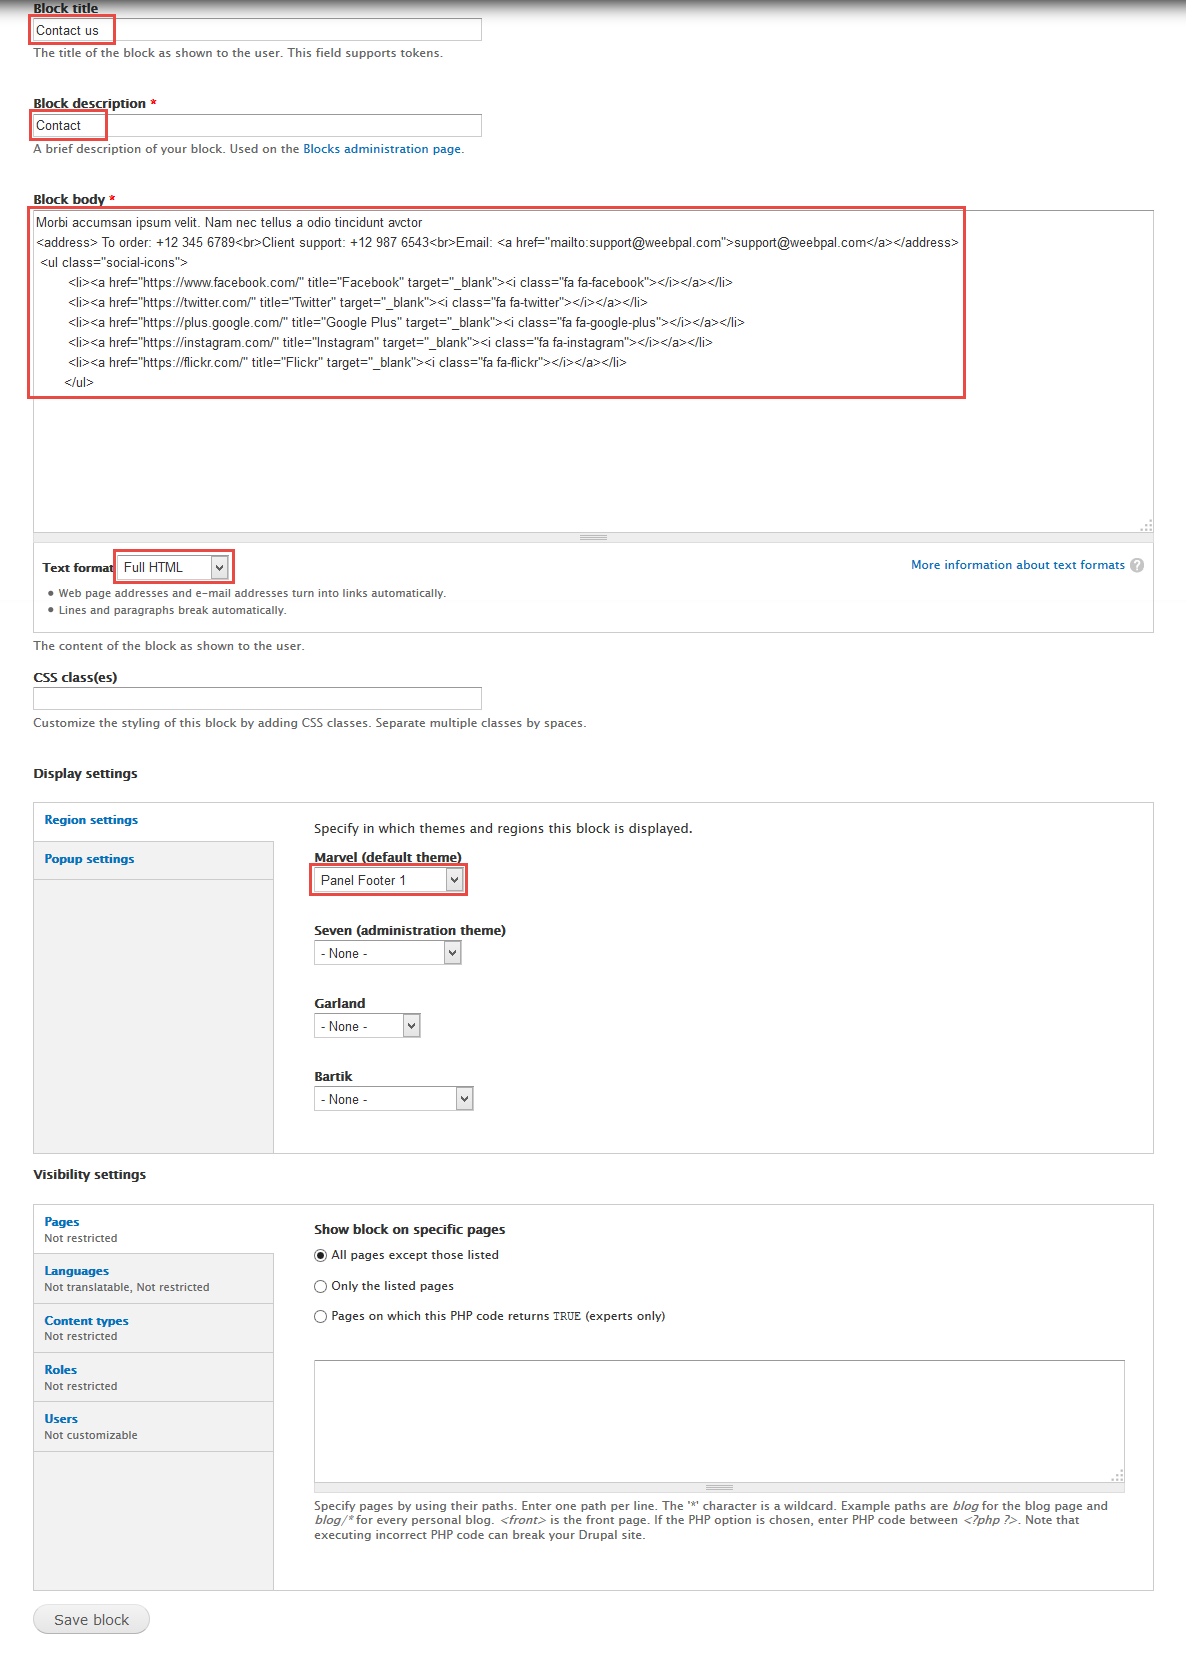
Contact
Front end Display
1. Navigate to Structure > Blocks
2. Click Add block link to create block, for example: Shopping cart block and set properties for them.
3. Click Save button
Refer to following HTML code:
Morbi accumsan ipsum velit. Nam nec tellus a odio tincidunt avctorTo order: +12 345 6789
Client support: +12 987 6543
Email: [email protected]
Home2 View page
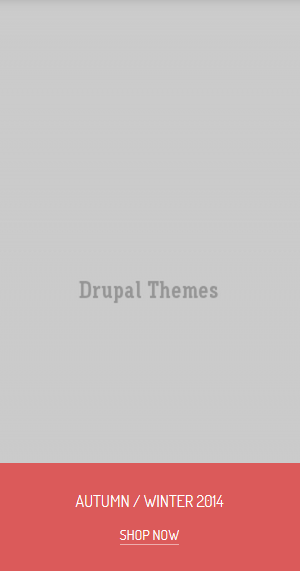
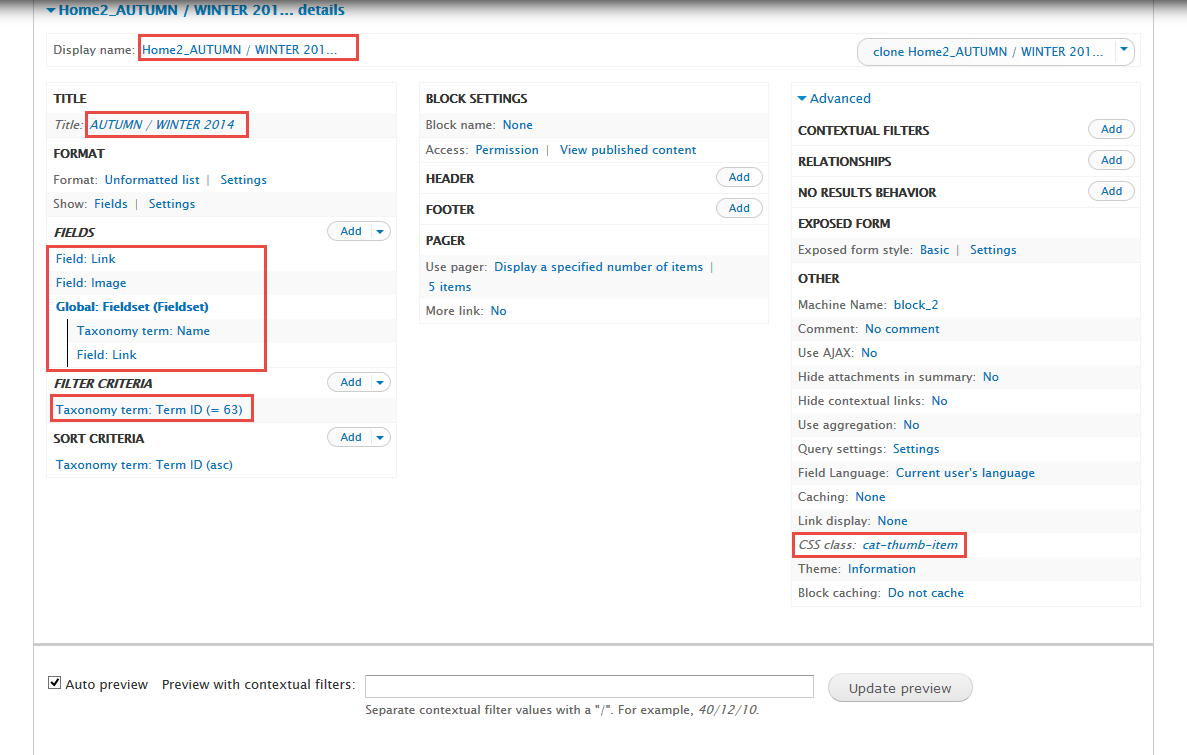
1. Create Home2_AUTUMN / WINTER 2014 block view
Front end Display
Stay open Collection view, click Add button add Block new.
1. Next to steps below to set properties for the following fields:
2. At Display name area, set following properties:
3. At Title area, set following properties:
4. At FIELDS area, set following properties:
5. Set properties for Field: Image
6. Set properties for Global: Fieldset (Fieldset)
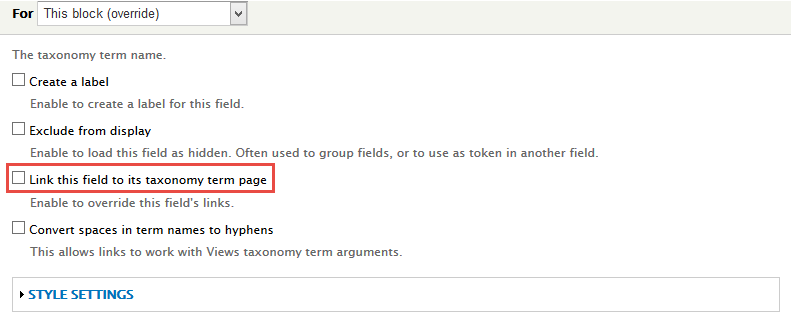
7. Set properties for Taxonomy term: Name
8. At FILTER CRITERIA area, set following properties:
9. At Advanced > OTHER area, add CSS class
10.Click Save block button.
2. Configure Home2_AUTUMN / WINTER 2014 block
1. Navigate to Structure > Blocks
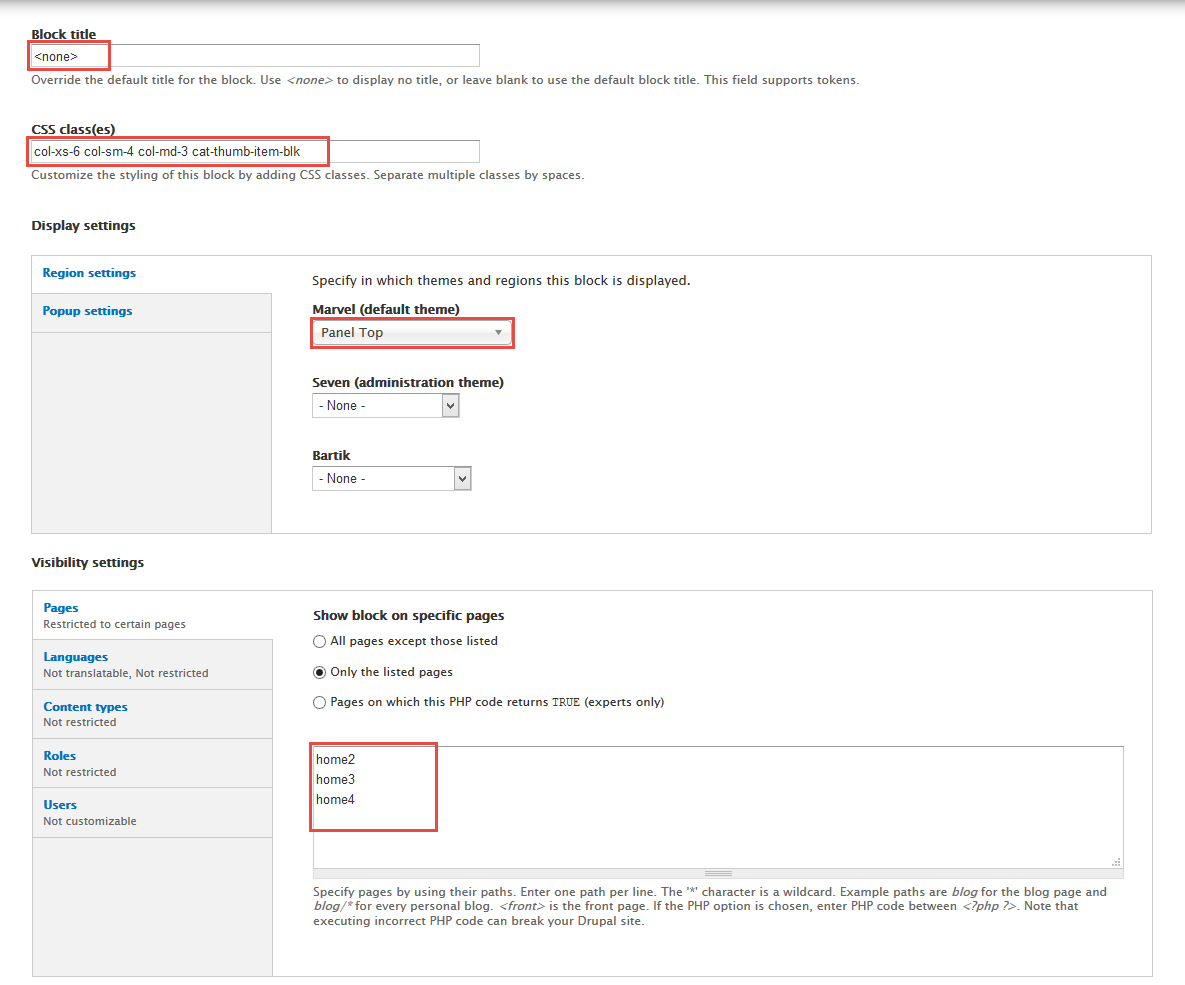
2. Find View: Collection View: Home2_AUTUMN / WINTER 2014, click configure link, set following properties
3.Click Save block button.
3. Create Home2_buy 2 get 10% off block view
Front end Display
Stay open Collection view, click Add button add Block new.
1. Next to steps below to set properties for the following fields:
2. At Display name area, set following properties:
3. At Title area, set following properties:
4. At FIELDS area, set following properties:
5. Set properties for Field: Image
6. Set properties for Global: Fieldset (Fieldset)
7. Set properties for Taxonomy term: Name
8. At FILTER CRITERIA area, set following properties:
9. At Advanced > OTHER area, add CSS class
10.Click Save block button.
4. Configure Home2_buy 2 get 10% off block
1. Navigate to Structure > Blocks
2. Find View: Collection View: Home2_buy 2 get 10% off, click configure link, set following properties
3.Click Save block button.
5. Create Home2, Home3, Home4 view
Front end Display
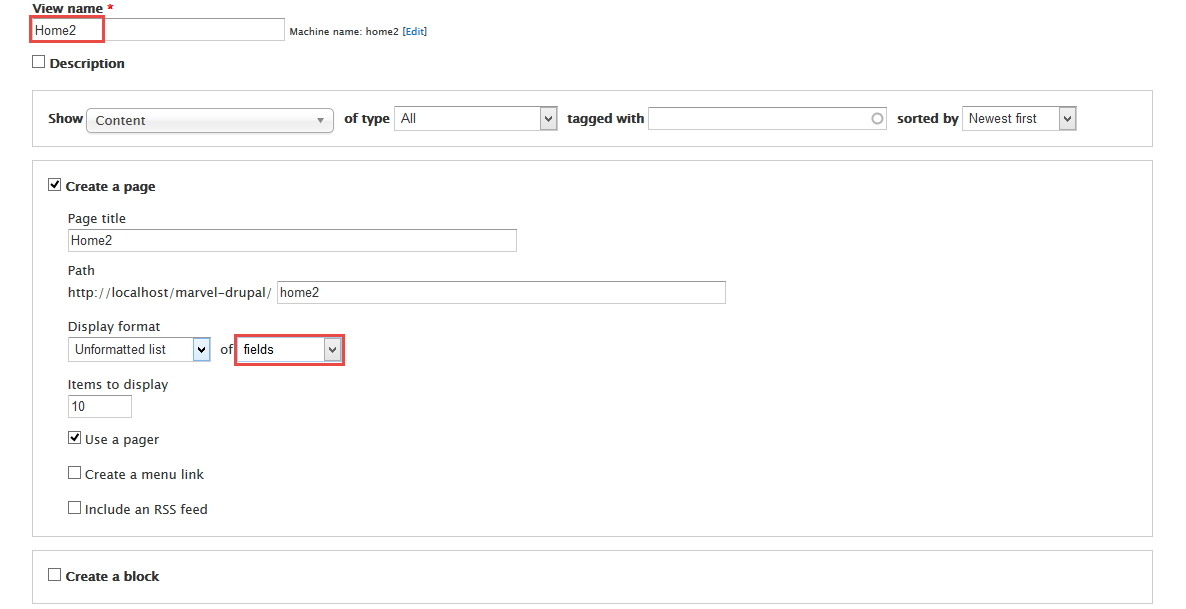
1. Navigate to Structure > Views, click Add views link, Create Home2 view with following properties:
2. Click Continue & edit button and set following properties:
3. At FIELDS area, click Add button to add fields: Field: Image, Global: Fieldset (Fieldset), Global: Fieldset (Fieldset), Global: Fieldset (Fieldset), Content: Body, Field: Link .
4. Set properties for Field: Image
5. Set properties for Global: Fieldset (Fieldset)
6. Set properties for Global: Fieldset (Fieldset)
7. Set properties for Global: Fieldset (Fieldset)
8. Set properties for Content: Title
9. Set properties for Content: Body
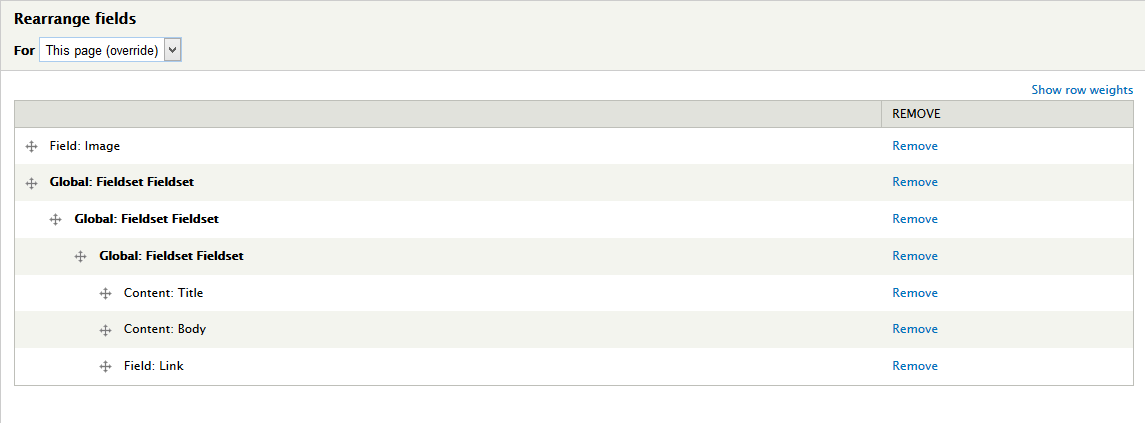
10. At FIELDS area, click Rearrange button and set following arrange
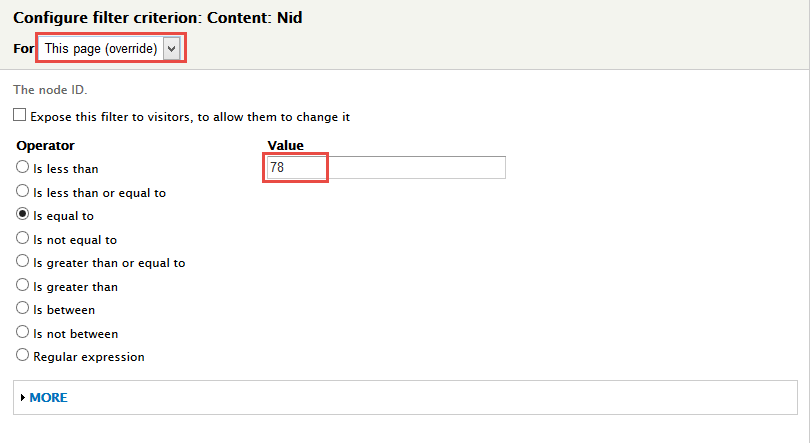
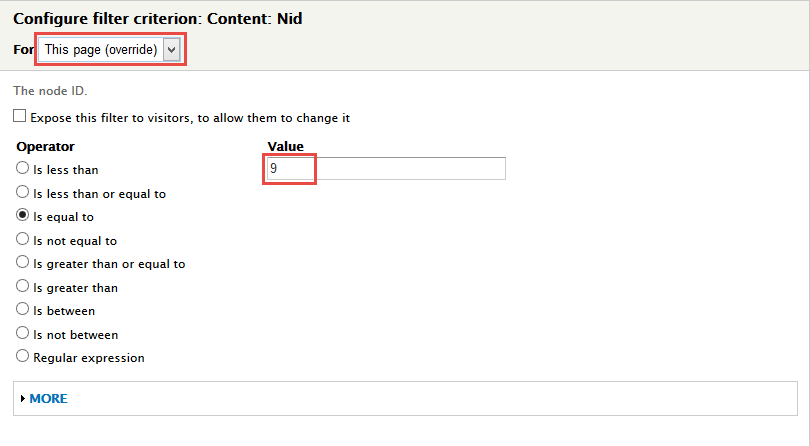
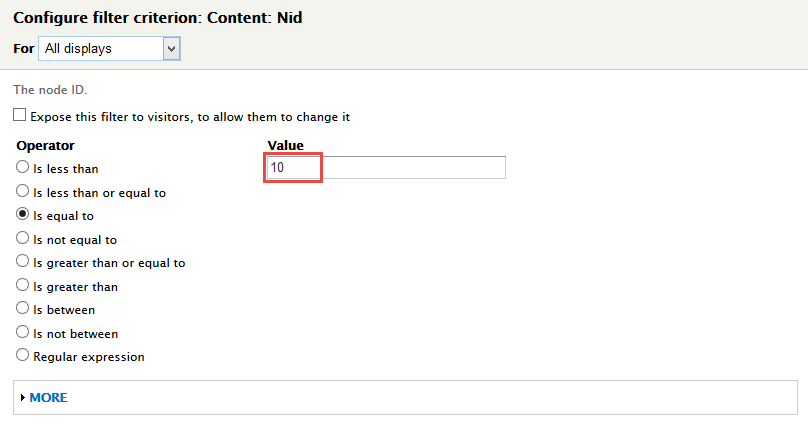
11. At FILTER CRITERIA area, click Add button and add file Content: Nid set the following properties:
12. Set properties for Content: Nid
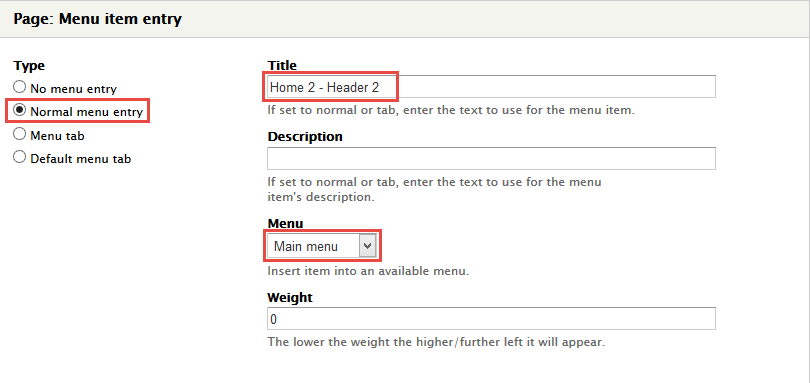
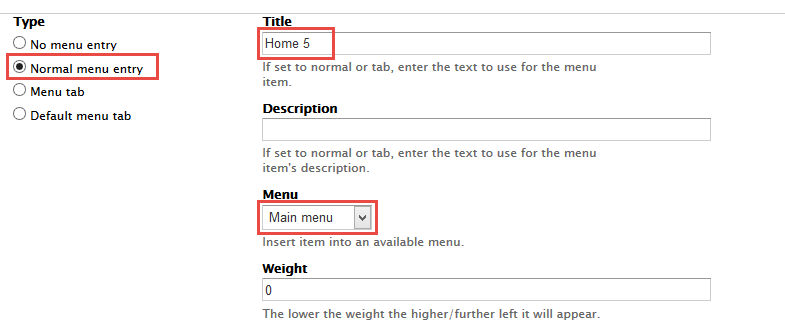
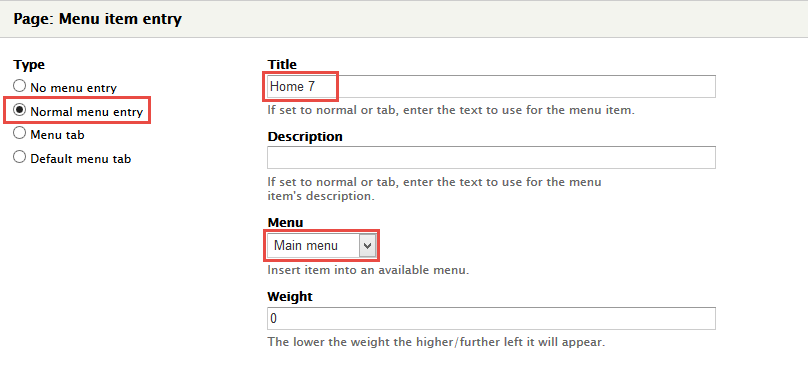
13. At PAGE SETTINGS > Menu area, set the following properties:
14. At Advanced > OTHER area, add CSS class
15.Click Save block button.
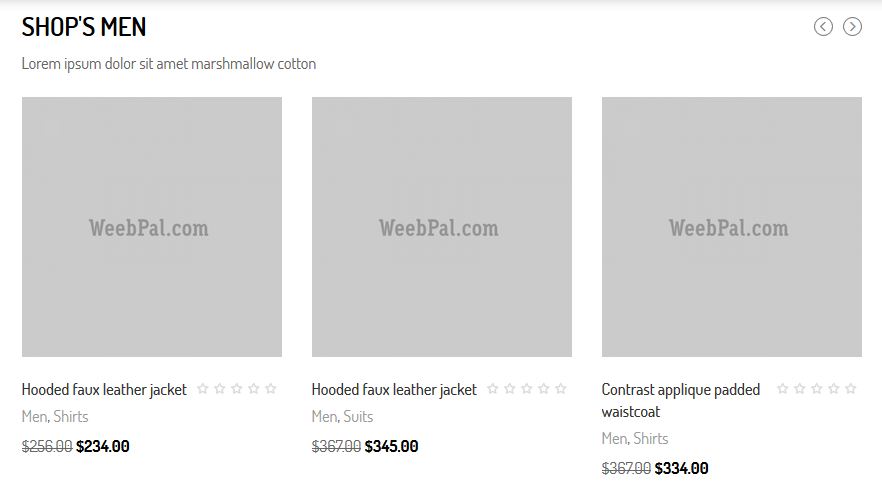
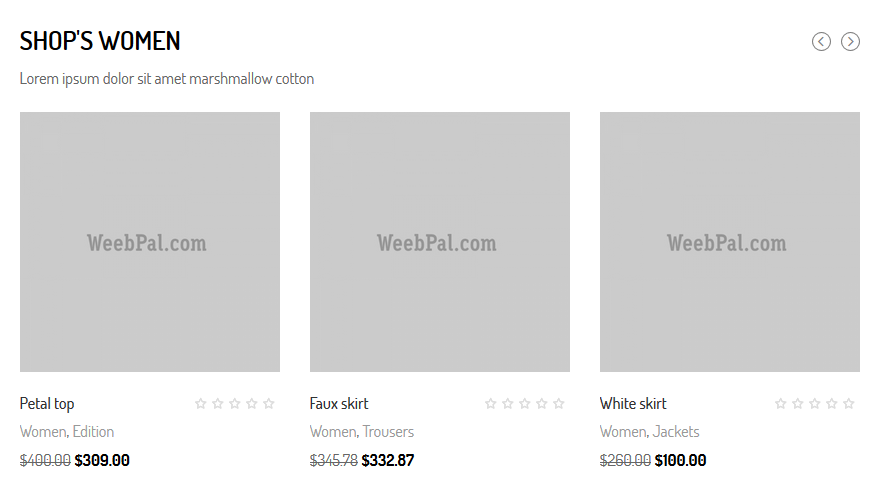
6. Create Shop's men home 2 block view
Front end Display
Stay open Home2 view, click Add button add Block new.
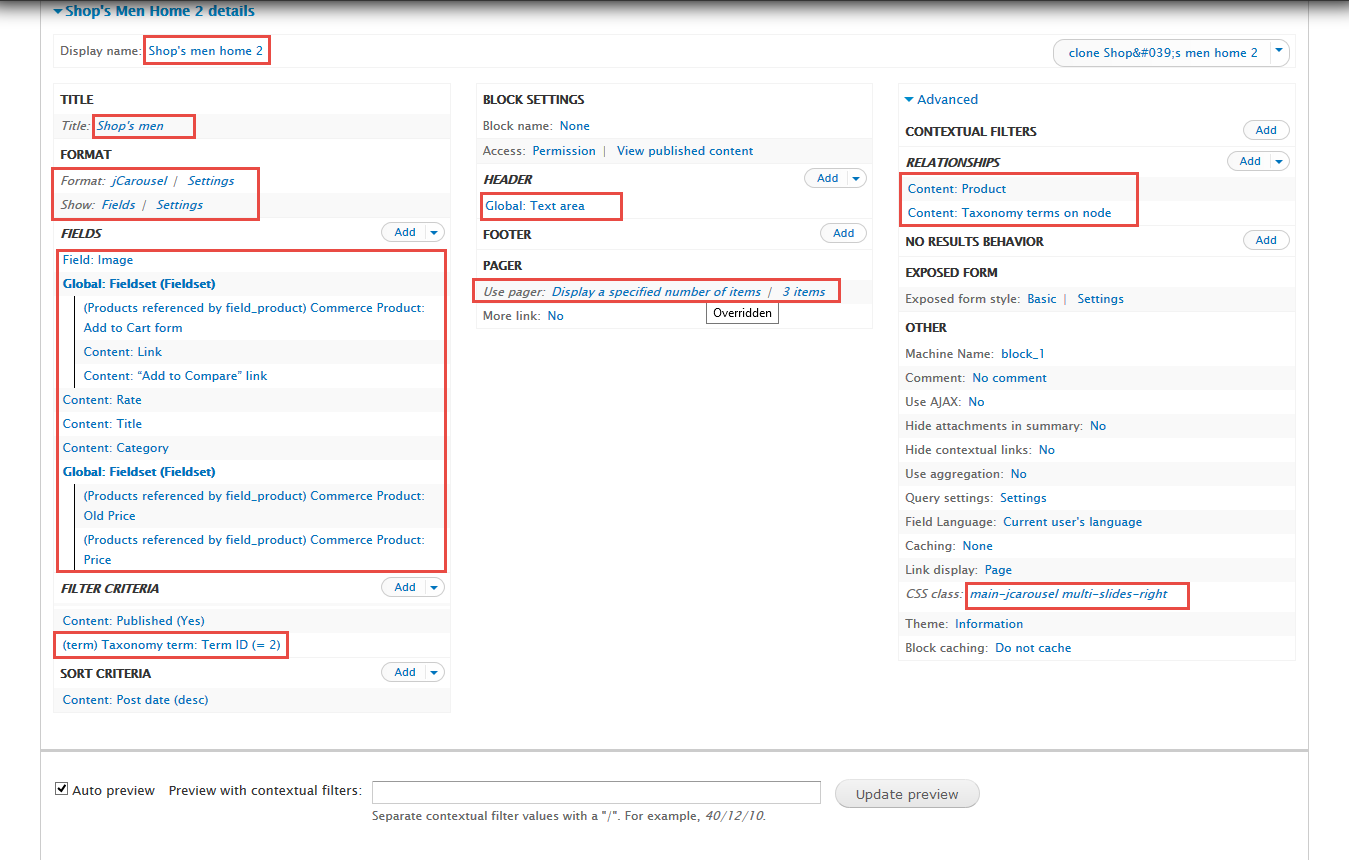
1. Next to steps below to set properties for the following fields:
2. At Display name area, set following properties:
3. At Title area, set following properties:
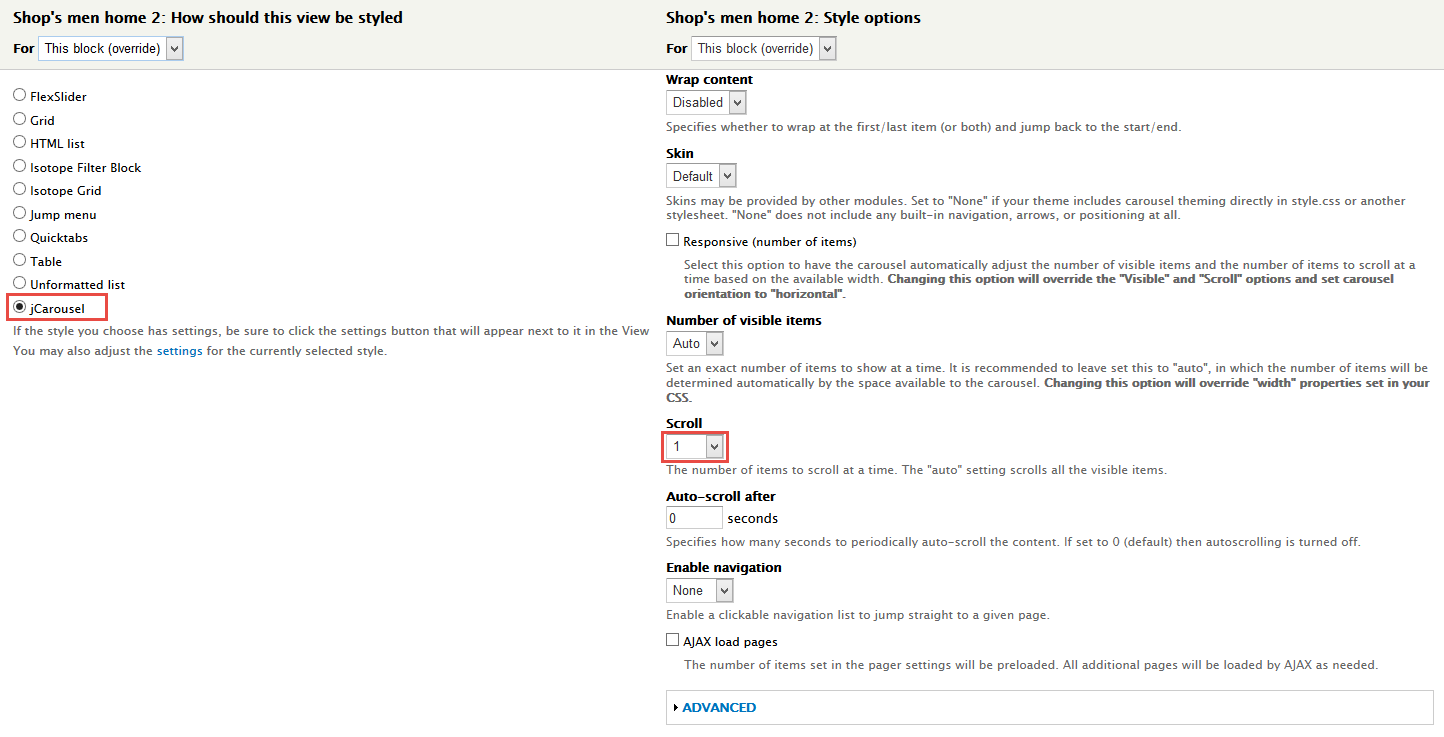
4. At FORMAT Format: jCarousel, click Settings and set following properties:
5. At Advanced > REALATIONSHIPS area, click Add button to add fields: Content: Product, Content: Taxonomy terms on node
6. Set properties for Content: Product
7. Set properties for Content: Taxonomy terms on node
8. At FIELDS area, click Add button to add fields: Field: Image, Global: Fieldset (Fieldset), Commerce Product: Add to Cart form, Content: Link, Content: “Add to Compare” link, Content: Rate, Content: Category, Global: Fieldset (Fieldset), Commerce Product: Old Price, Commerce Product: Price .
9. Set properties for Field: Image
10. Set properties for Global: Fieldset (Fieldset)
11. Set properties for Commerce Product: Add to Cart form
12. Set properties for Content: Link
13. Set properties for Content: “Add to Compare” link
14. Set properties for Content: Rate
15. Set properties for Content: Category
16. Set properties for Global: Fieldset (Fieldset)
17. Set properties for Commerce Product: Old Price
18. Set properties for Commerce Product: Price
19. At FIELDS area, click Rearrange button and set following arrange
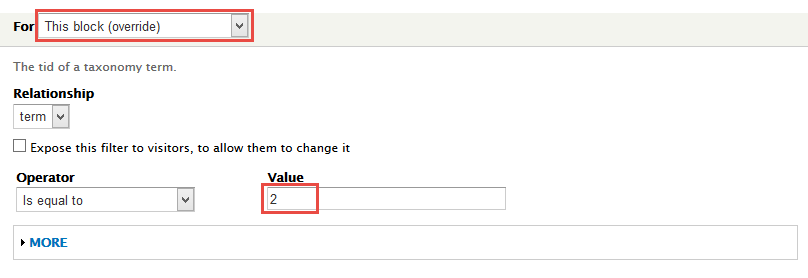
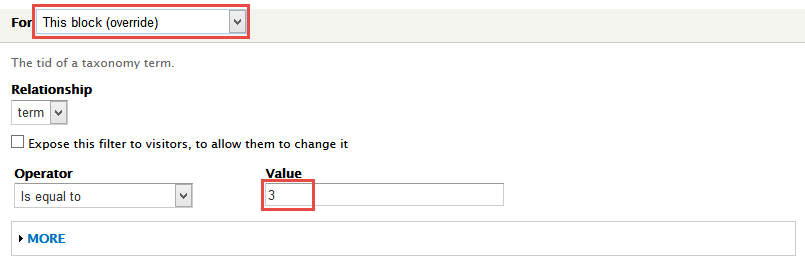
20. At FILTER CRITERIA area, click Add button and add file Taxonomy term: Term ID set the following properties:
21. Set properties for Taxonomy term: Term ID
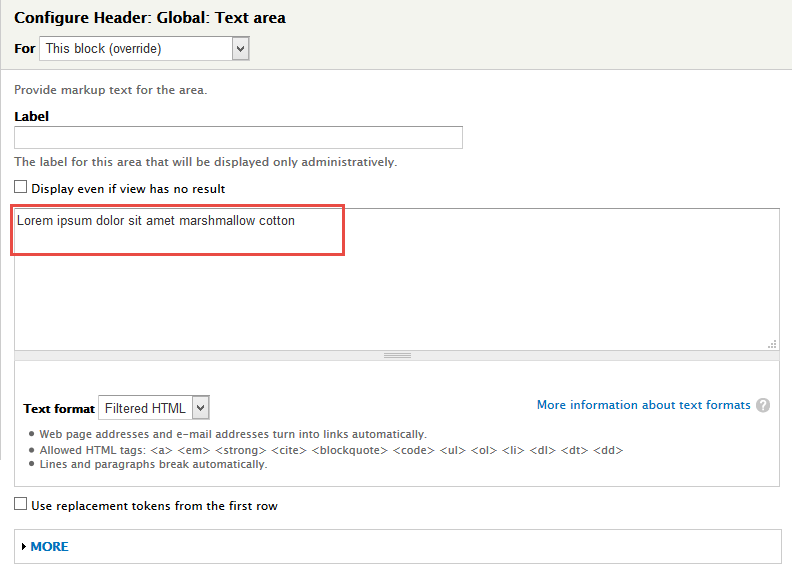
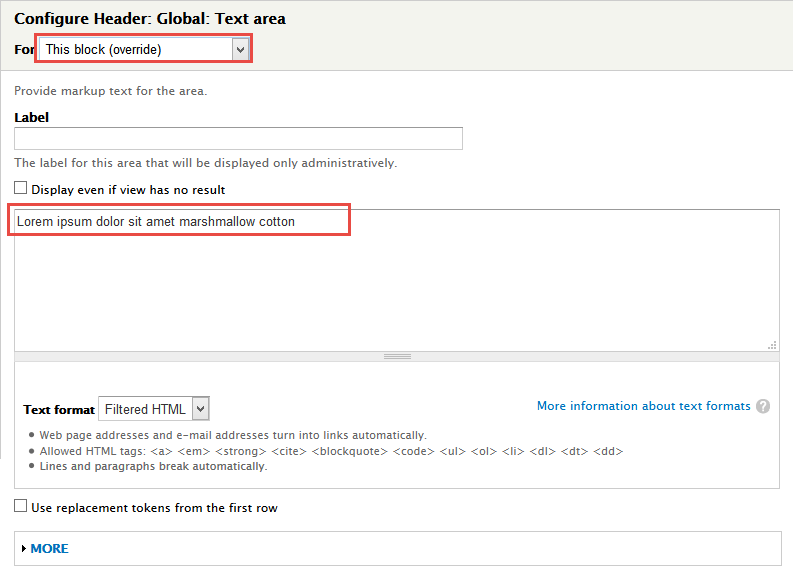
22. At Header area, Click Add button to add Global: Text area and set the following properties:
23. At PAGER > Use pager area, click link
24. At Advanced > OTHER area, add CSS class
25.Click Save block button.
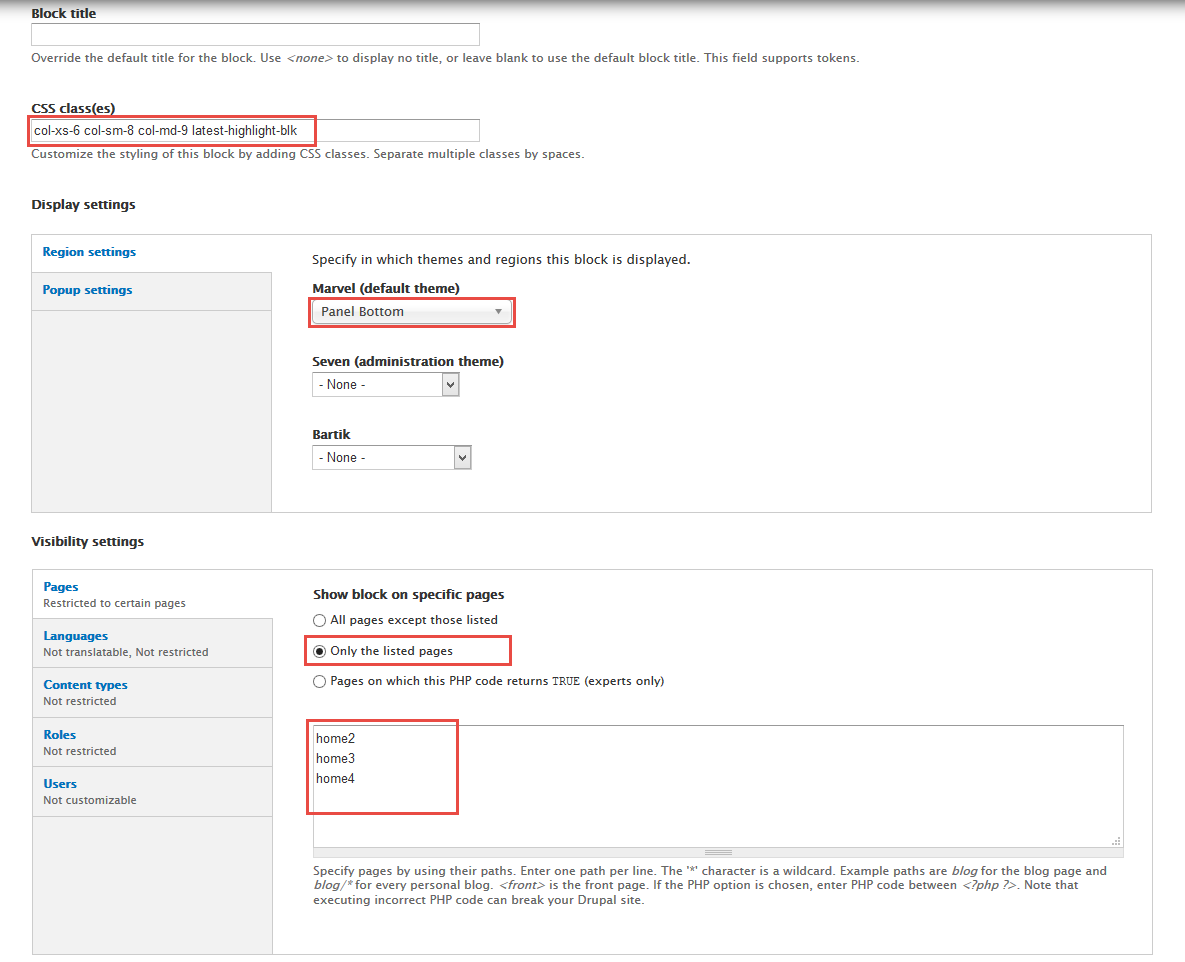
7. Configure Shop's men home 2 block
1. Navigate to Structure > Blocks
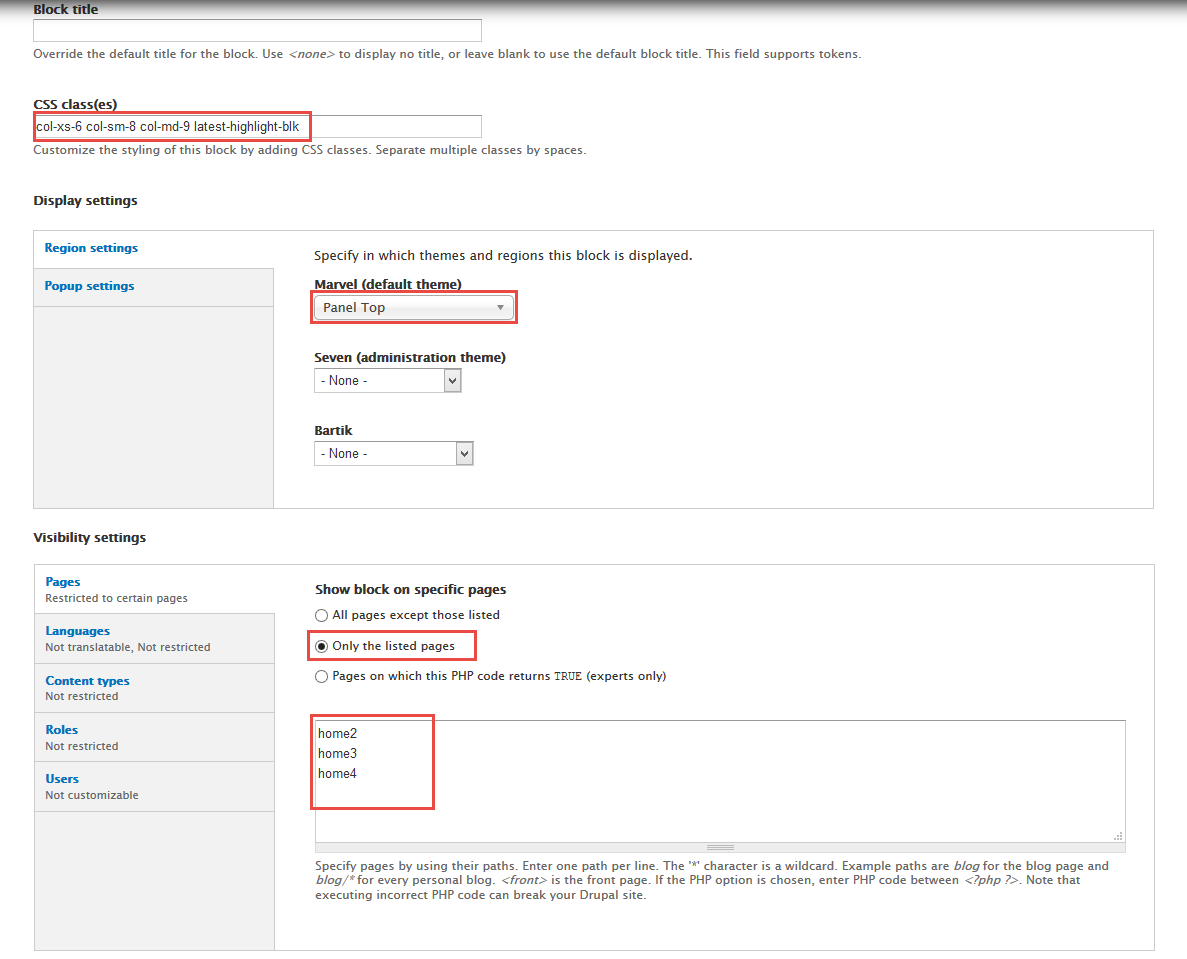
2. Find View: Home2: Shop's men home 2, click configure link, set following properties
3.Click Save block button.
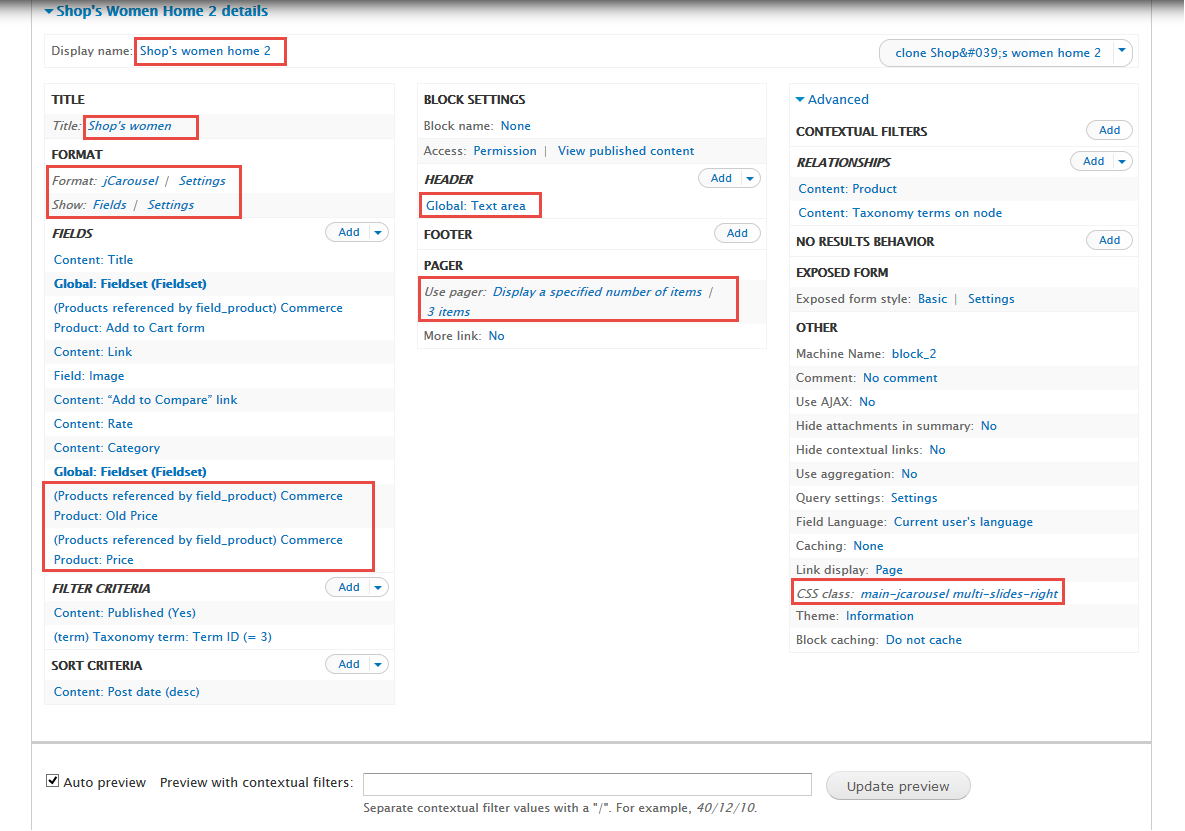
8. Create Shop's women home 2 block view
Front end Display
Stay open Home2 view, click Add button add Block new.
1. Next to steps below to set properties for the following fields:
2. At Display name area, set following properties:
3. At Title area, set following properties:
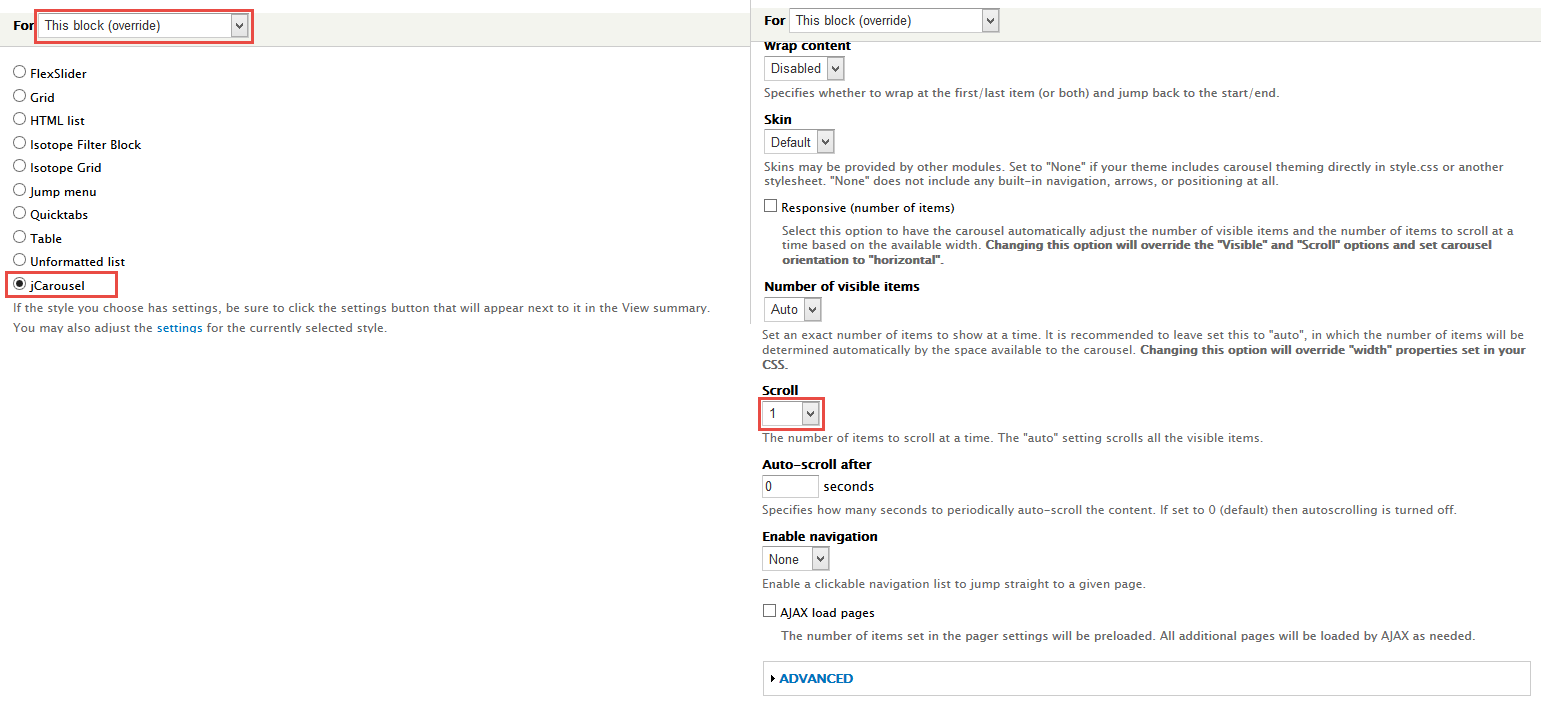
4. At FORMAT Format: jCarousel, click Settings and set following properties:
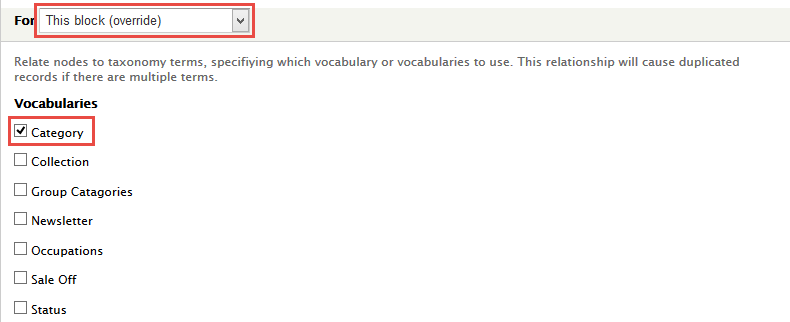
5. At Advanced > REALATIONSHIPS area, set following properties:
6. Set properties for Content: Taxonomy terms on node
7. At FIELDS area, click Add button to add fields: Commerce Product: Old Price, Commerce Product: Price .
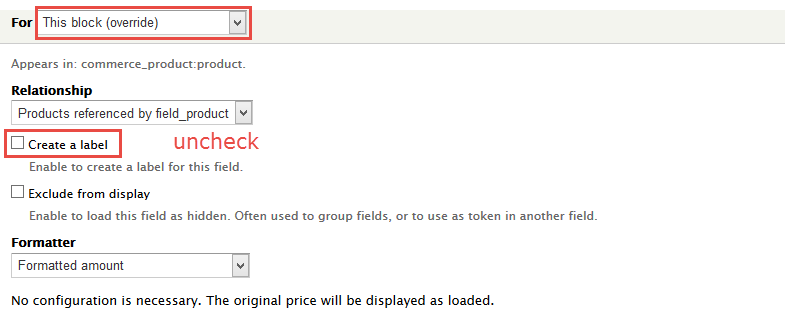
8. Set properties for Commerce Product: Old Price
9. Set properties for Commerce Product: Price
10. At FIELDS area, click Rearrange button and set following arrange
11. At FILTER CRITERIA area, set following properties:
12. At Header area, set following properties:
13. At PAGER > Use pager area, click link
14. At Advanced > OTHER area, add CSS class
15.Click Save block button.
9. Configure Shop's women home 2 block
1. Navigate to Structure > Blocks
2. Find View: Home2: Shop's women home 2, click configure link, set following properties
3.Click Save block button.
Home5 View page
1. Create Home5, Home6 view
Front end Display
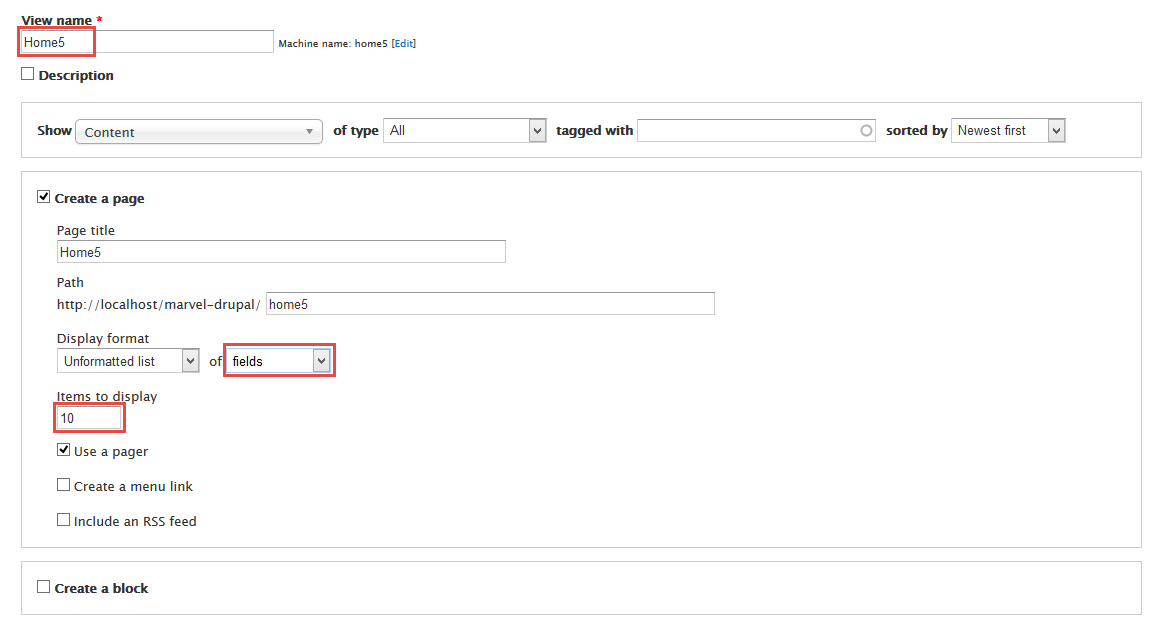
1. Navigate to Structure > Views, click Add views link, Create Home5 view with following properties:
2. Click Continue & edit button and set following properties:
3. At Title area, set following properties:
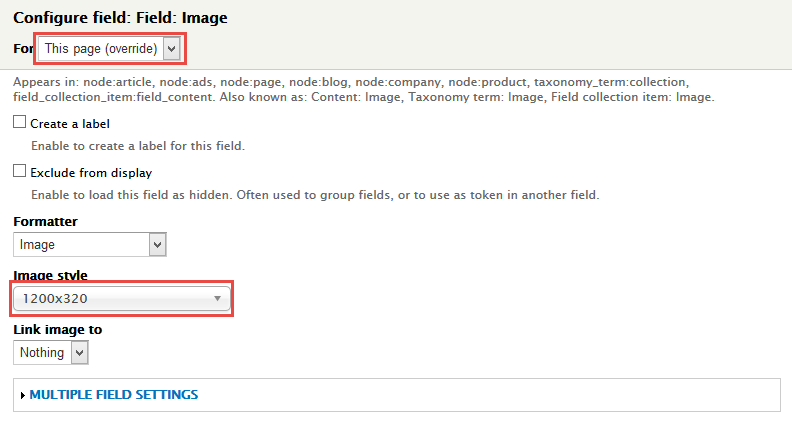
4. At FIELDS area, click Add button to add fields: Field: Image, Global: Fieldset (Fieldset), Global: Fieldset (Fieldset), Global: Fieldset (Fieldset), Content: Body, Field: Link .
5. Set properties for Field: Image
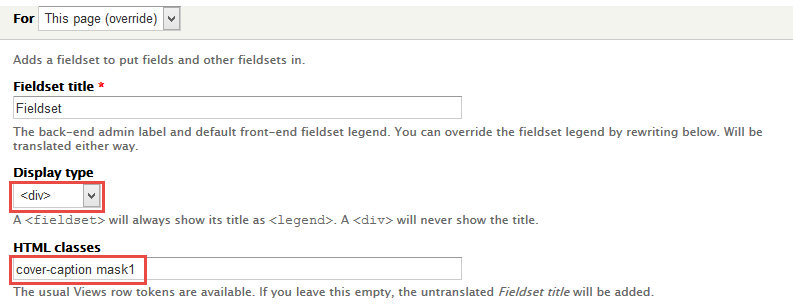
6. Set properties for Global: Fieldset (Fieldset)
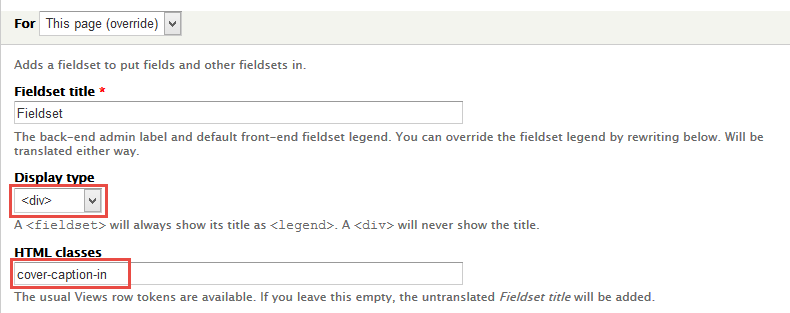
7. Set properties for Global: Fieldset (Fieldset)
8. Set properties for Global: Fieldset (Fieldset)
9. Set properties for Content: Title
10. Set properties for Content: Body
11. Set properties for Field: Link
12. At FILTER CRITERIA area, click Add button and add file Content: Nid set the following properties:
13. At PAGE SETTINGS > Menu area, set the following properties:
14. At Advanced > OTHER area, add CSS class
15.Click Save block button.
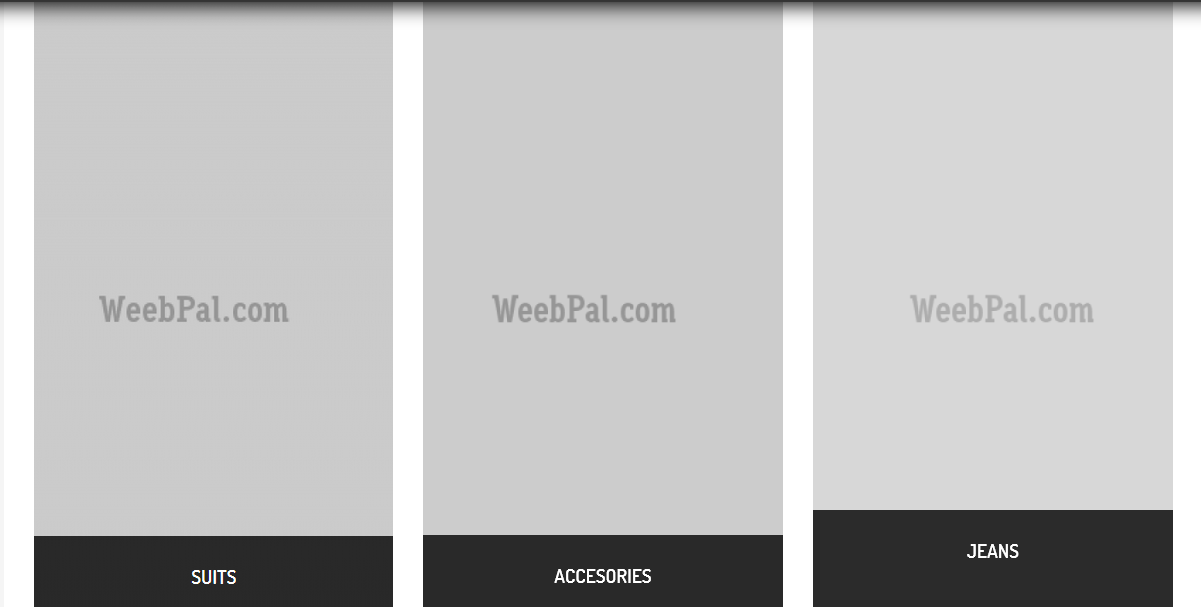
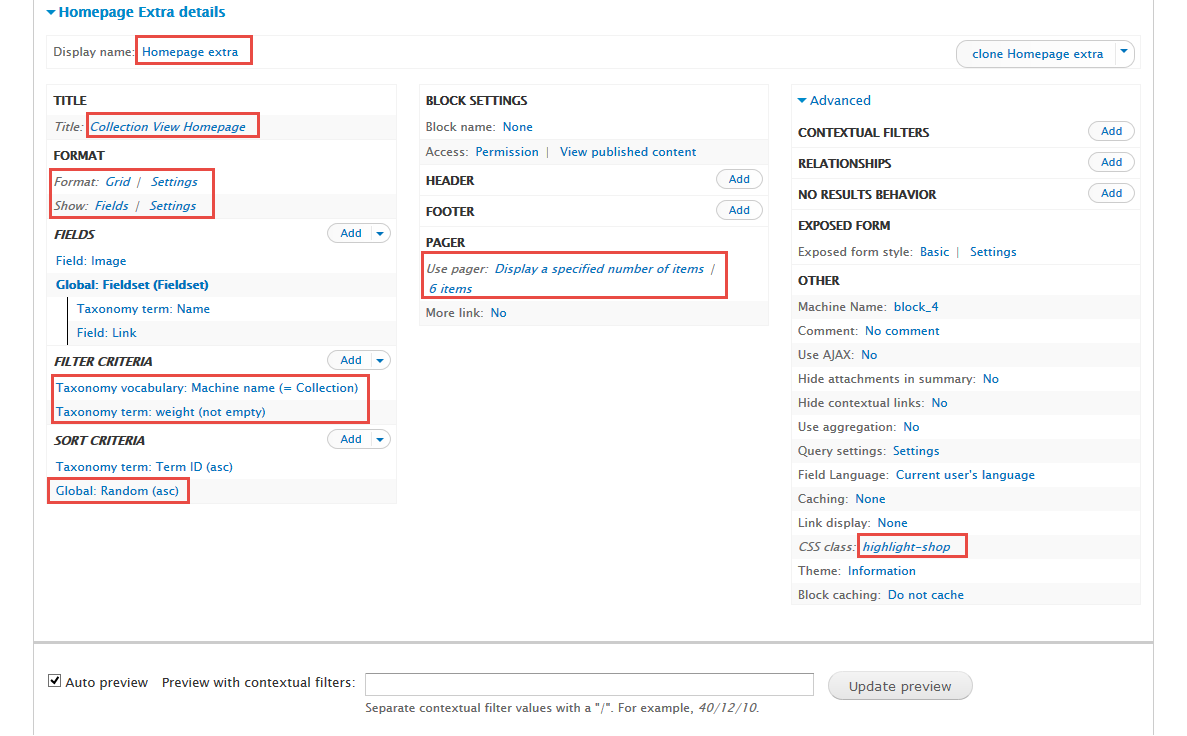
2. Create Homepage extra block view
Front end Display
Stay open Collection view, click Add button add Block new.
1. Next to steps below to set properties for the following fields:
2. At Display name area, set following properties:
3. At Title area, set following properties:
4. At FORMAT Format: Grid, click Settings and set following properties:
5. At FIELDS area, set following properties:
6. Set properties for Field: Image
7. Set properties for Global: Fieldset
8. Set properties for Taxonomy term: Name
9. At FILTER CRITERIA area, click Add button and add file Taxonomy vocabulary: Machine name, Taxonomy term: weight set the following properties:
10. Set properties for Taxonomy vocabulary: Machine name
11. Set properties for Taxonomy term: weight
12. At SORT CRITERIA area, Click Global: Random set following properties:
13. At PAGER > Use pager area, click link
14. At Advanced > OTHER area, add CSS class
15.Click Save block button.
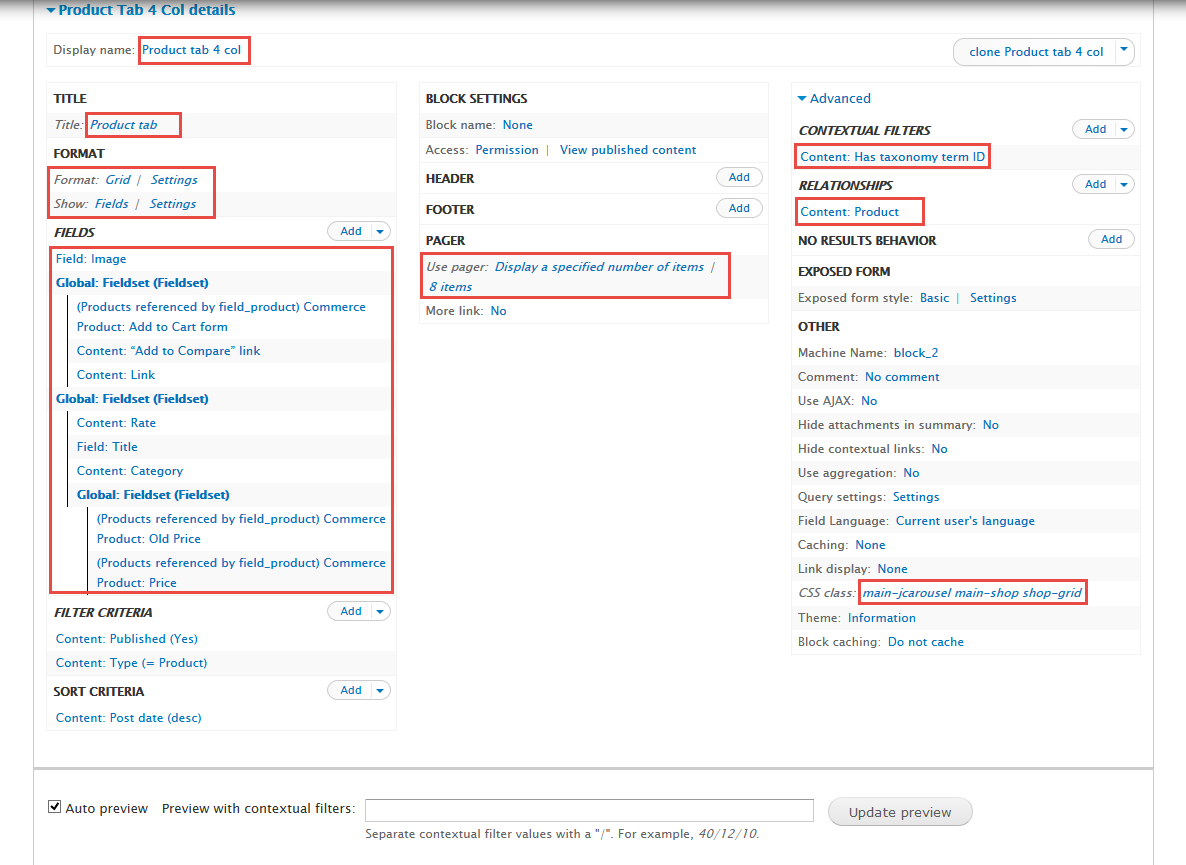
3. Create Product tab 4 col view
Front end Display
Stay open Product view, click Add button add Block new.
1. Next to steps below to set properties for the following fields:
2. At Display name area, set following properties:
3. At Title area, set following properties:
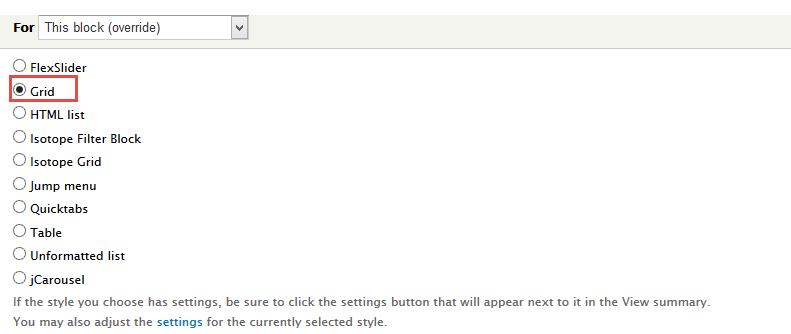
4. At FORMAT Format: Grid area, click Settings and set following properties:
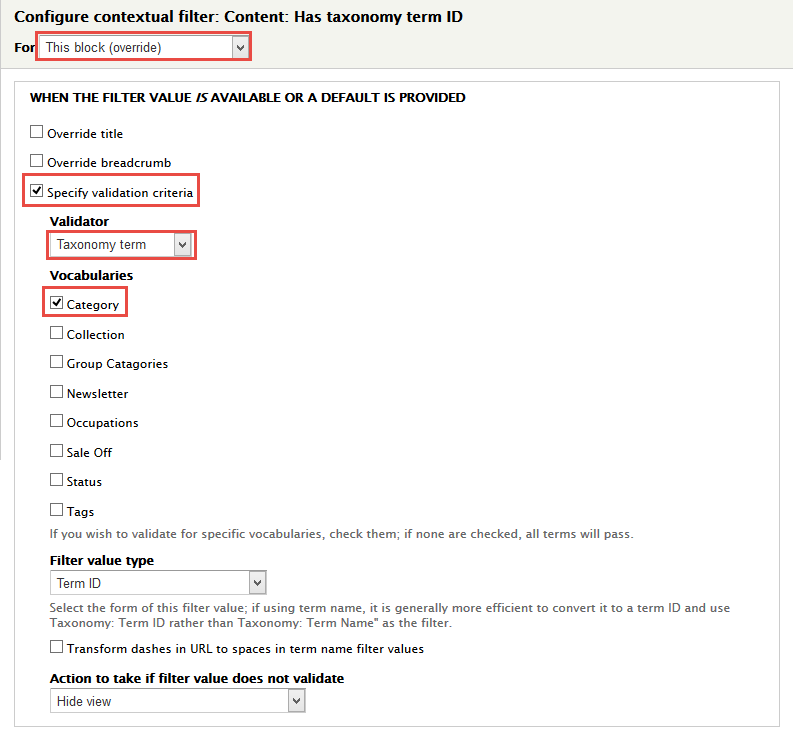
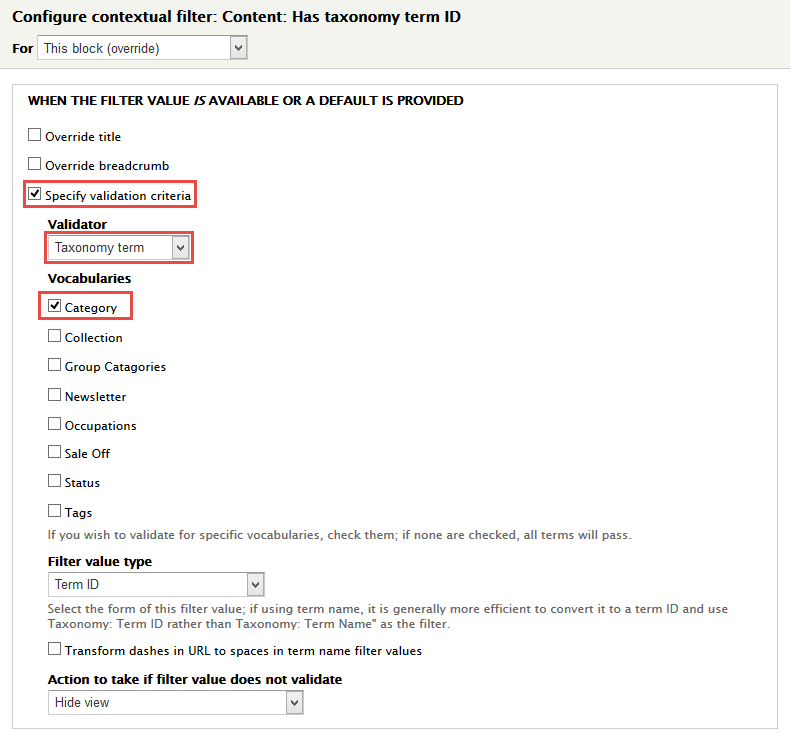
5. In Advanced > Contextual filters area, click Add button to add fields: Content: Has taxonomy term ID and set following properties:
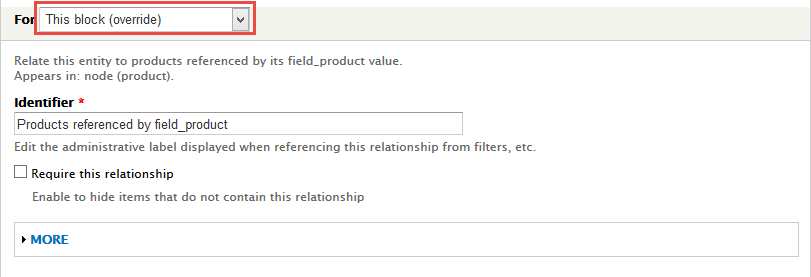
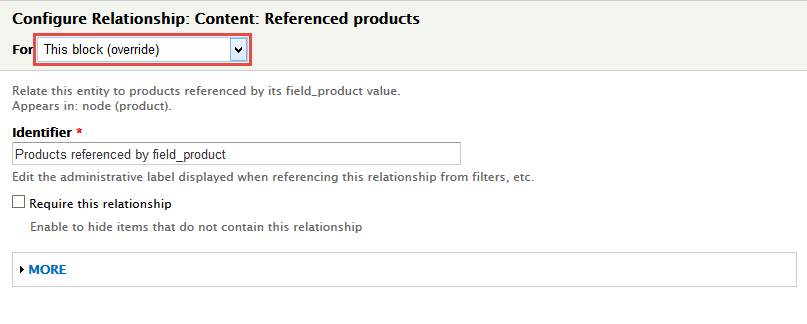
6. At Advanced > REALATIONSHIPS area, set following properties:
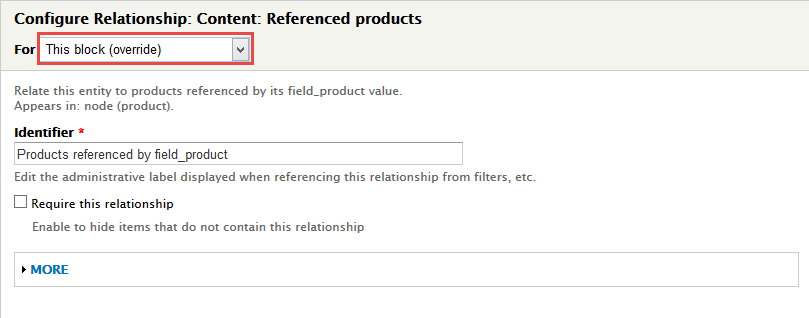
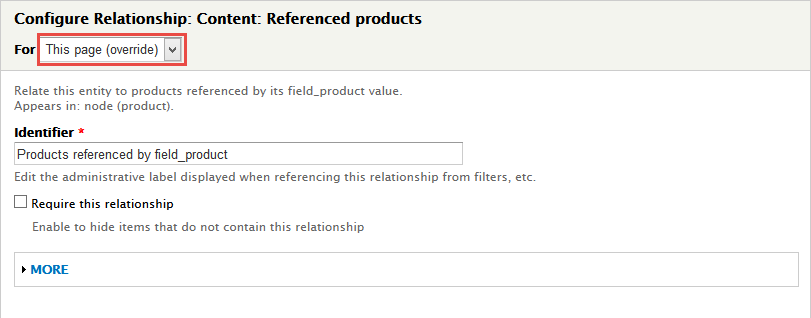
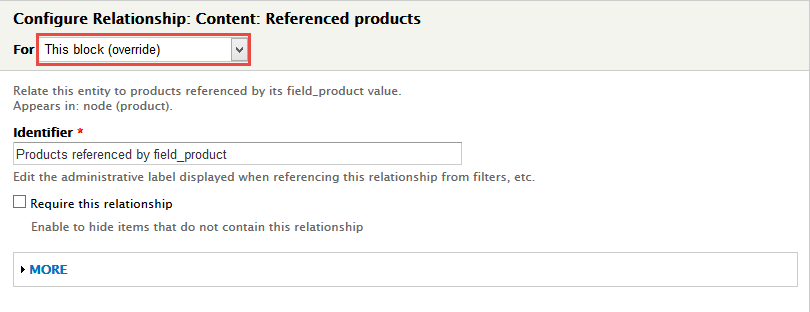
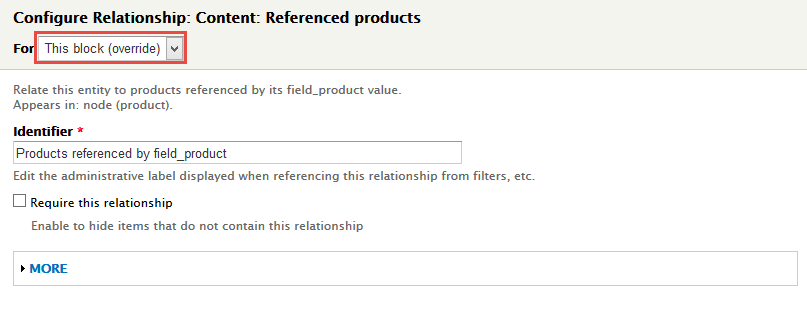
7. Set properties for Content: Referenced products
8. At FIELDS area, click Add button to add fields: Field: Image, Global: Fieldset (Fieldset), Commerce Product: Add to Cart form, Content: “Add to Compare” link, Content: Link, Global: Fieldset (Fieldset), Content: Rate, Field: Title, Content: Category, Global: Fieldset (Fieldset), Commerce Product: Old Price, Commerce Product: Price set following properties:
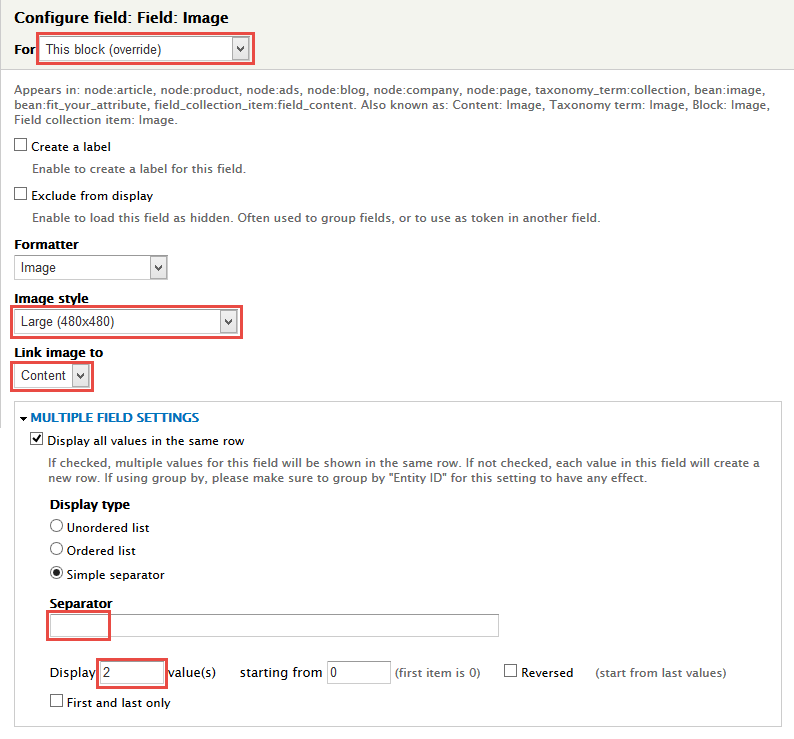
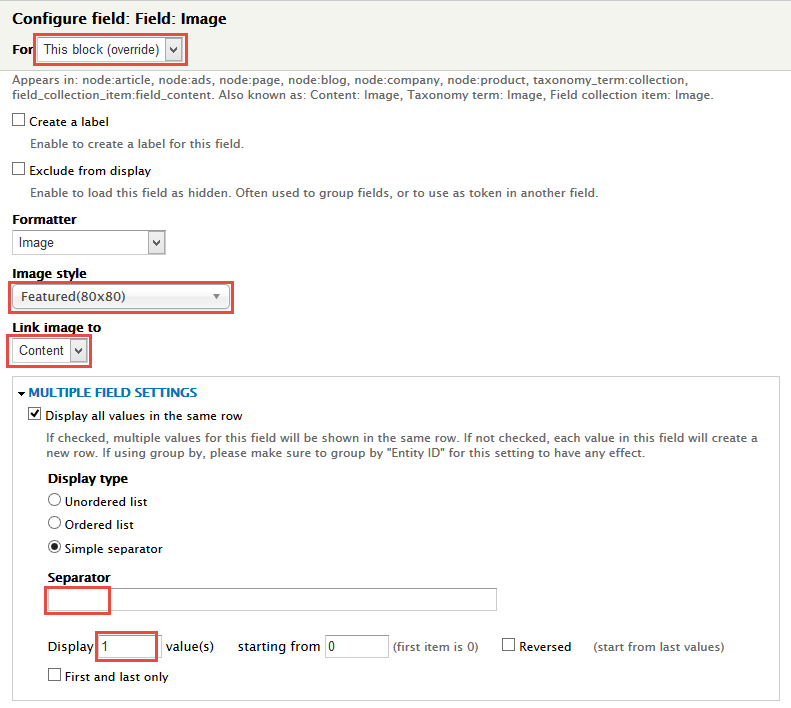
9. Set properties for Field: Image
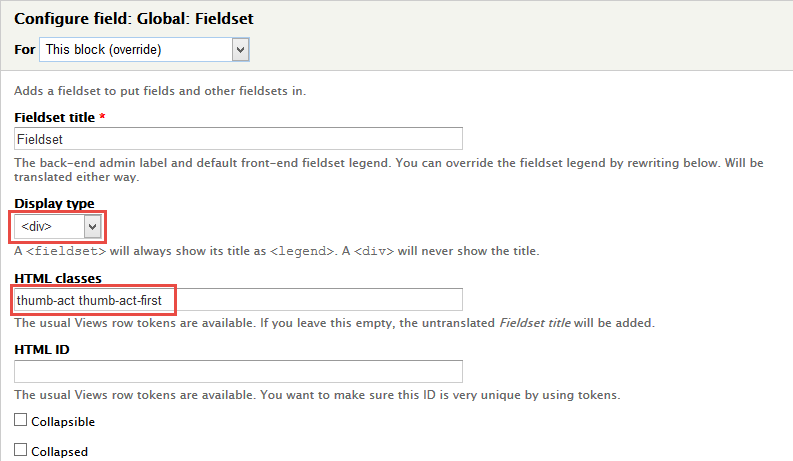
10. Set properties for Global: Fieldset (Fieldset)
11. Set properties for Commerce Product: Add to Cart form
12. Set properties for Content: “Add to Compare” link
13. Set properties for Content: Link
14. Set properties for Global: Fieldset (Fieldset)
15. Set properties for Content: Rate
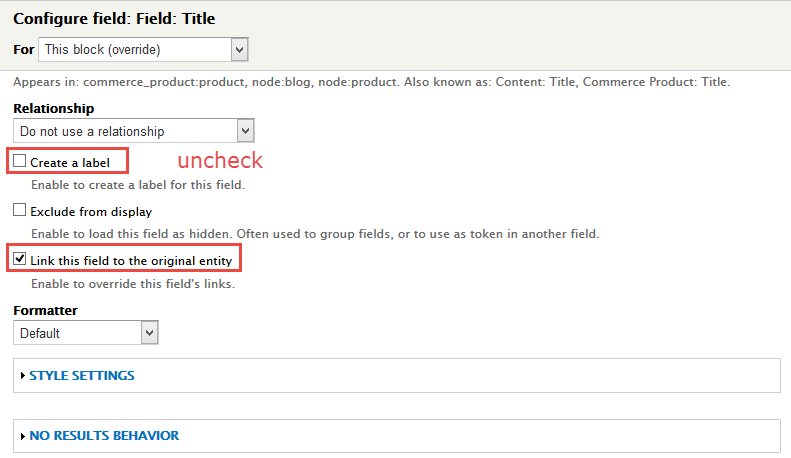
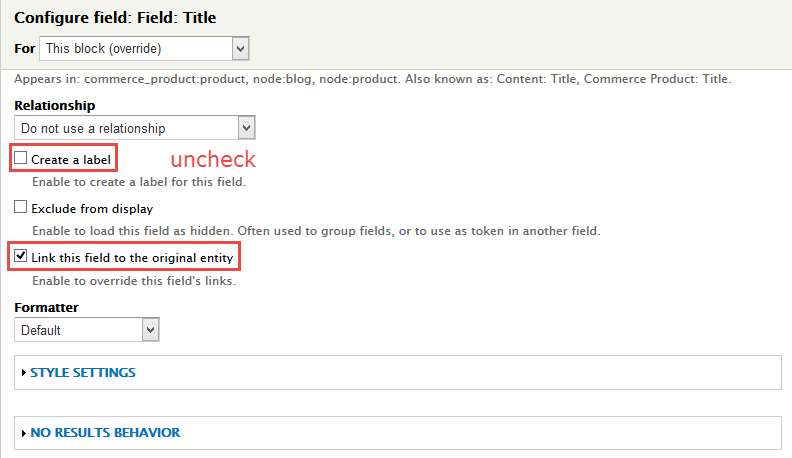
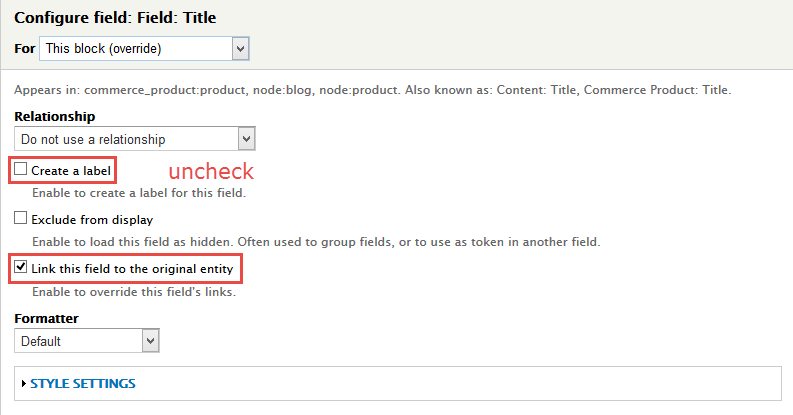
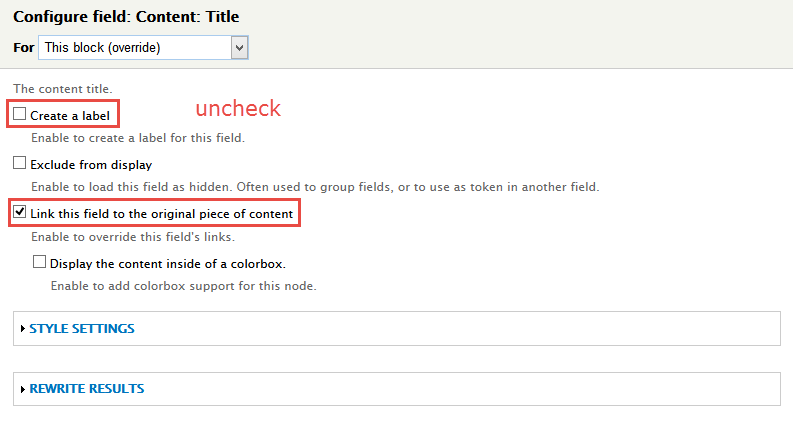
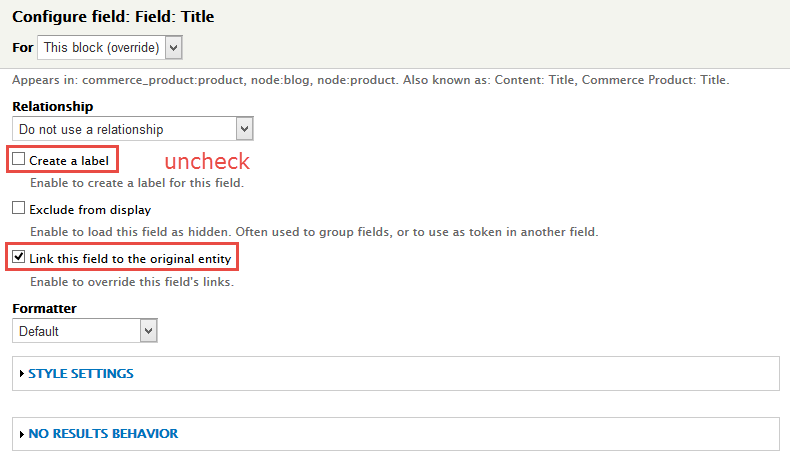
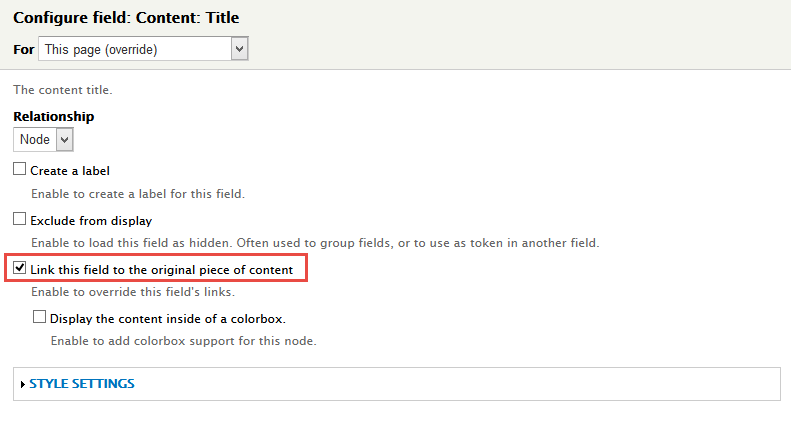
16. Set properties for Field: Title
17. Set properties for Content: Category
18. Set properties for Global: Fieldset (Fieldset)
19. Set properties for Commerce Product: Old Price
20. Set properties for Commerce Product: Price
21. At FIELDS area, click Rearrange button and set following arrange
22. At FILTER CRITERIA area, set following properties:
23. At PAGER > Use pager area, click link
24. In Advanced > OTHER area, add CSS class change following properties:
25.Click Save block button.
Home7 View page
1. Create Home7 view
Front end Display
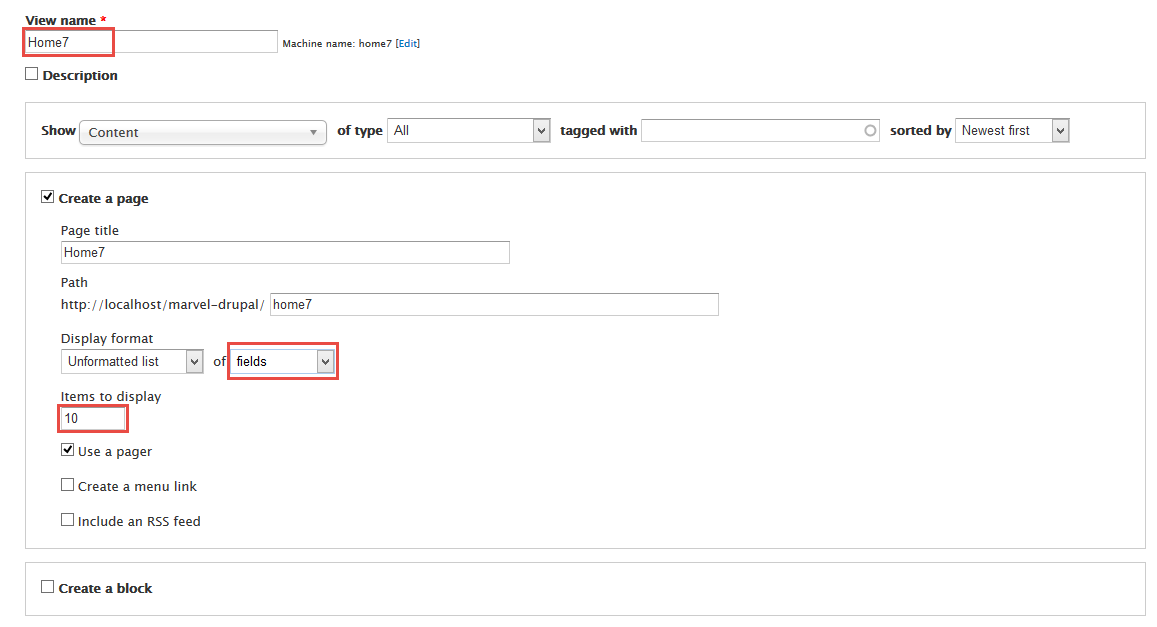
1. Navigate to Structure > Views, click Add views link, Create Home7 view with following properties:
2. Click Continue & edit button and set following properties:
3. At Title area, set following properties:
4. At FIELDS area, click Add button to add fields: Field: Imageset following properties.
5. At FILTER CRITERIA area, click Add button and add file Content: Nid set following properties:
6. At PAGE SETTINGS > Menu area, set the following properties:
7. At Advanced > OTHER area, add CSS class
8.Click Save block button.
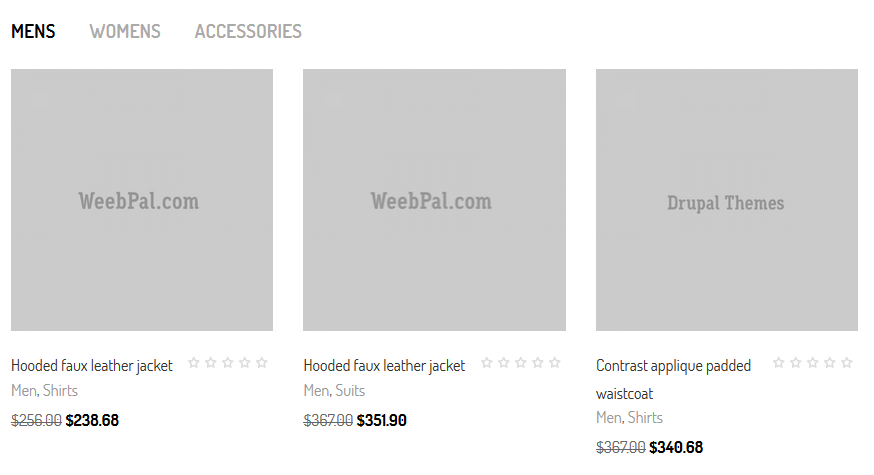
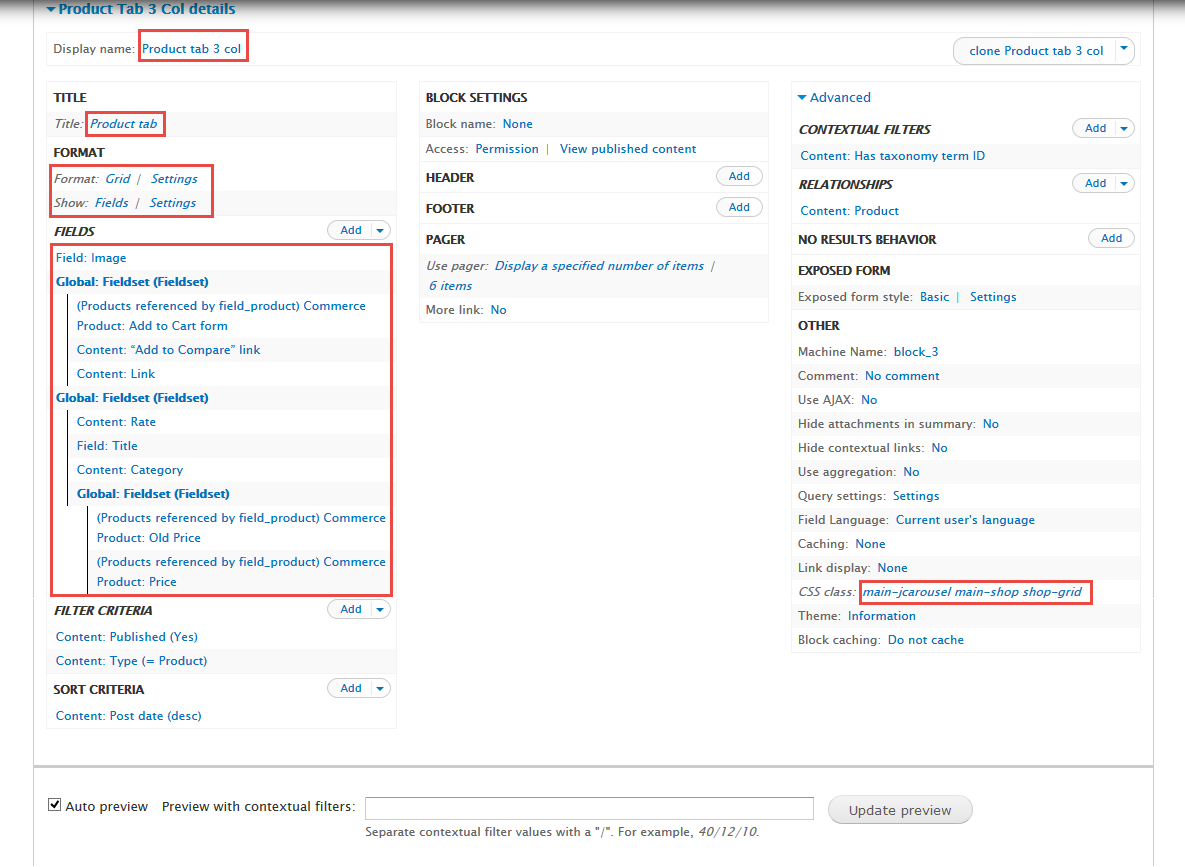
2. Create Product tab 3 col view
Front end Display
Stay open Product view, click Add button add Block new.
1. Next to steps below to set properties for the following fields:
2. At Display name area, set following properties:
3. At Title area, set following properties:
4. At FORMAT Format: Grid area, click Settings and set following properties:
5. In Advanced > Contextual filters area, set following properties:
6. At Advanced > REALATIONSHIPS area, set following properties:
7. Set properties for Content: Referenced products
8. At FIELDS area, click Add button to add fields: Field: Image, Global: Fieldset (Fieldset), Commerce Product: Add to Cart form, Content: “Add to Compare” link, Content: Link, Global: Fieldset (Fieldset), Content: Rate, Field: Title, Content: Category, Global: Fieldset (Fieldset), Commerce Product: Old Price, Commerce Product: Price.
9. Set properties for Field: Image
10. Set properties for Global: Fieldset (Fieldset)
11. Set properties for Commerce Product: Add to Cart form
12. Set properties for Content: “Add to Compare” link
13. Set properties for Content: Link
14. Set properties for Global: Fieldset (Fieldset)
15. Set properties for Content: Rate
16. Set properties for Field: Title
17. Set properties for Content: Category
18. Set properties for Global: Fieldset (Fieldset)
19. Set properties for Commerce Product: Old Price
20. Set properties for Commerce Product: Price
21. At FIELDS area, click Rearrange button and set following arrange
22. At FILTER CRITERIA area, set following properties:
23. At PAGER > Use pager area, click link
24. At Advanced > OTHER area, add CSS class
25.Click Save block button.
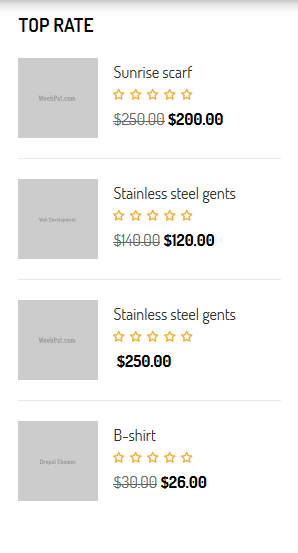
3. Create Top rates view
Front end Display
Stay open Product view, click Add button add Block new.
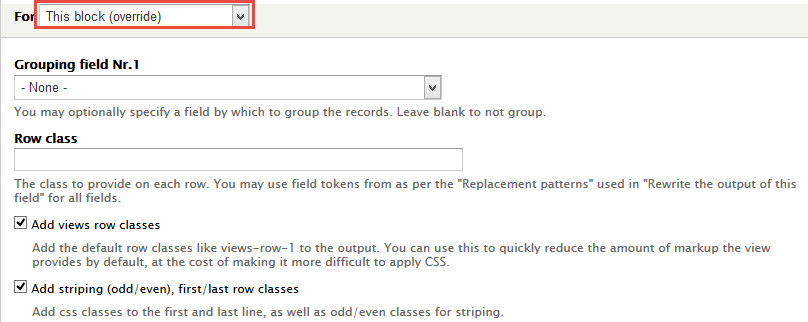
1. Next to steps below to set properties for the following fields:
2. At Display name area, set following properties:
3. At Title area, set following properties:
4. At FORMAT Format: Grid area, click Settings and set following properties:
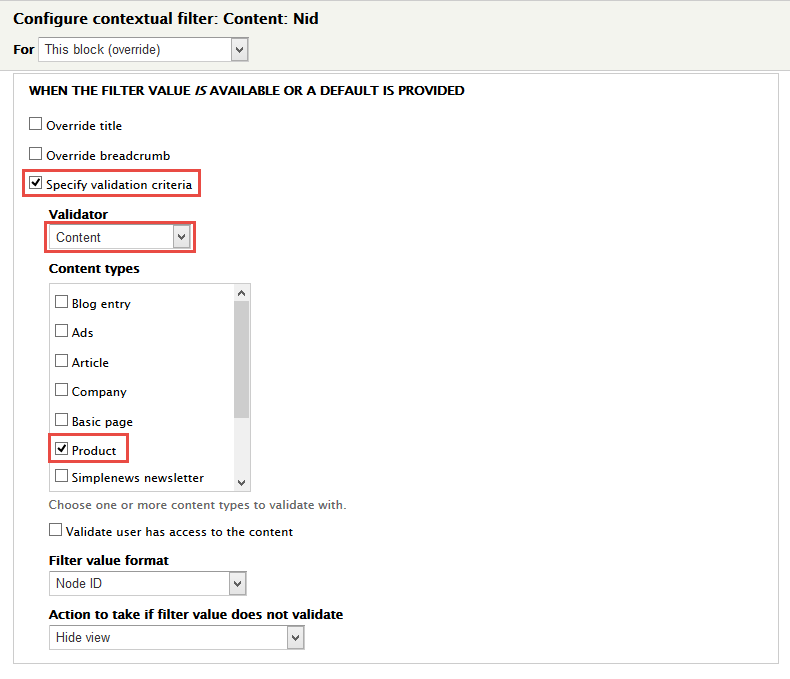
5. In Advanced > Contextual filters area, set following properties:
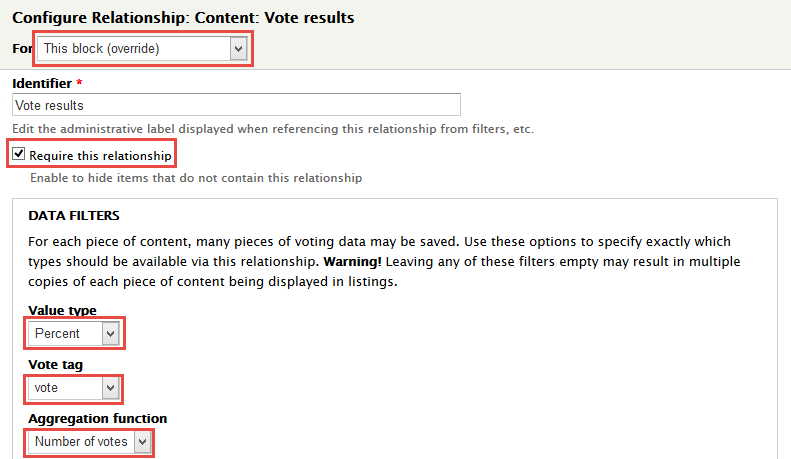
6. In Advanced > REALATIONSHIPS area, click Add button to add fields: Content: Vote results and set following properties:
7. In FIELDS area, click Add button to add fields: Field: Title, Commerce Product: Old Price, Commerce Product: Price field and set following properties:
8. Set properties for Field: Image
9. Set properties for Field: Title
10. Set properties for Global: Fieldset (Fieldset)
11. Set properties for Commerce Product: Old Price
12. Set properties for Commerce Product: Price
13. At FIELDS area, click Rearrange button and set following arrange
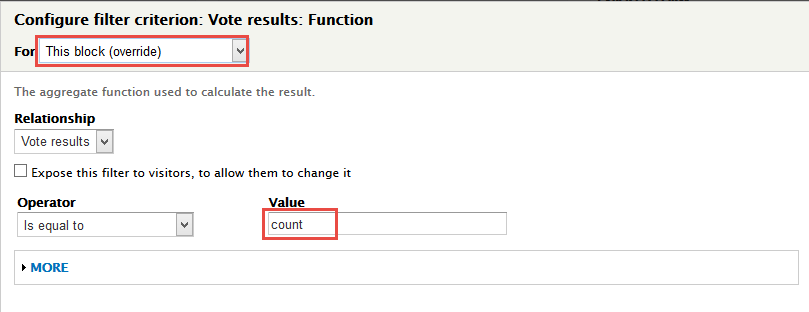
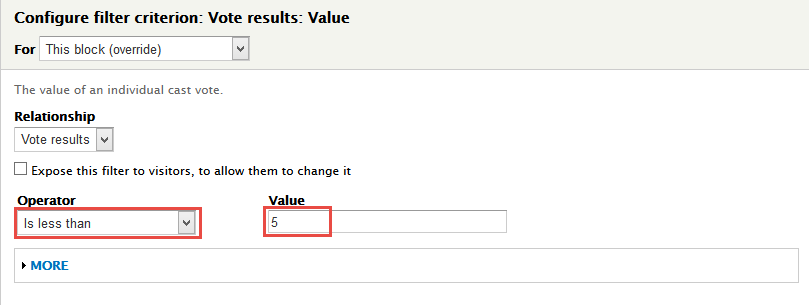
14. In FILTER CRITERIA area, click Add button to add Vote results: Function, Vote results: Value set following properties:
15. Set properties for Vote results: Function
16. Set properties for Vote results: Value
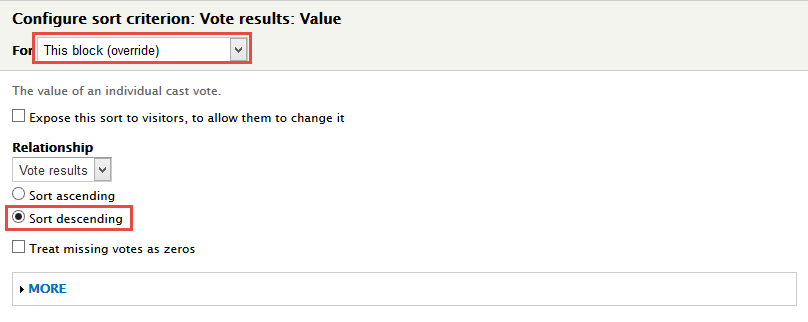
17. At SORT CRITERIA area, Click Add button to add Vote results: Value
18. At PAGER > Use pager area, click link
19. In Advanced > OTHER area, add CSS class change following properties:
20.Click Save block button.
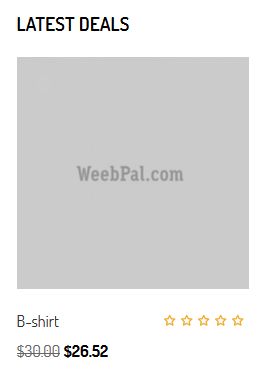
4. Create LATEST DEALS view
Front end Display
Stay open Product view, click Add button add Block new.
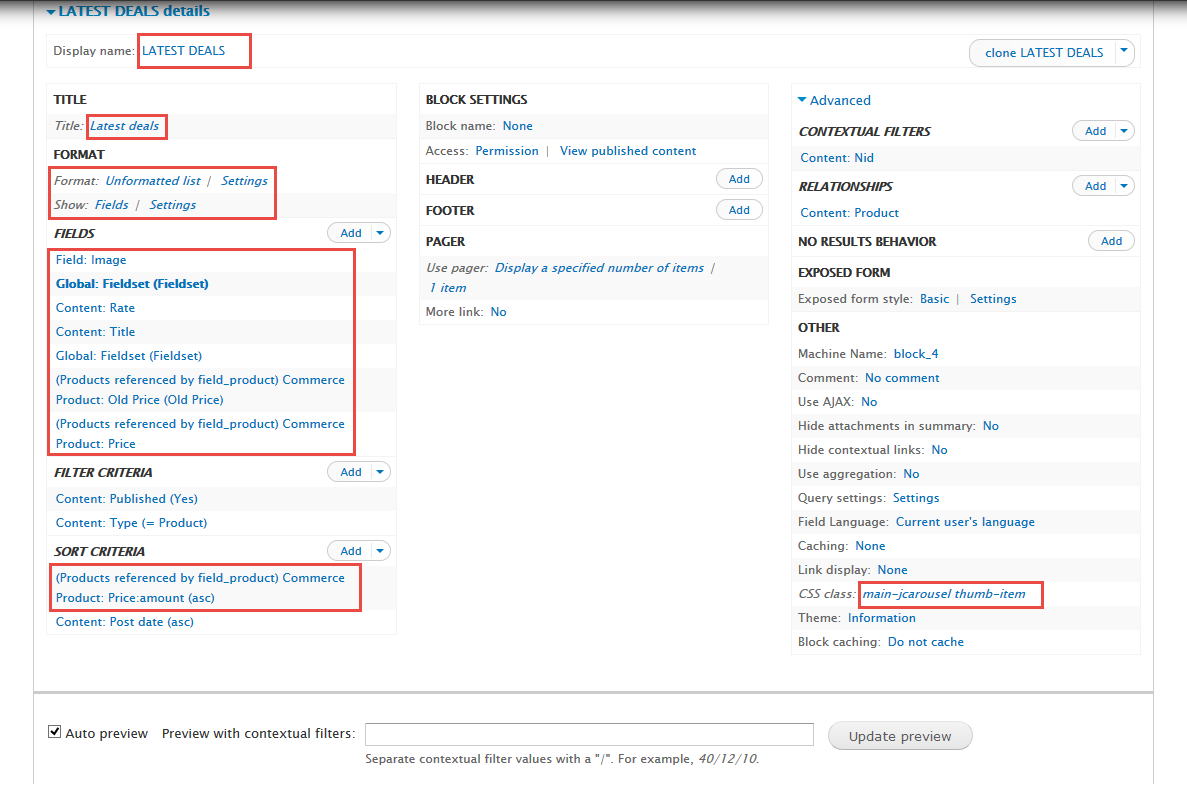
1. Next to steps below to set properties for the following fields:
2. At Display name area, set following properties:
3. At Title area, set following properties:
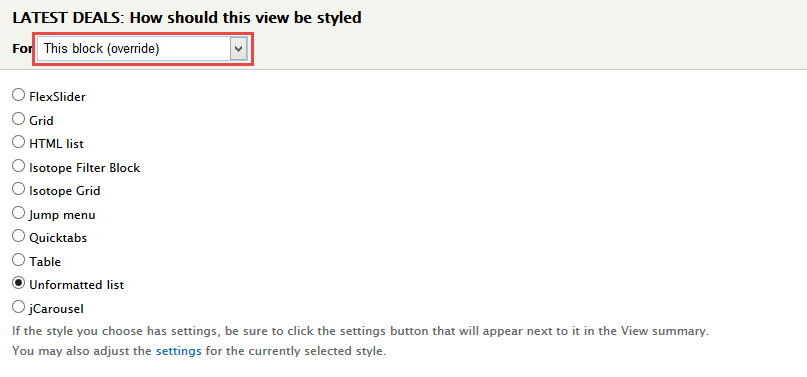
4. At FORMAT Format area, set following properties:
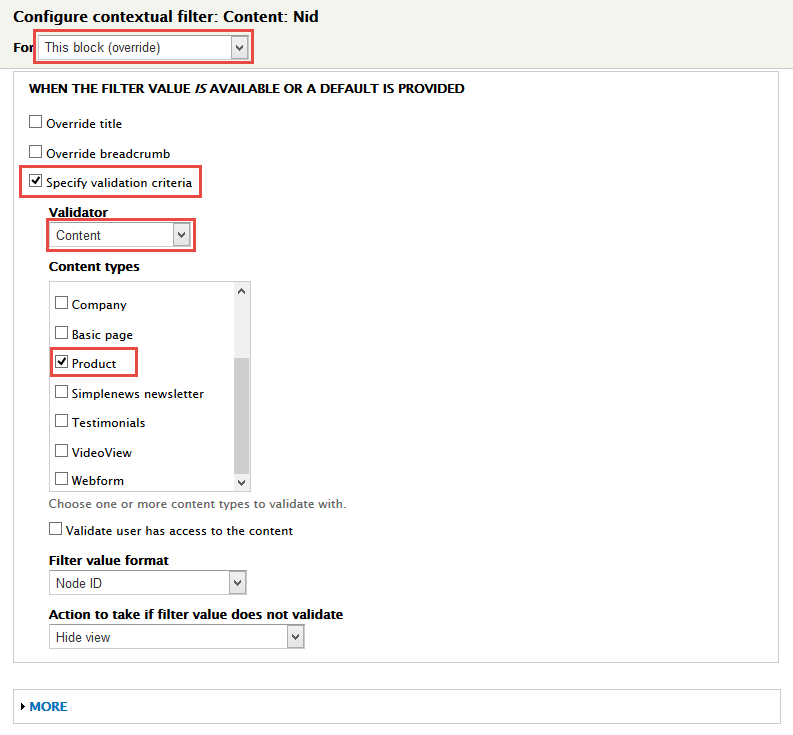
5. In Advanced > Contextual filters area, click Add button to add fields: Content: Nid and set following properties:
6. In Advanced > REALATIONSHIPS area, set following properties:
7. In FIELDS area, click Add button to add fields: Content: Rate, Content: Title, Global: Fieldset (Fieldset), Commerce Product: Old Price, Commerce Product: Price set following properties:
8. Set properties for Field: Image
9. Set properties for Global: Fieldset (Fieldset)
10. Set properties for Content: Rate
11. Set properties for Content: Title
12. Set properties for Global: Fieldset (Fieldset)
13. Set properties for Commerce Product: Old Price
14. Set properties for Commerce Product: Price
15. At FIELDS area, click Rearrange button and set following arrange
16. At FILTER CRITERIA area, set following properties:
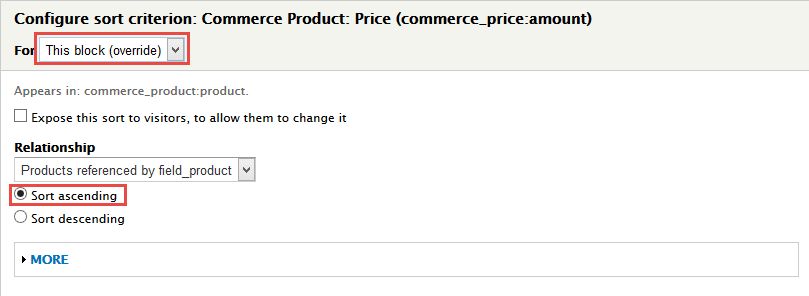
17. At SORT CRITERIA area, Click Add button to add Commerce Product: Price:amount set following properties:
18. At PAGER > Use pager area, click link
19. In Advanced > OTHER area, add CSS class change following properties:
20.Click Save block button.
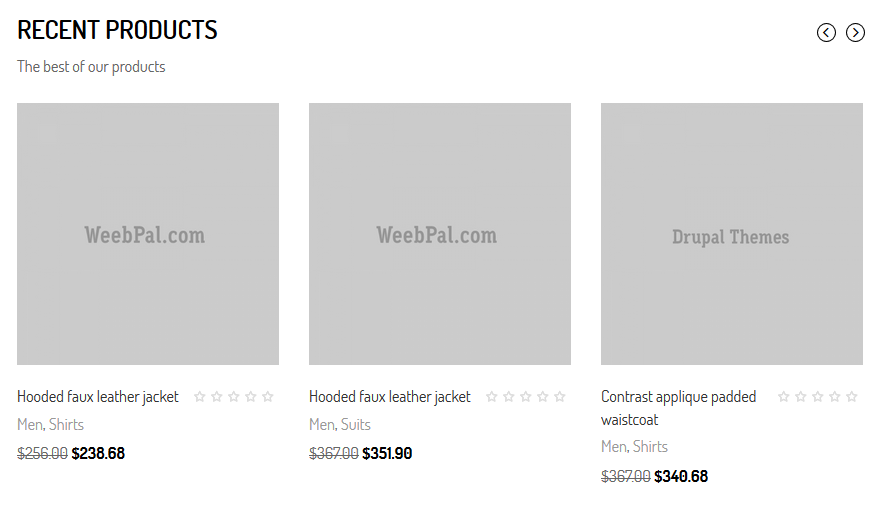
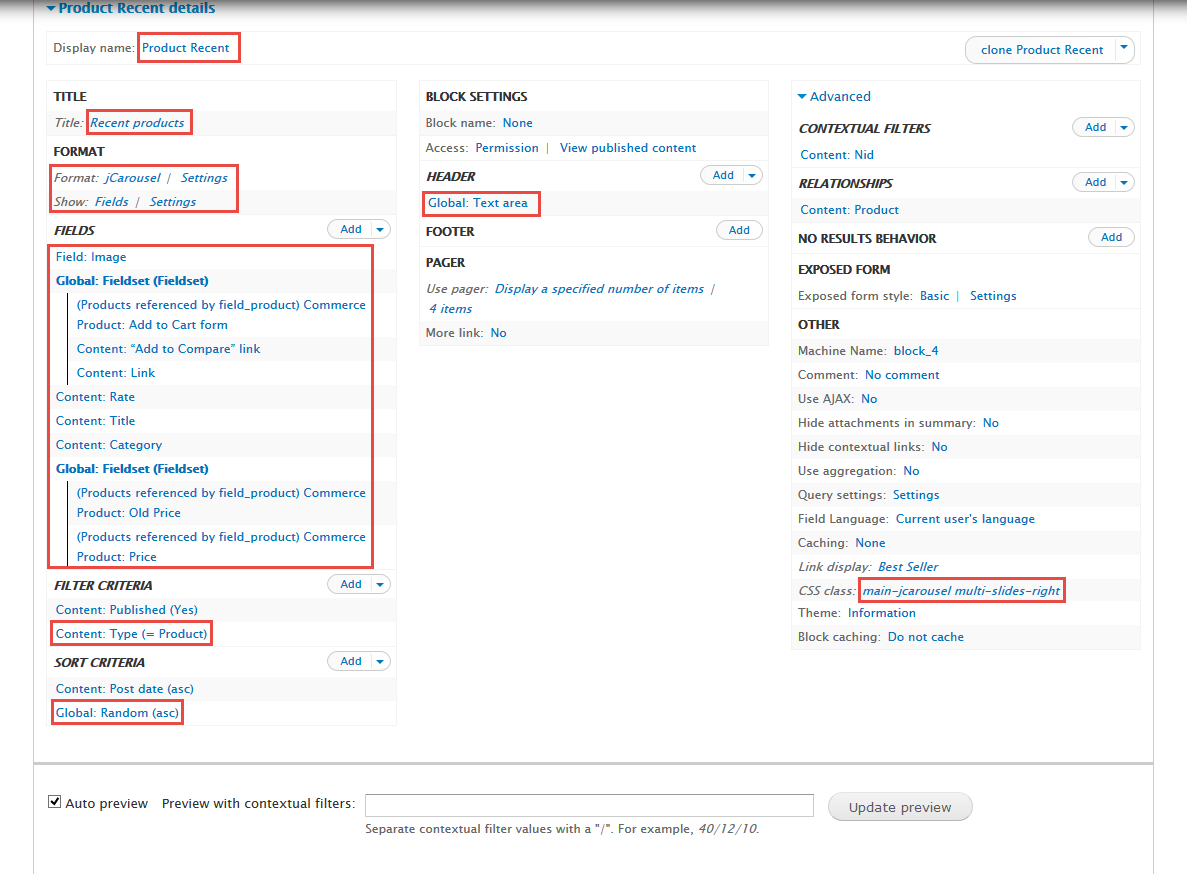
5. Create Product Recent view
Front end Display
Stay open Product view, click Add button add Block new.
1. Next to steps below to set properties for the following fields:
2. At Display name area, set following properties:
3. At Title area, set following properties:
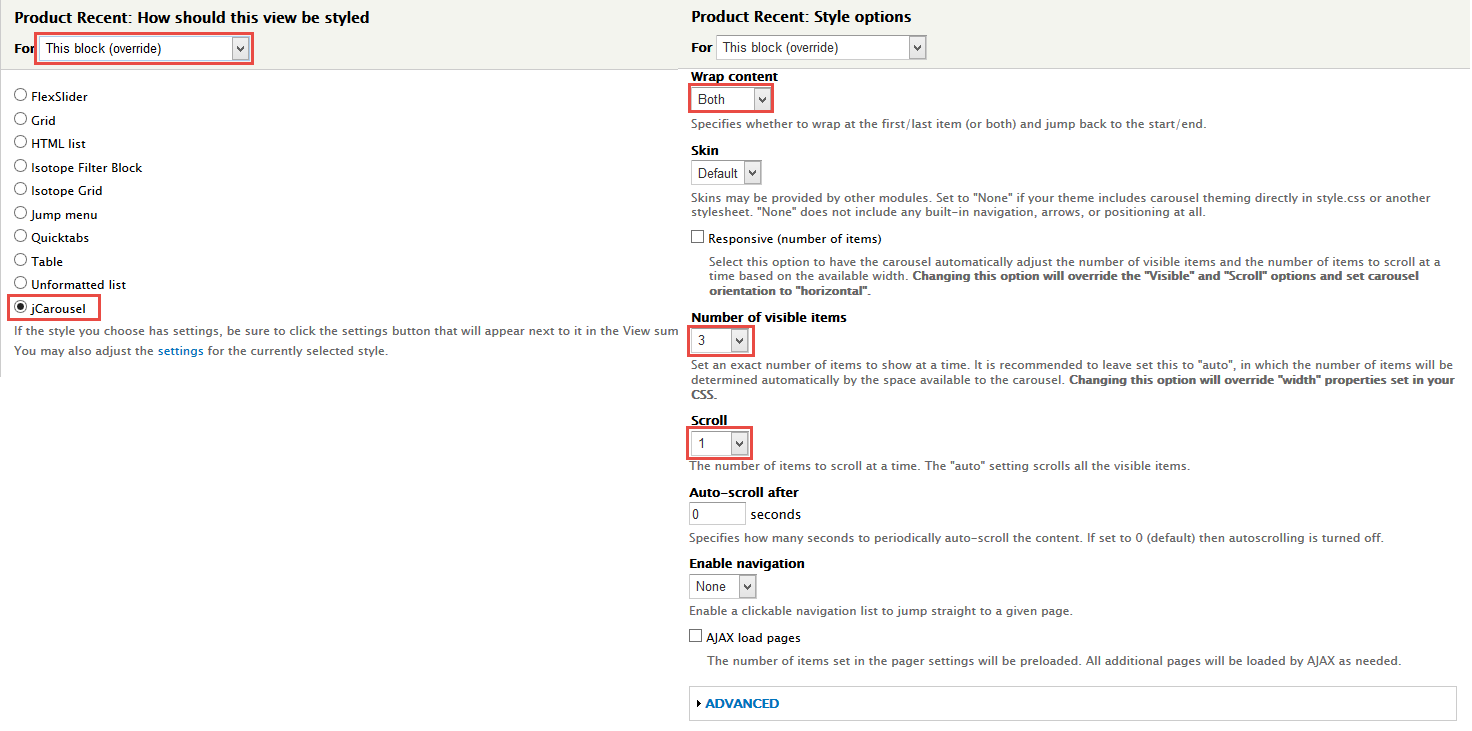
4. At FORMAT Format: jCarousel area, click Settings and set following properties:
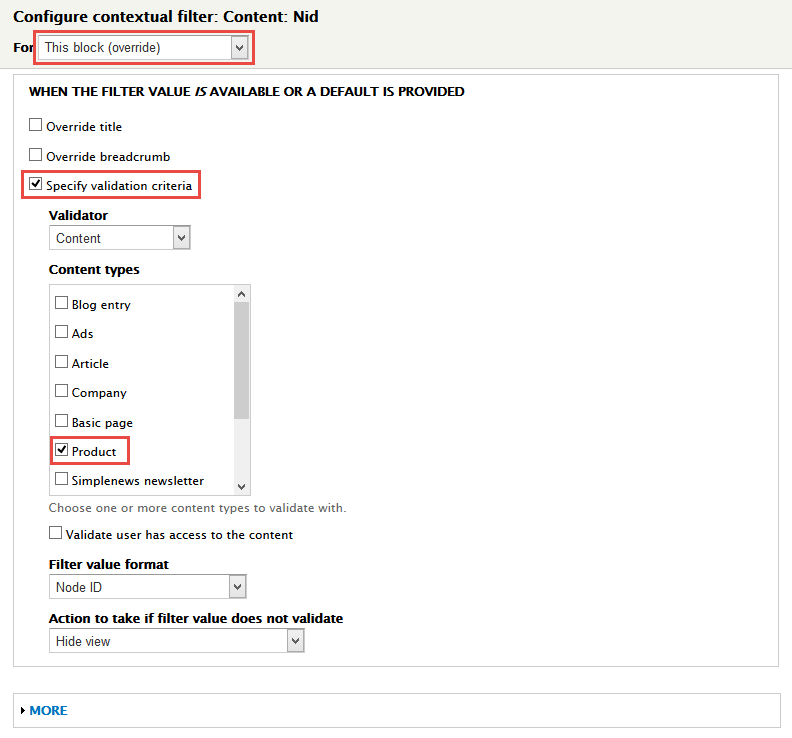
5. In Advanced > Contextual filters area, set following properties:
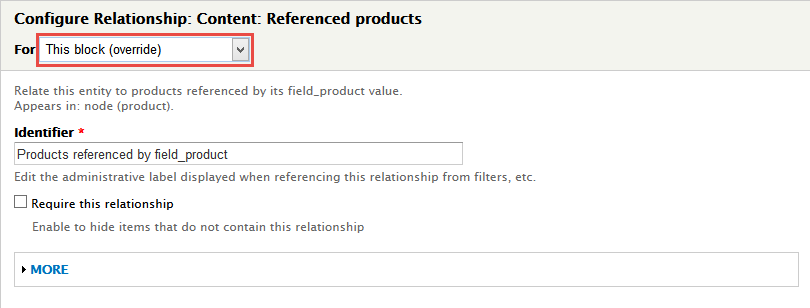
6. In Advanced > REALATIONSHIPS area, set following properties:
7. In FIELDS area, click Add button to add fields: Commerce Product: Add to Cart form, Content: “Add to Compare” link, Content: Link, Content: Title, Content: Category, Global: Fieldset (Fieldset), Commerce Product: Old Price, Commerce Product: Price field and set following properties:
8. Set properties for Field: Image
9. Set properties for Global: Fieldset (Fieldset)
10. Set properties for Commerce Product: Add to Cart form
11. Set properties for Content: “Add to Compare” link
12. Set properties for Content: Link
13. Set properties for Content: Title
14. Set properties for Content: Category
15. Set properties for Global: Fieldset (Fieldset)
16. Set properties for Commerce Product: Old Price
17. Set properties for Commerce Product: Price
18. At FIELDS area, click Rearrange button and set following arrange
19. In FILTER CRITERIA area, click Add button to add Content: Type set following properties:
20. At SORT CRITERIA area, Click Add button to add Global: Random set following properties:
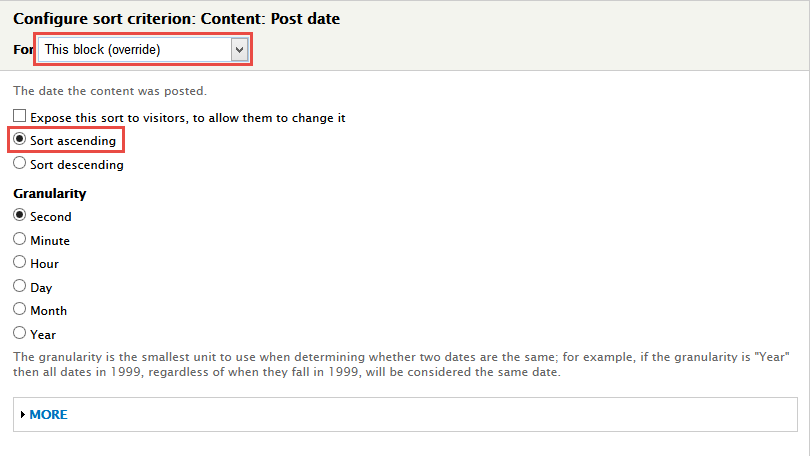
21. Set properties for Content: Post date
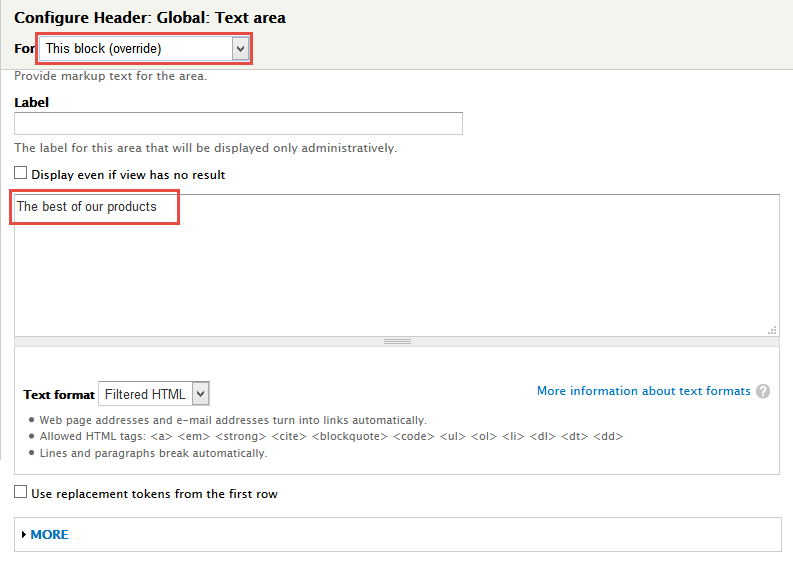
22. At Header area, Click Add button to add Global: Text area and set the following properties:
23. At PAGER > Use pager area, click link
24. In Advanced > OTHER area, add CSS class change following properties:
25.Click Save block button.
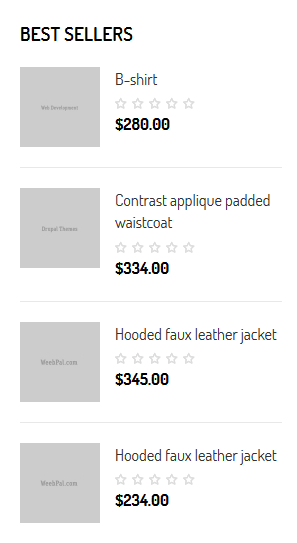
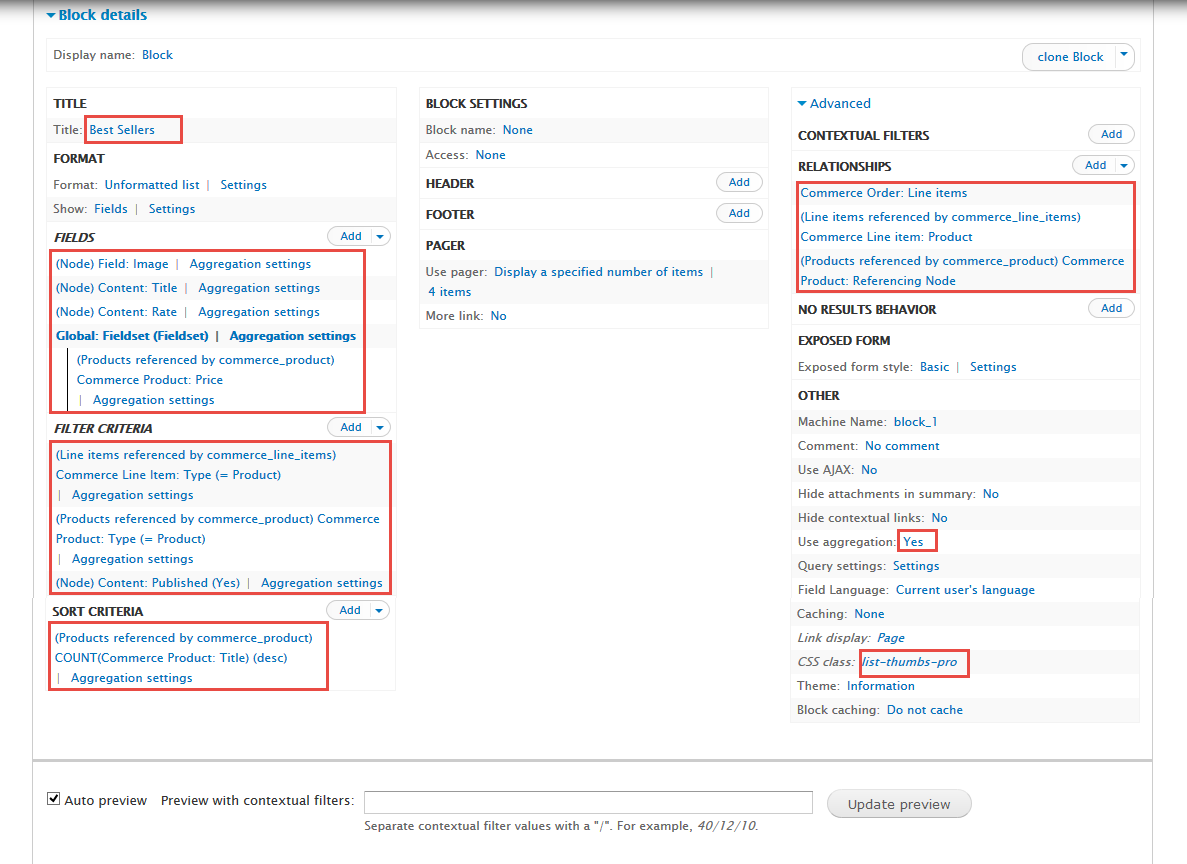
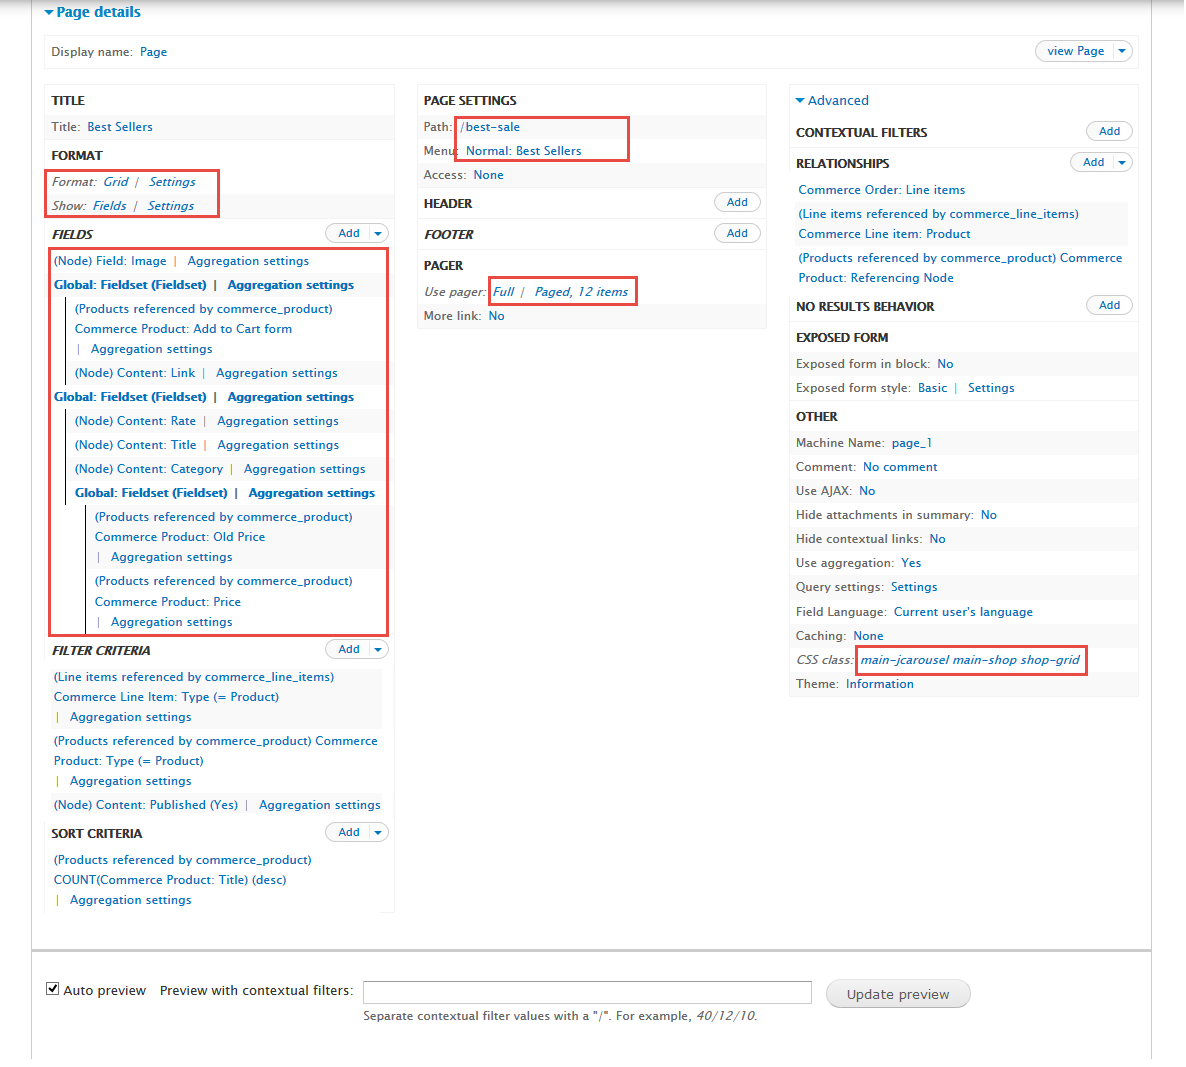
6. Create Bestsellers block view
Front end Display
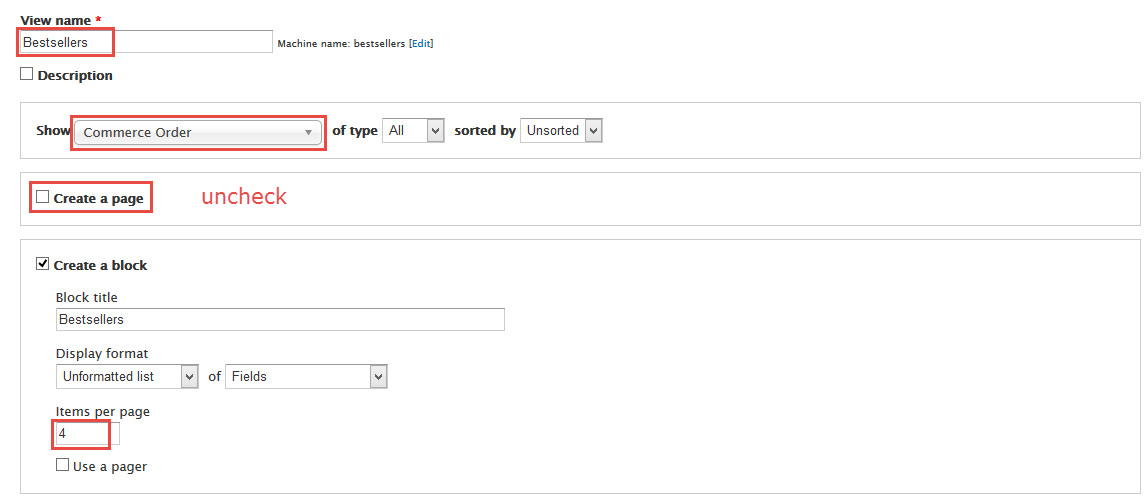
1. Navigate to Structure > Views, click Add views link, Create Bestsellers view with following properties:
2. Click Continue & edit button and set following properties:
3. At Title area, set following properties:
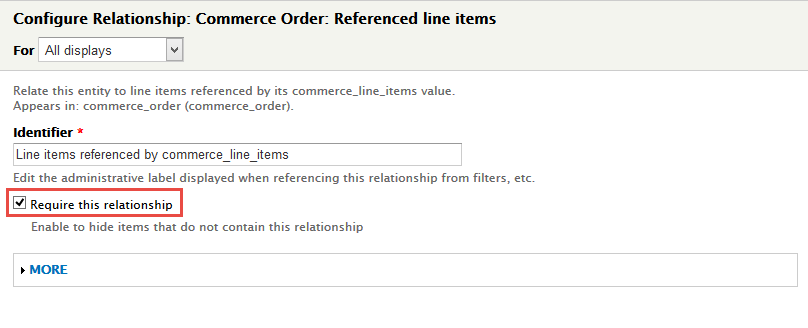
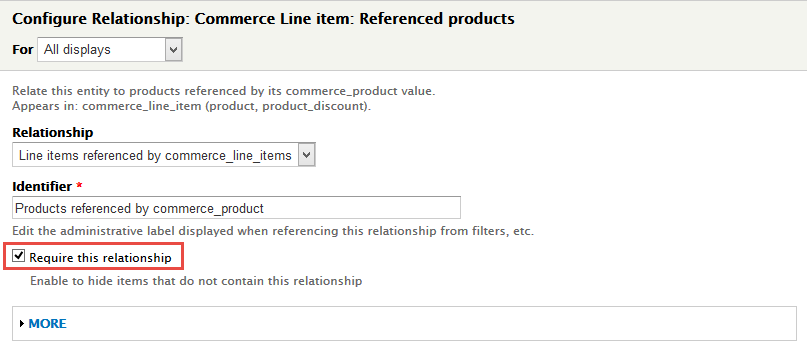
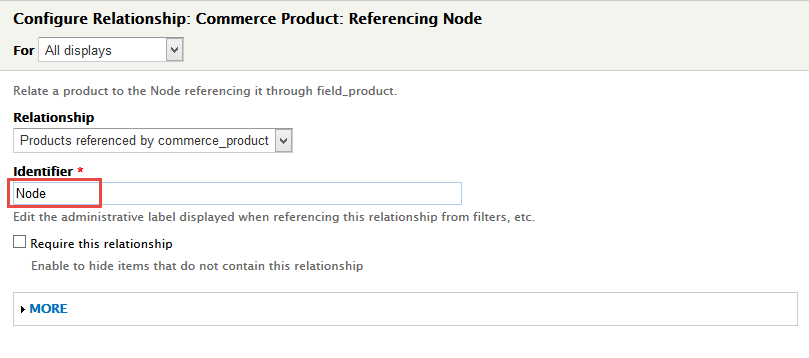
4. In Advanced > REALATIONSHIPS area, click Add button to add fields: Commerce Order: Line items, Commerce Line item: Product, Commerce Product: Referencing Node and set following properties:
5. Set properties for Commerce Order: Referenced line items
6. Set properties for Commerce Line item: Referenced products
7. Set properties for Commerce Product: Referencing Node
8. In Advanced > OTHER area, add Use aggregation change following properties:
9. In FIELDS area, click Add button to add fields: Field: Image, Content: Title, Content: Rate, Global: Fieldset (Fieldset), Commerce Product: Pricefield and set following properties:
10. Set properties for Field: Image
11. Set properties for Content: Title
12. Set properties for Content: Rate
13. Set properties for Global: Fieldset (Fieldset)
14. Set properties for Commerce Product: Price
15. At FIELDS area, click Rearrange button and set following arrange
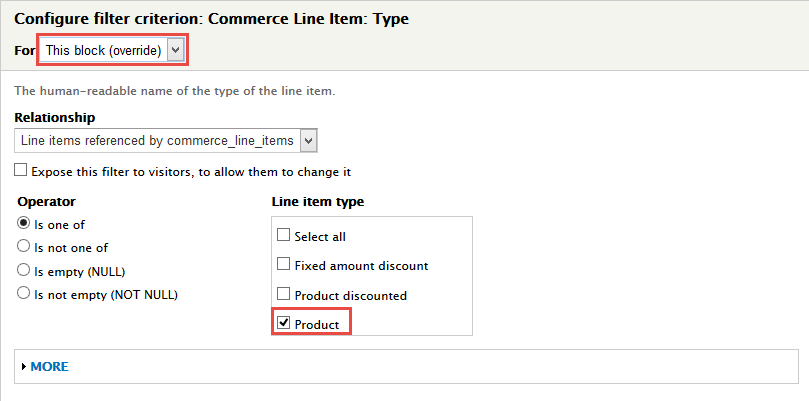
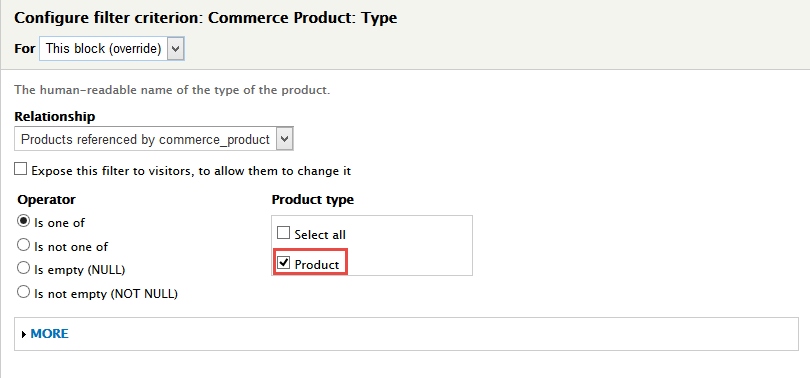
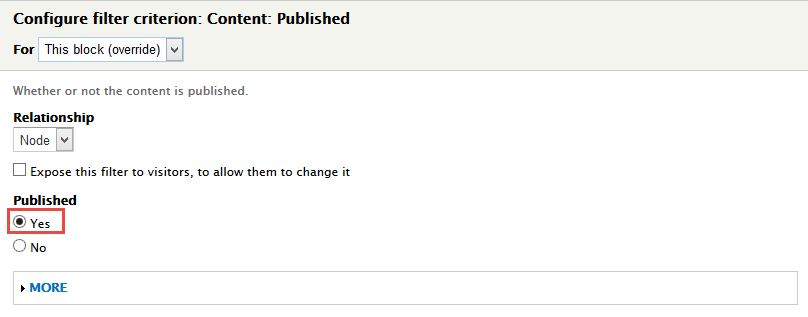
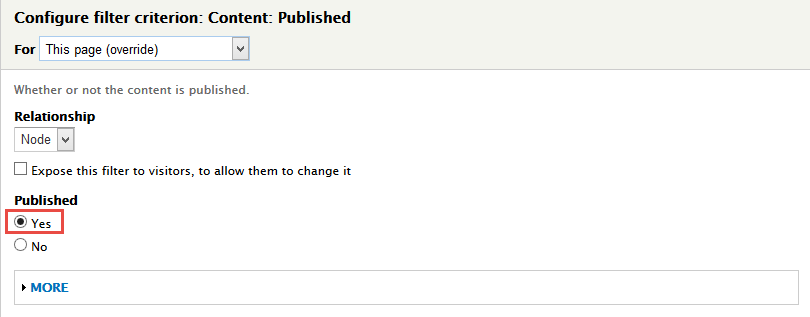
16. In FILTER CRITERIA area, click Add button to add Commerce Line Item: Type, Commerce Product: Type, Content: Published set following properties:
17. Set properties for Commerce Line Item: Type
18. Set properties for Commerce Product: Type
19. Set properties for Content: Published
20. At SORT CRITERIA area, Click Add button to add COUNT(Commerce Product: Title) set following properties:
21. In Advanced > OTHER area, add CSS class change following properties:
22.Click Save block button.
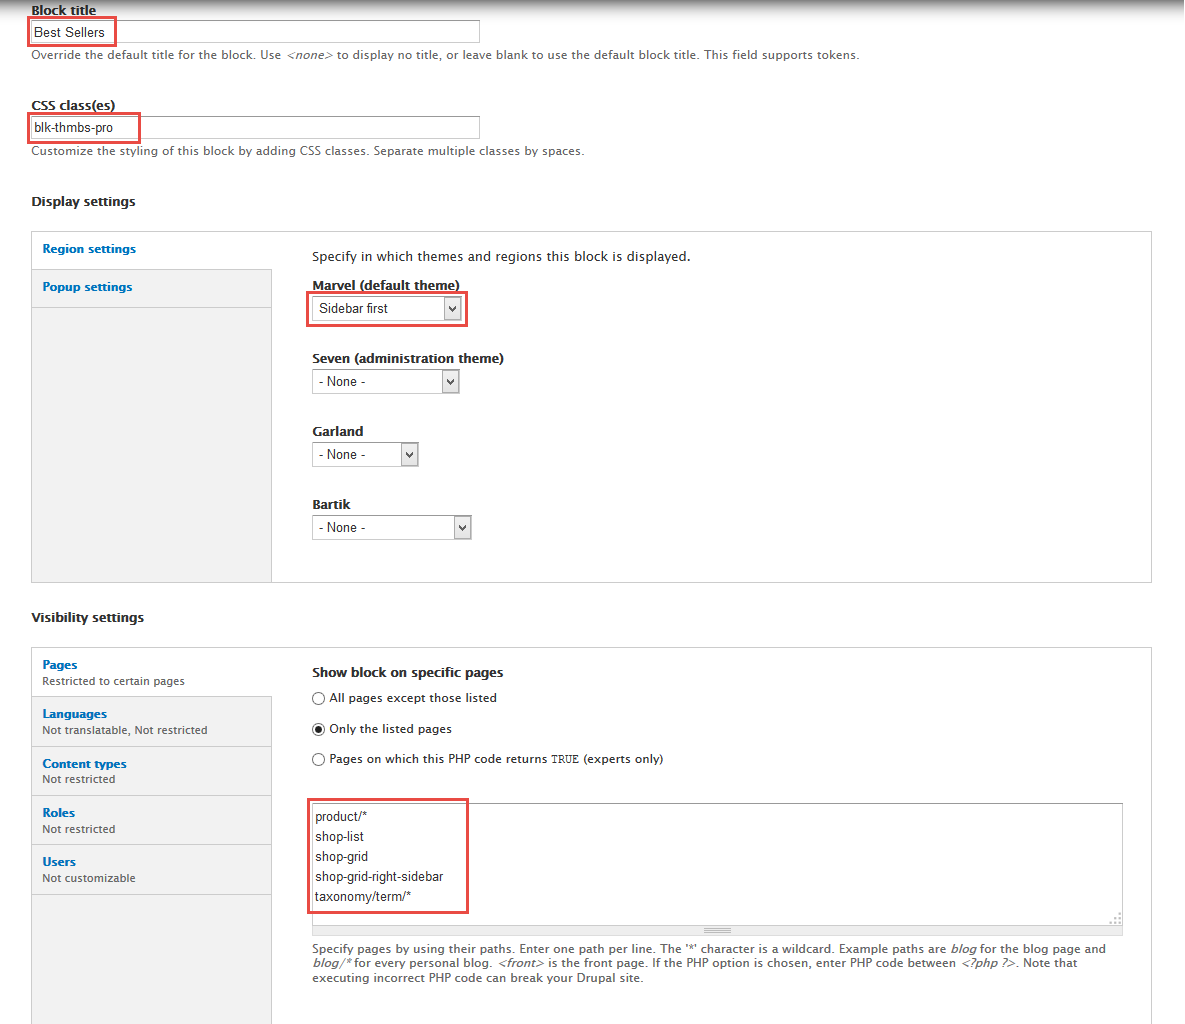
7. Configure Bestsellers block
1. Navigate to Structure > Blocks
2. Find View: Bestsellers, click configure link, set following properties
3.Click Save block button.
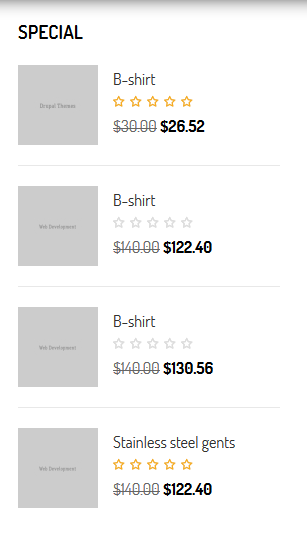
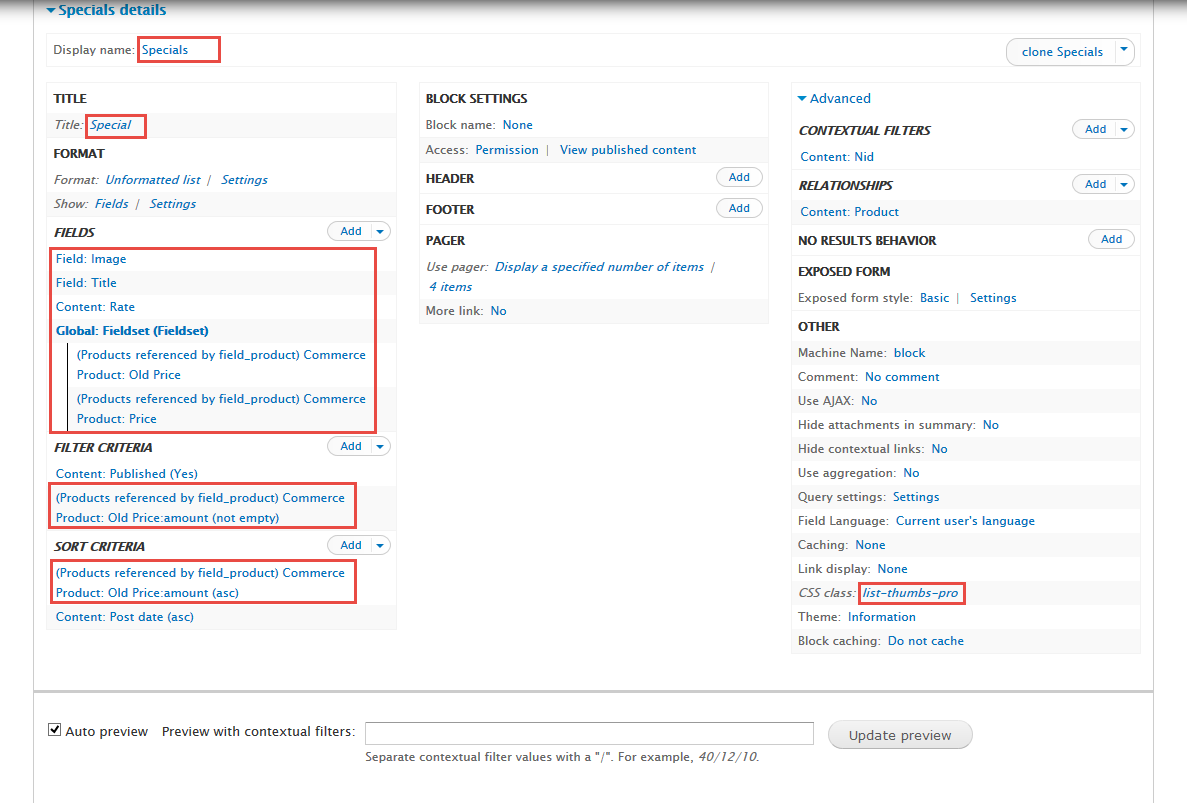
8. Create Specials view
Front end Display
Stay open Product view, click Add button add Block new.
1. Next to steps below to set properties for the following fields:
2. At Display name area, set following properties:
3. At Title area, set following properties:
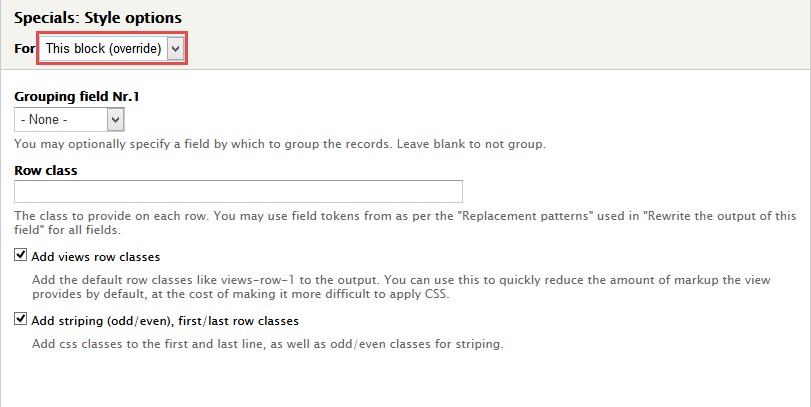
4. At FORMAT Format area, set following properties:
5. In Advanced > Contextual filters area, set following properties:
6. In Advanced > REALATIONSHIPS area, set following properties:
7. In FIELDS area, click Add button to add fields: Field: Title, Commerce Product: Old Price, Commerce Product: Price set following properties:
8. Set properties for Field: Image
9. Set properties for Field: Title
10. Set properties for Global: Fieldset (Fieldset)
11. Set properties for Commerce Product: Old Price
12. Set properties for Commerce Product: Price
13. At FIELDS area, click Rearrange button and set following arrange
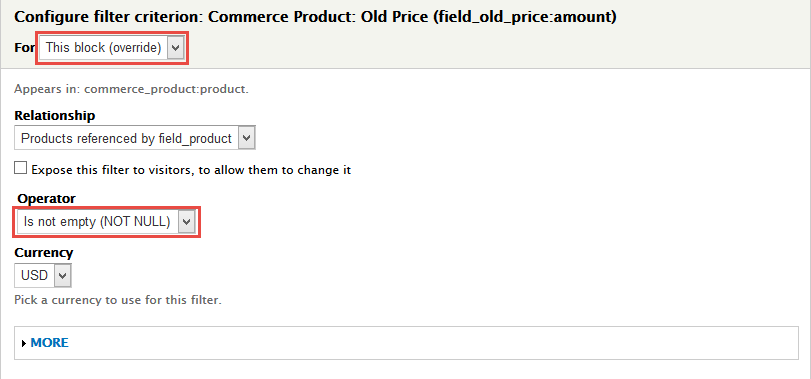
14. At FILTER CRITERIA area, click Add button and add file Commerce Product: Old Price set following properties:
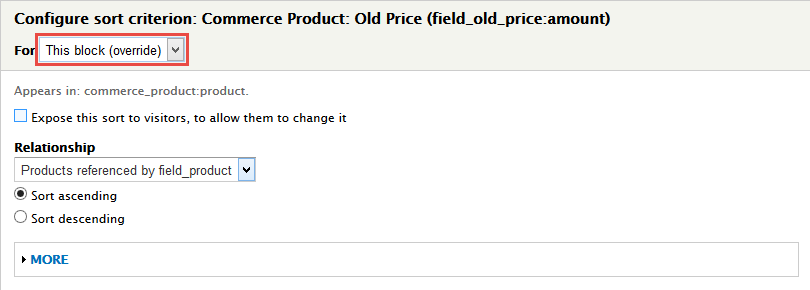
15. At SORT CRITERIA area, Click Add button to add Commerce Product: Old Price set following properties:
16. At PAGER > Use pager area, click link
17. In Advanced > OTHER area, add CSS class change following properties:
18.Click Save block button.
Configuration Context
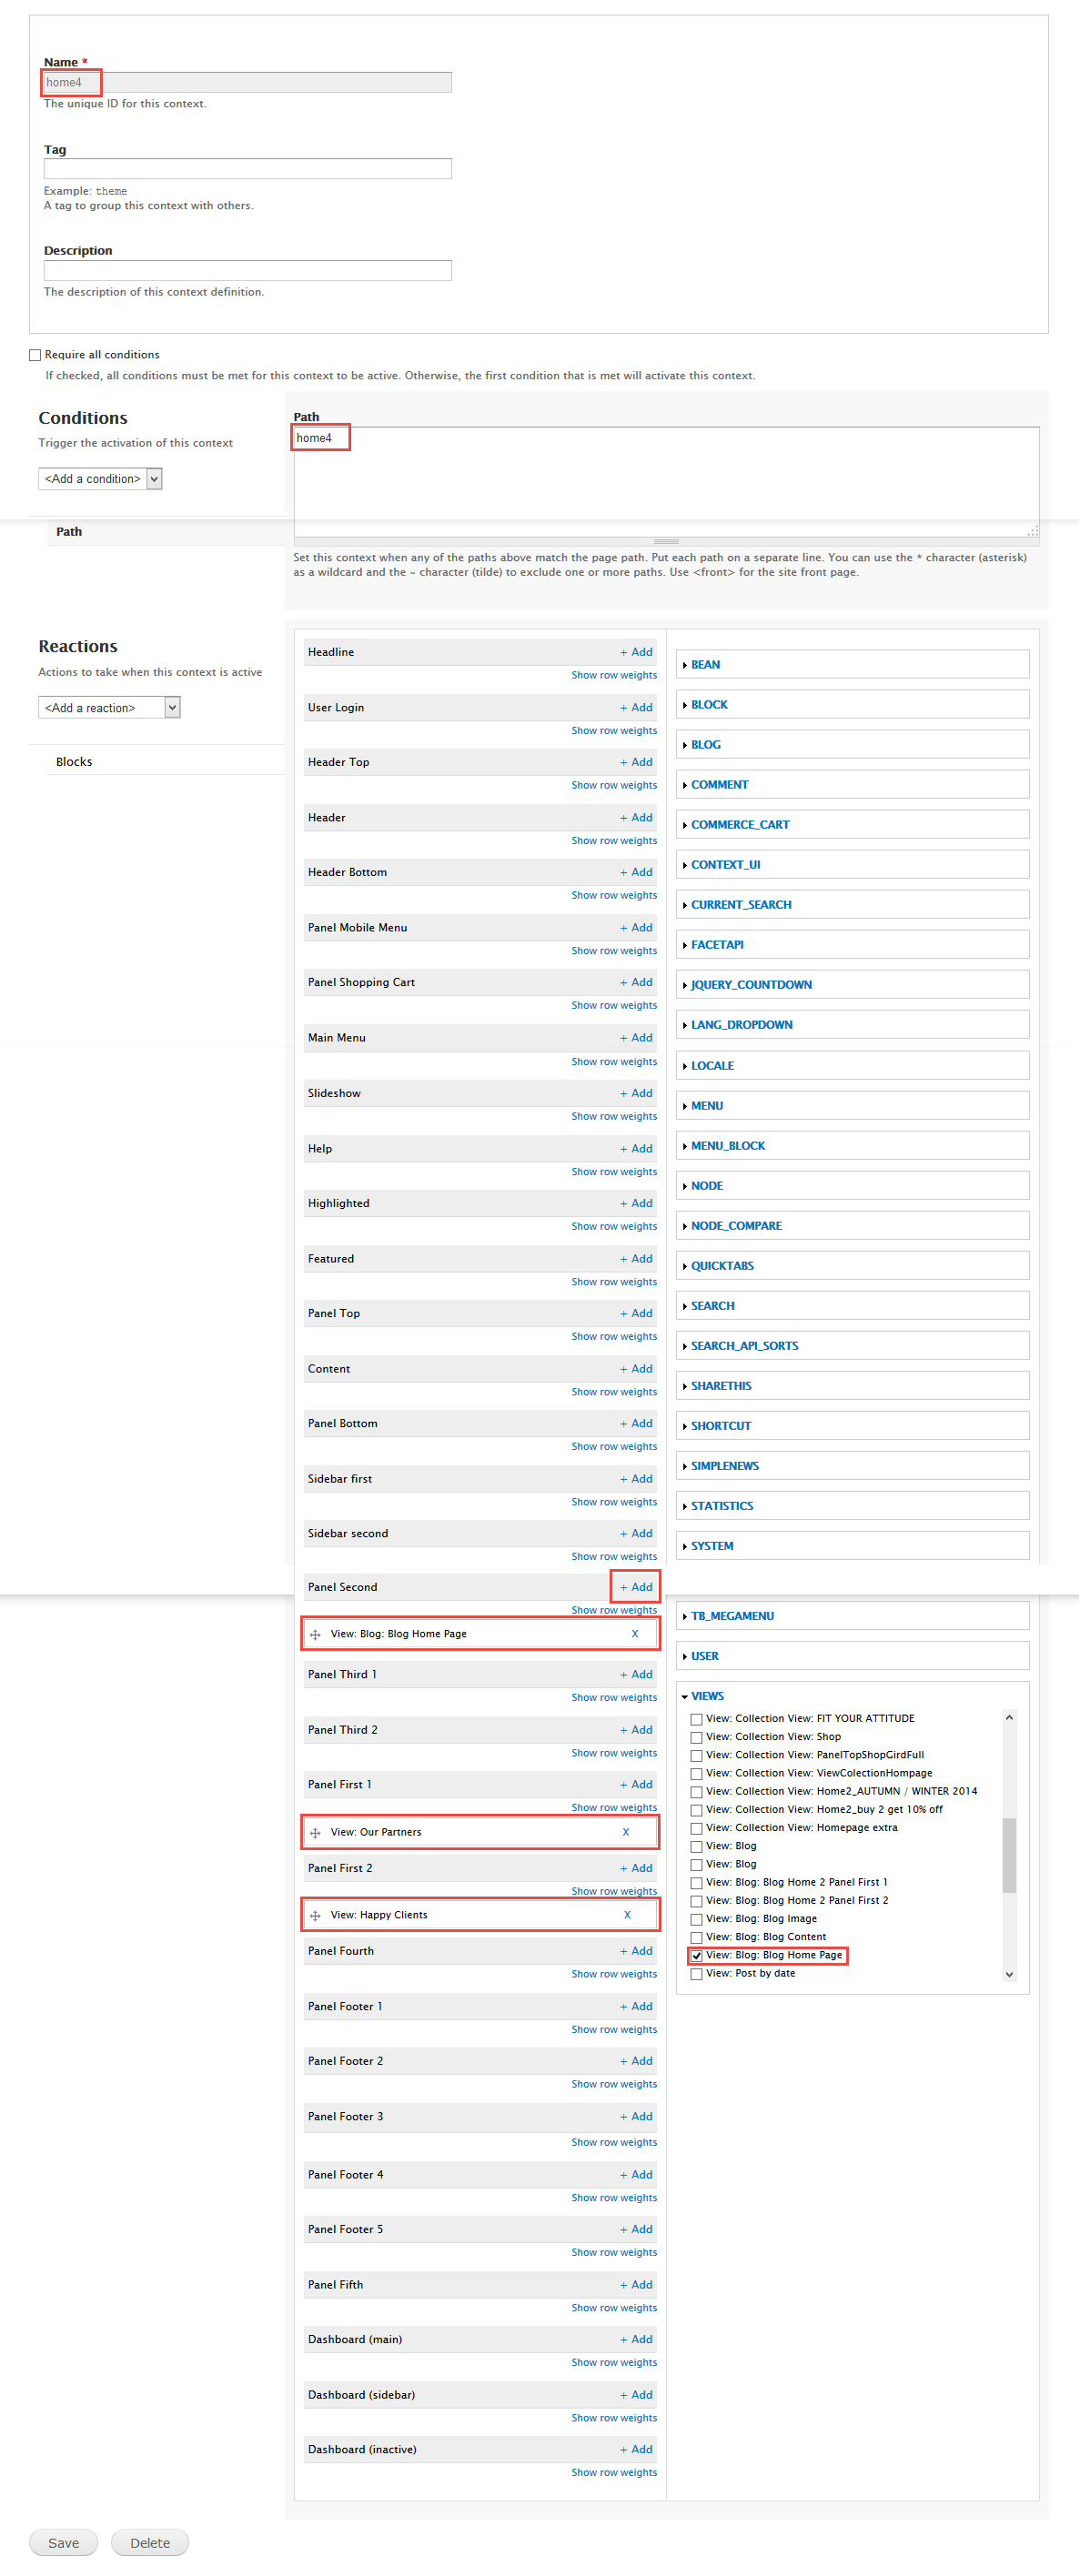
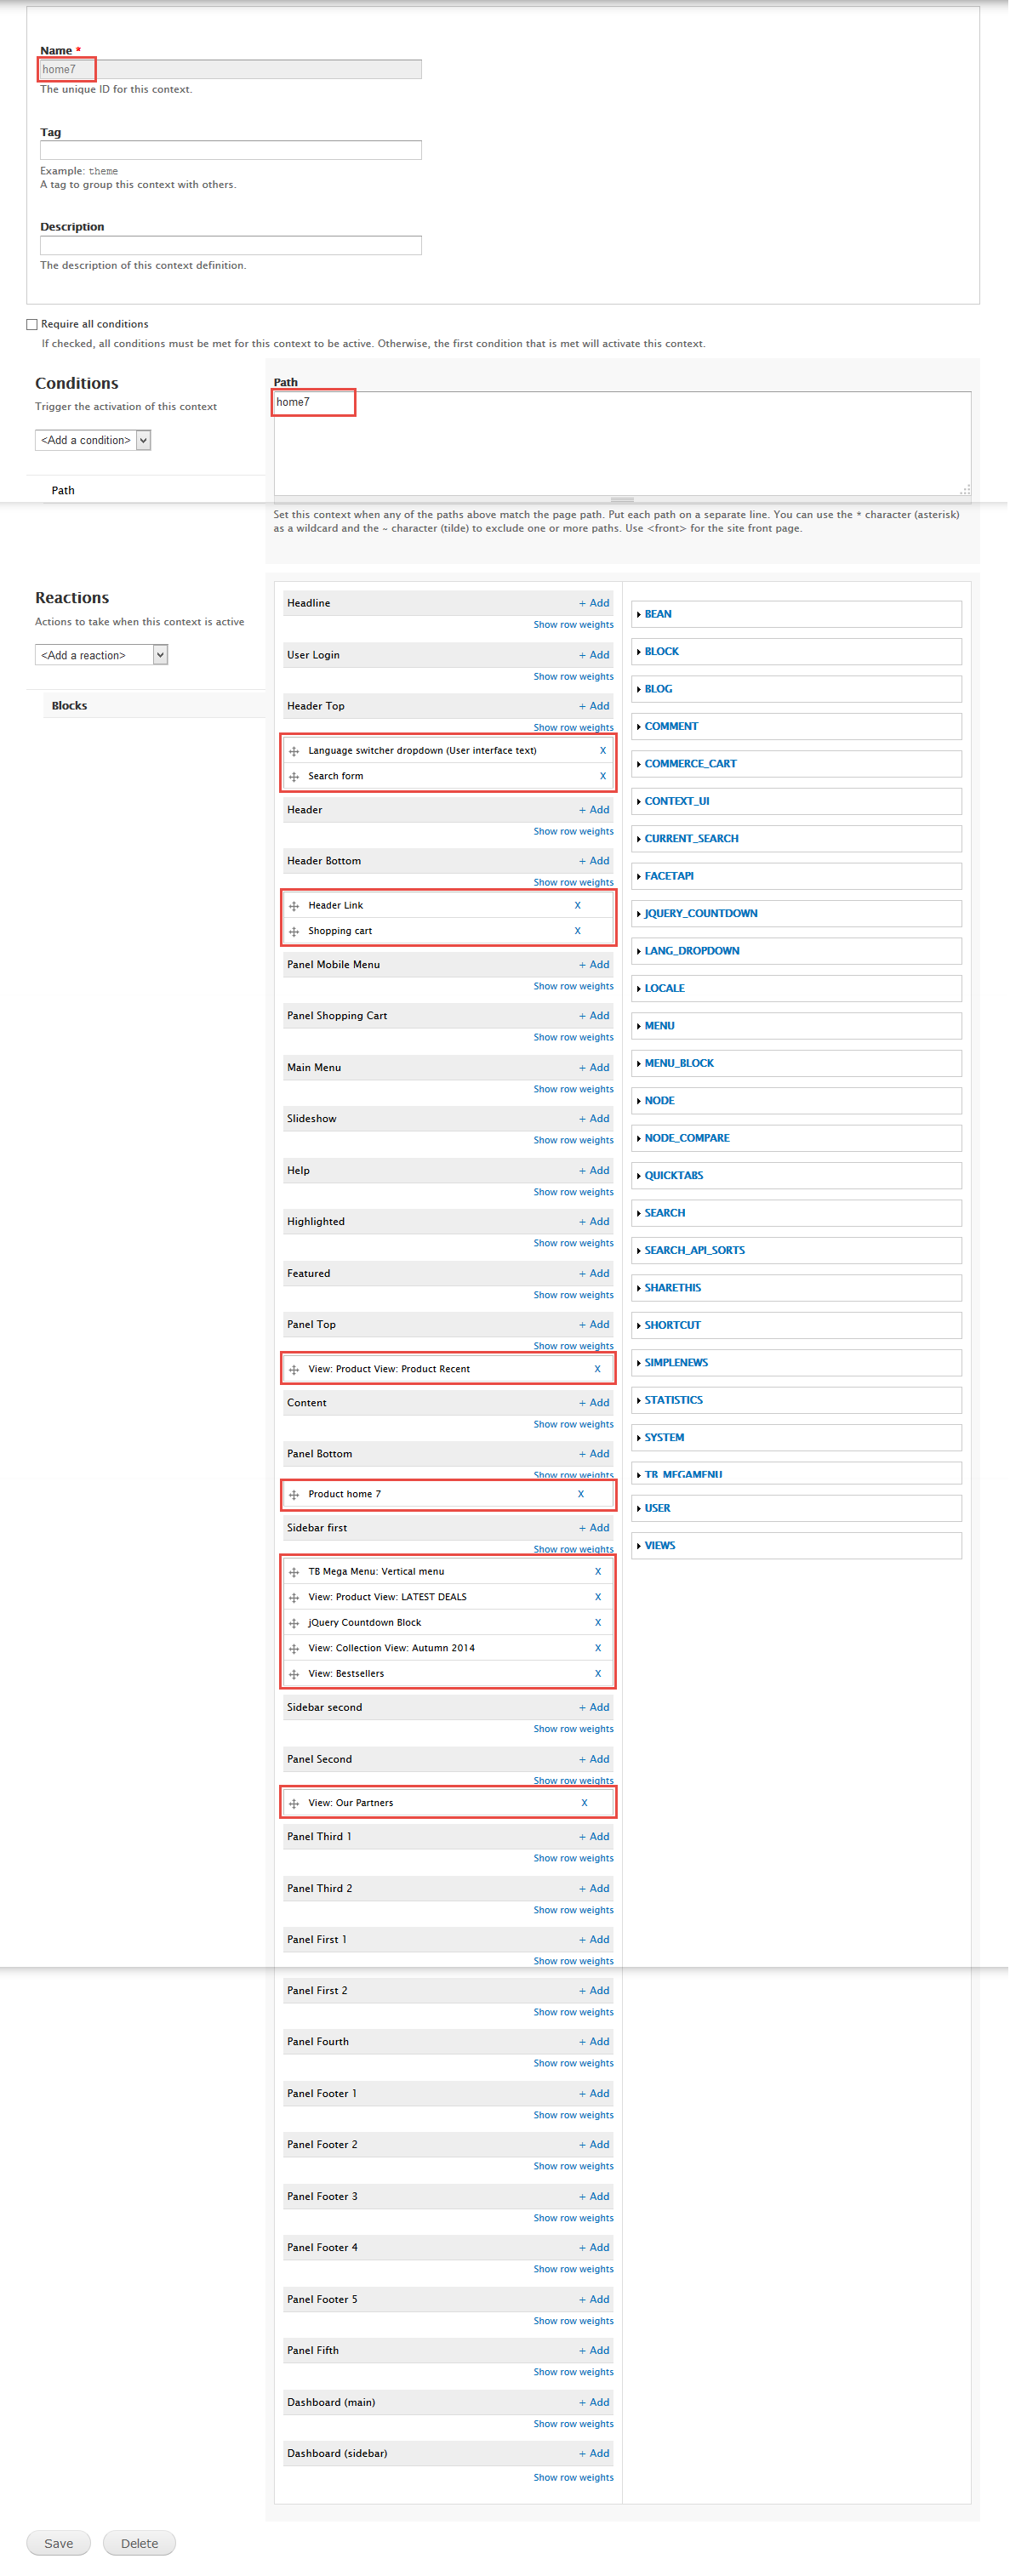
Create home4 context
1. Navigate to Structure > Context. Click Add link to create home4
2. In Add a conditon and Add a reaction add condition and reaction: Path, Blocks and set following properties:
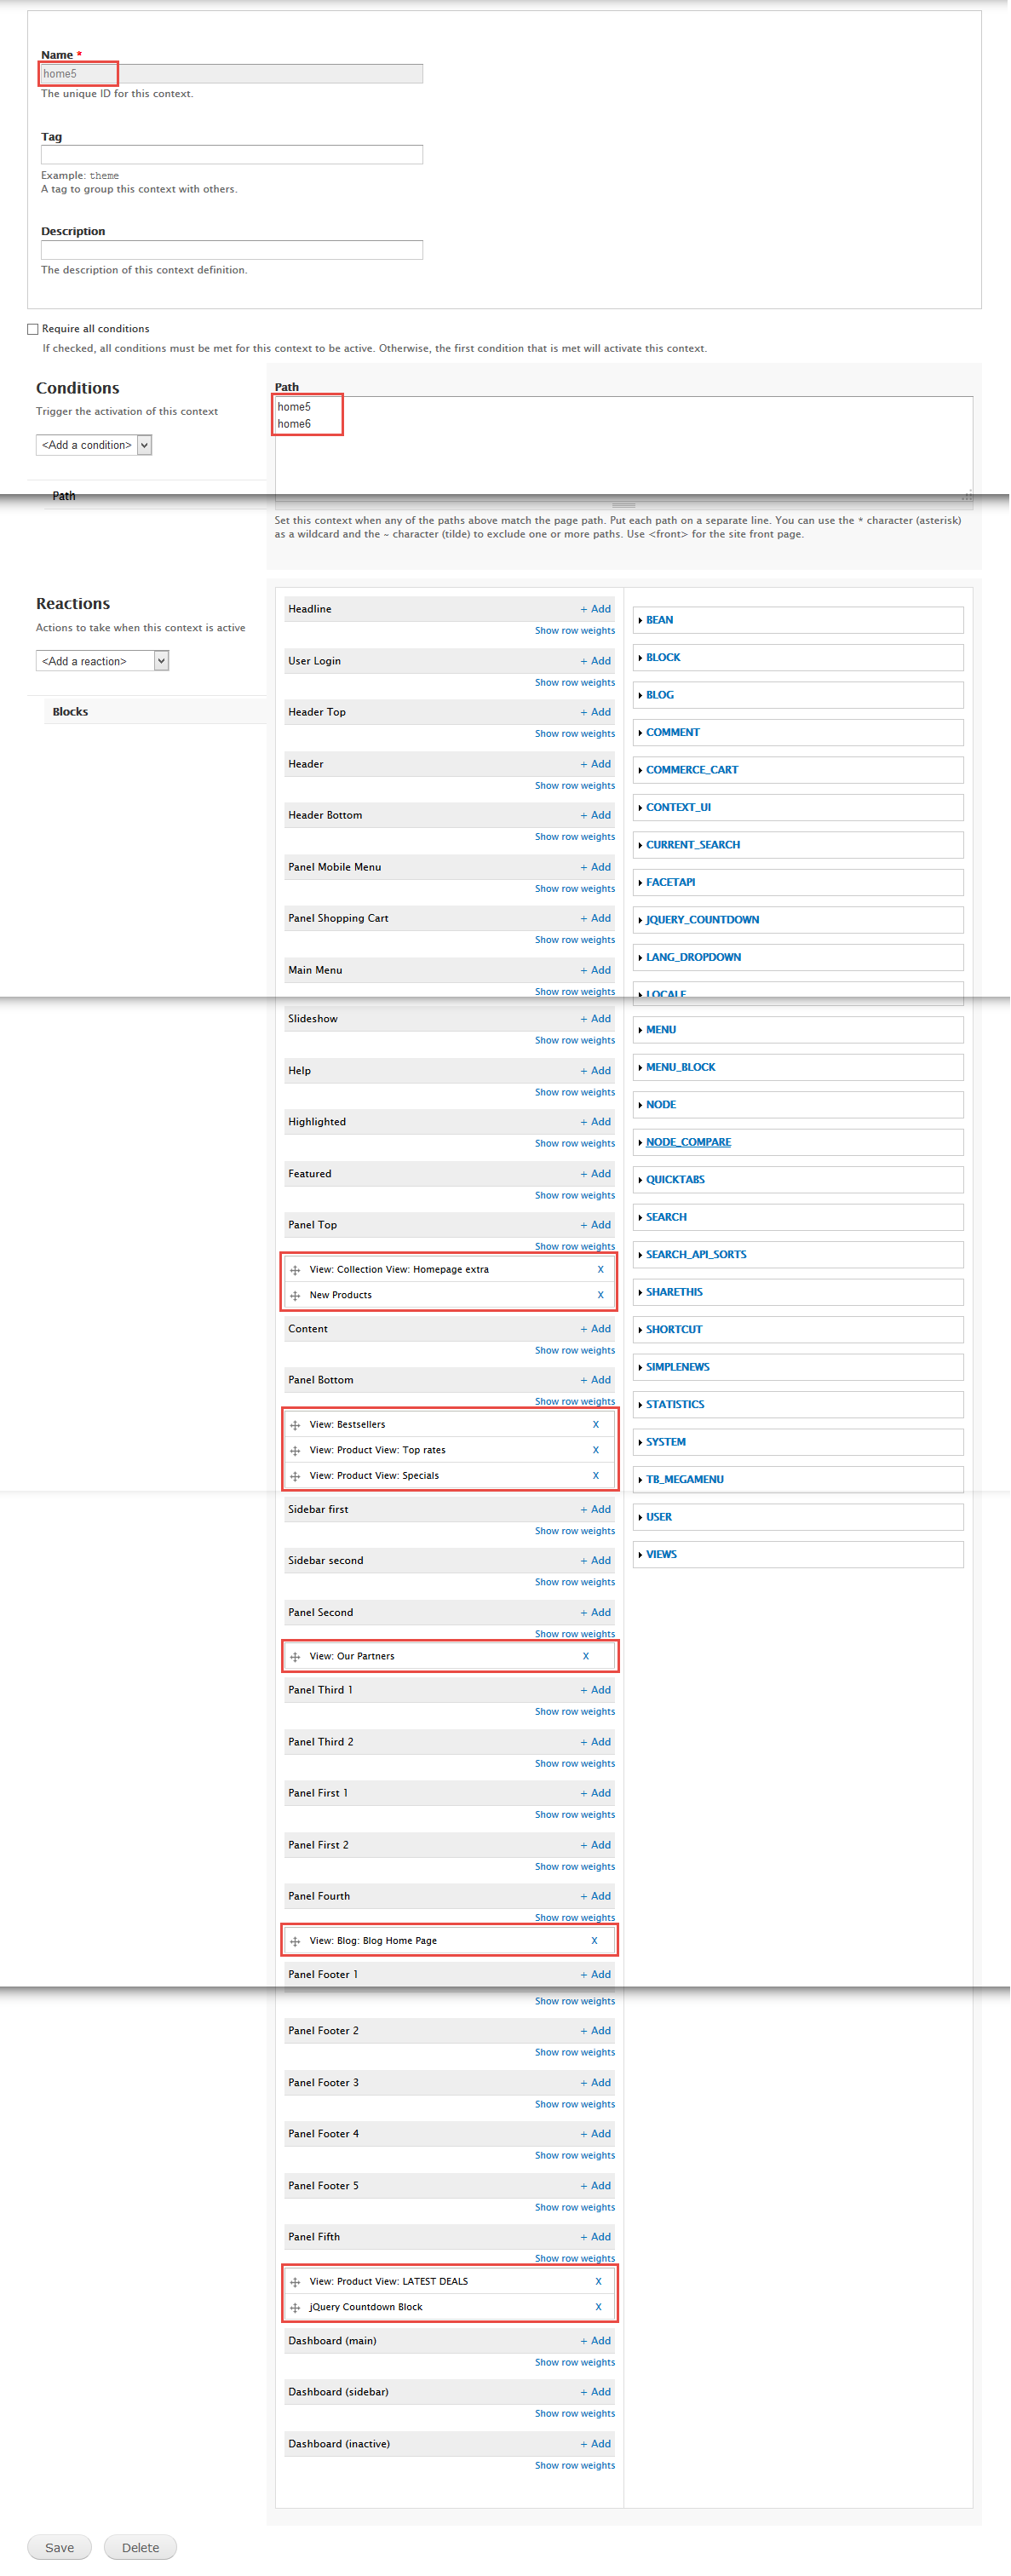
3. Add context for home5
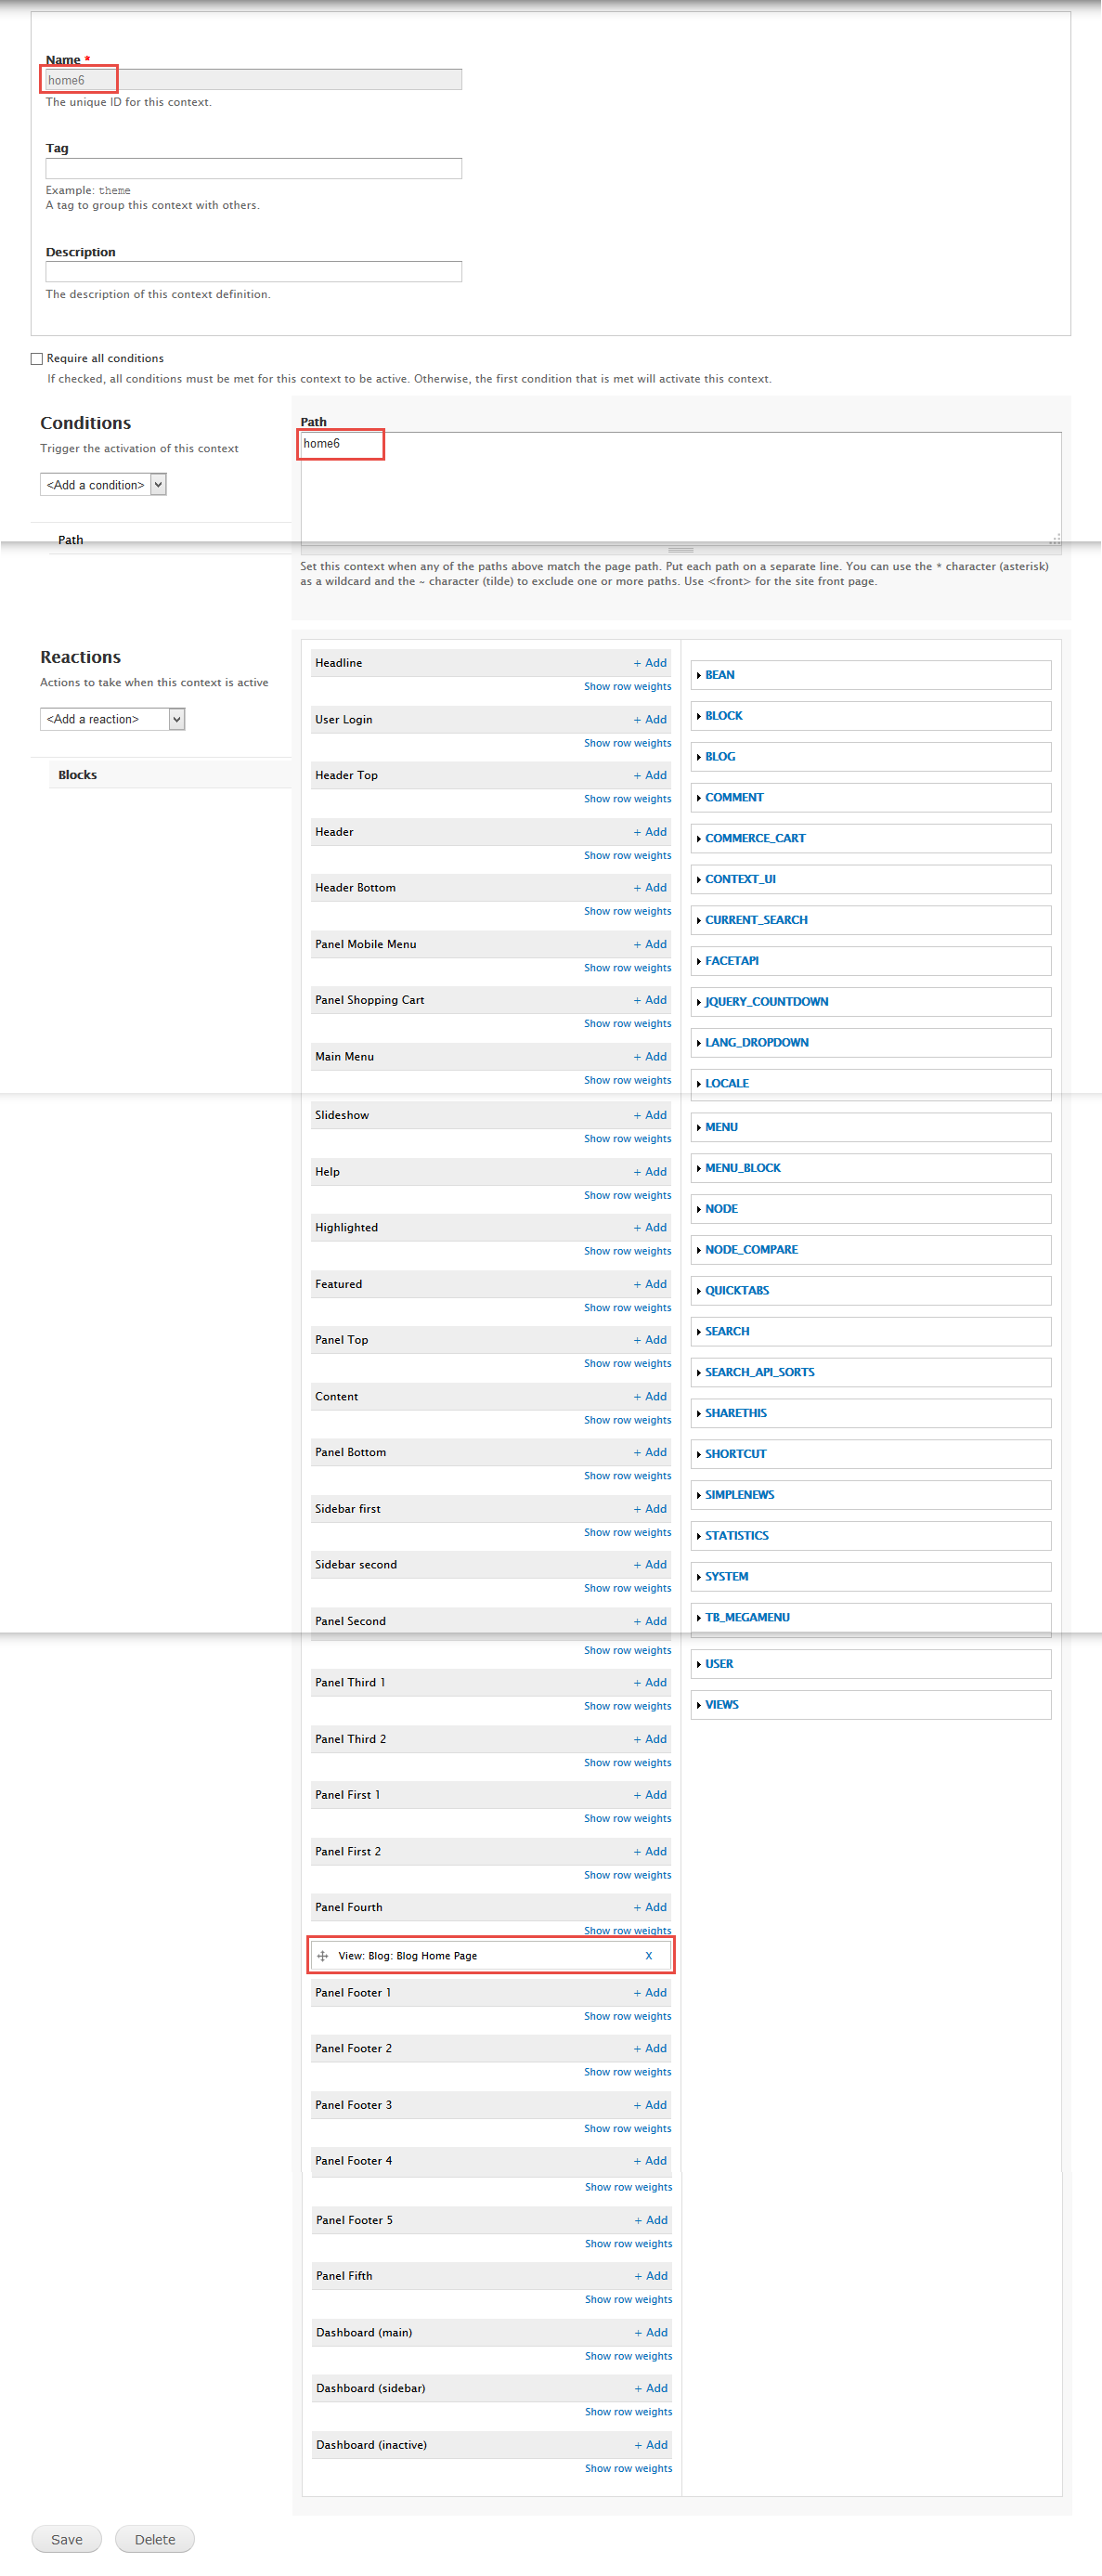
4. Add context for home6
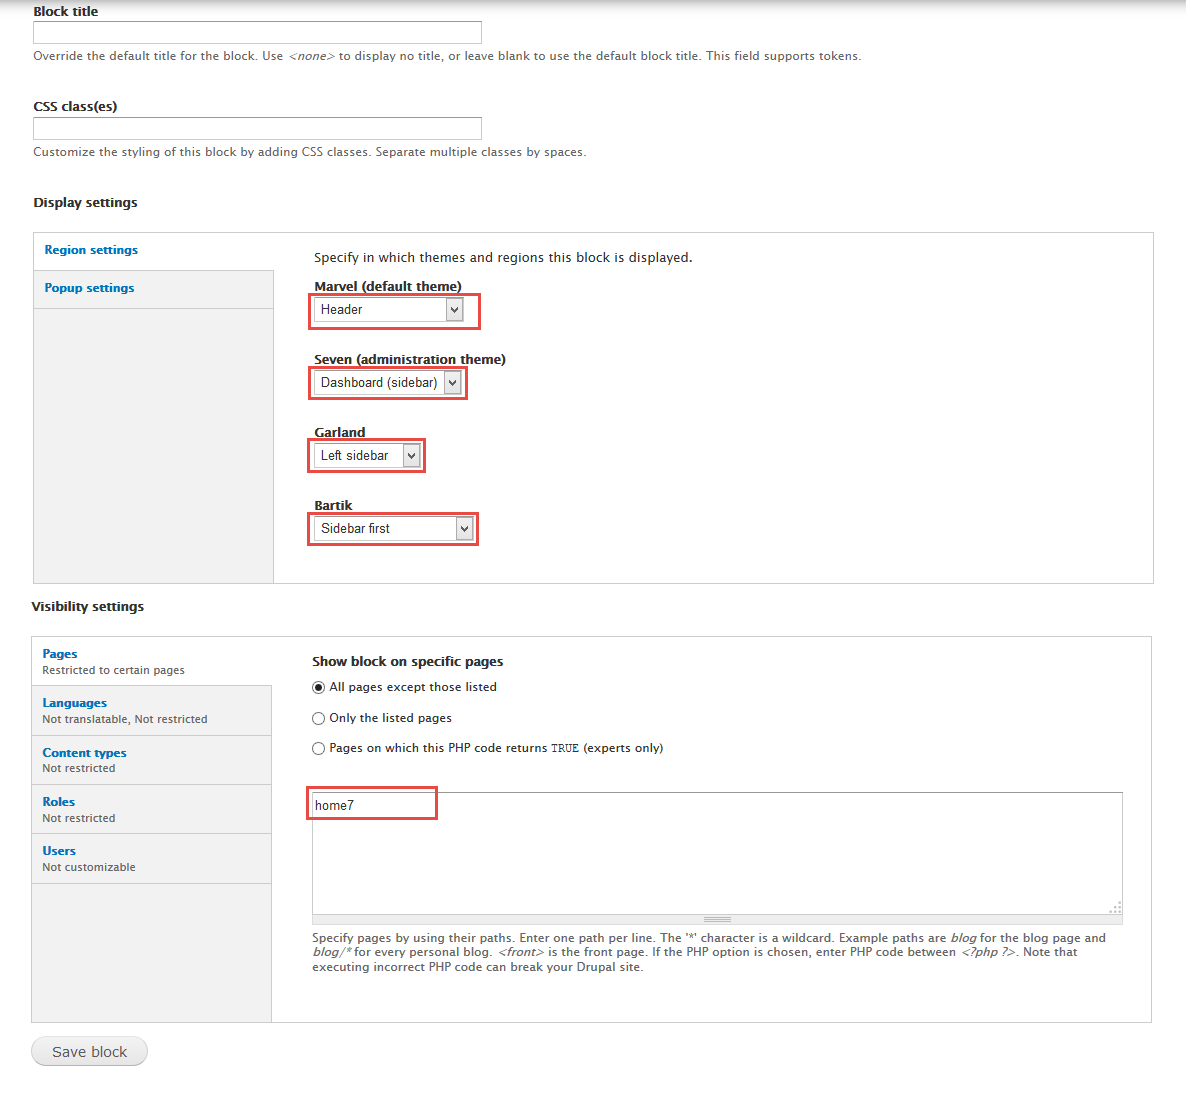
5. Add context for home7
Ads page view
Front end Display
1. Create Ads page view
1. Navigate to Structure > Views, click Add views link, Create Ads view with following properties:
2. At Title area, set following properties:
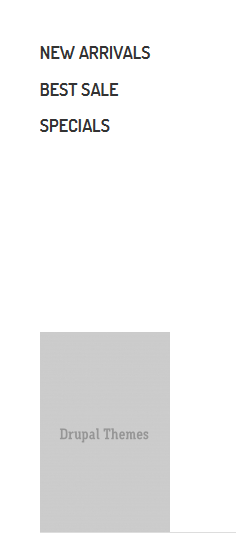
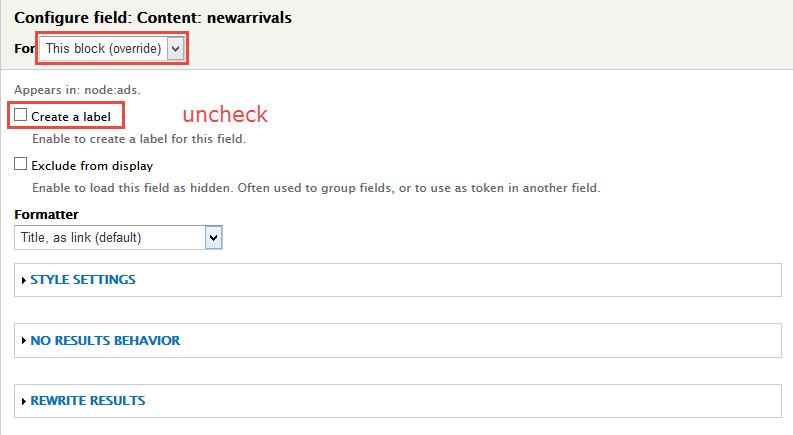
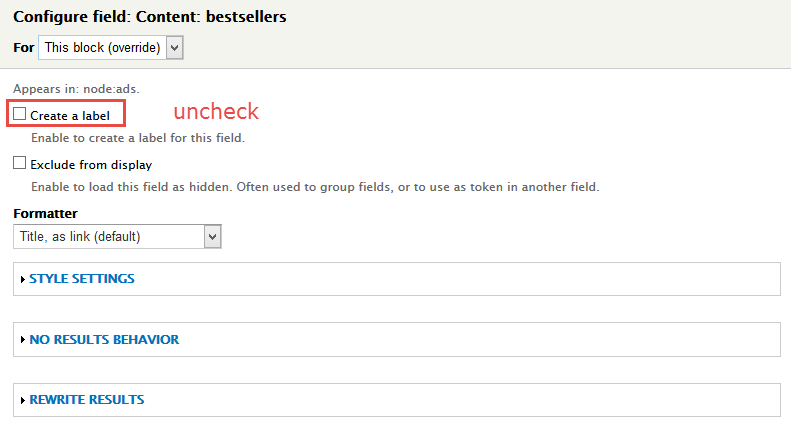
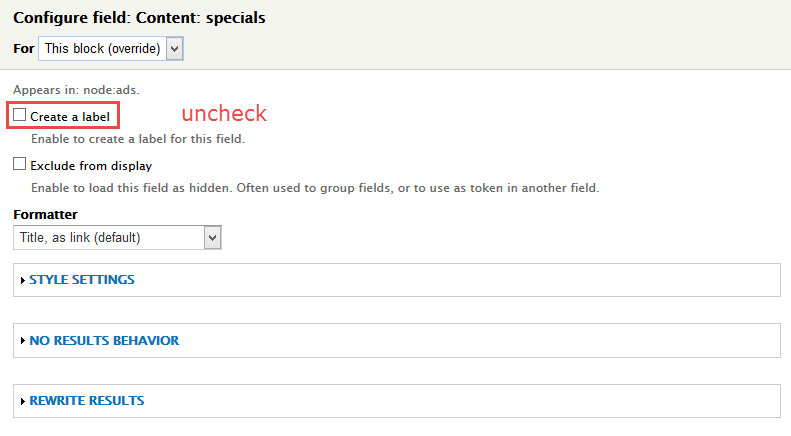
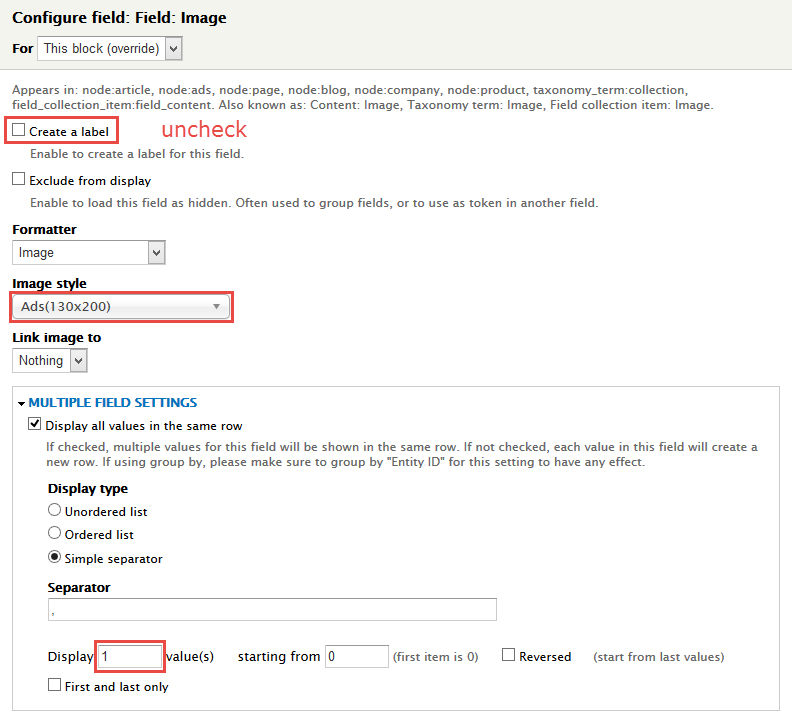
3. In FIELDS area, click Add button to add fields: Content: newarrivals, Content: bestsellers, Content: specials, Field: Image field and set following properties:
4. Set properties for Content: newarrivals
5. Set properties for Content: bestsellers
6. Set properties for Content: specials
7. Set properties for Field: Image
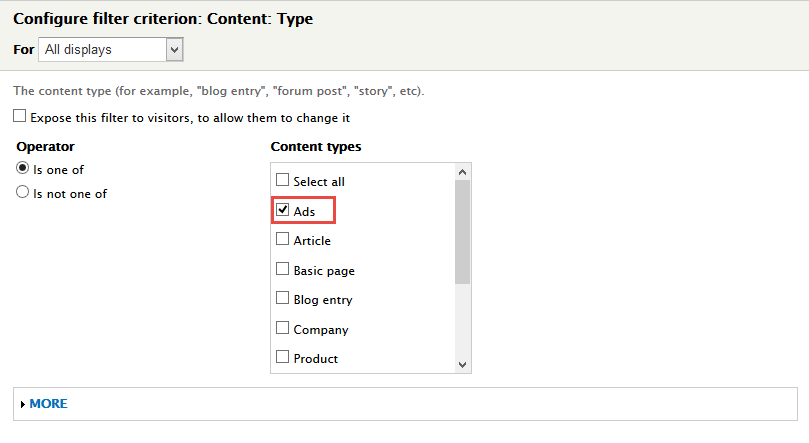
8. In FILTER CRITERIA area, click Add button to add Content: Type and set following properties:
9. At Advanced > OTHER area, add CSS class
10. Click Save block button.
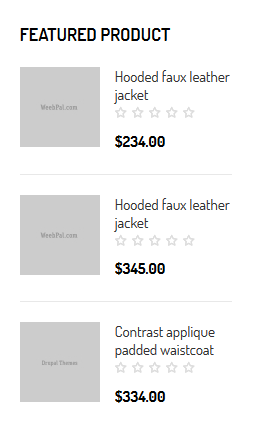
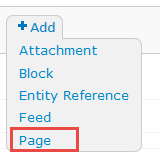
2. Create Featured Product view
Front end Display
Stay open Product view, click Add button add Block new.
1. Next to steps below to set properties for the following fields:
2. At Display name area, set following properties:
3. At Title area, set following properties:
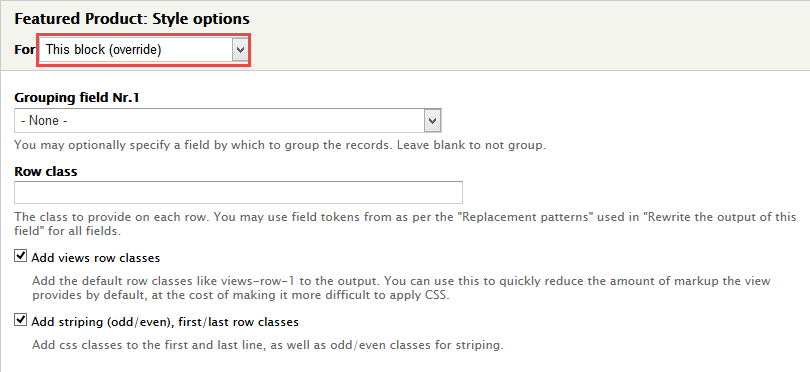
4. At FORMAT Format area, set following properties:
5. In Advanced > Contextual filters area, set following properties:
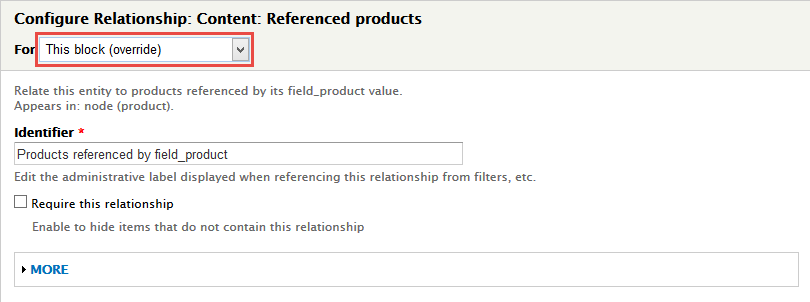
6. In Advanced > REALATIONSHIPS area, set following properties:
7. In FIELDS area, set following properties:
8. Set properties for Field: Image
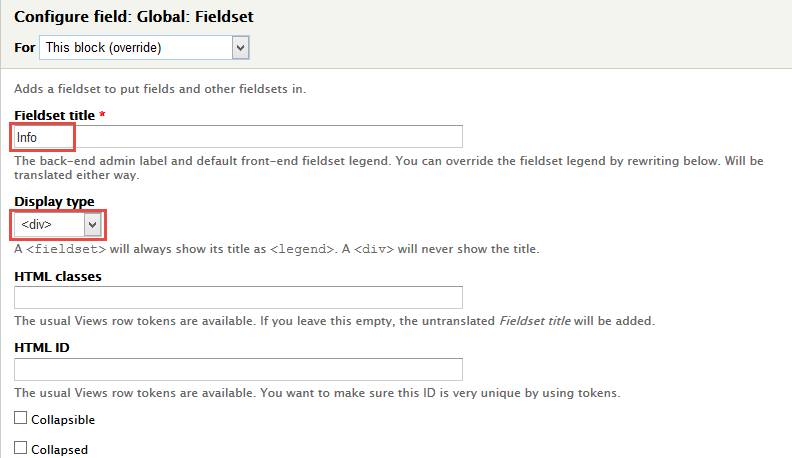
9. Set properties for Global: Fieldset (Info)
10. Set properties for Commerce Product: Price
11. At FIELDS area, click Rearrange button and set following arrange
12. In FILTER CRITERIA area, click Add button to add Content: Type and set following properties:
13. At PAGER > Use pager area, click link
14. In Advanced > OTHER area, add CSS class change following properties:
15. Click Save block button.
Create Subpages
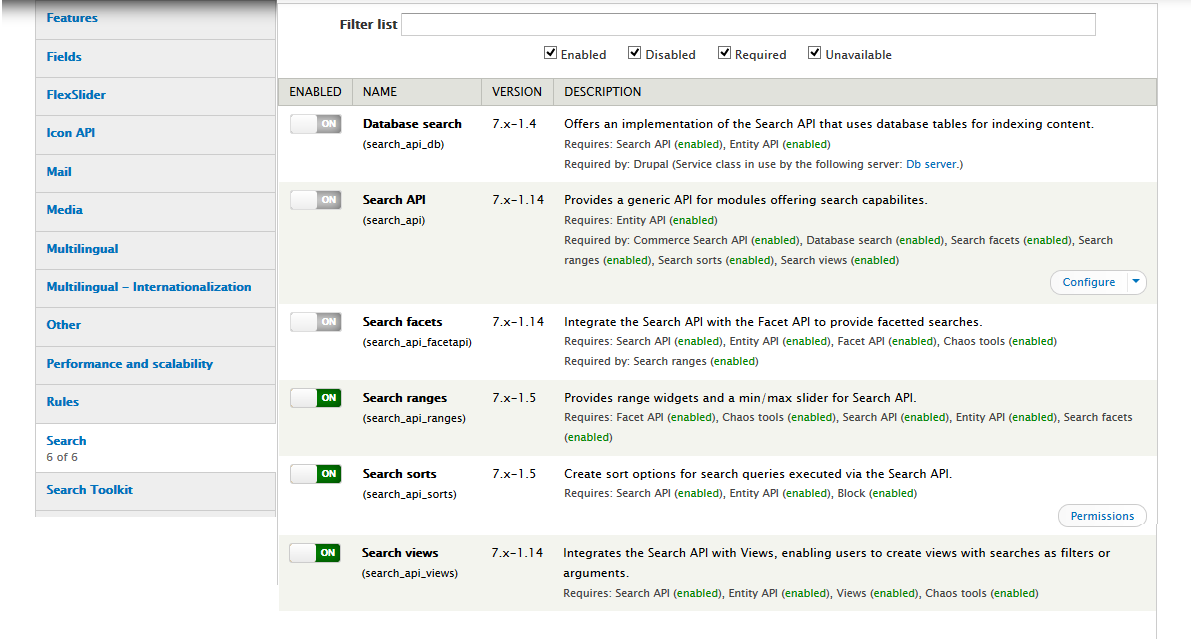
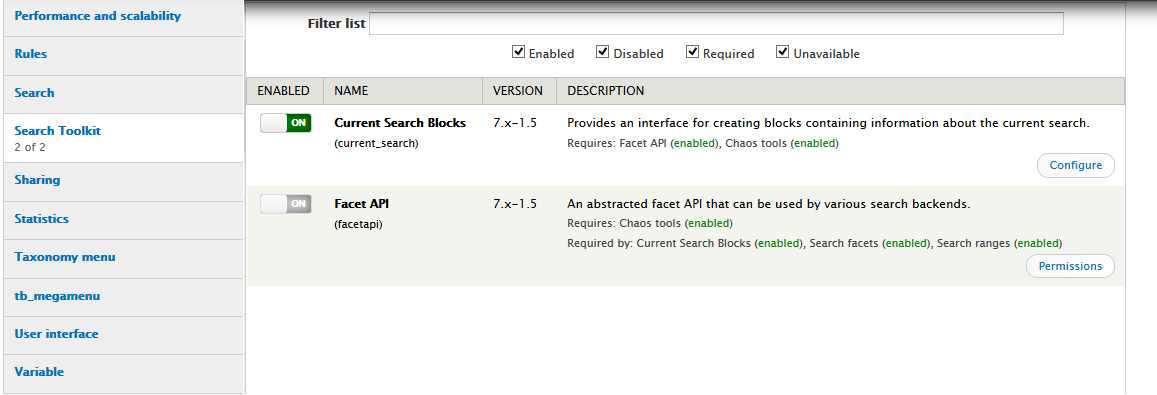
Search API configuration
1. Preparation
2. Create a Search API Index
1. Create a Search API Server
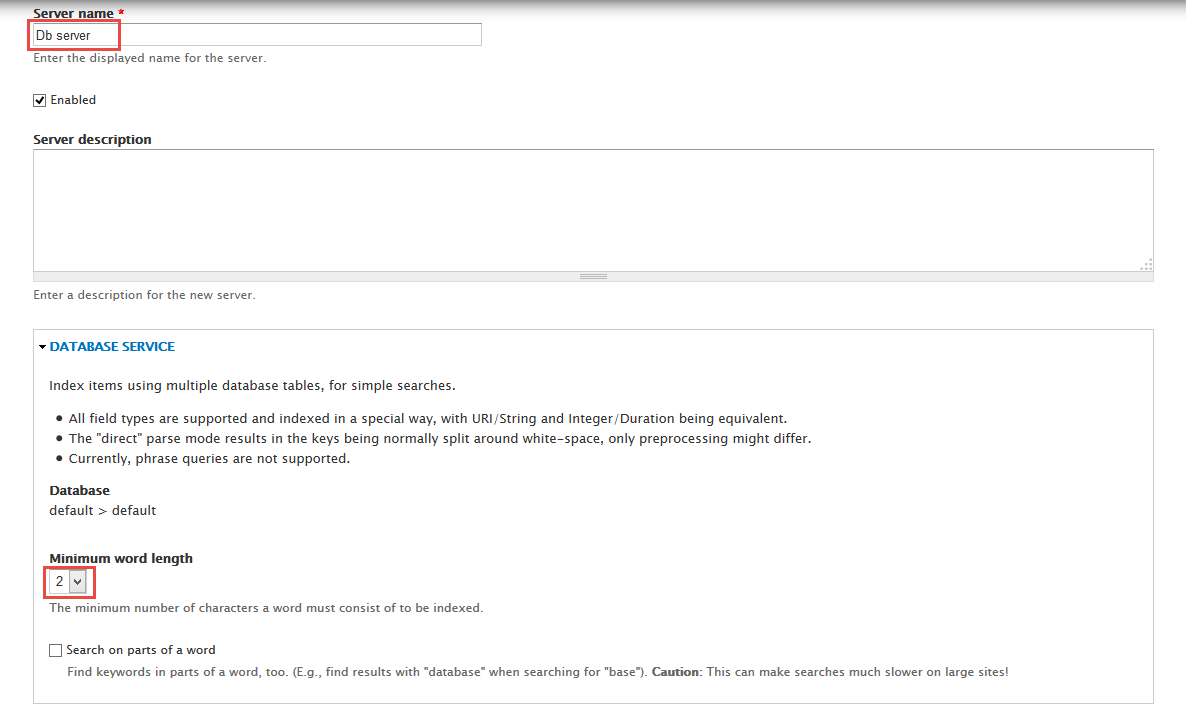
The first step required for our search page, is to create a Search API server. This will let Search API know how and where the index will be stored.
1. Navigate to Configuration > Search API, click Add server link, Create Db server server with following properties:
2. Click Create server
3. Create a Search API Index
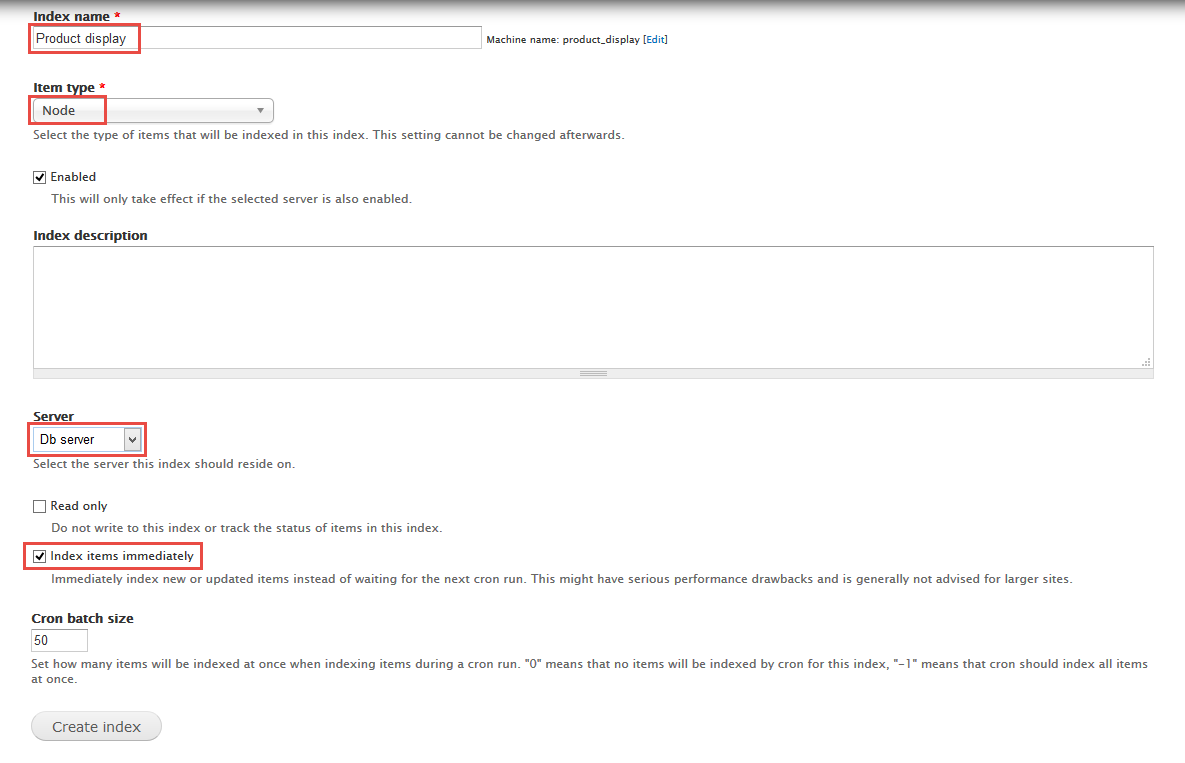
Now, we need to create a Search API index and define which fields should be stored in the index.
1. Navigate to Configuration > Search API, click Add index link, Create Product display index with following properties:
2. Click Create index
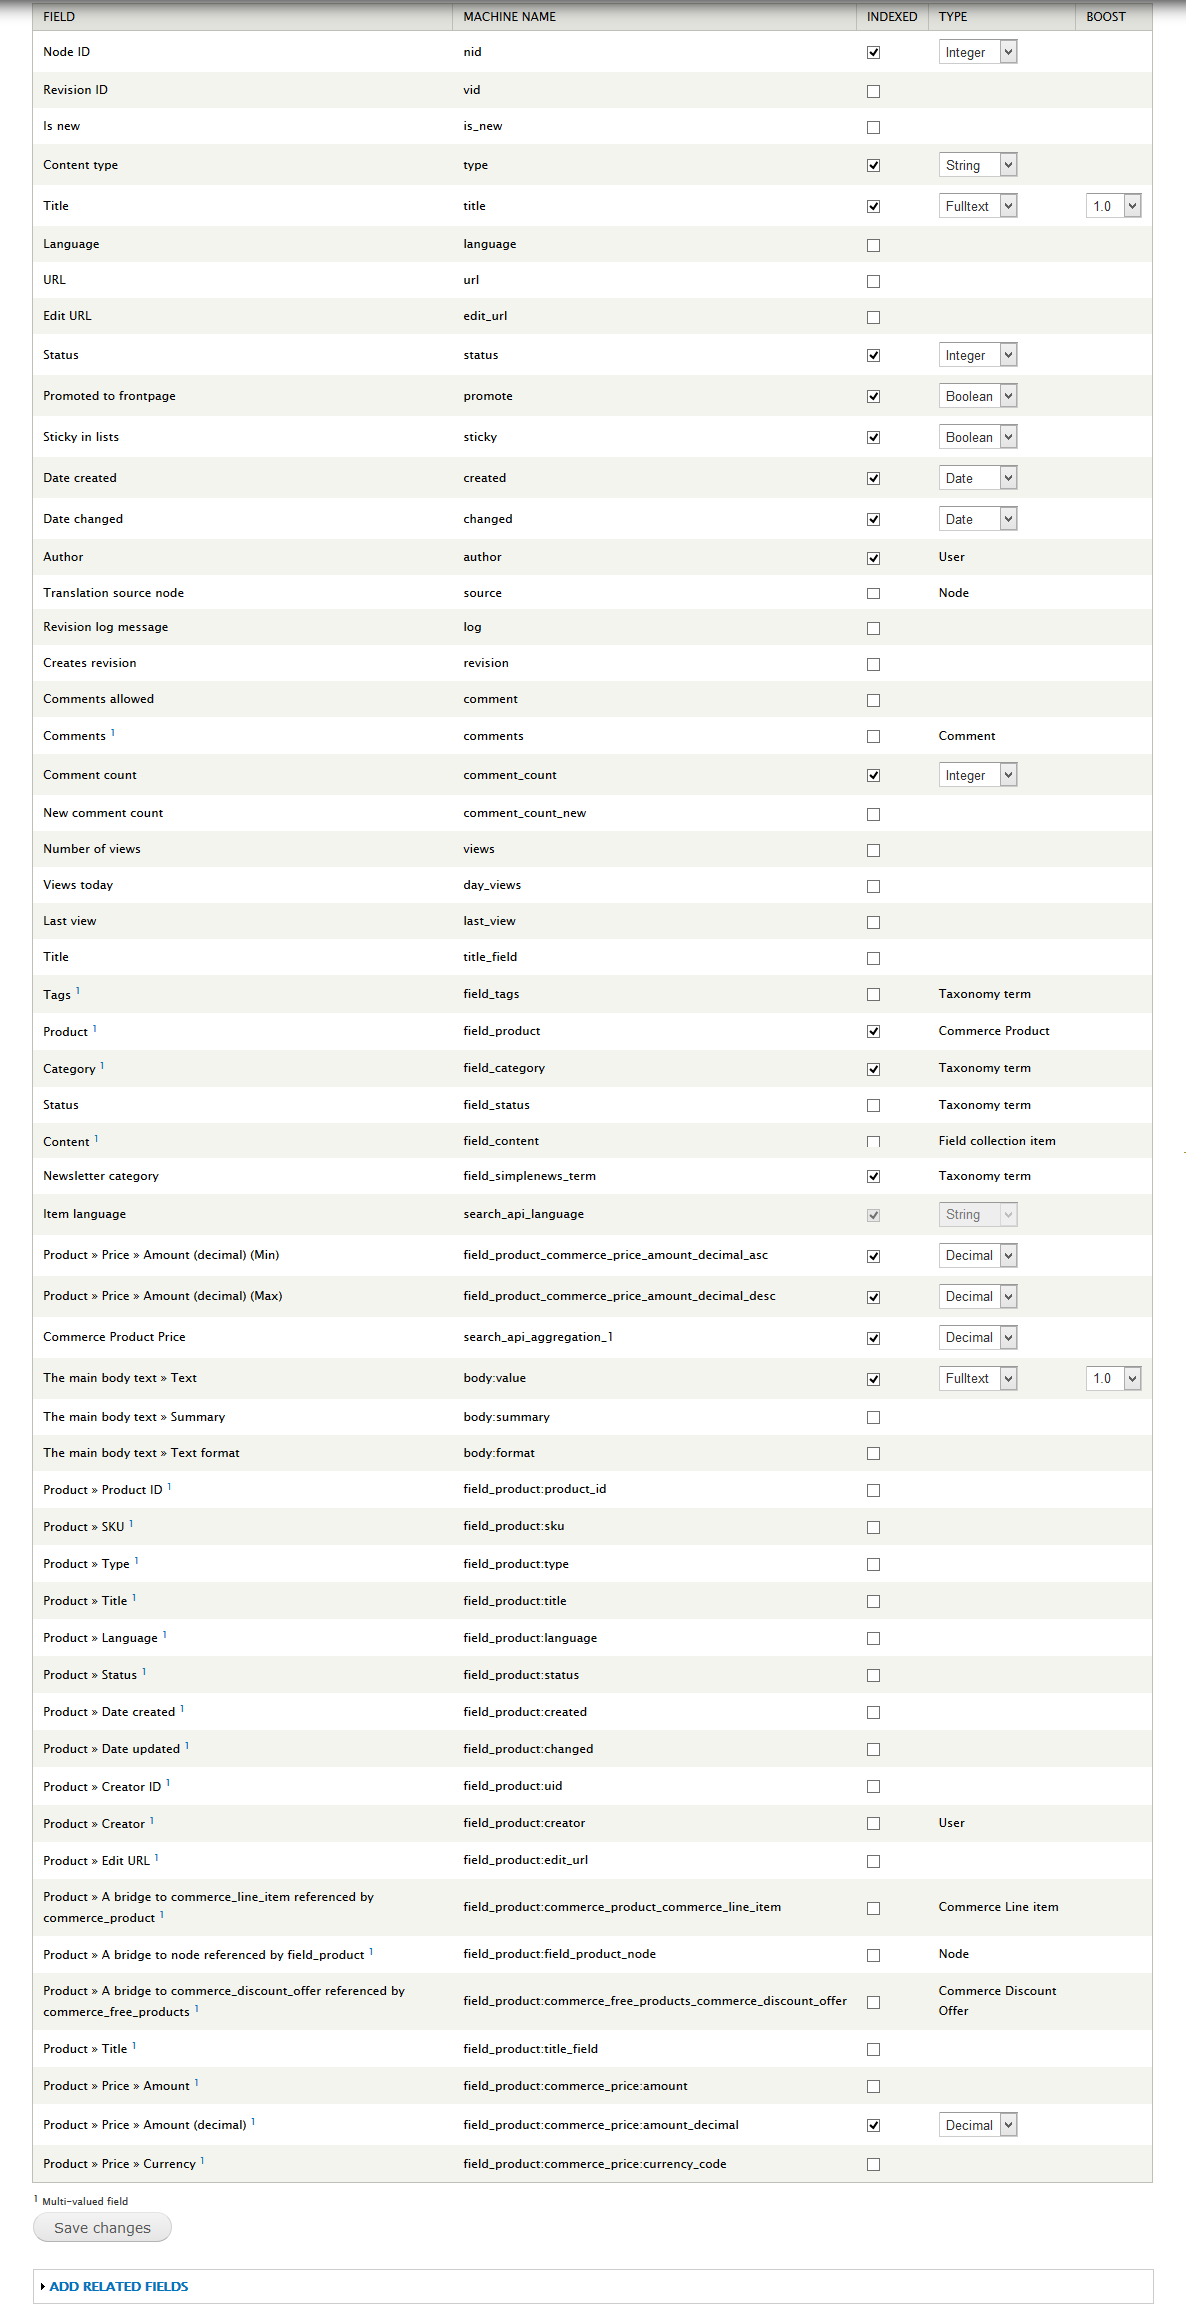
4. Define Index fields
On the Fields page, we have to define which fields will be indexed.
1. Navigate to Configuration > Search API, at Product display index row, click edit > fields
2. Click on Add related fields section, and select Product variations and click on "Add fields".
Now, choose whatever fields you want index for searching by checking on them. Follow steps below:
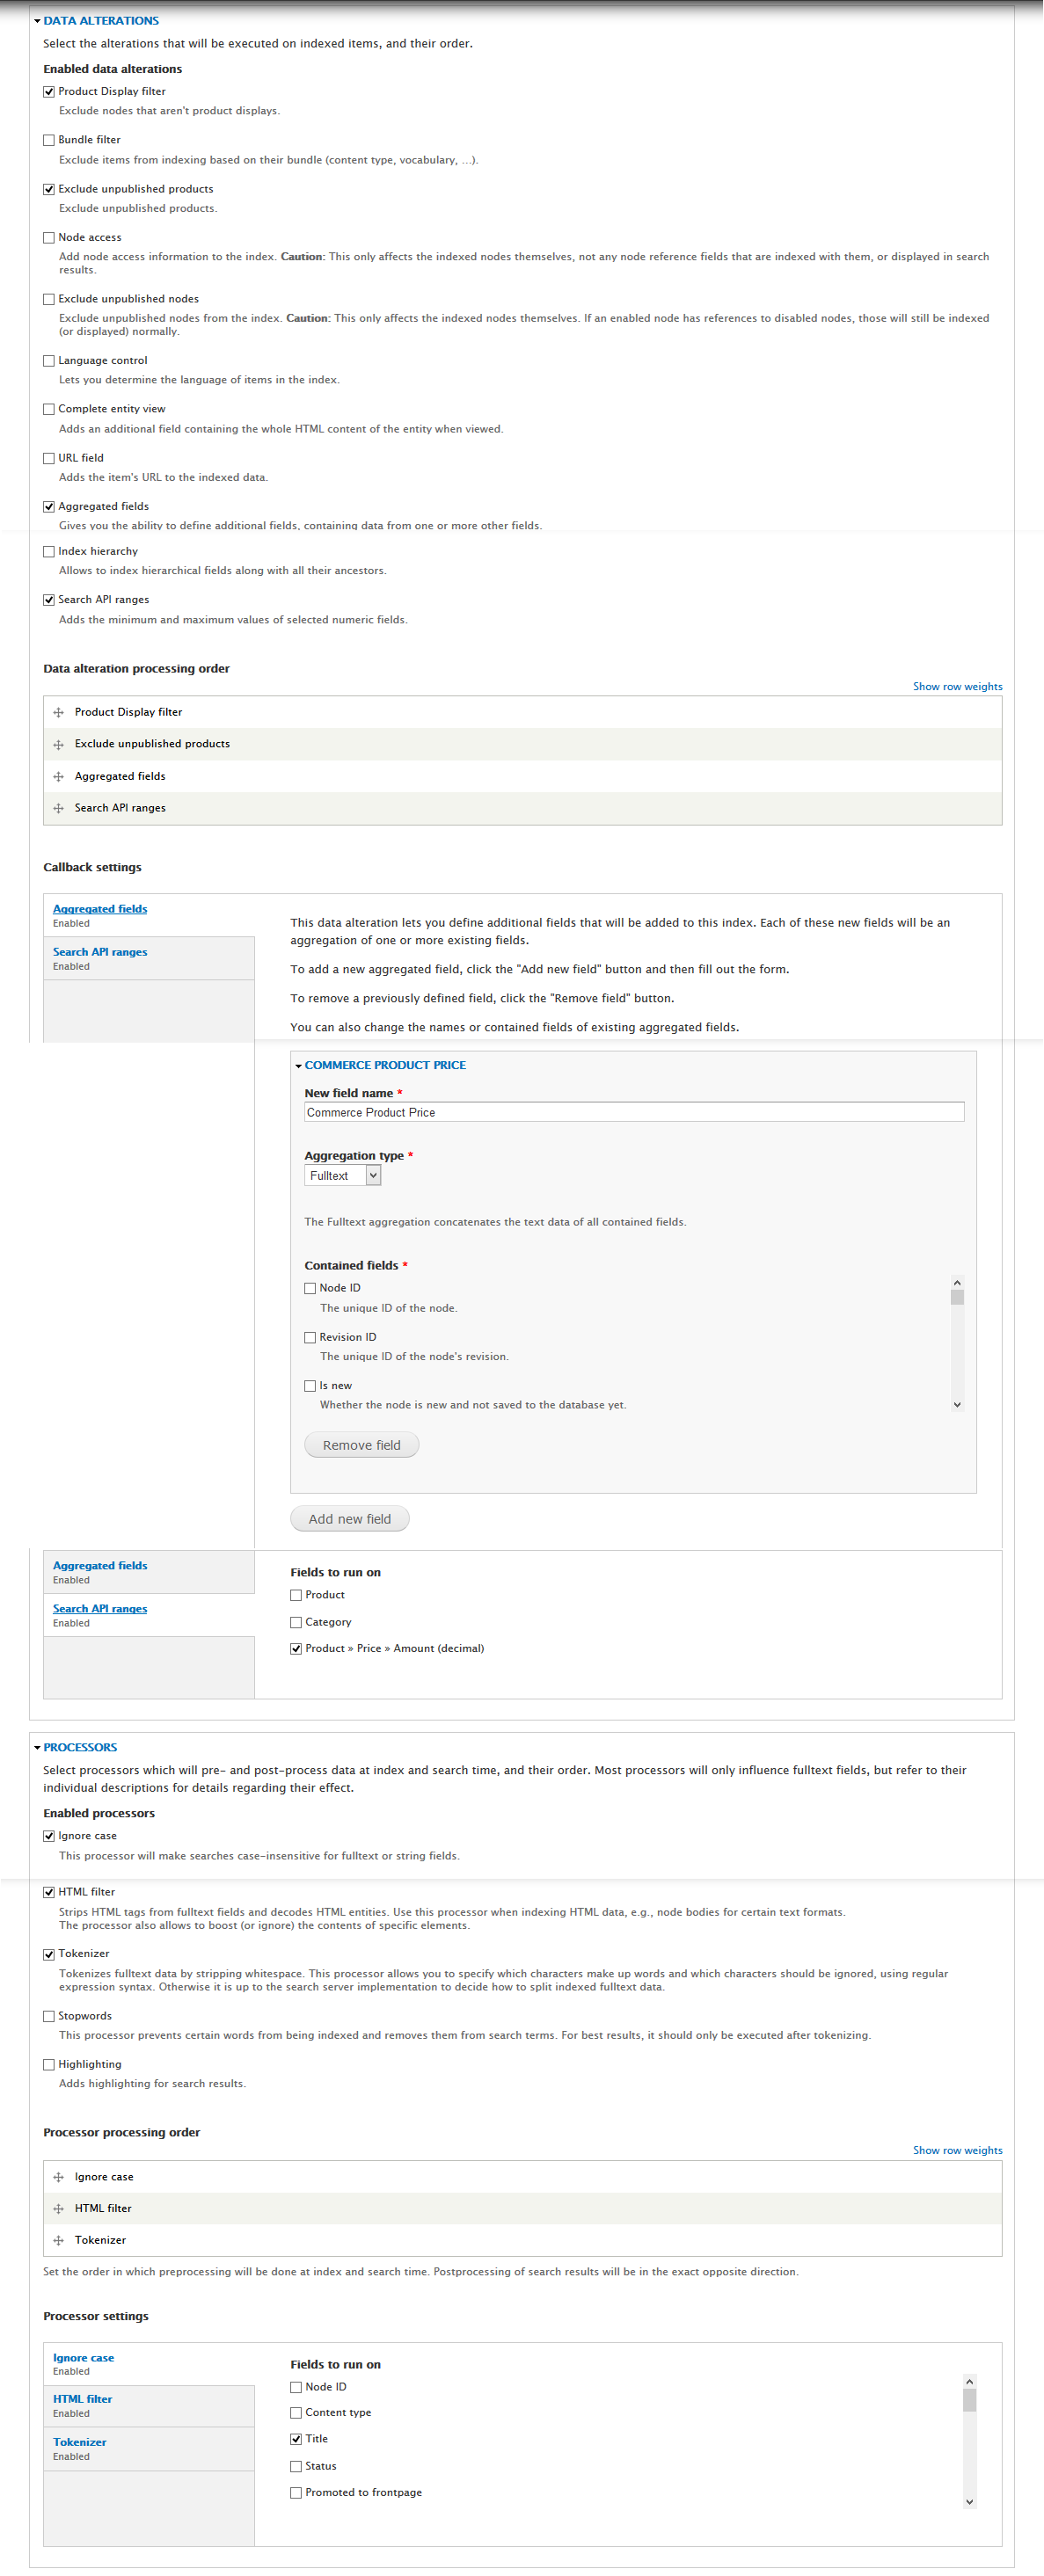
3. In Filters tab, choose the following options and click Save configuration button.
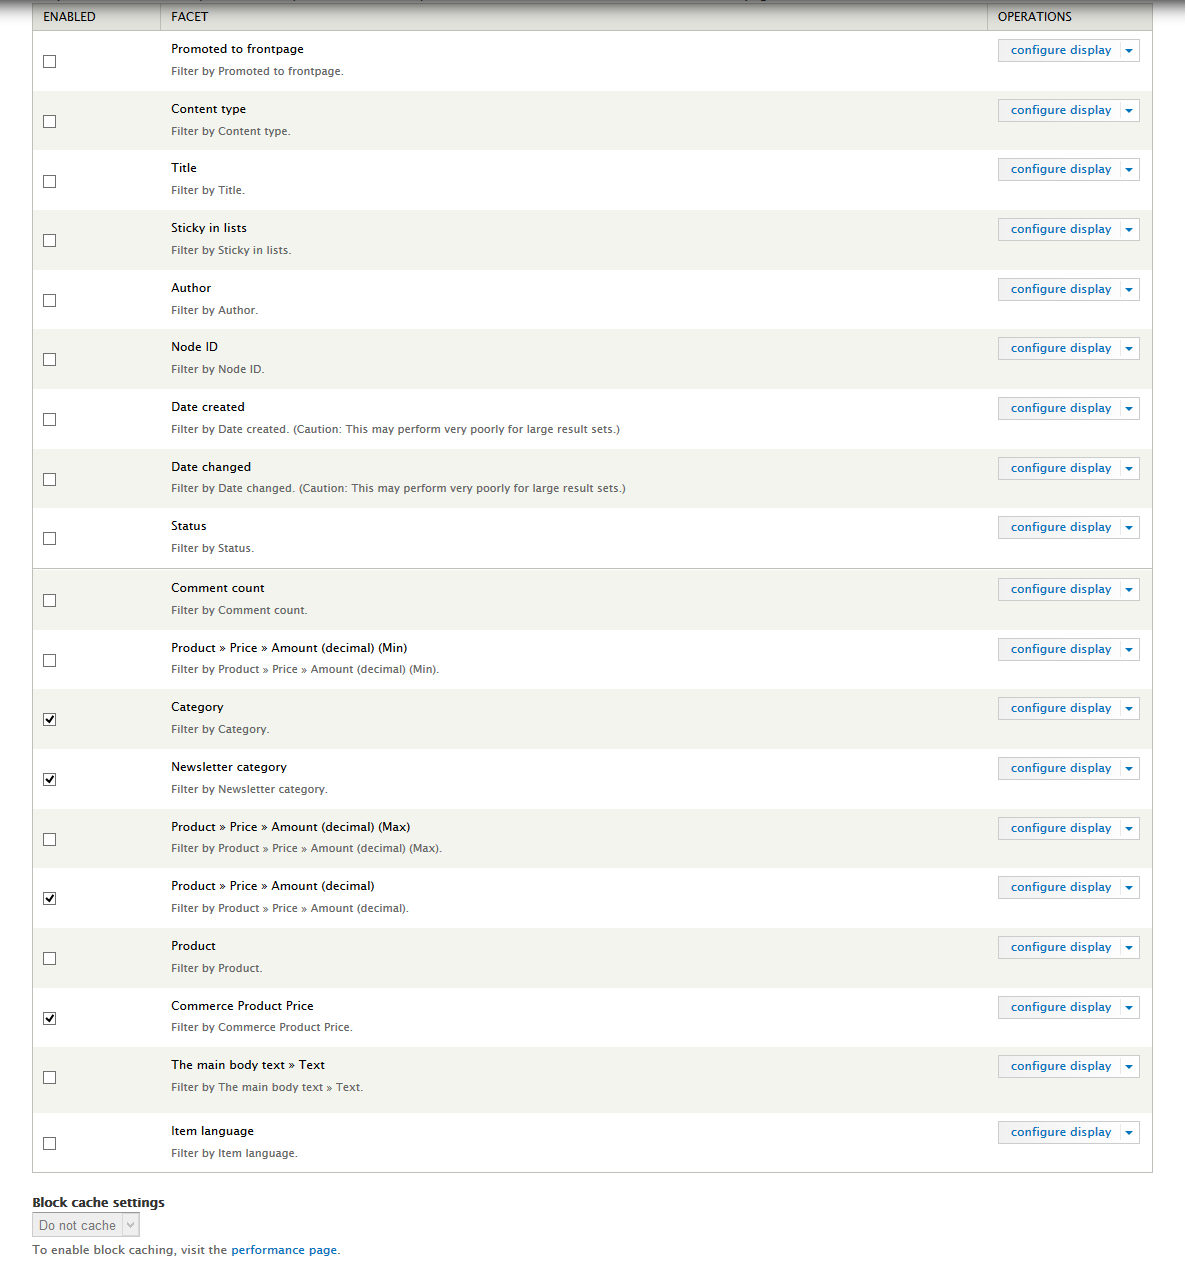
4. In Facets tab, choose whatever facets you want to use to search
Note: What is facet? It is block content which is help you customize the searching
Index Content
Now that we have setup our Search API index, the next step is to index some data.
Click on Status, click on Index now
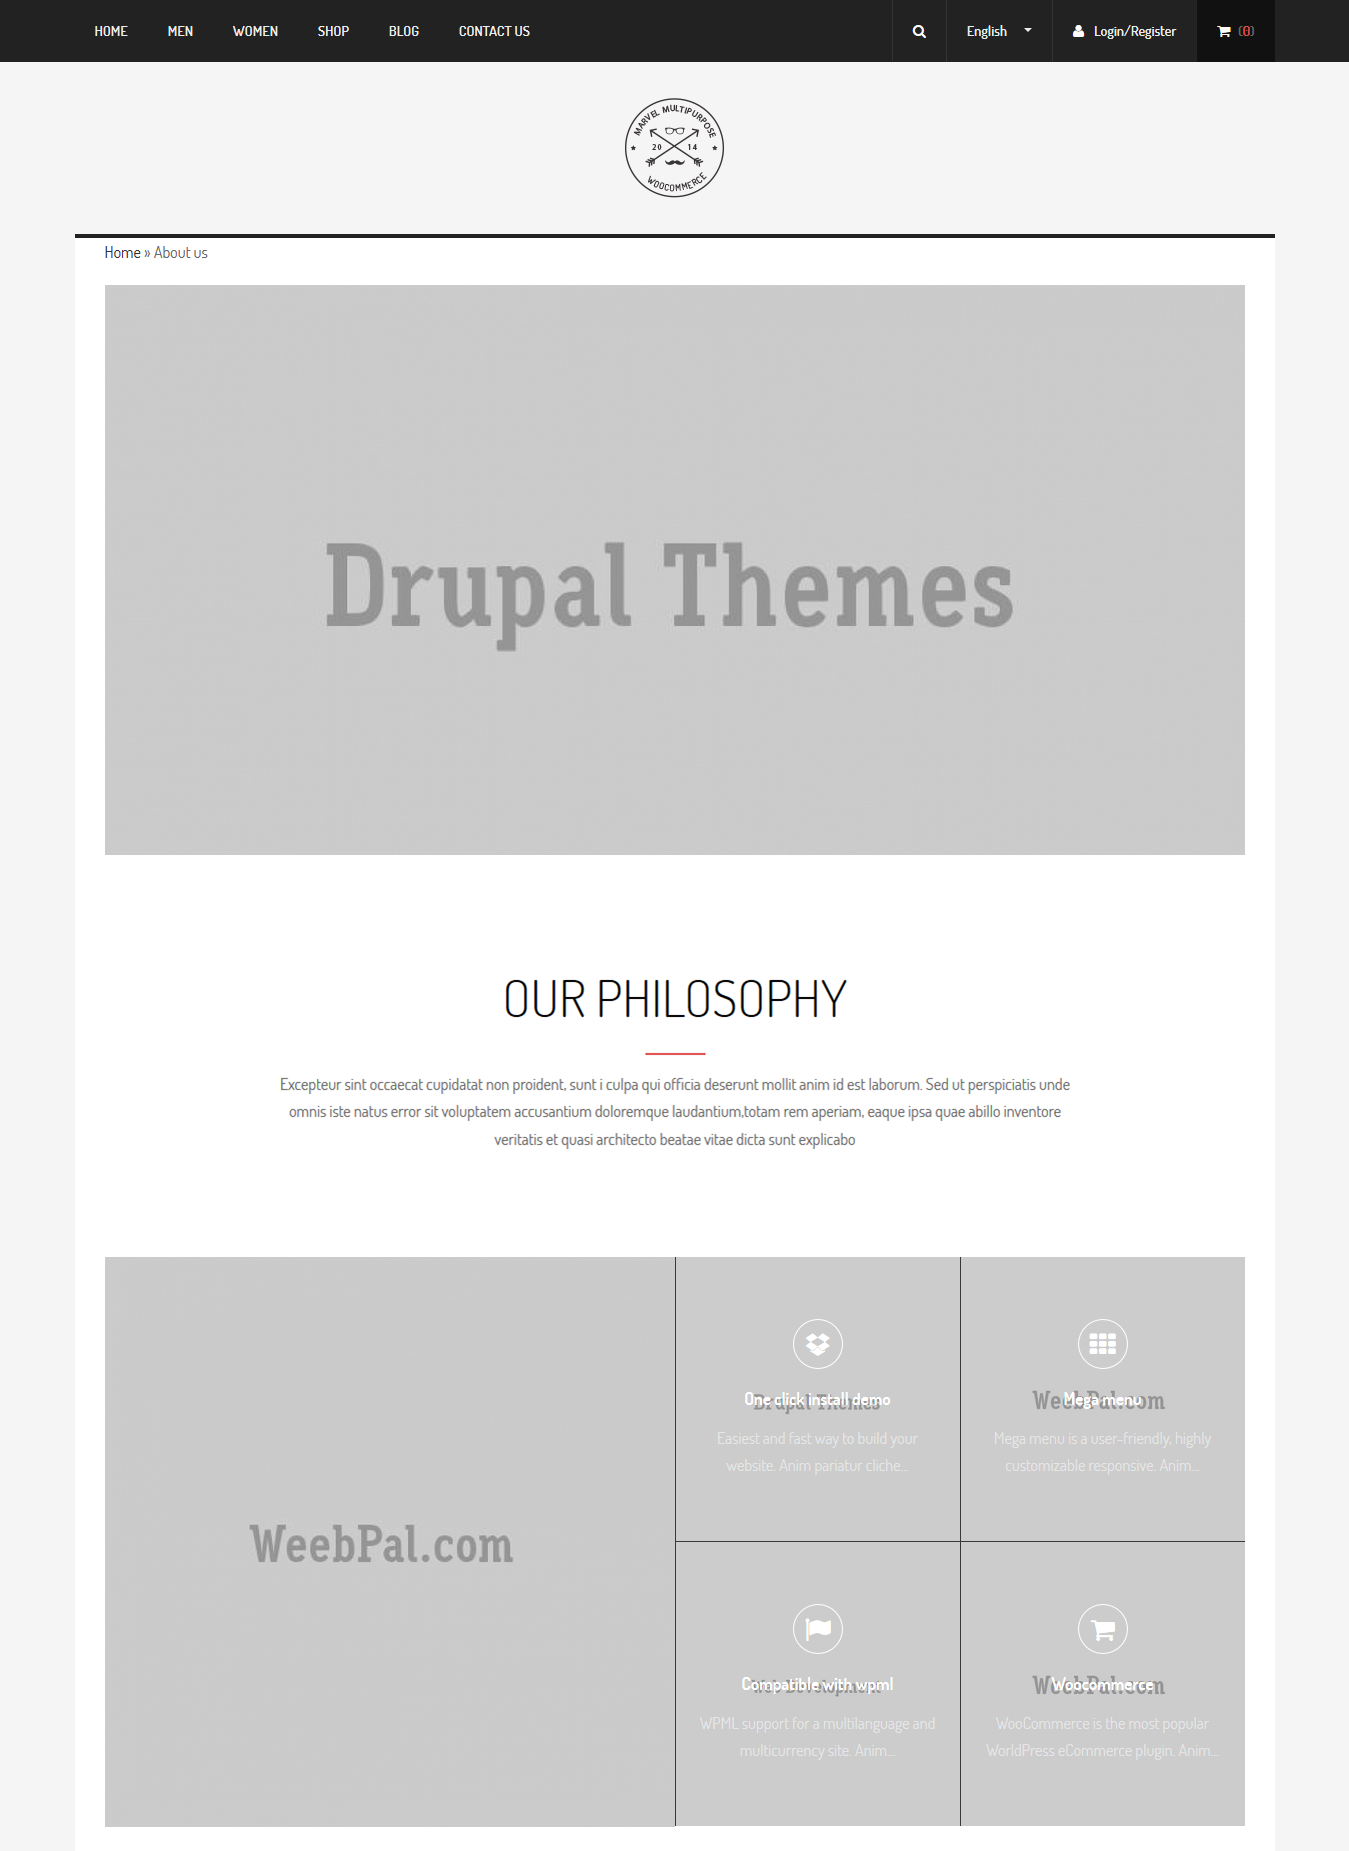
About Us page
1. About Us view setting
Front end Display
1. Navigate to Structure > Views, click Add views link, Create Aboutus view with following properties:
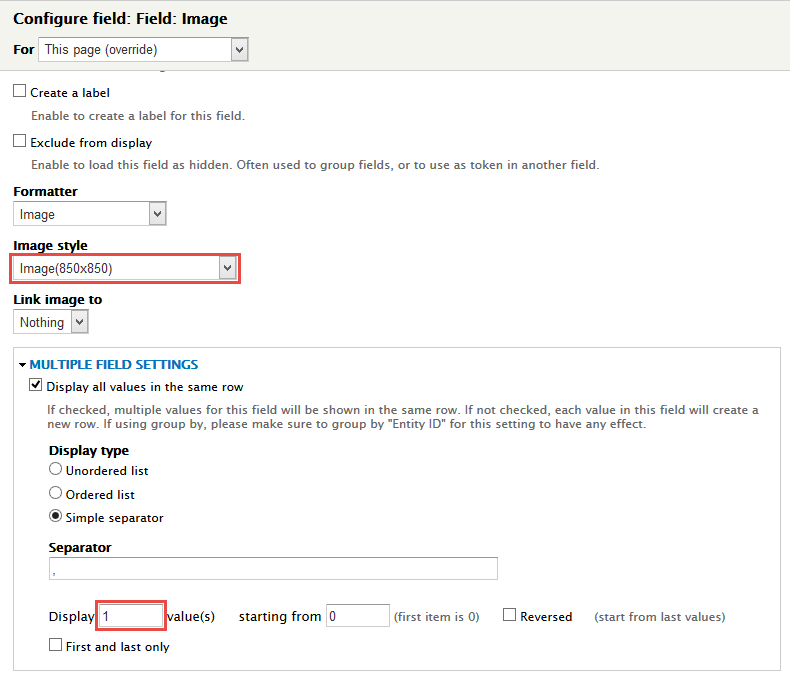
2. At FIELDS area, click Add button to add fields: Field: Image.
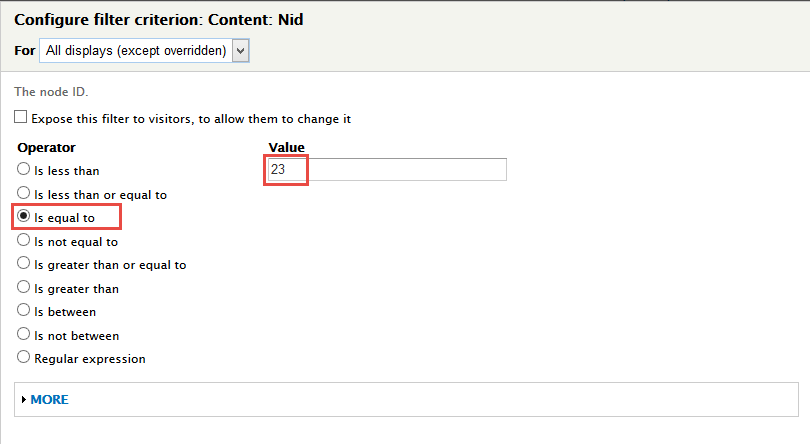
3. At FILTER CRITERIA area, click Add button and add file Content: Nid (= 23), Content: Type (= Article)
4. Set properties for Content: Nid (= 23)
5. Set properties for Content: Type (= Article)
6. At PAGE SETTINGS > Path area, set the following properties:
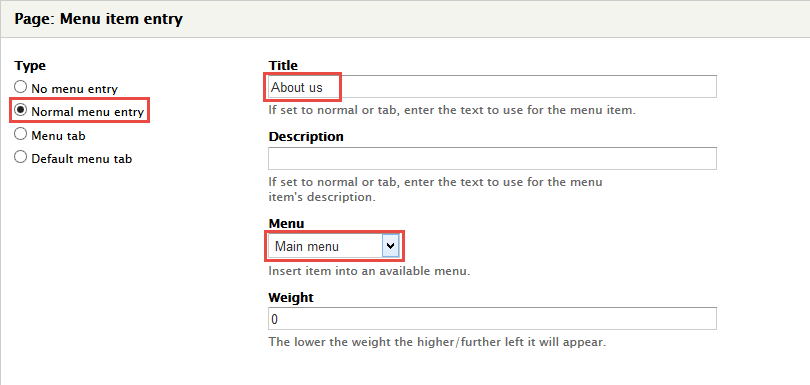
7. At PAGE SETTINGS > Menu area, set the following properties:
8. At Advanced > OTHER area, add CSS class
2. Create About Us page view
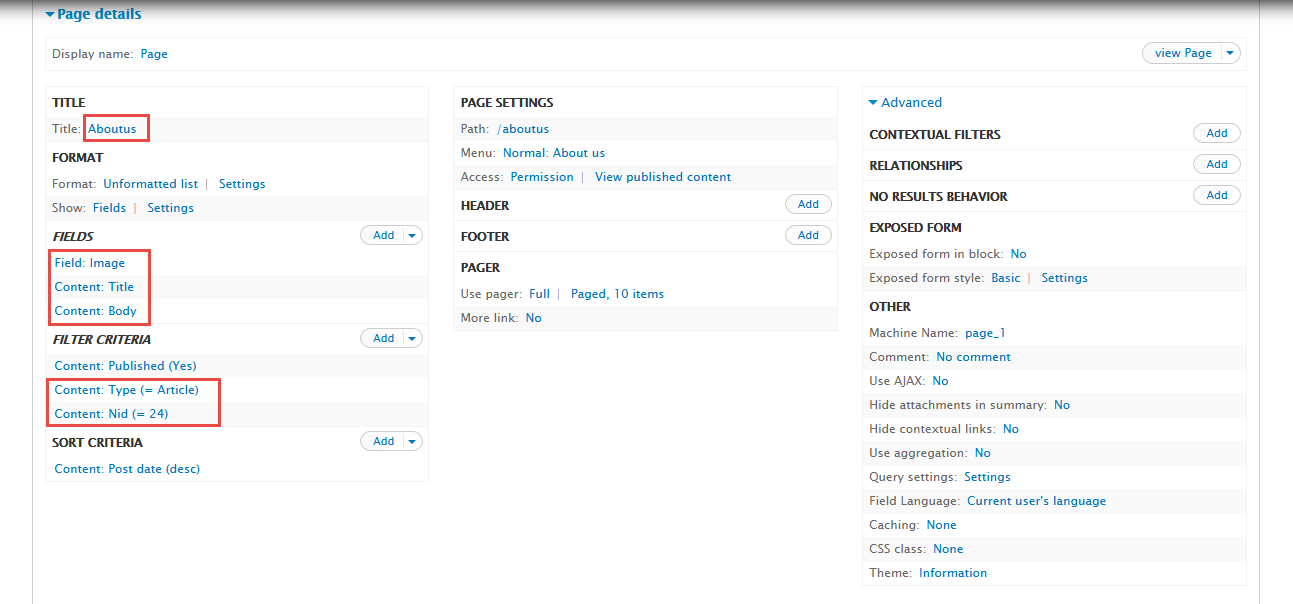
Stay open About Us view, click Add button add Page new.
Next to steps below to set properties for the following fields:
1. At Title area, set following properties:
2. At FIELDS area, click Add button to add fields: Field: Image, Content: Title, Content: Body .
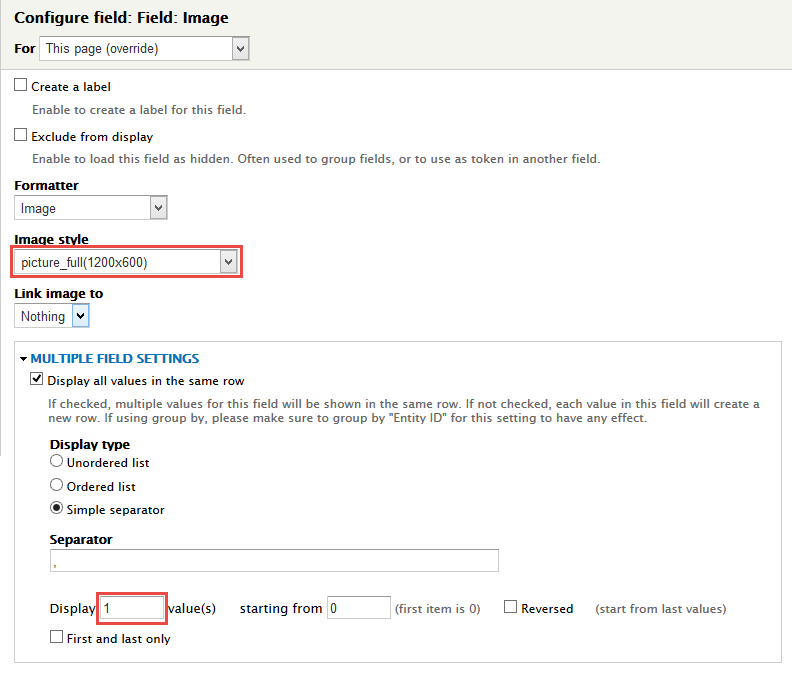
3. Set properties for Field: Image
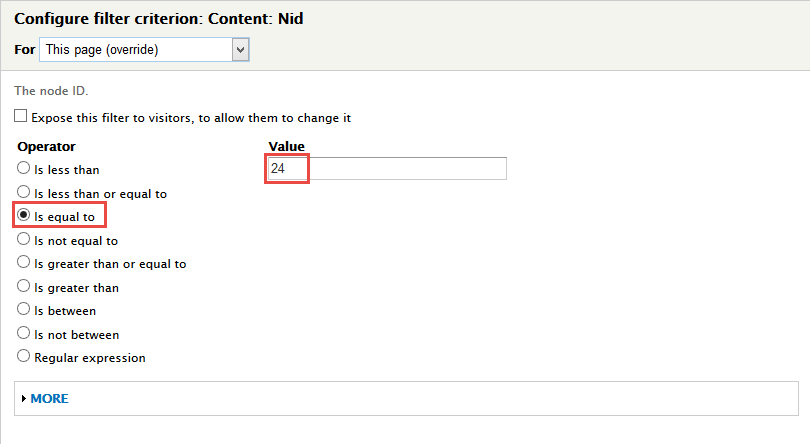
4. At FILTER CRITERIA area, click Add button and add file Content: Type, Content: Nid (= 24)
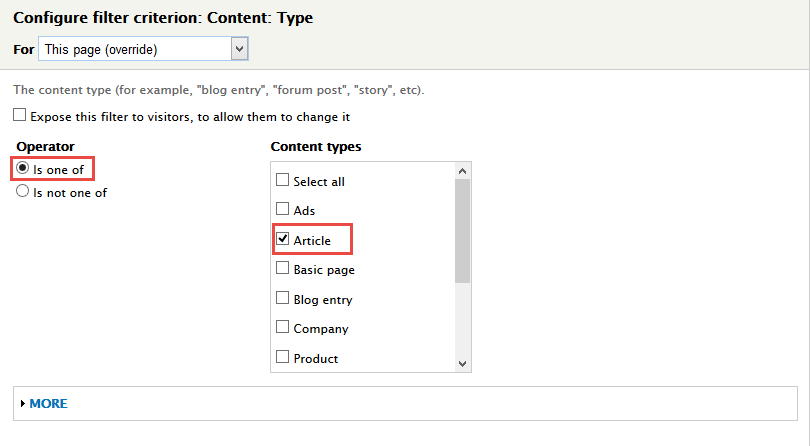
5. Set properties for Content: Type
6. Set properties for Content: Nid (= 24)
3. Create About Us block view
Stay open About Us view, click Add button add Block new.
Next to steps below to set properties for the following fields:
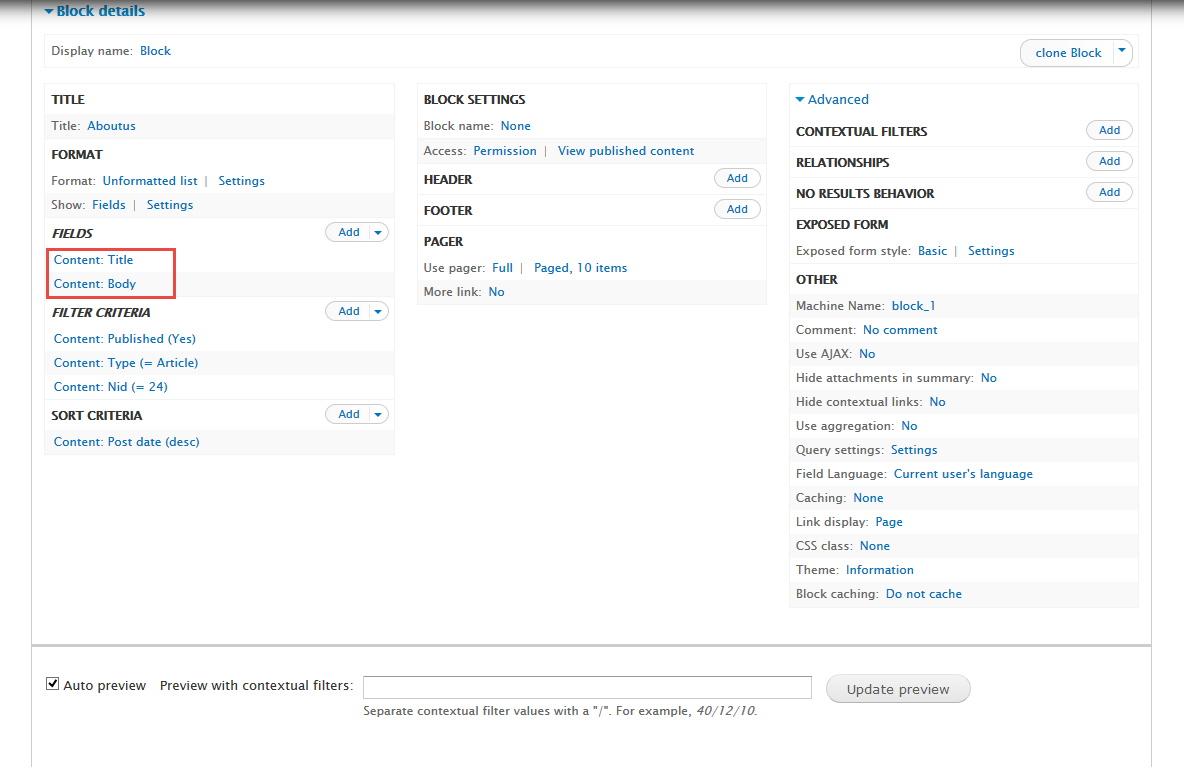
2. At FIELDS area, click Add button to add fields: Content: Title, Content: Body field and set following properties.
4. Configure About Us block
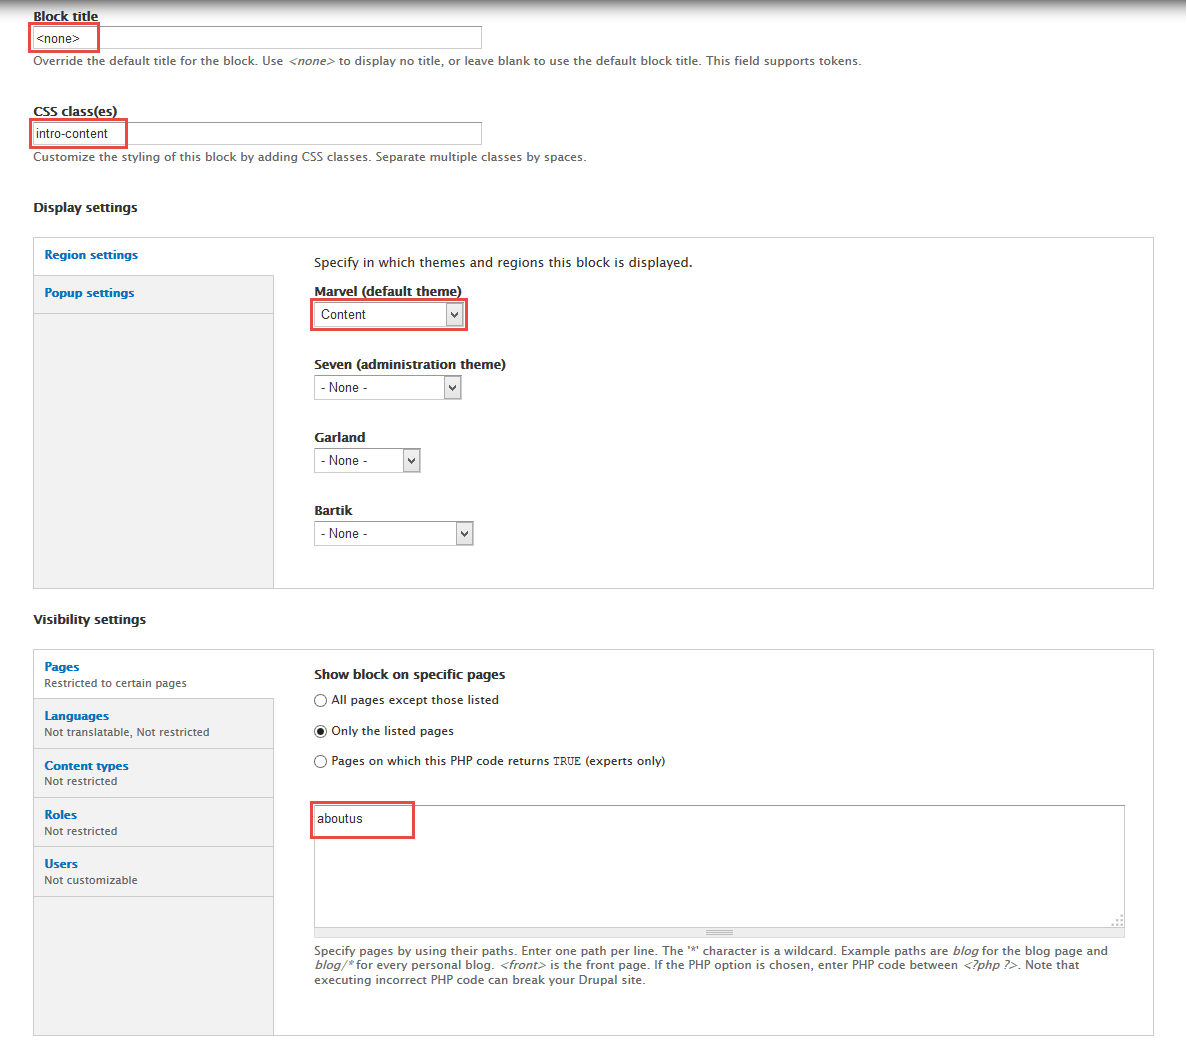
1. Navigate to Structure > Blocks
2. Find View: Aboutus, click configure link, set following properties
3.Click Save block button.
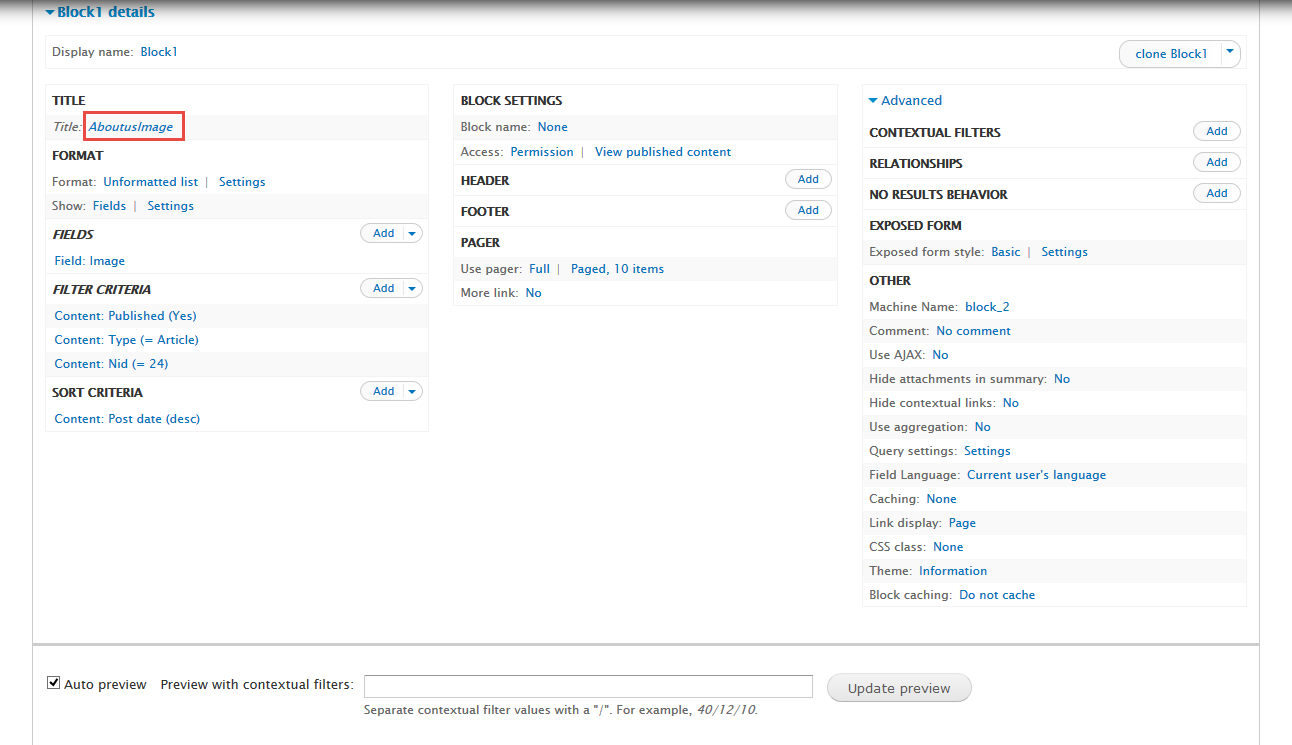
5. Create About Us image block view
Stay open About Us view, click Add button add Block new.
Next to steps below to set properties for the following fields:
1. At Title area, set following properties:
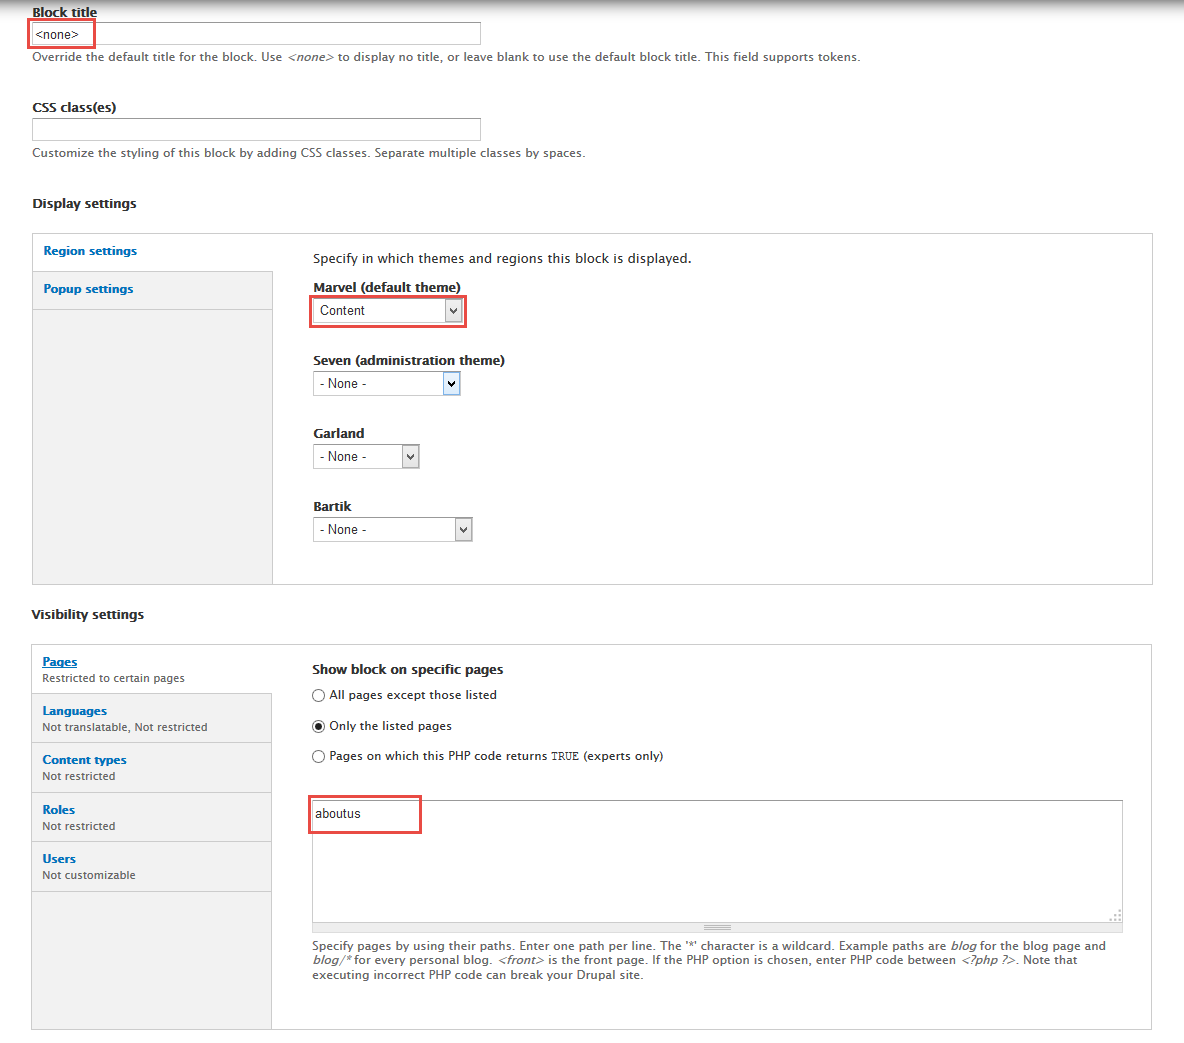
6. Configure About Us image block
1. Navigate to Structure > Blocks
2. Find View: Aboutus: Block1, click configure link, set following properties
3.Click Save block button.
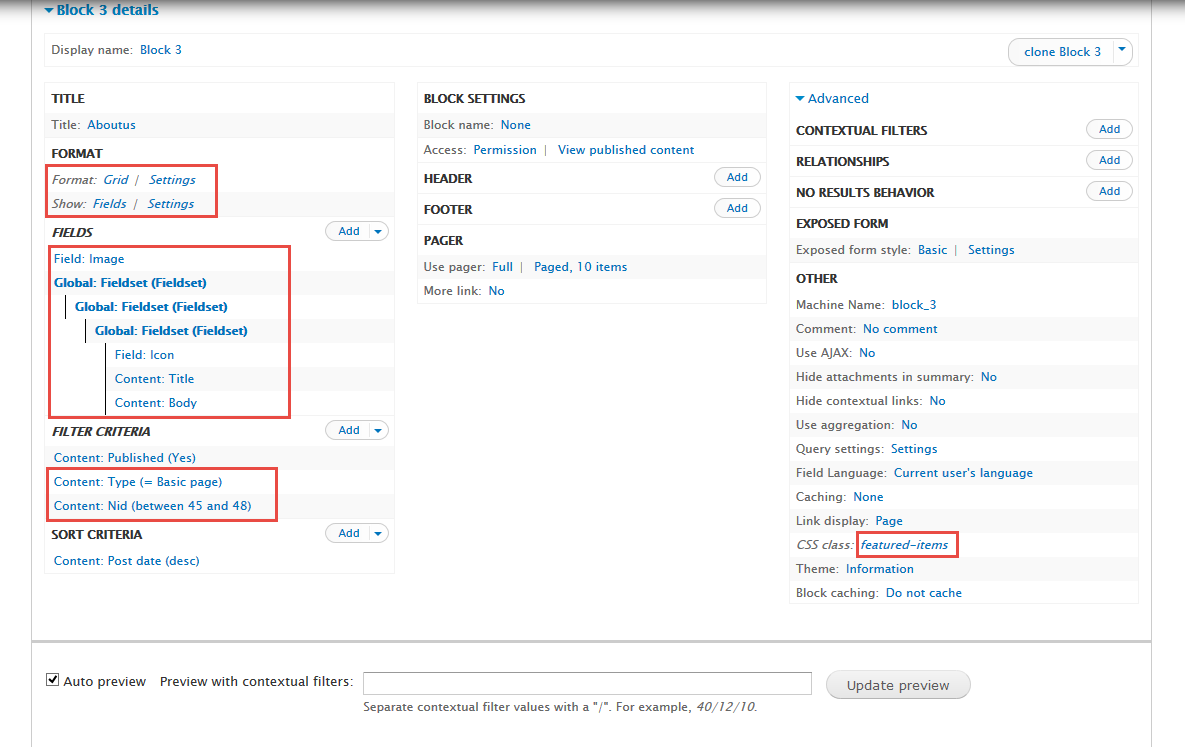
7. Create About Us image block view
Stay open About Us view, click Add button add Block new.
1. Next to steps below to set properties for the following fields:
2. At FORMAT Format: Grid area, click Settings and set following properties:
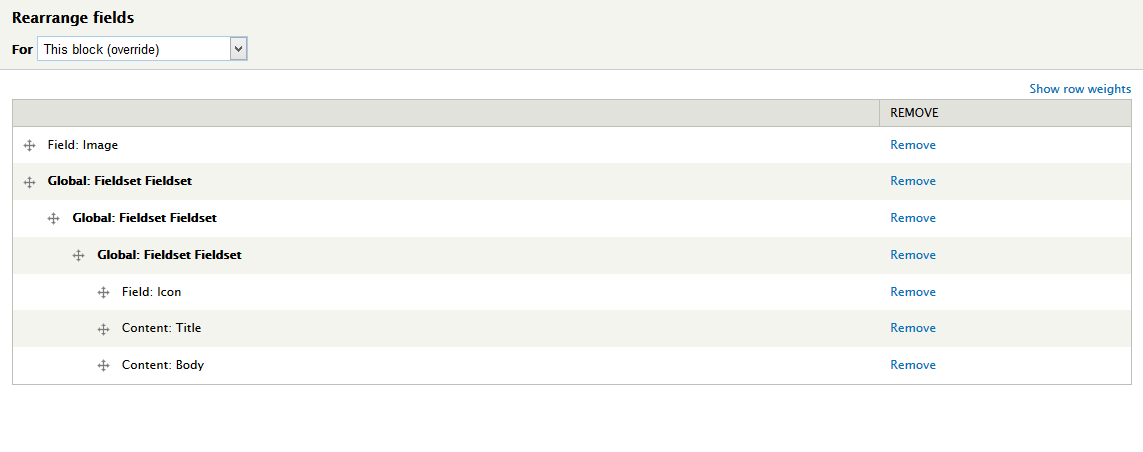
3. At FIELDS area, click Add button to add fields: Field: Image, Global: Fieldset (Fieldset), Global: Fieldset (Fieldset), Global: Fieldset (Fieldset), Field: Icon, Content: Title, Content: Body .
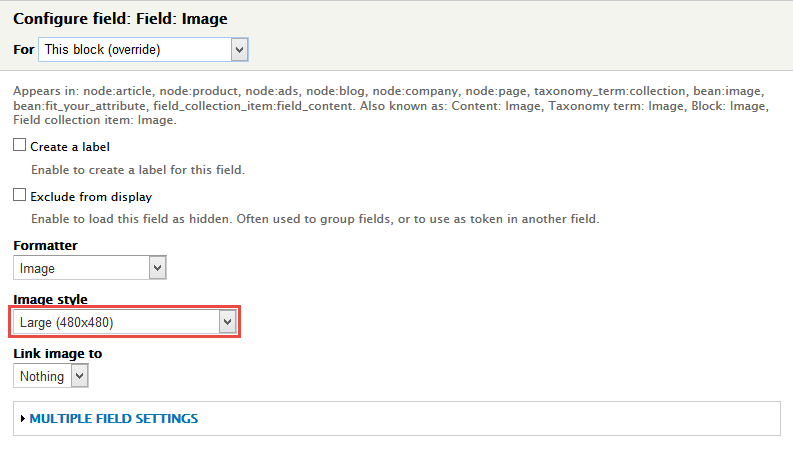
4. Set properties for Field: Image
5. Set properties for Global: Fieldset (Fieldset)
6. Set properties for Global: Fieldset (Fieldset)
7. Set properties for Global: Fieldset (Fieldset)
8. Set properties for Field: Icon
9. Set properties for Content: Body
10. At FIELDS area, click Rearrange button and set following arrange
11. At FILTER CRITERIA area, click Add button and add file Content: Type, Content: Nid
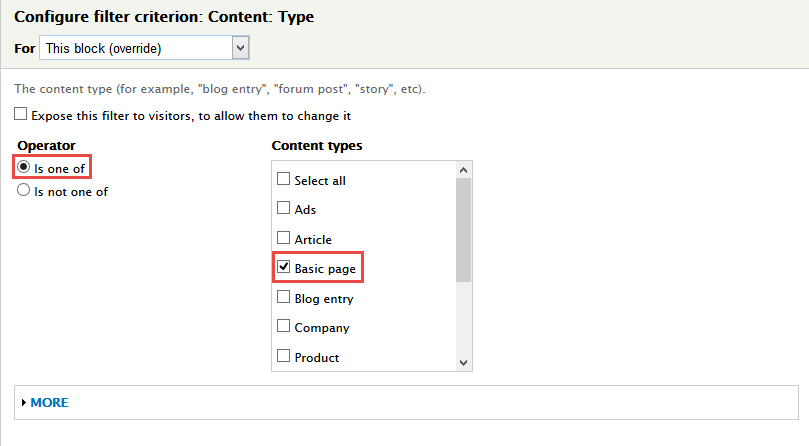
12. Set properties for Content: Type
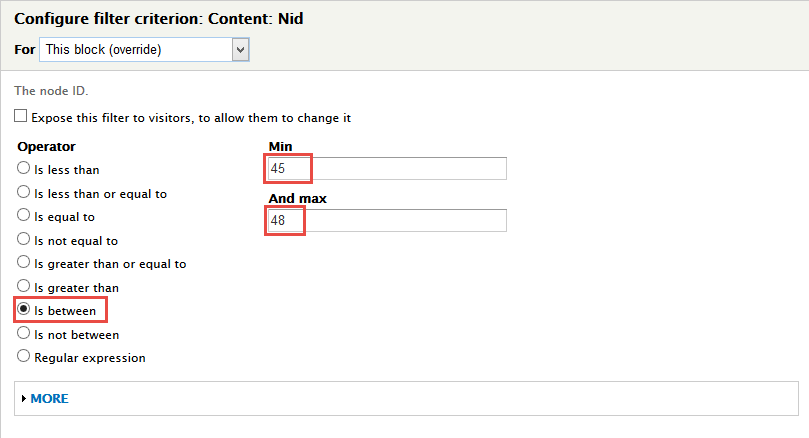
13. Set properties for Content: Nid
14. At Advanced > OTHER area, add CSS class
8. Configure About Us block3 block
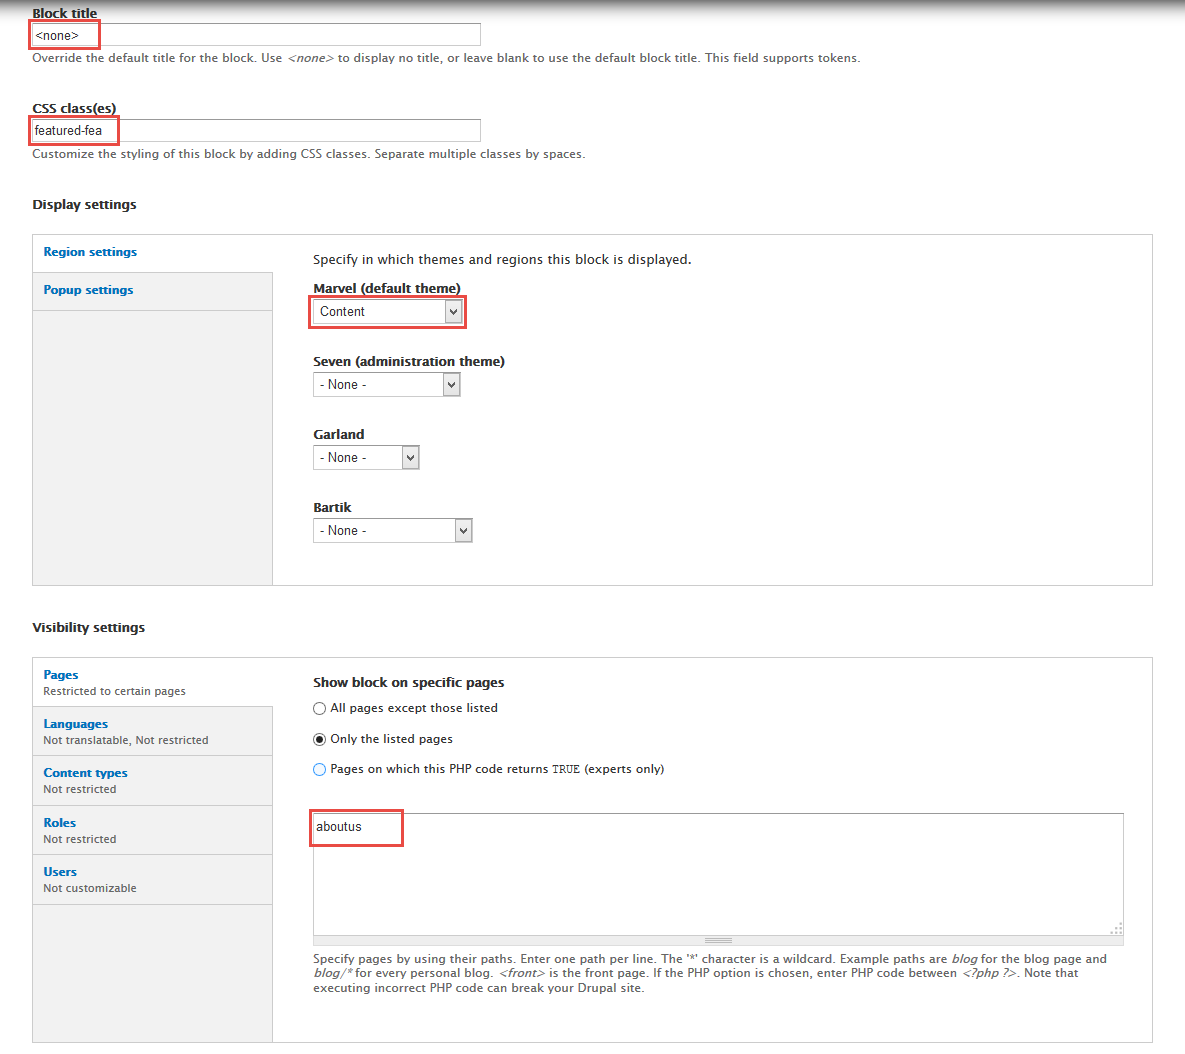
1. Navigate to Structure > Blocks
2. Find View: Aboutus: Block 3, click configure link, set following properties
3.Click Save block button.
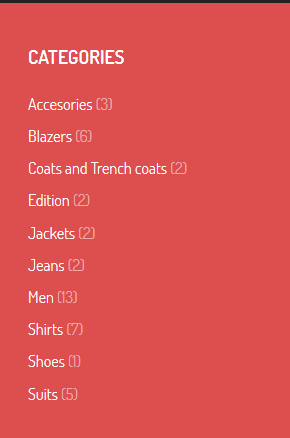
Category view
Front end Display
1. Create Category block view
1. Navigate to Structure > Views, click Add views link, Create Category view with following properties:
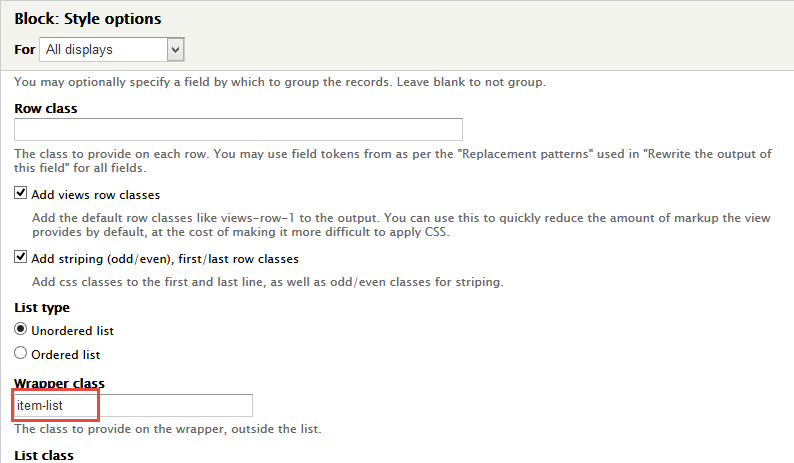
2. At FORMAT Format: HTML list area, click Settings and set following properties:
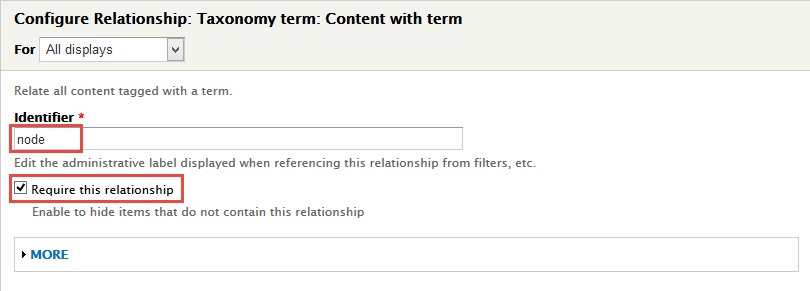
3. In Advanced > REALATIONSHIPS area, click Add button to add fields: Taxonomy term: Content with term and set following properties:
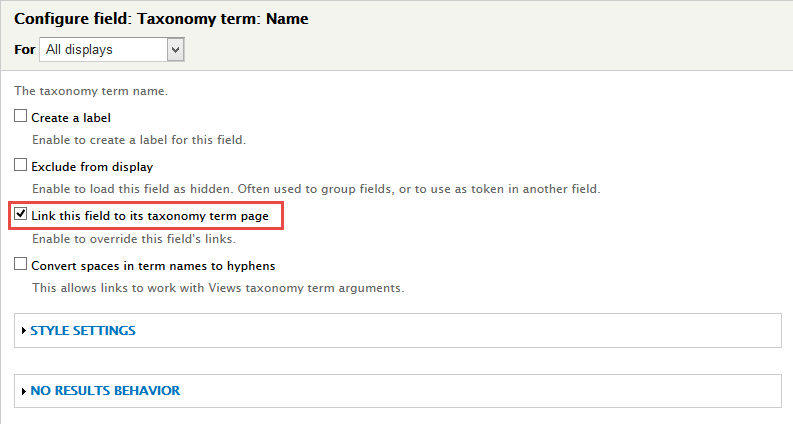
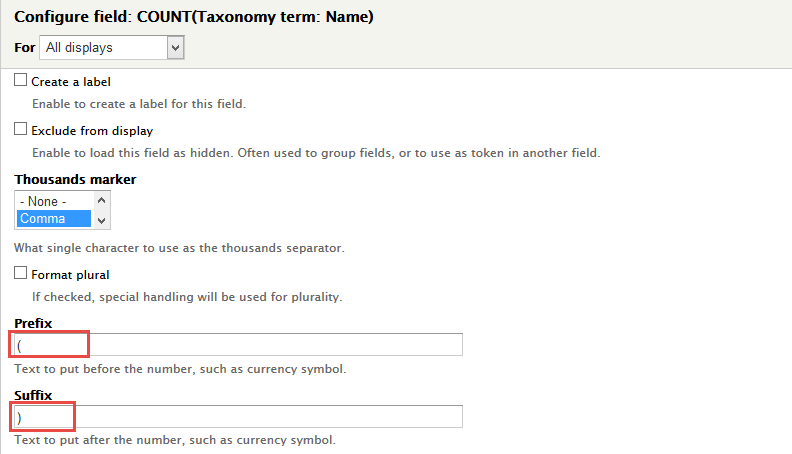
4. In FIELDS area, click Add button to add fields: Taxonomy term: Name, COUNT(Taxonomy term: Name) field and set following properties:
5. Set properties for Taxonomy term: Name
6. Set properties for COUNT(Taxonomy term: Name)
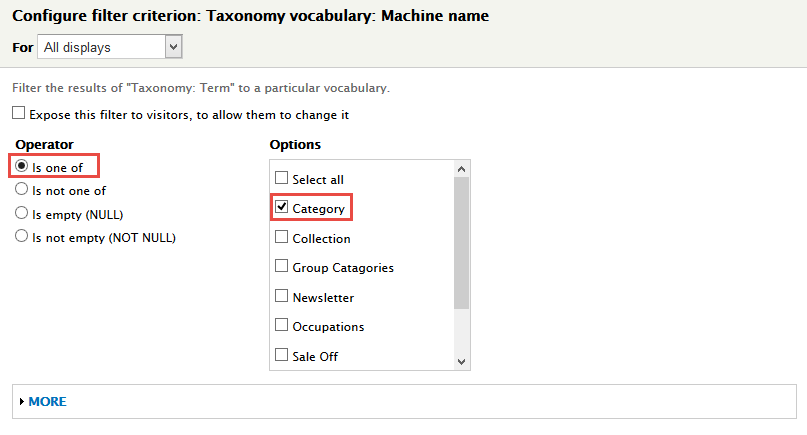
7. In FILTER CRITERIA area, click Add button to add Taxonomy vocabulary: Machine name and set following properties:
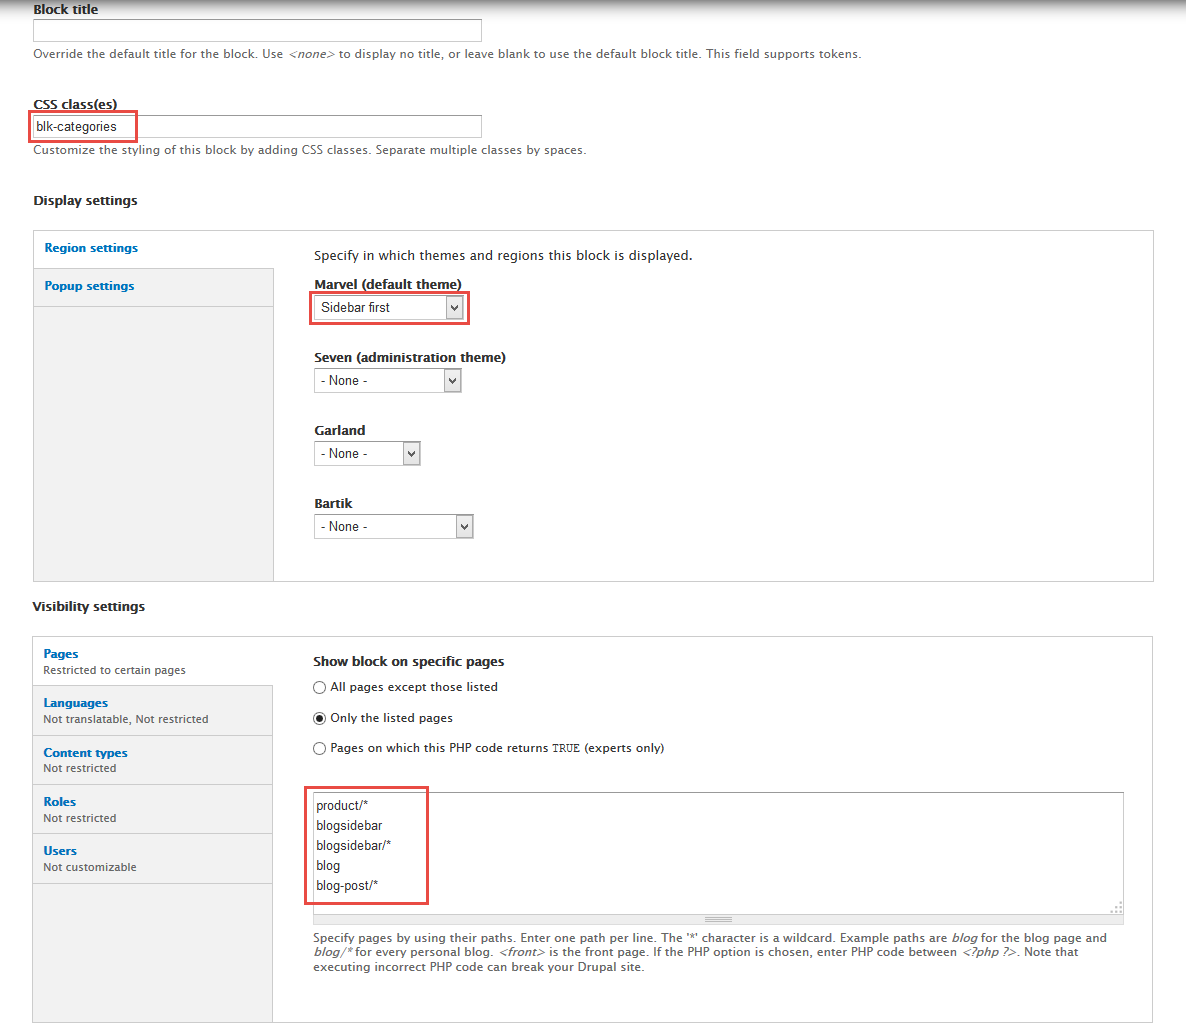
8. At Advanced > OTHER area, add CSS class
2. Configure Category block
1. Navigate to Structure > Blocks
2. Find View: Category, click configure link, set following properties
3.Click Save block button.
Happy Clients view
Front end Display
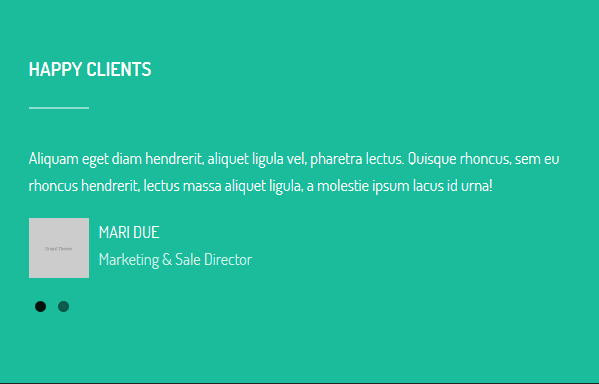
1. Create Happy Clients block view
1. Navigate to Structure > Views, click Add views link, Create Happy Clients view with following properties:
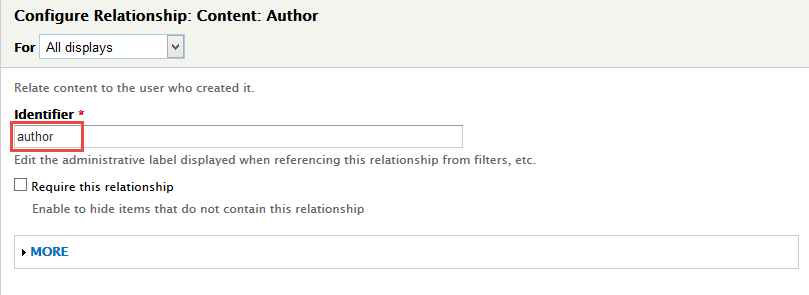
2. In Advanced > REALATIONSHIPS area, click Add button to add fields: Content: Author and set following properties:
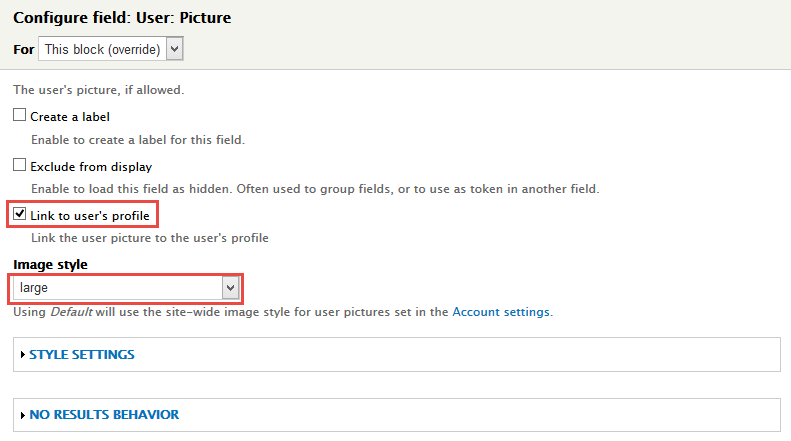
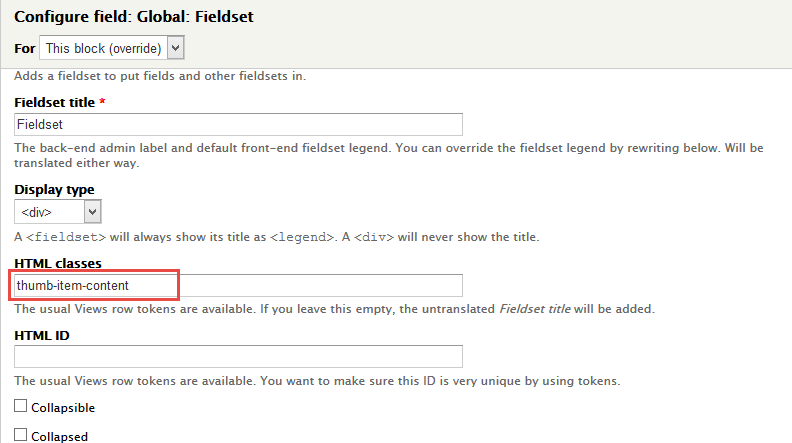
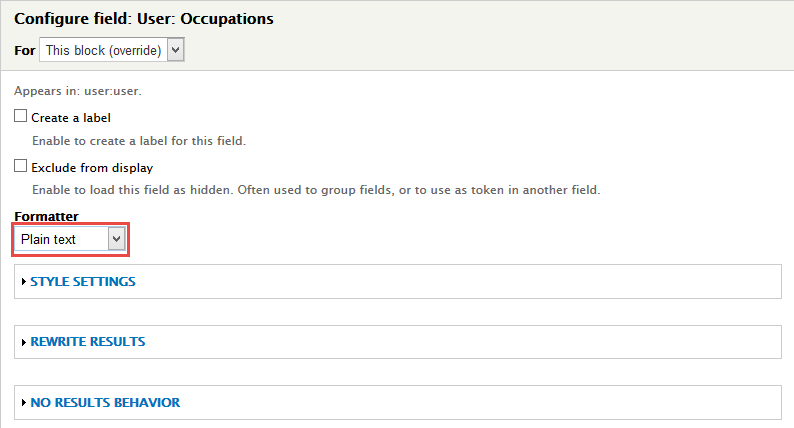
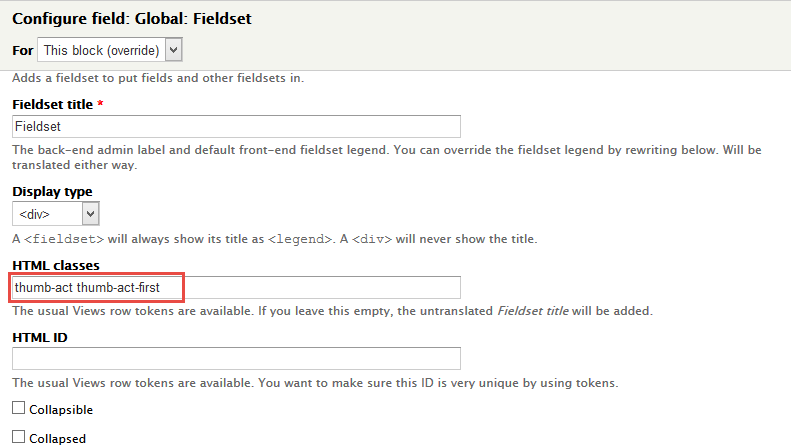
3. In FIELDS area, click Add button to add fields: Content: Body, Global: Fieldset (Fieldset), User: Picture, User: Full Name, User: Occupations field and set following properties:
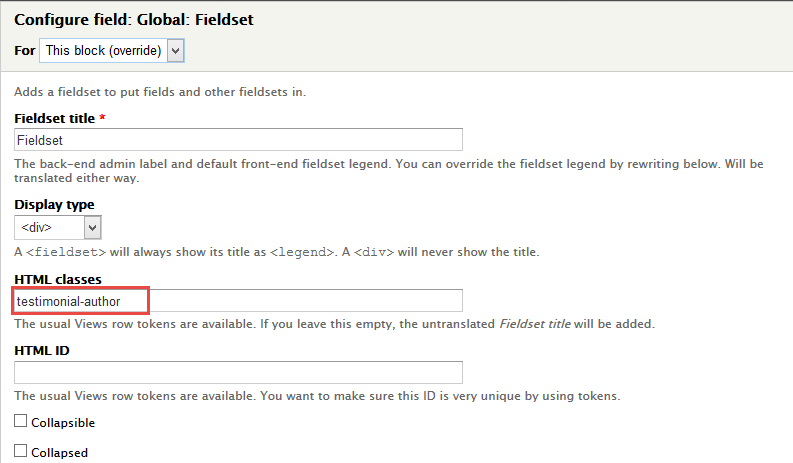
4. Set properties for Global: Fieldset (Fieldset)
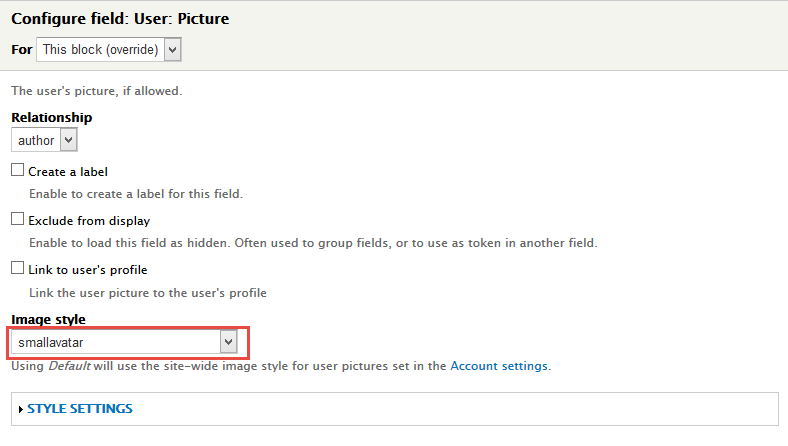
5. Set properties for User: Picture
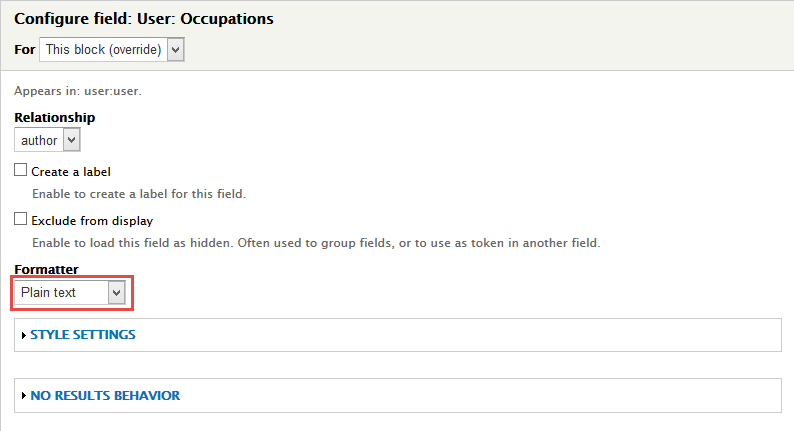
6. Set properties for User: Occupations
7. At Advanced > OTHER area, add CSS class
2. Configure Happy Clients block
1. Navigate to Structure > Blocks
2. Find View: Happy Clients, click configure link, set following properties
3.Click Save block button.
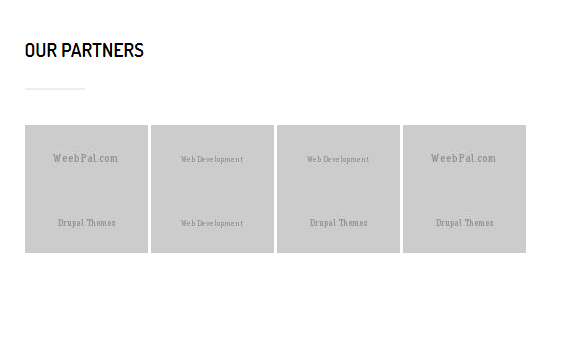
Our Partners view
Front end Display
1. Create Our Partners block view
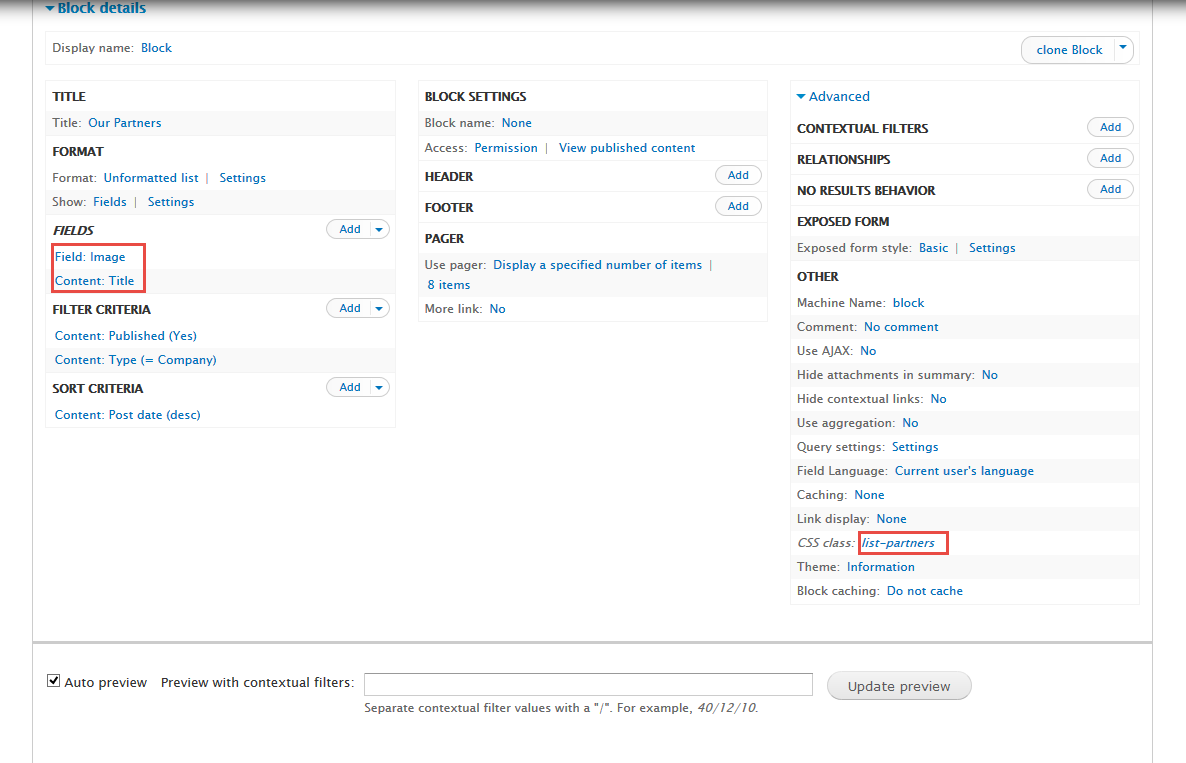
1. Navigate to Structure > Views, click Add views link, Create Our Partners view with following properties:
2. In FIELDS area, click Add button to add fields: Field: Image, Content: Title field and set following properties:
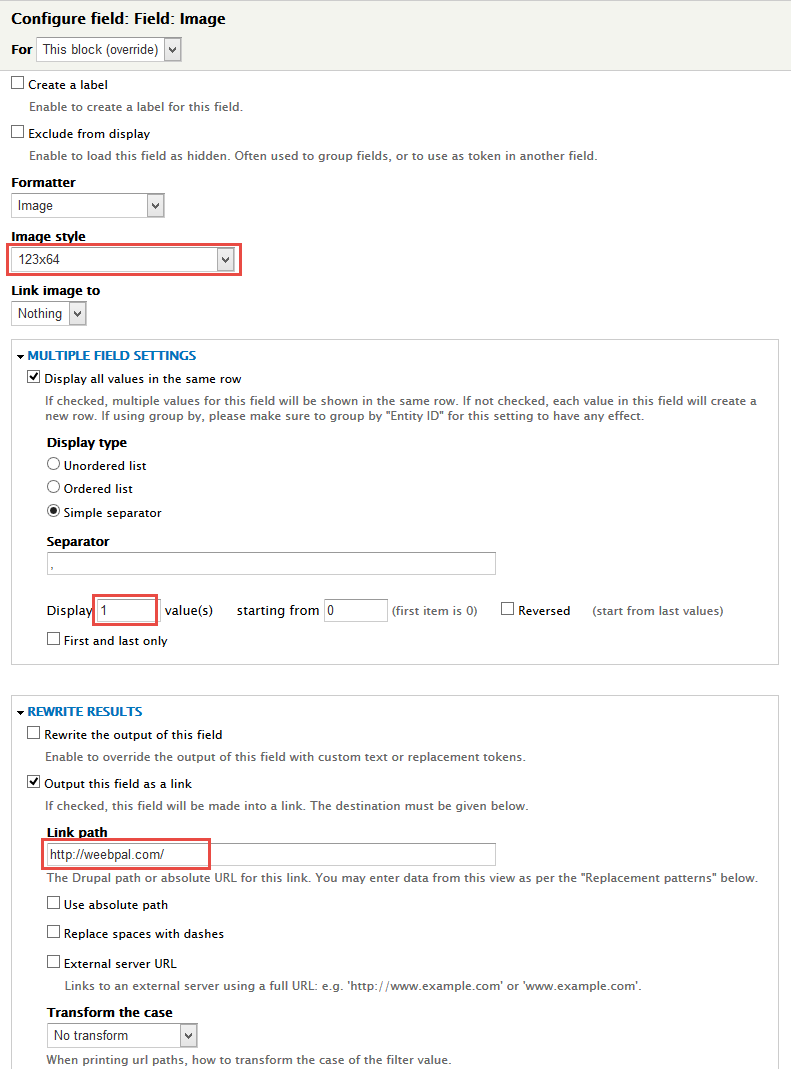
3. Set properties for Field: Image
4. Set properties for Content: Title
5. At Advanced > OTHER area, add CSS class
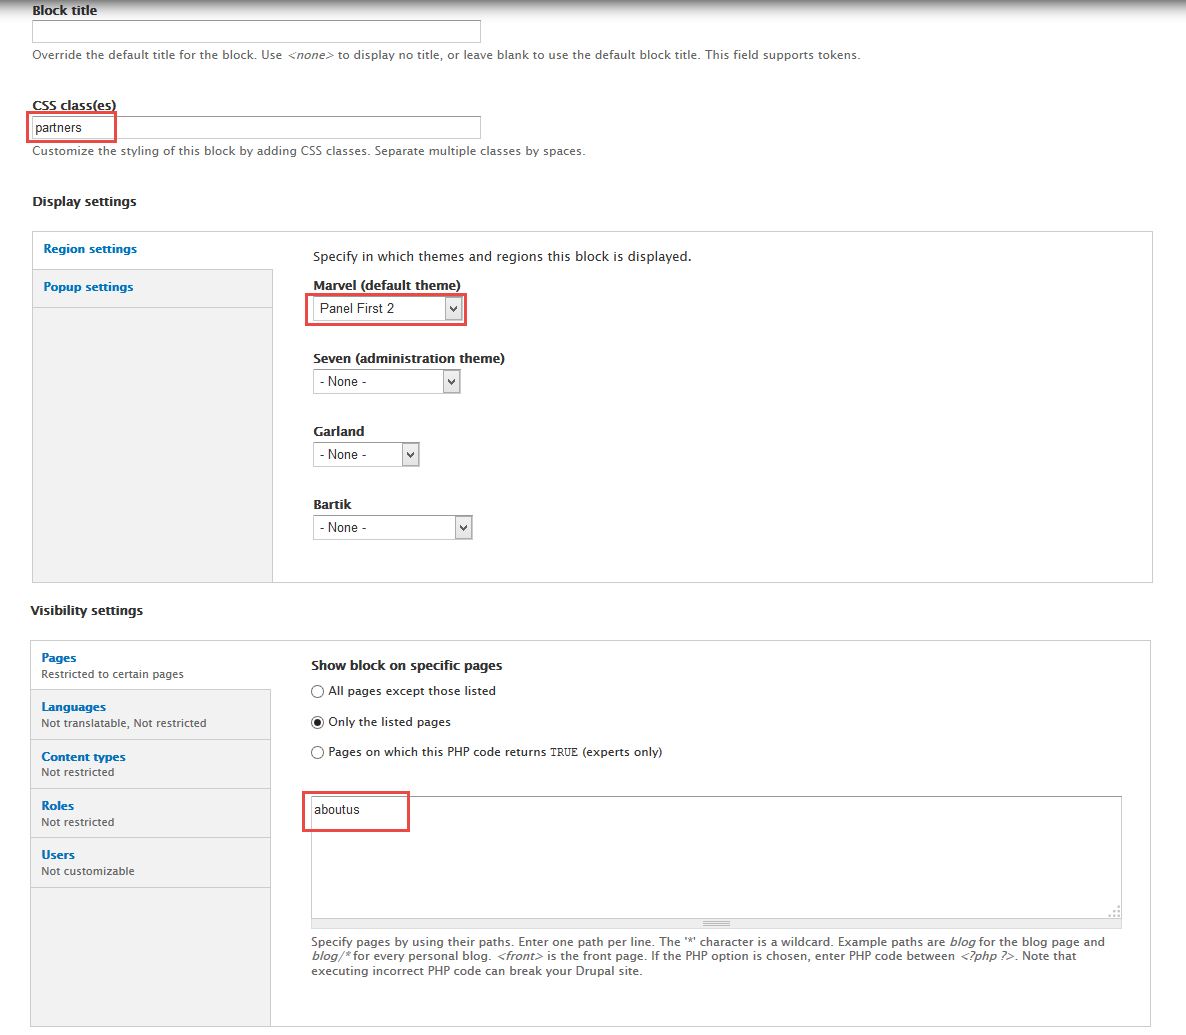
2. Configure Our Partners block
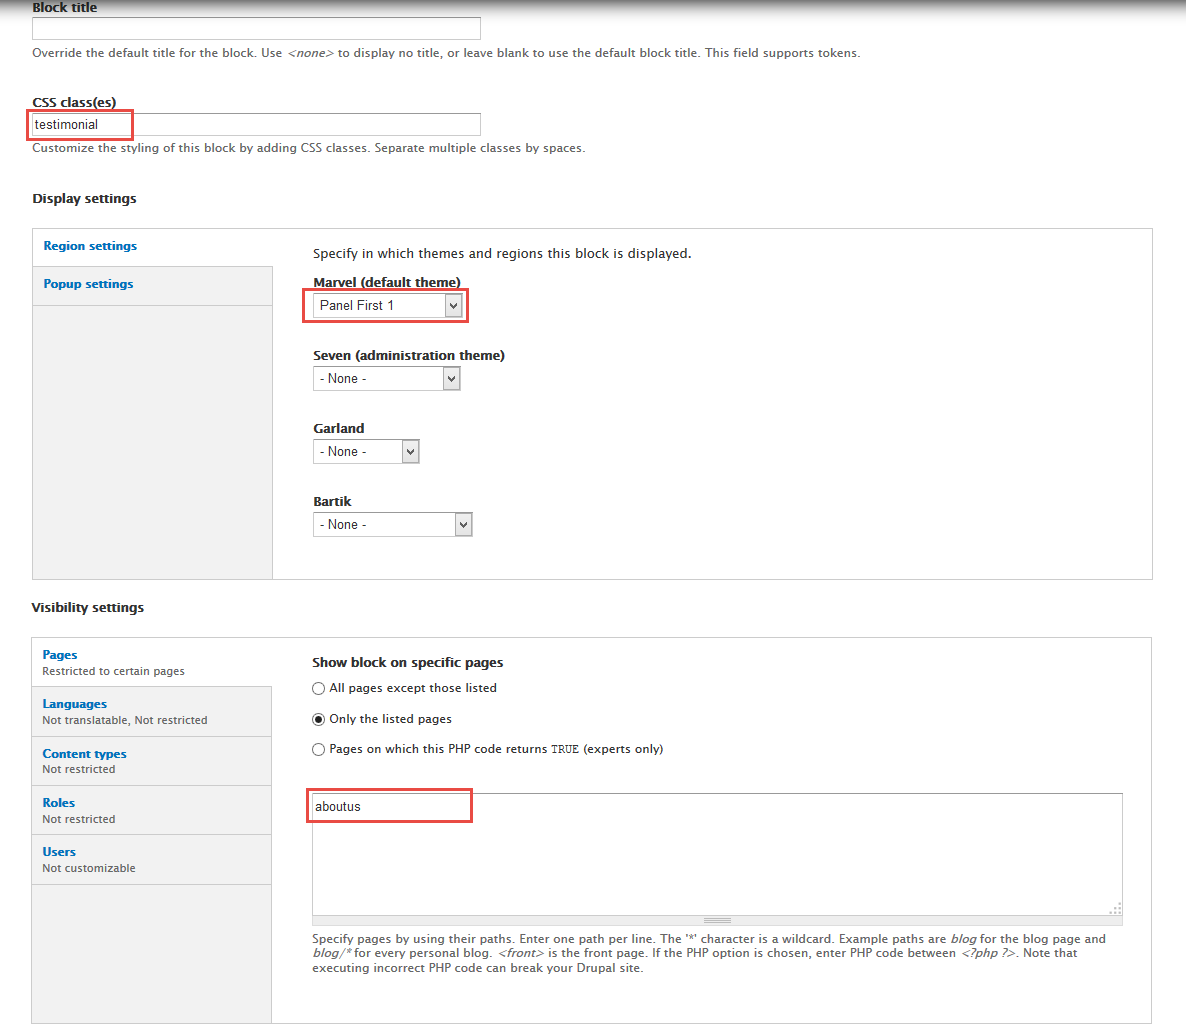
1. Navigate to Structure > Blocks
2. Find View: Our Partners, click configure link, set following properties
3.Click Save block button.
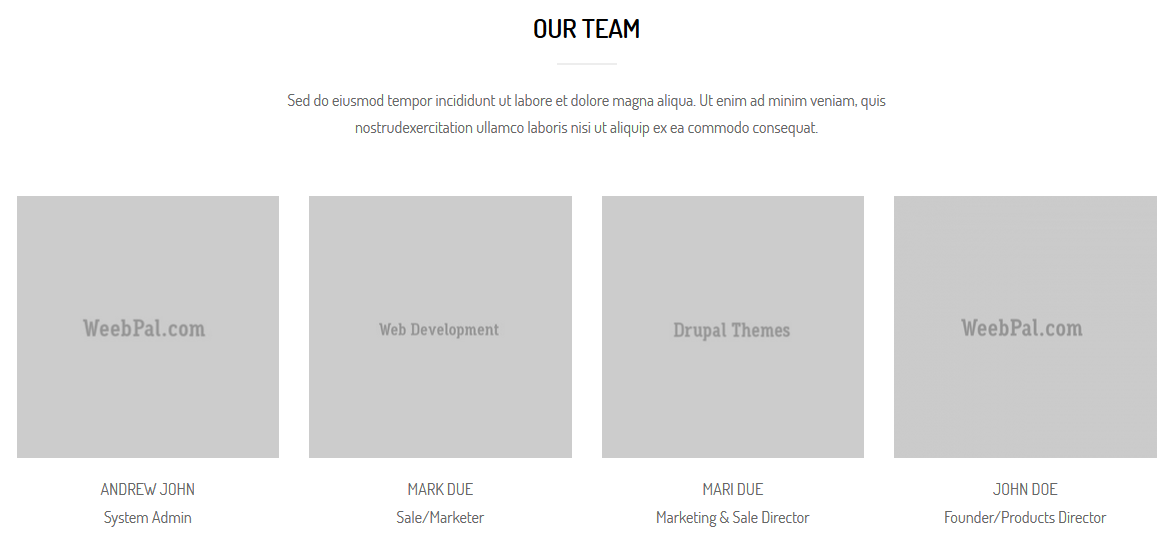
Our Team view
Front end Display
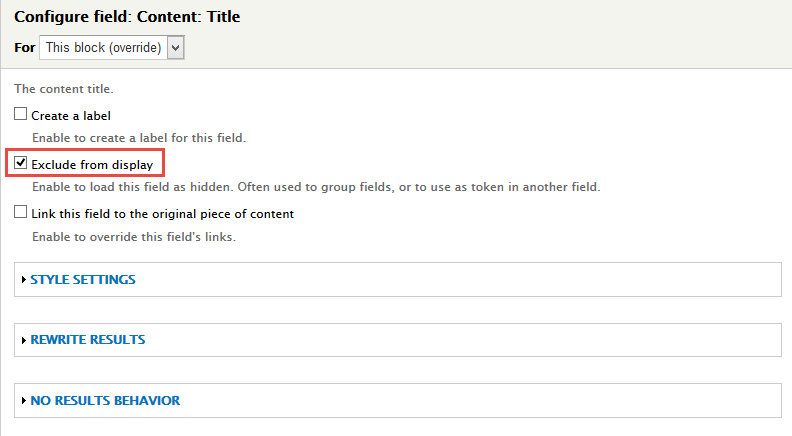
1. Create Our Team block view
1. Navigate to Structure > Views, click Add views link, Create Our Team view with following properties:
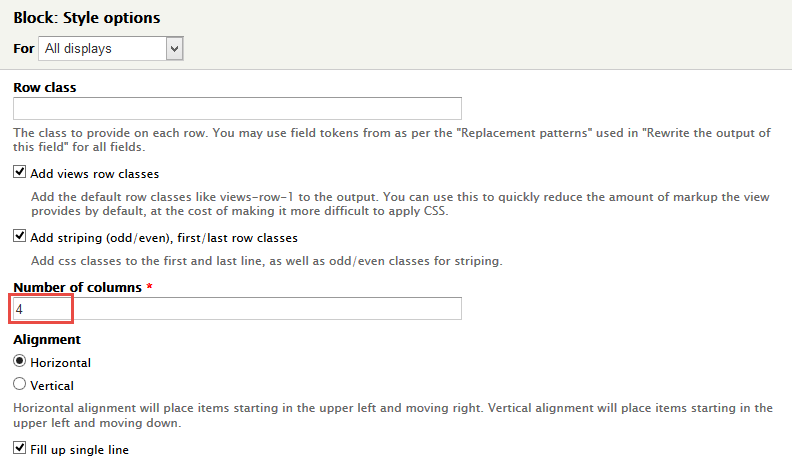
2. At FORMAT Format: Grid area, click Settings and set following properties:
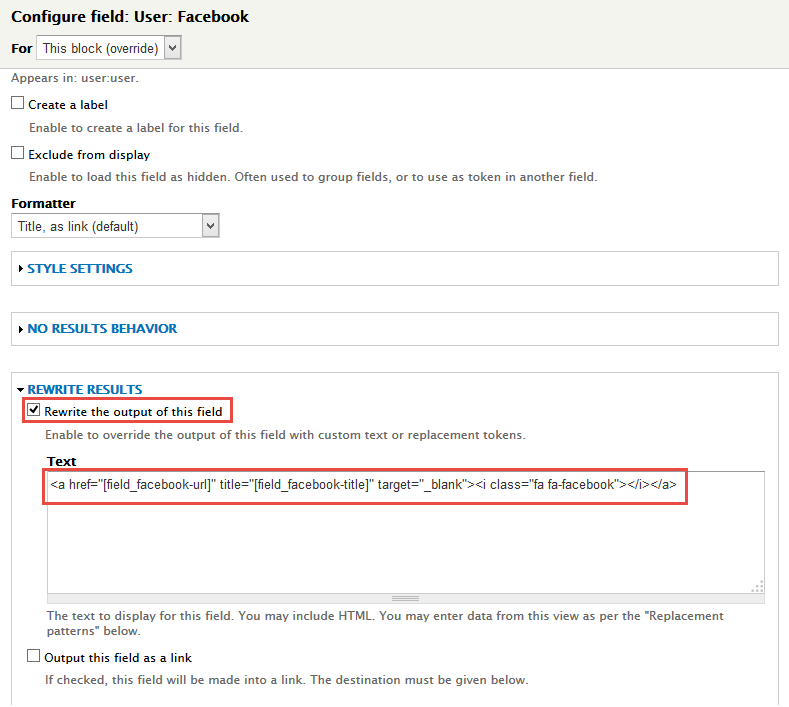
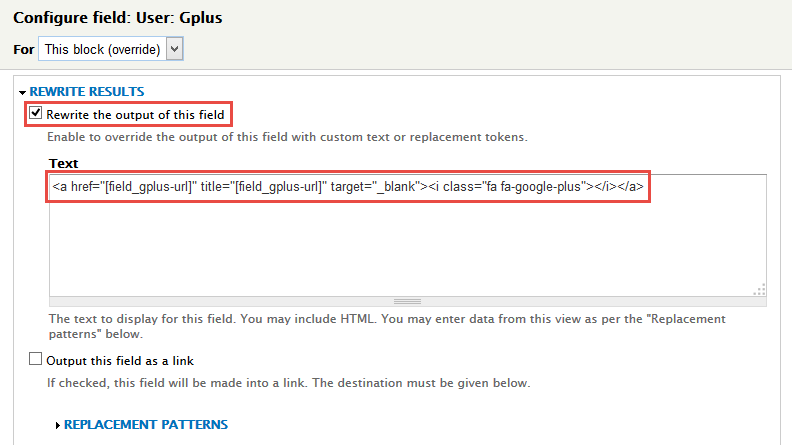
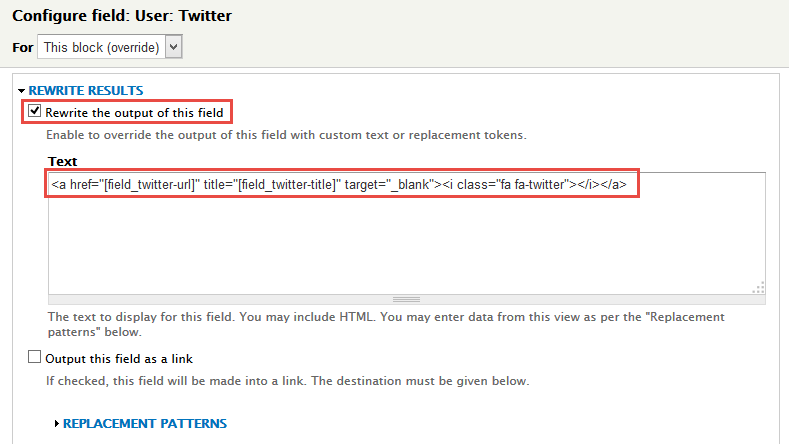
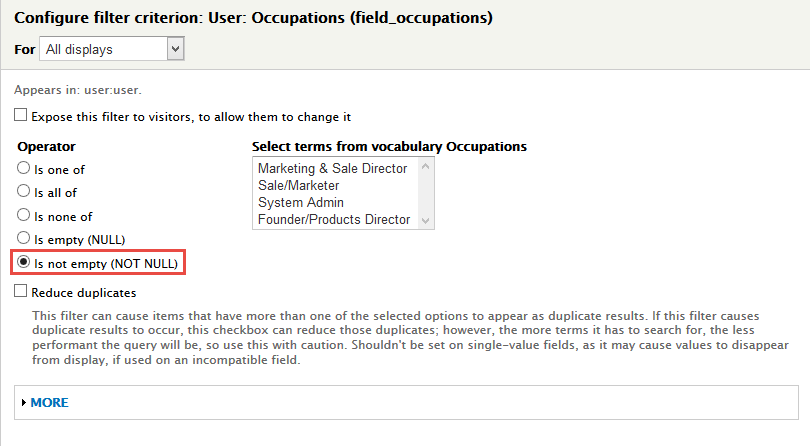
3. In FIELDS area, click Add button to add fields: User: Picture, Global: Fieldset (Fieldset), User: Full Name, User: Occupations, Global: Fieldset (Fieldset), User: Facebook, User: Gplus, User: Twitter field and set following properties:
4. Set properties for User: Picture
5. Set properties for Global: Fieldset (Fieldset)
6. Set properties for User: Occupations
7. Set properties for Global: Fieldset (Fieldset)
8. Set properties for User: Facebook
9. Set properties for User: Gplus
10. Set properties for User: Twitter
11. In FILTER CRITERIA area, click Add button to add User: Occupations and set following properties:
12. At HEADER area, click Add button field Global: Text area and set following properties:
13. At Advanced > OTHER area, add CSS class
2. Configure Our Team block
1. Navigate to Structure > Blocks
2. Find View: Our Team, click configure link, set following properties
3.Click Save block button.
Bestsellers page
Stay open Bestsellers view, click Add button add Page new.
1. Next to steps below to set properties for the following fields:
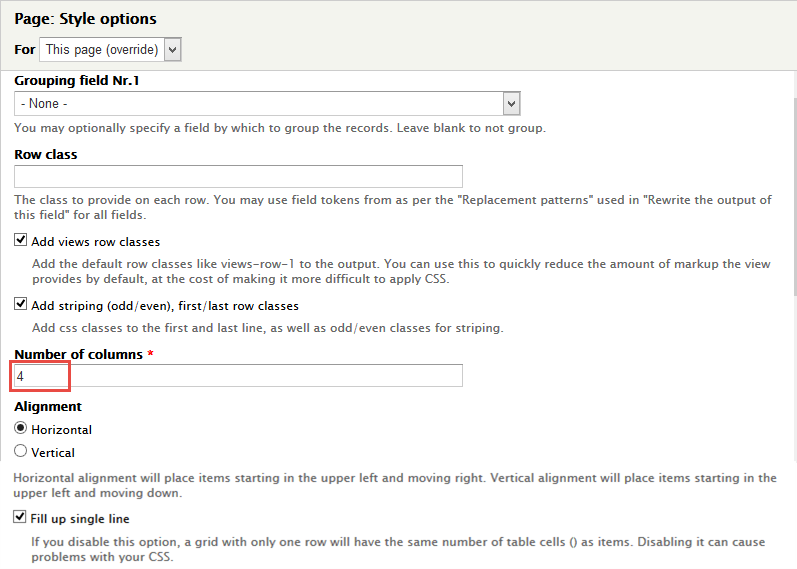
2. At FORMAT Format: Grid area, click Settings and set following properties:
3. In FIELDS area, click Add button to add fields: Global: Fieldset (Fieldset), Commerce Product: Add to Cart form, Content: Link, Global: Fieldset (Fieldset), Content: Category, Global: Fieldset (Fieldset), Commerce Product: Old Price field and set following properties:
4. Set properties for Field: Image
5. Set properties for Global: Fieldset (Fieldset)
6. Set properties for Commerce Product: Add to Cart form
7. Set properties for Content: Link
8. Set properties for Global: Fieldset (Fieldset)
9. Set properties for Content: Rate
10. Set properties for Content: Title
11. Set properties for Content: Category
12. Set properties for Commerce Product: Old Price
14. At FIELDS area, click Rearrange button and set following arrange
13. In FILTER CRITERIA area, click Add button to add Commerce Product: Type, Content: Published set following properties:
14. Set properties for Commerce Product: Type
14. Set properties for Content: Published
15. At PAGE SETTINGS > Path area, set the following properties:
16. At PAGE SETTINGS > Menu area, set the following properties:
17. At PAGER > Use pager area, click link
18. In Advanced > OTHER area, add CSS class change following properties:
19. Click Save button.
Blog page
1. Create Blog view
Front end Display
1. Navigate to Structure > Views, click Add views link, Create Bestsellers view with following properties:
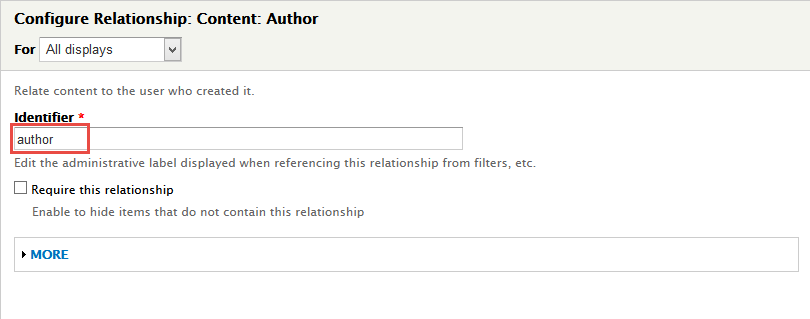
2. In Advanced > REALATIONSHIPS area, click Add button to add fields: Content: Author and set following properties:
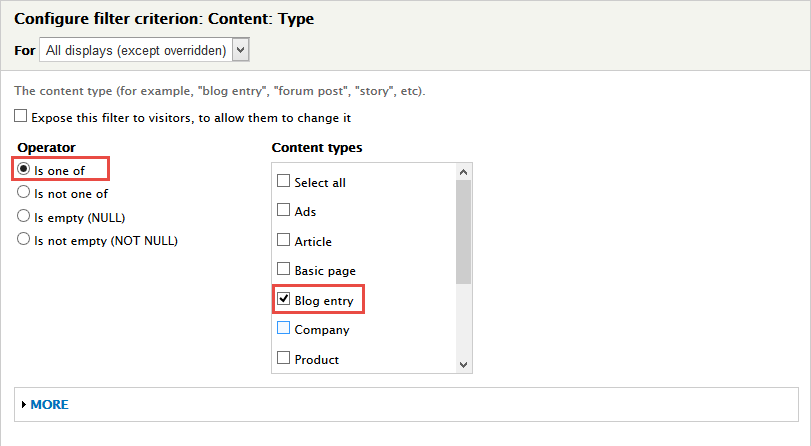
3. In FILTER CRITERIA area, click Add button to add Content: Type and set following properties:
4. At PAGE SETTINGS > Path area, set the following properties:
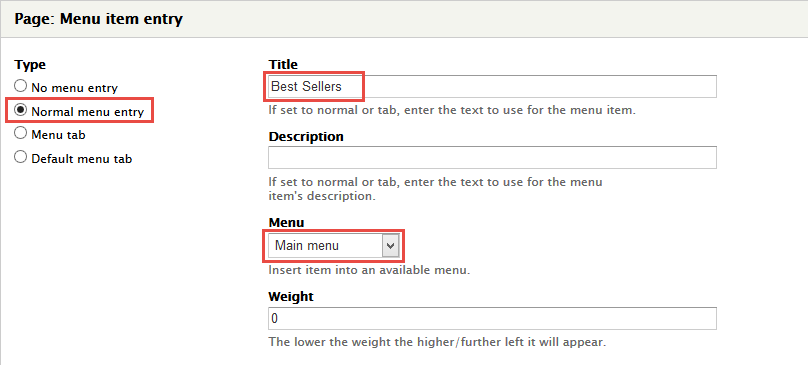
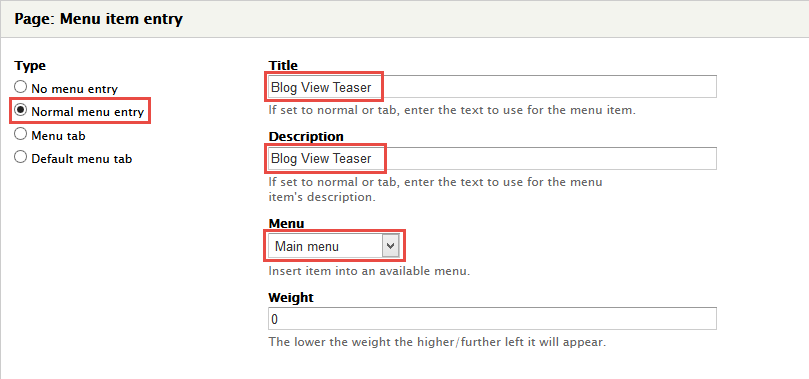
5. At PAGE SETTINGS > Menu area, set the following properties:
6. In Advanced > OTHER area, add CSS class change following properties:
7. Click Save button.
2. Create Blog SideBar view
Stay open Blog view, click Add button add Page new.
Front end Display
1. Next to steps below to set properties for the following fields:
2. At Display name area, set following properties:
3. At Title area, set following properties:
4. At FORMAT Format: Unformatted list area, click Settings and set following properties:
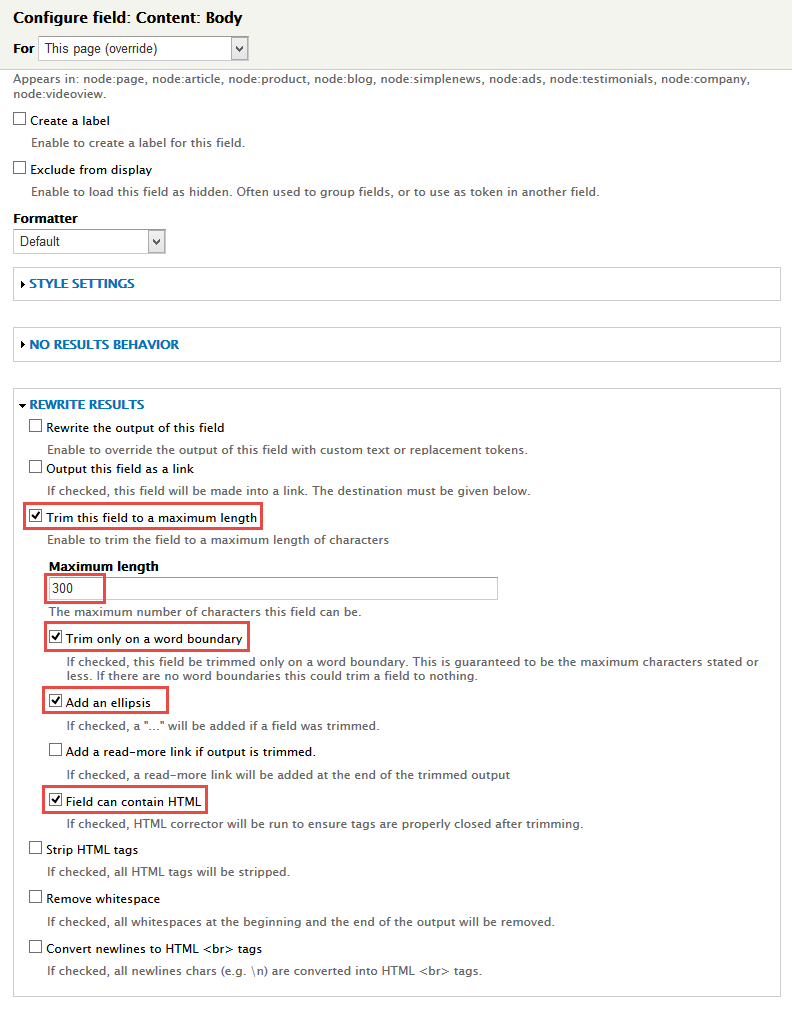
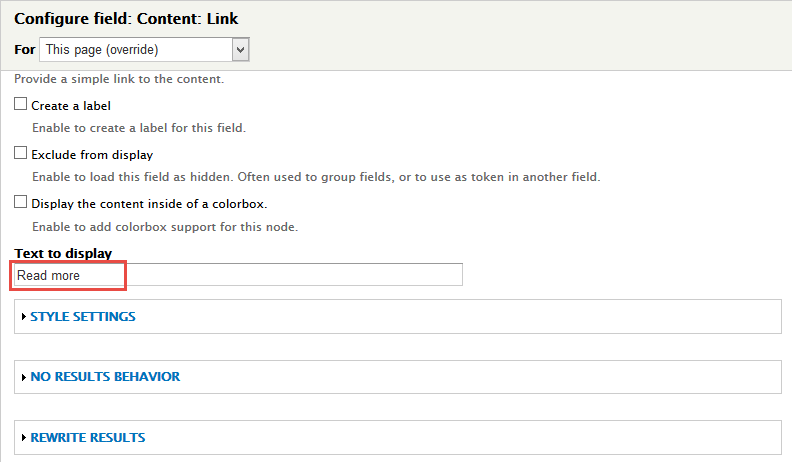
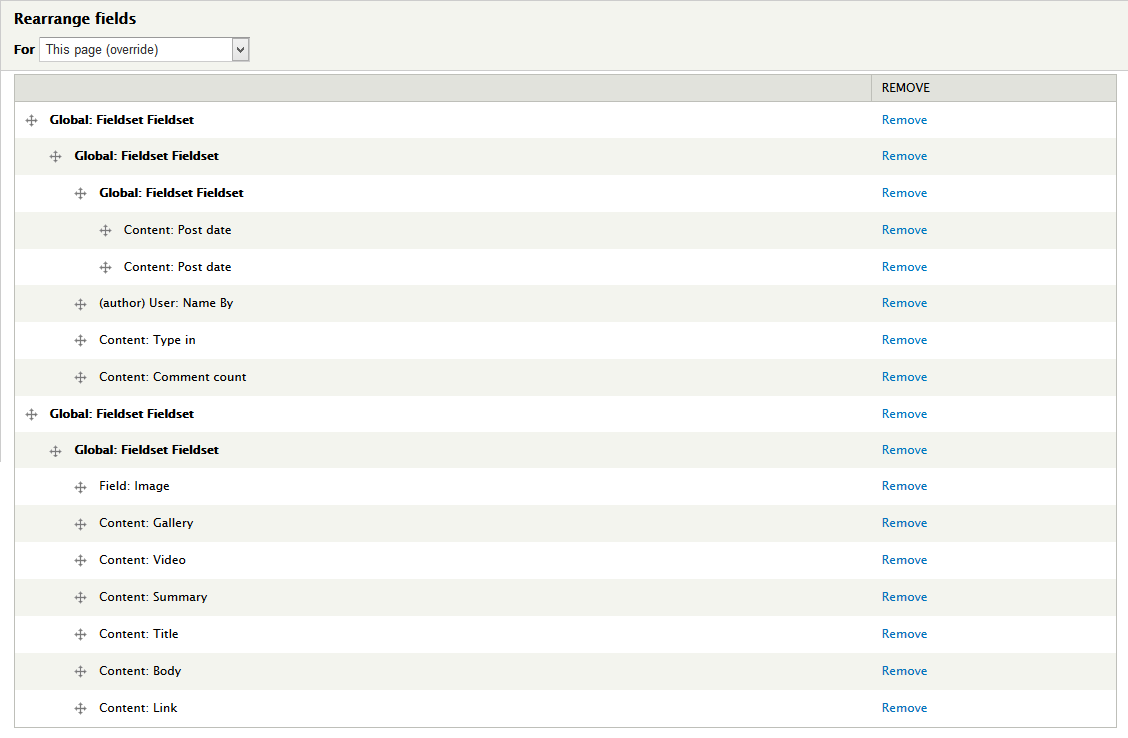
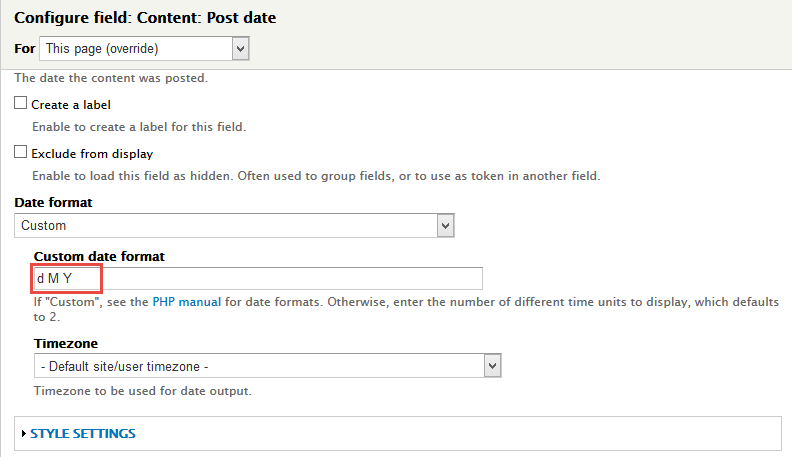
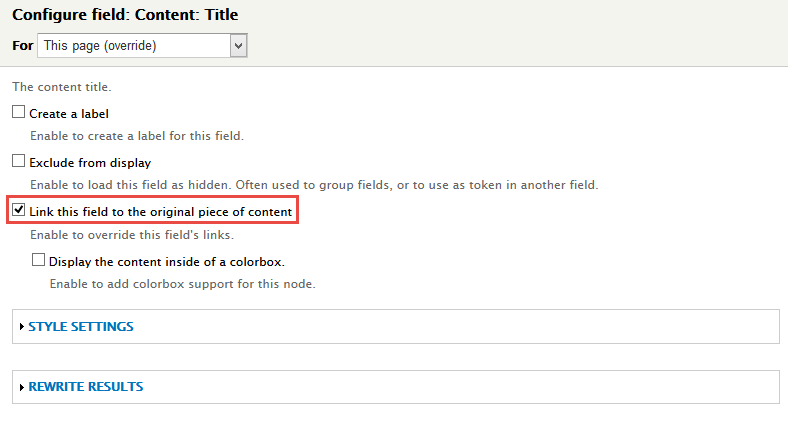
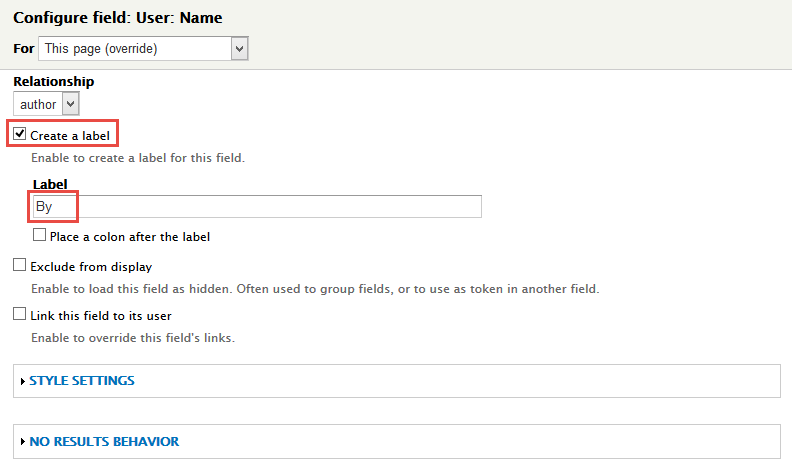
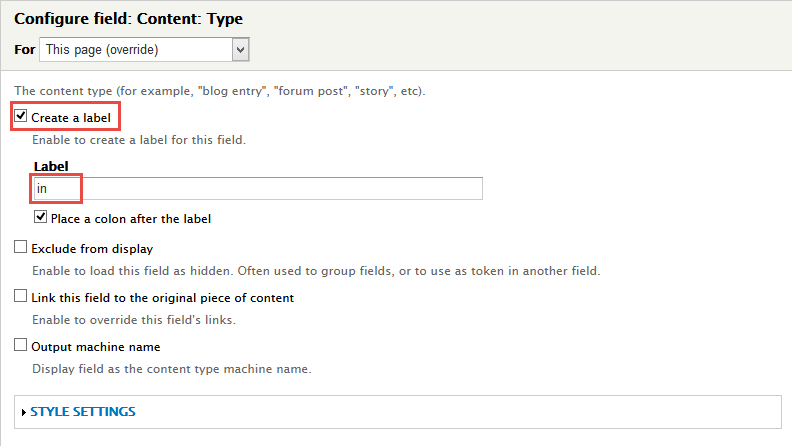
5. In FIELDS area, click Add button to add fields: Global: Fieldset (Fieldset), Global: Fieldset (Fieldset), Global: Fieldset (Fieldset), Content: Post date, Content: Post date, User: Name (By), Content: Type (in), Content: Comment count, Global: Fieldset (Fieldset), Global: Fieldset (Fieldset), Field: Image, Content: Gallery, Content: Video, Content: Summary, Content: Title, Content: Body, Content: Link field and set following properties:
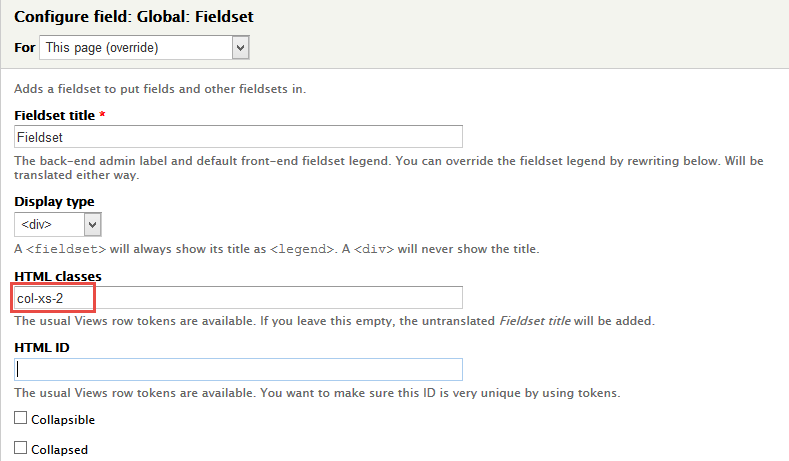
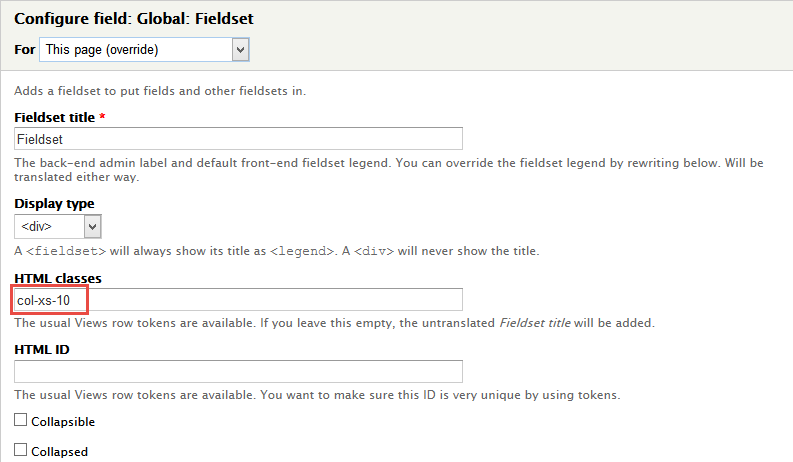
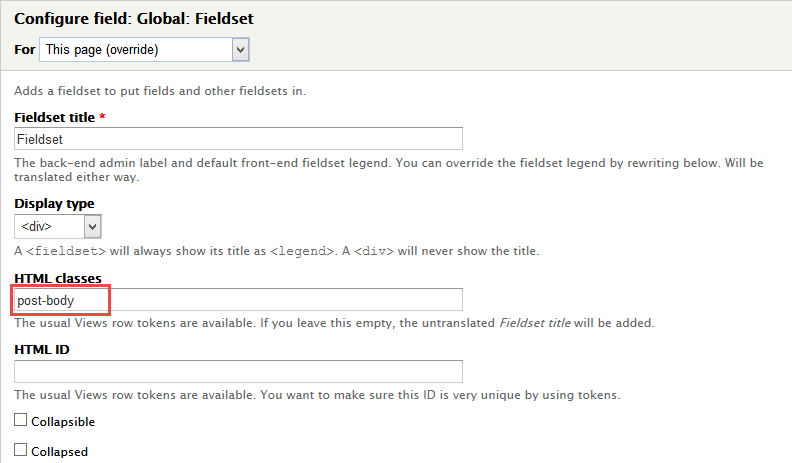
6. Set properties for Global: Fieldset (Fieldset)
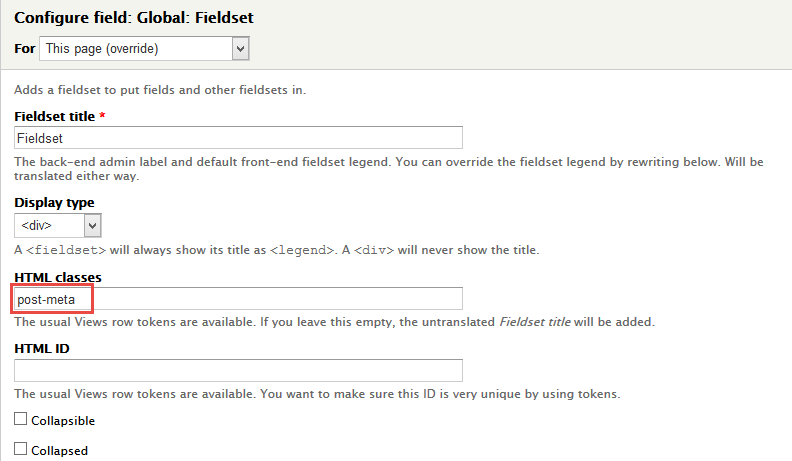
7. Set properties for Global: Fieldset (Fieldset)
8. Set properties for Global: Fieldset (Fieldset)
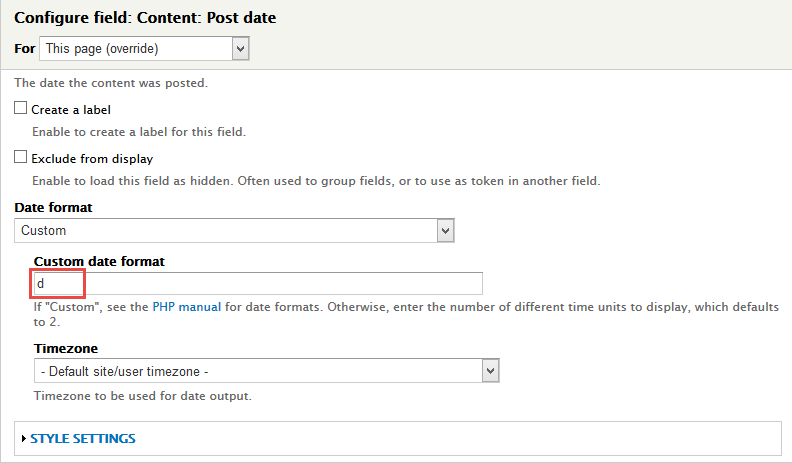
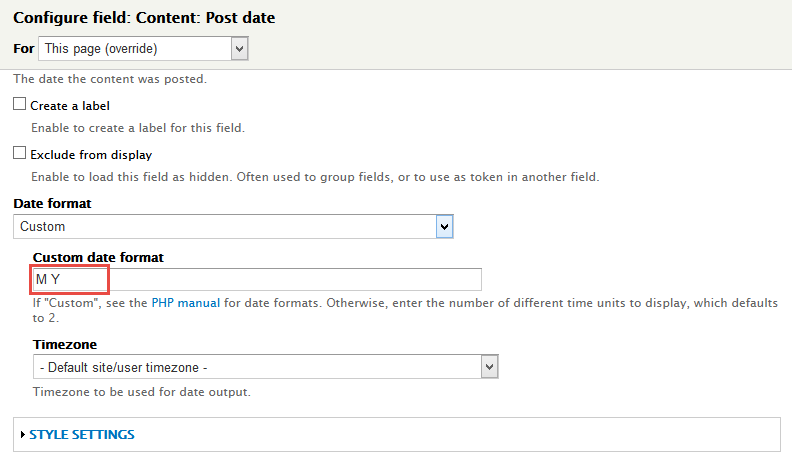
9. Set properties for Content: Post date
10. Set properties for Content: Post date
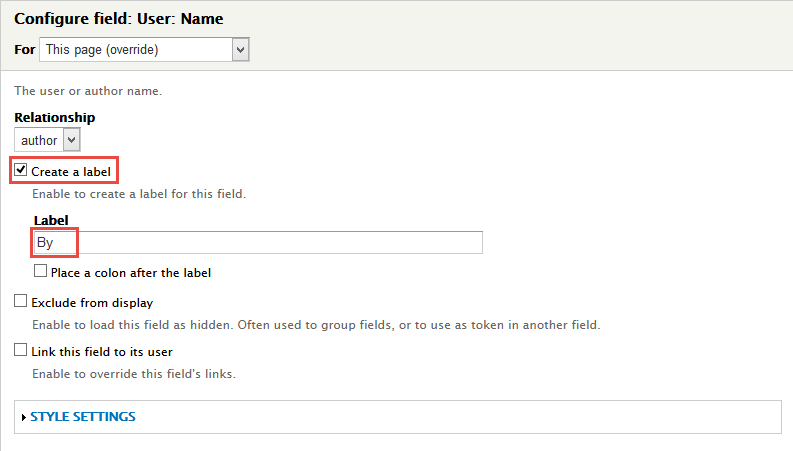
11. Set properties for User: Name (By)
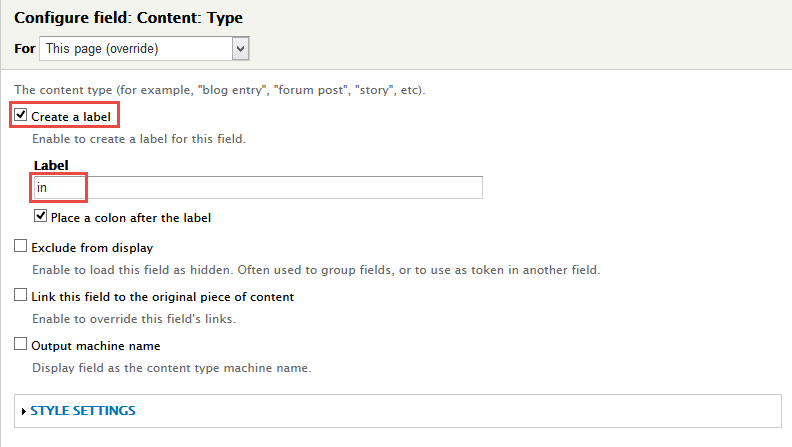
12. Set properties for Content: Type (in)
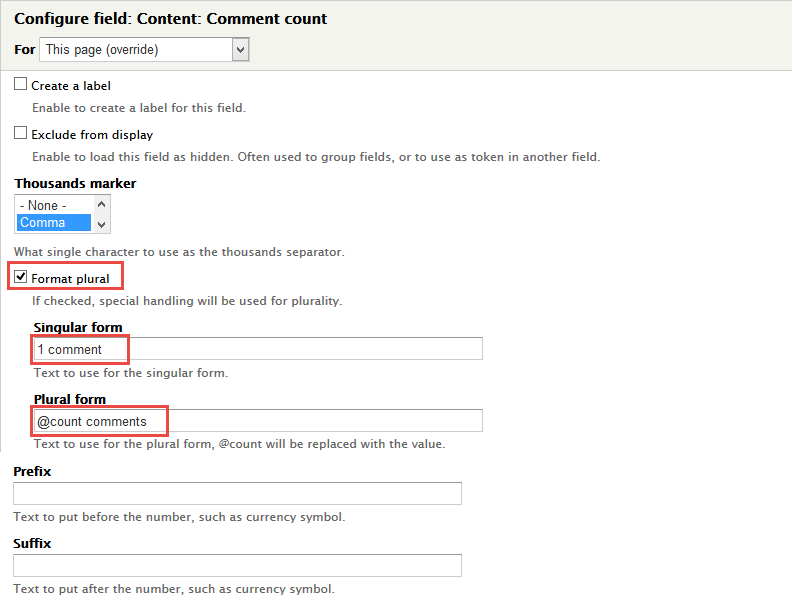
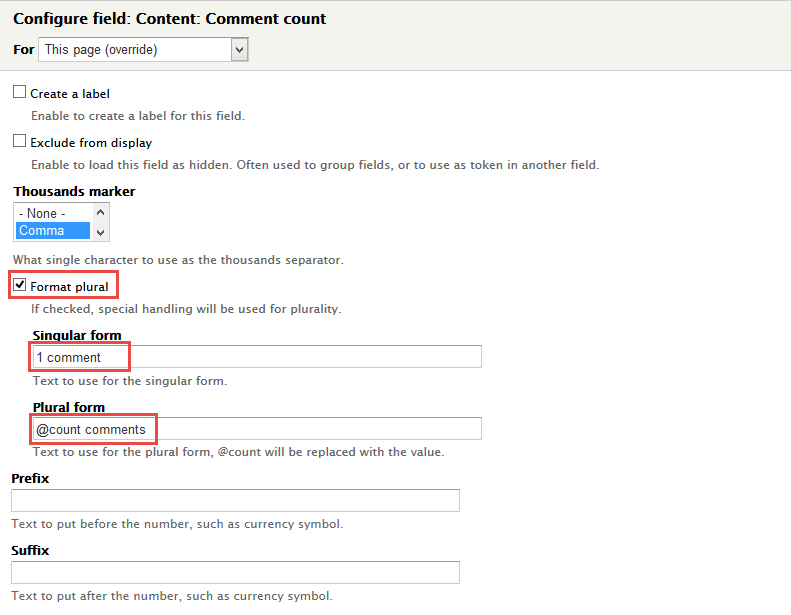
13. Set properties for Content: Comment count
14. Set properties for Global: Fieldset (Fieldset)
15. Set properties for Global: Fieldset (Fieldset)
16. Set properties for Field: Image
17. Set properties for Content: Gallery
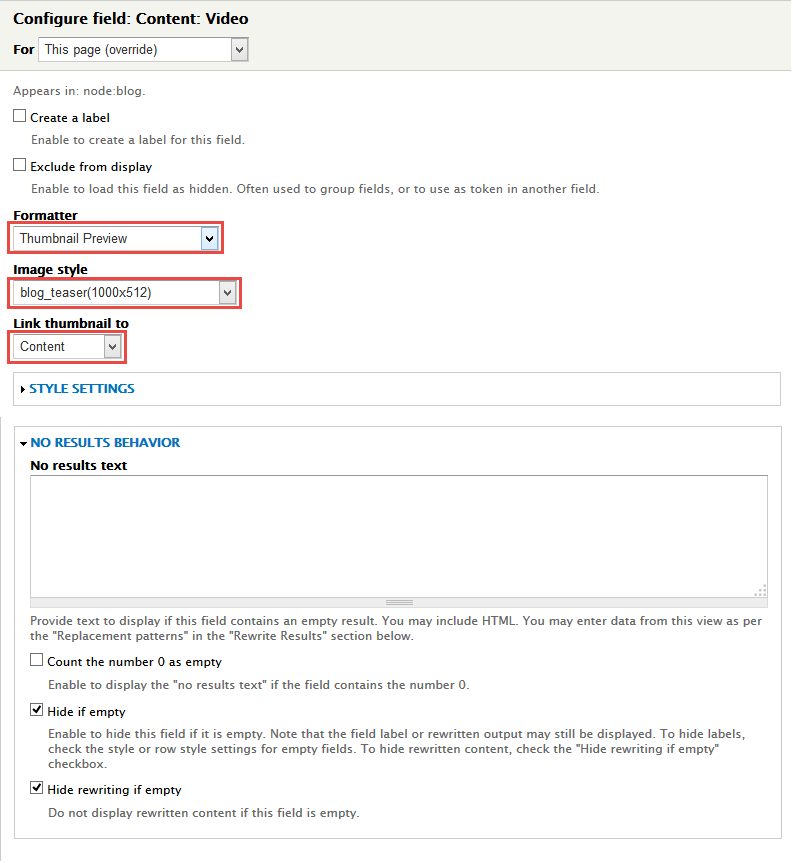
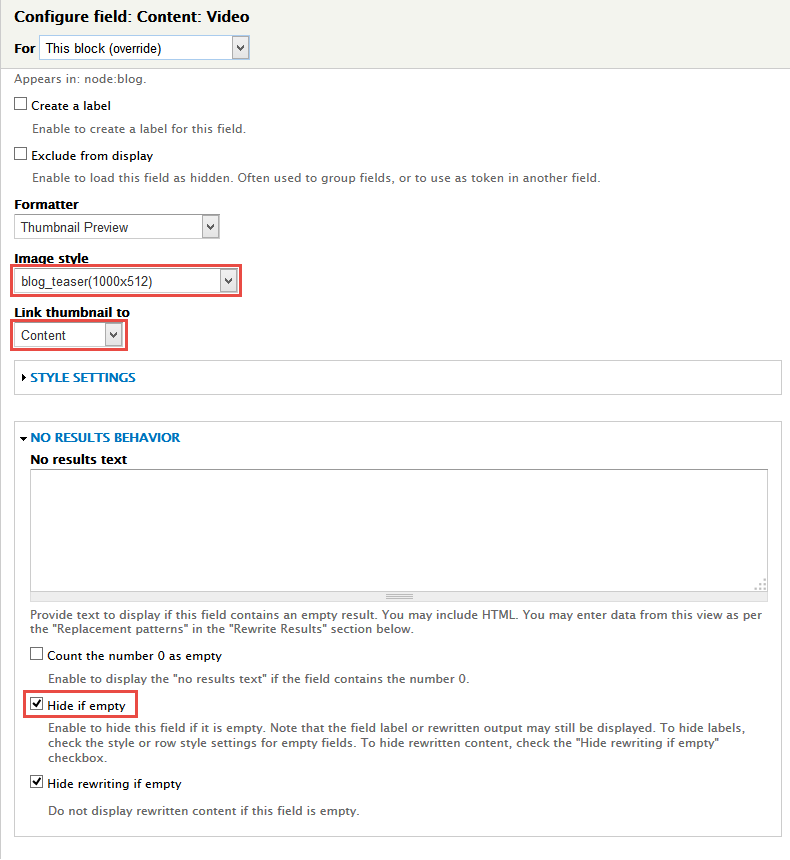
18. Set properties for Content: Video
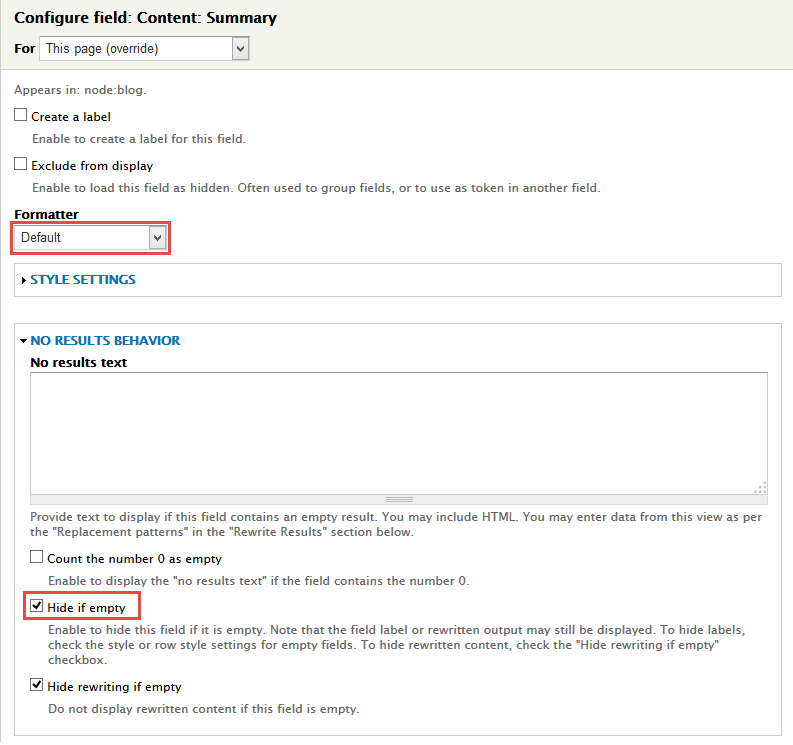
19. Set properties for Content: Summary
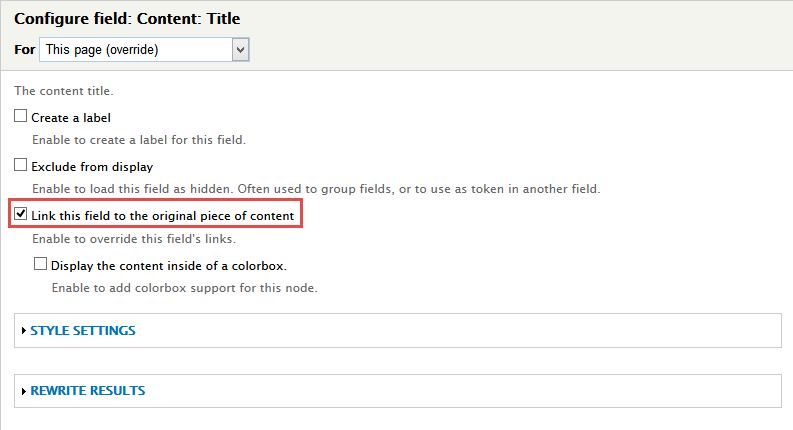
20. Set properties for Content: Title
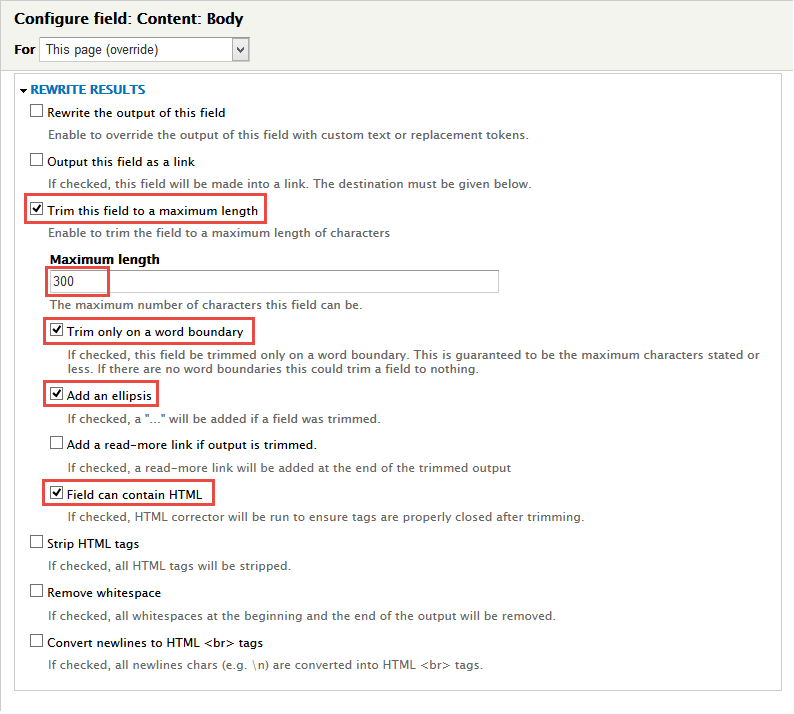
21. Set properties for Content: Body
22. Set properties for Content: Link
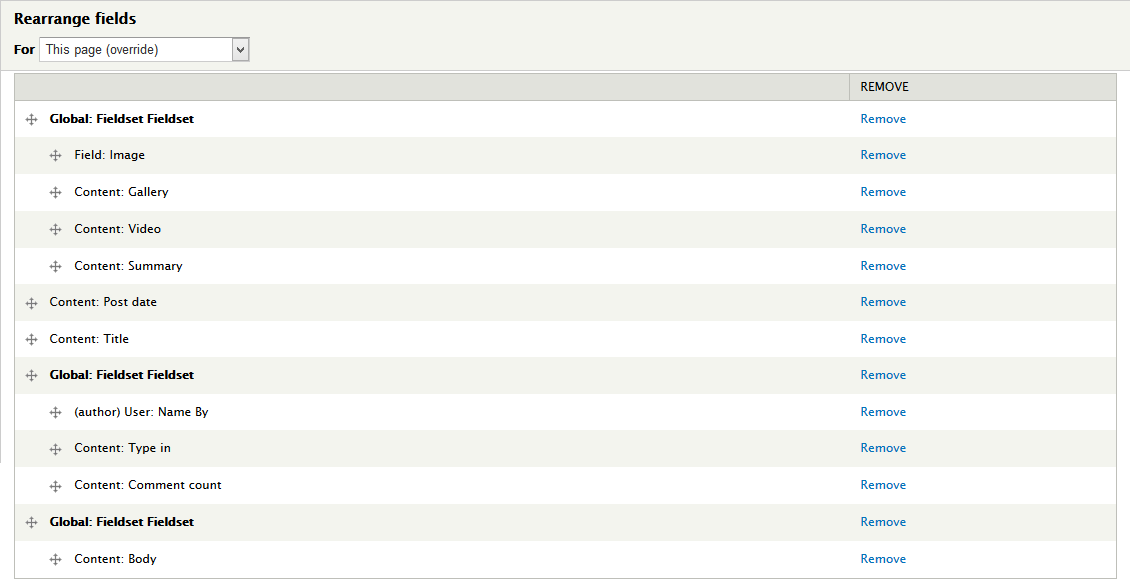
23. At FIELDS area, click Rearrange button and set following arrange
24. At PAGE SETTINGS > Path area, set the following properties:
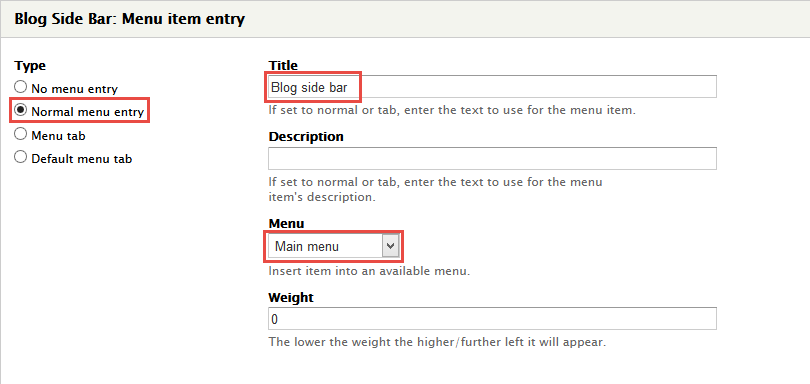
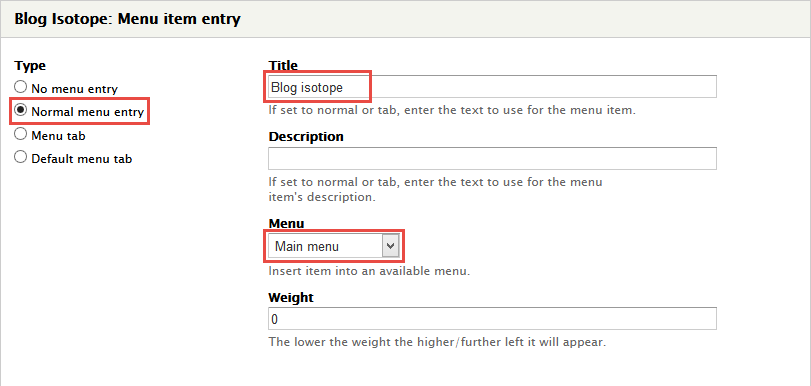
25. At PAGE SETTINGS > Menu area, set the following properties:
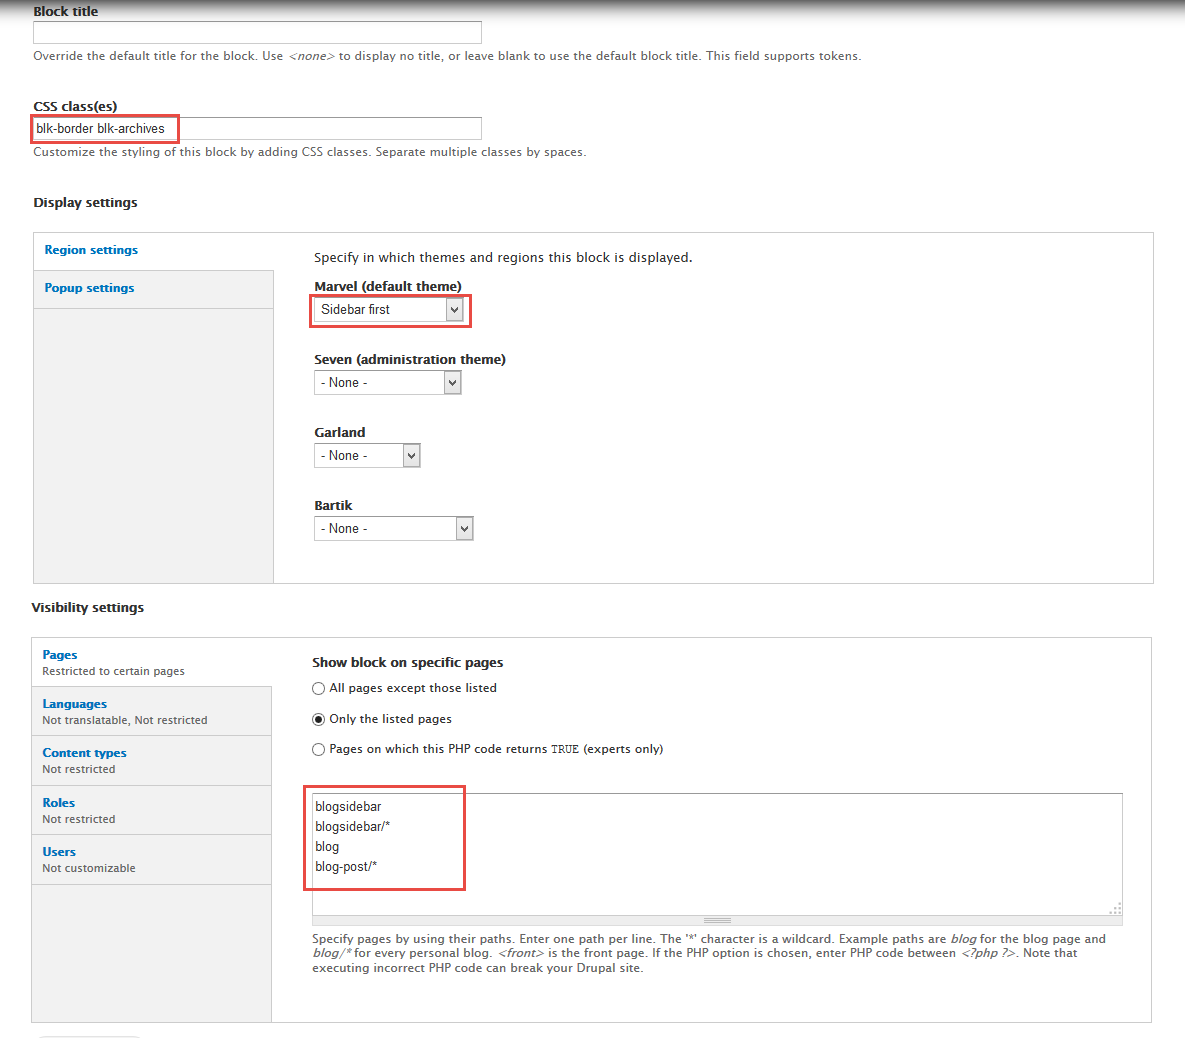
26. In Advanced > OTHER area, add CSS class change following properties:
27. Click Save button.
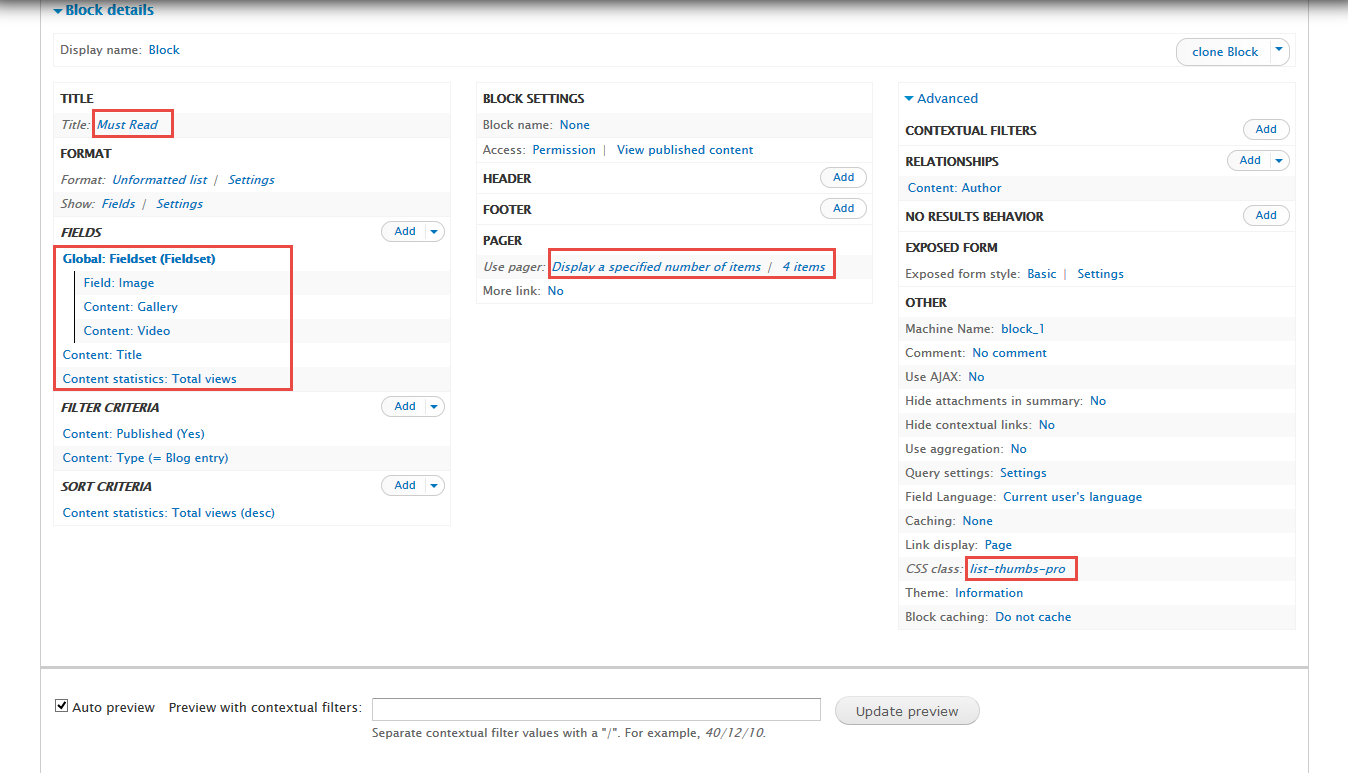
3. Create Must Read block view
Stay open Blog view, click Add button add Block new.
Front end Display
1. Next to steps below to set properties for the following fields:
2. At Title area, set following properties:
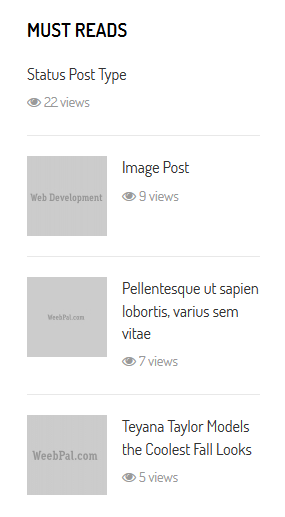
3. In FIELDS area, click Add button to add fields: Global: Fieldset (Fieldset), Field: Image, Content: Gallery, Content: Video, Content: Title, Content statistics: Total views field and set following properties:
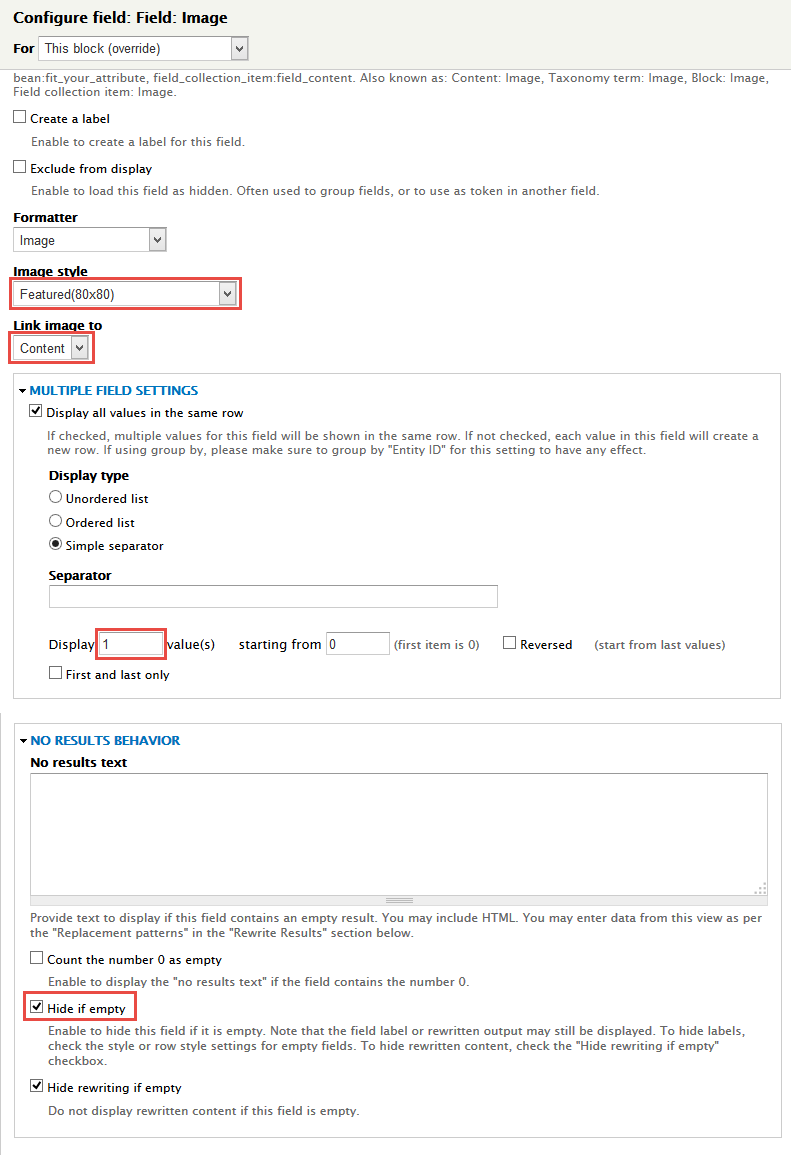
4. Set properties for Field: Image
5. Set properties for Content: Gallery
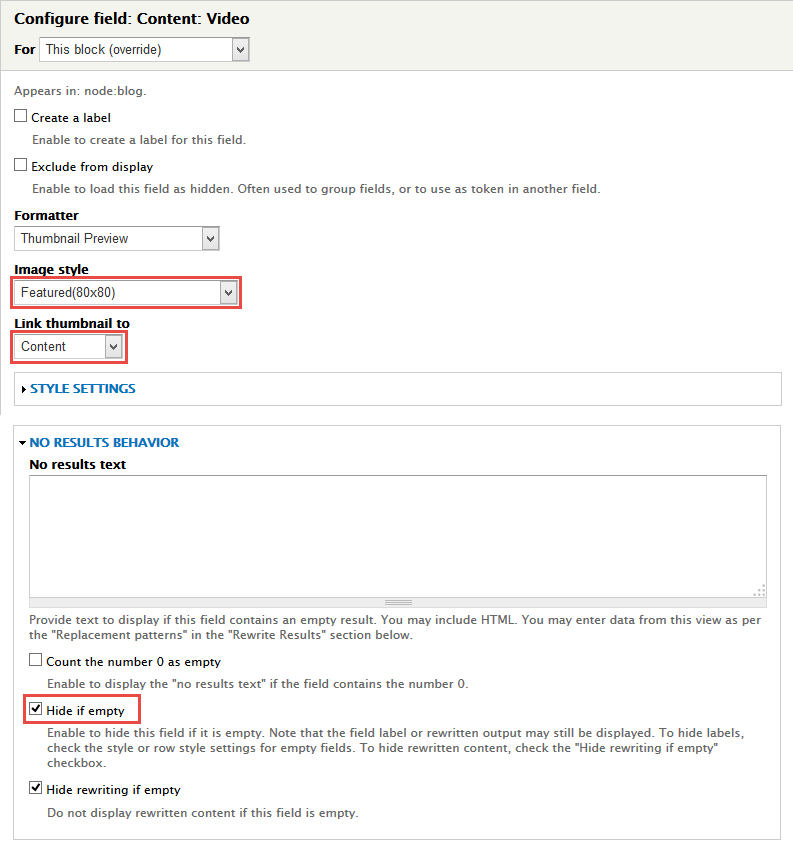
6. Set properties for Content: Video
7. Set properties for Content: Title
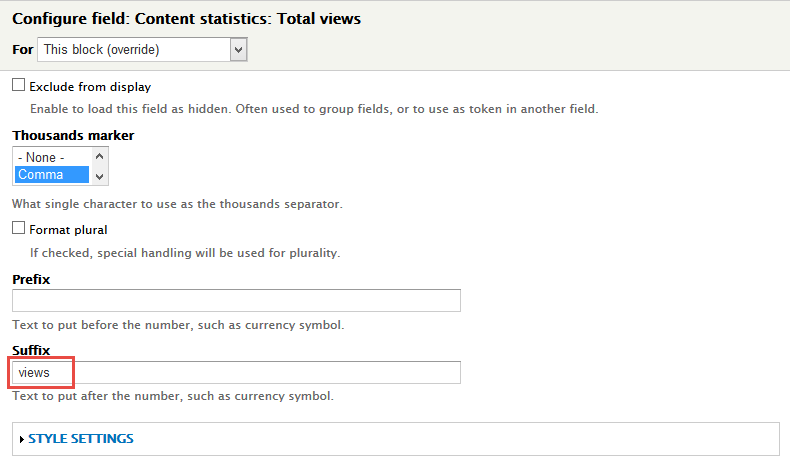
8. Set properties for Content statistics: Total views
9. At PAGER > Use pager area, click link
10. In Advanced > OTHER area, add CSS class change following properties:
11. Click Save button.
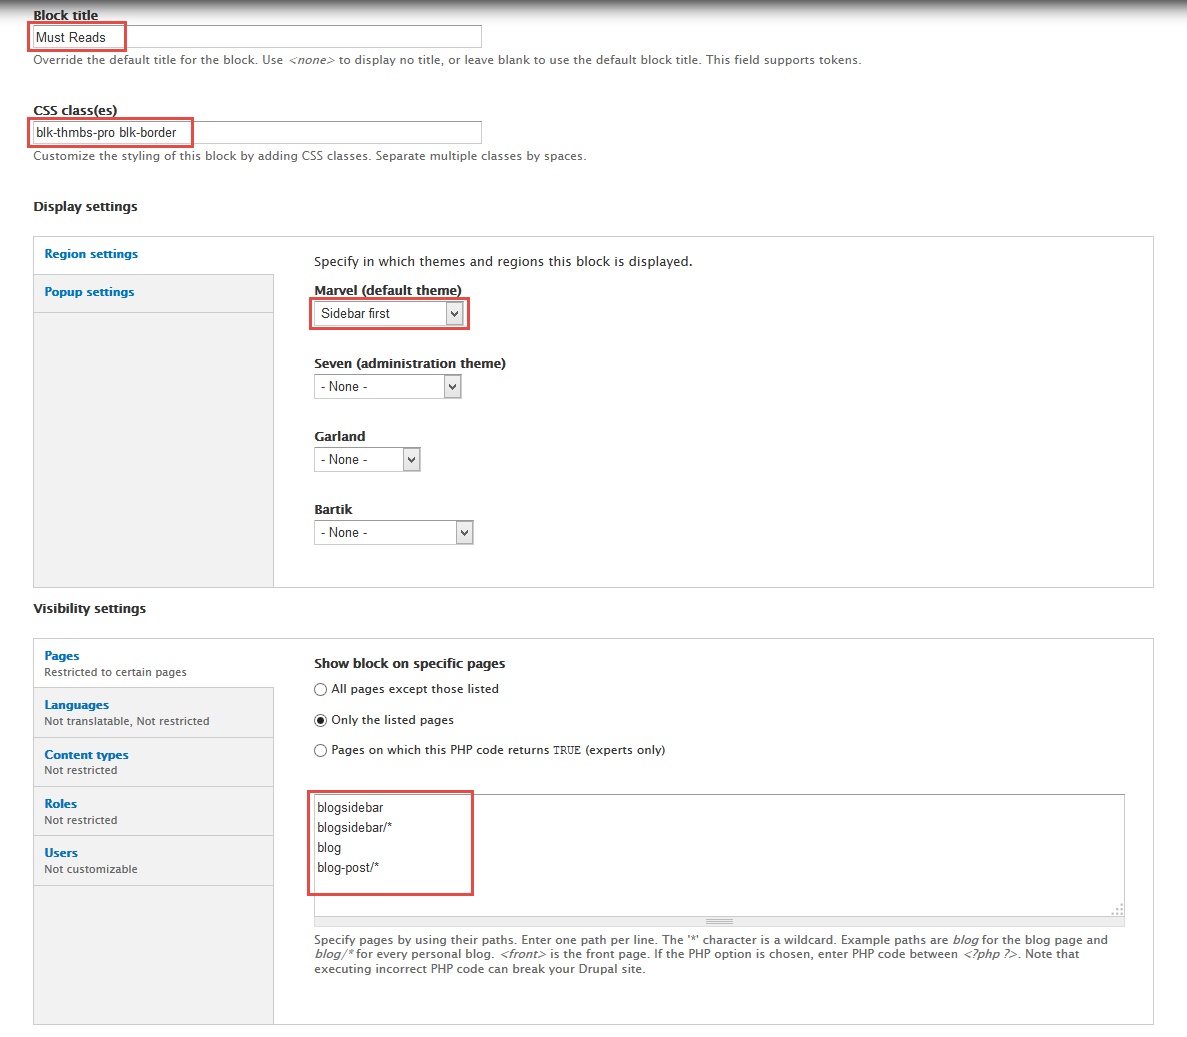
4. Configure Must Read block
1. Navigate to Structure > Blocks
2. Find View: Blog, click configure link, set following properties
3.Click Save block button.
5. Create Blog Full Width view
Stay open Blog view, click Add button add Page new.
1. Next to steps below to set properties for the following fields:
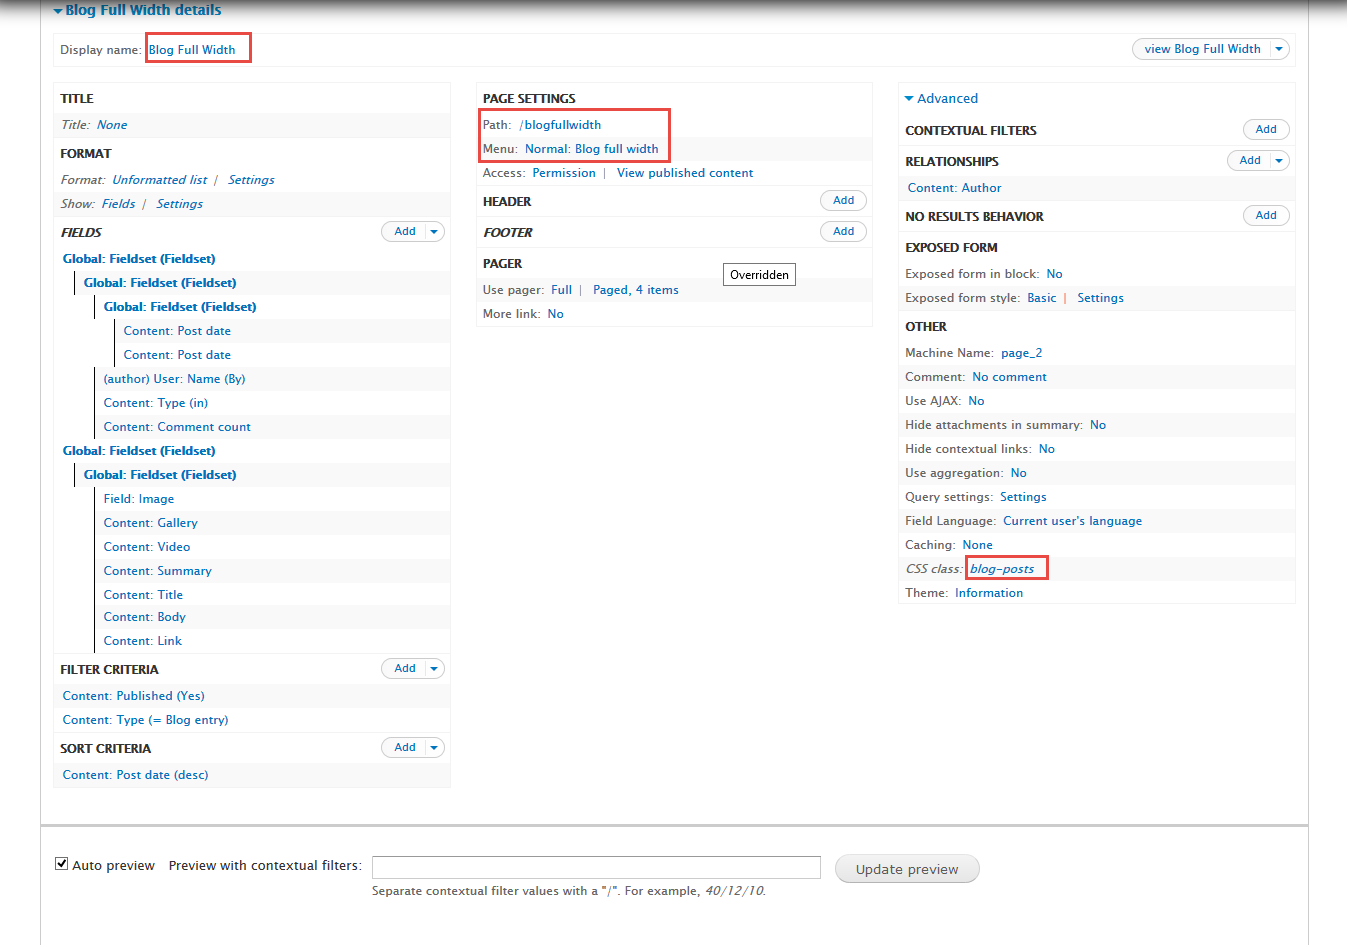
2. At Display name area, set following properties:
3. At PAGE SETTINGS > Path area, set the following properties:
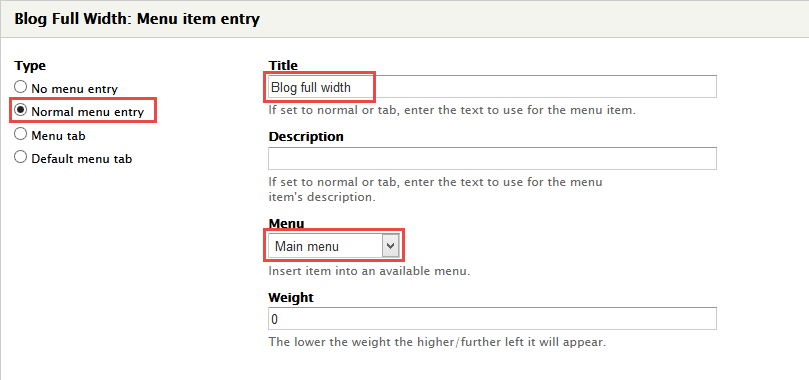
4. At PAGE SETTINGS > Menu area, set the following properties:
5. In Advanced > OTHER area, add CSS class change following properties:
6. Click Save button.
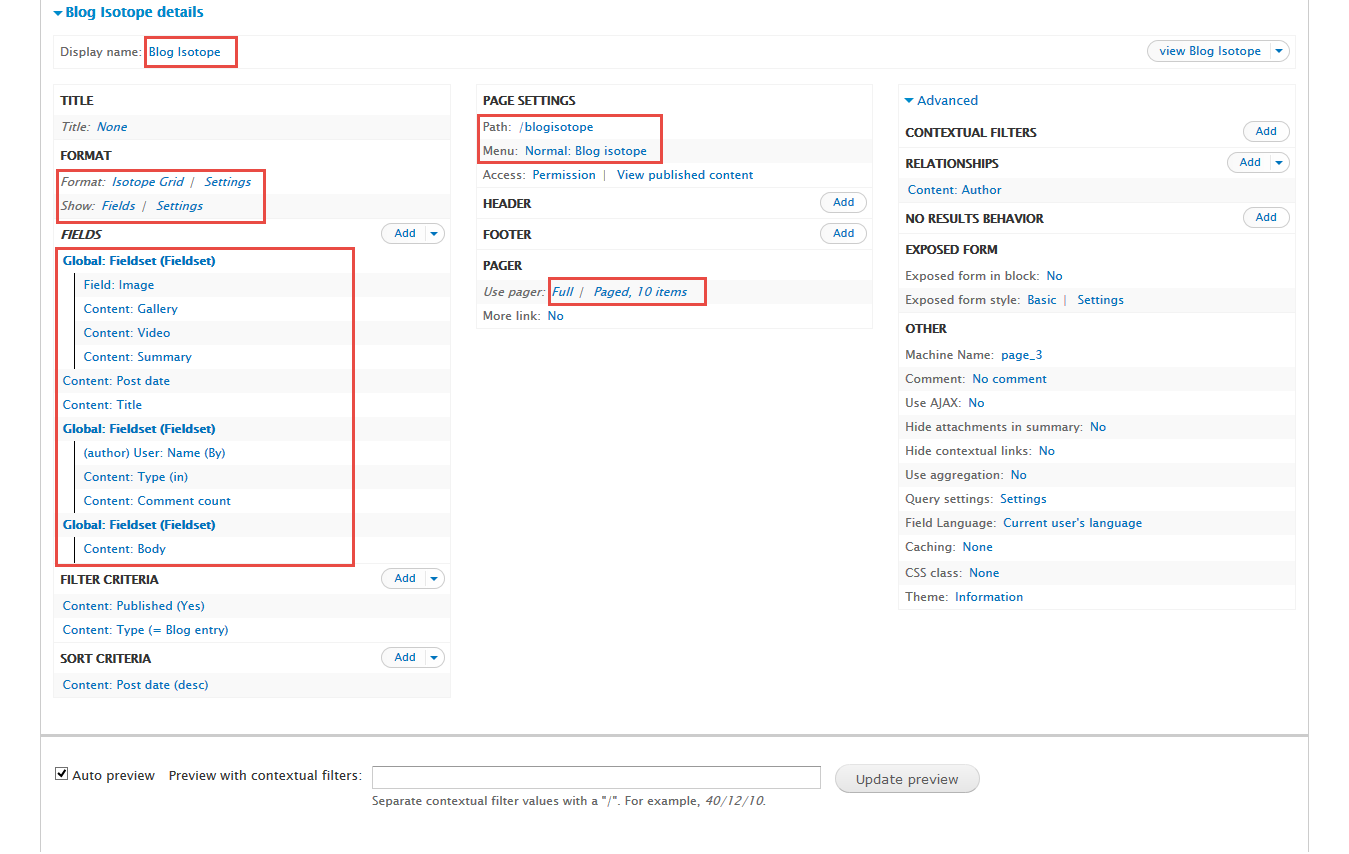
6. Create Blog Isotope view
Stay open Blog view, click Add button add Page new.
1. Next to steps below to set properties for the following fields:
2. At Display name area, set following properties:
3. At FORMAT Format: Isotope Grid area, click Settings and set following properties:
4. In FIELDS area, click Add button to add fields: Global: Fieldset (Fieldset), Field: Image, Content: Gallery, Content: Video, Content: Summary, Content: Post date, Content: Title, Global: Fieldset (Fieldset), User: Name (By), Content: Type (in), Content: Comment count, Global: Fieldset (Fieldset), Content: Body field and set following properties:
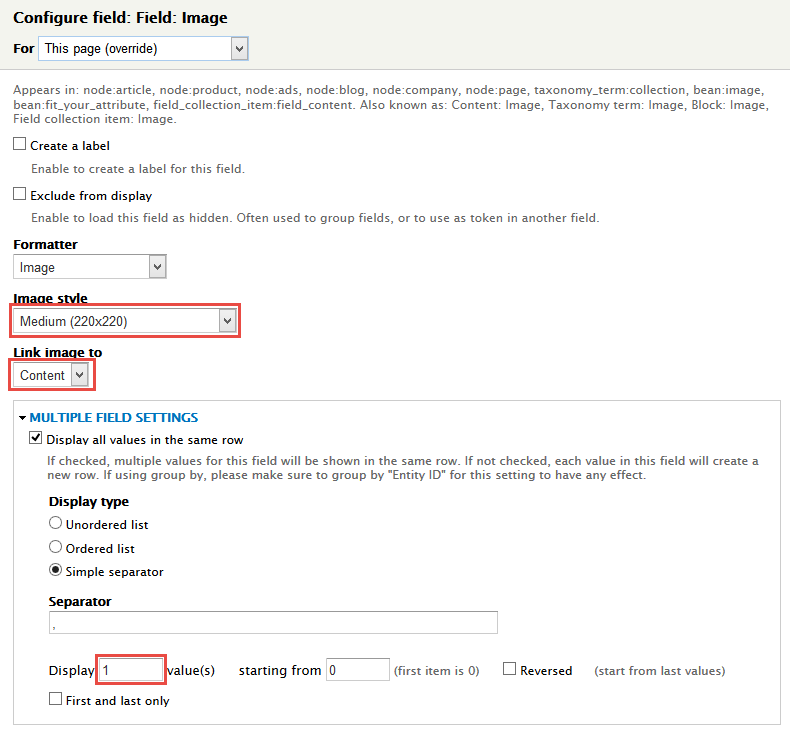
5. Set properties for Field: Image
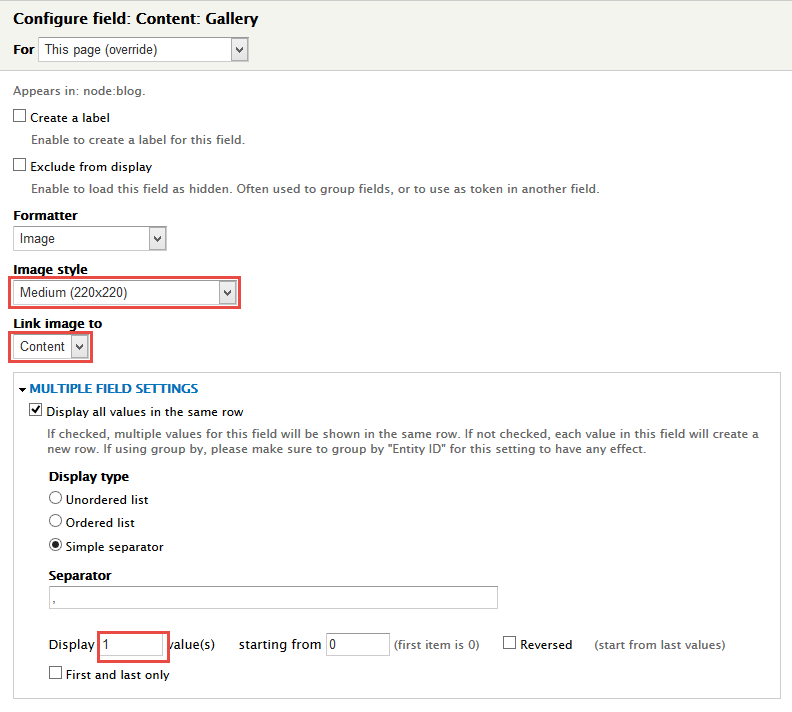
6. Set properties for Content: Gallery
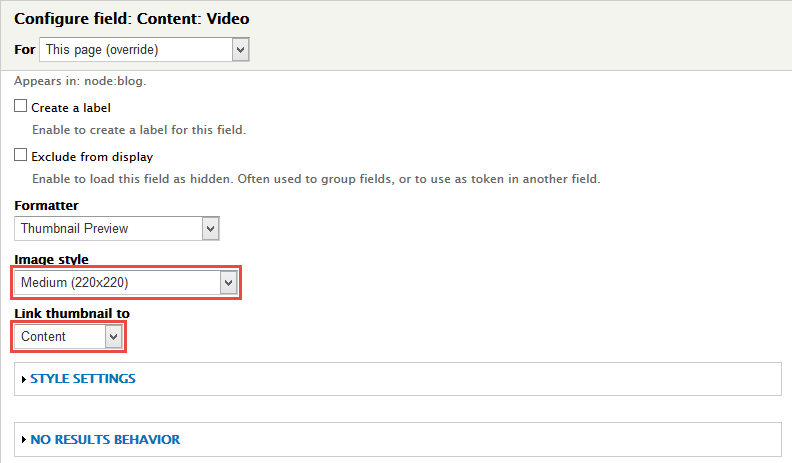
7. Set properties for Content: Video
8. Set properties for Content: Post date
9. Set properties for Content: Title
10. Set properties for User: Name (By)
11. Set properties for Content: Type (in)
12. Set properties for Content: Comment count
13. Set properties for Content: Body
14. At FIELDS area, click Rearrange button and set following arrange
15. At PAGE SETTINGS > Path area, set the following properties:
16. At PAGE SETTINGS > Menu area, set the following properties:
17. At PAGER > Use pager area, click link
18. Click Save button.
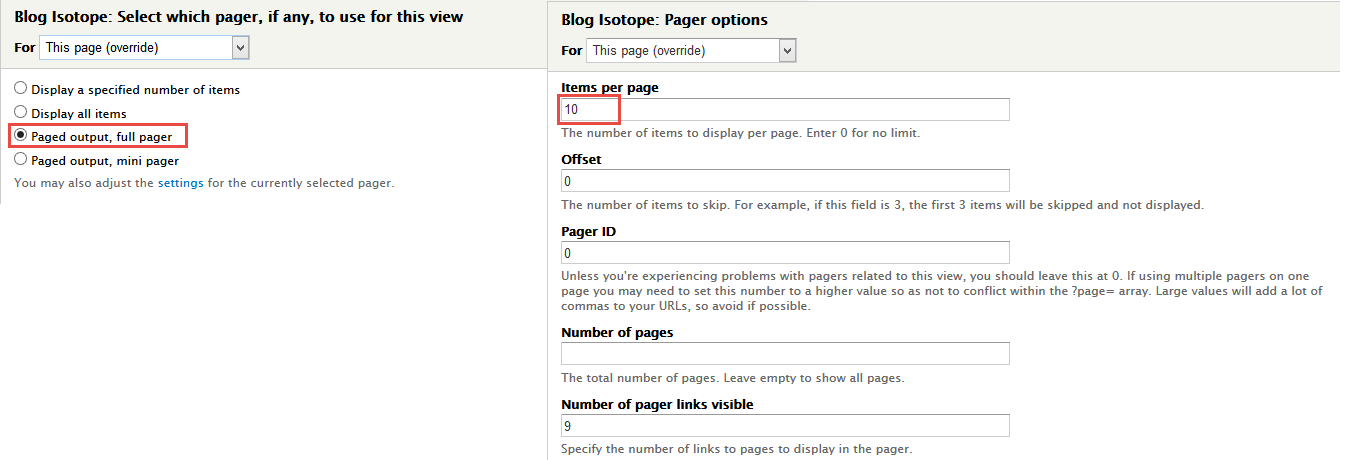
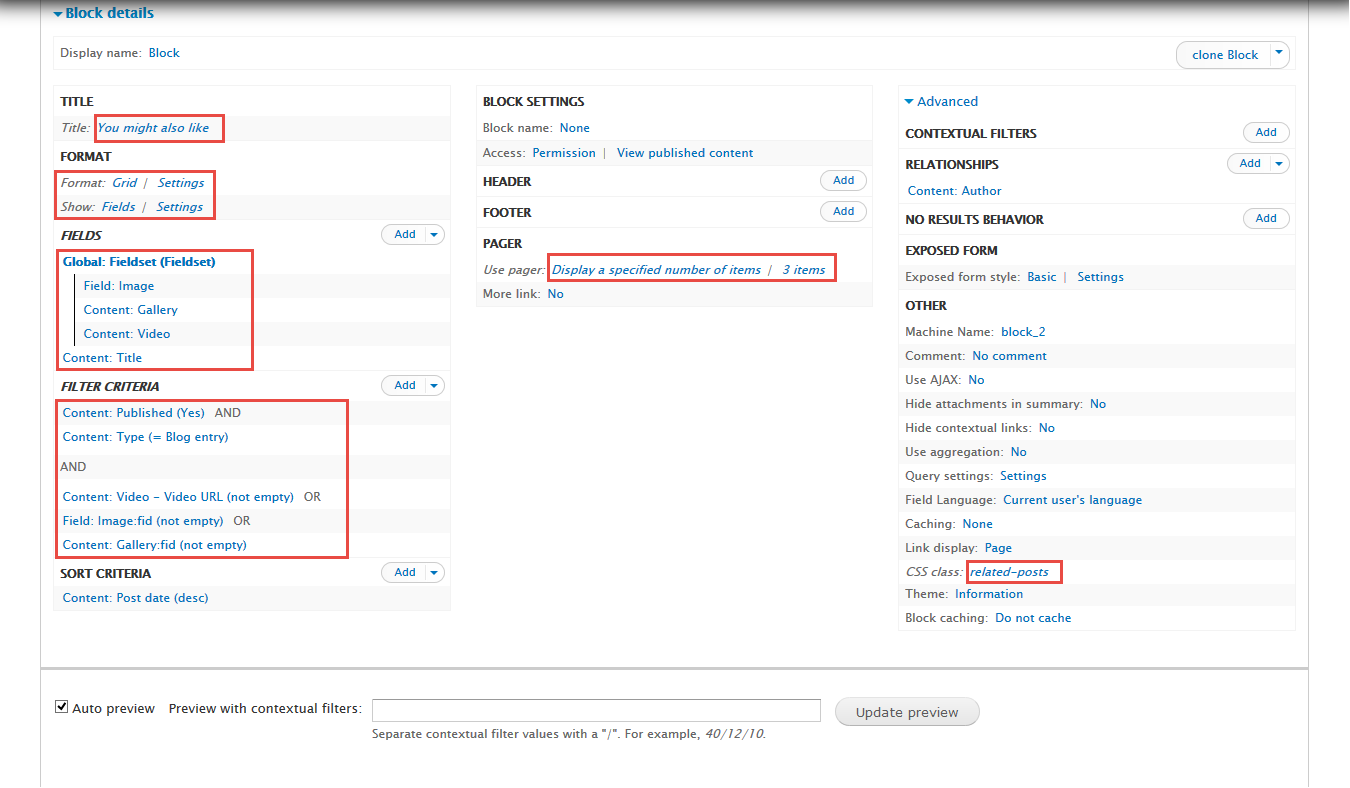
7. Create You might also like view
Stay open Blog view, click Add button add Block new.
Front end Display
1. Next to steps below to set properties for the following fields:
2. At Title area, set following properties:
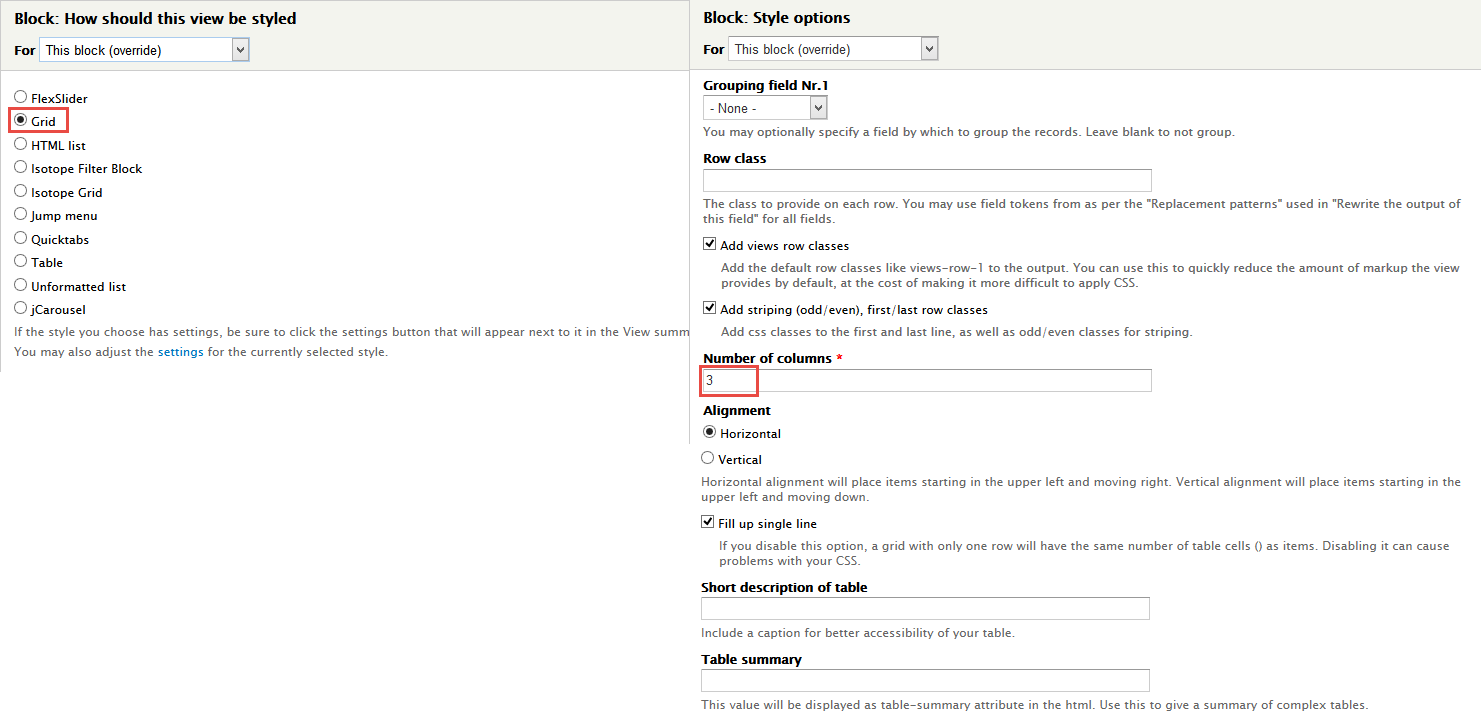
3. At FORMAT Format: Isotope Grid area, click Settings and set following properties:
4. In FIELDS area, click Add button to add fields: Global: Fieldset (Fieldset), Field: Image, Content: Gallery, Content: Video, Content: Title field and set following properties:
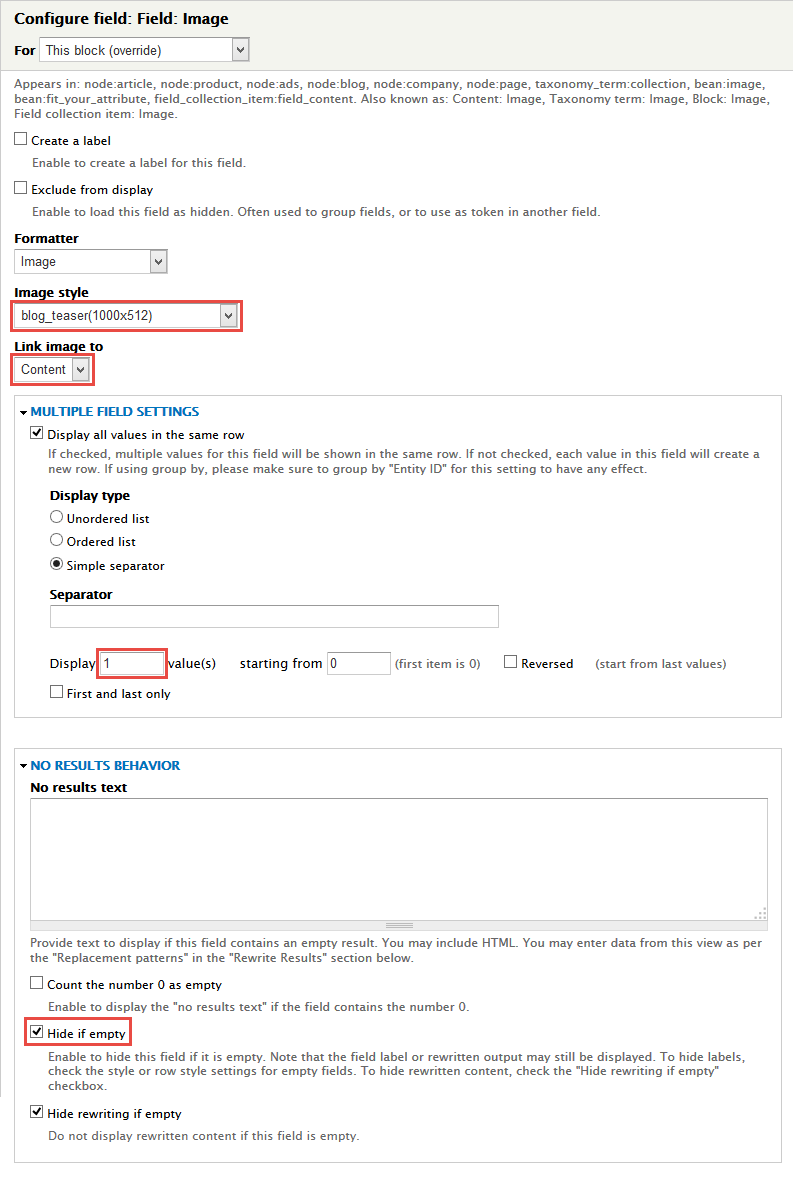
5. Set properties for Field: Image
6. Set properties for Content: Gallery
7. Set properties for Content: Video
8. Set properties for Content: Title
9. At FIELDS area, click Rearrange button and set following arrange
10. In FILTER CRITERIA area, click Add button to add Content: Video - Video URL, Field: Image:fid, Content: Gallery:fid field and set following properties:
11. Set properties for Content: Video - Video URL
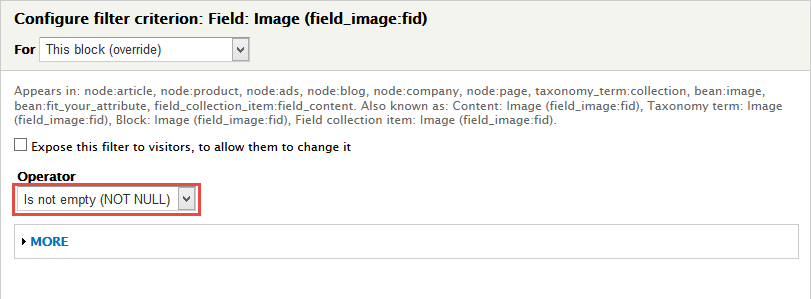
12. Set properties for Field: Image:fid
13. Set properties for Content: Gallery:fid
14. At PAGER > Use pager area, click link
15. In Advanced > OTHER area, add CSS class change following properties:
16. Click Save button.
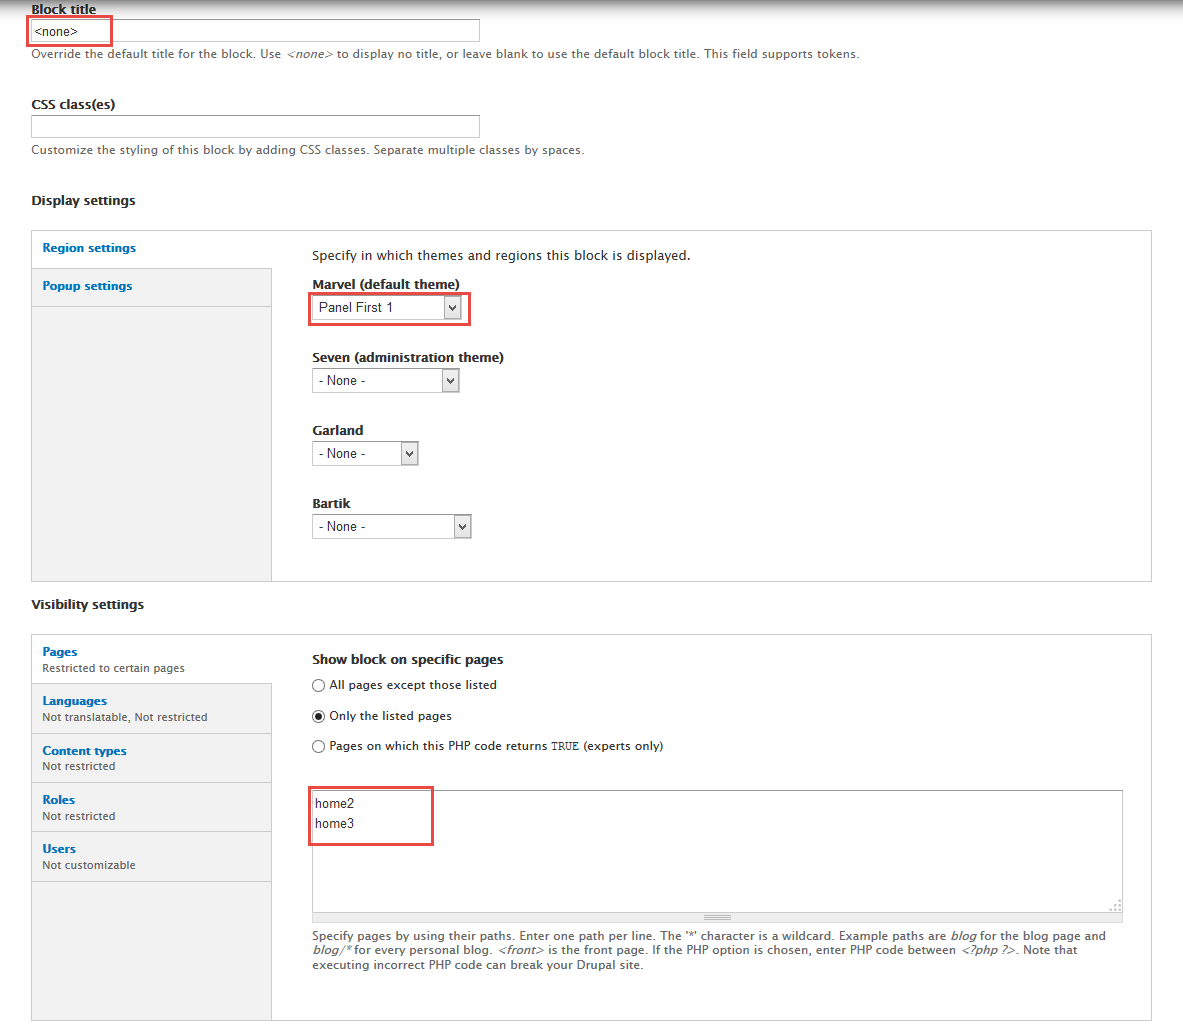
8. Configure Blog Home 2 Panel First 1 block
1. Navigate to Structure > Blocks
2. Find View: Blog: Blog Home 2 Panel First 1, click configure link, set following properties
3.Click Save block button.
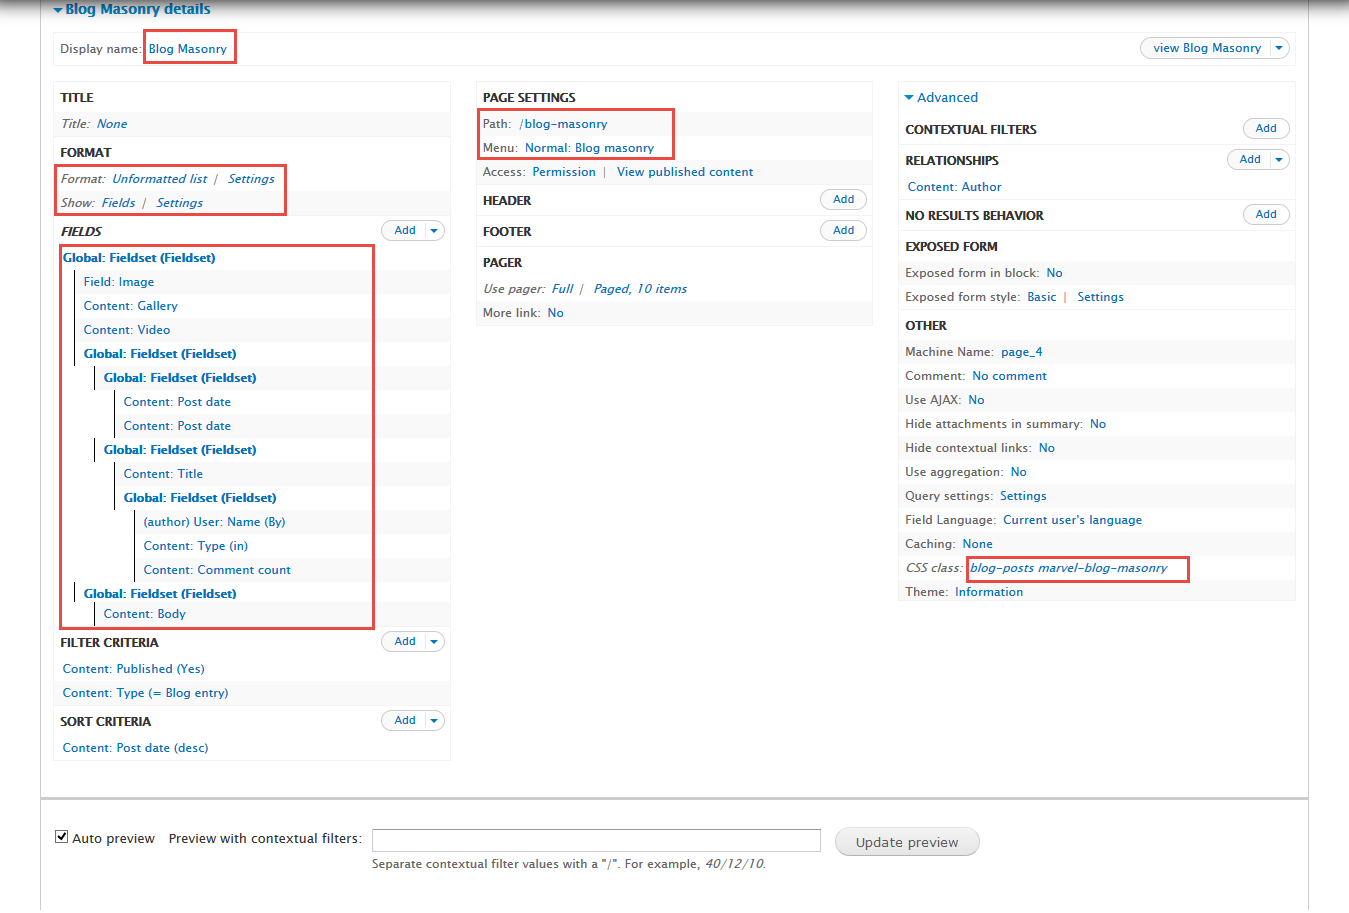
9. Create Blog Masonry view
Stay open Blog view, click Add button add Page new.
1. Next to steps below to set properties for the following fields:
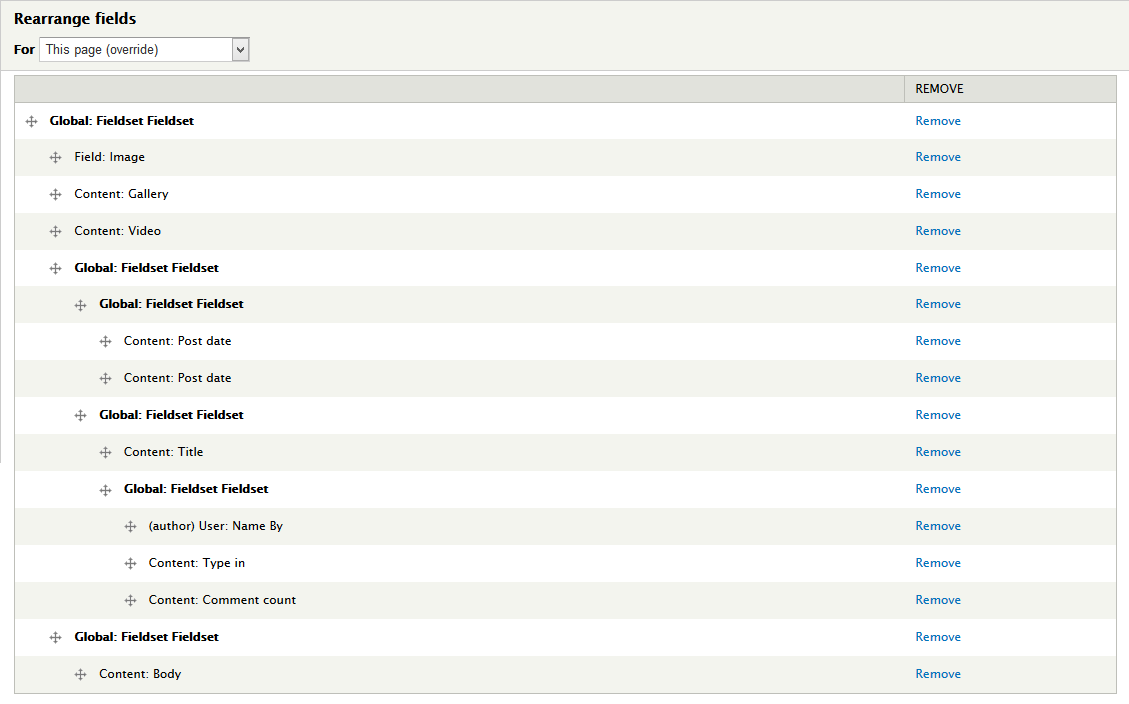
2. In FIELDS area, click Add button to add fields: Global: Fieldset (Fieldset), Field: Image, Content: Gallery, Content: Video, Global: Fieldset (Fieldset), Global: Fieldset (Fieldset), Content: Post date, Content: Post date, Global: Fieldset (Fieldset), Content: Title, Global: Fieldset (Fieldset), User: Name (By), Content: Type (in), Content: Comment count, Global: Fieldset (Fieldset), Content: Body field and set following properties:
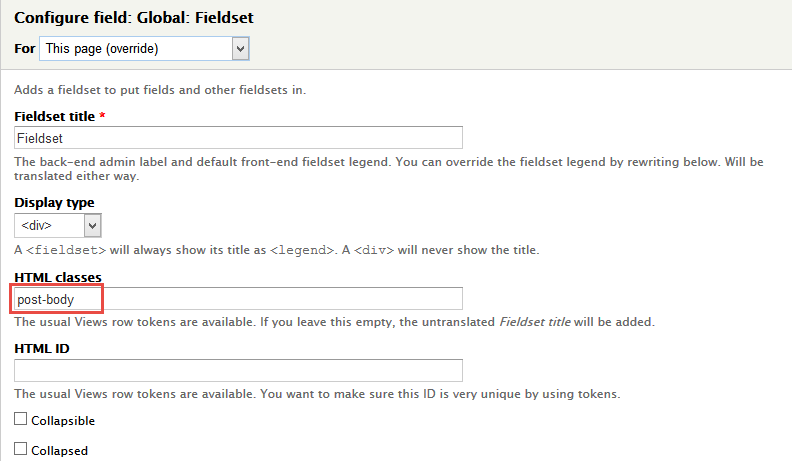
3. Set properties for Global: Fieldset (Fieldset)
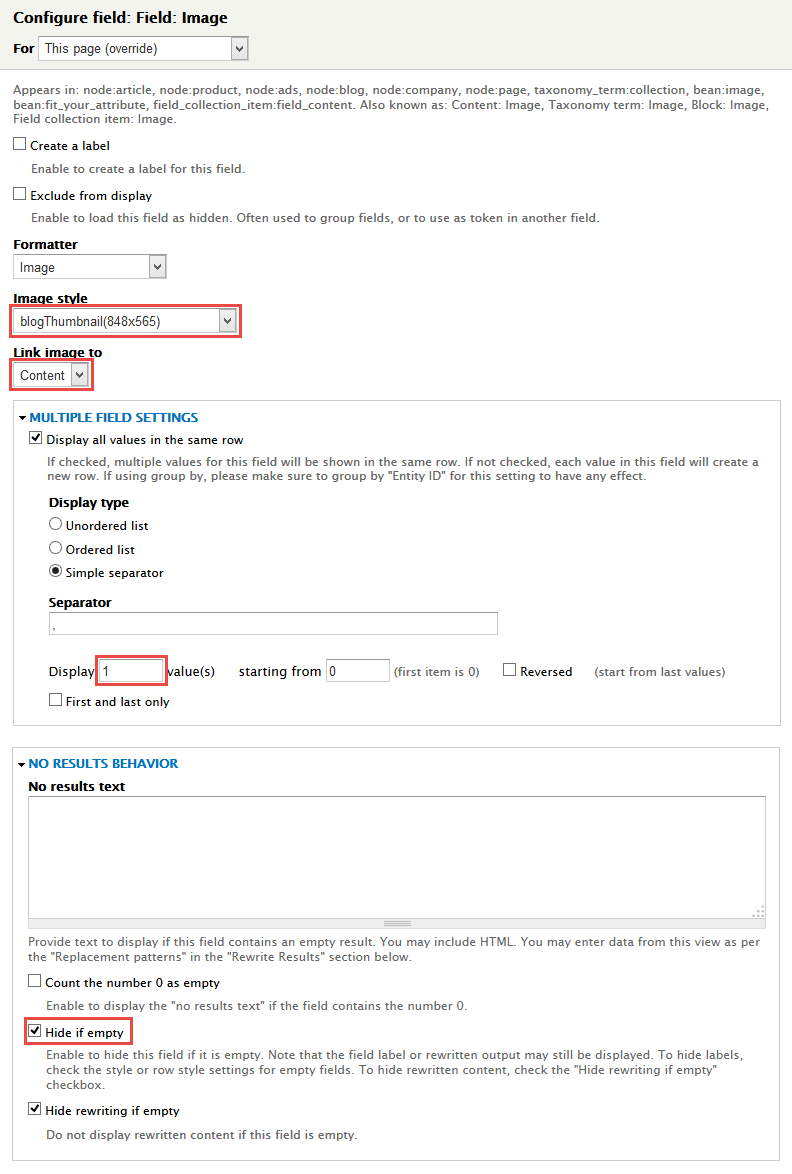
4. Set properties for Field: Image
5. Set properties for Global: Fieldset (Fieldset)
6. Set properties for Global: Fieldset (Fieldset)
7. Set properties for Global: Fieldset (Fieldset)
8. Set properties for Global: Fieldset (Fieldset)
9. Set properties for Global: Fieldset (Fieldset)
10. At FIELDS area, click Rearrange button and set following arrange
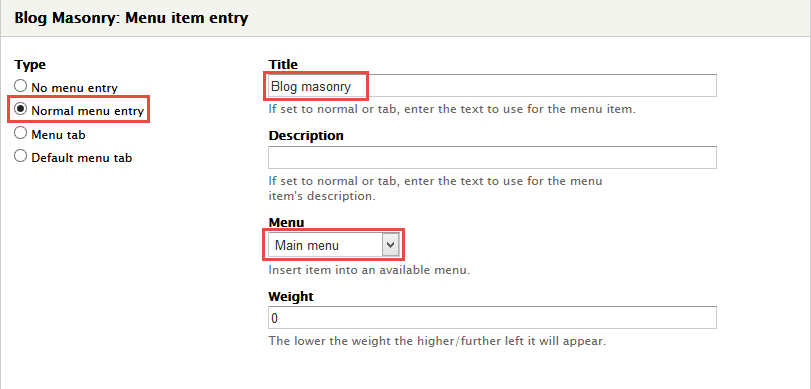
11. At PAGE SETTINGS > Path area, set the following properties:
12. At PAGE SETTINGS > Menu area, set the following properties:
13. In Advanced > OTHER area, add CSS class change following properties:
14. Click Save button.
10. Create Blog Home 2 Panel First 1 view
Stay open Blog view, click Add button add Block new.
Front end Display
1. Next to steps below to set properties for the following fields:
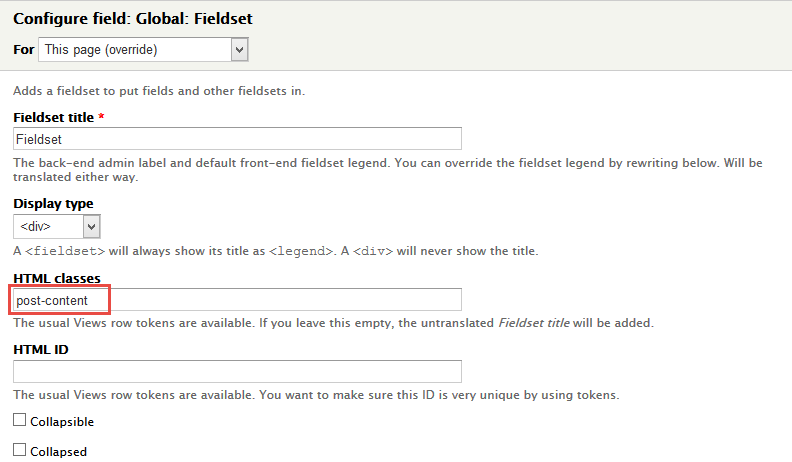
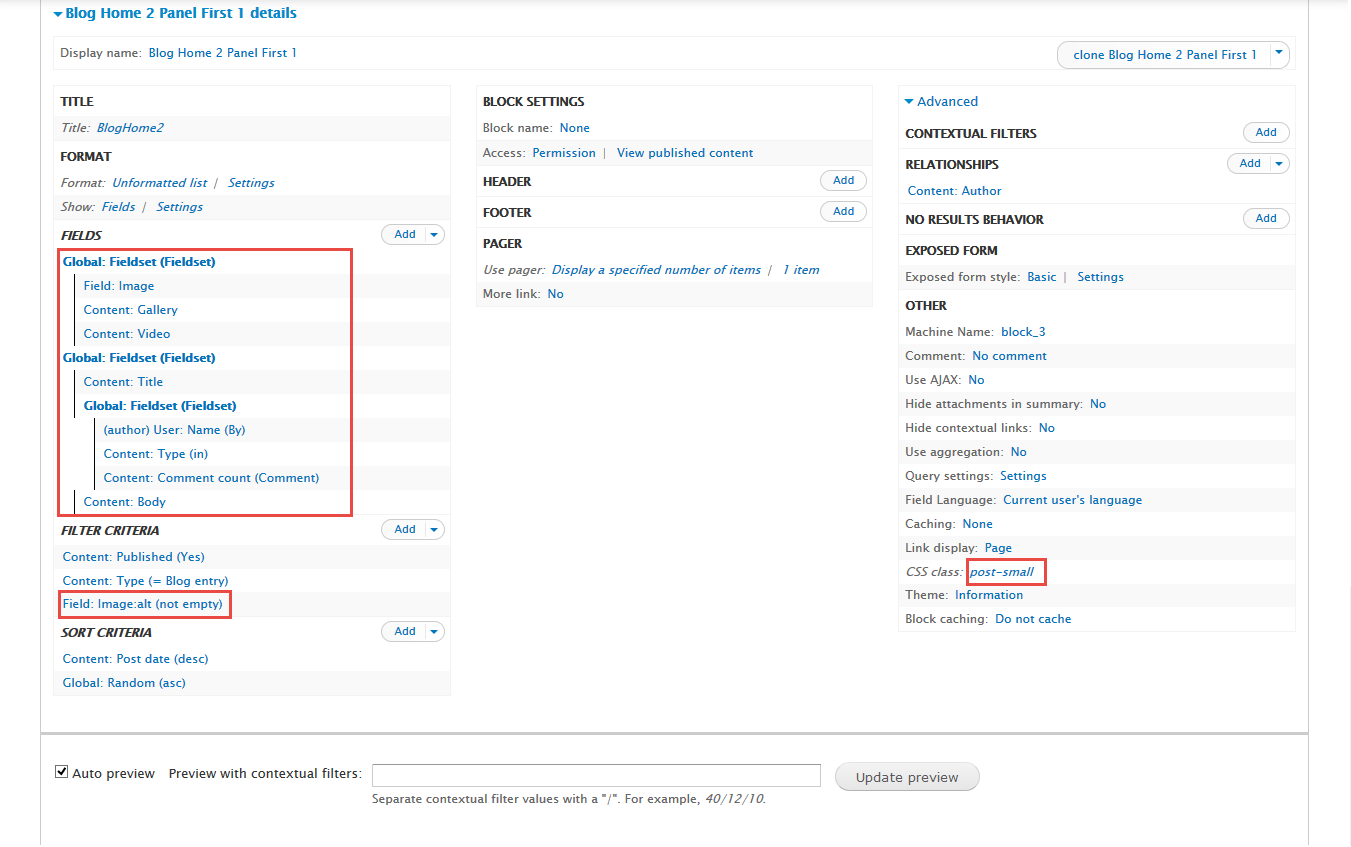
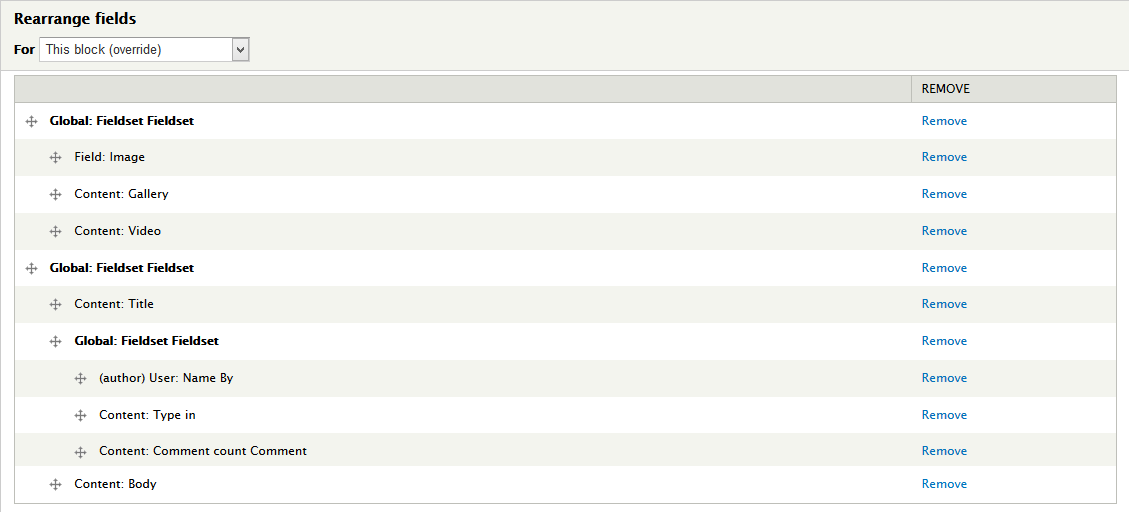
2. In FIELDS area, click Add button to add fields: Global: Fieldset (Fieldset), Field: Image, Content: Gallery, Content: Video, Global: Fieldset (Fieldset), Content: Title, Global: Fieldset (Fieldset), User: Name (By), Content: Type (in), Content: Comment count, Content: Body field and set following properties:
3. Set properties for Global: Fieldset (Fieldset)
4. Set properties for Field: Image
5. Set properties for Global: Fieldset (Fieldset)
6. Set properties for Global: Fieldset (Fieldset)
7. At FIELDS area, click Rearrange button and set following arrange
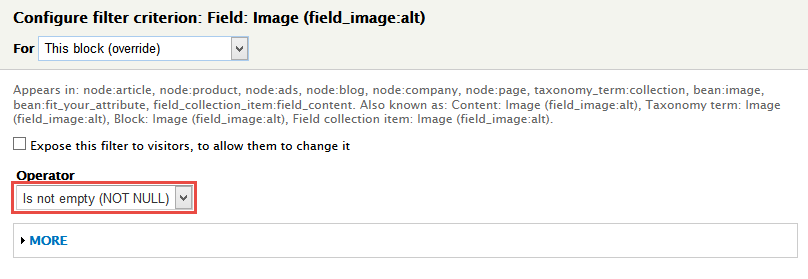
8. In FILTER CRITERIA area, click Add button to add Field: Image:alt and set following properties:
9. In Advanced > OTHER area, add CSS class change following properties:
10. Click Save button.
11. Configure Blog Home 2 Panel First 1 block
1. Navigate to Structure > Blocks
2. Find View: Blog: Blog Home 2 Panel First 1, click configure link, set following properties
3.Click Save block button.
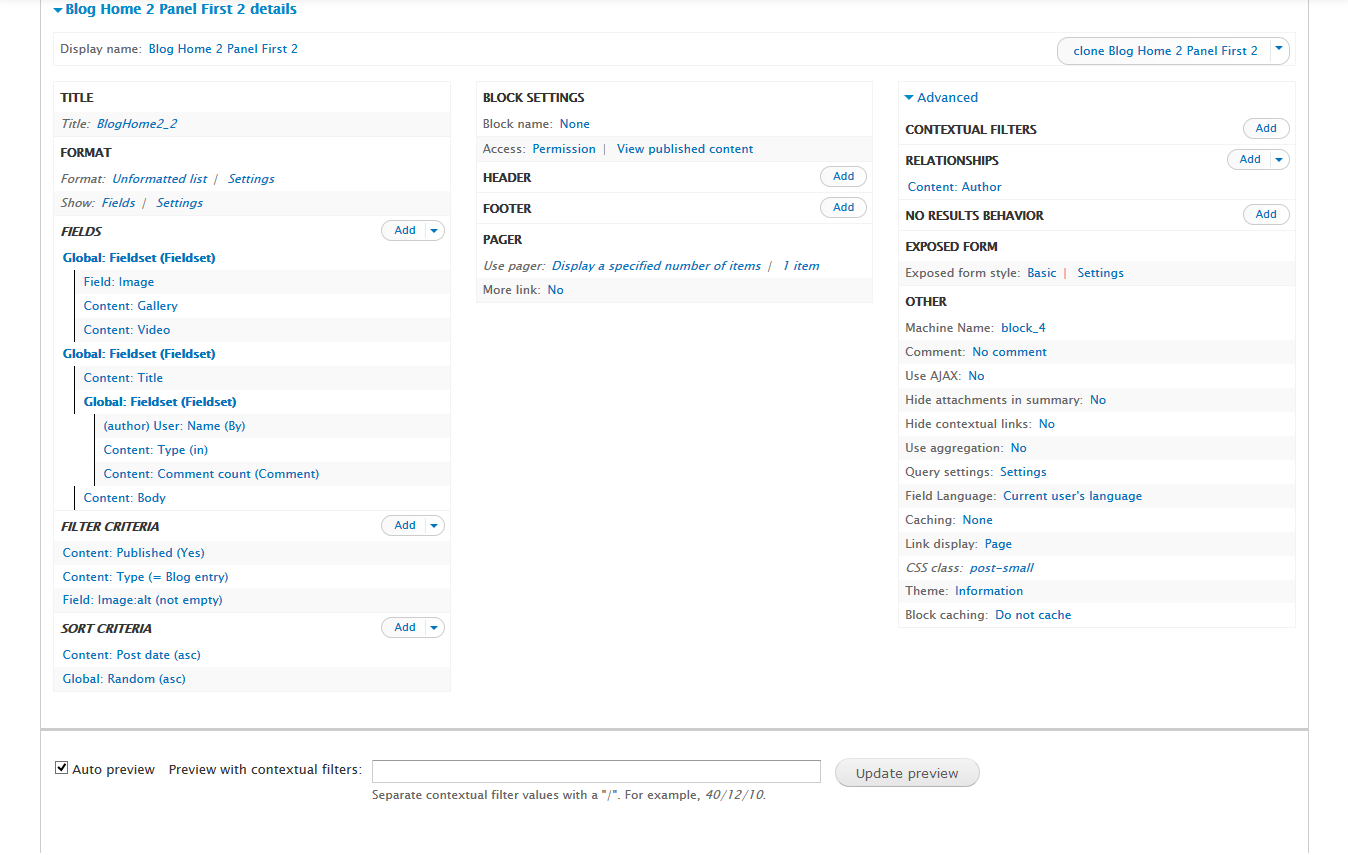
12. Create Blog Home 2 Panel First 2 view
Stay open Blog view, click Add button add Block new.
Front end Display
13. Configure Blog Home 2 Panel First 2 block
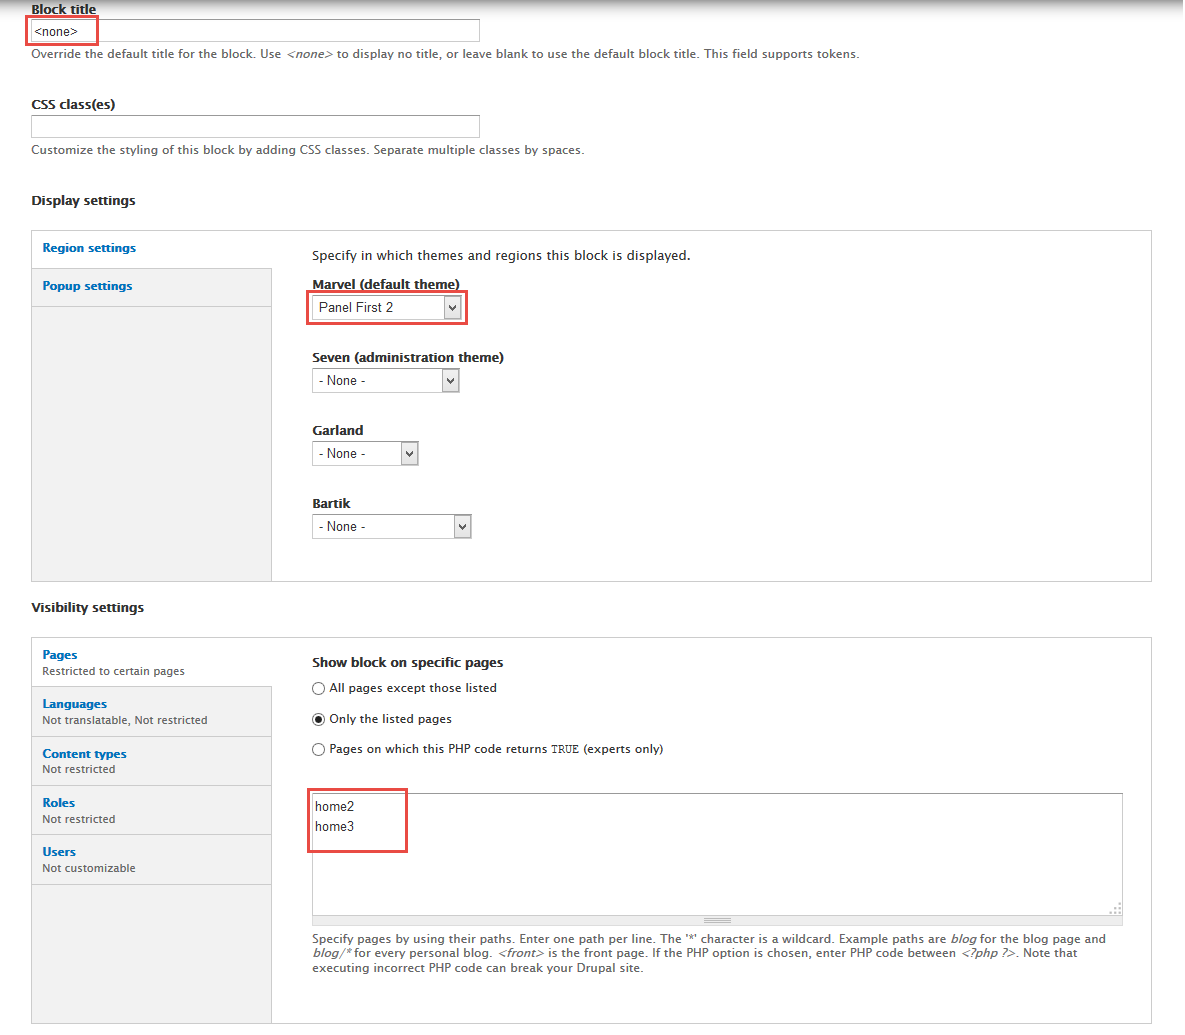
1. Navigate to Structure > Blocks
2. Find View: Blog: Blog Home 2 Panel First 2, click configure link, set following properties
3. Click Save block button.
14. Create Blog Image view
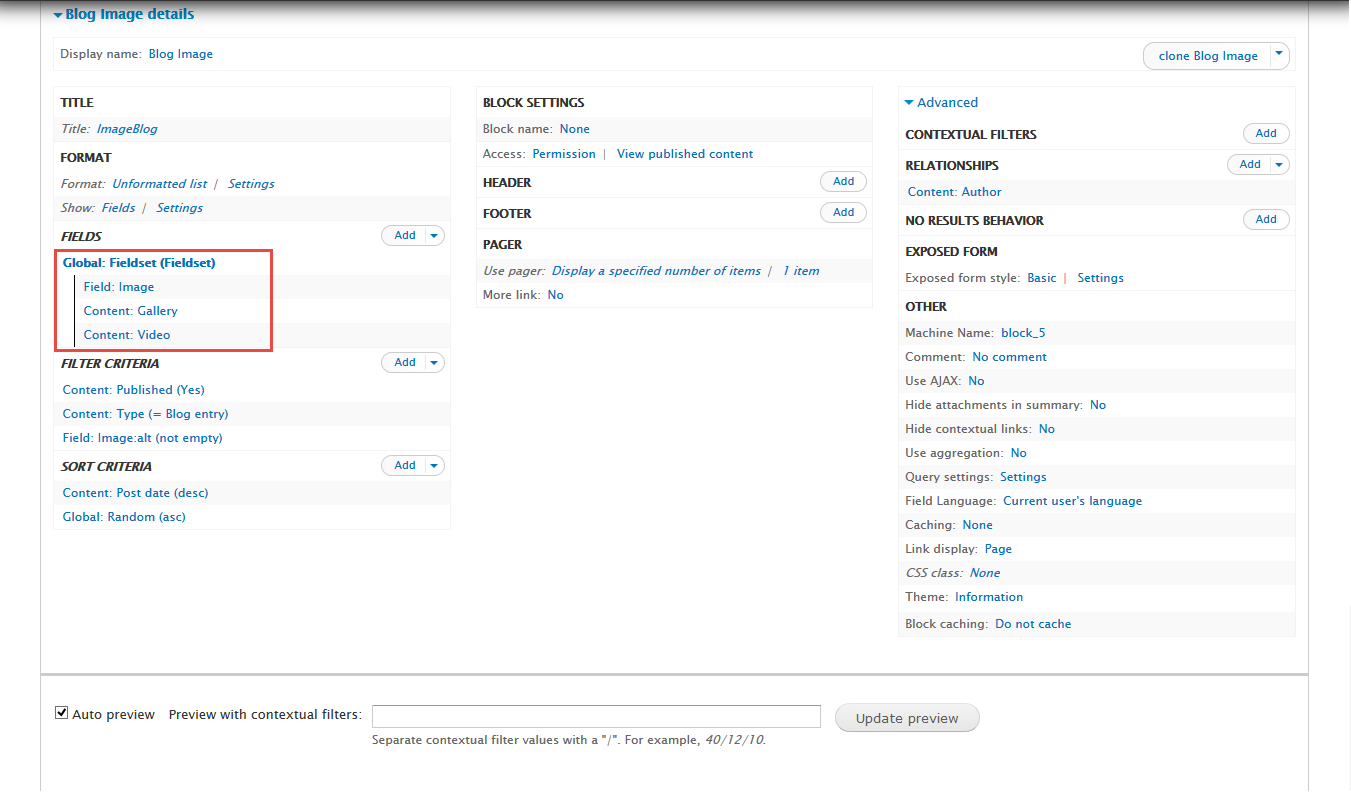
Stay open Blog view, click Add button add Block new.
1. Next to steps below to set properties for the following fields:
2. In FIELDS area, click Add button to add fields: Global: Fieldset (Fieldset), Field: Image, Content: Gallery, Content: Video field and set following properties:
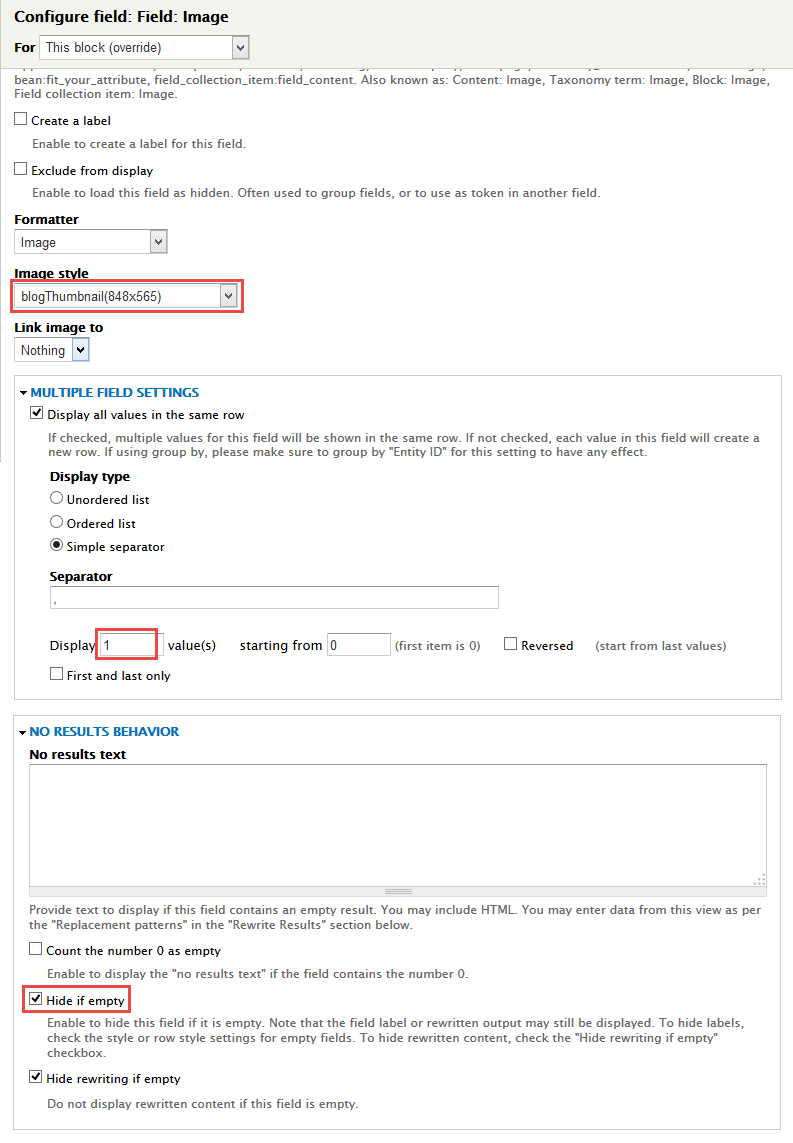
3. Set properties for Field: Image
4. At FIELDS area, click Rearrange button and set following arrange
5. Click Save button.
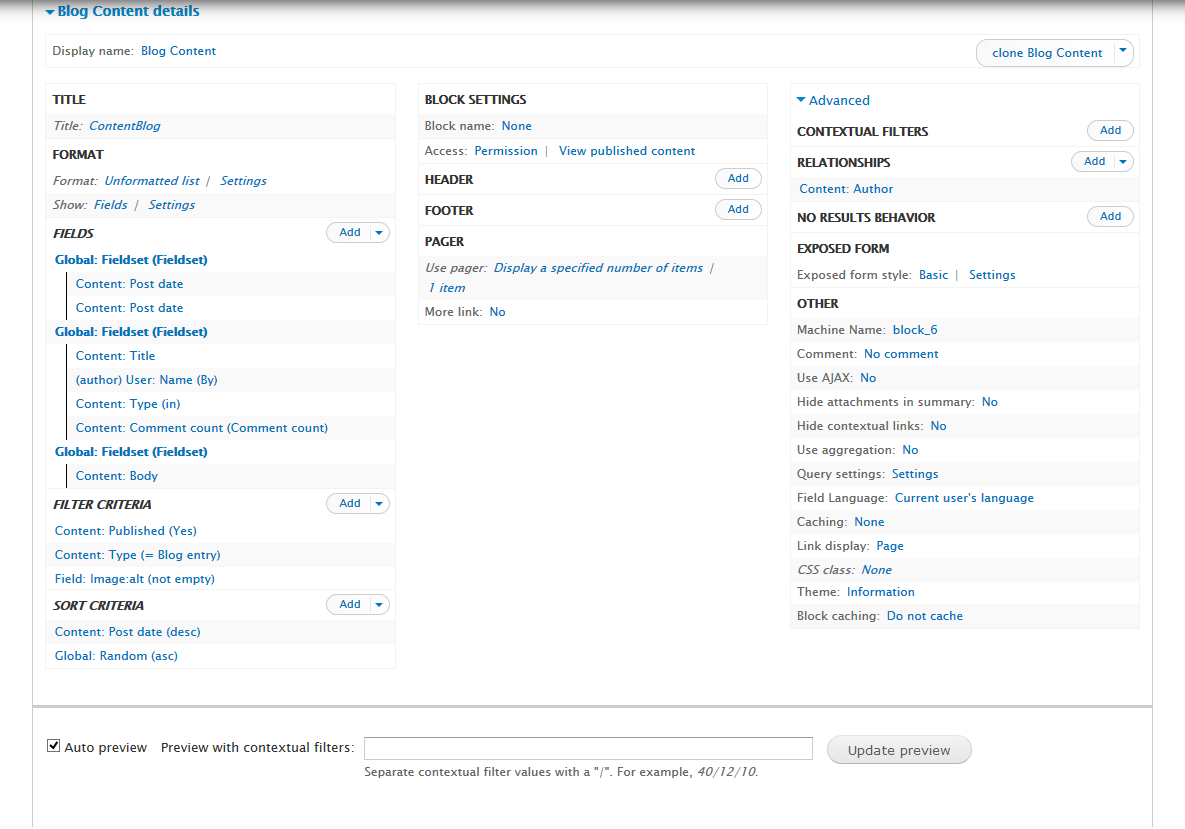
15. Create Blog Content view
Stay open Blog view, click Add button add Block new.
1. Next to steps below to set properties for the following fields:
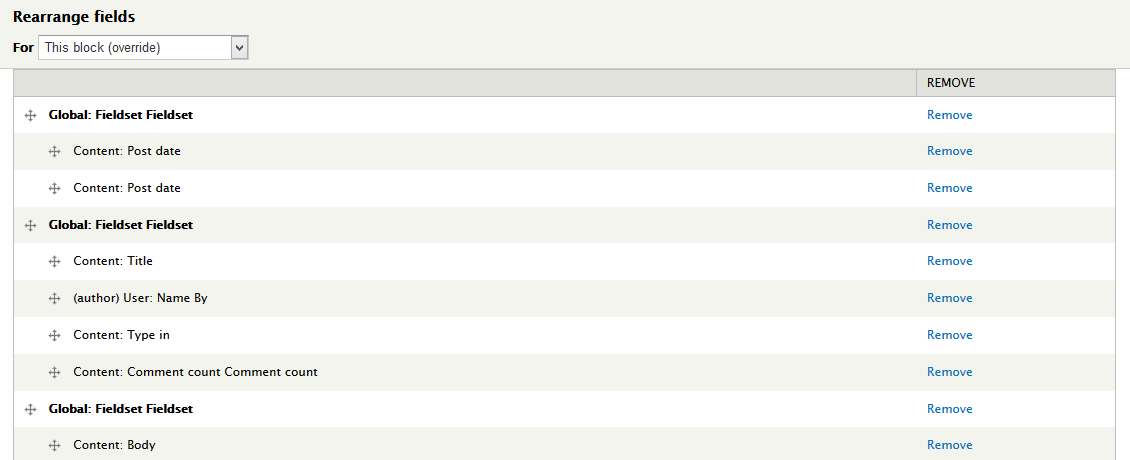
2. At FIELDS area, click Rearrange button and set following arrange
3. Click Save button.
16. Create Blog Home Page view
Stay open Blog view, click Add button add Block new.
1. Next to steps below to set properties for the following fields:
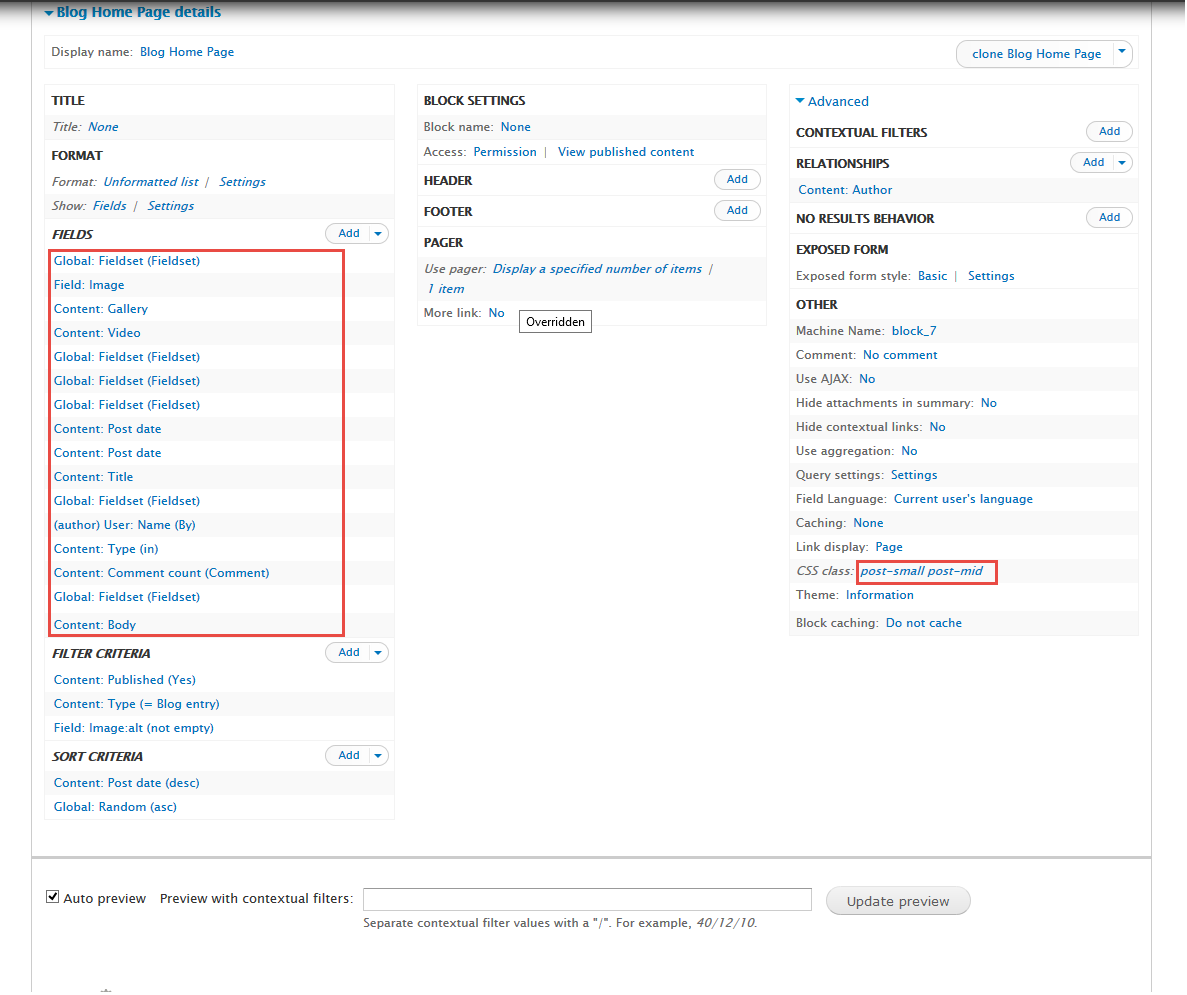
2. In FIELDS area, click Add button to add fields: Global: Fieldset (Fieldset), Field: Image, Content: Gallery, Content: Video, Global: Fieldset (Fieldset), Global: Fieldset (Fieldset), Global: Fieldset (Fieldset), Content: Post date, Content: Post date, Global: Fieldset (Fieldset), User: Name (By), Content: Type (in), Content: Comment count (Comment), Global: Fieldset (Fieldset), Content: Body field and set following properties:
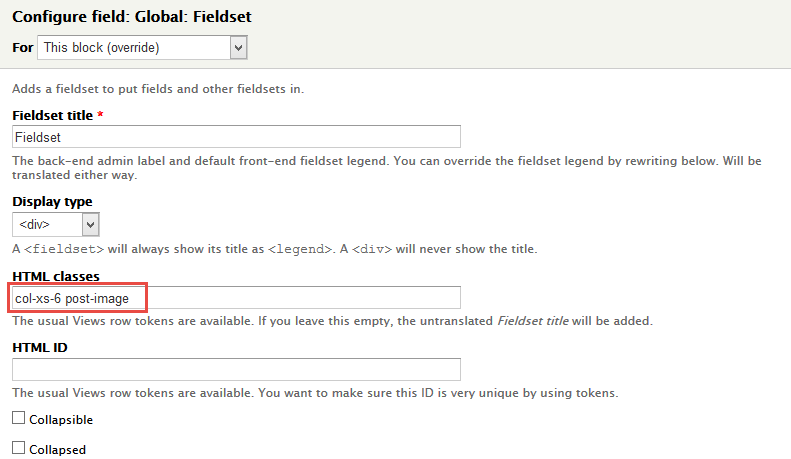
3. Set properties for Global: Fieldset (Fieldset)
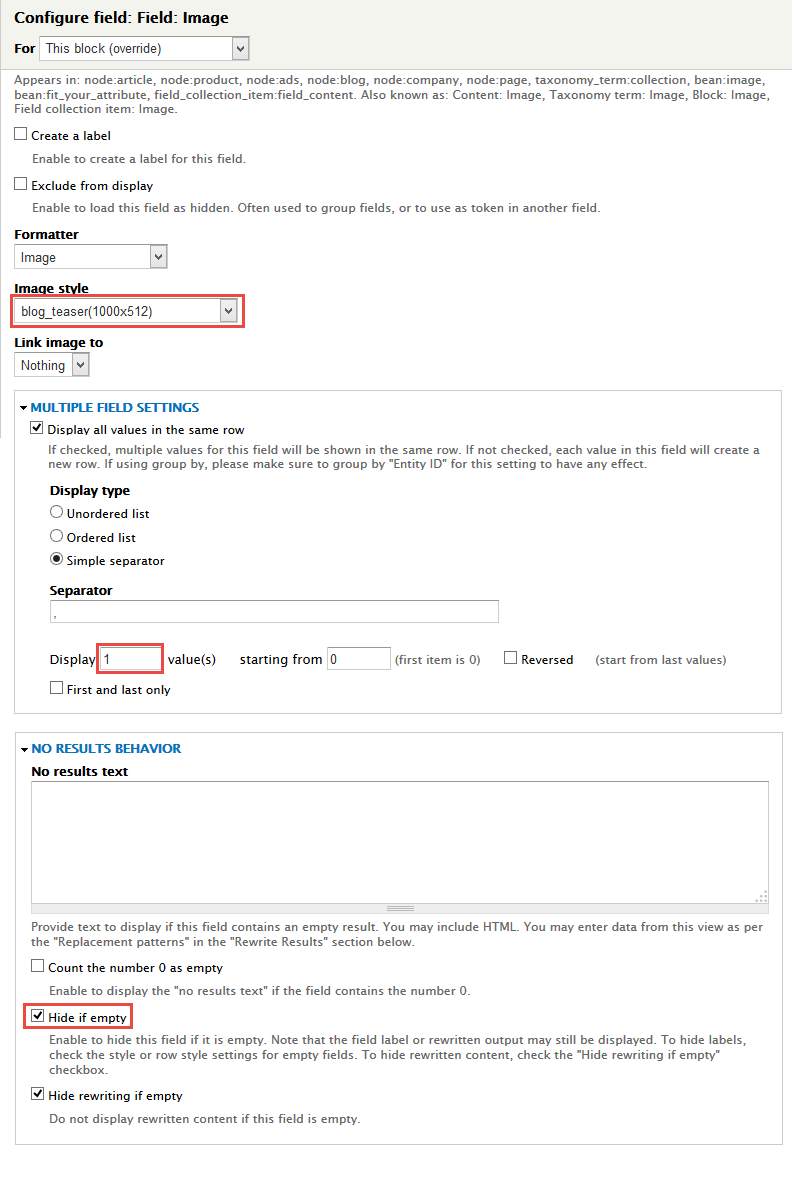
4. Set properties for Field: Image
5. Set properties for Global: Fieldset (Fieldset)
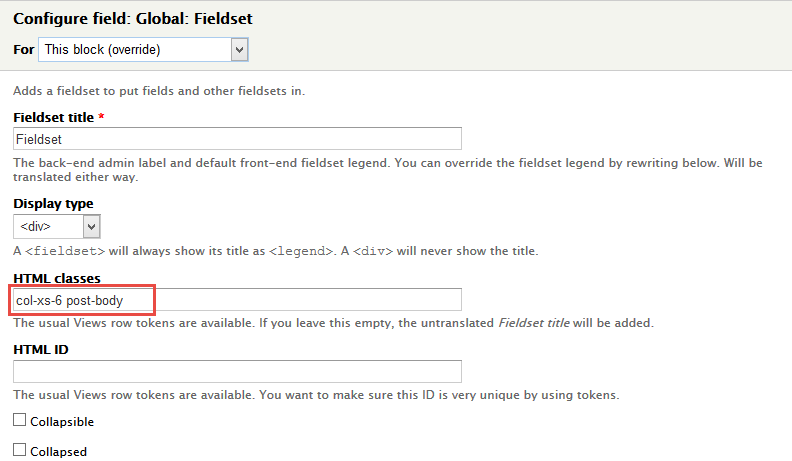
6. Set properties for Global: Fieldset (Fieldset)
7. Set properties for Global: Fieldset (Fieldset)
8. Set properties for Global: Fieldset (Fieldset)
9. At FIELDS area, click Rearrange button and set following arrange
10. In Advanced > OTHER area, add CSS class change following properties:
11. Click Save button.
Product page
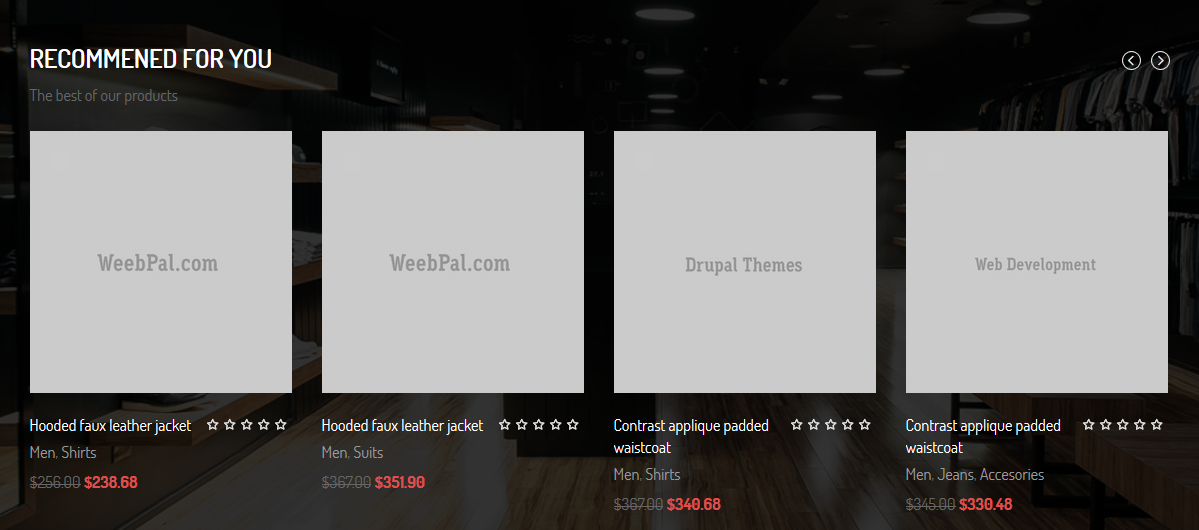
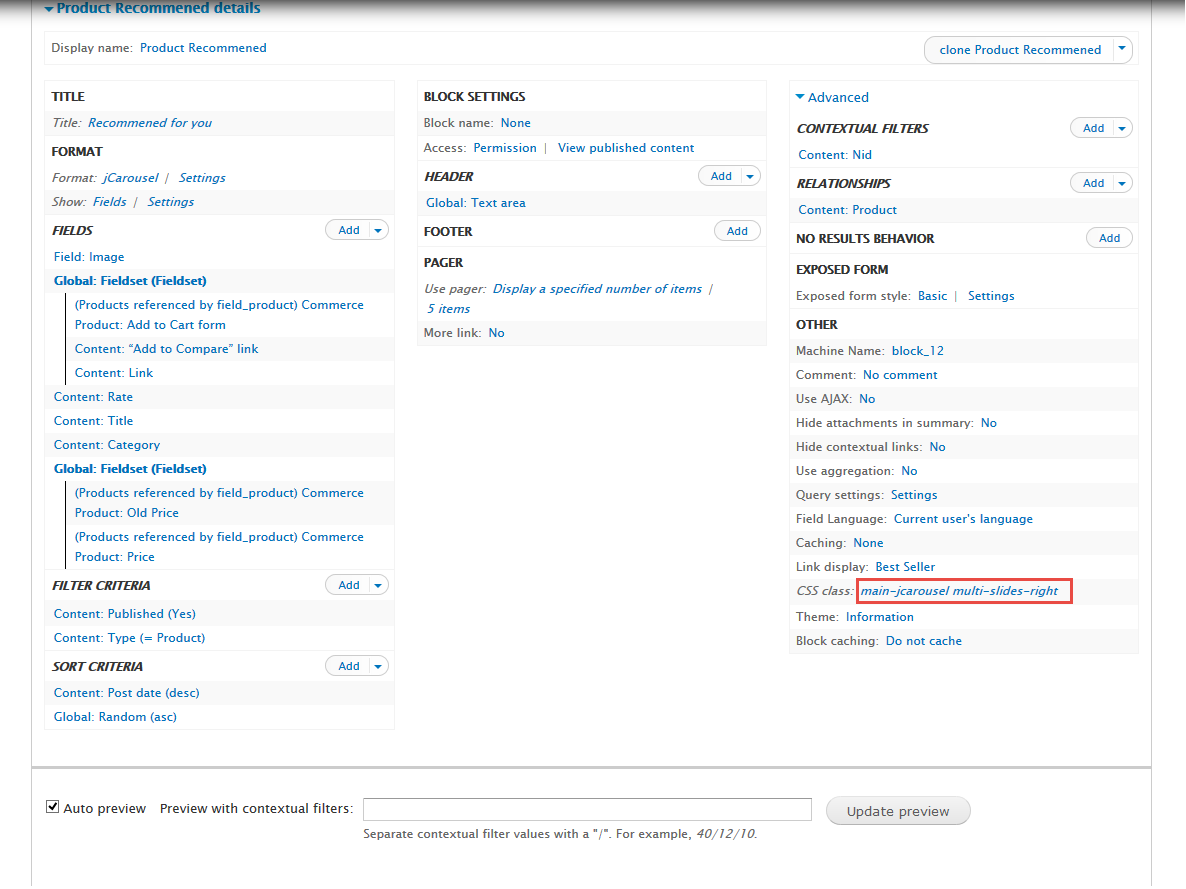
1. Create Product Recommened view
Front end Display
Stay open Product view, click Add button add Block new.
1. Next to steps below to set properties for the following fields:
2. In Advanced > OTHER area, add CSS class change following properties:
3. Click Save button.
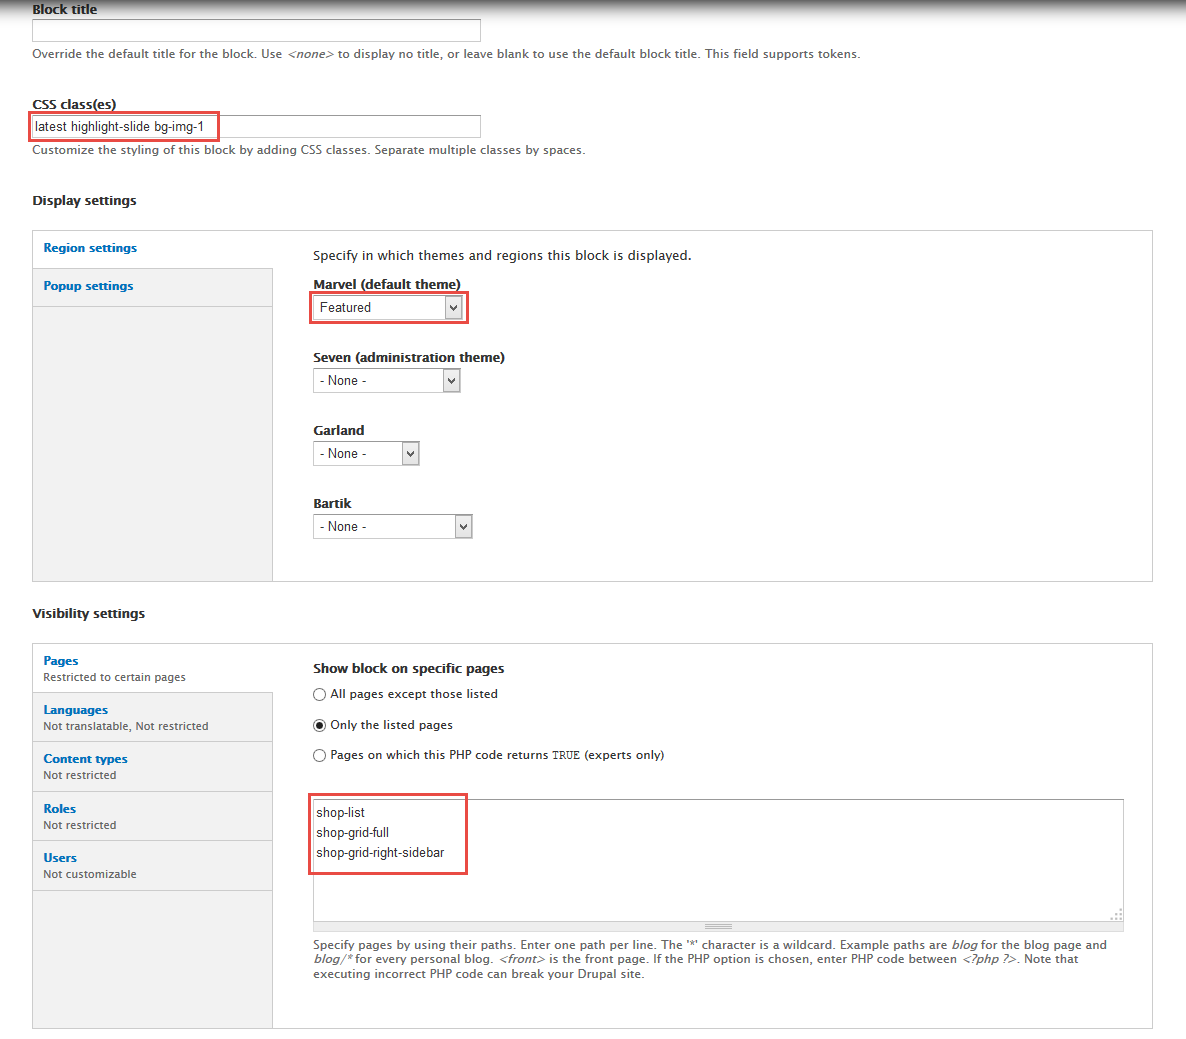
2. Configure Product Recommened block
1. Navigate to Structure > Blocks
2. Find View: Product View: Product Recommened, click configure link, set following properties
3. Click Save block button.
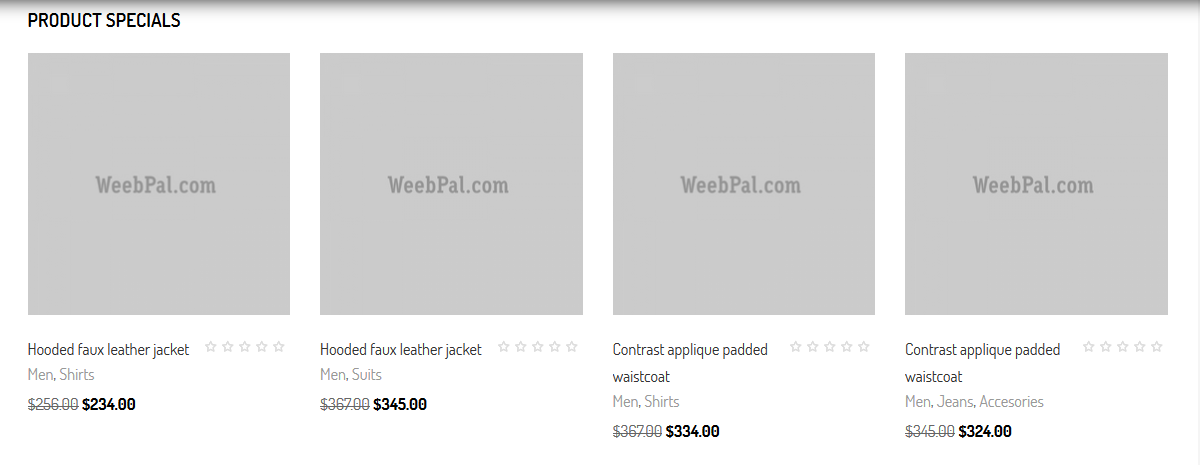
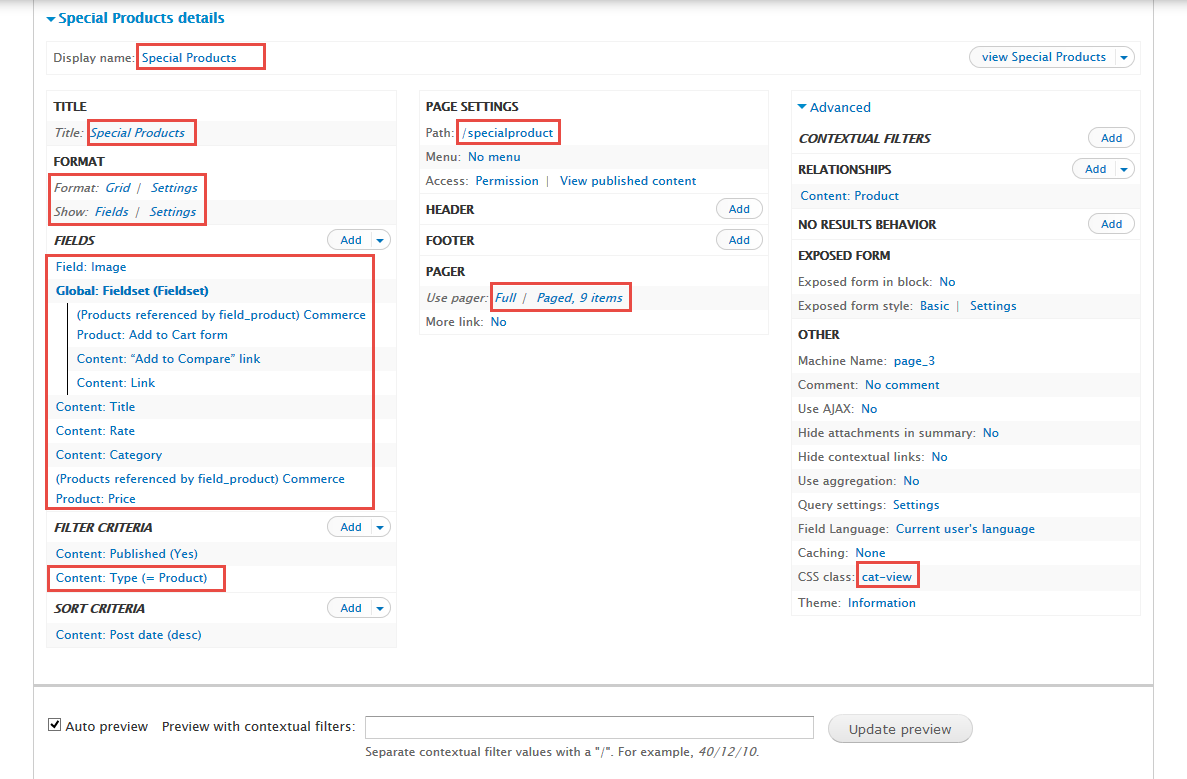
3. Create Product specials pages view
Front end Display
Stay open Product view, click Add button add Page new.
1. Next to steps below to set properties for the following fields:
2. At Display name area, set following properties:
3. At Title area, set following properties:
2. At FORMAT Format: Grid area, click Settings and set following properties:
4. In FIELDS area, click Add button to add fields: Commerce Product: Add to Cart form, Content: “Add to Compare” link, Content: Category, Commerce Product: Price field and set following properties:
5. Set properties for Field: Image
6. Set properties for Global: Fieldset (Fieldset)
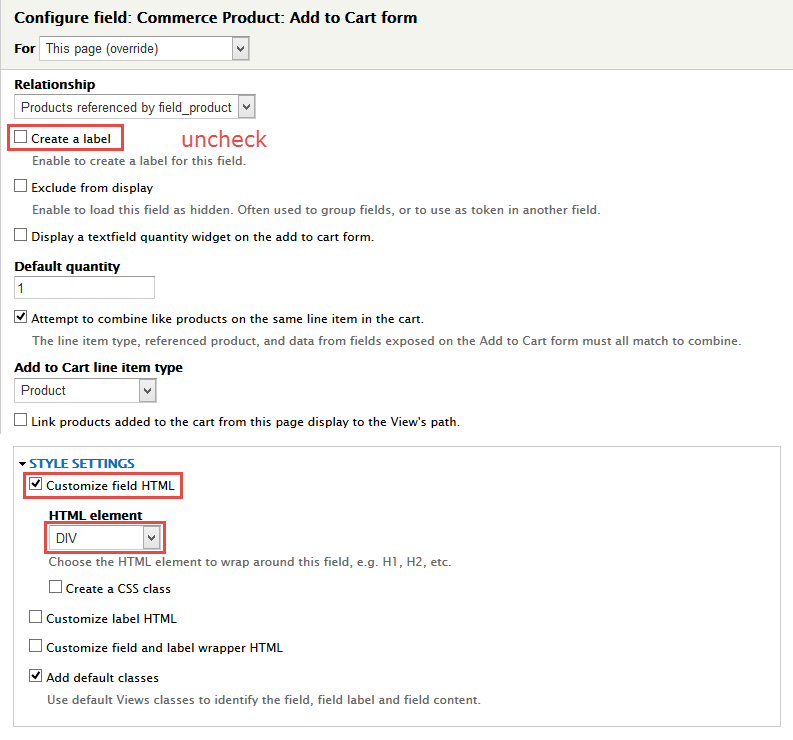
7. Set properties for Commerce Product: Add to Cart form
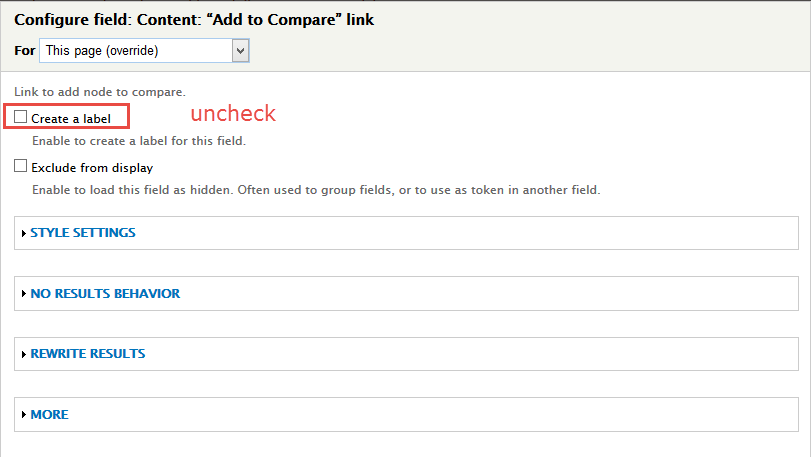
8. Set properties for Content: “Add to Compare” link
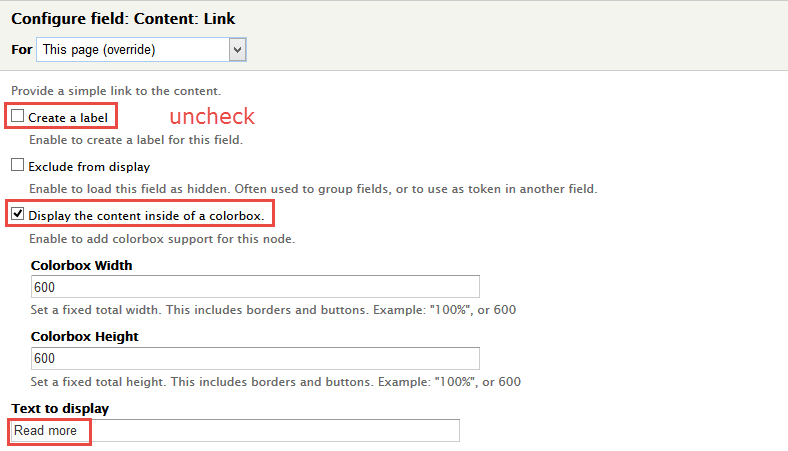
9. Set properties for Content: Link
10. Set properties for Content: Category
11. Set properties for Commerce Product: Price
12. At FIELDS area, click Rearrange button and set following arrange
13. In FILTER CRITERIA area, click Add button to add Content: Type and set following properties:
14. At PAGE SETTINGS > Path area, set the following properties:
15. At PAGER > Use pager area, click link
16. In Advanced > OTHER area, add CSS class change following properties:
17. Click Save button.
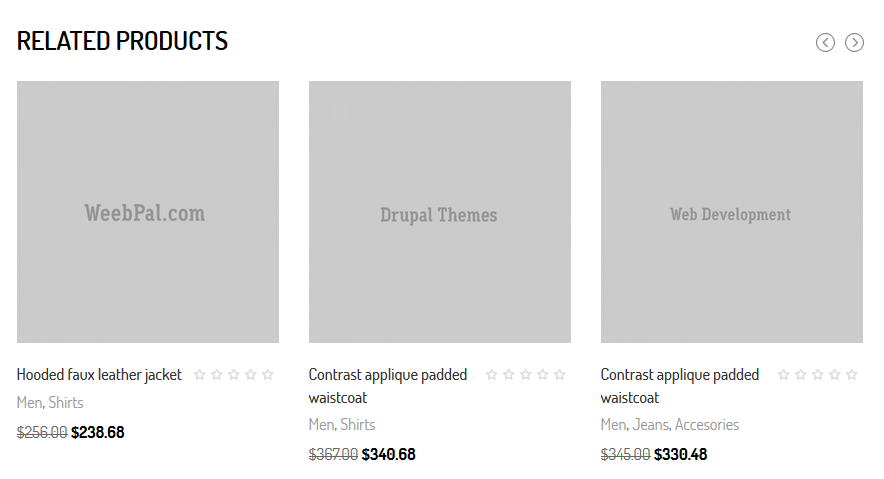
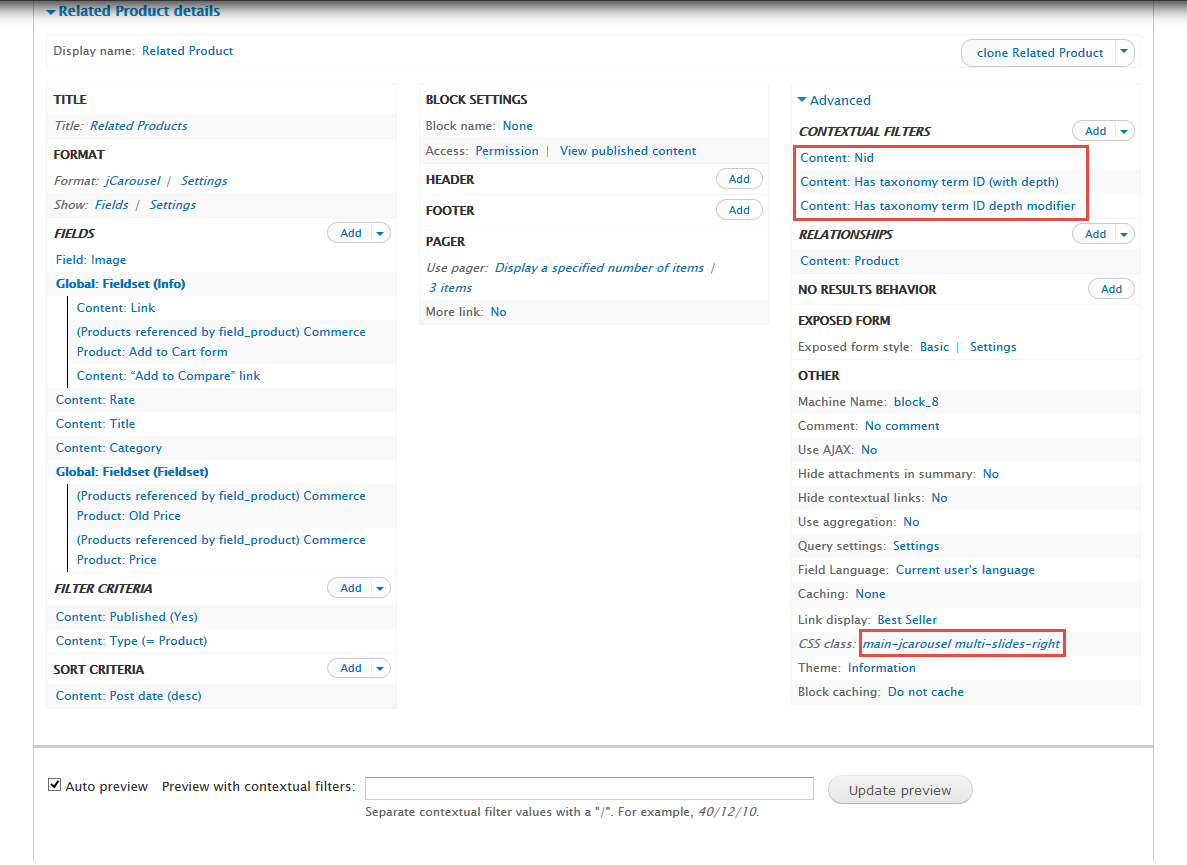
4. Create Related Product view
Stay open Product view, click Add button add Block new.
Front end Display
1. Next to steps below to set properties for the following fields:
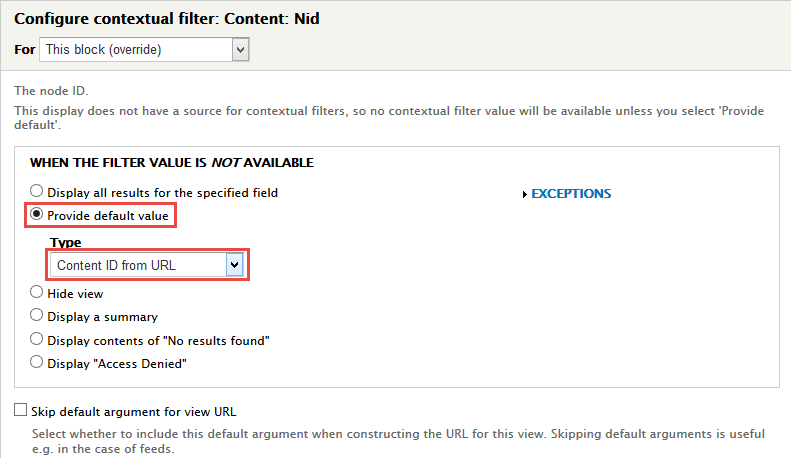
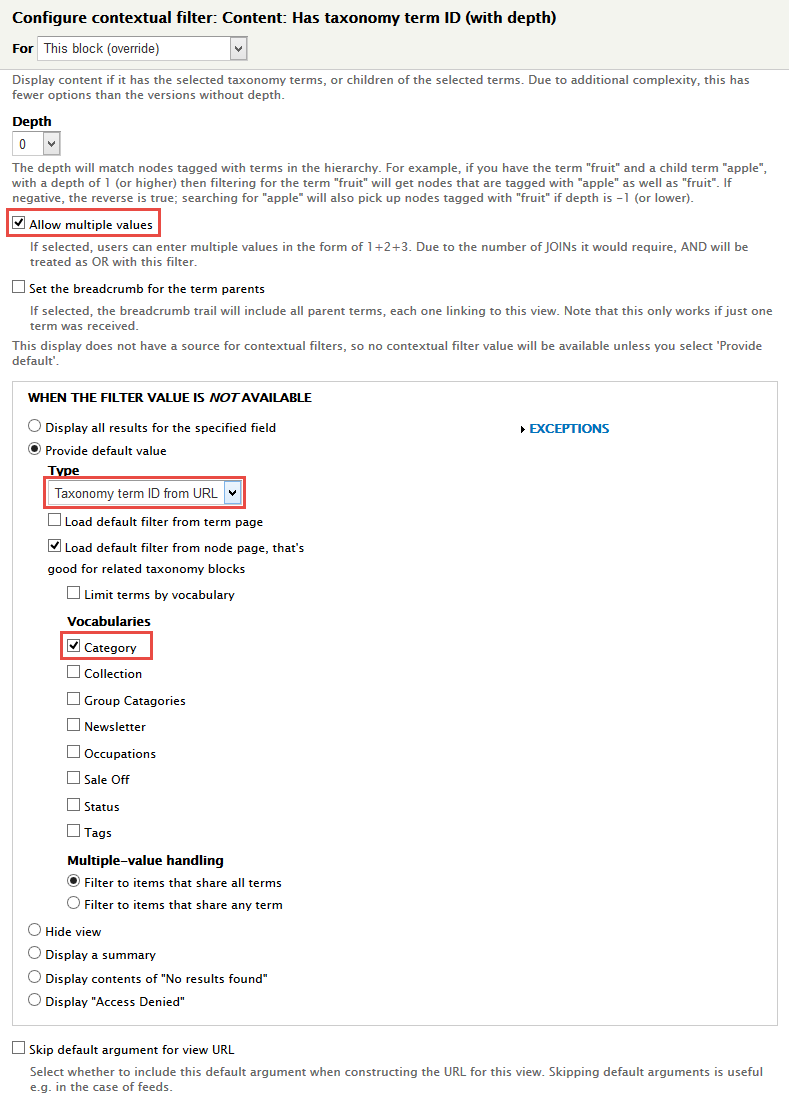
2. In Advanced > Contextual filters area, click Add button to add fields: Content: Has taxonomy term ID, Content: Has taxonomy term ID depth modifier and set following properties:
3. Set properties for Content: Nid
4. Set properties for Content: Has taxonomy term ID
5. In Advanced > OTHER area, add CSS class change following properties:
6. Click Save button.
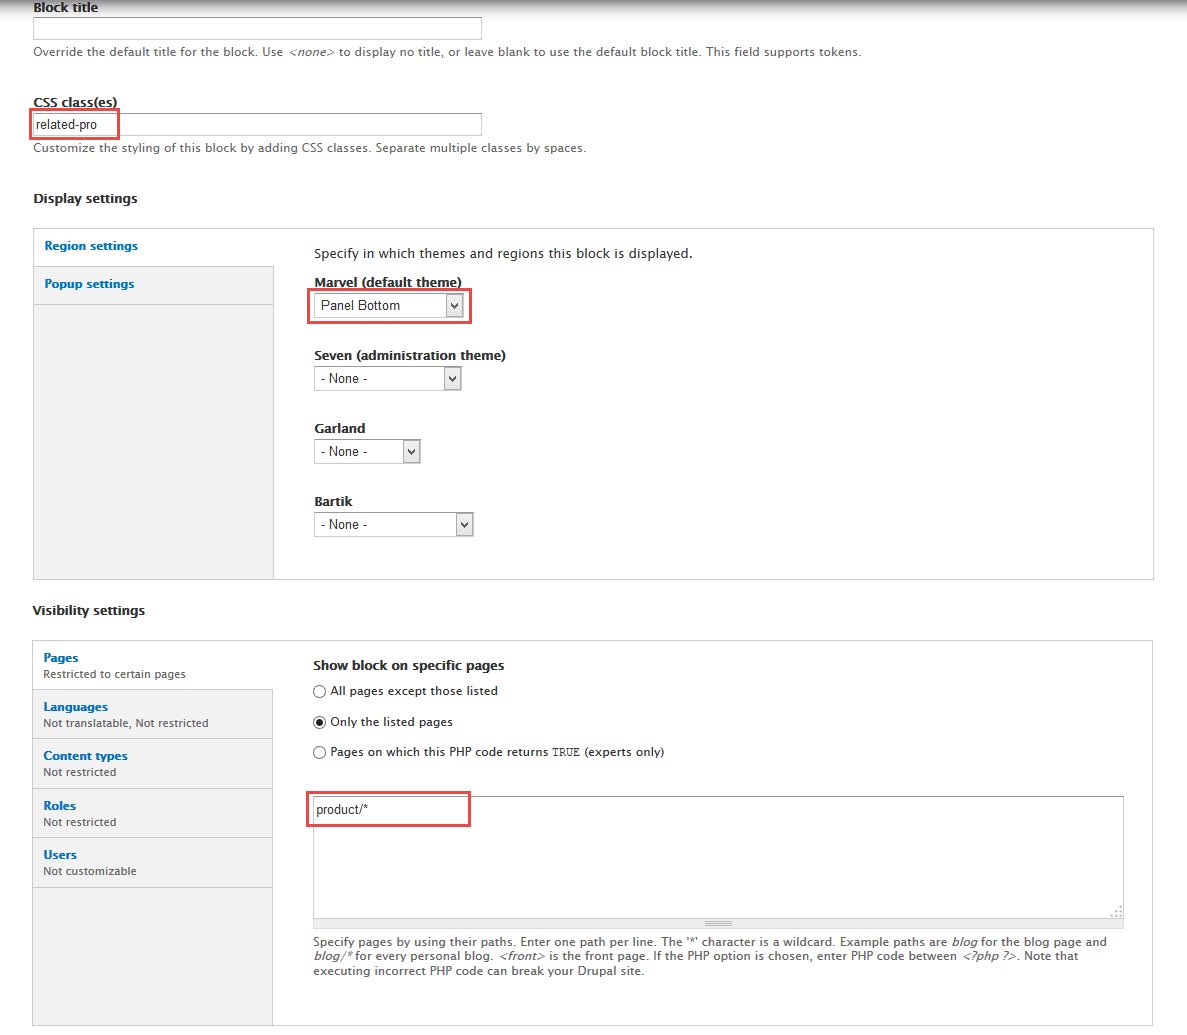
5. Configure Related Product block
1. Navigate to Structure > Blocks
2. Find View: Product View: Related Product, click configure link, set following properties
3. Click Save block button.
Post by date page
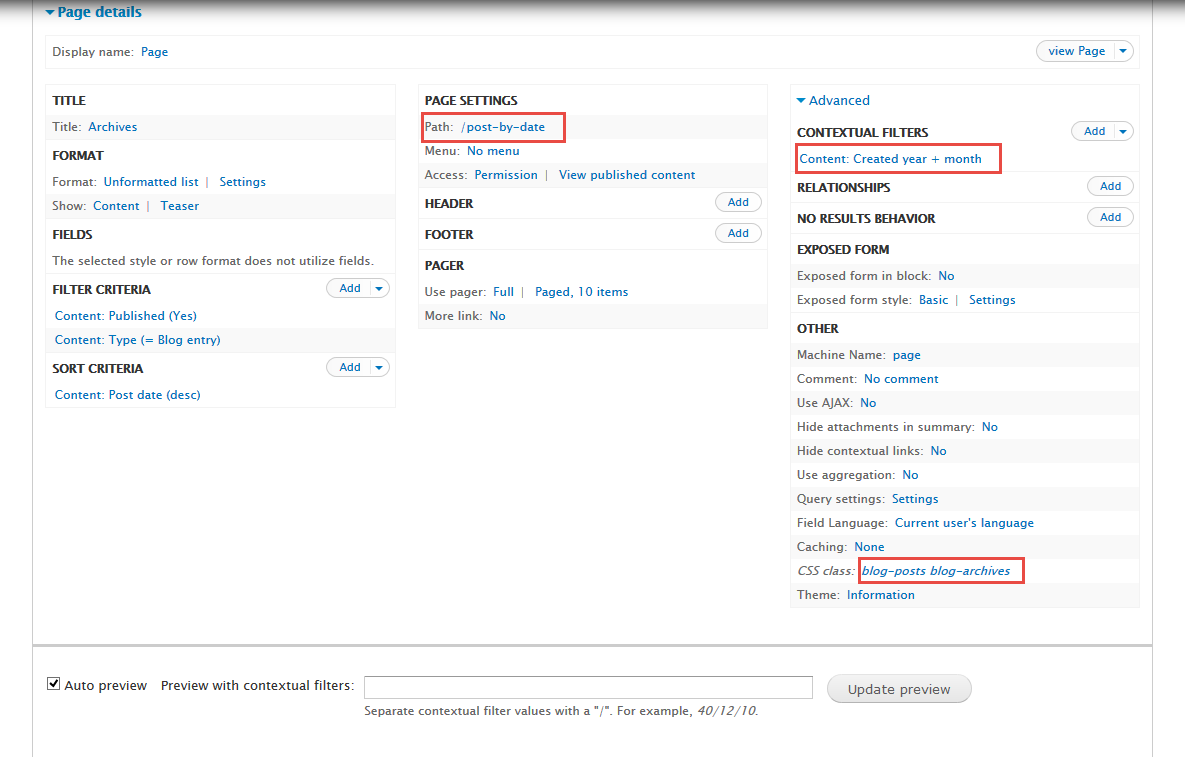
1. Create Post by date view
1. Navigate to Structure > Views, click Add views link, Create Post by date view with following properties:
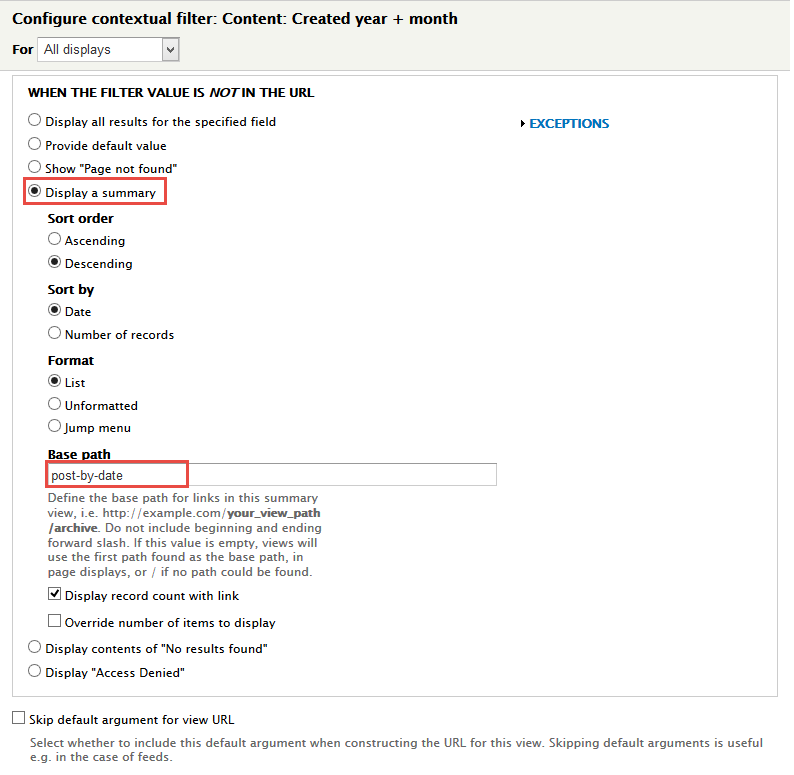
2. In Advanced > Contextual filters area, click Add button to add fields: Content: Created year + month and set following properties:
3. In Advanced > OTHER area, add CSS class change following properties:
4. Click Save button.
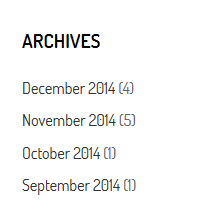
2. Create Post by date block view
Stay open Post by date view, click Add button add Block new.
Front end Display
1. Next to steps below to set properties for the following fields:
2. In FIELDS area, click Add button to add fields: Content: Title field and set following properties:
3. In Advanced > OTHER area, add CSS class change following properties:
4. Click Save button.
3. Configure Post by date block
1. Navigate to Structure > Blocks
2. Find View: Product View: Product Recommened, click configure link, set following properties
3. Click Save block button.
Shop page
1. Create Shop-grid view
Front end Display
1. Navigate to Structure > Views, click Add views link, Create Shop-grid view with following properties:
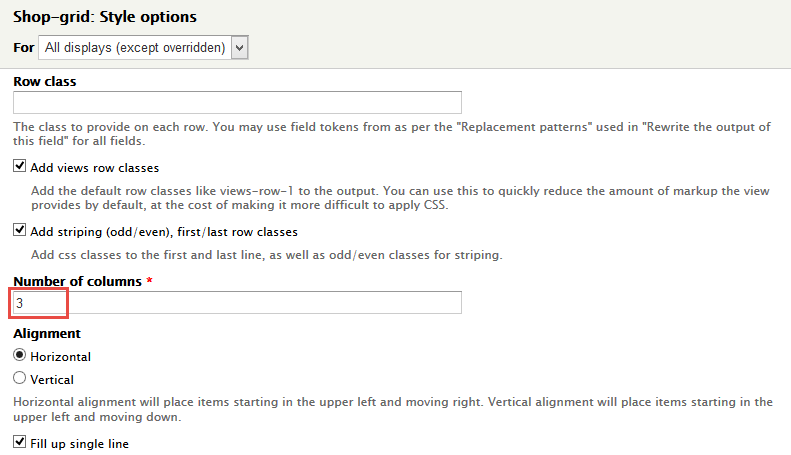
2. At FORMAT Format: Grid area, click Settings and set following properties:
3. In Advanced > REALATIONSHIPS area, click Add button to add fields: Indexed Node: Product and set following properties:
4. In FIELDS area, click Add button to add fields: Indexed Node: Image, Global: Fieldset (Fieldset), Commerce Product: Add to Cart form, Content: Link, Global: Fieldset (Fieldset), Indexed Node: Rate, Indexed Node: Title, Indexed Node: Category, Global: Fieldset (Fieldset), Commerce Product: Old Price, Commerce Product: Price field and set following properties:
5. Set properties for Indexed Node: Image
6. Set properties for Global: Fieldset (Fieldset)
7. Set properties for Commerce Product: Add to Cart form
8. Set properties for Content: Link
9. Set properties for Global: Fieldset (Fieldset)
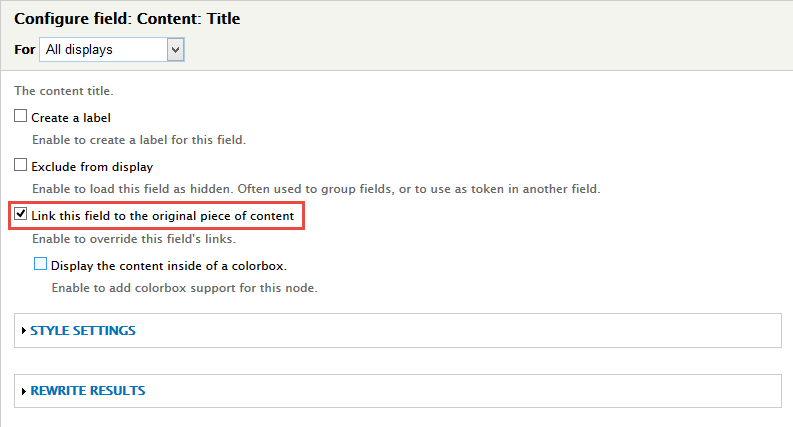
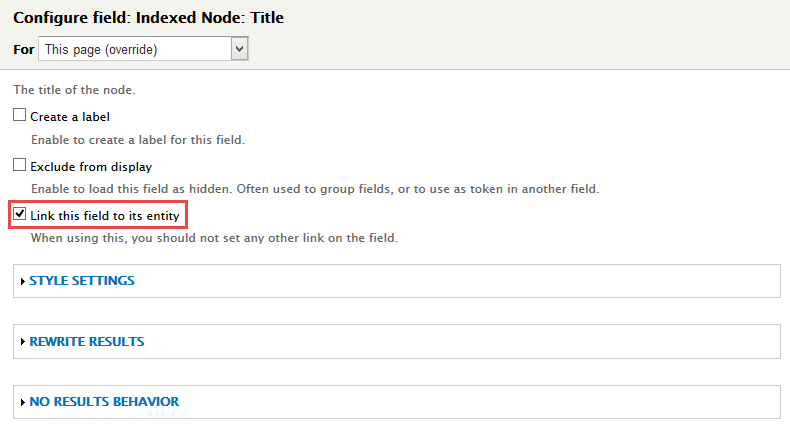
10. Set properties for Indexed Node: Title
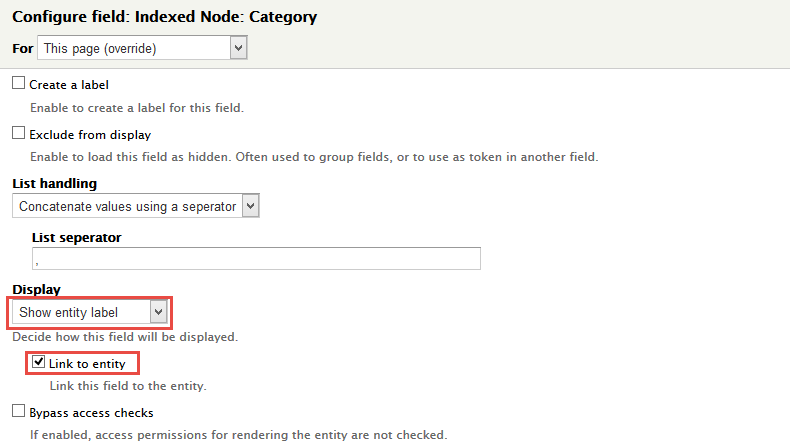
11. Set properties for Indexed Node: Category
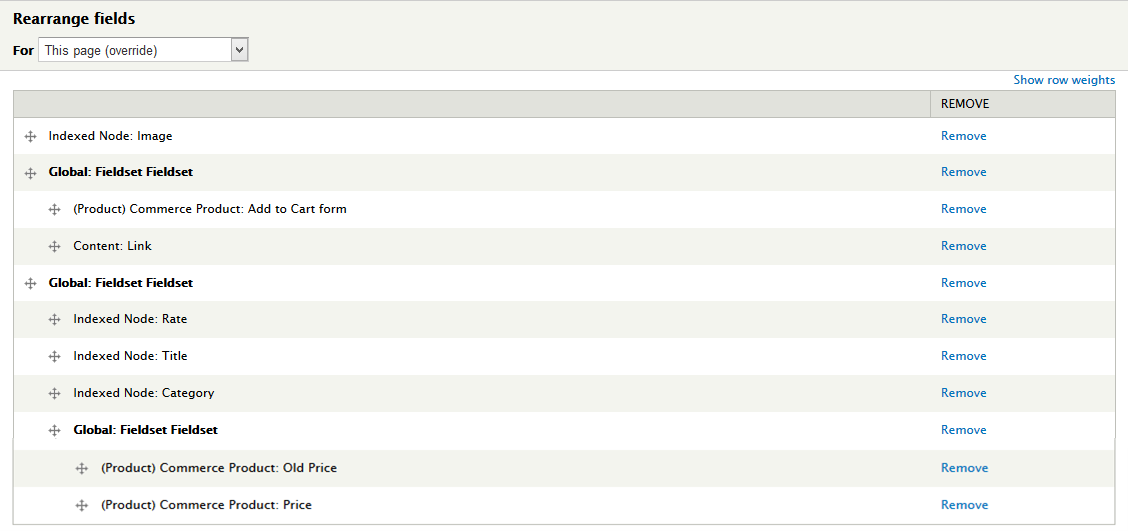
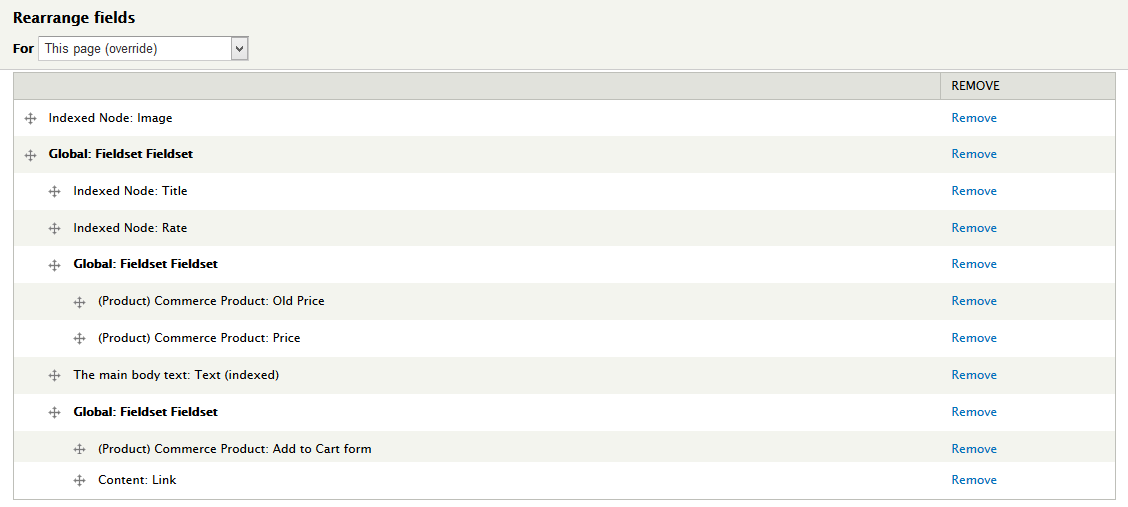
12. At FIELDS area, click Rearrange button and set following arrange
13. In FILTER CRITERIA area, click Add button to add Search: Fulltext search and set following properties:
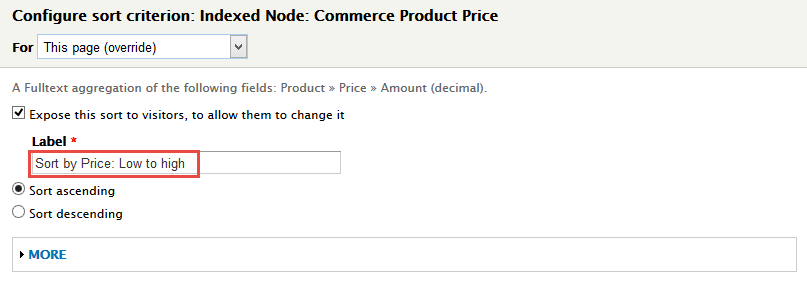
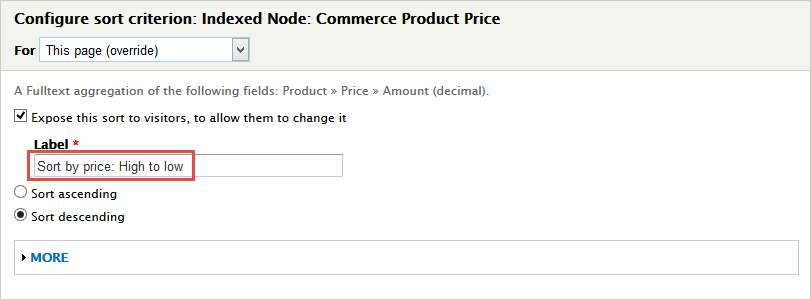
14. At SORT CRITERIA area, Click Add button to add Indexed Node: Date changed, Indexed Node: Commerce Product Price, Indexed Node: Commerce Product Price
15. Set properties for Indexed Node: Date changed
16. Set properties for Indexed Node: Commerce Product Price
17. Set properties for Indexed Node: Commerce Product Price
18. At PAGE SETTINGS > Path area, set the following properties:
19. In Advanced > OTHER area, add CSS class change following properties:
20. Click Save button.
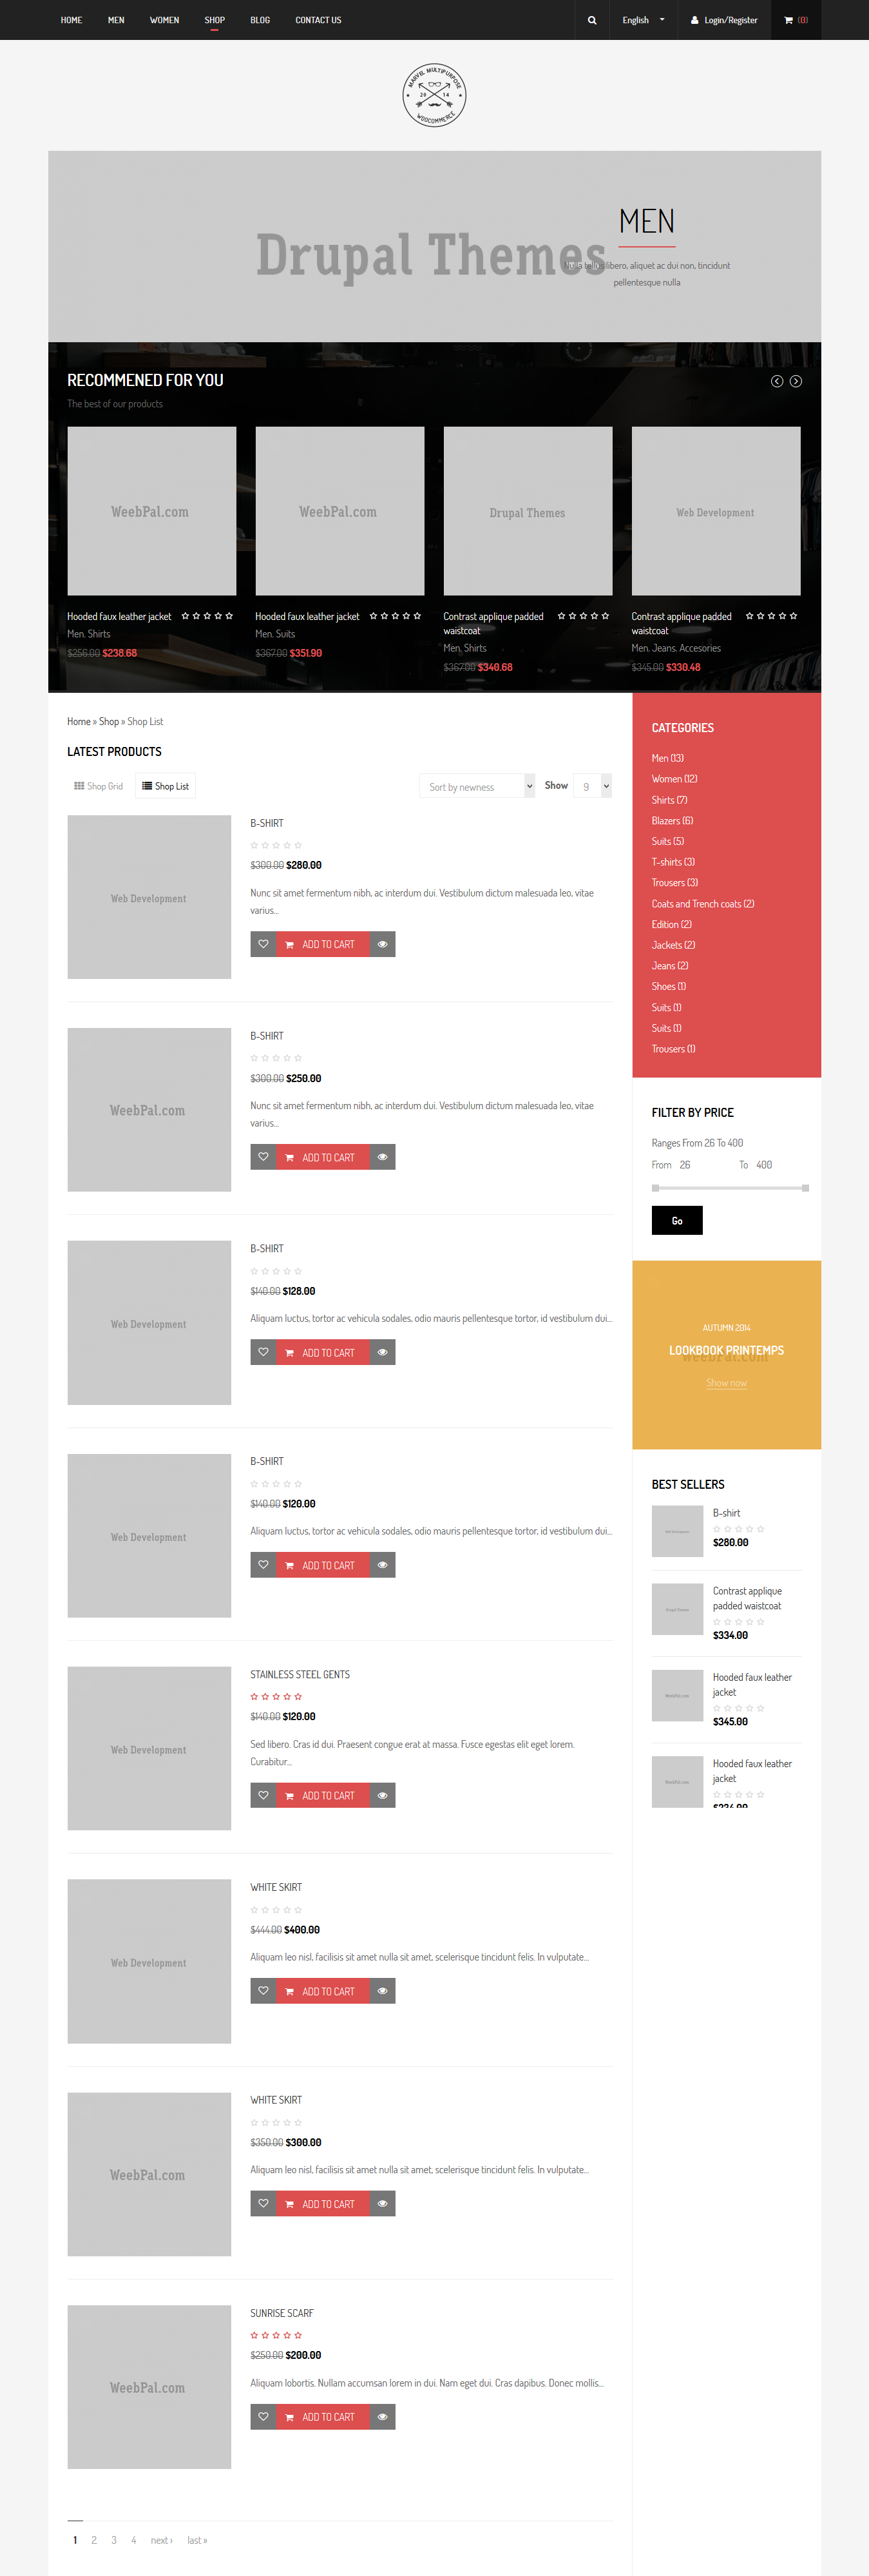
2. Create Shop-list view
Stay open Blog view, click Add button add Page new.
Front end Display
1. Next to steps below to set properties for the following fields:
2. At FIELDS area, click Rearrange button and set following arrange
3. At PAGE SETTINGS > Path area, set the following properties:
4. In Advanced > OTHER area, add CSS class change following properties:
5. Click Save button.
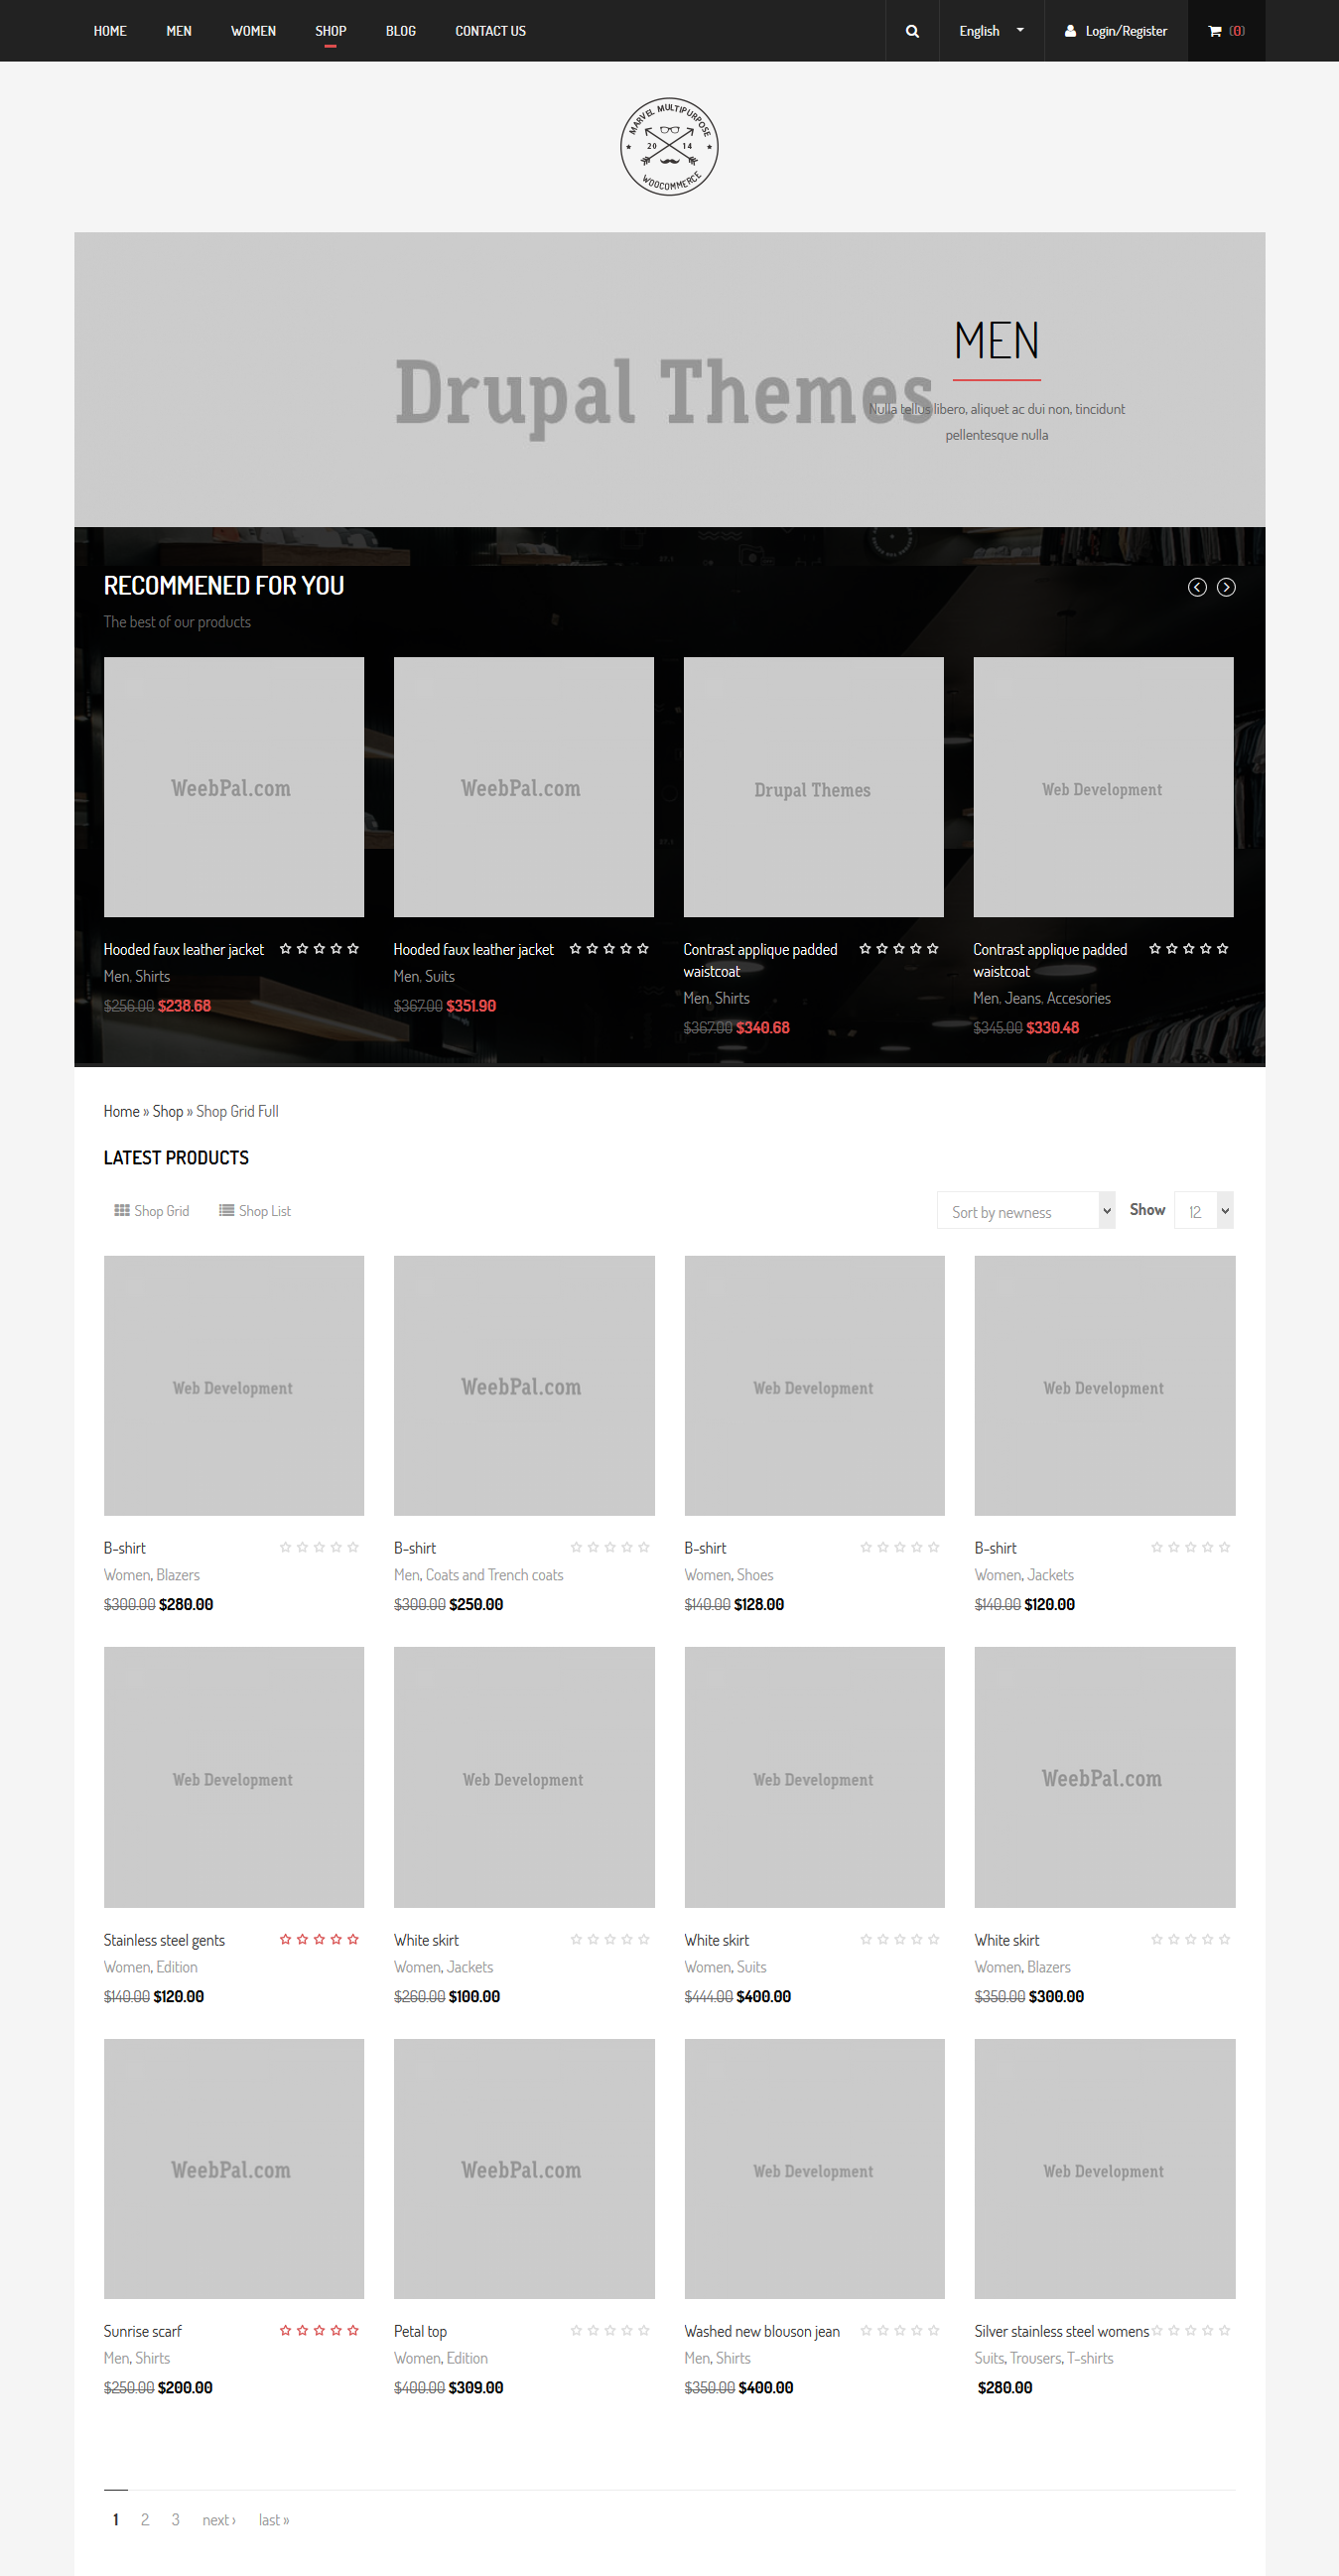
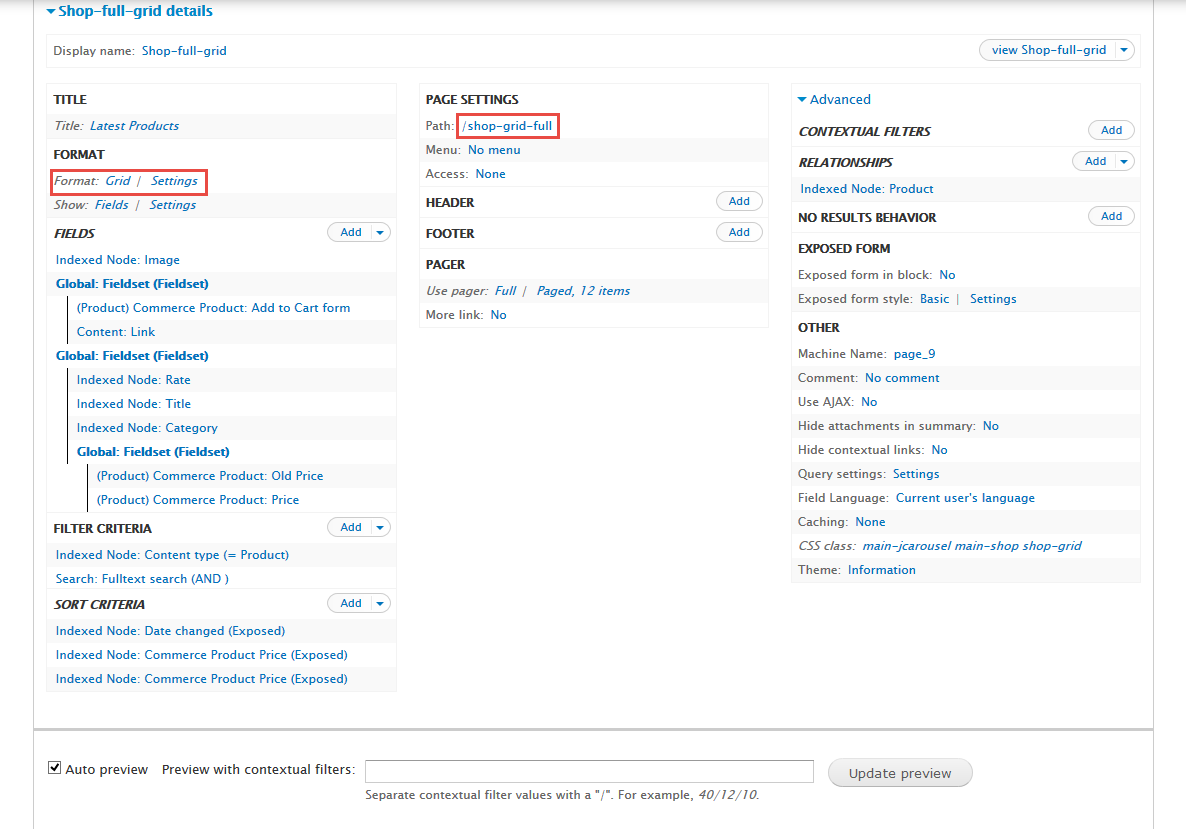
3. Create Shop-full-grid view
Stay open Blog view, click Add button add Page new.
Front end Display
1. Next to steps below to set properties for the following fields:
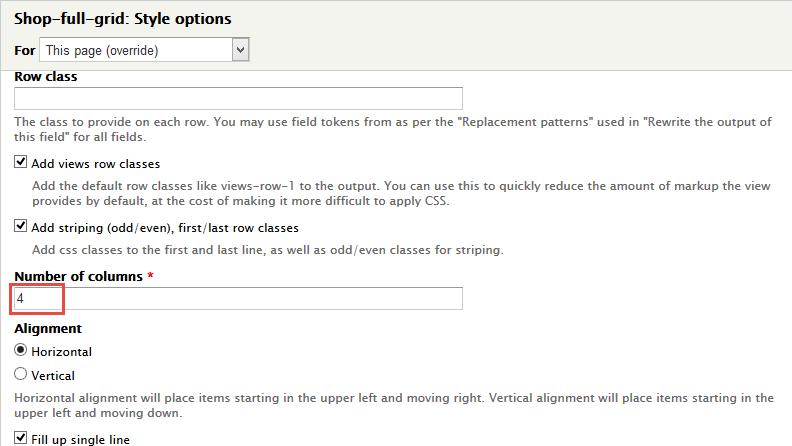
2. At FORMAT Format: Grid area, click Settings and set following properties:
3. At PAGE SETTINGS > Path area, set the following properties:
4. Click Save button.
4. Create Shop-grid-right-sidebar view
Stay open Blog view, click Add button add Page new.
Front end Display
1. Next to steps below to set properties for the following fields:
2. At PAGE SETTINGS > Path area, set the following properties:
3. Click Save button.
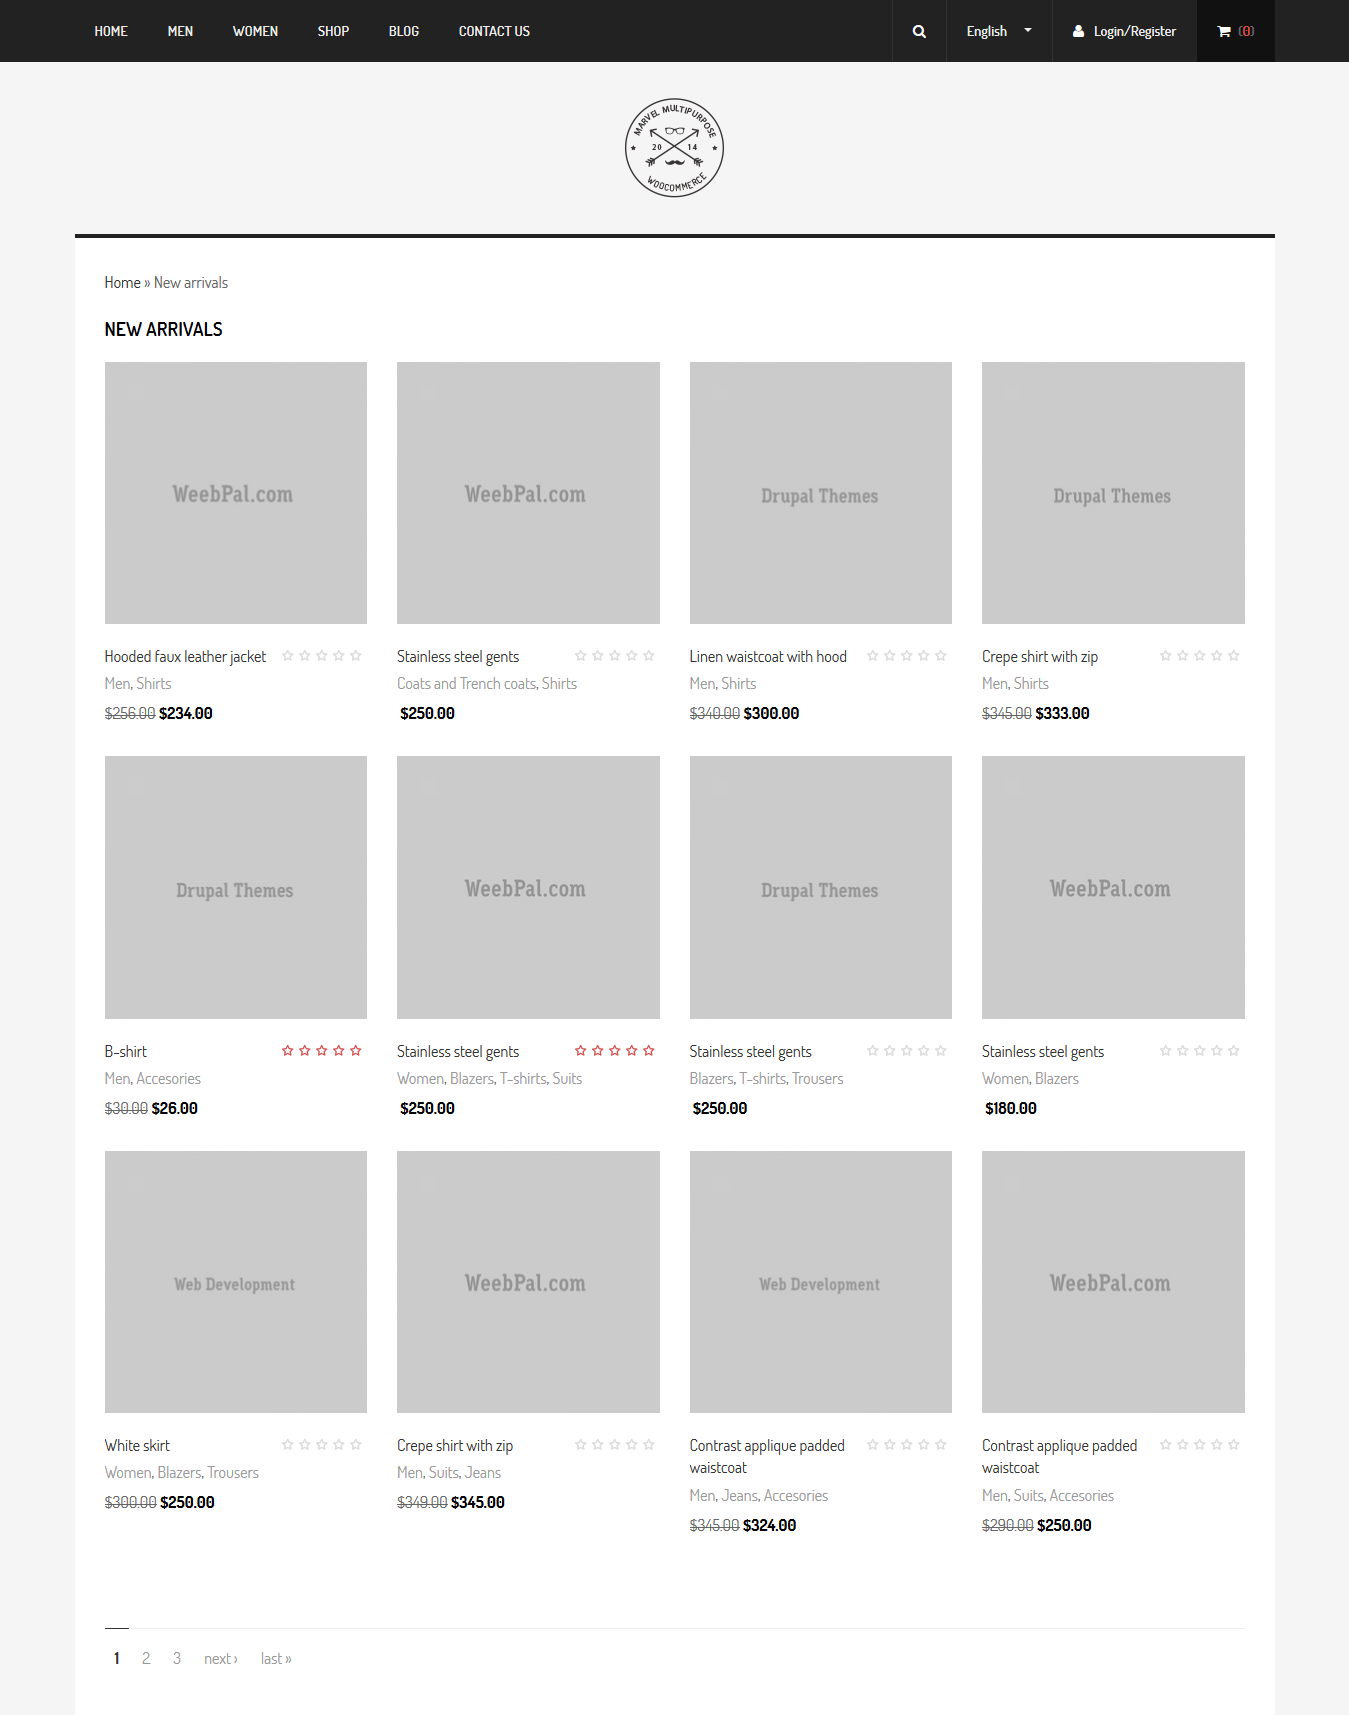
5. Create New-arrivals view
Stay open Blog view, click Add button add Page new.
Front end Display
1. Navigate to Structure > Views, click Add views link, Create New-arrivals view with following properties:
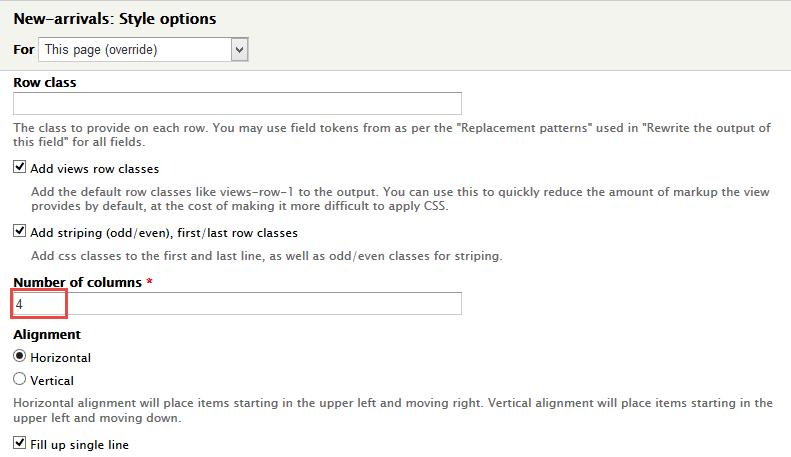
2. At FORMAT Format: Grid area, click Settings and set following properties:
3. At PAGE SETTINGS > Path area, set the following properties:
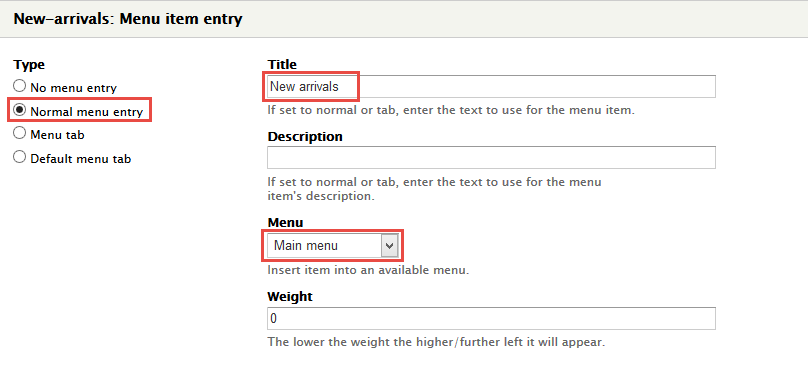
4. At PAGE SETTINGS > Menu area, set the following properties:
5. Click Save button.
6. Create Search Taxonomy view
Stay open Blog view, click Add button add Page new.
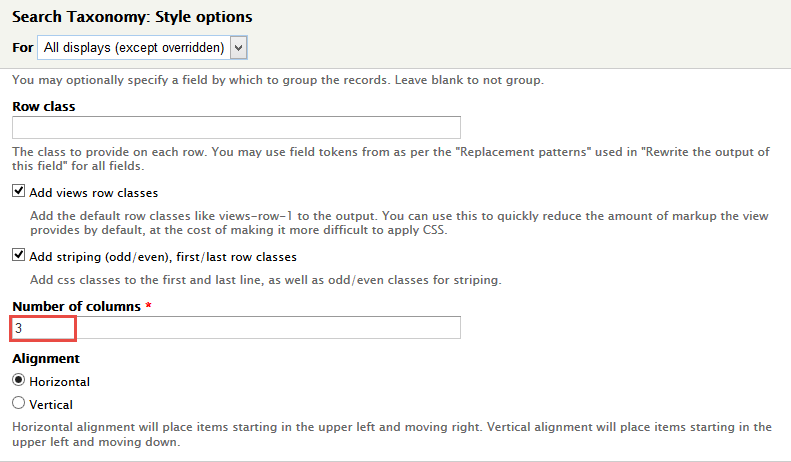
1. Navigate to Structure > Views, click Add views link, Create Search Taxonomy view with following properties:
2. At FORMAT Format: Grid area, click Settings and set following properties:
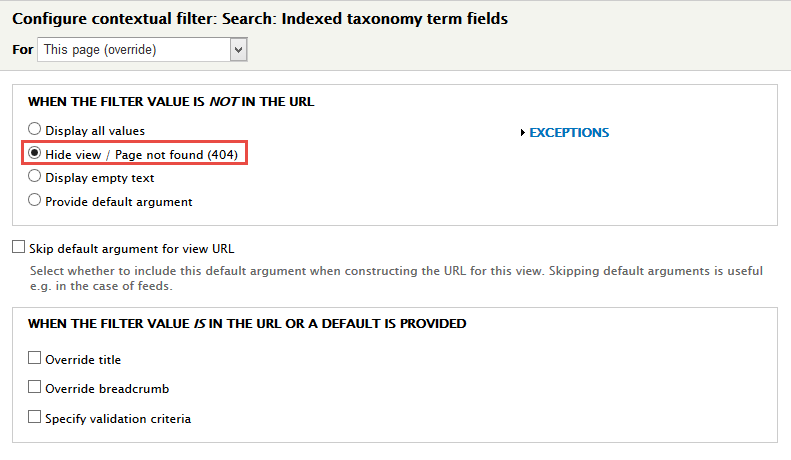
3. In Advanced > Contextual filters area, click Add button to add fields: Search: Indexed taxonomy term fields and set following properties:
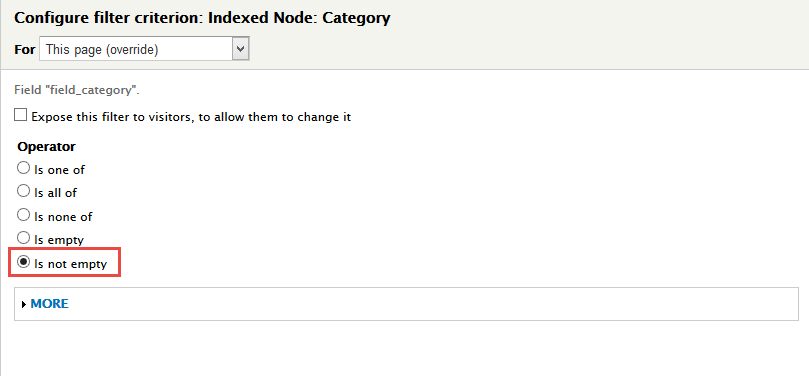
4. In FILTER CRITERIA area, click Add button to add Indexed Node: Category and set following properties:
5. At PAGE SETTINGS > Path area, set the following properties:
6. Click Save button.
More Configurations
Site Information
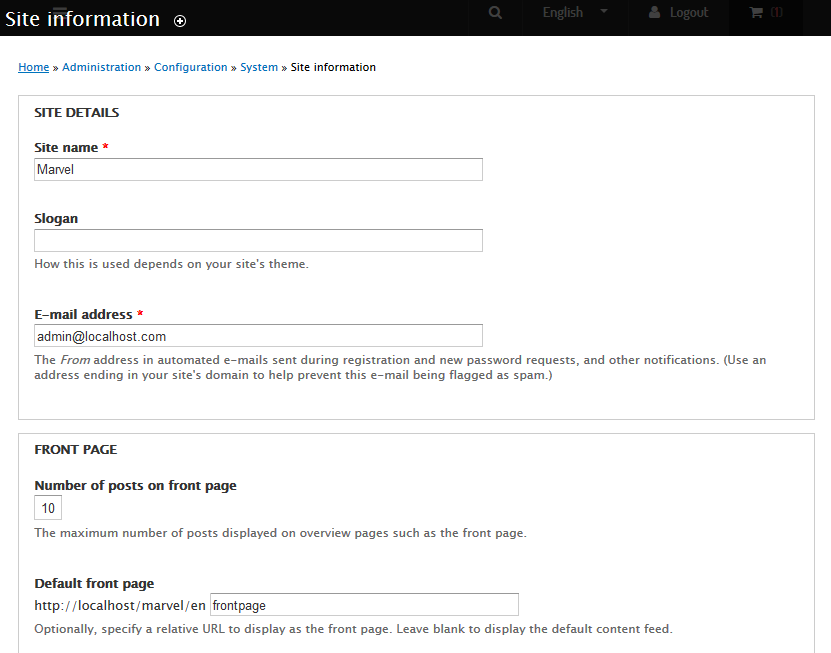
In this section, you can change basic settings, such as the site name, slogan, e-mail address.
1. Log in to Administration site page by administrator account
2. Navigate to the Site Information page Configuration > System: Site information
3. Change site details from the view:
- Site name
- Slogan
- E-mail address
- Set Default Front page
4. Click on Save configuration to finish editing.
Color Configuration
1. Create a new color.
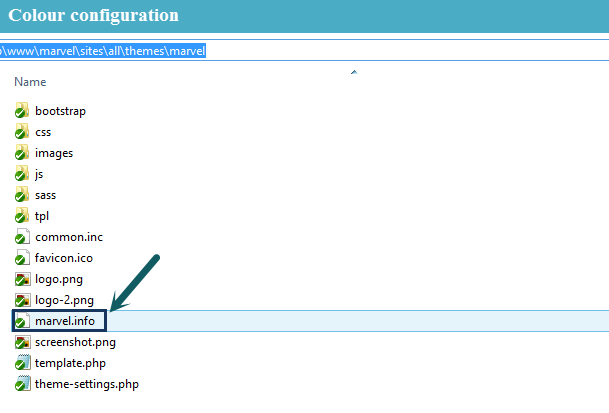
Step 1: Navigate to the directory: marvel/sites/all/themes/marvel, you can find file marvel.info, open this file.
Step 2: Locate the skins[ ] arrays and add new code row:
Step 3: Save file.
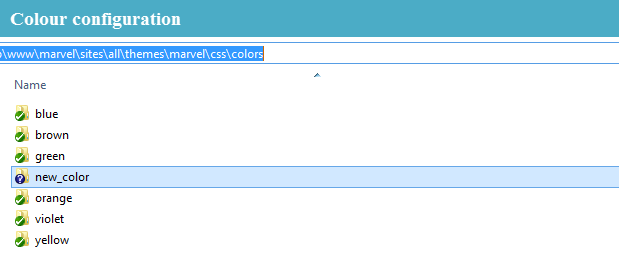
Step 4: Navigate to the directory: marvel/sites/all/themes/marvel/css/colors, clone a folder, then rename it "new_color"
Step 5: new_color folder includes images folder and style.css file.
Now, you can style new color for theme by modifying style.css file.
2. Create a new background.
Step 1: Navigate to the directory: marvel/sites/all/themes/marvel, you can find file, open file marvel.info
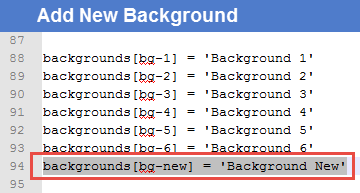
Step 2: Locate the backgrounds[ ] arrays and add new code row:
Step 3: Save file.
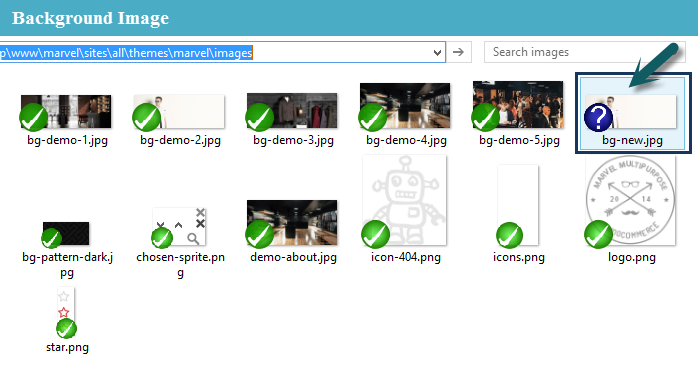
Step 4: Move your background image into the directory: marvel/sites/all/themes/marvel/images
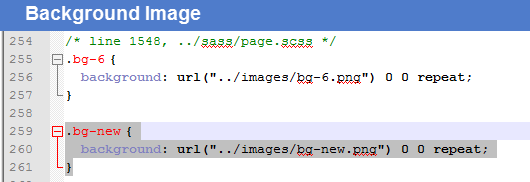
Step 5: Navigate to the directory: marvel/sites/all/themes/marvel/css, open file base.css, and add new code row:
Step 6: Save file.
3. Configuration.
Step 1: Log into website by administrator account.
Step 2: Go to Appearance find marvel 7.34, click on Settings
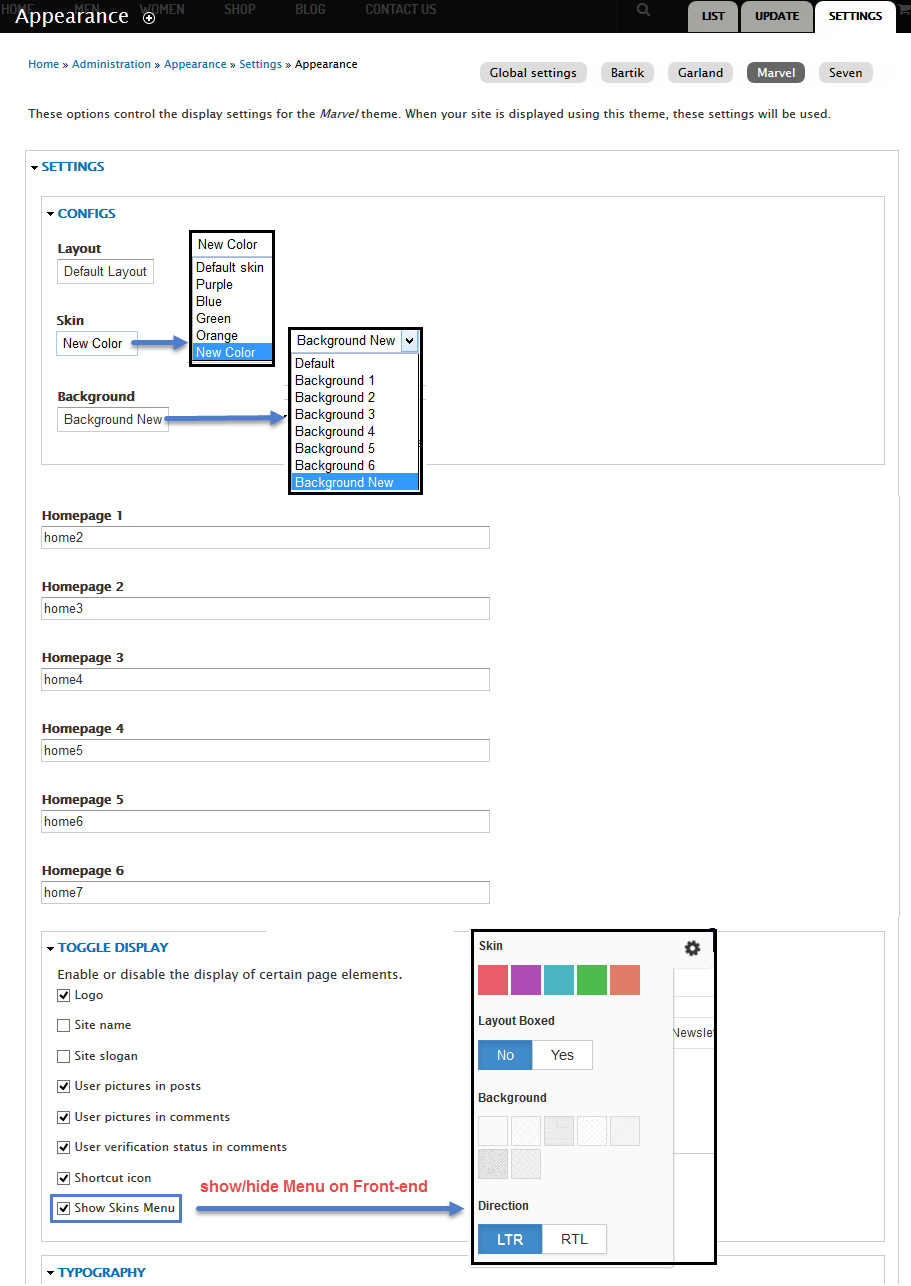
Step 3: At CONFIGS area, select one of options for Layout, Skin, Background to set default, (e.g: New Color), and at TOGGLE DISPLAY area, check Show Skins Menu option if you want to display Skins menu on front-end pages.
Language Configuration
This section guides you how to have multiple languages for your site. Marvel Theme supports both Left to Right and Right to Left languages.
Step 1: Navigate to Configuration > Regional and Language > Languages then add new language.
Step 2: Check to enable and set default language
Step 3: Save configuration


