
-

- Doc Navigation
- Taxonomy Configurations
- Media Configurations
Overview
Starting with a new theme, it's sometimes takes a lot of time for first time users to really understand how it works. You may want to know how to customize layouts, typography, block styles and make it look the way you want.
In most cases you won't need to know PHP or database queries, but basic knowledge would be very helpful to get great results.
If you're an experienced Drupal developer or if you want to build the theme from zero with only the basic appearance of your theme, find this guide in handy. This guide will give you the detailed step by step installation guide to help you start building the content for Pinteros D8 to look exactly like the demo site.
1. Pinteros Package
Pinteros D8 is the Drupal 8 version of Pinteros.
Pinteros is a multipurpose theme that can serve a wide range of interest - whether you're a blogger wanting a have a place to talk about something; or a photographer wishing to showcase the best shots of yours; or a news curator who desires to have an information page.
Included content:
- README.txt
- Pinteros D8 theme: pinteros_d8-8.1.7.zip
- Demo Profile for Pinteros D8: pinteros_d8-demo-8.1.7.zip
2. Features
- Documentation included.
- Browser compatibility
- Web Technology (Html5/Css3, Twitter Bootstrap 3.1.1, Font Awesome 4.0.3,…)
- Fully responsive.
- Color variations
- Easy customization.
- High usability
- Support both Left to Right and Right to Left Languages
3. Screenshots
Let's glance through the theme's design & some features:
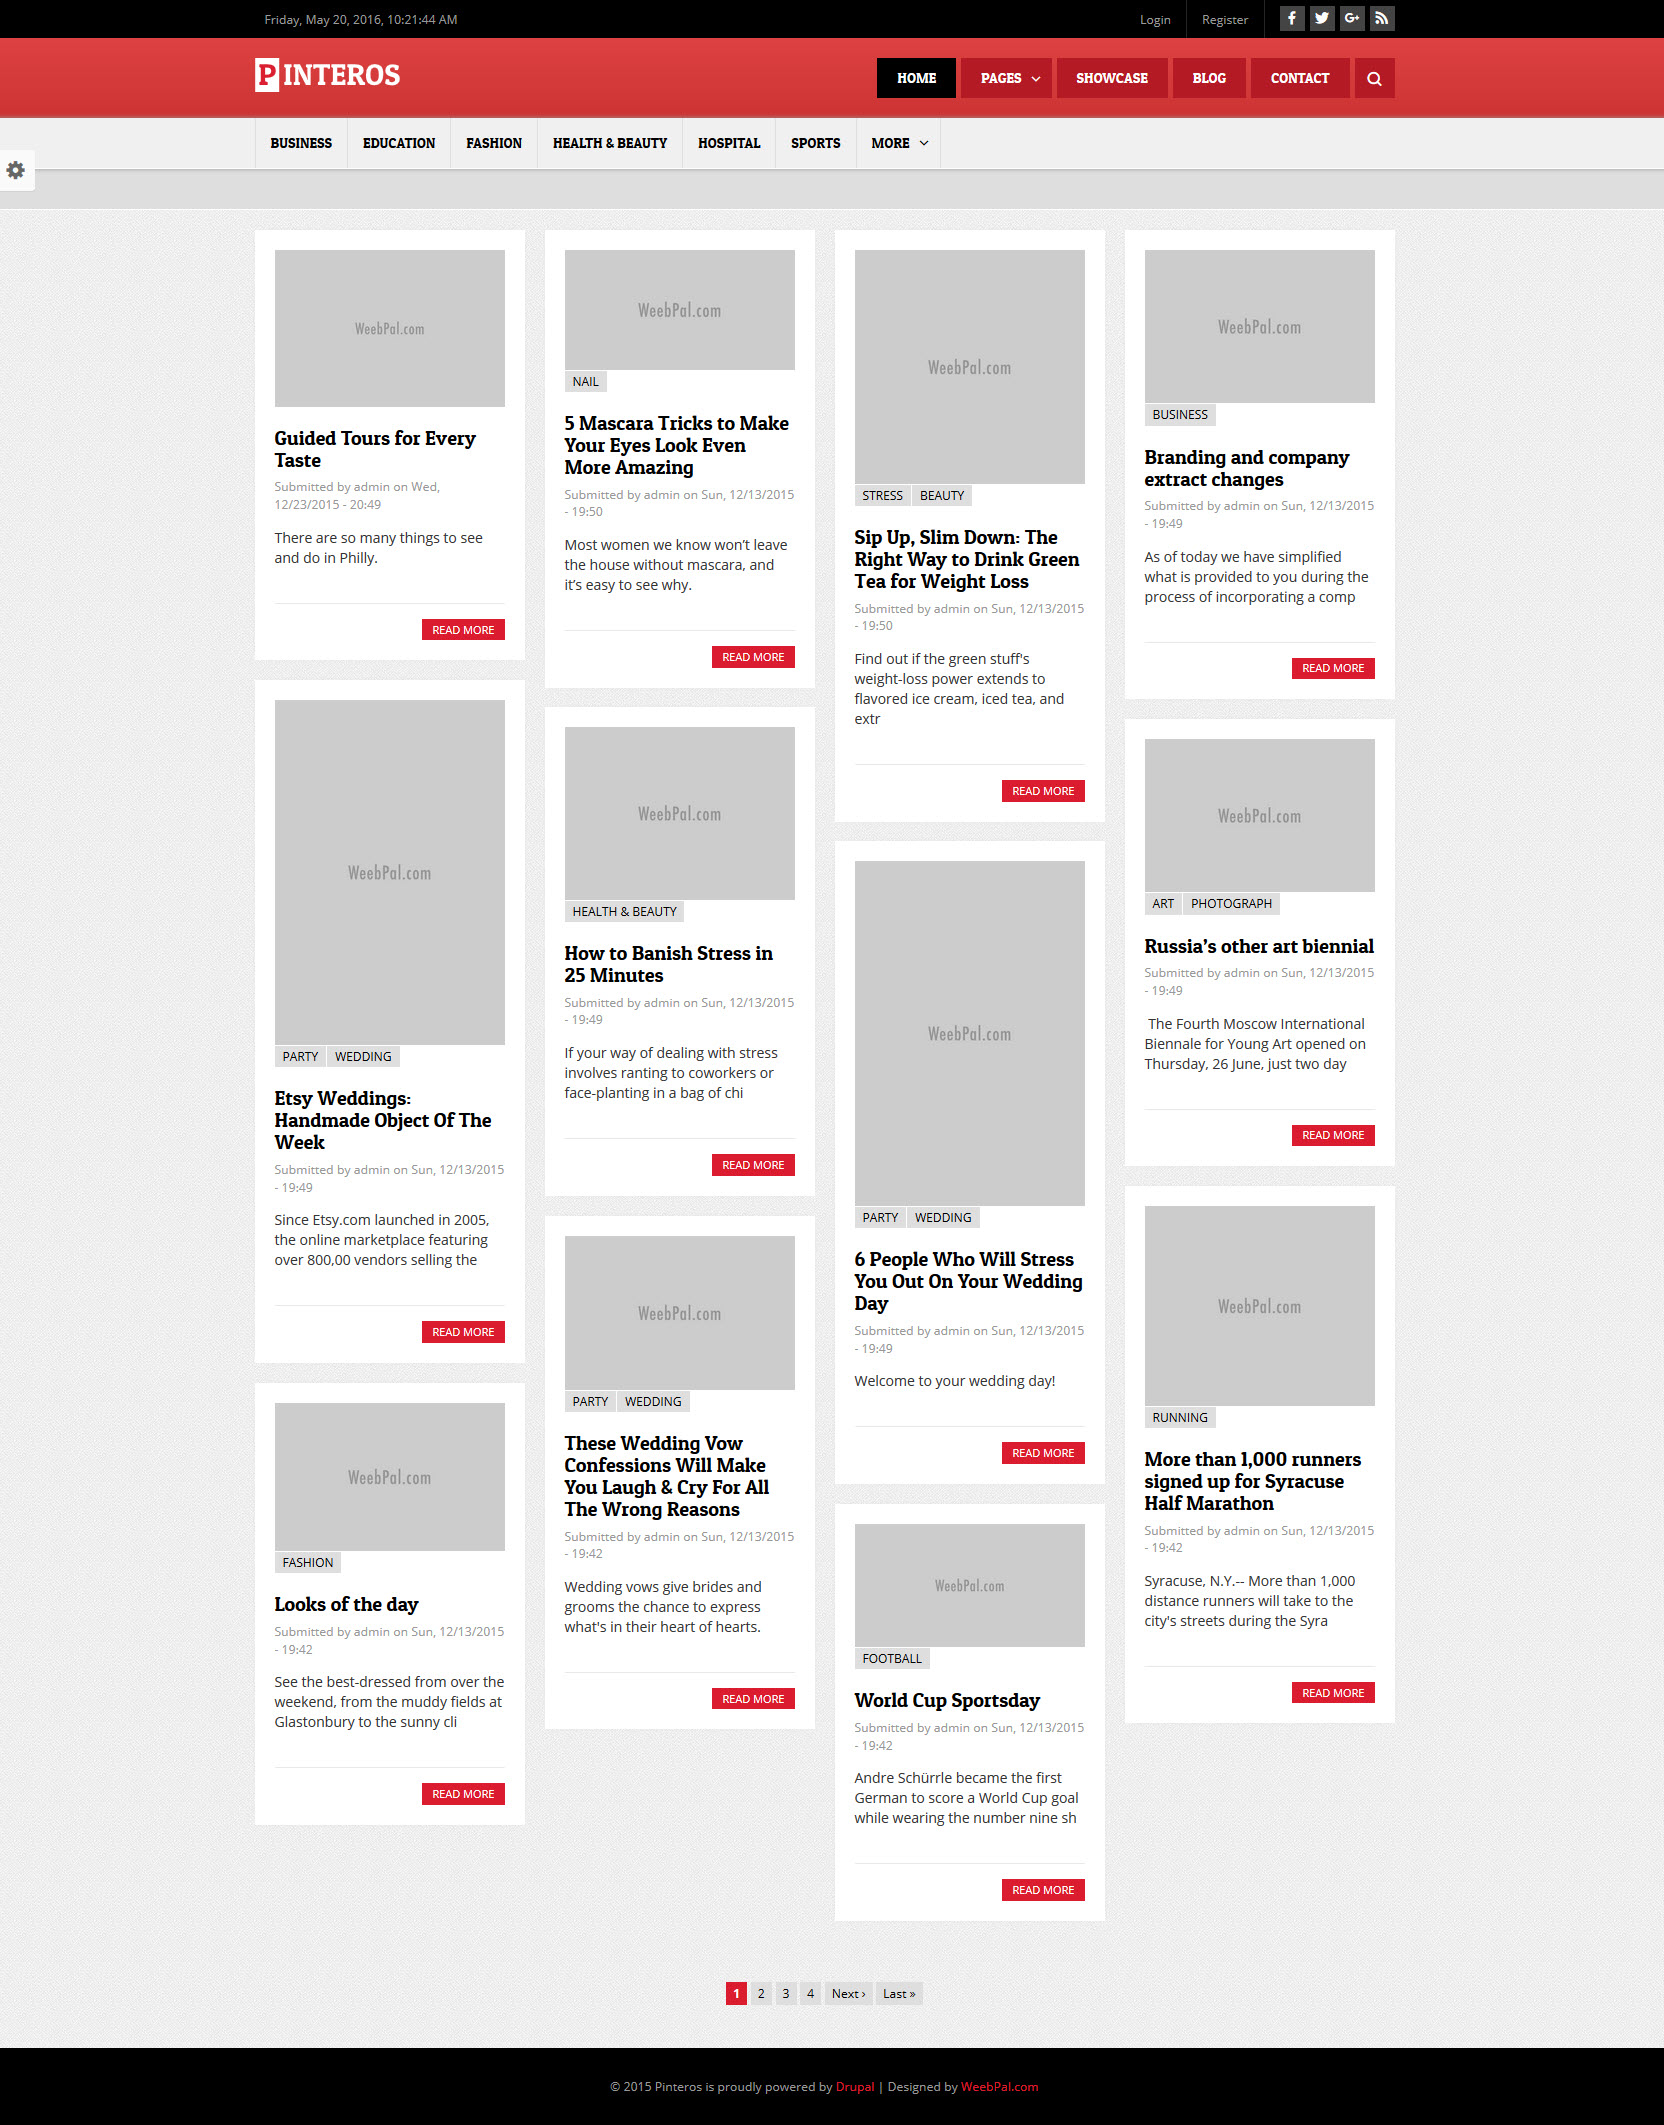
Home
Page

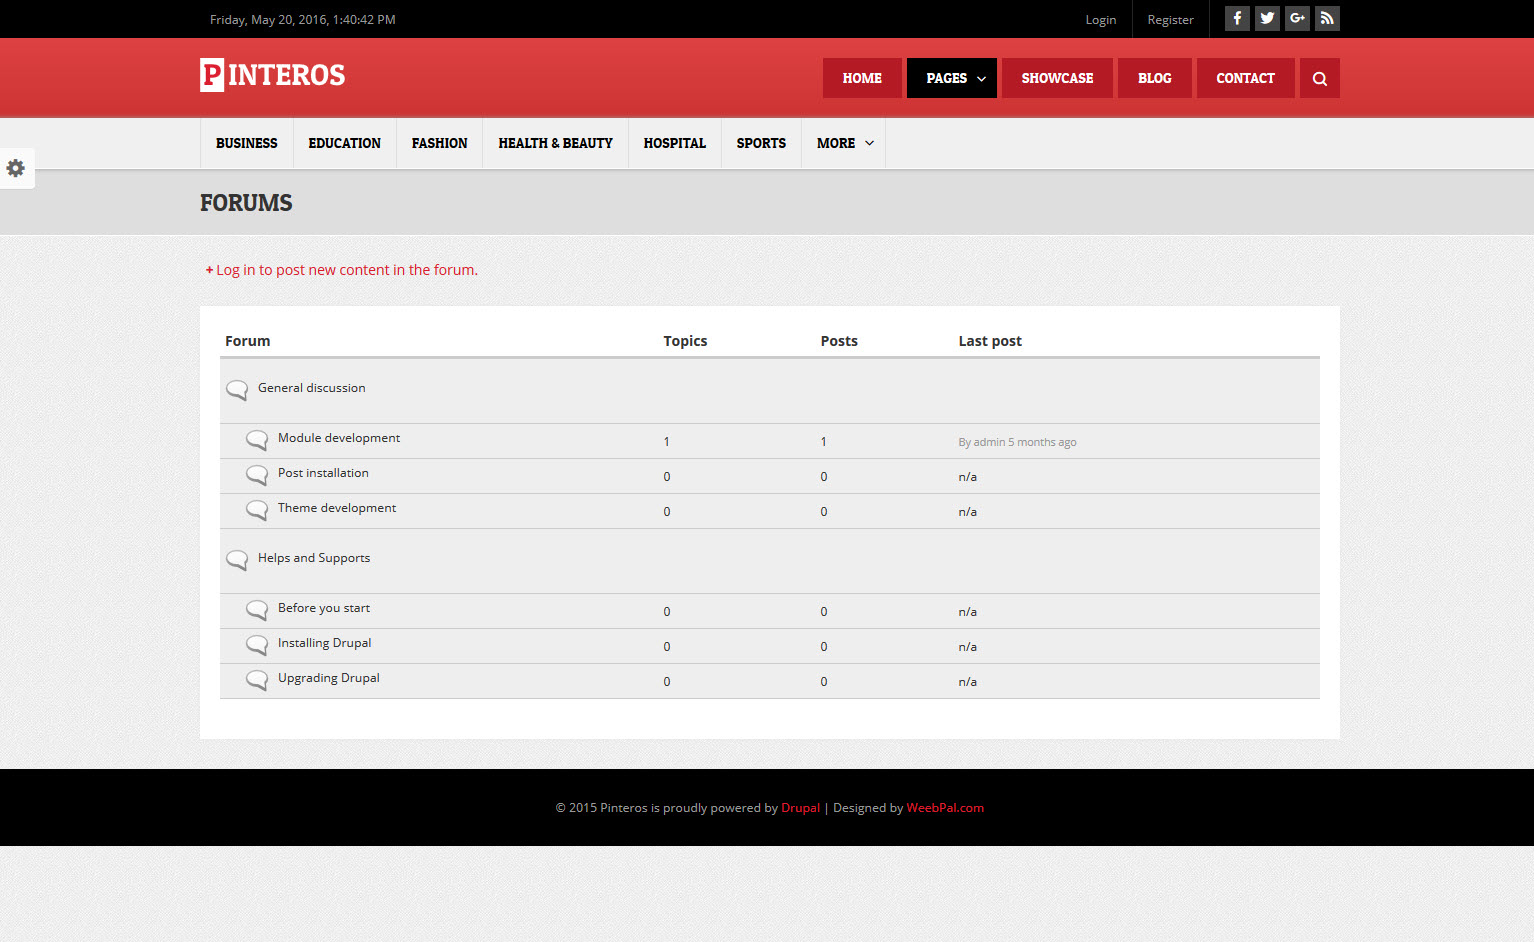
Forums Page
Categories page

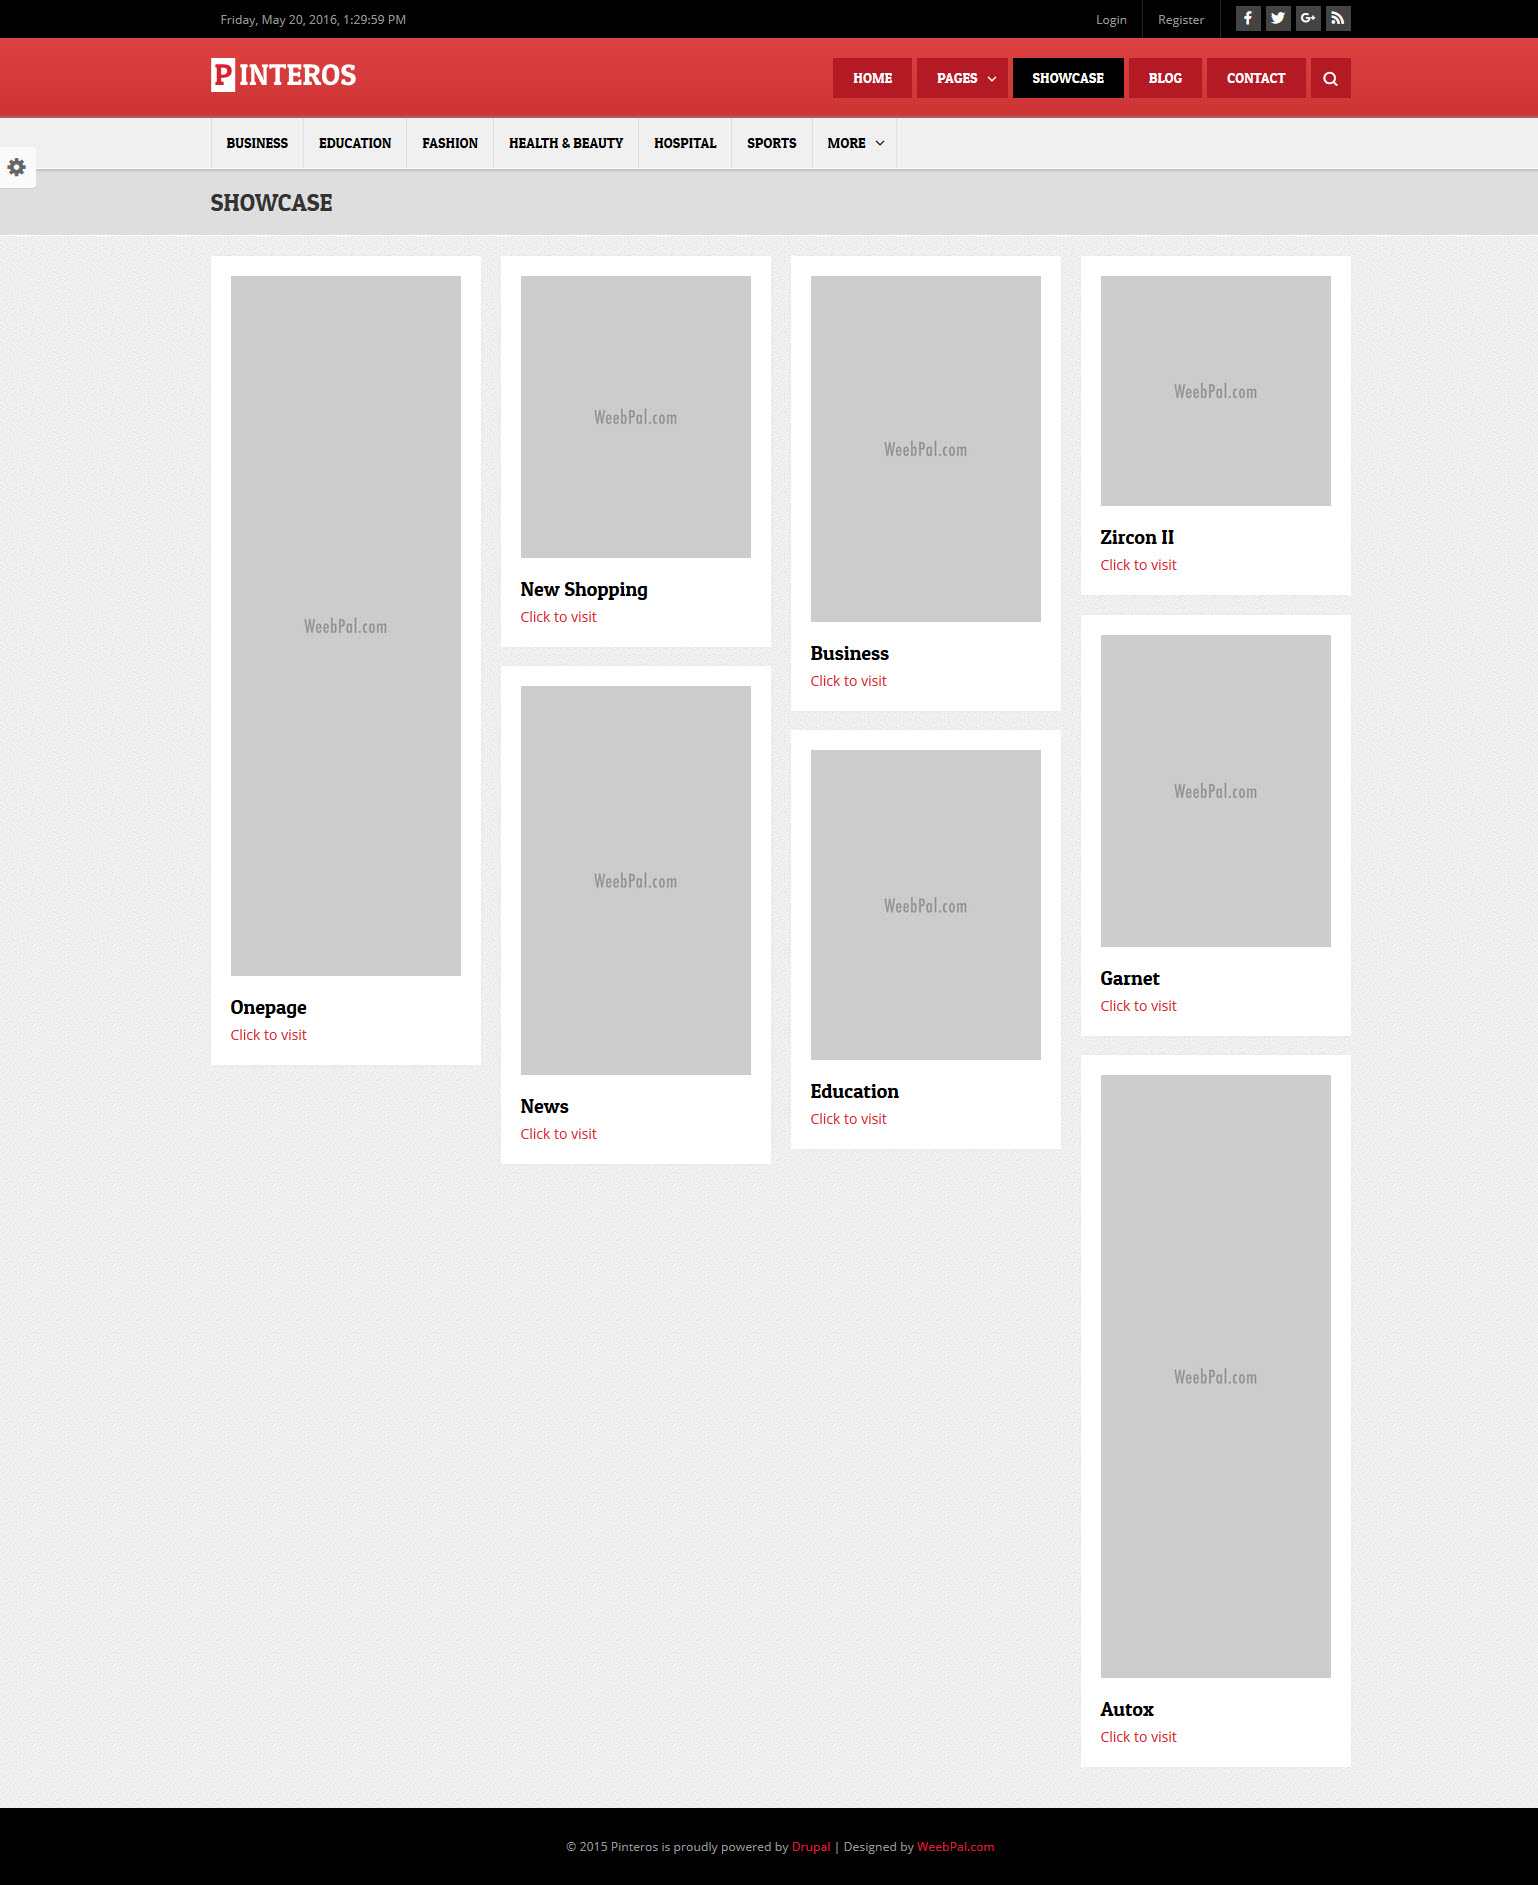
Showcase page
Blogs page

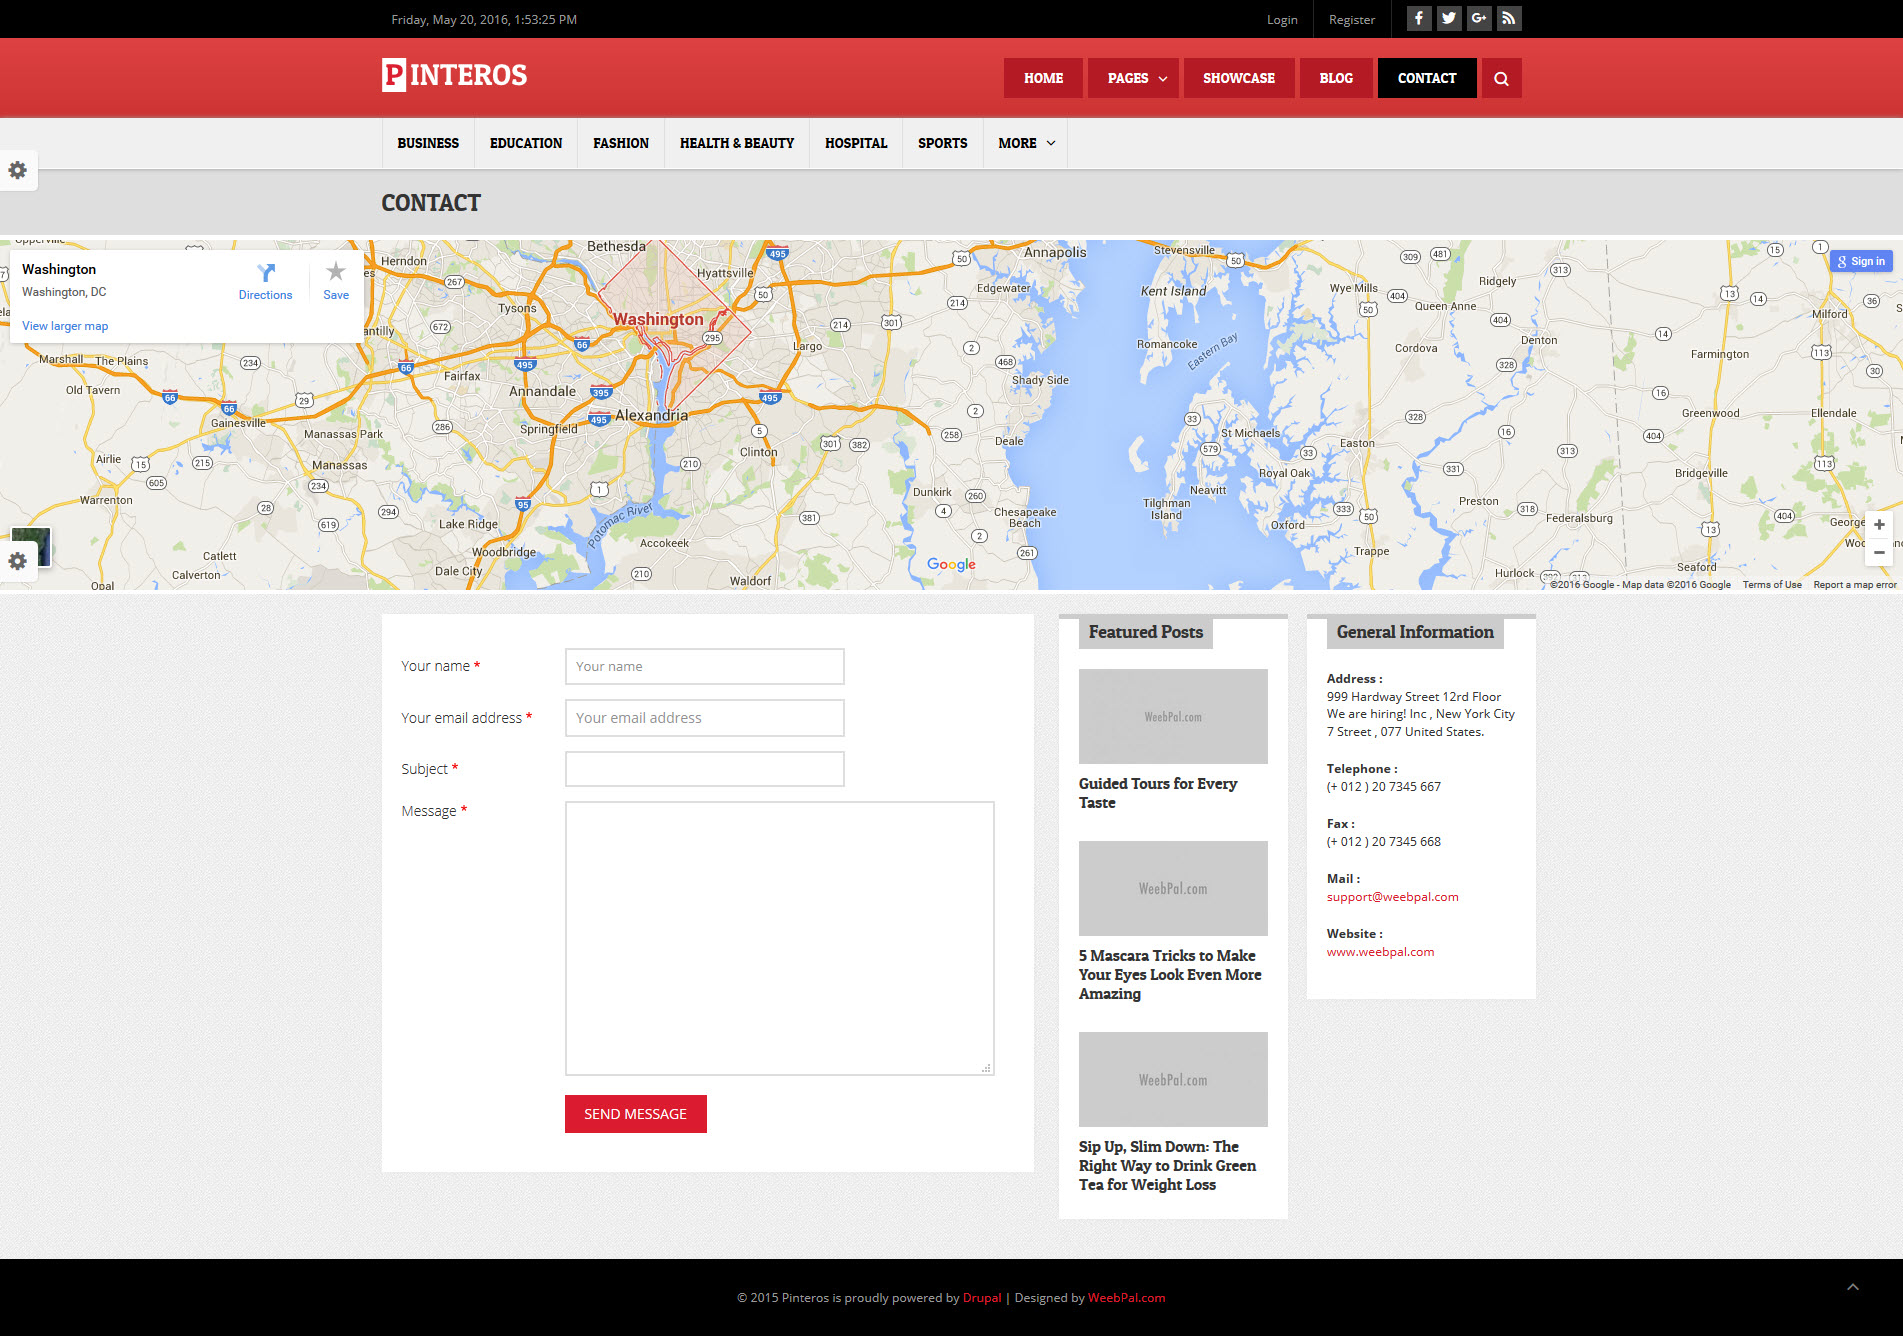
Contact page
Homepage with Layout box

4. System Configuration
Database
- MySQL 5.5.3/MariaDB 5.5.20/Percona Server 5.5.8 or higher with PDO and an InnoDB-compatible primary storage engine,
- PostgreSQL 9.1.2 or higher with PDO,
- SQLite 3.7.11 or higher
PHP
- PHP 5.5.9 or higher
- PHP 5GD library installed
- Disabled error_reporting flag on production server
- Enabled mod_rewrite in Apache for clean URLs
- Memory limit set up at least 128MB
If you are new to Drupal, please take a reference to System requirements on drupal.org.
5. Module requirements
Core Modules
- Action
- Block Content
- Update manager
- Locale
- Quick Edit
Third-party Modules
Download Drupal core files, and extend your site with modules at here.
Installation
How to install a WeebPal demo package
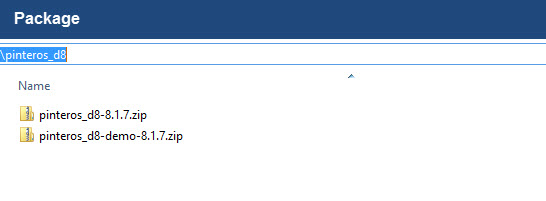
1. Download one theme package of your choice (e.g: pinteros)
Files included:
- README.txt
- Pinteros D8 theme: pinteros_d8-8.1.7.zip
- Demo Profile for Pinteros D8: pinteros_d8-demo-8.1.7.zip This demo package includes all source codes and content, including sample images. This package will be used to build a site like our demo for the theme easily.
The below steps will give you the installation guide so that you can build your website to look exactly like the Pinteros D8 Demo
- pinteros_d8-8.1.7.zip
2. Extract pinteros_d8-demo-8.1.7.zip above and copy it into your host, and rename the directory

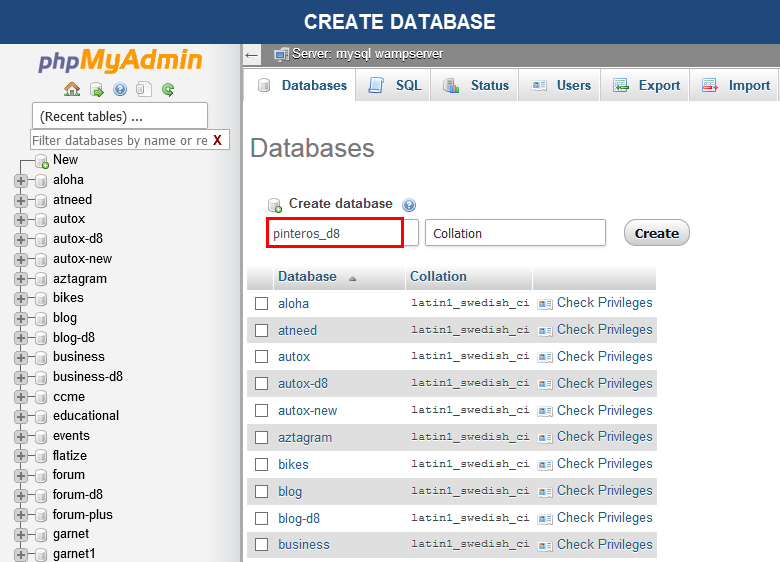
3. Access your MySQL database and create a new database (e.g: pinteros_d8) and user account. Don't forget to add correct permissions to new user to access the database
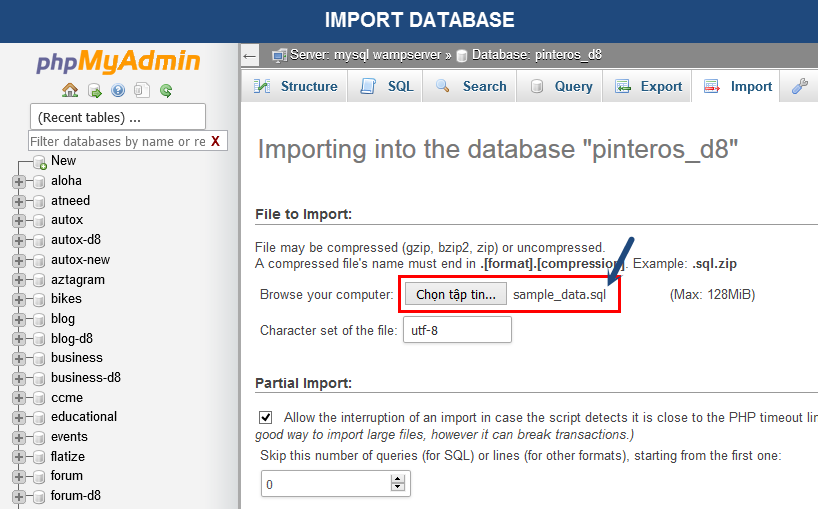
4. In the demo directory database/ , you can find database dump named sample_data.sql.
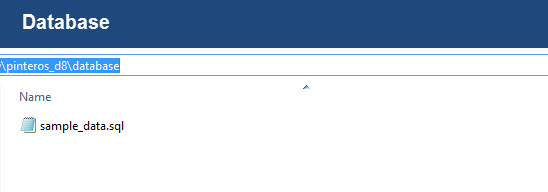
Import this file into new database.
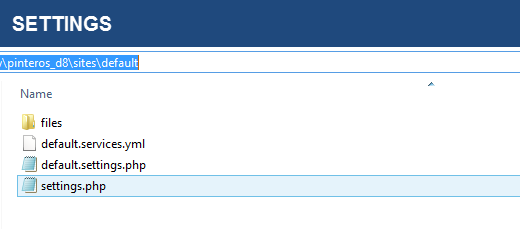
5. Now, you need to modify sites/default/default.settings.php file. Clone default.settings.php file, then rename it "settings.php"
6. Open settings.php, locate the $database array and set proper credentials. Then move the $database code to the bottom of the file.
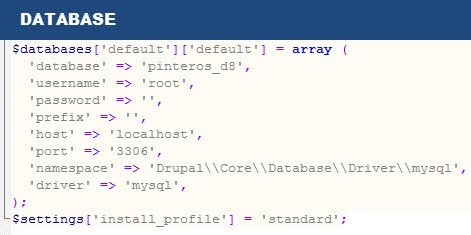
                     $databases['default']['default'] = array (
                      'database' => 'databasename',
                      'username' => 'username',
                      'password' => 'password',
                      'prefix' => '',
                      'host' => 'localhost',
                      'port' => '3306',
                      'namespace' => 'Drupal\\Core\\Database\\Driver\\mysql',
                      'driver' => 'mysql',
                       );
                   $settings['install_profile'] = 'standard';
When using this installation, you are installing everything from our preview server. So don't forget to set proper values to access to your database: db name, db admin username, db admin password, host, etc.
7. Open the browser and visit your website with the prepopulated content & layout exactly like our Pinteros Demo
Now, you can visit administrator site with the admin account admin/admin to delete the unnecessary contents and add the new ones.
How to install a WeebPal theme for Drupal developers
If you're an experienced Drupal user or if you want to build the theme from zero with only the basic appearance of pinteros Theme, find this guide in handy.
1. Install Drupal
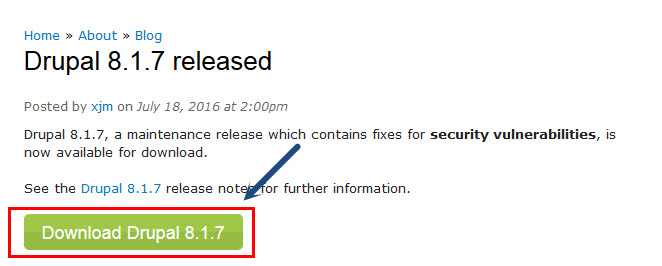
1. Go to Drupal download page and download the latest version of Drupal 8
2. Extract and copy Drupal folder to your host and rename the directory (e.g: pinteros)
Follow steps below to install a Drupal site only:3. Access to database and create a new database with a name such as pinteros_d8.
4. Open browser and navigate to your website.
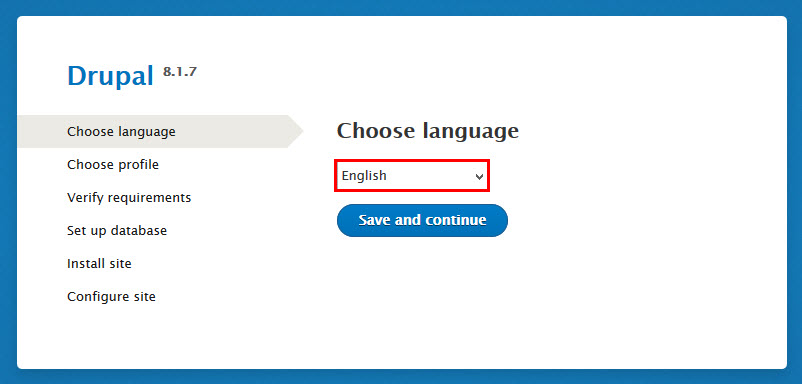
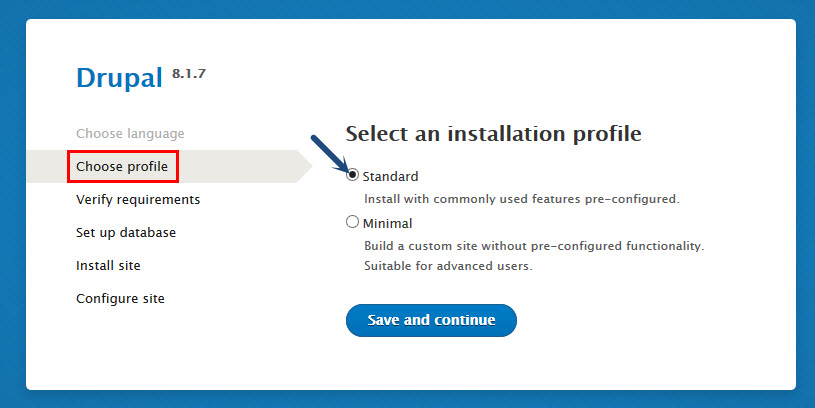
5. Choose language => click Save and continue button.
6. Select Standard => click Save and continue button.
7. Enter database parameters => click Save and continue button.

8. Enter site information => click Save and continue button.

9. Click Visit your new site and you will have a new site.
You can refer the guide from drupal.org to delve more details about drupal installation.
2. Install Pinteros Theme
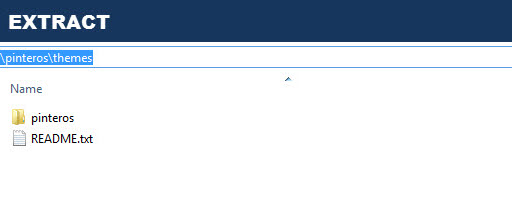
- Extract Pinteros theme .ZIP file:
- pinteros_d8-8.1.7.zip
-
Move this theme into your Drupal folder: sites/all/themes
-
Navigate to Appearance > Choose Enable and set default pinteros theme

3. Install Required Modules
Now that you've enabled pinteros theme, you will install and enable the required modules (listed in the Module Requirements section) to customize and use them.
If you don't know how to install the contributed modules, this tutorial is an essential guide.
Cheat to install modules & theme:
- Extract pinteros_d8-8.1.7.zip
- Open extracted folder, go to sites/all and copy all folders inside (modules, themes, libraries)
- Paste them to your host, folder sites/all
Note: See this guide to get more details about installation
Taxonomy configuration
Quick Information
- Taxonomy: Taxonomy can be simply understood as category management using organizational keywords known in other systems as categories, tags or metadata. It allows you to connect, relate and classify your website's content. In Drupal, these terms are gathered within "vocabularies". The Taxonomy module allows you to create, manage and apply those vocabularies.
- Vocabulary: for example product category, tag, provider name, ...
- Term: the items in each vocabulary. For example: vocabulary product category has some terms: laptop, pc, mobile, tablet, camera, headphone, ...
- For more information about taxonomy, please see: Organizing content with taxonomies
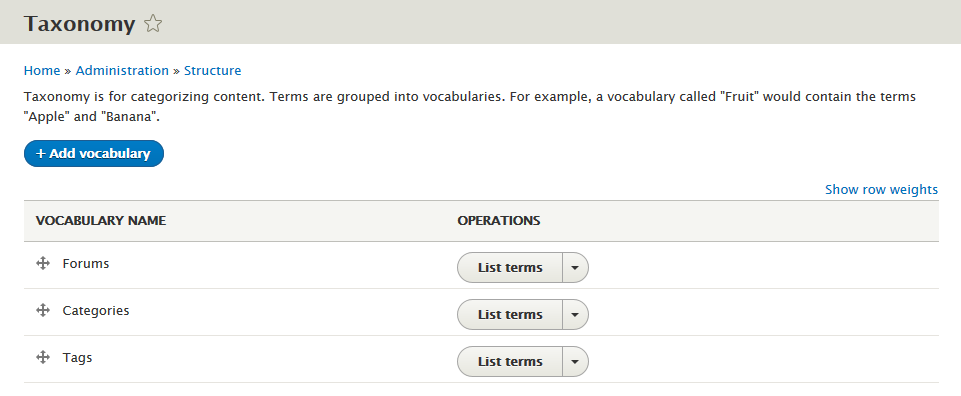
Step 1: Navigate to Structure > Taxonomy to create vocabularies as the following:
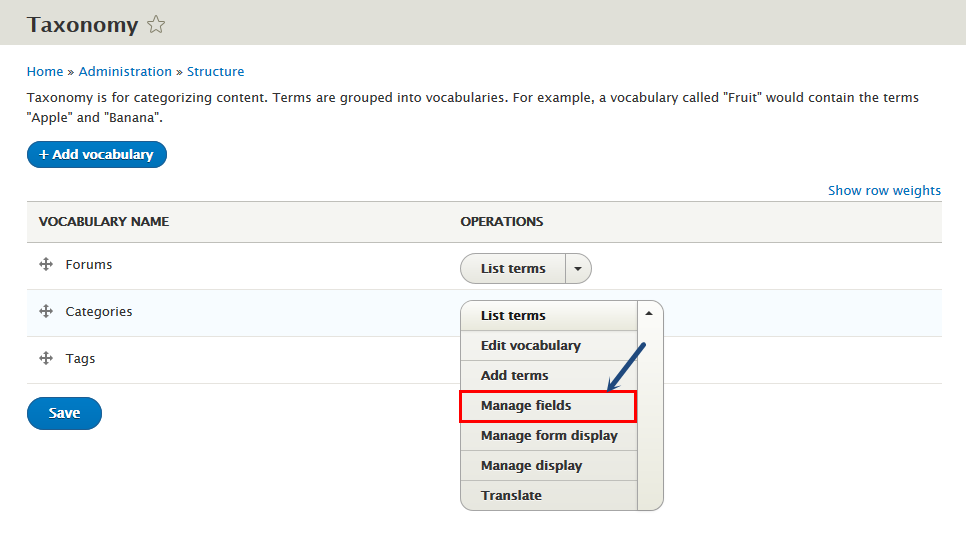
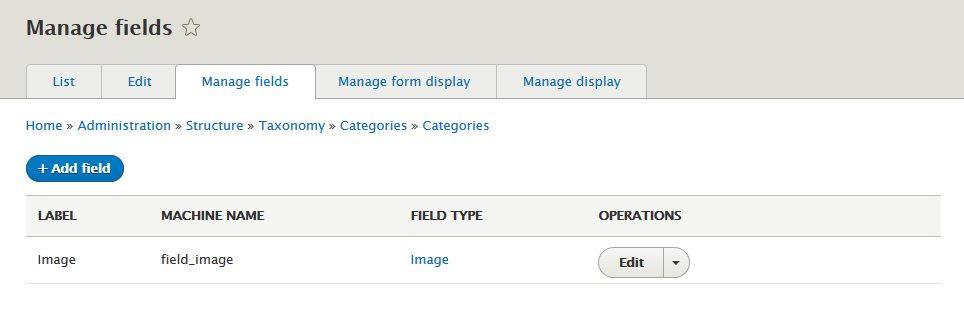
Step 2: At Categories line, find and click Manage field link
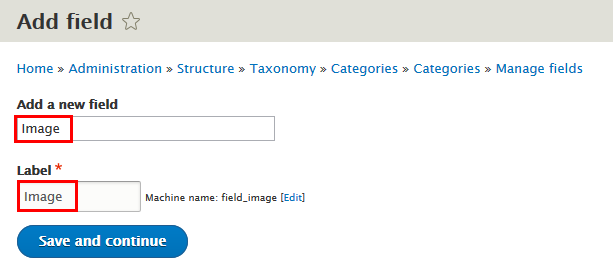
Step 3: At Manage field tabs, click Add field button to add Image field:
Step 4: Set properties for Image field
Step 5: Go to Manage display tabs, set following properties:

Then, add terms for each vocabulary
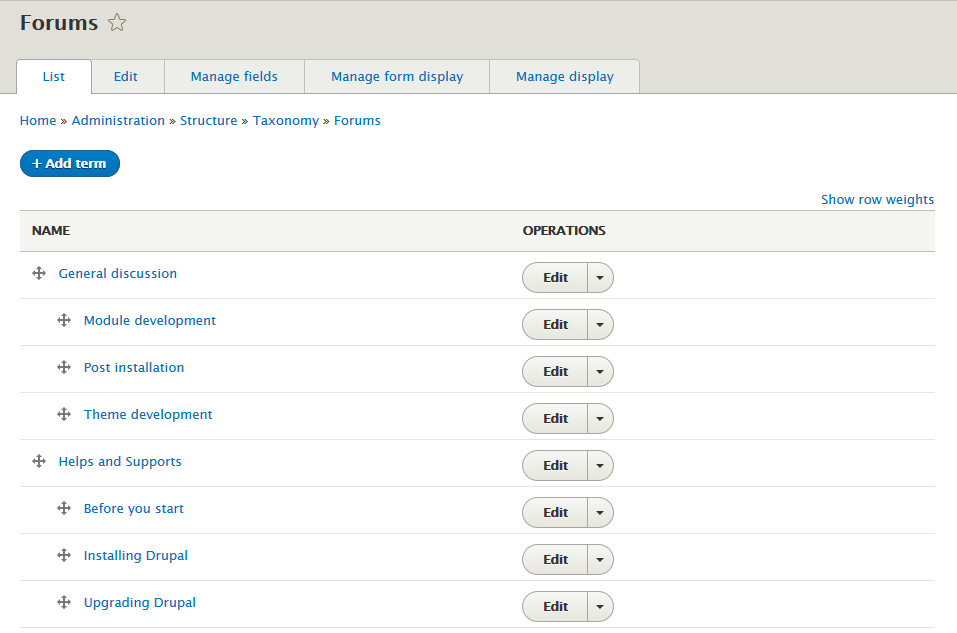
Terms of Forums:
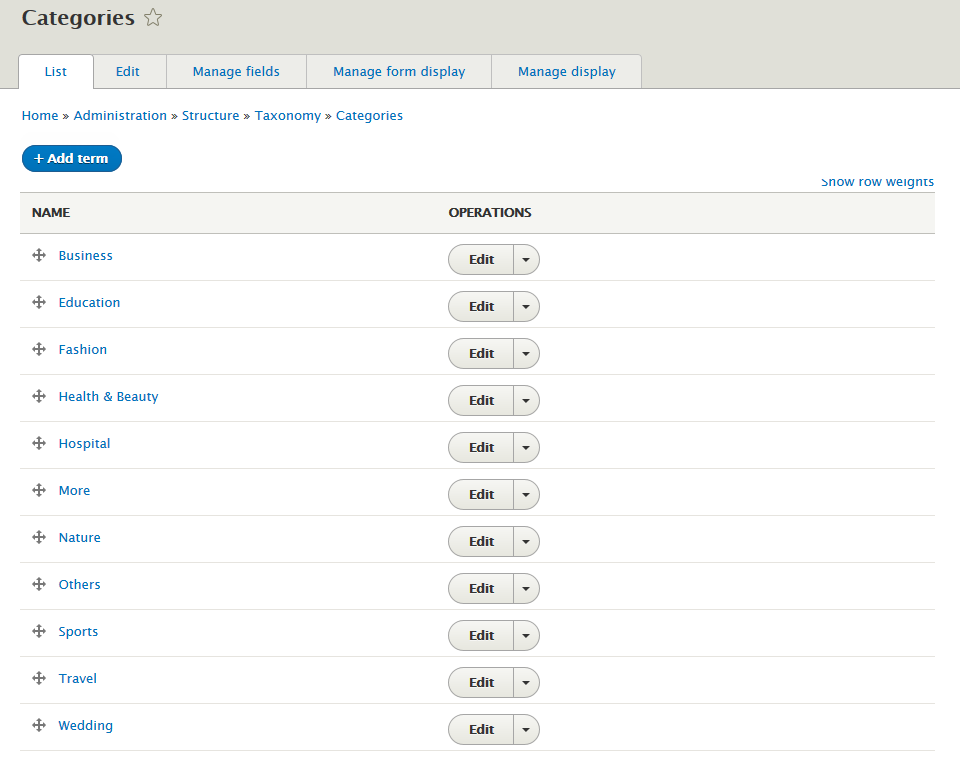
Terms of Categories:
Note: See this guide to get more details about taxonomy configuration
Media configuration
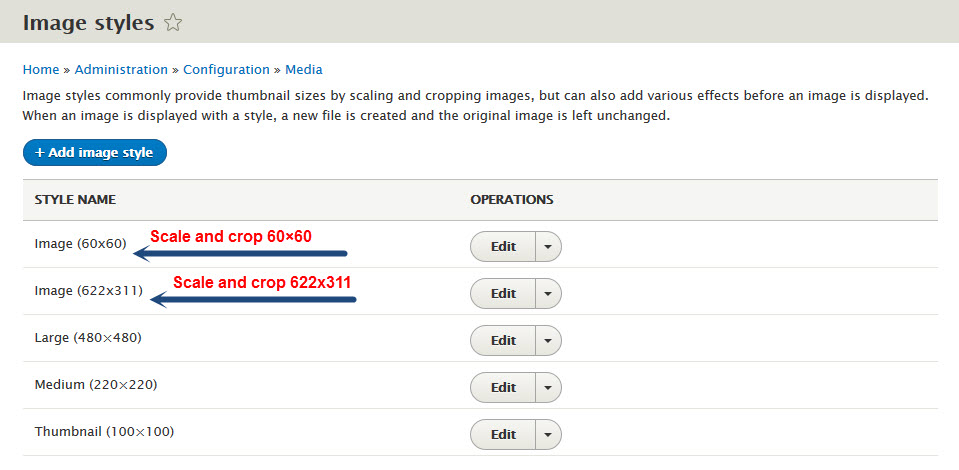
Image Style Configuration
Image styles are the presets of image settings. Image styles are used to define how the images are shown.
Navigate to Configuration, In MEDIA area, click Image styles, then create image styles as the following:
Content type configuration
Modify Article type
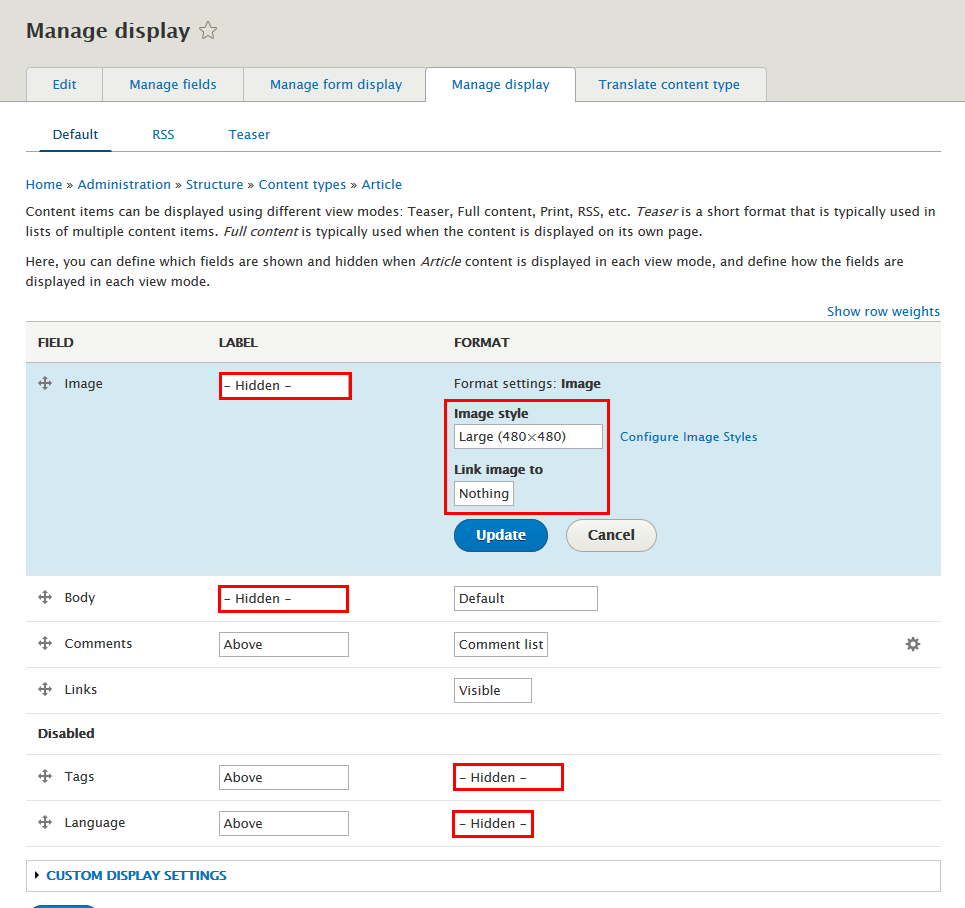
Step 1: Navigate to Structure > Content Type > Article. In Article, go to Manage display > Default tab, set following properties:
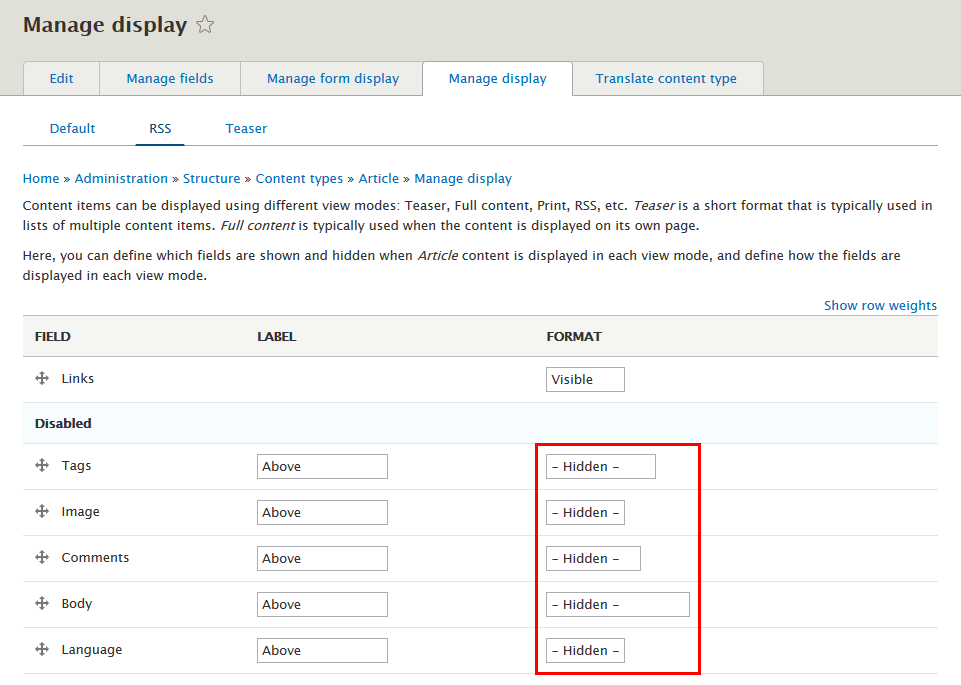
Step 2: Go to Manage display > RSS tab, set following properties:
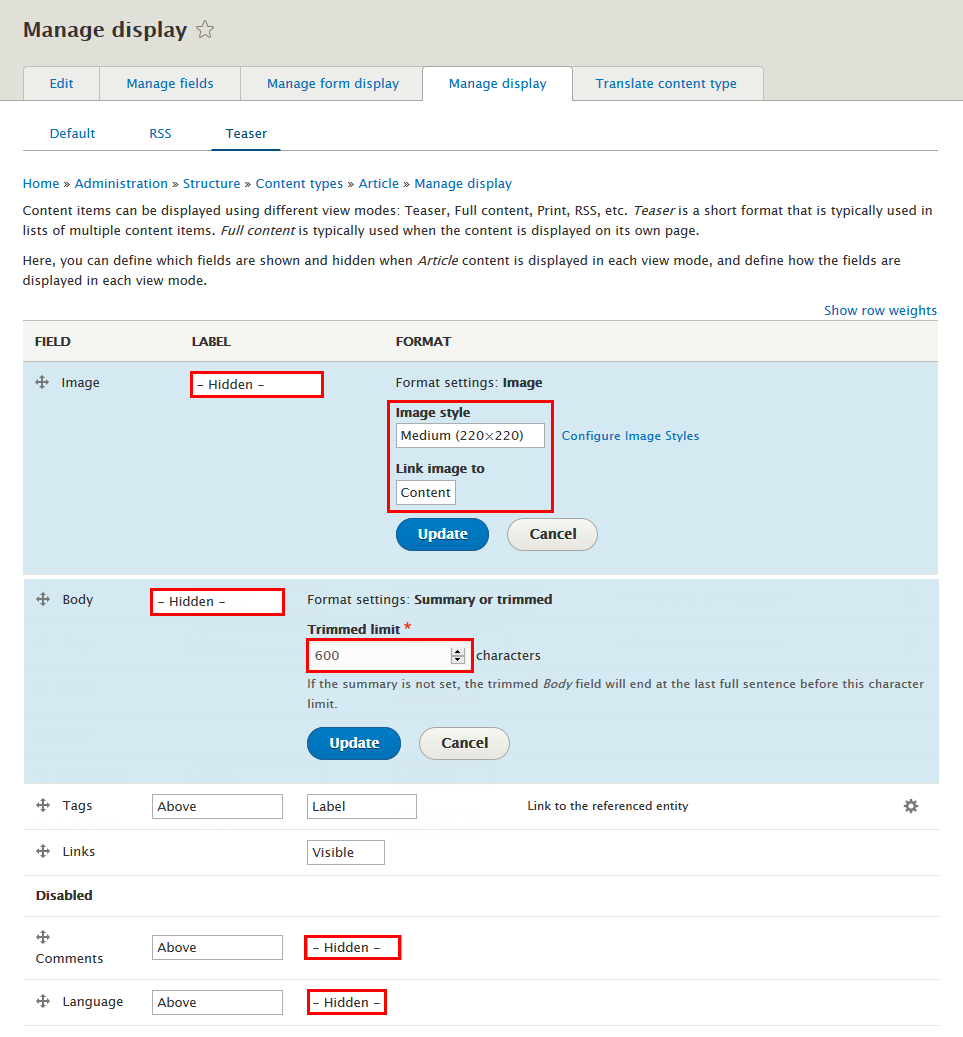
Step 3: Go to Manage display > Teaser tab, set following properties:
Step 4: Click Save button
Modify Basic page type
Step 1: Navigate to Structure > Content Type > Basic page. In Basic page, go to Manage display > Teaser tab, set following properties:

Step 2: Click Save button
Modify Forum topic type
Note: Required Modules: Forum
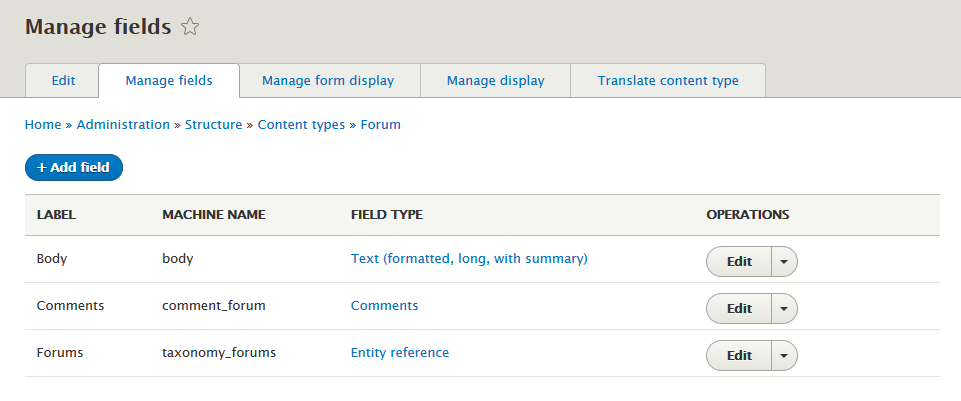
Step 1: Navigate to Structure > Content Type > Forum topic. In Forum topic, go to Manage fields tab, set following properties:
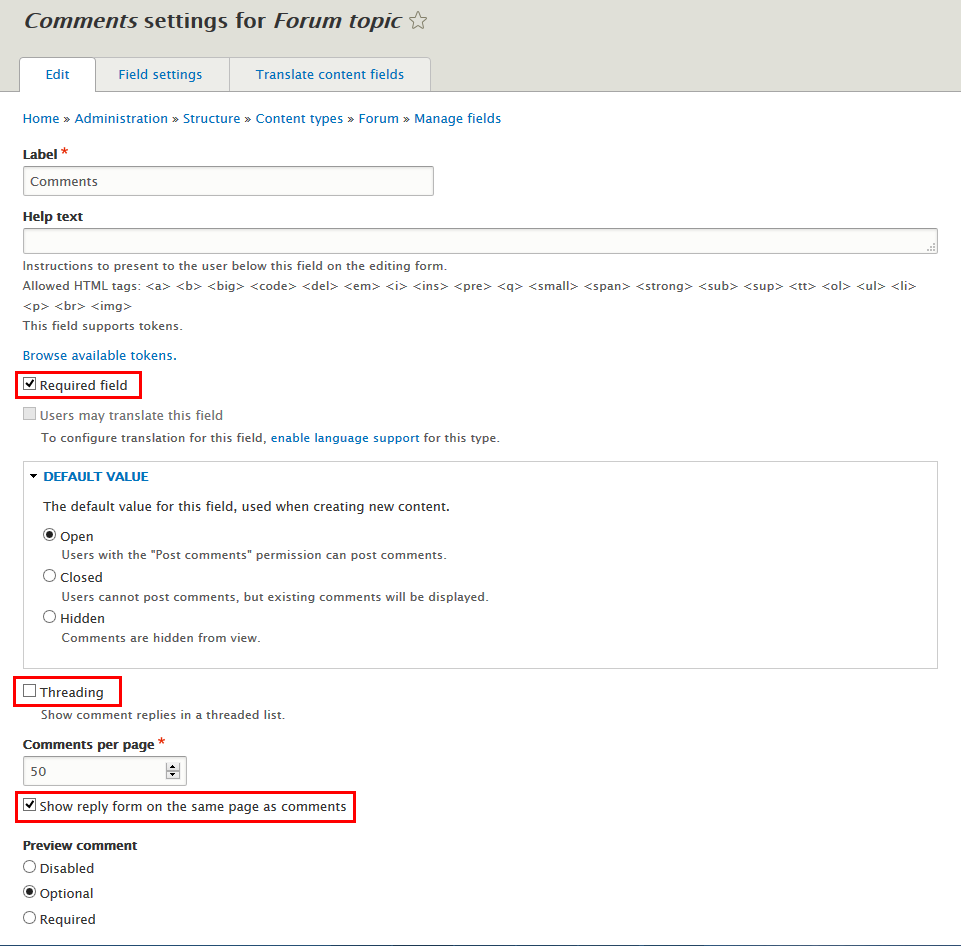
Step 2: Set properties for Comments field
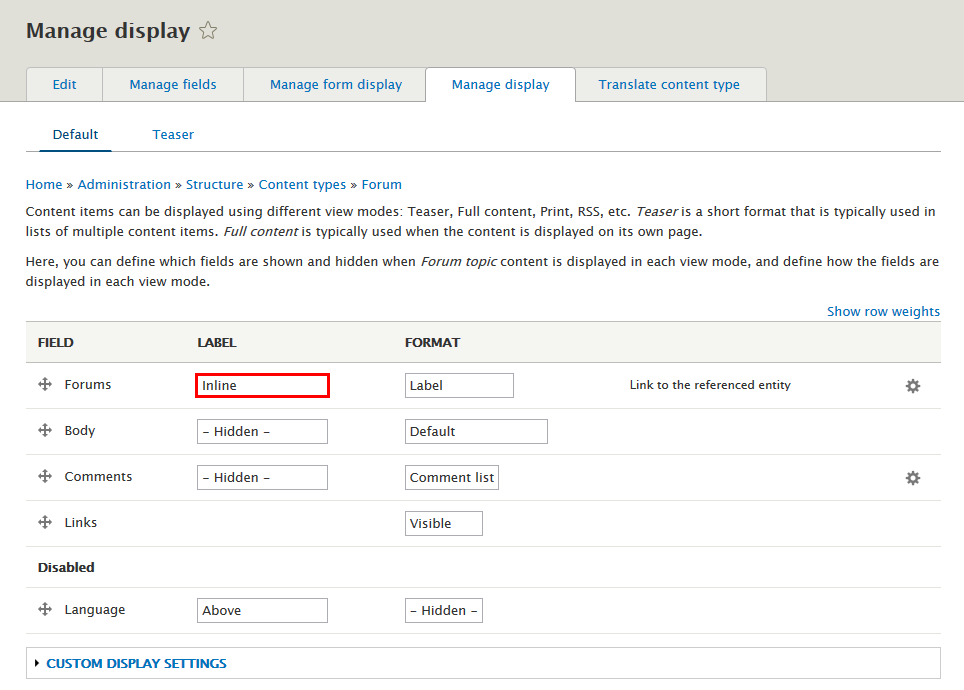
Step 3: Go to Manage display > Default tab, set following properties:
Step 4: Click Save button
Create Blog type
Step 1: Navigate to Structure > Content Type
Step 2: Click Add Content Type link to create Blog type
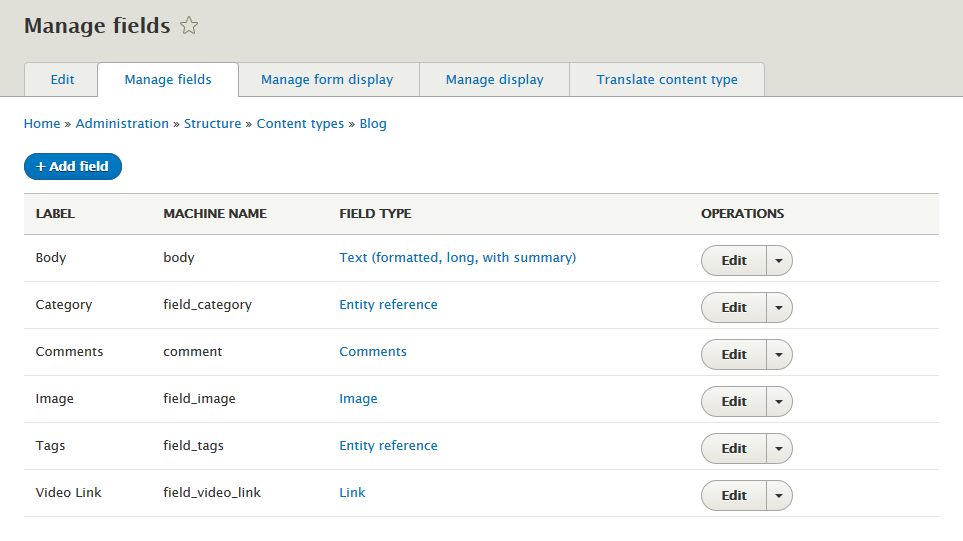
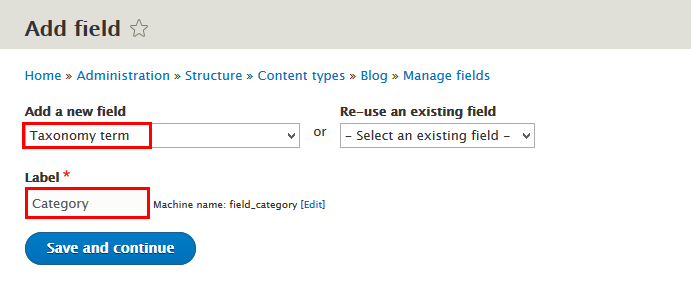
Step 3: Click Save and manage fields button, then add following fields:
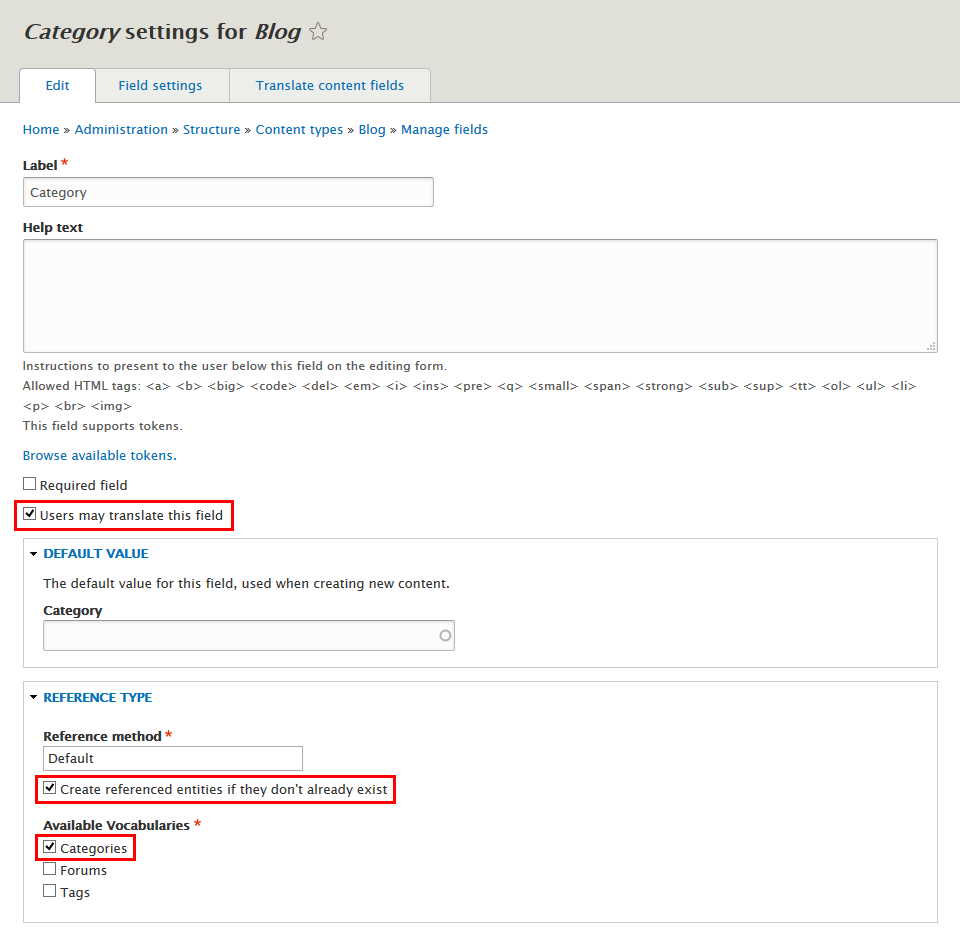
Step 4: Set properties for Category field
Step 5: Set properties for Comments field

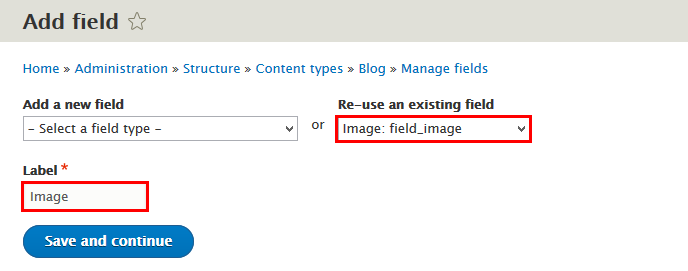
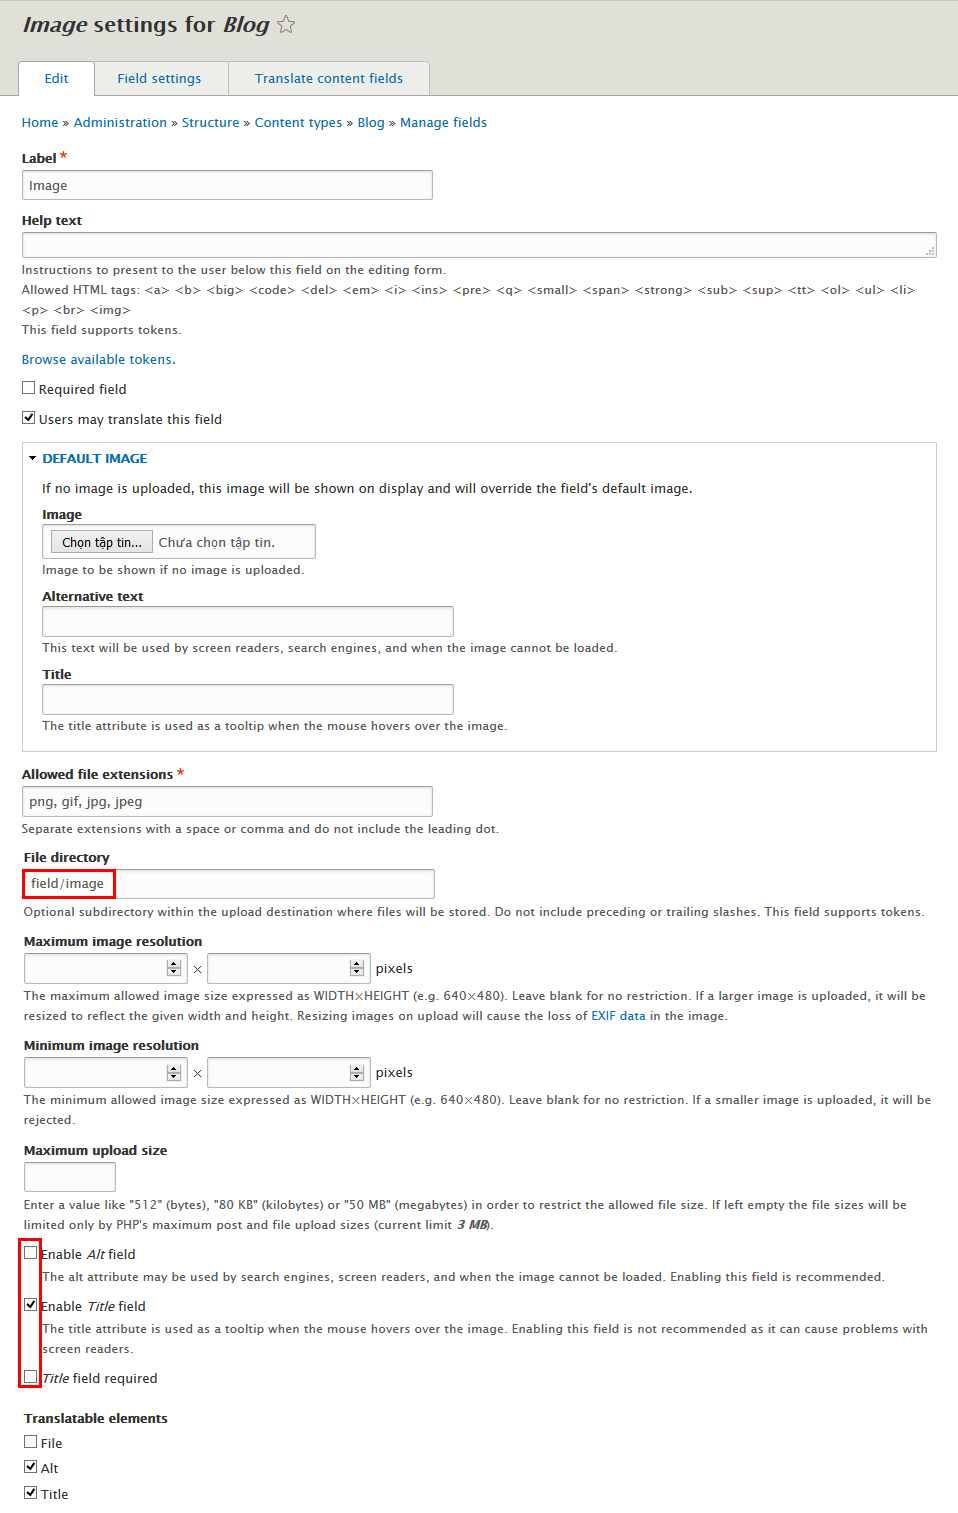
Step 6: Set properties for Image field
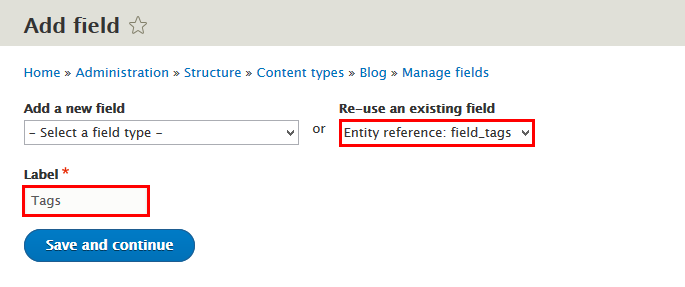
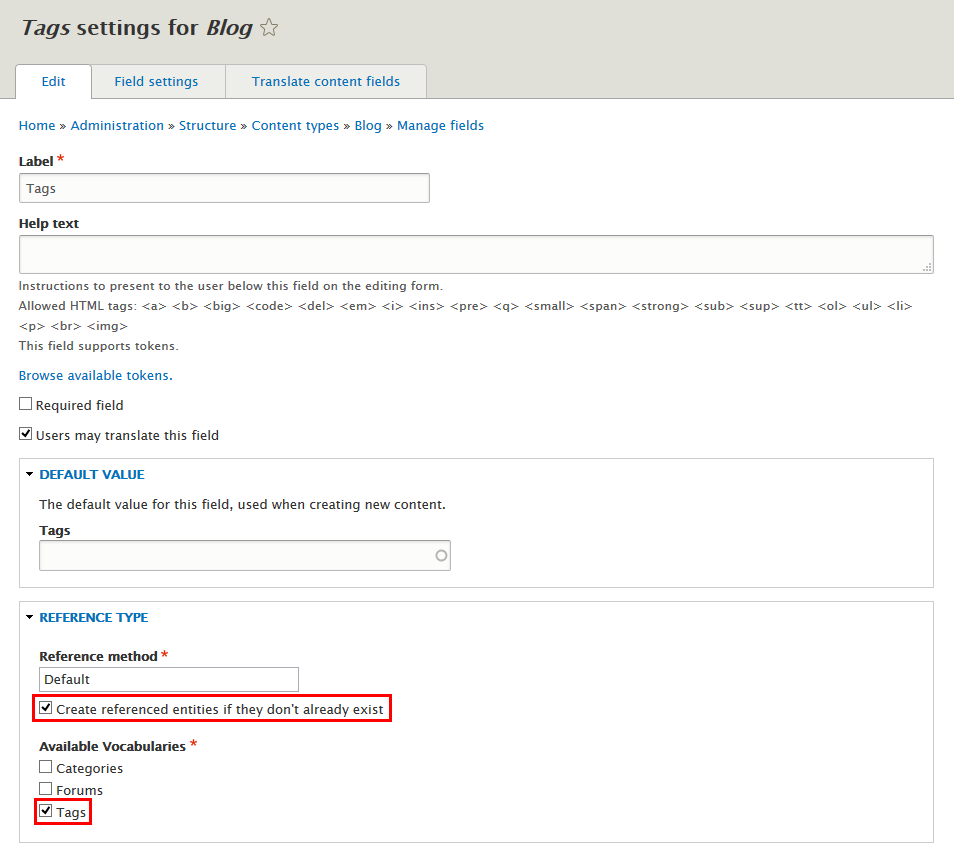
Step 7: Set properties for Tags field
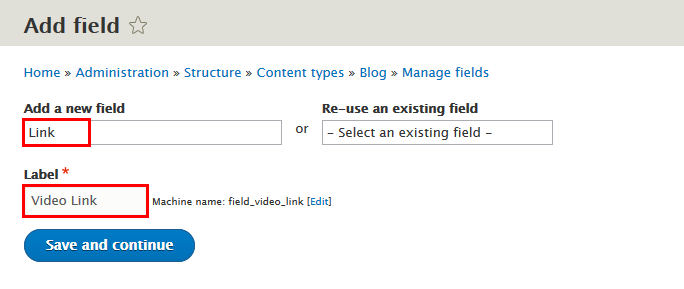
Step 8: Set properties for Video Link field
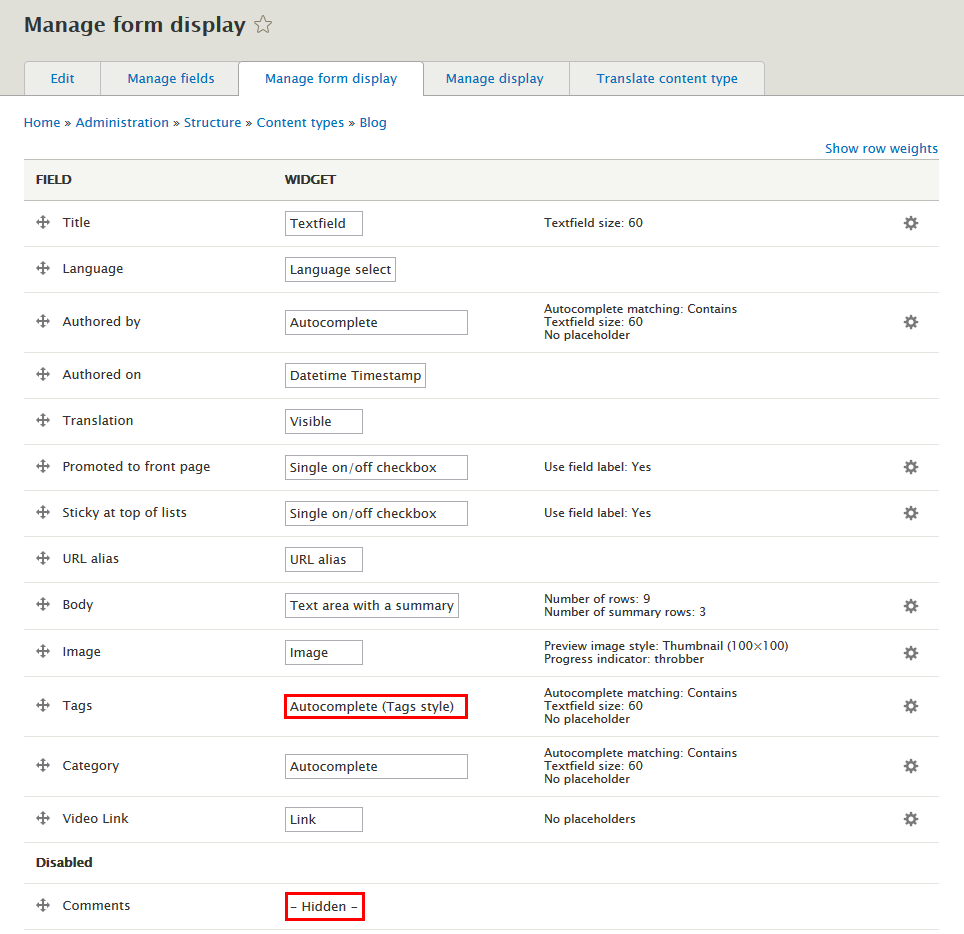
Step 9: Go to Manage form display tab, set following properties:
Step 10: Go to Manage display > Default tab, set following properties:

Step 11: Go to Manage display > Teaser tab, set following properties:

Step 12: Click Save button
Create Showcase type
Step 1: Navigate to Structure > Content Type
Step 2: Click Add Content Type link to create Showcase type
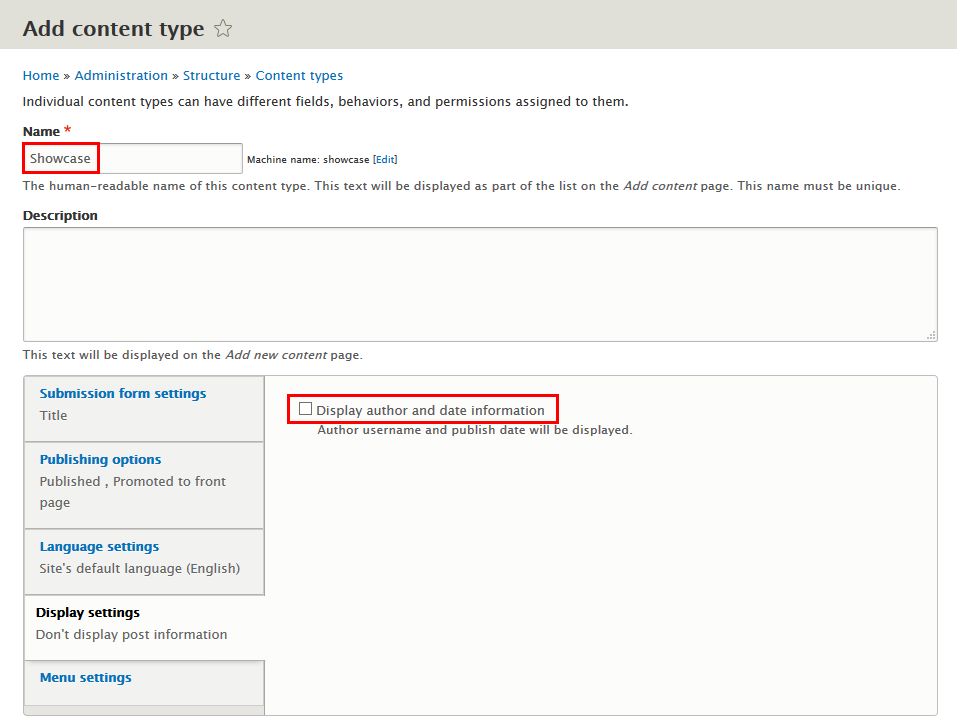
Step 3: Click Save and manage fields button, then add following fields:
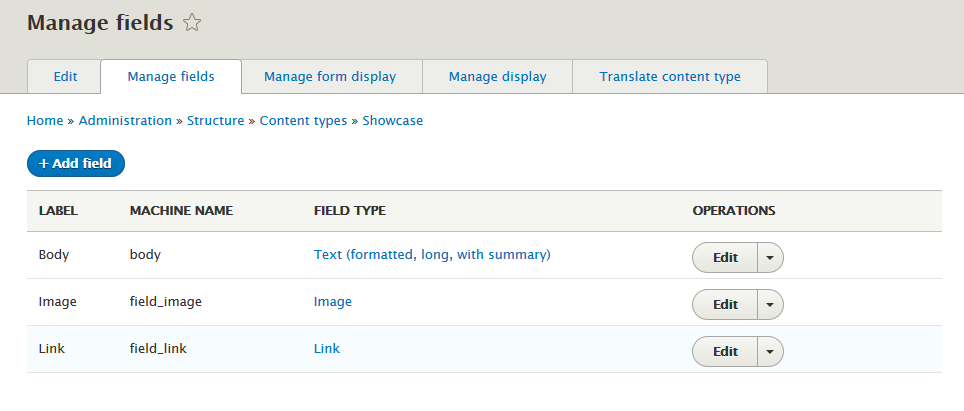
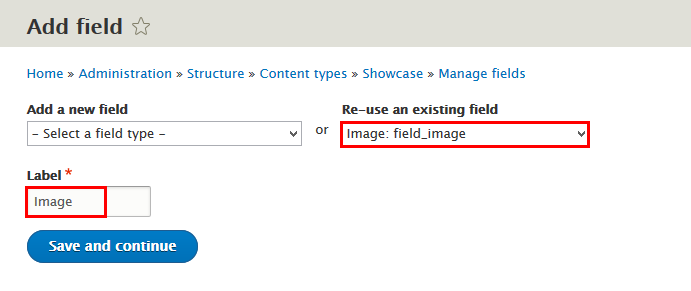
Step 4: Set properties for Image field

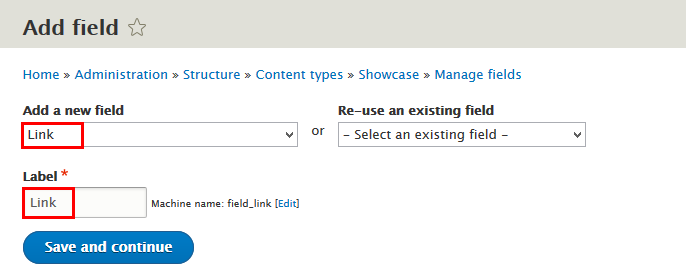
Step 5: Set properties for Link field
Step 6: Go to Manage form display tab, set following properties:

Step 7: Go to Manage display > Default tab, set following properties:
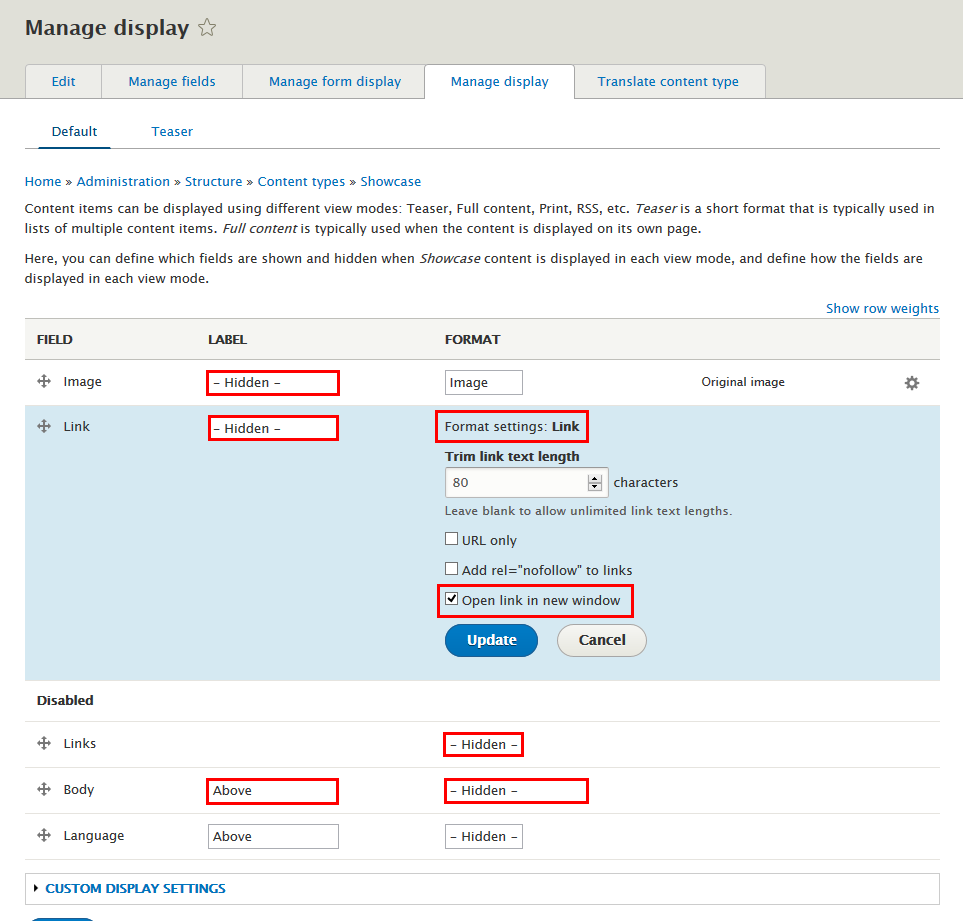
Step 8: Go to Manage display > Teaser tab, set following properties:
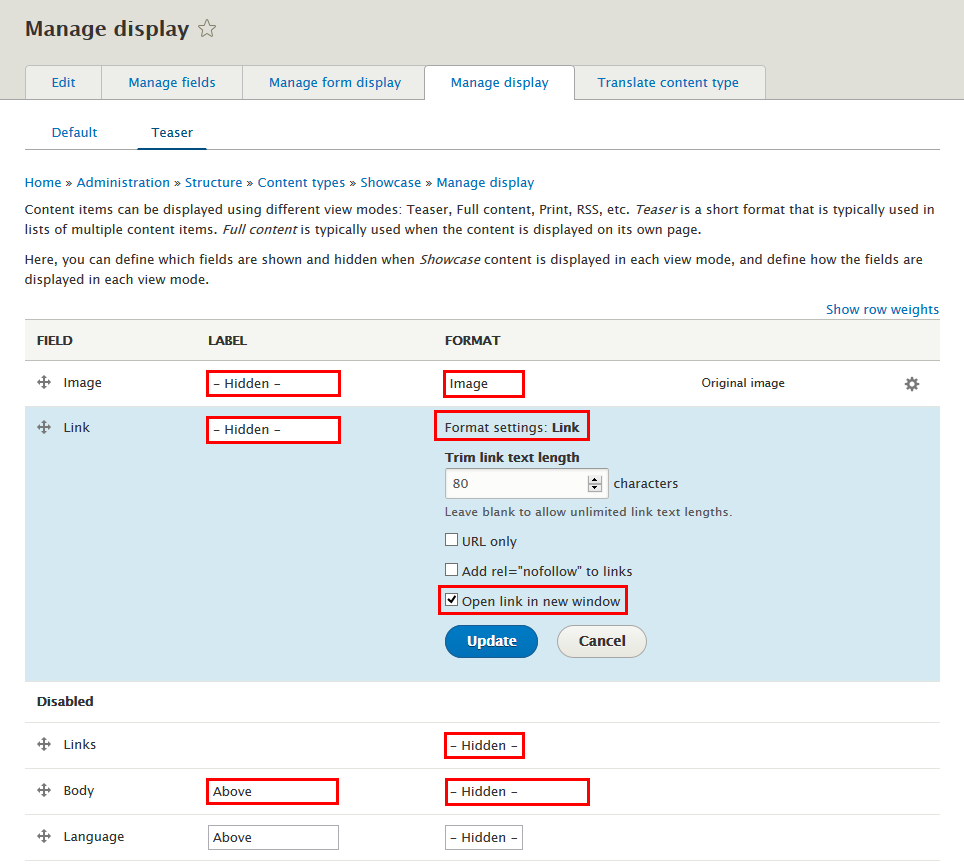
Step 9: Click Save button
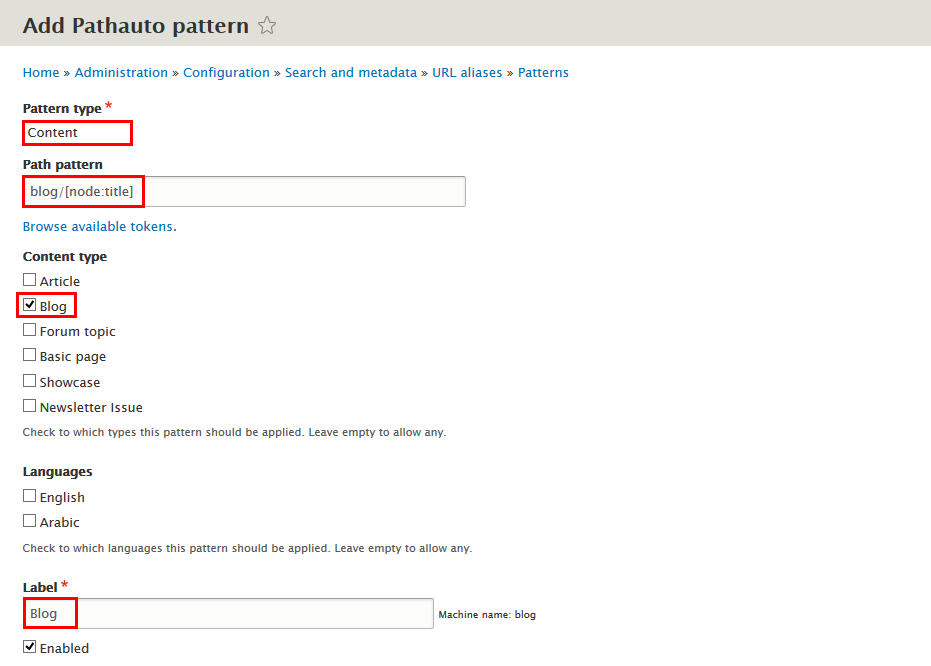
Configure URL aliases
Step 1: Navigate to Configuration > Search and metadata > URL aliases click Patterns tabs then add Add Pathauto pattern following properties:
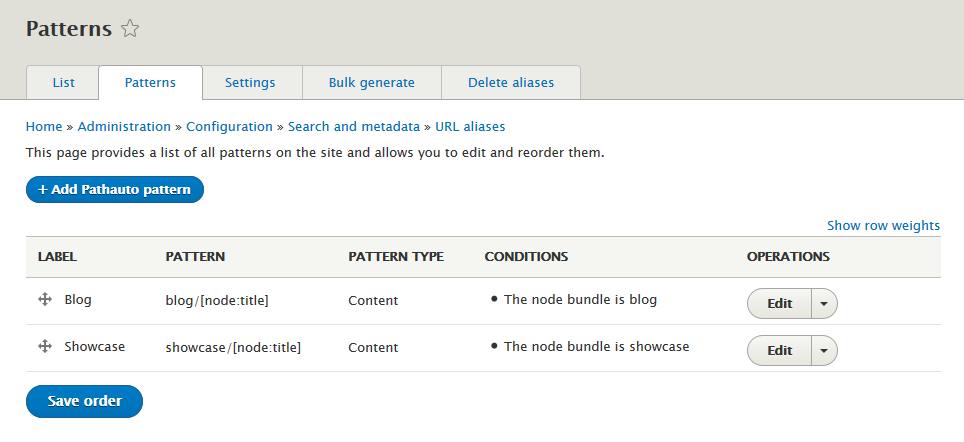
Step 2:Set properites for Blog pattern
Step 3:Set properites for Showcase pattern
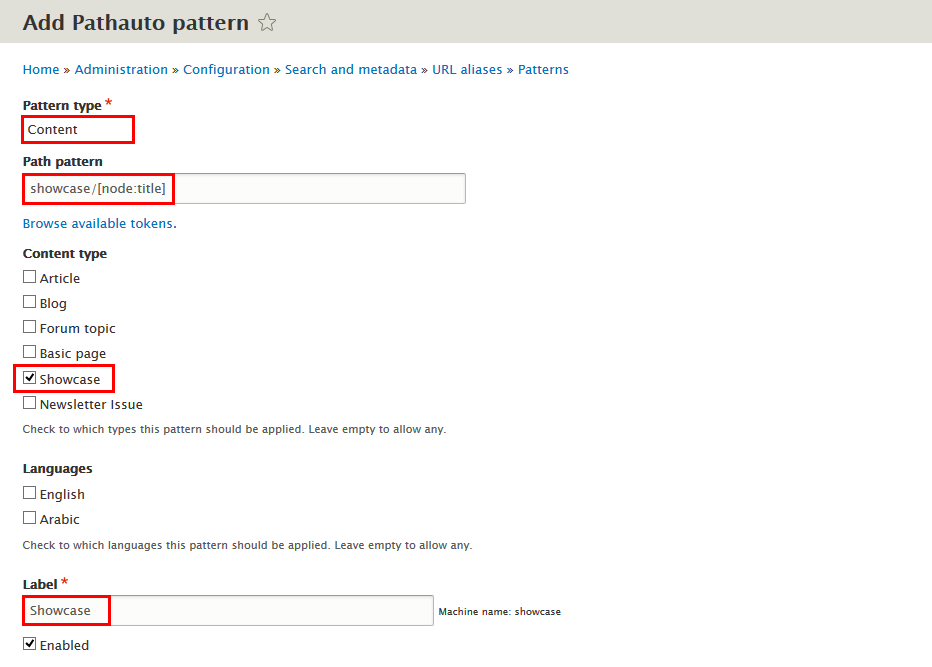
Step 4: Click Save button
Home Page
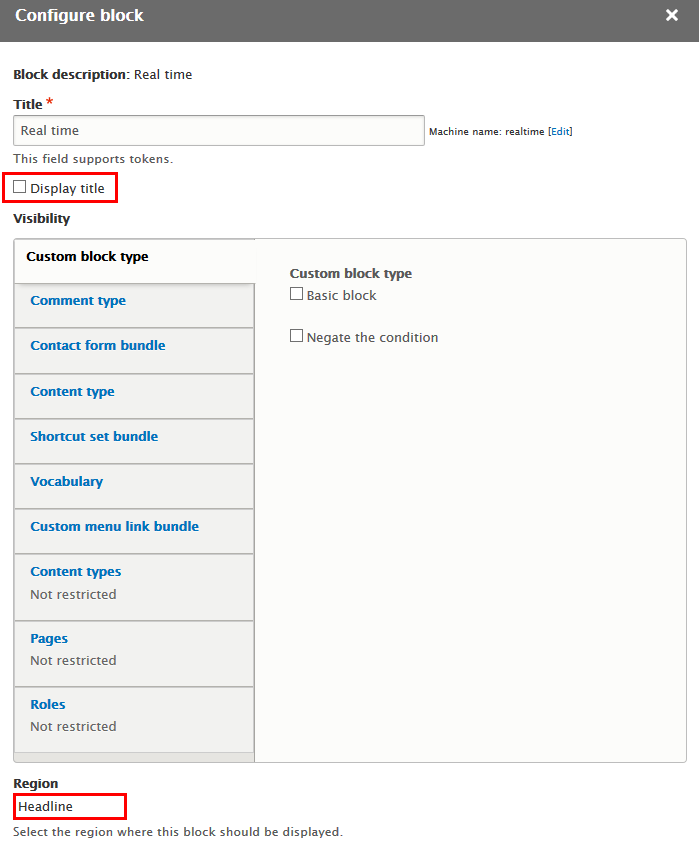
Headline block
Front end Display

1. Real time block
Front end Display

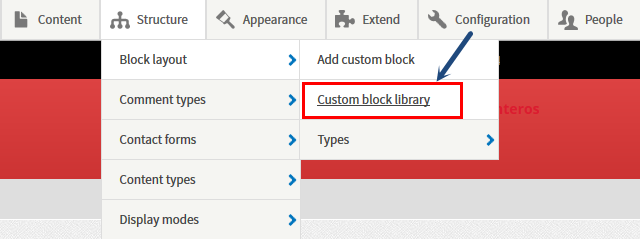
Step 1: Navigate to Structure > Block layout, find Custom block library
Step 2: Click Add custom block button to create Real time block
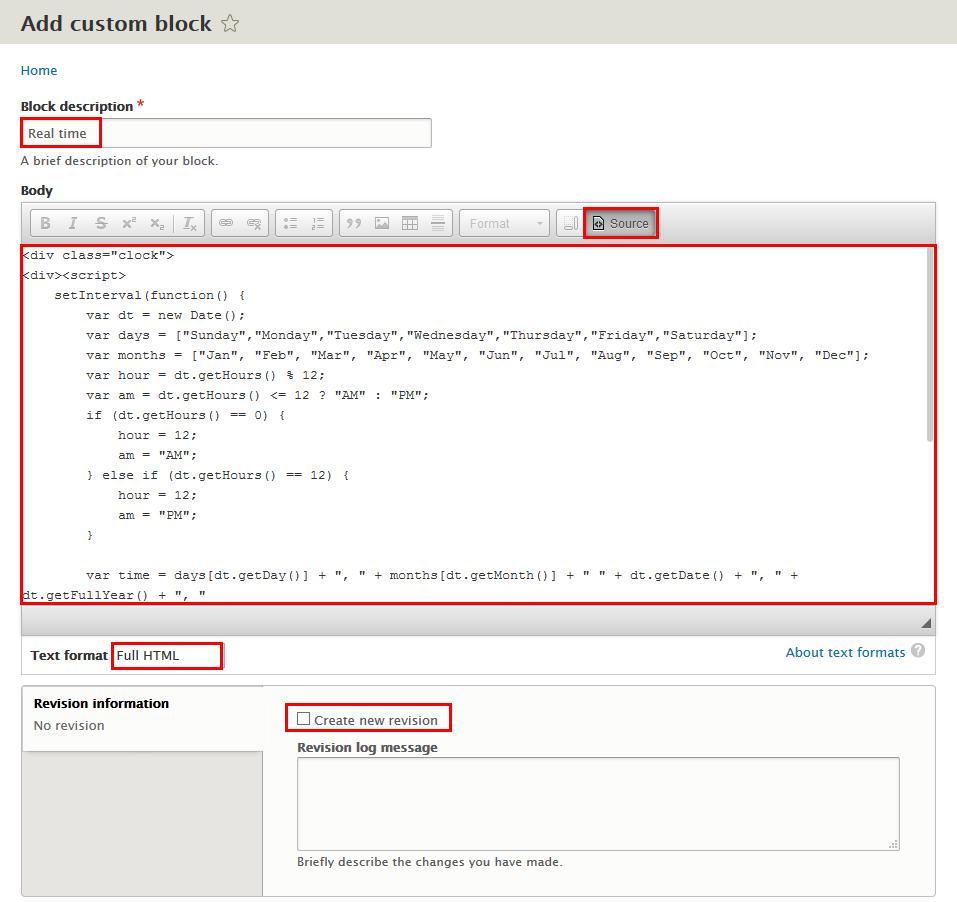
Step 3: Click Save button
Download the code of the custom block Real Time in here.
2. Social Menu block
Front end Display
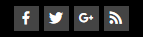
Step 1: Navigate to Structure > Block layout, find Custom block library
Step 2: Click Add custom block button to create Social Menu block

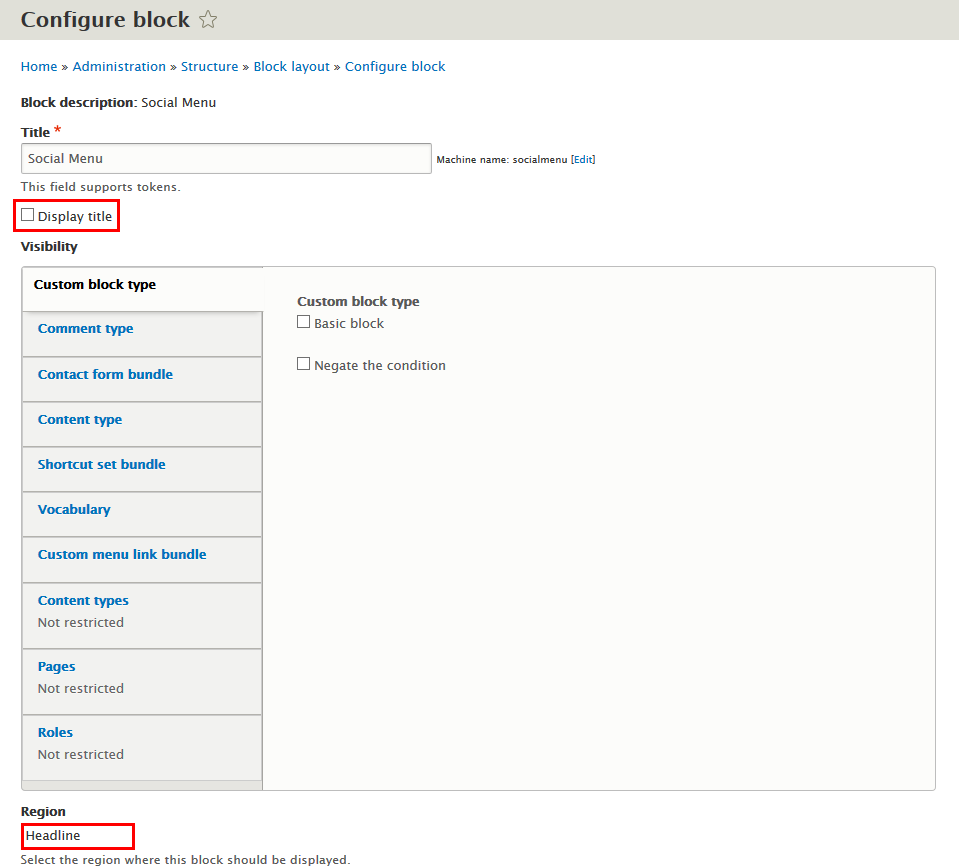
Step 3: Click Save button
Download the code of the custom block Socail List in here.
3. User account menu block
Front end Display
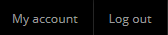
3.1 Add link menu item
Step 1: Navigate to Structure > Menu, find User account menu

Step 2: Click Add link button to create Log out menu iem
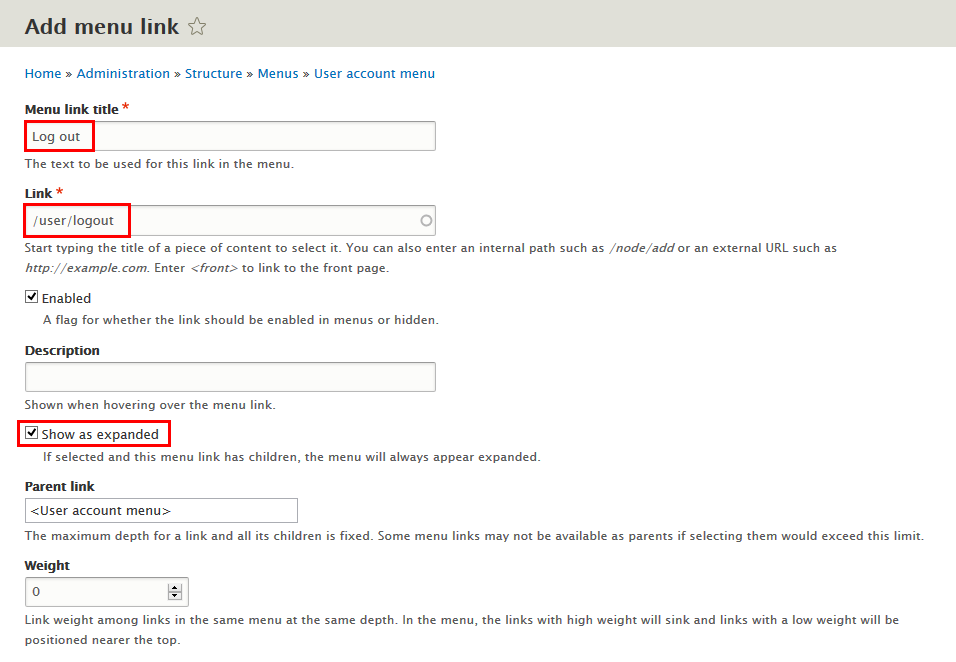
Step 3: Click Save button
3.2 Configure User account menu block
Step 1: Navigate to Structure > Block layout
Step 2: Find Secondary menu at User account menu line, click Configure button and set following properites:
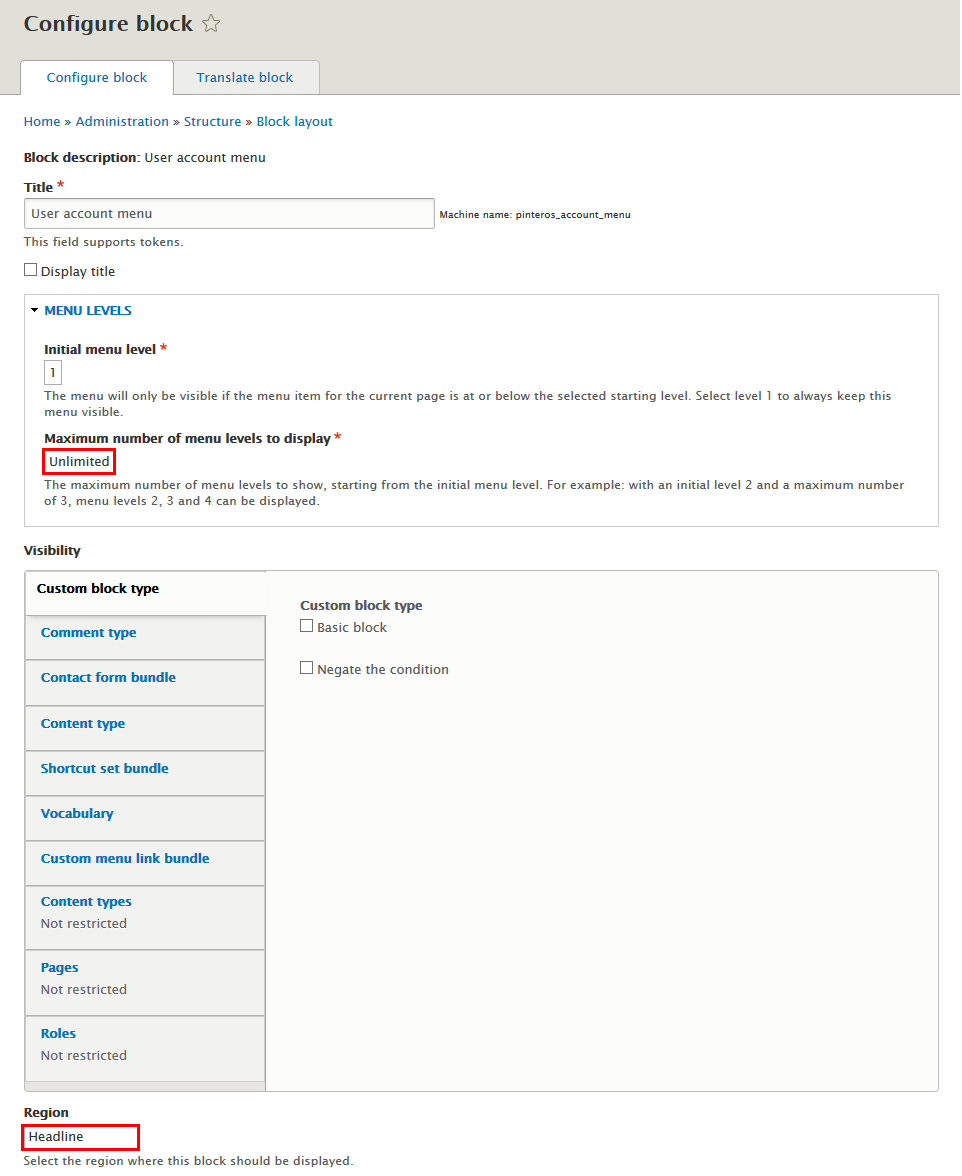
Step 3: Click Save block button.
4. Anonymous Menu block
Front end Display
4.1 Create Anonymous Menu
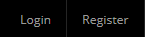
Step 1: Navigate to Structure > Menu, find Add menu click to create Anonymous Menu

Step 2: Click Add link button to create Login menu iem
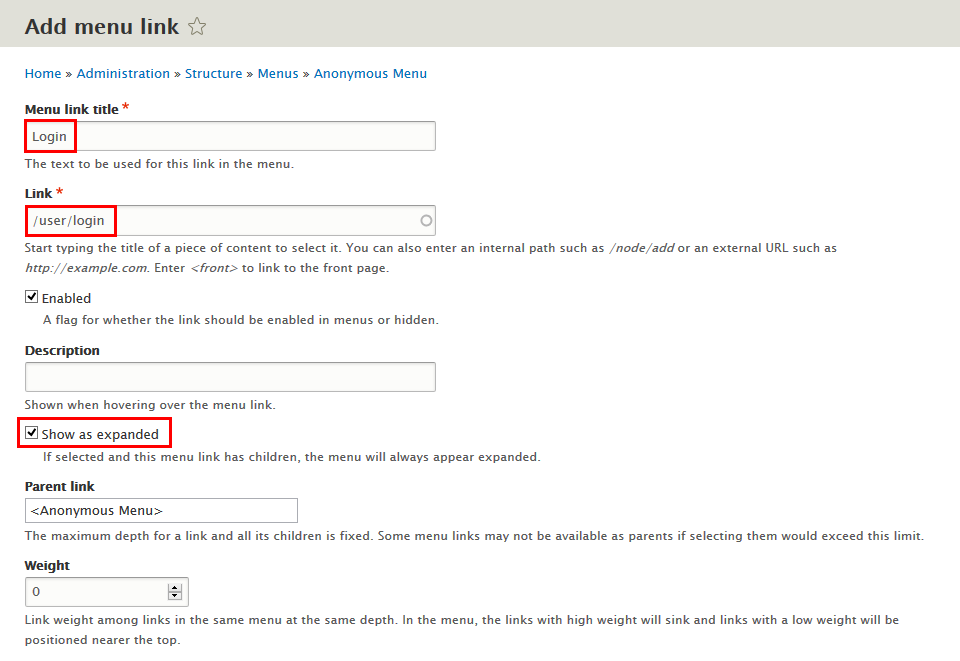
Step 3: Click Add link button to create Register menu iem
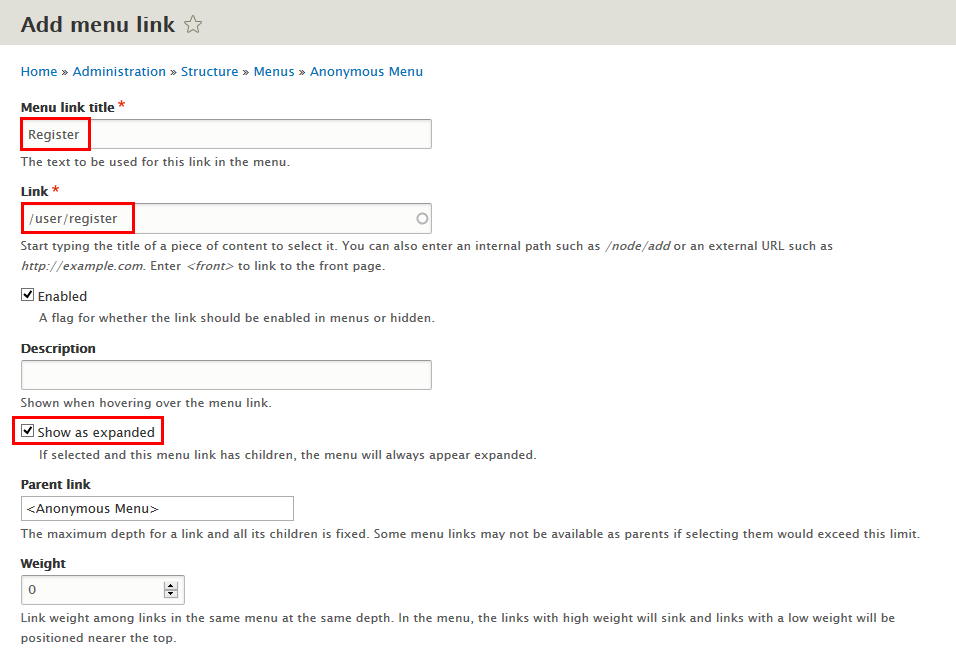
Step 4: Click Save button
4.2 Configure Anonymous Menu block
Step 1: Navigate to Structure > Block layout
Step 2: Find Headline click Place block button
Step 3: Find Anonymous Menu click Place block button and set following properites:
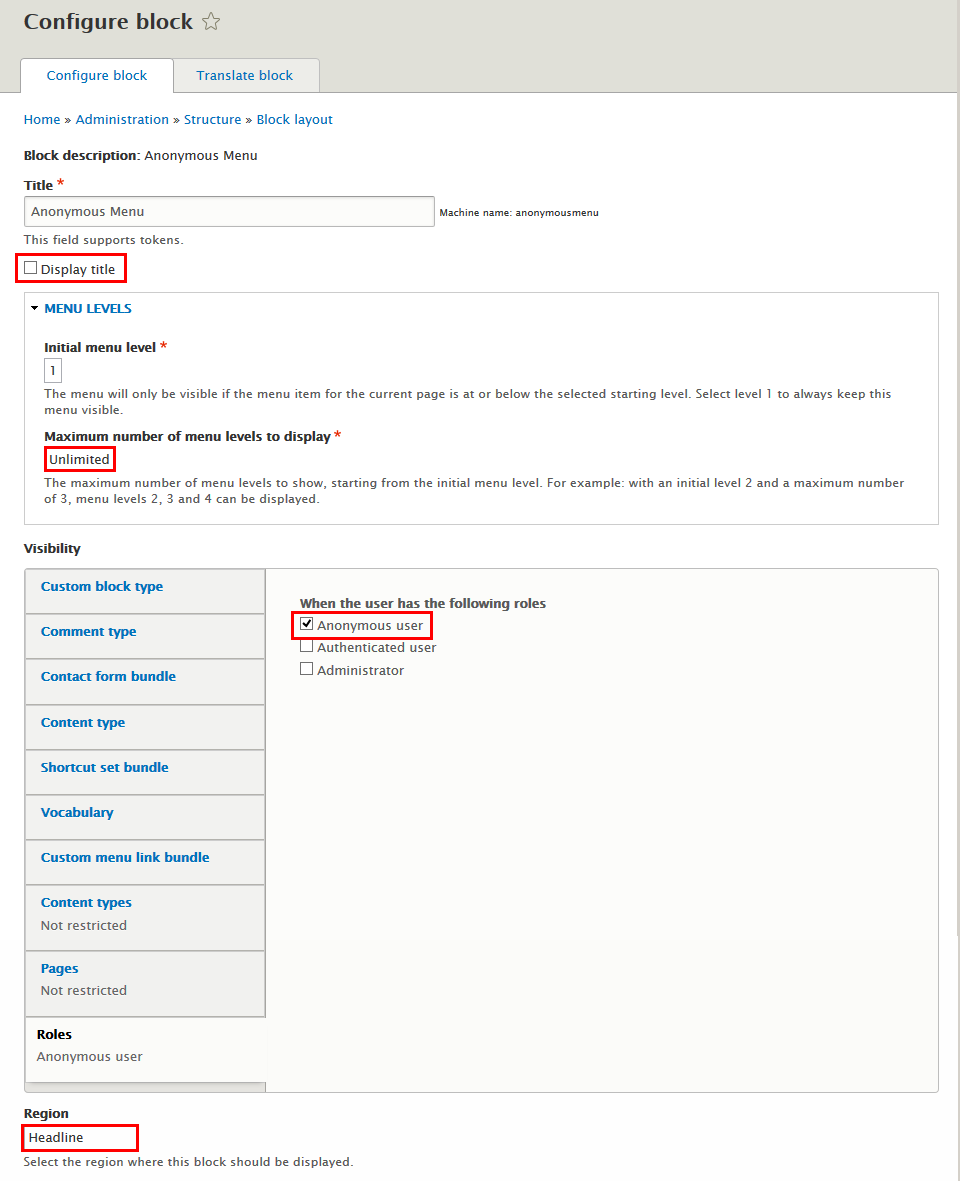
Step 4: Click Save block button.
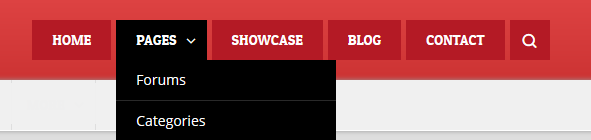
Categories Menu block
Front end Display

1. Create Categories Menu menu
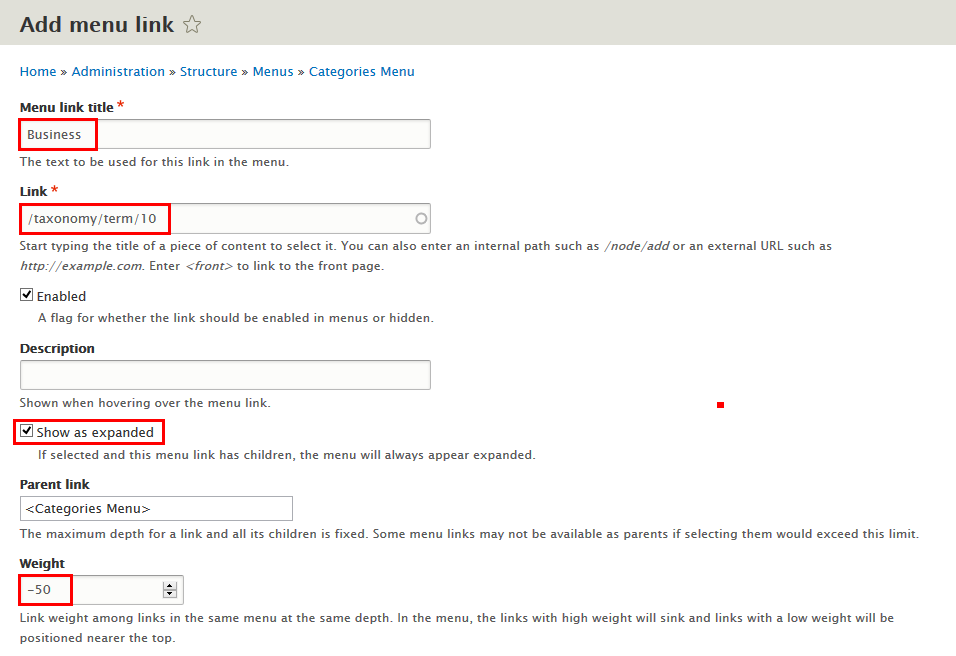
Step 1: Navigate to Structure > Menu, find Add menu click to create Categories Menu

Step 2: Click Add link button to create Business menu iem
Step 3: Click Add link button to create Education menu iem

Step 4: Click Add link button to create Fashion menu iem

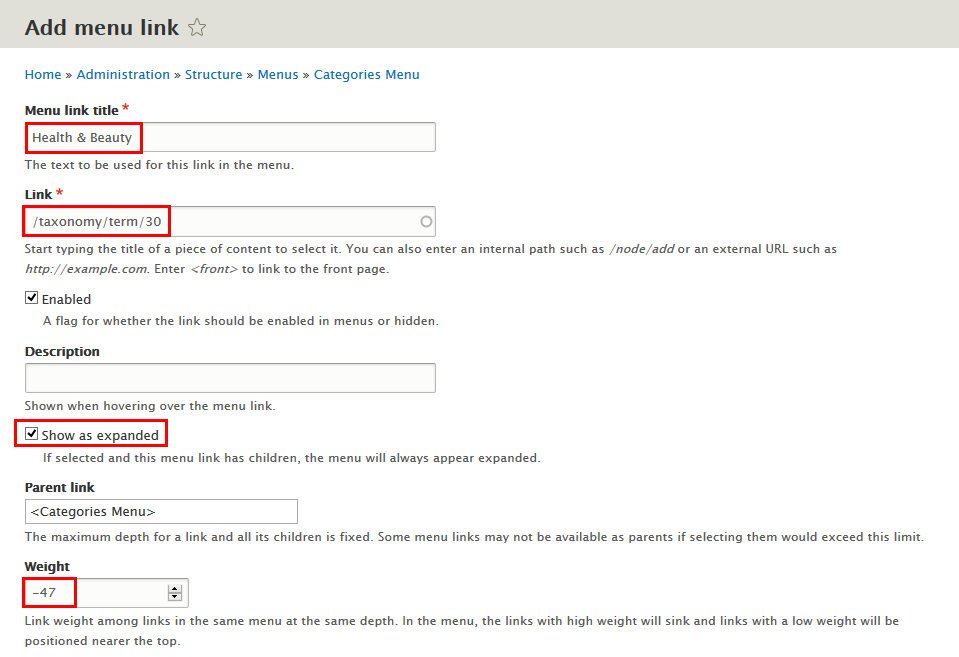
Step 5: Click Add link button to create Health & Beauty menu iem
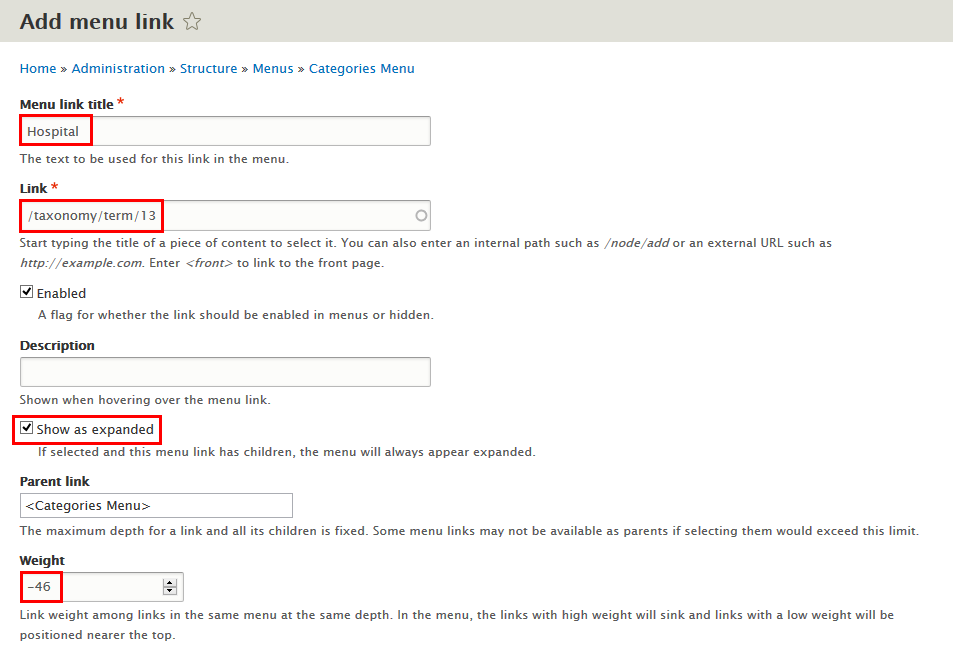
Step 6: Click Add link button to create Hospital menu iem
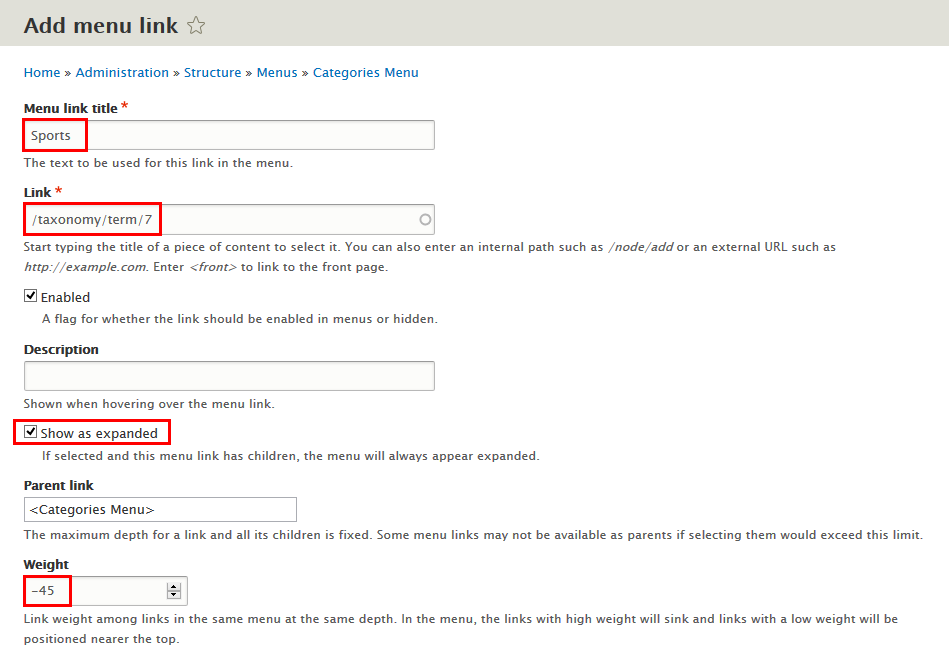
Step 7: Click Add link button to create Sports menu iem
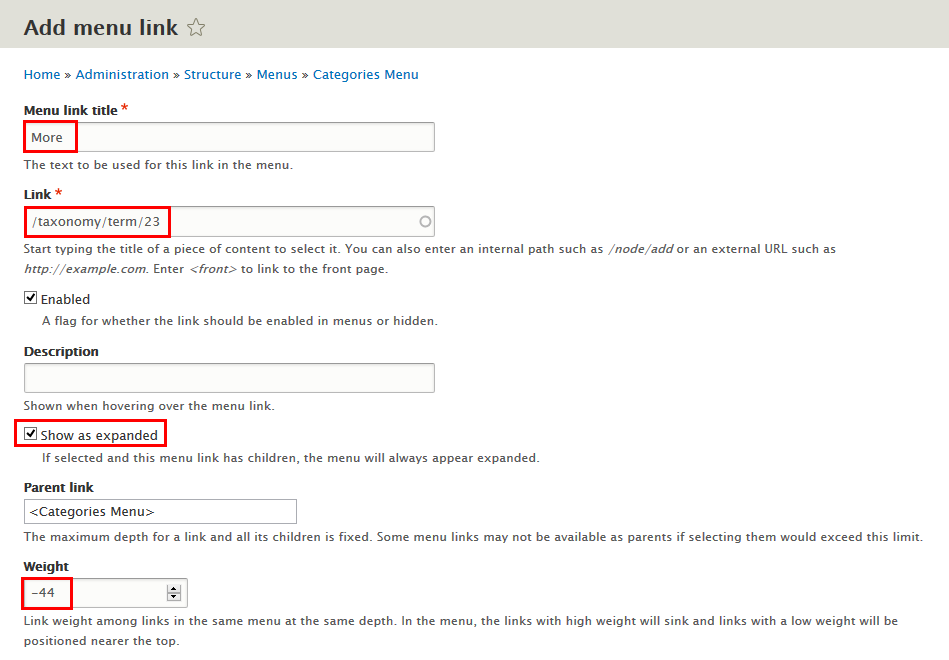
Step 8: Click Add link button to create More menu iem
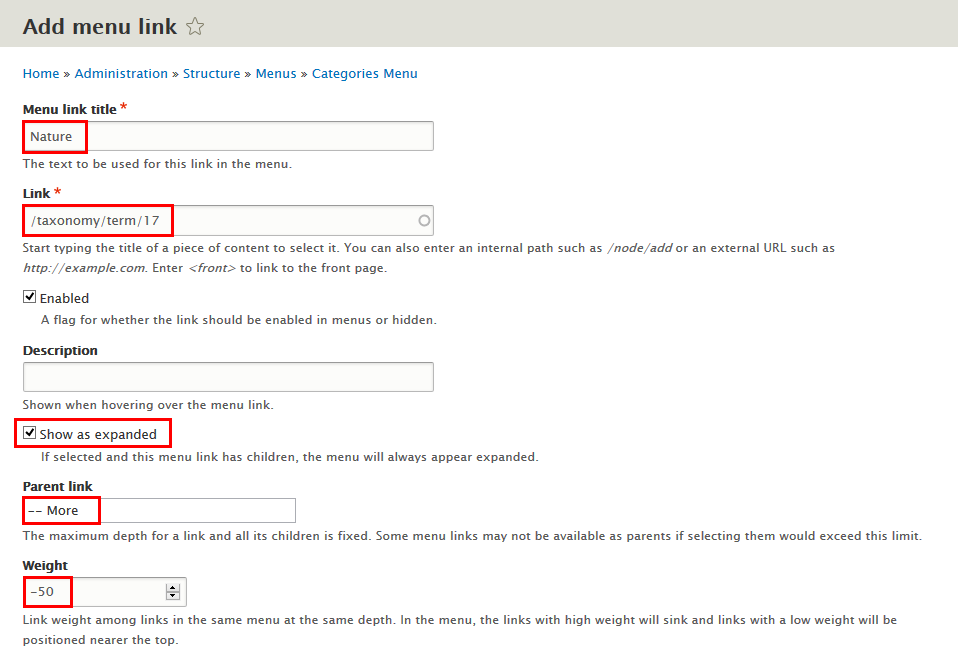
Step 9: Click Add link button to create Nature menu iem
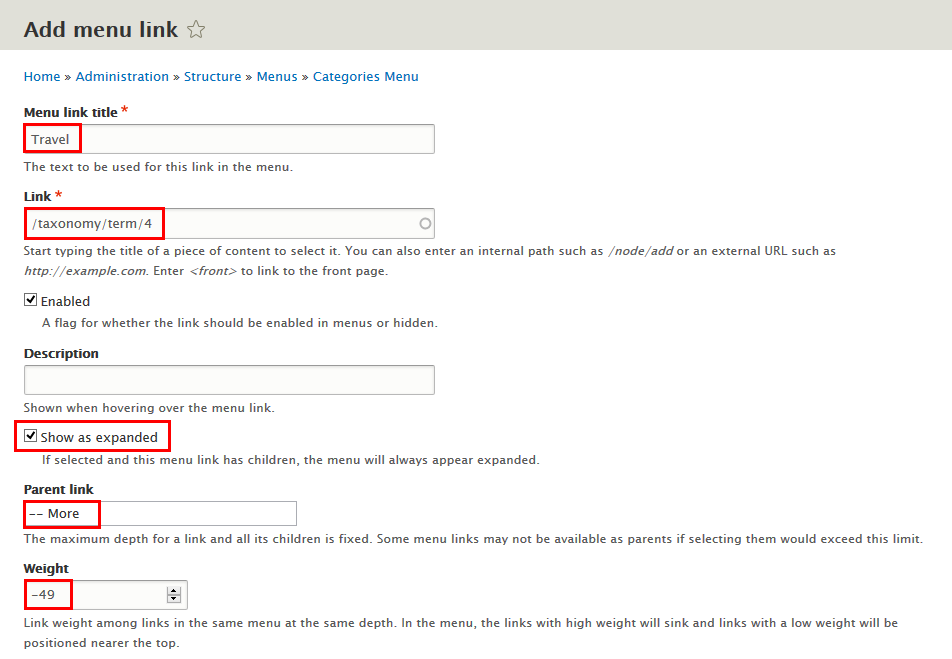
Step 10: Click Add link button to create Travel menu iem
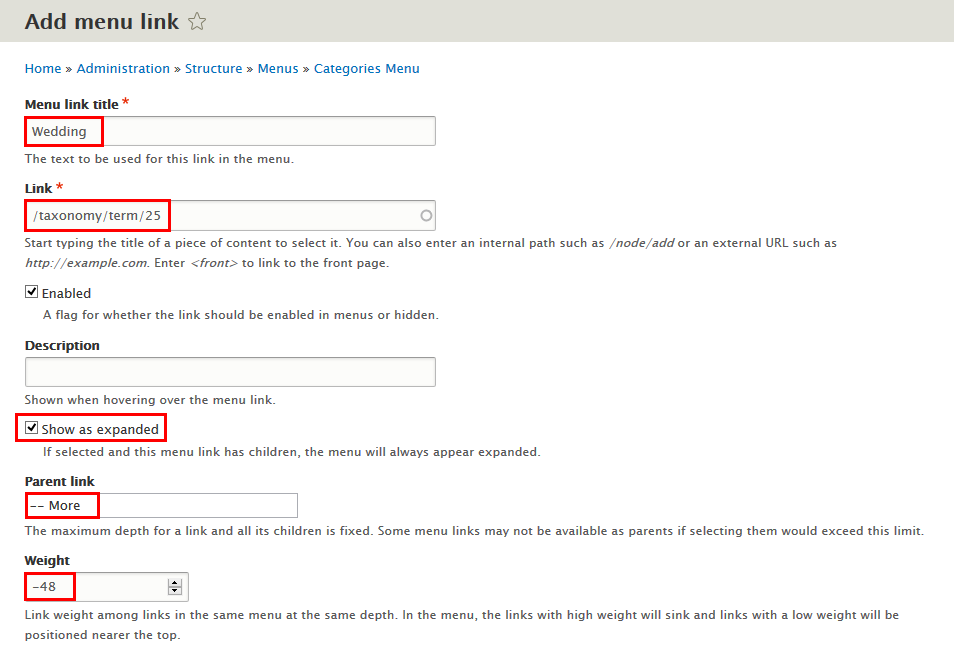
Step 11: Click Add link button to create Wedding menu iem
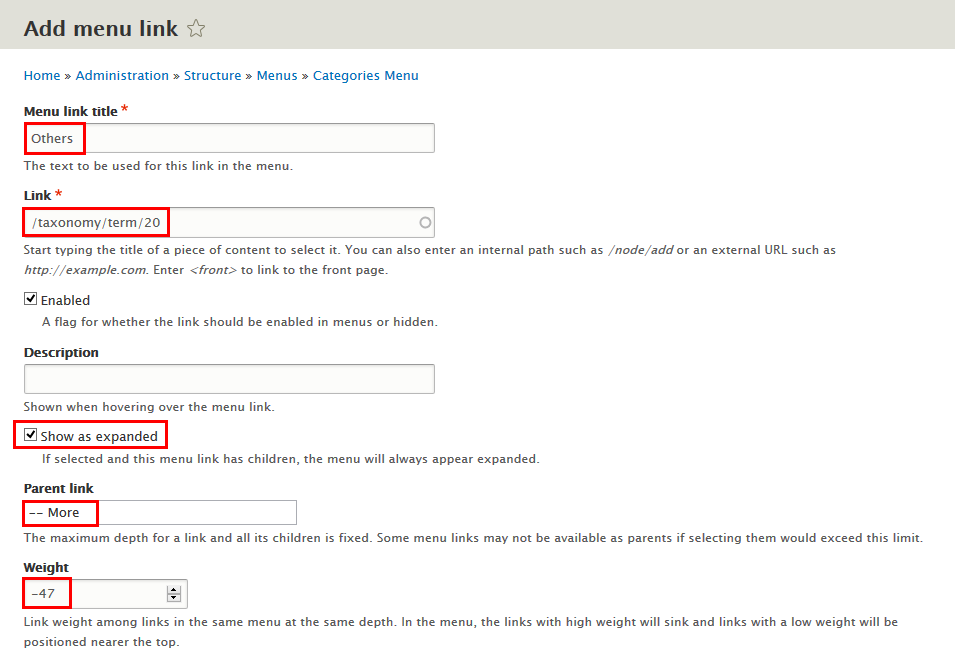
Step 12: Click Add link button to create Others menu iem
Step 13: Click Save button
2. Configure Categories Menu block
Step 1: Navigate to Structure > Block layout
Step 2: Find Secondary menu click Place block button
Step 3: Find Categories Menu click Place block button and set following properites:

Step 4: Click Save block button.
Frontpage
Front end Display

Edit Frontpage view
Step 1: Navigate to Structure > View ,find Fontpage view view, click Edit button. Then click Edit button and set following properties:
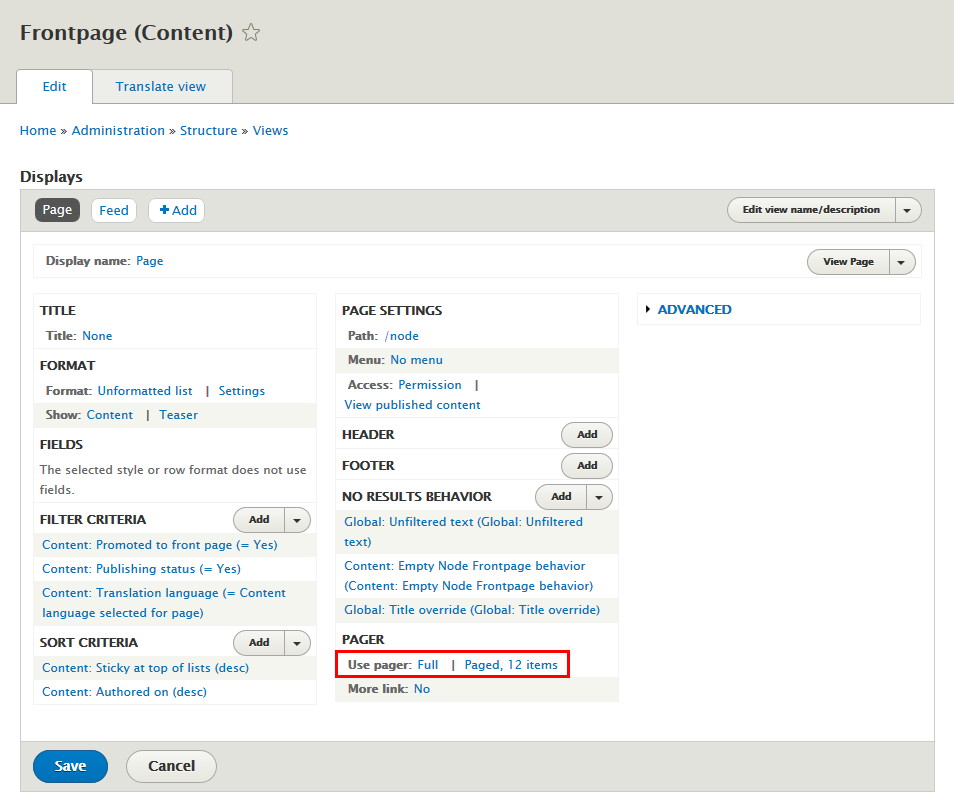
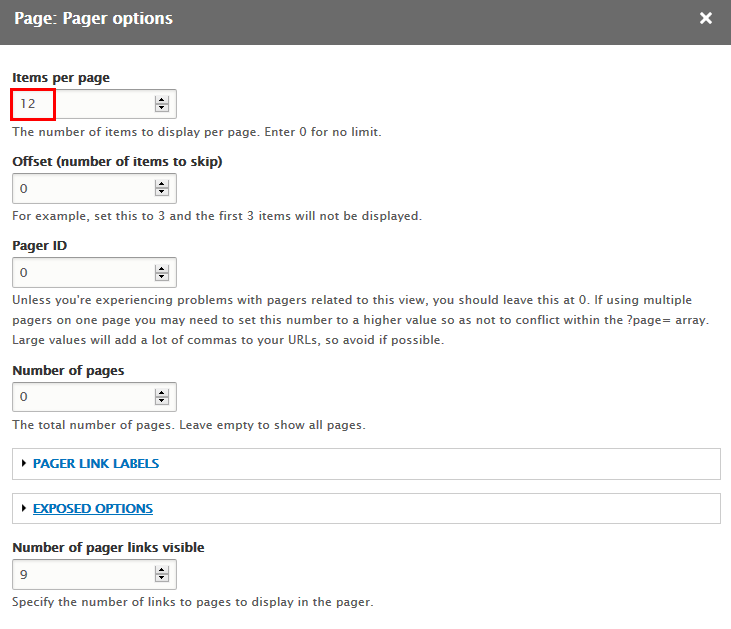
Step 2:At PAGER > Use pager area, find Paged, 10 items click link and set following properties:
Step 3: Click Save to save view
Copyright block
Front end Display

Create & configure Copyright block
Step 1: Navigate to Structure > Block layout, find Custom block library
Step 2: Click Add custom block button to create Copyright block
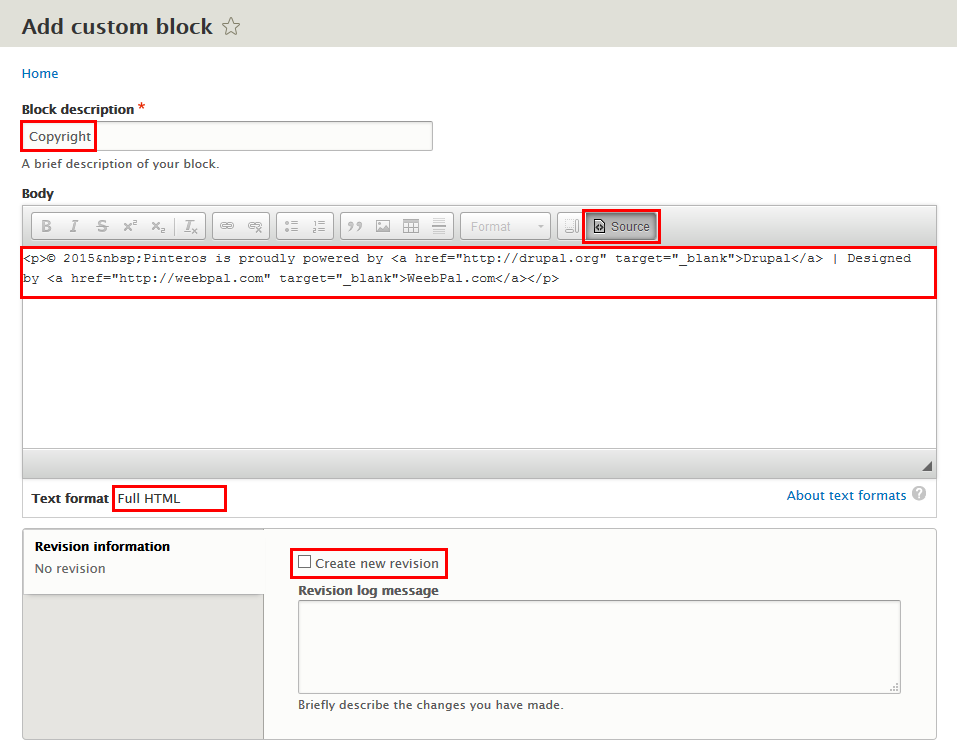
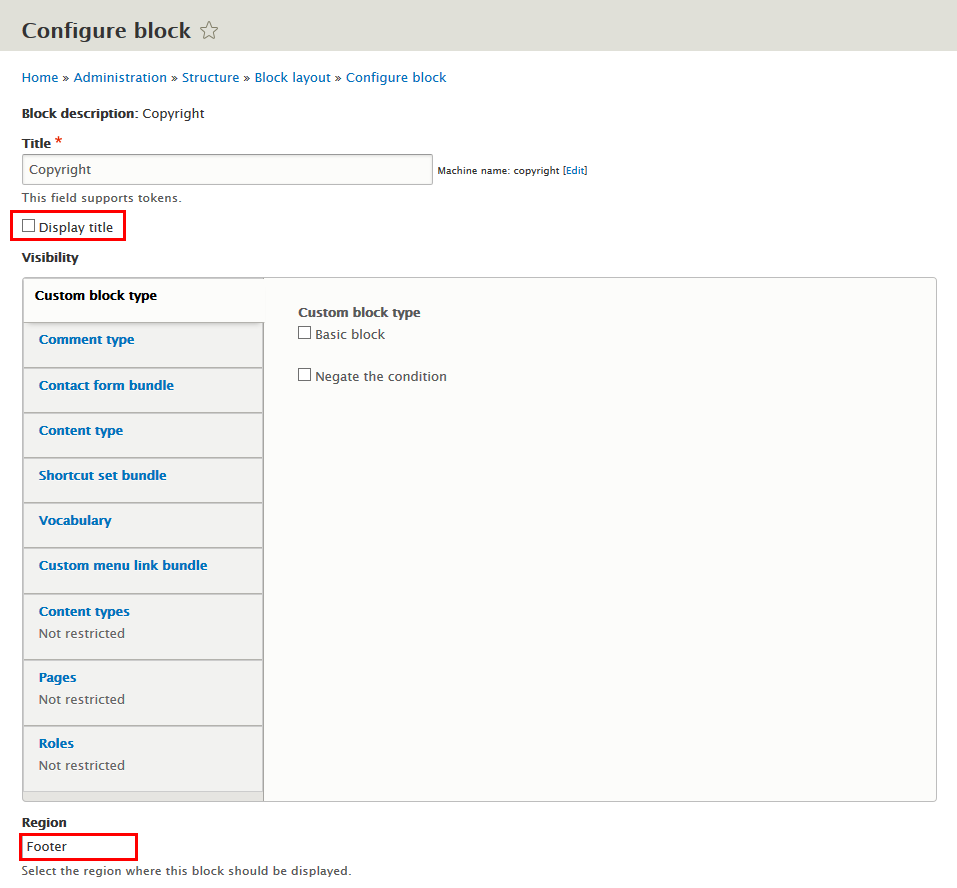
Step 3: Click Save button
Refer to following HTML code:
© 2015 Pinteros is proudly powered by Drupal | Designed by WeebPal.com
Main navigation block
Front end Display
Configure Main navigation block
Step 1: Navigate to Structure > Block layout
Step 2: Find Primary menu area, at Main navigation line. Then click Configure button and set following properites:

Step 3: Click Save block button.
Create Subpages
Sidebar first: Featured Posts block
Front end Display
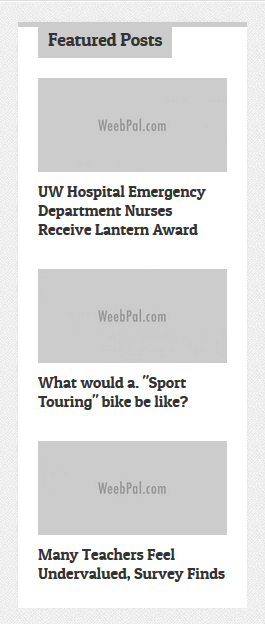
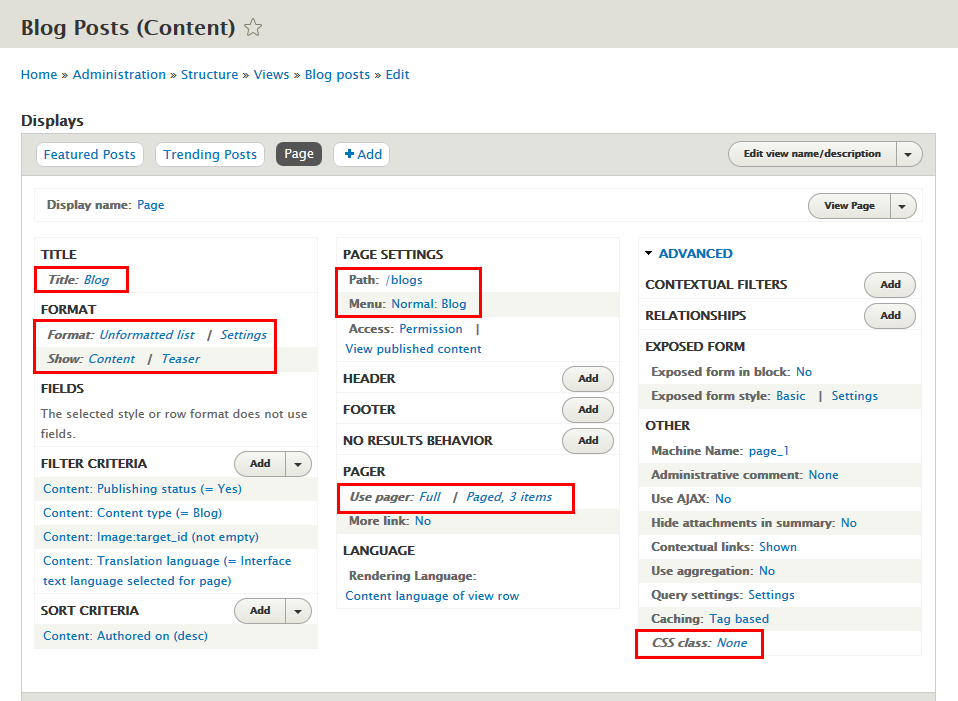
1. Create Blog Posts: Featured Posts block view
Step 1: Navigate to Structure > Views, click Add new view, then create Blog Posts view with following settings:
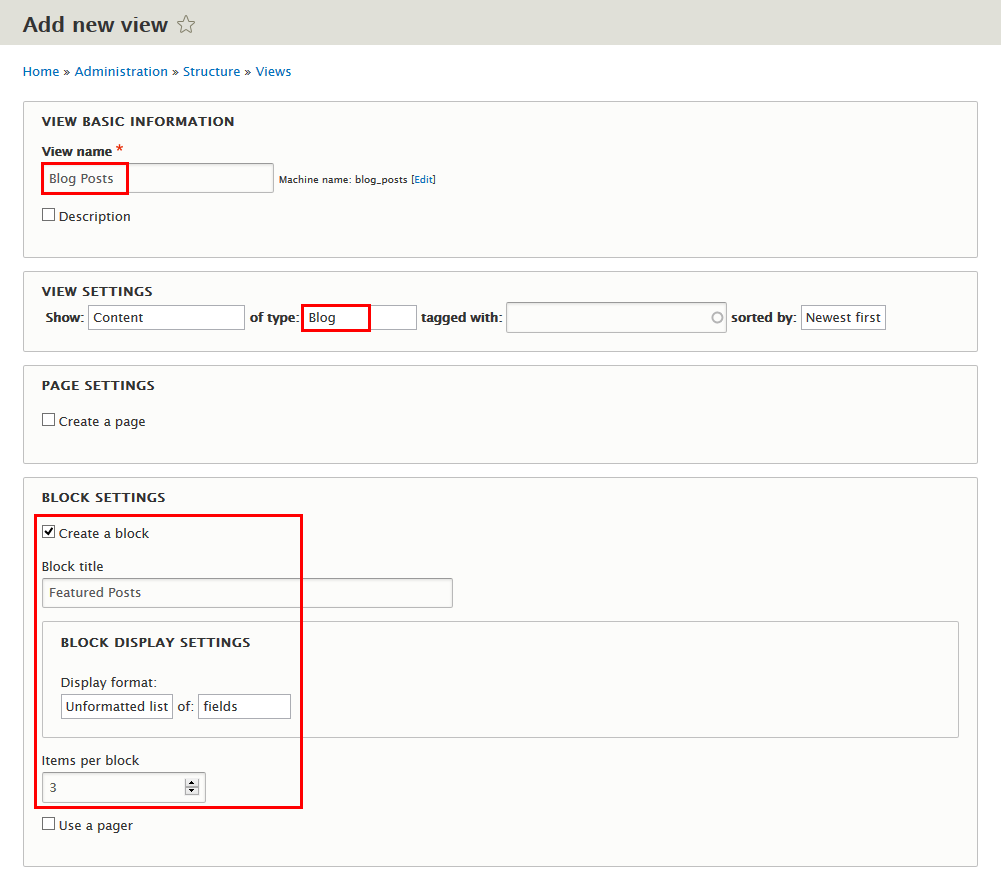
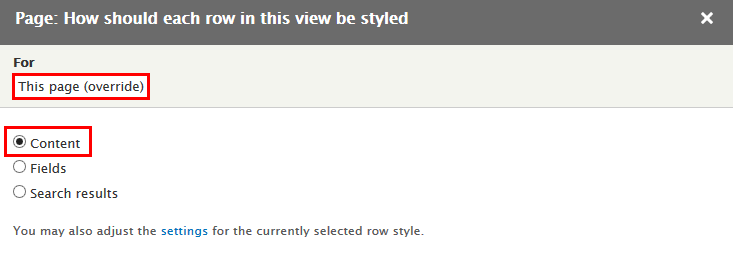
Step 2: Click Save and edit button. Next to steps below to set properties for following fields:
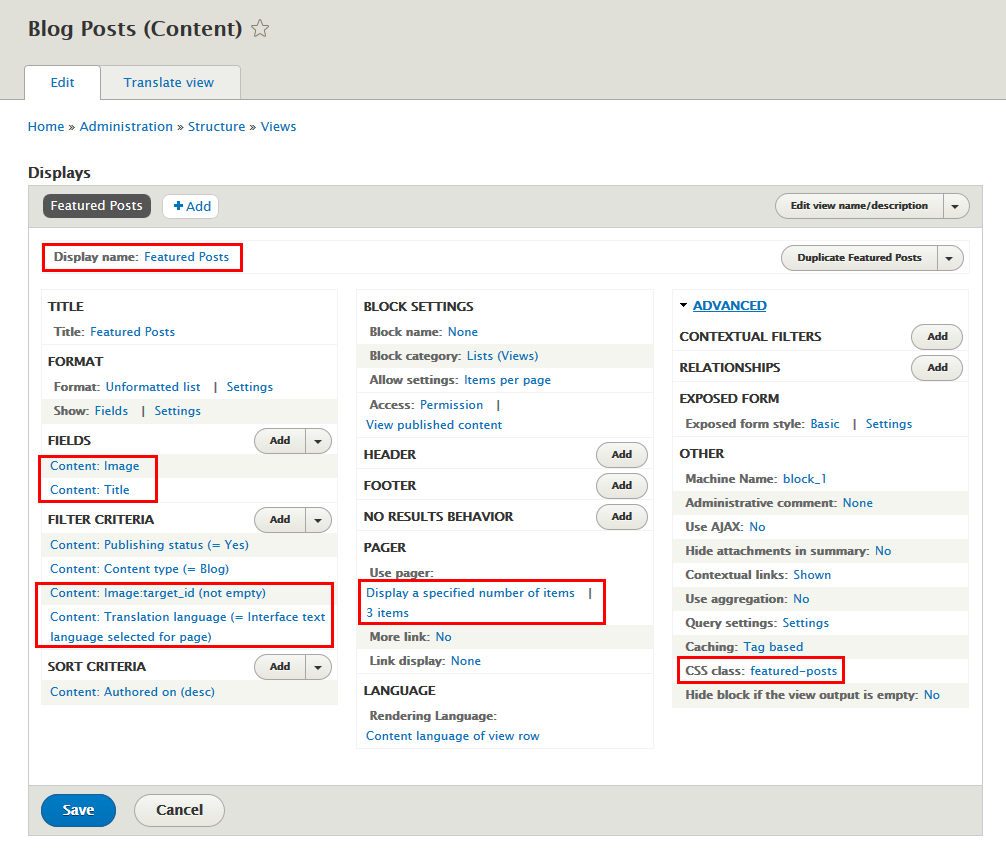
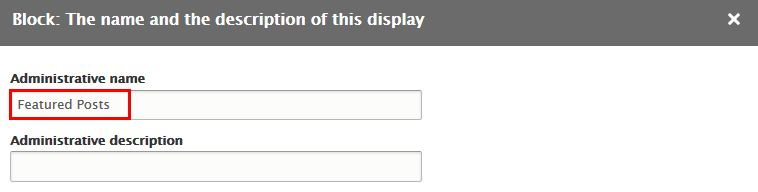
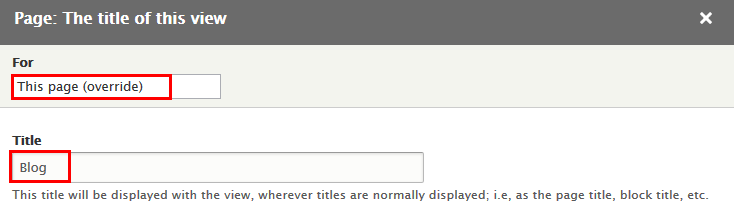
Step 3: At Display name area, click and set properties:
Step 4: At FIELDS area, click Add button to add fields: Content: Image
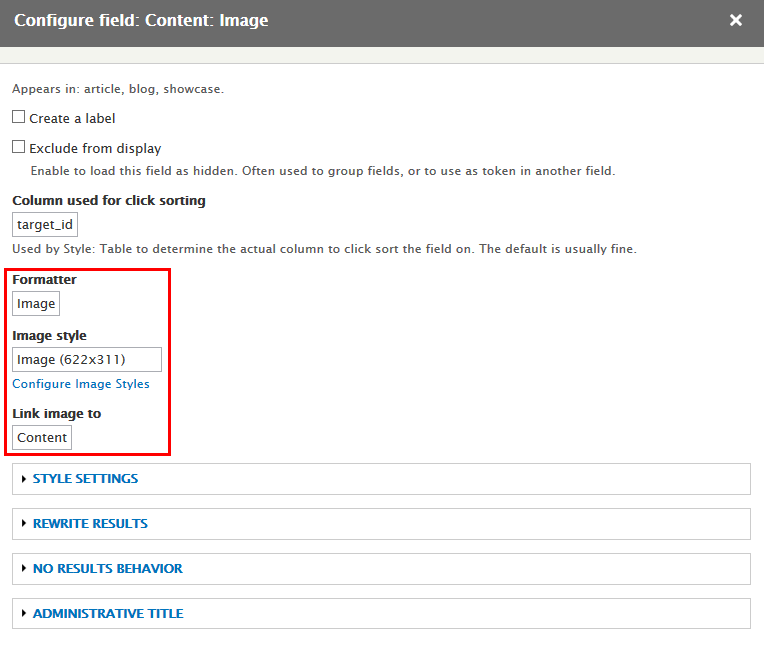
Step 5: Set properties for Content: Image
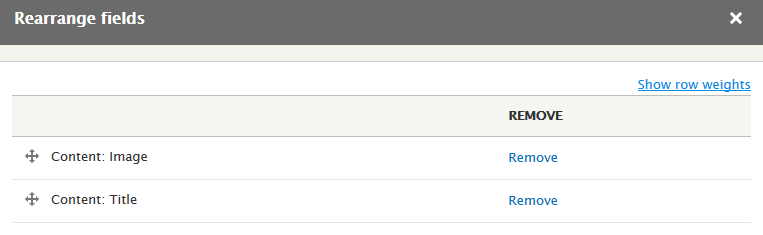
Step 6: At FIELDS area, click Rearrange button and set following arrange
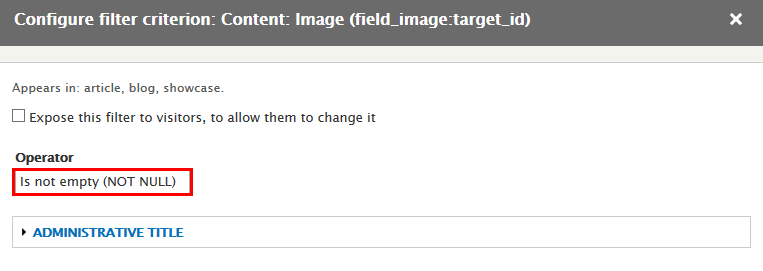
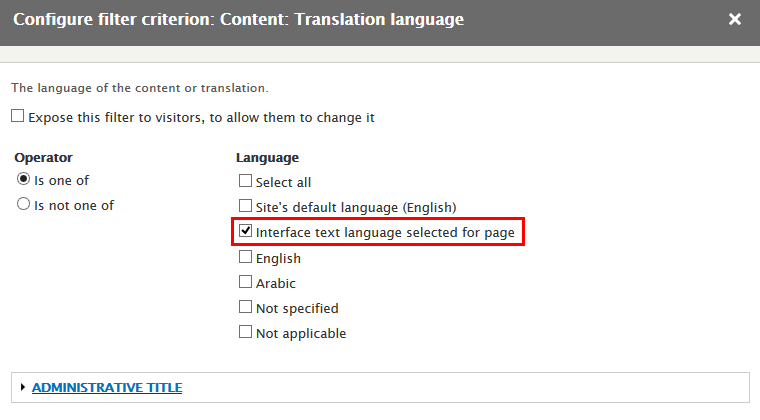
Step 7: At Advanced > FILTER CRITERIA area, add Content: Image (field_image:target_id), Content: Translation language fields
Step 8: Set properties for Content: Image (field_image:target_id)
Step 9: Set properties for Content: Translation language
Step 10: At Advanced > OTHER area, add CSS class:

Step 11: Click Save to save view
2. Configure Blog Posts: Featured Posts block
Step 1: Navigate to Structure > Block layout
Step 2: Find Sidebar first click Place block button
Step 3: Find Blog Posts: Featured Posts block click Place block button and set following properites:
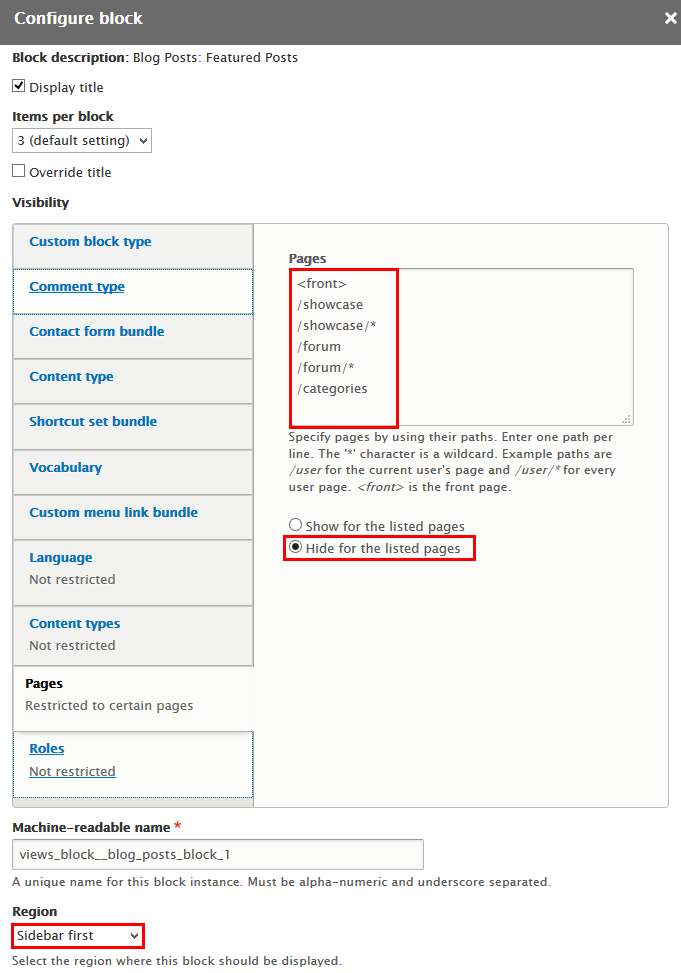
Step 4: Click Save block button.
Sidebar first: About us block
Front end Display

Step 1: Navigate to Structure > Block layout click Add custom block to create About us block and set with following properties:


Step 2: Click Save button
Refer to following HTML code:
Weebpal provides further quality premium Drupal themes with subtle designs, optimal distributions, and committed support, which is suited for a higher business/individual level...
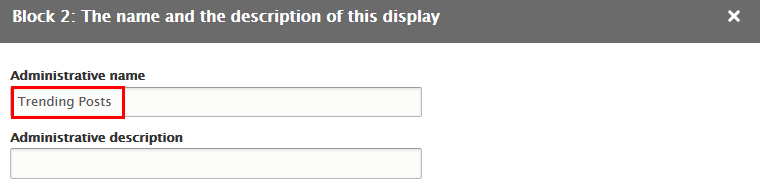
Sidebar first: Trending Posts block
Front end Display

1. Add Blog Posts: Trending Posts block view
Step 1: Navigate to Structure > Views, find Blog Posts view, then click Add > Block button to create Blog Posts: Trending Posts block view with following properties:

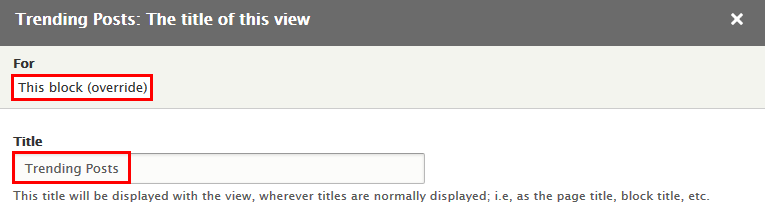
Step 2: At Display name area, click and set properties:
Step 3: At TITLE area, find Title field and set following properites:
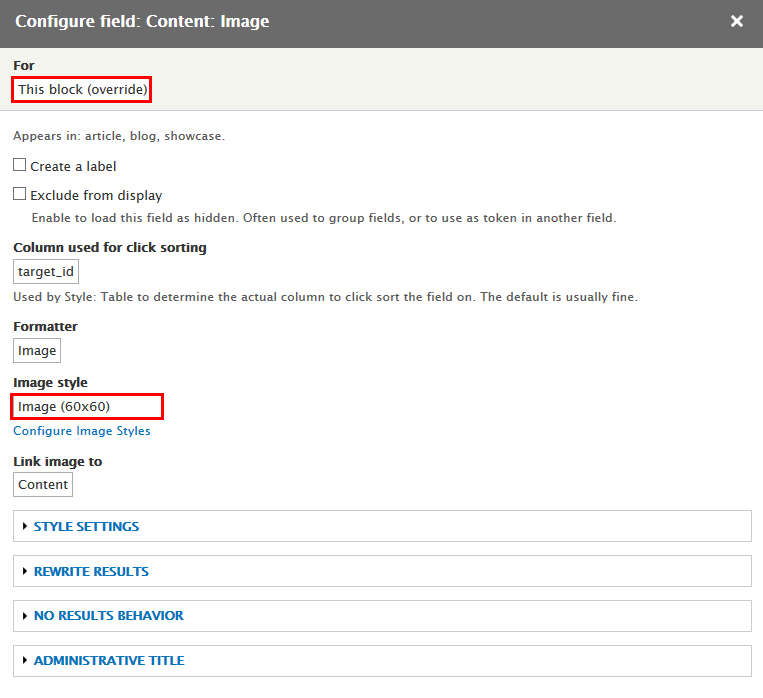
Step 4: At FIELDS area, find Content: Image field, click and set following properites:
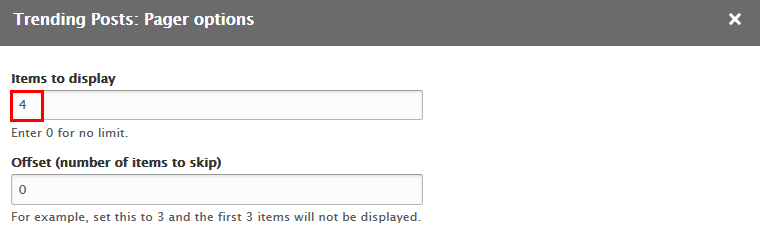
Step 5: At PAGER area, find Use pager click Display a specified number of items link and set following properites
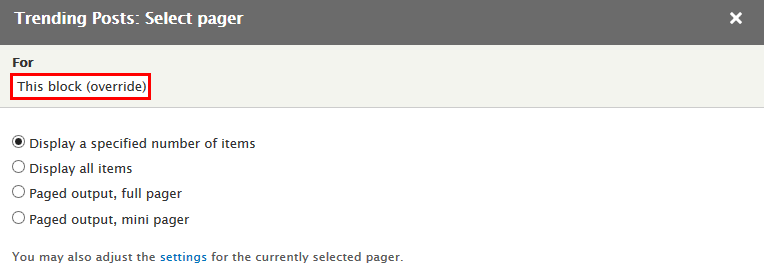
Step 6: At PAGER area, find Use pager click 3 items link and set following properites
Step 7: At Advanced > OTHER area, add CSS class:

Step 8: Click Save to save view
2. Configure BlogBlog Posts: Trending Posts block
Step 1: Navigate to Structure > Block layout
Step 2: Find Sidebar first click Place block button
Step 3: Find Blog Posts: Trending Posts click Place block button and set following properites:
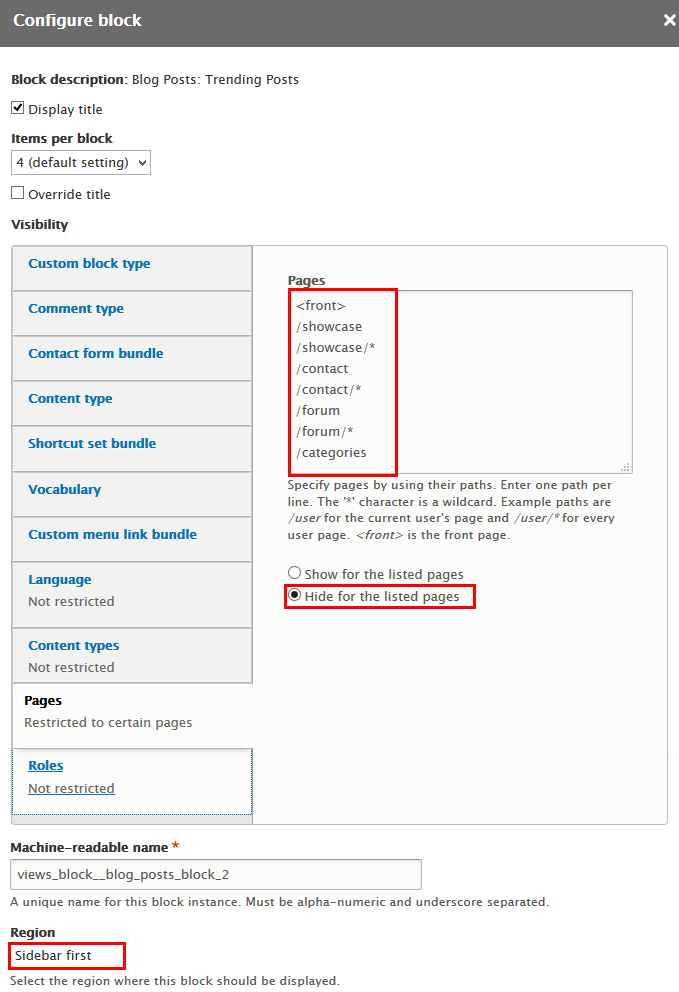
Step 4: Click Save block button.
Sidebar first: Recent comments block
Front end Display
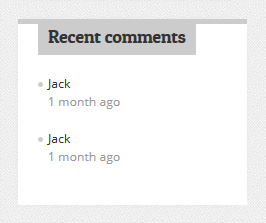
Step 1: Navigate to Structure > Block layout
Step 2: Find Sidebar first click Place block button
Step 3: Find Recent comments click Place block button and set following properites:

Step 4: Click Save block button.
Sidebar first: Newsletters block
Front end Display
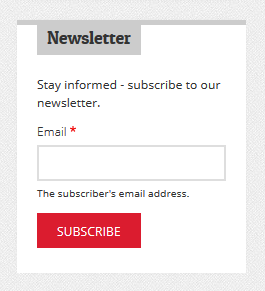
Step 1: Navigate to Structure > Block layout
Step 2: Find Sidebar first click Place block button
Step 3: Find Simplenews subscription click Place block button and set following properites:
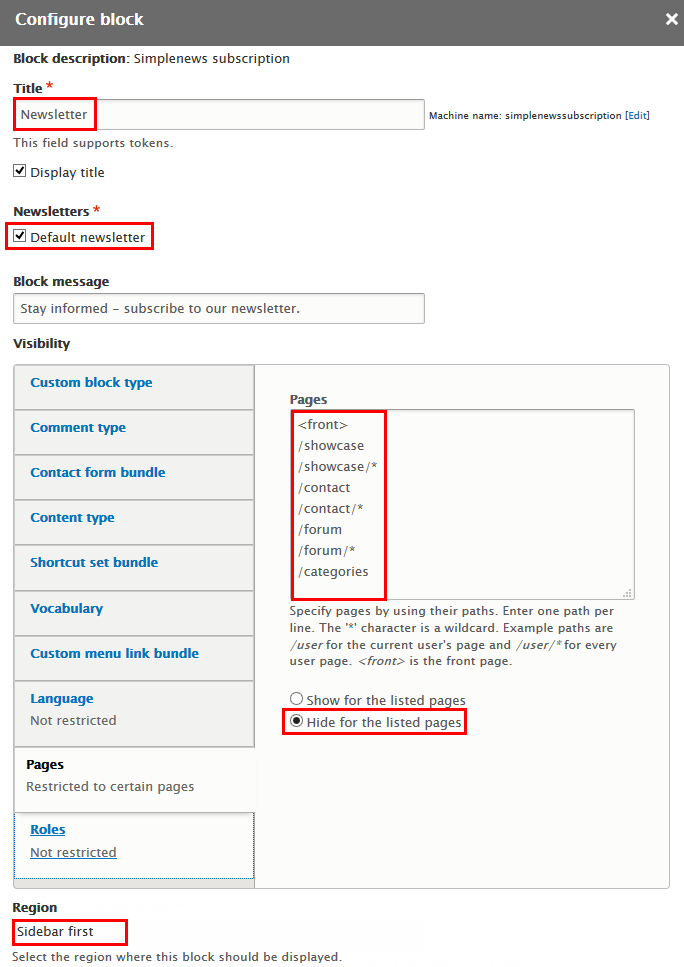
Step 4: Click Save block button.
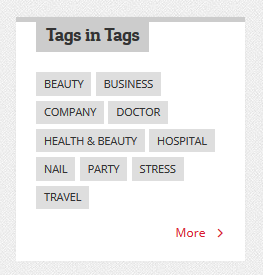
Sidebar first: Tags in Tags block
Front end Display
1. Create Tags in Tags block view
Step 1: Navigate to Structure > Views, click Add new view, then create Tags in Tags view with following settings:
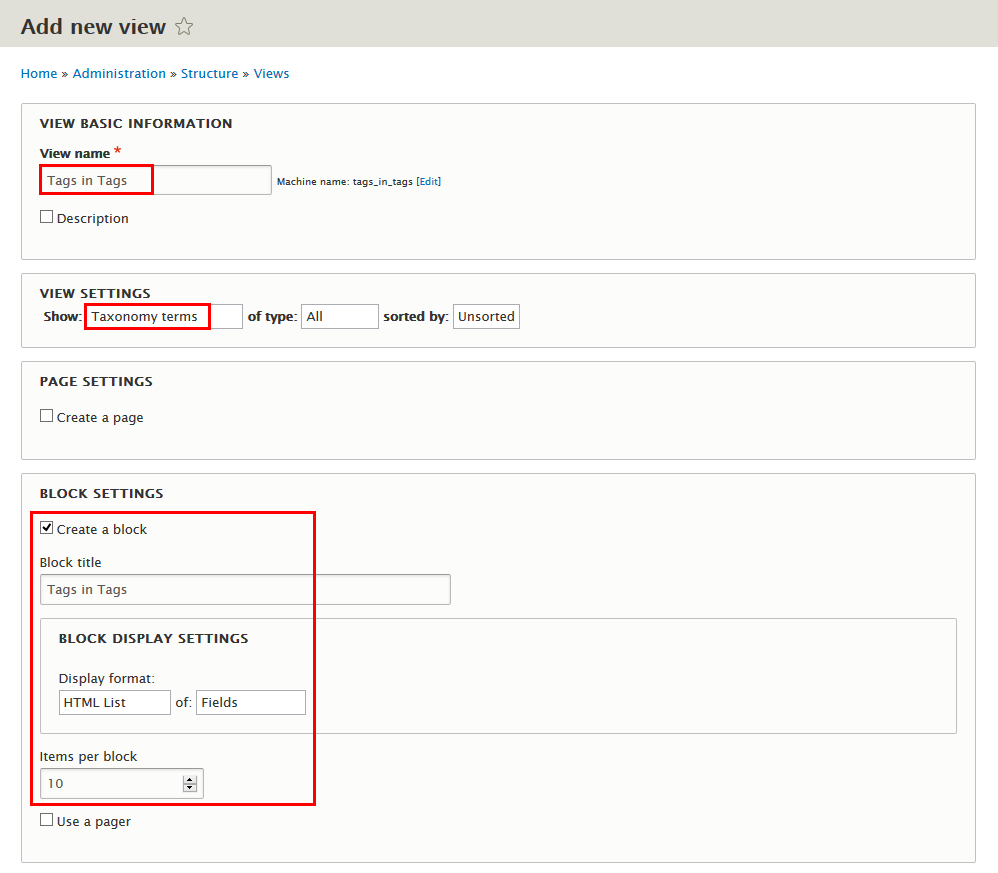
Step 2: Click Save and edit button. Next to steps below to set properties for following fields:
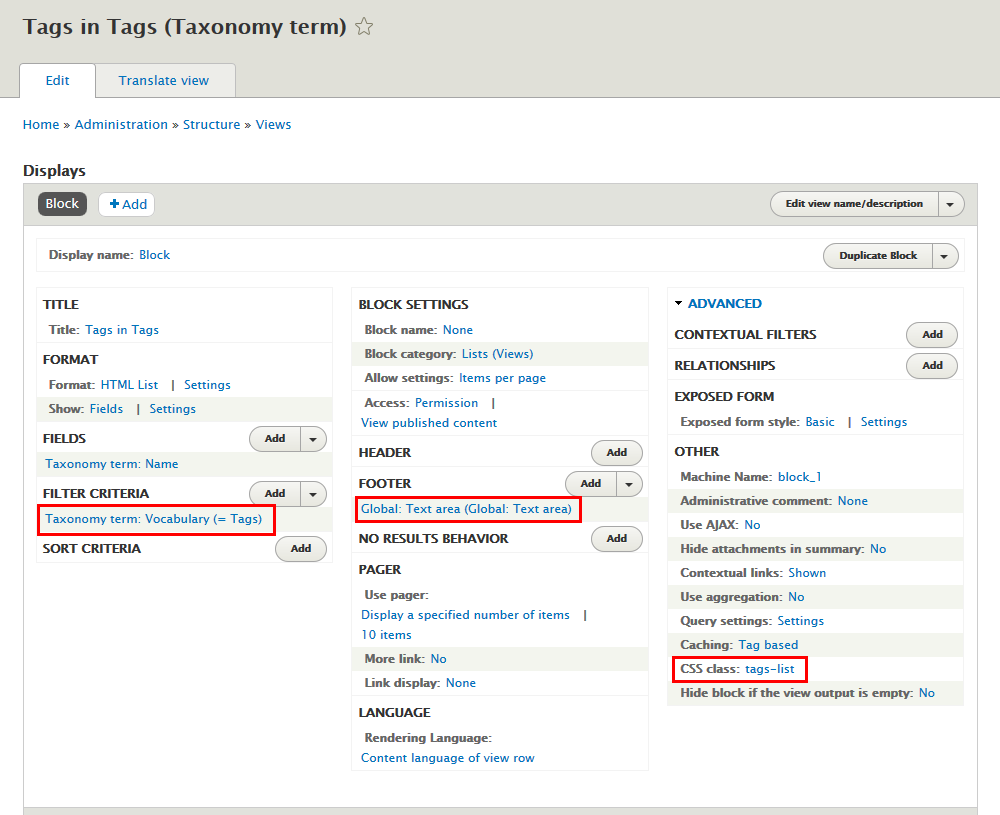
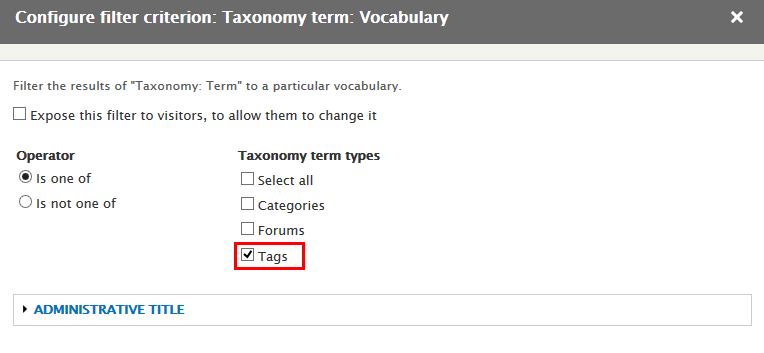
Step 3: At Advanced > FILTER CRITERIA area, add Taxonomy term: Vocabulary fields
Step 4: Set properties for Taxonomy term: Vocabulary
Step 5: At FOOTER area, click Add button to add field Global: Text area with following properties:
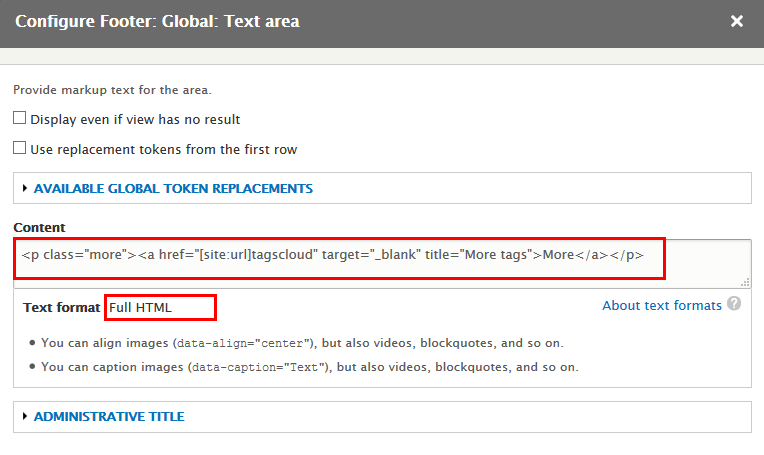
Refer to following HTML code:
Step 6: At Advanced > OTHER area, add CSS class:

Step 7: Click Save to save view
2. Configure Tags in Tags block
Step 1: Navigate to Structure > Block layout
Step 2: Find Sidebar first click Place block button
Step 3: Find Tags in Tags click Place block button and set following properites:
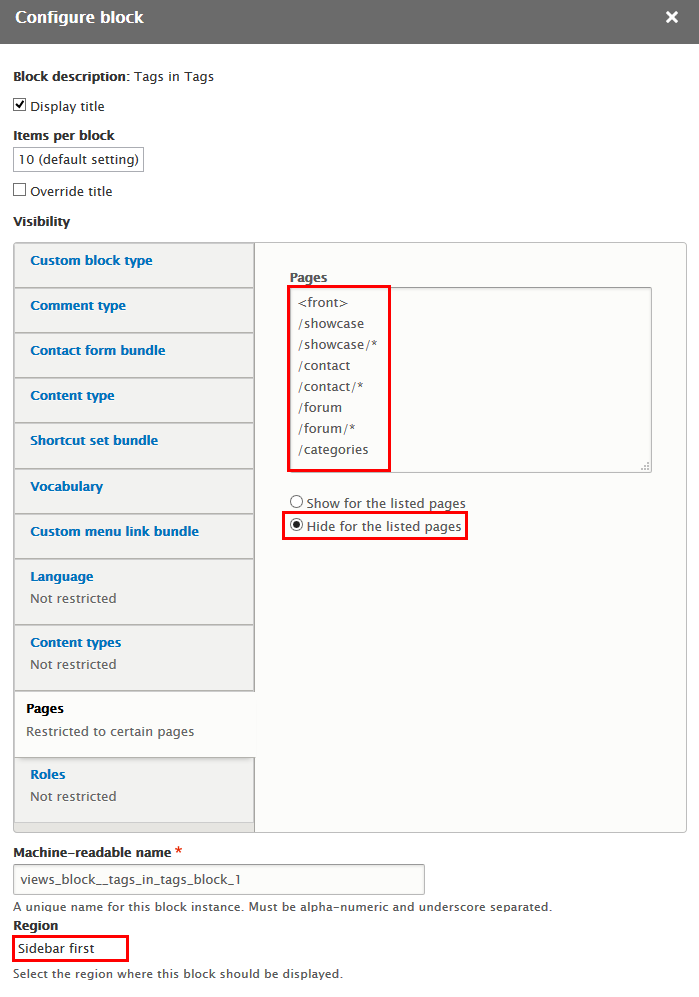
Step 4: Click Save block button.
Sidebar first: General Information block
Front end Display
Step 1: Navigate to Structure > Block layout click Add custom block to create General Informationus block and set with following properties:


Step 2: Click Save button
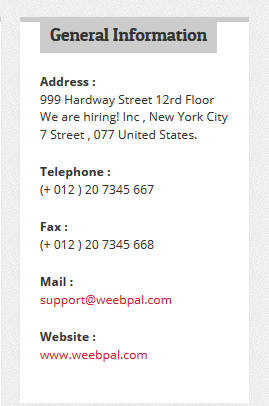
Refer to following HTML code:
Address :
999 Hardway Street 12rd Floor We are hiring! Inc , New York City 7 Street , 077 United States.Telephone :
(+ 012 ) 20 7345 667Fax :
(+ 012 ) 20 7345 668Mail :
[email protected]Website :
www.weebpal.com
Page title block
Configure Page title block
Step 1: Navigate to Structure > Block layout
Step 2: Find Content area, at Page title line. Then click Configure button and set following properites:
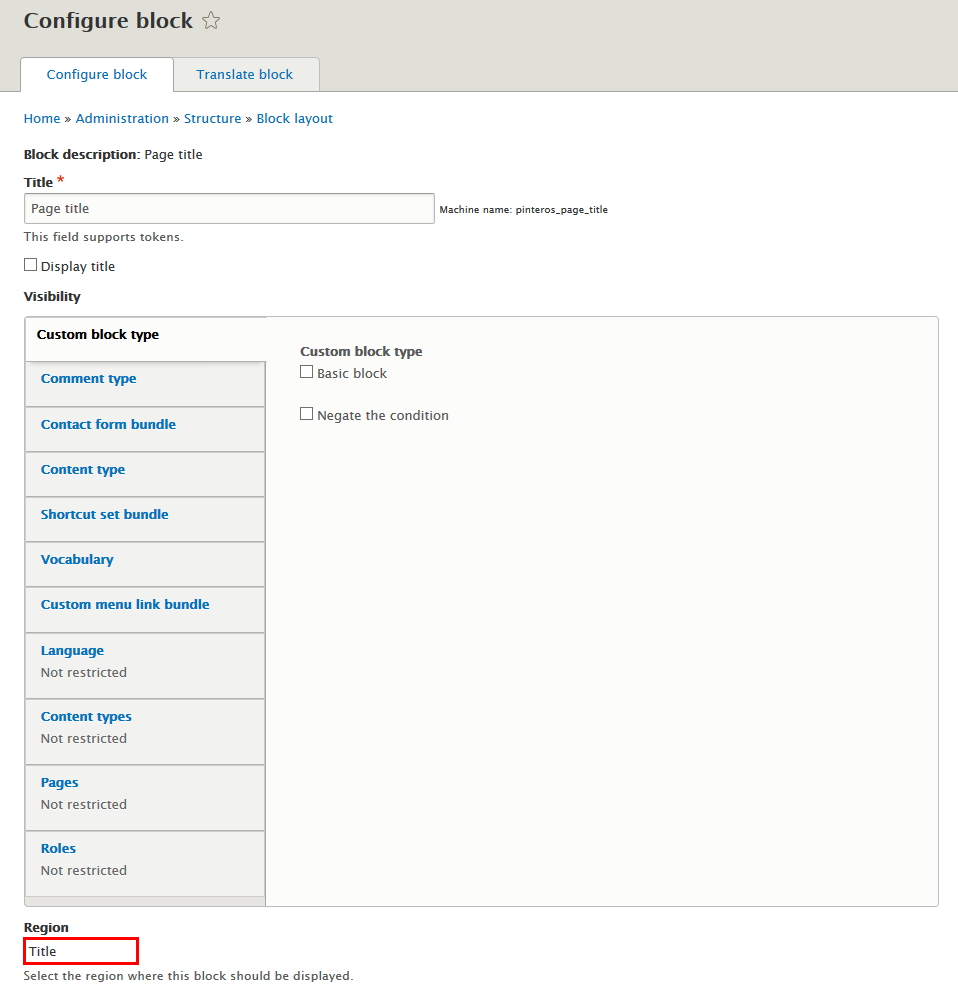
Step 3: Click Save block button.
Pages page
Front end Display
Add Pages content
Step 1: Navigate to Content > Add content click Basic page, create Pages content with following properties:
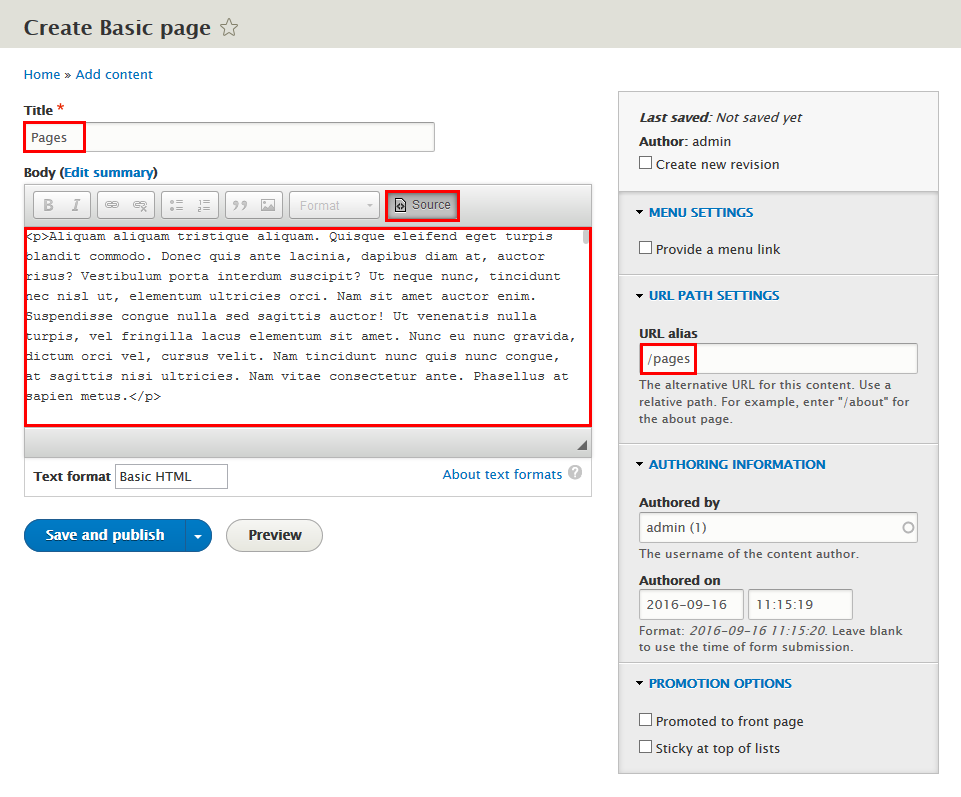
Step 2: Click Save button
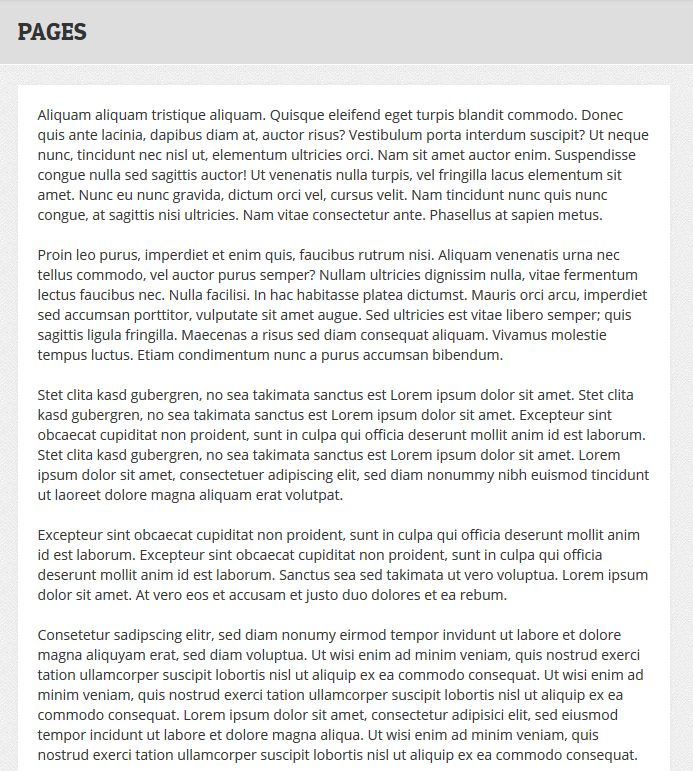
Refer to following HTML code:
							Aliquam aliquam tristique aliquam. Quisque eleifend eget turpis blandit commodo. Donec quis ante lacinia, dapibus diam at, auctor risus? Vestibulum porta interdum suscipit? Ut neque nunc, tincidunt nec nisl ut, elementum ultricies orci. Nam sit amet auctor enim. Suspendisse congue nulla sed sagittis auctor! Ut venenatis nulla turpis, vel fringilla lacus elementum sit amet. Nunc eu nunc gravida, dictum orci vel, cursus velit. Nam tincidunt nunc quis nunc congue, at sagittis nisi ultricies. Nam vitae consectetur ante. Phasellus at sapien metus.

							Proin leo purus, imperdiet et enim quis, faucibus rutrum nisi. Aliquam venenatis urna nec tellus commodo, vel auctor purus semper? Nullam ultricies dignissim nulla, vitae fermentum lectus faucibus nec. Nulla facilisi. In hac habitasse platea dictumst. Mauris orci arcu, imperdiet sed accumsan porttitor, vulputate sit amet augue. Sed ultricies est vitae libero semper; quis sagittis ligula fringilla. Maecenas a risus sed diam consequat aliquam. Vivamus molestie tempus luctus. Etiam condimentum nunc a purus accumsan bibendum.

							Stet clita kasd gubergren, no sea takimata sanctus est Lorem ipsum dolor sit amet. Stet clita kasd gubergren, no sea takimata sanctus est Lorem ipsum dolor sit amet. Excepteur sint obcaecat cupiditat non proident, sunt in culpa qui officia deserunt mollit anim id est laborum. Stet clita kasd gubergren, no sea takimata sanctus est Lorem ipsum dolor sit amet. Lorem ipsum dolor sit amet, consectetuer adipiscing elit, sed diam nonummy nibh euismod tincidunt ut laoreet dolore magna aliquam erat volutpat.

							Excepteur sint obcaecat cupiditat non proident, sunt in culpa qui officia deserunt mollit anim id est laborum. Excepteur sint obcaecat cupiditat non proident, sunt in culpa qui officia deserunt mollit anim id est laborum. Sanctus sea sed takimata ut vero voluptua. Lorem ipsum dolor sit amet. At vero eos et accusam et justo duo dolores et ea rebum.

							Consetetur sadipscing elitr, sed diam nonumy eirmod tempor invidunt ut labore et dolore magna aliquyam erat, sed diam voluptua. Ut wisi enim ad minim veniam, quis nostrud exerci tation ullamcorper suscipit lobortis nisl ut aliquip ex ea commodo consequat. Ut wisi enim ad minim veniam, quis nostrud exerci tation ullamcorper suscipit lobortis nisl ut aliquip ex ea commodo consequat. Lorem ipsum dolor sit amet, consectetur adipisici elit, sed eiusmod tempor incidunt ut labore et dolore magna aliqua. Ut wisi enim ad minim veniam, quis nostrud exerci tation ullamcorper suscipit lobortis nisl ut aliquip ex ea commodo consequat.

							Lorem ipsum dolor sit amet, consectetuer adipiscing elit. Aenean commodo ligula eget dolor. Aenean massa. Cum sociis natoque penatibus et magnis dis parturient montes, nascetur ridiculus mus. Donec quam felis, ultricies nec, pellentesque eu, pretium quis, sem. Nulla consequat massa quis enim. Donec pede justo, fringilla vel, aliquet nec, vulputate eget, arcu. In enim justo, rhoncus ut, imperdiet a, venenatis vitae, justo. Nullam dictum felis eu pede mollis pretium. Integer tincidunt. Cras dapibus.

							Vivamus elementum semper nisi. Aenean vulputate eleifend tellus. Aenean leo ligula, porttitor eu, consequat vitae, eleifend ac, enim. Aliquam lorem ante, dapibus in, viverra quis, feugiat a, tellus. Phasellus viverra nulla ut metus varius laoreet. Quisque rutrum. Aenean imperdiet. Etiam ultricies nisi vel augue. Curabitur ullamcorper ultricies nisi. Nam eget dui. Etiam rhoncus. Maecenas tempus, tellus eget condimentum rhoncus, sem quam semper libero, sit amet adipiscing sem neque sed ipsum.

							Nam quam nunc, blandit vel, luctus pulvinar, hendrerit id, lorem. Maecenas nec odio et ante tincidunt tempus. Donec vitae sapien ut libero venenatis faucibus. Nullam quis ante. Etiam sit amet orci eget eros faucibus tincidunt. Duis leo. Sed fringilla mauris sit amet nibh. Donec sodales sagittis magna. Sed consequat, leo eget bibendum sodales, augue velit cursus nunc, quis gravida magna mi a libero. Fusce vulputate eleifend sapien. Vestibulum purus quam, scelerisque ut, mollis sed, nonummy id, metus.

							Nullam accumsan lorem in dui. Cras ultricies mi eu turpis hendrerit fringilla. Vestibulum ante ipsum primis in faucibus orci luctus et ultrices posuere cubilia Curae; In ac dui quis mi consectetuer lacinia. Nam pretium turpis et arcu. Duis arcu tortor, suscipit eget, imperdiet nec, imperdiet iaculis, ipsum. Sed aliquam ultrices mauris. Integer ante arcu, accumsan a, consectetuer eget, posuere ut, mauris. Praesent adipiscing. Phasellus ullamcorper ipsum rutrum nunc. Nunc nonummy metus.

							Vestibulum volutpat pretium libero. Cras id dui. Aenean ut eros et nisl sagittis vestibulum. Nullam nulla eros, ultricies sit amet, nonummy id, imperdiet feugiat, pede. Sed lectus. Donec mollis hendrerit risus. Phasellus nec sem in justo pellentesque facilisis. Etiam imperdiet imperdiet orci. Nunc nec neque. Phasellus leo dolor, tempus non, auctor et, hendrerit quis, nisi. Curabitur ligula sapien, tincidunt non, euismod vitae, posuere imperdiet, leo. Maecenas malesuada. Praesent congue erat at massa.

							Sed cursus turpis vitae tortor. Donec posuere vulputate arcu. Phasellus accumsan cursus velit. Vestibulum ante ipsum primis in faucibus orci luctus et ultrices posuere cubilia Curae; Sed aliquam, nisi quis porttitor congue, elit erat euismod orci, ac placerat dolor lectus quis orci. Phasellus consectetuer vestibulum elit. Aenean tellus metus, bibendum sed, posuere ac, mattis non, nunc. Vestibulum fringilla pede sit amet augue. In turpis. Pellentesque posuere. Praesent turpis. Aenean posuere, tortor sed cursus feugiat, nunc augue blandit nunc, eu sollicitudin urna dolor sagittis lacus. Donec elit libero, sodales nec, volutpat a, suscipit non, turpis. Nullam sagittis. Suspendisse pulvinar, augue ac venenatis condimentum, sem libero volutpat nibh, nec pellentesque velit pede quis nunc. Vestibulum ante ipsum primis in faucibus orci luctus et ultrices posuere cubilia Curae; Fusce id purus. Ut varius tincidunt libero. Phasellus dolor. Maecenas vestibulum mollis
Categories page
Front end Display

Create Categories page view
Step 1: Navigate to Structure > Views, click Add new view, then create Categories view with following settings:

Step 2: Click Save and edit button. Next to steps below to set properties for following fields:
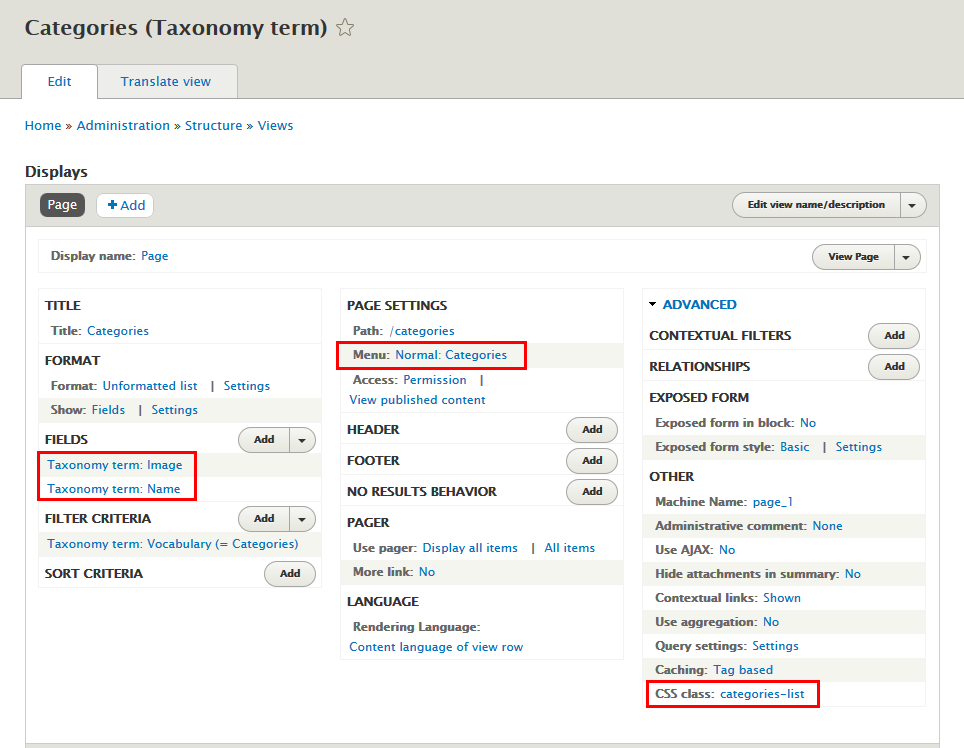
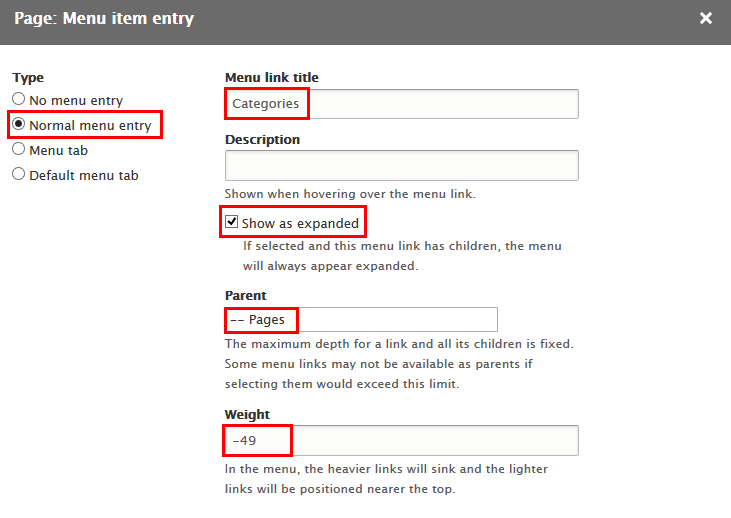
Step 3: At PAGE SETTINGS area, find and click Menu link and set following properites:
Step 4: At FIELDS area, click Add button to add fields: Taxonomy term: Image
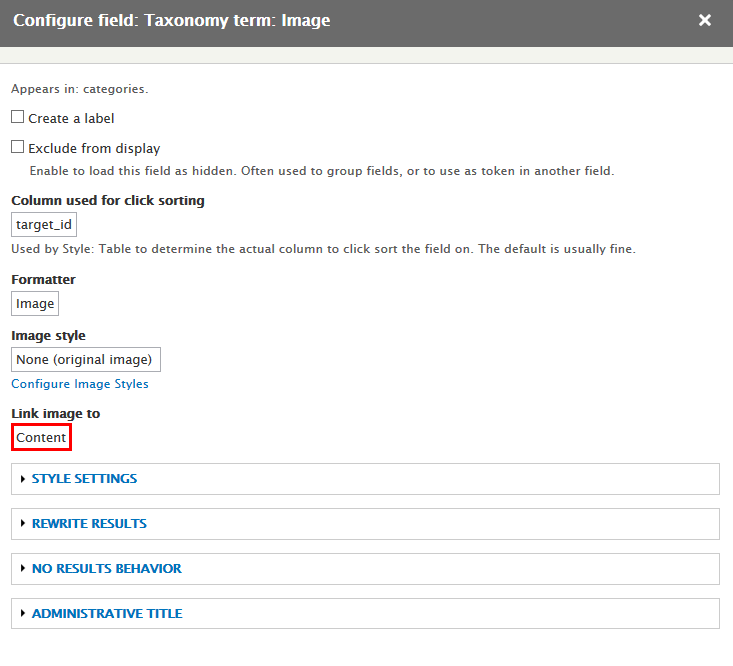
Step 5: Set properties for Taxonomy term: Image
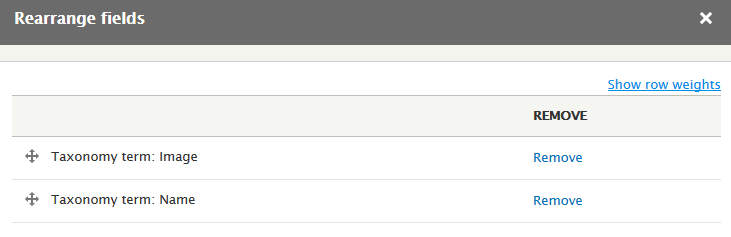
Step 6: At FIELDS area, click Rearrange button and set following arrange
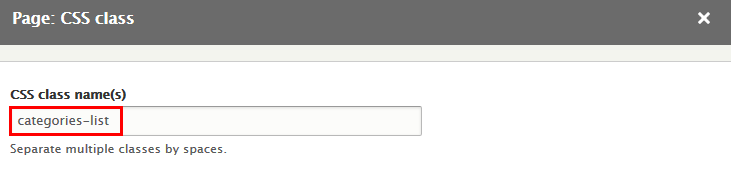
Step 7: At Advanced > OTHER area, add CSS class:
Step 8: Click Save to save view
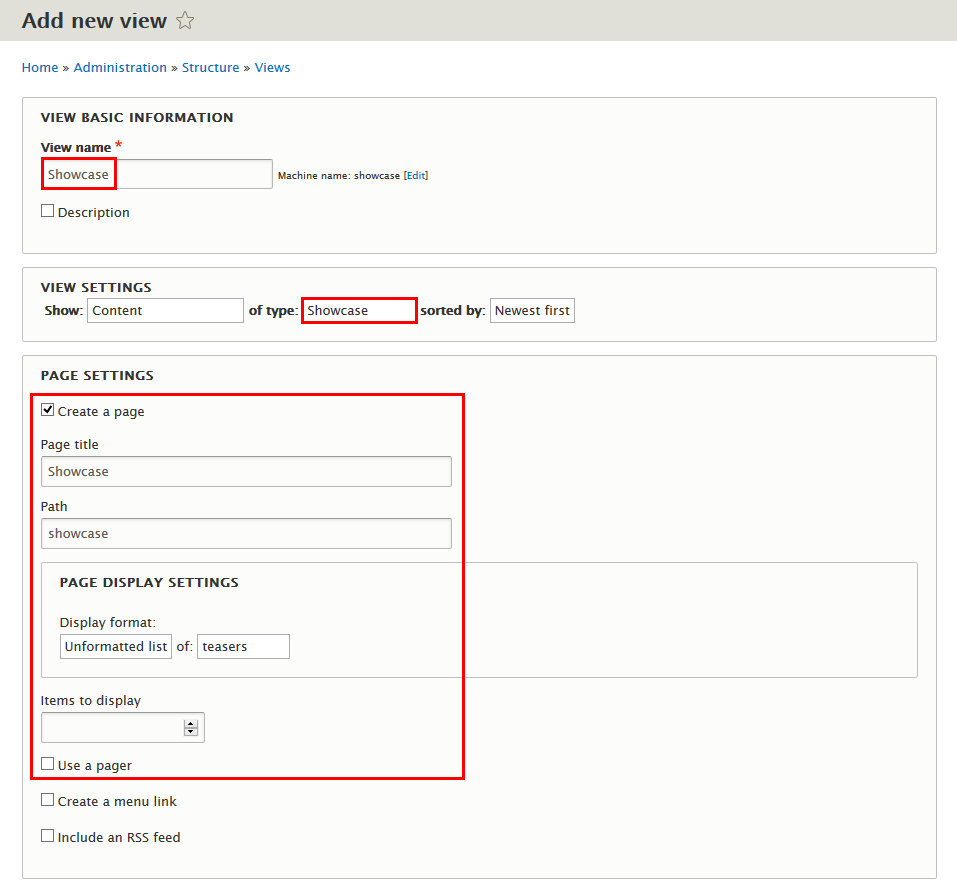
Showcase page
Front end Display

Create Showcase page view
Step 1: Navigate to Structure > Views, click Add new view, then create Showcase view with following settings:
Step 2: Click Save and edit button. Next to steps below to set properties for following fields:
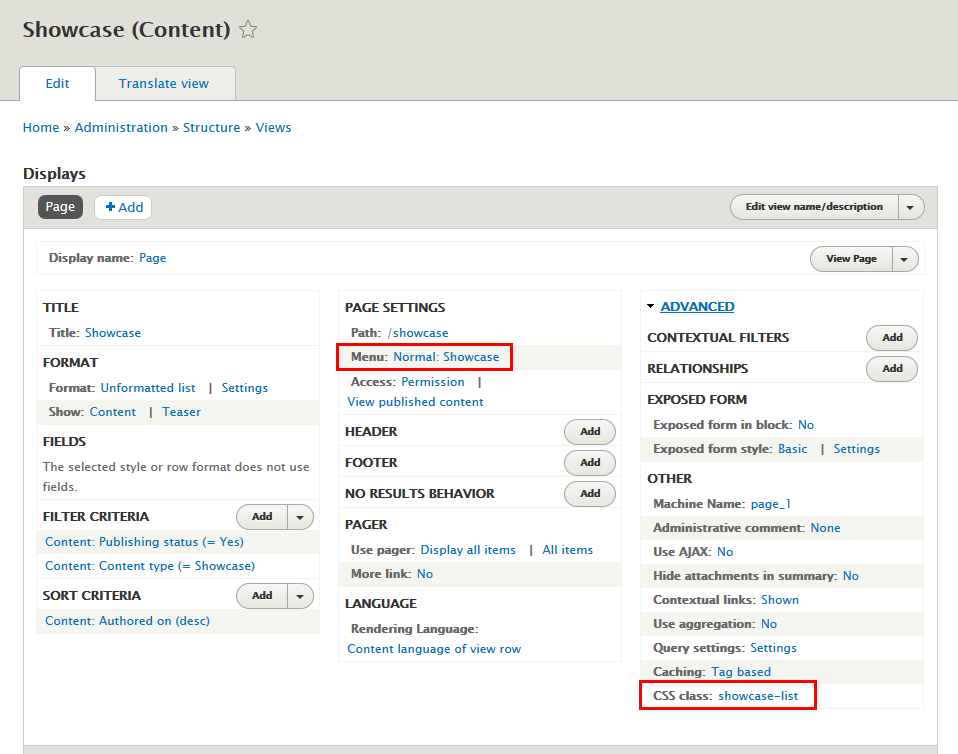
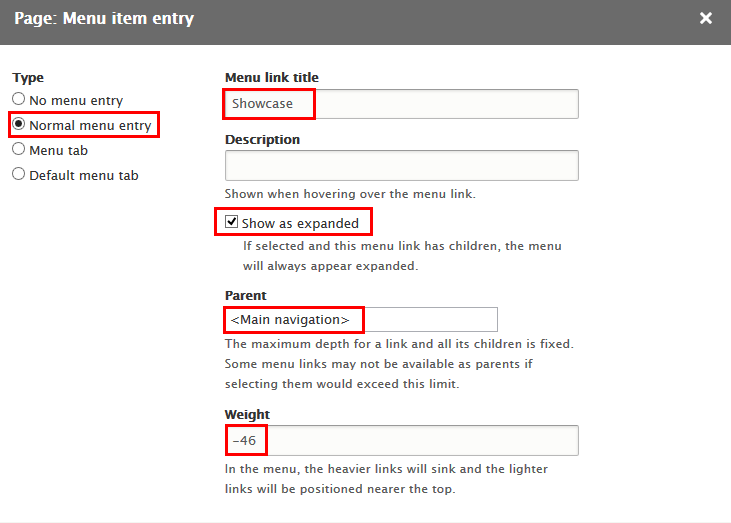
Step 3: At PAGE SETTINGS area, find and click Menu link and set following properites:
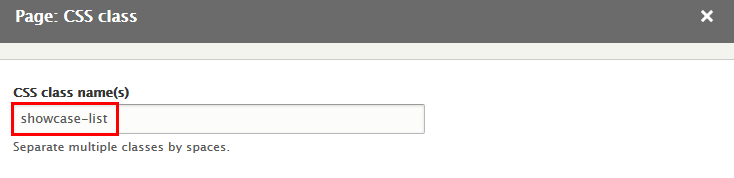
Step 4: At Advanced > OTHER area, add CSS class:
Step 5: Click Save to save view
Blog page
Front end Display
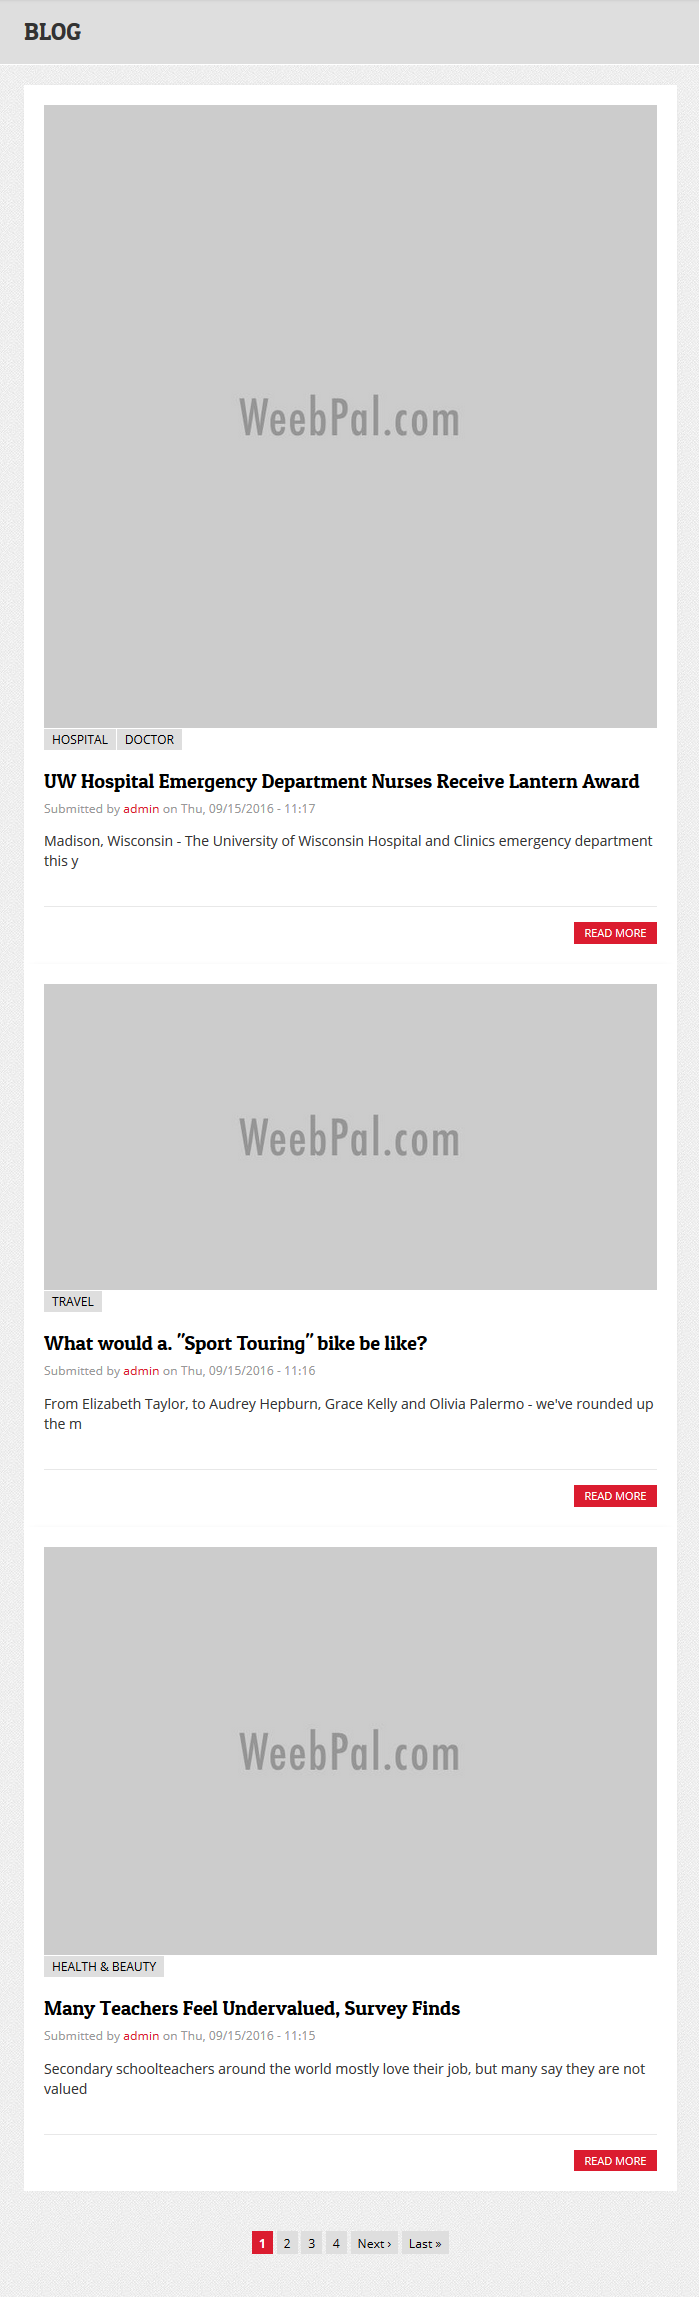
1. Add Blog page view
Step 1: Navigate to Structure > Views, find Blog Posts view, then click Add > Page button to create Blog page view with following properties:
Step 2: At TITLE area, find Title field and set following properites:
Step 3:At FORMAT area, find Show click Fields link and set following properties:
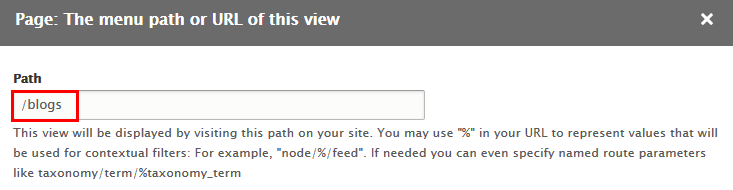
Step 4: At PAGE SETTINGS area, find and click Path link and set following properites:
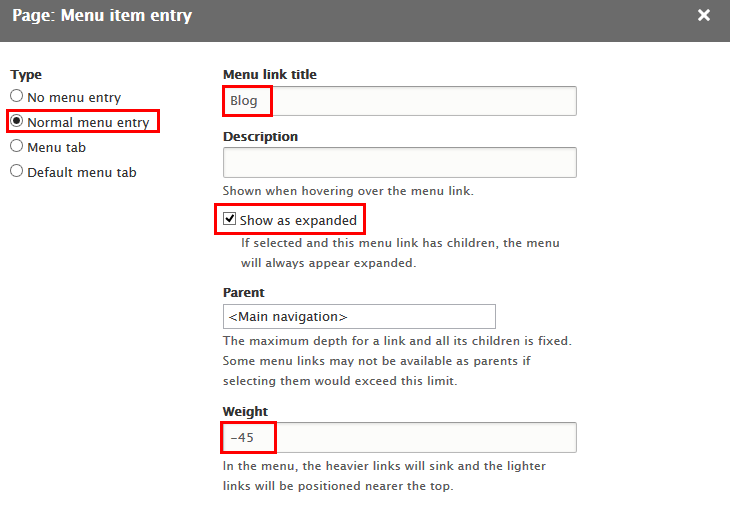
Step 5: At PAGE SETTINGS area, find and click Menu link and set following properites:
Step 6: At PAGER area, find Use pager click Display a specified number of items link and set following properites

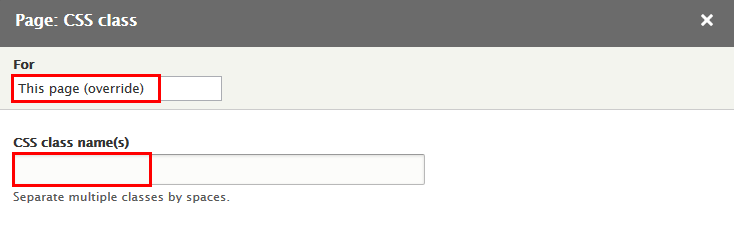
Step 7: At Advanced > OTHER area, add CSS class:
Step 8: Click Save to save view
Contact page
Front end Display
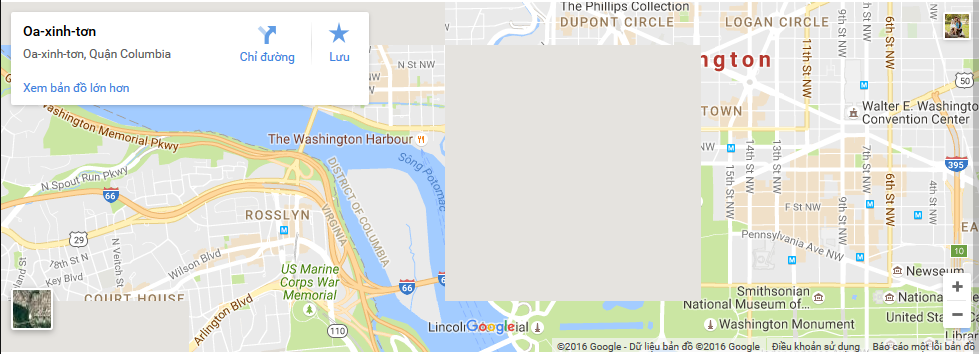
Create Gmap block
Step 1: Navigate to Structure > Block layout click Add custom block to create Gmap block and set with following properties:
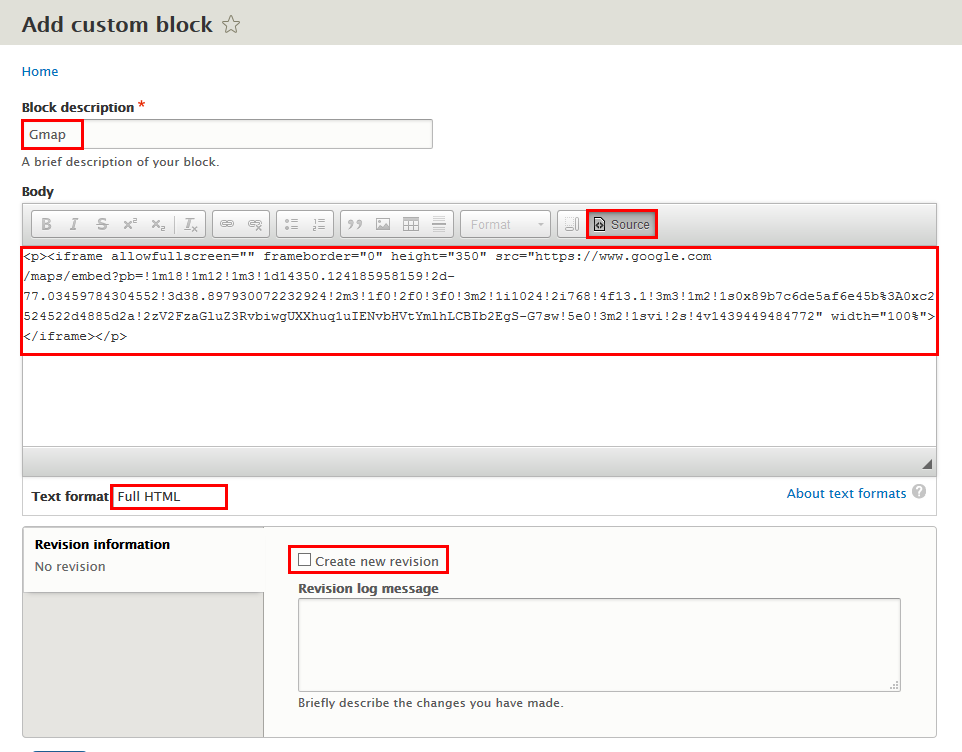

Step 2: Click Save button
Refer to following HTML code:
More Configurations
Site Information
In this section, you can change basic settings, such as the site name, slogan, e-mail address.
1. Log in to Administration site page by administrator account
2. Navigate to the Site Information page Configuration > System > Basic site settings

3. Change site details from the view:
- Site name
- Slogan
- E-mail address
- Set Default Front page
4. Click on Save configuration to finish editing.
Appearance Settings
Configuration
Step 1: Log into website by administrator account.
Step 2: Go to Appearance find Pinteros 8.1.7, click on Settings
Step 3: At CONFIGS area, select one of options for Layout, Skins menu, Background to set default and at TOGGLE DISPLAY area, check Show Skins Menu option if you want to display Skins menu on front-end pages.

Language Configuration
This section guides you how to have multiple languages for your site. Pinteros D8 Theme supports both Left to Right and Right to Left languages.
Step 1: Navigate to Configuration > Regional and Language > Languages then add new language.
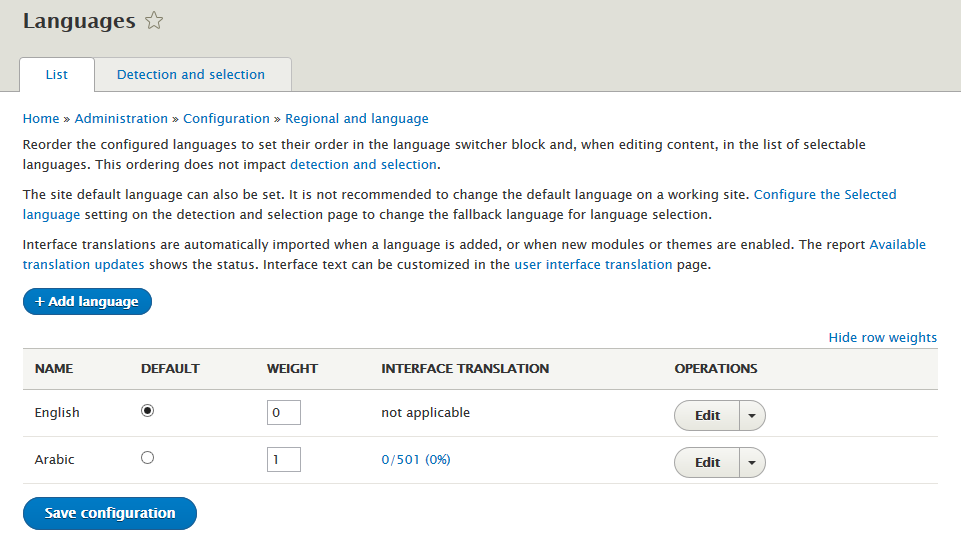
Step 2: Check to enable and set default language
Step 3: Save configuration